Embed Size (px)
Citation preview
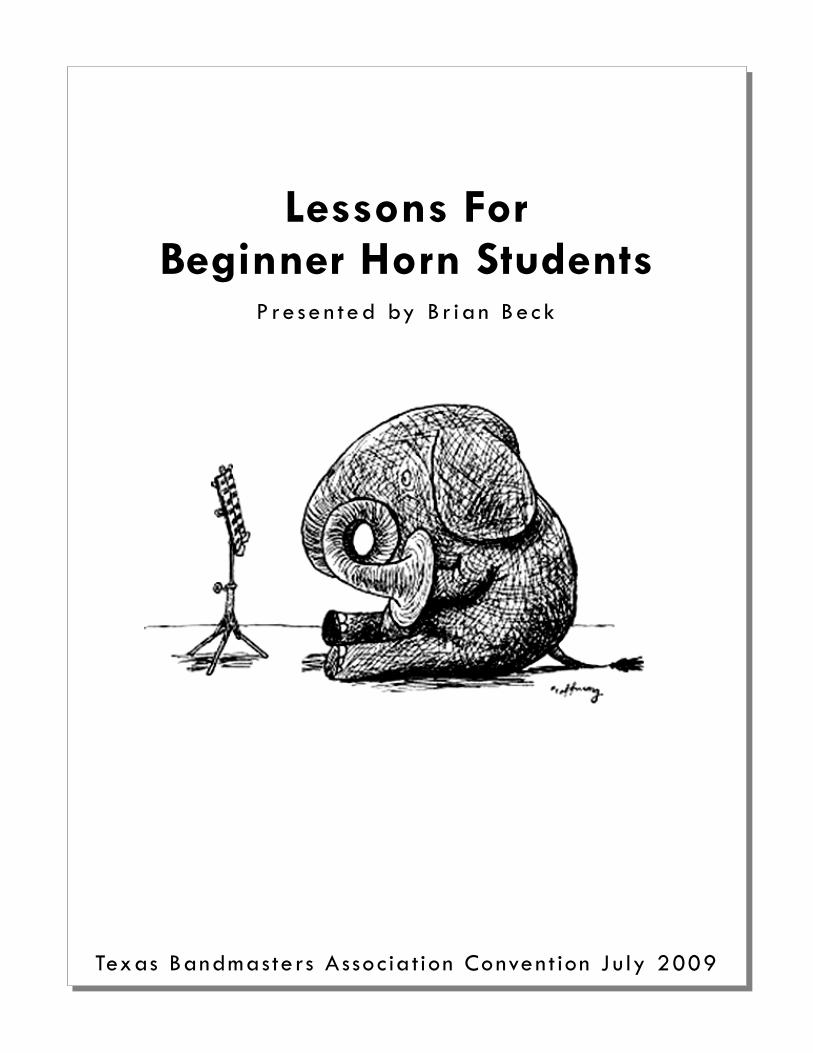
Lessons For Beginner Horn Students
P re se n ted by B r ian Bec k
Texas Bandmasters Assoc iat ion Convent ion Ju ly 2009
Brian Beck
Brian Beck serves as Director of Bands at Faubion Middle School in McKinney, Texas. Prior to Faubion, he taught in the Duncanville Independent School District as a band director at Byrd Middle School, where he was “Teacher of the Year” in 2009. Additionally, he taught beginner classes at Daniel and Brandenburg Intermediate Schools. Mr. Beck is a 1994 alumnus of the Duncanville Band Program and was a member of the TMEA All-State Band. He holds a Bachelor’s Degree in Music Education from Texas A&M University-Commerce and a Master’s Degree in Music Education from the University of Houston.
Bands under Mr. Beck’s direction have received consistent Superior ratings at UIL concert and sight-reading contests as well as Best in Class awards at other contests and festivals. The Byrd Symphonic I Band has been a perennial finalist in the TMEA Honor Band competition each year and has been selected as Texas State Honor Band a record three times (1982, 2004, and 2008). The Duncanville High School Wind Ensemble was also selected as the 5A Texas State Honor Band for a historic third time. This is also the first time in TMEA’s history that a 5A high school and its feeder CCC school have won in back-to-back competitions simultaneously. Mr. Beck is very active in composing and arranging for both instrumental and vocal ensembles, many featured in honor band concerts, state marching contests, compact disc recordings, and choral concerts. His arrangements of Russian Sailor’s Dance and La Basque were featured in the Reed Middle School CCC Honor Band concert in 2003, and Why Then Should I Fear? was commissioned and performed by the Cooper High School AA Honor Band at its TMEA concert in 2004. Other works by Mr. Beck were performed at the 2005 Honor Band concerts featuring the Byrd Middle School Symphonic I Band and Duncanville High School Wind Ensemble. These included an original composition, Technicolor Pachyderms, commissioned by friend and colleague David Brandon, former Director of Bands at Byrd Middle School, and a wind band transcription of the second movement of Sergei Prokofiev’s Symphony No. 5 commissioned by Dr. Tom Shine. Other pieces premiered a the 2009 TMEA Conventions were Mosswood Lullaby, an original composition dedicated to Olivia Williams (daughter of long-time friends Gary and Brittney Williams) and a transcription of Percy Grainger’s Jutish Medley. Mr. Beck is a member of the Association of Songwriters, Composers, Arrangers, and Publishers (ASCAP), and his works have been published by Southern Music Publications, Anthem Publications, and Alfred Publishing. Other affiliations include Texas Music Educators Association, where he served as the Region XX Middle School Band Chairman, and Texas Bandmasters Association, and was selected as the 2009 Phi Beta Mu “Outstanding Young Bandmaster of the Year.” Mr. Beck lives in McKinney with his wife, Dr. Kelley Beck, a Neuropsychologist at Integra Hospital of Plano, and dogs Daphne and Bailey.
b r i a n ebe c k@ya ho o . c om
Begin With The End In Mind Beginning band is just that - the beginning. These student are at the front end of a seven-year musical experience and hopefully a lifelong affinity. Since these students will be in band for a while, make sure they are on the correct instrument. Collaborate with the other schools in the district to assure proper instrumentation and balance for the middle and, ultimately, high school. Below are some questions to help with recruiting: 1. How many horn players are in 7th-12th grades? 2. What does the high school need? 3. Are there other middle schools in the district? 4. How many horns does the school own? 5. Do students use home horns? Recruiting Fifth Grade Students It is always a great idea to perform for the fifth graders, multiple times if possible. Take time to bring over a band to demonstrate each instrument. Have a student from each section play something fun for the audience. This might be the first opportunity for most actually to see and hear an instrument. Good times to perform are just before Winter Break and a few days before sixth grade choice sheets are passed out to the students (around early March). Emphasize the importance of academic excellence to the audience and let them know that they must maintain good grades to play a school-owned instrument. This attracts the high achievers to these very important instruments and prevents most eligibility problems over the next seven years. At no time should the horn be described as the “most difficult” or “hardest” brass instrument to play so as not to scare off students who might otherwise be interested. Every instrument has its own set of challenges. Beginner Interview Directors must be a bit more discriminating in selecting students for school-owned instruments, mostly due to the fact that there are a limited number of instruments available. An ideal horn player should come across as confident, willing to try new things, and not afraid to make mistakes. A good ear helps as well; students who can match pitch with their voice usually have an easier time with horn. Students who perform well on the Selmer Test (distinguishing higher and lower pitches) would be good candidates for horn. Take time during the interview process to give potential horn students a mini lesson. The following are some physical characteristics to check when considering a student for horn: 1. Look for medium to thin lips, covering the top teeth, and with no pronounced “cupid’s bow” when forming an embouchure. Students with lips that are too full may have trouble forming an embouchure small enough for the horn mouthpiece.
2. Have the student bite down and check for a natural overbite. Students whose jaw protrudes too far forward may have problems with horn angle and top lip pressure.
3. Demonstrate a flat chin and have the student duplicate. The chin controls how much of the bottom lip is being used in the aperture and can greatly affect the student’s tone and response.
4. If the student can obtain a fairly relaxed sound on the mouthpiece while demonstrating the correct physical characteristics, they have a good chance of being successful playing horn.
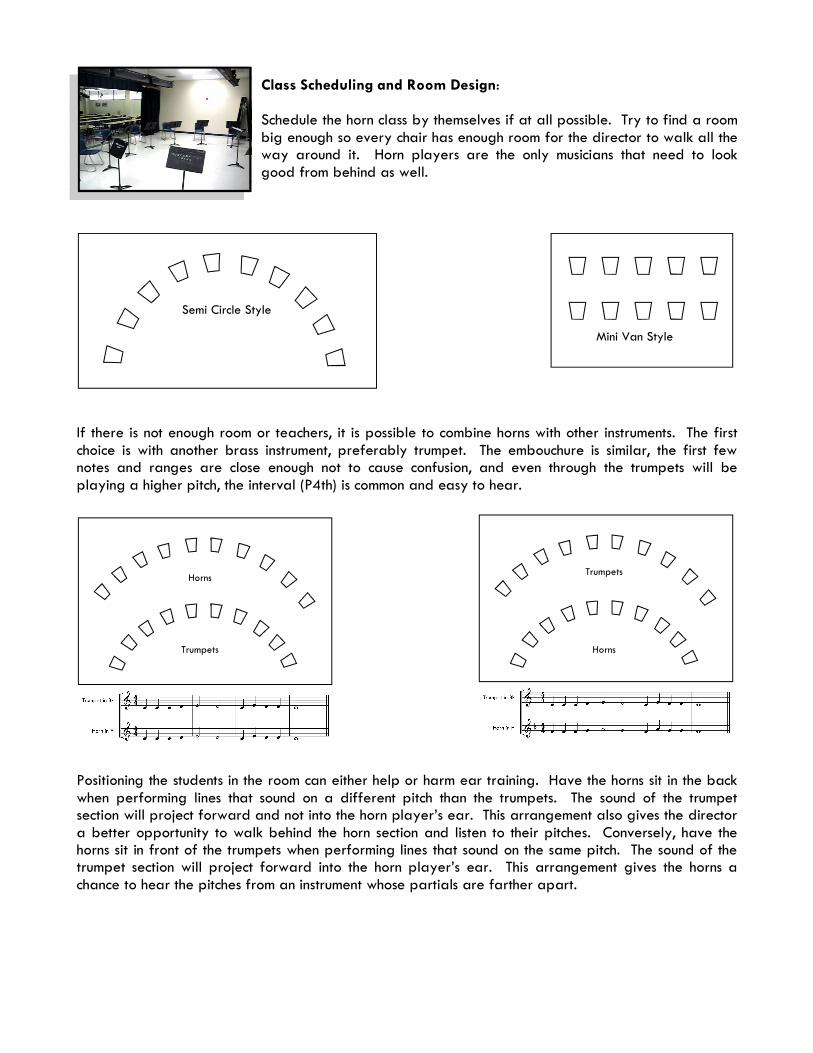
Class Scheduling and Room Design: Schedule the horn class by themselves if at all possible. Try to find a room big enough so every chair has enough room for the director to walk all the way around it. Horn players are the only musicians that need to look good from behind as well.
If there is not enough room or teachers, it is possible to combine horns with other instruments. The first choice is with another brass instrument, preferably trumpet. The embouchure is similar, the first few notes and ranges are close enough not to cause confusion, and even through the trumpets will be playing a higher pitch, the interval (P4th) is common and easy to hear.
Positioning the students in the room can either help or harm ear training. Have the horns sit in the back when performing lines that sound on a different pitch than the trumpets. The sound of the trumpet section will project forward and not into the horn player’s ear. This arrangement also gives the director a better opportunity to walk behind the horn section and listen to their pitches. Conversely, have the horns sit in front of the trumpets when performing lines that sound on the same pitch. The sound of the trumpet section will project forward into the horn player’s ear. This arrangement gives the horns a chance to hear the pitches from an instrument whose partials are farther apart.
Semi Circle Style
Mini Van Style
Trumpets
Horns
Horns
Trumpets
Supplies for Beginner Horn Students:
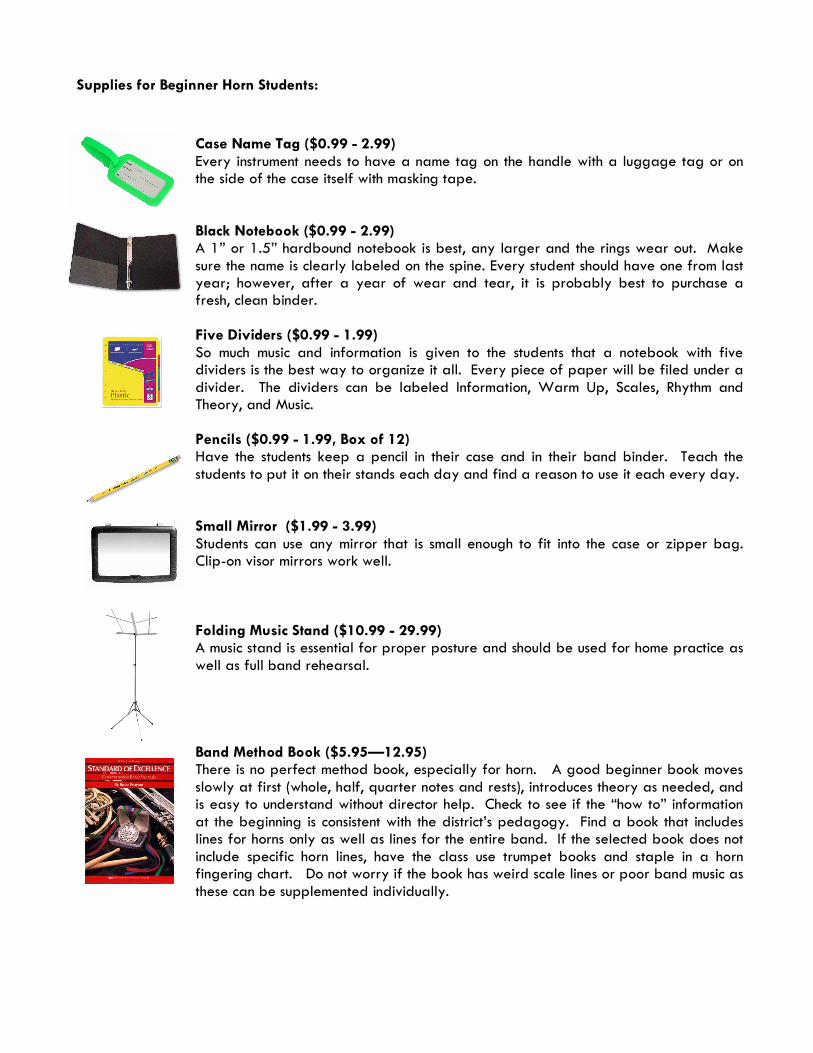
Case Name Tag ($0.99 - 2.99) Every instrument needs to have a name tag on the handle with a luggage tag or on the side of the case itself with masking tape. Black Notebook ($0.99 - 2.99) A 1” or 1.5” hardbound notebook is best, any larger and the rings wear out. Make sure the name is clearly labeled on the spine. Every student should have one from last year; however, after a year of wear and tear, it is probably best to purchase a fresh, clean binder. Five Dividers ($0.99 - 1.99) So much music and information is given to the students that a notebook with five dividers is the best way to organize it all. Every piece of paper will be filed under a divider. The dividers can be labeled Information, Warm Up, Scales, Rhythm and Theory, and Music. Pencils ($0.99 - 1.99, Box of 12) Have the students keep a pencil in their case and in their band binder. Teach the students to put it on their stands each day and find a reason to use it each every day. Small Mirror ($1.99 - 3.99) Students can use any mirror that is small enough to fit into the case or zipper bag. Clip-on visor mirrors work well. Folding Music Stand ($10.99 - 29.99) A music stand is essential for proper posture and should be used for home practice as well as full band rehearsal. Band Method Book ($5.95—12.95) There is no perfect method book, especially for horn. A good beginner book moves slowly at first (whole, half, quarter notes and rests), introduces theory as needed, and is easy to understand without director help. Check to see if the “how to” information at the beginning is consistent with the district’s pedagogy. Find a book that includes lines for horns only as well as lines for the entire band. If the selected book does not include specific horn lines, have the class use trumpet books and staple in a horn fingering chart. Do not worry if the book has weird scale lines or poor band music as these can be supplemented individually.
Supplies for Beginner Horn Students:
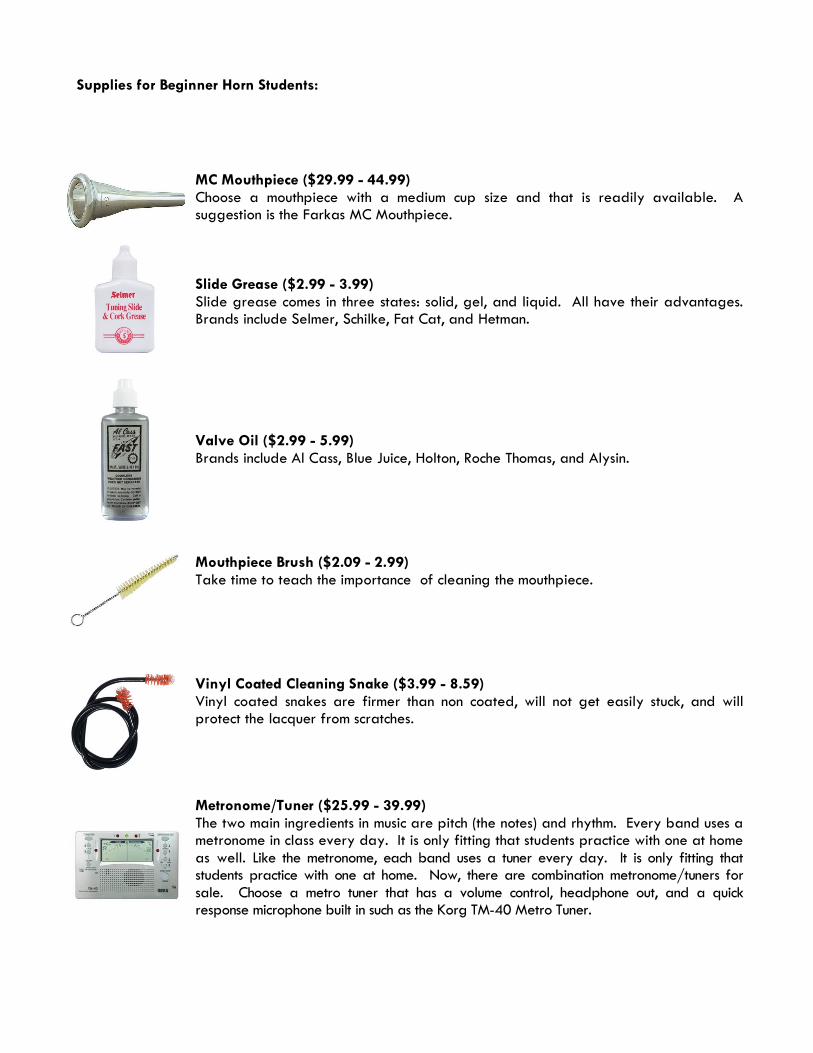
MC Mouthpiece ($29.99 - 44.99) Choose a mouthpiece with a medium cup size and that is readily available. A suggestion is the Farkas MC Mouthpiece. Slide Grease ($2.99 - 3.99) Slide grease comes in three states: solid, gel, and liquid. All have their advantages. Brands include Selmer, Schilke, Fat Cat, and Hetman. Valve Oil ($2.99 - 5.99) Brands include Al Cass, Blue Juice, Holton, Roche Thomas, and Alysin. Mouthpiece Brush ($2.09 - 2.99) Take time to teach the importance of cleaning the mouthpiece. Vinyl Coated Cleaning Snake ($3.99 - 8.59) Vinyl coated snakes are firmer than non coated, will not get easily stuck, and will protect the lacquer from scratches. Metronome/Tuner ($25.99 - 39.99) The two main ingredients in music are pitch (the notes) and rhythm. Every band uses a metronome in class every day. It is only fitting that students practice with one at home as well. Like the metronome, each band uses a tuner every day. It is only fitting that students practice with one at home. Now, there are combination metronome/tuners for sale. Choose a metro tuner that has a volume control, headphone out, and a quick response microphone built in such as the Korg TM-40 Metro Tuner.
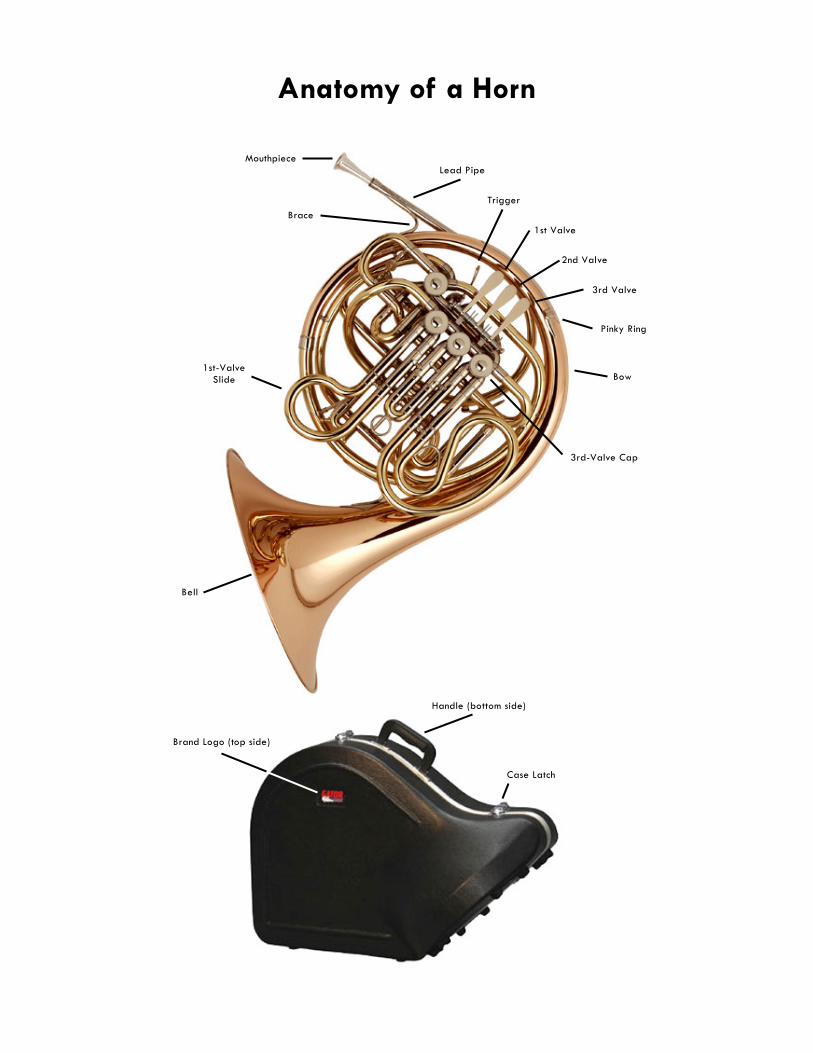
Anatomy of a Horn
Mouthpiece
Brace
Lead Pipe
Bow 1st-Valve Slide
Trigger
2nd Valve
1st Valve
3rd Valve
3rd-Valve Cap
Handle (bottom side)
Brand Logo (top side)
Case Latch
Bell
Pinky Ring
Beginning of the Year: The first few days are usually spent checking rosters, listing supplies, and assigning instruments. School instrument checkout takes longer than expected. Because of this, these classes begin the year a little behind, so be patient and remain positive. The most effective way to get the students to turn in their rental fee is to begin without them. Reward the diligent by teaching them first. Whoever has a mouthpiece gets to learn first. Whoever has paid the rental fee gets to hold the instrument first. Lesson 1: Getting the horn out Even though it’s out of order - even though the students know nothing about horn, it is important to teach the class how to get the horn out of the case and hold it properly. This will help protect the horn from damages as well as excite the class about playing. Plus, students are going to attempt it at home anyway, so it’s best to teach them early the proper way - the only way. Taking time now will help protect the district’s investment in costly instruments.
It is always wise to assume the students know nothing and will experiment at home. Do not trust any method book to educate the students on instrument assembly and maintenance.
When You Assume . . .
☺☺☺☺ Correct Position ☺☺☺☺
���� Watch the bell ! ����
☺☺☺☺ You did it! ☺☺☺☺
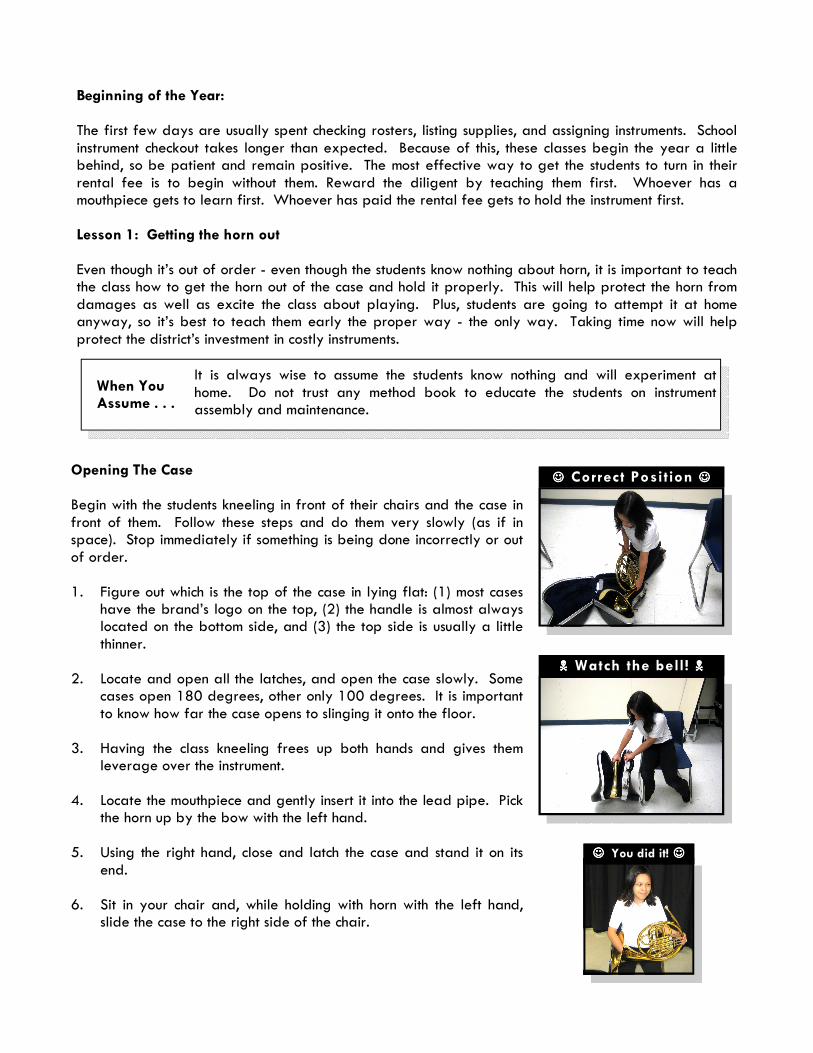
Opening The Case Begin with the students kneeling in front of their chairs and the case in front of them. Follow these steps and do them very slowly (as if in space). Stop immediately if something is being done incorrectly or out of order. 1. Figure out which is the top of the case in lying flat: (1) most cases
have the brand’s logo on the top, (2) the handle is almost always located on the bottom side, and (3) the top side is usually a little thinner.
2. Locate and open all the latches, and open the case slowly. Some
cases open 180 degrees, other only 100 degrees. It is important to know how far the case opens to slinging it onto the floor.
3. Having the class kneeling frees up both hands and gives them
leverage over the instrument. 4. Locate the mouthpiece and gently insert it into the lead pipe. Pick
the horn up by the bow with the left hand. 5. Using the right hand, close and latch the case and stand it on its
end. 6. Sit in your chair and, while holding with horn with the left hand,
slide the case to the right side of the chair.
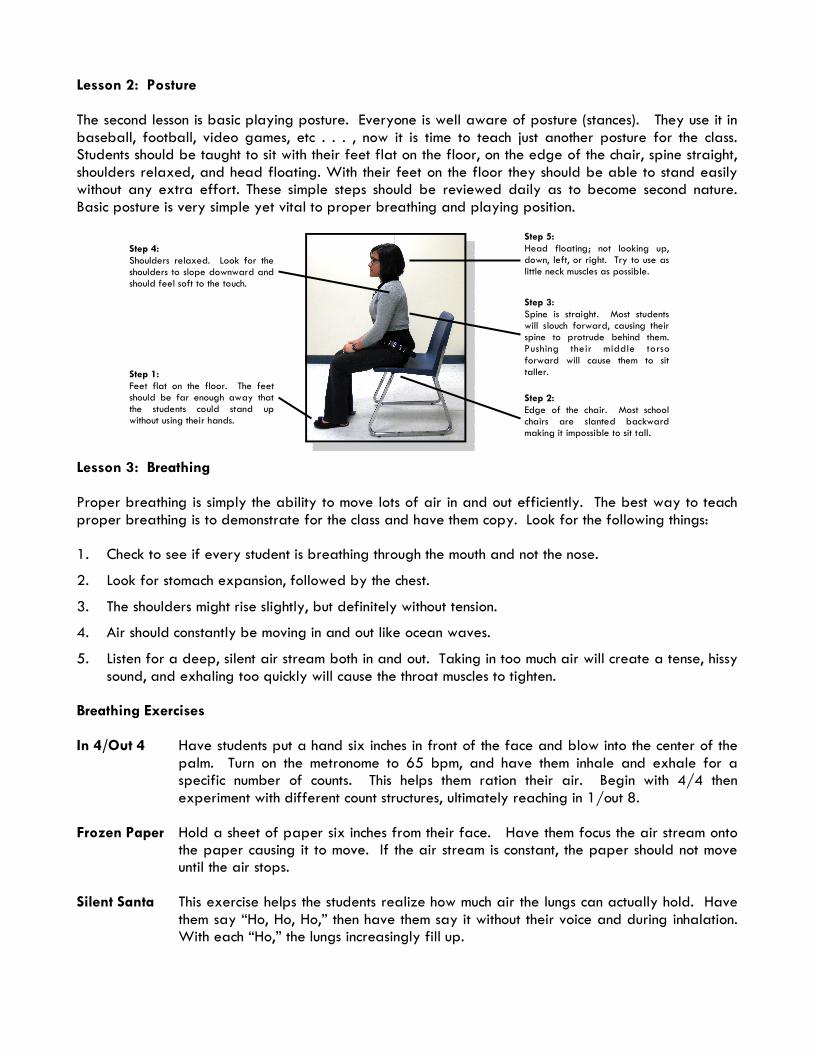
Lesson 2: Posture The second lesson is basic playing posture. Everyone is well aware of posture (stances). They use it in baseball, football, video games, etc . . . , now it is time to teach just another posture for the class. Students should be taught to sit with their feet flat on the floor, on the edge of the chair, spine straight, shoulders relaxed, and head floating. With their feet on the floor they should be able to stand easily without any extra effort. These simple steps should be reviewed daily as to become second nature. Basic posture is very simple yet vital to proper breathing and playing position. Lesson 3: Breathing Proper breathing is simply the ability to move lots of air in and out efficiently. The best way to teach proper breathing is to demonstrate for the class and have them copy. Look for the following things: 1. Check to see if every student is breathing through the mouth and not the nose.
2. Look for stomach expansion, followed by the chest.
3. The shoulders might rise slightly, but definitely without tension.
4. Air should constantly be moving in and out like ocean waves.
5. Listen for a deep, silent air stream both in and out. Taking in too much air will create a tense, hissy sound, and exhaling too quickly will cause the throat muscles to tighten.
Breathing Exercises In 4/Out 4 Have students put a hand six inches in front of the face and blow into the center of the
palm. Turn on the metronome to 65 bpm, and have them inhale and exhale for a specific number of counts. This helps them ration their air. Begin with 4/4 then experiment with different count structures, ultimately reaching in 1/out 8.
Frozen Paper Hold a sheet of paper six inches from their face. Have them focus the air stream onto
the paper causing it to move. If the air stream is constant, the paper should not move until the air stops.
Silent Santa This exercise helps the students realize how much air the lungs can actually hold. Have
them say “Ho, Ho, Ho,” then have them say it without their voice and during inhalation. With each “Ho,” the lungs increasingly fill up.
Step 1: Feet flat on the floor. The feet should be far enough away that the students could stand up without using their hands.
Step 2: Edge of the chair. Most school chairs are slanted backward making it impossible to sit tall.
Step 3: Spine is straight. Most students will slouch forward, causing their spine to protrude behind them. Pushing their middle torso forward will cause them to sit taller.
Step 4: Shoulders relaxed. Look for the shoulders to slope downward and should feel soft to the touch.
Step 5: Head floating; not looking up, down, left, or right. Try to use as little neck muscles as possible.

Lesson 4: Embouchure The embouchure is a fancy word meaning how the face looks when the student is playing. Stress how very little changes from the “natural” face to “horn” face. It is important for each student to have a mirror, as this will help them see what the director is asking them to do. Most students will come very close just by watching the director. Take time to compliment and correct every embouchure in the room.
It is time to practice blowing air through the aperture. Have the student breathe in saying “ah” and blow out saying “poo” (just like the Simpsons). Have them lightly touch their lips, checking for softness. Check every student.
Horn Face (Embouchure)
Relaxed, no crinkles
Normal
Neither up, nor down
Normal
Soft, against teeth
Lightly toughing
Firm against the Canines (Cuspid)
Apart (pinky width)
Softly laying on bottom of mouth
Flat, pointing downward
Slightly dropped straight down, not
protruding forward
Natural Face
Relaxed, no crinkles
Normal
Neither up, nor down
Normal
Soft, against teeth
Lightly touching
Natural
Together naturally
Softly laying on bottom of mouth
Soft to the touch
Natual
Forehead
Ears
Eyebrows
Nose
Cheeks
Lips
Corners
Teeth
Tongue
Chin
Jaw
Parts of the Face
Corners stay in the same place as “natural,” but are firmly against the Canine (Cuspid).
Equal amounts of lip showing on top and bottom. Lips should be soft to the touch.
Chin flat and pointing downward. Jaw slightly dropped straight down, not protruding forward.
Tongue out of the way of the air— “whispy” sounds or hiss means tongue is too high
Teeth apart (pinky width).
An oval aperture. The aperture is the center opening of the lips where the air comes out.
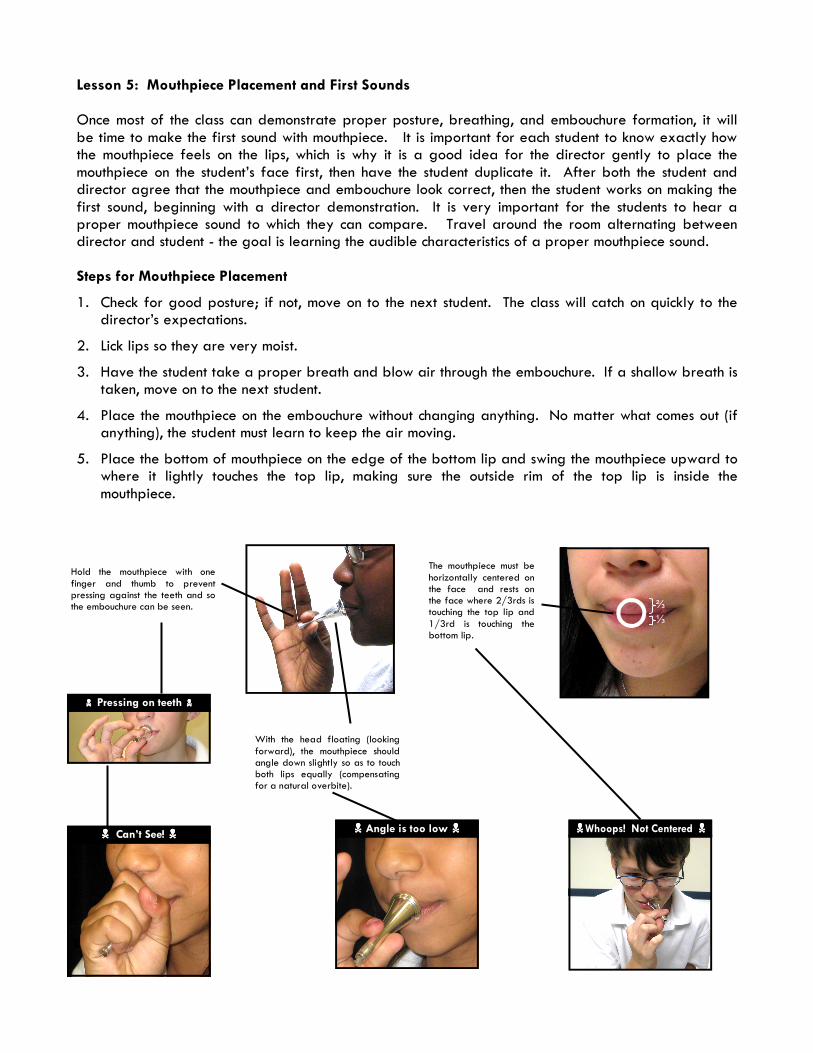
Lesson 5: Mouthpiece Placement and First Sounds Once most of the class can demonstrate proper posture, breathing, and embouchure formation, it will be time to make the first sound with mouthpiece. It is important for each student to know exactly how the mouthpiece feels on the lips, which is why it is a good idea for the director gently to place the mouthpiece on the student’s face first, then have the student duplicate it. After both the student and director agree that the mouthpiece and embouchure look correct, then the student works on making the first sound, beginning with a director demonstration. It is very important for the students to hear a proper mouthpiece sound to which they can compare. Travel around the room alternating between director and student - the goal is learning the audible characteristics of a proper mouthpiece sound. Steps for Mouthpiece Placement
1. Check for good posture; if not, move on to the next student. The class will catch on quickly to the director’s expectations.
2. Lick lips so they are very moist.
3. Have the student take a proper breath and blow air through the embouchure. If a shallow breath is taken, move on to the next student.
4. Place the mouthpiece on the embouchure without changing anything. No matter what comes out (if anything), the student must learn to keep the air moving.
5. Place the bottom of mouthpiece on the edge of the bottom lip and swing the mouthpiece upward to where it lightly touches the top lip, making sure the outside rim of the top lip is inside the mouthpiece.
���� Whoops! Not Centered ���� ���� Angle is too low ���� ���� Can’t See! ����
���� Pressing on teeth ����
Hold the mouthpiece with one finger and thumb to prevent pressing against the teeth and so the embouchure can be seen.
The mouthpiece must be horizontally centered on the face and rests on the face where 2/3rds is touching the top lip and 1/3rd is touching the bottom lip.
With the head floating (looking forward), the mouthpiece should angle down slightly so as to touch both lips equally (compensating for a natural overbite).
⅔
⅓
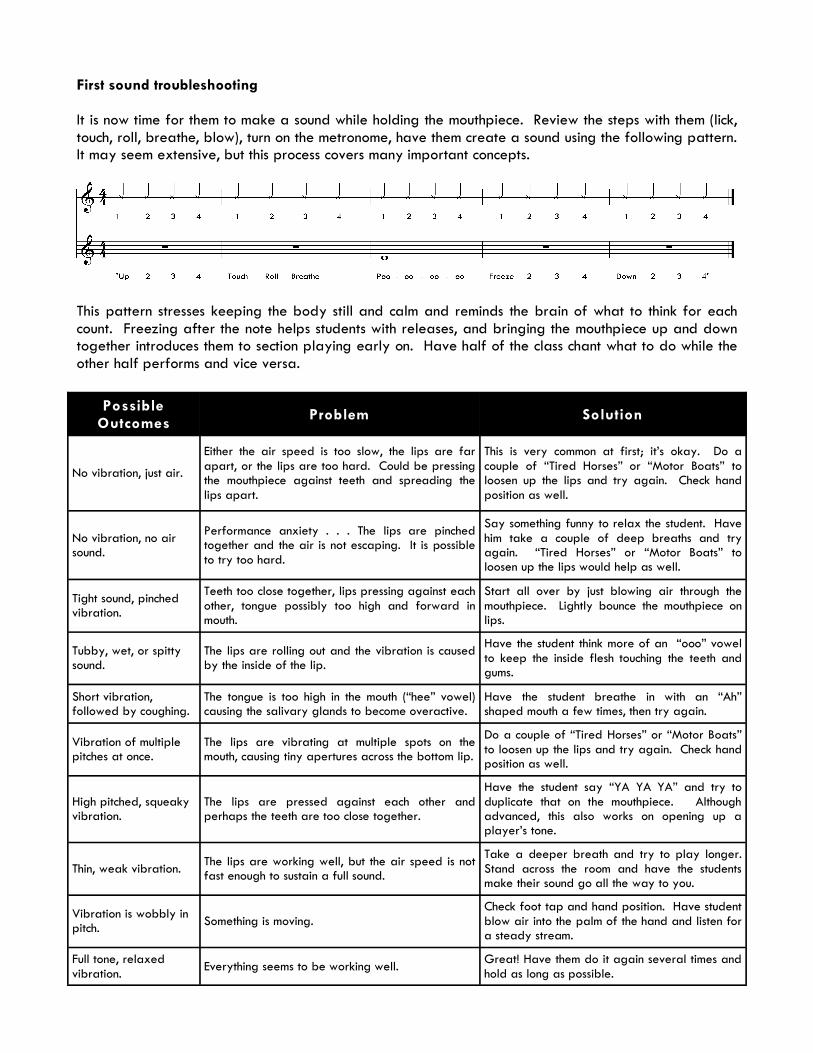
First sound troubleshooting It is now time for them to make a sound while holding the mouthpiece. Review the steps with them (lick, touch, roll, breathe, blow), turn on the metronome, have them create a sound using the following pattern. It may seem extensive, but this process covers many important concepts.
This pattern stresses keeping the body still and calm and reminds the brain of what to think for each count. Freezing after the note helps students with releases, and bringing the mouthpiece up and down together introduces them to section playing early on. Have half of the class chant what to do while the other half performs and vice versa.
Possible Outcomes
Problem Solution
No vibration, just air.
Either the air speed is too slow, the lips are far apart, or the lips are too hard. Could be pressing the mouthpiece against teeth and spreading the lips apart.
This is very common at first; it’s okay. Do a couple of “Tired Horses” or “Motor Boats” to loosen up the lips and try again. Check hand position as well.
No vibration, no air sound.
Performance anxiety . . . The lips are pinched together and the air is not escaping. It is possible to try too hard.
Say something funny to relax the student. Have him take a couple of deep breaths and try again. “Tired Horses” or “Motor Boats” to loosen up the lips would help as well.
Tubby, wet, or spitty sound.
The lips are rolling out and the vibration is caused by the inside of the lip.
Have the student think more of an “ooo” vowel to keep the inside flesh touching the teeth and gums.
Short vibration, followed by coughing.
The tongue is too high in the mouth (“hee” vowel) causing the salivary glands to become overactive.
Have the student breathe in with an “Ah” shaped mouth a few times, then try again.
Full tone, relaxed vibration.
Everything seems to be working well. Great! Have them do it again several times and hold as long as possible.
Tight sound, pinched vibration.
Teeth too close together, lips pressing against each other, tongue possibly too high and forward in mouth.
Start all over by just blowing air through the mouthpiece. Lightly bounce the mouthpiece on lips.
Vibration of multiple pitches at once.
The lips are vibrating at multiple spots on the mouth, causing tiny apertures across the bottom lip.
Do a couple of “Tired Horses” or “Motor Boats” to loosen up the lips and try again. Check hand position as well.
High pitched, squeaky vibration.
The lips are pressed against each other and perhaps the teeth are too close together.
Have the student say “YA YA YA” and try to duplicate that on the mouthpiece. Although advanced, this also works on opening up a player’s tone.
Thin, weak vibration. The lips are working well, but the air speed is not fast enough to sustain a full sound.
Take a deeper breath and try to play longer. Stand across the room and have the students make their sound go all the way to you.
Vibration is wobbly in pitch.
Something is moving. Check foot tap and hand position. Have student blow air into the palm of the hand and listen for a steady stream.
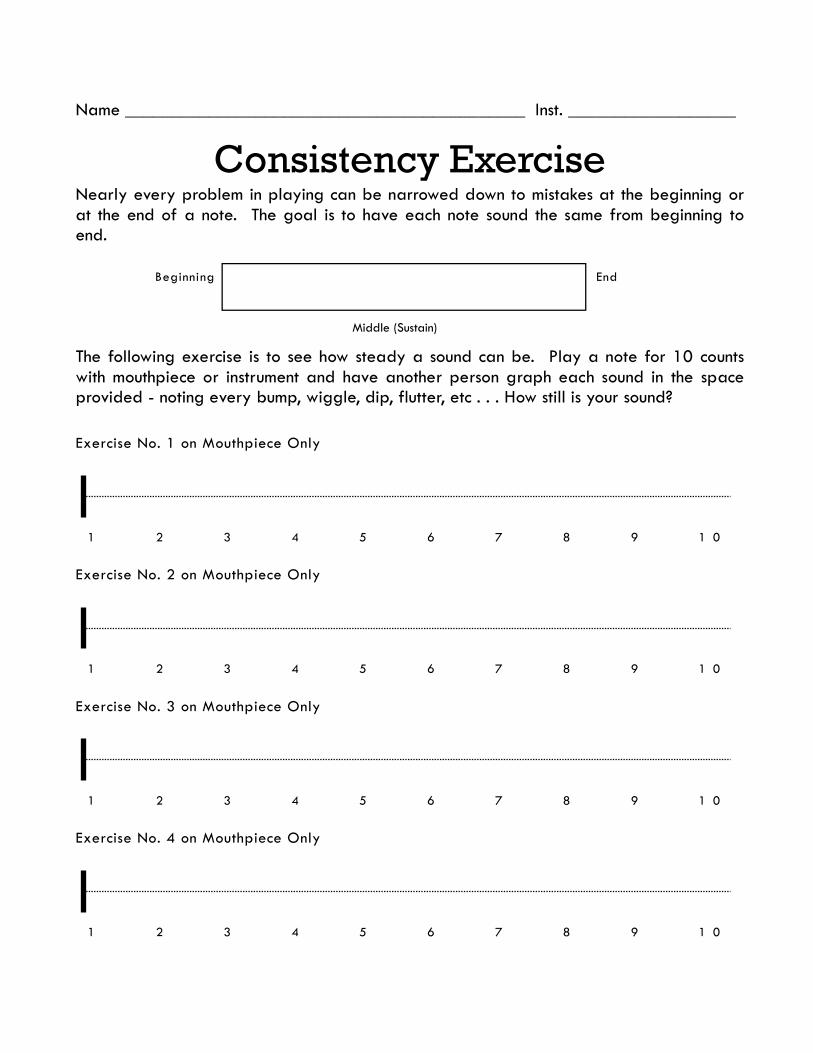
Name ___________________________________________ Inst. __________________
Consistency Exercise Nearly every problem in playing can be narrowed down to mistakes at the beginning or at the end of a note. The goal is to have each note sound the same from beginning to end. The following exercise is to see how steady a sound can be. Play a note for 10 counts with mouthpiece or instrument and have another person graph each sound in the space provided - noting every bump, wiggle, dip, flutter, etc . . . How still is your sound?
Beginning
Middle (Sustain)
End
Exercise No. 1 on Mouthpiece Only
1 2 3 4 5 6 7 8 9 1 0
Exercise No. 2 on Mouthpiece Only
1 2 3 4 5 6 7 8 9 1 0
Exercise No. 3 on Mouthpiece Only
1 2 3 4 5 6 7 8 9 1 0
Exercise No. 4 on Mouthpiece Only
1 2 3 4 5 6 7 8 9 1 0
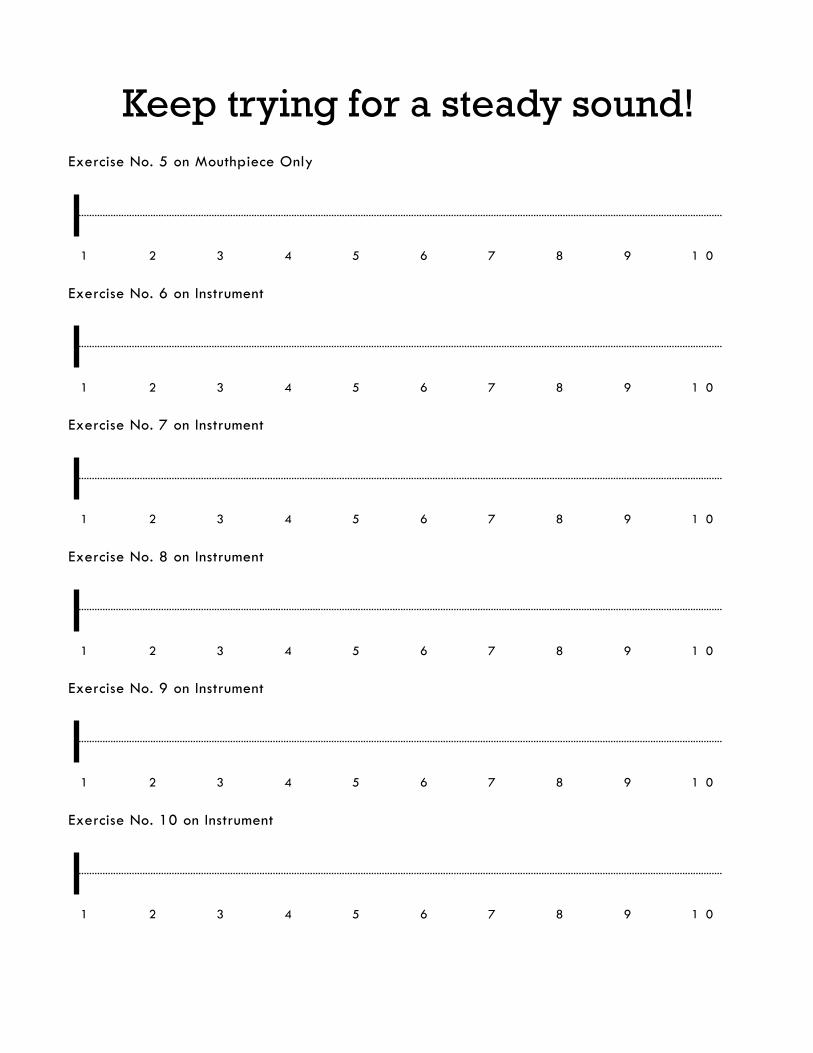
Exercise No. 5 on Mouthpiece Only
1 2 3 4 5 6 7 8 9 1 0
Exercise No. 6 on Instrument
1 2 3 4 5 6 7 8 9 1 0
Exercise No. 7 on Instrument
1 2 3 4 5 6 7 8 9 1 0
Exercise No. 8 on Instrument
1 2 3 4 5 6 7 8 9 1 0
Exercise No. 9 on Instrument
1 2 3 4 5 6 7 8 9 1 0
Exercise No. 10 on Instrument
1 2 3 4 5 6 7 8 9 1 0
Keep trying for a steady sound!
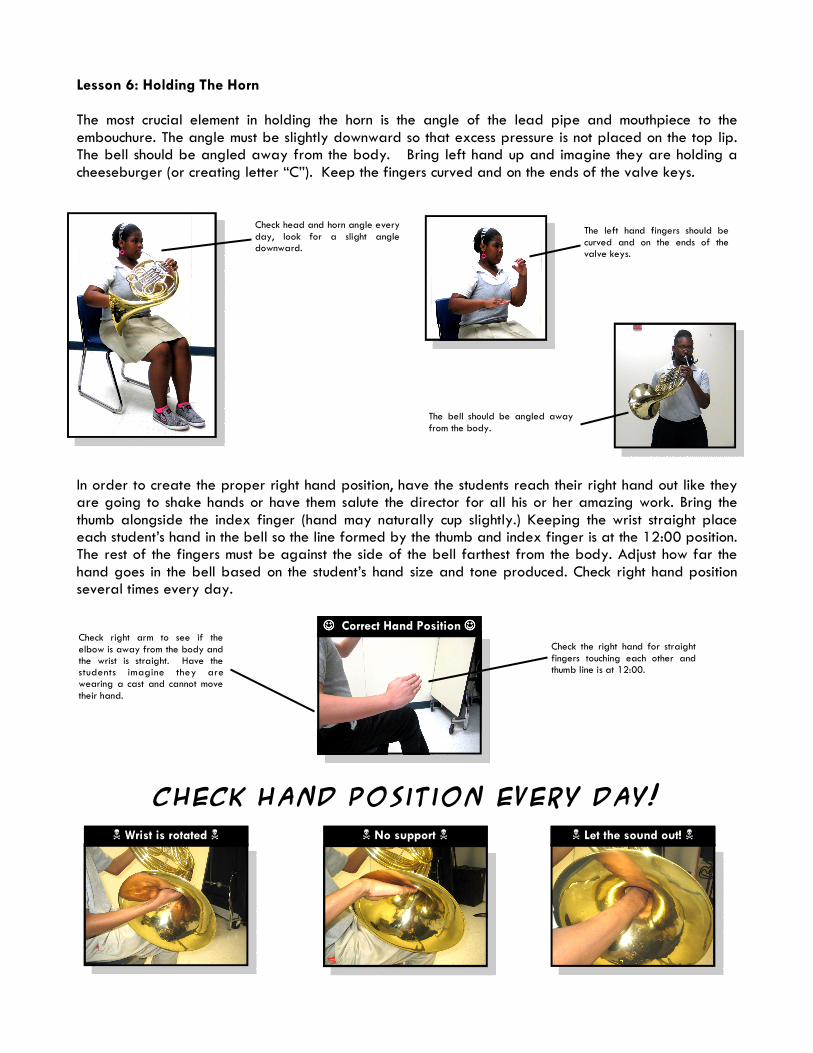
Lesson 6: Holding The Horn The most crucial element in holding the horn is the angle of the lead pipe and mouthpiece to the embouchure. The angle must be slightly downward so that excess pressure is not placed on the top lip. The bell should be angled away from the body. Bring left hand up and imagine they are holding a cheeseburger (or creating letter “C”). Keep the fingers curved and on the ends of the valve keys.
In order to create the proper right hand position, have the students reach their right hand out like they are going to shake hands or have them salute the director for all his or her amazing work. Bring the thumb alongside the index finger (hand may naturally cup slightly.) Keeping the wrist straight place each student’s hand in the bell so the line formed by the thumb and index finger is at the 12:00 position. The rest of the fingers must be against the side of the bell farthest from the body. Adjust how far the hand goes in the bell based on the student’s hand size and tone produced. Check right hand position several times every day.
Check hand position every day!
Check head and horn angle every day, look for a slight angle downward.
The bell should be angled away from the body.
The left hand fingers should be curved and on the ends of the valve keys.
☺☺☺☺ Correct Hand Position ☺☺☺☺
� Let the sound out! � � No support � � Wrist is rotated �
Check right arm to see if the elbow is away from the body and the wrist is straight. Have the students imagine they are wearing a cast and cannot move their hand.
Check the right hand for straight fingers touching each other and thumb line is at 12:00.
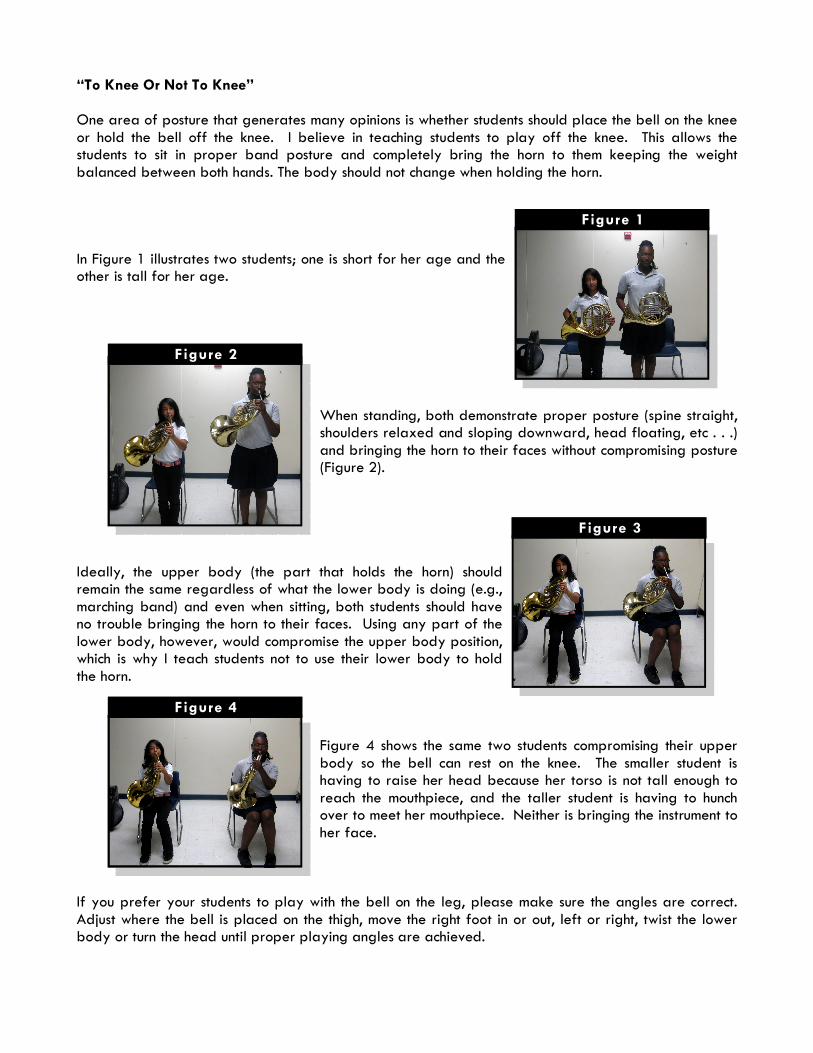
“To Knee Or Not To Knee” One area of posture that generates many opinions is whether students should place the bell on the knee or hold the bell off the knee. I believe in teaching students to play off the knee. This allows the students to sit in proper band posture and completely bring the horn to them keeping the weight balanced between both hands. The body should not change when holding the horn. In Figure 1 illustrates two students; one is short for her age and the other is tall for her age.
When standing, both demonstrate proper posture (spine straight, shoulders relaxed and sloping downward, head floating, etc . . .) and bringing the horn to their faces without compromising posture (Figure 2).
Ideally, the upper body (the part that holds the horn) should remain the same regardless of what the lower body is doing (e.g., marching band) and even when sitting, both students should have no trouble bringing the horn to their faces. Using any part of the lower body, however, would compromise the upper body position, which is why I teach students not to use their lower body to hold the horn.
Figure 4 shows the same two students compromising their upper body so the bell can rest on the knee. The smaller student is having to raise her head because her torso is not tall enough to reach the mouthpiece, and the taller student is having to hunch over to meet her mouthpiece. Neither is bringing the instrument to her face.
If you prefer your students to play with the bell on the leg, please make sure the angles are correct. Adjust where the bell is placed on the thigh, move the right foot in or out, left or right, twist the lower body or turn the head until proper playing angles are achieved.
Figure 1
Figure 2
Figure 3
Figure 4
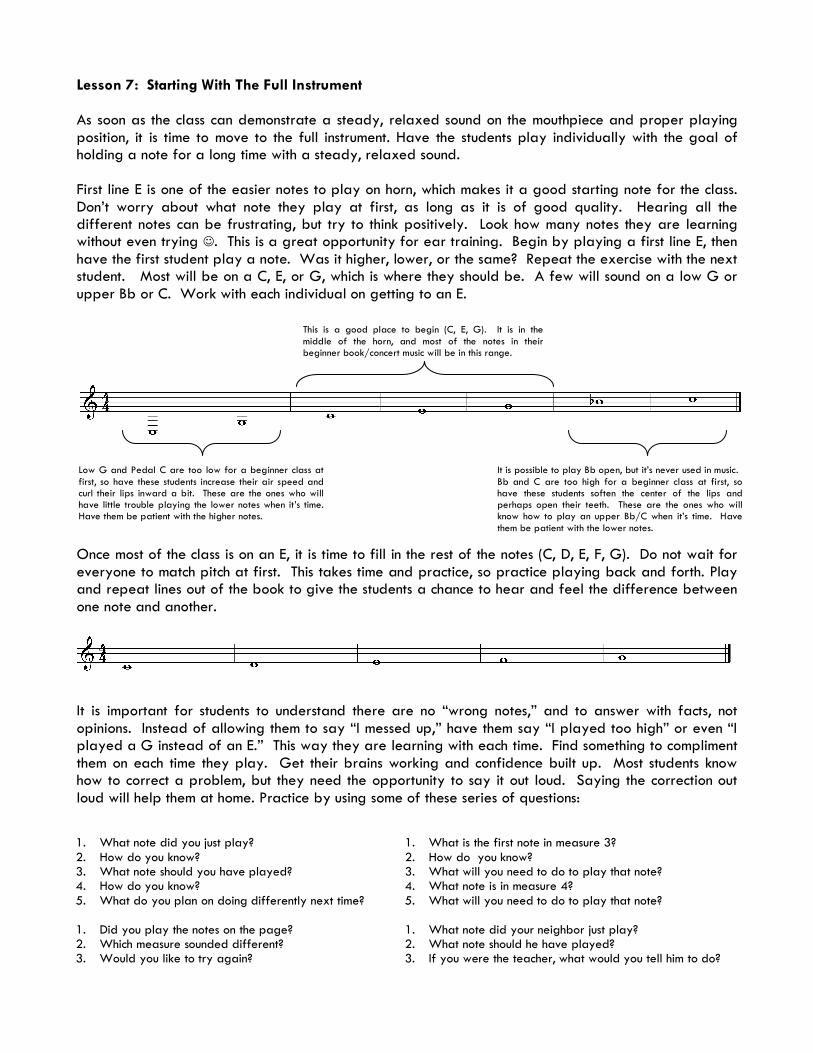
Lesson 7: Starting With The Full Instrument As soon as the class can demonstrate a steady, relaxed sound on the mouthpiece and proper playing position, it is time to move to the full instrument. Have the students play individually with the goal of holding a note for a long time with a steady, relaxed sound. First line E is one of the easier notes to play on horn, which makes it a good starting note for the class. Don’t worry about what note they play at first, as long as it is of good quality. Hearing all the different notes can be frustrating, but try to think positively. Look how many notes they are learning without even trying ☺. This is a great opportunity for ear training. Begin by playing a first line E, then have the first student play a note. Was it higher, lower, or the same? Repeat the exercise with the next student. Most will be on a C, E, or G, which is where they should be. A few will sound on a low G or upper Bb or C. Work with each individual on getting to an E.
Once most of the class is on an E, it is time to fill in the rest of the notes (C, D, E, F, G). Do not wait for everyone to match pitch at first. This takes time and practice, so practice playing back and forth. Play and repeat lines out of the book to give the students a chance to hear and feel the difference between one note and another.
It is important for students to understand there are no “wrong notes,” and to answer with facts, not opinions. Instead of allowing them to say “I messed up,” have them say “I played too high” or even “I played a G instead of an E.” This way they are learning with each time. Find something to compliment them on each time they play. Get their brains working and confidence built up. Most students know how to correct a problem, but they need the opportunity to say it out loud. Saying the correction out loud will help them at home. Practice by using some of these series of questions:
This is a good place to begin (C, E, G). It is in the middle of the horn, and most of the notes in their beginner book/concert music will be in this range.
It is possible to play Bb open, but it’s never used in music. Bb and C are too high for a beginner class at first, so have these students soften the center of the lips and perhaps open their teeth. These are the ones who will know how to play an upper Bb/C when it’s time. Have them be patient with the lower notes.
Low G and Pedal C are too low for a beginner class at first, so have these students increase their air speed and curl their lips inward a bit. These are the ones who will have little trouble playing the lower notes when it’s time. Have them be patient with the higher notes.
1. What note did you just play? 2. How do you know? 3. What note should you have played? 4. How do you know? 5. What do you plan on doing differently next time? 1. Did you play the notes on the page? 2. Which measure sounded different? 3. Would you like to try again?
1. What is the first note in measure 3? 2. How do you know? 3. What will you need to do to play that note? 4. What note is in measure 4? 5. What will you need to do to play that note? 1. What note did your neighbor just play? 2. What note should he have played? 3. If you were the teacher, what would you tell him to do?
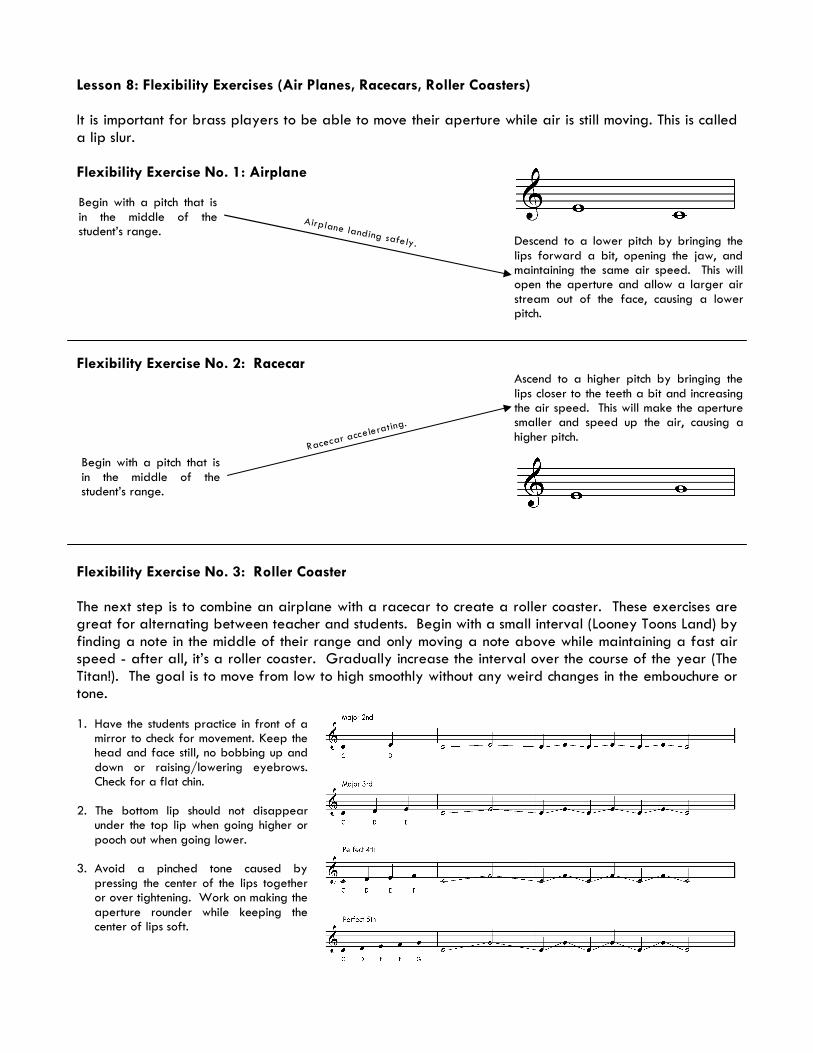
Lesson 8: Flexibility Exercises (Air Planes, Racecars, Roller Coasters) It is important for brass players to be able to move their aperture while air is still moving. This is called a lip slur. Flexibility Exercise No. 1: Airplane
Flexibility Exercise No. 2: Racecar
Flexibility Exercise No. 3: Roller Coaster The next step is to combine an airplane with a racecar to create a roller coaster. These exercises are great for alternating between teacher and students. Begin with a small interval (Looney Toons Land) by finding a note in the middle of their range and only moving a note above while maintaining a fast air speed - after all, it’s a roller coaster. Gradually increase the interval over the course of the year (The Titan!). The goal is to move from low to high smoothly without any weird changes in the embouchure or tone. 1. Have the students practice in front of a mirror to check for movement. Keep the head and face still, no bobbing up and down or raising/lowering eyebrows. Check for a flat chin.
2. The bottom lip should not disappear under the top lip when going higher or pooch out when going lower.
3. Avoid a pinched tone caused by pressing the center of the lips together or over tightening. Work on making the aperture rounder while keeping the center of lips soft.
Begin with a pitch that is in the middle of the student’s range.
Airplane landing safely.
Racecar a
cceleratin
g.
Descend to a lower pitch by bringing the lips forward a bit, opening the jaw, and maintaining the same air speed. This will open the aperture and allow a larger air stream out of the face, causing a lower pitch.
Begin with a pitch that is in the middle of the student’s range.
Ascend to a higher pitch by bringing the lips closer to the teeth a bit and increasing the air speed. This will make the aperture smaller and speed up the air, causing a higher pitch.
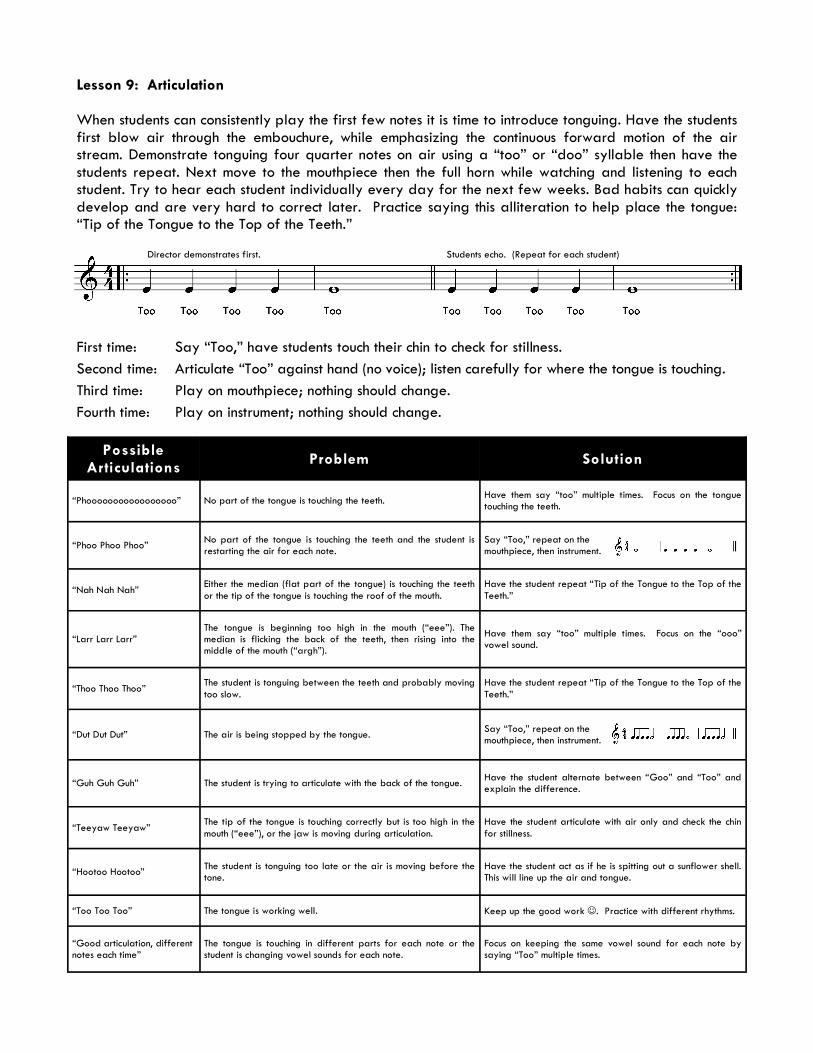
Lesson 9: Articulation When students can consistently play the first few notes it is time to introduce tonguing. Have the students first blow air through the embouchure, while emphasizing the continuous forward motion of the air stream. Demonstrate tonguing four quarter notes on air using a “too” or “doo” syllable then have the students repeat. Next move to the mouthpiece then the full horn while watching and listening to each student. Try to hear each student individually every day for the next few weeks. Bad habits can quickly develop and are very hard to correct later. Practice saying this alliteration to help place the tongue: “Tip of the Tongue to the Top of the Teeth.”
First time: Say “Too,” have students touch their chin to check for stillness.
Second time: Articulate “Too” against hand (no voice); listen carefully for where the tongue is touching.
Third time: Play on mouthpiece; nothing should change.
Fourth time: Play on instrument; nothing should change.
Possible Articulations
Problem Solution
“Phooooooooooooooooo” No part of the tongue is touching the teeth. Have them say “too” multiple times. Focus on the tongue touching the teeth.
“Phoo Phoo Phoo” No part of the tongue is touching the teeth and the student is restarting the air for each note.
Say “Too,” repeat on the mouthpiece, then instrument.
“Nah Nah Nah” Either the median (flat part of the tongue) is touching the teeth or the tip of the tongue is touching the roof of the mouth.
Have the student repeat “Tip of the Tongue to the Top of the Teeth.”
“Larr Larr Larr” The tongue is beginning too high in the mouth (“eee”). The median is flicking the back of the teeth, then rising into the middle of the mouth (“argh”).
Have them say “too” multiple times. Focus on the “ooo” vowel sound.
“Thoo Thoo Thoo” The student is tonguing between the teeth and probably moving too slow.
Have the student repeat “Tip of the Tongue to the Top of the Teeth.”
“Dut Dut Dut” The air is being stopped by the tongue. Say “Too,” repeat on the mouthpiece, then instrument.
“Guh Guh Guh” The student is trying to articulate with the back of the tongue. Have the student alternate between “Goo” and “Too” and explain the difference.
“Teeyaw Teeyaw” The tip of the tongue is touching correctly but is too high in the mouth (“eee”), or the jaw is moving during articulation.
Have the student articulate with air only and check the chin for stillness.
“Hootoo Hootoo” The student is tonguing too late or the air is moving before the tone.
Have the student act as if he is spitting out a sunflower shell. This will line up the air and tongue.
“Too Too Too” The tongue is working well. Keep up the good work ☺. Practice with different rhythms.
“Good articulation, different notes each time”
The tongue is touching in different parts for each note or the student is changing vowel sounds for each note.
Focus on keeping the same vowel sound for each note by saying “Too” multiple times.
Director demonstrates first. Students echo. (Repeat for each student)
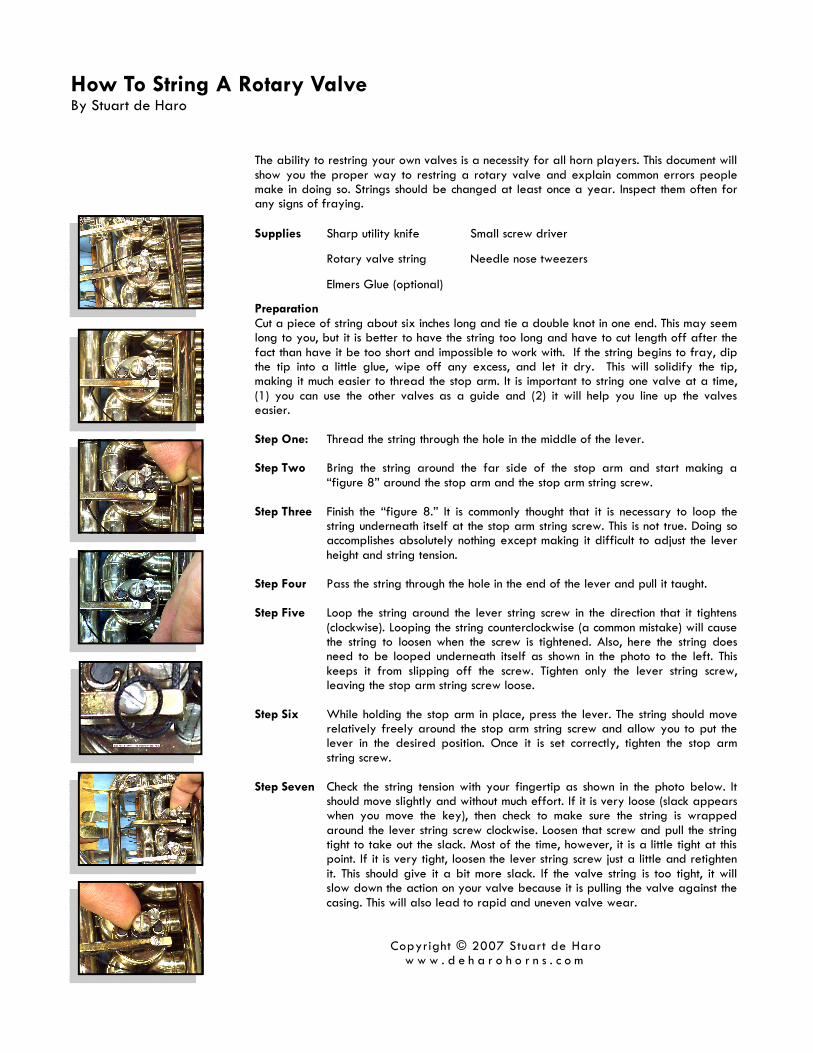
The ability to restring your own valves is a necessity for all horn players. This document will show you the proper way to restring a rotary valve and explain common errors people make in doing so. Strings should be changed at least once a year. Inspect them often for any signs of fraying. Supplies Sharp utility knife Small screw driver
Rotary valve string Needle nose tweezers
Elmers Glue (optional)
Preparation Cut a piece of string about six inches long and tie a double knot in one end. This may seem long to you, but it is better to have the string too long and have to cut length off after the fact than have it be too short and impossible to work with. If the string begins to fray, dip the tip into a little glue, wipe off any excess, and let it dry. This will solidify the tip, making it much easier to thread the stop arm. It is important to string one valve at a time, (1) you can use the other valves as a guide and (2) it will help you line up the valves easier. Step One: Thread the string through the hole in the middle of the lever. Step Two Bring the string around the far side of the stop arm and start making a
“figure 8” around the stop arm and the stop arm string screw. Step Three Finish the “figure 8.” It is commonly thought that it is necessary to loop the
string underneath itself at the stop arm string screw. This is not true. Doing so accomplishes absolutely nothing except making it difficult to adjust the lever height and string tension.
Step Four Pass the string through the hole in the end of the lever and pull it taught. Step Five Loop the string around the lever string screw in the direction that it tightens
(clockwise). Looping the string counterclockwise (a common mistake) will cause the string to loosen when the screw is tightened. Also, here the string does need to be looped underneath itself as shown in the photo to the left. This keeps it from slipping off the screw. Tighten only the lever string screw, leaving the stop arm string screw loose.
Step Six While holding the stop arm in place, press the lever. The string should move
relatively freely around the stop arm string screw and allow you to put the lever in the desired position. Once it is set correctly, tighten the stop arm string screw.
Step Seven Check the string tension with your fingertip as shown in the photo below. It
should move slightly and without much effort. If it is very loose (slack appears when you move the key), then check to make sure the string is wrapped around the lever string screw clockwise. Loosen that screw and pull the string tight to take out the slack. Most of the time, however, it is a little tight at this point. If it is very tight, loosen the lever string screw just a little and retighten it. This should give it a bit more slack. If the valve string is too tight, it will slow down the action on your valve because it is pulling the valve against the casing. This will also lead to rapid and uneven valve wear.
Copyright © 2007 Stuart de Haro w w w . d e h a r o h o r n s . c o m
How To String A Rotary Valve By Stuart de Haro