Embed Size (px)
Citation preview

Lesson 4 - Revising the Document Layout
Microsoft Word 2010

Learning Goals
• The goal of this lesson is for the students to successfully revise the layout of a document. The student will change document views, revise margins and alignment, modify tab settings, create page numbers as well as apply headers and footers to the document.
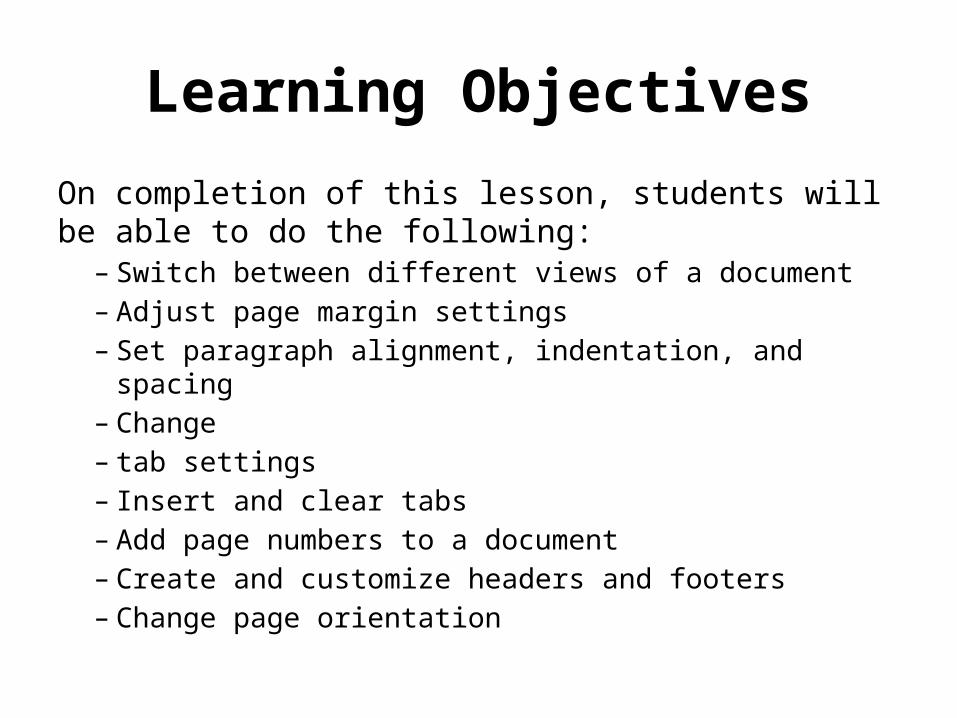
Learning Objectives
On completion of this lesson, students will be able to do the following:– Switch between different views of a document – Adjust page margin settings– Set paragraph alignment, indentation, and spacing– Change – tab settings– Insert and clear tabs– Add page numbers to a document– Create and customize headers and footers– Change page orientation
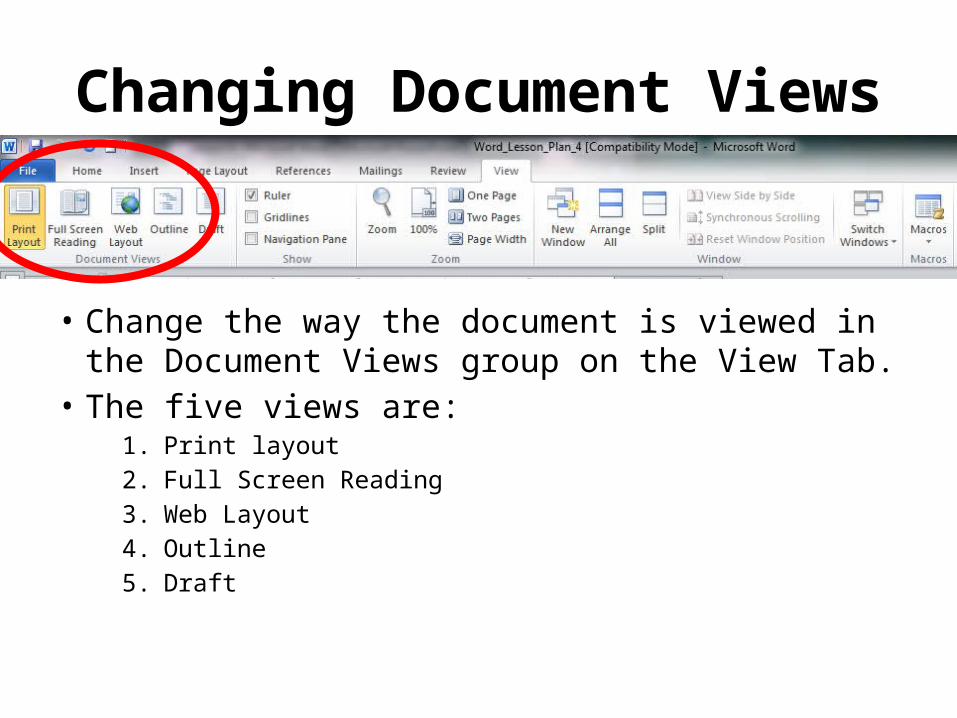
Changing Document Views
• Change the way the document is viewed in the Document Views group on the View Tab.
• The five views are:1. Print layout2. Full Screen Reading3. Web Layout4. Outline5. Draft

Print Layout View
Print Layout View shows how your document will look once it is printed. It contains all elements of your document.

Full Reading View
Full reading view is used to comfortably read a document on screen, not edit it.
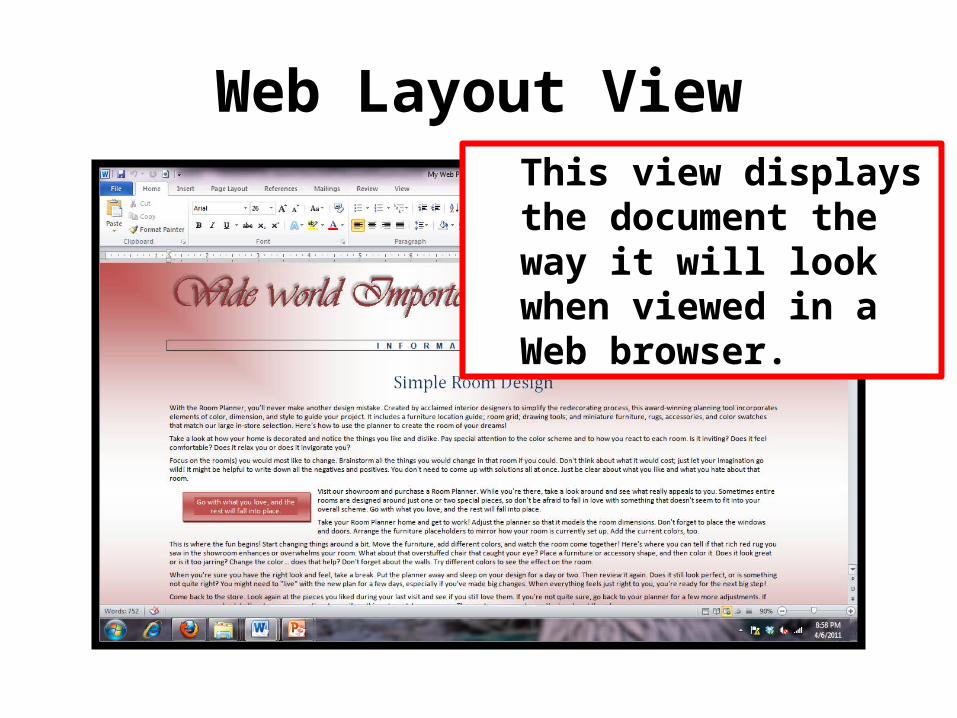
Web Layout ViewThis view displays the document the way it will look when viewed in a Web browser.

Outline View
This view displays the structure of a document as nested levels of headings and body text, and provides tools for viewing and changing its hierarchy.

Draft View
This view displays the content of a document with a simplified layout so that you can type and edit quickly.

Print Layout vs. Print Preview
• You can edit a document in Print Layout view but you cannot edit in Print Preview.
Print Layout View
Print Preview

Adjusting Page Margins
• Margins are the blank space around the edge of your document.
• Default in Word 2010 is 1” (top, bottom, left and right)• Use the ruler bar to adjust first line, hanging, left and
right indents.– Hold down the ALT key while dragging the margins to see
margin measurements.• Margins can also be adjusted in the Page Setup tab.• Margins apply to the whole document, or specific
sections if sections exist


Aligning Text on a Page
• Vertical Alignment – Adjusts white space on the top and bottom of the page.– Found on the Arrange group on the Page Layout
ribbon.• Horizontal Alignment – Adjusts white space on
the left and right.– Found on the Paragraph group on the Home
ribbon.
Text Indentation
• Leaving an amount of space between the margin and the start of a line.
• Indents may be changed or created – Using the Paragraph Group on the Page Layout
ribbon.– Using the Paragraph Group on the Home ribbon.– Using the Ruler.
Line and Paragraph Spacing in a Document
• Used to make a document easier to read.• Paragraph spacing is changed in the Paragraph group in
the Page Layout tab.• Line spacing is changed in the Paragraph group in the
Home tab.– Or…
• Ctrl + 1 used to set single line spacing. • Ctrl + 2 used to set double line spacing. • Ctrl + 5 used to set 1.5 line spacing.
• By default, “Normal” paragraph spacing is 0 pt. above paragraphs and 10 pt. below.

Formatting a Paragraph
• Paragraph formatting is applied up to the next paragraph mark and any new paragraphs after that paragraph.
• Can be applied before or after typing a paragraph.

Working With Tabs
• Default tab stops are set at .5”, left aligned• Can be viewed on the ruler bar• Type of tab stop determined on the left side of the ruler bar
– Left - Sets the start position of text that will then run to the right as you type.
– Right –Sets the start position of text that will then run to the left as you type.
– Center - The text centers on this position as you type.– Decimal - Aligns numbers around a decimal point. Independent of
the number of digits, the decimal point will be in the same position.– Bar - Doesn't position text. It inserts a vertical bar at the tab
position.

Inserting Page Numbers
• Insert using the Page Number command in the Head and Footer Group on the Insert Ribbon.

Headers and footers
• Used for page numbers, document titles, pictures, dates, times etc.
• Can appear on every page, just on odd or even pages and/or not on the first page.
• Create on the Insert tab in the Header & Footer group.

Switching page orientation
• Options:– Portrait – Taller than wide– Landscape – Wider than tall
• Change using the Orientation command in the Page Setup group on the Page Layout ribbon.
• View the whole page by using the Zoom dropdown list on the standard toolbar.