Embed Size (px)
Citation preview

HumanEyes LensFree Printing User's Guide
LensFree Printing
User Guide

HumanEyes LensFree Printing User Guide
ii
This page intentionally left blank

HumanEyes Creative3D User’s Guide
HumanEyes® LensFree
Printing
User’s Guide
http://www.humaneyes.com
Document version 1-0-0.1
2007 HumanEyes Technologies, Ltd.
All rights reserved. HumanEyes Creative and the HumanEyes logo are trademarks of
HumanEyes Technologies Ltd. All other trademarks and registered trademarks are the
property of their respective owners.
Reproduction or use of editorial or pictorial content in any manner, without express
written permission of HumanEyes Technologies Ltd., is prohibited. No patent liability
is assumed with respect to the use of the information contained herein. While every
precaution has been taken in the preparation of this manual, HumanEyes Technologies
Ltd. assumes no responsibility for errors or omissions. Neither is any liability assumed
for damages resulting from the use of the information contained herein. Pictures in this
document are for illustration purposes only.

HumanEyes LensFree Printing User's Guide
Table of Contents
Table of Contents ..................................................................................................................... 4
About This Guide..................................................................................................................... 5
Audience............................................................................................................................. 5
Purpose ............................................................................................................................... 5
Document Conventions ...................................................................................................... 5
Related Documents............................................................................................................. 5
Technical Support............................................................................................................... 5
Introduction .............................................................................................................................. 6
Product Highlights.............................................................................................................. 6
Installing HumanEyes LensFree Printing ................................................................................ 7
System Requirements ......................................................................................................... 7
Installation .......................................................................................................................... 7
Using HumanEyes LensFree Printing...................................................................................... 8
Concepts ............................................................................................................................. 8
Getting Started.................................................................................................................... 8
Printing Tips........................................................................................................................... 13

HumanEyes LensFree Printing User's Guide
About This Guide This guide contains the information necessary to print lenticular images (including 3D and 2D effect)
on glass or clear plastic substrate. This document will guide the reader through the process of printing
the lenticular barrier and then printing the interlaced lenticular image on the opposite side of the
barrier.
Audience
This guide is intended for users of HumanEyes PrintPro users. Users should be printers who are
familiar with the HumanEyes PrintPro software as well as Apple Macintosh in general and Mac OS X
(v10.4) in particular. Users should be comfortable navigating the Mac OS X interface.
Purpose
This user guide explains the functionality of HumanEyes LensFree Printing and provides instructions
for proper use. This guide is not intended to replace HumanEyes3D PrintPro 2.0 User's Guide and
should be used as an addendum to the HumanEyes3D PrintPro 2.0 User's Guide.
Document Conventions
The following document conventions are used in this manual:
Convention Meaning
Bold Names of windows and dialog boxes are in bold type.
Arial Arial font is used to designate file names, as well as things that you click
or select, such as command buttons, menu items and tab names.
Note:
Notes contain information of special importance and are marked by this
icon.
Important:
This icon marks important information.
Warning:
To warn readers about possible damage to equipment or data, or about
potential problems in the outcome of what they are doing.
Related Documents
• HumanEyes3D PrintPro 2.0 User's Guide, which describes the function and use of
HumanEyes3D PrintPro 2.0 and provides a detailed description of 3D project creation, editing
and production.
Technical Support
Please contact your authorized HumanEyes reseller for assistance or send an email to:

HumanEyes LensFree Printing User Guide
6
Introduction Welcome to HumanEyes LensFree Printing, an amazing new way to produce 3D content. LensFree
Printing is an innovative solution for the production of lenticular effects without the need for
specialized lenticular substrate. This feature is a major addition to the PrintPro product line. Now
printers can produce backlit posters quickly and at a reduced price.
This product is limited to printers operating a printer that allows for the direct printing on glass and
plastic substrates (e.g. flatbed printers).
Product Highlights
• Allows for the use of any clear glass or plastic substrate to replace lenticular substrate for
backlit applications
• Provides PrintPro users with a quick and easy method of printing on glass or plastic
LensFree printing is a simple yet powerful add-on to the PrintPro family. Using LensFree Printing any
printer can produce stunning lenticular output for backlit applications – without the need of classical
lenticular substrate

HumanEyes Creative3D User’s Guide
Installing HumanEyes LensFree Printing 7
Installing HumanEyes LensFree Printing
System Requirements
LensFree Printing is an add-on to PrintPro 2.0. It is configured by the HASP and can be upgraded from
current versions of PrintPro.
1. PowerPC® G4 or G5 processor
2. Mac OS X 10.4 and later
3. QuickTime 6.1 or later
4. 256 MB of RAM (1GB recommended for production purposes)
5. 30 MB for HumanEyes3D
Installation
The HASP plug prevents unauthorized use of HumanEyes3D and must be connected every time you
use it. You need administrator privileges to install the driver.
To install the software and HASP driver:
1. Make sure that the HASP is in the USB drive.
2. Place the HumanEyes3D CD in the CD-ROM drive
3. Run HumanEyes.mpkg. This will install the HumanEyes3D software and the HASP
driver, as well as the “HumanEyes 3D Layers” Plug-In for Adobe® PhotoShop® and
the user guide. The first time HumanEyes3D is run, a folder named
HumanEyesProjects will be created in your home directory. This will be the default
folder for storing your projects.
After the HASP driver has been successfully installed and loaded, the HASP LED should be lit. If it is
not, restart your computer.
NOTE: Visit http://www.ealaddin.com/h2 from time to time to check for new drivers for the HASP.
HumanEyes LensFree Printing User Guide
8
Using HumanEyes LensFree Printing
Concepts
Before one begins with LensFree Printing it is very important to understand the concepts behind the
LensFree Printing.
Essentially, what LensFree Printing does is that it creates a lenticular barrier without the lenticular.
Remember that a lenticular lens is pre-grooved with lenticuls (lines) at pre-defined spacing (based on
the LPI). LensFree printing will print the lenticuls on the plastic at almost any spacing one desires
(LPI).
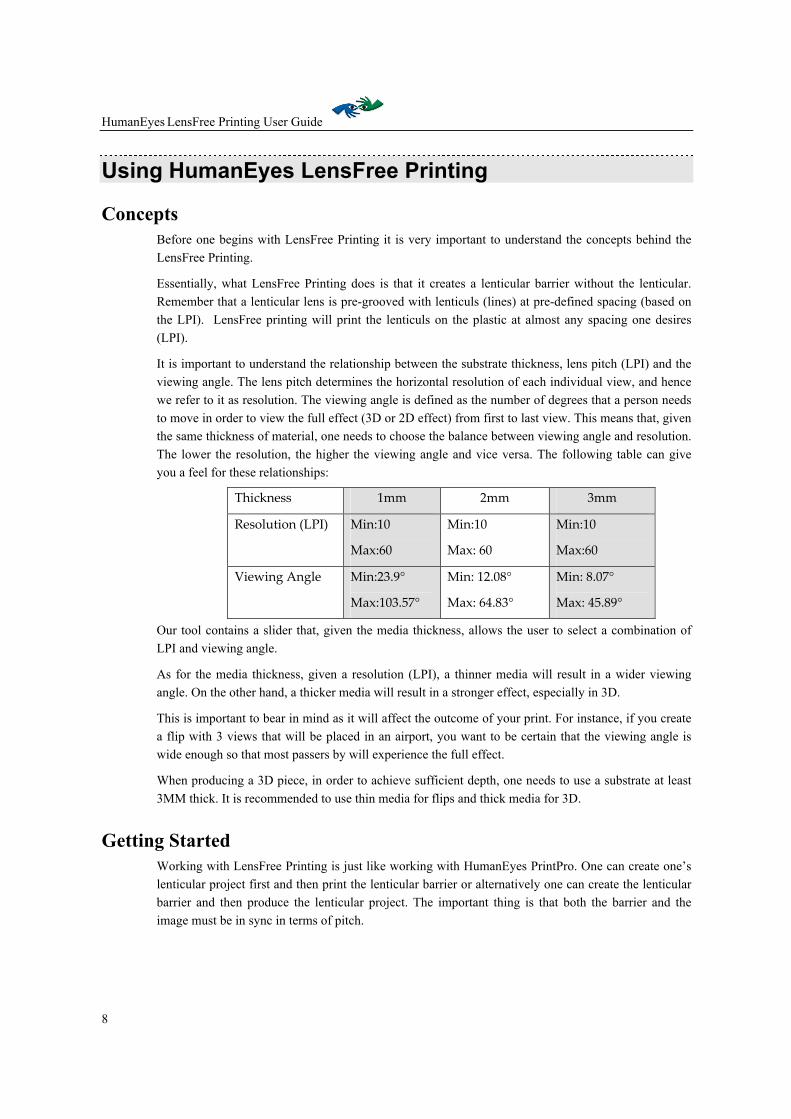
It is important to understand the relationship between the substrate thickness, lens pitch (LPI) and the
viewing angle. The lens pitch determines the horizontal resolution of each individual view, and hence
we refer to it as resolution. The viewing angle is defined as the number of degrees that a person needs
to move in order to view the full effect (3D or 2D effect) from first to last view. This means that, given
the same thickness of material, one needs to choose the balance between viewing angle and resolution.
The lower the resolution, the higher the viewing angle and vice versa. The following table can give
you a feel for these relationships:
Thickness 1mm 2mm 3mm
Resolution (LPI) Min:10
Max:60
Min:10
Max: 60
Min:10
Max:60
Viewing Angle Min:23.9°
Max:103.57°
Min: 12.08°
Max: 64.83°
Min: 8.07°
Max: 45.89°
Our tool contains a slider that, given the media thickness, allows the user to select a combination of
LPI and viewing angle.
As for the media thickness, given a resolution (LPI), a thinner media will result in a wider viewing
angle. On the other hand, a thicker media will result in a stronger effect, especially in 3D.
This is important to bear in mind as it will affect the outcome of your print. For instance, if you create
a flip with 3 views that will be placed in an airport, you want to be certain that the viewing angle is
wide enough so that most passers by will experience the full effect.
When producing a 3D piece, in order to achieve sufficient depth, one needs to use a substrate at least
3MM thick. It is recommended to use thin media for flips and thick media for 3D.
Getting Started
Working with LensFree Printing is just like working with HumanEyes PrintPro. One can create one’s
lenticular project first and then print the lenticular barrier or alternatively one can create the lenticular
barrier and then produce the lenticular project. The important thing is that both the barrier and the
image must be in sync in terms of pitch.

HumanEyes Creative3D User’s Guide
Using HumanEyes LensFree Printing 9
Workflow
The overall workflow has three steps:
1. Create LensFree media (the lenticular barrier) by printing the barrier file on a first side of a
glass/plastic media. The following picture illustrated a printed barrier:
2. Perform optical pitch test for the LensFree media, just as you would do for a lenticular sheet.
(For details, see HumanEyes3D® 1.3 User’s Guide “Performing the Pitch Test” section). We
recommend printing the pitch test pattern with a different color than black, e.g. magenta. To
do this take the pitch test file created by the software, open it with Photoshop or similar
program and change the color to magenta. This file will now be your pitch test file.
3. Interlace the content and Print the interlaced file on the second side of the media, just as you
would do with a lenticular media, as below

HumanEyes LensFree Printing User Guide
10
Please refer to this diagram for the detailed workflow procedure:
The detailed workflow is as follows:
1. Enter material thickness in section 1.
2. Enter Printer Resolution in section1.
3. Enter the width and height of the job in section 1.
4. Determine image model for the barrier pattern. We recommend using the bitmap image
model. Use CMYK if your RIP does not support bitmap. If you are using CMYK use error
diffusion screening.
Section 1:
Substrate
and Printer
details
Section 2:
Output
options,
based on
section1
Section 3:
Border
Details
Section 4:
Output
Details

HumanEyes Creative3D User’s Guide
Using HumanEyes LensFree Printing 11
5. After entering the above you will notice some suggestions that appear in section 2. Now it is
up to you to determine what viewing angle and resolution (LPI) you want (see concepts
above). You can adjust this balance by simply moving the slider back and forth. You will
notice the numbers change as you move from one end to the other.
6. One more setting in section 2 is the “Number of White Pixels” setting. The rule of thumb is
as follows: The smaller the number used, the darker the image, but the smaller the
ghosting/blur. For the sharpest resolution aim for a setting 1/5 – 1/3 of the total number of
pixels.
7. One last optional setting is the optional border setting in section 3. The border setting allows
for a nice black border around your outputted image. This can be used for framing.
8. After clicking “OK” you will see the following window:
Y
ou will fill in this information for the lenticular (barrier) file. This is the file you will print for the front
side of the media.
9. Once you have saved the barrier file, you will see the following summary file:

HumanEyes LensFree Printing User Guide
12
This window provides with information that should be recorded for use on the lenticular image.
Bear in mind that your image must line up with the lenticular and therefore, you must use the
same settings that you used for the LensFree™ lenticular (barrier).

HumanEyes Creative3D User’s Guide
Printing Tips 13
Printing Tips The following tips should help you get up and running:
� For 3D project use a material thickness of at least 3MM. Otherwise it will be very difficult to see depth.
� For flip and animations, the thinner the material the bigger the viewing angle and/or the higher apparent
resolution (LPI).
� Printing the barrier and the image are the same as in PrintPro 1.3. Please refer to the manual for details.
� It is recommended to always use a viewing angle greater angle between 30° to 90°.
� It is best to do a pitch test for each project. We recommend a color pitch test pattern.
� Alignment is quite simple - when printing the lenticular image, make sure to print alignment marks as
well. Then all one needs to do is to take the barrier and the image place them together until the
alignment mark is solid or clear.
� It is important to understand the correlation between viewing angle, viewing distance and the project
you are creating. For example if you were going to create a flip the following table explains the
correlations at a viewing distance of 10m.
What you can see from this is that when creating a flip project, you need to take into account your
application. Some of the questions that should be asked are:
� What is my viewing distance?
� How fast will people at that viewing distance be walking by?
� What effect am I trying to achieve.
When working with a 3D application the only thing to be aware of is that when using narrow viewing
angles, it is possible that the image will not look good. That is, 3D will look good only when the
viewer is located within predefined areas. The width of these areas is determined by the viewing angle.
The following table will give you an idea of what to expect when viewing a 3D picture from a viewing
distance of 10m:
Viewing Angle Number of Views Flip Change
8° 2 Every 70cm
8° 4 Every 35cm
12° 2 Every 1m
12° 4 Every .5 m
20° 2 Every 1.7m
20° 4 Every .85m
Viewing Angle Viewing Area
8° 1.4 m
12° 2 m
20° 3.4 m

HumanEyes LensFree Printing User Guide
14
Thank you for using HumanEyes LensFree
Printing
http://www.humaneyes.com