Embed Size (px)
Citation preview

©Copyright LOTRONIC 2012 NIGHT+LIGHT Page 1
LED Strobe
User Manual Manuel d’Utilisation
Bedienungsanleitung Manual de utilizare Instrukcja obsługi
Manual de Instruções
IMPORTANT NOTE: Electric products must not be put into household waste. Please bring them to a recycling centre. Ask your local authorities or your dealer about the way to proceed. NOTE IMPORTANTE : Les produits électriques ne doivent pas être mis au rebut avec les ordures ménagères.
Veuillez les faire recycler là où il existe des centres pour cela. Consultez les autorités locales ou votre revendeur sur la façon de les recycler. WICHTIGER HINWEIS: Elektrogeräte gehören nicht in den Hausmüll. Sie müssen in speziellen Betrieben recycelt werden. Bringen Sie sie zu einer speziellen Entsorgungsstelle für Elektrokleingeräte (Wertstoffhof)! NOTA IMPORTANTA: Deseurile care provin de la produsele electrice si electronice nu se vor pune la gunoiul menajer. Dezafectarea acestora trebuie sa se faca la centrele de colectare special amenajate. Contactati autoritatile locale pentru informatii privind procedura de dezafectare a deseurilor electrice si electronice. UWAGA: Elektryczne produkty nie mogą być wyrzucane wraz z odpadami domowymi.Prosimy o przyniesienie ich do centrum recyklingu. Zapytaj się z lokalnymi władzami lub sprzedawcą na temat sposobu postępowania. NOTA IMPORTANTE: Produtos eléctricos não deverão ser postos em contentores de lixo caseiros. Por favor, deposite-os em contentores para reciclagem. Questione as autoridades locais ou onde adquiriu o produto sobre como deverá proceder.

©Copyright LOTRONIC 2012 NIGHT+LIGHT Page 2
1. Safety Instructions
• Please keep this User Manual for future reference. If you sell the unit to another user, be sure that he also receives this instruction booklet.
• Unpack and check the unit carefully that it has not been damaged during transport before using the unit. • Before operating, ensure that the voltage and frequency of power supply match the power requirements of the unit. • It’s important to ground the yellow/green conductor to earth in order to avoid electric shock. • The unit is for indoor use only in a dry location. • The unit must be installed in a location with adequate ventilation, at least 50cm from adjacent surfaces. Be sure that
no ventilation slots are blocked.
• Disconnect mains power before fuse replacement or servicing. • Replace fuse only with the same type. • Make sure there are no inflammable materials close to the unit during operation. • Use safety cable when fixing this unit. • In the event of serious operating problem, stop using the unit immediately. • Never try to repair the unit by yourself. Repair carried out by unskilled people can lead to damage or malfunction.
Please contact the nearest authorized technical assistance center and always use the same type of spare parts.
• Do not touch any wires during operation as high voltage might be causing electric shock.
2. Specifications Supply Voltage: .............................................................................................AC220~240V 50/60HZ Power: ........................................................................................................................................ 10W LED: .............................................................................................................. White 8 mm LED 50pcs Function: ......................................................................... sound active mode with sensitivity control Dimensions: ............................................................................................................. 200x170x140mm Weight: ...................................................................................................................................... 500g
3. Installation The unit should be mounted via its screw holes on the bracket. Always ensure that the unit is firmly fixed to avoid vibration and slipping while operating. Always ensure that the structure to which you are attaching the unit is secure and is able to support a weight of 10 times of the unit’s weight. Also always use a safety cable that can hold 12 times of the weight of the unit when installing the fixture. The equipment must be fixed by professionals. It must be fixed at a place where is out of the reach of people and nobody can pass by or under it.
4. Operation Connect the unit to an appropriate mains outlet. Switch the unit on via the ON/OFF switch. Turn the sensitivity control of the built-in microphone to the desired level. The unit will flash to the sound of the music.
5. Fixture Cleaning The cleaning of the lenses must be carried out periodically to optimize light output. Cleaning frequency depends on the environment in which the fixture operates: damp, smoky or particularly dirty surrounding can cause greater accumulation of dirt on the unit’s optics.
• Clean with soft cloth using normal glass cleaning fluid. • Always dry the parts carefully. • Clean the external optics at least every 20 days.
GB

©Copyright LOTRONIC 2012 NIGHT+LIGHT Page 3
Lire attentivement les consignes de sécurité qui contiennent des informations importantes concernant l’installation, le fonctionnement et la maintenance
1. Consignes de sécurité
• Dès réception de l’appareil, ouvrez le carton et vérifiez que le contenu est complet et en bon état. • Assurez-vous que la tension secteur convient à cet appareil et qu’elle ne dépasse pas la tension d’alimentation
indiquée sur la plaque signalétique de l’appareil..
• Cet appareil doit être relié à la terre afin d’éviter un choc électrique. • Uniquement pour utilisation à l’intérieur à un endroit sec! • Installez l’appareil à un endroit bien ventilé à une distance minimum de 50cm de toute surface. Assurez-vous que les
fentes de ventilation ne sont pas bloquées.
• Débranchez l’appareil du secteur avant toute manipulation ou entretien. • Lorsque vous remplacez le fusible, utilisez uniquement un fusible qui présente exactement les mêmes
caractéristiques que l’ancien.
• Vérifiez qu’aucun matériau inflammable ne se trouve à proximité de l’effet pendant le fonctionnement. • Fixez l’appareil avec un câble de sécurité. • En cas de dysfonctionnement, arrêtez immédiatement l’appareil et débranchez-le du secteur. • N’essayez jamais de réparer l’appareil par vous-même. Une réparation mal faite peut entraîner des dommages et des
dysfonctionnements. Contactez un service technique agréé. Utilisez uniquement des pièces détachées identiques aux pièces d’origine.
• Ne pas toucher de fils électriques pendant le fonctionnement car les tensions élevées peuvent provoquer une électrocution.
2. Caractéristiques techniques Alimentation: ................................................................................................AC220~240V 50/60HZ Consommation: ......................................................................................................................... 10W LED: ........................................................................................................... 50 LED blanches de 8mm Modes de fonctionnement: ...................................................................................... Activation audio Dimensions: ............................................................................................................. 200x170x140mm Poids: ......................................................................................................................................... 500g
3. Installation Fixez l’appareil sur l’étrier au moyen des trous de vis. Assurez-vous que l’appareil est solidement fixé afin d’éviter des vibrations et des mouvements pendant le fonctionnement. Vérifiez que le support sur lequel vous allez installer l’appareil est solide et capable de supporter au moins 10 fois le poids de l’appareil. Lors de l’installation utilisez toujours un câble de sécurité supplémentaire qui peut porter 12 fois le poids le d’appareil. Cet appareil doit être installé par des professionnels. Il doit être installé à un endroit où il est hors de portée des personnes et où personne ne peut passer en-dessous.
4. Fonctionnement Branchez l’appareil sur une prise secteur appropriée. Mettez l’appareil sous tension au moyen de l’interrupteur ON/OFF. Réglez la sensibilité du microphone intégré au moyen du bouton SENSITIVITY. Le stroboscope clignotera au rythme de la musique.
5. Nettoyage de l’appareil Nettoyez régulièrement l’appareil afin d’optimiser la puissance lumineuse. La fréquence de nettoyage dépend des conditions d’utilisation. Un environnement humide, enfumé ou particulièrement sale favorise l’accumulation de poussière sur les optiques.
• Utilisez un chiffon doux et du nettoyant à vitres classique. • Séchez toutes les pièces soigneusement. • Nettoyez les optiques externes au moins une fois toutes les 3 semaines.
F
©Copyright LOTRONIC 2012 NIGHT+LIGHT Page 4
Aufmerksam die Sicherheitshinweise lesen. Sie enthalten wichtige Informationen bez. der Installation, des Betriebs und der Instandhaltung.
1. Sicherheitshinweise
• Nach Empfang die Verpackung öffnen und prüfen, ob der Inhalt vollständig und in gutem Zustand ist. • Prüfen, ob die Netzspannung der angegebenen Betriebsspannung entspricht. • Das Gerät muss geerdet werden. • Nur für Innengebrauch in einer trockenen Umgebung! • Das Gerät an einem gut belüfteten Ort in einer Mindestentfernung von 50cm zur nächsten Fläche anbringen. Die
Belüftungsschlitze dürfen weder blockiert noch verstopft sein.
• Das Gerät vor Reparatur- und Wartungsarbeiten vom Netz trennen. • Die Sicherung nur durch eine Sicherung mit denselben technischen Daten ersetzen. • Während des Betriebs dürfen sich keine brennbaren Materialien in der Nähe des Geräts befinden. • Das Gerät zusätzlich mit einem Sicherheitskabel befestigen. • Im Störfall sofort das Gerät ausschalten und vom Netz trennen. • Niemals das Gerät selbst reparieren. Dadurch können Schäden und Betriebsstörungen entstehen. Das Gerät nur von
einem anerkannten Techniker reparieren lassen und nur Ersatzteile benutzen, die mit den Originalteilen identisch sind.
• Während des Betriebs nicht das Gerät berühren, denn die hohen Spannungen können einen Stromschlag verursachen.
2. Technische Daten Versorgung: ...................................................................................................AC220~240V 50/60HZ Verbrauch: .................................................................................................................................. 10W LED: ............................................................................................................... 50 weiße 8 mm Ø LEDs Betriebsarten: ............................................................... Audioaktivierung mit Empfindlichkeitsregler Abmessungen: ......................................................................................................... 200x170x140mm Gewicht: ..................................................................................................................................... 500g
3. Installation Den Haltebügel mittels der 3 Schraublöcher am Gerät befestigen. Das Gerät muss fest und sicher installiert werden, um Erschütterungen und Spielraum während der Bewegungen zu vermeiden. Die Montagefläche muss stabil sein und mindestens 10-mal das Gewicht des Geräts tragen können. Bei der Montage das Gerät immer zusätzlich durch ein Sicherheitskabel absichern, dass mindestens 12-mal das Gewicht des Geräts tragen kann. Das Gerät darf nur von einem Fachmann installiert werden. Es muss an einer Stelle installiert werden, wo es für Menschen unzugänglich ist und niemand unter dem Montagebereich stehen oder gehen kann.
4. Betrieb Das Gerät an eine geeignete Netzsteckdose anschließen. Das Gerät mit dem ON/OFF Schalter einschalten. Den Empfindlichkeitsregler des eingebauten Mikrofons auf den gewünschten Pegel einstellen. Das Gerät blinkt zum Rhythmus der Musik.
5. Reinigung des Geräts Regelmäßig die Linse des Geräts reinigen, um eine optimale Leuchtkraft zu erhalten. Die Häufigkeit hängt von den Betriebsumständen ab. In einer feuchten, rauchigen oder staubigen Umgebung sammelt sich mehr Schmutz an.
• Die Linse mit einem weichen Tuch und normalem Glasreiniger abwischen. • Alle Teile sorgfältig trocknen. • Die Linse mindestens einmal alle 3 Wochen reinigen. Die Innenseite der Linse alle 1-2 Monate.
D

©Copyright LOTRONIC 2012 NIGHT+LIGHT Page 5
1. Instructiuni de siguranta
Pastrati manualul pentru referinte ulterioare. In cazul in care vindeti produsul unui alt utilizator, asigurati-va ca acesta va primi si acest manual de instructiuni. • Despachetati produsul si verificati aparatul cu atentie pentru a observa daca a fost sau nu deteriorat in timpul
transportului. • Inainte de punerea in functiune, asigurati-va ca tensiunea si frecventa retelei de alimentare corespunde
cerintelor aparatului. • Este important sa legati conductorul galben/verde la pamantare pentru a evita un soc electric. • Aparatul este destinat utilizarii in interior, intr-un loc uscat. • Aparatul trebuie instalat intr-un loc cu ventilatie corespunzatoare, la cel putin 50cm de suprafetele adiacente.
Asigurati-va ca orificiile de aerisire nu sunt blocate. • Deconectati de la reteaua de alimentare inainte de inlocuirea sigurantei sau de intretinerea aparatului. • Inlocuiti siguranta doar cu una de acelasi tip. • Asigurati-va ca nu exista materiale inflamabile in apropierea aparatului in timpul functionarii. • Folositi cablu de siguranta atunci cand fixati aparatul. • In cazul unor probleme grave de functionare, incetati sa mai folositi aparatul. • Nu incercati sa reparati aparatul. Reparatiile efectuate de persoane necalificate pot duce la deteriorarea sau
functionarea defectuoasa. Va rugam sa contactati cel mai apropiat centru autorizat de asistenta tehnica si folositi mereu acelasi tip de piese de schimb.
• Pe durata functionarii aparatului nu atingeti nici un fir – pericol de electrocutare. • Nu atingeti nici un cablu in timpul functionarii deoarece tensiunea ridicata ar putea cauza un soc electric.
2. Specificatii Alimentare: ............................................................................................... AC220~240V, 50/60HZ Putere: ................................................................................................................................... 10W LED: ................................................................................................................. LED alb 8 mm, 50buc. Functii: ....................................................... modul de activare al sunetului cu controlul sensibilitatii Dimensiuni: .............................................................................................................. 200x170x140mm Greutate: .................................................................................................................................... 500g 3. Instalare Aparatul ar trebui montat cu ajutorul suruburilor pe suport. Intotdeauna asigurati-va ca aparatul este fixat ferm pentru a evita vibratiile si alunecarea in timpul functionarii. Intotdeauna asigurati-va ca structura pe care ati atasat aparatul este capabila sa suporte o greutate de 10 ori mai mare decat greutatea aparatului. De asemenea, folositi intotdeauna un cablu de siguranta, care poate suporta de 12 ori greutatea aparatului atunci cand instalati dispozitivul de prindere. Echipamentul trebuie sa fie fixat de catre profesionisti. Acesta trebuie sa fie fixat intr-un loc in care sa nu fie la indemana oamenilor si nimeni sa nu poata trece pe sub el. 4. Functionare Conectati aparatul la o priza de alimentare corespunzatoare. Porniti aparatul prin intermediul comutatorului PORNIRE / OPRIRE. Rotiti comutatorul sensibilitatii microfonului incorporat la nivelul dorit.Unitatea va lumina la sunetul muzicii. 5. Curatarea dispozitivului de fixare Curatarea lentilelor trebuie efectuata periodic, pentru a optimiza nivelul de lumina. Frecventa curatarii depinde de mediul in care functioneaza dispozitivul de prindere: umed, fum sau mediu murdar care provoca o acumulare mai mare de murdarie pe dispozitivul optic al unitatii. • Curatati cu un material moale, folosind lichid de curatare pentru sticla. • Uscati intotdeauna componentele cu atentie. • Curatati dispozitivele optice externe cel putin la fiecare 20 de zile.
RO

©Copyright LOTRONIC 2012 NIGHT+LIGHT Page 6
1. Instrukcja bezpieczeństwa
• Prosimy zachować instrukcję obsługi na przyszłość.Jeśli sprzedajesz urządzenie innemu użytkownikowi, należy pamiętać o instrukcji obsługi.
• Przed uruchomieniem rozpakuj i sprawdź urządzenie, czy nie została uszkodzona podczas transportu. • Przed uruchomieniem upewnij się, że napięcie i częstotliwość zasilania odpowiadają wymaganiom urządzenia. • Sprawdź czy urządzenie jest uziemione, aby uniknąć porażenia prądem elektrycznym. • Urządzenie przeznaczone jest do użytku w pomieszczeniach zamkniętych, w suchym miejscu. • Urządzenie musi być zainstalowane w miejscu o odpowiedniej wentylacji, co najmniej 50cm odstępu z sąsiednimi
powierzchniami. Pamiętaj, aby otwory wentylacyjne nie były zablokowane.
• Odłącz zasilanie przed wymianą bezpiecznika lub konserwacją. • Wymieniaj bezpiecznik tylko na tego samego typu. • Upewnij się, że podczas pracy nie ma żadnych materiałów łatwopalnych w pobliżu urządzenia. • Użyj linkę zabezpieczającą przy instalacji tego urządzenia. • W razie poważnego problemu operacyjnego, natychmiast zatrzymaj urządzenie. • Nigdy nie próbuj naprawiać urządzenia samodzielnie. Naprawy przeprowadzone przez niewykwalifikowane osoby
mogą prowadzić do uszkodzenia lub awarii. Proszę skontaktować się z najbliższym autoryzowanym centrum technicznym i zawsze używać części zamiennych tego samego typu.
• Nie dotykać żadnych przewodów podczas pracy, wysokie napięcie może być przyczyną porażenia prądem. 2. Specyfiakcja techniczna Zasilanie: .......................................................................................................AC220~240V 50/60HZ Pobór mocy: ............................................................................................................................... 10W LED: .............................................................................................................. White 8 mm LED 50pcs Tryb: ............................................................................. Aktywacja dźwiękiem lub manualna kontrola Wymiary: .................................................................................................................. 200x170x140mm Waga: ......................................................................................................................................... 500g
3. Instalacja Urządzenie powinno być zamontowane w odpowiedni sposób, za pośrednictwem otworów w uchwycie. Zawsze upewnij się, że urządzenie jest solidnie przymocowane, aby uniknąć wibracji i problemów w czasie pracy. Zawsze upewnij się, że struktura, do której są mocowane urządzenie jest solidna i może wytrzymać 10 razy większą wagę. Należy też użyć kabla bezpieczeństwa, który może utrzymać 12 razy większy ciężar urządzenia. Urządzenia muszą być ustawione przez specjalistów w miejscu bezpiecznym, z dala od ludzi.
4. Eksploatacja Podłącz urządzenie do odpowiedniego gniazdka sieciowego. Włącz urządzenie przełącznik przycisk ON / OFF. Ustaw tryb auto lub kontrole poprzez dźwięk. Jeśli wybierzesz tryb dźwięku, urządzenie będzie reagował w rytm muzyki. Obróć pokrętło czułości, aby wyregulować czułość wbudowanego mikrofonu do pożądanego poziomu. Jeśli wybierzesz tryb AUTO, można ustawić szybkość stroboskopu za pomocą pokrętła SPEED.
5. Konserwacja Czyszczenia wewnętrznych i zewnętrznych soczewek optycznych i / lub lustra muszą być przeprowadzane okresowo w celu optymalizacji strumienia świetlnego.Częstotliwość czyszczenia zależy od środowiska, w którym urządzenie działa: wilgoć, zadymienie lub zabrudzenie otoczenia może spowodować większe gromadzenie się zanieczyszczeń na urządzeniach optycznych. Czyścić miękką szmatką przy użyciu płynu do zwykłych powierzchni szklanych Czyścić zewnętrzne elementy optyczne co najmniej co 20 dni. Oczyść wewnętrzne optykę co najmniej raz na 30/60 dni.
PL
©Copyright LOTRONIC 2012 NIGHT+LIGHT Page 7
Leia atentamente as instruções de segurança contém informações importantes sobre instalação, operação e manutenção
1. Informações de Segurança
• Após a recepção do dispositivo, abra o pacote e verificar se o conteúdo está completo e em bom estado. • Verifique se a voltagem da rede é adequada a esta unidade e não exceda a voltagem de alimentação indicada na
placa de identificação da unidade.
• Este aparelho deve ter ligação terra de modo a evitar choque eléctrico. • Somente para uso interior e num ambiente seco! • Instale numa área bem ventilada a uma distância mínima de 50cm de qualquer superfície. Certifique-se de que as
aberturas de ventilação não estão bloqueadas.
• Desligue a energia antes do manuseamento ou manutenção. • Quando substituir o fusível, utilize apenas um fusível que tem exactamente as mesmas características do antigo. • Assegurar que nenhum material inflamável está perto do equipamento. • Fixe o aparelho com um cabo de segurança. • Se ocorrer uma avaria, pare imediatamente e desligue da tomada. • Nunca tente reparar o equipamento sozinho. A reparação incorrecta pode provocar danos ou interrupções. Entre em
contacto com o centro de serviço autorizado. Use apenas peças idênticas às peças originais.
• Não toque no fio eléctrico durante a operação devido a alta voltagem que pode causar choque eléctrico.
2. Características Técnicas Voltagem: ......................................................................................................AC220~240V 50/60HZ Potência: .................................................................................................................................... 10W LED: ...................................................................................................... 50pc LEDs broncos de 8 mm Função: ................................................. Modo de activação por som com controlo de sensibilidade Dimensões: .............................................................................................................. 200x170x140mm Peso: .......................................................................................................................................... 500g
3. Instalação Ligar o dispositivo para o suporte através dos orifícios. Certifique-se de que a unidade está fixa de forma segura para impedir a vibração durante a operação. Verifique se o local onde vai instalar a unidade é estável e sólido, sendo capaz de suportar pelo menos 10 vezes o peso da unidade. Ao instalar usar sempre um cabo de segurança que pode transportar até 12 vezes o peso do dispositivo. Este aparelho deve ser instalado por profissionais e deve ser instalado num local está inacessível às pessoas e que ninguém possa passar por baixo.
4. Funcionamento Ligar o equipamento a uma tomada eléctrica. Ligue o equipamento utilizando o botão ON / OFF. Ajuste a sensibilidade do microfone, com o botão SENSITIVITY. O strobe funciona ao ritmo da música. 5. Limpeza Limpe a lente interna e externa e/ou espelhos para maximizar a saída de luz. Deve ser feita a limpeza com frequência dependendo das condições de utilização. Um ambiente húmido, com fumo ou particularmente sujo, favorece o acumular de poeira na óptica.
• Use um pano macio para limpar o vidro. • Secar cuidadosamente todas as peças. • Limpe as ópticas externas pelo menos uma vez a cada 3 semanas e as lentes internas a cada 1-2 meses
PT

1 ©Copyright LOTRONC 2012 NIGHT+LIGHT
Dual GEM LED Light
User Manual
Manuel d’Utilisation
Bedienungsanleitung
Manual de Instruções
Manual de utilizare
Instrukcja obsługi

2 ©Copyright LOTRONC 2012 NIGHT+LIGHT
1. Safety Instructions
• Please keep this User Manual for future reference. If you sell the unit to another user, be sure that he also receives this instruction booklet.
• Unpack and check the unit carefully that it has not been damaged during transport before using the unit. • Before operating, ensure that the voltage and frequency of power supply match the power requirements of the unit. • It’s important to ground the yellow/green conductor to earth in order to avoid electric shock. • The unit is for indoor use only in a dry location. • The unit must be installed in a location with adequate ventilation, at least 50cm from adjacent surfaces. Be sure that
no ventilation slots are blocked.
• Disconnect mains power before fuse replacement or servicing. • Replace fuse only with the same type. • Make sure there are no inflammable materials close to the unit during operation. • Use safety cable when fixing this unit. • In the event of serious operating problem, stop using the unit immediately. • Never try to repair the unit by yourself. Repair carried out by unskilled people can lead to damage or malfunction.
Please contact the nearest authorized technical assistance center and always use the same type of spare parts.
• Do not touch any wires during operation as high voltage might be causing electric shock.
2. Specifications Supply Voltage: ...................................................................... AC220~240V 50/60HZ Power: ................................................................................................................. 60W Fuse: ........................................................................................................................ 1A LED: ................................................ Red 36pcs, Green 16pcs, Blue 32pcs, White 8pcs Operating modes: ........................................................Sound activation or auto-run. Dimensions: .................................................................................... 340x260x195mm Weight: .............................................................................................................. 1.8kg
3. Installation The unit should be mounted via its screw holes on the bracket. Always ensure that the unit is firmly fixed to avoid vibration and slipping while operating. Always ensure that the structure to which you are attaching the unit is secure and is able to support a weight of 10 times of the unit’s weight. Also always use a safety cable that can hold 12 times of the weight of the unit when installing the fixture. The equipment must be fixed by professionals. And it must be fixed at a place where is out of the touch of people and has no one pass by or under it.
4. Operation Plug the unit into an appropriate mains outlet. Switch the unit on via the ON/OFF switch. Set the AUTO-Sound switch to AUTO for automatic operation or to SOUND for music controlled operation. If you select SOUND mode, the unit will react to the rhythm of the music. Turn the SENSITIVITY knob to adjust the sensitivity of the built-in microphone to the desired level. If you select AUTO mode, you can adjust the strobe speed via the SPEED knob.
GB

3 ©Copyright LOTRONC 2012 NIGHT+LIGHT
Lire attentivement les consignes de sécurité qui contiennent des informations importantes concernant l’installation, le fonctionnement et la maintenance
5. Fixture Cleaning The cleaning of internal and external optical lenses and/or mirrors must be carried out periodically to optimize light output. Cleaning frequency depends on the environment in which the fixture operates: damp, smoky or particularly dirty surrounding can cause greater accumulation of dirt on the unit’s optics.
• Clean with soft cloth using normal glass cleaning fluid. • Always dry the parts carefully. • Clean the external optics at least every 20 days. Clean the internal optics at least every 30/60 days.
IMPORTANT NOTE: Electric products must not be put into household waste. Please bring them to a recycling centre. Ask your local authorities or your dealer about the way to proceed.
1. Consignes de sécurité
• Dès réception de l’appareil, ouvrez le carton et vérifiez que le contenu est complet et en bon état. • Assurez-vous que la tension secteur convient à cet appareil et qu’elle ne dépasse pas la tension d’alimentation
indiquée sur la plaque signalétique de l’appareil..
• Cet appareil doit être relié à la terre afin d’éviter un choc électrique. • Uniquement pour utilisation à l’intérieur à un endroit sec! • Installez l’appareil à un endroit bien ventilé à une distance minimum de 50cm de toute surface. Assurez-vous que les
fentes de ventilation ne sont pas bloquées.
• Débranchez l’appareil du secteur avant toute manipulation ou entretien. • Lorsque vous remplacez le fusible, utilisez uniquement un fusible qui présente exactement les mêmes
caractéristiques que l’ancien.
• Vérifiez qu’aucun matériau inflammable ne se trouve à proximité de l’effet pendant le fonctionnement. • Fixez l’appareil avec un câble de sécurité. • En cas de dysfonctionnement, arrêtez immédiatement l’appareil et débranchez-le du secteur. • N’essayez jamais de réparer l’appareil par vous-même. Une réparation mal faite peut entraîner des dommages et des
dysfonctionnements. Contactez un service technique agréé. Utilisez uniquement des pièces détachées identiques aux pièces d’origine.
• Ne pas toucher de fils électriques pendant le fonctionnement car les tensions élevées peuvent provoquer une électrocution.
2. Caractéristiques techniques Alimentation: ............................................................................................... AC220~240V 50/60HZ Consommation: ......................................................................................................................... 60W Fusible: .......................................................................................................................................... 1A LED: ...................................................................... Rouge 36pcs, Vert 16pcs, Bleu 32pcs, Blanc 8pcs Modes de fonctionnement: ...........................................Activation par la musique ou automatique Dimensions: ........................................................................................................... 340x260x195mm Poids: ........................................................................................................................................ 1,8kg
F

4 ©Copyright LOTRONC 2012 NIGHT+LIGHT
Aufmerksam die Sicherheitshinweise lesen. Sie enthalten wichtige Informationen bez. der Installation, des Betriebs und der Instandhaltung.
3. Installation Fixez l’appareil sur l’étrier au moyen des trous de vis. Assurez-vous que l’appareil est solidement fixé afin d’éviter des vibrations et des mouvements pendant le fonctionnement. Vérifiez que le support sur lequel vous allez installer l’appareil est solide et capable de supporter au moins 10 fois le poids de l’appareil. Lors de l’installation utilisez toujours un câble de sécurité supplémentaire qui peut porter 12 fois le poids le d’appareil. Cet appareil doit être installé par des professionnels. Il doit être installé à un endroit où il est hors de portée des personnes et où personne ne peut passer en-dessous.
4. Fonctionnement Branchez l’appareil sur une prise secteur appropriée et mettez-le sous tension au moyen de l’interrupteur M/A. Mettez le commutateur AUTO-Sound sur AUTO pour un fonctionnement automatique ou sur SOUND pour un fonctionnement commandé par la musique. Tournez le bouton SENSITIVITY pour régler la sensibilité du microphone au niveau désiré si l’appareil fonctionne en mode AUDIO. Si vous l’utilisez en mode AUTO, vous pouvez régler la vitesse du stroboscope au moyen du bouton SPEED.
5. Nettoyage de l’appareil Nettoyez régulièrement les lentilles internes et externes e/ou miroirs afin d’optimiser la puissance lumineuse. La fréquence de nettoyage dépend des conditions d’utilisation. Un environnement humide, enfumé ou particulièrement sale favorise l’accumulation de poussière sur les optiques.
• Utilisez un chiffon doux et du nettoyant à vitres classique. • Séchez toutes les pièces soigneusement. • Nettoyez les optiques externes au moins une fois toutes les 3 semaines et les optiques internes tous les 1-2
mois.
NOTE IMPORTANTE : Les produits électriques ne doivent pas être mis au rebut avec les ordures ménagères. Veuillez les faire recycler là où il existe des centres pour cela. Consultez les autorités locales ou votre revendeur sur la façon de les recycler.
1. Sicherheitshinweise
• Nach Empfang die Verpackung öffnen und prüfen, ob der Inhalt vollständig und in gutem Zustand ist. • Prüfen, ob die Netzspannung der angegebenen Betriebsspannung entspricht. • Das Gerät muss geerdet werden. • Nur für Innengebrauch in einer trockenen Umgebung! • Das Gerät an einem gut belüfteten Ort in einer Mindestentfernung von 50cm zur nächsten Fläche anbringen. Die
Belüftungsschlitze dürfen weder blockiert noch verstopft sein.
• Das Gerät vor Reparatur- und Wartungsarbeiten vom Netz trennen. • Die Sicherung nur durch eine Sicherung mit denselben technischen Daten ersetzen. • Während des Betriebs dürfen sich keine brennbaren Materialien in der Nähe des Geräts befinden. • Das Gerät zusätzlich mit einem Sicherheitskabel befestigen.
D

5 ©Copyright LOTRONC 2012 NIGHT+LIGHT
• Im Störfall sofort das Gerät ausschalten und vom Netz trennen. • Niemals das Gerät selbst reparieren. Dadurch können Schäden und Betriebsstörungen entstehen. Das Gerät nur von
einem anerkannten Techniker reparieren lassen und nur Ersatzteile benutzen, die mit den Originalteilen identisch sind.
• Während des Betriebs nicht das Gerät berühren, denn die hohen Spannungen können einen Stromschlag verursachen.
2. Technische Daten Versorgung: .......................................................................... AC220~240V 50/60HZ Verbrauch: .......................................................................................................... 60W Sicherung: ............................................................................................................... 1A LEDs: ................................................................. 36 rote, 16 grüne, 32 blaue, 8 weiße Betriebsarten: ................................................... Audioaktivierung oder automatisch. Abmessungen: ................................................................................ 340x260x195mm Gewicht: ............................................................................................................. 1,8kg 3. Installation Den Haltebügel mittels der 3 Schraublöcher am Gerät befestigen. Das Gerät muss fest und sicher installiert werden, um Erschütterungen und Spielraum während der Bewegungen zu vermeiden. Die Montagefläche muss stabil sein und mindestens 10-mal das Gewicht des Geräts tragen können. Bei der Montage das Gerät immer zusätzlich durch ein Sicherheitskabel absichern, dass mindestens 12-mal das Gewicht des Geräts tragen kann. Das Gerät darf nur von einem Fachmann installiert werden. Es muss an einer Stelle installiert werden, wo es für Menschen unzugänglich ist und niemand unter dem Montagebereich stehen oder gehen kann. 4. Betrieb Das Gerät an eine geeignete Netzsteckdose anschließen. Das Gerät mit dem ON/OFF Schalter einschalten. Den AUTO-SOUND Schalter auf AUTO für automatischen Betrieb oder auf SOUND für musikgesteuerten Betrieb stellen. Wenn der Schalter auf SOUND steht, reagiert das Gerät auf die Musik. Den SENSITIVITY Knopf auf die gewünschte Mikrofonempfindlichkeit einstellen. Im AUTO Betrieb kann die Blitzgeschwindigkeit des Stroboskops mit dem SPEED Knopf eingestellt werden. 5. Reinigung des Geräts Regelmäßig die Linse des Geräts reinigen, um eine optimale Leuchtkraft zu erhalten. Die Häufigkeit hängt von den Betriebsumständen ab. In einer feuchten, rauchigen oder staubigen Umgebung sammelt sich mehr Schmutz an.
• Die Linse mit einem weichen Tuch und normalem Glasreiniger abwischen. • Alle Teile sorgfältig trocknen. • Die Linse mindestens einmal alle 3 Wochen reinigen. Die Innenseite der Linse alle 1-2 Monate.
WICHTIGER HINWEIS: Elektrogeräte gehören nicht in den Hausmüll. Sie müssen in speziellen Betrieben recycelt werden. Bringen Sie sie zu einer speziellen Entsorgungsstelle für Elektrokleingeräte (Wertstoffhof)!

6 ©Copyright LOTRONC 2012 NIGHT+LIGHT
Leia atentamente as instruções de segurança contém informações importantes sobre instalação, operação e manutenção
1. Informações de Segurança
• Após a recepção do dispositivo, abra o pacote e verificar se o conteúdo está completo e em bom estado. • Verifique se a voltagem da rede é adequada a esta unidade e não exceda a voltagem de alimentação indicada na
placa de identificação da unidade.
• Este aparelho deve ter ligação terra de modo a evitar choque eléctrico. • Somente para uso interior e num ambiente seco! • Instale numa área bem ventilada a uma distância mínima de 50cm de qualquer superfície. Certifique-se de que as
aberturas de ventilação não estão bloqueadas.
• Desligue a energia antes do manuseamento ou manutenção. • Quando substituir o fusível, utilize apenas um fusível que tem exactamente as mesmas características do antigo. • Assegurar que nenhum material inflamável está perto do equipamento. • Fixe o aparelho com um cabo de segurança. • Se ocorrer uma avaria, pare imediatamente e desligue da tomada. • Nunca tente reparar o equipamento sozinho. A reparação incorrecta pode provocar danos ou interrupções. Entre em
contacto com o centro de serviço autorizado. Use apenas peças idênticas às peças originais.
• Não toque no fio eléctrico durante a operação devido a alta voltagem que pode causar choque eléctrico.
2. Características Técnicas Voltagem: ............................................................................... AC220~240V 50/60HZ Potência: ............................................................................................................. 60W Fusível: .................................................................................................................... 1A LED: ...................................... Vermelho 36pcs, Verde 16pcs, azul 32pcs, branco 8pcs Modos de Operação: ............................................ Activação por som ou automático. Dimensões: ..................................................................................... 340x260x195mm Peso: ……………………………………………………………………………………………………………… 1.8kg
3. Instalação Ligar o dispositivo para o suporte através dos orifícios. Certifique-se de que a unidade está fixa de forma segura para impedir a vibração durante a operação. Verifique se o local onde vai instalar a unidade é estável e sólido, sendo capaz de suportar pelo menos 10 vezes o peso da unidade. Ao instalar usar sempre um cabo de segurança que pode transportar até 12 vezes o peso do dispositivo. Este aparelho deve ser instalado por profissionais e deve ser instalado num local está inacessível às pessoas e que ninguém possa passar por baixo.
4. Funcionamento Ligar o equipamento a uma tomada apropriada e ligar à corrente com interruptor ON/OFF. Definir para AUTO-Sound para funcionamento automático ou SOUND para uma operação controlada por som. Regule a o botão SENSITIVITY para ajustar a sensibilidade do microfone para o nível desejado se o equipamento estiver em modo de AUDIO. Se usar no modo AUTO, poderá ajustar a velocidade do strobe utilizando o botão SPEED.
PT

7 ©Copyright LOTRONC 2012 NIGHT+LIGHT
5. Limpeza Limpe a lente interna e externa e/ou espelhos para maximizar a saída de luz. Deve ser feita a limpeza com frequência dependendo das condições de utilização. Um ambiente húmido, com fumo ou particularmente sujo, favorece o acumular de poeira na óptica.
• Use um pano macio para limpar o vidro. • Secar cuidadosamente todas as peças. • Limpe as ópticas externas pelo menos uma vez a cada 3 semanas e as lentes internas a cada 1-2 meses
NOTA IMPORTANTE: Produtos eléctricos não deverão ser postos em contentores de lixo caseiros. Por favor, deposite-os em contentores para reciclagem. Questione as autoridades locais ou onde adquiriu o produto sobre como deverá proceder.
1. Instrukcja bezpieczeństwa
• Prosimy zachować instrukcję obsługi na przyszłość.Jeśli sprzedajesz urządzenie innemu użytkownikowi, należy pamiętać o instrukcji obsługi.
• Przed uruchomieniem rozpakuj i sprawdź urządzenie, czy nie została uszkodzona podczas transportu. • Przed uruchomieniem upewnij się, że napięcie i częstotliwość zasilania odpowiadają wymaganiom
urządzenia. • Sprawdź czy urządzenie jest uziemione, aby uniknąć porażenia prądem elektrycznym. • Urządzenie przeznaczone jest do użytku w pomieszczeniach zamkniętych, w suchym miejscu. • Urządzenie musi być zainstalowane w miejscu o odpowiedniej wentylacji, co najmniej 50cm odstępu z
sąsiednimi powierzchniami. Pamiętaj, aby otwory wentylacyjne nie były zablokowane. • Odłącz zasilanie przed wymianą bezpiecznika lub konserwacją. • Wymieniaj bezpiecznik tylko na tego samego typu. • Upewnij się, że podczas pracy nie ma żadnych materiałów łatwopalnych w pobliżu urządzenia. • Użyj linkę zabezpieczającą przy instalacji tego urządzenia. • W razie poważnego problemu operacyjnego, natychmiast zatrzymaj urządzenie. • Nigdy nie próbuj naprawiać urządzenia samodzielnie. Naprawy przeprowadzone przez niewykwalifikowane
osoby mogą prowadzić do uszkodzenia lub awarii. Proszę skontaktować się z najbliższym autoryzowanym centrum technicznym i zawsze używać części zamiennych tego samego typu.
• Nie dotykać żadnych przewodów podczas pracy, wysokie napięcie może być przyczyną porażenia prądem. 2. Specyfiakcja techniczna Zasilanie: ................................................................... AC220~240V 50/60HZ Pobór mocy: ............................................................................................. 60W Bezpiecznik: ................................................................................................ 1A LED: ............. Czerwone 36pcs, Zielone 16pcs, Niebieskie 32pcs, Białe 8pcs Tryby: ............................................................. Aktywacja dźwiękiem lub auto. Wymiary: ..........................................................................340 x 260 x 195mm Waga: ..................................................................................................... 1.8kg
PL

8 ©Copyright LOTRONC 2012 NIGHT+LIGHT
3. Instalacja Urządzenie powinno być zamontowane w odpowiedni sposób, za pośrednictwem otworów w uchwycie. Zawsze upewnij się, że urządzenie jest solidnie przymocowane, aby uniknąć wibracji i problemów w czasie pracy. Zawsze upewnij się, że struktura, do której są mocowane urządzenie jest solidna i może wytrzymać 10 razy większą wagę. Należy też użyć kabla bezpieczeństwa, który może utrzymać 12 razy większy ciężar urządzenia. Urządzenia muszą być ustawione przez specjalistów w miejscu bezpiecznym, z dala od ludzi. 4. Eksploatacja Podłącz urządzenie do odpowiedniego gniazdka sieciowego. Włącz urządzenie przełącznik przycisk ON / OFF. Ustaw tryb auto lub kontrole poprzez dźwięk. Jeśli wybierzesz tryb dźwięku, urządzenie będzie reagował w rytm muzyki. Obróć pokrętło czułości, aby wyregulować czułość wbudowanego mikrofonu do pożądanego poziomu. Jeśli wybierzesz tryb AUTO, można ustawić szybkość stroboskopu za pomocą pokrętła SPEED. 5. Konserwacja Czyszczenia wewnętrznych i zewnętrznych soczewek optycznych i / lub lustra muszą być przeprowadzane okresowo w celu optymalizacji strumienia świetlnego.Częstotliwość czyszczenia zależy od środowiska, w którym urządzenie działa: wilgoć, zadymienie lub zabrudzenie otoczenia może spowodować większe gromadzenie się zanieczyszczeń na urządzeniach optycznych. Czyścić miękką szmatką przy użyciu płynu do zwykłych powierzchni szklanych Czyścić zewnętrzne elementy optyczne co najmniej co 20 dni. Oczyść wewnętrzne optykę co najmniej raz na 30/60 dni.
UWAGA: Elektryczne produkty nie mogą być wyrzucane wraz z odpadami domowymi.Prosimy o przyniesienie ich do centrum recyklingu. Zapytaj się z lokalnymi władzami lub sprzedawcą na temat sposobu postępowania.

©Copyright LOTRONIC 2012 Page 1
MMIINNII LLAASSEERR LLIIGGHHTT EEFFFFEECCTT
RReeff..:: MMIINNIILLAASSEERR
UUSSEERR’’SS MMAANNUUAALL MMAANNUUEELL DD’’UUTTIILLIISSAATTIIOONN
BBEEDDIIEENNUUNNGGSSAANNLLEEIITTUUNNGG MMAANNUUAALL DDEE IINNSSTTRRUUÇÇÕÕEESS
IINNSSTTRRUUKKCCJJAA OOBBSSŁŁUUGGII GGHHIIDD DDEE UUTTIILLIIZZAARREE
IMPORTANT NOTE: Electric products must not be put into household waste. Please bring them to a recycling centre. Ask your local authorities or your dealer about the way to proceed. NOTE IMPORTANTE : Les produits électriques ne doivent pas être mis au rebut avec les ordures ménagères. Veuillez les faire recycler là où il existe des centres pour cela. Consultez les autorités locales ou votre revendeur sur la façon de les recycler.
WICHTIGER HINWEIS: Elektrogeräte gehören nicht in den Hausmüll. Sie müssen in speziellen Betrieben recycelt werden. Bringen Sie sie zu einer speziellen Entsorgungsstelle für Elektrokleingeräte (Wertstoffhof)! Produtos eléctricos não deverão ser postos em contentores de lixo caseiros. Por favor, deposite-os em contentores para reciclagem. Questione as autoridades locais ou onde adquiriu o produto sobre como deverá proceder Produkty elektryczne nie mogą być utylizowane wraz z odpadami domowymi, po wyeksploatowaniu urządzenia proszę skierować je do recyklingu.. Deseurile electrice si electronice nu trebuie anmestecate cu gunoiul menajer. Pentru dezafectarea acestora, prezentati-le la centrele de colectare special amenajate in acest scop. Interesati-va la autoritatile locale despre procedura de dezafectare.
GB – INSTRUCTION MANUAL Thank you for purchasing this product. Please read user guide for safety and operations information before using the product. Keep this manual for future reference. This product can create perfect laser programs and effects since it has passed a series of strictly tests before delivery. Please check the attachments listed on the page after opening the carton. In the event of carton damage or attachment missing in transit, please contact your dealer or our after sales service department. CONTENTS OF THE CARTON 1x laser light effect 1x adaptor 1x User manual Technical specifications Laser diode: Green 532nm, Red 650nm Laser power: R: 50mw, G: 5mw Input power: 5Vdc, 1A Control mode: Sound control, Auto control, strobe control, the external potentiometer can adjust sound sensitivity, strobe speed & motor rotation speed. Effect: While rotating, the laser light creates a strobe effect with more than 5,000 dots moving and flashing like fireflies and stars in the sky. Dimensions: 130 x 92 x 51 mm Net weight: 0.4 Kg
Warning Do not expose the human eye directly to laser beam. Do not turn on and off the unit frequently. Before using this unit make sure the power supply is grounded. This unit is intended for indoor use only and should be protected from
water, moisture and vibrations. Do not use the unit continuously over an extended period of time. Maintain the unit at a working temperature of 15°C-35°C.
Keep the unit clean to optimize light output. Do not let any objects nor liquids enter the housing. They will cause
malfunction and electrical shock. Keep at least 1m away from shiny objects. It is preferably to transport the unit in its original packaging to avoid
damage.

©Copyright LOTRONIC 2012 Page 2
INSTALLATION 1. First of all, make sure that the supplied voltage matches the voltage
marked on the base of the laser unit; 2. Installation should be made by an experienced technician. 3. Please check if the fan and the ventilation holes are not blocked; 4. The laser unit should be securely installed. 5. The laser light must be installed in such a way that it is not accessible
to the audience. Do not direct the light beam to the audience. Direct the beam well above eye height.
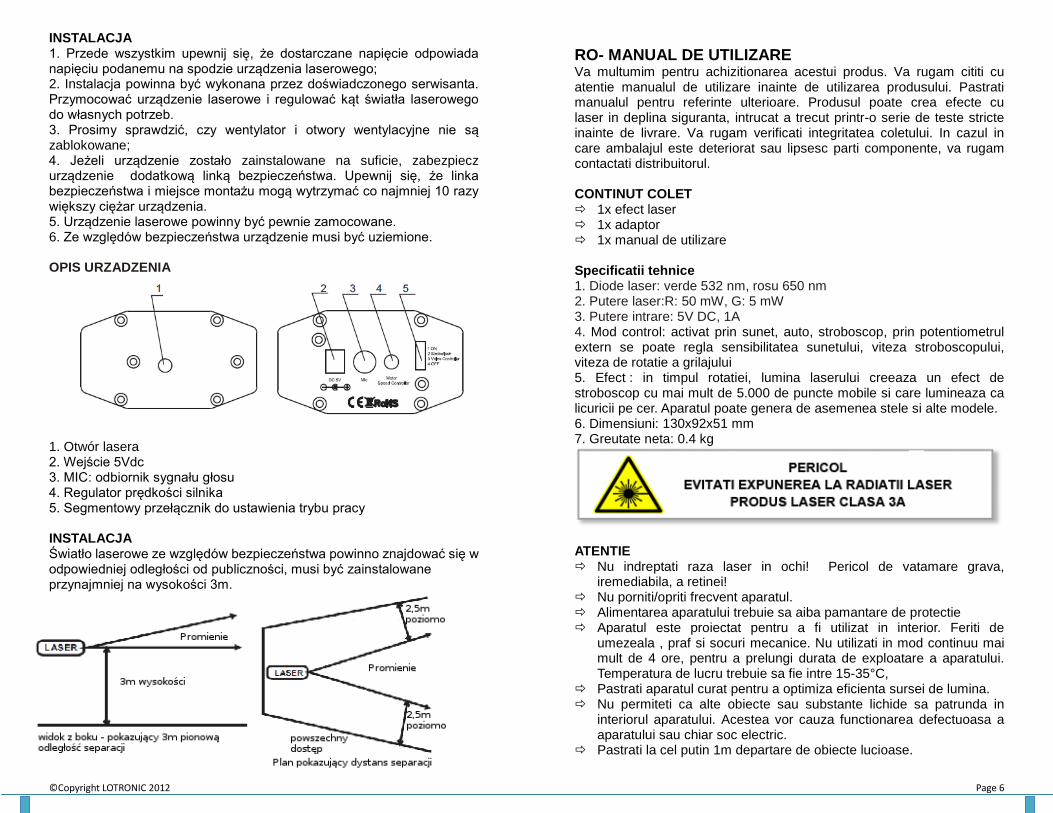
DESCRIPTION OF THE UNIT
1. Laser aperture 2. 5Vdc input 3. MIC: Voice signal receiver 4. Speed controller of the motor 5. Segment switch to set the operating mode
Installation Laser light above maximum permissible exposure should not be accessible to the audience and must be installed in at least 3m height.
F - MANUEL D’UTILISATION Lire attentivement le manuel avant la première mise en service et le conserver pour référence ultérieure. Cet appareil a quitté l’usine en parfait état après avoir passé une série de contrôles de qualité très stricts. Vérifiez le contenu à l’ouverture de l’emballage L’emballage doit contenir les pièces suivantes : 1 Effet laser IBIZA LIGHT 1 adaptateur 1 manuel d’utilisation CARACTERISTIQUES TECHNIQUES Diode Laser: Vert 532nm, Rouge 650nm Puissance du laser: R: 50mW, V: 5mW Tension d’entrée: 5Vdc, 1A Mode de fonctionnement: Commande audio, automatique, stroboscope Réglages: Sensibilité audio, vitesse du stroboscope et vitesse de rotation du moteur. Effet: Le laser crée un effet de stroboscope avec plus de 5.000 points qui bougent et clignotent comme des lucioles et des étoiles dans le ciel. Dimensions: 130 x 92 x 51 mm Poids net: 0.4 Kg
AVERTISSEMENTS o Ne pas exposer l’œil humain au rayon laser. o Ne pas mettre fréquemment l’appareil sous et hors tension. o Uniquement pour utilisation à l’intérieur. Tenir à l’abri de l’eau, de
l’humidité et de secousses. La température de fonctionnement est de 15-35°C. Ne pas utiliser l’appareil en continue sous peine de diminuer sa durée de vie.
o Nettoyez régulièrement l’appareil avec un chiffon propre pour retirer la poussière accumulée et optimiser la puissance lumineuse.
o Ne pas laisser pénétrer des objets ou liquides dans l’appareil. Ils provoqueraient un court-circuit ou un choc électrique.
o Respecter une distance d’au moins 1m de tout objet brilliant. o Transporter l’appareil dans son emballage d’origine afin d’éviter et
l’endommager.

©Copyright LOTRONIC 2012 Page 3
INSTALLATION 1. Respectez les consignes contenues dans le mode d’emploi. Ne pas
démonter l’appareil. En cas de problème, adressez-vous à votre revendeur.
2. L’installation doit être effectuée par un technicien qualifié 3. Vérifiez que le ventilateur et les orifices de ventilation ne sont ni
bloqués, ni obstrués. 4. Le laser doit être solidement installé. 5. Le laser doit être installé de telle façon qu’il n’est pas accessible par le public. Ne pas diriger le rayon sur le public. Il est impératif que personne ne puisse regarder directement dans le rayon. Diriger le rayon vers le haut. DESCRIPTION DE L’APPAREIL
1. Sortie du rayon laser 2. Entrée d’alimentation 5Vdc 3. MIC: Microphone intégré 4. Contrôleur de vitesse du moteur 5. Commutateur multi-positions pour sélectionner le mode de
fonctionnement
Installation Un laser supérieur à l’exposition maximale admissible (MPE) ne doit pas être accessible au public et être installé à au moins 3m au-dessus du sol.
D- ANLEITUNG Vor der ersten Inbetriebnahme die Anleitung durchlesen, um das Gerät sicher und richtig zu bedienen. Alle Anweisungen und Hinweise müssen genau befolgt werden. Das Gerät wurde zahlreichen strengen Qualitätskontrollen unterworfen und hat unser Werk in einwandfreiem Betriebszustand verlassen. Packen Sie das Gerät aus und untersuchen Sie es auf eventuelle Transportschäden. Die Verpackung muss folgende Teile enthalten: 1 Lasereffekt 1 Adapter 1 Anleitung TECHNISCHE DATEN Laser Diode: Grün 532nm, Rot 650nm Laserleistung: R: 50mW, G: 5mW Versorgungsspannung: 5Vdc, 1A Betriebsarten: Audiosteuerung, automatisch, Stroboskop Regler: Audioempfindlichkeit, Blitzgeschwindigkeit und Motordrehgeschwindigkeit Effekt: Der Laser erzeugt einen Stroboskopeffekt mit über 5.000 Punkten, die sich wie Glühwürmchen und Sterne in der Luft bewegen und funkeln. Abmessungen: 130 x 92 x 51 mm Nettogewicht: 0.4 Kg Warnhinweise
• Das Gerät nicht kurz hintereinander ein- und ausschalten. • Nur für Innengebrauch. Vor Wasser, Feuchtigkeit und
Erschütterungen schützen. Die Betriebstemperatur beträgt 15-35°C. Nicht über einen längeren Zeitraum ununterbrochen benutzen, da sich sonst die Lebensdauer erheblich verkürzt.
• Das Gerät regelmäßig mit einem sauberen Tuch abwischen, um den angesammelten Staub zu entfernen und die Leuchtkraft zu erhalten.
• Brennbare bzw. explosive oder glänzende Gegenstände und Materialien müssen mindestens 1,50m vom Gerät entfernt sein.
• Keine Gegenstände oder Flüssigkeiten ins Gerät dringen lassen. Es besteht Stromschlaggefahr.
• Das Gerät nur im Originalkarton transportieren.

©Copyright LOTRONIC 2012 Page 4
INSTALLATION Bedienungsanleitung befolgen. Nicht das Gerät auseinanderbauen. Im Problemfall wenden Sie sich bitte an einen Fachmann. Die Installation muss von einem Fachmann vorgenommen werden. Prüfen Sie, dass der Ventilator und die Belüftungsschlitze nicht verstopft sind. Der Laser muss unter Berücksichtigung aller Sicherheitsvorschriften angebracht werden. Der Laser muss für das Publikum unzugänglich angebracht werden. Den Laser in mindestens 3m Höhe anbringen. Niemals den Strahl auf die Menschen richten, immer nur in die Höhe. Es muss unmöglich sein, direkt in den Laserstrahl zu blicken. BESCHREIBUNG
1. Laserstrahlaustritt 2. 5Vdc Anschluss für die Stromversorgung 3. MIC: Eingebautes Mikrofon 4. Blitzgeschwindigkeitsregler 5. Stufenschalter zur Betriebswahl
Hinweis Ein Laser, der die maximal zulässige Aussetzung (MPE) überschreitet, darf nicht dem Publikum zugänglich sein und muss mindestens 3m über Bodenhöhe angebracht werden.
PT – MANUAL DE INSTRUÇÕES De modo a poder operar e usar o equipamento correctamente e com segurança, leia este manual antes de o usar. Guarde este manual para referência futura. Verifique os conteúdos da embalagem. Caso algum componente esteja danificado ou em falta, consulte o seu vendedor ou o nosso departamento de vendas. A embalagem contém: Efeito de Luz Laser: 1 Transformador: 1 Manual de instruções: 1 Especificações: Díodo Laser: Verde 532nm, Vermelho 650nm Potência Laser: Vermelho: 50mw, Verde: 5mw Alimentação: 5Vdc, 1A Modo de Controlo: Controlo por som, Auto, strobe, o potenciómetro exterior pode ajustar a sensibilidade de som, velocidade strobe, graduação de velocidade de rotação. Efeito: Quando em rotação, o laser cria um efeito strobe com mais de 5,000 pontos em movimento e a piscar. A unidade também pode gerar estrelas e outros padrões. Dimensões: 130 x 92 x 51 mm Peso Liquido: 0.4 Kg
Aviso
Não exponha os seus olhos à luz directa do Laser Não desligue e ligue a unidade com frequência Esta unidade é para ser usada em espaços fechados. A
temperatura de funcionamento é de 15-35ºC. Não a utilize por longos períodos de tempo.
Limpe a lente externa do equipamento com um pano limpo para remover o pó e ter o máximo desempenho.
Não deite líquidos para cima do equipamento. Tal procedimento causa avarias ou choques eléctricos.
Mantenha a distância mínima de 1m de objectos brilhantes. Guarde a embalagem original caso tenha a necessidade de
transportar o equipamento.

©Copyright LOTRONIC 2012 Page 5
INSTALAÇÃO 1. Em primeiro lugar, certifique-se de que a voltagem corresponde à tensão marcado na base da unidade de laser; 2. A instalação deve ser feita por um técnico experiente. 3. Verifique se a ventoinha e os orifícios de ventilação não estão bloqueados. 4. A unidade de laser deve ser instalada com segurança. 5. A unidade laser deve ser instalada para que não esteja acessível ao público. Não direccione os feixes de luz em direcção ao público. DESCRIÇÃO DA UNIDADE
1. Orifício Laser 2. Entrada 5Vdc 3. MIC: receptor de sinal voz 4. Controlo de velocidade de motor 5. Interruptor para configurar modo de operação
Instalação Luz laser acima do máximo de exposição permitida não deve estar acessível ao público e deve ser instalada a pelo menos uma altura de 3m de altura.
PL - INSTRUKCJA OBSŁUGI Dziękujemy za zakup w sieci dystrybucyjnej LSpro, prosimy o uważne przeczytanie niniejszej instrukcji przed pierwszym uruchomieniem urządzenia w celu zapoznania się z obsługą i środkami bezpieczeństwa. ZAWARTOŚĆ OPAKOWANIA 1x efekt laserowy 1x adapter 1x instrukcja obsługi SPECYFIKACJA TECHNICZNA Dioda laserowa: 532nm zielona, czerwona 650nm Moc lasera: Czerwona: 50mW, Zielona: 5mW Zasilanie: 5V, 1A Tryb sterowania: kontrola dźwiękiem, sterowanie automatyczne, regulacja stroboskopu, regulacja czułości, prędkość stroboskopu przy sterowaniu dźwiękiem, prędkość obrotowa. Efekt: podczas obracania, światło lasera tworzy efekt stroboskopowy z ponad 5000 punktów ruchu, które migają. Urządzenie może także generować gwiazdy i inne wzory. Wymiary: 130 x 92 x 51 mm Waga netto: 0,4 kg
OSTRZEŻENIE Nie wolno narażać ludzkiego oka na bezpośrednie działanie wiązki laserowej. Nie należy często włączać i wyłączać urządzenia. Przed użyciem urządzenia upewnić się, że zasilanie jest uziemione. Urządzenie przeznaczone jest do użytku w pomieszczeniach i powinny być chronione przed wodą, wilgocią i wibracjami. Nie używać urządzenia w sposób ciągły przez dłuższy okres czasu. Temperatura pracy urządzenia 15 ° C-35 ° C. Przechowuj urządzenie w czystości, aby zoptymalizować strumień świetlny. Nie pozwól, aby jakiekolwiek przedmioty ani płyny dostał się do urządzenia. Mogą one spowodować awarię i porażenie prądem. Zachowaj odległość co najmniej 1m od świecących elementów. Transportuj urządzenie w oryginalnym opakowaniu, aby uniknąć uszkodzenia.
©Copyright LOTRONIC 2012 Page 6
INSTALACJA 1. Przede wszystkim upewnij się, że dostarczane napięcie odpowiada napięciu podanemu na spodzie urządzenia laserowego; 2. Instalacja powinna być wykonana przez doświadczonego serwisanta. Przymocować urządzenie laserowe i regulować kąt światła laserowego do własnych potrzeb. 3. Prosimy sprawdzić, czy wentylator i otwory wentylacyjne nie są zablokowane; 4. Jeżeli urządzenie zostało zainstalowane na suficie, zabezpiecz urządzenie dodatkową linką bezpieczeństwa. Upewnij się, że linka bezpieczeństwa i miejsce montażu mogą wytrzymać co najmniej 10 razy większy ciężar urządzenia. 5. Urządzenie laserowe powinny być pewnie zamocowane. 6. Ze względów bezpieczeństwa urządzenie musi być uziemione. OPIS URZADZENIA
1. Otwór lasera 2. Wejście 5Vdc 3. MIC: odbiornik sygnału głosu 4. Regulator prędkości silnika 5. Segmentowy przełącznik do ustawienia trybu pracy INSTALACJA Światło laserowe ze względów bezpieczeństwa powinno znajdować się w odpowiedniej odległości od publiczności, musi być zainstalowane przynajmniej na wysokości 3m.
RO- MANUAL DE UTILIZARE Va multumim pentru achizitionarea acestui produs. Va rugam cititi cu atentie manualul de utilizare inainte de utilizarea produsului. Pastrati manualul pentru referinte ulterioare. Produsul poate crea efecte cu laser in deplina siguranta, intrucat a trecut printr-o serie de teste stricte inainte de livrare. Va rugam verificati integritatea coletului. In cazul in care ambalajul este deteriorat sau lipsesc parti componente, va rugam contactati distribuitorul. CONTINUT COLET 1x efect laser 1x adaptor 1x manual de utilizare Specificatii tehnice 1. Diode laser: verde 532 nm, rosu 650 nm 2. Putere laser:R: 50 mW, G: 5 mW 3. Putere intrare: 5V DC, 1A 4. Mod control: activat prin sunet, auto, stroboscop, prin potentiometrul extern se poate regla sensibilitatea sunetului, viteza stroboscopului, viteza de rotatie a grilajului 5. Efect : in timpul rotatiei, lumina laserului creeaza un efect de stroboscop cu mai mult de 5.000 de puncte mobile si care lumineaza ca licuricii pe cer. Aparatul poate genera de asemenea stele si alte modele. 6. Dimensiuni: 130x92x51 mm 7. Greutate neta: 0.4 kg
ATENTIE Nu indreptati raza laser in ochi! Pericol de vatamare grava,
iremediabila, a retinei! Nu porniti/opriti frecvent aparatul. Alimentarea aparatului trebuie sa aiba pamantare de protectie Aparatul este proiectat pentru a fi utilizat in interior. Feriti de
umezeala , praf si socuri mecanice. Nu utilizati in mod continuu mai mult de 4 ore, pentru a prelungi durata de exploatare a aparatului. Temperatura de lucru trebuie sa fie intre 15-35°C,
Pastrati aparatul curat pentru a optimiza eficienta sursei de lumina. Nu permiteti ca alte obiecte sau substante lichide sa patrunda in
interiorul aparatului. Acestea vor cauza functionarea defectuoasa a aparatului sau chiar soc electric.
Pastrati la cel putin 1m departare de obiecte lucioase.

©Copyright LOTRONIC 2012 Page 7
Instalare 1.Asigurati-va ca tensiunea utilizata corespunde cu cea inscrisa pe
aparat; 2.Instalarea trebuie efectuata de catre un profesionist. Fixati laser-ul si
reglati unghiul; 3.Verificati ca ventilatorul sau orificiul de evacuare sa nu fie blocat; 4.Laser-ul trebuie sa fie instalat in conditii de siguranta. 5.Lumina laserului trebuie instalata astfel incat publicul sa nu aiba acces
la ea. Nu indreptati lumina fascicului laser inspre public. Indreptati-o mai sus de inaltimea ochilor.
DESCRIEREA APARATULUI
1. Deschidere laser 2. Intrare 5V DC 3. MIC: receptor pentru semnalul sunetului 4. Dispozitivul de control al vitezei motorului 5. Comutator segment pentru setarea modului de functionare
Instalare Expunerea maxima admisa a luminii laser nu trebuie sa fie accesibila publicului si trebuie sa fie instalata la cel putin 3 m inaltime.
ES - MANUAL DE UTILIZACION Lea atentamente el manual, antes de poner en marcha el equipo y conserve este manual para futuras consultas. Verifique el contenido del embalaje a su apertura. El embalaje, ha de contener: 1 Efecto láser IBIZA LIGHT 1 adaptador 1 manual de uso CARACTERISTICAS TECNICAS Diodo Láser: Verde 532nm, Rojo 650nm Potencia del láser: R: 50mW, V: 5mW Tensión de entrada: 5Vdc, 1A Modo de funcionamiento: Comandado por sonido, automático, estroboscopio. Ajustes: Sensibilidad audio, velocidad de rotación de los motivos y del estrobo. Efecto: El láser crea un efecto estroboscópico con mas de 5.000 puntos que se mueven y parpadean por todo el lugar de proyección. El aparato, puede también generar estrellas y otros motivos. Dimensiones: 130 x 92 x 51 mm... Peso neto: 0.4 Kg.
ADVERTENCIAS o No exponer el ojo humano a los haces del láser. o No enchufar desenchufar el equipo constantemente. o Únicamente para uso en interiores, proteger del agua, de la
humedad y el polvo. La temperatura de trabajo, ha de estar entre 15-35°C. No utilizar el aparato de forma continua, ya que le acortara la duración de vida del equipo.
o Limpie regularmente el equipo con un paño seco y sin pelusas. o No deje penetrar líquidos ni objetos dentro del equipo. Estos, pueden
provocar incendios, cortocircuitos y descargas eléctricas. o Respete una distancia de al menos un metro, con cualquier objeto
brillante o reflectante. o Transportar el aparato dentro de su embalaje de origen.
INSTALACION 1. Asegúrese de que la tensión del enchufe corresponde a la admitida
por el equipo o alimentador. 2. La instalación, ha de ser efectuada por un técnico cualificado. 3. Verifique que el ventilador o las oberturas de ventilación no estén

©Copyright LOTRONIC 2012 Page 8
obstruidas o bloqueadas. 4. El láser ha de estar solidamente instalado. 5. El láser ha de estar instalado fuera del alcance de las personas. No dirigir el láser hacia las personas. Es imperativo que ninguna persona mire directamente dentro del haz. Dirija el haz hacia arriba. DESCRIPCION DEL APARATO
a. Salida de rayo láser b. Entrada alimentación 5Vdc c. MIC: Micrófono integrado d. Control de la velocidad del motor e. Conmutador multiposición para seleccionar el modo de
funcionamiento.
Instalación Un láser superior a la exposición máxima admitida (MPE) no puede estar accesible al público y tiene que estar instalado al menos a 3 metros de altura.
GB - This LASER effect is built for PROFESSIONAL use only. It must be used and controlled by a professional in sufficiently large premises because of its high output power. Always set up and install all laser effects so that all laser light is at least 3 meters (9.8 feet) above the floor. Never
create a fixed point. F - Cet effet LASER est un appareil conçu uniquement pour un usage PROFESSIONNEL. Il doit utilisé et installé par un professionnel à une hauteur minimale de 3m dans des salles suffisamment grandes en raison de sa puissance importante. Toujours installer et configurer le laser de sorte que tous les effets du laser sont au moins à 3 mètres au-dessus du sol. Ne jamais créer de point fixe. D – Dieser LASER Effekt ist nur für GEWERBLICHEN Gebrauch. Aufgrund seiner hohen Ausgangsleistung darf das Gerät nur von einem Fachmann in ausreichend großen Räumen installiert und betrieben werden. Es muss in mindesten 3m Bodenhöhe angebracht werden. Der Strahl darf auf keinen Fall auf einen festen Punkt gerichtet sein. NL - Dit LASER effect is alleen voor professioneel gebruik. Door zijn hoge vermogen mag het apparaat alleen van een specialist in voldoende grote ruimten worden geïnstalleerd en bediend. Het moet worden aangebracht in tenminste 3m vloerhoogte. In geen geval de beam op een vast punt richten. PT - Este efeito LASER foi desenhado apenas para uso PROFISSIONAL. Deve ser usado e controlado por um profissional em locais grandes devido à sua elevada potência de saída. Configurar sempre e instalar todos os efeitos laser de modo a que a luz do laser esteja a pelo menos 3 metros (9,8 pés) do chão. Nunca crie um ponto fixo. PL - LASER jest zbudowany do użytku profesjonalnego. Musi być on wykorzystywany i kontrolowany przez profesjonalistów w pomieszczeniach wystarczająco dużych ze względu na dużą moc wyjściową. Należy skonfigurować i zainstalować wszystkie efekty laserowe, tak aby wszystkie światła laserowe znajdowały się co najmniej 3 metry (9,8 stóp) nad podłogą. Nigdy nie tworzyć stałego punktu. RO- Acest aparat este destinat utlizarii profesionale. Acest aparat trebuie instalat de catre profesionisti la o inaltime de cel putin 3m datorita puterii mari de iesire.