Embed Size (px)
Citation preview
LEATHER REBACKING James Reid-Cunningham
Seminar in Standards of Excellence in Hand Bookbinding The Guild of Book Workers
Washington, D.C. October 25, 2013
Thirty years ago, leather rebacking was the primary repair for damaged leather bindings, but in the last few decades many newer and easier methods have been developed to address the problem of leather bindings with loose boards and/or spines. These new techniques led to leather rebacking falling out of favor, although there are several other reasons. Historically, leather rebacking was meant to be a cheap repair, except when used on heavily decorated volumes. It was cheaper to reback a book than to provide it with a new binding. Poor materials were often used, especially in the 19th and early 20th centuries; this is evident from the very large number of rebacked books where the boards are loose once again. The leather was chemically unstable, and often it was pared very thin. Often no extra method of board attachment was provided, so the boards were only held on using very thin leather. The tendency of restorers to “age” a rebacked volume by re-staining the existing leather to blend with the repair leather, or rubbing dirt on it, led to leather rebacking being perceived as contrary to contemporary conservation principles based on preserving original material whenever possible.
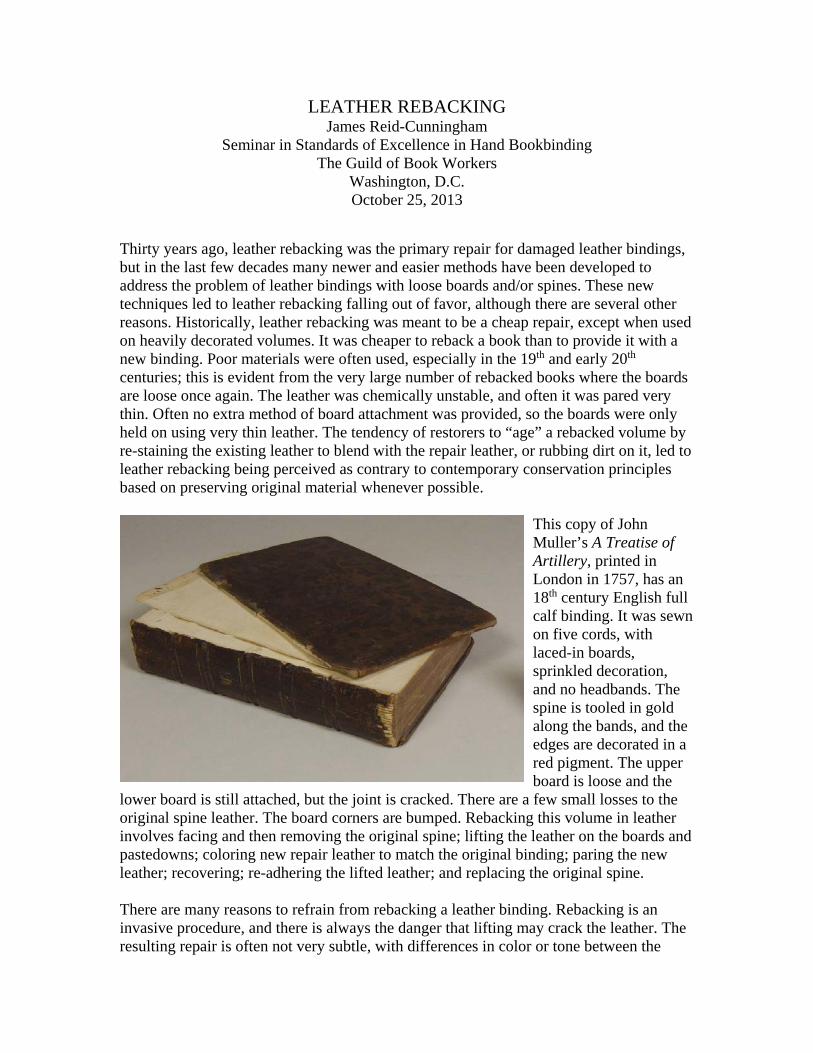
This copy of John Muller’s A Treatise of Artillery, printed in London in 1757, has an 18th century English full calf binding. It was sewn on five cords, with laced-in boards, sprinkled decoration, and no headbands. The spine is tooled in gold along the bands, and the edges are decorated in a red pigment. The upper board is loose and the
lower board is still attached, but the joint is cracked. There are a few small losses to the original spine leather. The board corners are bumped. Rebacking this volume in leather involves facing and then removing the original spine; lifting the leather on the boards and pastedowns; coloring new repair leather to match the original binding; paring the new leather; recovering; re-adhering the lifted leather; and replacing the original spine. There are many reasons to refrain from rebacking a leather binding. Rebacking is an invasive procedure, and there is always the danger that lifting may crack the leather. The resulting repair is often not very subtle, with differences in color or tone between the
2
original binding and the repair leather, or lumps resulting from lifting, or a ridge apparent along the feathered edge of the new leather. Leather rebacking is the most difficult treatment for a book conservator. Lifting, paring, dyeing and covering are complicated and take time to master. Even when mastered, rebacking is an extremely time-consuming repair, therefore it is expensive, and few books warrant the cost. It is a treatment most likely done for dealers or collectors who desire an attractive binding. Institutions with enormous backlogs of damaged leather bindings are more likely to turn to simpler, less expensive repairs such as joint tacketing, board slotting, or tissue reinforcements of the joint. As a repair technique, leather rebacking is most suitable for valuable books with extensive decoration that should be saved, or for bindings likely to be displayed or exhibited. Books without extant spines are good candidates for rebacking, allowing the conservator to match the original boards in ways that are impossible with other techniques. PRESERVING THE ORIGINAL SPINE
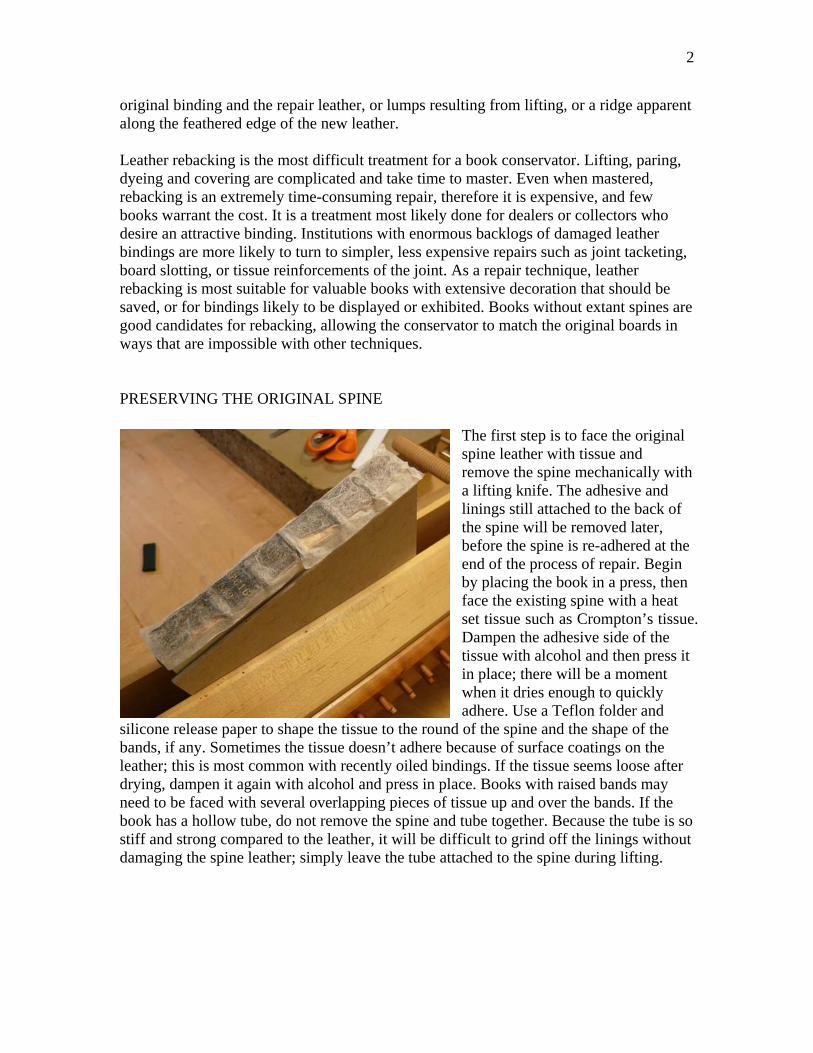
The first step is to face the original spine leather with tissue and remove the spine mechanically with a lifting knife. The adhesive and linings still attached to the back of the spine will be removed later, before the spine is re-adhered at the end of the process of repair. Begin by placing the book in a press, then face the existing spine with a heat set tissue such as Crompton’s tissue. Dampen the adhesive side of the tissue with alcohol and then press it in place; there will be a moment when it dries enough to quickly adhere. Use a Teflon folder and
silicone release paper to shape the tissue to the round of the spine and the shape of the bands, if any. Sometimes the tissue doesn’t adhere because of surface coatings on the leather; this is most common with recently oiled bindings. If the tissue seems loose after drying, dampen it again with alcohol and press in place. Books with raised bands may need to be faced with several overlapping pieces of tissue up and over the bands. If the book has a hollow tube, do not remove the spine and tube together. Because the tube is so stiff and strong compared to the leather, it will be difficult to grind off the linings without damaging the spine leather; simply leave the tube attached to the spine during lifting.
3
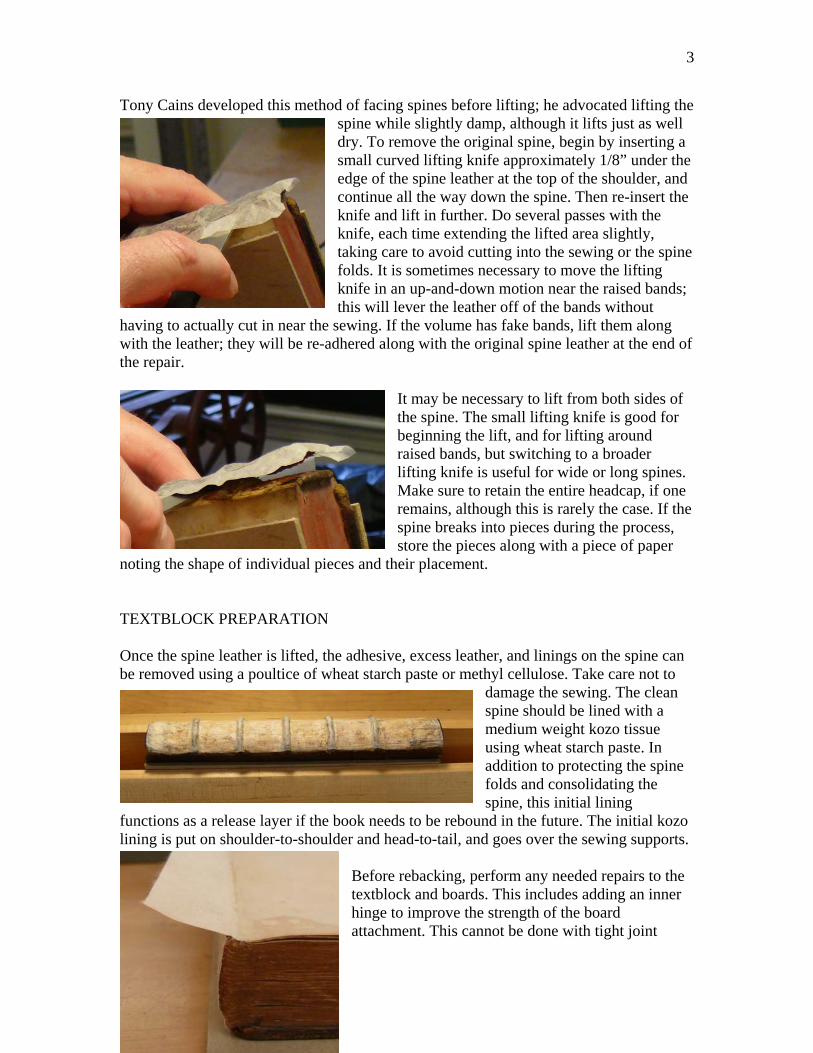
Tony Cains developed this method of facing spines before lifting; he advocated lifting the spine while slightly damp, although it lifts just as well dry. To remove the original spine, begin by inserting a small curved lifting knife approximately 1/8” under the edge of the spine leather at the top of the shoulder, and continue all the way down the spine. Then re-insert the knife and lift in further. Do several passes with the knife, each time extending the lifted area slightly, taking care to avoid cutting into the sewing or the spine folds. It is sometimes necessary to move the lifting knife in an up-and-down motion near the raised bands; this will lever the leather off of the bands without
having to actually cut in near the sewing. If the volume has fake bands, lift them along with the leather; they will be re-adhered along with the original spine leather at the end of the repair.
It may be necessary to lift from both sides of the spine. The small lifting knife is good for beginning the lift, and for lifting around raised bands, but switching to a broader lifting knife is useful for wide or long spines. Make sure to retain the entire headcap, if one remains, although this is rarely the case. If the spine breaks into pieces during the process, store the pieces along with a piece of paper
noting the shape of individual pieces and their placement. TEXTBLOCK PREPARATION Once the spine leather is lifted, the adhesive, excess leather, and linings on the spine can be removed using a poultice of wheat starch paste or methyl cellulose. Take care not to
damage the sewing. The clean spine should be lined with a medium weight kozo tissue using wheat starch paste. In addition to protecting the spine folds and consolidating the spine, this initial lining
functions as a release layer if the book needs to be rebound in the future. The initial kozo lining is put on shoulder-to-shoulder and head-to-tail, and goes over the sewing supports.
Before rebacking, perform any needed repairs to the textblock and boards. This includes adding an inner hinge to improve the strength of the board attachment. This cannot be done with tight joint
4
bindings with attached boards, because there isn’t enough room in the joint to insert new material; adding anything in the joint will cause the joint to break. If the board is loose, a new hinge will add strength and also hide the repair at the inner joint. The simplest method is to adhere a piece of heavyweight kozo tissue to the shoulder with wheat starch paste; when dry, the tissue is folded back against the flyleaf. It will be adhered under the lifted pastedown following the rebacking. Before rebacking, the corners should be repaired if they are bumped or damaged. If the board corners at the spine are damaged, reinforce them before proceeding with the repair. Use a spatula or brush to insert dry wheat starch paste into the corner, and work it in. Wrap the corner with silicone release paper and bone over the corner. Avoid using too much paste or too much pressure because the moisture can move through the dry board and stain the leather. LIFTING THE ORIGINAL BOARD LEATHER
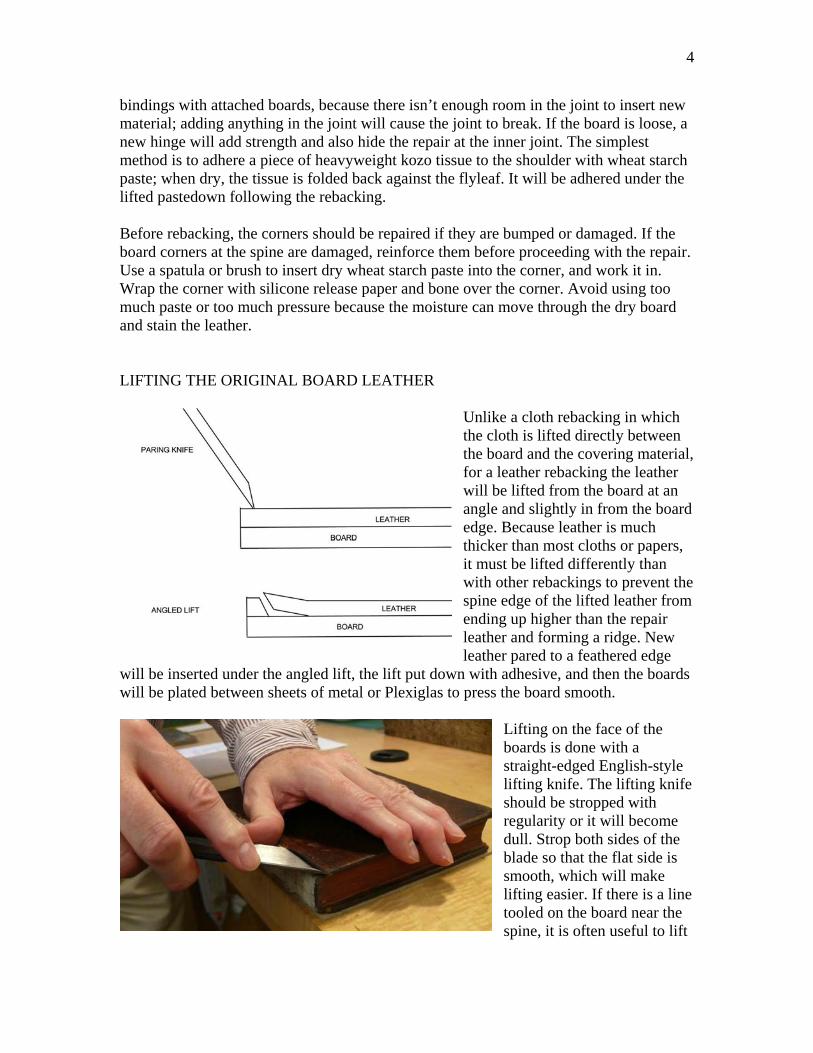
Unlike a cloth rebacking in which the cloth is lifted directly between the board and the covering material, for a leather rebacking the leather will be lifted from the board at an angle and slightly in from the board edge. Because leather is much thicker than most cloths or papers, it must be lifted differently than with other rebackings to prevent the spine edge of the lifted leather from ending up higher than the repair leather and forming a ridge. New leather pared to a feathered edge
will be inserted under the angled lift, the lift put down with adhesive, and then the boards will be plated between sheets of metal or Plexiglas to press the board smooth.
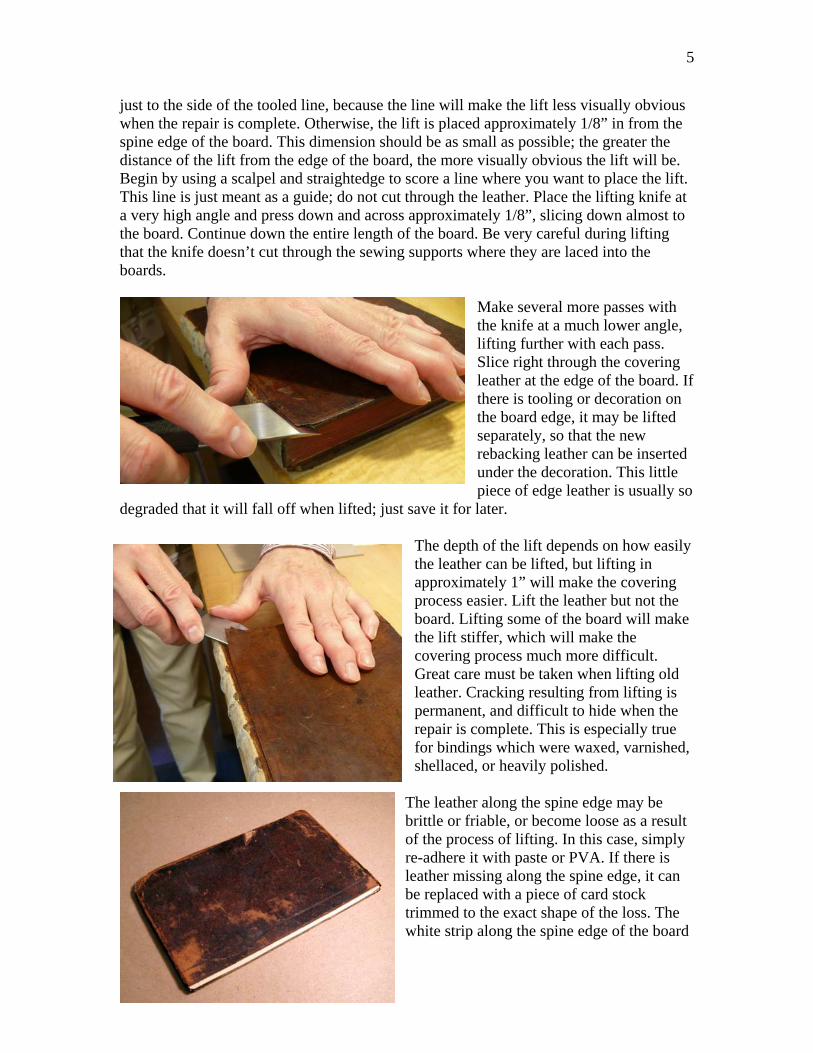
Lifting on the face of the boards is done with a straight-edged English-style lifting knife. The lifting knife should be stropped with regularity or it will become dull. Strop both sides of the blade so that the flat side is smooth, which will make lifting easier. If there is a line tooled on the board near the spine, it is often useful to lift
5
just to the side of the tooled line, because the line will make the lift less visually obvious when the repair is complete. Otherwise, the lift is placed approximately 1/8” in from the spine edge of the board. This dimension should be as small as possible; the greater the distance of the lift from the edge of the board, the more visually obvious the lift will be. Begin by using a scalpel and straightedge to score a line where you want to place the lift. This line is just meant as a guide; do not cut through the leather. Place the lifting knife at a very high angle and press down and across approximately 1/8”, slicing down almost to the board. Continue down the entire length of the board. Be very careful during lifting that the knife doesn’t cut through the sewing supports where they are laced into the boards.
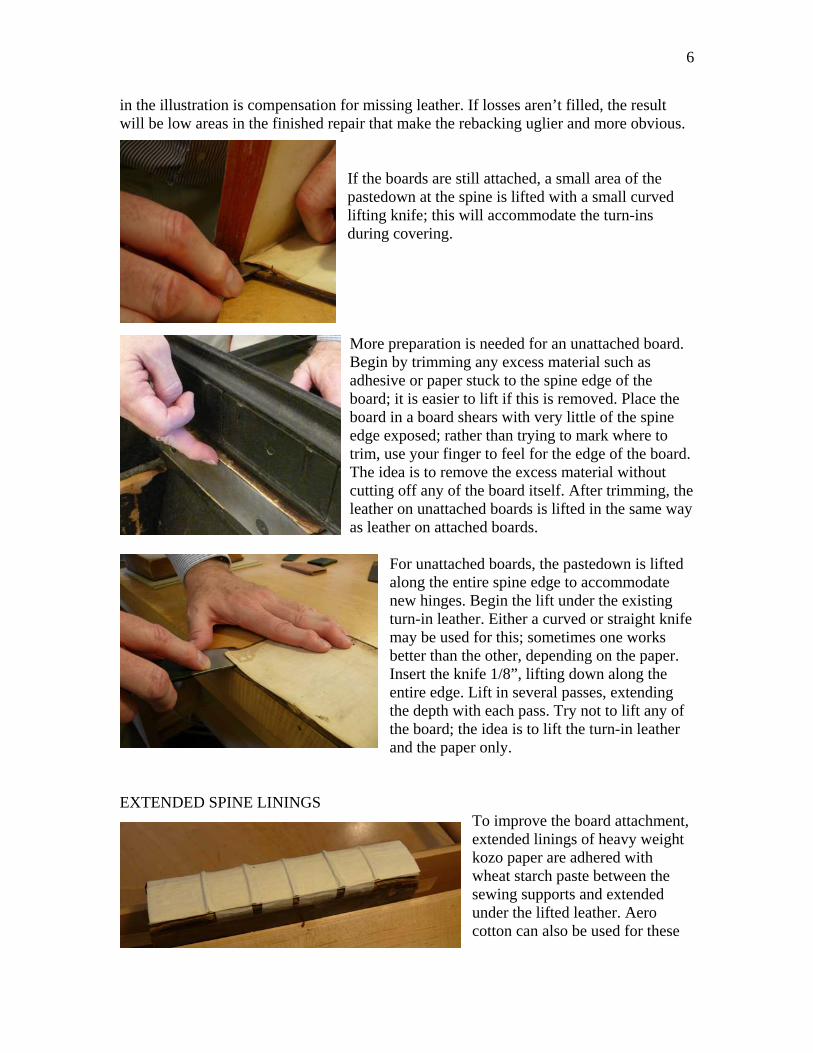
Make several more passes with the knife at a much lower angle, lifting further with each pass. Slice right through the covering leather at the edge of the board. If there is tooling or decoration on the board edge, it may be lifted separately, so that the new rebacking leather can be inserted under the decoration. This little piece of edge leather is usually so
degraded that it will fall off when lifted; just save it for later.
The depth of the lift depends on how easily the leather can be lifted, but lifting in approximately 1” will make the covering process easier. Lift the leather but not the board. Lifting some of the board will make the lift stiffer, which will make the covering process much more difficult. Great care must be taken when lifting old leather. Cracking resulting from lifting is permanent, and difficult to hide when the repair is complete. This is especially true for bindings which were waxed, varnished, shellaced, or heavily polished.
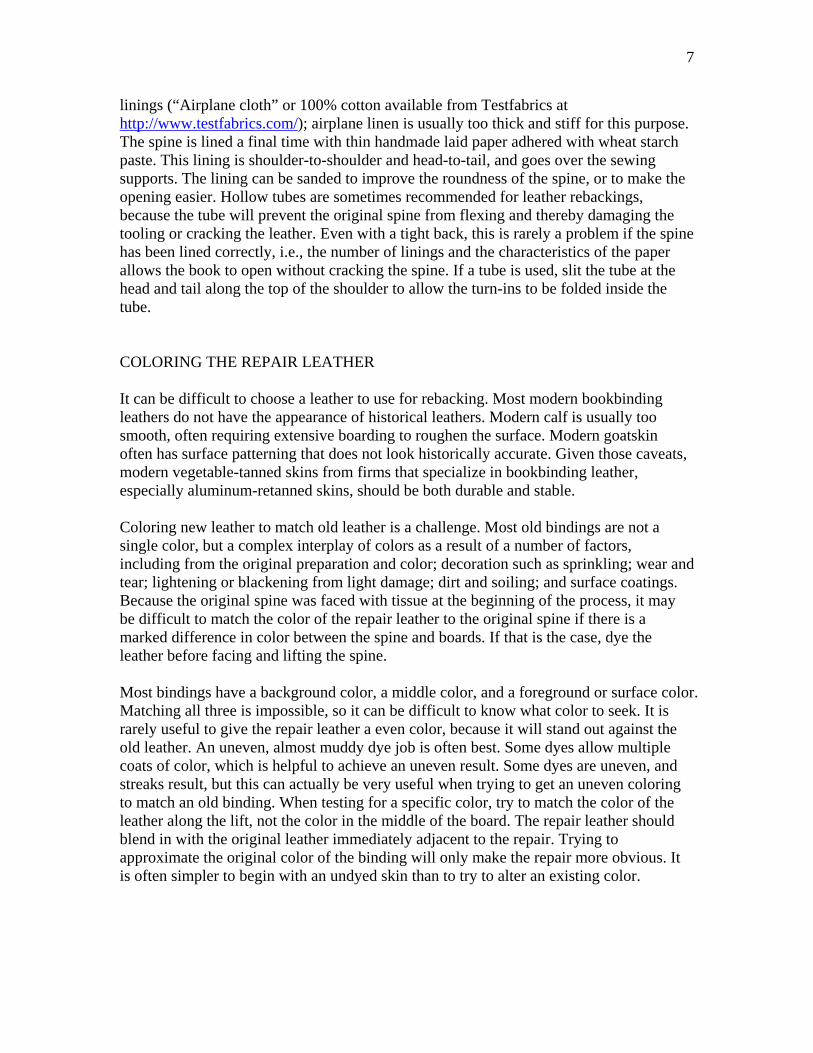
The leather along the spine edge may be brittle or friable, or become loose as a result of the process of lifting. In this case, simply re-adhere it with paste or PVA. If there is leather missing along the spine edge, it can be replaced with a piece of card stock trimmed to the exact shape of the loss. The white strip along the spine edge of the board
6
in the illustration is compensation for missing leather. If losses aren’t filled, the result will be low areas in the finished repair that make the rebacking uglier and more obvious.
If the boards are still attached, a small area of the pastedown at the spine is lifted with a small curved lifting knife; this will accommodate the turn-ins during covering. More preparation is needed for an unattached board. Begin by trimming any excess material such as adhesive or paper stuck to the spine edge of the board; it is easier to lift if this is removed. Place the board in a board shears with very little of the spine edge exposed; rather than trying to mark where to trim, use your finger to feel for the edge of the board. The idea is to remove the excess material without cutting off any of the board itself. After trimming, the leather on unattached boards is lifted in the same way as leather on attached boards.
For unattached boards, the pastedown is lifted along the entire spine edge to accommodate new hinges. Begin the lift under the existing turn-in leather. Either a curved or straight knife may be used for this; sometimes one works better than the other, depending on the paper. Insert the knife 1/8”, lifting down along the entire edge. Lift in several passes, extending the depth with each pass. Try not to lift any of the board; the idea is to lift the turn-in leather and the paper only.
EXTENDED SPINE LININGS
To improve the board attachment, extended linings of heavy weight kozo paper are adhered with wheat starch paste between the sewing supports and extended under the lifted leather. Aero cotton can also be used for these
7
linings (“Airplane cloth” or 100% cotton available from Testfabrics at http://www.testfabrics.com/); airplane linen is usually too thick and stiff for this purpose. The spine is lined a final time with thin handmade laid paper adhered with wheat starch paste. This lining is shoulder-to-shoulder and head-to-tail, and goes over the sewing supports. The lining can be sanded to improve the roundness of the spine, or to make the opening easier. Hollow tubes are sometimes recommended for leather rebackings, because the tube will prevent the original spine from flexing and thereby damaging the tooling or cracking the leather. Even with a tight back, this is rarely a problem if the spine has been lined correctly, i.e., the number of linings and the characteristics of the paper allows the book to open without cracking the spine. If a tube is used, slit the tube at the head and tail along the top of the shoulder to allow the turn-ins to be folded inside the tube. COLORING THE REPAIR LEATHER It can be difficult to choose a leather to use for rebacking. Most modern bookbinding leathers do not have the appearance of historical leathers. Modern calf is usually too smooth, often requiring extensive boarding to roughen the surface. Modern goatskin often has surface patterning that does not look historically accurate. Given those caveats, modern vegetable-tanned skins from firms that specialize in bookbinding leather, especially aluminum-retanned skins, should be both durable and stable. Coloring new leather to match old leather is a challenge. Most old bindings are not a single color, but a complex interplay of colors as a result of a number of factors, including from the original preparation and color; decoration such as sprinkling; wear and tear; lightening or blackening from light damage; dirt and soiling; and surface coatings. Because the original spine was faced with tissue at the beginning of the process, it may be difficult to match the color of the repair leather to the original spine if there is a marked difference in color between the spine and boards. If that is the case, dye the leather before facing and lifting the spine. Most bindings have a background color, a middle color, and a foreground or surface color. Matching all three is impossible, so it can be difficult to know what color to seek. It is rarely useful to give the repair leather a even color, because it will stand out against the old leather. An uneven, almost muddy dye job is often best. Some dyes allow multiple coats of color, which is helpful to achieve an uneven result. Some dyes are uneven, and streaks result, but this can actually be very useful when trying to get an uneven coloring to match an old binding. When testing for a specific color, try to match the color of the leather along the lift, not the color in the middle of the board. The repair leather should blend in with the original leather immediately adjacent to the repair. Trying to approximate the original color of the binding will only make the repair more obvious. It is often simpler to begin with an undyed skin than to try to alter an existing color.

8
Selaset dyes are available from the Leather Conservation Centre in England (http://www.leatherconservation.com/); they are very stable when properly sealed. Selaset dyes come with color charts that allow the binder to match any color using only black, red, brown, yellow and blue dye. The dye is very concentrated, and is mixed in water in a ratio of one part dye to five parts water (1:5). Mix the color in very small amounts when first trying to match the color. Because skins take dye unevenly, test small spots on a scrap of the same skin to be used
in the rebacking. Insert the test skin under the lift to get a clear idea of how well it will match the original. Selaset dye can be applied to wet or dry skin. Tape an oversized piece of the repair leather to a piece of binder’s board, then use a ball of bandaging cotton (“Rolled Absorbent Cotton”) to apply the color. Selaset dyes produce such a uniform finish that it can be difficult to make the skin look uneven. Try applying dye by dabbing small amounts across the skin and letting it dry slightly before applying a second coat of dye of a different tone. Several coats are possible. Too many coats may leave excess dye on the surface of the skin, which may come off during the covering process. Selaset dyes must be sealed or they will remain water-soluble. Tinofix sealant is mixed in a ratio of one part Tinofix to ten parts water (1:10). Following dyeing and after the leather is dry, rub the Tinofix solution across the skin with a cotton ball and allow to dry. The leather can be touched up after rebacking using medium density acrylics. PARING Every national bookbinding tradition has its own technique of paring leather. However you do it, the finished product is all that matters. The first goal is a piece of repair leather with the edges pared so thin that they do not form a bump when inserted under the original leather. Second, the headcap area has to be the correct thickness to produce the desired shape of headcap, whether there are headbands present or not. Third, having thicker leather over the joints makes for a stronger repair, but more leather in the joint also means the book opens more stiffly. Lastly, the turn-ins have to be pared so that they are not apparent on the spine, although in some cases this looks historically accurate. These considerations vary from book to book, so there is no “right” way to pare the leather. Paring is a matter of balancing thicknesses across the leather. There is no formula to follow.
To begin, cut the colored leather to size, with enough excess at the sides to fit comfortably under the lifts, and short turn-ins at head and tail, which make covering much simpler. English binders traditionally used a straight-edged paring knife, which is a mirror image of a straight-edged lifting knife.
9
The paring knife is first used parallel to the edge of the leather and at a high angle to produce a feathered edge around all sides of the leather.
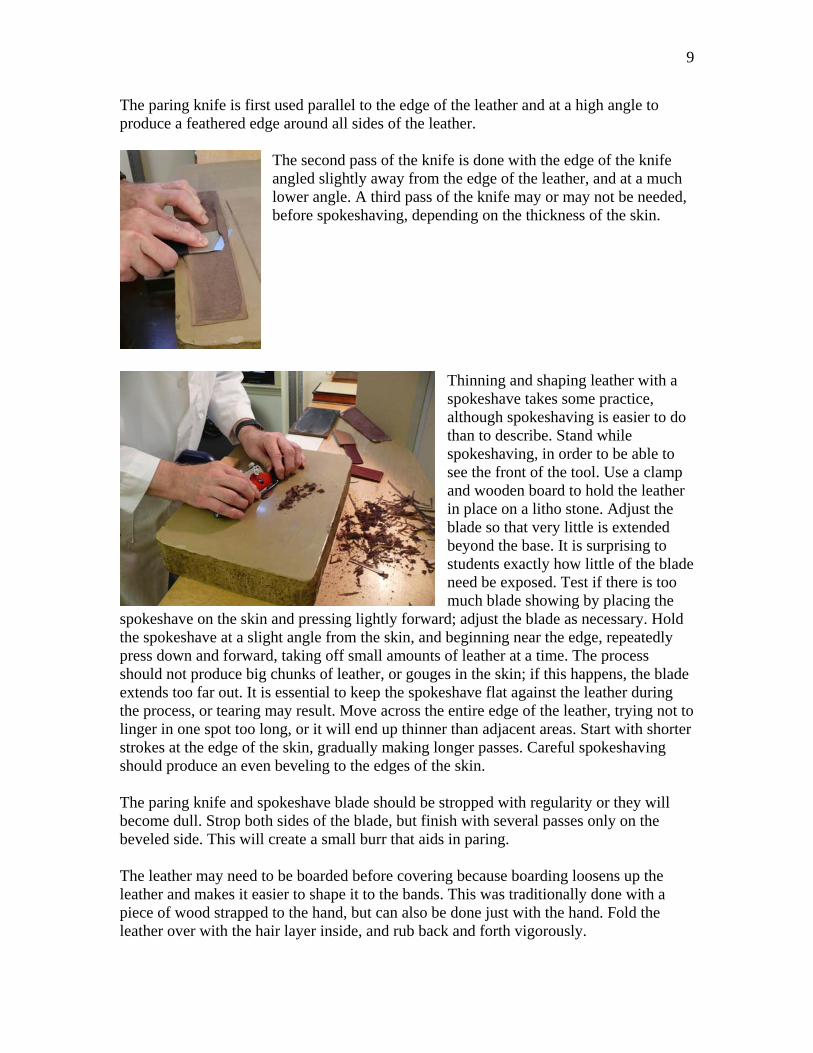
The second pass of the knife is done with the edge of the knife angled slightly away from the edge of the leather, and at a much lower angle. A third pass of the knife may or may not be needed, before spokeshaving, depending on the thickness of the skin.
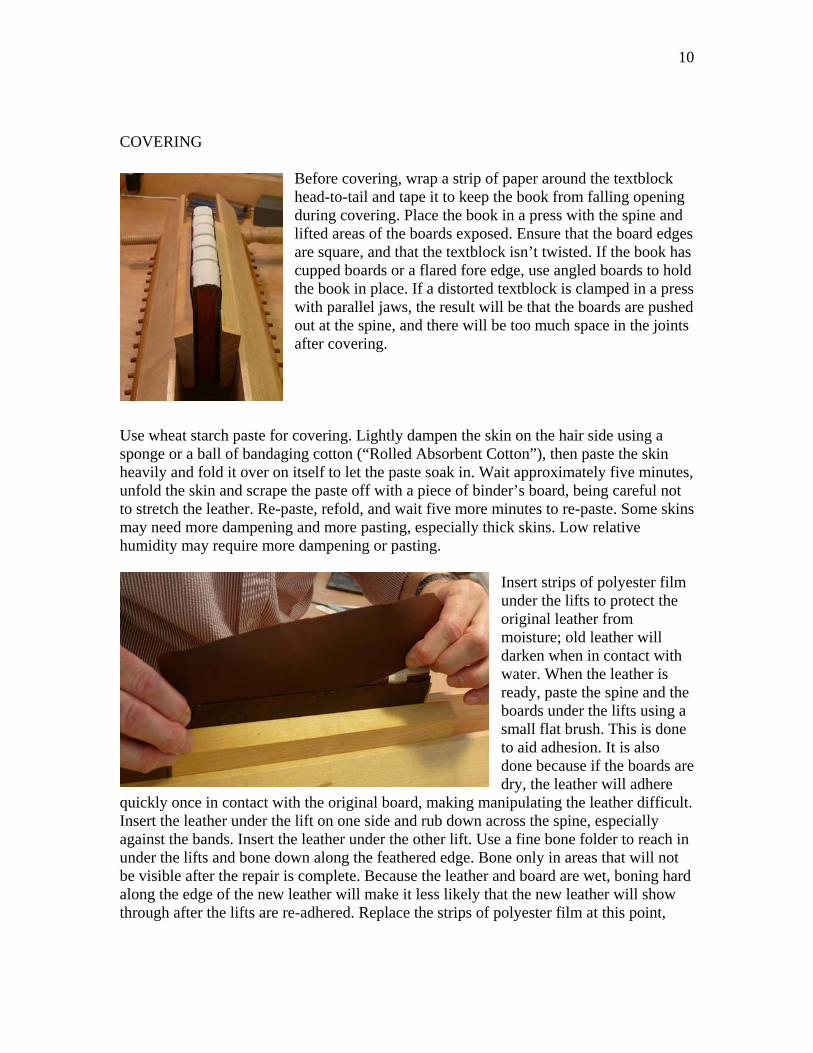
Thinning and shaping leather with a spokeshave takes some practice, although spokeshaving is easier to do than to describe. Stand while spokeshaving, in order to be able to see the front of the tool. Use a clamp and wooden board to hold the leather in place on a litho stone. Adjust the blade so that very little is extended beyond the base. It is surprising to students exactly how little of the blade need be exposed. Test if there is too much blade showing by placing the
spokeshave on the skin and pressing lightly forward; adjust the blade as necessary. Hold the spokeshave at a slight angle from the skin, and beginning near the edge, repeatedly press down and forward, taking off small amounts of leather at a time. The process should not produce big chunks of leather, or gouges in the skin; if this happens, the blade extends too far out. It is essential to keep the spokeshave flat against the leather during the process, or tearing may result. Move across the entire edge of the leather, trying not to linger in one spot too long, or it will end up thinner than adjacent areas. Start with shorter strokes at the edge of the skin, gradually making longer passes. Careful spokeshaving should produce an even beveling to the edges of the skin. The paring knife and spokeshave blade should be stropped with regularity or they will become dull. Strop both sides of the blade, but finish with several passes only on the beveled side. This will create a small burr that aids in paring. The leather may need to be boarded before covering because boarding loosens up the leather and makes it easier to shape it to the bands. This was traditionally done with a piece of wood strapped to the hand, but can also be done just with the hand. Fold the leather over with the hair layer inside, and rub back and forth vigorously.
10
COVERING
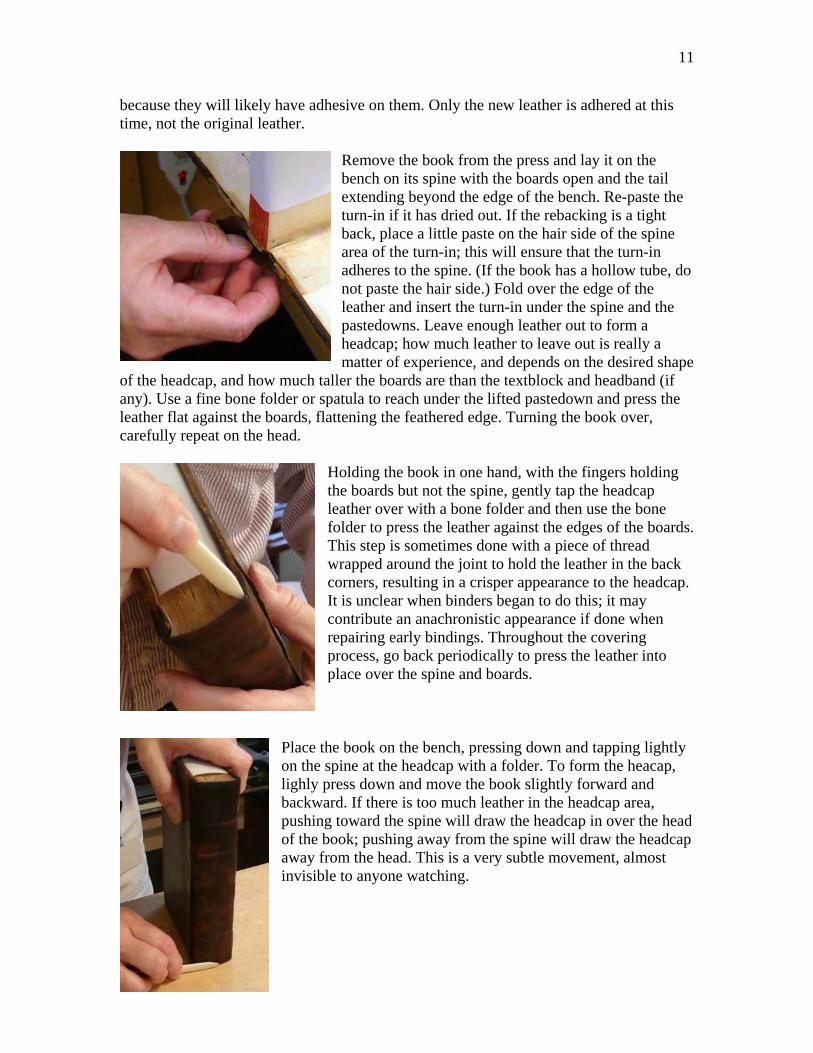
Before covering, wrap a strip of paper around the textblock head-to-tail and tape it to keep the book from falling opening during covering. Place the book in a press with the spine and lifted areas of the boards exposed. Ensure that the board edges are square, and that the textblock isn’t twisted. If the book has cupped boards or a flared fore edge, use angled boards to hold the book in place. If a distorted textblock is clamped in a press with parallel jaws, the result will be that the boards are pushed out at the spine, and there will be too much space in the joints after covering.
Use wheat starch paste for covering. Lightly dampen the skin on the hair side using a sponge or a ball of bandaging cotton (“Rolled Absorbent Cotton”), then paste the skin heavily and fold it over on itself to let the paste soak in. Wait approximately five minutes, unfold the skin and scrape the paste off with a piece of binder’s board, being careful not to stretch the leather. Re-paste, refold, and wait five more minutes to re-paste. Some skins may need more dampening and more pasting, especially thick skins. Low relative humidity may require more dampening or pasting.
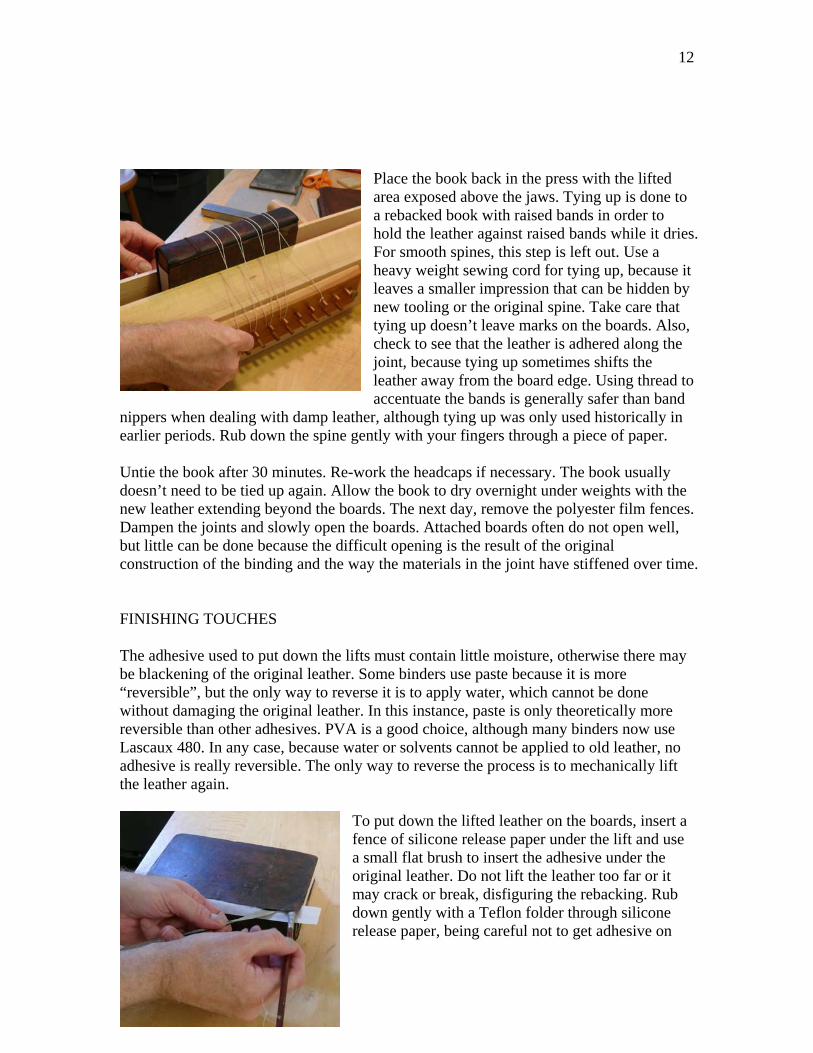
Insert strips of polyester film under the lifts to protect the original leather from moisture; old leather will darken when in contact with water. When the leather is ready, paste the spine and the boards under the lifts using a small flat brush. This is done to aid adhesion. It is also done because if the boards are dry, the leather will adhere
quickly once in contact with the original board, making manipulating the leather difficult. Insert the leather under the lift on one side and rub down across the spine, especially against the bands. Insert the leather under the other lift. Use a fine bone folder to reach in under the lifts and bone down along the feathered edge. Bone only in areas that will not be visible after the repair is complete. Because the leather and board are wet, boning hard along the edge of the new leather will make it less likely that the new leather will show through after the lifts are re-adhered. Replace the strips of polyester film at this point,
11
because they will likely have adhesive on them. Only the new leather is adhered at this time, not the original leather.
Remove the book from the press and lay it on the bench on its spine with the boards open and the tail extending beyond the edge of the bench. Re-paste the turn-in if it has dried out. If the rebacking is a tight back, place a little paste on the hair side of the spine area of the turn-in; this will ensure that the turn-in adheres to the spine. (If the book has a hollow tube, do not paste the hair side.) Fold over the edge of the leather and insert the turn-in under the spine and the pastedowns. Leave enough leather out to form a headcap; how much leather to leave out is really a matter of experience, and depends on the desired shape
of the headcap, and how much taller the boards are than the textblock and headband (if any). Use a fine bone folder or spatula to reach under the lifted pastedown and press the leather flat against the boards, flattening the feathered edge. Turning the book over, carefully repeat on the head.
Holding the book in one hand, with the fingers holding the boards but not the spine, gently tap the headcap leather over with a bone folder and then use the bone folder to press the leather against the edges of the boards. This step is sometimes done with a piece of thread wrapped around the joint to hold the leather in the back corners, resulting in a crisper appearance to the headcap. It is unclear when binders began to do this; it may contribute an anachronistic appearance if done when repairing early bindings. Throughout the covering process, go back periodically to press the leather into place over the spine and boards.
Place the book on the bench, pressing down and tapping lightly on the spine at the headcap with a folder. To form the heacap, lighly press down and move the book slightly forward and backward. If there is too much leather in the headcap area, pushing toward the spine will draw the headcap in over the head of the book; pushing away from the spine will draw the headcap away from the head. This is a very subtle movement, almost invisible to anyone watching.
12
Place the book back in the press with the lifted area exposed above the jaws. Tying up is done to a rebacked book with raised bands in order to hold the leather against raised bands while it dries. For smooth spines, this step is left out. Use a heavy weight sewing cord for tying up, because it leaves a smaller impression that can be hidden by new tooling or the original spine. Take care that tying up doesn’t leave marks on the boards. Also, check to see that the leather is adhered along the joint, because tying up sometimes shifts the leather away from the board edge. Using thread to accentuate the bands is generally safer than band
nippers when dealing with damp leather, although tying up was only used historically in earlier periods. Rub down the spine gently with your fingers through a piece of paper. Untie the book after 30 minutes. Re-work the headcaps if necessary. The book usually doesn’t need to be tied up again. Allow the book to dry overnight under weights with the new leather extending beyond the boards. The next day, remove the polyester film fences. Dampen the joints and slowly open the boards. Attached boards often do not open well, but little can be done because the difficult opening is the result of the original construction of the binding and the way the materials in the joint have stiffened over time. FINISHING TOUCHES The adhesive used to put down the lifts must contain little moisture, otherwise there may be blackening of the original leather. Some binders use paste because it is more “reversible”, but the only way to reverse it is to apply water, which cannot be done without damaging the original leather. In this instance, paste is only theoretically more reversible than other adhesives. PVA is a good choice, although many binders now use Lascaux 480. In any case, because water or solvents cannot be applied to old leather, no adhesive is really reversible. The only way to reverse the process is to mechanically lift the leather again.
To put down the lifted leather on the boards, insert a fence of silicone release paper under the lift and use a small flat brush to insert the adhesive under the original leather. Do not lift the leather too far or it may crack or break, disfiguring the rebacking. Rub down gently with a Teflon folder through silicone release paper, being careful not to get adhesive on
13
either the new or the original leather. Very little pressure is necessary to get the lifts to adhere; too much pressure may push moisture through the leather, causing staining.
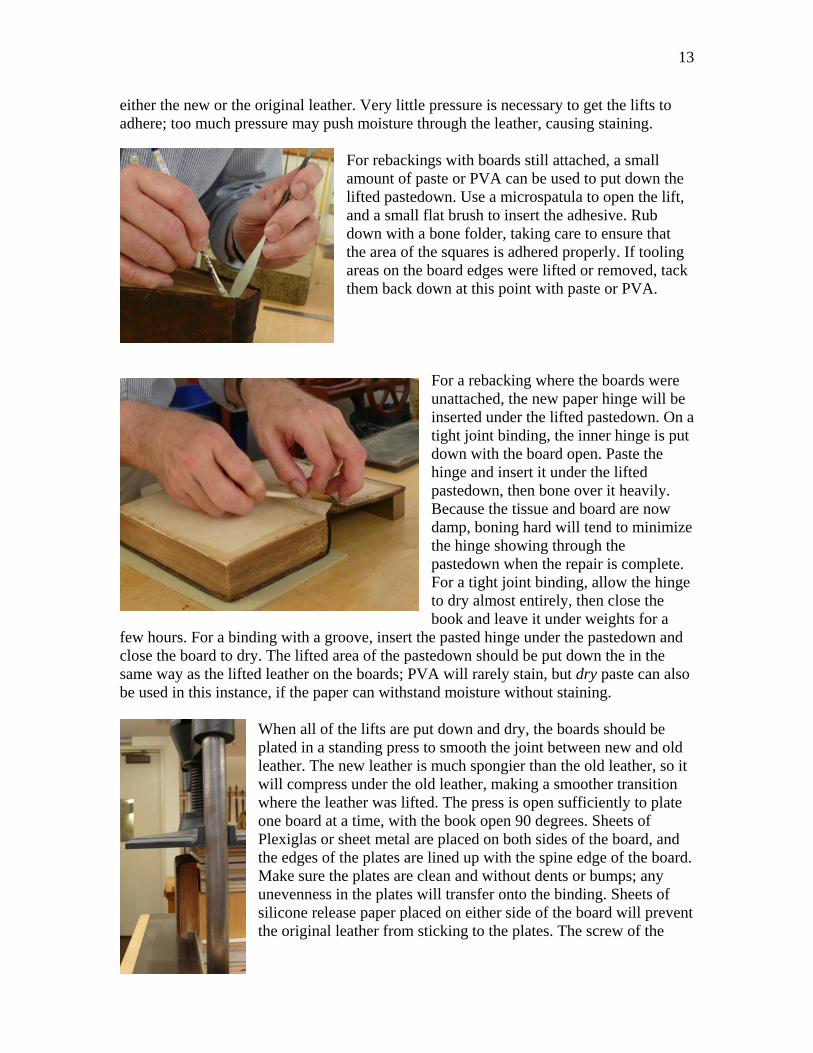
For rebackings with boards still attached, a small amount of paste or PVA can be used to put down the lifted pastedown. Use a microspatula to open the lift, and a small flat brush to insert the adhesive. Rub down with a bone folder, taking care to ensure that the area of the squares is adhered properly. If tooling areas on the board edges were lifted or removed, tack them back down at this point with paste or PVA.
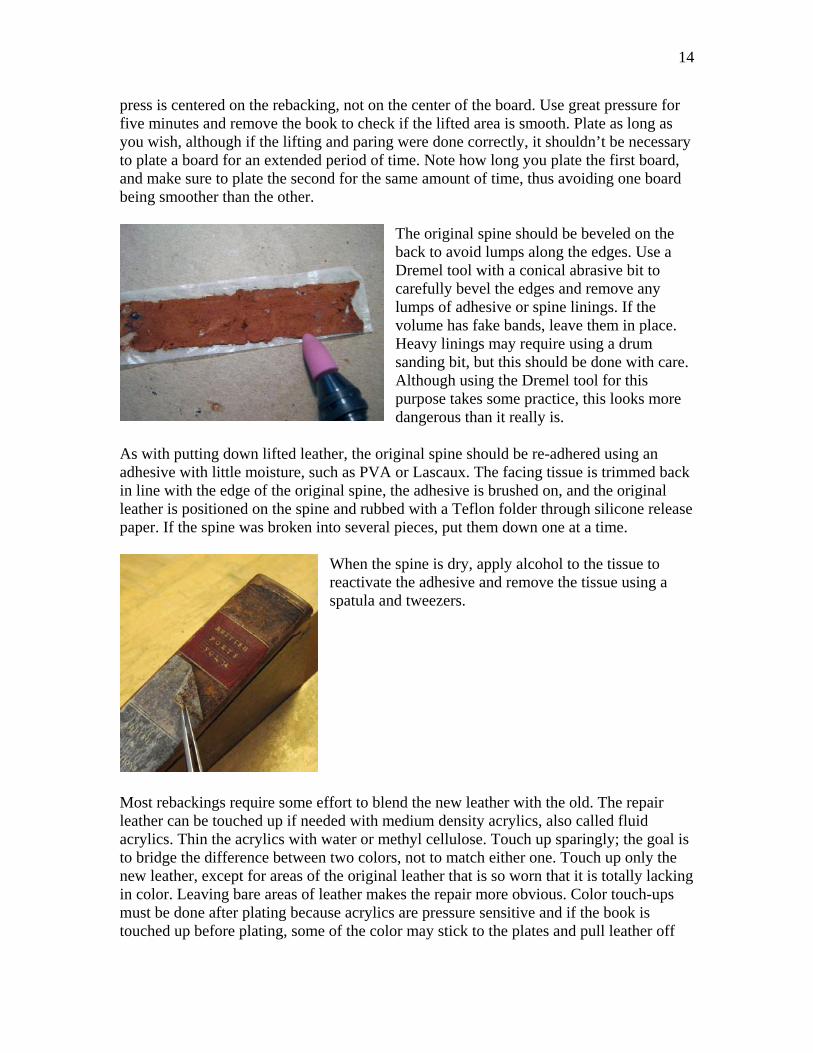
For a rebacking where the boards were unattached, the new paper hinge will be inserted under the lifted pastedown. On a tight joint binding, the inner hinge is put down with the board open. Paste the hinge and insert it under the lifted pastedown, then bone over it heavily. Because the tissue and board are now damp, boning hard will tend to minimize the hinge showing through the pastedown when the repair is complete. For a tight joint binding, allow the hinge to dry almost entirely, then close the book and leave it under weights for a
few hours. For a binding with a groove, insert the pasted hinge under the pastedown and close the board to dry. The lifted area of the pastedown should be put down the in the same way as the lifted leather on the boards; PVA will rarely stain, but dry paste can also be used in this instance, if the paper can withstand moisture without staining.
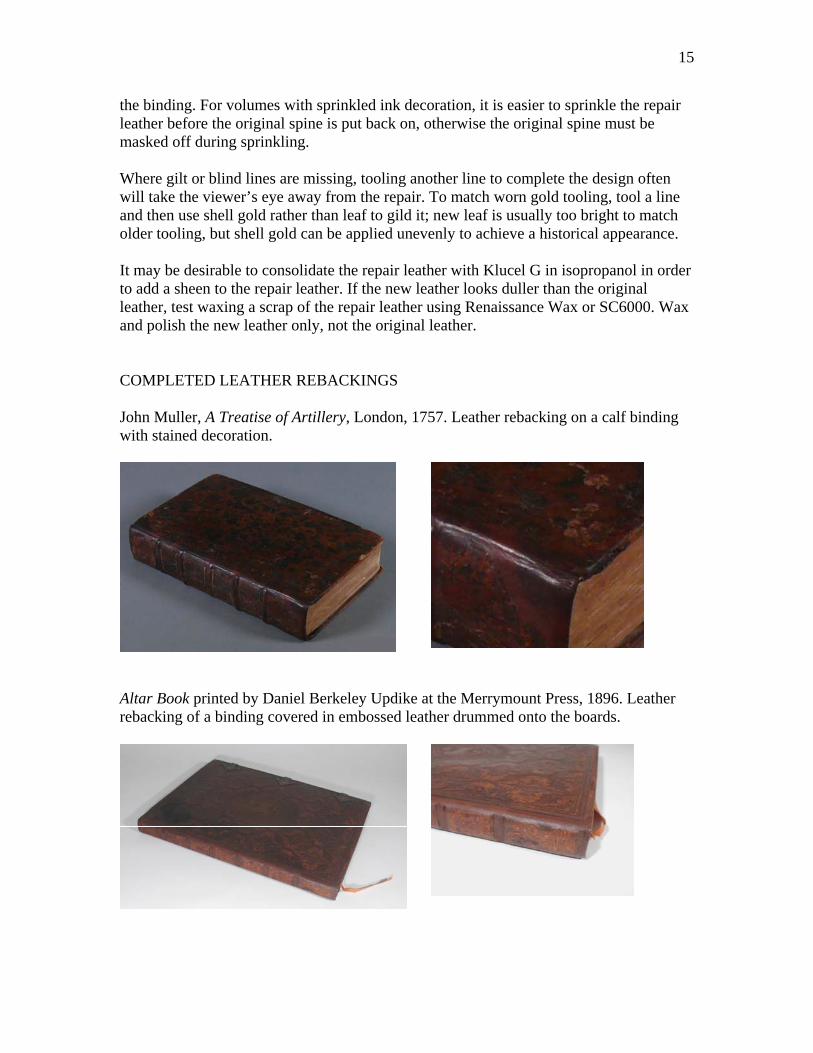
When all of the lifts are put down and dry, the boards should be plated in a standing press to smooth the joint between new and old leather. The new leather is much spongier than the old leather, so it will compress under the old leather, making a smoother transition where the leather was lifted. The press is open sufficiently to plate one board at a time, with the book open 90 degrees. Sheets of Plexiglas or sheet metal are placed on both sides of the board, and the edges of the plates are lined up with the spine edge of the board. Make sure the plates are clean and without dents or bumps; any unevenness in the plates will transfer onto the binding. Sheets of silicone release paper placed on either side of the board will prevent the original leather from sticking to the plates. The screw of the
14
press is centered on the rebacking, not on the center of the board. Use great pressure for five minutes and remove the book to check if the lifted area is smooth. Plate as long as you wish, although if the lifting and paring were done correctly, it shouldn’t be necessary to plate a board for an extended period of time. Note how long you plate the first board, and make sure to plate the second for the same amount of time, thus avoiding one board being smoother than the other.
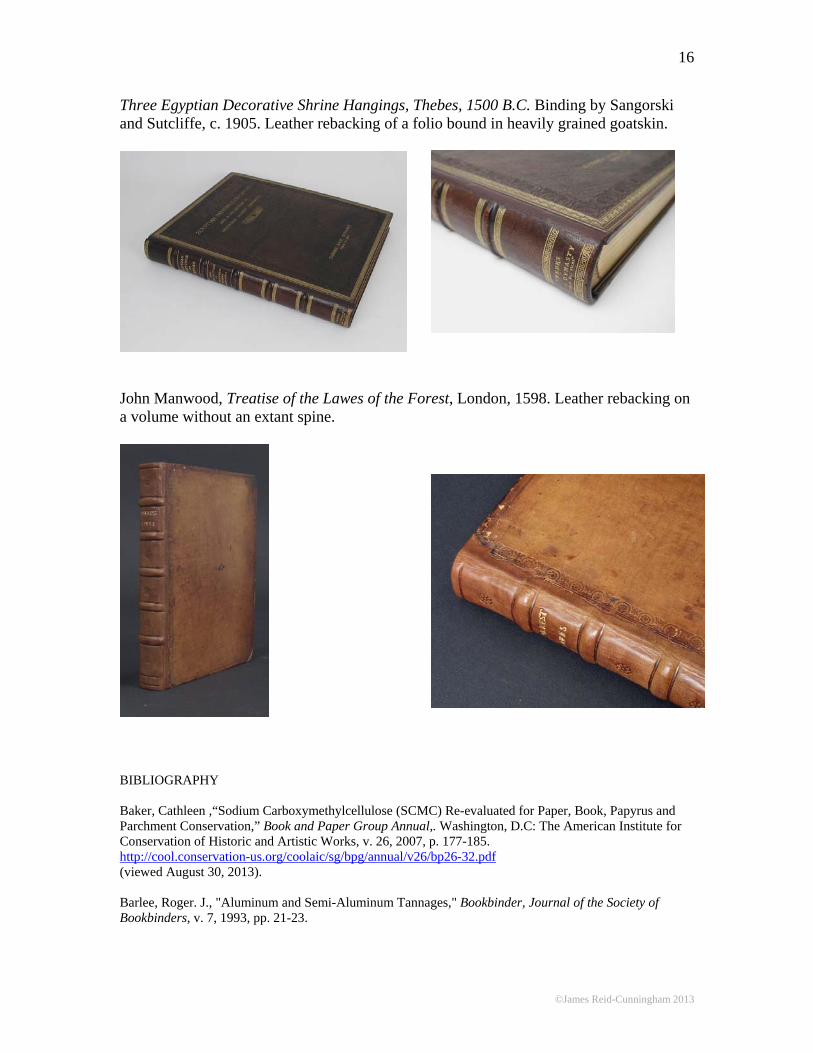
The original spine should be beveled on the back to avoid lumps along the edges. Use a Dremel tool with a conical abrasive bit to carefully bevel the edges and remove any lumps of adhesive or spine linings. If the volume has fake bands, leave them in place. Heavy linings may require using a drum sanding bit, but this should be done with care. Although using the Dremel tool for this purpose takes some practice, this looks more dangerous than it really is.
As with putting down lifted leather, the original spine should be re-adhered using an adhesive with little moisture, such as PVA or Lascaux. The facing tissue is trimmed back in line with the edge of the original spine, the adhesive is brushed on, and the original leather is positioned on the spine and rubbed with a Teflon folder through silicone release paper. If the spine was broken into several pieces, put them down one at a time.
When the spine is dry, apply alcohol to the tissue to reactivate the adhesive and remove the tissue using a spatula and tweezers.
Most rebackings require some effort to blend the new leather with the old. The repair leather can be touched up if needed with medium density acrylics, also called fluid acrylics. Thin the acrylics with water or methyl cellulose. Touch up sparingly; the goal is to bridge the difference between two colors, not to match either one. Touch up only the new leather, except for areas of the original leather that is so worn that it is totally lacking in color. Leaving bare areas of leather makes the repair more obvious. Color touch-ups must be done after plating because acrylics are pressure sensitive and if the book is touched up before plating, some of the color may stick to the plates and pull leather off
15
the binding. For volumes with sprinkled ink decoration, it is easier to sprinkle the repair leather before the original spine is put back on, otherwise the original spine must be masked off during sprinkling. Where gilt or blind lines are missing, tooling another line to complete the design often will take the viewer’s eye away from the repair. To match worn gold tooling, tool a line and then use shell gold rather than leaf to gild it; new leaf is usually too bright to match older tooling, but shell gold can be applied unevenly to achieve a historical appearance. It may be desirable to consolidate the repair leather with Klucel G in isopropanol in order to add a sheen to the repair leather. If the new leather looks duller than the original leather, test waxing a scrap of the repair leather using Renaissance Wax or SC6000. Wax and polish the new leather only, not the original leather. COMPLETED LEATHER REBACKINGS John Muller, A Treatise of Artillery, London, 1757. Leather rebacking on a calf binding with stained decoration.
Altar Book printed by Daniel Berkeley Updike at the Merrymount Press, 1896. Leather rebacking of a binding covered in embossed leather drummed onto the boards.
©James Reid-Cunningham 2013
16
Three Egyptian Decorative Shrine Hangings, Thebes, 1500 B.C. Binding by Sangorski and Sutcliffe, c. 1905. Leather rebacking of a folio bound in heavily grained goatskin.
John Manwood, Treatise of the Lawes of the Forest, London, 1598. Leather rebacking on a volume without an extant spine.
BIBLIOGRAPHY Baker, Cathleen ,“Sodium Carboxymethylcellulose (SCMC) Re-evaluated for Paper, Book, Papyrus and Parchment Conservation,” Book and Paper Group Annual,. Washington, D.C: The American Institute for Conservation of Historic and Artistic Works, v. 26, 2007, p. 177-185. http://cool.conservation-us.org/coolaic/sg/bpg/annual/v26/bp26-32.pdf (viewed August 30, 2013). Barlee, Roger. J., "Aluminum and Semi-Aluminum Tannages," Bookbinder, Journal of the Society of Bookbinders, v. 7, 1993, pp. 21-23.
©James Reid-Cunningham 2013
17
Barlee, Roger. J., Lanning, David, and McLean, William, "The Manufacture of Leather," The New Bookbinder, v. 19, 1999, pp. 48-59. Barlee, Roger. J., “Development of Archival Quality Leather,” Skin Deep, no.12, Autumn 2001, np. Available at: http://www.hewit.com/skin_deep/?volume=12&article=1 (viewed May 26, 2013). Brock, David, “Board reattachment,” Abbey Newsletter, vol. 24, no. 6, 2001, p. 97. Brockman, James, “Rebacking: An Alternative Approach,” The New Bookbinder, v. 11, 1991, pp. 36-46. Brockman, James, Rebacking of Leather Bindings, Guild of Book Workers Seminar in Standards of Excellence in Hand Bookbinding, 1990. http://www.guildofbookworkers.org/events/documents/1990-Brockman_James.pdf (viewed September 6, 2013) British Leather Manufacturers' Research Association, The Conservation of Bookbinding Leather: a Report Prepared by the British Leather Manufacturers' Research Association for the British Library, London: The British Library, 1984. Cains, Anthony, “A Facing Method for Leather, Paper and Membrane,” in The Institute of Paper Conservation Conference Papers Manchester 1992, Gainsborough, Lincolnshire: The Institute of Paper Conservation, 1992, pp. 153-157. Ellement, Peter G. and Tuck, David H., “The Manufacture of Bookbinding Leathers,” in Petherbridge, Guy, Conservation of Library and Archive Materials and the Graphic Arts, London: Butterworths, 1987, pp.253-260. Fogle, Sonia, ed., Recent Advances in Leather Conservation: Proceedings of a Refresher Course Sponsored by FAIC, Washington, DC: The Foundation of the American Institute for Conservation of Historic and Artistic Works, 1985. Fredericks, Maria, “Conference Review: Progress in Leather Conservation,” WAAC Newsletter, v. 19, no. 2, May 1997. http://cool.conservation-us.org/waac/wn/wn19/wn19-2/wn19-209.html (viewed May 26, 2013). Haines, Betty M., "Bookbinding Leather," The New Bookbinder, v.7, 1987, pp. 63-82. Haines, Betty M., Parchment: the Physical and Chemical Characteristics of Parchment and the Materials Used in its Conservation, Northampton: Leather Conservation Centre, 1999. Haines, Betty M., “The Structure of Leather,” in Petherbridge, Guy, Conservation of Library and Archive Materials and the Graphic Arts, London: Butterworths, 1987, pp. 239-252. Haines, Betty M., Surface Coatings for Binding Leathers, Northampton: Leather Conservation Centre, 2002. Koninklijke Bibliotheek, Guidelines for the Conservation of Leather and Parchment Bookbindings, 1995. http://r-i.si/stuff/readings/books/Probably%20not%20relevant/Guidelines%20for%20the%20Conservation%20of%20Leather%20and%20Parchment%20Book-bindings.pdf (viewed May 26, 2013). This title should be used with caution. Kuhn, Hermann, “Leather,” in Conservation and Restoration of Works of Art and Antiquities, Oxford: Butterworth-Heinemann, 1987, p.182-192.
©James Reid-Cunningham 2013
18
Metzger, Consuela, moderator, “Use of Adhesives on Leather: Discussion,” Book and Paper Group Annual, Washington, D.C.: The American Institute for Conservation of Historic and Artistic Works, v. 22, 2003, p. 99-104. http://cool.conservation-us.org/coolaic/sg/bpg/annual/v22/bp22-19.pdf (viewed May 26, 2013). Middleton, Bernard, “Ageing New Work,” Binder Vision, Volume 3, (possibly this is #10), video. Middleton, Bernard, Rebacking a Leather Tight Back, video, New York: Guild of Book Workers, 1992. Middleton, Bernard, “Rebacking an Antiquarian Book,” Binder Vision, Program 2, (possibly this is #9), video. Middleton, Bernard, Rebacking of Leather-Bound Books, Guild of Book Workers Seminar in Standards of Excellence in Hand Bookbinding, 1992. http://www.guildofbookworkers.org/events/documents/1992-Middleton_Bernard.pdf (viewed September 6, 2013). Middleton, Bernard. The Restoration of Leather Bindings. New Castle, DE: Oak Knoll Press, 1998, 3rd ed. Plenderleith, H. J., The Preservation of Leather Bookbindings, London: The British Museum, 1953. Rahme, Lotta and Hartman, Dag, Leather: Preparation and Tanning by Traditional Methods, Portland, OR: Caber Press, 2002. Reed, Ronald, Ancient Skin, Parchments and Leather, New York: Seminar Press, 1972. St. John, Kristen, “Survey of Current Methods and Materials Used for the Conservation of Leather Bookbindings,” Book and Paper Group Annual, Washington, D.C.: The American Institute for Conservation of Historic and Artistic Works, v. 19, 2000, p. 43-48. http://cool.conservation-us.org/coolaic/sg/bpg/annual/v19/bp19-32.html (viewed May 26, 2013). Waterer, John W., A Guide to the Conservation and Restoration of Objects Made Wholly or in Part of Leather, London: G. Bell & Sons, 1972. (Excellent glossary of British and American terminology).