Embed Size (px)
Citation preview

1
Learning Management System
User Guide
version 07082013

2
Contents
1. Getting Started
Creating an Account
Activating Your Course or Library
Logging In and Out of Your Training Account
Setting Up Your Profile
Changing Your Password
Checking Out a Course
Starting Your Training
Creating a Customer Support Ticket
Accessing a Previous Service Ticket
Closing a Support Ticket
Re-opening a Closed Support Ticket
Using the Search Bar
2. Personal Trainer
Opening Your Personal Trainer
Resetting an Entire Course
Adjusting Your Goal
Opening Account Details
Downloading Your Course Reports
Viewing Your Awards
3. Wall
Writing a Message on Your Wall
Attaching a File with Your Wall Post
Deleting a Wall Post Attachment
Eliminating a Wall Post
Writing a Message on a Contact’s Wall
4. Messages
Sending a Message
Attaching a File
Removing an Attached File
Reading Unread Messages
Deleting Old Messages
Archiving Messages
Locating Archived Messages
Viewing Sent Messages
Responding to Messages
5. Notes | Tasks
Creating & Saving Notes
3
Finding Old Notes
Exporting Notes
Deleting Notes
Creating & Saving New Tasks
Finding Old Tasks
Exporting Tasks
Deleting Tasks
6. File Directory
Viewing Files from My Wall, Contacts, and Courses
7. Contacts
Adding Users to My Contacts
Viewing Sent Requests & Canceling Contact Requests
Responding to Contact Requests
Removing Contacts from My Contacts
Blocking Contacts
8. Courses
Viewing Your Library
Activating Additional Courses
Checking Out a Course
Determining the Date of Your Next Available Check-out
Watching Your Course Training
Resetting a Quiz
Resetting Your Final Exam
Checking In a Course
Adding Courses to Your Training Plan Queue
Modifying Your Training Plan Queue
Switching Courses
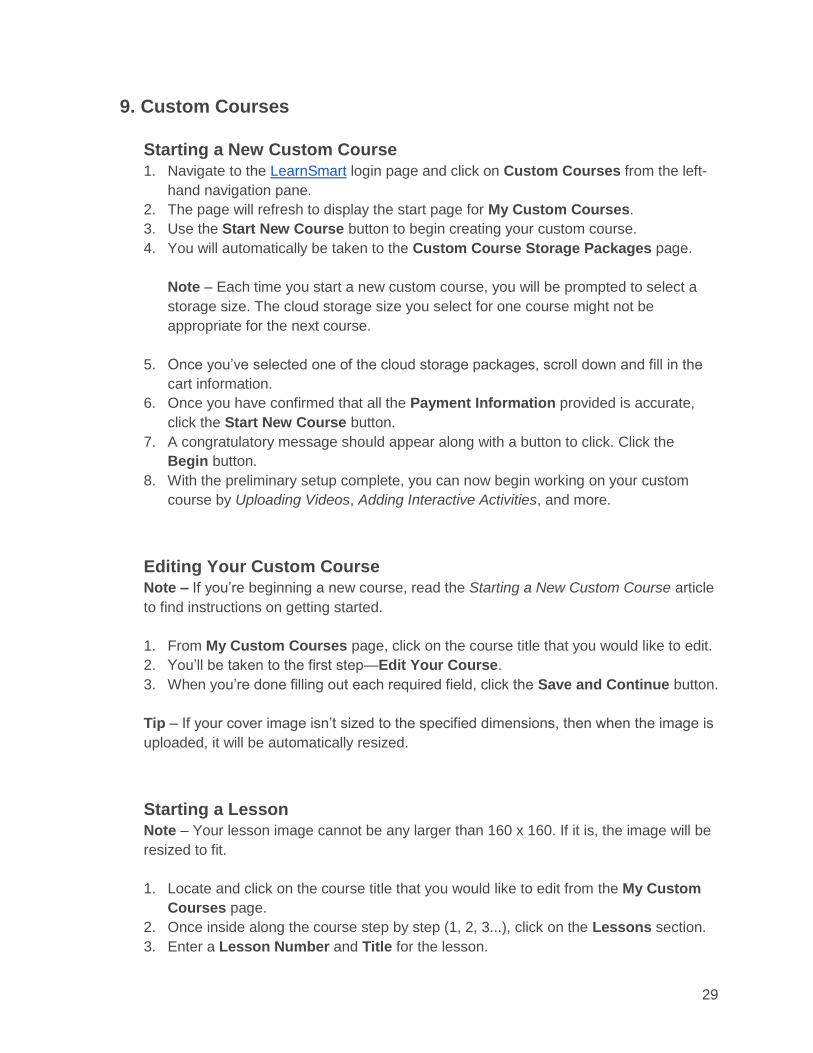
9. Custom Courses
Starting a New Custom Course
Editing Your Custom Course
Starting a Lesson
Adding a New Lesson
Adding Media Files to a Lesson
Switching Lessons
Removing an Uploaded File
Uploading Videos
Adding Interactive Activities
Changing the Order of Objects in Your Course
Opening the Quiz Editor
Creating a New Quiz
4
Adding Another Question to a Quiz
Adding to Your Course Bookshelf
Creating a New Category
Viewing Your Course Bookshelf
Creating Internal Course Notes
Publishing Your Course
Assigning a License
10. Settings
Updating Your Display Name
Changing Your Profile Picture
Allowing Chat
Disabling the Save Chat Conversations Function
Updating Your Profile & Wall Privacy
Changing Your Time
Updating Exported Documents’ Destination Email
Tracking the Amount of Time Spent Training
Managing Your Account
11. Course Theater
Accessing Your Course Theater
Starting a Chat Session
Course Syllabus Features
Using the Course Bookshelf
Adding a Wall Post to the Course Wall
Viewing Your Course Progress
Utilizing the Read More Tab
Using the Whiteboard
Writing on the Whiteboard
Saving Whiteboard Images
Clearing Your Whiteboard
12. Shared Training
Starting a Chat Session
Starting & Ending a Shared Training Session
Writing on a Contact's Wall
Using Your Whiteboard
13. iPad Video App
Downloading the Video App
Watching Your Video Training
Watching Your Training Offline
Transferring Data from Your iPad to Your Online Account

5
14. Admin Console
Accessing Your Admin Console and Dashboard
Creating a Group
Adding Members to Groups
Adding Admin Access to a Member
Adding Admin Access to an Existing Member
Adding Members Options
Removing Admin Access from an Admin
Uploading New Members
Deactivating Members
Finding the Deactivated Members List
Moving Members from One Group to Another
Moving a Member from One Group to Another
Inviting Existing Members
Searching for Members
Viewing Member's Details
Removing a Member
Viewing Member's Individual Reports
Permanently Assigning a Course or Library Access
Assigning a Course
Assigning Courses to Members or Groups
Adding Members to Previously Assigned Courses
Adjusting Completion Dates
Un-assigning Courses from Groups or Individuals
Searching for Groups
Working with the Reports Dashboard
Downloading Reports
Viewing Amount of Time Spent Training
Viewing Number of Members Training
Managing Course Distribution
Viewing Allocated Courses
Reviewing Member Activity
Determining Which Members Received Awards and Certificates
Uploading Outside Completed Course Information
Reviewing Members’ Course Participation
Allowing Administrators to Assign Access
Creating a Customized Company Page
Customizing Learning Management Appearances
Managing Social Permissions
Setting Custom Course Admin Settings
Navigating to Other Pages
Navigating to Training Page

6

7
1. Getting Started
Creating an Account
If you don't already have a LearnSmart account, creating one is easy! There are two
ways to create your account:
Option 1
1. While checking out, you can create your account by clicking on the Login & Create
an Account button.
2. The page will refresh and display a section called Create a New Account.
3. Fill in all the blanks with the appropriate information.
4. When finished, click Create Account.
Option 2
1. Visit the LearnSmart login page to set up your account.
2. Under the Create a New Account option, enter information in all of the entry fields.
3. Click Create Account.
Tip – Once you create an account, you will be able to view all of the LearnSmart
purchases that you make, as long as you are logged in at the time of purchase.
Activating Your Course or Library
Before you can view any of our training, you must create an account. Once your account
is created and you've completed your purchase, you have access to your training
product. To activate your training:
1. Sign in with your email and password on the LearnSmart login page.
2. The page will refresh, asking you to set up your account.
3. When you have finished Setting Up Your Profile, you will be taken to the LearnSmart
Cloud home page. On the navigation pane, click Manage Courses.

8
4. Locate the banner reading My Catalog I Full Catalog; click on the + Activate New
Training button.
5. The new page will display all courses and libraries that require activating. To activate
a course or a library, click on the Activate button to the far right.
6. Activating your course or library adds that product to your catalog and returns you to
the My Courses page. You can now access it and begin Watching Your Course
Training or Working with Your Personal Trainer.
Logging In and Out of Your Training Account
Note to Corporate Members - To log in to your account, follow these instructions and
provide the login and password information supplied to you by your administrator.
1. If you haven't created your training account, follow the instructions under the
Creating an Account article.
2. In your browser, navigate to the LearnSmart login page and click on My Account.
3. In the email address and password fields, enter your information.
4. Click Login Now!
Note – Your password is located in the email that you received with the subject line
“Your LearnSmart Training Password.”
5. Click Logout in the upper right-hand corner following your name to sign out.

9
Setting Up Your Profile
When getting started with Activating Your Course or Library, you can decide to set up
your account now or bypass setup until later. To bypass setting up your profile, click
Enter Now. You will be allowed to continue to the LearnSmart Cloud home page where
you can access your training. To set your profile up later on, follow the instructions under
the Adjusting Settings section.
If you decide to continue with setting up your profile, follow these directions:
Setting Up Your Profile
1. Choose your display name.
2. Upload your photo or choose an avatar.
Selecting Your Privacy Settings
1. Choose to Enable or Disable chat features.
2. Select the privacy settings for your profile and wall.
3. Click Enter Now.
Changing Your Password
If at any point you need to change your password, navigate to your account by clicking
on My Account. Look for the Edit Password & Security tab, and click on it. The page
will refresh to display entry fields for your Old Password, New Password, and to
Confirm Password. When done updating your password, click the Submit button.

10
Checking Out a Course
1. From the LearnSmart Cloud home page, click the Manage Courses tab on the
navigation pane.
2. Select a course from My Catalog.
3. Click on the course and the page will display a course description.
4. Locate the Check-out button above the course description.
5. A pop-up window will open telling you that the course was successfully checked out.
6. It will now display under My Courses.
Tip – If you have reached your maximum number of checkouts, a message will display
telling you how much longer until your next available checkout. If you need additional
checkouts, fill out a Customer Service ticket.
Starting Your Training
Before starting your training, ensure you have completed these processes:
● Creating an Account
● Activating Your Course or Library
● Logging Into Your Training Account
● Checking Out a Course
With that checklist complete, from the LearnSmart Cloud home page, below the course
title, click start training. Or from the Courses page, click Play below the course title.
The page will refresh to display the Course Theater, which includes your video player,
Course Syllabus, Whiteboard, and additional training features.
Creating a Customer Support Ticket
If you’re encountering any issues or errors while training, please contact Customer
Support by submitting a service ticket.
To create a Customer Support ticket, go to http://www.learnsmartsystems.com/tkt/ and
fill in all the entries with appropriate information. Once you are finished, client the
Submit Ticket button to send your request to Customer Support. Remember to hang on
to your ticket number.
Tip – Once you have a ticket number, you can always go back and review your ticket.
To review your ticket, read the Accessing a Previous Support Ticket article.
Accessing a Previous Service Ticket
To access a previous ticket,

11
1. Go to http://www.learnsmartsystems.com/tkt/.
2. Locate and click on the I already have a ticket link.
3. Enter in your email address and ticket number.
4. Click the Grab Your Ticket button.
5. The page will refresh displaying details concerning your ticket.
6. On this page, you can add a comment, or you can close your ticket.
Closing a Support Ticket
To close a previous ticket,
1. Navigate to http://www.learnsmartsystems.com/tkt/.
2. Access your ticket by clicking on the I already have a ticket link.
7. Enter in the necessary information and click the Grab Your Ticket button.
3. On the new page, details about your ticket will appear.
4. Look below the ticket information for the Close ticket link.
Note – Once you’ve closed a ticket, you can re-open it by clicking the re-open button
located above the Ticket Number.
Re-opening a Closed Support Ticket
To re-open a support ticket, open the Get My Ticket page, and enter your email address
and ticket number. The page will refresh to show that ticket’s details. Locate and click on
the re-open button.
Using the Search Bar
In the very top right-hand corner of every LearnSmart Cloud page, you'll find the search
bar. Use the search bar to search for courses by keyword, or to look up technical terms
in our glossary. Click inside the search bar and begin typing a word or phrase. Results
for your entry will display as a drop-down list. Click on the search result that best
matches your search.

12
2. Personal Trainer
Opening Your Personal Trainer
1. From the LearnSmart Cloud home page, click on See More Details to open the
personal trainer.
Note – Look for the personal trainer below the pie chart.
2. The page will refresh, opening a new page displaying:
a. An overview of the course you are currently training in, divided into sections.
Course Progress, Time Spent Training, Quiz Performance, and Awards
b. A navigation pane, along the left-hand side, taking you to different pages.
Your Account Details page, Reports Dashboard page, and Awards page
3. This page will assist you in formulating a plan of action for your training and in
tracking your progress in your current training course.
Tip – Resetting an Entire Course
As you’re training, your quiz scores, video watched, and labs completed are stored as
data. At any point, if your administrator allows, you can permanently erase all of that
data with the click of a button. Click the Reset button, located above the Personal
Trainer entrance button.
Adjusting Your Goal
1. While on the LearnSmart Cloud home page, click on See More Details to open the
personal trainer.
Note – Find the personal trainer below the pie chart.
2. The page will refresh, opening a new page. Under the Course Progress section,
click on the Adjust button.
3. In the mini pop-up window, you have the option to address your completion date and
how many days a week you plan on training. Specify those details.
4. Once you've made your changes, click Save New Goal. This action updates the plan
displayed under the Course Progress section.
Tip – The Course Progress section tells you how many hours a week you need to train
to reach your completion goal. If you find that you are working ahead or getting behind in
your training, the Course Progress display will automatically recalculate your pace to
keep you on track.
Opening Account Details
In the Personal Trainer, there’s the option to open account details. Opening this menu
item allows you to change your personal and business details.
13
Downloading Your Course Reports
1. From the LearnSmart Cloud home page, click on See More Details to open the
personal trainer.
Note – The personal trainer is located below the pie chart.
2. The page will refresh opening a new page. Under the Time Spent Training and
Quiz Performance sections, if you click on Detailed Report, those charts will open
on a new page and provide a more in-depth look at those areas.
3. When looking at either section, you also have the option of downloading the report
by clicking Download Report.
Tip – You can adjust the time frame your chart displays by entering different dates, and
clicking Get Dates.
Viewing Your Awards
Once you have completed a course, you will receive a Certificate of Completion (you
finished the course's quizzes and videos) or a Certificate of Mastery (you succeeded in
passing the final exam). Go to the Awards section on your personal trainer, and the
award(s) will show for that course. You can click on it to print or download for records.

14
3. Wall
Writing a Message on Your Wall
1. Navigate to the LearnSmart Cloud home page.
2. Scroll down and under My Wall, a bar displays the message: "Post a new discussion
on this wall..." Click inside that bar.
3. The bar will expand and a cursor will flash, indicating that you can begin typing.
4. When you have finished, click Post towards the bar's bottom right-hand corner.
5. Your new status will appear below the Post bar. Now, all of your contacts can see
what is on your mind.
Tip – If you'd like to share a document or picture on your wall, use the Attach a file
button to add content with your status updates. All attachments appear as downloadable
links. For further instruction, see the Attaching a File with Your Wall Post article.
Attaching a File with Your Wall Post
Note – Before making a post, you can add other content (i.e. pictures or documents).
1. From My Wall, at the Post bar's bottom right-hand corner, click on Attach a file.
2. A new pop-up window will appear asking you to enter the Filename.
3. Enter the file name, and click Open.
4. The pop-up window will disappear and return you to My Wall. You'll notice a quick
message telling you the file is loading, and then the attachment will appear as a link.
5. When you've finished writing your status, click on the Post button towards the bar's
bottom right-hand corner.
6. Once completed, the new post will appear below the Post bar. The attachment will
appear as a link.
Tip – If the file is unsupported by the LearnSmart system, an error message will show.
When it appears, select a different file type.
Deleting a Wall Post Attachment
Once you have posted a status with an attachment, you must delete your entire wall post
to remove the attachment. To delete a wall post, follow the steps given under Eliminating
a Wall Post.

15
Eliminating a Wall Post
1 After posting your wall post, you can eliminate the post by hovering your mouse
over the wall post's top right-hand corner.
2 An X will appear. Click on it to remove the post.
3 A message will ask you how to proceed. Click Yes to continue removing the post.
Note – Clicking No will stop the process and return you back to your wall.
4 Wait a few seconds and then the post will no longer display on your wall.
Writing a Message on a Contact’s Wall
1. Select a contact from the My Contacts list.
2. A mini popup will appear displaying the contact's information, click on view profile.
3. The page will refresh displaying his or her wall, click in the box on the contact's wall
reading, "Post a new discussion on this wall."
4. When you have finished your wall post, click Post.

16
4. Messages
Sending a Message
Note – You can only send messages to those users who are listed under My Contacts.
Not sure how to add someone to that list? Read how under the Adding Users to My
Contacts article.
1. Navigate to the LearnSmart Cloud home page.
2. Locate the navigation pane on the left-hand side of the page and click Messages.
3. A new page will load with a button in the top left-hand corner reading New Message.
Click on the New Message button.
4. A new page will open where you can fill in the To field with your contact's name.
5. After finishing your message, locate and select send message.
6. A pop-up message will appear confirming your message was successfully sent.
Tip – Contacts will receive your message the next time they sign into their LearnSmart
Training Account.
Attaching a File
Note – LearnSmart’s system supports .pdf, .png, .jpeg, .jpg, .gif, .doc, .docx, .xls, .xlsx,
.txt, .csv, .mpeg, .mpeg2, .mp3, .mp4, .m4v files.
1. After composing your message, locate the Attach a file button and click on it.
2. A new pop-up window will appear asking you to enter the File name.
3. Once the correct File name is entered, click Open.
4. The pop-up window will close and be replaced by the New Message page.
5. Your file will load, and then the attachment will appear as a link below the Attach a
file button with a checkmark next to the file name.
Tip – If the file is unsupported by LearnSmart system, an error message will appear.
When that displays, select a different file type.
Removing an Attached File
Having completed the steps under Attaching a File, you realize that it is the wrong file.
No worries. To remove the file from your message before sending it, simply click on the
check mark located to the left-hand of the file name. This action will detach the file from
your message and allow you to add other files.

17
Reading Unread Messages
1. Navigate to the LearnSmart Cloud home page.
2. When you have a new message, you either receive a notification at the top of your
screen, or a number will appear on your Messages tab.
3. Click on the Messages tab to open your newest message.
4. To open the message, double click on the message's subject line.
5. This will prompt a new page to open displaying the contents of the message.
Deleting Old Messages
Deleting messages is one way of doing things, but the LearnSmart way is archiving
them. By archiving your messages, you free up space in your Inbox, while saving them
for future reference. To archive your messages, follow the instructions listed under
Archiving Messages.
Archiving Messages
Note – Once archived, the message will no longer appear on the main Messages page.
1. From the LearnSmart Cloud home page, locate the navigation pane and click the
Messages tab.
2. A new page will load with all sent, read, and unread messages listed, starting with
the most recent unread messages.
3. Identify which message you want to archive and find in the bottom right-hand corner
of the message the Archive button. Click on that button to move the message to
your archived messages.
Locating Archived Messages
1. Navigate to the LearnSmart Cloud home page.
2. On the navigation pane, click Messages.
3. A new page will load with all read and unread messages listed, starting with the most
recent unread message.
4. In the box titled All Messages, look to the right for the Archived button.
5. Clicking on this button will open a new window displaying all the messages
previously saved as archives.
Tip – If you would like to move a message from Archived back to All Messages, simply
click the Restore button for that message.

18
Viewing Sent Messages
When on your Messages page, all your sent, read, and unread messages are listed,
starting with the most recent unread messages. Your Messages page is set up using a
conversational format. When looking at a message, the most recent response to the
message will display. You can see what you said by clicking on the message, and view
the message's conversation history.
Responding to Messages
1. While on the LearnSmart Cloud home page, locate the navigation pane and click the
Messages tab.
2. A new page will load displaying all sent, read, and unread messages listed, starting
with the most recent unread messages.
3. On that list, select a message to send a reply message.
4. The page will refresh and display the last response in a conversational format. Click
inside the box at the bottom and type.
5. Once you have finished your message, click Reply.
6. When sent, your message will appear as the most recent contribution to the
conversation thread.

19
5. Notes l Tasks
Creating & Saving Notes
1. Navigate to the LearnSmart Cloud home page.
2. Locate the navigation pane and click Notes l Tasks.
3. Click on + New located in the upper right-hand corner of the middle box.
4. A sheet of lined paper will appear with the message new note! When the cursor
flashes, you are ready to write a note.
5. As you're writing notes, the text is automatically saved every ten seconds. However,
if you want, you can save in between those ten-second intervals by clicking on the
Save button in the upper right-hand corner.
Tip – You can write notes while you're watching a lesson. Locate the My Notes box
below the video player. Click on + New located in the upper right-hand corner of the My
Notes box. When the cursor appears you can begin typing.
Finding Old Notes
1. From the LearnSmart Cloud home page, locate and click Notes l Tasks on the
navigation pane.
2. Click on the course title that contains the notes you want to see.
3. A new page will load, displaying the notes you wrote for that course, along with a
hyperlink to the portion of training that note is linked to.
Tip – You can also view notes by clicking on All Notes. This will open a page displaying
all notes you've written, in order by date.
Exporting Notes
1. Navigate to the LearnSmart Cloud home page.
2. Locate the navigation pane and click Notes l Tasks.
3. Find the My Notes button and click on it.
4. Click on the course title that contains the tasks you want to see.
5. A new page will load displaying the notes you wrote for that course.
6. Locate and click the To Go button located in the upper right-hand corner of the box.
7. A pop-up box will appear asking you to select the email address where you would
like for the task to be sent.
Tip – While you're watching a lesson, you can also send notes. Locate the My Notes
box below the video player, and click on My Notes. Click on the To Go button located in
the upper right-hand corner of the My Notes box. Enter your email address into the pop-
up and the task will be sent to that address.

20
Deleting Notes
1. From the LearnSmart Cloud home page, find and click Notes l Tasks from the
navigation pane.
2. Click on the My Notes button.
3. Click on the course title that contains the notes you want to see.
4. A new page will load displaying the notes you wrote for that course.
5. In the lower right-hand corner of the note are little icons. One of those icons is an
image of a trash can.
6. Click on the trash can to delete the note.
7. A message will pop up inquiring if you'd like to delete that note. Click Yes, Delete.
8. The note will be removed from your list of notes.
Creating & Saving Tasks
1. On the LearnSmart Cloud home page, find the navigation pane and click on the
Notes l Tasks tab.
2. Find the My Tasks button and click on it.
3. Click on + New located in the upper right-hand corner of the box.
4. A sheet of lined paper will appear with the message new Task! When the cursor
flashes, you are ready to write a task.
5. Click the Save button to save that task. Text is automatically saved every ten
seconds. However, if you want to save before the next interval, click Save.
Tip – You can also write tasks while you're watching a lesson. Locate the My Notes box
below the video player, and click on My Tasks. Click on + New located in the upper
right-hand corner of the My Tasks. When the cursor appears you can begin writing.
Finding Old Tasks
1. Navigate to the LearnSmart Cloud home page.
2. From the navigation pane, click Notes l Tasks.
3. Find the My Tasks button and click on it.
4. Click on the course title that contains tasks you want to see.
5. A new page will load displaying tasks you created for that course, along with a
hyperlink to the portion of training that task is linked to.
Tip – If you can't remember which course contains the set of tasks you're looking for,
click on All Tasks. This will open a page displaying previous tasks written by date.
Exporting Tasks
1. Navigate to the LearnSmart Cloud home page.

21
2. Locate the navigation pane and click Notes l Tasks.
3. Find the My Tasks button and click on it.
4. Click on the course title that contains the tasks you want to see.
5. A new page will load displaying the tasks you wrote for that course.
6. Locate and click the To Go button located in the upper right-hand corner of the box.
7. A pop-up box will appear asking you to select the email address where you would
like for the task to be sent.
Tip – While you're watching a lesson, you can also send tasks. Locate the My Notes
box below the video player, and click on My Tasks. Click on the To Go button located in
the upper right-hand corner of the My Notes box. Enter your email address into the pop-
up and the task will be sent to that address.
Deleting Tasks
1. From the LearnSmart Cloud home page, locate the navigation pane and click on the
Notes l Tasks tab.
2. Click on the My Tasks button.
3. Click on the course title that contains the tasks you want to see.
4. A new page will load displaying the tasks you wrote for that course.
5. In the lower right-hand corner of the note are little icons. One icon is a picture of a
trash can.
6. Click on the trash can to delete the task.
7. A message will pop up inquiring if you'd like to delete that task. Click Yes, Delete.
8. The task will be removed from your list of tasks.

22
6. File Directory
Viewing Files from My Wall, Contacts, and Courses
1. From the LearnSmart Cloud home page, click File Directory, located on the
navigation pane.
2. A new page will open with buttons for My Wall, Contacts, and Courses files. Click
on the buttons respectively to find items.
3. A new page will load listing all the files associated with that button.
Tip – By clicking on the file name, you can download the file.
23
7. Contacts
Adding Users to My Contacts
Note – Before beginning, it will benefit you to have the first or last name of the person or
persons you would like to add.
1. Navigate to the LearnSmart Cloud home page.
2. Locate the navigation pane and click Manage Contacts.
3. A new page will load. In the Search for Contacts bar, enter the first and or last
name of the person, and click Search.
4. Underneath the Build Your Contacts section, a list of first and last names will
appear with the Send Invitation button.
5. Scroll up and down the list of names to find the individual's name; click the Send
Invitation button.
6. A box will appear saying an invitation was sent.
Viewing Sent Requests & Canceling Contact Requests
1. While on the LearnSmart Cloud home page, click Manage Contacts, located on the
navigation pane.
2. To the right of Pending Requests, click on by me.
3. Locate the Pending Requests box; you will find a list of all the requests that still
need a response.
4. Click Rescind to cancel the request for adding that person to your contact list.
Responding to Contact Requests
1. Navigate to the LearnSmart Cloud home page.
2. Locate the navigation pane and click Manage Contacts.
3. Locate the Pending Requests box, which shows invitations from other people
hoping to add you to their contact list.
4. To accept a request, click the Accept button. To deny the request, click Ignore.
Removing Contacts from My Contacts
1. From the LearnSmart Cloud home page, find the navigation pane and click on the
Manage Contacts tab.
2. A new page will load with a list of your current contacts under My Contacts.
3. Find the contact's name you are removing and click the remove button.
4. A message will appear confirming the contact was removed.

24
Blocking Contacts
Note – Once a person is blocked, you can always remove him or her from the blocked
list by clicking Remove.
1. Navigate to the LearnSmart Cloud home page.
2. Locate the navigation pane and click Manage Contacts.
3. Find the contact's name and click the block button.
4. A message will appear confirming the contact was blocked. That person is now
added to the blocked list located under My Contacts. Click on blocked in the upper
right-hand corner to view list.

25
8. Courses
Viewing Your Library
Note – Your library displays as a catalog, which grants you access to the courses
associated with that library.
1. Navigate to the LearnSmart Cloud home page.
2. Locate the navigation pane and click Manage Courses.
3. A new page will load, and on your screen you'll see various options for viewing your
course, which include:
My Catalog – A listing of all the courses you have access to through your library
Full Catalog – A complete listing of all LearnSmart courses, including courses soon
to come
Approved – A detailed listing of all the courses that have been assigned to you
Community – A view of all the courses that were custom created for everyone
Organization – A listing of courses that were custom created with limited access
4. Click on My Catalog, and choose to browse by a specific category or from a list
of courses.
Tip – You can also search for courses in the upper right-hand corner search bar by
typing in the course title or course exam number.
Activating Additional Courses
Once your account is created and you've completed your purchase, you then have
access to your training product. With this access, you can choose to individually train in
the course, or as an administrator, assign it to your members through the Admin
Console. If you choose to individually train, you must first activate the training by
completing the following steps:
1. On the navigation pane, click Manage Courses.
2. Locate the banner reading My Catalog I Full Catalog; click on the + Activate New
Training button.
3. The new page will display all courses and libraries that require activating. To activate
a course or a library, click on the Activate button to the far right.
4. Activating your course or library adds that product to your catalog and returns you to
the My Courses page. You can now access it and begin Watching Your Course
Training or Working with Your Personal Trainer.

26
Checking Out a Course
1. From the LearnSmart Cloud home page, click the Manage Courses tab on the
navigation pane.
2. Select a course...
To read the entire article about Checking Out a Course, please go to the Getting Started
section of the User Guide.
Determining the Date of Your Next Available Check-out
1. Navigate to the LearnSmart Cloud home page.
2. Locate the navigation pane and click Manage Courses.
3. Click on Access Details in the center next to My Courses.
4. Some account details will appear along with information concerning the date your
Next Available Check-out and number of checkouts remaining.
Watching Your Course Training
Once you've finished Checking Out a Course, you can begin your training by clicking on
the Play button under the course title. The page will refresh to display the Course
Theater, which includes your video player, Course Syllabus, Whiteboard, and
additional training features.
Resetting a Quiz
Inside of your video training, there are quizzes to reinforce the knowledge learned. After
taking a quiz, if you still need another attempt:
1. On the course Syllabus, click the MORE button located to the right of the quiz title.
2. That section of the Syllabus will expand to show the quiz title with a Reset button.
3. Click the Reset button.
Resetting the quizzes erases the previous data stored on your quiz attempts, and allows
you to take the quiz as though it was the first attempt.
Tip – Resetting Your Final Exam
Along with Resetting a Quiz, there are also options for Resetting an Entire Course and
your Final Exam. Final Exams are reset the same way as quizzes, by clicking the Reset
button next to the Final Exam title, on your course Syllabus. To learn more about
resetting a course, read the Resetting Your Course article listed in the Personal Trainer
section of the User Guide.

27
Checking In a Course
1. From the LearnSmart Cloud home page, click the Manage Courses tab on the
navigation pane.
2. Under My Courses, a list of all the courses you have checked out will display.
3. Below each checked-out course title, you will find two options - Check-in and Play.
4. Click on Check-in.
5. A pop-up window will appear, asking you if you'd like to check your course in; click
on Yes.
Adding Courses to Your Training Plan Queue
Note – This is not the same as checking out the course. This just loads the course as a
potential next course to train in; the course is archived for future training.
1. While on the LearnSmart Cloud home page, locate the navigation pane and click
Manage Courses.
2. A new page will load with My Courses as the heading of the first box.
3. In the middle of the page below My Courses, under My Catalog, you will find listed
all the courses you can access.
4. From that list, select the courses you would like to add.
5. Locate the Add to Plan button below the course title and click on it.
6. Clicking on it will add an icon of the course along with the course title to the Training
Plan Queue.
Modifying Your Training Plan
Adding Courses to Your Training Plan Queue was easy. Modifying it is equally as easy,
do so by using these buttons:
● (located in the top right-hand corner)
You can add course completion dates and notes with this button. A mini pop-up
window will appear asking you to enter a completion date and additional notes, or
instruction regarding that course.
● (located in the bottom right-hand corner of the course box)
This button allows you to rearrange the order of the courses. While clicking and
holding this button, you can drop a course in a new spot. The first course can be
moved to the third course, while the last course can be moved up to the first course.
You decide which one is priority.
Tip – If you see a course highlighted in charcoal, it's from your administrator.
Furthermore, this is a course he or she assigned to you for completion.

28
Switching Courses
While on the LearnSmart Cloud home page, notice the current course title is displayed.
Just below that locate the Switch Course drop-down menu. Click on the menu's arrow
to select a different checked-out course and begin training. To add other courses to the
drop-down list, follow the instructions listed under Checking Out a Course.
29
9. Custom Courses
Starting a New Custom Course
1. Navigate to the LearnSmart login page and click on Custom Courses from the left-
hand navigation pane.
2. The page will refresh to display the start page for My Custom Courses.
3. Use the Start New Course button to begin creating your custom course.
4. You will automatically be taken to the Custom Course Storage Packages page.
Note – Each time you start a new custom course, you will be prompted to select a
storage size. The cloud storage size you select for one course might not be
appropriate for the next course.
5. Once you’ve selected one of the cloud storage packages, scroll down and fill in the
cart information.
6. Once you have confirmed that all the Payment Information provided is accurate,
click the Start New Course button.
7. A congratulatory message should appear along with a button to click. Click the
Begin button.
8. With the preliminary setup complete, you can now begin working on your custom
course by Uploading Videos, Adding Interactive Activities, and more.
Editing Your Custom Course
Note – If you’re beginning a new course, read the Starting a New Custom Course article
to find instructions on getting started.
1. From My Custom Courses page, click on the course title that you would like to edit.
2. You’ll be taken to the first step—Edit Your Course.
3. When you’re done filling out each required field, click the Save and Continue button.
Tip – If your cover image isn’t sized to the specified dimensions, then when the image is
uploaded, it will be automatically resized.
Starting a Lesson
Note – Your lesson image cannot be any larger than 160 x 160. If it is, the image will be
resized to fit.
1. Locate and click on the course title that you would like to edit from the My Custom
Courses page.
2. Once inside along the course step by step (1, 2, 3...), click on the Lessons section.
3. Enter a Lesson Number and Title for the lesson.

30
4. Upload your lesson image and click Upload.
5. If you’d like, you have space to add an internal lesson Description.
6. When you have added all the appropriate details, click Save and Continue.
Tip – If desired, while building the course, remember to uncheck the Publish box to
ensure that the lesson is NOT visible to the public.
Adding a New Lesson
When in the Lessons section of the course, you can add a new lesson by clicking Add
Another Lesson towards the bottom of the screen. The page refreshes and you can
begin the process again of Starting a Lesson.
Adding Media Files to a Lesson
The Lessons section of the course allows you to add lessons and then images, videos,
interactive activities as labs, and course materials to that lesson. By default, when
objects are added, they are added to the most recently created lesson. Before adding
media, make sure you’re in the correct lesson first. If you’re uncertain as to how to get to
the correct lesson, follow the instructions given in the Switching Lessons article.
Once you’re in the correct lesson, click on the Build section button from the numbered
sequence across the top. The page will refresh and provide you with options for videos,
labs, quizzes, and the bookshelf. To learn more about those options, read the Uploading
Videos, Adding Interactive Activities, Creating a New Quiz, or Adding to Your Course
Bookshelf instructional articles.
Switching Lessons
In the right column, your Course Timeline, under the Progress tab, you’ll see a listing
of all the created lessons along with any labs, quizzes, and videos added. To switch to a
specific lesson, find the triangle to the left-hand of the lesson title. Click on it and the
lesson box will drop down to display that lesson’s contents. Now you can begin adding
media to a lesson by clicking the Add Assets button.
Removing an Uploaded File
While working on your custom course, you have the option to upload an image, video,
lab, and more to your course. However, you may want to delete an image or object that
you’ve uploaded. This set of instructions is specific to removing an image, but the steps
are similar for removing any uploaded object. To remove an uploaded image from the
Lessons section, follow these instructions:

31
1. Select the course title that you would like to edit on the My Custom Courses page.
2. Progress to the Lessons section.
3. Under Upload a Cover Image, find the image you’d like to remove.
4. Look to the right of the file name and find the remove button.
5. When you click on it, a confirmatory message will appear, asking if you’d like to
delete the image. Select Yes, Delete to proceed with the removal.
6. The page will refresh and the image will no longer appear under Pending Upload.
7. To store the changes, click Save and Continue.
Tip – You can also completely delete an object by scrolling down the page and looking
for the delete button. Click that button to delete the entire video including title, file, and
description.
Uploading Videos
Note – When uploading videos, the LearnSmart Online Learning Management System
accepts .mp4 and .m4v files.
1. Locate and click on the course title that you would like to edit from My Custom
Courses page.
2. Within the third section—Build Video, Quizzes, and Labs—locate the Choose
Media to Upload section.
3. To begin uploading videos, start by providing your video with a specific name.
4. Next, add a video to SD or HD by clicking the Browse button.
Hint – SD and HD players differ in quality. Upload HD videos to the HD player, and
the SD video accordingly.
5. If you’d like, you can add a video Description.
6. When you’ve adjusted everything to your liking, click the Save and Continue button.
Tip – If the Publish box is checked, then your course is visible to the public. To make
the course invisible, uncheck the box.
Adding Interactive Activities
Note – The LearnSmart Learning Management System allows you to create interactive
activities as labs in the form of .swf files. So be certain that when adding labs, they are
Swift files.
1. From My Custom Courses page, click on the course title that you would like to edit.
2. Navigate to the third section—Build Video, Quizzes, and Labs. This section allows
you to Upload Media.

32
3. From the drop-down menu, change the display to Lab Files by clicking on the drop-
down arrow.
4. The page will refresh to provide you with options to upload interactive activities.
5. Name your lab, and then Browse your files to add your activity.
6. Once you’ve selected your activity file, click the Upload Lab button.
7. Add the answer to your lab through the Help section. Browse for the file and click
Upload Lab Answer.
8. Wrap up the lab with a Description, and then click Save and Continue.
Tip – If you’d like to remove a lab, simply look for the remove button to the right of the
file name. For further instructions, read the Removing an Uploaded Object article.
Changing the Order of Objects in Your Course
Note – All the pieces of a custom course—lessons, quizzes, videos, and labs are
moveable within the course preview pane on the right hand of your screen. To move a
lab within a lesson:
1. From the third section—Build Video, Quizzes, and Labs, move over to the right side of your screen. There should be a column, your Course Timeline, displaying all of your lesson, lab, quiz, and video titles.
2. Select an object to move, either a lesson, lab, video, or quiz. 3. In the bottom right-hand corner of that object’s rectangle, you’ll notice three lines
on top of each other. 4. Clicking on those lines enables you to relocate that object. Simply click and drag
the object to its new position. 5. Let go of the object to lock and save the reorder.
Opening the Quiz Editor
We want to make building quizzes easy for you and an appropriate fit for your needs. So
we’ve provided you with three quiz options through our Quiz Editor. You can create
three different types of quizzes:
1. Section Quiz – Quizzes that appear at the end of every chapter, or every other
chapter, or every three; you decide.
2. Assessments – Tests that typically appear at the beginning of course as an
evaluation of the user’s knowledge in the subject before taking the course.
3. Final Exams – Longer tests that appear at the end of the course covering all
information taught within the course.

33
To build these quizzes, access the Quiz Editor from the Build section and click on the
Build Quizzes tab. Next, locate the Open Quiz Editor button. The page will refresh,
taking you to the welcome page for the Quiz Editor. Click the Start New Quiz button to
begin Creating a New Quiz.
Creating a New Quiz
Note – When you create a quiz, it appears after a lesson and becomes attached to the
lesson it follows. So be sure that when you open the Quiz Editor, you’ve opened it
under the correct lesson. To read more concerning this, go to the Adding Media Files to
a Lesson article.
Part I – Selecting a Quiz Type
1. From the Quiz Editor Welcome page, click on the Start New Quiz button.
2. The screen will refresh taking you to the Create/Edit Quiz section.
3. Start your quiz creation process by selecting a type of quiz from the drop-down
menu. Your options are:
Section Quiz – Quizzes that appear at the end of every chapter, or every other
chapter, or every three; you decide.
Assessments – Tests that typically appear at the beginning of course as an
evaluation of the user’s knowledge in the subject before taking the course.
Final Exams – Longer tests that appear at the end of the course covering all
information taught within the course.
4. Next provide a name and Description for the quiz.
5. Determine how the quiz will be scored and choose your quiz features.
6. Once everything is set up as you wish, click on the Save and Continue button.
Part II – Completing the Quiz
7. The new page that you are taken to is where you will Add Questions. In this section
there are different question types—Multiple Choice, True/False, etc.
Note – For a description of each question type, change the drop-down menu to a
different question type and the page will refresh displaying that question type.
8. After selecting a question type, begin typing in your Question, Answer, and
Explanation as appropriate.
Note – Short Answer questions can be specified as case-sensitive.
9. Once you’ve created one question, you can add an additional question by clicking
the Add Another Question button.
10. Once you have added all the questions to the quiz, click Save and Continue.
11. After you’ve reviewed your quiz and completed the necessary changes, click the
Finalize button to continue.

34
12. Check the agreement box and click the Finalize Quiz button to finish.
13. Back inside the course, the quiz you created should appear on the left-hand side
after the corresponding lesson.
Tip – Use the drop-down menu to switch the chapter a quiz follows, by selecting the
correct chapter title.
Adding Another Question to a Quiz
Adding questions to a quiz is literally a click away. You still have to add all the
information, but the initial start-up takes clicking on the Add Another Question button
(located towards the bottom of the page). The page will refresh to a blank question
template allowing you to begin create a new question.
Adding to Your Course Bookshelf
Note – Add files to your course bookshelf. Many file formats may be uploaded to the
course bookshelf including; .pdf, .doc, .docx, .png, .jpg, .jpeg, .mov, .exe, .mp4, & .mp3.
The bookshelf is intended for internal supplemental materials such as a course syllabus
or audio files. Files uploaded to the course bookshelf will not appear in the course
timeline.
1. While working in the third section—Build Video, Quizzes, and Labs—you can add
bookshelf materials.
2. In the left-hand Course pane, you will find three tabs: Upload Media, Build
Quizzes, and Add to Bookshelf. Click on Add to Bookshelf.
3. Provide a name for the Bookshelf Item, add it to a Bookshelf Category, and then
select an Icon.
4. Now to actually add the item, you have two options:
Option 1 – You can choose to upload a saved file by using the Browse button and
clicking Upload.
Option 2 – You can insert a Web URL.
5. Once you’ve added a course Description, select Save and Continue.
Tip – Remember to uncheck the Publish box to ensure that the lesson is NOT visible to
the public.
Creating a New Category
When you first begin building a custom course, the only category you have is General.
Everything you add to the Bookshelf will be added to the General category. You have
the capability to create a new category by clicking the New button to the right of Choose

35
Bookshelf Category. A small pop-up window will appear inquiring as to what you would
like to title this new category. Enter a name and click Save. The page will refresh and t
new category will be added to the drop-down menu under the Choose Bookshelf
Category section.
Viewing Your Course Bookshelf
While creating your custom course, at any time, you have the option of viewing your
course bookshelf. On the right side of your screen, find your course title. Just below that,
you will notice three tabs—Progress, Notes, and Bookshelf. Click on the Bookshelf
tab to view what you have added to your course bookshelf.
Creating Internal Course Notes
Note – Don’t confuse the internal course notes with course notes. If you’d like to add
course notes that trainees can access, add them as a .pdf or .doc file under the Course
Bookshelf. For more instructions on adding course notes, please read the Adding to
Your Course Bookshelf article.
1. Add notes at any point by selecting the Notes tab from the left-hand column.
Note – It’s located below your course title.
2. A notepad will replace your course outline. In the top right-hand corner of the pad,
locate and click the + new note button.
3. The page will refresh and the notepad will allow you to begin entering information on
it. In the upper right-hand corner of the note, click the save button to store that note.
Tip – After creating a note you can edit it under the Notes tab.
Publishing Your Course
After all the work you put into compiling your course, you finally get the gratification of
pressing the Publish button. You can publish your course while inside the course by
working through adding all the features, and then at the end, clicking on the Publish
button. Or from the very beginning, you can publish by sliding the tab in the upper right-
hand corner of the course box to the right.
Assigning a License
1. Click the Assign License button.
2. The page will refresh and in the empty field blank, you’ll be asked to enter a user’s
email address.
3. Once you’ve entered his or her address, please click Submit.

36
4. A pop-up window will open asking you if you’d like to continue. Click Yes.
5. A confirmatory message should appear.

37
10. Settings
Updating Your Display Name
While on the LearnSmart Cloud home page, click Settings on the navigation pane. Next,
type in the name you would like to display, and click Save Display Name.
Changing Your Profile Picture
1. On the LearnSmart Cloud page, locate the navigation pane and click Settings.
2. Select a picture. You can upload your own photo by using the Browse button, or
select from the offered list of photos.
3. Your profile picture will automatically update.
Allowing Chat
1. From the LearnSmart Cloud home page, click on Settings.
2. Click on Privacy Permissions.
3. Under Community Participation, from the drop-down list, select Enable Chat.
4. Changes are automatically saved.
Disabling the Save Chat Conversation Function
1. On the LearnSmart Cloud home page, click Settings located the navigation pane.
2. Click on Privacy Permissions.
3. Under Saving Chat Sessions, from the drop-down list, select the Do Not Keep
Chat State option.
4. Changes are automatically saved.
Updating Your Profile & Wall Privacy
1. Navigate to the LearnSmart Cloud home page.
2. Locate the navigation pane and click Settings.
3. Click on Privacy Permissions.
4. Under My Profile & Wall Access, from the drop-down list, select your preferred
level of privacy.
5. Changes are automatically saved.
Changing Your Time
1. From the LearnSmart Cloud home page, locate the navigation pane and click the
Settings tab.

38
2. Click on Time Settings.
3. Find your region and select the correct time zone.
Updating Exported Documents’ Destination Email
Note – Email addresses assigned to a device must be accessible on that device.
1. On the LearnSmart Cloud home page, find and click Settings.
2. Click on Guide Export Settings.
3. Select the device you're using and type in your preferred email address. Email
addresses can be changed at any time, and you can add as many email addresses
to each device as desired.
4. When finished, click Save Export Settings.
Tracking the Amount of Time Spent Training
1. Navigate to the LearnSmart Cloud home page.
2. Locate the navigation pane and click Settings.
3. Click on Usage.
4. All the courses you have taken will display along with the amount of time spent
training that week.
5. To extend the time frame, change the dates and click Get Report.
Managing Your Account
Clicking on the Manage Account button opens the Your Account home page. This
page allows you to edit and view various details of your account such as changing your
password, username, or contact information. Buttons on this page will also return you to
your Cloud home page.

39
11. Course Theater
Accessing Your Course Theater
From the LearnSmart Cloud home page, click on the play button or start training
located center top of your screen. The page will refresh displaying your Course Theater.
Starting a Chat Session
1. From the LearnSmart Cloud home page or Course Theater, select a contact from the
My Contacts list.
2. A popup will display the contact's…
To read the entire article about Starting a Chat Session, please go to the Shared
Training section of the User Guide.
Course Syllabus Features
There are three features we want to highlight about the Course Theater's Syllabus:
• The More button (located to the right of every video chapter title, below the
status bar)
It allows you to expand that chapter and view its subheadings. With this feature, you
can even skip around between chapters.
• My Starred Training (located in the top right-hand corner of the Syllabus)
This button allows you to view all of the subheadings you have starred. Starring
subheadings is advantageous to make specific topics easier to access.
• My History (located in top right-hand corner of the Syllabus)
This button generates a list of subheadings you have watched.
• The Reset button (located to the right of each quiz title)
You can read more about this feature by going to the Resetting a Quiz article in the
Courses section of the User Guide.
Tip – When using these features, you can always return to the Syllabus by clicking on
the Syllabus tab.
Using the Course Bookshelf
Note – Your pop-up blocker must be disengaged to download files.

40
1. While looking at your training, scroll down to the bottom right for the Course
Bookshelf pane on the Course Theater; there is a list of the additional resources
(i.e. – Exam Manuals, Printables, 15-Minute Guides, and so on) that can be
accessed. When looking at these resources, they are grouped by category, and can
be viewed as such by clicking on the Category tab on the Bookshelf.
2. Click on the document’s title.
3. A new tab or window will open with a copy of the document.
Adding a Wall Post to the Course Wall
1. While watching your training, you can write a post to other users training in that
course. Start by scrolling down to the Course Wall.
2. Enter your text inside the bar reading, "Post a new discussion on this wall..."
3. When finished, click Post.
Tip – Whenever you write a post, you can add an attachment to it. To read more
instructions continue on to Attaching a File with Your Wall Post.
Viewing Your Course Progress
While training, you can instantly track your training by looking at your Progress
Tracking pane towards the bottom left of your screen. It displays your:
Overall Course Progress
Time Spent Training
Quiz Performance
So at any point you can see how you are progressing in that course.
Utilizing the Read More Tab
Scroll down to where you see Course Wall, and click on the tab labeled Read More.
The Read More tab on the Course Theatre displays additional information about the
subheading you are watching on the player. Additional information will display.
Using the Whiteboard
1. Within the Course Theatre, locate the Whiteboard.
Note – Under the video player
2. Activate the Whiteboard by clicking on the marker.
3. The Whiteboard will expand. Now it is ready for use.

41
Tip – The default medium is a pencil for drawing. If you would like to switch to keyboard
typing, click the text symbol to switch to typing. Read more about the text symbol's
function under Writing on the Whiteboard.
Writing on the Whiteboard
1. Click anywhere inside the Whiteboard and a text box will display there.
2. Type your text and hit the enter button to insert the text on the Whiteboard.
3. If you need to elaborate on that text or start anew, with the text symbol active, click
again inside the Whiteboard.
4. This will create a new text box.
Tip – The Whiteboard also allows you to set the font, its size, and color. Click on each
icon respectively located along the top of the Whiteboard to adjust these features.
Saving Whiteboard Images
Once you have created an image using the Whiteboard's typing and drawing tools, save
the image by clicking Save. Your image will appear as a .png image in a pop-up.
Download the image to your computer by right-clicking and selecting Save Image As...
Tip – If you're using Firefox or Chrome and your image isn't appearing in a new window
or tab, check to make sure that pop-ups are not being blocked.
Clearing Your Whiteboard
Note – Click the Clear All button to eliminate everything on the Whiteboard. To clear
select items from the board, follow these instructions:
1. Click on the eraser.
2. Click and drag your mouse over the text or drawings you are removing.
3. To cover more area or erase smaller details, adjust the eraser size accordingly.

42
12. Shared Training
Starting a Chat Session
3. From the LearnSmart Cloud home page or Course Theater, select a contact from the
Now Training list of your My Contacts pane.
4. A popup will display the contact's information. If the contact is online click chat now.
5. A chat window will open displaying your last conversation with that person, and now
you can begin a new one.
Tip – If the contact is offline, you can still begin a chat with the person. The chat window
will open allowing you to chat. The contact will receive the message the next time he or
she logs in to the LearnSmart system.
Starting & Ending a Shared Training Session
1. Before beginning your course training, you can set up shared screen training session
with other individuals viewing the course. While in Course Theater, click on the
button for any contact and invite them to the session.
Note - You can add as many people as desired; repeat the above step as needed.
2. A message will appear asking you if you'd like to continue, click Yes.
3. The page will refresh to upload the Shared Training Session features. One of those
features is a box in the bottom right-hand corner called Shared Participants. This
box shows which users are participating and observing.
4. In a shared session, your Whiteboard and chat messages are shared with others.
However, only Participants can request permission to use those interactive tools;
Observers can only look at the training with you. To change an individual’s status
from Observer to Participant, right-click on the user's name, and select the Change
to Participant option.
5. Once you are finished sharing a session, click Quit to end the session. a
confirmation message will appear asking if you would like to end the shared session;
click Yes.
Writing on a Contact’s Wall
1. Select a contact from the My Contacts list.
2. A mini popup will appear displaying the contact’s information...
To read the entire article about Writing on a Contact’s Wall, please go to the Wall section
of the User Guide.

43
Using Your Whiteboard
1. Within the Course Theatre, locate the Whiteboard.
Note – Under the video player...
To finish this article about Using Your Whiteboard and other Whiteboard features,
please go to the Course Theater section of the User Guide.

44
13. iPad Video App
Downloading the Video App
Note – The LearnSmart Plus app was made for iPad 1.0, and functions on iPad versions
2.0-4.0.
Once you have activated your account, navigate to the App Store. Find the LearnSmart
Plus app, click on it, and download it for free. Then log in to begin watching training. For
additional information, go to iTunes Preview.
Watching Your Video Training
Note – When courses are checked in and out of your main account, those changes will
translate to your iPad.
1. Start out by setting your iPad to online mode.
2. Once you log in through the iPad app, all the courses you have currently checked out
will display.
3. Click Download and wait for the download to complete. Once the download is
complete, click Play to begin watching.
Watching Your Training Offline
Note – Once a course is checked in, it will be erased off of your iPad. Before switching
to offline there are two things you need to do:
• Make sure the video you want to watch offline is checked out from your main
account; and
• Be sure that the video is downloaded while online.
Now you can switch your iPad to offline, open up the app, and click Play. Enjoy your
portable training!
Transferring Your Data from Your iPad to Your Online Account
Make sure your iPad is in online mode. Open up your LearnSmart Plus app. Next time
you're online in your training account, refresh the page, and the account will be updated
with the new data from your iPad. The Cloud makes training anywhere easy.

45
14. Admin Console (for administrators only)
Accessing Your Admin Console DashBoard
Locate and click on the l Admin Console l button in the upper right-hand corner. A
new page will load displaying your Dashboard. The Dashboard displays information
showing members and their Time Spent Training, Number of Members Training, who
has Recently Added Courses, and who has Recently Trained.
Creating a Group
1. In the upper right-hand corner, click on the l Admin Console l button.
2. Across the top, locate and click on the Members tab.
3. In the lower left-hand corner of the screen, click on Create a Group.
4. A window will pop-up; create a group name, supply a group description, and specify
the group’s catalog access.
5. Click Create Group, and the group name will appear.
Tip – Groups can be categorized by location, manager, etc. You have the freedom to
decide how to do it. There is also no limit to the number of groups you can create.
Adding Members to Groups
Note – Along with adding members individually, you can add them collectively by
creating an Excel spreadsheet. Read how to collectively add under the Uploading New
Members article.
1. Click on the l Admin Console l button.
2. Across the top, locate and click on the Members tab.
3. Click + Add a Member and a new window will open.
4. Enter the member's email and password; click Add Member.
5. Next, provide the individual's details, and assign them to a group. Included in this
section is the option to select a level of Admin Access.
Adding Admin Access to a Member
Note – You can adjust all of these details later on, but save yourself work and
complete it now. Under the Admin Access section, you can make a user a group
admin or a super admin by choosing an option from the Select a group to
administrate drop-down menu. We highly recommend having at least two Super
Admins.
6. Once you've filled in all the entries, click Save Changes to complete the process.

46
Tip – The user will be able to change the password later. Be sure to keep track of the
original because the user will need it. Offer your member instructions listed under the
Changing Your Password article to create a new one.
Shortcut – You can always add members from the Dashboard by locating and clicking
on + Add a Member. The next step is to enter the user's information.
Adding Admin Access to an Existing Member
When under the Members tab of the Admin Console, it is easy to assign an existing
member admin credentials.
1. Start by clicking on the user’s name.
2. When the page refreshes, scroll down to the Admin Access section.
3. From the drop-down menu, select Super Admin or the group title to make that
person an admin.
Adding Members Options
When adding members, there are a few other options to work with as an administrator.
• Invite Existing Member. This function allows you to invite an existing user into
your Admin Console by entering the user’s email address. Once the user accepts
your invitation, the person is added as a member to your Admin Console, while
remaining in his or her original console. However, this feature does not apply to
administrators; they cannot be added as members to other consoles, and will
remain in their console.
• Invitation History. This option displays all the users recently added to your
Admin Console. The history lists users in a chart, including the status of
the invitation.
Removing Admin Access from an Administrator
Note – We highly recommend having at least two Super Admins, even if one of the two
is a fake identity. It is better to have one just as a precaution.
1. Access your l Admin Console l.
2. Click the Members tab.
3. Click on the name of the member you would like to remove admin access from.
4. Under Admin Access, click Remove.
5. Click the Members tab to return to the full list of members.

47
Uploading New Members
Note – This process requires an Excel spreadsheet saved as a .txt or .csv (comma
delimited) file. When saving the file, select .txt or .csv file under the drop-down menu of
Save file type as.
1. Locate and click on the l Admin Console l button in the upper right-hand corner.
2. Across the top locate and click on the Members tab.
3. Click + Upload Members and a new window will open.
4. Create and save an Excel spreadsheet based on the downloadable template.
5. Click Choose File to open the Excel file containing the members' information.
6. A table will display with a column identifying valid users. If you are satisfied, then
click Upload Members.
7. If no errors are reported, then a message will appear confirming how many members
were successfully uploaded. If all done, click Finish Upload.
Note – If your file contains details improperly entered, a table will present to you the
errors that need addressing.
8. A confirmatory message will appear stating that the upload was successful.
Deactivating Members
1. Click on the l Admin Console l button.
2. On the ribbon across the top, click on the Members tab.
3. From the list of members, check the box to the left-hand of the person's name you
are deactivating.
4. Click on the Deactivate Members button located on the bottom bar.
5. A pop-up box will appear asking if you would like to deactivate that person; click OK.
6. A new window will appear displaying the user's name under the Deactivated
Members list.
Tip – If you deactivate a member, you can always reinstate them by clicking the
Reactivate button.
Finding the Deactivated Members List
1. Access your l Admin Console l.
2. Click on the Members tab and towards the bottom left-hand of the screen you'll see
Administrators and Deactivated.
3. Click on Deactivated to view the deactivated list.

48
Moving Members from One Group to Another
1. Locate and click on the l Admin Console l button.
2. Across the top, locate and click on the Members tab.
3. Check the box to the left-hand of the member’s name, towards the bottom of the
screen, a bar will appear.
4. Under the Move Selected Members to a Group drop-down menu, select the group.
5. Click Move Members. The group title will change for the selected individuals.
Tip – Moving a Member from One Group to Another
To move individual members, locate the member and to the right of his or her name click
the displayed group name. A drop-down list of groups will appear; click on the group
name where you would like to move the member.
Inviting Existing Members
1. Click on the l Admin Console l button.
2. On the ribbon across the top, click on the Members tab.
3. On the left-hand panel, locate and click the + Add a Member button, and a new
window will open.
4. In this new window, on the left panel, you will find a menu of items to select, such as
Inviting Existing Members.
5. The window will refresh including an entry field where you can type an individual’s
email address to send them an invitation to your Admin Console.
6. Send the request, and a prompt will appear confirming that the invitation was sent.
Tip – To view the people that you’ve added to your Admin Console, along with the status
of your request, go to Invitation History. This option displays all the users recently
added to your Admin Console. The history lists users in a chart, including the status of
the invitation.
Searching for Members
While on the Members page, below the All Members title, there is a search bar. To find
the member, type in his or her email address, first name, or last name. Click the Search
Members button. At any point while using the search bar, you can reset the page to
display all members by clicking the Reset button.
Viewing Member’s Account Details
1. Locate and click on the l Admin Console l button in the upper right-hand corner.
2. Across the top locate and click on the Members tab.

49
3. Click on the user's name you want to view and a new window will open displaying his
or her account details. These details include the user’s:
Personal Details
Business Details
Settings for Admin Access
Tip – Removing a Member
As an administrator, Account Details also offers you the option to removing individual
members from your console, through the Admin Console. To remove a member, click
the Remove this member button. Clicking this button removes the user from your
console, and prevents them from logging into his or her account. Removing someone
from your console can be undone; you can always add them back by reactivating them.
For additional instruction on reactivating a member, read the Deactivating Members
article in the Admin Console.
Viewing Member’s Individual Reports
1. While on the Members tab, you click on individual's names to view his or her
individual report.
2. When you click on a user's name, a new page will load displaying the user's profile
including his or her Personal Details, Business Details, and Admin Access.
3. This page also provides a navigation pane on the left-hand side that allows you to
see a member's Awards and Reports Dashboard.
Assigning a Course
Assigning a Course is a two part process. The first part involves adding the course to a
group’s or user’s library. And then to complete the process, access to the course must
be granted. If you stop with part one, users will be unable to access the course. Here’s
how it begins:
Assigning Courses to Members or Groups
Note – In order to assign courses to members, they must have some type of
library access and be a part of one of your groups. To add a user to one of your
groups, follow the instructions under Adding Members to Groups.
1. Locate and click on the l Admin Console l button.
2. Across the top locate and click on the Courses tab.
3. On the left navigation pane, click on the Assign Courses button.
4. A new page will appear. Select a course along with a group to whom you are
assigning that course.

50
5. Once the course and group are selected, in another box, more entry fields will
appear. Fill in the information including a mandatory completion date, and
click on Save Assignments.
6. When the process is done, a confirmation message will pop-up. Click OK.
Tip – More than one course can be assigned to a group at a time. Click on as
many courses as desired and select the group or groups to complete those
courses.
Permanently Assigning a Course or Library Access
Note – Administrators can assign a group or an individual permanent access to
various courses and or libraries.
1. Find and click on the l Admin Console l button.
2. Across the top locate and click on the Licenses tab.
3. Select the course by clicking Assign Access.
4. A new page will open asking you to specify whether access should be given
to one member, all members, or just one group. Select your preference and
click Continue.
5. Check the box next to each user's name to assign training.
6. Click Assign Access.
7. A pop-up message will confirm that you want to assign permanent access to
the selected users; click Continue.
8. The page will finish loading and confirm that the transfer was successful.
Adding Members to Previously Assigned Courses
1. Click on the l Admin Console l button.
2. Across the top locate and click on the Courses tab.
3. On the left navigation pane, click on the Manage Assignments button.
4. Click on the member's group and a list of all the courses assigned will appear.
5. Click the edit button for the course you would like to assign.
6. Click the Assign button for each person.
Tip – To remove individuals from the course, click Un-assign next to their name.
Adjusting Completion Dates
Note – When Assigning Courses to Members or Groups, it is essential to assign a
course, set a completion date, and select the members who will train in that course.
However, you can always go back later to modify any of those three areas. These
instructions focus on modifying the completion date.

51
1. While in the l Admin Console l, return to the Courses tab.
2. Select Manage Assignments from the navigation pane.
3. Click on the group name you are adjusting.
4. The page will refresh to display all the courses the admin assigned this group. Select
a course to adjust that course's completion date.
5. Click on the date listed under the Completion Date column. The page will show
members Assigned and Unassigned; enter the new date.
6. Click the button located to the right of the Completion Date entry field to save the
new date.
Un-assigning Courses from Groups or Individuals
Note – Following these instructions removes the entire group from the course. To un-
assign select members, and follow the Tip under the Adding Members to Previously
Assigned Courses article.
1. Locate and click on the l Admin Console l button.
2. Across the top locate and click on the Courses tab.
3. On the navigation pane, click on the Manage Assignments button.
4. Click on the member's group and a list of all the courses assigned will appear.
5. Find the course you are un-assigning and click the Un-assign button.
6. A pop-up message will appear and click on Yes, Process to un-assign that course
from the group.
7. After clicking this button, the course will no longer appear under Assignments.
Searching for Groups
1. Find and click on the l Admin Console l button.
2. Across the top locate and click on the Courses tab.
3. Click inside Search by Group and type the group's name, and then click Search.
4. A list of groups will appear matching the typed group name. Click on the appropriate
group that matches your search.
Working with the Reports Dashboard
Locate and click on the l Admin Console l button in the upper right-hand corner. To
open the Reports Dashboard, click on the Reports tab. A new page will load displaying
your Reports Dashboard.
The Reports Dashboard

52
• Shows the number of active members training and each member’s course progress.
• Presents charts informing you of average user progress, average time spent training,
and quiz performance.
• Allows you to open up additional report details about a course by clicking the Full
Details button.
• Provides you with the flexibility to determine how much information is presented by
selecting all members or specific groups.
• Collects user’s feedback and comments and divides the data by course.
Tip – While in the Reports Dashboard, you can change from viewing all members to
one specific group by locating the drop-down menu to the right of the Reports
Dashboard banner. Click on the downward facing arrow and select a group. The page
will refresh to show you an updated view of the Reports Dashboard.
Downloading Reports
As you look through all the reports, look for the Download Report button to save .csv
files of the data. When you click the Download Report button, a pop-up window will
open; click OK to save the file.
Viewing Amount of Time Spent Training
1. Locate and click on the l Admin Console l button in the upper right-hand corner.
2. Across the top locate and click on the Reports tab.
3. Click on Time Training to view all groups’ amount of training time.
4. To view a specific group's total training time, click on the drop-down menu in the
upper right-hand corner and select the group's name.
Tip – By default, the graph shows a week's amount of time spent training. To extend or
shorten the time range, change the dates and click Get Dates.
Viewing Number of Members Training
1. Find and click on the l Admin Console l button.
2. Across the top locate and click on the Reports tab.
3. Click on Members Training to view all groups training in particular courses.
4. To view a specific group's number of members training, click on the drop-down menu
in the upper right-hand corner and select the group's name.

53
Tip – To start, the graph covers a specific period of member training time. To extend or
shorten the range of time, change the dates and click Get Dates.
Managing Course Distribution
Note – Course Distribution is the data surrounding individual courses and how they
are distributed, whereas Allocated Courses is a graphical representation of
those courses.
1. Locate and click on the l Admin Console l button.
2. Across the top locate and click on the Reports tab.
3. Click on Course Distribution.
4. The page will refresh with table headings of Course ID, Course Name, and Count
(or the number of those courses distributed).
Viewing Allocated Courses
1. Locate and click on the l Admin Console l button in the upper right-hand corner.
2. Across the top locate and click on the Reports tab.
3. Click on Allocated Courses.
4. To view a specific group's number of assigned courses, click on the drop-down menu
in the upper right-hand corner and select the group's name.
Tip – To start, the graph covers a specific period of course assignments. To extend or
shorten the range of time, change the dates and click Get Dates.
Reviewing Member Activity
1. Locate and click on the l Admin Console l button.
2. Across the top locate and click on the Reports tab.
3. Click on Latest Usage.
4. Click Have Trained to see which members have trained today, this week, this
month, or a custom time frame.
5. To view member activity for a specific course, click on the drop-down menu to the
right of the screen corner, and select the course title.
Determining Which Members Received Awards and Certificates
1. Find and click on the l Admin Console l button.
2. Across the top locate and click on the Reports tab.
3. Click on Completed Courses.

54
4. Under the Certificate of Mastery heading, you'll find a list of members' names along
with their completion date.
Note – Users are awarded Certificate of Mastery (Award for passing all the quizzes
and mastering the course) and Certificate of Completion (Award for finishing and
viewing all the videos).
5. To view a specific course, click on the drop-down menu to the right of the screen,
and select the course title.
Uploading Outside Completed Course Information
Note – The Outside Completed Courses section acts as a storage place for records
covering previous course information. This serves as data storage for completed
courses outside LearnSmart's Learning Management System.
1. Locate and click on the l Admin Console l button.
2. Across the top locate and click on the Reports tab.
3. Click on Completed Courses.
4. Scroll down the Outside Completed Courses section, to the far right, and locate
the symbol.
5. The page will refresh displaying a new page. Enter the Course Title in the box, and
click Add Course Title.
6. The course title will appear in the Remove an Outside Course Title box.
7. Scroll down to Upload Member Results to an Outside Course, and click on the
Choose File button.
Note – For this step, download an Excel templated file. The uploaded file must be in
a 'tab' (txt / tsv) or 'comma' (csv) delimited format.
8. Once you've opened the file, click the Upload Member Results button.
9. The page will refresh displaying the file name.
Tip – In addition to displaying under the Completed Courses section, these records will
appear under users' Award section.
Reviewing Members’ Course Participation
1. Locate and click on the l Admin Console l button.
2. Across the top locate and click on the Reports tab.
3. Click on Course Participation.
4. The page will refresh to display all users in alphabetical order, along with the courses
they are assigned and or training in, and their progress in those courses.

55
Note – User’s course progress is broken down by chapter providing a more detailed
report on his or her course completion.
Tip – You can filter how members’ information is displayed by using the drop-down
menus above the data. You can filter by member, status, group, and course.
Allowing Administrators to Assign Access
1. Locate and click on the l Admin Console l button in the upper right-hand corner.
2. Across the top locate and click on the Settings tab.
3. To allow administrators to assign purchased keys along with the super admin.
Managing Social Permissions
1. Locate and click on the l Admin Console l button.
2. Across the top locate and click on the Settings tab.
3. Under the Social Permissions option, there are two settings that can be specified.
Option 1 – Restrict Company Visibility
4. To restrict members to only interact with only other members within your company,
check the box next to "Restrict to within the Company."
Option 2 – Final Exam Reset
5. To allow members to reset their Final Exams, check the box next to “Allow Final
Exam Reset.”
Note – Resetting the Final Exam eliminates all the data stored about the Final Exam,
and allows users to retake the Final Exam as though it was their first attempt.
Setting Account Creation Permissions
1. Locate and click on the l Admin Console l button.
2. Across the top locate and click on the Settings tab.
3. In the first section, the fourth option down, you’ll find a checkbox next to the “Restrict
members from creating new accounts” option.
4. Check this box if you wish to allow only Administrators to create new accounts.

56
Creating a Customized Company Page
1. Locate and click on the l Admin Console l button.
2. Across the top locate and click on the Settings tab.
3. On the navigation pane, click on Create a Custom Page.
4. Fill in steps 1, 2, and 3 with the required information. Click Preview to preview.
5. To proceed, click on Save.
6. On the training home page, a new tab will be added to all members' navigation pane.
Tip – This is your custom page and you may use it any way that is most beneficial to
your organization. If you're not sure what to include, consider these content ideas:
• Training dates.
• Required courses to be completed by a department or group.
• Group training lists so members can coordinate live study sessions.
• A live study session schedule that members can choose to attend.
Customizing Learning Management Appearances
1. Find and click on the l Admin Console l button.
2. Across the top locate and click on the Settings tab.
3. The second section offers these options, if you've purchased them—a Customizable Header, Customizable Header Bar, Choose Background Color,
Custom Web Address, or Customizable Footer.
Note – If you change the header or footer, be sure to click on Set Custom Header
or Set Custom Footer, respectively.
4. Once you've customized these options, click on Save Changes.
Setting Custom Course Admin Settings
As you and members in your Console create custom courses, there are a few settings
that you can configure. They include:
Choosing who can create custom courses
Specifying who can view the custom course titles in their library
These options have predefined defaults. So if you do not adjust them, there are settings
in place.
Navigating to Other Pages
In addition to the navigation panes across the top and along the left-hand side of your
page, the Company Page also allows navigation to other pages. The Company Page

57
provides a link to your company page through the Custom Web Address and a link to
your Course Catalog. Clicking on either of those links opens the requested page in a
new tab.
Navigating to Training Page
While on the l Admin Console l, if at any time you wish to return to the Training Page,
click on Go To Training.


![PSYC 1113 Introductory Psychology (Fall 2019) · 3 Course Requirements (1000 points possible) 1. SmartBook/LearnSmart quizzes (180 points [18%]): You will read 12 of the 17 chapters](https://img.dokumen.tips/doc/110x75/5fb740669203fd0d223f13ca/psyc-1113-introductory-psychology-fall-2019-3-course-requirements-1000-points.jpg)


![User Guide...User. {{]}]} {}]}](https://img.dokumen.tips/doc/110x75/60918ca14327954d24291644/-user-guide-user-.jpg)

