Embed Size (px)
Citation preview

8/3/2019 Learn to Troubleshoot Power Supply Problems
http://slidepdf.com/reader/full/learn-to-troubleshoot-power-supply-problems 1/5
Learn to troubleshoot power supplyproblems
By Marsha Glick July 19, 2001, 7:00am PDT
A bad power supply can be the root of many PC problems. Experience can help a tech diagnose problems caused by a faulty power supply that would normally be overlooked by a novice. Thisarticle outlines how to diagnose a faulty supply by testing its voltage outputs, as well as how toreplace the defective unit.
The symptomsJust about any intermittent problem can be caused by a faulty power supply. I normally look there first when the symptoms are a little weird. Common power-related symptoms include:
y Any power-on or system startup failures or lockupsy S pontaneous rebooting or intermittent lockups during normal operationy Intermittent parity check or other memory-type errorsy H DD and fan simultaneously failing to spin (no +12V)y O verheating due to fan failurey S mall brownouts that cause the system to restarty Electric shocks that are felt when the case is touched
There are also some obvious clues that should lead you to suspect a faulty power supply. These
include:y A system that is completely dead (nothing happens when the system is turned on)y S mokey Circuit breakers popping when the PC is turned on
Measure the output voltagesO ne of the simplest tests you can perform on a power supply is to measure the output voltages.This will show whether the supply is operating correctly and if the supplied voltage is within the
proper tolerance range. Note that you must check the output voltages while the supply is under aload, which means that it will be installed and running in the PC.
Caution: Power supplies can be dangerousI do not recommend that any inexperienced person open the cover of a power supply. Evenwhen unplugged, a supply should be considered dangerous. Capacitors can maintain a linevoltage charge for a considerable period of time. S horting one by mistake feels just like beingelectrocuted by 120 volts from a receptacle. If you are unsure or uncomfortable with workingaround high voltage, don¶t !

8/3/2019 Learn to Troubleshoot Power Supply Problems
http://slidepdf.com/reader/full/learn-to-troubleshoot-power-supply-problems 2/5
Use the right equipmentMost of the experienced technicians I know use good quality DMMs (digital multimeters, seeF igure A ). These can range in price from just under $100 to well over $300. The price normally
reflects the number of special features built into the meter. This type of meter is preferable to theolder analog V O M (volt-ohm meter) because the DMM injects only 1.5 volts into a circuit whenconducting continuity tests, while a V O M typically injects 9 volts, which is enough to damage aPC¶s sensitive electronic components.
Figure A
Back probingMeasuring voltages on a running computer can be tricky. S ince you cannot disconnect the power
plugs from the drives or motherboard while the power is on, you must use a technique calledback probing . This involves inserting the test probes of the meter into the back of the Molex
power plug while it is still attached to the drive. There is usually enough room to fit the tip of the probe into the rear of the plug and make contact with the metal pin on the end of each wire itcontains. I have one set of leads (shown in F igure A ) that are bent almost 90 degrees to allow meto insert them and avoid the bundle of other cables and other components that are normally in theway.
A quick note about polarity: All the vo l tages you¶ ll be l ooking for are DC. Look at any of the power plugs in a PC and you will see that the wires are color-coded ( see F igure B ).
8/3/2019 Learn to Troubleshoot Power Supply Problems
http://slidepdf.com/reader/full/learn-to-troubleshoot-power-supply-problems 3/5
Figure B
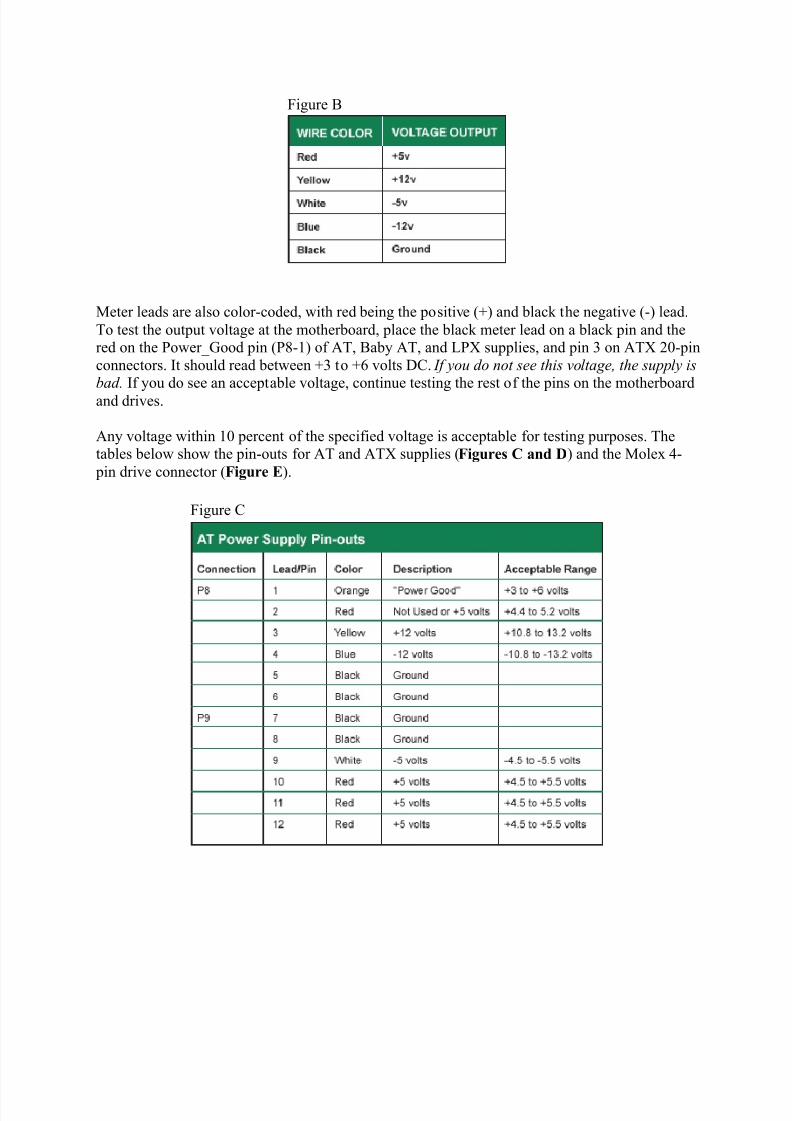
Meter leads are also color-coded, with red being the positive (+) and black the negative (-) lead.To test the output voltage at the motherboard, place the black meter lead on a black pin and thered on the Power_Good pin (P8-1) of AT, Baby AT, and LPX supplies, and pin 3 on ATX 20-pinconnectors. It should read between +3 to +6 volts DC. If you do not see this vo l tage, the supp l y isbad. If you do see an acceptable voltage, continue testing the rest of the pins on the motherboardand drives.
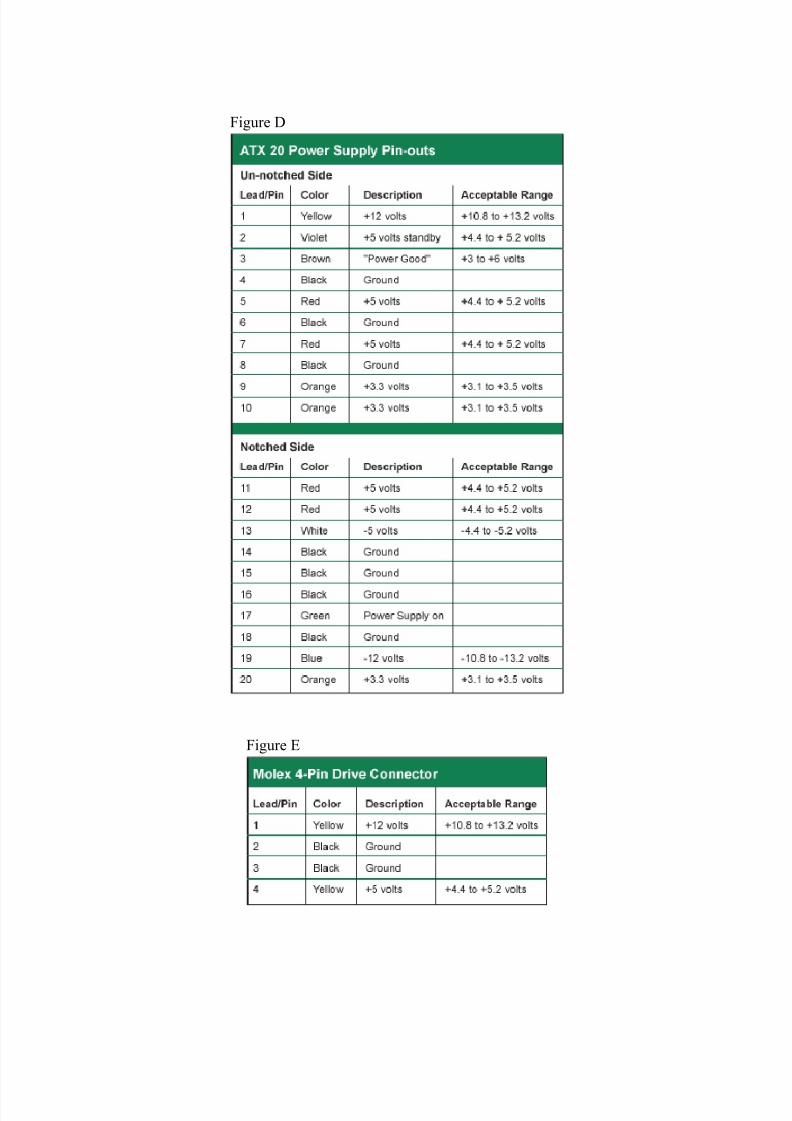
Any voltage within 10 percent of the specified voltage is acceptable for testing purposes. Thetables below show the pin-outs for AT and ATX supplies ( F igures C and D ) and the Molex 4-
pin drive connector ( F igure E ).
Figure C
8/3/2019 Learn to Troubleshoot Power Supply Problems
http://slidepdf.com/reader/full/learn-to-troubleshoot-power-supply-problems 4/5
Figure D
Figure E

8/3/2019 Learn to Troubleshoot Power Supply Problems
http://slidepdf.com/reader/full/learn-to-troubleshoot-power-supply-problems 5/5
Always have a spareS ome problems cannot be found through direct measurement, so having a spare supply available
for substitution is essential. If the problems disappear with the installation of a ³known good´unit, you have just confirmed a diagnosis.
Replace the bad power supplyIf testing reveals that the power supply is not providing the proper output voltages, then it should
be repaired or replaced. S ince power supplies do not contain many user serviceable parts, for most people, this means replacement. Before you start, make sure the new supply has the correctform factor and power rating. A replacement supply should provide at least as many watts as theold one. I normally go up one size when replacing power supplies.
Replacing a power supply is pretty straightforward. Unplug all the cables from the back of the
unit.O
pen the case and unplug all the drive power cables and the power cables feeding themotherboard. Check the power lead to the CPU fan. (This is usually a small-gauge pair of wiresthat can break if you pull too hard.) O n some PCs, you must also remove the power switch.
Unscrew the supply from the case after all the power leads are free and remove it from the case.S lide the new supply into the case and connect all the power leads, starting at the motherboard.Don¶t fully secure it in place until you power up the system for a function test. If everythingseems to be working, shut it down, finish securing the new power supply and the case, and put it
back in service.
S tay tunedFor those of you who feel they just have to open up that old power supply, my next article willoutline how to change the fuse in the power supply, repairing it for about $2.