Embed Size (px)
Citation preview

1 | P a g e
Learn Quickly Creating Professional Looking Desktop
Application Using Python2.7/wxPython, wxFormBuilder ,
Py2exe and InnoSetup
Take your ability to develop powerful applications for desktop to the next level today.
This book is the companion to my video series on
Learning GUI with Python
You may freely copy and distribute this eBook as lo ng as you do not
modify the text. You must not make any charge for t his eBook.
Author: Umar Yusuf
Tel: +2348039508010 URL: www.UmarYusuf.com
Email: [email protected]

2 | P a g e
LESSON CONTENTS
1: Introduction and overview of our app
2: Beautiful Apps created with wxPython
3: Downloading and Installation o Python 2.x.x o Python Libraries: wxPython, and Py2Exe o wxFormBuilder o InnoSetup o Editor/IDE
4: Testing installations
5: Developing the console program
6: Sketch the App GUI (Graphical User Interface)
7: Creating GUI (Graphical User Interface) � Setup wxformbuilder � Create Frame Window � Add Menu and Status bars � Add Widgets (Buttons and TextControl) � Define/name Widgets Methods
8: Binding Events to Methods
9: Compiling, Packaging and distributing our
completed App
10: References
(NotePad++, SublimeText, or AptanaStudio)
(easy_install, PIP)

3 | P a g e
INTRODUCTION AND OVERVIEW OF OUR APP
My name is Umar Yusuf, am based in Nigeria, Africa. I
love to help people grow in their technical careers !
I have a passion for condensing complex topics into
accessible concepts, practical skills and ready-to-
use examples.
See more details about me here: www.UmarYusuf.com
This tutorial will show you how to design and build a
fully-functional desktop Graphical User Interface
(GUI) application for maths Expression Evaluation
using a combination of Python 2.x, wxPython,
wxFormBuilder, Py2exe and InnoSetup.
All of the above programs are free for Linux, Mac a nd
Windows. This tutorial is written with the needs of
Windows users in mind and was written on a 32-bit
operating System computer using the Windows-7
operating system. The desktop app in the tutorial w as
written and tested on the same system. The program
will also work on Mac and Linux systems which have
Python 2.7.x and compatible wxPython installed.

4 | P a g e
Though I will try to keep this simple and show
through example, some background and understanding of
the command prompt and python programming will serve
you well not only in this tutorial but in your
computing life in general.
Purpose of our Desktop App: the app we are developing
will allow user perform any of the following Valid
Mathematical Expression Operations [+, -, *, and /] –
addition, subtraction, multiplication, and division ,
that is entered.
I will use the wxWidgets library with its Python
binding (wxPython), to convert a console (command
line) program into a Graphical User Interface (GUI)
app.
CLI vs. GUI CLI (Command Line Interface)
� Take fewer resources.
� Users have much more control of their system.
� Only need to execute few lines to perform a task.

5 | P a g e
Some GUI library for Python:
• Tkinter - Python's standard GUI package. (Tcl/Tk)
• wxPython - A Python extension module that wraps
wxWidgets library.
• PySide/PyQt - A Python binding of the cross-
platform GUI toolkit Qt.
• Kivy - a modern graphical user interface toolkit
that allows you to easily develop natural
interfaces for a wide selection of devices.
GUI (Graphical User Interface)
� Easier for user to view and
control your application.
� Ability of multitasking.

6 | P a g e
BEAUTIFUL APPS BUILT WITH WXPYTHON
Application fully or partly developed with wxPython
include the following;-
1) Task Coach – a simple to do manager to keep track
of personal task and to do list –
www.taskcoach.org
2) Bit Torrent – a peer-to-peer Torrent application
– www.bittorrent.com
3) Drop Box – a storage provider/files synchroniser
– www.dropbox.com
7 | P a g e
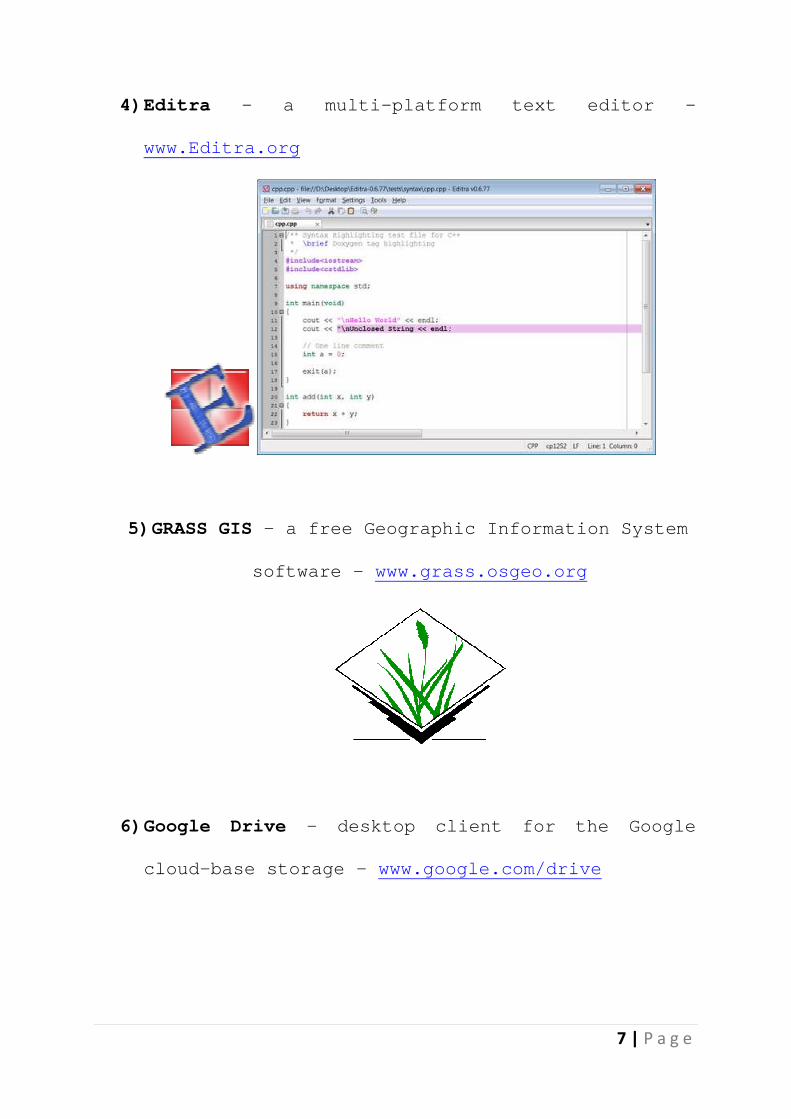
4) Editra – a multi-platform text editor –
www.Editra.org
5) GRASS GIS – a free Geographic Information System
software – www.grass.osgeo.org
6) Google Drive – desktop client for the Google
cloud-base storage – www.google.com/drive

8 | P a g e
7) Chandler – a personal information manager –
www.chandlerproject.org
8) Phatch – a photo batch processor –
www.photobatch.stani.be

9 | P a g e
9) GUI2Exe - is a Graphical User Interface frontend
to all the “executable builders” available for
the Python programming language –
www.gui2exe.googlecode.com
Source: www.wikipedia.org/wiki/WxPython
More Applications can be seen here: www.wiki.wxpython.org/wxPythonPit%20Apps

10 | P a g e
DOWNLOADING AND INSTALLATION
Installing Python 2.x
Python is an easy to learn, powerful programming
language. You will find that you will be pleasantly
surprised on how easy it is to concentrate on the
solution to the problem rather than the syntax and
structure of the language you are programming in (A
Byte of Python). You can install Python on Windows by
downloading from this link: www.python.org/downloads
NOTE: Don't use Python3.x, because the wxPython library isn't fully supported as at this writing. Make sure you install Python 2, not Python 3.
Installing wxPython
WxPython is a free GUI toolkit which can be used to
build Python GUIs. You can install wxPython on
Windows by downloading from this link:
www.wxpython.org/download.php

11 | P a g e
Installing Py2Exe
Py2Exe is a Python Distutils extension which conver ts
python scripts into executable windows programs, ab le
to run without requiring a python installation
(Official website: www.py2exe.org ). There are couple
of different ways you can install py2exe;-
A. Download from the official website www.py2exe.org
or from their source forge project page at:
www.sourceforge.net/projects/py2exe
B. You can also (unofficially) download it from this
link: www.lfd.uci.edu/~gohlke/pythonlibs
C. The third option is to use your PC command prompt
(cmd) to install it by running
This could only be possible after you have
installed easy_install and PIP which can be
gotten from option “B ” above .
pip install py2exe

12 | P a g e
Installing Text Editor/IDE
There are many text/code editors to choose from! Am
going to list some I have used, any of them you go
with is just fine.
Python IDLE: This comes with Python installation NotePad++: www.notepad-plus-plus.org SublimeText: www.sublimetext.com (I will use this) AptanaStudio: www.aptana.com PyCharm: www.jetbrains.com/pycharm
I will be using SublimeText for the tutorial.
Installing wxFormBuilder
wxFormBuilder is a free Python RAD GUI constructor
toolkit for wxWidgets GUI design which can be used to
build Python GUIs. You can install wxFormBuilder on
Windows from links below:
www.wxFormBuilder.org or
www.sourceforge.net/projects/wxformbuilder

13 | P a g e
Installing InnoSetup
Inno Setup Compiler is a free script-driven
installation system created in Delphi/Pascal dialec t
by Jordan Russell. Inno Setup is used to create
installer for Windows programs. You can install Inn o
Setup on Windows from links below:
www.innosetup.com or www.jrsoftware.org

14 | P a g e
TESTING INSTALLATIONS
Testing Python Installation
After installing Python on your windows PC, launch
your command prompt and type and hit enter.
If you didn’t get a screen similar to the one below ,
then it means python isn’t recognized.
Now, you need to add python path to the system’s
environment variable. Two options are available; -
FIRST OPTION: run this code below on your command
prompt to add python path automatically.
Python
[Environment]::SetEnvironmentVariable("Path", "$env :Path;C: \ Python27", "User")

15 | P a g e
SECOND OPTION: add python path manually as follow;
To do this,
1) Click on the start menu
2) Right-click on Computers
3) Click on Properties
4) Click on “Advance System Settings” and
“Environment Variables” under advance tab.

16 | P a g e
5) Select “Path” under System variables and click
“Edit”

17 | P a g e
The variable value field is a list of directories
separated by Semicolons (;).
Go to the end of the list and enter the directory
where python is installed after adding a Semicolon.
If you installed python on C: drive, then the
directory path should be else enter
your appropriate path, then click on “Ok” throughou t.
Open a fresh command prompt and type “ python ” hit
enter. If you have setup your path correctly, this
will open a Python Shell as shown below.
You may also add this path (although not necessary
for this tutorial)
C:\Python27
C: \ Python27 \ Scripts;C: \ Python27 \ Lib \ site - packages

18 | P a g e
Testing wxPython Installation
To test for wxpython installation, from your Python
Shell as opened from above, type hit
enter. If you see error message then your wxpython
wasn’t install properly.
Testing Py2exe Installation
Just as above, type and hit enter. If
the Python Shell displays something, then your
installation has a problem.
Type and hit enter to exit.
import wx
quit()
import py2exe

19 | P a g e
Testing Text Editor/IDE Installation
This is pretty simple, you should see an icon on yo ur
desktop or start menu representing the editor/IDE y ou
installed. You can launch the software from those
icons.

20 | P a g e
Testing wxFormBuilder Installation
Look for the icon/shortcut and launch the software.

21 | P a g e
Testing Inno Setup Compiler Installation
Just as above, check for the icon/shortcut and laun ch
the software.

22 | P a g e
DEVELOPING THE CONSOLE PROGRAM
In this section I will explain how our app
(Expression Evaluator) works on a command prompt
(knowledge of Python basics will help). We will
leverage on a powerful python function used to
evaluate maths expressions .
The complete console version of our Expression
Evaluator app is less than 15 lines of python code (I
will explain each line soon).
Now go to your desktop/any location on your PC and
create a folder name it “ EXPRESSION_EVALUATOR” then
save a python file as “ eval.py ” from your text editor
(my editor is sublimetext).
eval()

23 | P a g e
Type the following code in your eval.py file and save
it.
If you run/launch the “ eval.py ” file by double
clicking on it, you should see command prompt as
follow asking you to enter an expression.

24 | P a g e
Type a valid mathematical expression and press ente r
to see the result. If you entered an invalid
expression, the program will out an error massage.
Below I tried expressing “2+2”, and it gave me “4”
excellent!
When I tried expressing “2+a”, the console crashed
after showing an error message (which you may not
have noticed) - try it! This is because “a” isn’t a
number and isn’t defined, making the expression
invalid.
Now let’s re-run/re-launch the program in a little
bit different way from above so we can see our erro r
message if we supplied an invalid expression.
Hold “ Shift ” button on your keyboard and right-click
inside the program’s folder “ EXPRESSION_EVALUATOR”,
then select “ Open command window here ”. This will
open the command prompt directly from the folder.

25 | P a g e
Type and hit enter. You should see
screen similar to the previous one (except with the
folder’s path on the first line) asking you to enter
an expression.
Python eval.py

26 | P a g e
This time even if we entered an invalid expression
our program with never close automatically until we
decide to close it. Or better still uncomment line- 14
in eval.py file so however we ran our file it will
never close until we press enter.
Ok, let’s dive into detail explanation of each line
of code in “ eval.py ” file. If you are comfortable
with python programming basic, skip to the next
section.

27 | P a g e
Line-1:
This line is called “SheBang” or “HashBang”. It
tells python shell;-
- That the file is a script
- To use python to execute the script
- The path to the python interpreter.
Line-2
This doesn’t do anything to the code; it is left
blank to make the code easier to read by us or
other programmers.
Line-3
Here we have a print function that outs a string
onto the console. In this case, the string within
the single quote will be written on the console.
#!/usr/bin/env python
print 'Welcome to EXPRESSION EVALUATOR System.'
Nothing is here

28 | P a g e
Line-4
The same as line-3 above. But here we are telling
python to write the hyphen “-” character 40
times, to create a ruled line beneath the above
string. This is mainly for decoration.
Line-5
This doesn’t do anything to the code; it is left
blank to make the code easier to read by us or
other programmers.
Line-6
This is used to handle errors, try...except
statement block starts here. We basically put our
usual statements within the try -block and put all
our error handlers in the except -block.
try:
Nothing is here
print '-' * 40

29 | P a g e
Line-7
Here the raw_input() function is use to get user
input on the command prompt and stored in a
variable “ exp ” for further processing. This is
within the try...except , so note the indentation.
Line-8
We then pass the variable “ exp ” into the eval()
function. Then store the result in a new variable
called “ Answer ”.
Line-9
This doesn’t do anything to the code; it is left
blank to make the code easier to read by us or
other programmers.
Nothing is here
Answer = eval(exp)
exp = raw_input("Enter an Expression: ")

30 | P a g e
Line-10
The two variables “exp” and “ Answer ” are printed
on the console with the aid of string formatting
function.
Line-11
raw_input() function is used to allow the user to
terminate successful expression evaluation.
Line-12
Error handlers are placed in the except -block.
Line-13
In this case the error handler in the except -
block is to use print function to output the
string above.
except:
raw_input("Done! Press Enter to Exit")
print "%s =" %(exp), Answer
print 'Oops! INVALID MATHEMATICAL EXPRESSION, TRY AGAIN.'

31 | P a g e
Line-14
This is optional, if the “#” sign is removed,
raw_input() function will allow the user to
terminate an unsuccessful expression evaluation.
Line-15
This doesn’t do anything to the code; it is left
blank to make the code easier to read by us or
other programmers.
Basically these line of codes made-up the console
version of the Expression Evaluator app! And you ca n
enhance it further by allowing more Object Oriented
Programming concepts within it.
#raw_input("Press Enter to Exit")
Nothing is here
Our next task is to convert this
code into a more user friendl y GUI
app for windows, where the user
uses elements such as button, text
input box to manipulate the app.

32 | P a g e
eval() Function Warning! Warning!! Warning!!!
This tutorial has not had a deep look at the “ eval() ”
function. There are other features and parameters
that can be passed to this function.
Just a word of warning the “ eval() ” function can be
dangerous if you do not know what you are doing. So
in the meantime just use it for simple examples suc h
as the ones shown here.
33 | P a g e
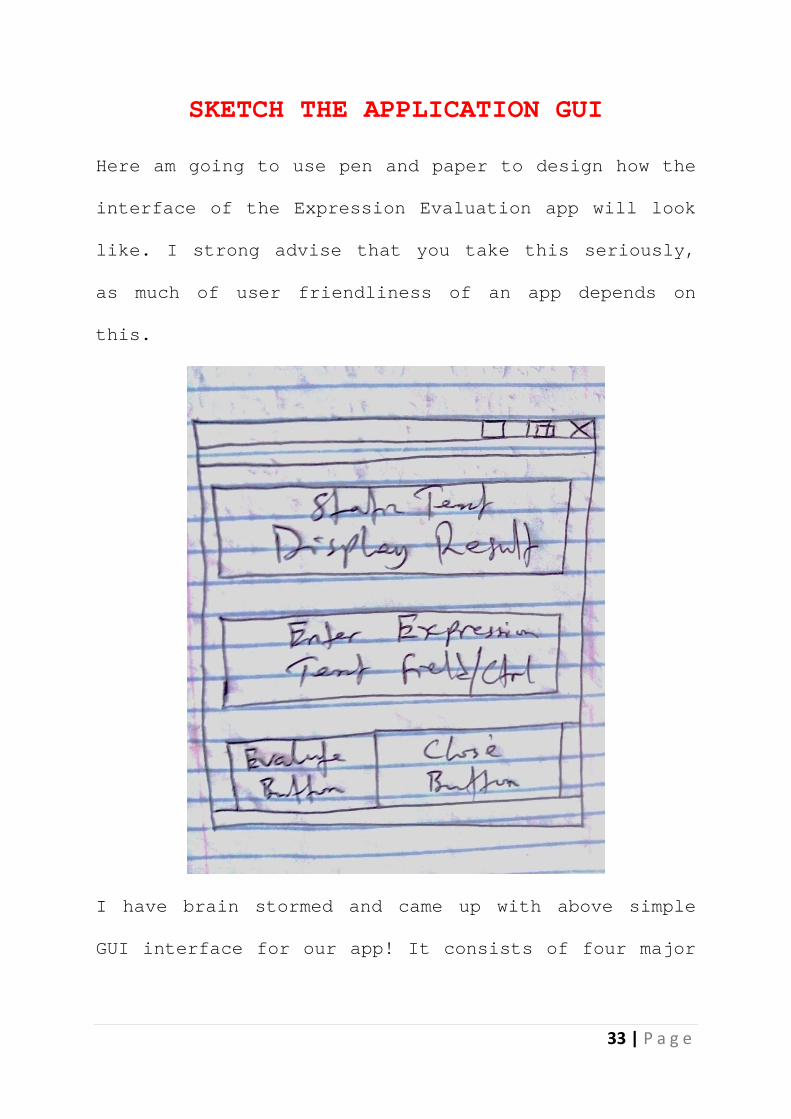
SKETCH THE APPLICATION GUI
Here am going to use pen and paper to design how th e
interface of the Expression Evaluation app will loo k
like. I strong advise that you take this seriously,
as much of user friendliness of an app depends on
this.
I have brain stormed and came up with above simple
GUI interface for our app! It consists of four majo r

34 | P a g e
elements (widgets/control) on a window frame as
follow;
From the top I placed a “ Static Text Label ” widget to
display result of an expression. Then just below it I
placed a “ Text Input Box ” widget to collect
expression from the user. At the bottom, I placed t wo
“ Buttons ” – the left-button will evaluate the given
expression while the right-button will close the ap p
window.
These widgets/elements have technical name associat ed
with them in wxPython. For instance;-
Static Text Label = wxStaticText
Text Input Box = wxTextCtrl
Button = wxButton
Image Button = wx.BitmapButton
Image = wx.StaticBitmap
Combo Box = wx.ComboBox
Check Box = wx.CheckBox
Radio Button = wx.RadioButton
And so many widgets like so, take note of UPPER cas e
letters within the names, “wxbutton” is NOT the sam e
as “wxButton”.

35 | P a g e
CREATING GRAPHICAL USER INTERFACE-GUI
Since we know how the app interface will be and we
know the logics involved from the console version.
Then let the fun begging by creating a Professional
Looking Desktop GUI Application using wxPython GUI
library.
First step I will create a simple example of wxpyth on
app and show you the minimum code required a wxpyth on
program.
Create a python file in the project folder and name
it “ frame.py ” then enter the following code into it.

36 | P a g e
Above is the minimum code require for a window fram e
to be created using wxPython, I will explain each
line in a minute.
wxPython API consist of a set of functions and
widgets. Widgets are essential building blocks of a
GUI application. Under windows, widgets are called
controls.
In wxPython, we have lots of widgets. These can be
divided into some logical groups as follow;-
� Base widgets � Top level widgets � Containers � Dynamic widgets

37 | P a g e
� Static widgets � Other widgets
EXPLAINING THE CODE
In every wxPython application, we must import wx
library
We created an application object by initiating clas s
wx.App
We create the frame widgets and use the “ Show() ”
method to show the window frame. The frame widgets
took in some parameter namely; parent (None), ID (-
1), then the frame’s title (‘My first Window App’).
All the parameters are separated by comma as seen
above.

38 | P a g e
On the last line, we call the MainLoop() on our app
object. The MainLoop is an endless cycle that catch es
up all events coming up to your application. It is an
integral part of any windows GUI application.
If you run the file “ frame.py ” you should see a
window/frame appear on your screen as shown
below;
Although the code is very simple, you can hardcode a
lot more widgets such as button, text boxes, combo
boxes, etc onto the frame. But don’t worry about th at

39 | P a g e
now as am going to introduce you a powerful wxPytho n
code builder called wxFormBuilder.
With wxFormBuilder, you can easily create a more
complex frame than the one above on the fly. All yo u
do is to use available widgets in it to get going, so
you need not to worry about the GUI interface much
instead you focus more on the program’s logics and
functionality.
Let’s get started with wxFormBuilder by creating th e
GUI interface for our Expression Evaluator App!
Now create a subfolder in the main project folder ( )
and call it “GUI”, that is where we will save all
files associated with wxFormBuilder.
Launch wxFormBuilder and save it as “ Eval_Project ” in
the “GUI” folder.

40 | P a g e
On the right hand side, you will see “ Object
Properties ”, under the “ Properties ” tab set the
Project name to “EvalProject”, set the file name to
“gui” (this is the name for the generated python
file) and set “code generation” to python.

41 | P a g e
Note that we only change/set three elements on our
project as seen above in red arrows, these elements
are;
Name = which is the project name, “EvalProject”
File = which is the name of the code file that will
be generated, “gui”
Code_generation = which is the programming language
code you want to generate, “Python” in this case.
You may generate for C++, PHP, Lua, or XRC
Under the “ Form” tab in the designer view, create a
frame and set its size to 250 -Width by 300 -
Height.
Note the name of the frame is “MyFrame1”. This name
will be used for our frame object class.

42 | P a g e
Switch to the “Layout” tab and add a “wxBoxSizer”,
leave the orient property on wxVERTICAL.
It is important to note here, that there two method s
of widgets layout management in wxpython namely;
1) Using Coordinates - position of widgets are
defined in terms of x, y coordinates
2) Using Sizers - Sizers are layout managers, they
are used prevalently in complex layout programs
Let’s add the remaining widgets to our frame.

43 | P a g e
Under the “ Common” tab, select “wxStaticText” then
EXPAND and STRETCH it by clicking on the respective
icons on the toolbar (see screen shot below).
On the object property, set the “wxStaticText” as
follow;-
Name to “DisplayResult”
Style to wxALIGN_CENTRE
Label to “DisplayResult”
Font point size to 20

44 | P a g e
Add the next widgets on our sketch, which is a Text
box (“ TextCtrl” as its being called in wxPython).
Then EXPAND and STRETCH it as we did above for
“wxStaticText”.
On the object property, set the “wxTextCtrl” as
follow;-
Name to “EnterExpression”
Style to “wxTE_CENTRE”
Font point size to 20

45 | P a g e
The last two widgets on our sketch are the two
buttons (Evaluate and Close buttons).
Add the first “wxButton” (Evaluate button), then
EXPAND and STRETCH it as we did above for
“wxTextCtrl”
On the object property, set the “wxButton” as
follow;-
Name to “Button1”
Label to “Evaluate”
Font point size to 20
Repeat this process for the second button (Close
button); remember to change the name appropriately.

46 | P a g e
Boom! We are done with our GUI design, now save you
work and generate the python code. Check your proje ct
folder, you should see a file named “ gui.py ” that is
the file containing wxpython code for our program’s
GUI.

47 | P a g e
If you run/launch the GUI file (“ gui.py ”) nothing
will show, this is because wxFormBuilder doesn’t
create the wxPython app MainLoop() method by default
so we need to edit the file manually using our text
editor.
Open “ gui.py ” file in your text editor and type the
minimum required wxpython code at the end of the
file. See the code below;-

48 | P a g e
Note: that “MyFrame1” is the name of our Main Frame
class. The code above has been explained in the
previous section.
If you have followed the tutorial correctly to this
point, running/launching “ gui.py ” file should present
something similar to the screen below;
Wow! That’s our GUI in work...
At the moment, our app is dormant (it doesn’t
evaluate anything). This is because we have not
binded the widgets events to methods/functions.

49 | P a g e
OVERRIDE Warning! Warning!! Warning!!!
Since we have edited the generated code
file “ gui.py ”, if we regenerate the file
from wxFormBuilder it will overwrite the
changes we made.
So anytime you regenerate the “ gui.py ”
file, make sure you re-edit it to place
back the code you hardcoded in.
A perfect solution to this problem is to
create a separate file that will contain
another subclass to handle the execution
of the “gui.py” file. This is good for
complex programs.
For this tutorial, we will maintain just
a file since our app is quite a simple
one. That is our “gui.py” file will
handle both GUI and logic codes.

50 | P a g e
BINDING EVENTS TO METHODS
Events are part of every GUI application. All GUI
applications are event-driven. An application react s
to different event types which are generated during
its life. Events are generated mainly by the user o f
an application.
Working with events is straightforward in wxPython.
There are three steps:
Identify the event name
Create an event handler. This is a method that is
called when an event is generated
Bind an event to an event handler
In wxPython we say bind a method to an event.
Sometimes the word hook is used.
There are different types of events to different
wxWidgets. For our expression Evaluator App, we wil l
use only on event type called “OnButtonClick”. This
event is generated when a user clicks on a button.
Let’s hook our buttons to event handler by followin g
the steps above;-

51 | P a g e
Identifying the event name
From our project (Eval_Project) in wxFormBuilder,
select button1 (that’s Evaluate button) and the go to
“Object Properties” panel then select “Events” tab,
you should see “OnButtonClick” event.
Type in the name of the event handler, I named mine
“ EvaluateFunc ” (it can be any name meaningful).
Do the same for button2 (that’s Close button), name
it “CloseFunc”.
Now regenerate the code file “ gui.py ” and open it in
a text editor. Scrolling down, you should see this

52 | P a g e
screen below;- Note: you have to retype the code that creates
the wxPython app MainLoop(), for your “gui.py” to o pen the frame.
Create an event handler; this is a method that is
called when an event is generated.
The event handler names we defined for our buttons
above, that’s (“ EvaluateFunc ” and “CloseFunc”) are
names for the functions or methods that are called
when an “OnButtonClick” event is generated.
To create the “ EvaluateFunc ” function for the first
button, override the event handler functions, by
replacing the “ event.Skip() ” methods with the code
that does whatever you want the buttons to do.

53 | P a g e
We want the first button to evaluate an entered
expression in the “EnterExpression” text box, so we
will write a code for doing just that within the
function.
As for the second button, we want it to close the
frame so we will write a code that too inside the
function.
Hence, the codes within our (“ EvaluateFunc ” and
“CloseFunc”) function should look like the screen
below;-

54 | P a g e
Let’s not forget to retype the code that creates th e
wxPython app MainLoop() for our “gui.py” file to
launch the GUI. So the final code in “gui.py” towar d
the bottom of the file should look like this;-
Now, our Expression Evaluator App should work as
expected if we entered a valid expression and click ed
“Evaluate” button. If an invalid expression is
entered, error report is printed out.

55 | P a g e
Bind an event to an event handler
wxFormBuilder does this step automatically for us, so
we don’t need to worry about it. But had it been we
are typing our GUI code manually, then we will use
the Bind() method of wxPython to accomplish this
step.
Congrats! That is it; our Expression Evaluator Application is
now ready for packaging and distribution. Before we
compile and package our program, let me explain the
code within the two button functions (EvaluateFunc,
and CloseFunc).

56 | P a g e
The first function “EvaluateFunc”, which is the eve nt
handler for the first button (button1), uses the
try...except block to enter expression and evaluate
it using the eval() function.
From the code above, we defined the “EvaluateFunc”
function then within the try..except block a variable
“ exp ” is use to get/store the entered expression
using wxpython GetValue() method. Then another
variable “Result” is used to store the evaluated
expression after converting it to string using str()
method. We then displayed the “Result” variable on
the “ DisplayResult ” static text with help of
SetLabel() method.
At the end of the try..except block, we set the
“ DisplayResult ” static text to an error message if an
invalid expression is entered.

57 | P a g e
For the second function “CloseFunc”, this is the
event handler for the second button (button2). The
code is pretty simple as seen.
We defined the “CloseFunc” function then call the
Close() method used for closing windows’ frame in
wxpython.
Now let’s talk about compiling, packaging and
distributing our Expression Evaluator Application.

58 | P a g e
COMPILING, PACKAGING AND DISTRIBUTING
OUR COMPLETED APP
Am glad you read this far, we are almost there!
For sure, we can zip the “gui.py” file and distribu te
it by emails or other means. But the problem with
this is that only users with Python and wxPython
installed on their PC can run the application (so w e
have a drawback).
The aim of this section is to take our application to
the next level by making it possible for every
computer system to run it. To achieve this, we make
use of two programs we installed earlier (Py2exe an d
Inno Setup Compiler).
First we use the Py2exe python library to create an
executable for our application.

59 | P a g e
Create a blank file name “setup.py” and type this
code below in it.
Run the following code on the
command prompt to create an executable for our app.
This will run and generate to folders named “build”
and “dist” in our project folder. Open the “dist”
folder, the app executable will be seen there and t he
“build” folder is no longer essential.
Python setup.py py2exe

60 | P a g e
Contents of your “dist” folder should look like min e
below;- the executable file is shown with arrow.
Double clicking the executable file should open up
the Expression Evaluator Application, BOOM!

61 | P a g e
Now we can rename the “dist” folder to something we
want (name of our app) and zip it for distribution
with others. Any PC would be able to run our
application with or without Python/wxPython install ed
on the computer.
To more professionalism to our program, we will
compile it into an installer using the Inno Setup
Compiler.
Launch the Inno Setup Compiler and chose “create a
new script file using wizard” and click “Ok”.

62 | P a g e
On the next couple of screen press “Next” and file
the appropriate details asked.

63 | P a g e
On the “Application file” window, click “Browse” th en
navigate to the “dist” folder and select the
executable file (gui.exe).

64 | P a g e
Click on “Add files” button to add all the files
within the “dist” folder
On the next window chose option that suite your
needs. I will accept default options and go to next
“Application documentation” then select your setup
language.
On the “Compiler settings” window, you can select a n
icon for the installer setup file and you can also
set password for the installer.

65 | P a g e
Select “Yes” when you see the screen below to compi le
instantly.

66 | P a g e
Save your script and inno setup compiler does its
thing... This script can be edited using
Delphi/Pascal dialect programming language.
When it finishes, go to the folder you selected for
the setup output to see the installer created by in no
setup compiler placed in a folder named “output”.

67 | P a g e
This setup can now be distributed for installation on
window PCs that doesn’t have python installed.
Our application is now more professional. We can ru n
the installer to install the Expression evaluator
program on a computer system.

68 | P a g e

69 | P a g e
After installing it, check the windows start panel,
or desktop (if you enabled this option) to see your
need app as show above. An icon to the software wil l
also be available in the system’s control panel for
un-installation.
This mark the end to this tutorial, hope you enjoye d
reading it?
This ebook is not meant to be an exhaustive study o n
making desktop GUI application with Python, nor
should it be only reference. There are literally
hundreds of explanations online, so if you didn’t
find this one suitable, certainly a bit of searchin g
will reveal one better suited to you.
However, you can still learn to develop more comple x
applications and more tricks in using wxPython by
getting more video lessons from this link:
www.umaryusuf.com/wxpy
Warm regards!
Author: Umar Yusuf Tel: +2348039508010 URL: www.UmarYusuf.com Email: [email protected]

70 | P a g e
REFERENCES
a) www.python.org
b) www.wxpython.org/docs/api
c) www.wxwidgets.org/docs
d) www.xoomer.virgilio.it/infinity77/wxPython/index.ht ml
e) www.daniweb.com/software-
development/python/threads/128350/starting-wxpython -
gui-code
f) www.zetcode.com/wxpython
g) www.wiki.wxpython.org/AnotherTutorial
h) www.wiki.wxpython.org/FrontPage
i) www.wxformbuilder.com
j) www.py2exe.org
k) www.innosetup.com
l) www.remobjects.com/ps
m) www.Py2Exe.org
n) www.jrsoftware.org
o) www.swaroopch.com