Embed Size (px)
Citation preview

Leapfrog Xeed Manual Page 1
Kop
Platte tekst

Leapfrog Xeed Manual Page 2
FOLLOW US ONLINE!
facebook.com/lpfrg
twitter.com/Leapfrog_3D
instagram.com/leapfrog_3d
Sign up for our newsletter www.lpfrg.com

Leapfrog Xeed Manual Page 3
Dear Customer, Congratulations with the purchase of your very own Leapfrog Xeed 3D printer. In this document we will help you get started with your first print and with all the prints to come after that. Also, we would like to help you get acquainted with the Leapfrog 3D Printers Ecosystem. We will be by your side when you are setting up your printer and help you with any questions you might have during printing. We will also cheer you on when you are making your amazing and value-added prints.
The Ecosystem: tips & tricks, installation videos, and support You are now officially part of The Ecosystem: the place where all Leapfrog 3D printer users gather to help each other and to interact with the Leapfrog 3D Printers support team. Here are a few valuable tips on what you are able to find there.
The
ecosystem
The Ecosystem can be entered through http://xeed.lpfrg.com/. The Ecosystem is constantly growing in content and users. Here are some of the most important things you can find:
- Installation & support videos, as well as the manual for all the printers - The latest software settings for all materials - Solutions for the most common issues - Our forum is where users help each other and where you can post some your amazing prints ;every once in
a while, we highlight a few of the posted prints in our newsletter and on our website, giving credit to the individual who posted the featured photos.
- The Leapfrog 3D Printers support team: if you have any questions you can request help by submitting a ticket online, and we will gladly help you out!
Are you set to install? To get started you need the following items:
- Your Leapfrog XEED - At least one roll of 1.75mm filament - Print stickers - Your software license key. The voucher is either present in the Xeed package or is sent to you via email.
We will keep you up-to-date on our social media platforms about print settings and other Leapfrog 3D Printers news. You are also invited to share your prints on our pages.
The following pages will help you get started. Happy printing!
The Leapfrog Team

Leapfrog Xeed Manual Page 4
TABLE OF CONTENTS
1 Quick printing Guide .......................................................................................................................................... 6
1.1. Unpacking your Xeed and finding the right place for it ................................................................... 6
1.2 Printer parts ...................................................................................................................................... 7
1.3 Prepare your printer ......................................................................................................................... 9
1.3.1. Initial start-up ................................................................................................................. 9
1.3.2 Setup network connection ............................................................................................ 10
1.3.3 Update LilyPrint ............................................................................................................. 11
1.3.4. Leveling the print bed .................................................................................................. 13
1.3.5. Setting the Z-offset ....................................................................................................... 14
1.4 Loading your filament ..................................................................................................................... 15
1.4.1. Temperature control .................................................................................................... 16
1.4.2. Quick Load and quick Unload ....................................................................................... 16
1.5 Uploading your 3D model and initiating your print. ....................................................................... 18
1.5.1 Uploading a model from a USB device .......................................................................... 18
1.5.2. Uploading a model from your computer ..................................................................... 19
2 Preparing for your next print ........................................................................................................................... 20
2.1 Removing your print and replacing your print sticker .................................................................... 20
2.2 Changing filament ........................................................................................................................... 21
2.2.1 Unload your filament .................................................................................................... 21
3 Create your own printable file: using Simplify3D Software ............................................................................. 22
3.1 Installing Simplify3d ........................................................................................................................ 22
3.2 Simplify3d software overview ........................................................................................................ 23
3.3 Importing print profiles (.FFF settings) ........................................................................................... 23
3.4 Simplify3d workflow – the slicing process ...................................................................................... 23
3.4 Printing with dual extrusion and support materials ....................................................................... 25
3.4.1 How to print with dual extrusion .................................................................................. 25
3.4.2 Applying support structures to your stl model(s) ......................................................... 26
3.5 Material guide ................................................................................................................................. 26

Leapfrog Xeed Manual Page 5
4 Frequently Asked Questions ............................................................................................................................ 28
4.1 Troubleshooting Support ................................................................................................................ 28
5 Glossary of 3D printing vocabulary .................................................................................................................. 29
5.1 3D printing vocabulary .................................................................................................................... 29

Leapfrog Xeed Manual Page 6
1 QUICK PRINTING GUIDE
We know you cannot wait to start 3D printing! This section contains the following information: 1.1 Unpacking your Leapfrog XEED and finding the right place for it 1.2 Printer parts 1.3 Prepare your XEED 1.4 Loading filament 1.5 Uploading your 3D model
1.1. UNPACKING YOUR XEED AND FINDING THE RIGHT PLACE FOR IT
Unpack your Xeed carefully, according to the following steps.
Before you start, make sure that you have cleared a spot where you want to place the printer. We advise you to find a place at room temperature, where there is no draft (i.e. it is not recommended to place the Xeed printer next to a window or in the draft of air conditioning) and where the printer cannot get wet. Choose a surface which is sturdy (so the printer cannot move) and supports the weight of the machine. It is useful to have another three sets of hands to help out, because the machine is very heavy.
STEP A: Remove the six screws by using an automatic drill or screwdriver (see picture). STEP B: Remove the wooden box by lifting it up. Remember that it’s important to save the packaging material. STEP C: Carefully take of the plastic and foam protection. STEP D: Lift the printer to the chosen spot. Remember that the printer is very heavy. STEP E: Install the door handle with the included screws.

Leapfrog Xeed Manual Page 7
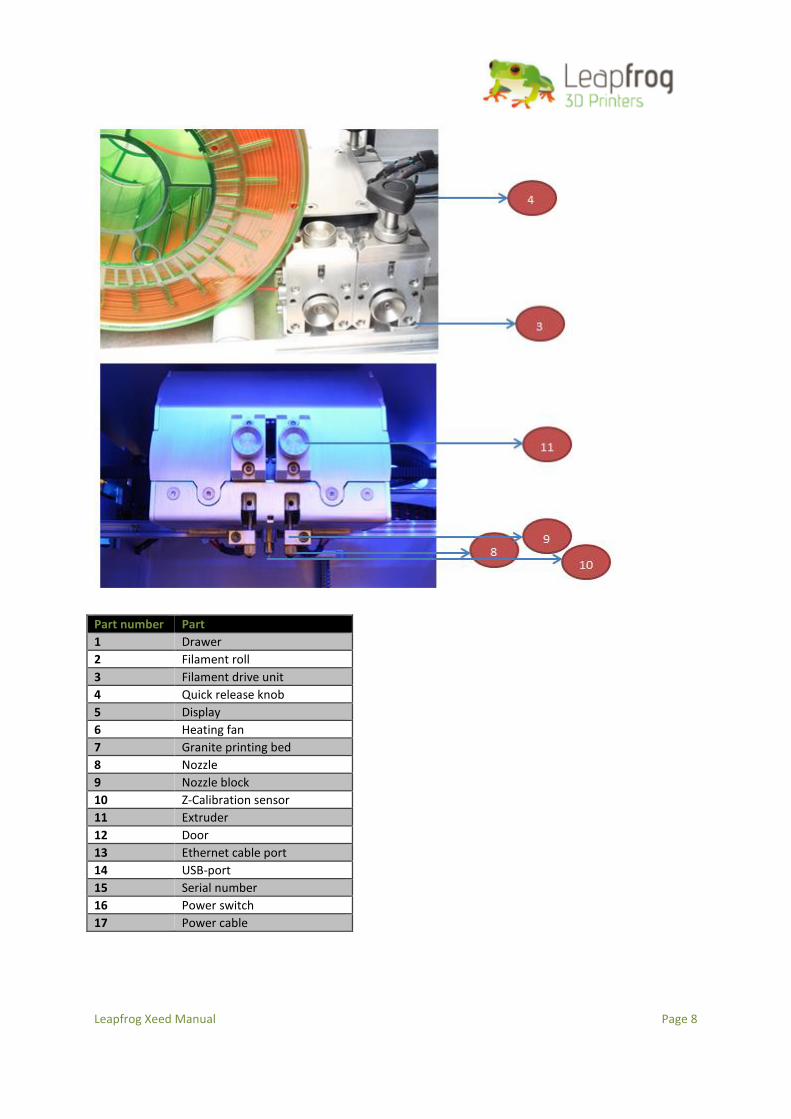
1.2 PRINTER PARTS
Leapfrog Xeed Manual Page 8
HS
Part number Part
1 Drawer
2 Filament roll
3 Filament drive unit
4 Quick release knob
5 Display
6 Heating fan
7 Granite printing bed
8 Nozzle
9 Nozzle block
10 Z-Calibration sensor
11 Extruder
12 Door
13 Ethernet cable port
14 USB-port
15 Serial number
16 Power switch
17 Power cable

Leapfrog Xeed Manual Page 9
1.3 PREPARE YOUR PRINTER
Before you can use the Xeed, we have to go through the initial setup. This will make sure the Xeed is connected to the network and is up-to-date. Being connected with the network gives you access to the Xeed through a LAN network, which enables you to remotely control the printer, upload g-code files, and more.
1.3.1. INITIAL START-UP
To get started, you will need the following: -USB keyboard -USB mouse -Ethernet cable to Xeed with Internet access Step 1: Plug in your keyboard and mouse into the two USB ports at the backside of the printer. Step 2: Plug the Ethernet cable into Ethernet cable port the back of the Xeed which is above the USB Ports. Step 3: Plug in the power cable into the power port which is also located at the back of the backside of the printer. Step 4: Turn on the Xeed by switching the power button to the ‘ON’ position. The Xeed will begin to start-up, this process normally takes around 60 seconds. The screen will show some text scrolling during this start-up period. When the Xeed has completed this process, the home page of LilyPrint, the software running on the Xeed, is shown on the 7" touch screen.
Leapfrog Xeed Manual Page 10
1.3.2 SETUP NETWORK CONNECTION
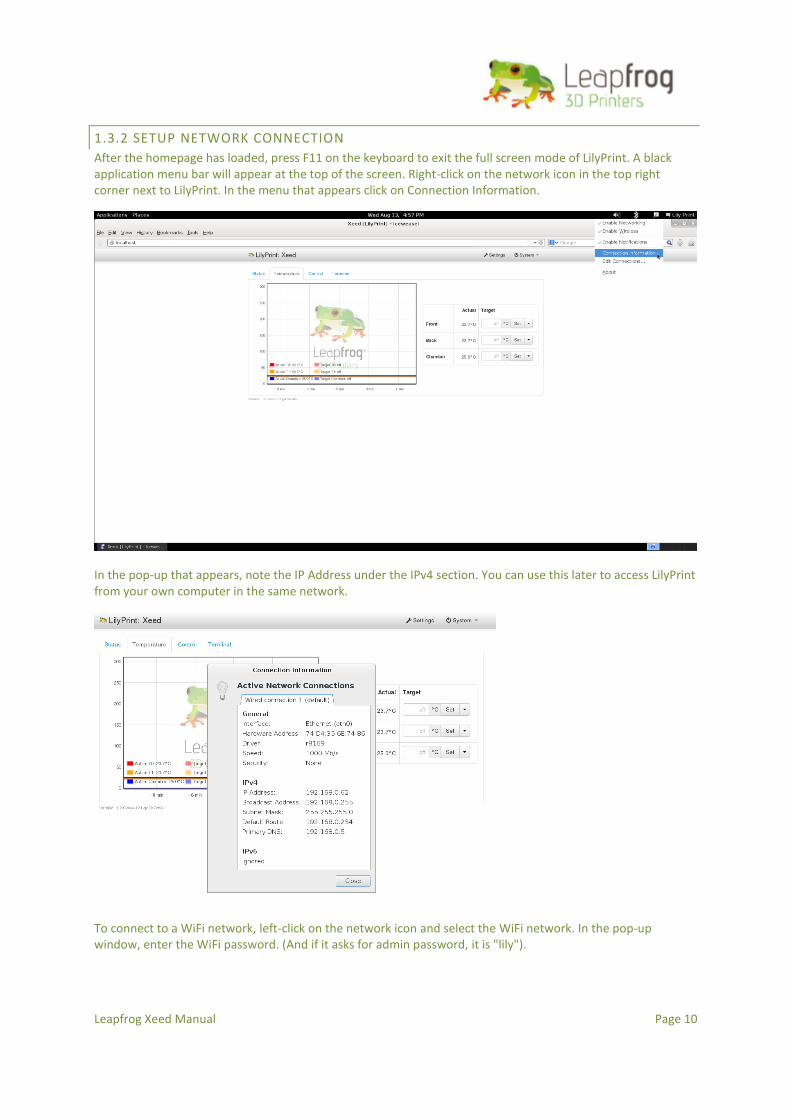
After the homepage has loaded, press F11 on the keyboard to exit the full screen mode of LilyPrint. A black application menu bar will appear at the top of the screen. Right-click on the network icon in the top right corner next to LilyPrint. In the menu that appears click on Connection Information.
In the pop-up that appears, note the IP Address under the IPv4 section. You can use this later to access LilyPrint from your own computer in the same network.
To connect to a WiFi network, left-click on the network icon and select the WiFi network. In the pop-up window, enter the WiFi password. (And if it asks for admin password, it is "lily").
Leapfrog Xeed Manual Page 11
1.3.3 UPDATE LILYPRINT
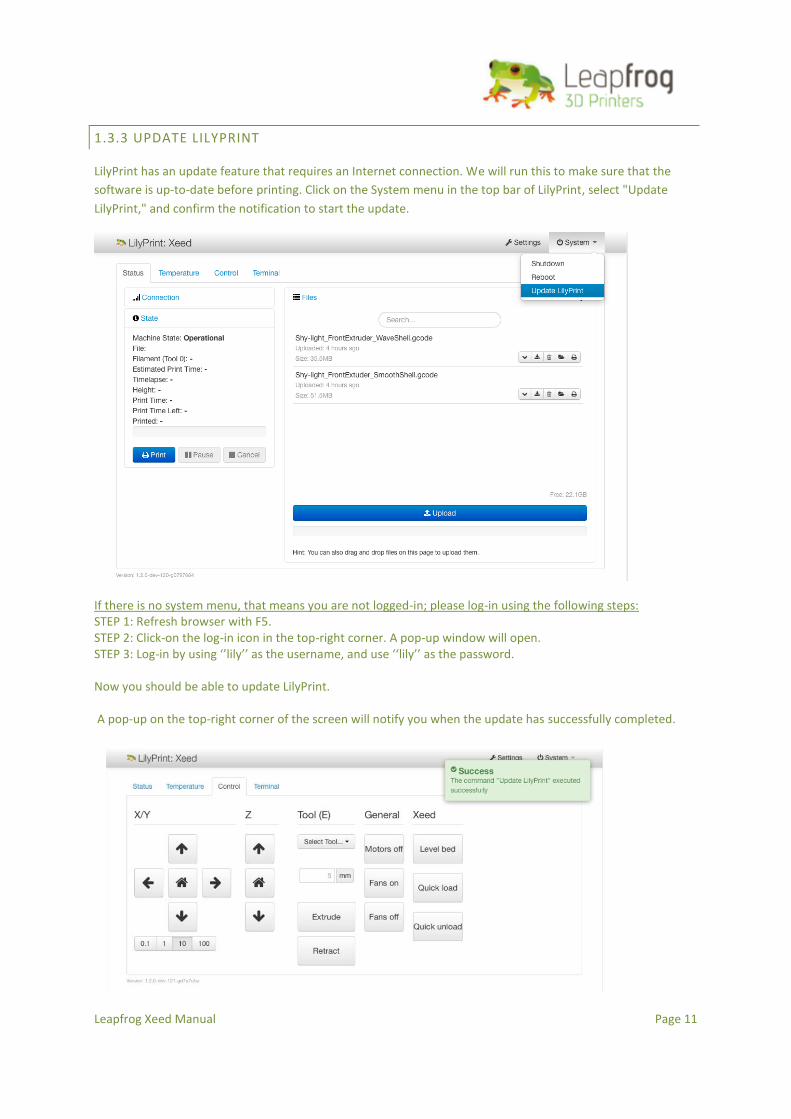
LilyPrint has an update feature that requires an Internet connection. We will run this to make sure that the
software is up-to-date before printing. Click on the System menu in the top bar of LilyPrint, select "Update
LilyPrint," and confirm the notification to start the update.
If there is no system menu, that means you are not logged-in; please log-in using the following steps: STEP 1: Refresh browser with F5. STEP 2: Click-on the log-in icon in the top-right corner. A pop-up window will open. STEP 3: Log-in by using ‘’lily’’ as the username, and use ‘‘lily’’ as the password. Now you should be able to update LilyPrint. A pop-up on the top-right corner of the screen will notify you when the update has successfully completed.

Leapfrog Xeed Manual Page 12
When the update is complete, reboot the system by clicking on the System Menu and selecting Reboot.
Warning: Never reboot by turning the power switch OFF. This can cause serious damage to the
machine and/or the software.
Note: Keeping your printer up-to-date is strongly recommend, because new features are added
regularly.
Your Xeed now has been successfully updated to the latest LilyPrint version.
Leapfrog Xeed Manual Page 13
1.3.4. LEVELING THE PRINT BED
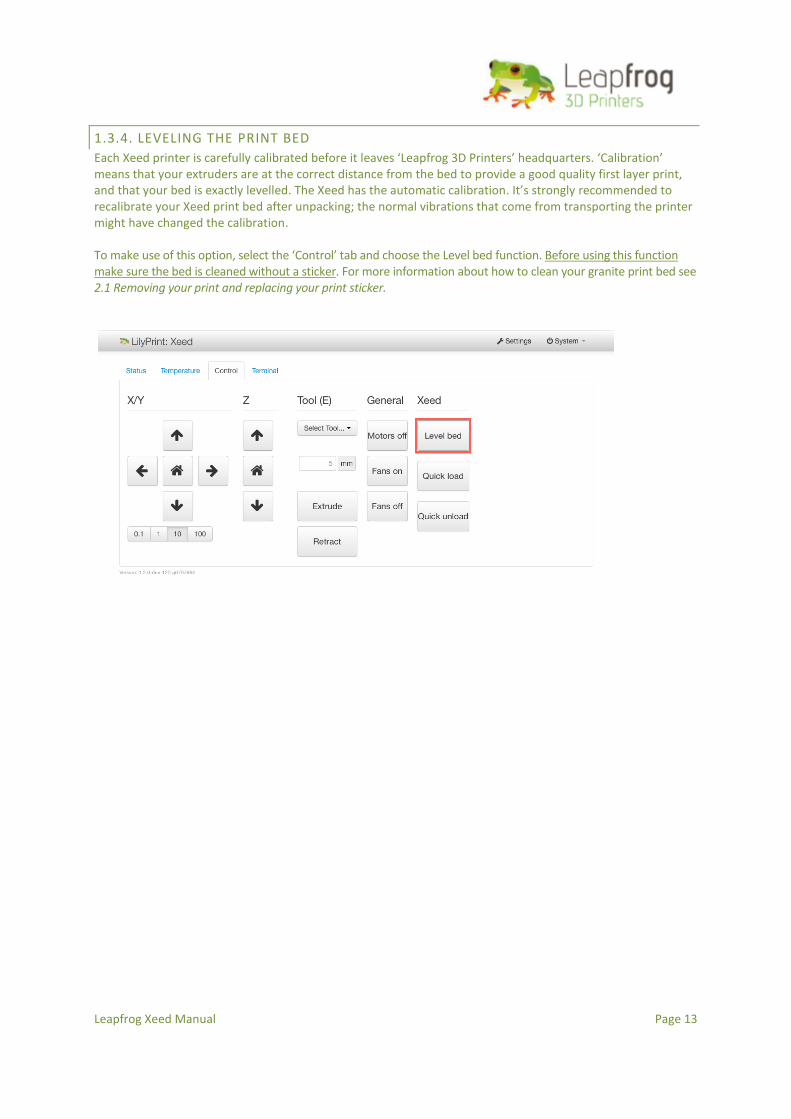
Each Xeed printer is carefully calibrated before it leaves ‘Leapfrog 3D Printers’ headquarters. ‘Calibration’ means that your extruders are at the correct distance from the bed to provide a good quality first layer print, and that your bed is exactly levelled. The Xeed has the automatic calibration. It’s strongly recommended to recalibrate your Xeed print bed after unpacking; the normal vibrations that come from transporting the printer might have changed the calibration. To make use of this option, select the ‘Control’ tab and choose the Level bed function. Before using this function make sure the bed is cleaned without a sticker. For more information about how to clean your granite print bed see 2.1 Removing your print and replacing your print sticker.

Leapfrog Xeed Manual Page 14
1.3.5. SETTING THE Z-OFFSET
The Xeed uses a variable called z-Offset to calibrate, the distance between the nozzle and the print bed. This setting is very important, because the print bed will not start at the correct print position to provide the best quality print.
Warning: Incorrect z-offset setting can cause machine damage.
The (Set) zOffset button can be found under the control tab in LilyPrint. The default setting is 0.00mm, but the actual setting can be slight deviation relative to the default settings depending on different print bed and nozzle heights; if you adjust your extruder nozzle height, for example, you will have to calibrate the zOffset again. If you notice at the start of a print that the nozzle is not close enough to the bed, you have to increase the z-offset. Once calibrated, there is often no need to adjust the zOffset any more unless a change in the printer hardware has been made (i.e. the print bed is replaced or the nozzles/extruders have been replaced) Be aware that a print sticker or other adhesives can change the distance between the nozzles and the print bed. To calibrate the zOffset, follow the instructions carefully. Step1: place a 0.05mm paper between the nozzle and the bed. Step2: Select the Set zOffset button. Step3: In the pop-up window select the Start Calibration button. The bed will home and move close to the nozzle. Step 4: Use the up arrow until the paper is slightly pinched between the nozzle and the print bed. There needs to be a moderate amount of friction if try to pull the paper from between the nozzle and the print bed. You can use the down arrow if you think you are too close. Step 5: Press 'Save' to save the new z-offset.
Warning: If you recently have adjusted the height of your extruders or have replaced your print bed, homing the printer can damage the machine. You need to loosen the grub screws holding your extruders in the print head before running Set ZOffset. When you have the correct zOffset, remember to tighten the screws again before printing.

Leapfrog Xeed Manual Page 15
1.4 LOADING YOUR FILAMENT
The first step to loading your filament is to unpack the roll, and cut the tip of the filament into a sharp point using a pair of wire cutters or scissors. Open the filament drawer located on the left side of the printer by pushing in on the drawer and letting it pop back out. If you’re loading the filament into the right extruder, place the filament roll in the filament drive unit closest to the front of the printer; the left extruder gets loaded by placing the filament roll in the filament drive unite near the back of the printer (in the picture below the right extruder is loaded). Make sure the spool is placed with the filament unrolling from the bottom of the roll.
1. Cut the filament at an angle of roughly 45 degrees. 2. Push the filament through the inlet gland and rotate the encoder wheel towards the machine until the
filament blocks onto the motor wheel. 3. Continue to spin the right encoder wheel on the drive unit until it passes the outlet gland. 4. Apply the “quick load” function explained in subsection 1.4.2
Leapfrog Xeed Manual Page 16
1.4.1. TEMPERATURE CONTROL
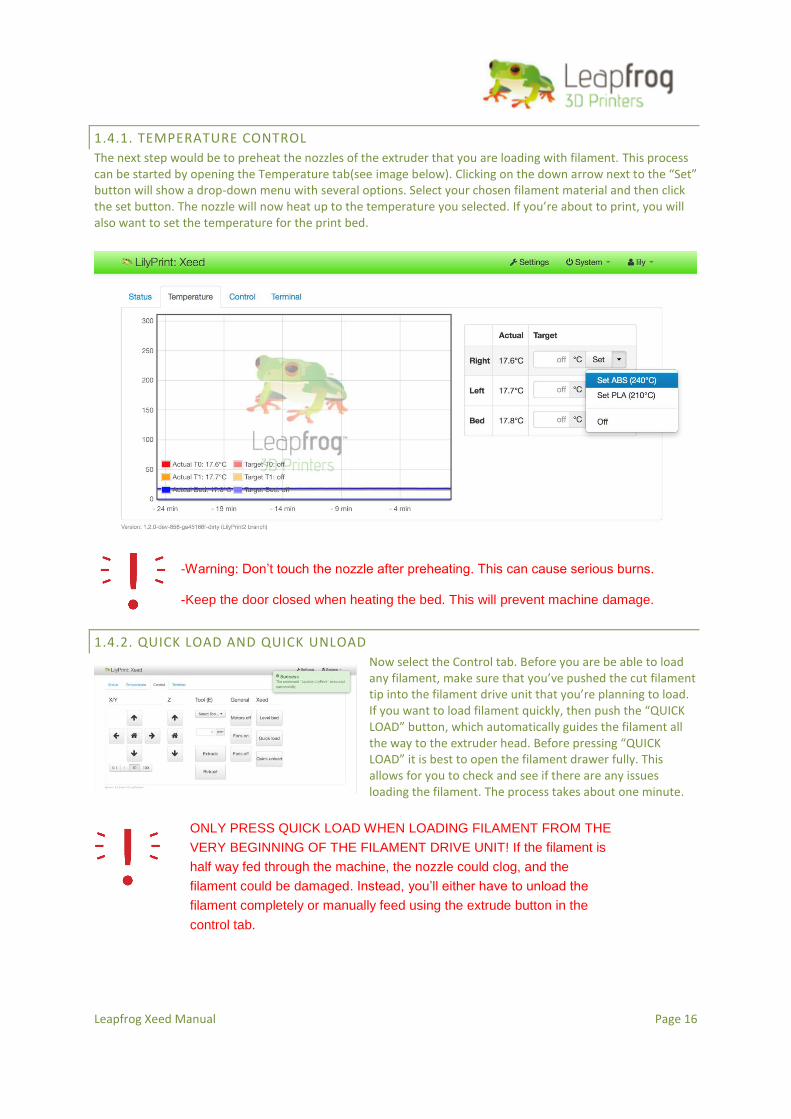
The next step would be to preheat the nozzles of the extruder that you are loading with filament. This process can be started by opening the Temperature tab(see image below). Clicking on the down arrow next to the “Set” button will show a drop-down menu with several options. Select your chosen filament material and then click the set button. The nozzle will now heat up to the temperature you selected. If you’re about to print, you will also want to set the temperature for the print bed.
-Warning: Don’t touch the nozzle after preheating. This can cause serious burns.
-Keep the door closed when heating the bed. This will prevent machine damage.
1.4.2. QUICK LOAD AND QUICK UNLOAD
Now select the Control tab. Before you are be able to load any filament, make sure that you’ve pushed the cut filament tip into the filament drive unit that you’re planning to load. If you want to load filament quickly, then push the “QUICK LOAD” button, which automatically guides the filament all the way to the extruder head. Before pressing “QUICK LOAD” it is best to open the filament drawer fully. This allows for you to check and see if there are any issues loading the filament. The process takes about one minute.
ONLY PRESS QUICK LOAD WHEN LOADING FILAMENT FROM THE
VERY BEGINNING OF THE FILAMENT DRIVE UNIT! If the filament is
half way fed through the machine, the nozzle could clog, and the
filament could be damaged. Instead, you’ll either have to unload the
filament completely or manually feed using the extrude button in the
control tab.

Leapfrog Xeed Manual Page 17
The reverse process happens during “QUICK UNLOAD”. Again, this process is best done with the filament drawer open. It will first slowly retract filament from the nozzle and will then quickly retract the remaining distance. It is useful to help the filament roll in rotating to ensure the filament returns to the roll properly. If the filament did not retract fully, pull the knob on the filament driver unit and manually retract the last part of filament. It is possible the filament catches in the driver unit because the molten filament created a blob. In this case, please refer to the appendix (removing catching filament from the filament drive unit).
Please be aware that these functions only work with the nozzles heated
up to avoid clogging the nozzles.
Leapfrog Xeed Manual Page 18
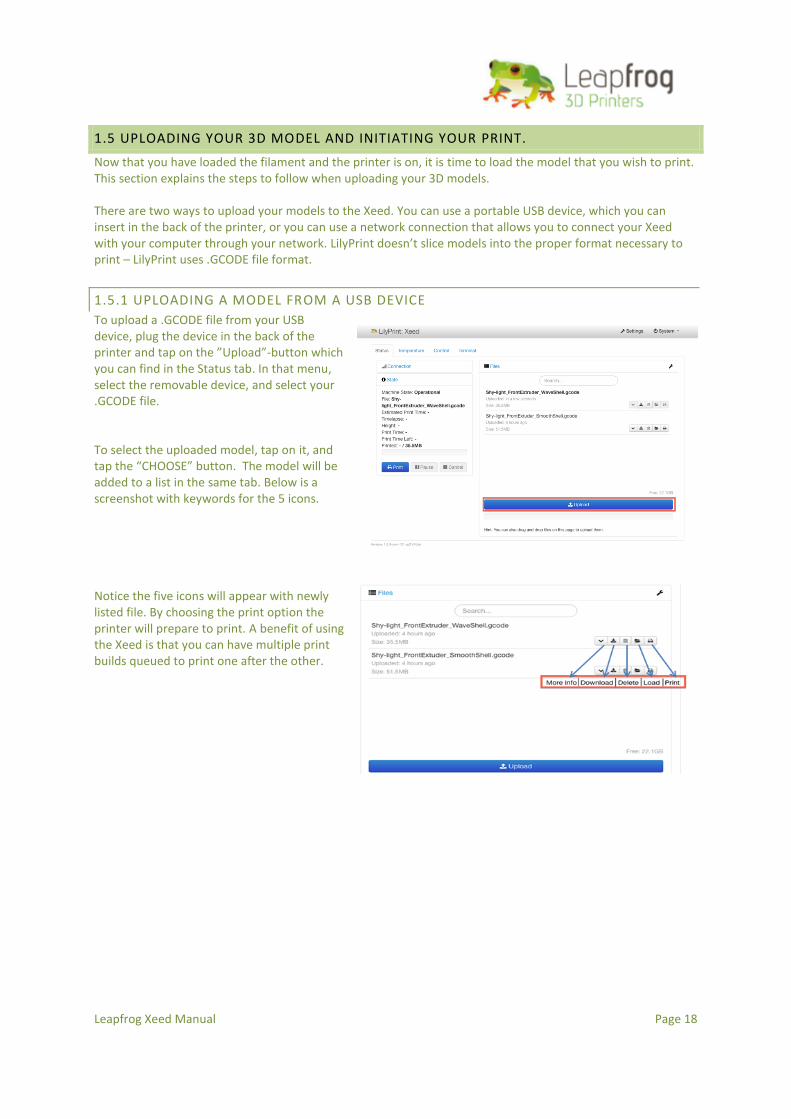
1.5 UPLOADING YOUR 3D MODEL AND INITIATING YOUR PRINT.
Now that you have loaded the filament and the printer is on, it is time to load the model that you wish to print. This section explains the steps to follow when uploading your 3D models. There are two ways to upload your models to the Xeed. You can use a portable USB device, which you can insert in the back of the printer, or you can use a network connection that allows you to connect your Xeed with your computer through your network. LilyPrint doesn’t slice models into the proper format necessary to print – LilyPrint uses .GCODE file format.
1.5.1 UPLOADING A MODEL FROM A USB DEVICE
To upload a .GCODE file from your USB device, plug the device in the back of the printer and tap on the ”Upload”-button which you can find in the Status tab. In that menu, select the removable device, and select your .GCODE file. To select the uploaded model, tap on it, and tap the “CHOOSE” button. The model will be added to a list in the same tab. Below is a screenshot with keywords for the 5 icons. Notice the five icons will appear with newly listed file. By choosing the print option the printer will prepare to print. A benefit of using the Xeed is that you can have multiple print builds queued to print one after the other.
Leapfrog Xeed Manual Page 19
Preparing for your next print
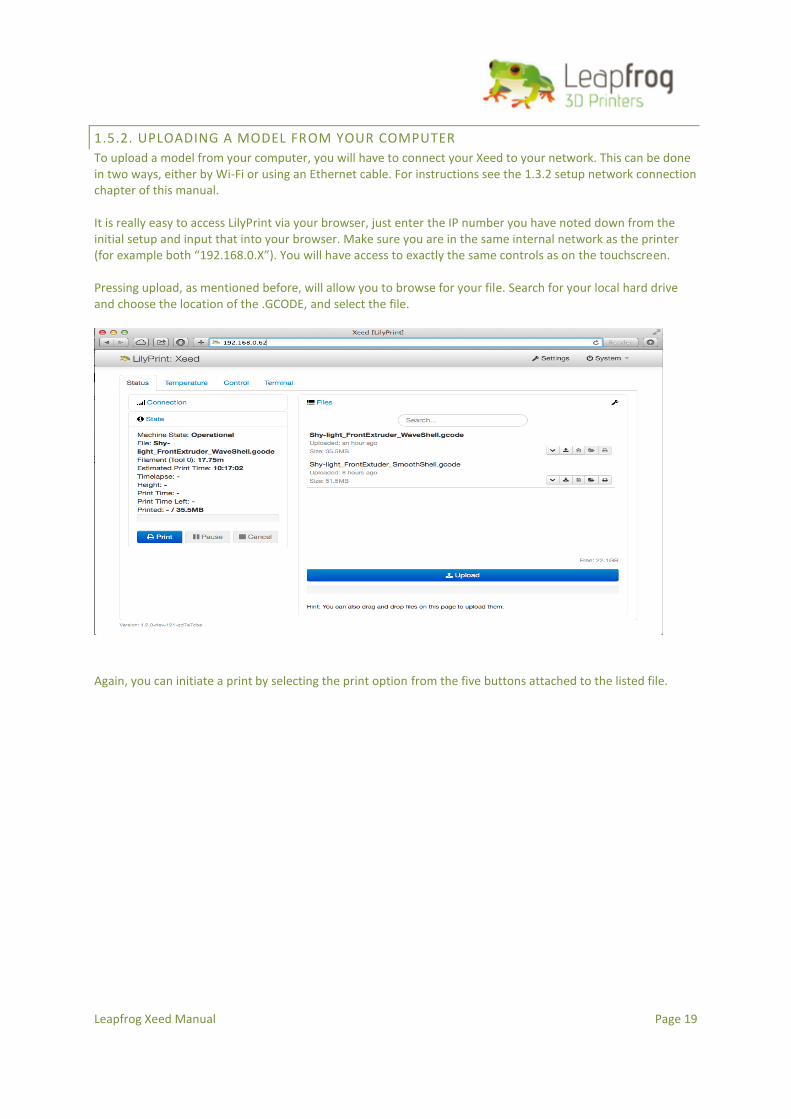
1.5.2. UPLOADING A MODEL FROM YOUR COMPUTER
To upload a model from your computer, you will have to connect your Xeed to your network. This can be done in two ways, either by Wi-Fi or using an Ethernet cable. For instructions see the 1.3.2 setup network connection chapter of this manual. It is really easy to access LilyPrint via your browser, just enter the IP number you have noted down from the initial setup and input that into your browser. Make sure you are in the same internal network as the printer (for example both “192.168.0.X”). You will have access to exactly the same controls as on the touchscreen. Pressing upload, as mentioned before, will allow you to browse for your file. Search for your local hard drive and choose the location of the .GCODE, and select the file.
Again, you can initiate a print by selecting the print option from the five buttons attached to the listed file.
Leapfrog Xeed Manual Page 20
2 PREPARING FOR YOUR NEXT PRINT
In this chapter, we will take you through the process of preparing your printer for your next print. We will take you through the steps of replacing your print sticker and exchanging your filament.
2.1 REMOVING YOUR PRINT AND REPLACING YOUR PRINT STICKER
The print bed of the Xeed is made out of a granite bed to ensure that it will stay as flat as possible. To make sure that your print sticks to the bed, you need to apply a print sticker. You can re-use your sticker for printing multiple times as long as it is not too damaged. Even when it is damaged, you could opt to place your print on another section of the bed where the sticker is not damaged yet. In order to learn how to do this, we refer you to Chapter 3.4 where we cover the printer software.
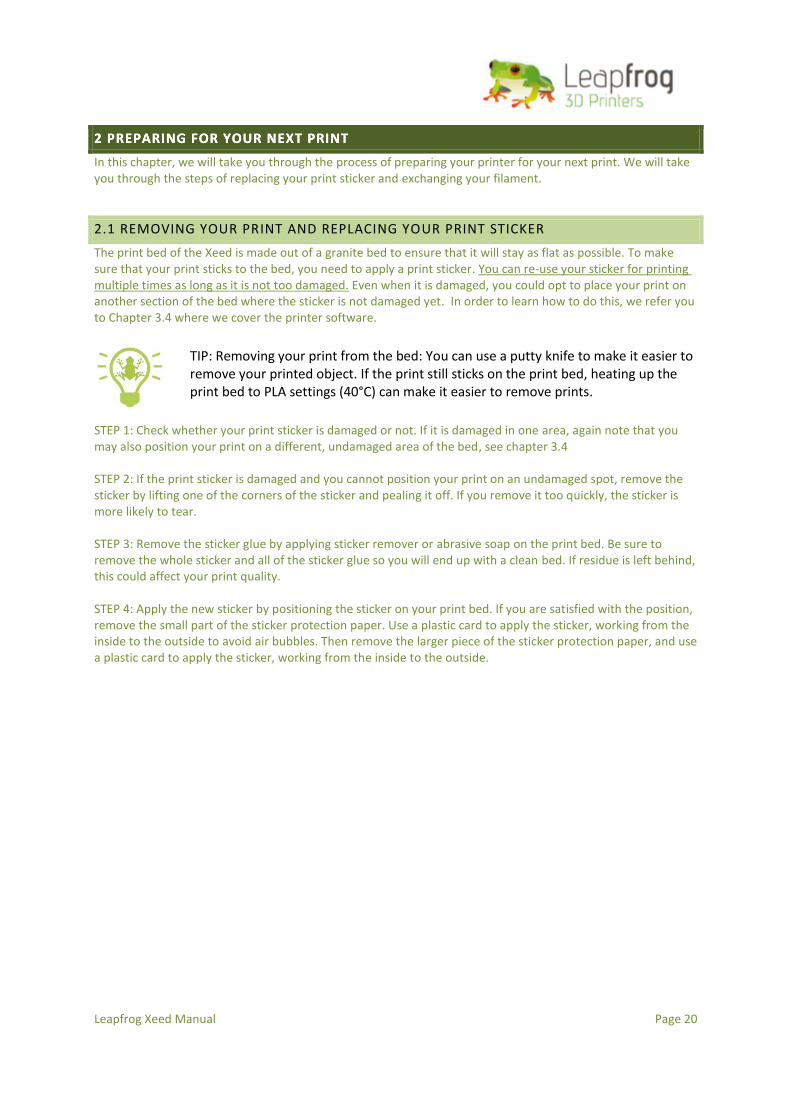
TIP: Removing your print from the bed: You can use a putty knife to make it easier to remove your printed object. If the print still sticks on the print bed, heating up the print bed to PLA settings (40°C) can make it easier to remove prints.
STEP 1: Check whether your print sticker is damaged or not. If it is damaged in one area, again note that you may also position your print on a different, undamaged area of the bed, see chapter 3.4 STEP 2: If the print sticker is damaged and you cannot position your print on an undamaged spot, remove the sticker by lifting one of the corners of the sticker and pealing it off. If you remove it too quickly, the sticker is more likely to tear. STEP 3: Remove the sticker glue by applying sticker remover or abrasive soap on the print bed. Be sure to remove the whole sticker and all of the sticker glue so you will end up with a clean bed. If residue is left behind, this could affect your print quality. STEP 4: Apply the new sticker by positioning the sticker on your print bed. If you are satisfied with the position, remove the small part of the sticker protection paper. Use a plastic card to apply the sticker, working from the inside to the outside to avoid air bubbles. Then remove the larger piece of the sticker protection paper, and use a plastic card to apply the sticker, working from the inside to the outside.
Leapfrog Xeed Manual Page 21
2.2 CHANGING FILAMENT
2.2.1 UNLOAD YOUR FILAMENT
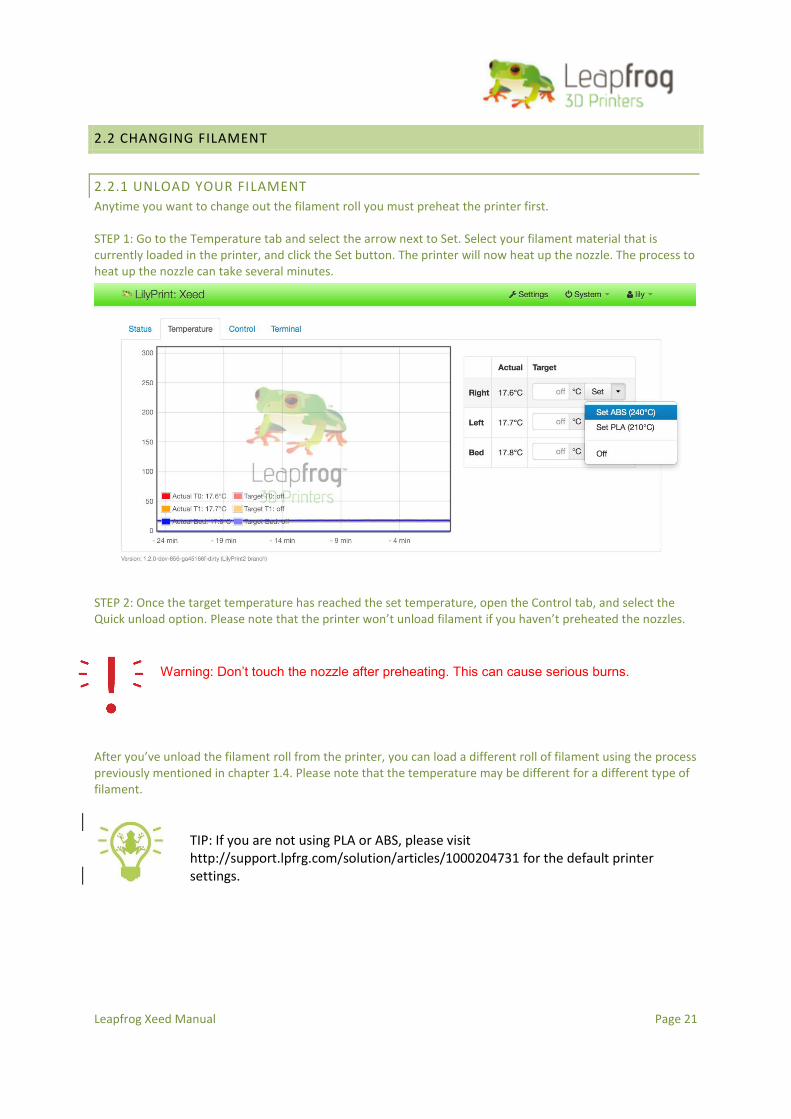
Anytime you want to change out the filament roll you must preheat the printer first. STEP 1: Go to the Temperature tab and select the arrow next to Set. Select your filament material that is currently loaded in the printer, and click the Set button. The printer will now heat up the nozzle. The process to heat up the nozzle can take several minutes.
STEP 2: Once the target temperature has reached the set temperature, open the Control tab, and select the Quick unload option. Please note that the printer won’t unload filament if you haven’t preheated the nozzles.
Warning: Don’t touch the nozzle after preheating. This can cause serious burns.
After you’ve unload the filament roll from the printer, you can load a different roll of filament using the process previously mentioned in chapter 1.4. Please note that the temperature may be different for a different type of filament.
TIP: If you are not using PLA or ABS, please visit http://support.lpfrg.com/solution/articles/1000204731 for the default printer settings.

Leapfrog Xeed Manual Page 22
3 CREATE YOUR OWN PRINTABLE FILE: USING SIMPLIFY3D SOFTWARE
In this chapter, we will teach you how to ‘slice’ a model (that is, taking a .STL file and turning it to .GCODE file) by using Simplify3D. In G-code, all movements of your printer and characteristics of the different layers are encoded. We offer print settings for Simplify3D, but every print is unique and will need these settings adjusted for optimal print quality. The more you practice with your print settings, the faster and easier it will be to arrive at the optimal settings. Among the many options that the software offers, there are options to change the temperature, the layer height, the infill (how massive or how hollow you want your object to be), as well as options for support structures (for structures with an overhang of more than 45 degrees). In Section 3.4.2 we will go over the most important options. If you want more information on advanced printing options, or support for your software, please revert to the website of Simplify3D: www.simplify3d.com/support/. We will go over the following: 3.1 Installing the software 3.2 Software overview 3.3 Importing print profiles (.FFF Settings) 3.4 Software workflow 3.5 Printing with dual extrusion and support structures 3.6 Material guide 3.7 Overview advanced print settings Below is a schematic workflow on how you get from an idea to a print. The first three steps have to be accomplished with other resources, as Simplify3D and LilyPrint are not model design programs. In this chapter, we will take you through the last four steps: from STL to print.
3.1 INSTALLING SIMPLIFY3D
STEP 1: Download and install the Simplify3D software for your Mac or PC. The download key and instructions are either on a card in the box with the printer, or it is sent to your email address straight from Simplify3D. At the time of writing this manual, Simplify3D version 3.0.1 is the latest version; different versions may have a different lay out. Simplify3D now uses a username and password to run the application and update. You will need to be connected to the internet in order to use Simplify3D.
TIP: The software gets regularly updated for new functions which are
accessible for free for existing customers.

Leapfrog Xeed Manual Page 23
3.2 SIMPLIFY3D SOFTWARE OVERVIEW
Here we will familiarize you with the Simplify3D software. When you open the Simplify3D software, you see the following screen. There are five sections in this screen that are important to get familiar with.
1. Build table: the build size you see in your screen corresponds to the build volume of your Xeed. Here, you can scale and position your model.
2. Menu bar: here you will find options that will pertain mainly to functions of the software. You can also find the machine control panel under the ‘tools’ menu.
3. Models: here you can import your .STL file, and auto center and arrange it. Multiple .STL files can be imported. If you double click on your model, you can scale and position it for optimal print.
4. Processes: here the different slicing processes (commonly called print settings) are listed. ‘Slicing’ is the process during which your .STL file is transformed into a .GCODE file.
5. Toolbar: here you can change the way your model is displayed on the build table, and can find shortcut buttons that direct you to the machine control panel and to and to an option that let you manually define support material.
3.3 IMPORTING PRINT PROFILES (.FFF SETTINGS)
Before you are able to make your first print, it is important to import the latest Print Profiles that Leapfrog 3D Printers offers for the Xeed Printer. Print Profiles in Simplify3D are in the file format of .FFF. A print profile quickly loads all the necessary settings for a specific type of filament (which extruder the filament is loaded, which temperature the extruder is set for, the print speed, cooling fan speed, etc.). To download the latest recommended Xeed print profiles, please visit our website at http://support.lpfrg.com/support/solutions/articles/1000187305
3.4 SIMPLIFY3D WORKFLOW – THE SLICING PROCESS
Now we are ready to ‘slice’ a model up to the point where you will be able to print. Here are some steps to guide you through this process. Step 1: Make sure the 3D model that you are using is saved as file .STL format. Import your .STL file by clicking on “Import” button in the models section.
Step 2: Double click on the model name to scale and position your model according to your requirements.
For successful printing, be sure to position the print on a point where the sticker is not damaged. To move a print, change the values in the right pop up window, under the section ‘Change Position’. Your model might also need to be rotated; this can also be done using the right pop up window.
Leapfrog Xeed Manual Page 24
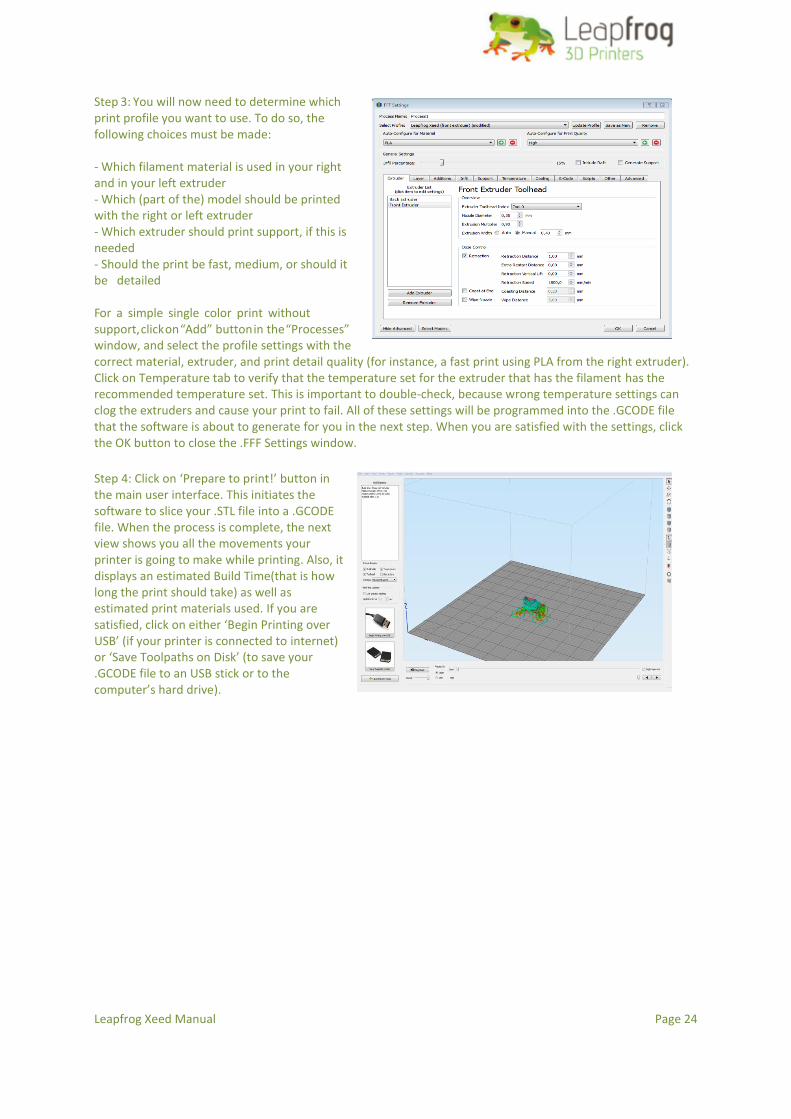
Step 3: You will now need to determine which print profile you want to use. To do so, the following choices must be made: - Which filament material is used in your right and in your left extruder - Which (part of the) model should be printed with the right or left extruder - Which extruder should print support, if this is needed - Should the print be fast, medium, or should it be detailed For a simple single color print without support, click on “Add” button in the “Processes” window, and select the profile settings with the correct material, extruder, and print detail quality (for instance, a fast print using PLA from the right extruder). Click on Temperature tab to verify that the temperature set for the extruder that has the filament has the recommended temperature set. This is important to double-check, because wrong temperature settings can clog the extruders and cause your print to fail. All of these settings will be programmed into the .GCODE file that the software is about to generate for you in the next step. When you are satisfied with the settings, click the OK button to close the .FFF Settings window.
Step 4: Click on ‘Prepare to print!’ button in the main user interface. This initiates the software to slice your .STL file into a .GCODE file. When the process is complete, the next view shows you all the movements your printer is going to make while printing. Also, it displays an estimated Build Time(that is how long the print should take) as well as estimated print materials used. If you are satisfied, click on either ‘Begin Printing over USB’ (if your printer is connected to internet) or ‘Save Toolpaths on Disk’ (to save your .GCODE file to an USB stick or to the computer’s hard drive).
STEP 4: Select standard settings for your print
P 5: Prepare to print and select printing method.
1
Leapfrog Xeed Manual Page 25
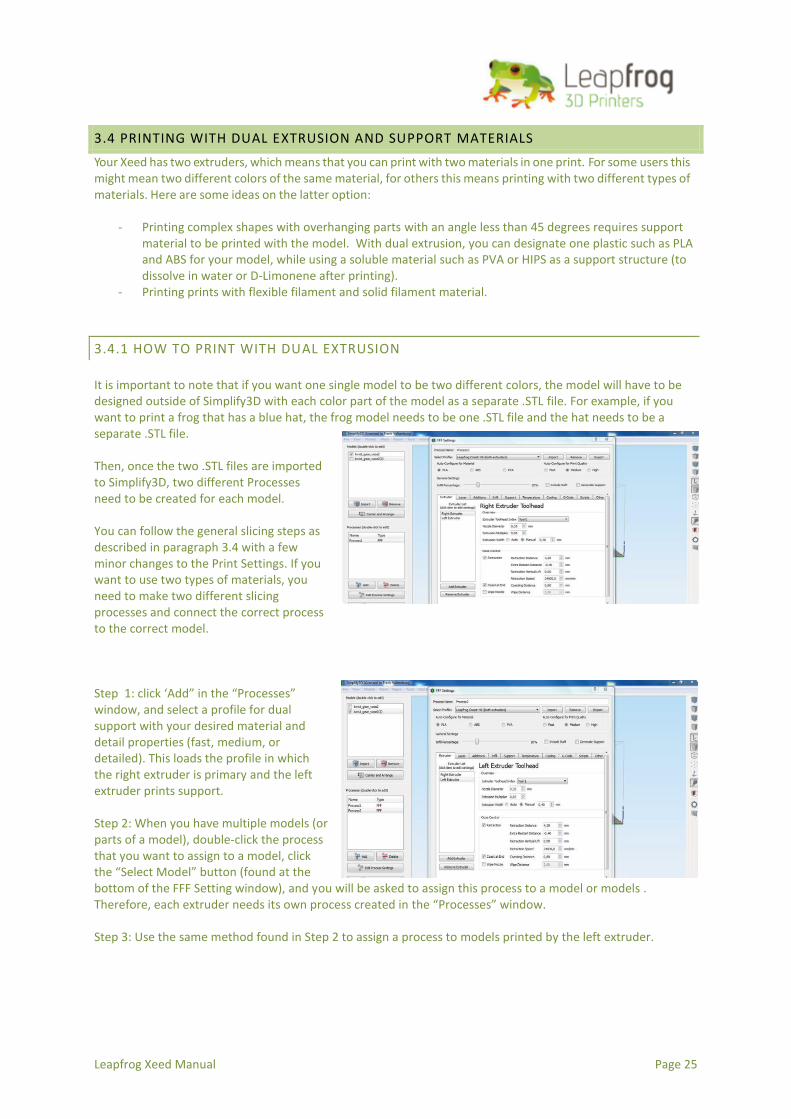
3.4 PRINTING WITH DUAL EXTRUSION AND SUPPORT MATERIALS
Your Xeed has two extruders, which means that you can print with two materials in one print. For some users this might mean two different colors of the same material, for others this means printing with two different types of materials. Here are some ideas on the latter option:
- Printing complex shapes with overhanging parts with an angle less than 45 degrees requires support material to be printed with the model. With dual extrusion, you can designate one plastic such as PLA and ABS for your model, while using a soluble material such as PVA or HIPS as a support structure (to dissolve in water or D-Limonene after printing).
- Printing prints with flexible filament and solid filament material.
3.4.1 HOW TO PRINT WITH DUAL EXTRUSION
It is important to note that if you want one single model to be two different colors, the model will have to be designed outside of Simplify3D with each color part of the model as a separate .STL file. For example, if you want to print a frog that has a blue hat, the frog model needs to be one .STL file and the hat needs to be a separate .STL file. Then, once the two .STL files are imported to Simplify3D, two different Processes need to be created for each model. You can follow the general slicing steps as described in paragraph 3.4 with a few minor changes to the Print Settings. If you want to use two types of materials, you need to make two different slicing processes and connect the correct process to the correct model. Step 1: click ‘Add” in the “Processes” window, and select a profile for dual support with your desired material and detail properties (fast, medium, or detailed). This loads the profile in which the right extruder is primary and the left extruder prints support. Step 2: When you have multiple models (or parts of a model), double-click the process that you want to assign to a model, click the “Select Model” button (found at the bottom of the FFF Setting window), and you will be asked to assign this process to a model or models . Therefore, each extruder needs its own process created in the “Processes” window. Step 3: Use the same method found in Step 2 to assign a process to models printed by the left extruder.

1
Leapfrog Xeed Manual Page 26
3.4.2 APPLYING SUPPORT STRUCTURES TO YOUR STL MODEL(S)
The nozzles always need a surface to print on If your model has overhanging parts that extend outward with more than 45 degrees, the nozzle will not have enough surface to print that part of the layer. Therefore, Simplify3D allows you to add Generated Support Material (material that can be removed after the print is complete). You can either define the support structures manually or you can have Simplif3D automatically generate support for you on all parts where there is a 45 degree, or more, overhang. It is beneficial to use the minimum amount of support structures that are required, as this will keep the surface of your print as smooth as possible. You always apply support structures to your .STL model, not to your .GCODE (so you have to do this before the slicing procedure). To add support, open the Print Settings, click on the support tab, and check the Generate Support Material box. Manually adding support is done in the main user interface and is recommended for advanced Simplify3D users. In the default setting any support present will be printed by the left extruder. To change this, select the proper extruder for both processes in the ‘support extruder’ tab under ‘support’.
3.5 MATERIAL GUIDE
In this section, we will discuss the materials that Leapfrog 3D Printers offer and give you a general idea on how to use them. We advise to use Leapfrog filament for the optimal print experience. We can offer you a range of different colors and materials. Leapfrog filament can be bought at our website http://www.lpfrg.com/store.
Material Description
PLA Poly(lactic acid) or polylactide (PLA) is a thermoplastic aliphatic polyester derived from renewable sources, such as corn starch, tapioca products or sugarcanes. After printing, the surface is instantly smooth. There are no toxic fumes coming from heated PLA, so printing with this filament is safe (although it is always advisable to print in a ventilated area).
PLA PRO PLA PRO is a PLA variety which provides more intense coloring as well as UV-, draught- and heat resistance. This makes it very suitable for architects and industrial designers.
ABS Acrylonitrile butadiene styrene (ABS) is a common thermoplastic. This is the same material that LEGO bricks are made from. After printing you can smooth the surface of ABS using sand paper or acetone. ABS is commonly used in engineering applications, since it can handle much more stress than PLA. When printing with ABS, a very small amount of toxic fumes may get into the air. It is advisable to print in a ventilated environment or with a (fume) cover.
PVA Polyvinyl alcohol (PVOH, PVA, or PVAl) is a water-soluble synthetic polymer. It is used as a support material for PLA in 3D printing, because it can be easily removed.
HIPS High Impact Polystyrene (HIPS) is used as a support material for ABS in 3D printing. HIPS can be dissolved using D-Limonene.
Hybrid Hybrid is high in strength and toughness, extremely suitable for printing moving parts since it has an improved temperature resistance. This also means Hybrid has to be printed on a higher temperature to reach the right viscosity. It is a high strength engineering plastic which is also food safe (FDA approved). There are no toxic fumes released when printing. with hybrid.

1
Leapfrog Xeed Manual Page 27
Nylon Nylon is a generic designation for a family of synthetic polymers known generically as aliphatic polyamides. Nylon is one of the most commonly used polymers. It has self-lubricating properties which can be useful in, for example, bearings. The material is very tough and light. It is also able to withstand higher stress than most other printable plastics making it more suitable for engineering applications.

1
Leapfrog Xeed Manual Page 28
4 FREQUENTLY ASKED QUESTIONS
Although our instructions in this manual are, of course, highly brilliant, we can image that you will run into some questions while you are printing. This section of the manual is devoted to that. Note that you can find much more help and support in The Ecosystem, which you can access through http://xeed.lpfrg.com/ This section contains the answers or links to the following frequently asked questions.
4.1 TROUBLESHOOTING SUPPORT
How to fix filament clogged up the printer head. http://support.lpfrg.com/support/solutions/articles/1000186694 Print head fans not working –Resulting filament curling in the print head http://support.lpfrg.com/support/solutions/articles/1000202342 M999 Error on the XEED screen http://support.lpfrg.com/support/solutions/articles/1000201857 Adjusting the Z-offset http://support.lpfrg.com/support/solutions/articles/1000141749 How to resolve the "Low Disk Space" error in LilyPrint on your Leapfrog Xeed 3d Printer http://xeed.lpfrg.com/support/solutions/articles/1000138083 How to flash the latest firmware for your Xeed 3D printer http://xeed.lpfrg.com/support/solutions/articles/1000203383 How to check the function of the Xeed drive unit to make sure it is not a electronic issue. http://xeed.lpfrg.com/support/solutions/articles/1000197445-how-to-check-the-function-of-the-xeed-drive-unit-to-make-sure-it-is-not-a-electronic-issue- How to resolve the "black screen/white cursor" bootup error in LilyPrint on your Leapfrog Xeed 3d Printer http://xeed.lpfrg.com/support/solutions/articles/1000138105

1
Leapfrog Xeed Manual Page 29
5 GLOSSARY OF 3D PRINTING VOCABULARY
5.1 3D PRINTING VOCABULARY
“Slicing what?!?” We know that the vocabulary of 3D printing may be quite new to you. That’s why we are providing you with a short glossary below. Extruder The extruders of your Xeed can be found in your printhead. They handle the feeding and extruding of the filaments. They consist of two assemblies: a cold end to pull and feed the thermoplastic from the spool, and a hot end (nozzle and hot end) that melts and extrudes the thermoplastic. The Xeed is fitted with a dual extrusion system allowing it to use two plastics in the same print.
Extruding Extruding is the term for the process during which filament feeds through the nozzle. It is the opposite of retracting.
Extruder handle (commonly known as Quick Release knob) The extruder handles are the two parts at the drawer of your Xeed that you pull out to feed the filament through.
FDM or FFF (commonly known as Print Settings) Fused Deposition Modelling (FDM) or Fused Filament Fabrication (FFF) is the 3D printing technique that is used in your Xeed. FDM/FFF works on an additive principle by laying down material in layers; a plastic filament is unwound from a coil and supplies material to produce a part. Filament Filament is the material that is used by the 3D printer to build the 3D object. Xeed uses spools of filament with a thickness of 1.75mm of a variety of plastics and composites. Filament drive unit This is the part inside the drawer of the printer with the quick release knob which is designed for easy feeding of the filament. G-code The computer language that the Xeed understands and receives its instructions from. The Simplify3D software is used to create a .GCODE out of a .STL file. The instructions encrypted within a .GCODE file can range from moving the printing head in X and Y direction (and the print bed in the Z direction), to setting the temperature of the hot-end. Hot end The heated portion of the extruder mechanism, which gets hot enough to melt plastic (or potential- ly other materials). The hot end used in the Xeed can withstand temperatures of up to about 270 °C. (Heated) Print bed A build surface that is warmed in order to keep the base of an extruded part from cooling (and shrinking) too quickly. If the base layers of a print shrink too quickly, this will lead to so-called ‘warping’ : the most common result is corners of parts lifting off the build surface. Heated beds usually yield higher quality of finished prints. You can heat the bed to a maximum of 90 degrees. LilyPrint The software installed on the Xeed printer itself that allows you to control the printer without the use of a PC connection. Nozzle The nozzle is the part of the extruder where the filaments exits from: The default nozzle orifice diameter of the Xeed is 0.35mm, but this part can be replaced with different sizes to create a larger or smaller flow of filament.

1
Leapfrog Xeed Manual Page 30
Print head The print head is the part of the printer that moves along the x- and y-axes to build up the print. The print head contains the nozzle, extruder and the hot end. Print Sticker Since the print bed is made out of granite, you need to place a print sticker on the bed before printing to make sure your print will sticks to the bed. Retracting Retracting is the opposite of extruding. This means that the filament is guided backwards from the nozzle. Retraction is important to providing great quality prints. Slicing Slicing is the process through which the stl file (or the 3D model) is transferred into .GCODE(printable file). Simplify3D is the slicing software that comes with your Xeed. STL STL is a file format in which you have to save your 3D model in order to be able to convert it to a printable file. STL files describe only the surface geometry of a three dimensional object without any representation of color, texture or other common CAD model attributes. Support material Depending on the printing technique used, the Xeed has limitations in printing objects with less than 45 degrees overhang. To overcome this problem the printer can print a removable support structure out of filament material which literally supports the build of your print.
1
Leapfrog Xeed Manual Page 31
Leapfrog 3D Printers
H. Kamerlingh Onnesweg 10
PO Box 252
2408 AW Alphen aan den Rijn
The Netherlands
T +31 (0)172 503 625
W www.lpfrg.com
3D Printers