Embed Size (px)
Citation preview

LCP Pediatric Hip Plate 3.5/5.0for varus osteotomies.
Technique Guide
This publication is not intended fordistribution in the USA.
Instruments and implants approved by the AO Foundation.

Image intensifier control
WarningThis description alone does not provide sufficient background for direct use of the product. Instruction by a surgeon experienced in handling this product is highly recommended.
Reprocessing, Care and Maintenance of Synthes InstrumentsFor general guidelines, function control and dismantling of multi-part instruments,please refer to: www.synthes.com/reprocessing
Table of Contents
Introduction
Surgical Technique
Product Information
Bibliography 57
LCP Pediatric Hip Plate System 2
AO Principles 4
Indications 5
Clinical Cases 6
Standard Surgical Technique 8Preoperative Planning (functional and anatomical) 8Patient Positioning and Approach 13Guide Wire Insertion 14Osteotomy 19Proximal Fixation 22Reduction 27Distal Fixation 28Medialization 31
Alternative Surgical Technique 35Preoperative Planning (based on plate/screw angle) 35Patient Positioning and Approach 36Guide Wire Insertion 37
Implants 40
Instruments 45
Modules 56
LCP Pediatric Hip Plate 3.5/5.0 for varus osteotomies Technique Guide DePuy Synthes 1

The LCP Pediatric Hip Plates are part of an innovative con-cept consisting of the LCP Pediatric Hip Plates 2.7, 3.5 and5.0.
Pediatric Hip Plates cover treatment options for stable fixa-tion of varus and valgus as well as rotation osteotomies andfracture treatment of the proximal femur.
The highly successful technique of the locking compressionplate (LCP), which has enjoyed great success in adult surgeryover recent years, has been incorporated in this system dedicated to pediatrics.
LCP Pediatric Hip Plate System
Varus plate 5.0Varus plate 2.7
2 DePuy Synthes LCP Pediatric Hip Plate 3.5/5.0 for varus osteotomies Technique Guide

In comparison to conventional blade/plate systems the LCPPediatric Hip Plates have four main advantages:
Angular stabilityReduces the risk of primary and secondary loss of correction.Thanks to the angular stability a hip spica is no longer neces-sary in the majority of cases.For the LCP Pediatric Hip Plate 2.7, external splintage such asa spica is recommended as the plate is small and the infantnot compliant.
Easy and safe surgical techniqueInitial plate positioning with Kirschner wires rather than us-ing a chisel allows easy adjustment with less bone damage.
MedializationFor Pediatric Hip Plates 3.5 and 5.0 there is the possibility ofadditional medialization that means that just one off-set isrequired for each plate size.
Low profilePlate design and locking construct allow minimal muscle dis-ruption and reduce soft tissue irritation.
Features and Benefits
The LCP pediatric hip plates have a universal design for theleft and right femur. They have the following main character-istics ensuring excellent fixation in the bone:– LCP Pediatric Hip Plates 3.5 and 5.0 have three neckscrews in the proximal part and combi-holes for locking orcortex screws in the distal part
– LCP Pediatric Hip Plate 2.7 has two neck screws in theproximal part and combi-holes for locking or cortexscrews in the distal part
Valgus plate 5.0
LCP Pediatric Hip Plate 3.5/5.0 for varus osteotomies Technique Guide DePuy Synthes 3

AO Principles
Stable fixationThe fixation of the LCP plate with angular stable screws re-duces the risk of loss of correction in osteotomies intra- andpost-operatively even if fragments are only partially reducedand compressed.
Preservation of blood supplyThe features of the child periosteum allow blood supply tobe preserved even if the periosteum is elevated.
Early mobilizationThe use of LCP implants allows an early and active mobiliza-tion, including cast-free postoperative management (Pedi-atric Hip Plates 3.5 and 5.0) in younger and handicappedchildren where appropriate.For the LCP Pediatric Hip Plate 2.7, external splintage such asa spica is recommended as the plate is small and the infantnot compliant.
4 DePuy Synthes LCP Pediatric Hip Plate 3.5/5.0 for varus osteotomies Technique Guide

Indications
The LCP Pediatric Plate System consists of different plates fordifferent indications.This surgical technique focuses on the LCP Pediatric Hip Plate3.5 for varus osteotomies.
The LCP Pediatric Hip Plate for varus osteotomies is intendedfor use in pediatric patients up to adolescence and for small-stature adult patients.
Specific indications include:– Idiopathic valgus hip– Idiopathic and acquired subluxation of the femoral head– Femoral head subluxation in neuromuscular diseases/problems
– High retroversion and anteversion in combination with ahigh CCD-angle
Important: Make sure to choose the appropriate plate corresponding to age, size and bone quality of the patient.
LCP Pediatric Hip Plate 3.5/5.0 for varus osteotomies Technique Guide DePuy Synthes 5

Clinical Cases
Case 1 11 year old girl, severe in-toeing which was the reason forclarification. The diagnosis shows poor coverage of both hipjoints and strong valgus deformation of the femoral necks.Since the strong valgus deformation was the main compo-nent and the parents refused a pelvic osteotomy, the indica-tion was set for a varisation and derotation intertrochantericosteotomy. Internal fixation was achieved with a 5.0 LCP Pediatric Hip Plate 110°.
Case 23 year old, slightly retarded girl, unstable hip. Radiologic clarification shows subluxation with dysplastic hip cup andextremely high valgus. A bilateral varisation osteotomy wasplanned and performed with a 3.5 LCP Pediatric Hip Plate110°, combined with a triple osteotomy of the right pelvis.A bilateral pelvic osteotomy is not indicated due to highpelvis instability.
Preoperative, AP view Postoperative, good containment afterbilateral correction of varisation by 30°
Preoperative, AP view and abduction Postoperative, good containment
6 DePuy Synthes LCP Pediatric Hip Plate 3.5/5.0 for varus osteotomies Technique Guide

Case 3 16 year old, tall boy with severe out-toeing. Internal and ex-ternal rotation of the hip 0–10–100. With a good coverageof the hip, the patient and his parents requested a correctionof the rotation. Internal fixation was achieved with a 5.0 LCPPediatric Hip Plate 120°.
Case 4 10 year old, girl with hiperlaxity dislocated right hip. Genetic disease. Femoral osteotomy: derotation and Dega acetabularosteotomy.
Preoperative Postoperative
Preoperative, reduced anteversion,respectively retroversion
Postoperative, rotation by 20°
LCP Pediatric Hip Plate 3.5/5.0 for varus osteotomies Technique Guide DePuy Synthes 7

1Determine correction angle
The surgical procedure described on the following pagesuses guide wires to help plate placement. These guide wiresare inserted with the help of an aiming block. In order to setthe correct angle of the aiming block, the correction anglehas to be determined first.
The angle of the aiming block can be calculated on the basisof the selected plate/screw angle and the desired correctionangle. The correction angle can be established with two dif-ferent planning methods described below.
A. Functional aspect: The functional abduction view onthe x-ray shows the amount of correction.This technique is based on the optimal anatomical positionof the femoral head in the acetabulum (containment) and isnot focused on an anatomical calculated correction angle.The pathological neck/shaft (CCD) angle is not relevant todetermine the correction angle.
B. Anatomical aspect: The planning is based on theactual pathological neck/shaft angle (CCD).This technique is used when the desired final neck shaft an-gle is not one of the plate/screw angles. The technique is derived from the original osteotomy technique described byMüller (1971).
Standard Surgical TechniquePreoperative Planning
8 DePuy Synthes LCP Pediatric Hip Plate 3.5/5.0 for varus osteotomies Technique Guide

A. Functional aspect
The functional planning is based on a clear ap pelvis x-ray.For the calculation of the correction angle there are two options:1. Functional, abduction x-ray until we have an optimal containment of the femoral head.
2. Create a blueprint of the proximal femur on the AP pelvicx-ray, rotate this blueprint around the center of thefemoral head until you have a satisfactory containment.
Calculation of the correction: The angle between theanatomical axis of the femur in the AP x-ray and the abduc-tion x-ray or the AP x-ray and the blueprint, respectively de-termine the correction angle.
Note: The use of the blueprint technique reduces the x-rayexposure!
LCP Pediatric Hip Plate 3.5/5.0 for varus osteotomies Technique Guide DePuy Synthes 9

B. Anatomical aspect
The anatomical planning is based on a clear AP pelvis x-raywith at least 30° of internal rotation of both legs. This guar-antees the correct projection of the real femoral neck/shaft(CCD) angle.1. Measure the pathological neck/shaft angle2. Determine the desired neck/shaft angle
Note: To control the planned correction a blueprint of theproximal femur on the AP pelvic x-ray can be performed. Ro-tate this blueprint around the planned osteotomy up yourplanned CCD angle and control the position of the femoralhead.
Calculation of the correction: The angle between the ini-tial axis of the femoral neck in the AP x-ray and the plannedneck/shaft angle determine the correction angle.
Standard Surgical TechniquePreoperative Planning
10 DePuy Synthes LCP Pediatric Hip Plate 3.5/5.0 for varus osteotomies Technique Guide

+= or
Formula
Bone model: Synbone PR0839 Current CCD: 165°Rotation: 65°Desired CCD: 130°Plate/screw angle: 110°
Positioning Kirschner wire angle = 35°(correction angle)plus 110° (plate/screw angle) = 145°
Positioning Kirschner wire angle = correction angle (results from the functional or anatomical aspects)
+ plate/screw angle
LCP Pediatric Hip Plate 3.5/5.0 for varus osteotomies Technique Guide DePuy Synthes 11

A
C
1
2
3
D
B
2Plate Type
This technique guide focuses on the LCP Pediatric Hip Plates3.5/5.0 and describes a varus osteotomy of the proximal femur with a 110° varus plate 3.5 (corresponds to implantArt. No. 02.108.311).
The surgical technique refers to screw holes where applicable.Please see the designation of each hole as marked.
A, B: Neck screwsC: Calcar screwD: Positioning Kirschner wire1, 2 and 3: LCP or cortex shaft screws
Standard Surgical TechniquePreoperative Planning
12 DePuy Synthes LCP Pediatric Hip Plate 3.5/5.0 for varus osteotomies Technique Guide

1
2
1Position patient
Position the patient either in the supine (1) or lateral (2) position. For the supine position a radiolucent table is recom-mended.
2Approach
Use a standard lateral approach to the proximal femur.
Standard Surgical Technique
Patient Positioning and Approach
LCP Pediatric Hip Plate 3.5/5.0 for varus osteotomies Technique Guide DePuy Synthes 13
Standard Surgical Technique
Guide Wire Insertion
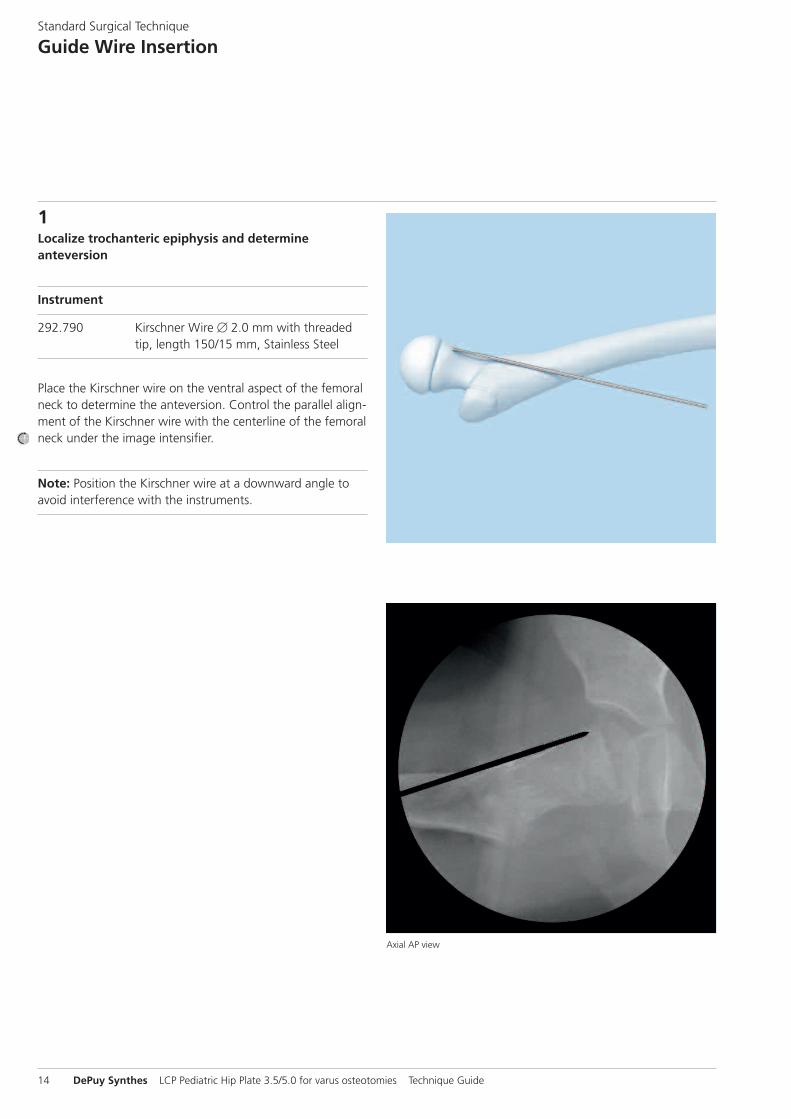
1Localize trochanteric epiphysis and determineanteversion
Instrument
292.790 Kirschner Wire � 2.0 mm with threaded tip, length 150/15 mm, Stainless Steel
Place the Kirschner wire on the ventral aspect of the femoralneck to determine the anteversion. Control the parallel align-ment of the Kirschner wire with the centerline of the femoralneck under the image intensifier.
Note: Position the Kirschner wire at a downward angle toavoid interference with the instruments.
Axial AP view
14 DePuy Synthes LCP Pediatric Hip Plate 3.5/5.0 for varus osteotomies Technique Guide

1
2
2Insert positioning Kirschner wire in hole D
Instruments for 3.5 mm plate
292.790 Kirschner Wire � 2.0 mm with threaded tip, length 150/15 mm, Stainless Steel
03.108.001 Aiming Block for Screws � 3.5 mm, for LCP Pediatric Hip Plates
03.108.006 Positioner for Aiming Block
314.070 Screwdriver, hexagonal, small, � 2.5 mm, with Groove
Instruments for 5.0 mm plate
292.790 Kirschner Wire � 2.0 mm with threaded tip, length 150/15 mm, Stainless Steel
03.108.002 Aiming Block for Screws � 5.0 mm, for LCP Pediatric Hip Plates
03.108.006 Positioner for Aiming Block
314.070 Screwdriver, hexagonal, small, � 2.5 mm, with Groove
Set the calculated positioning wire angle (see "PreoperativePlanning" section) on the positioner for aiming block andtighten the hex screw. (1)
Assemble the positioner and the aiming block. (2)
LCP Pediatric Hip Plate 3.5/5.0 for varus osteotomies Technique Guide DePuy Synthes 15

3
4
Standard Surgical TechniqueGuide Wire Insertion
The wing of the aiming block must be placed parallel to theproximal femur shaft. The positioner and the two front spikesof the aiming block must be in contact with the femur. (3)
The entry point for the positioning Kirschner wire is 5 to 6 mmdistal to the trochanteric epiphysis in the AP view. Insert thepositioning Kirschner wire parallel to the initially positionedanteversion Kirschner wire and, in the axial view, in the cen-ter of the femoral neck. Remove the anteversion Kirschnerwire.
Tip: To facilitate insertion, first center-punch the surface ofthe bone at the entry point before inserting positioner andwire.
Important: All following steps refer to the positioningKirschner wire, therefore its exact position is crucial for a successful surgery.
Verify optimal placement of the positioning Kirschner wirewith the image intensifier. (4)
To avoid slippage of the positioner do not remove the posi-tioning Kirschner wire until the two neck screws are in place.
Note: Do not bend the Kirschner wire while drilling as thismay result in correction mistakes.
Axial AP view
16 DePuy Synthes LCP Pediatric Hip Plate 3.5/5.0 for varus osteotomies Technique Guide
1
2
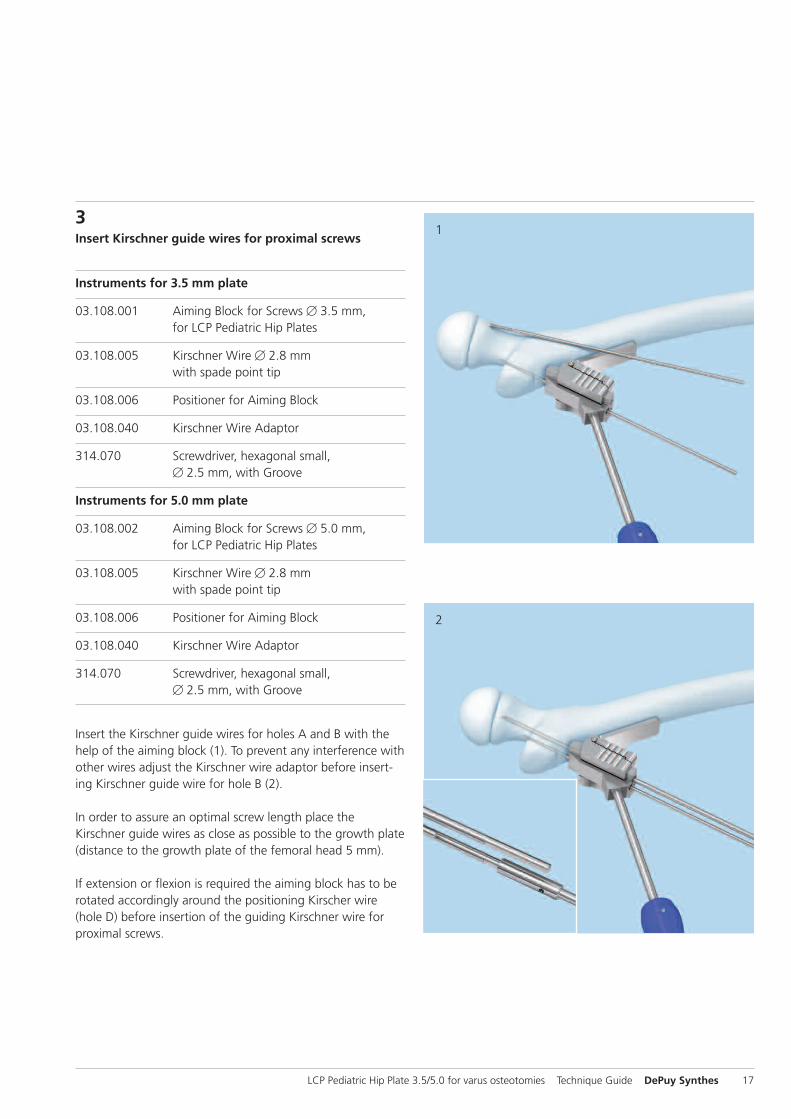
3Insert Kirschner guide wires for proximal screws
Instruments for 3.5 mm plate
03.108.001 Aiming Block for Screws � 3.5 mm, for LCP Pediatric Hip Plates
03.108.005 Kirschner Wire � 2.8 mm with spade point tip
03.108.006 Positioner for Aiming Block
03.108.040 Kirschner Wire Adaptor
314.070 Screwdriver, hexagonal small, � 2.5 mm, with Groove
Instruments for 5.0 mm plate
03.108.002 Aiming Block for Screws � 5.0 mm, for LCP Pediatric Hip Plates
03.108.005 Kirschner Wire � 2.8 mm with spade point tip
03.108.006 Positioner for Aiming Block
03.108.040 Kirschner Wire Adaptor
314.070 Screwdriver, hexagonal small, � 2.5 mm, with Groove
Insert the Kirschner guide wires for holes A and B with thehelp of the aiming block (1). To prevent any interference withother wires adjust the Kirschner wire adaptor before insert-ing Kirschner guide wire for hole B (2).
In order to assure an optimal screw length place theKirschner guide wires as close as possible to the growth plate(distance to the growth plate of the femoral head 5 mm).
If extension or flexion is required the aiming block has to berotated accordingly around the positioning Kirscher wire(hole D) before insertion of the guiding Kirschner wire forproximal screws.
LCP Pediatric Hip Plate 3.5/5.0 for varus osteotomies Technique Guide DePuy Synthes 17

Standard Surgical TechniqueGuide Wire Insertion
With the Kirschner guide wires for holes A and B, the posi-tion and length of the screws are defined while, at the sametime, the holes are predrilled for the 3.5 mm screws.
When the Kirschner guide wires are inserted correctly, remove the aiming block and positioner for aiming block.
Avoid bending the positioning Kirschner wire with the aim-ing block while inserting the guide wires as this may result incorrection mistakes.
Note: Once a guiding Kirschner wire is inserted, flexion orextension correction will not be able any more.
Tip: To remove the positioner and aiming block loosen thehex screw on the positioner.
Important: Verify the optimal position of the Kirschner wireswith the image intensifier in the AP and axial views. (3, 4)Do not penetrate the epiphysis.
3
4
AP view
Axial AP view
18 DePuy Synthes LCP Pediatric Hip Plate 3.5/5.0 for varus osteotomies Technique Guide

1
2
Instruments
03.108.008 Positioner for Osteotomy
333.060 Positioning Plate, triangular, length 45 mm, 90°/50°/40°
333.070 Positioning Plate, triangular, length 45 mm, 80°/70°/30°
333.080 Positioning Plate, triangular, length 45 mm, 100°/60°/20°
292.790 Kirschner Wire � 2.0 mm with threaded tip, length 150/15 mm, Stainless Steel
The optimal position of the osteotomy for the 3.5 mm plateis 10 mm distal to the Kirschner guide wires. Determine thedistance with the corresponding end of the positioner for osteotomy (1). Hold the positioner for osteotomy against thetwo Kirschner guide wires and mark the distance with theoscillating saw or another sharp instrument on the bone.
Perform the osteotomy in one cut - with an oscillating sawand constant irrigation and cooling - perpendicular to thefemoral shaft. (2)
Note: If there is extreme coxa valga the osteotomy cut has tobe 3– 4 mm further distal otherwise the distance for the cal-car screw is too short.
Note for 5.0 mm plate: The optimal position of the osteotomy is 13 mm distal to the Kirschner guide wires.
Standard Surgical Technique
Osteotomy
LCP Pediatric Hip Plate 3.5/5.0 for varus osteotomies Technique Guide DePuy Synthes 19
3
4
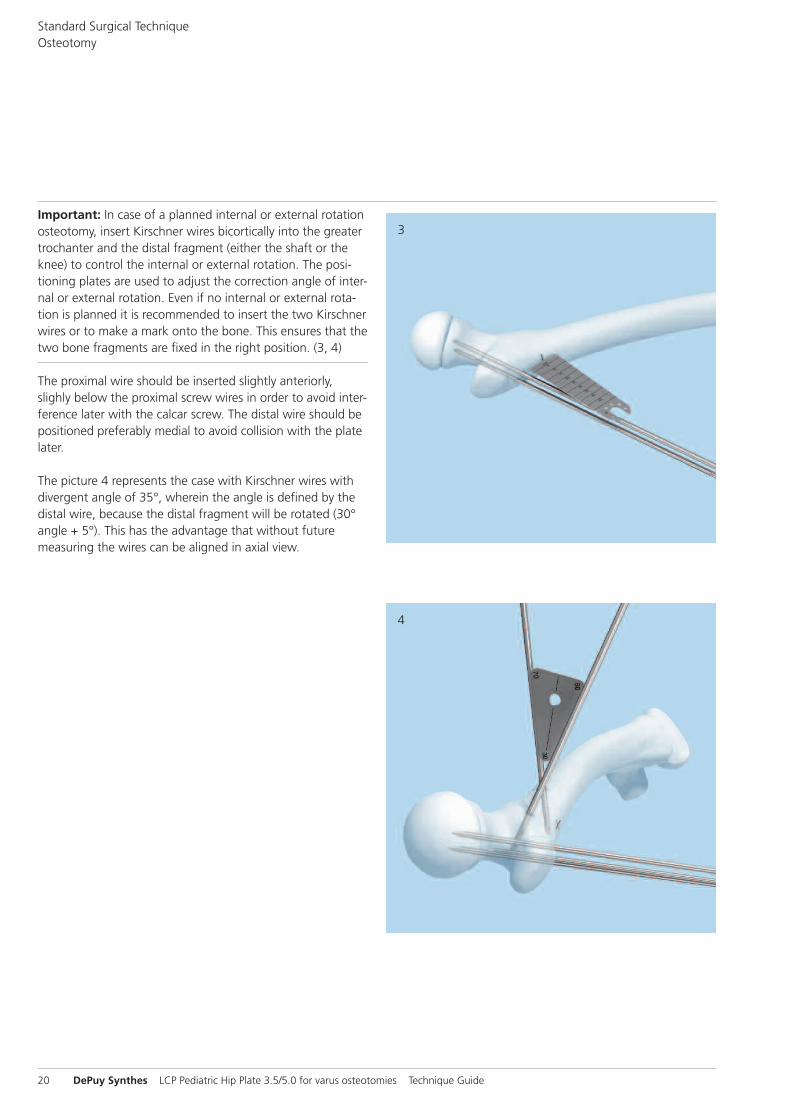
Important: In case of a planned internal or external rotationosteotomy, insert Kirschner wires bicortically into the greatertrochanter and the distal fragment (either the shaft or theknee) to control the internal or external rotation. The posi-tioning plates are used to adjust the correction angle of inter-nal or external rotation. Even if no internal or external rota-tion is planned it is recommended to insert the two Kirschnerwires or to make a mark onto the bone. This ensures that thetwo bone fragments are fixed in the right position. (3, 4)
The proximal wire should be inserted slightly anteriorly,slighly below the proximal screw wires in order to avoid inter-ference later with the calcar screw. The distal wire should bepositioned preferably medial to avoid collision with the platelater.
The picture 4 represents the case with Kirschner wires withdivergent angle of 35°, wherein the angle is defined by thedistal wire, because the distal fragment will be rotated (30°angle + 5°). This has the advantage that without futuremeasuring the wires can be aligned in axial view.
Standard Surgical TechniqueOsteotomy
20 DePuy Synthes LCP Pediatric Hip Plate 3.5/5.0 for varus osteotomies Technique Guide

LCP Pediatric Hip Plate 3.5/5.0 for varus osteotomies Technique Guide DePuy Synthes 21

Standard Surgical Technique
Proximal Fixation
Fixation in the proximal fragment must always be done withlocking screws. Ensure that the locking screws are at least5 mm away from the growth plate of the femoral head.
1Position plate
Instruments for 3.5 mm plate
03.108.009 LCP Drill Sleeve 3.5, for Drill Bits � 2.8 mm, for LCP Pediatric Hip Plate
03.108.008 Positioner for Osteotomy
Instruments for 5.0 mm plate
03.108.010 LCP Drill Sleeve 5.0, for Drill Bits � 4.3 mm, for LCP Pediatric Hip Plate
03.108.004 Reduction Sleeve 4.3/2.8
03.108.008 Positioner for Osteotomy
Insert drill sleeves into plate holes A and B. Tighten thesleeves with the wrench of the positioner for osteotomy.Slide the plate over the Kirschner guide wires and the positioning Kirschner wire.
Note: In case of a slight misfit of the proximal fragment, remove a small bone wedge.
Tip: Fix the proximal fragment (femoral neck/head fragment)with forceps taking care not to disturb the positioning of theplate. This provides better handling of the proximal fragmentand greater safety in terms of rotation.
Note for 5.0 mm plate: An additional reduction sleevemust be inserted in each LCP drill sleeve before sliding theplate over the wires.
22 DePuy Synthes LCP Pediatric Hip Plate 3.5/5.0 for varus osteotomies Technique Guide

2Determine screw length and insert femoral neck screwsA and B
Instrument
03.108.003 Direct Measuring Device for Kirschner Wires � 2.8 mm, length 200 mm
Determine the screw length by measuring the insertiondepth of the Kirschner guide wire with the direct measuringdevice for Kirschner guide wires. Slide the appropriate end ofthe measuring device over the Kirschner guide wire againstthe LCP drill sleeve and determine the proper screw length,which will typically be the next size smaller than what wasmeasured. Remove the LCP drill sleeve and the Kirschnerguide wire in hole A.
If necessary use the wrench at one end of the positioner forosteotomy.
Insert the screw in hole A.
Note: If the positioning Kirschner wire has already been removed, for screw insertion it has to be reinserted in hole Dsince it protects against rotation during screw insertion.
Note for 5.0 mm plate: Remove the reduction sleeve andenlarge the hole from 2.8 mm to 4.3 mm with the LCP drillbit. Then follow the instructions as described in step 2.
LCP Pediatric Hip Plate 3.5/5.0 for varus osteotomies Technique Guide DePuy Synthes 23
Standard Surgical TechniqueProximal Fixation
Instruments for 3.5 mm plate
511.770 Torque Limiter, 1.5 Nm, for Compact Air Drive and for Power Drive
314.030 Screwdriver Shaft, hexagonal, small, � 2.5 mm
314.116 Screwdriver Shaft Stardrive 3.5, SD15, self-holding, for AO/ASIF Quick Coupling
397.705 Handle for Torque Limiter Nos. 511.770 and 511.771
Instruments for 5.0 mm plate
310.430 LCP Drill Bit � 4.3 mm with Stop, length 221 mm, 2-flute, for Quick Coupling
511.771 Torque Limiter, 4 Nm, for Compact Air Drive and Power Drive
314.152 Screwdriver Shaft 3.5, hexagonal, self-holding
314.164 Screwdriver Stardrive 4.5/5.0, SD25, with Groove, length 240 mm
397.705 Handle for Torque Limiter Nos. 511.770 and 511.771
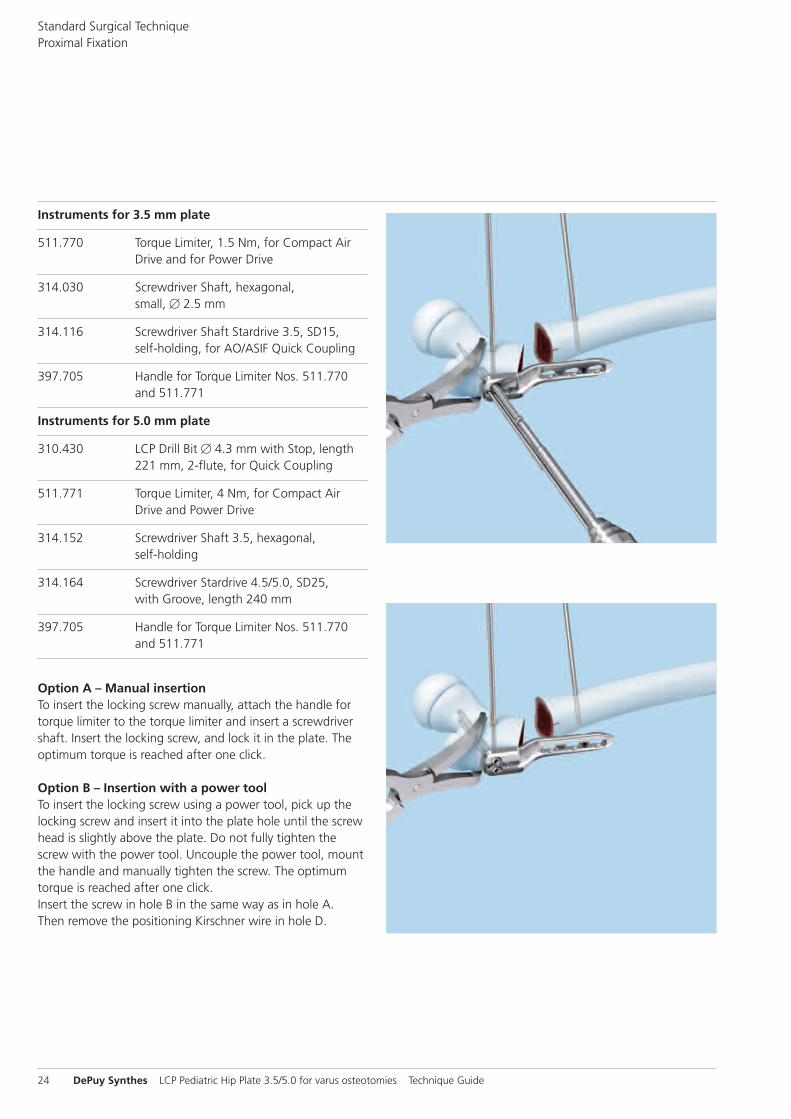
Option A – Manual insertionTo insert the locking screw manually, attach the handle fortorque limiter to the torque limiter and insert a screwdrivershaft. Insert the locking screw, and lock it in the plate. Theoptimum torque is reached after one click.
Option B – Insertion with a power toolTo insert the locking screw using a power tool, pick up thelocking screw and insert it into the plate hole until the screwhead is slightly above the plate. Do not fully tighten thescrew with the power tool. Uncouple the power tool, mountthe handle and manually tighten the screw. The optimumtorque is reached after one click.Insert the screw in hole B in the same way as in hole A.Then remove the positioning Kirschner wire in hole D.
24 DePuy Synthes LCP Pediatric Hip Plate 3.5/5.0 for varus osteotomies Technique Guide

3Insert calcar screw in hole C
Instruments for 3.5 mm plate
310.284 LCP Drill Bit � 2.8 mm with Stop, length 165 mm, 2-flute, for Quick Coupling
03.108.009 LCP Drill Sleeve 3.5, for Drill Bits � 2.8 mm, for LCP Pediatric Hip Plate
319.010 Depth Gauge for Screws � 2.7 to 4.0 mm, measuring range up to 60 mm
511.770 Torque Limiter, 1.5 Nm, for Compact Air Drive and for Power Drive
314.030 Screwdriver Shaft, hexagonal, small, � 2.5 mm
314.116 Screwdriver Shaft Stardrive 3.5, SD15, self-holding, for AO/ASIF Quick Coupling
Instruments for 5.0 mm plate
310.430 LCP Drill Bit � 4.3 mm with Stop, length 221 mm, 2-flute, for Quick Coupling
03.108.010 LCP Drill Sleeve 5.0, for Drill Bits � 4.3 mm, for LCP Pediatric Hip Plate
319.100 Depth Gauge for Screws � 4.5 to 6.5 mm, measuring range up to 110 mm
511.771 Torque Limiter, 4 Nm, for Compact Air Drive and Power Drive
314.152 Screwdriver Shaft 3.5, hexagonal, self-holding
314.164 Screwdriver Stardrive 4.5/5.0, SD25, with Groove, length 240 mm
LCP Pediatric Hip Plate 3.5/5.0 for varus osteotomies Technique Guide DePuy Synthes 25

4
3
1
2
1Mount the LCP Drill sleeve onto hole C (1) and drill the holefor the calcar screw (2) with the LCP drill bit through bothcortices. Remove the LCP drill sleeve and determine thescrew length with the depth gauge.
Insert the screw in hole C. (3, 4)
Standard Surgical TechniqueProximal Fixation
26 DePuy Synthes LCP Pediatric Hip Plate 3.5/5.0 for varus osteotomies Technique Guide

1
2
Standard Surgical Technique
Reduction
Instrument
399.121 Bone Holding Forceps, self-centering, soft lock, length 239 mm
For an optimal fixation the plate must be aligned with theaxis of the femoral shaft. When the plate is aligned, fix itwith the reduction forceps. (1)
Important: If the plate is not aligned parallel to the femoralshaft in the AP view it can lead to variations of the plannedneck/shaft (CCD) angle.
Important: In case of a planned internal or external rotationosteotomy, the plate is fixed with the forceps and the distalpart of the femur rotated (in this case laterally) until the tworotation wires are parallel in axial view. Definitive fixation withthe forceps. Fixation of the plate by screw insertion in hole 1and 3. Afterwards, the rotation wires can be removed. (2)
Note: If the achieved rotation correction is too little or toomuch, the wires should be left in the bone for another rota-tion correction.
If additional extension or flexion is required, the plate will nolonger be aligned with the femoral shaft, making fixationmore difficult due to the skewed position of the plate.
Tip: The alignment can be facilitated with LCP drill sleeves inthe distal part of the plate and /or with a forceps fixed onthe proximal part. These instruments serve as handles duringthe repositioning of the osteotomy.
Note: Check whether medialization is required under the im-age intensifier. If so, follow the steps described on page 31.
LCP Pediatric Hip Plate 3.5/5.0 for varus osteotomies Technique Guide DePuy Synthes 27

Since this plate is an LCP plate, it is important to useeither locking or cortex screws.
Option A: Distal fixation with locking screwsInsert screws in holes 1, 2 and 3.
Instruments for 3.5 mm plate
314.030 Screwdriver Shaft, hexagonal, small, � 2.5 mm
314.116 Screwdriver Shaft Stardrive 3.5, SD15, self-holding, for AO/ASIF Quick Coupling
319.010 Depth Gauge for Screws � 2.7 to 4.0 mm, measuring range up to 60 mm
511.770 Torque Limiter, 1.5 Nm, for Compact Air Drive and for Power Drive
397.705 Handle for Torque Limiter Nos. 511.770 and 511.771
03.108.009 LCP Drill Sleeve 3.5, for Drill Bits � 2.8 mm, for LCP Pediatric Hip Plate
310.284 LCP Drill Bit � 2.8 mm with Stop, length 165 mm, 2-flute, for Quick Coupling
Standard Surgical Technique
Distal Fixation
Instruments for 5.0 mm plate
314.152 Screwdriver Shaft 3.5, hexagonal, self-holding
314.119 Screwdriver Shaft Stardrive 4.5/5.0, SD25, self-holding, for AO/ASIF Quick Coupling
319.100 Depth Gauge for Screws � 4.5 to 6.5 mm, measuring range up to 110 mm
03.108.010 LCP Drill Sleeve 5.0, for Drill Bits � 4.3 mm, for LCP Pediatric Hip Plate
310.430 LCP Drill Bit � 4.3 mm with Stop, length 221 mm, 2-flute, for Quick Coupling
511.771 Torque Limiter, 4 Nm, for Compact Air Drive and Power Drive
397.705 Handle for Torque Limiter Nos. 511.770 and 511.771
28 DePuy Synthes LCP Pediatric Hip Plate 3.5/5.0 for varus osteotomies Technique Guide
1
2
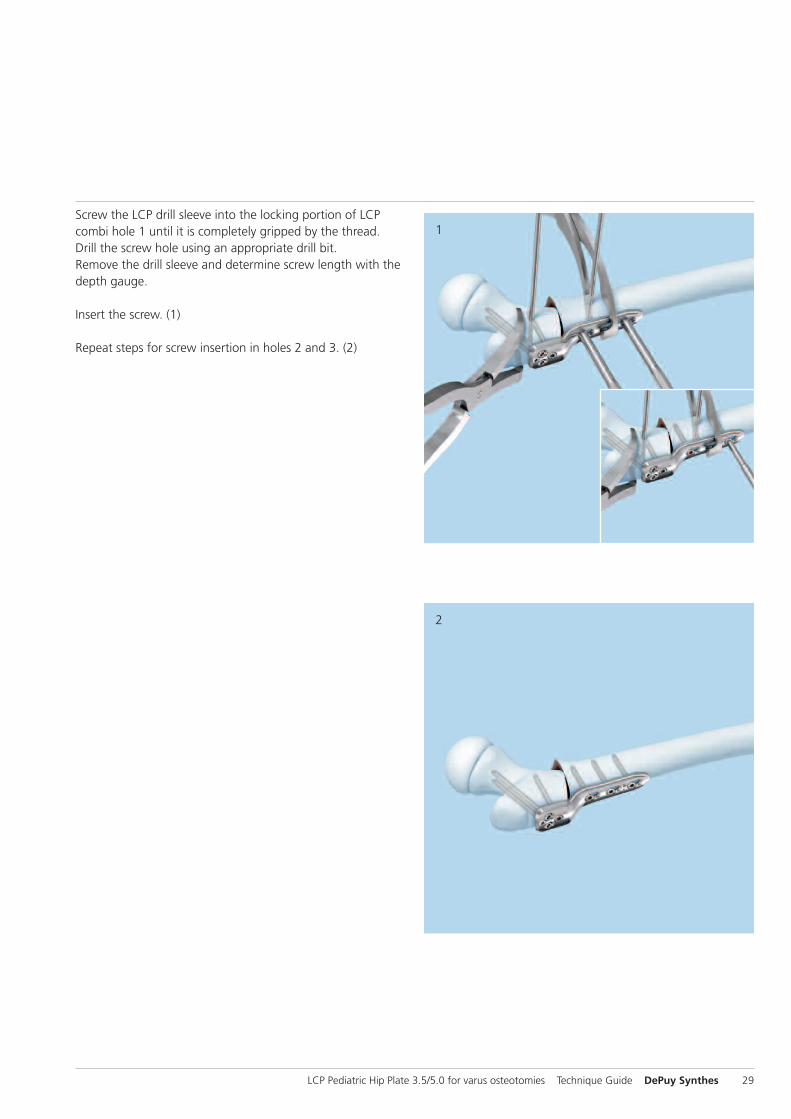
Screw the LCP drill sleeve into the locking portion of LCPcombi hole 1 until it is completely gripped by the thread.Drill the screw hole using an appropriate drill bit.Remove the drill sleeve and determine screw length with thedepth gauge.
Insert the screw. (1)
Repeat steps for screw insertion in holes 2 and 3. (2)
LCP Pediatric Hip Plate 3.5/5.0 for varus osteotomies Technique Guide DePuy Synthes 29
1
2
Standard Surgical TechniqueDistal Fixation
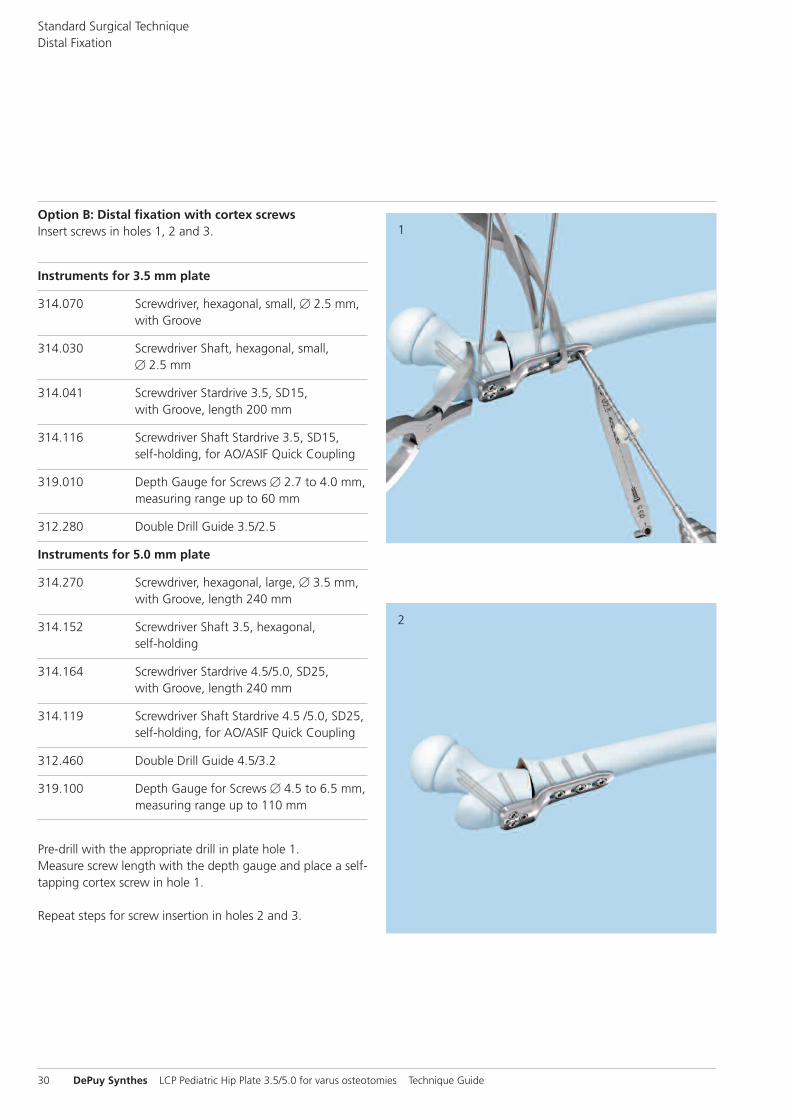
Option B: Distal fixation with cortex screwsInsert screws in holes 1, 2 and 3.
Instruments for 3.5 mm plate
314.070 Screwdriver, hexagonal, small, � 2.5 mm, with Groove
314.030 Screwdriver Shaft, hexagonal, small, � 2.5 mm
314.041 Screwdriver Stardrive 3.5, SD15, with Groove, length 200 mm
314.116 Screwdriver Shaft Stardrive 3.5, SD15, self-holding, for AO/ASIF Quick Coupling
319.010 Depth Gauge for Screws � 2.7 to 4.0 mm, measuring range up to 60 mm
312.280 Double Drill Guide 3.5/2.5
Instruments for 5.0 mm plate
314.270 Screwdriver, hexagonal, large, � 3.5 mm, with Groove, length 240 mm
314.152 Screwdriver Shaft 3.5, hexagonal, self-holding
314.164 Screwdriver Stardrive 4.5/5.0, SD25, with Groove, length 240 mm
314.119 Screwdriver Shaft Stardrive 4.5 /5.0, SD25, self-holding, for AO/ASIF Quick Coupling
312.460 Double Drill Guide 4.5/3.2
319.100 Depth Gauge for Screws � 4.5 to 6.5 mm, measuring range up to 110 mm
Pre-drill with the appropriate drill in plate hole 1.Measure screw length with the depth gauge and place a self-tapping cortex screw in hole 1.
Repeat steps for screw insertion in holes 2 and 3.
30 DePuy Synthes LCP Pediatric Hip Plate 3.5/5.0 for varus osteotomies Technique Guide

Standard Surgical Technique
Medialization
Note: Medialization is only possible if the distal part is fixedwith locking screws.
Instruments for 3.5 mm plate
314.030 Screwdriver Shaft, hexagonal, small, � 2.5 mm
314.116 Screwdriver Shaft Stardrive 3.5, SD15, self-holding, for AO/ASIF Quick Coupling
319.010 Depth Gauge for Screws � 2.7 to 4.0 mm, measuring range up to 60 mm
511.770 Torque Limiter, 1.5 Nm, for Compact Air Drive and for Power Drive
03.108.007 Instrument for Medialization
03.108.009 LCP Drill Sleeve 3.5, for Drill Bits � 2.8 mm, for LCP Pediatric Hip Plate
310.284 LCP Drill Bit � 2.8 mm with Stop, length 165 mm, 2-flute, for Quick Coupling
397.705 Handle for Torque Limiter Nos. 511.770 and 511.771
Instruments for 5.0 mm plate
314.152 Screwdriver Shaft 3.5, hexagonal, self-holding
314.119 Screwdriver Shaft Stardrive 4.5/5.0, SD25, self-holding, for AO/ASIF Quick Coupling
319.100 Depth Gauge for Screws � 4.5 to 6.5 mm, measuring range up to 110 mm
511.771 Torque Limiter, 4 Nm, for Compact Air Drive and Power Drive
03.108.007 Instrument for Medialization
03.108.010 LCP Drill Sleeve 5.0, for Drill Bits � 4.3 mm, for LCP Pediatric Hip Plate
310.430 LCP Drill Bit � 4.3 mm with Stop, length 221 mm, 2-flute, for Quick Coupling
397.705 Handle for Torque Limiter Nos. 511.770 and 511.771
LCP Pediatric Hip Plate 3.5/5.0 for varus osteotomies Technique Guide DePuy Synthes 31
1
2
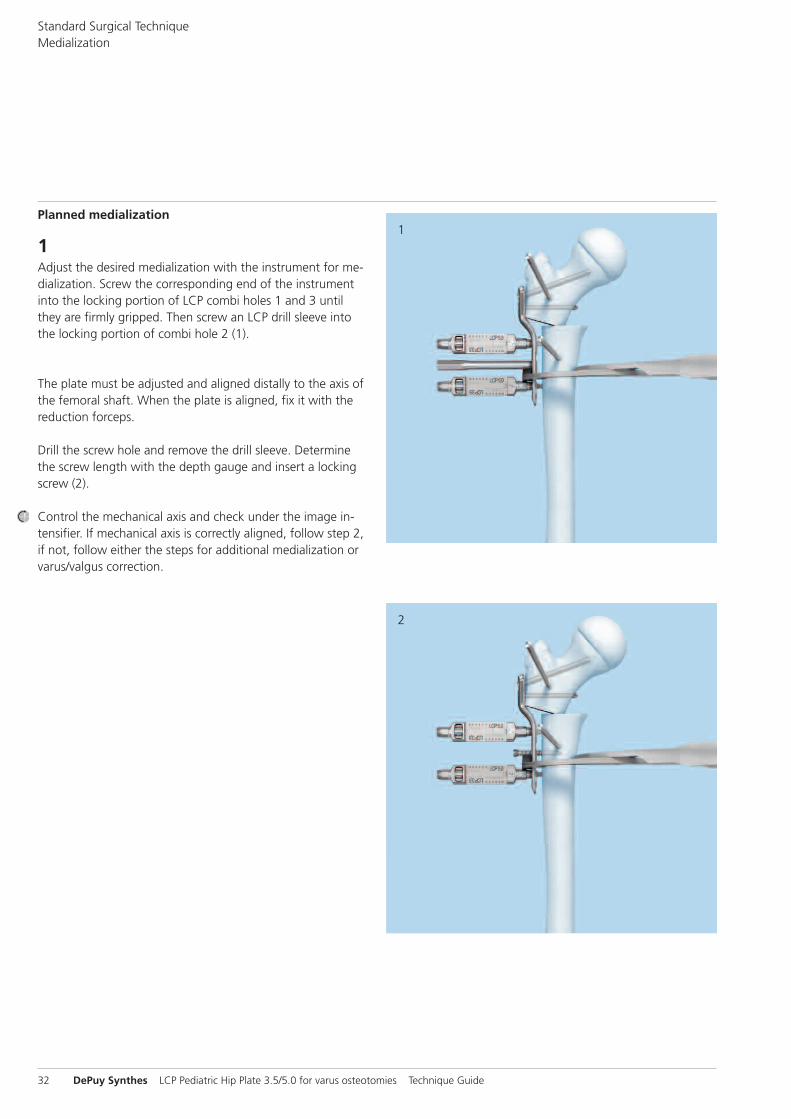
Planned medialization
1Adjust the desired medialization with the instrument for me-dialization. Screw the corresponding end of the instrumentinto the locking portion of LCP combi holes 1 and 3 untilthey are firmly gripped. Then screw an LCP drill sleeve intothe locking portion of combi hole 2 (1).
The plate must be adjusted and aligned distally to the axis ofthe femoral shaft. When the plate is aligned, fix it with thereduction forceps.
Drill the screw hole and remove the drill sleeve. Determinethe screw length with the depth gauge and insert a lockingscrew (2).
Control the mechanical axis and check under the image in-tensifier. If mechanical axis is correctly aligned, follow step 2,if not, follow either the steps for additional medialization orvarus/valgus correction.
Standard Surgical TechniqueMedialization
32 DePuy Synthes LCP Pediatric Hip Plate 3.5/5.0 for varus osteotomies Technique Guide

3
4
2Remove the instrument for medialization in hole 1 and inserta drill sleeve. Pre-drill the screw hole and remove the drillsleeve. Determine the screw length with the depth gaugeand insert a locking screw (3). Repeat step two for hole 3 (4).
Note: Tighten the screws manually with the torque limiter.
LCP Pediatric Hip Plate 3.5/5.0 for varus osteotomies Technique Guide DePuy Synthes 33

Additional medialization (following planned medialization)If the mechanical axis is not in line, additional medializationis required.
1. Loosen screw in hole 2 if already inserted.2. Adjust the desired medialization with both instrumentsfor medialization to the same correction level.
3. Tighten screw in hole 2.
If the mechanical situation is satisfactory, follow step 2 onpage 33. If not, repeat additional medialization.
Standard Surgical TechniqueMedialization
34 DePuy Synthes LCP Pediatric Hip Plate 3.5/5.0 for varus osteotomies Technique Guide
1
2
Alternative Surgical Technique
Preoperative Planning
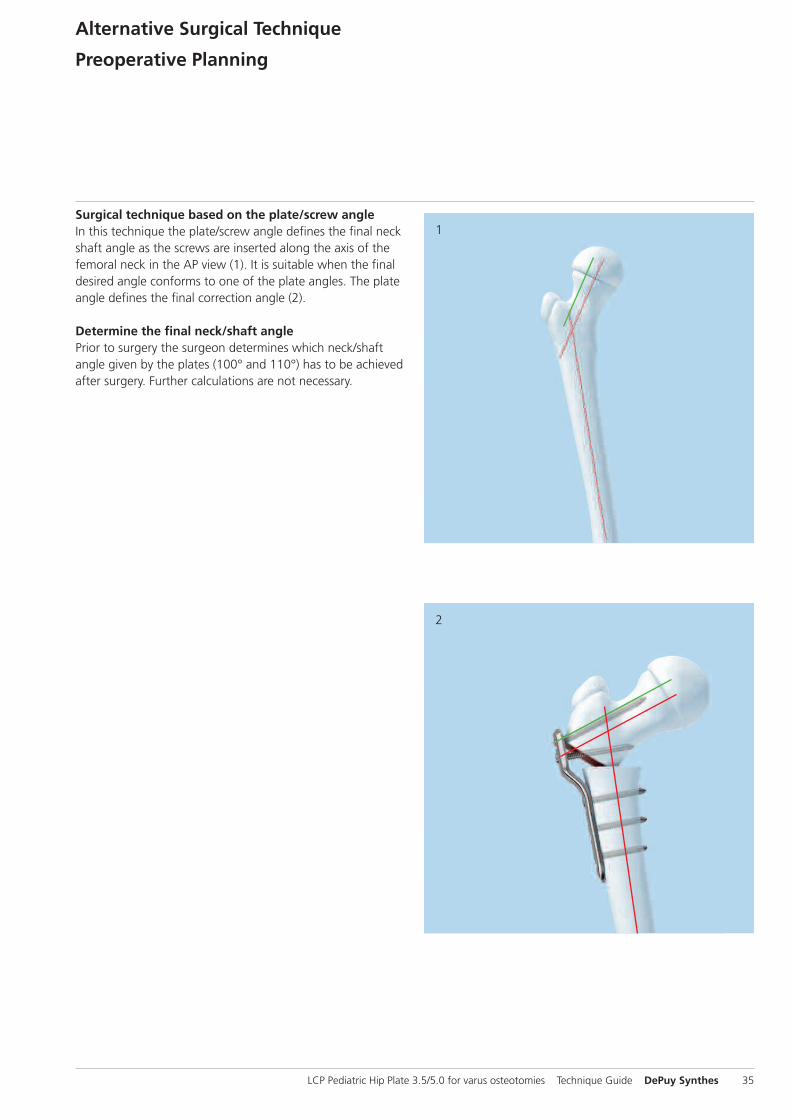
Surgical technique based on the plate/screw angleIn this technique the plate/screw angle defines the final neckshaft angle as the screws are inserted along the axis of thefemoral neck in the AP view (1). It is suitable when the finaldesired angle conforms to one of the plate angles. The plateangle defines the final correction angle (2).
Determine the final neck/shaft anglePrior to surgery the surgeon determines which neck/shaft angle given by the plates (100° and 110°) has to be achievedafter surgery. Further calculations are not necessary.
LCP Pediatric Hip Plate 3.5/5.0 for varus osteotomies Technique Guide DePuy Synthes 35

1
2
1Position patient
Position the patient in the supine (1) or lateral (2) position onthe radiolucent table. Then position the image intensifier sothat the visualization of the hip is possible in AP and axialviews.
Alternative Surgical Technique
Patient Positioning and Approach
2Approach
Use a standard lateral approach to the proximal femur.
36 DePuy Synthes LCP Pediatric Hip Plate 3.5/5.0 for varus osteotomies Technique Guide

Alternative Surgical Technique
Guide Wire Insertion
1Localize trochanteric epiphysis and determineanteversion
Instrument
292.790 Kirschner Wire � 2.0 mm with threaded tip, length 150/15 mm, Stainless Steel
Place the Kirschner wire on the ventral aspect of the femoralneck to determine the anteversion. Control the parallel align-ment of the Kirschner wire with the centerline of the femoralneck under the image intensifier.
Note:When positioning the Kirschner wire do not interferewith the aiming block.
Axial AP view
LCP Pediatric Hip Plate 3.5/5.0 for varus osteotomies Technique Guide DePuy Synthes 37
1
2
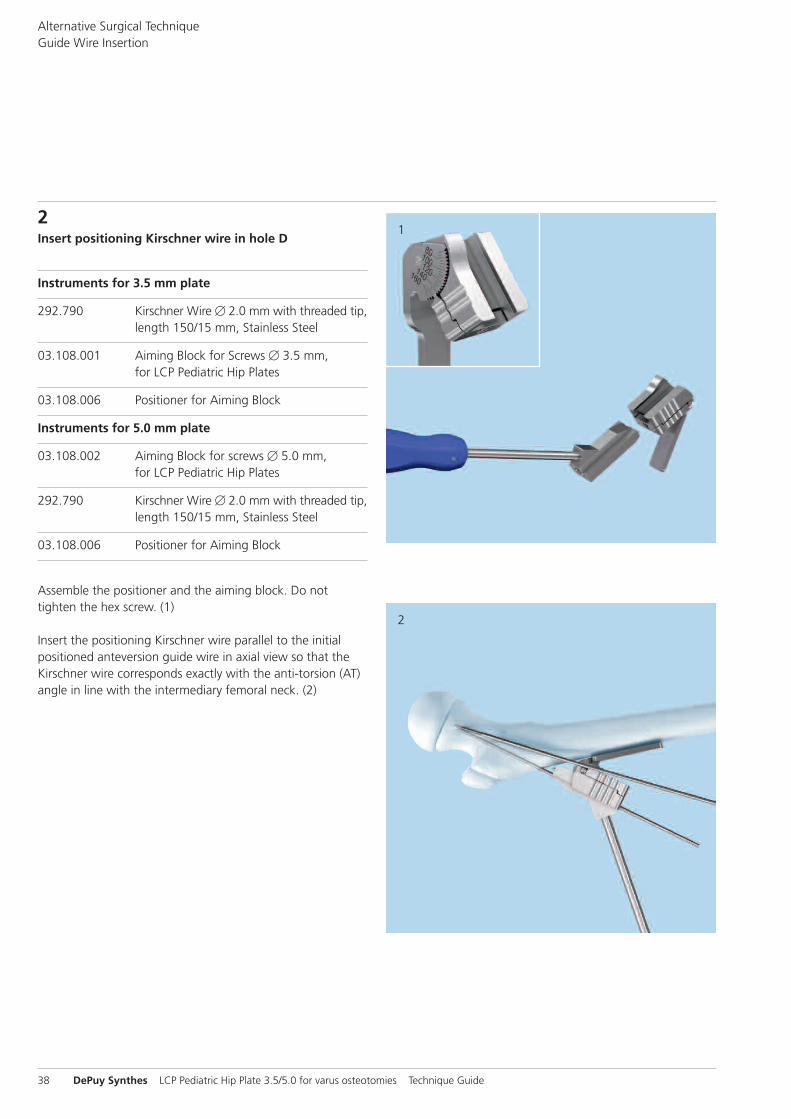
2Insert positioning Kirschner wire in hole D
Instruments for 3.5 mm plate
292.790 Kirschner Wire � 2.0 mm with threaded tip, length 150/15 mm, Stainless Steel
03.108.001 Aiming Block for Screws � 3.5 mm, for LCP Pediatric Hip Plates
03.108.006 Positioner for Aiming Block
Instruments for 5.0 mm plate
03.108.002 Aiming Block for screws � 5.0 mm, for LCP Pediatric Hip Plates
292.790 Kirschner Wire � 2.0 mm with threaded tip, length 150/15 mm, Stainless Steel
03.108.006 Positioner for Aiming Block
Assemble the positioner and the aiming block. Do nottighten the hex screw. (1)
Insert the positioning Kirschner wire parallel to the initial positioned anteversion guide wire in axial view so that theKirschner wire corresponds exactly with the anti-torsion (AT)angle in line with the intermediary femoral neck. (2)
Alternative Surgical TechniqueGuide Wire Insertion
38 DePuy Synthes LCP Pediatric Hip Plate 3.5/5.0 for varus osteotomies Technique Guide

3
4
Important: All following steps refer to the positioningKirschner wire, therefore the exact position is crucial for asuccessful surgery.
Verify the optimal placement of the positioning Kirschnerwire with the image intensifier. (3, 4)
Notes:– If additional extension or flexion is required the aimingblock has to be positioned accordingly.
– The two front spikes of the aiming block must be in contact with the femur.
– The positioning Kirschner wire stays inserted until thetwo neck shaft screws are fixed.
– Do not bend the Kirschner wire while drilling as thismay result in correction mistakes.
If the insertion of the positioning Kirschner wire is satisfac-tory, follow step 3 on page 17. Axial AP view
AP view
LCP Pediatric Hip Plate 3.5/5.0 for varus osteotomies Technique Guide DePuy Synthes 39

Product range of LCP Pediatric Hip Plates and LCPCondylar Plates 3.5 and 5.0The product range consists of 23 plates:– Small fragment plates 3.5 – Large fragment plates 5.0– Available sterile or unsterile packed
For proximal femurPlates for varus osteotomies (2.7, 3.5 and 5.0)The plates are available with screw angles of 100° or 110°and 2 (2.7) or 3 (3.5 / 5.0) distal fixation screws.
Plates for valgization osteotomies (3.5 and 5.0)The plates are available with a screw angle of 140° and 3distal fixation screws.
Plates for fractures and rotation osteotomies (3.5 and 5.0)The plates are available with a screw angle of 130° and 3, 5, 7 or 9 distal fixation screws.
For distal femur Plates for supracondylar fractures and deformitiesThe plates are available with a screw angle of 90° and 3, 5 or 7 distal fixation screws.
Overview of available technique guides:– LCP Pediatric Hip Plate 3.5 and 5.0 for varus osteotomies(Art. No.036.001.073)
– LCP Pediatric Hip Plate 2.7 for varus osteotomies(Art. No.036.001.060)
– LCP Pediatric Hip Plate 3.5 and 5.0 for fractures / derota-tional osteotomies (Leaflet) (Art. No. 036.001.063)
– LCP Pediatric Hip Plate Straight Valgus 3.5 and 5.0 forvalgus osteotomies (Art. No. 036.001.057)
– LCP Pediatric Condylar Plate 3.5 and 5.0 for supracondylardeformities and fractures (Art. No. 036.001.065)
Implants
40 DePuy Synthes LCP Pediatric Hip Plate 3.5/5.0 for varus osteotomies Technique Guide

For proximal femurPlates for varus osteotomies
02.108.300 LCP Paediatric Hip Plate 2.7, 100°,width 12 mm, length 46 mm
02.108.301 LCP Paediatric Hip Plate 2.7, 110°, width 12 mm, length 46 mm
02.108.303 LCP Pediatric Hip Plate 2.7, 130°, width 12 mm, length 46 mm
02.108.310 LCP Paediatric Hip Plate 3.5, 100°,width 19 mm, length 73 mm
02.108.311 LCP Pediatric Hip Plate 3.5, 110°, width 19 mm, length 73 mm
02.108.320 LCP Paediatric Hip Plate 5.0, 100°,width 23 mm, length 90 mm
02.108.321 LCP Pediatric Hip Plate 5.0, 110°, width 23 mm, length 90 mm
Plate for valgization osteotomy
02.108.316 LCP Pediatric Hip Plate 3.5, 140°, straight, width 19 mm, length 70 mm
02.108.326 LCP Pediatric Hip Plate 5.0, 140°, straight, width 23 mm, length 90 mm
LCP Pediatric Hip Plate 3.5/5.0 for varus osteotomies Technique Guide DePuy Synthes 41

Implants
Plates for fractures and derotation osteotomies
02.108.330 LCP Pediatric Hip Plate 3.5, 130°, width 19 mm, length 62 mm
02.108.340 LCP Pediatric Hip Plate 5.0, 130°, width 23 mm, length 79 mm
02.108.331 LCP Pediatric Hip Plate 3.5, 130°, width 19 mm, length 88 mm
02.108.341 LCP Pediatric Hip Plate 5.0, 130°, width 23 mm, length 111 mm
02.108.332 LCP Pediatric Hip Plate 3.5, 130°, width 19 mm, length 114 mm
02.108.342 LCP Pediatric Hip Plate 5.0, 130°, width 23 mm, length 143 mm
02.108.333 LCP Pediatric Hip Plate 3.5, 130°, width 19 mm, length 140 mm
02.108.343 LCP Pediatric Hip Plate 5.0, 130°, width 23 mm, length 175 mm
42 DePuy Synthes LCP Pediatric Hip Plate 3.5/5.0 for varus osteotomies Technique Guide

For distal femurPlates for supracondylar fractures and deformities
02.108.410 LCP Pediatric Condylar Plate 3.5, 90°, shaft 3 holes
02.108.420 LCP Pediatric Condylar Plate 5.0, 90°, shaft 3 holes
02.108.411 LCP Pediatric Condylar Plate 3.5, 90°, shaft 5 holes
02.108.421 LCP Pediatric Condylar Plate 5.0, 90°, shaft 5 holes
02.108.412 LCP Pediatric Condylar Plate 3.5, 90°, shaft 7 holes
02.108.422 LCP Pediatric Condylar Plate 5.0, 90°, shaft 7 holes
LCP Pediatric Hip Plate 3.5/5.0 for varus osteotomies Technique Guide DePuy Synthes 43

Implants
Screw overviewCortex screws, self-tapping, stainless steel
202.866 – Cortex Screws Stardrive � 2.7 mm,02.969 lengths 6 –60 mm
204.816 – Cortex Screws � 3.5 mm,204.860 lengths 16 –60 mm
02.200.016 – Cortex Screws Stardrive � 3.5 mm,02.200.070 self-tapping, lengths 16 –70 mm
214.818 – Cortex Screws � 4.5 mm, self-tapping,214.870 lengths 18 –70 mm
Locking screws, self-tapping, stainless steel
202.206 – Locking Screws Stardrive � 2.7 mm 202.260 (head LCP 2.4), lengths 6 –60 mm
213.016 – Locking Screws � 3.5 mm,213.060 lengths 16 –60 mm
212.104 – Locking Screws Stardrive � 3.5 mm,212.124 lengths 16 –60 mm
213.318 – Locking Screws � 5.0 mm,213.375 lengths 18 –75 mm
212.203 – Locking Screws Stardrive � 5.0 mm,212.224 lengths 18 –75 mm
All implants are also available sterile packed.Add Suffix “S” to part number.
44 DePuy Synthes LCP Pediatric Hip Plate 3.5/5.0 for varus osteotomies Technique Guide
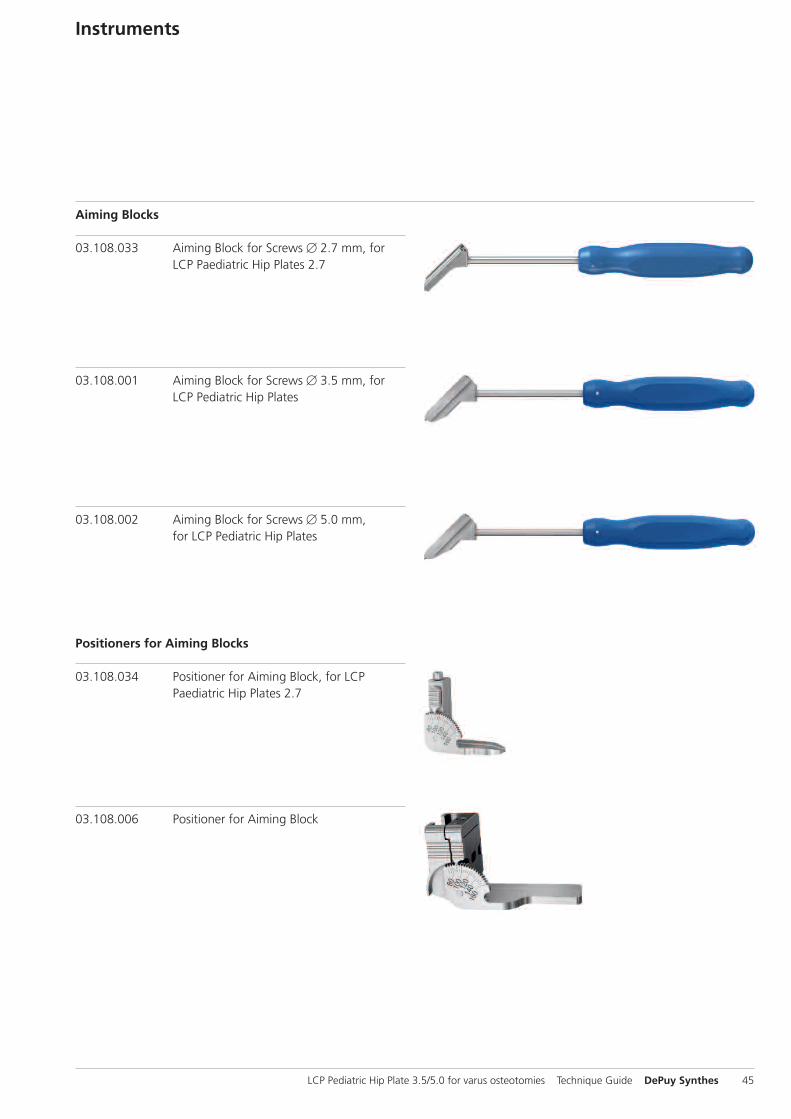
Instruments
Positioners for Aiming Blocks
03.108.034 Positioner for Aiming Block, for LCPPaediatric Hip Plates 2.7
03.108.006 Positioner for Aiming Block
03.108.001 Aiming Block for Screws � 3.5 mm, forLCP Pediatric Hip Plates
Aiming Blocks
03.108.033 Aiming Block for Screws � 2.7 mm, forLCP Paediatric Hip Plates 2.7
03.108.002 Aiming Block for Screws � 5.0 mm,for LCP Pediatric Hip Plates
LCP Pediatric Hip Plate 3.5/5.0 for varus osteotomies Technique Guide DePuy Synthes 45

Instruments
03.108.008 Positioner for Osteotomy
Positioners for Osteotomy
03.108.039 Positioner for Osteotomy, for LCP Paediatric Hip Plates 2.7
Drill Sleeves and Reduction Sleeve
03.108.036 LCP Drill Sleeve 2.7, for Drill Bits � 2.0 mm,for LCP Paediatric Hip Plates 2.7
03.108.009 LCP Drill Sleeve 3.5, for Drill Bits � 2.8 mm,for LCP Pediatric Hip Plate
03.108.010 LCP Drill Sleeve 5.0, for Drill Bits � 4.3 mm, for LCP Pediatric Hip Plate
03.108.003 Direct Measuring Device for KirschnerWires � 2.8 mm, length 200 mm
03.108.037 Direct Measuring Device for KirschnerWires � 2.0 mm, for LCP Paediatric HipPlates 2.7
03.108.004 Reduction Sleeve 4.3/2.8
46 DePuy Synthes LCP Pediatric Hip Plate 3.5/5.0 for varus osteotomies Technique Guide
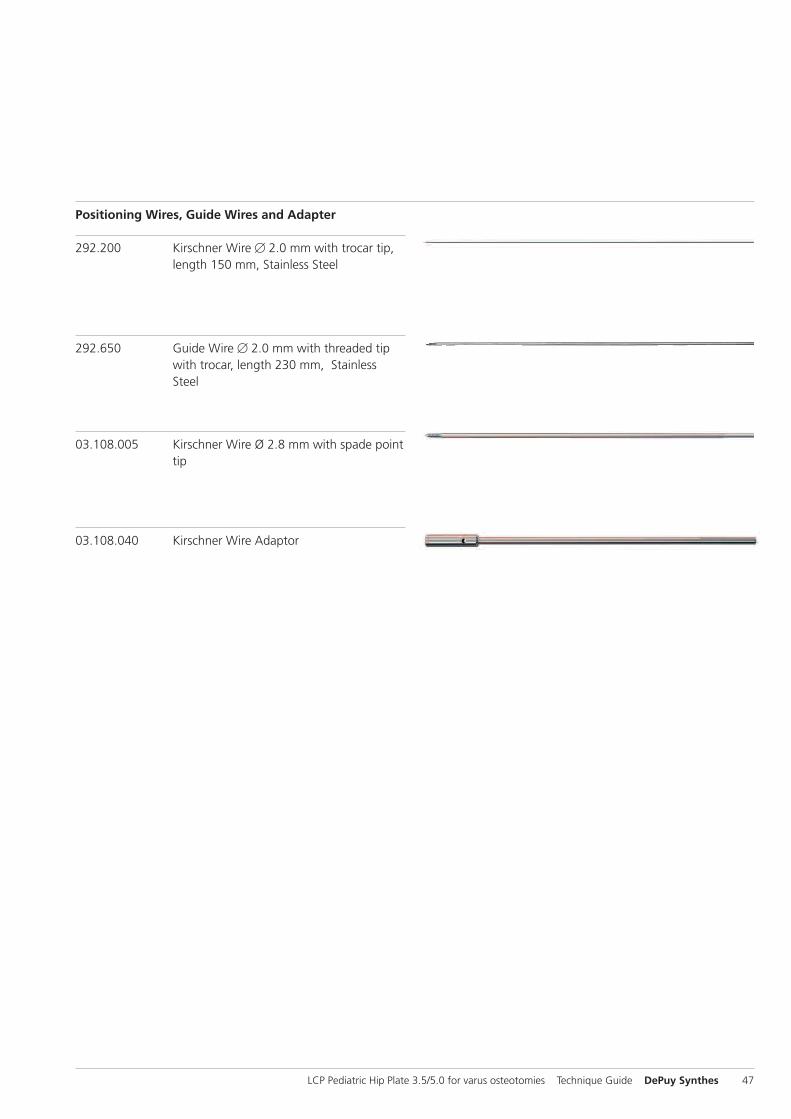
03.108.040 Kirschner Wire Adaptor
292.650 Guide Wire � 2.0 mm with threaded tipwith trocar, length 230 mm, StainlessSteel
Positioning Wires, Guide Wires and Adapter
292.200 Kirschner Wire � 2.0 mm with trocar tip,length 150 mm, Stainless Steel
03.108.005 Kirschner Wire Ø 2.8 mm with spade pointtip
LCP Pediatric Hip Plate 3.5/5.0 for varus osteotomies Technique Guide DePuy Synthes 47

Instruments
310.284 LCP Drill Bit � 2.8 mm with Stop, length 165 mm, 2-flute, for Quick Coupling
310.250 Drill Bit � 2.5 mm, length 110/85 mm, 2-flute, for Quick Coupling
Drill Bits
323.062 Drill Bit � 2.0 mm, with double marking,length 140/115 mm, 3-flute, for QuickCoupling
310.280 Drill Bit � 2.7 mm, length 125/100 mm, 2-flute, for Quick Coupling
310.310 Drill Bit � 3.2 mm, length 145/120 mm, 2-flute, for Quick Coupling
310.430 LCP Drill Bit � 4.3 mm with Stop, length 221 mm,2-flute, for Quick Coupling
48 DePuy Synthes LCP Pediatric Hip Plate 3.5/5.0 for varus osteotomies Technique Guide

312.460 Double Drill Guide 4.5/3.2
312.280 Double Drill Guide 3.5/2.5
323.260 Universal Drill Guide 2.7
Drill Guides
312.240 Double Drill Guide 2.7/2.0
LCP Pediatric Hip Plate 3.5/5.0 for varus osteotomies Technique Guide DePuy Synthes 49

Instruments
319.100 Depth Gauge for Screws � 4.5 to 6.5 mm, measuring range up to 110 mm
03.503.036 Depth Gauge for MatrixMANDIBLE,measuring range from 6 to 40 mm
Depth Gauges
319.010 Depth Gauge for Screws � 2.7 to 4.0 mm, measuring range up to 60 mm
50 DePuy Synthes LCP Pediatric Hip Plate 3.5/5.0 for varus osteotomies Technique Guide

313.304 Screwdriver Shaft Stardrive, SD8, cylindrical,with Groove, shaft � 3.5 mm, for AO/ASIFQuick Coupling
314.041 Screwdriver Stardrive 3.5, SD15, with Groove, length 200 mm
313.302 Screwdriver Stardrive, SD8, cylindrical, withGroove, shaft � 3.5 mm
314.270 Screwdriver, hexagonal, large, � 3.5 mm, with Groove, length 240 mm
Screwdrivers and Screwdriver Shafts
314.070 Screwdriver, hexagonal, small, � 2.5 mm, with Groove
314.164 Screwdriver Stardrive 4.5/5.0, SD25, with Groove, length 240 mm
LCP Pediatric Hip Plate 3.5/5.0 for varus osteotomies Technique Guide DePuy Synthes 51
Instruments
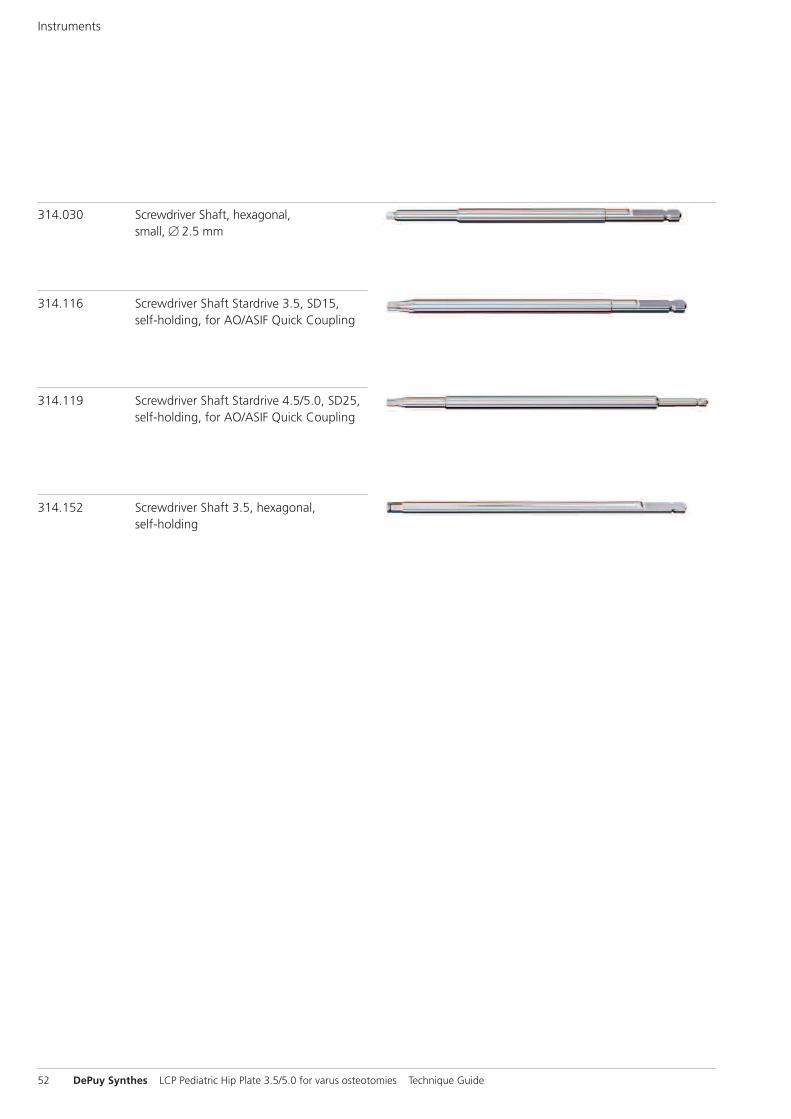
314.152 Screwdriver Shaft 3.5, hexagonal, self-holding
314.116 Screwdriver Shaft Stardrive 3.5, SD15, self-holding, for AO/ASIF Quick Coupling
314.030 Screwdriver Shaft, hexagonal, small, � 2.5 mm
314.119 Screwdriver Shaft Stardrive 4.5/5.0, SD25, self-holding, for AO/ASIF Quick Coupling
52 DePuy Synthes LCP Pediatric Hip Plate 3.5/5.0 for varus osteotomies Technique Guide

Bone Holding Forceps and Reduction Forceps
399.091 Bone Holding Forceps, self-centering, softlock, length 191 mm
399.121 Bone Holding Forceps, self-centering, soft lock, length 239 mm
399.124 Reduction Forceps, toothed, soft lock, length 250 mm
399.098 Reduction Forceps, toothed, soft lock,length 194 mm
LCP Pediatric Hip Plate 3.5/5.0 for varus osteotomies Technique Guide DePuy Synthes 53

Instruments
397.705 Handle for Torque Limiter Nos. 511.770 and 511.771
511.770 Torque Limiter, 1.5 Nm, for Compact Air Drive and Power Drive
511.776 Torque Limiter, 0.8 Nm, with AO/ASIFQuick Coupling
Torque Limiters
03.110.005 Handle for Torque Limiters 0.4/0.8/1.2 Nm
511.771 Torque Limiter, 4 Nm, for Compact Air Drive and Power Drive
54 DePuy Synthes LCP Pediatric Hip Plate 3.5/5.0 for varus osteotomies Technique Guide

333.070 Positioning Plate, triangular, length 45 mm, 80°/70°/30°
Positioning Plates
333.060 Positioning Plate, triangular, length 45 mm, 90°/50°/40°
333.080 Positioning Plate, triangular, length 45 mm, 100°/60°/20°
Others
03.108.007 Instrument for Medialization
313.300 Combined Holding Sleeve for CortexScrews Stardrive � 2.4/2.7 mm, SD8, for Screwdriver Shafts � 3.5 mm
LCP Pediatric Hip Plate 3.5/5.0 for varus osteotomies Technique Guide DePuy Synthes 55

Modules
Modules for implants, standard
68.108.032 Modular Tray for LCP Paediatric Plates 2.7, size 1/2, without Contents, Vario Case System
68.108.030 Modular Tray for LCP Paediatric Plates 3.5, size 1/2, without Contents, Vario Case System
68.108.031 Modular Tray for LCP Paediatric Plates 5.0, size 1/2, without Contents, Vario Case System
Modules for instruments, standard
68.108.041 Modular Tray for Instruments for LCP Paediatric Plates 2.7, size 1/2, without Contents, Vario Case System
68.108.040 Modular Tray for Instruments for LCP Paediatric Plates 3.5 and 5.0, size 1/1, without Contents, Vario Case System
68.108.042 Modular Tray for General Instruments, for LCP Paediatric Plates 3.5 and 5.0, size 1/1, without Contents, Vario Case System
Labeling clips
68.108.033 Labeling Clip for LCP Paediatric Plates 3.5, Vario Case System
68.108.034 Labeling Clip for LCP Paediatric Plates 5.0, Vario Case System
68.108.035 Labeling Clip for LCP Paediatric Plates 2.7, Vario Case System
68.108.043 Labeling Clip for Instruments for LCP Paediatric Plates 3.5 and 5.0, Vario Case System
68.108.044 Labeling Clip for Instruments for LCP Paediatric Plates 2.7, Vario Case System
68.108.045 Labeling Clip for General Instruments, for LCP Paediatric Plates 3.5 and 5.0, Vario Case System
56 DePuy Synthes LCP Pediatric Hip Plate 3.5/5.0 for varus osteotomies Technique Guide

Bibliography
Hefti F et al. (1998) Kinderorthopädie in der Praxis. BerlinHeidelberg New York: Springer
Müller ME (1971) Die hüftnahen Femurosteotomien.2. Auflage. Stuttgart: Thieme
Müller ME, Allgöwer M, Schneider R, Willenegger H (1995)Manual of Internal Fixation. 3rd, expanded and completelyrevised ed. 1991. Berlin, Heidelberg, New York: Springer
Morrissy RT, Weinstein SL (2001) Atlas of Pediatric Ortho-pedic Surgery. Philadelphia: Williams & Wilkins
Rüedi TP, Buckley RE, Moran CG (2007) AO Principles of Fracture Management. 2nd expanded ed. 2002. Stuttgart,New York: Thieme
LCP Pediatric Hip Plate 3.5/5.0 for varus osteotomies Technique Guide DePuy Synthes 57

0123
Synthes GmbHEimattstrasse 34436 OberdorfSwitzerlandTel: +41 61 965 61 11Fax: +41 61 965 66 00www.depuysynthes.com
This publication is not intended for distribution in the USA.
All surgical techniques are available as PDF files at www.synthes.com/lit ©
DePuy Synthes Traum
a, a division of Synthes GmbH
. 2015. All rights reserved. 036.001.073
DSEM/TRM/0814/0181(1) 01/15