Embed Size (px)
Citation preview

LCD MonitorLCD FarbmonitorMoniteur LCDMonitor LCDMonitor LCD
LL-191AOPERATION MANUALBEDIENUNGSANLEITUNGMODE D'EMPLOIMANUALE D'USOMANUAL DE FUNCIONAMIENTO
191A_cover1_2.P65 12/15/2003, 5:25 PM1

Table of Contents/Inhaltsverzeichnis/Table des matières/Indice/Índice/
Notice for Users in the USA . . . . . . . . . . . . . . . . . . . . . . . . . . . . . . . . . . . . . . . . . . . . . . . . . . . . . . . . . . . 3Notice for Users in Europe . . . . . . . . . . . . . . . . . . . . . . . . . . . . . . . . . . . . . . . . . . . . . . . . . . . . . . . . . . . . 4Notice for Users in the UK . . . . . . . . . . . . . . . . . . . . . . . . . . . . . . . . . . . . . . . . . . . . . . . . . . . . . . . . . . . . . 5Notice for Users in Australia . . . . . . . . . . . . . . . . . . . . . . . . . . . . . . . . . . . . . . . . . . . . . . . . . . . . . . . . . . . 5TCO'03 (LL-191A-W) . . . . . . . . . . . . . . . . . . . . . . . . . . . . . . . . . . . . . . . . . . . . . . . . . . . . . . . . . . . . . . . . . 6TCO'99 (LL-191A-B) . . . . . . . . . . . . . . . . . . . . . . . . . . . . . . . . . . . . . . . . . . . . . . . . . . . . . . . . . . . . . . . . . 7
English . . . . . . . . . . . . . . . . . . . . . . . . . . . . . . . . . . . . . . . . . . . . . . . . . . . . . . . . . . . . . . . . . . 9
Deutsch . . . . . . . . . . . . . . . . . . . . . . . . . . . . . . . . . . . . . . . . . . . . . . . . . . . . . . . . . . . . . . . . 31
Français . . . . . . . . . . . . . . . . . . . . . . . . . . . . . . . . . . . . . . . . . . . . . . . . . . . . . . . . . . . . . . . . 53
Italiano . . . . . . . . . . . . . . . . . . . . . . . . . . . . . . . . . . . . . . . . . . . . . . . . . . . . . . . . . . . . . . . . . 75
Español . . . . . . . . . . . . . . . . . . . . . . . . . . . . . . . . . . . . . . . . . . . . . . . . . . . . . . . . . . . . . . . . . 97
. . . . . . . . . . . . . . . . . . . . . . . . . . . . . . . . . . . . . . . . . . . . . . . . . . . . . . . . . . . . . . . . . . . 119
191A_cover1_2.P65 12/15/2003, 5:25 PM2

3
En
glis
hD
euts
chF
ran
çais
Ital
ian
oE
spañ
ol
En
glis
h
Notice for Users in the USA
FCC Statement
WARNING – FCC Regulations state that any unauthorized changes or modifications to this equipmentnot expressly approved by the manufacturer could void the user's authority to operate this equipment.
Note: This equipment has been tested and found to comply with the limits for a Class B digital devicepursuant to Part 15 of the FCC Rules.
These limits are designed to provide reasonable protection against harmful interference in aresidential installation. This equipment generates, uses and can radiate radio frequency energy and, ifnot installed and used in accordance with the instructions, may cause harmful interference to radiocommunications. However, there is no guarantee that interference will not occur in a particularinstallation. If this equipment does cause harmful interference to radio or television reception, whichcan be determined by turning the equipment off and on, the user is encouraged to try to correct theinterference by one or more of the following measures:- Reorient or relocate the receiving antenna.- Increase the distance between the equipment and receiver.- Connect the equipment into an outlet on a circuit different from that to which the receiver is
connected.- Consult the dealer or an experienced radio/TV technician for help.
Use nothing but the included cables and AC cord to insure compliance with FCC regulation for ClassB computing equipment.
Declaration of Conformity
SHARP LCD Color Monitor LL-191A-W/LL-191A-BThis device complies with part 15 of the FCC rules. Operation is subject to the following conditions: (1)this device may not cause harmful interference, and (2) this device must accept any interferencereceived, including interference that may cause undesired operation.
Responsible Party: SHARP ELECTRONICS CORPORATIONSharp Plaza, Mahwah, New Jersey 07430TEL: 1-800-BE-SHARP
* As an ENERGY STAR® Partner, SHARP has determined that this product meets the ENERGYSTAR® guidelines for energy efficiency.
This product utilizes tin-lead solder, and fluorescent lamp containing a small amount of mercury.Disposal of these materials may be regulated due to environmental considerations. For disposal orrecycling information, please contact your local authorities or the Electronics IndustriesAlliance: www.eiae.org
IMPORTANT:To aid in reporting in case of loss or theft, pleaserecord the monitor's model and serial numbers inthe space provided. The numbers are located onthe rear of the monitor.
Model No.:
Serial No.:
191A_notice.P65 12/15/2003, 5:32 PM3

4
Notice for Users in Europe
This equipment complies with the requirements of Directives 89/336/EEC and 73/23/EEC as amendedby 93/68/EEC.
Dieses Gerät entspricht den Anforderungen der EG-Richtlinien 89/336/EWG und 73/23/EWG mitÄnderung 93/68/EWG.
Ce matériel répond aux exigences contenues dans les directives 89/336/CEE et 73/23/CEE modifiéespar la directive 93/68/CEE.
Dit apparaat voldoet aan de eisen van de richtlijnen 89/336/EEG en 73/23/EEG, gewijzigd door 93/68/EEG.
Dette udstyr overholder kravene i direktiv nr. 89/336/EEC og 73/23/EEC med tillæg nr. 93/68/EEC.
Quest' apparecchio è conforme ai requisiti delle direttive 89/336/EEC e 73/23/EEC, come emendatadalla direttiva 93/68/EEC.
Η εγκατασταση ανταποκρινεται στιζ απαιτησειζ των οδηγιων τηζ Ευρωπαïκηζ Ενωσηζ 89/336/ΕΟΚ κατ73/23/ΕΟΚ, óπωζ οι κανονισµοι αυτοι συµπληρωθηκαν απó την οδηγια 93/68/ΕΟΚ.
Este equipamento obedece às exigências das directivas 89/336/CEE e 73/23/CEE, na sua versãocorrigida pela directiva 93/68/CEE.
Este aparato satisface las exigencias de las Directivas 89/336/CEE y 73/23/CEE, modificadas pormedio de la 93/68/CEE.
Denna utrustning uppfyller kraven enligt riktlinjerna 89/336/EEC och 73/23/EEC så som komplette rasav 93/68/EEC.
Dette produktet oppfyller betingelsene i direktivene 89/336/EEC og 73/23/EEC i endringen 93/68/EEC.
Tämä laite täyttää direktiivien 89/336/EEC ja 73/23/EEC vaatimukset, joita on muutettu direktiivillä 93/68/EEC.
CAUTION:TO PREVENT ELECTRICAL SHOCK, DISCONNECT THE AC CORD BEFORE SERVICING.
CAUTION:FOR A COMPLETE ELECTRICAL DISCONNECTION, PULL OUT THE MAIN PLUG.
VORSICHT:UM DIE STROMZUFUHR VOLLSTÄNDIG ZU UNTERBRECHEN, DEN NETZSTECKER HERAUSZIEHENENTFERNEN.
ATTENTION :POUR UN ARRET TOTAL DE L'APPAREIL, DEBRANCHEZ LA PRISE DU COURANT SECTEUR.
VARNING:FÖR TOTAL ELEKTRISK URKOPPLING, KOPPLA UR KONTAKTEN OCH.
PRECAUCION:PARA UNA COMPLETA DESCONEXION ELECTRICA DESENCHUFE LA CLAVIJA DE LA RED.
PRECAUCION:A FIN DE EVITAR DESCARGAS ELÉCTRICAS, DESCONECTE EL ENCHUFE DE LA RED ANTES DEREALIZAR CUALQUIER OPERACIÓN DE SERVICIO.
ATTENZIONE:PER EVITARE FOLGORAZIONI, SCOLLEGATE IL CAVO DI COLLEGAMENTO ALLA RETE INALTERNATA PRIMA DI EFFETTUARE UN INTERVENTO DI SERVIZIO TECNICO.
ATTENZIONE:PER UNO SCOLLEGAMENTO ELETTRICO COMPLETO, TIRATE FUORI LA SPINA PRINCIPALE.
191A_notice.P65 12/15/2003, 5:32 PM4

5
En
glis
hD
euts
chF
ran
çais
Ital
ian
oE
spañ
ol
En
glis
h
Notice for Users in the UK
Notice for Users in Australia
Service InquiriesPlease contact your dealer for service if required or contact Sharp Corporation of Australia on1 300 13 50 22 for referral to your nearest Sharp authorized Service Center.
FOR CUSTOMERS IN U.K.IMPORTANT
The wires in this mains lead are coloured in accordance with the following code:GREEN-AND-YELLOW : EarthBLUE : NeutralBROWN : Live
As the colours of the wires in the mains lead of this apparatus may not correspond with the colouredmarkings identifying the terminals in your plug proceed as follows:
• The wire which is coloured GREEN-AND-YELLOW must be connected to the terminal in the plugwhich is marked by the letter E or by the safety earth or coloured green or green-and-yellow.
• The wire which is coloured BLUE must be connected to the terminal which is marked with theletter N or coloured black.
• The wire which is coloured BROWN must be connected to the terminal which is marked with theletter L or coloured red.
Ensure that your equipment is connected correctly. If you are in any doubt consult a qualifiedelectrician. "WARNING: THIS APPARATUS MUST BE EARTHED."
191A_notice.P65 12/15/2003, 5:32 PM5

6
Congratulations!
The display you have just purchased carries the TCO'03 Displayslabel. This means that your display is designed, manufactured andtested according to some of the strictest quality and environmentalrequirements in the world. This makes for a high performanceproduct, designed with the user in focus that also minimizes theimpact on our natural environment.
Some of the features of the TCO'03 Display requirements:
Ergonomics • Good visual ergonomics and image quality in order to improve the working environment for the user
and to reduce sight and strain problems. Important parameters are luminance, contrast, resolution,reflectance, colour rendition and image stability.
Energy • Energy-saving mode after a certain time – beneficial both for the user and the environment • Electrical safety
Emissions • Electromagnetic fields • Noise emissions
Ecology• The product must be prepared for recycling and the manufacturer must have a certified environmental
management system such as EMAS or ISO 14 001• Restrictions on
- chlorinated and brominated flame retardants and polymers - heavy metals such as cadmium, mercury and lead.
The requirements included in this label have been developed by TCO Development in cooperation withscientists, experts, users as well as manufacturers all over the world. Since the end of the 1980s TCOhas been involved in influencing the development of IT equipment in a more user-friendly direction. Ourlabelling system started with displays in 1992 and is now requested by users and IT-manufacturers allover the world.
For more information, please visitwww.tcodevelopment.com
LL-191A-W
191A_notice.P65 12/15/2003, 5:32 PM6

7
En
glis
hD
euts
chF
ran
çais
Ital
ian
oE
spañ
ol
En
glis
h
LL-191A-B
Congratulations!You have just purchased a TCO'99 approved and labelled product! Your choice has provided you with aproduct developed for professional use. Your purchase has also contributed to reducing the burden onthe environment and also to the further development of environmentally adapted electronics products.
Why do we have environmentally labelled computers?In many countries, environmental labelling has become an established method for encouraging theadaptation of goods and services to the environment. The main problem, as far as computers and otherelectronics equipment are concerned, is that environmentally harmful substances are used both in theproducts and during their manufacture. Since it is not so far possible to satisfactorily recycle the majorityof electronics equipment, most of these potentially damaging substances sooner or later enter nature.There are also other characteristics of a computer, such as energy consumption levels, that areimportant from the viewpoints of both the work (internal) and natural (external) environments. Since allmethods of electricity generation have a negative effect on the environment (e.g. acidic and climate-influencing emissions, radioactive waste), it is vital to save energy. Electronics equipment in offices isoften left running continuously and thereby consumes a lot of energy.
What does labelling involve?This product meets the requirements for the TCO'99 scheme which provides for international andenvironmental labelling of personal computers. The labelling scheme was developed as a joint effort bythe TCO (The Swedish Confederation of Professional Employees), Svenska Naturskyddsforeningen(The Swedish Society for Nature Conservation) and Statens Energimyndighet (The Swedish NationalEnergy Administration).Approval requirements cover a wide range of issues: environment, ergonomics, usability, emission ofelectric and magnetic fields, energy consumption and electrical and fire safety.The environmental demands impose restrictions on the presence and use of heavy metals, brominatedand chlorinated flame retardants, CFCs (freons) and chlorinated solvents, among other things. Theproduct must be prepared for recycling and the manufacturer is obliged to have an environmental policywhich must be adhered to in each country where the company implements its operational policy.The energy requirements include a demand that the computer and/or display, after a certain period ofinactivity, shall reduce its power consumption to a lower level in one or more stages. The length of timeto reactivate the computer shall be reasonable for the user.Labelled products must meet strict environmental demands, for example, in respect of the reduction ofelectric and magnetic fields, physical and visual ergonomics and good usability.Below you will find a brief summary of the environmental requirements met by this product. Thecomplete environmental criteria document may be ordered from:
TCO DevelopmentSE-114 94 Stockholm, SwedenFax: +46 8 782 92 07Email (Internet): [email protected] information regarding TCO'99 approved and labelled products may also beobtained via the Internet, using the address: http://www.tco-info.com/
191A_notice.P65 12/15/2003, 5:32 PM7

8
Environmental requirements
Flame retardantsFlame retardants are present in printed circuit boards, cables, wires, casings and housings. Theirpurpose is to prevent, or at least to delay the spread of fire. Up to 30% of the plastic in a computer casingcan consist of flame retardant substances. Most flame retardants contain bromine or chloride, and thoseflame retardants are chemically related to another group of environmental toxins, PCBs. Both the flameretardants containing bromine or chloride and the PCBs are suspected of giving rise to severe healtheffects, including reproductive damage in fish-eating birds and mammals, due to the bio-accumulative*processes. Flame retardants have been found in human blood and researchers fear that disturbances infoetus development may occur.The relevant TCO'99 demand requires that plastic components weighing more than 25 grams must notcontain flame retardants with organically bound bromine or chlorine. Flame retardants are allowed in theprinted circuit boards since no substitutes are available.
Cadmium**Cadmium is present in rechargeable batteries and in the colour-generating layers of certain computerdisplays. Cadmium damages the nervous system and is toxic in high doses. The relevant TCO'99requirement states that batteries, the colour-generating layers of display screens and the electrical orelectronics components must not contain any cadmium.
Mercury**Mercury is sometimes found in batteries, relays and switches. It damages the nervous system and istoxic in high doses. The relevant TCO'99 requirement states that batteries may not contain any mercury.It also demands that mercury is not present in any of the electrical or electronics components associatedwith the labelled unit. There is however one exception. Mercury is, for the time being, permitted in theback light system of flat panel monitors as there today is no commercially available alternative. TCOaims on removing this exception when a mercury free alternative is available.
CFCs (freons)The relevant TCO'99 requirement states that neither CFCs nor HCFCs may be used during themanufacture and assembly of the product. CFCs (freons) are sometimes used for washing printed circuitboards. CFCs break down ozone and thereby damage the ozone layer in the stratosphere, causingincreased reception on earth of ultraviolet light with e.g. increased risks of skin cancer (malignantmelanoma) as a consequence.
Lead**Lead can be found in picture tubes, display screens, solders and capacitors. Lead damages the nervoussystem and in higher doses, causes lead poisoning. The relevant TCO'99 requirement permits theinclusion of lead since no replacement has yet been developed.
* Bio-accumulative is defined as substances which accumulate within living organisms.
** Lead, Cadmium and Mercury are heavy metals which are Bio-accumulative.
191A_notice.P65 12/15/2003, 5:32 PM8

9
Eng
lish
Table of Contents
Tips and safety precautions . . . . . . . . . . . . . . . . . . . . . . . . . . . . . . . . . . . . . . . . . . . . . . . . . . . . . . . . . . . . 10Product description . . . . . . . . . . . . . . . . . . . . . . . . . . . . . . . . . . . . . . . . . . . . . . . . . . . . . . . . . . . . . . . . . . 11Angle adjustment . . . . . . . . . . . . . . . . . . . . . . . . . . . . . . . . . . . . . . . . . . . . . . . . . . . . . . . . . . . . . . . . . . . . 12Connecting the monitor and turning the monitor on and off . . . . . . . . . . . . . . . . . . . . . . . . . . . . . . . . . . . 13
Connecting the monitor to a computer . . . . . . . . . . . . . . . . . . . . . . . . . . . . . . . . . . . . . . . . . . . . . . . . 13Connection of headphones (commercially available) . . . . . . . . . . . . . . . . . . . . . . . . . . . . . . . . . . . . 14Connecting the monitor to a power source . . . . . . . . . . . . . . . . . . . . . . . . . . . . . . . . . . . . . . . . . . . . . 14Turning the power on . . . . . . . . . . . . . . . . . . . . . . . . . . . . . . . . . . . . . . . . . . . . . . . . . . . . . . . . . . . . . . 14Turning the power off . . . . . . . . . . . . . . . . . . . . . . . . . . . . . . . . . . . . . . . . . . . . . . . . . . . . . . . . . . . . . . 15
Adjusting the screen display and speaker volume . . . . . . . . . . . . . . . . . . . . . . . . . . . . . . . . . . . . . . . . . . 16Adjusting the backlight . . . . . . . . . . . . . . . . . . . . . . . . . . . . . . . . . . . . . . . . . . . . . . . . . . . . . . . . . . . . . 16Adjusting the speaker volume . . . . . . . . . . . . . . . . . . . . . . . . . . . . . . . . . . . . . . . . . . . . . . . . . . . . . . . 17Setting display mode . . . . . . . . . . . . . . . . . . . . . . . . . . . . . . . . . . . . . . . . . . . . . . . . . . . . . . . . . . . . . . 17Checking product information . . . . . . . . . . . . . . . . . . . . . . . . . . . . . . . . . . . . . . . . . . . . . . . . . . . . . . . 17
Adjusting the screen display . . . . . . . . . . . . . . . . . . . . . . . . . . . . . . . . . . . . . . . . . . . . . . . . . . . . . . . . . . . 18Automatic screen adjustment . . . . . . . . . . . . . . . . . . . . . . . . . . . . . . . . . . . . . . . . . . . . . . . . . . . . . . . . 18Manual screen adjustment . . . . . . . . . . . . . . . . . . . . . . . . . . . . . . . . . . . . . . . . . . . . . . . . . . . . . . . . . . 19
Monitor care . . . . . . . . . . . . . . . . . . . . . . . . . . . . . . . . . . . . . . . . . . . . . . . . . . . . . . . . . . . . . . . . . . . . . . . . 22Monitor care . . . . . . . . . . . . . . . . . . . . . . . . . . . . . . . . . . . . . . . . . . . . . . . . . . . . . . . . . . . . . . . . . . . . . 22Storage . . . . . . . . . . . . . . . . . . . . . . . . . . . . . . . . . . . . . . . . . . . . . . . . . . . . . . . . . . . . . . . . . . . . . . . . . 22Troubleshooting . . . . . . . . . . . . . . . . . . . . . . . . . . . . . . . . . . . . . . . . . . . . . . . . . . . . . . . . . . . . . . . . . . 22Information for customers on environmentally friendly disposal of this SHARP product . . . . . . . . . 23
Specifications . . . . . . . . . . . . . . . . . . . . . . . . . . . . . . . . . . . . . . . . . . . . . . . . . . . . . . . . . . . . . . . . . . . . . . . 24Installing set-up information and the ICC profile (For Windows) . . . . . . . . . . . . . . . . . . . . . . . . . . . . . . . 26Information about the ColorSync profile (For MacOS) . . . . . . . . . . . . . . . . . . . . . . . . . . . . . . . . . . . . . . . 29Instructions for attaching a VESA-compliant arm . . . . . . . . . . . . . . . . . . . . . . . . . . . . . . . . . . . . . . . . . . . 30
191A_gb.P65 12/15/2003, 5:27 PM9

10
Tips and safety precautions
- The TFT color LCD panel used in this monitor ismade with the application of high precisiontechnology. However, there may be minutepoints on the screen where pixels never light orare permanently lit. Also, if the screen is viewedfrom an acute angle there may be uneven colorsor brightness. Please note that these are notmalfunctions but common phenomena of LCDsand will not affect the performance of themonitor.
- Do not display a still picture for a long time, asthis could cause an afterimage to remain.
- If the brightness is adjusted to the minimumsetting it may be difficult to see the screen.
- The quality of the computer signal may influencethe quality of the display. We recommend usinga computer able to emit high quality videosignals.
- Never rub or tap the monitor with hard objects.- Please understand that Sharp Corporation bears
no responsibility for errors made during use bythe customer or a third party, nor for any othermalfunctions or damage to this product arisingduring use, except where indemnity liability isrecognized under law.
- This monitor and its accessories may beupgraded without advance notice.
Location- Do not use the monitor where ventilation is poor,
where there is a lot of dust, where humidity ishigh, or where the monitor may come intocontact with oil or steam, as this could lead tofire.
- Ensure that the monitor does not come intocontact with water or other fluids. Ensure that noobjects such as paper clips or pins enter themonitor as this could lead to fire or electricshock.
- Do not place the monitor on top of unstableobjects or in unsafe places. Do not allow themonitor to come into contact with strong shocksor vibrations. Causing the monitor to fall ortopple over may damage it.
- Do not use in places where the monitor will besubject to direct sunlight, near heatingequipment or anywhere else where there islikelihood of high temperature, as this may leadto generation of excessive heat and outbreak offire.
The Power Cord- Do not damage the power cord nor place heavy
objects on it, stretch it or over bend it. Also, donot add extension cords. Damage to the cordmay result in fire or electric shock.
- Use only the power cord supplied with the monitor.- Insert the power plug directly into the AC outlet.
Adding an extension cord may lead to fire as aresult of overheating.
- Do not remove or insert the power plug with wethands. Doing so could result in electric shock.
Monitor and accessory checklist- Please check that the following items are
included in the package.- LCD monitor (1)- Analog signal cable (1)
(model name: 0NIT15G4-0015)- Audio cable (1)
(model name: 0NIT17A3-U006)- Power cord (1)- CD-ROM (1)- Operation manual (1)
Notes:- Use only the cables supplied with the monitor.- You are advised to retain the carton in case the
monitor needs to be transported.- Sharp Corporation holds authorship rights to the
Utility Disk program. Do not reproduce it withoutpermission.
- The shape of the supplied accessories may notbe exactly same as shown in this manual.
Manual Scope- In this manual, Microsoft Windows XP will be
referred to as "Windows XP", Microsoft WindowsMillennium as "Windows Me", MicrosoftWindows 2000 as "Windows 2000", MicrosoftWindows 98 as "Windows 98", MicrosoftWindows 95 as "Windows 95", and MicrosoftWindows Version 3.1 as "Windows 3.1". Whenthere is no need to distinguish betweenprograms, the term "Windows" will be used.
- Microsoft and Windows are registeredtrademarks of Microsoft Corporation.
- Macintosh is a registered trademark of AppleComputer, Inc.
- All other brand and product names aretrademarks or registered trademarks of theirrespective holders.
03_191A_gb.P65 12/16/2003, 1:30 PM10

11
Eng
lish
1. AUTO button ............................ This button is used to perform automatic adjustment of the screen(CLOCK, PHASE, H-POS and V-POS). (p.18)
2. MENU button ........................... This button is used to pop-up, select and close the OSD (On ScreenDisplay) Menu.
3. / MODE button ..................... When the OSD Menu is displayed:This button is used to select menu options.
When the OSD Menu is not displayed:This button is used to set DISPLAY MODE.
4. buttons ............................. When the OSD Menu is displayed:These buttons are used to select an option or adjust the value of theselected option.
When the OSD Menu is not displayed:These buttons are used to adjust backlight brightness and speakervolume.
5. Speakers.................................. Audio entering via the external device connected to the monitor canbe heard.
6. Headphone terminal ............... Headphones (commercially available) can be connected here.7. Power button ............................ Pressing this button turns the power on.
Press the button again to turn the power off.8. Power LED............................... This LED is lit green when in use and orange when in power-saving mode.9. Main power switch10. Power terminal11. Analog RGB input terminal ..... The analog signal cable is connected here. The analog signal cable
included should be used.12. Audio input terminal ................ A computer's audio output terminal can be connected here. The audio
cable included should be used.13. Security lock anchor ................ By connecting a security lock (commercially available) to the security
lock anchor, the monitor is fixed so that it cannot be transported.The security slot works in conjunction with Kensington Micro SaverSecurity Systems.
14. Ventilation openings ............... Never block the ventilation openings as this may lead to overheatinginside the monitor and result in malfunction.
Product description
191A_gb.P65 12/15/2003, 5:27 PM11

12
CAUTION!
- Be sure to hold both sides of the monitor whenadjusting the viewing angle. The LCD panelused in this monitor is made of glass. Pressurefrom hands on the LCD panel could causedamage.
Angle adjustment
approx. 25°
approx. 5°
191A_gb.P65 12/15/2003, 5:27 PM12

13
Eng
lish
CAUTION!
- When connecting, ensure that both the monitorand computer are switched off.
- Be careful not to over bend the cable or addextension cords as this could lead to amalfunction.
Connecting the monitor to a computer
Connect the accessory analog signal cable to theanalog RGB output terminal of the computer.
- Paying attention to connector direction, firmlyinsert the signal cable vertically into theconnector, and then tighten the screws at bothsides.
If connecting to a D-sub15 pin 2 row Apple PowerMacintosh, attach a Macintosh conversion adapter(commercially available) to the analog signalcable.
Note:- If connecting to the Sun Ultra series, a
conversion adapter (commercially available)may be required.
Connecting the monitor and turning the monitor on and off
Analog signal cable
Analog RGB terminal(Mini D-sub 15 pin, 3 row)
Analog RGB terminal(Mini D-sub 15 pin, 3 row)
Macintosh conversion adapter
Connect the accessory audio cableWhen the accessory audio cable is connected tothe audio output terminal of the computer, thesound of the connected computer is output fromthe monitor speakers. You can also use theheadphone jack of the display.
Audio output terminal
Audio cable
Audio input terminal
191A_gb.P65 12/15/2003, 5:27 PM13
14
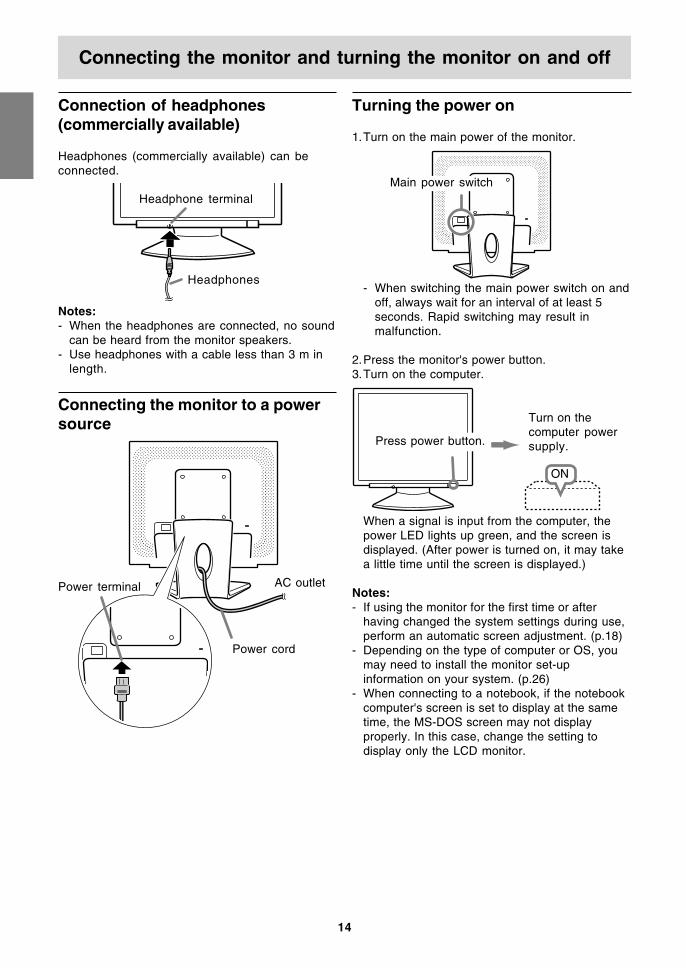
Connection of headphones(commercially available)
Headphones (commercially available) can beconnected.
Notes:- When the headphones are connected, no sound
can be heard from the monitor speakers.- Use headphones with a cable less than 3 m in
length.
Connecting the monitor to a powersource
Connecting the monitor and turning the monitor on and off
Turning the power on
1.Turn on the main power of the monitor.
- When switching the main power switch on andoff, always wait for an interval of at least 5seconds. Rapid switching may result inmalfunction.
2.Press the monitor's power button.3.Turn on the computer.
When a signal is input from the computer, thepower LED lights up green, and the screen isdisplayed. (After power is turned on, it may takea little time until the screen is displayed.)
Notes:- If using the monitor for the first time or after
having changed the system settings during use,perform an automatic screen adjustment. (p.18)
- Depending on the type of computer or OS, youmay need to install the monitor set-upinformation on your system. (p.26)
- When connecting to a notebook, if the notebookcomputer's screen is set to display at the sametime, the MS-DOS screen may not displayproperly. In this case, change the setting todisplay only the LCD monitor.
Turn on thecomputer powersupply.
ON
Headphones
Headphone terminal
AC outlet
Power cord
Power terminal
Main power switch
Press power button.
191A_gb.P65 12/15/2003, 5:27 PM14
15
Eng
lish
Connecting the monitor and turning the monitor on and off
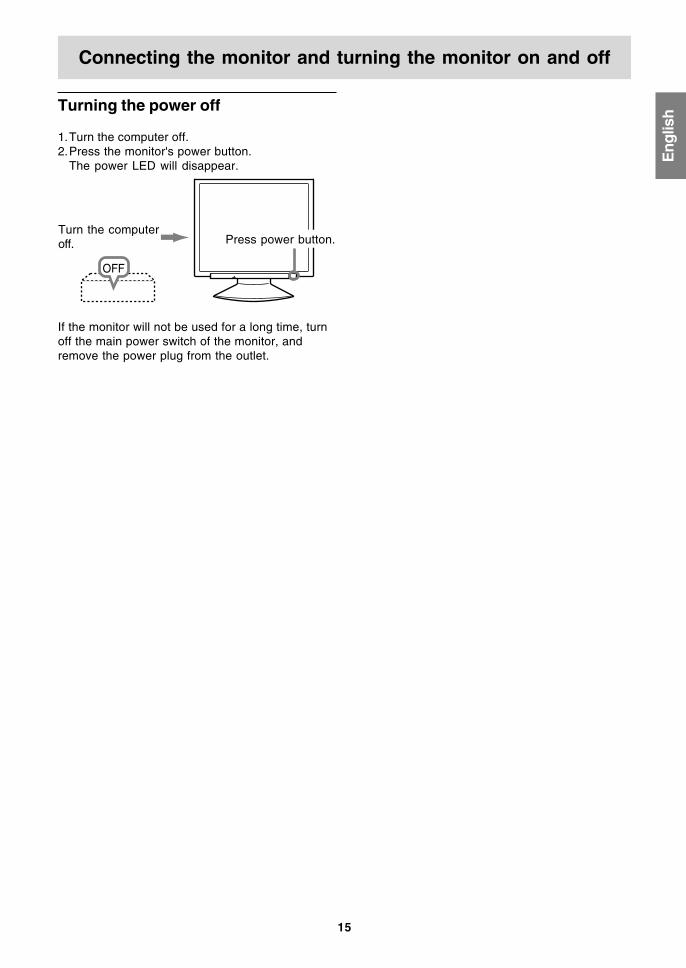
Turning the power off
1.Turn the computer off.2.Press the monitor's power button.
The power LED will disappear.
If the monitor will not be used for a long time, turnoff the main power switch of the monitor, andremove the power plug from the outlet.
OFF
Turn the computeroff. Press power button.
191A_gb.P65 12/15/2003, 5:27 PM15

16
Adjusting the screen display and speaker volume
Adjustment lock functionBy disabling the control buttons (i.e. setting thelock) any attempted changes to adjusted valueswill be voided.1.Turn off the monitor power.2.While pressing the MENU button, press the
power button (i.e. turn the power on).Continue to press the buttons until[ADJUSTMENT LOCKED] appears on the screen.The lock is set when the message is displayed.
Note:- When the lock is in place, all buttons other than
the power button are disabled.
Adjustment lock release1.Turn off the monitor power.2.While pressing the MENU button, press the
power button (i.e. turn the power on).Continue to press the buttons until [ADJUSTMENTUNLOCKED] appears on the screen. The lock isreleased when the message is displayed.
Adjusting the backlight
1.Without the OSD Menu being displayed, pressthe or the button.
2.Check that [BRIGHT] is selected.If it is not selected, press the / MODE buttonand select [BRIGHT].
3.Adjust by pressing the button (darker) or button (lighter).
Note:- On Screen display for adjustment disappears
several seconds after the last operation.
Note:- All adjustments will be saved even after turning
the power off.
Resetting all adjustment valuesAll adjustment values can be returned to theiroriginal ex-factory values in one command.1.Turn off the monitor power.2.Press the MENU button and the / MODE
button simultaneously, and while doing thispress the power button (i.e. turn the power on).Continue to press the buttons until [ALL RESET]appears on the screen. Reset is complete whenthe displayed message disappears.
Notes:- While [ALL RESET] is displayed, the control
buttons are disabled.- It is not possible to reset values when the
adjustment lock is in place. Remove theadjustment lock before attempting to operatecontrol buttons.
ADJUSTMENT Menu resetSettings of items in the ADJUSTMENT Menu(CLOCK, PHASE, H-POS, V-POS) can be returnedto their original ex-factory values.1.Turn on the monitor power.2.Press the MENU button and the button
simultaneously. When [RESET] appears on thescreen, the reset is complete.
Notes:- While [RESET] is displayed, the control buttons
are disabled.- It is not possible to reset values when the
adjustment lock is in place. Remove theadjustment lock before attempting to operatecontrol buttons.
191A_gb.P65 12/15/2003, 5:27 PM16

17
Eng
lishAdjusting the speaker volume
1.Without the OSD Menu being displayed, pressthe or the button.
2.Check that [VOLUME] is selected.If it is not selected, press the / MODE buttonand select [VOLUME].
3.Adjust by pressing the button (decrease) or button (increase).
Note:- On Screen display for adjustment disappears
several seconds after the last operation.
Adjusting the screen display and speaker volume
Setting display mode
Color tone or brightness can be changed with onecommand.
STDDisplays image with the color tone results fromoriginal scheme of liquid crystal panel.
OFFICEDisplay brightness is lowered. (This mode savespower.)
sRGBsRGB is international standard of colorrepresentation specified by IEC (InternationalElectrotechnical Commission).Color conversion is made in taking account ofliquid crystal's characteristics and representscolor tone close to its original image.
VIVIDDisplays an image with dynamic and vividprimary colors.
- If [DISPLAY MODE] is set to [sRGB] or [VIVID],[WHITE BALANCE] is set to [STD], and [GAMMA]is set to [0].
How to setPress the / MODE button when the OSD Menu isnot displayed.Each time the button is pressed the next menuitem appears. (STD → OFFICE → sRGB → VIVID→ STD)On Screen display for adjustment disappearsseveral seconds after the last operation.
Checking product information
A model name (MODEL), a serial no. (S/N), andusage time (USAGE TIME) of the monitor can bechecked.1.Turn the power off.2.While pressing the / MODE button, press the
monitor's power button (i.e. turn the power on).The product information will display.
3.Press the MENU button.
Note:- Please note that the indication of usage time at
purchase may not be 0 (zero), as a result offactory inspection and other activities duringmanufacture.
191A_gb.P65 12/15/2003, 5:27 PM17

18
Adjusting the screen display
Adjusting the screen automaticallyAutomatic adjustment can be performed usingeither the AUTO button or the MENU button.
AUTO button1.Press the AUTO button.2.Press the AUTO button again.
[ADJUSTING] will appear on the screen, andafter a few seconds [ADJUSTING] will disappear.(The automatic adjustment is now complete.)
MENU button1.Press the MENU button.
The ADJUSTMENT Menu will be displayed.
2.Press the button.The screen will become dark and [ADJUSTING]will be displayed. After a few seconds theADJUSTMENT Menu will return. (The automaticadjustment is now complete.)
3.Press the MENU button 5 times to make the OSD(On Screen Display) Menu disappear.
Notes:- In most cases automatic adjustment is sufficient.- It may not be possible to achieve correct
adjustment with the first automatic adjustment. Insuch a case, try repeating the automaticadjustment 2 or 3 times.
- If necessary due to any of the following, manualadjustments (p.19) can be performed after theautomatic adjustment.- When further fine adjustment is needed.- When [OUT OF ADJUST] is displayed. (When
the screen displays an entirely dark image, theautomatic screen adjustment may be disabled.When making an automatic adjustment, besure to either use the Adjustment Pattern or trydisplaying an image that makes the entirescreen very bright.)
- When the computer's video input signals areComposite Sync or Sync on Green. (Automaticadjustments may not be possible.)
- Automatic adjustment may not be achievedcorrectly depending on what is displayed on thescreen - moving pictures or the MS-DOS promptetc.
Automatic screen adjustment
Options in the ADJUSTMENT Menu can beadjusted automatically (CLOCK, PHASE, H-POS,V-POS).
Note:- When setting up this monitor for the first time or
after having changed an aspect of the currentsystem, perform an automatic screen adjustmentbefore use.
Screen display for adjustmentFirst display an image that makes the entirescreen light.If you are using Windows, you can use theAdjustment Pattern on the accompanying CD-ROM.
Opening the Adjustment Pattern (for Windows)This explanation is for Windows 95/98/2000/Me/XP, and assumes that the CD-ROM drive is "D"drive.1.Load the accessory CD-ROM into the CD-ROM
drive of the computer.2.Open [My Computer] and select CD-ROM. If
using Windows 3.1, open [File Manager] andchoose "D" drive.
3.Double click on [Adj_uty.exe] to run theAdjustment Program. The Adjustment Patternwill appear.
Adjustment Pattern
After completing the adjustments, press thecomputer's [Esc] key to exit the AdjustmentProgram.
Note:- If your computer's display mode is set to 65K
colors, you may see the different color levels ineach color pattern or the gray scale may lookcolored. (This is due to the specification of theinput signal and is not a malfunction.)
191A_gb.P65 12/15/2003, 5:27 PM18

19
Eng
lish
ADJUSTMENT Menu
AUTOWhen [AUTO] is selected with the button, the[CLOCK], [PHASE], [H-POS] and [V-POS] settingsare automatically adjusted.
CLOCKThe figure below demonstrates how to adjust sothat vertical flicker noise is not emitted.( buttons)
PHASEThe figure below demonstrates how to adjust sothat horizontal flicker noise is not emitted.( buttons)Note:- Adjustments to [PHASE] should be made only
after [CLOCK] has been correctly set.
H-POS (horizontal positioning) and V-POS(vertical positioning)To center the Adjustment Pattern within theboundaries of the screen, adjust the left-right (H-POS) values and the up-down (V-POS) values.( buttons)
Manual screen adjustment
1.Display an image that makes the entire screenlight. (p.18)
2.Display the OSD Menu by pressing the MENUbutton.ADJUSTMENT Menu
MENUGAIN CONTROL Menu
MENUCOLOR CONTROL Menu
MENUMODE SELECT-1 Menu
MENU
MODE SELECT-2 Menu
MENUThe OSD Menu closes.
Notes:- The OSD Menu automatically disappears
approximately 30 seconds after the last command.- This chapter provides the procedure how to
adjust the screen by using Adjustment Pattern(for Windows).
Adjusting the screen display
Screen frame
Vertical flicker noise
Horizontal flicker noise
AdjustmentPattern
Select theoption bypressing the
/ MODEbutton.
Select theoption bypressing the
/ MODEbutton.
Select theoption bypressing the
/ MODEbutton.
Select theoption bypressing the
/ MODEbutton.
Select theoption bypressing the
/ MODEbutton.
191A_gb.P65 12/15/2003, 5:27 PM19

20
Adjusting the screen display
COLOR CONTROL Menu
WHITE BALANCE1.After selecting [WHITE BALANCE], press the
button.The WHITE BALANCE menu will be displayed.
2.Use the buttons to select [COOL], [·], [STD],[·], [WARM] or [USER].COOL ... Color tone bluer than standard • ......... Color tone slightly bluer than standardSTD ...... Color tone standard setting • ......... Color tone slightly redder than standardWARM .. Color tone redder than standardUSER
- Selecting [USER] will display the settingvalues for [R-CONTRAST], [G-CONTRAST]and [B-CONTRAST], in order to make fineadjustments.
- Use the / MODE button to select[R-CONTRAST], [G-CONTRAST] and[B-CONTRAST].
R-CONTRAST ..... button for blue-greenbutton for red
G-CONTRAST ..... button for purplebutton for green
B-CONTRAST...... button for yellowbutton for blue
3.Press the MENU button.
Notes:- On settings other than [STD] not all gradations
can be displayed. To display all gradations, setto [STD].
- If [DISPLAY MODE] is set to [sRGB] or [VIVID],no other setting than [STD] can be selected.
GAMMAAdjust so that dark and bright images are easy tosee. If the screen is dark and hard to see, increasethe numerical value. If it is bright and hard to see,lower the numerical value. ( buttons)- If [DISPLAY MODE] is set to [sRGB] or [VIVID],
[GAMMA] can not be set.
GAIN CONTROL Menu
AUTOWhen [AUTO] is selected with the button, the[BLACK LEVEL] and [CONTRAST] settings areautomatically adjusted. After the automaticadjustment, perform manual adjustment whennecessary.
BLACK LEVELTotal screen brightness can be adjusted whilewatching the color pattern. ( buttons)
CONTRASTWhile watching the color pattern, adjustments canbe made so that all gradations appear.( buttons)
Notes:About AUTO (Auto Gain Control function)- The Auto Gain Control adjusts contrast and
black level based on the brightest and darkestcolors of the image displayed.
- If you are not using the Adjustment Pattern it isnecessary to have black area and white area ofat least 5 mm x 5 mm on the screen. Adjustmentmay not be possible without those areas.
- If the signal coming from the computer isComposite Sync or Sync on Green, automaticadjustment cannot be performed. Pleaseperform manual adjustment instead.
- If [OUT OF ADJUST] is displayed, performmanual adjustment.
Color pattern
191A_gb.P65 12/15/2003, 5:27 PM20

21
Eng
lish
MODE SELECT-1 Menu
Note:- Depending on the resolution of the input signal,
even if menu options can be selected, thedisplay may not change.
OSD H-POSITION (OSD horizontal position)The position of the OSD Menu can be moved tothe left and right. ( buttons)
OSD V-POSITION (OSD vertical position)The position of the OSD Menu can be moved upand down. ( buttons)
SCALING (Level of scaling)The sharpness of the image can be adjusted. ( buttons)Note:- When the display mode is set to less than
1280 x 1024 pixels, the display is enlarged tocover the whole screen (i.e. the side ratio of thedisplay may change).
400LINES (degree of resolution)You can specify the horizontal resolution of a 400-line screen when using US text, etc. ( buttons)
640: 640 x 400 dot mode720: 720 x 400 dot mode (US text etc.)
Note:- As the resolution input for other than 400 lines is
done automatically, there is no need to set it.
LANGUAGEYou can choose the language used in OSD Menu.1.Press the button.
The Language Selection Menu will be displayedon the screen.
2.Use the / MODE button to choose a language.3.Press the MENU button.
Adjusting the screen display
MODE SELECT-2 Menu
INFORMATIONA model name (MODEL), a serial no. (S/N), andusage time (USAGE TIME) of the monitor can bechecked.1.After selecting [INFORMATION], press the
button.The product information will display.
2.Press the MENU button.
OFF TIMERPower is automatically shut off when the set timeelapses.1.After selecting [OFF TIMER], press the button.2.Set [ON]/[OFF] by pressing the buttons.
If selecting [ON], press the / MODE button andset the shut-off time by pressing the buttons.(Between 1 and 23 hours may be set, by thehour.)
3.Press the MENU button.- When [ON] is selected, the remaining time is
displayed in the upper right of the screen duringthe last 5 minutes before the shut-off. (Theremaining time is displayed for approx. 5seconds, on each minute.)
- If the power button is pressed after the firstdisplay of the remaining time but before thepower shuts off, the OFF TIMER will be set toone hour.To subsequently turn the power off, press thepower button again. (When next turning onpower, power is again automatically shut offwhen the set time elapses.)
- If the monitor is turned on when the [OFF TIMER]is set to [ON], the set time appears on the displayfor several seconds. (If there is no input signal,[NO SIGNAL] is displayed.)
191A_gb.P65 12/15/2003, 5:27 PM21

22
Monitor care
Monitor care
Always remove the plug from the AC outlet whencleaning the monitor.
Cabinet and control panel sectionUse a soft dry cloth to lightly wipe away any grimefrom the cabinet and control panel.If they are very dirty, apply neutral detergent to adampened soft cloth, wring it out well and wipeaway grime.
LCD panel sectionUse a soft dry cloth to lightly wipe away dirt anddust from the surface of the LCD panel. (A softcloth such as gauze or that used for lens cleaningis suitable.)
CAUTION!
- Never use thinner, benzine, alcohol, glasscleaner, etc, as this could lead to color changeor change in shape.
- Never scratch the monitor with anything hard orapply strong pressure as this could leave marksor result in malfunction.
Storage
If the monitor will not be used for a long period oftime, be sure to remove the power plug from theAC outlet.
CAUTION!
- Do not leave the monitor in contact with rubberor plastic items for long periods of time as thiscould lead to color change or change in shape.
Troubleshooting
If you think the monitor may be faulty, pleasecheck the following points before taking it to berepaired.If afterwards it still does not work, please contactthe shop where you purchased the monitor or yournearest Sharp authorized Service Center.
The monitor's fluorescent tubes have a limitedlife span.- If the screen darkens, persistently flickers or
does not light up, the fluorescent tube hasreached the end of its operational life span.Please inquire at the shop where youpurchased the monitor or your nearest Sharpauthorized Service Center.
- In the initial period of use, due to thecharacteristics of fluorescent tubes the screenmay flicker. (This is not a malfunction.) Shouldthis happen, check by first turning off thepower, then turning it on again.
No image appears on the screen (power LED isnot lit).- Is the power cord connected properly? (p.14)
No image appears on the screen (power LED is lit).- Is the computer connected properly? (p.13)- Is the computer turned on?- Does the computer's signal timing correspond to
monitor specifications? (p.25)- Is the computer in power-saving mode?
Control buttons do not work.- Is the adjustment lock on? (p.16)
The image appears distorted.- Does the computer's signal timing correspond to
monitor specifications? (p.25)- Perform automatic screen adjustment. (p.18)- If you can change the refresh rate on the
computer you are using, change the value to alower frequency. (p.25)
No sound can be heard from the speakers.- Is the audio cable connected correctly? (p.13)- Perform the volume adjustment procedure. (p.17)- Are the headphones connected?- There is no sound from the speakers when the
monitor is in power-saving mode (the powerLED lights up orange).
191A_gb.P65 12/15/2003, 5:27 PM22

23
Eng
lish
Monitor care
Information for customers onenvironmentally friendly disposal ofthis SHARP product
If this product cannot be used any more, it shouldbe given away and disposed of in a legally correctand environmentally sound way.
DO NOT DISPOSE OF THIS PRODUCT WITHYOUR HOUSEHOLD WASTE OR MIXED WITHOTHER WASTES ! YOU MIGHT ENDANGER THEENVIRONMENT !
Sharp Corporation is committed to protecting theenvironment and conserving energy. Our goal is tominimize the environmental impact of our productsby continually implementing and improvingproduct technologies, designs, and customerinformation aimed at environmental conservation.
(1) For our customers in United Kingdom,Germany, France, and ItalyPlease contact your local authorities forcollection and recycling facilities, or contact arecycling service company, which is licensedfor the recycling of electronic equipment.SHARP recommends the recycling services ofMIREC, the General information on MIREC canbe obtained from http://www.mirec.com/.MIREC services have to be paid for by the lastowner of the electronic equipment in question.
(2) For our customers in the USAThis product utilizes tin-lead solder, and afluorescent lamp containing a small amount ofmercury. Disposal of these materials may beregulated due to environmental considerations.For collection and recycling information,please contact your local authorities orthe Electronics Industries Alliance:http://www.eiae.org
(3) For our customers in JapanCall toll free number 0120-845-530 forrecycling Information.
191A_gb.P65 12/15/2003, 5:27 PM23

24
Dimensions (Units: mm)
- Analog signal cable: approx. 1.8 m- Audio cable: approx. 1.8 m
Note:- As a part of our policy of continuous
improvement, SHARP reserves the right to makedesign and specification changes for productimprovement without prior notice. Theperformance specification figures indicated arenominal values of production units. There maybe some deviations from these values inindividual units.
Specifications
Product specificationsModel name
LL-191A-W (White)/LL-191A-B (Black)LCD display
48 cm measured diagonally TFT LCD moduleResolution (max.)
SXGA 1280 x 1024 pixelsDisplayable colors (max.)
Approx.16.19 million colors (6 bit + FRC)Brightness (max.)
220 cd/m2
Dot pitch0.294 (H) x 0.294 (V) mm
Contrast ratio500:1
Angle of visibilityLeft-right 160°; up-down 160°(contrast ratio > 5)
Screen display sizeHorizontal 376.3 mm x Vertical 301.1 mm
Video signalAnalog RGB (0.7 Vp-p) [75Ω]
Sync signalSeparate Sync (TTL level: +/-), Sync onGreen, Composite Sync (TTL level: +/-)
Expansion compensationDigital scaling (Enlarges VGA/SVGA/XGA etc. tofull screen size.)
Plug & PlayVESA DDC2B compatible
Power managementVESA: based on DPMS
Speaker output1 W + 1 W
Input signal terminalMini D-sub15 pin (3 row)
Audio input terminalMini stereo jack
Headphone terminalMini stereo jack
Screen tiltUpward approx. 0 - 25°; downward approx. 0 - 5°
Power supplyAC100 - 240 V, 50/60 Hz
Temperature of operating environment5 - 35°C
Power consumption33 W (with no audio input)(36 W maximum, 1.8 W when in power-savingmode)
DimensionsApprox. 419 (W) x 213 (D) x 409 (H) mm
WeightApprox. 7.8 kg (approx. 5.7 kg excluding stand)(Excluding cables.)
03_191A_gb.P65 12/22/2003, 9:44 AM24

25
Eng
lish
The analog RGB input connector pin(Mini D-sub connector with 15 pins)
Specifications
Relevant signal timings
- Recommended resolution is 1280 x 1024.- All are compliant only with non-interlaced.- Frequencies for Power Macintosh and the Sun
Ultra series are reference values. To connect,another adapter (commercially available) maybe required.
- If the monitor is receiving timing signals that arenot compatible, [OUT OF TIMING] will appear.Follow your computer's instruction manual to setthe timing so that it is compatible with themonitor.
- If the monitor is not receiving any signal (synchsignal), [NO SIGNAL] will appear.
Display mode
VESA
US text
PowerMacintoshseries
Sun Ultraseries
Hsync VsyncDotfrequency
No. Function
1 Red video signal input
2 Green video signal input
3 Blue video signal input
4 GND
5 GND
6 For red video signal GND
7 For green video signal GND
8 For blue video signal GND
9 +5V
10 GND
11 GND
12 DDC data
13 For Hsync signal input
14 For Vsync signal input
15 DDC clock
Power managementThe monitor is based on VESA DPMS (DisplayPower Management Signaling).To activate the monitor's power managementfunction, both the video card and the computermust conform to the VESA DPMS standard.
DPMS: Display Power Management Signalling
DDC (Plug & Play)This monitor supports the VESA DDC (DisplayData Channel) standard.DDC is a signal standard for carrying out Plug &Play functions on the monitor or computer. Ittransfers information such as degree of resolutionbetween the monitor and computer. You can usethis function if your computer is DDC compliantand if it is set so that it can detect the Plug & Playmonitor.There are many varieties of DDC due to thedifferences between systems. This monitor workswith DDC2B.
DPMS mode ScreenPower
H-sync V-syncconsumption
ON Display on Yes Yes
STANDBY No Yes
SUSPEND Display off Yes No
OFF No No
36 W
1.8 W
191A_gb.P65 12/15/2003, 5:27 PM25

26
Installing set-up information and the ICC profile (For Windows)
Depending on the type of computer or OS, youmay need to install the monitor set-up informationon your system. If so, follow the steps below toinstall the monitor set-up information. (Dependingon the type of computer or OS, command namesand methods may differ. Please follow thecomputer's own operation manual while readingthis.)
About the ICC profileAn ICC (International Color Consortium) profile isa file that describes the color reproductioncharacteristics of the LCD monitor. Using anapplication compatible with an ICC profile, highlyaccurate color reproduction can be realized.- Windows 98/2000/Me/XP all use the ICC profile.- When installing Windows 98/2000/Me/XP set-up
information (described below), the ICC profile isalso installed. If you would like to install the ICCprofile only, please refer to Installing the ICCprofile on page 28.
- When using the ICC profile, set as follows:- [DISPLAY MODE]: [STD] or [OFFICE]- [WHITE BALANCE]: [STD]- [GAMMA]: [0]
For Windows 95
Installing monitor set-up information intoWindows 95.This explanation assumes that the CD-ROM driveis "D" drive.
1. Load the accessory CD-ROM into the CD-ROMdrive of the computer.
2. Click on the [Start] button. From [Settings],choose [Control Panel].
3. Double click on [Display].4. Click on [Settings], [Advanced Properties], and
[Monitor], then [Change].5. Click on [Have disk], confirm that [Copy
manufacturer's files from:] is [D:] then click [OK].6. Confirm that the monitor details are selected,
and click [OK].7. Check that the monitor details are displayed,
then click [Apply].8. Click [OK], and close the window.
For Windows 98
Installing monitor set-up information intoWindows 98, and setting the monitor's ICC profileas a predetermined value.This explanation assumes that the CD-ROM driveis "D" drive.
If the "Add New Hardware Wizard" has appeared:1. Load the accessory CD-ROM into the CD-ROM
drive of the computer.2. Click [Next].3. Check [Display a list of all the drivers in a
specific location, so you can select the driveryou want.], then click [Next].
4. When [Models] is displayed, click on [Havedisk], confirm that [Copy manufacturer's filesfrom:] is [D:], and click [OK].
5. Confirm that the monitor details are selected,then click [Next], [Next], and [Finish]. If the "AddNew Hardware Wizard" appears, repeat theinstallation commands beginning from 2above.
If the "Add New Hardware Wizard" has notappeared:1. Load the accessory CD-ROM into the CD-ROM
drive of the computer.2. Click on the [Start] button. From [Settings],
choose [Control Panel].3. Double click on [Display].4. Click on [Settings], [Advanced] and [Monitor].5. In [Options], check [Automatically detect Plug &
Play monitors] and click on [Change].6. Click [Next].7. Click on [Display a list of all the drivers in a
specific location, so you can select the driveryou want.], then click [Next].
8. When [Models] is displayed, click on [Havedisk], confirm that [Copy manufacturer's filesfrom:] is [D:], and click [OK].
9. Confirm that the monitor details are selected,then click [Next], [Next], and [Finish].
10. Check that the monitor details are displayed,then click [Apply].
11. Click [OK], and close the window.
191A_gb.P65 12/15/2003, 5:27 PM26

27
Eng
lish
Installing set-up information and the ICC profile (For Windows)
For Windows 2000
Installing monitor set-up information intoWindows 2000, and setting the monitor's ICCprofile as a predetermined value.This explanation assumes that the CD-ROM driveis "D" drive.
1. Load the accessory CD-ROM into the CD-ROMdrive of the computer.
2. Click on the [Start] button. From [Settings],choose [Control Panel].
3. Double click on [Display].4. Click on [Settings], [Advanced] and [Monitor].5. Click on [Properties], [Driver] and [Update
Driver].6. When [Upgrade Device Driver Wizard]
appears, click [Next].7. Check [Display a list of the known drivers for
this device so that I can choose a specificdriver] and click [Next].
8. When [Models] is displayed, click on [Havedisk], confirm that [Copy manufacturer's filesfrom:] is [D:], and click [OK].
9. Select the monitor from the list displayed andclick [Next].
10. Click [Next], confirm that the monitor's nameappears on the screen, and click [Finish]. If[The Digital Signature Not Found] appears,click [Yes].
11. Click on [Close].12. Click [OK], and close the window.
For Windows Me
Installing monitor set-up information into WindowsMe, and setting the monitor's ICC profile as apredetermined value.This explanation assumes that the CD-ROM driveis "D" drive.
If the "Add New Hardware Wizard" has appeared:1. Load the accessory CD-ROM into the CD-ROM
drive of the computer.2. Check [Specify the location of the driver
[Advanced]] and click [Next].3. Check [Display a list of all the drivers in a
specific location, so you can select the driveryou want.], then click [Next].
4. When [Models] is displayed, click on [Havedisk], confirm that [Copy manufacturer's filesfrom:] is [D:], and click [OK].
5. Select the monitor details from the list, thenclick [Next], [Next], and [Finish]. If the "Add NewHardware Wizard" appears, repeat theinstallation commands beginning from 2above.
If the "Add New Hardware Wizard" has notappeared:1. Load the accessory CD-ROM into the CD-ROM
drive of the computer.2. Click on the [Start] button. From [Settings],
choose [Control Panel].3. Double click on [Display].4. Click on [Settings], [Advanced] and [Monitor].5. In [Options], check [Automatically detect Plug &
Play monitors] and click on [Change].6. Check [Specify the location of the driver
[Advanced]] and click [Next].7. Check [Display a list of all the drivers in a
specific location, so you can select the driveryou want.] and click [Next].
8. When [Models] is displayed, click on [Havedisk], confirm that [Copy manufacturer's filesfrom:] is [D:], and click [OK].
9. Select the monitor details, then click [Next],[Next], and [Finish].
10.Check that the monitor details are displayed,then click [Apply].
11.Click [OK], and close the window.
191A_gb.P65 12/15/2003, 5:27 PM27

28
For Windows XP
Installing monitor set-up information into WindowsXP, and setting the monitor's ICC profile as apredetermined value.This explanation assumes that the CD-ROM driveis "D" drive.
1. Load the accessory CD-ROM into the CD-ROMdrive of the computer.
2. Click on the [Start] button. Choose [ControlPanel].
3. Switch to "Classic View".4. Double click on [Display].5. Click on [Settings], [Advanced] and [Monitor].6. Click on [Properties], [Driver] and [Update
Driver].7. When [Hardware Update Wizard] appears,
check [Install from a list or specific location[Advanced]] and click [Next].
8. Check [Don't search. I will choose the driver toinstall.] and click [Next].
9. Click on [Have Disk], confirm that [Copymanufacturer's files from:] is [D:], and click [OK].
10. Select the monitor from the list displayed andclick [Next].If [has not passed Windows Logo testing...]appears, click [Continue Anyway].
11. Confirm that the monitor's name appears onthe screen.
12. Click on [Finish].13. Click on [Close].14. Click [OK], and close the window.
Installing the ICC profileInstalling the monitor's ICC profile. (If the set-upinformation has already been installed, so too hasthe profile, and there is no need to install it.)This explanation assumes that the CD-ROM driveis "D" drive.
1. Load the accessory CD-ROM into the CD-ROMdrive of the computer.
2. Click on the [Start] button. From [Settings],choose [Control Panel].
3. Double click on [Display].4. Click on [Settings] and [Advanced].5. Click on [General] and from [Compatibility]
select [Apply the new display setting withoutrestarting], then click on [Color Management].
6. Click [Add], and select CD-ROM as the filelocation.
7. Choose the color profile that you would like toinstall, and click on [Add].
8. Choose the profile and click on [Set AsDefault].
9. Click [OK], and close the window.
- When using the ICC profile, set as follows:- [DISPLAY MODE]: [STD] or [OFFICE]- [WHITE BALANCE]: [STD]- [GAMMA]: [0]
Installing set-up information and the ICC profile (For Windows)
191A_gb.P65 12/15/2003, 5:27 PM28

29
Eng
lish
Information about the ColorSync profile (For MacOS)
About the ColorSync profileColorSync is Apple Computer's color managementsystem and enables color reproductioncharacteristics to be realized when used with acompatible application. A ColorSync profiledescribes the color characteristics of the LCDmonitor.
Notes:- This monitor's ColorSync profile works with
MacOS 8.5 or above.- When using the ColorSync profile, set as
follows:- [DISPLAY MODE]: [STD] or [OFFICE]- [WHITE BALANCE]: [STD]- [GAMMA]: [0]
Setting up the ColorSync profile
Notes:- It is necessary to have PC Exchange or File
Exchange installed in your system.- Depending on the type of computer or OS,
command names and methods may differ.Please follow the computer's own operationmanual while reading this.
1.Load the accessory CD-ROM into the CD-ROMdrive of the computer.
2. Copy the profile to be used from the CD-ROM tothe ColorSync profile folder in the system folder.
3.Using the ColorSync on the control panel,choose the profile to be used.
191A_gb.P65 12/15/2003, 5:27 PM29

30
Instructions for attaching a VESA-compliant arm
The following stand or arm can be attached to themonitor.- Stand (sold separately)
Model name: NL-S02-H (Ivory)NL-S02-B (Black)
- VESA-compatible arm (commercially available)
Compatible commercially available armsAttachments must satisfy the following.- Compatible with the VESA standard.- Have a gap of 100 mm x 100 mm between the
screw holes on the section to be attached.- Not be likely to fall off or break off after being
attached to the monitor.
How to attach the arm or stand- Be careful not to over bend the cable or add
extension cords as this could lead to malfunction.- While following these instructions, please also
refer to the installation instructions in theoperation manual included with the arm or stand.
CAUTION!
- Be careful not to get your fingers pinchedbetween the display and stand nor to let thestand drop. These could lead to injury.
1.Remove the cables.2.Spread out a soft cloth on a suitable horizontal
surface.3.Being careful not to damage the monitor, gently
lay the monitor on it display-side down.4.Remove the four screws and then remove the
stand from the monitor.
Notes:- The stand is specially made for use with this
monitor. Once having removed the stand, neverattempt to attach it to another device.
- Once having removed the screws, store themtogether with the stand and if the stand is everre-attached be sure to use the original screws.Using different screws could lead to a malfunction.
5.Attach the arm to the monitor with the four screws.
Note:- The screws used to attach the arm should be M4
screws with a length of 6 - 8 mm protruding fromthe surface to be attached. Using differentscrews could cause the monitor to fall off or to beinternally damaged.
Screw used to attach arm
ArmPart of monitor to which arm isattached
03_191A_gb.P65 12/19/2003, 2:29 PM30

31
Eng
lish
Deu
tsch
Fran
çais
Inhaltsverzeichnis
Tipp und Sicherheitsvorkehrungen . . . . . . . . . . . . . . . . . . . . . . . . . . . . . . . . . . . . . . . . . . . . . . . . . . . . . . 32Produktbeschreibung . . . . . . . . . . . . . . . . . . . . . . . . . . . . . . . . . . . . . . . . . . . . . . . . . . . . . . . . . . . . . . . . 33Winkeleinstellung . . . . . . . . . . . . . . . . . . . . . . . . . . . . . . . . . . . . . . . . . . . . . . . . . . . . . . . . . . . . . . . . . . . 34Anschließen des Monitors und Ein- und Ausschalten des Monitors . . . . . . . . . . . . . . . . . . . . . . . . . . . . 35
Verbinden des Monitors mit einem Computer . . . . . . . . . . . . . . . . . . . . . . . . . . . . . . . . . . . . . . . . . . 35Anschluss von Kopfhörern (im Handel erhältlich) . . . . . . . . . . . . . . . . . . . . . . . . . . . . . . . . . . . . . . . 36Anschließen des Monitors an eine Stromquelle . . . . . . . . . . . . . . . . . . . . . . . . . . . . . . . . . . . . . . . . . 36Einschalten des Monitors . . . . . . . . . . . . . . . . . . . . . . . . . . . . . . . . . . . . . . . . . . . . . . . . . . . . . . . . . . . 36Ausschalten des Monitors . . . . . . . . . . . . . . . . . . . . . . . . . . . . . . . . . . . . . . . . . . . . . . . . . . . . . . . . . . 37
Einstellen der Bildschirmanzeige und der Lautsprecher-Lautstärke . . . . . . . . . . . . . . . . . . . . . . . . . . . 38Einstellen der Hintergrundbeleuchtung . . . . . . . . . . . . . . . . . . . . . . . . . . . . . . . . . . . . . . . . . . . . . . . 38Einstellen der Lautsprecher-Lautstärke . . . . . . . . . . . . . . . . . . . . . . . . . . . . . . . . . . . . . . . . . . . . . . . 39Einstellen des Displaymodus . . . . . . . . . . . . . . . . . . . . . . . . . . . . . . . . . . . . . . . . . . . . . . . . . . . . . . . 39Überprüfen der Geräteinformationen . . . . . . . . . . . . . . . . . . . . . . . . . . . . . . . . . . . . . . . . . . . . . . . . . 39
Einstellen der Bildschirmanzeige . . . . . . . . . . . . . . . . . . . . . . . . . . . . . . . . . . . . . . . . . . . . . . . . . . . . . . . 40Automatische Bildschirmeinstellung . . . . . . . . . . . . . . . . . . . . . . . . . . . . . . . . . . . . . . . . . . . . . . . . . . 40Manuelle Bildschirmeinstellung . . . . . . . . . . . . . . . . . . . . . . . . . . . . . . . . . . . . . . . . . . . . . . . . . . . . . 41
Pflege des Monitors . . . . . . . . . . . . . . . . . . . . . . . . . . . . . . . . . . . . . . . . . . . . . . . . . . . . . . . . . . . . . . . . . . 44Pflege des Monitors . . . . . . . . . . . . . . . . . . . . . . . . . . . . . . . . . . . . . . . . . . . . . . . . . . . . . . . . . . . . . . . 44Lagerung . . . . . . . . . . . . . . . . . . . . . . . . . . . . . . . . . . . . . . . . . . . . . . . . . . . . . . . . . . . . . . . . . . . . . . . 44Fehlersuche . . . . . . . . . . . . . . . . . . . . . . . . . . . . . . . . . . . . . . . . . . . . . . . . . . . . . . . . . . . . . . . . . . . . . 44Informationen für Kunden über umweltfreundliche Entsorgung dieses SHARP-Produkts . . . . . . . . 45
Technische Daten . . . . . . . . . . . . . . . . . . . . . . . . . . . . . . . . . . . . . . . . . . . . . . . . . . . . . . . . . . . . . . . . . . . 46Installieren der Setup-Informationen und des ICC-Profils (Für Windows) . . . . . . . . . . . . . . . . . . . . . . . 48Informationen zum Profil ColorSync (Für MacOS) . . . . . . . . . . . . . . . . . . . . . . . . . . . . . . . . . . . . . . . . . . 51Anweisungen zum Anbringen eines VESA-kompatiblen Monitorarms . . . . . . . . . . . . . . . . . . . . . . . . . . 52
191A_dt.P65 12/15/2003, 5:27 PM31

32
Tipp und SicherheitsvorkehrungenTipp und Sicherheitsvorkehrungen
- Das TFT-Farb-LCD-Panel wurde unter Einsatzhochentwickelter Technologie gefertigt. Es jannjedoch vorkommen, dass an einigen StellenBildpunkte nicht aufleuchten oder permanentangezeigt werden. Wenn der Bildschirm von derSeite aus angesehen wird, können die Farbenunregelmäßig oder zu hell erscheinen. Dies istnormal bei LCD-Monitoren und hat keinenEinfluss auf die Leistungsfähigkeit des Gerätes.
- Die Bildschirmanzeige sollte nicht über langeZeiträume hinweg stehenbleiben, da dies einenEinbrenneffekt zur Folge haben könnte.
- Wenn die Helligkeit auf die Mindesteinstellunggesetzt wird, ist der Bildschirm eventuell schlechtlesbar.
- Die Qualität des Computersignals kann dieAnzeigequalität beeinträchtigen. Wir empfehlenden Einsatz eines Computers, der Videosignalehoher Qualität aussenden kann.
- Der Monitor darf niemals mit hartenGegenständen abgerieben oder berührt werden.
- Wir bitten um Ihr Verständnis, dass SharpCorporation über die gesetzlich anerkannteLeistungshaftung hinaus keine Haftung für Fehlerübernimmt, die sich aus der Verwendung durchden Kunden oder einen Dritten ergeben, undauch nicht für sonstige Funktionsstörungen oderSchäden, die während der Verwendung amGerät entstehen.
- Eine Aktualisierung dieses Monitors und seinesZubehörs ist vorbehalten.
Aufstellort- Verwenden Sie den Monitor nicht an schlecht
belüfteten Orten mit hoher Staubentwicklung,hoher Luftfeuchtigkeit oder an Orten, an denender Monitor mit Öl oder Dampf in Kontaktkommen könnte, da dies ein Brandrisiko birgt.
- Achten Sie darauf, dass der Monitor nicht mitWasser oder anderen Flüssigkeiten in Berührungkommt. Achten Sie darauf, dass keinerleiGegenstände, beispielsweise Büroklammernoder sonstige spitze Gegenstände, in denMonitor gesteckt werden. Die Folge könnte einBrand oder Stromschlag sein.
- Stellen Sie den Monitor nicht auf wackligeUnterlagen oder auf unsichere Stellen. SetzenSie den Monitor keinen starken Stößen oderErschütterungen aus. Wenn der Monitorherunterfällt oder umkippt, könnte er Schadennehmen.
- Stellen Sie den Monitor nicht an Stellen auf, diedirekter Sonneneinstrahlung ausgesetzt sind,und nicht in der Nähe von Heizungen oder ananderen Stellen, an denen hohe Temperaturenauftreten, da dies zu einer übermäßig starkenErhitzung mit der Folge eines Brandes führenkönnte.
Das Netzkabel- Beschädigen Sie das Netzkabel nicht, stellen
Sie keine schweren Gegenstände darauf, undüberdehnen oder knicken Sie es nicht.Verwenden Sie keine Verlängerungskabel. Einbeschädigtes Kabel kann einen Brand oderStromschlag verursachen.
- Nur das mit dem Monitor mitgelieferte Netzkabelverwenden.
- Stecken Sie den Netzstecker direkt in dieNetzsteckdose. Die Verwendung einesVerlängerungskabels kann aufgrund vonÜberhitzung zu einem Brand führen.
- Den Netzstecker nicht mit nassen Händenabziehen oder einstecken. Dadurch könnenelektrische Schläge verursacht werden.
Checkliste für Monitor und Zubehör- Prüfen Sie den Kartoninhalt auf Vollständigkeit.
- LCD-Monitor (1)- Analogsignalkabel (1)
(Modellbezeichnung: 0NIT15G4-0015)- Audiokabel (1)
(Modellbezeichnung: 0NIT17A3-U006)- Netzkabel (1)- CD-ROM (1)- Bedienungsanleitung (1)
Hinweise:- Nur die mit dem Monitor mitgelieferten Kabel
verwenden.- Bewahren Sie den Karton für einen eventuellen
Transport des Monitors auf.- Sharp Corporation besitzt Urheberrechte am
Programm Utility Disk. Eine Reproduktion istohne Genehmigung nicht zulässig.
- Die Form des mitgelieferten Zubehörs kann vonden Abbildungen in diese Anleitung abweichen.
Inhalt de Anleitung- In dieser Anleitung wird Microsoft Windows XP
als "Windows XP" bezeichnet, MicrosoftWindows Millennium als "Windows Me",Microsoft Windows 2000 als "Windows 2000",Microsoft Windows 98 als "Windows 98",Microsoft Windows 95 als "Windows 95" undMicrosoft Windows Version 3.1 als "Windows3.1". Falls keine Unterscheidung zwischen denProgrammen erforderlich ist, wird der Begriff"Windows" verwendet.
- Microsoft und Windows sind eingetrageneWarenzeichen der Microsoft Corporation.
- Macintosh ist ein eingetragenes Warenzeichender Apple Computer, Inc.
- Alle andere Warenzeichen sind das Eigentumder jeweiligen Gesellschaften.
04_191A_dt.P65 12/16/2003, 1:30 PM32

33
Eng
lish
Deu
tsch
Fran
çais
1. Taste AUTO .............................. Diese Taste dient zum Ausführen automatischer Einstellung desBildschirms (CLOCK, PHASE, H-POS und V-POS). (S.40)
2. Taste MENU ............................. Mit dieser Taste öffnen, wählen und schließen Sie das OSD (OnScreen Display) -Menü.
3. Taste / MODE ....................... Wenn das OSD-Menü angezeigt wird:Diese Taste wird zum Wählen der Menüoptionen verwendet.
Wenn kein OSD-Menü angezeigt wird:Diese Taste wird zur Einstellung von DISPLAY MODE verwendet.
4. Tasten ............................... Wenn das OSD-Menü angezeigt wird:Mit diesen Tasten wählen Sie eine Option oder erhöhen oderverringern den Wert einer ausgewählten Option.
Wenn kein OSD-Menü angezeigt wird:Mit diesen Tasten stellen Sie die Helligkeit derHintergrundbeleuchtung und die Lautstärke der Lautsprecher ein.
5. Lautsprecher ............................ Töne, die über die an den Monitor angeschlossenen externen Geräteeingehen, sind hörbar.
6. Kopfhöreranschluss ................ Hier können (im Handel erhältlich) Kopfhörer angeschlossen werden.7. Netzschalter .............................. Mit dieser Taste schalten Sie den Monitor ein.
Schalten Sie den Monitor über den Netzschalter wieder aus.8. Betriebs-LED ............................ Diese LED leuchtet im Betrieb grün und im Stromsparmodus orange.9. Hauptnetzschalter10. Netzanschluss11. Analoger RGB-Eingangsanschluss ...... Hier wird der Analogsignalkabel eingesteckt. Das mitgelieferte
Analogsignalkabel muss verwendet werden.12. Audioeingangsanschluss ....... Hier kann ein Audioausgangsanschluss des Computers angeschlossen
werden. Das mitgelieferte Audiokabel muss verwendet werden.13. Sicherheitsverriegelung .......... Wenn Sie eine Sicherheitsverriegelung anbringen (im Handel erhältlich),
wird der Monitor so befestigt, dass er nicht wegtransportiert werden kann.Die Diebstahlsicherung wird in Verbindung mit dem Kensington-Mikrosicherheitssystem eingesetzt.
14. Lüftungsöffnungen ................... Decken Sie nie die Lüftungsöffnungen ab, da sich das Monitorinneresonst zu stark erwärmen würde und dies Funktionsstörungen zurFolge hätte.
Produktbeschreibung
191A_dt.P65 12/15/2003, 5:27 PM33

34
ACHTUNG!
- Achten Sie darauf, den Monitor beim Einstellendes Sichtwinkels immer an beiden Seiten zuhalten. Das in diesem Monitor verwendete LCD-Panel besteht aus Glas. Durch Druck mit derHand auf das LCD-Panel können Schädenhervorgerufen werden.
Winkeleinstellung
Ca. 25°
Ca. 5°
191A_dt.P65 12/15/2003, 5:27 PM34
35
Eng
lish
Deu
tsch
Fran
çais
Anschließen des Monitors und Ein-und Ausschalten des Monitors
ACHTUNG!
- Bevor Sie den Monitor anschließen, müssen Sieden Monitor und den Computer ausschalten.
- Achten Sie darauf, dass Sie das Kabel nichtüberdehnen, und schließen Sie keinVerlängerungskabel an, da diesFunktionsstörungen hervorrufen kann.
Verbinden des Monitors mit einemComputer
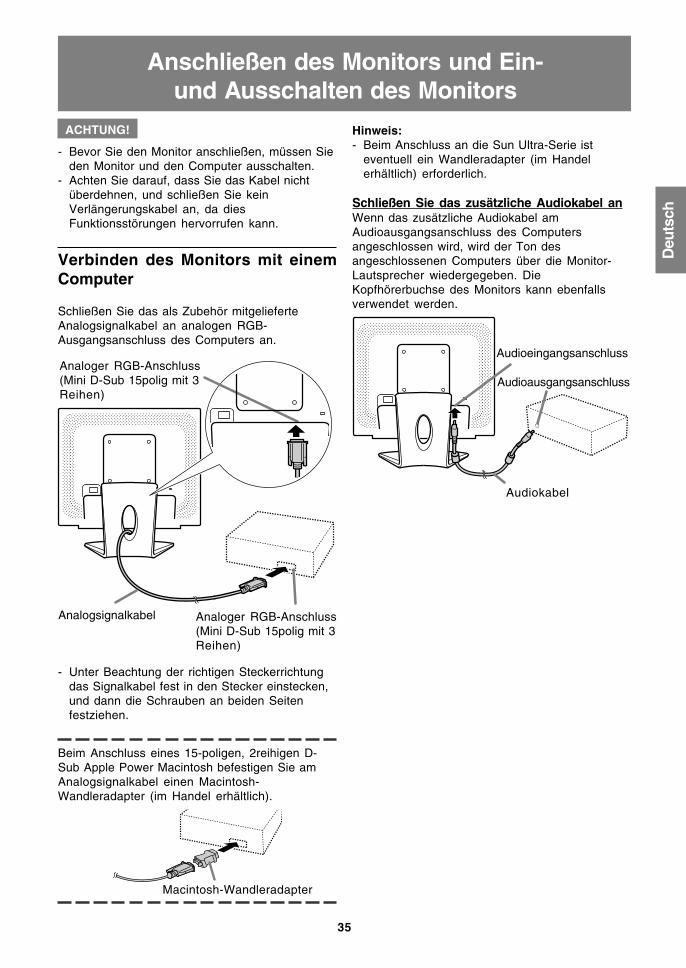
Schließen Sie das als Zubehör mitgelieferteAnalogsignalkabel an analogen RGB-Ausgangsanschluss des Computers an.
- Unter Beachtung der richtigen Steckerrichtungdas Signalkabel fest in den Stecker einstecken,und dann die Schrauben an beiden Seitenfestziehen.
Beim Anschluss eines 15-poligen, 2reihigen D-Sub Apple Power Macintosh befestigen Sie amAnalogsignalkabel einen Macintosh-Wandleradapter (im Handel erhältlich).
Macintosh-Wandleradapter
Hinweis:- Beim Anschluss an die Sun Ultra-Serie ist
eventuell ein Wandleradapter (im Handelerhältlich) erforderlich.
Schließen Sie das zusätzliche Audiokabel anWenn das zusätzliche Audiokabel amAudioausgangsanschluss des Computersangeschlossen wird, wird der Ton desangeschlossenen Computers über die Monitor-Lautsprecher wiedergegeben. DieKopfhörerbuchse des Monitors kann ebenfallsverwendet werden.
Audioausgangsanschluss
Audiokabel
Audioeingangsanschluss
Analogsignalkabel
Analoger RGB-Anschluss(Mini D-Sub 15polig mit 3Reihen)
Analoger RGB-Anschluss(Mini D-Sub 15polig mit 3Reihen)
191A_dt.P65 12/15/2003, 5:27 PM35

36
Einschalten des Monitors1.Den Monitor mit dem Hauptnetzschalter
einschalten.
Anschluss von Kopfhörern(im Handel erhältlich)
Kopfhörer (im Handel erhältlich) könnenangeschlossen werden.
Hinweise:- Wenn Kopfhörer angeschlossen sind, ertönt aus
den Lautsprechern des Monitors kein Klang.- Verwenden Sie Kopfhörer mit einem Kabel von
weniger als 3 m Länge.
Anschließen des Monitors an eineStromquelle
Kopfhörer
Kopfhöreranschluss
Anschließen des Monitors und Ein- und Ausschalten des Monitors
- Beim Aus- und Einschalten des Monitors mitdem Hauptnetzschalter sollten Sie mindestensfünf Sekunden warten. Durch ein schnellesUmschalten können Fehlfunktionen auftreten.
2. Drücken Sie den Netzschalter am Monitor.3.Schalten Sie den Computer ein.
Wenn ein Signal vom Computer eingegebenwird, leuchtet die Betriebs-LED grün auf und dieWiedergabe wird aktiviert. (Nach demEinschalten des Gerätes kann es eine kurze Zeitdauern, bis die Wiedergabe aktiviert wird.)
Hinweise:- Wenn Sie den Monitor zum ersten Mal einrichten
oder eine Komponente des bestehenden Systemsgeändert haben, führen Sie vor der Verwendungeine automatische Bildschirmeinstellung durch.(S.40)
- Je nach Computer oder Betriebssystem mussdie Installation der Monitor-Setup-Informationeneventuell über einen Computer erfolgen. (S.48)
- Wenn der Bildschirm eines angeschlossenenNotebooks so eingestellt ist, dass er gleichzeitigangezeigt wird, wird der MS-DOS-Bildschirmmöglicherweise nicht einwandfrei angezeigt.Ändern Sie in diesem Fall die Einstellungen so,dass die Anzeige nur auf dem Monitor erfolgt.
Hauptnetzschalter
Schalten Sie denComputer ein.
ON
Netzschalter betätigen.
Netzsteckdose
Netzkabel
Netzanschluss
191A_dt.P65 12/15/2003, 5:27 PM36
37
Eng
lish
Deu
tsch
Fran
çais
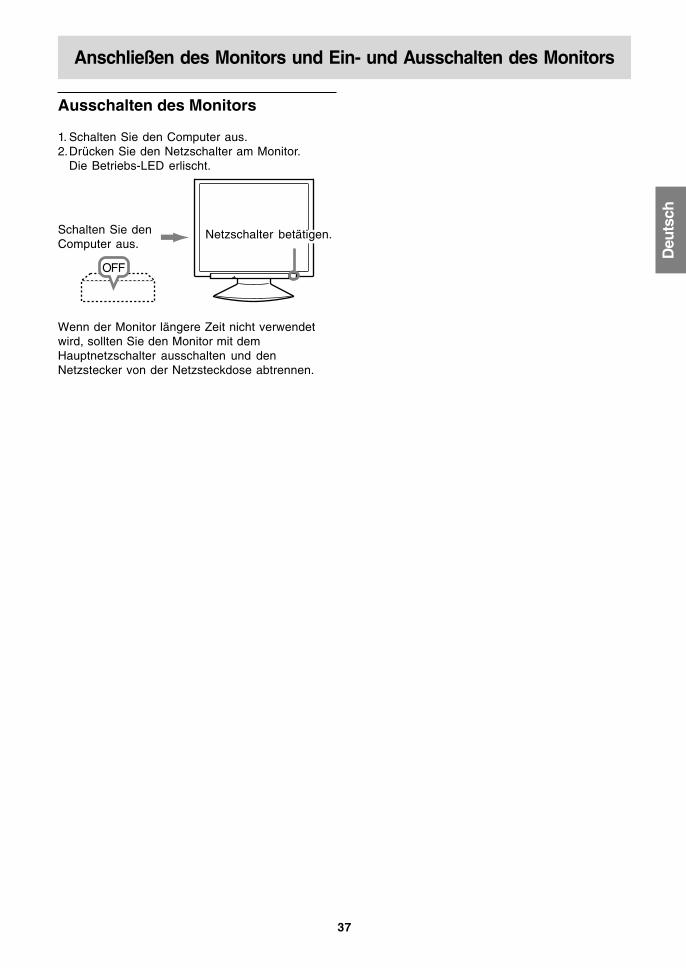
Ausschalten des Monitors
1. Schalten Sie den Computer aus.2.Drücken Sie den Netzschalter am Monitor.
Die Betriebs-LED erlischt.
Wenn der Monitor längere Zeit nicht verwendetwird, sollten Sie den Monitor mit demHauptnetzschalter ausschalten und denNetzstecker von der Netzsteckdose abtrennen.
Anschließen des Monitors und Ein- und Ausschalten des Monitors
OFF
Schalten Sie denComputer aus.
Netzschalter betätigen.
191A_dt.P65 12/15/2003, 5:27 PM37
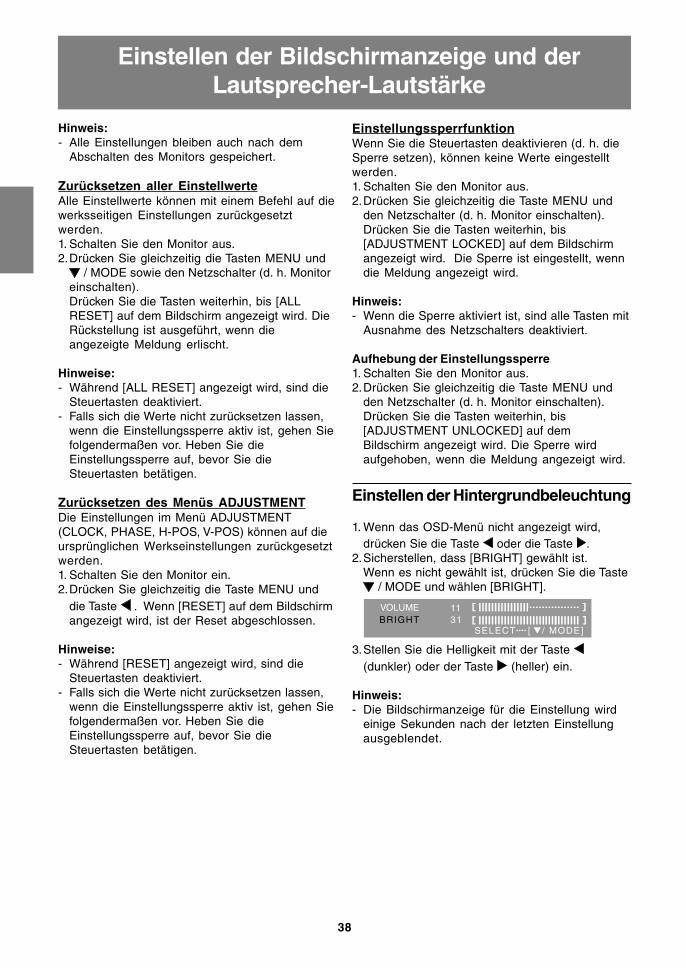
38
Hinweis:- Alle Einstellungen bleiben auch nach dem
Abschalten des Monitors gespeichert.
Zurücksetzen aller EinstellwerteAlle Einstellwerte können mit einem Befehl auf diewerksseitigen Einstellungen zurückgesetztwerden.1. Schalten Sie den Monitor aus.2.Drücken Sie gleichzeitig die Tasten MENU und
/ MODE sowie den Netzschalter (d. h. Monitoreinschalten).Drücken Sie die Tasten weiterhin, bis [ALLRESET] auf dem Bildschirm angezeigt wird. DieRückstellung ist ausgeführt, wenn dieangezeigte Meldung erlischt.
Hinweise:- Während [ALL RESET] angezeigt wird, sind die
Steuertasten deaktiviert.- Falls sich die Werte nicht zurücksetzen lassen,
wenn die Einstellungssperre aktiv ist, gehen Siefolgendermaßen vor. Heben Sie dieEinstellungssperre auf, bevor Sie dieSteuertasten betätigen.
Zurücksetzen des Menüs ADJUSTMENTDie Einstellungen im Menü ADJUSTMENT(CLOCK, PHASE, H-POS, V-POS) können auf dieursprünglichen Werkseinstellungen zurückgesetztwerden.1. Schalten Sie den Monitor ein.2.Drücken Sie gleichzeitig die Taste MENU und
die Taste . Wenn [RESET] auf dem Bildschirmangezeigt wird, ist der Reset abgeschlossen.
Hinweise:- Während [RESET] angezeigt wird, sind die
Steuertasten deaktiviert.- Falls sich die Werte nicht zurücksetzen lassen,
wenn die Einstellungssperre aktiv ist, gehen Siefolgendermaßen vor. Heben Sie dieEinstellungssperre auf, bevor Sie dieSteuertasten betätigen.
EinstellungssperrfunktionWenn Sie die Steuertasten deaktivieren (d. h. dieSperre setzen), können keine Werte eingestelltwerden.1. Schalten Sie den Monitor aus.2.Drücken Sie gleichzeitig die Taste MENU und
den Netzschalter (d. h. Monitor einschalten).Drücken Sie die Tasten weiterhin, bis[ADJUSTMENT LOCKED] auf dem Bildschirmangezeigt wird. Die Sperre ist eingestellt, wenndie Meldung angezeigt wird.
Hinweis:- Wenn die Sperre aktiviert ist, sind alle Tasten mit
Ausnahme des Netzschalters deaktiviert.
Aufhebung der Einstellungssperre1. Schalten Sie den Monitor aus.2.Drücken Sie gleichzeitig die Taste MENU und
den Netzschalter (d. h. Monitor einschalten).Drücken Sie die Tasten weiterhin, bis[ADJUSTMENT UNLOCKED] auf demBildschirm angezeigt wird. Die Sperre wirdaufgehoben, wenn die Meldung angezeigt wird.
Einstellen der Hintergrundbeleuchtung
1. Wenn das OSD-Menü nicht angezeigt wird,drücken Sie die Taste oder die Taste .
2.Sicherstellen, dass [BRIGHT] gewählt ist.Wenn es nicht gewählt ist, drücken Sie die Taste
/ MODE und wählen [BRIGHT].
3.Stellen Sie die Helligkeit mit der Taste (dunkler) oder der Taste (heller) ein.
Hinweis:- Die Bildschirmanzeige für die Einstellung wird
einige Sekunden nach der letzten Einstellungausgeblendet.
Einstellen der BildschirmanzeigeEinstellen der Bildschirmanzeige und derLautsprecher-Lautstärke
191A_dt.P65 12/15/2003, 5:27 PM38

39
Eng
lish
Deu
tsch
Fran
çais
Überprüfen der Geräteinformationen
Die Modellbezeichnung (MODEL), dieSeriennummer (S/N) und die Verwendungszeit(USAGE TIME) des Monitors kann überprüftwerden.1.Schalten Sie den Monitor aus.2.Während des Drückens der Taste / MODE
drücken Sie den Netzschalter am Monitor (d.h.der Monitor wird eingeschaltet).Die Produktinformation wird angezeigt.
3.Drücken Sie die Taste MENU.
Hinweis:- Bitte beachten Sie, dass die Anzeige der
Verwendungszeit beim Kauf wegen derInspektionen im Werk und anderen Aktivitätenwährend der Herstellung möglicherweise nicht 0(Null) ist.
Einstellen der Bildschirmanzeige und der Lautsprecher-Lautstärke
Einstellen der Lautsprecher-Lautstärke
1. Wenn das OSD-Menü nicht angezeigt wird,drücken Sie die Taste oder die Taste .
2.Sicherstellen, dass [VOLUME] gewählt ist.Wenn es nicht gewählt ist, drücken Sie die Taste
/ MODE und wählen [VOLUME].
3.Stellen Sie die Helligkeit mit der Taste (verringern) oder der Taste (erhöhen) ein.
Hinweis:- Die Bildschirmanzeige für die Einstellung wird
einige Sekunden nach der letzten Einstellungausgeblendet.
Einstellen des Displaymodus
Der Farbton oder die Helligkeit kann mit einemBefehl geändert werden.
STDDer Farbton stammt vom Originalschema desLCD-Panels.
OFFICEDie Display-Helligkeit wird verringert. (DieserModus spart Energie.)
sRGBsRGB ist ein internationaler Standard für dieFarbdarstellung, der von der IEC (InternationalElectrotechnical Commission) festgelegt wurde.Es erfolgt eine Farbumwandlung anhand derLCD-Eigenschaften, so dass ein Farbtondargestellt wird, der dem Originalbild nahekommt.
VIVIDErgibt ein Bild mit dynamischen und lebhaftenPrimärfarben.
- Wenn [DISPLAY MODE] auf [sRGB] oder [VIVID]gestellt ist, ist [WHITE BALANCE] auf [STD]gestellt, und [GAMMA] ist auf [0] gestellt.
EinstellungDrücken Sie die Taste / MODE, wenn das OSD-Menü nicht angezeigt wird. Jedesmal beimDrücken der Taste wird das nächste Menüangezeigt. (STD → OFFICE → sRGB → VIVID →STD)Die Bildschirmanzeige für die Einstellung wirdeinige Sekunden nach der letzten Einstellungausgeblendet.
191A_dt.P65 12/15/2003, 5:27 PM39

40
Einstellen der Bildschirmanzeige
Automatisches Einstellen des BildschirmsAutomatische Einstellung kann entweder mit der TasteAUTO oder der Taste MENU ausgeführt werden.
Taste AUTO1.Drücken Sie die Taste AUTO.2.Drücken Sie die Taste AUTO erneut.
[ADJUSTING] erscheint im Bildschirm, und nacheinigen Sekunden verschwindet [ADJUSTING]wieder. (Die automatische Einstellung ist damitabgeschlossen.)
Taste MENU1.Drücken Sie die Taste MENU.
Das Menü ADJUSTMENT wird angezeigt.
2.Drücken Sie die Taste .Der Bildschirm wird dunkel, und [ADJUSTING]wird angezeigt. Nach einigen Sekunden wirdwieder das Menü ADJUSTMENT angezeigt. (Dieautomatische Einstellung ist hiermitabgeschlossen.)
3.Drücken Sie die Taste MENU fünfmal, um dasOSD (On Screen Display)-Menü auszublenden.
Hinweise:- In den meisten Fällen reicht eine automatische
Einstellung aus.- Es ist möglich, dass mit der ersten
automatischen Einstellung keine richtigeEinstellung erzielt werden kann. In diesem Fallsollte die automatische Einstellung zwei bis dreiMal wiederholt werden.
- Falls erforderlich, können in folgenden Fällen nachder automatischen Einstellung auch noch manuelleEinstellungen vorgenommen werden (S.41).- Wenn eine weitere Feineinstellung erforderlich ist.- Wenn [OUT OF ADJUST] angezeigt wird.
(Wenn auf dem Bildschirm ein ganz dunklesBild angezeigt wird, ist die automatischeBildschirmjustierung möglicherweisedeaktiviert. Vergewissern Sie sich beimAusführen einer automatischen Einstellung,dass entweder das Einstellmuster verwendetwird, oder versuchen Sie, ein Bild anzuzeigen,das den gesamten Bildschirm sehr hellerscheinen lässt.)
- Wenn das Videoeingangssignal des ComputersComposite Sync oder Sync on Green ist. (Dieautomatische Einstellung ist eventuell nicht möglich.)
- Es ist möglich, dass eine automatische Einstellungabhängig von der auf dem Bildschirmwiedergegebenen Anzeige - bewegliche Bilder oderdie MS-DOS-Eingabeaufforderung - nichtausgeführt werden kann.
Automatische Bildschirmeinstellung
Die Optionen im Menü ADJUSTMENT könnenautomatisch eingestellt werden (CLOCK, PHASE,H-POS, V-POS).
Hinweis:- Wenn Sie den Monitor zum ersten Mal einrichten
oder eine Komponente des bestehendenSystems geändert haben, führen Sie vor derVerwendung eine automatischeBildschirmeinstellung durch.
Bildschirmanzeige zur EinstellungZeigen Sie zunächst ein Bild an, das dengesamten Bildschirm sehr hell erscheinen lässt.Wenn Sie mit Windows arbeiten, können Sie dasEinstellmuster auf der mitgelieferten CD-ROMverwenden.
Öffnen des Einstellmusters (für Windows)Die in den nachstehenden Bedienungshinweisenerwähnten Windows-Meldungen basieren auf derenglischen Windows-Version. Diese Anweisungenbetreffen Windows 95/98/2000/Me/XP. Dabei wirdvon Laufwerk "D" als CD-ROM-Laufwerkangenommen.1.Die mitgelieferte CD-ROM in das CD-ROM-
Laufwerk des Computer einlegen.2.Öffnen Sie [My Computer], und wählen Sie CD-
ROM. Unter Windows 3.1 öffnen Sie [FileManager], und wählen Sie Laufwerk "D".
3.Doppelklicken Sie auf [Adj_uty.exe], um dasEinstellprogramm auszuführen. DasEinstellmuster wird angezeigt.
Einstellmuster
Nach dem Ausführen aller Einstellungendrücken Sie am Computer auf die Taste [Esc],um das Einstellprogramm zu beenden.
Hinweis:- Wenn der Anzeigemodus Ihres Computers auf 65K
Farben eingestellt ist, lassen sich die verschiedenenFarbgrade in den einzelnen Farbmustern darstellen,oder die Graustufen sehen farbig aus. (Dies liegt ander Spezifikation des Eingangssignals und ist keineFunktionsstörung.)
191A_dt.P65 12/15/2003, 5:27 PM40

41
Eng
lish
Deu
tsch
Fran
çais
Manuelle Bildschirmeinstellung
1.Zeigen Sie zunächst ein Bild an, das dengesamten Bildschirm sehr hell erscheinen lässt.(S.40)
2.Rufen Sie das OSD-Menü durch Drücken derTaste MENU ab.Menü ADJUSTMENT
MENUMenü GAIN CONTROL
MENUMenü COLOR CONTROL
MENUMenü MODE SELECT-1
MENUMenü MODE SELECT-2
MENUDas OSD-Menü wird geschlossen.
Hinweise:- Das OSD-Menü wird ca. 30 Sekunden nach dem
letzten Befehl automatisch ausgeblendet.- In diesem Kapitel wird die Vorgehensweise zum
Einstellen des Bildschirms mit Hilfe desEinstellmusters (für Windows) beschrieben.
Einstellen der Bildschirmanzeige
Menü ADJUSTMENT
AUTOWenn [AUTO] mit der Taste gewählt ist, werdendie Einstellungen von [CLOCK], [PHASE], [H-POS]und [V-POS] automatisch vorgenommen.
CLOCKDie untenstehende Abbildung zeigt, welcheEinstellung vorgenommen werden muss, umvertikales Flimmern zu verhindern. (Tasten )
PHASEDie untenstehende Abbildung zeigt, welcheEinstellung vorgenommen werden muss, umhorizontales Flimmern zu verhindern. (Tasten )Hinweis:- Die Einstellungen unter [PHASE] dürfen erst
erfolgen, nachdem [CLOCK] korrekt eingestelltwurde.
H-POS (horizontale Positionierung) und V-POS(vertikale Positionierung)Um das Einstellmuster innerhalb der Grenzen desBildschirms zu zentrieren, justieren Sie die Wertelinks-rechts (H-POS) und oben-unten (V-POS).(Tasten )
Wählen Siedie Optiondurch Drückender Taste
/ MODE.
Wählen Siedie Optiondurch Drückender Taste
/ MODE.
Wählen Siedie Optiondurch Drückender Taste
/ MODE.
Wählen Siedie Optiondurch Drückender Taste
/ MODE.
Wählen Siedie Optiondurch Drückender Taste
/ MODE.
Vertikales Flimmern
Horizontales Flimmern
Bildschirmrahmen
Einstellmuster
191A_dt.P65 12/15/2003, 5:27 PM41

42
Menü COLOR CONTROL
WHITE BALANCE1.Nach der Wahl von [WHITE BALANCE] drücken
Sie die Taste .Das Menü WHITE BALANCE erscheint.
2.Wählen Sie [COOL], [·], [STD], [·], [WARM] oder[USER] mit den Tasten aus.COOL ... Farbton mit stärkerem Blaustich als
normal • .......... Farbton mit leicht stärkerem Blaustich
als normalSTD ...... Farbton entspricht der Standardeinstellung • .......... Farbton mit leicht stärkerem Rotstich
als normalWARM .. Farbton mit stärkerem Rotstich als normalUSER
- Wenn [USER] ausgewählt wird, werden dieEinstellwerte für [R-CONTRAST],[G-CONTRAST] und [B-CONTRAST]angezeigt, damit die Feineinstellungvorgenommen werden kann.
- Wählen Sie [R-CONTRAST], [G-CONTRAST]und [B-CONTRAST] mit der Taste / MODEaus.
R-CONTRAST .....Taste für blau-grünTaste für rot
G-CONTRAST .....Taste für violettTaste für grün
B-CONTRAST......Taste für gelbTaste für blau
3.Drücken Sie die Taste MENU.
Hinweise:- Bei einer anderen Einstellung als [STD] können
nicht alle Abstufungen angezeigt werden. Um alleAbstufungen anzuzeigen, stellen Sie [STD] ein.
- Wenn [DISPLAY MODE] auf [sRGB] oder [VIVID]eingestellt ist, kann keine andere Einstellung als[STD] gewählt werden.
GAMMADas Bild so einstellen, dass dunkle und helleBildteile sichtbar wiedergegeben werden. Wenndas Bild zu dunkel und schwer zu erkennen ist,sollte der Zahlenwert erhöht werden. Wenn dasBild zu hell und schwer zu erkennen ist, sollte derZahlenwert verringert werden. (Tasten )- Wenn [DISPLAY MODE] auf [sRGB] oder [VIVID]
gestellt ist, kann [GAMMA] nicht eingestellt werden.
Menü GAIN CONTROL
AUTOWenn [AUTO] mit der Taste gewählt ist, werdendie Einstellungen von [BLACK LEVEL] und[CONTRAST] automatisch vorgenommen. Nachder automatischen Einstellung führen Siemanuelle Einstellung wenn erforderlich.
BLACK LEVELDie gesamte Bildschirmhelligkeit kann währendder Anzeige des Farbmusters eingestellt werden.(Tasten )
CONTRASTWährend der Anzeige des Farbmusters können dieEinstellungen so erfolgen, dass alle Abstufungenangezeigt werden. (Tasten )
Hinweise:Über AUTO (Funktion Auto Gain Control)- Die Funktion Auto Gain Control justiert den
Kontrast und den Schwarzwert basierend aufder hellsten und dunkelsten Farbe desangezeigten Bildes.
- Wenn Sie das Einstellmuster nicht verwenden,müssen Sie einen schwarzen und weißenBereich in einer Größe von 5 mm x 5 mmanzeigen lassen, ansonsten ist keineEinstellung möglich.
- Wenn es sich bei dem vom Computerkommenden Signal um das Signal CompositeSync oder Sync on Green handelt, ist keineautomatische Einstellung möglich. Nehmen Siedie Einstellung statt dessen manuell vor.
- Wenn [OUT OF ADJUST] angezeigt wird, solltedie manuelle Einstellung durchgeführt werden.
Farbmuster
Einstellen der Bildschirmanzeige
191A_dt.P65 12/15/2003, 5:27 PM42

43
Eng
lish
Deu
tsch
Fran
çais
Menü MODE SELECT-1
Hinweis:- Abhängig von der Auflösung des
Eingangssignals ändert sich die Anzeigeeventuell selbst dann nicht, wenn dieMenüoptionen ausgewählt werden können.
OSD H-POSITION (OSD horizontale Position)Die Position der OSD-Menü kann nach links undrechts verschoben werden. (Tasten )
OSD V-POSITION (OSD vertikale Position)Die Position der OSD-Menü kann nach oben undunten verschoben werden. (Tasten )
SCALING (Skalierungsgrad)Die Bildschärfe lässt sich einstellen. (Tasten )Hinweis:- Wenn der Anzeigemodus auf weniger als
1280 x 1024 Pixel gesetzt ist, wird die Anzeigeso vergrößert, dass sie den gesamten Bildschirmeinnimmt (d. h. das Seitenverhältnis der Anzeigekann sich ändern).
400LINES (Auflösungsgrad)Sie können die horizontale Auflösung einesBildschirms mit 400 Zeilen festlegen, wenn SieUS-Text usw. verwenden. (Tasten )
640: 640 x 400 Punktemodus720: 720 x 400 Punktemodus (US-Text usw.)
Hinweis:- Da die Auflösungseingabe für einen anderen
Wert als 400 Zeilen automatisch erfolgt, mussdiese Auflösung nicht eingestellt werden.
LANGUAGE (Sprache)Sie können die Sprache für das OSD-Menüauswählen.1.Drücken Sie die Taste .
Das Sprachenauswahlmenü wird angezeigt.2. Wählen Sie die Sprache mit der Taste / MODE
aus.3. Drücken Sie die Taste MENU.
Einstellen der Bildschirmanzeige
Menü MODE SELECT-2
INFORMATIONDie Modellbezeichnung (MODEL), dieSeriennummer (S/N) und die Verwendungszeit(USAGE TIME) des Monitors kann überprüftwerden.1.Nach der Wahl von [INFORMATION] drücken Sie
die Taste .Die Produktinformation wird angezeigt.
2.Drücken Sie die Taste MENU.
OFF TIMERDas Gerät wird automatisch ausgeschaltet,nachdem die eingestellte Zeit abgelaufen ist.1.Nach der Wahl von [OFF TIMER] drücken Sie die
Taste .2.Stellen [ON]/[OFF] durch Drücken der Tasten
ein.Wenn [ON] gewählt wird, drücken Sie die Taste
/ MODE und stellen Sie die Ausschaltzeitdurch Drücken der Tasten ein. (Zwischen 1und 23 Stunden können in Stunden eingestelltwerden.)
3.Drücken Sie die Taste MENU.- Wenn [ON] gewählt wurde, wird die
verbleibende Zeit oben rechts auf demBildschirm während der letzten fünf Minuten vordem Ausschalten angezeigt. (Die verbleibendeZeit wird ca. fünf Sekunden lang jede Minuteangezeigt.)
- Wenn der Netzschalter nach der ersten Anzeigeder Restzeit aber vor dem Ausschalten gedrücktwird, wird der OFF TIMER auf eine Stundeeingestellt.Zum Ausschalten des Gerätes drücken Sieerneut den Netzschalter. (Beim nächstenEinschalten des Gerätes wird das Gerät erneutautomatisch ausgeschaltet, wenn dieeingestellte Zeit verstrichen ist.)
- Wenn der Monitor bei Einstellung desAusschalttimers [OFF TIMER] auf [ON]eingeschaltet wird, wird die eingestellte Zeiteinige Sekunden lang angezeigt. (Wenn keinEingangssignal vorhanden ist, wird [NOSIGNAL] angezeigt.)
191A_dt.P65 12/15/2003, 5:27 PM43
44
Pflege des Monitors
Pflege des Monitors
Ziehen Sie immer erst den Stecker aus derNetzsteckdose, bevor Sie Reinigungsarbeiten amMonitor ausführen.
Gehäuse und BedienfeldWischen Sie das Gehäuse und das Bedienfeld miteinem weichen, trockenen Tuch vorsichtig sauber.Falls starke Verschmutzungen auftreten, geben Sieetwas neutrales Reinigungsmittel auf ein feuchtes,weiches Tuch, wringen Sie es gut aus, undwischen Sie den Monitor sauber.
LCD-PanelWischen Sie Schmutz und Staub von derOberfläche des LCD-Panels mit einem weichen,trockenen Tuch vorsichtig ab. (Es eignet sich einweiches Tuch, beispielsweise ein Gaze-Tuch, dasauch zum Reinigen von Linsen verwendet wird.)
ACHTUNG!
- Verwenden Sie auf keinen Fall Verdünner,Benzin, Alkohol, Glasreiniger usw., da dies Farb-oder Formveränderungen hervorrufen kann.
- Verkratzen Sie den Monitor nicht mit hartenGegenständen oder durch zu starken Andruck,da dies bleibende Spuren hinterlassen oderFunktionsstörungen hervorrufen kann.
Lagerung
Wenn der Monitor längere Zeit nicht verwendetwird, ziehen Sie den Netzstecker aus derNetzsteckdose.
ACHTUNG!
- Lassen Sie den Monitor nicht über längere Zeitmit Gummi- oder Kunststoffgegenständen inBerührung kommen, da dies Farb- oderFormveränderungen verursachen kann.
Fehlersuche
Falls Störungen am Monitor auftreten, prüfen Sieerst folgende Punkte, bevor Sie sich an denKundendienst wenden.Falls sich die Störung hiermit nicht beheben lässt,wenden Sie sich an das Geschäft, in dem Sie denMonitor gekauft haben, oder an dienächstgelegene autorisierte Sharp-Kundendienstzentrale.
Die Leuchtstoffröhren des Monitors weisen einebegrenzte Lebensdauer auf.- Wenn sich der Bildschirm verdunkelt,
dauernd flackert oder nicht aufleuchtet, hatdie Leuchtstoffröhre das Ende ihrerBetriebslebensdauer erreicht. Wenden Siesich an das Geschäft, in dem Sie den Monitorgekauft haben, oder an das nächsteautorisierte Sharp-Kundendienstzentrum.
- Am Anfang kann aufgrund der Eigenschaftender Leuchtstoffröhre Flimmern auftreten. (Eshandelt sich dabei nicht um eineFunktionsstörung.) Schalten Sie in diesemFall probeweise den Monitor aus und wiederein.
Auf dem Monitor wird nichts angezeigt.(Betriebs-LED leuchtet nicht)- Ist das Netzkabel richtig angeschlossen? (S.36)
Auf dem Monitor wird nichts angezeigt.(Betriebs-LED leuchtet)- Ist der Computer richtig angeschlossen? (S.35)- Ist der Computer eingeschaltet?- Entspricht der Signaltakt des Computers den
Monitorspezifikationen? (S.47)- Wurde der Computer in den Stromsparmodus
gesetzt?
Die Steuertasten funktionieren nicht.- Ist die Einstellungssperre aktiviert? (S.38)
Das Bild wird verzerrt angezeigt.- Entspricht der Signaltakt des Computers den
Monitorspezifikationen? (S.47)- Führen Sie die automatische
Bildschirmeinstellung durch. (S.40)- Wenn die Auffrischungsrate im verwendeten
Computer geändert werden kann, sollte der Wertauf eine tiefere Frequenz geändert werden.(S.47)
Aus den Lautsprechern ertönt kein Klang.- Ist das Audiokabel richtig angeschlossen?
(S.35)- Regeln Sie die Lautstärke. (S.39)- Sind die Kopfhörer angeschlossen?- Es kommt kein Ton von den Lautsprechern,
wenn der Monitor im Stromsparmodus ist (dieBetriebs-LED leuchtet orangefarben auf).
191A_dt.P65 12/15/2003, 5:27 PM44

45
Eng
lish
Deu
tsch
Fran
çais
Informationen für Kunden überumweltfreundliche Entsorgungdieses SHARP-Produkts
Wenn dieses Produkt nicht mehr verwendetwerden kann, muss es auf legale undumweltfreundliche Weise entsorgt werden.
ENTSORGEN SIE DIESES PRODUKT NICHT MITDEM HAUSHALTSMÜLL ODER GEMISCHT MITANDEREM MÜLL! DABEI BESTEHT GEFAHRFÜR DIE UMWELT!
Sharp Corporation ist zum Umweltschutz und zurEinsparung von Energie entschlossen. Unser Zielist, die Umweltbelastung durch unsere Produktezu minimieren, indem wir neueProdukttechnologien entwickeln ud einsetzen, unddie Kunden auf umweltbewusstes Verhaltenhinweisen.
(1) Für unsere Kunden in Belgien, denNiederlanden, Schweden und der SchweizSHARP nimmt an den nationalenRecyclingsystemen für Elektronikmüll teil, dieauf der Basis der Umweltschutzgesetzgebungin diesen Ländern eingerichtet wurden.Einzelheiten über die betreffenden Ländersiehe hier.
Pflege des Monitors
(2) Für unsere Kunden in Großbritannien,Deutschland, Frankreich und ItalienBitte wenden Sie sich an die örtlichenBehörden für Müllsammlung und Recyclingoder an eine Recylingfirma, die zum Recyclingvon Elektronikgeräten lizensiert ist.SHARP empfiehlt die Recyclingdienste vonMIREC; weitere Informationen über MIRECsiehe Website des Unternehmens beihttp://www.mirec.com/.MIREC-Dienste müssen vom letzten Besitzerdes betreffenden Elektronikgeräts bezahltwerden.
(3) Für unsere Kunden in den USAIn diesem Produkt ist Zinn-Blei-Lötmaterial undeine Fluoreszenzlampe mit einer geringenMenge Quecksilber verwendet. DieEntsorgung dieser Materialien kann aufgrundvon Umweltvorschriften geregelt sein. Bittewenden Sie sich an die örtlichen Behördenoder an die Electronics Industries Alliance:http://www.eiae.org
(4) Für unsere Kunden in JapanRufen Sie gebührenfrei bei 0120-845-530 an,um Recycling-Information zu erhalten.
Land Recycling-Information für das Land
Schweden Bitte verwenden Sie dasschwedische Elektronik-Recyclingsystem namens"ELRETUR", siehe auch Website beihttp://www.el-kretsen.se
Die Niederlande Bitte verwenden Sie das holländischeElektronik-Recyclingsystem namens"ICT-Milieu", siehe auch Website beihttp://www.nederlandict.nl/index.php
Belgien Bitte verwenden Sie das belgischeElektronik-Recyclingsystem namens"Recupel", siehe auch Website beihttp://www.recupel.be
Schweiz Bitte verwenden Sie dasschweizerische Elektronik-Recyclingsystem namens "SWICO",siehe auch Website beihttp://www.swico.ch
191A_dt.P65 12/15/2003, 5:27 PM45

46
Abmessungen (Einheiten: mm)
- Analogsignalkabel: ca. 1,8 m- Audiokabel: ca. 1,8 m
Hinweis:- Bedingt durch fortlaufende technische
Verbesserungen behält sich SHARP das Rechtvor, das Design und die Spezifikationen ohnevorherige Ankündigung ändern zu können. Dieangegebenen Leistungswerte stellen dieNennwerte einer in Serienherstellungproduzierten Einheit dar. GeringeAbweichungen bei einzelnen Geräten sindmöglich.
ProduktspezifikationenModellbezeichnung
LL-191A-W (Weiß)/LL-191A-B (Schwarz)LCD-Anzeige
48 cm diagonal gemessen TFT-LCD-ModulAuflösung (max.)
SXGA 1280 x 1024 PixelAnzeigbare Farben (max.)
Ca. 16,19 Millionen Farben (6 bit + FRC)Helligkeit (max.)
220 cd/m2
Punktabstand0,294 (H) x 0,294 (V) mm
Kontrastverhältnis500:1
BlickwinkelLinks-rechts 160°, oben-unten 160°(Kontrastverhältnis > 5)
BildschirmanzeigegrößeHorizontal 376,3 mm x vertikal 301,1 mm
VideosignalAnalog RGB (0,7 Vp-p) [75Ω]
Sync-SignalSeparate Sync (TTL-Pegel: +/-), Sync onGreen, Composite Sync (TTL-Pegel: +/-)
ErweiterungskompensationDigitaler Skalierungsgrad (Vergrößerung vonVGA/SVGA/XGA usw. auf gesamteBildschirmgröße.)
Plug & PlayVESA: DDC2B-kompatibel
Power ManagementVESA: basiert auf DPMS
Lautsprecherausgang1 W + 1 W
Eingangssignalanschluss15poliger Mini-D-Sub-Anschluss (3 Reihen)
AudioeingangsanschlussMini-Stereobuchse
KopfhöreranschlussMini-Stereobuchse
Bildschirmneigungnach oben ca. 0 - 25°, nach unten ca. 0 - 5°
Stromversorgung100 - 240 VAC, 50/60 Hz
Umgebungstemperatur5 - 35 °C
Leistungsaufnahme33 W (Kein Audioeingang)(36 W max., 1,8 W im Stromsparmodus)
Abmessungen (B x T x H)Ca. 419 mm x 213 mm x 409 mm
GewichtCa. 7,8 kg (ca. 5,7 kg ohne Monitorfuß)(Ohne Kabel)
Technische Daten
04_191A_dt.P65 12/22/2003, 9:44 AM46

47
Eng
lish
Deu
tsch
Fran
çais
Technische Daten
Relevante Signaltakte
- Die empfohlene Auflösung ist 1280 x 1024.- Alle nur mit Non-Interlace.- Die Frequenzen für die Serien Power Macintosh
und Sun Ultra sind lediglich Referenzwerte. Fürden Anschluss ist evtl. ein anderer Adapter (imHandel erhältlich) notwendig.
- Wenn der Monitor Taktsignale empfängt, dienicht kompatibel sind, wird [OUT OF TIMING]angezeigt. Stimmen Sie den Takt anhand derAnweisungen im Computer-Benutzeranleitungauf den Monitor ab.
- Wenn der Monitor überhaupt kein Signalempfängt (Sync-Signal), wird [NO SIGNAL]angezeigt.
VESA
US-Text
PowerMacintosh-Serie
Sun Ultra-Serie
Anzeigemodus Hsync Vsync Punktfrequenz
Pinbelegung des Analogsignal-Eingangsstecker(15-poliger Mini-D-Sub-Stecker)
Nr. Funktion
1 Roter Videosignaleingang
2 Grüner Videosignaleingang
3 Blauer Videosignaleingang
4 GND
5 GND
6 Für rotes Videosignal GND
7 Für grünes Videosignal GND
8 Für blaues Videosignal GND
9 +5V
10 GND
11 GND
12 DDC-Daten
13 Für Hsync-Signaleingang
14 Für Vsync-Signaleingang
15 DDC-Takt
Power ManagementDer Monitor basiert auf VESA DPMS (DisplayPower Management Signaling).Um die Power Management-Funktion desMonitors zu aktivieren, müssen sowohl dieVideokarte als auch der Computer dem StandardVESA DPMS entsprechen.
DPMS: Display Power Management Signalling
DDC (Plug & Play)Dieser Monitor unterstützt den Standard VESA DDC(Display Data Channel).DDC ist ein Signalstandard zum Ausführen von Plug& Play-Funktionen am Monitor oder Computer. Erüberträgt Informationen, beispielsweise denAuflösungsgrad, zwischen dem Monitor und demComputer. Sie können diese Funktion anwenden,wenn Ihr Computer DDC-kompatibel und so gesetztist, dass er den Plug & Play-Monitor erkennen kann.Aufgrund der vielen verschiedenen Systeme gibt esviele Varianten von DDC. Dieser Monitor arbeitet mitDDC2B.
DPMS- Bild- Leistungs- H-sync V-syncModus schirm aufnahme
EIN Anzeige ein Ja Ja
STANDBY Nein Ja
SUSPEND Anzeige aus Ja Nein
AUS Nein Nein
36 W
1,8 W
191A_dt.P65 12/15/2003, 5:27 PM47

48
Installieren der Setup-Informationen und des ICC-Profils (Für Windows)
Je nach dem verwendeten Computer oderBetriebssystem muss die Installation der Monitor-Setup-Informationen usw. eventuell über denComputer erfolgen. Führen Sie in diesem Fall dieunten beschriebenen Schritte zum Installieren derMonitor-Setup-Informationen aus. (Je nach demverwendeten Computertyp oder Betriebssystemkönnen die Befehlsnamen und Verfahren von denhier beschriebenen abweichen. Lesen Sie auchdas Benutzeranleitung Ihres Computers.)
Informationen zum ICC-ProfilEin ICC-Profil (International Color Consortium) isteine Datei, in der die Farbwiedergabeeigenschaftendes LCD-Monitors beschrieben sind. DurchEinsatz einer Anwendung, die mit einem ICC-Profil zusammenarbeitet, lässt sich hochgenaueFarbreproduktion erzielen.- Windows 98/2000/Me/XP verwenden alle das
ICC-Profil.- Beim Installieren der Setup-Informationen unter
Windows 98/2000/Me/XP (unten beschrieben)wird auch das ICC-Profil installiert. Falls Sie nurdas ICC-Profil installieren möchten, lesen Siedie Anweisungen unter Installieren des ICC-Profils auf Seite 50.
- Bei Verwendung des ICC-Profils folgendeEinstellungen verwenden:- [DISPLAY MODE]: [STD] oder [OFFICE]- [WHITE BALANCE]: [STD]- [GAMMA]: [0]
Für Windows 95
Installieren der Monitor-Setup-Informationen unterWindows 95. Die in den nachstehendenBedienungshinweisen erwähnten Windows-Meldungen basieren auf der englischen Windows-Version.Dabei wird von Laufwerk "D" als CD-ROM-Laufwerk angenommen.
1. Die mitgelieferte CD-ROM in das CD-ROM-Laufwerk des Computer einlegen.
2. Klicken Sie auf die Schaltfläche [Start]. WählenSie unter [Settings] die Option [Control Panel].
3. Doppelklicken Sie auf [Display].4. Klicken Sie auf [Settings], [Advanced
Properties] und [Monitor] und dann auf[Change].
5. Klicken Sie auf [Have disk], bestätigen Sie, dassneben [Copy manufacturer's files from:] [D:]angezeigt wird, und klicken Sie dann auf [OK].
6. Bestätigen Sie, dass die Monitordetailsausgewählt sind, und klicken Sie auf [OK].
7. Prüfen Sie, ob der Monitor angezeigt wird, undklicken Sie dann auf [Apply].
8. Klicken Sie auf [OK], und schließen Sie dasFenster.
Für Windows 98
Installieren der Monitor-Setup-Informationen unterWindows 98 und Festlegen des Monitor-ICC-Profils als vorbestimmter Wert. Die in dennachstehenden Bedienungshinweisen erwähntenWindows-Meldungen basieren auf der englischenWindows-Version.Dabei wird von Laufwerk "D" als CD-ROM-Laufwerk angenommen.
Wenn der "Add New Hardware Wizard" angezeigtwird:1. Die mitgelieferte CD-ROM in das CD-ROM-
Laufwerk des Computer einlegen.2. Klicken Sie auf [Next].3. Aktivieren Sie [Display a list of all the drivers in
a specific location, so you can select the driveryou want.], und klicken Sie auf [Next].
4. Wenn [Models] angezeigt wird, klicken Sie auf[Have disk], bestätigen Sie, dass neben [Copymanufacturer's files from:] [D:] angezeigt wird,und klicken Sie dann auf [OK].
5. Bestätigen Sie, dass die Monitordetailsausgewählt sind, klicken Sie dann auf [Next],[Next] und auf [Finish]. Wenn der "Add NewHardware Wizard" angezeigt wird, wiederholenSie die Installationsschritte ab Schritt 2.
Wenn der "Add New Hardware Wizard" nichtangezeigt wird:1. Die mitgelieferte CD-ROM in das CD-ROM-
Laufwerk des Computer einlegen.2. Klicken Sie auf die Schaltfläche [Start]. Wählen
Sie unter [Settings] die Option [Control Panel].3. Doppelklicken Sie auf [Display].4. Klicken Sie auf [Settings], [Advanced] und
[Monitor].5. Aktivieren Sie unter [Options] [Automatically
detect Plug & Play monitors], und klicken Sieauf [Change].
6. Klicken Sie auf [Next].7. Klicken Sie auf [Display a list of all the drivers
in a specific location, so you can select thedriver you want.] und dann auf [Next].
8. Wenn [Models] angezeigt wird, klicken Sie auf[Have disk], bestätigen Sie, dass neben [Copymanufacturer's files from:] [D:] angezeigt wird,und klicken Sie dann auf [OK].
9. Bestätigen Sie, dass die Monitordetailsausgewählt sind, klicken Sie dann auf [Next],[Next] und auf [Finish].
10. Prüfen Sie, ob der Monitor angezeigt wird, undklicken Sie dann auf [Apply].
11. Klicken Sie auf [OK], und schließen Sie dasFenster.
191A_dt.P65 12/15/2003, 5:27 PM48

49
Eng
lish
Deu
tsch
Fran
çais
Für Windows Me
Installieren der Monitor-Setup-Informationen unterWindows Me und Festlegen des Monitor-ICC-Profils als vorbestimmter Wert. Die in dennachstehenden Bedienungshinweisen erwähntenWindows-Meldungen basieren auf der englischenWindows-Version.Dabei wird von Laufwerk "D" als CD-ROM-Laufwerk angenommen.
Wenn der "Add New Hardware Wizard" angezeigtwird:1. Die mitgelieferte CD-ROM in das CD-ROM-
Laufwerk des Computer einlegen.2. Aktivieren Sie [Specify the location of the driver
[Advanced]], und klicken Sie auf [Next].3. Aktivieren Sie [Display a list of all the drivers in
a specific location, so you can select the driveryou want.], und klicken Sie auf [Next].
4. Wenn [Models] angezeigt wird, klicken Sie auf[Have disk], bestätigen Sie, dass neben [Copymanufacturer's files from:] [D:] angezeigt wird,und klicken Sie dann auf [OK].
5. Wählen Sie die Monitordetails aus der Listeaus, klicken Sie dann auf [Next], [Next] und auf[Finish]. Wenn der "Add New Hardware Wizard"angezeigt wird, wiederholen Sie dieInstallationsschritte ab Schritt 2.
Wenn der "Add New Hardware Wizard" nichtangezeigt wird:1. Die mitgelieferte CD-ROM in das CD-ROM-
Laufwerk des Computer einlegen.2. Klicken Sie auf die Schaltfläche [Start]. Wählen
Sie unter [Settings] die Option [Control Panel].3. Doppelklicken Sie auf [Display].4. Klicken Sie auf [Settings], [Advanced] und
[Monitor].5. Aktivieren Sie unter [Options] [Automatically
detect Plug & Play monitors], und klicken Sieauf [Change].
6. Aktivieren Sie [Specify the location of the driver[Advanced]], und klicken Sie auf [Next].
7. Aktivieren Sie [Display a list of all the drivers ina specific location, so you can select the driveryou want.], und klicken Sie auf [Next].
8. Wenn [Models] angezeigt wird, klicken Sie auf[Have disk], bestätigen Sie, dass neben [Copymanufacturer's files from:] [D:] angezeigt wird,und klicken Sie dann auf [OK].
9. Wählen Sie die Monitordetails, klicken Siedann auf [Next], [Next] und auf [Finish].
10.Prüfen Sie, ob die Monitordetails angezeigtwerden, und klicken Sie dann auf [Apply].
11.Klicken Sie auf [OK], und schließen Sie dasFenster.
Installieren der Setup-Informationen und des ICC-Profils (Für Windows)
Für Windows 2000
Installieren der Monitor-Setup-Informationen unterWindows 2000 und Festlegen des Monitor-ICC-Profils als vorbestimmter Wert. Die in dennachstehenden Bedienungshinweisen erwähntenWindows-Meldungen basieren auf der englischenWindows-Version.Dabei wird von Laufwerk "D" als CD-ROM-Laufwerk angenommen.
1. Die mitgelieferte CD-ROM in das CD-ROM-Laufwerk des Computer einlegen.
2. Klicken Sie auf die Schaltfläche [Start]. WählenSie unter [Settings] die Option [Control Panel].
3. Doppelklicken Sie auf [Display].4. Klicken Sie auf [Settings], [Advanced] und
[Monitor].5. Klicken Sie auf [Properties], [Driver] und
[Update Driver].6. Wenn [Upgrade Device Driver Wizard]
angezeigt wird, klicken Sie auf [Next].7. Aktivieren Sie [Display a list of the known
drivers for this device so that I can choose aspecific driver], und klicken Sie auf [Next].
8. Wenn [Models] angezeigt wird, klicken Sie auf[Have disk], bestätigen Sie, dass neben [Copymanufacturer's files from:] [D:] angezeigt wird,und klicken Sie dann auf [OK].
9. Wählen Sie den Monitor aus der angezeigtenListe aus, und klicken Sie auf [Next].
10. Klicken Sie auf [Next], vergewissern Sie sich,dass der Name des Monitors angezeigt wird,und klicken Sie auf [Finish]. Wenn [The DigitalSignature Not Found] angezeigt wird, klickenSie auf [Yes].
11. Klicken Sie auf [Close].12. Klicken Sie auf [OK], und schließen Sie das
Fenster.
191A_dt.P65 12/15/2003, 5:27 PM49

50
Installieren des ICC-ProfilsInstallieren des Monitor-ICC-Profils. (Wenn dieSetup-Informationen bereits installiert wurden, istauch das Profil bereits installiert. Es braucht dannnicht mehr extra installiert zu werden.)Die in den nachstehenden Bedienungshinweisenerwähnten Windows-Meldungen basieren auf derenglischen Windows-Version.Dabei wird von Laufwerk "D" als CD-ROM-Laufwerk angenommen.
1. Die mitgelieferte CD-ROM in das CD-ROM-Laufwerk des Computer einlegen.
2. Klicken Sie auf die Schaltfläche [Start]. WählenSie unter [Settings] die Option [Control Panel].
3. Doppelklicken Sie auf [Display].4. Klicken Sie auf [Settings] und [Advanced].5. Klicken Sie auf [General], und wählen Sie unter
[Compatibility] die Option [Apply the newdisplay setting without restarting]. Klicken Siedann auf [Color Management].
6. Klicken Sie auf [Add], und wählen Sie alsDateipfad CD-ROM aus.
7. Wählen Sie das Farbprofil, das Sie installierenmöchten, und klicken Sie auf [Add].
8. Wählen Sie das Profil, und klicken Sie auf [SetAs Default].
9. Klicken Sie auf [OK], und schließen Sie dasFenster.
- Bei Verwendung des ICC-Profils folgendeEinstellungen verwenden:- [DISPLAY MODE]: [STD] oder [OFFICE]- [WHITE BALANCE]: [STD]- [GAMMA]: [0]
Installieren der Setup-Informationen und des ICC-Profils (Für Windows)
Für Windows XP
Installieren der Monitor-Setup-Informationen unterWindows XP und Festlegen des Monitor-ICC-Profils als vorbestimmter Wert. Die in dennachstehenden Bedienungshinweisen erwähntenWindows-Meldungen basieren auf der englischenWindows-Version.Dabei wird von Laufwerk "D" als CD-ROM-Laufwerk angenommen.
1. Die mitgelieferte CD-ROM in das CD-ROM-Laufwerk des Computer einlegen.
2. Klicken Sie auf die Schaltfläche [Start]. Wählen[Control Panel].
3. Wechseln Sie auf "Classic View".4. Doppelklicken Sie auf [Display].5. Klicken Sie auf [Settings], [Advanced] und
[Monitor].6. Klicken Sie auf [Properties], [Driver] und
[Update Driver].7. Wenn [Hardware Update Wizard] angezeigt
wird, aktivieren Sie [Install from a list or specificlocation [Advanced]], und klicken Sie auf[Next].
8. Aktivieren Sie [Don't search. I will choose thedriver to install.], und klicken Sie auf [Next].
9. Aktivieren Sie [Have Disk], bestätigen Sie,dass neben [Copy manufacturer's files from:][D:] angezeigt wird, und klicken Sie dann auf[OK].
10. Wählen Sie den Monitor aus der angezeigtenListe aus, und klicken Sie auf [Next].Wenn [has not passed Windows Logo testing...]angezeigt wird, klicken Sie auf [ContinueAnyway].
11. Vergewissern Sie sich, dass der Name desMonitors angezeigt wird, und klicken Sie auf[Finish].
12. Klicken Sie auf [Close].13. Klicken Sie auf [OK], und schließen Sie das
Fenster.
191A_dt.P65 12/15/2003, 5:27 PM50

51
Eng
lish
Deu
tsch
Fran
çais
Informationen zum Profil ColorSync (Für MacOS)
Informationen zum Profil ColorSyncColorSync ist das Farbverwaltungssystem vonApple Computers. Mit dieser Funktion erkennt dasSystem die Farbwiedergabeeigenschaften beiVerwendung mit einer kompatiblen Anwendung.Ein ColorSync-Profil beschreibt dieFarbeigenschaften des LCD-Monitors.
Hinweise:- Das ColorSync-Profil dieses Monitors kann
zusammen mit MacOS 8.5 oder höher eingesetztwerden.
- Bei Verwendung des ColorSync-Profils folgendeEinstellungen verwenden:- [DISPLAY MODE]: [STD] oder [OFFICE]- [WHITE BALANCE]: [STD]- [GAMMA]: [0]
Einstellen des Profils ColorSync
Hinweise:- Auf Ihrem System muss entweder PC Exchange
oder File Exchange installiert sein.- Je nach dem verwendeten Computertyp oder
Betriebssystem können die Befehlsnamen undVerfahren von den hier beschriebenenabweichen. Lesen Sie auch dasBenutzeranleitung Ihres Computers.
1.Die mitgelieferte CD-ROM in das CD-ROM-Laufwerk des Computer einlegen.
2.Kopieren Sie das zu verwendende Profil von derCD-ROM zum Profilordner ColorSync imSystemordner.
3.Wählen Sie mit Hilfe von ColorSync imKontrollfeld das zu verwendende Profil aus.
191A_dt.P65 12/15/2003, 5:27 PM51

52
Anweisungen zum Anbringen eines VESA-kompatiblen Monitorarms
Der folgende Fuß oder Arm kann am Monitorangebracht werden.- Fuß (getrennt erhältlich)
Modellbezeichnung: NL-S02-H (Hellgrau)NL-S02-B (Schwarz)
- VESA-kompatibler Arm (im Handel erhältlich)
Kompatible im Handel erhältliche ArmeWenn ein Arm oder Fuß installiert werden soll, istfolgendes zu beachten.- Kompatibilität mit dem VESA-Standard.- Zwischen den Schraubenbohrungen in dem zu
befestigenden Abschnitt muss ein Abstand vonmindestens 100 mm x 100 mm vorliegen.
- Er darf nicht abfallen oder abbrechen, nachdemer am Monitor befestigt wurde.
Befestigen des Arms oder Fußes- Achten Sie darauf, dass Sie das Kabel nicht
überdehnen, und schließen Sie keinVerlängerungskabel an, da diesFunktionsstörungen hervorrufen kann.
- Neben diesen Anweisungen lesen Sie auch dieInstallationsanweisungen in der Bedienungsanleitung,die im Lieferumfang des Arms oder Fußes enthalten ist.
ACHTUNG!
- Darauf achten, nicht die Finger zwischenDisplay und Fuß einzuklemmen oder den Fußfallenzulassen. Dabei besteht die Gefahr vonVerletzungen.
1. Die Kabel abtrennen.2. Breiten Sie ein weiches Tuch auf einer
waagerechten Oberfläche aus.3. Legen Sie den Monitor mit der Anzeigeseite
nach unten darauf. Achten Sie dabei darauf,dass der Monitor nicht beschädigt wird.
4.Lösen Sie die vier Schrauben, und nehmen Sieden Ständer vom Monitor ab.
Hinweise:- Der Fuß ist nur für diesen Monitor bestimmt,
verwenden Sie ihn für keine anderen Geräteoder nutzen Sie ihn auf keine andere Weise.
- Wir empfehlen, die vier abgenommenenSchrauben zusammen mit dem abgenommenenFuß aufzubewahren, damit Sie den Fuß wiedermit den dazugehörigen Schrauben verwendenkönnen. Die Verwendung anderer Schraubenkann zu Fehlfunktionen führen.
5.Befestigen Sie den Arm mit den vier Schraubenam Monitor.
Hinweis:- Zur Befestigung des Arms sollten M4-
Schrauben verwendet werden, die in einerLänge von 6 - 8 mm über die Fläche, an dersie befestigt werden, hervorstehen. Wenn Sieeine andere Schraubenart verwenden, kannder Monitor herunterfallen oder im Innerenbeschädigt werden.
Schraube zur Befestigungdes ArmsArmTeil des Monitors, an demder Arm befestigt wird
04_191A_dt.P65 12/19/2003, 3:15 PM52

53
Eng
lish
Deu
tsch
Fran
çais
Italia
noE
spañ
olE
nglis
h
Table des matières
Conseils et mesures de sécurité . . . . . . . . . . . . . . . . . . . . . . . . . . . . . . . . . . . . . . . . . . . . . . . . . . . . . . . . 54Description du produit . . . . . . . . . . . . . . . . . . . . . . . . . . . . . . . . . . . . . . . . . . . . . . . . . . . . . . . . . . . . . . . . 55Réglage de l'inclinaison . . . . . . . . . . . . . . . . . . . . . . . . . . . . . . . . . . . . . . . . . . . . . . . . . . . . . . . . . . . . . . 56Raccordement, activation et désactivation du moniteur . . . . . . . . . . . . . . . . . . . . . . . . . . . . . . . . . . . . . 57
Raccordement du moniteur à un ordinateur . . . . . . . . . . . . . . . . . . . . . . . . . . . . . . . . . . . . . . . . . . . . 57Raccordement d'un casque audio (en vente dans le commerce) . . . . . . . . . . . . . . . . . . . . . . . . . . . 58Raccordement du moniteur à une source d'alimentation . . . . . . . . . . . . . . . . . . . . . . . . . . . . . . . . . . 58Activation de l'alimentation . . . . . . . . . . . . . . . . . . . . . . . . . . . . . . . . . . . . . . . . . . . . . . . . . . . . . . . . . 58Désactivation de l'alimentation . . . . . . . . . . . . . . . . . . . . . . . . . . . . . . . . . . . . . . . . . . . . . . . . . . . . . . 59
Réglage de l'affichage du moniteur et du volume des haut-parleurs . . . . . . . . . . . . . . . . . . . . . . . . . . . 60Réglage du rétro-éclairage . . . . . . . . . . . . . . . . . . . . . . . . . . . . . . . . . . . . . . . . . . . . . . . . . . . . . . . . . 60Réglage du volume des haut-parleurs . . . . . . . . . . . . . . . . . . . . . . . . . . . . . . . . . . . . . . . . . . . . . . . . 61Réglage du mode d'affichage . . . . . . . . . . . . . . . . . . . . . . . . . . . . . . . . . . . . . . . . . . . . . . . . . . . . . . . 61Confirmation des informations sur l'appareil . . . . . . . . . . . . . . . . . . . . . . . . . . . . . . . . . . . . . . . . . . . 61
Réglage de l'affichage du moniteur . . . . . . . . . . . . . . . . . . . . . . . . . . . . . . . . . . . . . . . . . . . . . . . . . . . . . 62Réglage automatique de l'écran . . . . . . . . . . . . . . . . . . . . . . . . . . . . . . . . . . . . . . . . . . . . . . . . . . . . . 62Réglage manuel de l'écran . . . . . . . . . . . . . . . . . . . . . . . . . . . . . . . . . . . . . . . . . . . . . . . . . . . . . . . . . 63
Entretien du moniteur . . . . . . . . . . . . . . . . . . . . . . . . . . . . . . . . . . . . . . . . . . . . . . . . . . . . . . . . . . . . . . . . 66Entretien du moniteur . . . . . . . . . . . . . . . . . . . . . . . . . . . . . . . . . . . . . . . . . . . . . . . . . . . . . . . . . . . . . . 66Stockage . . . . . . . . . . . . . . . . . . . . . . . . . . . . . . . . . . . . . . . . . . . . . . . . . . . . . . . . . . . . . . . . . . . . . . . . 66Dépannage . . . . . . . . . . . . . . . . . . . . . . . . . . . . . . . . . . . . . . . . . . . . . . . . . . . . . . . . . . . . . . . . . . . . . . 66Informations pour les clients à propos de l'environnement pour ce produit SHARP . . . . . . . . . . . . . . . . . . . 67
Caractéristiques techniques . . . . . . . . . . . . . . . . . . . . . . . . . . . . . . . . . . . . . . . . . . . . . . . . . . . . . . . . . . . 68Installation des fichiers relatifs au paramétrage du moniteur et au profil ICC (Pour Windows) . . . . . . . 70Informations sur le profil ColorSync (Pour MacOS) . . . . . . . . . . . . . . . . . . . . . . . . . . . . . . . . . . . . . . . . . 73Instructions relatives à l'installation d'un bras conforme VESA . . . . . . . . . . . . . . . . . . . . . . . . . . . . . . . . 74
191A_fr.P65 12/15/2003, 5:28 PM53

54
Conseils et mesures de sécurité
Le cordon d'alimentation électrique- Ne pas endommager le cordon d'alimentation,
ne pas déposer d'objets lourds sur le cordon, nepas l'étendre ni le plier de manière excessive.Ne pas y ajouter de rallonge non plus. Toutendommagement du cordon d'alimentation peutentraîner un début d'incendie ou des chocsélectriques.
- Utilisez uniquement le cordon d'alimentationfourni avec le moniteur.
- Insérer la prise d'alimentation directement dansla prise de secteur. Ajouter une rallonge peutentraîner une surchauffe, voire un débutd'incendie.
- Ne débranchez pas ni ne branchez la prised'alimentation avec des mains humides. En lefaisant, vous risquez l'électrocution.
Moniteur et liste des accessoires- S'assurer que les éléments suivants sont bien
présents dans l'emballage :- Moniteur LCD (1)- Câble de signal analogique (1)
(nom du modèle : 0NIT15G4-0015)- Câble audio (1)
(nom du modèle : 0NIT17A3-U006)- Cordon d'alimentation (1)- CD-ROM (1)- Mode d'emploi (1)
Remarques :- Utilisez uniquement les câbles fournis avec le
moniteur.- Il est conseillé de conserver le carton
d'emballage pour le cas où le moniteur devraitêtre transporté.
- Sharp Corporation détient les droits d'auteur duprogramme Utility Disk. Ne pas le reproduiresans autorisation préalable.
- Il se peut que la forme des accessoires fournisdiffère légèrement de celle des accessoiresdécrits dans ce mode d'emploi.
Étendue du mode d'emploi- Dans ce mode d'emploi, "Windows XP" fera
référence à Microsoft Windows XP, "WindowsMe" à Microsoft Windows Millennium, "Windows2000" à Microsoft Windows 2000, "Windows 98"à Microsoft Windows 98, "Windows 95" àMicrosoft Windows 95, et "Windows 3.1" à laversion 3.1 de Microsoft Windows ; lorsqu'il n'yaura pas lieu de distinguer les programmes, leterme "Windows" sera utilisé.
- Microsoft et Windows sont des marquesdéposées de la Microsoft Corporation.
- Macintosh est une marque déposée de AppleComputer, Inc.
- Toutes les autres marques sont la propriété descompagnies respectives.
- Le panneau couleur LCD TFT utilisé dans cemoniteur est fabriqué avec une technologie de hauteprécision. Cependant, il peut avoir quelques pointsminuscules sur l'écran où les pixels ne s'allumentjamais ou sont allumés en permanence. De plus, sil'écran est regardé avec un angle aigu, les couleursou la luminosité peuvent paraître inégales. Noter quece n'est pas un mauvais fonctionnement mais unphénomène courant des écrans LCD et que celan'affecte aucunement les performances du moniteur.
- Ne pas laisser le moniteur en veille inutilementpendant de longues périodes car cela pourraitprovoquer l'apparition d'image récurrente.
- Si la luminosité est ajustée à son réglageminimum, il peut s'avérer difficile de consulter lemoniteur.
- La qualité du signal de l'ordinateur peutinfluencer la qualité de la diffusion du moniteur.Il est recommandé d'utiliser un ordinateurcapable d'émettre des signaux vidéo de hautequalité.
- Ne jamais heurter ou taper sur le moniteur avecdes objets durs.
- Il faut savoir que la société Sharp décline touteresponsabilité en cas d'erreur survenue durantl'utilisation par le client ou une tierce personne, ainsiqu'en cas de dysfonctionnement ou d'unendommagement causé au produit en coursd'utilisation, excepté lorsque qu'un dédommagementsous garantie est reconnu par la loi.
- Ce moniteur ainsi que ces accessoires sontsusceptibles d'évoluer sans avis préalable.
Lieu d'installation- Ne pas utiliser le moniteur dans un endroit
faiblement ventilé, poussiéreux, relativementhumide, ou encore là où il est susceptibled'entrer en contact avec de l'huile ou de lavapeur car cela pourrait provoquer un débutd'incendie.
- S'assurer que le moniteur ne sera pas entrer encontact avec de l'eau ou d'autres fluides.S'assurer que des agrafes ou des attachestrombones ne pénètrent pas à l'intérieur dumoniteur car cela pourrait provoquer un débutd'incendie ou des chocs électriques.
- Ne pas installer le moniteur au-dessus d'objetsinstables ou dans des endroits peu sûrs. Faireattention que le moniteur ne reçoive pas dechocs important ni de vibrations. Laisser tomberle moniteur peut l'endommager sérieusement.
- Ne pas utiliser le moniteur dans des endroits oùil est susceptible d'être exposé à la lumièredirecte du soleil, à proximité d'une source dechaleur ou partout ailleurs où il risque d'êtresoumis à des températures élevées ; cela peutmener à des dégagements excessifs de chaleuret conduire à un début d'incendie.
05_191A_fr.P65 12/16/2003, 1:31 PM54

55
Eng
lish
Deu
tsch
Fran
çais
Italia
noE
spañ
olE
nglis
h
Description du produit
1. Bouton AUTO ........................... Ce bouton est utilisé pour effectuer le réglage automatique sur l'écran(CLOCK, PHASE, H-POS et V-POS). (p.62)
2. Bouton MENU .......................... Ce bouton est utilisé pour faire apparaître, sélectionner et refermer lemenu OSD (On Screen Display).
3. Bouton / MODE .................... Lorsque le menu OSD est affiché :Ce bouton est utilisé pour sélectionner les options du menu.
Lorsque le menu OSD n'est pas affiché :Ce bouton est utilisé pour régler DISPLAY MODE.
4. boutons ............................. Lorsque le menu OSD est affiché :Ces boutons sont utilisés pour sélectionner une option ou pourrégler la valeur de l'option sélectionnée.
Lorsque le menu OSD n'est pas affiché :Ces boutons sont utilisés pour ajuster la luminosité du rétro-éclairage et le volume des haut-parleurs.
5. Haut-parleurs ........................... Les signaux audio entrant via un appareil extérieur connecté aumoniteur peuvent être écoutés.
6. Borne pour casque audio ....... Un casque audio (en vente dans le commerce) peut y être connecté.7. Bouton d'alimentation .............. Appuyez sur ce bouton pour mettre sous tension le moniteur.
Appuyez à nouveau sur ce bouton pour mettre le moniteur horstension.
8. Diode d'alimentation ................ Cette diode est éclairée en vert lorsque le moniteur est en coursd'utilisation, et en orange lorsqu'il se trouve en mode d'économied'énergie.
9. Interrupteur principal10. Borne d'alimentation11. Borne d'entrée analogique RVB .... Le câble de signal analogique est raccordé. Le câble de signal
analogique fourni doit être utilisé.12. Borne d'entrée audio ................ La borne de sortie audio d'un ordinateur peut y être connectée. Le
câble audio fourni doit être utilisé.13. Ancrage du verrou de sécurité ... En installant un verrou de sécurité (en vente dans le commerce) sur
l'ancrage du verrou de sécurité, le moniteur reste fixé et ne peut doncpas être transporté.Les trous de prévention antivol sont adaptés aux systèmes desécurité Kensington Micro Saver.
14. Ouvertures de ventilation ........ Ne jamais obstruer les ouvertures de ventilation car cela peutentraîner une surchauffe à l'intérieur du moniteur et provoquer undysfonctionnement.
191A_fr.P65 12/15/2003, 5:28 PM55
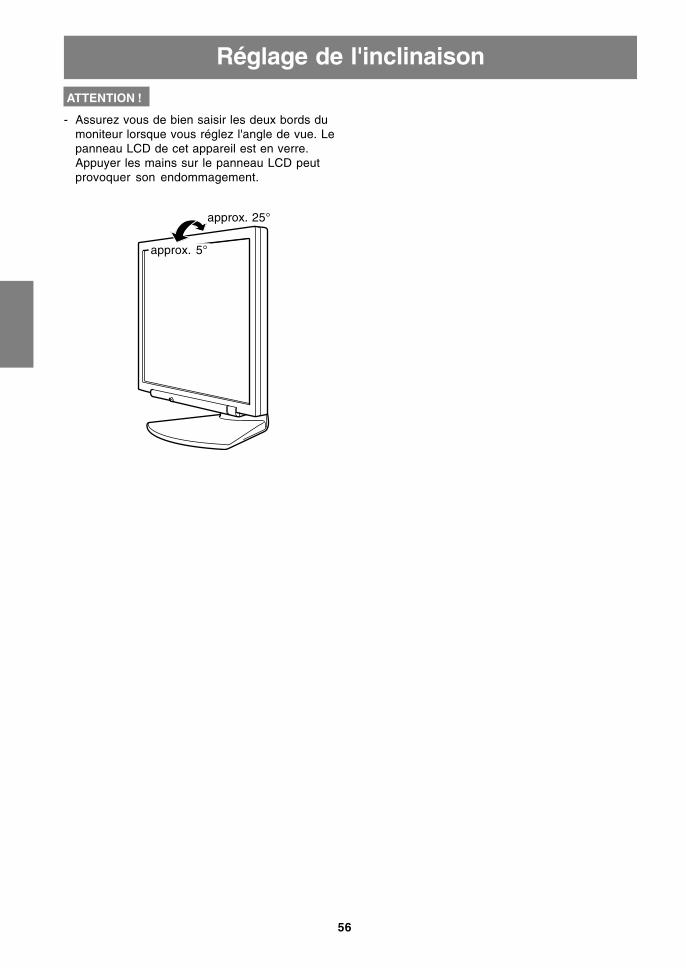
56
ATTENTION !
- Assurez vous de bien saisir les deux bords dumoniteur lorsque vous réglez l'angle de vue. Lepanneau LCD de cet appareil est en verre.Appuyer les mains sur le panneau LCD peutprovoquer son endommagement.
Réglage de l'inclinaison
approx. 25°
approx. 5°
191A_fr.P65 12/15/2003, 5:28 PM56
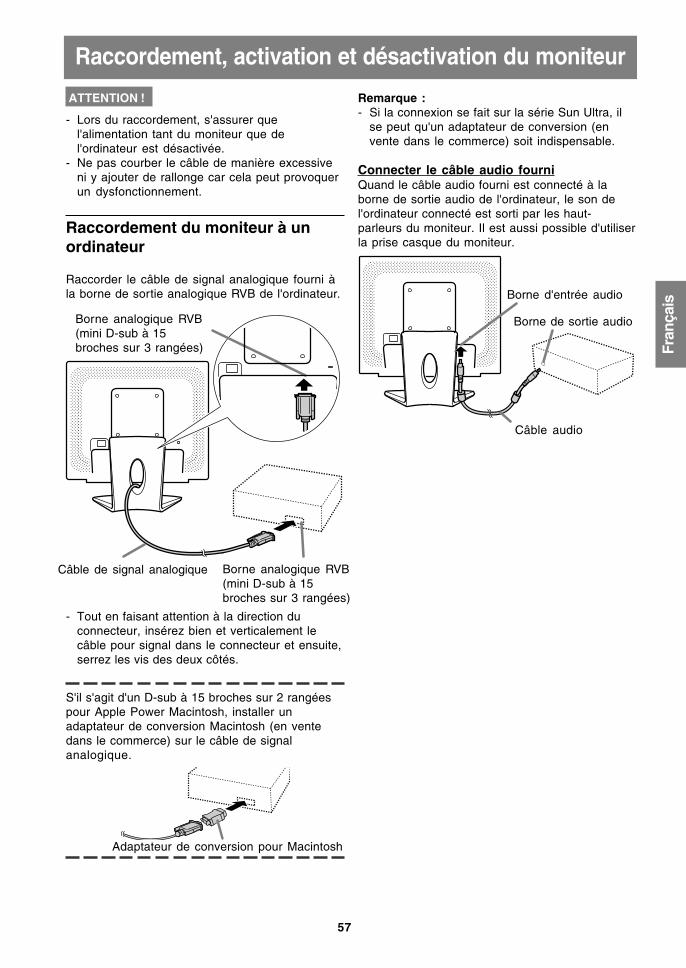
57
Eng
lish
Deu
tsch
Fran
çais
Italia
noE
spañ
olE
nglis
h
ATTENTION !
- Lors du raccordement, s'assurer quel'alimentation tant du moniteur que del'ordinateur est désactivée.
- Ne pas courber le câble de manière excessiveni y ajouter de rallonge car cela peut provoquerun dysfonctionnement.
Raccordement du moniteur à unordinateur
Raccorder le câble de signal analogique fourni àla borne de sortie analogique RVB de l'ordinateur.
- Tout en faisant attention à la direction duconnecteur, insérez bien et verticalement lecâble pour signal dans le connecteur et ensuite,serrez les vis des deux côtés.
S'il s'agit d'un D-sub à 15 broches sur 2 rangéespour Apple Power Macintosh, installer unadaptateur de conversion Macintosh (en ventedans le commerce) sur le câble de signalanalogique.
Raccordement, activation et désactivation du moniteur
Câble de signal analogique
Borne analogique RVB(mini D-sub à 15broches sur 3 rangées)
Borne analogique RVB(mini D-sub à 15broches sur 3 rangées)
Adaptateur de conversion pour Macintosh
Remarque :- Si la connexion se fait sur la série Sun Ultra, il
se peut qu'un adaptateur de conversion (envente dans le commerce) soit indispensable.
Connecter le câble audio fourniQuand le câble audio fourni est connecté à laborne de sortie audio de l'ordinateur, le son del'ordinateur connecté est sorti par les haut-parleurs du moniteur. Il est aussi possible d'utiliserla prise casque du moniteur.
Câble audio
Borne de sortie audio
Borne d'entrée audio
191A_fr.P65 12/15/2003, 5:28 PM57

58
Activation de l'alimentation
1.Activer la source d'alimentation principale dumoniteur.
- Pour allumer et éteindre avec l'interrupteurprincipal, toujours laisser un intervalle d'aumoins 5 secondes. Une manœuvre trop rapiderisque de causer des dysfonctionnements.
2.Appuyer sur le bouton d'alimentation du moniteur.3.Mettre l'ordinateur sous tension.
Quand un signal arrive en entrée en provenancede l'ordinateur, la diode d'alimentation s'allumeen vert, et l'écran s'affiche (après la mise soustension, il peut s'écouler un peu de temps avantque l'image ne s'affiche).
Remarques :- Lors de la toute première installation du
moniteur, ou après avoir changé un desparamètres de la configuration du système,effectuer un réglage automatique de l'écranavant de commencer l'utilisation. (p.62)
- En fonction du système d'exploitation ou del'ordinateur, il peut s'avérer nécessaire d'installerles fichiers relatifs au paramétrage du moniteurdu moniteur. (p.70)
- En cas de raccordement à un ordinateurportable, si l'écran de ce dernier est réglé defaçon à afficher en même temps, l'écran MS-DOS peut ne pas s'afficher correctement. Dansce cas, modifier les paramètres afin que lemoniteur soit le seul à afficher.
Raccordement d'un casque audio(en vente dans le commerce)
Un casque audio (en vente dans le commerce)peut être raccordé.
Remarques :- Lorsque les casques audio sont connectés,
aucun son ne peut être émis à partir des haut-parleurs du moniteur.
- Utiliser le casque audio ayant un câble demoins de 3 m de longueur.
Raccordement du moniteur à unesource d'alimentation
Raccordement, activation et désactivation du moniteur
Mettre l'ordinateursous tension.
ON
Appuyer sur le boutond'alimentation.
Prise desecteur
Cordond'alimentation
Borned'alimentation
Casque audio
Borne pour casque audio Interrupteur principal
191A_fr.P65 12/15/2003, 5:28 PM58

59
Eng
lish
Deu
tsch
Fran
çais
Italia
noE
spañ
olE
nglis
h
Désactivation de l'alimentation
1. Mettre l'ordinateur hors tension.2.Appuyer sur le bouton d'alimentation du
moniteur.La diode d'alimentation s'éteind.
Si le moniteur devait ne pas être utilisé pendantune période de temps prolongée, arrêterl'alimentation principale du moniteur, puisdébrancher la prise d'alimentation de la prise desecteur.
Raccordement, activation et désactivation du moniteur
OFF
Mettre l'ordinateurhors tension.
Appuyer sur le boutond'alimentation.
191A_fr.P65 12/15/2003, 5:28 PM59
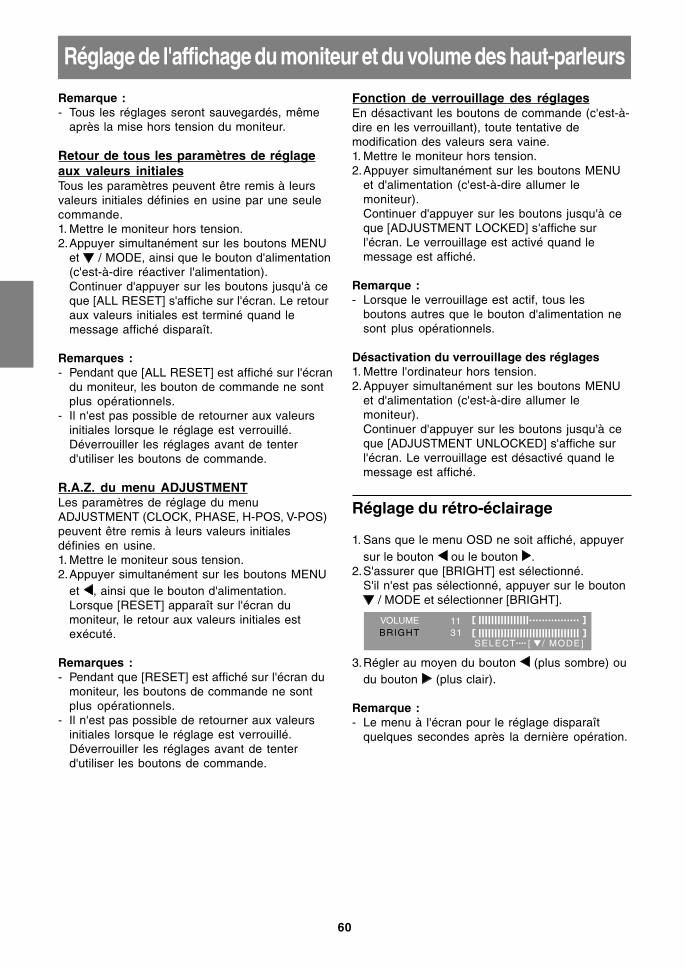
60
Réglage de l'affichage du moniteur et du volume des haut-parleurs
Fonction de verrouillage des réglagesEn désactivant les boutons de commande (c'est-à-dire en les verrouillant), toute tentative demodification des valeurs sera vaine.1. Mettre le moniteur hors tension.2.Appuyer simultanément sur les boutons MENU
et d'alimentation (c'est-à-dire allumer lemoniteur).Continuer d'appuyer sur les boutons jusqu'à ceque [ADJUSTMENT LOCKED] s'affiche surl'écran. Le verrouillage est activé quand lemessage est affiché.
Remarque :- Lorsque le verrouillage est actif, tous les
boutons autres que le bouton d'alimentation nesont plus opérationnels.
Désactivation du verrouillage des réglages1. Mettre l'ordinateur hors tension.2.Appuyer simultanément sur les boutons MENU
et d'alimentation (c'est-à-dire allumer lemoniteur).Continuer d'appuyer sur les boutons jusqu'à ceque [ADJUSTMENT UNLOCKED] s'affiche surl'écran. Le verrouillage est désactivé quand lemessage est affiché.
Réglage du rétro-éclairage
1. Sans que le menu OSD ne soit affiché, appuyersur le bouton ou le bouton .
2.S'assurer que [BRIGHT] est sélectionné.S'il n'est pas sélectionné, appuyer sur le bouton
/ MODE et sélectionner [BRIGHT].
3.Régler au moyen du bouton (plus sombre) oudu bouton (plus clair).
Remarque :- Le menu à l'écran pour le réglage disparaît
quelques secondes après la dernière opération.
Remarque :- Tous les réglages seront sauvegardés, même
après la mise hors tension du moniteur.
Retour de tous les paramètres de réglageaux valeurs initialesTous les paramètres peuvent être remis à leursvaleurs initiales définies en usine par une seulecommande.1. Mettre le moniteur hors tension.2.Appuyer simultanément sur les boutons MENU
et / MODE, ainsi que le bouton d'alimentation(c'est-à-dire réactiver l'alimentation).Continuer d'appuyer sur les boutons jusqu'à ceque [ALL RESET] s'affiche sur l'écran. Le retouraux valeurs initiales est terminé quand lemessage affiché disparaît.
Remarques :- Pendant que [ALL RESET] est affiché sur l'écran
du moniteur, les bouton de commande ne sontplus opérationnels.
- Il n'est pas possible de retourner aux valeursinitiales lorsque le réglage est verrouillé.Déverrouiller les réglages avant de tenterd'utiliser les boutons de commande.
R.A.Z. du menu ADJUSTMENTLes paramètres de réglage du menuADJUSTMENT (CLOCK, PHASE, H-POS, V-POS)peuvent être remis à leurs valeurs initialesdéfinies en usine.1. Mettre le moniteur sous tension.2.Appuyer simultanément sur les boutons MENU
et , ainsi que le bouton d'alimentation.Lorsque [RESET] apparaît sur l'écran dumoniteur, le retour aux valeurs initiales estexécuté.
Remarques :- Pendant que [RESET] est affiché sur l'écran du
moniteur, les boutons de commande ne sontplus opérationnels.
- Il n'est pas possible de retourner aux valeursinitiales lorsque le réglage est verrouillé.Déverrouiller les réglages avant de tenterd'utiliser les boutons de commande.
191A_fr.P65 12/15/2003, 5:28 PM60

61
Eng
lish
Deu
tsch
Fran
çais
Italia
noE
spañ
olE
nglis
h
Réglage du volume des haut-parleurs
1. Sans que le menu OSD ne soit affiché, appuyersur le bouton ou le bouton .
2.S'assurer que [VOLUME] est sélectionné.S'il n'est pas sélectionné, appuyer sur le bouton
/ MODE et sélectionner [VOLUME].
3.Régler au moyen du bouton (diminue) ou dubouton (augmenter).
Remarque :- Le menu à l'écran pour le réglage disparaît
quelques secondes après la dernière opération.
Réglage du mode d'affichage
Le ton de couleur ou la luminosité peut êtrechangée avec une seule commande.
STDAffiche une image dont les nuances de couleurrésultent des combinaisons originales d'unécran à cristaux liquides.
OFFICELa luminosité de l'affichage est baissée. (Cemode est un mode économie d'énergie.)
sRGBsRGB est la norme internationale de lareprésentation des couleurs spécifiée par la IEC(International Electrotechnical Commission(Commission Electrotechnique Internationale)).La conversion des couleurs est réalisée entenant compte des caractéristiques d'un écran àcristaux liquides et la représentation descouleurs est très proche de l'image originale.
VIVIDAffiche une image avec des couleurs primairesdynamiques et éclatantes.
- Si [DISPLAY MODE] est réglé sur [sRGB] ou[VIVID], [WHITE BALANCE] est réglé sur [STD],et [GAMMA] est réglé à [0].
Comment effectuer le réglageAppuyer sur le bouton / MODE quand le menuOSD n'est pas affiché.À chaque fois que le bouton est appuyé, l'optionsuivante du menu apparaît. (STD → OFFICE →sRGB → VIVID → STD)Le menu à l'écran pour le réglage disparaîtquelques secondes après la dernière opération.
Réglage de l'affichage du moniteur et du volume des haut-parleurs
Confirmation des informations surl'appareil
Le nom du modèle (MODEL), le numéro de série(S/N) et la durée d'utilisation (USAGE TIME) dumoniteur peuvent être vérifiés.1.Coupez l'alimentation.2.Tout en appuyant sur le bouton / MODE,
appuyez sur le bouton d'alimentation dumoniteur (autrement dit mettez-le sous tension).Les données sur le produit seront affichées.
3.Appuyer sur le bouton MENU.
Remarque :- Veuillez noter que la durée d'utilisation au
moment de l'achat n'est pas nécessairementnulle (0) du fait des inspections usine et desopérations intervenant au cours de lafabrication.
191A_fr.P65 12/15/2003, 5:28 PM61

62
Réglage de l'affichage du moniteur
Réglage automatique de l'écranLe réglage automatique peut être effectué enutilisant soit le bouton AUTO ou le bouton MENU.
Bouton AUTO1.Appuyez sur le bouton Auto.2. Appuyez à nouveau sur le bouton Auto.
[ADJUSTING] apparaîtra sur l'écran etdisparaîtra quelques secondes plus tard.(Le réglage automatique est à présent terminé.)
Bouton MENU1.Appuyer sur le bouton MENU.
Le menu ADJUSTMENT apparaît.
2.Appuyer sur le bouton .Le moniteur s'assombrit et [ADJUSTING] estaffiché. Après quelques secondes, le menuADJUSTMENT réapparaît. (Le réglageautomatique est à présent terminé.)
3.Appuyer 5 fois sur le bouton MENU pour fairedisparaître le menu OSD.
Remarques :- Dans la plupart des cas, le réglage automatique
s'avère suffisant.- Il peut ne pas être possible de réaliser un
réglage correct avec le premier réglageautomatique. Dans ce cas, essayer de répéter leréglage automatique 2 ou 3 fois.
- Si nécessaire, en raison d'un des facteurssuivants, des réglages manuels peuvent êtreeffectués après un réglage automatique. (p.63)- Lorsqu'un réglage fin est nécessaire.- Lorsque [OUT OF ADJUST] est affiché.
(Lorsque le moniteur affiche une imagecomplètement noire, il se peut que le réglageautomatique de l'écran ne soit pasopérationnel. Lors de la réalisation d'unréglage automatique, veiller soit à utiliser lamire de réglage, soit à essayer d'afficher uneimage très claire.)
- Lorsque les signaux vidéo d'entrée del'ordinateur sont de type Composite Sync ouSync on Green. (Il se peut que le réglageautomatique soit impossible.)
- Il peut ne pas être possible de réalisercorrectement un réglage automatique selon cequi est affiché sur l'écran - images animées,commandes MS-DOS, etc.
Réglage automatique de l'écran
Les options CLOCK, PHASE, H-POS, V-POS dumenu ADJUSTMENT peuvent être ajustéesautomatiquement.
Remarque :- Lors de la toute première installation du
moniteur, ou après avoir changé un desparamètres de la configuration du système,effectuer un réglage automatique de l'écranavant l'utilisation.
Affichage à l'écran pour le réglageD'abord afficher une image qui rend la totalité del'écran du moniteur très lumineuse.Si l'on se trouve sous un environnement Windows,on peut se servir de la mire de réglage se trouvantsur la CD-ROM fournie.
Ouverture de la mire de réglage (pour Windows)Les messages Windows mentionnés dans lemode d'emploi suivant se réfèrent à la versionanglaise de Windows. Les explications qui suiventsont valables pour les versions 95/98/Me/2000/XPde Windows et considèrent que le lecteur de CD-ROM est le lecteur "D".1. Placer le CD-ROM d'accessoires dans le lecteur
de CD-ROM de l'ordinateur.2.Ouvrir [My Computer] et sélectionner CD-ROM.
S'il s'agit de Windows 3.1, ouvrir [File Manager]et choisir le lecteur "D".
3.Double-cliquer sur [Adj_uty.exe] pour lancer leprogramme de réglage. La mire de réglageapparaîtra.
Mire de réglage
Après avoir effectué les réglages, appuyer sur latouche [Esc] de l'ordinateur pour quitter leprogramme de réglage.
Remarque :- Si le mode d'affichage de l'ordinateur utilisé est
réglé sur 65K couleurs, il est possible de voirdifférents niveaux de couleurs dans chaque mirede couleurs ou il se peut que l'échelle de gris aitl'air colorée. (Ceci est dû aux caractéristiquestechniques du signal d'entrée ; il ne s'agit pas d'undysfonctionnement.)
191A_fr.P65 12/15/2003, 5:28 PM62

63
Eng
lish
Deu
tsch
Fran
çais
Italia
noE
spañ
olE
nglis
h
Menu ADJUSTMENT (AJUST)
AUTOQuand [AUTO] est sélectionné avec le bouton ,les réglages de [CLOCK], [PHASE], [H-POS] et[V-POS] sont effectués automatiquement.
CLOCK (HORLOGE)L'illustration suivante montre comment le réglagedoit s'opérer de manière à ce que le scintillementvertical soit minimisé. (Boutons )
PHASEL'illustration suivante montre comment le réglagedoit s'opérer de manière à ce que le scintillementhorizontal soit minimisé. (Boutons )Remarque :- Les réglages de [PHASE] ne doivent être
effectués qu'après avoir réglé [CLOCK]correctement.
H-POS (positionnement horizontal) et V-POS(positionnement vertical)Pour centrer la mire de réglage dans les limites del'écran du moniteur, régler les valeurs gauche etdroite (H-POS) ainsi que les valeurs haut et bas(V-POS). (Boutons )
Réglage manuel de l'écran
1. D'abord afficher une image qui rend la totalitéde l'écran du moniteur très lumineuse. (p.62)
2. Faire apparaître sur l'écran le menu OSD enappuyant sur le bouton MENU.Menu ADJUSTMENT
MENU
Menu GAIN CONTROL
MENU
Menu COLOR CONTROL
MENU
Menu MODE SELECT-1
MENU
Menu MODE SELECT-2
MENULe menu OSD est désactivé.
Remarques :- Le menu OSD disparaît automatiquement environ
30 secondes après la dernière commande.- Ce chapitre aborde la procédure de réglage de
l'écran au moyen de la mire de réglage (pourWindows).
Réglage de l'affichage du moniteur
Scintillement vertical
Scintillement horizontal
Sélectionnerl'option enappuyant surle bouton
/ MODE.
Sélectionnerl'option enappuyant surle bouton
/ MODE.
Sélectionnerl'option enappuyant surle bouton
/ MODE.
Sélectionnerl'option enappuyant surle bouton
/ MODE.
Sélectionnerl'option enappuyant surle bouton
/ MODE. Mire deréglage
Cadre de l'écran
191A_fr.P65 12/15/2003, 5:28 PM63

64
Réglage de l'affichage du moniteur
Menu COLOR CONTROL (CTRL. DES COULEURS)
WHITE BALANCE1.Après avoir sélectionné [WHITE BALANCE],
appuyer sur le bouton .Le menu WHITE BALANCE sera affiché.
2.Utiliser les boutons pour sélectionner[COOL], [·], [STD], [·], [WARM] ou [USER].COOL ..... Nuance de couleur plus bleutée que la
couleur standard • ............ Nuance de couleur légèrement plus
bleutée que la couleur standardSTD ......... Paramètre standard de nuance de couleurs • ............ Nuance de couleur légèrement plus
rougeâtre que la couleur standardWARM ..... Nuance de couleur plus rougeâtre que
la couleur standardUSER
- Le fait de sélectionner [USER], permettrad'afficher les valeurs de réglage pour[R-CONTRAST], [G-CONTRAST] et[B-CONTRAST], afin de pouvoir effectuerdes réglages fins.
- Utiliser le bouton / MODE pour sélectionner[R-CONTRAST], [G-CONTRAST] et[B-CONTRAST].
R-CONTRAST ..... bouton pour le bleu-vertbouton pour le rouge
G-CONTRAST ..... bouton pour le violetbouton pour le vert
B-CONTRAST...... bouton pour le jaunebouton pour le bleu
3.Appuyer sur le bouton MENU.
Remarques :- En ce qui concerne les paramètres autres que les
[STD], toutes les gradations ne peuvent pas êtreaffichées. Pour afficher toutes les gradations,définir le paramètre sur [STD].
- Si [DISPLAY MODE] est réglé sur [sRGB] ou[VIVID], il n'est pas possible de sélectionner unréglage autre que [STD].
GAMMAFaire en sorte que les images sombres et clairessoient faciles à regarder. Si l'écran est sombre etdifficile à regarder, augmenter la valeurnumérique. S'il est clair et difficile à regarder,réduire la valeur numérique. (Boutons )- Si [DISPLAY MODE] est réglé sur [sRGB] ou
[VIVID], [GAMMA] ne peut pas être réglé.
Menu GAIN CONTROL (CTRL. LUMINOSIT)
AUTOQuand [AUTO] est sélectionné avec le bouton ,les réglages de [BLACK LEVEL] et de[CONTRAST] sont effectués automatiquement.Après le réglage automatique, effectuer le réglagemanuel si nécessaire.
BLACK LEVELLa luminosité totale du moniteur peut être régléetout en visualisant la mire de couleurs.(Boutons )
CONTRASTTout en visualisant la mire de couleurs, desréglages peuvent être effectués de manière à ceque toutes les gradations apparaissent.(Boutons )
Remarques :À propos de la fonction AUTO (Fonction deréglage automatique des couleurs)- La commande du réglage automatique des
couleurs ajuste le contraste et le niveau de noiren se basant sur la couleur la plus claire et laplus foncée de l'image diffusée.
- Si la mire de réglage n'est pas utilisé, il estnécessaire de préserver une zone de noir et unezone de blanc d'au moins 5 x 5 mm sur l'écran,car les réglages sont impossibles à effectuersans ces zones.
- Si le signal émis par l'ordinateur est compositesync ou sync sur vert, le réglage automatique nepeut être exécuté. Exécuter un réglage manuel.
- Si [OUT OF ADJUST] est affiché, effectuer unréglage manuel.
Mire de couleurs
191A_fr.P65 12/15/2003, 5:28 PM64

65
Eng
lish
Deu
tsch
Fran
çais
Italia
noE
spañ
olE
nglis
h
Réglage de l'affichage du moniteur
Menu MODE SELECT-2(MODE SÉLECTION-2)
INFORMATIONLe nom du modèle (MODEL), le numéro de série(S/N) et la durée d'utilisation (USAGE TIME) dumoniteur peuvent être vérifiés.1.Après avoir sélectionné [INFORMATION],
appuyez sur le bouton .Les données sur le produit seront affichées.
2.Appuyer sur le bouton MENU.
OFF TIMER (Minuterie de mise hors service)L'alimentation est coupée à l'expiration de ladurée prescrite.1.Après avoir sélectionné [OFF TIMER], appuyez
sur le bouton .2.Choisissez Marche [ON] ou Arrêt [OFF] en
utilisant les boutons .Si vous choisissez Marche [ON], appuyez sur lebouton / MODE. puis précisez la durée avantcoupure de l'alimentation en utilisant lesboutons . (La durée peut être réglée entre 1et 23 heures par pas d'une heure.)
3.Appuyer sur le bouton MENU.- Si vous choisissez Marche [ON], le temps restant
avant la coupure de l'alimentation est indiquédans le coin supérieur droit de l'écran dès quece temps devient égal à 5 minutes. (Le tempsrestant est affiché pendant environ 5 secondestoutes les minutes.)
- Si le bouton d'alimentation reste appuyé aprèsle premier affichage du temps restant et avant lacoupure de l'alimentation, OFF TIMER sera régléà une heure.Pour couper ensuite l'alimentation, appuyez unenouvelle fois sur le bouton d'alimentation. (Aprèsune nouvelle mise sous tension, la coupure del'alimentation intervient à nouveau lorsque ladurée prescrite est écoulée.)
- Si le moniteur est mis en service lorsque [OFFTIMER] est sur [ON], la durée réglée s'affichependant plusieurs secondes. (Si aucun signaln'est appliqué à l'entrée, [NO SIGNAL] s'affiche.)
Menu MODE SELECT-1(MODE SÉLECTION-1)
Remarque :- En fonction de la résolution du signal d'entrée,
même si les options peuvent être sélectionnées,l'affichage ne peut pas être modifié.
OSD H-POSITION (positionnement horizontalOSD)Le positionnement du menu OSD peut être modifiévers la gauche et vers la droite.(Boutons )
OSD V-POSITION (positionnement vertical OSD)Le positionnement du menu OSD peut être modifiévers le haut et vers le bas. (Boutons )
SCALING (Niveau de cadrage)La netteté de l'image peut être réglée. (Boutons )Remarque :- Lorsque le mode d'affichage est réglé à un
niveau inférieur à 1280 x 1024 pixels, l'imageest étendue de manière à couvrir la totalité del'écran (c'est-à-dire que le rapport latéral del'image peut être modifié).
400LINES (degré de résolution)Il est possible d'utiliser une résolution horizontaled'écran de 400 lignes lors de la saisie de texte US,etc. (Boutons )
640 : Mode 640 x 400 points720 : Mode 720 x 400 points (saisie de texte US, etc.)
Remarque :- Étant donné que la résolution du signal d'entrée
pour les moniteurs autres que les 400 lignes serègle automatiquement, il n'y a aucune raisonde la définir.
LANGUAGE (LANGUE)Il est possible de choisir la langue d'affichage dumenu OSD.1.Appuyer sur le bouton .
Le Menu du choix de la langue sera affiché surl'écran du moniteur.
2.Utiliser le bouton / MODE pour choisir lalangue.
3.Appuyer sur le bouton MENU.
191A_fr.P65 12/15/2003, 5:28 PM65

66
Entretien du moniteur
Les lampes de rétroéclairage du moniteur ontune durée de vie limitée.- Si l'écran s'assombrit, scintille constamment
ou ne s'éclaire plus, c'est que la lampe derétroéclairage a atteint sa limite de vie. Serenseigner auprès du revendeur ou duréparateur agréé Sharp le plus proche.
- Au début de l'utilisation, en raison de laconception des lampes de rétroéclairage, ilse peut que l'écran scintille. (Il ne s'agit pasd'un dysfonctionnement.) Si cela se produit,essayer d'abord d'éteindre et de rallumer lemoniteur.
Aucune image n'apparaît à l'écran du moniteur(la diode d'alimentation ne s'éclaire pas).- le cordon d'alimentation est-il branché
correctement? (p.58)
Aucune image n'apparaît à l'écran du moniteur(la diode est éclairée).- L'ordinateur est-il branché correctement? (p.57)- L'ordinateur est-il sous tension?- La fréquence du signal de l'ordinateur
correspond-elle aux caractéristiques techniquesdu moniteur? (p.69)
- L'ordinateur est-il en mode d'économied'énergie?
Les boutons de commande ne fonctionnent pas.- Le verrouillage est-il actif? (p.60)
L'image est déformée.- La fréquence du signal de l'ordinateur
correspond-elle aux caractéristiques techniquesdu moniteur? (p.69)
- Effectuez le réglage automatique de l'écran.(p.62)
- Si vous pouvez modifier la fréquence derafraîchissement de l'ordinateur utilisé,choisissez une valeur plus basse. (p.69)
Aucun son n'est émis par les haut-parleurs.- Le câble audio est-il raccordé correctement?
(p.57)- Exécutez la procédure de réglage du volume.
(p.61)- Les casques audio sont-ils branchés?- Aucun son ne sort des haut-parleurs quand le
moniteur est en mode d'économie d'énergie (ladiode d'alimentation est éclairée en orange).
Entretien du moniteur
Toujours débrancher la prise de l'alimentation dela prise de secteur lors du nettoyage du moniteur.
Châssis et panneau de commandeUtiliser un chiffon doux et sec pour éliminer lapoussière du chassis et du panneau decommande.Si le chassis et le panneau de commandes'avèrent vraiment sales, imbiber le chiffon douxavec un détergent neutre, le tordre et éliminer lessaletés.
Panneau LCDUtiliser un chiffon doux et sec pour éliminer lapoussière de la surface du panneau LCD.(Un chiffon doux tel qu'une gaze utilisée pour lenettoyage des lentilles est idéal.)
ATTENTION !
- Ne jamais utiliser de dissolvant, d'essence,d'alcool, de nettoyant pour vitre, etc. car ceux-cipeuvent décolorer ou altérer le moniteur.
- Ne jamais frotter le moniteur avec des matériauxdurs ni appliquer sur le moniteur des pressionsexcessives car celui-ci peut laisser des marquesou entraîner des dysfonctionnements.
Stockage
Si le moniteur devait ne pas être utilisé pendantune période de temps prolongée, s'assurer que laprise d'alimentation est débranchée de la prise desecteur.
ATTENTION !
- Ne pas laisser le moniteur en contact avec desobjets en caoutchouc ou en plastique pendantdes périodes de temps prolongées car ceux-cipeuvent décolorer ou altérer le moniteur.
Dépannage
Si le moniteur est jugé défectueux, vérifier lespoints suivants avant de l'emmener en réparation.Si après cela, il ne fonctionne toujours pascorrectement, contacter le magasin où il a étéacheté ou votre réparateur agréé Sharp le plusproche.
191A_fr.P65 12/15/2003, 5:28 PM66

67
Eng
lish
Deu
tsch
Fran
çais
Italia
noE
spañ
olE
nglis
h
Entretien du moniteur
Informations pour les clients à proposde l'environnement pour ce produitSHARP
Si ce produit n'est plus utilisable, il doit être mis aurebut conformément aux dispositions légales etenvironnementales concernant ce type de produit.
NE PAS JETER CE PRODUIT AVEC LESORDURES MENAGERES OU D'AUTRESDECHETS. VOUS RISQUEZ DE DEGRADERL'ENVIRONNEMENT.
La société Sharp s'implique dans la protection del'environnement et la sauvegarde de l'énergie.Notre but est de minimiser l'impact surl'environnement de nos produits par ledéveloppement et l'amélioration continue de nostechnologies et de la conception de nos produits.De même, les instructions que nous donnons ànos clients vont dans le sens de la conservationde l'environnement.
(1) Pour notre clientèle en Belgique, aux PaysBas, en Suède et en SuisseSHARP participe au système de reclyclagenational des équipements électroniques, misen place par chacun de ces pays à partir deleur lois sur l'environnement. Voir ici les détailspour chacun de ces pays.
(2) Pour notre clientèle au Royaume Uni, enAllemagne, en France et en ItalieVeuillez contacter les autorités locales pour leramassage et le recyclage des équipements,ou contacter une société de recyclage qui estautorisée à recycler les équipementsélectroniques.SHARP recommande le service de recylageMIREC. Vous trouverez des informationsgénérales sur MIREC sur le site Web :http://www.mirec/com/Les servires MIREC sont à payer par le dernierpropriétaire de l'équipement électroniqueconcerné.
(3) Pour notre clientèle aux Etats Unisd'AmériqueCe produit utilise un brasage tendre et unelampe fluorescente contenant un peu demercure. La mise au rebut de ces matériauxpeut être réglementée en raison deconsidérations environnementales. Pour lesinformations concernant le ramassage et lerecyclage, veuillez contacter les autoritéslocales ou l'Electronics Industries Alliance.http://www.eiae.org
(4) Pour notre clientèle au JaponAppelez le numéro de téléphone gratuit 0120-845-530 pour obtenir des informations sur lerecyclage.
Pays Informations sur le recyclage dans ce pays
Suède Veuillez utiliser le système derecyclage suédois pour les appareilsélectroniques appelé "ELRETUR" etregardez le site webhttp://www.el-kretsen.se
Pays-Bas Veuillez utiliser le système derecyclage hollandais pour lesappareils électroniques appelé "ICT-Milieu" et regardez le site webhttp://www.nederlandict.nl/index.php
Belgique Veuillez utiliser le système derecyclage belge pour les appareilsélectroniques appelé "Recupel" etregardez le site webhttp://www.recupel.be
Suisse Veuillez utiliser le système derecyclage suisse pour les appareilsélectroniques appelé "SWICO" etregardez le site webhttp://www.swico.ch
191A_fr.P65 12/15/2003, 5:28 PM67

68
Dimensions (Unités : mm)
- Câble de signal analogique : approx. 1,8 m- Câble audio : approx. 1,8 m
Remarque :- SHARP se réserve le droit d'apporter des
modifications à la présentation et auxcaractéristiques des appareils à find'amélioration. Les valeurs indiquées dans cedocument sont les valeurs nominales desappareils de série mais de légères différencespeuvent être constatées d'un appareil à l'autre.
Caractéristiques techniques
Caractéristiques techniques du produitNom du modèle
LL-191A-W (Blanc)/LL-191A-B (Noir)Moniteur LCD
48 cm en diagonaleModule TFT à cristaux liquides
Résolution (max.)SXGA 1280 x 1024 pixels
Couleurs affichables (max.)Approx. 16,19 millions de couleurs (6 bit + FRC)
Luminosité (max.)220 cd/m2
Définition0,294 (H) x 0,294 (V) mm
Rapport de contraste500 : 1
Angle de visibilitéGauche-droite : 160° ; Haut-bas : 160°(Rapport de contraste > 5)
Surface d'affichageHorizontal : 376,3 mm x Vertical : 301,1 mm
Signal vidéoAnalogique RVB (0,7 Vp-p) [75Ω]
Signal sync.Sync individuel (niveau TTL : +/-), type SyncOn green, Composite Sync (niveau TTL : +/-)
Compensation d'extensionRedimensionnement numérique (Élargissementde VGA/SVGA/XGA, etc. à la taille plein écran.)
Plug & PlayVESA : DDC2B compatible
Gestion de l'alimentationVESA : basé sur le DPMS
Sortie des haut-parleurs1 W + 1 W
Borne d'entrée signalMini D-sub 15 broches sur 3 rangées
Borne d'entrée audioMini-prise stéréo
Borne pour casque audioMini-prise stéréo
Inclinaison du moniteurVers le haut approx. 0 - 25°Vers le bas approx. 0 - 5°
AlimentationCA100 - 240 V, 50/60 Hz
Température recommandée du lieu d'utilisation5 - 35°C
Consommation d'électricité33 W (Sans entrée audio)(36 W Maximum, 1,8 W en mode économied'énergie)
Dimensions (L x P x H)Approx. 419 mm x 213 mm x 409 mm
PoidsApprox. 7,8 kg (approx. 5,7 kg sans le support)(Sans les câbles.)
05_191A_fr.P65 12/22/2003, 9:45 AM68

69
Eng
lish
Deu
tsch
Fran
çais
Italia
noE
spañ
olE
nglis
h
Caractéristiques techniques
Fréquences des signaux (analogique)
- La résolution recommandée est 1280 x 1024.- Toutes les fréquences sont non entrelacées.- Les fréquences pour les séries Macintosh et Sun
Ultra sont des valeurs de référence. Pour leraccordement, un autre adaptateur (en ventedans le commerce) peut être nécessaire.
- Si le moniteur reçoit des signaux de fréquencenon compatibles, le message [OUT OF TIMING]apparaîtra. Suivre le mode d'emploi del'ordinateur utilisé pour régler la fréquence demanière à ce qu'elle soit compatible avec lemoniteur.
- Si le moniteur ne reçoit pas de signal defréquence (signal de synchronisation), lemessage [NO SIGNAL] apparaîtra.
Saisie de texte US
VESA
Mode affichage Hsync VsyncBande
passante
SérieMacintosh
Série SunUltra
La broche du connecteur d'entréeanalogique RVB(Mini connecteur de type D-sub 15 broches)
N° Fonction
1 Entrée du signal vidéo rouge
2 Entrée du signal vidéo vert
3 Entrée du signal vidéo bleu
4 GND
5 GND
6 Pour mise à la terre du signal vidéo rouge
7 Pour mise à la terre du signal vidéo vert
8 Pour mise à la terre du signal vidéo bleu
9 +5V
10 GND
11 GND
12 Données DDC
13 Pour entrée signal H-sync.
14 Pour entrée signal V-sync.
15 Horloge DDC
Gestion de l'alimentationLe moniteur est basé sur un système VESA DPMS(signalisation de la gestion d'alimentation del'affichage).Pour activer la fonction de gestion de l'alimentationdu moniteur, la carte vidéo et l'ordinateur doiventêtre conformes à la norme VESA DPMS.
DPMS : Display Power Management Signalling
DDC (Plug & Play)Ce moniteur supporte la norme VESA DDC (DisplayData Channel).Le DDC est une norme de signal servant à exécuterles fonctions Plug & Play sur un moniteur ou unordinateur. Il transfère des informations telles que ledegré de résolution entre le moniteur et l'ordinateur. Ilest possible d'utiliser cette fonction si l'ordinateurutilisé est conforme à la norme DDC et s'il est réglé demanière à pourvoir détecté un moniteur Plug & Play.Il existe de nombreuses variétés de DDC en raisondes différences entre les systèmes. Ce moniteurfonctionne selon les DDC2B.
Mode DPMS Ecran Consommation H-sync V-syncélectrique
Activé Affichage activé Oui Oui
En veilleAffichage
Non Oui
Suspendu désactivé Oui Non
Désactivé Non Non
36 W
1,8 W
191A_fr.P65 12/15/2003, 5:28 PM69

70
Installation des fichiers relatifs au paramétrage dumoniteur et au profil ICC (Pour Windows)
En fonction du type d'ordinateur ou du systèmed'exploitation, il peut parfois s'avérer nécessaired'installer des fichiers relatifs au paramétrage dumoniteur. Si c'est le cas, il convient de procédercomme suit pour installer sur l'ordinateur lesfichiers relatifs au paramétrage du moniteur. (Lenom des commandes et les procédures peuventvarier en fonction du type d'ordinateur ou dusystème d'exploitation. Veiller à suivre le propremode d'emploi de l'ordinateur tout en lisant ce quisuit.)
A propos du profil ICCLe profil ICC (International Color Consortium) estun fichier qui décrit les caractéristiques del'affichage des couleurs du moniteur LCD.L'utilisation d'une application compatible avec unprofil ICC permet de réaliser un affichage trèsfidèle des couleurs.- Windows 98/2000/Me/XP utilisent tous les trois
le profil ICC.- Lors de l'installation de Windows 98/2000/Me/
XP (décrite ci-après), le profil ICC s'installeégalement. Si l'on veut uniquement installer leprofil ICC, il faut se reporter à la sectionInstallation du profil ICC à la page 72.
- Si vous utilisez le profil ICC, effectuez lesréglages suivants :- [DISPLAY MODE] : [STD] ou [OFFICE]- [WHITE BALANCE] : [STD]- [GAMMA] : [0]
Pour Windows 95
Installation des fichiers relatifs au paramétrage dumoniteur sous Windows 95. Les messagesWindows mentionnés dans le mode d'emploisuivant se réfèrent à la version anglaise deWindows.Les explications qui suivent considèrent que lelecteur de CD-ROM est le lecteur "D".
1. Placer le CD-ROM d'accessoires dans lelecteur de CD-ROM de l'ordinateur.
2. Cliquer sur le bouton [Start]. Dans le menu[Settings], choisir l'option [Control Panel].
3. Double-cliquer sur [Display].4. Cliquer sur [Settings], sur [Advanced
Properties], et sur [Monitor], et enfin sur[Change].
5. Cliquer sur [Have disk], confirmer que le [Copymanufacturer's files from:] est [D:] et ensuitecliquer sur [OK].
6. Confirmer la sélection des caractéristiques dumoniteur et ensuite cliquer sur [OK].
7. S'assurer que le moniteur affiche une image,ensuite cliquer sur [Apply].
8. Cliquer sur [OK] et refermer la fenêtre.
Pour Windows 98
Installation des fichiers relatifs au paramétrage dumoniteur sous Windows 98, et au réglage du profilICC du moniteur en tant que valeur par défaut. Lesmessages Windows mentionnés dans le moded'emploi suivant se réfèrent à la version anglaisede Windows.Les explications qui suivent considèrent que lelecteur de CD-ROM est le lecteur "D".
Si la boîte de dialogue "Add New HardwareWizard" est affichée :1. Placer le CD-ROM d'accessoires dans le
lecteur de CD-ROM de l'ordinateur.2. Cliquer sur [Next].3. Cocher la case [Display a list of all the drivers
in a specific location, so you can select thedriver you want.], ensuite cliquer sur [Next].
4. Lorsque [Models] apparaît, cliquer sur [Havedisk], confirmer que le [Copy manufacturer'sfiles from:] est [D:] et ensuite cliquer sur [OK].
5. Confirmer la sélection des caractéristiques dumoniteur et ensuite cliquer sur [Next], [Next] et[Finish]. Si la boîte de dialogue "Add NewHardware Wizard" apparaît, répéter lescommandes d'installation à partir du point 2.
Si la boîte de dialogue "Add New HardwareWizard" n'est pas affichée :1. Placer le CD-ROM d'accessoires dans le
lecteur de CD-ROM de l'ordinateur.2. Cliquer sur le bouton [Start]. Dans le menu
[Settings], choisir l'option [Control Panel].3. Double-cliquer sur [Display].4. Cliquer sur [Settings], sur [Advanced], et sur [Monitor].5. Dans [Options], cocher [Automatically detect
Plug & Play monitors] et cliquer sur [Change].6. Cliquer sur [Next].7. Cocher la case [Display a list of all the drivers
in a specific location, so you can select thedriver you want.], ensuite cliquer sur [Next].
8. Lorsque [Models] apparaît, cliquer sur [Havedisk], confirmer que le [Copy manufacturer'sfiles from:] est [D:] et ensuite cliquer sur [OK].
9. Confirmer la sélection des caractéristiques dumoniteur et ensuite cliquer sur [Next], [Next] et[Finish].
10. S'assurer que le moniteur diffuse une image,ensuite cliquer sur [Apply].
11. Cliquer sur [OK] et refermer la fenêtre.
191A_fr.P65 12/15/2003, 5:28 PM70

71
Eng
lish
Deu
tsch
Fran
çais
Italia
noE
spañ
olE
nglis
h
Pour Windows Me
Installation des fichiers relatifs au paramétrage dumoniteur sous Windows Me, et au réglage duprofil ICC du moniteur en tant que valeur pardéfaut. Les messages Windows mentionnés dansle mode d'emploi suivant se réfèrent à la versionanglaise de Windows.Les explications qui suivent considèrent que lelecteur de CD-ROM est le lecteur "D".
Si la boîte de dialogue "Add New HardwareWizard" est apparue :1. Placer le CD-ROM d'accessoires dans le
lecteur de CD-ROM de l'ordinateur.2. Cocher la case [Specify the location of the
driver [Advanced]] et cliquer [Next].3. Cocher la case [Display a list of all the drivers
in a specific location, so you can select thedriver you want.], ensuite cliquer sur [Next].
4. Lorsque [Models] apparaît, cliquer sur [Havedisk], et s'assurer que [Copy manufacturer'sfiles from:] est [D:] et cliquer sur [OK].
5. Sélectionner les caractéristiques du moniteurdans la liste et ensuite cliquer sur [Next], [Next]et [Finish]. Si la boîte de dialogue "Add NewHardware Wizard" apparaît, répéter lescommandes d'installation à partir du point 2.
Si la boîte de dialogue "Add New HardwareWizard" n'est pas apparue :1. Placer le CD-ROM d'accessoires dans le
lecteur de CD-ROM de l'ordinateur.2. Cliquer sur le bouton [Start]. Dans le menu
[Settings], choisir l'option [Control Panel].3. Double-cliquer sur [Display].4. Cliquer sur [Settings], sur [Advanced], et sur
[Monitor].5. Dans [Options], cocher [Automatically detect
Plug & Play monitors] et cliquer sur [Change].6. Cocher la case [Specify the location of the
driver [Advanced]] et cliquer sur [Next].7. Cocher la case [Display a list of all the drivers
in a specific location, so you can select thedriver you want.] et cliquer sur [Next].
8. Lorsque [Models] apparaît, cliquer sur [Havedisk], et s'assurer que [Copy manufacturer'sfiles from:] est [D:] et cliquer sur [OK].
9. Sélectionner les caractéristiques du moniteuret ensuite cliquer sur [Next], [Next] et [Finish].
10.S'assurer que les caractéristiques du moniteursont affichés, ensuite cliquer sur [Apply].
11.Cliquer sur [OK] et refermer la fenêtre.
Installation des fichiers relatifs au paramétrage du moniteur etau profil ICC (Pour Windows)
Pour Windows 2000
Installation des fichiers relatifs au paramétrage dumoniteur sous Windows 2000, et au réglage duprofil ICC du moniteur en tant que valeur pardéfaut. Les messages Windows mentionnés dansle mode d'emploi suivant se réfèrent à la versionanglaise de Windows.Les explications qui suivent considèrent que lelecteur de CD-ROM est le lecteur "D".
1. Placer le CD-ROM d'accessoires dans lelecteur de CD-ROM de l'ordinateur.
2. Cliquer sur le bouton [Start]. Dans le menu[Settings], choisir l'option [Control Panel].
3. Double-cliquer sur [Display].4. Cliquer sur [Settings], sur [Advanced], et sur
[Monitor].5. Cliquer sur [Properties], sur [Driver], et sur
[Update Driver].6. Lorsque [Upgrade Device Driver Wizard]
apparaît, cliquer sur [Next].7. Cocher la case [Display a list of the known
drivers for this device so that I can choose aspecific driver] et cliquer sur [Next].
8. Lorsque [Models] apparaît, cliquer sur [Havedisk], et s'assurer que [Copy manufacturer'sfiles from:] est [D:] et cliquer sur [OK].
9. Sélectionner le moniteur dans la listedéroulante et cliquer sur [Next].
10. Cliquer sur [Next], s'assurer que le nom dumoniteur apparaît dans l'écran et cliquer sur[Finish]. Si [The Digital Signature Not Found]apparaît, cliquer [Yes].
11. Cliquer sur [Close].12. Cliquer sur [OK] et refermer la fenêtre.
191A_fr.P65 12/15/2003, 5:28 PM71

72
Installation du profil ICCInstallation du profil ICC du moniteur. (Sil'information relative au paramétrage a déjà étéinstallée, alors le profil l'a été également, et il n'estdonc plus nécessaire de l'installer.)Les messages Windows mentionnés dans lemode d'emploi suivant se réfèrent à la versionanglaise de Windows.Les explications qui suivent considèrent que lelecteur de CD-ROM est le lecteur "D".
1. Placer le CD-ROM d'accessoires dans lelecteur de CD-ROM de l'ordinateur.
2. Cliquer sur le bouton [Start]. Dans le menu[Settings], choisir l'option [Control Panel].
3. Double-cliquer sur [Display].4. Cliquer sur [Settings] et sur [Advanced].5. Cliquer sur [General] et dans [Compatibility]
sélectionner [Apply the new display settingwithout restarting], ensuite cliquer sur [ColorManagement].
6. Cliquer sur [Add], et sélectionner CD-ROMcomme emplacement du fichier.
7. Choisir le profil de couleur souhaité et cliquersur [Add].
8. Choisir le profil et cliquer sur [Set As Default].9. Cliquer sur [OK] et refermer la fenêtre.
- Si vous utilisez le profil ICC, effectuez lesréglages suivants :- [DISPLAY MODE] : [STD] ou [OFFICE]- [WHITE BALANCE] : [STD]- [GAMMA] : [0]
Installation des fichiers relatifs au paramétrage du moniteur etau profil ICC (Pour Windows)
Pour Windows XP
Installation des fichiers relatifs au paramétrage dumoniteur sous Windows XP, et au réglage du profilICC du moniteur en tant que valeur par défaut. Lesmessages Windows mentionnés dans le moded'emploi suivant se réfèrent à la version anglaisede Windows.Les explications qui suivent considèrent que lelecteur de CD-ROM est le lecteur "D".
1. Placer le CD-ROM d'accessoires dans lelecteur de CD-ROM de l'ordinateur.
2. Cliquer sur le bouton [Start]. Sélectionner[Control Panel].
3. Commutation sur "Classic View".4. Double-cliquer sur [Display].5. Cliquer sur [Settings], sur [Advanced], et sur
[Monitor].6. Cliquer sur [Properties], sur [Driver], et sur
[Update Driver].7. Lorsque [Hardware Update Wizard] apparaît,
cocher la case [Install from a list or specificlocation [Advanced]] et cliquer sur [Next].
8. Cocher la case [Don't search. I will choose thedriver to install.] et cliquer sur [Next].
9. Cliquer sur [Have disk], et s'assurer que [Copymanufacturer's files from:] est [D:] et cliquer sur[OK].
10. Sélectionner le moniteur dans la listedéroulante et cliquer sur [Next].Si [has not passed Windows Logo testing...]apparaît, cliquer [Continue Anyway].
11. S'assurer que le nom du moniteur apparaîtdans l'écran et cliquer sur [Finish].
12. Cliquer sur [Close].13. Cliquer sur [OK] et refermer la fenêtre.
191A_fr.P65 12/15/2003, 5:28 PM72

73
Eng
lish
Deu
tsch
Fran
çais
Italia
noE
spañ
olE
nglis
h
Informations sur le profil ColorSync (Pour MacOS)
A propos du profil ColorSyncColorSync est le système de gestion des couleursde Apple Computer et il permet de réaliser lescaractéristiques de l'affichage de couleurs lorsd'une utilisation avec une application compatible.Un profil ColorSync décrit les caractéristiques decouleur du moniteur LCD.
Remarques :- Le profil ColorSync de ce moniteur fonctionne
sous MacOS 8.5 ou version ultérieure.- Si vous utilisez le profil ColorSync, effectuez les
réglages suivants :- [DISPLAY MODE] : [STD] ou [OFFICE]- [WHITE BALANCE] : [STD]- [GAMMA] : [0]
Configuration du profil ColorSync
Remarques :- Il est nécessaire que PC Exchange ou File
Exchange soient installés sur votre ordinateur.- Le nom des commandes et les procédures
peuvent varier en fonction du type d'ordinateurou du système d'exploitation. Veiller à suivre lepropre mode d'emploi de l'ordinateur tout enlisant ce qui suit :
1.Placer le CD-ROM d'accessoires dans le lecteurde CD-ROM de l'ordinateur.
2.Copiez le profil à utiliser du CD-ROM dans ledossier profil de ColorSync du dossier système.
3.En utilisant ColorSync sur le panneau deconfiguration, choisir le profil souhaité.
191A_fr.P65 12/15/2003, 5:28 PM73

74
Le support ou le bras suivant peut être fixé aumoniteur.- Support (vendu séparement)
Nom du modèle : NL-S02-H (Ivoire)NL-S02-B (Noir)
- Bras conforme à la norme VESA (en vente dansle commerce)
Bras compatibles en vente dans le commerceLes fixations doivent satisfaire aux points suivants :- Compatibilité avec la norme VESA- Subsistance d'un écart d'au moins 100 mm x
100 mm entre les trous des vis présents sur lasection à fixer
- Le bras ou le support ne doit ni tomber ni serompre après l'installation du moniteur.
Comment fixer le bras ou le support- Ne pas courber le câble de manière excessive
ni y ajouter de rallonge car cela peut provoquerun dysfonctionnement.
- Tout en suivant ces instructions, se reporter auxinstructions relatives à l'installation dans lemode d'emploi qui accompagne le bras ou lesupport.
ATTENTION !
- Faites attention de ne pas vous pincer les doigtsentre l'affichage et le support ou de ne paslaisser tomber le support. Ceci pourrait entraînerdes blessures corporelles.
1.Retirer les câbles.2.Étendre un drap doux sur une surface
horizontale adéquate.3.Tout en prenant garde de ne pas endommager
le moniteur, déposer avec précautions lemoniteur l'écran tourné vers le bas.
4.Retirer les quatre vis et ensuite le support dumoniteur.
Remarques :- Le support est conçu spécifiquement pour ce
moniteur, ne pas l'utiliser pour un autreéquipement ou à d'autres fins.
- il est conseillé de conserver ensemble lesquatre vis retirées avec le support afin depouvoir réutiliser le support en le fixant à l'aidedes quatre vis adaptées. L'utilisation d'autres visrisque d'endommager le moniteur.
5. Fixer le bras au moniteur à l'aide des quatre vis.
Remarque :- Les vis servant à fixer le bras doivent être de
type M4 d'une longueur de 6 mm à 8 mmdépassant de la surface à fixer. Utiliser d'autrestypes de vis peut provoquer la chute dumoniteur ou un endommagement des piècesinternes.
Vis de fixation du bras
Bras
Partie du moniteur à laquellevient se fixer le bras
Instructions relatives à l'installation d'un bras conforme VESA
05_191A_fr.P65 12/19/2003, 3:32 PM74

75
Eng
lish
Fran
çais
Italia
noE
spañ
olE
nglis
h
Indice
Suggerimenti e precauzioni per la sicurezza . . . . . . . . . . . . . . . . . . . . . . . . . . . . . . . . . . . . . . . . . . . . . . 76Descrizione del prodotto . . . . . . . . . . . . . . . . . . . . . . . . . . . . . . . . . . . . . . . . . . . . . . . . . . . . . . . . . . . . . . 77Regolazione dell'angolazione . . . . . . . . . . . . . . . . . . . . . . . . . . . . . . . . . . . . . . . . . . . . . . . . . . . . . . . . . 78Collegamento del monitor ed accensione e spegnimento del monitor . . . . . . . . . . . . . . . . . . . . . . . . . . 79
Collegamento del monitor ad un computer . . . . . . . . . . . . . . . . . . . . . . . . . . . . . . . . . . . . . . . . . . . . . 79Collegamento delle cuffie (da acquistare in commercio) . . . . . . . . . . . . . . . . . . . . . . . . . . . . . . . . . . 80Collegamento del monitor ad una sorgente di alimentazione elettrica . . . . . . . . . . . . . . . . . . . . . . . 80Accensione . . . . . . . . . . . . . . . . . . . . . . . . . . . . . . . . . . . . . . . . . . . . . . . . . . . . . . . . . . . . . . . . . . . . . . 80Spegnimento . . . . . . . . . . . . . . . . . . . . . . . . . . . . . . . . . . . . . . . . . . . . . . . . . . . . . . . . . . . . . . . . . . . . 81
Regolazione della visualizzazione sullo schermo e volume dell'altoparlante . . . . . . . . . . . . . . . . . . . . 82Regolazione della retroilluminazione . . . . . . . . . . . . . . . . . . . . . . . . . . . . . . . . . . . . . . . . . . . . . . . . . 82Regolazione del volume dell'altoparlante . . . . . . . . . . . . . . . . . . . . . . . . . . . . . . . . . . . . . . . . . . . . . 83Impostazione della modalità del display . . . . . . . . . . . . . . . . . . . . . . . . . . . . . . . . . . . . . . . . . . . . . . . 83Verifica delle informazioni relative al prodotto . . . . . . . . . . . . . . . . . . . . . . . . . . . . . . . . . . . . . . . . . . 83
Regolazione della visualizzazione sullo schermo . . . . . . . . . . . . . . . . . . . . . . . . . . . . . . . . . . . . . . . . . . 84Regolazione automatica dello schermo . . . . . . . . . . . . . . . . . . . . . . . . . . . . . . . . . . . . . . . . . . . . . . . 84Regolazione manuale dello schermo . . . . . . . . . . . . . . . . . . . . . . . . . . . . . . . . . . . . . . . . . . . . . . . . . 85
Cura del monitor . . . . . . . . . . . . . . . . . . . . . . . . . . . . . . . . . . . . . . . . . . . . . . . . . . . . . . . . . . . . . . . . . . . . 88Cura del monitor . . . . . . . . . . . . . . . . . . . . . . . . . . . . . . . . . . . . . . . . . . . . . . . . . . . . . . . . . . . . . . . . . . 88Immagazzinamento . . . . . . . . . . . . . . . . . . . . . . . . . . . . . . . . . . . . . . . . . . . . . . . . . . . . . . . . . . . . . . . 88Ricerca ed eliminazione di inconvenienti . . . . . . . . . . . . . . . . . . . . . . . . . . . . . . . . . . . . . . . . . . . . . . 88Le informazioni per i clienti sull'eliminazione di questo prodotto SHARP in condizioni di protezione ambientale . . . . . . . 89
Specifiche . . . . . . . . . . . . . . . . . . . . . . . . . . . . . . . . . . . . . . . . . . . . . . . . . . . . . . . . . . . . . . . . . . . . . . . . . . 90Installazione delle informazioni di setup e del profilo ICC (Per Windows) . . . . . . . . . . . . . . . . . . . . . . . 92Informazioni sul profilo ColorSync (Per MacOS) . . . . . . . . . . . . . . . . . . . . . . . . . . . . . . . . . . . . . . . . . . . 95Istruzioni per collegare un braccio compatibile VESA . . . . . . . . . . . . . . . . . . . . . . . . . . . . . . . . . . . . . . . 96
191A_it.P65 12/15/2003, 5:28 PM75

76
Suggerimenti e precauzioni per la sicurezza
- Lo schermo LCD-TFT a colori usato in questomonitor è stato fabbricato applicando tecnologiadi alta precisione. Ciononostante sullo schermopotrebbero apparire piccolissimi punti dove ipixel o non s'illuminano o rimangono sempreilluminati. Inoltre, nel caso che la visione avvieneda un'angolazione molto alta potrebbero notarsidisuniformità di colori o luminosità. Vogliatenotare che queste cose non sono sintomi dicattivo funzionamento ma rientrano nella normaper gli schermi a cristalli liquidi e non hannoeffetto alcuno sul rendimento del funzionamentodel monitor.
- Non lasciate che lo schermo visualizziinutilmente per lunghi periodi di tempo, in quantociò può lasciare una persistenza dell'immagine.
- Se la luminosità è regolata sull'impostazioneminima, sarà difficile vedere lo schermo.
- La qualità del segnale del computer puòesercitare un'influenza sulla qualità del display.Consigliamo l'uso di un computer in grado diemettere dei segnali video di alta qualità.
- Non strofinate e non battete mai il monitor conoggetti duri.
- Per favore abbiate comprensione per il fatto chela Sharp Corporation non si assume nessunaresponsabilità per errori fatti nell'uso da parte delcliente o di terzi, né per altri difetti difunzionamento o danni a questo prodotto, che siverifichino durante l'uso, ad eccezione dei casinei quali la responsabilità per un indennizzo èriconosciuta dalla legge.
- Il monitor ed i suoi accessori possono venireaggiornati con ampliamenti senza preavviso.
Collocazione- Non utilizzate il monitor in luoghi nei quali la
ventilazione è scadente, vi è molta polvere,l'umidità è elevata e nei quali il monitor puòvenire a contatto con olio o vapore, in quanto ciòpuò dar luogo ad un incendio.
- Assicuratevi che il monitor non venga a contattocon acqua oppure altri liquidi. Assicuratevi chenessun oggetto come graffette o spilli penetri nelmonitor, in quanto ciò può dare luogo a incendiooppure folgorazione.
- Non collocate il monitor su oggetti instabilioppure in posti insicuri. Non consentite che ilmonitor venga sottoposto a forti urti e vibrazioni.Provocando la caduta oppure il rovesciamentodel monitor lo si può danneggiare.
- Non utilizzate il monitor in luoghi, nei quali essopuò essere esposto alla luce solare diretta,trovarsi vicino ad apparecchi di riscaldamentooppure in qualsiasi altro luogo, nel quale un'altatemperatura è probabile, in quanto ciò può dareluogo ad un'eccessiva generazione di calore edallo scoppio di un incendio.
Il cavo di alimentazione rete- Non danneggiate il cavo alimentazione rete, non
mettete degli oggetti pesanti su di esso, nontiratelo e non piegatelo eccessivamente. Nonaggiungete inoltre dei cavi di prolunga. Danni alcavo possono dare luogo ad incendi ofolgorazioni.
- Usare solamente il cavo di alimentazione retefornito insieme al monitor.
- Inserite la spina di alimentazione direttamentenella presa di corrente alternata.L'aggiunta di un cavo di prolunga può dare luogoad un incendio, derivante da surriscaldamento.
- Non rimuovere o non inserire la spina dialimentazione con le mani bagnate. Si rischia diprovocare una scossa elettrica.
Lista di controllo del monitor e degli accessori- Per favore controllate che la confezione contenga
i seguenti articoli.- Monitor LCD (1)- Cavo segnale analogico (1)
(nome del modello: 0NIT15G4-0015)- Cavo audio (1)
(nome del modello: 0NIT17A3-U006)- Cavo di alimentazione rete (1)- CD-ROM (1)- Manuale d'uso (1)
Note:- Usare solamente i cavi forniti in dotazione con il
monitor.- Vi si suggerisce di conservare il cartone per il
caso in cui risulti necessario trasportare ilmonitor.
- La Sharp Corporation è proprietaria dei dirittid'autore per i programmi del dischetto delle utilità.Non riproducetelo senza averne il permesso.
- La forma degli accessori forniti può noncorrispondere esattamente a quanto illustrato inquesto manuale.
Presentazione del manuale- In questo manuale si farà riferimento a Microsoft
Windows XP come "Windows XP", a MicrosoftWindows Millennium come "Windows Me", aMicrosoft Windows 2000 come "Windows 2000",a Microsoft Windows 98 come "Windows 98", aMicrosoft Windows 95 come "Windows 95", ed aMicrosoft Windows Versione 3.1 come " Windows3.1". Quando non occorre fare una distinzione traprogrammi, si userà il termine "Windows".
- Microsoft e Windows sono marchi registrati dellaMicrosoft Corporation.
- Macintosh è un marchio registrato della AppleComputer, Inc.
- Tutti gli altri nomi di marca o di prodotto sonomarchi o marchi registrati dei rispettivi titolari.
06_191A_it.P65 12/16/2003, 1:31 PM76

77
Eng
lish
Fran
çais
Italia
noE
spañ
olE
nglis
h
Descrizione del prodotto
1. Tasto AUTO .............................. Questo tasto si usa per eseguire la regolazione automatica delloschermo (CLOCK, PHASE, H-POS e V-POS). (p.84)
2. Tasto MENU ............................. Questo tasto si usa per visualizzare, selezionare e chiudere il menuOSD (On Screen Display).
3. Tasto / MODE ....................... Quando il menu OSD è visualizzato:Questo tasto si usa per selezionare delle opzioni di menu.
Quando il menu OSD non è visualizzato:Questo tasto serve per predisporre DISPLAY MODE.
4. Tasti ................................... Quando il menu OSD è visualizzato:Questi tasti si usano per selezionare una opzione od impostare ilvalore dell'opzione selezionata.
Quando il menu OSD non è visualizzato:Questi tasti si usano per regolare la luminosità dellaretroilluminazione e il volume dell'altoparlante.
5. Altoparlanti ............................... Si può sentire l'entrata dell'audio attraverso il dispositivo esternocollegato al monitor.
6. Terminale per le cuffie ............. Le cuffie (da acquistare in commercio) si possono collegare qui.7. Tasto di alimentazione ............ Premendo questo tasto si accende l'alimentazione.
Premete il tasto ancora una volta, per spegnere l'alimentazione.8. LED di alimentazione .............. Questo LED è illuminato in verde durante l'uso ed in arancione nel
modo risparmio energetico.9. Interruttore principale rete10. Terminale di alimentazione11. Terminale di ingresso RGB analogico .. Collegate il cavo segnale analogico in questa posizione. Si dovrebbe
usare il cavo segnale analogico accluso.12. Terminale di ingresso audio ... Il terminale di uscita audio di un computer può essere collegato in
questa posizione. Si dovrebbe usare il cavo audio accluso.13. Ancoraggio di sicurezza .......... Collegando una serratura di sicurezza (da acquistare in commercio)
all'ancoraggio di sicurezza, il monitor rimane bloccato, in modo danon poter essere trasportato.Il foro antifurto funziona unitamente ai sistemi di sicurezza KensingtonMicro Saver.
14. Fori per la ventilazione ............ Non ostruite mai i fori per la ventilazione, in quanto ciò può provocareun surriscaldamento all'interno del monitor e dare luogo a distrurbi alfunzionamento.
191A_it.P65 12/15/2003, 5:28 PM77

78
ATTENZIONE!
- Assicurarsi di tenere entrambi i lati del monitorquando si regola l'angolo di visione. Il schermoLCD usato in questo monitor è fatto di vetro.Una pressione con le mani sullo schermo LCDpuò causare danni.
Regolazione dell'angolazione
circa 25°
circa 5°
191A_it.P65 12/15/2003, 5:28 PM78

79
Eng
lish
Fran
çais
Italia
noE
spañ
olE
nglis
h
Collegamento del monitor ad un computer
Collegare il cavo accessorio del segnale analogicoal terminale di uscita analogica RGB del computer.
- Prestando attenzione alla direzione delconnettore, inserire bene il cavo del segnaleverticalmente nel connettore, poi stringere le vitisu entrambi i lati.
Se eseguite il collegamento ad un D sub a 15 pin in2 file per un Apple Power Macintosh, collegate unadattatore di conversione Macintosh (da acquistarein commercio) al cavo segnale analogico.
Nota:- Se eseguite il collegamento alla serie Sun Ultra,
potrebbe essere necessario un adattatore diconversione (da acquistare in commercio).
ATTENZIONE!
- Quando eseguite i collegamenti, assicurateviche sia il monitor che il computer siano spenti.
- Fate attenzione a non piegare eccessivamente ilcavo oppure nell'aggiungere dei cavi diprolunga, in quanto ciò potrebbe dare luogo adisturbi al funzionamento.
Collegamento del monitor ed accensione e spegnimento del monitor
Cavo segnaleanalogico
Terminale RGB analogico(D sub mini a 15 pin in 3 file)
Adattatore di conversione Macintosh
Collegare il cavo audio, accessorioQuando il cavo audio, accessorio, è collegato alterminale di uscita audio del computer, il suonodel computer collegato viene ascoltato daglialtoparlante dello schermo. È anche possibileavvalersi della presa per cuffie dello schermo.
Terminale di uscita audio
Cavo audio
Terminale di ingresso audio
Terminale RGB analogico(D sub mini a 15 pin in 3 file)
191A_it.P65 12/15/2003, 5:28 PM79

80
Accensione
1.Posizionate su acceso l'interruttore principalerete del monitor.
- Per accendere e spegnere l'interruttoredell'alimentazione principale, attenderesempre un tempo di almeno 5 secondi fra ledue operazioni. Farlo rapidamente potrebbeessere causa di malfunzionamento.
2.Premere il tasto di alimentazione del monitor.3.Accendete il computer.
Quando in ingresso arriva un segnale dalcomputer, Il LED di alimentazione si illumineràin verde ed appare la schermata. (Dopol'accensione, per la visualizzazione dellaschermata bisogna attendere un piccolissimotempo.)
Note:- Quando impostate il monitor oppure un computer
collegato per la prima volta, quando collegate uncomputer supplementare oppure dopo avercambiato un aspetto del sistema attuale, eseguiteuna regolazione automatica dello schermo primadell'uso. (p.84)
- A seconda del computer o del sistema operativo,potrebbe essere necessario usare il computerper installare le informazioni di setup delmonitor. (p.92)
- Quando collegate ad un notebook, se loschermo del computer del notebook è impostatoin modo da visualizzare contemporaneamente,lo schermo MS-DOS potrebbe non essere ingrado di visualizzare correttamente. In questocaso modificate le impostazioni in modo chesolo il monitor visualizzi.
Collegamento delle cuffie(da acquistare in commercio)
Le cuffie (da acquistare in commercio) possonoessere collegate.
Note:- Quando le cuffie sono collegate, non è possibile
sentire nessun suono dagli altoparlanti delmonitor.
- Utilizzare le cuffie con un cavo di lunghezzainferiore a 3 m.
Collegamento del monitor ad unasorgente di alimentazione elettrica
Collegamento del monitor ed accensione e spegnimento del monitor
Accendete ilcomputer.
ON
Cuffie
Terminale per le cuffie
Cavo dialimentazione rete
Terminale dialimentazione
Premete il tasto dialimentazione.
Interruttore principale rete
Presa di correntealternata
191A_it.P65 12/15/2003, 5:28 PM80

81
Eng
lish
Fran
çais
Italia
noE
spañ
olE
nglis
h
Spegnimento
1. Spegnete il computer.2.Premete il tasto di alimentazione del monitor.
Il LED di alimentazione si spegnerà.
Se si prevede di non usare il monitor per unperiodo di tempo piuttosto lungo, spegnerelInterruttore principale rete del monitor, erimuovere la spina dell'alimentazione principaledalla presa della rete elettrica.
Collegamento del monitor ed accensione e spegnimento del monitor
OFF
Spegnete ilcomputer.
Premete il tasto dialimentazione.
191A_it.P65 12/15/2003, 5:28 PM81

82
Regolazione della visualizzazione sullo schermo e volume dell'altoparlante
Nota:- Tutte le regolazioni verranno conservate anche
dopo che si è spenta l'alimentazione.
Reset di tutti i valori di regolazioneTutti i valori delle regolazioni si possono riportareai loro valori originali di fabbrica in un comando.1. Spegnete l'alimentazione del monitor.2. Premete il tasto MENU ed il tasto / MODE
simultaneamente, e, nel farlo, premete il tasto dialimentazione (cioè accendete l'alimentazione).Continuate a premere i tasti fino a quando [ALLRESET] appare sullo schermo. Quando ilmessaggio visualizzato scompare, lareinizializzazione è completata.
Note:- Mentre [ALL RESET] è visualizzato, i tasti di
controllo sono disattivati.- Non è possibile resettare dei valori, mentre il
blocco di regolazioni è in funzione.Rimuovete il blocco di regolazioni, prima ditentare di far funzionare i tasti di controllo.
Reset del menu ADJUSTMENT(REGOLAZIONE)I valori predisposti per le voci (CLOCK, PHASE, H-POS, V-POS) del menu ADJUSTMENT(REGOLAZIONE) possono essere riportati ai valoriiniziali di fabbrica.1. Accendete l'alimentazione del monitor.2. Premete il tasto MENU ed il tasto
simultaneamente. Quando sullo schermo appare[RESET] il reset è completo.
Note:- Mentre [RESET] è visualizzato, i tasti di controllo
sono disattivati.- Non è possibile resettare dei valori, mentre il
blocco di regolazioni è in funzione.Rimuovete il blocco di regolazioni, prima ditentare di far funzionare i tasti di controllo.
Funzione del blocco di regolazioniDisattivando i tasti di controllo (cioè settando ilblocco) si impedirà ogni tentativo di cambiare ivalori regolati.1. Spegnete l'alimentazione del monitor.2.Mentre premete il tasto MENU, premete il tasto
di alimentazione (cioè accendetel'alimentazione).Continuate a premere i tasti fino a quando[ADJUSTMENT LOCKED] appare sullo schermo.Il blocco è impostato quando il messaggio èvisualizzato.
Nota:- Quando il blocco è attivato, tutti i tasti, ad
eccezione del tasto di alimentazione sonodisabilitati.
Disattivazione del blocco della regolazione1. Spegnete l'alimentazione del monitor.2. Mentre premete il tasto MENU, premete il tasto
di alimentazione (cioè accendetel'alimentazione).Continuate a premere i tasti fino a quando[ADJUSTMENT UNLOCKED] appare sulloschermo. Quando appare il messaggio, il bloccoè disattivato.
Regolazione della retroilluminazione
1. Senza che il menu OSD sia visualizzato premeteil tasto oppure il tasto .
2.Controllare che [BRIGHT] sia selezionato.Se non è selezionato, premere il tasto
/ MODE e selezionare [BRIGHT].
3. Eseguite la regolazione, premendo il tasto (più scuro) oppure il tasto (più chiaro).
Nota:- L'On Screen display per la regolazione
scompare alcuni secondi dopo l'ultimaoperazione.
191A_it.P65 12/15/2003, 5:28 PM82

83
Eng
lish
Fran
çais
Italia
noE
spañ
olE
nglis
h
Regolazione del volume dell'altoparlante
1.Senza che il menu OSD sia visualizzato premeteil tasto oppure il tasto .
2.Controllare che [VOLUME] sia selezionato.Se non è selezionato, premere il tasto
/ MODE e selezionare [VOLUME].
3.Eseguite la regolazione, premendo il tasto (diminuisce) oppure il tasto (aumenta).
Nota:- L'On Screen display per la regolazione
scompare alcuni secondi dopo l'ultimaoperazione.
Impostazione della modalità deldisplay
La tonalità del colore o la luminosità si puòimpostare come segue.
STDVisualizza un'immagine con la tonalità di colorerisultante dallo schema originale del pannello acristalli liquidi.
OFFICELa luminosità dell'esposizione è abbassata.(Questo modo permette di risparmiarel'alimentazione.)
sRGBsRGB è lo standard internazionale dellarappresentazione dei colori specificato dall' IEC(International Electrotechnical Commission(Commissione Elettrotecnica Internazionale)).La conversione del colore si effettua, tenendoconto delle caratteristiche dei cristalli liquidi erappresenta la tonalità di colore vicina a quelladell'immagine originale.
VIVIDVisualizza un'immagine con colori primaridinamici e vividi.
- Se [DISPLAY MODE] viene impostato su [sRGB]o [VIVID], [WHITE BALANCE] verrà impostato su[STD], e [GAMMA] su [0].
Regolazione della visualizzazione sullo schermo e volume dell'altoparlante
PredisposizioneA menu OSD non visualizzato agire sul tasto
/ MODE .Ad ogni successiva pressione del tasto comparela voce successiva del menù (nell'ordine: STD →OFFICE → sRGB → VIVID → STD).L'On Screen display per la regolazione scomparealcuni secondi dopo l'ultima operazione.
Verifica delle informazioni relative alprodotto
Sullo schermo si possono verificare il nome delmodello (voce MODEL), il numero di serie (voce S/N), e la durata di uso (voce USAGE TIME).1.Spegnere l'apparecchio.2.Tenendo premuto il tasto / MODE button, agire
sul tasto di attivazione ubicato sul telecomando(cioè, accendere l'apparecchio).Le informazioni del prodotto vengonovisualizzate.
3.Premere il tasto MENU.
Nota:- Notare che l'indicazione dalla durata di uso al
momento dell'acquisto può risultare diversa da 0(zero), a seguito dei controlli effettuati in fabbricae di altre simili attività che possono aver avutoluogo durante la fabbricazione.
191A_it.P65 12/15/2003, 5:28 PM83

84
Regolazione della visualizzazione sullo schermo
Regolazione automatica dello schermoLa regolazione automatica può essere effettuatausando il tasto AUTO o il tasto MENU.
Tasto AUTO1. Premere il tasto AUTO.2. Premere nuovamente il tasto AUTO.
[ADJUSTING] comparirà sullo schermo e dopoalcuni secondi [ADJUSTING] sparirà.(La regolazione automatica ora è completata.)
Tasto MENU1.Premete il tasto MENU.
Il menu ADJUSTMENT verrà visualizzato.
2.Premete il tasto .Lo schermo diventerà scuro e verrà visualizzato[ADJUSTING]. Pochi secondi dopo il menuADJUSTMENT ritornerà. (La regolazioneautomatica è ora completa.)
3.Premete il tasto MENU 5 volte per farscomparire il menu OSD (On Screen Display).
Note:- Nella maggioranza dei casi la regolazione
automatica è sufficiente.- Potrebbe non essere possibile ottenere la giusta
regolazione mediante la prima regolazioneautomatica. In questo caso, provare a ripetere laregolazione automatica 2 o 3 volte.
- Se necessario, per una qualsiasi delle causeseguenti, si possono eseguire delle regolazionimanuali dopo aver eseguito la regolazioneautomatica (p.85).- Quando occorre un'ulteriore regolazione fine.- Quando [OUT OF ADJUST] viene visualizzato.
(Quando lo schermo visualizza un'immaginecompletamente scura, la regolazioneautomatica dello schermo può esseredisattivata. Quando eseguite una regolazioneautomatica, assicuratevi di usare ilmonoscopio di regolazione oppure tentate divisualizzare un'immagine che rende loschermo molto luminoso.)
- Quando i segnali video di input del computersono Composite Sync oppure Sync on Green.(Le regolazioni automatiche potrebbero nonessere possibili.)
- La regolazione automatica potrebbe non essereottenuta correttamente a seconda di quanto èvisualizzato sullo schermo - immagini inmovimento o la richiesta MS-DOS, ecc.
Regolazione automatica dello schermo
Le opzioni nel menu ADJUSTMENT si possonoregolare automaticamente (CLOCK, PHASE(FASE), H-POS, V-POS).
Nota:- Quando impostate questo monitor per la prima
volta oppure dopo aver cambiato un aspetto delsistema corrente, prima dell'uso, eseguite unaregolazione automatica dello schermo.
Visualizzazione della schermata per regolazionePrima di tutto visualizzate un'immagine che rendechiaro l'intero schermo.Se state utilizzando Windows, potete usare ilmonoscopio sul CD-ROM accluso.
Visualizzazione del monoscopio (per Windows)I messaggi di Windows, citati nelle istruzioni perl'uso che seguono, si basano sulla versioneinglese di Windows.Questa spiegazione è per Windows 95/98/Me/2000/XP, e parte dall'ipotesi che l'unità per CD-ROM sia "D".1. Inserire il CD-ROM degli accessori nel lettore
CD-ROM del computer.2.Aprite [My Computer] e selezionate CD-ROM. Se
state usando Windows 3.1, aprite [File Manager]e selezionate drive D.
3.Fate un doppio clic su [Adj_uty.exe], pereseguire il Programma di regolazione. Ilmonoscopio apparirà.
Monoscopio
Dopo aver completato le regolazioni, premete iltasto [Esc] del computer, per uscire dalProgramma di regolazione.
Nota:- Se il modo di visualizzazione del vostro
computer è impostato su 65K colori, potretevedere i valori differenti del colore in ognitracciato di colore oppure la scala dei grigi potràapparire colorata. (Ciò è dovuto alle specifichedel segnale di ingresso e non ad un difetto delfunzionamento.)
191A_it.P65 12/15/2003, 5:28 PM84

85
Eng
lish
Fran
çais
Italia
noE
spañ
olE
nglis
h
Menu ADJUSTMENT (REGOL)
AUTOQuando [AUTO] è selezionato con il tasto , leimpostazioni [CLOCK], [PHASE], [H-POS] e[V-POS] sono eseguite automaticamente.
CLOCKLa figura seguente dimostra come eseguire laregolazione in modo che non venga emesso delrumore di sfarfallamento verticale. (tasti )
PHASE (FASE)La figura seguente dimostra come eseguire laregolazione in modo che non venga emesso delrumore di sfarfallamento orizzontale. (tasti )Nota:- La regolazione della [PHASE] (FASE) si
dovrebbe eseguire solo dopo che si è impostatocorrettamente il [CLOCK].
H-POS (posizionamento orizzontale) e V-POS(posizionamento verticale)Per centrare il monoscopio all'interno dei bordidello schermo, regolate i valori sinistra - destra(H-POS) (posizione orizzontale) ed i valori su - giù(V-POS) (posizione verticale). (tasti )
Regolazione manuale dello schermo
1.Prima di tutto visualizzate un'immagine cherende chiaro l'intero schermo. (p.84)
2.Visualizzare il menu OSD premendo il tastoMENU.Menu ADJUSTMENT
MENUMenu GAIN CONTROL
MENUMenu COLOR CONTROL
MENUMenu MODE SELECT-1
MENUMenu MODE SELECT-2
MENUIl menu OSD si chiude.
Note:- Il menu OSD scompare automaticamente circa
30 secondi dopo l'ultimo comando.- Questo capitolo fornisce la procedura di
regolazione dello schermo mediante ilmonoscopio (per Windows).
Regolazione della visualizzazione sullo schermo
Rumore di sfarfallamento verticale
Rumore di sfarfallamento orizzontale
Selezionarel'opzionepremendo iltasto
/ MODE.
Selezionarel'opzionepremendo iltasto
/ MODE.
Selezionarel'opzionepremendo iltasto
/ MODE.
Selezionarel'opzionepremendo iltasto
/ MODE.
Selezionarel'opzionepremendo iltasto
/ MODE.
Quadro dello schermo
Monoscopio
191A_it.P65 12/15/2003, 5:28 PM85

86
Regolazione della visualizzazione sullo schermo
Menu COLOR CONTROL (CONTROLLO COLORE)
WHITE BALANCE1.Dopo aver selezionato [WHITE BALANCE],
premere il tasto .Il menu WHITE BALANCE sarà visualizzato.
2.Usate i tasti per selezionare [COOL], [·],[STD], [·], [WARM] oppure [USER].COOL (freddo) .... tonalità del colore più tendente
al blu rispetto allo standard • ......................... tonalità del colore
leggermente più tendente alblu rispetto allo standard
STD ..................... Impostazione standard dellatonalità di colore
• ......................... tonalità del coloreleggermente più tendente alrosso rispetto allo standard
WARM (caldo) .... tonalità di colore più tendenteal rosso rispetto allo standard
USER (UTENTE)- Selezionando [USER] si visualizzano i valori
delle impostazioni per [R-CONTRAST],[G-CONTRAST] e [B-CONTRAST], alloscopo di eseguire delle regolazioni fini.
- Usate il tasto / MODE per selezionare [R-CONTRAST], [G-CONTRAST] e [B-CONTRAST].
R-CONTRAST ..... tasto per blu - verde tasto per rosso
G-CONTRAST ..... tasto per porpora tasto per verde
B-CONTRAST...... tasto per giallo tasto per blu
3.Premete il tasto MENU.
Note:- Nelle impostazioni diverse da [STD] non tutte le
gradazioni possono essere visualizzate. Pervisualizzare tutte le gradazioni, impostate su [STD].
- Se la modalità del colore [DISPLAY MODE] si trovasu [sRGB] o [VIVID], non è possibile selezionarealcuna altra predisposizione all'infuori di [STD].
GAMMARegolare in modo da migliorare la visione delleimmagini scure e di quelle chiare. Se lo schermo èscuro e la visione non è buona, aumentare il valorenumerico. Se lo schermo è chiaro e la visione non èbuona, diminuire il valore numerico. (tasti )- Se [DISPLAY MODE] viene impostato su [sRGB]
o [VIVID], [GAMMA] non può essere impostato.
Menu GAIN CONTROL (CTRL. GUADAGNO)
AUTOQuando [AUTO] viene selezionato con il tasto , leimpostazioni [BLACK LEVEL] e [CONTRAST] sonoeseguite automaticamente. Dopo la regolazioneautomatica, eseguire la regolazione manuale senecessario.
BLACK LEVEL (LIVELLO DEL NERO)La luminosità totale dello schermo si può regolare,osservando il tracciato di colore. (tasti )
CONTRAST (CONTRASTO)Mentre state osservando il tracciato di colore, sipossono eseguire le regolazioni in modo che tuttele gradazioni appaiano. (tasti )
Note:A proposito della funzione AUTO (Auto GainControl function (Funzione controllo automaticodel guadagno))- Il Controllo automatico del guadagno regola il
contrasto ed il livello del nero sulla base delcolore più luminoso e più scuro dell'immaginevisualizzata.
- Se non utilizzate il monoscopio, è necessarioavere un'area di nero ed un'area di bianco dialmeno 5 mm x 5 mm sullo schermo. In casocontrario, le regolazioni potrebbero non esserepossibili.
- Se il segnale proveniente dal computer è unsegnale sinc composito oppure sinc su verde,risulta impossibile eseguire la regolazioneautomatica. Per favore eseguite invece laregolazione manuale.
- Se risulta visualizzato il messaggio [OUT OFADJUST] procedere alla regolazione manuale.
Tracciato di colore
191A_it.P65 12/15/2003, 5:28 PM86

87
Eng
lish
Fran
çais
Italia
noE
spañ
olE
nglis
h
Menu MODE SELECT-1 (SELEZ. MODO-1)
Nota:- A seconda della risoluzione del segnale di
input, anche se si possono selezionare delleopzioni di menu, il display potrebbe noncambiare.
OSD H-POSITION (posizione orizzontale dell'OSD)La posizione del menu dell'OSD può esserespostata verso sinistra e verso destra. (tasti )
OSD V-POSITION (posizione verticale dell'OSD)La posizione del menu dell'OSD può esserespostata in su ed in giù. (tasti )
SCALING (livello della scala)Si può regolare la definizione dell'immagine.(tasti )Nota:- Quando la modalità del display è impostata su
meno di 1280 x 1024 pixel, il display èingrandito per coprire l'intero schermo (cioè ilrapporto dei lati del display può cambiare).
400 LINES (grado di risoluzione)Potete specificare la risoluzione orizzontale di unoschermo a 400 righe, quando usate del testo UStext, ecc. (tasti )
640: modo 640 x 400 pixel720: modo 720 x 400 pixel (testo US ecc.)
Nota:- Dato che l'input della risoluzione in casi diversi
dalle 400 righe è eseguito automaticamente,non vi è l'esigenza di impostarlo.
LANGUAGE (LINGUA)Potete cambiare la lingua usata nel menu OSD.1.Premete il tasto .
Il menu di selezione della lingua verràvisualizzato sullo schermo.
2.Usate il tasto / MODE per scegliere unalingua.
3.Premete il tasto MENU.
Regolazione della visualizzazione sullo schermo
Menu MODE SELECT-2 (SELEZ. MODO-2)
INFORMATION (INFORMAZIONE)Sullo schermo si possono verificare il nome delmodello (voce MODEL), il numero di serie (voce S/N), e la durata di uso (voce USAGE TIME).1.Una volta selezionata la voce [INFORMATION],
agire sul tasto .Le informazioni del prodotto vengonovisualizzate.
2.Premere il tasto MENU.
OFF TIMER(TIMER PER SPEGNIMENTO AUTOMATICO)Allo scadere del periodo di tempo predispostol'apparecchio si spegne automaticamente.1.Dopo aver selezionato la voce [OFF TIMER],
premere il tasto .2.Selezionare la posizione [ON] o [OFF] agendo
opportunamente sui tasti o .Se è stata selezionata la posizione [ON], agirepoi sul tasto / MODE e predisporre il periododi tempo al termine del quale si vuole chel'apparecchio si spenga automaticamente,agendo opportunamente sui tasti o . (Lapredisposizione può essere effettuata in unità diore, da 1 a 23 ore.)
3.Premere il tasto MENU.- Se è stata selezionata la posizione [ON], nel
corso degli ultimi 5 minuti prima dellospegnimento, e per una durata di circa 5secondi allo scadere di ogni minuto, sulloschermo in alto a destra viene visualizzato iltempo rimanente sino allo spegnimento.
- Se il tasto di alimentazione viene premuto dopoil primo display del tempo rimanente pero primache venga scollegata l'alimentazione, l'OFFTIMER verrà impostato su un'ora.Per procedere poi allo spegnimentodell'apparecchio premere di nuovo il tasto dialimentazione (quando, successivamente, siriaccenderà l'apparecchio, questo verrànuovamente a spegnersi automaticamente altermine del periodo di tempo precedentemetepredisposto).
- Se si attiva il monitor con il timer di spegnimentoa tempo [OFF TIMER] sulla posizione [ON], sulloschermo compare per alcuni secondi il tempopredisposto per lo spegnimento (in assenza disegnali di ingresso compare il messaggio [NOSIGNAL] "nessun segnale").
191A_it.P65 12/15/2003, 5:28 PM87
88
Cura del monitor
Cura del monitor
Quando pulite il monitor, scollegate sempre laspina dalla presa di corrente alternata.
Mobile e pannello di controlloUsate un panno morbido ed asciutto per portarevia ogni sporcizia dal mobile e dal pannello dicontrollo.Se sono molto sporchi, applicate del detersivoneutro ad un panno morbido inumidito, strizzatelobene, e portate via la sporcizia, detergendo.
Sezione schermo LCDUsate un panno morbido ed asciutto per portarevia la sporcizia e la polvere dalla superficie delloschermo LCD. (E' adatto un panno morbido comela garza oppure quello che si usa per pulire lelenti.)
ATTENZIONE!
- Non usate mai dei solventi, della benzina,dell'alcol, del detersivo per vetri, ecc. in quandociò può dare luogo a cambiamenti di colore o diforma.
- Non graffiate mai il monitor con qualcosa di duroe non esercitate mai una forte pressione, inquanto ciò può lasciare dei segni o dare luogo adifetti di funzionamento.
Immagazzinamento
Se il monitor non verrà usato per lungo tempo,assicuratevi di aver scollegato la spina rete dallapresa di corrente alternata.
ATTENZIONE!
- Non lasciate il monitor a contatto con gomma oplastica per periodi di tempo prolungati inquanto ciò può dare luogo a cambiamenti delcolore o delle forma.
Ricerca ed eliminazione diinconvenienti
Se pensate che il monitor possa avere dei difetti difunzionamento, per favore controllate i puntiseguenti, prima di portarlo a riparare.Se, dopo questo, esso continua a non funzionare,per favore mettetevi in contatto con il negoziodove avete acquistato il monitor oppure al piùvicino centro autorizzato del Servizio TecnicoAssistenza Clienti della Sharp.
I tubi fluorescenti del monitor hanno una duratadi vita utile limitata.- Se lo schermo si scurisce, lampeggia con
insistenza o non si illumina, significa che iltubo fluorescente ha raggiunto la fine dellasua durata di servizio.Per favore informatevi presso il negozio, dalquale avete acquistato il monitor oppure dalCentro del Servizio Tecnico Assistenza Clientidella Sharp più vicino a voi.
- Nel periodo iniziale del loro uso, a causa dellecaratteristiche dei tubi fluorescenti, lo schermopotrebbe presentare uno sfarfallamento.(Questo non è un difetto del funzionamento.)Se ciò dovesse verificarsi, controllate,spegnendo prima di tutto l'alimentazione equindi riaccendendola.
Nel monitor non appare nessun'immagine(il LED dell'alimentazione non è acceso).- Il cavo di alimentazione rete è collegato
correttamente? (p.80)
Nel monitor non appare nessun'immagine(il LED dell'alimentazione è acceso).- Il computer è collegato correttamente? (p.79)- Il computer è acceso?- La sincronizzazione del segnale del computer
corrisponde alle specifiche del monitor? (p.91)- Il computer si trova nel modo risparmio energetico?
I tasti di controllo non funzionano.- Il blocco di regolazioni è attivo? (p.82)
L'immagine appare distorta.- La sincronizzazione del segnale del computer
corrisponde alle specifiche del monitor? (p.91)- Eseguite la regolazione automatica dello
schermo. (p.84)- Se è possibile modificare il rapporto di
frequenza del computer che si sta utilizzando,passare ad una frequenza inferiore. (p.91)
Non si sente nessun suono dagli altoparlanti.- Il cavo audio è connesso correttamente? (p.79)- Eseguite la procedura di regolazione del
volume. (p.83)- Le cuffie sono collegate?- Non c'è suono dagli altoparlanti quando il
monitor si trova in modalità di risparmioenergetico (la spia LED di alimentazione siillumina in colore arancione).
191A_it.P65 12/15/2003, 5:28 PM88

89
Eng
lish
Fran
çais
Italia
noE
spañ
olE
nglis
h
Cura del monitor
Le informazioni per i clientisull'eliminazione di questo prodottoSHARP in condizioni di protezioneambientale
Se questo prodotto non può più essere usato,dovrebbe essere dato via ed essere eliminato inmodo legalmente corretto ed in condizioniambientali sane.
NON BUTTARE VIA QUESTO PRODOTTO CON IVOSTRI RIFIUTI DOMESTICI O MESCOLATOCON ALTRI RIFIUTI! POTRESTE METTEREL'AMBIENTE IN PERICOLO!
La Sharp Corporation si dedica alla protezionedell'ambiente ed a conservare l'energia. Il nostroobiettivo è di minimizzare l'impatto ambientale deinostri prodotti realizando e migliorandocontinuamente le tecnologie dei prodotti, i disegnie le informazioni del cliente diretti alla protezioneambientale.
(1) Per i nostri clienti in Belgio, Olanda, Svezia eSvizzera.La SHARP partecipa nei sistemi di riciclaggionazionale rispettivi per apparecchi elettronici,che sono stati fondati in base alle leggi diprotezione ambientale in questi paesi. Si pregadi vedere qui i particolari sui paesi rispettivi.
Paese Informazioni per il riciclaggio per quello paese
Svezia Si prega di usare il sistema diriciclaggio elettronico svedesedenominato "ELRETUR", e consultareil sito web facendo clic suhttp://www.el-kretsen.se
Olanda Si prega di usare il sistema diriciclaggio elettronico olandesedenominato "ICT-Milieu", e consultareil sito web facendo clic suhttp://www.nederlandict.nl/index.php
Belgio Si prega di usare il sistema diriciclaggio elettronico belgadenominato "Recupel", e consultare ilsito web facendo clic suhttp://www.recupel.be
Svizzera Si prega di usare il sistema diriciclaggio elettronico svizzerodenominato "SWICO", e consultare ilsito web facendo clic suhttp://www.swico.ch
(2) Per i nostri clienti nel Regno Unito, inGermania, in Francia ed ItaliaSi prega di prendere contatto con le vostreautorità locali per le facilità di raccolta ericiclaggio, o con una azienda di servizio diriciclaggio autorizzata ad effettuare ilriciclaggio degli apparecchi elettronici.La SHARP suggerisce i servizi di riciclaggiodella MIREC, e le informazioni generali dellaMIREC possono essere ottenute facendo clicsu http://www.mirec.com/.I servizi MIREC devono essere pagatidall'ultimo proprietario dell'apparecchioelettronico in questione.
(3) Per i nostri clienti negli Stati UnitiQuesto prodotto utilizza la saldatura stagno epiombo e una lampada fluorescente che contieneuna piccola quantità di mercurio. L'eliminazionedi questi materiali può essere regolata con dovuteconsiderazioni ambientali. Per la raccolta e leinformazioni sul riciclaggio, si prega di prenderecontatto con le vostre autorità locali o laElectronics Industries Alliance:http://www.eiae.org
(4) Per i nostri clienti in GiapponeChiamare il numero senza pagamento 0120-845-530 le informazioni sul riciclaggio.
191A_it.P65 12/15/2003, 5:28 PM89

90
Dimensioni (Unità: mm)
- Cavo segnale analogico: circa 1,8 m- Cavo audio: circa 1,8 m
Nota:- Per facilitare una politica di miglioramenti
continui, la SHARP si riseva il diritto di cambiareil disegno e le caratteristische perperfezionamenti senza preavviso. Lecaratteristiche di prestazioni numericamenteindicate sono valori nominali delle unità diproduzione. Possono tuttaria verificarsivariazioni di valori rispetto ai suddetti nelle unitàindividuali.
Specifiche
Specifiche del prodottoNome del modello
LL-191A-W (Bianco)/LL-191A-B (Nero)Display LCD
48 cm misurati diagonalmente Modulo TFT LCDRisoluzione (max.)
SXGA 1280 x 1024 pixelColori visualizzabili (max.)
Circa 16,19 million di colori (6 bit + FRC)Luminosità (max.)
220 cd/m2
Dimensione dei pixel0,294 (H) x 0,294 (V) mm
Rapporto del contrasto500:1
Angolo di visibilitàSinistra - destra 160°; alto - basso 160°(rapporto del contrasto > 5)
Dimensioni di visualizzazione dello schermoOrizzontale 376,3 mm x Verticale 301,1 mm
Segnale videoRGB analogico (0,7 Vp-p) [75Ω]
Segnale di sincronismoSincronismo separato (livello TTL: +/-),sincronismo su verde, sincronismo composito(livello TTL: +/-)
Compensazione dell'espansioneFiltraggio digitale (Ingrandimento degli schermiVGA/SVGA/XGA, ecc. sino a schermo di grandidimensioni.)
Plug & PlayVESA Compatibile DDC2B
Gestione dell'energiaVESA: basata su DPMS
Uscita altoparlanti1 W + 1 W
Terminale del segnale di ingressoD sub mini a 15 pin in 3 file
Terminale di ingresso audioJack stereo mini
Terminale per le cuffieJack stereo mini
Inclinazione dello schermoVerso l'alto circa 0 - 25°; verso il basso circa 0 - 5°
AlimentazioneAC100 - 240 V, 50/60 Hz
Temperatura dell'ambiente operativo5 - 35°C
Potenza assorbita33 W (senza ingresso audio)(36 W Massima, 1,8 W in modo risparmioenergetico)
Dimensioni (L x P x A)Circa 419 mm x 213 mm x 409 mm
PesoCirca 7,8 kg (circa 5,7 kg escluso il supporto)(Esclusi i cavi.)
06_191A_it.P65 12/22/2003, 9:45 AM90

91
Eng
lish
Fran
çais
Italia
noE
spañ
olE
nglis
h
Specifiche
Sincronizzazioni rilevanti del segnale
- La risoluzione consigliata è 1280 x 1024.- Tutti sono conformi solo al non interlacciamento.- Le frequenze per le serie Power Macintosh e
Sun Ultra sono valori di riferimento. Percollegare, potrebbe essere necessario un altroadattatore (da acquistare in commercio).
- Se il monitor riceve dei segnali di sincronismoche non sono compatibili, verrà visualizzato[OUT OF TIMING]. Seguite il manuale diistruzioni del vostro computer per impostare ilsincronismo in modo da renderlo compatibilecon quello del monitor.
- Se il monitor non riceve nessun segnale(segnale di sincronismo), verrà visualizzato [NOSIGNAL].
Frequenzapunti
Modalità divisualizzazione
Sincronismoorizzontale
Sincronismoverticale
VESA
Testo USSerie PowerMacintosh
Serie SunUltra
Pin del connettore di ingresso del segnaleanalogico(Connettore D sub mini a 15 pin)
N° Funzione
1 Segnale video rosso in ingresso
2 Segnale video verde in ingresso
3 Segnale video blu in ingresso
4 GND (massa)
5 GND (massa)
6 GND (massa) per il segnale video rosso
7 GND (massa) per il segnale video verde
8 GND (massa) per il segnale video blu
9 +5V
10 GND (massa)
11 GND (massa)
12 Dati DDC
13 Per l'input del segnale di sincronismo orizzontale
14 Per l'input del segnale di sincronismo verticale
15 Clock DDC
Gestione dell'energiaIl monitor è basato su VESA DPMS (Display PowerManagement Signaling) (Segnalazioni dellagestione dell'energia del display).Per attivare la funzione di gestione dell'energiadel monitor, sia la scheda video che il computerdevono essere conformi alle norme dello standardVESA DPMS.
DPMS: Display Power Management Signalling
Modo Schermo Potenza Sinc. Sinc.DPMS assorbita orizzontale verticale
ON Attivo Sì Sì
STANDBY No Sì
SUSPEND Non attivo Sì No
OFF No No
36 W
1,8 W
DDC (Plug & Play)Questo monitor supporta lo standard VESA DDC(Display Data Channel).DDC è uno standard per i segnali per eseguire lefunzioni Plug & Play sul monitor o sul PC. Essotrasferisce delle informazioni, come il grado dirisoluzione, tra il monitor ed il PC. Potete utilizzarequesta funzione se il vostro PC è conforme al DDCe se è impostato in modo da rilevare il monitor Plug& Play.Vi sono molte varietà di DDC dovute alle differenzetra i sistemi. Questo monitor funziona con DDC2B.
191A_it.P65 12/15/2003, 5:28 PM91

92
Installazione delle informazioni di setup e delprofilo ICC (Per Windows)
A seconda del computer oppure del sistemaoperativo può essere necessario usare ilcomputer per eseguire l'installazione delleinformazioni di setup del monitor, ecc. In questocaso, seguite i passi indicati sotto per installare leinformazioni di setup del monitor. (A seconda deltipo di computer oppure del sistema operativo, inomi dei comandi ed i metodi possono esseredifferenti. Per favore seguite il manuale d'usoproprio del computer, mentre leggete questo.)
Profilo ICCUn profilo ICC (International Color Consortium) èun file che descrive le caratteristiche cromatichedi riproduzione del monitor LCD. Utilizzandoun'applicazione che funziona con un profilo ICC,si può realizzare un'elevata riproduzione deicolori.
- Windows 98/Me/2000/XP utilizzano tutti i profiliICC.
- Quando si installano le informazioni del setup diWindows 98/Me/2000/XP (descritte di seguito),anche il profilo ICC viene installato. Sedesiderate installare solo il profilo ICC, perfavore fate riferimento a Installazione del profiloICC a pagina 94.
- In caso di uso del profilo ICC, procedere allapredisposizione come segue:- Modalità [DISPLAY MODE]: [STD] o [OFFICE]- Modalità [WHITE BALANCE]: [STD]- Modalità [GAMMA]: [0]
Per Windows 95
Installazione delle informazioni di setup delmonitor in Windows 95. I messaggi di Windows,citati nelle istruzioni per l'uso che seguono, sibasano sulla versione inglese di Windows.In questa spiegazione si parte dall'ipotesi chel'unità per CD-ROM sia "D".
1. Inserire il CD-ROM degli accessori nel lettoreCD-ROM del computer.
2. Fate clic sul pulsante [Start]. Da [Settings],scegliete [Control Panel].
3. Fate doppio clic su [Display].4. Fate clic su [Settings], [Advanced Properties], e
[Monitor], e quindi [Change].5. Fate clic su [Have disk], confermate che [Copy
manufacturer's files from:] è [D:] quindi fate clicsu [OK].
6. Verificate che le impostazioni del monitor sianoselezionate e fate clic su [OK].
7. Controllate che il monitor visualizzi, quindi fateclic su [Apply].
8. Fate clic su [OK], e chiudete la finestra.
Per Windows 98
Installazione delle informazioni di setup delmonitor in Windows 98, e impostazione del profiloICC del monitor come valore predeterminato. Imessaggi di Windows, citati nelle istruzioni perl'uso che seguono, si basano sulla versioneinglese di Windows.In questa spiegazione si parte dall'ipotesi chel'unità per CD-ROM sia "D".
Se è apparsa la schermata "Add New HardwareWizard":1. Inserire il CD-ROM degli accessori nel lettore
CD-ROM del computer.2. Fate clic su [Next].3. Spuntate [Display a list of all the drivers in a
specific location, so you can select the driveryou want.], quindi fate clic su [Next].
4. Quando viene visualizzato [Models], fate clicsu [Have disk], confermate che [Copymanufacturer's files from:] è [D:], e fate clic su[OK].
5. Verificate che i particolari del monitor sianoselezionati, fate quindi clic su [Next], [Next], e[Finish]. Se appare "Add New HardwareWizard", ripetete i comandi dell'installazione,cominciando da 2 sopra.
Se la schermata "Add New Hardware Wizard" nonè apparsa:1. Inserire il CD-ROM degli accessori nel lettore
CD-ROM del computer.2. Fate clic sul pulsante [Start]. Da [Settings],
scegliete [Control Panel].3. Fate doppio clic su [Display].4. Fate clic su [Settings], [Advanced] e [Monitor].5. In [Options], spuntate [Automatically detect
Plug & Play monitors] e fate clic su [Change].6. Fate clic su [Next].7. Fate clic su [Display a list of all the drivers in a
specific location, so you can select the driveryou want.], quindi fate clic su [Next].
8. Quando viene visualizzato [Models], fate clicsu [Have disk], confermate che [Copymanufacturer's files from:] è [D:], e fate clic su[OK].
9. Verificate che i particolari del monitor sianoselezionati, fate quindi clic su [Next], [Next], e[Finish].
10. Controllate che il monitor visualizzi, quindi fateclic su [Apply].
11. Fate clic su [OK], e chiudete la finestra.
191A_it.P65 12/15/2003, 5:28 PM92

93
Eng
lish
Fran
çais
Italia
noE
spañ
olE
nglis
h
Installazione delle informazioni di setup e del profilo ICC (Per Windows)
Per Windows Me
Installazione delle informazioni di setup delmonitor in Windows Me, e impostazione del profiloICC del monitor come valore predeterminato. Imessaggi di Windows, citati nelle istruzioni perl'uso che seguono, si basano sulla versioneinglese di Windows.In questa spiegazione si parte dall'ipotesi chel'unità per CD-ROM sia "D".
Se è apparsa la schermata "Add New HardwareWizard":1. Inserire il CD-ROM degli accessori nel lettore
CD-ROM del computer.2. Spuntate [Specify the location of the driver
[Advanced]] e fate clic su [Next].3. Spuntate [Display a list of all the drivers in a
specific location, so you can select the driveryou want.], quindi fate clic su [Next].
4. Quando viene visualizzato [Models], fate clicsu [Have disk], confermate che [Copymanufacturer's files from:] è [D:], e fate clic su[OK].
5. Selezionate i dettagli del monitor dalla lista,fate quindi clic su [Next], [Next], e [Finish]. Seappare "Add New Hardware Wizard", ripetete icomandi dell'installazione, cominciando da 2sopra.
Se la schermata "Add New Hardware Wizard" nonè apparsa:1. Inserire il CD-ROM degli accessori nel lettore
CD-ROM del computer.2. Fate clic sul pulsante [Start]. Da [Settings],
scegliete [Control Panel].3. Fate doppio clic su [Display].4. Fate clic su [Settings], [Advanced] e [Monitor].5. In [Options], spuntate [Automatically detect
Plug & Play monitors] e fate clic su [Change].6. Spuntate [Specify the location of the driver
[Advanced]] e fate clic su [Next].7. Spuntate [Display a list of all the drivers in a
specific location, so you can select the driveryou want.] e fate clic su [Next].
8. Quando viene visualizzato [Models], fate clicsu [Have disk], confermate che [Copymanufacturer's files from:] è [D:], e fate clic su[OK].
9. Selezionate i dettagli del monitor, quindi fateclic su, [Next], [Next], e [Finish].
10. Controllate che i dettagli del monitorsianovisualizzati, fate quindi clic su [Apply].
11. Fate clic su [OK], e chiudete la finestra.
Per Windows 2000
Installazione delle informazioni di setup delmonitor in Windows 2000, e impostazione delprofilo ICC del monitor come valorepredeterminato. I messaggi di Windows, citatinelle istruzioni per l'uso che seguono, si basanosulla versione inglese di Windows.In questa spiegazione si parte dall'ipotesi chel'unità per CD-ROM sia "D".
1. Inserire il CD-ROM degli accessori nel lettoreCD-ROM del computer.
2. Fate clic sul pulsante [Start]. Da [Settings],scegliete [Control Panel].
3. Fate doppio clic su [Display].4. Fate clic su [Settings], [Advanced] e [Monitor].5. Fate clic su [Properties], [Driver] e [Update
Driver].6. Quando appare [Upgrade Device Driver
Wizard], fate clic su [Next].7. Spuntate [Display a list of the known drivers for
this device so that I can choose a specificdriver] e fate clic su [Next].
8. Quando viene visualizzato [Models], fate clicsu [Have disk], confermate che [Copymanufacturer's files from:] è [D:], e fate clic su[OK].
9. Selezionate il monitor dall'elenco visualizzatoe fate clic su [Next].
10. Fate clic su [Next], verificate che il nome delmonitor appaia sullo schermo, e fate clic su[Finish]. Se appare [The Digital Signature NotFound], fate clic su [Yes].
11. Fate clic su [Close].12. Fate clic su [OK], e chiudete la finestra.
191A_it.P65 12/15/2003, 5:28 PM93

94
Installazione delle informazioni di setup e del profilo ICC (Per Windows)
Installazione del profilo ICCInstallazione del profilo ICC del monitor. (Se leinformazioni di setup sono già installate, lo èanche il profilo e non occorre installarlo.)I messaggi di Windows, citati nelle istruzioni perl'uso che seguono, si basano sulla versioneinglese di Windows.In questa spiegazione si parte dall'ipotesi chel'unità per CD-ROM sia "D".
1. Inserire il CD-ROM degli accessori nel lettoreCD-ROM del computer.
2. Fate clic sul pulsante [Start]. Da [Settings],scegliete [Control Panel].
3. Fate doppio clic su [Display].4. Fate clic su [Settings] e [Advanced].5. Fate clic su [General] e da [Compatibility]
selezionate [Apply the new display settingwithout restarting], quindi fate clic su [ColorManagement].
6. Fate clic su [Add], e selezionate CD-ROM comelocalizzazione del file.
7. Selezionate il profilo cromatico che voleteinstallare e fate clic su [Add].
8. Selezionate il profilo e fate clic su [Set AsDefault].
9. Fate clic su [OK], e chiudete la finestra.
- In caso di uso del profilo ICC, procedere allapredisposizione come segue:- Modalità [DISPLAY MODE]: [STD] o [OFFICE]- Modalità [WHITE BALANCE]: [STD]- Modalità [GAMMA]: [0]
Per Windows XP
Installazione delle informazioni di setup delmonitor in Windows XP, e impostazione del profileICC del monitor come valore predeterminato. Imessaggi di Windows, citati nelle istruzioni perl'uso che seguono, si basano sulla versioneinglese di Windows.In questa spiegazione si parte dall'ipotesi chel'unità per CD-ROM sia "D".
1. Inserire il CD-ROM degli accessori nel lettoreCD-ROM del computer.
2. Fate clic sul pulsante [Start]. Scegliete [ControlPanel].
3. Cambia in "Classic View".4. Fate doppio clic su [Display].5. Fate clic su [Settings], [Advanced] e [Monitor].6. Fate clic su [Properties], [Driver] e [Update
Driver].7. Quando appare [Hardware Update Wizard],
spuntate [Install from a list or specific location[Advanced]], fate clic su [Next].
8. Spuntate [Don't search. I will choose the driverto install.] e fate clic su [Next].
9. Fate clic su [Have disk], confermate che [Copymanufacturer's files from:] è [D:], e fate clic su[OK].
10. Selezionate il monitor dall'elenco visualizzatoe fate clic su [Next].Se appare [has not passed Windows Logotesting...], fate clic su [Continue Anyway].
11. Verificate che il nome del monitor appaia sulloschermo, e fate clic su [Finish].
12. Fate clic su [Close].13. Fate clic su [OK], e chiudete la finestra.
191A_it.P65 12/15/2003, 5:28 PM94

95
Eng
lish
Fran
çais
Italia
noE
spañ
olE
nglis
h
Informazioni sul profilo ColorSync (Per MacOS)
Il profilo ColorSyncColorSync è il sistema di gestione dei colori dellaApple Computer e consente di realizzare lariproduzione dei colori, quando lo si usa conun'applicazione compatibile. Un profilo ColorSyncdescrive le caratteristiche cromatiche del monitorLCD.
Note:- Il profilo ColorSync di questo monitor funziona
con MacOS 8.5 o superiore.- In caso di uso del profilo ColorSync, procedere
alla predisposizione come segue:- Modalità [DISPLAY MODE]: [STD] o [OFFICE]- Modalità [WHITE BALANCE]: [STD]- Modalità [GAMMA]: [0]
Impostazione del profilo ColorSync
Note:- Il computer deve contenere installati uno dei
due programmi PC Exchange o File Exchange.- A seconda del tipo di computer oppure del
sistema operativo, i nomi dei comandi ed imetodi possono essere differenti. Per favoreseguite il manuale d'uso proprio del computer,mentre leggete questo.
1. Inserire il CD-ROM degli accessori nel lettoreCD-ROM del computer.
2.Copiare il profilo da usare dal CD-ROM allacartella di profili ColorSync nella cartellasistema.
3.Utilizzando il ColorSync sul pannello dicontrollo, selezionate il profilo da usare.
191A_it.P65 12/15/2003, 5:28 PM95

96
5. Attaccate il braccio al monitor con le quattro viti.
Nota:- Le viti usate per attaccare il braccio dovrebbero
essere viti M4 con una lunghezza di 6 - 8 mmsporgenti dalla superficie da collegare. Usandoqualsiasi altro tipo di viti può dare luogo allacaduta del monitor oppure a danni alla parteinterna del monitor.
Il supporto o braccio seguente può essere fissatoal monitor.- Supporto (venduto separatamente)
Nome del modello: NL-S02-H (Avorio)NL-S02-B (Nero)
- Braccio compatibile VESA (da acquistare incommercio)
Bracci compatibili da acquistare in commercioI collegamenti devono soddisfare le seguenti condizioni.- Compatibilità con lo standard VESA.- Presentare un intervallo di almeno 100 mm x 100
mm tra i fori delle viti sulla sezione da collegare.- Avere una struttura che renda improbabile una caduta
oppure una rottura dopo il collegamento al monitor.
Come collegare il braccio oppure il supporto- Fate attenzione a non piegare eccessivamente il
cavo oppure nell'aggiungere dei cavi diprolunga, in quanto ciò potrebbe dare luogo adisturbi al funzionamento.
- Nel seguire queste istruzioni, per favore fateriferimento anche alle istruzioni perl'installazione nel manuale d'uso accluso albraccio oppure al supporto.
ATTENZIONE!
- Fare attenzione non mettere le vostre diteintrappolate fra il display ed il supporto nélasciare il supporto cadere. Si rischia di ferirsi.
1.Rimuovere i cavi.2.Stendete un panno morbido su una superficie
orizzontale adatta.3.Facendo attenzione a non danneggiare il monitor,
appoggiate il monitor sul lato del suo display.4.Rimuovete le quattro viti e rimuovete quindi il
supporto dal monitor.
Note:- Il supporto è progettato appositamente per questo
monitor, non usatelo per altri apparecchi e scopi.- Vi si raccomanda di conservare le quattro viti,
che sono state tolte, insieme al supporto, che èstato rimosso, in modo da poterlo usare dinuovo, fissando con le quattro viti corrette.Usando altre viti si può danneggiare il monitorinternamente.
Istruzioni per collegare un braccio compatibile VESA
Viti usate per attaccare ilbraccio
Braccio
Parte del monitor alla quale ilbraccio è collegato
06_191A_it.P65 12/19/2003, 2:30 PM96

97
Eng
lish
Fran
çais
Italia
noE
spañ
olE
nglis
h
Índice
Sugerencias y precauciones de seguridad . . . . . . . . . . . . . . . . . . . . . . . . . . . . . . . . . . . . . . . . . . . . . . . 98Descripción del producto . . . . . . . . . . . . . . . . . . . . . . . . . . . . . . . . . . . . . . . . . . . . . . . . . . . . . . . . . . . . . . 99Ajuste de ángulo . . . . . . . . . . . . . . . . . . . . . . . . . . . . . . . . . . . . . . . . . . . . . . . . . . . . . . . . . . . . . . . . . . . 100Conexión del monitor y encendido/apagado del mismo . . . . . . . . . . . . . . . . . . . . . . . . . . . . . . . . . . . . 101
Conexión del monitor a un ordenador . . . . . . . . . . . . . . . . . . . . . . . . . . . . . . . . . . . . . . . . . . . . . . . 101Conexión de auriculares (de venta en el comercio) . . . . . . . . . . . . . . . . . . . . . . . . . . . . . . . . . . . . 102Conexión del monitor a una toma de corriente. . . . . . . . . . . . . . . . . . . . . . . . . . . . . . . . . . . . . . . . . 102Encendido . . . . . . . . . . . . . . . . . . . . . . . . . . . . . . . . . . . . . . . . . . . . . . . . . . . . . . . . . . . . . . . . . . . . . 102Apagado . . . . . . . . . . . . . . . . . . . . . . . . . . . . . . . . . . . . . . . . . . . . . . . . . . . . . . . . . . . . . . . . . . . . . . . 103
Ajuste de la pantalla y volumen del altavoz . . . . . . . . . . . . . . . . . . . . . . . . . . . . . . . . . . . . . . . . . . . . . . 104Regulación de la retroiluminación . . . . . . . . . . . . . . . . . . . . . . . . . . . . . . . . . . . . . . . . . . . . . . . . . . 104Ajuste del volumen del altavoz . . . . . . . . . . . . . . . . . . . . . . . . . . . . . . . . . . . . . . . . . . . . . . . . . . . . . 105Configuración del modo de pantalla . . . . . . . . . . . . . . . . . . . . . . . . . . . . . . . . . . . . . . . . . . . . . . . . . 105Comprobación de la información del producto. . . . . . . . . . . . . . . . . . . . . . . . . . . . . . . . . . . . . . . . . 105
Ajuste de la pantalla . . . . . . . . . . . . . . . . . . . . . . . . . . . . . . . . . . . . . . . . . . . . . . . . . . . . . . . . . . . . . . . . 106Ajuste de pantalla automático . . . . . . . . . . . . . . . . . . . . . . . . . . . . . . . . . . . . . . . . . . . . . . . . . . . . . . 106Ajuste de pantalla manual . . . . . . . . . . . . . . . . . . . . . . . . . . . . . . . . . . . . . . . . . . . . . . . . . . . . . . . . . 107
Conservación del monitor . . . . . . . . . . . . . . . . . . . . . . . . . . . . . . . . . . . . . . . . . . . . . . . . . . . . . . . . . . . . 110Conservación del monitor . . . . . . . . . . . . . . . . . . . . . . . . . . . . . . . . . . . . . . . . . . . . . . . . . . . . . . . . . 110Almacenamiento. . . . . . . . . . . . . . . . . . . . . . . . . . . . . . . . . . . . . . . . . . . . . . . . . . . . . . . . . . . . . . . . . 110Solución de problemas . . . . . . . . . . . . . . . . . . . . . . . . . . . . . . . . . . . . . . . . . . . . . . . . . . . . . . . . . . . 110Información para clientes acerca del desecho de este producto SHARP de forma de proteger el medio ambiente . . . . 111
Especificaciones . . . . . . . . . . . . . . . . . . . . . . . . . . . . . . . . . . . . . . . . . . . . . . . . . . . . . . . . . . . . . . . . . . . 112Instalación de la información de configuración y del perfil ICC (Para Windows) . . . . . . . . . . . . . . . . . 114Información acerca del perfil ColorSync (Para MacOS) . . . . . . . . . . . . . . . . . . . . . . . . . . . . . . . . . . . . 117Instrucciones para acoplar un brazo de compatibilidad VESA . . . . . . . . . . . . . . . . . . . . . . . . . . . . . . . 118
191A_es.P65 12/15/2003, 5:29 PM97

98
Sugerencias y precauciones de seguridad
- El panel LCD en color TFT utilizado en estemonitor ha sido fabricado aplicando unatecnología de alta precisión. Sin embargo, haymuchos puntos minúsculos en la pantalla en losque los píxeles nunca se encienden o semantienen encendidos permanentemente.Además, si la pantalla se mira desde un ánguloagudo, pueden verse incluso colores o brilloirregulares. Tenga en cuenta que esto no esningún fallo del funcionamiento, sino que es unfenómeno común de los LCDs y no afectará paranada al rendimiento del monitor.
- No deje el monitor funcionando en imagen fijadurante prolongados intervalos de tiempo, yaque ello puede provocar que permanezcanimágenes sombra.
- Si la luminosidad se ajusta al nivel mínimo,puede resultar difícil ver el contenido de lapantalla.
- La calidad de la señal transmitida por elordenador puede afectar la calidad de lapantalla. Le recomendamos que utilice unordenador capaz de transmitir señales de vídeode alta calidad.
- No frote ni golpee jamás el monitor con objetosduros.
- Sharp Corporation no asume responsabilidadalguna por las faltas cometidas durante el usopor parte del usuario o de terceros, ni porcualquier otra anomalía o daños a este productoque pudieran resultar durante su utilización,excepto en los casos en los que la obligación deindemnizar esté legalmente reconocida.
- El presente monitor y sus accesorios puedenactualizarse sin previo aviso.
Ubicación- No coloque el monitor en lugares mal ventilados,
polvorientos o con un alto grado de humedad odonde el monitor pueda entrar en contacto conaceite o vapor, ya que ello podría provocar unincendio.
- Asegúrese de que el monitor no entre encontacto con agua u otros líquidos. Asegúrese deque no penetren en el monitor objetos tales comoclips o alfileres ya que ello podría provocar unincendio o una descarga eléctrica.
- No coloque el monitor sobre objetos inestables oen lugares inseguros. No permita que el monitorquede sometido a intensas sacudidas ovibraciones. La caída o vuelco del monitor puedeprovocar la avería del mismo.
- No coloque el monitor en lugares en los quequede expuesto directamente a los rayossolares, ni cerca de equipos de calefacción ocualquier otro lugar donde se puedan alcanzaraltas temperaturas, ya que ello puede llevar a uncalentamiento excesivo y provocar un incendio.
El cable de alimentación- No deteriore el cable de alimentación ni coloque
objetos pesados sobre el mismo ni lo estire odoble excesivamente. No utilice tampoco cablesde prolongación. Si el cable de alimentación sedaña, puede provocar un incendio o una descargaeléctrica.
- Utilice solamente el cable de alimentaciónsuministrado con el monitor.
- Enchufe la clavija de alimentación directamenteen la toma de corriente alterna. El uso de un cablede prolongación puede provocar un incendiocomo resultado de un calentamiento excesivo.
- No quite ni introduzca la clavija de alimentacióncon las manos húmedas. Esto podría ocasionaruna descarga eléctrica.
Lista de comprobación del monitor y susaccesorios- Compruebe que el paquete incluye los
siguientes componentes:- Monitor LCD (1)- Cable de señal analógica (1)
(nombre del modelo: 0NIT15G4-0015)- Cable de audio (1)
(nombre del modelo: 0NIT17A3-U006)- Cable de alimentación(1)- CD-ROM (1)- Manual de uso (1)
Notas:- Utilice solamente los cables suministrados con el
monitor.- Guarde la caja de cartón por si necesita
transportar el monitor.- Sharp Corporation es titular de los derechos de
autor del programa del Disquete de utilidades.No lo reproduzca sin previa autorización.
- La forma de los accesorios suministrados puedeno coincidir totalmente con la mostrada en estemanual.
Contenido del manual- En este manual nos referimos a Microsoft
Windows XP como "Windows XP", a MicrosoftWindows Millennium como "Windows Me", aMicrosoft Windows 2000 como "Windows 2000",a Microsoft Windows 98 como "Windows 98", aMicrosoft Windows 95 como "Windows 95" y aMicrosoft Windows Versión 3.1 como "Windows3.1". Cuando no haya necesidad de hacerdistinción entre los diferentes programas, seutilizará el término "Windows".
- Microsoft y Windows son marcas registradas deMicrosoft Corporation.
- Macintosh es una marca registrada de AppleComputer, Inc.
- Todas las otras marcas comerciales son depropiedad de la compañía respectiva.
07_191A_es.P65 12/16/2003, 1:31 PM98

99
Eng
lish
Fran
çais
Italia
noE
spañ
olE
nglis
h
Descripción del producto
1. Botón AUTO ............................. Este botón se utiliza para hacer un ajuste automático de la pantalla(CLOCK, PHASE, H-POS y V-POS). (p.106)
2. Botón MENU ............................ Este botón se utiliza para ampliar, seleccionar y cerrar el menú OSD(On Screen Display).
3. Botón / MODE...................... Cuando el menú OSD se vea en la pantalla:Este botón se utiliza para seleccionar opciones de menú.
Cuando el menú OSD no se vea en la pantalla:Este botón se utiliza para seleccionar DISPLAY MODE.
4. Botones ............................ Cuando el menú OSD se vea en la pantalla:Estos botones se utilizan para seleccionar una opción o ajustar elvalor la opción seleccionada.
Cuando el menú OSD no se vea en la pantalla:Estos botones se utilizan para regular la luminosidad de laretroiluminación y el volumen de los altavoces.
5. Altavoces ................................. Puede escuchar el audio que entra a través del dispositivo externoconectado al monitor.
6. Borne de auriculares ............... Aquí se pueden conectar unos auriculares (de venta en el comercio).7. Botón de encendido/apagado .. Si pulsa este botón se enciende el monitor.
Pulse de nuevo el botón para apagar el monitor.8. LED indicador de conexión .... Este indicador LED se ilumina de color verde cuando el monitor se
encuentra en uso y naranja cuando se encuentra en el modo deahorro de energía.
9. Interruptor primario10. Borne de alimentación11. Borne de entrada RGB analógica ....... El cable de señal analógica suministrado se conecta aquí. Debe
usarse el cable de señal analógica incluido.12. Borne de audio ........................ Aquí se puede conectar un borne de salida de audio de un
ordenador. Debe usarse el cable de audio incluido.13. Anclaje de seguridad .............. Si conecta un cierre de seguridad (de venta en el comercio) al anclaje
de seguridad, el monitor queda enclavado de forma que es imposibletransportarlo.El orificio de seguridad antirrobo actúa junto con los sistemas deseguridad Kensington Micro Saver.
14. Orificios de ventilación ............ No bloquee jamás los orificios de ventilación, ya que ello puedellevar a un calentamiento excesivo del interior del monitor y hacerque funcione de manera anómala.
191A_es.P65 12/15/2003, 5:29 PM99

100
¡PRECAUCIÓN!
- Asegúrese de sostener ambos lados del monitoral ajustar el ángulo de visión. El panel LCD quese utiliza en este monitor es de vidrio. Sipresiona el panel LCD con las manos podríadañarlo.
Ajuste de ángulo
aprox. 25°
aprox. 5°
191A_es.P65 12/15/2003, 5:29 PM100
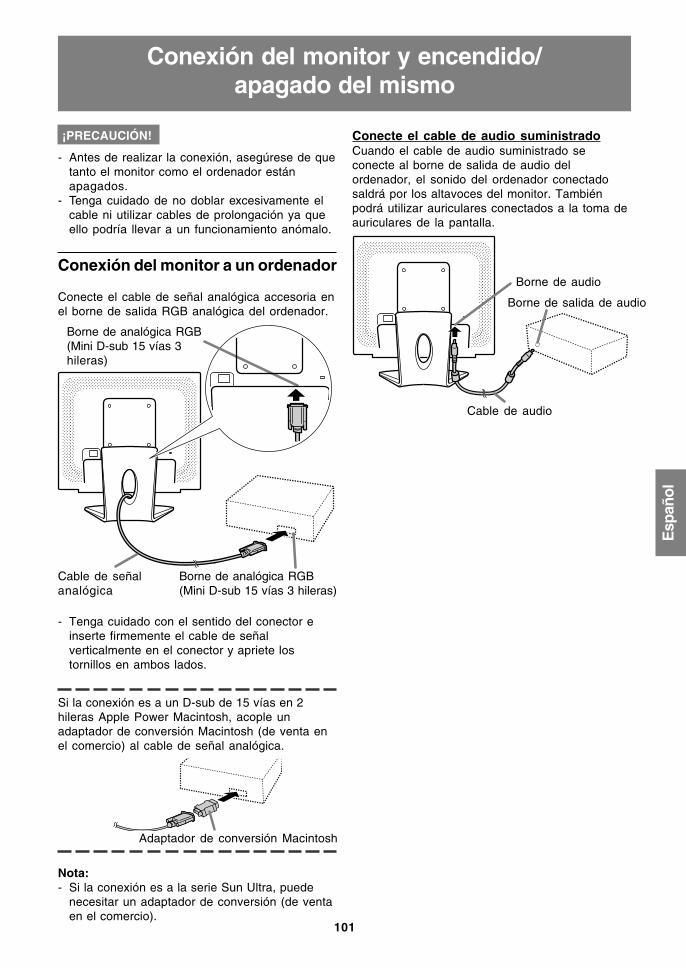
101
Eng
lish
Fran
çais
Italia
noE
spañ
olE
nglis
h
¡PRECAUCIÓN!
- Antes de realizar la conexión, asegúrese de quetanto el monitor como el ordenador estánapagados.
- Tenga cuidado de no doblar excesivamente elcable ni utilizar cables de prolongación ya queello podría llevar a un funcionamiento anómalo.
Conexión del monitor a un ordenador
Conecte el cable de señal analógica accesoria enel borne de salida RGB analógica del ordenador.
- Tenga cuidado con el sentido del conector einserte firmemente el cable de señalverticalmente en el conector y apriete lostornillos en ambos lados.
Si la conexión es a un D-sub de 15 vías en 2hileras Apple Power Macintosh, acople unadaptador de conversión Macintosh (de venta enel comercio) al cable de señal analógica.
Nota:- Si la conexión es a la serie Sun Ultra, puede
necesitar un adaptador de conversión (de ventaen el comercio).
Conexión del monitor y encendido/apagado del mismo
Cable de señalanalógica
Borne de analógica RGB(Mini D-sub 15 vías 3hileras)
Borne de analógica RGB(Mini D-sub 15 vías 3 hileras)
Adaptador de conversión Macintosh
Conecte el cable de audio suministradoCuando el cable de audio suministrado seconecte al borne de salida de audio delordenador, el sonido del ordenador conectadosaldrá por los altavoces del monitor. Tambiénpodrá utilizar auriculares conectados a la toma deauriculares de la pantalla.
Cable de audio
Borne de audio
Borne de salida de audio
191A_es.P65 12/15/2003, 5:29 PM101

102
Conexión de auriculares(de venta en el comercio)
Se pueden conectar auriculares (de venta en elcomercio).
Notas:- Cuando están conectados los auriculares, no se
oye ningún sonido por los altavoces del monitor.- Utilice los auriculares con un cable de menos
de 3 m de largo.
Conexión del monitor a una toma decorriente
Conexión del monitor y encendido/apagado del mismo
Auriculares
Borne de auriculares
Toma decorrientealterna
Cable de alimentación
Borne dealimentación
Encendido
1.Conmute el interruptor primario del monitor.
- Cuando conecte y desconecte la Interruptorprimario, espere siempre durante un intervalode 5 segundos. El cambio rápido puedecausar un fallo en el funcionamiento.
2.Pulse el botón de encendido/apagado delmonitor.
3.Encienda el ordenador.
Cuando se introduzca una señal procedente delordenador, el LED indicador de conexión seiluminará de color verde, y se visualizará lapantalla. (Después de conectar la alimentación,puede que la pantalla tarde en visualizarse unpoco de tiempo.)
Notas:- Al usar por primera vez el monitor, o tras haber
modificado cualquier configuración durante eluso, lleve a cabo un ajuste automático de lapantalla. (p.106)
- Según sea el tipo de ordenador o de sistemaoperativo, puede que sea necesario utilizar elordenador para llevar a cabo la instalación de lainformación de configuración del monitor.(p.114)
- Si la conexión es a un ordenador portátil y lapantalla del portátil está configurada de modoque funcione al mismo tiempo, puede que lapantalla de MS-DOS no se vea correctamente.En este caso, cambie la configuración de modoque sólo se vea el monitor.
ON
Encienda elordenador.
Pulse el botón deencendido/apagado.
Interruptor primario
191A_es.P65 12/15/2003, 5:29 PM102

103
Eng
lish
Fran
çais
Italia
noE
spañ
olE
nglis
h
Apagado
1. Apague el ordenador.2.Pulse el botón de encendido/apagado del
monitor.El LED indicador de conexión se apagará.
Si no se va a utilizar el monitor durante muchotiempo, desconecte la interruptor primario delmonitor y desenchufe la clavija de alimentaciónde la toma de corriente.
Conexión del monitor y encendido/apagado del mismo
OFF
Apague elordenador.
Pulse el botón deencendido/apagado.
191A_es.P65 12/15/2003, 5:29 PM103
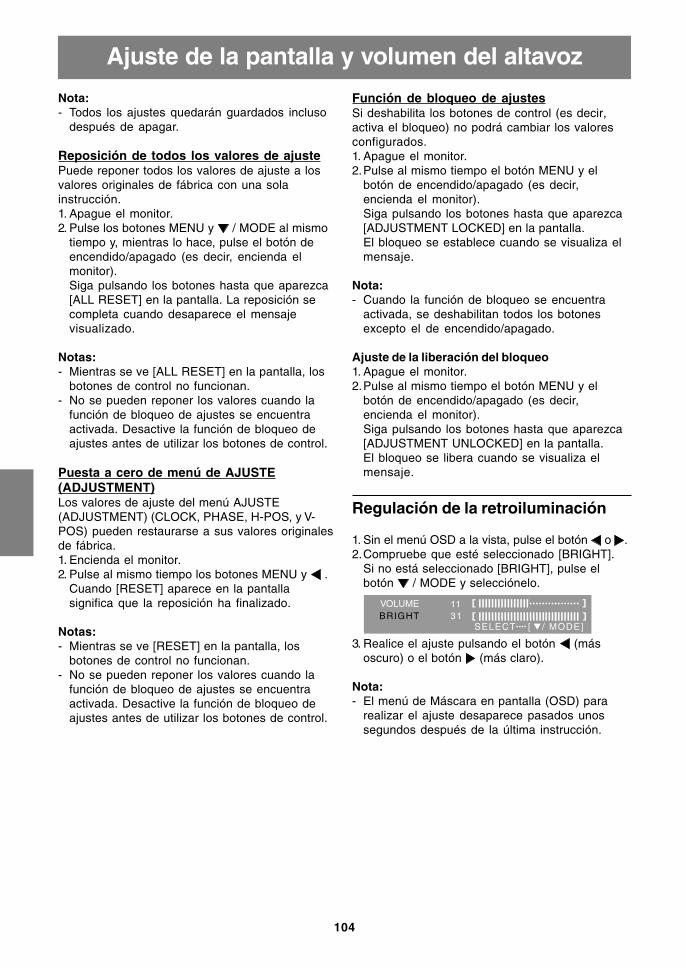
104
Ajuste de la pantalla y volumen del altavoz
Nota:- Todos los ajustes quedarán guardados incluso
después de apagar.
Reposición de todos los valores de ajustePuede reponer todos los valores de ajuste a losvalores originales de fábrica con una solainstrucción.1. Apague el monitor.2. Pulse los botones MENU y / MODE al mismo
tiempo y, mientras lo hace, pulse el botón deencendido/apagado (es decir, encienda elmonitor).Siga pulsando los botones hasta que aparezca[ALL RESET] en la pantalla. La reposición secompleta cuando desaparece el mensajevisualizado.
Notas:- Mientras se ve [ALL RESET] en la pantalla, los
botones de control no funcionan.- No se pueden reponer los valores cuando la
función de bloqueo de ajustes se encuentraactivada. Desactive la función de bloqueo deajustes antes de utilizar los botones de control.
Puesta a cero de menú de AJUSTE(ADJUSTMENT)Los valores de ajuste del menú AJUSTE(ADJUSTMENT) (CLOCK, PHASE, H-POS, y V-POS) pueden restaurarse a sus valores originalesde fábrica.1. Encienda el monitor.2. Pulse al mismo tiempo los botones MENU y .
Cuando [RESET] aparece en la pantallasignifica que la reposición ha finalizado.
Notas:- Mientras se ve [RESET] en la pantalla, los
botones de control no funcionan.- No se pueden reponer los valores cuando la
función de bloqueo de ajustes se encuentraactivada. Desactive la función de bloqueo deajustes antes de utilizar los botones de control.
Función de bloqueo de ajustesSi deshabilita los botones de control (es decir,activa el bloqueo) no podrá cambiar los valoresconfigurados.1. Apague el monitor.2.Pulse al mismo tiempo el botón MENU y el
botón de encendido/apagado (es decir,encienda el monitor).Siga pulsando los botones hasta que aparezca[ADJUSTMENT LOCKED] en la pantalla.El bloqueo se establece cuando se visualiza elmensaje.
Nota:- Cuando la función de bloqueo se encuentra
activada, se deshabilitan todos los botonesexcepto el de encendido/apagado.
Ajuste de la liberación del bloqueo1. Apague el monitor.2.Pulse al mismo tiempo el botón MENU y el
botón de encendido/apagado (es decir,encienda el monitor).Siga pulsando los botones hasta que aparezca[ADJUSTMENT UNLOCKED] en la pantalla.El bloqueo se libera cuando se visualiza elmensaje.
Regulación de la retroiluminación
1. Sin el menú OSD a la vista, pulse el botón o .2.Compruebe que esté seleccionado [BRIGHT].
Si no está seleccionado [BRIGHT], pulse elbotón / MODE y selecciónelo.
3. Realice el ajuste pulsando el botón (másoscuro) o el botón (más claro).
Nota:- El menú de Máscara en pantalla (OSD) para
realizar el ajuste desaparece pasados unossegundos después de la última instrucción.
191A_es.P65 12/15/2003, 5:29 PM104

105
Eng
lish
Fran
çais
Italia
noE
spañ
olE
nglis
h
Ajuste del volumen del altavoz
1. Sin el menú OSD a la vista, pulse el botón o .2.Compruebe que esté seleccionado [VOLUME].
Si no está seleccionado [VOLUME], pulse elbotón / MODE y selecciónelo.
3.Realice el ajuste pulsando el botón (disminución) o el botón (aumento).
Nota:- El menú de Máscara en pantalla (OSD) para
realizar el ajuste desaparece pasados unossegundos después de la última instrucción.
Configuración del modo de pantalla
La tonalidad cromática o brillo puede cambiarsecon un comando.
STDLa imagen se verá con la tonalidad resutltantede la combinación de colores original del panelde cristal líquido.
OFFICEBaja el brillo de la pantalla. (Este mode ahorraenergía.)
sRGBsRGB es la norma internacional derepresentación cromática especificada por laIEC (International Electrotechnical Commission(Comisión Electrotécnica Internacional)).La conversión cromática se hace teniendo encuenta las características del cristal líquido yrepresenta una tonalidad parecida a la de laimagen original.
VIVIDMuestra una imagen con colores dinámicos y vivos.
- Si el [DISPLAY MODE] está en [sRGB] o [VIVID],[WHITE BALANCE] está en [STD] y [GAMMA]está en [0].
Forma de ajustarPulse el botón / MODE cuando no estévisualizándose el menú OSD.Cada vez que pulse el botón, aparecerá elelemento siguiente del menú. (STD → OFFICE →sRGB → VIVID → STD)El menú de Máscara en pantalla (OSD) pararealizar el ajuste desaparece pasados unossegundos después de la última instrucción.
Ajuste de la pantalla y volumen del altavoz
Comprobación de la información delproducto
Se puede comprobar el nombre del modelo(MODEL), el número de serie (S/N) y tiempo deutilización (USAGE TIME) del monitor.1.Desconecte la alimentación.2.Mientras pulsa el botón / MODE, pulse el
botón de encendido/apagado del monitor (esdecir, conecte la alimentación).Aparecerá la información del producto.
3.Pulse el botón MENU.
Nota:- Tenga en cuenta que la indicación del tiempo de
utilización en el momento de la compra tal vezno sea 0 (cero) debido a las inspeccioneshechas en la fábrica y a otras actividadesrealizadas durante la fabricación.
191A_es.P65 12/15/2003, 5:29 PM105

106
Ajuste de la pantalla
Ajuste automático de la pantalla
Botón AUTO1.Pulse el botón AUTO.2.Vuelva a pulsar el botón AUTO.
Aparecerá [ADJUSTING] en la pantalla ydespués de unos segundos, desaparecerá[ADJUSTING].(Esto completa el ajuste automático.)
Botón MENU1.Pulse el botón MENU.
Aparecerá el menú ADJUSTMENT.
2.Pulse el botón .La pantalla se obscurecerá y aparecerá[ADJUSTING]. Tras unos segundos volverá averse el menú ADJUSTMENT. (El ajusteautomático ha finalizado.)
3.Pulse el botón MENU 5 veces para quedesaparezca el menú OSD de la pantalla.
Notas:- En la mayoría de los casos, el ajuste automático
es suficiente.- Puede que no sea posible lograr el ajuste correcto
con el primer ajuste automático. En tal caso, intenterepetir el ajuste automático 2 ó 3 veces.
- Se puede llevar a cabo un ajuste manual tras elajuste automático, si resultara necesario debidoa una de las siguientes circunstancias. (p.107)- Cuando sea necesario realizar un ajuste de
precisión.- Cuando se vea [OUT OF ADJUST] en la
pantalla. (Cuando en la pantalla se vea unaimagen totalmente oscura, el ajuste automáticode la pantalla puede estar deshabilitado. Alrealizar un ajuste automático, asegúrese deutilizar bien el Patrón de ajuste o bien intentarque aparezca una imagen que ponga toda lapantalla muy clara.)
- Cuando las señales de entrada de vídeo delordenador sean Composite Sync o Sync onGreen. (Los ajustes automáticos quizás nopuedan realizarse.)
- El ajuste automático puede que no se realicecorrectamente dependiendo de lo que sevisualiza en la pantalla: imágenes enmovimiento, indicación MS-DOS, etc.
Ajuste de pantalla automático(cuando se utiliza una señal analógica)
Las opciones del Menú ADJUSTMENT (RELOJ,FASE, H-POS, V-POS) se pueden ajustarautomáticamente.
Nota:- Al configurar por primera vez el monitor o tras
cambiar cualquier aspecto del sistema actual,lleve a cabo un ajuste de pantalla automáticoantes de su uso.
Máscara en pantalla para el ajusteEn primer lugar aparece una imagen que ponetoda la pantalla muy clara.Si está utilizando Windows, puede utilizar elPatrón de ajuste incluido en el CD-ROM.
Apertura del Patrón de ajuste (para Windows)Los mensajes de Windows mencionados acontinuación se refieren la versión inglesa.Esta explicación es para Windows 95/98/Me/2000/XP y en ella se da por supuesto que la unidad deCD-ROM es la "D".1. Introduzca el CD-ROM suministrado en la
unidad de CD-ROM del ordenador.2.Abra [My Computer] y seleccione CD-ROM. Si
está utilizando Windows 3.1, abra [FileManager] y seleccione unidad "D".
3.Haga doble clic en [Adj_uty.exe] para ejecutar elprograma de ajuste. En la pantalla aparecerá elPatrón de ajuste.
Patrón de ajuste
Una vez finalizados los ajustes, pulse la tecla[Esc] del ordenador para salir del programa deajuste.
Nota:- Si el modo de visualización del ordenador está
configurado en 65.000 colores, puede ver losdiferentes niveles de color de cada patróncromático o la escala de grises puede aparecercoloreada. (Esto se debe a la especificación dela señal de entrada y no se trata de unaanomalía.)
191A_es.P65 12/15/2003, 5:29 PM106

107
Eng
lish
Fran
çais
Italia
noE
spañ
olE
nglis
h
Menú ADJUSTMENT
AUTOCuando se selecciona [AUTO] con el botón , seajustan automáticamente las selecciones[CLOCK], [PHASE], [H-POS] y [V-POS].
CLOCKEn la figura siguiente se muestra cómo efectuar elajuste de forma que no se genere un parpadeovertical. (botones )
PHASEEn la figura siguiente se muestra cómo efectuar elajuste de forma que no se genere un parpadeohorizontal. (botones )Nota:- Los ajustes de [PHASE] deberían realizarse sólo
después de haber ajustado correctamente[CLOCK].
H-POS (posición horizontal) y V-POS (posiciónvertical)Para centrar el Patrón de ajuste dentro de los límitesde la pantalla, ajuste los valores a izquierda/derecha(H-POS) y arriba abajo (V-POS). (botones )
Ajuste de pantalla manual
1. En primer lugar aparece una imagen que ponetoda la pantalla muy clara. (p.106)
2. Haga que aparezca el menú OSD pulsando elbotón MENU.Menú ADJUSTMENT
MENUMenú GAIN CONTROL
MENUMenú COLOR CONTROL
MENUMenú MODE SELECT-1
MENUMenú MODE SELECT-2
MENUSe cierra el menú OSD.
Notas:- El menú OSD desaparece automáticamente unos
30 segundos después de la última instrucción.- En este capítulo se describe cómo ajustar la pantalla
utilizando el Patrón de ajuste (para Windows).
Ajuste de la pantalla
Parpadeo vertical
Parpadeo horizontal
Marco de la pantalla
Patrón deajuste
Seleccionela opciónpulsando elbotón
/ MODE.
Seleccionela opciónpulsando elbotón
/ MODE.
Seleccionela opciónpulsando elbotón
/ MODE.
Seleccionela opciónpulsando elbotón
/ MODE.
Seleccionela opciónpulsando elbotón
/ MODE.
191A_es.P65 12/15/2003, 5:29 PM107

108
Ajuste de la pantalla
Menú COLOR CONTROL
WHITE BALANCE1.Después de seleccionar [WHITE BALANCE],
pulse el botón .Aparecerá el menú WHITE BALANCE.
2.Utilice los botones para seleccionar[COOL], [·], [STD], [·], [WARM] o [USER].COOL ... Tonalidad más azul que la estándar • .......... Tonalidad ligeramente más azul que la
estándarSTD ...... Ajuste de tonalidad cromática
estándar • .......... Tonalidad ligeramente más roja que la
estándarWARM .. Tonalidad más roja que la estándarUSER
- Al seleccionar [USER] (usuario), aparecenlos valores programados para[R-CONTRAST], [G-CONTRAST] y[B-CONTRAST], para poder efectuar ajustesde precisión.
- Utilice el botón / MODE para seleccionar[R-CONTRAST], [G-CONTRAST] y[B-CONTRAST].
R-CONTRAST ..... botón para azul-verde botón para rojo
G-CONTRAST ..... botón para púrpura botón para verde
B-CONTRAST...... botón para amarillo botón para azul
3.Pulse el botón MENU.
Notas:- No todas las gradaciones pueden verse en
ajustes diferentes a [STD]. Ajuste a [STD] paraver todas las gradaciones.
- Si ajusta [DISPLAY MODE] a [sRGB] o [VIVID],no podrá seleccionar más que el ajuste [STD].
GAMMAAjuste para que las imágenes oscuras y brillantesse puedan ver fácilmente. Si la pantalla estáoscura y se ve con dificultad, aumente el valornumérico. Si está brillante y difícil de ver,disminuya el valor numérico. (botones )- Si [DISPLAY MODE] está en [sRGB] o [VIVID], no
puede seleccionar [GAMMA].
Menú GAIN CONTROL
AUTOCuando se selecciona [AUTO] con el botón , seajustan automáticamente las selecciones [BLACKLEVEL] y [CONTRAST]. Después del ajusteautomático, haga el ajuste manual cuando seanecesario.
BLACK LEVELLa luminosidad total de la pantalla puede ajustarsemientras se observa el patrón cromático.(botones )
CONTRASTMientras se observa el patrón cromático puedenrealizarse ajustes de modo que aparezcan todaslas gradaciones. (botones )
Notas:Acerca del AUTO (Función Control Automáticode Ganancia)- La función Control Automático de Ganancia
ajusta el contraste y el nivel de negro en base alcolor más claro y más ocuro de la imagenmostrada.
- Si no está utilizando el Patrón de ajuste,necesita ver un sector blanco de 5 x 5 mm en lapantalla. El ajuste no es posible sin este sector.
- Si la señal procedente del ordenador esComposite Sync o Sync on Green, no se podrárealizar un ajuste automático. En tal caso,realice un ajuste manual.
- Si se visualiza [OUT OF ADJUST], realice elajuste manual.
Patrón cromático
191A_es.P65 12/15/2003, 5:29 PM108

109
Eng
lish
Fran
çais
Italia
noE
spañ
olE
nglis
h
Menú MODE SELECT-1
Nota:- Según sea la resolución de la señal de entrada,
la pantalla puede no cambiar incluso si puedenseleccionarse las opciones del menú.
OSD H-POSITION (posición horizontal OSD)La posición del menú OSD puede moverse haciala izquierda y hacia la derecha. (botones )
OSD V-POSITION (posición vertical OSD)La posición del menú OSD puede moverse haciaarriba y abajo. (botones )
SCALING (nivel de graduación)La nitidez de la imagen puede regularse.(botones )Nota:- Cuando el modo de pantalla se ajusta de modo
que sea inferior a 1280 x 1024 píxels, la imagenaumenta ocupando toda la pantalla (es decir, larelación lateral de la pantalla puede cambiar).
400LINES (grado de resolución)Puede programar la resolución horizontal de unapantalla de 400 líneas si utiliza US text, etc.(botones )
640: 640 x 400 dot mode720: 720 x 400 dot mode (US text etc.)
Nota:- Puesto que la entrada de resolución diferente a
la de 400 líneas se realiza automáticamente, nohay necesidad de programarla.
LANGUAGEPuede seleccionar el idioma del menú OSD.1.Pulse el botón .
En la pantalla aparecerá el Menú de seleccióndel idioma.
2.Utilice el botón / MODE para seleccionar unidioma.
3.Pulse el botón MENU.
Ajuste de la pantalla
Menú MODE SELECT-2
INFORMATION (INFORMACIÓN)Se puede comprobar el nombre de modelo(MODEL), el número de serie (S/N) y tiempo deutilización (USAGE TIME) del monitor.1.Después de seleccionar [INFORMATION], pulse
el botón .Aparecerá la información del producto.
2.Pulse el botón MENU.
OFF TIMER (TEMPORIZADOR DE APAGADO)La alimentación se desconecta automáticamentecuando pasa el tiempo establecido.1.Después de seleccionar [OFF TIMER], pulse el
botón .2. Ponga [ON]/[OFF] pulsando los botones .
Si se selecciona [ON], pulse el botón / MODEy ponga el tiempo de apagado pulsando losbotones . (Se puede poner un tiempo deentre 1 y 23 horas en intervalos de 1 hora.)
3.Pulse el botón MENU.- Cuando se seleccione [ON], el tiempo restante
se visualizará en la esquina superior derechade la pantalla durante los últimos 5 minutosantes de desconectarse la alimentación. (Eltiempo restante se visualiza durante 5 segundosaproximadamente cada minuto.)
- Si se pulsa el botón de encendido/apagadodespués de la primera indicación del tiemporemanente pero antes de que se desactive, seajustará el OFF TIMER a una hora.Para desconectar la alimentaciónposteriormente, pulse de nuevo el botón deencendido/apagado. (Cuando conecte de nuevola alimentación, ésta se desconectará otra vezautomáticamente al transcurrir el tiempoestablecido.)
- Si se enciende el monitor cuando [OFF TIMER]está en [ON], la hora establecida aparecerá enla pantalla durante varios segundos. (Si no hayseñal de entrada, se visualizará [NO SIGNAL].)
191A_es.P65 12/15/2003, 5:29 PM109

110
Conservación del monitor
Los tubos fluorescentes del monitor tienen unavida útil limitada.- Si la pantalla se oscurece, parpadea
persistentemente o no se enciende, el tubofluorescente ha llegado al fin de su vida útil.Consulte a su proveedor o al servicio autorizadode asistencia técnica de Sharp más cercano.
- Debido a las características de los tubosfluorescentes, la pantalla puede reverberardurante el período inicial de uso. (No se tratade una anomalía.) Si esto ocurriera, intente enprimer lugar solucionar el problema apagandoy encendiendo el monitor de nuevo.
Si no se ve ninguna imagen en el monitor (elLED indicador de conexión no se enciende).- ¿Está correctamente conectado el cable de
alimentación? (p.102)
Si no se ve ninguna imagen en el monitor (elLED indicador de conexión está encendido).- ¿Está el ordenador conectado correctamente?
(p.101)- ¿Está el ordenador encendido?- ¿Se corresponde la sincronización de la señal
del ordenador con las especificaciones delmonitor? (p.113)
- ¿Se encuentra el ordenador en el modo deahorro de energía?
Los botones de control no funcionan.- ¿Está activado el bloqueo de ajustes? (p.104)
La imagen aparece distorsionada.- ¿Se corresponde la sincronización de la señal
del ordenador con las especificaciones delmonitor? (p.113)
- Haga un ajuste automático de la pantalla.(p.106)
- Si puede cambiar la frecuencia de regeneraciónen el ordenador que está utilizando, cambie elvalor a una frecuencia más baja. (p.113)
No sale ningún sonido de los altavoces.- ¿Está conectado correctamente el cable de
audio? (p.101)- Lleve a cabo el procedimiento de ajuste del
volumen. (p.105)- ¿Están conectados los auriculares?- No hay sonido de los altavoces cuando el monitor
está en el modo de ahorro de energía (el LEDindicador de conexión se enciende en naranja).
Conservación del monitor
Desenchufe siempre la clavija de la toma decorriente alterna antes de limpiar el monitor.
Caja y sector del panel de controlUtilice un paño suave y seco para limpiar, sinapretar demasiado, la caja y el panel de control.Si estuvieran muy sucios, eche un poco dedetergente neutro en un paño suave previamentehumedecido, escúrralo bien y proceda a lalimpieza.
Sector del panel LCDUtilice un paño suave y seco para limpiar, sinapretar demasiado, la suciedad y el polvo de lasuperficie del panel LCD. (Es adecuado un pañotal como gasa o los utilizados para limpiar gafas.)
¡PRECAUCIÓN!
- No utilice jamás disolventes, gasolina, alcohol,limpiacristales, etc., ya que podrían decolorarloo deformarlo.
- No rasque jamás el monitor con objetos duros niaplique una presión fuerte sobre el mismo, yaque ello podría dejar señales o resultar en unfuncionamiento anómalo.
Almacenamiento
Si no va a utilizar el monitor durante un largoperíodo de tiempo, asegúrese de desenchufar laclavija de alimentación de la toma de corrientealterna.
¡PRECAUCIÓN!
- No deje el monitor en contacto con objetos decaucho o plástico durante períodosprolongados, ya que esto podría decolorarlo odeformarlo.
Solución de problemas
Si cree que el monitor pudiera estar averiado,compruebe los puntos siguientes antes de llevarloa reparar.Si después de ello sigue sin funcionar, póngaseen contacto con su proveedor o con el servicioautorizado de asistencia técnica de Sharp máscercano.
191A_es.P65 12/15/2003, 5:29 PM110

111
Eng
lish
Fran
çais
Italia
noE
spañ
olE
nglis
h
Conservación del monitor
Información para clientes acerca deldesecho de este producto SHARP deforma de proteger el medio ambiente
Si no puede seguir utilizando este producto, debeentregarse y desecharse de forma legalmentecorrecta para proteger el medio ambiente.
¡NO SE DESHAGA DE ESTE PRODUCTO CONLA BASURA DEL HOGAR O MEZCLADO CONOTROS RESIDUOS! ¡PUEDE DAÑAR EL MEDIOAMBIENTE!
Sharp Corporation está comprometida a protegerel medio ambiente y a la conservación de energía.Nuestra meta es reducir el impacto sobre el medioambiente de nuestos productos, ejecutando ymejorando continuamente las tecnologías diseñode productos y la información a los clientes parala conservación del medio ambiente.
(1) Para nuestros clientes de Bélgica, Holanda,Suecia y SuizaSHARP forma parte de los respectivossistemas de reciclado nacional de equiposelectrónicos, poniendo en práctica las leyes demedio ambiente de estos países. Acontinuación se dan detalles sobre losrespectivos países.
País Información de reciclado para ese país
Suecia Utilice el sistema de reciclado deelectrónicos sueco llamado"ELRETUR", y visite el sitio deInternet enhttp://www.el-kretsen.se
Holanda Utilice el sistema de reciclado deelectrónicos holandés "ICT-Milieu", yvisite el sitio de Internet enhttp://www.nederlandict.nl/index.php
Bélgica Utilice el sistema de reciclado deelectrónicos belga "Recupel", y visiteel sitio de Internet enhttp://www.recupel.be
Suiza Utilice el sistema de reciclado deelectrónicos suizo "SWICO", y visite elsitio de Internet enhttp://www.swico.ch
(2) Para nuestros clientes en el Reino Unido,Alemania, Francia e ItaliaLlame al gobierno local acerca de larecolección e instalaciones de recicladoollame a una empresa de servicio de recicladoque tenga licencia para el reciclado deequipos electrónicosSHARP recomienda los servicios de recicladode MIREC, la información general acerca deMIREC puede obtenerse enhttp://www.mirec.com/.El pago de los servicios de MIREC está acargo del último propietario del equipoelectrónico a reciclar.
(3) Fara nuestros clientes en los EE.UU.Este producto utiliza la soldadura en plomo yuna lámpara fluorescente con una pequeñacantidad de mercurio. El desecho de estosmateriales puede estar sujeto areglamentación para proteger el medioambiente. Para información sobre larecolección y reciclado, llame al gobierno localo a la Alianza de Industrias Electrónicas:http://www.eiae.org
(4) Para nuestros clientes en JapónLlame al teléfono gratuito 0120-845-530 parainformación sobre el reciclado.
191A_es.P65 12/15/2003, 5:29 PM111

112
Dimensiones (Unidades: mm)
- Cable de señal analógica: aprox. 1,8 m- Cable de audio: aprox. 1,8 m
Nota:- Como parte de la política de mejoras continuas,
SHARP se reserva el derecho de realizarcambios en el diseño y especificaciones para lamejora del producto sin previo aviso. Las figurasindicadas que especifican el rendimiento sonvalores nominales de los aparatos deproducción. Puede haber algunas desviacionesde estos valores en los aparatos individuales.
Especificaciones
Especificaciones del productoNombre del modelo
LL-191A-W (Blanco)/LL-191A-B (Negro)Display LCD
48 cm medidos en diagonal Módulo TFT LCDResolución (máx.)
SXGA 1280 x 1024 pixelsColores reproducibles (máx.)
Aprox. 16,19 millones de colores (6 bit + FRC)Luminosidad (máx.)
220 cd/m2
Retícula0,294 (H) x 0,294 (V) mm
Relación de contraste500:1
Ángulo de visibilidadIzquierda-derecha 160°; arriba-abajo 160°(relación de contraste > 5)
Tamaño de pantallaHorizontal 376,3 mm x Vertical 301,1mm
Señal vídeoAnalógica RGB (0,7 Vp-p) [75Ω]
Señales de sincronizaciónSeparate Sync (nivel TTL: +/-), Sync onGreen, Composite Sync (nivel TTL: +/-)
Compensación de la ampliaciónGraduación digital (Amplía VGA/SVGA/XGA, etc.a tamaño de pantalla completo. )
Plug & PlayVESA: DDC2B compatible
Gestión de energíaVESA: basada en DPMS
Salida de altavoces1 W + 1 W
Borne de señales de entradaMini D-sub de 15 vías (3 hileras)
Borne de audio de entradaClavija estéreo mini
Borne de auricularesClavija estéreo mini
Inclinación de pantallaHacia arriba aprox. 0 - 25°Hacia abajo aprox. 0 - 5°
Suministro eléctricoCA100 - 240 V, 50/60 Hz
Temperatura ambiental5 - 35°C
Consumo eléctrico33 W (Sin entrada de audio)(36 W máximo, 1,8 W en el modo de ahorro deenergía)
Dimensiones (An. x F x Al.)Aprox. 419 mm x 213 mm x 409 mm
PesoAprox. 7,8 kg (5,7 kg aprox. sin el pedestal)(Excluyendo los cables.)
07_191A_es.P65 12/22/2003, 9:45 AM112

113
Eng
lish
Fran
çais
Italia
noE
spañ
olE
nglis
h
Especificaciones
Sincronizaciones de las señalescorrespondientes
- La resolución recomendada es de 1280 x 1024.- Todos son compatibles únicamente con «non-
interlace».- Las frecuencias para las series Power
Macintosh y Sun Ultra son sólo valores dereferencia. Para establecer la conexión puedeque sea necesario otro adaptador (de venta enel comercio).
- Si el monitor recibe señales de sincronizaciónque no son compatibles, aparecerá [OUT OFTIMING]. Consulte el manual de instrucciones desu ordenador para ajustar la sincronización deforma compatible con el monitor.
- Si el monitor no recibe ninguna señal (synchsignal), aparecerá [NO SIGNAL].
VESA
US textSeriesPowerMacintosh
SeriesSun Ultra
Modo display Hsync Vsync Frecuencia
Gestión de energíaEl monitor está basado en la tecnología VESADPMS (Display Power Management Signaling).Para activar la función Power Management delmonitor, tanto la tarjeta de vídeo como el ordenadordeben cumplir el estándar VESA DPMS.
DDC (Plug & Play)Este monitor soporta el estándar VESA DDC(Display Data Channel).DDC es un estándar de señalización para laejecución de las funciones Plug & Play en elmonitor u ordenador. Transmite información talcomo el grado de resolución entre el monitor y elordenador. Puede utilizar esta función si suordenador tiene compatibilidad DDC y si estáconfigurado de modo que pueda detectar elmonitor Plug & Play.Existen numerosas variedades de DDC debido alas diferencias entre los sistemas. El presentemonitor opera con DDC2B.
Vías del conector de entrada RGB analógica(Conector Mini D-sub de 15 vías)
Nº Función
1 Señal de entrada vídeo rojo
2 Señal de entrada vídeo verde
3 Señal de entrada vídeo azul
4 GND
5 GND
6 GND para señal de vídeo rojo
7 GND para señal de vídeo verde
8 GND para señal de vídeo azul
9 +5V
10 GND
11 GND
12 Datos DDC
13 Para entrada de señal Hsync
14 Para entrada de señal Vsync
15 Reloj DDC
DPMS: Display Power Management Signalling(Sistema de administración de energía del monitor)
Modo DPMS Pantalla Consumo de H-sync V-synccorriente
ON Encendida Sí Sí
STANDBY No Sí
SUSPEND Apagada Sí No
OFF No No
36 W
1,8 W
191A_es.P65 12/15/2003, 5:29 PM113

114
Instalación de la información de configuración ydel perfil ICC (Para Windows)
Según sea el tipo de ordenador o de sistemaoperativo, puede que sea necesario utilizar elordenador para llevar a cabo la instalación de lainformación de configuración del monitor, etc. Siasí fuera, siga los pasos que se indican acontinuación para instalar la información deconfiguración del monitor. (Dependiendo del tipode ordenador o de sistema operativo, los nombresde los comandos y los procedimientos a seguirpodrían ser diferentes. Siga el manual de usopropio del ordenador mientras lee esto.)
Acerca del perfil ICCUn perfil ICC (Consorcio Internacional de Color)es un archivo en el que se describen lascaracterísticas de reproducción cromática delmonitor LCD. El uso de una aplicación compatiblecon un perfil ICC permite obtener unareproducción cromática muy precisa.- Tanto Windows 98/2000/Me/XP utilizan el perfil ICC.- Al instalar la información de configuración de
Windows 98/2000/Me/XP (descrita acontinuación), se instala también el perfil ICC. Siúnicamente desea instalar el perfil ICC consulteel apartado Instalación del perfil ICC en lapágina 116.
- Cuando se utilice el perfil ICC, ajuste de laforma siguiente:- [DISPLAY MODE]: [STD] o [OFFICE]- [WHITE BALANCE]: [STD]- [GAMMA]: [0]
Para Windows 95
Instalación de la información de configuración delmonitor en Windows 95. Los mensajes deWindows mencionados en la siguiente nota deservicio se basan en la versión inglesa.En la explicación se da por supuesto que launidad de CD-ROM es la "D".
1. Introduzca el CD-ROM suministrado en launidad de CD-ROM del ordenador.
2. Haga clic sobre el botón [Start]. En [Settings],seleccione [Control Panel].
3. Haga doble clic en [Display].4. Haga clic sobre [Settings], [Advanced
Properties], [Monitor] y por último sobre[Change].
5. Haga clic en [Have disk], confirme que [Copymanufacturer's files from:] es [D:] y acontinuación haga clic sobre [OK].
6. Confirme que los datos sobre el monitor estánseleccionados y haga clic sobre [OK].
7. Compruebe que el monitor está funcionando ya continuación haga clic en [Apply].
8. Haga clic sobre [OK] y cierre la ventana.
Para Windows 98
Instalación de la información de configuración delmonitor en Windows 98 y configuración del perfilICC del monitor como valor predeterminado.Los mensajes de Windows mencionados acontinuación se refieren a la versión inglesa.En la explicación se da por supuesto que launidad de CD-ROM es la "D".
Si ya ha aparecido el "Add New Hardware Wizard":1. Introduzca el CD-ROM suministrado en la
unidad de CD-ROM del ordenador.2. Haga clic sobre [Next].3. Coloque una tilde en [Display a list of all the
drivers in a specific location, so you can selectthe driver you want.] y a continuación haga clicsobre [Next].
4. Cuando aparezca [Models], haga clic en [Havedisk], confirme que [Copy manufacturer's filesfrom:] es [D:] y haga clic sobre [OK].
5. Confirme que los datos sobre el monitor estánseleccionados y a continuación haga clicsobre [Next], [Next] y [Finish]. Si aparece el"Add New Hardware Wizard", repita loscomandos de instalación empezando por elpaso 2 antes descrito.
Si el "Add New Hardware Wizard" no apareció:1. Introduzca el CD-ROM suministrado en la
unidad de CD-ROM del ordenador.2. Haga clic sobre el botón [Start]. En [Settings],
seleccione [Control Panel].3. Haga doble clic en [Display].4. Haga clic en [Settings], [Advanced] y [Monitor].5. En [Options], seleccione [Automatically detect
Plug & Play monitors] y haga clic sobre[Change].
6. Haga clic sobre [Next].7. Haga clic en [Display a list of all the drivers in a
specific location, so you can select the driveryou want.] y a continuación sobre [Next].
8. Cuando aparezca [Models], haga clic en [Havedisk], confirme que [Copy manufacturer's filesfrom:] es [D:] y haga clic sobre [OK].
9. Confirme que los datos sobre el monitor estánseleccionados y a continuación haga clicsobre [Next], [Next] y [Finish].
10. Compruebe que el monitor está funcionando ya continuación haga clic en [Apply].
11. Haga clic sobre [OK] y cierre la ventana.
191A_es.P65 12/15/2003, 5:29 PM114

115
Eng
lish
Fran
çais
Italia
noE
spañ
olE
nglis
h
Instalación de la información de configuración y del perfil ICC (Para Windows)
Para Windows Me
Instalación de la información de configuración delmonitor en Windows Me y configuración del perfilICC del monitor como valor predeterminado.Los mensajes de Windows mencionados acontinuación se refieren a la versión inglesa.En la explicación se da por supuesto que launidad de CD-ROM es la "D".
Si ya ha aparecido "Add New Hardware Wizard":1. Introduzca el CD-ROM suministrado en la
unidad de CD-ROM del ordenador.2. Coloque una tilde en [Specify the location of
the driver [Advanced]] y haga clic sobre [Next].3. Coloque una tilde en [Display a list of all the
drivers in a specific location, so you can selectthe driver you want.] y a continuación haga clicsobre [Next].
4. Cuando aparezca [Models], haga clic en [Havedisk], confirme que [Copy manufacturer's filesfrom:] es [D:] y haga clic sobre [OK].
5. Seleccione en la lista los datos del monitor y acontinuación haga clic sobre [Next], [Next] y[Finish]. Si aparece el "Add New HardwareWizard", repita los comandos de instalaciónempezando por el paso 2 antes descrito.
Si el "Add New Hardware Wizard" no apareció:1. Introduzca el CD-ROM suministrado en la
unidad de CD-ROM del ordenador.2. Haga clic sobre el botón [Start]. En [Settings],
seleccione [Control Panel].3. Haga doble clic en [Display].4. Haga clic en [Settings], [Advanced] y [Monitor].5. En [Options], seleccione [Automatically detect
Plug & Play monitors] y haga clic sobre[Change].
6. Coloque una tilde en [Specify the location ofthe driver [Advanced]] y haga clic sobre [Next].
7. Coloque una tilde en [Display a list of all thedrivers in a specific location, so you can selectthe driver you want.] y haga clic sobre [Next].
8. Cuando aparezca [Models], haga clic en [Havedisk], confirme que [Copy manufacturer's filesfrom:] es [D:] y haga clic sobre [OK].
9. Seleccione los datos del monitor y acontinuación haga clic sobre [Next], [Next] y[Finish].
10.Compruebe que los datos del monitoraparecen en la pantalla y a continuación hagaclic en [Apply].
11.Haga clic sobre [OK] y cierre la ventana.
Para Windows 2000
Instalación de la información de configuración delmonitor en Windows 2000 y configuración delperfil ICC del monitor como valor predeterminado.Los mensajes de Windows mencionados acontinuación se refieren la versión inglesa.En la explicación se da por supuesto que launidad de CD-ROM es la "D".
1. Introduzca el CD-ROM suministrado en launidad de CD-ROM del ordenador.
2. Haga clic sobre el botón [Start]. En [Settings],seleccione [Control Panel].
3. Haga doble clic en [Display].4. Haga clic en [Settings], [Advanced] y [Monitor].5. Haga clic sobre [Properties], [Driver] y [Update
Driver].6. Cuando aparezca el Asistente [Upgrade
Device Driver Wizard], haga clic sobre [Next].7. Coloque una tilde en [Display a list of the
known drivers for this device so that I canchoose a specific driver] y haga clic sobre[Next].
8. Cuando aparezca [Models], haga clic en [Havedisk], confirme que [Copy manufacturer's filesfrom:] es [D:] y haga clic sobre [OK].
9. Seleccione el monitor en la lista que aparece yhaga clic en [Next].
10. Haga clic sobre [Next], asegúrese de que elnombre del monitor aparece en la pantalla yhaga clic en [Finish]. Si aparece [The DigitalSignature Not Found], haga clic en [Yes].
11. Haga clic sobre [Close].12. Haga clic sobre [OK] y cierre la ventana.
191A_es.P65 12/15/2003, 5:29 PM115

116
Instalación de la información de configuración y del perfil ICC (Para Windows)
Para Windows XP
Instalación de la información de configuración delmonitor en Windows XP y configuración del perfilICC del monitor como valor predeterminado.Los mensajes de Windows mencionados acontinuación se refieren la versión inglesa.En la explicación se da por supuesto que launidad de CD-ROM es la "D".
1. Introduzca el CD-ROM suministrado en launidad de CD-ROM del ordenador.
2. Haga clic sobre el botón [Start]. Seleccione[Control Panel].
3. Cambie a "Classic View".4. Haga doble clic en [Display].5. Haga clic en [Settings], [Advanced] y [Monitor].6. Haga clic sobre [Properties], [Driver] y [Update
Driver].7. Cuando aparezca el Asistente [Hardware
Update Wizard], compruebe [Install from a listor specific location [Advanced]], haga clicsobre [Next].
8. Coloque una tilde en [Don't search. I willchoose the driver to install.] y haga clic sobre[Next].
9. Haga clic en [Have disk], confirme que [Copymanufacturer's files from:] es [D:] y haga clicsobre [OK].
10. Seleccione el monitor en la lista que aparece yhaga clic en [Next].Si aparece [has not passed Windows Logotesting...], haga clic en [Continue Anyway].
11. Asegúrese de que el nombre del monitoraparece en la pantalla y haga clic en [Finish].
12. Haga clic sobre [Close].13. Haga clic sobre [OK] y cierre la ventana.
Instalación del perfil ICCInstalación del perfil ICC del monitor. (Si ya hainstalado la información de configuración, sehabrá instalado también el perfil por lo que nohace falta que lo vuelva a instalar.)Los mensajes de Windows mencionados acontinuación se refieren a la versión inglesa.En la explicación se da por supuesto que launidad de CD-ROM es la "D".
1. Introduzca el CD-ROM suministrado en launidad de CD-ROM del ordenador.
2. Haga clic sobre el botón [Start]. En [Settings],seleccione [Control Panel].
3. Haga doble clic en [Display].4. Haga clic en [Settings] y [Advanced].5. Haga clic sobre [General], en [Compatibility]
seleccione [Apply the new display settingwithout restarting] y a continuación haga clicen [Color Management].
6. Haga clic sobre [Add] y seleccione CD-ROMpara indicar la ubicación de los archivos.
7. Seleccione el perfil color que desea instalar yhaga clic sobre [Add].
8. Seleccione el perfil y haga clic en [Set AsDefault].
9. Haga clic sobre [OK] y cierre la ventana.
- Cuando se utilice el perfil ICC, ajuste de laforma siguiente:- [DISPLAY MODE]: [STD] o [OFFICE]- [WHITE BALANCE]: [STD]- [GAMMA]: [0]
191A_es.P65 12/15/2003, 5:29 PM116

117
Eng
lish
Fran
çais
Italia
noE
spañ
olE
nglis
h
Información acerca del perfil ColorSync (Para MacOS)
Acerca del perfil ColorSyncColorSync es el sistema de gestión del color deApple Computer y permite obtener característicasde reproducción cromática cuando se utiliza conuna aplicación compatible. Un perfil ColorSyncdescribe las características cromáticas del monitorLCD.
Notas:- El perfil ColorSync de este monitor funciona con
MacOS 8.5 o superior.- Cuando se utilice el perfil ColorSync, ajuste de la
forma siguiente:- [DISPLAY MODE]: [STD] o [OFFICE]- [WHITE BALANCE]: [STD]- [GAMMA]: [0]
Configuración del perfil ColorSync
Notas:- Debe tener PC Exchange o File Exchange
instalado en sul sistema.- Dependiendo del tipo de ordenador o de
sistema operativo, los nombres de loscomandos y los procedimientos a seguir podríanser diferentes. Siga el manual de uso propio delordenador mientras lee esto.
1. Introduzca el CD-ROM suministrado en launidad de CD-ROM del ordenador.
2.Copie el perfil a utilizarse desde un CD-ROM ala carpeta de perfil ColorSync en la carpeta desistema.
3.En el panel de control seleccione ColorSync yelija el perfil a utilizar.
191A_es.P65 12/15/2003, 5:29 PM117

118
El siguiente pedestal o brazo puede instalarse enel monitor.- Pedestal (vendido separadamente)
Nombre del modelo: NL-S02-H (Gris Plomizo)NL-S02-B (Negro)
- Brazo compatible con VESA (de venta en elcomercio)
Brazos compatibles de venta en el comercioLos accesorios deben cumplir los siguientes requisitos:- Deben ser compatibles con el estándar VESA.- Deben tener una separación mínima de 100 mm
x 100 mm entre los orificios para los tornillos enla sección a acoplar.
- No deben caerse ni romperse una vezacoplados al monitor.
Cómo acoplar el brazo o el pedestal- Tenga cuidado de no doblar excesivamente el
cable ni utilizar cables de prolongación ya queello podría llevar a un funcionamiento anómalo.
- Al mismo tiempo que sigue estas instrucciones,consulte también las instrucciones deinstalación en el manual de uso suministradocon el brazo o el pedestal.
¡PRECAUCIÓN!
- Tenga cuidado de no atrapar sus dedos entre la pantallay el pedestal ni deje caer el pedestal. Puede herirse.
1.Retire los cables.2.Extienda un paño suave sobre una superficie
horizontal apropiada.3.Con mucho cuidado de no dañar el monitor,
deposítelo suavemente sobre el paño con laparte de la pantalla mirando hacia abajo.
4. Retire los cuatro tornillos y desmonte elpedestal del monitor.
Notas:- El pedestal se ha diseñado específicamente
para este monitor, no la use con ningún otroequipo ni para otro fin.
- Le recomendamos que guarde los cuatrotornillos junto con el pedestal que ha retiradopara que volver a utilizar el pedestal fijando loscuatro tornillos correctos. Si utiliza otro tipo detornillos, puede dañar la parte interior delmonitor.
Instrucciones para acoplar un brazo de compatibilidad VESA
5. Acople el brazo al monitor apretando los cuatrotornillos.
Nota:- Los tornillos utilizados para acoplar el brazo
deberían de ser del tamaño M4 con un salientede 6 - 8 mm desde el plano sobre el que debeacoplarse. El uso de diferentes tornillos puedeprovocar la caída del monitor o causar daños enla parte interior.
Tornillo utilizado para fijar elbrazo
Brazo
Parte del monitor a la que sefija el brazo
07_191A_es.P65 12/19/2003, 3:33 PM118

汉语
119
技巧提示和安全注意事项 . . . . . . . . . . . . . . . . . . . . . . . . . . . . . . . . . . . . . . . . . . . . . . . . . . . . . . . . . . . . . 120产品说明 . . . . . . . . . . . . . . . . . . . . . . . . . . . . . . . . . . . . . . . . . . . . . . . . . . . . . . . . . . . . . . . . . . . . . . . . . . 121角度调节 . . . . . . . . . . . . . . . . . . . . . . . . . . . . . . . . . . . . . . . . . . . . . . . . . . . . . . . . . . . . . . . . . . . . . . . . . . . . . . . . 122连接显示器、开关显示器的电源 . . . . . . . . . . . . . . . . . . . . . . . . . . . . . . . . . . . . . . . . . . . . . . . . . . . . . . . . 123
连接显示器与电脑 . . . . . . . . . . . . . . . . . . . . . . . . . . . . . . . . . . . . . . . . . . . . . . . . . . . . . . . . . . . . . . . . 123连接耳机(市售) . . . . . . . . . . . . . . . . . . . . . . . . . . . . . . . . . . . . . . . . . . . . . . . . . . . . . . . . . . . . . . . . . 124连接显示器的电源 . . . . . . . . . . . . . . . . . . . . . . . . . . . . . . . . . . . . . . . . . . . . . . . . . . . . . . . . . . . . . . . . 124打开电源 . . . . . . . . . . . . . . . . . . . . . . . . . . . . . . . . . . . . . . . . . . . . . . . . . . . . . . . . . . . . . . . . . . . . . . . 124关闭电源 . . . . . . . . . . . . . . . . . . . . . . . . . . . . . . . . . . . . . . . . . . . . . . . . . . . . . . . . . . . . . . . . . . . . . . . 125
调节画面显示和扬声器音量 . . . . . . . . . . . . . . . . . . . . . . . . . . . . . . . . . . . . . . . . . . . . . . . . . . . . . . . . . . . . 126调节背光灯 . . . . . . . . . . . . . . . . . . . . . . . . . . . . . . . . . . . . . . . . . . . . . . . . . . . . . . . . . . . . . . . . . . . . . 126调节扬声器音量 . . . . . . . . . . . . . . . . . . . . . . . . . . . . . . . . . . . . . . . . . . . . . . . . . . . . . . . . . . . . . . . . . . 127设置“DISPLAY MODE”(显示模式) . . . . . . . . . . . . . . . . . . . . . . . . . . . . . . . . . . . . . . . . . . . . . . . . . 127检查产品信息 . . . . . . . . . . . . . . . . . . . . . . . . . . . . . . . . . . . . . . . . . . . . . . . . . . . . . . . . . . . . . . . . . . . . 127
调节画面显示 . . . . . . . . . . . . . . . . . . . . . . . . . . . . . . . . . . . . . . . . . . . . . . . . . . . . . . . . . . . . . . . . . . . . . . 128自动画面调节 . . . . . . . . . . . . . . . . . . . . . . . . . . . . . . . . . . . . . . . . . . . . . . . . . . . . . . . . . . . . . . . . . . . . 128手动画面调节 . . . . . . . . . . . . . . . . . . . . . . . . . . . . . . . . . . . . . . . . . . . . . . . . . . . . . . . . . . . . . . . . . . . . 129
显示器的维护 . . . . . . . . . . . . . . . . . . . . . . . . . . . . . . . . . . . . . . . . . . . . . . . . . . . . . . . . . . . . . . . . . . . . . . 132显示器的维护 . . . . . . . . . . . . . . . . . . . . . . . . . . . . . . . . . . . . . . . . . . . . . . . . . . . . . . . . . . . . . . . . . . . . 132储藏 . . . . . . . . . . . . . . . . . . . . . . . . . . . . . . . . . . . . . . . . . . . . . . . . . . . . . . . . . . . . . . . . . . . . . . . . . . . 132故障诊断 . . . . . . . . . . . . . . . . . . . . . . . . . . . . . . . . . . . . . . . . . . . . . . . . . . . . . . . . . . . . . . . . . . . . . . . 132有关用户爱护环境地丢弃本夏普产品的信息 . . . . . . . . . . . . . . . . . . . . . . . . . . . . . . . . . . . . . . . . . . . . 133
规格 . . . . . . . . . . . . . . . . . . . . . . . . . . . . . . . . . . . . . . . . . . . . . . . . . . . . . . . . . . . . . . . . . . . . . . . . . . . . . . 134安装设置信息和ICC文档(用于“Windows”) . . . . . . . . . . . . . . . . . . . . . . . . . . . . . . . . . . . . . . . . . . . . . . 136关于“ColorSync”(彩色同步)文档的信息(用于苹果机的MacOS) . . . . . . . . . . . . . . . . . . . . . . . . . . . . . 139关于安装VESA规格支架的说明 . . . . . . . . . . . . . . . . . . . . . . . . . . . . . . . . . . . . . . . . . . . . . . . . . . . . . . . . . 140
目录

120
技巧提示和安全注意事项显示器与附件的检查清单- 请检查本包装内包括下列物品。
- 液晶显示器(1)- 模拟信号线(1) (型号名称:0NIT15G4-0015 )- 音频线(1) (型号名称:0NIT17A3-U006 )- 电源线(1)- 光盘(1)- 使用说明书(1)
注:- 只能使用随同显示器附送的连接线。- 建议您把包装纸箱保存好,以备需要搬运显示器时之用。
- 日本夏普株式会社具有工具软件盘中的软件的著作权(版权)。未经许可不得复制。
- 提供的附件的形状可能与本说明书里所示的不完全
相同。
本说明书所涉及的范围- 在本说明书中,将用“Windows XP”来表示“微软视窗XP”,用“Windows Me”来表示“微软视窗千禧版”,用“Windows 2000”来表示“微软视窗2000”,用“Windows 98”表示“微软视窗98”, 用“Windows 95”表示“微软视窗95”, 用“Windows3.1”表示“微软视窗3.1版本”。在不需要对程序进行区别时,将使用名称“Windows”。
- “Microsoft”(微软)和“Windows”(视窗)是“Microsoft Corporation”(微软公司)的注册商标。
- “Macintosh”是“Apple Computer, Inc.”(苹果电脑公司)的注册商标。
- 所有其它的商标及产品名称均为其所有权人的商标或注册商标。
- 本显示器所使用的TFT彩色液晶显示屏是用高精度技术制造的。但是,在屏幕上可能会有微小的斑点。在这些斑点之处,像素或者从来不亮,或者总是点亮。另外,如果从一个倾斜的锐角来观看屏幕,可能会看到彩色或亮度并不均匀。请注意,这并不是故障,而是液晶显示屏的共同现象。这不会影响显示器的性能。
- 不要让屏幕长时间显示静止不变的画面,否则会在屏幕上留下“残留影像”。
- 如果把亮度调节到最小,那么有可能不容易看见所显示的画面。
- 电脑信号的质量高低会影响到所显示的图像的质量。建议采用能够输出高质量视频信号的电脑。
- 决不能用坚硬物件刮擦或敲打液晶显示器。- 请注意,除了由法律规定的赔偿之外,日本夏普株式会社对于客户或第三方在使用本机时所产生的错误不承担责任,对于在使用本机时所产生的任何其他有关本机的故障或损坏也不负责任。
- 本显示器及其附件若有升级,恕不另行通知。
位置- 不要在通风不良、多灰尘、潮湿、或会接触到油污或水汽的地方使用本显示器,否则有可能引起火灾。
- 决不可使本显示器接触到水或其他液体,也不可让像曲别针或大头针那样的物件掉落到显示器中,否则有可能引起火灾或电击。
- 不要把显示器放置于不稳定物体之上或不安全之处。不要让显示器遭受强烈冲击或振动。如果显示器跌落或跌倒,可能会使其损坏。
- 不要在会受到阳光直射、靠近取暖设施、或任何可能有高温的地方使用本显示器,否则可能导致机器过热,并引起火灾。
电源线- 不要使电源线受损,也不要在电源线上放置重物、拉伸电源线、或使电源线过度弯曲。另外,请不要增添延长的电源线。如果电源线损坏,则可能引起火灾或电击。
- 只能使用随同显示器附送的电源线。- 请把电源插头直接插入到交流电源插座中。如果另外增添延长的电源线,那么就可能会由于过热而导致火灾。
- 请勿用潮湿的手拔下或插上电源插头。否则会引起触电。

汉语
121
产品说明
6
1 2 3 4
5
7
8
9 10 11 12
13
5
14
1.“AUTO”(自动)按钮 ..................... 此按钮用于进行画面的自动调节(“CLOCK”(时钟)、“PHASE”(相位)、“H-POS”(水平位置)和“V-POS”(垂直位置))。(128页)
2.“MENU”(菜单)按钮 .................... 该按钮用于弹出、选择、以及关闭“OSD”(“On Screen Display”(屏幕显示))菜单。
3. / “MODE”(模式)按钮 ......... 当“OSD”(屏幕显示)菜单显示出来时: 该按钮用于选择菜单上的选项。
当“OSD”(屏幕显示)菜单没有显示出来时:该按钮用于设置“DISPLAY MODE”(显示模式)。
4. 按钮 ..................................... 当“OSD”(屏幕显示)菜单显示出来时:这些按钮用于选择选项或对被选中的选项值进行调整。
当“OSD”(屏幕显示)菜单没有显示出来时:这些按钮用于调节扬声器的音量和背光灯的亮度。
5. 扬声器 .......................................... 可以收听通过与显示器连接的外部设备输入的音频信号。6. 耳机端子 ...................................... 耳机(市售)从这儿连接。7. 电源按钮 ...................................... 按下该钮将电源打开。
再一次按下该按钮,就将电源关闭。8. 电源指示灯 .................................. 显示器处于使用状态时,该指示灯以绿色亮起;当处于省电模式时,
以橙色亮起。9. 主电源开关10.电源端子11.模拟“RGB”(红绿蓝)输入端子 ... 模拟信号线连接到这里。使用附送的模拟信号线。12.音频输入端子 ............................... 电脑的音频输出端子从这儿连接。使用附送的音频线。13.安全锁固定器 ............................... 把安全锁(市售)连接到这个安全锁固定器,就可以把显示器固定起来
不能搬动。该安全槽与“Kensington Micro Saver”(肯辛顿微型救助)安全系统联动。
14.散热孔 .......................................... 切勿堵塞散热孔,否则可能导致显示器内部过热而引起故障。

122
要小心!
- 调节观看角度时,请务必抓住显示器的边上。此显示器的液晶显示屏是用玻璃制作的。如果用手对液晶显示屏施力,可能会损坏液晶显示屏。
角度调节
约25度
1234567123456712345671234567约5度

汉语
123
要小心!
- 在进行连接时,请务必确认显示器和电脑的电源都已经关闭。
- 注意不要过度弯曲连接线,也不要增加延长的电线,因为这样可能会引起故障。
连接显示器与电脑
将附送的模拟信号线连接到电脑的模拟“RGB”(红绿蓝)输出端子上。
- 注意连接器的方向,将信号线紧紧地垂直插入连接器,然后拧紧两边的螺钉。
如果连接到两排D-sub 15芯“Apple PowerMacintosh”(强力苹果电脑),那么请在模拟信号线上添加一个“Macintosh”转接头(市售)。
注:- 连接“Sun Ultra”系列时,可能需要转接头(市售)。
连接显示器、开关显示器的电源
“Macintosh”转接头
连接附送的音频线
当附送的音频线连接到电脑的音频输出端子上时,所连接的电脑的声音就从显示器的扬声器中播放出来。也可以使用显示器的耳机插孔。
音频输入端子
音频线
音频输出端子
模拟信号线
模拟“RGB”(红绿蓝)端子(15芯小型D-sub,3排)
模拟“RGB”(红绿蓝)端子(15芯小型D-sub,3排)
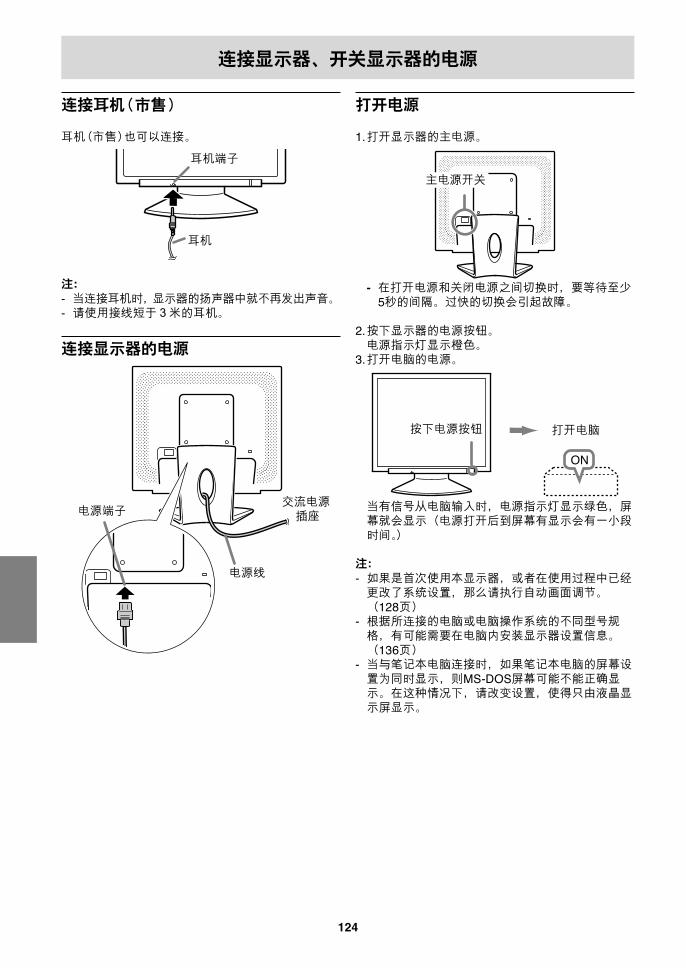
124
打开电源
1.打开显示器的主电源。
- 在打开电源和关闭电源之间切换时,要等待至少5秒的间隔。过快的切换会引起故障。
2.按下显示器的电源按钮。电源指示灯显示橙色。
3.打开电脑的电源。
当有信号从电脑输入时,电源指示灯显示绿色,屏幕就会显示(电源打开后到屏幕有显示会有一小段时间。)
注:- 如果是首次使用本显示器,或者在使用过程中已经更改了系统设置,那么请执行自动画面调节。(128页)
- 根据所连接的电脑或电脑操作系统的不同型号规格,有可能需要在电脑内安装显示器设置信息。(136页)
- 当与笔记本电脑连接时,如果笔记本电脑的屏幕设置为同时显示,则MS-DOS屏幕可能不能正确显示。在这种情况下,请改变设置,使得只由液晶显示屏显示。
连接耳机(市售)
耳机(市售)也可以连接。
注:- 当连接耳机时,显示器的扬声器中就不再发出声音。- 请使用接线短于3米的耳机。
连接显示器的电源
连接显示器、开关显示器的电源
主电源开关
耳机端子
耳机
打开电脑按下电源按钮
ON
电源端子
电源线
交流电源 插座

汉语
125
关闭电源
1.关闭电脑的电源。2.按下显示器的电源按钮。电源指示灯就会熄灭。
如果显示器长时间搁置不使用,请务必关闭显示器的主电源开关,并将电源插头从插座上拔出来。
连接显示器、开关显示器的电源
关闭电脑的电源 按下电源按钮
OFF

126
调节画面显示和扬声器音量调节锁定功能
通过使控制按钮无效(也就是设置锁定功能),就可以防止更改任何已经调节好了的设置内容。1. 关闭显示器的电源。2.一边按住“MENU”(菜单)按钮,一边同时按下电源按钮(也就是打开显示器的电源)。一直按下按钮直到[ADJUSTMENT LOCKED](调节锁定)显示在屏幕上。当此信息显示时,锁定功能设置操作就完成。
注:- 在设置了锁定功能时,除了电源按钮之外,所有其它的按钮都不再起作用。
调节锁定解锁1.关闭显示器的电源。2.一边按住“MENU”(菜单)按钮,一边同时按下电源按钮(也就是打开显示器的电源)。一直按下按钮直到[ADJUSTMENTUNLOCKED](调节解锁)显示在屏幕上。当此信息显示时,解锁操作就完成。
调节背光灯
1.在“OSD”(屏幕显示)菜单没有显示出来的情况
下,按下 按钮或 按钮。2.检查[BRIGHT](亮度)是否被选择。
如果没有被选择,按下 /“MODE”(模式)按钮,然后选择[BRIGHT](亮度)。
3.按下 (变暗)按钮或 (变亮)按钮进行调节。
注:- 在进行了最后的操作之后,相隔几秒钟后,调节功能的屏幕显示消失。
注:- 即使关闭了电源,所有的调节内容也都会被保存起来。
使所有的调节内容复原
只要用一个命令,就可以把所有的调节内容都恢复到本显示器出厂时所设置的默认值。1.关闭显示器的电源。
2.同时按下“MENU”(菜单)按钮和 /“MODE”(模式)按钮,与此同时按下电源按钮(也就是打开显示器的电源)。一直按下按钮直到[ALL RESET](全部复原)显示在屏幕上。当显示的内容消失时,复原操作就完成了。
注:- 当显示出[ALL RESET](全部复原)的时候,控制按钮不能使用。
- 当启动了调节锁定功能时,就不能进行复原。所以,在想要操作控制按钮之前,要先解除调节锁定功能。
“ADJUSTMENT”(调节)菜单复原
在“ADJUSTMENT”(调节)菜单上的调节项目(“CLOCK”(时钟)、“PHASE”(相位)、“H-POS”(水平位置)、“V-POS”(垂直位置)),能被复原到出厂时所设置的默认值。1.打开显示器的电源。
2.同时按下“MENU”(菜单)按钮和 按钮。当画面上出现[RESET](复原)时,复原操作就完成了。
注:- 显示[RESET](复原)时,控制按钮不起作用。- 当启动了调节锁定功能时,就不能进行复原。所以,在想要操作控制按钮之前,要先解除调节锁定功能。

汉语
127
调节画面显示和扬声器音量
调节扬声器音量
1.在“OSD”(屏幕显示)菜单没有显示的情况下,
按下 按钮或 按钮。2.检查[VOLUME](音量)是否被选择。
如果没有选择,按下 /“MODE”(模式)按钮,选择[VOLUME](音量)选项。
3.通过按 按钮(降低音量)或 按钮(提高音量)进行调节。
注:- 在进行了最后的操作之后,相隔几秒钟后,调节功能的屏幕显示消失。
设置“DISPLAY MODE”(显示模式)
色度和亮度可以用同一个指令进行调节。
“STD”(标准)它用由液晶面板的最初的配置产生的色度来显示图像。
“OFFICE”(省电)显示屏的亮度较低。(此模式省电。)
“sRGB”(标准红绿蓝)“sRGB”(标准红绿蓝)是由IEC(国际电工技术委员会)指定的彩色表示的国际标准。色彩的转换顾及液晶的本身特性,并尽量使得所表示的色彩的色度接近于原始图像。
“VIVID”(鲜艳)它用动态的和“VIVID”(鲜艳)的原始色彩来显示图像。
- 如将[DISPLAY MODE](显示模式)设定为[sRGB](标准红绿蓝)或[VIVID](鲜艳),则[WHITEBALANCE](白色平衡)被设定为[STD](标准),[GAMMA](灰度)被设定为[0]。
如何设置
当“OSD”(屏幕显示)菜单没有显示出来时,那么请
按下 /“MODE”(模式)按钮。每按一次该按钮,就会显示出下一个菜单项目。(“STD”(标准)→“OFFICE”(省电)→“sRGB”(标准红绿蓝)→“VIVID”(鲜艳)→“STD”(标准))在进行了最后的操作之后,相隔几秒钟后,调节功能的屏幕显示消失。
检查产品信息
可检查显示器的机型名(MODEL)(机型)、系列号(S/N)(系列号)和使用时间(USAGE TIME)(使用时间)。1. 关闭电源。
2. 按下 /“MODE”(模式)按钮,与此同时按下显示器的电源按钮(也就是打开显示器的电源)。会显示本机的信息。
3. 按下“MENU”(菜单)按钮。
注∶- 因出厂检验和生产过程中的其它活动,使用时间的显示可能不为0(zero)(零)。
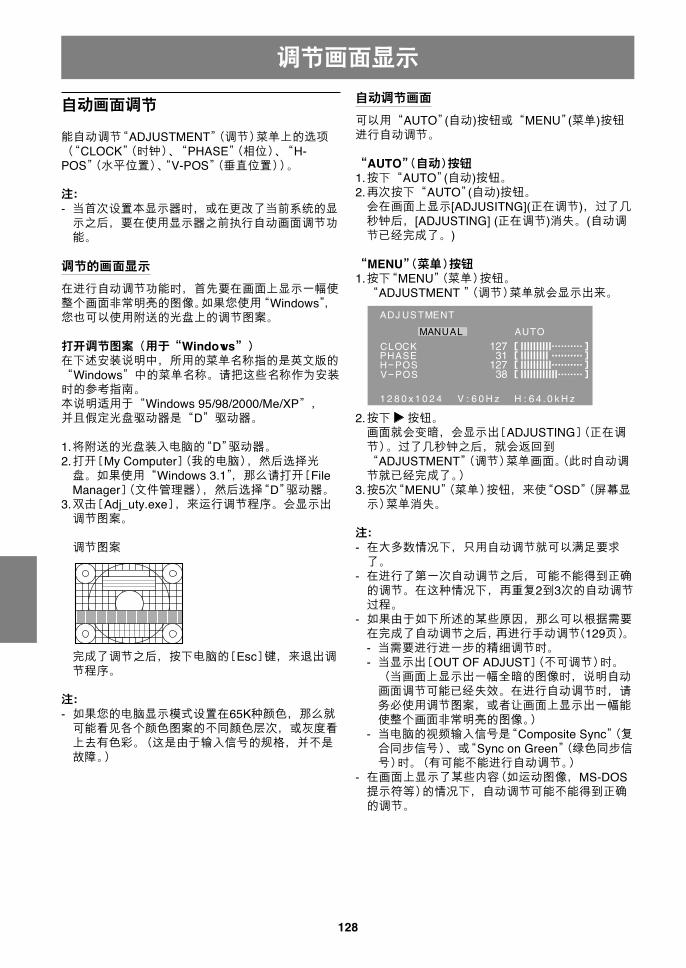
128
调节画面显示自动调节画面
可以用“AUTO”(自动)按钮或“MENU”(菜单)按钮进行自动调节。
“AUTO”(自动)按钮1.按下“AUTO”(自动)按钮。2.再次按下“AUTO”(自动)按钮。会在画面上显示[ADJUSITNG](正在调节),过了几秒钟后,[ADJUSTING] (正在调节)消失。(自动调节已经完成了。)
“MENU”(菜单)按钮1.按下“MENU”(菜单)按钮。“ADJUSTMENT ”(调节)菜单就会显示出来。
2.按下 按钮。画面就会变暗,会显示出[ADJUSTING](正在调节)。过了几秒钟之后,就会返回到“ADJUSTMENT”(调节)菜单画面。(此时自动调节就已经完成了。)
3.按5次“MENU”(菜单)按钮,来使“OSD”(屏幕显示)菜单消失。
注:- 在大多数情况下,只用自动调节就可以满足要求了。
- 在进行了第一次自动调节之后,可能不能得到正确的调节。在这种情况下,再重复2到3次的自动调节过程。
- 如果由于如下所述的某些原因,那么可以根据需要在完成了自动调节之后,再进行手动调节(129页)。- 当需要进行进一步的精细调节时。- 当显示出[OUT OF ADJUST](不可调节)时。(当画面上显示出一幅全暗的图像时,说明自动画面调节可能已经失效。在进行自动调节时,请务必使用调节图案,或者让画面上显示出一幅能使整个画面非常明亮的图像。)
- 当电脑的视频输入信号是“Composite Sync”(复合同步信号)、或“Sync on Green”(绿色同步信号)时。(有可能不能进行自动调节。)
- 在画面上显示了某些内容(如运动图像,MS-DOS提示符等)的情况下,自动调节可能不能得到正确的调节。
自动画面调节
能自动调节“ADJUSTMENT”(调节)菜单上的选项(“CLOCK”(时钟)、“PHASE”(相位)、“H-POS”(水平位置)、“V-POS”(垂直位置))。
注:- 当首次设置本显示器时,或在更改了当前系统的显示之后,要在使用显示器之前执行自动画面调节功能。
调节的画面显示
在进行自动调节功能时,首先要在画面上显示一幅使整个画面非常明亮的图像。如果您使用“Windows”,您也可以使用附送的光盘上的调节图案。
打开调节图案(用于“Windows”)在下述安装说明中,所用的菜单名称指的是英文版的“Windows”中的菜单名称。请把这些名称作为安装时的参考指南。本说明适用于“Windows 95/98/2000/Me/XP”,并且假定光盘驱动器是“D”驱动器。
1.将附送的光盘装入电脑的“D”驱动器。2.打开[My Computer](我的电脑),然后选择光盘。如果使用“Windows 3.1”,那么请打开[FileManager](文件管理器),然后选择“D”驱动器。
3.双击[Adj_uty.exe],来运行调节程序。会显示出调节图案。
调节图案
完成了调节之后,按下电脑的[Esc]键,来退出调节程序。
注:- 如果您的电脑显示模式设置在65K种颜色,那么就可能看见各个颜色图案的不同颜色层次,或灰度看上去有色彩。(这是由于输入信号的规格,并不是故障。)

汉语
129
“ADJUSTMENT”(调节)菜单
“AUTO”(自动)用 按钮选择[AUTO](自动)后,将自动调节[CLOCK](时钟)、[PHASE](相位)、[H-POS] (水平位置)和[V-POS](垂直位置)的设定。
“CLOCK”(时钟)下图表示消除垂直颤动杂波的调节方法。( 按钮)
“PHASE”(相位)下图表示消除水平颤动杂波的调节方法。( 按钮)
注:- 只有在先正确地设置好了[CLOCK](时钟)之后,才可以调节[PHASE](相位)。
“H-POS”(水平位置)与“V-POS”(垂直位置)为了要把调节图案置于屏幕边框的正中间,可以调节左-右(H-POS)(水平位置)的数值和上-下(V-POS)(垂直位置)的数值。( 按钮)
手动画面调节
1.显示使整个屏幕发亮的图像。(128页)2.按下“MENU”(菜单)按钮,显示“OSD”(屏幕显示)菜单。
“ADJUSTMENT”(调节)菜单
MENU
“GAIN CONTROL”(增益控制)菜单
MENU
“COLOR CONTROL”(色彩控制)菜单
MENU
“MODE SELECT-1”(模式选择-1)菜单
MENU
“MODE SELECT-2”(模式选择-2)菜单
MENU
“OSD”(屏幕显示)菜单关闭。
注:- 在进行了最后一次操作之后,在大约30秒钟之后“OSD”(屏幕显示)菜单就会自动消失。
- 本章说明利用调节图案调节屏幕的步骤(用于“Windows”)。
调节画面显示
垂直颤动杂波
水平颤动杂波
屏幕边框
调节图案
按下 /“MODE”(模式)按钮,选择选项。
按下 /“MODE”(模式)按钮,选择选项。
按下 /“MODE”(模式)按钮,选择选项。
按下 /“MODE”(模式)按钮,选择选项。
按下 /“MODE”(模式)按钮,选择选项。

130
“GAIN CONTROL”(增益控制)菜单
“AUTO”(自动)用 按钮选择[AUTO](自动)后,将自动调节[BLACKLEVEL](黑色电平)和[CONTRAST](对比度)设定。自动调节后如有必要,请进行手动调节。
“BLACK LEVEL”(黑色电平)在观看彩色图案时,可以调节整个画面的亮度。
( 按钮)
“CONTRAST”(对比度)在观看彩色图案时,可以进行调节,以便使所有的明
暗层次都能够很好地呈现出来。( 按钮)
注:有关AUTO(自动增益控制功能)- “自动增益控制”功能根据所显示图像上最明亮和最暗淡的色彩,来调节图像的对比度和黑色电平。
- 如果您没有使用“调节图案”,那么就需要有一块至少5毫米 × 5毫米面积显示黑色和白色的屏幕区域。如果不是这样,可能就不能够进行调节。
- 如果来自电脑的信号是复合“Composite Sync”(同步信号)或者“Sync on Green”(绿色同步信号),那么就不能够进行自动调节。此时,请做手动调节。
- 如果显示出[OUT OF ADJUST](不可调节),那么请进行手动调节。
彩色图案
调节画面显示
“COLOR CONTROL”(色彩控制)菜单
“WHITE BALANCE”(白色平衡)1.选择[WHITE BALANCE](白色平衡)后,按下 按钮。会显示WHITEBALANCE(白色平衡)菜单。
2.用 按钮,来选择[COOL](冷)、[·]、[STD](标准)、[·]、[WARM](暖)、或[USER](用户)。“COOL”(冷) .........色调比标准更加偏向蓝色 • .......................色调比标准稍稍偏向蓝色“STD”(标准) ........色调的标准设置 • .......................色调比标准稍稍偏向红色“WARM”(暖) .......色调比标准更加偏向红色“USER”(用户)
- 如果选择了[USER](用户)、就会显示出用于[R-CONTRAST](红色对比度)、[G-CONTRAST](绿色对比度)、以及[B-CONTRAST](蓝色对比度)的设置值,以便进行精细调节。
- 用 /“MODE”(模式)按钮,来选择[R-CONTRAST](红色对比度)、[G-CONTRAST](绿色对比度)、或者[B-CONTRAST](蓝色对比度)。
“R-CONTRAST”(红色对比度)
按钮用于蓝绿色 按钮用于红色
“G-CONTRAST”(绿色对比度)
按钮用于紫色 按钮用于绿色
“B-CONTRAST”(蓝色对比度)
按钮用于黄色 按钮用于蓝色
3.转到下一个菜单:“MENU”(菜单)按钮
注:- 如果不设置为[STD](标准),那么就不能显示出所有的明暗层次。要想显示出所有的明暗层次,就应该设置为[STD](标准)。
- 如果“DISPLAY MODE”(显示模式)设置为[sRGB](标准红绿蓝)或[VIVID](鲜艳),那么除了[STD](标准)之外不能设置为任何其他选项。
“GAMMA”(灰度)调节后可易于观看较暗和较亮的图像。如果画面太暗难以观看,请增大数值。如果画面太亮难以观
看,请减小数值。( 按钮)- 如将[DISPLAY MODE](显示模式)设定为
[sRGB](标准红绿蓝)或[VIVID](鲜艳),则不能设定 [GAMMA](灰度)。

汉语
131
“MODE SELECT-1”(模式选择-1)菜单
注:- 由于输入信号的解像度有所不同,即使菜单选项可以选择,显示的画面也可能不改变。
“OSD H-POSITION”(屏幕显示水平位置)“OSD”(屏幕显示)菜单的位置可以向左或向右移
动。( 按钮)
“OSD V-POSITION”(屏幕显示垂直位置)“OSD”(屏幕显示)菜单的位置可以向上或向下移
动。( 按钮)
“SCALING”(缩放比例)(放大缩小的程度)可以调节图像的清晰度。( 按钮)注:- 当显示模式被设置为小于1280×1024像素时,那么所显示的画面就被放大到覆盖整个屏幕(也就是说,画面的长宽比例可能被改变)。
400 “LINES”(线)(解像度的高低程度)当使用US文本等的时候,可以指定400线水平解像度
的画面。( 按钮)640:640×400像素模式720:720×400像素模式(US文本等)
注:- 因为不是400线的输入信号的解像度是自动确定的,所以不需要进行设置。
“LANGUAGE”(语言)可以选择“OSD”(屏幕显示)菜单上所使用的语言。
1.按下 按钮。画面上就会显示出语言选择菜单。
2.用 /“MODE”(模式)按钮来选择一种语言。3.按下“MENU”(菜单)按钮。
调节画面显示
“MODE SELECT-2”(模式选择-2)菜单
“INFORMATION”(信息)可检查显示器的机型名(MODEL)(机型)、系列号(S/N)(系列号)和使用时间(USAGE TIME)(使用时间)。1.选择[INFORMATION](信息)后按下 按钮。会显示本机的信息。
2.按下“MENU”(菜单)按钮。
“OFF TIMER”(关闭定时器)到达设定时间后,自动关闭电源。1.选择[OFF TIMER](关闭定时器)后按下 按钮。2.按下 按钮,设定[ON](打开)/[OFF](关闭)。如果选择[ON](打开),则请按下 / “MODE”(模式)按钮,并按下 设定关闭时间。(可以1小时的间隔,设定1至23个小时。)
3.按下“MENU”(菜单)按钮。- 选择[ON](打开)时,会在关闭前的最后5分钟内,在屏幕的右上方显示剩余时间。(每分钟显示剩余时间约5秒钟。)
- 如果在关闭电源前第1次显示剩余时间后按下电源按钮,则“OFF TIMER”(关闭定时器)被设定为1小时。要接着关闭电源时,请再次按下电源按钮。(下次打开电源时,当到达设定时间后,将再次自动关闭电源。)
- 当[OFF TIMER](关闭定时器)被设定为[ON](打开)时打开显示器,则会在显示器上显示几秒钟设定时间。(如无输入信号,则会显示[NO SIGNAL](无信号)。)

132
显示器的维护
在清扫显示器时,请务必先把电源插头从交流电源插座中拔出。
外壳和控制面板部分
用柔软的干布轻轻擦掉外壳和控制面板上的尘垢。如果非常脏,那么可以用中性洗涤剂沾湿软布,充分拧干后将尘垢擦掉。
液晶显示屏部分
用柔软的干布轻轻擦掉液晶显示屏上的污垢和灰尘。(像医用纱布或擦镜头布那样的软布就很适用。)
要小心!
- 决不可使用稀释剂、汽油、酒精、玻璃清洁剂等,否则可能导致颜色改变或变形。
- 决不可用任何硬物刮擦显示器,也不可对显示器施加强力,否则可能会使显示器留下划痕或导致故障。
储藏
如果将会长期不再使用本显示器,那么请务必把电源插头从交流电源插座中拔出。
要小心!
- 不要让显示器长时间接触橡胶或塑料制品,否则可能导致颜色改变或变形。
显示器的维护
故障诊断
如果您感到显示器可能有了故障,那么在请人修理之前请先检查如下各项。如果问题仍然不能消除,那么请与您购买本显示器的商店或就近的日本夏普株式会社授权的服务中心接洽。
本显示器的荧光灯管是有一定时间寿命的。- 如果屏幕变暗、持续不停地颤动或者不能点亮,则荧光灯可能已至使用寿命。请与您购买本显示器的商店或就近的日本夏普株式会社授权的服务中心接洽。
- 在使用的最初阶段,由于荧光灯管的特性,画面可能会有颤动。(这不是故障。)如果发生这种现象,请先把电源关闭,然后再把电源打开试一试。
显示器上不显示图像(电源指示灯不点亮)- 电源线是否正确地连接好了?(124页)
显示器上不显示图像(电源指示灯点亮)- 电脑是否正确地连接好了?(123页)- 电脑的电源是否已经打开了?- 电脑的信号时序是否符合显示器所需的规格?(135页)
- 电脑是否处于省电模式?
控制按钮不起作用- 是否设置了调节锁定功能?(126页)
显示的图像失真- 电脑的信号时序是否符合显示器所需的规格?(135页)
- 启动自动画面调节。(128页)- 如果您能改变您所使用的电脑的刷新频率,那么请将频率值调低。(135页)
从扬声器中听不到声音- 音频线是否正确地连接好了?(123页)- 请您执行音量调节的程序。(127页)- 是否连接了耳机?- 当显示器处于省电模式时,扬声器中没有声音(电源指示灯呈橙色点亮)。

汉语
133
显示器的维护
(2) 对于英国、德国、法国和意大利的用户请向当地特许再生利用电子设备的回收和再生利用机构或再生利用服务公司洽询。夏普公司推荐MIREC的再生利用服务,可从网页http://www.mirec.com/获得MIREC的综合信息。必须由电子设备的最终持有者支付MIREC服务费。
(3) 对于美国的用户本机使用锡铅焊料,荧光灯含有少量的水银。因对环境有影响,这些物质的丢弃可能会受到限制。有关回收和再生利用的信息,请向当地政府或电子工业联盟∶http://www.eiae.org洽询。
(4) 对于日本的用户有关再生利用信息,请拨打免费电话∶0120-845-530。
国家 该国的再生利用信息
瑞典
荷兰
比利时
瑞士
请利用瑞典的电子设备再生利用系统“ELRETUR”,访问网站http://www.el-kretsen.se
请利用荷兰的电子设备再生利用系统“ICT-Milieu”,访问网站http://www.nederlandict.nl/index.php
请利用比利时的电子设备再生利用系统“Recupel”,访问网站http://www.recupel.be
请利用瑞士的电子设备再生利用系统“SWICO”,访问网站http://www.swico.ch
有关用户爱护环境地丢弃本夏普产品的信息
如果本机已不能使用,则应合法地并爱护环境地将其丢弃。
丢弃时请勿将本机与一般垃圾一起丢弃或与其它垃圾混在一起!否则会破坏环境!
夏普公司已作出保证,要保护环境并节省能源。我们的目标是通过不断改进生产技术、产品设计和向用户提供环保信息,最大限度地减少我公司产品对环境的影响。
(1) 对于比利时、荷兰、瑞典和瑞士的用户夏普公司参加各国的电器产品的再生利用系统,这些系统是这些国家的环境保护法所规定的。下面是各国的详细说明。

134
产品规格
型号名称LL-191A-W(白色)/LL-191A-B(黑色)
液晶显示器48厘米对角线长TFT液晶显示模块
解像度(最大)SXGA 1280×1024像素
可显示的色彩种数(最大)约16,190,000种颜色(6位+FRC)
亮度(最大)220烛光/米2
像素间距0.294(水平)× 0.294(垂直)毫米
对比度500:1
可视角度左-右160度;上-下160度(对比度 > 5)
屏幕显示尺寸水平376.3毫米×垂直301.1毫米
视频信号模拟“RGB”(红绿蓝)(0.7伏峰峰值)[75Ω]
同步信号分离同步(TTL电平:+/-)、“Sync on Green”(绿色同步)、“Composite Sync”(复合同步)(TTL电平:+/-)
扩展补偿数字放大(将VGA/SVGA/XGA等放大到全屏幕。)
VESA:DDC2B兼容电源管理
VESA:基于DPMS扬声器输出功率
1瓦+1瓦输入信号端子
15芯小型D-sub(3排)音频输入端子袖珍型立体声插孔
耳机端子袖珍型立体声插孔
屏幕倾斜向上约0-25度-向下约0-5度
电源交流100-240伏、50/60赫兹
工作环境温度5-35
耗电量33瓦(在没有音频信号输入时)
(最大36瓦,在省电模式下运行时耗电为1.8瓦)尺寸(宽×深×高)约419毫米×213毫米×409毫米
重量约7.8公斤(约5.7公斤,不包括底座)
(不包括模拟信号线。)
规格外形尺寸(单位:毫米)
362
409
259
419
213
74
- 模拟信号线:约1.8米- 音频线:约1.8米
注:- 作为不断改进的政策的一个组成部分,夏普公司保留为改进产品而改变设计和规格而不预先通知的权利。上述性能规格数据是产品的额定值。可能与各显示器的实际数值有所不同。
“Plug & Play”(即插即用)

汉语
135
规格
相关的信号时序
- 推荐使用的分辨率为1280x1024。- 全部规格都只适合非隔行扫描信号。- 对于“Power Macintosh”(强力苹果电脑)和“SUN
Ultra”系列的频率只是参考值。连接时,可能需要另外的适配器(市售)。
- 如果显示器正在接收到的是不能兼容的时序信号,那么就会显示出[OUT OF TIMING](时序不同)。请按照您的电脑的使用说明书来设置能与本显示器兼容的时序。
- 如果显示器没有接收到任何信号(“synch signal”[同步信号]),那么就会显示出[NO SIGNAL](无信号)。
显示模式
“PowerMacintosh”(强力苹果电脑)系列
VESA
US文本
电源管理
本显示器采用了VESA DPMS(“Display PowerManagement Signaling”(显示器电源管理信号))。要使显示器的“Power Management”(电源管理)功能起作用,视频卡和电脑都必须符合VESA DPMS(显示器电源管理信号)标准。
DDC(“Plug & Play”(即插即用))
本显示器支持VESA DDC(“Display Data Channel”(显示数据通道))标准。DDC是一种为了在显示器或电脑上支持“Plug &Play”(即插即用)功能而制订的信号标准。该标准在显示器与电脑之间传输诸如解像度等级那样的信息。如果您的电脑符合DDC标准,而且被设置为能够检测出“Plug & Play”(即插即用)显示器,那么您就可以使用本功能。由于系统与系统之间各有不同,所以DDC也有许多不同的变种。本显示器采用了DDC2B。
DPMS模式 屏幕 功率消耗 水平同步 垂直同步
ON (打开) 显示器开启 36瓦 是 是
STANDBY (待机) 否 是
SUSPEND (休眠) 显示器关闭 1.8瓦 是 否
OFF (关闭) 否 否
Sun Ultra系列
水平同步(千赫兹)
垂直同步(赫兹)
像素频率(兆赫兹)
模拟“RGB”(红绿蓝)输入连接器的插脚
15芯小型D-sub连接器
序号 功能
1 红色视频信号输入
2 绿色视频信号输入3 蓝色视频信号输入4 GND(地线)
5 GND(地线)6 用于红色视频信号“GND”(地线)7 用于绿色视频信号“GND”(地线)
8 用于蓝色视频信号“GND”(地线)9 + 5伏10 GND(地线)
11 GND(地线)12 DDC数据13 用于水平同步信号输入
14 用于垂直同步信号输入15 DDC时钟

136
对于“Windows 98”
把显示器设置信息安装到“Windows 98”,把显示器的ICC文档设置为预先确定的值。在下述安装说明中,所用的菜单名称指的是英文版的“Windows”中的菜单名称。请把这些名称作为安装时的参考指南。在本说明中,假定光盘驱动器是“D”驱动器。
如果已经显示出了“Add New Hardware Wizard”(添加新硬件向导):
1. 将附送的光盘装入电脑的“D”驱动器。2. 单击[Next](下一步)。3. 选择[Display a list of all the drivers in a specific
location, so you can select the driver youwant.](显示指定位置的全部驱动程序清单,这样就能选择所需的驱动程序。),然后单击[Next](下一步)。
4. 当显示出[Models](型号)时,单击[Havedisk](搜索软盘驱动器),确认[Copymanufacturer’s files from:](复制制造商的文件从:)[D:],然后单击[OK](确定)。
5. 确认已经选择了显示器的详细信息,然后单击[Next](下一步)、[Next](下一步),然后[Finish](完成)。如果显示出“Add NewHardware Wizard”(添加新硬件向导),那么请从上述第2步开始重复进行安装命令操作。
如果没有显示出“Add New Hardware Wizard”(添加新硬件向导):
1. 将附送的光盘装入电脑的“D”驱动器。2. 单击[Start](开始)按钮。从[Settings](设置)
菜单上选择[Control Panel](控制面板)。3. 双击[Display](显示)。4. 单击[Settings](设置)、[Advanced](高级),
然后[Monitor](显示器)。5. 在[Options](选项)中,选择[Automatically
detect Plug & Play monitors](自动检测即插即用显示器),然后单击[Change](更改)。
6. 单击[Next](下一步)。7. 单击[Display a list of all the drivers in a specific
location, so you can select the driver youwant.](显示指定位置的全部驱动程序清单,这样就能选择所需的驱动程序。),然后单击[Next](下一步)。
8. 当显示出[Models](型号)时,单击[Havedisk](搜索软盘驱动器),确认[Copymanufacturer’s files from:](复制制造商的文件从:)[D:],然后单击[OK](确定)。
9. 确认已经选择了显示器的详细信息,然后单击[Next](下一步)、[Next](下一步),然后[Finish](完成)。
10.检查确认显示器的详细信息已经显示出来,然后单击[Apply](应用)。
11.单击[OK](确定),关闭显示窗。
安装设置信息和ICC文档(用于“Windows”)根据电脑或电脑操作系统的不同型号规格,有可能需要在电脑内安装设置信息。如果属于这种情况,那么请按照如下步骤来安装显示器设置信息。(由于电脑或电脑操作系统的型号规格不同,操作命令的名称和方法也可能有所不同。在阅读本操作说明时,请参照电脑本身的使用说明书。)
关于ICC文档ICC(国际色彩协会)文档是一个描述液晶显示器色彩再生特性的文件。使用适合ICC文档的显示器可以获得高精度的色彩再生。- “Windows 98”、“Windows Me”、“Windows
2000”、“Windows XP”都使用ICC文档。- 在安装“Windows 98”、“Windows Me”、“Windows 2000”、“Windows XP”的设置信息(如下所述)时,就会把ICC文档也安装进去。如果只想安装ICC文档,那么请参阅第138页的“安装ICC文档”。
- 使用ICC文档时,请如下设置∶- [DISPLAY MODE](显示模式)∶[STD](标准)或
[OFFICE](省电)- [WHITE BALANCE](白色平衡)∶[STD](标准)- [GAMMA](灰度)∶[0]
对于“Windows 95”
把显示器设置信息安装到“Windows 95”。在下述安装说明中,所用的菜单名称指的是英文版的“Windows”中的菜单名称。请把这些名称作为安装时的参考指南。在本说明中,假定光盘驱动器是“D”驱动器。
1. 将附送的光盘装入电脑的“D”驱动器。2. 单击[Start](开始)按钮。从[Settings](设置)
菜单上选择[Control Panel](控制面板)。3. 双击[Display](显示)。4. 单击[Settings](设置)、[Advanced
Properties](高级属性)、[Monitor](显示器),然后[Change](更改)。
5. 单击[Have disk](搜索软盘驱动器),确认[Copy manufacturer’s files from:](复制制造商的文件从:)[D:],然后单击[OK](确定)。
6. 确认已经选择了显示器的详细信息,然后单击[OK](确定)。
7. 检查确认显示器的详细信息已经显示出来,然后单击[Apply](应用)。
8. 单击[OK](确定),关闭显示窗。

汉语
137
安装设置信息和ICC文档(用于“Windows”)
对于“Windows Me”
把显示器设置信息安装到“Windows Me”,把显示器的ICC文档设置为预先确定的值。在下述安装说明中,所用的菜单名称指的是英文版的“Windows”中的菜单名称。请把这些名称作为安装时的参考指南。在本说明中,假定光盘驱动器是“D”驱动器。
如果已经显示出了“Add New Hardware Wizard”(添加新硬件向导):
1. 将附送的光盘装入电脑的“D”驱动器。2. 选择[Specify the location of the driver
[Advanced]](指定驱动程序的所在位置[高级]),然后单击[Next](下一步)。
3. 选择[Display a list of all the drivers in a specificlocation, so you can select the driver youwant.](显示指定位置的全部驱动程序清单,这样就能选择所需的驱动程序。),然后单击[Next](下一步)。
4. 当显示出[Models](型号)时,单击[Havedisk](搜索软盘驱动器),确认[Copymanufacturer’s files from:](复制制造商的文件从:)[D:],然后单击[OK](确定)。
5. 从清单上选择显示器的详细信息,然后单击[Next](下一步)、[Next](下一步),然后[Finish](完成)。如果显示出“Add NewHardware Wizard”(添加新硬件向导),那么请从上述第2步开始重复进行安装命令操作。
如果没有显示出“Add New Hardware Wizard”(添加新硬件向导):
1. 将附送的光盘装入电脑的“D”驱动器。2. 单击[Start](开始)按钮。从[Settings](设置)
菜单上选择[Control Panel](控制面板)。3. 双击[Display](显示)。4. 单击[Settings](设置)、[Advanced](高级),
然后[Monitor](显示器)。5. 在[Options](选项)中,选择[Automatically
detect Plug & Play monitors](自动检测即插即用显示器),然后单击[Change](更改)。
6. 选择[Specify the location of the driver[Advanced]](指定驱动程序的所在位置[高级]),然后单击[Next](下一步)。
7. 选择[Display a list of all the drivers in a specificlocation, so you can select the driver you want.](显示指定位置的全部驱动程序清单,这样就能选择所需的驱动程序。),然后单击[Next](下一步)。
8. 当显示出[Models](型号)时,单击[Havedisk](搜索软盘驱动器),确认[Copymanufacturer’s files from:](复制制造商的文件从:)[D:],然后单击[OK](确定)。
9. 选择显示器的详细信息,然后单击[Next](下一步)、[Next](下一步),然后[Finish](完成)。
10.检查确认显示器的详细信息已经显示出来,然后单击[Apply](应用)。
11.单击[OK](确定),关闭显示窗。
对于“Windows 2000”
把显示器设置信息安装到“Windows 2000”,把显示器的ICC文档设置为预先确定的值。在下述安装说明中,所用的菜单名称指的是英文版的“Windows”中的菜单名称。请把这些名称作为安装时的参考指南。在本说明中,假定光盘驱动器是“D”驱动器。
1. 将附送的光盘装入电脑的“D”驱动器。2. 单击[Start](开始)按钮。从[Settings](设置)
菜单上选择[Control Panel](控制面板)。3. 双击[Display](显示)。4. 单击[Settings](设置)、[Advanced](高级),
然后[Monitor](显示器)。5. 单击[Properties](属性)、[Driver](驱动程
序),然后[Update Driver](更新驱动程序)。6. 当[Upgrade Device Driver Wizard](更新设备驱
动程序向导)显示出来时,单击[Next](下一步)。
7. 选择[Display a list of the known drivers for thisdevice so that I can choose a specific driver](显示对于该设备的已知驱动程序清单,这样就能选择一个指定的驱动程序),然后单击[Next](下一步)。
8. 当显示出[Models](型号)时,单击[Havedisk](搜索软盘驱动器),确认[Copymanufacturer’s files from:](复制制造商的文件从:)[D:],然后单击[OK](确定)。
9. 从所显示的清单上选择显示器,然后单击[Next](下一步)。
10.单击[Next](下一步),确认显示器的名称出现在屏幕上,然后单击[Finish](完成)。如果显示出[The Digital Signature Not Found](没有找到数字签名),请单击[Yes](是)。
11.单击[Close](关闭)。12.单击[OK](确定),关闭显示窗。

138
安装设置信息和ICC文档(用于“Windows”)
安装ICC文档
安装显示器的ICC文档。(如果已经安装了设置信息,那么也就已经安装了ICC文档,不需要再行安装了。)在下述安装说明中,所用的菜单名称指的是英文版的“Windows”中的菜单名称。请把这些名称作为安装时的参考指南。在本说明中,假定光盘驱动器是“D”驱动器。
1. 将附送的光盘装入电脑的“D”驱动器。2. 单击[Start](开始)按钮。从[Settings](设置)
菜单上选择[Control Panel](控制面板)。3. 双击[Display](显示)。4. 单击[Settings](设置),然后单击[Advanced]
(高级)。5. 单击[General](常规),从[Compatibility](兼容
性)选择[Apply the new display setting withoutrestarting](应用新的显示设置而不重新启动),然后单击[Color Management](色彩管理)。
6. 单击[Add](添加),选择光盘作为文件位置。7. 选择想要安装的彩色文档,然后单击[Add](添
加)。8. 选择文档,然后单击[Set As Default](设置为默
认)。9. 单击[OK](确定),关闭显示窗。
- 使用ICC文档时,请如下设置∶- [DISPLAY MODE](显示模式)∶[STD](标准)或
[OFFICE](省电)- [WHITE BALANCE](白色平衡)∶[STD](标准)- [GAMMA](灰度)∶[0]
对于“Windows XP”
把显示器设置信息安装到“Windows XP”,把显示器的ICC文档设置为预先确定的值。在下述安装说明中,所用的菜单名称指的是英文版的“Windows”中的菜单名称。请把这些名称作为安装时的参考指南。在本说明中,假定光盘驱动器是“D”驱动器。
1. 将附送的光盘装入电脑的“D”驱动器。2. 单击[Start](开始)按钮。选择[Control Panel]
(控制面板)。3. 切换到“Classic View(经典视图)”。4. 双击[Display](显示)。5. 单击[Settings](设置)、[Advanced](高级)、
然后[Monitor](显示器)。6. 单击[Properties](属性)、[Driver](驱动程
序)、然后[Update Driver](更新驱动程序)。7. 当显示出[Hardware Update Wizard](硬件更新
向导)时,选择[Install from a list or specificlocation[Advanced]](从列表或指定位置安装[高级]),然后单击[Next](下一步)。
8. 选择[Don’t search, I will choose the drive toinstall.](不要搜索,自己选择驱动程序安装。),然后单击[Next](下一步)。
9. 单击[Have Disk](搜索软盘驱动器),确认[Copy manufacturer’s files from:](复制制造商的文件从:)[D:],然后单击[OK](确定)。
10.从所显示的清单上选择所需的显示器,然后单击[Next](下一步)。如果显示出[has not passedWindows Logo testing ...](没有通过视窗商标测试⋯),那么请单击[Continue Anyway](仍然继续)。
11.确认该显示器的名称已在屏幕上显示出来。12.单击[Finish](完成)。13.单击[Close](关闭)。14.单击[OK](确定),关闭显示窗。

汉语
139
关于“ColorSync”(彩色同步)文档的信息(用于苹果机的MacOS)关于“ColorSync”(彩色同步)文档 “ColorSync”(色彩同步)是“Apple Computer”(苹果电脑)的色彩管理系统。与兼容的显示器一起使用时,能实现色彩再生特性。“ColorSync”(彩色同步)文档描述了液晶显示器的色彩特性。
注:- 本显示器的“ColorSync”(彩色同步)文档要用
MacOS8.5或更高的版本。- 使用ColorSync(彩色同步)文档时,请如下设置∶
- [DISPLAY MODE](显示模式)∶[STD](标准)或[OFFICE](省电)
- [WHITE BALANCE](白色平衡)∶[STD](标准)- [GAMMA](灰度)∶[0]
设置“ColorSync”(彩色同步)文档
注:- 需将“PC Exchange”(PC交换)或“File
Exchange”(文件交换)安装在系统内。- 由于电脑或电脑操作系统的型号规格不同,操作命令的名称和方法也可能有所不同。在阅读本操作说明时,请参照电脑本身的使用说明书。
1.将附送的光盘装入电脑的“D”驱动器。2.把要用的文档从光盘复制到系统文件夹中的“ColorSync”(彩色同步)文档文件夹中。
3.用控制面板上的“ColorSync”(彩色同步),来选择要用的文档。

140
关于安装VESA规格支架的说明5.用四个螺钉把支架安装到显示器上。
注:- 用于安装支架的螺钉应该是长度为从安装表面突出
6毫米到8毫米的M4螺钉。使用其它的螺钉可能导致显示器脱落或设备内部的损坏。
下列底座或支架可以装配到显示器上。- 底座(另外销售)
型号名称∶NL-S02-H(灰白色)NL-S02-B(黑色)
- 可用于VESA的支架(市售)
可以使用的市售支架装配必须满足:- 和VESA规格兼容- 在将要安装的地方的螺钉孔间距必须为100毫米×
100毫米。- 在把支架或底座安装到显示器上之后,支架或底座不得跌落或折断。
如何装配支架或者底座- 注意不要过度弯曲连接线或者增加延长线,否则会引起故障。
- 按照这些指令进行操作时,请参考支架或者底座附带的使用说明书里的安装指令。
要小心!
- 小心别将手指夹在显示器和底座之间,也不要碰倒底座,否则都可能造成伤害。
1.去掉连接线。2.在一个合适的水平面上铺上一块柔软的布。3.注意不要损坏了显示器,轻轻的将显示器显示面朝下放在布上。
4.除去四个螺钉,然后从显示器上除去底座。
注:- 底座是为该显示器专门制造的。一旦除去底座,不要试图将其装配到其它设备上。
- 一旦除去了螺钉,将它们和底座保存在一起。如果重新装配底座,请务必使用最初的螺钉。用不同的螺钉可能会引起故障。
6 - 8毫米
用于安装支架的螺钉
支架
显示器上用于安装支架的部分

M E M O
141

M E M O
142

M E M O
143

M E M O
144

M E M O
145

M E M O
146

191A_cover4.P65 12/15/2003, 5:26 PM147

SHARP CORPORATION
Printed in ChinaGedruckt in ChinaImprimé en ChineStampato in Cina
Impreso en China
P/N: 0NI-191A-E0011925-1300-5520
191A_cover4.P65 12/15/2003, 5:26 PM148