Embed Size (px)
Citation preview

Operator’s Manual
Para obtener una versión gratis de este manual en español, escriba a la direcciónindicada más abajo. Asegúrese de indicar el modelo y el número de serie de su producto.
Pour obtenir gratuitement une version en français de ce manuel, écrivez à l’adresseci–dessous. N’oubliez pas d’indiquer les numéros de modèle et de série de votre produit.
Lawn-Boy Inc., Attn.: Parts Dept., 8111 Lyndale Ave S, Bloomington, MN 55420-1196.
Domestic English (EN)
Form No. 3324-469 Rev A
SilverPro Series Walk Power Lawn MowerModel No. 10247—200000001 and UpModel No. 10252—200000001 and UpModel No. 10323—200000001 and UpModel No. 10324—200000001 and Up

�2001 Lawn-Boy, Inc.All Rights Reserved Printed in USA2
The engine exhaust from this product containschemicals known to the State of California tocause cancer, birth defects, or other reproductiveharm.
WARNING
IMPORTANT: This engine is not equipped with a sparkarrester muffler. It is a violation of California PublicResource Code Section 4442 to use or operate this engineon any forest–covered, brush–covered or grass–coveredland. Other states or federal areas may have similar laws.
This spark ignition system complies with CanadianICES-002.
Ce système d’allumage par étincelle de véhicule estconforme à la norme NMB-002 du Canada.
The enclosed Engine Owner’s Manual is supplied forinformation regarding The U.S. EnvironmentalProtection Agency (EPA) and the California EmissionControl Regulation of emission systems, maintenanceand warranty.
Keep this engine Owner’s Manual with your unit.Should this engine Owner’s Manual become damagedor illegible, replace immediately. Replacements may beordered through the engine manufacturer.
ContentsPage
Introduction 2. . . . . . . . . . . . . . . . . . . . . . . . . . . . . . . . Safety 3. . . . . . . . . . . . . . . . . . . . . . . . . . . . . . . . . . . . .
General Lawn Mower Safety 3. . . . . . . . . . . . . . . . Safety and Instruction Decals 6. . . . . . . . . . . . . . .
Assembly 6. . . . . . . . . . . . . . . . . . . . . . . . . . . . . . . . . . Unfolding the Handle 6. . . . . . . . . . . . . . . . . . . . . . Adjusting the Handle Height 7. . . . . . . . . . . . . . . .
Before Starting 7. . . . . . . . . . . . . . . . . . . . . . . . . . . . . . Mixing Gasoline and Oil 7. . . . . . . . . . . . . . . . . . .
Operation 9. . . . . . . . . . . . . . . . . . . . . . . . . . . . . . . . . . Starting the Engine 9. . . . . . . . . . . . . . . . . . . . . . . . Stopping the Engine 9. . . . . . . . . . . . . . . . . . . . . . . Using the Self-propel Drive 10. . . . . . . . . . . . . . . . . Adjusting the Cutting Height 10. . . . . . . . . . . . . . . . Operating Tips 10. . . . . . . . . . . . . . . . . . . . . . . . . . .
Maintenance 12. . . . . . . . . . . . . . . . . . . . . . . . . . . . . . . . Recommended Maintenance Schedule 12. . . . . . . . Cleaning the Lawn Mower Housing 13. . . . . . . . . . Cleaning the Self-propel Drive 14. . . . . . . . . . . . . . Lubricating the Self-propel Drive 14. . . . . . . . . . . . Adjusting the Self-propel Drive Cable 14. . . . . . . .
Servicing the Air Filter 15. . . . . . . . . . . . . . . . . . . . Maintaining the Spark Plug 15. . . . . . . . . . . . . . . . . Maintaining the Blade 16. . . . . . . . . . . . . . . . . . . . . Cleaning the Exhaust Port 17. . . . . . . . . . . . . . . . . .
Storage 18. . . . . . . . . . . . . . . . . . . . . . . . . . . . . . . . . . . . Preparing the Fuel System 18. . . . . . . . . . . . . . . . . . Preparing the Engine 18. . . . . . . . . . . . . . . . . . . . . . General Information 18. . . . . . . . . . . . . . . . . . . . . . . Folding the Handle 19. . . . . . . . . . . . . . . . . . . . . . . . Removing from Storage 19. . . . . . . . . . . . . . . . . . . .
Accessories 19. . . . . . . . . . . . . . . . . . . . . . . . . . . . . . . . Installing a Rear Grass Catcher 19. . . . . . . . . . . . . . Installing the Cover Plate 22. . . . . . . . . . . . . . . . . . . Installing the Mulch Plate 22. . . . . . . . . . . . . . . . . .
Troubleshooting 24. . . . . . . . . . . . . . . . . . . . . . . . . . . . . Federal Emission Control Warranty Statement 26. . . . . The Lawn-Boy No-Worry Warranty 28. . . . . . . . . . . . . IMPORTANT: The two-stroke engine provided on thisproduct meets the EPA Phase I Non-Road Emissionsregulations for engines under 19 kW. This product doesnot meet CARB TIER 1 regulations and cannot be soldin California.
IntroductionThank you for choosing a Lawn-Boy product. We wantyou to be completely satisfied with your new purchase.
Read this manual carefully to learn how to operate andmaintain your product properly. The information in thismanual can help you and others avoid injury and productdamage. Although Lawn-Boy designs and produces safeproducts, you are responsible for operating the productproperly and safely.
Whenever you contact your Authorized Service Dealer orthe factory for help with service, genuine Lawn-Boy parts,or additional information, have the model number and theserial number of your product handy. You will find themodel number and serial number decal on the product asillustrated in Figure 1.
1064
1
Figure 11. Model number and serial number decal
Write the product model number and serial number in thespace below:
3
Model No.
Serial No.
This manual identifies potential hazards and has specialsafety messages that help you and others avoid personalinjury and even death. DANGER, WARNING, andCAUTION are words used to identify the level of hazard.
DANGER signals an extreme hazard that will causeserious injury or death if you do not follow therecommended precautions.
WARNING signals a hazard that may cause serious injuryor death if you do not follow the recommendedprecautions.
CAUTION signals a hazard that may cause minor ormoderate injury if you do not follow the recommendedprecautions.
This manual uses two other words to highlightinformation. Important calls attention to specialmechanical information and Note emphasizes generalinformation worthy of special attention.
SafetyThis lawn mower meets or exceeds CPSC blade safetyrequirements for walk-behind rotary mowers and theB71.1 specifications of the American NationalStandards Institute, in effect at time of production.
Lawn-Boy designed this lawn mower for cutting andmulching grass, or, when equipped with a grass bag, forcatching cut grass. Any use for purposes other than thesecould prove dangerous to the operator or to bystanders.
Note: The engine on this lawn mower is not equippedwith a spark arrester muffler. Operating this lawn moweron any forest-covered, brush-covered, or unimprovedgrass-covered land without an approved spark arrestermuffler may violate your state law.
WARNING
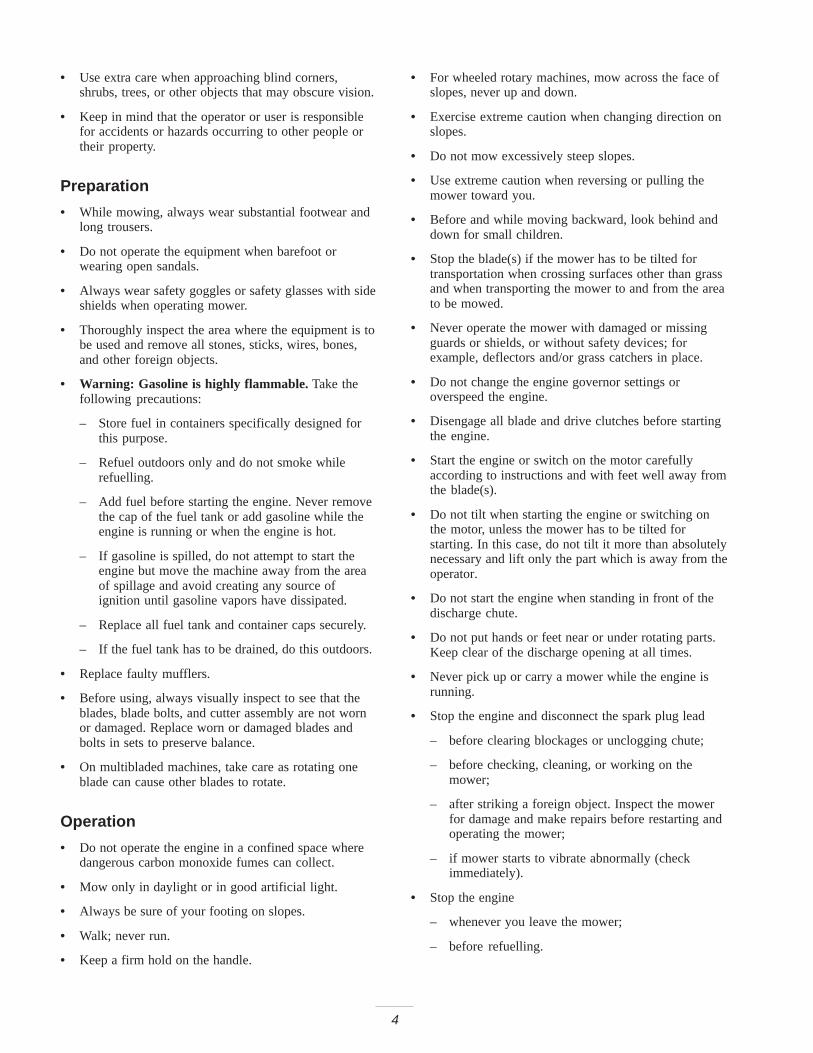
POTENTIAL HAZARD• Engine exhaust contains carbon monoxide,
which is an odorless, deadly poison.
WHAT CAN HAPPEN• Carbon monoxide can kill you.
HOW TO AVOID THE HAZARD• Do not run the engine indoors or in an enclosed
area.
To ensure maximum safety, best performance, and togain knowledge of the product, it is essential that youand any other operator of the lawn mower read andunderstand the contents of this manual before themotor is ever started. Pay particular attention to thesafety alert symbol which means CAUTION,WARNING, OR DANGER — “personal safetyinstruction.” Read and understand the instructionbecause it has to do with safety. Failure to comply withinstruction may result in personal injury.
General Lawn Mower SafetyThe following instructions have been adapted from theANSI/OPEI standard B71.1—1998 and ISO standard5395:1990(E). Information or terminology specific toLawn-Boy lawn mowers is enclosed in parenthesis.
This cutting machine is capable of amputating hands andfeet and throwing objects. Failure to observe the followingsafety instructions could result in serious injury or death.
Training
• Read the instructions carefully. Be familiar with thecontrols and the proper use of the equipment beforestarting.
• See manufacturer’s instructions for proper operationand installation of accessories. Only use accessoriesapproved by the manufacturer.
• Never allow children or people unfamiliar with theseinstructions to use the mower. Local regulations mayrestrict the age of the operator.
• Never mow while people, especially children, or petsare nearby. Stop mower if anyone enters the area.
Tragic accidents can occur if the operator is not alert tothe presence of children. Children are often attracted tothe mower and the mowing activity. Never assume thatchildren will remain where you last saw them.
• Keep children out of the mowing area and under thewatchful care of a responsible adult.
• Be alert and turn mower off if children enter the area.
4
• Use extra care when approaching blind corners,shrubs, trees, or other objects that may obscure vision.
• Keep in mind that the operator or user is responsiblefor accidents or hazards occurring to other people ortheir property.
Preparation
• While mowing, always wear substantial footwear andlong trousers.
• Do not operate the equipment when barefoot orwearing open sandals.
• Always wear safety goggles or safety glasses with sideshields when operating mower.
• Thoroughly inspect the area where the equipment is tobe used and remove all stones, sticks, wires, bones,and other foreign objects.
• Warning: Gasoline is highly flammable. Take thefollowing precautions:
– Store fuel in containers specifically designed forthis purpose.
– Refuel outdoors only and do not smoke whilerefuelling.
– Add fuel before starting the engine. Never removethe cap of the fuel tank or add gasoline while theengine is running or when the engine is hot.
– If gasoline is spilled, do not attempt to start theengine but move the machine away from the areaof spillage and avoid creating any source ofignition until gasoline vapors have dissipated.
– Replace all fuel tank and container caps securely.
– If the fuel tank has to be drained, do this outdoors.
• Replace faulty mufflers.
• Before using, always visually inspect to see that theblades, blade bolts, and cutter assembly are not wornor damaged. Replace worn or damaged blades andbolts in sets to preserve balance.
• On multibladed machines, take care as rotating oneblade can cause other blades to rotate.
Operation
• Do not operate the engine in a confined space wheredangerous carbon monoxide fumes can collect.
• Mow only in daylight or in good artificial light.
• Always be sure of your footing on slopes.
• Walk; never run.
• Keep a firm hold on the handle.
• For wheeled rotary machines, mow across the face ofslopes, never up and down.
• Exercise extreme caution when changing direction onslopes.
• Do not mow excessively steep slopes.
• Use extreme caution when reversing or pulling themower toward you.
• Before and while moving backward, look behind anddown for small children.
• Stop the blade(s) if the mower has to be tilted fortransportation when crossing surfaces other than grassand when transporting the mower to and from the areato be mowed.
• Never operate the mower with damaged or missingguards or shields, or without safety devices; forexample, deflectors and/or grass catchers in place.
• Do not change the engine governor settings oroverspeed the engine.
• Disengage all blade and drive clutches before startingthe engine.
• Start the engine or switch on the motor carefullyaccording to instructions and with feet well away fromthe blade(s).
• Do not tilt when starting the engine or switching onthe motor, unless the mower has to be tilted forstarting. In this case, do not tilt it more than absolutelynecessary and lift only the part which is away from theoperator.
• Do not start the engine when standing in front of thedischarge chute.
• Do not put hands or feet near or under rotating parts.Keep clear of the discharge opening at all times.
• Never pick up or carry a mower while the engine isrunning.
• Stop the engine and disconnect the spark plug lead
– before clearing blockages or unclogging chute;
– before checking, cleaning, or working on themower;
– after striking a foreign object. Inspect the mowerfor damage and make repairs before restarting andoperating the mower;
– if mower starts to vibrate abnormally (checkimmediately).
• Stop the engine
– whenever you leave the mower;
– before refuelling.
5
• Reduce the throttle setting during engine run-out and,if the engine is provided with a shut-off valve, turn thefuel off at the conclusion of mowing.
• Stop the blade(s) when crossing gravel drives, walks,or roads.
• Shut the engine off and wait until the blade comes tocomplete stop before removing grass catcher.
• Do not operate the mower while under the influence ofalcohol or drugs.
• If the equipment should start to vibrate abnormally,stop the engine and check immediately for the cause.Vibration is generally a warning of trouble.
Slopes are a major factor related to slip and fall accidentswhich can result in severe injury. All slopes require extracaution feel uneasy on a slope, do not mow it.
• Watch for holes, ruts, or bumps. Tall grass can hideobstacles.
• Do not mow near drop-offs, ditches, or embankments.The operator could lose footing or balance.
• Do not mow on wet grass. Reduced footing couldcause slipping.
Maintenance and Storage
• Keep all nuts, bolts (especially blade attachmentbolts), and screws tight to be sure the equipment is insafe working condition.
• Never store the equipment with gasoline in the tankinside a building where fumes may reach an openflame or spark.
• Allow the engine to cool before storing in anyenclosure.
• To reduce the fire hazard, keep the engine, muffler,battery compartment, and gasoline storage area free ofgrass, leaves, or excessive grease.
• Check the grass catcher frequently for wear ordeterioration.
• Replace worn or damaged parts for safety.
• Use extra care when handling gasoline; vapors areexplosive.
• Never tamper with safety devices. Check their properoperation regularly.
• Keep the mower free of grass, leaves, or other debrisbuild-up. Clean up oil or fuel spillage.
• Stop and inspect the equipment if you strike an object.Repair, if necessary, before restarting.
• Never attempt to make wheel height adjustments whilethe engine is running.
• Always disconnect electric mowers (live operated)before cleaning, repairing, or adjusting.
• Grass catcher components are subject to wear, damage,and deterioration, which could expose moving parts orallow objects to be thrown. Frequently checkcomponents and replace with manufacturer’srecommended parts when necessary.
• Mower blades are sharp and can cut. Wrap the blade(s)or wear gloves, and use extra caution when servicingthem.
• Do not change the engine governor setting oroverspeed the engine.
• To ensure the best performance and safety, purchaseonly genuine Lawn-Boy replacement parts andaccessories. Do not use “will fit” parts andaccessories; they may cause a safety hazard.
6
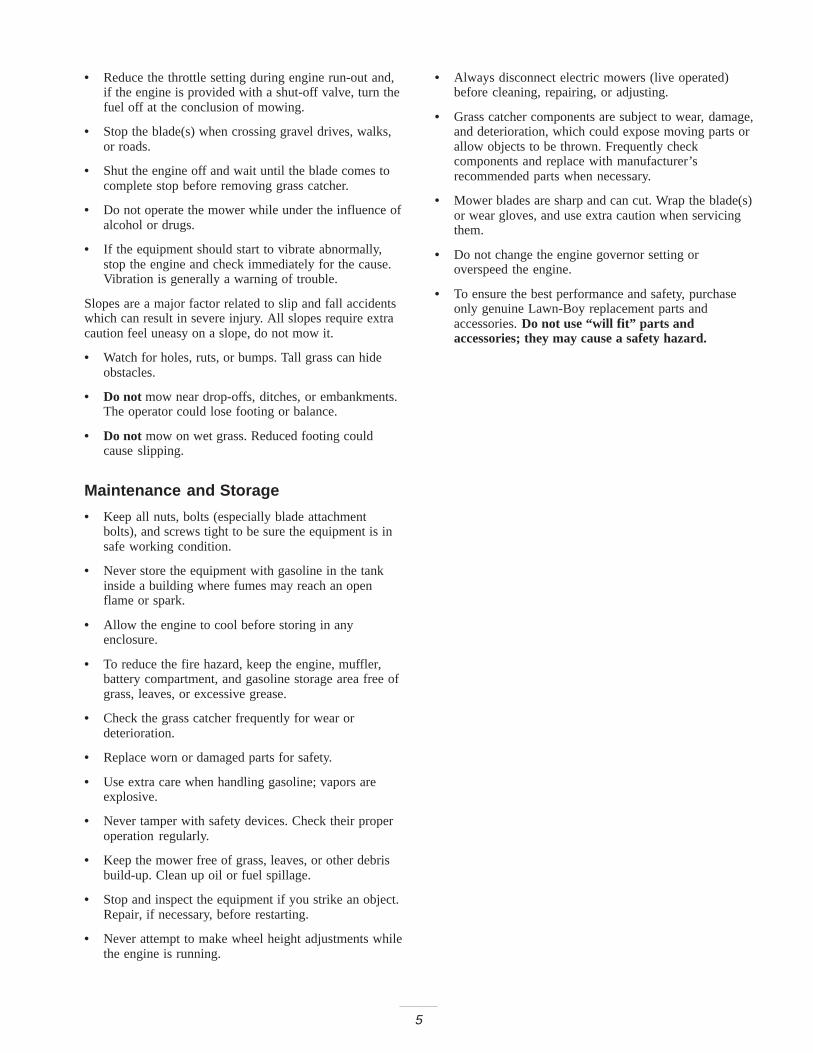
Safety and Instruction Decals
Safety decals and instructions are easily visible to the operator and are located near anyarea of potential danger. Replace any decal that is damaged or lost.
By Front Height Adjuster(Part No. 92-2914 Right)(Part No. 92-2915 Left)
On Mower Housing(Part No. 93-7250)
On Top of Grass Catcher Chute(Part No. 92-2919)
(Model 10324)
On Mower Housing(Part No. 43-8480)
On Mower Housing(Part No. 99-6018)
AssemblyNote: Determine the left and right sides of the lawn mower by standing in the operating position.
Unfolding the Handle
WARNING
POTENTIAL HAZARD• Folding or unfolding the handle improperly can
pinch, stretch, or damage one or more of thecables.
WHAT CAN HAPPEN• Any pinched, stretched, or damaged cable may
cause an operational failure that results in anunsafe operating condition.
HOW TO AVOID THE HAZARD• Do not pinch, stretch, or damage the cables.• Handle the cables with care when folding or
unfolding the handle.• Do not use the lawn mower if one or more of
the cables are pinched, stretched, or damaged.Contact your Authorized Service Dealer.
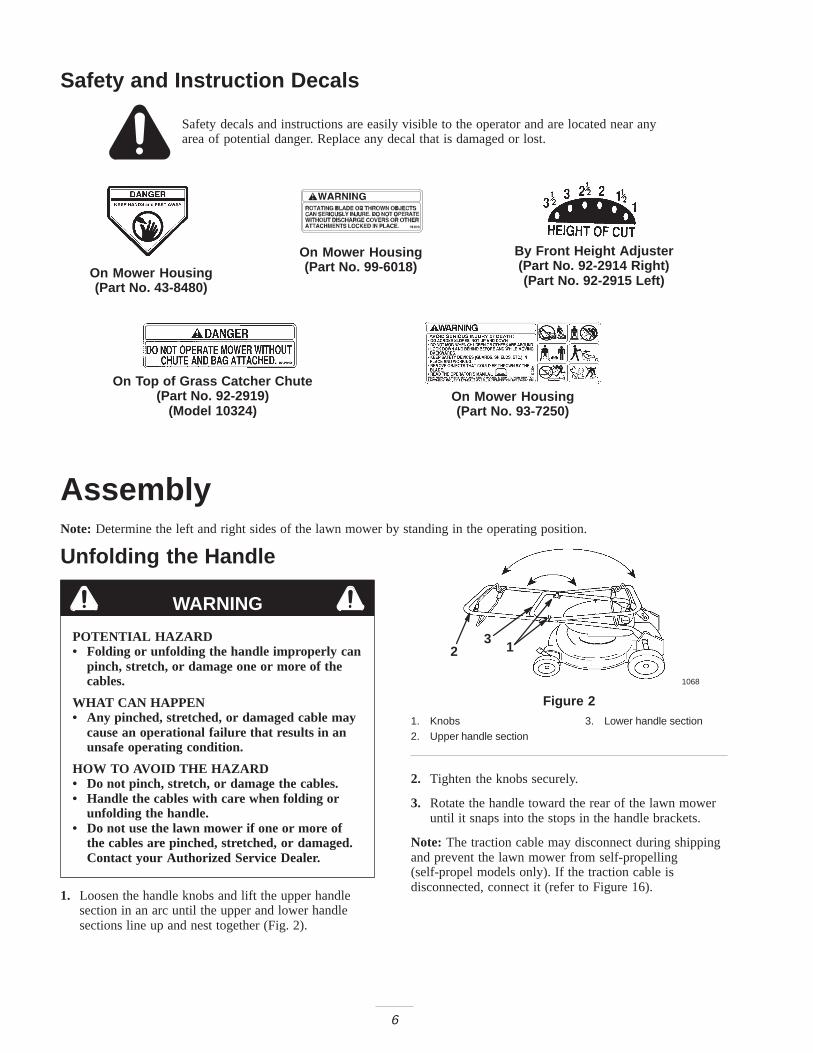
1. Loosen the handle knobs and lift the upper handlesection in an arc until the upper and lower handlesections line up and nest together (Fig. 2).
1068
2 13
Figure 21. Knobs2. Upper handle section
3. Lower handle section
2. Tighten the knobs securely.
3. Rotate the handle toward the rear of the lawn moweruntil it snaps into the stops in the handle brackets.
Note: The traction cable may disconnect during shippingand prevent the lawn mower from self-propelling(self-propel models only). If the traction cable isdisconnected, connect it (refer to Figure 16).
7
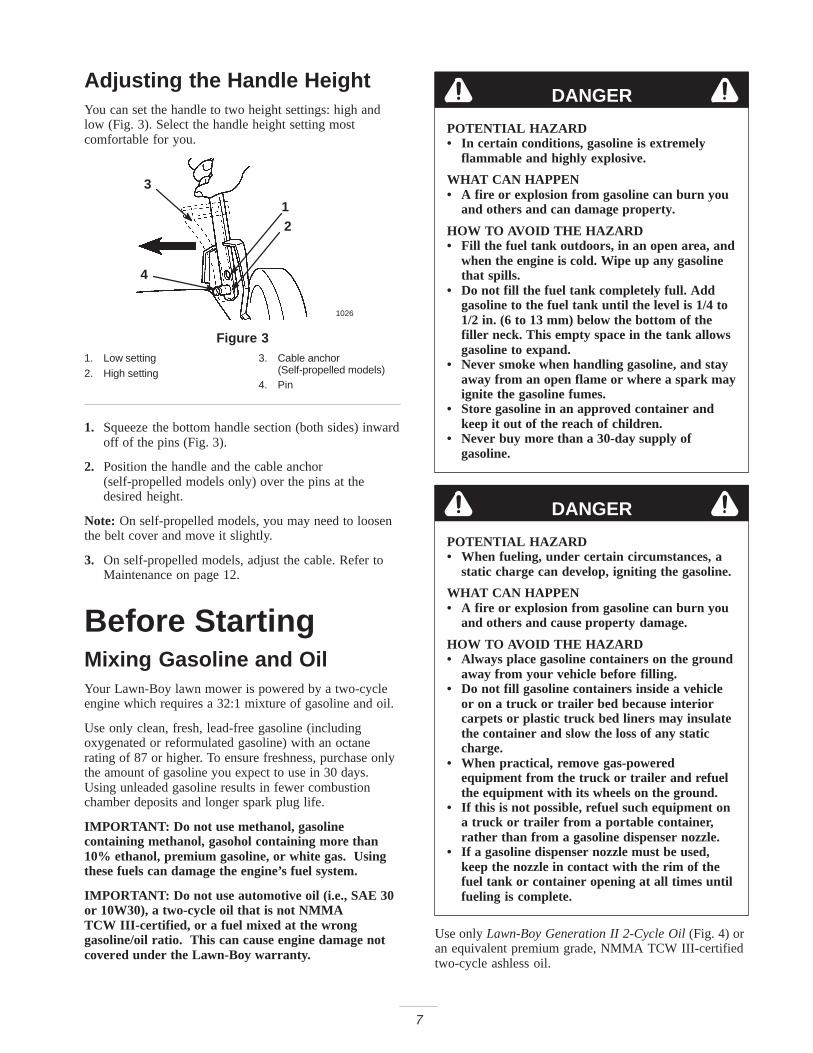
Adjusting the Handle HeightYou can set the handle to two height settings: high andlow (Fig. 3). Select the handle height setting mostcomfortable for you.
1026
12
3
4
Figure 31. Low setting2. High setting
3. Cable anchor(Self-propelled models)
4. Pin
1. Squeeze the bottom handle section (both sides) inwardoff of the pins (Fig. 3).
2. Position the handle and the cable anchor(self-propelled models only) over the pins at thedesired height.
Note: On self-propelled models, you may need to loosenthe belt cover and move it slightly.
3. On self-propelled models, adjust the cable. Refer toMaintenance on page 12.
Before StartingMixing Gasoline and OilYour Lawn-Boy lawn mower is powered by a two-cycleengine which requires a 32:1 mixture of gasoline and oil.
Use only clean, fresh, lead-free gasoline (includingoxygenated or reformulated gasoline) with an octanerating of 87 or higher. To ensure freshness, purchase onlythe amount of gasoline you expect to use in 30 days.Using unleaded gasoline results in fewer combustionchamber deposits and longer spark plug life.
IMPORTANT: Do not use methanol, gasolinecontaining methanol, gasohol containing more than10% ethanol, premium gasoline, or white gas. Usingthese fuels can damage the engine’s fuel system.
IMPORTANT: Do not use automotive oil (i.e., SAE 30or 10W30), a two-cycle oil that is not NMMA TCW III-certified, or a fuel mixed at the wronggasoline/oil ratio. This can cause engine damage notcovered under the Lawn-Boy warranty.
DANGER
POTENTIAL HAZARD• In certain conditions, gasoline is extremely
flammable and highly explosive.
WHAT CAN HAPPEN• A fire or explosion from gasoline can burn you
and others and can damage property.
HOW TO AVOID THE HAZARD• Fill the fuel tank outdoors, in an open area, and
when the engine is cold. Wipe up any gasolinethat spills.
• Do not fill the fuel tank completely full. Addgasoline to the fuel tank until the level is 1/4 to1/2 in. (6 to 13 mm) below the bottom of thefiller neck. This empty space in the tank allowsgasoline to expand.
• Never smoke when handling gasoline, and stayaway from an open flame or where a spark mayignite the gasoline fumes.
• Store gasoline in an approved container andkeep it out of the reach of children.
• Never buy more than a 30-day supply ofgasoline.
DANGER
POTENTIAL HAZARD• When fueling, under certain circumstances, a
static charge can develop, igniting the gasoline.
WHAT CAN HAPPEN• A fire or explosion from gasoline can burn you
and others and cause property damage.
HOW TO AVOID THE HAZARD• Always place gasoline containers on the ground
away from your vehicle before filling.• Do not fill gasoline containers inside a vehicle
or on a truck or trailer bed because interiorcarpets or plastic truck bed liners may insulatethe container and slow the loss of any staticcharge.
• When practical, remove gas-poweredequipment from the truck or trailer and refuelthe equipment with its wheels on the ground.
• If this is not possible, refuel such equipment ona truck or trailer from a portable container,rather than from a gasoline dispenser nozzle.
• If a gasoline dispenser nozzle must be used,keep the nozzle in contact with the rim of thefuel tank or container opening at all times untilfueling is complete.
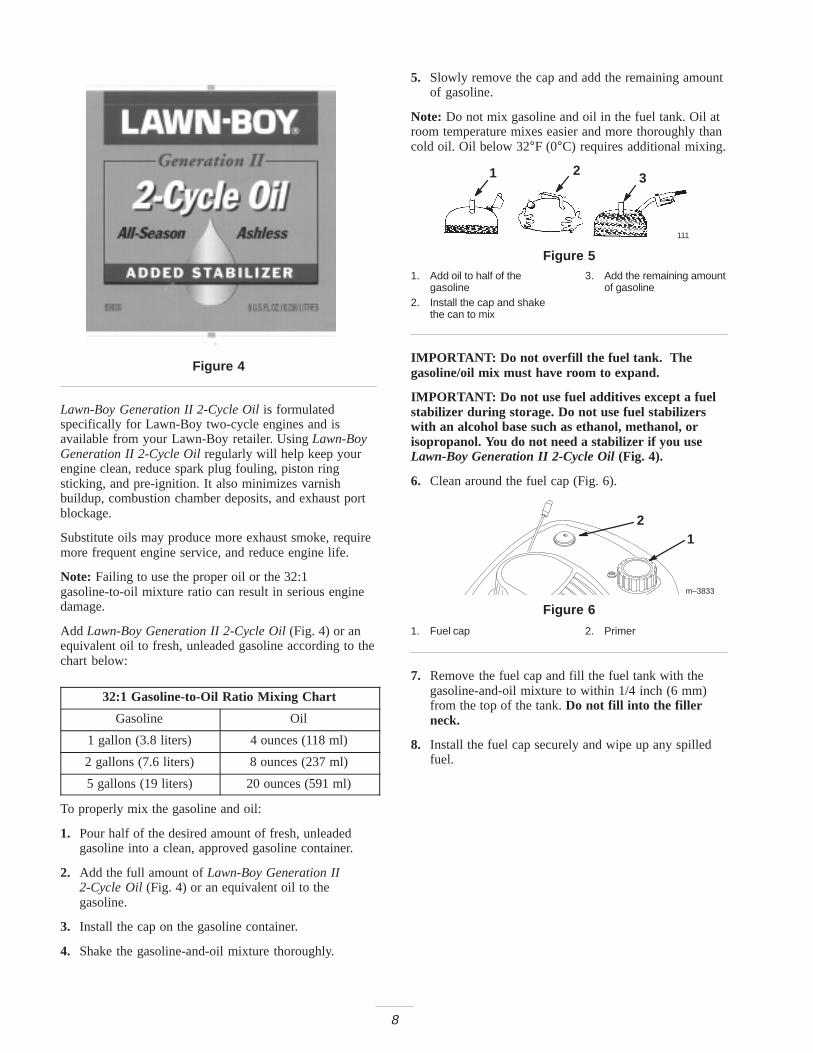
Use only Lawn-Boy Generation II 2-Cycle Oil (Fig. 4) oran equivalent premium grade, NMMA TCW III-certifiedtwo-cycle ashless oil.
8
Figure 4
Lawn-Boy Generation II 2-Cycle Oil is formulatedspecifically for Lawn-Boy two-cycle engines and isavailable from your Lawn-Boy retailer. Using Lawn-BoyGeneration II 2-Cycle Oil regularly will help keep yourengine clean, reduce spark plug fouling, piston ringsticking, and pre-ignition. It also minimizes varnishbuildup, combustion chamber deposits, and exhaust portblockage.
Substitute oils may produce more exhaust smoke, requiremore frequent engine service, and reduce engine life.
Note: Failing to use the proper oil or the 32:1gasoline-to-oil mixture ratio can result in serious enginedamage.
Add Lawn-Boy Generation II 2-Cycle Oil (Fig. 4) or anequivalent oil to fresh, unleaded gasoline according to thechart below:
32:1 Gasoline-to-Oil Ratio Mixing Chart
Gasoline Oil
1 gallon (3.8 liters) 4 ounces (118 ml)
2 gallons (7.6 liters) 8 ounces (237 ml)
5 gallons (19 liters) 20 ounces (591 ml)
To properly mix the gasoline and oil:
1. Pour half of the desired amount of fresh, unleadedgasoline into a clean, approved gasoline container.
2. Add the full amount of Lawn-Boy Generation II2-Cycle Oil (Fig. 4) or an equivalent oil to thegasoline.
3. Install the cap on the gasoline container.
4. Shake the gasoline-and-oil mixture thoroughly.
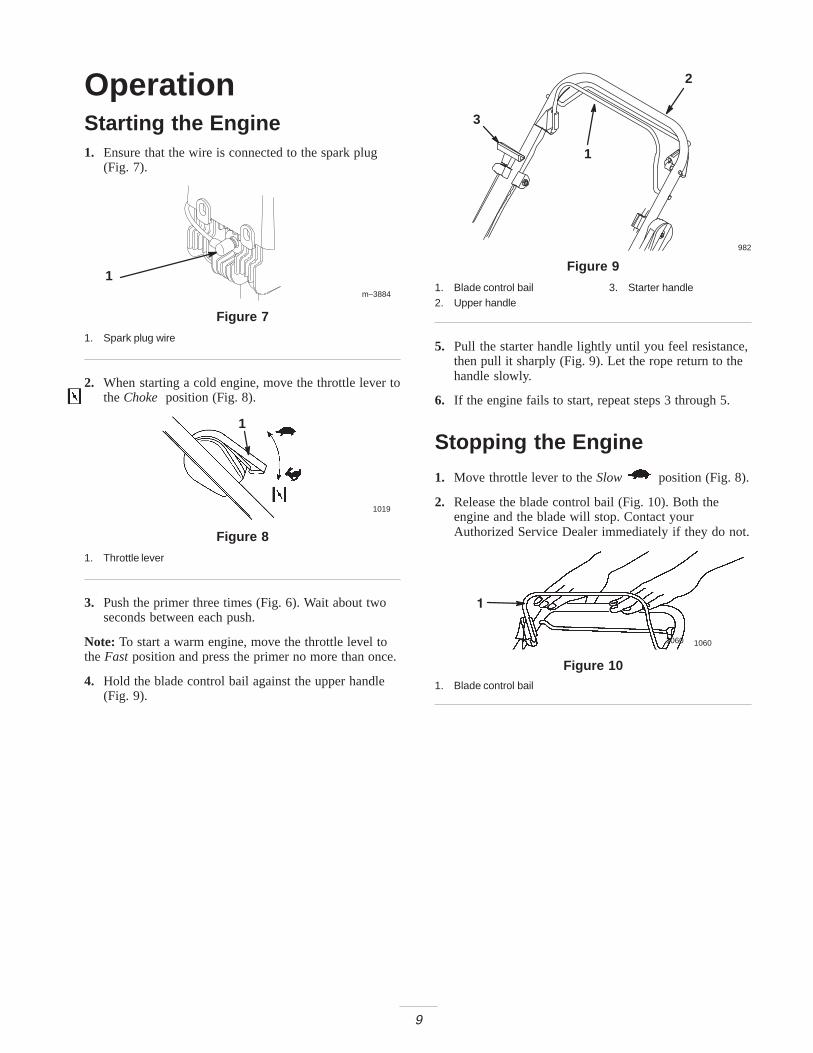
5. Slowly remove the cap and add the remaining amountof gasoline.
Note: Do not mix gasoline and oil in the fuel tank. Oil atroom temperature mixes easier and more thoroughly thancold oil. Oil below 32°F (0°C) requires additional mixing.
111
1 2 3
Figure 51. Add oil to half of the
gasoline2. Install the cap and shake
the can to mix
3. Add the remaining amountof gasoline
IMPORTANT: Do not overfill the fuel tank. Thegasoline/oil mix must have room to expand.
IMPORTANT: Do not use fuel additives except a fuelstabilizer during storage. Do not use fuel stabilizerswith an alcohol base such as ethanol, methanol, orisopropanol. You do not need a stabilizer if you useLawn-Boy Generation II 2-Cycle Oil (Fig. 4).
6. Clean around the fuel cap (Fig. 6).
m–3833
12
Figure 6
1. Fuel cap 2. Primer
7. Remove the fuel cap and fill the fuel tank with thegasoline-and-oil mixture to within 1/4 inch (6 mm)from the top of the tank. Do not fill into the fillerneck.
8. Install the fuel cap securely and wipe up any spilledfuel.
9
OperationStarting the Engine1. Ensure that the wire is connected to the spark plug
(Fig. 7).
m–3884
1
Figure 7
1. Spark plug wire
2. When starting a cold engine, move the throttle lever tothe Choke position (Fig. 8).
1019
1
Figure 8
1. Throttle lever
3. Push the primer three times (Fig. 6). Wait about twoseconds between each push.
Note: To start a warm engine, move the throttle level tothe Fast position and press the primer no more than once.
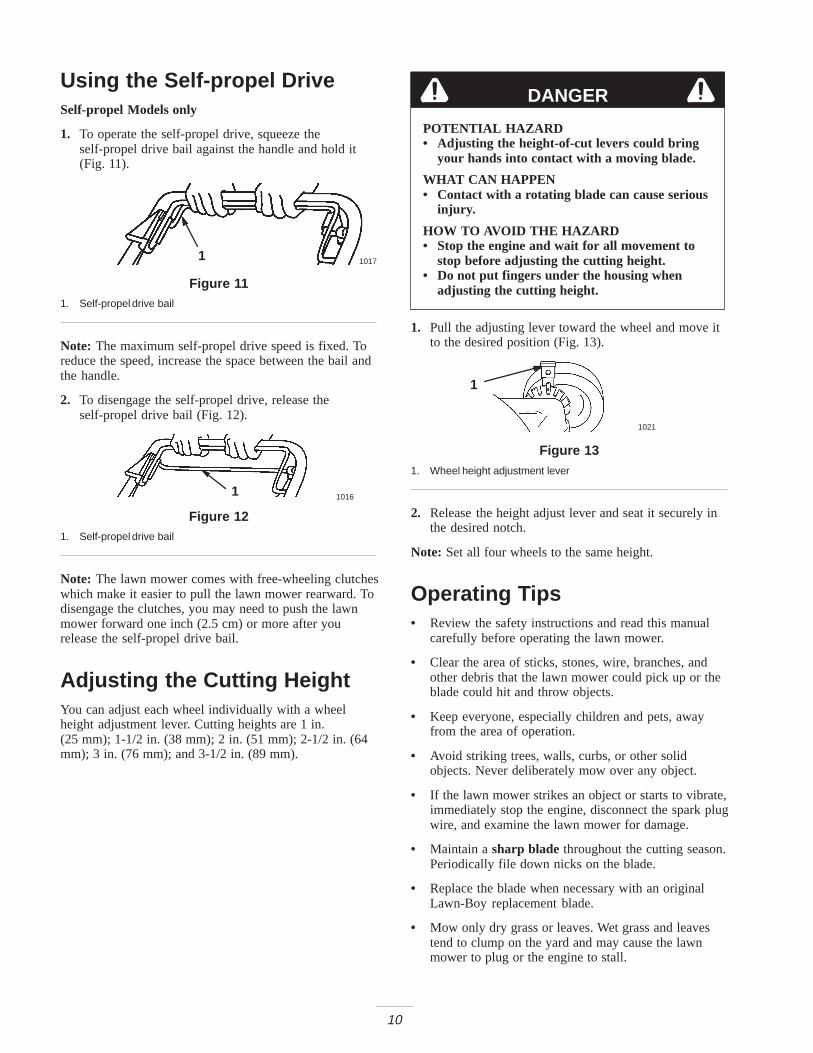
4. Hold the blade control bail against the upper handle(Fig. 9).
982
1
3
2
Figure 9
1. Blade control bail2. Upper handle
3. Starter handle
5. Pull the starter handle lightly until you feel resistance,then pull it sharply (Fig. 9). Let the rope return to thehandle slowly.
6. If the engine fails to start, repeat steps 3 through 5.
Stopping the Engine
1. Move throttle lever to the Slow position (Fig. 8).
2. Release the blade control bail (Fig. 10). Both theengine and the blade will stop. Contact yourAuthorized Service Dealer immediately if they do not.
1
1060 1060
Figure 101. Blade control bail
10
Using the Self-propel DriveSelf-propel Models only
1. To operate the self-propel drive, squeeze theself-propel drive bail against the handle and hold it(Fig. 11).
10171
Figure 111. Self-propel drive bail
Note: The maximum self-propel drive speed is fixed. Toreduce the speed, increase the space between the bail andthe handle.
2. To disengage the self-propel drive, release theself-propel drive bail (Fig. 12).
10161
Figure 121. Self-propel drive bail
Note: The lawn mower comes with free-wheeling clutcheswhich make it easier to pull the lawn mower rearward. Todisengage the clutches, you may need to push the lawnmower forward one inch (2.5 cm) or more after yourelease the self-propel drive bail.
Adjusting the Cutting HeightYou can adjust each wheel individually with a wheelheight adjustment lever. Cutting heights are 1 in. (25 mm); 1-1/2 in. (38 mm); 2 in. (51 mm); 2-1/2 in. (64mm); 3 in. (76 mm); and 3-1/2 in. (89 mm).
DANGER
POTENTIAL HAZARD• Adjusting the height-of-cut levers could bring
your hands into contact with a moving blade.
WHAT CAN HAPPEN• Contact with a rotating blade can cause serious
injury.
HOW TO AVOID THE HAZARD• Stop the engine and wait for all movement to
stop before adjusting the cutting height.• Do not put fingers under the housing when
adjusting the cutting height.
1. Pull the adjusting lever toward the wheel and move itto the desired position (Fig. 13).
1021
1
Figure 131. Wheel height adjustment lever
2. Release the height adjust lever and seat it securely inthe desired notch.
Note: Set all four wheels to the same height.
Operating Tips• Review the safety instructions and read this manual
carefully before operating the lawn mower.
• Clear the area of sticks, stones, wire, branches, andother debris that the lawn mower could pick up or theblade could hit and throw objects.
• Keep everyone, especially children and pets, awayfrom the area of operation.
• Avoid striking trees, walls, curbs, or other solidobjects. Never deliberately mow over any object.
• If the lawn mower strikes an object or starts to vibrate,immediately stop the engine, disconnect the spark plugwire, and examine the lawn mower for damage.
• Maintain a sharp blade throughout the cutting season.Periodically file down nicks on the blade.
• Replace the blade when necessary with an originalLawn-Boy replacement blade.
• Mow only dry grass or leaves. Wet grass and leavestend to clump on the yard and may cause the lawnmower to plug or the engine to stall.

11
WARNING
POTENTIAL HAZARD• Wet grass or leaves can cause you to slip and
contact the blade.
WHAT CAN HAPPEN• Blade contact can seriously injure you.
HOW TO AVOID THE HAZARD• Mow only in dry conditions.
• Clean clippings or leaves from the underside of thelawn mower deck after each mowing. See Cleaning theLawn Mower Housing on page 13.
• Keep the engine in good running condition.
WARNING
POTENTIAL HAZARD• Operating a lawn mower with its engine
running at a speed greater than the factorysetting can cause an unsafe operating condition.
WHAT CAN HAPPEN• The lawn mower could throw a part of the
blade or engine into the operator’s orbystander’s area and cause serious personalinjury or death.
HOW TO AVOID THE HAZARD• Do not change the engine speed setting.• If you suspect the engine speed is faster than
normal, contact your Authorized ServiceDealer.
• Clean the air filter frequently. Mulching stirs up moreclippings and dust which clogs the air filter andreduces engine performance.
• To achieve the best mulching action, set the lawnmower cutting height so that the lawn mower cuts nomore than a third of the grass stem or a maximum ofone-inch (25 mm) long clippings. If you try to mulchmore or if the grass is very lush, the mulching actionwill be poor. Under these conditions, use the sidedischarge or grass catcher. A few days later, install themulch plate on your lawn mower to resume mulching.
Cutting Grass
• In the summer heat, cut the grass at the 2, 2-1/2, or3-inch (51, 64, or 76 mm) cutting height-settings. Onlycut off about one-third of the grass blade. Do not cutbelow the two-inch setting unless the grass is sparse orit is late autumn when the grass growth begins to slowdown.
• When cutting grass over six inches tall, first mowusing the highest cutting height setting and walkingslower; then mow again at a lower setting for bestlawn appearance. If the grass is too long and leavesclumps on top of the lawn, the lawn mower may plugup and cause the engine to stall.
• Alternate the mowing direction. This helps dispersethe clippings over the lawn for even fertilization.
If the finished cut lawn appearance is unsatisfactory, tryone or more of the following:
• Sharpen the blade.
• Walk at a slower pace while mowing.
• Raise the cutting height on your lawn mower.
• Cut the grass more frequently.
• Overlap the cutting swaths instead of cutting a fullswath with each pass.
• Set the cutting height on the front wheels one notchlower than the rear wheels.
Cutting Leaves
• After cutting the lawn, make sure that half of the lawnshows through the cut leaf cover. You may need tomake one or more passes over the leaves.
• For light leaf coverage, set all the wheels at the samecutting height.
• If there are more than 5 inches (12.7 cm) of leaves onthe lawn, set the front wheels one or two notcheshigher than the rear wheels. This makes it easier tofeed the leaves under the lawn mower deck.
• Slow down your mowing speed if the lawn mowerdoes not cut the leaves finely enough.
• If you mow over oak leaves, you can add lime to thegrass in the spring to reduce the acidity of the leaves.
12
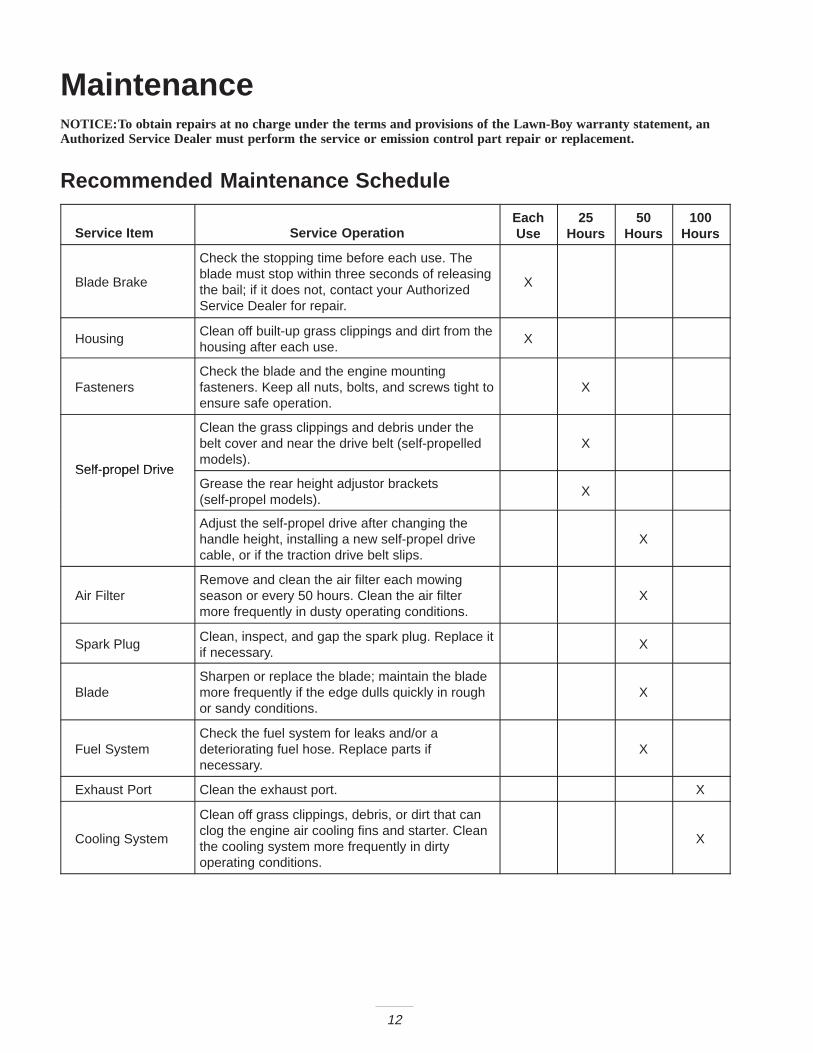
MaintenanceNOTICE:To obtain repairs at no charge under the terms and provisions of the Lawn-Boy warranty statement, anAuthorized Service Dealer must perform the service or emission control part repair or replacement.
Recommended Maintenance Schedule
Service Item Service OperationEachUse
25Hours
50Hours
100Hours
Blade Brake
Check the stopping time before each use. Theblade must stop within three seconds of releasingthe bail; if it does not, contact your AuthorizedService Dealer for repair.
X
Housing Clean off built-up grass clippings and dirt from thehousing after each use.
X
FastenersCheck the blade and the engine mountingfasteners. Keep all nuts, bolts, and screws tight toensure safe operation.
X
Self-propel Drive
Clean the grass clippings and debris under thebelt cover and near the drive belt (self-propelledmodels).
X
Self-propel DriveGrease the rear height adjustor brackets(self-propel models).
X
Adjust the self-propel drive after changing thehandle height, installing a new self-propel drivecable, or if the traction drive belt slips.
X
Air FilterRemove and clean the air filter each mowingseason or every 50 hours. Clean the air filtermore frequently in dusty operating conditions.
X
Spark Plug Clean, inspect, and gap the spark plug. Replace itif necessary.
X
BladeSharpen or replace the blade; maintain the blademore frequently if the edge dulls quickly in roughor sandy conditions.
X
Fuel SystemCheck the fuel system for leaks and/or adeteriorating fuel hose. Replace parts ifnecessary.
X
Exhaust Port Clean the exhaust port. X
Cooling System
Clean off grass clippings, debris, or dirt that canclog the engine air cooling fins and starter. Cleanthe cooling system more frequently in dirtyoperating conditions.
X
13
CAUTION
POTENTIAL HAZARD• If you leave the wire on the spark plug, someone could start the engine.
WHAT CAN HAPPEN• Someone accidentally starting the engine could seriously injure you or other bystanders.
HOW TO AVOID THE HAZARD• Disconnect the wire from the spark plug before you do any maintenance. Set the wire aside
so it does not accidentally contact spark plug.
Cleaning the Lawn MowerHousingA clean lawn mower housing provides the best cuttingperformance. Check for grass buildup and clean it aftereach use.
Washing Method
1. Move the lawn mower to a flat concrete or asphaltsurface near a garden hose.
2. Start the engine.
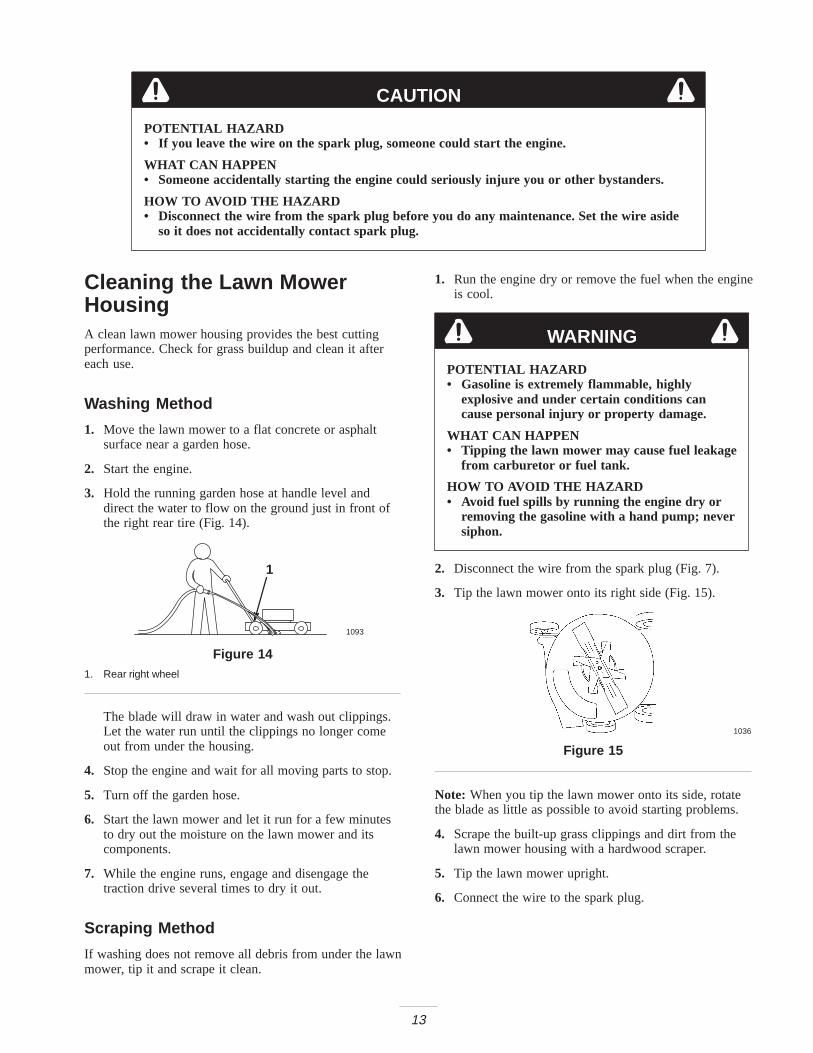
3. Hold the running garden hose at handle level anddirect the water to flow on the ground just in front ofthe right rear tire (Fig. 14).
1093
1
Figure 141. Rear right wheel
The blade will draw in water and wash out clippings.Let the water run until the clippings no longer comeout from under the housing.
4. Stop the engine and wait for all moving parts to stop.
5. Turn off the garden hose.
6. Start the lawn mower and let it run for a few minutesto dry out the moisture on the lawn mower and itscomponents.
7. While the engine runs, engage and disengage thetraction drive several times to dry it out.
Scraping Method
If washing does not remove all debris from under the lawnmower, tip it and scrape it clean.
1. Run the engine dry or remove the fuel when the engineis cool.
WARNING
POTENTIAL HAZARD• Gasoline is extremely flammable, highly
explosive and under certain conditions cancause personal injury or property damage.
WHAT CAN HAPPEN• Tipping the lawn mower may cause fuel leakage
from carburetor or fuel tank.
HOW TO AVOID THE HAZARD• Avoid fuel spills by running the engine dry or
removing the gasoline with a hand pump; neversiphon.
2. Disconnect the wire from the spark plug (Fig. 7).
3. Tip the lawn mower onto its right side (Fig. 15).
1036
Figure 15
Note: When you tip the lawn mower onto its side, rotatethe blade as little as possible to avoid starting problems.
4. Scrape the built-up grass clippings and dirt from thelawn mower housing with a hardwood scraper.
5. Tip the lawn mower upright.
6. Connect the wire to the spark plug.
14
Cleaning the Self-propel DriveSelf-propel Models only
Under certain conditions, the clippings can collect underthe belt drive cover and in the pulley groove. This cancause the belt to slip, the self-propel drive to lose power,or the self-propel drive not to disengage.
Clean the grass clippings and debris from under the beltcover every 25 hours of operation.
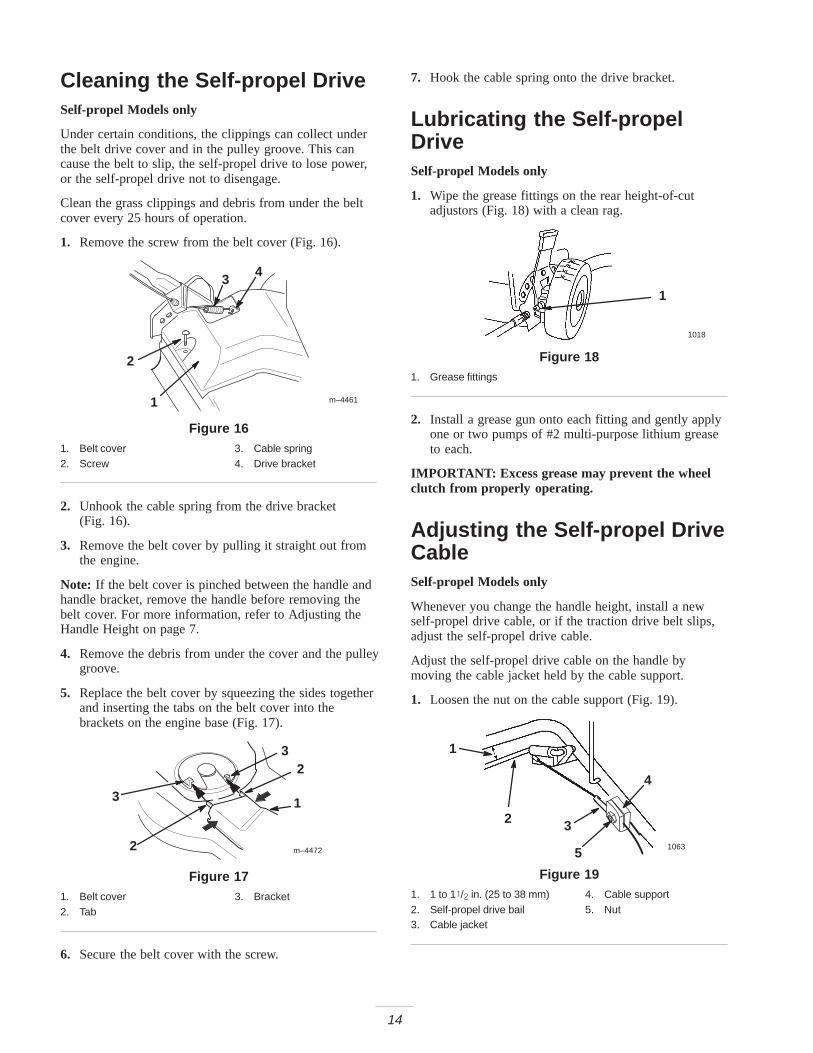
1. Remove the screw from the belt cover (Fig. 16).
m–44611
3
2
4
Figure 161. Belt cover2. Screw
3. Cable spring4. Drive bracket
2. Unhook the cable spring from the drive bracket (Fig. 16).
3. Remove the belt cover by pulling it straight out fromthe engine.
Note: If the belt cover is pinched between the handle andhandle bracket, remove the handle before removing thebelt cover. For more information, refer to Adjusting theHandle Height on page 7.
4. Remove the debris from under the cover and the pulleygroove.
5. Replace the belt cover by squeezing the sides togetherand inserting the tabs on the belt cover into thebrackets on the engine base (Fig. 17).
m–4472
13
2
32
Figure 171. Belt cover2. Tab
3. Bracket
6. Secure the belt cover with the screw.
7. Hook the cable spring onto the drive bracket.
Lubricating the Self-propelDriveSelf-propel Models only
1. Wipe the grease fittings on the rear height-of-cutadjustors (Fig. 18) with a clean rag.
1018
1
Figure 181. Grease fittings
2. Install a grease gun onto each fitting and gently applyone or two pumps of #2 multi-purpose lithium greaseto each.
IMPORTANT: Excess grease may prevent the wheelclutch from properly operating.
Adjusting the Self-propel DriveCableSelf-propel Models only
Whenever you change the handle height, install a newself-propel drive cable, or if the traction drive belt slips,adjust the self-propel drive cable.
Adjust the self-propel drive cable on the handle bymoving the cable jacket held by the cable support.
1. Loosen the nut on the cable support (Fig. 19).
1063
1
2 3
4
5
Figure 191. 1 to 1�/� in. (25 to 38 mm)2. Self-propel drive bail3. Cable jacket
4. Cable support5. Nut
15
2. Hold the self-propel drive bail 1 to 1-1/2 in. (25 to38 mm) from the handle (Fig. 19).
3. Pull the cable jacket down (away from the bail) toremove the slack in the cable between the bail and thecable support.
4. Tighten the nut on the cable support.
5. Release the bail and ensure that the cable is loose.
Note: The cable must be loose when you release the bailor the lawn mower may creep when you disengage thebail.
Servicing the Air FilterClean the air filter once every season or every 50 hours;clean it more frequently under dusty conditions.
Note: Do not operate the engine without the air filterelement; extreme engine damage will occur.
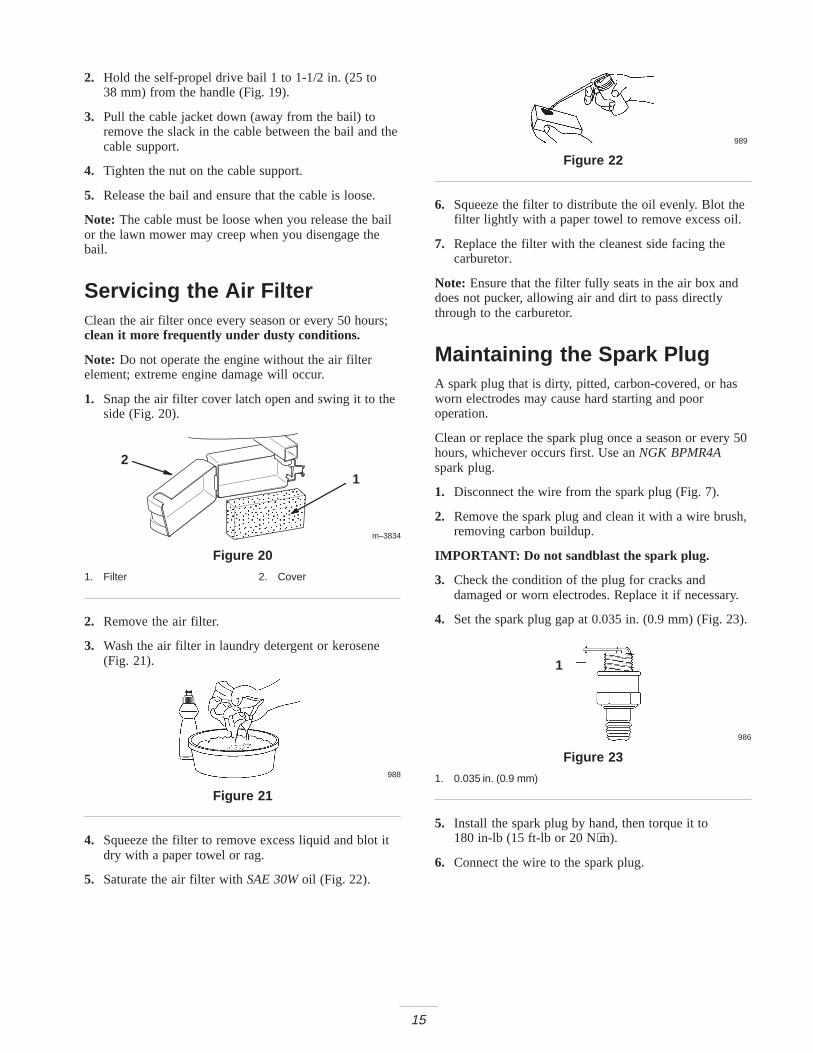
1. Snap the air filter cover latch open and swing it to theside (Fig. 20).
ÎÎÎÎÎÎÎÎÎÎÎÎÎÎÎÎ
m–3834
12
Figure 20
1. Filter 2. Cover
2. Remove the air filter.
3. Wash the air filter in laundry detergent or kerosene(Fig. 21).
988
Figure 21
4. Squeeze the filter to remove excess liquid and blot itdry with a paper towel or rag.
5. Saturate the air filter with SAE 30W oil (Fig. 22).
989
Figure 22
6. Squeeze the filter to distribute the oil evenly. Blot thefilter lightly with a paper towel to remove excess oil.
7. Replace the filter with the cleanest side facing thecarburetor.
Note: Ensure that the filter fully seats in the air box anddoes not pucker, allowing air and dirt to pass directlythrough to the carburetor.
Maintaining the Spark PlugA spark plug that is dirty, pitted, carbon-covered, or hasworn electrodes may cause hard starting and pooroperation.
Clean or replace the spark plug once a season or every 50hours, whichever occurs first. Use an NGK BPMR4Aspark plug.
1. Disconnect the wire from the spark plug (Fig. 7).
2. Remove the spark plug and clean it with a wire brush,removing carbon buildup.
IMPORTANT: Do not sandblast the spark plug.
3. Check the condition of the plug for cracks anddamaged or worn electrodes. Replace it if necessary.
4. Set the spark plug gap at 0.035 in. (0.9 mm) (Fig. 23).
986
1
Figure 23
1. 0.035 in. (0.9 mm)
5. Install the spark plug by hand, then torque it to180 in-lb (15 ft-lb or 20 N⋅m).
6. Connect the wire to the spark plug.

16
Maintaining the BladeA straight, sharp blade provides maximum cuttingperformance. Regularly inspect and sharpen the blade.
WARNING
POTENTIAL HAZARD• The blade is sharp.
WHAT CAN HAPPEN• Contact with the sharp blade can cause serious
personal injury.
HOW TO AVOID THE HAZARD• Wear gloves or wrap the sharp edges of the
blade with a rag.
1. Disconnect the wire from the spark plug (Fig. 7).
2. Tip the lawn mower onto its right side (Fig. 15).
Inspecting the Blade
Carefully examine the blade for sharpness and wear,especially where the flat and the curved parts meet(Fig. 24A). Because sand and abrasive material can wearaway the metal that connects the flat and curved parts ofthe blade, check the blade before using the lawn mower. Ifyou notice a slot or wear (Figs. 24B and 24C), replace theblade; refer to Removing the Blade on page 16.
270
1
1
1
2
3
4
A
B
C
Figure 241. Sail2. Flat part of blade
3. Wear4. Slot formed
Note: For the best performance, install a new blade beforethe cutting season begins. During the year, file down anysmall nicks to maintain the cutting edge.
DANGER
POTENTIAL HAZARD• A worn or damaged blade could break and a
piece of the blade could be thrown into theoperator’s or bystander’s area.
WHAT CAN HAPPEN• A thrown piece of the blade could cause serious
personal injury or death to the operator orbystanders.
HOW TO AVOID THE HAZARD• Inspect the blade periodically for wear or
damage.• Replace a worn or damaged blade.
Removing the Blade
1. Remove the blade nut and the mulching fan (Fig. 25).
4
2 31
M–2909
Figure 251. Blade nut2. Mulching fan
3. Blade4. Blade driver
2. Remove the blade from the blade driver (Fig. 25).
3. Examine the mulch fan for worn or bent blades.Replace it if necessary.
4. Examine the blade driver for bent or sheared drivelugs. Replace it if necessary.
Sharpening the Blade
File the top side of the blade to maintain its originalcutting angle (Fig. 26A) and inner cutting edge radius(Fig. 26B).
153
1
m�4783
2A B
Figure 261. Sharpen at this angle only 2. Maintain the original
radius here
Note: The blade will remain balanced if you remove thesame amount of material from both cutting edges.
17
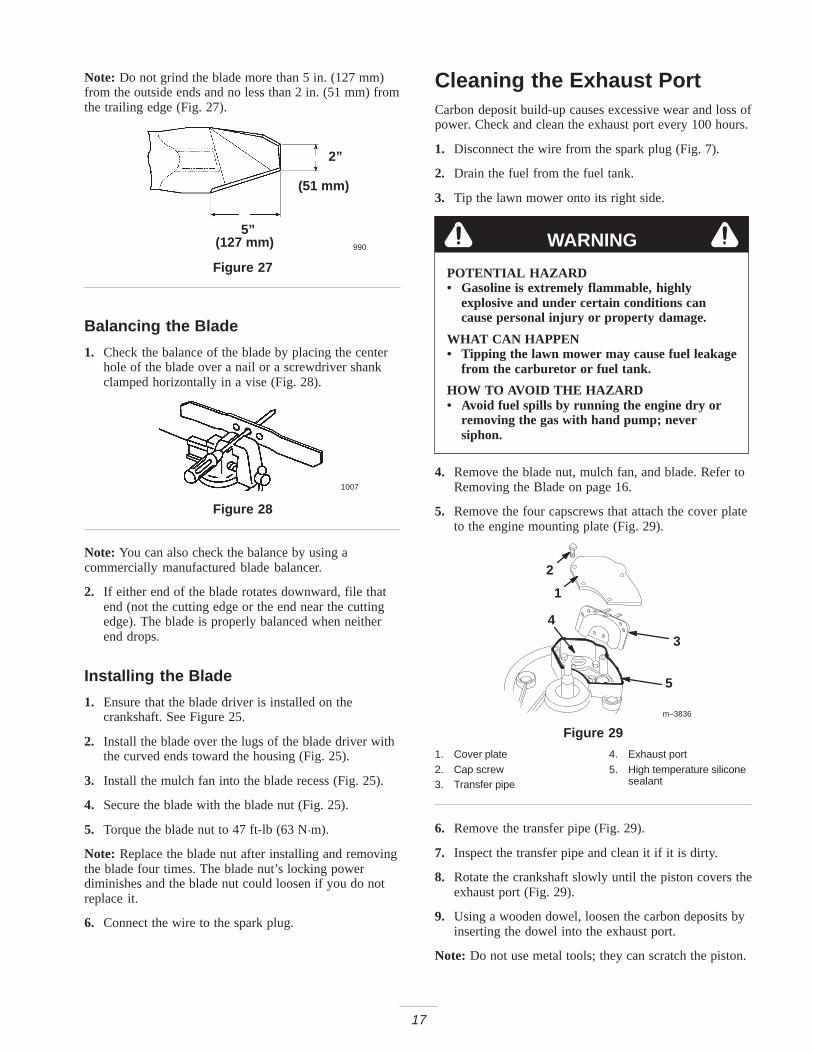
Note: Do not grind the blade more than 5 in. (127 mm)from the outside ends and no less than 2 in. (51 mm) fromthe trailing edge (Fig. 27).
990
2”
(51 mm)
5”(127 mm)
Figure 27
Balancing the Blade
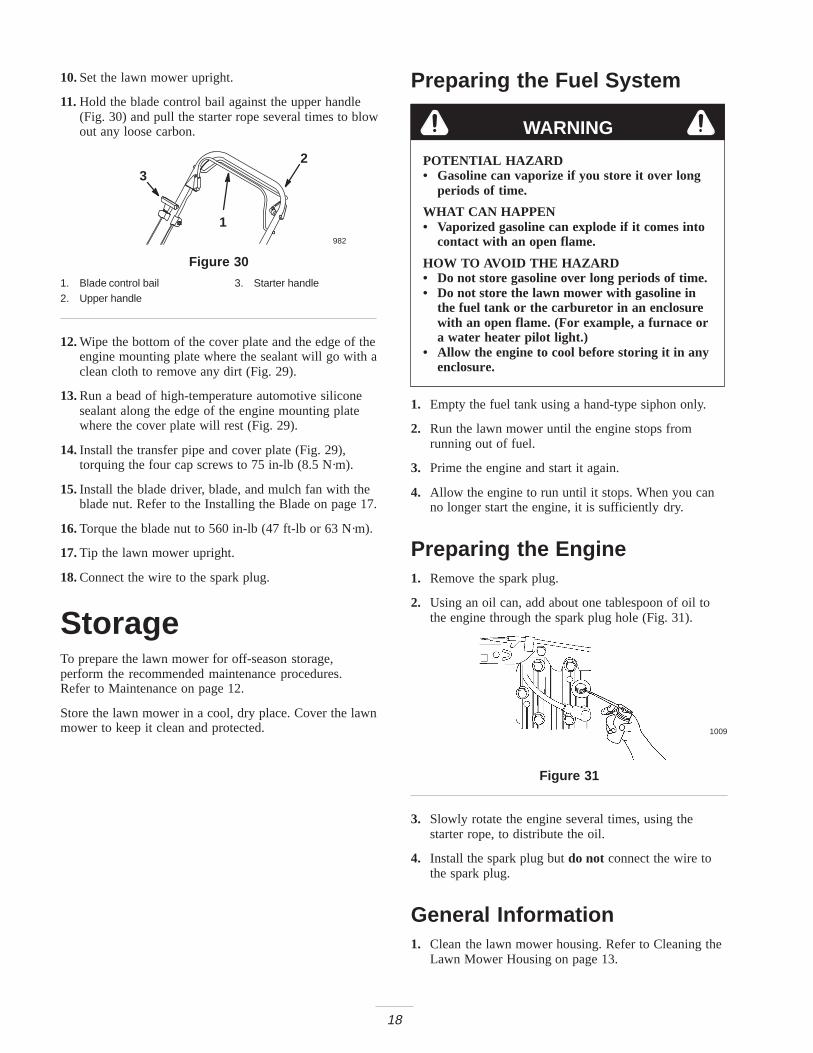
1. Check the balance of the blade by placing the centerhole of the blade over a nail or a screwdriver shankclamped horizontally in a vise (Fig. 28).
1007
Figure 28
Note: You can also check the balance by using acommercially manufactured blade balancer.
2. If either end of the blade rotates downward, file thatend (not the cutting edge or the end near the cuttingedge). The blade is properly balanced when neitherend drops.
Installing the Blade
1. Ensure that the blade driver is installed on thecrankshaft. See Figure 25.
2. Install the blade over the lugs of the blade driver withthe curved ends toward the housing (Fig. 25).
3. Install the mulch fan into the blade recess (Fig. 25).
4. Secure the blade with the blade nut (Fig. 25).
5. Torque the blade nut to 47 ft-lb (63 N�m).
Note: Replace the blade nut after installing and removingthe blade four times. The blade nut’s locking powerdiminishes and the blade nut could loosen if you do notreplace it.
6. Connect the wire to the spark plug.
Cleaning the Exhaust PortCarbon deposit build-up causes excessive wear and loss ofpower. Check and clean the exhaust port every 100 hours.
1. Disconnect the wire from the spark plug (Fig. 7).
2. Drain the fuel from the fuel tank.
3. Tip the lawn mower onto its right side.
WARNING
POTENTIAL HAZARD• Gasoline is extremely flammable, highly
explosive and under certain conditions cancause personal injury or property damage.
WHAT CAN HAPPEN• Tipping the lawn mower may cause fuel leakage
from the carburetor or fuel tank.
HOW TO AVOID THE HAZARD• Avoid fuel spills by running the engine dry or
removing the gas with hand pump; neversiphon.
4. Remove the blade nut, mulch fan, and blade. Refer toRemoving the Blade on page 16.
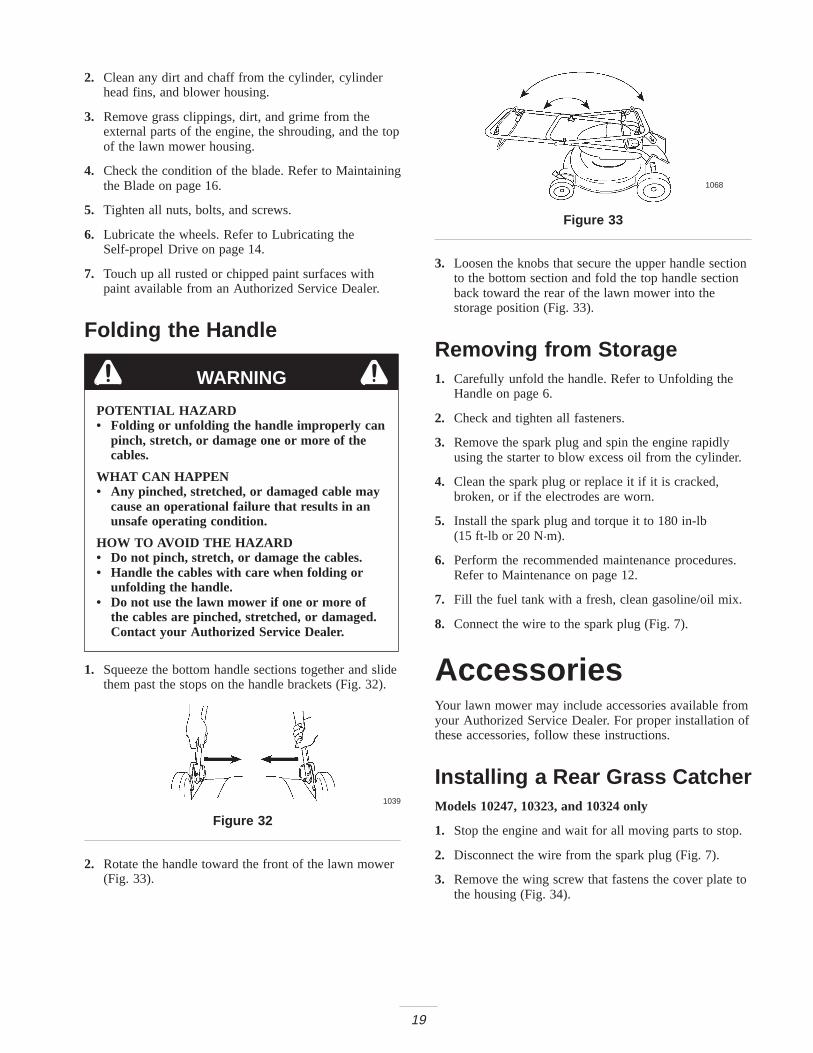
5. Remove the four capscrews that attach the cover plateto the engine mounting plate (Fig. 29).
m–3836
1
3
2
4
5
Figure 29
1. Cover plate2. Cap screw3. Transfer pipe
4. Exhaust port5. High temperature silicone
sealant
6. Remove the transfer pipe (Fig. 29).
7. Inspect the transfer pipe and clean it if it is dirty.
8. Rotate the crankshaft slowly until the piston covers theexhaust port (Fig. 29).
9. Using a wooden dowel, loosen the carbon deposits byinserting the dowel into the exhaust port.
Note: Do not use metal tools; they can scratch the piston.
18
10.Set the lawn mower upright.
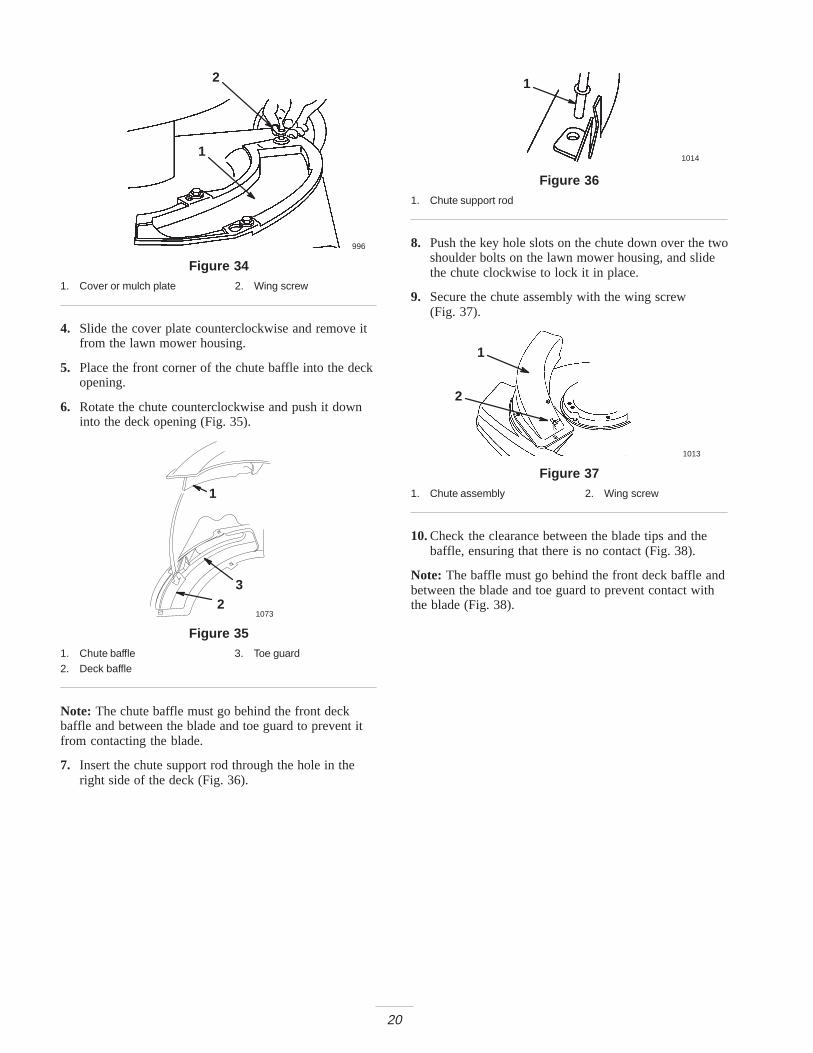
11.Hold the blade control bail against the upper handle(Fig. 30) and pull the starter rope several times to blowout any loose carbon.
982
1
32
Figure 30
1. Blade control bail2. Upper handle
3. Starter handle
12.Wipe the bottom of the cover plate and the edge of theengine mounting plate where the sealant will go with aclean cloth to remove any dirt (Fig. 29).
13.Run a bead of high-temperature automotive siliconesealant along the edge of the engine mounting platewhere the cover plate will rest (Fig. 29).
14.Install the transfer pipe and cover plate (Fig. 29),torquing the four cap screws to 75 in-lb (8.5 N·m).
15.Install the blade driver, blade, and mulch fan with theblade nut. Refer to the Installing the Blade on page 17.
16.Torque the blade nut to 560 in-lb (47 ft-lb or 63 N·m).
17.Tip the lawn mower upright.
18.Connect the wire to the spark plug.
StorageTo prepare the lawn mower for off-season storage,perform the recommended maintenance procedures.Refer to Maintenance on page 12.
Store the lawn mower in a cool, dry place. Cover the lawnmower to keep it clean and protected.
Preparing the Fuel System
WARNING
POTENTIAL HAZARD• Gasoline can vaporize if you store it over long
periods of time.
WHAT CAN HAPPEN• Vaporized gasoline can explode if it comes into
contact with an open flame.
HOW TO AVOID THE HAZARD• Do not store gasoline over long periods of time.• Do not store the lawn mower with gasoline in
the fuel tank or the carburetor in an enclosurewith an open flame. (For example, a furnace ora water heater pilot light.)
• Allow the engine to cool before storing it in anyenclosure.
1. Empty the fuel tank using a hand-type siphon only.
2. Run the lawn mower until the engine stops fromrunning out of fuel.
3. Prime the engine and start it again.
4. Allow the engine to run until it stops. When you canno longer start the engine, it is sufficiently dry.
Preparing the Engine1. Remove the spark plug.
2. Using an oil can, add about one tablespoon of oil tothe engine through the spark plug hole (Fig. 31).
1009
Figure 31
3. Slowly rotate the engine several times, using thestarter rope, to distribute the oil.
4. Install the spark plug but do not connect the wire tothe spark plug.
General Information1. Clean the lawn mower housing. Refer to Cleaning the
Lawn Mower Housing on page 13.
19
2. Clean any dirt and chaff from the cylinder, cylinderhead fins, and blower housing.
3. Remove grass clippings, dirt, and grime from theexternal parts of the engine, the shrouding, and the topof the lawn mower housing.
4. Check the condition of the blade. Refer to Maintainingthe Blade on page 16.
5. Tighten all nuts, bolts, and screws.
6. Lubricate the wheels. Refer to Lubricating theSelf-propel Drive on page 14.
7. Touch up all rusted or chipped paint surfaces withpaint available from an Authorized Service Dealer.
Folding the Handle
WARNING
POTENTIAL HAZARD• Folding or unfolding the handle improperly can
pinch, stretch, or damage one or more of thecables.
WHAT CAN HAPPEN• Any pinched, stretched, or damaged cable may
cause an operational failure that results in anunsafe operating condition.
HOW TO AVOID THE HAZARD• Do not pinch, stretch, or damage the cables.• Handle the cables with care when folding or
unfolding the handle.• Do not use the lawn mower if one or more of
the cables are pinched, stretched, or damaged.Contact your Authorized Service Dealer.
1. Squeeze the bottom handle sections together and slidethem past the stops on the handle brackets (Fig. 32).
1039
Figure 32
2. Rotate the handle toward the front of the lawn mower (Fig. 33).
1068
Figure 33
3. Loosen the knobs that secure the upper handle sectionto the bottom section and fold the top handle sectionback toward the rear of the lawn mower into thestorage position (Fig. 33).
Removing from Storage1. Carefully unfold the handle. Refer to Unfolding the
Handle on page 6.
2. Check and tighten all fasteners.
3. Remove the spark plug and spin the engine rapidlyusing the starter to blow excess oil from the cylinder.
4. Clean the spark plug or replace it if it is cracked,broken, or if the electrodes are worn.
5. Install the spark plug and torque it to 180 in-lb(15 ft-lb or 20 N�m).
6. Perform the recommended maintenance procedures.Refer to Maintenance on page 12.
7. Fill the fuel tank with a fresh, clean gasoline/oil mix.
8. Connect the wire to the spark plug (Fig. 7).
AccessoriesYour lawn mower may include accessories available fromyour Authorized Service Dealer. For proper installation ofthese accessories, follow these instructions.
Installing a Rear Grass CatcherModels 10247, 10323, and 10324 only
1. Stop the engine and wait for all moving parts to stop.
2. Disconnect the wire from the spark plug (Fig. 7).
3. Remove the wing screw that fastens the cover plate tothe housing (Fig. 34).
20
996
1
2
Figure 341. Cover or mulch plate 2. Wing screw
4. Slide the cover plate counterclockwise and remove itfrom the lawn mower housing.
5. Place the front corner of the chute baffle into the deckopening.
6. Rotate the chute counterclockwise and push it downinto the deck opening (Fig. 35).
1073
1
23
Figure 351. Chute baffle2. Deck baffle
3. Toe guard
Note: The chute baffle must go behind the front deckbaffle and between the blade and toe guard to prevent itfrom contacting the blade.
7. Insert the chute support rod through the hole in theright side of the deck (Fig. 36).
1014
1
Figure 361. Chute support rod
8. Push the key hole slots on the chute down over the twoshoulder bolts on the lawn mower housing, and slidethe chute clockwise to lock it in place.
9. Secure the chute assembly with the wing screw(Fig. 37).
1013
2
1
Figure 371. Chute assembly 2. Wing screw
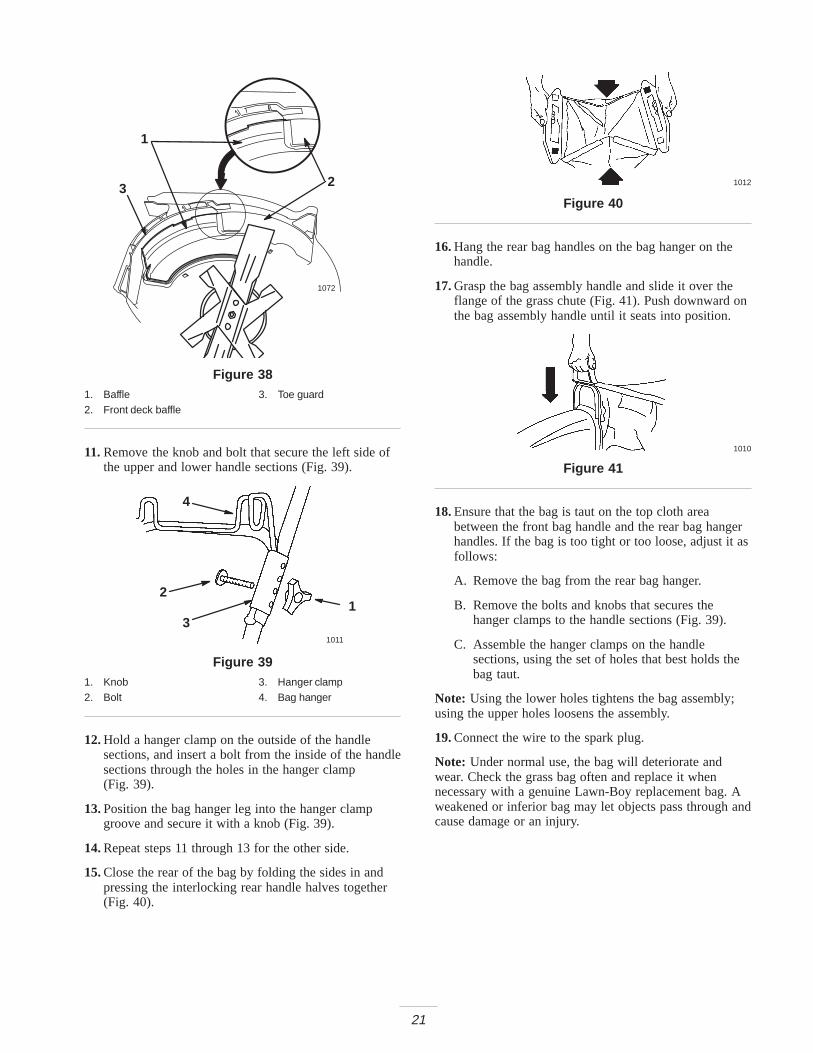
10.Check the clearance between the blade tips and thebaffle, ensuring that there is no contact (Fig. 38).
Note: The baffle must go behind the front deck baffle andbetween the blade and toe guard to prevent contact withthe blade (Fig. 38).
21
1072
1
23
Figure 381. Baffle2. Front deck baffle
3. Toe guard
11.Remove the knob and bolt that secure the left side ofthe upper and lower handle sections (Fig. 39).
1011
21
3
4
Figure 391. Knob2. Bolt
3. Hanger clamp4. Bag hanger
12.Hold a hanger clamp on the outside of the handlesections, and insert a bolt from the inside of the handlesections through the holes in the hanger clamp(Fig. 39).
13.Position the bag hanger leg into the hanger clampgroove and secure it with a knob (Fig. 39).
14.Repeat steps 11 through 13 for the other side.
15.Close the rear of the bag by folding the sides in andpressing the interlocking rear handle halves together(Fig. 40).
1012
Figure 40
16.Hang the rear bag handles on the bag hanger on thehandle.
17.Grasp the bag assembly handle and slide it over theflange of the grass chute (Fig. 41). Push downward onthe bag assembly handle until it seats into position.
1010
Figure 41
18.Ensure that the bag is taut on the top cloth areabetween the front bag handle and the rear bag hangerhandles. If the bag is too tight or too loose, adjust it asfollows:
A. Remove the bag from the rear bag hanger.
B. Remove the bolts and knobs that secures thehanger clamps to the handle sections (Fig. 39).
C. Assemble the hanger clamps on the handlesections, using the set of holes that best holds thebag taut.
Note: Using the lower holes tightens the bag assembly;using the upper holes loosens the assembly.
19.Connect the wire to the spark plug.
Note: Under normal use, the bag will deteriorate andwear. Check the grass bag often and replace it whennecessary with a genuine Lawn-Boy replacement bag. Aweakened or inferior bag may let objects pass through andcause damage or an injury.
22
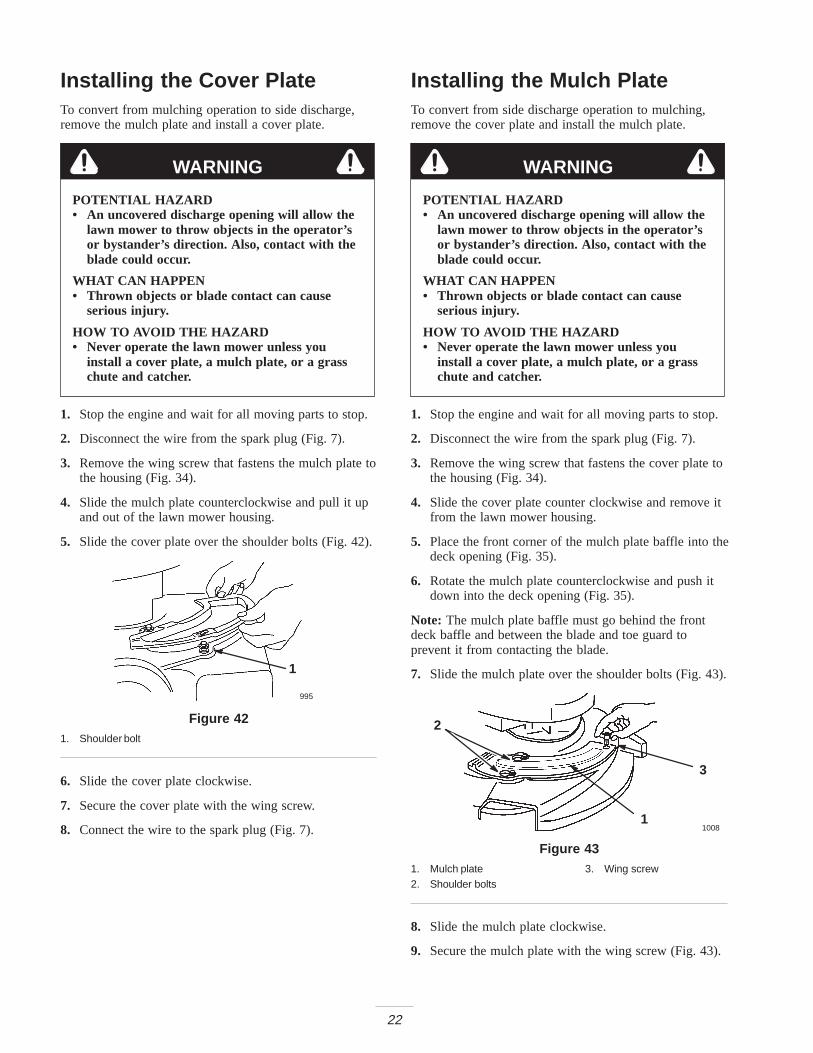
Installing the Cover PlateTo convert from mulching operation to side discharge,remove the mulch plate and install a cover plate.
WARNING
POTENTIAL HAZARD• An uncovered discharge opening will allow the
lawn mower to throw objects in the operator’sor bystander’s direction. Also, contact with theblade could occur.
WHAT CAN HAPPEN• Thrown objects or blade contact can cause
serious injury.
HOW TO AVOID THE HAZARD• Never operate the lawn mower unless you
install a cover plate, a mulch plate, or a grasschute and catcher.
1. Stop the engine and wait for all moving parts to stop.
2. Disconnect the wire from the spark plug (Fig. 7).
3. Remove the wing screw that fastens the mulch plate tothe housing (Fig. 34).
4. Slide the mulch plate counterclockwise and pull it upand out of the lawn mower housing.
5. Slide the cover plate over the shoulder bolts (Fig. 42).
995
1
Figure 421. Shoulder bolt
6. Slide the cover plate clockwise.
7. Secure the cover plate with the wing screw.
8. Connect the wire to the spark plug (Fig. 7).
Installing the Mulch PlateTo convert from side discharge operation to mulching,remove the cover plate and install the mulch plate.
WARNING
POTENTIAL HAZARD• An uncovered discharge opening will allow the
lawn mower to throw objects in the operator’sor bystander’s direction. Also, contact with theblade could occur.
WHAT CAN HAPPEN• Thrown objects or blade contact can cause
serious injury.
HOW TO AVOID THE HAZARD• Never operate the lawn mower unless you
install a cover plate, a mulch plate, or a grasschute and catcher.
1. Stop the engine and wait for all moving parts to stop.
2. Disconnect the wire from the spark plug (Fig. 7).
3. Remove the wing screw that fastens the cover plate tothe housing (Fig. 34).
4. Slide the cover plate counter clockwise and remove itfrom the lawn mower housing.
5. Place the front corner of the mulch plate baffle into thedeck opening (Fig. 35).
6. Rotate the mulch plate counterclockwise and push itdown into the deck opening (Fig. 35).
Note: The mulch plate baffle must go behind the frontdeck baffle and between the blade and toe guard toprevent it from contacting the blade.
7. Slide the mulch plate over the shoulder bolts (Fig. 43).
1008
3
1
2
Figure 431. Mulch plate2. Shoulder bolts
3. Wing screw
8. Slide the mulch plate clockwise.
9. Secure the mulch plate with the wing screw (Fig. 43).

23
10.Check the clearance between the blade tips and thebaffle, ensuring that there is no contact (Fig. 38).
Note: The baffle must go behind the front deck baffle andbetween the blade and toe guard to prevent contact withthe blade (Fig. 38).
11.Connect the wire to the spark plug.
Note: Use only a genuine Lawn-Boy replacement cuttingblade. Other blades may strike the mulch plate when youstart and run the engine.

24
TroubleshootingLawn-Boy designed and built your lawn mower for trouble-free operation. Check the following components and itemscarefully. If a problem continues, see your Authorized Service Dealer.
PROBLEM CORRECTIVE ACTION
Engine does not start 1. Fill the fuel tank with a fresh gasoline-and-oil mixture.
2. Move the throttle lever to the Fast position.
3. Press the primer three times.
4. Connect the wire to the spark plug.
5. Clean the spark plug, check the spark plug gap, and replacethe spark plug if it is damaged.
Engine starts hard or loses power 1. Move the throttle to the Fast position.
2. Drain and fill the fuel tank with a fresh gasoline-and-oil mixture.
3. Clean the fuel cap vent hole.
4. Clean or replace the air filter element.
5. Clean the lawn mower discharge chute.
6. Clean the underside of the lawn mower deck.
7. Clean the spark plug, check the spark plug gap, and replacethe spark plug if it is damaged.
Engine runs rough 1. Connect the wire to the spark plug.g g
2. Clean the spark plug, check the spark plug gap, and replacethe spark plug if it is damaged.
3. Move the throttle lever to the Fast position.
4. Clean or replace the air filter.
Lawn mower or engine vibratesi l
1. Balance the blade.gexcessively
2. Tighten the blade mounting nut.
3. Clean the lawn mower discharge chute.
4. Clean the underside of the lawn mower deck.
5. Tighten the engine mounting bolts.
Uneven cutting pattern 1. Place all four wheels at the same height.
2. Sharpen and balance the blade.
3. Change the mowing pattern.
4. Clean the underside of the lawn mower deck.

25
PROBLEM CORRECTIVE ACTION
Discharge chute plugs 1. Move the throttle lever to the Fast position.
2. Raise the cutting height.
3. Allow the grass to dry before mowing.
4. Clean the underside of the lawn mower deck.
Lawn mower does not self-propel 1. Make sure the end of the cable spring is hooked into the drivebracket.
2. Adjust the self-propel drive cable.
3. Clean debris from under the belt cover.

Federal Emission Control Warranty StatementA Two-Year Limited Warranty
Your Warranty Rights and ObligationsThe U.S. Environmental Protection Agency (EPA), Lawn-Boy, andLawn-Boy Warranty Company are pleased to explain the emissioncontrol system warranty on your 1997 and later utility/lawn/gardenequipment engine. 1997 and later model year utility/lawn/gardenequipment engines must be designed, built and equipped, at thetime of sale, to meet the U.S. EPA regulations for small non-roadengines. The equipment engine must be free from defects inmaterials and workmanship, which cause it to fail to conform withU.S. EPA standards, for the first two years of engine use from thedate of sale to the ultimate purchaser. Lawn-Boy and Lawn-BoyWarranty Company warrant the emission control system on yourutility/lawn/garden equipment engine for the period of time listedabove, provided there has been no abuse, neglect, or impropermaintenance of your utility/lawn/garden equipment engine.
Your emission control system may include parts such as thecarburetor or fuel injection system, the ignition system, andcatalytic converter. Also included may be hoses, belts, connec-tors, and other emission related assemblies.
Where a warrantable condition exists, Lawn-Boy and Lawn-BoyWarranty Company promise to repair your engine at no cost to you,including diagnosis, parts, and labor.
Manufacturer’s Warranty CoverageLawn-Boy and its affiliate, Lawn-Boy Warranty Company, pur-suant to an agreement between them, jointly warrant the 1997 andlater utility/lawn/garden equipment engines for two years from thedate of delivery. If any emission-related part on your engine isdefective in materials or workmanship, we will repair or replace thepart, free of charge.
Owner ResponsibilitiesAs the engine owner, you are responsible for the performance ofthe required maintenance listed in your operator’s manual. Werecommend that you retain all receipts covering maintenance onyour equipment, but we cannot deny warranty solely for the lack ofreceipts or for your failure to ensure the performance of allscheduled maintenance.
Any replacement part or service that is equivalent in performanceand durability may be used in non-warranty maintenance orrepairs, and shall not reduce the warranty obligations of the enginemanufacturer.
As the engine owner, you should be aware that we may deny youwarranty coverage if your engine or a part has failed due to abuse,neglect, improper maintenance, or unapproved modifications orparts.
You are responsible for presenting your equipment engine to anAuthorized Service Dealer as soon as a problem exists. Thewarranty repairs should be completed in a reasonable amount oftime, not to exceed thirty (30) days.
If you have any questions regarding your warranty rights andresponsibilities, or if you need a referral to a Lawn-Boy ServiceDealer, please feel free to contact us at:
Customer Service DepartmentLawn-Boy Warranty Company8111 Lyndale Avenue SouthBloomington, MN 55420-1196952-888-8801 or 800-LB-MOWER (800-526-6937)
Warranted PartsThe warranty period begins on the date the engine or equipment isdelivered to a retail purchaser. Lawn-Boy and Lawn-Boy WarrantyCompany jointly warrant to the initial owner and each subsequentpurchaser that the engine is free from defects in materials and
workmanship, which cause the engine to fail to conform withapplicable regulations, for a period of two years.
Failures caused by abuse, neglect, or improper maintenance arenot covered. The use of add-on or modified parts can be groundsfor disallowing a warranty claim. We are not liable to cover failuresof warranted parts caused by the use of add-on or modified parts.We are liable for damages to other engine components caused bythe failure of a warranted part still under warranty. The owner isresponsible for the performance of the required maintenance, asdefined in the operator’s manual.
Any warranted part which is not scheduled for replacement asrequired maintenance, or which is scheduled only for regularinspection to the effect of “repair or replace as necessary” shall bewarranted for the warranty period. Any warranted part which isscheduled for replacement as required maintenance shall bewarranted for the period of time up to the first scheduledreplacement point for that part. Coverage under this warrantyextends only to the parts listed below (the emissions system parts)to the extent that these parts were present on the engine whenpurchased.
• Fuel Metering System
– Cold start enrichment system including the choke mecha-nism or priming system
– Fuel pump
– Air fuel ratio feedback system
– Carburetor and internal parts
– Fuel injection system
• Air Induction System
– Air cleaner
– Reed intake system
– Intake manifold
– Controlled hot air intake system
• Ignition System
– Spark plug(s)
– Ignition coils and electronics
– Advance/retard mechanisms
• Catalytic Converter/Thermal Reactor System
– Catalytic converter
– Thermal reactor
– Exhaust manifold
• Air Injection System
– Air injection system or pulse valve
– Valves affecting distribution of air
• Exhaust Gas Recirculation (EGR) System
– EGR valve body and piping system connecting to theintake side of the engine
– EGR control system
• Particulate Controls
– Traps, filters, precipitators, and any other device used tocapture particulate emissions
• Miscellaneous Items Used in the Above Systems
– Vacuum, temperature, and time-sensitive valves andswitches
– Electronic controls
– Hoses, connectors, and assemblies of same

How to Get Warranty ServiceShould you feel your Lawn-Boy Product requires warranty service,contact the dealer who sold you the product or any AuthorizedService Dealer or Master Service Dealer. The Yellow Pages ofyour telephone directory is a good reference source. The dealerwill either arrange service at his/her dealership or recommendanother Authorized Service Dealer who may be more convenient.You may need proof of purchase (copy of registration card, salesreceipt, etc.) for warranty validation. The owner shall not becharged for diagnostic labor which leads to the determination thata warranted part is defective, if the diagnostic work is performed ata warranty station.
General ConditionsNeither Lawn-Boy nor Lawn-Boy Warranty Company is liable forindirect, incidental or consequential damages in connection withthe use of the Lawn-Boy Products covered by this warranty, exceptfor damages to other engine components caused by the failure of awarranted part still under warranty.
All implied warranties of merchantability (that the product is fit forordinary use) and fitness for use (that the product is fit for aparticular purpose) are limited to the duration of the expresswarranty.
Some states do not allow exclusions of incidental or consequentialdamages, or limitations on how long an implied warranty lasts, sothe above exclusions and limitations may not apply to you.
This warranty gives you specific legal rights, and you may alsohave other rights which vary from state to state.
Part No. 374-0026 Rev. B
Silver Series WPMSilverPro Series WPMCommercial WPM
The Lawn-Boy No-Worry WarrantyA Two-Year Full Warranty
(Limited Warranty for Commercial Use)
Conditions and Products CoveredFor a period of two years from the date of purchase, Lawn-Boy andits affiliate, Lawn-Boy Warranty Company, pursuant to an agree-ment between them, jointly promise to repair any Lawn-BoyProduct used for normal residential purposes* if defective inmaterials or workmanship or if it stops functioning due to the failureof a component. The following time periods apply from the date ofpurchase:
Products Warranty Period
• All Mowers 2 year full warranty• All Batteries 1 year full warranty
This warranty covers the cost of parts and labor, but you must paytransportation costs.
This warranty applies to all Silver Series, SilverPro Series, andCommercial Series Walk Power Mowers.
* Normal residential purposes means use of the product on thesame lot as your home. Use at more than one location isconsidered commercial use, and the commercial use warrantywould apply.
Limited Warranty for Commercial UseLawn-Boy Walk Power Mowers used for commercial, institutional,or rental use are warranted against defects in materials orworkmanship. Components failing due to normal wear are notcovered by this warranty. The following time periods apply from thedate of purchase:
Products Warranty Period
• Commercial Series Mowers 1 year• All Other Lawn-Boy Mowers 45 days
Instructions for Obtaining Warranty ServiceShould you feel your Lawn-Boy Product contains a defect inmaterials or workmanship, contact the dealer who sold you theproduct or any Authorized Service Dealer or Master ServiceDealer. The Yellow Pages of your telephone directory is a goodreference source. The dealer will either arrange service at his/herdealership or recommend another Authorized Service Dealer whomay be more convenient. You may need proof of purchase (copy ofregistration card, sales receipt, etc.) for warranty validation.
If for any reason you are dissatisfied with the Service Dealer’sanalysis of the defect in materials or workmanship or if you need areferral to a Lawn-Boy Service Dealer, please feel free to contactus at:
Customer Service DepartmentLawn-Boy Warranty Company8111 Lyndale Avenue SouthBloomington, MN 55420-1196952-888-8801 or 800-LB-MOWER (800-526-6937)
Owner ResponsibilitiesYou must maintain your Lawn-Boy Product by following themaintenance procedures described in the operator’s manual.Such routine maintenance, whether performed by a dealer or byyou, is at your expense.
Items and Conditions Not CoveredThere is no other express warranty except for special emissionsystem coverage on some products. This express warranty doesnot cover:
• Cost of regular maintenance service or parts, such as filters,fuel, lubricants, oil changes, spark plugs, blade sharpening,worn blade, cable/linkage adjustments, or brake and clutchadjustments.
• Any product or part which has been altered or misused orrequired replacement or repair due to accidents or lack ofproper maintenance.
• Repairs necessary due to improper fuel, contaminants in thefuel system, or failure to properly prepare the fuel system priorto any period of non-use over three months.
• Repairs necessary due to improper battery care, electricalsupply irregularities, or failure to properly prepare the mowerprior to any period of non-use.
• Pickup and delivery charges.
All repairs covered by this warranty must be performed by anAuthorized Lawn-Boy Service Dealer using Lawn-Boy approvedreplacement parts.
General ConditionsRepair by an Authorized Lawn-Boy Service Dealer is your soleremedy under this warranty.
Neither Lawn-Boy or Lawn-Boy Warranty Company is liable forindirect, incidental or consequential damages in connection withthe use of the Lawn-Boy Products covered by this warranty,including any cost or expense of providing substitute equipment orservice during reasonable periods of malfunction or non-usepending completion of repairs under this warranty.
Some states do not allow exclusions of incidental or consequentialdamages, or limitations on how long an implied warranty lasts, sothe above exclusions and limitations may not apply to you.
This warranty gives you specific legal rights, and you may alsohave other rights which vary from state to state.
Countries Other than the United States or CanadaCustomers who have purchased Lawn-Boy products exported from the United States or Canada should contact their Lawn-BoyDistributor (Dealer) to obtain guarantee policies for your country, province, or state. If for any reason you are dissatisfied with yourDistributor’s service or have difficulty obtaining guarantee information, contact the Lawn-Boy importer. If all other remedies fail, you maycontact us at Lawn-Boy Warranty Company.
Part No. 374-0003 Rev. C