Embed Size (px)
Citation preview
LASER SERIES: Laser Cutting and
Etching Safety and Basic Use
COURSE # LAS 101 Version 2.7
LASER SERIES: Laser Cutting and Etching Safety and Basic Use
Copyright © 2005 – 2010 TechShop, Inc All rights reserved Version 2.7 Page 2 of 37
The Fine Print
Copyright © 2005 – 2010 TechShop, Inc. All rights reserved This manual is furnished under license and may be used or copied only in accordance with the terms of such license. The content of this manual is furnished for informational use only, is subject to change without notice, and should not be construed as a commitment by TechShop Inc. Except as permitted by such license, no part of this publication may be reproduced, stored in a retrieval system, or transmitted, in any form or by any means, electronic, mechanical, recording, or otherwise, without the prior written permission of TechShop Inc. TechShop and the TechShop logo are either registered trademarks or trademarks of TechShop Inc in the United States and/or other countries. Microsoft and Windows logo are either registered trademarks or trademarks of Microsoft Corporation in the United States and/or other countries. Apple, Mac and Macintosh are either registered trademarks or trademarks of Apple Computer, Inc. in the United States and/or other countries. SnagIt is either registered trademarks or trademarks of TechSmith Corporation in the United States and/or other countries. All other registered trademarks or trademarks are the property of the respective owners. These class materials are the copyrighted property of TechShop and are intended for use in an instructional setting. Successful completion of SBU’s are REQUIRED for many of the products at TechShop, an instructor must sign off on this requirement. It is NOT enough to just read and follow these materials.
Colophon
These materials were created electronically using Microsoft Word®. Art was produced using Adobe Illustrator®, Adobe PhotoShop® and SnagIt® for screen captures. The Arial® family of typefaces is used throughout these materials. These materials were written by Laura Mappin.
LASER SERIES: Laser Cutting and Etching Safety and Basic Use
Copyright © 2005 – 2010 TechShop, Inc All rights reserved Version 2.7 Page 3 of 37
Course Synopsis In this Safety and Basic Use class (SBU), you will learn how to safely use the Laser Cutter/Etcher/Engraver to cut a shape out of paperboard. What you learn about the process for this material can be applied to any other materials you may use in the Laser Cutter. You will also have an opportunity to raster text onto an anodized aluminum tag. This class is taught in a highly interactive fashion. Your eager participation makes it easier for the instructor to tell if you understand the concepts and feel comfortable around this machine. Our goal is for you to come back and use the lasers confidently on your own. If you have any questions about anything pertaining to safety and basic usage, please ask.
Time Required: 2 Hours
Tools Required (most provided by TechShop)
Epilog Laser Cutter Computer with CorelDraw Ruler (or tape measure) Note taking paper and pen/pencil (bring with you)
Materials Required for Class (provided by TechShop)
Material to cut and etch/engrave
Materials to bring when you use the Laser Cutter as a TechShop Member
Your Laser SBU Notes! Your material to cut or etch/engrave Notebook to record results/parameters for next time Ruler or tape measure Washers or quarters to weigh down light materials
LASER SERIES: Laser Cutting and Etching Safety and Basic Use
Copyright © 2005 – 2010 TechShop, Inc All rights reserved Version 2.7 Page 4 of 37
SAFETY
General Safety
◊ Eye protection is required when working with anything that might get into your eyes, like metal shards, chemicals, sawdust
◊ Closed-toe shoes must be worn at all times ◊ Long sleeved shirts should be worn when working with chemicals, short
sleeved shirts should be worn for anything with a rotary motor (saws, mills, lathes, etc.)
◊ Never leave a machine running and unattended
Shop Etiquette
◊ Never talk to anyone while they are working with a piece of equipment ◊ Leave the area you are working in cleaner than when you arrived ◊ Never leave a machine running and unattended ◊ Begin final clean-up and store your project no later than 11:30 pm
Equipment Specific Safety
◊ Laser Mantra – o ALWAYS WATCH YOUR WORK! o OPEN THE LID if you see a fire. o BLOW IT OUT if the fire keeps burning. o DON’T USE Auto Focus.
◊ You can cause great harm to yourself and burn the building down with these machines. If you follow the safety rules, the chance of you causing this should be close to zero
◊ These lasers affect your material by heating it. You job can change in seconds with the accumulation of energy – HEAT – in your material. ALWAYS MONITOR YOUR LASING JOB! NEVER leave the room while your job is running.
◊ Some materials, like wood, are burned in order to achieve an etch or cut. Some materials, like acrylic change their chemical structure. In all cases, some light may be visible. This light at the point of lasing may be ok as long as it stays with the motion of the laser. If a flame appears while the laser is in operation, stop your job and try again with lower heat settings.
◊ Each TechShop laser cutter is a finely calibrated piece of machinery. Please close the lids quietly and do not push or jar the machines at any time. Do not lean on or press on the tray. BE SURE the edge guards are in the down position before operating.
LASER SERIES: Laser Cutting and Etching Safety and Basic Use
Copyright © 2005 – 2010 TechShop, Inc All rights reserved Version 2.7 Page 5 of 37
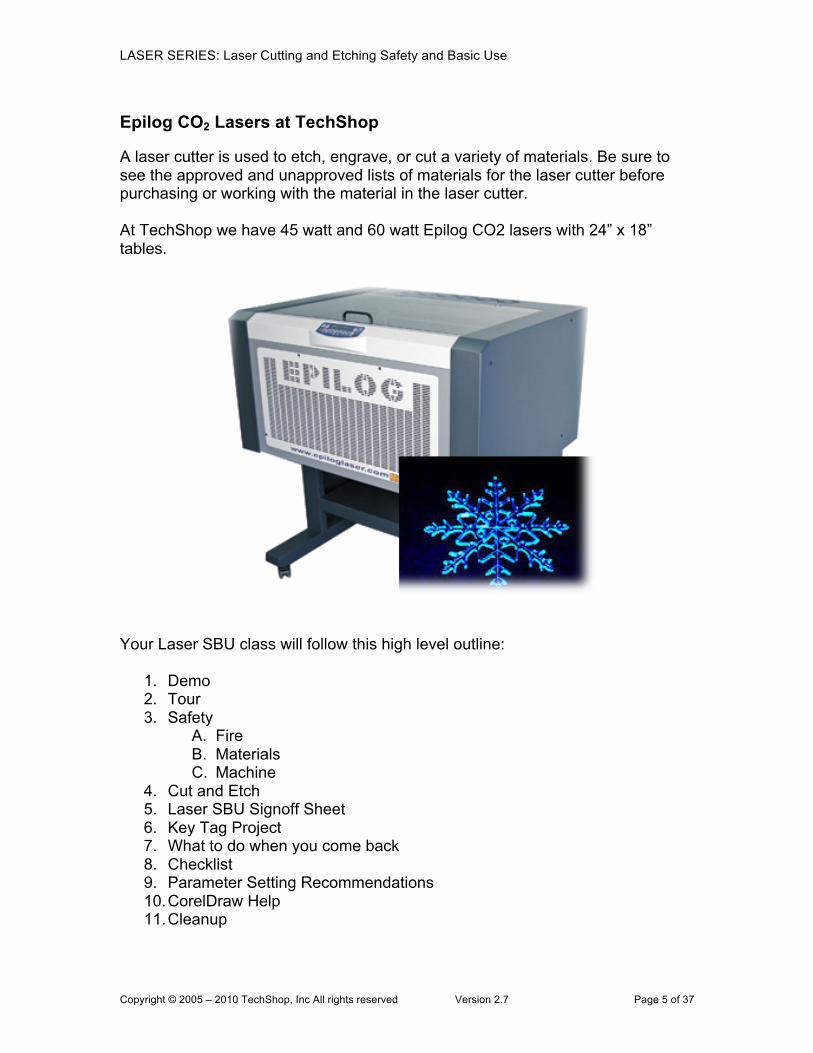
Epilog CO2 Lasers at TechShop
A laser cutter is used to etch, engrave, or cut a variety of materials. Be sure to see the approved and unapproved lists of materials for the laser cutter before purchasing or working with the material in the laser cutter. At TechShop we have 45 watt and 60 watt Epilog CO2 lasers with 24” x 18” tables.
Your Laser SBU class will follow this high level outline:
1. Demo 2. Tour 3. Safety
A. Fire B. Materials C. Machine
4. Cut and Etch 5. Laser SBU Signoff Sheet 6. Key Tag Project 7. What to do when you come back 8. Checklist 9. Parameter Setting Recommendations 10. CorelDraw Help 11. Cleanup
LASER SERIES: Laser Cutting and Etching Safety and Basic Use
Copyright © 2005 – 2010 TechShop, Inc All rights reserved Version 2.7 Page 6 of 37
Demo
a. Raster vs Vector
The laser is a printer that prints with heat. It first prints all your raster data, similar to an ink jet printer that prints with ink, putting down “dots of heat” instead of ink. It then moves like a plotter and follows your vector paths to draw or carve them into your material. Raster data is made of pixels. File types of jpg, gif, png, and bmp are all examples of raster data. Images that come from your camera or scanner are also raster data. The laser varies the amount of heat delivered for each pixel, resulting in what looks like a photo burned into your material. Vector data is expressed via equations. Straight lines, circles, rectangles, splines, hand drawn squiggly curves are all examples of vector data. The above is true from the perspective of software applications that handle vector and raster data. The laser treats the data slightly differently. For the laser, all data is treated as raster data except for vector data that also has a line thickness of “hairline”. “Hairline” is the smallest non-zero value possible for vectors in CorelDraw, which is the main application used to send files to the lasers. If you develop your artwork in another application, choose the smallest non-zero thickness.available and your data will typically import into CorelDraw as hairline thickness. Just because you’re using vector data doesn’t mean you must cut through. You can score cardboard to mark the fold likes to make it into a box. Conversely, just because you’re using raster data doesn’t mean you can’t etch through. You will see examples of this in class. Each method has the capacity to produce a fire. Always watch your work!
b. Turn off laser beam There are two ways to stop the machine – one for convenience and one for emergency.
i. Stop/pause button WAIT for the machine to stop before you leave it This method does not stop the laser immediately.
LASER SERIES: Laser Cutting and Etching Safety and Basic Use
Copyright © 2005 – 2010 TechShop, Inc All rights reserved Version 2.7 Page 7 of 37
Use this method for convenience when you have to leave the room and want to just pause your job.
ii. Lift Lid Use this method if there is a fire. This immediately turns off the laser beam but it does not stop the motion of the X/Y table.
c. Make sure exhaust fan is on The fan should always be on. Do not turn the fan off. Each TechShop laser cutter is connected to an exhaust fan system to remove toxic fumes. For your safety, always make sure the fan is running when operating the laser cutter. It has a separate on/off switch from the laser machines and must be turned on independently. One switch may run the exhaust for all lasers in your area.

LASER SERIES: Laser Cutting and Etching Safety and Basic Use
Copyright © 2005 – 2010 TechShop, Inc All rights reserved Version 2.7 Page 8 of 37
Tour
The Epilog Laser cutter is controlled by software and is installed as a printing device. This is the front panel of the laser cutter:
The Reset button is your general button to get out of other modes of operation and moves the machine back to its basic power up state. It will move the head back to the current home position, which may be the default position or your latest custom home position. The Go button starts to print a job. Go will also continue a job that has been paused using the Stop button. Go is also your button to press to answer affirmative to a question on the panel. Stop is a pause button; it stops the job at the end of the current vector. Pressing the Go button will continue the job exactly where it left off. X/Y Off tells the machine to let go of its hold on the X/Y axes and give control to you. It requires confirmation by following up with hitting Go. The Focus button moves you into focus mode, which allows the Up and Down buttons to work. Pressing Reset gets you out of focus mode and ready to accept a job. The Up and Down arrows move the bed up and down to set the focus. They are not accessible when you are not in Focus mode.
LASER SERIES: Laser Cutting and Etching Safety and Basic Use
Copyright © 2005 – 2010 TechShop, Inc All rights reserved Version 2.7 Page 9 of 37
The Pointer toggles on/off the red pointer light. This pointer can be turned on and off independently at any time while a job is running and it will not affect the job.
d. Reservation cleanup The user before you had to do the following, which explains why the machine and the room are in the state they are for you. See next section for detailed instructions on each step.
i. Carefully remove table from laser and place in bag to return to front desk
ii. Remove focus gauge, place in bag, and return to front desk iii. Vacuum up debris from metal bay to remove this fire hazard iv. Check the lens; if dirty, let front desk staff know v. Leave laser on, open, in focus mode vi. Leave exhaust fan on
e. Reservation setup Be careful when moving parts and material around in the laser. The laser is a finely calibrated machine. Bumping parts can knock it out of alignment for you and everyone after you resulting in less precise cuts and etches and possibly ruined projects.
vii. Vacuum up debris from metal bay to remove this fire hazard Always ensure you start with a clean machine.
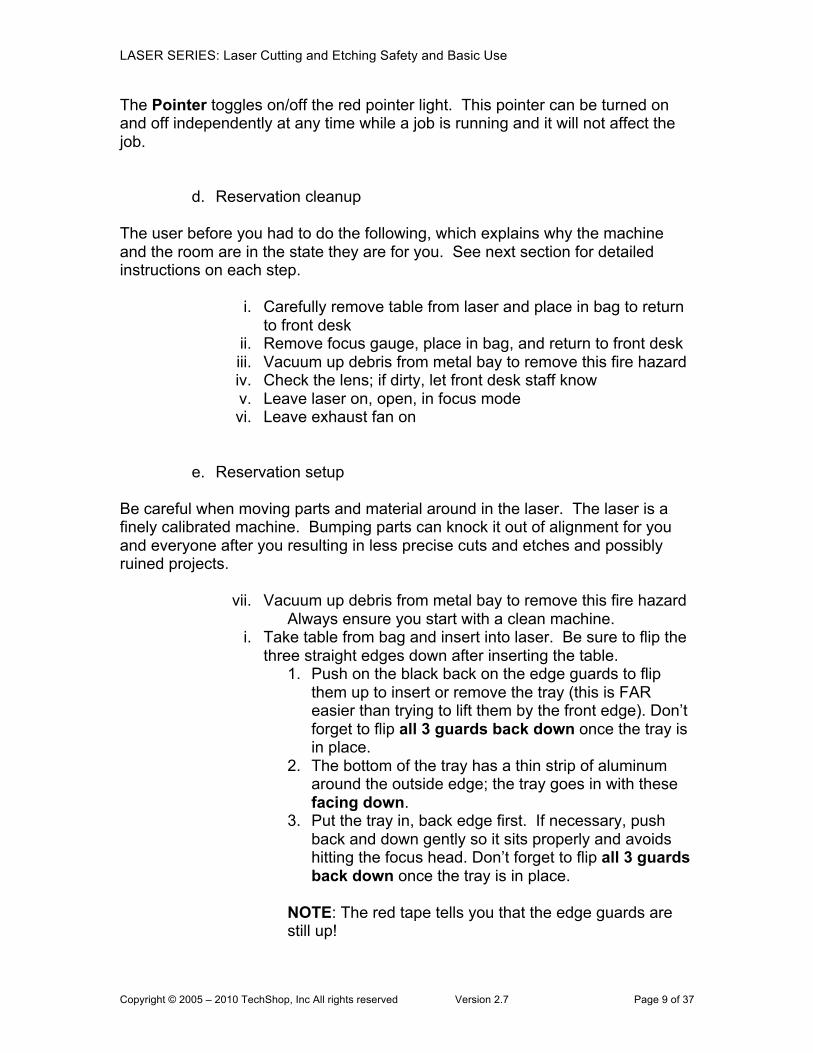
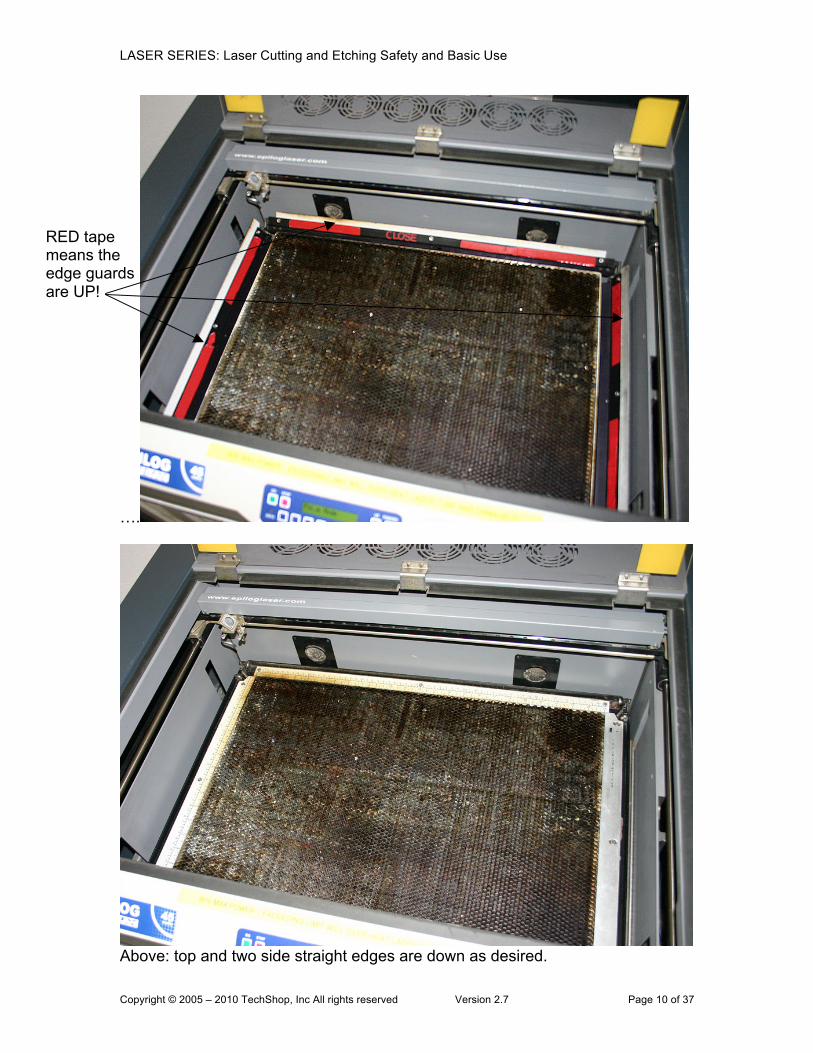
i. Take table from bag and insert into laser. Be sure to flip the three straight edges down after inserting the table.
1. Push on the black back on the edge guards to flip them up to insert or remove the tray (this is FAR easier than trying to lift them by the front edge). Don’t forget to flip all 3 guards back down once the tray is in place.
2. The bottom of the tray has a thin strip of aluminum around the outside edge; the tray goes in with these facing down.
3. Put the tray in, back edge first. If necessary, push back and down gently so it sits properly and avoids hitting the focus head. Don’t forget to flip all 3 guards back down once the tray is in place.
NOTE: The red tape tells you that the edge guards are still up!
LASER SERIES: Laser Cutting and Etching Safety and Basic Use
Copyright © 2005 – 2010 TechShop, Inc All rights reserved Version 2.7 Page 10 of 37
….
Above: top and two side straight edges are down as desired.
RED tape means the edge guards are UP!

LASER SERIES: Laser Cutting and Etching Safety and Basic Use
Copyright © 2005 – 2010 TechShop, Inc All rights reserved Version 2.7 Page 11 of 37
ii. Place focus gauge in rest position
iii. Check the lens for cleanliness 1. If dirty, ask front desk staff to have it cleaned 2. Do not touch the lens or mirror. Hold below the optics
near where the focus gauge sits. iv. Place your material on laser table v. Focus laser onto top surface of your material
Perform these steps in the following order to ensure that you DO NOT bump the lens assembly with your material or with the laser table:
1. Make sure the focus gauge is in its rest position and
not facing down.
2. Choose Focus mode by pushing the Focus button on the front panel. This moves the X/Y table sideways.
3. Press the Down arrow button on the front panel to
move the table down more than enough to accommodate the thickness of your material.
4. Place the focus gauge on top of the magnetic plate
(near the front of lens assembly) so that the tip hangs straight down. The focus gauge is magnetically held onto the top of the lens assembly.
5. Place your material under the focus gauge.

LASER SERIES: Laser Cutting and Etching Safety and Basic Use
Copyright © 2005 – 2010 TechShop, Inc All rights reserved Version 2.7 Page 12 of 37
6. While in focus mode, press the Up arrow button and CAREFULLY move the bed up, being sure not to run into the lens assembly. When the table gets close to the focus gauge, move in small increments.
7. Never move the table up without the focus gauge in
place. It is possible to run the table off its rails.
8. BE SURE to turn the focus gauge over after you have set the focus.
9. Hit Reset to get out of Focus Mode.
f. Set home position
i. Default home position Default home position is the upper left corner of the table where the two straight edges meet. To see this point, turn on the pointer and hit Reset. You will see the red dot move to the upper left point where the straight edges meet. This point is usually setup to correspond to the upper left corner of your file – your (0,yMax) coordinate, not (0,0)
ii. Set home to a different location Use this method when you have material that cannot be placed square with the straight edges.
Focus Gauge
LASER SERIES: Laser Cutting and Etching Safety and Basic Use
Copyright © 2005 – 2010 TechShop, Inc All rights reserved Version 2.7 Page 13 of 37
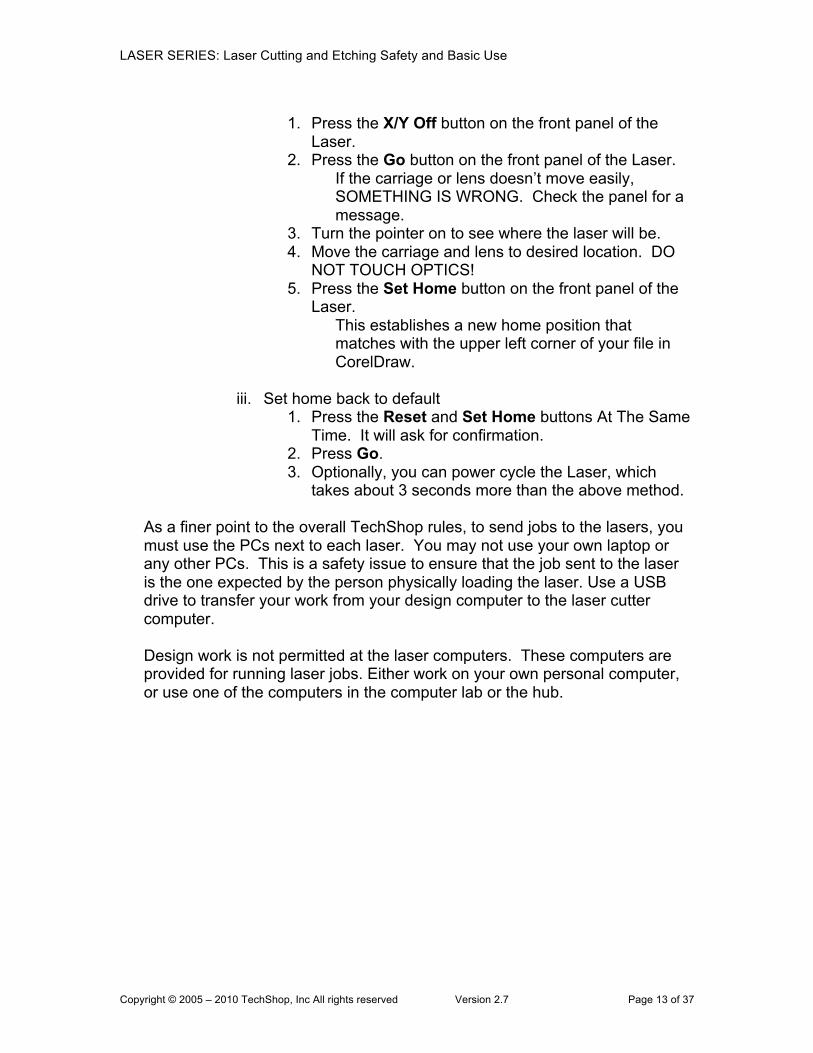
1. Press the X/Y Off button on the front panel of the
Laser. 2. Press the Go button on the front panel of the Laser.
If the carriage or lens doesn’t move easily, SOMETHING IS WRONG. Check the panel for a message.
3. Turn the pointer on to see where the laser will be. 4. Move the carriage and lens to desired location. DO
NOT TOUCH OPTICS! 5. Press the Set Home button on the front panel of the
Laser. This establishes a new home position that matches with the upper left corner of your file in CorelDraw.
iii. Set home back to default
1. Press the Reset and Set Home buttons At The Same Time. It will ask for confirmation.
2. Press Go. 3. Optionally, you can power cycle the Laser, which
takes about 3 seconds more than the above method.
As a finer point to the overall TechShop rules, to send jobs to the lasers, you must use the PCs next to each laser. You may not use your own laptop or any other PCs. This is a safety issue to ensure that the job sent to the laser is the one expected by the person physically loading the laser. Use a USB drive to transfer your work from your design computer to the laser cutter computer. Design work is not permitted at the laser computers. These computers are provided for running laser jobs. Either work on your own personal computer, or use one of the computers in the computer lab or the hub.
LASER SERIES: Laser Cutting and Etching Safety and Basic Use
Copyright © 2005 – 2010 TechShop, Inc All rights reserved Version 2.7 Page 14 of 37
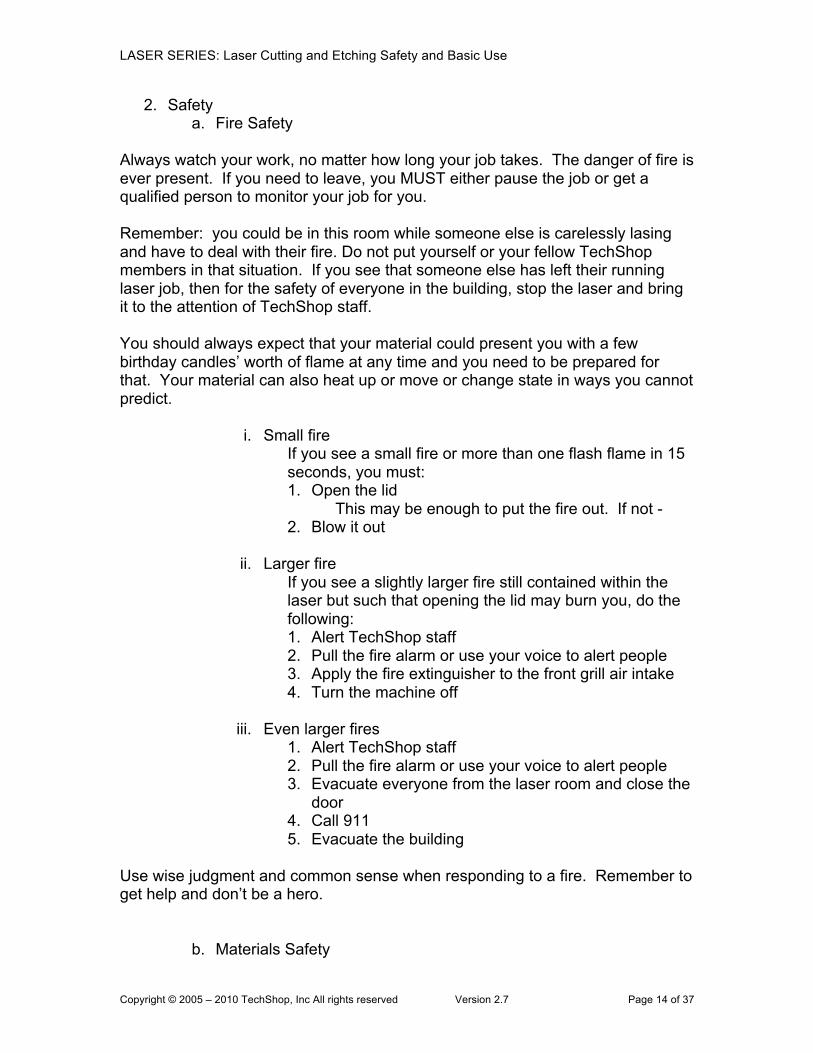
2. Safety a. Fire Safety
Always watch your work, no matter how long your job takes. The danger of fire is ever present. If you need to leave, you MUST either pause the job or get a qualified person to monitor your job for you. Remember: you could be in this room while someone else is carelessly lasing and have to deal with their fire. Do not put yourself or your fellow TechShop members in that situation. If you see that someone else has left their running laser job, then for the safety of everyone in the building, stop the laser and bring it to the attention of TechShop staff. You should always expect that your material could present you with a few birthday candles’ worth of flame at any time and you need to be prepared for that. Your material can also heat up or move or change state in ways you cannot predict.
i. Small fire If you see a small fire or more than one flash flame in 15 seconds, you must: 1. Open the lid
This may be enough to put the fire out. If not - 2. Blow it out
ii. Larger fire
If you see a slightly larger fire still contained within the laser but such that opening the lid may burn you, do the following: 1. Alert TechShop staff 2. Pull the fire alarm or use your voice to alert people 3. Apply the fire extinguisher to the front grill air intake 4. Turn the machine off
iii. Even larger fires
1. Alert TechShop staff 2. Pull the fire alarm or use your voice to alert people 3. Evacuate everyone from the laser room and close the
door 4. Call 911 5. Evacuate the building
Use wise judgment and common sense when responding to a fire. Remember to get help and don’t be a hero.
b. Materials Safety
LASER SERIES: Laser Cutting and Etching Safety and Basic Use
Copyright © 2005 – 2010 TechShop, Inc All rights reserved Version 2.7 Page 15 of 37
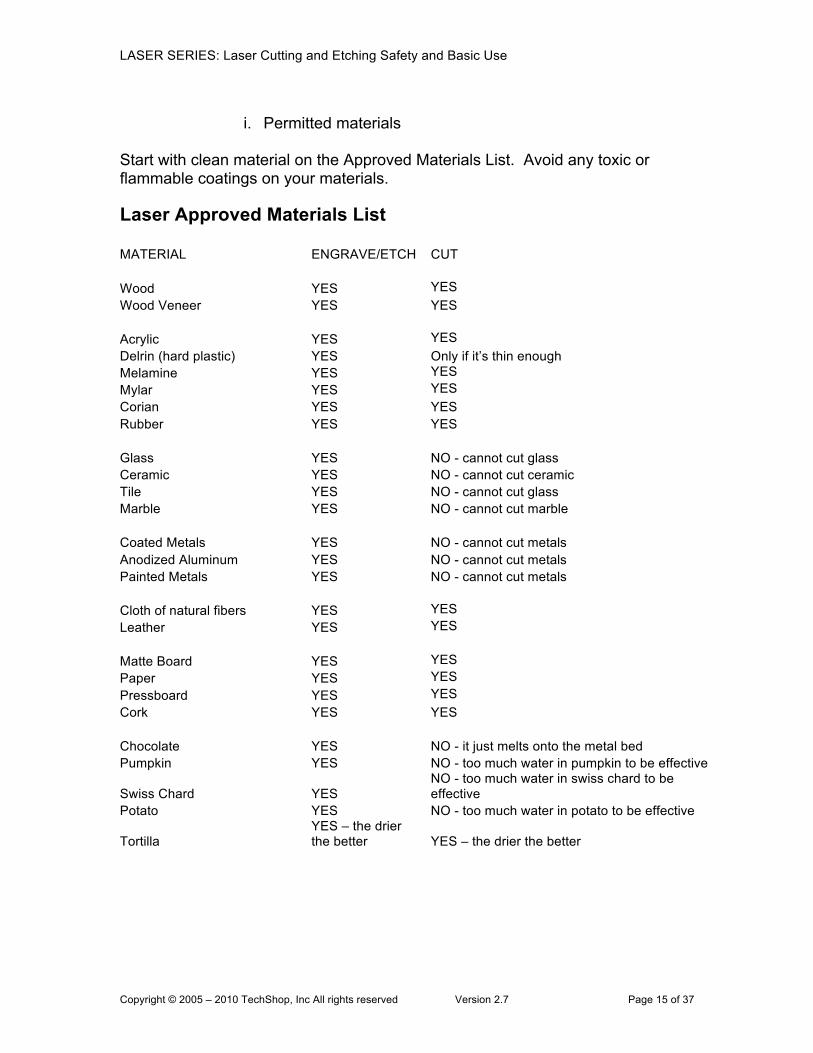
i. Permitted materials
Start with clean material on the Approved Materials List. Avoid any toxic or flammable coatings on your materials.
Laser Approved Materials List
MATERIAL ENGRAVE/ETCH CUT Wood YES YES Wood Veneer YES YES Acrylic YES YES Delrin (hard plastic) YES Only if it’s thin enough Melamine YES YES Mylar YES YES Corian YES YES Rubber YES YES Glass YES NO - cannot cut glass Ceramic YES NO - cannot cut ceramic Tile YES NO - cannot cut glass Marble YES NO - cannot cut marble Coated Metals YES NO - cannot cut metals Anodized Aluminum YES NO - cannot cut metals Painted Metals YES NO - cannot cut metals Cloth of natural fibers YES YES Leather YES YES Matte Board YES YES Paper YES YES Pressboard YES YES Cork YES YES Chocolate YES NO - it just melts onto the metal bed Pumpkin YES NO - too much water in pumpkin to be effective
Swiss Chard YES NO - too much water in swiss chard to be effective
Potato YES NO - too much water in potato to be effective
Tortilla YES – the drier the better YES – the drier the better

LASER SERIES: Laser Cutting and Etching Safety and Basic Use
Copyright © 2005 – 2010 TechShop, Inc All rights reserved Version 2.7 Page 16 of 37
ii. Prohibited materials
1. Poisonous gases 1. HCl – hydrogen chloride 2. HFl – hydrogen fluoride 3. HCN – hydrogen cyanide
2. Flash fire 3. Melt or explode
Laser Unapproved Materials
PVC Contains chlorine, will produce hydrogen chloride gas and can harm your body and the machine's optics!
Vinyl Contains chlorine, will produce hydrogen chloride gas and can harm your body and the machine's optics!
PVC Foams Contains chlorine, will produce hydrogen chloride gas and can harm your body and the machine's optics!
Foam Core Modern foam core is usually made of PVC, so it contains chlorine, will produce hydrogen chloride gas; it also risks a flash fire
Styrofoam Can flash fire
Polycarbonate or PETG
Does not cut. TAP Plastics sells both polycarbonate and acrylic. Be Careful! Read your label. Lexan is a trade name for polycarbonate. Plexiglas is a trade name for acrylic.
ABS Gives off hydrogen cyanide polymer clay Contains pvc. Fiberglass Get approval from TechShop staff
Metals
Cannot be etched by this laser AND risk reflecting the laser beam back up into the laser. Some metals may change appearance but not predictable enough to usually be usable as an engraving. If someone claims they are etching metals on these lasers, they are etching a metal with a plastic coating or anodized surface or other etchable covering.
iii. Materials that are not on either list
1. Get approval from TechShop staff person 2. Increase your chances of getting this approval by:
a. Buying from a reputable source b. Having the corresponding MSDS with you
Do not lase anything that is not on the Approved Materials List or has not been.permitted by TechShop staff. TechShop has many other ways to manipulate non-laserable materials. Consider the CNC mills, saws, maybe even the plasma cutter. Ask TechShop staff for more ideas.
c. Machine Safety
LASER SERIES: Laser Cutting and Etching Safety and Basic Use
Copyright © 2005 – 2010 TechShop, Inc All rights reserved Version 2.7 Page 17 of 37
i. Vacuum cut off bits ii. Check lens iii. Don’t use auto focus
Do not use auto focus, DO NOT USE AUTO FOCUS, DO NOT USE AUTO FOCUS!!! It can fail and then the machine is unusable for hours or days until external support fixes it.
LASER SERIES: Laser Cutting and Etching Safety and Basic Use
Copyright © 2005 – 2010 TechShop, Inc All rights reserved Version 2.7 Page 18 of 37
Cut and Etch
For this class, you will be given paperboard, and you will send artwork to the laser cutter to cut and etch on the paperboard. Each person will take a turn to improve the previous person’s job. In this way, you will see a number of ways to mark your material. You can then apply these techniques to your own materials. If you have ANY questions about any operation or task, be sure to ask your instructor or another TechShop staff member before proceeding.
a. Make simple art in CorelDraw including: i. Make two ovals
1. Set the large one to “hairline” outline thickness 2. Set the small one to 3pt outline thickness
This will show the difference between hairline and NOT hairline as well as how smoothly this laser can cut curves.
ii. Make two hand drawn curves with the pen tool 1. Set the top one to “hairline” outline thickness 2. Set the lower one to .5 pt outline thickness
This will show the difference between the thinnest rastered line and a vector line.
iii. Make a small letter “H” to cut out Show a tiny cutout piece.
iv. Draw a rectangle with no outline and a Fountain Fill (gradient) with Light Orange
Show how laser handles color.
b. Setup first job with draft parameters: i. Draft DPI ii. Choose Combined iii. Raster Speed iv. Raster Power v. Vector Speed vi. Vector Power vii. Frequency – follow the chart viii. Auto focus – DO NOT USE!!
Take the Laser Advanced Class to learn more about these and other parameters. When using the Speed and Power Recommendations, it is best to start at the low end of the heat spectrum, with high speed and low power. You are less likely to have a fire situation, and it causes much less duty cycle on the laser tube, which will ultimately cause the laser to run better for longer.
LASER SERIES: Laser Cutting and Etching Safety and Basic Use
Copyright © 2005 – 2010 TechShop, Inc All rights reserved Version 2.7 Page 19 of 37
Slower speed increases heat. Think of the candle analogy. If you slowly pass your hand across the flame, your hand will receive more heat than if you pass it across more quickly.
c. Send and run job i. Laser is ready to receive a job if it says “Job:” on the panel.
Press “Reset” button if needed. ii. Send job to “printer” – user must press “Go” button to run
job. d. Each person takes turn improving parameters and running job
i. Hone in on dpi first. Dpi affects the heat delivered to raster art. You can cause a fire JUST BY increasing your dpi for raster art. Dpi also affects vector art but only in the quality of the vector, not in depth of cut.
ii. Hone in on power and speed Start at low heat settings; increase power in small increments per trial. If you reach 90% power and still don’t have the effects you want, decrease the speed in small increments per trial run.
e. Last two people experience flames and manage them by opening the lid when appropriate.
Review max behavior for pushing machine
LASER SERIES: Laser Cutting and Etching Safety and Basic Use
Copyright © 2005 – 2010 TechShop, Inc All rights reserved Version 2.7 Page 20 of 37
3. Laser SBU Signoff Sheet
I will always watch my work.
I will open the lid if I have more than one flash flame in a 15 second period.
I will blow it out if the fire continues to burn.
I will not allow any continuous flame to keep burning.
I will not use more heat than is necessary to accomplish my cut or etch job.
I will not use auto-focus.
I will not put any prohibited items in the laser.
I will get the agreement from TechShop staff before putting any material in the laser that is not on the Laser Approved Materials list.
I understand that if I leave the machine unattended while it is running, at a minimum I have no recourse if I find my job has been stopped. I may even lose my membership.
If I am in doubt about the use of the laser cutter/etcher, I will ask TechShop staff for help.
I have received a copy of the Laser SBU Handout and I will bring it with me and refer to it when using the Laser Cutter/Etcher at TechShop.
I will treat the Laser tray and all other Laser equipment with GREAT CARE, not leaning on the tray nor running the focus into the tray.
LASER SERIES: Laser Cutting and Etching Safety and Basic Use
Copyright © 2005 – 2010 TechShop, Inc All rights reserved Version 2.7 Page 21 of 37
Key Tag Project
For this project, each student will need one anodized aluminum key tag, provided in class and available from the Retail Store in TechShop. You will also need the Key Tag jig that is available for checkout from the Front Desk. If you have ANY questions about any operation or task, be sure to ask your instructor or another TechShop staff member before proceeding.
Preparing for this project
For this project after class, you may change the text in the file provided but in the interests of time, please do not change the font or incorporate graphics. For future key tag projects, you may want to spend some time on one of the Hub Computers, designing your graphic or text. Locate and open the CorelDraw file named TAG_Names.cdr Use your USB drive to take your finished work to the Laser Cutter (don’t forget to reserve time via the front desk, the laser cutters are in very high demand).
a. Prepare the computer. The computer is normally on and should be left on. Make sure the monitor is also on.
b. Turn on the laser cutter. The On/Off switch for the laser cutters is on the left side of the machine.
c. Make sure the exhaust fan is running If it is not running, turn it on. This exhaust fan is external to the laser. Both the laser and the exhaust fan must be on before running your job.
d. Check the lens A dirty lens can affect your power settings significantly and can also be a source of fire. If dirty, alert TechShop staff so they may clean it.
e. Check the metal bay for debris
NOTE: Don’t forget to lower the 3 edge guards after placing the vector grid.
f. Place the anodized key tags in the jig provided at the upper left
corner of the grid. BE SURE to use only approved materials
LASER SERIES: Laser Cutting and Etching Safety and Basic Use
Copyright © 2005 – 2010 TechShop, Inc All rights reserved Version 2.7 Page 22 of 37
g. Set the focus manually
Getting Started
h. Check out the Key Tag Jig from the Front Desk if it hasn’t been
provided for you.
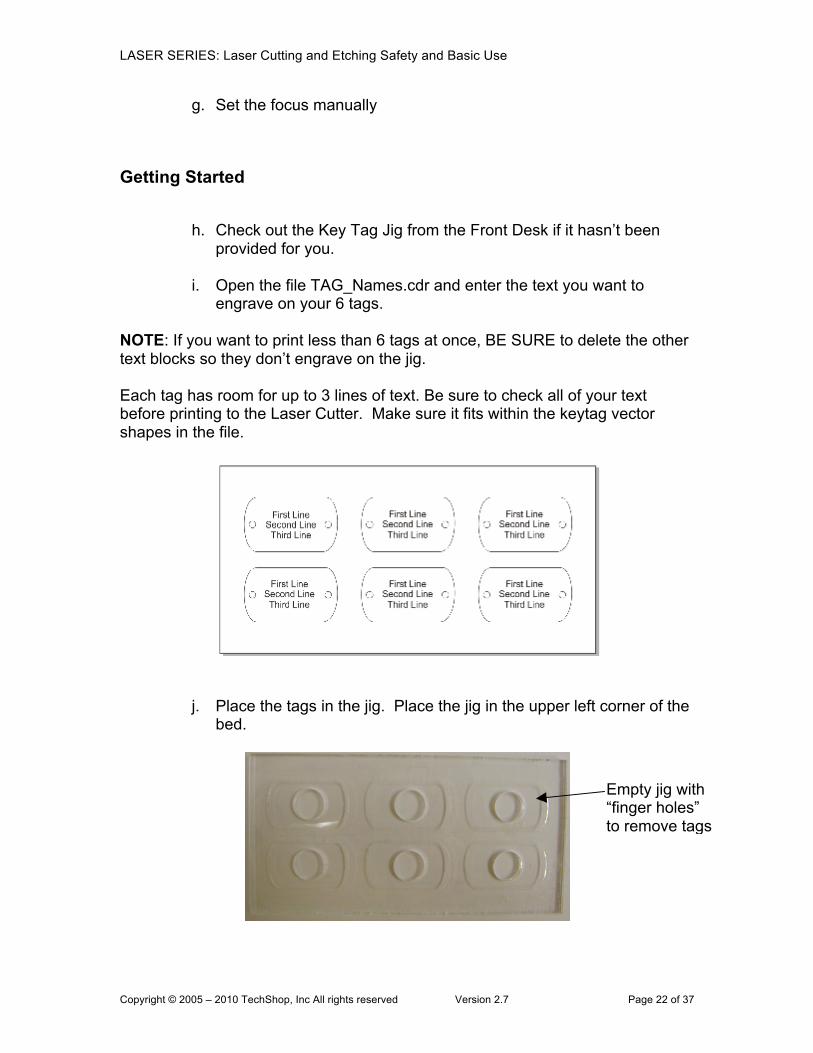
i. Open the file TAG_Names.cdr and enter the text you want to engrave on your 6 tags.
NOTE: If you want to print less than 6 tags at once, BE SURE to delete the other text blocks so they don’t engrave on the jig. Each tag has room for up to 3 lines of text. Be sure to check all of your text before printing to the Laser Cutter. Make sure it fits within the keytag vector shapes in the file.
j. Place the tags in the jig. Place the jig in the upper left corner of the bed.
Empty jig with “finger holes” to remove tags

LASER SERIES: Laser Cutting and Etching Safety and Basic Use
Copyright © 2005 – 2010 TechShop, Inc All rights reserved Version 2.7 Page 23 of 37
k. From the File Menu, choose Print. The Print window will appear.
l. Click the Properties button on the Print window.
m. The tags are anodized aluminum, so, you should set the Resolution to your desired output (300DPI, etc), the Job Type to Raster, and the Raster Speed and Power to:
DPI/Speed/Power DPI/Speed/Power DPI/Speed/Power
300/90/90 400/90/80 600/90/70
NOTE: This info came from the chart on the bulletin board in the Laser Room and/or this handout.
n. The Piece Size is 8 x 4, which is the size overall of the jig. Be sure to set this or else the laser will print your file in the middle of the table.
o. Click OK to accept the new Properties you have just set.
p. Click Print to print this job.
BE SURE to return the jig to the Front Desk along with the Laser Tray and Focus Gauge.
LASER SERIES: Laser Cutting and Etching Safety and Basic Use
Copyright © 2005 – 2010 TechShop, Inc All rights reserved Version 2.7 Page 24 of 37
4. What to do when you come back
a. Attach your USB thumb drive to the computer. b. Launch CorelDraw on the computer. This resets all parameters to
their default settings. c. Bring in your file:
From the File menu, choose Open, locate your thumb drive and select your file. Click Open. Some common file formats for carrying raster data are .JPG, .GIF, .PNG Some common file formats for carrying both raster and vector data are .DXF, .DWG, .EPS, .PDF, .SVG
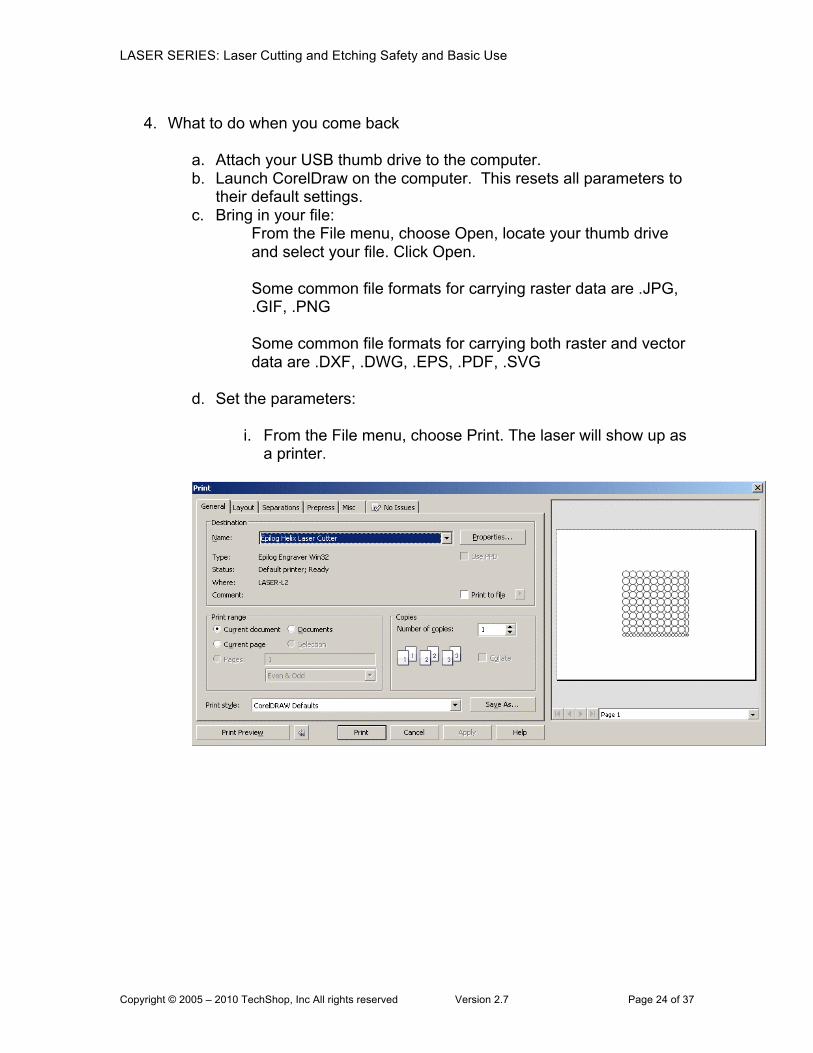
d. Set the parameters:
i. From the File menu, choose Print. The laser will show up as a printer.
LASER SERIES: Laser Cutting and Etching Safety and Basic Use
Copyright © 2005 – 2010 TechShop, Inc All rights reserved Version 2.7 Page 25 of 37
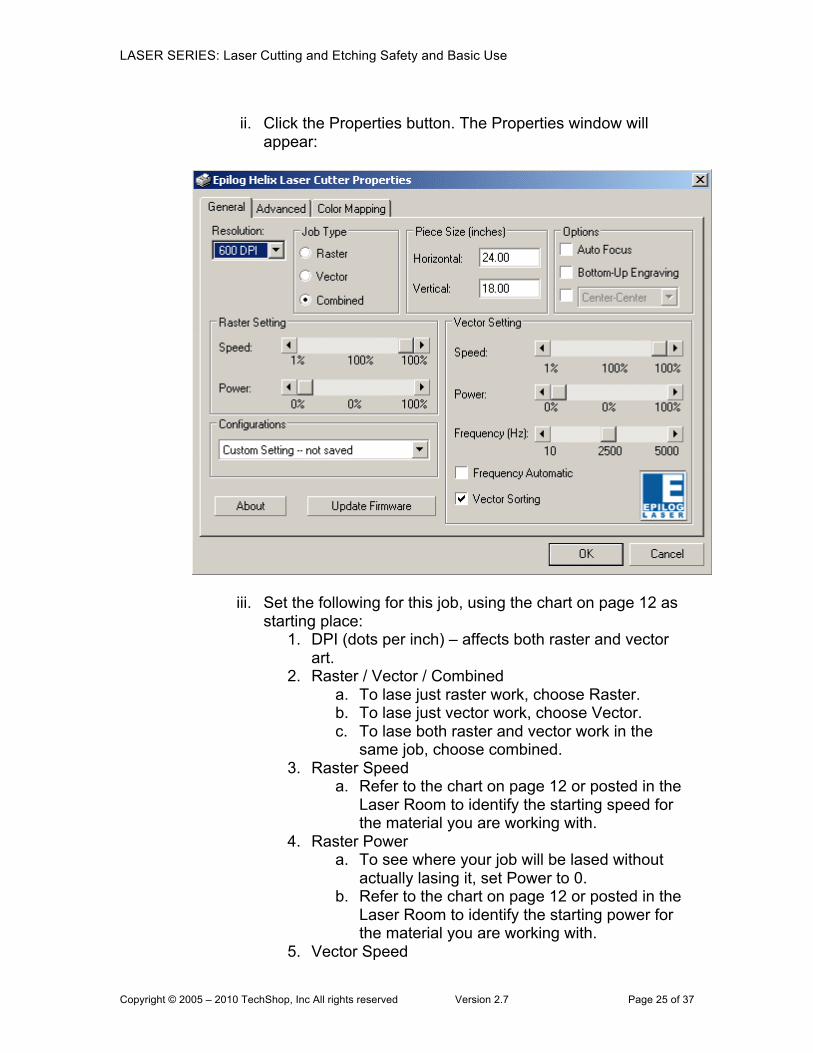
ii. Click the Properties button. The Properties window will
appear:
iii. Set the following for this job, using the chart on page 12 as starting place:
1. DPI (dots per inch) – affects both raster and vector art.
2. Raster / Vector / Combined a. To lase just raster work, choose Raster. b. To lase just vector work, choose Vector. c. To lase both raster and vector work in the
same job, choose combined. 3. Raster Speed
a. Refer to the chart on page 12 or posted in the Laser Room to identify the starting speed for the material you are working with.
4. Raster Power a. To see where your job will be lased without
actually lasing it, set Power to 0. b. Refer to the chart on page 12 or posted in the
Laser Room to identify the starting power for the material you are working with.
5. Vector Speed
LASER SERIES: Laser Cutting and Etching Safety and Basic Use
Copyright © 2005 – 2010 TechShop, Inc All rights reserved Version 2.7 Page 26 of 37
a. Refer to the chart on page 12 or posted in the Laser Room to identify the starting speed for the material you are working with.
6. Vector Power a. To see where your job will be lased without
actually lasing it, choose Power of 0. b. Refer to the chart on page 12 or posted in the
Laser Room to identify the starting power for the material you are working with.
7. Frequency is usually set to 2500. Follow guidelines in parameter charts.
8. Frequency Automatic should not be checked. 9. Vector Sorting should be checked. 10. Auto Focus should NEVER be checked. 11. Piece size should be set to your document
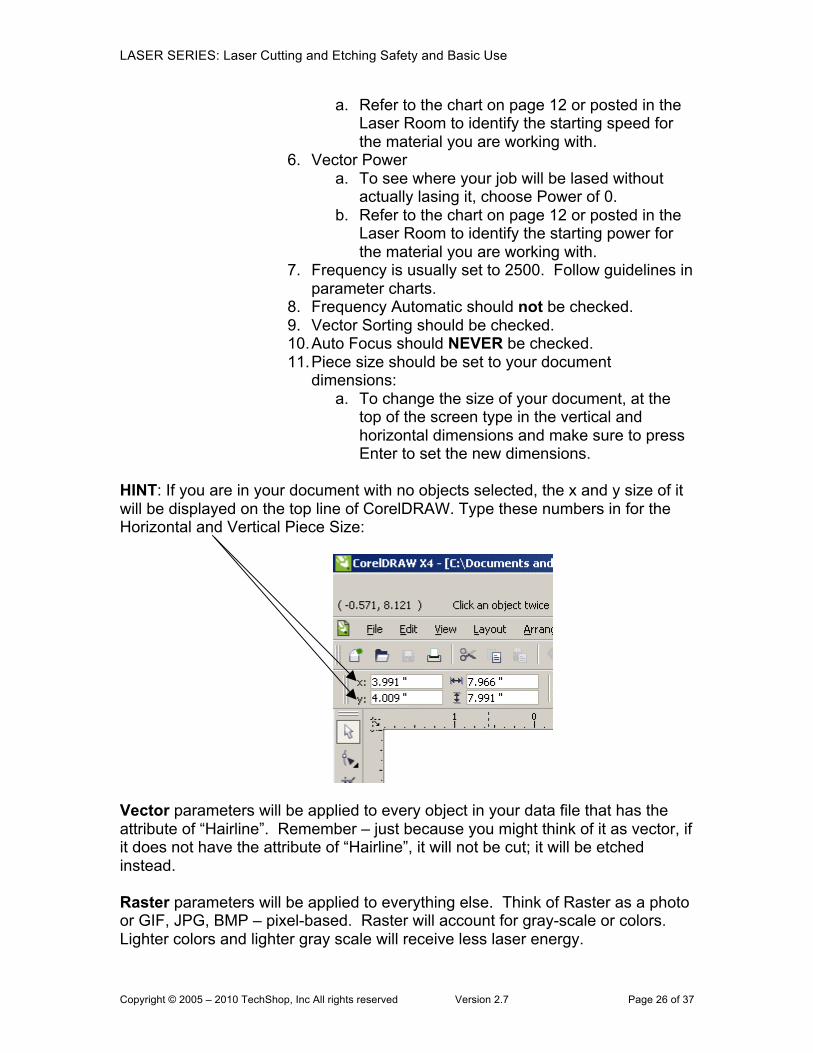
dimensions: a. To change the size of your document, at the
top of the screen type in the vertical and horizontal dimensions and make sure to press Enter to set the new dimensions.
HINT: If you are in your document with no objects selected, the x and y size of it will be displayed on the top line of CorelDRAW. Type these numbers in for the Horizontal and Vertical Piece Size:
Vector parameters will be applied to every object in your data file that has the attribute of “Hairline”. Remember – just because you might think of it as vector, if it does not have the attribute of “Hairline”, it will not be cut; it will be etched instead. Raster parameters will be applied to everything else. Think of Raster as a photo or GIF, JPG, BMP – pixel-based. Raster will account for gray-scale or colors. Lighter colors and lighter gray scale will receive less laser energy.

LASER SERIES: Laser Cutting and Etching Safety and Basic Use
Copyright © 2005 – 2010 TechShop, Inc All rights reserved Version 2.7 Page 27 of 37
Consult the documentation posted on the wall in the Laser Room or this handout to determine what speed and power settings might work for your material. Remember, these are just a starting place, you will need to experiment. IMPORTANT NOTE: Some experimentation will be required to get the desired result. Start at a lower energy level and work up to find your sweet spot. Always bring extra scrap material with you that is identical in quality to what you want to finally lase. Use this scrap to test and verify that the machine and your material are behaving as you expect.
2. Print the job a. Click the Print button on the Print screen. b. Wait for the green Data light on the laser’s front panel to go off.
Your job is now downloaded to the Laser Cutter. c. Push the Go button to start cutting. d. Watch your job as it is lased. Ensure that everything is going
correctly.
LASER SERIES: Laser Cutting and Etching Safety and Basic Use
Copyright © 2005 – 2010 TechShop, Inc All rights reserved Version 2.7 Page 28 of 37
5. Checklist
a. Focus – did you move the surface of your material into the plane of the laser?
b. Lens – did you check to see if the lens is dirty. If it is dirty, ask a staff person to clean it.
c. Exhaust fan – is the exhaust fan on? d. Parameters – are your vector and raster speed and power
parameters set appropriately for your material and the job you’re trying to accomplish?
e. Parameters – are your paremeters set for the machine you’re using? Are you using 60 watt parameters on the 45 watt machine? Are you using parameters from one machine on another of the same wattage? They are not guaranteed to work that way. If you’re on the same machine as before, have you tested your parameters to make sure they still work as before?
6. Parameter Setting Recommendations The following tables provide parameter recommendations for materials in Epilog 45 watt and 60 watt CO2 Lasers at TechShop:
LASER SERIES: Laser Cutting and Etching Safety and Basic Use
Copyright © 2005 – 2010 TechShop, Inc All rights reserved Version 2.7 Page 29 of 37
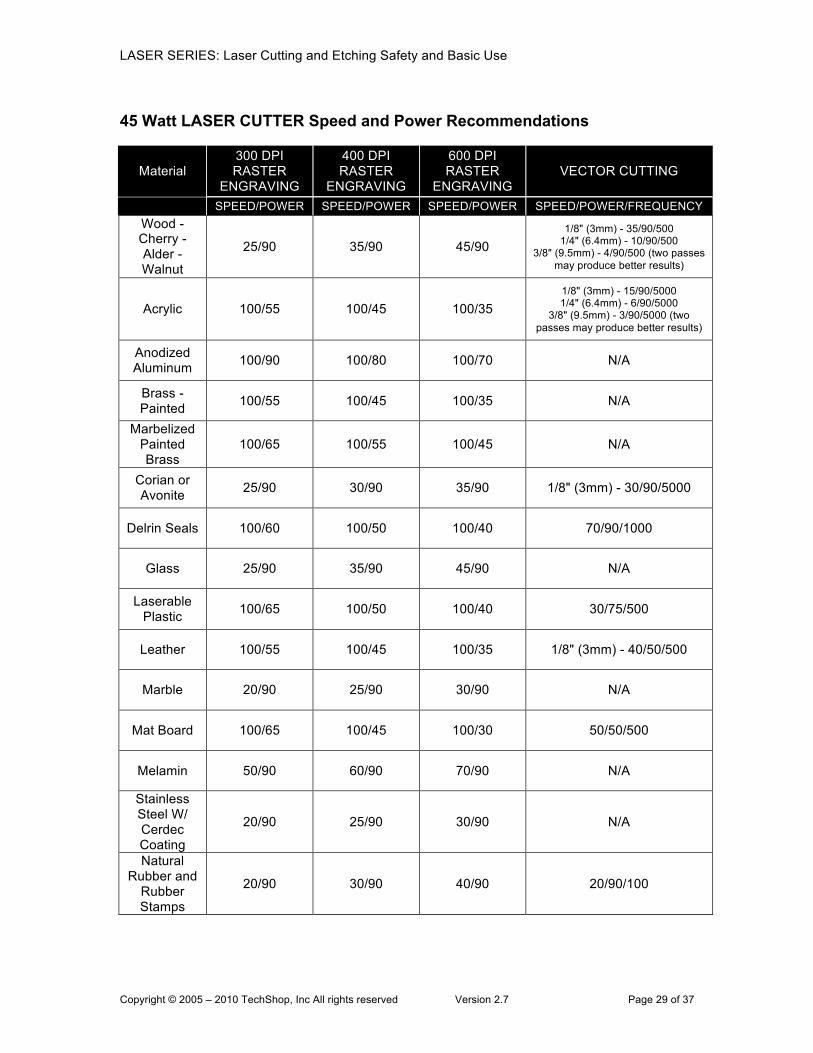
45 Watt LASER CUTTER Speed and Power Recommendations
Material 300 DPI RASTER
ENGRAVING
400 DPI RASTER
ENGRAVING
600 DPI RASTER
ENGRAVING VECTOR CUTTING
SPEED/POWER SPEED/POWER SPEED/POWER SPEED/POWER/FREQUENCY Wood - Cherry - Alder - Walnut
25/90 35/90 45/90 1/8" (3mm) - 35/90/500
1/4" (6.4mm) - 10/90/500 3/8" (9.5mm) - 4/90/500 (two passes
may produce better results)
Acrylic 100/55 100/45 100/35 1/8" (3mm) - 15/90/5000 1/4" (6.4mm) - 6/90/5000
3/8" (9.5mm) - 3/90/5000 (two passes may produce better results)
Anodized Aluminum 100/90 100/80 100/70 N/A
Brass - Painted 100/55 100/45 100/35 N/A
Marbelized Painted Brass
100/65 100/55 100/45 N/A
Corian or Avonite 25/90 30/90 35/90 1/8" (3mm) - 30/90/5000
Delrin Seals 100/60 100/50 100/40 70/90/1000
Glass 25/90 35/90 45/90 N/A
Laserable Plastic 100/65 100/50 100/40 30/75/500
Leather 100/55 100/45 100/35 1/8" (3mm) - 40/50/500
Marble 20/90 25/90 30/90 N/A
Mat Board 100/65 100/45 100/30 50/50/500
Melamin 50/90 60/90 70/90 N/A
Stainless Steel W/ Cerdec Coating
20/90 25/90 30/90 N/A
Natural Rubber and
Rubber Stamps
20/90 30/90 40/90 20/90/100

LASER SERIES: Laser Cutting and Etching Safety and Basic Use
Copyright © 2005 – 2010 TechShop, Inc All rights reserved Version 2.7 Page 30 of 37
60 Watt LASER CUTTER Speed and Power Recommendations
Material 300 DPI RASTER
ENGRAVING
400 DPI RASTER
ENGRAVING
600 DPI RASTER
ENGRAVING VECTOR CUTTING
SPEED/POWER SPEED/POWER SPEED/POWER SPEED/POWER/FREQUENCY Wood - Cherry - Alder - Walnut
55/90 80/90 100/90
1/8" (3mm) - 35/90/500 1/4" (6.4mm) - 20/90/500 3/8" (9.5mm) - 10/90/500
(two passes may produce better results)
Acrylic 100/50 100/40 100/30 1/8" (3mm) - 20/90/5000
1/4" (6.4mm) - 17/90/5000 3/8" (9.5mm) - 9/90/5000 (two
passes may produce better results)
Alumamark 100/30 100/25 100/20 N/A
Anodized Aluminum 100/55 100/45 100/20 N/A
Painted Brass 100/30 100/25 100/20 N/A
Marbelized Painted Brass
100/40 100/35 100/30 N/A
Corian or Avonite 20/90 30/90 40/90 1/8" (3mm) - 50/80/5000
Delrin Seals 100/40 100/30 100/20 60/85/5000
Glass 35/90 45/90 55/90 N/A
Laserable Plastic 100/45 100/35 100/25 30/40/50
Leather 100/40 100/30 100/20 1/8" (3mm) - 60/90/500
Marble 95/90 100/90 100/80 N/A
Mat Board 100/65 100/55 100/45 50/40/500
Melamine 100/60 100/70 100/80 N/A
Stainless Steel W/ Cerdec Coating
N/A 30/90 35/90 N/A
Natural Rubber and
Rubber Stamps
15/90 25/90 35/90 20/90/100
LASER SERIES: Laser Cutting and Etching Safety and Basic Use
Copyright © 2005 – 2010 TechShop, Inc All rights reserved Version 2.7 Page 31 of 37
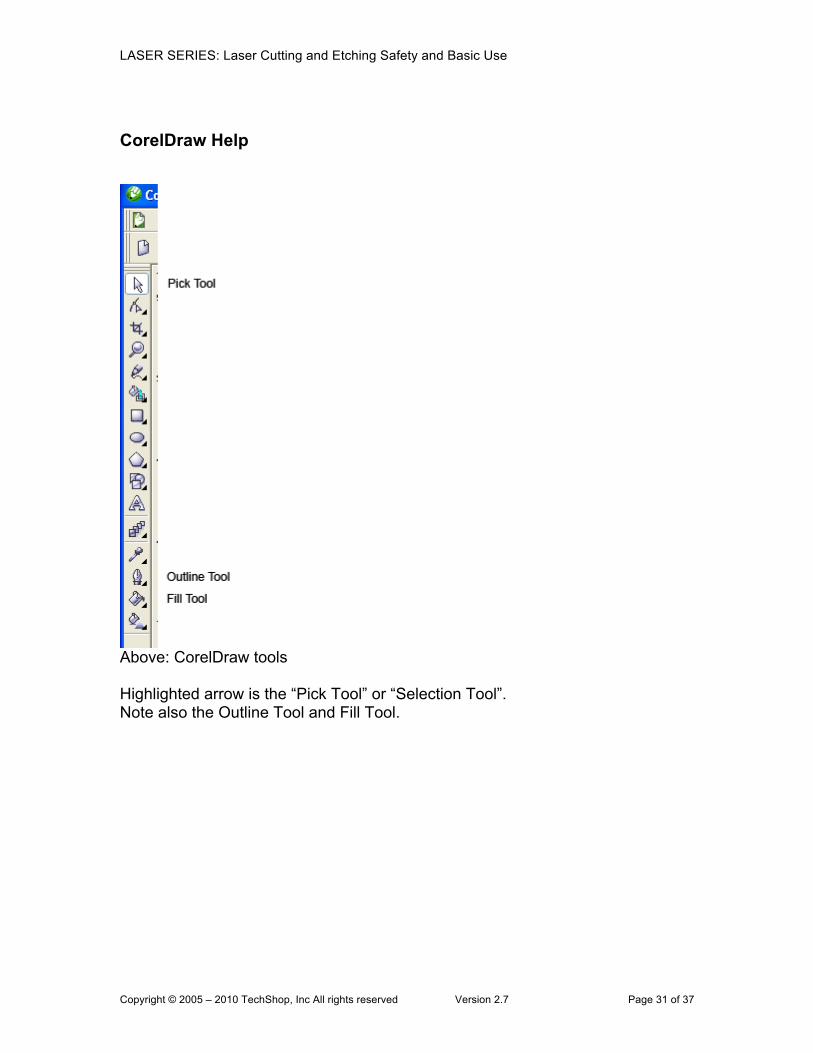
CorelDraw Help
Above: CorelDraw tools Highlighted arrow is the “Pick Tool” or “Selection Tool”. Note also the Outline Tool and Fill Tool.

LASER SERIES: Laser Cutting and Etching Safety and Basic Use
Copyright © 2005 – 2010 TechShop, Inc All rights reserved Version 2.7 Page 32 of 37
CorelDraw window showing document dimensions The example above shows a CorelDraw window for a document of the dimensions 8.5” wide by 11.0” tall. To get the document dimensions to appear at the top of the screen as above, use the “Pick Tool” and click outside all objects so that no objects are selected.
Close up of document dimensions including portrait and landscape indicators
LASER SERIES: Laser Cutting and Etching Safety and Basic Use
Copyright © 2005 – 2010 TechShop, Inc All rights reserved Version 2.7 Page 33 of 37
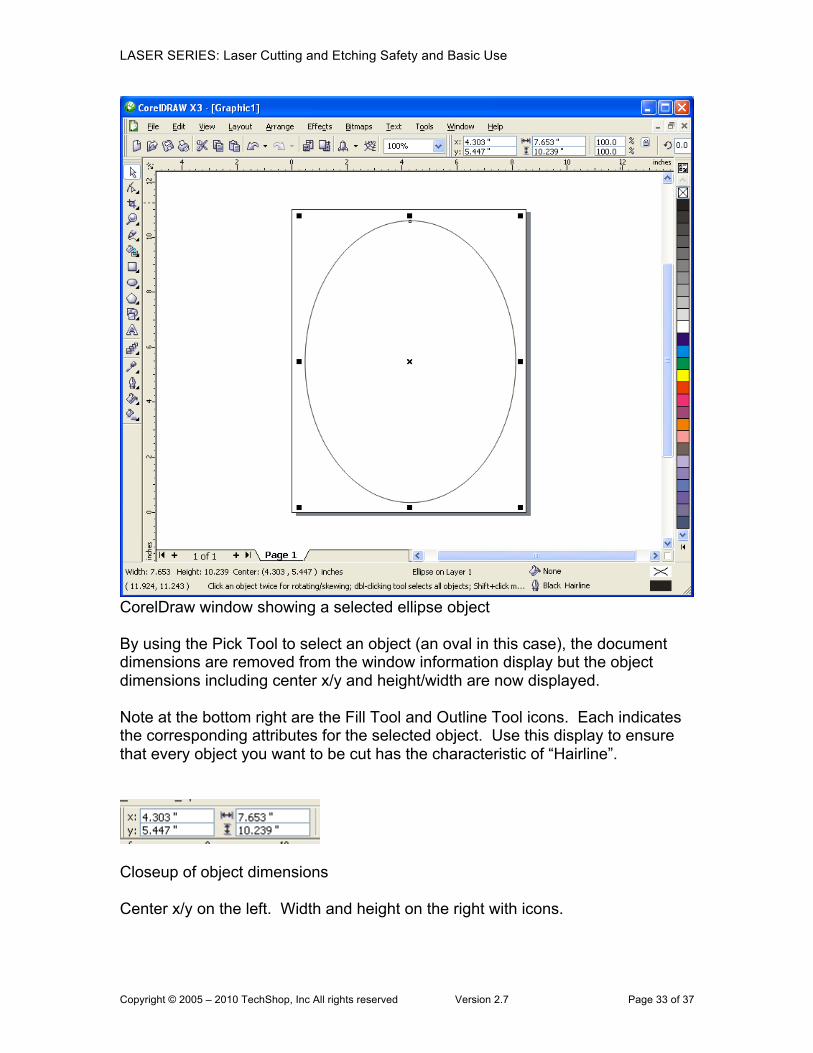
CorelDraw window showing a selected ellipse object By using the Pick Tool to select an object (an oval in this case), the document dimensions are removed from the window information display but the object dimensions including center x/y and height/width are now displayed. Note at the bottom right are the Fill Tool and Outline Tool icons. Each indicates the corresponding attributes for the selected object. Use this display to ensure that every object you want to be cut has the characteristic of “Hairline”.
Closeup of object dimensions Center x/y on the left. Width and height on the right with icons.
LASER SERIES: Laser Cutting and Etching Safety and Basic Use
Copyright © 2005 – 2010 TechShop, Inc All rights reserved Version 2.7 Page 34 of 37
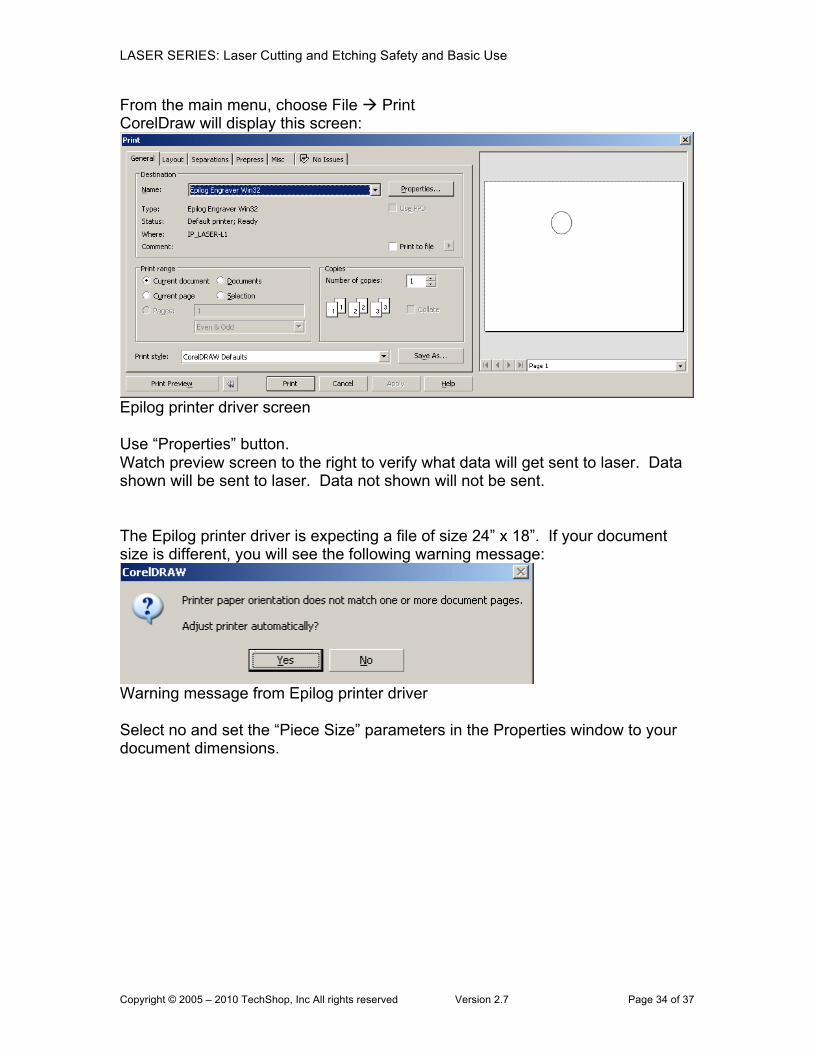
From the main menu, choose File Print CorelDraw will display this screen:
Epilog printer driver screen Use “Properties” button. Watch preview screen to the right to verify what data will get sent to laser. Data shown will be sent to laser. Data not shown will not be sent. The Epilog printer driver is expecting a file of size 24” x 18”. If your document size is different, you will see the following warning message:
Warning message from Epilog printer driver Select no and set the “Piece Size” parameters in the Properties window to your document dimensions.

LASER SERIES: Laser Cutting and Etching Safety and Basic Use
Copyright © 2005 – 2010 TechShop, Inc All rights reserved Version 2.7 Page 35 of 37
Epilog printer driver parameter window Note “Piece Size” at 24.00 x 18.00. Set these to your document size.
LASER SERIES: Laser Cutting and Etching Safety and Basic Use
Copyright © 2005 – 2010 TechShop, Inc All rights reserved Version 2.7 Page 36 of 37
Cleanup
a. Vacuum under the wire mesh table if your session produced small parts that fell through the mesh.
b. Check the lens: This lens is NOT user cleanable. If the lens is dirty, alert the Front Desk or TechShop staff so they may clean it.
c. Return the jig, tray and focus gauge to the Front Desk.
Questions:
• Given all other things equal, if you increase DPI, what effect will that have on your vector art? What changes might this make you consider for your vector art?
• Given all other things equal, if you increase DPI, what effect will that have
on your raster art? What changes might this make you consider for your raster art?
• Power setting can range from 0% to 100%. What is the lowest heat
setting you could choose for Power? • Speed setting can range from 1% to 100%. What is the lowest heat
setting you could choose for Speed? • Does it make sense to use the same parameter settings on the 60 watt
lasers as on the 45 watt lasers?
LASER SERIES: Laser Cutting and Etching Safety and Basic Use
Copyright © 2005 – 2010 TechShop, Inc All rights reserved Version 2.7 Page 37 of 37
COOL LINKS
www.EpilogLaser.com/tech_library.htm has great technical info and projects for use with the Epilog Laser. www.epiloglaser.com/sample_club.htm has great projects for the laser Cutter. www.laserbits.com offers laser specific materials for etching and cutting. www.instructables.com offers many projects that would be suitable for the laser cutter. www.tapplastics.com to research whether your material can be used on the laser cutter and it is also a good place to purchase acrylic of all kinds. Check out the TechShop store for cool anodized aluminum items, like luggage tags, golf divot tools, license plates, and much more!
WHAT’S NEXT?
After successfully completing this LAS-101 Laser Cutting and Etching SBU, you might be interested in these classes: LAS201 Laser Engraver Rotary Attachment SBU LAS203 Laser Cutting and Etching 2 LAS301 Fabric Etching and Cutting on the Laser LAS302 Make a Messenger Bag with the Sewing Machine and Laser Cutter WLD104 CNC Plasma Cutter SBU FIN101 Sand Blasting and Powder Coating SBU


![FIB Secondary Etching Method for Fabrication of Fine CNT ... · laser etching method was utilized to obtain microstructures of CNT brushes [21]. Moreover, the patterned growth of](https://img.dokumen.tips/doc/110x75/5e7104f042569253791c508c/fib-secondary-etching-method-for-fabrication-of-fine-cnt-laser-etching-method.jpg)