Embed Size (px)
Citation preview

Laser lab: safety and
procedures
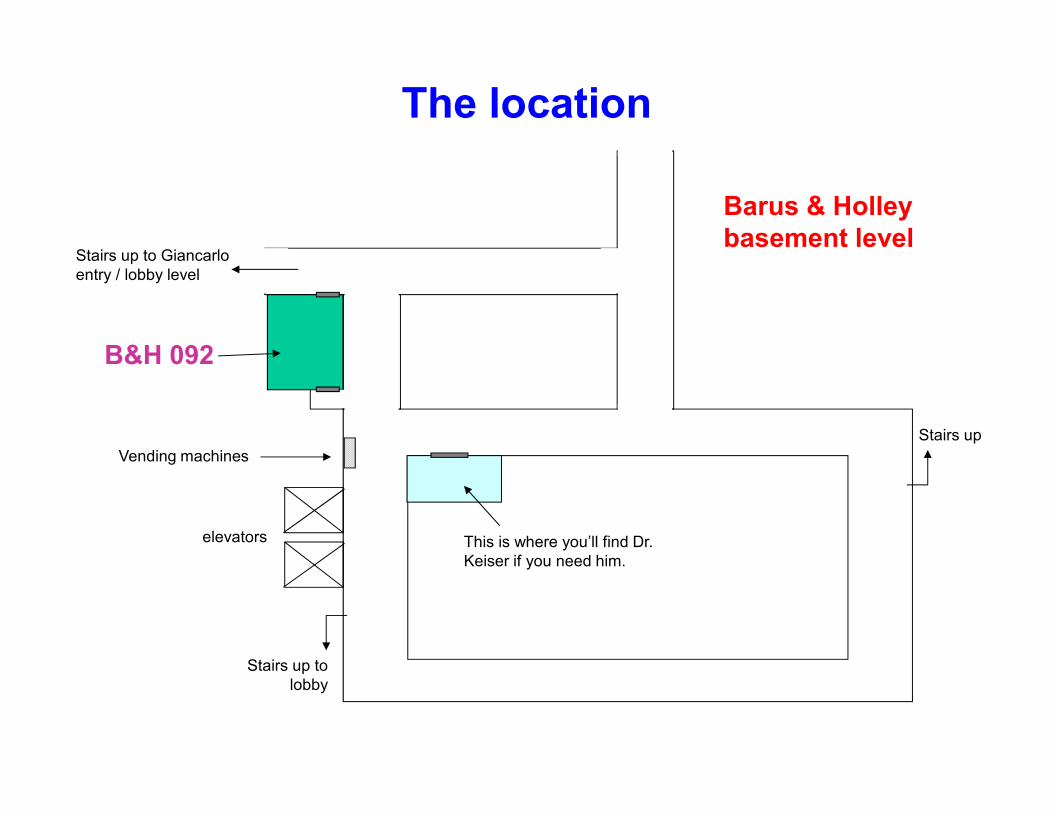
The location
B&H 092
Barus & Holley
basement levelStairs up to Giancarlo
entry / lobby level
elevators This is where you’ll find Dr.
Keiser if you need him.
Stairs up to
lobby
Stairs up
Vending machines

Laser safety
1. Eye safetyThe main hazard from lasers is eye damage.
DO NOT LET ANY LASER BEAM ENTER YOUR EYE.
The lasers used in this lab are low-power lasers. So scattered light from rough
surfaces is not hazardous. But a direct beam, either from the laser or from a
reflection off of a mirrored surface, could be damaging. Therefore
DO NOT LET ANY LASER BEAM ENTER YOUR EYE.
The laser beam should always propagate in a plane parallel to the surface of the
table, roughly six inches above the surface. Reflections are most likely to
occur in this plane. If you bend over, your eye will cross through this plane.
So, always be aware of where all stray beams are, so that you
DO NOT LET ANY LASER BEAM ENTER YOUR EYE.

Laser safety
2. Electrical safetyThe secondary hazard from lasers is electrical. When energized, our laser tube
operates above 1000 volts. Touching this would be extremely unpleasant.
Therefore do not touch the laser tube when it is energized.
You can tell if it is energized by looking at the warning light on the power supply,
next to the power switch. Don’t trust the glow of the tube – if things
malfunction, the tube might not be glowing but could still be energized.
Note: it is ok to touch the four alignment adustment knobs even while the tube is
energized. Just don’t touch the tube itself.
Also
DO NOT LET ANY LASER BEAM ENTER YOUR EYE.
(just in case you forgot)

The HeNe tube and power supplyThis is the gain medium of the laser you will be building. It is a
helium-neon tube, inside a glass envelope, with a power supply for
providing the high voltage.
“energized”
light
on/off switch, in the
on position
Protective red cap to prevent you from
electrocuting yourself. Do not remove these.
HeNe tube mounted on breadboard,
energized and glowing

Can I touch the windows on the ends of the
HeNe tube?
NO.
This is a close-up view of
one of the two end windows
of the HeNe tube.
Notice that it is set at an
angle – can you guess why?
NEVER TOUCH EITHER OF
THESE WINDOWS. They
scratch very easily. Even a
small fingerprint will make it
impossible for the laser to
operate.

Can I touch the knobs on the tube mount?
Yes, although you might not
want to do that.
The tube is already very well
aligned. It should need no
further alignment (or, maybe
just the tiniest little tweaks). It
is difficult to align from
scratch, so avoid moving it
by anything more than the
tiniest little bit.
However, the four knobs are perfectly safe to touch even
when the tube is energized: there is no electrical hazard.
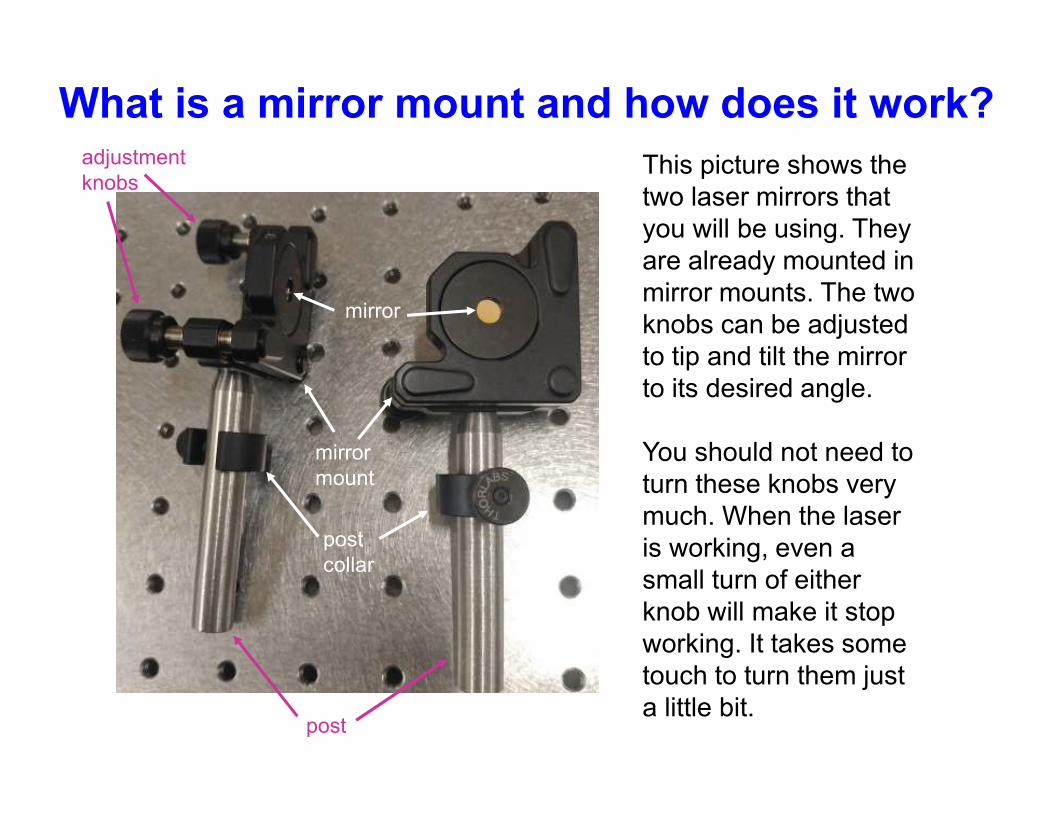
What is a mirror mount and how does it work?
This picture shows the
two laser mirrors that
you will be using. They
are already mounted in
mirror mounts. The two
knobs can be adjusted
to tip and tilt the mirror
to its desired angle.
You should not need to
turn these knobs very
much. When the laser
is working, even a
small turn of either
knob will make it stop
working. It takes some
touch to turn them just
a little bit.post
mirror
mount
mirror
adjustment
knobs
post
collar

Can I touch the mirror surfaces?
The mirror surfaces are extremely
delicate. Any slight scratch will destroy
them.
So we NEVER TOUCH THE OPTICS.
Don’t even blow on them.
Looking at them is ok though;
If you suspect that the mirrors are
damaged or dirty or anything else, ask
an expert for help.
Optics should be handled only by the
mount, never by the optical surface.

What about those post holders?You will find the tube set
up with two post holders
already screwed to the
breadboard, one on
either end of the tube.
These are the ones you
will use when you first
align the laser. Do not
move them.
To mount a mirror, just slide the post into the holder and tighten the
thumb screw to hold the mirror in place.
When you do that, be careful not to allow the mirror surface to get
touched by anything at all.
After the thumb screw is tight, you can make fine adjustments to the
tip and tilt of the mirror using the mirror mount’s adjustment knobs.
post holder #1post holder #2

What is an iris and how does it work?
An iris is a circular aperture that can be
used to make sure a laser beam is
pointing in the correct direction and at
the correct height.
It also blocks scattered light that doesn’t
make it through the central opening.
The size of the opening is variable,
depending on the size of the laser. Just
slide the lever on top from left to right
and back.

Can I open and close the iris?
Yes. Just be gentle with it. You
may find it useful to adjust the
size of the opening when
aligning the laser mirrors.
You should not remove the iris
from its post holder, or unscrew
the post holder from the table.
The iris location and height
above the table has been
carefully set so that we can
always be sure the alignment
laser beam is pointing in the right
direction.
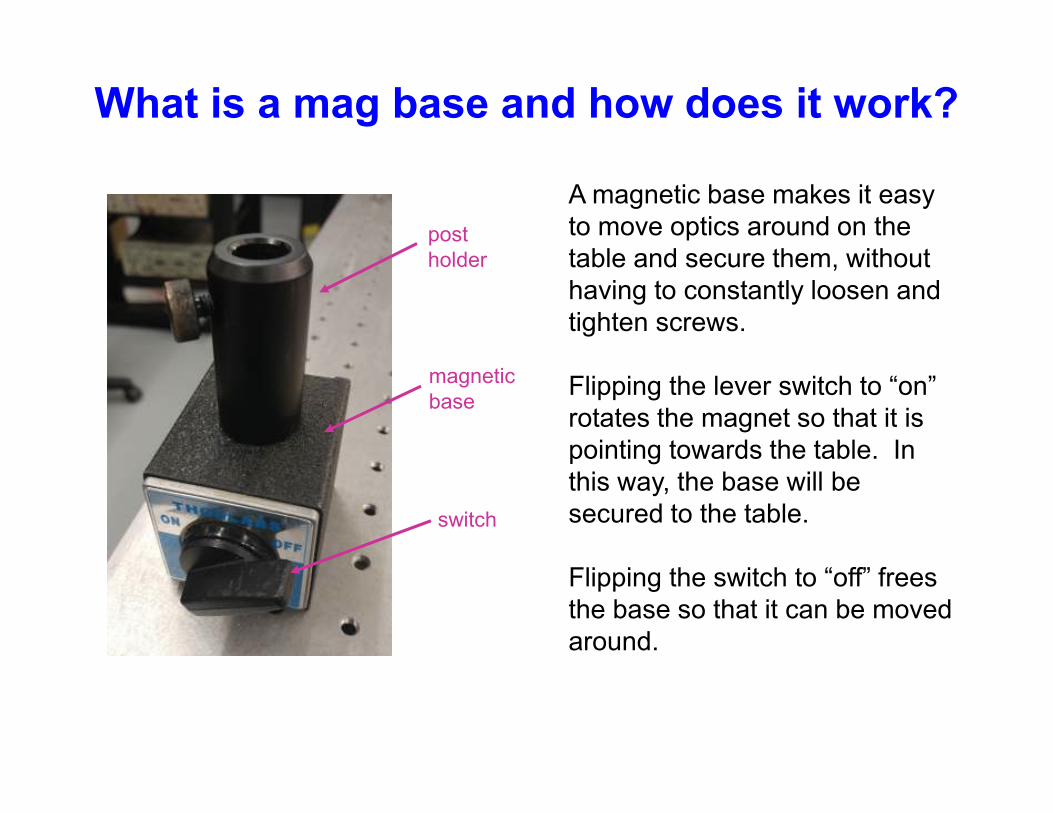
What is a mag base and how does it work?
A magnetic base makes it easy
to move optics around on the
table and secure them, without
having to constantly loosen and
tighten screws.
Flipping the lever switch to “on”
rotates the magnet so that it is
pointing towards the table. In
this way, the base will be
secured to the table.
Flipping the switch to “off” frees
the base so that it can be moved
around.
post
holder
magnetic
base
switch

The alignment laser
You are going to align the HeNe
laser using another laser to
guide the alignment. We will call
this the “alignment laser”. It is
also a HeNe, manufactured by
Uniphase.
It has been carefully aligned
before the lab, and is a pain to
realign, so don’t touch the tube.
You can turn it on and off with
the key on the front of the
Uniphase power supply.Uniphase
alignment
laser
its power
supply, with
on-off switch

The optical power meter
This is the device that you will use to measure the optical power
generated by the laser. It consists of a head and a controller.
There are many buttons.
You only need to push one of them: the red one (on/off)
After the device starts up, it will display the optical power entering the
head on the LCD display. Notice that the units are also displayed, and
they update automatically: nW (nanowatts), µW (microwatts), and so on.
head
controller
LCD display
on/off button
When making
measurements,
direct the laser
beam into the
center of this
circular opening, at
normal incidence.
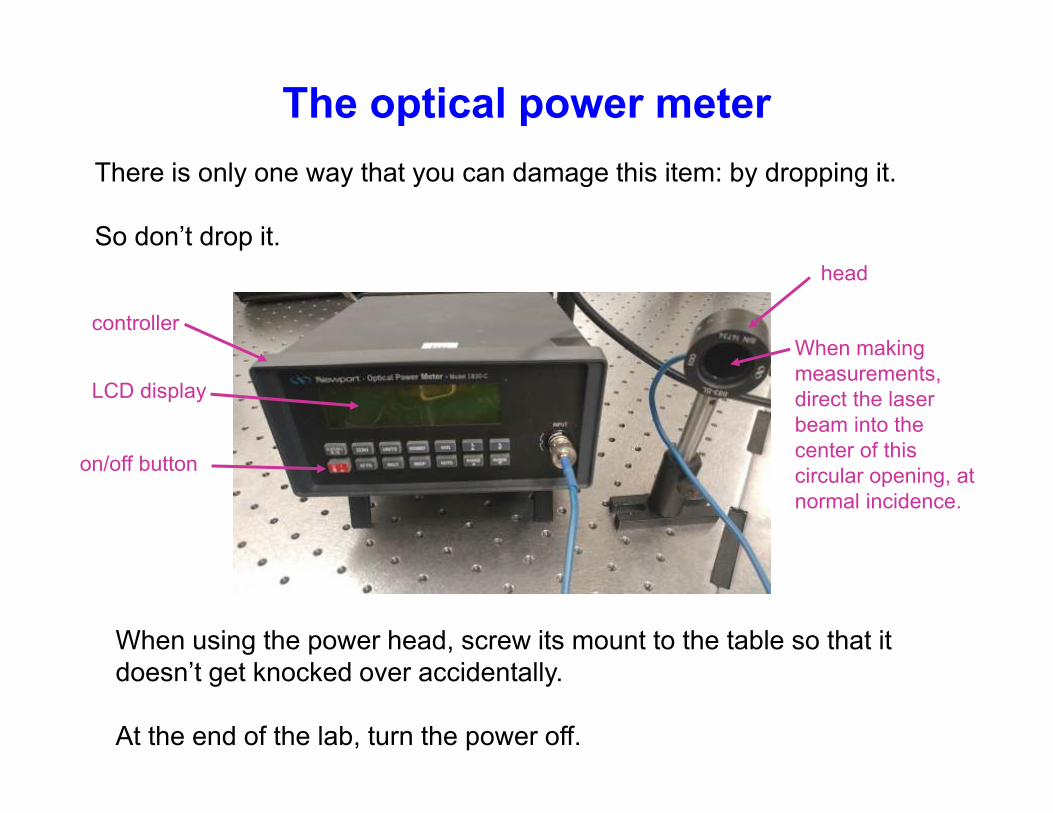
The optical power meter
There is only one way that you can damage this item: by dropping it.
So don’t drop it.
head
controller
When using the power head, screw its mount to the table so that it
doesn’t get knocked over accidentally.
At the end of the lab, turn the power off.
LCD display
on/off button
When making
measurements,
direct the laser
beam into the
center of this
circular opening, at
normal incidence.