Embed Size (px)
Citation preview

Large-Scale Deployment Guide

Mindjet MindManager 8 Large Scale Deployment Guide ii
Abstract
This document provides complete information about how to customize and administer large‐scale deployments of MindManager 8. Topics include:
Mindjet MindManager 8 components Understanding large‐scale deployment strategies Deploying MindManager using the installation wizard or from the command line Deploying MindManager with Windows Active Directory Deploying Mind Manager with Windows Server 2003 running Terminal Services Deploying MindManager with Citrix Presentation Server
Document Version 1.6 © 2008 Mindjet LLC. All Rights Reserved.

Mindjet MindManager 8 Large Scale Deployment Guide iii
Contents
Abstract ........................................................................................................ ii
Contents ...................................................................................................... iii
List of Tables ............................................................................................... vi
About This Guide ...................................................................................... vii Getting Help ...................................................................................................... vii
System Requirements .................................................................................. 1
Understanding Deployment Strategies ....................................................... 3 Running the Standard Setup Manually or Automatically ............................ 3 Running the Admin Setup Manually or Automatically ................................ 3 Deploying MindManager with Active Directory ........................................... 4 Deploying MindManager with Windows Server 2003 .................................. 4 Deploying MindManager with Citrix Presentation Server ........................... 4 Using System Management Software and a Custom Setup ......................... 4 Deploying MindManager on a Shared Network Drive ................................. 5
Using the Admin Setup ............................................................................... 6 Required Software .............................................................................................. 7 Required Permissions and Privileges ............................................................... 7 Differences between the Standard and Admin Setups .................................. 7 Installing MindManager 8: An Overview ....................................................... 8
Per‐machine setup ............................................................................................. 8 Per‐user setup .................................................................................................... 8
What Gets Installed ................................................................................... 10 MindManager Components ............................................................................ 10
Library ............................................................................................................... 11 Dictionaries ....................................................................................................... 11

Mindjet MindManager 8 Large Scale Deployment Guide iv
Tutorials ............................................................................................................ 11 PDF‐XChange ................................................................................................... 12 User Configuration Files ................................................................................. 12
Shortcuts and Start Menu items ...................................................................... 13 Shared System Software ................................................................................... 13 Third‐Party Software ........................................................................................ 14 Registry Keys ..................................................................................................... 16
What Remains After Uninstallation .......................................................... 19 Remaining Files, Folders, and Software Components ................................. 19 Remaining Registry Keys ................................................................................. 20
Deploying with the Installation Wizard ................................................... 21 Starting the Installation .................................................................................... 21 Customizing the Installation ........................................................................... 22
Disabling Default Features ............................................................................. 22 Changing the Default Installation Folder ..................................................... 23 Deploying User Data and the Library to a Server ....................................... 23
Completing the Installation ............................................................................. 26
Deploying from the Command Line ......................................................... 27 Configuring Installation Parameters from the Command Line ................. 28 Configuring Features from the Command Line ........................................... 29
Customizing the Installation with Setup.exe ............................................... 29 Customizing the Installation with MSI ......................................................... 30
Configuring Functions from the Command Line ......................................... 33 Configuring Functions from the Registry ..................................................... 34 Deploying User Data, the Library, and Tutorials ......................................... 35
Deploying User Data, the Library, and Tutorials from the Command Line .................................................................................................................... 35 Deploying User Data from the Registry ....................................................... 36
Sample Setup Commands ................................................................................ 37 Simple Installation ........................................................................................... 38 Silent Installation ............................................................................................. 38 Sample Customized Installation Using ADDLOCAL and REMOVE ...... 38 Uninstallation ................................................................................................... 38
Deploying with Active Directory .............................................................. 39
Deploying with Windows Server 2003 ...................................................... 41
Mindjet MindManager 8 Large Scale Deployment Guide v
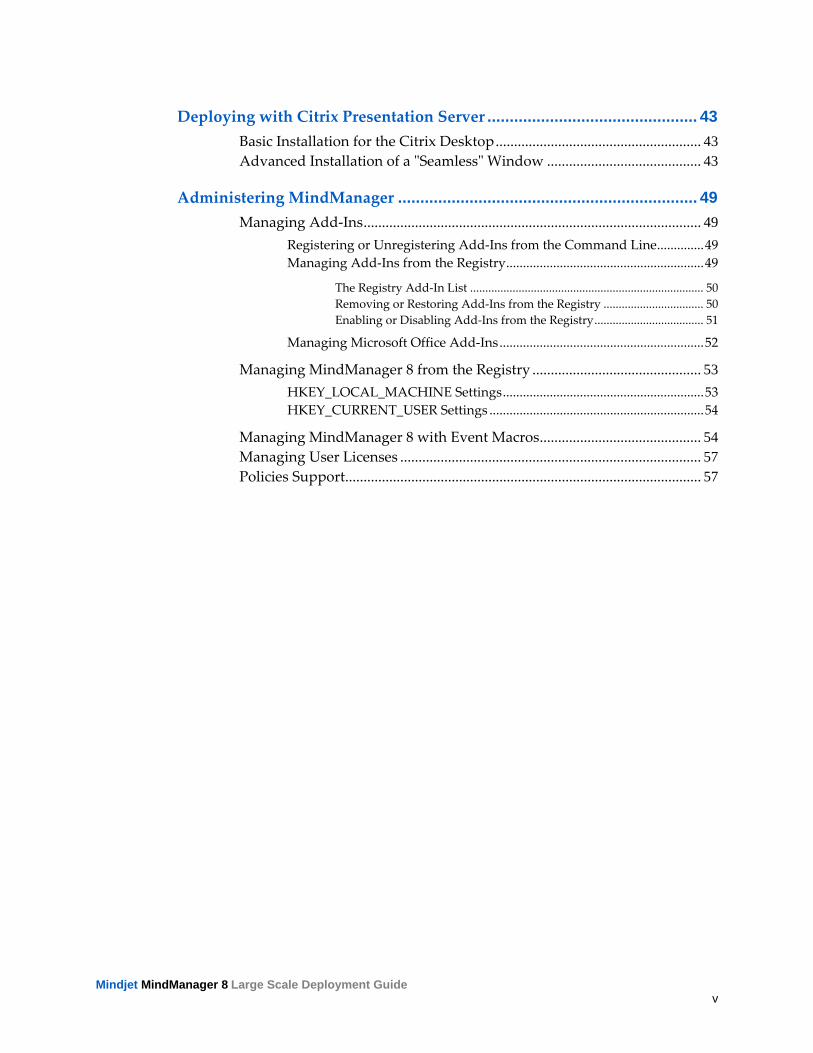
Deploying with Citrix Presentation Server ............................................... 43 Basic Installation for the Citrix Desktop ........................................................ 43 Advanced Installation of a ʺSeamlessʺ Window .......................................... 43
Administering MindManager ................................................................... 49 Managing Add‐Ins ............................................................................................ 49
Registering or Unregistering Add‐Ins from the Command Line .............. 49 Managing Add‐Ins from the Registry ........................................................... 49
The Registry Add‐In List ............................................................................. 50 Removing or Restoring Add‐Ins from the Registry ................................. 50 Enabling or Disabling Add‐Ins from the Registry .................................... 51
Managing Microsoft Office Add‐Ins ............................................................. 52
Managing MindManager 8 from the Registry .............................................. 53 HKEY_LOCAL_MACHINE Settings ............................................................ 53 HKEY_CURRENT_USER Settings ................................................................ 54
Managing MindManager 8 with Event Macros ............................................ 54 Managing User Licenses .................................................................................. 57 Policies Support ................................................................................................. 57

Mindjet MindManager 8 Large Scale Deployment Guide vi
List of Tables
Table 1: System Requirements for MindManager 8 ...................................................................................... 1
Table 2: Configuration Files ........................................................................................................................ 12
Table 3: Location of Shared System Components ....................................................................................... 13
Table 4: Third‐Party Software Overview .................................................................................................... 14
Table 5: MindManager Registry Key Overview .......................................................................................... 16
Table 6: Remaining Files, Folders, and Software components .................................................................... 19
Table 7: Remaining Registry Keys .............................................................................................................. 20
Table 8: Configuring Installation Parameters from the Command Line ..................................................... 28
Table 9: Configuring Features with MSI from the Command Line ............................................................ 31
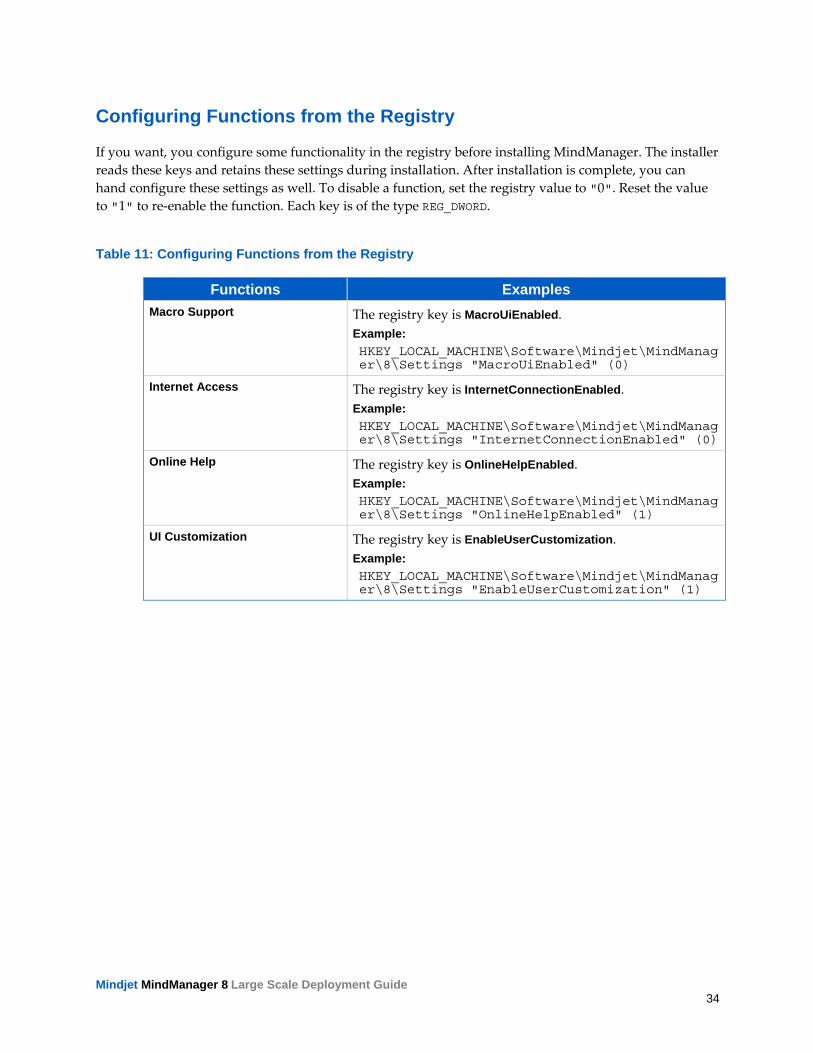
Table 11: Configuring Functions from the Command Line ........................................................................ 33
Table 12: Configuring Functions from the Registry .................................................................................... 34
Table 13: User Data Deployment Options................................................................................................... 35
Table 14: Library Deployment Options ....................................................................................................... 36
Table 15: Tutorial Deployment Options ...................................................................................................... 36
Table 16: User Data Registry Key Values .................................................................................................... 37
Table 17: Properties Editable in Properties Table ....................................................................................... 39
Table 18: HKEY_LOCAL_MACHINE Registration Values ........................................................................ 53
Table 19: HKEY_LOCAL_MACHINE Settings ........................................................................................... 53
Table 20: HKEY_CURRENT_USER Settings ............................................................................................... 54
Table 21: Event Macros ............................................................................................................................... 55

Mindjet MindManager 8 Large Scale Deployment Guide vii
About This Guide
Many Mindjet customers have requested support for customized deployment of MindManager to large numbers of client machines. We have worked with them to support the following options:
Running the standard setup manually or automatically Running the admin setup manually or automatically Deploying MindManager 8 using the installation wizard Deploying MindManager 8 from the command line Deploying MindManager 8 with Windows Server 2003 running Terminal Services Deploying MindManager 8 with Citrix Presentation Server Deploying MindManager with Windows Active Directory (limited support*)
This deployment option is not supported:
Install the program on a Shared Network Drive
Mindjet does not support large‐scale deployment for MindManager Lite.
* Check with your support representative for more information.
Getting Help
For technical support with this product, go to http://www.mindjet.com/support. Here you find links to the Knowledge Base, User Forums, and other online resources. You can also submit a support request.

Mindjet MindManager 8 Large Scale Deployment Guide 1
System Requirements
The following are the hardware and software requirements for MindManager 8:
Table 1: System Requirements for MindManager 8
Hardware Requirements
Software Requirements Browser Requirements
• Pentium 700 MHz or higher
• 256 MB RAM or higher
• 150 MB disk space (50 MB on installation drive during install)
• 1024x768 resolution or higher
• 16‐bit/65K color or higher
Operating System (32-bit)
• Microsoft Windows XP Home SP2 • Microsoft Windows XP Professional SP2 • Microsoft Windows XP Tablet PC SP2 • Microsoft Windows Vista
Ultimate/Business • Microsoft Windows Server 2003 • Microsoft Systems Management Server
Using Windows Server 2003 • Citrix MetaFrame Presentation Server 4.5
Software Requirements
• .NET 2.0 or higher* • MSXML 6 SP1 or higher* • MS VC++ 2005 SP1 Redistributable or
higher* • Microsoft Office XP/2003/2007 • Microsoft Project 2002/2003/2007,
including Multilingual User Interface Packs (for optimal use)
• Microsoft Visio 2002/2003/2007 (for optimal use)
• Adobe Acrobat 6.0 or higher (for PDF Export)
• Adobe Flash Player (for Tutorials playback)
* Included in the Admin setup package
• Microsoft Internet Explorer 6.0 or higher
• Mozilla Firefox 2.0 or higher

Mindjet MindManager 8 Large Scale Deployment Guide 2
For deploying Mindjet MindManager 8 in a terminal server environment, the following are prerequisites:
• Windows Server 2003 running Terminal Services
or
• Citrix MetaFrame Presentation Server 4.5
When using this method, each client machine must also meet the software and hardware requirements. When running MindManager 8 on a terminal server, the client must be able to connect and handle RDP. The server requirements depend on the number of clients.
Mindjet MindManager 8 Large Scale Deployment Guide 3
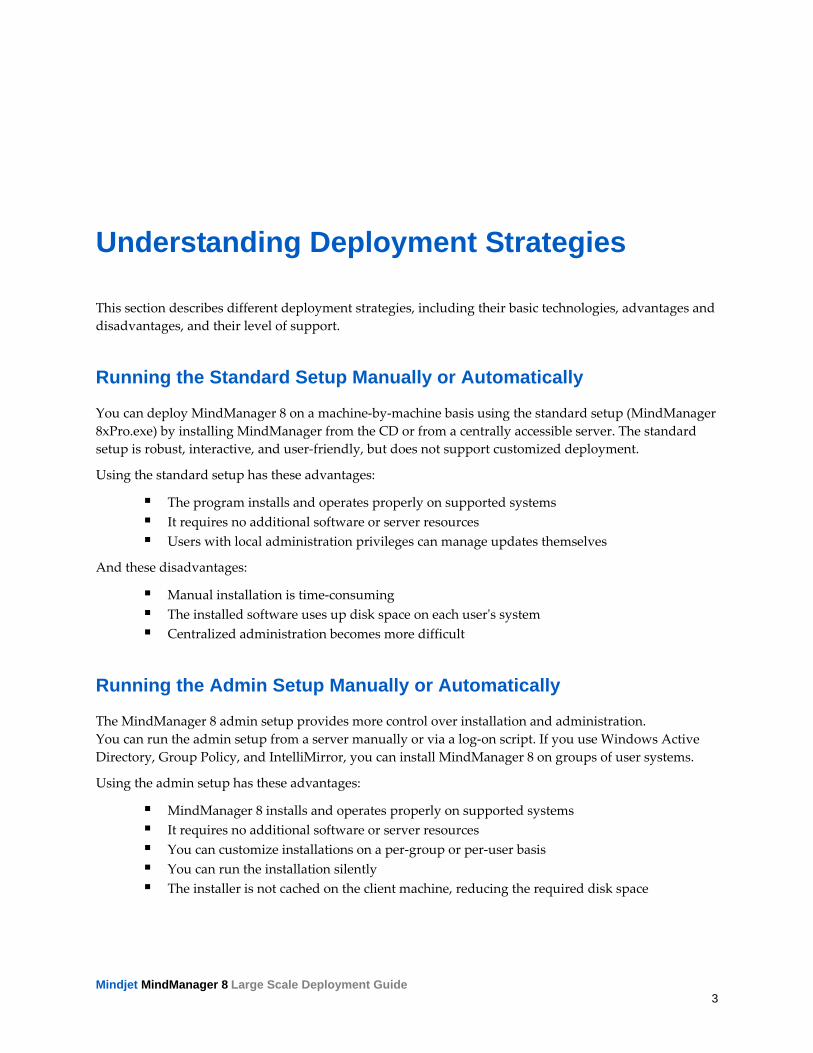
Understanding Deployment Strategies
This section describes different deployment strategies, including their basic technologies, advantages and disadvantages, and their level of support.
Running the Standard Setup Manually or Automatically
You can deploy MindManager 8 on a machine‐by‐machine basis using the standard setup (MindManager 8xPro.exe) by installing MindManager from the CD or from a centrally accessible server. The standard setup is robust, interactive, and user‐friendly, but does not support customized deployment.
Using the standard setup has these advantages:
The program installs and operates properly on supported systems It requires no additional software or server resources Users with local administration privileges can manage updates themselves
And these disadvantages:
Manual installation is time‐consuming The installed software uses up disk space on each userʹs system Centralized administration becomes more difficult
Running the Admin Setup Manually or Automatically
The MindManager 8 admin setup provides more control over installation and administration. You can run the admin setup from a server manually or via a log‐on script. If you use Windows Active Directory, Group Policy, and IntelliMirror, you can install MindManager 8 on groups of user systems.
Using the admin setup has these advantages:
MindManager 8 installs and operates properly on supported systems It requires no additional software or server resources You can customize installations on a per‐group or per‐user basis You can run the installation silently The installer is not cached on the client machine, reducing the required disk space

Mindjet MindManager 8 Large Scale Deployment Guide 4
And these disadvantages:
Access to the original installer is required for repair and other setup operations
Deploying MindManager with Active Directory
This method is not yet fully supported. Due to the application architecture, MindManager only supports Computer‐based Software installations via Active Directory. User‐based deployment is not supported. Using a third party tool such as Orca allows you to edit properties for deployment. See Deploying MindManager 8 with Active Directory.
Deploying MindManager with Windows Server 2003
Deploying MindManager 8 from a terminal server to a thin client is another supported option. With this architecture it is possible, for example, to ʺrunʺ a Windows XP application on a Windows 2000 client machine, where one server services many clients. You need to deploy MindManager 8 using Windows Server 2003 Terminal Services in order to use full color mode in MindManager.
Deploying MindManager with Citrix Presentation Server
The Citrix MetaFrame Presentation Server is a sophisticated terminal server environment built on top of the Windows Terminal Services provided by Windows Server. This is currently the only tested and supported Citrix platform for MindManager (although other combinations may work).
Using System Management Software and a Custom Setup
System management software, such as Microsoft System Management Server, enables you to centrally install and administer client machines. While you can deploy MindManager 8 using such software, there is no specialized support for this in MindManager 8. Information contained in this document supplies much of the information you need if you choose to deploy MindManager in this way.
Using system management software has these advantages:
You can deploy the software to many machines with one command You can create different setups for different groups of users Updating the software is simple
And these disadvantages:
You have to have system management software in place It takes time to create the custom setup The installed software uses up disk space on each userʹs system
Mindjet MindManager 8 Large Scale Deployment Guide 5
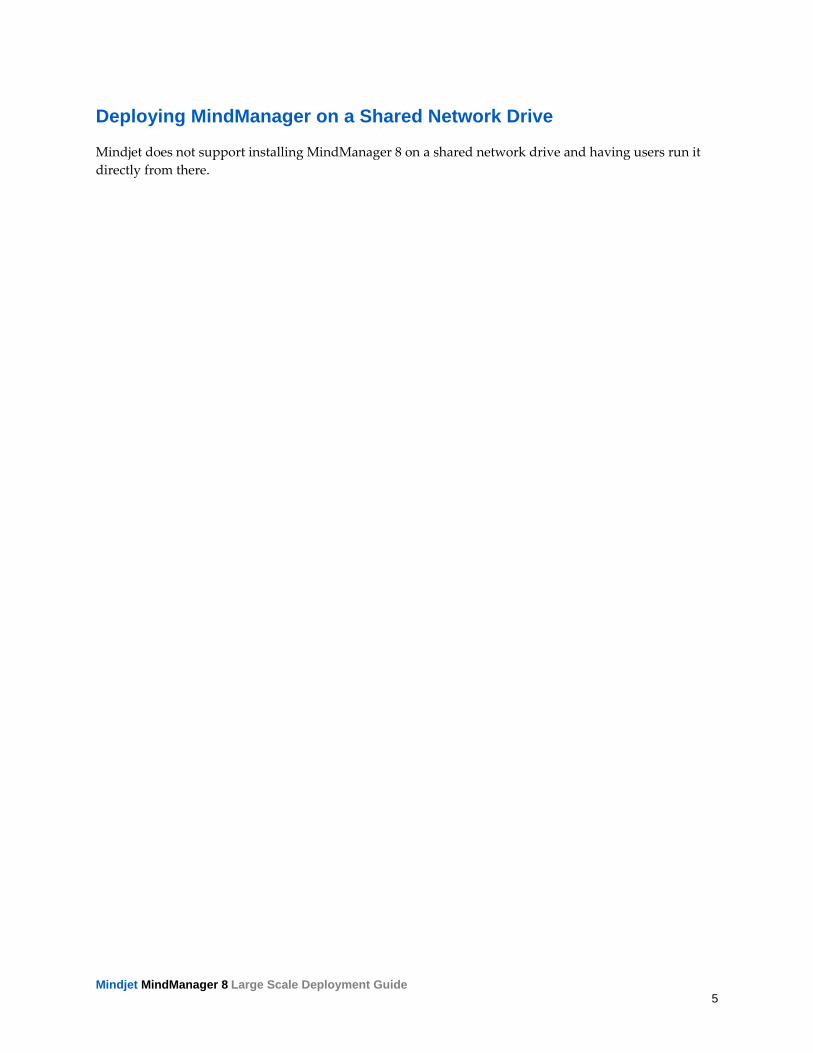
Deploying MindManager on a Shared Network Drive
Mindjet does not support installing MindManager 8 on a shared network drive and having users run it directly from there.

Mindjet MindManager 8 Large Scale Deployment Guide 6
Using the Admin Setup
MindManager 8 admin setup (available on CD or at http://www.mindjet.com) gives systems administrators more control over an installation. It is distributed in a .zip archive file MindManager_8.x.xyz_Admin_<language>.zip that contains the files:
Mindjet MindManager 8 Admin.msi
instmsi30.exe dotnetfx20.exe
msxml6_x86.msi vcredist_sp1_x86.exe Mindjet_MindManager_8_Large_Scale_Deployment_Guide.pdf
Mindjet MindManager 8 Admin.msi is the Microsoft installer file for MindManager 8. instmsi30.exe file is the engine installer for the Microsoft Windows Installer.
dotnetfx20.exe is Microsoft’s .NET Framework 2.0 redistributable setup.
msxml6_x86.msi is the MSXML 6.0 installer
vcredist_sp1_x86.exe is a self‐extracting executable file that installs the latest version of the Microsoft Visual C++ run‐time files and operating system components.
Mindjet_MindManager_8_Large_Scale_Deployment_Guide.pdf is this Deployment Guide.
Using the admin setup gives you nearly complete control over your MindManager 8 deployment including:
Deploying (or not deploying) specific components, such as the PDF writer Disabling functions, such as internet access Storing components on network drives, such as user data or the library
You also have the option of configuring many items from the registry.
Warning:
Only experienced system administrators should attempt deploying MindManager 8 using the Admin Setup.
Configuring MindManager 8 from the command line or by editing registry keys should be undertaken with caution as well.

Mindjet MindManager 8 Large Scale Deployment Guide 7
Important:
You should check for and install any missing components in the order listed above.
Required Software
All required software is in included in the admin setup package. It contains some software which must be installed on your system before using the setup. You should verify that this software is already installed on your system, and if not, install it from the admin package.
dotnetfx20.exe installs the Microsoft Net Framework 2.0 Check the installed programs in the Control Panel to check existing installation.
msxml6_x86.msi installs the MSXML 6.0 Parser Check the installed programs in the Control Panel to check existing installation.
vcredist_sp1_x86.exe installs the VC++ Redistributable components Check for existence of registry key: HKEY_LOCAL_MACHINE\SOFTWARE\Microsoft\Windows\CurrentVersion\Uninstall\ {7299052b‐02a4‐4627‐81f2‐1818da5d550d} Or simply re‐install.
Required Permissions and Privileges
Administrator privileges are required to install any Windows software including MindManager 8.
No special privileges or disk permissions are required to run MindManager 8. A user can run the program as a restricted user, ʺnormalʺ user, power user, or administrator. The program does assume that it has read/write/create privileges in the HKEY_CURRENT_USER registry key as well as the user profile section of the hard disk and below.
If a user does not have write privileges in the HKEY_LOCAL_MACHINE registry key, then:
The Help > Check for Updates command is removed for that user, ensuring that they wonʹt try to perform an upgrade that they are not authorized to do.
MindManager does not repair any broken registry file associations and other local machine registration settings on startup.
Differences between the Standard and Admin Setups
The MindManager 8 admin setup is based on the standard setup with a number of important differences:
Caching: The admin setup does not cache the setup on the computer where it is being installed. Instead the setup should be run from a network location that remains accessible from the workstation at all times. This ensures proper operation of the Modify, Repair and Remove entries in the “Add/Remove programs” Control Panel applet and avoid duplication of the installation source on every system where MindManager 8 is installed.

Mindjet MindManager 8 Large Scale Deployment Guide 8
Patching: Admin setups are only delivered as full setups, not patch setups. The reason for this is that system administrators might modify the admin setup to suit the needs of their individual company. If the installation database is transformed in this way, a future MindManager 8 patch would not be able to properly update the installation. We avoid this problem by not delivering patch updates at all for our admin setups. To upgrade, you need to uninstall the previous version of MindManager and install the upgrade.
Packaging: We exclude the Microsoft Windows Installer engine and .NET Framework installer. Both components need to be installed prior to running MindManager.msi if they are missing from a user’s machine.
User Data: The admin setup includes option to specify the location of user data. Library Files: There is also an option to have MindManager 8 extract the library files as usual
or to have the administrator set this up ʺmanuallyʺ ahead of time. This is described in Installing User Data and Library Files to a Server.
For more a more in‐depth look at the admin setup and MindManager 8 components, see Installing MindManager 8: An Overview.
Installing MindManager 8: An Overview
This section gives a general overview of the admin setup and MindManager 8 components. With this information, you understand the installation process and are able to decide what you may wish to customize for your MindManager deployment.
Per-machine setup The MindManager 8 setup installs the program on a client machine and only sets per‐machine registry settings in the HKEY_LOCAL_MACHINE and HKEY_CLASSES_ROOT registry keys. It does not directly create or set any registry keys or values in the HKEY_CURRENT_USER registry key.
The MindManager 8 installer installs all program files to this default folder:
C:\Program Files\Mindjet\MindManager 8
Administrator privileges are required to install any Windows software, including MindManager 8.
Per-user setup Each time MindManager launches; it checks the UserData.ini file, located in:
C:\Documents and Settings\Username\Local Settings\Application Data\Mindjet\MindManager\8
to see if a per‐user setup needs to be done. If this file is missing or if the version of MindManager installed is newer than the version the user last ran, then MindManager prepares for a ʺnewʺ per‐user installation by deleting the following registry key:
HKEY_CURRENT_USER\Software\Mindjet\MindManager\8\User Interface
MindManager also determines if the per‐user application data files (outline print templates and spell check auto‐correct dictionaries) are present. If not, it copies them from the ʺAll Usersʺ folder:

Mindjet MindManager 8 Large Scale Deployment Guide 9
C:\Documents and Settings\All Users\Application Data\Mindjet\MindManager\8
Finally, MindManager determines if the per‐user Library files need to be installed using the same UserData.ini algorithm described above and checking that the LSDUserDataExtract registry setting is not set to 0. If so, then a separate background task/program is run to unzip the library files from a MindManager sub‐folder:
C:\Program Files\Mindjet\MindManager 8\sys\<language version>
The Vista system folder structure uses environmental variables instead of real paths. Note the different path structure below:
%USERPROFILE%\Local Setting\Application Data\Mindjet\MindManager\8
%ALLUSERPROFILE%\Application Data\Mindjet\MindManager\8
%ProgramFiles%\Mindjet\MindManager 8\sys\<language version>

Mindjet MindManager 8 Large Scale Deployment Guide 10
What Gets Installed
The MindManager 8 Admin setup installs:
Required program files Configurable MindManager Components Shortcuts and Start Menu items Third‐party add‐ins Shared system software Registry keys
The default location for required program files is:
C:\Program Files\Mindjet\MindManager 8
This folder contains MindManager.exe, MindManager DLLs, and third‐party components. No user files are stored in this folder.
MindManager uses merge modules to install required system software, such as ATL80.dll. If MindManager uses a later version of a component than one already installed on the machine, the required version gets installed. For more information, see Shared System Software.
The first time a user runs MindManager 8, user data is placed in this default location:
C:\Documents and Settings\UserName\Local Settings\Application Data\Mindjet\MindManager\8
where UserName is the current user name. You must enable viewing hidden files to see this directory.
The first time a user starts MindManager 8, the application also searches to see if a Microsoft Office custom dictionary exists for that user (e.g. ʺC:\Documents and Settings\UserName\ Application Data\Microsoft\Proof\CUSTOM.DICʺ). If the user‐specific Microsoft Office custom dictionary is found, a reference to that dictionary is added to the list of spelling dictionaries.
MindManager stores maps at this default location:
C:\Documents and Settings\UserName\My Documents\My Maps
MindManager Components
MindManager installs a variety of configurable components, including:

Mindjet MindManager 8 Large Scale Deployment Guide 11
Library Dictionary Tutorials PDF‐XChange
User configuration files are also installed to help govern their behavior.
Library The Library component consists of two sub‐components: Images and the Template Organizer. These are optional but highly recommended components. Images are a library of pictures used to help make maps more memorable. The Template Organizer contains a variety of map and web templates.
The library does not get uninstalled if you uninstall MindManager; this content is preserved for users upgrading to newer versions of MindManager.
The default location for the Library is:
C:\Documents and Settings\<user name>\Local Settings\Application Data\Mindjet\MindManager\8\Library\<language version>
You may wish to install the library to a different location. See the documentation for deploying with the Installation Wizard or from the command line for instructions.
Dictionaries The Dictionaries component contains spell check dictionaries available for MindManager, including dictionaries for over 10 languages. When using the installer, you can choose which dictionaries to install. You can also control dictionary installation from the command line.
Dictionaries do not get uninstalled if you uninstall MindManager; this content is preserved for users upgrading to newer versions of MindManager.
The default location for Dictionaries is:
C:\Documents and Settings\<user name>\Local Settings\Application Data\Mindjet\MindManager\8\Spell
Tutorials By default, three tutorials get installed with MindManager 8. Other tutorials open from the Internet. The default location for local tutorials is:
C:\Program Files\Mindjet\MindManager 8\<language version>
You can customize your tutorial installation by choosing:
To deploy them to a server, rather than installing them on local machines To not deploy tutorials at all To install additional tutorials using MM8Tutorials.msi.

Mindjet MindManager 8 Large Scale Deployment Guide 12
To customize tutorial installation, see Deploying User Data, the Library, and Tutorials from the Command Line.
PDF-XChange PDF‐XChange is an optional component that allows you to export maps to PDF. Users without a full‐license for PDF‐XChange see a prominent watermark when printing to PDF from other document formats. The watermark prompts the user to purchase a full version of PDF‐XChange. Printing from the Outline view within MindManager also produces this watermark.
PDF‐XChange components get installed in two places:
Its installer, PDFX3SA_sm.exe, gets installed at %ProgramFiles%\Mindjet\MindManager 8 Other components get installed at %ProgramFiles%\Mindjet\MindManager 8\ PDF-
XChange 3
The installer PDFX3SA_sm.exe gets uninstalled with MindManager. Its other components do not.
User Configuration Files MindManager creates and stores user configuration files for different purposes.
Table 2: Configuration Files
File Name Location and Function ImagePropertyDatabase.dat C:\Documents and Settings\<username>\Local
Settings\Application Data\Mindjet\MindManager\8
This file is created dynamically by MindManager (not the installer). It collects information about keywords assigned by the user to images.
UserData.ini C:\Documents and Settings\<username>\Local Settings\Application Data\Mindjet\MindManager\8
This file detects the first time MindManager is launched by a user and initiates procedures such as registry cleanup.
Library.ini C:\Documents and Settings\<username>\Local Settings\Application Data\Mindjet\ MindManager\8\Library\<language version>
This file detects the library installation time. Because MindManager installs the library the first time it gets launched, this file prevents multiple library installations.
Mindjet MindManager 8 Large Scale Deployment Guide 13
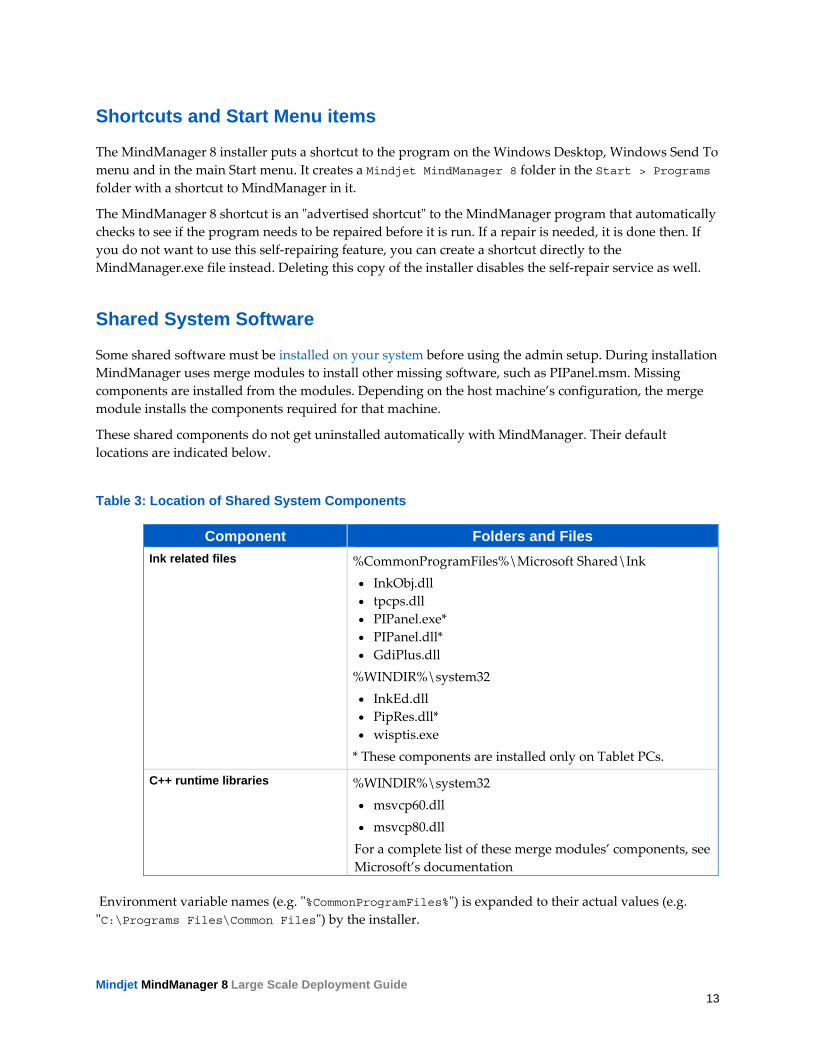
Shortcuts and Start Menu items
The MindManager 8 installer puts a shortcut to the program on the Windows Desktop, Windows Send To menu and in the main Start menu. It creates a Mindjet MindManager 8 folder in the Start > Programs folder with a shortcut to MindManager in it.
The MindManager 8 shortcut is an ʺadvertised shortcutʺ to the MindManager program that automatically checks to see if the program needs to be repaired before it is run. If a repair is needed, it is done then. If you do not want to use this self‐repairing feature, you can create a shortcut directly to the MindManager.exe file instead. Deleting this copy of the installer disables the self‐repair service as well.
Shared System Software
Some shared software must be installed on your system before using the admin setup. During installation MindManager uses merge modules to install other missing software, such as PIPanel.msm. Missing components are installed from the modules. Depending on the host machine’s configuration, the merge module installs the components required for that machine.
These shared components do not get uninstalled automatically with MindManager. Their default locations are indicated below.
Table 3: Location of Shared System Components
Component Folders and Files Ink related files %CommonProgramFiles%\Microsoft Shared\Ink
• InkObj.dll • tpcps.dll • PIPanel.exe* • PIPanel.dll* • GdiPlus.dll %WINDIR%\system32 • InkEd.dll • PipRes.dll* • wisptis.exe * These components are installed only on Tablet PCs.
C++ runtime libraries %WINDIR%\system32 • msvcp60.dll • msvcp80.dll For a complete list of these merge modules’ components, see Microsoft’s documentation
Environment variable names (e.g. ʺ%CommonProgramFiles%ʺ) is expanded to their actual values (e.g. ʺC:\Programs Files\Common Filesʺ) by the installer.

Mindjet MindManager 8 Large Scale Deployment Guide 14
Third-Party Software
MindManager uses some third‐party software. Unless otherwise stated, the installer
Looks to see if the component is already installed. If it isn’t, or if MindManager uses a newer version, the software gets installed or updated.
Places third‐party software at C:\Program Files\Mindjet\MindManager 8\ Uninstalls third‐party software when MindManager get uninstalled
Except for PDF‐XChange, all third‐party software is required.
Table 4: Third-Party Software Overview
Third-Party Software Description and Vendor adfactry.dll • Active Delivery Factory is a self‐extracting zip
executable • Inner Media, Inc.
atl70.dll • Active Template Library, template‐based C++ classes, creates COM objects
• Microsoft BCGCBPRO730u.dll • BCG Control Bar Professional DLL for
MindManager • BCGSoft Ltd. Portions
ChartFX.ClientServer.core.dll • Chart FX Client Server ActiveX Control is used with spread‐sheets to create bar charts
• Software FX, Inc. dunzip32.dll
• DynaZIP‐32 Multi‐Threading UnZIP DLL • Inner Media, Inc.
dzip32.dll • DynaZIP‐32 Multi‐Threading ZIP DLL • Inner Media, Inc.
extensibility.dll • Allows addition of add‐ins • Microsoft
gdiplus.dll • GDI+ is a C/C++ API that supports integrating graphics and images on both the video display and printer
• Microsoft HTS32MM.dll • An HTML control that supports inserting
pictures, hyperlinks, tables, and other objects into RTF text
• Sub Systems, Inc.

Mindjet MindManager 8 Large Scale Deployment Guide 15
Third-Party Software Description and Vendor Independentsoft.Webdav.dll • WebDAV protocol client API for .NET
Framework • Independentsoft
libtidyU.dll • HTML Tidy fixes a variety of HTML issues • WWW Consortium
Microsoft.Licensing. ... .dll files and .pdb file
• Microsoft licensing administration • Microsoft
Microsoft.Web.Services3.dll • Microsoft Web Services Enhancements 3.0 for Microsoft .NET Framework
• Microsoft Mfc80.dll • Microsoft Foundation Classes, wrap Windows
APIs in C++ libraries, forming application framework
• Other components are associated with this .dll. See Microsoft’s documentation for complete information.
msvci70.dll • Microsoft C++ Runtime Library • Microsoft
msvcp70.dll • Microsoft C++ Runtime Library • Microsoft
mscr70.dll • Microsoft C++ Runtime Library • Microsoft
PDFX3SA_sm.exe • This exe installs PDF‐Exchange to c:\Program Files \PDF-XChange
• PDF‐XChange export maps to PDF. For other document formats, it places a prominent watermark on the document, asking the user to purchase the product.
• This installer gets uninstalled with MindManager, but the application itself does not.
• Tracker Software Ltd. SB6ENT.OCX • WinWrapBasic supports Visual Basic scripting
within MindManager • Polar Engineering
SBE6_000.cnt, SBE6_000.hlp, SBE6_000.chm
• WinWrapBasic Help files • Polar Engineering
SBE6_32.dll
• WinWrapBasic supports Visual Basic scripting within MindManager
• Polar Engineering

Mindjet MindManager 8 Large Scale Deployment Guide 16
Third-Party Software Description and Vendor Sfxbe322.dll • A 32‐bit active delivery self‐extracting back end
zip executable. • Inner Media, Inc.
Sfxfe32.exe • A 32‐bit active delivery self‐extracting front end zip executable.
• Inner Media, Inc. Spr32du70.dll • FarPoint Spreadsheet Control
• FarPoint Technologies, Inc. Ssce5532.dll • Spell checker engine
• Wintertree Software, Inc. TER32MM.DLL • RTF edit control
• Sub Systems, Inc. Vic32.dll • Image processor
• Catenary Systems, Inc. vsflex8n.ocx • VSFlexGrid8 (Unicode) helps display, edit, and
format tabular data in spreadsheets. Helps integrate with Microsoft Excel.
• ComponentOne Zlib.dll • Lossless data compression library
• Jean‐Loup Gailly and Mark Adler
Registry Keys
The installer places any per‐machine MindManager 8 registry settings in or below the key:
HKEY_LOCAL_MACHINE\SOFTWARE\Mindjet\MindManager\8
These are the settings used by MindManager and its add‐ins on a per‐machine basis. No per‐user values are stored in this key.
Following Windows guidelines, MindManager registers its associated file types, COM objects etc. in sub‐keys of HKEY_CLASSES_ROOT.
Table 5: MindManager Registry Key Overview
Key Type Location/Key HKEY_LOCAL_MACHINE HKEY_LOCAL_MACHINE\SOFTWARE\Mindjet\MindMana
ger\8
HKEY_CLASSES_ROOT HKEY_CLASSES_ROOT\...(all keys below this level)
• .mmap*

Mindjet MindManager 8 Large Scale Deployment Guide 17
Key Type Location/Key • .mmas • .mmat • .mmbas • .mmmp • .mmms • .mmp* • Mindjet.MindManager.Custom.Document • Mindjet.MindManager.Document.8 • Mindjet.MindManager.Document.Template.8 • Mindjet.MindManager.Macro.8 • Mindjet.MindManager.MapMarker.8Mindjet.MindManager.MapMarkerSet.8
• MMindjet.MindManager.MapPart.8 • Mindjet.MindManager.Style.8 • Mindjet.Mm5GenericSmartMapPart.AddIn • Mindjet.Mm5GenericSmartMapPart.AddIn.3 • Mindjet.Mm5OutlookMapMinderLinker.AddIn • Mindjet.Mm5OutlookMapMinderLinker.AddIn.3 • Mindjet.Mm5Sort.AddIn • Mindjet.Mm5Sort.AddIn.3 • Mindjet.Mm5WebExportAddIn • Mindjet.Mm5WebExportAddIn.3 • Mindjet.Mm8ExcelLinker.AddIn.3 • Mindjet.Mm8ExcelLinker.AddIn. • Mindjet.Mm6MsProject.AddIn. • Mindjet.Mm6MsProject.AddIn.3 • Mindjet.Mm8Outlook.AddIn. • Mindjet.Mm8Outlook.AddIn.3 • Mindjet.Mm8OutlookLinker.AddIn. • Mindjet.Mm8Outlooklinker.AddIn.3 • Mindjet.Mm8PPExport.AddIn. • Mindjet.Mm8PPExport.AddIn.3 • Mindjet.Mm8Project.AddIn. • Mindjet.Mm8Project.AddIn.3 • Mindjet.Mm8VisioExport.AddIn. • Mindjet.Mm8VisioExport.AddIn.3 • Mindjet.Mm8Word.AddIn. • Mindjet.Mm8Word.AddIn.3 • MindManager.Application • MindManager.Application.8 • MindManager.Color • MindManager.Color.8

Mindjet MindManager 8 Large Scale Deployment Guide 18
Key Type Location/Key • MindManager.TextFont. • MindManager.TextFont.8 • Mm5WebExport.Page • Mm5WebExport.Page.3 • Mm5WebExport.Pages • Mm5WebExport.Pages.3 • Mm5WebExport.VariantSets • Mm5WebExport.VariantSets.1 • Mm5WebExport.WebExport • Mm5WebExport.WebExport.3 • Mm5WebExport.WebExports • Mm5WebExport.WebExports.3 • MM8InternetExplorer.BHO • MM8InternetExplorer.BHO.2 HKEY_CLASSES_ROOT\Mindjet.Denali.Client.... (all keys below this level)
• * Keys that remain after uninstalling MindManager Uninstall Key HKEY_LOCAL_MACHINE\SOFTWARE\Microsoft\Window
s\CurrentVersion\Uninstall
HKEY_CURRENT_USER HKEY_CURRENT_USER\Software\Mindjet\MindManager\8
Uninstall information for the program is stored in a sub‐key of:
HKEY_LOCAL_MACHINE\SOFTWARE\Microsoft\Windows\CurrentVersion\Uninstall
The name of the sub‐key is the Globally Unique Identifier (GUID) for the program (which changes with each release). You can find it by using RegEdit to search for ʺMindManagerʺ in the Uninstall key. The uninstallation key does not remain after uninstalling MindManager.
When a user runs MindManager 8, any per‐user registry settings are stored in or below the key:
HKEY_CURRENT_USER\Software\Mindjet\MindManager\8
Some Current User keys remain after uninstalling MindManager. These keys help preserve user data for upgrading to the next version of MindManager.

Mindjet MindManager 8 Large Scale Deployment Guide 19
What Remains After Uninstallation
When you uninstall MindManager 8, almost all traces of the application are removed, including all components located at C:\Program Files\Mindjet\MindManager 8 (except for PDF‐XChange program files). Most registry keys get removed as well. Map files (.mmp and .mmap files) do not get deleted.
On Microsoft Vista or any other system where the system administrator has disallowed the use of RegEdit to export the registry key (i.e. DisableRegistryTools is set), the registry key is backed up to a MM8 registry subkey under:
HKCU\Software\Mindjet\MindManager\MMX8RegistryBackup_<date>_<time>.
Most remnants are left behind to preserve user data when upgrading to a new version of MindManager. See Remaining Files, Folders, and Software Components and Remaining Registry keys for more information.
Remaining Files, Folders, and Software Components
When you uninstall MindManager, the installer leaves behind some components it installed with the program. In general, what gets left behind fits one of these scenarios:
User data (the library, images, templates) gets left behind to support upgrading to the next version of MindManager
Shared components, such as C++ libraries, and their registry keys get left behind because they may be required for other purposes
A backup of your registry
Table 6: Remaining Files, Folders, and Software components
Component Location and Explanation C++ runtime libraries See Shared System Components for locations.
These files may be in use by other applications.
Ink related files See Shared System Components for locations. These files may be in use by other applications.

Mindjet MindManager 8 Large Scale Deployment Guide 20
Component Location and Explanation MMX8RegistryBackup_<date>_<time>
C:\MyDocuments\
Opening this file gives you the option to add its contents to your current registry.
msvcp60.dll %WINDIR%\system32
This software may be in use by other applications.
msvcrt.dll %WINDIR%\system32
This software may be in use by other applications.
XML-related files See Shared System Components for locations. These files may be in use by other applications.
PDF-XChange c:\ProgramFiles\Mindjet\MindManager\PDF-XChange
This software may be in use by other applications.
User Data C:\Documents and Settings\<local user>\Local Settings\Application Data\Mindjet\MindManager\8
Contains dictionaries, images, templates dictionaries etc. which the user may have customized. Does not uninstall so the user does not lose this data when upgrading.
Remaining Registry Keys
Some registry keys remain after uninstallation. A backup copy of your registry gets placed at:
C:\My Documents\MMX8RegistryBackup_<date>_<time>
Table 7: Remaining Registry Keys
Registry Key Location and Explanation HKEY_CLASSES_ROOT HKEY_CLASSES_ROOT\
• .mmap • .mmp
These keys register .mmap file extensions.
HKEY_CURRENT_USER HKEY_CURRENT_USER\Software\Mindjet\MindManager\8\
Keys at or below this preserve user data for upgrading.
HKEY_LOCAL_MACHINE HKEY_LOCAL_MACHINE\SOFTWARE\Mindjet\MindManager\8\Installer\
This key and those below it are left behind for the installer.
Mindjet MindManager 8 Large Scale Deployment Guide 21
Deploying with the Installation Wizard
Using the admin setup to install MindManager 8 is straight forward and simple. Unlike the basic setup, you have customization options, though not as many as from the command line.
Starting the Installation
To install MindManager 8:
1. Launch the installer.
2. At the welcome screen, click Next.
3. Select I agree to the terms of the license agreement and click Next.
4. Enter the Customer Information (User Name and Organization).
5. Click Next.
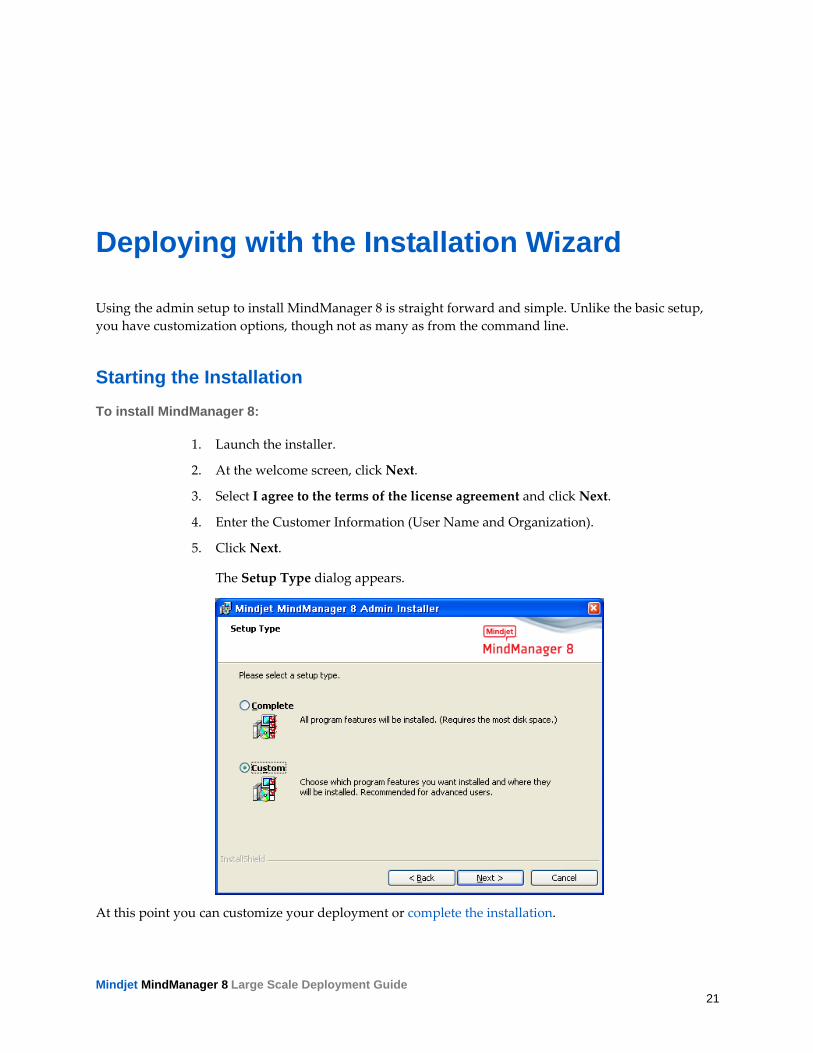
The Setup Type dialog appears.
At this point you can customize your deployment or complete the installation.
Mindjet MindManager 8 Large Scale Deployment Guide 22
Customizing the Installation
A custom installation allows you to:
Disable default features Change the default installation directory Deploy user data and the library on a separate server
If you need to customize the installation beyond these parameters, install MindManager 8 from the command line.
Disabling Default Features
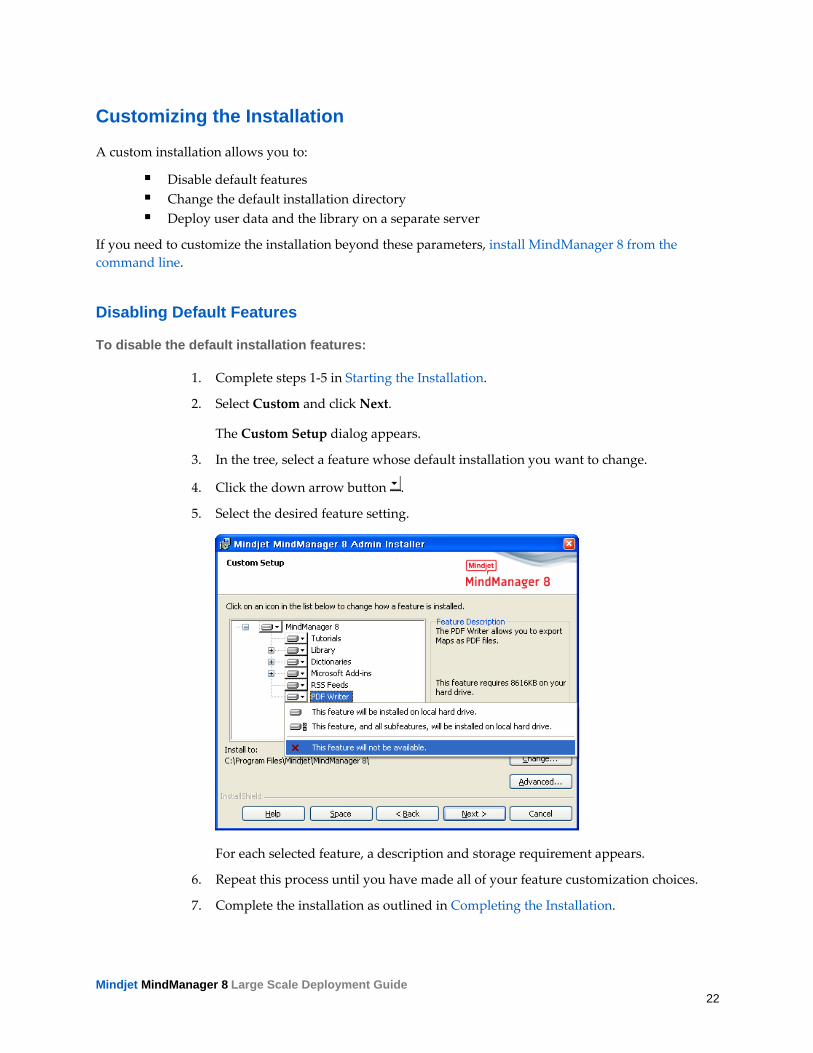
To disable the default installation features:
1. Complete steps 1‐5 in Starting the Installation.
2. Select Custom and click Next.
The Custom Setup dialog appears.
3. In the tree, select a feature whose default installation you want to change.
4. Click the down arrow button .
5. Select the desired feature setting.
For each selected feature, a description and storage requirement appears.
6. Repeat this process until you have made all of your feature customization choices.
7. Complete the installation as outlined in Completing the Installation.
Mindjet MindManager 8 Large Scale Deployment Guide 23
Changing the Default Installation Folder
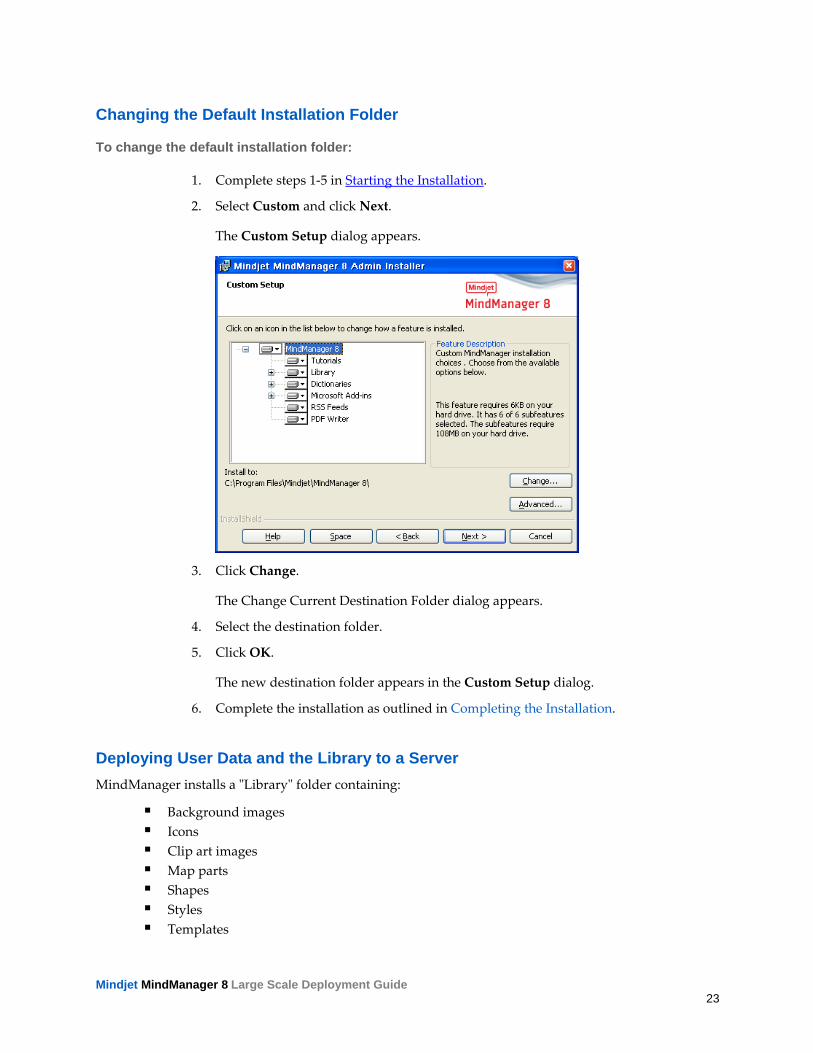
To change the default installation folder:
1. Complete steps 1‐5 in Starting the Installation.
2. Select Custom and click Next.
The Custom Setup dialog appears.
3. Click Change.
The Change Current Destination Folder dialog appears.
4. Select the destination folder.
5. Click OK.
The new destination folder appears in the Custom Setup dialog.
6. Complete the installation as outlined in Completing the Installation.
Deploying User Data and the Library to a Server MindManager installs a ʺLibraryʺ folder containing:
Background images Icons Clip art images Map parts Shapes Styles Templates

Mindjet MindManager 8 Large Scale Deployment Guide 24
Web export templates
The entire library consists of 29 MB. By default, these files are stored on a per‐user basis in this folder:
C:\Documents and Settings\UserName\Local Settings\Application Data\Mindjet\MindManager\8\Library\<language version>
where UserName is the current userʹs logon name.
You can store user data and the library in a network folder for various reasons in order to:
Save space on usersʹ systems Decrease the time required to run the program the first time Allow roaming users access to their customized libraries Assure that all users have a fixed, easily updatable set of library files
You can install these files once to a common location (perhaps in a read‐only folder). Multiple users can then share the files, or a single user can access them from multiple machines. If a user needs to edit these files, install them in a directory with write privileges.
Note: You cannot install user data and the library to separate locations from the installation wizard. To install them separately, you must install them from the command line.

Mindjet MindManager 8 Large Scale Deployment Guide 25
To deploy user data and the library to a server:
1. Complete steps 1‐5 in Starting the Installation.
2. From the Custom Setup dialog, click Advanced.
The Deploy User Data Files dialog appears.
3. Select Deploy user data on server.
4. Click Browse.
The Browse for Folder dialog appears.
5. Select the destination folder.
6. Click OK.
The new directory appears in the Server base path field.
7. Choose from the following options:
• Extract library to the server path the first time MindManager starts • Use Separate folders per user
We recommend selecting both of these options to avoid having to configure the user data folder and the library folder separately. You may want to create the user folders before installation, giving you the chance to make the files read only.
8. Click OK to close the dialog.
9. Complete the installation as outlined in Completing the Installation.
These are all of the customization choices you have from the installer interface. You have more control if you install MindManager from the command line.

Mindjet MindManager 8 Large Scale Deployment Guide 26
Completing the Installation
To complete the standard installation:
1. Select Complete and click Next.
The Ready to Install dialog appears.
2. Choose your shortcut options.
3. Click Install.
4. After the installation is complete, choose from the following options:
• Launch Mindjet MindManager 8 • Register Mindjet MindManager 8
5. Click Finish.

Mindjet MindManager 8 Large Scale Deployment Guide 27
Deploying from the Command Line
While you may wish to customize your MindManager deployment from the installer interface, you have much greater control over the installation from the command line, including:
Configuring installation parameters Specifying what to install on a feature by feature basis Enabling or disabling program functions Specifying where to install libraries, tutorials, and user data Specifying the MindManager license key or the location of the license file.
This section identifies what you may configure and provides examples of command line arguments for customizing your deployment. A sample installation command demonstrating most of these options is included in Sample Setup Commands.
Here is a link for general command line options for the Microsoft installer:
http://msdn.microsoft.com/library/default.asp?url=/library/en‐us/msi/setup/command_line_options.asp

Mindjet MindManager 8 Large Scale Deployment Guide 28
Configuring Installation Parameters from the Command Line
You can set a number of public properties with command line options.
Table 8: Configuring Installation Parameters from the Command Line
Parameter Description of Values INSTALLDIR Specifies where the program should be installed. For
example: "C:\Program Files\Mindjet\MindManager 8\"
LICENSEKEY Specifies the license key for your MindManager 8 installation. Note: No validation is performed for this key, it is simply written to the registry. Users will start in trial mode, but on activation the dialog will be pre‐populated with the license key. If the license key is not valid, MindManager 8 runs in a restricted (trial) mode.
LSDLICENSEFILEPATH Specifies the location of the license file for your MindManager 8 installation. Optional: If this parameter is not specified, the license key location defaults to the INSTALLDIR. Users must have access to this location when they launch MindManager for the first time to allow MindManager to activate automatically. If the license file is inaccessible, activation is attempted each time the user subsequently starts MindManager.
USERNAME Specifies the User Name for registering MindManager. Optional parameter; the Windows User Name will be used if this parameter is not supplied.
COMPANYNAME Specifies the Company Name for registering MindManager. Optional parameter; the Windows Company Name will be used if this parameter is not supplied.

Mindjet MindManager 8 Large Scale Deployment Guide 29
Configuring Features from the Command Line
The admin setup is a Basic MSI project, not an InstallScript project; there is no record mode to run an install with Setup.iss. Basic MSI projects do not create or use a response file for silent installations. The article at this URL describes the use of response files for silent installations:
http://helpnet.installshield.com/robo/projects/helplibdevstudio9/IHelpSetup_EXECmdLine.htm#bParam
Tip
When configuring features from the command line, it is better to use /s silent installation in order to avoid conflicts with properties set through the installer interface.
You can remove or add features from the command line by using ADDLOCAL or REMOVE on a feature by feature basis. To simplify the process, use ADDLOCAL=”ALL” and then remove features you do not want. Examples are provided below.
Customizing the Installation with Setup.exe You can use the following options to add or remove features from the command line setup.exe:
/v=command line access to msi file /qn=when used with /v parameter, silent (no user interface) parameter passed to msi file
See this documentation for a complete list of command line options for setup.exe:
http://helpnet.installshield.com/Robo/BIN/Robo.dll?mgr=agm&tpc=%2Frobo%2Fprojects%2Finstallshield11helplib%2FIHelpSetup_EXECmdLine.htm&
Tip
Here are examples of adding and removing features through the setup.exe file, using silent install:
Adding: <directory>\setup.exe /v"ADDLOCAL=\"MSWordAddin\" /qn" Removing: <directory>\setup.exe /v"ADDLOCAL=\"ALL\"
"REMOVE=\"MSWordAddin\" /qn"
You can also string together multiple features for inclusion or removal:
<directory>\setup.exe /v"ADDLOCAL=\"All\" REMOVE=\"MSWordAddin,PDFWriter,RSS\" /qn"

Mindjet MindManager 8 Large Scale Deployment Guide 30
Important:
On a VISTA system, security features require that you run silent install (/qn) as the Administrator, not as a member of the Administrator group.
Customizing the Installation with MSI You can use these options to add or remove features from the command line with MSI.exe:
/i=install mode /qn=silent (no user interface) parameter
See this documentation for a complete list of command line options for msiexec.exe:
http://helpnet.installshield.com/Robo/BIN/Robo.dll?mgr=agm&tpc=%2Frobo%2Fprojects%2Finstallshield11helplib%2FIHelpCmdLineMSI.htm&wnd=In
Tip
Here are examples of adding and removing features through the msiexec.exe file, using silent install:
Adding: msiexec /i "<directory>\filename.msi" ADDLOCAL="MSWordAddin" /qn
Removing: msiexec /i "<directory>\filename.msi" ADDLOCAL="ALL" REMOVE="MSWordAddin" /qn
You can also string together multiple features for inclusion or removal:
msiexec /i "<directory>\filename.msi" ADDLOCAL="ALL" REMOVE="MSWordAddin,PDFWriter,RSS" /qn

Mindjet MindManager 8 Large Scale Deployment Guide 31
Table 9: Configuring Features with MSI from the Command Line
Feature Comments Library Available add-ins
The default add‐in is Library, which installs add‐ins below. You can also specify a subset. • Images • Shapes • BackgroundImages • Icons • ImageGallery • Icons • TemplateOrganizer • Templates • WebTemplates • Styles • MapParts • MapMarkers Example: msiexec /i "<directory>\filename.msi" ADDLOCAL="ALL" REMOVE="WebTemplates" /qn
Dictionaries Available add-ins
The default add‐in is Dictionaries, which installs add‐ins below. You can also specify a subset. • Swedish • Spanish • NorwegianB • BrasilianPortuguese • Italian • Danish • Finnish • CanadianEnglish • USEnglish • UKEnglish • French • Dutch • German Example: msiexec /i "<directory>\filename.msi" ADDLOCAL="ALL" REMOVE="CanadianEnglish" /qn

Mindjet MindManager 8 Large Scale Deployment Guide 32
Feature Comments Microsoft Add-Ins Available add-ins
The default add‐in is MSAddins, which installs add‐ins below. You can also specify a subset. • MSWordAddin • MSOutlookAddin • MSOutlookLinkerAddin • MSOutlookMapMinderLinkerAddin • MSProjectAddin • MSExcelLinkerAddin • MSVisioAddin • MSIEAddin
Example:
msiexec /i "<directory>\filename.msi" ADDLOCAL="ALL" REMOVE="MSProjectAddin" /qn
PDF Writer The add‐in is PDFWriter Example: msiexec /i "<directory>\filename.msi" ADDLOCAL="ALL" REMOVE="PDFWriter" /qn
RSS The add‐in is RSS Example:
msiexec /i "<directory>\filename.msi" ADDLOCAL="ALL" REMOVE="RSS" /qn
Mindjet MindManager 8 Large Scale Deployment Guide 33
Configuring Functions from the Command Line
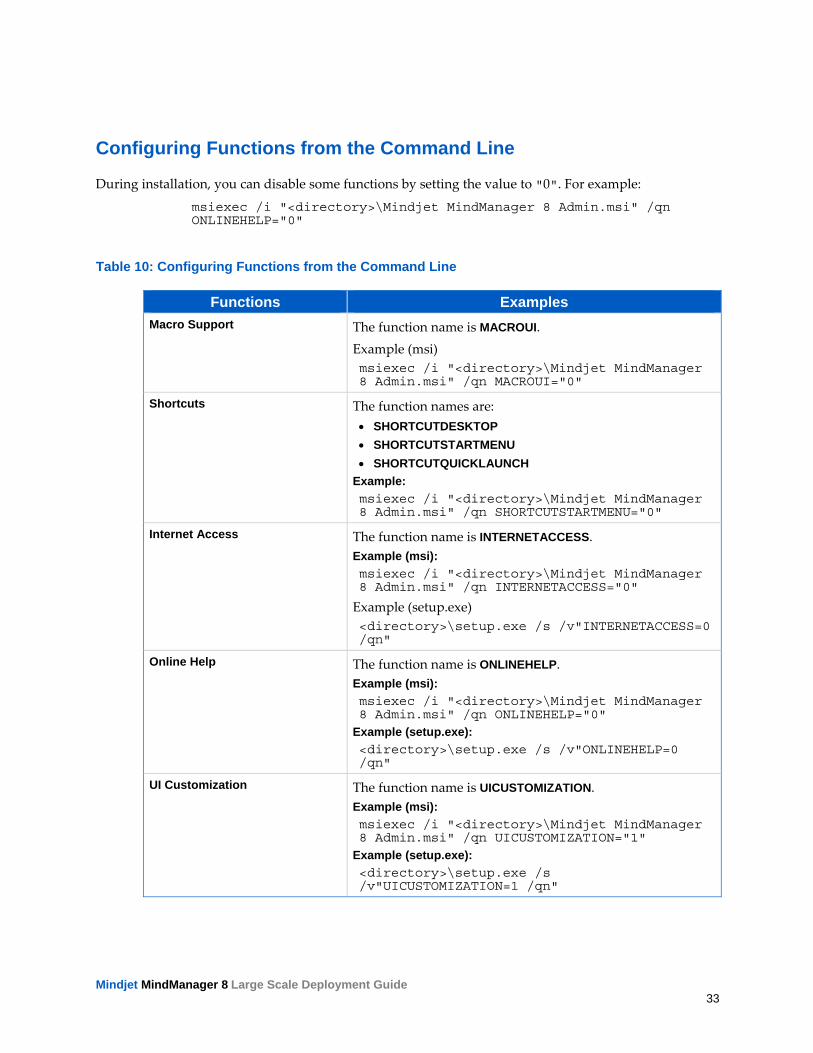
During installation, you can disable some functions by setting the value to "0". For example:
msiexec /i "<directory>\Mindjet MindManager 8 Admin.msi" /qn ONLINEHELP="0"
Table 10: Configuring Functions from the Command Line
Functions Examples Macro Support The function name is MACROUI.
Example (msi) msiexec /i "<directory>\Mindjet MindManager 8 Admin.msi" /qn MACROUI="0"
Shortcuts The function names are: • SHORTCUTDESKTOP • SHORTCUTSTARTMENU • SHORTCUTQUICKLAUNCH
Example: msiexec /i "<directory>\Mindjet MindManager 8 Admin.msi" /qn SHORTCUTSTARTMENU="0"
Internet Access The function name is INTERNETACCESS. Example (msi): msiexec /i "<directory>\Mindjet MindManager 8 Admin.msi" /qn INTERNETACCESS="0"
Example (setup.exe) <directory>\setup.exe /s /v"INTERNETACCESS=0 /qn"
Online Help The function name is ONLINEHELP. Example (msi): msiexec /i "<directory>\Mindjet MindManager 8 Admin.msi" /qn ONLINEHELP="0"
Example (setup.exe): <directory>\setup.exe /s /v"ONLINEHELP=0 /qn"
UI Customization The function name is UICUSTOMIZATION. Example (msi): msiexec /i "<directory>\Mindjet MindManager 8 Admin.msi" /qn UICUSTOMIZATION="1"
Example (setup.exe): <directory>\setup.exe /s /v"UICUSTOMIZATION=1 /qn"
Mindjet MindManager 8 Large Scale Deployment Guide 34
Configuring Functions from the Registry
If you want, you configure some functionality in the registry before installing MindManager. The installer reads these keys and retains these settings during installation. After installation is complete, you can hand configure these settings as well. To disable a function, set the registry value to "0". Reset the value to "1" to re‐enable the function. Each key is of the type REG_DWORD.
Table 11: Configuring Functions from the Registry
Functions Examples Macro Support The registry key is MacroUiEnabled.
Example: HKEY_LOCAL_MACHINE\Software\Mindjet\MindManager\8\Settings "MacroUiEnabled" (0)
Internet Access The registry key is InternetConnectionEnabled. Example: HKEY_LOCAL_MACHINE\Software\Mindjet\MindManager\8\Settings "InternetConnectionEnabled" (0)
Online Help The registry key is OnlineHelpEnabled. Example: HKEY_LOCAL_MACHINE\Software\Mindjet\MindManager\8\Settings "OnlineHelpEnabled" (1)
UI Customization The registry key is EnableUserCustomization. Example: HKEY_LOCAL_MACHINE\Software\Mindjet\MindManager\8\Settings "EnableUserCustomization" (1)
Mindjet MindManager 8 Large Scale Deployment Guide 35
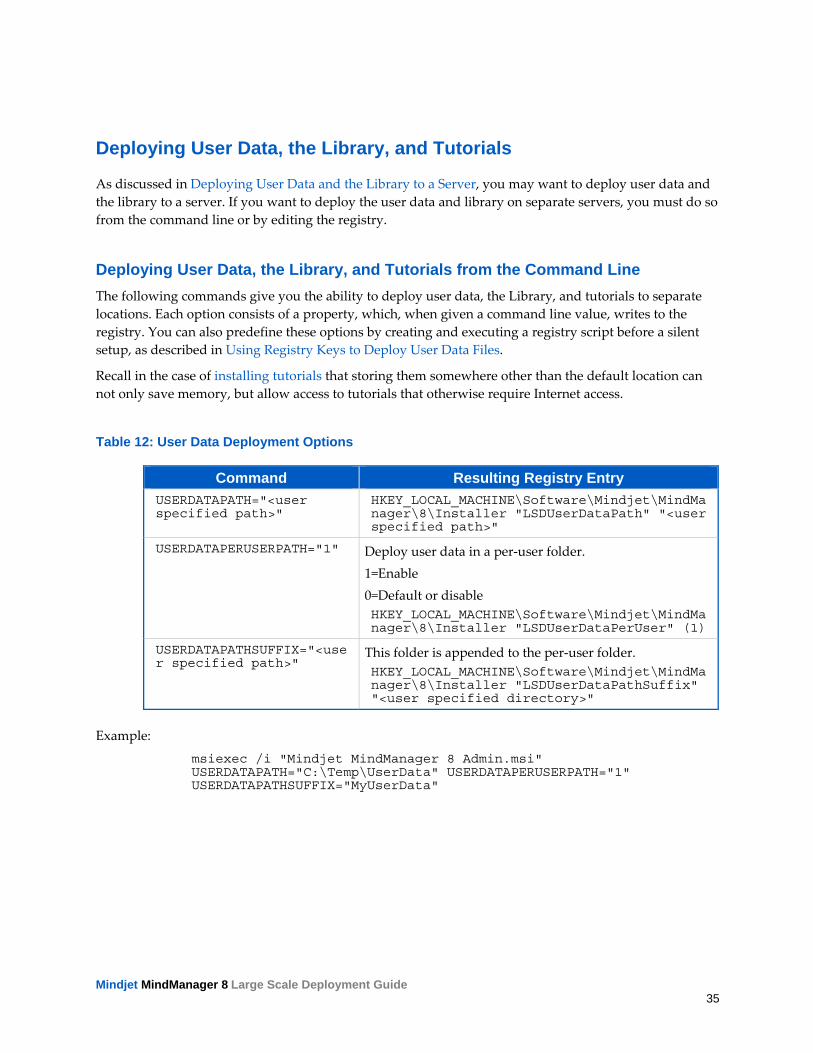
Deploying User Data, the Library, and Tutorials
As discussed in Deploying User Data and the Library to a Server, you may want to deploy user data and the library to a server. If you want to deploy the user data and library on separate servers, you must do so from the command line or by editing the registry.
Deploying User Data, the Library, and Tutorials from the Command Line The following commands give you the ability to deploy user data, the Library, and tutorials to separate locations. Each option consists of a property, which, when given a command line value, writes to the registry. You can also predefine these options by creating and executing a registry script before a silent setup, as described in Using Registry Keys to Deploy User Data Files.
Recall in the case of installing tutorials that storing them somewhere other than the default location can not only save memory, but allow access to tutorials that otherwise require Internet access.
Table 12: User Data Deployment Options
Command Resulting Registry Entry USERDATAPATH="<user specified path>"
HKEY_LOCAL_MACHINE\Software\Mindjet\MindManager\8\Installer "LSDUserDataPath" "<user specified path>"
USERDATAPERUSERPATH="1" Deploy user data in a per‐user folder. 1=Enable 0=Default or disable HKEY_LOCAL_MACHINE\Software\Mindjet\MindManager\8\Installer "LSDUserDataPerUser" (1)
USERDATAPATHSUFFIX="<user specified path>"
This folder is appended to the per‐user folder. HKEY_LOCAL_MACHINE\Software\Mindjet\MindManager\8\Installer "LSDUserDataPathSuffix" "<user specified directory>"
Example:
msiexec /i "Mindjet MindManager 8 Admin.msi" USERDATAPATH="C:\Temp\UserData" USERDATAPERUSERPATH="1" USERDATAPATHSUFFIX="MyUserData"

Mindjet MindManager 8 Large Scale Deployment Guide 36
Table 13: Library Deployment Options
Command Resulting Registry Entry LIBRARIESPATH="<user specified path>"
HKEY_LOCAL_MACHINE\Software\Mindjet\MindManager\8\Installer "LSDLibraryPath" "<user specified path>"
LIBRARIESPERUSERPATH="1" Deploy libraries in a per‐user folder. 1=Enable 0=Disable HKEY_LOCAL_MACHINE\Software\Mindjet\MindManager\8\Installer "LSDLibraryPerUser" (1)
LIBRARIESPATHSUFFIX="<user specified directory>"
This folder is appended to the per‐user folder. HKEY_LOCAL_MACHINE\Software\Mindjet\MindManager\8\Installer "LSDLibraryPathSuffix" "<user specified directory>"
LIBRARIESEXTRACT=”1” Extract libraries to path the first time MindManager starts. 1=Enable 0=Disable HKEY_LOCAL_MACHINE\Software\Mindjet\MindManager\8\Installer "LSDLibraryExtract" (1)
Example:
msiexec /i "Mindjet MindManager 8 Admin.msi" LIBRARIESPATH ="C:\Temp\Libraries" LIBRARIESPERUSERPATH ="1" LIBRARIESPATHSUFFIX ="MyLibraries" LIBRARIESEXTRACT="1"
Table 14: Tutorial Deployment Options
Command Resulting Registry Entry TUTORIALSLOCATION="<user specified path>
HKEY_LOCAL_MACHINE\Software\Mindjet\MindManager\8\Settings\TutorialsLocation "<user specified path>"
Example:
msiexec /i "Mindjet MindManager 8 Admin.msi" TUTORIALSLOCATION ="C:\Temp\Tutorials"
Deploying User Data from the Registry During a silent (non‐interactive) installation, you can deploy data user files by setting some registry values on the userʹs system in the registry key before running the installer:
HKEY_LOCAL_MACHINE\Software\Mindjet\MindManager\8\Installer
Mindjet MindManager 8 Large Scale Deployment Guide 37
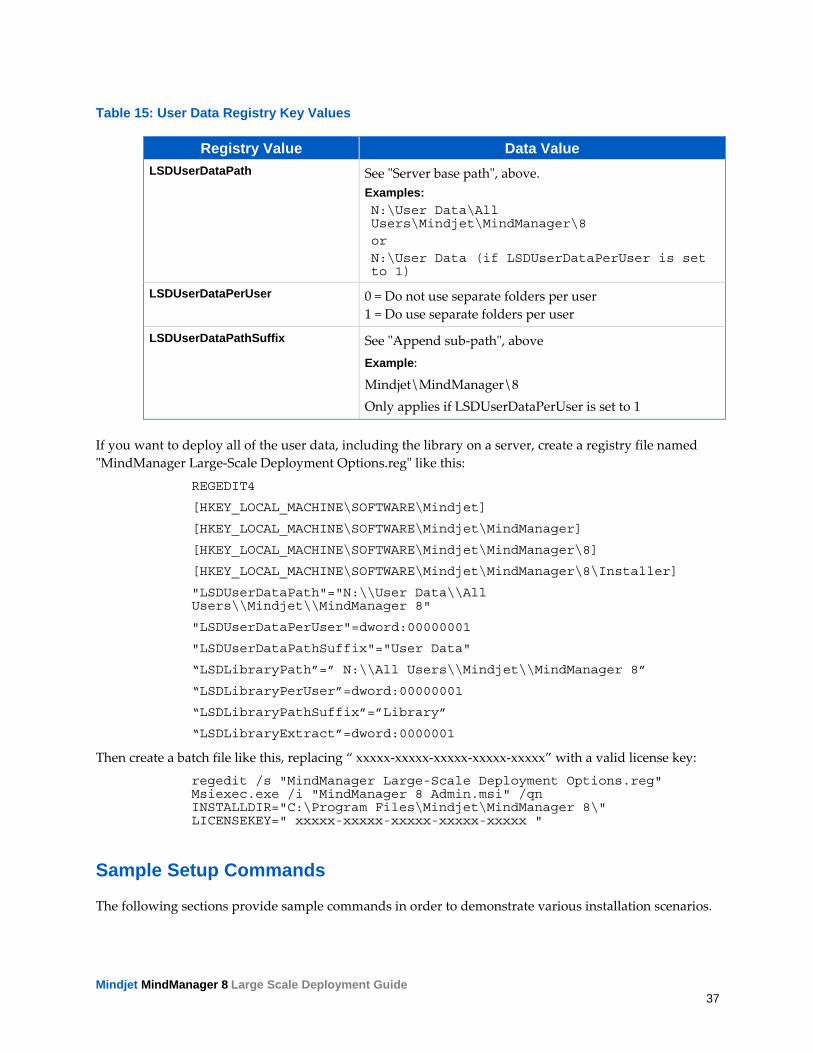
Table 15: User Data Registry Key Values
Registry Value Data Value LSDUserDataPath See ʺServer base pathʺ, above.
Examples: N:\User Data\All Users\Mindjet\MindManager\8 or N:\User Data (if LSDUserDataPerUser is set to 1)
LSDUserDataPerUser 0 = Do not use separate folders per user 1 = Do use separate folders per user
LSDUserDataPathSuffix See ʺAppend sub‐pathʺ, above Example: Mindjet\MindManager\8 Only applies if LSDUserDataPerUser is set to 1
If you want to deploy all of the user data, including the library on a server, create a registry file named ʺMindManager Large‐Scale Deployment Options.regʺ like this:
REGEDIT4
[HKEY_LOCAL_MACHINE\SOFTWARE\Mindjet]
[HKEY_LOCAL_MACHINE\SOFTWARE\Mindjet\MindManager]
[HKEY_LOCAL_MACHINE\SOFTWARE\Mindjet\MindManager\8]
[HKEY_LOCAL_MACHINE\SOFTWARE\Mindjet\MindManager\8\Installer]
"LSDUserDataPath"="N:\\User Data\\All Users\\Mindjet\\MindManager 8"
"LSDUserDataPerUser"=dword:00000001
"LSDUserDataPathSuffix"="User Data"
“LSDLibraryPath”=” N:\\All Users\\Mindjet\\MindManager 8”
“LSDLibraryPerUser”=dword:00000001
“LSDLibraryPathSuffix”=”Library”
“LSDLibraryExtract”=dword:0000001
Then create a batch file like this, replacing “ xxxxx‐xxxxx‐xxxxx‐xxxxx‐xxxxx” with a valid license key:
regedit /s "MindManager Large-Scale Deployment Options.reg" Msiexec.exe /i "MindManager 8 Admin.msi" /qn INSTALLDIR="C:\Program Files\Mindjet\MindManager 8\" LICENSEKEY=" xxxxx-xxxxx-xxxxx-xxxxx-xxxxx "
Sample Setup Commands
The following sections provide sample commands in order to demonstrate various installation scenarios.
Mindjet MindManager 8 Large Scale Deployment Guide 38
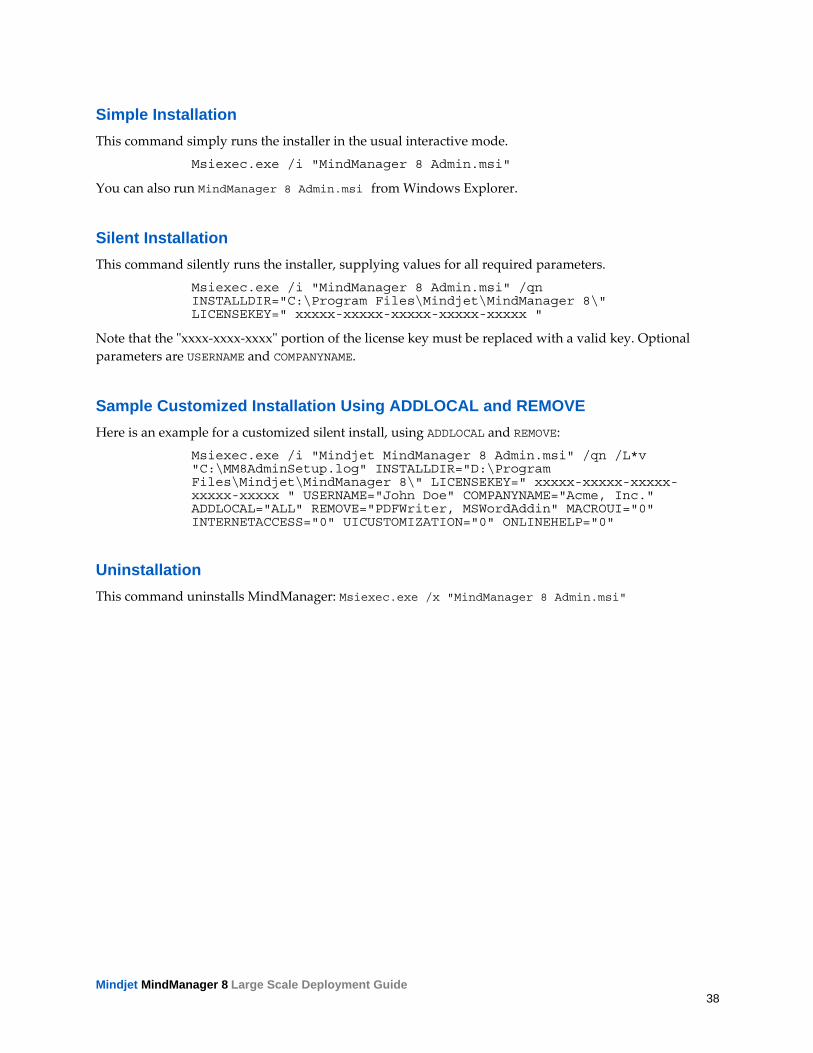
Simple Installation This command simply runs the installer in the usual interactive mode.
Msiexec.exe /i "MindManager 8 Admin.msi"
You can also run MindManager 8 Admin.msi from Windows Explorer.
Silent Installation This command silently runs the installer, supplying values for all required parameters.
Msiexec.exe /i "MindManager 8 Admin.msi" /qn INSTALLDIR="C:\Program Files\Mindjet\MindManager 8\" LICENSEKEY=" xxxxx-xxxxx-xxxxx-xxxxx-xxxxx "
Note that the ʺxxxx‐xxxx‐xxxxʺ portion of the license key must be replaced with a valid key. Optional parameters are USERNAME and COMPANYNAME.
Sample Customized Installation Using ADDLOCAL and REMOVE Here is an example for a customized silent install, using ADDLOCAL and REMOVE:
Msiexec.exe /i "Mindjet MindManager 8 Admin.msi" /qn /L*v "C:\MM8AdminSetup.log" INSTALLDIR="D:\Program Files\Mindjet\MindManager 8\" LICENSEKEY=" xxxxx-xxxxx-xxxxx-xxxxx-xxxxx " USERNAME="John Doe" COMPANYNAME="Acme, Inc." ADDLOCAL="ALL" REMOVE="PDFWriter, MSWordAddin" MACROUI="0" INTERNETACCESS="0" UICUSTOMIZATION="0" ONLINEHELP="0"
Uninstallation This command uninstalls MindManager: Msiexec.exe /x "MindManager 8 Admin.msi"
Mindjet MindManager 8 Large Scale Deployment Guide 39
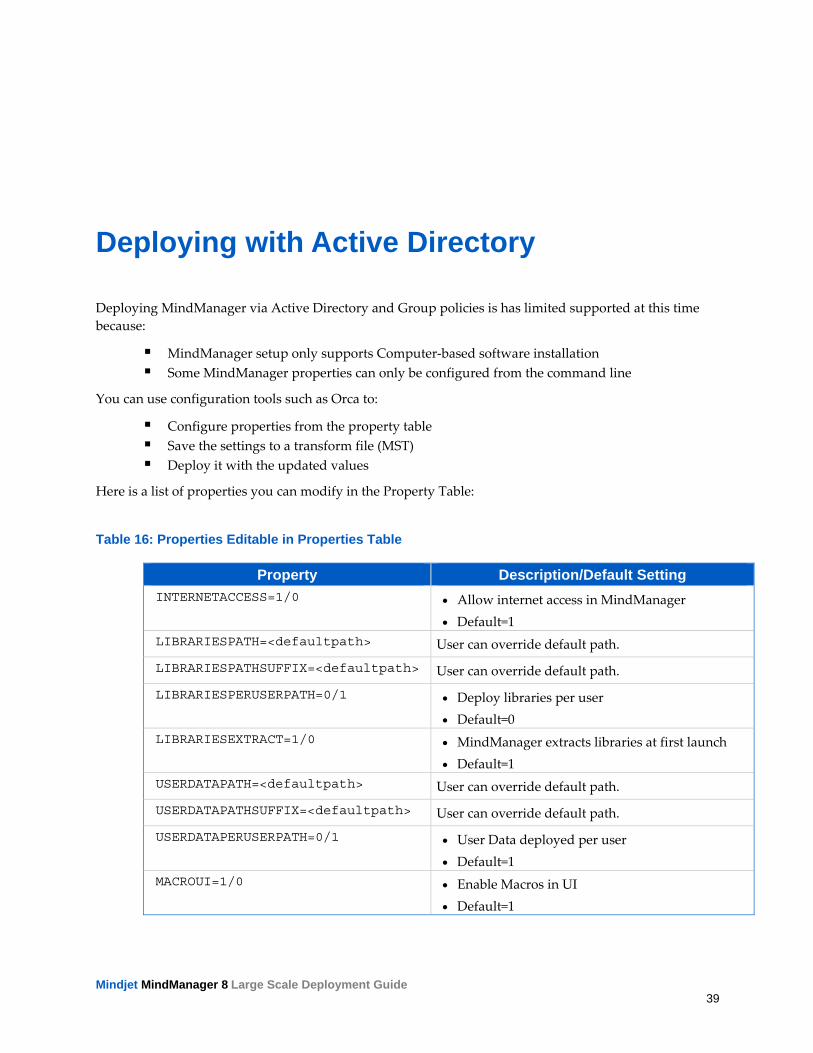
Deploying with Active Directory
Deploying MindManager via Active Directory and Group policies is has limited supported at this time because:
MindManager setup only supports Computer‐based software installation Some MindManager properties can only be configured from the command line
You can use configuration tools such as Orca to:
Configure properties from the property table Save the settings to a transform file (MST) Deploy it with the updated values
Here is a list of properties you can modify in the Property Table:
Table 16: Properties Editable in Properties Table
Property Description/Default Setting INTERNETACCESS=1/0 • Allow internet access in MindManager
• Default=1 LIBRARIESPATH=<defaultpath> User can override default path.
LIBRARIESPATHSUFFIX=<defaultpath> User can override default path.
LIBRARIESPERUSERPATH=0/1 • Deploy libraries per user • Default=0
LIBRARIESEXTRACT=1/0 • MindManager extracts libraries at first launch • Default=1
USERDATAPATH=<defaultpath> User can override default path.
USERDATAPATHSUFFIX=<defaultpath> User can override default path.
USERDATAPERUSERPATH=0/1 • User Data deployed per user • Default=1
MACROUI=1/0 • Enable Macros in UI • Default=1

Mindjet MindManager 8 Large Scale Deployment Guide 40
Property Description/Default Setting ONLINEHELP=1/0 • Enable online help
• Default=1 REBOOTISREQUIRED=No/Yes • Require reboot after installation
• Default=No TOPICALERTSLINKER=1/0 • Enable topic alerts linker
• Default=1 UICUSTOMIZATION=1/0 (default=1) • Enable UI customization
• Default=1 SHORTCUTDESKTOP=1/0 (default=1) • Create Desktop shortcut
• Default=1 SHORTCUTQUICKLAUNCH=1/0 • Create QuickLaunch shortcut
• Default=1 SHORTCUTSTARTMENU=1/0 (default=1) • Create StartMenu shortcut
• Default=1
We recommend:
• Saving these settings to the transform file as a backup, rather than directly to the MSI • Deploying MindManager 8 on a per-machine basis only, avoiding the possibility that the
machines with multiple users get multiple copies of MindManager installed • Creating a policy for “Always install elevated” otherwise the installation may fail • On the features table, setting the InstallLevel for the PDFWriter to 101 or higher if you want
to disable it

Mindjet MindManager 8 Large Scale Deployment Guide 41
Deploying with Windows Server 2003
You can install MindManager 8 with Windows Server 2003 running Terminal Services and then deploy it to variety of client machines.
To install MindManager 8 on a Windows Server 2003 running Windows Terminal Services (WTS):
1. Log on to the Windows Terminal Server as an administrator.
2. Launch Mindjet MindManager 8 Admin.msi.
• We recommend using the Add/Remove Programs applet in the Windows Control Panel.
• Avoid running the installer directly from Windows Explorer unless you are familiar with using the ʺchange user /installʺ and ʺchange user /executeʺ commands.
3. Select Add New Programs and then CD or Floppy.
The automatic procedure does not find the MindManager setup program.
4. For the Run Installation Program dialog, click Browse.
5. In the Browse dialog:
• Change Files of type to Programs. • Navigate to the location of the MindManager installer. • Select Mindjet MindManager 8 Admin.msi. • Click Open and then Next to start the installer.
6. In the Customer Information dialog, leave the User Name blank or chose a ʺgenericʺ name.
The user can customize this in MindManager by entering an Organization name and the MindManager License Key.
7. In the Setup Type dialog, choose Complete or Custom as desired.
For details about customization, see Deploying MindManager 8 Using the Installation Wizard.
8. Complete the installation as outlined in Completing the Standard Installation.
You can now run MindManager on the server with the Windows Remote Desktop Connection client.
Mindjet MindManager 8 Large Scale Deployment Guide 42
MindManager 8 runs in full color mode and does not support 256‐color mode. For best results run the terminal server clients in full color mode as well. Deploying MindManager 8 under Windows 2000 server will function, but with less than optimal results.
Tip
For known issues operating MindManager with Windows Server 2003, consult: “Known Issues Running MindManager on a Windows Terminal Server or Citrix MetaFrame Presentation Server” online in the Support Center Knowledge Base at Mindjet.com.

Mindjet MindManager 8 Large Scale Deployment Guide 43
Deploying with Citrix Presentation Server
The Citrix MetaFrame Presentation Server is a sophisticated terminal server environment built on top of the Windows Terminal Services provided by Windows Server. This is currently the only tested and supported Citrix platform for MindManager (although other combinations may work).
Tip
For known issues operating MindManager with Citrix MetaFrame Presentation Server, consult: Known Issues Running MindManager on a Windows Terminal Server or Citrix MetaFrame Presentation Server online in the Support Center Knowledge Base at Mindjet.com.
Basic Installation for the Citrix Desktop
For better Citrix performance, do not install MindManager 8 on a C: drive. After installation, MindManager appears as part of the Citrix Desktop – a single window containing icons for all the published applications.
Advanced Installation of a "Seamless" Window
You can also install MindManager to Citrix as a seamless individual application window, instead of installing as part of the Citrix desktop, as described above.
To install MindManager as a "seamless" individual application window:
1. Install MindManager on a Windows Server 2003 running Windows Terminal Services (WTS)
2. Click the Presentation Server Console button from the Citrix toolbar.
3. Log on to the server.

Mindjet MindManager 8 Large Scale Deployment Guide 44
4. In the tree, select Applications.
5. Right‐click Applications.
6. Select Publish Applications. (The Application Publishing Wizard appears).
7. Specify what to publish.

Mindjet MindManager 8 Large Scale Deployment Guide 45
8. Define the Program Neighborhood Settings.
•
9. Define the Application Appearance options. (Set to High Color or True Color).
10. Specify special client requirements. (Default settings are fine).

Mindjet MindManager 8 Large Scale Deployment Guide 46
11. Specify the number of licenses you have purchased in the ʺMaximum instancesʺ
field.
12. Specify which servers will deploy MindManager.
13. Specify users. (We recommend doing this by group to ease adding single users).

Mindjet MindManager 8 Large Scale Deployment Guide 47
14. Leave the File Type Associations page empty; MindManager is registered on the
server.
Once you are done, you should see the MindManager application in the Applications section:
The MindManager icon now appears in authorized usersʹ Citrix Program Neighborhood.

Mindjet MindManager 8 Large Scale Deployment Guide 48
For more configuration options, please consult your Citrix documentation.

Mindjet MindManager 8 Large Scale Deployment Guide 49
Administering MindManager
There are other administrative issues involved in deploying MindManager 8 on a large scale. You can address many of them using administrative tools and methods described below.
Managing Add-Ins
MindManager uses a number of add‐in DLLs. The Add‐Ins are automatically registered when MindManager is installed. On startup, the Add‐Ins check for any other required resources (e.g. the supported version(s) of Microsoft Word). They enable or disable themselves as appropriate. If an add‐in fails to start, it is automatically removed from the MindManager list of add‐ins (but not from the disk).
Registering or Unregistering Add-Ins from the Command Line
To unregister the MindManager Word add-in:
1. Select Start>Run.
2. Enter the command: regsvr32 /u "C:\Program Files\Mindjet\MindManager 8\Mm6Word.dll"
To restore an unregistered add‐in: the MindManager Word add‐in,
3. Select Start>Run.
4. Enter the command: regsvr32 "C:\Program Files\Mindjet\MindManager 8\Mm6Word.dll"
Managing Add-Ins from the Registry Users can enable and disable add‐ins via the MindManager Tools > Add‐Ins command. However, if desired it is possible to disable or remove individual MindManager add‐ins via the Windows Registry.
Mindjet MindManager 8 Large Scale Deployment Guide 50
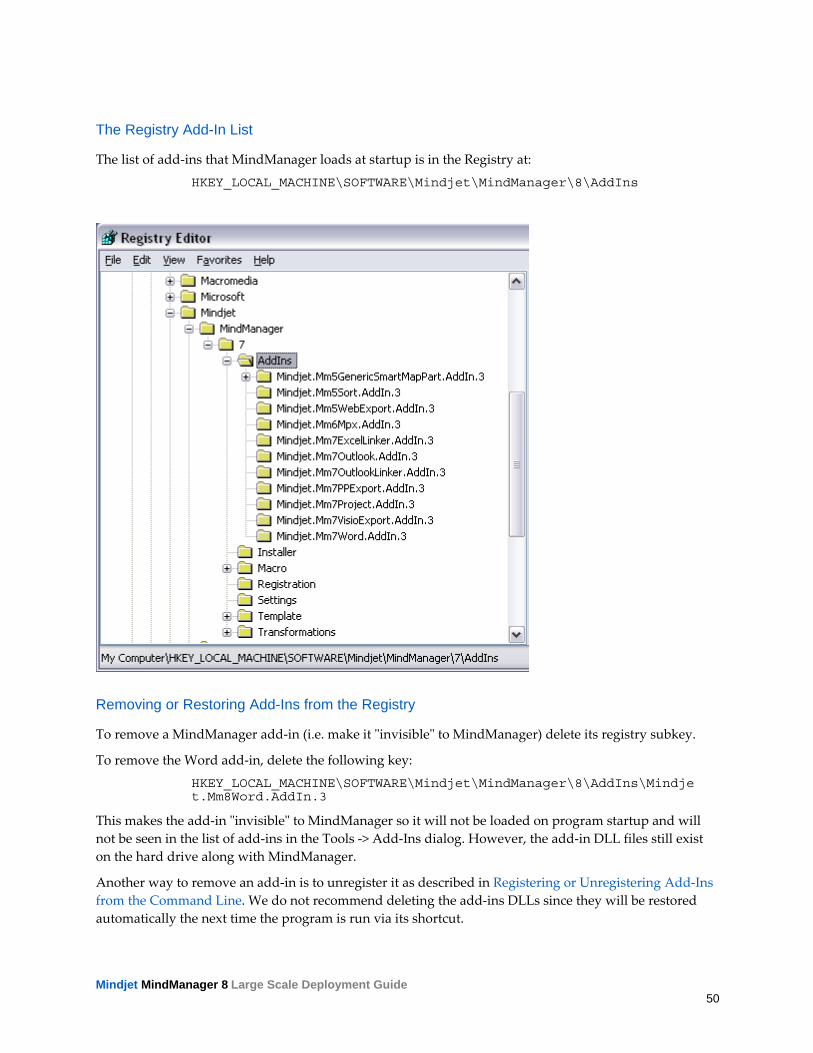
The Registry Add-In List
The list of add‐ins that MindManager loads at startup is in the Registry at:
HKEY_LOCAL_MACHINE\SOFTWARE\Mindjet\MindManager\8\AddIns
Removing or Restoring Add-Ins from the Registry
To remove a MindManager add‐in (i.e. make it ʺinvisibleʺ to MindManager) delete its registry subkey.
To remove the Word add‐in, delete the following key:
HKEY_LOCAL_MACHINE\SOFTWARE\Mindjet\MindManager\8\AddIns\Mindjet.Mm8Word.AddIn.3
This makes the add‐in ʺinvisibleʺ to MindManager so it will not be loaded on program startup and will not be seen in the list of add‐ins in the Tools ‐> Add‐Ins dialog. However, the add‐in DLL files still exist on the hard drive along with MindManager.
Another way to remove an add‐in is to unregister it as described in Registering or Unregistering Add‐Ins from the Command Line. We do not recommend deleting the add‐ins DLLs since they will be restored automatically the next time the program is run via its shortcut.

Mindjet MindManager 8 Large Scale Deployment Guide 51
Enabling or Disabling Add-Ins from the Registry
Users can disable or enable a given add‐in directly from MindManager via the Tools ‐> Add‐Ins command. Add‐ins can also be disabled via the Windows Registry as described below.
There are two keys to consider when disabling an add‐in for a given user:
HKEY_LOCAL_MACHINE\SOFTWARE\Mindjet\MindManager\8\AddIns\AddInName
HKEY_CURRENT_USER\SOFTWARE\Mindjet\MindManager\8\AddIns\AddInName
where AddInName is the actual name of the add‐in (e.g. Mindjet.Mm6Word.AddIn.1).
When a given user starts MindManager, the program checks first in the HKEY_CURRENT_USER subkey for a ʺLoadBehaviorʺ value. If it exists, it is used.
If it does not exist, MindManager copies the LoadBehavior value from the HKEY_LOCAL_MACHINE subkey to the HKEY_CURRENT_USER subkey and then uses that value.

Mindjet MindManager 8 Large Scale Deployment Guide 52
Therefore, to disable an add‐in for the current user, set the LoadBehavior value in the HKEY_CURRENT_USER subkey to 0.
To disable the add‐in for all new users, set the LoadBehavior value in the HKEY_LOCAL_MACHINE subkey to 0.
Note: This has no effect on users that have already run MindManager at least once. For them you must set LoadBehavior in the HKEY_CURRENT_USER subkey.
Similarly, setting LoadBehavior to 2 enables the add‐in again.
Managing Microsoft Office Add-Ins When MindManager is installed, it registers add‐ins for MS Office products. The location of this add‐in registration in the Windows Registry depends on the application and the add‐in. For example, the MindManager add‐in for Microsoft Word is registered on a per‐machine basis (so all users of the machine have it) at:
HKEY_LOCAL_MACHINE\SOFTWARE\Microsoft\Office\Word\Addins\Mindjet. Mm8Word.AddIn.3
Note that Word handles the Tools ‐> ʺCOM Add‐Insʺ command and user interface differently than MindManager. In Word, if an add‐in is registered in HKEY_LOCAL_MACHINE (HKLM), then it is not displayed in the COM Add‐Ins dialog. If an add‐in is registered in HKEY_CURRENT_USER (HKCU), it is displayed in the dialog and can be turned off and on. If the add‐in is registered both in HKLM and HKCU, Word ignores the HKCU entry and just uses the HKLM entry.
The registry data values for the Microsoft program add‐ins are the same as described for the MindManager add‐ins and can be edited in a similar fashion.

Mindjet MindManager 8 Large Scale Deployment Guide 53
Managing MindManager 8 from the Registry
MindManager 8 supports registry settings to make it easier for system administrators to control the MindManager environment presented to their users. Most MindManager 8 registry settings can be set via the MindManager 8 user interface. These registry settings relevant to Large‐Scale Deployment are not available from the MindManager 8 user interface. See also the user data options, which can also be set via registry settings.
HKEY_LOCAL_MACHINE Settings The following MindManager 8 registry settings are used on a per‐machine basis:
HKEY_LOCAL_MACHINE\SOFTWARE\Mindjet\MindManager\8\Registration
Table 17: HKEY_LOCAL_MACHINE Registration Values
Value Name Type Value Data ShowActivatedLicense REG_DWORD 0 to not show the MindManager user the license
key being used or allow it to be changed. 1 to show the license key.
ChangeActivatedLicense REG_DWORD 0 to prevent changing the MindManager license key. 1 to allow the license key to be changed.
The following MindManager 8 registry settings are used on a per‐machine basis:
HKEY_LOCAL_MACHINE\SOFTWARE\Mindjet\MindManager\8\Settings
Table 18: HKEY_LOCAL_MACHINE Settings
Value Name Type Value Data LocalUserDataDirectory REG_SZ Path to copy user data files (e.g. Image Library
files, etc.)at first launch. May contain environment variables. For example: N:\UserData\%USERNAME%\MindManager 8
If no path is specified, then this path is assumed: %USERPROFILE%\Local Settings\ Application Data\MindManager\8
This setting can be overridden by the same setting in HKEY_CURRENT_USER (see below) or by the LSDUserDataPath setting described earlier.

Mindjet MindManager 8 Large Scale Deployment Guide 54
PerUserInstallation REG_DWORD 0 for per‐machine license key management. 1 for per‐user license key management.
HKEY_CURRENT_USER Settings The following MindManager 8 registry settings are used on a per‐user basis:
HKEY_CURRENT_USER\SOFTWARE\Mindjet\MindManager\8\Settings
Table 19: HKEY_CURRENT_USER Settings
Value Name Type Value Data AllowUpdateCheck REG_DWORD 0 to hide the Help, Check for Updates command.
1 to show this command. 2 to show this command only if the user has write privileges to HKEY_LOCAL_MACHINE (default)
DisableAnimation REG_DWORD 0 to allow animation of maps for smoother scrolling. 1 to disable animation of maps for one‐jump scrolling which is less graphics intensive and perhaps more desirable in a low‐bandwidth Windows Terminal Server environment.
LocalUserDataDirectory REG_SZ Path to copy user data files (e.g. Image Library files, etc.) to when a new user first starts MindManager. May contain environment variables. For example: N:\UserData\%USERNAME%\MindManager 8
If no path is specified, then this path is assumed: %USERPROFILE%\Local Settings\Application Data\MindManager\8
This setting can be overridden by the LSDUserDataPath setting described earlier.
Managing MindManager 8 with Event Macros
MindManager 8 can trigger certain Event Macros that can help system administrators monitor the usage of the program more carefully.
These macros are examples only. You need to customize them for your environment.

Mindjet MindManager 8 Large Scale Deployment Guide 55
Microsoft added the Outlook Object Model Guard to Outlook 2002, forcing the display of a message informing the user that a program is trying to send a message via Outlook. The user must approve the send. This behavior can be controlled by Outlook system policies.
Table 20: Event Macros
Event Name When Fired OnApplicationStarted At the end of InitInstance, only when started in ʺnormalʺ
mode, not /RegServer, /UnregServer, etc.)
OnExpiredTrialStarted Just before the ʺTrial Expiredʺ dialog
OnFirstUse Just before we install ʺper‐user dataʺ
OnBuyButtonPressed Just before the ʺBuy MindManagerʺ dialog is displayed
When a macro event is fired, 0 or more macros are run. The mapping of macro event names to macro filenames is determined on startup.
On startup, MindManager 8 looks in the registry at
HKEY_LOCAL_MACHINE\SOFTWARE\Mindjet\MindManager\8
for a key named Event Macros. If it is found, we might expect to find keys such as these:
Event Macros\
OnApplicationStarted\
EventMacro_OnApplicationStarted.mmbas
EventMacro_OnApplicationStartedTwo.mmbas
Path="C:\Temp\EventMacro_OnApplicationStartedTwo.mmbas"
OnBuyButtonPressed\
EventMacro_OnBuyButtonPressed.mmbas
OnExpiredTrialStarted\
EventMacro_OnExpiredTrialStarted.mmbas
OnFirstUse\
EventMacro_OnFirstUse.mmbas
Each event key can have 0 or more macro key names. Each macro key can have an optional ʺPathʺ value. If the ʺPathʺ value is not there, then the key name is the path. If the path is a relative path (e.g.

Mindjet MindManager 8 Large Scale Deployment Guide 56
ʺEventMacro_OnApplicationStarted.mmbasʺ), it is converted to an absolute path relative to the default macro folder for the user (e.g. ʺC:\Documents and Settings\UserName\Local Settings\Application Data\Mindjet\MindManager\8\macrosʺ).
If the ʺEvent Macrosʺ key is not in the registry, then MindManager looks for event macros in the default macro folder (see above) with a name of the form:
EventMacro_<EventName>.mmbas
For example:
EventMacro_OnApplicationStarted.mmbas
Therefore, it is possible to get macro events to run a macro simply by putting macros with the proper name in the userʹs macro folder. However, for most typical IT uses, the ʺEvent Macrosʺ key will be used since this can point to macros on some network drive, for example.
For example, this ʺEventMacro_OnApplicationStarted.mmbasʺ macro uses the Outlook object model to send a notification email:
'#Uses "EventMacro_Utilities.mmbas"
Sub Main
SendNotificationEmail "MindManager event: Application Started"
End Sub
Where the ʺEventMacro_Utilities.mmbasʺ file contains:
' Utilities for use with MindManager event macros
Public Sub SendNotificationEmail(eventString As String)
' Sends the subject string to the appropriate IT person
' to notify them of the MindManager event that just occurred
' Get access to our email program
Dim outlookApp As Outlook.Application
Set outlookApp = New Outlook.Application
' Create a message
Dim message As Outlook.MailItem
Set message = outlookApp.CreateItem(olMailItem)
message.To = "System Administrator"
message.Subject = eventString
message.Body = eventString
' Send the message
message.Send
Mindjet MindManager 8 Large Scale Deployment Guide 57
End Sub
Managing User Licenses
Each MindManager 8 user must have a license. Please contact your reseller or MindManager 8 sales representative for licensing terms appropriate for Large‐Scale Deployment. MindManager 8 does not include any special support for proprietary third‐party license management software.
MindManager can check and administer license keys on a per‐user or per‐machine basis. MindManager first looks for a license key in:
HKEY_CURRENT_USER\SOFTWARE\Mindjet\MindManager\8\Registration\SlpLicenseKey
If one is not found, then it looks in
HKEY_LOCAL_MACHINE\SOFTWARE\Mindjet\MindManager\8\Registration\SlpLicenseKey
The default MindManager installation administers license keys on a per‐machine basis. A license key is entered or a license file is copied to the machine after the program is installed Then MindManager is activated, and all users of that machine have access to the program via that license key.
To achieve per-user license key administration for MindManager:
1. Install MindManager with no license key or license file: Use the installation wizard (which does not ask for a key), or use command‐line installation without specifying a license key or license file.
Or, set the registry key: HKEY_LOCAL_MACHINE\SOFTWARE\Mindjet\ MindManager\8\Settings\PerUserInstallation to 1 after installation. This setting instructs MindManager to save any license key the user enters to the HKCU setting instead of the HKLM setting.
2. The administrator should put the userʹs license key in the userʹs HKCU registry setting, above, or communicate the userʹs license key to them and let the user enter the license key in the license key dialog that is automatically displayed when the user activates MindManager.
Policies Support
MindManager does not offer official Windows Policies support.