Embed Size (px)
Citation preview
Rev. 01/13/2020
1 STP-5.1 Uniform Corrosion Process (LOP)
LABORATORY PROCEDURE
LF-5.1, UNIFORM CORROSION TESTING
CONTENTS 1. ABSTRACT .................................................................................................... 2
2. OVERVIEW ................................................................................................... 2
3. PROCEDURE ................................................................................................ 3
3.1. COUPON PREPARATION ...................................................................... 3
3.2. COUPON MEASUREMENT .................................................................... 4
3.3. PRODUCT MIXING AND LABELING ...................................................... 5
3.4. COUPON CLEANING AND WEIGHING .................................................. 7
3.5. COUPON IMMERSION (Dunking) ......................................................... 11
3.6. COUPON REMOVAL AND CLEANING ................................................. 14
3.7. FINAL COUPON ACID CLEANING ....................................................... 14
3.8. FINAL WEIGHING ................................................................................. 15
3.9. RESULTS AND SPREADSHEET INPUT .............................................. 16
3.10. ISSUING REPORTS TO COMPANIES ................................................. 17
4. INTERGRANULAR ANALYSIS INSTRUCTION .......................................... 17
5. CALCULATIONS ......................................................................................... 17
5.1. COUPON AREA .................................................................................... 18
5.2. WEIGHT LOSS ...................................................................................... 18
5.3. CORROSION RATE .............................................................................. 18
5.4. DENSITY ............................................................................................... 18
5.5. AVERAGE ............................................................................................. 18
6. TRAINING.................................................................................................... 18
APPENDIX A, Uniform Corrosion Coupon Specification………………………….19
APPENDIX B, Sample Corrosion Results letter……………………………………20
APPENDIX C, AD-700 for fishing line……………………………………………….24
Rev. 01/13/2020
2 STP-5.1 Uniform Corrosion Process (LOP)
References: STP 5.1 Uniform Corrosion
NWST-01313, FINAL REPORT An Investigation of Fire Retardant caused Corrosion (Ocean City. Gehring, 1974) STP 5.2 Intergranular Corrosion LF-5.1.1 Corrosion Coupon Log STP-3.1 Determination of Optimum Mixing LF-5.1.2 Corrosion Label Merge Template Logbook 5 – Acid Cleaning reagents LF-5.1.3 Corrosion Coupon Cleaning Log LF-5.1.4 Aluminum Reagent Preparation LF-5.1.5 Steel Reagent Preparation LF-5.1.6 Brass Reagent Preparation LF-5.1.7 Magnesium Reagent Preparation LF-5.1.8 Surfactant Log LF-5.1.9 90-day Corrosion template LF-5.1.10 Corrosion Control Coupon Log LF-5.2 Intergranular Corrosion Process (LOP) LF-5.2.1 IGA Procedure QP-5.1 Qualification Plan for Uniform Corrosion Procedure
Attachments: (a) Appendix A: Uniform Corrosion Coupon Specification
(b) Appendix B: Sample Corrosion Results letter
1. Abstract
1.1. This procedure outlines the entire uniform corrosion process. All instruction is for
WFCS laboratory personnel and is based upon Standard Test Procedure (STP)
5.1, Uniform Corrosion.
2. Overview
2.1. Wildland Fire Chemical Systems performs uniform corrosion testing on all
product types (Retardant, Foam, or Water Enhancers). The acceptance limits of
this procedure are outlined in each of the applicable Forest Service
Specifications.
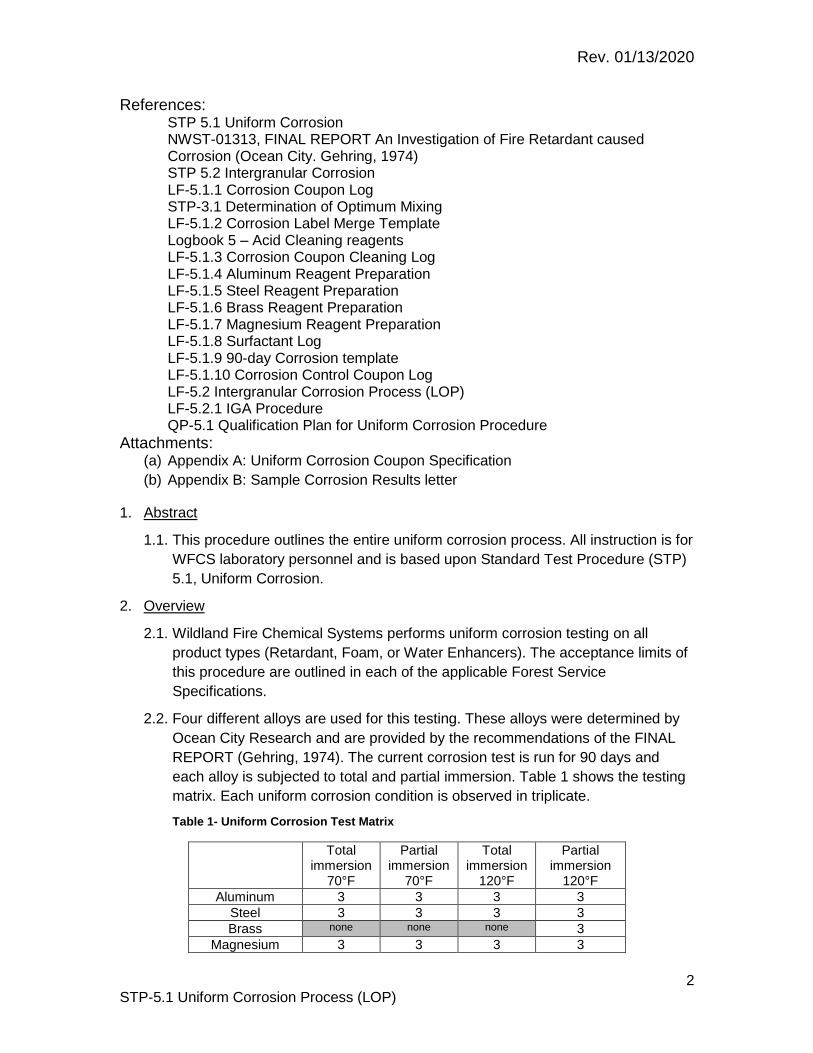
2.2. Four different alloys are used for this testing. These alloys were determined by
Ocean City Research and are provided by the recommendations of the FINAL
REPORT (Gehring, 1974). The current corrosion test is run for 90 days and
each alloy is subjected to total and partial immersion. Table 1 shows the testing
matrix. Each uniform corrosion condition is observed in triplicate.
Table 1- Uniform Corrosion Test Matrix
Total immersion
70°F
Partial immersion
70°F
Total immersion
120°F
Partial immersion
120°F
Aluminum 3 3 3 3
Steel 3 3 3 3
Brass none none none 3
Magnesium 3 3 3 3
Rev. 01/13/2020
3 STP-5.1 Uniform Corrosion Process (LOP)
2.3. Following the 90-day immersion, the coupons are acid cleaned and weighed.
This is done alongside a control coupon to evaluate and capture weight loss
during the acid cleaning. The uniform corrosion test evaluates total weight loss
of a coupon with respect to its dimensions. The density of each coupon is then
used with the weight loss to calculate the thickness loss per year in mils/year
(mpy) which is equal to one thousandth of an inch.
2.4. The results are collected and an average calculated of each triplicate
measurement. The average mpy is compared to Table 4 of the applicable Forest
Service Specification. A letter is then sent to the company informing them of how
their product performed.
2.5. Uniform corrosion testing is performed on fresh products as well as 1-year
stability aged products to determine longevity of the product.
2.6. Uniform corrosion testing is considered complete once each letter is sent to the
company. Intergranular (IGA) corrosion is then performed as follow up in
accordance with STP-5.2.
3. Procedure
This procedure is outlined chronologically for each task performed. Some
sections may be performed in an alternative order for preparation efficiency. It is
NOT recommended to start uniform corrosion on more than two batches in one
day. The analyst shall refer to the calendar to determine if 90 days following
immersion, that laboratory personnel will be present to remove the samples (i.e.
holidays, weekends). The general rules are:
No uniform corrosion started on Mondays
Check calendar for future holidays to avoid overlap with coupon removal
Sections 3.4 and 3.5 MUST be completed on the same day.
BE SURE to wear all appropriate Personal Protection Equipment as
deemed necessary by the task being performed (i.e. gloves, goggles, ear
protection, etc.).
3.1. COUPON PREPARATION
Coupons are currently ordered from Corrosion Test Supply using the
specifications outlined in Appendix A. Alternative suppliers may be a future
capability but require validation first.
3.1.1. Use the active copy of Lab Form (LF) LF-5.1.1 to record each batch of
coupons.
3.1.2. Fill in product name, FID, mix ratio and any other needed identifiers.
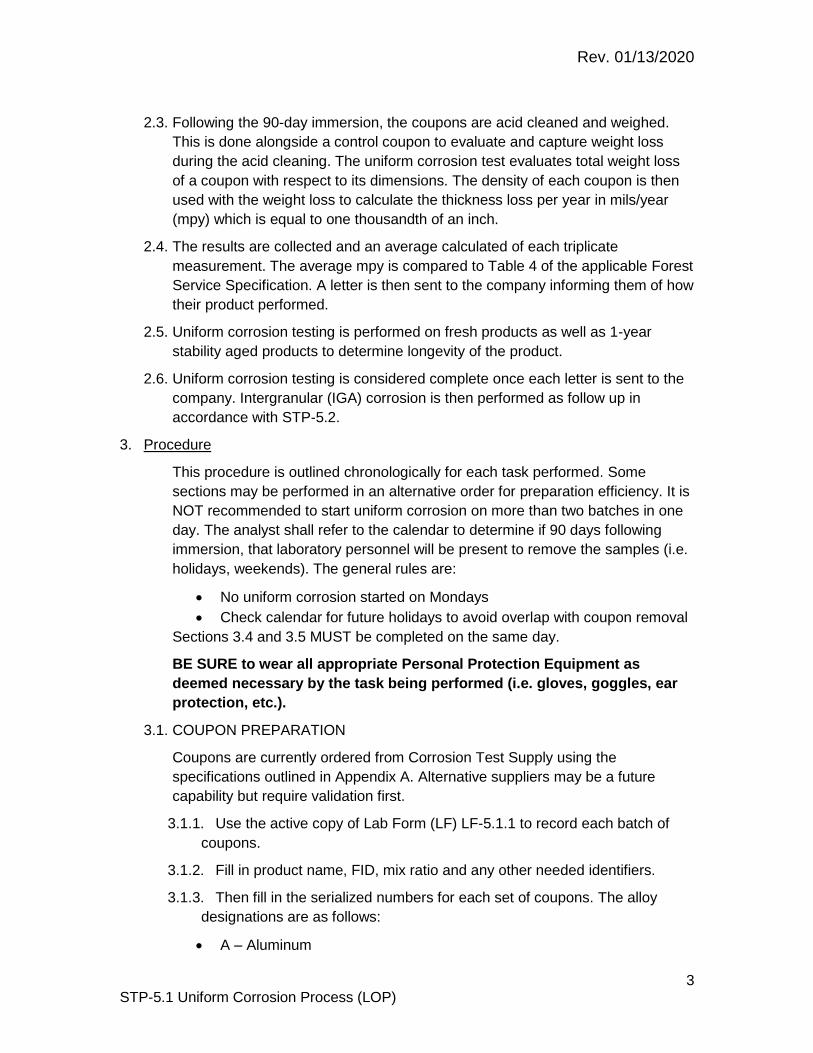
3.1.3. Then fill in the serialized numbers for each set of coupons. The alloy
designations are as follows:
A – Aluminum
Rev. 01/13/2020
4 STP-5.1 Uniform Corrosion Process (LOP)
G – Steel
C – Brass
L – Magnesium
3.1.4. Use the vibrating etcher to record unique coupon identification to match
the numbers recorded on LF-5.1.1. It is acceptable to start a batch with full
identification (i.e. A12122) and proceed with subsequent coupons in a batch
to only include the alloy designation and final three digits (i.e. A123, A124,
etc.).
3.1.5. Alternatively, the coupons can be pre-stamped with a serial identifier and
these numbers are then recorded on LF-5.1.1.
3.2. COUPON MEASUREMENT
3.2.1. After coupons are marked with a unique identifier, they are measured to
determine the area dimensions.
NOTE: Each corrosion coupon batch is segregated for data transcription
purposes. For example all coupons to be dunked in product Y at a 2.0%
concentration are measured in a batch of coupons (Aluminum, Steel,
Brass, Magnesium) followed by the next batch of coupons for the next
product or dilution.
3.2.2. Log on to the corrosion laptop and load the LabVIEW program titled
Caliper.vi which is located on the desktop. There are instructions listed in
the program on how to proceed, but they are also listed below.
3.2.3. Once the VI is opened, assure the BLACK BOX ABC SWITCH is set to
the “B” or “Caliper” setting. Also assure the flash drive is connected to save
the results. These results auto-fill into a spreadsheet that can be imported
into Excel.
3.2.4. Before taking any measurements, fill in each of the fields. Standard
practice is to measure in the order outlined in section 3.1.3. Also be sure to
zero the caliper by pressing the “set button.”
3.2.5. Press the “check mark” button when the number of coupons, alloy
designation, and number of first coupon fields are filled in and then press
the “ ” to run the program.
3.2.6. The Coupon being measured field should now read the first coupon’s
number.
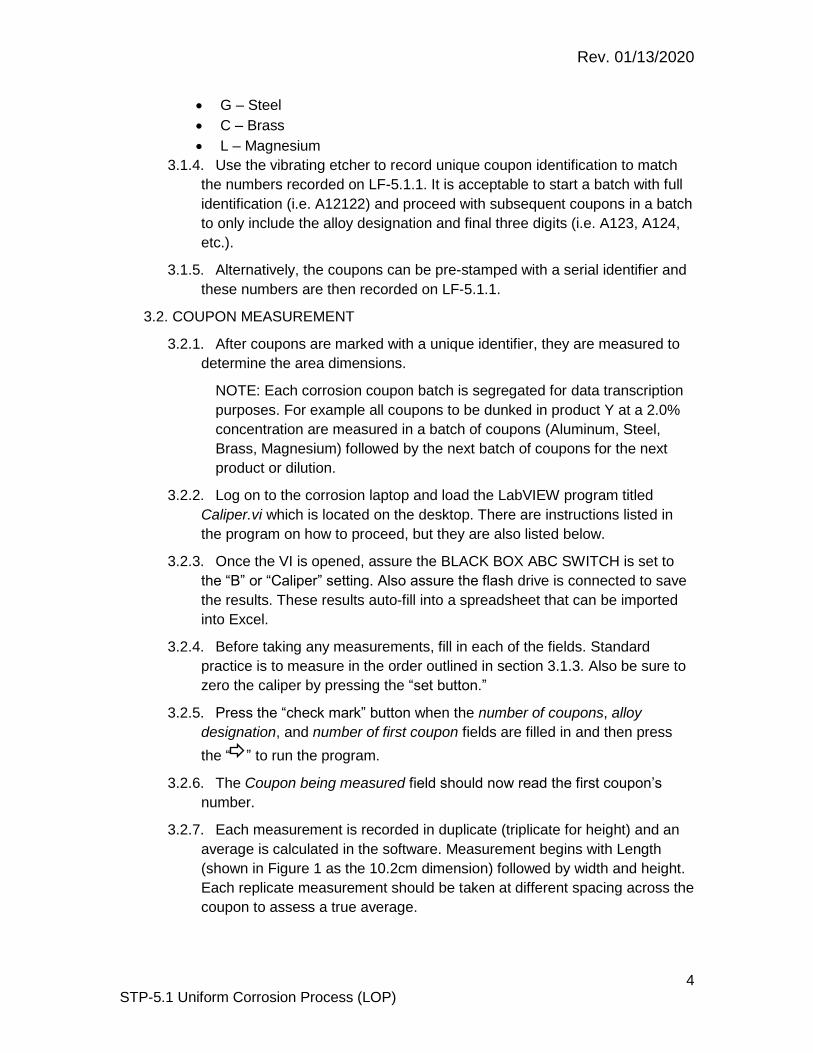
3.2.7. Each measurement is recorded in duplicate (triplicate for height) and an
average is calculated in the software. Measurement begins with Length
(shown in Figure 1 as the 10.2cm dimension) followed by width and height.
Each replicate measurement should be taken at different spacing across the
coupon to assess a true average.
Rev. 01/13/2020
5 STP-5.1 Uniform Corrosion Process (LOP)
3.2.8. Each measurement should be recorded with the caliper snugly adjusted
to the coupon, holding it in place.
3.2.9. To record a measurement, press the “set” button on the caliper. When all
replicates have been measured, the next coupon will illuminate for that
dimensional measurement.
3.2.10. All lengths are recorded, followed by width and height of the selected
alloy.
3.2.11. Width is the 2.5 cm dimension, and height is the 0.3 cm dimension in
Figure 1.
Figure 1- Coupon Dimensions
3.2.12. When each of the replicate measurements have been completed for a
coupon, the next coupon number will populate the Coupon being measured
field for the same (length, width, or height) dimension. Continue through the
program measuring duplicate (or triplicate for H) measurements for each
dimension of each coupon.
3.2.13. When all coupons of an alloy have been measured, the program will
terminate and automatically export the results to two locations, the desktop
and the flash drive.
NOTE: It is good practice to assure your first series of measurements is
recorded to reduce the need for rework.
3.2.14. Repeat starting at section 3.2.4 for each separate alloy in a batch. Any
number of measurement batches can be recorded in a given day, but it
works best to always keep them in order (Aluminum, Steel, Brass,
Magnesium).
3.2.15. When measurement of a batch has been completed, record this on LF-
5.1.1 by checking the measurement check box and entering the date.
3.2.16. Upon completion, each batch of coupons are then ready to be used for
analysis.
3.3. PRODUCT MIXING AND LABELING
Rev. 01/13/2020
6 STP-5.1 Uniform Corrosion Process (LOP)
3.3.1. Use the proper LF mix sheet to calculate correct volumes or weights for
mixing. Follow the instructions on the applicable LF for mixing each product
type. It is standard to mix around 95,000mL to assure enough product for
annual, 14-day stability tests, and uniform corrosion. Sometimes more or
less is needed depending on the product type, age, and dilution. Each LF
template should provide this estimated volume.
3.3.2. Refer to STP 3.1 and associated mixing instructions for specific
laboratory operation and safety considerations.
3.3.3. After completion of mixing, the volume is allocated into the sample jars
and carboys as instructed on the LF.
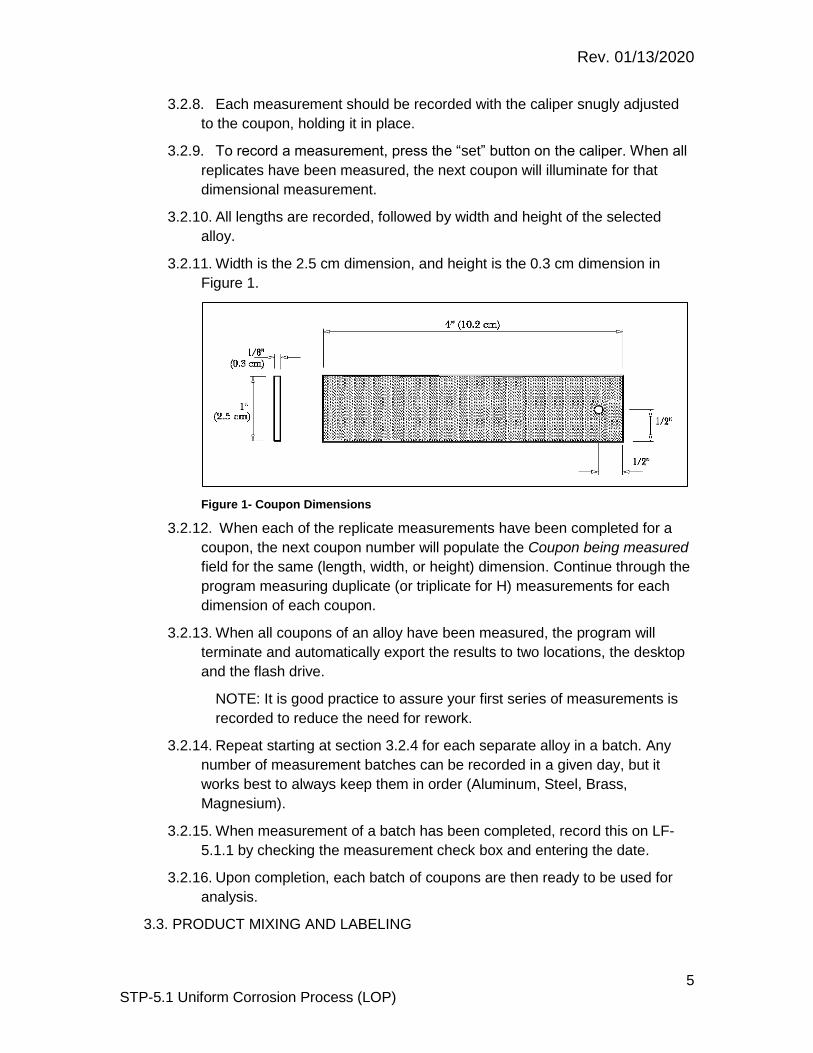
3.3.4. 40 jars are used; 19 filled with 800 mL (total) and 21 filled with 400 mL
(partial). Each jar is then capped with a lid. One “total” or full jar is set aside
for measurement (pH, viscosity, etc.) and the remaining 39 are sorted on
the benchtop as follows:
L total total partial partial total total partial partial total total partial partial
C partial partial partial
G total total partial partial total total partial partial total total partial partial
A total total partial partial total total partial partial total total partial partial
-------------------------------------Edge of benchtop----------------------------------------
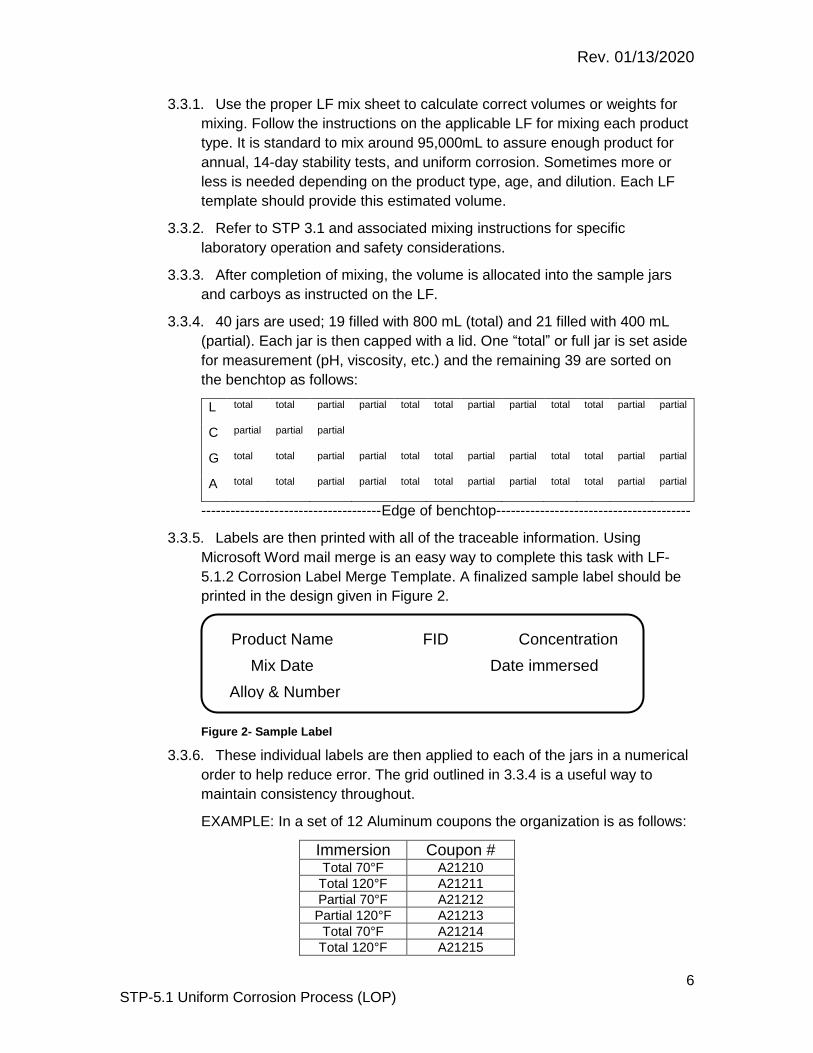
3.3.5. Labels are then printed with all of the traceable information. Using
Microsoft Word mail merge is an easy way to complete this task with LF-
5.1.2 Corrosion Label Merge Template. A finalized sample label should be
printed in the design given in Figure 2.
Figure 2- Sample Label
3.3.6. These individual labels are then applied to each of the jars in a numerical
order to help reduce error. The grid outlined in 3.3.4 is a useful way to
maintain consistency throughout.
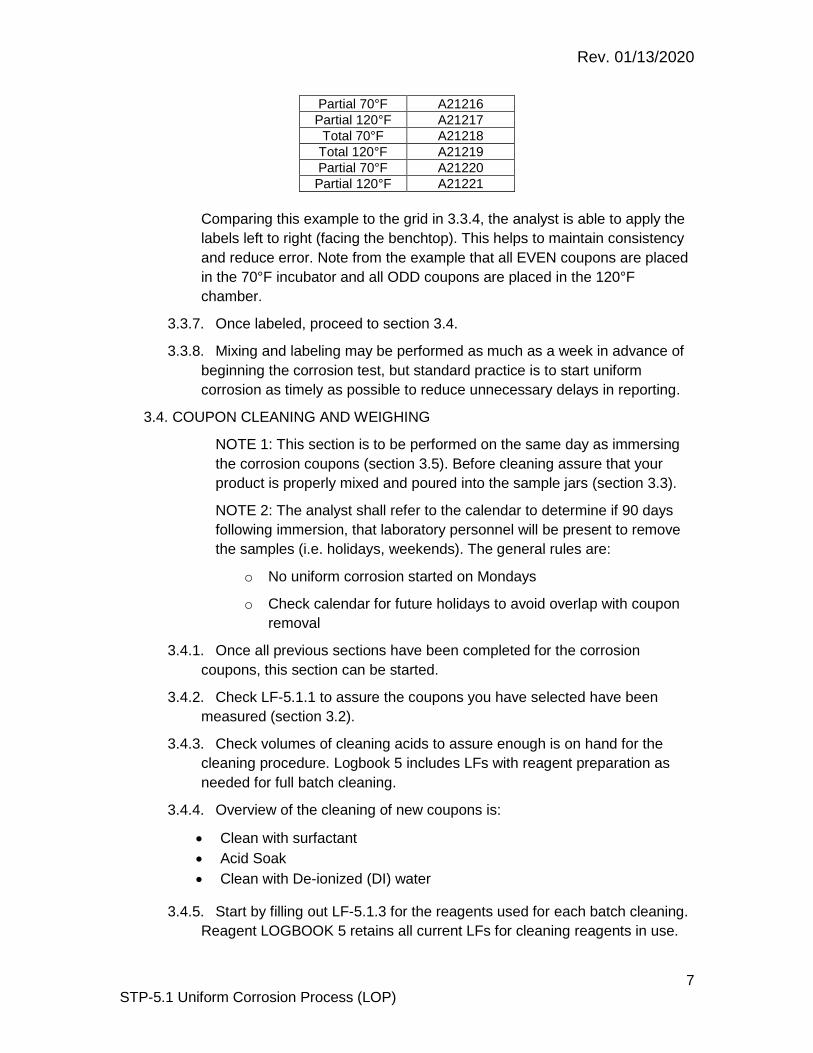
EXAMPLE: In a set of 12 Aluminum coupons the organization is as follows:
Immersion Coupon # Total 70°F A21210
Total 120°F A21211
Partial 70°F A21212
Partial 120°F A21213
Total 70°F A21214
Total 120°F A21215
Product Name FID Concentration
Mix Date Date immersed
Alloy & Number
Rev. 01/13/2020
7 STP-5.1 Uniform Corrosion Process (LOP)
Partial 70°F A21216
Partial 120°F A21217
Total 70°F A21218
Total 120°F A21219
Partial 70°F A21220
Partial 120°F A21221
Comparing this example to the grid in 3.3.4, the analyst is able to apply the
labels left to right (facing the benchtop). This helps to maintain consistency
and reduce error. Note from the example that all EVEN coupons are placed
in the 70°F incubator and all ODD coupons are placed in the 120°F
chamber.
3.3.7. Once labeled, proceed to section 3.4.
3.3.8. Mixing and labeling may be performed as much as a week in advance of
beginning the corrosion test, but standard practice is to start uniform
corrosion as timely as possible to reduce unnecessary delays in reporting.
3.4. COUPON CLEANING AND WEIGHING
NOTE 1: This section is to be performed on the same day as immersing
the corrosion coupons (section 3.5). Before cleaning assure that your
product is properly mixed and poured into the sample jars (section 3.3).
NOTE 2: The analyst shall refer to the calendar to determine if 90 days
following immersion, that laboratory personnel will be present to remove
the samples (i.e. holidays, weekends). The general rules are:
o No uniform corrosion started on Mondays
o Check calendar for future holidays to avoid overlap with coupon
removal
3.4.1. Once all previous sections have been completed for the corrosion
coupons, this section can be started.
3.4.2. Check LF-5.1.1 to assure the coupons you have selected have been
measured (section 3.2).
3.4.3. Check volumes of cleaning acids to assure enough is on hand for the
cleaning procedure. Logbook 5 includes LFs with reagent preparation as
needed for full batch cleaning.
3.4.4. Overview of the cleaning of new coupons is:
Clean with surfactant
Acid Soak
Clean with De-ionized (DI) water
3.4.5. Start by filling out LF-5.1.3 for the reagents used for each batch cleaning.
Reagent LOGBOOK 5 retains all current LFs for cleaning reagents in use.
Rev. 01/13/2020
8 STP-5.1 Uniform Corrosion Process (LOP)
LF-5.1.4 Nitric Acid (Aluminum)
LF-5.1.5 Stannous Chloride (Steel)
LF-5.1.6 ½ strength Hydrochloric Acid (1:1) (Brass)
LF-5.1.7 Chromic Acid (Magnesium)
LF-5.1.8 Surfactant Log
3.4.6. Before using ScotchBrite green scrubbers on new coupons cut to
approximate dimensions (1.5” x 3”) and pre-scrub using the dummy
coupons to help remove coarse fibers from each pad. Only use on dummy
alloy for the applicable new coupon(s). DO NOT use ScotchBrite green
scrubbers on different alloy types.
3.4.7. SURFACTANT CLEANING – use cleaning solution, 409 Formula
Antibacterial All Purpose Cleaner (LF-5.1.8) for all initial cleaning prior to
acid cleaning. Use the conditioned green scrubber on the same alloy used
to condition.
3.4.7.1. Spray the scrubber with enough surfactant to coat scrubber.
3.4.7.2. Use light force when cleaning. Scrub across each dimensional
surface 10 times.
3.4.7.3. Rinse with tap water, and set aside. Repeat surfactant cleaning on
all coupons to degrease or remove any packaging residue.
3.4.8. ACID CLEANING – use appropriate acid reagent for each alloy type.
Section 3.4.5 outlines the lab forms and reagents to use on the different
types.
3.4.8.1. Each acid is poured (fresh) into their containers. Nitric acid,
Stannous Chloride, and 1:1 hydrochloric acid are put into 800 mL
plastic beakers (filled to approximately 750 mL). The Chromic acid is
poured into individual 125 mL test tubes (with approximately 75mL of
acid).
3.4.8.2. Place the stannous chloride beaker into an ice bath and allow to
cool to within the temperature range outlined in section 3.4.8.4. Place
each of the test tubes containing chromic acid into the water bath
beaker, arranging them upright sitting in the glass beads.
3.4.8.3. Turn on the electric hot plate and allow the water bath to just
reach boiling.
3.4.8.4. Acid cleaning is performed by an acid soak as outlined below:
(1) Aluminum, 5 minutes at room temperature (70°F + 5°F)
(2) Steel, 6 minute soak at 32°F + 5°F
(3) Brass, 5 minutes at room temperature (70°F + 5°F)
(4) Magnesium, 15 minute soak at 212°F + 5°F
Rev. 01/13/2020
9 STP-5.1 Uniform Corrosion Process (LOP)
3.4.8.5. Once each of the acid solutions are in the proper temperature
range, begin the acid soak times. (1), (2), and (3) Coupons should be
cleaned in sets of 6 (this assures enough room in each container so
they are not touching during the acid soak). Acid soaks for (4) are
done individually and can all be performed all during the same time
interval.
3.4.8.6. Use digital timers with the preset times to assure consistency. It is
acceptable to perform acid soaks concurrently with other alloy types
just assure they are removed at the designated intervals.
3.4.8.7. When each soak has been completed, move the coupons to an
800 mL beaker of water to await final scrub cleaning.
3.4.8.8. Grab a new clean scrubber, condition as in section 3.4.6, but do
not add surfactant.
3.4.8.9. Scrub each coupon under running tap water. 10 scrubs on each
dimensional side.
3.4.8.10. When finished, rinse the coupon with tap water and place in a
third 800 mL beaker filled with deionized water.
3.4.8.11. Repeat sections 3.4.8.9 and 3.4.8.10 with all coupons of an alloy
type.
3.4.8.12. Once an entire alloy is finished, start at section 3.4.8.8 with the
next alloy and a new 800 mL beaker of fresh DI water. Again, be sure
to only use scrubbers conditioned with the same alloy they are used to
clean.
3.4.8.13. When all coupons of all alloy types are in DI water move to the
coupon drying section.
3.4.9. COUPON DRYING – Wearing gloves, one alloy at a time, dump out the
DI water and individually wipe each coupon with a chemwipe (or no-lint
tissue equivalent) and hang on the wire hooks in the industrial oven.
3.4.9.1. Repeat with all alloy types until all cleaned coupons are
suspended in the oven.
3.4.9.2. Set the oven temperature to 150oF and close the oven doors. Wait
1 hour or until the coupons are visibly dry, then turn off the oven and
allow coupons to cool.
3.4.9.3. Coupon cooling can be accelerated by opening the oven doors or
removing them from the oven hooks and placing in open air.
NOTE: Be sure to always wear gloves when handling coupons after cleaning.
3.4.9.4. After the coupons have cooled to room temperature, move to the
Initial Coupon Weighing section.
Rev. 01/13/2020
10 STP-5.1 Uniform Corrosion Process (LOP)
3.4.10. INITIAL COUPON WEIGHING – LabVIEW is used to record the initial
weights of the coupons
3.4.10.1. From the desktop of the corrosion computer select the LabVIEW
VI labeled “initialweight.vi”
3.4.10.2. Once the VI is opened, assure the BLACK BOX ABC SWITCH is
set to the “A” or “Balance” setting. Also assure the attached Sartorius
balance is powered “on”. Make sure the flash drive is connected to
save the results. These results auto-fill into a spreadsheet that can be
imported into Excel.
3.4.10.3. Coupons are weighed in batches by alloy type. Starting with the
aluminum coupons (followed in order by steel, brass, and magnesium),
select the alloy designation, how many coupons, and the number of
first coupon in the available fields.
3.4.10.4. Press the “check mark” button when the number of coupons, alloy
designation, and number of first coupon fields are filled in and then
press the “ ” to run the program. Follow the program prompts, which
starts with taring and recording the tare weight before handling any
coupons.
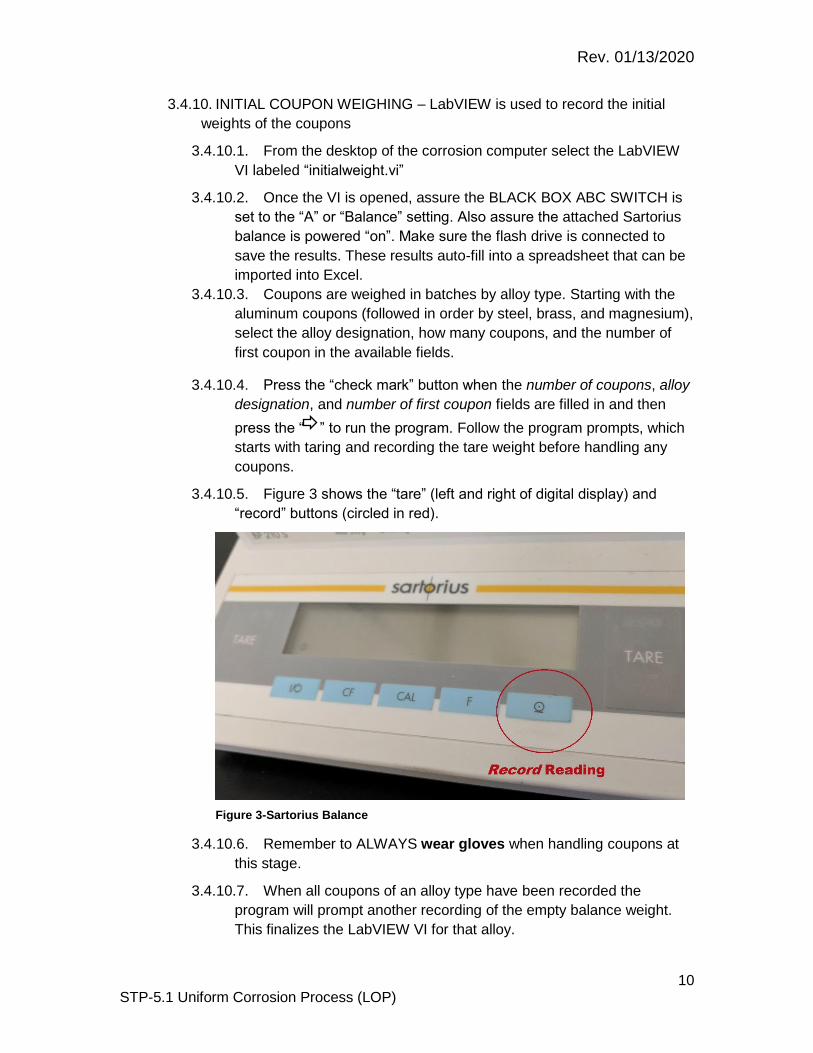
3.4.10.5. Figure 3 shows the “tare” (left and right of digital display) and
“record” buttons (circled in red).
Figure 3-Sartorius Balance
3.4.10.6. Remember to ALWAYS wear gloves when handling coupons at
this stage.
3.4.10.7. When all coupons of an alloy type have been recorded the
program will prompt another recording of the empty balance weight.
This finalizes the LabVIEW VI for that alloy.

Rev. 01/13/2020
11 STP-5.1 Uniform Corrosion Process (LOP)
3.4.10.8. Repeat starting with section 3.4.10.4 for the next alloy type.
3.4.10.9. When all cleaned coupons have been recorded, navigate to the
desktop. Select the link labeled Shortcut to SIMPTECH (E:).
3.4.10.10. Open the file named coupons_initial_weights_hp.xls and scroll to
the bottom of the spreadsheet to make sure the coupons just weighed
have been properly recorded.
3.4.10.11. If nothing appears, troubleshoot and re-weigh the coupons before
moving to section 3.5.
3.4.10.11.1. Troubleshooting is not commonly required. It can include
but is not limited to restarting the computer, LabVIEW program, or
reattaching the flash drive.
3.4.10.12. If all coupons have been recorded successfully move to section
3.5 for immersion. REMINDER coupons MUST be dunked the same
day they are cleaned.
3.4.11. DO NOT proceed to the next step until it is confirmed that the initial
weights and measurements results exist.
3.5. COUPON IMMERSION (Dunking)
When all previous steps have been completed, the coupons are ready to be
immersed in the fire chemical product(s). All coupons require attachment of
green fishing line, and the partially immersed coupons will require a small 2”
dash to use as a sightline when dunking. Remember to ALWAYS use
gloves when handling coupons at this stage.
3.5.1. MARKING – Align all coupons as shown in figure 4 and (with a wax pen)
mark the partial immersed coupons 2” from the bottom with a small dash.
Minimize the mark’s length as much as possible while remaining visible to
reduce interference with the testing.
Figure 4- Marking partial immersion coupons
Rev. 01/13/2020
12 STP-5.1 Uniform Corrosion Process (LOP)
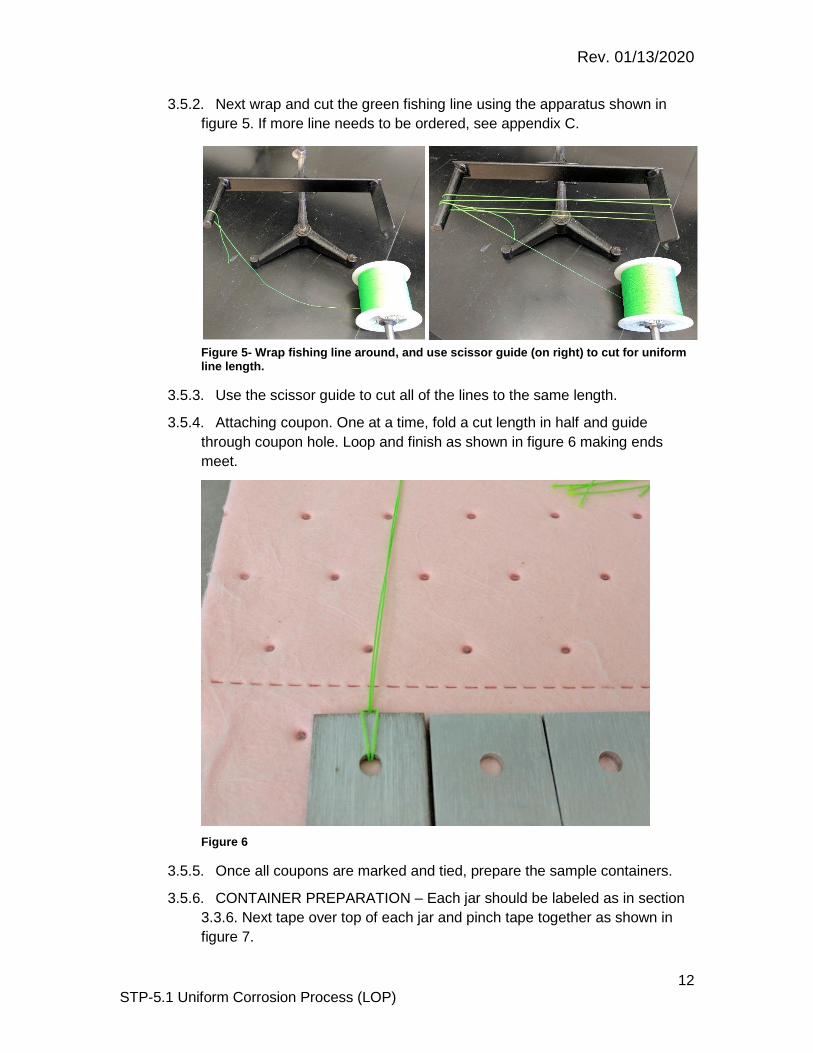
3.5.2. Next wrap and cut the green fishing line using the apparatus shown in
figure 5. If more line needs to be ordered, see appendix C.
Figure 5- Wrap fishing line around, and use scissor guide (on right) to cut for uniform line length.
3.5.3. Use the scissor guide to cut all of the lines to the same length.
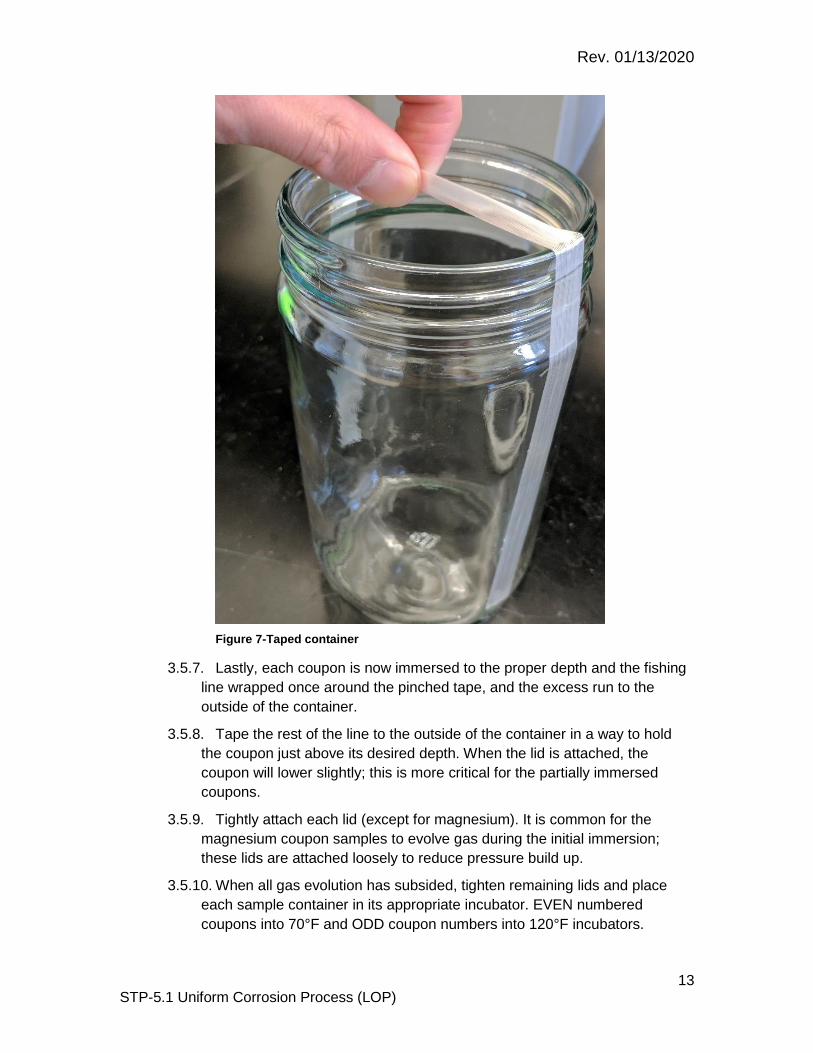
3.5.4. Attaching coupon. One at a time, fold a cut length in half and guide
through coupon hole. Loop and finish as shown in figure 6 making ends
meet.
Figure 6
3.5.5. Once all coupons are marked and tied, prepare the sample containers.
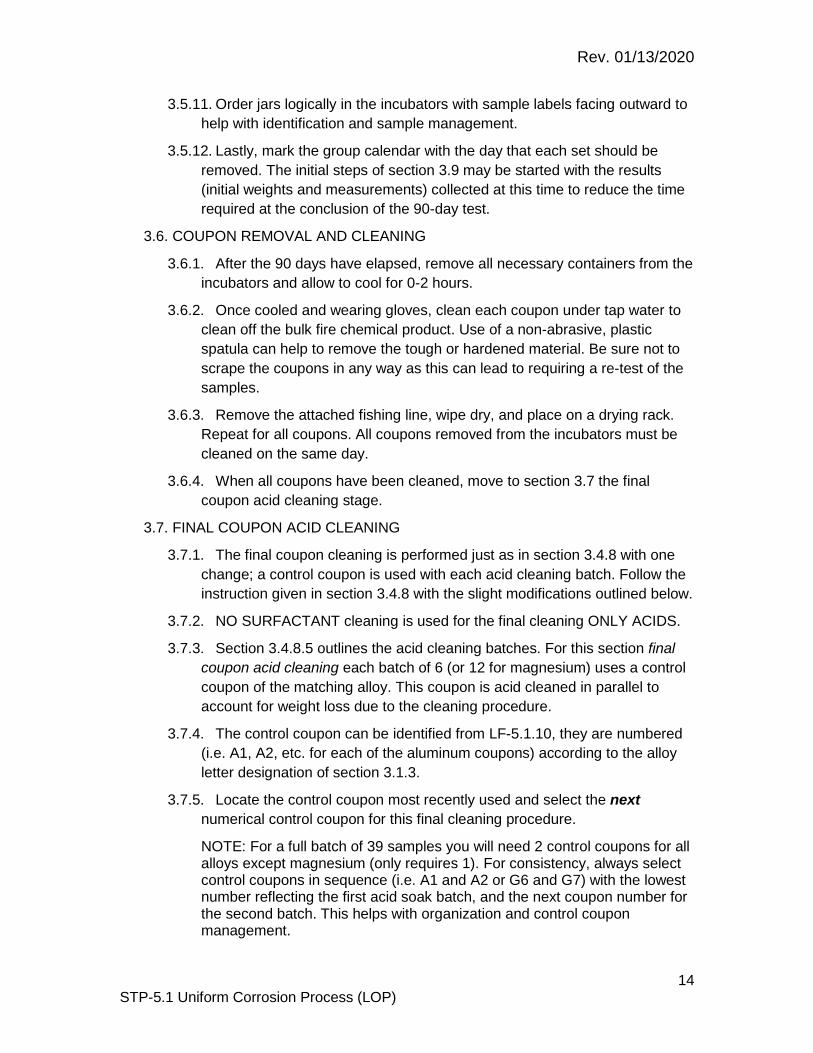
3.5.6. CONTAINER PREPARATION – Each jar should be labeled as in section
3.3.6. Next tape over top of each jar and pinch tape together as shown in
figure 7.
Rev. 01/13/2020
13 STP-5.1 Uniform Corrosion Process (LOP)
Figure 7-Taped container
3.5.7. Lastly, each coupon is now immersed to the proper depth and the fishing
line wrapped once around the pinched tape, and the excess run to the
outside of the container.
3.5.8. Tape the rest of the line to the outside of the container in a way to hold
the coupon just above its desired depth. When the lid is attached, the
coupon will lower slightly; this is more critical for the partially immersed
coupons.
3.5.9. Tightly attach each lid (except for magnesium). It is common for the
magnesium coupon samples to evolve gas during the initial immersion;
these lids are attached loosely to reduce pressure build up.
3.5.10. When all gas evolution has subsided, tighten remaining lids and place
each sample container in its appropriate incubator. EVEN numbered
coupons into 70°F and ODD coupon numbers into 120°F incubators.
Rev. 01/13/2020
14 STP-5.1 Uniform Corrosion Process (LOP)
3.5.11. Order jars logically in the incubators with sample labels facing outward to
help with identification and sample management.
3.5.12. Lastly, mark the group calendar with the day that each set should be
removed. The initial steps of section 3.9 may be started with the results
(initial weights and measurements) collected at this time to reduce the time
required at the conclusion of the 90-day test.
3.6. COUPON REMOVAL AND CLEANING
3.6.1. After the 90 days have elapsed, remove all necessary containers from the
incubators and allow to cool for 0-2 hours.
3.6.2. Once cooled and wearing gloves, clean each coupon under tap water to
clean off the bulk fire chemical product. Use of a non-abrasive, plastic
spatula can help to remove the tough or hardened material. Be sure not to
scrape the coupons in any way as this can lead to requiring a re-test of the
samples.
3.6.3. Remove the attached fishing line, wipe dry, and place on a drying rack.
Repeat for all coupons. All coupons removed from the incubators must be
cleaned on the same day.
3.6.4. When all coupons have been cleaned, move to section 3.7 the final
coupon acid cleaning stage.
3.7. FINAL COUPON ACID CLEANING
3.7.1. The final coupon cleaning is performed just as in section 3.4.8 with one
change; a control coupon is used with each acid cleaning batch. Follow the
instruction given in section 3.4.8 with the slight modifications outlined below.
3.7.2. NO SURFACTANT cleaning is used for the final cleaning ONLY ACIDS.
3.7.3. Section 3.4.8.5 outlines the acid cleaning batches. For this section final
coupon acid cleaning each batch of 6 (or 12 for magnesium) uses a control
coupon of the matching alloy. This coupon is acid cleaned in parallel to
account for weight loss due to the cleaning procedure.
3.7.4. The control coupon can be identified from LF-5.1.10, they are numbered
(i.e. A1, A2, etc. for each of the aluminum coupons) according to the alloy
letter designation of section 3.1.3.
3.7.5. Locate the control coupon most recently used and select the next
numerical control coupon for this final cleaning procedure.
NOTE: For a full batch of 39 samples you will need 2 control coupons for all alloys except magnesium (only requires 1). For consistency, always select control coupons in sequence (i.e. A1 and A2 or G6 and G7) with the lowest number reflecting the first acid soak batch, and the next coupon number for the second batch. This helps with organization and control coupon management.
Rev. 01/13/2020
15 STP-5.1 Uniform Corrosion Process (LOP)
3.7.6. Record all reagent traceability and control coupons used on LF-5.1.3.
3.7.7. Treat the control coupon just as you would any other coupon with regards
to soaking, scrubbing, and drying.
3.7.8. When all coupons have gone through the cleaning and are in DI water
awaiting drying proceed as in section 3.4.9 (excluding the direction of
3.4.9.4. DO NOT proceed to the Initial weighing section- continue with
section 3.8, final weighing; the LabVIEW programs operate differently and
cannot be used interchangeably.
3.8. FINAL WEIGHING
3.8.1. Once all coupons (including controls) have been dried and cooled it is
time for the final weighing.
3.8.2. From the desktop, open the finalweight.vi LabVIEW program. The
process is very similar to the initial weighing section (3.4.10) with the
addition of the control coupons. There is on-screen instruction that helps
describe the process flow.
3.8.3. Fill in all the fields and be sure to add the numbers of the control coupons
for this batch of samples. As performed in the initial weighing section, group
coupons by alloy type.
3.8.4. When the program fields are updated to reflect the batch of coupons to be
weighed, click the check mark button followed by the “ ” to run the
program.
3.8.5. Tare the balance and record the tared weight as the on-screen prompts
instruct.
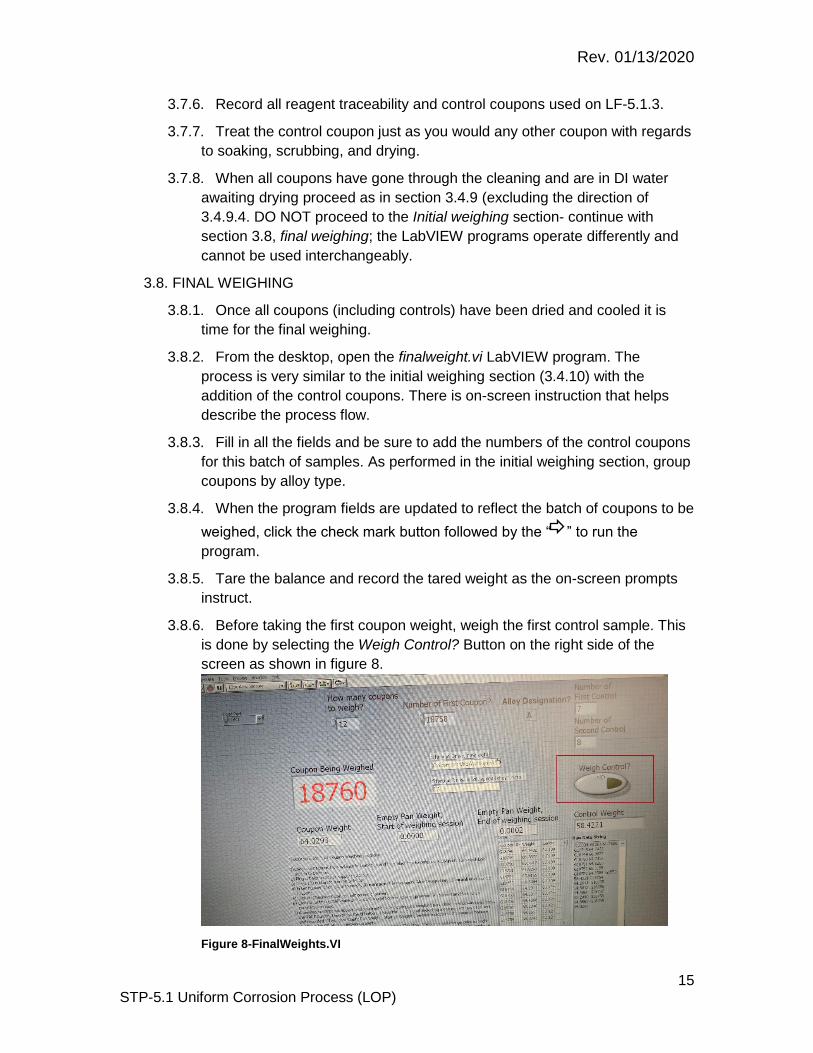
3.8.6. Before taking the first coupon weight, weigh the first control sample. This
is done by selecting the Weigh Control? Button on the right side of the
screen as shown in figure 8.
Figure 8-FinalWeights.VI

Rev. 01/13/2020
16 STP-5.1 Uniform Corrosion Process (LOP)
3.8.7. When the button is illuminated, record the mass of the control coupon
(same button as in figure 3), wait to hear the audible “beep” indicating the
data was collected, and then press the Weigh Control? button once more to
deactivate the function.
3.8.8. Proceed as normal until you reach the next control coupon and repeat the
steps above. The standard practice is to weigh the control coupon just
before weighing the coupons it was acid cleaned with.
EXAMPLE: The ordered coupon weights would follow the diagram below
starting at the top and moving down:
Control sample #1
(Aluminum)
A21212
A21213
A21214
A21215
A21216
A21217
Control sample #2
(Aluminum)
A21218
A21219
A21220
A21221
A21222
A21223
3.8.9. When all coupons have been weighed, follow the on-screen prompts to
take a final balance weight to complete the data collection.
3.8.10. Repeat starting at section 3.8.3 with each alloy type until the entire
corrosion batch has been completed.
3.8.10.1. Confirm the data was recorded by selecting the link labeled
Shortcut to SIMPTECH (E:) on the desktop.
3.8.10.2. Open the file named coupons_final_weights.xls and scroll to the
bottom of the spreadsheet to make sure the coupons just weighed
have been properly recorded.
3.9. RESULTS AND SPREADSHEET INPUT
3.9.1. Locate LF-5.1.9, 90-day corrosion template and update all labels on the
template to reflect the new batch of samples. Additional tabs may be
First batch of coupons
exposed to acid “soak”
cleaning
Second batch of
coupons exposed to
acid “soak” cleaning
Rev. 01/13/2020
17 STP-5.1 Uniform Corrosion Process (LOP)
duplicated for subsequent dilutions of a product type. Save in an
appropriate desktop location as well as on the corrosion flash drive.
3.9.2. Input the start date of each batch and calculate the end date. Add this
end date to the group calendar if this has not already been performed. Also
make sure these dates are included on the appropriate mix sheet LF (i.e.
LF-3.1.1).
3.9.3. Use the LabVIEW data files to copy and paste the measurements and
weights into LF-5.1.9.
3.9.4. When LF-5.1.9 is completed, check for transcription error and consistency
in measurement and calculations. All spreadsheet calculations are
described in section 5.
3.9.5. Use the results of LF-5.1.9 to draft a letter to the company describing the
outcome of the testing.
3.10. ISSUING REPORTS TO COMPANIES
3.10.1. Once LF-5.1.9 is completed a report (or letter) is issued to the company.
Included in the report are all results from the 90-day corrosion and a
narrative explaining whether or not the results meet the acceptance limits of
the applicable specification.
3.10.2. The letter also includes the formulation ID# of the product tested and the
current specification it was tested under (with any revision or amendment
iterations included).
3.10.3. All relevant tables are included within the letter with results
3.10.4. Refer to Appendix A for an example of the drafted letter format.
3.10.5. The final paragraph always includes a question asking the company if
they would like to proceed with intergranular corrosion on the applicable
alloys (either aluminum or magnesium, or both). Standard practice is to only
submit coupons for analysis for products that pass the uniform corrosion
testing limits. This is all outlined in LF-5.2.
4. Intergranular Analysis Instruction
4.1. This instruction is described in LF-5.2 Intergranular Corrosion Process (LOP)
and on LF-5.2.1, IGA Procedure with use of the Sample Analysis Request
(SAR), attachment (c).
5. Calculations
Calculations used in LF-5.1.9 are explained in this section. Simple arithmetic
equations and conversions are not included (i.e. Days are calculated from the
“In” and “Out” dates).
Rev. 01/13/2020
18 STP-5.1 Uniform Corrosion Process (LOP)
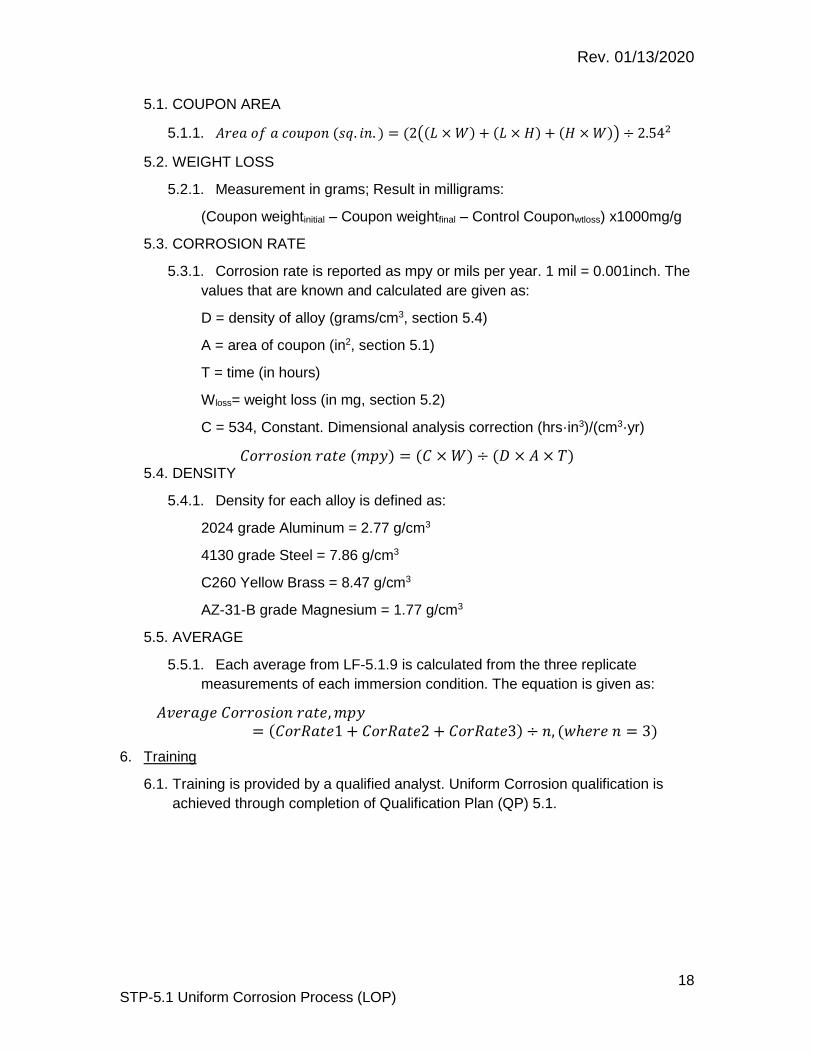
5.1. COUPON AREA
5.1.1. 𝐴𝑟𝑒𝑎 𝑜𝑓 𝑎 𝑐𝑜𝑢𝑝𝑜𝑛 (𝑠𝑞. 𝑖𝑛. ) = (2((𝐿 × 𝑊) + (𝐿 × 𝐻) + (𝐻 × 𝑊)) ÷ 2.542
5.2. WEIGHT LOSS
5.2.1. Measurement in grams; Result in milligrams:
(Coupon weightinitial – Coupon weightfinal – Control Couponwtloss) x1000mg/g
5.3. CORROSION RATE
5.3.1. Corrosion rate is reported as mpy or mils per year. 1 mil = 0.001inch. The
values that are known and calculated are given as:
D = density of alloy (grams/cm3, section 5.4)
A = area of coupon (in2, section 5.1)
T = time (in hours)
Wloss= weight loss (in mg, section 5.2)
C = 534, Constant. Dimensional analysis correction (hrs·in3)/(cm3·yr)
𝐶𝑜𝑟𝑟𝑜𝑠𝑖𝑜𝑛 𝑟𝑎𝑡𝑒 (𝑚𝑝𝑦) = (𝐶 × 𝑊) ÷ (𝐷 × 𝐴 × 𝑇) 5.4. DENSITY
5.4.1. Density for each alloy is defined as:
2024 grade Aluminum = 2.77 g/cm3
4130 grade Steel = 7.86 g/cm3
C260 Yellow Brass = 8.47 g/cm3
AZ-31-B grade Magnesium = 1.77 g/cm3
5.5. AVERAGE
5.5.1. Each average from LF-5.1.9 is calculated from the three replicate
measurements of each immersion condition. The equation is given as:
𝐴𝑣𝑒𝑟𝑎𝑔𝑒 𝐶𝑜𝑟𝑟𝑜𝑠𝑖𝑜𝑛 𝑟𝑎𝑡𝑒, 𝑚𝑝𝑦= (𝐶𝑜𝑟𝑅𝑎𝑡𝑒1 + 𝐶𝑜𝑟𝑅𝑎𝑡𝑒2 + 𝐶𝑜𝑟𝑅𝑎𝑡𝑒3) ÷ 𝑛, (𝑤ℎ𝑒𝑟𝑒 𝑛 = 3)
6. Training
6.1. Training is provided by a qualified analyst. Uniform Corrosion qualification is
achieved through completion of Qualification Plan (QP) 5.1.
19 Appendix A
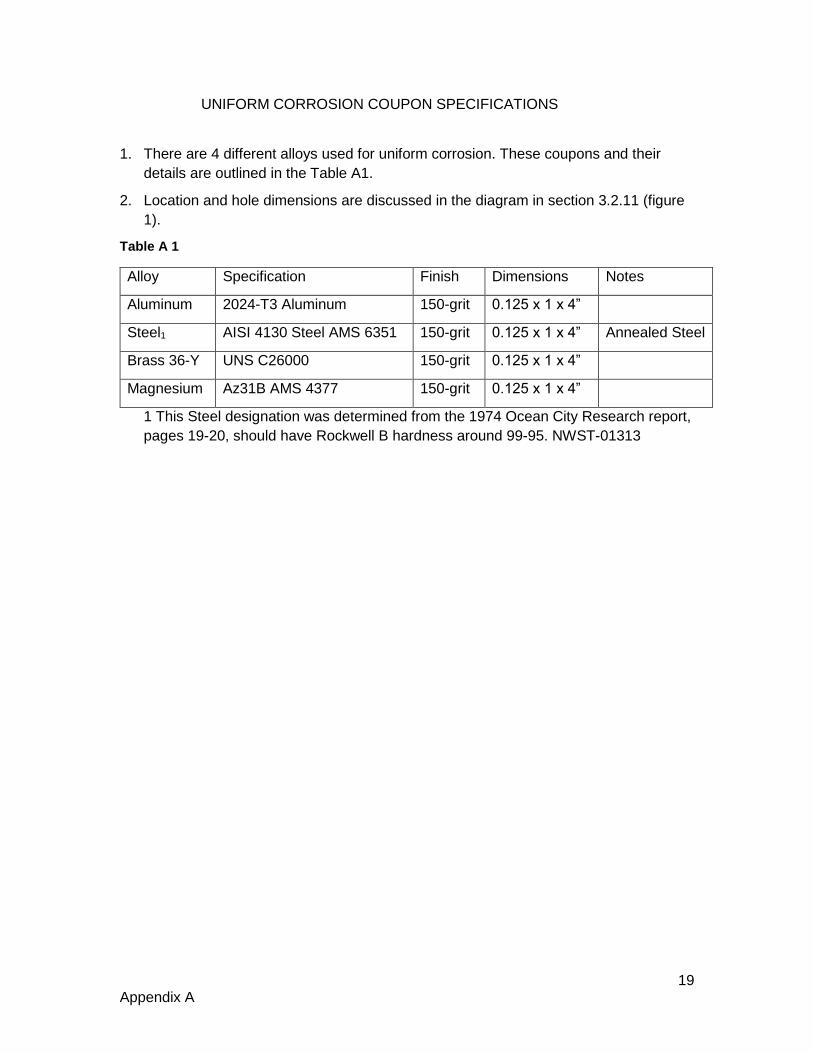
UNIFORM CORROSION COUPON SPECIFICATIONS
1. There are 4 different alloys used for uniform corrosion. These coupons and their
details are outlined in the Table A1.
2. Location and hole dimensions are discussed in the diagram in section 3.2.11 (figure
1).
Table A 1
Alloy Specification Finish Dimensions Notes
Aluminum 2024-T3 Aluminum 150-grit 0.125 x 1 x 4”
Steel1 AISI 4130 Steel AMS 6351 150-grit 0.125 x 1 x 4” Annealed Steel
Brass 36-Y UNS C26000 150-grit 0.125 x 1 x 4”
Magnesium Az31B AMS 4377 150-grit 0.125 x 1 x 4”
1 This Steel designation was determined from the 1974 Ocean City Research report,
pages 19-20, should have Rockwell B hardness around 99-95. NWST-01313
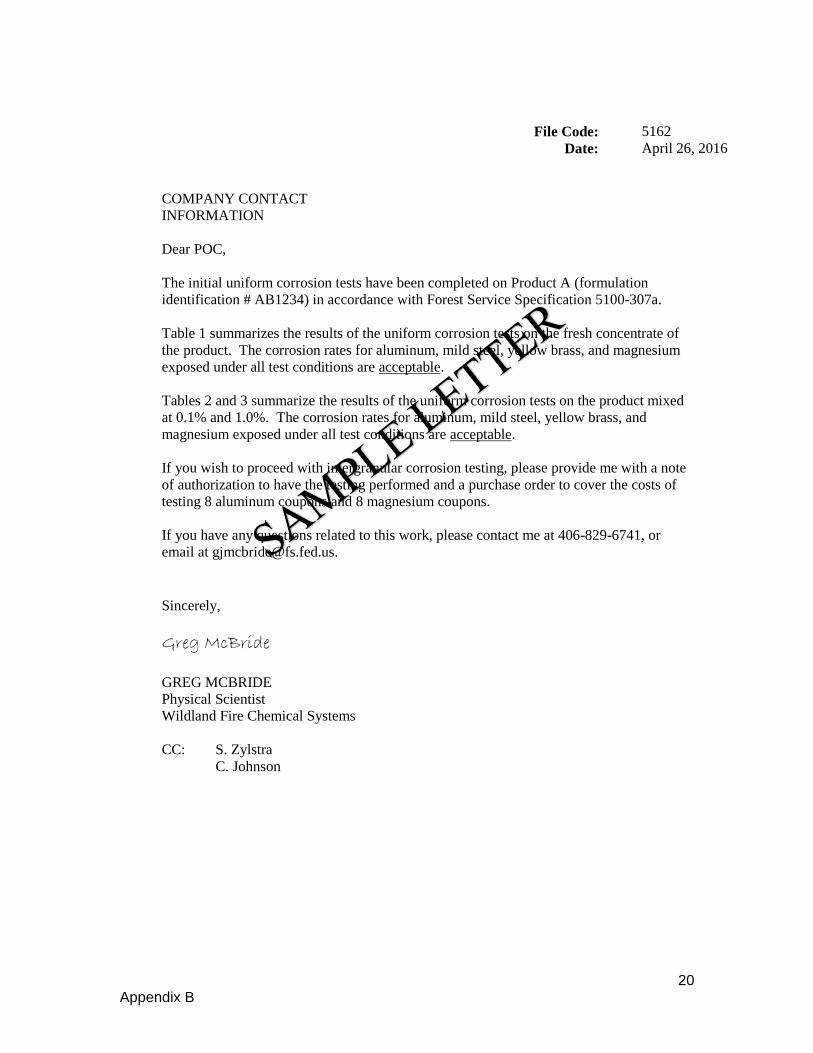
20 Appendix B
File Code: 5162
Date: April 26, 2016
COMPANY CONTACT
INFORMATION
Dear POC,
The initial uniform corrosion tests have been completed on Product A (formulation
identification # AB1234) in accordance with Forest Service Specification 5100-307a.
Table 1 summarizes the results of the uniform corrosion tests on the fresh concentrate of
the product. The corrosion rates for aluminum, mild steel, yellow brass, and magnesium
exposed under all test conditions are acceptable.
Tables 2 and 3 summarize the results of the uniform corrosion tests on the product mixed
at 0.1% and 1.0%. The corrosion rates for aluminum, mild steel, yellow brass, and
magnesium exposed under all test conditions are acceptable.
If you wish to proceed with intergranular corrosion testing, please provide me with a note
of authorization to have the testing performed and a purchase order to cover the costs of
testing 8 aluminum coupons and 8 magnesium coupons.
If you have any questions related to this work, please contact me at 406-829-6741, or
email at [email protected].
Sincerely,
Greg McBride GREG MCBRIDE
Physical Scientist
Wildland Fire Chemical Systems
CC: S. Zylstra
C. Johnson
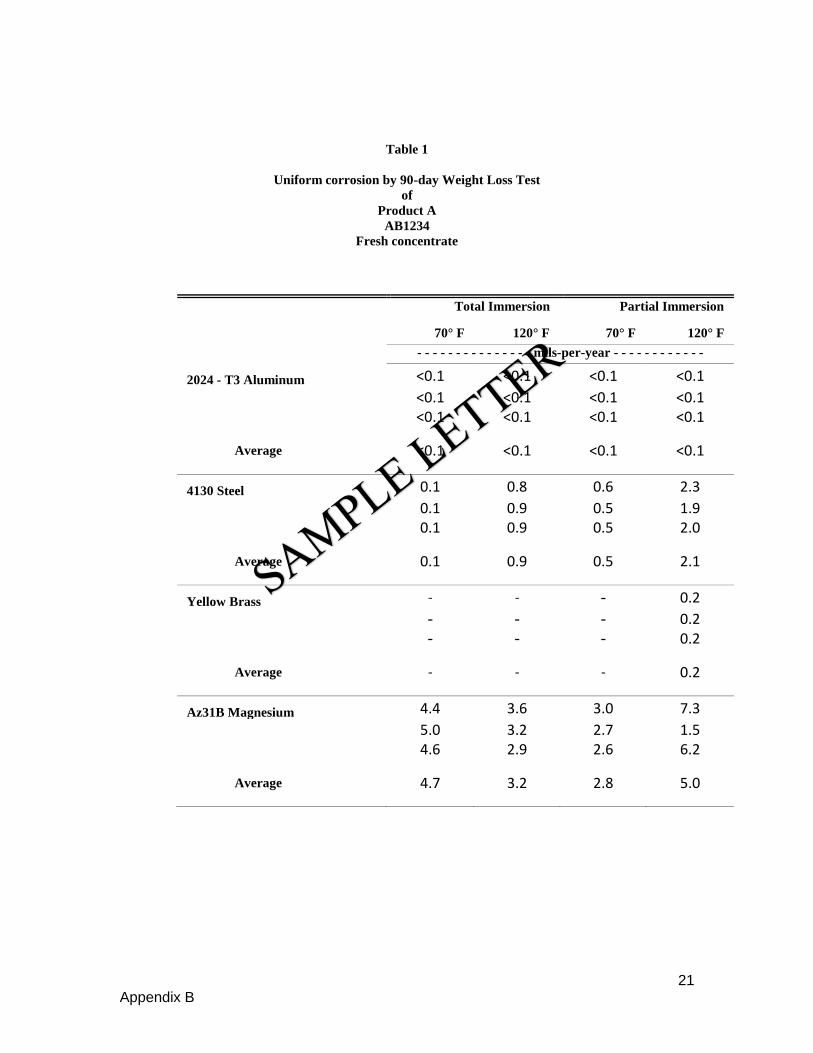
21 Appendix B
Table 1
Uniform corrosion by 90-day Weight Loss Test
of
Product A
AB1234
Fresh concentrate
Total Immersion Partial Immersion
70° F 120° F 70° F 120° F
- - - - - - - - - - - - - - - mils-per-year - - - - - - - - - - - -
2024 - T3 Aluminum <0.1 <0.1 <0.1 <0.1 <0.1 <0.1 <0.1 <0.1 <0.1 <0.1 <0.1 <0.1
Average <0.1 <0.1 <0.1 <0.1
4130 Steel 0.1 0.8 0.6 2.3 0.1 0.9 0.5 1.9 0.1 0.9 0.5 2.0
Average 0.1 0.9 0.5 2.1
Yellow Brass - - - 0.2 - - - 0.2 - - - 0.2
Average - - - 0.2
Az31B Magnesium 4.4 3.6 3.0 7.3 5.0 3.2 2.7 1.5 4.6 2.9 2.6 6.2
Average 4.7 3.2 2.8 5.0
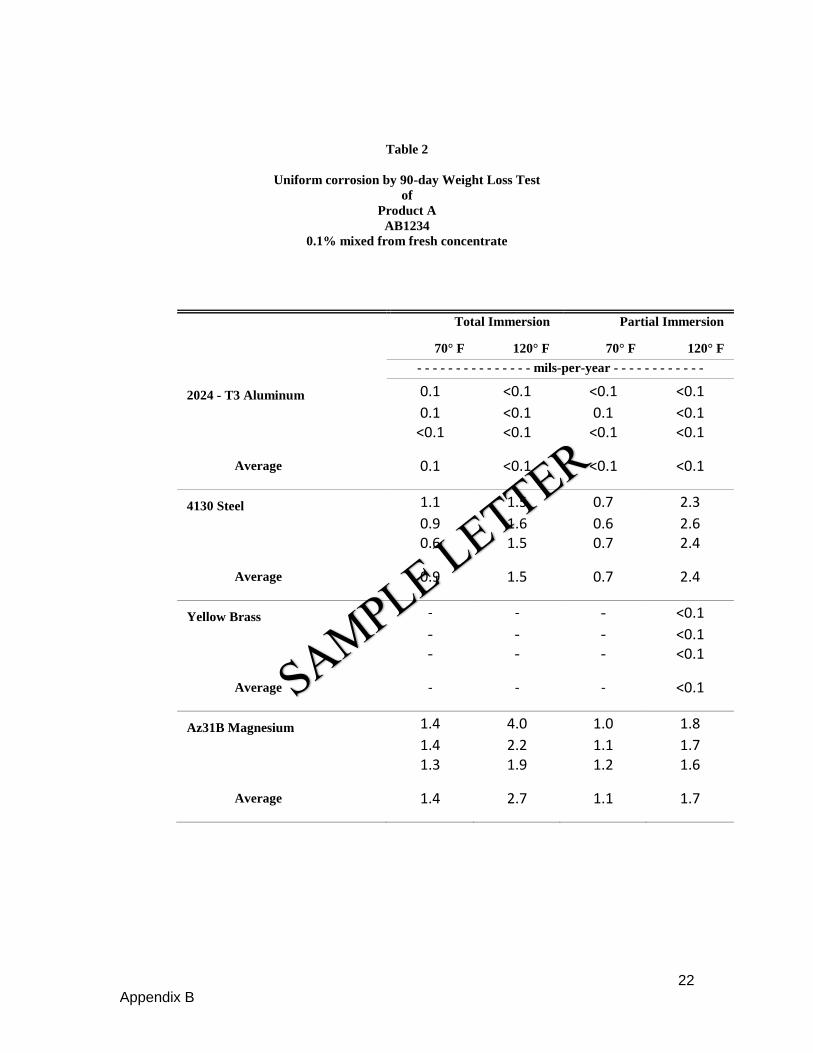
22 Appendix B
Table 2
Uniform corrosion by 90-day Weight Loss Test
of
Product A
AB1234
0.1% mixed from fresh concentrate
Total Immersion Partial Immersion
70° F 120° F 70° F 120° F
- - - - - - - - - - - - - - - mils-per-year - - - - - - - - - - - -
2024 - T3 Aluminum 0.1 <0.1 <0.1 <0.1 0.1 <0.1 0.1 <0.1 <0.1 <0.1 <0.1 <0.1
Average 0.1 <0.1 <0.1 <0.1
4130 Steel 1.1 1.5 0.7 2.3 0.9 1.6 0.6 2.6 0.6 1.5 0.7 2.4
Average 0.9 1.5 0.7 2.4
Yellow Brass - - - <0.1 - - - <0.1 - - - <0.1
Average - - - <0.1
Az31B Magnesium 1.4 4.0 1.0 1.8 1.4 2.2 1.1 1.7 1.3 1.9 1.2 1.6
Average 1.4 2.7 1.1 1.7
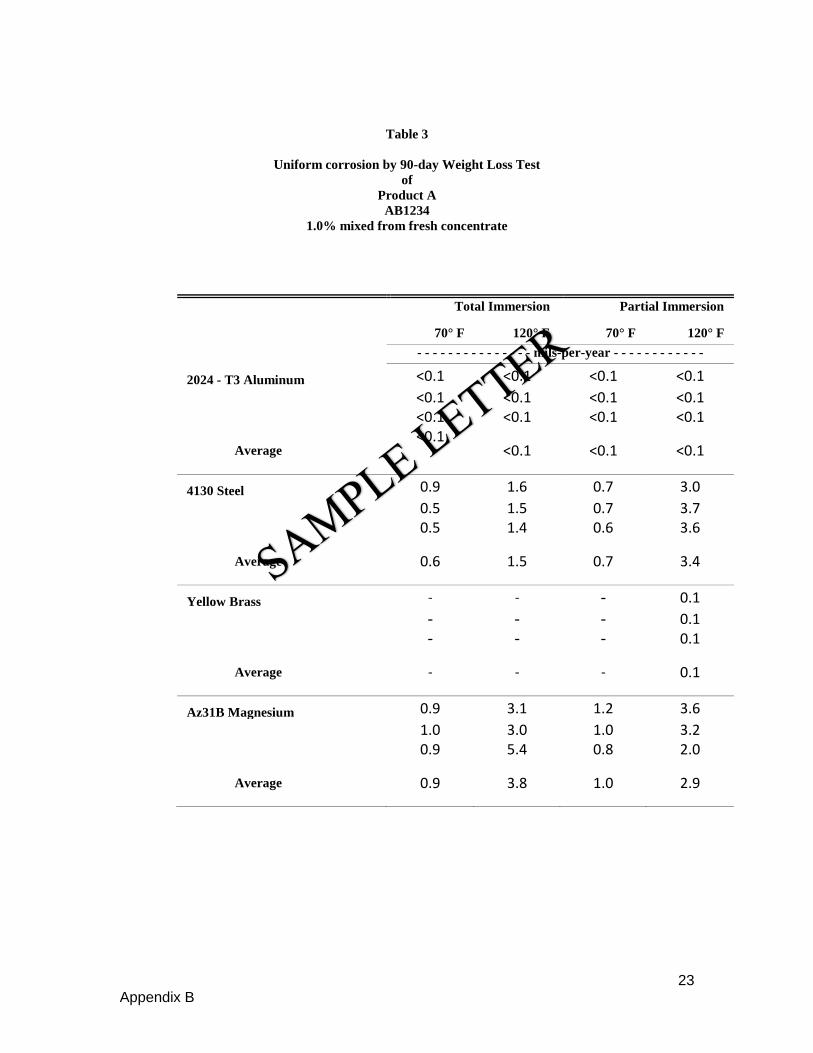
23 Appendix B
Table 3
Uniform corrosion by 90-day Weight Loss Test
of
Product A
AB1234
1.0% mixed from fresh concentrate
Total Immersion Partial Immersion
70° F 120° F 70° F 120° F
- - - - - - - - - - - - - - - mils-per-year - - - - - - - - - - - -
2024 - T3 Aluminum <0.1 <0.1 <0.1 <0.1 <0.1 <0.1 <0.1 <0.1 <0.1 <0.1 <0.1 <0.1
Average <0.1
<0.1 <0.1 <0.1
4130 Steel 0.9 1.6 0.7 3.0 0.5 1.5 0.7 3.7 0.5 1.4 0.6 3.6
Average 0.6 1.5 0.7 3.4
Yellow Brass - - - 0.1 - - - 0.1 - - - 0.1
Average - - - 0.1
Az31B Magnesium 0.9 3.1 1.2 3.6 1.0 3.0 1.0 3.2 0.9 5.4 0.8 2.0
Average 0.9 3.8 1.0 2.9
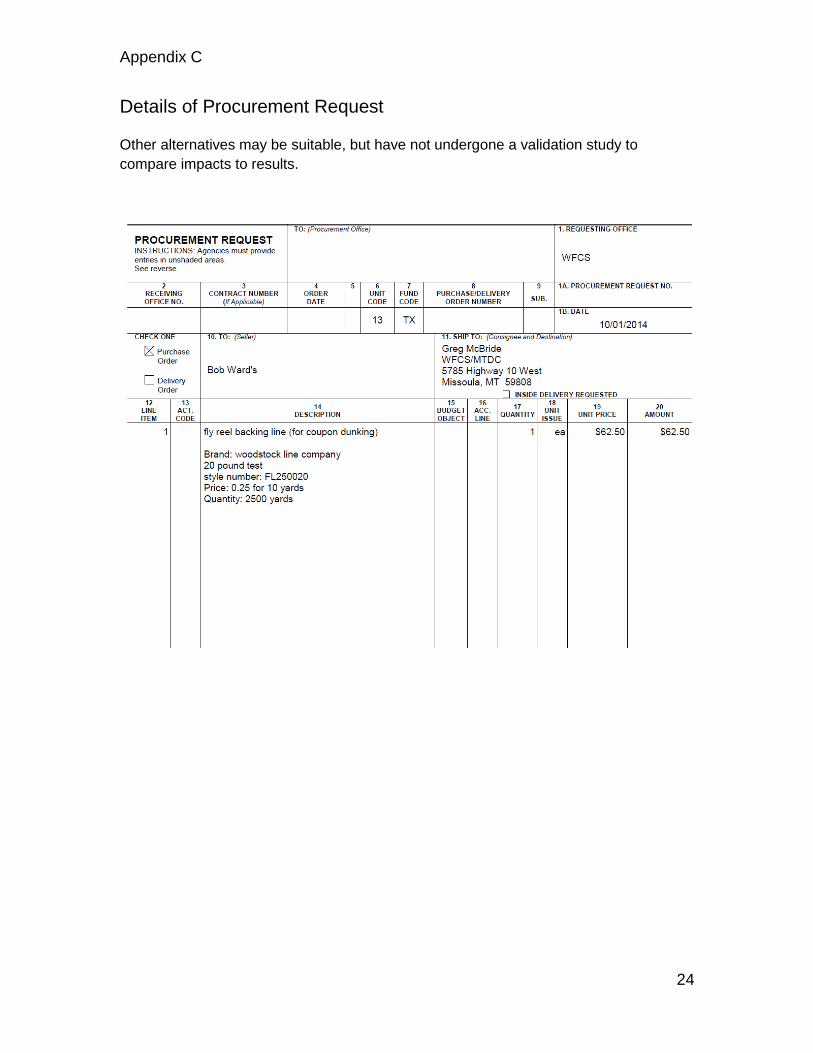
Appendix C
24
Details of Procurement Request
Other alternatives may be suitable, but have not undergone a validation study to
compare impacts to results.