Embed Size (px)
Citation preview
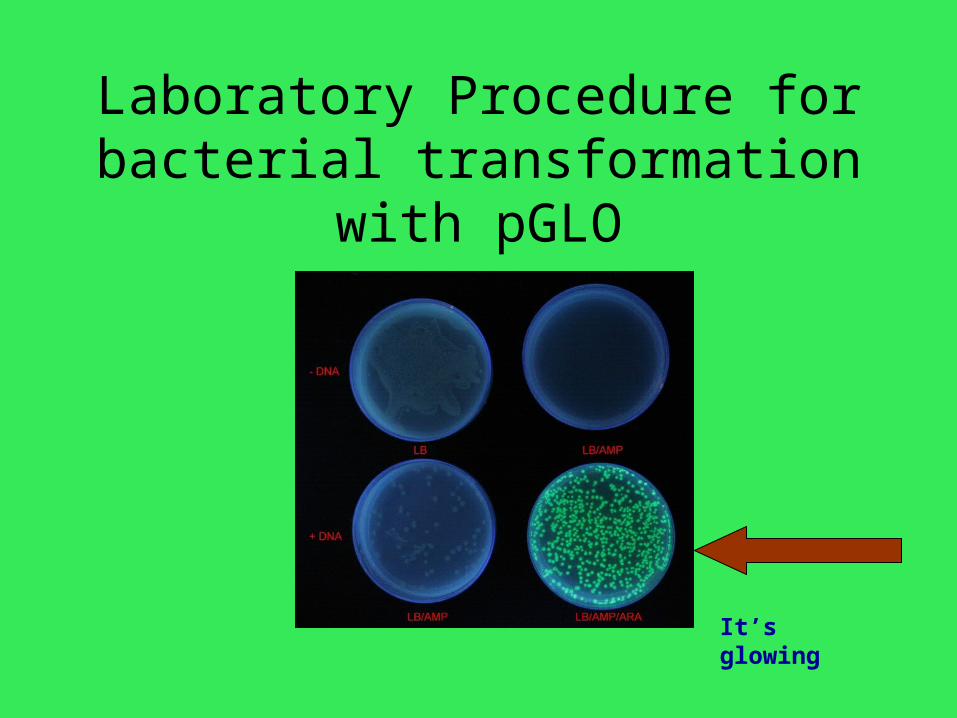
Laboratory Procedure forbacterial transformation with
pGLO
It’s glowing
Background
• GFP (green fluorescent protein) comes from a jellyfish; Aequorea victoria– Causes bioluminescence (glowing)
• Bacteria contain plasmids– Circular pieces of DNA that can be used to
transfer genes from one organism to another


The purpose
• Learn the principles of bacterial transformation
• Transfer genes from a plasmid into the bacteria E.coli
• Describe how to recognize a transformation has occurred
• Explain the usefulness of this technique in other applications

Safety
• E coli is a bacteria– Keep work areas clean– Practice sterile techniques– Wear gloves– Wash you hands before leaving lab

Assignments
• You will be assigned to one of the following groups;– LB –plasmid (control)– LB +plasmid (control)
• You are responsible for ALL procedures and ALL results from both groups
Procedures
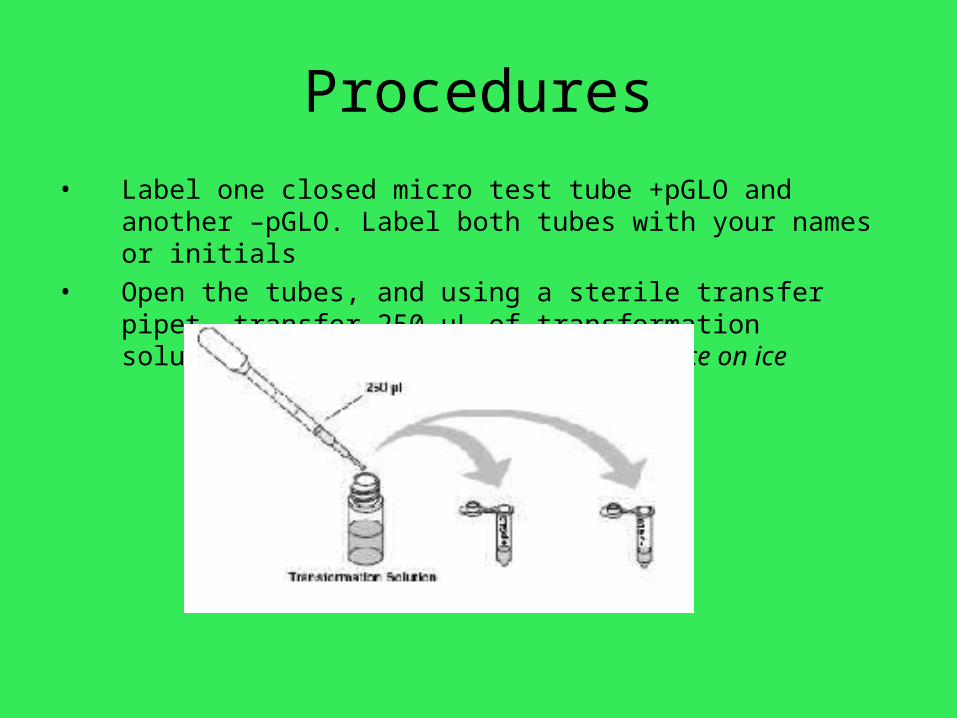
• Label one closed micro test tube +pGLO and another –pGLO. Label both tubes with your names or initials
• Open the tubes, and using a sterile transfer pipet, transfer 250 µL of transformation solution (CaCl2) into each tube. Place on ice

• Use a sterile loop to pick up a single colony of bacteria from your starter plate.
• Pick up the +pGLO tube and immerse the loop into the transformation solution at the bottom of the tube.
• Spin the loop between your index finger and thumb until the entire colony is dispersed in the transformation solution.
• Place the tube back on the ice. • Using a new sterile loop, repeat for the –pGLO tube.
Close the –pGLO tube and place on the ice

• Use a sterile inoculating loop to add on loopful of plasmid DNA to the +plasmid tube
• DO NOT add to the –plasmid tube• Return the tube to the ice• Both tubes must now incubate for 15 minutes

• While the tubes are incubating, label your Petri dishes (on the bottom) as follows:– Group names– Date– 1.+plasmid LB/AMP (this is the exp. Group)– 2. -plasmid LB/AMP (this is the control group)– 3. Either: + plasmid LB OR –plasmid LB
based on your assigned group

Heat shock
• After 15 minutes of incubation – Remove BOTH tubes from the ice and
immediately immerse in a 400 C water bath for 90 seconds
– Gently swirl tubes while in the water bath– Remove after 90 seconds and return to ice for
1 minute

• Use a sterile pipet to add 250 µL of Luria broth (LB) to each tube
• Gently tap the tubes to mix the LB with the suspension
• Place the test tubes in a rack for a 5-15 minute recovery

• Cells from the –plasmid tube will be spread on the –plasmid plates
• Cells from the +plasmid tubes will be spread on the +plasmid plates

Plating
• Clamshell or slightly open the Petri dish• Using a sterile pipet add 100 µL from the correct tube and place
onto the Petri dish• Pour 4-6 glass beads onto the plate surface• Use a back-forth motion (not round and round) to spread the
suspension on the plate surface
• To remove the glass beads, hold over the container and gently tap beads out

Wrap it up
• Wrap the plates up with tape and write your initials on the tape
• Place upside down in the incubator at 370 C for 24 hours.
• This concludes Day 1• Make sure to record any quantitative
observations you made in this part of the lab

Day 2
• Remove your plates from the incubator
• Examine the plates – Count each bacterial colony by marking it with
a permanent marker– Record your results on your lab data sheet
• Place the plates under the UV light to determine if they “glow”– Record the results

Clean-up
• Clean up as instructed
• Make sure to wash your hands before leaving lab

Lab Analysis
• Complete the lab analysis questions for HW
• Your teacher will discuss further lab requirements