Embed Size (px)
Citation preview

Operating Instructions
Laboratory GlasswareWasherG 7883
To prevent accidentsand machine damageread these instructionsbeforeinstallation or use.
UV
M.-Nr. 05 893 860

IMPORTANT SAFETY INSTRUCTIONS . . . . . . . . . . . . . . . . . . . . . . . . . . . . . . . . . 3Description of the machine . . . . . . . . . . . . . . . . . . . . . . . . . . . . . . . . . . . . . . . . . . 7Guide to the lab washer . . . . . . . . . . . . . . . . . . . . . . . . . . . . . . . . . . . . . . . . . . . . 8Opening and closing the door . . . . . . . . . . . . . . . . . . . . . . . . . . . . . . . . . . . . . . 10Water softener . . . . . . . . . . . . . . . . . . . . . . . . . . . . . . . . . . . . . . . . . . . . . . . . . . . 12Setting the water softener . . . . . . . . . . . . . . . . . . . . . . . . . . . . . . . . . . . . . . . . . . . 14Filling the salt reservoir . . . . . . . . . . . . . . . . . . . . . . . . . . . . . . . . . . . . . . . . . . . . . 15Salt indicator . . . . . . . . . . . . . . . . . . . . . . . . . . . . . . . . . . . . . . . . . . . . . . . . . . . . . 16Adding rinse aid . . . . . . . . . . . . . . . . . . . . . . . . . . . . . . . . . . . . . . . . . . . . . . . . . . 17Setting the rinse aid dosage . . . . . . . . . . . . . . . . . . . . . . . . . . . . . . . . . . . . . . . . . 18Adding neutralizing agent . . . . . . . . . . . . . . . . . . . . . . . . . . . . . . . . . . . . . . . . . . 19Adding detergent . . . . . . . . . . . . . . . . . . . . . . . . . . . . . . . . . . . . . . . . . . . . . . . . . 22Loading . . . . . . . . . . . . . . . . . . . . . . . . . . . . . . . . . . . . . . . . . . . . . . . . . . . . . . . . . 24Adjusting the upper basket . . . . . . . . . . . . . . . . . . . . . . . . . . . . . . . . . . . . . . . . . . 28Program guide . . . . . . . . . . . . . . . . . . . . . . . . . . . . . . . . . . . . . . . . . . . . . . . . . . . 29Operation . . . . . . . . . . . . . . . . . . . . . . . . . . . . . . . . . . . . . . . . . . . . . . . . . . . . . . . 31Turning on . . . . . . . . . . . . . . . . . . . . . . . . . . . . . . . . . . . . . . . . . . . . . . . . . . . . . . . 31Starting a program. . . . . . . . . . . . . . . . . . . . . . . . . . . . . . . . . . . . . . . . . . . . . . . . . 31Drying . . . . . . . . . . . . . . . . . . . . . . . . . . . . . . . . . . . . . . . . . . . . . . . . . . . . . . . . . . 32Changing a program . . . . . . . . . . . . . . . . . . . . . . . . . . . . . . . . . . . . . . . . . . . . . . . 32At the end of a program. . . . . . . . . . . . . . . . . . . . . . . . . . . . . . . . . . . . . . . . . . . . . 32Turning off . . . . . . . . . . . . . . . . . . . . . . . . . . . . . . . . . . . . . . . . . . . . . . . . . . . . . . . 32Canceling a program. . . . . . . . . . . . . . . . . . . . . . . . . . . . . . . . . . . . . . . . . . . . . . . 33Programming special functions . . . . . . . . . . . . . . . . . . . . . . . . . . . . . . . . . . . . . 34Machine care . . . . . . . . . . . . . . . . . . . . . . . . . . . . . . . . . . . . . . . . . . . . . . . . . . . . 43Trouble shooting . . . . . . . . . . . . . . . . . . . . . . . . . . . . . . . . . . . . . . . . . . . . . . . . . 46After Sales Service . . . . . . . . . . . . . . . . . . . . . . . . . . . . . . . . . . . . . . . . . . . . . . . 49Caring for the environment . . . . . . . . . . . . . . . . . . . . . . . . . . . . . . . . . . . . . . . . . 52Installation . . . . . . . . . . . . . . . . . . . . . . . . . . . . . . . . . . . . . . . . . . . . . . . . . . . . . . 53Plumbing. . . . . . . . . . . . . . . . . . . . . . . . . . . . . . . . . . . . . . . . . . . . . . . . . . . . . . . . 55Water inlet . . . . . . . . . . . . . . . . . . . . . . . . . . . . . . . . . . . . . . . . . . . . . . . . . . . . . . . 55Electrical connection . . . . . . . . . . . . . . . . . . . . . . . . . . . . . . . . . . . . . . . . . . . . . . 58Technical data . . . . . . . . . . . . . . . . . . . . . . . . . . . . . . . . . . . . . . . . . . . . . . . . . . . 60
Contents
2

This appliance is only intended forspecialized applications. Only usethe appliance for its intendedpurpose. Any other use, conversionor modification is dangerous. Themanufacturer cannot be heldresponsible for damages caused byimproper use of this machine.
This appliance complies with currentsafety requirements. Improper use ofthe appliance can lead to personalinjury and material damage.
Read all instructions before installingor using this appliance.
Keep these operating instructions ina safe place and pass them on toany future user.
Installation and ServiceThe machine should only beinstalled, maintained and repaired
by a Miele authorized servicetechnician. Repairs by unqualifiedpersons could be dangerous.
Do not install the machine in anarea where a danger of explosion
or freezing may be present.
Be certain this appliance isproperly installed and grounded by
an authorized technician. To guaranteethe electrical safety of this appliance,continuity must exist between theappliance and an effective groundingsystem. It is imperative that this basicsafety requirement be met. If there isany doubt, have the electrical system ofthe building checked by a qualifiedtechnician. The manufacturer cannot beheld responsible for damage or injurycaused by the lack of or inadequacy ofan effective grounding system.
A damaged machine is dangerous;turn off the machine at the main
power supply immediately and call theMiele Technical Service Department.
Before servicing, disconnect thepower supply by either removing
the fuse or "tripping" the circuit breaker.
IMPORTANT SAFETY INSTRUCTIONS
3

UsePersonnel operating the machineshould be trained regularly.
Children and untrained personnel mustnot be allowed access to the machineor its controls.
BURN AND SCALD HAZARDThis washer reaches very high
temperatures. Take care whenunloading the unit. Let baskets andinserts cool before touching them. Anywater which may remain in containerswill be very hot and must be emptiedinto the wash cabinet.
BURN HAZARDThe heating elements become
extremely hot during use. Do not touchthe heating elements during or directlyafter the end of a program.
Take care when handling liquidssuch as detergents, wetting agents
or neutralizing agents. These maycontain irritating or corrosiveingredients. Do not use an organicsolvent in this washer, as an explosionmay occur. Wear protective gloves andgoggles. The manufacturer’s safetyconditions must be observed for allchemical agents.
Avoid inhaling powdereddetergent. If swallowed, it can
cause burning in the mouth and throator inhibit breathing.
Be careful when sorting items withsharp pointed ends. If possible,
place the pointed end downwards.
The water in the machine must notbe used as drinking water.
Do not sit or lean on the open door.Injury or machine damage could
result.
Never use a water hose or a highpressure hose to clean the
machine or the areas surrounding it.
Only use cleaning agentsformulated for special processes
and approved by Miele for use with thismachine. Use of unsuitable cleaningagents could adversely affect thecomponents of the machine.
IMPORTANT SAFETY INSTRUCTIONS
4

Pre-treatments with cleaning ordisinfecting agents can create
suds, as can certain rinsing agents. Forpre-treatment and / or cleaning, onlyuse low-sudsing detergents anddisinfecting agents which have beenapproved by Miele. Suds can have anadverse effect on the cleaning process.
When a chemical additive isrecommended on technical
application grounds (for example, witha cleaning agent), this does not implythat the manufacturer of the machinetakes responsibility for the effect of thechemical on the material of the itemsbeing cleaned. Please be aware thatchanges in formulation, storageconditions, etc, which may not bepublished by the chemical producer,can have a negative effect on thecleaning result.
When using cleaning agents andspecialized products, it is essential
that the manufacturer’s instructions arefollowed. Only use the product for theapplication described by themanufacturer to avoid any materialdamage or the occurrence of strongchemical reactions.
The machine is designed only foroperation with water and additive
cleaning agents. Organic solvents mustnot be used in the machine. Anexplosion or machine corrosion couldoccur with the use of organic solvents.
In critical applications where veryexact requirements must be met, it
is highly recommended that all therelevant factors for the process, suchas cleaning agent, quality of water, etc.,are discussed with Miele’s ApplicationSpecialist.
The mobile units and specialinserts should only be used for
their specific applications.
Empty any containers or utensilsbefore arranging them in the
machine.
Do not allow any remains of acidsor solvents, particularly
hydrochloric acid or chloride solutions,to get into the wash cabinet. Thepresence of any solvents should beminimized.
To prevent corrosion damage,ensure that solutions or steam
containing hydrochloric acid do notcome into contact with the steel outercasing of the machine.
IMPORTANT SAFETY INSTRUCTIONS
5

Accessories
Only genuine Miele parts oraccessories should be used with
the Laboratory Glassware washer. Theperformance and safety of non-genuineparts or accessories cannot beguaranteed, and use of such parts oritems may void the machine warranty. Ifyou have specific questions aboutmachine options or accessories, pleasecall Miele.
Disposal of an appliance
When discarding a lab washer,disconnect it from the power
supply, remove the door to the washcabinet and cut off the power cord.
For environmental and safetyreasons, ensure the machine is
completely drained of any residualwater and cleaning agent. (Observesafety regulations and wear safetygoggles and gloves). Make appropriatearrangements for the safe disposal ofthe machine.
SAVE THESEINSTRUCTIONS
IMPORTANT SAFETY INSTRUCTIONS
6

The G 7883 is the "industry standard"undercounter washer designed tohandle the vast majority of glasswarecleaning applications.
Description of the machine
7

a "On/Off" button
b "Door" button
c Display
d "Display" indicator
e "Drying" indicator
f "Start" indicator
g "Start" button
h "Drying" button
i "Display" button(toggles between the elapsedtime, active wash blocks and actualtemperature displays)
j "Add liquid detergent" indicator *
k "Add rinse aid" indicator
l "Add neutralizing agent" indicator
m "Recharge Softener" indicator
n "Check fill/drain" indicator
o Program sequence display
p Program selector
* (only with optional DOS-Module)
Guide to the lab washer
8

a Connection for optional DOS-Module
b Filter combination
c Salt reservoir(water softener)
d Powdered detergent dispenser
e Rinse aid reservoir(with dosage selector)
f Rinse aid level indicators
Guide to the lab washer
9

Electric door lockThe machine is equipped with anelectric door lock. The door can only beopened when the electrical supply tothe machine is turned on, and the"On/Off" button is pressed.
To open the door^ Press the "Door" button in as far as it
will go. At the same time, grip thehandle and open the door.
After the first intake of water, the doorremains locked and cannot be openeduntil the end of the program (exceptduring the "Rinse" and "Drain"programs). The machine can beprogrammed to open during the"Drying" program, if desired.
Do not touch the heating elements.They remain hot for some time afterthe end of the program and cancause burns.
To close the door^ Lift the door upwards and push it
until it clicks shut. Do not press therelease catch while shutting the door.
To cancel a programIf a program has to be canceled in anemergency, e.g. the program has beeninterrupted due to a fault, the door willhave to be opened manually.
^ Turn the program selector to the"Stop" f position. The program iscanceled after approximately2 seconds.
Opening and closing the door
10

To open the door with theemergency releaseThe emergency release should only beused when the door cannot be openednormally, e.g. in the event of a powerfailure.
^ Turn the program selector to "Stop"f.
^ Press the "On/Off" button to turn themachine off.
^ Take precaution against pressurewave release (rapid opening of thedoor). ^ Pull the emergency release cable
(located at the bottom of the machinebehind the service panel) downwardsto open the door.
The door latch will reset after theemergency cable has been activated.
Opening and closing the door
11

Before using the machine for the firsttime, the water softener should beprogrammed. The water needs to besoftened to avoid calcium depositbuildup on the items being cleaned andin the machine itself.
To ensure a steady supply of soft water:
1. Make sure the water softener isprogrammed correctly.The softener contains settings from1 - 60 gr/gal or 20 - 1080 ppm.
2. The salt reservoir must be filled withreactivation salt.(If the water hardness level is below4 gr/gal [70 ppm]), the reservoirdoes not need to be filled.)
The machine is set at the factory for awater hardness level of 19 gr/gal(340 ppm).
Your local water authority will adviseyou on the water hardness in yourarea. If the water supply is harder orsofter than the factory setting(including below 4 gr/gal or70 ppm), the setting will need to bechanged. See "Setting the watersoftener".
Water softener
12

Settings
Settings1 - 30
gr/gal1 - 30
ppmCaCO3
Settings31 - 60
gr/gal31 - 60
ppmCaCO3
123456789
101112131415161718192021222324252627282930
123456789
101112131415161718
19 *)2021222324252627282930
2040507090110130140160180200220230250270290310320340360380400410430450470490500520540
313233343536373839404142434445464748495051525354555657585960
313233343536373839404142434445464748495051525354555657585960
56058059061063065067068070072074076077079081083085086088090092094095097099010101030104010601080
*) factory setting
Water softener
13

Setting the water softener^ Turn off the machine with the "On/Off"
button.
^ Turn the program selector to the"Stop" f position.
^ Press and hold the "Start" 6 and"Display" ß buttons at the sametime. Turn the machine on with the"On/Off" button.The current program status "P..." willappear in the display.The "Fill/Drain" indicator willilluminate.
The first time the water softener is setthe "Recharge Softener" light willilluminate. This light will also illuminateafter restoring the factory settings, see"Programming special functions".
^ Press the "Drying" 0 button once."E01" (programming level 1) willappear in the display.
^ Turn the program selector one switchposition clockwise (1 o’clockposition).The number "19" will appear in thedisplay (this indicates the factorywater hardness setting in gr/gal,equivalent to 340 ppm).
^ Press the "Display" ß button asmany times as necessary, or hold it inuntil the required value (hardnesslevel in gr/gal) appears in the display.Once the number "60" has beenreached, the counter will begin againat "0".
^ Press the "Start" 6 button. "SP" willappear in the display.
^ Press the "Start" 6 button again.
The setting will now be stored inmemory. The display will go out.
For future servicing, it is useful to makea note of your water hardness level.
^ Enter your water hardness level here:
gr/gal
or
ppm
^ If your water is already soft and youwould like to deactivate the watersoftener, set the hardness setting to"0".
Water softener
14
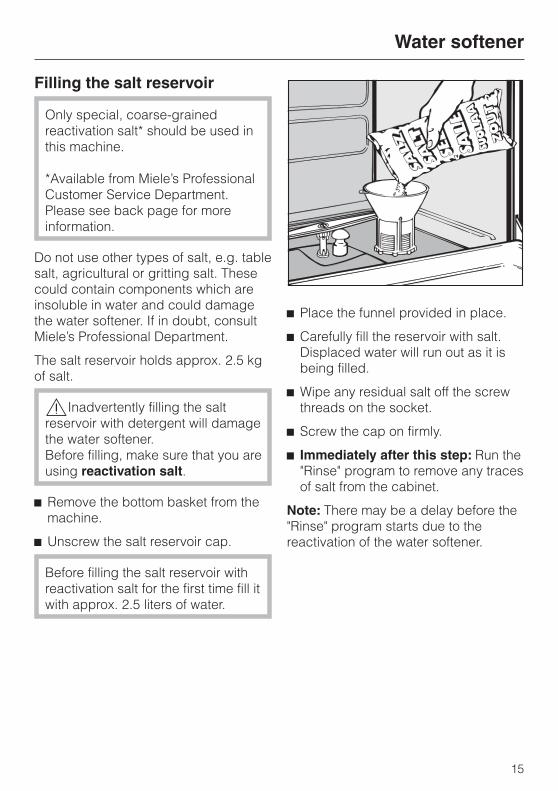
Filling the salt reservoir
Only special, coarse-grainedreactivation salt* should be used inthis machine.
*Available from Miele’s ProfessionalCustomer Service Department.Please see back page for moreinformation.
Do not use other types of salt, e.g. tablesalt, agricultural or gritting salt. Thesecould contain components which areinsoluble in water and could damagethe water softener. If in doubt, consultMiele’s Professional Department.
The salt reservoir holds approx. 2.5 kgof salt.
,Inadvertently filling the saltreservoir with detergent will damagethe water softener.Before filling, make sure that you areusing reactivation salt.
^ Remove the bottom basket from themachine.
^ Unscrew the salt reservoir cap.
Before filling the salt reservoir withreactivation salt for the first time fill itwith approx. 2.5 liters of water.
^ Place the funnel provided in place.
^ Carefully fill the reservoir with salt.Displaced water will run out as it isbeing filled.
^ Wipe any residual salt off the screwthreads on the socket.
^ Screw the cap on firmly.
^ Immediately after this step: Run the"Rinse" program to remove any tracesof salt from the cabinet.
Note: There may be a delay before the"Rinse" program starts due to thereactivation of the water softener.
Water softener
15

Salt indicator
When the salt reservoir is empty the"Recharge Softener" indicator, b,illuminates to remind you to fill thereservoir.
Reactivation takes place automaticallyduring a program. The "Recharging"indicator, a, illuminates while this isoccurring.
Water softener
16

Rinse aid is not used in laboratoryglassware cleaning applications.
If rinse aid is required, the rinse aiddosage must be activated withassistance from Miele TechnicalService.
Rinse aid (e.g. Mielclear) is filled in thestorage container and dispensedautomatically. The storage reservoirholds about 180 ml.
,Inadvertently filling the storagereservoir with detergent will damagethe reservoir. Be sure only to userinse aid in the reservoir.
^ If the "Add Rinse aid" indicatorilluminates, the rinse aid storagecontainer needs to be refilled.The storage container has a levelindicator on the interior of the door.
^ Open the door.
^ Unscrew the cap.
^ Pour rinse aid into the storagecontainer until the level indicator isdark (see arrow in the illustration).Use a funnel if necessary.
^ Replace and tighten the cap. Cleanup any spilled rinse aid to preventoversudsing in the next wash.
^ Wait until the "Rinse" indicator on thecontrol panel illuminates beforeadding any more rinse aid.
Adding rinse aid
17

Setting the rinse aid dosage
The dosage adjuster (see arrow in theillustration) in the opening has settingsadjustable from 1 to 6 (1 - 6 ml).It is preset to "3" (3 ml).
^ Use a flat headed screwdriver to turnthe dial to the correct setting.
If spots remain on the items, use ahigher setting.
If smearing or cloudy streaks appear,use a lower setting.
Adding rinse aid
18

Neutralizer (pH-level: acidic)neutralizes detergent residue on thesurface of glassware and other itemsbeing cleaned. It is automaticallydispensed in the rinse following thewash step of a program.
The relevant program (see "ProgramGuide" - DOS 3) cannot be started untilthe dispensing system has beenprimed. (This function can only becanceled by a Miele Service Engineer.)
^ Place the container of neutralizer(red) next to the machine.
When the "Add neutralizer" indicatorilluminates:
^ Insert the siphon tube into thecontainer (observe the color code).
Setting the dosage and priming thedispensing system
^ See "Programming special functions".
ImportantThe container should not be allowedto empty completely.
Adding neutralizing agent
19

Setting the neutralizer dosageand priming the neutralizerdispensing systemFirst you need to access theprogramming mode:
To access the programming mode
^ Turn the program selector to "Stop"f.
^ Turn the machine off.
^ Press and hold the "Display" ß and"Start" 6 button. At the same timeturn the lab washer on by the mainswitch I-0.The display shows the currentprogram status "P...".The Fill/Drain indicator lights.
^ Press the "Drying" 0 button twice."E02" (programming level 2) appearsin the display.
The dosage is factory set to 0.10, youmay or may not be required to adjust it.
Set the dosage concentrationaccording to the detergentmanufacturer’s recommendations.
Example:The manufacturer recommends aneutralizer concentration of 0.3 %. Thevalue to be set is 0.30.
^ First access the programming level to"E02".
^ Turn the program selector clockwise to"Intensive".The display shows the set dosageconcentration in % from 0.05 % -0.5 %.
^ Press and hold the "Display" ßbutton until the desired valueappears.The dosage time / dosageconcentration is saved.
^ Please note the dosage setting:
To store the settings
^ Press the "Start" 6 button. "SP"appears in the display.
^ Press the "Start" 6 button again. Thechange has been saved.
NOTE: This change will set theneutralizer dispensing amount for allwash programs that use neutralizer.
Adding neutralizing agent
20

Priming the neutralizing system
^ Access the programming modelevel 2 (see "Adding neutralizer - Toaccess the programming mode").
^ Turn the program selector to"Universal"."do3" appears in the display.
^ Press the "Display" ß button.The dosage system will be primedautomatically. The priming lasts210 seconds and is complete when"0" appears in the display.
^ Put the selector dial back to the12 o’clock position and turn themachine off with I-0.
After the dispensing system is primed,then always:
^ Turn the unit back on.
^ Start the "Rinse" program, so thatafter priming any agents in the washcabinet are diluted before beingdrained away.
Adding neutralizing agent
21

Only use cleaning agents formulatedfor this machine. Do not usedetergents formulated fordomestic dishwashers.
Liquid detergentIt is recommended that mildly alkalineliquid detergents be dispensed via theoptional DOS module.
Note
As a separate option, this machine canalso be fitted with a dispenser pump forautomatic liquid detergent dispensing(DOS-Module G 60). This is connectedexternally. Contact Miele for details.
The optional DOS Module G 60 issupplied with its own installation andconnection instructions.
See "Programming special functions"for information on priming thedispensing system and setting thedosage.
Maintenance of the dispensingsystemTo ensure trouble-free operation, thefollowing regular maintenance shouldbe carried out by a Miele approvedservice technician.
Replace the dispensing hoses in theDOS modules every 12-18 months.
Take care when handling liquidagents and additives. These maycontain irritant or corrosiveingredients.Follow the manufacturer’s safetyinstructions and relevant Health andSafety procedures carefully.Wear protective gloves and goggles.
Adding detergent
22

Powdered detergentIf you are using powdered detergent, itmust be placed in the detergentcontainer prior to every program,except for "Rinse" and "Drain".
^ Press the opening catch on thecontainer forward. The flap will springopen. The flap is always open at theend of a program.
^ Add detergent to the compartment.
Dosage: approx. 3g/l, equivalent to30 g per cleaning sequence.
The manufacturer’s instructionsshould be followed if they differ fromthe above.
^ Close the dispenser lid.
Adding detergent
23

The following instructions relate only tobasic preparation and loading ofglassware. There are additionalrequirements for particular applications.
Loading the machine
Remove debris
^ Empty all glassware before loadinginto the machine.
Ensure that no acid or solventresidues, especially hydrochloricacid or chlorides, get into the washcabinet.
^ Remove all agar residue from petridishes.
^ Remove blood clots and residue fromtest tubes, etc.
^ Remove all stoppers, corks, labels,sealing wax residue, etc.
Note
^ Load items so that water will cover allsurfaces. This ensures that they willbe properly cleaned.
^ Do not place items to be cleanedinside of other pieces, where theymay be concealed.
^ Hollow vessels, such as beakers,graduated cylinders, flasks, etc.,should be inverted and placed in thecorrect inserts to ensure propercleaning. A cover net can be used toreduce the risk of glass breakageduring the wash process.
^ Petri dishes and similar items shouldbe placed in the correct insert withthe soiled side facing center.
^ Pipettes should be placed with thenarrow end pointing down.
^ Deep-based items should be placedat an angle to allow water to run offeasily.
^ Tall, narrow pieces should be placedin the center of the basket for bestwater coverage.
^ The spray arms must not be blockedby items that are too tall or hangthrough baskets. Check clearance bymanually rotating the spray arms.
Loading
24

Important:
Make sure that the spring adapter forthe water connection engages correctlywhen a basket or injector unit isinserted into the machine. It must be4 - 5 mm higher than the waterconnection inlet in the machine. If this isnot the case, adjust the adapter byperforming the following steps:
^ Loosen the locking ring.
^ Push up the adapter 4 - 5 mm andtighten the locking ring.
Select baskets and inserts which areappropriate for the application.
Please contact Miele’s applicationspecialist for advice:1-800-991-9380
Loading
25

Loading examples
O 188 Upper basket
For various inserts.
E 350Injector wagon
For narrow necked glassware,15 injectors, 160 mm high;18 injectors, 220 mm high.
O 187Injector wagon
(Upper basket) For direct injection ofnarrow necked glassware,34 injectors,160 mm high.
Loading
26

U 874 Lower basket
For various inserts.
E 109
Stainless steel half insert toaccommodate 21 beakers up to 250 ml,Erlenmeyer flasks, round flasks etc.
E 106
Stainless steel half insert with 28 springhooks in 2 different heights for variousglassware, e.g. narrow necked flasks,graduated cylinders, medicine bottles,etc.
Loading
27

Adjusting the upper basketThe upper basket can be adjustedabove and below the middle positionby 2 cm.
Example:Upper basket O 188/1 and lowerbasket U 874
(measurements do not include inserts)
Upperbasketposition
Upper basketheight
Lower basketheight
cm inches cm inches
Upper 15.5 6 1/8" 28.5 11 1/4"
Middle 17.5 6 7/8" 26.5 10 7/16"
Lower 19.5 7 11/16" 24.5 9 5/8"
To adjust the upper basket:
^ Pull out the upper basket, lift from therunners and remove.
^ Unscrew the roller bearings on bothsides of the basket with a wrenchand reposition as required.
Loading
28

Program Program cycle
Pre-Wash
Mainwash 1
1)
Mainwash 2
1)
Rinse Rinse Finalrinse 11) 2)
Finalrinse 21) 2)
Drying(Optionalfunction)
Custom X DOS 180°C/3’
DOS 31’
X XDI
75/1’X DI
X
INORGANICA XDOS 350°C/1’
DOS 175°C/3’
DOS 31’
XDI
XDI
X DI70°C/1
min
X
ORGANICA DOS 165°C/3’
DOS 185°C/3’
DOS 31 min
X XDI
X DI80°C/1’
X
STANDARD DOS 175°C/3’
DOS 31’
XDI
X DI75°C/1’
X
UNIVERSAL X DOS 180°C/3’
DOS 31’
X XDI
X DI75°C/1’
X
INTENSIVE X DOS 185°C/3’
DOS 31’
XDI
XDI
X DI85°C/1’
X
PLASTIC X DOS 155°C/3’
DOS 31’
X XDI
X DI55°C/1’
X
DRAIN
RINSE X
X = Sections included in a program (with temperature/temperature holding time)1) Temperature or temperature holding time changeable (see "Programming special functions").2) DOS 2 = Rinse aid dosage possible (needs to be programmed by the Miele Technical Service).
DOS 3 = Neutralizer dosageDI = distilled water
Program guide
29

Program Program cycle
Pre-Wash ThermalDisinfectionand/or main
wash 1)
Rinse Rinse Final rinse
1) 2)
Drying(Optionalfunction)
varioTD X DOS 1X
55°C/3’
DOS 3X1’
X X93°C/10’
DI
(X)
SPECIAL93°C-10’
DOS 1X
93°C/10’
DOS 3X1’
X X75°C/3’
DI
(X)
X = Sections included in a program (with temperature/temperature holding time)
1) Temperature or temperature holding time changeable (see "Programming special functions").2) DOS 2 = Rinse aid dosage possible (needs to be programmed by the Miele Technical Service).
DOS 3 = Neutralizer dosageDI = distilled water
Program guide
30

Turning on^ Close the door.
^ Press the "On/Off" button.
When the program selector is at the"Stop" f position, a point lights up inthe display.
Starting a program^ Turn the program selector clockwise
or counterclockwise to the requiredprogram.
The temperature of the first rinse ofthe program selected (except for"Pre-Wash" and "Drain") is shown inthe display. The "Start" indicator willflash.
^ Select the "Drying" 0 function ifrequired (see "Drying").
^ Press the "Start" 6 button. The actualtemperature will appear in thedisplay.
The "Start" indicator will remain lit.
Once the program has started, all otherprograms are blocked. If the programselector is turned to another program,the values shown in the display will goout. The values can be seen again if theprogram selector is turned back to theposition of the program currently inoperation.
^ During a program, the "Display" ßbutton can be used to togglebetween the elapsed time, the activewash block and the actualtemperature.
Wash block codes
1 = Pre-Rinse 12 = Pre-Rinse 23 = Main Wash 14 = Main Wash 25 = Chemical Disinfection6 = Interim rinse 17 = Interim rinse 28 = Interim rinse 39 = Interim rinse 4
10 = Final rinse 111 = Final rinse 212 = Drying TA13 = Drying
Operation
31
Drying"Drying" 0 may be selected as anadditional feature once a program hasbeen selected (except in the "Rinse"and "Drain" programs).
Drying is phased over 10 minutes. Thetotal running time of the programlengthens accordingly.
Changing a programA wrongly selected program may bechanged as described below.
If the "Start" 6 button has not yetbeen pressed
^ Turn the program selector to therequired program.
^ Select the "Drying" 0 function ifrequired (see "Drying").
^ Press the "Start" 6 button.
If "Start" 6 has already beenpressed, see "Canceling a program".
At the end of a program^ The "Complete" indicator in the
program sequence displayilluminates, and the "Start" 6indicator will go out.
^ A "0" will appear in the middle of thedisplay. All indicators will come onand go out in sequence.
^ Simultaneously, a buzzer will soundfor approximately 30 seconds(standard setting). The buzzerfunction can be changed (see"Programming special functions").
Use the "Display" ß button to view thetotal running time or temperature of aprogram.
Turning off^ Press and release the "On/Off" button.
Note:The machine is fitted with an electricdoor lock. The door can only beopened if the "On/Off" button is pressed(see "Opening and closing the door").
Operation
32

Canceling a program^ Turn the program selector to the
"Stop" f position (the program willstop after approximately 2 seconds).
^ Open the door.
,Caution: Water and items in themachine may be hot. Danger ofburning or scalding.
^ Arrange the load securely. Wearprotective gloves where necessary,and observe appropriate health andsafety regulations relating toinfectious diseases.
^ Replenish powder detergent, ifnecessary.
^ Close the door.
^ Select and start the "Drain" program.
^ When finished with "Drain", select andrestart the desired program.
Operation
33

For future servicing, pleasedocument any alterations to thestandard factory settings.
General note
Program selector positions that havenot been allocated to a function areindicated in the middle part of thedisplay by a bar (-).
The programming level is called up viathe "Stop" f position.
Accessing the programminglevelBefore performing any of the specialfunctions that follow, the programmingmode of the labwasher controller needsto be accessed.
^ Turn the program selector to "Stop"f.
^ Turn the machine off.
^ Press and hold the "Display" ß and"Start" 6 buttons. At the same time,turn the machine on with the "On/Off"button.
^ The display will show the currentprogram status "P...".The "Fill/Drain" indicator willilluminate.
^ Press 0 twice. "E02" (programminglevel 2) appears in the display.
Programming special functions
34

1. Setting the dosageconcentration and priming thedosage system
Before performing any of thefollowing special functions, theprogramming mode of the controllerneeds to be accessed. See"Accessing the programming level".
1.1 DOS 1 (Liquid detergent)by DOS unit G 60 or C 60 (Optionalaccessory)
1.1.1 Setting the dosageconcentration
^ Access the programming level E02 ofthe controller (see "Accessing theprogramming level").
Set the dosage concentrationaccording to the detergentmanufacturer’s recommendations.
Example:The manufacturer recommends adetergent concentration of 0.5%.The value to be set is 0.50.
^ Turn the program selector to"Inorganica". The display showseither the dosage time in seconds(for powdered detergent) or the setdosage concentration in % (for liquiddetergent).
"10" = Dosage time of 10 seconds forpowdered detergent, or
"0.10" - "0.80" = 0.1 % - 0.8 %concentration for liquid detergentdosage.
^ Press and hold "Display" ß until thedesired value appears.
^ Please note the dosage setting here:
^ Press the "Display" ß button.The dosage system will be primedautomatically. The priming is done ifthe display shows "0".
Programming special functions
35

1.1.2 Priming the detergent system
a) If the dosage concentration is set:
^ Turn the program selector to"Custom". "do1" appears in thedisplay.
^ Press the "Display" ß button.The dosage system will be primedautomatically. The priming is done ifthe display shows "0".
To store the settings:
^ Press the "Start" 6 button. "SP"appears in the display.
^ Press the "Start" 6 button again. Thechange has been saved.
b) If the system is primed only (e.g.because the dosage system wascompletely empty):
^ Select programming level "E02"(see "Accessing the programminglevel").
^ Turn the program selector to"Custom"."do1" appears in the display.
^ Press the "Display" ß button.The dosage system will be primedautomatically. The priming iscomplete if the display shows "0".
^ Turn the machine off with the "On/Off"button.
When the dispensing system isprimed, always:
^ Run the "Rinse" program afterwardsto remove any detergent orneutralizer residues in the washchamber.
Programming special functions
36

Before performing any of thefollowing special functions, theprogramming mode of the controllerneeds to be accessed.
1.2 DOS 3 (Neutralizer)
1.2.1 Setting the dosage concentration
The dosage is factory set at 0.10, youmay or may not be required to adjust it.
Set the dosage concentrationaccording to the detergentmanufacturer’s recommendations.
Example:The manufacturer recommends aneutralizer concentration of 0.3 %.The value to be set is 0.30.
^ First access the programming levelE02.
^ Turn the program selector clockwise to"Intensive". The display shows the setdosage concentrationin % from 0.05 % - 0.5 %.
^ Press and hold "Display" ß until thedesired value appears.
^ Please note the dosage setting:
To store the settings:
^ Press the "Start" 6 button. "SP"appears in the display.
^ Press the "Start" 6 button again. Thesetting has been saved.
NOTE: This change will set theneutralizer dispensing amount for allwash programs that use neutralizer.
1.2.2 Priming the neutralizer system
a) If the dosage concentration is set:
^ Turn the program selector to"Universal". "do3" appears in thedisplay.
^ Press "Display" ß.The dosage system will be primedautomatically. The priming is completewhen "0" appears in the display.
To store the settings:
^ Press the "Start" 6 button. "SP"appears in the display.
^ Press the "Start" 6 button again. Thesetting has been saved.
b) If the system is primed only (e.g.because the dosage system wascompletely emptied):
^ Select programming level 2(see "Accessing the programminglevel").
^ Turn the program selector to "Universal"."do3" appears in the display.
^ Press "Display" ß.The dosage system will be primedautomatically. The priming iscomplete when "0" appears in thedisplay.
^ Turn the machine off with the "On/Off"button.
When the dispensing system isprimed, always:
^ Run the "Rinse" program afterwards toremove any detergent or neutralizerresidues in the wash chamber.
Programming special functions
37

2. Changes in wash temperatureand / or temperature holdingtime at "Main wash" (exceptSPECIAL 93°C-10’ and "Finalrinse")
Any changes to the washtemperature and/or the temperatureholding time should be recorded inthe appropriate section of the"Program guide".
The factory setting of the cleaning andfinal rinse temperature with temperatureholding time can be seen in the"Program guide".The cleaning and final rinsetemperature can be changed from 30°C - 93 °C and 30 °C - 70 °C (programs"Standard" and "Universal"),respectively. The temperature holdingtime can be changed from 1 to 15minutes.
^ Turn the program selector to "STOP"f.
^ Turn the machine off.
^ Press and hold "Display" ß and"Start" 6. At the same time, turn thelab washer on with the "On/Off"button.The displays shows the currentprogram status "P...".The "Fill/Drain" indicator willilluminate.
Programming special functions
38

"Main wash" temperature
^ Main wash 1:Press and hold the "Drying" 0button until "E09" appears in thedisplay.Main wash 2:Press and hold the "Drying" 0button until "E12" appears in thedisplay.
^ Turn the program selector to theprogram to be changed. The currentvalue appears in the display after °C.
^ Press and hold "Display" ß until thedesired value appears in the display.
To store settings
^ Press the "Start" 6 button. "SP"appears in the display.
^ Press the "Start" 6 button again. Thechange has been saved.
"Main wash" temperature holdingtime
^ Turn the program selector to "STOP"f .
^ Main wash 1:Press and hold "Drying" 0 until "E10"appears in the display.Main wash 2:Press and hold "Drying" 0 until "E13"appears in the display.
^ Turn the program selector back to theprogram to be changed. The currentvalue appears in the display aftermin.
^ Press and hold "Display" ß until thedesired value appears in the display.
To store settings
^ Press the "Start" 6 button. "SP"appears in the display.
^ Press the "Start" 6 button again. Thechange has been saved.
Programming special functions
39

"Final rinse" temperature
^ Turn the program selector to "STOP"f .
^ Final rinse 1:Press and hold "Drying" 0 until "E22"appears in the display.Final rinse 2:Press and hold "Drying" 0 until "E25"appears in the display.
^ Turn the program selector back to theprogram to be changed. The currentvalue appears in the display after °C.
^ Press and hold "Display" ß until thedesired value appears in the display.
To store settings
^ Press the "Start" 6 button. "SP"appears in the display.
^ Press the "Start" 6 button again. Thechange has been saved.
"Final rinse" temperature holdingtime
^ Turn the program selector to "Stop"f.
^ Final rinse 1:Press and hold "Drying" 0 until "E23"appears in the display.Final rinse 2:Press and hold "Drying" 0 until "E26"appears in the display.
^ Turn the program selector back to theprogram to be changed. The currentvalue appears in the display aftermin.
^ Press and hold "Display" ß until thedesired value appears in the display.
To store settings
^ Press the "Start" 6 button. "SP"appears in the display.
^ Press the "Start" 6 button again. Thechange has been saved.
Programming special functions
40

3. Setting the buzzerA buzzer can be set to signal thefollowing:
– End of program = continuous buzzer
– Error = rhythmic buzz
– Timer to allow sampling of the lastfinal rinse water= intervals of 3 short buzzes and2 seconds break
^ Turn the program selector to "STOP"f.
^ Turn the machine off.
^ Press and hold "Display" ß and"Start" 6. At the same time, turn thelab washer on with the "On/Off"button.The displays shows the currentprogram status "P...".The "Fill/Drain" indicator lights.
^ Press "Drying" 0 4 times. "E04"appears in the display.
^ Turn the program selector to"Inorganica". A number between "20"and "27" appears in the display."20" = Buzzer is turned off"21" = End of program
(factory setting)"22" = Error"23" = Error and End of program"24" = Test sample extraction"25" = End of program and
Test sample extraction"26" = Error and Test sample
extraction"27" = All functions
(End of program, Error,Test sample extraction).
^ Press and hold "Display" ß until thedesired value appears in the display.
^ Press the "Start" 6 button. "SP"appears in the display.
^ Press the "Start" 6 button again. Thechange has been saved.
^ Please note the changed setting:
To turn the buzzer off:
^ Turn the program selector to "STOP"f or press the "Display" ß button.
Programming special functions
41

4. Restoring the factorysettings^ Turn the program selector to "STOP"
f .
^ Turn the machine off.
^ Press and hold "Display" ß and"Start" 6. At the same time, turn thelab washer on with the "On/Off"button.The displays shows the currentprogram status "P...".The "Fill/Drain" indicator lights.
^ Press and hold "Drying" 0 until "E33"appears in the display.
^ Turn the program selector to anyposition (except "STOP").The display shows either "00" or "PP"."00" = factory setting; electronic wasnot reprogrammed."PP" = electronic was reprogrammed.
^ If "PP" is displayed press "Display" ßto change from "PP" to "00".
^ Press the "Start" 6 button. "SP"appears in the display.
^ Press the "Start" 6 button again.All factory settings are now restored.
If the hardness level setting in thewater softener had been changed,this will reset to the factory setting of340 ppm (19 gr/gal). This will needto be reset to suit the hardness levelin your area.
Changes in programs "Custom","Inorganica" and "Organica" cannotbe reset.
Programming special functions
42

Filter combination
,The machine must not be usedwithout all the filters in place. Thefilters protect the circulation pumpfrom damage caused by foreignobjects.
The filter combination in the base ofthe wash cabinet should beinspected regularly and cleaned ifnecessary.Caution:Watch out for sharp objects whichcould cause injury.
Cleaning the coarse filter
^ Press the two tabs together. Removeand clean the coarse filter.
^ Put the clean filter back in positionand press until it clicks in place.
Cleaning the fine, flat and micro-finefilters
^ Remove the coarse filter.
^ Remove the fine filter (if fitted) from be-tween the flat and the micro-fine filters.
^ To unscrew the micro-fine filter, graspthe two tabs and turn counter-clockwise twice.
^ Remove both filters together.
^ Clean the filters.
^ Replace the filter combination inreverse order. The flat filter must lieflat in the base of the wash cabinet.
Machine care
43

Cleaning the non-return valveand drain pumpIf water has not been pumped away atthe end of a program, the drain pumpor the non-return valve may be blocked.
^ Turn off the washer.
^ Remove the filter combination fromthe wash cabinet.
^ Tilt the locking clamp to the side.
^ Pull out the non-return valve andrinse under running water.
The drain pump is located beneath thenon-return valve (see arrow).
^ Before returning the non-return valve,check that the drain pump is notblocked. Spin the propeller severaltimes in both directions to check forobstructions.
^ Carefully refit the non-return valveand secure it with the locking clamp.Refit and lock the filter in place.
For safety reasons the load shouldbe washed again.
Machine care
44

Cleaning the filters in the waterinletFilters are incorporated in the screwconnection of the water inlet hose toprotect the water inlet valve. If thesefilters become dirty, they need to becleaned, otherwise insufficient waterflows into the wash cabinet.
,The plastic housing of the waterconnection contains an electricalcomponent. It must not besubmerged in water.
To clean the filters
^ Disconnect the machine from themain electrical supply.
^ Turn off the water supply.
^ Unscrew the water inlet hose.
^ Clean the large area filter, 1, and finefilter, 2, replace with new filters, ifnecessary.
^ Replace filters and the seal. Makesure they are sitting correctly.
^ Reconnect the hose to the water inlet,making sure that it goes back onstraight.
^ Open the water tap carefully.If there is a leak, tighten theconnections.
Cleaning the control panel^ The control panel should only be
cleaned with a damp cloth or asuitable cleaner for use on plasticmaterials.
,Do not use abrasive cleaners,glass cleaners or all-purposecleaners! They will damage thecontrol panel.
Cleaning the front of themachine^ Use a cleaner suitable for the type of
material the machine front is fittedwith.
,Do not use detergentscontaining ammonia or thinners.
Machine care
45

With the aid of the following guide, minor problems can be fixed without a servicecall.
The Miele control unit includes a wide range of fault codes to indicate specificerrors. These fault codes are indicated on the display by a flashing F. . . (Rangingfrom F1 up to F30.) If one of these codes appears, please contact the MieleTechnical Service Department at 1-800-991-9380 for assistance.
What if … Possible fault Fixthe machine does notstart?
The door is notproperly closed.
Close the door firmly.
The fuse is defectiveor the breaker hastripped.
Make sure the circuit breakerhas not tripped.
"Fdo" appears in thedisplay.
Follow the instructions to primethe dispensing system(see "Programming specialfunctions DOS 1 - 1.1.2Priming the detergent system"and "DOS 3 - 1.2.2 Priming theneutralizer system")
a few minutes afterstarting a program, the"Fill/Drain" indicatorflashes and the faultcode "F..E" appears inthe display?
– The water valvesare closed.
– The filters in thewater inlet hoseare dirty.
– Turn the program selector to"Stop" f (the fault codegoes out).
– Press the "On/Off" button toturn the machine off.
– Open the water valve orclean the filters (see "Labwasher care").
– Turn the machine on againand reselect the program.
Trouble shooting
46
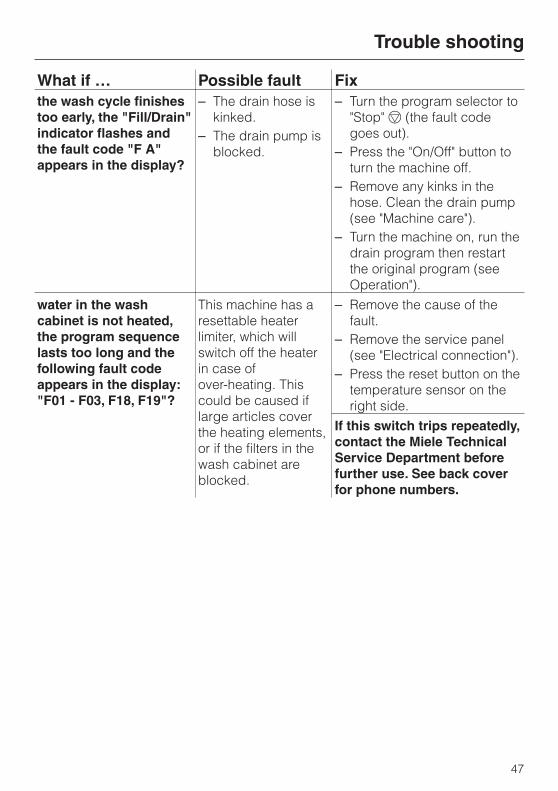
What if … Possible fault Fixthe wash cycle finishestoo early, the "Fill/Drain"indicator flashes andthe fault code "F A"appears in the display?
– The drain hose iskinked.
– The drain pump isblocked.
– Turn the program selector to"Stop" f (the fault codegoes out).
– Press the "On/Off" button toturn the machine off.
– Remove any kinks in thehose. Clean the drain pump(see "Machine care").
– Turn the machine on, run thedrain program then restartthe original program (seeOperation").
water in the washcabinet is not heated,the program sequencelasts too long and thefollowing fault codeappears in the display:"F01 - F03, F18, F19"?
This machine has aresettable heaterlimiter, which willswitch off the heaterin case ofover-heating. Thiscould be caused iflarge articles coverthe heating elements,or if the filters in thewash cabinet areblocked.
– Remove the cause of thefault.
– Remove the service panel(see "Electrical connection").
– Press the reset button on thetemperature sensor on theright side.
If this switch trips repeatedly,contact the Miele TechnicalService Department beforefurther use. See back coverfor phone numbers.
Trouble shooting
47

What if … Possible fault FixI need to open the doorduring a power failure?
– see "Opening andclosing the door."
the fault was caused bya possible misfunction.
– Turn the programselector to "Stop" f(the fault code goesout).
– Press the "On/Off"button to turn themachine off.
– Turn the machine onagain and reselect theprogram.
If there are furtherdifficulties, or if the faultcode "F..." appears inthe display, pleasecontact the MieleService Department. Seeback cover for phonenumbers.
Trouble shooting
48

In the event of a fault which you cannotcorrect yourself please contact theMiele Technical Service Department
Please quote the model of yourmachine. This information can be foundon the machine’s front panel.
After Sales Service
49

50

INSTALLATION INSTRUCTIONS

Disposal of the packingmaterialThe protective packing materials areenvironmentally safe and can berecycled.
Ensure that any plastic wrappings,bags, etc. are disposed of safely andkept out of the reach of children.Danger of suffocation!
Disposal of the applianceAppliances contain materials which canbe recycled. Please contact your localauthorities about recycling in your area.
Ensure that the machine presents nodanger to children while being storedfor disposal. See "Important SafetyInstructions".
Caring for the environment
52

Please refer to the installationdiagram supplied with the machine.
,Furniture and fittings installednear the machine must be of acommercial standard (able towithstand the effects of steam).
Installation options
– Free-standing
– Undercounter
The machine can be installed under acontinuous counter or sink drain. Therecess must be at least 60 cm wide,60 cm deep and 82 cm high.
Positioning and securing themachineTo ensure stability, the machine must bealigned and screwed to the counter.
^ Open the door.
^ Secure the machine to the front edgeof the worktop using the screws tothe left and right of the front trim.
^ When not mounted undercounter,floor mounting brackets must beused.
Do not use silicone sealant to sealthe gaps between the machine andany neighboring units. This willhinder ventilation to the circulationpump.
Steam Deflector (protects thecountertop)
Depending on the requirements for anundercounter installation, a steamdeflector can be ordered from the MieleTechnical Service Department.
The underside of the countertop isprotected from steam damage by astainless steel plate.
Installation
53

Removing the lid (if necessary)If necessary, remove the lid from themachine to make installation possible.
^ Open the door.
^ Remove the fixing screws on the leftand right sides using a phillipsheadscrewdriver.
^ Pull the machine lid approx. 5 mmforwards, lift it upwards and remove.
Important for machines with steamcondenser (depending on model)
^ To prevent countertop damage bysteam, the supplied self adhesiveprotective foil (25 x 58 cm) must beplaced underneath the countertopnear the steam condenser.
Installation
54

Water inlet^ The machine must be connected to
the water supply in accordance withlocal and national regulations.
^ The washer is constructed so it maybe connected to a supply without anextra non-return valve, unlessrequired by code.
^ An acceptable water pressure (flowrate) is 10 - 147 psi. However, therecommended pressure is25 - 60 psi.If the water pressure is below 30 psi,the fill time will take longer.If the "Fill/Drain" fault code "F..E" isdisplayed, contact the TechnicalService Department.
^ The machine is supplied to beconnected to a standard cold (codedblue) or hot (coded red) water supplyto a maximum temperature of 158 °F(70 °C.)Connect the water intake hoses to thecold and hot water faucets.If no hot water supply is available, thehot water intake hose with the redmarking needs to be connected tocold water by a y-adapter.
For a DI water connection (H2Opure), see the next page.
^ Water valves with 3/4" male hosethread are to be provided on site.They should be easily accessible sothe water supply can be turned off ifnecessary.
^ The inlet hoses are 5 ½ feet (1.7 m)long, terminating in a 3/4" female hosethread. The water inlet filters in thethreads must not be removed.
^ Large surface area filters areenclosed in the kit supplied with themachine.Install these filters between the watervalve and the water inlet hose (seeillustration in "Machine Care/Cleaningthe filters in the water inlet"). Thelarge surface area filter for DI water ismade from stainless steel and can berecognized by its matte surface.
,Do not cut the inlet hose ordamaged it in any way.
^ See the supplied installation diagram.
Plumbing
55

DI-Water connection
The machine comes with a standardconnection for a pressure-resistantsystem. The recommended waterpressure (flow rate) is 25 - 60 psihowever, water pressure of 10 - 147 psiis acceptable.
^ The DI pressure-tested hose (marked"H2O pure") with a 3/4" hose threadmust be connected to the on-sitewater valve for DI purified water.
If the DI water connection is notused, the electronics needs to bereprogrammed by a Miele technician.The water intake hose remains at therear side of the machine.
Plumbing
56

Drainage^ The drainage system is fitted with a
non-return valve which prevents dirtywater from flowing back into themachine via the drain hose.
^ The machine should preferably beconnected to a separate drainagesystem onsite.If separate drainage is not availablecontact your Miele applicationspecialist for advice.The onsite drain connection pointshould be located between 1 ft.(0.3 m) and 3 ft. (1 m) above thelower edge of the machine.If it is lower than 1 ft. (0.3 m), lay thehose in a curve at a height of at least1 ft. (0.3 m).The drainage system must be able totake a minimum drainage flow of16 l/min.
^ The drain hose is approx. 5 ft. (1.5 m)long, is flexible and has an internaldiameter of 7/8 in. (22 mm). It mustnot be shortened. Hose clamps aresupplied for securing it in position.
^ A longer drain hose (up to 12 ft. [4 m]long) is available to order from theMiele Technical Service Department.
^ The drainage system must notexceed 12 ft. (4 meters).
^ See the supplied installation diagram.
Plumbing
57

,All electrical work must beperformed by a qualified person inaccordance with local and nationalsafety regulations.
The machine comes equipped forconnection to a 208 V, 60 Hz, 3 phasepower supply. It is equipped with a 6 ft.long, 12/4 AWG power cord, without aplug. A plug, rated for the requiredpower which will fit the receptacle, is tobe supplied by the electrician doing theinstallation. It should be connected tothe main power supply.
Voltage: 208 V, 3 phase
Frequency: 60 Hz
Rated Load: 6 kW
Circuit breaker: 3 x 20 A
Black : connect to L1 (hot)
Red: connect to L2 (hot)
White: connect to L3 (hot)
Green: connect to GND (ground)
It can be converted to use a singlephase power supply in accordancewith the conversion and wiring diagram.The cord must be changed from a12/4 AWG to a 10/3 AWG. ContactMiele Technical Service for moreinformation
Voltage: 208 V, 1 phase
Frequency: 60 Hz
Rated Load: 6 kW
Circuit breaker: 2 x 30 A
^ Connection should be made via asuitable isolator, with an "On/Off"button easily accessible for servicingwork.
^ A damaged power cord must only bereplaced with a genuine Miele cordby a Miele service technician.
WARNINGTHIS APPLIANCE MUST BEGROUNDED
Electrical connection
58

Grounding connection^ The ground lead must be connected
to the screw connection point(marked with the ground symbol 8) atthe back of the machine.
The machine must only be operatedwith the voltage, frequency andfusing shown on the data platelocated on the rear of the machine,and on the plinth (behind the servicepanel).
The conversion diagram and thewiring diagram is secured to the innerside of the service panel.
Removing the service panel
Disconnect the machine from themain electrical supply.
^ Remove the fixing screws, a, fromthe service panel.
^ Hold the service panel at both sidesand pull upwards.
^ Unscrew the facing, b. Remove theplastic protective cap.
^ See the supplied installation diagram.
Re-assembling the servicepanel^ Refit the plastic protective cap,
facing and service panel in thereverse order to which they wereremoved.
Electrical connection
59

English Metric
Height: 33 7/16" (32 5/16") 85 (82) cm
Width: 23 5/8 " 60 cm
Depth: 23 5/8 " 60 cm
Voltage: 208 V
Power cord approx. 5’ 11" 1.8 m
Water pressure (flow rate):Recommended 25 - 60 psi 1.72 - 4.13 barAcceptable 10 - 147 psi .7 - 10 bar
Cold or Hot waterconnection up to max. 158°F 70 °C
DI-Water connectionRecommended 25 - 60 psi 1.72 - 4.13 barAcceptable 10 - 147 psi .7 - 10 bar
Delivery head: min. 12" 0.3 mmax. 39 3/8" 1 m
Drainage length: max. 13’ 1" 4 m
Water intake hose approx. 5’ 7" 1.7 m
Drain hose: approx. 4’ 7" 1.4 m
Noise level in dB (A):Sound pressure level LpA At machine 1 m (39 3/8") awayFree stand unit: 64.8 52.9Built under counter: 62 50.1
Technical data
60

61

62

63
All rights reserved / 1104
This paper has been bleached without the use of chlorine.
M.-Nr. 05 893 860 / 01M.-Nr. 05 893 860 / 01