Embed Size (px)
Citation preview

Laboratory
12 Applications Network Application Performance Analysis
Objective
The objective of this lab is to analyze the performance of an Internet application protocol and its relation to the underlying network protocols. In addition, this lab reviews some of the topics covered in previous labs.
Overview
Network applications are part network protocol (in the sense that they exchange messages with their peers on other machines) and part traditional application program (in the sense that they interact with the users). OPNET’s Application Characterization Environment (ACE) provides powerful visualization and diagnosis capabilities that aid in network application analysis. ACE provides specific information about the root cause of application problems. ACE can also be used to predict application behavior under different scenarios. ACE takes as input a real trace file captured using any protocol analyzer, or using OPNET’s capture agents (not included in the Academic Edition). In this lab you will analyze the performance of an FTP application. You will analyze the probable bottlenecks for the application scenario under investigation. You will also study the sensitivity of the application to different network conditions such as bandwidth and packet loss. The trace was captured on a real network, which is shown in the figure below, and already imported into ACE. The FTP application runs on that network; the client connects to the server over a 768 Kbps Frame Relay circuit with 36 ms of latency. The FTP application downloads a 1 MB file in 37 seconds. Normally, the download time for a file this size should be about 11 seconds.

2
Procedure
Open the Application Characterization Environment
1. Start OPNET IT Guru Academic Edition ⇒ Choose Open from the File menu.
2. Select Application Characterization from the pull-down menu.
3. Select FTP_with_loss from the list ⇒ Click OK.
Visualize the Application
After opening the file, ACE shows the Data Exchange Chart (DEC), depicting the flow of application traffic between tiers. The DEC you see on your screen may or may not show the FTP Server tier as the top tier. If it does not, drag the tier label from the bottom to the top, so your screen matches the one shown in the following diagram.

3
1. Select Network Chart Only from the drop-down menu in the middle of the dialog box.
2. Differentiate the messages flowing in different directions by selecting View ⇒ Split Groups.
To get a better understanding of this traffic, you will zoom in on the transaction. To understand how the Application Chart and Network Chart views differ, you will view both simultaneously.
3. Select Application and Network Charts from the drop-down menu in the middle of the dialog box.
4. To disable the split groups view, select View ⇒ Split Groups.
5. Select View ⇒ Set Visible Time Range ⇒ Set Start Time to 25.2 and End Time to 25.5 ⇒ Click OK.
6. The Application Message Chart shows a single message flowing from the FTP Server to the Client. To show the size, rest the cursor on the message to show the tooltip. Client Payload is shown as 8192.
The Data Exchange Chart can display the following: - The Application Chart, which shows the flow of application traffic between tiers. - The Network Chart, which shows the flow of network traffic between tiers, including the effects of network protocols on application traffic. Network protocols split packets into segments, add headers, and often include mechanisms to ensure reliable data transfer. These network protocol effects can influence application behavior.

4
The Network Chart shows that this application message causes many packets to flow over the network. These packets are a mix of large (blue and green) packets from the FTP Server to the Client and small (red) packets from the Client to the FTP Server. As the red color indicates, these packets contain 0 bytes of application data. They are the acknowledgments sent by TCP.
Analyze with AppDoctor
AppDoctor’s Summary of Delays provides insight into the root cause of the overall application delay.
1. From the AppDoctor menu, select Summary of Delays ⇒ Check the Show Values checkbox.
Notice that the largest contributing factor to the application response time is protocol/congestion. Only about 30 percent of the file download time is caused by the limited bandwidth of the Frame Relay circuit (768 Kbps). Notice also that application delay (processing inside the node) by both the Client and FTP Server is a very minor contributing factor to the application response time.

5
2. Close the Summary of Delays dialog box.
The Diagnosis function of AppDoctor should give further insight into the cause of the protocol/congestion delay.
3. From the AppDoctor menu, select Diagnosis.
6
The diagnosis shows four bottlenecks: transmission delay, protocol/congestion delay, retransmissions, and out of sequence packets. One factor that contributes to protocol/congestion delay is retransmissions. So it is no surprise that here, in the more detailed diagnosis, you see retransmissions listed as a bottleneck. The out-of-sequence packets, also listed as a bottleneck, are a side effect of the retransmissions. Correcting that issue will probably also cure the out of sequence packets problem.
4. Close the Diagnosis Window.
AppDoctor also provides summary statistics for the application transaction.
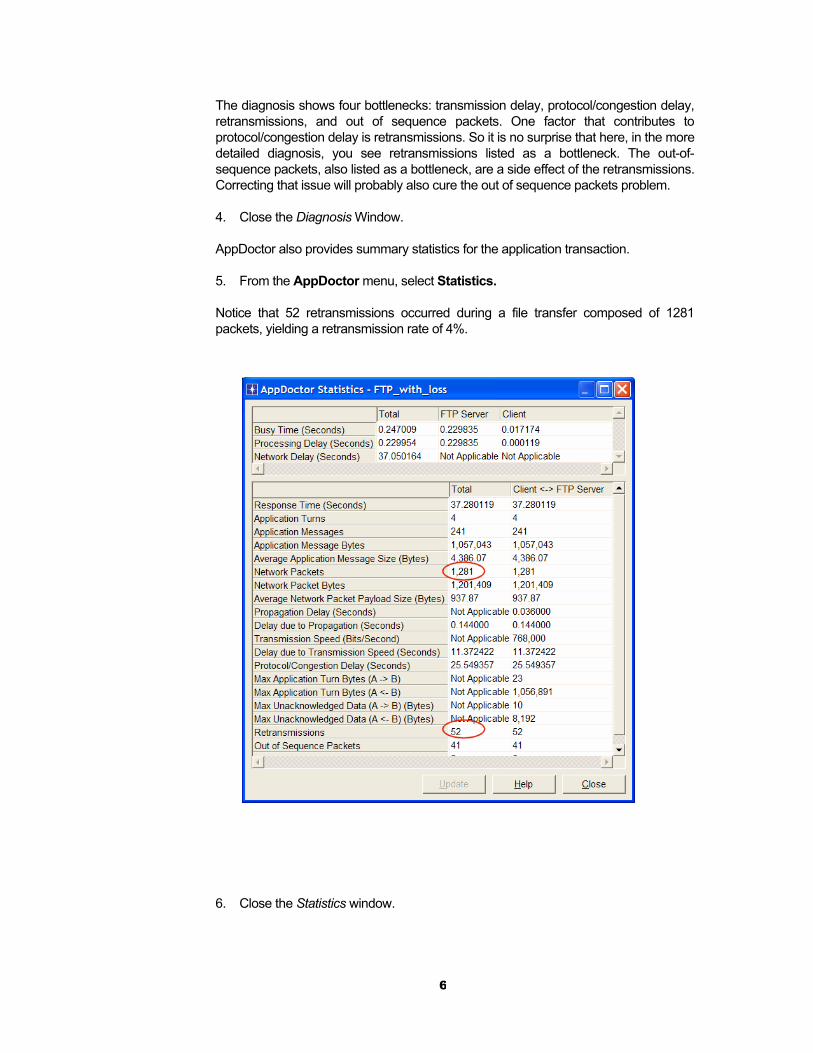
5. From the AppDoctor menu, select Statistics.
Notice that 52 retransmissions occurred during a file transfer composed of 1281 packets, yielding a retransmission rate of 4%.
6. Close the Statistics window.

7
Examine the Statistics
To view the actual network throughput, use the Graph Statistics feature.
1. From the Data Exchange Chart, select Graph Statistics from the Graph menu
(or click the button: ).
2. Select the two Network Throughput statistics that measure Kbits/sec.
3. Click Show.
8
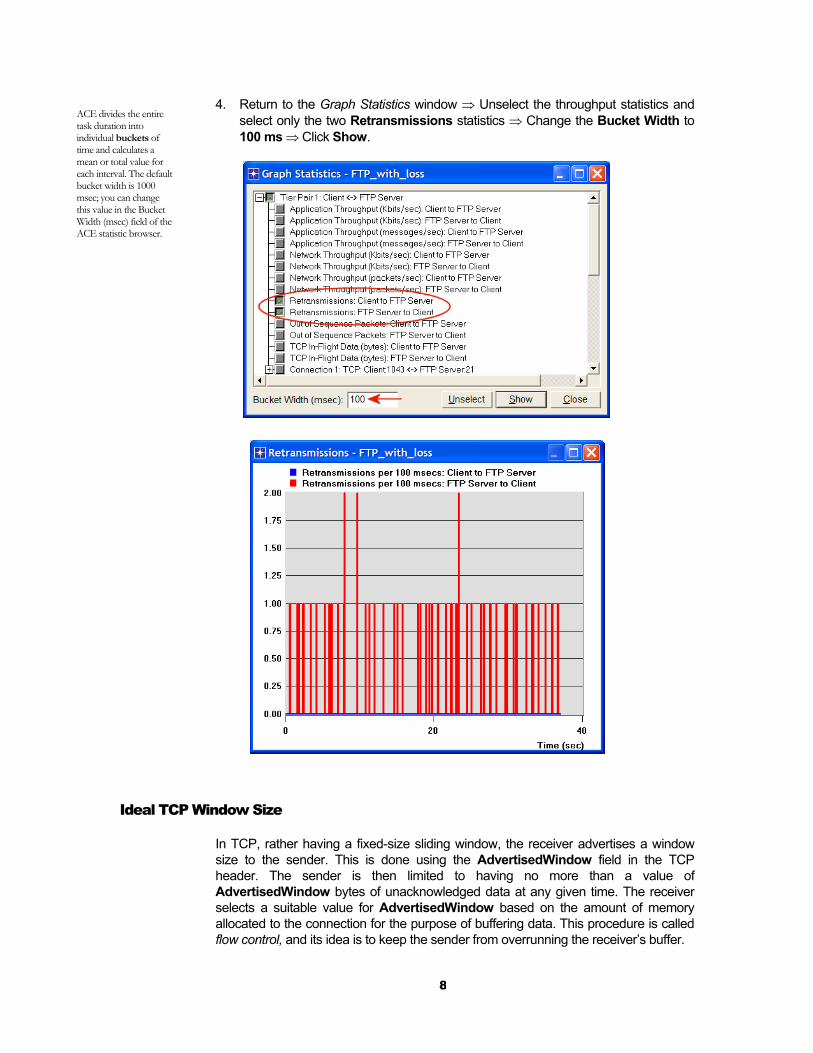
4. Return to the Graph Statistics window ⇒ Unselect the throughput statistics and select only the two Retransmissions statistics ⇒ Change the Bucket Width to 100 ms ⇒ Click Show.
Ideal TCP Window Size
In TCP, rather having a fixed-size sliding window, the receiver advertises a window size to the sender. This is done using the AdvertisedWindow field in the TCP header. The sender is then limited to having no more than a value of AdvertisedWindow bytes of unacknowledged data at any given time. The receiver selects a suitable value for AdvertisedWindow based on the amount of memory allocated to the connection for the purpose of buffering data. This procedure is called flow control, and its idea is to keep the sender from overrunning the receiver’s buffer.
ACE divides the entire task duration into individual buckets of time and calculates a mean or total value for each interval. The default bucket width is 1000 msec; you can change this value in the Bucket Width (msec) field of the ACE statistic browser.

9
In addition TCP maintains a new state variable for each connection, called CongestionWindow, which is used by the source to limit how much data it is allowed to have in transit at a given time. The congestion window is congestion control’s counterpart to flow control’s advertised window. It is dynamically sized by TCP in response to the congestion status of the connection.
TCP will send data only if the amount of sent-but-not-yet-acknowledged data is less than the minimum of the congestion window and the advertised window. ACE autocalculates the optimum window size based on the bandwidth-delay product as follows:
1. Return to the Graph Statistics window ⇒ Select the TCP In-Flight Data (bytes) FTP_Server to Client statistic ⇒ Assign 1000 to the Bucket Width (msec).
2. Click Show. From the graph, the ideal window size calculated by ACE is about 7
KB.
3. You can now close all opened graphs (delete the panel when you are asked to do that) and close the Graph Statistics window.
The bandwidth-delay product of a connection gives the “volume” of the connection—the number of bits it holds. It corresponds to how many bits the sender must transmit before the first bit arrives at the receiver.

10
Impact of Network Bandwidth
ACE QuickPredict enables you to study the sensitivity of an application to network conditions such as bandwidth and latency.
1. Click on the QuickPredict button: .
2. In the QuickPredict Control dialog box assign 512Kbps to the Min Bandwidth field and 10Mbps to the Max Bandwidth field ⇒ Click the Update Graph button.
3. The resulting graph should resemble the following one:
4. Close the graph and the QuickPredict Control dialog box.

11
Deploy an Application
OPNET IT Guru can be used to perform predictive studies of applications that are characterized in ACE. ACE uses the trace files to create application fingerprints that characterize the data exchange between tiers. From these fingerprints, a simulation can show how the application will behave under different conditions. For example the ACE topology wizard can be used to build a network model from the ACE file of this lab, FTP_with_loss, to answer the following question: What will the performance of the FTP application be when deployed to 100 simultaneous users over an IP network?
Follow the following steps to answer the above question:
1. From the IT Guru main window, select File ⇒ New ⇒ Select Project from the pull-down menu ⇒ Click OK.
2. Name the project <your initials>_FTP, and the scenario ManyUsers ⇒Click OK.
3. In the Startup Wizard, select Import from ACE ⇒ Click Next.
4. The Configure ACE Application dialog box appears.
i. Set the Name field to FTP Application.
ii. Set the Repeat application field to 2. This field controls how many times a user executes the application per hour.
iii. Leave the limit at the default value, Infinite.
iv. Click on Add Task ⇒ In the Contained Tasks table, click on the word Specify... ⇒ Select FTP_with_loss from the pull-down menu.
v. Click Next.

12
5. The Create ACE Topology dialog box appears. Set Number of Clients to 100 and set Packet Latency to 40. Leave all other settings at the default values.
6. Click Create.
7. Select File ⇒ Save ⇒ Click OK to save the project.
13
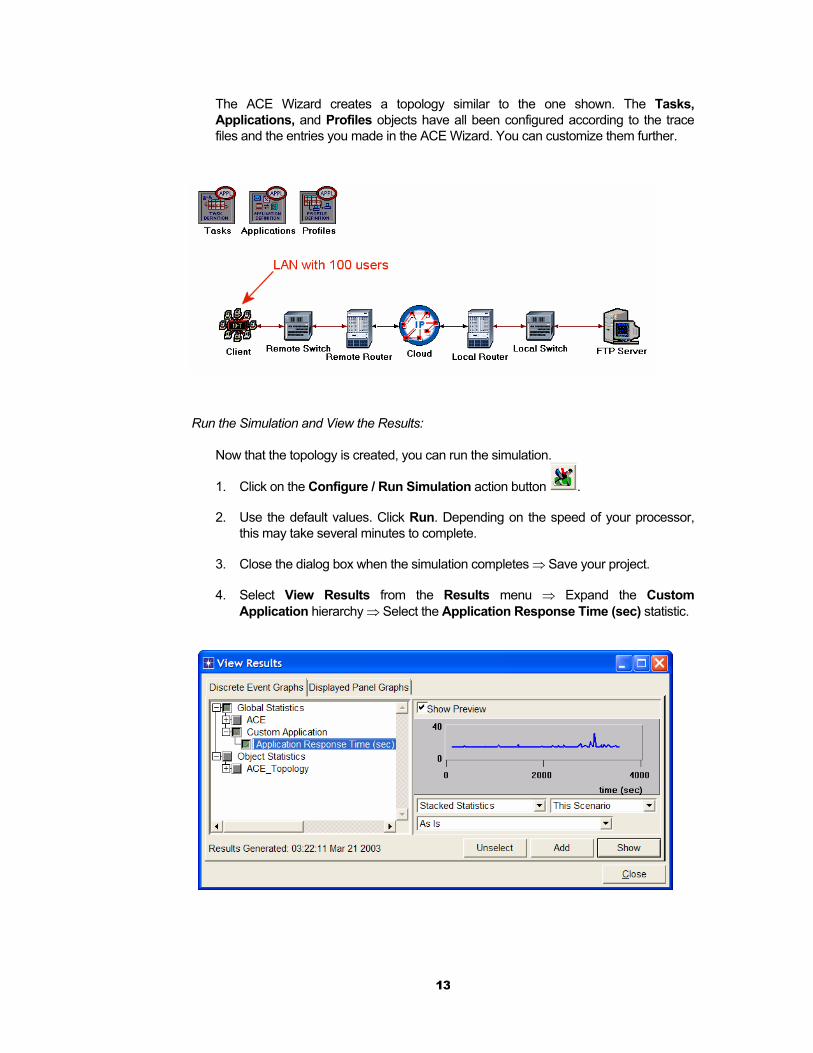
The ACE Wizard creates a topology similar to the one shown. The Tasks, Applications, and Profiles objects have all been configured according to the trace files and the entries you made in the ACE Wizard. You can customize them further.
Run the Simulation and View the Results:
Now that the topology is created, you can run the simulation.
1. Click on the Configure / Run Simulation action button .
2. Use the default values. Click Run. Depending on the speed of your processor, this may take several minutes to complete.
3. Close the dialog box when the simulation completes ⇒ Save your project.
4. Select View Results from the Results menu ⇒ Expand the Custom Application hierarchy ⇒ Select the Application Response Time (sec) statistic.
14
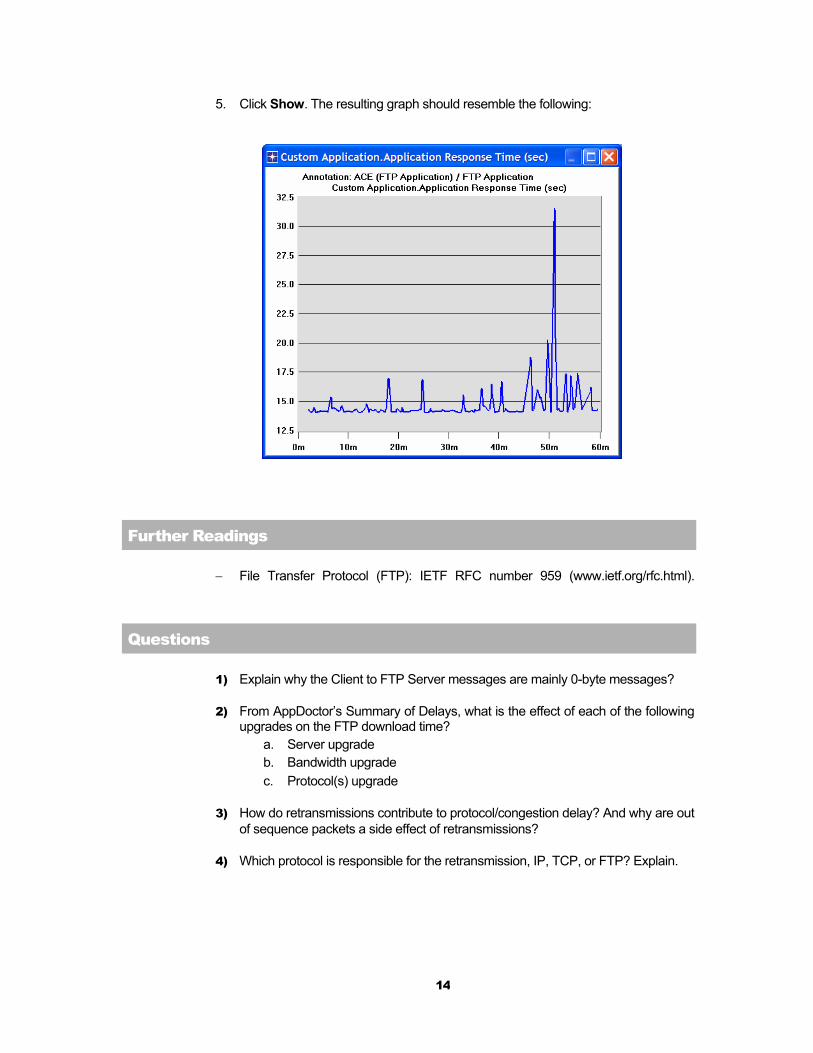
5. Click Show. The resulting graph should resemble the following:
Further Readings
− File Transfer Protocol (FTP): IETF RFC number 959 (www.ietf.org/rfc.html).
Questions
1) Explain why the Client to FTP Server messages are mainly 0-byte messages?
2) From AppDoctor’s Summary of Delays, what is the effect of each of the following upgrades on the FTP download time?
a. Server upgrade b. Bandwidth upgrade c. Protocol(s) upgrade
3) How do retransmissions contribute to protocol/congestion delay? And why are out of sequence packets a side effect of retransmissions?
4) Which protocol is responsible for the retransmission, IP, TCP, or FTP? Explain.
15
5) In the Network Throughput graph, the throughput from the FTP Server to the Client has an average value of about 300 Kbps and has a spike to about 500 Kbps. But the Frame Relay circuit has an available bandwidth of 768 Kbps. Explain why the throughput is not close to the available bandwidth.
6) Explain how the TCP in-flight data is used as an indicator of the TCP window size and how the bandwidth-delay product of the connection is used as an indicator of the ideal window size.
7) Comment on the graph we received that shows the relation between the network bandwidth and the FTP application response time. Why does the response time look unaffected by increasing the bandwidth beyond a specific point?
8) In the Deploy an Application section, a network model with multiple users was created based on the ACE file, FTP_with_loss. Duplicate the created scenario to create a new one with the name Q8_ManyUsers_ExistingTraffic. In this new scenario add an “existing” traffic of 80% load in the network. Examine how the existing traffic affects the FTP application's response time. Note: A simple way to simulate the existing traffic is to apply background utilization traffic of 80% to the link between the Remote Router and the IP Cloud.
Lab Report
Prepare a report that follows the guidelines explained in Lab 0. The report should include the answers to the above questions as well as the graphs you generated from the simulation scenarios. Discuss the results you obtained and compare these results with your expectations. Mention any anomalies or unexplained behaviors.