Embed Size (px)
Citation preview

Lab 4. Photogate Fun
© National Instruments Corporation 1
Lab 4: Photogate Fun
Introduction Surging through the heart of microprocessors are digital pulses, single pulses, bursts of pulses, and wave trains of pulses. Pulses are the life- giving blood of all digital systems and of NI myDAQ. Simple high or low signals transmit data based on their state, timing, rate, and pattern. They are the simplest measurement a computer can make.
Fig. 1 Tachometer Built from Old CD, DC Motor, and Photogate
Purpose This Lab uses myDAQ to measure pulse counts, counts/second, or the pulse length. An infrared photogate will be built and used to measure the speed and acceleration of a small toy race car hurtling down a track.
Equipment • NI myDAQ • TL072 or Equivalent Op Amp • 10 Ω Resistor • Solderless Breadboard Counter Circuits
• Infrared LED SI5312-H or Equivalent • Phototransistor SI5811 or Equivalent (lens is black)

Lab 4. Photogate Fun
2 ni.com
• Resistors: Two 22 kΩ , One 4.7 kΩ, and One 100 Ω • Transistor 2Ν3904
Prerequisite Reference Materials
Using the NI ELVISmx DMM: http://decibel.ni.com/content/docs/DOC-12877
Using the FGEN: http://decibel.ni.com/content/docs/DOC-12940
Using the Scope: http://decibel.ni.com/content/docs/DOC-12942
Some Background on IR Photogates An IR photogate uses a phototransistor to measure the amount of light from an optical beam originating from an IR LED. Infrared light is chosen so as to minimize any signal from ambient light sources often found in our normal working environment. We cannot see infrared light, but a phototransistor can. When the optical beam is blocked, the phototransistor changes from a high to a low state. This transition signals the start of a pulse. When the optical beam is unblocked, the phototransistor changes back to its normal state (i.e., from a low state to a high state). The low to high signals the end of a pulse. The pulse described is a negative pulse (HI-LO-HI). It is often inverted to (LO-HI-LO) by a transistor amplifier. The time between the start and end of pulse is the pulse length or width (Fig. 2).
Fig. 2 Pulse Definitions
Infrared Light-Emitting Diode (LED) (Optional) The I-V characteristic curve of an LED is most informative. Build an I-V curve tracer following the circuit found in “V-I Characteristic II–Nonlinear Devices” by E. Doering: I-V Curve Tracer Video: http://decibel.ni.com/content/docs/DOC-12661 This uses an op amp configured as a voltage follower (current booster), a 10 Ω resistor, a breadboard, and myDAQ.

Lab 4. Photogate Fun
© National Instruments Corporation 3
Fig. 3 The characteristic I-V curve of an Infrared Light-Emitting Diode
In the forward-biased region, the current rises exponentially for V > 1.0 volts (Fig. 3). The IR LED can take a maximum current of 100 mA. In our circuit, the forward-biased current is about 40 mA {(5 V-1.0 V)/100 Ω}. Exercise 4-1: Building the Photogate Circuit
Assemble the circuit components for the counter circuit. Measure and record all of the resistors using the DMM(Ω). Build the following photogate circuit, as shown in Fig. 4.
Fig. 4 Photogate Circuit
MyDAQ provides the power supply (5 V and DGND) to bias the LED, the photodiode, and the single-transistor amplifier circuit.

Lab 4. Photogate Fun
4 ni.com
Measure the voltage at the output points x and y using DMM(V).
Fill in the chart: Vx Vy Optical beam unblocked Optical beam blocked Note: The range of the output Vy falls within the digital TTL logic levels (0 or 1). The photogate output signal can be input into the myDAQ digital input lines.
Exercise 4-2: Measuring Speed with the Photogate
Building the Test Car Find an old Matchbox or toy race car and secure a card (3 cm x 3 cm) to its roof (Fig. 5). Plastic airplane glue, silicon glue, or a hot glue gun can be used.
Fig. 5 Small Racing Car with Card Glued to Roof

Lab 4. Photogate Fun
© National Instruments Corporation 5
Align the photogate perpendicular to the car’s line of motion at a height so that when the car passes through the photogate, the optical beam will be blocked by the card. Just in case you don’t have racetrack lying around, you can build a ramp out of angled wood or cardboard. Adding sides to the ramp are helpful to guide the car down the track and through the sensor gate. Measuring the Car’s Speed Connect the photogate output to the myDAQ socket (AI 0+) and the circuit ground to (AI 0–-). Use the oscilloscope Scope with the following settings: Photogate Output to AI 0 Channel 0 Source AI 0, 1 v/div Time Base 200 msec/div Trigger-Edge, Channel 0 source, Level 0.2 V Horizontal Position 10% Acquisition Mode [Run Once] Run the car past the sensor to view the photogate pulse. Note: The intrinsic ‘Scope Timeout’ feature limits our ability to see the pulse on an expanded time scale. Another approach uses NI ELVISmx Oscilloscope VI and provides more flexibility. Launch and View the LabVIEW program Pulse Logger.vi.
Fig. 6 Sequence of Pulses Displayed on a LabVIEW Graph
The sample rate has been set to 10 k samples per second in (Fig. 6). The record length has been set to 50 k samples. Thus, the recording time is

Lab 4. Photogate Fun
6 ni.com
50 k/10 k (samples/samples per sec) or 5 seconds. This provides a window of time to catch the car hurtling down the ramp. You can change the record length to suit your application. Set the car on top of the ramp, let it go, and press [Run]. Observe the signal on oscilloscope, as in Fig. 7.
To expand the scale to better see the pulse, pick a time a little earlier than the start of the pulse. Replace the origin value of the photogate signal graph with this value. Pick a time a little later than the end of the pulse time and replace the maximum time (5 seconds) with this value. Note: Make sure AutoScale x-axis is unchecked.
Fig. 7 Zoom in on the x axis of the Pulse by Modifying the First and Last Values
Measure the start time, stop time, pulse width, and pulse amplitude from the trace. To calculate the speed of the car, it is just the length of the card (3 cm)/(pulse width). Here is Another Way The DAQ Assistant Express VI can be configured to measure pulse width directly. Open a blank LabVIEW VI and go to the block diagram panel. Select the DAQ Assistant VI and place it on a block diagram.
Lab 4. Photogate Fun
© National Instruments Corporation 7
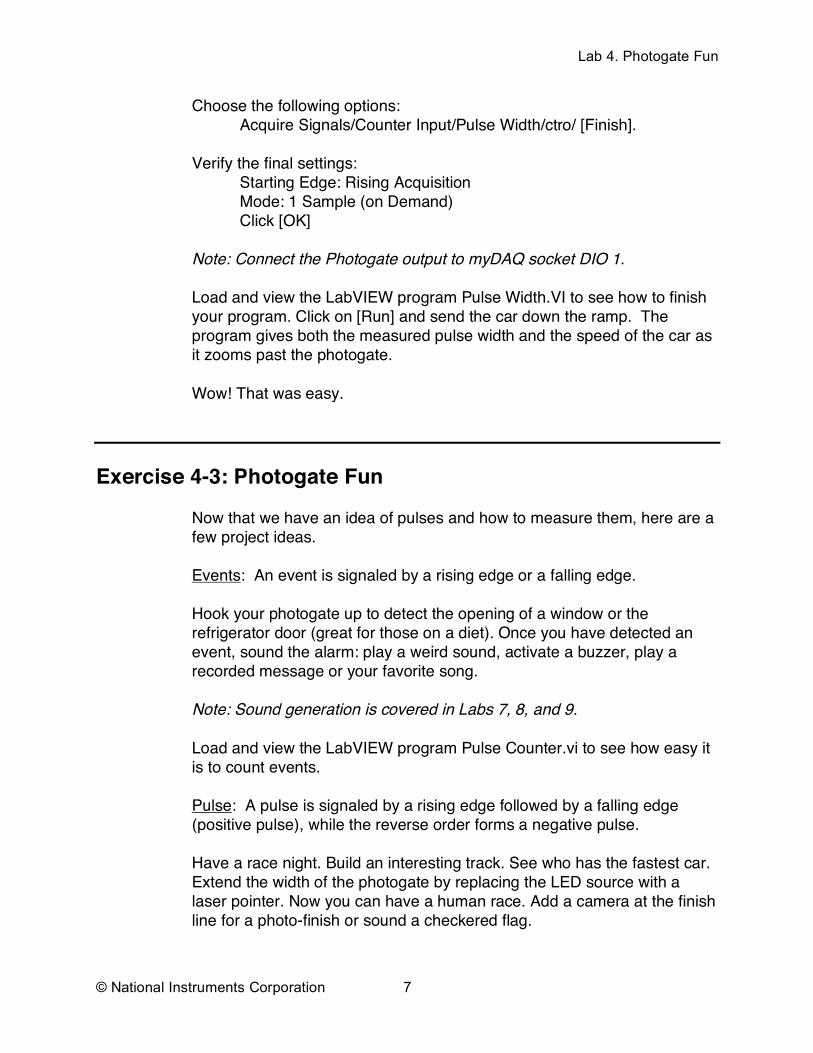
Choose the following options: Acquire Signals/Counter Input/Pulse Width/ctro/ [Finish]. Verify the final settings: Starting Edge: Rising Acquisition
Mode: 1 Sample (on Demand) Click [OK]
Note: Connect the Photogate output to myDAQ socket DIO 1. Load and view the LabVIEW program Pulse Width.VI to see how to finish your program. Click on [Run] and send the car down the ramp. The program gives both the measured pulse width and the speed of the car as it zooms past the photogate. Wow! That was easy.
Exercise 4-3: Photogate Fun
Now that we have an idea of pulses and how to measure them, here are a few project ideas. Events: An event is signaled by a rising edge or a falling edge. Hook your photogate up to detect the opening of a window or the refrigerator door (great for those on a diet). Once you have detected an event, sound the alarm: play a weird sound, activate a buzzer, play a recorded message or your favorite song. Note: Sound generation is covered in Labs 7, 8, and 9. Load and view the LabVIEW program Pulse Counter.vi to see how easy it is to count events. Pulse: A pulse is signaled by a rising edge followed by a falling edge (positive pulse), while the reverse order forms a negative pulse. Have a race night. Build an interesting track. See who has the fastest car. Extend the width of the photogate by replacing the LED source with a laser pointer. Now you can have a human race. Add a camera at the finish line for a photo-finish or sound a checkered flag.

Lab 4. Photogate Fun
8 ni.com
Pulse Trains: A sequence of uniform pulses (pulse + delay, pulse + delay, etc.) forms a rectangular wave or a square wave (if pulse width = delay). Pulse waveforms can be described with parameters like frequency, period, ‘On’ time, and ‘Off’ time. A tachometer is a measurement of the angular speed of a wheel expressed in the number of pulses per second (frequency) or revolutions per minute (rpm). Attach a CD to a motor (Fig. 8). Cut a hole in the edge of the CD the width of the optical beam. As the disc spins, a wave train is produced by the photogate that is proportional to the angular speed.
References: “Introduction to NI ELVIS II,” B.E. Paton, Lab 10 Mechanical Motion.