Embed Size (px)
Citation preview

SOA 11g Workshop – Lab 1 1
Creating a Web Service Using Top-Down Development
Oracle JDeveloper support multiple ways of creating Web Services. JDeveloper wizards
include the ability to create Web Services from EJBs, POJOs (Plain Old Java Objects),
Database DML and PL/SQL, JMS and others. In this lab we’ll use what’s often
described as a best practice in Service Oriented Architectures: Top-Down development.
Using this method we start by using WSDL and let JDeveloper generate the Java Web
Service from there. All we have to do from that point is include our service specific code
deploy to the application server.
We will be creating a CreditScore service that accepts a Social Security number and
returns a score based on certain SSN criteria. For simplicity sake, we will return a score
in of “583” if the SSN begins with a 1, “644” if the SSN begins with a 2, and “721” if the
SSN begins with 3.
Oracle® SOA Suite 11
Hands-On Workshop Lab 1
Lab 1
L

SOA 11g Workshop – Lab 1 2
Create the JDeveloper Application and Project
By default in this installation JDeveloper will create workspaces and projects within the
/home/oracle/jdevleoper/mywork sub-directory.
Perform the following steps:
1. If it’s not already started double click on the Start/Stop Weblogic Server(s) Desktop
icon or right click on it and select “Open”.
2. At the pop up click OK to select the default: Start

SOA 11g Workshop – Lab 1 3
3. At the next pop up leave the default and click OK. After 7-9 minutes the server is
started.
4. A status dialog is displayed. When “Starting Admin Server………OK” is displayed
click Close.
5. Verify that all but OSB was started and click Close.
6. Start JDeveloper by double clicking on the JDeveloper 11g icon on the Desktop OR
right-click on the icon and select “Open”:

SOA 11g Workshop – Lab 1 4
7. Create a new Application by selecting FileNew. This will open up a dialog box.
8. With the General category selected choose the Generic Application item and click
OK.

SOA 11g Workshop – Lab 1 5
9. Set the Application Name to CreditScore and click Next.
10. At the step 2 dialog, set the Project Name to CreditScore. Under the Project
Technologies Tab, select the Web Services technology in the “Available:” box and
move it into the “Selected:” box by clicking the right arrow button . The
completed dialog should look like:

SOA 11g Workshop – Lab 1 6
11. Click Finish. The Workspace and Project are created.
12. Right click on the CreditScore project and select New.

SOA 11g Workshop – Lab 1 7
13. In the New Gallery dialog navigate to Web Services under the Business Tier category
and select the “Java Web Service from WSDL” item. Click OK.
14. The Create java Web Service from WSDL wizard comes up. Click Next at step 1.
15. At step 2 select the default Java EE 1.5 with support for JAX-WS annotations. Click
Next.

SOA 11g Workshop – Lab 1 8
16. At step three click the Browse button. We are going to use a WSDL in the
/home/oracle/MyFiles directory called CreditScoreService.wsdl.
17. We are going to use a WSDL in the /home/oracle/MyFiles directory called
CreditScoreService.wsdl. Navigate to the MyFiles directory by clicking the Browse
button and then select this file. Click Open and then Finish.

SOA 11g Workshop – Lab 1 9
18. At this point JDeveloper generates the java classes based on the WSDL definition. It
will be our responsibility to define what the web service will actually do.
19. From the Application Navigator Projects tab right click on the
CreditScorePortImpl.java source file under CreditScoreApplication
Sourcescom.example.globalcompanynscreditscoreservice and click Open.
20. Into this java code we will cut and paste some pre-created source to define what this
Web Service does. Minimize JDeveloper and open up a Terminal window from the
Desktop by double clicking on the Terminal icon OR right clicking on the icon and
selecting Open.
SOA 11g Workshop – Lab 1 10
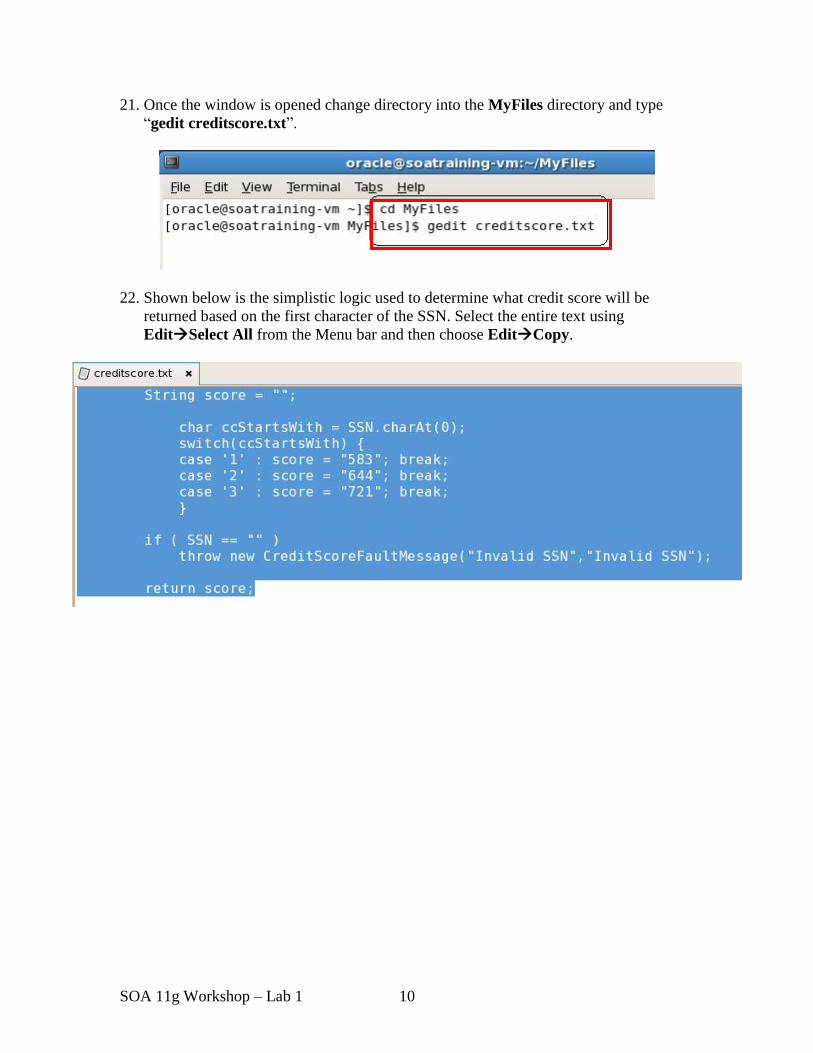
21. Once the window is opened change directory into the MyFiles directory and type
“gedit creditscore.txt”.
22. Shown below is the simplistic logic used to determine what credit score will be
returned based on the first character of the SSN. Select the entire text using
EditSelect All from the Menu bar and then choose EditCopy.

SOA 11g Workshop – Lab 1 11
23. Go back to JDeveloper and find the “return null;” line in the java source. Highlight
this text by a left mouse click and drag over the line. Replace the code by doing an
EditPaste.
The result should look like:
24. Now right click on the CreditScore project and select “Project Properties”.

SOA 11g Workshop – Lab 1 12
25. Select the Java EE Application property and set both the “Java EE Web Application
Name” and the “Java EE Web Context Root” to CreditScore. Click OK.
26. Save the project by selecting File SaveAll on the JDeveloper Menu Bar or using
the icon.
Create the Application Server Connection and Deploy the Web Service
NOTE: Skip to step 7 of this section as an Application Server Connection has
already been created for your convenience. The first six steps are for your reference.
1. Select FileNew from the Menu Bar.

SOA 11g Workshop – Lab 1 13
2. With the GeneralConnections category selected choose the Application Server
Connection Item and click OK.
3. In step 1 of the wizard enter LocalAppServer and click Next. Since we are
deploying this web service to Weblogic Server 10.3.x the default “Connection Type”
is fine.
4. In step 2 enter the username weblogic and password welcome1. Click Next.

SOA 11g Workshop – Lab 1 14
5. In step 3 the default ports are fine. Change the WLS Domain to domain1. Click Next.
6. In step 4 click the Test Connection button. You should see a successful result. Click
Finish.

SOA 11g Workshop – Lab 1 15
7. Now that there is a connection to an Application Server we can deploy the web
service. Right click on the CreditScore project and navigate to
DeployWebServicestoLocalAppServer.
8. You may receive this diaalog. If you get prompted for a Confirm ReDeploy then
select the Yes button, else presson to step 9.

SOA 11g Workshop – Lab 1 16
9. Verify a successful deployment by looking at the “Deployment – Log” window.
Test the Web Service
1. Bring up the Firefox browser by double clicking on the Desktop icon OR right
clicking on the icon and selecting “Open”.
2. Select the Enterprise Manager FastLink from the tool bar.

SOA 11g Workshop – Lab 1 17
3. Login as weblogic/welcome1. It will take a couple of minutes for the application to
instantiate the first time.
4. When the Farm_domain1 page displays navigate down to
Farm_domain1Application Deployments and click the CreditScore-
CreditScore-context-root (Admin Server) link.
5. Scroll down to the “Web Services” section and click the Test button.
6. Scroll down to the Input Arguments section and enter a SSN that begins with a 1. If
you recall the code in the web service should return a value of 583 if all is well…
Click the Test Web Service button at the bottom of the page.
SOA 11g Workshop – Lab 1 18
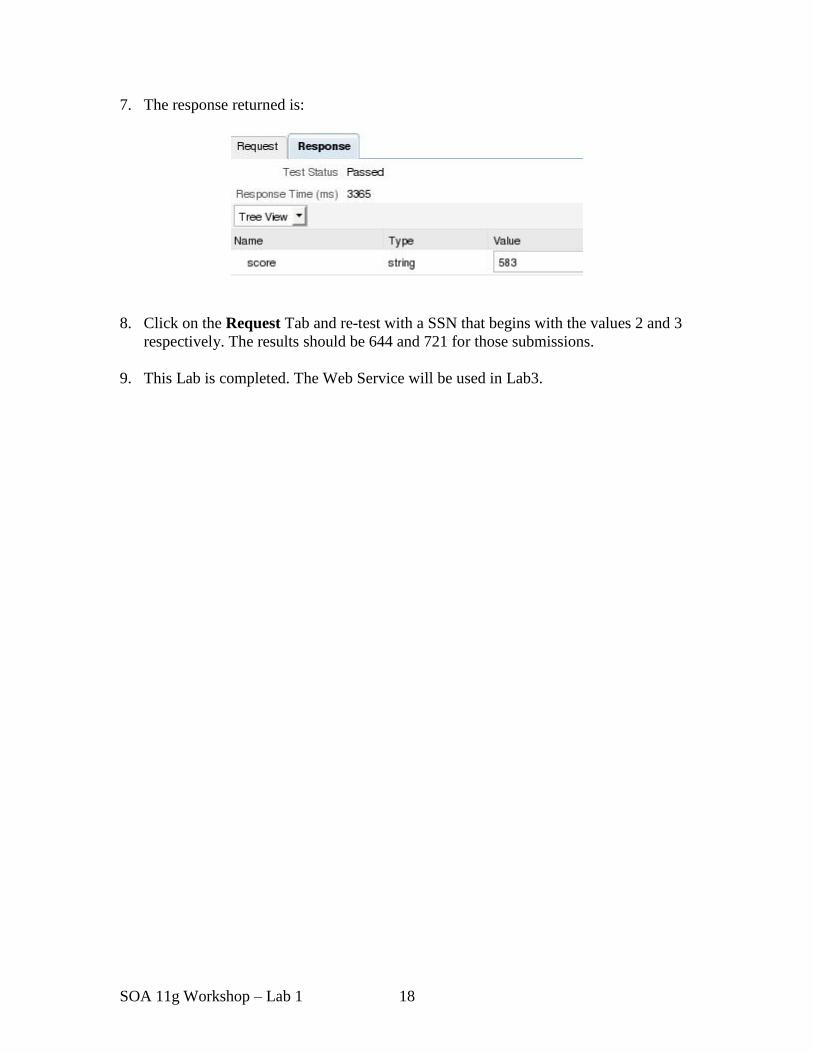
7. The response returned is:
8. Click on the Request Tab and re-test with a SSN that begins with the values 2 and 3
respectively. The results should be 644 and 721 for those submissions.
9. This Lab is completed. The Web Service will be used in Lab3.