Embed Size (px)
Citation preview
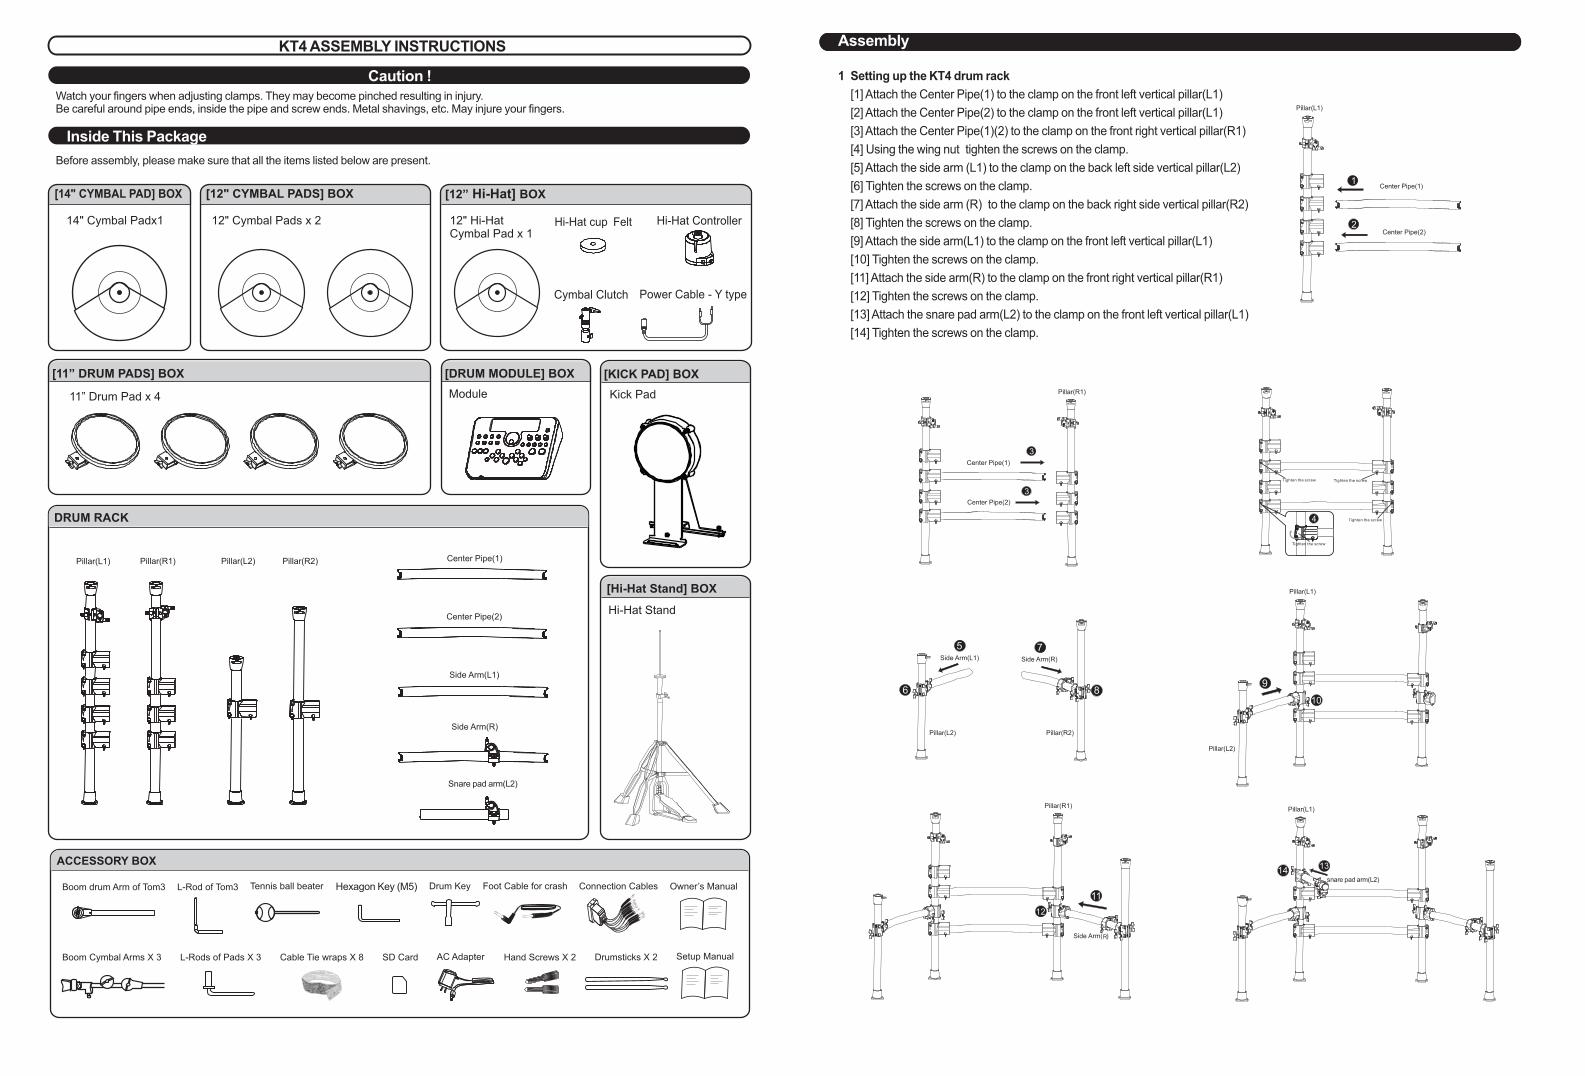
Watch your fingers when adjusting clamps. They may become pinched resulting in injury.Be careful around pipe ends, inside the pipe and screw ends. Metal shavings, etc. May injure your fingers.
Before assembly, please make sure that all the items listed below are present.
Caution !
Inside This Package
Assembly
5
Assembly
6
Side Arm(L1) Side Arm(R)
7
89
11
10
Side Arm( )R
1314
12
Center Pipe(1)
3
3Center Pipe(2)
Tighten the screw
Tighten the screw
Tighten the screw
44
Tighten the screw
Center Pipe(1)
Center Pipe(2)
1
2
KT4 ASSEMBLY INSTRUCTIONS
Hi-Hat Stand
Center Pipe(1)
Center Pipe(2)
Side Arm(L1)
Side Arm(R)
[DRUM MODULE] BOX
Module Kick Pad
[ ] BOXKICK PAD
[Hi-Hat Stand] BOX
11” Drum Pad x 4
12" Cymbal Pads x 214" Cymbal Padx1
[11” DRUM PADS] BOX
[14" CYMBAL PAD] BOX [12" CYMBAL PADS] BOX
DRUM RACK
Snare pad arm(L2)
snare pad arm(L2)
1 Setting up the
[1] Attach the Center Pipe(1) to the clamp on the pillar(L1)
[2] Attach the Center Pipe(2) to the clamp on the pillar(L1)
[3] Attach the Center Pipe(1)(2) to the clamp on the pillar(R1)
[4] Using the wing nut tighten the screws on the clamp.
[5] Attach the side arm (L1) to the clamp on the pillar(L2)
[6] Tighten the screws on the clamp.
[7] Attach the side arm (R) to the clamp on the pillar(R2)
[8] Tighten the screws on the clamp.
[9] Attach the side arm(L1) to the clamp on the pillar(L1)
[10] Tighten the screws on the clamp.
[11] Attach the side arm(R) to the clamp on the pillar(R1)
[12] Tighten the screws on the clamp.
[13] Attach the (L2) to the clamp on the pillar(L1)
[14] Tighten the screws on the clamp.
KT4 drum rack
front left vertical
front left vertical
front right vertical
back left side vertical
back right side vertical
front left vertical
front right vertical
snare pad arm front left vertical
Pillar(L1) Pillar(R1) Pillar(L2) Pillar(R2)
Pillar(L2) Pillar(R2)
Pillar(L1)
Pillar(L2)
Pillar(R1)Pillar(L1)
Pillar(R1)
Pillar(L1)
Setup Manual
Owner’s Manual
Drumsticks X 2AC Adapter
Connection CablesHexagon Key (M5)L-Rod of Tom3Boom drum Arm of Tom3
ACCESSORY BOX
Boom Cymbal Arms X 3
Drum KeyTennis ball beater
Cable Tie wraps X 8
Foot Cable for crash
Hand Screws X 2L-Rods of Pads X 3
12" Hi-Hat Cymbal Pad x 1
[12” BOX Hi-Hat]
Hi-Hat Controller
Cymbal Clutch Power Cable - Y type
Hi-Hat cup Felt
SD Card
0
5
25
75
95
100
KMC_KT4__ Setup Manual_003_150917
2015 9 17 10:13:28
3
2
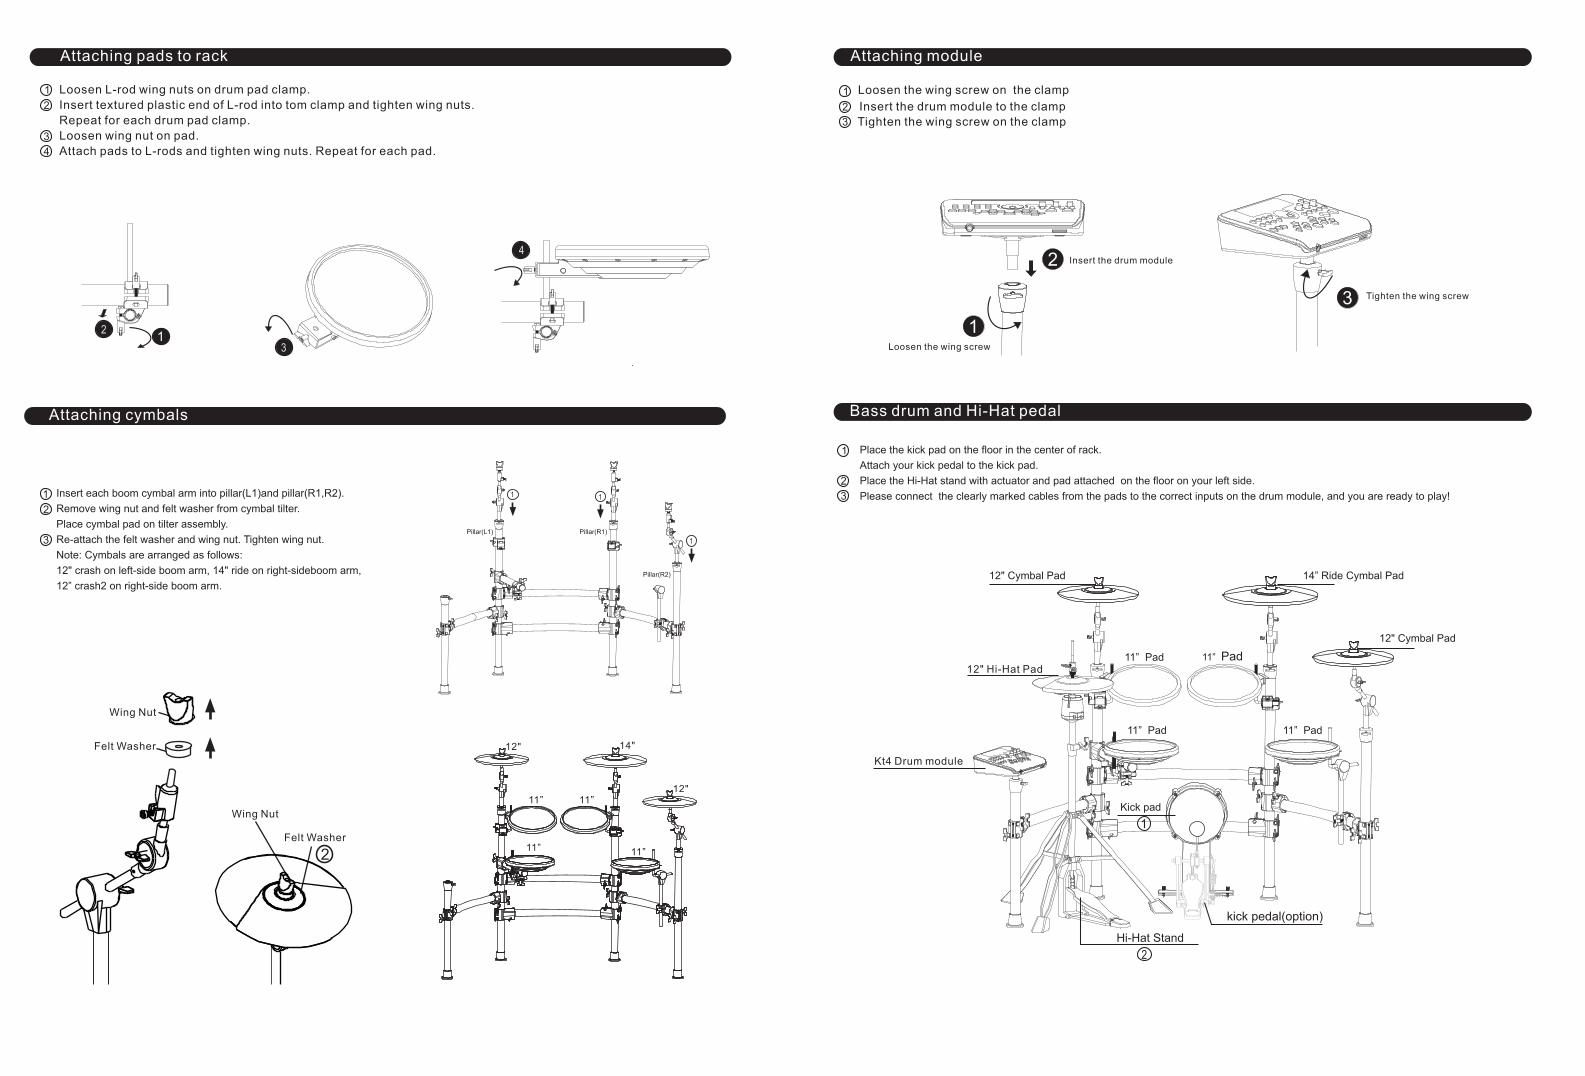
Insert each boom cymbal arm into pillar(L1)and pillar(R1,R2).
Remove wing nut and felt washer from cymbal tilter.
Place cymbal pad on tilter assembly.
Re-attach the felt washer and wing nut. Tighten wing nut.
Note: Cymbals are arranged as follows:
12" crash on left-side boom arm, 14" ride on right-sideboom arm,
12” crash2 on right-side boom arm.
1
Loosen the wing screw on the clamp
Insert the drum module to the clamp
Tighten the wing screw on the clamp
Loosen L-rod wing nuts on drum pad clamp.
Insert textured plastic end of L-rod into tom clamp and tighten wing nuts.
Repeat for each drum pad clamp.
Loosen wing nut on pad.
Attach pads to L-rods and tighten wing nuts. Repeat for each pad.
1
2
3
4
Attaching pads to rack Attaching module
Attaching cymbals Bass drum and Hi-Hat pedal
1
2
3
Place the kick pad on the floor in the center of rack.
Attach your kick pedal to the kick pad.
Place the on the floor on your left side.
Please connect the clearly marked cables from the pads to the correct inputs on the drum module, and you are ready to play!
Hi-Hat stand with actuator and pad attached
1
2
3
Wing Nut
Felt Washer
Wing Nut
Felt Washer
1
2
14"12"
12"11”11”
11” 11”
1Loosen the wing screw
2 Insert the drum module
3 Tighten the wing screw
12" Cymbal Pad
12" Cymbal Pad
14” Cymbal PadRide
11” Pad 11” Pad
11” Pad 11” Pad
Kt4 Drum module
Kick pad
kick pedal(option)
1
Hi-Hat Stand
12" Hi-Hat Pad
Pillar(L1) Pillar(R1)
Pillar(R2)
0
5
25
75
95
100
KMC_KT4__ Setup Manual_003_150917
2015 9 17 10:13:32