Embed Size (px)
Citation preview

1
KOKODA CHALLENGE
TRAINING FOR THE BEGINNER TO INTERMEDIATE By Steven Halligan, 3 times KC finisher and Director of Halligans Fitness Personal Training.
When training to enter and complete the Kokoda Challenge events as a beginner to intermediate
participant one of the most important things to bear in mind is to “start with the end in mind”- and
finish as a full team. There are many aspects of your fitness and team to be considered and prepared
for such as;
1. The improvement of your fitness level (cardiovascular specific training for the event)
2. Preparation of your body for the differing terrain (Strength training and core work)
3. Understanding the terrain and knowing the track. This entails using the course notes and
actually training on parts of the track to understand what is the Gold Coast Kokoda
Challenge or at minimum training on a similar terrain if you live outside the Gold Coast
region.
4. Getting the right team together (knowing the people that you are preparing to do the
challenge with and understanding what they are capable of in the middle of the night and 50
kilometres into the event and their potential to absolutely lose it)
I will outline a 20 week program to get you from the couch to the finish line and hopefully as a full
team.
The Kokoda Challenge events have participants with many differing fitness levels. My role is to help
the beginner to the intermediate challenge participants to make it possible for you to attain a base
fitness level to complete the challenge in a respectable time in as safe as possible manner.
I will break the training into 3 parts to make it easier to understand and make sense of,
1. Strength training, core and flexibility
2. General fitness
3. Course specific fitness and training
LET’S START WITH
1. Strength training, core and flexibility
In the gym nothing beats functional / compound exercises. Many people make it too complicated
and try to use weights to copy the action of the sport or fitness event that is being mimicked in some
strange manner, nothing beats the real thing. However something that will help is to strengthen the
muscles that will be under the load, mainly the legs. Through strength training you will be able to
improve strength, endurance under loads and to assist in getting used to dealing with lactic acid
burn that you will no doubt feel when climbing the serious terrain.
Some basic exercises to do are as follows:

2
PLEASE NOTE- Some exercises are only to be done if you have no back, ankle or knee problems.
Make sure that you have consulted with your doctor before using the program that I have outlined.
Legs
Squats
Lunges
Walking Lunges
Jump Squats
Static Wall Squat
Standing Calf Raises
Upper Body
Chest - Push Ups
Back - Bent Over Dumbbell Row
Tricep - Tricep Dips (not essential but will come in handy when using poles)
Bicep - Bicep Curls (not essential but will come in handy when using poles)
EXERCISES
The following exercises are to be performed collectively, if you can do the following exercises every
second to third day, performing one to three sets until you cannot do anymore (go to failure) and
making sure that your posture is correct at all times, these exercises will contribute to assisting you
in improving your strength and fitness much faster and more effectively.
The purpose of the stretches are to assist you in maintaining flexibility and also to help your muscles
recover from the following exercises.
Legs- Squats
Lunges-
Squats: to start the squat stand in an upright position with your feet shoulder width apart toes pointing
straight forward, hands out in front of you (picture 1), make sure your posture is correct, when you go
down into the squat position stick your bum out (picture 4), tip your pelvis forward, make sure your knees
do not go in front of your toes and keep your knees in line with your shoulders and toes

3
Lunges-
Walking Lunges-
Jump Squats-
Lunge: stand with your feet shoulder width apart,
feet pointing forward, be aware of your posture
(picture 1), step out with one foot striking the
ground heel first, tip your pelvis forward, bum out
and then drop down making sure your knee does
not go in front of your toes (picture 2). To get back
to the start of the position simply step back up
into the starting position (picture 3).
Walking Lunges: Very similar to a stationary lunge,
however you are travelling in a forward motion,
start with your feet shoulder width apart, feet
pointing forward, be aware of your posture, step
out with one foot striking the ground heel first, tip
your pelvis forward, bum out and then drop down
making sure your knee does not go in front of your
toes (picture 2). With the back leg step forward
and then go into the next lunge.
Jump Squats:- to start the jump squat stand in an
upright position with your feet shoulder width
apart toes pointing straight forward, hands out in
front of you go into a squat position (picture 1),
make sure your posture is correct, make sure your
knees do not go in front of your toes and keep
your knees in line with your shoulders and toes
then jump up as high as possible(picture 2 and 3),
when landing go straight back into the squat
position then repeat.
PLEASE NOTE ONLT ATTEMPT THIS EXERCISE IF
YOU HAVE NO KNEE, ANKLE OR BACK PROBLEMS

4
Static Wall Squat-
Standing Calf Raises-
Chest- Push Ups
Push up: the push up can be performed in a few different ways
MENS
MENS - First of all we will start with the men's push up which is
on your toes and hands. When performing the men’s push up
make sure you keep your feet relatively close together and your
hands should be spread a little more than a hands width of your
shoulders, keep your hands pointed forward, and make sure that
your head stays up in a neutral position throughout the whole
movement, draw your belly button into your spine (picture 1).
Slowly let your body drop down towards the floor bending at the
elbow to the point where your upper arms are parallel with the
floor (picture 2), for the next part of the exercise push up and
return to the starting position
LADIES - The second kind of push up is on your knees. The
starting position is similar to the men's push up, the difference is
that you are on your knees as displayed in the pictures above. To
perform the ladies push up simply use your knees as a pivot, you
can cross your feet or leave them apart. Your knees are used as a
pivot to make the exercise a little easier than the former example
of the men’s push up.
Standing Calf Raises: stand with your feet shoulder
width apart, feet pointing forward, on the edge of
a step (on the balls of your feet as demonstrated
in picture) be aware of your posture. Lower your
heels down to the bottom of range of motion that
your ankle will allow, then go up onto your tippy
toes then repeat.
Static Wall Squat: to start the static wall squat
stand in front of a wall an upright position with
your feet shoulder width apart toes pointing
straight forward, lean up against the wall and then
lower your body down sliding on the wall into the
position as displayed in the pictures. When
performing the Static Wall Squat make sure your
posture is correct (shoulders and head against the
wall), make sure your knees are at right angles and
that your knees do not go in front of your toes.
Keep your knees in line with your shoulders and
toes. HOLD AS LONG AS POSSIBLE IN THE STATIC
WALL SQUAT POSITION.
5
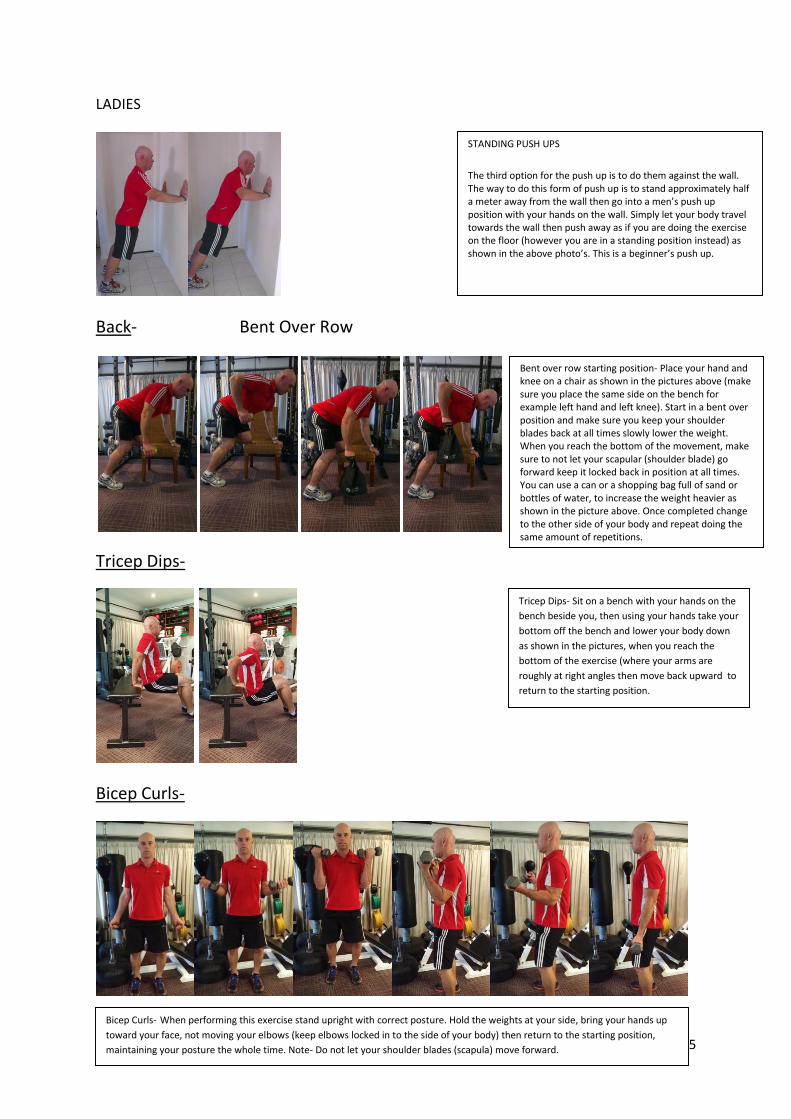
LADIES
Back- Bent Over Row
Tricep Dips-
Bicep Curls-
STANDING PUSH UPS
The third option for the push up is to do them against the wall. The way to do this form of push up is to stand approximately half a meter away from the wall then go into a men’s push up position with your hands on the wall. Simply let your body travel towards the wall then push away as if you are doing the exercise on the floor (however you are in a standing position instead) as shown in the above photo’s. This is a beginner’s push up.
Bent over row starting position- Place your hand and knee on a chair as shown in the pictures above (make sure you place the same side on the bench for example left hand and left knee). Start in a bent over position and make sure you keep your shoulder blades back at all times slowly lower the weight. When you reach the bottom of the movement, make sure to not let your scapular (shoulder blade) go forward keep it locked back in position at all times. You can use a can or a shopping bag full of sand or bottles of water, to increase the weight heavier as shown in the picture above. Once completed change to the other side of your body and repeat doing the same amount of repetitions.
Tricep Dips- Sit on a bench with your hands on the
bench beside you, then using your hands take your
bottom off the bench and lower your body down
as shown in the pictures, when you reach the
bottom of the exercise (where your arms are
roughly at right angles then move back upward to
return to the starting position.
Bicep Curls- When performing this exercise stand upright with correct posture. Hold the weights at your side, bring your hands up
toward your face, not moving your elbows (keep elbows locked in to the side of your body) then return to the starting position,
maintaining your posture the whole time. Note- Do not let your shoulder blades (scapula) move forward.

6
Abdominals- Abdominal Bracing / Plank
Crunches
There are three options with abdominal bracing the first is on your toes and your elbows the second is on your knees and the third is
actually doing it lying totally on the floor. You must draw in your belly button toward your spine to activate your core muscles, make
sure you keep your shoulder blades retracted back as well and make sure your head is in a neutral position throughout the exercise, try
not to let your bum drop down too much as you will place stress on your lumbar spine (lower back) also don't lift your bum up to high,
try and stay relatively straight throughout the movement, then hold as long as possible.
Abdominal bracing or also known as the plank, this exercise is a static exercise. The most important thing with this exercise
is to make sure that your posture is correct and that all of your body parts are in the right position

7
WEEK 1-10
WEEK 10-20
DATE SESSION 1 DATE SESSION 2
Warm up: ___Mins Level: Warm up: ___Mins Level:
EXERCISE SET 1 SET 2 SET 3 TIME/LEVEL HR EXERCISE SET 1 SET 2 SET 3 TIME/LEVEL HR
Squats / / / Squats / / /
Lunges / / / Lunges / / /
Static Wall Squat / / / Static Wall Squat / / /
Push Ups / / / Push Ups / / /
Tricep Dips / / / Tricep Dips / / /
Bent Over Row / / / Bent Over Row / / /
Bicep Curls / / / Bicep Curls / / /
Plank/Ab Bracing / / / Plank/Ab Bracing / / /
/ / / / / /
/ / / / / /
/ / / / / /
/ / / / / /Comments: Comments:
DATE SESSION 3 DATE SESSION 4
Warm up: ___Mins Level: Warm up: ___Mins Level:
EXERCISE SET 1 SET 2 SET 3 TIME/LEVEL HR EXERCISE SET 1 SET 2 SET 3 TIME/LEVEL HR
Squats / / / Squats / / /
Lunges / / / Lunges / / /
Static Wall Squat / / / Static Wall Squat / / /
Push Ups / / / Push Ups / / /
Tricep Dips / / / Tricep Dips / / /
Bent Over Row / / / Bent Over Row / / /
Bicep Curls / / / Bicep Curls / / /
Plank/AbBracing / / / Plank/Ab Bracing / / /
/ / / / / /
/ / / / / /
/ / / / / /
/ / / / / /
Comments: Comments:
DATE SESSION 1 DATE SESSION 2
Warm up: ___Mins Level: Warm up: ___Mins Level:
EXERCISE SET 1 SET 2 SET 3 TIME/LEVEL HR EXERCISE SET 1 SET 2 SET 3 TIME/LEVEL HR
Squats / / / Squats / / /
Walking Lunges / / / Walking Lunges / / /
Jump Squats/Squats / / / Jump Squats/Squats / / /
Static Wall Squat / / / Static Wall Squat / / /
Standing Calf Raises / / / Standing Calf Raises / / /
Bent Over Row / / / Bent Over Row / / /
Bicep Curls / / / Bicep Curls / / /
Push Ups / / / Push Ups / / /
Tricep Dips / / / Tricep Dips / / /
Plank/Ab Bracing / / / Plank/Ab Bracing / / /
/ / / / / /
/ / / / / /Comments: Comments:
DATE SESSION 3 DATE SESSION 4
Warm up: ___Mins Level: Warm up: ___Mins Level:
EXERCISE SET 1 SET 2 SET 3 TIME/LEVEL HR EXERCISE SET 1 SET 2 SET 3 TIME/LEVEL HR
Squats / / / Squats / / /
Walking Lunges / / / Walking Lunges / / /
Jump Squats/Squats / / / Jump Squats/Squats / / /
Static Wall Squat / / / Static Wall Squat / / /
Standing Calf Raises / / / Standing Calf Raises / / /
Bent Over Row / / / Bent Over Row / / /
Bicep Curls / / / Bicep Curls / / /
Push Ups / / / Push Ups / / /
Tricep Dips / / / Tricep Dips / / /
Plank/Ab Bracing / / / Plank/Ab Bracing / / /
/ / / / / /
/ / / / / /
Comments: Comments:

8
2. General fitness
To get a base level of fitness it is important to do some cardio training. Try and do a minimum of 30
minutes at a time if possible, just think about when you do the event you could be on your feet for
up to 39hours, so the more you can improve your fitness level the better chance you have of getting
to the finish line. The Kokoda Challenge is not a race, but the quicker you can finish the event the
less fatigued you will be and you will see less weird stuff in the woods, trust me the longer you are
out there the more difficult it becomes and you can start to hallucinate after 24 hours plus of no
sleep coupled with fatigue. In saying that it is important to do the event at a pace that you are used
to, on the day of the event it is not the time to try and ramp up the speed, it is about pacing yourself
and sticking around that pace for the entire event.
Here are some examples of fitness conditioning training that you can do to increase your level of
overall fitness to help prepare you for the event.
You can choose to do one of these activities often or mix them up and rotate between the activities
that you like the most.
Walking / Jogging / Running for 5 kilometres- when doing any of these try and aim to build
up to 5 kilometres regularly, this will quickly develop your fitness level and it is easy to find
20 to 45 minutes especially when you start from your house.
Hill Running
Circuit training
Interval Training
OR INDOOR CARDIO
Treadmill
Cross trainer
Rower
Indoor Bike
If you would like more information contact me via the information below.
Steven Halligan
Director
Halligan's Fitness Personal Training
web: www.halligansfitness.com.au e-mail: [email protected]