Embed Size (px)
Citation preview

Contents
The TWAIN Datasource ..................................................................................................................1
Using the TWAIN Datasource ....................................................................................................1
How do I begin? .........................................................................................................................2
Changing or creating a Setting Shortcut ....................................................................................3
The main Scanner window .........................................................................................................5
The Image Settings window .......................................................................................................9Preview area ....................................................................................................................... 11General tab ..........................................................................................................................12Size tab ...............................................................................................................................14Adjust tab: black and white ..................................................................................................17Adjust tab: color/grayscale ..................................................................................................19Enhance tab ........................................................................................................................21Detect tab ............................................................................................................................26
Advanced Image Setup ............................................................................................................28Advanced tab ......................................................................................................................28Content Settings tab ............................................................................................................31Creating color/grayscale or black and white images based on the content of your documents, Example 1 ............................................................................................33Creating multiple images for each side of a document, Example 2 ....................................35Creating different settings for each side of a document, Example 3 ...................................37
The Device Settings window ....................................................................................................39Device - General tab ...........................................................................................................40Device - Transport tab .........................................................................................................43Device - Sorting tab .............................................................................................................46
Precedence for sorting rules ...........................................................................................46Sorting - General tab ......................................................................................................47Sorting - Patch tab ..........................................................................................................49Sorting - Barcode tab ......................................................................................................52
Device - Stacking tab ..........................................................................................................59Device - Indexing tab ...........................................................................................................59Device - Printer tab ..............................................................................................................64Device - Multifeed tab ..........................................................................................................69Device - Batch tab ...............................................................................................................74Device - Patch tab ...............................................................................................................76
Intelligent printing .....................................................................................................................79
The Diagnostics window ..........................................................................................................83Diagnostics - General tab ....................................................................................................84Diagnostics - Debug tab ......................................................................................................85Diagnostics - Logs tab .........................................................................................................86
The Scan Validation Tool ..........................................................................................................87Starting the Scan Validation Tool .........................................................................................87The Scan Validation Tool toolbar buttons ............................................................................88
Appendix A Controlled Dual Stacking ...........................................................................................89
Device - Stacking tab ...............................................................................................................89Recommended configurations for using the Stacking option ..........................................91
A-61848 / TWAIN October 2016 i

ii A-61848 / TWAIN October 2016
The TWAIN Datasource
The information in this guide provides procedures for using the TWAIN/TWAINDSM Datasource as well as descriptions of the features. The same features should be available on the user interface of the scanning application you are using (e.g., Kodak Capture Pro Software).
This guide describes the default TWAIN Datasource interface. Your application may change the TWAIN Datasource user interface to better suit its purpose. If your application provider has customized the TWAIN Datasource interface, it may not match the default screen configurations as described in this guide.
Using the TWAIN Datasource
The Kodak i5x50 Scanners can provide a wide variety of electronic images. This can be done by using the TWAIN Datasource that is provided in concert with your scanning application. The TWAIN Datasource is the part of the capture system which links the scanner to your scanning application.
When using the TWAIN Datasource, the main Scanner window will display a list of Setting Shortcuts. Each Setting Shortcut is a group of specific image and device settings. The supplied Setting Shortcuts represent some common electronic image outputs used for a wide variety of input documents. If none of the Setting Shortcuts meet your scanning needs, you can create a customized Setting Shortcut. For example, you could create a Setting Shortcut called “Invoices” and whenever you want to scan invoices, you simply select that Setting Shortcut. For more information, refer to “Changing or creating a Setting Shortcut” on page 3.
NOTE: If you are using the ISIS Driver, see the Scanning Setup Guide for the ISIS Driver, A-61849 for more information.
If you do not have a scanning application, you may use the Scan Validation Tool to access the TWAIN Datasource and scan with your scanner. The Scan Validation Tool is provided as a diagnostic aid and may not be the best choice for a high-volume scanning application. More information on how to use the Scan Validation Tool is provided at “The Scan Validation Tool” on page 87.
A-61848 / TWAIN October 2016 1
How do I begin? The goal is to make scanning as simple as possible. This is accomplished by selecting a Setting Shortcut from the main Scanner window and then selecting OK/Scan.
The scanner comes with some Setting Shortcuts already defined. In most cases, you will find that these shortcuts are all you will need. If you find that you need different settings, then you should create your own Setting Shortcut. Your shortcut will be added to the list of Setting Shortcuts and available for all future scanning.
Most of the options you will want to set are available on these two windows:
• Image Settings: clicking the Settings button on the main Scanner window, displays the Image Settings window. From this window you can set your image processing parameters by using the General, Size, Adjust, Enhance and Detect tabs. You can also access the Device settings, by clicking the Device button or the Advanced settings by clicking the Advanced Image Setup icon.
• Device Settings: the Device button is located on the Image Settings window. When you select Device, you will have access to the General, Transport, Indexing, Batch, Multifeed and Patch tabs. Other tabs (e.g., Sorting, Stacking, and Printing) may be displayed depending on any accessories that are installed. From the Device Settings window, you can also access Diagnostics.
The procedures that follow describe how to configure a customized Setting Shortcut. Complete descriptions of the features and options on the Scanner window and tabs are found in “The main Scanner window” on page 5.
NOTE: Setting Shortcuts can sometimes be overridden by your scanning application. If this happens, the shortcut you selected will appear in the main Scanner window with the word <Changed> next to it. This is normal for an application that does not use Setting Shortcuts and downloads its preferred individual settings to the scanner first and then provides access to the TWAIN Datasource.
When you click OK to begin scanning, you will be asked if you want to save the changed settings. When using an application that does not use Setting Shortcuts, select No to this prompt and continue scanning.
2 A-61848 / TWAIN October 2016
Changing or creating a Setting Shortcut
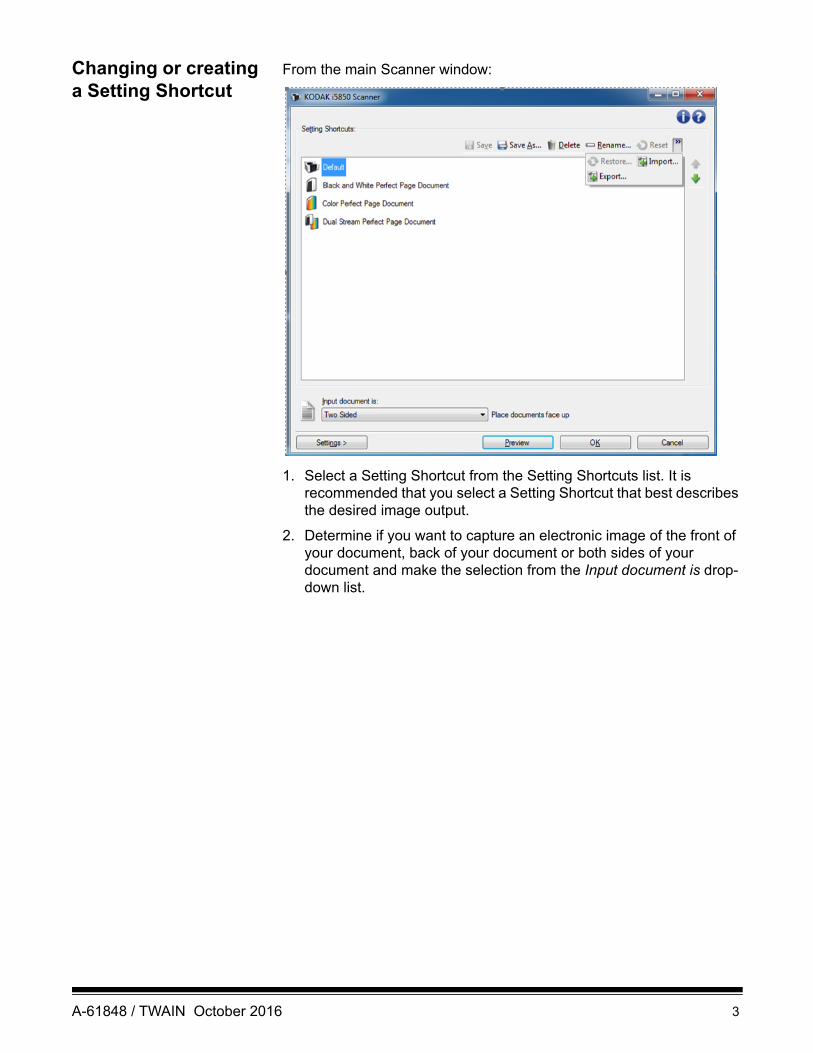
From the main Scanner window:
1. Select a Setting Shortcut from the Setting Shortcuts list. It is recommended that you select a Setting Shortcut that best describes the desired image output.
2. Determine if you want to capture an electronic image of the front of your document, back of your document or both sides of your document and make the selection from the Input document is drop-down list.
A-61848 / TWAIN October 2016 3
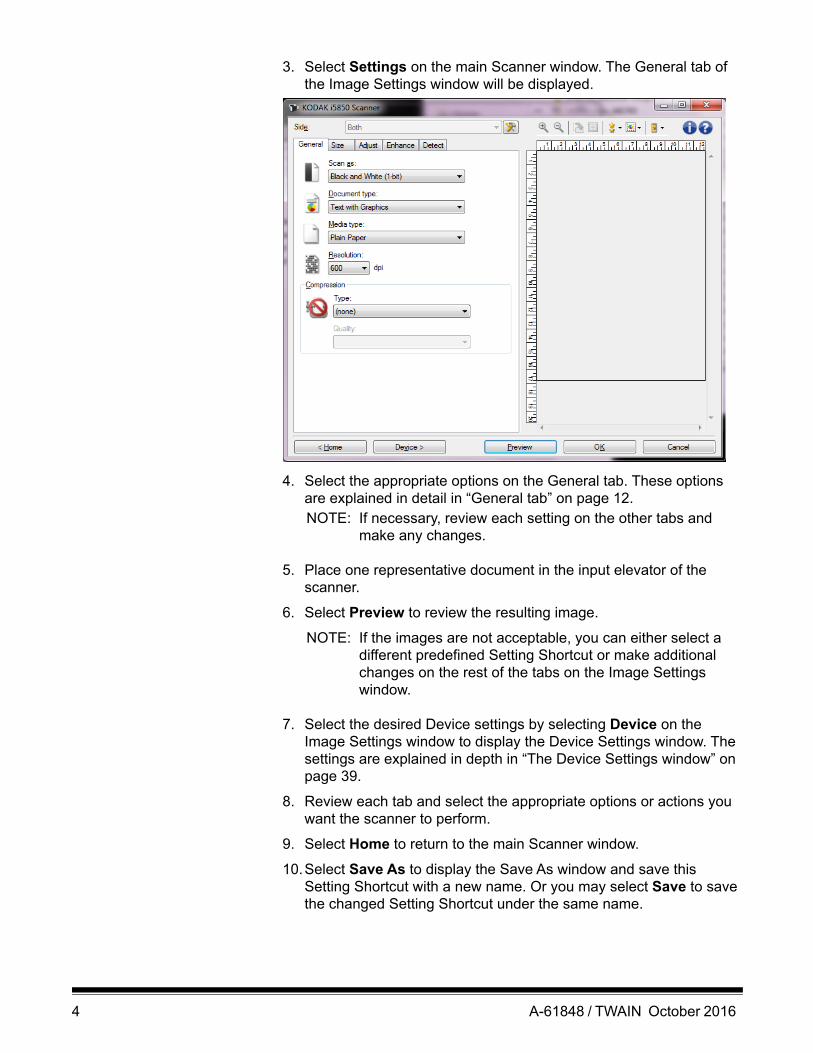
3. Select Settings on the main Scanner window. The General tab of the Image Settings window will be displayed.
4. Select the appropriate options on the General tab. These options are explained in detail in “General tab” on page 12.NOTE: If necessary, review each setting on the other tabs and
make any changes.
5. Place one representative document in the input elevator of the scanner.
6. Select Preview to review the resulting image.
NOTE: If the images are not acceptable, you can either select a different predefined Setting Shortcut or make additional changes on the rest of the tabs on the Image Settings window.
7. Select the desired Device settings by selecting Device on the Image Settings window to display the Device Settings window. The settings are explained in depth in “The Device Settings window” on page 39.
8. Review each tab and select the appropriate options or actions you want the scanner to perform.
9. Select Home to return to the main Scanner window.
10.Select Save As to display the Save As window and save this Setting Shortcut with a new name. Or you may select Save to save the changed Setting Shortcut under the same name.
4 A-61848 / TWAIN October 2016
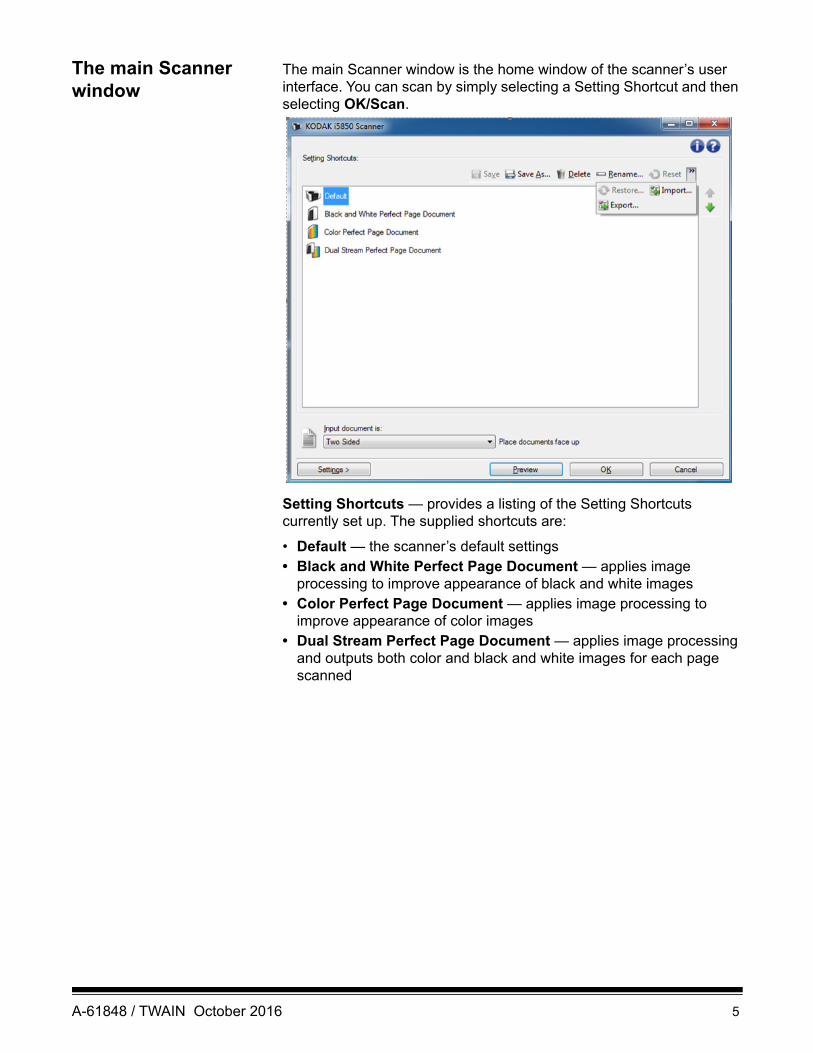
The main Scanner window
The main Scanner window is the home window of the scanner’s user interface. You can scan by simply selecting a Setting Shortcut and then selecting OK/Scan.
Setting Shortcuts — provides a listing of the Setting Shortcuts currently set up. The supplied shortcuts are:
• Default — the scanner’s default settings• Black and White Perfect Page Document — applies image
processing to improve appearance of black and white images• Color Perfect Page Document — applies image processing to
improve appearance of color images• Dual Stream Perfect Page Document — applies image processing
and outputs both color and black and white images for each page scanned
A-61848 / TWAIN October 2016 5
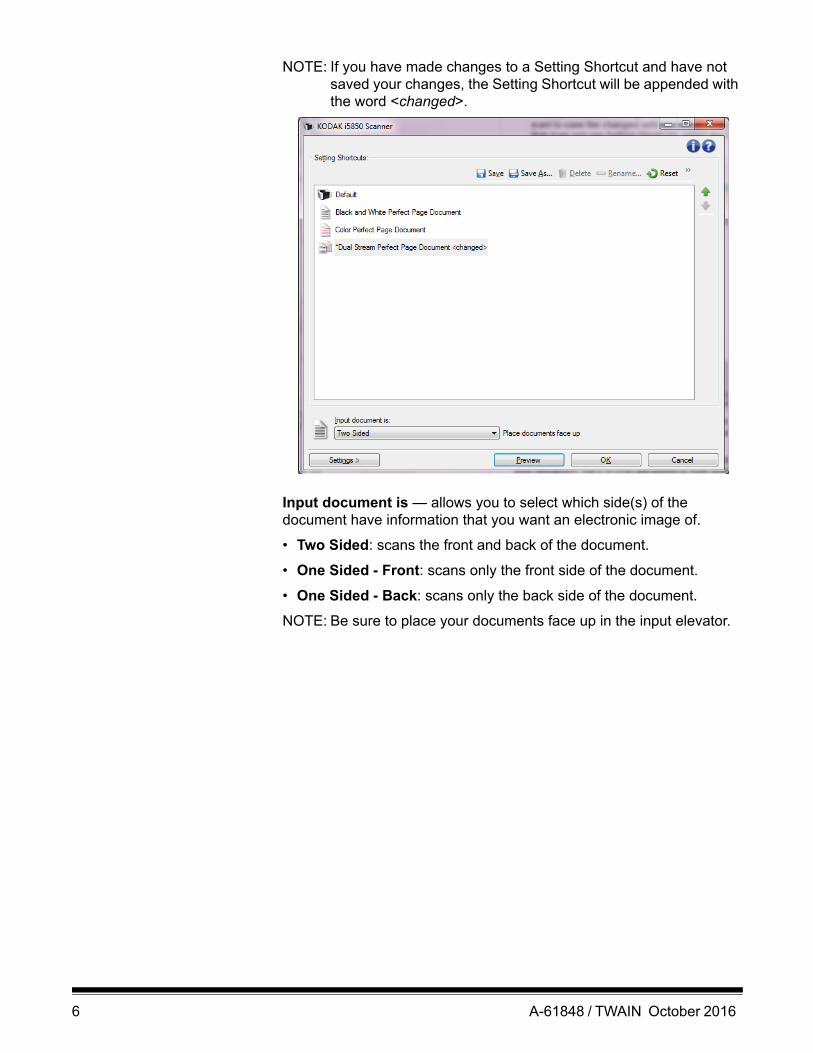
NOTE: If you have made changes to a Setting Shortcut and have not saved your changes, the Setting Shortcut will be appended with the word <changed>.
Input document is — allows you to select which side(s) of the document have information that you want an electronic image of.
• Two Sided: scans the front and back of the document.
• One Sided - Front: scans only the front side of the document.
• One Sided - Back: scans only the back side of the document.
NOTE: Be sure to place your documents face up in the input elevator.
6 A-61848 / TWAIN October 2016
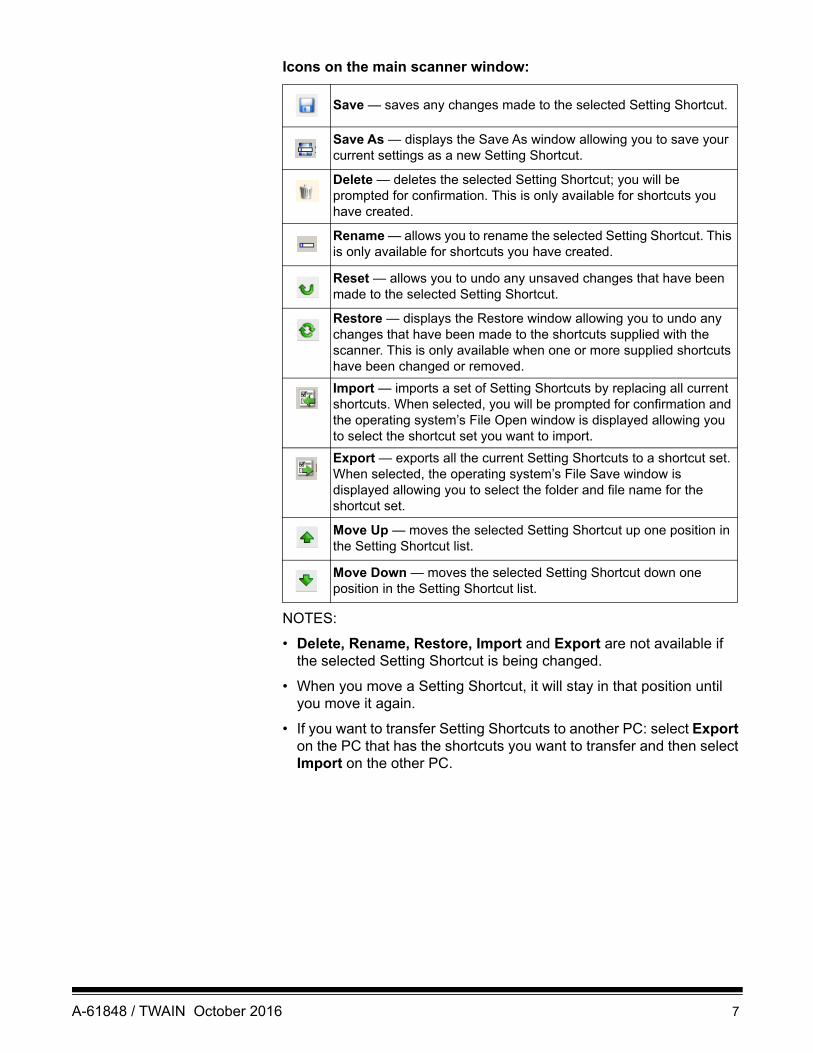
Icons on the main scanner window:
NOTES:
• Delete, Rename, Restore, Import and Export are not available if the selected Setting Shortcut is being changed.
• When you move a Setting Shortcut, it will stay in that position until you move it again.
• If you want to transfer Setting Shortcuts to another PC: select Export on the PC that has the shortcuts you want to transfer and then select Import on the other PC.
Save — saves any changes made to the selected Setting Shortcut.
Save As — displays the Save As window allowing you to save your current settings as a new Setting Shortcut.
Delete — deletes the selected Setting Shortcut; you will be prompted for confirmation. This is only available for shortcuts you have created.
Rename — allows you to rename the selected Setting Shortcut. This is only available for shortcuts you have created.
Reset — allows you to undo any unsaved changes that have been made to the selected Setting Shortcut.
Restore — displays the Restore window allowing you to undo any changes that have been made to the shortcuts supplied with the scanner. This is only available when one or more supplied shortcuts have been changed or removed.
Import — imports a set of Setting Shortcuts by replacing all current shortcuts. When selected, you will be prompted for confirmation and the operating system’s File Open window is displayed allowing you to select the shortcut set you want to import.
Export — exports all the current Setting Shortcuts to a shortcut set. When selected, the operating system’s File Save window is displayed allowing you to select the folder and file name for the shortcut set.
Move Up — moves the selected Setting Shortcut up one position in the Setting Shortcut list.
Move Down — moves the selected Setting Shortcut down one position in the Setting Shortcut list.
A-61848 / TWAIN October 2016 7
Settings — displays the Image Settings window which allows you to make changes to the selected Setting Shortcut. From this window you can also access the Device settings and Diagnostic windows.
Preview — initiates a scan and then displays the Image Settings window with the scanned image placed in the preview area. The image displayed is a sample based on your current shortcut settings.
OK/Scan — when selected, you will be prompted to save any unsaved changes.
NOTE: If this button is OK, any unsaved changes will remain in effect for the current scan session.
Cancel — closes the main Scanner window and discards any changes.
Information Icons
About: displays the scanners’ version and copyright information.
Help: displays help information for the window currently being displayed.
8 A-61848 / TWAIN October 2016
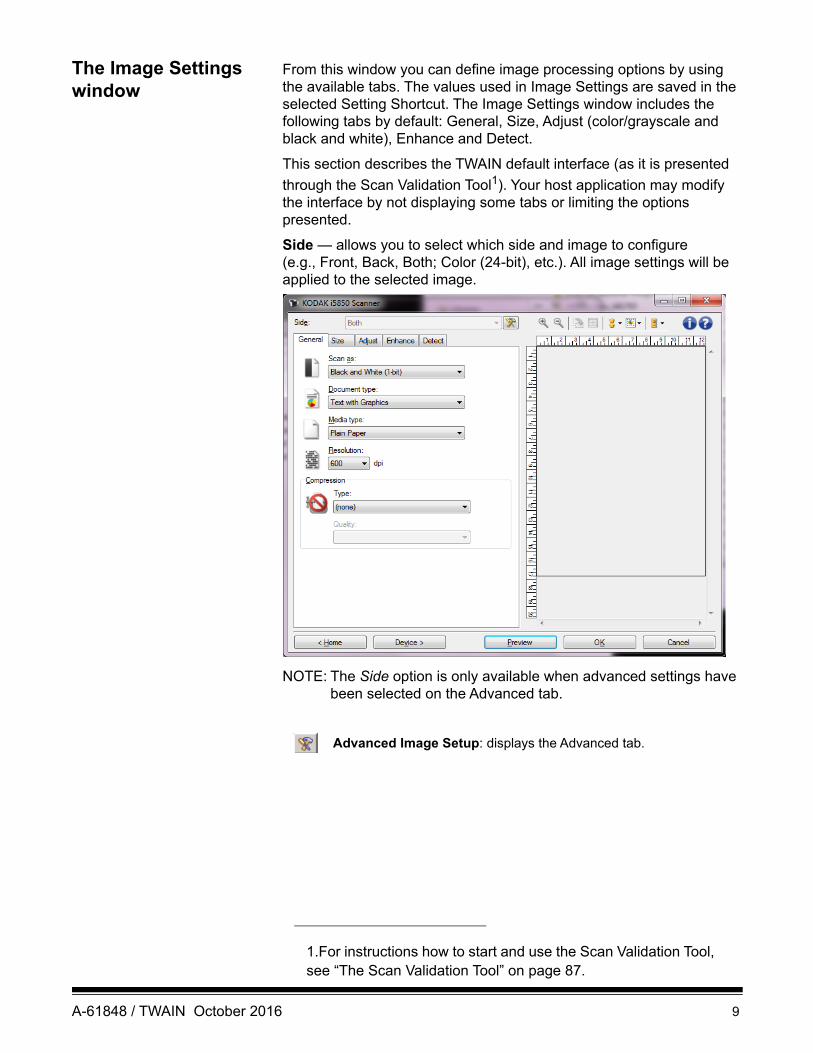
The Image Settings window
From this window you can define image processing options by using the available tabs. The values used in Image Settings are saved in the selected Setting Shortcut. The Image Settings window includes the following tabs by default: General, Size, Adjust (color/grayscale and black and white), Enhance and Detect.
This section describes the TWAIN default interface (as it is presented
through the Scan Validation Tool1). Your host application may modify the interface by not displaying some tabs or limiting the options presented.
Side — allows you to select which side and image to configure (e.g., Front, Back, Both; Color (24-bit), etc.). All image settings will be applied to the selected image.
NOTE: The Side option is only available when advanced settings have been selected on the Advanced tab.
1.For instructions how to start and use the Scan Validation Tool, see “The Scan Validation Tool” on page 87.
Advanced Image Setup: displays the Advanced tab.
A-61848 / TWAIN October 2016 9
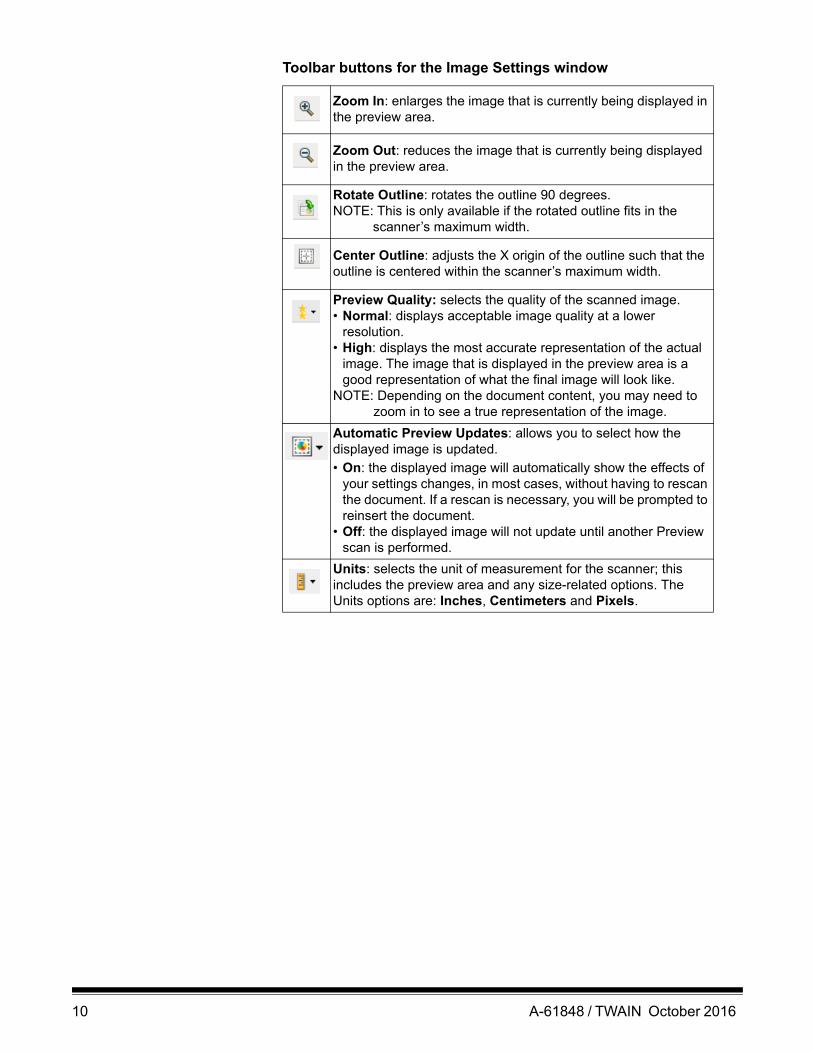
Toolbar buttons for the Image Settings window
Zoom In: enlarges the image that is currently being displayed in the preview area.
Zoom Out: reduces the image that is currently being displayed in the preview area.
Rotate Outline: rotates the outline 90 degrees.NOTE: This is only available if the rotated outline fits in the
scanner’s maximum width.
Center Outline: adjusts the X origin of the outline such that the outline is centered within the scanner’s maximum width.
Preview Quality: selects the quality of the scanned image.• Normal: displays acceptable image quality at a lower
resolution.• High: displays the most accurate representation of the actual
image. The image that is displayed in the preview area is a good representation of what the final image will look like.
NOTE: Depending on the document content, you may need to zoom in to see a true representation of the image.
Automatic Preview Updates: allows you to select how the displayed image is updated.
• On: the displayed image will automatically show the effects of your settings changes, in most cases, without having to rescan the document. If a rescan is necessary, you will be prompted to reinsert the document.
• Off: the displayed image will not update until another Preview scan is performed.
Units: selects the unit of measurement for the scanner; this includes the preview area and any size-related options. The Units options are: Inches, Centimeters and Pixels.
10 A-61848 / TWAIN October 2016
Preview area The preview area displays a sample image that is based on your current shortcut settings. An image will be displayed in this area after a preview scan has been performed.
Outline — if you select Document: Manually Select or Image: Part of document on the Size tab, the preview area will also show the current Outline selections. If the outline does not align with your preview image, you may use the mouse to adjust the size and location of the outline. As the mouse cursor moves around the outline, the cursor will change indicating that you can adjust the outline by pressing and holding the left mouse button.
• Move: place the mouse cursor within the outline to adjust the location of the outline.
• Corner: place the mouse cursor over one of the corner graphics to adjust two sides at the same time.
• Side: place the mouse cursor over one of the side graphics to adjust that side.
• Rotate: place the mouse cursor over the rotated graphic to adjust the angle of the outline.
Home — returns you to the main Scanner window.
Device — displays the Device Settings window.
Preview — initiates a scan and places the image in the preview area. The image displayed is a sample based on your current shortcut settings.
OK/Scan — when selected, you will be prompted to save any unsaved changes.
NOTE: If this button is OK, any unsaved changes will remain in effect for the current scan session.
Cancel — closes the main Scanner window without saving any changes.
A-61848 / TWAIN October 2016 11
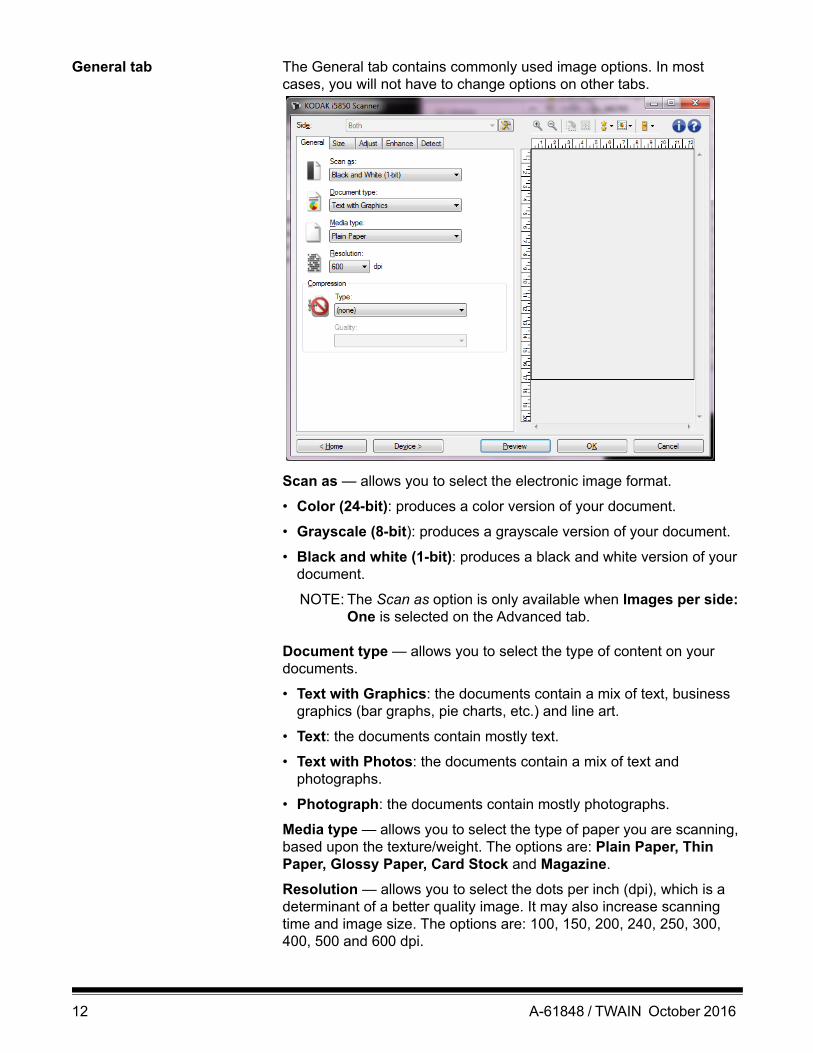
General tab The General tab contains commonly used image options. In most cases, you will not have to change options on other tabs.
Scan as — allows you to select the electronic image format.
• Color (24-bit): produces a color version of your document.
• Grayscale (8-bit): produces a grayscale version of your document.
• Black and white (1-bit): produces a black and white version of your document.
NOTE: The Scan as option is only available when Images per side: One is selected on the Advanced tab.
Document type — allows you to select the type of content on your documents.
• Text with Graphics: the documents contain a mix of text, business graphics (bar graphs, pie charts, etc.) and line art.
• Text: the documents contain mostly text.
• Text with Photos: the documents contain a mix of text and photographs.
• Photograph: the documents contain mostly photographs.
Media type — allows you to select the type of paper you are scanning, based upon the texture/weight. The options are: Plain Paper, Thin Paper, Glossy Paper, Card Stock and Magazine.
Resolution — allows you to select the dots per inch (dpi), which is a determinant of a better quality image. It may also increase scanning time and image size. The options are: 100, 150, 200, 240, 250, 300, 400, 500 and 600 dpi.
12 A-61848 / TWAIN October 2016
Compression — allows you to reduce your electronic image size.
• Type: the scanner will produce a color version of your document.
- (none): no compression, which may produce a large image size.- Group-4: uses a CCITT standard to compress a black and white
image, often used in conjunction with TIFF files.- JPEG: uses JPEG techniques to compress the image.
• Quality — if you choose JPEG compression, select one of the quality options:
- Draft: maximum compression which produces the smallest image size.
- Good: a fair amount of compression but still produces acceptable image quality.
- Better: some compression which produces decent image quality.- Best: minimal compression which produces very good image
quality.- Superior: the least amount of compression which produces the
largest image size.
NOTE: This option is not applied to the preview image.
A-61848 / TWAIN October 2016 13

Size tab
Document — allows you to select how the scanner will detect your document as it is being fed through the scanner.
• Automatically Detect and Straighten: the scanner will automatically find each document (regardless of size) and will straighten any document that may have been fed crooked.
• Automatically Detect: the scanner will automatically find each document (regardless of size). If a document is fed crooked, it will not be straightened.
• Manually Select: the scanner will return an image based on the area you specify with the Outline options. It is suggested that you only use this option for scan jobs that contain same-sized documents.
Image — allows you to select which part of the document you want to use for creating your electronic image.
• Entire document: if you select Document: Automatically Detect and Straighten, Document: Automatically Detect or Document: Manually Select, returns the entire document.
• Part of the document: if you select Document: Automatically Detect and Straighten, returns the portion of the document which you specify with the Outline options.
14 A-61848 / TWAIN October 2016

Outline — allows you to select the location and size to use for creating your electronic image. The preview area will show the outline.
• Origin (x, y):
- if you select Document: Automatically Detect and Straighten, (x) this is the distance from the left edge of the document and (y) is the distance from the top edge of the document.
- if you select Document: Manually Select (x) is the distance from the left edge of the scanner’s paper path and (y) is the distance from the first portion of the document detected by the scanner.
• Size (w, h): if you select Document: Automatically Detect and Straighten or Document: Manually Select, this is the width and height of the electronic image.
NOTE: The electronic image may be shorter than you specified if the outline goes beyond the end of the scanned document.
• Angle: allows you to select the angle of the outline.
• Predefined sizes: provides a list of commonly used paper sizes. Selecting an item in this list will automatically set the size of the outline to that paper’s size. Custom will be displayed when the outline size does not match any sizes in the list.
NOTE: You can also adjust the outline displayed in the preview area using your mouse.
Border — allows you to select what action to perform on the edges of your electronic image.
• (none)
• Add: includes up to approximately 0.25 cm (0.1 inches) of border around all of the image edges.
NOTE: This option is only available for Document: Automatically Detect and Straighten, Document: Automatically Detect or Document: Manually Select.
A-61848 / TWAIN October 2016 15
• Remove: produces an image that contains just the document by eliminating any residual border. Residual border can be caused by variations in a document edge; for example, when a document is not a perfect rectangle and/or was fed crooked.
NOTES:• While this option will not remove large amounts of residual
border, there is a possibility that a small amount of the document will be lost.
• This option is only available when both Document: Automatically Detect and Straighten and Image: Entire Document are selected.
Post-scan rotation options — allows you to select any rotation to be applied to the electronic image after is has been scanned.
• (none)
• Automatic — the scanner will analyze each document to determine how it was fed and will rotate the image to the proper orientation.
• Automatic - default to 90: the scanner will analyze the content of each document to determine how it was fed and will rotate the image to the proper orientation. If the scanner cannot determine how the document was fed, it will rotate the image 90 degrees.
• Automatic - default 180: the scanner will analyze the content of each document to determine how it was fed and will rotate the image to the proper orientation. If the scanner cannot determine how the document was fed, it will rotate the image 180 degrees.
• Automatic - default 270: the scanner will analyze the content of each document to determine how it was fed and will rotate the image to the proper orientation. If the scanner cannot determine how the document was fed, it will rotate the image 270 degrees.
• 90, 180, 270 degrees — the amount of rotation that will be performed.
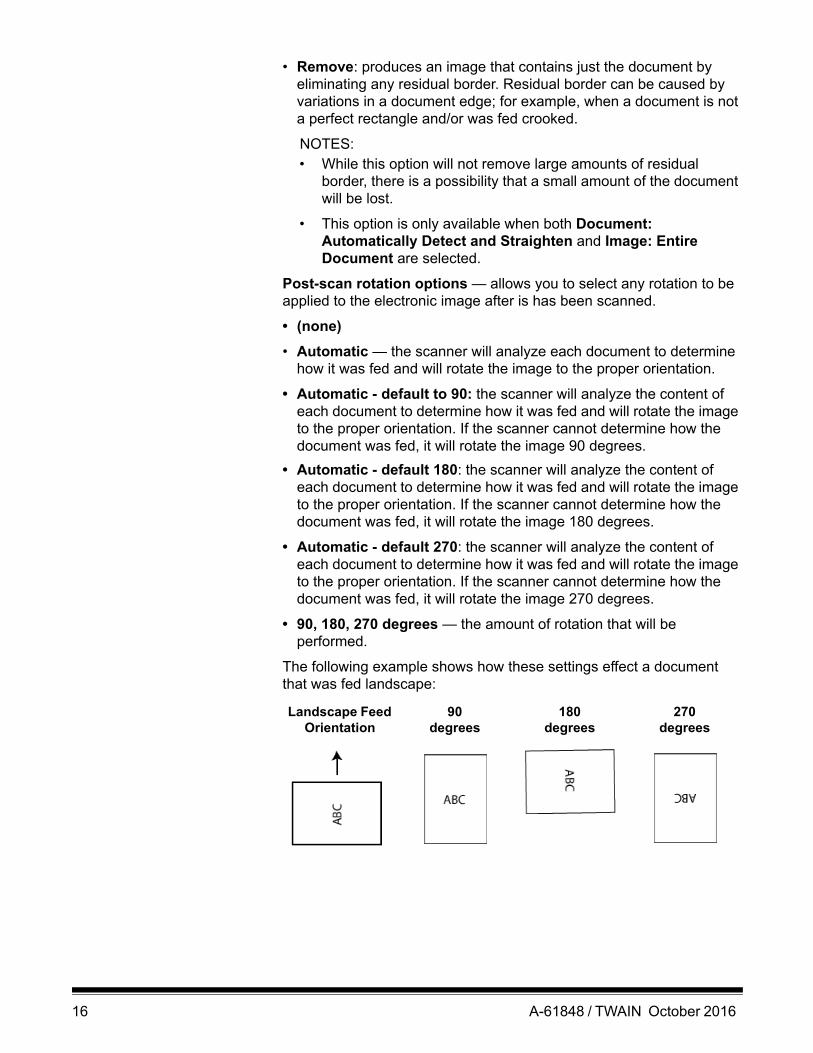
The following example shows how these settings effect a document that was fed landscape:
Landscape Feed Orientation
90 degrees
180 degrees
270 degrees
16 A-61848 / TWAIN October 2016
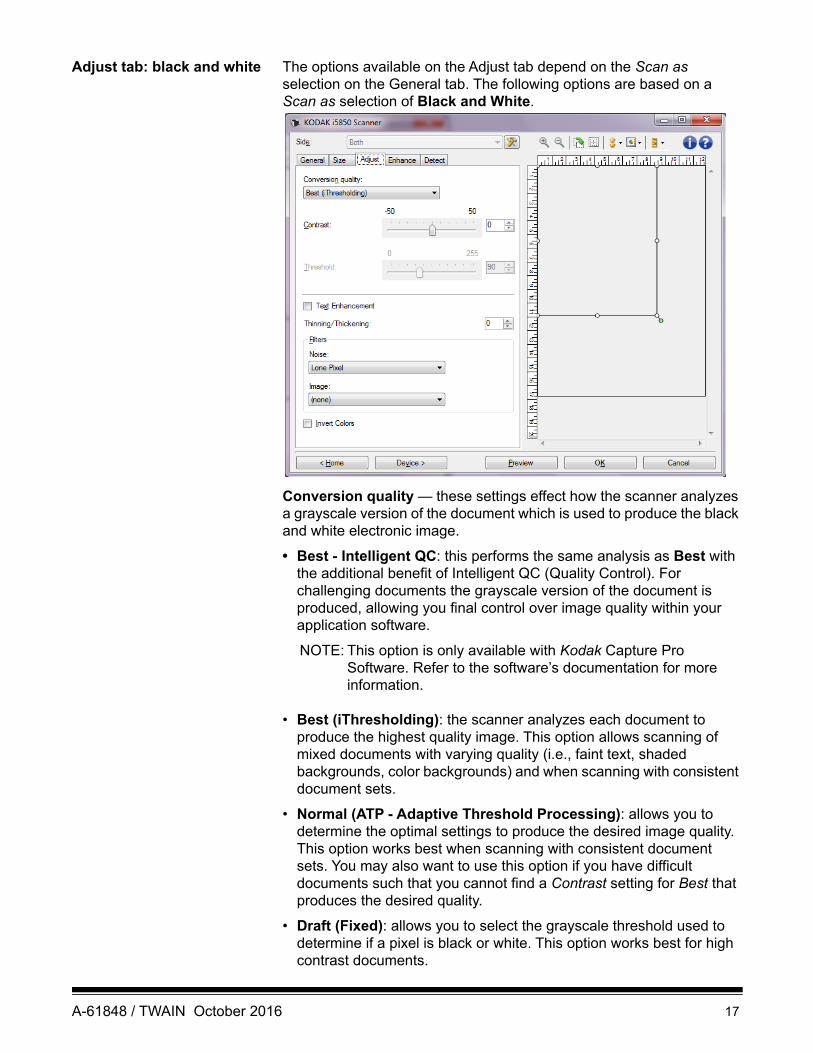
Adjust tab: black and white The options available on the Adjust tab depend on the Scan as selection on the General tab. The following options are based on a Scan as selection of Black and White.
Conversion quality — these settings effect how the scanner analyzes a grayscale version of the document which is used to produce the black and white electronic image.
• Best - Intelligent QC: this performs the same analysis as Best with the additional benefit of Intelligent QC (Quality Control). For challenging documents the grayscale version of the document is produced, allowing you final control over image quality within your application software.
NOTE: This option is only available with Kodak Capture Pro Software. Refer to the software’s documentation for more information.
• Best (iThresholding): the scanner analyzes each document to produce the highest quality image. This option allows scanning of mixed documents with varying quality (i.e., faint text, shaded backgrounds, color backgrounds) and when scanning with consistent document sets.
• Normal (ATP - Adaptive Threshold Processing): allows you to determine the optimal settings to produce the desired image quality. This option works best when scanning with consistent document sets. You may also want to use this option if you have difficult documents such that you cannot find a Contrast setting for Best that produces the desired quality.
• Draft (Fixed): allows you to select the grayscale threshold used to determine if a pixel is black or white. This option works best for high contrast documents.
A-61848 / TWAIN October 2016 17
Contrast — allows you to make an image sharper or softer. Decreasing this setting makes the image softer and reduce noise in the image. Increasing this setting makes the image clearer and light information more visible. The options range from -50 to 50. The default is 0.
NOTE: This is only available for Conversion quality: Best and Conversion quality: Normal.
Threshold — aids in controlling the level at which a pixel is considered black or white. Decreasing this setting will make the image appear lighter, and can be used to subdue background noise. Increasing this setting will make the image appear darker, and can be used to help pick up light information. This options range from 0 to 255. The default is 90.
NOTE: This is only available for Conversion quality: Normal and Conversion quality: Draft.
Text Enhancement — allows you to configure the scanner to improve the appearance of text. Turn this option on if your document is mostly text and the characters are disconnected or not smooth. This option is only available for the i5x50 Scanner.
NOTE: This may have no effect on small fonts and effectiveness may be diminished if Thinning/Thickening is being used.
Thinning/Thickening — allows you to make the pixels thinner or thicker. Decreasing this setting will make the pixels thinner/smaller. Increasing this setting will make the pixels thicker/larger. The default is 0, no thinning or thickening.
Filters • Noise
- (none)- Lone Pixel: reduces random noise by converting a single black
pixel to white when it is completely surrounded by white pixels or by converting a single white pixel to black when it is completely surrounded by black pixels.
- Majority Rule: sets each pixel based on its surrounding pixels. The pixel will become white if the majority of the surrounding pixels are white and vice versa.
- Background: locates and analyzes the background areas of the image (e.g., non-text areas) and reduces random noise that may be multiple pixels in size.
• Image
- (none)- Halftone Removal: enhances dot matrix text and images with
halftone screens (e.g., newspaper photographs).
Invert Colors — allows you to select how the black pixels will be stored in the image. By default the black pixels are stored as black and the white pixels are stored as white. Turn this option on if you want the black pixels stored as white and the white pixels stored as black.
18 A-61848 / TWAIN October 2016
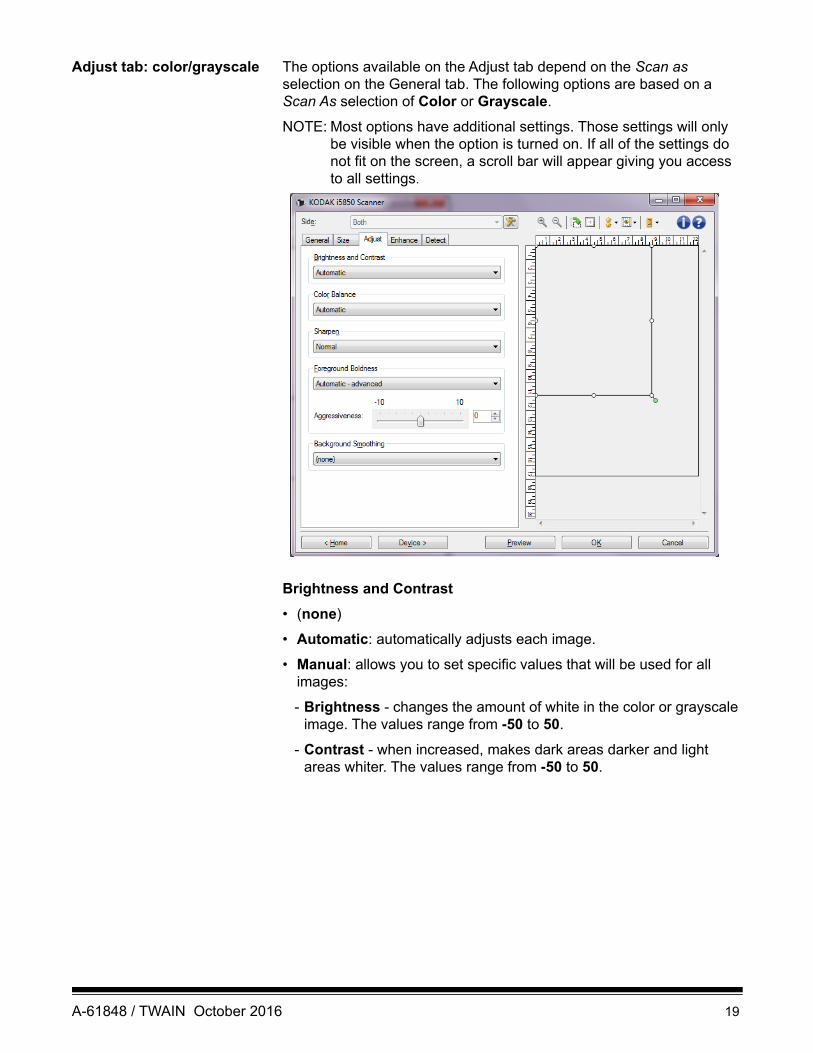
Adjust tab: color/grayscale The options available on the Adjust tab depend on the Scan as selection on the General tab. The following options are based on a Scan As selection of Color or Grayscale.
NOTE: Most options have additional settings. Those settings will only be visible when the option is turned on. If all of the settings do not fit on the screen, a scroll bar will appear giving you access to all settings.
Brightness and Contrast
• (none)
• Automatic: automatically adjusts each image.
• Manual: allows you to set specific values that will be used for all images:
- Brightness - changes the amount of white in the color or grayscale image. The values range from -50 to 50.
- Contrast - when increased, makes dark areas darker and light areas whiter. The values range from -50 to 50.
A-61848 / TWAIN October 2016 19
Color Balance
• (none)
• Automatic: adjusts the white background of each document to pure white. This option compensates for the variations that occur between different weights and brands of paper. This is not recommended for use with photographs.
• Automatic - advanced: for advanced users who want to further adjust the Automatic option.- Aggressiveness - allows you to adjust the extent of the variation.
Increasing this value can help with documents that have yellowed due to age. The values range from -2 to 2.
• Manual: allows you to set specific values that will be used for all images:- Red - changes the amount of red in the color image. The values
range from -50 to 50.- Blue - changes the amount of blue in the color image. The values
range from -50 to 50.- Green - changes the amount of green in the color image. The
values range from -50 to 50.
NOTE: Color Balance is not available for grayscale images.
Sharpen - increases how noticeable the edges within the image are.• (none)• Normal• High• Exaggerated
Foreground Boldness — use this option for documents or forms where you want the foreground (e.g., text, lines, etc.) to be more prominent.
• (none)
• Automatic: all of the foreground will be bolder.
• Automatic - advanced: for advanced users that want to further adjust the Automatic option.
- Aggressiveness - allows you to adjust the extent at which the foreground is determined. The values range from -10 to 10.
Background Smoothing — using this option for documents or forms with a background color will help produce images with a more uniform background color. This option improves image quality and may reduce file size.
• (none)
• Automatic: smooths up to three background colors.
• Automatic - advanced: for advanced users that want to further adjust the Automatic option.
- Aggressiveness - allows you to adjust the extent at which the background(s) are determined. The values range from -10 to 10.
20 A-61848 / TWAIN October 2016
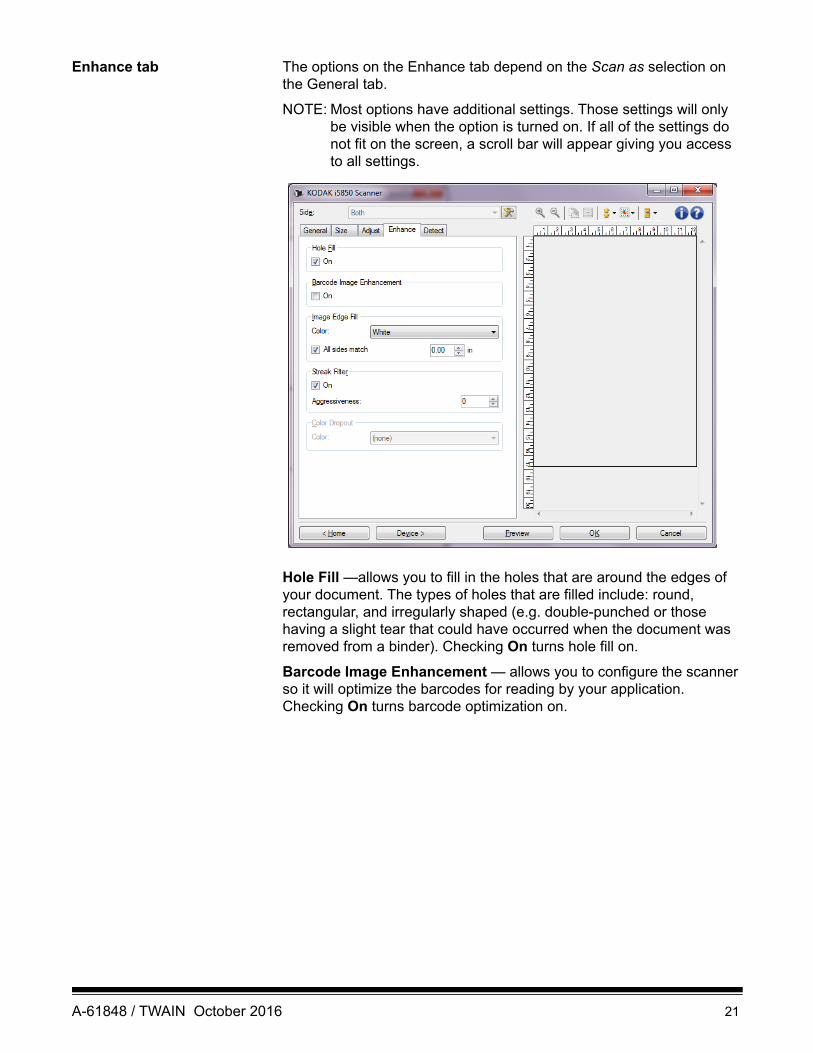
Enhance tab The options on the Enhance tab depend on the Scan as selection on the General tab.
NOTE: Most options have additional settings. Those settings will only be visible when the option is turned on. If all of the settings do not fit on the screen, a scroll bar will appear giving you access to all settings.
Hole Fill —allows you to fill in the holes that are around the edges of your document. The types of holes that are filled include: round, rectangular, and irregularly shaped (e.g. double-punched or those having a slight tear that could have occurred when the document was removed from a binder). Checking On turns hole fill on.
Barcode Image Enhancement — allows you to configure the scanner so it will optimize the barcodes for reading by your application. Checking On turns barcode optimization on.
A-61848 / TWAIN October 2016 21
Image Edge Fill — fills the edges of the final electronic image by covering the area with the specified color.
• Color: - (none)- Automatic: the scanner will automatically fill the edges of the image
using the surrounding color.- Automatic - include tears: in addition to filling the edges, the
scanner will also fill in tears along the edge of document.- White- Black
• All sides match: when turned on, an equal amount will be filled in on all sides. This option is only available for Black or White.
• Top: determines how much of the top edge will be filled in.
• Left/Right: the option on the left will determine how much of the left edge will be filled in and the option on the right will determine how much of the right edge will be filled in.
• Bottom: determines how much of the bottom edge will be filled in.
NOTES:
• The Top, Left/Right and Bottom options are not available when All sides match is turned on.
• When using Image Edge Fill, be careful not to enter a value too large as it could fill in image data that you want to keep.
This option is not applied to the preview image.
Streak Filter — allows you to configure the scanner to filter vertical streaks from your images. Streaks are lines which may appear on an image and are not part of the original document. Streaks may be caused by contaminants on your documents (e.g., dirt, dust or frayed edges) or by not following the recommended cleaning procedures for your scanner.
• On: turns streak filter on.
• Aggressiveness: allows you to adjust the extent at which the streaks are filtered. The values range from -2 to 2. The default is 0.
22 A-61848 / TWAIN October 2016
Color Dropout — used to eliminate a form's background so that only the entered data is included in the electronic image (i.e., remove the form’s lines and boxes). For black and white images, these settings effect the grayscale version of the document which the scanner analyzes to produce that electronic image.
• Color: select the desired dropout color.- (none)- Multiple: drops colors other than dark shades (e.g., black or dark
blue ink). This feature does a color analysis of every image scanned and drops out up to 5 different colors. The individual colors could be any of more than 16 million colors. Use the Aggressiveness slider to adjust the color. You do not need to pick which color(s) to drop. Multiple is available for grayscale output.
- Predominant: drops the predominant color. Use this option even if your forms are all the same color, as it drops a wider range of single colors. This option is also a good choice if you have several forms that each have one form color as you can mix the forms in a single batch.
- Red- Green- Blue- Orange- Orange and Red
• Aggressiveness: allows you to adjust the extent at which colors are dropped. The values range from -10 to 10. The default is 0. This option is only available when Color is set to Multiple or Predominant.
• Include non-dropped image: for each dropout image, the scanner will also generate the original version of the image (i.e., the application will receive two separate images).
NOTE: All Color Dropout options are available when the Scan as selection is Black and White or Grayscale.
A-61848 / TWAIN October 2016 23
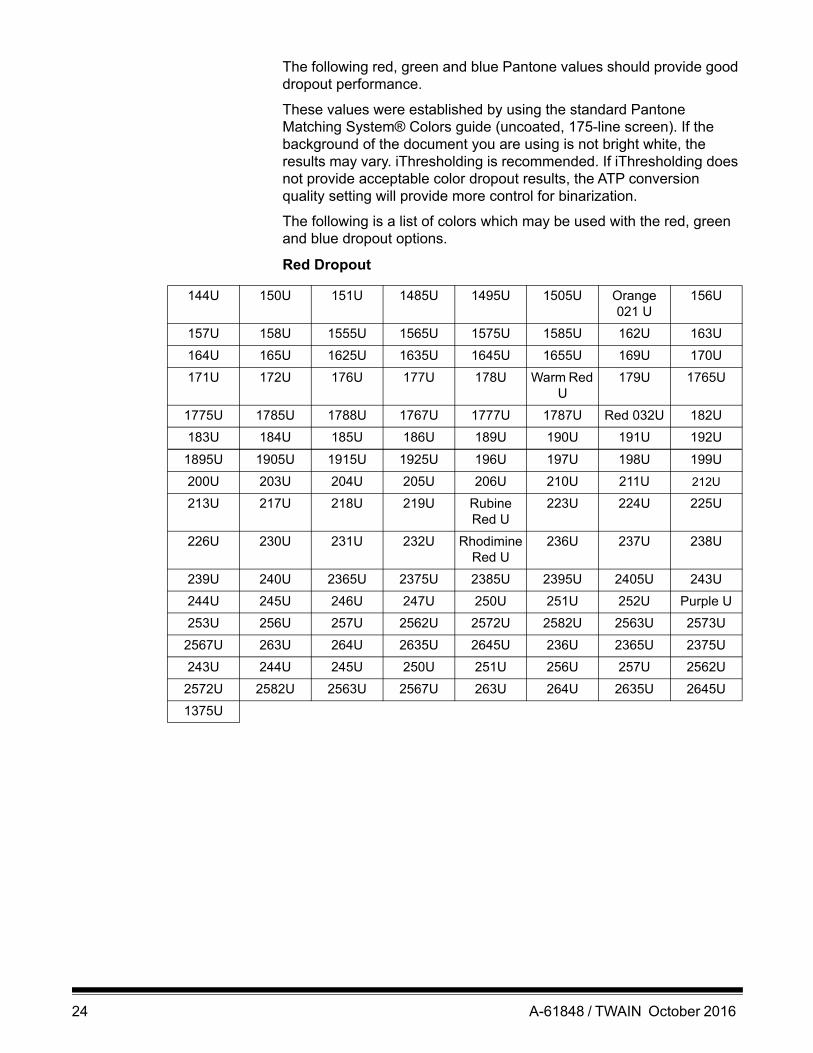
The following red, green and blue Pantone values should provide good dropout performance.
These values were established by using the standard Pantone
Matching System® Colors guide (uncoated, 175-line screen). If the background of the document you are using is not bright white, the results may vary. iThresholding is recommended. If iThresholding does not provide acceptable color dropout results, the ATP conversion quality setting will provide more control for binarization.
The following is a list of colors which may be used with the red, green and blue dropout options.
Red Dropout
144U 150U 151U 1485U 1495U 1505U Orange 021 U
156U
157U 158U 1555U 1565U 1575U 1585U 162U 163U
164U 165U 1625U 1635U 1645U 1655U 169U 170U
171U 172U 176U 177U 178U Warm Red U
179U 1765U
1775U 1785U 1788U 1767U 1777U 1787U Red 032U 182U
183U 184U 185U 186U 189U 190U 191U 192U
1895U 1905U 1915U 1925U 196U 197U 198U 199U
200U 203U 204U 205U 206U 210U 211U 212U
213U 217U 218U 219U Rubine Red U
223U 224U 225U
226U 230U 231U 232U Rhodimine Red U
236U 237U 238U
239U 240U 2365U 2375U 2385U 2395U 2405U 243U
244U 245U 246U 247U 250U 251U 252U Purple U
253U 256U 257U 2562U 2572U 2582U 2563U 2573U
2567U 263U 264U 2635U 2645U 236U 2365U 2375U
243U 244U 245U 250U 251U 256U 257U 2562U
2572U 2582U 2563U 2567U 263U 264U 2635U 2645U
1375U
24 A-61848 / TWAIN October 2016
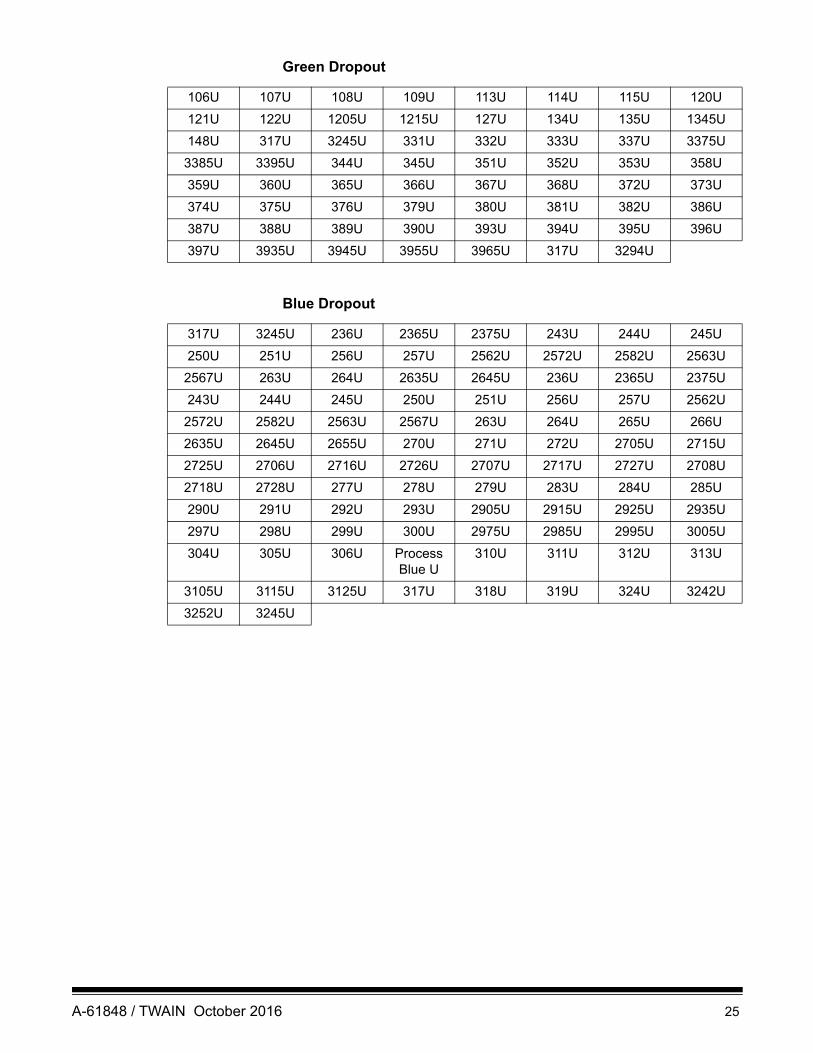
Green Dropout
Blue Dropout
106U 107U 108U 109U 113U 114U 115U 120U
121U 122U 1205U 1215U 127U 134U 135U 1345U
148U 317U 3245U 331U 332U 333U 337U 3375U
3385U 3395U 344U 345U 351U 352U 353U 358U
359U 360U 365U 366U 367U 368U 372U 373U
374U 375U 376U 379U 380U 381U 382U 386U
387U 388U 389U 390U 393U 394U 395U 396U
397U 3935U 3945U 3955U 3965U 317U 3294U
317U 3245U 236U 2365U 2375U 243U 244U 245U
250U 251U 256U 257U 2562U 2572U 2582U 2563U
2567U 263U 264U 2635U 2645U 236U 2365U 2375U
243U 244U 245U 250U 251U 256U 257U 2562U
2572U 2582U 2563U 2567U 263U 264U 265U 266U
2635U 2645U 2655U 270U 271U 272U 2705U 2715U
2725U 2706U 2716U 2726U 2707U 2717U 2727U 2708U
2718U 2728U 277U 278U 279U 283U 284U 285U
290U 291U 292U 293U 2905U 2915U 2925U 2935U
297U 298U 299U 300U 2975U 2985U 2995U 3005U
304U 305U 306U Process Blue U
310U 311U 312U 313U
3105U 3115U 3125U 317U 318U 319U 324U 3242U
3252U 3245U
A-61848 / TWAIN October 2016 25
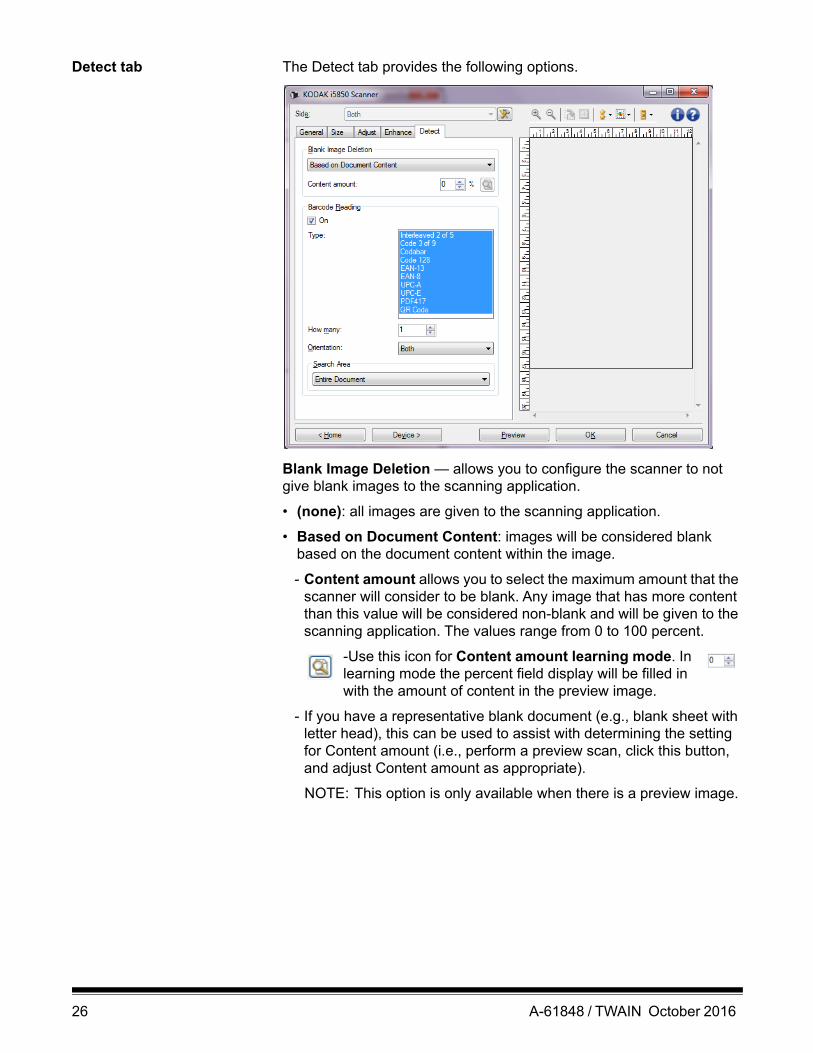
Detect tab The Detect tab provides the following options.
Blank Image Deletion — allows you to configure the scanner to not give blank images to the scanning application.
• (none): all images are given to the scanning application.
• Based on Document Content: images will be considered blank based on the document content within the image.
- Content amount allows you to select the maximum amount that the scanner will consider to be blank. Any image that has more content than this value will be considered non-blank and will be given to the scanning application. The values range from 0 to 100 percent.
-Use this icon for Content amount learning mode. In learning mode the percent field display will be filled in with the amount of content in the preview image.
- If you have a representative blank document (e.g., blank sheet with letter head), this can be used to assist with determining the setting for Content amount (i.e., perform a preview scan, click this button, and adjust Content amount as appropriate).
NOTE: This option is only available when there is a preview image.
26 A-61848 / TWAIN October 2016

• Based on Size: images will be considered blank based on the size of the image that would be given to the scanning application (i.e., after all other settings have been applied).
- Final image size: allows you to select the minimum image size that the scanner will consider to be non-blank. Any image that is less than this value will be considered blank and will not be given to the scanning application. The values range from 1 to 1000 KB (1 KB equals 1024 bytes).
Barcode Reading — allows you to configure the scanner to search your images for barcodes and return the information to the scanning application. Checking On turns barcode reading on.
• Type: select one or more barcode types you want the scanner to search for:
- Codabar- Code 128- Code 3 of 9- EAN-13- EAN-8- Interleaved 2 of 5- UPC-A- UPC-E- PDF417- QR Code
• How many: select the number of barcodes the scanner will search for.
• Orientation: select the orientation of the barcodes to search for. Selections are: Horizontal, Vertical or Both.
NOTE: This is relative to the final image (i.e., after any cropping and rotation has been applied).
• Search Area: select the area of the image to search.
- Entire Document- Part of Document
Origin (x, y): (x) is the distance from the left edge of the image and (y) is the distance from the top edge of the image.
Size (w, h): the width and height of the area to search.
NOTE: These are relative to the final image (i.e., after any cropping and rotation has been applied).
A-61848 / TWAIN October 2016 27
Advanced Image Setup
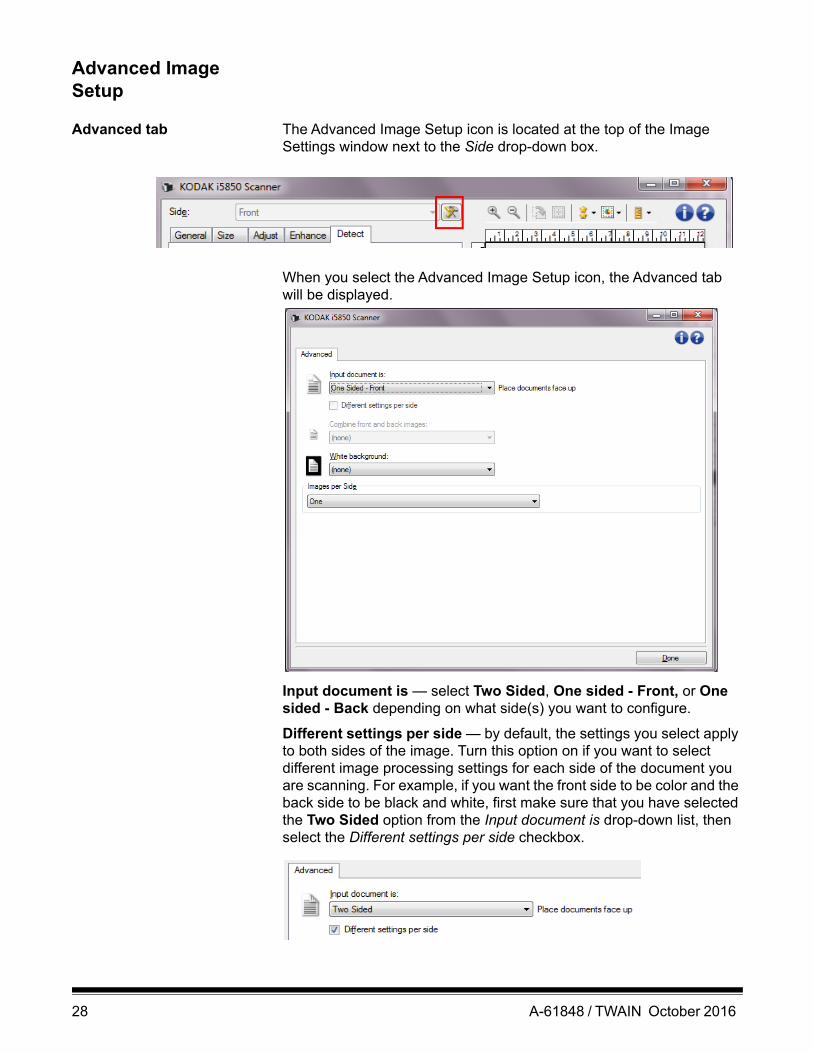
Advanced tab The Advanced Image Setup icon is located at the top of the Image Settings window next to the Side drop-down box.
When you select the Advanced Image Setup icon, the Advanced tab will be displayed.
Input document is — select Two Sided, One sided - Front, or One sided - Back depending on what side(s) you want to configure.
Different settings per side — by default, the settings you select apply to both sides of the image. Turn this option on if you want to select different image processing settings for each side of the document you are scanning. For example, if you want the front side to be color and the back side to be black and white, first make sure that you have selected the Two Sided option from the Input document is drop-down list, then select the Different settings per side checkbox.
28 A-61848 / TWAIN October 2016
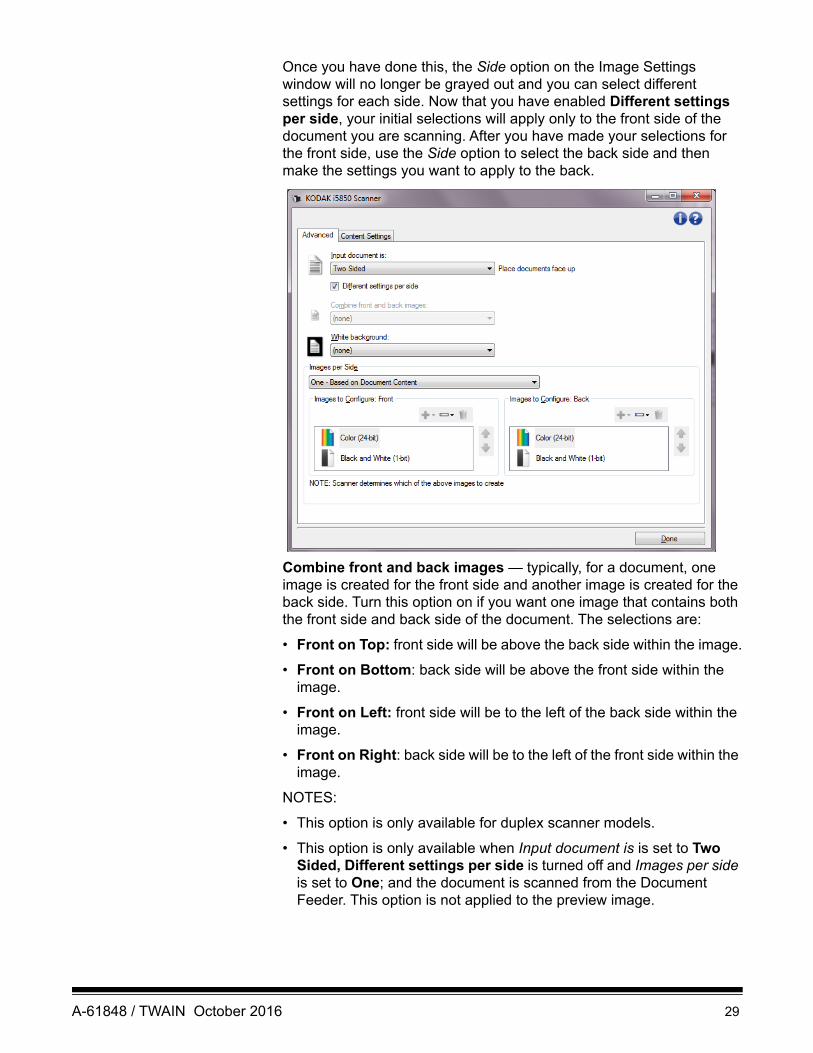
Once you have done this, the Side option on the Image Settings window will no longer be grayed out and you can select different settings for each side. Now that you have enabled Different settings per side, your initial selections will apply only to the front side of the document you are scanning. After you have made your selections for the front side, use the Side option to select the back side and then make the settings you want to apply to the back.
Combine front and back images — typically, for a document, one image is created for the front side and another image is created for the back side. Turn this option on if you want one image that contains both the front side and back side of the document. The selections are:
• Front on Top: front side will be above the back side within the image.
• Front on Bottom: back side will be above the front side within the image.
• Front on Left: front side will be to the left of the back side within the image.
• Front on Right: back side will be to the left of the front side within the image.
NOTES:
• This option is only available for duplex scanner models.
• This option is only available when Input document is is set to Two Sided, Different settings per side is turned off and Images per side is set to One; and the document is scanned from the Document Feeder. This option is not applied to the preview image.
A-61848 / TWAIN October 2016 29

White background — when turned on, indicates which side(s) of the document will see White instead of Black where there is no paper.
• (none): uses the Black background for the front and back sides.
• Both Sides: uses the White background for the front and back sides.
The following are examples of when white background is used:
• Scanning non-rectangular documents and, in the final image, you want the area outside the document to be White instead of Black.
• Scanning lightweight or thin paper, with printing on one side, and you do not want the black background to bleed through the document and appear in the final image.
Images per side — indicates how many images the scanner will create for a side, based on your imaging selections.
• One: indicates you want the scanner to create one image.
• One - Based on Document Content: indicates you want the scanner to automatically detect if the document is color/grayscale or black and white.
• One - Based on Toggle Patch: indicates you want to tell the scanner, via a toggle patch document, if the document is color/grayscale or black and white.
• Multiple: indicates you want the scanner to create more than one image.
NOTE: If you select One - Based on Document Content from the Images per side option, the Content Settings tab will be displayed.
Images to Configure — indicates which electronic images you need to configure.
NOTE: This is only available if you select anything other than One from the Images per side option. For procedures on how to configure advanced options, see the sections that follow, entitled:
• “Creating color/grayscale or black and white images based on the content of your documents, Example 1.”
• “Creating multiple images for each side of a document, Example 2.”
• “Creating different settings for each side of a document, Example 3.”
When available, use the up and down arrows to select the order in which the images will be delivered by the scanner to the scanning application.
30 A-61848 / TWAIN October 2016
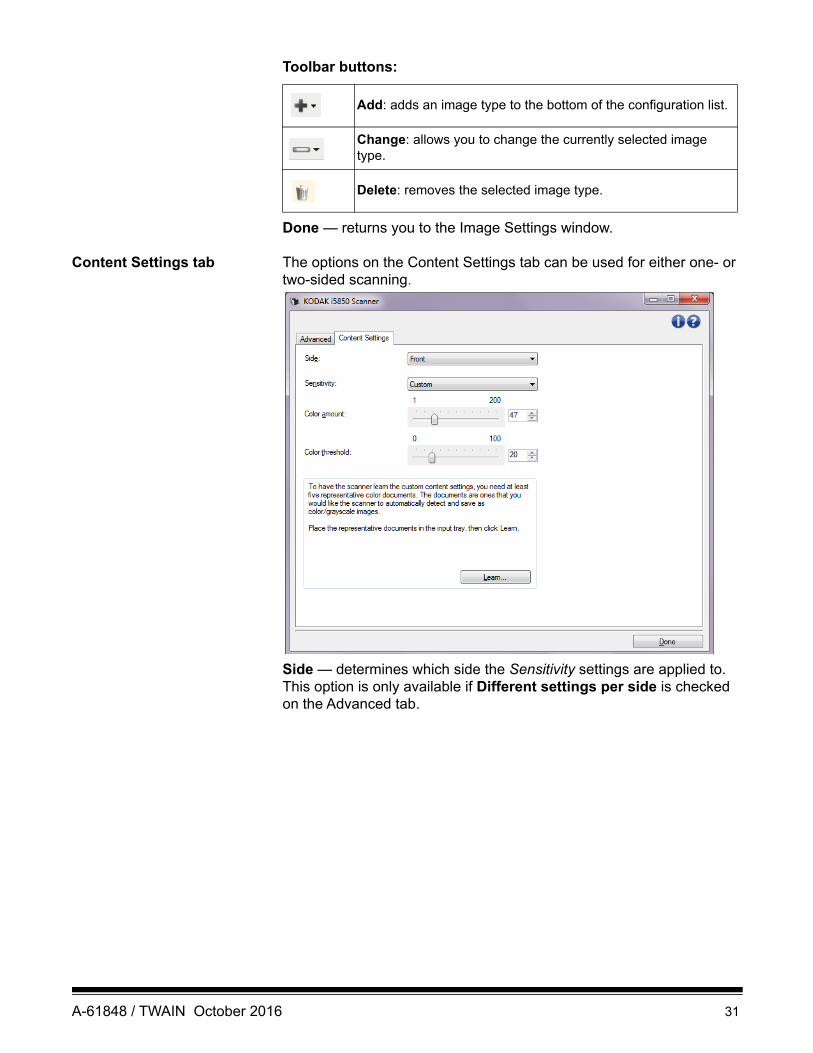
Toolbar buttons:
Done — returns you to the Image Settings window.
Content Settings tab The options on the Content Settings tab can be used for either one- or two-sided scanning.
Side — determines which side the Sensitivity settings are applied to. This option is only available if Different settings per side is checked on the Advanced tab.
Add: adds an image type to the bottom of the configuration list.
Change: allows you to change the currently selected image type.
Delete: removes the selected image type.
A-61848 / TWAIN October 2016 31
Sensitivity
• Low: documents requiring only a small amount of color to be saved as color/grayscale images. Used for capturing documents that are primarily black text with small logos, or contain small amounts of highlighted text or small colorful photos.
• Medium: documents requiring more color, as compared with the Low option, before they are saved as color/grayscale images.
• High: documents requiring more color, as compared with the Medium option, before they will be saved as color/grayscale images. Used for distinguishing documents containing medium- to large-size colorful photos from plain black text. Photos with neutral colors may require adjustments to the Color Threshold or Color Amount values in order to be captured correctly.
• Custom: allows you to manually adjust the Color amount and/or Color threshold.
NOTE: When setting Sensitivity values, it is suggested that you start with the Medium option and scan a typical job set. If too many documents were returned as color/grayscale vs. black and white, then change to the High option and re-run the job. If too few documents were returned as color/grayscale vs. black and white, then change to the Low option and re-run the job. If none of these options provide the desired result, select Custom to manually adjust Color Amount and/or Color Threshold. Custom also allows access to the Learn mode which provides a method for the scanner to analyze documents and recommend settings.
Color amount — the amount of color that needs to be present in a document before it will be saved as either color/grayscale. As the value of Color Amount increases, more color pixels are required. Valid values are 1 to 200.
Color threshold — the color threshold or saturation (i.e., pale blue vs. dark blue) at which a given color will be included in the color amount calculation. A higher value indicates that a more intense color is required. Valid values are 0 to 100.
Learn — allows you to calculate your settings based on representative color documents scanned. Before selecting Learn, place at least 5 representative color documents in the input elevator. The documents will be scanned and analyzed to determine the recommended Color amount.
NOTE: These Color amount and Color threshold sliders will be updated automatically. If these values do not provide the desired results with your job set, you may need to manually adjust the Color Threshold.
32 A-61848 / TWAIN October 2016
Creating color/grayscale or black and white images based on the content of your documents, Example 1
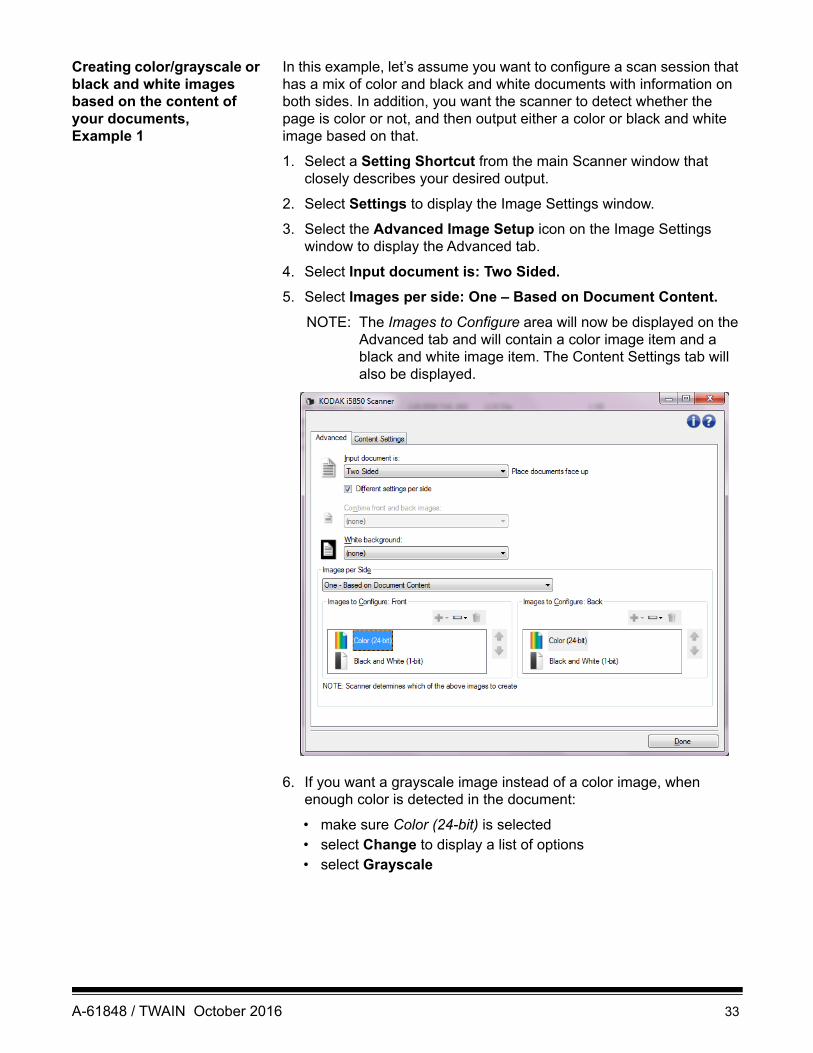
In this example, let’s assume you want to configure a scan session that has a mix of color and black and white documents with information on both sides. In addition, you want the scanner to detect whether the page is color or not, and then output either a color or black and white image based on that.
1. Select a Setting Shortcut from the main Scanner window that closely describes your desired output.
2. Select Settings to display the Image Settings window.
3. Select the Advanced Image Setup icon on the Image Settings window to display the Advanced tab.
4. Select Input document is: Two Sided.
5. Select Images per side: One – Based on Document Content.
NOTE: The Images to Configure area will now be displayed on the Advanced tab and will contain a color image item and a black and white image item. The Content Settings tab will also be displayed.
6. If you want a grayscale image instead of a color image, when enough color is detected in the document:
• make sure Color (24-bit) is selected• select Change to display a list of options• select Grayscale
A-61848 / TWAIN October 2016 33
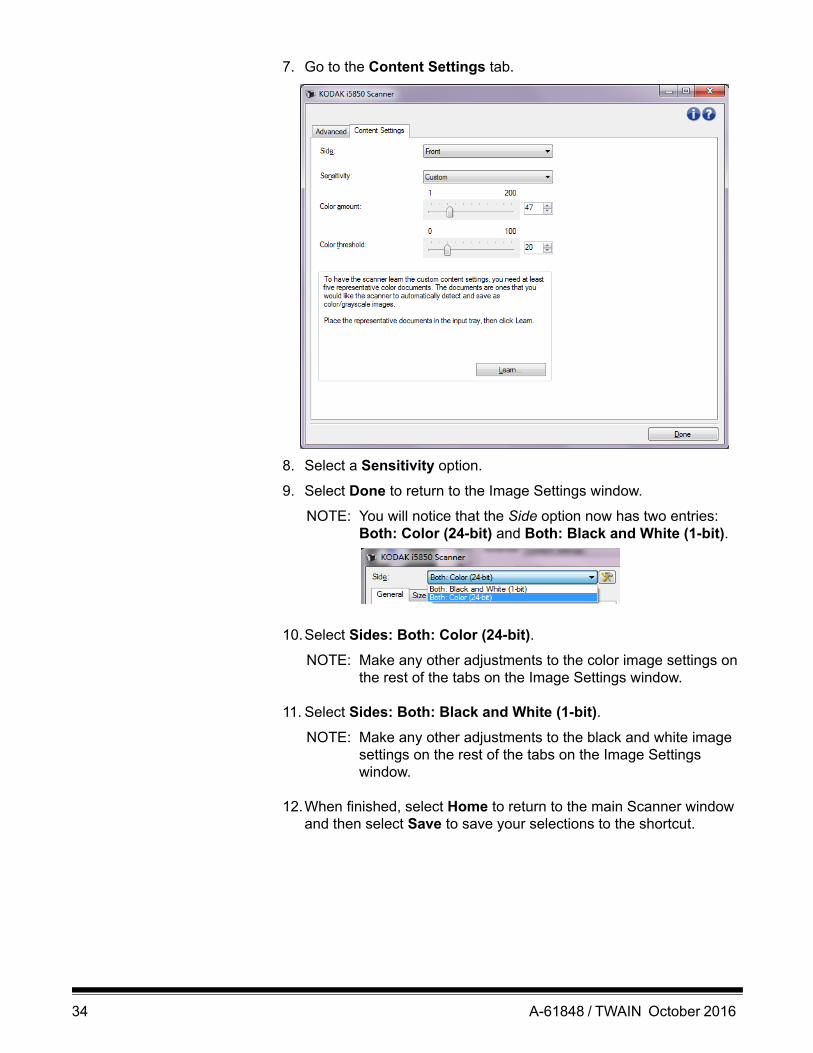
7. Go to the Content Settings tab.
8. Select a Sensitivity option.
9. Select Done to return to the Image Settings window.
NOTE: You will notice that the Side option now has two entries: Both: Color (24-bit) and Both: Black and White (1-bit).
10.Select Sides: Both: Color (24-bit).
NOTE: Make any other adjustments to the color image settings on the rest of the tabs on the Image Settings window.
11. Select Sides: Both: Black and White (1-bit).
NOTE: Make any other adjustments to the black and white image settings on the rest of the tabs on the Image Settings window.
12.When finished, select Home to return to the main Scanner window and then select Save to save your selections to the shortcut.
34 A-61848 / TWAIN October 2016
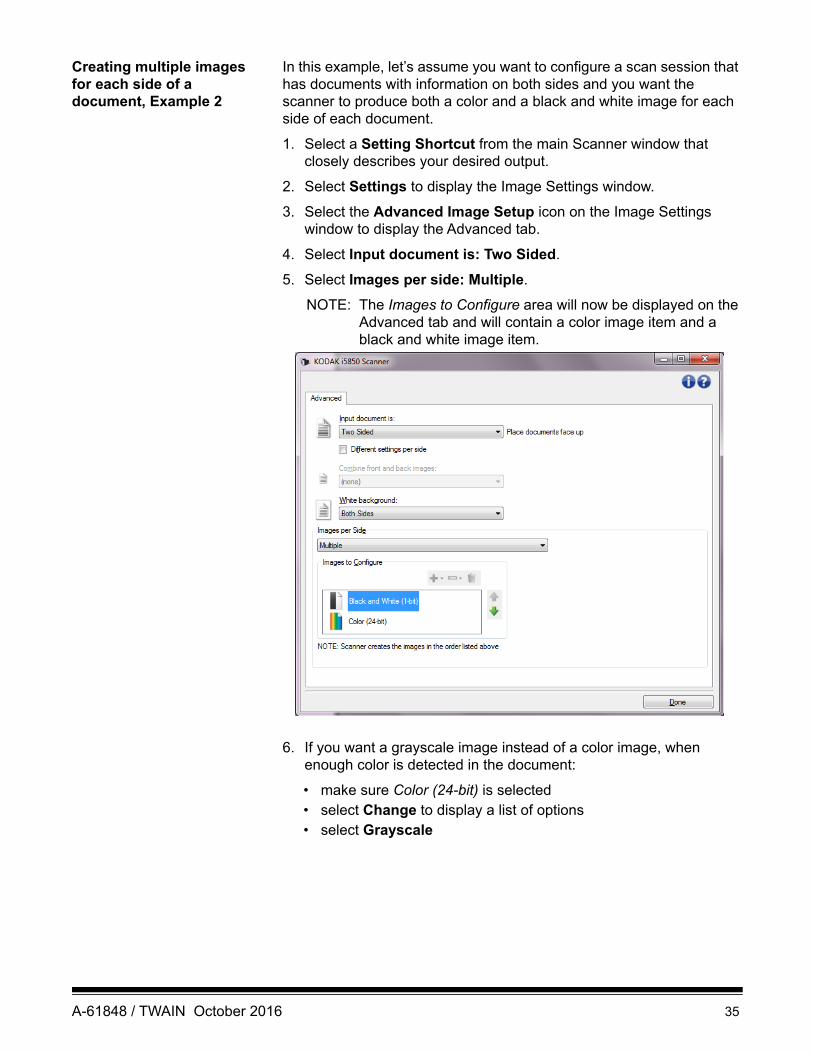
Creating multiple images for each side of a document, Example 2
In this example, let’s assume you want to configure a scan session that has documents with information on both sides and you want the scanner to produce both a color and a black and white image for each side of each document.
1. Select a Setting Shortcut from the main Scanner window that closely describes your desired output.
2. Select Settings to display the Image Settings window.
3. Select the Advanced Image Setup icon on the Image Settings window to display the Advanced tab.
4. Select Input document is: Two Sided.
5. Select Images per side: Multiple.
NOTE: The Images to Configure area will now be displayed on the Advanced tab and will contain a color image item and a black and white image item.
6. If you want a grayscale image instead of a color image, when enough color is detected in the document:
• make sure Color (24-bit) is selected• select Change to display a list of options• select Grayscale
A-61848 / TWAIN October 2016 35
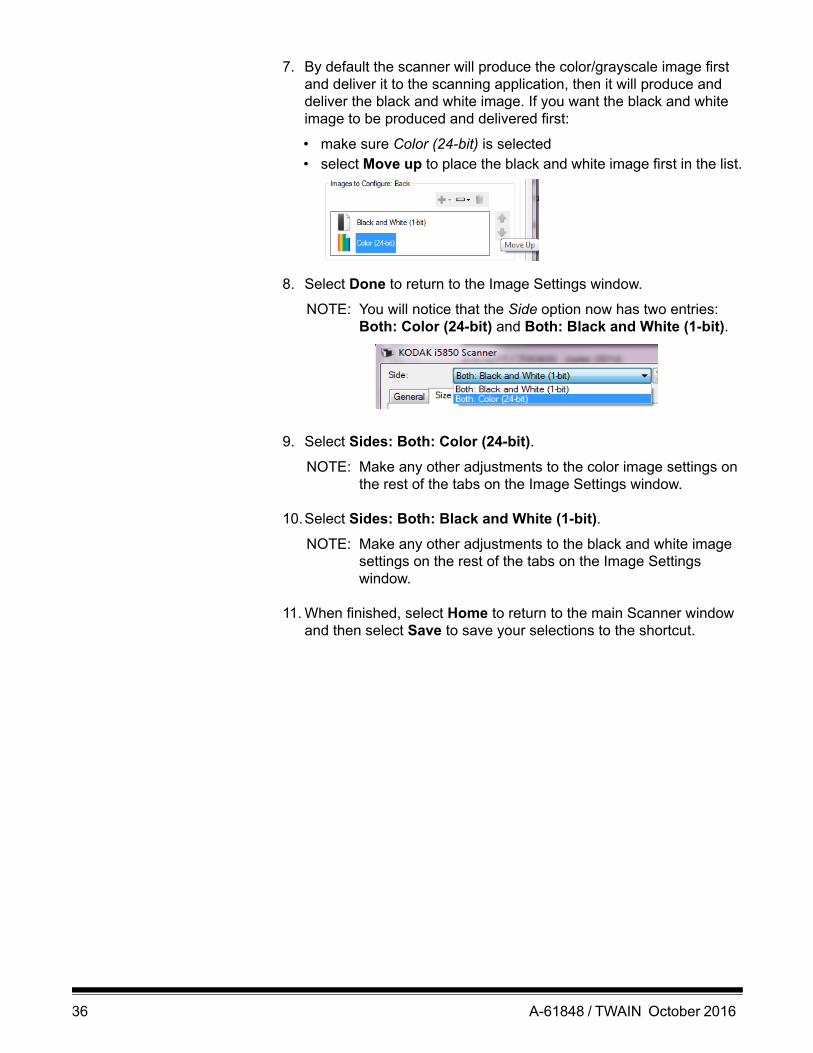
7. By default the scanner will produce the color/grayscale image first and deliver it to the scanning application, then it will produce and deliver the black and white image. If you want the black and white image to be produced and delivered first:
• make sure Color (24-bit) is selected• select Move up to place the black and white image first in the list.
8. Select Done to return to the Image Settings window.
NOTE: You will notice that the Side option now has two entries: Both: Color (24-bit) and Both: Black and White (1-bit).
9. Select Sides: Both: Color (24-bit).
NOTE: Make any other adjustments to the color image settings on the rest of the tabs on the Image Settings window.
10.Select Sides: Both: Black and White (1-bit).
NOTE: Make any other adjustments to the black and white image settings on the rest of the tabs on the Image Settings window.
11. When finished, select Home to return to the main Scanner window and then select Save to save your selections to the shortcut.
36 A-61848 / TWAIN October 2016
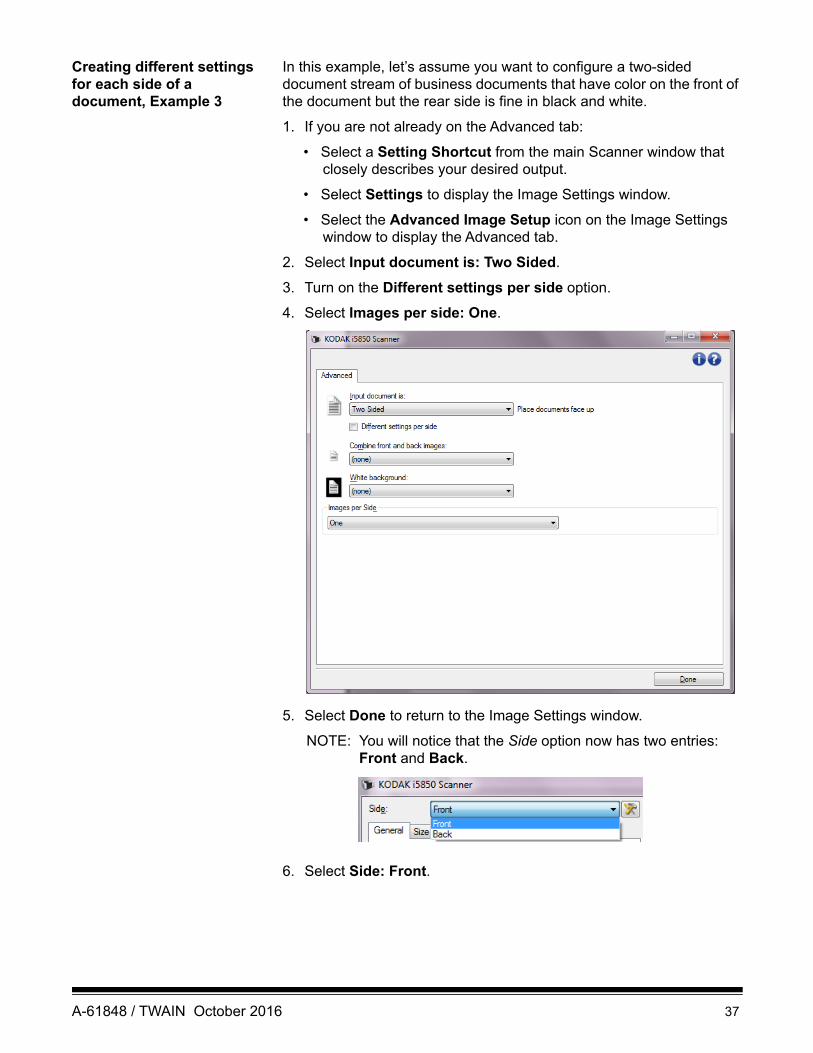
Creating different settings for each side of a document, Example 3
In this example, let’s assume you want to configure a two-sided document stream of business documents that have color on the front of the document but the rear side is fine in black and white.
1. If you are not already on the Advanced tab:
• Select a Setting Shortcut from the main Scanner window that closely describes your desired output.
• Select Settings to display the Image Settings window.
• Select the Advanced Image Setup icon on the Image Settings window to display the Advanced tab.
2. Select Input document is: Two Sided.
3. Turn on the Different settings per side option.
4. Select Images per side: One.
5. Select Done to return to the Image Settings window.
NOTE: You will notice that the Side option now has two entries: Front and Back.
6. Select Side: Front.
A-61848 / TWAIN October 2016 37
7. Select Color (24-bit) for the Scan as option on the General tab.
NOTE: Make any other adjustments to the front side settings on the rest of the tabs on the Image Settings window.
8. Select Side: Back.
9. Select Black and White (1-bit) for the Scan as option on the General tab.
NOTE: Make any other adjustments to the back side settings on the rest of the tabs on the Image Settings window.
10.When finished, select Home to return to the main Scanner window and then select Save to save your selections to the shortcut.
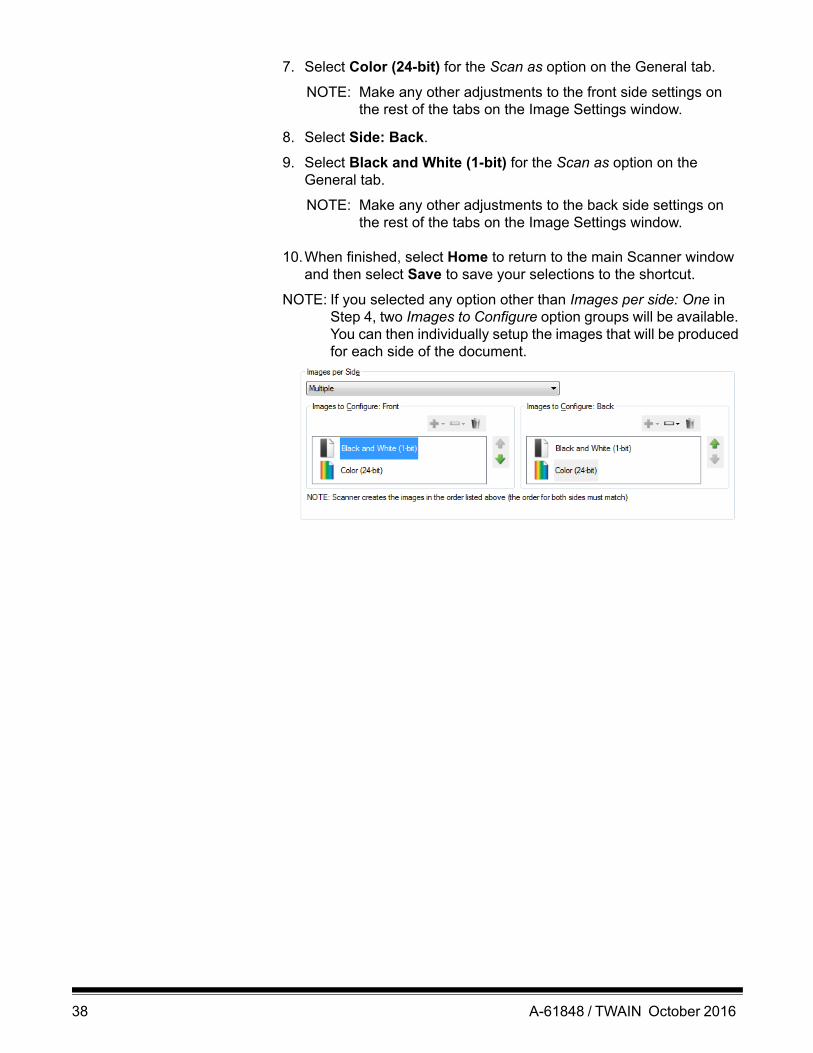
NOTE: If you selected any option other than Images per side: One in Step 4, two Images to Configure option groups will be available. You can then individually setup the images that will be produced for each side of the document.
38 A-61848 / TWAIN October 2016
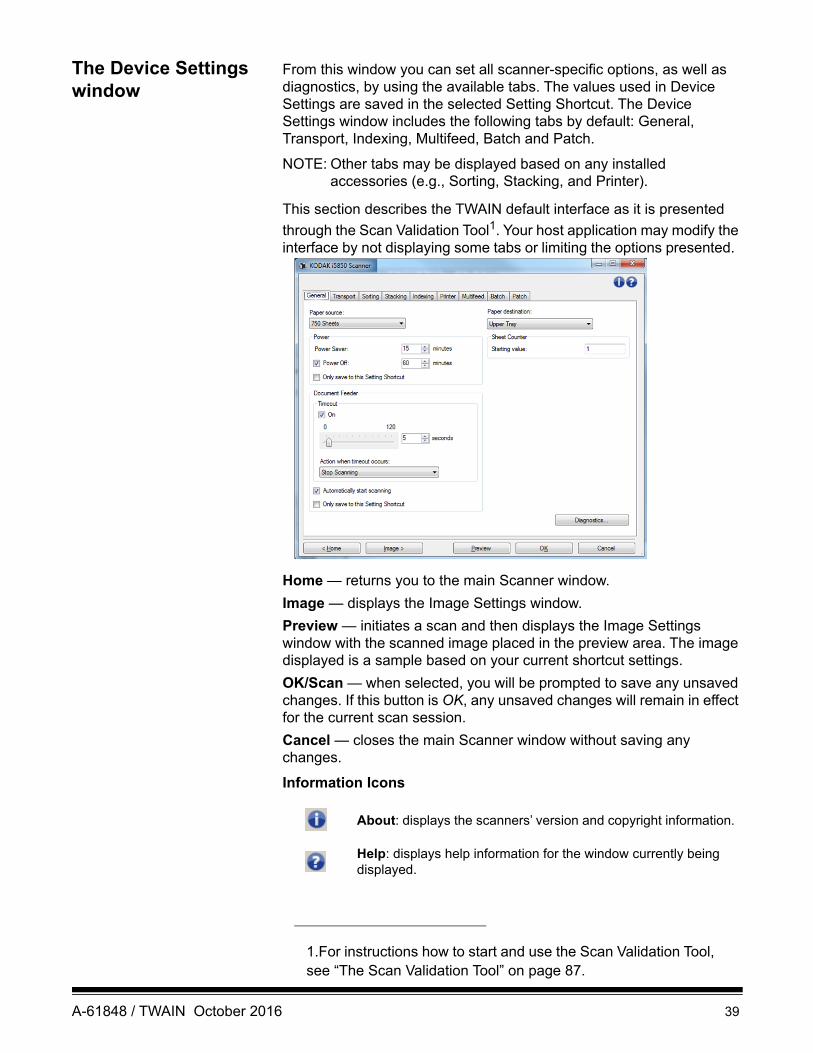
The Device Settings window
From this window you can set all scanner-specific options, as well as diagnostics, by using the available tabs. The values used in Device Settings are saved in the selected Setting Shortcut. The Device Settings window includes the following tabs by default: General, Transport, Indexing, Multifeed, Batch and Patch.
NOTE: Other tabs may be displayed based on any installed accessories (e.g., Sorting, Stacking, and Printer).
This section describes the TWAIN default interface as it is presented
through the Scan Validation Tool1. Your host application may modify the interface by not displaying some tabs or limiting the options presented.
Home — returns you to the main Scanner window.
Image — displays the Image Settings window.
Preview — initiates a scan and then displays the Image Settings window with the scanned image placed in the preview area. The image displayed is a sample based on your current shortcut settings.
OK/Scan — when selected, you will be prompted to save any unsaved changes. If this button is OK, any unsaved changes will remain in effect for the current scan session.
Cancel — closes the main Scanner window without saving any changes.
Information Icons
1.For instructions how to start and use the Scan Validation Tool, see “The Scan Validation Tool” on page 87.
About: displays the scanners’ version and copyright information.
Help: displays help information for the window currently being displayed.
A-61848 / TWAIN October 2016 39
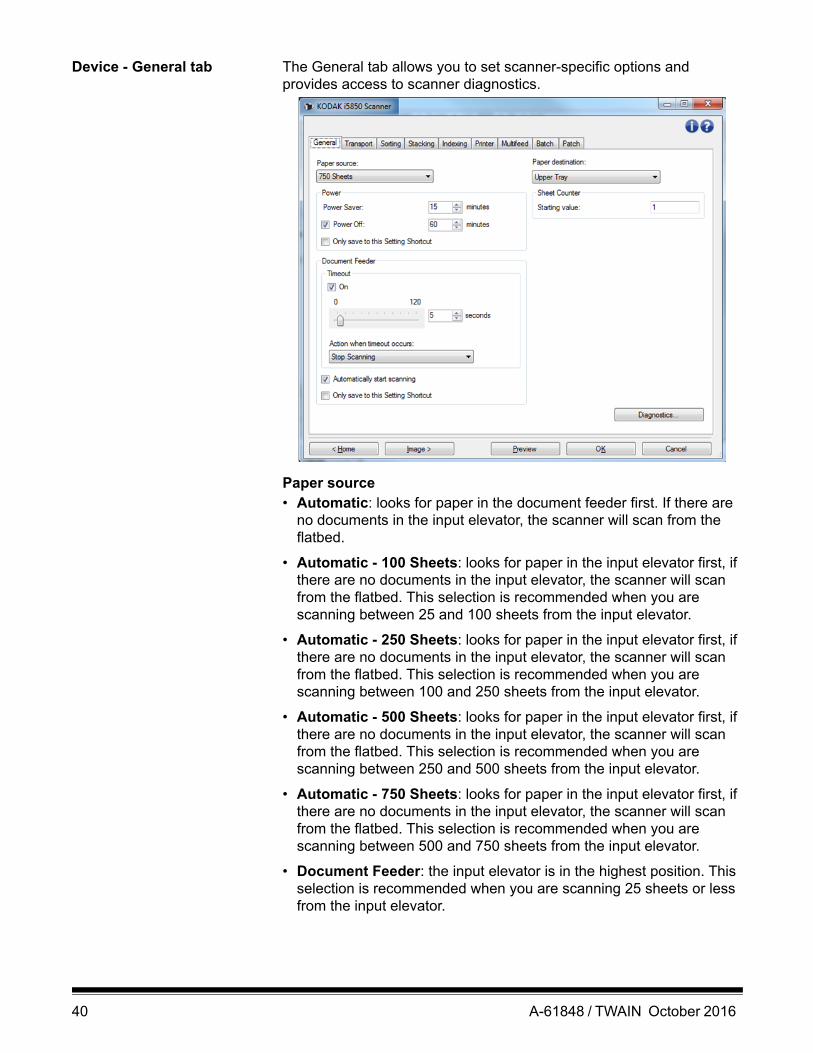
Device - General tab The General tab allows you to set scanner-specific options and provides access to scanner diagnostics.
Paper source• Automatic: looks for paper in the document feeder first. If there are
no documents in the input elevator, the scanner will scan from the flatbed.
• Automatic - 100 Sheets: looks for paper in the input elevator first, if there are no documents in the input elevator, the scanner will scan from the flatbed. This selection is recommended when you are scanning between 25 and 100 sheets from the input elevator.
• Automatic - 250 Sheets: looks for paper in the input elevator first, if there are no documents in the input elevator, the scanner will scan from the flatbed. This selection is recommended when you are scanning between 100 and 250 sheets from the input elevator.
• Automatic - 500 Sheets: looks for paper in the input elevator first, if there are no documents in the input elevator, the scanner will scan from the flatbed. This selection is recommended when you are scanning between 250 and 500 sheets from the input elevator.
• Automatic - 750 Sheets: looks for paper in the input elevator first, if there are no documents in the input elevator, the scanner will scan from the flatbed. This selection is recommended when you are scanning between 500 and 750 sheets from the input elevator.
• Document Feeder: the input elevator is in the highest position. This selection is recommended when you are scanning 25 sheets or less from the input elevator.
40 A-61848 / TWAIN October 2016
• 100 Sheets — this selection is recommended when you are scanning between 25 and 100 sheets from the input elevator.
• 250 Sheets — this selection is recommended when you are scanning between 100 and 250 sheets from the input elevator.
• 500 Sheets — this selection is recommended when you are scanning between 250 and 500 sheets from the input elevator.
• 750 Sheets — this selection is recommended when you are scanning between 500 and 750 sheets from the input elevator.
• Flatbed — the scanner will scan from the flatbed.
NOTE: The Automatic and Flatbed options are only available if you had the flatbed accessory attached when the scanning application connected to the scanner.
Power
• Power Saver — allows you to set the amount of time, in minutes, the scanner has to be inactive before going into power saver mode.
• Power Off — check this option to set the amount of time, in minutes, the scanner has to be in power saver mode before it automatically turns off.
NOTE: The Power settings are shared with all Setting Shortcuts. Any changes will affect other shortcuts unless you turn on the Only save to this Setting Shortcut option.
Document Feeder• Timeout: allows you to select the amount of time, in seconds, the
scanner will wait once the last document enters the feeder before the timeout action occurs. This option can be turned off.
• Action when timeout occurs: indicates the action that will be taken when the document feeder timeout has been reached.
- Stop Scanning: scanning will stop and control will return to the scanning application (i.e., ends the job).
- Pause Scanning: scanning will stop but the scanning application will be waiting for additional images (i.e., stops the feeder). Scanning may be resumed by pressing the Start/Resume button on the scanner. Scanning may be stopped by pressing the Stop/Pause button on the scanner or via the scanning application.
- Pause Scanning - wait for paper: scanning will stop but the scanning application will be waiting for additional images (i.e., stops the feeder). Scanning will be resumed by placing documents into the input elevator. Scanning may be stopped by pressing the Stop/Pause button on the scanner or via the scanning application.
A-61848 / TWAIN October 2016 41
Automatically start scanning — if checked, and not scanning from the flatbed, the scanner will wait up to 10 seconds for documents to be placed in the input elevator before scanning will begin. In addition, once the input elevator has been emptied, the scanner will automatically resume scanning when paper is placed in the input elevator. The scanner will wait the amount of time specified by the document feeder timeout.
If this option is not checked, the scanner will go into a paused mode and you can press the Start/Resume button on the Operator Control Panel to start scanning.
This option can be disabled to allow the operator the opportunity to enable the Overrides option from the scanner’s Operator Control Panel before scanning begins.
NOTE: The Document Feeder settings are shared with all Setting Shortcuts. Any changes will affect other shortcuts unless you turn on the Only save to this Setting Shortcut option.
Paper Destination — when sorting, the destination specifies the default tray for paper that is not sorted. When not sorting, paper destination can be used e.g. to send thick pages out the rear exit or to send documents to the upper tray, for lead edge alignment.• Upper Tray: select this option to use the topmost output tray.
• Lower Tray: select this option to use the lower/normal output tray.
• Rear Exit: select this option to use the rear paper exit.
NOTES:
• This option is available for only the i5650S and i5850S scanners.
• For models that support this option, some selections may not be available.
• For Rear Exit, make sure the space available behind the scanner will allow paper to fully exit the scanner. Pull the scanner away from any walls and clear any obstacles behind it, as needed.
Sheet Counter — enter the number to be assigned to the next physical sheet of paper entering the scanner. This is incremented sequentially by the scanner and is returned in the image header.
NOTE: Changing the sheet counter value will affect the Counter option on the Device - Printer tab.
Diagnostics — displays the Diagnostics tab.
42 A-61848 / TWAIN October 2016
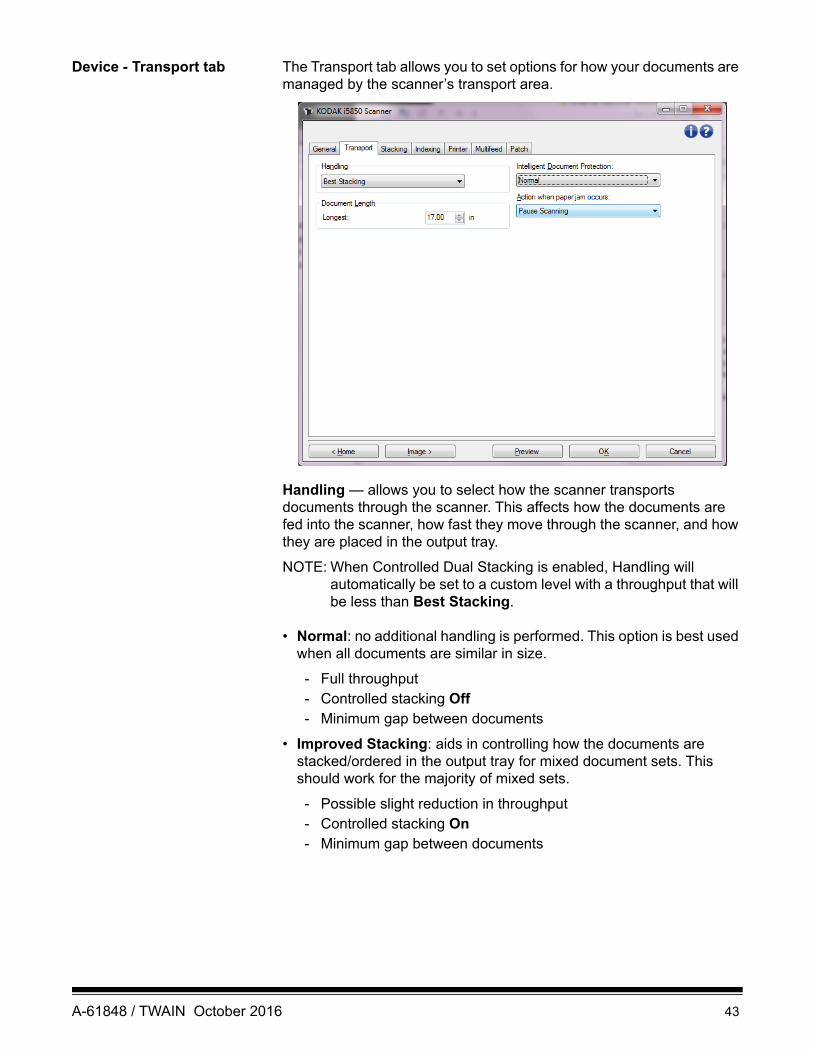
Device - Transport tab The Transport tab allows you to set options for how your documents are managed by the scanner’s transport area.
Handling — allows you to select how the scanner transports documents through the scanner. This affects how the documents are fed into the scanner, how fast they move through the scanner, and how they are placed in the output tray.
NOTE: When Controlled Dual Stacking is enabled, Handling will automatically be set to a custom level with a throughput that will be less than Best Stacking.
• Normal: no additional handling is performed. This option is best used when all documents are similar in size.
- Full throughput- Controlled stacking Off- Minimum gap between documents
• Improved Stacking: aids in controlling how the documents are stacked/ordered in the output tray for mixed document sets. This should work for the majority of mixed sets.
- Possible slight reduction in throughput- Controlled stacking On- Minimum gap between documents
A-61848 / TWAIN October 2016 43
• Best Stacking: when your document set contains a great variability in size, this option provides the best control of how the documents are stacked/ordered within the output tray.
- Slight reduction in throughput- Controlled stacking On- Large interdocument gap
• Fragile: for documents that need extra care as they are transported through the scanner and placed in the output tray.
- Greatly reduced throughput- Controlled stacking Off- Minimum interdocument gap- One-quarter transport speed
• Thick: for documents that are thicker than card stock (110 lb. / 0.25 mm).
- Greatly reduced throughput- Controlled stacking On- Minimum interdocument gap- One-quarter transport speed
• Thin: for documents that are thinner than 20 lb. bond paper (e.g., rice paper).
- Greatly reduced throughput- Controlled stacking On- Large interdocument gap- One-quarter transport speed
Document Length
Longest — select a value that indicates the length of the longest document in your document set.
NOTES:
• Changing this value will affect the maximums for the following settings: Image Size - Outline; Printer - Offset From Lead Edge; Multifeed - Length Detection.
• Not all combinations of settings for Scan as and Resolution are supported at the larger lengths. To allow for greater flexibility with applications, the scanner will not generate an error until it sees a document whose length is not supported.
• The scanner’s throughput may be reduced for larger lengths.
• If a document that is longer than this value is scanned, the transport will stop (leaving the document in the scanner) and a document jam message will be displayed.
44 A-61848 / TWAIN October 2016
• The Maximum Length will always range from 2.5 to 180 inches but the true maximum length of the scan will depend on the bit depth (color/grayscale/black and white and the resolution used for the scan). Black and white 200 dpi will be 180 inches, but color 600 dpi will be much less. If the scanner’s processing capacity is exceeded before the user-selected Maximum Length is reached, then a document jam will be displayed on the Operator Control Panel of the scanner and the image will not be sent to the host application.
• If scanning a stack of mixed documents, where some of the documents are very long, the best option may be to select when to enable Longest scanning by using either the Allow Maximum Length override or the Maximum Length Detection batch override option from the scanner’s Operator Control Panel.
• When Controlled Dual Stacking is enabled, the default setting will be limited to the maximum length of 10 inches/254 mm. See Chapter 5, “Length Protection Enabled” in the User’s Guide for more information.
Intelligent Document Protection — allows you to select how aggressively the scanner detects documents that enter the scanner incorrectly. This can occur when documents are not prepared properly for scanning (e.g., stapled or paper clipped documents).
• (none)
• Minimum: select this option if the scanner is stopping too frequently on documents that you do not want it to detect.
NOTE: Documents may become more damaged before detection occurs.
• Normal: this is the recommended option as it provides a balance between minimizing document damage and stopping the scanner unnecessarily.
• Maximum: select this option to get the least amount of document damage.
NOTE: This may cause the scanner to stop unnecessarily.
Action when paper jam occurs — allows you to select what happens when the scanner detects a paper jam.
• Stop Scanning: scanning will stop and control will return to the scanning application (i.e., ends the job). Verify that the paper path has been cleared and restart the scan session from the scanning application.
• Pause Scanning: scanning will stop but the scanning application will be waiting for additional images (i.e., stops the feeder). Clear the paper path, then scanning may be resumed by pressing the Start/Resume button on the scanner. Scanning may be stopped by pressing the Stop/Pause button on the scanner or via the scanning application.
Diagnostics — displays the Diagnostics tab.
A-61848 / TWAIN October 2016 45
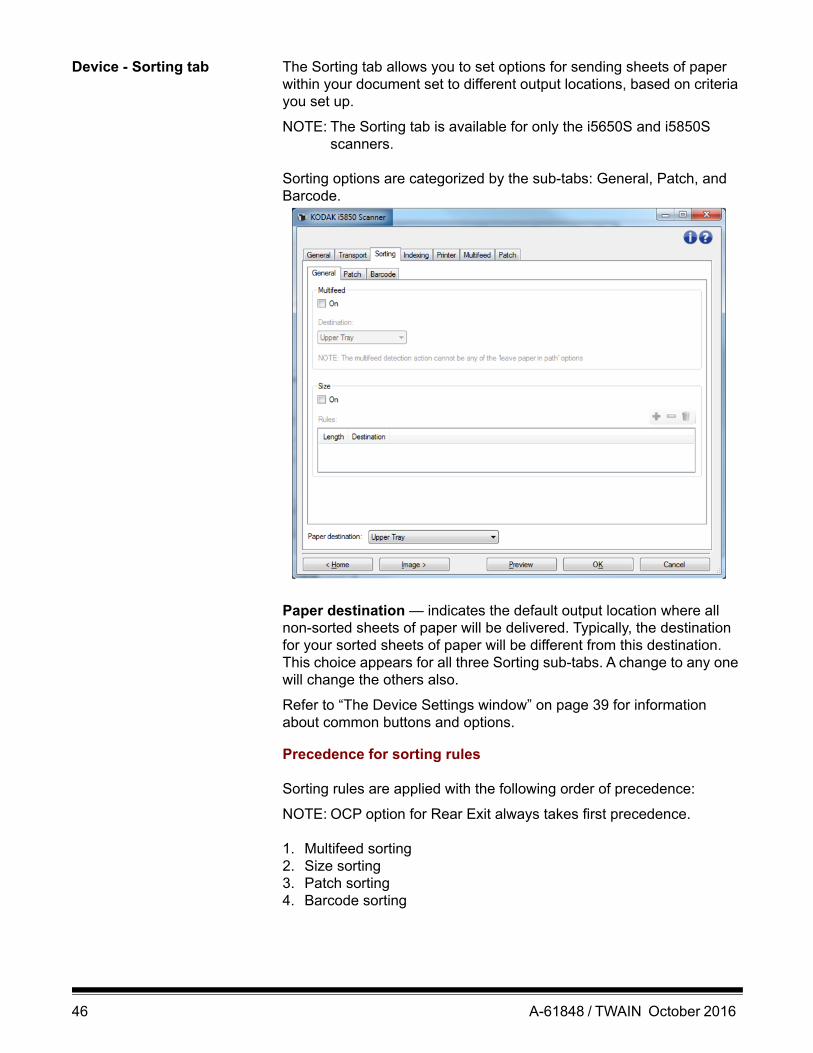
Device - Sorting tab The Sorting tab allows you to set options for sending sheets of paper within your document set to different output locations, based on criteria you set up.
NOTE: The Sorting tab is available for only the i5650S and i5850S scanners.
Sorting options are categorized by the sub-tabs: General, Patch, and Barcode.
Paper destination — indicates the default output location where all non-sorted sheets of paper will be delivered. Typically, the destination for your sorted sheets of paper will be different from this destination. This choice appears for all three Sorting sub-tabs. A change to any one will change the others also.
Refer to “The Device Settings window” on page 39 for information about common buttons and options.
Precedence for sorting rules
Sorting rules are applied with the following order of precedence:
NOTE: OCP option for Rear Exit always takes first precedence.
1. Multifeed sorting2. Size sorting3. Patch sorting4. Barcode sorting
46 A-61848 / TWAIN October 2016
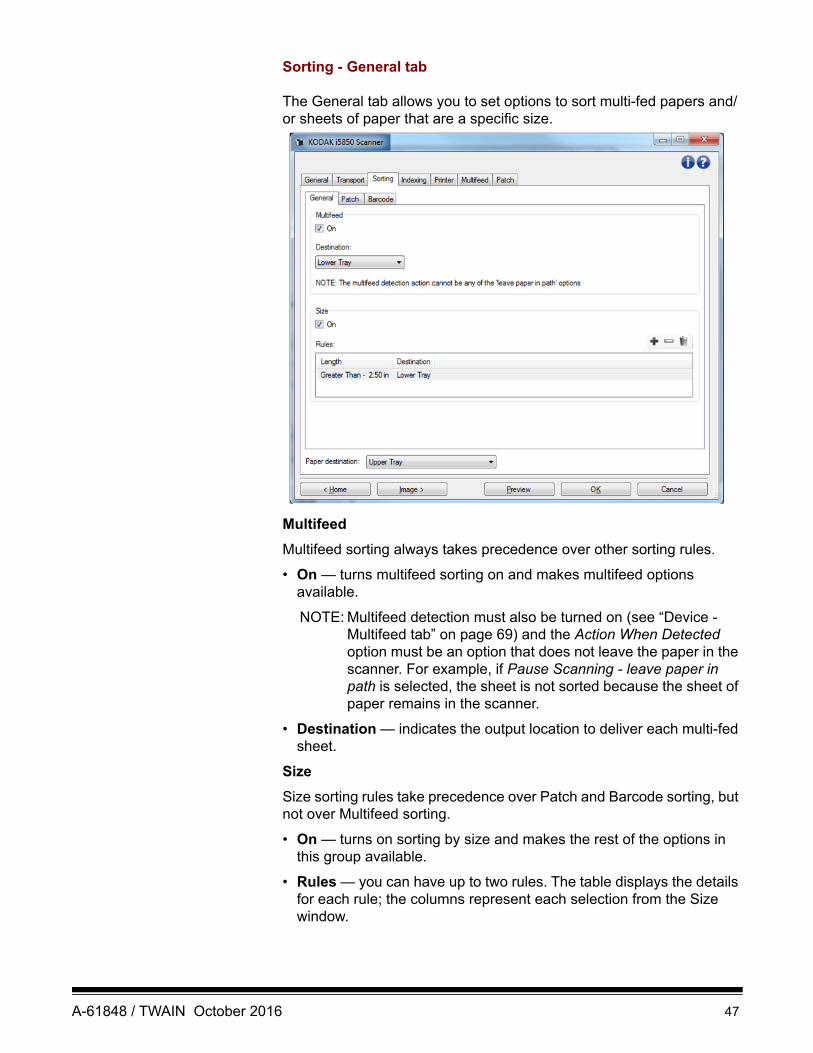
Sorting - General tab
The General tab allows you to set options to sort multi-fed papers and/or sheets of paper that are a specific size.
Multifeed
Multifeed sorting always takes precedence over other sorting rules.
• On — turns multifeed sorting on and makes multifeed options available.
NOTE: Multifeed detection must also be turned on (see “Device - Multifeed tab” on page 69) and the Action When Detected option must be an option that does not leave the paper in the scanner. For example, if Pause Scanning - leave paper in path is selected, the sheet is not sorted because the sheet of paper remains in the scanner.
• Destination — indicates the output location to deliver each multi-fed sheet.
Size
Size sorting rules take precedence over Patch and Barcode sorting, but not over Multifeed sorting.
• On — turns on sorting by size and makes the rest of the options in this group available.
• Rules — you can have up to two rules. The table displays the details for each rule; the columns represent each selection from the Size window.
A-61848 / TWAIN October 2016 47
Buttons for rules:Add — allows you to create a new rule. The Size window will be displayed.NOTE:This option will not be available if you have created
the maximum number of allowed rules.
Change — allows you to change the currently selected rule. The Size window will be displayed, with the current options for this rule selected.
Delete — allows you to remove the currently selected rule.
NOTE: Refer to “The Device Settings window” on page 39 for information about common buttons and options.
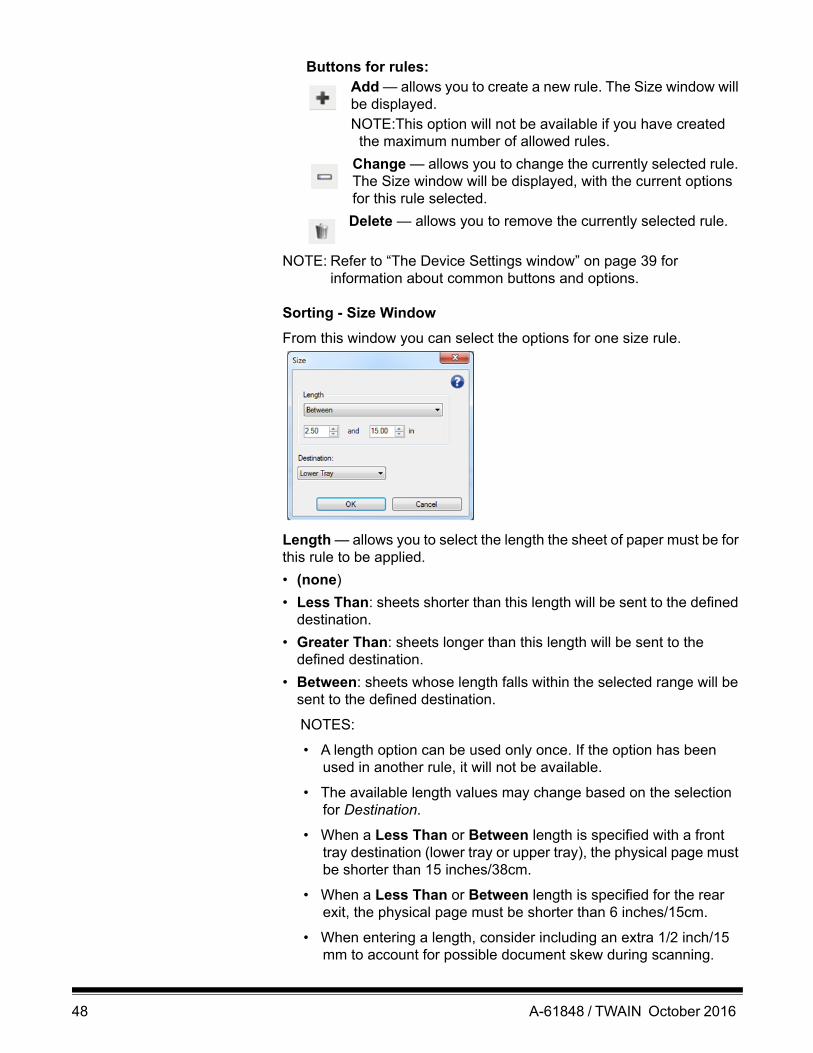
Sorting - Size Window
From this window you can select the options for one size rule.
Length — allows you to select the length the sheet of paper must be for this rule to be applied.
• (none)
• Less Than: sheets shorter than this length will be sent to the defined destination.
• Greater Than: sheets longer than this length will be sent to the defined destination.
• Between: sheets whose length falls within the selected range will be sent to the defined destination.
NOTES:
• A length option can be used only once. If the option has been used in another rule, it will not be available.
• The available length values may change based on the selection for Destination.
• When a Less Than or Between length is specified with a front tray destination (lower tray or upper tray), the physical page must be shorter than 15 inches/38cm.
• When a Less Than or Between length is specified for the rear exit, the physical page must be shorter than 6 inches/15cm.
• When entering a length, consider including an extra 1/2 inch/15 mm to account for possible document skew during scanning.
48 A-61848 / TWAIN October 2016
Destination — indicates the output location to deliver each sheet that this rule is applied to.
OK — saves any changes and closes this window.
Cancel — closes this window without saving any changes.
Help: displays help information for this window
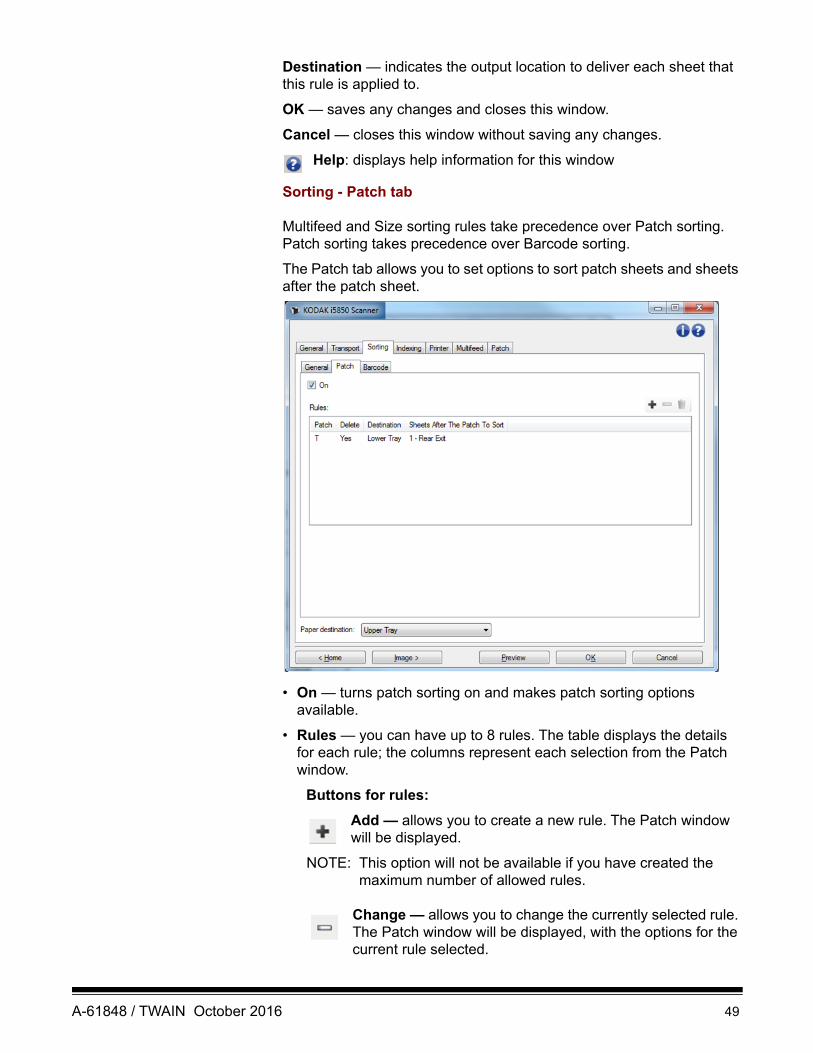
Sorting - Patch tab
Multifeed and Size sorting rules take precedence over Patch sorting. Patch sorting takes precedence over Barcode sorting.
The Patch tab allows you to set options to sort patch sheets and sheets after the patch sheet.
• On — turns patch sorting on and makes patch sorting options available.
• Rules — you can have up to 8 rules. The table displays the details for each rule; the columns represent each selection from the Patch window.
Buttons for rules:
Add — allows you to create a new rule. The Patch window will be displayed.
NOTE: This option will not be available if you have created the maximum number of allowed rules.
Change — allows you to change the currently selected rule. The Patch window will be displayed, with the options for the current rule selected.
A-61848 / TWAIN October 2016 49
Delete — allows you to remove the currently selected rule.
NOTE: Refer to “The Device Settings window” on page 39 for information about common buttons and options.
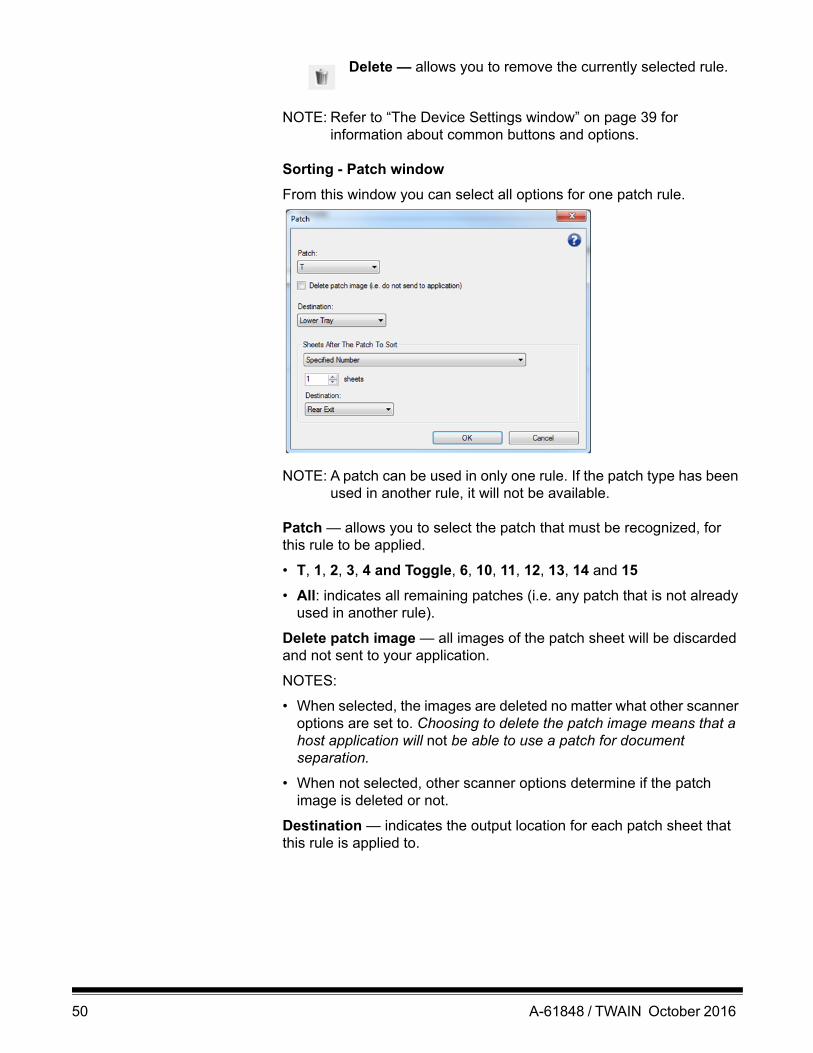
Sorting - Patch window
From this window you can select all options for one patch rule.
NOTE: A patch can be used in only one rule. If the patch type has been used in another rule, it will not be available.
Patch — allows you to select the patch that must be recognized, for this rule to be applied.
• T, 1, 2, 3, 4 and Toggle, 6, 10, 11, 12, 13, 14 and 15
• All: indicates all remaining patches (i.e. any patch that is not already used in another rule).
Delete patch image — all images of the patch sheet will be discarded and not sent to your application.
NOTES:
• When selected, the images are deleted no matter what other scanner options are set to. Choosing to delete the patch image means that a host application will not be able to use a patch for document separation.
• When not selected, other scanner options determine if the patch image is deleted or not.
Destination — indicates the output location for each patch sheet that this rule is applied to.
50 A-61848 / TWAIN October 2016
Sheets After The Patch To Sort — allows you to select which sheets of paper, immediately following the patch sheet, will be sent to the Destination you set up.
• (none)
• Specified Number: allows you to select an exact number of sheets from 1 to 99.
• All Until This Patch: indicates every sheet of paper is sent to the Destination, up to the next sheet of paper when this rule's patch is detected.
NOTE: Use this option if you have an unknown number of consecutive pages in your document set that you want to sort. In this case, obtain two patch sheets with this patch type, then place one patch sheet before the pages to sort and place the other patch sheet after the pages to sort.
• All Following: indicates every sheet of paper after the patch sheet is sent to the destination, until the scanning session ends.
NOTES:
• Sorting that is in progress will continue until finished. So if you have a rule to sort a specific number of sheets, and a second sorting rule is met before that number of sheets has been sorted, the second rule will be ignored.
• Sorting will be terminated by any of the following events:- Stop scanning- Multifeed that stops scanning- Jam that stops scanning
Destination: the output location to deliver each sheet that this patch sorting rule is applied to.
NOTE: Destination is available only when Sheets After The Patch To Sort is not (none).
OK — saves any changes and closes this window.
Cancel — closes this window without saving any changes.
Help: displays help information for this window
NOTE: If something happens during patch sorting that disables the scanner (e.g. a multifeed that stops the scanner and ends the job), then any Patch sorting rule in effect will be considered completed. No further action will be taken based on that rule.
A-61848 / TWAIN October 2016 51
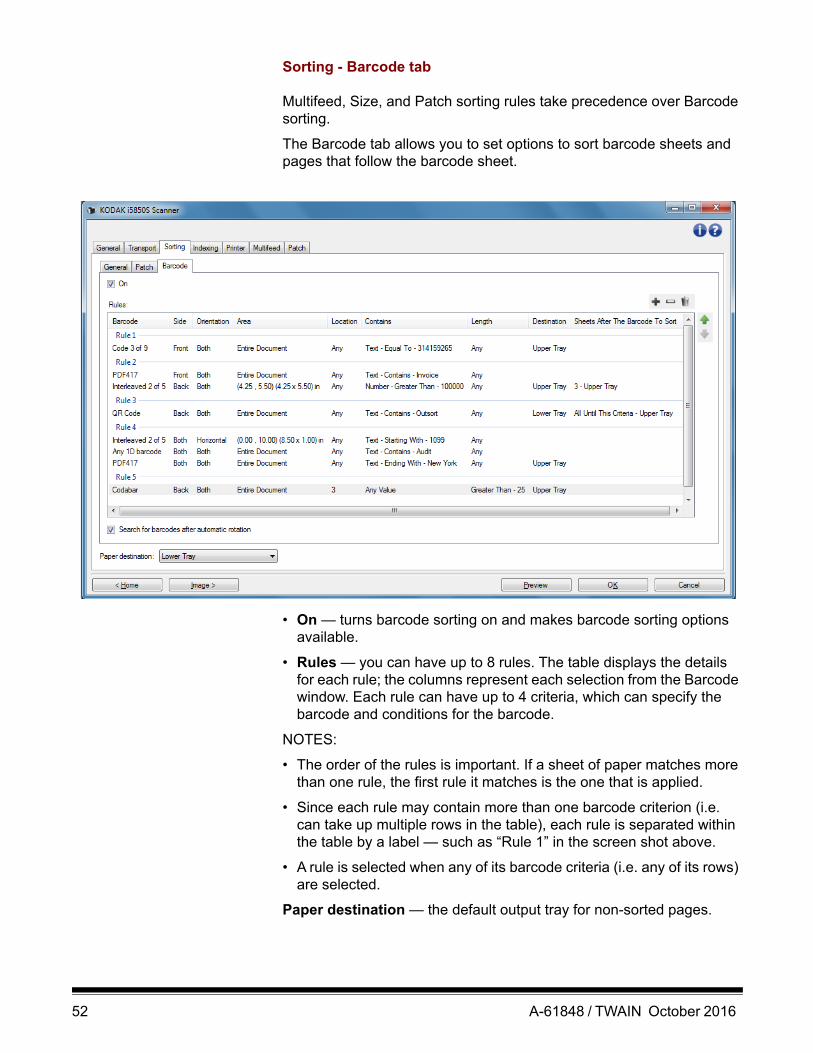
Sorting - Barcode tab
Multifeed, Size, and Patch sorting rules take precedence over Barcode sorting.
The Barcode tab allows you to set options to sort barcode sheets and pages that follow the barcode sheet.
• On — turns barcode sorting on and makes barcode sorting options available.
• Rules — you can have up to 8 rules. The table displays the details for each rule; the columns represent each selection from the Barcode window. Each rule can have up to 4 criteria, which can specify the barcode and conditions for the barcode.
NOTES:
• The order of the rules is important. If a sheet of paper matches more than one rule, the first rule it matches is the one that is applied.
• Since each rule may contain more than one barcode criterion (i.e. can take up multiple rows in the table), each rule is separated within the table by a label — such as “Rule 1” in the screen shot above.
• A rule is selected when any of its barcode criteria (i.e. any of its rows) are selected.
Paper destination — the default output tray for non-sorted pages.
52 A-61848 / TWAIN October 2016
Buttons for rules:
Add — allows you to create a new rule. The Barcode window will be displayed.
NOTE: This option will not be available if you have created the maximum number of allowed rules.
Change — allows you to change the currently selected rule. The Barcode window will be displayed, with the options for the current rule selected.
Delete — allows you to remove the currently selected rule.
Move Up — allows you to move the currently selected rule up one position.
Move Down — allows you to move the currently selected rule down one position.
NOTE: Delete, Move Up, and Move Down apply to the entire rule, not just the selected table row.
Search for barcodes after automatic rotation — means the scanner will look for a matching rule after automatic rotation of the image, oriented by the text in the image. This setting can affect sorting by barcode only if you use one of the following options:
• Orientation Horizontal or Vertical
• Search for a barcode by Area within the image
• Choose a barcode based on Location (reading from top down and left to right in the image)
If you do not use one of the above options, then do not check Search for barcodes after automatic rotation.
NOTES:
• This option may impact how quickly your documents are scanned.
• Refer to “The Device Settings window” on page 39 for information about common buttons and options.
A-61848 / TWAIN October 2016 53
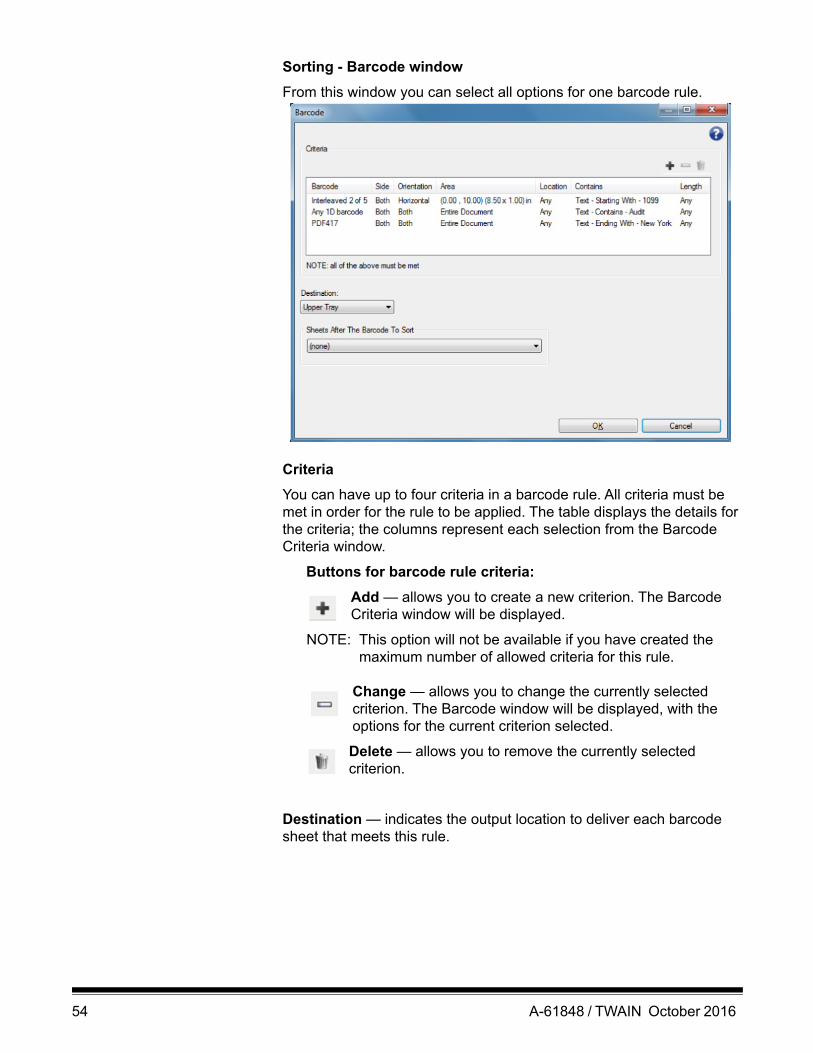
Sorting - Barcode window
From this window you can select all options for one barcode rule.
Criteria
You can have up to four criteria in a barcode rule. All criteria must be met in order for the rule to be applied. The table displays the details for the criteria; the columns represent each selection from the Barcode Criteria window.
Buttons for barcode rule criteria:
Add — allows you to create a new criterion. The Barcode Criteria window will be displayed.
NOTE: This option will not be available if you have created the maximum number of allowed criteria for this rule.
Change — allows you to change the currently selected criterion. The Barcode window will be displayed, with the options for the current criterion selected.
Delete — allows you to remove the currently selected criterion.
Destination — indicates the output location to deliver each barcode sheet that meets this rule.
54 A-61848 / TWAIN October 2016
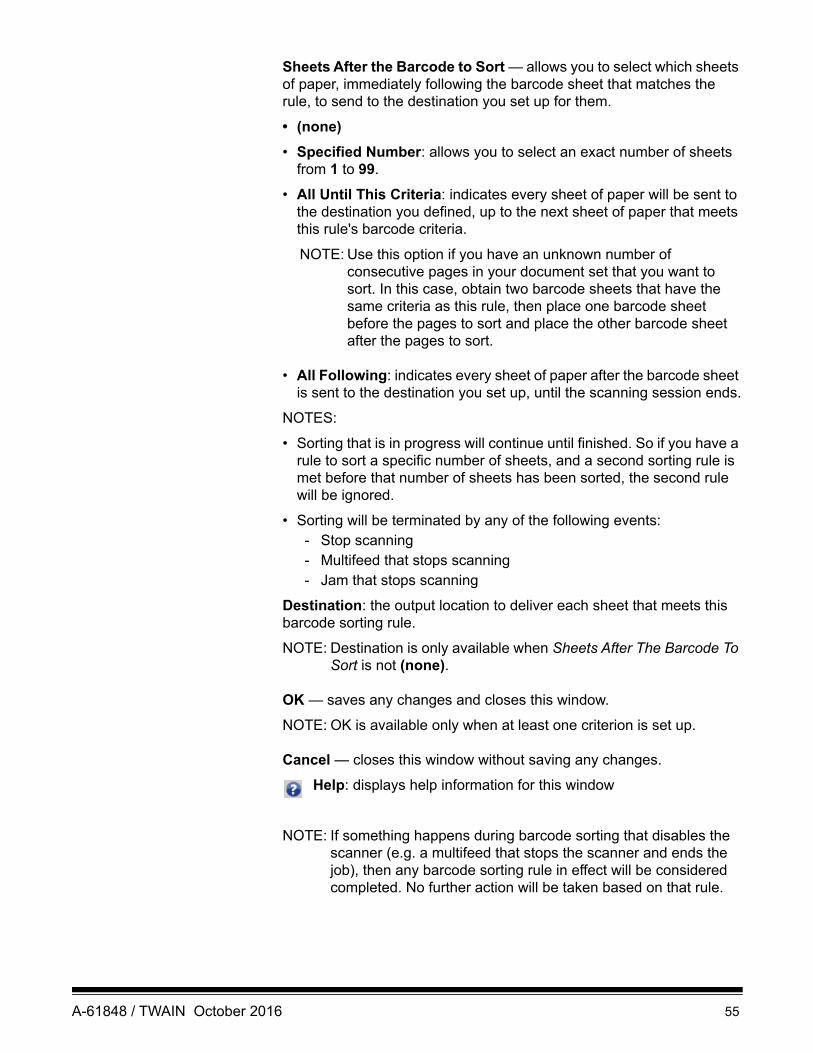
Sheets After the Barcode to Sort — allows you to select which sheets of paper, immediately following the barcode sheet that matches the rule, to send to the destination you set up for them.
• (none)
• Specified Number: allows you to select an exact number of sheets from 1 to 99.
• All Until This Criteria: indicates every sheet of paper will be sent to the destination you defined, up to the next sheet of paper that meets this rule's barcode criteria.
NOTE: Use this option if you have an unknown number of consecutive pages in your document set that you want to sort. In this case, obtain two barcode sheets that have the same criteria as this rule, then place one barcode sheet before the pages to sort and place the other barcode sheet after the pages to sort.
• All Following: indicates every sheet of paper after the barcode sheet is sent to the destination you set up, until the scanning session ends.
NOTES:
• Sorting that is in progress will continue until finished. So if you have a rule to sort a specific number of sheets, and a second sorting rule is met before that number of sheets has been sorted, the second rule will be ignored.
• Sorting will be terminated by any of the following events:- Stop scanning- Multifeed that stops scanning- Jam that stops scanning
Destination: the output location to deliver each sheet that meets this barcode sorting rule.
NOTE: Destination is only available when Sheets After The Barcode To Sort is not (none).
OK — saves any changes and closes this window.
NOTE: OK is available only when at least one criterion is set up.
Cancel — closes this window without saving any changes.
Help: displays help information for this window
NOTE: If something happens during barcode sorting that disables the scanner (e.g. a multifeed that stops the scanner and ends the job), then any barcode sorting rule in effect will be considered completed. No further action will be taken based on that rule.
A-61848 / TWAIN October 2016 55
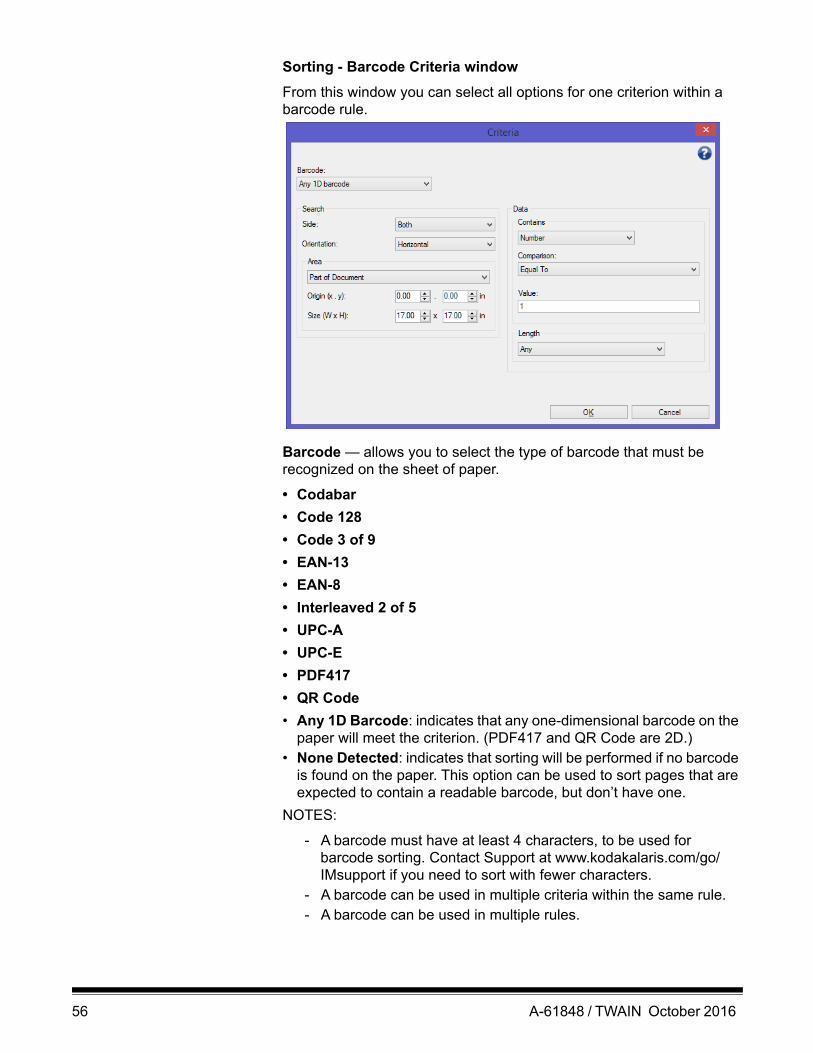
Sorting - Barcode Criteria window
From this window you can select all options for one criterion within a barcode rule.
Barcode — allows you to select the type of barcode that must be recognized on the sheet of paper.
• Codabar
• Code 128
• Code 3 of 9
• EAN-13
• EAN-8
• Interleaved 2 of 5
• UPC-A
• UPC-E
• PDF417
• QR Code
• Any 1D Barcode: indicates that any one-dimensional barcode on the paper will meet the criterion. (PDF417 and QR Code are 2D.)
• None Detected: indicates that sorting will be performed if no barcode is found on the paper. This option can be used to sort pages that are expected to contain a readable barcode, but don’t have one.
NOTES:
- A barcode must have at least 4 characters, to be used for barcode sorting. Contact Support at www.kodakalaris.com/go/IMsupport if you need to sort with fewer characters.
- A barcode can be used in multiple criteria within the same rule. - A barcode can be used in multiple rules.
56 A-61848 / TWAIN October 2016
Search — indicates where on the sheet of paper to look for the sorting barcode.
• Side: select which side of the paper to look on, for the sorting barcode.
- Both: look on both sides of the paper. It does not matter which side the barcode is on.
- Front: only look for barcode on the front side of the paper.
- Back: only look for barcode on the back side of the paper.
• Orientation: select the orientation for the barcode. Only barcodes in the selected orientation will be checked against barcode sorting criteria.
- Horizontal
- Vertical
- Both
• Area: select the portion of the paper to search.
- Entire Document
- Part of Document
• Origin (x, y): (x) is the distance from the left edge of the image and (y) is the distance from the top edge of the image.
• Size (w, h): the width and height of the area to search, relative to the transport.
• Location: select the position within the search area where the barcode needs to be. Search for barcode will proceed from upper left to lower right on the image.
- Any: indicates the barcode can be anywhere within the search area
- 1: must be the first barcode in the search area
- 2: must be the second barcode in the search area
- etc.
NOTES:
• Location is not available when Barcode is None Detected.
• Location is not available when Area is Part of Document.
• Use Location options if there are multiple barcodes on the sheet of paper and you want to sort based on a specific one. For example, if there are three barcodes down the center of the paper and you want to sort based on the middle one, then you would select 2.
A-61848 / TWAIN October 2016 57
Data — indicates what must be in the barcode data.
• Contains — select the type of data.
- Any Value: the data can be anything. Use this option to sort by barcode type — e.g. any Code 3 of 9.
- Number: allows you to compare the barcode data with a number up to 9 digits long. Any non-digit characters, even a space, will cause the comparison to fail.
• Comparison: select how to compare: Equal To, Not Equal To, Less Than, Greater Than, Less Than or Equal To, and Greater Than or Equal To.
• Value: enter up to a nine-digit number to compare the barcode data with.
- Text: allows you to compare the barcode data with a string of characters. The character value searched for must fall within the first 4096 characters of the barcode value.
• Comparison: select how to compare: Contains, Equal To, Not Equal To, Starting With, Not Starting With, Ending With, and Not Ending With. The comparison is not case-sensitive, so “DATA” is equal to “data”.
• Value: enter up to 32 characters to compare the barcode data with.
• Length — select how much data there must be (i.e. number of digits and characters), from 1 to 99.
- Any: any number of characters meets the criterion
- Equal To
- Not Equal To
- Less Than
- Greater Than
- Between
NOTE: The Data options are not available when Barcode is None Detected.
OK — saves any changes and closes this window.
Cancel — closes this window without saving any changes.
Help: displays help information for this window
58 A-61848 / TWAIN October 2016
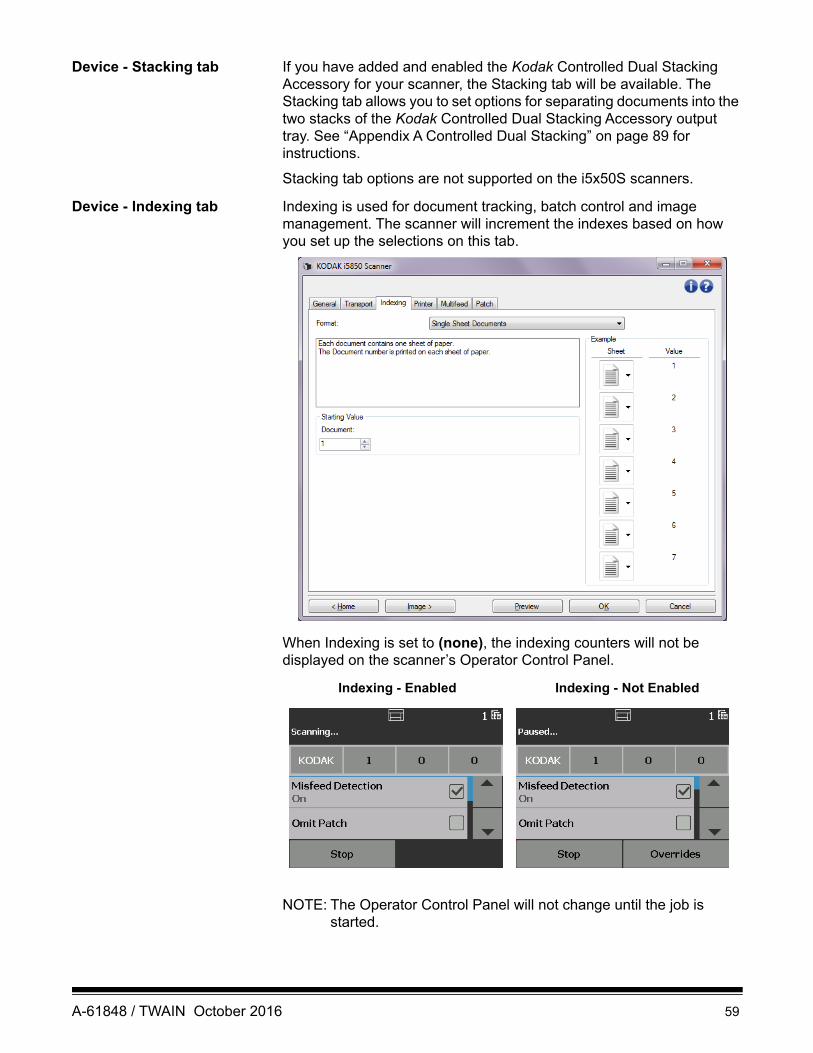
Device - Stacking tab If you have added and enabled the Kodak Controlled Dual Stacking Accessory for your scanner, the Stacking tab will be available. The Stacking tab allows you to set options for separating documents into the two stacks of the Kodak Controlled Dual Stacking Accessory output tray. See “Appendix A Controlled Dual Stacking” on page 89 for instructions.
Stacking tab options are not supported on the i5x50S scanners.
Device - Indexing tab Indexing is used for document tracking, batch control and image management. The scanner will increment the indexes based on how you set up the selections on this tab.
When Indexing is set to (none), the indexing counters will not be displayed on the scanner’s Operator Control Panel.
NOTE: The Operator Control Panel will not change until the job is started.
Indexing - Enabled Indexing - Not Enabled
A-61848 / TWAIN October 2016 59
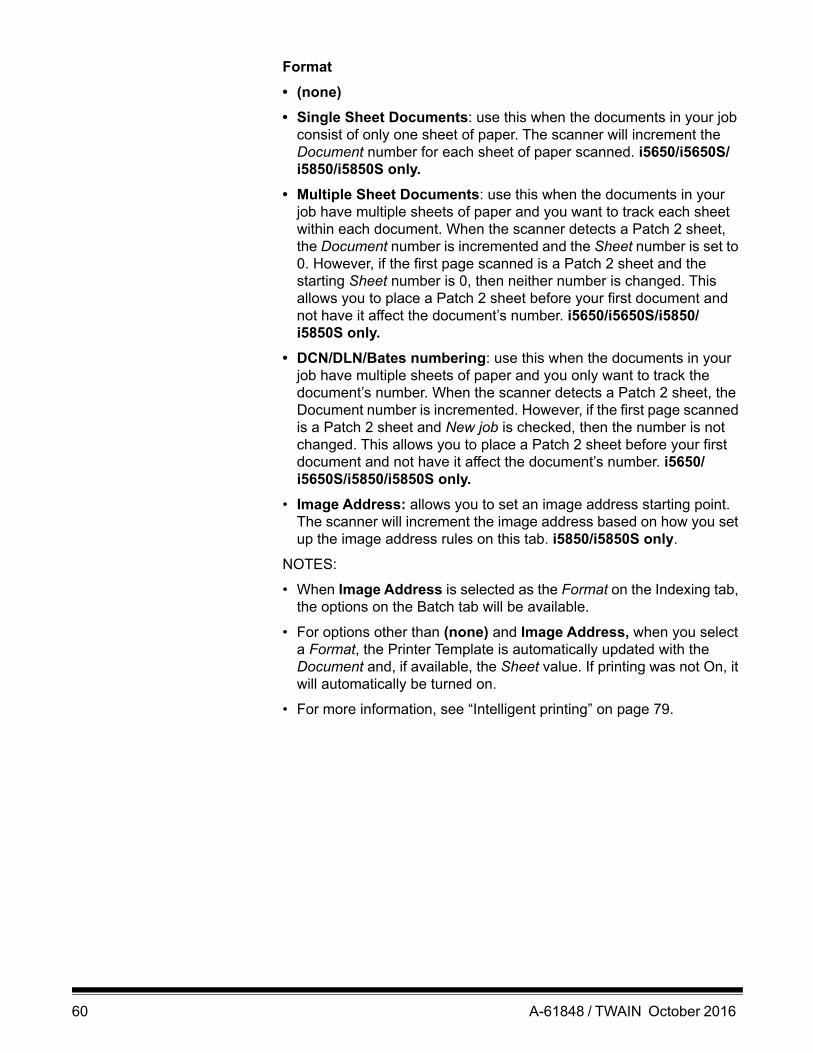
Format
• (none)
• Single Sheet Documents: use this when the documents in your job consist of only one sheet of paper. The scanner will increment the Document number for each sheet of paper scanned. i5650/i5650S/i5850/i5850S only.
• Multiple Sheet Documents: use this when the documents in your job have multiple sheets of paper and you want to track each sheet within each document. When the scanner detects a Patch 2 sheet, the Document number is incremented and the Sheet number is set to 0. However, if the first page scanned is a Patch 2 sheet and the starting Sheet number is 0, then neither number is changed. This allows you to place a Patch 2 sheet before your first document and not have it affect the document’s number. i5650/i5650S/i5850/i5850S only.
• DCN/DLN/Bates numbering: use this when the documents in your job have multiple sheets of paper and you only want to track the document’s number. When the scanner detects a Patch 2 sheet, the Document number is incremented. However, if the first page scanned is a Patch 2 sheet and New job is checked, then the number is not changed. This allows you to place a Patch 2 sheet before your first document and not have it affect the document’s number. i5650/i5650S/i5850/i5850S only.
• Image Address: allows you to set an image address starting point. The scanner will increment the image address based on how you set up the image address rules on this tab. i5850/i5850S only.
NOTES:
• When Image Address is selected as the Format on the Indexing tab, the options on the Batch tab will be available.
• For options other than (none) and Image Address, when you select a Format, the Printer Template is automatically updated with the Document and, if available, the Sheet value. If printing was not On, it will automatically be turned on.
• For more information, see “Intelligent printing” on page 79.
60 A-61848 / TWAIN October 2016
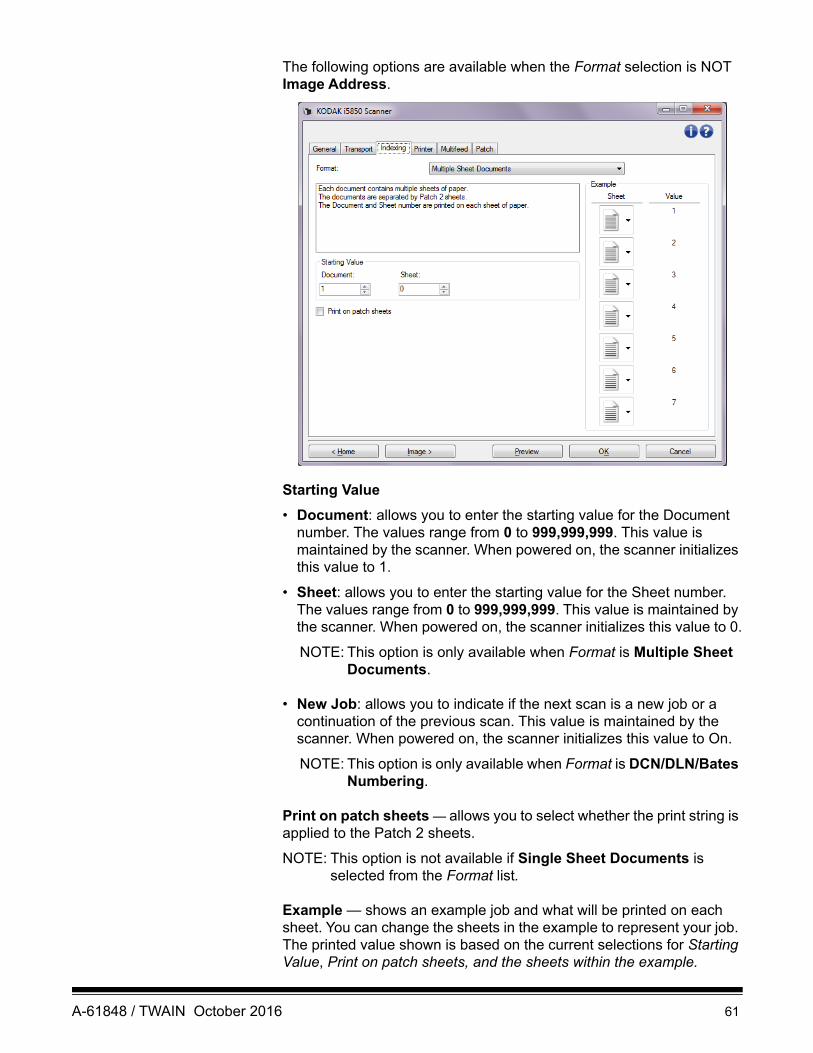
The following options are available when the Format selection is NOT Image Address.
Starting Value
• Document: allows you to enter the starting value for the Document number. The values range from 0 to 999,999,999. This value is maintained by the scanner. When powered on, the scanner initializes this value to 1.
• Sheet: allows you to enter the starting value for the Sheet number. The values range from 0 to 999,999,999. This value is maintained by the scanner. When powered on, the scanner initializes this value to 0.
NOTE: This option is only available when Format is Multiple Sheet Documents.
• New Job: allows you to indicate if the next scan is a new job or a continuation of the previous scan. This value is maintained by the scanner. When powered on, the scanner initializes this value to On.
NOTE: This option is only available when Format is DCN/DLN/Bates Numbering.
Print on patch sheets — allows you to select whether the print string is applied to the Patch 2 sheets.
NOTE: This option is not available if Single Sheet Documents is selected from the Format list.
Example — shows an example job and what will be printed on each sheet. You can change the sheets in the example to represent your job. The printed value shown is based on the current selections for Starting Value, Print on patch sheets, and the sheets within the example.
A-61848 / TWAIN October 2016 61
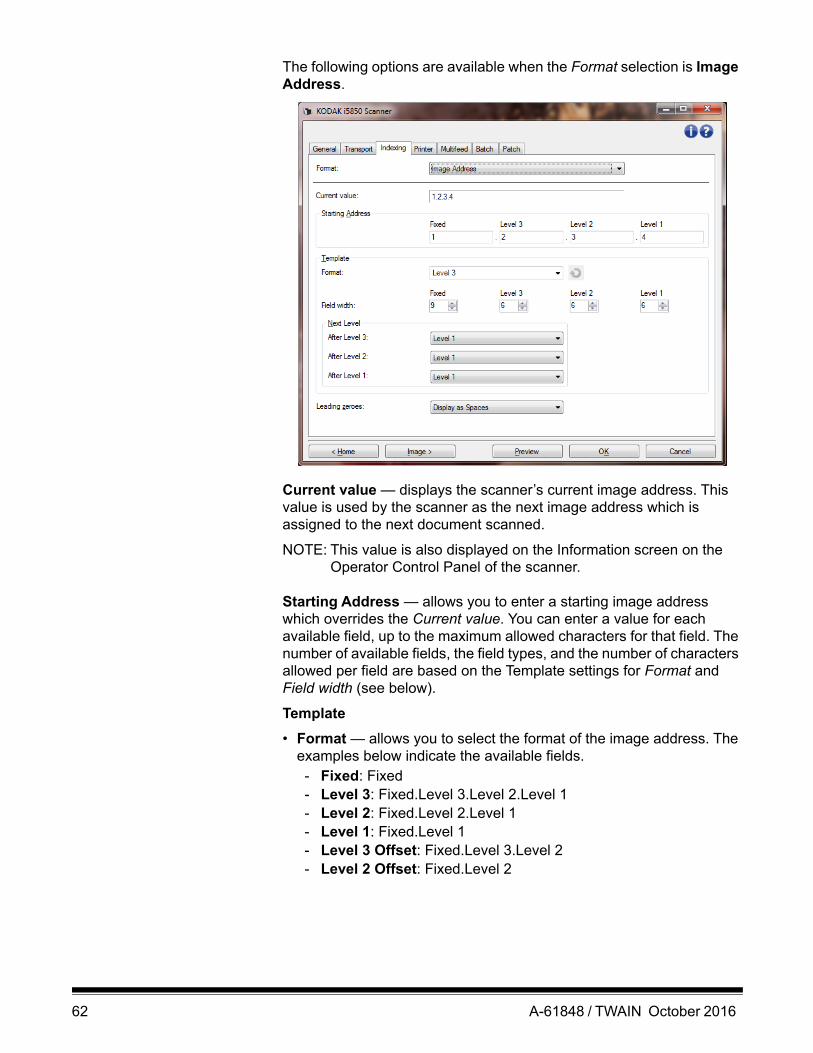
The following options are available when the Format selection is Image Address.
Current value — displays the scanner’s current image address. This value is used by the scanner as the next image address which is assigned to the next document scanned.
NOTE: This value is also displayed on the Information screen on the Operator Control Panel of the scanner.
Starting Address — allows you to enter a starting image address which overrides the Current value. You can enter a value for each available field, up to the maximum allowed characters for that field. The number of available fields, the field types, and the number of characters allowed per field are based on the Template settings for Format and Field width (see below).
Template
• Format — allows you to select the format of the image address. The examples below indicate the available fields.- Fixed: Fixed- Level 3: Fixed.Level 3.Level 2.Level 1- Level 2: Fixed.Level 2.Level 1- Level 1: Fixed.Level 1- Level 3 Offset: Fixed.Level 3.Level 2- Level 2 Offset: Fixed.Level 2
62 A-61848 / TWAIN October 2016
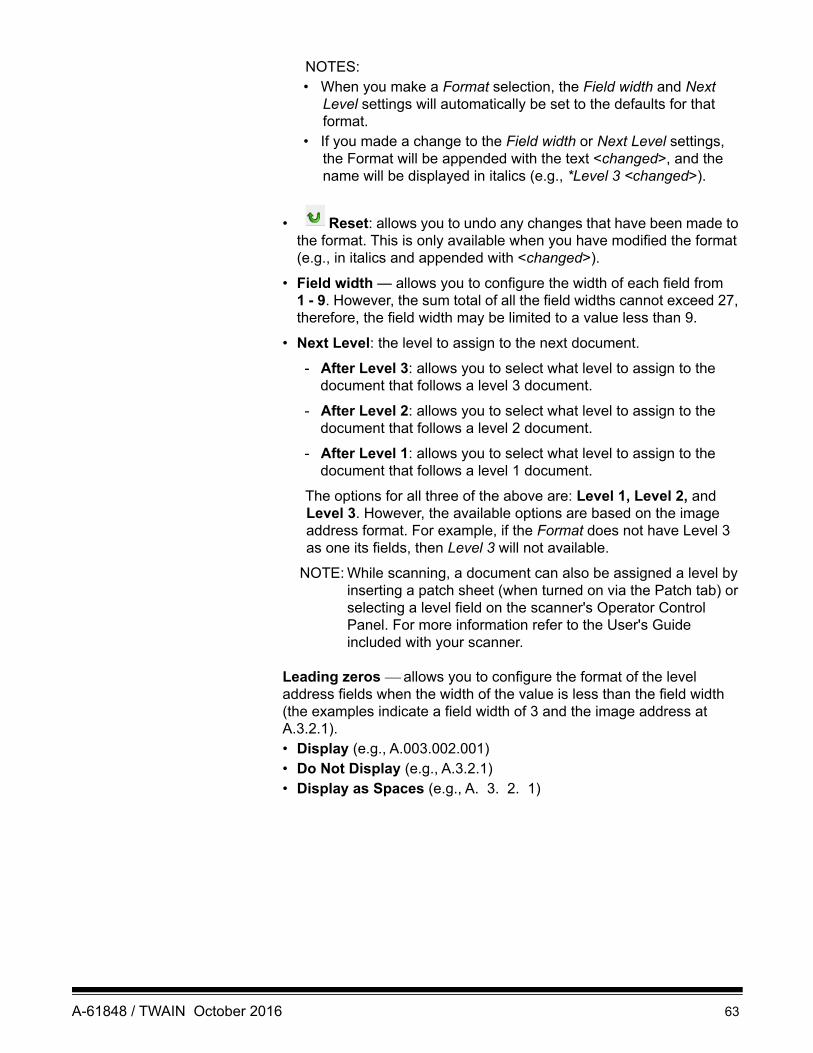
NOTES:• When you make a Format selection, the Field width and Next
Level settings will automatically be set to the defaults for that format.
• If you made a change to the Field width or Next Level settings, the Format will be appended with the text <changed>, and the name will be displayed in italics (e.g., *Level 3 <changed>).
• Reset: allows you to undo any changes that have been made to the format. This is only available when you have modified the format (e.g., in italics and appended with <changed>).
• Field width — allows you to configure the width of each field from 1 - 9. However, the sum total of all the field widths cannot exceed 27, therefore, the field width may be limited to a value less than 9.
• Next Level: the level to assign to the next document.
- After Level 3: allows you to select what level to assign to the document that follows a level 3 document.
- After Level 2: allows you to select what level to assign to the document that follows a level 2 document.
- After Level 1: allows you to select what level to assign to the document that follows a level 1 document.
The options for all three of the above are: Level 1, Level 2, and Level 3. However, the available options are based on the image address format. For example, if the Format does not have Level 3 as one its fields, then Level 3 will not available.
NOTE: While scanning, a document can also be assigned a level by inserting a patch sheet (when turned on via the Patch tab) or selecting a level field on the scanner's Operator Control Panel. For more information refer to the User's Guide included with your scanner.
Leading zeros allows you to configure the format of the level address fields when the width of the value is less than the field width (the examples indicate a field width of 3 and the image address at A.3.2.1).• Display (e.g., A.003.002.001)• Do Not Display (e.g., A.3.2.1)• Display as Spaces (e.g., A. 3. 2. 1)
A-61848 / TWAIN October 2016 63
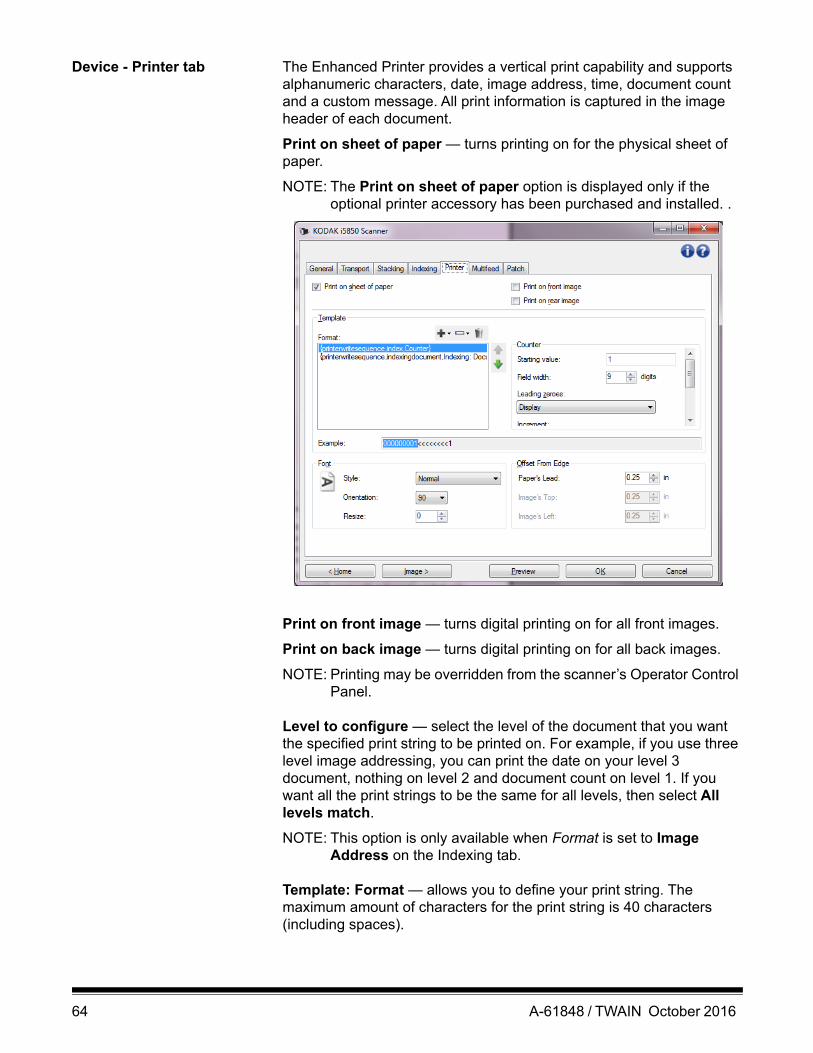
Device - Printer tab The Enhanced Printer provides a vertical print capability and supports alphanumeric characters, date, image address, time, document count and a custom message. All print information is captured in the image header of each document.
Print on sheet of paper — turns printing on for the physical sheet of paper.
NOTE: The Print on sheet of paper option is displayed only if the optional printer accessory has been purchased and installed. .
Print on front image — turns digital printing on for all front images.
Print on back image — turns digital printing on for all back images.
NOTE: Printing may be overridden from the scanner’s Operator Control Panel.
Level to configure — select the level of the document that you want the specified print string to be printed on. For example, if you use three level image addressing, you can print the date on your level 3 document, nothing on level 2 and document count on level 1. If you want all the print strings to be the same for all levels, then select All levels match.
NOTE: This option is only available when Format is set to Image Address on the Indexing tab.
Template: Format — allows you to define your print string. The maximum amount of characters for the print string is 40 characters (including spaces).
64 A-61848 / TWAIN October 2016
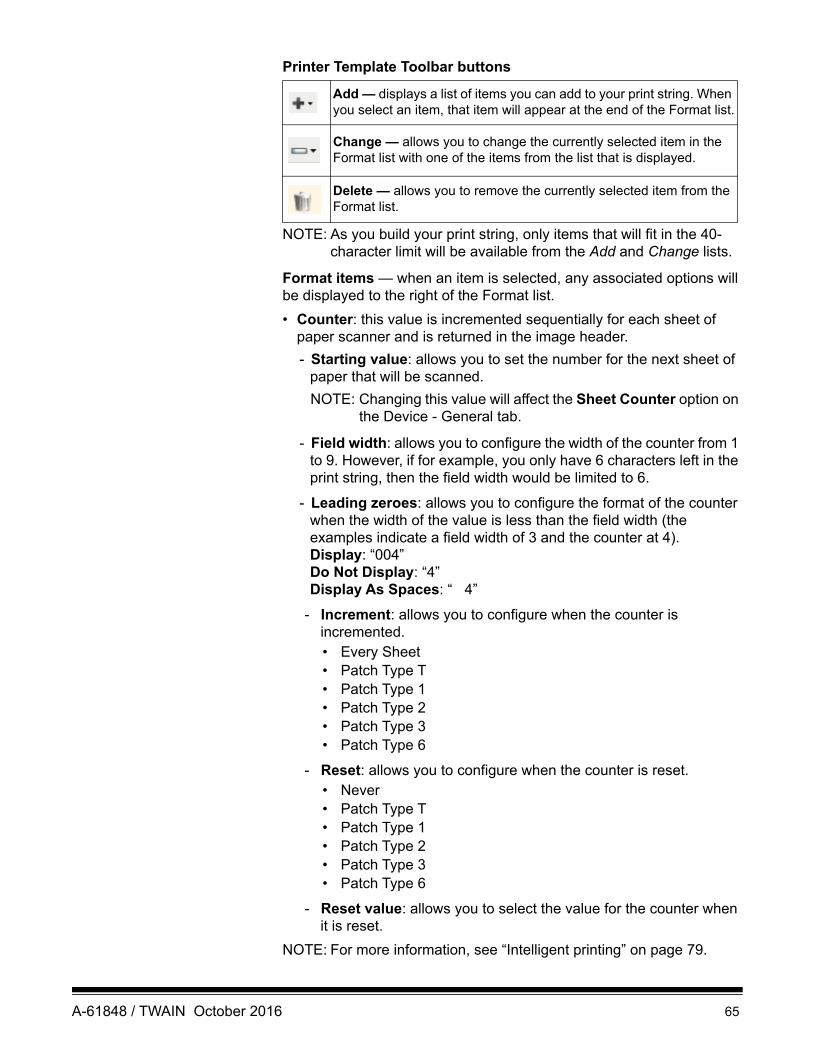
Printer Template Toolbar buttons
NOTE: As you build your print string, only items that will fit in the 40-character limit will be available from the Add and Change lists.
Format items — when an item is selected, any associated options will be displayed to the right of the Format list.
• Counter: this value is incremented sequentially for each sheet of paper scanner and is returned in the image header.
- Starting value: allows you to set the number for the next sheet of paper that will be scanned.
NOTE: Changing this value will affect the Sheet Counter option on the Device - General tab.
- Field width: allows you to configure the width of the counter from 1 to 9. However, if for example, you only have 6 characters left in the print string, then the field width would be limited to 6.
- Leading zeroes: allows you to configure the format of the counter when the width of the value is less than the field width (the examples indicate a field width of 3 and the counter at 4). Display: “004”Do Not Display: “4” Display As Spaces: “ 4”
- Increment: allows you to configure when the counter is incremented.• Every Sheet• Patch Type T• Patch Type 1• Patch Type 2• Patch Type 3• Patch Type 6
- Reset: allows you to configure when the counter is reset.• Never• Patch Type T• Patch Type 1• Patch Type 2• Patch Type 3• Patch Type 6
- Reset value: allows you to select the value for the counter when it is reset.
NOTE: For more information, see “Intelligent printing” on page 79.
Add — displays a list of items you can add to your print string. When you select an item, that item will appear at the end of the Format list.
Change — allows you to change the currently selected item in the Format list with one of the items from the list that is displayed.
Delete — allows you to remove the currently selected item from the Format list.
A-61848 / TWAIN October 2016 65
• Date- Format:
MMDDYYYYMMDDYYDDMMYYYYDDMMYYYYYYMMDDYYMMDDDDD (Julian)YYYYDDD (Julian)YYDDD (Julian)
- Separator: (the examples indicate a format of YYYYMMDD)(none)Slash: 2010/08/24Hyphen: 2010-08-24Period: 2010.08.24Space: 2010 08 24
- Specific date: allows you to select a specific date if you do not want to use the current date within the scanner.
• Time
- Format:HHmmHHmmssHHmmss.xxhhmmhhmmsshhmmss.xxhhmm tthhmmss tthhmmss.xx tt
NOTE: HH is 24 hours, from 00 to 23; hh is 12 hours, from 01 to 12; mm is minutes from 00 to 59, ss is seconds from 00 to 59; xx is a counter from 00 to 99; and tt is AM or PM.
- Specific time: allows you to select a specific time if you do not want to use the current time within the scanner.
• Space: adds a space.
• Indexing: Document and Indexing: Sheet: these options are available based on the setting of Format on the Indexing tab.
NOTE: These options are automatically added to the template. You cannot remove them, but can move them within the template.
• Image Address: Fixed and Image Address: Levels: these are defined on the Indexing tab. Only the levels currently defined will be available.
NOTE: This option is only available when Format is set to Image Address on the Indexing tab.
66 A-61848 / TWAIN October 2016
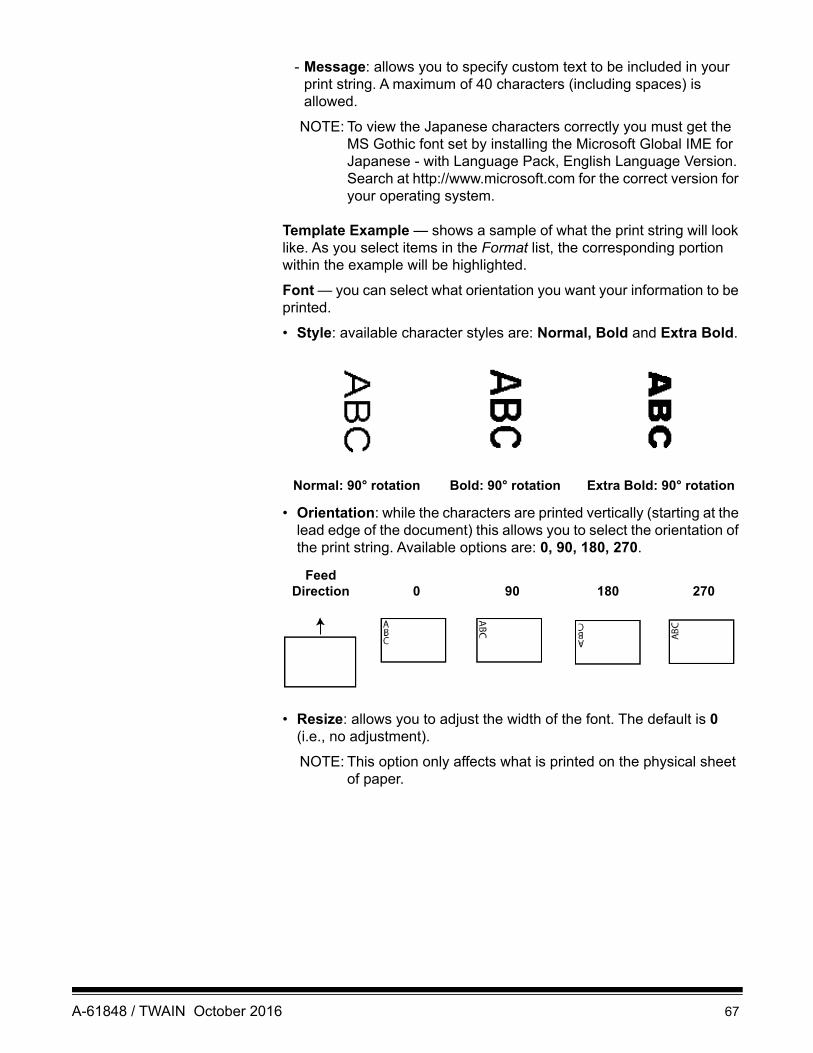
- Message: allows you to specify custom text to be included in your print string. A maximum of 40 characters (including spaces) is allowed.
NOTE: To view the Japanese characters correctly you must get the MS Gothic font set by installing the Microsoft Global IME for Japanese - with Language Pack, English Language Version. Search at http://www.microsoft.com for the correct version for your operating system.
Template Example — shows a sample of what the print string will look like. As you select items in the Format list, the corresponding portion within the example will be highlighted.
Font — you can select what orientation you want your information to be printed.
• Style: available character styles are: Normal, Bold and Extra Bold.
• Orientation: while the characters are printed vertically (starting at the lead edge of the document) this allows you to select the orientation of the print string. Available options are: 0, 90, 180, 270.
• Resize: allows you to adjust the width of the font. The default is 0 (i.e., no adjustment).
NOTE: This option only affects what is printed on the physical sheet of paper.
Normal: 90° rotation Bold: 90° rotation Extra Bold: 90° rotation
Feed Direction 0 90 180 270
A-61848 / TWAIN October 2016 67
Offset from Edge — select a value to determine how far the printed information will appear from the edge.
• Paper’s Lead: select a value for the distance from the leading edge of the document.
NOTES:
• Printing automatically stops 6.3 mm (1/4-inch) from the trailing edge of the document even if the information has not been completely printed.
• The horizontal print position is determined by the location of the ink cartridge in the scanner. See the User’s Guide for information about setting print positions.
• This option is only available when printing on the physical sheet of paper.
• The offset from the lead edge may also be overridden from the scanner’s Operator Control Panel.
• Image’s Top: select a value for the distance from the top edge of the image.
• Image’s Left: select a value for the distance from the left edge of the image.
NOTE: The Image’s Top and Image’s Left options are only available when digitally printing on images.
68 A-61848 / TWAIN October 2016
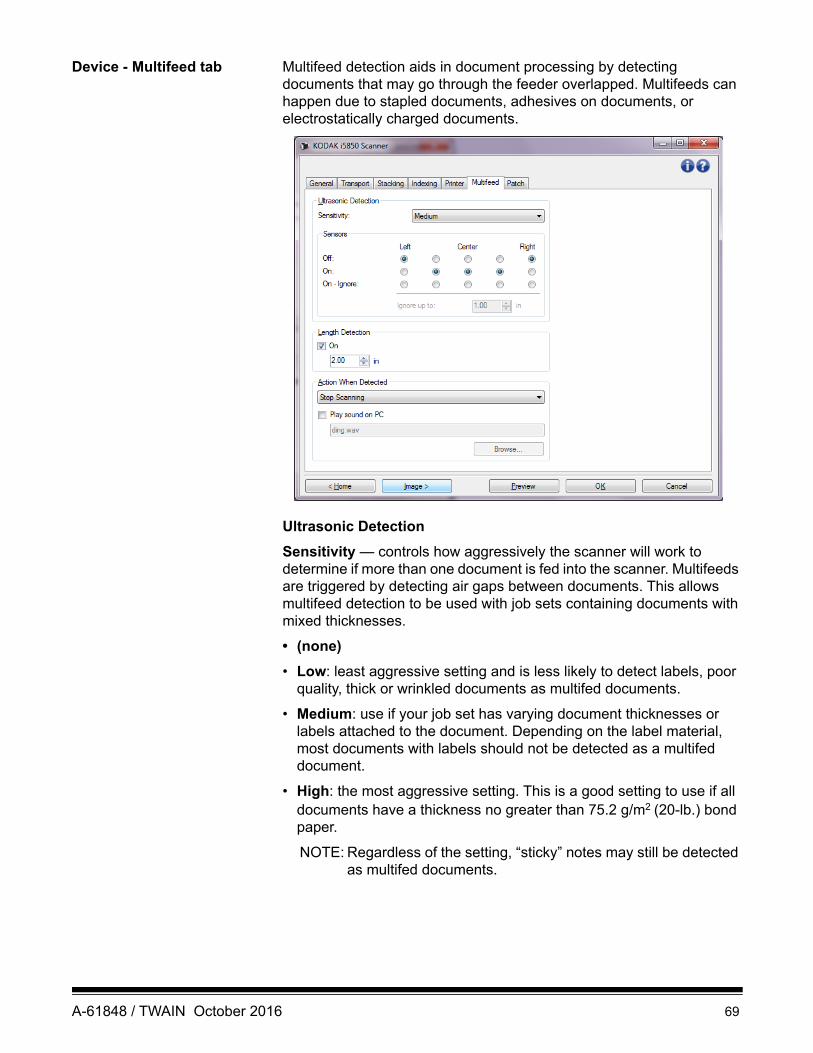
Device - Multifeed tab Multifeed detection aids in document processing by detecting documents that may go through the feeder overlapped. Multifeeds can happen due to stapled documents, adhesives on documents, or electrostatically charged documents.
Ultrasonic Detection
Sensitivity — controls how aggressively the scanner will work to determine if more than one document is fed into the scanner. Multifeeds are triggered by detecting air gaps between documents. This allows multifeed detection to be used with job sets containing documents with mixed thicknesses.
• (none)
• Low: least aggressive setting and is less likely to detect labels, poor quality, thick or wrinkled documents as multifed documents.
• Medium: use if your job set has varying document thicknesses or labels attached to the document. Depending on the label material, most documents with labels should not be detected as a multifed document.
• High: the most aggressive setting. This is a good setting to use if all documents have a thickness no greater than 75.2 g/m2 (20-lb.) bond paper.
NOTE: Regardless of the setting, “sticky” notes may still be detected as multifed documents.
A-61848 / TWAIN October 2016 69
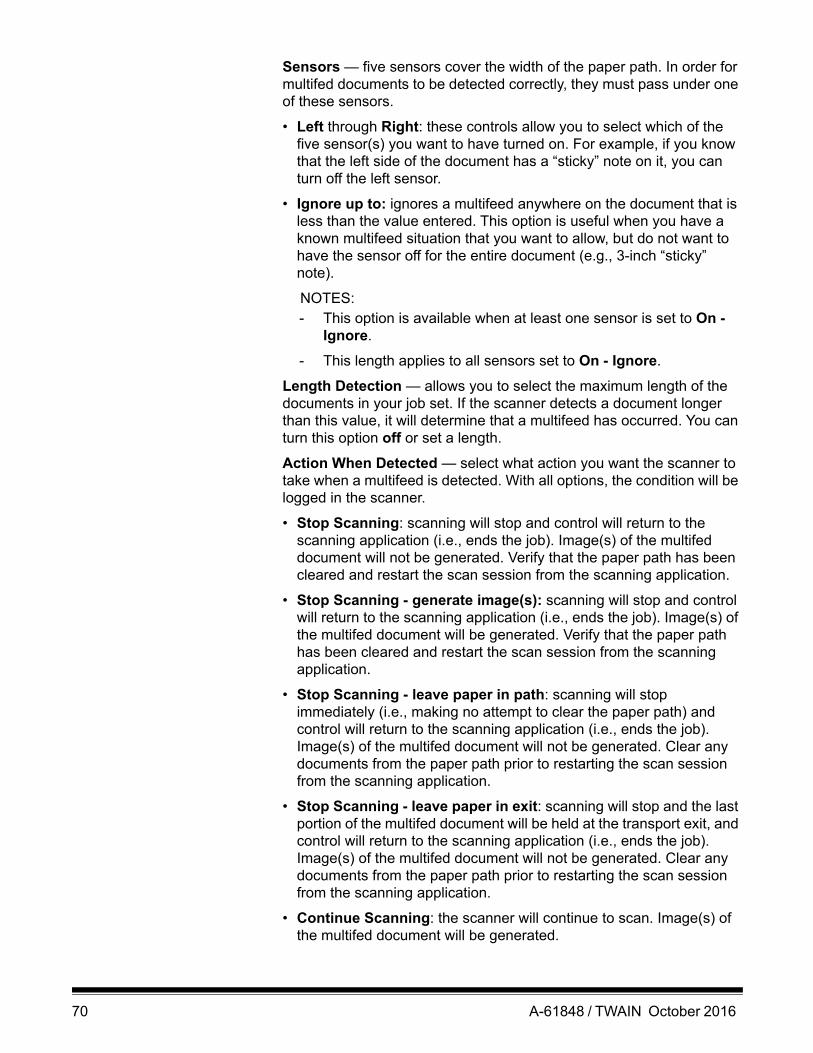
Sensors — five sensors cover the width of the paper path. In order for multifed documents to be detected correctly, they must pass under one of these sensors.
• Left through Right: these controls allow you to select which of the five sensor(s) you want to have turned on. For example, if you know that the left side of the document has a “sticky” note on it, you can turn off the left sensor.
• Ignore up to: ignores a multifeed anywhere on the document that is less than the value entered. This option is useful when you have a known multifeed situation that you want to allow, but do not want to have the sensor off for the entire document (e.g., 3-inch “sticky” note).
NOTES:- This option is available when at least one sensor is set to On -
Ignore.
- This length applies to all sensors set to On - Ignore.
Length Detection — allows you to select the maximum length of the documents in your job set. If the scanner detects a document longer than this value, it will determine that a multifeed has occurred. You can turn this option off or set a length.
Action When Detected — select what action you want the scanner to take when a multifeed is detected. With all options, the condition will be logged in the scanner.
• Stop Scanning: scanning will stop and control will return to the scanning application (i.e., ends the job). Image(s) of the multifed document will not be generated. Verify that the paper path has been cleared and restart the scan session from the scanning application.
• Stop Scanning - generate image(s): scanning will stop and control will return to the scanning application (i.e., ends the job). Image(s) of the multifed document will be generated. Verify that the paper path has been cleared and restart the scan session from the scanning application.
• Stop Scanning - leave paper in path: scanning will stop immediately (i.e., making no attempt to clear the paper path) and control will return to the scanning application (i.e., ends the job). Image(s) of the multifed document will not be generated. Clear any documents from the paper path prior to restarting the scan session from the scanning application.
• Stop Scanning - leave paper in exit: scanning will stop and the last portion of the multifed document will be held at the transport exit, and control will return to the scanning application (i.e., ends the job). Image(s) of the multifed document will not be generated. Clear any documents from the paper path prior to restarting the scan session from the scanning application.
• Continue Scanning: the scanner will continue to scan. Image(s) of the multifed document will be generated.
70 A-61848 / TWAIN October 2016
• Pause Scanning - leave paper in path: scanning will stop immediately (i.e., making no attempt to clear the paper path) but the scanning application will be waiting for additional images (i.e., stops the feeder). Image(s) of the multifed document will not be generated. Clear any documents from the paper path prior to resuming the scan session. Scanning may be resumed by pressing the Start/Resume button on the scanner. Scanning may be stopped by pressing the Stop/Pause button on the scanner or via the scanning application. The user configured multifeed sound will be made by the scanner.
• Pause Scanning - generate image(s): scanning will stop but the scanning application will be waiting for additional images (i.e., stops the feeder). Image(s) of the multifed document will be generated. Scanning may be resumed by pressing the Start/Resume button on the scanner. Scanning may be stopped by pressing the Stop/Pause button on the scanner or via the scanning application.
This option allows you to inspect a preview image of the scanned page and choose to Accept the scanned image or Rescan the page and discard the image from the scan that triggered a multifeed alarm. The scanned images will not be sent to the host application until accepted. This option allows all multifeed events to be handled at the scanner. No image manipulation is required in the scanning application. This option also allows you to stay in front of the scanner reducing wasted movement and fatigue. This option is provided by the scanner. No changes to the scanning application are required.
A-61848 / TWAIN October 2016 71
The preview image will be oriented per the image processing settings that were selected within the TWAIN Datasource (Rotate 90). If the scanning application is rotating the image or performing other image processing, the preview image will not have scanning image processing applied.
- If scanning in duplex (front and back), then both images will be displayed.
- If scanning in black and white, a black and white image will be displayed.
- If scanning in color/grayscale, a color/grayscale image will be displayed.
- If scanning in dual stream, a color/grayscale image will be displayed.
- If scanning in black and white using VRS software, a grayscale image will be displayed.
- Accepting the images: if you want to accept the image, touch Accept on the Operator Control Panel or press the Start/Resume button on the scanner. When Accept is selected, the images shown in the scanner’s preview will immediately be sent to the scanning application and scanning will continue.
- Rescanning the page: if the page needs to be rescanned, remove the top page(s) from the output tray and place the pages back in the input elevator (be sure to correct any document preparation issues). When the pages are ready to rescan, touch Rescan on the Operator Control Panel. The preview images will be discarded. If printing was not enabled, the scanner will immediately start scanning. If printing was enabled, the scanner will go to the Paused screen where you can choose to Omit Printing on the next page scanned. You can then press the Start/Resume button on the scanner to continue scanning.
• Pause Scanning - leave paper at exit: scanning will stop and the last portion of the multifed document will be held at the transport exit, but the scanning application will be waiting for additional images (i.e., stops the feeder). Image(s) of the multifed document will not be generated. Clear any documents from the paper path prior to resuming the scan session. Scanning may be resumed by pressing the Start/Resume button on the scanner. Scanning may be stopped by pressing the Stop/Pause button on the scanner or via the scanning application.
72 A-61848 / TWAIN October 2016
• Interactive Multifeed Recovery: scanning will stop but the scanning application will be waiting for additional images (i.e., stops the feeder). Images of the multifed document will be displayed on your computer. You can accept these images or rescan to replace them. You can make your selection on your computer or by using the scanner’s Operator Control Panel. Send the images to your application and resume scanning by selecting Accept. Selecting Rescan will discard the images and scanning will resume. Scanning may be stopped by selecting Stop.
NOTE: Put the multifed document(s) into the input elevator before selecting Rescan.
Play sound on PC — turn this option on if you want the PC to make a sound when a multifeed is detected. You can click the Browse button to select the desired .wav file.
NOTE: The sound on the PC may not occur at the exact time the multifeed is detected by the scanner.
A-61848 / TWAIN October 2016 73
Device - Batch tab Batching is the operation of counting pages or documents.
NOTE: This tab is only available when Format is set to Image Address on the Indexing tab.
On — turns batching on and makes the rest of the options on this tab available.
Level to count — sets the level to count. The options are Level 1, Level 2, and Level 3.
NOTE: The level you want to count must exist in the image address template as defined on the Indexing tab.
How Many To Count — defines the number of documents to be counted prior to performing the action to take when the count has been reached.
When Count Reached
• Next level: defines the level for the next document after the count is reached. Options are: (none), Level 1, Level 2, and Level 3.
NOTE: The level you want to count must exist in the image address template as defined on the Indexing tab.
74 A-61848 / TWAIN October 2016

Action to take: defines the action to be taken after processing the last document in the batch.
• Pause Scanning: scanning will stop but the scanning application will be waiting for additional images (i.e., stops the feeder). Scanning may be resumed by touching Resume on the scanner’s Operator Control Panel. Scanning may be stopped by touching End Job on the scanner’s Operator Control Panel or via the scanning application.
• Stop Scanning: scanning will stop and control will return to the scanning application (i.e., ends the job). Restart the scan session from the scanning application.
• Continue Scanning and Restart Count: the scanner will continue to scan and automatically start a new batch by resetting How Many to Count.
NOTE: You can also end a batch before the How Many to Count value is reached by using the scanner’s Operator Control Panel.
A-61848 / TWAIN October 2016 75
Device - Patch tab The Patch tab provides choices of what patch type(s) to recognize. One or more patches can be selected at a time. The type of patch recognized is returned in the image header.
Patch Readers can automatically sense predefined patch code(s) and be configured to control document level changes. See Chapter 6, Patch Reading in the User’s Guide for complete information.
Patch Confirmation Tone — the confirmation tone may be used to signal that a patch has been recognized by the scanner. The default is no confirmation tone.
Recognize — select which patch type(s) to recognize.
• Level 2: assigns a Level 2 to the current document (whether it is your document with a patch on it or a Level 2 patch sheet).
• Level 3: assigns a Level 3 to the current document (whether it is your document with a patch on it or a Level 3 patch sheet).
• Transfer: assigns a level to the next document (after the Transfer patch sheet).
- None: select this if you do not want to recognize transfer patches.- As Level 2 - As Level 3
NOTE: The Transfer patch will be treated as Level 0.
76 A-61848 / TWAIN October 2016
Feature
• Patch Types 1, 4 and 6 — these patch types can be used by the scanning application for post-scan image control. (They are not used for image addressing.) For example, use these patch types for workflow control, such as changing between black and white and color/grayscale imaging.
NOTE: This option is only available when Format is set to Image Address on the Indexing tab.
Use Heads — select which patch heads/readers you want to use. Each patch head/reader can be turned on and off independently.
NOTE: This option is only available when Format is set to Image Address on the Indexing tab.
Scanner — this option allows you to use a set of Scanner Control patches. These patches are new patch patterns numbered from 10 -15 and are reserved for automatically controlling features of the scanner by inserting patch pages into the batches of paper during document preparation. For example, you may have a job that requires that you scan envelopes that contain the pages you are scanning. The envelopes trigger a multifeed that is slowing down your scanning throughput. To avoid this, you can use the Action when patch is detected option in the scanning application to select one of the Scanner Control patches and assign the Turn Off Multifeed – For One Sheet option. If, for example, you select a Patch Type 10 you could insert a Patch 10 sheet in front of the envelopes to prevent the scanner from triggering a multifeed.
Select one of the following when a patch is detected:
• Turn Off Multifeed – For One Sheet: disables multifeed detection for the page following the patch that is used to trigger this feature.
• Turn Off Multifeed – Between Patches: toggle a multifeed detection off until another patch of the same kind is read. This feature can be used if there is a group of documents together in the batch that would trigger an undesired multifeed event.
A-61848 / TWAIN October 2016 77
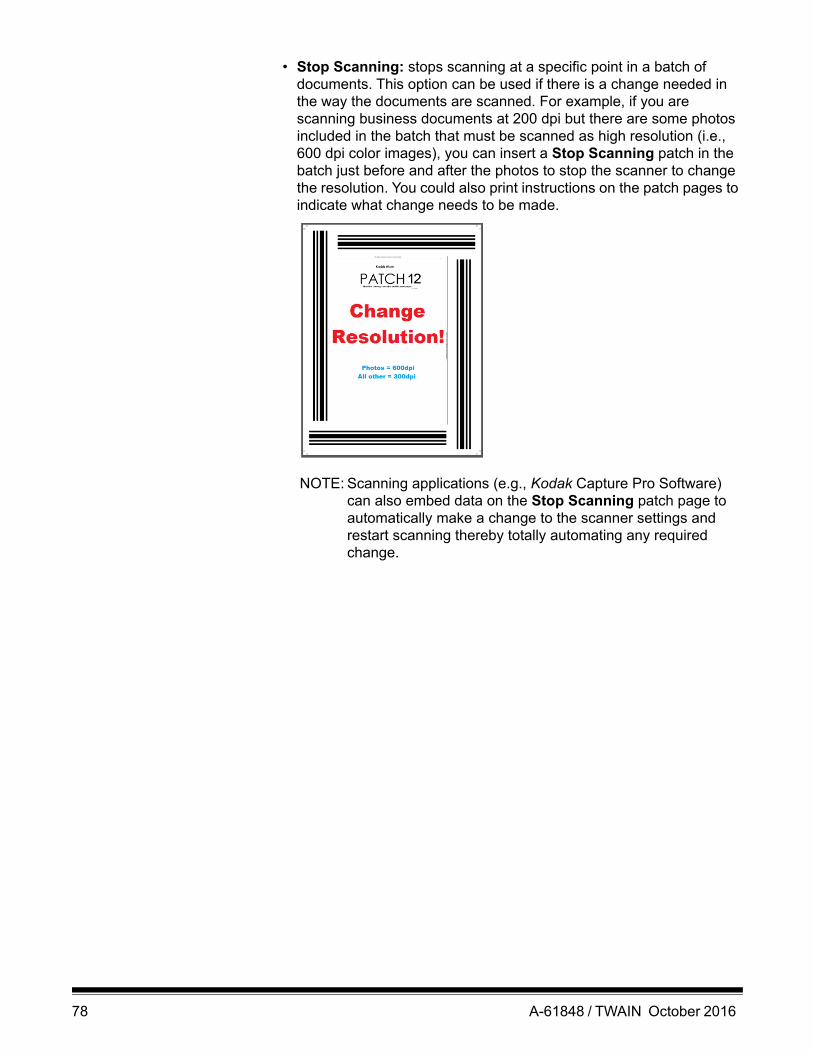
• Stop Scanning: stops scanning at a specific point in a batch of documents. This option can be used if there is a change needed in the way the documents are scanned. For example, if you are scanning business documents at 200 dpi but there are some photos included in the batch that must be scanned as high resolution (i.e., 600 dpi color images), you can insert a Stop Scanning patch in the batch just before and after the photos to stop the scanner to change the resolution. You could also print instructions on the patch pages to indicate what change needs to be made.
NOTE: Scanning applications (e.g., Kodak Capture Pro Software) can also embed data on the Stop Scanning patch page to automatically make a change to the scanner settings and restart scanning thereby totally automating any required change.
78 A-61848 / TWAIN October 2016
Intelligent printing Some Kodak Scanners support intelligent printing which allows the scanner to digitally or physically print unique numbers on each document that is batch scanned. For example, if you are feeding batches of documents where each document is a group of pages that needs to have a unique Document Locator number physically printed on the page, Intelligent Printing allows you to do this. There are three options available with Intelligent Printing.
1. Patch counting: the Kodak i5x50, i5x50S, and i5x50V Scanners have options that when you are printing the scanner counter on your images/pages, you can have the counter incremented for every page scanned or only when a page with a patch pattern is scanned. You can also select a patch type as a document separator sheet and reset the counter by using a different patch page. The limitations when using the patch Counting option are that the printing is also printed on the pages with the patch pattern and the patch pages you use must be printed with the patch bars in the vertical orientation. There is no metadata included in the patch images to indicate that it was read as a patch page.
IMPORTANT: Some combinations of patch usage and intelligent printing, or indexing and intelligent printing, are complex to set up correctly. It is possible to set up printing so it looks correct — but image header information will not match the print string information if other setup is not correct. You risk unexpected results, if you use the following combinations.
• Patch Counting with Indexing is challenging to set up. If you are having problems with synchronization of counters between the printed page values and the host software counter values, you may have inadvertently configured your scanner for Patch Counting and Indexing.
• If you intend to use indexing, your TWAIN print format string should probably NOT contain the value Counter.
• If you intend to use patch counting, your TWAIN print format string should probably NOT contain the values: “Indexing: Document””Indexing: Sheet” “Image Address:Fixed” “Image Address:Level 3””Image Address:Level 2“Image Address:Level 1”
A-61848 / TWAIN October 2016 79

.
2. Indexing: the i5650, i5650S, i5850, and i5850S scanners have indexing capabilities. Indexing provides three pre-configured options to determine how you want the physical pages or images of your documents to be numbered. When any indexing option is selected, the print control will automatically be updated to include the Index counter(s). Only Type 2 patches for document separators can be used. Indexing also allows you to have the Type 2 patch pages printed when they are scanned. An interactive example tool in the scanning application is available to see how the intelligent printing counters will increment when pages are scanned. When using Indexing, there is no metadata included in the patch images to indicate that it was read as a patch page.
- Single Sheet Documents is similar to the printer page counter. In Single Sheet Document indexing every page is printed with an incrementing Document counter. The print template will include the “Indexing: Document” counter.
80 A-61848 / TWAIN October 2016
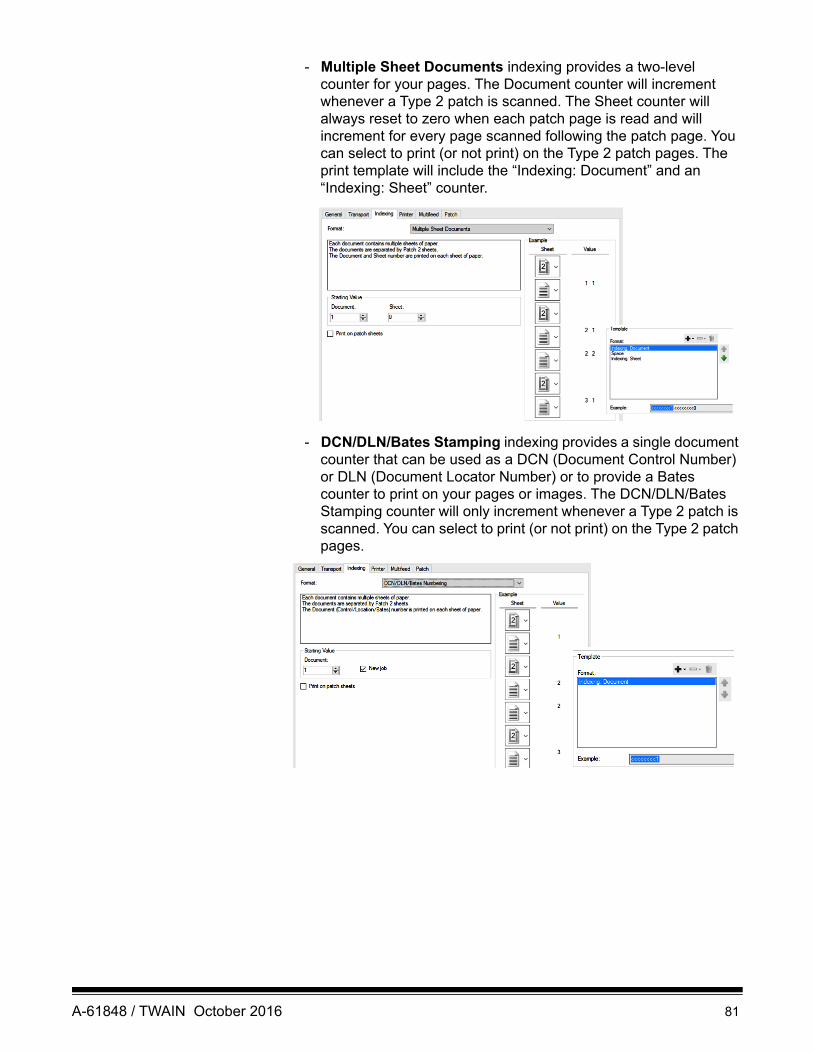
- Multiple Sheet Documents indexing provides a two-level counter for your pages. The Document counter will increment whenever a Type 2 patch is scanned. The Sheet counter will always reset to zero when each patch page is read and will increment for every page scanned following the patch page. You can select to print (or not print) on the Type 2 patch pages. The print template will include the “Indexing: Document” and an “Indexing: Sheet” counter.
- DCN/DLN/Bates Stamping indexing provides a single document counter that can be used as a DCN (Document Control Number) or DLN (Document Locator Number) or to provide a Bates counter to print on your pages or images. The DCN/DLN/Bates Stamping counter will only increment whenever a Type 2 patch is scanned. You can select to print (or not print) on the Type 2 patch pages.
A-61848 / TWAIN October 2016 81
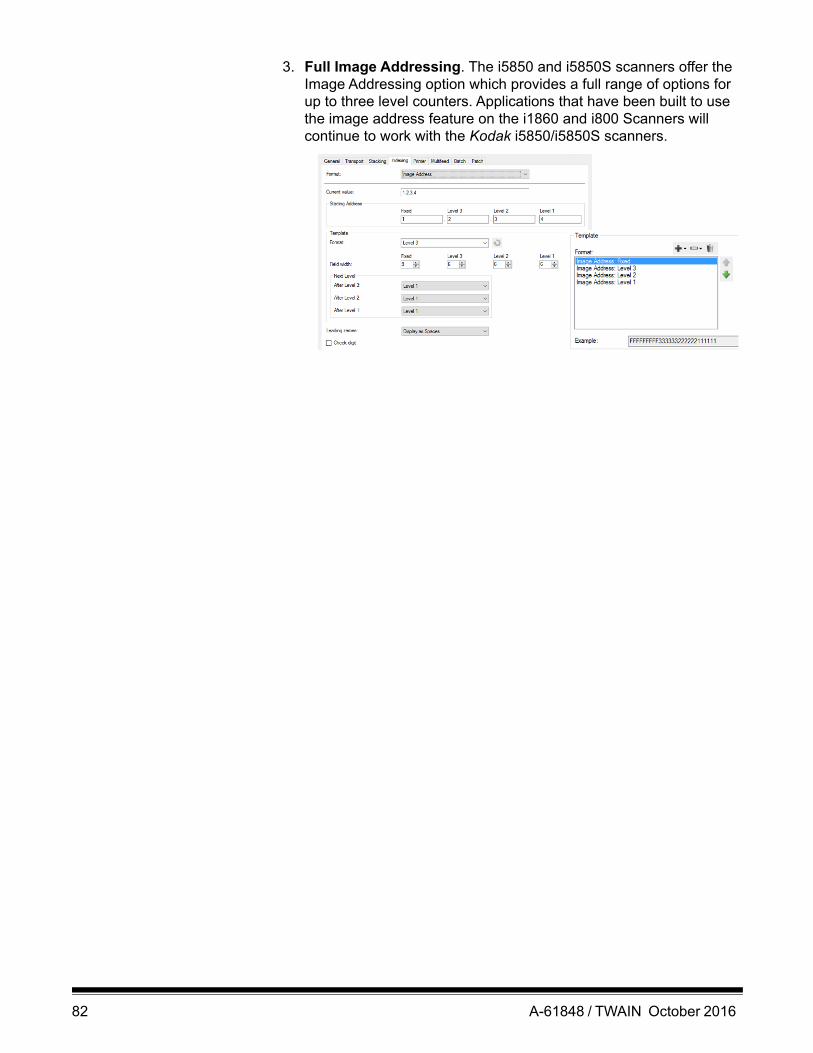
3. Full Image Addressing. The i5850 and i5850S scanners offer the Image Addressing option which provides a full range of options for up to three level counters. Applications that have been built to use the image address feature on the i1860 and i800 Scanners will continue to work with the Kodak i5850/i5850S scanners.
82 A-61848 / TWAIN October 2016
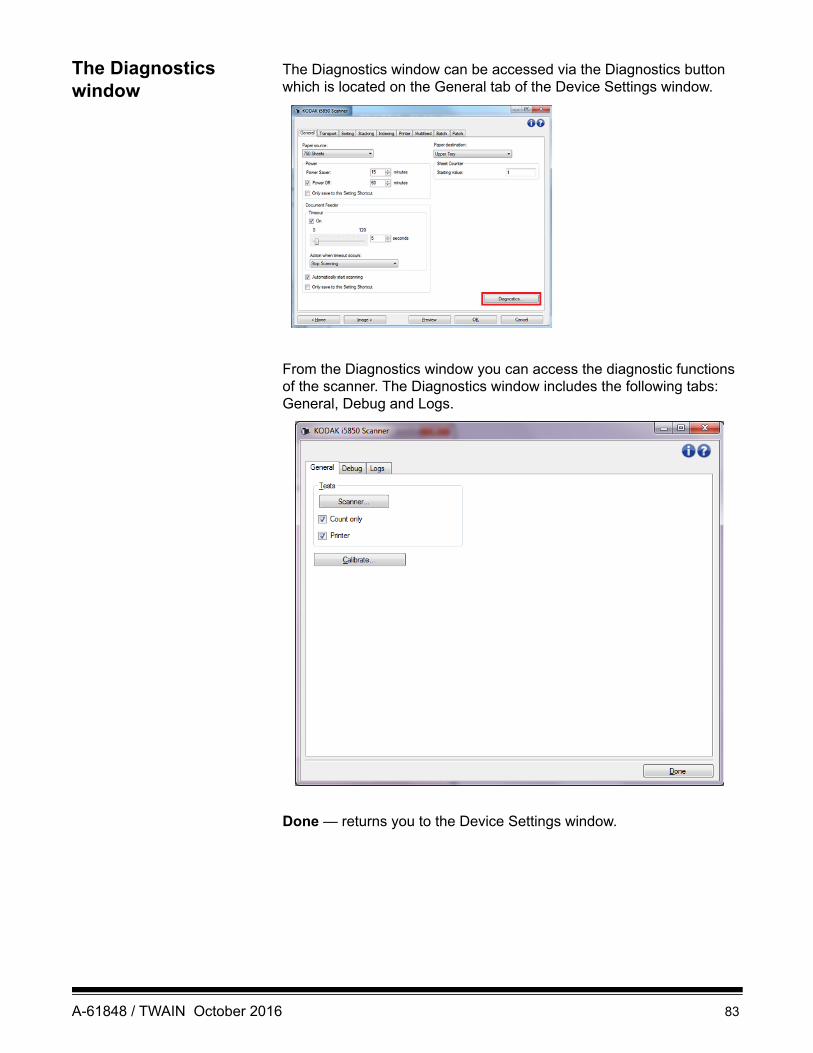
The Diagnostics window
The Diagnostics window can be accessed via the Diagnostics button which is located on the General tab of the Device Settings window.
From the Diagnostics window you can access the diagnostic functions of the scanner. The Diagnostics window includes the following tabs: General, Debug and Logs.
Done — returns you to the Device Settings window.
A-61848 / TWAIN October 2016 83
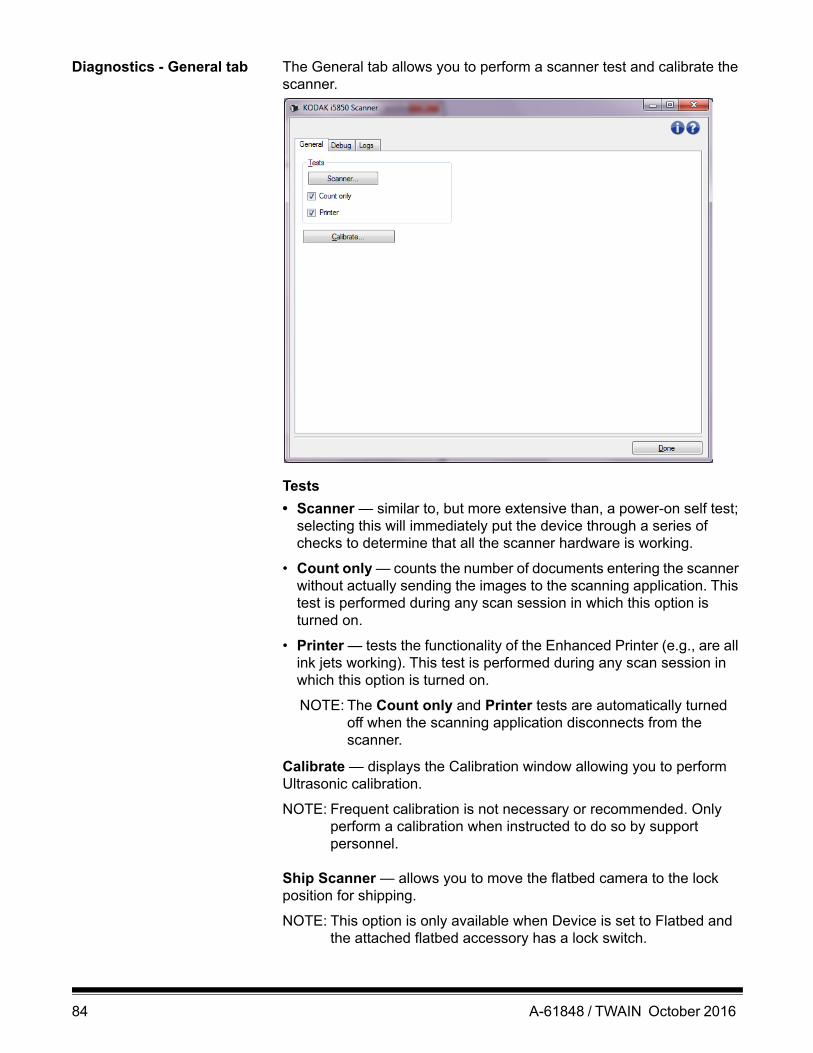
Diagnostics - General tab The General tab allows you to perform a scanner test and calibrate the scanner.
Tests
• Scanner — similar to, but more extensive than, a power-on self test; selecting this will immediately put the device through a series of checks to determine that all the scanner hardware is working.
• Count only — counts the number of documents entering the scanner without actually sending the images to the scanning application. This test is performed during any scan session in which this option is turned on.
• Printer — tests the functionality of the Enhanced Printer (e.g., are all ink jets working). This test is performed during any scan session in which this option is turned on.
NOTE: The Count only and Printer tests are automatically turned off when the scanning application disconnects from the scanner.
Calibrate — displays the Calibration window allowing you to perform Ultrasonic calibration.
NOTE: Frequent calibration is not necessary or recommended. Only perform a calibration when instructed to do so by support personnel.
Ship Scanner — allows you to move the flatbed camera to the lock position for shipping.
NOTE: This option is only available when Device is set to Flatbed and the attached flatbed accessory has a lock switch.
84 A-61848 / TWAIN October 2016
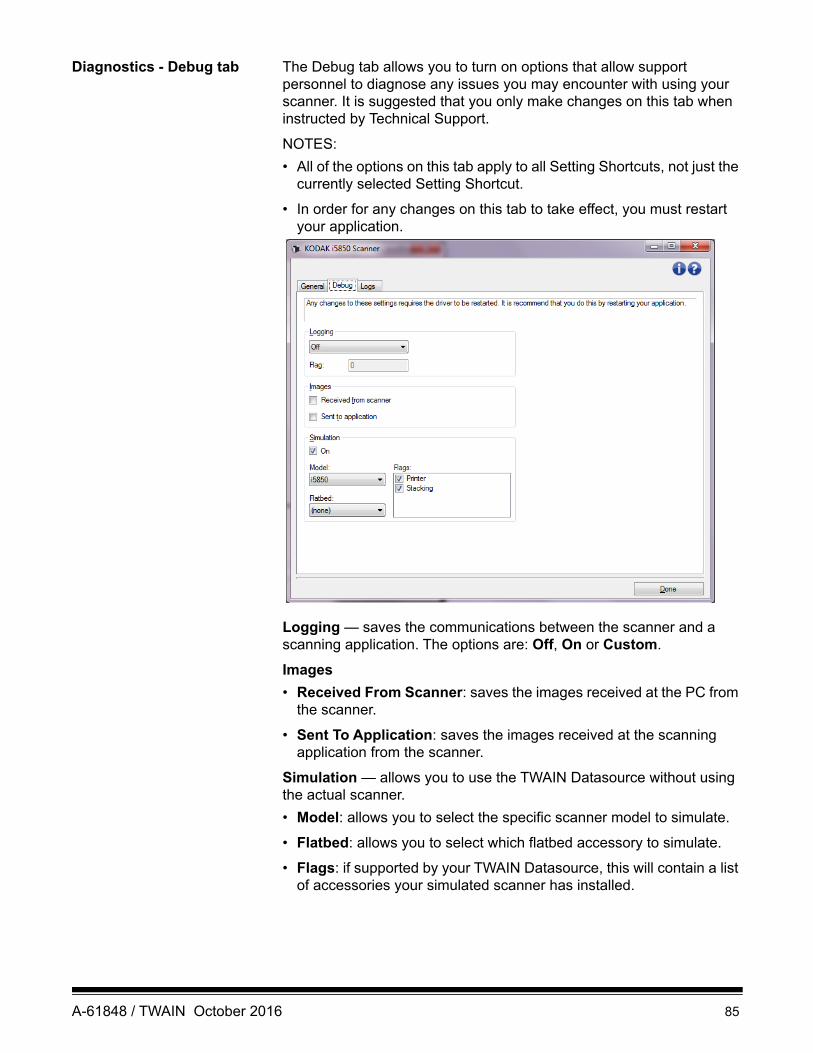
Diagnostics - Debug tab The Debug tab allows you to turn on options that allow support personnel to diagnose any issues you may encounter with using your scanner. It is suggested that you only make changes on this tab when instructed by Technical Support.
NOTES:
• All of the options on this tab apply to all Setting Shortcuts, not just the currently selected Setting Shortcut.
• In order for any changes on this tab to take effect, you must restart your application.
Logging — saves the communications between the scanner and a scanning application. The options are: Off, On or Custom.
Images
• Received From Scanner: saves the images received at the PC from the scanner.
• Sent To Application: saves the images received at the scanning application from the scanner.
Simulation — allows you to use the TWAIN Datasource without using the actual scanner.
• Model: allows you to select the specific scanner model to simulate.
• Flatbed: allows you to select which flatbed accessory to simulate.
• Flags: if supported by your TWAIN Datasource, this will contain a list of accessories your simulated scanner has installed.
A-61848 / TWAIN October 2016 85
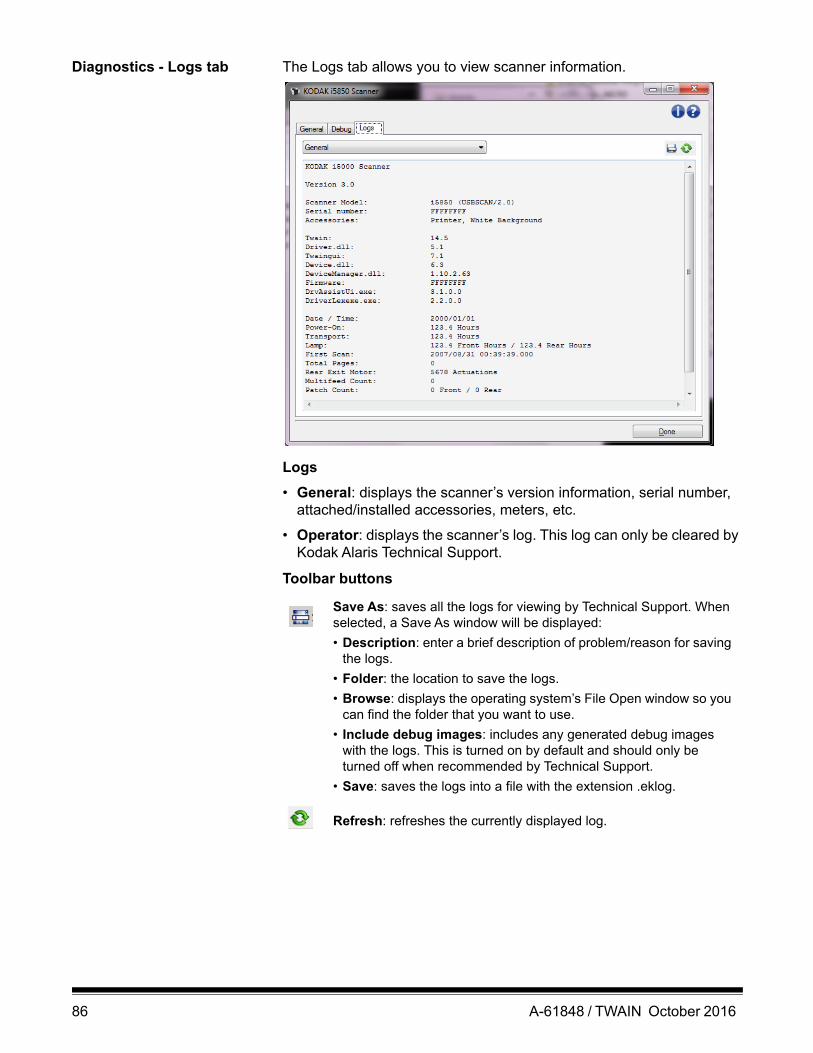
Diagnostics - Logs tab The Logs tab allows you to view scanner information.
Logs
• General: displays the scanner’s version information, serial number, attached/installed accessories, meters, etc.
• Operator: displays the scanner’s log. This log can only be cleared by Kodak Alaris Technical Support.
Toolbar buttons
Save As: saves all the logs for viewing by Technical Support. When selected, a Save As window will be displayed:
• Description: enter a brief description of problem/reason for saving the logs.
• Folder: the location to save the logs.
• Browse: displays the operating system’s File Open window so you can find the folder that you want to use.
• Include debug images: includes any generated debug images with the logs. This is turned on by default and should only be turned off when recommended by Technical Support.
• Save: saves the logs into a file with the extension .eklog.
Refresh: refreshes the currently displayed log.
86 A-61848 / TWAIN October 2016

The Scan Validation Tool
Another useful diagnostic tool is the Scan Validation Tool (SVT), a diagnostic application provided by Kodak Alaris, Inc. The SVT user interface allows access to all the features of the scanner and is a good way to verify that the scanner is working properly. The Scan Validation Tool allows you to verify scanner functionality using the TWAIN/TWAINDSM Datasource and the ISIS Driver.
Starting the Scan Validation Tool
1. Select Start>Programs>Kodak>Document Imaging>i5x50>SVT Diagnostics.
2. Select TWAIN/TWAINDSM (or ISIS) for the Driver Type and the Kodak Scanner i5x50 Scanner as the Driver.
Driver Types include:• TWAIN — uses the TWAIN interface via the Windows-provided
twain_32.dll. This option is only available if twain_32.dll exists in the Windows folder.
• TWAINDSM — uses the TWAIN interface via the TWAIN Working Group’s 2.x Data Source Manager (DSM). This option is only available if TWAINDSM.dll exists in the Windows Systems folder.
• ISIS — uses the ISIS interface. This option is only available if PIXDFLTN.DLL exists in the Windows 32-bit Systems folder.
The Scan Validation Tool dialog box will be displayed
.
A-61848 / TWAIN October 2016 87
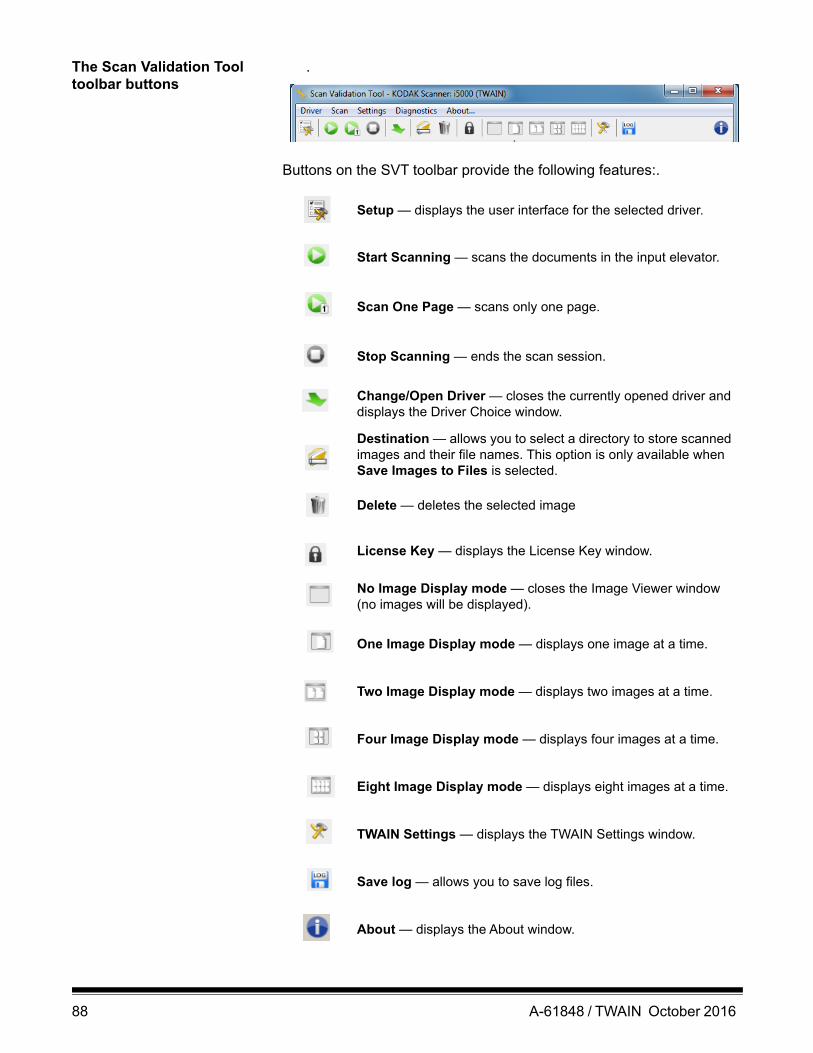
The Scan Validation Tool toolbar buttons
.
Buttons on the SVT toolbar provide the following features:.
Setup — displays the user interface for the selected driver.
Start Scanning — scans the documents in the input elevator.
Scan One Page — scans only one page.
Stop Scanning — ends the scan session.
Change/Open Driver — closes the currently opened driver and displays the Driver Choice window.
Destination — allows you to select a directory to store scanned images and their file names. This option is only available when Save Images to Files is selected.
Delete — deletes the selected image
License Key — displays the License Key window.
No Image Display mode — closes the Image Viewer window (no images will be displayed).
One Image Display mode — displays one image at a time.
Two Image Display mode — displays two images at a time.
Four Image Display mode — displays four images at a time.
Eight Image Display mode — displays eight images at a time.
TWAIN Settings — displays the TWAIN Settings window.
Save log — allows you to save log files.
About — displays the About window.
88 A-61848 / TWAIN October 2016
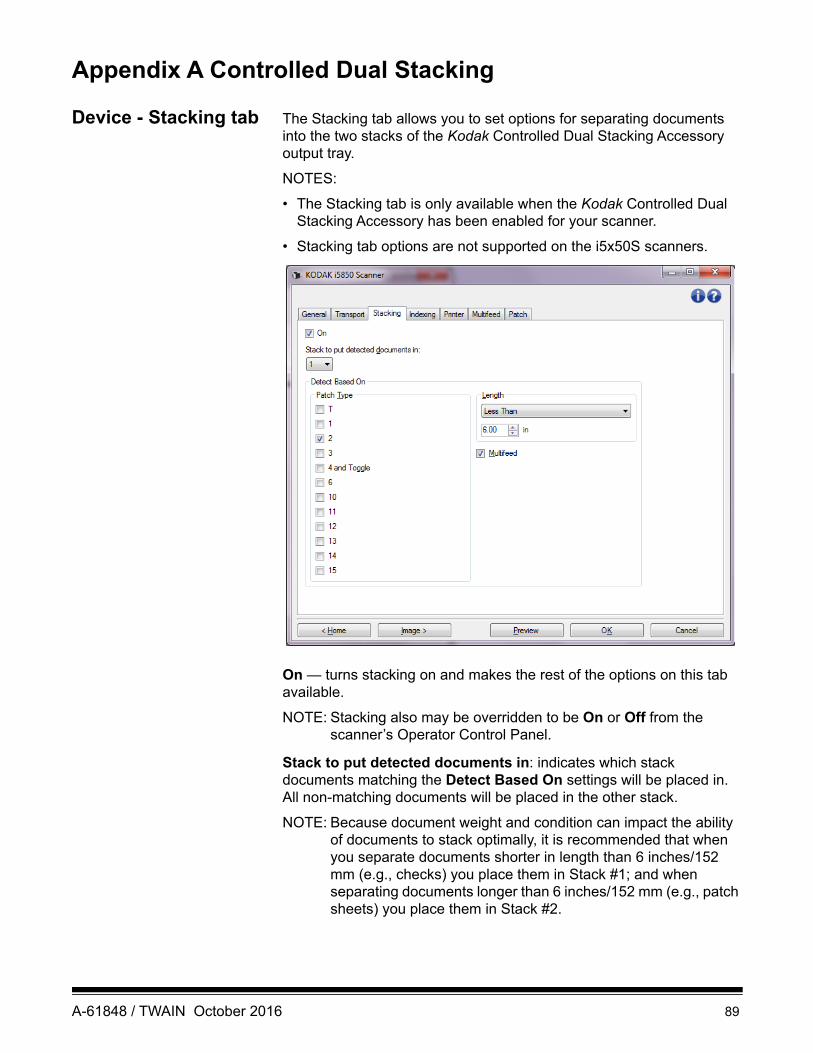
Appendix A Controlled Dual Stacking
Device - Stacking tab The Stacking tab allows you to set options for separating documents into the two stacks of the Kodak Controlled Dual Stacking Accessory output tray.
NOTES:
• The Stacking tab is only available when the Kodak Controlled Dual Stacking Accessory has been enabled for your scanner.
• Stacking tab options are not supported on the i5x50S scanners.
On — turns stacking on and makes the rest of the options on this tab available.
NOTE: Stacking also may be overridden to be On or Off from the scanner’s Operator Control Panel.
Stack to put detected documents in: indicates which stack documents matching the Detect Based On settings will be placed in. All non-matching documents will be placed in the other stack.
NOTE: Because document weight and condition can impact the ability of documents to stack optimally, it is recommended that when you separate documents shorter in length than 6 inches/152 mm (e.g., checks) you place them in Stack #1; and when separating documents longer than 6 inches/152 mm (e.g., patch sheets) you place them in Stack #2.
A-61848 / TWAIN October 2016 89
Detect Based On• Patch Type — allows you to select which patch sheets, if any, to
separate from the document set and place in the selected stack. Options are any combination of: T, 1, 2, 3, 4 and Toggle, 6, 10, 11, 12, 13, 14 and 15. It is recommended that the patch sheets go into Stack #2.
The Dual Stacking option on the scanner’s Operator Control Panel allows you to use patch sheets to separate a document(s) from the documents being scanned into Stack #2 or Stack #1.
NOTES:
• The scanner will generate images for patch sheets.
• The scanner will only recognize vertical patches.
• Printing the patch sheets on stiff paper will aid in reliable stacking.
• See the section entitled, “Patch code requirements” in Chapter 6 of the User’s Guide for more information.
Length — allows you to select which documents to separate from the document set based on the document’s length.
• (none)
• Less Than: documents shorter than this length will be separated and placed in the selected stack. This is recommended when separating shorter documents (e.g., checks) into Stack 1.
• Greater Than: documents longer than this length will be separated and placed in the selected stack. This is recommended when separating longer documents into Stack 2.
• Between: documents whose length falls within the selected range will be separated and placed in the selected stack.
NOTES:
• When entering a length, consider including an extra 1/2 inch / 25 mm to account for possible document skew during scanning.
• For documents shorter than 6 inches / 152 mm, you may consider using the Short Document Insert to improve stacking in Stack 1.
Multifeed — select this option if you want to separate all documents that are determined to have been multifed. The settings to turn on and configure multifeed detection are on the Device - Multifeed tab.
NOTES:
• This option can provide additional functionality by allowing you to detect thicker documents and separate them into Stack #2. This is a good choice to consider when Length based detection cannot be used because all of the documents are a similar size.
• This option will not automatically turn on multifeed detection. Refer to “Device - Multifeed tab” on page 69.
90 A-61848 / TWAIN October 2016
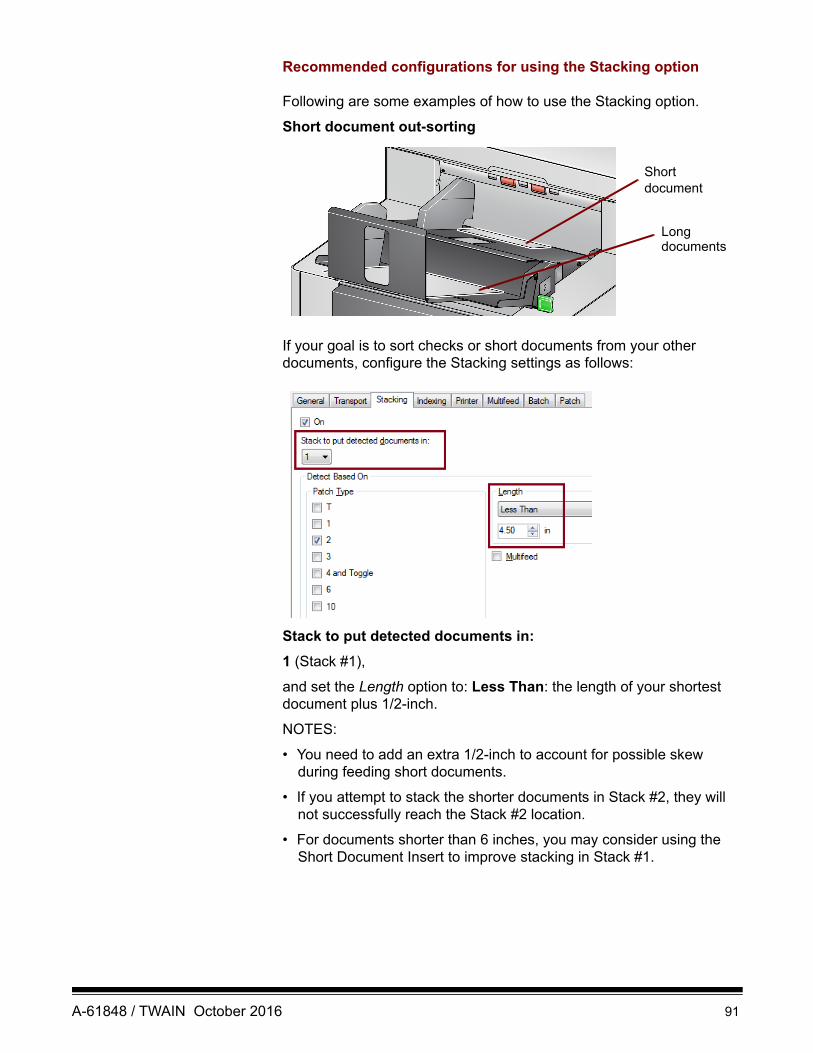
Recommended configurations for using the Stacking option
Following are some examples of how to use the Stacking option.
Short document out-sorting
If your goal is to sort checks or short documents from your other documents, configure the Stacking settings as follows:
Stack to put detected documents in:
1 (Stack #1),
and set the Length option to: Less Than: the length of your shortest document plus 1/2-inch.
NOTES:
• You need to add an extra 1/2-inch to account for possible skew during feeding short documents.
• If you attempt to stack the shorter documents in Stack #2, they will not successfully reach the Stack #2 location.
• For documents shorter than 6 inches, you may consider using the Short Document Insert to improve stacking in Stack #1.
Short document
Longdocuments
A-61848 / TWAIN October 2016 91
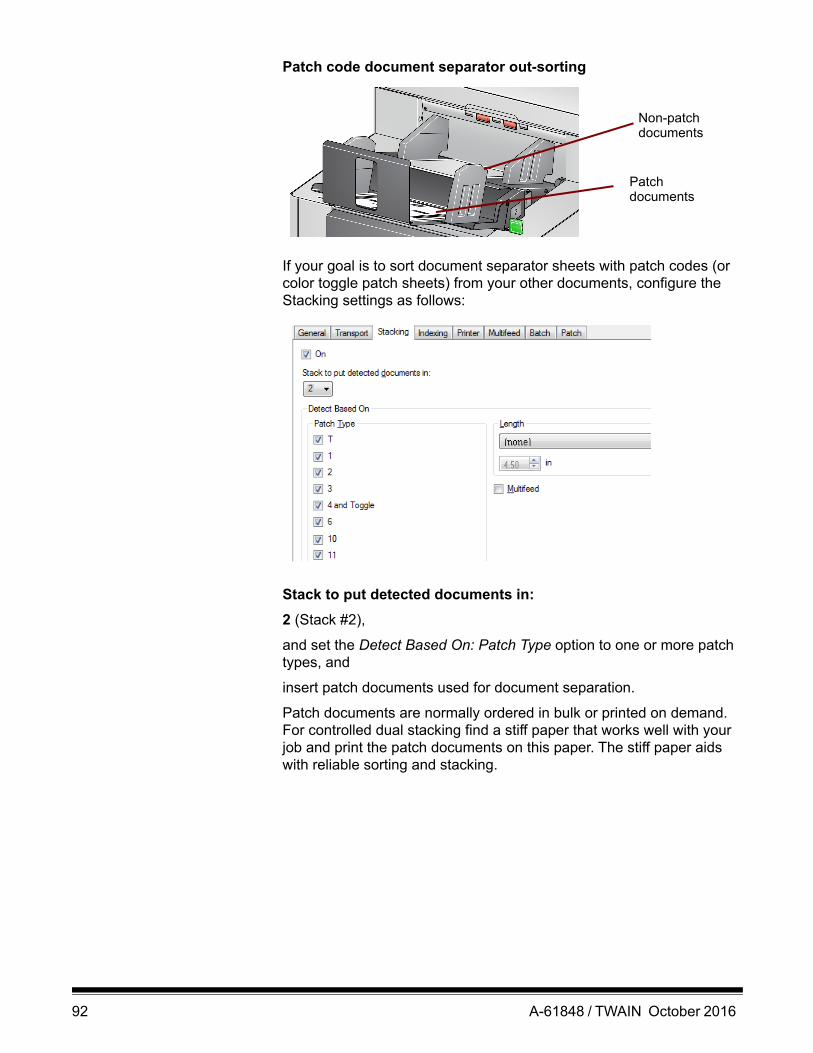
Patch code document separator out-sorting
If your goal is to sort document separator sheets with patch codes (or color toggle patch sheets) from your other documents, configure the Stacking settings as follows:
Stack to put detected documents in:
2 (Stack #2),
and set the Detect Based On: Patch Type option to one or more patch types, and
insert patch documents used for document separation.
Patch documents are normally ordered in bulk or printed on demand. For controlled dual stacking find a stiff paper that works well with your job and print the patch documents on this paper. The stiff paper aids with reliable sorting and stacking.
Non-patchdocuments
Patchdocuments
92 A-61848 / TWAIN October 2016
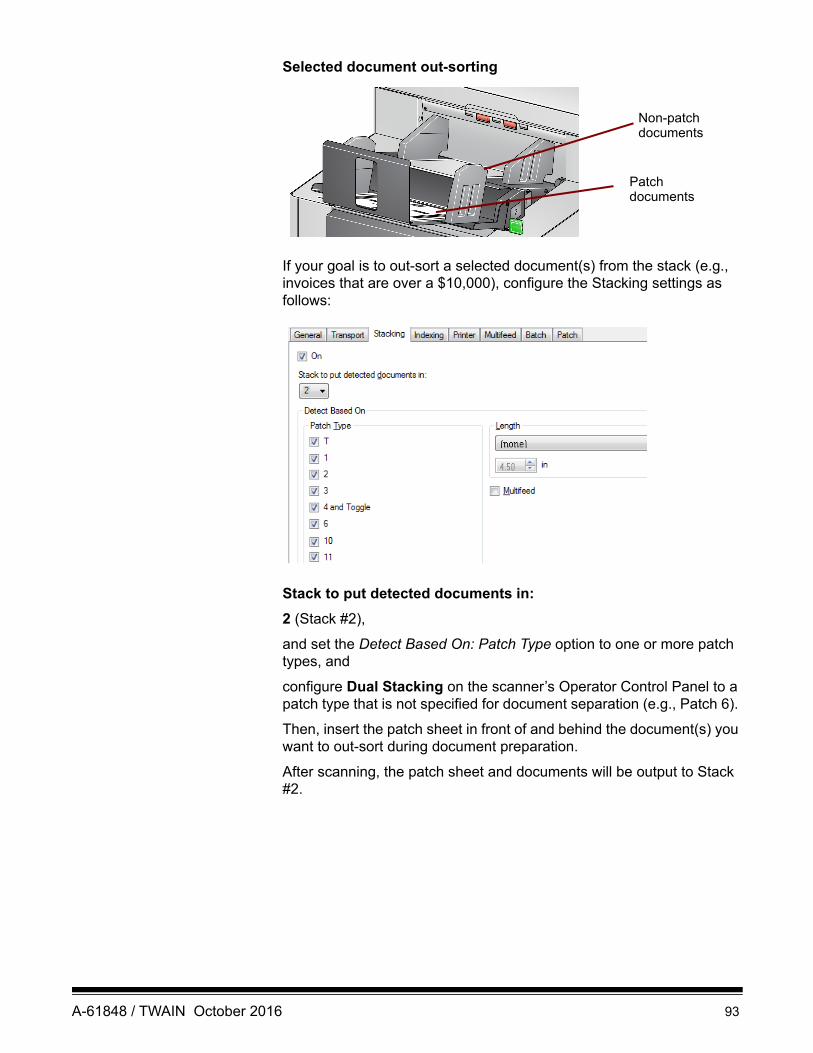
Selected document out-sorting
If your goal is to out-sort a selected document(s) from the stack (e.g., invoices that are over a $10,000), configure the Stacking settings as follows:
Stack to put detected documents in:
2 (Stack #2),
and set the Detect Based On: Patch Type option to one or more patch types, and
configure Dual Stacking on the scanner’s Operator Control Panel to a patch type that is not specified for document separation (e.g., Patch 6).
Then, insert the patch sheet in front of and behind the document(s) you want to out-sort during document preparation.
After scanning, the patch sheet and documents will be output to Stack #2.
Non-patchdocuments
Patchdocuments
A-61848 / TWAIN October 2016 93
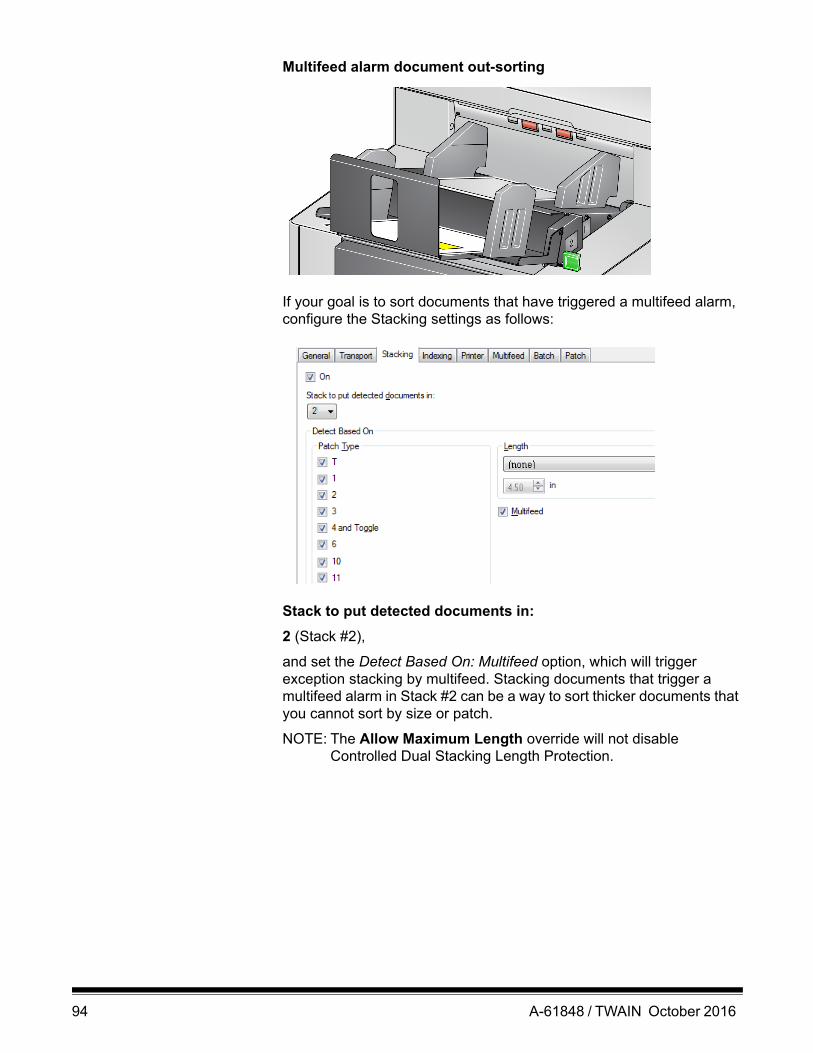
Multifeed alarm document out-sorting
If your goal is to sort documents that have triggered a multifeed alarm, configure the Stacking settings as follows:
Stack to put detected documents in:
2 (Stack #2),
and set the Detect Based On: Multifeed option, which will trigger exception stacking by multifeed. Stacking documents that trigger a multifeed alarm in Stack #2 can be a way to sort thicker documents that you cannot sort by size or patch.
NOTE: The Allow Maximum Length override will not disable Controlled Dual Stacking Length Protection.
94 A-61848 / TWAIN October 2016