Embed Size (px)
Citation preview

ROPE WORKS ARCHIVE
GO TO ARTICLE OF THE MONTH ARCHIVE
GO TO ANIMATED KNOTS
GO TO DOWNLOAD PAGES
HomeGUESTBOOK
Rope Works can now be ordered bycredit card Through PayPal
KNOTBOARD OF THE MONTH ARCHIVE- A page that displays a lis...otboards that have been included in KNOTBOARD OF THE MONTH
http://www.northnet.org/ropeworks/text/arch.html (1 of 8) [9/2/2004 9:01:44 PM]

Order a copy of RopeWorks now !
ARTICLE OF THE MONTH ARCHIVE
"TURK'S HEAD "
"RINGBOLT HITCHING"
"BOATSWAIN'S WHISTLE KNOT"
"DIAGONAL LASHING"
"CONSTRICTOR KNOT"
"MONKEY'S PAW (Turh's Head Style)"
"MOORING HITCH"
"JUG KNOT"
"BELAYING TO A CLEAT"
"WHIPPING"
"FIGURE-EIGHT"
"TRIPOD LASHING"
"SHEET BEND"
KNOTBOARD OF THE MONTH ARCHIVE- A page that displays a lis...otboards that have been included in KNOTBOARD OF THE MONTH
http://www.northnet.org/ropeworks/text/arch.html (2 of 8) [9/2/2004 9:01:44 PM]

"MASTHEAD KNOT"
"FLOOR LASHING"
"MAULS"
"FUSING"
"TAUT-LINE"
"SPANISH WINDLESS"
"ROPE HALTER"
"LADDER LASHING"
"SEIZING"
"FIDS"
"JAPANESE SQUARE LASHINGS"
"MARLIN SPIKE HITCH"
"FOOTROPE KNOT"
"CAMP STOOL:"
"MONKEY'S PAW (Coil Stile)"
"MAKING A CLEAT"
"ROPE WRENCH"
"NETTING"
"PROLONG KNOT"
"LIFE BASKET"
KNOTBOARD OF THE MONTH ARCHIVE- A page that displays a lis...otboards that have been included in KNOTBOARD OF THE MONTH
http://www.northnet.org/ropeworks/text/arch.html (3 of 8) [9/2/2004 9:01:44 PM]

"KNOB COVERING"
"CROWN KNOT"
"WALL KNOT"
"ALAMAR KNOT"
GO TO TOP OF PAGE
ANIMATED KNOTS
"(Animated) TURK'S HEAD"
"(Animated) BOATSWAIN'S WHISTLE KNOT"
"(Animated) CONSTRICTOR KNOT"
"(Animated) MOORING HITCH"
"(Animated) BELAYING TO A CLEAT"
"(Animated) FIGURE-EIGHT"
"(animated) WHIPPING"
"(animated) BOWLINE"
"(animated) BOWLINE ON A BIGHT"
KNOTBOARD OF THE MONTH ARCHIVE- A page that displays a lis...otboards that have been included in KNOTBOARD OF THE MONTH
http://www.northnet.org/ropeworks/text/arch.html (4 of 8) [9/2/2004 9:01:44 PM]

"(animated) CROWN KNOT"
GO TO TOP OF PAGE
DOWNLOAD OF THE MONTH
The following PFD files are based on articles being assembled for a new publication. However,some of the knotboards are contained in ROPE WORKS.
These PDF files are formatted so that the printed copy can be placed in a three-ring-binder.
PDF files can be opened and printed using Acrobat Reader.
DOWN LOAD INSTRUCTIONS
When using Netscape as your browser, these files can be DOWNLOADED by clicking on the title.
When using Internet Explorer as your browser, select the DOWNLOAD FILE function and enterthe URL that appears after the title.
"BOWLINE ON A BIGHT" -------------http://humber.northnet.org/ropeworks/reader/bowbight.pdf
"CLOVE HITCH" ------------- http://humber.northnet.org/ropeworks/reader/clove.pdf
"SQUARE LASHING" -------------http://humber.northnet.org/ropeworks/reader/squarlas.pdf
"EYE SPLICE" ------------- http://humber.northnet.org/ropeworks/reader/eyespli.pdf
KNOTBOARD OF THE MONTH ARCHIVE- A page that displays a lis...otboards that have been included in KNOTBOARD OF THE MONTH
http://www.northnet.org/ropeworks/text/arch.html (5 of 8) [9/2/2004 9:01:44 PM]

"TURK'S HEAD " ------------- http://humber.northnet.org/ropeworks/reader/turkshea.pdf
"RINGBOLT HITCHING" -------------http://humber.northnet.org/ropeworks/reader/ringbolt.pdf
"BOATSWAIN'S WHISTLE KNOT " -------------http://humber.northnet.org/ropeworks/reader/boatswai.pdf
"DIAGONAL LASHING " -------------http://humber.northnet.org/ropeworks/reader/diaglash.pdf
"CONSTRICTOR KNOT " -------------http://humber.northnet.org/ropeworks/reader/bowbight.pdf
"MONKEY'S PAW (Turk's Head Style):" -------------http://humber.northnet.org/ropeworks/reader/constric.pdf
"MOORING HITCH" ------------- http://humber.northnet.org/ropeworks/reader/mooring.pdf
"JUG KNOT" ------------- http://humber.northnet.org/ropeworks/reader/jugknot.pdf
"BELAYING TO A CLEAT" -------------http://humber.northnet.org/ropeworks/reader/cleat.pdf
"WHIPPING" ------------- http://humber.northnet.org/ropeworks/reader/whipping.pdf
"FIGURE-EIGHT KNOT" -------------http://humber.northnet.org/ropeworks/reader/fig8-t.pdf
"TRIOD LASHING" ------------- http://humber.northnet.org/ropeworks/reader/tripod.pdf
"SHEET BEND" ------------- http://humber.northnet.org/ropeworks/reader/sheben.pdf
"MASTHEAD KNOT" -------------http://humber.northnet.org/ropeworks/reader/masthead.pdf
"FLOOR LASHING" ------------- http://humber.northnet.org/ropeworks/reader/flash.pdf
"MAULS" ------------- http://humber.northnet.org/ropeworks/reader/mauls.pdf
KNOTBOARD OF THE MONTH ARCHIVE- A page that displays a lis...otboards that have been included in KNOTBOARD OF THE MONTH
http://www.northnet.org/ropeworks/text/arch.html (6 of 8) [9/2/2004 9:01:44 PM]

"FUSING" ------------- http://humber.northnet.org/ropeworks/reader/fusing.pdf
"TAUT-LINE HITCH" ------------- http://humber.northnet.org/ropeworks/reader/tautline.pdf
"SPANISH WINDLESS" -------------http://humber.northnet.org/ropeworks/reader/swindless.pdf
"ROPE HALTER" ------------- http://humber.northnet.org/ropeworks/reader/Rhalter.pdf
"LADDER LASHING" ------------- http://humber.northnet.org/ropeworks/reader/ladder.pdf
"SEIZING" ------------- http://humber.northnet.org/ropeworks/reader/seizing.pdf
"FIDS" ------------- http://humber.northnet.org/ropeworks/reader/fusing.pdf
"JAPANESE SQUARE LASHINGS:" -------------http://humber.northnet.org/ropeworks/reader/JsqarLSH.pdf
"MARLIN SPIKE HITCH:" -------------http://humber.northnet.org/ropeworks/reader/marlin.pdf
"FOOTROPE KNOT:" -------------http://humber.northnet.org/ropeworks/reader/footrope.pdf
"CAMP STOOL:" ------------- http://humber.northnet.org/ropeworks/reader/campstool.pdf
"MONKEY'S PAW (Coil Stile):" -------------http://humber.northnet.org/ropeworks/reader/monkpawcoil.pdf
"MAKING A CLEAT:" ------------- http://humber.northnet.org/ropeworks/reader/cleat_.pdf
"ROPE WRENCH:" ------------- http://humber.northnet.org/ropeworks/reader/wrench.pdf
"NETTING:" ------------- http://humber.northnet.org/ropeworks/reader/net-1.pdf
"PROLONG KNOT:" ------------- http://humber.northnet.org/ropeworks/reader/prolong.pdf
"LIFE BASKET:" ------------- http://humber.northnet.org/ropeworks/reader/lifbas.pdf
KNOTBOARD OF THE MONTH ARCHIVE- A page that displays a lis...otboards that have been included in KNOTBOARD OF THE MONTH
http://www.northnet.org/ropeworks/text/arch.html (7 of 8) [9/2/2004 9:01:44 PM]

"KNOB COVERING:" -------------http://humber.northnet.org/ropeworks/read02/knobcover.pdf
"CROWN KNOT:" ------------- http://humber.northnet.org/ropeworks/read02/crown.pdf
"WALL KNOT:" ------------- http://humber.northnet.org/ropeworks/read02/wallknot.pdf
"ALAMAR KNOT:" ------------- http://humber.northnet.org/ropeworks/read02/alamar.pdf
GO TO TOP OF PAGE
KNOTBOARD OF THE MONTH ARCHIVE- A page that displays a lis...otboards that have been included in KNOTBOARD OF THE MONTH
http://www.northnet.org/ropeworks/text/arch.html (8 of 8) [9/2/2004 9:01:44 PM]

HomeGUESTBOOK
GO TO ARCHIVE
ARTICLE OF THE MONTH
Each month there will be a new knot related article displayed on this page.
THIS MONTH'S IS THE :
<
ALAMAR KNOT
The alamar knot is a decorative knot related to the pretzel knot. The pretzel knot is tied in a singlestrand; the alamar knot is tied by doubling the strands as showwn in [Step 1]
[Step 1] Double the strand as shown.
ALAMAR KNOT
http://www.northnet.org/ropeworks/text/m.html (1 of 3) [9/2/2004 9:01:50 PM]

[Sterp 2]
[Sterp3]
[Step 4]
ALAMAR KNOT
http://www.northnet.org/ropeworks/text/m.html (2 of 3) [9/2/2004 9:01:50 PM]

[Step 5] Add tassels or other end decorations.
KNOTBOARD OF THE MONTH
ARCHIVE
HomeE-Mail
ALAMAR KNOT
http://www.northnet.org/ropeworks/text/m.html (3 of 3) [9/2/2004 9:01:50 PM]

This site was updated JUNE 23, 2002 :
Rope Works can now be ordered by credit card Through PayPal
FastCounter by LinkExchange
FastCounter by LinkExchangehttp://www.fastcounter.com
GUESTBOOKE-Mail
Rope Works- a book on rope, knots, splicing, and lashing
http://www.northnet.org/ropeworks/index.html [9/2/2004 9:01:51 PM]
<
HomeGUESTBOOK
GUESTBOOK.....
Please enter your name:
and your email address:
Enter your comments and suggestions below:
Thanks for your input
Rope Making-A page that describes the topics on rope making covered in Rope Works.
http://www.northnet.org/ropeworks/text/g.html (1 of 2) [9/2/2004 9:01:52 PM]

Order a copy of RopeWorks now !
Home
Rope Making-A page that describes the topics on rope making covered in Rope Works.
http://www.northnet.org/ropeworks/text/g.html (2 of 2) [9/2/2004 9:01:52 PM]

HomeGUESTBOOK
E-MailTo place an order use the following to caculate the the Total Payment.
Rope Works Order: (must be in US funds)
QUANITY * $8.35 COST OF BOOKS
SHIPPING See below
TOTAL COST OF BOOKS + SHIPPING
NY Sales Tax (7%)If your live in New York State, caculateand add the NY Sales Tax
TOTAL PAYMENT TOTAL + NY Sales Tax
Shipping and Handling Fees
To each shipping address in the USA or Canada:
one or two books $3.00.●
Three or four books 3.50●
To each shipping address outside the USA or Canada:
one or two books $5.00.●
three or more books check with me by E-mail ([email protected])●
To order by regular mail
ORDER BY MAIL
To order by credit card through PayPal
Use the work sheet above to caculate the TOTAL PAYMENT
Enter the TOTAL PAYMENT as the Amount: on the PayPal page.
Rope Works Order Form- For a book of knots, hitches, splicing, lashing...ll learn to tie knots, do splices, and make lashings with confidence.
http://www.northnet.org/ropeworks/text/o.html [9/2/2004 9:01:52 PM]

HomeE-Mail
KNOTBOARD OF THEMONTH
TURK'S HEAD:Description ----
Three strand braid worked in a continuous circle.
Use ----(1) As a decorative knot around a staff or railing.(2) Worked tight around a checked or crackedtool handle or canoe paddle to reinforce them.(3) As a neckerchief slide or wogal.
Comments ----The form of Turks head shown here is a fivecrown Turk's head, this is only one of a group ofknots that go by the name Turk's heads. Thecrown number is determined by counting thenumber of bights at the edge of the knot. Tomake a larger loop the, increase the size of thewraps made in steps 1 - 4 and then, at step 7 usethree strand braiding to increase the number ofcrowns. The number of crowns can be increasedby increments of three; so that the number ofcrowns in a larger loop can be 8, 11, 14, etc..Thesize of the finished Turk's head depends on thesize of the rope used and the number of times thestrand is chased.
Other Names ----Three lead by five bight Turk's head, ordinaryTurk's head.
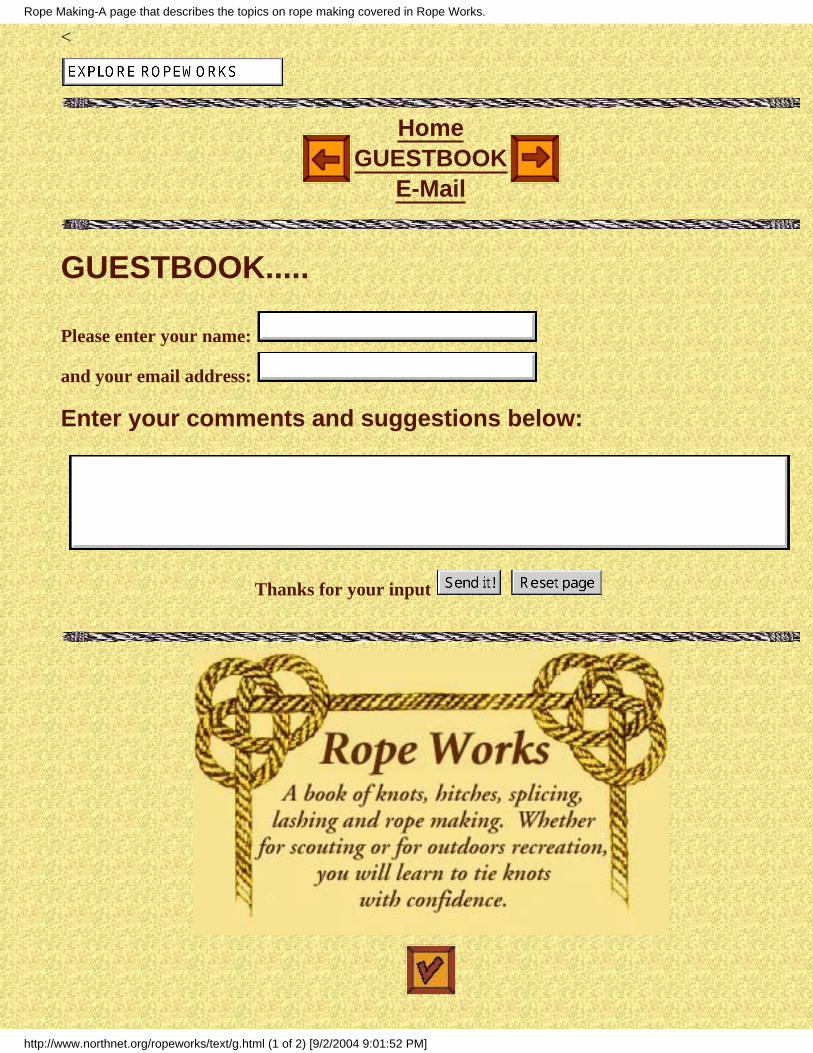
Narration ------ (For Turk's head knotboard.)(1) Start at the center of the line, by taking a
TURK'S HEAD: KNOTBOARD OF THE MONTH
http://www.northnet.org/ropeworks/archive/turkhed.html (1 of 3) [9/2/2004 9:01:53 PM]
bight around an object (the fingers of the lefthand work well) (2) Complete the round turnand cross the running end over the standing end.(3) Take a second bight around the object so thatthe running end is between the standing end andthe first wrap. (4) Lay the running end across thefirst wrap then (5) tuck the running end underthe standing end. (6) lay the standing end acrossthe second wrap and (7) tuck it under the firstwrap. (8) rotate the knot around the object sothat you are looking at the opposite side. (9)Cross the second wrap over the first wrap. (10)Reeve the standing end through the eye formedbetween the two wraps. (11) Reeve the runningend through the eye between the two wraps sothat the ends are in opposite directions. (12)Chase, follow, the strand of the knot two or threetimes. Cut off and secure the ends.
[NOTE] To determine the length of line to use,wrap the line around the object four times for asingle strand knot. Add three and one half wrapsfor each time you intend to chase the originalstrand.
ANIMATED KNOT
TURK'S HEAD KNOT
TURK'S HEAD: KNOTBOARD OF THE MONTH
http://www.northnet.org/ropeworks/archive/turkhed.html (2 of 3) [9/2/2004 9:01:53 PM]

HomeE-Mail
TURK'S HEAD: KNOTBOARD OF THE MONTH
http://www.northnet.org/ropeworks/archive/turkhed.html (3 of 3) [9/2/2004 9:01:53 PM]

HomeE-Mail
KNOTBOARD OF THEMONTH
RINGBOLT HITCHING:
Description ----A series of interlocking lark's head knot that forma ridge around the outside of a ring or loop.
Use ----To prevent chafing; as a decoration.
Comments ----There are many forms of ringbolt hitching, theform shown here is one of the simplest and doesnot require the use of a needle as many otherforms do. Ringbolt hitching was used to preventchafing of ropes that were reeved through handforged iron rings and to keep them from clangingagainst objects around them. In the present,
RINGBOLT HITCHING: KNOTBOARD OF THE MONTH
http://www.northnet.org/ropeworks/archive/ringbolt.html (1 of 3) [9/2/2004 9:01:54 PM]

ringbolt hitching can be used to protect syntheticropes that are easily chafed by a applying a layerof material that is not easily chafed.
Other Names ----Platted Ring; Hog Backing; Cockscombing.
Narration ------ (For Ringbolt Hitching knotboard.)(1) Start the ringbolt hitching by tying a half knotaround the object. (2) Tie a half hitch around theobject so that the standing end is trapped underthe half hitch. (3) pull the half hitch tight. (4) Tiethe next half hitch in the opposite directionaround the object. (5) Pull the half hitch tight. (6)Tie another half hitch in the opposite directionaround the object; the same direction as the firsthalf hitch. (7) Pull half hitch tight. (8) When thelength of the ringbolt hitching is within 5 or 6 halfhitches of being long enough; form a bight in thea short piece of twine so that the eye of the bightis toward the end of the work. (9) Continue to addhalf hitches until the ringbolt hitching iscompleted; reeve the running end through the eyeof the bight. (10) Use the short piece of twine topull the running end under the half hitches. (11)Cut off the end of the twine.
RINGBOLT HITCHING: KNOTBOARD OF THE MONTH
http://www.northnet.org/ropeworks/archive/ringbolt.html (2 of 3) [9/2/2004 9:01:54 PM]

HomeE-Mail
RINGBOLT HITCHING: KNOTBOARD OF THE MONTH
http://www.northnet.org/ropeworks/archive/ringbolt.html (3 of 3) [9/2/2004 9:01:54 PM]

HomeE-Mail
KNOTBOARD OF THEMONTH
BOATSWAIN'S WHISTLEKNOT:
Description ----A two lead knot that is built up from twointerlocking underhand loops to looks like a turk'shead knot when it is worked tight.
Use ----As a decorative knot to attach a whistle or a knifeto a lanyard ---- to form a toggle or button.
Other names ----Sailor's knife lanyard knot, marlingspike lanyardknot, single-strand diamond knot, two stranddiamond knot ---- pipe lanyard knot.
Narration -- (ForBoatswain's Whistle Knot knotboard.)
((1) Use the left hand to hold the middle of astrand of rope so that the loop of the bight is tothe back of the hand and the two leads arebetween the fingers and hanging down across thepalm. (2) Use the bottom lead, to lay anunderhand loop over the standing end of top lead.(3) Form a bight in the bottom lead so that itsrunning end is under the running end of the toplead. (4) Weave the running end of the bottomlead over the right edge of the top underhandloop, then under the standing end of the bottomlead, and over the left edge of the top underhand
BOATSWAIN'S WHISTLE KNOT- a two strand decorative knot.
http://www.northnet.org/ropeworks/archive/boawhi.html (1 of 3) [9/2/2004 9:01:55 PM]

hand loop. This forms two interlocking underhandloops. (5) Form the next bight by placing therunning end of the top lead under the top edge ofthe top underhand loop. (6) Reeve the runningend of the top lead to the outside of the standingend of the bottom lead and up through the middleof the interlocking underhand knots. (7) Form thenext bight by placing the running end of thebottom lead under the bottom edge of the bottomunderhand loop. (8) Reeve the running end ofbottom lead to the outside of the standing end ofthe bottom lead and up through the middle of theinterlocking underhand knots. (9) Work the knottight.
ANIMATED KNOT
BOATSWAIN'S WHISTLEKNOT
BOATSWAIN'S WHISTLE KNOT- a two strand decorative knot.
http://www.northnet.org/ropeworks/archive/boawhi.html (2 of 3) [9/2/2004 9:01:55 PM]

HomeE-Mail
BOATSWAIN'S WHISTLE KNOT- a two strand decorative knot.
http://www.northnet.org/ropeworks/archive/boawhi.html (3 of 3) [9/2/2004 9:01:55 PM]

HomeE-Mail
ROPE WORKS ©1996 Gerald L. Findley, all rights reserved
KNOTBOARD OF THE MONTH
DIAGONAL LASHING:Use ----
Diagonal lashing is used to bind poles together that crosseach other but do not touch when their ends are lashed inplace in a structure.
Comments ----The diagonal lashing gets its name from the fact that thewrapping turns cross the poles diagonally.
The diagonal lashing can be used to bind poles that crosseach other from 90o to 45o. If the angle between thepoles is less than 45o a shear lashing should be used.
The diagonal lashing makes use of the timber hitch to pullpoles together that are not touching each other. Thetimber hitch allows the poles to be drawn togetherwithout changing the relative positions of the poles.[NOTE] If a square lashing were used to bind poles thatdo not touch, the beginning clove hitch would pull thecross pole toward the clove hitch causing unnecessarybowing of the cross pole and could also produce a forcethat would act along the length of the pole to which theclove hitch is tied. These additional force, if strongenough, can place unnecessary strain on other lashingwithin the structure causing the structure to twist and fail.
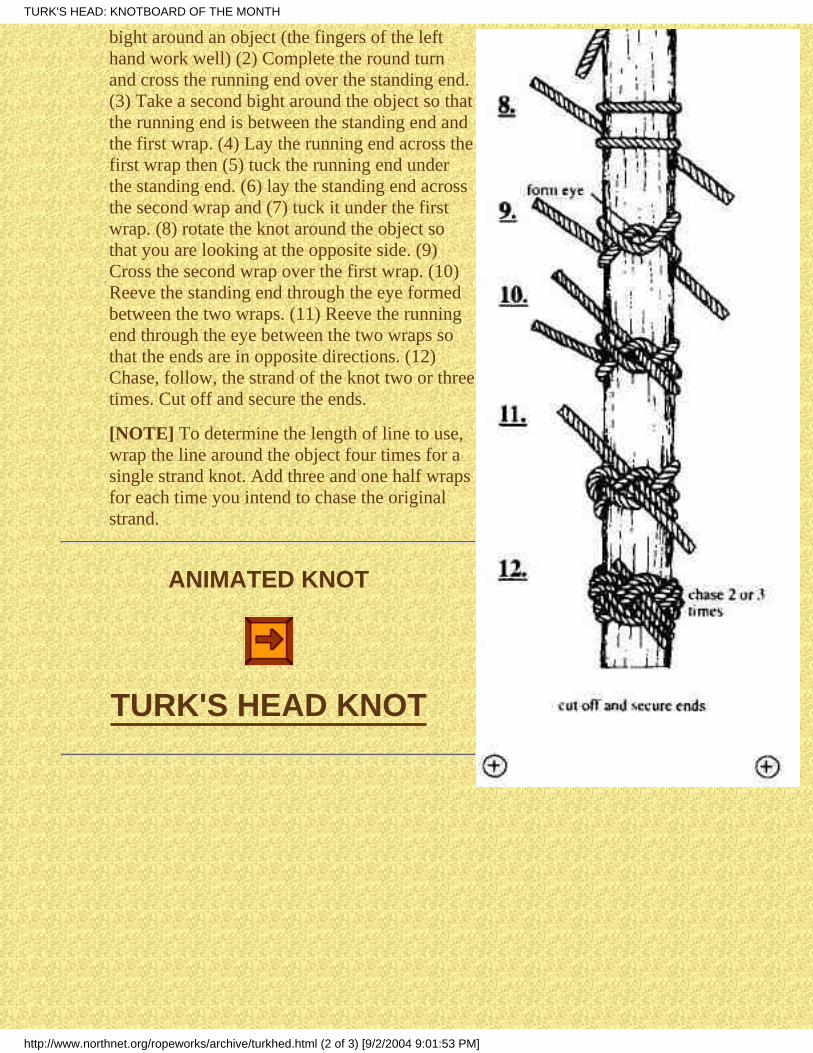
Narration ------ (For Diagonal Lash knotboard.)(1) Tie a timber hitch diagonally around both poles. (2)Start the wrapping turns on the opposite diagonal to thetimber hitch, by pulling the rope tight so that the polescontact each other. (3) Take 3 to 4 wrapping turns; keep
DIAGONAL LASHING: KNOTBOARD OF THE MONTH
http://www.northnet.org/ropeworks/archive/daglas1.html (1 of 2) [9/2/2004 9:01:57 PM]
the wrapping turns parallel; pull each wrapping turn tight.[NOTE] If the wrapping turns are allowed to cross, theincreased friction between the strands of the rope willmake it difficult to tighten the wrapping turns. (4) Startthe second set of wrapping turns by going past andaround the vertical pole. [NOTE] Going around the polethe rope allows the direction of the rope to be changedwithout crossing the first set of wrapping diagonally. (5)Take 3 to 4 wrapping turns; be sure to keep the wrappingturns parallel; pull each wrapping turn tight. (6) Start thefrapping turns by going past and around one of the poles.[NOTE] Going around the pole with the rope allows thedirection of the rope to be changed without crossing thewrapping turns diagonally. (7) Take 2 to 3 frapping turns;keep the frapping turns parallel. Be sure to pull each turntight. (8) End the lashing with a clove hitch. Take the firsthalf hitch of the clove hitch by going past and thenaround one of the poles. Lock the half hitch tight againstthe lashing by working it tight. (9) Take a second halfhitch around the pole. (10) Work the second half hitchtight against the first half hitch so that the clove hitch islocked against the lashing.
[NOTE]If very smooth rope is used, the lashing can be mademore secure by adding a third or forth half hitch to the clove hitch.
HomeE-Mail
DIAGONAL LASHING: KNOTBOARD OF THE MONTH
http://www.northnet.org/ropeworks/archive/daglas1.html (2 of 2) [9/2/2004 9:01:57 PM]

Home
ARCHIVE
ROPE WORKS ©1996 Gerald L. Findley, all rights reserved
KNOTBOARD OF THEMONTH
Each month there will be new knotboard and descritive textdisplayed on this page.
THIS MONTH'S IS THE :
CONSTRICTOR KNOT:Dscription ----
A clove hitch with a half knot under the cross-point.
Use ----To tie a smaller rope to a larger one, or to tie a rope toa stake or pole; a substitute for whipping; as a lashingfor light construction ; as a hose clamp.
Comments ----A secure nonslip knot ; difficult to untie withoutcutting.
[NOTE]Use this method of tying the constrictor knot on eitherside of where you intend to cut a rope. This is a fastand easy way to prevent a rope from unlaying when itis cut.
Narration ------ (For Constrictor Knot knotboard.)((1) take a bight around an pole. (2) Continuewrapping the running part around the pole so that therunning part crosses over the standing part. (3)
CONSTRICTOR KNOT- A clove hitch with a half knot under the cross-point
http://www.northnet.org/ropeworks/archive/constri.html (1 of 2) [9/2/2004 9:01:58 PM]

Complete the turn around the pole. (4) Cross therunning part over the standing part so that (5) a bightis formed around the standing part. (6) Reeve therunning part under the cross part of the loop in thestanding part to form a half knot under thecross-point. (7) Pull the standing tight. (8) Lock theknot tight by pulling hard on both the standing partand the running part.
ANIMATED KNOT
BOATSWAIN'S WHISTLEKNOT
KNOTBOARD OF THE MONTH
ARCHIVE
HomeE-Mail
CONSTRICTOR KNOT- A clove hitch with a half knot under the cross-point
http://www.northnet.org/ropeworks/archive/constri.html (2 of 2) [9/2/2004 9:01:58 PM]

HomeE-Mail
KNOTBOARD OF THEMONTH
MONKIE'S PAW:Dscription ----
Two forms of the monkey's paw are sown here thefirst is formed from four interlocking loops: a fourcrown turk's head; the second is constructed fromthree interlocking coils.
Use ----The core determines what the monkey's paw can beused for. When tied over a stone or heavy ball, themonkey's paw can be used to add weight to aheaving line. If tied over a cork ball with small cordthe monkey's paw makes a good float for boat keysor other small items used around a water front. Tiedover a ball of twine or other soft material, themonkey's paw can be used as weight on the end of arope for the game jump the shot. A Monkey's Pawcan also be used as a toggle..
Comments ----Neither form of the Monkey's Paw has an advantageover the other. Which one you choose to use is amatter of personal preference.
Core Size -----The diameter of the core should be between threeand four diameters of the rope being used..
Narration ------ (For Monkey's Paw Turk's Headknotboard.)
(1) Form an overhand loop (2) Form a second
KNOTBOARD OF THE MONTH
http://www.northnet.org/ropeworks/archive/monkpaw.html (1 of 2) [9/2/2004 9:01:59 PM]

overhand loop over the left edge of the first overhandloop . (3) Cross the standing end over the runningend. (4) Weave the running end across the loops byplacing the running end over the right side of the toploop (5) then under the right side of the bottom loop(6) next, over the left side of the top loop (7) andfinally under the left side of the of the bottom loop.(8) Pull the running end through until a third loopequal in size to the first two loops. (9) Add the fourthloop by placing the running end parallel to thestanding end. (10) Chase the original pattern 2 to 3times. (11) Work tight over the core.
HomeE-Mail
KNOTBOARD OF THE MONTH
http://www.northnet.org/ropeworks/archive/monkpaw.html (2 of 2) [9/2/2004 9:01:59 PM]

Home
ARCHIVE
KNOTBOARD OF THEMONTH
Each month there will be new knotboard and descritive textdisplayed on this page.
THIS MONTH'S IS THE :
MOORING HITCH:Dscription ----
An underhand loop toggled to the standing part witha bight made in the running end.
Use ----To securely tie off a rope so that it can be quicklyuntied, especially a small boat to a dock or piling.
Comments ----A secure knot that is easily tied or untied in wet ordry rope; when properly tied a non closing loop isformed, this allows the hitch to move up or down apiling as the water level changes.
Narration ------ (For Mooring Hitch Knotboard.)(1) Take a bight around an object. (2) Form anunderhand loop in the running part. (3) Place the eyeof the underhand loop over the standing part. (4) Pulla bight of the standing part through the eye of theunderhand loop. (5) Pull the underhand loop tightaround the bight. (6) Place the running part under theeye of the bight that was pulled through theunderhand loop. (7) Pull a bight of the running partthrough the eye of the standing part bight. (8) Pull on
KNOTBOARD OF THE MONTH
http://www.northnet.org/ropeworks/archive/mooring.html (1 of 2) [9/2/2004 9:02:01 PM]

the standing part to tighten the standing part bightaround the running part bight.
ANNIMATED KNOT
MOORING HITCH
KNOTBOARD OF THE MONTH
ARCHIVE
HomeE-Mail
KNOTBOARD OF THE MONTH
http://www.northnet.org/ropeworks/archive/mooring.html (2 of 2) [9/2/2004 9:02:01 PM]

Home
ARCHIVE
KNOTBOARD OF THEMONTH
Each month there will be new knotboard and descritive textdisplayed on this page.
THIS MONTH'S IS THE :
JUG KNOT:Use ----
- to provide a convenient carrying handle for jug orbottle ---- to attach a tool, such as a hammer to asecurity line to prevent accidental dropping --- to adda wrist loop to a walking staff --- to attach a safetyline to a canoe paddle ..... use your imagination, butbe sure that you keep safety in mind.
Other Names ----Jar knot, moonshiner's knot, hackamore, bridle knot..
Comments ----The most common use is to provide a loop handleattached to the neck of a bottle. The loop handlemakes it easy to carry several bottles with one hand.If a toggle or a two strand button knot such asboatswain whistle knot is added to the free end of therope, The loop of the jug knot can be use to togglethe bottle to a belt so that the bottle can be use as acanteen.
Plastic bottles with screw-on lids such as soda, sportdrink, and mineral water bottles make strong,
KNOTBOARD OF THE MONTH
http://www.northnet.org/ropeworks/archive/jugknot.html (1 of 3) [9/2/2004 9:02:05 PM]

lightweight containers for carrying water on hikesand camp outs. 2 and 3 liter soda bottles are largeenough to use as water containers around the campkitchen. Smaller bottles (8 to 16 oz.) can be used aspersonal water bottles or canteens. These bottles canbe made even more convenient by using a jug knot toattach a loop handle.
To help keep your water cool and refreshing in hotweather, place a sock over the bottle, wet the sockwhen you fill the bottle, evaporation will do the rest.
In cold weather, carry your water bottle under yourcoat. A dry sock placed over the bottle will help keepthe water from freezing. In cold weather, carry yourwater bottle under your coat. A dry sock placed overthe bottle will help keep the water from freezing.
In cold weather, carry your water bottle under your coat. A dry sock placed over the bottlewill help keep the water from freezing.
Narration ------ (For Jug Knot Knotboard.)Narrative ---- (For jug knot knotboard) (1) Form a bight in the middle of a 24 to 30 inchlong by 3/16 inch diameter rope. (2) Fold the bight down over the standing ends to form twoloops. (3) Place the right loop over the side of the left loop. (4) Weave the middle of thebight under the standing end; then over the left edge of the right loop; (6) next go under theright edge of the left loop; (7) finally pass the bight over the right side of the left loop. ( 8)Turn the tops of the original loops down over the knot. ( 9) Place the knot over the neck of abottle and work the knot tight so that the bight forms a 4 to 5 inch loop handle and the looseends are even.
KNOTBOARD OF THE MONTH
ARCHIVE
KNOTBOARD OF THE MONTH
http://www.northnet.org/ropeworks/archive/jugknot.html (2 of 3) [9/2/2004 9:02:05 PM]

HomeE-Mail
KNOTBOARD OF THE MONTH
http://www.northnet.org/ropeworks/archive/jugknot.html (3 of 3) [9/2/2004 9:02:05 PM]

Home
ARCHIVE
KNOTBOARD OF THEMONTH
Each month there will be new knotboard and descritive textdisplayed on this page.
THIS MONTH'S IS THE :
BELAYING TO A CLEAT:Use ----
To secure a flag lanyard, to moor a boat to a dock.
Comments ----Belaying to a cleat is a fast non-jamming method ofsecuring a rope anywhere along its length withoutreeving any part of the rope through or aroundanything.
Narration ------ ( For Belaying to a CleatKnotboard.)(1) Take a turn around the cleat and pull the linetight. (2) Complete a round turn around the cleat . (3)Place the line across the cleat. (4) Take a bightaround one horn of the cleat. (5) Place the line acrossthe cleat a second time. (6) Take a bight around theother horn of the cleat to form a figure eight aroundthe horns of the cleat. (7) Repeat steps 3 through 6.(8) Form an underhand loop. (9) Place the eye of theunderhand loop over the horn of the cleat. (10) Pullthe underhand loop tight to form a half hitch aroundthe horn of the cleat, this locks the rope in place.
BELAYING TO A CLEAT-directions for securing a rope to a cleat
http://www.northnet.org/ropeworks/archive/cleat.html (1 of 2) [9/2/2004 9:02:06 PM]

ANNIMATED KNOT
BELAYING TO A CLEAT
KNOTBOARD OF THE MONTH
ARCHIVE
HomeE-Mail
BELAYING TO A CLEAT-directions for securing a rope to a cleat
http://www.northnet.org/ropeworks/archive/cleat.html (2 of 2) [9/2/2004 9:02:06 PM]

Home
ARCHIVE
KNOTBOARD OF THEMONTH
Each month there will be new knotboard and descritive textdisplayed on this page.
THIS MONTH'S IS THE :
WHIPPING:Description ----
Twine wrapped and secured to the end of a rope.
Use ----To prevent the fraying of the end of a rope.
Comments ----Even though "whipping" is done in several differentways, the finished "whippings" have similarappearance: the ends are secured under the turns, thelength of the whipping is equal to the diameter of therope, and all turns are parallel. Synthetic rope, ropemade of plastic, should be whipped and fused toprevent the rope from fraying. Fusing helps to holdthe whipping in place and the whipping helps toprevent the fused rope strands from braking apart.
Narration ------ ( For Whipping Knotboard.)(1) Take a turn around the cleat and pull the linetight. (2) Complete a round turn around the cleat . (3)Place the line across the cleat. (4) Take a bightaround one horn of the cleat. (5) Place the line acrossthe cleat a second time. (6) Take a bight around theother horn of the cleat to form a figure eight around
KNOTBOARD OF THE MONTH
http://www.northnet.org/ropeworks/archive/whipping.html (1 of 2) [9/2/2004 9:02:08 PM]

the horns of the cleat. (7) Repeat steps 3 through 6.(8) Form an underhand loop. (9) Place the eye of theunderhand loop over the horn of the cleat. (10) Pullthe underhand loop tight to form a half hitch aroundthe horn of the cleat, this locks the rope in place.
KNOTBOARD OF THE MONTH
ARCHIVE
HomeE-Mail
KNOTBOARD OF THE MONTH
http://www.northnet.org/ropeworks/archive/whipping.html (2 of 2) [9/2/2004 9:02:08 PM]

Home
ARCHIVE
KNOTBOARD OF THEMONTH
Each month there will be new knotboard and descritive textdisplayed on this page.
THIS MONTH'S IS THE :
FIGURE-EIGHT KNOT:Description ----
Interlocking overhand loops, the running part goesthrough the eye of one loop and the standing partgoes through the eye of the other loop.
Use ----(1) As a stopper knot; to keep a rope from unreevingfrom a pulley block; to prevent a rope from unlaying.(2) When tied on a bight, makes a reliable loop forrescue work and mountaineering.
Comments ----Easier to tie and untie than an overhand knot; doesnot damage the rope fiber or jam like an overhandknot.
Narration ------ ( For Figure-eight Knotboard.)(1) Form an overhand loop. (2) Take a bight aroundthe standing part. (3) Form the second overhand loopby bring the running part over the top edge of the firsoverhand loop. (4) Complete the knot by reeving therunning part through the eye of the first overhandloop (5) and pull tight.
KNOTBOARD OF THE MONTH
http://www.northnet.org/ropeworks/archive/figure8.html (1 of 3) [9/2/2004 9:02:09 PM]

FIGURE-EIGHT ON A BIGHT:Description ----
Interlocking overhand loops tied on a bight in therunning part (the bight is used as the running part);the running part goes through the eye of one loopand the standing part goes through the eye of theother loop.
Use ----(1) Makes a reliable loop for rescue work andmountaineering. (2) As a stopper knot; to keep a ropefrom unreeving from a pulley block; to prevent arope from unlaying.
Comments ----Easier to tie and untie than an overhand knot; doesnot damage the rope fiber or jam like an overhandknot on a bight.
Narration ------ ( For Figure-eight on a Bight Knotboard.)(1) Form a bight in the rope. [NOTE] Treat the two strands of the bight as a single strand asthe rest of the knot is tied. (2) Form an overhand loop. (3) Take a bight around the standingpart. (4) Form the second overhand loop by bring the running part over the top edge of thefirs overhand loop. (5) Complete the knot by reeving the running part through the eye of thefirst overhand loop (6) and pull tight.
ANNIMATED KNOT
BELAYING TO A CLEAT
KNOTBOARD OF THE MONTH
KNOTBOARD OF THE MONTH
http://www.northnet.org/ropeworks/archive/figure8.html (2 of 3) [9/2/2004 9:02:09 PM]

ARCHIVE
HomeE-Mail
KNOTBOARD OF THE MONTH
http://www.northnet.org/ropeworks/archive/figure8.html (3 of 3) [9/2/2004 9:02:09 PM]
Home
ARCHIVE
KNOTBOARD OF THEMONTH
Each month there will be new knotboard and descritive textdisplayed on this page.
THIS MONTH'S IS THE :
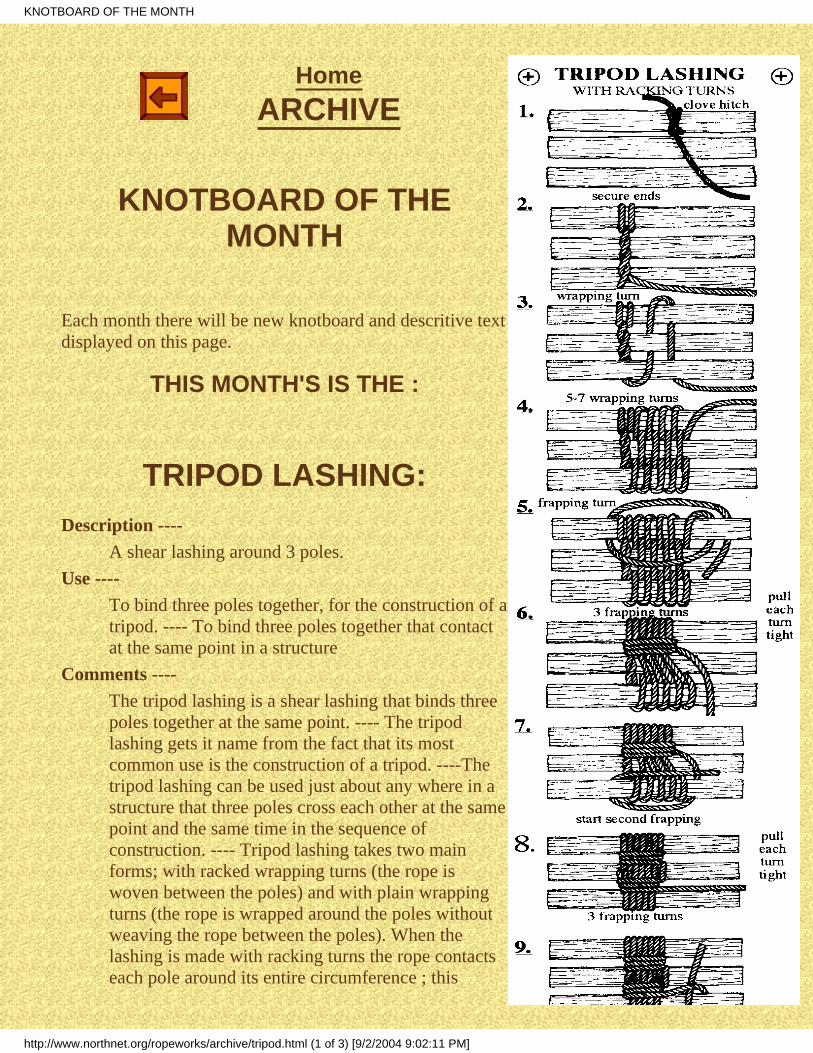
TRIPOD LASHING:Description ----
A shear lashing around 3 poles.
Use ----To bind three poles together, for the construction of atripod. ---- To bind three poles together that contactat the same point in a structure
Comments ----The tripod lashing is a shear lashing that binds threepoles together at the same point. ---- The tripodlashing gets it name from the fact that its mostcommon use is the construction of a tripod. ----Thetripod lashing can be used just about any where in astructure that three poles cross each other at the samepoint and the same time in the sequence ofconstruction. ---- Tripod lashing takes two mainforms; with racked wrapping turns (the rope iswoven between the poles) and with plain wrappingturns (the rope is wrapped around the poles withoutweaving the rope between the poles). When thelashing is made with racking turns the rope contactseach pole around its entire circumference ; this
KNOTBOARD OF THE MONTH
http://www.northnet.org/ropeworks/archive/tripod.html (1 of 3) [9/2/2004 9:02:11 PM]

contact makes the tripod lashing with racking turnsthe most secure form of tripod lashing: thereforetripod lashing with racking turns should be usedwhen safety is important. However, for lightstructures where there would be no danger if thelashing slipped, the faster to tie tripod lashing withplain wrapping turns may be used.
Laying Out The Poles ----For most tripod lashings, lay the pole side by sidewith the butt ends aligned. The alignment of the buttsof the pole insures that the tripod legs are the desiredlength.
[NOTE]The practice of laying the center pole in the opposite direction to the outside poles createsseveral problems. When the poles are laid in opposite directions the wrappings must be puton loosely so that when the center pole is rotated to its proper position the lashing istightened around the poles. If the wrappings are put on to tight, the rope is stretched causingdamage to the rope fibers, therefore weakening the lashing. On the other hand, if the rope iswrapped two loosely, the lashing will not tighten enough when the center pole is rotated andthe lashing will be able to slip along the length of the pole. Either way, the rope to loose orthe rope to tight, a dangerous situation is created.
Setting Up A Tripod -----Set up the tripod by crossing the outside poles so that the cross point of the poles is underthe center pole. Crossing the outside poles under the center pole causes part of the load thatis placed on the tripod to be taken up by the wood to wood contact of the poles.
Narration ------ ( For Tripod Lashing Knotboard.)
KNOTBOARD OF THE MONTH
http://www.northnet.org/ropeworks/archive/tripod.html (2 of 3) [9/2/2004 9:02:11 PM]

(1) Tie a clove hitch around one of the outside poles. (2) Secure the standing part bywrapping it around the running part. [NOTE] Wrapping the standing part around the runningpart prevents the clove hitch from slipping around the pole. If the clove hitch slips thelashing will loosen up from the inside. (3) Start the racked wrapping turns by weaving therope between the poles. (4) Take a total of 5 to 7 wrapping turns. Pull each wrapping turntight as it is made. [NOTE] The stiffness of the tripod lashing depends on the number andtightness of the wrapping turns. As the tightness of the wrapping turns or the number ofwrapping turns increases, the stiffness of the tripod will increase. (5) Take the first frappingturn by taking the rope around the pole that the clove hitch was tied to, then between theoutside pole and the center pole. (6) Take 3 frapping turns. Pull each frapping turn tight as itis made. (7) Start the second set of frapping turns by taking the rope across the center poleand reeving it between the second outside pole and the center pole. Take the second set offrapping turns in the opposite direction to the first set of frapping turns. [NOTE] Taking thesecond set of frapping turns in the opposite direction to the first set of frapping turnsprevents the rope from crossing the wrappings at a diagonal. Unnecessary crossing of therope increases friction between the strands of the rope making it difficult to tighten thelashing properly. (8) Take a total of 3 frapping turns. Pull each turn tight. (9) Take the firsthalf hitch of the ending clove hitch around the second outside pole by taking the rope pastthe pole and then around the pole. (10) Work the half hitch tight so that it is locked againstthe lashing. [NOTE] See the narration for square lashing for instructions on working the halfhitch tight. (11) Take the second half hitch of the ending clove hitch. (12) Work the halfhitch tight to complete the ending clove hitch. [NOTE] If the clove hitch is not worked tightso that it is locked against the lashing the clove hitch will slip around the pole allowing thelashing to loosen. [NOTE] If very smooth rope is being used, a 3rd half hitch should beadded to the clove hitch to insure that the lashing will stay in place.
KNOTBOARD OF THE MONTH
ARCHIVE
HomeE-Mail
KNOTBOARD OF THE MONTH
http://www.northnet.org/ropeworks/archive/tripod.html (3 of 3) [9/2/2004 9:02:11 PM]

Home
ARCHIVE
KNOTBOARD OF THEMONTH
Each month there will be new knotboard and descritive textdisplayed on this page.
THIS MONTH'S IS THE :
SHEET BEND:Description ----
An interlocked bight and half hitch.
Use ----To temporarily join two ropes, especially if the ropesare of different sizes.
Comments ----The sheet bend is a secure but easily untied knot. ----When tying the sheet bend the running parts shouldbe left long because there is some initial slip in theknot when the knot is first brought under tension. ----The proper and more secure way to tie the sheet bendis so that the two end the rope are on the same side ofthe knot.
Other Names ----Weavers knot
Related Knots ----Bowline; becket hitch; these knots share the same formbut are tied in a different way or have a different use.Narrative ---- (For sheet bend knotboard.)
(1) Form a bight in the running part of the
KNOTBOARD OF THE MONTH
http://www.northnet.org/ropeworks/archive/sheben.html (1 of 2) [9/2/2004 9:02:12 PM]

left-hand rope. (2) Reeve the running part of theright-hand rope through the eye of the bight inthe left-hand rope. (3) With the right-handrunning part take a bight around the runningpart and the standing part of the left-hand rope.(4) Pass the right-hand running part over theleft-hand standing part, (5) under the right-handrope, and (6) over the standing part of theleft-hand rope. (7) Pull tight.
ANNIMATED KNOT
SHEET BEND
KNOTBOARD OF THE MONTH
ARCHIVE
HomeE-Mail
KNOTBOARD OF THE MONTH
http://www.northnet.org/ropeworks/archive/sheben.html (2 of 2) [9/2/2004 9:02:12 PM]

Home
ARCHIVE
KNOTBOARD OF THEMONTH
Each month there will be new knotboard and descritive textdisplayed on this page.
THIS MONTH'S IS THE :
MASTHEAD KNOT:Description ----
A multiple loop knot formed by reeving the looselymade loops of two over hand knots through eachother and then securing the knot to a mast (pole).
Use ----On board ship, a masthead knot was used to rig atemporary mast if the mast was lost in battle orduring a storm. On land a masthead knot can be usedto rig a gin pole or a flag pole.
Comments ----There are several forms of the Masthead Knot. Thisform of the Masthead Knot was chosen for itssymmetry and the ease of transition to the runninghalf hitches used to secure it to the pole.
Other Names ----Jury mast knot, pitcher knot.
Narrative ---- (For masthead knot knotboard.)(1) Loosely tie two over hand knots. (2) Place theloop of one overhand knot on top of the loop of theloop of the other over hand knot. (3&4) Reeve the
KNOTBOARD OF THE MONTH
http://www.northnet.org/ropeworks/archive/masthead.html (1 of 2) [9/2/2004 9:02:14 PM]

loops of the overhand knot through the half knot partof the opposite overhand knot. (5) Place over a poleand draw the three loops up even. (6) Secure to thepole with a series of running half hitches above andbelow the mast head knot.
[NOTE]A forth loop my be formed by tying or splicing theends together. If a fourth loop is made, nail a cleatsto the pole to prevent the mast head knot fromslipping.
[NOTE]Attach the guy lines to the loops with becket hitches.
KNOTBOARD OF THE MONTH
ARCHIVE
HomeE-Mail
KNOTBOARD OF THE MONTH
http://www.northnet.org/ropeworks/archive/masthead.html (2 of 2) [9/2/2004 9:02:14 PM]

HomeARCHIVEARCHIVE
KNOTBOARD OF THEMONTH
Each month there will be new knotboard and descritive textdisplayed on this page.
THIS MONTH'S IS THE :
FLOOR LASHING:Use ----
to lash a series of poles to a set of stringers to form aflat surface such as a deck, a table top, or a road way.
Comments ----When using a floor lashing, both ends of the deckingpoles must be lashed at the same tine to insure a firmeven surface.
When placing the decking poles on the stringers, laythe decking poles so that their butt end are inalternating direction. Alternating the but ends of thedecking poles will compensate for the natural taperof the poles so that the length of the decking alongeach stringer will be equal.
Narrative ---- (For floor lashing knotboard)(1) Tie a clove hitch around each stringer. (2) Securethe short end of the rope by wrapping it around therunning end (wrap with the lay of the rope ). (3)Place the decking poles on the stringers and take abight around the first pole. (4) Next, on the inside ofthe stringer, pull a bight up between the first deckingpole and the next decking pole. (5) Place the eye of
KNOTBOARD OF THE MONTH
http://www.northnet.org/ropeworks/archive/flash.html (1 of 2) [9/2/2004 9:02:17 PM]

the bight over the end of the decking pole. (6) Pulltight. (7) On the outside of the stringer, place a bightover the next decking pole. (8) Pull tight. (9) Repeatsteps 4 through 8 until all decking poles are lashed inplace. (10) Tie the first half hitch of the ending clovehitch. Work half hitch tight. (11) Tie the second halfhitch of the ending clove hitch. Work half hitch tight(12) to form clove hitch.
KNOTBOARD OF THE MONTH
ARCHIVE
HomeE-Mail
KNOTBOARD OF THE MONTH
http://www.northnet.org/ropeworks/archive/flash.html (2 of 2) [9/2/2004 9:02:17 PM]
HomeARCHIVEARCHIVE
ARTICLE OF THE MONTH
Each month there will be article on this page.
THIS MONTH'S IS THE :
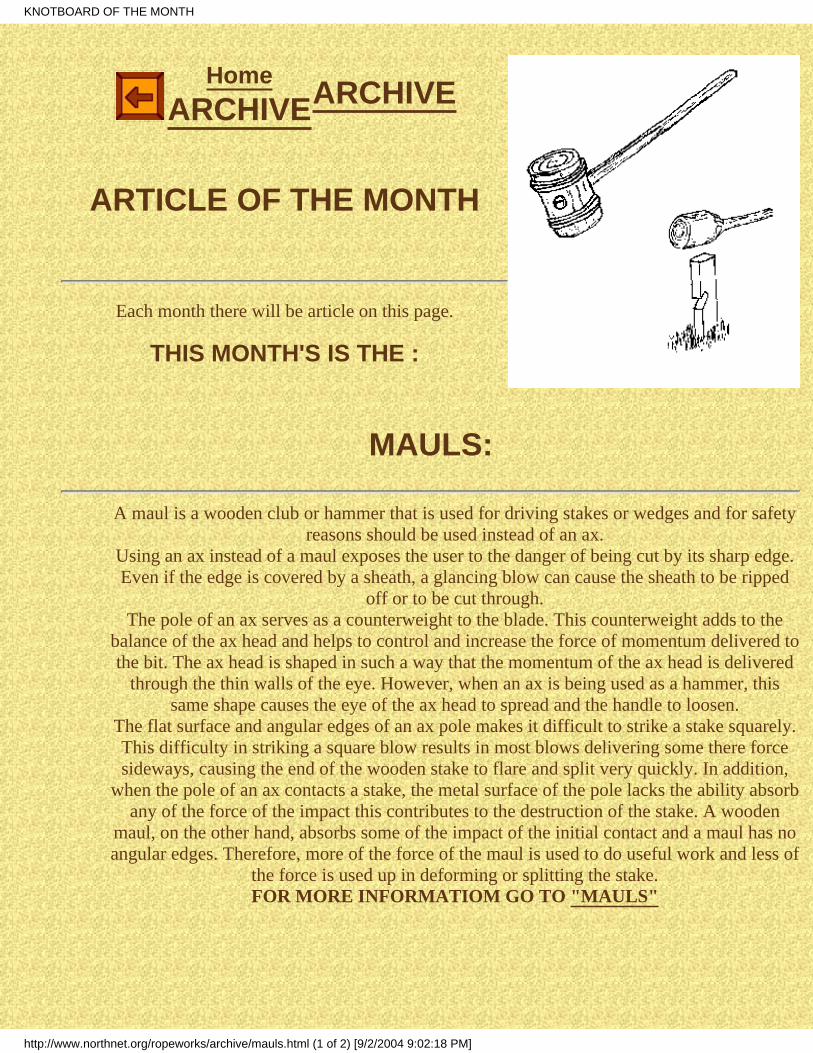
MAULS:
A maul is a wooden club or hammer that is used for driving stakes or wedges and for safetyreasons should be used instead of an ax.
Using an ax instead of a maul exposes the user to the danger of being cut by its sharp edge.Even if the edge is covered by a sheath, a glancing blow can cause the sheath to be ripped
off or to be cut through.The pole of an ax serves as a counterweight to the blade. This counterweight adds to the
balance of the ax head and helps to control and increase the force of momentum delivered tothe bit. The ax head is shaped in such a way that the momentum of the ax head is delivered
through the thin walls of the eye. However, when an ax is being used as a hammer, thissame shape causes the eye of the ax head to spread and the handle to loosen.
The flat surface and angular edges of an ax pole makes it difficult to strike a stake squarely.This difficulty in striking a square blow results in most blows delivering some there forcesideways, causing the end of the wooden stake to flare and split very quickly. In addition,
when the pole of an ax contacts a stake, the metal surface of the pole lacks the ability absorbany of the force of the impact this contributes to the destruction of the stake. A wooden
maul, on the other hand, absorbs some of the impact of the initial contact and a maul has noangular edges. Therefore, more of the force of the maul is used to do useful work and less of
the force is used up in deforming or splitting the stake.FOR MORE INFORMATIOM GO TO "MAULS"
KNOTBOARD OF THE MONTH
http://www.northnet.org/ropeworks/archive/mauls.html (1 of 2) [9/2/2004 9:02:18 PM]

"MAULS"
ARTICLE OF THE MONTH
ARCHIVE
HomeE-Mail
KNOTBOARD OF THE MONTH
http://www.northnet.org/ropeworks/archive/mauls.html (2 of 2) [9/2/2004 9:02:18 PM]

HomeARCHIVEARCHIVE
ARTICLE OF THE MONTH
Each month there will be an article on this page.
THIS MONTH'S IS THE :
FUSIING:Use ----
To prevent a rope from fraying.
Comments ----The ends of a synthetic rope can be fused to prevent the rope from fraying. This is done byheating the end of the rope so that the ends of the rope fibers melt together.
The fusing can be done by holding the end of the rope to the side of a candle or other smallflame. If the end of the rope is placed in the flame or held too close to the flame, the plasticwill ignite causing the end of the rope to turn black. Burning plastic can also give off toxicfumes . If the end of the rope is held above the flame, unburned carbon particle will bedeposited on the melted plastic causing it to turn black. A candle flame will generate enoughheat to fuse the end of a rope up to about one inch in diameter. If the rope is larger than oneinch, a propane torch will work better .
FOR MORE INFORMATIOM GO TO "FUSING"
KNOTBOARD OF THE MONTH
http://www.northnet.org/ropeworks/archive/fusing.html (1 of 2) [9/2/2004 9:02:20 PM]

ARTICLE OF THE MONTH
ARCHIVE
HomeE-Mail
KNOTBOARD OF THE MONTH
http://www.northnet.org/ropeworks/archive/fusing.html (2 of 2) [9/2/2004 9:02:20 PM]

HomeARCHIVEARCHIVE
ARTICLE OF THE MONTH
Each month there will be article on this page.
THIS MONTH'S IS THE :
TAUT-LINE HITCH:Description ----Two half hitches with an extra turn.
Use ----To adjust the tension on guy lines.
FOR MORE INFORMATIOM GO TO "TAUT-LINE"
ARTICLE OF THE MONTH
ARCHIVE
KNOTBOARD OF THE MONTH
http://www.northnet.org/ropeworks/archive/tautline.html (1 of 2) [9/2/2004 9:02:21 PM]
HomeE-Mail
KNOTBOARD OF THE MONTH
http://www.northnet.org/ropeworks/archive/tautline.html (2 of 2) [9/2/2004 9:02:21 PM]

Home
ARCHIVE
ARTICLE OF THE MONTH
Each month there will be new knotboard and descritive textdisplayed on this page.
THIS MONTH'S IS THE :
SPANISH WINDLESS:Description ----
A Spanish windless is a device for moving heavy loads such as rocks and logs.
[WARNING]When setting up a Spanish Windless do not use nylon or other synthetic fiber ropes thatstretch under a load. If you slip or let go of the poles the energy you used to stretch the ropewill be released as the rope returns to its original length. This release of energy could causethe poles of the windless to spin around causing injuries to any one near by. Natural fiberropes, such as sisal, have little stretch; therefore are much safer to use.
MATERIALS:1 - 8 foot * 3 inch pole1 - 5 foot * 3 inch pole1 - 3/4 inch * 50 foot (natural fiber)
SETUP:
STEP 1:Tie one end of the rope to the load and the other end to a secure anchorpoint. Leave some slack in the rope so that the windless can be rigged.
ARTICLE OF THE MONTH- A page that displays a new HOW TO Article related to ropes, knots, splices, or lashings.
http://www.northnet.org/ropeworks/archive/Swindless.html (1 of 3) [9/2/2004 9:02:24 PM]

STEP 2:Follow the diagrams to set up the poles at the mid point of the rope.
STEP 3:While one person holds the up right pole, a second person rotates thelonger pole around the upright so that the rope begins to wrap around theupright pole. Adjust the height of the rope so that it can be easily steppedover.
STEP 4:Continue to rotate the longer pole around the upright.
[NOTE]:As the rope wraps around the upright it will be necessary to move thebase of the upright to keep it vertical.
[NOTE]:Be careful that the two ends of the rope are kept at the same level on theupright.
ARTICLE OF THE MONTH- A page that displays a new HOW TO Article related to ropes, knots, splices, or lashings.
http://www.northnet.org/ropeworks/archive/Swindless.html (2 of 3) [9/2/2004 9:02:24 PM]

ARTICLE OF THE MONTH
ARCHIVE
HomeE-Mail
ARTICLE OF THE MONTH- A page that displays a new HOW TO Article related to ropes, knots, splices, or lashings.
http://www.northnet.org/ropeworks/archive/Swindless.html (3 of 3) [9/2/2004 9:02:24 PM]

HomeGUESTBOOK
GO TO ARCHIVE
ARTICLE OF THE MONTH
Each month there will be new knotboard and descritive text displayed on this page.
THIS MONTH'S IS THE :
ROPE HALTER
Start with an eye splice.(The Eye splice will form one end of the nose piece of the halter)
Decide how long the nose piece must be then tie a quick eye into the rope.
Quick Eye STEP1
Decide where the quick eye must be. Then reeve the lead end through the lay of the rope asshown. ( Slightly larger than the diameter of the rope)
ARTICLE OF THE MONTH- A page that displays a new HOW TO Article related to ropes, knots, splices, or lashings.
http://www.northnet.org/ropeworks/archive/Rhalter.html (1 of 4) [9/2/2004 9:02:26 PM]

Quick Eye STEP 2
Observe which strand of the lead end is directly under the strand of the nose piece end. Reevethe eye splice under that strand.
Quick Eye STEP 3
Work the eye into shape. (Do not just pull on the ends this will distort the eye.) When the eye isin shape, the strands of the rope should lay even showing little or no distortion.
Finnish the halter by reeving the lead end through the two eyes as shown.
ARTICLE OF THE MONTH- A page that displays a new HOW TO Article related to ropes, knots, splices, or lashings.
http://www.northnet.org/ropeworks/archive/Rhalter.html (2 of 4) [9/2/2004 9:02:26 PM]
ARTICLE OF THE MONTH
ARCHIVE
Home
ARTICLE OF THE MONTH- A page that displays a new HOW TO Article related to ropes, knots, splices, or lashings.
http://www.northnet.org/ropeworks/archive/Rhalter.html (3 of 4) [9/2/2004 9:02:26 PM]

E-MailARTICLE OF THE MONTH- A page that displays a new HOW TO Article related to ropes, knots, splices, or lashings.
http://www.northnet.org/ropeworks/archive/Rhalter.html (4 of 4) [9/2/2004 9:02:26 PM]

© 2000, Gerald L. Findley
LADDER LASHING:
Comments:
Ladder lashing allows for a quick andsecure method for constructing a ladderor for constructing a decking with evenlyspace decking pieces.
This form of lashing has severaladvantages over the traditional floorlashing. Less material is required becauseunlike floor lashing a space can be leftbetween each piece of the decking. Also,each rung is securely lashed in place byseveral loops of rope in much the sameway as a square lashing; with thetraditional floor lashing only a single loopof the rope holds each end of the deckingin place, therefore if one piece loosens,the entire deck loosens.
The ladder lashing has two forms; left andright, each is a mirror image of the other.
START: The ladder lashing is started byusing a clove hitch stopped with two halfhitches to secure a rope to the top end ofeach rail.
STEP 1: Lay an overhand loop over eachside rail so that the running end of eachloop is to the outside.
ARTICLE OF THE MONTH- A page that displays a new HOW TO Article related to ropes, knots, splices, or lashings.
http://www.northnet.org/ropeworks/archive/ladder.html (1 of 7) [9/2/2004 9:02:29 PM]

STEP 2: Place a rung across the rails sothat the standing part of each overhandloop is over the end of the rung and therunning part of each overhand loop isunder the rung.
STEP 3: Pull the running part side ofeach overhand loop behind and to theoutside of each rail.
ARTICLE OF THE MONTH- A page that displays a new HOW TO Article related to ropes, knots, splices, or lashings.
http://www.northnet.org/ropeworks/archive/ladder.html (2 of 7) [9/2/2004 9:02:29 PM]

STEP 4: Then pull the loop over the endof the rung.
STEP 5: Work each rope until it istightened around the rung and the rung isin its desired position.
STEP 6: Form an overhand loop in eachrunning part.
ARTICLE OF THE MONTH- A page that displays a new HOW TO Article related to ropes, knots, splices, or lashings.
http://www.northnet.org/ropeworks/archive/ladder.html (3 of 7) [9/2/2004 9:02:29 PM]

STEP 7: Place an overhand loop overeach end of the rung to form a half hitcharound each end of the rung.
STEP 8: Work the half hitch tight.
STEP 9: Repeat steps 1 through 8 foreach additional rung.
END: Finnish the lashing by tying aclove hitch around each rail so that theclove hitch is directly under the bottomrung.
ARTICLE OF THE MONTH- A page that displays a new HOW TO Article related to ropes, knots, splices, or lashings.
http://www.northnet.org/ropeworks/archive/ladder.html (4 of 7) [9/2/2004 9:02:29 PM]

Quick Eye STEP 3
Work the eye into shape. (Do not just pull on the ends this will distort the eye.) When the eye isin shape, the strands of the rope should lay even showing little or no distortion.
Finnish the halter by reeving the lead end through the two eyes as shown.
ARTICLE OF THE MONTH- A page that displays a new HOW TO Article related to ropes, knots, splices, or lashings.
http://www.northnet.org/ropeworks/archive/ladder.html (5 of 7) [9/2/2004 9:02:29 PM]

ARTICLE OF THE MONTH
ARCHIVE
Home
ARTICLE OF THE MONTH- A page that displays a new HOW TO Article related to ropes, knots, splices, or lashings.
http://www.northnet.org/ropeworks/archive/ladder.html (6 of 7) [9/2/2004 9:02:29 PM]

E-MailARTICLE OF THE MONTH- A page that displays a new HOW TO Article related to ropes, knots, splices, or lashings.
http://www.northnet.org/ropeworks/archive/ladder.html (7 of 7) [9/2/2004 9:02:29 PM]

SEIZING:
Use ---- To bind ropes together or to binda rope to an object. Sometimes used tobind the running end of a rope to thestanding end of the rope to prevent a knotfrom spilling.
Comments ---- Seizings do not use asmuch material and are not as bulky as aknot or a splice; nor does the seizingdamage the fiber of the rope. The fibers ofa rope do not need to be bent or separatedto be seized as they do when a knot isbeing tied or a splice worked. If theseizing is no longer needed, the seizingcan be cut away and the rope isundamaged.
The seizings shown here can be workedwith out the use of a needle. Howeverthere are many forms of seizing thatrequire the use of a needle to apply themto a rope.
To form an eye, 3 to 4 seizing should beused. This ensures that the eye will safelyremain in place even if one of the seizingsis damaged.
If there is additional strain on the ropes,
ARTICLE OF THE MONTH- A page that displays a new HOW TO Article related to ropes, knots, splices, or lashings.
http://www.northnet.org/ropeworks/archive/seizing.html (1 of 4) [9/2/2004 9:02:32 PM]

such as at the first seizing of an eye,racked turns should be used.
Materials ---- The diameter of the"twine" that is being used to do theseizing should be 1/8 to 1/12 the diameterof the rope being seized. The length of the"twine" should be about 3 feet for each 1inch of diameter of the rope.
Narration ---- (For seizing knotboard.)(1) Fold a piece of twine in half over onestrand of the rope. (2) Start the first layerof wrapping turns by laying the end of thetwine that is between
the ropes over the other end. (3) Wrap theoutside strand around the ropes so that sothat the wrapping turns are parallel toeach other; pull each wrapping turn tight.(4) When the width of the wrapping isequal to the diameter of the rope, end thefirst layer of wrapping turns by reevingthe twine between the ropes; pull tight.(5) Add a layer of riding turns; the ridingturns are laid in the grove between thewrapping turns and pulled tight but not sotight as to separate the wrapping turns ofthe first layer. (6) When the riding turnshave been completed, end the riding turnsby reeving the end of the twine betweenthe ropes so that it is in the oppositedirection to the other end of the twine. (7)Add frapping turns; reeve the end of thetwine between the ropes at the other endof the wrappings; pull tight. (8) Use asquare knot to end the frapping turns:reeve the ends of the twine between the
ARTICLE OF THE MONTH- A page that displays a new HOW TO Article related to ropes, knots, splices, or lashings.
http://www.northnet.org/ropeworks/archive/seizing.html (2 of 4) [9/2/2004 9:02:32 PM]
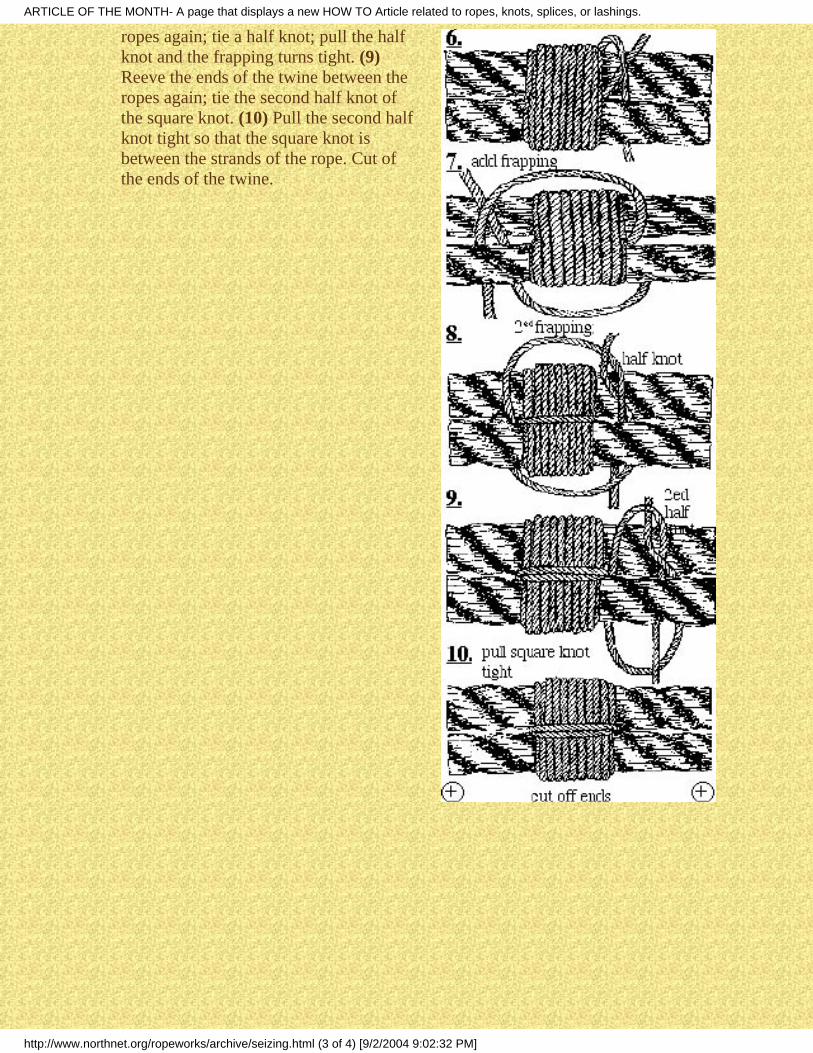
ropes again; tie a half knot; pull the halfknot and the frapping turns tight. (9)Reeve the ends of the twine between theropes again; tie the second half knot ofthe square knot. (10) Pull the second halfknot tight so that the square knot isbetween the strands of the rope. Cut ofthe ends of the twine.
ARTICLE OF THE MONTH- A page that displays a new HOW TO Article related to ropes, knots, splices, or lashings.
http://www.northnet.org/ropeworks/archive/seizing.html (3 of 4) [9/2/2004 9:02:32 PM]

For a printout of the above and additinalinformation go to....
http://www.northnet.org/ropeworks/reader/sezing.pdf
For printouts of previous articles go to ...
ARCHIVES.
ARTICLE OF THE MONTH
ARCHIVE
HomeE-Mail
ARTICLE OF THE MONTH- A page that displays a new HOW TO Article related to ropes, knots, splices, or lashings.
http://www.northnet.org/ropeworks/archive/seizing.html (4 of 4) [9/2/2004 9:02:32 PM]

FIDS:
A fid is a tool that is used to open the lay of a rope when working a splice or toloosen knots.
MAKING A WOODEN FID:
Split out an 8 inch by 3/4 inch piece of close grained, smooth, hardwood. Carve andsmooth the piece to the shape shown in the diagram.
MAKING METAL FIDS:
Materials:
1 --- 8 inch * 1/2 inch copper tubing orsteel electrical conduit.
2 --- 1 inch diameter * 3 inch long pieceof smooth grained hardwood.
2 --- 4D finishing nails.
ARTICLE OF THE MONTH- A page that displays a new HOW TO Article related to ropes, knots, splices, or lashings.
http://www.northnet.org/ropeworks/archive/fid.html (1 of 7) [9/2/2004 9:02:34 PM]

Construction:
Cut the tubing diagonally into two pieces as shown in the diagram (Use a hacksaw).
Making a Closed Fid:
STEP 1: Use a triangular file to enlarge the diagonal opening in one of the halves of thetubing. File the opening to the shape indicated by the dotted lines in the diagram.
STEP 2: Close the diagonal opening. Using light taps with a hammer gently roll the twoedges toward each other to form the tubing into a cone. (When the two edges of theopening meet the seam in the tubing should be straight).
STEP 3: Solder the edges of the opening together.
3A] Clean the edges of the opening with steel wool.
3B] Spread soldering paste along the cleaned edges.
3C] Solder the seam. Use a propane torch to apply heat to the side of the fid that isopposite the seam. (Heating the tube from the opposite side, will ensures that metalis heated all the way through so that the solder will flow into the seam and not justspread out on the surface.) As you heat the tubing test the seam for the propertemperature by touching the solder to the seam. When the solder starts to melt andflow into the seam, move the solder along the seam until the entire seam is filledwith solder.
ARTICLE OF THE MONTH- A page that displays a new HOW TO Article related to ropes, knots, splices, or lashings.
http://www.northnet.org/ropeworks/archive/fid.html (2 of 7) [9/2/2004 9:02:34 PM]

STEP 4: Cleanup the seam with steel-wool and a file. Make sure that there are no sharpedges to catch or cut the rope fibers when the fid is being used.
Making an Open Fid:
STEP 1: Enlarge the diagonal opening of the other piece of tubing by setting the tubingon end and forcing a rod into the opening. When the rod is forced into the opening, thecross section of the tubing should become "U" shaped.
ARTICLE OF THE MONTH- A page that displays a new HOW TO Article related to ropes, knots, splices, or lashings.
http://www.northnet.org/ropeworks/archive/fid.html (3 of 7) [9/2/2004 9:02:34 PM]

STEP 2: With a round file, enlarge the diagonal opening to the shape shown by thedotted line.
STEP 3: Smooth all rough and sharp edges with a file and steel-wool.
STEP 4: Gently tap the edges of the opening toward each other so that a cross sectionanywhere along its entire length will be "U" shaped.
Making Handles For Fids:
STEP 1: Carve one end of a 1 inch diameter * 3 inch long piece of wood so that it willfit snugly into the end of the fid.
STEP 2: Attach handle to fid.2A] Drill a small hole into the side of the fid about 1/2 inch from the end.
ARTICLE OF THE MONTH- A page that displays a new HOW TO Article related to ropes, knots, splices, or lashings.
http://www.northnet.org/ropeworks/archive/fid.html (4 of 7) [9/2/2004 9:02:34 PM]

2B] Insert the handle into the end of the fid. Then drive a finishing nail through thehole into the wood of the handle.
2C] Cut the nail off close to the side of the fid. Then file the nail down so that it issmooth and even with the surface.
ARTICLE OF THE MONTH- A page that displays a new HOW TO Article related to ropes, knots, splices, or lashings.
http://www.northnet.org/ropeworks/archive/fid.html (5 of 7) [9/2/2004 9:02:34 PM]

STEP 3: Finish the handle. Here is a chance to be creative. You can carve a simplerounded handle or let your imagination take over.
For a printout of the above go to....
http://www.northnet.org/ropeworks/reader/fid.pdf
ARTICLE OF THE MONTH- A page that displays a new HOW TO Article related to ropes, knots, splices, or lashings.
http://www.northnet.org/ropeworks/archive/fid.html (6 of 7) [9/2/2004 9:02:34 PM]

For printouts of previous articles go to ...
ARCHIVES.
ARTICLE OF THE MONTH
ARCHIVE
HomeE-Mail
ARTICLE OF THE MONTH- A page that displays a new HOW TO Article related to ropes, knots, splices, or lashings.
http://www.northnet.org/ropeworks/archive/fid.html (7 of 7) [9/2/2004 9:02:34 PM]

© 1999, Gerald L. Findley
MARLIN SPIKE HITCH:
Description A loop formed by a half hitcharound a bight in the standing part of therope.
Use To temporarily hold a toggle (a MarlinSpike) so that a rope can be pulled tight; asa mooring hitch that can be dropped overthe end of a stake or pole; to hold the rungsof a rope ladder.
Comments A secure temporary hitch thatcan be easily spilled by removing thetoggle. The Marlin Spike Hitch gets itname from the practice of using it around aMarlin Spike or similar tool to tightenknots and servicing,
Other Names Slip Noose; especially whenthe half hitch is pulled closed around thebight.
Narrative ---- (For marlin spikeknotboard) (1) Form an overhand loop. (2)
ARTICLE OF THE MONTH- A page that displays a new HOW TO Article related to ropes, knots, splices, or lashings.
http://www.northnet.org/ropeworks/archive/marlinspike.html (1 of 3) [9/2/2004 9:02:36 PM]

Then form a bight in the standing part. (3)Place the bight under the overhand loop.(4) Then reeve the bight through theunderhand loop. (5) Pass a toggle
ARTICLE OF THE MONTH- A page that displays a new HOW TO Article related to ropes, knots, splices, or lashings.
http://www.northnet.org/ropeworks/archive/marlinspike.html (2 of 3) [9/2/2004 9:02:36 PM]

ARTICLE OF THE MONTH
ARCHIVE
HomeE-Mail
ARTICLE OF THE MONTH- A page that displays a new HOW TO Article related to ropes, knots, splices, or lashings.
http://www.northnet.org/ropeworks/archive/marlinspike.html (3 of 3) [9/2/2004 9:02:36 PM]

FOOTROPE KNOTDescription: a three strand knot that lookssomewhat like a turk's head knot.
Comments: This knot was tied in the "footrope"(the rope that was tied under the yard arm for thesailors to stand on when they were setting the sails)to prevent the sailors' feet from slipping along thefootrope.
Use: as a stopper knot in the end of a rope.
STEP 1: Unlay 4 to 5turns of the lay.
STEP 2: Tie a loosecrown knot.
STEP 3:
STEP 4:
STEP 5:
ARTICLE OF THE MONTH- A page that displays a new HOW TO Article related to ropes, knots, splices, or lashings.
http://www.northnet.org/ropeworks/archive/footrope.html (1 of 4) [9/2/2004 9:02:38 PM]

STEP 6:
STEP 7: Tie a wall knot under the crown knot but tuck the strands up through the center ofthe crown knot.
STEP 8:
STEP 9:
STEP 10:
STEP 11:
ARTICLE OF THE MONTH- A page that displays a new HOW TO Article related to ropes, knots, splices, or lashings.
http://www.northnet.org/ropeworks/archive/footrope.html (2 of 4) [9/2/2004 9:02:38 PM]

STEP 12:
STEP 13: Work tight and finish by combing out the fibers to form a tassel of relay the strandand whip the end of the rope.
ARTICLE OF THE MONTH- A page that displays a new HOW TO Article related to ropes, knots, splices, or lashings.
http://www.northnet.org/ropeworks/archive/footrope.html (3 of 4) [9/2/2004 9:02:38 PM]

ARTICLE OF THE MONTH- A page that displays a new HOW TO Article related to ropes, knots, splices, or lashings.
http://www.northnet.org/ropeworks/archive/footrope.html (4 of 4) [9/2/2004 9:02:38 PM]

HomeGUESTBOOK
GO TO ARCHIVE
ARTICLE OF THE MONTH
Each month there will be new knotboard and descriptive text displayed on this page.
THIS MONTH'S IS THE :
© 2001, Gerald L. Findley
CAMP STOOL:
MATERIALS:
3 --- 2 Foot * 2 inch poles
20 --- 1/2 inch diameter sticks (variouslengths)
1 --- 3/8 inch * 5 foot rope
1 --- 1/4 inch * 12foot rope
CAMP STOOL1
http://www.northnet.org/ropeworks/archive/campstool.html (1 of 8) [9/2/2004 9:02:42 PM]

CONSTRUCTION:
STEP 1: Cut a grove 1 inch deep and 3/8 inch wide in each end of the 2 foot poles.Be sure that the groves are in the same direction.
STEP 2: Lash the 2 foot pole together at their centers with the 1/4 inch * 12 footrope. Use the equal shear tripod lash shown here.
2A] Tie a clove hitch around one of the poles; secure the end by wrapping it aroundthe standing end.
CAMP STOOL1
http://www.northnet.org/ropeworks/archive/campstool.html (2 of 8) [9/2/2004 9:02:42 PM]

2B] Take 4 wraps around the 3 poles; follow the pattern shown for each wrap.
CAMP STOOL1
http://www.northnet.org/ropeworks/archive/campstool.html (3 of 8) [9/2/2004 9:02:42 PM]
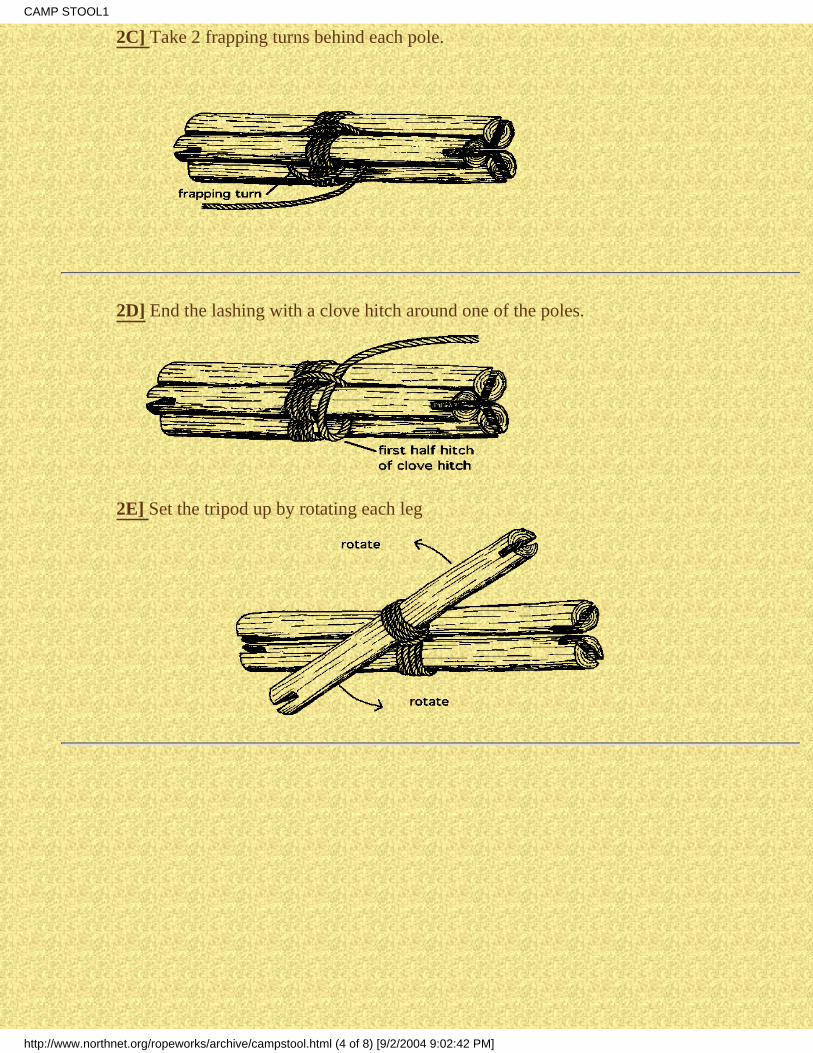
2C] Take 2 frapping turns behind each pole.
2D] End the lashing with a clove hitch around one of the poles.
2E] Set the tripod up by rotating each leg
CAMP STOOL1
http://www.northnet.org/ropeworks/archive/campstool.html (4 of 8) [9/2/2004 9:02:42 PM]

STEP 3: Prepare the seat supportrope by marking the middle of the3/8 inch * 5 foot rope by tying apiece of twine around it. Thenform a loop that has a 42 inchcircumference by temporarilytying the ends of the ropetogether.
STEP 4: Place the seat supportrope in the groves at the top of thepoles so that the middle of therope is in one of the groves.Adjust the ends poles so that theyare evenly spaced around theloop.
STEP 5: Add the bracingrope. Tie a bowline into oneend of the 1/4 inch * 10 footrope. Then weave the ropeback and forth between theends of the tripod poles;follow the pattern shown inthe diagram. End by tying aslippery half hitch through theeye of the bowline.
CAMP STOOL1
http://www.northnet.org/ropeworks/archive/campstool.html (5 of 8) [9/2/2004 9:02:42 PM]

STEP 6: Assemble the seat.
6A] Lift one strand of the layof the seat support rope oneither side of the pole that isat the midpoint of the ropeloop.
6B] Slide the ends of a 1/2 inchstick under the lifted strands ofthe seat support rope
CAMP STOOL1
http://www.northnet.org/ropeworks/archive/campstool.html (6 of 8) [9/2/2004 9:02:42 PM]

6C] Lift the next strand of the layof the rope on either side of thepole that is at the midpoint of theseat support rope
6C] Insert the next 1/2 inchstick.
[NOTE] To keep the ends of thetripod poles at a equal distance fromeach other as the seat is beingconstructed, the temporary knot thatjoins the two ends of the seat supportrope will need to be retied severaltimes.
6E] Continue in this manner until theseat is the desired size.
6F] Permanently join the 2 ends of therope loop with a short splice.
6G] Trim the ends of the 1/2 inchsticks so that they extend about 2 1/2inches beyond the rope.
[NOTE] By removing the 1/4 inchbrace rope, this stool can be folded fortransport and storage.
CAMP STOOL1
http://www.northnet.org/ropeworks/archive/campstool.html (7 of 8) [9/2/2004 9:02:42 PM]

>
CAMP STOOL1
http://www.northnet.org/ropeworks/archive/campstool.html (8 of 8) [9/2/2004 9:02:42 PM]

!-- Generation of PM publication page 1 -->
MONKEY'S PAW(coil style)
(1) Form the first coil by stacking three loop on top of each other.
(2) Insert core into center of coil.
ARTICLE OF THE MONTH- A page that displays a new HOW TO Article related to ropes, knots, splices, or lashings.
http://www.northnet.org/ropeworks/archive/monkpawcoil.html (1 of 6) [9/2/2004 9:02:44 PM]

3) Start second coil by forming a small loop at the bottom of the first coil.
(4) Pass the running end behind and
ARTICLE OF THE MONTH- A page that displays a new HOW TO Article related to ropes, knots, splices, or lashings.
http://www.northnet.org/ropeworks/archive/monkpawcoil.html (2 of 6) [9/2/2004 9:02:44 PM]

(5) across the front to for the first loop of the second coil
(6) Add the second and third loops of the second coil.
ARTICLE OF THE MONTH- A page that displays a new HOW TO Article related to ropes, knots, splices, or lashings.
http://www.northnet.org/ropeworks/archive/monkpawcoil.html (3 of 6) [9/2/2004 9:02:44 PM]
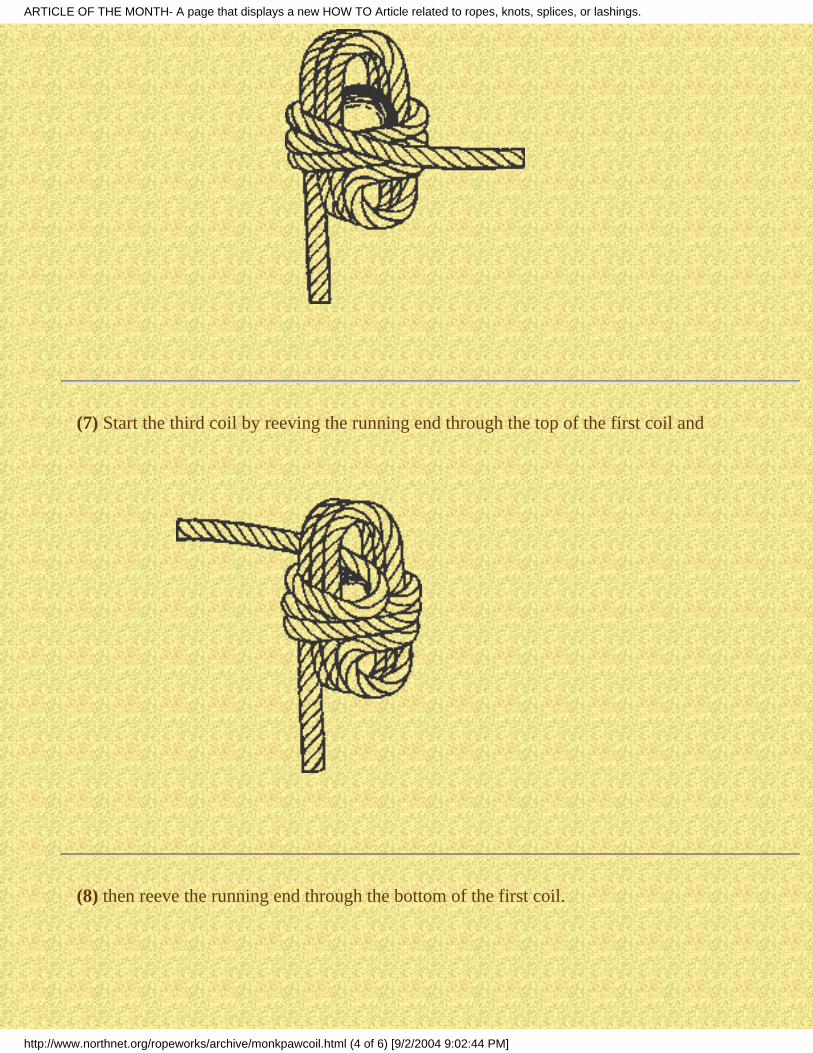
(7) Start the third coil by reeving the running end through the top of the first coil and
(8) then reeve the running end through the bottom of the first coil.
ARTICLE OF THE MONTH- A page that displays a new HOW TO Article related to ropes, knots, splices, or lashings.
http://www.northnet.org/ropeworks/archive/monkpawcoil.html (4 of 6) [9/2/2004 9:02:44 PM]
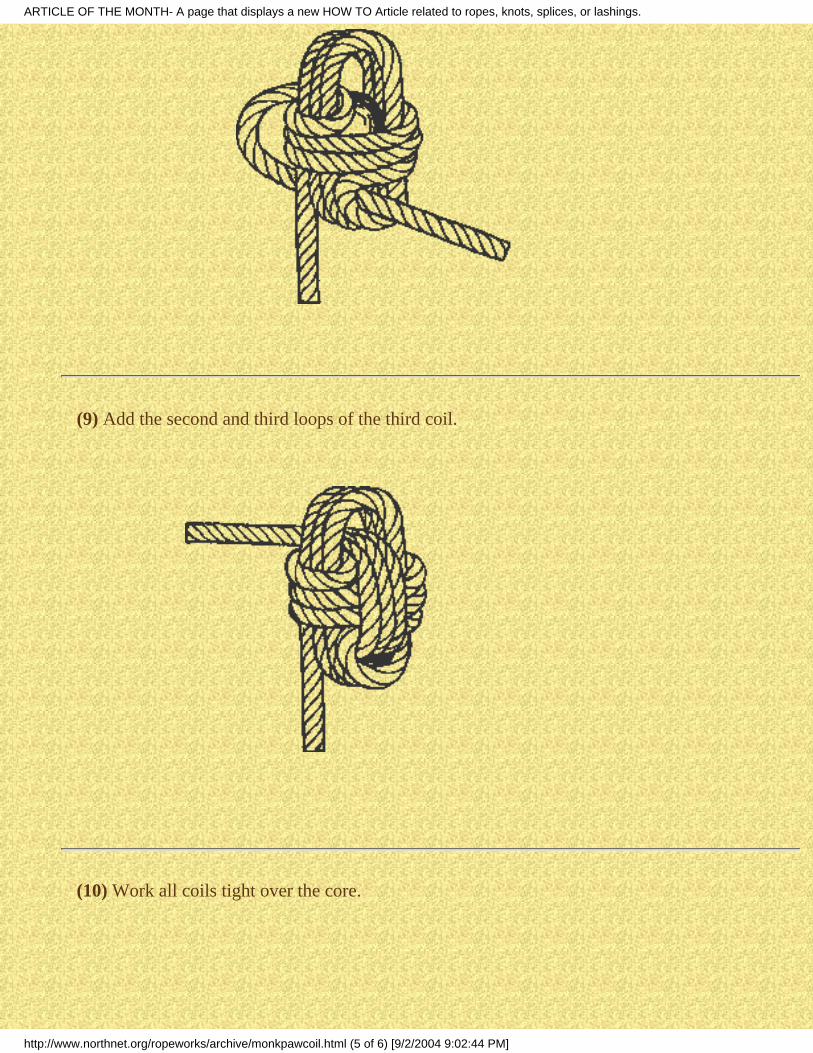
(9) Add the second and third loops of the third coil.
(10) Work all coils tight over the core.
ARTICLE OF THE MONTH- A page that displays a new HOW TO Article related to ropes, knots, splices, or lashings.
http://www.northnet.org/ropeworks/archive/monkpawcoil.html (5 of 6) [9/2/2004 9:02:44 PM]

ARTICLE OF THE MONTH- A page that displays a new HOW TO Article related to ropes, knots, splices, or lashings.
http://www.northnet.org/ropeworks/archive/monkpawcoil.html (6 of 6) [9/2/2004 9:02:44 PM]

Flag Pole Cleat:
A cleat is a device used to temporarily securea line. When valuable equipment such as boatis being tied off, a commercially made cleatshould be used. However, when a rusticappearance is desired a temporary cleat canbe made with rope and wood.
GreenStickCleat:
ARTICLE OF THE MONTH- A page that displays a new HOW TO Article related to ropes, knots, splices, or lashings.
http://www.northnet.org/ropeworks/archive/cleat_.html (1 of 7) [9/2/2004 9:02:46 PM]

[Step 1] Round lash a piece of flexible greenwood or a naturally curved piece of wood to theflag pole to make the horns of the cleat.
[Step 2] Tighten the round lashing by driving asmall wedge on either side of the cleat.
[Step 3] Use frapping turns to raise the horns ofthe cleat.
ARTICLE OF THE MONTH- A page that displays a new HOW TO Article related to ropes, knots, splices, or lashings.
http://www.northnet.org/ropeworks/archive/cleat_.html (2 of 7) [9/2/2004 9:02:46 PM]

Dry Wood Cleat:
Suggestion 1 ----
If only dry wood is available a cleat canbe made as shown in the followingdiagrams:
ARTICLE OF THE MONTH- A page that displays a new HOW TO Article related to ropes, knots, splices, or lashings.
http://www.northnet.org/ropeworks/archive/cleat_.html (3 of 7) [9/2/2004 9:02:46 PM]
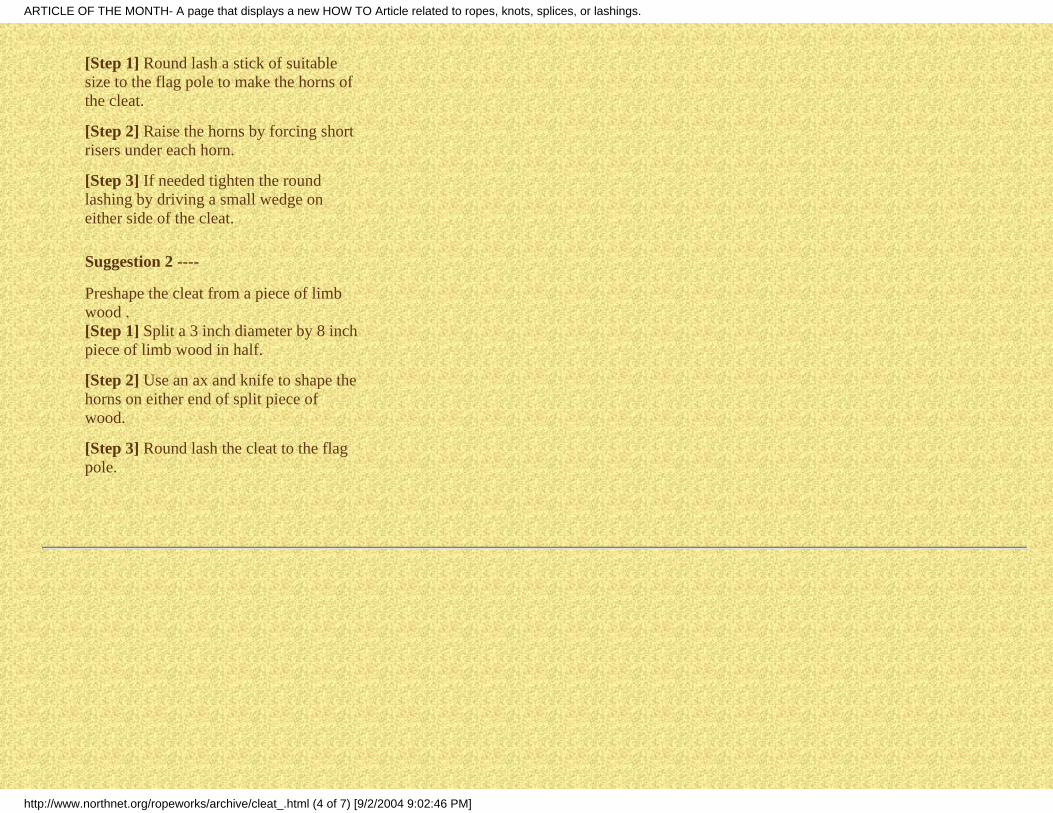
[Step 1] Round lash a stick of suitablesize to the flag pole to make the horns ofthe cleat.
[Step 2] Raise the horns by forcing shortrisers under each horn.
[Step 3] If needed tighten the roundlashing by driving a small wedge oneither side of the cleat.
Suggestion 2 ----
Preshape the cleat from a piece of limbwood .[Step 1] Split a 3 inch diameter by 8 inchpiece of limb wood in half.
[Step 2] Use an ax and knife to shape thehorns on either end of split piece ofwood.
[Step 3] Round lash the cleat to the flagpole.
ARTICLE OF THE MONTH- A page that displays a new HOW TO Article related to ropes, knots, splices, or lashings.
http://www.northnet.org/ropeworks/archive/cleat_.html (4 of 7) [9/2/2004 9:02:46 PM]
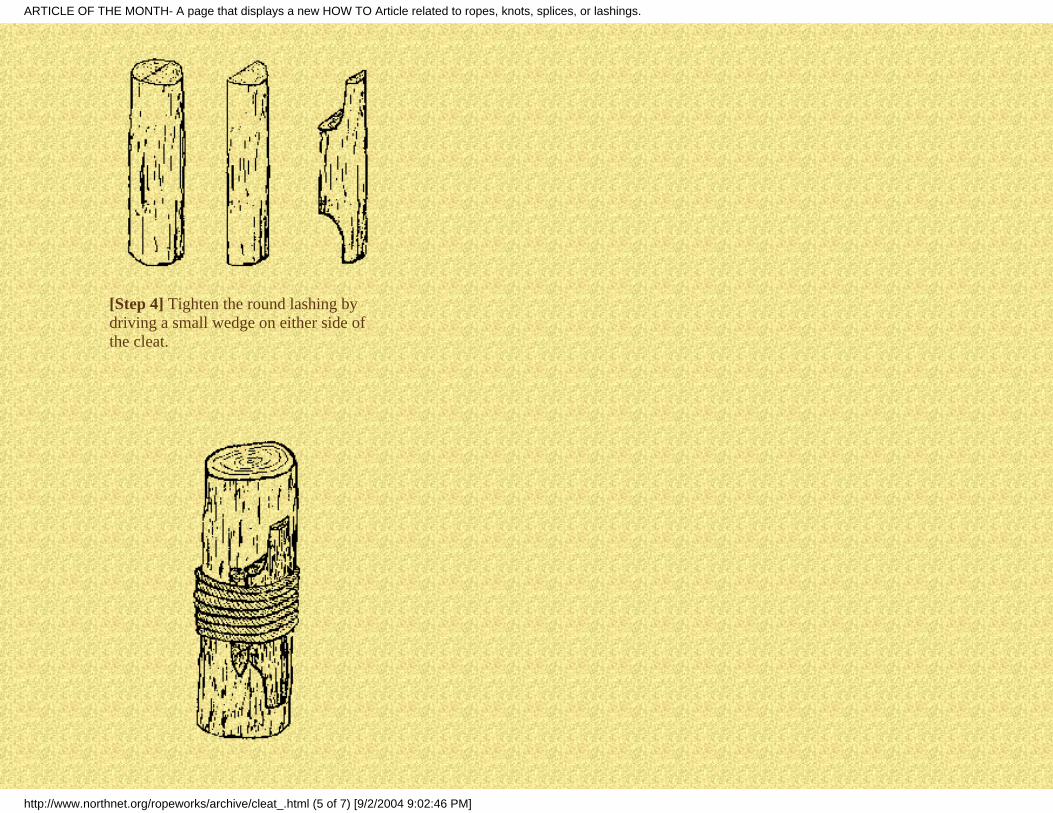
[Step 4] Tighten the round lashing bydriving a small wedge on either side ofthe cleat.
ARTICLE OF THE MONTH- A page that displays a new HOW TO Article related to ropes, knots, splices, or lashings.
http://www.northnet.org/ropeworks/archive/cleat_.html (5 of 7) [9/2/2004 9:02:46 PM]
Precut Cleats:
A cleat can be made from hard woodlumber by sawing it to the desired shapeand then round lashed to the flag pole.Small wedges are used on either side ofthe cleat to tighten the round lashing andto stabilize the cleat.
ARTICLE OF THE MONTH- A page that displays a new HOW TO Article related to ropes, knots, splices, or lashings.
http://www.northnet.org/ropeworks/archive/cleat_.html (6 of 7) [9/2/2004 9:02:46 PM]

Making Wedges:
[Step 1] Cut to size. Length --- slightlylonger than the width of the roundlashing. Diameter --- slightly larger thanthe gap formed between the rope, the flagpole, and the cleat.
[Step 2] Cut one end off at an angle.
[Step 3] Taper the sides of the point sothat the point of the wedge is on one side.
ARTICLE OF THE MONTH- A page that displays a new HOW TO Article related to ropes, knots, splices, or lashings.
http://www.northnet.org/ropeworks/archive/cleat_.html (7 of 7) [9/2/2004 9:02:46 PM]

LEBORDER=0 CELLSPACING=0 CELLPADDING=0 LANG=en DIR=LTR WIDTH="612" COLS="8">
ROPE WRENCH:A rope wrench is a simple tool that can be used to tighten the ropes of a lashing. Use a crochet stick that isabout 18 inches long and 1 1/2 inches in diameter; the crotch should be about 6 inches from the end.
Using A Rope Wrench:
[STEP 1] Use the rope wrench by placing it over the pole next to the rope that is to be tightened.
[STEP 2] Wrap the rope around the fork of the wrench.
ARTICLE OF THE MONTH- A page that displays a new HOW TO Article related to ropes, knots, splices, or lashings.
http://www.northnet.org/ropeworks/archive/wrench.html (1 of 3) [9/2/2004 9:02:48 PM]
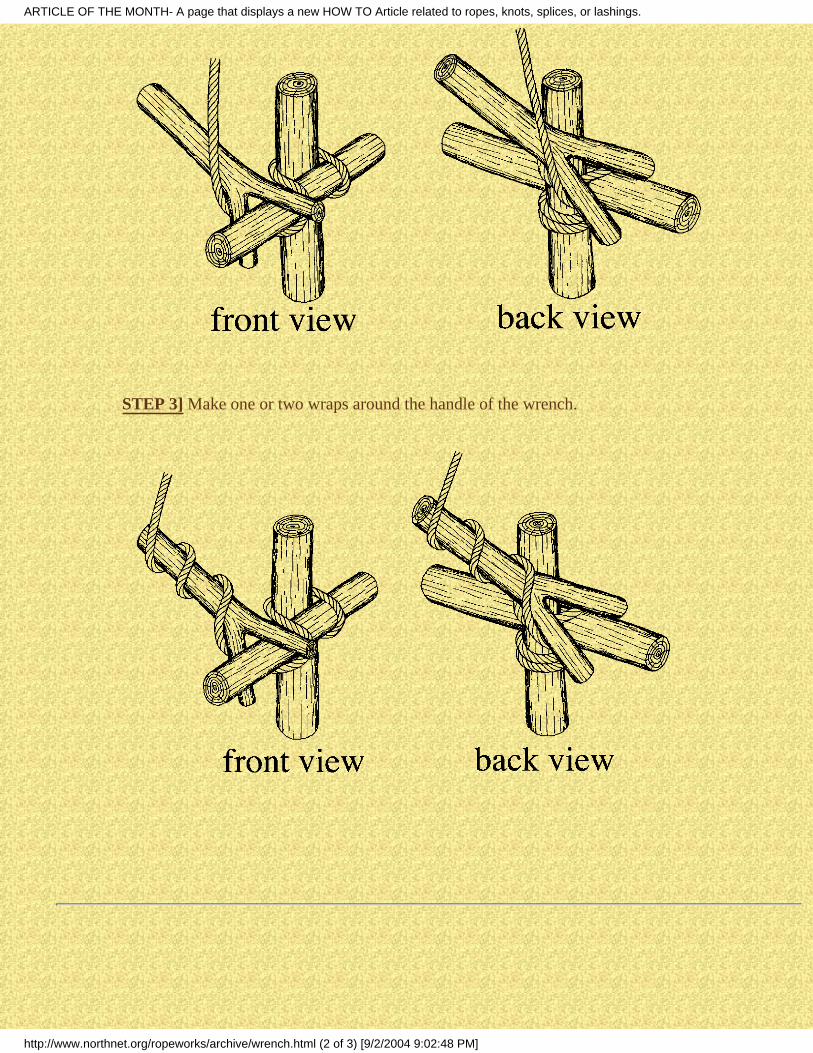
STEP 3] Make one or two wraps around the handle of the wrench.
ARTICLE OF THE MONTH- A page that displays a new HOW TO Article related to ropes, knots, splices, or lashings.
http://www.northnet.org/ropeworks/archive/wrench.html (2 of 3) [9/2/2004 9:02:48 PM]

[STEP 4] Grasp the handle so that you are holding the rope firmly to the handle; thenrotate the wrench around the pole.
[NOTE] Tighten each turn of a lashing as it is made. The friction between the rope andthe pole is too great to tighten more then one turn at a time.
Maintain the tightness of the rope by keeping a small amount of tension on it or bypressing the rope firmly against one of the poles while taking the next turn around thepoles.
Be careful that the rope is not tightened so tight that the fibers of the rope begin to break.
ARTICLE OF THE MONTH- A page that displays a new HOW TO Article related to ropes, knots, splices, or lashings.
http://www.northnet.org/ropeworks/archive/wrench.html (3 of 3) [9/2/2004 9:02:48 PM]

!--Generation of PM publication page 1 -->
NETTING:The making of netting is an ancient craft. Many prehistoriccultures used netting for a verity of uses, storage bags, fencing,hammock, just to name some and of course the obvious use asa fish net. No matter what the netting was used for, the knittingof the mesh was done by tying a series of loops in some typeof twine.
In one method, the basic knot used was the sheet bend. Toform and tie the loops a knitting shuttle and a spacer (gauge)were used.
NETTING TOOLS:
The size of the shuttle and gauge that is needed will depend on the project that you areworking on. The size of the shuttle and gauge given in the following directions is aconvenient size for many projects and is also a good size to use for practicing the craft ofnetting. Shuttles and gauges of different sizes can be made by changing the size of thematerials used.
Knitting Shuttle:
crosssections
ARTICLE OF THE MONTH- A page that displays a new HOW TO Article related to ropes, knots, splices, or lashings.
http://www.northnet.org/ropeworks/archive/net-1.html (1 of 10) [9/2/2004 9:02:55 PM]

Make the knitting shuttle from a 1/4 inch * 1 inch * 12 inch piece of smooth grained hardwood. Carve and sand the shuttle to the shape shown in the diagram. Leave the shuttleunfinished; varnish or paint has a tendency to become sticky.
Knitting Gauge:
Make the knitting gauge from a 1/4 inch * 1 1/4 inch * 12 inch piece of smoothgrained hard wood. Carve and sand the gauge to the shape shown in the diagram.Leave the gauge unfinished; varnish or paint has a tendency to become sticky.
Filling The Knitting Shuttle:
STEP 1: Fill the shuttle with twine.Start by tying a single hitch aroundthe tongue of the shuttle and thenpass the twine through the notch.
STEP 2: Turn the shuttleover, loop the twine aroundthe tongue and then throughthe notch.
ARTICLE OF THE MONTH- A page that displays a new HOW TO Article related to ropes, knots, splices, or lashings.
http://www.northnet.org/ropeworks/archive/net-1.html (2 of 10) [9/2/2004 9:02:55 PM]

STEP 3: Continue turning the shuttle from side and looping the twine around thetongue until the shuttle is filled.
[NOTE] To prevent synthetic twine from fraying, use a candle flame to cut and fusethe ends.
[WARNING] Using a butane cigarette lighter to cut or fuse synthetic rope or twinemay cause the lighter to over heat and explode.
DIAMOND MESH NETTING:Diamond mesh netting is the easiest of the two forms of mesh to make. Square meshnetting will be dealt with latter.
Casting On: To start diamond mesh netting the first row of mesh loops is cast on to aloop of some kind. The kind of loop used depends on the project; a ring, grommet,frame, or loop of twine may be used. The following directions are for casting on to aring but the same steps may be used for any starting loop.
STEP 1: Tie the end of the twine to the ring with a clove hitch stopped with twohalf hitches.
ARTICLE OF THE MONTH- A page that displays a new HOW TO Article related to ropes, knots, splices, or lashings.
http://www.northnet.org/ropeworks/archive/net-1.html (3 of 10) [9/2/2004 9:02:55 PM]

STEP 2: Place the twine behind the gauge then bring the twine in front of thegauge and to the right.
[NOTE]: The dotted circles in each ofthe diagrams is used to show theposition of the thumb and finger of theleft hand.
STEP 3: Reeve the twine through the ring from the front to the back so that anoverhand loop is formed.
STEP 4: Pull the twine to the left to tighten the twine around the ring and thegauge.
ARTICLE OF THE MONTH- A page that displays a new HOW TO Article related to ropes, knots, splices, or lashings.
http://www.northnet.org/ropeworks/archive/net-1.html (4 of 10) [9/2/2004 9:02:55 PM]

STEP 5: Lay the twine across the ring from left to right.
STEP 6: Reeve the twine through the ring from the back to the front.
ARTICLE OF THE MONTH- A page that displays a new HOW TO Article related to ropes, knots, splices, or lashings.
http://www.northnet.org/ropeworks/archive/net-1.html (5 of 10) [9/2/2004 9:02:55 PM]
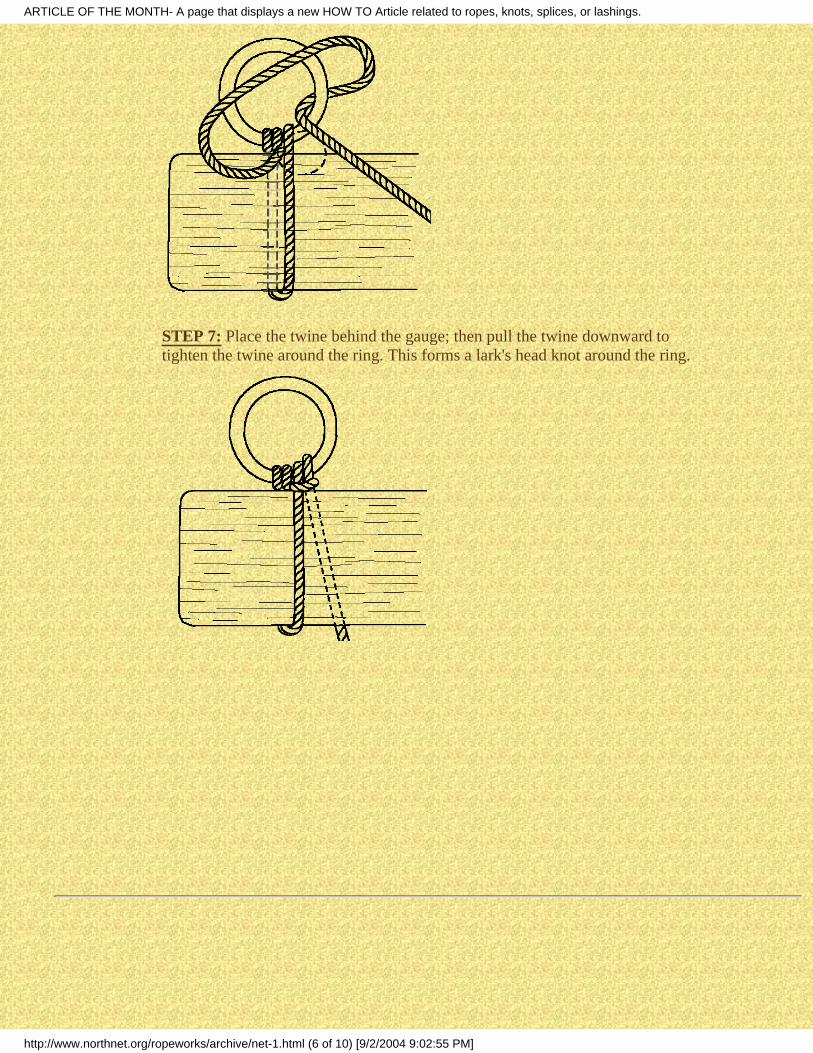
STEP 7: Place the twine behind the gauge; then pull the twine downward totighten the twine around the ring. This forms a lark's head knot around the ring.
ARTICLE OF THE MONTH- A page that displays a new HOW TO Article related to ropes, knots, splices, or lashings.
http://www.northnet.org/ropeworks/archive/net-1.html (6 of 10) [9/2/2004 9:02:55 PM]

KNITTING A ROWOF MESH:Netting is made by knitting roes of mesh using a shuttle and a gauge. The gauge isused to determine the size of the mesh, and the shuttle is used to hold the twine andform and tie the mesh loops. The basic knot used in netting is the sheet bend. Thefollowing diagrams illustrate the tying of the sheet bend as it is used for knitting a net.
STEP 1: Bring the twine down and up the back of the gauge. Then pick up thenext loop by passing the shuttle through the loop from front to back.
STEP 2: Pull the twine to the left to tighten the twine around the gauge. Use thethumb and finger of the left hand to hold the twine in place.
STEP 3: Lay a loop of twine over the loop just picked up.
ARTICLE OF THE MONTH- A page that displays a new HOW TO Article related to ropes, knots, splices, or lashings.
http://www.northnet.org/ropeworks/archive/net-1.html (7 of 10) [9/2/2004 9:02:55 PM]

STEP 4: Pass the shuttle in back of the picked up loop and the through the loopthat was laid on top.
STEP 5: Pull the twine downward and slightly to the right to tighten the knot.
STEP 6: Repeat steps 1 through 5 for each loop in the row.
STARTING A NEWROW:
STEP 1: When the end of a row of mesh is reached, slide the accumulated loopsoff the gauge, turn the work piece over so that the running end of the twine is onthe left side of the work piece.
ARTICLE OF THE MONTH- A page that displays a new HOW TO Article related to ropes, knots, splices, or lashings.
http://www.northnet.org/ropeworks/archive/net-1.html (8 of 10) [9/2/2004 9:02:55 PM]

STEP 2: Wrap the twine around the gauge from front to back; pick up the firstloop by passing the shuttle through the loop from back to front.
STEP 3: Knit the loop in place byfollowing the directions for knitting a rowof mesh.
ADDING A LOOP:For some projects it is necessary to increase the width of the netting part waythrough the project. The width of the netting is increased by adding loops of mesh.
A loop is added by picking up the same loop a second time so that two loops areformed in the new row of mesh are tied to the same loop in the previous row ofmesh.
ARTICLE OF THE MONTH- A page that displays a new HOW TO Article related to ropes, knots, splices, or lashings.
http://www.northnet.org/ropeworks/archive/net-1.html (9 of 10) [9/2/2004 9:02:55 PM]

ARTICLE OF THE MONTH- A page that displays a new HOW TO Article related to ropes, knots, splices, or lashings.
http://www.northnet.org/ropeworks/archive/net-1.html (10 of 10) [9/2/2004 9:02:55 PM]

PROLONG KNOTDESCRIPTION:
A flat knot that is made by interweaving two strands of rope.
USE:
As stair tread, mat, or chafing gear; also as a decorative knot in a two strand lanyard.
COMMENTS:
The prolong knot gets its name from the fact that it can be extended to any length.
TYING:
STEP 1:
Place the center of therope over a peg or hookand tie a loose half knot.
STEP 2:
Extend the half knot asshown.
STEP 3:
Twist the left loop andextend it to the right side.
[NOTE] This will startthe over under pattern
of the weaving.
ARTICLE OF THE MONTH- A page that displays a new HOW TO Article related to ropes, knots, splices, or lashings.
http://www.northnet.org/ropeworks/archive/prolong.html (1 of 6) [9/2/2004 9:03:00 PM]

STEP 4:
Twist the right loop andextend it to the left sideso that it is over the firstextended loop.
STEP 5:
Weave the left strand tothe right in the patternshown.
ARTICLE OF THE MONTH- A page that displays a new HOW TO Article related to ropes, knots, splices, or lashings.
http://www.northnet.org/ropeworks/archive/prolong.html (2 of 6) [9/2/2004 9:03:00 PM]

STEP 6:
Weave the right strand tothe left in the patternshown.
[NOTE] This completesthe four bight prolongknot. At this stage it maybe ended and workedfirm (over tighteningdistorts the knot) or thestrands my be doubbledas shown in laterdiagrams.
STEP 7:
Twist the left loop andextend it to the right side.
STEP 8:
Twist the right loop andextend it to the left sideso that it is over the firstextended loop.
ARTICLE OF THE MONTH- A page that displays a new HOW TO Article related to ropes, knots, splices, or lashings.
http://www.northnet.org/ropeworks/archive/prolong.html (3 of 6) [9/2/2004 9:03:00 PM]

STEP 9:
Weave the right strand tothe left in the patternshown.
STEP 10:
Weave the left strand tothe right in the patternshown. This completesthe 7 bight form of theprolong knot.
[NOTE] The prolongknot can be extendedthree bights at a time byrepeating steps 7 through10 for each extension.
ARTICLE OF THE MONTH- A page that displays a new HOW TO Article related to ropes, knots, splices, or lashings.
http://www.northnet.org/ropeworks/archive/prolong.html (4 of 6) [9/2/2004 9:03:00 PM]

STEP 11:
Start doubling the strandsby chacing (following)the opposite strand.
STEP 12:
Complete doubling thestrands. Then work theknot into a firm mat . Donot over tighten thestrands as this will distortthe mat.
[NOTE] The ends of thestrands can be hidden bysewing them to theadjacent strand on theunderside of the mat.
ARTICLE OF THE MONTH- A page that displays a new HOW TO Article related to ropes, knots, splices, or lashings.
http://www.northnet.org/ropeworks/archive/prolong.html (5 of 6) [9/2/2004 9:03:00 PM]

ARTICLE OF THE MONTH- A page that displays a new HOW TO Article related to ropes, knots, splices, or lashings.
http://www.northnet.org/ropeworks/archive/prolong.html (6 of 6) [9/2/2004 9:03:00 PM]

1996, Gerald L. Findley
LIFE BASKET:
Description ---- A body harness made by combining a bowline on a bight and a frenchbowline.
Use ---- To lower a severally injured person when a life threatening situation exists.
Comments ---- The life basket is a secure harness that can be used to move an injuredperson that is weakened or unconscious. However, unless there is a life threateningsituation, such as a burning building or immediate danger of avalanche, you shouldwait for a trained rescue team.
If you attempt to use the life basket, do not allow the rope to slide through your handsas you lower the injured person . The friction caused by the sliding rope can causesevere painful rope burns and loss of control of the rope. The rope must be let out in ahand over hand manner to insure a safe, controlled descent.
1.
ARTICLE OF THE MONTH- A page that displays a new HOW TO Article related to ropes, knots, splices, or lashings.
http://www.northnet.org/ropeworks/archive/lifbas.html (1 of 6) [9/2/2004 9:03:02 PM]

Narration ---- (1) Tie a bowline on a bight. Place one loop of the bowline on a bightaround each leg. [NOTE] (The bowline on a bight should be large enough so that whenit is in place the knot should be close to the victims belt buckle. Be sure to leave therunning part of the rope extending about 3 feet beyond the knot.)
2.
ARTICLE OF THE MONTH- A page that displays a new HOW TO Article related to ropes, knots, splices, or lashings.
http://www.northnet.org/ropeworks/archive/lifbas.html (2 of 6) [9/2/2004 9:03:02 PM]

(2) Take a half hitch around the victimschest.
ARTICLE OF THE MONTH- A page that displays a new HOW TO Article related to ropes, knots, splices, or lashings.
http://www.northnet.org/ropeworks/archive/lifbas.html (3 of 6) [9/2/2004 9:03:02 PM]

(3) Form a bight in the standing part by pulling it under the right hand part of the halfhitch so that an underhand loop is formed around the cross point of the half hitch.
(4) Fold the bight around and reeve it through the eye of the underhand loop.
(5) Reeve the running part of the rope through the bight.
ARTICLE OF THE MONTH- A page that displays a new HOW TO Article related to ropes, knots, splices, or lashings.
http://www.northnet.org/ropeworks/archive/lifbas.html (4 of 6) [9/2/2004 9:03:02 PM]

(6) Take the slack out of the running part of the rope and fold the it over to forminterlocking bights.
(7) Pull on the standing part so that the bight in the running part of the rope is pulledthrough the eye of the underhand loop and the underhand loop flips over and tightensaround the bight to form a French Bowline.
ARTICLE OF THE MONTH- A page that displays a new HOW TO Article related to ropes, knots, splices, or lashings.
http://www.northnet.org/ropeworks/archive/lifbas.html (5 of 6) [9/2/2004 9:03:02 PM]

ARTICLE OF THE MONTH- A page that displays a new HOW TO Article related to ropes, knots, splices, or lashings.
http://www.northnet.org/ropeworks/archive/lifbas.html (6 of 6) [9/2/2004 9:03:02 PM]

SPHERICAL KNOB COVERING
This knot is used to cover knobs. One example would be to cover a knob at the endof a walking stick.
The length of cord neededto tie the knob coveringknot depends on the sizeof the cord and thenumber of times thepattern is to be chased. Agood length to start withis 8 times thecircumference of theknob for each time thepattern is to be chased.[Example: a one inchknob has a circumferenceof a little over 3 inches.To cover a one inch knobit would require about 25inches of cord for eachtime the pattern is chased.The pattern should bechased at least 2 times.
ARTICLE OF THE MONTH- A page that displays a new HOW TO Article related to ropes, knots, splices, or lashings.
http://www.northnet.org/ropeworks/archive02/knobcover.html (1 of 3) [9/2/2004 9:03:06 PM]
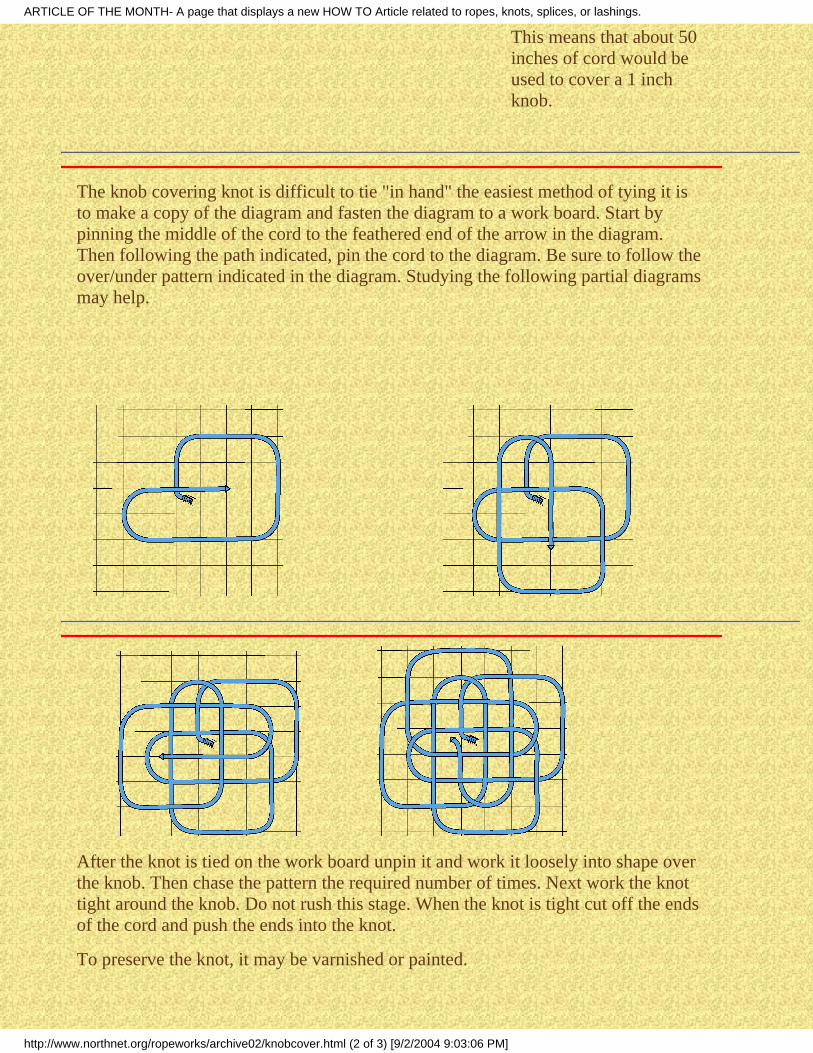
This means that about 50inches of cord would beused to cover a 1 inchknob.
The knob covering knot is difficult to tie "in hand" the easiest method of tying it isto make a copy of the diagram and fasten the diagram to a work board. Start bypinning the middle of the cord to the feathered end of the arrow in the diagram.Then following the path indicated, pin the cord to the diagram. Be sure to follow theover/under pattern indicated in the diagram. Studying the following partial diagramsmay help.
After the knot is tied on the work board unpin it and work it loosely into shape overthe knob. Then chase the pattern the required number of times. Next work the knottight around the knob. Do not rush this stage. When the knot is tight cut off the endsof the cord and push the ends into the knot.
To preserve the knot, it may be varnished or painted.
ARTICLE OF THE MONTH- A page that displays a new HOW TO Article related to ropes, knots, splices, or lashings.
http://www.northnet.org/ropeworks/archive02/knobcover.html (2 of 3) [9/2/2004 9:03:06 PM]

Walking Stick:
Carve a knob on the endof the walking stick.
If desired, the size of theknob can be increased bywrapping it with tape.
Tie the covering knotand work it tight overthe knob.
ARTICLE OF THE MONTH- A page that displays a new HOW TO Article related to ropes, knots, splices, or lashings.
http://www.northnet.org/ropeworks/archive02/knobcover.html (3 of 3) [9/2/2004 9:03:06 PM]

CROWN KNOT:
Use ---- To tie of the end of a rope so that it does not unlay. ----- To begin a backsplice. ---- As part of several multiple strand knots.
(1) Tie off the rope 6 complete lays from the end.
(2) Unlay the rope to the tied off point.
ARTICLE OF THE MONTH- A page that displays a new HOW TO Article related to ropes, knots, splices, or lashings.
http://www.northnet.org/ropeworks/archive02/crown.html (1 of 3) [9/2/2004 9:03:07 PM]

(3) Place the end of one of the unlayed strand between the other two unlayedstrands;
(4) press the strand firmly between the strands so that a loop is formed. [NOTE] Asyou are looking at the end of the rope work counterclockwise around the rope .
(5) Fold the second strand over the first strand. [NOTE] This will hold the loop inthe first strand in place.
(6) Reeve the end of the third strand through the eye of the loop.
ARTICLE OF THE MONTH- A page that displays a new HOW TO Article related to ropes, knots, splices, or lashings.
http://www.northnet.org/ropeworks/archive02/crown.html (2 of 3) [9/2/2004 9:03:07 PM]

(7) Fold the third strand over the second strand. [NOTE] This will hold the secondstrand in place.
(8) Pull the loop closed. [NOTE] Work and pull all three strands until the knot iseven and symmetrical.
ARTICLE OF THE MONTH- A page that displays a new HOW TO Article related to ropes, knots, splices, or lashings.
http://www.northnet.org/ropeworks/archive02/crown.html (3 of 3) [9/2/2004 9:03:07 PM]

TABLE BORDER=0 CELLSPACING=0 CELLPADDING=0 LANG=en DIR=LTRWIDTH="500" COLS="5">
WALL KNOT
Use ---- To tie of the end of a rope so that it does not unlay. ---- As
part of several multiple strand knots.
(1) Tie off the rope 6 complete lays from the end
(2) Unlay the rope to the tied off point.
ARTICLE OF THE MONTH- A page that displays a new HOW TO Article related to ropes, knots, splices, or lashings.
http://www.northnet.org/ropeworks/archive02/wallknot.html (1 of 3) [9/2/2004 9:03:09 PM]

NOTE: work the knot in a counterclockwise direction as you look at the end of therope.
(3) Place the end of one of the unlayed strands under the strand to its left. (Holdthe loop open as you work the knot).
(4) Place the second strand under the first and tthird strand.
(5) Placce the third strand under the second strand.
ARTICLE OF THE MONTH- A page that displays a new HOW TO Article related to ropes, knots, splices, or lashings.
http://www.northnet.org/ropeworks/archive02/wallknot.html (2 of 3) [9/2/2004 9:03:09 PM]

(6) Reeve the end of the third strand up through the loop formed in the first strand.[A]
[B]
(7) work tight.
ARTICLE OF THE MONTH- A page that displays a new HOW TO Article related to ropes, knots, splices, or lashings.
http://www.northnet.org/ropeworks/archive02/wallknot.html (3 of 3) [9/2/2004 9:03:09 PM]

ALAMAR KNOT
The alamar knot is a decorative knot related to the pretzel knot. The pretzel knot is tied in a singlestrand; the alamar knot is tied by doubling the strands as showwn in [Step 1]
[Step 1] Double the strand as shown.
[Sterp 2]
[Sterp3]
ALAMAR KNOT
http://www.northnet.org/ropeworks/archive02/alamar.html (1 of 2) [9/2/2004 9:03:09 PM]

[Step 4]
[Step 5] Add tassels or other end decorations.
ALAMAR KNOT
http://www.northnet.org/ropeworks/archive02/alamar.html (2 of 2) [9/2/2004 9:03:09 PM]

TURK'S HEAD KNOT
RERUN ANIMATION
HomeE-Mail
animated TURK'S HEAD KNOT
http://www.northnet.org/ropeworks/archive/Aturkhed.html [9/2/2004 9:03:12 PM]

BOATSWAIN'S WHISTLE KNOT
RERUN ANIMATION
HomeE-Mail
animated BOATSWAIN'S WHISTLE KNOT
http://www.northnet.org/ropeworks/archive/Abowhis.html [9/2/2004 9:03:15 PM]

CONSTRICTOR KNOT
RERUN ANIMATION
HomeE-Mail
animated CONSTRICTOR KNOT
http://www.northnet.org/ropeworks/archive/Aconstri.html [9/2/2004 9:03:16 PM]

MOORING HITCH
RERUN ANIMATION
HomeE-Mail
animated MOORING HITCH
http://www.northnet.org/ropeworks/archive/Amoor.html [9/2/2004 9:03:19 PM]
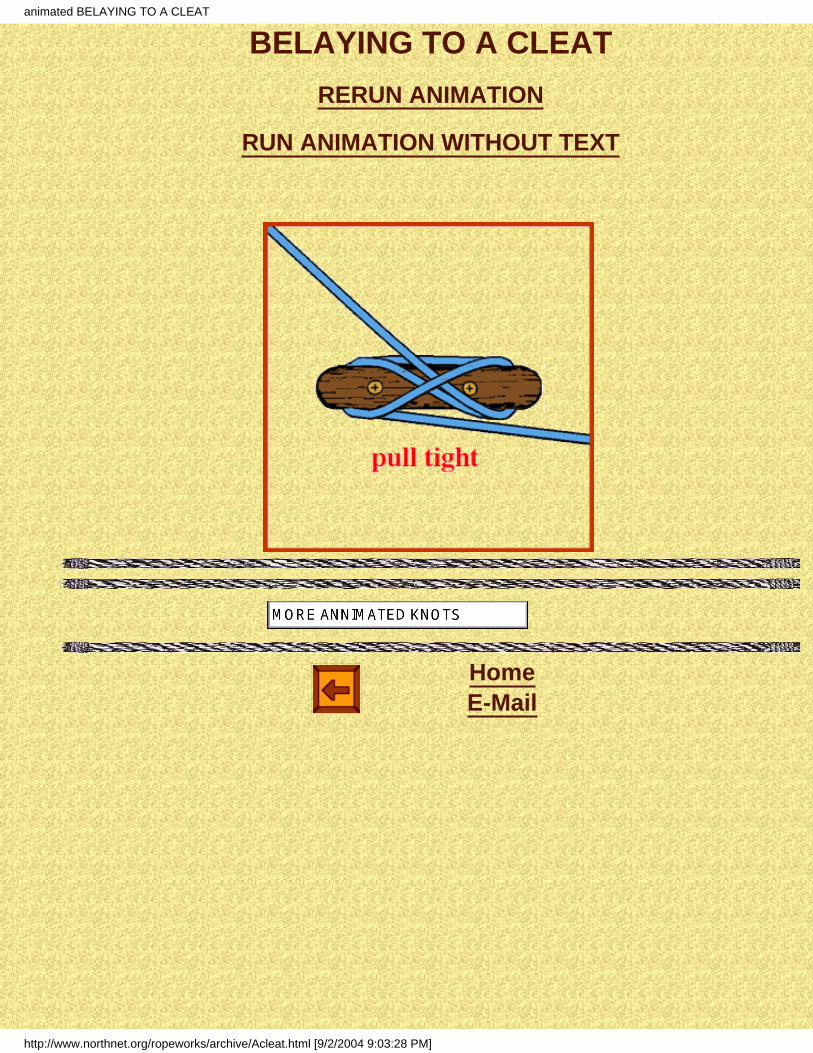
BELAYING TO A CLEAT
RERUN ANIMATION
RUN ANIMATION WITHOUT TEXT
HomeE-Mail
animated BELAYING TO A CLEAT
http://www.northnet.org/ropeworks/archive/Acleat.html [9/2/2004 9:03:28 PM]

FIGURE-EIGHT KNOT
RERUN ANIMATION
HomeE-Mail
animated FIGURE-EIGHT KNOT
http://www.northnet.org/ropeworks/archive/Afig8.html [9/2/2004 9:03:29 PM]

WHIPPING
RERUN ANIMATION
HomeE-Mail
animated WHIPPING
http://www.northnet.org/ropeworks/archive/AwhipV.html [9/2/2004 9:03:37 PM]

BOWLINE
RERUN ANIMATION
HomeE-Mail
animated BOWLINE
http://www.northnet.org/ropeworks/archive/AbowV.html [9/2/2004 9:03:41 PM]

BOWLINE ON A BIGHT
RUN ANIMATION WITH TEXT
RUN ANIMATION WITHOUT TEXT
HomeE-Mail
animated BOWLINE ON A BIGHT
http://www.northnet.org/ropeworks/archive/Abowbit.html [9/2/2004 9:03:48 PM]
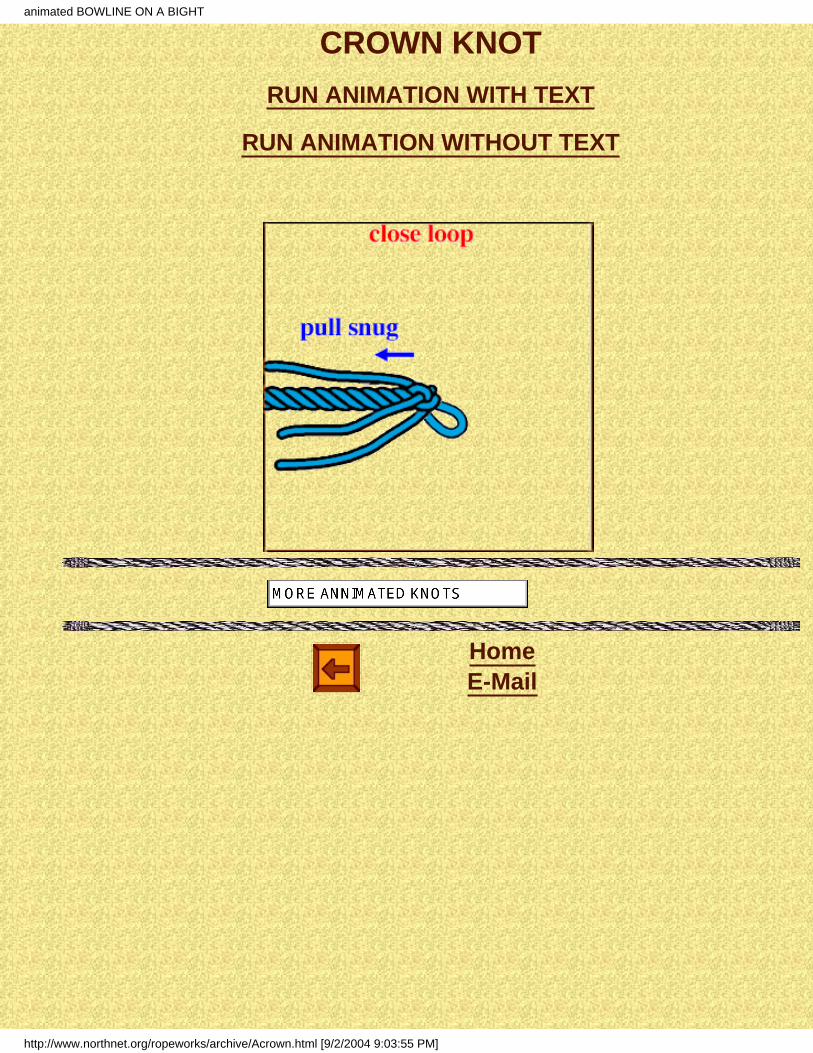
CROWN KNOT
RUN ANIMATION WITH TEXT
RUN ANIMATION WITHOUT TEXT
HomeE-Mail
animated BOWLINE ON A BIGHT
http://www.northnet.org/ropeworks/archive/Acrown.html [9/2/2004 9:03:55 PM]

Skip navigation
●
Search●
Contact Us●
●
ProductsAll●
Acrobat family●
Document Services●
Digital imaging●
Video and audio●
Web publishing●
Print publishing●
SolutionsEnterprise●
Government●
Adobe Studio●
Digital imaging●
Education●
Partners●
SupportSupport main●
Downloads●
Training●
Forums●
Announcements●
PurchaseAdobe Store●
Your account●
Volume licensing●
Other ways to buy●
Customer service●
Adobe Reader - Download
http://www.adobe.com/products/acrobat/readstep2.html (1 of 3) [9/2/2004 9:03:58 PM]

CompanyAbout Adobe●
Press●
Jobs●
Investors●
Adobe Ventures●
Community●
Contact Adobe●
Download Adobe Reader
Thank you for your interest in Adobe® Reader® — free software for viewing and printingAdobe Portable Document Format (PDF) files. Created from applications like AdobeAcrobat® 6.0, Adobe Photoshop® Album photo software, and more, Adobe PDF files can beviewed on most major operating systems. Adobe Reader 6.0 is the newest version of thefamiliar Adobe Acrobat Reader software. It also replaces Adobe Acrobat eBook Reader,software for viewing high-fidelity eBooks on your notebook or desktop computer.
IMPORTANT: Review the system requirements before downloading and installing AdobeReader 6.0.
To distribute Adobe Reader software or place an "Includes Adobe Reader" logo on yourprinted material, see details.
Step 1 of 2
Choose your language and platform. Your selection will determine the version ofsoftware that you will download.
Language Platform
Step 2 of 2
The platform and language combination specified will determine the version of AdobeReader that you will receive.
Full version: You will receive the full-featured version of Adobe Reader software.Recommended for broadband users.
Basic version: You will receive a compact version of Adobe Reader software withoutall available options. This version will transfer more quickly over dial-up connections.
By downloading software from the Adobe Web site, you agree to the terms of our licenseagreements. Please read the following license agreements before downloading:
Adobe Reader license agreement.
Adobe Reader - Download
http://www.adobe.com/products/acrobat/readstep2.html (2 of 3) [9/2/2004 9:03:58 PM]

An accessible, text-only Adobe Reader download page is available if you are using a screenreader. An Adobe Reader archive page enables you to find and download an earlier version ofAdobe Reader.
Copyright © 2004 Adobe Systems Incorporated. All rights reserved.
Terms of Use●
Privacy Policy●
Accessibility●
Avoid software piracy●
Permissions and trademarks●
Product License Agreements●
Adobe Reader - Download
http://www.adobe.com/products/acrobat/readstep2.html (3 of 3) [9/2/2004 9:03:58 PM]
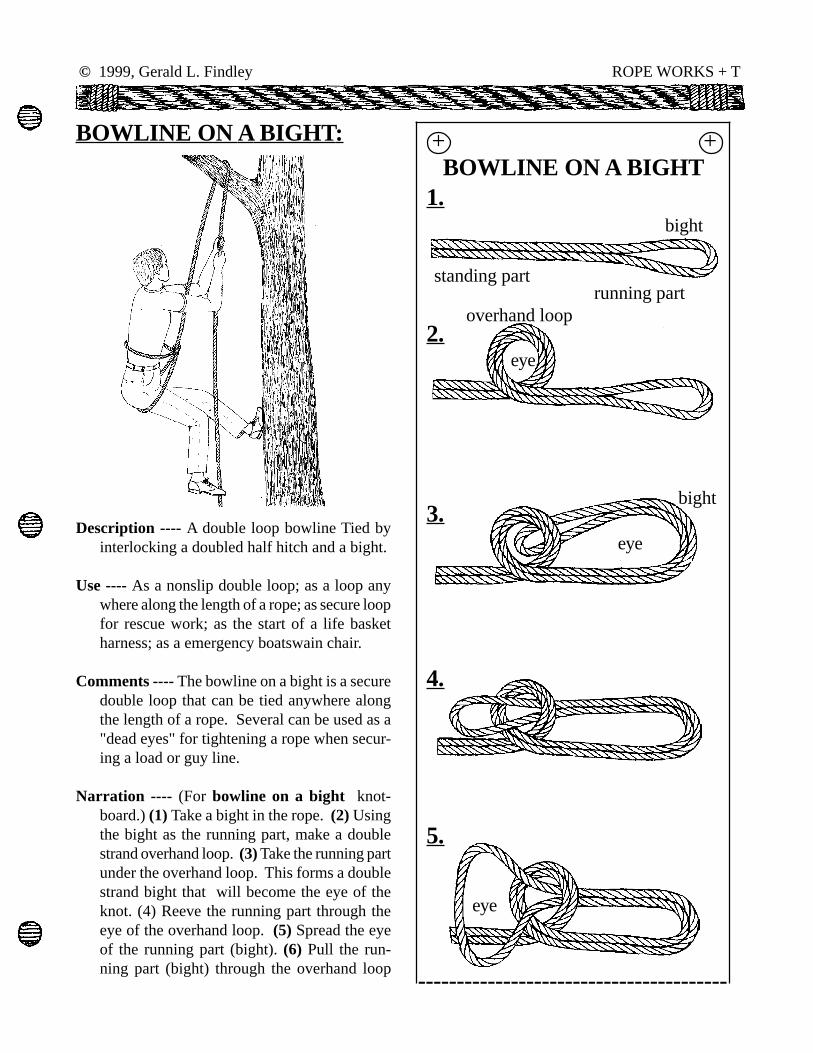
© 1999, Gerald L. Findley ROPE WORKS + T
BOWLINE ON A BIGHT: + +BOWLINE ON A BIGHT
1.bight
standing partrunning part
2.
5.
3.
4.
eye
bight
eye
eye
overhand loop
Description ---- A double loop bowline Tied byinterlocking a doubled half hitch and a bight.
Use ---- As a nonslip double loop; as a loop anywhere along the length of a rope; as secure loopfor rescue work; as the start of a life basketharness; as a emergency boatswain chair.
Comments ---- The bowline on a bight is a securedouble loop that can be tied anywhere alongthe length of a rope. Several can be used as a"dead eyes" for tightening a rope when secur-ing a load or guy line.
Narration ---- (For bowline on a bight knot-board.) (1) Take a bight in the rope. (2) Usingthe bight as the running part, make a doublestrand overhand loop. (3) Take the running partunder the overhand loop. This forms a doublestrand bight that will become the eye of theknot. (4) Reeve the running part through theeye of the overhand loop. (5) Spread the eyeof the running part (bight). (6) Pull the run-ning part (bight) through the overhand loop
----------------------------------------
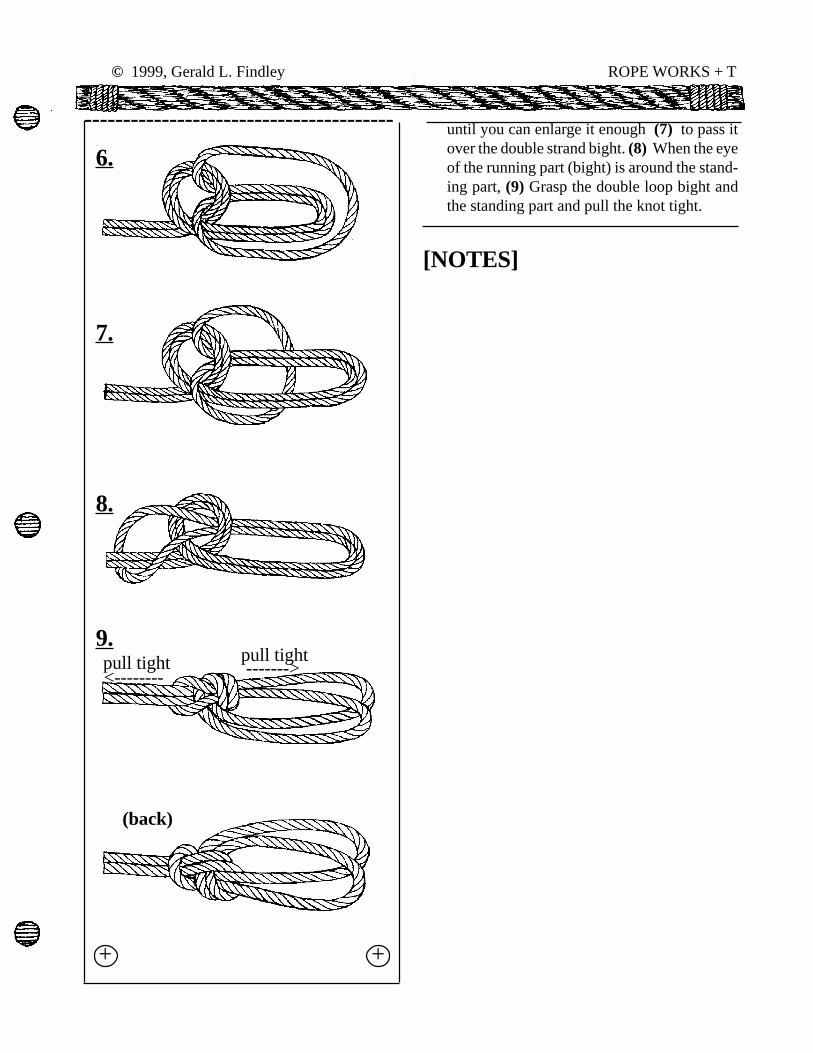
© 1999, Gerald L. Findley ROPE WORKS + T
+ +
6.
8.
7.
9.pull tight
(back)
------->
----------------------------------------
<--------pull tight
until you can enlarge it enough (7) to pass itover the double strand bight. (8) When the eyeof the running part (bight) is around the stand-ing part, (9) Grasp the double loop bight andthe standing part and pull the knot tight.
[NOTES]

© 1999, Gerald L. Findley ROPE WORKS + T
CLOVE HITCH:
Description —- Two single hitches (half hitches)tied in the same direction around an object.
Uses —-To secure a line to a post or pole; to startand end most lashings.
Comments — Can be untied (spilled) by pullingon the standing part so that it rotates the crosspoint in the knot until it goes over the end ofthe rope.
The length of the standing part can be ad-justed by rotating the loops of the knot aroundthe pole. To shorten the standing part, pull onthe running end so that it rotates the cross pointtoward the standing end . To lengthen thestanding part, pull on the standing part so thatthe cross point is rotated toward the runningpart.
Because the clove hitch can be spilled byrotating the standing part against the crosspoint, the clove hitch will spill itself if it is tiedso that standing part moves back and forth insuch a way that it cause the loops of the knotto slide around the pole. To prevent the clovehitch from spilling, ‘stop’ it by tying two halfhitches around the standing part.
+ +CLOVE HITCH
2.
4.
3.
standing part
running part1.
1st half hitch
When under constant tension the clove hitchhas little tendency to slide along the length of thepole even if the tension is nearly parallel to thepole. ----------------------------------------
----- loop
----- loopof clovehitch
two half hitches---------
runningpart ---------
standingpart----
STOPPEDCLOVE HITCH

© 1999, Gerald L. Findley ROPE WORKS + T
+ +
5.
6.
8.
2nd half hitch
running part
standing part
7. (front)
pull tight
<--------
(back)
--------->pull tight
Narrative ---- (For clove hitch knotboard.) (1)Start the clove hitch by taking a bight aroundan object with the running part. (2) Cross therunning part over the standing part to form ahalf hitch. (3) Start the second half hitch bycontinuing to wrap the standing part aroundthe object in the same direction as the first halfhitch. (4) Form a second bight around the ob-ject. (5) Finish the second half hitch. (6)&(7)Grasp the standing part and the running part:pull tight the clove hitch tight.
----------------------------------------
(1) Form two underhandloops in the runningpart of the rope.
(4) Pull tight.
(3) Drop the loops overthe end of the pole.
(2) Place the right under-hand loop on top of theleft underhand loop.
CLOVE HITCH; OVER AN END:
A clove hitch can be tied over the end of apole or stake by using this method.

© 1999, Gerald L. Findley ROPE WORKS + T
SQUARE LASHING:
Use ---- To bind poles that are in contact and crosseach other at any angle from 45o to 90o.
Comments ---- The square lashing gets it namefrom the fact that the wrapping turns are at 90o
or "square" to the poles.
Traditional square lashing is the most fre-quently used and the most secure form of lash-ing. If tied properly, the square lashing willremain tight and secure, but, as with all lash-ings, if any steps are omitted or done carelessly,the lashing will loosen and create a dangeroussituation.
The square lashing can be used to bindpoles together that cross and contact each otherat any angle from 45o to 90o. If the angle ofcontact is greater than 45o, a shear lashingshould be used.
When tying a square lashing, the poles andthe rope must be positioned properly to achievethe maximum strength. The cross pole should
------->
force
<--------
----->
running end
----->
be position so that the force applied to the crosspole is directed toward the pole it is lashed to;this allows the wood to wood contact to barepart of the lode; if the force tends to separatethe poles, only the rope will be supporting theload. The beginning clove hitch should be tiedto the pole that is closest to parallel to the di-rection of the force and to the side of the crosspole that is opposite to the direction of the force.
In most cases the force applied to a structure isdue to gravity, therefore downward, this meansthat the beginning clove hitch is usually tied tothe vertical pole, and under the cross pole. Thestanding end of the rope is secured by wrap-ping it around the running end.
Narration ------ (For square lash knotboard.)(1) Tie a clove hitch to the vertical pole. (2)Wrap the standing end of the rope around therunning end [NOTE] The wrapping of thestanding part around the running part is to se-cure the clove hitch so that it will not sliparound the pole and loosen the lashing fromthe inside. (3) Bring the running end up andover the cross pole; then around the verticalpole; and back down over the cross pole. (4)Pass the rope behind the vertical pole and backup in front of the cross pole; this completes thefirst wrapping. [NOTE] Notice that the ropegoes around the pole perpendicular, at 90o, tothe length of the pole. This 90o angle gives thesquare lashing its name. (5) Take two morewrapping turns for a total of three wrappings:pull each turn tight. [NOTE] When the wrap-pings are taken around the vertical pole the ropeshould be to the inside of the previous wrap-ping turn; and the wrappings around the crosspole should be to the outside of the previouswrapping turn. When this pattern of taking thewrapping turns is followed the rope strands re-main parallel; this insures the maximum con-tact between the wood and the rope. Also ifthe strands are not kept parallel, the additionalfriction between the crossed strands will makeit difficult to properly tighten the wrappingturns. (6) Start the frapping turns by taking one
wrapping 1
wrapping 2wrapping 3
crosspole ----
>
--->
------->
--------->
verticalpole<------
clove hitch
<-----
<--wrapping 2
<--wrapping 1
wood to wood contact
standingend clove
hitch

© 1999, Gerald L. Findley ROPE WORKS + T
keeping tension on the running end pull it inthe opposite direction so that the loop of thehalf hitch will slip around the pole. This takesup any slack left in the rope. Work the runningend back and forth in this way until the halfhitch is locked tight against the lashing. If thishalf hitch is not locked against the lashing theending clove hitch can slip around the pole al-lowing the lashing to loosen. (9) Add a secondhalf hitch to form a clove hitch around the crosspole; work half hitch tight.
--------->
pull
second half hitch
---------->
halfhitch
-----
-------standingend
runningend-----
pull<---------
complete turn around the cross pole; [NOTE]The turn around the cross pole prevents the ropefrom crossing the wrapping turns on a diago-nal. If the change of direction between thewrapping turns and the frapping turns is madeby passing the rope diagonally across the wrap-ping turns, the increased friction between therope strands will make it difficult to pull thewrapping turns tight. A diagonal across thewrapping turns will also allow unnecessarymovement within the completed lashing, whichcould cause chaffing of the rope. (7) Take atleast two frapping turns; keep the turns paral-lel to each other; pull each turn tight as it ismade. [NOTE] Keeping the frapping turnsparallel prevents unnecessary friction betweenthe turns making it easier to tighten the frap-ping turns. (8) When the last frapping turn isin place, take a half hitch around the cross pole,work the half hitch tight. [NOTE] To preventthe rope from crossing the wrapping turns di-agonally when tying the half hitch, take the ropepast the cross pole on the same plain as thefrapping turns, then around the cross pole.[NOTE] To work the half hitch tight, first pullthe running end toward the standing end. Thiswill tighten the frapping turns. Next, while
[NOTE] If smooth rope is being used a third halfhitch added to the clove hitch will help insurethat the lashing will stay securely in place.

© 1999, Gerald L. Findley ROPE WORKS + T
+ +SQUARE LASHING
+ +
clove hitch
1.
2.
3.
secure end start wrappingturn
4.
first wrappingturn
7.
first frappingturn
6.
make 2 frapping turns
8.
work 1st
half hitchtight
1st
half hitch
work tightto formclove hitch
9.
----------------------------------------
2nd
half hitch
5. make 3 wrapping turns
----------------------------------------

© 1999, Gerald L. Findley ROPE WORKS + T
EYE SPLICE:
Use ---- To form a permanent loop or eye in theend of a rope.
Comments ---- The loop formed by a well madeeye splice maintains 85% or more of the origi-nal strength of the rope; this makes the eyesplice the preferred way to form an permanentloop in the end of a rope. However if the eye isto be subjected to repeated chafing, such as arope being pulled through it, the eye should beserviced with a wear resistant twine.
Narration ---- (For eye splice knotboard) (1)&(2)Count back and unlay 5 rounds of the lay ofthe rope. (3) Fan the unlayed end of the ropeand place it over the standing part of the rope.The strand to the inside of the eye must looklike it is coming out from under the other twostrands and the other two strands must befanned in such a way that they do not crosseach other. (4) While holding the inside strandin place, stick the middle strand under one ofthe strands of the standing end of the rope.
+ +EYE SPLICE
1.
2.
1 2 3 4 5
unlay
overunder
over
3.fan end
stickmiddlestrand
4.
5. stick inside strand
----------------------------------------

© 1999, Gerald L. Findley ROPE WORKS + T
+ +
rotate1/2<
>6.
front8F.
back
stick thirdstrand
7.
8B.
(5) Pass the inside strand over the standing endstrand and stick it under the next standing endstrand. [N0TE] The second strand goes inwhere the first strand came out. (6) Turn thesplice over. (7) Stick the third strand underthe remaining strand of the standing end.[NOTE] The third strand is stuck in where thesecond strand came out and comes out wherethe first strand went in. [NOTE] When thethird strand is stuck it appears to go backwardbut when it is examined closely you will seethat it is stuck in the same direction as the othertwo strands. (8B) & (8F) Complete the spliceby working the strands snug and adding 3 to 550unds of tucks.
[NOTE] When the strands are folded back overthe eye, you will notice that there is one strandgoing in and one strand coming out betweeneach of the strands of the standing end.
----------------------------------------

© 1999, Gerald L. Findley ROPE WORKS + T
+ +TURK'S HEAD
TURK'S HEAD:Description ---- Three
strand braid worked in acontinuous circle.
Use ---- (1) As a decorativeknot around a staff orrailing. (2) Worked tightaround a checked orcracked tool handle orcanoe paddle to rein-force them. (3) As aneckerchief slide orwogal.
1.
2.
3.
4.
5.
6.
bight
cross
running endstandingend
-----------------------------------------
Comments ---- The form of Turks head shownhere is a five crown Turk's head, this is onlyone of a group of knots that go by the nameTurk's heads.
The crown number is determined by count-ing the number of bights at the edge of the knot.To make a larger loop, increase the size of thewraps made in steps 1 - 4 and then, at step 7use three strand braiding to increase the num-ber of crowns. The number of crowns can beincreased by increments of three; so that thenumber of crowns in a larger loop can be 8,11, 14, etc..

© 1999, Gerald L. Findley ROPE WORKS + T
+ +
7.
8.
9.
10.
11.
12.
The size of the finished Turk's Head dependson the size of the rope used and the number oftimes the strand is chased.
Other Names ---- Three lead by five bight Turk'shead, ordinary Turk's head.
Narration ------ (For Turk's head knotboard.)(1) Start at the center of the line, by taking abight around an object (the fingers of the lefthand work well) (2) Complete the round turnand cross the running end over the standingend. (3) Take a second bight around the objectso that the running end is between the stand-ing end and the first wrap. (4) Lay the runningend across the first wrap then (5) tuck the run-ning end under the standing end. (6) lay thestanding end across the second wrap and (7)tuck it under the first wrap. (8) rotate the knotaround the object so that you are looking atthe opposite side. (9) Cross the second wrapover the first wrap. (10) Reeve the standingend through the eye formed between the twowraps. (11) Reeve the running end through theeye between the two wraps so that the ends arein opposite directions. (12) Chase, follow, thestrand of the knot two or three times. Cut offand secure the ends.
[NOTE] To determine the length of line to use,wrap the line around the object four times fora single strand knot. Add three and one halfwraps for each time you intend to chase theoriginal strand.
chase 2 or 3times
form eye
cut off and secure ends
----------------------------------------

© 1999, Gerald L. Findley ROPE WORKS + T
RINGBOLT HITCHING:
Description ---- A series interlocking lark's headknot that form a ridge around the outside of aring or loop.
Use ---- To prevent chafing; as a decoration.
Comments ---- There are many forms of ringbolthitching, the form shown here is one of the sim-plest and does not require the use of a needleas many other forms do. Ringbolt hitching wasused to prevent chafing of ropes that werereeved through hand forged iron rings and tokeep them from clanging against objectsaround them. In the present, ringbolt hitchingcan be used to protect synthetic ropes that areeasily chafed by a applying a layer of materialthat is not easily chafed.
Other Names ---- Platted Ring; Hog Backing;Cockscombing.
Narration ----- (For ringbolt hitching knotboard.)(1) Start the ringbolt hitching by tying a halfknot around the object. (2) Tie a half hitcharound the object so that the standing end istrapped under the half hitch. (3) pull the halfhitch tight. (4) Tie the next half hitch in theopposite direction around the object. (5) Pullthe half hitch tight. (6) Tie another half hitchin the opposite direction around the object; thesame direction as the first half hitch. (7) Pull
1.
<------
- pull tight
5.
4.half hitch
pull tight----
--->
half hitch
+ +
3.
2.
RINGBOLTHITCHING
half knot
----------------------------------------

© 1999, Gerald L. Findley ROPE WORKS + T
half hitch tight. (8) When the length of the ring-bolt hitching is within 5 or 6 half hitches ofbeing long enough; form a bight in the a shortpiece of twine so that the eye of the bight istoward the end of the work. (9) Continue toadd half hitches until the ringbolt hitching iscompleted; reeve the running end through theeye of the bight. (10) Use the short piece oftwine to pull the running end under the halfhitches. (11) Cut off the end of the twine.
[NOTES]
+ +
pull through<------
---
-
pull tight
half hitch6.
------
->
8.
9.
10.
11.
----------------------------------------
7.
cut of end
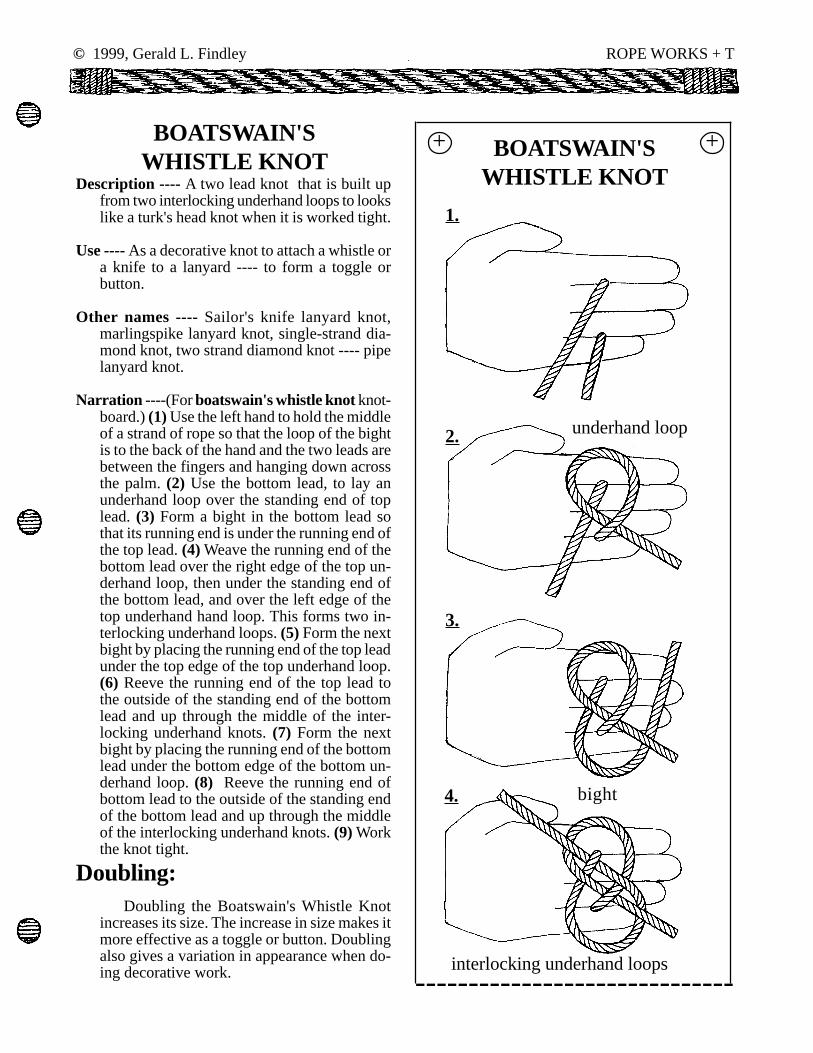
© 1999, Gerald L. Findley ROPE WORKS + T
BOATSWAIN'SWHISTLE KNOT
Description ---- A two lead knot that is built upfrom two interlocking underhand loops to lookslike a turk's head knot when it is worked tight.
Use ---- As a decorative knot to attach a whistle ora knife to a lanyard ---- to form a toggle orbutton.
Other names ---- Sailor's knife lanyard knot,marlingspike lanyard knot, single-strand dia-mond knot, two strand diamond knot ---- pipelanyard knot.
Narration ----(For boatswain's whistle knot knot-board.) (1) Use the left hand to hold the middleof a strand of rope so that the loop of the bightis to the back of the hand and the two leads arebetween the fingers and hanging down acrossthe palm. (2) Use the bottom lead, to lay anunderhand loop over the standing end of toplead. (3) Form a bight in the bottom lead sothat its running end is under the running end ofthe top lead. (4) Weave the running end of thebottom lead over the right edge of the top un-derhand loop, then under the standing end ofthe bottom lead, and over the left edge of thetop underhand hand loop. This forms two in-terlocking underhand loops. (5) Form the nextbight by placing the running end of the top leadunder the top edge of the top underhand loop.(6) Reeve the running end of the top lead tothe outside of the standing end of the bottomlead and up through the middle of the inter-locking underhand knots. (7) Form the nextbight by placing the running end of the bottomlead under the bottom edge of the bottom un-derhand loop. (8) Reeve the running end ofbottom lead to the outside of the standing endof the bottom lead and up through the middleof the interlocking underhand knots. (9) Workthe knot tight.
+ +
3.
2.
1.
BOATSWAIN'SWHISTLE KNOT
------------------------------
underhand loop
bight4.
interlocking underhand loops
Doubling the Boatswain's Whistle Knotincreases its size. The increase in size makes itmore effective as a toggle or button. Doublingalso gives a variation in appearance when do-ing decorative work.
Doubling:
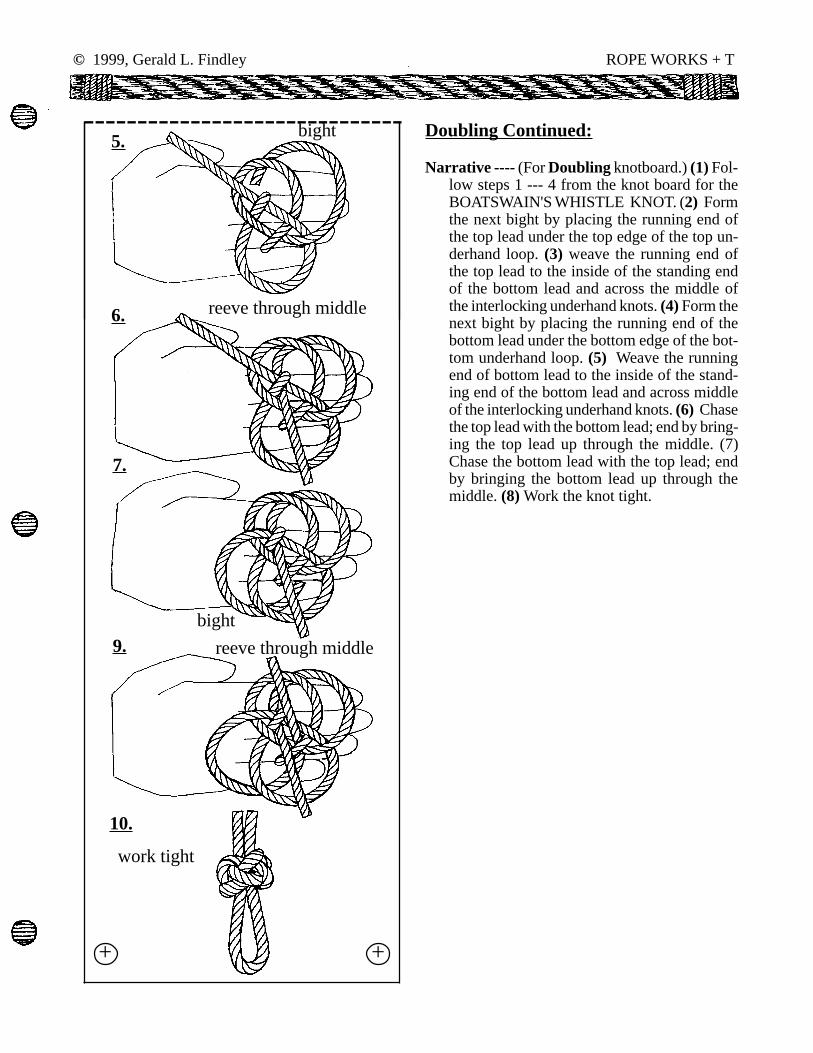
© 1999, Gerald L. Findley ROPE WORKS + T
------------------------------
+ +
10.
5.
6.
9.
bight
reeve through middle
7.
bight
reeve through middle
work tight
Doubling Continued:
Narrative ---- (For Doubling knotboard.) (1) Fol-low steps 1 --- 4 from the knot board for theBOATSWAIN'S WHISTLE KNOT. (2) Formthe next bight by placing the running end ofthe top lead under the top edge of the top un-derhand loop. (3) weave the running end ofthe top lead to the inside of the standing endof the bottom lead and across the middle ofthe interlocking underhand knots. (4) Form thenext bight by placing the running end of thebottom lead under the bottom edge of the bot-tom underhand loop. (5) Weave the runningend of bottom lead to the inside of the stand-ing end of the bottom lead and across middleof the interlocking underhand knots. (6) Chasethe top lead with the bottom lead; end by bring-ing the top lead up through the middle. (7)Chase the bottom lead with the top lead; endby bringing the bottom lead up through themiddle. (8) Work the knot tight.

© 1999, Gerald L. Findley ROPE WORKS + T
+ +
+ +----------------------------------------
----------------------------------------
BOATSWAIN'SWHISTLE KNOT
(DOUBLED)
1.
2.
3.
4.
5.
6.
7.
8.
Follow steps 1 -- 4 from the knotboard for the
BOATSWAIN'S WHISTLE KNOT
top underhand loopbottom lead
weave inside lead
top lead bottom underhand loop
weave inside lead
chase top lead
chase bottom lead
work tight

© 1999, Gerald L. Findley ROPE WORKS + T
DIAGONAL LASHING:
Use ---- Diagonal lashing is used to bind poles to-gether that cross each other but do not touchwhen their ends are lashed in place in a struc-ture.
Comments ---- The diagonal lashing gets its namefrom the fact that the wrapping turns cross thepoles diagonally.
The diagonal lashing can be used to bind polesthat cross each other from 90o to 45o. If theangle between the poles is less than 45o a shearlashing should be used.
The diagonal lashing makes use of the timberhitch to pull poles together that are not touch-ing each other. The timber hitch allows thepoles to be drawn together without changingthe relative positions of the poles. [NOTE]If a square lashing were used to bind poles thatdo not touch, the beginning clove hitch wouldpull the cross pole toward the clove hitch caus-ing unnecessary bowing of the cross pole andcould also produce a force that would act alongthe length of the pole to which the clove hitchis tied. These additional force, if strong enough,can place unnecessary strain on other lashingwithin the structure causing the structure totwist and fail.
Narration ---- (For diagonal lash knotboard. ) (1)Tie a timber hitch diagonally around both poles.(2) Start the wrapping turns on the oppositediagonal to the timber hitch, by pulling the ropetight so that the poles contact each other. (3)Take 3 to 4 wrapping turns; keep the wrap-ping turns parallel; pull each wrapping turntight. [NOTE] If the wrapping turns are allowedto cross, the increased friction between thestrands of the rope will make it difficult totighten the wrapping turns. (4) Start the sec-ond set of wrapping turns by going past andaround the vertical pole. [NOTE] Going
+ +DIAGONAL LASHING
1.timberhitch
pulltight<--------
start firstwrap3.
2.
make 3 to 4wrappings
keep wrappingsparallel
pull eachwrappingtight
4.
start 2nd
wrapping
3 to 4wrappings
----------------------------------------
keep wrappingsparallel

© 1999, Gerald L. Findley ROPE WORKS + T
around the pole the rope allows the directionof the rope to be changed without crossing thefirst set of wrapping diagonally. (5) Take 3 to4 wrapping turns; be sure to keep the wrap-ping turns parallel; pull each wrapping turntight. (6) Start the frapping turns by going pastand around one of the poles. [NOTE] Goingaround the pole with the rope allows the direc-tion of the rope to be changed without cross-ing the wrapping turns diagonally. (7) Take 2to 3 frapping turns; keep the frapping turns par-allel. Be sure to pull each turn tight. (8) Endthe lashing with a clove hitch. Take the firsthalf hitch of the clove hitch by going past andthen around one of the poles. Lock the halfhitch tight against the lashing by working ittight. (9) Take a second half hitch around thepole. (10) Work the second half hitch tightagainst the first half hitch so that the clove hitchis locked against the lashing.
[NOTE] See the directions for square lashing forinstructions on working the half hitches tight.
[NOTE] If very smooth rope is used, the lashingcan be made more secure by adding a third orforth half hitch to the clove hitch.
+ +
------------------------------6. start
frapping
first frapping turn
make2 to 3frappings
pull eachfrappingtight
7.
8. halfhitch work
tight
9.secondhalfhitch
10.clove hitch
----->worktight
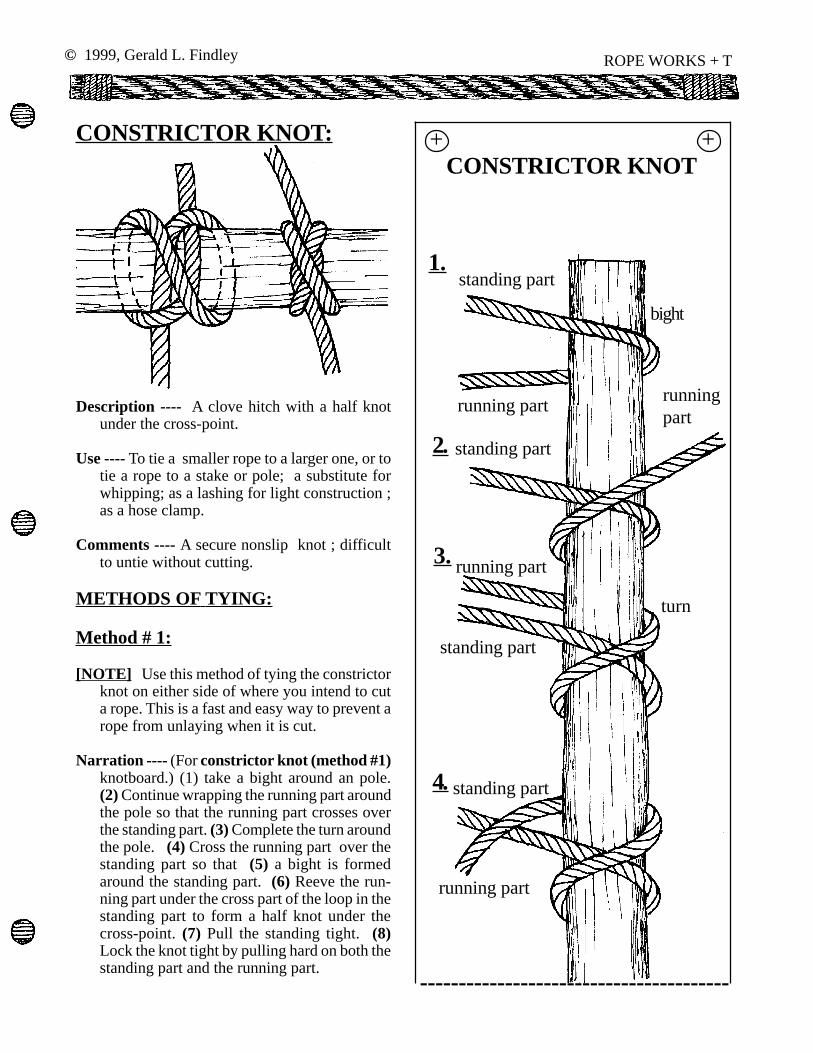
© 1999, Gerald L. Findley ROPE WORKS + T
CONSTRICTOR KNOT: + +CONSTRICTOR KNOT
3.
2.
1.
4.
bight
standing part
running part
running part
turn
standing part
running part
standing part
----------------------------------------
runningpart
standing part
Description ---- A clove hitch with a half knotunder the cross-point.
Use ---- To tie a smaller rope to a larger one, or totie a rope to a stake or pole; a substitute forwhipping; as a lashing for light construction ;as a hose clamp.
Comments ---- A secure nonslip knot ; difficultto untie without cutting.
METHODS OF TYING:
Method # 1:
[NOTE] Use this method of tying the constrictorknot on either side of where you intend to cuta rope. This is a fast and easy way to prevent arope from unlaying when it is cut.
Narration ---- (For constrictor knot (method #1)knotboard.) (1) take a bight around an pole.(2) Continue wrapping the running part aroundthe pole so that the running part crosses overthe standing part. (3) Complete the turn aroundthe pole. (4) Cross the running part over thestanding part so that (5) a bight is formedaround the standing part. (6) Reeve the run-ning part under the cross part of the loop in thestanding part to form a half knot under thecross-point. (7) Pull the standing tight. (8)Lock the knot tight by pulling hard on both thestanding part and the running part.

© 1999, Gerald L. Findley ROPE WORKS + T
8.
<-------pullhard
+ +
7.
6.
------->
------->pull
pullhard
standing part
running part
bight
METHODS OF TYING:
Method # 2: Over the end of a pole or rope.
underhandloop
[ 2 ] Place the loop over the end of the pole.
[ 3 ] Pull the opposite side of the loop down andunder the cross point of the underhand loop
-----------------------------------------5.
standing part
runningpart
down & under
half knot ----
[ 1 ] Start with an underhand loop laid on the pole.

© 1999, Gerald L. Findley ROPE WORKS + T
[ 4 ] ...... then pull it up and over the end of thepole ......
[ 5 ] ..... to form a second loop around the pole anda half knot under the cross point of the knot.
half knot
[ 6 ] Pull the two ends tight. The harder you pullthe tighter the knot.
pull----->
<------pull
Method # 3: Slippery constrictor knot.
[NOTE] This method of tying the constrictorknot allows it to be untied quickly and easily.
4.
3.
2.
1.
bight
running part
bight
<--------->pull
pull
runningpart
---------
2nd loop ---
up & over
standingpart

© 1999, Gerald L. Findley ROPE WORKS + T
Narration -----(For slippery constrictor knotknotboard.) (1) Tie the slippery constrictor knotthe same way as a regular constrictor knot but(2) form a bight in the running end before it is(3) reeved under the cross part of the loop inthe standing part. Pull the standing tight. (4)Lock the half knot tight by pulling hard on boththe standing part and the running part.
Method # 4: As a lashing.
whipping
spaced rungs
tying to a stake or pole
SUGGESTED USES: For the constric-tor knot.
round lashing
[NOTES]

© 1999, Gerald L. Findley ROPE WORKS +T
------------------------------
+ +
1.
MONKEY'S PAWMONKEY'S PAWMONKEY'S PAWMONKEY'S PAWMONKEY'S PAW(turks head)(turks head)(turks head)(turks head)(turks head)
2.
3.cross ends
4.
5.
MONKEY'S PAW:MONKEY'S PAW:MONKEY'S PAW:MONKEY'S PAW:MONKEY'S PAW:
2nd overhand loop
overhand loop
running endstanding end
Description ---- Theform of the monkey's pawsown here is formed from four interlockingloops: a four crown turk's head.
Use ---- The core determines what the monkey'spaw can be used for. When tied over a stone orheavy ball, the monkey's paw can be used toadd weight to a heaving line. If tied over a corkball with small cord the monkey's paw makesa good float for boat keys or other small itemsused around a water front. Tied over a ball oftwine or other soft material, the monkey's pawcan be used as weight on the end of a rope forthe game jump the shot. A Monkey's Paw canalso be used as a toggle.
Core Size ----- The diameter of the core should bebetween three and four diameters of the ropebeing used.
MONKEY'S PAW TURK'S HEADMONKEY'S PAW TURK'S HEADMONKEY'S PAW TURK'S HEADMONKEY'S PAW TURK'S HEADMONKEY'S PAW TURK'S HEAD
Narration ---- (For monkey's paw turk's headknotboard) (1) Form an overhand loop (2) Forma second overhand loop over the left edge ofthe first overhand loop . (3) Cross the standingend over the running end. (4) Weave the run-ning end across the loops by placing the run-ning end over the right side of the top loop (5)then under the right side of the bottom loop (6)next, over the left side of the top loop (7) and

© 1999, Gerald L. Findley ROPE WORKS +T
+ +
-----------------------------6.
work tight over a core11.
chase 2 to 3 times10.
9.
8.
7.
fourth loop
third loop
finally under the left side of the of the bottomloop. (8) Pull the running end through until athird loop equal in size to the first two loops.(9) Add the fourth loop by placing the runningend parallel to the standing end. (10) Chasethe original pattern 2 to 3 times. (11) Work tightover the core.
[NOTE] Join the two ends of the monkey's pawwith an eye splice, a short splice, or a seizing.

© 1999, Gerald L. Findley ROPE WORKS PLUS
MOORING HITCH : + +
MOORING HITCH
1.
2.
3.
4.
bight
under hand loop
eye
bight
Description —— An underhand loop toggled tothe standing part with a bight made in the run-ning end.
Use —— To securely tie off a rope so that it canbe quickly untied, especially a small boat to adock or piling.
Comments —— A secure knot that is easily tiedor untied in wet or dry rope; when properlytied a non closing loop is formed, this allowsthe hitch to move up or down a piling as thewater level changes.
Narrative ——(For mooring hitch knotboard.)(1) Take a bight around an object. (2) Form anunderhand loop in the running part. (3) Placethe eye of the underhand loop over the stand-ing part. (4) Pull a bight of the standing partthrough the eye of the underhand loop. (5) Pullthe underhand loop tight around the bight. (6)Place the running part under the eye of the bightthat was pulled through the underhand loop.(7) Pull a bight of the running part through theeye of the standing part bight. (8) Pull on thestanding part to tighten the standing part bightaround the running part bight.
standing part
running part
-----------------------------------------

© 1999, Gerald L. Findley ROPE WORKS PLUS
+ +
5.
6.
7.----->
pull tight
8.
bight
pulltight<-----
eye
---------------------------------------- [NOTES]
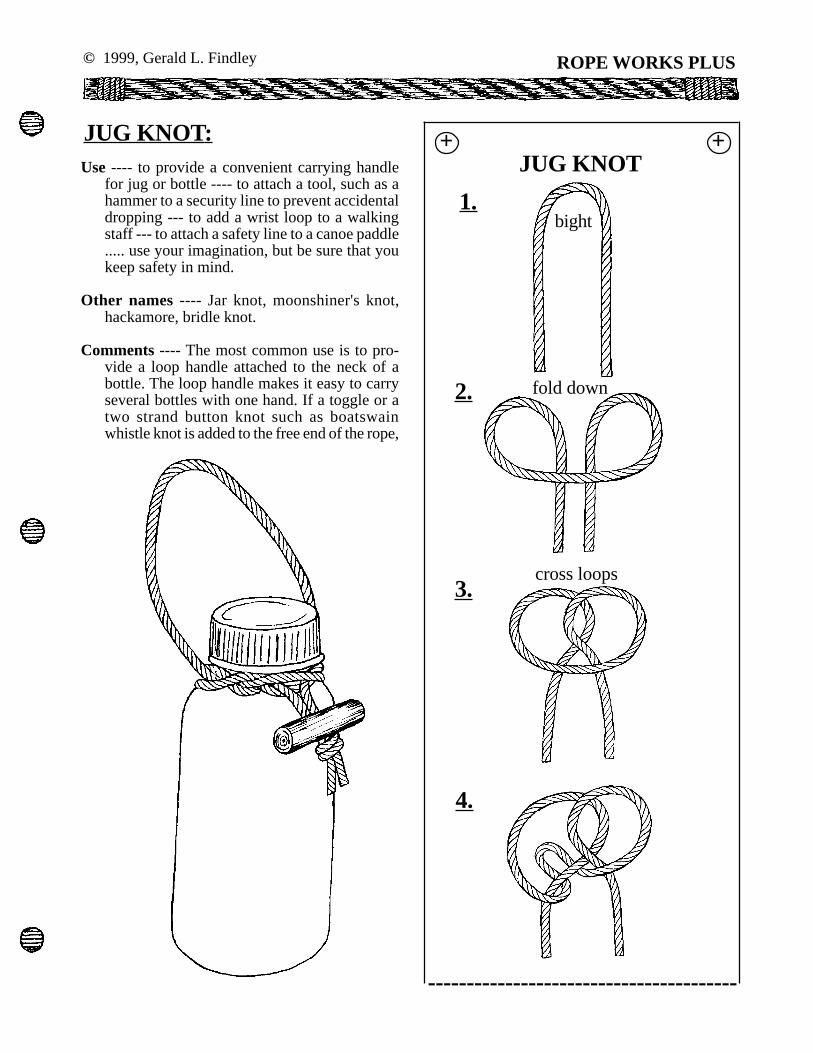
© 1999, Gerald L. Findley ROPE WORKS PLUS
+ +
1.
2.
3.
4.
Use ---- to provide a convenient carrying handlefor jug or bottle ---- to attach a tool, such as ahammer to a security line to prevent accidentaldropping --- to add a wrist loop to a walkingstaff --- to attach a safety line to a canoe paddle..... use your imagination, but be sure that youkeep safety in mind.
Other names ---- Jar knot, moonshiner's knot,hackamore, bridle knot.
Comments ---- The most common use is to pro-vide a loop handle attached to the neck of abottle. The loop handle makes it easy to carryseveral bottles with one hand. If a toggle or atwo strand button knot such as boatswainwhistle knot is added to the free end of the rope,
JUG KNOT:JUG KNOT
----------------------------------------
cross loops
fold down
bight

© 1999, Gerald L. Findley ROPE WORKS PLUS
+ +
5.
6.
9.
8.
7.
turndown
turndown
pull t
ight
<------
--
The loop of the jug knot can be use to togglethe bottle to a belt so that the bottle can be useas a canteen.
Plastic bottles with screw-on lids such assoda, sport drink, and mineral water bottlesmake strong, lightweight containers for carry-ing water on hikes and camp outs. 2 and 3 litersoda bottles are large enough to use as watercontainers around the camp kitchen. Smallerbottles (8 to 16 oz.) can be used as personalwater bottles or canteens. These bottles can bemade even more convenient by using a jug knotto attach a loop handle.
To help keep your water cool and re-freshing in hot weather, place a sock over thebottle, wet the sock when you fill the bottle,evaporation will do the rest.
In cold weather, carry your water bottleunder your coat. A dry sock placed over thebottle will help keep the water from freezing.
To protect your health, wash and disin-fect your water bottle with a chlorine bleachsolution and don’t share your water bottle withothers; show them how to make a water bottleof their own.
Narrative ---- (For jug knot knotboard) (1) Forma bight in the middle of a 24 to 30 inch longby 3/16 inch diameter rope. (2) Fold the bightdown over the standing ends to form two loops.(3) Place the right loop over the side of the leftloop. (4) Weave the middle of the bight underthe standing end; then over the left edge of theright loop; (6) next go under the right edge ofthe left loop; (7) finally pass the bight over theright side of the left loop. ( 8) Turn the tops ofthe original loops down over the knot. ( 9) Placethe knot over the neck of a bottle and work theknot tight so that the bight forms a 4 to 5 inchloop handle and the loose ends are even.
bight
pull t
ight
------
->
----------------------------------------
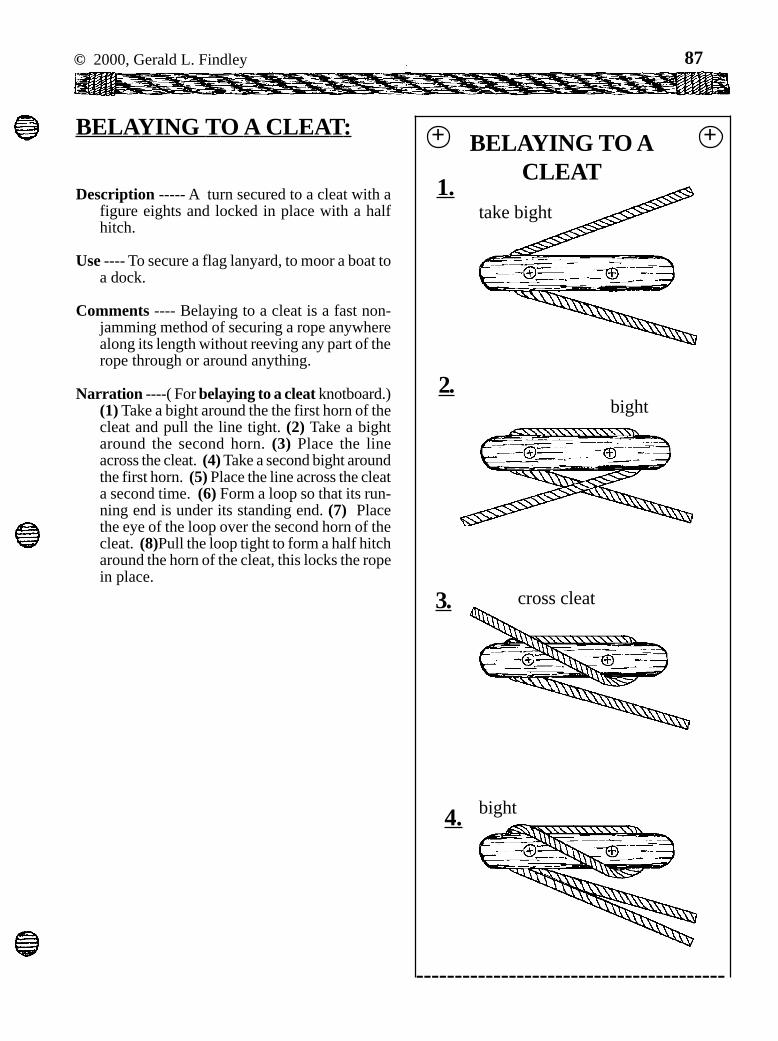
© 2000, Gerald L. Findley 87
BELAYING TO A CLEAT:
Description ----- A turn secured to a cleat with afigure eights and locked in place with a halfhitch.
Use ---- To secure a flag lanyard, to moor a boat toa dock.
Comments ---- Belaying to a cleat is a fast non-jamming method of securing a rope anywherealong its length without reeving any part of therope through or around anything.
Narration ----( For belaying to a cleat knotboard.)(1) Take a bight around the the first horn of thecleat and pull the line tight. (2) Take a bightaround the second horn. (3) Place the lineacross the cleat. (4) Take a second bight aroundthe first horn. (5) Place the line across the cleata second time. (6) Form a loop so that its run-ning end is under its standing end. (7) Placethe eye of the loop over the second horn of thecleat. (8)Pull the loop tight to form a half hitcharound the horn of the cleat, this locks the ropein place.
BELAYING TO ACLEAT
take bight1.
2.bight
3. cross cleat
4. bight
+ +
----------------------------------------

88 © 2000, Gerald L. Findley
holesforscrews
horn
horn
Use this pattern to make 8 hardwood cleats.Attach the cleats to the knotboard with 1 1/2 inchnumber 8 round head wood screws.
KNOTBOARD CLEA TPATTERN:
6.
+ +
7.
8.
place over horn
form loop
<-------
pull half hitch tight
----------------------------------------
5.
cross cleat
cross cleat

© 1999, Gerald L. Findley 5
methods to whipping. ---- Seizing: When twineis wrapped around two or more strands of ropeto hold the rope in place; the wrapping is doneusing methods similar to shear lashing.
Materials ---- The twine that is used for whippingshould be tightly spun or braided twine that isless then 1/8 the size of the rope to be whipped.Twine made of synthetic material should beused to whip synthetic rope, if natural fibertwine is used, the capillary action along the fi-bers of the rope draw water under the whip-ping causing the whipping to remain damp, sothat rot quickly sets in. Likewise, natural fibertwine should be used to whip natural fiber rope,the poor wicking action of synthetic fibers al-lowing the whipping to trap moisture in thenatural fiber rope, causing the rope to rot.
WHIPPING: METHOD 1:
Narration ----- (For whipping [method 1] knot-board.) (1) Form a loop in a 12 inch piece oftwine so that the ends of the twine are paralleland in opposite directions. Lay the loop on theend of the rope so that the ends of the twineand the rope are all parallel and one end of thetwine is extending beyond the end of the rope.(2) While holding the twine in place betweenthe thumb and forefinger, pass the loop of twinearound the end of the rope so that the wrap iswith the lay of the rope. (3) To finish the wrap-ping, pull the twine under the thumb so thatthe twine is wrapped toward the standing partof the rope, pull the twine tight. (4) While hold-ing the last wrapping in place between thethumb and forefinger, add additional wraps bypassing the loop of twine around the end of therope and pulling the wrap tight under the thumbfor each wrap. (5) Continue to add wraps untilthe length of the whipping is equal to the di-ameter of the rope. (6) While still holding thelast wrap tight between the thumb and forefin-ger, pull the loop closed by pulling on the endof the twine that is sticking out past the end ofthe rope. (7) Tighten the whipping by pullingon both ends of the twine. (8) Finish the whip-ping by cutting off the ends of the twine.
WHIPPING:
Description ---- Twine wrapped and secured to theend of a rope.
Use ---- To prevent the fraying of the end of a rope.
Comments ---- Even though "whipping" is donein several different ways, the finished "whip-pings" have similar appearance: the ends aresecured under the turns, the length of the whip-ping is equal to the diameter of the rope, andall turns are parallel.
Synthetic rope, rope made of plastic,should be whipped and fused to prevent therope from fraying. Fusing helps to hold thewhipping in place and the whipping helps toprevent the fused rope strands from brakingapart.
Other Names ---- Serving: When a rope iswrapped with twine to prevent chafing or wear-ing; the wrapping is done using the similar

6 © 1999, Gerald L. Findley
+ +
1.
2.
5.
3.
4.
+ +WHIPPING
|<------->|
6. ------>pull
7. <------- ------>
8. cut off ends
----------------------------------------
----------------------------------------
(12 inch twine)
diameterof rope
pull tight

© 1999, Gerald L. Findley 7
WHIPPING: METHOD 2:
Narration ----- (For whipping [method 2] knot-board.) (1) Form a bight in the end of a 24 inchpiece of twine and lay it parallel to the end ofthe rope so that part of the short side of thebight is extending beyond the end of the rope.(2) Take a wrap around the end of the rope;hold the bight and the wrap in place with thethumb and forefinger; pull wrap tight. (3) Whenthe length of the whipping is equal to the di-ameter of the rope, reeve the end of the twinethrough the eye of the bight. (4) Pull wrappingstight. (5) Pull on the end of the twine that isextending beyond the end of the rope until abight of the free end of the twine is pulled un-der and to the mid point of the wrappings. (6)Finish the whipping by cutting off the ends ofthe twine.
+ + WHIPPING
METHOD 2------>
pull tight
2.
bight1.
diameter of rope
|----------|3.
----------------------------------------

8 © 1999, Gerald L. Findley
+ +
4.
pull tight
------>
5.pull to center
6.cut off ends
+ +WHIPPING
METHOD 3----->
pull tight
3.
2. 12 inch twine
1. short bight
----------------------------------------
----------------------------------------

© 1999, Gerald L. Findley 9
+ +
4.|-------|
diameter of rope
6.<------- pull ------->
------>pull
7. cut of ends
5.
----------------------------------------
Narration ----(For whipping [ method 3] knot-board.) (1) Form a bight in a 6 inch piece oftwine; lay the bight parallel to the end of therope with the ends of the twine extending pastthe end of the rope. (2) Lay the end of a 24inch piece of twine next to the loop with thelong end extending past the end of the rope.(3) Take a wrap around the end of the rope;hold the bight and the wrap in place with thethumb and forefinger; pull wrap tight.(4) When the length of the whipping is equalto the diameter of the rope, reeve the end ofthe twine through the eye of the bight. (5) Usethe bight to pull the free end of the twine un-der the wrappings. (6) Tighten the whippingby pulling on the ends of the twine. (7) Finishthe whipping by cutting off the end of the twine.
WHIPPING: METHOD 3
BOUND WHIPPING:
Description ---- A whipping with strands acrossthe wraps.
Use ---- As a secure permanent whipping.
Comments ---- Bound whipping secures the wrap-ping turns by adding frapping turns to a stan-dard whipping.
Other Names ---- Sailmaker's Whipping, (usuallydone with a needle).
Tying a Bound Whipping:
STEP 1: Lay a loop formed from a 24 inch pieceof twine in one of the grooves between thestrands of the rope. The end of the twine to-ward the standing part of the rope should beabout 3 inches long.

10 © 1999, Gerald L. Findley
STEP 2: Wrap the twine around the end of therope, work toward the standing part of the rope.
STEP 3: When the length of the whipping is equalto the diameter of the rope, close the loop bypulling on the end of the twine that extendsbeyond the end of the rope.
diameter of rope
|---------|
------>pull
STEP 4: Pull on both ends of the twine to tightenthe whipping around the rope.
<-------pull
------>pull
STEP 5: Separate the ends of the rope strands,pull the twine between the strand to the rightof the groove that the twine was originally laidin and the other two strands.
----
--->
pull
[NOTE] If synthetic rope and twine were used theends of the rope and the twine may be fused.
STEP 6: Use a fid to lift the strand of the rope asshown in the diagram (this is the same strandthat the twine went around at the end of therope), reeve the twine under the strand; pulltwine tight.
STEP 7: Lay the twine over the original grooveand then pull the twine between the ends ofthe rope strands so that the twine is around therope strand to the left of the original groove;pull twine tight.
pull tight
------->
STEP 8: Use a fid to lift the rope strand as shownin the diagram (this is the same strand that thetwine went around at the end of the rope); reevethe ends of the twine through the opening andtie a half knot as shown in the diagram; pulltwine tight.
STEP 9: Reeve the ends of the twine through theopening again; tie a second half knot in theopposite direction as shown in the diagram; pulltwine tight to form a square knot.
STEP 10: Remove the fid and trim the ends ofthe twine close to the surface of the rope.
fid -------
---------half knot
-----half knot

© 1999, Gerald L. Findley 25
FIGURE-EIGHT KNOT:Description ---- Interlocking overhand loops, the
running part goes through the eye of one loopand the standing part goes through the eye ofthe other loop.
Use ---- (1) As a stopper knot; to keep a rope fromunreeving from a pulley block; to prevent arope from unlaying. (2) When tied on a bight,makes a reliable loop for rescue work andmountaineering.
Comments ---- Easier to tie and untie than an over-hand knot; does not damage the rope fiber orjam like an overhand knot.
Narration ---- (For figure eight knotboard.) (1)Form an overhand loop. (2) Take a bight aroundthe standing part. (3) Form the second over-hand loop by bring the running part over thetop edge of the firs overhand loop. (4) Com-plete the knot by reeving the running partthrough the eye of the first overhand loop (5)and pull tight.
FIGURE EIGHT ON A BIGHT:
Description ---- Interlocking overhand loops tiedon a bight in the running part (the bight is usedas the running part); the running part goesthrough the eye of one loop and the standingpart goes through the eye of the other loop.
Use ---- (1) Makes a reliable loop for rescue workand mountaineering. (2) As a stopper knot; tokeep a rope from unreeving from a pulleyblock; to prevent a rope from unlaying.
Comments ---- Easier to tie and untie than an over-hand knot; does not damage the rope fiber orjam like an overhand knot on a bight.
Narration ---- (For figure eight on a bight knot-board.) (1) Form a bight in the rope. [NOTE]Treat the two strands of the bight as a singlestrand as the rest of the knot is tied. (2) Forman overhand loop. (3) Take a bight around thestanding part. (4) Form the second overhandloop by bring the running part over the top edgeof the firs overhand loop. (5) Complete the knotby reeving the running part through the eye ofthe first overhand loop (6) and pull tight.
FIGURE-EIGHT
2.
3.
----------------------------------------
pull tightpull tight
5.
4.
overhandloop
bight
1.
standing part
running part
overhand loop
+ +
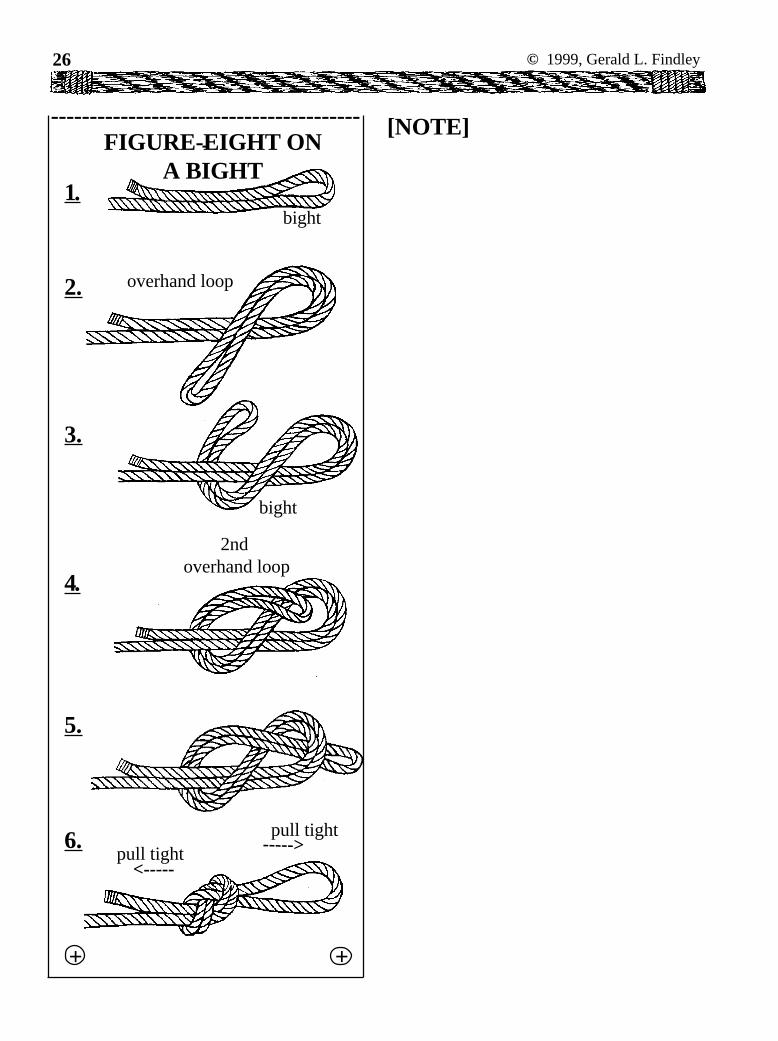
26 © 1999, Gerald L. Findley
+ +
<---------->pull tight
pull tight6.
5.
4.
bight
3.
2.
-----------------------------------------FIGURE-EIGHT ON
A BIGHT
bight1.
overhand loop
2nd overhand loop
[NOTE]

© 1999, Gerald L. Findley 135
TRIPOD LASHING:
Description ---- A shear lashing around 3 poles.
Use ---- To bind three poles together, for the con-struction of a tripod. ---- To bind three polestogether that contact at the same point in astructure.
Comments ----The tripod lashing is a shear lash-ing that binds three poles together at the samepoint. ---- The tripod lashing gets it name fromthe fact that its most common use is the con-struction of a tripod. ----The tripod lashing canbe used just about any where in a structure thatthree poles cross each other at the same pointand the same time in the sequence of construc-tion. ---- Tripod lashing takes two main forms;with racked wrapping turns (the rope is wovenbetween the poles) and with plain wrappingturns (the rope is wrapped around the poleswithout weaving the rope between the poles).When the lashing is made with racking turnsthe rope contacts each pole around its entirecircumference ; this contact makes the tripodlashing with racking turns the most secure formof tripod lashing: therefore tripod lashing withracking turns should be used when safety isimportant. However, for light structures wherethere would be no danger if the lashing slipped,the faster to tie tripod lashing with plain wrap-ping turns may be used.
Laying Out The Poles ---- For most tripod lash-ings, lay the pole side by side with the butt endsaligned. The alignment of the butts of the poleinsures that the tripod legs are the desiredlength.
----
>
lash at top endbutt ends alined----
>
[NOTE] The practice of laying the center pole inthe opposite direction to the outside poles cre-ates several problems. When the poles are laid
in opposite directions the wrappings must beput on loosely so that when the center pole isrotated to its proper position the lashing is tight-ened around the poles. If the wrappings are puton to tight, the rope is stretched causing dam-age to the rope fibers, therefore weakening thelashing. On the other hand, if the rope iswrapped two loosely, the lashing will nottighten enough when the center pole is rotatedand the lashing will be able to slip along thelength of the pole. Either way, the rope to looseor the rope to tight, a dangerous situation iscreated.
However, if the tripod is to be part ofa structure and the center pole will be at anangle greater then 90o to the outside poles, laythe center pole in the opposite direction to theoutside poles so that the rotation of the polesat the lashing is less then 90o. See gate waybelow for an example.
butt ends ofoutside poles--
--->
centerpole butt
----
->
<--
--
90o +
point of lashing

136 © 1999, Gerald L. Findley
Setting Up A Tripod ----- Set up the tripod bycrossing the outside poles so that the cross pointof the poles is under the center pole. Crossingthe outside poles under the center pole causespart of the load that is placed on the tripod tobe taken up by the wood to wood contact ofthe poles.
cross point ------->
outsidepole------->
<--------centerpole
<--------
wood towoodcontact
outsidepole--------->
--------->crosspoint
<--------
<--------
centerpole
If the outside poles are crossed above thecenter pole, the rope of the lashing will be re-quired to support all or most of the load; there-fore the tripod will not be as strong as when theoutside legs are crossed under the lashing.
no wood to woodcontact, rope sup-ports load
<-----------
If a symmetrical arrangement of the polesis needed within a structure, the tripod can beset up by rotating the poles around the lash-ing. This rotation cause the loss of the woodto wood contact so that the load is supportedonly by the ropes, and the joint between thepoles becomes very flexible; therefore the tri-pod may be unstable.
--------
->
rotation
<--------rotation
------->
centerpole -------> <-------
outsidepole
outsidepole
outsidepole
outsidepole
TRIPOD LASHING:(With Racking Turns)
Narration ---- (For tripod lashing with rackingturns knotboard.) (1) Tie a clove hitch aroundone of the outside poles. (2) Secure the stand-ing part by wrapping it around the running part.[NOTE] Wrapping the standing part aroundthe running part prevents the clove hitch fromslipping around the pole. If the clove hitch slipsthe lashing will loosen up from the inside. (3)Start the racked wrapping turns by weaving therope between the poles. (4) Take a total of 5 to7 wrapping turns. Pull each wrapping turn tightas it is made. [NOTE] The stiffness of the tri-pod lashing depends on the number and tight-ness of the wrapping turns. As the tightness ofthe wrapping turns or the number of wrappingturns increases, the stiffness of the tripod willincrease. (5) Take the first frapping turn by tak-ing the rope around the pole that the clove hitch
<--------

© 1999, Gerald L. Findley 137
+ +
+ +
clove hitch
secure ends
1.
2.
3.
4.
wrapping turn
5-7 wrapping turns
5. frapping turn
3 frapping turns6.
7.
8.
9.
3 frapping turns
pulleachturntight
pulleachturntight
10.
11.
12.second half hitch of clove hitch
work clove hitch tight
work half hitch tight
----------------------------------------
-----------------------------------------
start second frapping
first half hitch of clove hitch
WITH RACKING TURNSTRIPOD LASHING

138 © 1999, Gerald L. Findley
+ +1.
2.
3.
4.
5.
clove hitch
wrap end
4 to 6 wrappings
first frapping turn
2 or 3 frapping turns
was tied to, then between the outside pole andthe center pole. (6) Take 3 frapping turns. Pulleach frapping turn tight as it is made. (7) Startthe second set of frapping turns by taking therope across the center pole and reeving it be-tween the second outside pole and the centerpole. Take the second set of frapping turns inthe opposite direction to the first set of frap-ping turns. [NOTE] Taking the second set offrapping turns in the opposite direction to thefirst set of frapping turns prevents the rope fromcrossing the wrappings at a diagonal. Unnec-essary crossing of the rope increases frictionbetween the strands of the rope making it dif-ficult to tighten the lashing properly. (8) Takea total of 3 frapping turns. Pull each turn tight.(9) Take the first half hitch of the ending clovehitch around the second outside pole by takingthe rope past the pole and then around the pole.(10) Work the half hitch tight so that it is lockedagainst the lashing. [NOTE] See the narra-tion for square lashing for instructions on work-ing the half hitch tight. (11) Take the secondhalf hitch of the ending clove hitch. (12) Workthe half hitch tight to complete the ending clovehitch. [NOTE] If the clove hitch is not workedtight so that it is locked against the lashing theclove hitch will slip around the pole allowingthe lashing to loosen. [NOTE] If very smoothrope is being used, a 3rd half hitch should beadded to the clove hitch to insure that the lash-ing will stay in place.
TRIPOD LASHING:(WITH PLAIN TURNS)
Narration ---- (For tripod lashing with plainturns knotboard.) (1) Tie a clove hitch aroundone of the outside poles. (2) Secure the stand-ing part by wrapping it around the running part.[NOTE] Wrapping the standing part aroundthe running part prevents the clove hitch fromslipping around the pole. If the clove hitch slipsthe lashing will loosen up from the inside. (3)Start the wrapping turns by wrapping the ropearound the poles. Take a total of 4 to 6 wrap-ping turns. Pull each wrapping turn tight as itis made. [NOTE] The stiffness of the tripodlashing depends on the number and tightnessof the wrapping turns. As the tightness of the----------------------------------------
WITH PLAIN TURNTRIPOD LASHING

© 1999, Gerald L. Findley 139
-----------------------------------------
+ +
6.
7.
8.
9.
10.
half hitch
clove hitch
first frapping turn2 or 3 frapping turns
change direction wrapping turns or the number of wrapping turnsincreases, the stiffness of the tripod will in-crease. (4) Take the first frapping turn by pass-ing the rope around the pole that the clove hitchwas tied to, then between the outside pole andthe center pole. (5) Take 2 or 3 frapping turns.Pull each frapping turn tight as it is made. (6)Start the second set of frapping turns by takingthe rope around the center pole and reeving itbetween the second outside pole and the cen-ter pole. (7) Take the second set of frappingturns in the opposite direction to the first set offrapping turns. [NOTE] Taking the second setof frapping turns in the opposite direction tothe first set of frapping turns prevents the ropefrom crossing the wrappings at a diagonal. Un-necessary crossing of the rope increases fric-tion between the strands of the rope making itdifficult to tighten the lashing properly. (8) Takea total of 2 or 3 frapping turns. Pull each turntight. (9) Take the first half hitch of the endingclove hitch around the second outside pole bytaking the rope past the pole and then aroundthe pole. Work the half hitch tight so that it islocked against the lashing. [NOTE] See thenarration for square lashing for instructions onworking the half hitch tight. (10) Take the sec-ond half hitch of the ending clove hitch. Workthe half hitch tight to complete the ending clovehitch. [NOTE] If the clove hitch is not workedtight so that it is locked against the lashing theclove hitch will slip around the pole allowingthe lashing to loosen. [NOTE] If very smoothrope is being used, a 3rd half hitch should beadded to the clove hitch to insure that the lash-ing will stay in place.

140 © 1999, Gerald L. Findley
QUICK TRIPOD LASHING:
Comments ---- The tripod quick lash is one of thefastest ways to construct a tripod. However thetripod quick lash is not as secure as the moreconventional methods, therefore the tripodquick lash tripod should not be use for heavyloads.
Directions -----
STEP 2] Start the frapping turn by taking eachend around an outside pole and then betweenthe outside pole and the center pole.
STEP 3] Take 1 or 2 frapping turns with each end.Pull the frapping turns tight; this will alsotighten the wrappings.
[WARNING]
If one end of the square knot is pulled it can beup set into a lark's head knot. When this happensthe knot will slip causing the entire lashing toloosen and fail.
STEP 4] End the lashing by tying the ends of therope together with a square knot.
[NOTE] The frapping turns aretaken in opposite directions.
STEP 1] Lay the poles side by side with the withthe butt ends alined. Wrap 5 to 8 wrappingsaround all three poles.
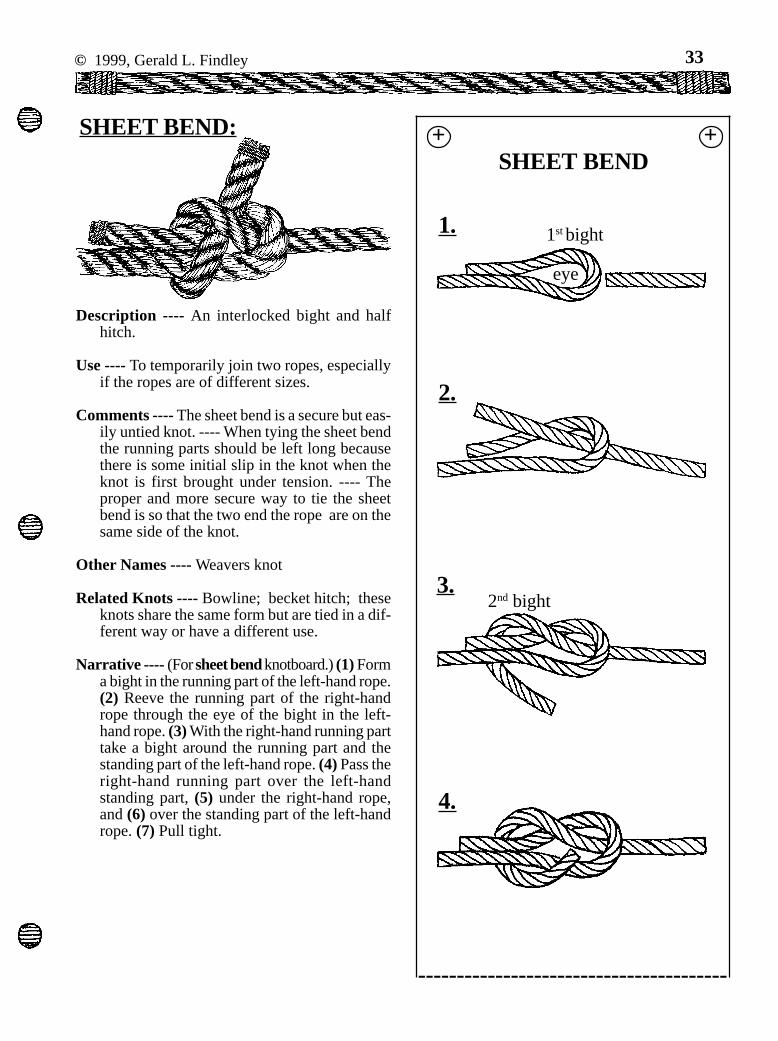
© 1999, Gerald L. Findley 33
SHEET BEND:
Description ---- An interlocked bight and halfhitch.
Use ---- To temporarily join two ropes, especiallyif the ropes are of different sizes.
Comments ---- The sheet bend is a secure but eas-ily untied knot. ---- When tying the sheet bendthe running parts should be left long becausethere is some initial slip in the knot when theknot is first brought under tension. ---- Theproper and more secure way to tie the sheetbend is so that the two end the rope are on thesame side of the knot.
Other Names ---- Weavers knot
Related Knots ---- Bowline; becket hitch; theseknots share the same form but are tied in a dif-ferent way or have a different use.
Narrative ---- (For sheet bend knotboard.) (1) Forma bight in the running part of the left-hand rope.(2) Reeve the running part of the right-handrope through the eye of the bight in the left-hand rope. (3) With the right-hand running parttake a bight around the running part and thestanding part of the left-hand rope. (4) Pass theright-hand running part over the left-handstanding part, (5) under the right-hand rope,and (6) over the standing part of the left-handrope. (7) Pull tight.
+ +SHEET BEND
1st bight
eye
2nd bight
1.
2.
3.
4.
----------------------------------------
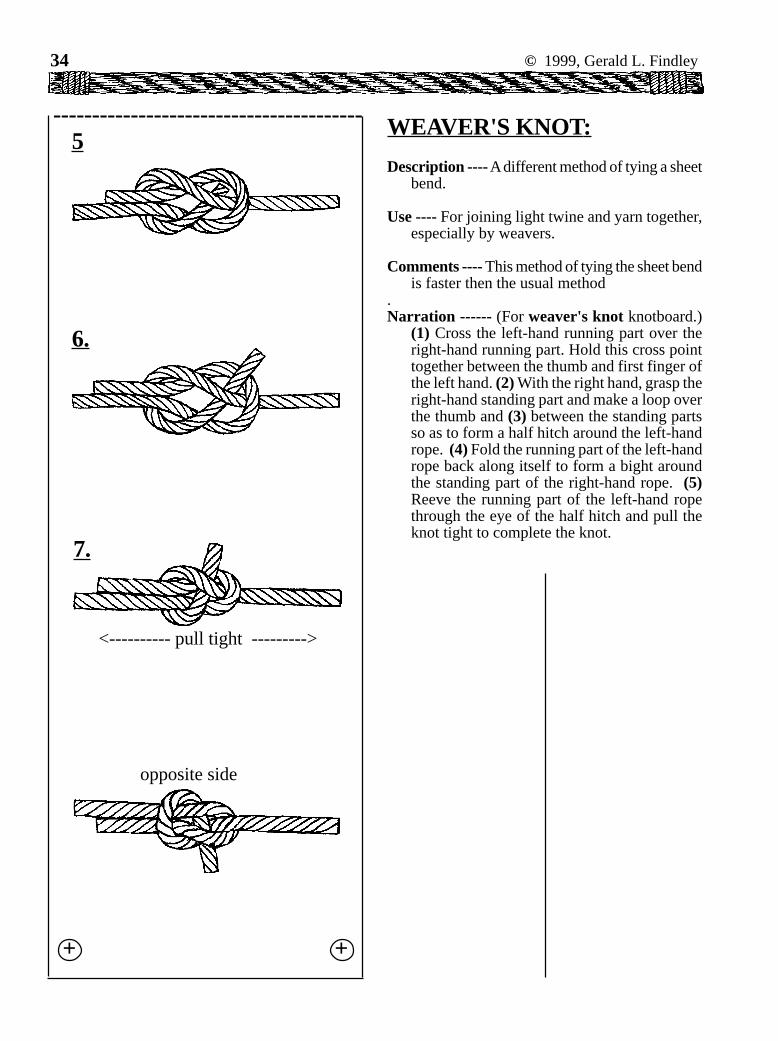
34 © 1999, Gerald L. Findley
WEAVER'S KNOT:
Description ---- A different method of tying a sheetbend.
Use ---- For joining light twine and yarn together,especially by weavers.
Comments ---- This method of tying the sheet bendis faster then the usual method
.Narration ------ (For weaver's knot knotboard.)
(1) Cross the left-hand running part over theright-hand running part. Hold this cross pointtogether between the thumb and first finger ofthe left hand. (2) With the right hand, grasp theright-hand standing part and make a loop overthe thumb and (3) between the standing partsso as to form a half hitch around the left-handrope. (4) Fold the running part of the left-handrope back along itself to form a bight aroundthe standing part of the right-hand rope. (5)Reeve the running part of the left-hand ropethrough the eye of the half hitch and pull theknot tight to complete the knot.
+ +
7.
6.
5
opposite side
<---------- pull tight --------->
----------------------------------------

© 1999, Gerald L. Findley 35
+ +----------------------------------------
+ +
1.
half hitch3.
bight
5.
<---------- pull tight --------->
WEAVER'S KNOT:
2.
4.
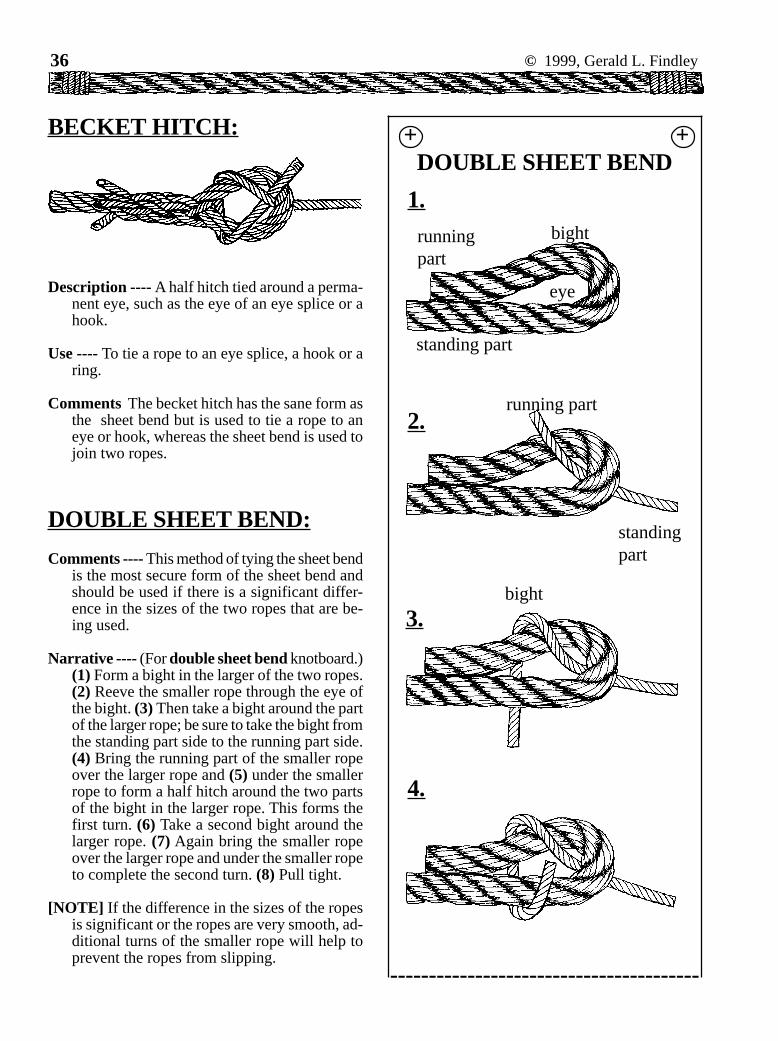
36 © 1999, Gerald L. Findley
BECKET HITCH: + +DOUBLE SHEET BEND
1.
2.
bightrunningpart
standing part
eye
running part
standingpart
3.
4.
bight
DOUBLE SHEET BEND:
Comments ---- This method of tying the sheet bendis the most secure form of the sheet bend andshould be used if there is a significant differ-ence in the sizes of the two ropes that are be-ing used.
Narrative ---- (For double sheet bend knotboard.)(1) Form a bight in the larger of the two ropes.(2) Reeve the smaller rope through the eye ofthe bight. (3) Then take a bight around the partof the larger rope; be sure to take the bight fromthe standing part side to the running part side.(4) Bring the running part of the smaller ropeover the larger rope and (5) under the smallerrope to form a half hitch around the two partsof the bight in the larger rope. This forms thefirst turn. (6) Take a second bight around thelarger rope. (7) Again bring the smaller ropeover the larger rope and under the smaller ropeto complete the second turn. (8) Pull tight.
[NOTE] If the difference in the sizes of the ropesis significant or the ropes are very smooth, ad-ditional turns of the smaller rope will help toprevent the ropes from slipping.
Description ---- A half hitch tied around a perma-nent eye, such as the eye of an eye splice or ahook.
Use ---- To tie a rope to an eye splice, a hook or aring.
Comments The becket hitch has the sane form asthe sheet bend but is used to tie a rope to aneye or hook, whereas the sheet bend is used tojoin two ropes.
----------------------------------------

© 1999, Gerald L. Findley 37
+ +
5.
6.
7.
8.
half hitch
second turn
<----- pull tight ------->
----------------------------------------
Use ---- For joining light rope, twine, thread, andyarn.
Comments ---- This method of tying the sheet bendis useful for tying a piece of rope onto anotherrope when the end of the rope is very short.
Narrative ---- (For sheet bend on a short endknotboard.) (1) Form an overhand loop. (2)Fold the loop over onto its standing part. (3)Pull a bight of the standing part through theloop to form an overhand knot in the runningpart. (4) Pull on the standing part and the run-ning part of the overhand knot to close the eyearound the standing part to form a slip noose.(5) Place the eye of the slip noose over therunning part of the second rope. (6) Pull on therunning part of the first rope and push on theoverhand knot to upset the slip noose so that abight of the second rope is pulled through theoverhand loop to form the sheet bend. (7) Pullon the standing parts of each rope to tightenthe sheet bend.
[NOTES]
SHEET BEND ONA SHORT END:

38 © 1999, Gerald L. Findley
1.
+ +
overhand loop
2.
3.
4.
+ +
5.
6.
sanding part
running part
eye
-------->eyepull through
slip noose
-------->push
<--------pull
--------><--------pull tight
back viewoverhand knot
-------><-------pullpull
7.
----------------------------------------
pull tight
----------------------------------------
fold over
SHEET BEND(SHORT END)
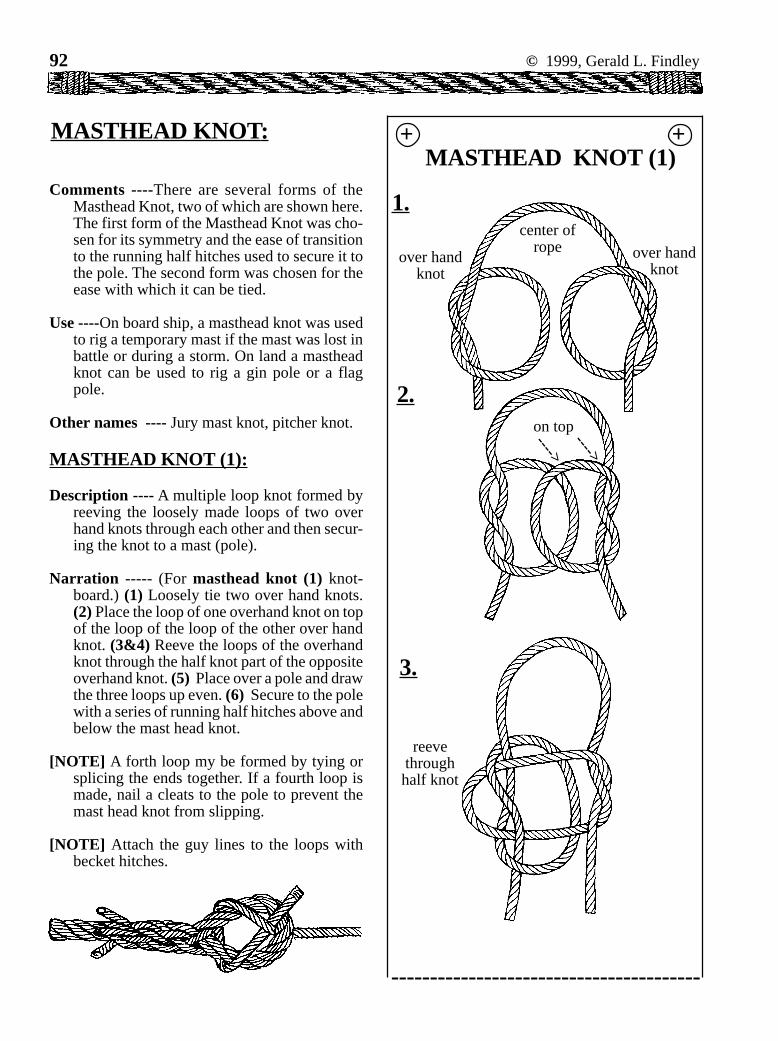
92 © 1999, Gerald L. Findley
+ +
----------------------------------------
MASTHEAD KNOT :MASTHEAD KNOT (1)
1.
2.
3.
Comments ----There are several forms of theMasthead Knot, two of which are shown here.The first form of the Masthead Knot was cho-sen for its symmetry and the ease of transitionto the running half hitches used to secure it tothe pole. The second form was chosen for theease with which it can be tied.
Use ----On board ship, a masthead knot was usedto rig a temporary mast if the mast was lost inbattle or during a storm. On land a mastheadknot can be used to rig a gin pole or a flagpole.
Other names ---- Jury mast knot, pitcher knot.
MASTHEAD KNOT (1):
Description ---- A multiple loop knot formed byreeving the loosely made loops of two overhand knots through each other and then secur-ing the knot to a mast (pole).
Narration ----- (For masthead knot (1) knot-board.) (1) Loosely tie two over hand knots.(2) Place the loop of one overhand knot on topof the loop of the loop of the other over handknot. (3&4) Reeve the loops of the overhandknot through the half knot part of the oppositeoverhand knot. (5) Place over a pole and drawthe three loops up even. (6) Secure to the polewith a series of running half hitches above andbelow the mast head knot.
[NOTE] A forth loop my be formed by tying orsplicing the ends together. If a fourth loop ismade, nail a cleats to the pole to prevent themast head knot from slipping.
[NOTE] Attach the guy lines to the loops withbecket hitches.
center ofrope
---->
---->
on top
reevethroughhalf knot
over handknot
over handknot
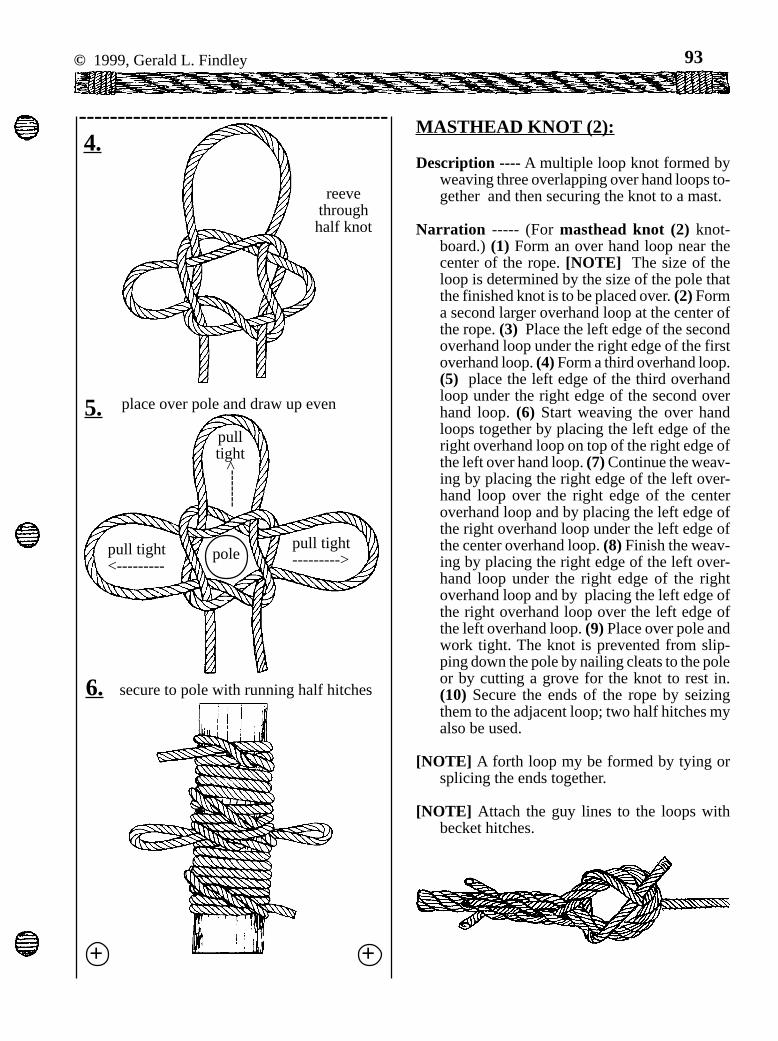
© 1999, Gerald L. Findley 93
+ +
----------------------------------------4.
5.
pole
place over pole and draw up even
secure to pole with running half hitches6.
reevethroughhalf knot
pull tight--------->
pull tight<---------
----
--->
MASTHEAD KNOT (2):
Description ---- A multiple loop knot formed byweaving three overlapping over hand loops to-gether and then securing the knot to a mast.
Narration ----- (For masthead knot (2) knot-board.) (1) Form an over hand loop near thecenter of the rope. [NOTE] The size of theloop is determined by the size of the pole thatthe finished knot is to be placed over. (2) Forma second larger overhand loop at the center ofthe rope. (3) Place the left edge of the secondoverhand loop under the right edge of the firstoverhand loop. (4) Form a third overhand loop.(5) place the left edge of the third overhandloop under the right edge of the second overhand loop. (6) Start weaving the over handloops together by placing the left edge of theright overhand loop on top of the right edge ofthe left over hand loop. (7) Continue the weav-ing by placing the right edge of the left over-hand loop over the right edge of the centeroverhand loop and by placing the left edge ofthe right overhand loop under the left edge ofthe center overhand loop. (8) Finish the weav-ing by placing the right edge of the left over-hand loop under the right edge of the rightoverhand loop and by placing the left edge ofthe right overhand loop over the left edge ofthe left overhand loop. (9) Place over pole andwork tight. The knot is prevented from slip-ping down the pole by nailing cleats to the poleor by cutting a grove for the knot to rest in.(10) Secure the ends of the rope by seizingthem to the adjacent loop; two half hitches myalso be used.
[NOTE] A forth loop my be formed by tying orsplicing the ends together.
[NOTE] Attach the guy lines to the loops withbecket hitches.
pulltight

94 © 1999, Gerald L. Findley
+ +
----------------------------------------
----------------------------------------
+ +
over hand loop1.
center of rope----->3.
2.
placeedgeunder
3rd overhand loop4.
2nd overhand loop
placeedgeunder
5.
6.startweavingacross
7.
8.
9.
10.
place overpole
<----- cleat
cleatnailedto pole
--->
----->
seizing
<-----
seizing
--><--MASTHEAD KNOT (2)

146 © 1999, Gerald L. Findley
FLOOR LASHING:
Use ---- to lash a series of poles to a set of string-ers to form a flat surface such as a deck, atable top, or a road way.
Comments ---- When using a floor lashing, bothends of the decking poles must be lashed atthe same tine to insure a firm even surface.
When placing the decking poles on the string-ers, lay the decking poles so that their buttend are in alternating direction. Alternatingthe but ends of the decking poles will com-pensate for the natural taper of the poles sothat the length of the decking along eachstringer will be equal.
Narration ---- (For floor lashing knotboard) (1)Tie a clove hitch around each stringer. (2)Secure the short end of the rope by wrappingit around the running end (wrap with the layof the rope ). (3) Place the decking poles onthe stringers and take a bight around the firstpole. (4) Next, on the inside of the stringer,pull a bight up between the first decking poleand the next decking pole. (5) Place the eyeof the bight over the end of the decking pole.(6) Pull tight. (7) On the outside of the stringer,place a bight over the next decking pole. (8)Pull tight. (9) Repeat steps 4 through 8 untilall decking poles are lashed in place. (10) Tiethe first half hitch of the ending clove hitch.Work half hitch tight. (11) Tie the second halfhitch of the ending clove hitch. Work halfhitch tight (12) to form clove hitch.
+ +FLOOR LASHING1.
2.
3.
4.
5.
6.
----------------------------------------
clovehitch
secure end
bight
bight to inside
eye of bight over end
pull tight
----->

© 1999, Gerald L. Findley 147
+ +
----------------------------------------7.
8.
10.
12.
11.
bight to outside
pull tight
----->
9. repeat steps 4 through 8
1 st. halfhitch
end with clove hitch
work tight2nd halfhitch
work tight
clovehitch
[NOTES]

174 © 1999, Gerald L. Findley
Mauls:
|----------------------18" to 24" ----------------------|
|---- 4" to 5" ---|
STEP 1: Use an ax torough out the maul.Form a handle bycutting away oneend of the piece ofwood so that it isabout 1 1/4 inchesin diameter. Leave4 to 5 inches of theother end at itsoriginal diameter toform the head of themaul.
STEP 2: Smooth the handlewith a knife.
A maul is a wooden club or hammer that isused for driving stakes or wedges and for safetyreasons should be used instead of an ax.
Using an ax instead of a maul exposes the userto the danger of being cut by its sharp edge. Evenif the edge is covered by a sheath, a glancing blowcan cause the sheath to be ripped off or to be cutthrough.
The pole of an ax serves as a counterweight tothe blade. This counterweight adds to the balanceof the ax head and helps to control and increasethe force of momentum delivered to the bit. Theax head is shaped in such a way that the momen-tum of the ax head is delivered through the thinwalls of the eye. However, when an ax is beingused as a hammer, this same shape causes the eyeof the ax head to spread and the handle to loosen.
The flat surface and angular edges of an ax polemakes it difficult to strike a stake squarely. Thisdifficulty in striking a square blow results in mostblows delivering some there force sideways, caus-ing the end of the wooden stake to flare and splitvery quickly. In addition, when the pole of an axcontacts a stake, the metal surface of the pole lacksthe ability absorb any of the force of the impactthis contributes to the destruction of the stake. Awooden maul, on the other hand, absorbs some ofthe impact of the initial contact and a maul has noangular edges. Therefore, more of the force of themaul is used to do useful work and less of the forceis used up in deforming or splitting the stake.
Making a Club Maul:
A club maul, for driving tent pegs and otherlight work, can be made from a piece of hardwoodthat is about 3 inches in diameter and 18 to 24inches long.

© 1999, Gerald L. Findley 175
MAKING A HAMMERMAUL:Materials:
To make the head of a hammer maul you willneed a 4 inch diameter, 10 inch long piece of hard,dense, unchecked, well seasoned, hardwood suchas elm, black gum or hophornbeam.
For the handle you will need a piece of wellseasoned ash, hickory, or similar straight grainedwood; 1 1/2 inch diameter and 3 to 4 foot long.
Making a Maul:
STEP1: Square the ends of the head with a saw.
-------midlineSTEP 2: Find and
mark the midlinebetween the twoends.
STEP 3: Locate the center of the handle hole oneach side of the maul head.
----- midline
[3A] Wrap a strip of paperaround the maul head.Cut the strip of paperoff so that the two endsjust meet.
STEP 4: Drill handle hole in head. Use a 1 1/4inch drill bit to drill a hole halfway throughthe head from one side, then finish drilling thehole from the other side of the maul head.
STEP 5: Make maul handle.
5A] Cut a saw kerft in the one end of thehandle. The depth of the kerft should beequal to 1/2 the diameter of the maul head.
5B] Use a knife to shave the end of the handledown until it can be easily driven throughthe head with light blows with a lightwooden block.
<------- saw kerft
STEP 6: Attach the maul head to the handle.
6A] Make a hardwood wedgethat is 1 1/4 inch wide, 3inches long, and 1/4 inchthick at its large end.
6B] Drive the handle into the maul head, makesure that the saw kerft is lined up acrossthe maul head.
6C] Then drive the wedge in place.
[3B] Locate handlehole by folding thestrip of paper inhalf to mark itsmid point, then un-fold it and wrap itaround the maulhead again. Markthe midline at thefold and at theends of the strip ofpaper.
[NOTE] If the holes do not lineup in the middleuse a chisel or wood rasp to cut away some ofthe excess wood.

176 © 1999, Gerald L. Findley
STEP 7: Reinforce the maul head to keep it fromsplitting by wrapping several turns of rope orwire around each end of the maul head. Thesecan be held in place with staples.
Another method of reinforcing the headwould be to drive a braided ring or a grom-met over each end of the head.
[NOTES]
MAUL --- DOVE TAIL HANDLE:
MATERIALS:
1 ----- Piece of seasoned hardwood that is2 2/2 to 3 inches in diameter and 5 to 7inches long for the head.
1 ----- piece of seasoned hardwood that is1 1/2 inches to 2 inches in diameter forthe handle.
CONSTRUCTION:
STEP 1: With a saw, cut 3 kerfts as shown at thecenter of the side of the head.
[NOTE] The width of the bottom of the dovetailnotch must be less than the diameter of thehandle.
600600
|-----------|Less than thediameter ofthe handle

© 1999, Gerald L. Findley 177
STEP 2: Use a knife or chisel to remove the woodto form the dovetail notch.
dovetail notch
STEP 3: Shape and fit handle to head.
[2]
[1]
3A] Flatten one side of the end of the handle.
[3]
[1] Equal to or greater than the width ofthe bottom of the dovetail notch.
[2] Equal to or less than the depth of thedovetail notch.
[3] Equal to the diameter of the head.
3B] Fit the handle to the bottom of the dovetailnotch. Gradually remove the surplus wooduntil the flattened part of the handle is thesame width as the width of the dove tailnotch.
3B] Flatten the remaining two sides of thehandle. Gradually remove the surplus wooduntil the handle fits snugly into the dove-tail notch in the head.
|-----| width of dovetail notch
3A] Tap handle firmly into dovetail notch.
ROPE WRENCH:
The dovetail maul makes a good ropewrench. Pass the rope over the head of themaul and then take several wraps around thehandle. The rope is then tightened by rotatingthe maul so that the rope wraps part way aroundthe head of the maul.
|----||----|
|-----|
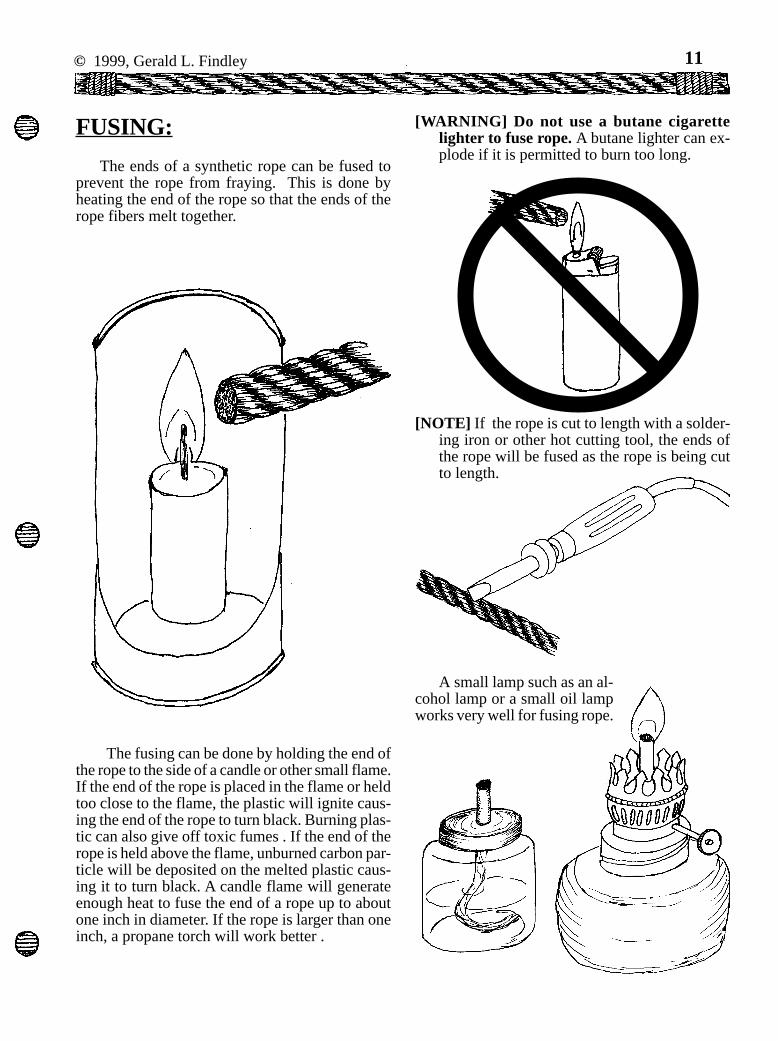
© 1999, Gerald L. Findley 11
FUSING:
The ends of a synthetic rope can be fused toprevent the rope from fraying. This is done byheating the end of the rope so that the ends of therope fibers melt together.
[WARNING] Do not use a butane cigarettelighter to fuse rope. A butane lighter can ex-plode if it is permitted to burn too long.
A small lamp such as an al-cohol lamp or a small oil lampworks very well for fusing rope.
[NOTE] If the rope is cut to length with a solder-ing iron or other hot cutting tool, the ends ofthe rope will be fused as the rope is being cutto length.
The fusing can be done by holding the end ofthe rope to the side of a candle or other small flame.If the end of the rope is placed in the flame or heldtoo close to the flame, the plastic will ignite caus-ing the end of the rope to turn black. Burning plas-tic can also give off toxic fumes . If the end of therope is held above the flame, unburned carbon par-ticle will be deposited on the melted plastic caus-ing it to turn black. A candle flame will generateenough heat to fuse the end of a rope up to aboutone inch in diameter. If the rope is larger than oneinch, a propane torch will work better .

66 © 1999, Gerald L. Findley
TAUT-LINE HITCH:Description —— Two half hitches with an extra
turn.
Use —— To adjust the tension on guy lines.
Comments —— The tension is adjusted by slid-ing the knot along the standing part of the rope.
graspstanding partslide knot
graspstanding part
slide knot
---- half hitch
----- running partstandingpart ----- ---- turns
When tied around an object other then itsown standing part ---- rolling hitch, magnushitch.
rolling hitch
midshipman’s hitch
secondturn
----running part -----
standingpart --------
-----
When tied so that the second turn is be-tween the first turn and the standing part ----midshipman’s hitch (see direction formidshipman’s hitch).
standingpart ----
running part -------
adjustable jam hitch
Use --- To tie-up a bundle so that the knot can betightened by sliding the knot toward the bundleand loosened by sliding the knot away fromthe bundle.
When tied with the two turns outside the loopand the half hitch inside the loop ---- adjustablejam hitch.
half hitch
To decrease the tension on a guy line,grasp the standing part just out side the loop,then slid the knot away from your hand.
Other Names —— There are several other namesthat are used interchangeable for the taut-linehitch and several related knots. Themidshipman’s hitch, rolling hitch, and magnushitch. The following seems to be the most com-mon usage of these name:
When tied around its own standing part ----taut line hitch.
-------half hitch
-----turns
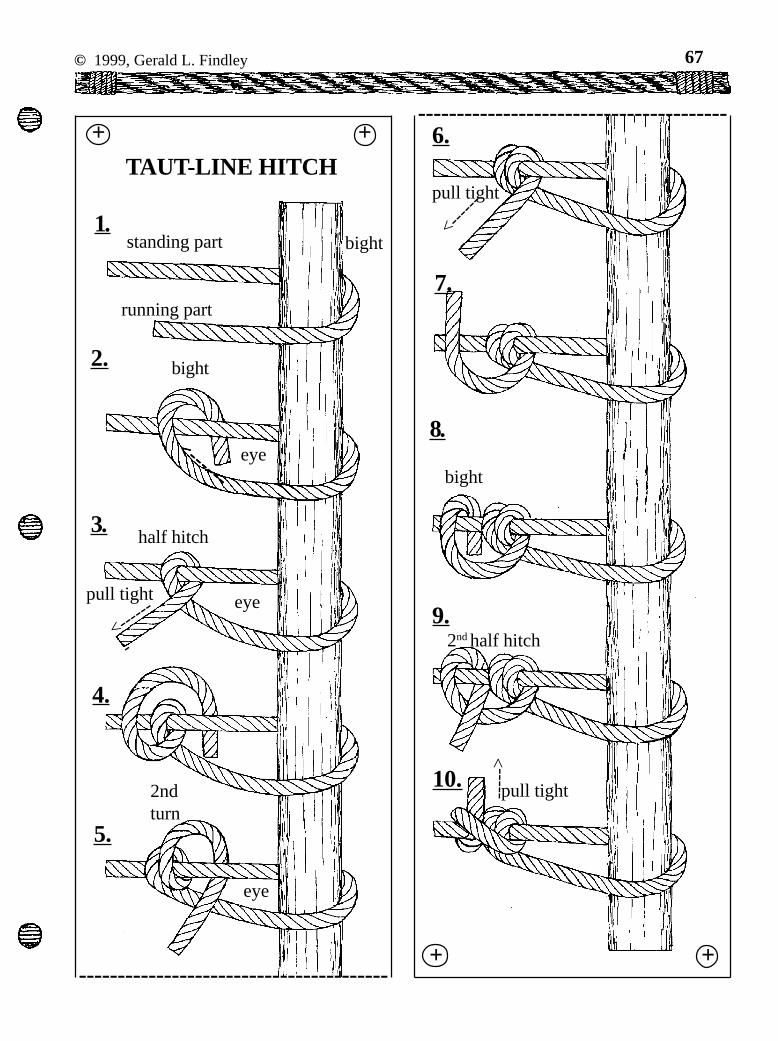
© 1999, Gerald L. Findley 67
1.
<------
<------
<------
<------
<------
----------------------------------------
7.
8.
10.
bightstanding part
2. bight
pull tight
half hitch
eye
eye
3.
eye
----------------------------------------6.
pull tight
<----
--
-
bight
2nd half hitch9.
pull tight----
->
TAUT-LINE HITCH
+ +
<------
-
5.
4.
+ +
running part
2ndturn

68 © 1999, Gerald L. Findley
Narrative ---- (For taut-line hitch knotboard.) (1)Take a bight around the pole. (2) Take a bightaround the standing part. (3) (The eye of thebight becomes the eye of the taut-line hitch)Pass the running part through the eye of theaut-line hitch (between standing part and thepole) this forms a half hitch around the stand-ing part; pull tight (4) Take a second bightaround the standing part in the same direction;(5) this results in two complete turns aroundthe standing part. (6) Pull tight. (7) Go to theoutside of the loop. (8) Take another bightaround the standing part; pass the running partbetween itself and the first half hitch, (9) thisforms the second half hitch, (10) Pull tight.
MIDSHIPMAN'S HITCH:
---
----
-second
turn
turn ----
standingpart
1.
2.
3.
halfhitch
4.
5.
(5) Opposite side.
(4) Take a halfhitch aroundthe standingpart so that it isoutside theloop.
(3) Pull the secondturn tight tolock it in place.
(2) Take a secondturn around thestanding partso that the run-ning endcrosses thefirst turn and isbetween thefirst turn andthe beginningof the knot.
Narrative ----(1) After taking a bight around an object, take a
turn around the standing part so that the turn isinside the loop.
Description ---- Two half hitches with an over-lapping extra turn.
Use ---- To adjust the tension on a guy line whenvery smooth rope is being used.
Comments ---- The midshipman's hitch is harderto adjust then the taut-ine hitch, therefor it isthe ideal knot for adjusting the tension on syn-thetic rope guy lines.
pulltightto
lock
[NOTES]

© 1996, Gerald L. Findley 137
SPANISH WINDLESS:
STEP 1: Tie one end of the rope to the load andthe other end to a secure anchor point. Leavesome slack in the rope so that the windless canbe rigged.
SETUP:
A Spanish windless is a device for movingheavy loads such as rocks and logs.
[WARNING] When setting up a Spanish Wind-less do not use nylon or other synthetic fiberrope that stretch under a load. If you slip orlet go of the poles the energy you used to stretchthe rope will be released as the rope returns toits original length. This release of energy couldcause the poles of the windless to spin aroundcausing injuries to any one near by. Naturalfiber ropes, such as sisal, have little stretch;therefore are much safer to use.
STEP 2: Follow the diagrams to set up the polesat the mid point of the rope.
STEP 3: While one person holds the up rightpole, a second person rotates the longer polearound the upright so that the rope begins towrap around the upright pole. Adjust the heightof the rope so that it can be easily stepped over.
MATERIALS:
1 — 8 foot * 3 inch pole1 — 5 foot * 3 inch pole1 — 3/4 inch * 50 foot (natural fiber)

138 © 1996, Gerald L. Findley
STEP 4: Continue to rotate the longer pole aroundthe upright.
NOTE] As the rope wraps around the upright itwill be necessary to move the base of the up-right to keep it vertical.
NOTE] Be careful that the two end of the ropeare kept at the same level on the upright.
keep rope atsame level
[NOTES]

ROPE HALTERStart with an eye splice.
(The Eye splice will form one end of the nose piece of the halter)
Decide how long the nose piece must be then tie a quick eye into the rope.
Quick Eye STEP1Decide where the quick eye must be. Then reeve the lead end through the lay of the rope as shown. ( Slightly largerthan the diameter of the rope)
Quick Eye STEP 2Observe which strand of the lead end is directly under the strand of the nose piece end. Reeve the eye splice underthat strand.
length of nose piece
lead end
eye splice
lead end
quick eyestrand of the nose pieceend
strand of the nose pieceend
eye splice quick eye
nose piece
nose piece
lead end
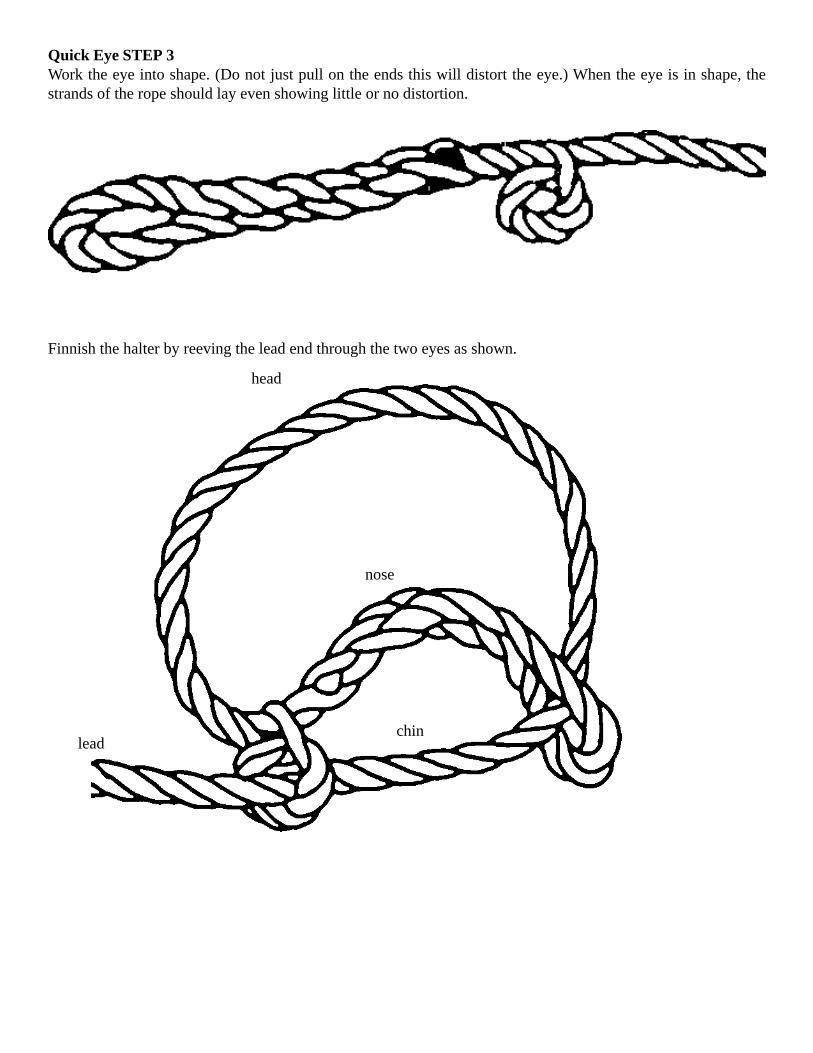
Quick Eye STEP 3Work the eye into shape. (Do not just pull on the ends this will distort the eye.) When the eye is in shape, thestrands of the rope should lay even showing little or no distortion.
Finnish the halter by reeving the lead end through the two eyes as shown.
head
nose
chinlead

148 © 2000, Gerald L. Findley
LADDER LASHING: STEP 1: Lay an overhand loop over each side railso that the running end of each loop is to theoutside.
Ladder lashing al-lows for a quick and se-cure method for con-structing a ladder or forconstructing a deckingwith evenly spacedecking pieces.
This form of lash-ing has several advan-tages over the tradi-tional floor lashing.Less material is re-quired because unlikefloor lashing a spacecan be left betweeneach piece of the deck-ing. Also, each rung issecurely lashed in placeby several loops of ropein much the same wayas a square lashing;with the traditionalfloor lashing only asingle loop of the ropeholds each end of thedecking in place, there-fore if one piece loos-ens, the entire deckloosens.
The ladder lash-ing has two forms; leftand right, each is a mir-ror image of the other.
Comments:
START: The ladder lashing is started by using aclove hitch stopped with two half hitches tosecure a rope to the top end of each rail.
------ clove hitch ---------two half hitches----
STEP 3: Pull the running part side of each over-hand loop behind and to the outside of eachrail.
-----><-----
STEP 2: Place a rung across the rails so that thestanding part of each overhand loop is over theend of the rung and the running part of eachoverhand loop is under the rung.
------><----
--overhand
loop
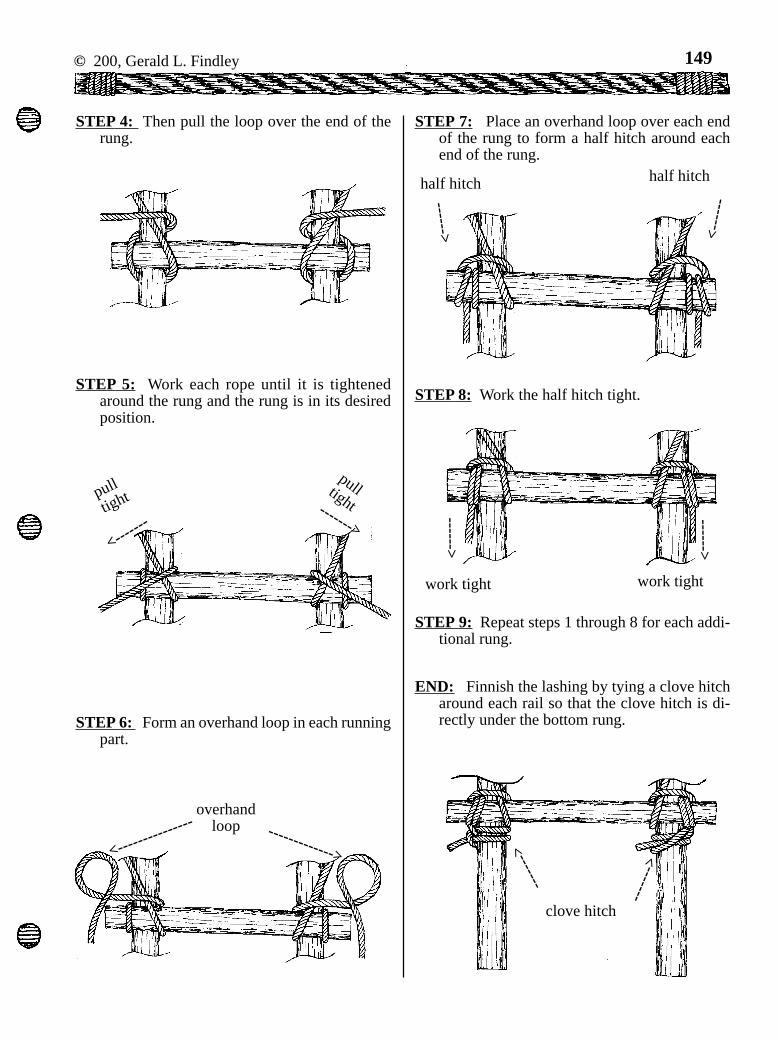
© 200, Gerald L. Findley 149
----
--->
clove hitch
STEP 7: Place an overhand loop over each endof the rung to form a half hitch around eachend of the rung.
half hitch
------>
half hitch
<---
---
STEP 8: Work the half hitch tight.
------>
work tight
------>
work tight
STEP 9: Repeat steps 1 through 8 for each addi-tional rung.
END: Finnish the lashing by tying a clove hitcharound each rail so that the clove hitch is di-rectly under the bottom rung.
----
--->
------------->
overhandloop
STEP 4: Then pull the loop over the end of therung.
STEP 5: Work each rope until it is tightenedaround the rung and the rung is in its desiredposition.
------->
pulltightpull
tight
<-------
STEP 6: Form an overhand loop in each runningpart.
<----------
-----

© 1999, Gerald L. Findley 17
SEIZING:
the ropes over the other end. (3) Wrap the out-side strand around the ropes so that so that thewrapping turns are parallel to each other; pulleach wrapping turn tight. (4) When the widthof the wrapping is equal to the diameter of therope, end the first layer of wrapping turns byreeving the twine between the ropes; pull tight.(5) Add a layer of riding turns; the riding turnsare laid in the grove between the wrapping turnsand pulled tight but not so tight as to separatethe wrapping turns of the first layer. (6) Whenthe riding turns have been completed, end theriding turns by reeving the end of the twinebetween the ropes so that it is in the oppositedirection to the other end of the twine. (7) Addfrapping turns; reeve the end of the twine be-tween the ropes at the other end of the wrap-pings; pull tight. (8) Use a square knot to endthe frapping turns: reeve the ends of the twinebetween the ropes again; tie a half knot; pullthe half knot and the frapping turns tight. (9)Reeve the ends of the twine between the ropesagain; tie the second half knot of the squareknot. (10) Pull the second half knot tight sothat the square knot is between the strands ofthe rope. Cut of the ends of the twine.
Use ---- To bind ropes together or to bind a ropeto an object. Sometimes used to bind the run-ning end of a rope to the standing end of therope to prevent a knot from spilling.
Comments ---- Seizings do not use as much ma-terial and are not as bulky as a knot or a splice;nor does the seizing damage the fiber of therope. The fibers of a rope do not need to bebent or separated to be seized as they do whena knot is being tied or a splice worked. If theseizing is no longer needed, the seizing can becut away and the rope is undamaged.
The seizings shown here can be workedwith out the use of a needle. However thereare many forms of seizing that require the useof a needle to apply them to a rope.
To form an eye, 3 to 4 seizing should beused. This ensures that the eye will safely re-main in place even if one of the seizings is dam-aged.
If there is additional strain on the ropes,such as at the first seizing of an eye, rackedturns should be used.
Materials ---- The diameter of the "twine" that isbeing used to do the seizing should be 1/8 to 1/12 the diameter of the rope being seized. Thelength of the "twine" should be about 3 feetfor each 1 inch of diameter of the rope.
Narration ---- (For seizing knotboard.) (1) Folda piece of twine in half over one strand of therope. (2) Start the first layer of wrapping turnsby laying the end of the twine that is between

18 © 1999, Gerald L. Findley
SEIZING1. center of twine
2.
5. add riding turns
6.
7. add frapping
8.half knot
9.
+ +
10. pull square knottight
cut off ends
2edhalfknot
4.
3.
----------------------------------------
2ed frapping;
----------------------------------------+ +
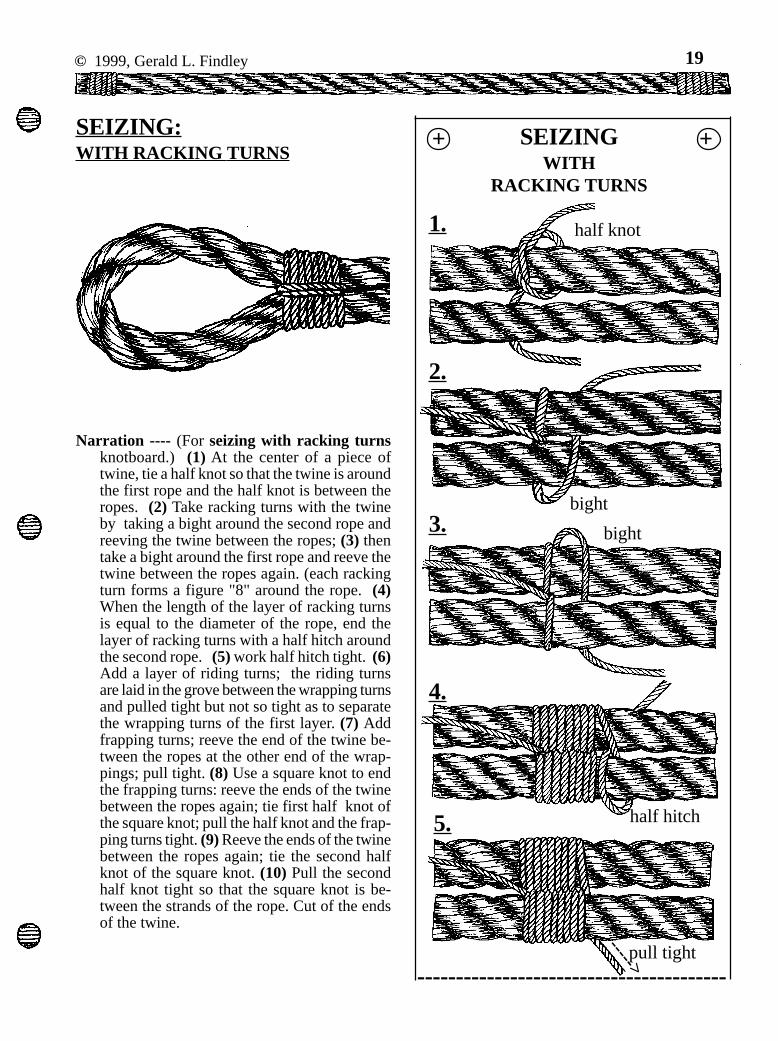
© 1999, Gerald L. Findley 19
Narration ---- (For seizing with racking turnsknotboard.) (1) At the center of a piece oftwine, tie a half knot so that the twine is aroundthe first rope and the half knot is between theropes. (2) Take racking turns with the twineby taking a bight around the second rope andreeving the twine between the ropes; (3) thentake a bight around the first rope and reeve thetwine between the ropes again. (each rackingturn forms a figure "8" around the rope. (4)When the length of the layer of racking turnsis equal to the diameter of the rope, end thelayer of racking turns with a half hitch aroundthe second rope. (5) work half hitch tight. (6)Add a layer of riding turns; the riding turnsare laid in the grove between the wrapping turnsand pulled tight but not so tight as to separatethe wrapping turns of the first layer. (7) Addfrapping turns; reeve the end of the twine be-tween the ropes at the other end of the wrap-pings; pull tight. (8) Use a square knot to endthe frapping turns: reeve the ends of the twinebetween the ropes again; tie first half knot ofthe square knot; pull the half knot and the frap-ping turns tight. (9) Reeve the ends of the twinebetween the ropes again; tie the second halfknot of the square knot. (10) Pull the secondhalf knot tight so that the square knot is be-tween the strands of the rope. Cut of the endsof the twine.
SEIZING:WITH RACKING TURNS
SEIZINGWITH
RACKING TURNS
1. half knot
2.
bight
bight3.
4.
half hitch5.
----------------------------------------
----->pull tight
+ +

20 © 1999, Gerald L. Findley
6. riding turns
7.
+ +
10.
and cut off ends
9. 2Nd halfknot
halfknot
8. tie squareknot
add frapping turns
----------------------------------------[NOTES]
pull square knottight
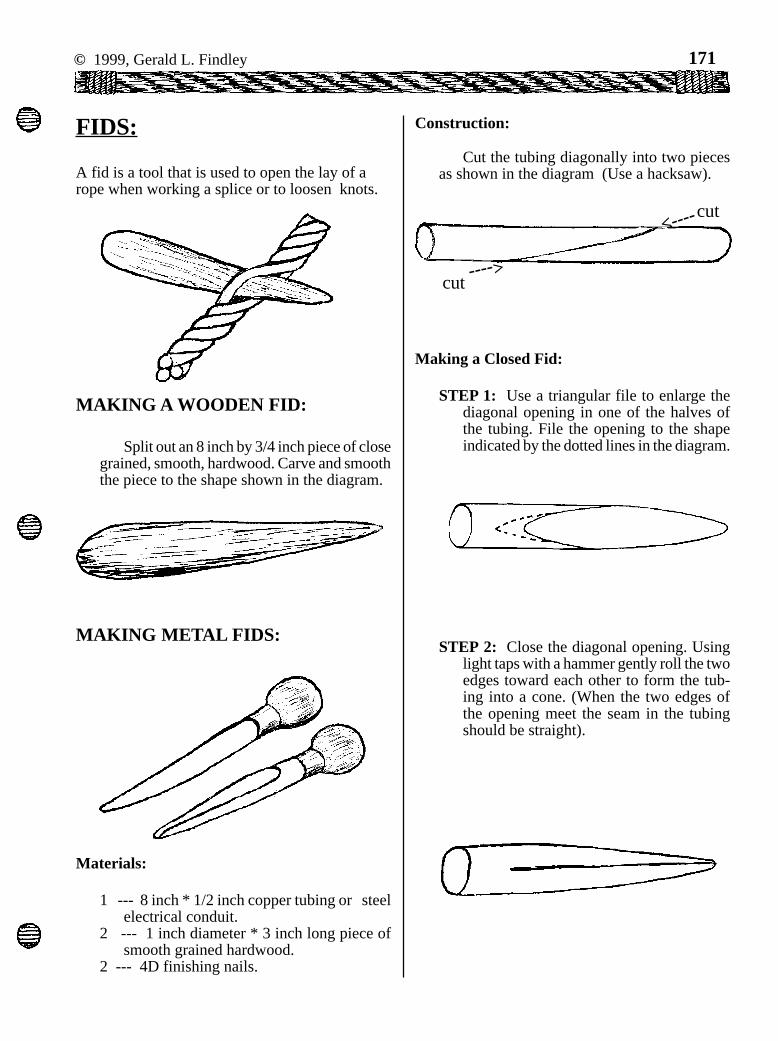
© 1999, Gerald L. Findley 171
FIDS:
A fid is a tool that is used to open the lay of arope when working a splice or to loosen knots.
STEP 2: Close the diagonal opening. Usinglight taps with a hammer gently roll the twoedges toward each other to form the tub-ing into a cone. (When the two edges ofthe opening meet the seam in the tubingshould be straight).
Making a Closed Fid:
STEP 1: Use a triangular file to enlarge thediagonal opening in one of the halves ofthe tubing. File the opening to the shapeindicated by the dotted lines in the diagram.
Construction:
Cut the tubing diagonally into two piecesas shown in the diagram (Use a hacksaw).
Materials:
1 --- 8 inch * 1/2 inch copper tubing or steelelectrical conduit.
2 --- 1 inch diameter * 3 inch long piece ofsmooth grained hardwood.
2 --- 4D finishing nails.
MAKING METAL FIDS:
MAKING A WOODEN FID:
Split out an 8 inch by 3/4 inch piece of closegrained, smooth, hardwood. Carve and smooththe piece to the shape shown in the diagram.
<----
<----
cut
cut

172 © 1999, Gerald L. Findley
STEP 3: Solder the edges of the opening to-gether.
3A] Clean the edges of the opening withsteel wool.
3B] Spread soldering paste along thecleaned edges.
3C] Solder the seam. Use a propane torchto apply heat to the side of the fid that isopposite the seam. (Heating the tubefrom the opposite side, will ensures thatmetal is heated all the way through sothat the solder will flow into the seamand not just spread out on the surface.)As you heat the tubing test the seam forthe proper temperature by touching thesolder to the seam. When the solderstarts to melt and flow into the seam,move the solder along the seam until theentire seam is filled with solder.
STEP 4: Cleanup the seam with steel-wooland a file. Make sure that there are no sharpedges to catch or cut the rope fibers whenthe fid is being used.
Making an Open Fid:
STEP 1: Enlarge the diagonal opening of theother piece of tubing by setting the tubingon end and forcing a rod into the opening.When the rod is forced into the opening,the cross section of the tubing should be-come “U” shaped.
STEP 2: With a round file, enlarge the diago-nal opening to the shape shown by the dot-ted line.

© 1999, Gerald L. Findley 173
STEP 3: Smooth all rough and sharp edgeswith a file and steel-wool.
STEP 4: Gently tap the edges of the openingtoward each other so that a cross sectionanywhere along its entire length will be“U” shaped.
Making Handles For Fids:
STEP 1: Carve one end of a 1 inch diameter *3 inch long piece of wood so that it will fitsnugly into the end of the fid.
STEP 2: Attach handle to fid.
2A] Drill a small hole into the side of thefid about 1/2 inch from the end.
2B] Insert the handle into the end of thefid. Then drive a finishing nail throughthe hole into the wood of the handle.
2C] Cut the nail off close to the side of thefid. Then file the nail down so that it issmooth and even with the surface.
STEP 3: Finish the handle. Here is a chanceto be creative. You can carve a simplerounded handle or let your imaginationtake over.

114 © 1999, Gerald L. Findley
JAPANESE SQUARELASHING S:
Comments —— The Japanese Square Lashingsare a group of similar lashings that are all tiedin a similar manner. The main difference is inthe way each lashing is started.
The simplest and easiest form of the Japa-nese square lashing is tied by looping the cen-ter of the rope around the vertical spar and car-rying the stands parallel to each other whiletaking the wrapping turns. The frapping turnsare taken by separating the ends of the ropeand taking them in opposite directions.
The Mark III is the same as the Mark IIbut a clove hitch is tied around the up rightspar when starting the lashing.
The MarkII Japanese Square Lashing is tiedby looping the center of the rope of the uprightspar and than forming the wrapping turns bytaking the ends of the rope in opposite direc-tions.
The Mark III is the most secure of the threeJapanese square lashings because the clovehitch helps to prevent the lashing from shift-ing along the vertical spar.
Narration -----(For Japanese square lash knot-board.) (1) Start the lashing by looping the cen-ter of the rope around the vertical spar so thatthe loops under the horizontal spar. (2) Startthe wrapping turns by leading the ends aroundthe spars so that the two strands of the ropeare parallel to each other. (3) When makingthe wrapping turns the two strands of the ropeare lead around the spars at 900 to the spars;do not allow the strand to cross, be sure to keepthe strands parallel. (4) Complete the wrap-ping turns by leading the rope strand aroundthe vertical pole. (5) Start the frapping turnsby separating the strands so that one strand isabove the horizontal spar and the other strandis below the horizontal spar. (6) Lead the frap-ping strands in opposite directions. (7) Maketwo complete frapping turns; pull each turntight as it is made; tie the first half knot of theending square knot. (8) Tie the second half knotof the square knot to complete the lashing. (9)For safety add half hitches; The half hitchesprevent the square knot from upsetting.
© 1999, Gerald L. Findley 115
+ +
----------------------------------------
----------------------------------------
+ +
JAPANESESQUARE LASHING
1.
2.
3.
4.
5.
6.
7.
8.
9.
loop centerof rope
around spar
lead parallel
wrappingturn
endwrapping
startfrapping
separateends
oppositedirections
pull tight end withsquare knot
half knot
half knot
for safety add half hitches

116 © 1999, Gerald L. Findley
----------------------------------------
----------------------------------------
+ +
1.
2.
3.
4.
5.
6.
7.
8.
9.
10.
+ +JAPANESE SQUARELASHING MARK II
middle of rope
cross behind
pull tight<--------
pull tight -------->
secondwrappingturn
start frapping
thirdwrappingturn
firstfrapping
secondfrapping
crossbetweenspars
pulleachfrap-pingtight
first halfknot ofsquare knot
pull tight<--------
pull tight<--------
pull tight<--------
pull tight -------->
squareknot

© 1999, Gerald L. Findley 117
Narration ---(For Japanese square lash, markII knotboard.) (1) Start the lashing by tying thecenter of the rope around the vertical spar witha clove hitch so that the clove hitch is underthe horizontal spar. (2) Make the first wrap-ping turn by leading the ends up over the frontof the horizontal spar and then in opposite di-rections behind the vertical spar. (3) Pull thestrands tight but do not allow them to cross eachother. (4) Add the second wrapping turn byleading the ends of the rope down over the frontof the horizontal spar and then in opposite di-rections behind the vertical spar. (5) Completethe frapping turns by leading the ends of therope up over the front of the horizontal sparand then in opposite directions behind the ver-tical spar. Position the strands of rope for start-ing the frapping tuns by leading them behindthe horizontal spar. [NOTE] When pulled tightthe strands will cross behind the vertical spar.
back of step (5)
crossed strands
<--- vertical spar
horizontalspar --->
(6) Lead the frapping strands in opposite di-rections below and in front of the vertical sparand then behind the horizontal spar. (7) Makethe second frapping turn by leading the endsabove and in front of the vertical spar and thenbehind the horizontal spar; pull each turn tightas it is made. (8) End the second frapping turnby tying the firs half knot of the ending squareknot. (9) Complete the ending square knot byadding a second half knot. (10) Pull the squareknot tight [NOTE] For safety add half hitchesaround the horizontal spar to either side of thesquare knot; The half hitches prevent the squareknot from upsetting.
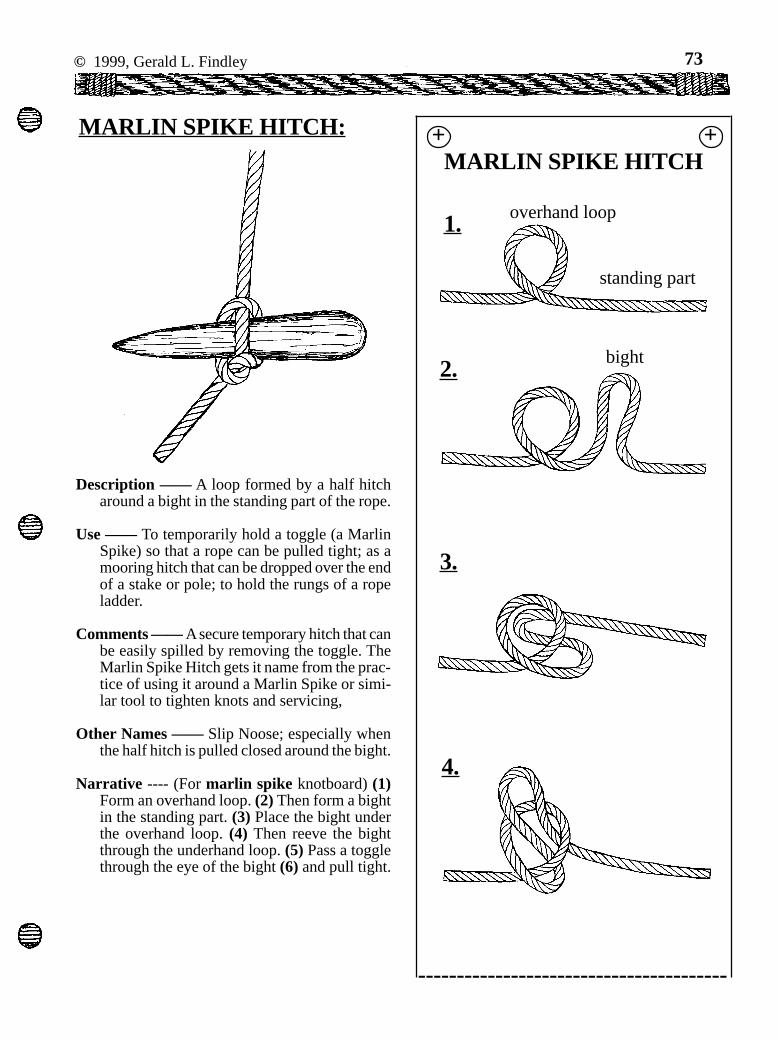
© 1999, Gerald L. Findley 73
+ +MARLIN SPIKE HITCH
2.
3.
4.
MARLIN SPIKE HITCH:
Description —— A loop formed by a half hitcharound a bight in the standing part of the rope.
Use —— To temporarily hold a toggle (a MarlinSpike) so that a rope can be pulled tight; as amooring hitch that can be dropped over the endof a stake or pole; to hold the rungs of a ropeladder.
Comments —— A secure temporary hitch that canbe easily spilled by removing the toggle. TheMarlin Spike Hitch gets it name from the prac-tice of using it around a Marlin Spike or simi-lar tool to tighten knots and servicing,
Other Names —— Slip Noose; especially whenthe half hitch is pulled closed around the bight.
Narrative ---- (For marlin spike knotboard) (1)Form an overhand loop. (2) Then form a bightin the standing part. (3) Place the bight underthe overhand loop. (4) Then reeve the bightthrough the underhand loop. (5) Pass a togglethrough the eye of the bight (6) and pull tight.
1. overhand loop
standing part
bight
----------------------------------------

74 © 1999, Gerald L. Findley
+ +
5.
6.
MARLIN SPIKE LADDER
toggle
pull tight
----------
--->
pull tight
<----------
-
SLIP NOOSE:----------------------------------------
Description ----- An overhand knot tied aroundits standing part.
Use ---- As a sliding loop for a snare; as a toggledstopper knot.
Comments ---- Related to the overhand knot. Of-ten confused with the slip knot.
Narrative ---- Tie by folding an overhand loopover the standing part and pulling a bight ofthe standing part through the eye of the over-hand loop. (See marlin spike hitch.)
bight ----
---- overhand loop
eye
---- standing partrunning
part ------
eye
---- bight
---- runningpart
--------
---standingpart
SLIP KNOT:
Description ----- An overhand knot tied aroundits running part.
Use ---- As a stopper knot.
Comments ---- Related to the overhand knot. Of-ten confused with the slip noose.
Narrative ---- Tie by folding an overhand loop overthe running part and pulling a bight of the run-ning part through the eye of the overhand loop.(See marlin spike hitch.)

FOOTROPE KNOTDescription: a three strand knot that looks somewhat like a turk’s head knot.Comments: This knot was tied in the “footrope” (the rope that was tied under the yard arm for the sailors to standon when they were setting the sails) to prevent the sailors’ feet from slipping along the footrope.Use: as a stopper knot in the end of a rope.
STEP 1: Unlay 4 to 5 turns of the lay.
STEP 5:
STEP 6:
STEP 10:
STEP 9:
STEP 8:
STEP 7: Tie a wall knot under thecrown knot but tuck the strands upthrough the center of the crownknot.
STEP 2: Tie a loose crown knot.
STEP 3:
STEP 4:
STEP 11:
STEP 12:
STEP 13: Work tight and fin-ish by combing out the fibersto form a tassel of relay thestrand and whip the end of therope.

126 © 1996, Gerald L. Findley
CAMP STOOL:
MATERIALS:
3 — 2 Foot * 2 inch poles20 — 1/2 inch diameter sticks (various lengths) 1 — 3/8 inch * 5 foot rope 1 — 1/4 inch * 12 foot rope
CONSTRUCTION:
STEP 1: Cut a grove 1 inch deep and 3/8 inchwide in each end of the 2 foot poles. Be surethat the groves are in the same direction.
2B] Take 4 wrapsaround the 3poles; follow thepattern shownfor each wrap.
(1)
(3)
2C] Take 2 frapping turns behind each pole.
---->
<----
frapping
(2)
-----------
-------
rotate
rotatestanding end
clove hitch
-------
--
first half hitch ofclove hitch
-------
-
2E] Set the tripod up by rotating each leg.
2D] End the lashing with a clove hitch aroundone of the poles.
|<-------------------- 24"-------------->|3/8" * 1"grove<------
STEP 2: Lash the 2 foot pole together at theircenters with the 1/4 inch * 12 foot rope. Usethe equal shear tripod lash shown here.
2A] Tie a clove hitch around one of the poles;secure the end by wrapping it around thestanding end.

© 1996, Gerald L. Findley 127
STEP 6: Assemble the seat.
6A] Lift one strand of the lay of the seat sup-port rope on either side of the pole that isat the midpoint of the rope loop.
bowline
slipperyhalf hitch
middle of rope
seat supportrope
6C] Insert the next 1/2 inch stick.
6C] Lift the next strand of the lay of the ropeon either side of the pole that is at the mid-point of the seat support rope .
6B] Slide the ends of a 1/2 inch stick underthe lifted strands of the seat support rope.
STEP 3: Prepare the seat support rope bymarking the middle of the 3/8 inch * 5 footrope by tying a piece of twine around it.Then form a loop that has a 42 inch cir-cumference by temporarily tying the endsof the rope together.
STEP 4: Place the seat support rope in thegroves at the top of the poles so that themiddle of the rope is in one of the groves.Adjust the ends poles so that they areevenly spaced around the loop.
STEP 5: Add the bracing rope. Tie a bowline intoone end of the 1/4 inch * 10 foot rope. Thenweave the rope back and forth between the endsof the tripod poles; follow the pattern shownin the diagram. End by tying a slippery halfhitch through the eye of the bowline.
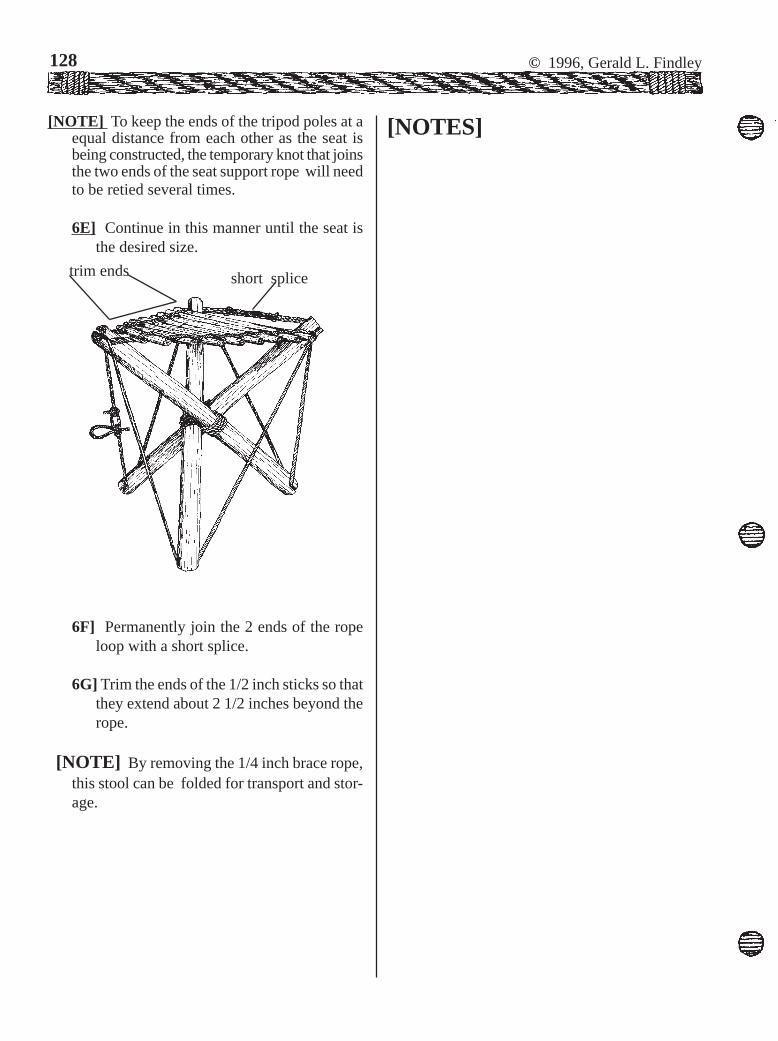
128 © 1996, Gerald L. Findley
[NOTE] To keep the ends of the tripod poles at aequal distance from each other as the seat isbeing constructed, the temporary knot that joinsthe two ends of the seat support rope will needto be retied several times.
6E] Continue in this manner until the seat isthe desired size.
6F] Permanently join the 2 ends of the ropeloop with a short splice.
6G] Trim the ends of the 1/2 inch sticks so thatthey extend about 2 1/2 inches beyond therope.
[NOTE] By removing the 1/4 inch brace rope,this stool can be folded for transport and stor-age.
trim ends short splice
[NOTES]

© 2001, Gerald L. Findley 79
+ +
----------------------------------------
1,
2.
3.
4.
5.
insert core
start second coil
form small loop
first loop
form first coil
MONKEY'S PAW(coil style)
-----------------------------MONKEY'S PAW: COIL STYLE
Narration ---- (For monkey's paw coil stile knot-board.) (1) Form the first coil by stacking threeloop on top of each other. (2) Insert core intocenter of coil. (3) Start second coil by forminga small loop at the bottom of the first coil. (4)Pass the running end behind and (5) across thefront to for the first loop of the second coil. (6)Add the second and third loops of the secondcoil. (7) Start the third coil by reeving the run-ning end through the top of the first coil and(8) then reeve the running end through thebottom of the first coil. (9) Add the second andthird loops of the third coil. (10) Work all coilstight over the core.
[NOTE] Join the two ends of the monkey's pawwith an eye splice, a short splice, or a seizing.

80 © 2001, Gerald L. Findley
+ +
----------------------------------------6.
7.
8.
10.
9.
second andthird loops
start third coil
reeve through
reeve through toform first loop
add second and third loops
work tight over core
[NOTES}\]
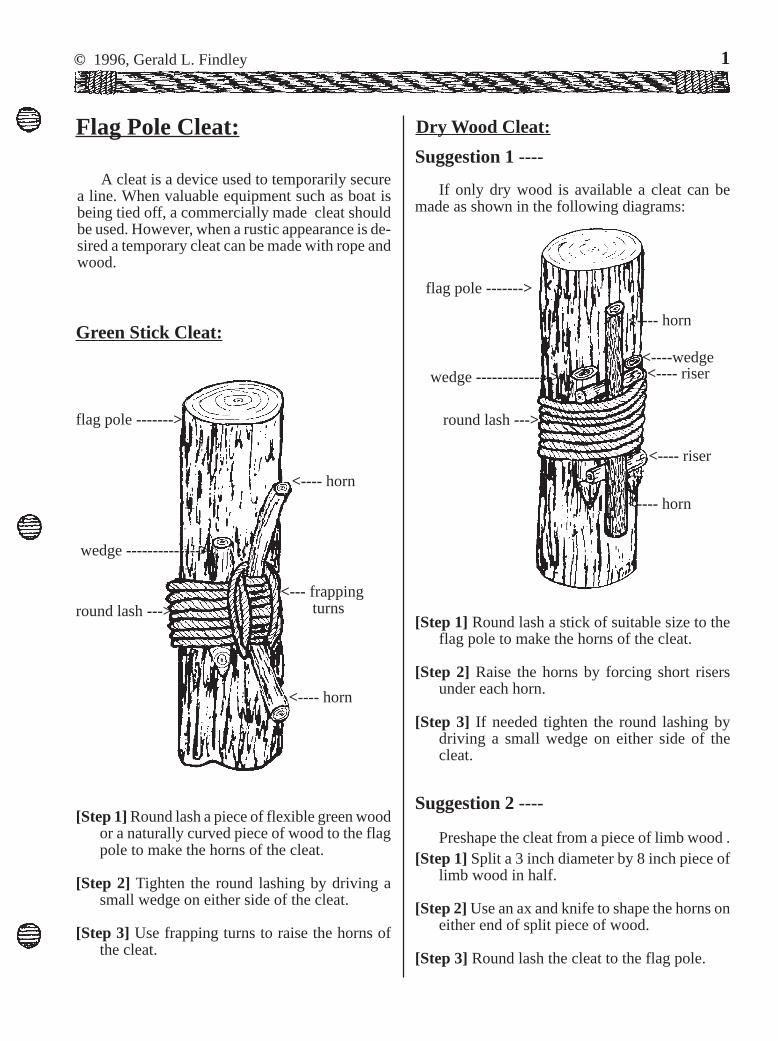
© 1996, Gerald L. Findley 1
Flag Pole Cleat:
A cleat is a device used to temporarily securea line. When valuable equipment such as boat isbeing tied off, a commercially made cleat shouldbe used. However, when a rustic appearance is de-sired a temporary cleat can be made with rope andwood.
[Step 1] Round lash a piece of flexible green woodor a naturally curved piece of wood to the flagpole to make the horns of the cleat.
[Step 2] Tighten the round lashing by driving asmall wedge on either side of the cleat.
[Step 3] Use frapping turns to raise the horns ofthe cleat.
flag pole ------->
round lash ---><--- frapping turns
<---- horn
<---- horn
wedge -------------->
Green Stick Cleat:
Dry Wood Cleat:
<---- horn
<---- horn
wedge -------------->
flag pole ------->
round lash --->
<---- riser<----wedge
<---- riser
[Step 1] Round lash a stick of suitable size to theflag pole to make the horns of the cleat.
[Step 2] Raise the horns by forcing short risersunder each horn.
[Step 3] If needed tighten the round lashing bydriving a small wedge on either side of thecleat.
If only dry wood is available a cleat can bemade as shown in the following diagrams:
Suggestion 1 ----
Suggestion 2 ----
Preshape the cleat from a piece of limb wood .[Step 1] Split a 3 inch diameter by 8 inch piece of
limb wood in half.
[Step 2] Use an ax and knife to shape the horns oneither end of split piece of wood.
[Step 3] Round lash the cleat to the flag pole.

© 1996, Gerald L. Findley2
[Step 4] Tighten the round lashing by driving asmall wedge on either side of the cleat.
Precut Cleats:
A cleat can be made from hard wood lumberby sawing it to the desired shape and then roundlashed to the flag pole. Small wedges are used oneither side of the cleat to tighten the round lashingand to stabilize the cleat.
1. 3.
Making Wedges:
[Step 1] Cut to size. Length --- slightly longer thanthe width of the round lashing. Diameter ---slightly larger than the gap formed betweenthe rope, the flag pole, and the cleat.
[Step 2] Cut one end off at an angle.
[Step 3] Taper the sides of the point so that thepoint of the wedge is on one side.
2.

© 1999, Gerald L. Findley 167
ROPE WRENCH:
fork
handle
|<------------ 18 inches -------------->|
Using A Rope Wrench:
[STEP 1] Use the rope wrench by placing it overthe pole next to the rope that is to be tightened.
[STEP 2] Wrap the rope around the fork of thewrench.
front view
STEP 3] Make one or two wraps around thehandle of the wrench.
[STEP 4] Grasp the handle so that you are hold-ing the rope firmly to the handle; then rotatethe wrench around the pole.
rotate---------------->
[NOTE] Tighten each turn of a lashing as it ismade. The friction between the rope and thepole is too great to tighten more then one turnat a time.
Maintain the tightness of the rope by keep-ing a small amount of tension on it or by press-ing the rope firmly against one of the poleswhile taking the next turn around the poles.
Be careful that the rope is not tightened sotight that the fibers of the rope begin to break.
|<-------->|6 inches
A rope wrench is a simple tool that can be usedto tighten the ropes of a lashing. Use a crochet stickthat is about 18 inches long and 1 1/2 inches indiameter; the crotch should be about 6 inches fromthe end.
back view
back viewfront view
front view back view

© 1996, Gerald L. Findley 99
NETTING:
The making of netting is an ancient craft. Manyprehistoric cultures used netting for a verity of uses,storage bags, fencing, hammock, just to name someand of course the obvious use as a fish net. Nomatter what the netting was used for, the knittingof the mesh was done by tying a series of loops insome type of twine.
In one method, the basic knot used was thesheet bend. To form and tie the loops a knittingshuttle and a spacer (gauge) were used.
|-------------|----|----------| 2 1/2" 1/4" 1 1/2"
|----|3/4"
cross sections
Make the knitting shuttle from a 1/4 inch * 1inch * 12 inch piece of smooth grained hard wood.Carve and sand the shuttle to the shape shown inthe diagram. Leave the shuttle unfinished; varnishor paint has a tendency to become sticky.
Knitting Gauge:
Make the knitting gauge from a 1/4 inch * 1 1/4 inch * 12 inch piece of smooth grained hardwood. Carve and sand the gauge to the shape shownin the diagram. Leave the gauge unfinished; var-nish or paint has a tendency to become sticky.
|--------------------12 inches------------------|
1 1/
4"
cross sections
|------------|
Filling The Knitting Shuttle:
STEP 1: Fill the shuttle with twine.Start by tying a single hitcharound the tongue of the shuttleand then pass the twine throughthe notch.
STEP 2: Turn the shuttle over,loop the twine around thetongue and then through thenotch.
NETTING TOOLS:
The size of the shuttle and gauge that is neededwill depend on the project that you are workingon. The size of the shuttle and gauge given in thefollowing directions is a convenient size for manyprojects and is also a good size to use for practic-ing the craft of netting. Shuttles and gauges of dif-ferent sizes can be made by changing the size ofthe materials used.
Knitting Shuttle:

100 © 1996, Gerald L. Findley
STEP 3: Continue turning the shuttle from sideand looping the twine around the tongue untilthe shuttle is filled.
[NOTE] To prevent synthetic twine from fraying,use a candle flame to cut and fuse the ends.
[WARNING] Using a butane cigarette lighter tocut or fuse synthetic rope or twine may causethe lighter to over heat and explode.
DIAMOND MESH NETTING:
Diamond mesh netting is the easiest of the twoforms of mesh to make. Square mesh netting willbe dealt with latter.
Casting On: To start diamond mesh netting thefirst row of mesh loops is cast on to a loop ofsome kind. The kind of loop used depends onthe project; a ring, grommet, frame or loop oftwine may be used. The following directionsare for casting on to a ring but the same stepsmay be used for any starting loop.
STEP 1: Tie theend of thetwine to thering with aclove hitchstopped withtwo halfhitches.
STEP 2: Place the twine behind the gauge thenbring the twine in front of the gauge and to theright.
[NOTE]: The dot-ted circles ineach of the dia-grams is used toshow the posi-tion of thethumb and fin-ger of the lefthand.
STEP 3: Reeve the twine through the ring fromthe front to the back so that an overhand loopis formed.
STEP 5: Lay the twine across the ring from leftto right.
pull
STEP 4: Pull the twine to the left to tighten thetwine around the ring and the gauge.

© 1996, Gerald L. Findley 101
STEP 6: Reeve the twine through the ring fromthe back to the front.
STEP 7: Place the twine behind the gauge; thenpull the twine downward to tighten the twinearound the ring. This forms a lark’s head knotaround the ring.
STEP 8: Repeat steps 2 through 7 for each addi-tional loop required for the project.
Netting is made by knitting roes of mesh usinga shuttle and a gauge. The gauge is used to deter-mine the size of the mesh, and the shuttle is usedto hold the twine and form and tie the mesh loops.The basic knot used in netting is the sheet bend.The following diagrams illustrate the tying of thesheet bend as it is used for knitting a net.
KNITTING A ROW OF MESH:
STEP 1: Bring the twine down and up the backof the gauge. Then pick up the next loop bypassing the shuttle through the loop from frontto back.
STEP 2: Pull the twine to the left to tighten thetwine around the gauge. Use the thumb andfinger of the left hand to hold the twine in place.
STEP 3: Lay a loop of twine over the loop justpicked up.

102 © 1996, Gerald L. Findley
STEP 4: Pass the shuttle in back of the picked uploop and the through the loop that was laid ontop.
STEP 5: Pull the twine downward and slightly tothe right to tighten the knot.
pull
------------>
STEP 6: Repeat steps 1 through 5 for each loopin the row.
STEP 1: When the endof a row of mesh isreached, slide the accu-mulated loops off thegauge, turn the workpiece over so that therunning end of thetwine is on the left sideof the work piece.
STARTING A NEW ROW:
STEP 2: Wrap the twine around the gauge fromfront to back; pick up the first loop by passingthe shuttle through the loop from back to front.
STEP 3: Knit the loop in place by following thedirections for knitting a row of mesh.
ADDING A LOOP:
For someprojects it is neces-sary to increasethe width of thenetting part waythrough theproject. The widthof the netting is in-creased by addingloops of mesh.
A loop is addedby picking up thesame loop a secondtime so that twoloops are formed inthe new row of meshare tied to the sameloop in the previousrow of mesh.

PROLONG KNOTDESCRIPTION: A flat knot that is made by interweaving two strands of rope.USE: As stair tread, mat, or chafing gear; also as a decorative knot in a two strand lanyard.COMMENTS: The prolong knot gets its name from the fact that it can be extended to any length.
STEP 2:Extend the half knot asshown.
TYING:STEP 1:Place the center of therope over a peg or hookand tie a loose half knot.
STEP 3:Twist the left loop andextend it to the right side.
[NOTE] This will startthe over under patternof the weaving.

STEP 4: Twist the right loop andextend it to the left sideso that it is over the firstextended loop.
STEP 5: Weave the left strand tothe right in the patternshown.
STEP 6: Weave the right strandto the left in the patternshown.
[NOTE] This completesthe four bight prolongknot. At this stage it maybe ended and workedfirm (over tighteningdistorts the knot) or thestrands my be doubbledas shown in later dia-grams.

STEP 7: Twist the left loop andextend it to the right side.
STEP 8: Twist the right loopand extend it to the leftside so that it is over thefirst extended loop.
STEP 9: Weave the right strandto the left in the patternshown.

STEP 10: Weave the left strand tothe right in the patternshown. This completesthe 7 bight form of theprolong knot.
[NOTE] The prolongknot can be extendedthree bights at a time byrepeating steps 7 through10 for each extension.
STEP 11: Start doubling thestrands by chacing (fol-lowing) the oppositestrand.

STEP 12: Complete doubling thestrands. Then work theknot into a firm mat . Donot over tighten thestrands as this will distortthe mat.
[NOTE] The ends of thestrands can be hidden bysewing them to the adja-cent strand on the under-side of the mat.

© 1996, Gerald L. Findley 69
LIFE BASKET :Description ---- A body harness made by com-
bining a bowline on a bight and a french bow-line.
Use ---- To lower a severally injured person whena life threatening situation exists.
Comments ---- The life basket is a secure harnessthat can be used to move an injured person thatis weakened or unconscious. However, unlessthere is a life threatening situation, such as aburning building or immediate danger of ava-lanche, you should wait for a trained rescueteam.
If you attempt to use the life basket, donot allow the rope to slide through your handsas you lower the injured person . The frictioncaused by the sliding rope can cause severepainful rope burns and loss of control of therope. The rope must be let out in a hand overhand manner to insure a safe, controlled de-scent.
Narration ---- (1) Tie a bowline on a bight. Placeone loop of the bowline on a bight around eachleg. [NOTE] (The bowline on a bight shouldbe large enough so that when it is in place theknot should be close to the victims belt buckle.Be sure to leave the running part of the ropeextending about 3 feet beyond the knot.)
(2) Take a half hitch around the victims chest.
2.
1.

70 © 1996, Gerald L. Findley
(3) Form a bight in the standing part by pulling itunder the right hand part of the half hitch sothat an underhand loop is formed around thecross point of the half hitch.
(4) Fold the bight around and reeve it through theeye of the underhand loop.
(5) Reeve the running part of the rope through thebight.
(6) Take the slack out of the running part of therope and fold the it over to form interlockingbights.
(7) Pull on the standing part so that the bight in therunning part of the rope is pulled through theeye of the underhand loop and the underhandloop flips over and tightens around the bightto form a French Bowline.
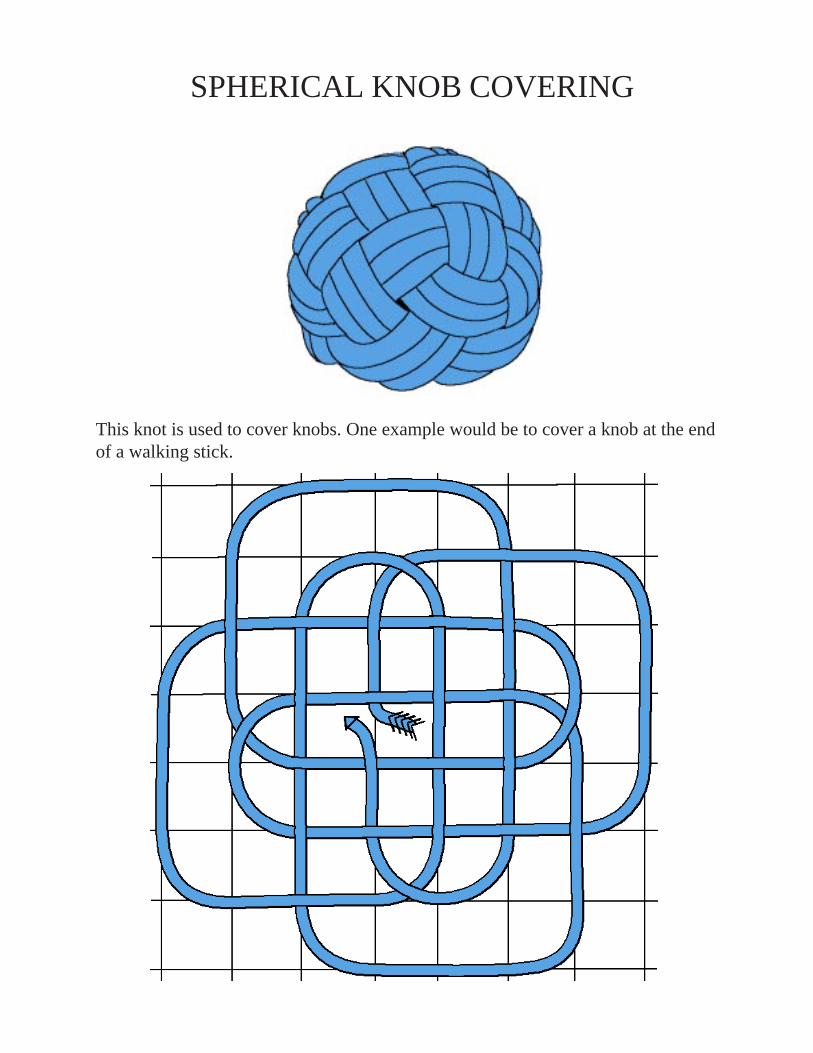
SPHERICAL KNOB COVERING
This knot is used to cover knobs. One example would be to cover a knob at the endof a walking stick.

After the knot is tied on the work board unpin it and work it loosely into shape overthe knob. Then chase the pattern the required number of times. Next work the knottight around the knob. Do not rush this stage. When the knot is tight cut off the ends ofthe cord and push the ends into the knot.
To preserve the knot, it may be varnished or painted.
The length of cord needed to tie the knob covering knot depends on the size of thecord and the number of times the pattern is to be chased. A good length to start with is8 times the circumference of the knob for each time the pattern is to be chased. [Ex-ample: a one inch knob has a circumference of a little over 3 inches. To cover a oneinch knob it would require about 25 inches of cord for each time the pattern is chased.The pattern should be chased at least 2 times. This means that about 50 inches of cordwould be used to cover a 1 inch knob.
The knob covering knot is difficult to tie “in hand” the easiest method of tying it is tomake a copy of the diagram and fasten the diagram to a work board. Start by pinningthe middle of the cord to the feathered end of the arrow in the diagram. Then follow-ing the path indicated, pin the cord to the diagram. Be sure to follow the over/underpattern indicated in the diagram. Studying the following partial diagrams may help.

Walking Stick:
Carve a knob on the endof the walking stick.
If desired, the size of theknob can be increased bywrapping it with tape.
Tie the covering knotand work it tight overthe knob.
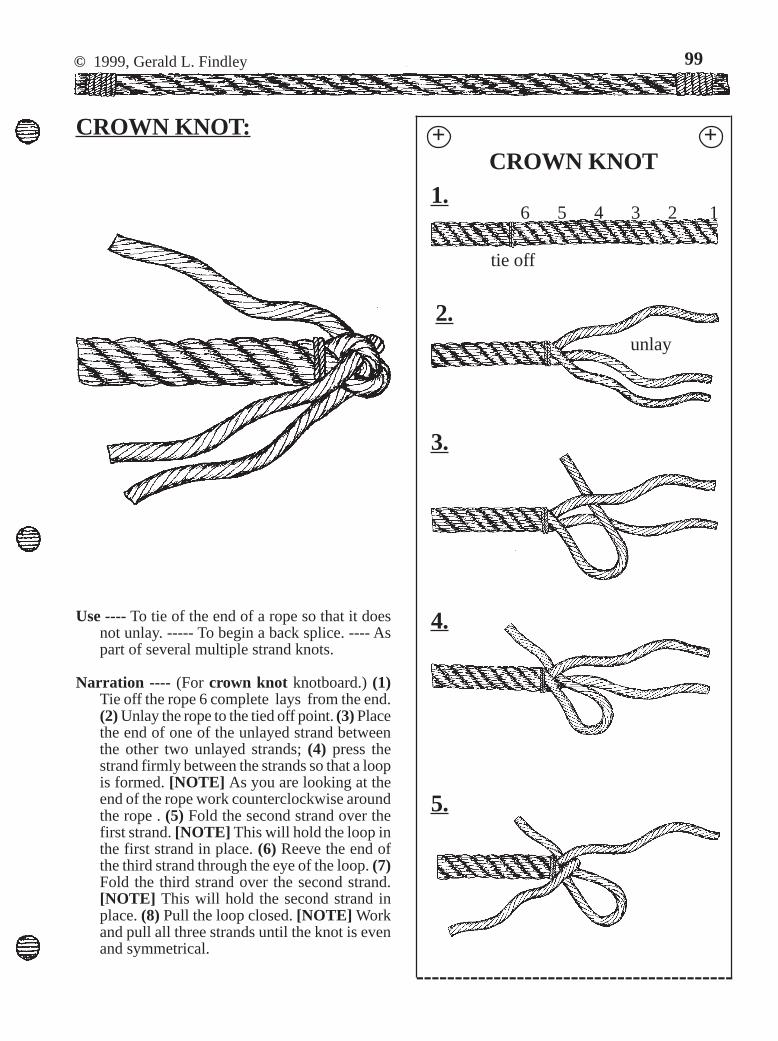
© 1999, Gerald L. Findley 99
CROWN KNOT:
Use ---- To tie of the end of a rope so that it doesnot unlay. ----- To begin a back splice. ---- Aspart of several multiple strand knots.
Narration ---- (For crown knot knotboard.) (1)Tie off the rope 6 complete lays from the end.(2) Unlay the rope to the tied off point. (3) Placethe end of one of the unlayed strand betweenthe other two unlayed strands; (4) press thestrand firmly between the strands so that a loopis formed. [NOTE] As you are looking at theend of the rope work counterclockwise aroundthe rope . (5) Fold the second strand over thefirst strand. [NOTE] This will hold the loop inthe first strand in place. (6) Reeve the end ofthe third strand through the eye of the loop. (7)Fold the third strand over the second strand.[NOTE] This will hold the second strand inplace. (8) Pull the loop closed. [NOTE] Workand pull all three strands until the knot is evenand symmetrical.
+ +CROWN KNOT
1.6 5 4 3 2 1
tie off
2.unlay
3.
4.
5.
-----------------------------------------

100 © 1999, Gerald L. Findley
+ +
6.
7.
8.
----------------------------------------[NOTE]
pull allstrandssnug andeven

WALL KNOT
Use ---- To tie of the end of a rope so that it does not unlay. ---- Aspart of several multiple strand knots.
(1) Tie off the rope 6 complete lays from the end
(2) Unlay the rope to the tied off point.
NOTE: work the knot in a counterclockwise direction as you look at the end of the rope.

(3) Place the end of one of the unlayed strands under the strand to its left. (Hold the loop open as
you work the knot).
(4) Place the second strand under the first and tthird strand.
(5) Placce the third strand under the second strand.
(6) Reeve the end of the third strand up through the loop formed in the first strand.
[A]
[B]

(7) work tight.


[Sterp 2]
[Sterp3]
ALAMAR KNOTThe alamar knot is a decorative knot related to the pretzel. The pretzel knot is tied in asingle strand; the alamar knot is tied by doubling the strands as showwn in [Step 1]
[Step 1] Double the strand as shown.

[Step 4]
[Step 5] Add tassels or other end decorations.

HomeE-Mail
ROPE WORKS ©1996 Gerald L. Findley, all rights reserved
LINKS
The International Guild of Knot Tyers
The International Guild of Knot Tyers, TexasBranch
Knots on the Web
Rope Works' Links
http://www.northnet.org/ropeworks/text/lin.html (1 of 2) [9/2/2004 9:06:18 PM]

U.S. Scouting Service Project
U.S. MACSCOUTER
HomeGUESTBOOK
Rope Works' Links
http://www.northnet.org/ropeworks/text/lin.html (2 of 2) [9/2/2004 9:06:18 PM]

HomeGUESTBOOK
ROPE WORKS ©1996 Gerald L. Findley, all rights reserved
The following topics about rope makingare covered in :
ROPE WORKSMATERIALS:
Any of the following materials may be used to make rope: binder twine, bailer twine, plastictwine, jute twine, yarn, string, or plastic bags. Just about any material that is made up of longflexible strands or that can be cut into strands can be used to make rope. However, onlytwines of proven strength should be used to make rope that will be expected to carry a load orlash a structure.
TYPE OF ROPE:
The type of rope that is explained in this book is three strand laid rope. This type of rope ismade by twisting three strands of fiber in one direction and then laying the three strandstogether by allowing the strands to twist together in the opposite direction.
A SIMPLE ROPE MACHINE:
Rope Making-A page that describes the topics on rope making covered in Rope Works.
http://www.northnet.org/ropeworks/text/r.html (1 of 3) [9/2/2004 9:06:31 PM]

The twisting and laying can be done by hand but this takes a longtime. To speed up the operation a machine is needed.
A rope machine consists of two devices; one that twists the threestrands, the twisting end; and one that is used to lay the twistedstrands together, the laying end.
ROPE WORKS has a set of diagrams showing a simple machinethat can be made from scrap lumber and coat hanger wire.
SETTING UP A ROPE MACHINE:
After the two ends of the rope machine are positioned, tie the endof the twine to the laying end hook. Then hook the twine over oneof the hooks on the twisting end, then back to the laying endhook. Continue back and forth until each of the three hooks onthe twisting end have two lengths of twine on it. Be careful tokeep the tension equal on all lengths of twine.
TWISTING THE STRANDS:
After the machine is set up, turn the cranks on the twisting end sothat the cranks are turning clockwise as you are looking at thecrank handles. It Is a good idea to mark this direction on the frame of the machine.
Twist the strands until they become firm and resist further twisting. If the strands are nottwisted tight enough the rope will be loose. On the other hand if you twist the strands tootight the strands will kink. Kinked or loose strands will weaken the rope. Experience willteach you when the amount of twist is just right.
[NOTE] During the twisting the laying end must not be turned.
[NOTE] While twisting and laying a modest amount of tension must be kept on the rope.
LAYING THE ROPE:
To lay the rope a rope-wrench will be needed. A rope-wrench can be made from a crotchedstick.
The actual laying of the rope is done by turning the laying end crank in a counterclockwisedirection and moving the rope-wrench toward the twisting end.
MAKING A GEARED ROPE MACHINE:
A geared rope machine not only speeds up theprocess of making rope but can also be used tomake rope several inches in diameter.
Rope Making-A page that describes the topics on rope making covered in Rope Works.
http://www.northnet.org/ropeworks/text/r.html (2 of 3) [9/2/2004 9:06:31 PM]

The patterns and instructions included inROPEWORKS are for building a wooden gearedrope machine that has a 3:1 gear ratio. This ropemachine can be constructed with hand tools.
Order a copy of RopeWorks now !Home
GUESTBOOKE-Mail
Rope Making-A page that describes the topics on rope making covered in Rope Works.
http://www.northnet.org/ropeworks/text/r.html (3 of 3) [9/2/2004 9:06:31 PM]

HomeGUESTBOOK
E-Mail ROPE WORKS ©1999
Gerald L. Findley, all rights reserved
Lashing
Lashings are used to join poles or spars when building pioneering structures. These structures canbe functional, such as tables, bridges, and towers or decorative such as gateways. The only limit asto the type of structure is the imagination of the builder.
Correctly tied lashings in pioneering structures are essential for safety. When young people see aninteresting structure they charge up and over with no thought as to the soundness of the structure.This places the responsibility for a safe structure directly on the builder.
The following topics about lashing arecovered in :
ROPE WORKSSquare Lashing
Diagonal LashingTripod Lashing With Racking Rurns
Tripod Lashing With Plain TurnsShear Lashing With Racking Turns
Shear Lashing With Plain TurnsShear Lashing Quick
Round LashingRound Lashing West Country
Floor Lashing
Lashing-A page describing lashing topics covered in Rope Works.
http://www.northnet.org/ropeworks/text/l.html (1 of 2) [9/2/2004 9:06:31 PM]

Order a copy of RopeWorks now !
HomeE-Mail
Lashing-A page describing lashing topics covered in Rope Works.
http://www.northnet.org/ropeworks/text/l.html (2 of 2) [9/2/2004 9:06:31 PM]

HomeGUESTBOOK
E-Mail ROPE WORKS ©1999
Gerald L. Findley, all rights reserved
Splicing
Splicing is used to join ropes together by interweaving the strands of the rope. Splicing is the safestway to fasten two ropes together or to form a loop. Knots could also be used to do these jobs butknots weaken the rope by as much as 30 to 55 percent of the original strength of the rope. However,with a splice the rope is 85 to 90 percent as strong as the original rope. Splicing should be usedwhenever there is a concern about safety or when the loop or joint is going to be left in the rope.
[NOTE] After a splice is started or after each round of tucks, fold the strands back over the work.You will notice that there is one strand going in and one strand coming out between each of thestrands of the standing end. If this configuration does not exist you have made a mistake; trace thestrands back and correct the mistake or pull strands out and start over.
The following topics about splicing arecovered in :
ROPE WORKSCrown KnotBack SpliceEye Splice
Short SpliceAdding A Round Of Tucks
Ending A Splice
Splicing-A page describing splicing topics covered in Rope Works.
http://www.northnet.org/ropeworks/text/s.html (1 of 2) [9/2/2004 9:06:33 PM]
Order a copy of RopeWorks now !Home
GUESTBOOKE-Mail
Splicing
Splicing-A page describing splicing topics covered in Rope Works.
http://www.northnet.org/ropeworks/text/s.html (2 of 2) [9/2/2004 9:06:33 PM]

HomeGUESTBOOK
E-Mail ROPE WORKS ©1996
Gerald L. Findley, all rights reserved
Knots
The use of rope in the workplace was common practice until the midpoint of this century. At thattime, modern materials handling techniques started to be used and the use of ropes declined. Alongwith this decline in the use of ropes in the work place there was also a decline in the knowledge ofhow to use rope safely.
The more common uses of rope by the average person is the securing of a load to a personal vehicleor for recreational purposes. Both of these uses require a knowledge of how to choose and tie safe,secure knots. If this knowledge is not available, the consequences can be devastating, resulting inpersonal injury or the loss of personal equipment.
For the last 35 years I have been learning and teaching about rope. My experience in teaching aboutrope has shown me that most people must be shown how to tie a knot in small, sequential steps, andthey must be shown many times before they can tie a knot with confidence.
In preparing this book I have attempted to design a set of teaching aids that present each selectedknot, splice, or lashing in small, sequential steps. These teaching aids enable the learner to studyeach step and to duplicate it with a length of practice rope.
The knots, splices and lashings presented in this book were selected because of their use by the BoyScouts of America and others who are interested in outdoor recreation.
The following knots and hitches are covered in :
ROPE WORKSWhipping (3 methods)
ServiceGrapevine ServiceRingbolt Hitching
SezingSezing With Racking Turns
Figure EightFigure Eight On A Bight
Stevedore KnotStopper KnotSquare KnotWater KnotSheet Bend
Double Sheet BendSheet Bend (Short End)
BowlineBowline On A Bight
Knots-A page describing the knots and hitches found in Rope Works.
http://www.northnet.org/ropeworks/text/k.html (1 of 2) [9/2/2004 9:06:34 PM]

French BowlineLineman's Loop
SheepshankTrumpet Knot
Sheepshank (Quick)Clove Hitch
Constrictor KnotMonkey's Paw
Turk's HeadTwo Half Hitches
Taut-line HitchTimber Hitch
Mooring HitchMarlin Spike Hitch
Marlin Spike LadderAnchor Bend
Belaying To A CleatJug Knot
Order a copy of RopeWorks now !
HomeE-Mail
Knots-A page describing the knots and hitches found in Rope Works.
http://www.northnet.org/ropeworks/text/k.html (2 of 2) [9/2/2004 9:06:34 PM]

HomeGUESTBOOK
ROPE WORKS ©1996 Gerald L. Findley, all rights reserved
INTRODUCTION
ROPE WORKS is a book that evolved to meet the needs of Scouts and Scouters. R0PE WORKS'97 pages are bound in a plastic comb binding that allows it to lay flat while in use. Its 6 inch by 81/2 inch size makes it convenient to carry as a reference source. ROPE WORKS provides detailedstep by step illustrations in a knot board layout. The knot board layout clearly shows each steprequired to tie a knot. The detailed steps allows the user of ROPE WORKS to learn the art of knottying, splicing, and lashing without the constant supervision of an instructor. The table of contents,glossary of terms and complete index will help you find and tie the knots you need.
Twenty-two pages of ROPE WORKS are devoted to rope making and the building of a gearedrope machine.
View our sample illustrations to see what we are talking about. Then order your copy of RopeWorks today by using the handy mail in order form found at our Ordering Information button.
KNOT SAFETY
If a knot is improperly tied or a wrong knot is used, an unsafe condition is created. Therefore it isnot just enough for the teacher to teach someone how to tie a knot correctly, but it is also necessaryto teach them how to use the knot correctly. Likewise it is the student's responsibility to learn howto correctly tie and use the knot. If either the teacher or the student does not accept theirresponsibility they are endangering themselves and others.
The most commonly used rope is right hand-lay rope; that is as you are looking at the rope, itappears to twist to the right and away from you. Because of the right-hand lay of most rope, themajority of knots hold best when tied in a right hand manner. If the knot is tied in a left-handmanner or the mirror image of its usual form, the knot may fail because the right-hand twist of therope may cause the knot to loosen or spill more easily. This is especially true if the tension on therope is repeatedly changed.
Thanks and safe tying.
Introduction to Rope Works-A page that describes the method of presentation in Rope Works
http://www.northnet.org/ropeworks/text/rbi.html (1 of 2) [9/2/2004 9:06:35 PM]

HomeGUESTBOOK
Introduction to Rope Works-A page that describes the method of presentation in Rope Works
http://www.northnet.org/ropeworks/text/rbi.html (2 of 2) [9/2/2004 9:06:35 PM]
Sign UpSteps
1. Review Selections
2. Sign In
3. Contact Information
4. Terms of Service
5. Online Purchase
6. InvoiceConfirmation
Please sign in to bCentral.com
with Microsoft ® .NET Passport
Register for a new Passport or Sign-in
If you dont already have a .NET Passport:Create a new Passport for your bCentral.com account
●
Current bCentral Customers, or if you have an existing Passport that you want to use withyour bCentral.com account:
Note: Only one .NET Passport may be associated with your bCentral account. Once a .NETPassport is associated with a bCentral account, you will be unable to change it. If you arecreating a bCentral business account accessible by more than one person at your business, wesuggest creating a .NET Passport for your business to use exclusively with bCentral. For moreinformation on Microsoft .NET Passport, please see http://www.passport.net/ .
●
About bCentral | Customer Service | Terms of Service | Advertise | Privacy Statement | Help
Copyright© 2004 Microsoft Corporation All Rights Reserved
Microsoft bCentral
http://ulogin.bcentral.com/cookie_detect.asp?from=...l%2Ecom%2Fglobal%2Fselect%5Faccount%2Easp%3F537814 [9/2/2004 9:06:38 PM]

* Microsoft.com Home|Site Map
Microsoft *Search Microsoft.com for:
Small Business Center
Home|
Search for
Online Services
*Online Services
Internet Marketing
*Sales Leads
*Search EngineSubmissions
*E-mail Marketing
*Business Listings
*Web Site Traffic
*Banner Advertising
Web Sites & Commerce
*Web Hosting
*E-commerce Solutions
*Site Traffic Analysis
*Web Collaboration
*Appointment Scheduling
More Business Tools
*Products Overview
Events & Support
*Events Overview
*Support Overview
*Site Map
Manage & Analyze your Web Site Trafficwith FastCounter Pro
Monitor the effectiveness of your Web site in real-time
Make sure your Web site is working for you!FastCounter Pro is our easy to use and affordabletraffic analysis service that allows you to monitoryour Web site traffic. Use this information to youradvantage and improve the design and efficiency ofyour Web site. FastCounter Pro allows you to:
Monitor the success of your Web site in real-time●
Measure the ROI of your advertising campaigns●
Track your conversions to see how valuable your traffic is●
Find out which referrer sends you the most sales●
See which keyword phrases are being used in search engines to find your site●
Collect data about the operating systems and browsers of your visitors●
Get online support 24x7●
Check out our live demo of FastCounter Pro!
FastCounter Pro — Monthly Plan — Free 30 Day Trial
US $19.95/month - Includes up to 50,000 page views/month($.30 per 1,000 page views above 50,000/month)
More Information Contact Microsoft
Web Site Traffic Analysis with Microsoft FastCounter Pro
http://www.bcentral.com/404.asp?404;http://www.bcentral.com/products/fs/default.asp (1 of 2) [9/2/2004 9:06:44 PM]

"More Info & Product Details"Start FastCounter Pro Live Demo"FastCounter Pro FAQs"FastCounter Pro How-To Guide"Support For FastCounter Pro"Online Services Privacy Policy"Online Services Terms of Service Policy
Questions about Microsoft products?Call (877) 637-8159(9am - 9pm ET Daily)
Please contact me with more info on howFastCounter Pro can help meet my needs
Manage Your Profile |Free Newsletter |Contact Us
©2004 Microsoft Corporation. All rights reserved. Terms of Use |Trademarks |Privacy Statement
Web Site Traffic Analysis with Microsoft FastCounter Pro
http://www.bcentral.com/404.asp?404;http://www.bcentral.com/products/fs/default.asp (2 of 2) [9/2/2004 9:06:44 PM]

Microsoft.com Home|Site Map
Search Microsoft.com for:
Home|
Search for
Online Services
Online Services
Internet Marketing
Sales Leads
Search EngineSubmissions
E-mail Marketing
Business Listings
Web Site Traffic
Banner Advertising
Web Sites & Commerce
Web Hosting
E-commerce Solutions
Site Traffic Analysis
Web Collaboration
Appointment Scheduling
More Business Tools
Products Overview
Events & Support
Events Overview
Support Overview
Site Map
Manage & Analyze your Web Site Trafficwith FastCounter Pro
Make sure your Web site is working for you!FastCounter Pro is our easy to use and affordabletraffic analysis service that allows you to monitoryour Web site traffic. Use this information to youradvantage and improve the design and efficiency ofyour Web site. FastCounter Pro allows you to:
Monitor the success of your Web site in real-time●
Measure the ROI of your advertising campaigns●
Track your conversions to see how valuable your traffic is●
Find out which referrer sends you the most sales●
See which keyword phrases are being used in search engines to find your site●
Collect data about the operating systems and browsers of your visitors●
Get online support 24x7●
Check out our live demo of FastCounter Pro!
FastCounter Pro — Monthly Plan — Free 30 Day Trial
US $19.95/month - Includes up to 50,000 page views/month($.30 per 1,000 page views above 50,000/month)
More Information Contact Microsoft
Web Site Traffic Analysis with Microsoft FastCounter Pro
http://www.microsoft.com/smallbusiness/products/online/fs/detail.mspx (1 of 2) [9/2/2004 9:07:01 PM]

"More Info & Product Details"Start FastCounter Pro Live Demo"FastCounter Pro FAQs"FastCounter Pro How-To Guide"Support For FastCounter Pro"Online Services Privacy Policy"Online Services Terms of Service Policy
Questions about Microsoft products?Call (877) 637-8159(9am - 9pm ET Daily)
Please contact me with more info on howFastCounter Pro can help meet my needs
Manage Your Profile |Free Newsletter |Contact Us
©2004 Microsoft Corporation. All rights reserved. Terms of Use |Trademarks |Privacy Statement
Web Site Traffic Analysis with Microsoft FastCounter Pro
http://www.microsoft.com/smallbusiness/products/online/fs/detail.mspx (2 of 2) [9/2/2004 9:07:01 PM]


![to a Friend. - zetatalk.com fileWeekly Chats on the Pole Shift ning 2/5/2012 11:31:47 AM] Weekly Chats on the Pole Shift ning Archives](https://img.dokumen.tips/doc/110x75/5d66f60988c993283a8b563c/to-a-friend-chats-on-the-pole-shift-ning-252012-113147-am-weekly-chats-on.jpg)