Embed Size (px)
Citation preview

Troop 521, Douglassville PA
Knot Master Program Guide
Larry J. Jolivette 5/18/2015

Page 2 of 33
Table of Contents Introduction .................................................................................................................................................. 4
Knot Terminology .......................................................................................................................................... 5
White Level ................................................................................................................................................... 6
Square Knot ............................................................................................................................................... 6
Two Half Hitches ....................................................................................................................................... 6
Taut Line Hitch .......................................................................................................................................... 7
Solomon Bar .............................................................................................................................................. 8
Yellow Level ................................................................................................................................................ 10
Bowline ................................................................................................................................................... 10
Timber Hitch............................................................................................................................................ 11
Clove Hitch .............................................................................................................................................. 11
Figure 8 Loop ........................................................................................................................................... 12
Square Lashing ........................................................................................................................................ 13
Shear Lashing .......................................................................................................................................... 14
Common Whipping ................................................................................................................................. 15
Green Level ................................................................................................................................................. 16
Sheet Bend .............................................................................................................................................. 16
Slipped Buntline ...................................................................................................................................... 16
Marlinspike Hitch .................................................................................................................................... 17
Adjustable Grip Hitch .............................................................................................................................. 17
Thief Knot ................................................................................................................................................ 18
Bowline on a Bight .................................................................................................................................. 18
Diagonal Lashing ..................................................................................................................................... 19
Tripod Lashing ......................................................................................................................................... 19
Round Lashing ......................................................................................................................................... 21
Blue Level .................................................................................................................................................... 22
Surgeon’s Knot ........................................................................................................................................ 22
Ashley Stopper ........................................................................................................................................ 22
Cleat Hitch (halyard) ............................................................................................................................... 23
Double Fisherman’s Knot ........................................................................................................................ 24
Constrictor .............................................................................................................................................. 24
Page 3 of 33
Improved Clinch ...................................................................................................................................... 25
Running Bowline ..................................................................................................................................... 25
Alpine Butterfly Knot .............................................................................................................................. 26
Red Level ..................................................................................................................................................... 27
Monkey’s Fist .......................................................................................................................................... 27
Trucker’s Hitch ........................................................................................................................................ 28
Turk’s Head Knot ..................................................................................................................................... 28
Windsor Tie Knot .................................................................................................................................... 29
Braid Knot ............................................................................................................................................... 30
Slippery Eight Loop ................................................................................................................................. 30
Tumble Hitch ........................................................................................................................................... 31
Gnat Hitch ............................................................................................................................................... 31
Prusik Hitch ............................................................................................................................................. 32
Make a Camp Gadget .............................................................................................................................. 32
Black Level ................................................................................................................................................... 33

Page 4 of 33
Introduction Knots and lashings are vital to a wide variety of outdoor activities including as camping, fishing,
boating, climbing, gardening, etc., and to responding in emergency situations such as first aid
administration and rescues. As such, tying knots and lashings is a skill that has been central to Scouting
since its inception over 100 years ago. Knots are an important part of the rank advancement from Scout
to First Class. Like a foreign language, the more you practice tying knots and lashings, the more
proficient and comfortable you become in putting them into use.
This program is similar to a martial arts program, in that, each level completed is depicted by a
“color” rank. In this case, a cord is used in place of a belt. The cord is tied in a Solomon bar and is
carried on the uniform with a carabineer. To begin, each participant will be given a white 5’ section of
Paracord and a carabineer. After completion of this level (white), there are 5 more levels; i.e., yellow,
green, blue, red and black.
The knots incorporated into the program range from the basic Scout knots to a variety of
advanced camping, rescue and decorative knots that may be useful in both the outdoors and everyday
life. The intent of this program is to reiterate and reinforce the role of knots in scouting, to spark an
interest in this challenging skill, and to provide a fun way to encourage practicing and improving knot
tying skills.
Each participant will get a sign-off booklet with each of the Knot Master levels. It is the
participant’s responsibility to seek out someone that holds a Knot Master rank above the level the
participant is working on, e.g., yellow or above is needed to sign-off on white requirements. The
participant must demonstrate the ability tie the knot without assistance, drawings or other aids. Once a
participant completes the requirements for a given level, they will demonstrate their knowledge of the
requirements to a Scoutmaster or other designated adult leader. Upon completion, they will receive the
next level color cord.
Page 5 of 33
Knot Terminology Bend: knot used to join two lengths of rope.
Bight: any part of a rope between the ends. Bight is also used to refer to a curved section of rope
within a knot being tied.
Binding Knot: knot that either constrict a single object or hold two objects snugly together.
Whippings and lashings serve a similar purpose but contain too many wraps to be properly
called a knot
Decorative Knot: an aesthetically pleasing knot.
Fraps: a set of loops coiled perpendicularly around the wraps of a lashing as a means of tightening.
Hitch: a knot that attaches a rope to an object, often a ring, rail, spar, or post.
Lashing: an arrangement of rope used to secure two or more items together in a rigid manner.
Loop: A bight becomes a loop when the two ropes cross. If the working end is crossed over the
standing line, it is an overhand loop. It is an underhand loop if the working end runs under
the standing part.
Loop Knot: a knot that forms a fixed loop. It is created when the end of a rope is fastened to its
own standing part or when a loop in the bight of a rope is knotted. Unlike a hitch, a loop
knot maintains is structure regardless of whether or not it is fastened to an object.
Noose: any sliding loop in which the loop tightens when pulled.
Open loop: a curve in a rope that resembles a semicircle in which the legs are not touching or
crossed. The legs of an open loop are brought together narrower that they are in a bight.
Slipped Knot: any knot that unties when an end is pulled.
Standing Part: the part of the rope that is not being used; may also be referred to as ‘standing end.’
Stopper Knot: type of knot tied to prevent a rope from slipping through a grommet, eyelet or hole.
Whipping: a binding knot tied around the end of a rope to prevent the rope from unraveling.
Working End: The active end being used to tie the knot. It may also be referred to as running end
or running part.
Wraps: a set a turns made around two spars (poles) to hold the spars tightly together.
Page 6 of 33
White Level The white level knots are as follows:
Square knot
Two half hitches
Taut line hitch
Solomon bar.
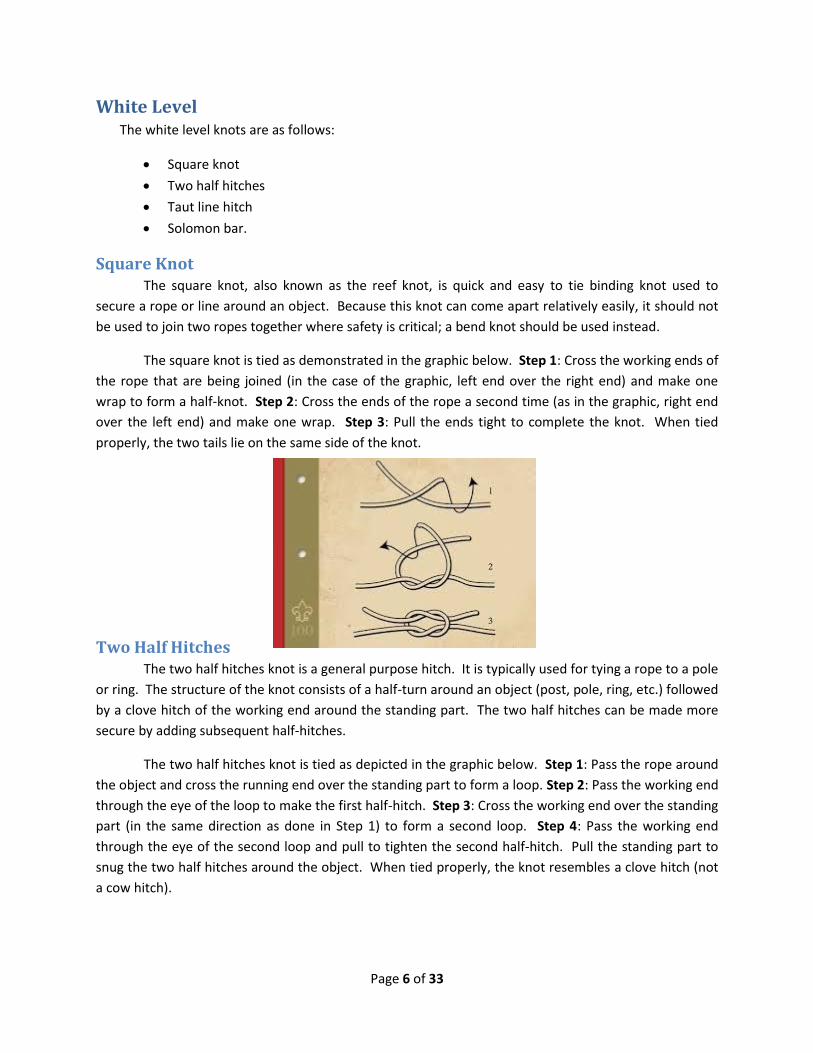
Square Knot The square knot, also known as the reef knot, is quick and easy to tie binding knot used to
secure a rope or line around an object. Because this knot can come apart relatively easily, it should not
be used to join two ropes together where safety is critical; a bend knot should be used instead.
The square knot is tied as demonstrated in the graphic below. Step 1: Cross the working ends of
the rope that are being joined (in the case of the graphic, left end over the right end) and make one
wrap to form a half-knot. Step 2: Cross the ends of the rope a second time (as in the graphic, right end
over the left end) and make one wrap. Step 3: Pull the ends tight to complete the knot. When tied
properly, the two tails lie on the same side of the knot.
Two Half Hitches The two half hitches knot is a general purpose hitch. It is typically used for tying a rope to a pole
or ring. The structure of the knot consists of a half-turn around an object (post, pole, ring, etc.) followed
by a clove hitch of the working end around the standing part. The two half hitches can be made more
secure by adding subsequent half-hitches.
The two half hitches knot is tied as depicted in the graphic below. Step 1: Pass the rope around
the object and cross the running end over the standing part to form a loop. Step 2: Pass the working end
through the eye of the loop to make the first half-hitch. Step 3: Cross the working end over the standing
part (in the same direction as done in Step 1) to form a second loop. Step 4: Pass the working end
through the eye of the second loop and pull to tighten the second half-hitch. Pull the standing part to
snug the two half hitches around the object. When tied properly, the knot resembles a clove hitch (not
a cow hitch).
Page 7 of 33
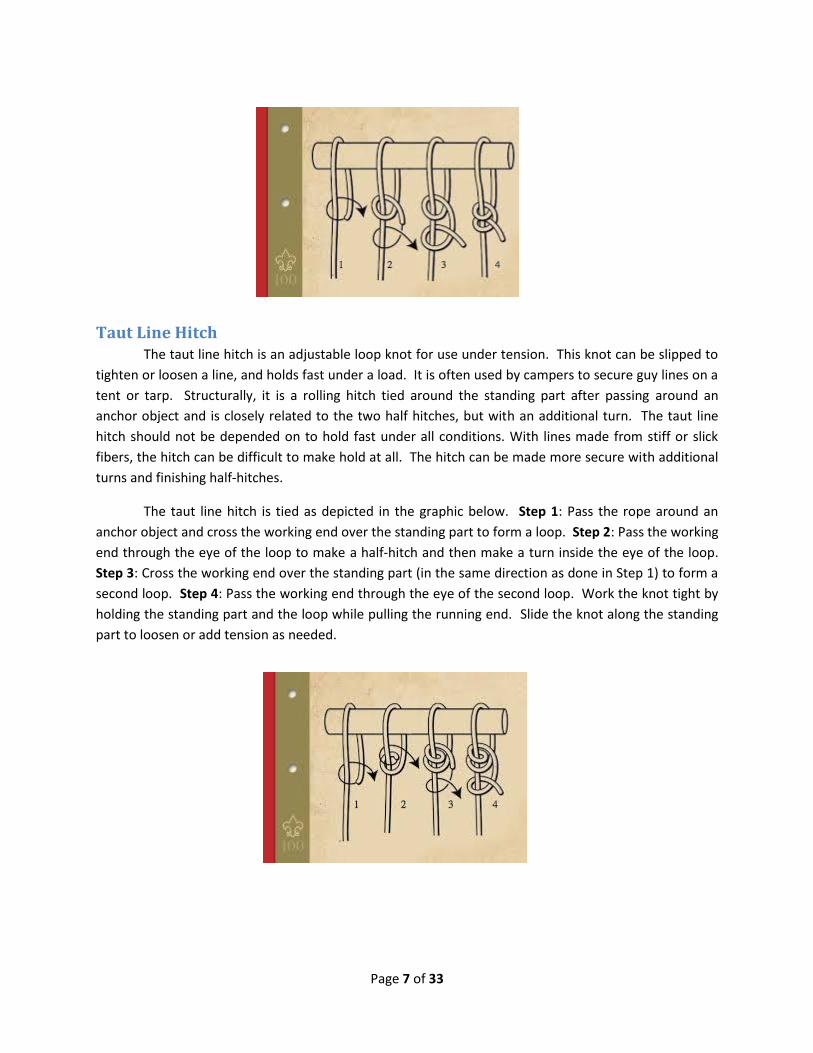
Taut Line Hitch The taut line hitch is an adjustable loop knot for use under tension. This knot can be slipped to
tighten or loosen a line, and holds fast under a load. It is often used by campers to secure guy lines on a
tent or tarp. Structurally, it is a rolling hitch tied around the standing part after passing around an
anchor object and is closely related to the two half hitches, but with an additional turn. The taut line
hitch should not be depended on to hold fast under all conditions. With lines made from stiff or slick
fibers, the hitch can be difficult to make hold at all. The hitch can be made more secure with additional
turns and finishing half-hitches.
The taut line hitch is tied as depicted in the graphic below. Step 1: Pass the rope around an
anchor object and cross the working end over the standing part to form a loop. Step 2: Pass the working
end through the eye of the loop to make a half-hitch and then make a turn inside the eye of the loop.
Step 3: Cross the working end over the standing part (in the same direction as done in Step 1) to form a
second loop. Step 4: Pass the working end through the eye of the second loop. Work the knot tight by
holding the standing part and the loop while pulling the running end. Slide the knot along the standing
part to loosen or add tension as needed.
Page 8 of 33
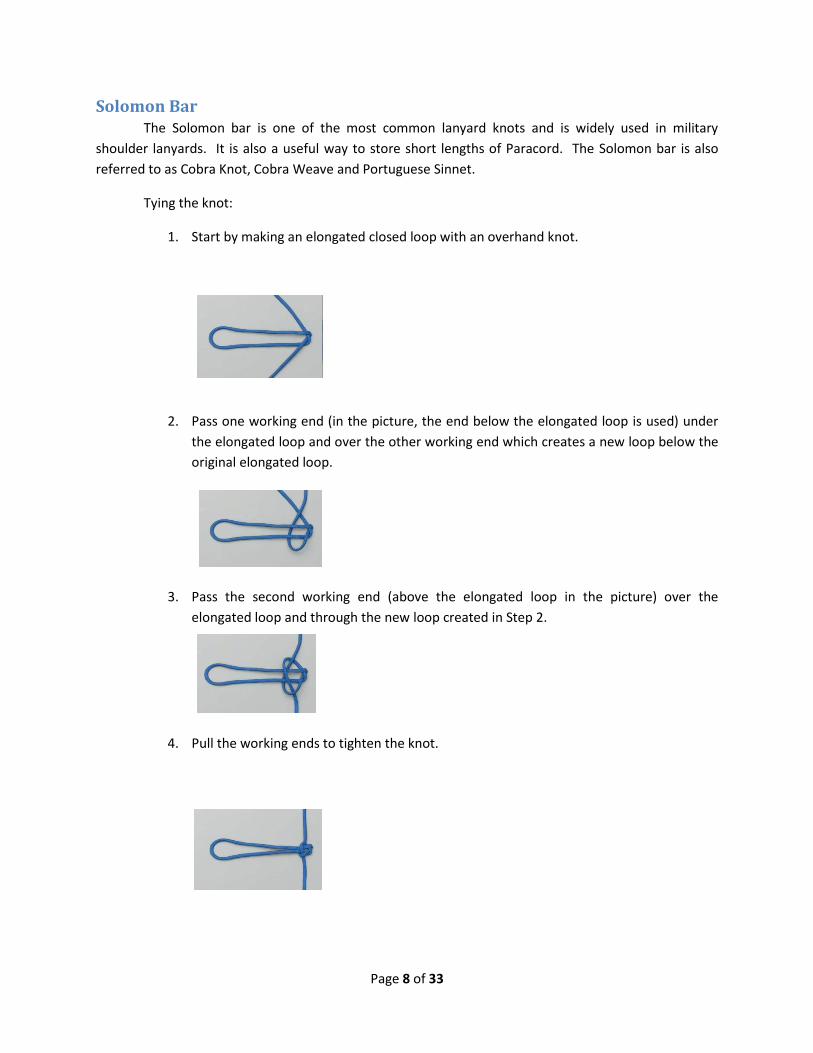
Solomon Bar The Solomon bar is one of the most common lanyard knots and is widely used in military
shoulder lanyards. It is also a useful way to store short lengths of Paracord. The Solomon bar is also
referred to as Cobra Knot, Cobra Weave and Portuguese Sinnet.
Tying the knot:
1. Start by making an elongated closed loop with an overhand knot.
2. Pass one working end (in the picture, the end below the elongated loop is used) under
the elongated loop and over the other working end which creates a new loop below the
original elongated loop.
3. Pass the second working end (above the elongated loop in the picture) over the
elongated loop and through the new loop created in Step 2.
4. Pull the working ends to tighten the knot.
Page 9 of 33
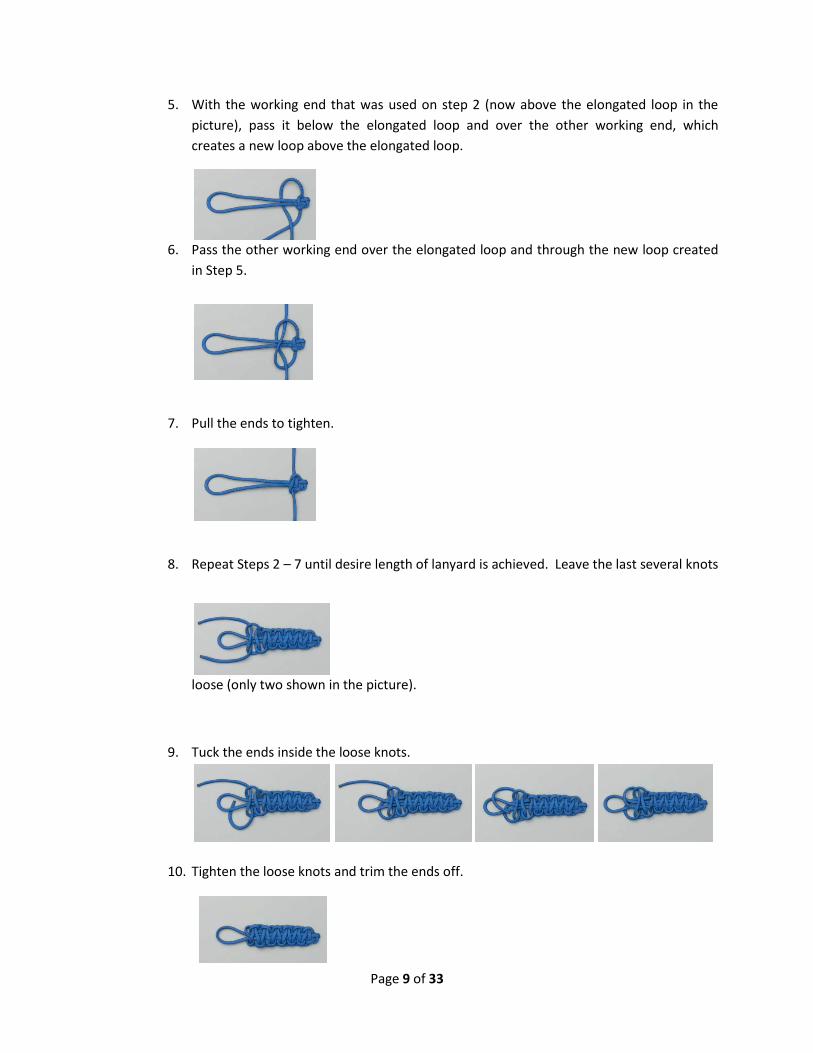
5. With the working end that was used on step 2 (now above the elongated loop in the
picture), pass it below the elongated loop and over the other working end, which
creates a new loop above the elongated loop.
6. Pass the other working end over the elongated loop and through the new loop created
in Step 5.
7. Pull the ends to tighten.
8. Repeat Steps 2 – 7 until desire length of lanyard is achieved. Leave the last several knots
loose (only two shown in the picture).
9. Tuck the ends inside the loose knots.
10. Tighten the loose knots and trim the ends off.
Page 10 of 33
Yellow Level The yellow level knots are as follows:
Bowline
Timber hitch
Clove hitch
Figure 8 loop
Square lashing
Shear lashing
Common whipping
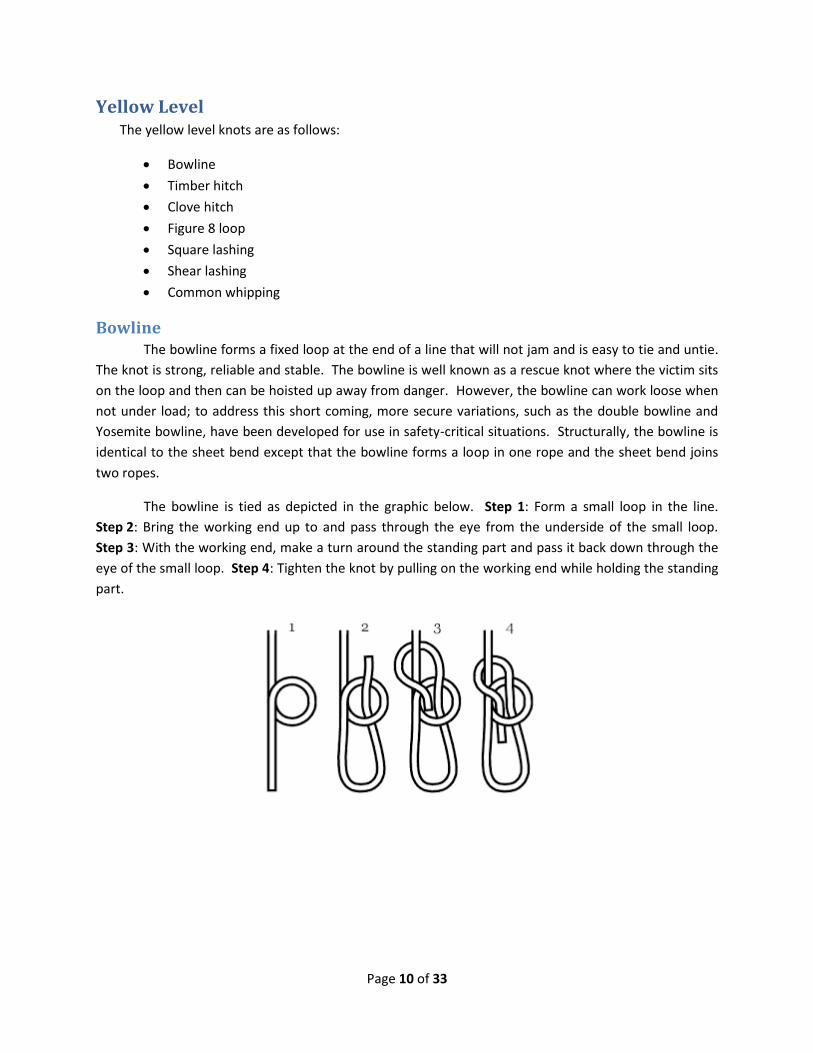
Bowline The bowline forms a fixed loop at the end of a line that will not jam and is easy to tie and untie.
The knot is strong, reliable and stable. The bowline is well known as a rescue knot where the victim sits
on the loop and then can be hoisted up away from danger. However, the bowline can work loose when
not under load; to address this short coming, more secure variations, such as the double bowline and
Yosemite bowline, have been developed for use in safety-critical situations. Structurally, the bowline is
identical to the sheet bend except that the bowline forms a loop in one rope and the sheet bend joins
two ropes.
The bowline is tied as depicted in the graphic below. Step 1: Form a small loop in the line.
Step 2: Bring the working end up to and pass through the eye from the underside of the small loop.
Step 3: With the working end, make a turn around the standing part and pass it back down through the
eye of the small loop. Step 4: Tighten the knot by pulling on the working end while holding the standing
part.

Page 11 of 33
Timber Hitch The timber hitch is a knot used to attach a single length of rope to a piece of wood for hauling or
hoisting. It is also used to initiate a diagonal lashing. An additional use is for attaching strings to the
bridge of ukuleles and classical acoustic guitars. The knot does not jam or slip, no matter how heavy the
load and is easy to tie and untie. It is best to complete the timber hitch with one or two half hitches
near the hauling end to keep the load from twisting.
The timber hitch is tied as depicted in the graph below. Step 1: pass the working end of a rope
around the object and take a turn around the standing part. Step 2: Tuck the working end back around
itself three to five times with the lay of the rope. Step 3: snug the knot up to the object by pulling on
the standing part while holding the working end.
Clove Hitch The clove hitch is a simple all-purpose hitch that is easy to tie and untie. However, it should be
used with caution because it can slip or come undone if the object if the object it is tied to rotates or if
constant pressure is not maintained on the line. It is commonly used in pioneering to start and finish a
lashing. The clove hitch is also used as a binding knot.
The clove hitch can be tied in at least two different ways. The first, as depicted in the graphic
immediately below, is used when an open end of the object in which the hitch is being to around is not
readily available. Step 1: make a turn around an object with the working end. Step 2: crossover the
turn and make a second turn around the object. Step 3: slip the working end under the second turn and
pull tight.
Alternatively, when an open end of the object that the hitch is being tied to is readily available,
the method depicted in the graphic below may be used to tie a clove hitch. Step 1: make a loop in the
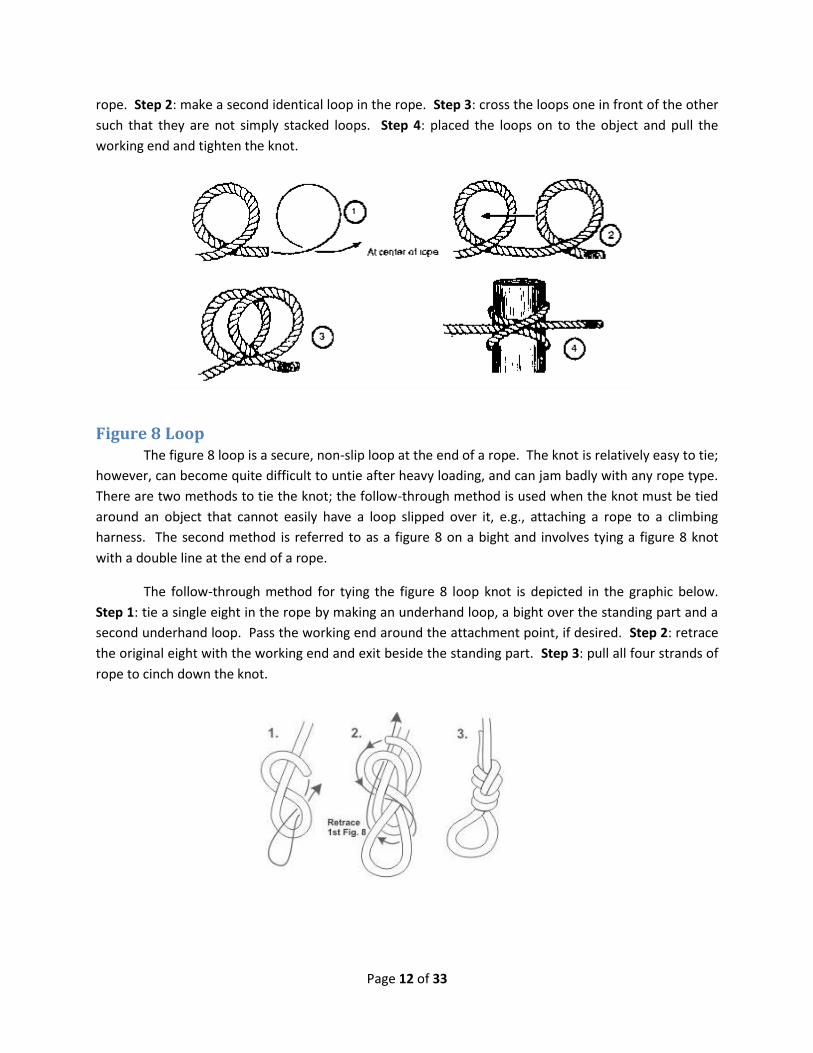
Page 12 of 33
rope. Step 2: make a second identical loop in the rope. Step 3: cross the loops one in front of the other
such that they are not simply stacked loops. Step 4: placed the loops on to the object and pull the
working end and tighten the knot.
Figure 8 Loop The figure 8 loop is a secure, non-slip loop at the end of a rope. The knot is relatively easy to tie;
however, can become quite difficult to untie after heavy loading, and can jam badly with any rope type.
There are two methods to tie the knot; the follow-through method is used when the knot must be tied
around an object that cannot easily have a loop slipped over it, e.g., attaching a rope to a climbing
harness. The second method is referred to as a figure 8 on a bight and involves tying a figure 8 knot
with a double line at the end of a rope.
The follow-through method for tying the figure 8 loop knot is depicted in the graphic below.
Step 1: tie a single eight in the rope by making an underhand loop, a bight over the standing part and a
second underhand loop. Pass the working end around the attachment point, if desired. Step 2: retrace
the original eight with the working end and exit beside the standing part. Step 3: pull all four strands of
rope to cinch down the knot.
Page 13 of 33
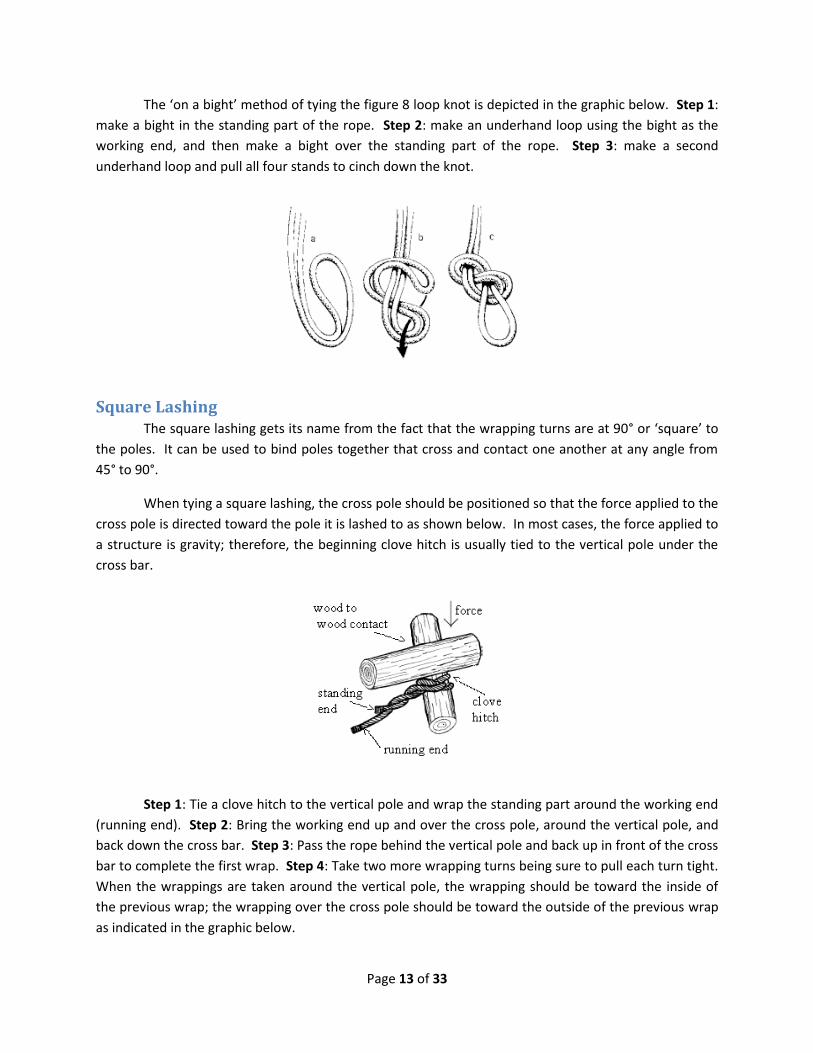
The ‘on a bight’ method of tying the figure 8 loop knot is depicted in the graphic below. Step 1:
make a bight in the standing part of the rope. Step 2: make an underhand loop using the bight as the
working end, and then make a bight over the standing part of the rope. Step 3: make a second
underhand loop and pull all four stands to cinch down the knot.
Square Lashing The square lashing gets its name from the fact that the wrapping turns are at 90° or ‘square’ to
the poles. It can be used to bind poles together that cross and contact one another at any angle from
45° to 90°.
When tying a square lashing, the cross pole should be positioned so that the force applied to the
cross pole is directed toward the pole it is lashed to as shown below. In most cases, the force applied to
a structure is gravity; therefore, the beginning clove hitch is usually tied to the vertical pole under the
cross bar.
Step 1: Tie a clove hitch to the vertical pole and wrap the standing part around the working end
(running end). Step 2: Bring the working end up and over the cross pole, around the vertical pole, and
back down the cross bar. Step 3: Pass the rope behind the vertical pole and back up in front of the cross
bar to complete the first wrap. Step 4: Take two more wrapping turns being sure to pull each turn tight.
When the wrappings are taken around the vertical pole, the wrapping should be toward the inside of
the previous wrap; the wrapping over the cross pole should be toward the outside of the previous wrap
as indicated in the graphic below.
Page 14 of 33
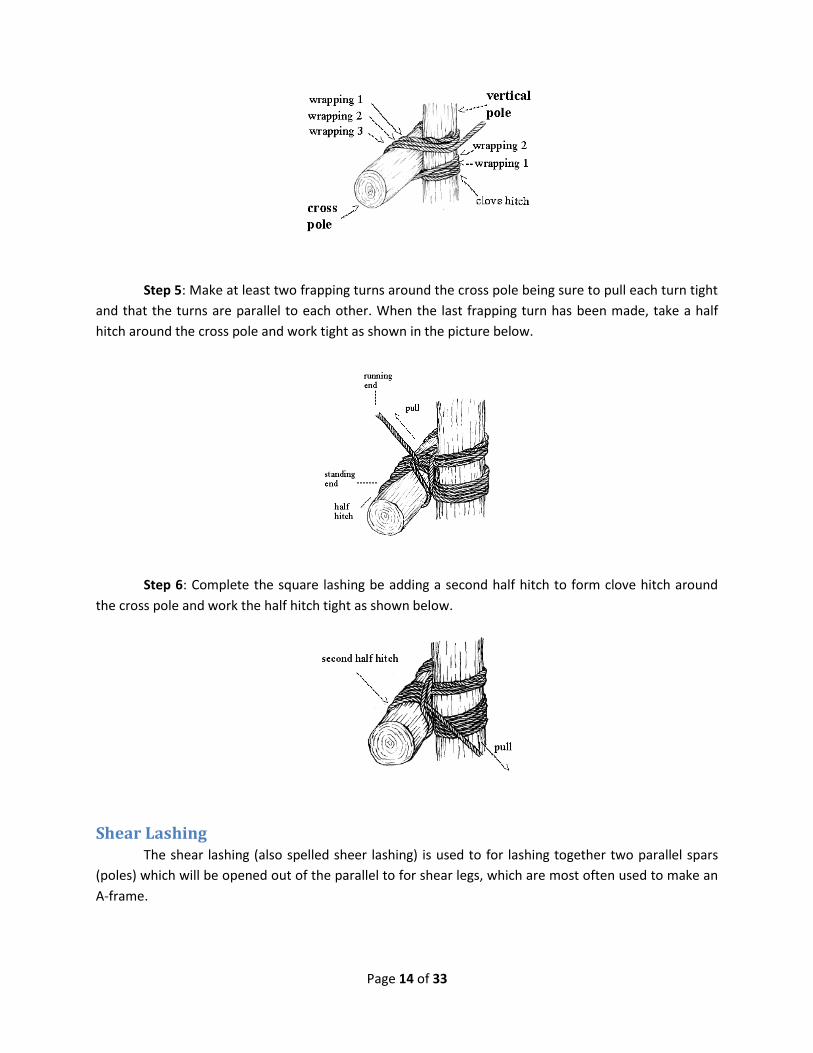
Step 5: Make at least two frapping turns around the cross pole being sure to pull each turn tight
and that the turns are parallel to each other. When the last frapping turn has been made, take a half
hitch around the cross pole and work tight as shown in the picture below.
Step 6: Complete the square lashing be adding a second half hitch to form clove hitch around
the cross pole and work the half hitch tight as shown below.
Shear Lashing The shear lashing (also spelled sheer lashing) is used to for lashing together two parallel spars
(poles) which will be opened out of the parallel to for shear legs, which are most often used to make an
A-frame.
Page 15 of 33
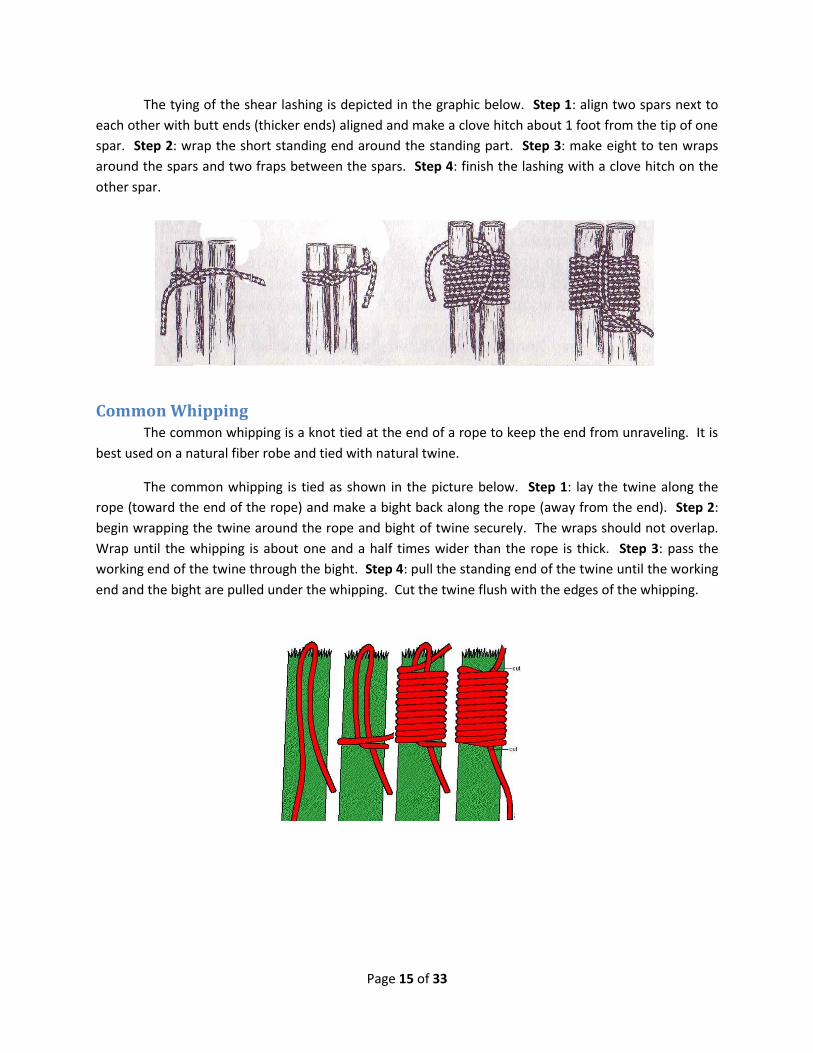
The tying of the shear lashing is depicted in the graphic below. Step 1: align two spars next to
each other with butt ends (thicker ends) aligned and make a clove hitch about 1 foot from the tip of one
spar. Step 2: wrap the short standing end around the standing part. Step 3: make eight to ten wraps
around the spars and two fraps between the spars. Step 4: finish the lashing with a clove hitch on the
other spar.
Common Whipping The common whipping is a knot tied at the end of a rope to keep the end from unraveling. It is
best used on a natural fiber robe and tied with natural twine.
The common whipping is tied as shown in the picture below. Step 1: lay the twine along the
rope (toward the end of the rope) and make a bight back along the rope (away from the end). Step 2:
begin wrapping the twine around the rope and bight of twine securely. The wraps should not overlap.
Wrap until the whipping is about one and a half times wider than the rope is thick. Step 3: pass the
working end of the twine through the bight. Step 4: pull the standing end of the twine until the working
end and the bight are pulled under the whipping. Cut the twine flush with the edges of the whipping.
Page 16 of 33
Green Level The green level knots are as follows:
Sheet bend
Slipped buntline
Marlinspike hitch
Adjustable grip hitch
Thief’s knot
Bowline on a bight
Diagonal lashing
Tripod lashing
Round lashing.
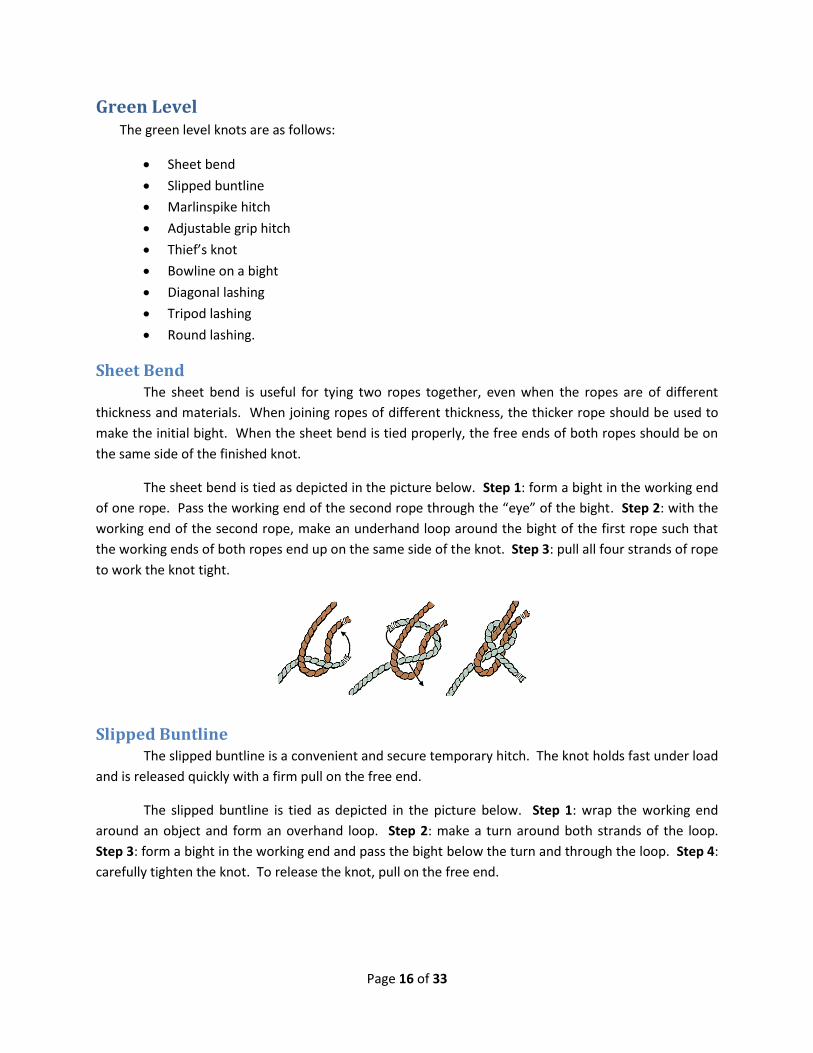
Sheet Bend The sheet bend is useful for tying two ropes together, even when the ropes are of different
thickness and materials. When joining ropes of different thickness, the thicker rope should be used to
make the initial bight. When the sheet bend is tied properly, the free ends of both ropes should be on
the same side of the finished knot.
The sheet bend is tied as depicted in the picture below. Step 1: form a bight in the working end
of one rope. Pass the working end of the second rope through the “eye” of the bight. Step 2: with the
working end of the second rope, make an underhand loop around the bight of the first rope such that
the working ends of both ropes end up on the same side of the knot. Step 3: pull all four strands of rope
to work the knot tight.
Slipped Buntline The slipped buntline is a convenient and secure temporary hitch. The knot holds fast under load
and is released quickly with a firm pull on the free end.
The slipped buntline is tied as depicted in the picture below. Step 1: wrap the working end
around an object and form an overhand loop. Step 2: make a turn around both strands of the loop.
Step 3: form a bight in the working end and pass the bight below the turn and through the loop. Step 4:
carefully tighten the knot. To release the knot, pull on the free end.

Page 17 of 33
Marlinspike Hitch The marlinspike hitch is a temporary knot use to grip a rod or bar. The advantages of this knots
is its relative ease in tying and is quick release properties. The marlinspike hitch is often used in the
construction of rope ladders and the suspension of sling hammocks.
The marlinspike hitch is tied as depicted in the graphic below. Step 1: form an overhand loop
and slide/rotate it over the standing part. Step 2: for a bight in the standing part beneath the overhand
loop. Step 3: pull the bight through the eye of the loop. Step 4: pass the object (bar, rod, toggle, etc.)
through the bight and pull the standing part above and below the knot to tighten.
Adjustable Grip Hitch The adjustable grip hitch is a simple friction hitch, which may be adjusted up and down the rope
under slack, but hold tight when under load. It can be used in place of the taut line hitch, typically with
better results.
The adjustable grip hitch is tied as depicted in the graphic below. Step 1: make an overhand
loop around an anchor object. Step 2: make two turns around the standing part ‘inside the loop’
towards the anchor object. Step 3: make a half-hitch around both strands of the loop. Step 4: work the
knot tight and slide the knot along the rope to increase or decrease tension, as necessary.

Page 18 of 33
Thief Knot While it is not a practical or secure knot, the thief knot has an interesting legend associated with
it. The thief knot resembles the square knot except that the working ends are on diagonally opposite
sides. It is said that sailors secured their belongings in a ditty bag using the thief knot, with the ends
hidden. If another sailor went through the bag, the odds were high that the thief would tie the bag with
a square knot, revealing the tampering, hence the name – thief knot.
The thief knot is tied as depicted in the graphic below. Step 1: for a bight in the working ends of
that are to be joined. Step 2: pass the second working end through the ‘eye’ of the bight, around both
strands of the bight and back through the ‘eye’ of the bight such that the two working ends are
diagonally opposite of each other and pull all four strands to tighten.
Bowline on a Bight The bowline of a bight is a knot which makes a pair of loops in the middle of a rope. The knot
may slip when only one loop is loaded. Uses of this knot include making a bosun’s chair, tying into two
anchor points in sport climbing and creating a seat while being hoisted.
The knot is tied as depicted in the graphic below. Step 1: create a bight in the rope and make an
overhand loop with the bighted end (working end) of the rope. Step 2: pass the working end up through
the eye creating a double loop below the eye. Step 3: bring the bight down toward the double loop.
Step 4: pass the bight around the double loop and to the top of the overhand loop. Tighten the knot by
pulling on the double loop while holding the standing line.
Page 19 of 33
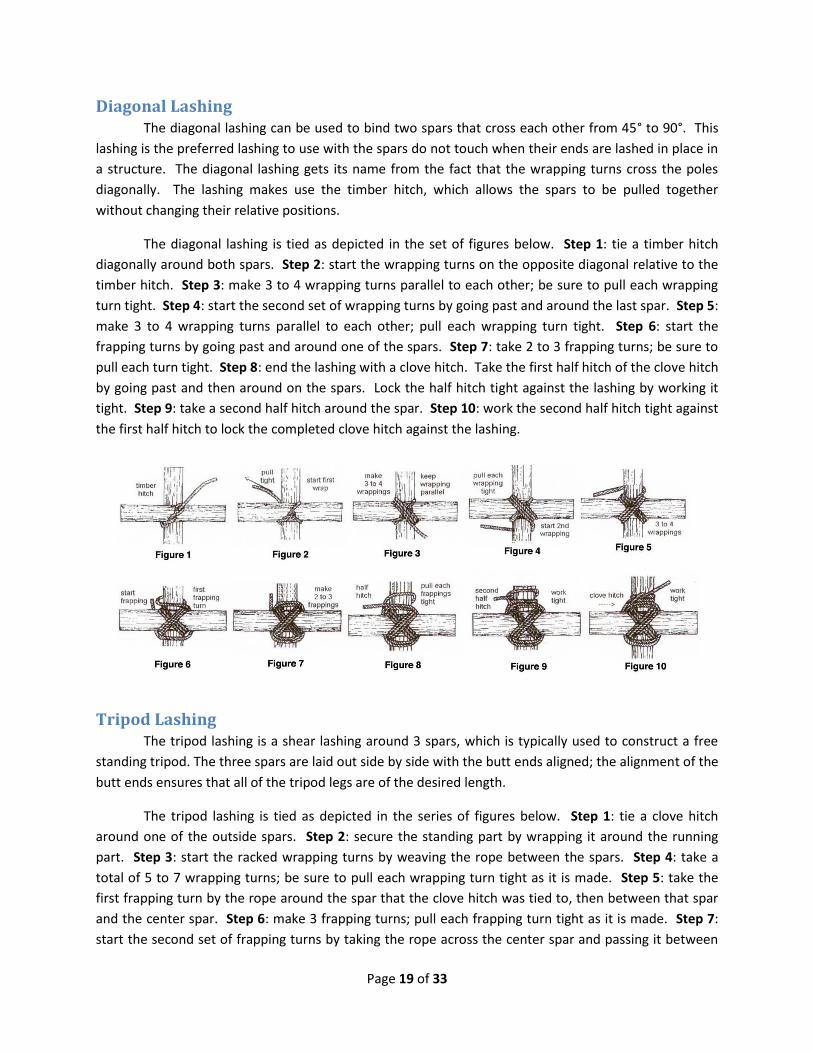
Diagonal Lashing The diagonal lashing can be used to bind two spars that cross each other from 45° to 90°. This
lashing is the preferred lashing to use with the spars do not touch when their ends are lashed in place in
a structure. The diagonal lashing gets its name from the fact that the wrapping turns cross the poles
diagonally. The lashing makes use the timber hitch, which allows the spars to be pulled together
without changing their relative positions.
The diagonal lashing is tied as depicted in the set of figures below. Step 1: tie a timber hitch
diagonally around both spars. Step 2: start the wrapping turns on the opposite diagonal relative to the
timber hitch. Step 3: make 3 to 4 wrapping turns parallel to each other; be sure to pull each wrapping
turn tight. Step 4: start the second set of wrapping turns by going past and around the last spar. Step 5:
make 3 to 4 wrapping turns parallel to each other; pull each wrapping turn tight. Step 6: start the
frapping turns by going past and around one of the spars. Step 7: take 2 to 3 frapping turns; be sure to
pull each turn tight. Step 8: end the lashing with a clove hitch. Take the first half hitch of the clove hitch
by going past and then around on the spars. Lock the half hitch tight against the lashing by working it
tight. Step 9: take a second half hitch around the spar. Step 10: work the second half hitch tight against
the first half hitch to lock the completed clove hitch against the lashing.
Tripod Lashing The tripod lashing is a shear lashing around 3 spars, which is typically used to construct a free
standing tripod. The three spars are laid out side by side with the butt ends aligned; the alignment of the
butt ends ensures that all of the tripod legs are of the desired length.
The tripod lashing is tied as depicted in the series of figures below. Step 1: tie a clove hitch
around one of the outside spars. Step 2: secure the standing part by wrapping it around the running
part. Step 3: start the racked wrapping turns by weaving the rope between the spars. Step 4: take a
total of 5 to 7 wrapping turns; be sure to pull each wrapping turn tight as it is made. Step 5: take the
first frapping turn by the rope around the spar that the clove hitch was tied to, then between that spar
and the center spar. Step 6: make 3 frapping turns; pull each frapping turn tight as it is made. Step 7:
start the second set of frapping turns by taking the rope across the center spar and passing it between
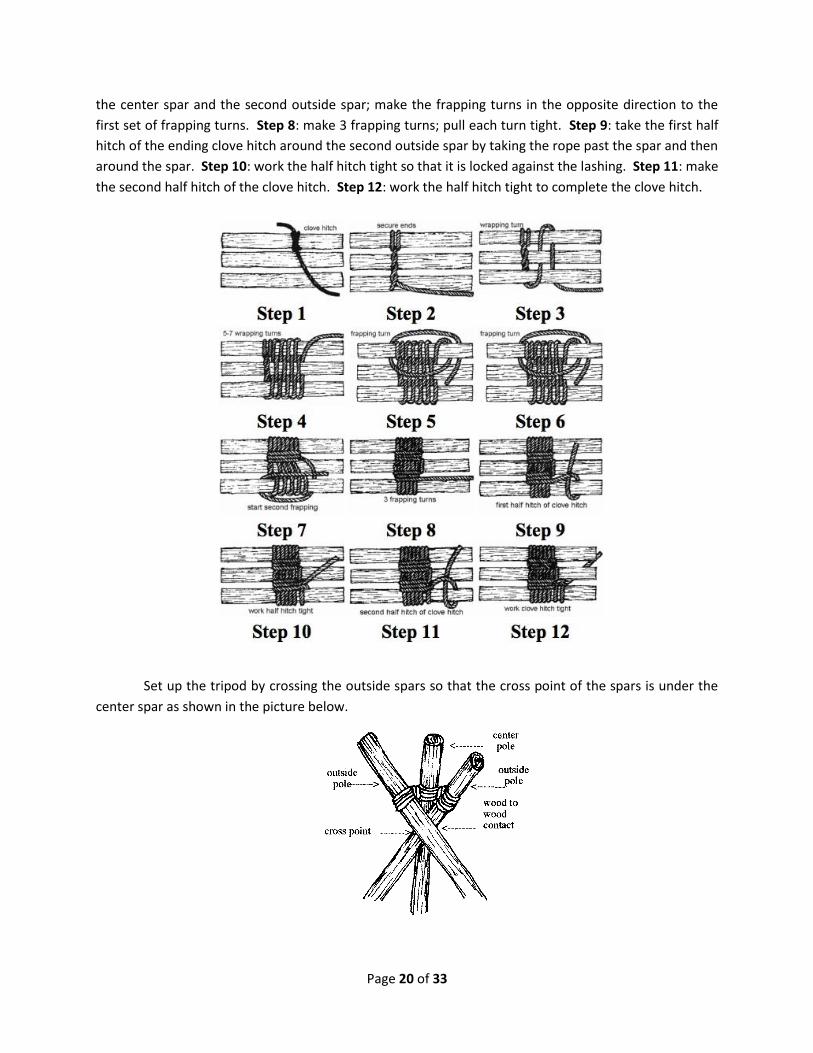
Page 20 of 33
the center spar and the second outside spar; make the frapping turns in the opposite direction to the
first set of frapping turns. Step 8: make 3 frapping turns; pull each turn tight. Step 9: take the first half
hitch of the ending clove hitch around the second outside spar by taking the rope past the spar and then
around the spar. Step 10: work the half hitch tight so that it is locked against the lashing. Step 11: make
the second half hitch of the clove hitch. Step 12: work the half hitch tight to complete the clove hitch.
Set up the tripod by crossing the outside spars so that the cross point of the spars is under the
center spar as shown in the picture below.

Page 21 of 33
Round Lashing The round lashing is used to join two parallel spars. When joining two spars to make a longer
one, it is common to make to use two round lashings distributed across the overlapping portions of the
two spars. It can be difficult to make the lashing tight enough to be secure; in this case, wedges may
‘hammered’ into place between the spars both above and below the lashing to make the lasing tighter
and more secure.
The round lashing is tied as depicted in the graphic below. Step 1: tie a clove hitch around both
spars. Step 2: make six to eight wraps around the two spars. Step 3: finish with another clove hitch.
Page 22 of 33
Blue Level The blue level knots are as follows:
Surgeon’s knot
Ashley stopper
Cleat hitch
Double fisherman’s knot
Constrictor
Improved clinch
Running bowline
Alpine butterfly knot.
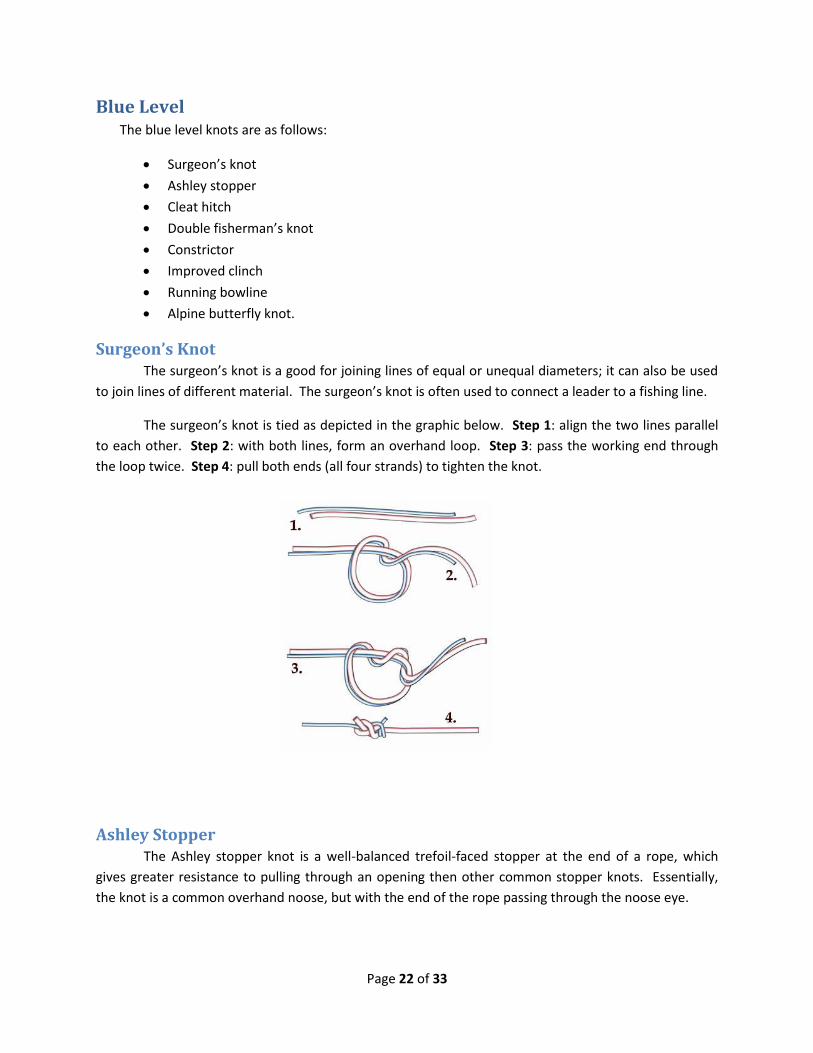
Surgeon’s Knot The surgeon’s knot is a good for joining lines of equal or unequal diameters; it can also be used
to join lines of different material. The surgeon’s knot is often used to connect a leader to a fishing line.
The surgeon’s knot is tied as depicted in the graphic below. Step 1: align the two lines parallel
to each other. Step 2: with both lines, form an overhand loop. Step 3: pass the working end through
the loop twice. Step 4: pull both ends (all four strands) to tighten the knot.
Ashley Stopper The Ashley stopper knot is a well-balanced trefoil-faced stopper at the end of a rope, which
gives greater resistance to pulling through an opening then other common stopper knots. Essentially,
the knot is a common overhand noose, but with the end of the rope passing through the noose eye.
Page 23 of 33
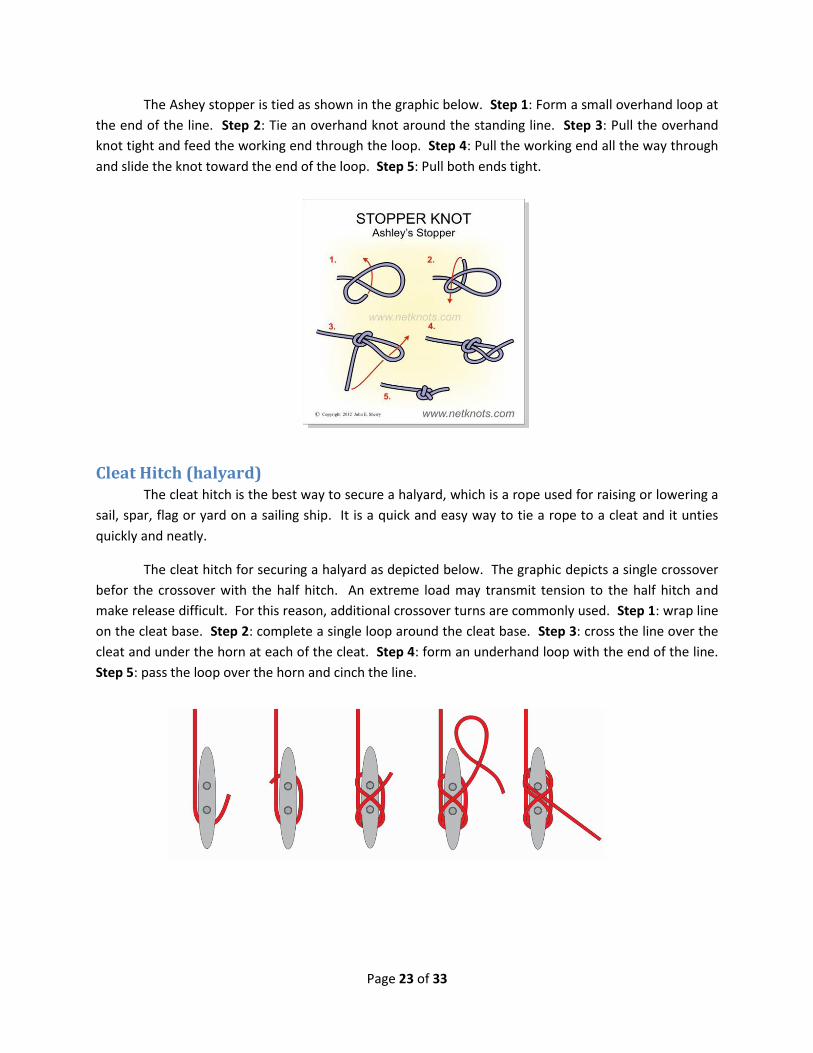
The Ashey stopper is tied as shown in the graphic below. Step 1: Form a small overhand loop at
the end of the line. Step 2: Tie an overhand knot around the standing line. Step 3: Pull the overhand
knot tight and feed the working end through the loop. Step 4: Pull the working end all the way through
and slide the knot toward the end of the loop. Step 5: Pull both ends tight.
Cleat Hitch (halyard) The cleat hitch is the best way to secure a halyard, which is a rope used for raising or lowering a
sail, spar, flag or yard on a sailing ship. It is a quick and easy way to tie a rope to a cleat and it unties
quickly and neatly.
The cleat hitch for securing a halyard as depicted below. The graphic depicts a single crossover
befor the crossover with the half hitch. An extreme load may transmit tension to the half hitch and
make release difficult. For this reason, additional crossover turns are commonly used. Step 1: wrap line
on the cleat base. Step 2: complete a single loop around the cleat base. Step 3: cross the line over the
cleat and under the horn at each of the cleat. Step 4: form an underhand loop with the end of the line.
Step 5: pass the loop over the horn and cinch the line.

Page 24 of 33
Double Fisherman’s Knot Despite its name, the double fisherman’s knot is rarely used in fishing. This knot securely ties
two ropes together or can be used to fasten the ends of a rope or cord together to make a loop. It is
essently two knots that slide together to form the finished knot.
The knot is tied as shown in the graphic below. Step 1: lay the ends of two lines parallel to each
other. Step 2: coil the free end of one rope twice around the second rope and pass the working end
back through the inside of the coils. Step 3: repeat Step 2 with the second rope in the opposite
direction. Pull on both ropes to tighten the two knots against each other.
Constrictor The constictor knot is a useful knot to tie up loose materials or the ends of bags. It is simple to
tie and grips itself so well that it is often difficult, or impossible, to untie.
The contrictor knot is tied as depicted below. It is tied similar to a clove hitch except that the
working end is passe over and under the standing part, instead of parallel to the standing part. Step 1:
make a turn around an object with the working end. Step 2: crossover the turn and make a second turn
around the object. Step 3: pass the working over standing part and then back under the the knot; pull
both the working end and the standing part to tighten the knot.

Page 25 of 33
Improved Clinch The improved clinch knot is one of the most widely used methods of securing a fishing line to a
hook, lure or swivel. When the line is lubricated and pulled tight, the knot changes its structure such
that the wrapped turns redistribute so that the inner strand becomes an outer wrap.
The improved clinch knot is tied as shown below. Step 1: pass the working end of the line
through the eye of the object (hook, lure or swivel). Step 2: wrap the working end around the standing
part making about 5 complete turns. Step 3: pass the working end through the loop beside the eye.
Step 4: pass the working end under the final turn. Step 5: lubricate and tighten the knot by pulling both
the working end and standing part. Step 6: trim the tag (working end).
Running Bowline The running bowline is a noose (sliding loop) knot that will not bind and can be easily slid open.
This knot can be useful for retrieving an object by throwing the open loop around it and the loop will
tighten down on the object when the standling line is pulled.
The running bowline is tied as depicted in the graphic below. Step 1: Form a bight near one end
of the rope and then an overhand loop above the below the bight (near the working end). Step 2: pass
the working end around the standing part (above the bight) and though the overhand loop. Step 3: pass
the working end behind and around the standing part (below the bight) and back through the overhand
loop. Step 4: tight the knot such that the standing part may pass through the knot freely.

Page 26 of 33
Alpine Butterfly Knot The Alpine butterfly knot provides a secure loop in the middle of a piece of rope, such as when a
line of hikers wish to hook along the length of a shared rope. It is also useful to shorten a rope (a much
safer option than the sheepshank method), isolate damaged sections of rope, or as an option for the
first part of a Trucker’s hitch.
The Alpine is tied as shown below. Step 1: make an overhand loop in the rope and twist the
loop one full rotation to make a figure 8. Step 2: fold the bottom loop of the figure 8 up around the top
loop of the figure 8. Step 3: pass the bottom loop through the top loop and pull the loop and the
standing parts on both sides of the knot to tighten.
Page 27 of 33
Red Level The red level requirements are as follows:
Monkey’s fist
Trucker’s hitch
Turks head knot
Windsor tie knot
Braid knot
Slippery eight loop
Round sinnet
Gnat hitch
Prusik knot
Make a camp gadget using at least one knot from the Knot Masters program
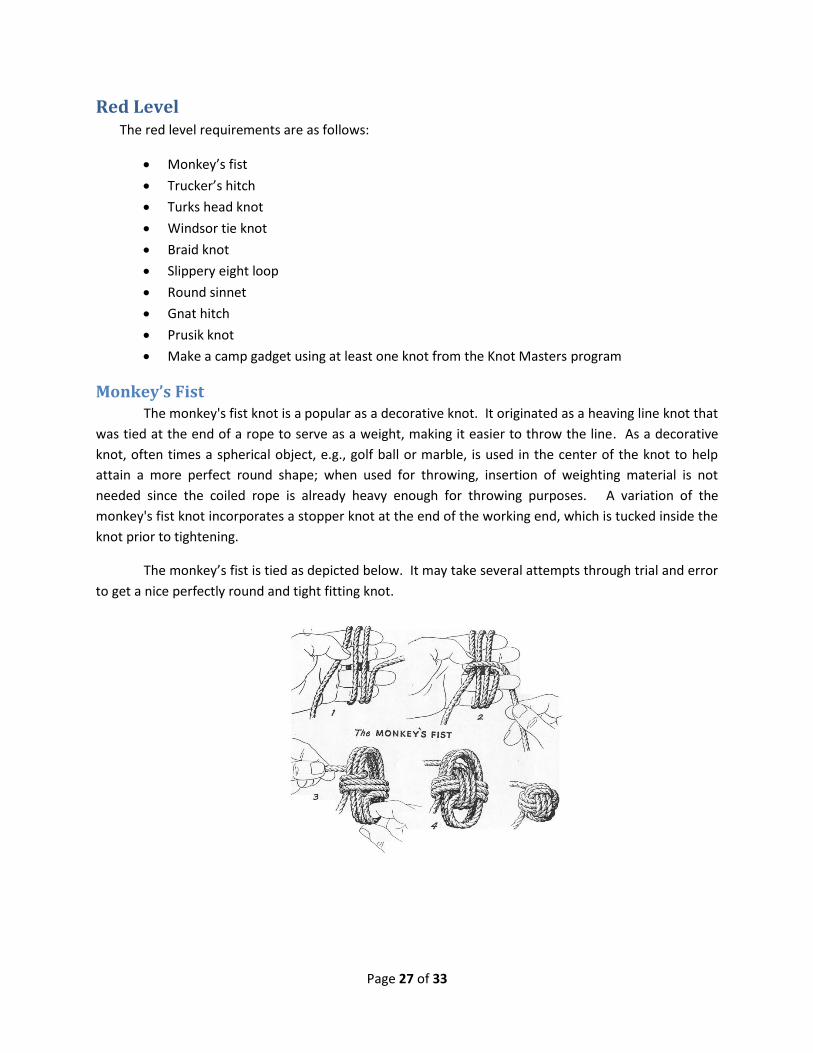
Monkey’s Fist The monkey's fist knot is a popular as a decorative knot. It originated as a heaving line knot that
was tied at the end of a rope to serve as a weight, making it easier to throw the line. As a decorative
knot, often times a spherical object, e.g., golf ball or marble, is used in the center of the knot to help
attain a more perfect round shape; when used for throwing, insertion of weighting material is not
needed since the coiled rope is already heavy enough for throwing purposes. A variation of the
monkey's fist knot incorporates a stopper knot at the end of the working end, which is tucked inside the
knot prior to tightening.
The monkey’s fist is tied as depicted below. It may take several attempts through trial and error
to get a nice perfectly round and tight fitting knot.
Page 28 of 33
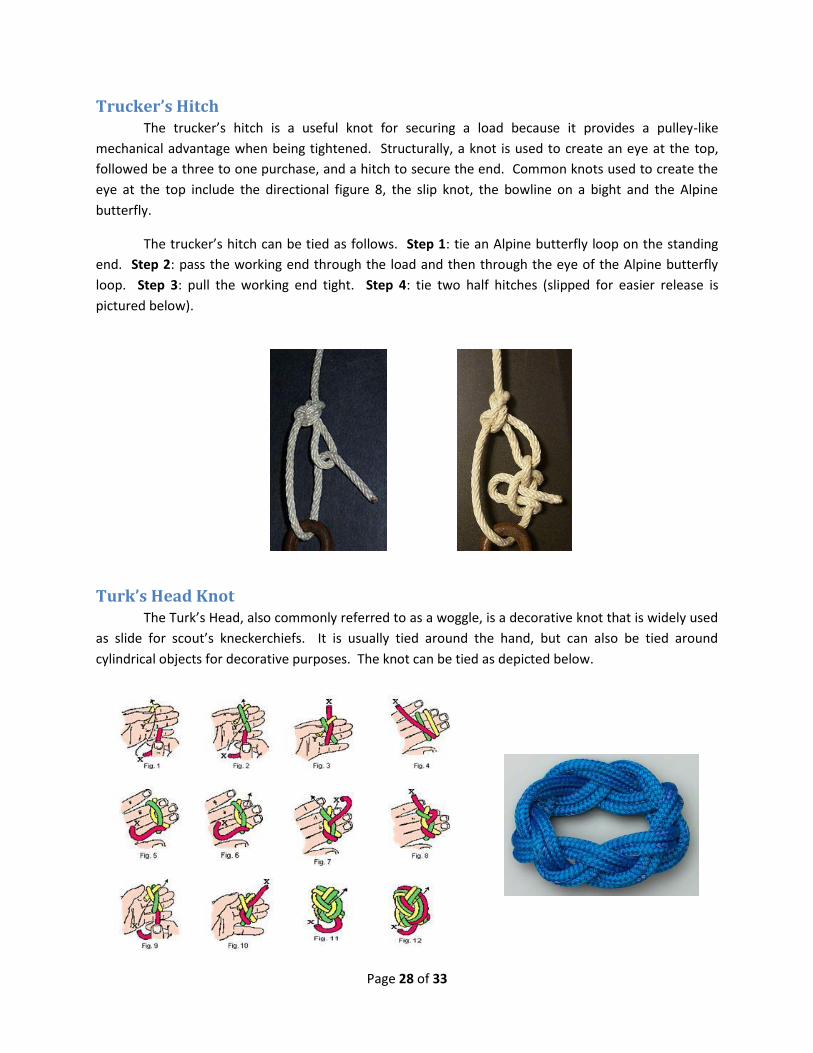
Trucker’s Hitch The trucker’s hitch is a useful knot for securing a load because it provides a pulley-like
mechanical advantage when being tightened. Structurally, a knot is used to create an eye at the top,
followed be a three to one purchase, and a hitch to secure the end. Common knots used to create the
eye at the top include the directional figure 8, the slip knot, the bowline on a bight and the Alpine
butterfly.
The trucker’s hitch can be tied as follows. Step 1: tie an Alpine butterfly loop on the standing
end. Step 2: pass the working end through the load and then through the eye of the Alpine butterfly
loop. Step 3: pull the working end tight. Step 4: tie two half hitches (slipped for easier release is
pictured below).
Turk’s Head Knot The Turk’s Head, also commonly referred to as a woggle, is a decorative knot that is widely used
as slide for scout’s kneckerchiefs. It is usually tied around the hand, but can also be tied around
cylindrical objects for decorative purposes. The knot can be tied as depicted below.

Page 29 of 33
Windsor Tie Knot While the Windsor tie knot is properly called the “Windsor,” it is sometimes referred to as the
“Full Windsor” to distinguish it from the “Half Windsor.” The advantages of this tie knot over other
‘simpler’ tie knots are that it yields a larger and more symmetrical knot and that the knot does not
require untying when the short end is pulled out – it just falls apart; the major disadvantage of this knot
is that it is less suitable for shorter ties because it uses relatively more material. Structurally, the
Windsor is bulky and symmetrical because the long end is wrapped around both sides before it is used
to form the final knot. The Windsor is tied as depicted below.
Page 30 of 33
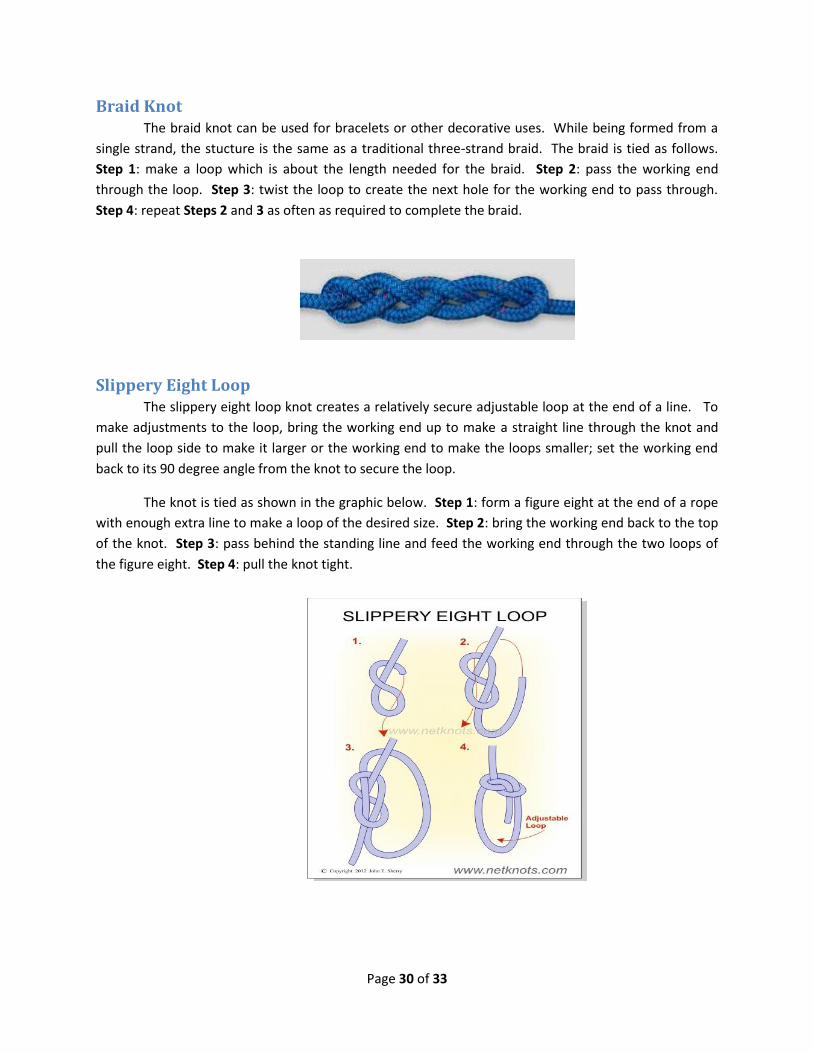
Braid Knot The braid knot can be used for bracelets or other decorative uses. While being formed from a
single strand, the stucture is the same as a traditional three-strand braid. The braid is tied as follows.
Step 1: make a loop which is about the length needed for the braid. Step 2: pass the working end
through the loop. Step 3: twist the loop to create the next hole for the working end to pass through.
Step 4: repeat Steps 2 and 3 as often as required to complete the braid.
Slippery Eight Loop The slippery eight loop knot creates a relatively secure adjustable loop at the end of a line. To
make adjustments to the loop, bring the working end up to make a straight line through the knot and
pull the loop side to make it larger or the working end to make the loops smaller; set the working end
back to its 90 degree angle from the knot to secure the loop.
The knot is tied as shown in the graphic below. Step 1: form a figure eight at the end of a rope
with enough extra line to make a loop of the desired size. Step 2: bring the working end back to the top
of the knot. Step 3: pass behind the standing line and feed the working end through the two loops of
the figure eight. Step 4: pull the knot tight.
Page 31 of 33
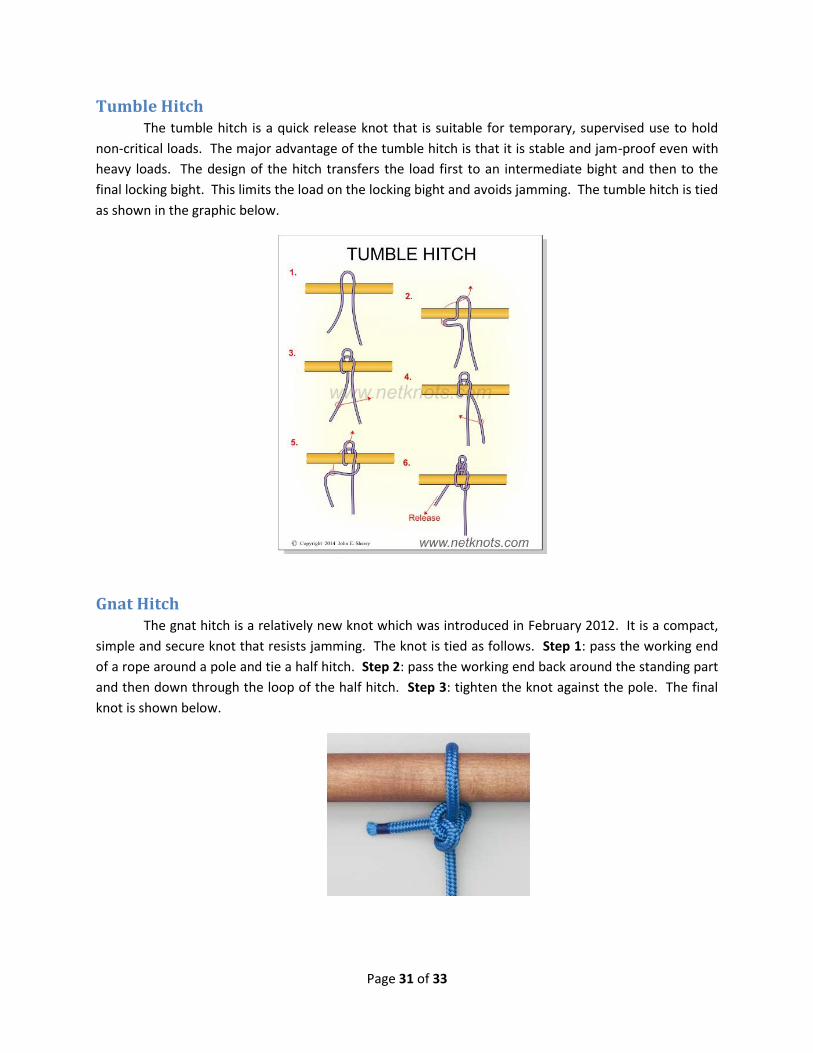
Tumble Hitch The tumble hitch is a quick release knot that is suitable for temporary, supervised use to hold
non-critical loads. The major advantage of the tumble hitch is that it is stable and jam-proof even with
heavy loads. The design of the hitch transfers the load first to an intermediate bight and then to the
final locking bight. This limits the load on the locking bight and avoids jamming. The tumble hitch is tied
as shown in the graphic below.
Gnat Hitch The gnat hitch is a relatively new knot which was introduced in February 2012. It is a compact,
simple and secure knot that resists jamming. The knot is tied as follows. Step 1: pass the working end
of a rope around a pole and tie a half hitch. Step 2: pass the working end back around the standing part
and then down through the loop of the half hitch. Step 3: tighten the knot against the pole. The final
knot is shown below.

Page 32 of 33
Prusik Hitch The Prusik hitch is a knot used to secure a loop to a tight line. The hitch slides along the tight
rope when not under load, but grips solidly upon loading. Mountaineers use this knot to form footholds
to help them climb a vertical rope. The loop should be formed with a double fisherman’s knot with a
rope or cord that is at most half the diameter of the main line. The knot is tied as shown below.
Make a Camp Gadget Design and build a gadget that could be useful in a camping setting. Some ideas for a camp
gadget include the following:
Table
Gateway
Paper towel holder
Zipper pulls for tents
Towel rack
Trash bag holder.

Page 33 of 33
Black Level To achieve the black level, you will need to research and learn a knot that is not included in this
guide. Then complete a project that uses at least two different knots, including your “new”
knot. This project needs to demonstrate that you can use knot tying skills in combination; the
project may be decorative and/or functional in nature. Imagination and creativity is strongly
encouraged.