Embed Size (px)
Citation preview

Kinetic Fit for iOS
10-26-16 v.1.3.4
QUICK START GUIDE
Kinetic Fit web site: https://www.kinetic.fit
App resources and FAQs: https://support.kurtkinetic.com/hc/en-us
App Store Download: https://itunes.apple.com/us/app/kinetic-fit/id1023388296?mt=8

1Thank you for selecting Kinetic products!
REQUIRED HARDWARE:
Compatible Trainers• T-6200 Rock and Roll | Smart Control• T-6100 Road Machine | Smart Control• T-6000 Smart Control Power Unit
Compatible trainers, equipped with inRide sensors• T-2800 Rock and Roll | Smart• T-2700 Road Machine | Smart
Compatible Kinetic trainers — require inRide sensor accessory add-on
• T-2300 & T-016 Rock and Roll• T-2200 & T-002i Road Machine• Pro Trainer (discontinued fluid model)
inRide accessory add-on (pre-installed on Kinetic Smart trainers)
• T-2000 & T-2002 Kinetic inRide Watt Meter
Other recommended accessories• T-2001 Kinetic Bluetooth Smart Heart Rate Strap• Also compatible with most Bluetooth Smart HR straps
Supported iOS devices (iOS 10 is recommended)• iPhone 5S or newer• iPad 4 and newer• iPad Mini 2 and newer• iOS 10 is recommended, minimum required: iOS 9
REQUIRED HARDWARE FOR SECOND-SCREEN VIDEO AND APP MIRRORING:
wireless set-up• Home wifi network• Apple TV• External monitor/TV
wired set-up• Device-to-HDMI adapter. (Check Apple web site for the
proper model for your device)• HDMI cable• External monitor
ADDITIONAL RESOURCES
SUPPORT SITEhttps://support.kurtkinetic.com/hc/en-us
KINETIC BLOGhttps://kurtkinetic.com/blog/
TRAINING RESOURCEShttps://kurtkinetic.com/training-resources/
KINETIC FIT SUBSCRIPTIONS
Kinetic Fit offers 3 subscription levels:• Core - Free• Smart - $10 month• The Sufferfest Streaming - $10 month
Learn more at: https://www.kinetic.fit
CONTACT INFO
Kinetic 5280 Main Street NE Minneapolis, MN 55421 1-877-226-7824
Customer Service Hours: 8am-4pm CST Monday - Friday
Before you get started with the Kinetic Fit app, let's run through a checklist to be sure that you have what you need to get connected and up and running. You'll need to have a trainer that communicates with apps using Bluetooth Low Energy (BLE) and a smart device.

2
NOTE
Version 1.0 firmware inRide sensors have a numeric ID after the word "inRide". Send sensor to Kinetic for free upgrade to 2.0
*Version 2.0 sensor firmware has limited compatibility with 3rd-party apps. Currently 2.0 sensors only connect with the following apps: Kinetic Fit, Kinetic inRide, TrainerRoad and Zwift.
If your inRide sensor works with the inRide app, but not the Kinetic Fit app, launch the inRide app and navigate to the sensors screen with our sensor connected. Check to see if there is a numeric ID in the sensor name. If there is, you'll need to submit your sensor for a free upgrade. See our form and upgrade protocol here:
https://support.kurtkinetic.com/hc/en-us/articles/206365366-How-do-I-exchange-a-version-1-inRide-sensor-
Version 2.0 firmware inRide sensors don't have any numeric ID, just the word "inRide". No upgrade needed. You are ready to roll.
Version 2.0 Sensor FirmwareYou need to have an updated inRide sensor with version 2.0 firmware to use the Fit app. All Kinetic Smart trainers have 2.0 firmware. Older inRide sensors have version 1.0 firmware.*
Smart Control Trainer ONLY: Check for firmware updates
For Kinetic inRide users ONLY: Version 2 sensor firmware
Smart Control trainers receive periodic firmware updates. A notification will appear when the Kinetic Fit app is launched and connected to a trainer. Firmware updates can take from 2 to 5 minutes. Keep the app in the foreground when performing firmware updates and don't let your device time out until updated.
Smart Control Update message appears at the top of home screen
Tap the screen over the update bar and a "start" notification will appear.
Updates can take as long as 5 minutes. You'll receive progress notifications and a success message.
3
FITNESS Duration
Intro to Power Training 1 4 weeks
Intro to Power Training 2 4 weeks
4 Week Basic Training: Strength and Fitness Combo 4 weeks
4 Week Fat Burner 4 weeks
OFFROAD
Mountain Bike Foundation 1 10 weeks
Mountain Bike Foundation 2 6 weeks
Mountain Bike Race Prep 1 10 weeks
Cyclocross Race Prep 1 10 weeks
ROAD
Road Bike Foundation 1 10 weeks
Masters 40+ Road Bike Foundation 1 10 weeks
Road Bike Foundation 2 - Climbing Focus 6 weeks
Road bike Foundation 2 - Threshold 6 weeks
Road Bike Race Prep 1 10 weeks
Century Prep 1 10 weeks
TRIATHLON
Triathlon Foundation 1 10 weeks
Time Trialist Foundation 1 10 weeks
Frederik Van Lierde's 12 week Plan 12 weeks
Kinetic Fit Subscriptions
Kinetic Fit Training Plans
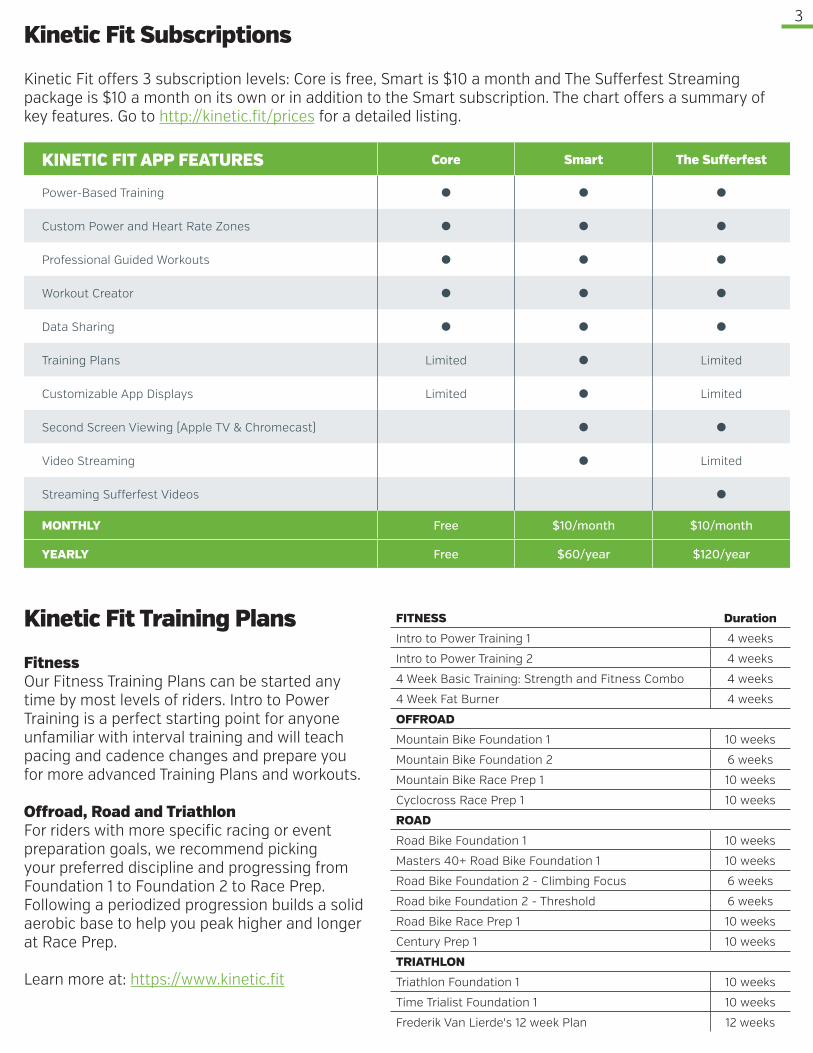
Kinetic Fit offers 3 subscription levels: Core is free, Smart is $10 a month and The Sufferfest Streaming package is $10 a month on its own or in addition to the Smart subscription. The chart offers a summary of key features. Go to http://kinetic.fit/prices for a detailed listing.
FitnessOur Fitness Training Plans can be started any time by most levels of riders. Intro to Power Training is a perfect starting point for anyone unfamiliar with interval training and will teach pacing and cadence changes and prepare you for more advanced Training Plans and workouts.
Offroad, Road and TriathlonFor riders with more specific racing or event preparation goals, we recommend picking your preferred discipline and progressing from Foundation 1 to Foundation 2 to Race Prep. Following a periodized progression builds a solid aerobic base to help you peak higher and longer at Race Prep.
Learn more at: https://www.kinetic.fit
KINETIC FIT APP FEATURES Core Smart The Sufferfest
Power-Based Training ● ● ●
Custom Power and Heart Rate Zones ● ● ●
Professional Guided Workouts ● ● ●
Workout Creator ● ● ●
Data Sharing ● ● ●
Training Plans Limited ● Limited
Customizable App Displays Limited ● Limited
Second Screen Viewing (Apple TV & Chromecast) ● ●
Video Streaming ● Limited
Streaming Sufferfest Videos ●
MONTHLY Free $10/month $10/month
YEARLY Free $60/year $120/year

4
1. Download and install Kinetic Fit App, create an account, login and open home page menu
2. Create a ProfileConfigure height, weight, age and power and heart rate zones
3. Configure ConnectionsShare to 3rd-party accounts: Training Peaks, Strava and more
4. Pair SensorsTrainers, inRide sensors, BLE speed/cadence sensors and more
5. Start a WorkoutChoose a workout, video and more
Kinetic Fit App: Quick Start Guide
1. Open Menu
3. Configure Connections
4. Pair Sensors
2. Create a Profile
5. Start a Workout

5
Start WorkoutSelect to start a workout. Preset workouts are grouped by power zones.
Start a Training PlanSelect to choose from any training plan included in your subscription level
Career TotalsShows current FTP, total ride hours, miles and kilojoules
Rider NameName entered in Profile
Training Stress ScoreSummarizes training load performed in last month and week
Training PlansWe encourage all Fit app users to use a training plan for maximum improvement! Get a Smart subscription to access all plans.
Ride HistoryScroll down to review ride history
MenuSelect to access app settings and more
Getting around the Kinetic Fit App home screen
Support Note:Customer Support is accessed by opening the app menu and selecting "Support." You'll find product FAQs, manuals, videos and more. Submit a ticket by selecting "Contact Us."
6
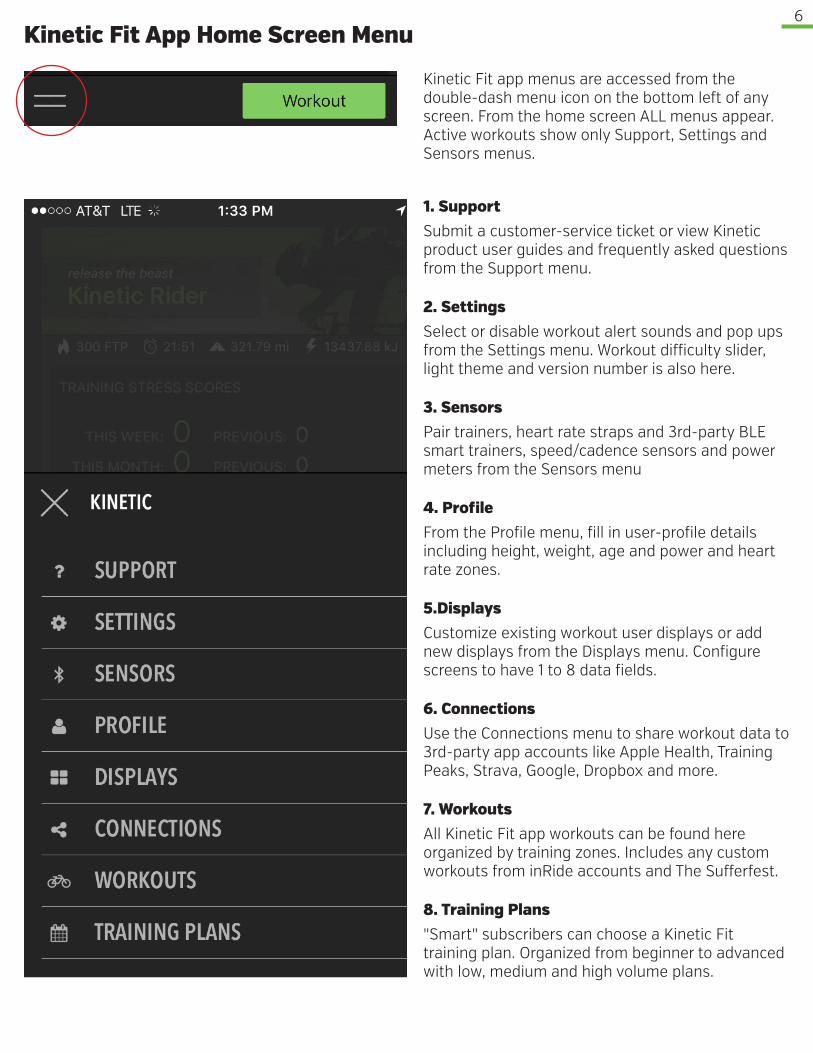
1. SupportSubmit a customer-service ticket or view Kinetic product user guides and frequently asked questions from the Support menu.
2. SettingsSelect or disable workout alert sounds and pop ups from the Settings menu. Workout difficulty slider, light theme and version number is also here.
3. SensorsPair trainers, heart rate straps and 3rd-party BLE smart trainers, speed/cadence sensors and power meters from the Sensors menu
4. ProfileFrom the Profile menu, fill in user-profile details including height, weight, age and power and heart rate zones.
5.DisplaysCustomize existing workout user displays or add new displays from the Displays menu. Configure screens to have 1 to 8 data fields.
6. ConnectionsUse the Connections menu to share workout data to 3rd-party app accounts like Apple Health, Training Peaks, Strava, Google, Dropbox and more.
7. WorkoutsAll Kinetic Fit app workouts can be found here organized by training zones. Includes any custom workouts from inRide accounts and The Sufferfest.
8. Training Plans"Smart" subscribers can choose a Kinetic Fit training plan. Organized from beginner to advanced with low, medium and high volume plans.
Kinetic Fit App Home Screen Menu
Kinetic Fit app menus are accessed from the double-dash menu icon on the bottom left of any screen. From the home screen ALL menus appear. Active workouts show only Support, Settings and Sensors menus.

71. Log in and create an account - Users with inRide accounts
Kinetic Fit app users who've previously used the inRide app can migrate their workout history and custom workouts into their Kinetic Fit app account. If you have an existing Kinetic inRide app account and want to migrate your data to the Kinetic Fit app, follow steps 1 and 2 then create a login and account for Kinetic Fit.
Update to latest inRide app. Version 2.3.4 and be sure you are connected to an online network.
Go back to the Kinetic Fit app and select rider profile again. This screen should appear, select Yes.
To create additional Kinetic Fit accounts: 1. Log out of current
Fit app account
2. Go back to the inRide app and change active account to desired account and quit app
3. Launch Fit app and repeat from step 3 on.
If you have multiple inRide user profiles, select and make active the profile you'll migrate first and quit out of the inRide app.
Launch the Kinetic Fit app. Select "Sign Up" and create an account. When finished, select "Sign Up" and navigate away from the app.
1
4 5
2 3
inRide app Support screen inRide app Profiles screen
logout icon

81. Log in and create an account - Users without inRide accounts
IMPORTANT: If you have an existing Kinetic inRide app account and want to migrate your workout history and custom workouts to the Kinetic Fit app, follow the steps on the page six. If not, start with the steps below after installing the Kinetic Fit app on your iOS device.
Select Sign Up to create an account. (You'll do this even if you already have an inRide app account).
You may use your email for only one account. Be sure it's the email you want linked before submitting.
Select "Sign Up" when finished and you'll go immediately to the home screen.
1 2 3

92. Create a profile - Set Power and Heart-rate zones
After creating your account login, you'll be sent back to the home screen. From there you can access your profile and fill out user details including height, weight, age and power and heart rate zones. You must log out to create additional profiles. Only one user profile per Kinetic Fit account is supported.
Scroll down to add your max heart rate if you know it. 220-(your age) will get you close to your max.
Select back arrow to exit
4 5
From the home screen, select menu from bottom left and select "Profile."
Add a birth date, height and weightand scroll to add power and heart rate training zones.
Scroll down to add your FTP if you know it. The app creates power zones with a 200 watt default FTP.
1 2 3
Enter Max heart rate then select Calculate Zones
Enter FTP number then select Calculate Zones
logout icon
back arrow

10
The Kinetic Fit app allows you to share your ride data with 3rd party apps. You can configure sharing to Apple Health, Strava, Map My Fitness, Training Peaks, 2Peak, iCloud and Dropbox. Most can also be set up to automatically share data when rides are completed.
3. Configure Connections - 3rd party app accounts
Select app, its name will turn green, then select "Connect"
Enter the account login you've configured for that app.
From the home screen, select menu from bottom left and select "Connections."
1 2 3
Allow sharing Select an app and "Configure" to open auto-sharing preferences and private/public when applicable
Repeat for other accounts. Connect to your Google account to enable YouTube playlists in "Video."
4 5 6

11
Social media sharing is configured in device settings rather than in user profiles. Before you can share to social media with the Kinetic Fit app, you’ll need to be sure that the social media apps have been installed and activated in device settings. Go to the settings main menu and scroll down to find Facebook and Twitter.
3. Configure Connections - Social Sharing
Be sure accounts are active in device settings. Select account.
In account settings, allow apps to use your account. Exit and open inRide app.
Social media icons will now show up along with any other sharing accounts that you’ve set up.
After completing a workout, or in History Overview, select the arrow icon to share.
1
2
3 4

12
1. From Home screen, open menu with double-dash icon and select "Sensors"
4. Pair Sensors - Pairing Screen
2
chain link icon select to pair sensor (broken link is disconnnected)
Calibrate and Firmware updates select and follow directions on screen
gear icon select to enter the sensor settings screen to rename a sensor or trainer and to calibrate trainers and update firmware (see below)
Sensor log screen
Bluetooth Smart speed/cadence sensors and power meters Many are now supported in the app. If they don't appear, they likely aren't supported yet.
Sensor Assignments Summary Icons represent speed, cadence, power (trainer) and heart rate sources. Select icons below each connected sensor to designate source.
Sensor name tap name and key pad will appear. Delete sensor name and rename.
3
4
2. Pair SensorsSensors display when detected. Select chain link on right to pair.
Unbroken links are connected
1a
Assignment icons Select icon below sensor to assign speed, cadence, power and heart rate
Gear icon select to rename sensor or to calibrate during a workout — at right >>

13
From the home screen (1) or from an active workout(1b), select the menu icon on the bottom left and select "Sensors." If a sensor loses pairing during a workout (1b), menu will only show options for Support, Settings and Sensors.
4. Pair sensors - initial pairing, re-pairing in a workout
Select back arrow to exit when “Connected” shows under sensor.
Detected sensors will display. Select chain link icon to initiate pairing. Be sure you're wearing the heart rate strap if you have one.
If pairing is lost in an active workout, select the menu icon and then "Sensors."
Or, select gear icon to go to Sensor Settings screen to rename sensors, update firmware or calibrate the trainer.
With sensor connected, select Calibrate and follow instructions. Firmware updates can take 2 to 5 minutes.
3 4 Tip: calibrate mid-workout
1b 2
gear icon select to enter the
sensor settings screen and calibrate a sensor
From the home screen, select menu from bottom left and select "Connections."
1

14
Select the Sensors icon on the bottom of the home screen to open the Sensors screen. Select the gear icon next to the sensor to be renamed and go into sensor settings screen. FOR INRIDE SENSORS ONLY: Pro Flywheel is auto-detected during calibration.
4. Pair sensors - renaming sensors
Select the name field and type in the new name. When finished, Select back arrow to exit.
3
From the home screen, select menu from bottom left and select "Sensors."
1
With chain link icons paired, select the gear icon for the sensor to be renamed.
2

155. Start workout - Choose a Workout, Warm Up and Calibrate
Start a workout by selecting solid green rider icon on bottom right of home screen. Workouts are organized by power zone and usually overlap into more than one zone. Select a workout and complete the full 10-minute built-in warm up before calibration. When calibration screen comes up, accelerate gradually past target speed (approx. 21 mph) and follow instructions.
From home screen, select "Workout" button
If you'd like to watch a video, select "Video" and follow screens. Otherwise, select "Warmup"
Ride the complete 10-minute warmup. You'll be automatically moved to the calibration screen.
Workouts are organized by power training zones. Select a zone to open individual workouts screen.
Workouts can be sorted by selecting Name, Duration, Intensity Factor (IF) or Training Stress Score (TSS).
Select "Begin" to start workout.
1
5 6
2 3
4
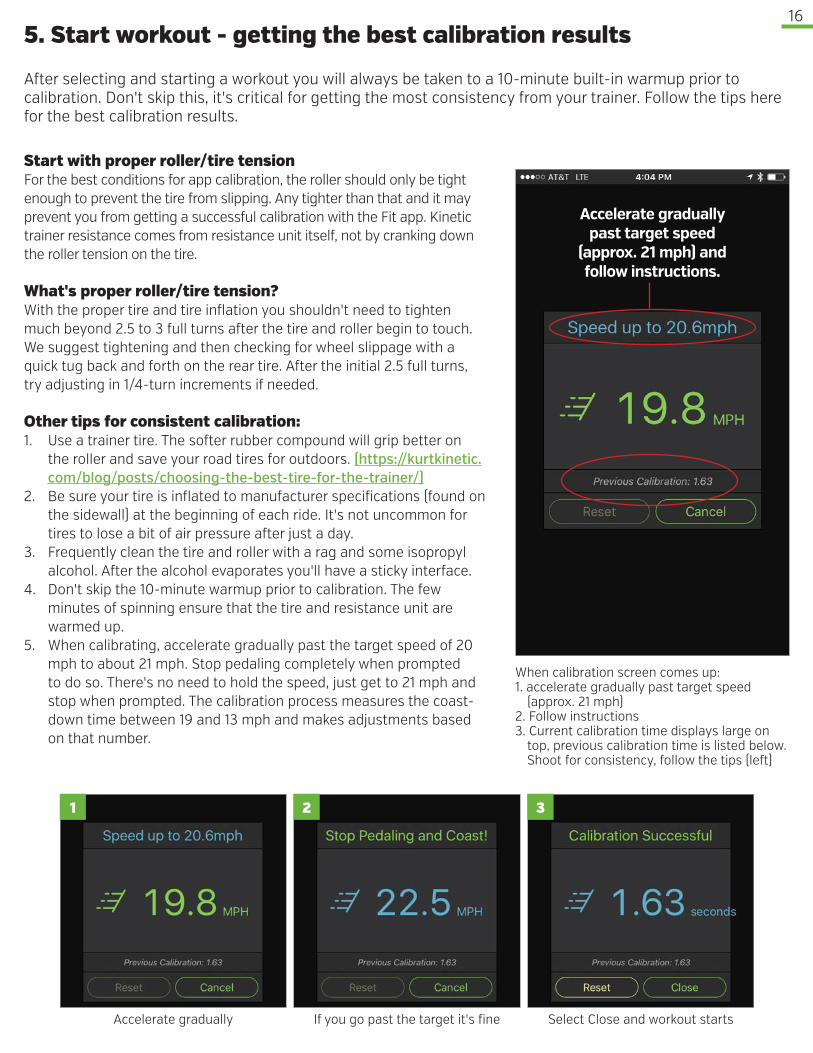
165. Start workout - getting the best calibration results
After selecting and starting a workout you will always be taken to a 10-minute built-in warmup prior to calibration. Don't skip this, it's critical for getting the most consistency from your trainer. Follow the tips here for the best calibration results.
Start with proper roller/tire tensionFor the best conditions for app calibration, the roller should only be tight enough to prevent the tire from slipping. Any tighter than that and it may prevent you from getting a successful calibration with the Fit app. Kinetic trainer resistance comes from resistance unit itself, not by cranking down the roller tension on the tire.
What's proper roller/tire tension?With the proper tire and tire inflation you shouldn't need to tighten much beyond 2.5 to 3 full turns after the tire and roller begin to touch. We suggest tightening and then checking for wheel slippage with a quick tug back and forth on the rear tire. After the initial 2.5 full turns, try adjusting in 1/4-turn increments if needed.
Other tips for consistent calibration:1. Use a trainer tire. The softer rubber compound will grip better on
the roller and save your road tires for outdoors. (https://kurtkinetic.com/blog/posts/choosing-the-best-tire-for-the-trainer/)
2. Be sure your tire is inflated to manufacturer specifications (found on the sidewall) at the beginning of each ride. It's not uncommon for tires to lose a bit of air pressure after just a day.
3. Frequently clean the tire and roller with a rag and some isopropyl alcohol. After the alcohol evaporates you'll have a sticky interface.
4. Don't skip the 10-minute warmup prior to calibration. The few minutes of spinning ensure that the tire and resistance unit are warmed up.
5. When calibrating, accelerate gradually past the target speed of 20 mph to about 21 mph. Stop pedaling completely when prompted to do so. There's no need to hold the speed, just get to 21 mph and stop when prompted. The calibration process measures the coast-down time between 19 and 13 mph and makes adjustments based on that number.
When calibration screen comes up: 1. accelerate gradually past target speed
(approx. 21 mph)2. Follow instructions3. Current calibration time displays large on
top, previous calibration time is listed below. Shoot for consistency, follow the tips (left)
If you go past the target it's fine Select Close and workout startsAccelerate gradually
Accelerate gradually past target speed
(approx. 21 mph) and follow instructions.
1 2 3

176. Saving a workout - Workout overview and history screens
cloud-arrow icon tap to share workout
1. Overall Workout
3. Time in heart rate zonesZone breaks are based on max heart rate in Kinetic Fit user profile.
2. Time in power zones
4. Mean Maximals showing time increments of 5 and 20 seconds and 1, 5 and 20 minutes
5. SharingOptions configured in device and Kinetic Fit user profile are available here.
review graphs showing overall workout and individual laps
trash tap to delete workout
Power zones showing time-in-zone, TSS, IF, NP and more. Just slide screen to access. Also a screen for heart rate zones
Kinetic Fit pre-programmed workouts stop automatically when you finish (unless you're doing a Free Ride). When a workout is finished or you end it, you'll be left at the Overview screens with options for sharing, reviewing ride data and deleting the workout. Review screens include the following:

18
Kinetic Fit for iOS
SPECIAL FEATURES + HOW-TO TIPS

19
In order to play video with the Kinetic Fit app, you'll first need to either have a TV monitor and Apple TV network set up in your trainer space or a HDMI cable and device adapter.
How to watch video during a workout - what you'll need
Select Airplay control panel by sliding screen up from the bottom and select Airplay
Select Apple TV to use be sure that "Mirroring" is on. Select Done and close control panel.
Go back to Kinetic Fit app and select workout and video as described on next page.
1 2 3
Go direct and wired with an Apple HDMI adapter and cable
Go wireless with an Apple TV and a wi-fi network
Using the Fit app with an Apple TV and a wi-fi network
option 1
option 2

20
Select a workout and "Begin"
One of the best features of the Kinetic Fit app is the ability to play video and watch a workout at the same time on the same screen with Apple TV or a Direct HDMI cable out to a monitor. Video plays after the built-in 10-minute warmup and sensor calibration.
How to watch video during a workout - selecting video in the app
If subscribed to The Sufferfest Streaming, you'll see the video options by swiping left.
To watch a video, select "Video."
Videos stored on your device or in DropBox can be found by swiping right. Select a video and "Play."
Swipe left or right: If a Google account has been synched in "Connections," you'll see your YouTube playlists.
You'll go back to the Workout Overview screen and select Warmup. Video to play is listed below overview.
1
4
2
5
3
6

21
The Kinetic Fit app has a separate workout category with The Sufferfest video workouts. If you own the corresponding video and have it stored on your device, you can select it and play it with the workout custom-tailored to your target power zones. Remember that the video will play after you've done the 10-minute warmup and calibration.
How to view The Sufferfest videos and synchronize the workouts
From home screen, select "Workout."
On Workout Overview screen, select "Video."
Select "The Sufferfest" category
On Video screen, select the corresponding The Sufferfest video stored on your device and select "Play."
Select a workout from The Sufferfest and "Begin."
You'll go back to Workout Overview screen and select "Warmup." Video to play is listed below overview.
1
4
2
5
3
6

22
Be sure you have an active Kinetic Fit app account. (Download and install the Kinetic Fit app, create an account and pair your inRide sensor.)
How to upgrade to The Sufferfest Streaming subscription
Kinetic is very excited to announce the release of our Sufferfest streaming subscription package for iOS. By logging in to the user dashboard at www.kinetic.fit, current Fit users can add unlimited streaming of all Sufferfest cycling videos for just $10 per month. Here are step by step instructions:
After completing steps 1 through 7, you’ll receive a receipt at your Kinetic Fit sign-in email address. You’ll also see The Sufferfest streaming library the next time you log into the Kinetic Fit app and select a video. Subscriptions automatically renew monthly. To cancel a subscription, go back to the your account page (step 6), scroll to the bottom and select “Cancel Subscription.”
Go to https://www.kinetic.fit and select "Dashboard" in the upper right corner
Enter the login info for your Fit account
Select "Subscription" in the left column (phone and tablet users may need to switch to landscape mode to see the side bar)
Scroll to the bottom of the Subscription page and enter credit card information and select "Save." Wait for the transaction.
Select "Subscribe" again to confirm subscriptionWhen credit card transaction is complete, select subscribe
1 2
3
5
76
4

23How to start a Training Plan
Kinetic Fit offers multiple training plans in 4 disciplines. All plans are available to Smart-level subscribers. For free app users, only one plan is available.
Scroll down and Select add to Calendar to sync to device calendar and receive calendar alerts. Select back arrow to exit.
To delete or discontinue a training
plan, select "X" and follow directions
Review the plan and select "Start."
From the home screen, select "Start a Training Plan."
3
1
Choose to start plan "Today" or on "Monday." We recommend Monday because are designed with workouts on weekends.
Select a plan.
Plans can be viewed by toggling between beginner, intermediate and advanced and by training volumes from low, medium and high.
4 5
2
Ability Leveltap to toggle
Volume Leveltap to toggle

24
We’ve introduced a built-in Functional Threshold Power (FTP) Test to get all Fit app users started in the right direction with their training and training zones. We encourage everyone to ride the FTP Test workout in order to get the best gains from your trainer workouts. The test workout is listed in the Kinetic Fit workout menu under the VO2 Max category. Select it and follow the directions on screen.
Why Do I Need to Know My FTP?
The beauty of knowing your FTP is that you can tailor your workout program to your exact fitness level. No more killing your season by trying to ride 300-watt intervals for 30 minutes when you're FTP is 230 watts. The Fit app automatically adjusts those your workout target numbers to fall within your abilities to execute, adapt and improve.
If you're new to power-based training, don't be scared away by the terms. The simplest way to define Functional Threshold Power (FTP) is the maximum average power a rider can maintain for an hour. Your current FTP number is important for a number of reasons:
• When you test regularly, FTP is your current, accurate gauge of your fitness level.
• It's a number that you can bump up, often dramatically, with a good power training program.
• Your FTP establishes your training zones within the Kinetic Fit app.
• And finally, the Kinetic Fit app customizes your workout target intensity based on training zones established by your FTP test — allowing you to TRAIN SMARTER, NOT HARDER.
How to test for Functional Threshold Power (FTP)
Scroll down and select VO2 Max category and FTP Test.
Directions and tips for the workout will appear on screen. Ride full warm up, calibrate and begin test.
2 3
Follow this link to learn more about our built-in FTP test: https://kurtkinetic.com/blog/posts/using-inrides-ftp-test-workout/
From home screen, select "Workout" button
1

25
Step 1: Pair your Google account to the Kinetic Fit app
How to view YouTube playlists with workouts - Step 1
Enter the Google login information for the account associated with your YouTube playlists
Select Allow
Chainlink icon will turn green when account is paired
Select Google and "Connect"
Your YouTube playlists will now be visible as video options in a workout
4
4
5
2
6
From the home screen, select menu from bottom left and select "Connections."
1

26
Step 2: Start a workout and select a playlist to watch.
Step 3: Device view modes offer tap-toggles between metrics and video and video/playlist control panel
YouTube playlists, like other video content, will play after the warm-up when the workout starts.
Video can be played on the device or mirrored to a second screen via Apple TV or Chromecast.
How to view YouTube playlists with workouts - Step 2
After selecting a workout, select Video
Double tap the video screen (while viewing video) to switch the device view between video and workout data.
Swipe left to get to the YouTube streaming options
Single tap the screen (while viewing video) to access video controls. You can pause and skip through a playlist or toggle on random play mode for the playlist.
Select from available playlists, highlight and select "Play."
Double Tap
Double Tap
1 2 3
swipe screen left to YouTube

27
Note: If you already have playlists, they'll show in Fit after pairing. You will need to sign in to YouTube with a Google account. Be sure to pair the same account in the Fit app.
How to build a YouTube playlist
Open YouTube on a mobile device or a computer. Select the account sign-in icon in the upper right.
Select “Create new playlist”
Sign in with your google account. If you have multiple accounts select the one you connected to the Fit app
Enter the name you want to give your play list.
Select as many videos as you want in the playlist, each time selecting “+” or “+ Add to,” and the playlist you created.
Find the first video you want to add to a playlist, then select “+” or “+ Add to” if on a desktop.
1
4 5 6
2 3

28
Kinetic Fit for iOS
TROUBLESHOOTING

29
Support screen opens Kinetic support web site topics. Search FAQs or select Contact Us and submit a new ticket.
When selecting Contact Us, open tickets will display. Select New to start a new ticket
A new ticket for your workout will be generated. Describe any issues as specifically as you can and Send.
Or from an active workout, select menu from bottom left and select "Support."
2
3 4
1b
Customer support tickets can be submitted during or after a workout when needed. Follow the directions below and be sure to be as specific as possible when describing any app issues. Kinetic offers a full site of frequently asked questions (FAQs) organized by each of our products.
Submitting customer service tickets from the Kinetic Fit app
From the home screen, select menu from bottom left and select "Support."
1
30
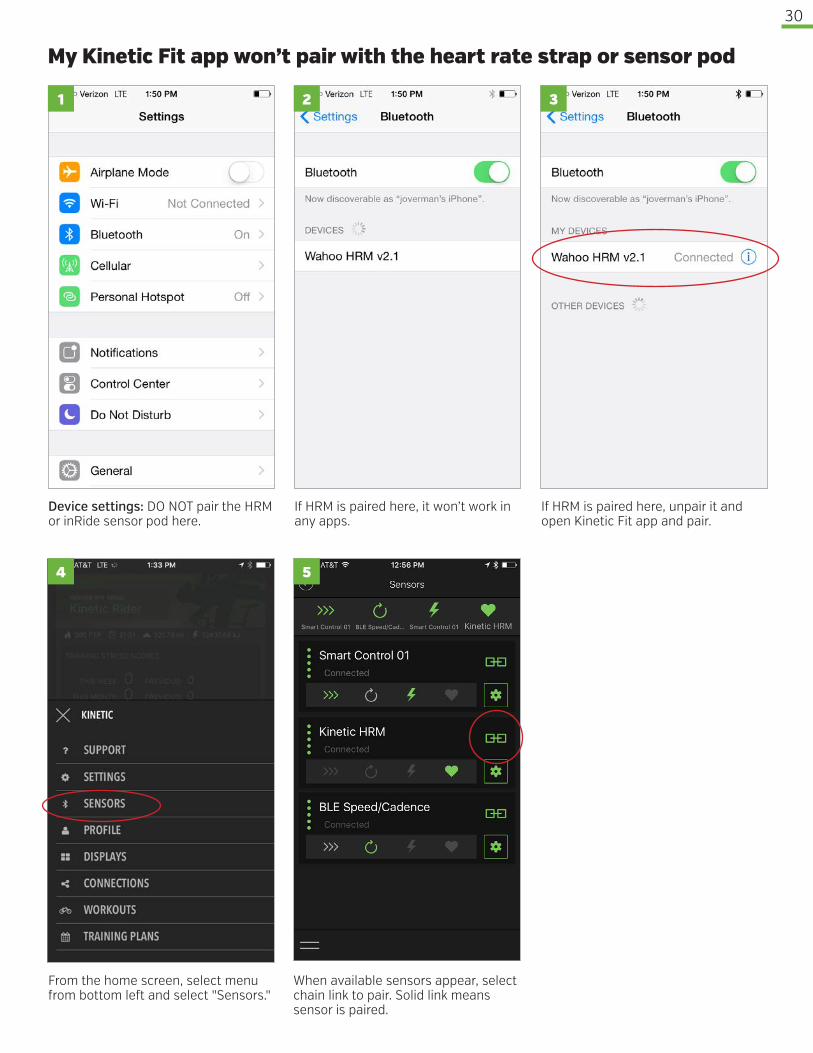
Device settings: DO NOT pair the HRM or inRide sensor pod here.
When available sensors appear, select chain link to pair. Solid link means sensor is paired.
From the home screen, select menu from bottom left and select "Sensors."
If HRM is paired here, it won’t work in any apps.
If HRM is paired here, unpair it and open Kinetic Fit app and pair.
My Kinetic Fit app won’t pair with the heart rate strap or sensor pod
1
4
2
5
3

31
5280 Main Street NE Minneapolis, MN 55421 • 1.877.226.7824kurtkinetic.com
©2016 KINETIC BY KURT ALL RIGHTS RESERVED


![[Tuto] Downgrade iOS 4.3.5 Vers iOS 4.3](https://img.dokumen.tips/doc/110x75/5571ff4e49795991699d04ef/tuto-downgrade-ios-435-vers-ios-43.jpg)


