Embed Size (px)
Citation preview

Column #97: Keyboard Entry and Display
The Nuts and Volts of BASIC Stamps (Volume 4) • Page 61
Column #97 May 2003 by Jon Williams:
Keyboard Entry and Display I'm sure you've heard, perhaps many time, that "Imitation is the sincerest form of flattery." I happen to agree with that assertion. What I've also found is that imitation is an excellent opportunity for self-education. Let me explain. I've been very fortunate in my career to be asked to provide training for those interested in learning what I happen to know. For the last couple of years, I've been employed by Parallax and have had the opportunity to teach many people [mostly teachers] how to program and use BASIC Stamps. I am often asked what steps one can take to learn to program BASIC Stamps, and I generally list three things: 1. Study the available documentation and examples 2. Solve a problem; yours or someone else's 3. Attempt to duplicate an existing device Of course, for the purposes of this month's article, we're going to focus on suggestion #3. The reason, honestly, has to do with a recent training session I conducted in the city of Utrecht, located in western Holland, not too far from Amsterdam. At that meeting I met an engineer named Wolter who showed me a really interesting project that he is working on and needing some assistance with. The UI for the project consisted of a 4x4 matrix keyboard connected to the
Column #97: Keyboard Entry and Display
Page 62 • The Nuts and Volts of BASIC Stamps (Volume 4)
BASIC Stamp through a 74C922. His demo used the DEBUG window but ultimately he would install an LCD for local display. After returning to Texas I had a couple of idea exchanges with Wolter. His use of the 74C922 and wanting to use an LCD tickled my interest. I remembered seeing this combination, and finally found it by digging through my old documentation. Way back in the early days of the BASIC Stamp, my buddy Scott Edwards (the creator of this column) had designed such a project with the BS1, and very cleverly came up with a scheme that allowed the 74C922 and the LCD to share the same IO pins. This makes perfect sense from a resource conservation point-of-view, since the Stamp can't write to the LCD and read from the 74922 at the same time. So we're going to use Scott's hardware design with a BS2 and imitate a controller that I recently encountered. Okay, what am I imitating? Well, not long ago I needed some extra storage space so, like many people, I went and rented a small room from on of those 24-hour-access storage companies. After signing the paperwork I was asked to give them a 4-digit access code of my choosing. The manager programmed the code into a computer then took me outside to the gate-access point to show me what to do with the code. Just before the entry gate was a small box with a telephone-style keypad and an LCD display. The instructions were quite clear: Press the [*] key, enter your access code then press the [#] key. If the code was correct and my bill paid up, I would be welcomed to come on in and have access to my storage unit. The manager told me that if I ever had a problem with my bill, I'd get a small message to see her. I assured her there would be no problem – and, of course, there hasn't been. After unloading some boxes into my nice new storage room, I found the same type control box on the exit of the facility. Getting out was the same as getting in and I had no problem. As I drove away I thought, "You know, I could have done that with a BASIC Stamp." So now I will. Share and Share Alike As I already mentioned, the hardware we'll use here was designed by Scott Edwards and is typical of his clever use of inexpensive components. Take a look at Figure 97.1. The outputs of the 74C922 are connected to the same pins used by the LCD buss and RS line through 10K resistors. The way the 74C922 works is very simple: When a key has been pressed, the Data Available pin goes high and the key value (0 – 15) is output from D0 – D3. When the Stamp pins are configured as inputs, the 10K resistors simply act like pull-ups and pull-downs so the pins can be read without any difficulty.

Column #97: Keyboard Entry and Display
The Nuts and Volts of BASIC Stamps (Volume 4) • Page 63
Figure 97.1: Keypad and LCD Interface
But won't we have a problem when we want to write to the LCD? Nope. Let's say that we want to send a high out to the LCD. If the associated 74C922 pin is also high then there is no issue (no current flow between Stamp and 74C922). If the 74C922 pin happens to be low, the high from the Stamp is felt across the 10K to the LCD. Again, no problem. Of course, the process is identical – just flipped – if we want to send a low to the LCD. That Scott Edwards is a very clever guy, isn't he? From a software standpoint there is no real challenge; we simply need to remember to make the buss pins inputs so we can read the 74C922 and make them outputs when we want to send data to the LCD. We can do that with just one line of code in each section.

Column #97: Keyboard Entry and Display
Page 64 • The Nuts and Volts of BASIC Stamps (Volume 4)
Keyboard Input After deciding to imitate the gate-entry controller I popped over to Tanner Electronics in Dallas and picked up a 74C922 and a Velleman 4x4 matrix keyboard. I put together a piece of test code and ran into my first problem to solve when using the keyboard and 74C922. If you look at Figure 97.2 you'll see how the keyboard is laid out, how the raw values are returned and how I actually needed them to be (in order to match the keyboard). Thanks to the utility of the PBASIC programming language, the translation is easily handled with one line of code, though, as you'll see, I spread that single line across many to make it easier to read.
Figure 97.2: Keyboard, Raw Codes and Translated Codes
Let's go ahead and look at the code for reading a key. I made the decision that this subroutine would actually wait for a key before returning. Obviously, waiting doesn't work for all applications. In those cases where waiting is not possible, we'll simply check the Data Available (aliased as KeyReady) line externally before calling this code. Get_Key: DirL = DirL & KeyCfg DO : LOOP UNTIL (KeyReady = Yes) keyIn = KeyPad LOOKUP keyIn, [ 1, 2, 3, 10, 4, 5, 6, 11, 7, 8, 9, 12, 14, 0, 15, 13 ], keyIn LOOKUP keyIn, ["0123456789ABCD*#"], char IF (showNum AND (keyIn < 10)) THEN

Column #97: Keyboard Entry and Display
The Nuts and Volts of BASIC Stamps (Volume 4) • Page 65
GOSUB Print_Char ENDIF IF (showExt AND (keyIn > 9)) THEN GOSUB Print_Char ENDIF IF (release = Yes) THEN DO PAUSE 5 LOOP WHILE (KeyReady = Yes) ELSE PAUSE KeyDelay ENDIF RETURN Before I get into a detailed explanation, let me just share some of my design decisions for this routine: it had to work with shared LCD lines, it had to translate the key code to match the printing on the keyboard, it had to translate the key to an ASCII character for display, it had to selectively allow display of digit and non-digit keys and finally, it had to create a delay for a key being held down or force the user to release the key before pressing it again. Now that you know the design decision, the code will be even simpler to follow. We start by making the associated IO lines inputs so they can be read by the Stamp. The first to be checked, of course, is the Data Available output from the 74C922, which the program has aliased as KeyReady. As you can see, the program will wait for a key to be ready using a DO-LOOP. Once a key is detected, the raw key value is read from the keyboard buss. Translating the raw key code to a value that matches the keyboard layout is a simple matter of using LOOKUP. One of the new features of the PBASIC compiler is the ability to break long list over multiple line (at the commas). We can take advantage of that feature with our translation code and even format the line so that the translation table exactly matches the keyboard. Once we have the translated key code, deriving the ASCII character for it is accomplished by using another LOOKUP table. This subroutine uses control variables to determine the rest of its behavior. The first is a bit called showNum that when set to one (Yes), will allow the routine to print the ASCII value of the key characters "0" to "9". The next control variable is called showExt (show extended); its purpose is to allow the display of the characters beyond the numeric set. In the case of the keyboard I used in my project, it has four hex characters, a star and the pound sign (it's a telephone keypad with "A" – "D" added). Finally, the variable release controls key repeating. When release is set to one, the user must release the key before the next can be read. In this case there is a short delay loop built in to prevent accidental repeating. When release is set to zero, a PAUSE is used to create a repeat delay for the key being held.
Column #97: Keyboard Entry and Display
Page 66 • The Nuts and Volts of BASIC Stamps (Volume 4)
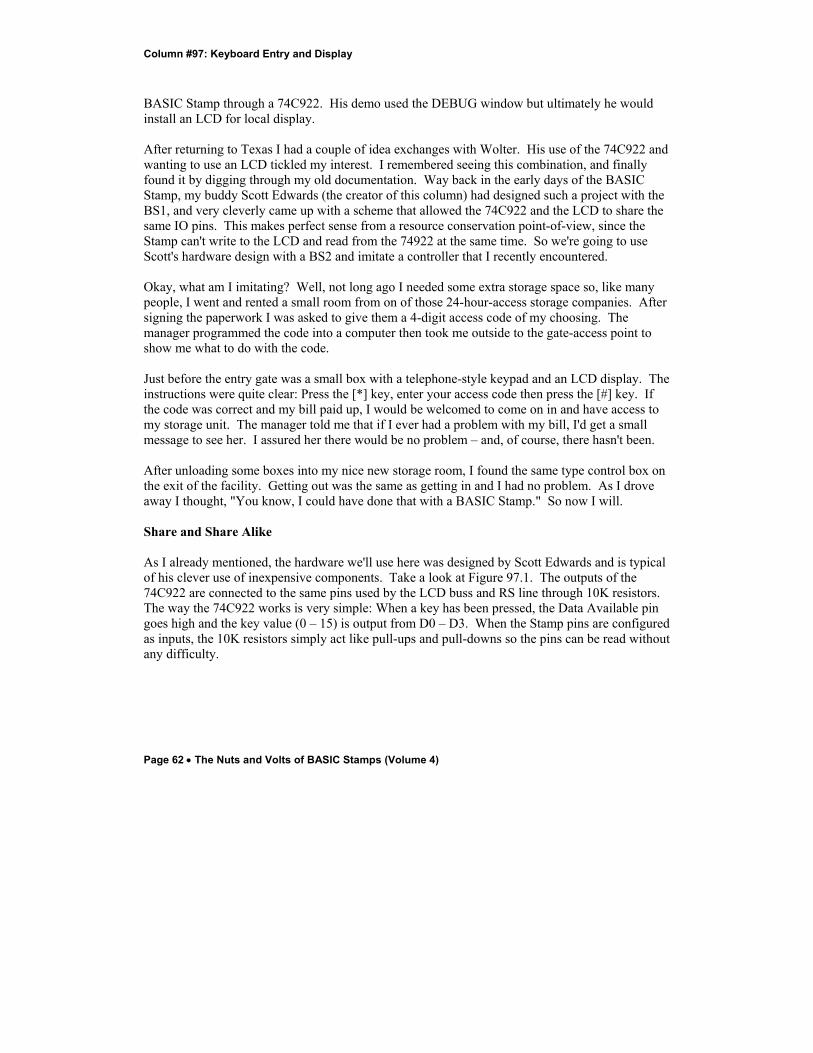
As you can see, this is a very robust input routine; I designed it that way. Many applications will have simpler requirements and you can strip away those things not needed in those applications. Numeric Input A frequent question on the BASIC Stamps mailing list is "How can I enter a number using a keyboard." Since my little gate control application needs this, I have created a fairly full-featured routine to accept numeric input from the keyboard. It also allows the user to escape without making the entry. As with the Get_Key subroutine, the Get_Number subroutine uses control variables and even affects bit flags. Let's take a look at the code: Get_Number: number = 0 inDigits = 0 hasNum = No showNum = No showExt = No DO GOSUB Get_Key IF (keyIn < 10) THEN IF (inDigits < maxDigits) THEN GOSUB Print_Char number = number * 10 + keyIn inDigits = inDigits + 1 hasNum = Yes ENDIF ELSE IF (keyIn = StarKey) THEN hasNum = No EXIT ENDIF ENDIF LOOP UNTIL (keyIn = PoundKey) RETURN The subroutine starts by clearing the return value (number), the number of digits entered (inDigits) and the flag indicating a valid entry (hasNum). It also clears the external display control variables, since the routine will want to examine the returned key before displaying it. One of the control variables used is called maxDigits. This value will cause the routine to stop accepting value keys after a specified number of digits have been entered. Of course, the maximum digits that can be entered is five, but we must be careful entering numbers like 99999 will cause a rollover error since it's greater than the 16-bit maximum value of 65,536.
Column #97: Keyboard Entry and Display
The Nuts and Volts of BASIC Stamps (Volume 4) • Page 67
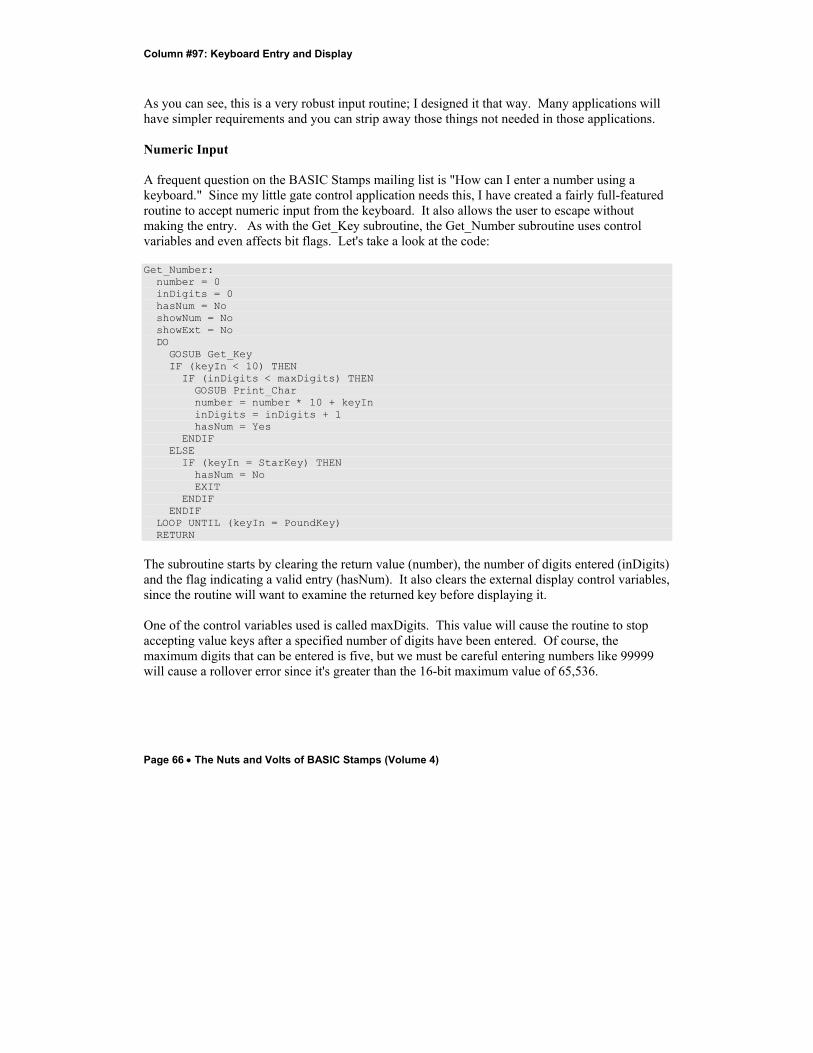
What the routine does, then, is wait for a key, check to see if it's a digit (0 – 9), then checks to see if there are digits left in our entry field. If this is the case, the character is printed and the key added to the return variable. A flag variable, hasNum, is set to indicate that we have in fact entered a number To add the new key to our numeric value, what we need to do is a decimal left shift of the current value, and then add the new digit to the one's column. Doing the decimal left shift accomplished by multiplying the current numeric value by 10. This process moves the previously-entered digits to the left. Once we've entered enough digits to fill the entry field, the routine will simply ignore any key except the star key which is used for escape, or the pound key which is used to accept the value. If the star key is pressed, you'll notice that the hasNum flag is cleared and the key input DO-LOOP is terminated with EXIT. Another way to end the entry loop is to press the pound key. Advance Use of Conditional Compilation Back in March I introduced you to another new Stamp compiler feature: conditional compilation. Most of the time I use this to set constants based on the connected Stamp, but we can also use it to determine code sections to compile based on our own settings. Let's say, for example, that we didn't have a 4x20 LCD handy but wanted to get started on the code while we waited for the good folks at Digi-Key to ship out our order. The Stamp compiler has a display feature built in (the DEBUG window) … can we use it to prove our program while waiting on the display? Yes. Let me show you how. Remember that conditional compilation control symbols are defined as either true (not zero) or false (zero). If the compiler encounters a symbol that has not been defined, it is assigned a value of false. I prefer to be very explicit in my declarations using zero and one. Like this: #DEFINE __LCD = 1 I've made the decision to precede conditional compilation symbols with two underscore characters; this isn't a requirement, just the convention I've selected for myself. While I'm waiting for my LCD to arrive, I'll change the definition to this: #DEFINE __LCD = 0

Column #97: Keyboard Entry and Display
Page 68 • The Nuts and Volts of BASIC Stamps (Volume 4)
Note that we can't use the constants Yes (1) and No (0) in our conditional compilation symbol definitions because conditional compilation directives are evaluated before anything else in the program, including constants definitions. If you look back in the Get_Key subroutine, you'll see a call to a subroutine called Print_Char. Here it is: Print_Char: #IF __LCD #THEN GOTO LCD_Write #ELSE DEBUG char RETURN #ENDIF When the LCD is selected, the character (passed in char) to the LCD_Write subroutine. Also note that GOTO is used here since there a RETURN at the end of LCD_Write. What Print_Char becomes, in this case, is an entry to the subroutine LCD_Write. If the LCD is not selected then the DEBUG window is used. What this means is you can run the program with or without the LCD. Likewise, one could develop a program that used either a standard LCD or serial LCD. One last note on conditional compilation: The directives actually control which lines of code are compiled and downloaded to the BASIC Stamp. Keep this is mind, since code compiled under one condition may need considerably more EEPROM space than under another. Remember that you can keep track of compiled code space with the Memory Map function in the editor. With the grunt work out of the way, the rest of the gate-control code is fairly simple: 1. Display menu 2. Wait for code 3. Check code against known codes 4. Open gate if code is valid. The program takes advantage of techniques we've used in the past, including last month's suggestion to store strings in EEPROM. This is, of course, is a demonstration program but could certainly be developed into a full-fledged application using past projects, including the serial interface for updating the customer database, and a real-time-clock to log entry and exit times. Have fun with it, and Happy Stamping!

Column #97: Keyboard Entry and Display
The Nuts and Volts of BASIC Stamps (Volume 4) • Page 69
' ========================================================================= ' ' File...... Security_Gate.BS2 ' Purpose... Security gate entry controller and message display ' Author.... Jon Williams, Parallax ' E-mail.... [email protected] ' Started... ' Updated... 22 MAR 2003 ' ' {$STAMP BS2} ' {$PBASIC 2.5} ' ' ========================================================================= ' -----[ Program Description ]--------------------------------------------- ' ' Provides entry control for a security gate or similar security system. ' The purpose of the program is to demonstrate keyboard input using the ' 74C922 and the conservation of Stamp IO resources by sharing buss lines ' with an LCD (hardware design by Scott Edwards). ' ' The (Velleman) keyboard used for this program is layed out like this: ' ' --- --- --- --- ' | 1 | 2 | 3 | A | R1 ' --- --- --- --- ' | 4 | 5 | 6 | B | R2 ' --- --- --- --- ' | 7 | 8 | 9 | C | R3 ' --- --- --- --- ' | * | 0 | # | D | R4 ' --- --- --- --- ' ' C C C C ' 1 2 3 4 ' -----[ Revision History ]------------------------------------------------ ' -----[ I/O Definitions ]------------------------------------------------- LcdE PIN 0 ' LCD Enable pin LcdRs PIN 3 ' Register Select LcdBuss VAR OUTB ' 4-bit LCD data bus KeyReady PIN 3 ' high when key available KeyPad VAR INB ' keys on pins 4 - 7

Column #97: Keyboard Entry and Display
Page 70 • The Nuts and Volts of BASIC Stamps (Volume 4)
GateCtrl PIN 15 ' use LED to indicate ' -----[ Conditional Compilation ]----------------------------------------- #DEFINE __LCD = 1 ' use LCD (otherwise DEBUG) ' -----[ Constants ]------------------------------------------------------- Yes CON 1 ' input or output high No CON 0 ' input or output low KeyCfg CON %00000111 ' keyboard port config KeyDelay CON 250 ' auto-repeat delay StarKey CON 14 ' [*] key PoundKey CON 15 ' [#] key ClrLCD CON $01 ' clear the LCD CrsrHm CON $02 ' move cursor to home DDRam CON $80 ' Display Data RAM control CGRam CON $40 ' Custom character RAM Line0 CON DDRam + 0 ' DDRAM address of line 1 Line1 CON DDRam + 64 ' DDRAM address of line 2 Line2 CON DDRam + 20 ' DDRAM address of line 3 Line3 CON DDRam + 84 ' DDRAM address of line 4 LcdCfg CON %11111001 ' LCD port config MsgPause CON 1500 ' delay for message display ' -----[ Variables ]------------------------------------------------------- keyIn VAR Byte ' returned by Get_Key showNum VAR Bit ' show number keys? showExt VAR Bit ' show extended keys? release VAR Bit ' force key release number VAR Word ' returned by Get_Number hasNum VAR Bit ' was number accepted? inDigits VAR Nib ' input digits maxDigits VAR Nib ' max digits to enter char VAR Byte ' ASCII char to display eeAddr VAR Word ' address of char in EE lineNum VAR Nib ' display line; 0 to 3 colNum VAR Byte ' column; 0 to 19

Column #97: Keyboard Entry and Display
The Nuts and Volts of BASIC Stamps (Volume 4) • Page 71
records VAR Byte ' number of user records pcode VAR Word ' passcode from db msgNum VAR Nib ' message to display idx VAR Byte ' general purpose var ' -----[ EEPROM Data ]----------------------------------------------------- Menu1 DATA "JONNY'S STORAGE", 0 Menu2 DATA "1. Press *", 0 Menu3 DATA "2. Enter passcode", 0 Menu4 DATA "3. Press #", 0 EnterPC DATA "Passcode: ", 0 WaitPlease DATA "Please wait... ", 0 Msg0 DATA "Invalid passcode ", 0 Msg1 DATA "Access granted ", 0 Msg2 DATA "Access denied ", 0 Msg3 DATA "Please see manager ", 0 ' Keep customer database after messages to allow for growth ' via external serial interface (not included here) ' ' Each record consists of the passcode and display message pointer Customers DATA 3 ' number of customers Passcodes DATA Word 1234, 1 ' customer passcodes, msgs DATA Word 0725, 1 DATA Word 0319, 2 ' -----[ Initialization ]-------------------------------------------------- Initialize: #IF __LCD #THEN PAUSE 500 ' let the LCD settle DirL = LcdCfg LcdBuss = %0011 ' 8-bit mode PULSOUT LcdE, 1 : PAUSE 5 PULSOUT LcdE, 1 : PAUSE 0 PULSOUT LcdE, 1 : PAUSE 0 LcdBuss = %0010 ' 4-bit mode PULSOUT LcdE, 1 char = %00101000 ' 2-line mode GOSUB LCD_Command char = %00001100 ' no crsr, no blink GOSUB LCD_Command char = %00000110 ' inc crsr, no disp shift GOSUB LCD_Command #ENDIF

Column #97: Keyboard Entry and Display
Page 72 • The Nuts and Volts of BASIC Stamps (Volume 4)
' -----[ Program Code ]---------------------------------------------------- Main: DO GOSUB Show_Menu DO GOSUB Get_Key LOOP UNTIL (keyIn = StarKey) ' wait for [*] GOSUB Get_Passcode ' get code from customer IF (hasNum = Yes) THEN ' code entered? GOSUB Check_Passcode ' check database GOSUB Print_Customer_Message ' print message PAUSE MsgPause ' time for message IF (msgNum = 1) THEN ' valid code? GOSUB Access_Granded ELSE IF (msgNum = 2) THEN ' two-part message? msgNum = 3 GOSUB Print_Customer_Message ' print second part PAUSE MsgPause ENDIF ENDIF ENDIF LOOP END ' -----[ Subroutines ]----------------------------------------------------- ' Display menu strings stored in DATA table Show_Menu: GOSUB Clear_Display colNum = 0 FOR lineNum = 0 TO 3 LOOKUP lineNum, [Menu1, Menu2, Menu3, Menu4], eeAddr GOSUB Move_To_XY GOSUB Print_String NEXT RETURN ' Get passcode from customer -- user numeric input Get_Passcode: GOSUB Clear_Display eeAddr = Menu1 ' reprint company name GOSUB Print_String

Column #97: Keyboard Entry and Display
The Nuts and Volts of BASIC Stamps (Volume 4) • Page 73
lineNum = 3 : colNum = 0 GOSUB Move_To_XY eeAddr = EnterPC ' print entry prompt GOSUB Print_String maxDigits = 4 GOSUB Get_Number ' enter passcode RETURN ' Compare user-entered passcode against database Check_Passcode: ' check for valid pc lineNum = 3 : colNum = 0 ' wait msg on line 3 GOSUB Move_To_XY eeAddr = WaitPlease GOSUB Print_String msgNum = 0 ' default to "Invalid" READ Customers, records ' get number of customers FOR idx = 0 TO (records - 1) ' loop through all eeAddr = Passcodes + (3 * idx) ' point to passcode READ eeAddr, Word pCode ' read it IF (number = pCode) THEN ' same as entry? eeAddr = eeAddr + 2 ' - point to message num READ eeAddr, msgNum ' - read message num EXIT ' - break out of loop ENDIF NEXT RETURN ' Print message in msgNum on Line 3 Print_Customer_Message: lineNum = 3 : colNum = 0 GOSUB Move_To_XY LOOKUP msgNum, [Msg0, Msg1, Msg2, Msg3], eeAddr GOSUB Print_String RETURN ' Allow access to facility Access_Granded: HIGH GateCtrl ' - raise gate PAUSE 2500 LOW GateCtrl RETURN ' Wait for key to be pressed, then return its value to caller ' -- can translate and display ASCII char of key

Column #97: Keyboard Entry and Display
Page 74 • The Nuts and Volts of BASIC Stamps (Volume 4)
' -- can force user to release or use timed debounce Get_Key: DirL = DirL & KeyCfg ' configure for kbd inputs DO : LOOP UNTIL (KeyReady = Yes) ' wait for key keyIn = KeyPad ' retrieve key value LOOKUP keyIn, [ 1, 2, 3, 10, 4, 5, 6, 11, 7, 8, 9, 12, 14, 0, 15, 13 ], keyIn ' translate kbd matrix LOOKUP keyIn, ["0123456789ABCD*#"], char ' translate key to ASCII IF (showNum AND (keyIn < 10)) THEN ' show numbers? GOSUB Print_Char ENDIF IF (showExt AND (keyIn > 9)) THEN ' show extended chars? GOSUB Print_Char ENDIF IF (release = Yes) THEN ' force release? DO PAUSE 5 ' short debounce LOOP WHILE (KeyReady = Yes) ' wait for release ELSE PAUSE KeyDelay ' delay between keys ENDIF RETURN ' Get a number of 1 to 5 digits ' -- character display is handled here ' -- [*] terminates input without accepting value ' -- [#] terminates input and accepts value ' ' NOTE: No error checking for 5-digit numbers greater than 65535 Get_Number: number = 0 ' clear work variable inDigits = 0 ' digits entered hasNum = No ' nothing entered yet showNum = No ' control display here showExt = No DO GOSUB Get_Key ' wait for new key IF (keyIn < 10) THEN ' number key? IF (inDigits < maxDigits) THEN ' room for entry? GOSUB Print_Char ' - show the key number = number * 10 + keyIn ' - add key to number inDigits = inDigits + 1 ' - update digit count hasNum = Yes ' - mark entry ENDIF

Column #97: Keyboard Entry and Display
The Nuts and Volts of BASIC Stamps (Volume 4) • Page 75
ELSE IF (keyIn = StarKey) THEN ' [*] = escape hasNum = No EXIT ENDIF ENDIF LOOP UNTIL (keyIn = PoundKey) ' wait for [#] RETURN ' Print string on display device at current position ' -- point to string by placing address in eeAddr Print_String: DO READ eeAddr, char ' get character from EE IF (char = 0) THEN EXIT ' check end GOSUB Print_Char ' print it eeAddr = eeAddr + 1 ' point to next LOOP RETURN ' Print character in char at current display position Print_Char: #IF __LCD #THEN GOTO LCD_Write #ELSE DEBUG char RETURN #ENDIF ' Clear the display (moves cursor Home) Clear_Display: #IF __LCD #THEN char = ClrLCD GOTO LCD_Command #ELSE DEBUG CLS RETURN #ENDIF ' Move display cursor to column 0 on line 0 Home_Cursor: #IF __LCD #THEN char = CrsrHm

Column #97: Keyboard Entry and Display
Page 76 • The Nuts and Volts of BASIC Stamps (Volume 4)
GOTO LCD_Command #ELSE DEBUG Home RETURN #ENDIF ' Move display cursor to lineNum, colNum Move_To_XY: #IF __LCD #THEN LOOKUP lineNum, [Line0, Line1, Line2, Line3], char char = char + (colNum // 20) GOTO LCD_Command #ELSE DEBUG CrsrXY, colNum, lineNum RETURN #ENDIF ' LCD output routines #IF __LCD #THEN LCD_Command: LOW LcdRs ' enter command mode LCD_Write: DirL = DirL | LcdCfg ' make LCD buss outputs LcdBuss = char.HighNib ' output high nibble PULSOUT LcdE, 1 ' strobe the Enable line LcdBuss = char.LowNib ' output low nibble PULSOUT LcdE, 1 HIGH LcdRs ' back to character mode RETURN #ENDIF