Embed Size (px)
Citation preview

Kerio Connect
Kerio Connect Client
Kerio Technologies

2015 Kerio Technologies s.r.o.

3
Contents
Kerio Connect Client . . . . . . . . . . . . . . . . . . . . . . . . . . . . . . . . . . . . . . . . . . . . . . . . . . . . . . . . . . 10
Kerio Connect Client . . . . . . . . . . . . . . . . . . . . . . . . . . . . . . . . . . . . . . . . . . . . . . . . . . . . . 10
Emails . . . . . . . . . . . . . . . . . . . . . . . . . . . . . . . . . . . . . . . . . . . . . . . . . . . . . . . . . . . . . . . . . . . 10
Calendars . . . . . . . . . . . . . . . . . . . . . . . . . . . . . . . . . . . . . . . . . . . . . . . . . . . . . . . . . . . . . . . 11
Contacts . . . . . . . . . . . . . . . . . . . . . . . . . . . . . . . . . . . . . . . . . . . . . . . . . . . . . . . . . . . . . . . . 12
Tasks . . . . . . . . . . . . . . . . . . . . . . . . . . . . . . . . . . . . . . . . . . . . . . . . . . . . . . . . . . . . . . . . . . . 13
Notes . . . . . . . . . . . . . . . . . . . . . . . . . . . . . . . . . . . . . . . . . . . . . . . . . . . . . . . . . . . . . . . . . . . 14
Configuring your Kerio Connect Client . . . . . . . . . . . . . . . . . . . . . . . . . . . . . . . . . . . . . . . . 15
What to configure in your Kerio Connect Client . . . . . . . . . . . . . . . . . . . . . . . . . . . 15
Configuring email signature . . . . . . . . . . . . . . . . . . . . . . . . . . . . . . . . . . . . . . . . . . . . . . 15
Hiding images from external sites . . . . . . . . . . . . . . . . . . . . . . . . . . . . . . . . . . . . . . . . 16
Setting messages as read . . . . . . . . . . . . . . . . . . . . . . . . . . . . . . . . . . . . . . . . . . . . . . . . . 18
Setting language . . . . . . . . . . . . . . . . . . . . . . . . . . . . . . . . . . . . . . . . . . . . . . . . . . . . . . . . . 19
Configuring time display . . . . . . . . . . . . . . . . . . . . . . . . . . . . . . . . . . . . . . . . . . . . . . . . . 21
Setting email addresses . . . . . . . . . . . . . . . . . . . . . . . . . . . . . . . . . . . . . . . . . . . . . . . . . . 22
Changing your password . . . . . . . . . . . . . . . . . . . . . . . . . . . . . . . . . . . . . . . . . . . . . . . . . 23
Displaying account quotas . . . . . . . . . . . . . . . . . . . . . . . . . . . . . . . . . . . . . . . . . . . . . . . 24
What to do when your quota is filled up . . . . . . . . . . . . . . . . . . . . . . . . . . . 25
Spam settings in Kerio Connect Client . . . . . . . . . . . . . . . . . . . . . . . . . . . . . . . . . . . . . . . . . 26
Overview . . . . . . . . . . . . . . . . . . . . . . . . . . . . . . . . . . . . . . . . . . . . . . . . . . . . . . . . . . . . . . . . 26
Moving messages to the Spam folder automatically . . . . . . . . . . . . . . . . . . . . . . . 26
Creating a spam whitelist . . . . . . . . . . . . . . . . . . . . . . . . . . . . . . . . . . . . . . . . . . . . . . . . 26
Helping Kerio Connect to recognize spam messages . . . . . . . . . . . . . . . . . . . . . . . 28
Customizing the appearance of Kerio Connect Client . . . . . . . . . . . . . . . . . . . . . . . . . . 30
Overview . . . . . . . . . . . . . . . . . . . . . . . . . . . . . . . . . . . . . . . . . . . . . . . . . . . . . . . . . . . . . . . . 30
Changing the color theme . . . . . . . . . . . . . . . . . . . . . . . . . . . . . . . . . . . . . . . . . . . . . . . . 30
Previewing messages . . . . . . . . . . . . . . . . . . . . . . . . . . . . . . . . . . . . . . . . . . . . . . . . . . . . . 31
Hiding the folders menu . . . . . . . . . . . . . . . . . . . . . . . . . . . . . . . . . . . . . . . . . . . . . . . . . 31
Configuring the Out of Office message . . . . . . . . . . . . . . . . . . . . . . . . . . . . . . . . . . . . . . . . 33
Configuring the Out of Office message . . . . . . . . . . . . . . . . . . . . . . . . . . . . . . . . . . . . 33
Sending messages in Kerio Connect Client . . . . . . . . . . . . . . . . . . . . . . . . . . . . . . . . . . . . . 35
Sending email messages . . . . . . . . . . . . . . . . . . . . . . . . . . . . . . . . . . . . . . . . . . . . . . . . . 35
Composing new messages . . . . . . . . . . . . . . . . . . . . . . . . . . . . . . . . . . . . . . . . . . . . . . . . 35
Defining your addresses . . . . . . . . . . . . . . . . . . . . . . . . . . . . . . . . . . . . . . . . . . . . . . . . . 38

4
Replying to messages . . . . . . . . . . . . . . . . . . . . . . . . . . . . . . . . . . . . . . . . . . . . . . . . . . . . 39
Forwarding messages . . . . . . . . . . . . . . . . . . . . . . . . . . . . . . . . . . . . . . . . . . . . . . . . . . . . 40
Creating calendar events from messages . . . . . . . . . . . . . . . . . . . . . . . . . . . . . . . . . . 41
Sharing email folders . . . . . . . . . . . . . . . . . . . . . . . . . . . . . . . . . . . . . . . . . . . . . . . . . . . . 41
Sorting email messages in Kerio Connect Client . . . . . . . . . . . . . . . . . . . . . . . . . . . . . . . 42
About sorting . . . . . . . . . . . . . . . . . . . . . . . . . . . . . . . . . . . . . . . . . . . . . . . . . . . . . . . . . . . 42
Sorting messages within a folder . . . . . . . . . . . . . . . . . . . . . . . . . . . . . . . . . . . . . . . . . 42
Sorting messages into folders . . . . . . . . . . . . . . . . . . . . . . . . . . . . . . . . . . . . . . . . . . . . 43
Creating filters . . . . . . . . . . . . . . . . . . . . . . . . . . . . . . . . . . . . . . . . . . . . . . . . . . . . . . . . . . 44
Arranging the order of filters . . . . . . . . . . . . . . . . . . . . . . . . . . . . . . . . . . . . . . . . . . . . . 48
Editing and deleting filters . . . . . . . . . . . . . . . . . . . . . . . . . . . . . . . . . . . . . . . . . . . . . . . 48
Examples of filtering rules . . . . . . . . . . . . . . . . . . . . . . . . . . . . . . . . . . . . . . . . . . . . . . . 49
Using calendars in Kerio Connect Client . . . . . . . . . . . . . . . . . . . . . . . . . . . . . . . . . . . . . . . 52
Overview . . . . . . . . . . . . . . . . . . . . . . . . . . . . . . . . . . . . . . . . . . . . . . . . . . . . . . . . . . . . . . . . 52
Creating calendars . . . . . . . . . . . . . . . . . . . . . . . . . . . . . . . . . . . . . . . . . . . . . . . . . . . . . . . 52
Creating events . . . . . . . . . . . . . . . . . . . . . . . . . . . . . . . . . . . . . . . . . . . . . . . . . . . . . . . . . . 53
Specifying travel time . . . . . . . . . . . . . . . . . . . . . . . . . . . . . . . . . . . . . . . . . . . . . 55
Repeating events . . . . . . . . . . . . . . . . . . . . . . . . . . . . . . . . . . . . . . . . . . . . . . . . . 57
Creating private events . . . . . . . . . . . . . . . . . . . . . . . . . . . . . . . . . . . . . . . . . . . 59
Creating events from email messages . . . . . . . . . . . . . . . . . . . . . . . . . . . . . . . . . . . . . 61
Creating and displaying public calendars . . . . . . . . . . . . . . . . . . . . . . . . . . . . . . . . . 62
Accepting invitations . . . . . . . . . . . . . . . . . . . . . . . . . . . . . . . . . . . . . . . . . . . . . . . . . . . . 62
Selecting viewing mode . . . . . . . . . . . . . . . . . . . . . . . . . . . . . . . . . . . . . . . . . . . . . . . . . . 64
Printing calendars . . . . . . . . . . . . . . . . . . . . . . . . . . . . . . . . . . . . . . . . . . . . . . . . . . . . . . . 65
Sharing calendars . . . . . . . . . . . . . . . . . . . . . . . . . . . . . . . . . . . . . . . . . . . . . . . . . . . . . . . . 66
Enabling notifications in Kerio Connect . . . . . . . . . . . . . . . . . . . . . . . . . . . . . . . . . . . . . . . . 67
Overview . . . . . . . . . . . . . . . . . . . . . . . . . . . . . . . . . . . . . . . . . . . . . . . . . . . . . . . . . . . . . . . . 67
Event and task reminders in Kerio Connect Client 8.4 and newer . . . . . . . . . . . 67
Desktop notifications (Chrome and Safari 6+) . . . . . . . . . . . . . . . . . . . . . . . . . . . . . 69
Pop-up notifications (Safari 5+, Firefox, IE) . . . . . . . . . . . . . . . . . . . . . . . . . . . . . . . . 71
Resetting your mobile device in Kerio Connect Client . . . . . . . . . . . . . . . . . . . . . . . . . 72
Managing your devices . . . . . . . . . . . . . . . . . . . . . . . . . . . . . . . . . . . . . . . . . . . . . . . . . . . 72
Resetting your devices . . . . . . . . . . . . . . . . . . . . . . . . . . . . . . . . . . . . . . . . . . . . . . . . . . . 72
Support for encrypted and digitally signed messages in Kerio Connect Client . . 75
Details . . . . . . . . . . . . . . . . . . . . . . . . . . . . . . . . . . . . . . . . . . . . . . . . . . . . . . . . . . . . . . . . . . 75
Encypting and signing messages . . . . . . . . . . . . . . . . . . . . . . . . . . . . . . . . . . . . . . . . . . 75

5
Initializing certificate store in Kerio Connect Client . . . . . . . . . . . . . . . . . . . . . . . . . . . . 76
Overview . . . . . . . . . . . . . . . . . . . . . . . . . . . . . . . . . . . . . . . . . . . . . . . . . . . . . . . . . . . . . . . . 76
Initializing your certificate store . . . . . . . . . . . . . . . . . . . . . . . . . . . . . . . . . . . . . . . . . . 76
Changing your certificate store password . . . . . . . . . . . . . . . . . . . . . . . . . . . . . . . . . 77
Resetting your certificate store password . . . . . . . . . . . . . . . . . . . . . . . . . . . . . . . . . 78
Importing personal certificates to Kerio Connect Client . . . . . . . . . . . . . . . . . . . . . . . . 80
About personal certificates . . . . . . . . . . . . . . . . . . . . . . . . . . . . . . . . . . . . . . . . . . . . . . . 80
Importing personal certificates into Kerio Connect Client . . . . . . . . . . . . . . . . . . 80
Displaying certificate details . . . . . . . . . . . . . . . . . . . . . . . . . . . . . . . . . . . . . . . . . . . . . 82
Downloading your certificate . . . . . . . . . . . . . . . . . . . . . . . . . . . . . . . . . . . . . . . . . . . . . 83
Deleting your certificate . . . . . . . . . . . . . . . . . . . . . . . . . . . . . . . . . . . . . . . . . . . . . . . . . . 84
Digitally signing messages in Kerio Connect Client . . . . . . . . . . . . . . . . . . . . . . . . . . . . 85
Overview . . . . . . . . . . . . . . . . . . . . . . . . . . . . . . . . . . . . . . . . . . . . . . . . . . . . . . . . . . . . . . . . 85
Prerequisites . . . . . . . . . . . . . . . . . . . . . . . . . . . . . . . . . . . . . . . . . . . . . . . . . . . . . . . . . . . . 85
Digitally signing messages . . . . . . . . . . . . . . . . . . . . . . . . . . . . . . . . . . . . . . . . . . . . . . . 85
Signing all messages automatically . . . . . . . . . . . . . . . . . . . . . . . . . . . . . . . . . . . . . . . 86
Encrypting messages in Kerio Connect Client . . . . . . . . . . . . . . . . . . . . . . . . . . . . . . . . . . 88
Overview . . . . . . . . . . . . . . . . . . . . . . . . . . . . . . . . . . . . . . . . . . . . . . . . . . . . . . . . . . . . . . . . 88
Prerequisites . . . . . . . . . . . . . . . . . . . . . . . . . . . . . . . . . . . . . . . . . . . . . . . . . . . . . . . . . . . . 88
Encrypting messages . . . . . . . . . . . . . . . . . . . . . . . . . . . . . . . . . . . . . . . . . . . . . . . . . . . . . 88
Reading encrypted messages . . . . . . . . . . . . . . . . . . . . . . . . . . . . . . . . . . . . . . . . . . . . . 89
Displaying encrypted messages directly . . . . . . . . . . . . . . . . . . . . . . . . . . . . . . . . . . 90
Using contacts in Kerio Connect Client . . . . . . . . . . . . . . . . . . . . . . . . . . . . . . . . . . . . . . . . 92
Creating contacts . . . . . . . . . . . . . . . . . . . . . . . . . . . . . . . . . . . . . . . . . . . . . . . . . . . . . . . . 92
Creating contacts in the Contacts section . . . . . . . . . . . . . . . . . . . . . . . . . . 92
Creating contacts from email messages . . . . . . . . . . . . . . . . . . . . . . . . . . . . 93
Auto-created contacts . . . . . . . . . . . . . . . . . . . . . . . . . . . . . . . . . . . . . . . . . . . . . 94
Creating contact groups . . . . . . . . . . . . . . . . . . . . . . . . . . . . . . . . . . . . . . . . . . . . . . . . . . 95
Editing contacts . . . . . . . . . . . . . . . . . . . . . . . . . . . . . . . . . . . . . . . . . . . . . . . . . . . . . . . . . 96
Deleting contacts . . . . . . . . . . . . . . . . . . . . . . . . . . . . . . . . . . . . . . . . . . . . . . . . . . . . . . . . 96
Sorting contacts . . . . . . . . . . . . . . . . . . . . . . . . . . . . . . . . . . . . . . . . . . . . . . . . . . . . . . . . . 97
Sorting contacts into folders . . . . . . . . . . . . . . . . . . . . . . . . . . . . . . . . . . . . . . . . . . . . . 97
Sharing your contact folders . . . . . . . . . . . . . . . . . . . . . . . . . . . . . . . . . . . . . . . . . . . . . 99
Using tasks in Kerio Connect Client . . . . . . . . . . . . . . . . . . . . . . . . . . . . . . . . . . . . . . . . . . 100
Creating tasks . . . . . . . . . . . . . . . . . . . . . . . . . . . . . . . . . . . . . . . . . . . . . . . . . . . . . . . . . 100
Working with tasks . . . . . . . . . . . . . . . . . . . . . . . . . . . . . . . . . . . . . . . . . . . . . . . . . . . . 101
Sorting tasks into folders . . . . . . . . . . . . . . . . . . . . . . . . . . . . . . . . . . . . . . . . . . . . . . 101
Sharing your task folders . . . . . . . . . . . . . . . . . . . . . . . . . . . . . . . . . . . . . . . . . . . . . . 101

6
Using notes in Kerio Connect Client . . . . . . . . . . . . . . . . . . . . . . . . . . . . . . . . . . . . . . . . . . 102
Creating notes . . . . . . . . . . . . . . . . . . . . . . . . . . . . . . . . . . . . . . . . . . . . . . . . . . . . . . . . . 102
Editing notes . . . . . . . . . . . . . . . . . . . . . . . . . . . . . . . . . . . . . . . . . . . . . . . . . . . . . . . . . . 102
Sending notes as email messages . . . . . . . . . . . . . . . . . . . . . . . . . . . . . . . . . . . . . . . 103
Working with notes . . . . . . . . . . . . . . . . . . . . . . . . . . . . . . . . . . . . . . . . . . . . . . . . . . . . 103
Sorting notes into folders . . . . . . . . . . . . . . . . . . . . . . . . . . . . . . . . . . . . . . . . . . . . . . 104
Sharing your notes folders . . . . . . . . . . . . . . . . . . . . . . . . . . . . . . . . . . . . . . . . . . . . . 104
Using delegation in Kerio Connect Client . . . . . . . . . . . . . . . . . . . . . . . . . . . . . . . . . . . . . 105
About delegation . . . . . . . . . . . . . . . . . . . . . . . . . . . . . . . . . . . . . . . . . . . . . . . . . . . . . . 105
Delegating users . . . . . . . . . . . . . . . . . . . . . . . . . . . . . . . . . . . . . . . . . . . . . . . . . . . . . . . 105
Removing delegation . . . . . . . . . . . . . . . . . . . . . . . . . . . . . . . . . . . . . . . . . . . . . . . . . . . 106
Accepting delegation . . . . . . . . . . . . . . . . . . . . . . . . . . . . . . . . . . . . . . . . . . . . . . . . . . 106
Using delegation: Examples . . . . . . . . . . . . . . . . . . . . . . . . . . . . . . . . . . . . . . . . . . . . 108
Sharing in Kerio Connect Client . . . . . . . . . . . . . . . . . . . . . . . . . . . . . . . . . . . . . . . . . . . . . . 113
Overview . . . . . . . . . . . . . . . . . . . . . . . . . . . . . . . . . . . . . . . . . . . . . . . . . . . . . . . . . . . . . . 113
Sharing folders . . . . . . . . . . . . . . . . . . . . . . . . . . . . . . . . . . . . . . . . . . . . . . . . . . . . . . . . 113
Sharing email folders . . . . . . . . . . . . . . . . . . . . . . . . . . . . . . . . . . . . . . . . . . . . 113
Sharing calendars . . . . . . . . . . . . . . . . . . . . . . . . . . . . . . . . . . . . . . . . . . . . . . . . 115
Sharing contacts, notes, and task folders . . . . . . . . . . . . . . . . . . . . . . . . . 116
Changing and removing sharing rights . . . . . . . . . . . . . . . . . . . . . . . . . . . . . . . . . . 117
Displaying shared folders . . . . . . . . . . . . . . . . . . . . . . . . . . . . . . . . . . . . . . . . . . . . . . 118
Emails, contacts, notes, tasks . . . . . . . . . . . . . . . . . . . . . . . . . . . . . . . . . . . . . 118
Calendars . . . . . . . . . . . . . . . . . . . . . . . . . . . . . . . . . . . . . . . . . . . . . . . . . . . . . . . 118
Hiding shared folders . . . . . . . . . . . . . . . . . . . . . . . . . . . . . . . . . . . . . . . . . . . . . . . . . . 119
Synchronizing folders with mobile devices . . . . . . . . . . . . . . . . . . . . . . . . . . . . . . . . . . . 120
Overview . . . . . . . . . . . . . . . . . . . . . . . . . . . . . . . . . . . . . . . . . . . . . . . . . . . . . . . . . . . . . . 120
Selecting folders to synchronize . . . . . . . . . . . . . . . . . . . . . . . . . . . . . . . . . . . . . . . . 120
Making calls from Kerio Connect Client . . . . . . . . . . . . . . . . . . . . . . . . . . . . . . . . . . . . . . 122
Overview . . . . . . . . . . . . . . . . . . . . . . . . . . . . . . . . . . . . . . . . . . . . . . . . . . . . . . . . . . . . . . 122
Making calls from Kerio Connect Client . . . . . . . . . . . . . . . . . . . . . . . . . . . . . . . . . 122
Selecting a default extension . . . . . . . . . . . . . . . . . . . . . . . . . . . . . . . . . . . . . . . . . . . 123
Pinning Kerio Connect Client to the Windows taskbar . . . . . . . . . . . . . . . . . . . . . . . . 125
Overview . . . . . . . . . . . . . . . . . . . . . . . . . . . . . . . . . . . . . . . . . . . . . . . . . . . . . . . . . . . . . . 125
Pinning Kerio Connect Client to taskbar . . . . . . . . . . . . . . . . . . . . . . . . . . . . . . . . 126
Using the pinned Kerio Connect Client . . . . . . . . . . . . . . . . . . . . . . . . . . . . . . . . . . 126
Configuring clients for instant messaging . . . . . . . . . . . . . . . . . . . . . . . . . . . . . . . . . . . . 129
Recommended IM clients . . . . . . . . . . . . . . . . . . . . . . . . . . . . . . . . . . . . . . . . . . . . . . . 129
Supported features . . . . . . . . . . . . . . . . . . . . . . . . . . . . . . . . . . . . . . . . . . . . . . . . . . . . 129
Configuring Pidgin for Microsoft Windows . . . . . . . . . . . . . . . . . . . . . . . . . . . . . . 129

7
Configuring Messages on Mac OS X . . . . . . . . . . . . . . . . . . . . . . . . . . . . . . . . . . . . . 131
Configuring Psi on Linux . . . . . . . . . . . . . . . . . . . . . . . . . . . . . . . . . . . . . . . . . . . . . . . 132
Contact lists . . . . . . . . . . . . . . . . . . . . . . . . . . . . . . . . . . . . . . . . . . . . . . . . . . . . . . . . . . . 132
Troubleshooting . . . . . . . . . . . . . . . . . . . . . . . . . . . . . . . . . . . . . . . . . . . . . . . . . . . . . . . 133
Initiating group chat in instant messaging . . . . . . . . . . . . . . . . . . . . . . . . . . . . . . . . . . . . 134
About group chat in instant messaging . . . . . . . . . . . . . . . . . . . . . . . . . . . . . . . . . 134
Pidgin for Microsoft Windows . . . . . . . . . . . . . . . . . . . . . . . . . . . . . . . . . . . . . . . . . . 134
Initiating group chat in Pidgin . . . . . . . . . . . . . . . . . . . . . . . . . . . . . . . . . . . . 134
Inviting people to group chat in Pidgin . . . . . . . . . . . . . . . . . . . . . . . . . . . 135
Joining and leaving group chats in Pidgin . . . . . . . . . . . . . . . . . . . . . . . . . 136
Messages for Mac OS X . . . . . . . . . . . . . . . . . . . . . . . . . . . . . . . . . . . . . . . . . . . . . . . . . 136
Initiating group chats in Messages . . . . . . . . . . . . . . . . . . . . . . . . . . . . . . . . 136
Inviting people to group chats in Messages . . . . . . . . . . . . . . . . . . . . . . . 137
Joining and leaving group chats in Messages . . . . . . . . . . . . . . . . . . . . . . 137
Psi for Linux . . . . . . . . . . . . . . . . . . . . . . . . . . . . . . . . . . . . . . . . . . . . . . . . . . . . . . . . . . . 138
Initiating group chat in Psi . . . . . . . . . . . . . . . . . . . . . . . . . . . . . . . . . . . . . . . 138
Inviting people to group chat in Psi . . . . . . . . . . . . . . . . . . . . . . . . . . . . . . . 139
Joining and leaving group chats in Psi . . . . . . . . . . . . . . . . . . . . . . . . . . . . 140
Kerio Connect Account Assistant . . . . . . . . . . . . . . . . . . . . . . . . . . . . . . . . . . . . . . . . . . . . . 142
About Kerio Connect Account Assistant . . . . . . . . . . . . . . . . . . . . . . . . . . . . . . . . 142
Using Kerio Connect Account Assistant . . . . . . . . . . . . . . . . . . . . . . . . . . . . . . . . . 142
Troubleshooting . . . . . . . . . . . . . . . . . . . . . . . . . . . . . . . . . . . . . . . . . . . . . . . . . . . . . . . 145
Configuring a Microsoft Exchange Internet account on Mac OS X . . . . . . . . . . . . . . 146
Overview . . . . . . . . . . . . . . . . . . . . . . . . . . . . . . . . . . . . . . . . . . . . . . . . . . . . . . . . . . . . . . 146
Enabling automatic discovery . . . . . . . . . . . . . . . . . . . . . . . . . . . . . . . . . . . . . . . . . . 146
Adding an Exchange Internet account . . . . . . . . . . . . . . . . . . . . . . . . . . . . . . . . . . . 147
Exchange account limitations . . . . . . . . . . . . . . . . . . . . . . . . . . . . . . . . . . . . . . . . . . 147
Creating Exchange ActiveSync accounts in Outlook 2013 . . . . . . . . . . . . . . . . . . . . . 148
Overview . . . . . . . . . . . . . . . . . . . . . . . . . . . . . . . . . . . . . . . . . . . . . . . . . . . . . . . . . . . . . . 148
Limitations of Outlook 2013 Exchange ActiveSync account . . . . . . . . . . . . . . 148
Creating Exchange ActiveSync profile . . . . . . . . . . . . . . . . . . . . . . . . . . . . . . . . . . . 149
Connecting to your calendar manually . . . . . . . . . . . . . . . . . . . . . . . . . . . . 151
Configuring Mail and Calendar on Microsoft Windows . . . . . . . . . . . . . . . . . . . . . . . . 153
Overview . . . . . . . . . . . . . . . . . . . . . . . . . . . . . . . . . . . . . . . . . . . . . . . . . . . . . . . . . . . . . . 153
Creating accounts . . . . . . . . . . . . . . . . . . . . . . . . . . . . . . . . . . . . . . . . . . . . . . . . . . . . . 153
Support for Apple iCal/Calendar using the CalDAV standard . . . . . . . . . . . . . . . . . 158
About CalDAV and Apple iCal/Calendar . . . . . . . . . . . . . . . . . . . . . . . . . . . . . . . . 158
Configuring CalDAV account . . . . . . . . . . . . . . . . . . . . . . . . . . . . . . . . . . . . . . . . . . . 158
Sharing calendars . . . . . . . . . . . . . . . . . . . . . . . . . . . . . . . . . . . . . . . . . . . . . . . . . . . . . . 159

8
Assigning delegates . . . . . . . . . . . . . . . . . . . . . . . . . . . . . . . . . . . . . . . . . . . . . . . . . . . . 161
Configuring Microsoft Windows 8 Mail using Exchange ActiveSync . . . . . . . . . . . 162
Overview . . . . . . . . . . . . . . . . . . . . . . . . . . . . . . . . . . . . . . . . . . . . . . . . . . . . . . . . . . . . . . 162
Configuring Kerio Connect . . . . . . . . . . . . . . . . . . . . . . . . . . . . . . . . . . . . . . . . . . . . . 162
Installing SSL certificate on your desktop . . . . . . . . . . . . . . . . . . . . . . . . . . . . . . . 162
Configuring Mail on Windows 8 . . . . . . . . . . . . . . . . . . . . . . . . . . . . . . . . . . . . . . . . 163
Synchronizing data with mobile devices . . . . . . . . . . . . . . . . . . . . . . . . . . . . . . . . . . . . . . 165
Overview . . . . . . . . . . . . . . . . . . . . . . . . . . . . . . . . . . . . . . . . . . . . . . . . . . . . . . . . . . . . . . 165
Configuring Microsoft Windows Phone 8 using Exchange ActiveSync . . . . . . . . . 166
Overview . . . . . . . . . . . . . . . . . . . . . . . . . . . . . . . . . . . . . . . . . . . . . . . . . . . . . . . . . . . . . . 166
Which data can be synchronized . . . . . . . . . . . . . . . . . . . . . . . . . . . . . . . . . . . . . . . 166
Configuring Kerio Connect . . . . . . . . . . . . . . . . . . . . . . . . . . . . . . . . . . . . . . . . . . . . . 166
Configuring Windows Phone 8 . . . . . . . . . . . . . . . . . . . . . . . . . . . . . . . . . . . . . . . . . . 167
Delegation in Microsoft Outlook 2011 . . . . . . . . . . . . . . . . . . . . . . . . . . . . . . . . . . . . . . . . 173
About delegation . . . . . . . . . . . . . . . . . . . . . . . . . . . . . . . . . . . . . . . . . . . . . . . . . . . . . . 173
Delegating users . . . . . . . . . . . . . . . . . . . . . . . . . . . . . . . . . . . . . . . . . . . . . . . . . . . . . . . 173
Kerio Connect Sync app for Android devices . . . . . . . . . . . . . . . . . . . . . . . . . . . . . . . . . 176
Overview . . . . . . . . . . . . . . . . . . . . . . . . . . . . . . . . . . . . . . . . . . . . . . . . . . . . . . . . . . . . . . 176
Installing the application . . . . . . . . . . . . . . . . . . . . . . . . . . . . . . . . . . . . . . . . . . . . . . . 176
Configuring your account . . . . . . . . . . . . . . . . . . . . . . . . . . . . . . . . . . . . . . . . . . . . . . 176
Removing accounts . . . . . . . . . . . . . . . . . . . . . . . . . . . . . . . . . . . . . . . . . . . . . . . . . . . . 178
Selecting folders for synchronization . . . . . . . . . . . . . . . . . . . . . . . . . . . . . . . . . . . 178
Tasks and calendars . . . . . . . . . . . . . . . . . . . . . . . . . . . . . . . . . . . . . . . . . . . . . 178
Contacts . . . . . . . . . . . . . . . . . . . . . . . . . . . . . . . . . . . . . . . . . . . . . . . . . . . . . . . . 180
Switching off the synchronization . . . . . . . . . . . . . . . . . . . . . . . . . . . . . . . . 180
Setting the synchronization interval . . . . . . . . . . . . . . . . . . . . . . . . . . . . . . . . . . . . 181
Creating contacts and calendar events . . . . . . . . . . . . . . . . . . . . . . . . . . . . . . . . . . 184
Creating tasks . . . . . . . . . . . . . . . . . . . . . . . . . . . . . . . . . . . . . . . . . . . . . . . . . . . . . . . . . 184
Editing tasks . . . . . . . . . . . . . . . . . . . . . . . . . . . . . . . . . . . . . . . . . . . . . . . . . . . . . . . . . . 186
Completing tasks . . . . . . . . . . . . . . . . . . . . . . . . . . . . . . . . . . . . . . . . . . . . . . . . . . . . . . 187
Configuring an Exchange ActiveSync account on Android devices . . . . . . . . . . . . 188
Overview . . . . . . . . . . . . . . . . . . . . . . . . . . . . . . . . . . . . . . . . . . . . . . . . . . . . . . . . . . . . . . 188
Configuring your account . . . . . . . . . . . . . . . . . . . . . . . . . . . . . . . . . . . . . . . . . . . . . . 188
Installing and upgrading Kerio Outlook Connector . . . . . . . . . . . . . . . . . . . . . . . . . . . 195
About Kerio Outlook Connector . . . . . . . . . . . . . . . . . . . . . . . . . . . . . . . . . . . . . . . . 195
Downloading Kerio Outlook Connector (Offline Edition) . . . . . . . . . . . . . . . . . 195
Installing Kerio Outlook Connector (Offline Edition) . . . . . . . . . . . . . . . . . . . . . 196
Switching from the online version to the offline version of the Kerio
Outlook Connector . . . . . . . . . . . . . . . . . . . . . . . . . . . . . . . . . . . . . . . . . . . . . . . . . . . . . 196

9
Upgrading Kerio Outlook Connector . . . . . . . . . . . . . . . . . . . . . . . . . . . . . . . . . . . . 196
Upgrading Microsoft Outlook . . . . . . . . . . . . . . . . . . . . . . . . . . . . . . . . . . . . . . . . . . 196
Creating profiles in MS Outlook . . . . . . . . . . . . . . . . . . . . . . . . . . . . . . . . . . . . . . . . . . . . . . 197
About profiles . . . . . . . . . . . . . . . . . . . . . . . . . . . . . . . . . . . . . . . . . . . . . . . . . . . . . . . . . 197
Creating user profiles . . . . . . . . . . . . . . . . . . . . . . . . . . . . . . . . . . . . . . . . . . . . . . . . . . 197
Converting old profiles to profiles for Kerio Outlook Connector
(Offline Edition) . . . . . . . . . . . . . . . . . . . . . . . . . . . . . . . . . . . . . . . . . . . . . . . . . . . . . . . . 201
Adding multiple accounts in a single profile in Microsoft Outlook . . . . . . . . . . . . 202
Overview . . . . . . . . . . . . . . . . . . . . . . . . . . . . . . . . . . . . . . . . . . . . . . . . . . . . . . . . . . . . . . 202
Adding additional account to a profile . . . . . . . . . . . . . . . . . . . . . . . . . . . . . . . . . . 202
Removing accounts from a profile . . . . . . . . . . . . . . . . . . . . . . . . . . . . . . . . . . . . . . 204
Synchronizing Microsoft Outlook with Kerio Connect . . . . . . . . . . . . . . . . . . . . . . . . 205
Online and offline modes . . . . . . . . . . . . . . . . . . . . . . . . . . . . . . . . . . . . . . . . . . . . . . 205
About synchronization . . . . . . . . . . . . . . . . . . . . . . . . . . . . . . . . . . . . . . . . . . . . . . . . . 205
Setting folder synchronization . . . . . . . . . . . . . . . . . . . . . . . . . . . . . . . . . . . . . . . . . 206
Solving synchronization conflicts . . . . . . . . . . . . . . . . . . . . . . . . . . . . . . . . . . . . . . . 207
Sorting messages in MS Outlook . . . . . . . . . . . . . . . . . . . . . . . . . . . . . . . . . . . . . . . . . . . . . . 208
About filters . . . . . . . . . . . . . . . . . . . . . . . . . . . . . . . . . . . . . . . . . . . . . . . . . . . . . . . . . . . 208
Creating filters . . . . . . . . . . . . . . . . . . . . . . . . . . . . . . . . . . . . . . . . . . . . . . . . . . . . . . . . 208
Subscribing and sharing folders in Microsoft Outlook . . . . . . . . . . . . . . . . . . . . . . . . 211
About sharing . . . . . . . . . . . . . . . . . . . . . . . . . . . . . . . . . . . . . . . . . . . . . . . . . . . . . . . . . 211
Sharing folders . . . . . . . . . . . . . . . . . . . . . . . . . . . . . . . . . . . . . . . . . . . . . . . . . . . . . . . . 211
Removing sharing . . . . . . . . . . . . . . . . . . . . . . . . . . . . . . . . . . . . . . . . . . . . . . . . . . . . . 213
Subscribing to shared folders . . . . . . . . . . . . . . . . . . . . . . . . . . . . . . . . . . . . . . . . . . 213
Using delegation in Microsoft Outlook with Kerio Outlook Connector . . . . . . . . . 216
About delegation . . . . . . . . . . . . . . . . . . . . . . . . . . . . . . . . . . . . . . . . . . . . . . . . . . . . . . 216
Delegating users . . . . . . . . . . . . . . . . . . . . . . . . . . . . . . . . . . . . . . . . . . . . . . . . . . . . . . . 216
Selecting from which address to send messages in Microsoft Outlook . . . . . . . . 219
Overview . . . . . . . . . . . . . . . . . . . . . . . . . . . . . . . . . . . . . . . . . . . . . . . . . . . . . . . . . . . . . . 219
Selecting the From address . . . . . . . . . . . . . . . . . . . . . . . . . . . . . . . . . . . . . . . . . . . . . 219
10
Kerio Connect Client
Kerio Connect Client
Kerio Connect Client is a web client designed to speed up your work.
The following sections will guide you through all the features of the interface.
To see all articles about the Kerio Connect Client, read the articles in the Kerio Connect Client
category.
Watch the Working with Kerio Connect Client video.
Emails
In the Email section in the Kerio Connect Client you can, for example:
• Send and receive messages
• Use fulltext search — Just type in what you need and search through messages, email
addresses, subjects, and so on.
• Receive less spam — Have you received a spam message? Just click on the Spam
button and Kerio Connect will remember. Or create your own whitelist.
• Add attachments easily — Just drag & drop an attachment into the composer window.
• Get automatic email address suggestions.
• Save drafts automatically — Start a message, go to another folder and come back to
finish the message.
• Customize your out of office message with text and exact time.
• Create filters to sort your messages to folders as they arrive.
• Stay on top of new messages with desktop notifications even if you are not currently
working with Kerio Connect Client.
• Digitally sign and encypt messages.

1.3 Calendars
11
Calendars
In the Calendar section in Kerio Connect Client you can, for example:
• Create events in seconds — Just double-click inside your calendar and create an event.
• Invite other people to your meeting.
• See immediately who is available (Free/Busy calendar).
• Set reminders for your events.
• Add travel time so that you never come late.
• Create repeated events.
• Share calendars with other people.
• See calendars that other people have shared with you.

Kerio Connect Client
12
Contacts
In the Contacts section in Kerio Connect Client you can:
• Create contacts easily in the contacts section or directly from an email message.
• Organize contacts into groups.
• Call people directly by clicking on their phone number.
• Share contacts with other people.
• See contacts that other people have shared with you.

1.5 Tasks
13
Tasks
In the Tasks section in Kerio Connect Client you can:
• Create tasks and sort them into groups.
• Share task groups with other people.
• See tasks that other people have shared with you.

Kerio Connect Client
14
Notes
In the Notes section in Kerio Connect Client you can:
• Write color-coded (multi-colored) notes.
• Share notes with others.
• See notes that other people have shared with you.
• Send notes as email messages with one click.

15
Configuring your Kerio Connect Client
What to configure in your Kerio Connect Client
In Kerio Connect Client, you can configure these settings:
• Email signature
• Hiding images from external sites
• Interface language and time zone
• Password (if allowed)
• Store quota (view only)
Configuring several additional settings is covered in other articles:
• Colors (theme)
• Message preview
• Hide/display folder tree
• Notifications for new messages and event/task reminders
• Mail filters
• Out of Office message
Configuring email signature
In Kerio Connect Client, you can create a signature block that is automatically appended to
every message you write.
1. Click your name in Kerio Connect Client and select Settings.
2. Go to Email → Signature.
3. Enter whatever text you want at the end of your messages and confirm.
You can also use HTML code instead of plain text.
The maximum length of the signature is 4095 ASCII characters.

Configuring your Kerio Connect Client
16
If you reply to a message, Kerio Connect Client places your signature directly under
your reply.
Hiding images from external sites
Kerio Connect Client hides all images from external sites in your emails.
To display them manually, click Display images under your message header.

2.3 Hiding images from external sites
17
To display messages automatically:
1. Click your name in Kerio Connect Client and select Settings.
2. Go to Email → Reading.
3. Select Display images from other websites.

Configuring your Kerio Connect Client
18
4. Click Save.
Setting messages as read
You can specify the time internal after which each message will be marked as read.
1. Click your name in Kerio Connect Client and select Settings.
2. Go to Email → Reading.
3. Check the Mark displayed messages as read option and select Immediately or set the
time interval.
4. Click Save.
You can also manually mark messages as read by clicking the colored dot next to each
message.

2.5 Setting language
19
Setting language
Newly redesigned in Kerio Connect 8.5!
The Kerio Connect Client interface is available in: Chinese, Croatian, Czech, Dutch, English (US
and UK), French, German, Hungarian, Italian, Japanese, Polish, Portuguese, Russian, Slovak,
Spanish, and Swedish.
All items, such as messages, contacts, events and tasks, in all folder types are sorted by the
alphabet of the selected language.
You can also add your own languages. See the Translating Kerio Connect Client to a
new language article.
To select a language:
1. Click your name in Kerio Connect Client and select Settings.
2. In the Language & Region section, select your preferred language.
3. Save your settings.

Configuring your Kerio Connect Client
20
Each language has its own rules for displaying time and date. See the following section for
more details.
Setting language in Kerio Connect Client 8.4 and older
To select a language for your interface:
1. Click your name in Kerio Connect Client and select Settings.
2. In the Language and time section, select your preferred language.
3. Save your settings.

2.6 Configuring time display
21
Configuring time display
Time settings are important for displaying the correct time when sending and receiving
messages.
By default, time zone settings are based on Kerio Connect server. If you are in a different time
zone, you can change the time settings.
Selecting time zones
1.
Click your name in Kerio Connect Client and select Settings.
2. In the Language & Region section, select your preferred time zone.
3. Save your settings.
Changing the time format
Time is displayed according to your selected language. You may want to use different
settings, for example, you want to display the Kerio Connect Client in French and use
English (US) for the date format.
1.
Click your name in Kerio Connect Client and select Settings.
2. In the Language & Region section, unselect the Set your locales according to the
language settings.
3. Select the date and time formats and the first day of the week.
4. Save your settings.

Configuring your Kerio Connect Client
22
Configuring time display in Kerio Connect Client 8.4 and older
To select a time zone and change the time format:
1.
Click your name in Kerio Connect Client and select Settings.
2. Go to Language and time.
3. Select your preferred time zone.
4. Uselect Set your locales... and select a new locales format.
5. Save your settings.
Setting email addresses
In Kerio Connect Client, you can set the address that is displayed on your outgoing messages
and the address that replies will come to.
1. Click your name in Kerio Connect Client and select Settings.
2. Go to the Email → Composing section .
3. Enter your email address in the Default From address and/or Special Reply-To address
fields.

2.8 Changing your password
23
4. Click Save.
Now, when you compose a message, you can select the From address from a drop-down menu.
Changing your password
To change your account password:
1. Log in to Kerio Connect Client securely via HTTPS.
2. Click your name in Kerio Connect Client and select Settings.
3. In the Password Change section , type your current and new passwords.
New in Kerio Connect 8.5!
If your administrator requires complex passwords, Kerio Connect Client tells you what
you must include in your new password.

Configuring your Kerio Connect Client
24
4. Save your settings.
If the Password Change option is not available, contact your administrator.
Displaying account quotas
If you receive messages with large attachments or have a lot of contacts, you may soon use up
the quotas assigned for your account.
The limitations include:
• Space available for your messages
• Number of items allowed
To see how much space you can use:
1. Click your name in Kerio Connect Client and select Settings.
2. Go to the My Quota section.
There you can see how much space your account is currently using, how many items you have,
and what your limitations are.

2.9 Displaying account quotas
25
What to do when your quota is filled up
If you reach any of the limits set for your account, you will not be able to receive new messages.
Once you reach 90% of a quota, a warning message is displayed in the top bar of Kerio Connect
Client.
To solve this problem, we recommend the following:
• Delete any unneeded messages in the Sent and Trash folders.
• Delete any other messages you do not need, especially ones with large attachments.
• Ask your administrator to turn on automatic items clean-out. This will automatically
delete old messages and messages from the trash)
• ask your administrator to add some space for your account

26
Spam settings in Kerio Connect Client
Overview
New in Kerio Connect 8.4!
Kerio Connect contains a sophisticated antispam filter.
You can:
• Let Kerio Connect move spam messages to your Spam folder automatically
• Create a "whitelist" of senders so you are sure you receive their messages
Moving messages to the Spam folder automatically
To automatically send all messages marked as spam to the Spam folder:
1. Click your name in Kerio Connect Client and select Settings.
2. In the Spam section, select Deliver spam messages to the Spam folder.
3. Click the Save button.
Creating a spam whitelist
In Kerio Connect Client, you can create a special whitelist of email addresses. Messages sent
from these addresses will never be considered spam.
To add email addresses to your whitelist:
1. Click your name in Kerio Connect Client and select Settings.
2. In the Spam section, under Spam whitelist, click the plus sign.

3.3 Creating a spam whitelist
27
3. Type the email addresses you want to add to the whitelist.
4. (Optional) Select Trust senders from my Contact folder.
5. (Optional) Select Add the email address of the original sender while sending a reply.
6. Click the Save button.
Adding addresses from email messages
New in Kerio Connect 8.5!
You can add messages to your whitelist directly from any messages you receive.
1. Select a message in Kerio Connect Client.
2. Click any name or email address in the message header.
3. Click Add to spam whitelist.

Spam settings in Kerio Connect Client
28
Kerio Connect adds the email address to your spam whitelist in your Kerio Connect Client
settings (see above).
Helping Kerio Connect to recognize spam messages
If a spam message arrives in your Inbox that is not marked as spam, select the message and
click the Spam button.

3.4 Helping Kerio Connect to recognize spam messages
29

30
Customizing the appearance of Kerio Connect Client
Overview
To customize the appearance of your Kerio Connect Client, you can:
• Change the color theme
• Select the position of the message preview pane
• Hide the folders menu
Changing the color theme
The default color of Kerio Connect Client is blue. To select a different color theme, click your
name in Kerio Connect Client and select Change theme.

4.3 Previewing messages
31
Previewing messages
In Kerio Connect Client, you can preview your email messages on the right, on the bottom, or
you can hide the preview window.
To select where to display previews of messages:
1. Click your name in Kerio Connect Client and select Settings.
2. Go to the Email section.
3. In the Preview pane section, select the position of the pane or disable it.
4. Click Save.
Hiding the folders menu
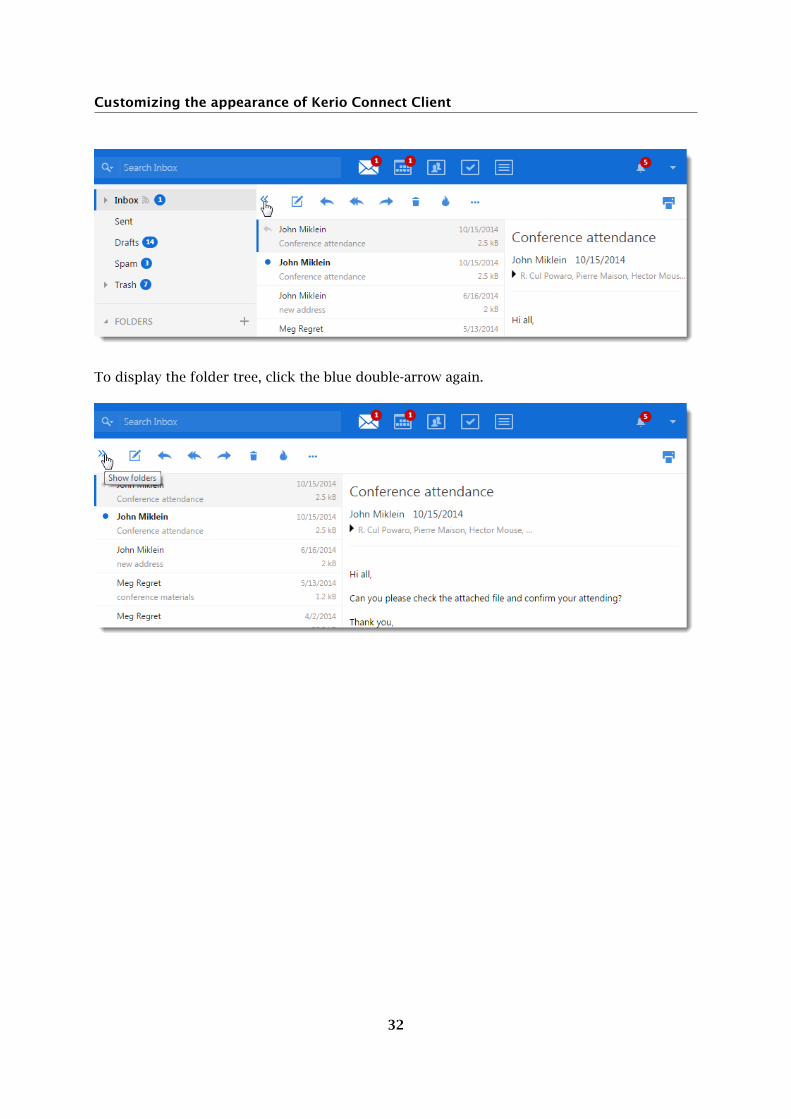
To save some space on your screen, you can hide the folder tree on the left.
Click the blue double-arrow button under the Search box.
You can hide the tree regardless of the position of the preview pane.
Customizing the appearance of Kerio Connect Client
32
To display the folder tree, click the blue double-arrow again.

33
Configuring the Out of Office message
Configuring the Out of Office message
Out of Office message is an automatic reply that Kerio Connect can send when you are away.
If you plan to go on holiday, you can let your business partners and customers know that you
are away. To do so, you can configure an out of office message.
1. Click your name in Kerio Connect Client and select Settings.
2. In section Out of Office, select the Send "Out of Office" messages option.
3. Write your message.
4. You can specify a time period when Kerio Connect sends this automatic reply.
5. Save your settings.

Configuring the Out of Office message
34
Kerio Connect sends the out of office message to each sender only once.
35
Sending messages in Kerio Connect Client
Sending email messages
To send a message, you can:
• Compose a new message
• Reply to a received message
• Forward a message
Composing new messages
To compose a new email message:
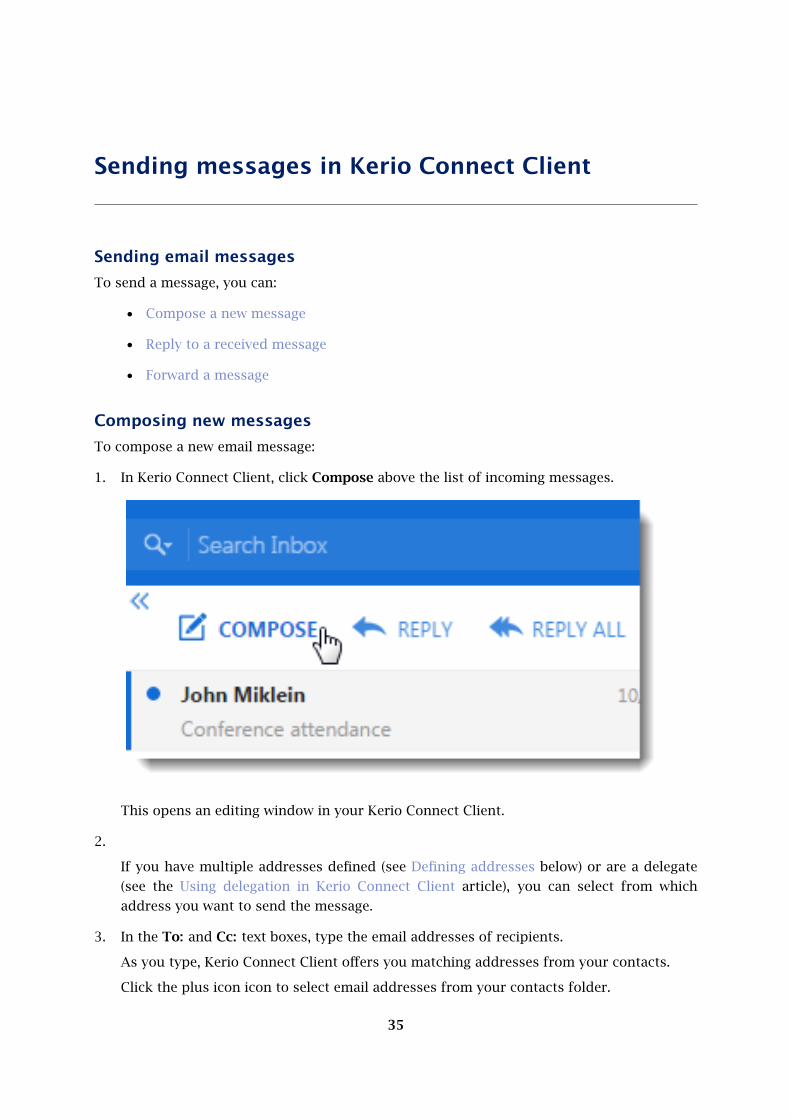
1. In Kerio Connect Client, click Compose above the list of incoming messages.
This opens an editing window in your Kerio Connect Client.
2.
If you have multiple addresses defined (see Defining addresses below) or are a delegate
(see the Using delegation in Kerio Connect Client article), you can select from which
address you want to send the message.
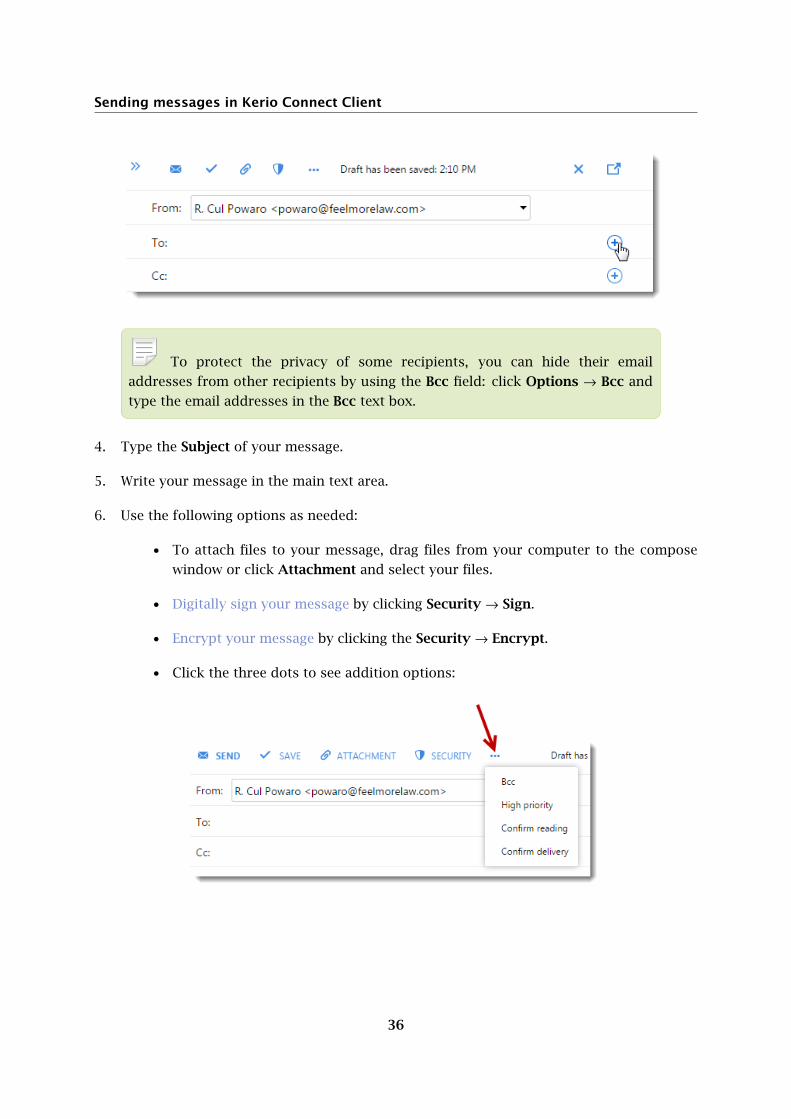
3. In the To: and Cc: text boxes, type the email addresses of recipients.
As you type, Kerio Connect Client offers you matching addresses from your contacts.
Click the plus icon icon to select email addresses from your contacts folder.
Sending messages in Kerio Connect Client
36
To protect the privacy of some recipients, you can hide their email
addresses from other recipients by using the Bcc field: click Options → Bcc and
type the email addresses in the Bcc text box.
4. Type the Subject of your message.
5. Write your message in the main text area.
6. Use the following options as needed:
• To attach files to your message, drag files from your computer to the compose
window or click Attachment and select your files.
• Digitally sign your message by clicking Security → Sign.
• Encrypt your message by clicking the Security → Encrypt.
• Click the three dots to see addition options:

6.2 Composing new messages
37
• Give the message a high priority,
• Request a read receipt (the Confirm reading option) and a delivery
confirmation receipt (the Confirm delivery option).
In the Email section of your Kerio Connect Client settings, you can select
both option to be used automatically.
7. Click Send.
Sending messages in Kerio Connect Client
38
Kerio Connect Client regularly saves drafts of your messages. If you want to send your
message later, click Save. The message is saved to your Drafts folder.
If you specify an email signature in your settings, Kerio Connect Client automatically adds that
signature to each message you compose.
After you click Send, Kerio Connects sends the messag e to all the recipients and saves a copy
to your Sent folder.
Kerio Connect Client does not currently support spell checking.
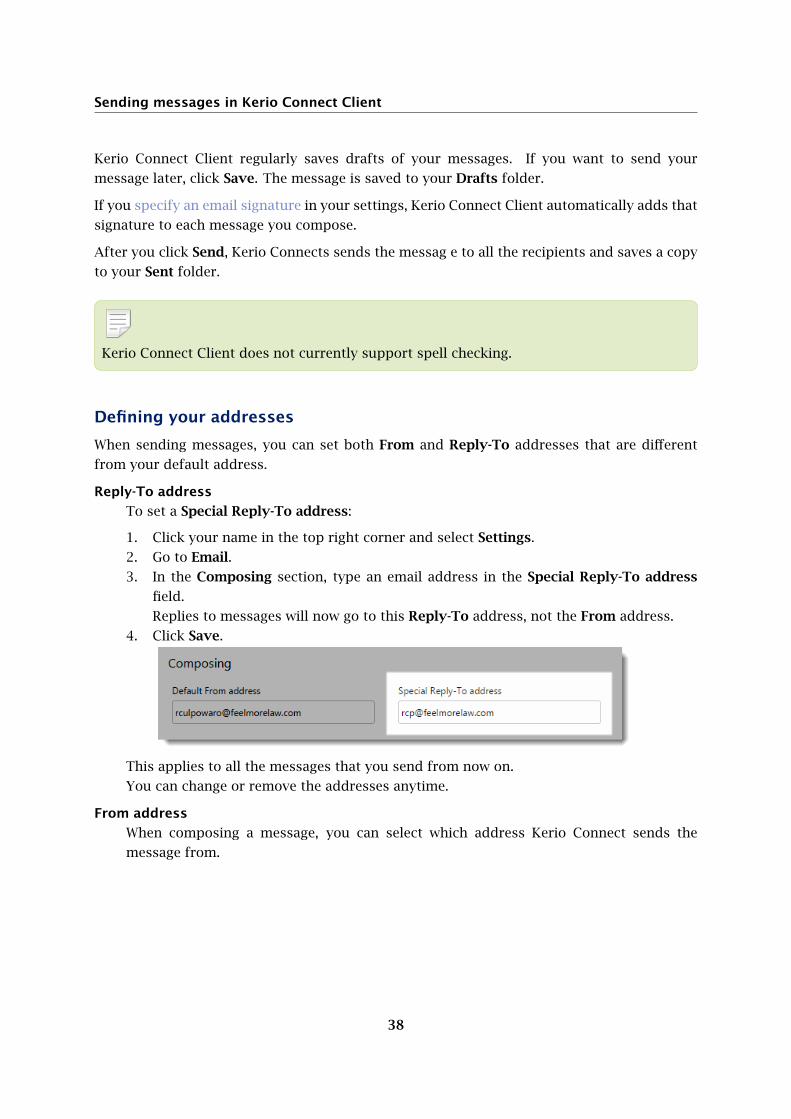
Defining your addresses
When sending messages, you can set both From and Reply-To addresses that are different
from your default address.
Reply-To address
To set a Special Reply-To address:
1. Click your name in the top right corner and select Settings.
2. Go to Email.
3. In the Composing section, type an email address in the Special Reply-To address
field.
Replies to messages will now go to this Reply-To address, not the From address.
4. Click Save.
This applies to all the messages that you send from now on.
You can change or remove the addresses anytime.
From address
When composing a message, you can select which address Kerio Connect sends the
message from.

6.4 Replying to messages
39
From addresses can be defined in two ways:
• In Kerio Connect Client, you can add a Default From address (Settings → Email
→ Composing), or send messages on behalf of another user if that person has
made you their delegate.
• Ask you administrator to add an alias in your Kerio Connect account settings.
Replying to messages
To reply to a message, click Reply.
If the message has multiple recipients and you want to send your reply to all of them, click
Reply All.
Kerio Connect Client automatically adds “Re:” before the message subject and copies the
original message into the message body.

Sending messages in Kerio Connect Client
40
Forwarding messages
If you want to send a message you’ve received to a third person, you can forward the message.
1. Select the message you want to forward.
2. Click More → Forward.

6.6 Creating calendar events from messages
41
This opens a new message window. Kerio Connect Client automatically adds “Fwd:” before
the message subject and copies the original message into the message body.
3. Add recipients as needed.
4. (Optional) Add your own message above the forwarded message.
5. Click Send.
The message appears in your Sent folder with the date and time.
Creating calendar events from messages
You can create a calendar event and invite all the message recipients and senders to the event.
See Using calendars in Kerio Connect Client.
Sharing email folders
You can share your email folders and display emails others share with you. To learn how, read
Sharing in Kerio Connect.

42
Sorting email messages in Kerio Connect Client
About sorting
In Kerio Connect Client, you can:
• Sort messages within individual folders using different criteria
• Sort received messages into different folders using rules you set up
Sorting messages within a folder
In Kerio Connect Client, you can sort messages according to various criteria.
Kerio Connect Client remembers your preferences in each individual folder.
Preview pane on the right
1. Go to a folder where you want to sort the messages.
2. Click the Sorting icon in the bottom bar.
3. Select how you want to sort the messages.
4. To sort messages in the reverse order, repeat the same procedure.
For example, if you sorted messages by date, with the most recent on top, click Date again
to list them with the oldest on top.

7.3 Sorting messages into folders
43
Preview pane on the bottom or hidden
1. To sort messages, click any header in the message list.
2. To reverse the order, click the same header again.
Sorting messages into folders
Messages delivered to Kerio Connect Client are stored in the Inbox folder.
If you have additional folders, you can move messages in three different ways:
Drag messages
You can drag messages to another folder.

Sorting email messages in Kerio Connect Client
44
Use the context menu
New in Kerio Connect 8.5!
Right-click a message, click Move and select a destination folder.
Select the Move also future messages from checkbox to create a filter rule for messages
from the same sender.
Create filters
Create filters with various conditions to move them automatically.
Creating filters
To automatically sort messages into folders or forward them to another address, use filters.
The order of the filters is important (see Arranging the order of filters below).
1. Click your name in Kerio Connect Client and select Settings.
2. In the Filters section, New filter.

7.4 Creating filters
45
3. Type a name for the filter.
4. Set the conditions for the filter.
Use a comma (,) or semi-colon (;) to separate multiple items (see Example 3 below).
5. Set the action to be taken.

Sorting email messages in Kerio Connect Client
46
6. You can also select the Skip other rules option (see below).

7.4 Creating filters
47
7. You can edit the Sieve script of the rule by clicking on View Source → Edit Source.
8. Save your settings.
Kerio Connect 8.4 and older
1. Click your name in Kerio Connect Client and select Settings.
2. In the Filters section, click New Filter.
3. To display all filter settings, click the icon
4. Set your filter(s).
Sorting email messages in Kerio Connect Client
48
5. For each filter, you can also check the Skip other rules option (see below).
6. Save your settings.
Arranging the order of filters
The order of filters is important. The filter at the top of the list is applied first.
You can drag & drop filters to sort the list.
If you check the Skip other rules option, no further filters are applied when the filter’s action
is executed.
See Example 1 below.
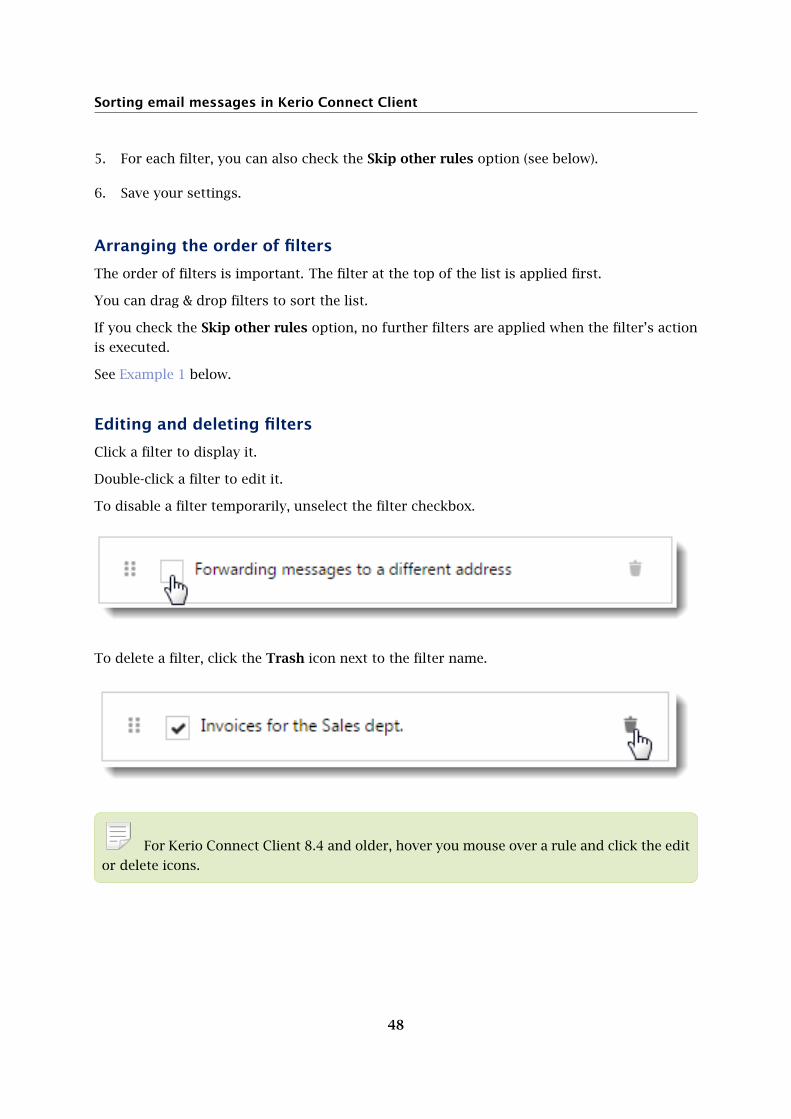
Editing and deleting filters
Click a filter to display it.
Double-click a filter to edit it.
To disable a filter temporarily, unselect the filter checkbox.
To delete a filter, click the Trash icon next to the filter name.
For Kerio Connect Client 8.4 and older, hover you mouse over a rule and click the edit
or delete icons.

7.7 Examples of filtering rules
49
Examples of filtering rules
Example 1: Order of filters
Mr. Powaro receives a message entitled Dept. meeting from Hector Mouse (email address
Kerio Connect checks the filters from 1 to 4:
1. Filter 1 forwards messages with subject Press conference to
As the subject is not Press conference, this filter does not apply and Kerio Connect
continues to filter 2.

Sorting email messages in Kerio Connect Client
50
2. Filter 2 marks messages from [email protected] as read.
As the sender is not [email protected], this filter does not apply and Kerio
Connect continues with filter 3.
3. Filter 3 moves messages from [email protected] to folder Pathology
department.
This condition is met. The message is moved to folder Pathology department.
In the filter 3 definition, the option Skip other rules is checked, so Kerio Connect applies
filter 3 and skips the other filters.

7.7 Examples of filtering rules
51
Example 2: Forwarding incoming messages to another email address
Creating a filter for forwarding incoming messages to another address.
Example 3: Adding multiple entries to an item in the rule
If you want to add multiple entries to an item, use a comma (,), or a semi-colon (;).
Messages from the address [email protected] which contain the words contract or
invoice in the subject are moved to folder Contract & Invoices.

52
Using calendars in Kerio Connect Client
Overview
In Kerio Connect Client, you can create and manage calendars where you can keep track of all
your professional and personal events.
Creating calendars
By default you have one calendar in Kerio Connect Client.
To create additional calendars:
1. In your Kerio Connect Client, go to the Calendars section.
2. Click the plus sign next to the My Calendars label.
3. Type a name for the new calendar.

8.3 Creating events
53
Click the arrow next to the calendar name to:
• Rename, share, or delete the calendar
• Select the color Kerio Connect Client uses to display events in this calendar
Creating events
To create events:
1. In your Kerio Connect Client, go to the Calendars section.
2. In the calendar grid, find the date you want to create an event for. Then:
• Double-click the grid, or
• Drag your mouse over the calendar grid, or
• Click New event.

Using calendars in Kerio Connect Client
54
3. In the New Event window:
• Type the name of the event
• Specify where the meeting takes place (see Configuring resources in Kerio
Connect)
• Specify the date and time of the event
• Invite attendees (to check their calendars for availability, click Find meeting time)
• Set up a recurring event
• Specify the time required for traveling to the event location
• Set a reminder time for the event
• Label the event
• Select a calendar to display the event in (this must be a calendar you created or a
calendar you are a delegate of)
• Mark the event as private

8.3 Creating events
55
4. Click Send.
When someone accepts or declines your invitation, Kerio Connect displays the information in
the notification area in the top bar.
Specifying travel time
New in Kerio Connect 8.5!
If you need some time to travel to an event, you can specify the time for individual events:
1. Double-click an event.
2. Specify the time in the Travel time section.

Using calendars in Kerio Connect Client
56
3. Save the event.
Kerio Connect Client then displays the time in your calendar.

8.3 Creating events
57
Travel time settings are specific for each user:
• You cannot set travel time for other users
• Other users’ settings are not displayed in your calendar
Repeating events
If you have a weekly meeting, you can set up a repeating event in Kerio Connect Client.
To create a recurring event:
1. Create a new event as described above.
2. Select the repeat frequency from the drop-down menu.
3. Click the cog wheel icon.
4. Based on your choice in step 1, you can set detailed options for the repeating event.

Using calendars in Kerio Connect Client
58
Changing repeating events
You can change a single event in the series, or all future events in the series.
1. Double-click a repeating event.
2. Change the event and click Save.
3. Click This Event to change a single event, or click Future Events to change also all future
events.

8.3 Creating events
59
Creating private events
If you mark an event as private, the details of the event stay hidden to users you share the
calendar with and to delegates — they can only see your free/busy information.
To mark an event as private, select the Private option in the event settings.

Using calendars in Kerio Connect Client
60

8.4 Creating events from email messages
61
The image below shows how the event looks in your calendar and in the calendar of your
delegate.
Creating events from email messages
In the Emails section, you can create an event and invite all the recipients and senders of a
message.
1. In the Emails section, select a message and click More → Invite Recipients.
This takes you to the Calendar section.
2. Edit the event as described above.
All the recipients and senders from the messages are included as attendees.
3. Save the event.

Using calendars in Kerio Connect Client
62
Creating and displaying public calendars
Any user can display public calendars.
To create public calendars, you must be a public folder administrator.
1. In your Kerio Connect Client, go to the Calendars section.
2. Click the arrow next to Public Folders and select New calendar.
3. Type the name of the calendar.
If a public calendar is available, it’s automatically displayed in the Calendar section of all users
under Public Folders.
Accepting invitations
When someone invites you to a meeting, Kerio Connect Client displays a number on the
Calendar tab or a notification.

8.6 Accepting invitations
63
When you receive an invitation:
1. In your Kerio Connect Client, go to the Calendars section.
2. Click the Meetings icon.
3. (Optional) Write a response to the sender.
4. Click Accept, Maybe or Decline.
To change your decision later, reopen the event, change your status, and click Send.

Using calendars in Kerio Connect Client
64
Selecting viewing mode
You can view Kerio Connect Client calendars in four different ways:
• Day view displays a single day.
• Week view displays a whole week.
The starting day is based on your selected locales.
•
New in Kerio Connect 9!
Month view displays 5 weeks in your calendar.
In Kerio Connect Client 8.5.3 and older, you can select the Overview mode which
displays from two to six weeks in your calendar — you can use the plus and minus
signs at bottom left to add or remove weeks from the view..
• Agenda displays a list of all events from the day you select onwards.

8.8 Printing calendars
65
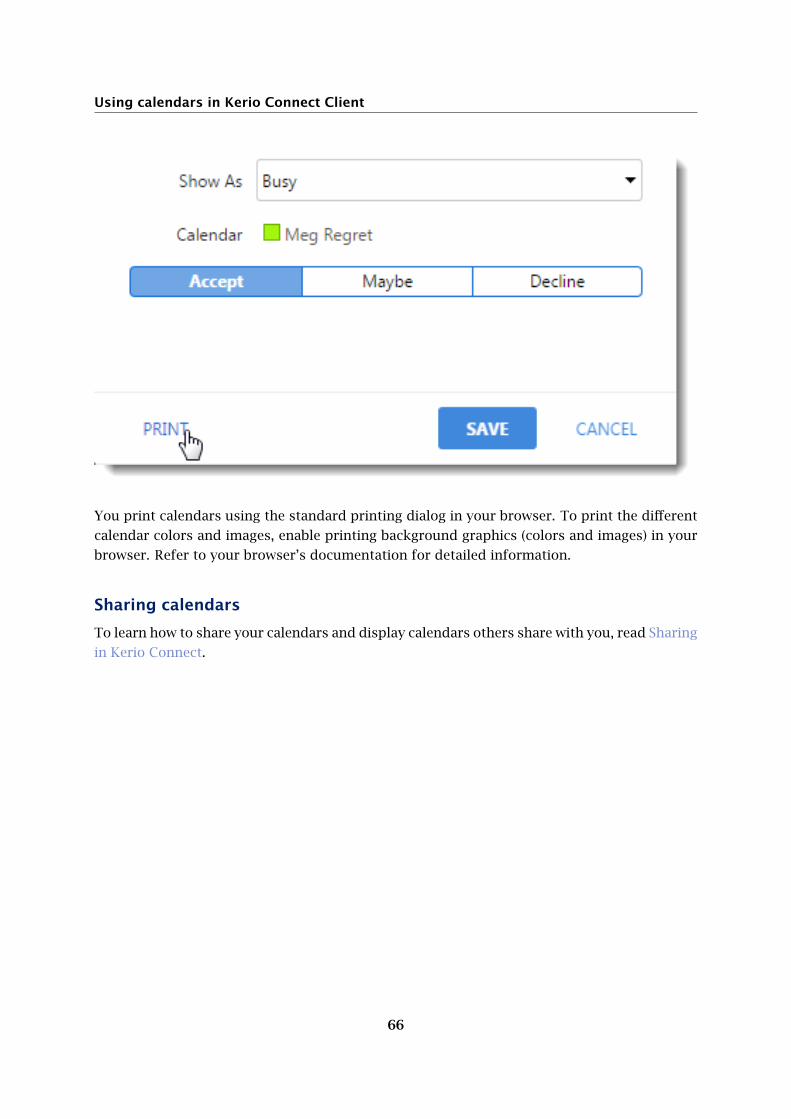
Printing calendars
New in Kerio Connect 8.5!
You can print any calendar in any viewing mode.
To print your calendar, click Print in the top right corner.
You can also print an event. Double-click an event and click the Print at the bottom.
Using calendars in Kerio Connect Client
66
You print calendars using the standard printing dialog in your browser. To print the different
calendar colors and images, enable printing background graphics (colors and images) in your
browser. Refer to your browser’s documentation for detailed information.
Sharing calendars
To learn how to share your calendars and display calendars others share with you, read Sharing
in Kerio Connect.

67
Enabling notifications in Kerio Connect
Overview
Kerio Connect Client can remind you about
• Upcoming events and tasks using reminders
• New messages and upcoming events and tasks using desktop notifications or pop-up
notifications, depending on your browser
Event and task reminders in Kerio Connect Client 8.4 and newer
Newly redesigned in Kerio Connect 8.4!
Kerio Connect Client can display reminders for your calendar events and tasks in the top bar.
These reminders are enabled by default. You can disable them in Kerio Connect client settings
— unselect the option Show reminders in toolbar.

Enabling notifications in Kerio Connect
68
The icon shows the number of events that are:
• Already started (grayed out)
• About to start
You can dismiss the reminders so that you no longer see them, or postpone them.
If you have more than one reminder, you can select Dismiss All or Dismiss All Missed events.

9.3 Desktop notifications (Chrome and Safari 6+)
69
Desktop notifications (Chrome and Safari 6+)
Desktop notifications are small pop-up windows that appear on your screen if you are using
one of these browsers:
• Chrome
• Safari 6 and later

Enabling notifications in Kerio Connect
70
To display desktop notifications:
1.
• Google Chrome
• Safari
2. Click your name in Kerio Connect Client and select Settings.
3. In the Reminderssection , select the types of notifications you want to receive (messages
and/or events and tasks).
These options are visible only if notifications are enabled in your browser.
4. Click Test Notification to make sure notifications work.
Your settings are saved automatically.
When a notification appears on your screen, click it. The new message, event, or task displays
in detail.

9.4 Pop-up notifications (Safari 5+, Firefox, IE)
71
Pop-up notifications (Safari 5+, Firefox, IE)
Pop-up notifications are small pop-up windows that appear on your screen if you are using
one of these browsers:
• Safari 5 and later
• Mozilla Firefox
• Microsoft Internet Explorer
To display pop-up notifications:
1. If you are using a pop-up blocker in your browser, you must disable it or add an exception
for your Kerio Connect address. These links describe the process for each browser:
• Mozilla Firefox
• Microsoft Internet Explorer
• Safari
2. Click your name in Kerio Connect Client and select Settings.
3. In the Reminders section, select the types of notifications you want to receive (messages
and/or events and tasks).
These options are visible only if you disable the pop-up blocker.
4. Click Test Notification to make sure the notifications work.
Your settings are saved automatically.
When a notification appears on your screen, click it and the new message, event, or task
displays in detail.

72
Resetting your mobile device in Kerio Connect
Client
Managing your devices
Kerio Connect Client shows all Exchange ActiveSync mobile devices (mobile phones, tablets)
connected to your Kerio Connect account.
Click your name in the top right corner and select Settings → Mobile Devices.
Resetting your devices
If you lose your device or the device is stolen, you can protect your personal data by deleting
all the data from the device. This action is also called remote wipe.
This action resets your device to factory settings. All data, including photos, videos,
music, calendars, emails, will be deleted from your device. Some devices may also delete all
data from memory cards.

10.2 Resetting your devices
73
1. In Kerio Connect Client, click your name in the top right corner and select Settings.
2. Go to the Mobile devices section.
3. In the list of mobile devices, find the device you want to reset and click Reset Device.
4. Type your Kerio Connect Client password to confirm the reset.
5. Once the device connects to the Kerio Connect server, all data will be removed from the
device.
You can cancel the reset before the device connects to the Kerio Connect server (click
Cancel).
6. When the reset is complete, select the device and click Remove Device to delete the device
from the list.

Resetting your mobile device in Kerio Connect Client
74
If your device is lost or stolen, we recommend changing your Kerio Connect password
after you reset your device.

75
Support for encrypted and digitally signed mes-
sages in Kerio Connect Client
Details
In Kerio Connect Client, you can:
• Sign your messages
• Encrypt your messages
• Display encrypted messages you receive
Kerio Connect uses the S/MIME standard to sign and encrypt the messages.
Encypting and signing messages
To sign and/or encrypt messages, you must:
1. Initialize your certificate store
2. Acquire and import your personal certificate to your Kerio Connect Client
3. Sign and/or encrypt messages you send (and display [decrypt] secured messages you
receive).

76
Initializing certificate store in Kerio Connect Client
Overview
Before you can digitally sign and/or encrypt messages, you must initialize your certificate
store.
Initializing your certificate store
1. Log in to your Kerio Connect Client securely via HTTPS.
2. Click your name and select Settings.
3. Go to the Secure Messages section.
4. Create a password for the certificate store.
You can:
• Use your Kerio Connect Client password
• Create a unique password for the certificate store (this is the more secure option)

12.3 Changing your certificate store password
77
Remember your password. Read the Resetting your password section for
more information.
5. Import your personal certificate.
When your store is initiated and your certificate imported, you can digitally sign, and encrypt
and decrypt messages.
Changing your certificate store password
You can change the password to your certificate store anytime.
1. In Kerio Connect Client, click your name and select Settings.
2. Go to the Secure Messages section.
3. In Certificate store protection, you can:
• Change the type of the password (same as for Kerio Connect Client or different)
• Change the password

Initializing certificate store in Kerio Connect Client
78
Resetting your certificate store password
If you forget the password to your certificate store (and you have a different password than
for your Kerio Connect account), you must initialize the store again.
1. Login to Kerio Connect Client, click your name and select Settings.
2. Go to the Secure Messages section.
3. Click the Forgotten password? link.

12.4 Resetting your certificate store password
79
4. Click Continue to confirm the reset action.
5. Type your Kerio Connect Client password and click Reset.
Now you must initialize your certificate store again and import all your certificates to start
sending encrypted and digitally signed messages.

80
Importing personal certificates to Kerio Connect
Client
About personal certificates
If you want to send encrypted or digitally signed messages, you must import a personal
certificate into Kerio Connect Client.
You can acquire a personal certificate in one of two ways:
• Ask your administrator to get you one,
• Download your own certificate for free from a site such as Comodo or Instant SSL
You must have a separate personal certificate for each of your email addresses, including any
aliases.
Back up your certificates so you can use them when re-initializing your certificate
store.
Importing personal certificates into Kerio Connect Client
1. Login to Kerio Connect Client securely, click your name and select Settings.
2. Go to the Secure Messages section.
3. Login to your certificate store.
4. In the Secure Messages section, click Import.

13.2 Importing personal certificates into Kerio Connect Client
81
5. Browse to find the certificate file, type the passphrase and click Import.

Importing personal certificates to Kerio Connect Client
82
The server verifies the validity of the certificate. If the certificate is not valid, ask your
administrator to upload a root certificate to the server.
6. Repeat steps 1-5 for all your certificates.
Displaying certificate details
To display details about your certificate, such as the serial number and validity status, click
the certificate menu and select Details.
13.4 Downloading your certificate
83
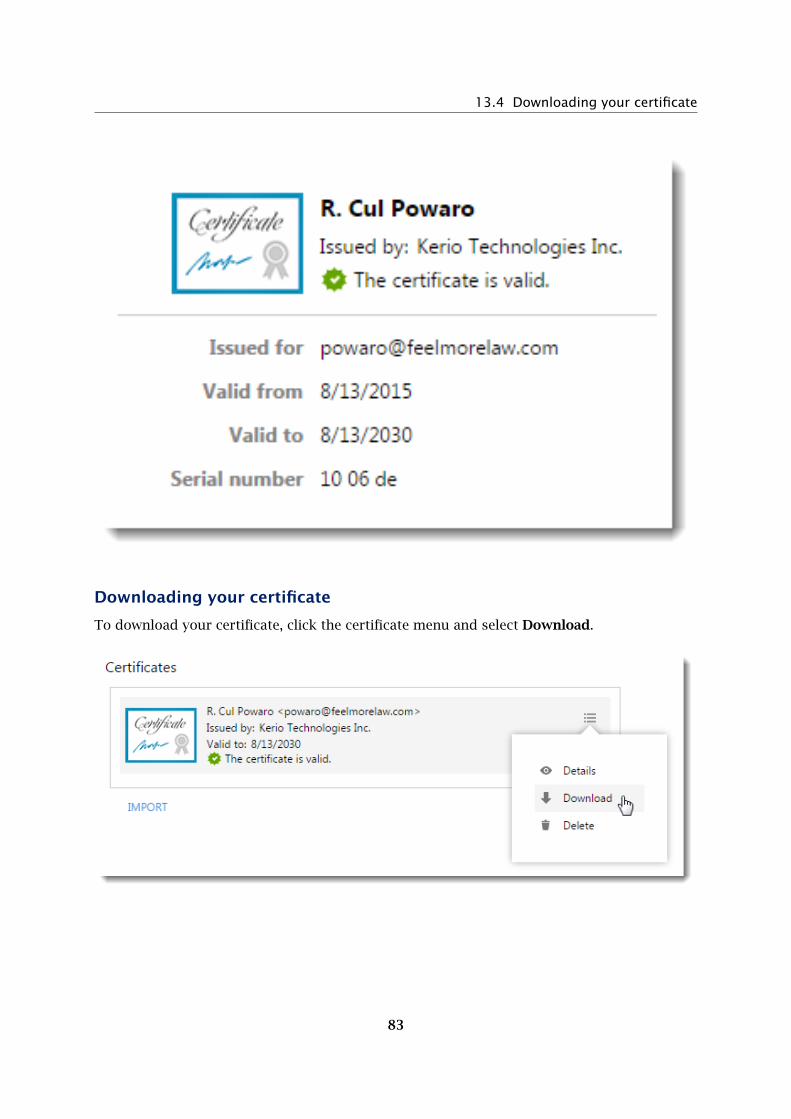
Downloading your certificate
To download your certificate, click the certificate menu and select Download.

Importing personal certificates to Kerio Connect Client
84
Download and back up your certificates so you can use them when re-initializing your
certificate store.
Deleting your certificate
To delete your certificate, click the certificate menu and select Delete.

85
Digitally signing messages in Kerio Connect Client
Overview
If you add your digital signature to your messages, the recipients know that you personally
have sent the message and the message has not been changed during the delivery.
Prerequisites
Before you can sign your messages digitally, you must:
• Initialize your certificate
• Import a valid personal certificate
Digitally signing messages
To digitally sign your messages:
1. Log in to your Kerio Connect Client securely via HTTPS.
2. Compose a message.
3. Click the Sign the message button.
You must enter the password for your certificate store.
4. Send the message.

Digitally signing messages in Kerio Connect Client
86
Signing all messages automatically
Kerio Connect Client can sign all your outgoing messages automatically.
1. Log in to your Kerio Connect Client securely via HTTPS.
2. Click your name and select Settings.
3. Go to the Secure Messages section.
4. In the Mail settings, select the Sign all outgoing messages option.
5. Save your settings.

14.4 Signing all messages automatically
87

88
Encrypting messages in Kerio Connect Client
Overview
If you encrypt your messages, only message recipients can read your messages.
Prerequisites
To encrypt messages, you must first:
• Initialize your certificate store
• Import a personal certificate
• Have the recipients’s public certificate
To acquire another user’s public certificate, ask them to send you a digitally signed
message, and then reply to that message.
Encrypting messages
To encrypt messages:
1. Compose a message.
2. Click the Encrypt the message icon.
If your certificate store is locked, enter your certificate store password.
3. Send the message.

15.4 Reading encrypted messages
89
Reading encrypted messages
To read an encrypted message, click the Display button.

Encrypting messages in Kerio Connect Client
90
If your certificate store is locked, enter your certificate store password first.
Displaying encrypted messages directly
If you do not want to click the Display button in every encrypted message you receive, Kerio
Connect Client can decrypt those messages automatically.
1. Login to Kerio Connect Client securely, click your name and select Settings.
2. Go to the Secure Messages section.
3. Login to your certificate store.
4. In the Secure Messages section, select the Display decrypted messages directly option.

15.5 Displaying encrypted messages directly
91
From now on, Kerio Connect Client displays all your messages directly.

92
Using contacts in Kerio Connect Client
Creating contacts
In Kerio Connect Client you can create contacts:
• In the Contacts section
• From any email message
Creating contacts in the Contacts section
1. In Kerio Connect Client, go to the Contacts section.
2. Click New contact.
3. Type the contact information.
4. Click Add field to add additional information.
To add items of already displayed information, click the plus sign at the right of an item.
5. Click Upload photo and select the contact photo.
The image file must be in the JPG format and cannot exceed 256 kB.
6. Click Save.

16.1 Creating contacts
93
If you synchronize your Kerio Connect account with an Exchange ActiveSync device,
the following applies due to the limitation of the Exchange ActiveSync protocol:
• Only the first three email addresses synchronize.
• The types of email addresses don’t synchronize (for example, work email, or home
email).
Creating contacts from email messages
New in Kerio Connect 8.5!
You can create or update contacts directly from the messages you receive.
1. Select a message in Kerio Connect Client.

Using contacts in Kerio Connect Client
94
2. Click any name or email address in the message header.
3. Click Create contact.
If the contact already exists, the option reads Update contact and opens the contact edit
window.
Auto-created contacts
If you send messages to addresses that are not in your contacts, Kerio Connect Client saves
the addresses.
These addresses are not visible in your contact folders. However, when you compose a
message, Kerio Connect Client offers you these addresses together with other addresses from
your contact list.
You can find additional info in Sending messages in Kerio Connect Client
16.2 Creating contact groups
95
Kerio Connect does the same when you receive a message from addresses that are
not in your contacts.
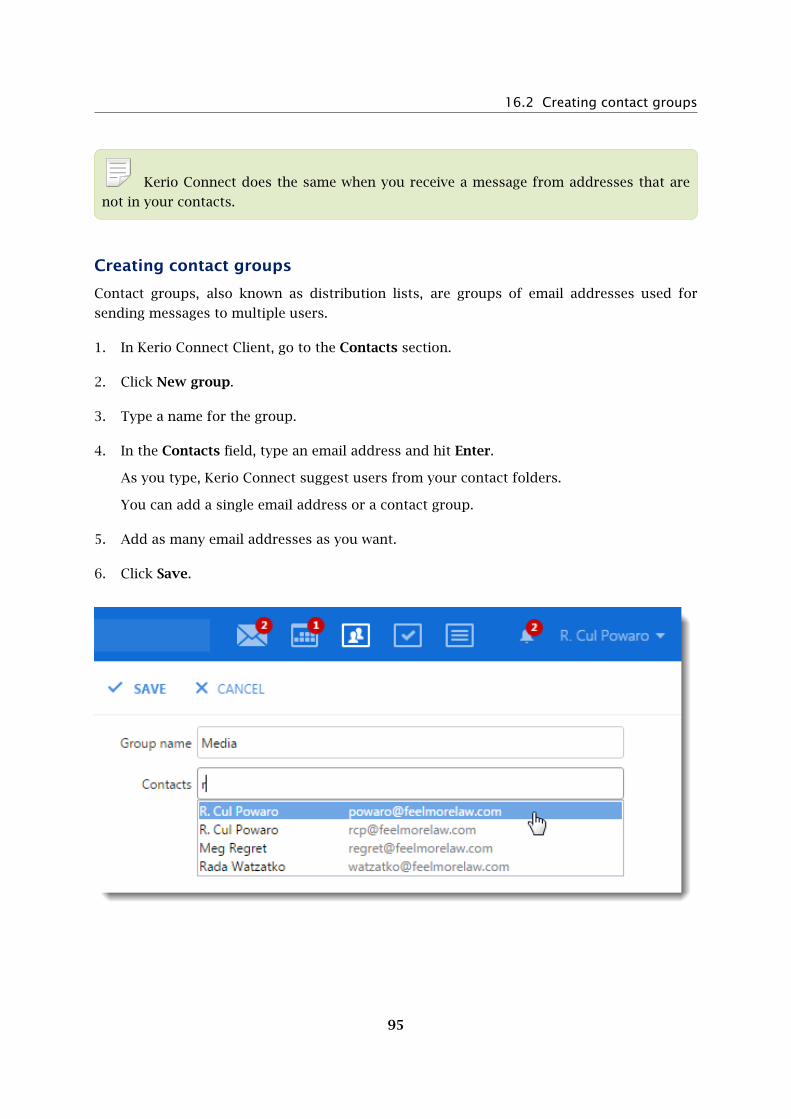
Creating contact groups
Contact groups, also known as distribution lists, are groups of email addresses used for
sending messages to multiple users.
1. In Kerio Connect Client, go to the Contacts section.
2. Click New group.
3. Type a name for the group.
4. In the Contacts field, type an email address and hit Enter.
As you type, Kerio Connect suggest users from your contact folders.
You can add a single email address or a contact group.
5. Add as many email addresses as you want.
6. Click Save.

Using contacts in Kerio Connect Client
96
Apple OS X does not support distribution lists — contact groups are not synchronized
to Address Book and vice versa.
Editing contacts
To edit your contacts or contact groups, double-click the contact in the list and make edits.
You can edit:
• Contacts you created in Kerio Connect Client
• Public contacts if you have appropriate rights
• Contacts shared with you if you have appropriate rights
New in Kerio Connect 8.5!
You can also click the name or email address in any message and update the contact (see
Creating contacts from email messages).
Deleting contacts
1. Go to the Contacts section.
2. Select the contact or group.
3. Click Delete.

16.5 Sorting contacts
97
To delete the auto-created contacts, you can also:
1. Go to the Email section.
2. Click Compose.
3. Type the email address you want to delete.
4. In the list of offered email addresses, click the delete icon next the contact you want to
delete.
To delete contacts shared with you, you must have appropriate rights.
Sorting contacts
In Kerio Connect Client, contacts are sorted according to contact’s Last name.
If the last name entry contains more names, the first one is used for sorting.
Sorting contacts into folders
Your default contact folder is My contacts.
To add another folder, click the plus sign next to Folders and specify a name.

Using contacts in Kerio Connect Client
98

16.7 Sharing your contact folders
99
To move contacts to different folders, drag the contact from its original folder to another in
the navigation tree on the left.
Sharing your contact folders
To share your contact folders and display contacts others share with you, read Sharing in
Kerio Connect.

100
Using tasks in Kerio Connect Client
Creating tasks
To create a new task:
1. In Kerio Connect Client, go to the Tasks section..
2. Specify the task in the Enter a new task field.
3. Click Add.
Double-click the task to:
• Add a reminder date and time (to learn about reminders, read Enabling notifications
in Kerio Connect)
• Add notes about the task
When you are done, save the task.

17.2 Working with tasks
101
Working with tasks
In the Tasks section, you can:
• Sort your tasks into folders
• Mark tasks as complete using the check box on their left
Finished tasks can be viewed in the Completed tasks section.
To remove a task, right-click it and select Delete.
Sorting tasks into folders
Your default task folder is My tasks.
To add another folder, click the plus sign next to FOLDERS and specify a name.
To move a task to a different folder, drag it from its original folder to another in the tree on
the left.
Sharing your task folders
You can also share your task folders and see tasks others share with you. To learn how, read
the article Sharing in Kerio Connect.

102
Using notes in Kerio Connect Client
Creating notes
To create a new note:
1. In Kerio Connect Client, go to the Notes section.
2. Click New note.
3. Write the text.
4. Click Save.
Editing notes
To edit a note, select the note in the list and click Edit.

18.3 Sending notes as email messages
103
Sending notes as email messages
You can send your note as an email message with one click.
1. In the Notes section in Kerio Connect Client, select a note.
2. Click Send as Message.
This opens a new message window containing the text of the note.
3. Compose the message as need and send.
See Sending messages in Kerio Connect Client for details.
Working with notes
In the notes section, you can:
• Sort your notes into folders.
• Change the color of your note (right-click it and select a color).
• Remove a note (right-click it and select Delete).

Using notes in Kerio Connect Client
104
Sorting notes into folders
Your default notes folder is My notes.
To add another folder, click the plus sign next to FOLDERS and specify a name.
To move a note to a different folder, drag it from its original folder to another in the tree on
the left.
Sharing your notes folders
You can share your notes and see note folders others share with you. To learn how, see the
article Sharing in Kerio Connect.

105
Using delegation in Kerio Connect Client
About delegation
Delegation is an advanced type of sharing. Delegate can act on your behalf: they can confirm
your event invitations, and send and receive messages for you.
You can delegate only to individual users, not a group of users. However, you can delegate to
as many users as you like.
Delegates can have access to your inbox and main calendar.
A delegate cannot create private events on another person’s behalf. Nor can they
see/edit the person’s other private events.
You can use the traditional sharing feature to share contacts, notes, and tasks.
Delegating users
You can delegate as many users as necessary.
1. In Kerio Connect Client, click your name and select Settings.
2. Go to the Delegation section.
3. Click Add delegate and type the name or email address of a user.
Kerio Connect Client offers users as you type. When you see the name of the person you
want to make a delegate, select it.

Using delegation in Kerio Connect Client
106
4. By default, your delegates have access only to your calendar (they can send and accept
event invitations).
To allow access to your Inbox, click the menu icon and select Access to Inbox.
5. Click Save.
Removing delegation
If you want to remove delegation rights from a user, click the menu icon and select Remove.
Accepting delegation
When someone delegates you to act on their behalf, you automatically become a delegate.
Kerio Connect Client displays that person’s inbox and calendar (see Using delegation below).
You cannot reject delegation. However, you can hide the delegated folders.

19.4 Accepting delegation
107
Hiding a delegated inbox
To remove a delegated inbox from your shared folders list, right-click the folder and select
Hide.
You are still a delegate — you can send messages on the person’s behalf — but you cannot see
their inbox.
Hiding all delegated folders
1. In Kerio Connect Client, click your name and select Settings.
2. Go to the Delegation section.
3. In People I am a delegate for, clear the dialog box next to the person’s name.

Using delegation in Kerio Connect Client
108
4. Click Save.
Now, you cannot send messages or create/accept events on another person’s behalf.
Select the dialog box again to restore your delegation rights.
Using delegation: Examples
The following examples describe how to use delegation in Kerio Connect Client.
Delegating users
R. Cul Powaro has delegated Meg Regret to act on his behalf.
Meg automatically becomes a delegate and her Kerio Connect Client displays Mr. Powaro’s
inbox and calendar.

19.5 Using delegation: Examples
109
Sending and receiving emails
When Meg Regret wants to send a message on behalf of Mr. Powaro, she selects his address
from the drop-down menu before composing a message.

Using delegation in Kerio Connect Client
110
When the message arrives, the recipient can see that Mr. Powaro has delegated Meg Regret to
act on his behalf.
Creating and accepting calendar events
When Meg Regret wants to create an event on behalf of Mr. Powaro, she selects his calendar
from the drop-down menu when creating an event.
When the invitation arrives, recipients can see it was sent by Mr. Powaro.

19.5 Using delegation: Examples
111
Mr. Miklein invites Mr. Powaro to a meeting. Meg Regret sees the invitation sent to Mr. Powaro
and can accept it on his behalf.
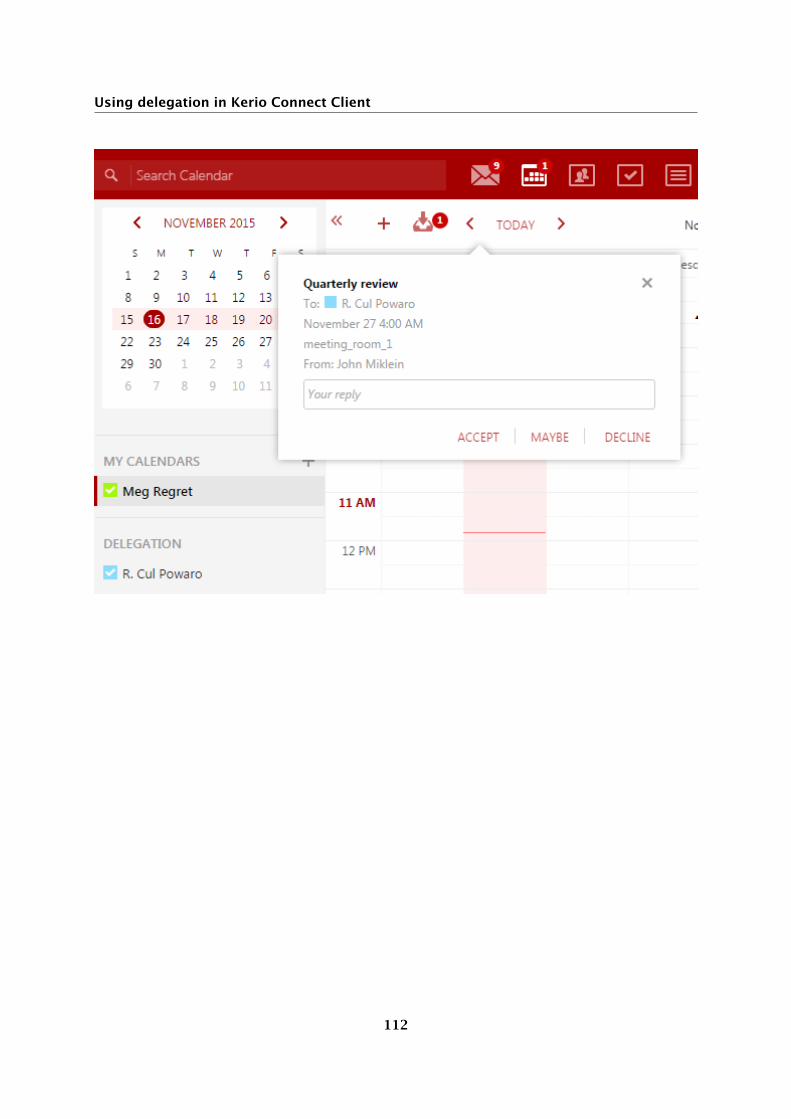
Using delegation in Kerio Connect Client
112

113
Sharing in Kerio Connect Client
Overview
For versions prior 8.4, see this article.
In Kerio Connect Client you can share any folder with other users.
First, you assign sharing rights to users. Then, users subscribe to shared folders.
This article describes how to:
• Share folders
• Change and remove sharing rights
• Display folders people share with you
• Hide shared folders
Sharing folders
Sharing email folders
To share your Inbox, you can use traditional sharing or delegation.
1. In your Kerio Connect Client, go to the Emails section.
2. Click the arrow next to the email folder name and select Sharing.
In Kerio Connect 8.4, you can share any email folder, including the Sent and
Trash folders.
3. Click the plus sign and start typing the name or email address of a user or group.
As you type, Kerio Connect Client offers you addresses from your contact lists.

Sharing in Kerio Connect Client
114
4. Click the plus sign and the down arrow to share with:
• Everyone in your company — Select Everyone from <your company>.
• Everyone from the server — Select Everyone from server.
5. Specify the rights for each user you share the folder with:
• Reader — Users can only see the messages.
• Editor — Users can add, delete, and edit messages.
• Owner — Users can set sharing as well as add, delete and edit messages.
6. Save your settings.
By default, you set the access rights for this folder only. To set the same access rights for
the subfolders, click the arrow next to Save and select Also for all subfolders.

20.2 Sharing folders
115
Sharing calendars
To share your calendar, you can use traditional sharing or delegation.
1. In your Kerio Connect Client, go to the Calendars section.
2. Click the arrow next to the calendar name and select Sharing.
3. Click the plus sign and start typing the name or email address of a user or group.
As you type, Kerio Connect Client offers you addresses from your contact lists.
4. Click the plus sign and the down arrow to share with:
• Everyone in your company — Select Everyone from <your company>.
• Everyone from the server — Select Everyone from server.
• Anonymous users — Select Public access.

Sharing in Kerio Connect Client
116
5. Specify the rights for each user you share your calendar with:
• Reader — Users can only see the events (automatically set for Public access).
• Editor — Users can add, delete, and edit events.
• Owner — Users can set sharing as well as add, delete and edit events.
6. Click Save.
Only the original owner can change events with more attendees. However, you can
use delegation instead of sharing — delegates can edit your events with multiple users.
Sharing contacts, notes, and task folders
1. In your Kerio Connect Client, go to the Contacts , Notes, or Tasks section.
2. Click the arrow next to the folder name and select Sharing.
3. Click the plus sign and start typing the name or email address of a user or group.
As you type, Kerio Connect Client offers you addresses from your contact lists.
4. Click the plus sign and the down arrow to share with:
• Everyone in your company — Select Everyone from <your company>.
• Everyone from the server — Select Everyone from server.

20.3 Changing and removing sharing rights
117
5. Specify the rights for each user you share the folder with:
• Reader — Users can only see the items.
• Editor — Users can add, delete, and edit items.
• Owner — Users can set sharing as well as add, delete and edit items.
6. Click Save.
Changing and removing sharing rights
To change sharing rights for any user, go to the Sharing dialog box and select a different level
of rights (Reader, Editor, Owner).
To stop sharing with a user, click the Trash icon.

Sharing in Kerio Connect Client
118
Displaying shared folders
Emails, contacts, notes, tasks
If someone shares an email, contact, notes or task folder with you, follow these steps to
subscribe to the shared folders:
1. In the appropriate section (Emails, Contacts, Notes, or Tasks), click the menu icon next to
Shared folders.
This displays a list of users and the number of folders that person shares with you.
2. Click a user to see all the folders they share with you.
3. Select the folders you want to display in your Kerio Connect Client.
Kerio Connect Client displays the folders immediately in the folder tree.
Calendars
If someone shares a calendar with you, follow these steps to subscribe to the shared folders:
1. In Kerio Connect Client, go to the Calendars section..
2. Click the menu icon next to People.
3. In the list of calendars shared with you, select the calendars you want to display.

20.5 Hiding shared folders
119
Now you can work with the shared calendarsas your rights permit.
If events also have attendees other than the original owner, you cannot change those
events regardless of your rights.
Hiding shared folders
To unsubscribe a shared folder, go to the sharing dialog and unselect the shared folder.
To hide the shared calendar, unselect next to the calendar name (you can display the calendar
later again).

120
Synchronizing folders with mobile devices
Overview
In Kerio Connect Client, you can select which folders will synchronize to your
iCal/CalDAV/CardDAV/Exchange ActiveSync clients.
Selecting folders to synchronize
1. Click your name in Kerio Connect Client and select Settings.
2. Go to section Folders to Sync.
3. Select which folders will synchronize.
The icon will help you identify the type of each folder (emails, contacts, tasks, notes)
4. Save.
If you subscribe to shared or public folders, they will also be available in the list of folders to
synchronize.

21.2 Selecting folders to synchronize
121
If you synchronize your Kerio Connect account via Exchange ActiveSync to an iOS
device, the Drafts folder will not synchronize (due to the limitations of Exchange ActiveSync
and the iOS device).

122
Making calls from Kerio Connect Client
Overview
In Kerio Connect Client, you can call any number from a message or from contact details just
by clicking the number.
If you have this feature available, you can see the Click to Call section in your Kerio Connect
Client (click your name and select Settings).
If you don’t see the Click to Call section, contact your administrator. Administrators must
enable this feature on the server.
Making calls from Kerio Connect Client
To make calls from Kerio Connect Client:
1. Select the number you want to call:
• In a message, select a number. When the Call icon appears, click it.
• In contact details, click any phone number.
2. Select the extension you want to place the call from, and click Dial.

22.3 Selecting a default extension
123
You can also set a default extension.
3. Your desk phone or softphone starts ringing. Answer the phone.
The phone of the person you are calling starts ringing.
When the call is established, Kerio Connect Client displays information about the call
duration in the bottom right corner.
4. End the call by clicking on the Hang up button or the end call icon.
Selecting a default extension
If you have more extensions in Kerio Operator, you can select the extension before making
each call or define a default extension for all your calls.
To select a default extension:
1. Click your name in Kerio Connect Client and select Settings.
2. Go to the Click to Call section.
3. Click the Select default extension option and select the extension you want to make your
default from the list.
4. Save the settings.

Making calls from Kerio Connect Client
124

125
Pinning Kerio Connect Client to the Windows taskbar
Overview
New in Kerio Connect 8.5!
To easily access your Kerio Connect Client, you can pin the Internet Explorer tab with Kerio
Connect Client to your Windows taskbar.
The resulting icon works as a bookmark to your Kerio Connect Client.

Pinning Kerio Connect Client to the Windows taskbar
126
Prerequisites
You must have:
• Internet Explorer 9 or later
• Microsoft Windows 7 or later
• Kerio Connect 8.5 and later
Pinning Kerio Connect Client to taskbar
1. In Internet Explorer, open your Kerio Connect Client in a new tab.
2. Drag the tab to the Windows taskbar.
3. Drop the tab when Pin to Taskbar appears.
Using the pinned Kerio Connect Client
The Kerio Connect Client icon stays displayed on your taskbar as a bookmark.
To access your inbox, click the icon, and Kerio Connect Client opens in Internet Explorer.
When you are logged in, the icon in the taskbar shows the number of unread messages in your
inbox.
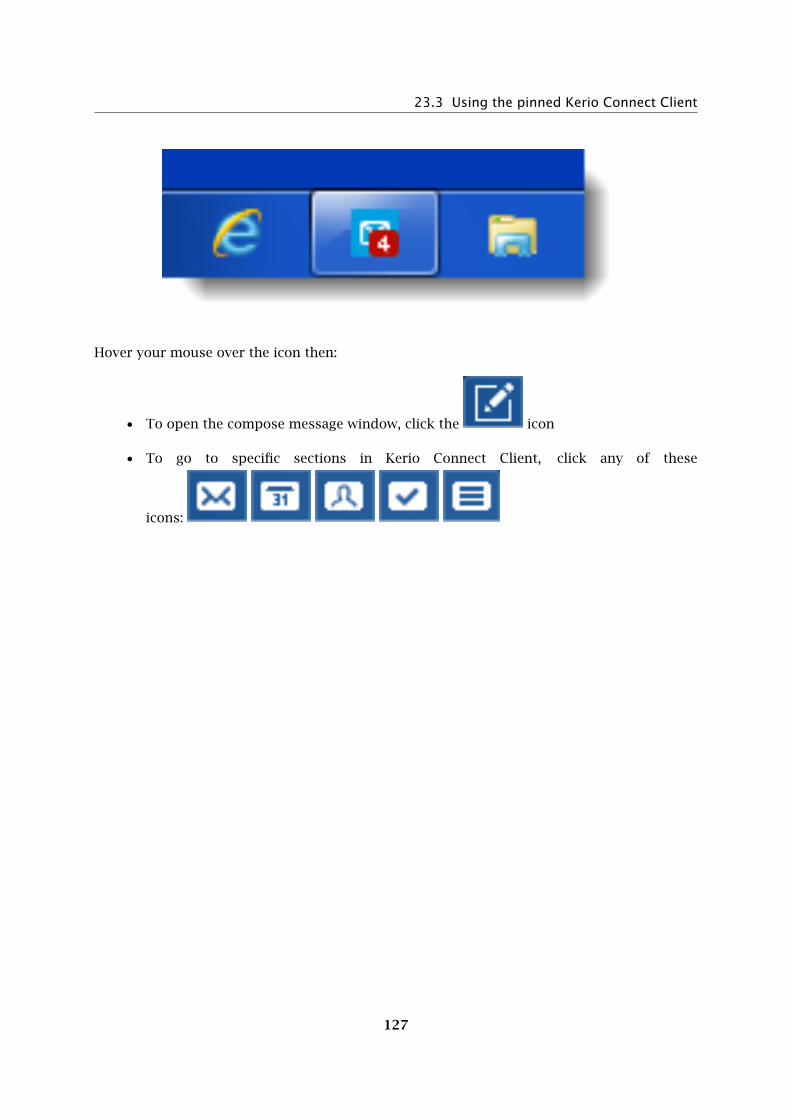
23.3 Using the pinned Kerio Connect Client
127
Hover your mouse over the icon then:
• To open the compose message window, click the icon
• To go to specific sections in Kerio Connect Client, click any of these
icons:

Pinning Kerio Connect Client to the Windows taskbar
128

129
Configuring clients for instant messaging
Recommended IM clients
Kerio instant messaging service is based on XMPP, an open technology for real-time
communication.
Kerio Connect recommends the following instant messaging clients:
• Pidgin for Microsoft Windows
• Psi for Linux
• Messages (iChat) for Mac OS X
Supported features
Kerio instant messaging service supports the following features:
• sending rich text messages
• presence notifications
• sharing files
• auto-populated contact list of your colleagues
• synchronization of contact photos
• auto-configuration on Mac
• audio/video chat (availability depends on your IM client)
• talking with multiple users in a single chat room (for more information on group chat,
read article Initiating group chat in instant messaging)
Configuring Pidgin for Microsoft Windows
To configure the Pidgin client, follow these steps:
1. Download and install Pidgin.
2. Run the application and click Accounts → Manage Accounts → Add.
3. Fill in the information — protocol (XMPP), your username and password, your domain.
4. Save the account.

Configuring clients for instant messaging
130
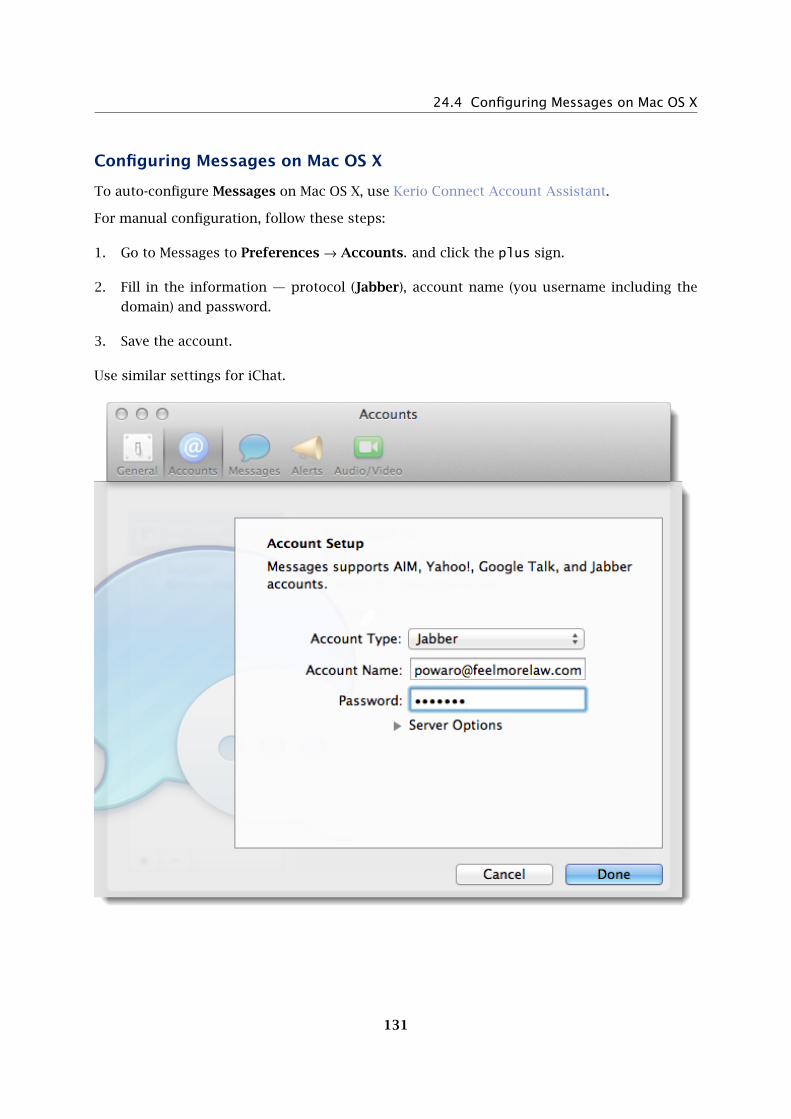
24.4 Configuring Messages on Mac OS X
131
Configuring Messages on Mac OS X
To auto-configure Messages on Mac OS X, use Kerio Connect Account Assistant.
For manual configuration, follow these steps:
1. Go to Messages to Preferences → Accounts. and click the plus sign.
2. Fill in the information — protocol (Jabber), account name (you username including the
domain) and password.
3. Save the account.
Use similar settings for iChat.
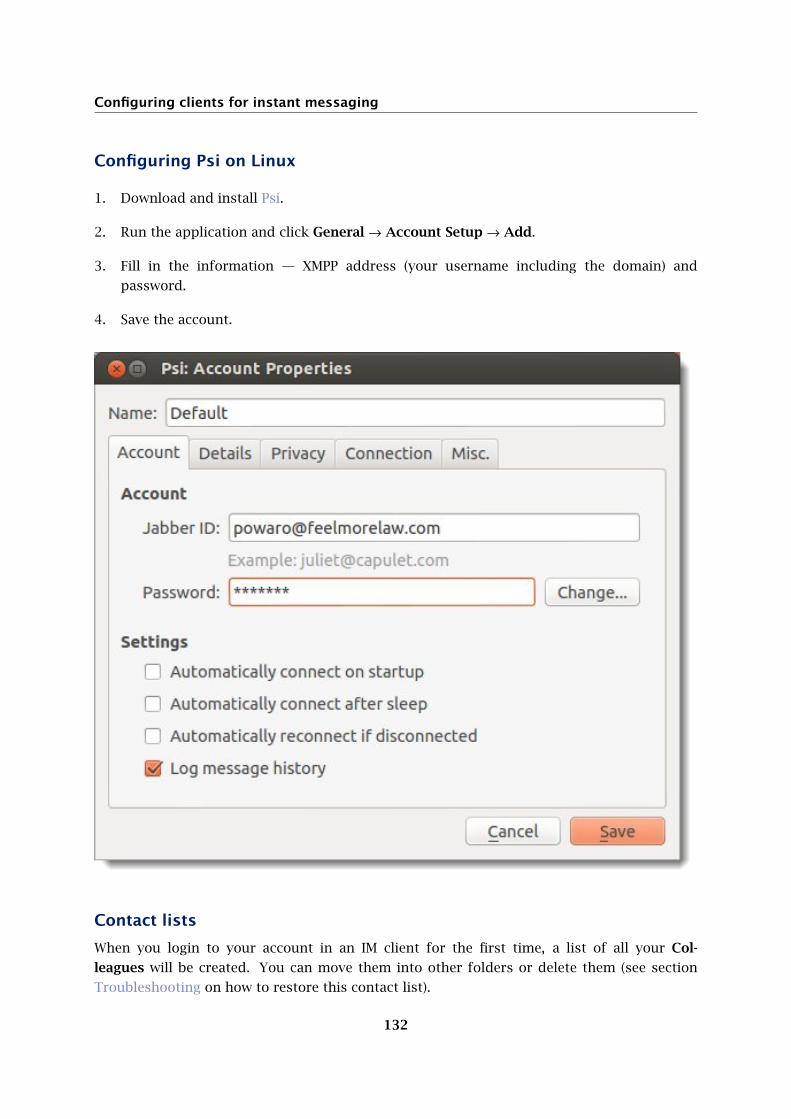
Configuring clients for instant messaging
132
Configuring Psi on Linux
1. Download and install Psi.
2. Run the application and click General → Account Setup → Add.
3. Fill in the information — XMPP address (your username including the domain) and
password.
4. Save the account.
Contact lists
When you login to your account in an IM client for the first time, a list of all your Col-
leagues will be created. You can move them into other folders or delete them (see section
Troubleshooting on how to restore this contact list).

24.7 Troubleshooting
133
You can create additional contact lists and add other contacts depending on the client you
use.
Troubleshooting
Contact list
If you have problems with your company contacts (Colleagues), ask your administrator to
restore your contact list.
Any change you have previously made to the Colleagues list will be lost. Your
external contacts will remain preserved.
Cannot connect to your account
If you cannot connect to your account, check your DNS settings for client auto-configuration
or configure the clients manually:
Pidgin
Go to Modify Account → tab Advanced and use one the following configurations:
• uncheck option Require encryption, add your server address and port 5222, or
• set Connection Security to Use old-style SSL, add your server address and port
5223
Messages
Go to Account Settings → tab Server Settings and use one the following configurations:
• uncheck option Use SSL, add your server address and port 5222, or
• check option Use SSL, add your server address and port 5223
Psi
Go to Modify Account → tab Connection, check option Manually Specify Host/Port and
use one the following configurations:
• set Encryption Connection to Always, add your server address (Host) and port
5222, or
• set Encryption Connection to Legacy SSL, add your server address (Host) and
port 5223

134
Initiating group chat in instant messaging
About group chat in instant messaging
If you use instant messaging in Kerio Connect and want to chat with multiple users and share
thoughts with all of them together, you can create a temporary chat room, i.e. group chat.
Kerio Connect does not require any additional settings to use group chats.
The server address for group chats is conference.[your_domain_name] , for example
conference.feelmorelaw.com.
This article describes group chat in:
• Pidgin for Microsoft Windows
• Messages for Mac OS X
• Psi for Linux
For information on initial configuration of instant messaging clients, read article Configuring
clients for instant messaging.
Pidgin for Microsoft Windows
Initiating group chat in Pidgin
1. In your Pidgin, click Buddies → Join a Chat.
2. Select account, type a room name, server, your nickname (Handle).

25.2 Pidgin for Microsoft Windows
135
3. Click Join.
4. To configure the chat room (e.g. secure the room with a password), click Configure Room
and set parameters.
You cannot change the parameters later.
5. Confirm the settings.
Inviting people to group chat in Pidgin
To invite people to a group chat, drag them from your contact list to the room list or click
Conversation → Invite.

Initiating group chat in instant messaging
136
Joining and leaving group chats in Pidgin
If you receive an invitation, click Accept to join the group chat.
You can also search through existing chat groups by clicking on Buddies → Join a Chat →
Room List → Find Rooms.
To leave a room, close the chatroom window.
Messages for Mac OS X
Initiating group chats in Messages
To create a group chat, add at least two users to a conversation.
1. Initiate a conversation in Messages.
2. Add users to this conversation.
Users receive an invitation and you can start chatting.

25.3 Messages for Mac OS X
137
Inviting people to group chats in Messages
To invite people to a multi user chat room, click the blue plus icon and invite users.
Joining and leaving group chats in Messages
To join a group chat, select it from the list of chats and click Accept.

Initiating group chat in instant messaging
138
To leave a chat room, delete it from the list of chats.
Psi for Linux
Initiating group chat in Psi
1. In your Psi, click General → Join Groupchat.
2. Type a conference host, room name, server, your nickname.
If you want to protect the chat room, type a password.

25.4 Psi for Linux
139
3. Click Join.
4. To configure the chat room (e.g. secure the room with a password), click the down arrow
above the user list and select Configure Room.
5. Apply the settings.
Inviting people to group chat in Psi
To invite people to a group chat, select a person in your contact list and click Invite To.

Initiating group chat in instant messaging
140
Joining and leaving group chats in Psi
To accept an invitation to a group chat, double-click the invitation text inside the event dialog
and click Join.

25.4 Psi for Linux
141
To leave a room, close the chatroom window.

142
Kerio Connect Account Assistant
About Kerio Connect Account Assistant
Kerio Connect Account Assistant is a single autoconfig tool which enables one-time
auto-configuration of the following applications:
• Apple Mail & Notes (secure IMAP, SMTP Submission)
• Apple Calendar & Reminders (CalDAV)
• Apple Contacts (CardDAV)
• Apple Messages (XMPP)
• Microsoft Outlook for Mac (Exchange Web Services)
• Microsoft Entourage (WebDAV)
Using Kerio Connect Account Assistant
Kerio Connect Account Assistant is unique for each user. Download it from your own
integration page.
1. Open the Mac integration page (e.g. http://mail.feelmorelaw.com/integration).
You can also click your name in Kerio Connect Client and select Integration with Mac.

26.2 Using Kerio Connect Account Assistant
143
2. Click on Set up my Mac and download Kerio Connect Account Assistant to your computer.

Kerio Connect Account Assistant
144
3. Once the download finishes, the installation program gets started — confirm installation
and run it.
4. Select which products installed on your computer to configure (you can configure any of
them later) and click Continue.

26.3 Troubleshooting
145
5. Enter your Kerio Connect Client password and click Continue.
Now the configuration application verifies your identity and server connection.
6. Click Configure to run the configuration of the selected applications.
Now the configured applications are available and ready.
All previous configuration modules are available at the integration page, upon
clicking on See other options.
Troubleshooting
Public contacts lost after upgading to OS X 10.11 El Capitan
Due to the changes in the Contacts application in OS X 10.11 El Capitan, users lose their public
contacts after upgrading their system to El Capitan. To get their public contacts back, they
must download and install Kerio Connect Account Assistant version 8.5.3 or newer.
Kerio Connect accounts deleted on OS X 10.11 El Capitan
Due to the changes in the Contacts application in OS X 10.11 El Capitan, all CardDAV accounts
created by Kerio Connect Account Assistant are deleted if you synchronize your Keychain with
iCloud.
Switch off the synchronization of Keychain and run the Kerio Connect Account Assistant to
configure the applications again.

146
Configuring a Microsoft Exchange Internet account
on Mac OS X
Overview
With Kerio Connect 8.3 and later, you can configure the Exchange (EWS) type of Internet
Accounts on Mac OS X 10.9 and later. The support for EWS Internet Account includes Apple
Mail & Notes, Calendar & Reminders, and Contacts.
You can also use Kerio Connect Account Assistant to configure these applications
using alternative account types that offer additional functionality.
Enabling automatic discovery
You can configure your DNS to support the Autodiscover feature. With autodiscovery, users
can use only their username and password to create an account.
1. Install a valid signed SSL certificate.
Go to, for example, StartCom to obtain your certificate, or use another certificate authority.
2. Add a SRV record to your DNS for autodiscovery:
_autodiscover._tcp.example.com. 86400 IN SRV 0 5 443 mail.example.com.
Replace example.com with your domain name, and mail.example.com with your email
server name
3. In the Kerio Connect Administration, verify that all users have the Full name set in their
user settings.
Autodiscover is not required. However, certain DNS configurations may incorrectly
trigger the autodiscover feature. Verify that you do not have any host records which resolve
autodiscover.yourdomain.com to an IP address.

27.3 Adding an Exchange Internet account
147
Adding an Exchange Internet account
1. In System Preferences, select Internet Accounts.
2. In the right window pane, select Exchange.
3. Type your email address and password.
4. Verify the information and click Continue.
5. Select the applications you want to configure and click Done.
Exchange account limitations
• Public and shared folders are not synchronized in Mail. You can use IMAP or Kerio
Connect Client.
• Public and shared calendars (without Delegation) are not synchronized in Calendar.
You can use CalDAV or Kerio Connect Client.
• Public and shared contacts are not synchronized in Contacts. The Global Address List
can be queried. You can use CardDAV or Kerio Connect Client.
• You cannot move or create folders within specially designated folders (e.g Inbox,
Drafts, Sent, Trash, Junk)
• Only one reminder can be synchronized with an event.

148
Creating Exchange ActiveSync accounts in Outlook
2013
Overview
New in Kerio Connect 8.5!
You can synchronize your account with Microsoft Outlook 2013 via Exchange ActiveSync
without installing Kerio Outlook Connector (both editions).
However, due to the implementation of the Exchange ActiveSync protocol in Outlook 2013 and
the protocol itself, there are multiple usage limitations.
Limitations of Outlook 2013 Exchange ActiveSync account
• You cannot synchronize your email filters from Kerio Connect Client.
• You cannot create additional contact, calendar, or task folders.
• Global Address List does not synchronize to Outlook 2013.
• You cannot share any folders.
• You cannot see contact groups created in Kerio Connect Client.
• Contact privacy does not synchronize to Outlook 2013.
• You cannot rename or delete calendar and task folders created in Kerio Connect Client.
• You cannot synchronize your drafts and notes, or task status.
• Delivery and read receipts do not work.
• You cannot set the out-of-office message.
• Free/Busy does not work automatically. You must connect to your calendar manually.

28.3 Creating Exchange ActiveSync profile
149
Creating Exchange ActiveSync profile
To create a profile for Exchange ActiveSync in Outlook 2013:
1. Go to Windows Control Panel → Mail and click Show Profiles.
2. Click Add, enter a name for the profile, and confirm.
3. Select Manual setup or additional server types, and click Next.
4. Select Outlook.com or Exchange ActiveSync compatible service, and click Next.

Creating Exchange ActiveSync accounts in Outlook 2013
150
5. Type the user, server, and login information, and click Next.
If the user is not from a primary domain, the username must include the domain (for
example, [email protected]).
6. When Outlook 2013 completes the test connection, click Close.
7. Click Finish.

28.3 Creating Exchange ActiveSync profile
151
Connecting to your calendar manually
To see your calendar, you must type your calendar URL in the Outlook 2013 options:
1. In Outlook 2013, go to File → Options → Calendar → Free/Busy Options.
2. Type your calendar address in the Search location field in the following format:
https://<_server_address>/freebusy/%SERVER%/%NAME%
Example: https://mail.feelmorelaw.com:443/freebusy/%SERVER%/%NAME%
3. Save your settings.

Creating Exchange ActiveSync accounts in Outlook 2013
152
Now you can see the Free/Busy information for all users when creating meetings.
153
Configuring Mail and Calendar on Microsoft Windows
Overview
New in Kerio Connect 8.5.2!
You can synchronize your account with the Mail and Calendar applications on Microsoft
Windows via Exchange ActiveSync.
Creating accounts
1. Go to the Mail or Calendar application and switch to Settings.
2. Click Accounts → Add account.
3. In the Choose an account dialog box, select Advanced setup.

Configuring Mail and Calendar on Microsoft Windows
154
4. Select Exchange ActiveSync.

29.2 Creating accounts
155
5. Type the email address and password, user name, domain and server, and click Sign-in.

Configuring Mail and Calendar on Microsoft Windows
156
6. When the application finishes the configuration, click Done.

29.2 Creating accounts
157
You can start using the Mail and Calendar application on your Microsoft Windows 10 machine.
158
Support for Apple iCal/Calendar using the CalDAV
standard
About CalDAV and Apple iCal/Calendar
CalDAV is an Internet standard which allows applications such as Apple iCal and Apple
Calendar to manage calendaring information on a remote server (Kerio Connect).
Kerio Connect supports the following CalDAV features:
• Calendar availability (free/busy information)
• Events with privacy tag
• Scheduling (invitation requests)
• Per-folder sharing (without delegation)
• Older sharing notifications
• Full delegation support
• Custom labels for shared calendars
Configuring CalDAV account
Automatic configuration
Use Kerio Connect Account Assistant to automatically configure Apple iCal/Calendar accounts
on Mac OS X 10.5 or later.
Manual configuration
1. Run the Apple iCal/Calendar application.
2. In the menu, select iCal/Calendar→ Preferences and go to the Accounts tab.
3. Click the + button to create a new account.
4. Type your credentials and the location of your Kerio Connect server.

30.3 Sharing calendars
159
5. Confirm.
Sharing calendars
If you configure Apple iCal/Calendar with CalDAV, you can share individual calendars with
other users.
You can also use an advanced type of sharing — delegation. A delegate has full control over
your calendar and can also create and accept meeting invitations on your behalf.
To share a calendar:
1. Select the calendar you want to share from the list of your calendars.
2. In the menu, select Edit → Share Calendar.
For OS X 10.7 and older, click Calendar → Share Calendar.
3. Click the + button to add users.
4. In the Privilege column, assign rights — Read only or Read & Write.

Support for Apple iCal/Calendar using the CalDAV standard
160
Adding shared, public or resource calendar
Users assigned sharing rights receive a notification which invites them to join the shared
calendar.
Accept the invitation and the calendar is added to your calendar list.
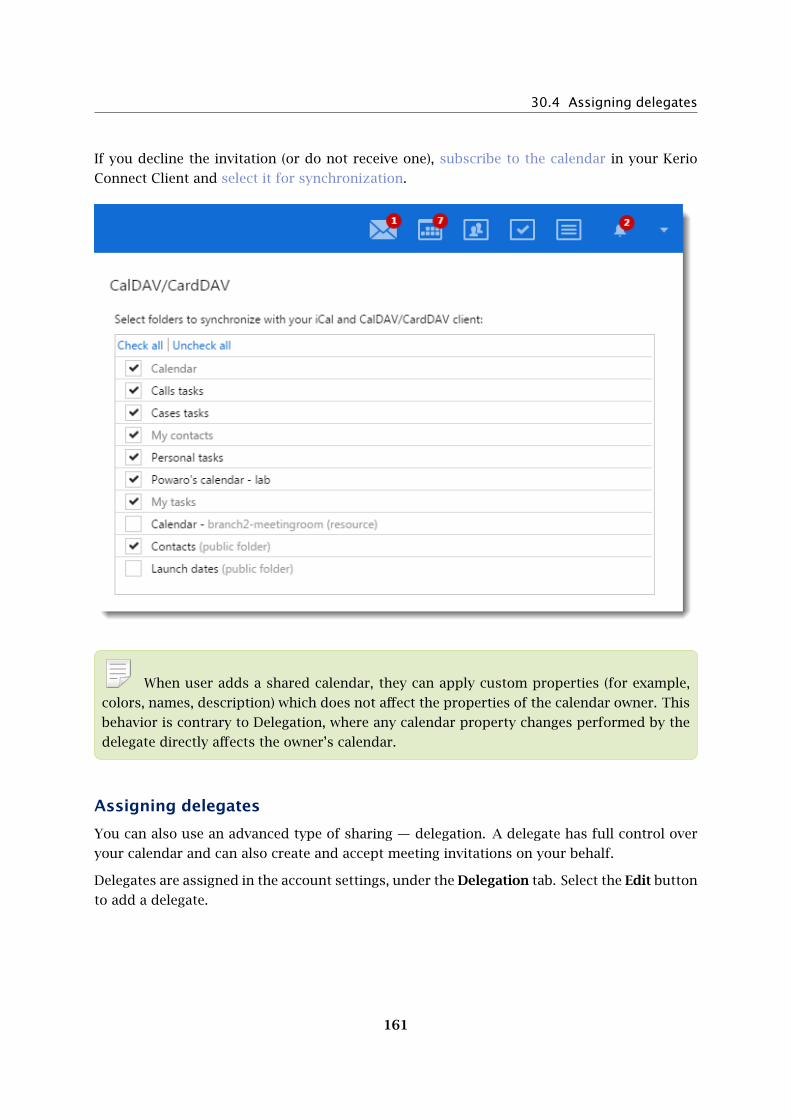
30.4 Assigning delegates
161
If you decline the invitation (or do not receive one), subscribe to the calendar in your Kerio
Connect Client and select it for synchronization.
When user adds a shared calendar, they can apply custom properties (for example,
colors, names, description) which does not affect the properties of the calendar owner. This
behavior is contrary to Delegation, where any calendar property changes performed by the
delegate directly affects the owner’s calendar.
Assigning delegates
You can also use an advanced type of sharing — delegation. A delegate has full control over
your calendar and can also create and accept meeting invitations on your behalf.
Delegates are assigned in the account settings, under the Delegation tab. Select the Edit button
to add a delegate.

162
Configuring Microsoft Windows 8 Mail using Ex-
change ActiveSync
Overview
Kerio Connect 8.1 and above supports the ability to synchronize mail, contacts, and calendars
to the Microsoft Windows 8 operating system via the Exchange ActiveSync protocol.
Beginning May 1, 2013, the support of Exchange ActiveSync in Kerio Connect is
available as an add-on. For detailed information, read the Exchange ActiveSync FAQs.
Configuring Kerio Connect
There is no additional configuration necessary to support Exchange ActiveSync (EAS) from
Microsoft Windows 8.
Check the following items:
• Exchange ActiveSync add-on in Kerio Connect
• HTTPS service running and port 443 open on your firewall
• SSL certificate signed by a certification authority to simplify desktop configuration
Installing SSL certificate on your desktop
Users need to install a certificate if Kerio Connect uses a self-signed certificate.
1. Go to the Kerio Connect Client login page and click Integration with Windows.
2. Click the Download SSL certificate link.
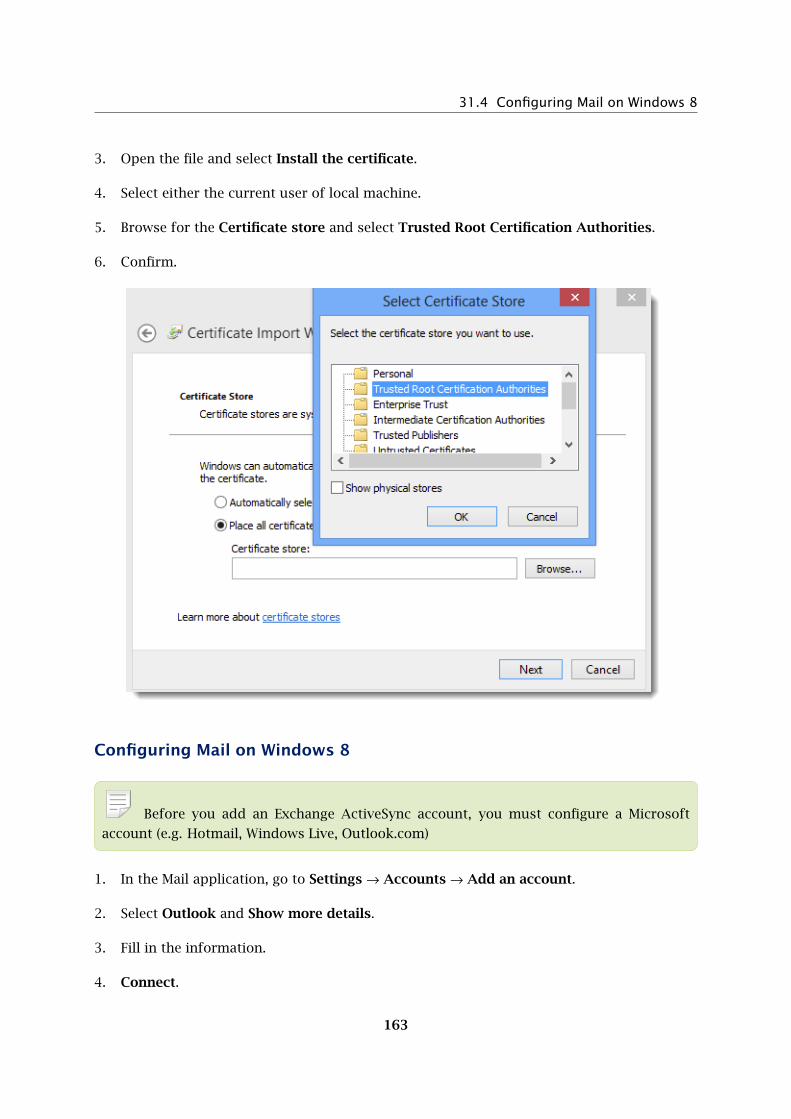
31.4 Configuring Mail on Windows 8
163
3. Open the file and select Install the certificate.
4. Select either the current user of local machine.
5. Browse for the Certificate store and select Trusted Root Certification Authorities.
6. Confirm.
Configuring Mail on Windows 8
Before you add an Exchange ActiveSync account, you must configure a Microsoft
account (e.g. Hotmail, Windows Live, Outlook.com)
1. In the Mail application, go to Settings → Accounts → Add an account.
2. Select Outlook and Show more details.
3. Fill in the information.
4. Connect.
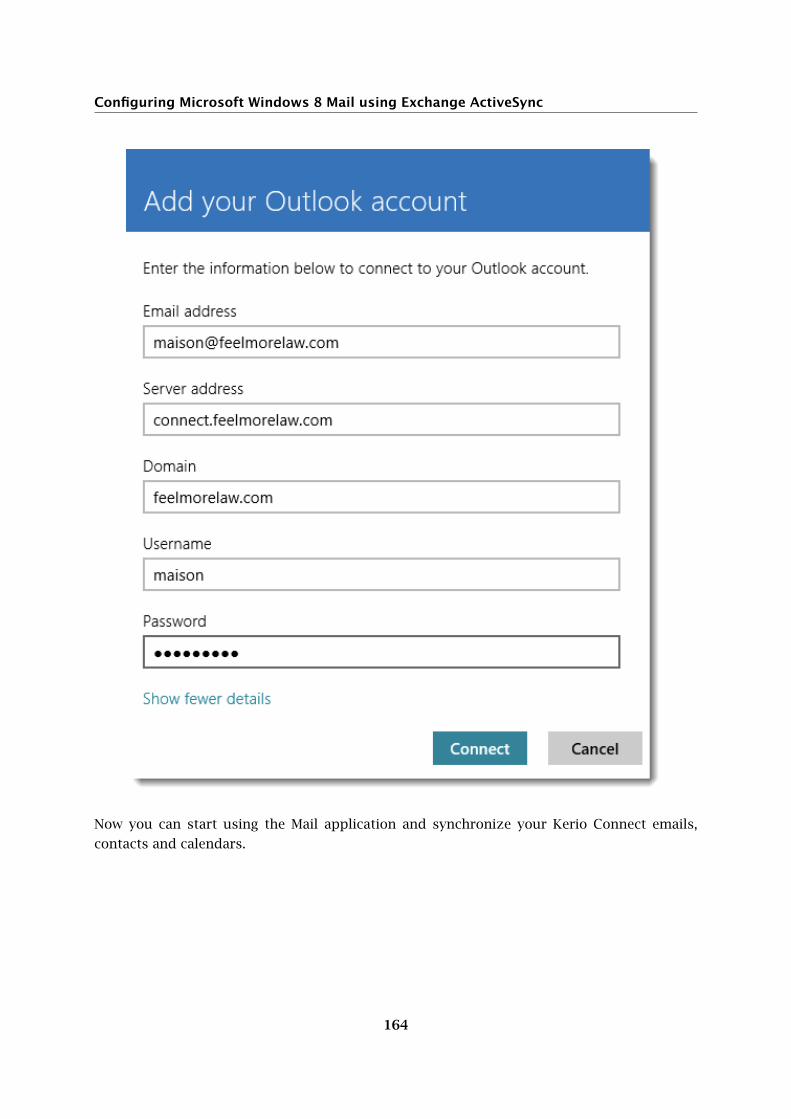
Configuring Microsoft Windows 8 Mail using Exchange ActiveSync
164
Now you can start using the Mail application and synchronize your Kerio Connect emails,
contacts and calendars.
165
Synchronizing data with mobile devices
Overview
You can synchronize your Kerio Connect account with various mobile devices.
Read the following articles with detailed information:
• Kerio Connect Sync app for Android devices
• Configuring your iPhone to communicate with Kerio Connect
• Configuring an Exchange ActiveSync account on Android devices
• Configuring Microsoft Windows Phone 8 using Exchange ActiveSync
• Configuring IMAP, CardDAV, and CalDAV on Android based devices
• Manual Configuration of CalDAV and CardDAV accounts

166
Configuring Microsoft Windows Phone 8 using Ex-
change ActiveSync
Overview
Kerio Connect 8.0.1 and above supports the ability to synchronize mail, contacts, calendars,
and tasks to Microsoft Windows Phone 8 devices via the Exchange ActiveSync protocol (EAS).
Which data can be synchronized
For detailed information about which data can be synchronized to your mobile device, see the
product pages.
Configuring Kerio Connect
There is no additional configuration necessary to support Exchange ActiveSync (EAS) from
Microsoft Windows Phone 8.
Check the following items:
• Exchange ActiveSync add-on in Kerio Connect
• HTTPS service running and port 443 open on your firewall
The status of configured EAS devices can be viewed from the users dialog once the account
has been successfully added. In the administration interface, go to Accounts → Users, right
click on a user and select More Actions → Mobile Devices. . . .

33.4 Configuring Windows Phone 8
167
Configuring Windows Phone 8
1. Launch the mail application from the home screen.
2. If it is the first time, create a new account. Otherwise, choose add email account from the
menu options.
3. Select advanced setup.
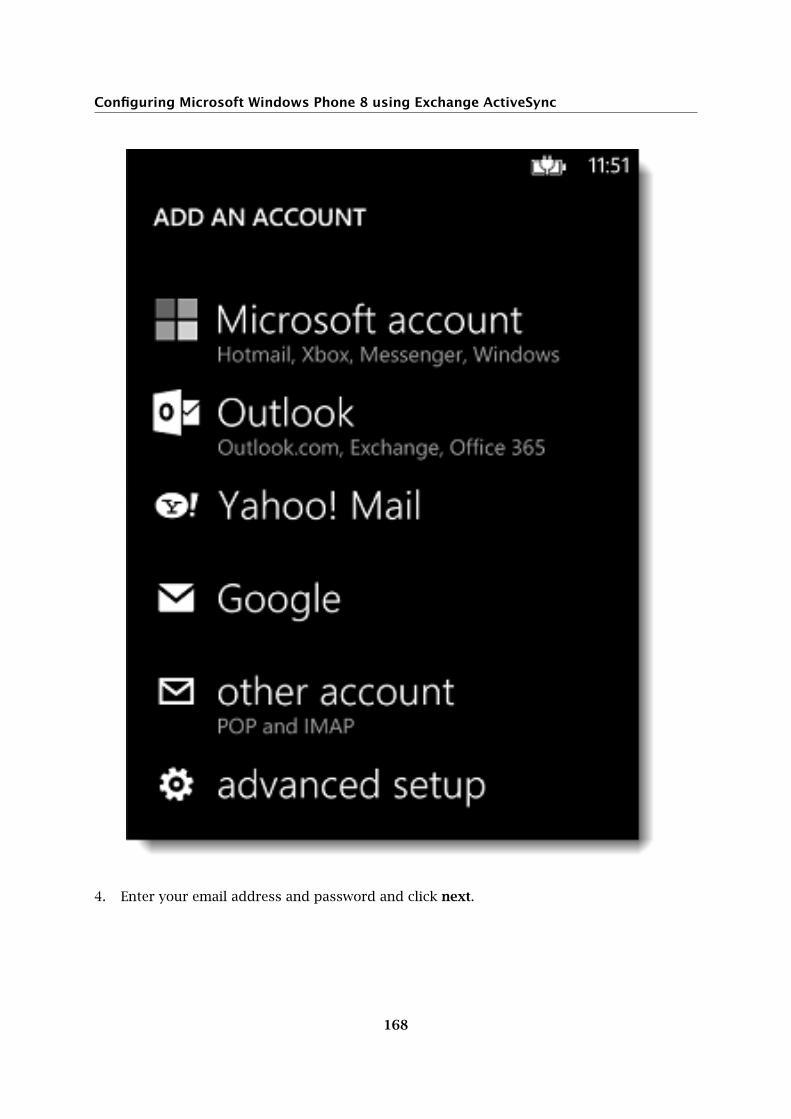
Configuring Microsoft Windows Phone 8 using Exchange ActiveSync
168
4. Enter your email address and password and click next.

33.4 Configuring Windows Phone 8
169

Configuring Microsoft Windows Phone 8 using Exchange ActiveSync
170
5. Select Exchange ActiveSync as the account type.
6. Enter the name of your domain (e.g. feelmorelaw.com) and server address (e.g.
mail.feelmorelaw.com).
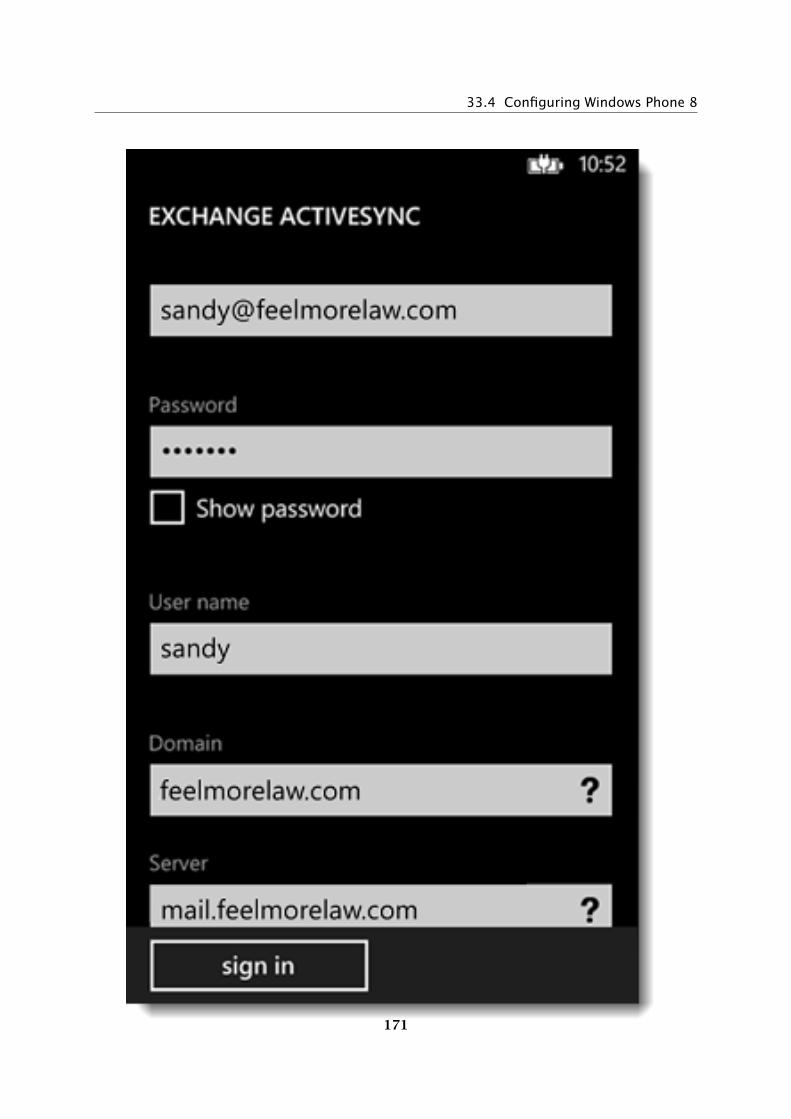
33.4 Configuring Windows Phone 8
171

Configuring Microsoft Windows Phone 8 using Exchange ActiveSync
172
7. Click Sign in.
Now you can synchronize your Windows Phone 8 device with your account.
If you are using a self-signed SSL certificate, you will receive an Untrusted Certificate
warning. Click continue to add the account. To avoid this warning, install a signed SSL
certificate on the Kerio Connect server. For details, refer to Configuring SSL certificates in
Kerio Connect.
If you synchronize your Kerio Connect account with an Exchange ActiveSync device,
the following applies due to the limitation of the Exchange ActiveSync protocol:
• Only the first three email addresses synchronize.
• The email address types don’t synchronize (for example, work email, or home
email).

173
Delegation in Microsoft Outlook 2011
About delegation
Delegation is an advanced type of sharing. A delegate can act on your behalf. A delegate can
act on your behalf — they can send/confirm your event invitations, and/or send/receive your
messages.
Delegating users
In Outlook 2011, delegates must have at least Editor rights to act on your behalf.
With a lower level of rights, you receive the following error message:
Assigning rights to delegates
1. In your account settings, go to section Delegates.
2. Select a delegate and click Set Permissions.

Delegation in Microsoft Outlook 2011
174
3. Kerio Connect 8.3.2 and newer — assign the delegate at least the Editor rights to Inbox
and/or Calendar.
Kerio Connect 8.2.0-8.3.1 — assign the delegate at least the Editor rights to both Inbox
and Calendar.

34.2 Delegating users
175
4. Confirm.

176
Kerio Connect Sync app for Android devices
Overview
New in Kerio Connect 8.5.2!
As an alternative to Exchange ActiveSync, the Kerio Connect Sync application for Android
devices uses CalDAV and CardDAV to:
• Synchronize your tasks, calendars, and contacts
• Synchronize public folders
• Push notifications to immediately synchronize changes
• Synchronize calendar colors
Kerio Connect sync is a free application available on Google Play.
Installing the application
To install Kerio Connect Sync, download the app from Google Play.
Configuring your account
This article is based on Android 5.0.2
To start synchronizing:
1. On your Android device, open Kerio Connect Sync.
2. Type your email address and tap Next.
3. Type your password and tap Next.
4. Verify (or type) the server name, your username and password, and tap Sign in.

35.3 Configuring your account
177
5. Confirm the certificate for your server if warning appears.
6. Select the task and calendar folders to synchronize with your device and tap Next.
You can change the settings any time later.
7. Select the contact folders to synchronize with your device and tap Finish.

Kerio Connect Sync app for Android devices
178
You can change the settings any time later.
8. Tap Done.
Kerio Connect Sync is ready to synchronize your tasks, contacts, and calendars.
Adding additional accounts
You can synchronize tasks, calendars, and contacts from multiple accounts with Kerio Connect
sync.
To add a new account:
1. On your Android device, open the Kerio Settings app.
2. Tap Add account.
3. Follow the same procedure as described above.
Removing accounts
To delete an account from Kerio Connect Sync:
1. On your Android device, open the Kerio Settings app.
2. Tap Remove account.
3. Tap the account you want to remove.
4. Tap OK to confirm the deletion.
Selecting folders for synchronization
Tasks and calendars
You can select the folders to synchronize with your Android device in your calendar or task
application settings.
You can also select the folders in the Kerio Connect Sync application:
1. Open the Kerio Settings app on your Android device.
2. Tap the gear icon next to your email address.

35.5 Selecting folders for synchronization
179
3. Tap Select calendars to sync.
The list with calendar and task folders opens.
4. Select folders to synchronize.
To select the task folders to synchronize, you can also:
1. Open the Tasks app on your Android device.
2. Go to the settings.
3. Tap the Displayed Lists option.
The list of all your task folders appears.
4. Select the folders you want to synchronize.

Kerio Connect Sync app for Android devices
180
Contacts
You can select the folders to synchronize with your Android device in your contacts
application settings.
Switching off the synchronization
To star/stop synchronizing tasks, and calendars in general:
1. Open the Kerio Settings app on your Android device.
2. Tap your email address.
3. Select the desired options.

35.6 Setting the synchronization interval
181
Setting the synchronization interval
Kerio Connect sync can synchronize the folders to your Android device periodically and you
can select how often:
1. Open the Kerio Settings app on your Android device.
2. Tap the gear icon next to your email address.

Kerio Connect Sync app for Android devices
182
3. Select Enable Push to immediately receive updates upon change.
This option depends on your server settings.
4. Select the Periodic auto sync option.
5. Tap Sync interval and select how often to synchronize your account.

35.6 Setting the synchronization interval
183

Kerio Connect Sync app for Android devices
184
Creating contacts and calendar events
Your contacts and calendars synchronize to you mobile device. Open your device’s
contact/calendar application to create, edit, or remove contacts and calendar events.
Creating tasks
Kerio Connect Sync contains the Tasks application where you can add, edit and remove your
tasks.
To create a new task:
1. On your Android device, open the Tasks app.
The application with your task folders opens.
2. Tap the plus sign.
3. Select the task folder.

35.8 Creating tasks
185
4. Type the name for the task.
5. Select the task status.

Kerio Connect Sync app for Android devices
186
6. Add a description.
7. Select the due date and time.
8. Save the task by tapping the tick sign .
9. Tap OK to confirm the deletion.
Editing tasks
To edit a task:
1. Open the Tasks application on your Android device.
2. Tap the task folder.
3. Tap the task you want to edit.
The task detail screen opens.
4. Tap the pencil icon .
5. Edit the task.
6. Save the task by tapping the tick sign .

35.10 Completing tasks
187
Kerio Connect Sync opens the task for editing.
Completing tasks
To mark tasks as complete:
1. Open the Tasks application on your Android device.
2. Tap the task folder.
3. Tap the task you want to mark as complete.
The task detail screen opens.
4. Tap the icon.
Displaying completed tasks
By default, completed tasks disappear from your task lists. To see them again:
1. Open the Tasks application on your Android device.
2. Go to the settings.
3. Enable the Show completed tasks option.
You can see completed tasks in the task folders

188
Configuring an Exchange ActiveSync account on An-
droid devices
Overview
This article describes the initial configuration of an Exchange ActiveSync account on Android
devices.
The synchronization includes:
• Direct push of all email folders (See Synchronizing folders with mobile devices)
• Direct push of the default contacts and calendar folders
• Meeting invitations
• Remote lookup of public and shared contacts
• Remote wipe (See Resetting your mobile device in Kerio Connect Client)
Configuring your account
This article is based on Android 5.0.2
1. On your Android device, go to Settings → Accounts → Add account.
2. Tap Exchange ActiveSync.
3. Type your email address and password.

36.2 Configuring your account
189

Configuring an Exchange ActiveSync account on Android devices
190
4. Tap Next.
If your Kerio Connect server does not supports autodiscovery (see How to configure an
environment to enable autodiscover feature with Kerio Connect), the manual configuration
page is displayed.
5. Fill in the rest of the information: the domain name and the server name.
6. Select Accept all SSL certificates in case Kerio Connect uses a self-signed certificate.

36.2 Configuring your account
191

Configuring an Exchange ActiveSync account on Android devices
192
Do not change the ports.
7. Tap Next.
8. Confirm the Remote security administration dialog box to allow Kerio Connect control
the security features (for example, the remote wipe).
9. Set the synchronization settings and tap Next.
You can set them later as well.

36.2 Configuring your account
193

Configuring an Exchange ActiveSync account on Android devices
194
10. Type a name for the account and tap Finish setup.
11. Tap Activate to activate the security features you confirmed in step 8.
Now you accounts starts syncing.
To change any configuration, go to the account settings on your Android device.

195
Installing and upgrading Kerio Outlook Connector
About Kerio Outlook Connector
Kerio Outlook Connector (Offline Edition) is a Microsoft Outlook extension that you can use
to manage your Kerio Connect email, events, contacts, and tasks in Microsoft Outlook.
The Offline Edition synchronizes all changes with Kerio Connect once you reconnect.
Downloading Kerio Outlook Connector (Offline Edition)
For supported versions of operating systems and Microsoft Outlook, visit Kerio Connect
product pages.
To download the installation package, follow these steps:
1. Open the Integration with Windows page in your browser:
• on the Kerio Connect Client login page, click on the Integration with Windows
link, or
• click your name in Kerio Connect Client and select Integration with Windows.
2. Click on Download Kerio Outlook Connector.

Installing and upgrading Kerio Outlook Connector
196
Installing Kerio Outlook Connector (Offline Edition)
Before you install Kerio Outlook Connector (Offline Edition), install and run at least
once the MS Outlook application.
A standard installation wizard is used to install Kerio Outlook Connector (Offline Edition).
After the installation, you must create a profile for each user.
Switching from the online version to the offline version of the Kerio Out-
look Connector
Kerio Outlook Connector (Offline Edition) includes a special utility which converts old profiles
to new profiles.
Upgrading Kerio Outlook Connector
If the administrator has turned on automatic updates, MS Outlook will check for new versions
automatically upon each startup.
If a new version is available, we recommend to update Kerio Outlook Connector.
Read article Kerio Updater Service installation for information on how Kerio Technologies has
improved the upgrade process.
Upgrading Microsoft Outlook
When you upgrade or downgrade MS Outlook, you must reinstall Kerio Outlook Connector
manually.

197
Creating profiles in MS Outlook
About profiles
After installing Kerio Outlook Connector (Offline Edition), or KOFF, you must create user
profiles before using Microsoft Outlook.
For Kerio Connect 8.3 and newer and Microsoft Outlook 2010 and newer, you can add multiple
Kerio Outlook Connector accounts in one profile in Microsoft Outlook. For older versions, a
single Kerio Outlook Connector account is allowed for each profile.
If you install KOFF on a computer with Kerio Outlook Connector, you can convert old
profiles to new ones.
If you are switching to Kerio Connect from another mailserver (e.g. Exchange), you must
create new profiles in MS Outlook.
Creating user profiles
You can create profiles automatically or manually.
Automatic configuration
Kerio Connect has a special tool for automatic configuration of your MS Outlook account.
1. Open the Integration with Windows page in your browser:
• on the Kerio Connect Client login page, click on the Integration with Windows
link, or
• click your name in Kerio Connect Client and select Integration with Windows.

Creating profiles in MS Outlook
198
2. Download the auto-configuration profile creator which is specific for each user account.
3. Run the profile creator tool.
The tool creates a Microsoft Outlook profile and synchronizes your Kerio Connect account to
Microsoft Outlook.
Manual configuration
To create a profile manually, go to the computer’s Control Panel → Mail and click Show
Profiles:
1. Click Add, enter a name for the profile and confirm.
2. Select Manually configure server settings or additional server types and continue.

38.2 Creating user profiles
199
3. Select Other service and Kerio Connect (KOC Offline Edition) and continue.
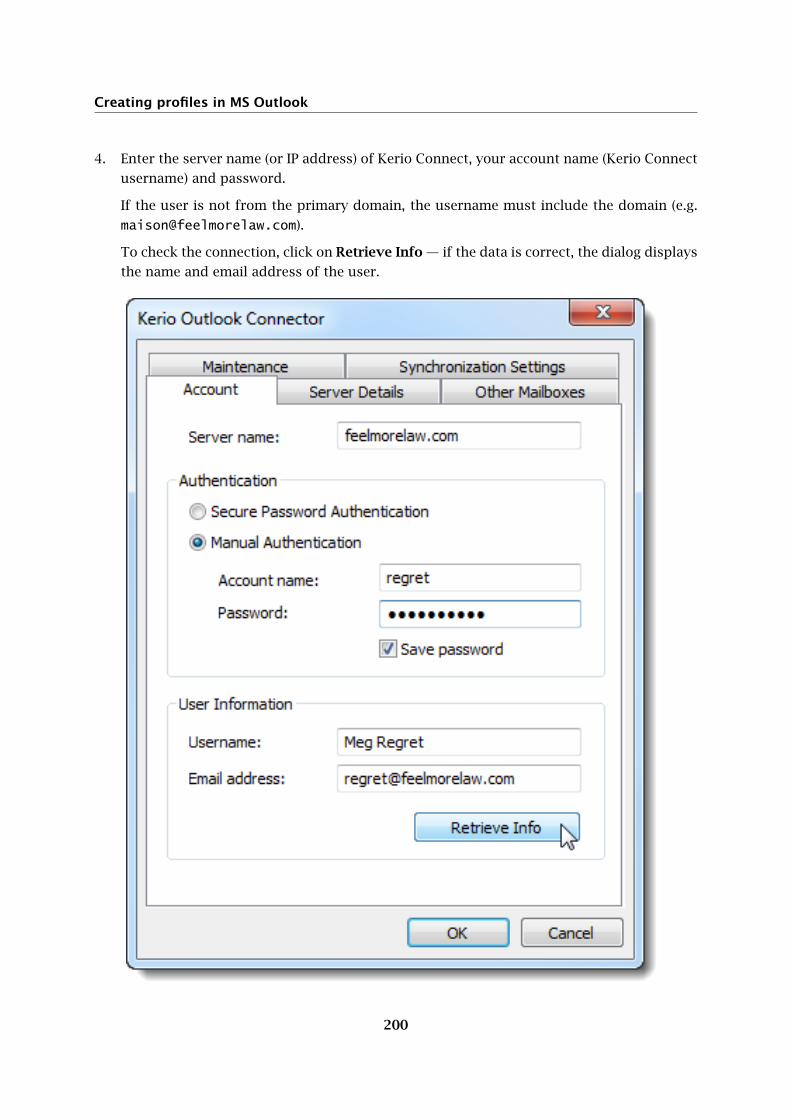
Creating profiles in MS Outlook
200
4. Enter the server name (or IP address) of Kerio Connect, your account name (Kerio Connect
username) and password.
If the user is not from the primary domain, the username must include the domain (e.g.
To check the connection, click on Retrieve Info — if the data is correct, the dialog displays
the name and email address of the user.

38.3 Converting old profiles to profiles for Kerio Outlook Connector (Offline Edition)
201
5. Confirm.
Converting old profiles to profiles for Kerio Outlook Connector (Offline
Edition)
1. Install Kerio Outlook Connector (Offline Edition).
2. Run Start → All Programs → Kerio → Outlook Profile Conversion Utility which converts
all Kerio profiles to profiles for Kerio Outlook Connector (Offline Edition).
One workstation is shared by multiple users
Install KOFF only once and run the Outlook Profile Conversion Utility for each user.
Kerio Outlook Connector is installed without connection to Kerio Connect
Run the Outlook Profile Conversion Utility.
To finish the conversion when you connect to the server, follow these steps for each Kerio
profile:
1. In the profiles dialog (in Control Panel → Mail), select the Kerio profile and click on Prop-
erties.
2. Click on User Accounts.
3. On the following page, double-click on the Kerio account and confirm the settings.
Conversion to the Kerio Outlook Connector profile is finished automatically

202
Adding multiple accounts in a single profile in Mi-
crosoft Outlook
Overview
When creating profiles in Microsoft Outlook 2010 and newer, you can now add multiple Kerio
Outlook Connector accounts in a single profile.
Adding additional account to a profile
1. Install Kerio Outlook Connector 8.3 and newer.
2. Create a profile in Microsoft Outlook.
3. Open the profile and click File → Account Settings.
4. On the E-mail tab, click New.

39.2 Adding additional account to a profile
203
5. Configure the new account manually.
6. Restart your Microsoft Outlook.
When you compose messages, you can now select from which account you want to send.

Adding multiple accounts in a single profile in Microsoft Outlook
204
Removing accounts from a profile
To remove accounts from a profile, follow these steps:
1. Open the profile in Microsoft Outlook.
2. Click File → Account Settings
3. On the E-mail tab, select the account you want to delete and click Remove.

205
Synchronizing Microsoft Outlook with Kerio Con-
nect
Online and offline modes
Kerio Outlook Connector (Offline Edition) supports both modes, online and offline:
Online mode
is the standard MS Outlook mode which requires connection to Kerio Connect
Offline mode
allows working with MS Outlook without connection to Kerio Connect
This requires all email, events, tasks, etc. are stored in the local message store on the
client station. When you switch to online mode, all new messages, events and tasks are
synchronized with the server’s store automatically.
About synchronization
Kerio Outlook Connect can synchronize any folder in Kerio Connect in one of the following
modes:
• full synchronization of the folder
• synchronization of header and message body in plain text — with this option,
attachments are not downloaded automatically
The default synchronization works as follows:
• Inbox — whole messages are synchronized.
• Other email folders — only message headers and body in plain text are synchronized.
• Events — whole events are synchronized.
• Contacts — whole contacts are synchronized.
• Tasks — whole tasks are synchronized.
• Notes — whole notes are synchronized.
Upon each startup of Microsoft Outlook, Kerio Outlook Connector synchronizes the currently
opened folder first.

Synchronizing Microsoft Outlook with Kerio Connect
206
Setting folder synchronization
To enable/disable synchronization and select a synchronization mode of individual folders,
follow these steps:
1. Right-click a folder and select Properties.
2. On tab Folder Synchronization, select the synchronization mode (or enable/disable the
synchronization).
3. Confirm the settings.
If you disable synchronization of a previously synchronized folder, all present items
will remain synchronized.

40.4 Solving synchronization conflicts
207
Solving synchronization conflicts
Synchronization conflict occurs when a message, event or any other item is changed both on
the server and in Kerio Outlook Connector between synchronization.
If a conflict occurs during the synchronization:
• the item saved on the server overrules the item in Microsoft Outlook (Kerio Outlook
Connector).
• you receive a special message with information about the conflict
The item from Microsoft Outlook is saved in a special folder called Conflicts (available only in
MS Outlook). If you prefer to keep the item in MS Outlook, move it from the Conflicts folder
and replace the synchronized item from the server to the original folder.

208
Sorting messages in MS Outlook
About filters
Messages delivered to you Microsoft Outlook via Kerio Outlook Connector (Offline Edition) are
stored in folder Inbox.
If you have additional folders, you can move messages:
• manually — drag messages to folders
• automatically — sort messages using filters
Creating filters
To sort messages to folders automatically, follow these steps to create filters:
1. In MS Outlook on tab Kerio Connect, click Options.
2. Click Filtering Rules.

41.2 Creating filters
209
3. Create new or edit existing rules.

Sorting messages in MS Outlook
210
Messages may comply with multiple rules. If you want messages to be filtered by the
first rules which matches, select the Stop processing more rules option in the Select the
actions section.
4. Click OK.
Rules are tested from the top downwards. Use the Up and Down buttons to move rules within
the list.

211
Subscribing and sharing folders in Microsoft Out-
look
About sharing
In Microsoft Outlook with Kerio Outlook Connector, you can share any folder with other users.
First, you assign sharing rights to users. Second, users subscribe to shared folders.
Sharing folders
1. In Microsoft Outlook, right-click a folder and select Properties.
2. In the Properties dialog, go to tab Folder Sharing.
3. Click the Add button.
4. In the Folder Sharing - Add dialog, select with whom to share the folder and type the
email address.
You can click Address Book to select from a list of users.

Subscribing and sharing folders in Microsoft Outlook
212
5. Click OK.
Kerio Connect assigns Reader rights by default.
6. Click OK to save the Properties dialog
Changing sharing rights
1. In Microsoft Outlook, right-click a folder and select Properties.
2. In the Properties dialog, go to tab Folder Sharing.
3. Click on a user and select the type of sharing rights from the drop-down menu.

42.3 Removing sharing
213
4. Click OK.
Removing sharing
1. In Microsoft Outlook, right-click a folder and select Properties.
2. In the Properties dialog, go to tab Folder Sharing.
3. Select a user and click Remove.
Subscribing to shared folders
Users can subscribe to shared folders by following these steps:
1. In Microsoft Outlook, go to File → Account Settings.
2. Double-click the Kerio Connect account.

Subscribing and sharing folders in Microsoft Outlook
214
3. Go to tab Other Mailboxes and click Add.
4. In the Attach Mailbox dialog, type the email address of the user who shares their folder
with you.

42.4 Subscribing to shared folders
215
5. Click OK and confirm the account settings.
Microsoft Outlook displays the shared folders in the tree under the user name of the folder
owner.

216
Using delegation in Microsoft Outlook with Kerio
Outlook Connector
About delegation
Delegation is an advanced typed of sharing. A delegate can act on your behalf. A delegate can
act on your behalf — they can send/confirm your event invitations, and/or send/receive your
messages.
Delegating users
1. Sign in to your profile in Microsoft Outlook and go to tab Kerio Connect.
2. Go to section Delegation.
3. Click Add under the Delegates who can act on my behalf box and select delegates.
4. By default, you allow delegates access to your calendar and Inbox. Click the switch button
next to the delegates name to disable acces to your Inbox (delegates can only send and
accept event invitations).

43.2 Delegating users
217
5. Save the settings.
You can delegate as many users as you wish.
The delegates can now see your Inbox/Calendar in Microsoft Outlook and can act on your
behalf.

Using delegation in Microsoft Outlook with Kerio Outlook Connector
218

219
Selecting from which address to send messages in
Microsoft Outlook
Overview
With Kerio Outlook Connector 8.3 and newer, you can now select from which address you
send messages in Microsoft Outlook.
The addresses from which you can choose from include:
• your email address
• all your aliases
• addresses from all accounts in your profiles
• address of people you are a delegate of
Selecting the From address
1. Open your profile in Microsoft Outlook.
2. Click New E-mail.
3. Click the From button and select an address.
Now you can compose the message and send it from your selected address.