Embed Size (px)
Citation preview

www.movescount.com/moveslink
M
SUUNTO PRECISION INSTRUMENTSUSER GUIDEwww.suunto.com/support
1. ADJUST FOCUS (1)
5. MEASURE HEIGHT FROM VARIABLE DISTANCE USING PERCENTAGE SCALE (21)
2. OBTAIN READING (5)
7. SET DECLINATION CORRECTION (33)6. MEASURE HORIZONTALDISTANCE WITH SECANT SCALE (27)
1. Take reverse bearing of at least two objects visible from your viewpoint and indicated on your map. (12)
2. Using a protractor and straight line tool, draw lines on map from position of objects according to measured bearings. (13)
3. Estimate your current position based on where the lines intersect. (14)
3. LOCATE OWN POSITION BYTRIANGULATION (11)
4. MEASURE HEIGHT WITH FIXED DISTANCE SCALE (15m, 20m, 66’) (15)
9. CARE AND MAINTENANCE (45)
1. Close one eye and look through optics. (2)
2. Turn optics knob until numbers are clear. (3)
NOTE: For best viewing, the oval-shaped aperture should be aligned with the sighting line (vertical or horizontal, depending on device). (4)
1. Keep both eyes open and look through optics towards target object. An optical illusion makes the object and sighting line appear to overlap, allowing an accurate reading. (6)
2. Read value from sighting line. (7)
Compass (KB-14, Tandem): main scale is the bearing from you to the object. Depending on your model, the secondary scale is the bearing in a different graduation or the reverse bearing from the object to you. (8) Clinometer (PM-5, Tandem): scale(s) shows vertical angle and/or height. If unsure of scale type, move instrument up or down to find indicator. (10)
NOTE: If you have adjustable declination, sight from adjusted sighting line. (9)
NOTE: If horizontal distance (D) cannot be measured due to sloping ground, use a nomogram for calculating height. (20)
h
i
H
D
H = h+i
h
H
D
H = h-i
i
hH
i
D
H = h+i
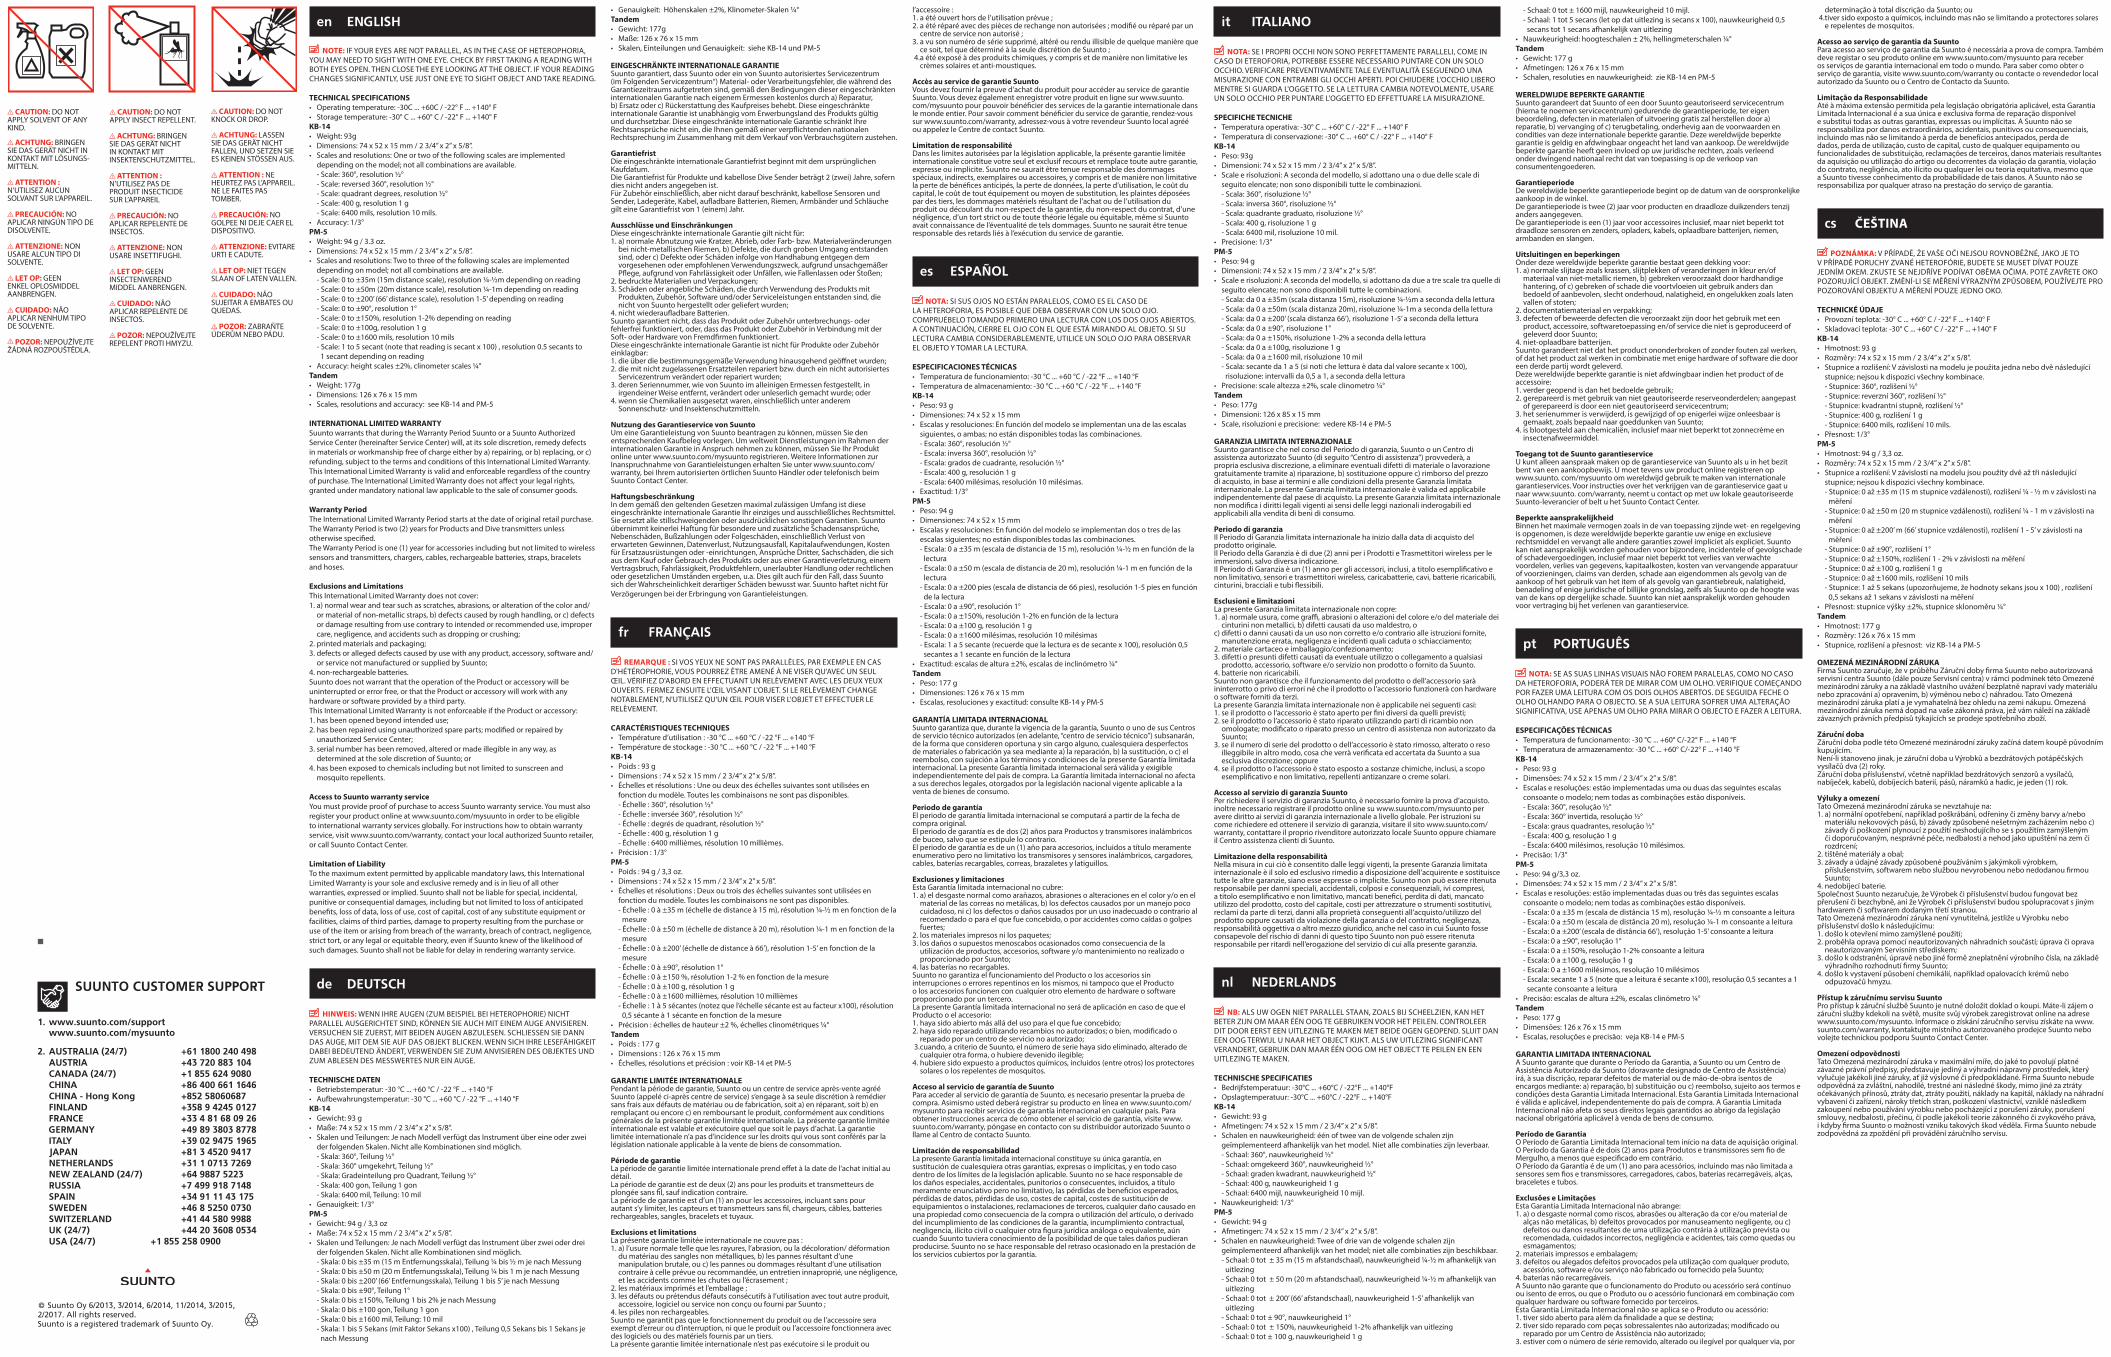
1. Measure distance to object. (23)
2. Take angle reading (c) to top of object. (24)
3. Calculate measured height (h). (25)
(h = c x d)
4. Add your height at eye level (i) to get total height (H) of object. (26)
(H = h + i)
h12 m / 39 ft
i 1.6 m / 5.3 ft
d25 m / 82 ft
c 48%
1. Measure slope distance (d). (29)
2. Take secant reading (c). (30)
3. Calculate horizontal distance (D). (32)
(D = d / c)
NOTE: Suunto secant scale is x100, so secant in this example is 1.15. (31)
D
115
d115c
20 m / 66 ft
17.4 m / 57 ft
NOTE: Applies to D-models only. (34)
1. Check local declination from your map or trusted website. (35)
2. Insert declination adjustment tool into opening on the side of your instrument. (36)
GET MORE (48)
W
E
N
S
270270
(East) WE (West)
3. Looking through optics with one eye closed, hold the fixed sighting line on any bearing marker, and move adjustable sighting line for east or west correction. (38)
+3 degree west correction (39)
4. Sight from adjusted sighting line to get corrected bearing reading. (40)
1800
E W
E W
8. DETERMINE A SPACE-ANGLE (41)
1. Sight known bearing of satellite with compass and check desired clearance east and west of bearing. (42)
2. While maintaining bearing, sight known angle (inclination) of satellite with clinometer and check desired clearance on both sides of angle. (43)
www.suunto.com/mysuunto
Use only water and mild soap for cleaning.(46)
To clean optics, unscrew optics knob until it comes completely out. Rinse interior cavity with water. Remove dust and excess water with cotton swab. Allow unit to dry completely before reassembling. (47)
KB-14PM-5
TANDEM
KB-14PM-5
TANDEM KB-14TANDEM
PM-5TANDEM
KB-14TANDEM TANDEM PM-5
TANDEM
PM-5TANDEM
N
S
EW
B
2
1
1 2
90
90
180
0
1800
(37)
NOTE: Only applies to models with 15, 20 or 66 in the name. (16)
NOTE: Only applies to models with PC in the name. (22)
NOTE: Only applies to models with S in the name. (28)
D = 15m / 20m / 66ft
TIP: The same procedure can be used for solar panel alignment, mobile network equipment installation, outdoor lighting arrangement for filming and photography, cave mapping, etc. (44)
1800
90
80
100
40
en
de
fr
es
it
nl
pt
cs
de DEUTSCH fr FRANÇAIS es ESPAÑOL it ITALIANO nl NEDERLANDS pt PORTUGUÊS cs ČEŠTINA
1 AJUSTEMENT DE LA MISE AU POINT2 Fermez un œil et regarder à travers
l‘optique.3 Tournez la molette de l‘optique jusqu‘à
ce que les chiffres apparaissent clairement.
4 REMARQUE : Pour une meilleure visualisation, l‘ouverture ovale doit être alignée avec la ligne de visée (verticale ou horizontale, en fonction de l‘appareil).
5 OBTENTION D‘UNE MESURE6 Gardez les deux yeux ouverts et
regardez à travers l‘optique en direction de l‘objet cible. Une illusion d‘optique provoque alors le chevauchement de l‘objet et de la ligne de visée, permettant ainsi une mesure précise.
7 Relevez la valeur donnée par la ligne de visée.
8 Boussole (KB-14, Tandem) : l‘échelle principale représente votre relèvement par rapport à l‘objet. En fonction du modèle, l‘échelle secondaire peut représenter le relèvement dans une graduation différente ou le relèvement de l‘objet par rapport à vous (relèvement inverse).
9 REMARQUE : Si la déclinaison est ajustable, visez depuis une ligne de visée ajustée.
10 Clinomètre (PM-5, Tandem) : les échelles montrent l‘angle vertical et/ou la hauteur. Si vous n‘êtes pas sûr du type d‘échelle, déplacez l‘instrument vers le haut ou le bas pour voir l‘indicateur.
11 REPÉRAGE DE LA POSITION PAR TRIANGULATION
12 Effectuez le relèvement inverse d‘au moins deux objets visibles depuis votre position et indiqués sur votre carte.
13 En utilisant un rapporteur et une règle, tracez des lignes sur la carte depuis la position des objets en respectant les relèvements obtenus.
14 Votre position peut alors être estimée en fonction du point d‘intersection des lignes.
15 MESURE DE LA HAUTEUR AVEC UNE ÉCHELLE DE DISTANCE FIXE (15 m, 20 m, 66‘)
16 REMARQUE : Ne s‘applique qu‘aux modèles dont le nom contient 15, 20 ou 66.
17 Tenez-vous à une distance de l‘objet à mesurer qui correspond à l‘échelle de hauteur à utiliser.
18 Si le sol est de niveau, effectuez une mesure depuis le sommet de l‘objet et ajoutez votre hauteur au niveau des yeux pour obtenir sa hauteur totale.
19 En pente modérée, effectuez trois mesures et ajoutez ou soustrayez-les, comme nécessaire.
20 REMARQUE : S‘il n‘est pas possible de mesurer la distance horizontale (D) en raison de la pente du terrain, utilisez un abaque pour calculer la hauteur.
21 MESURE DE LA HAUTEUR DEPUIS DES DISTANCES VARIABLES AVEC L‘ÉCHELLE EN POURCENTAGE
22 REMARQUE : Ne s‘applique qu‘aux modèles dont le nom contient PC.
23 Mesurez la distance vous séparant de l‘objet.
24 Effectuez la mesure d‘angle (c) par rapport au sommet de l‘objet.
25 Calculez la hauteur mesurée (h).26 Ajoutez votre hauteur au niveau des
yeux (i) pour obtenir la hauteur totale (H) de l‘objet.
27 MESURE D‘UNE DISTANCE HORIZONTALE AVEC L‘ÉCHELLE SÉCANTE
28 REMARQUE : Ne s‘applique qu‘aux modèles dont le nom contient S.
29 Mesurez la distance de pente (d). 30 Effectuez la mesure de la sécante (c).31 REMARQUE : L‘échelle sécante Suunto
est au facteur x100 ; dans cet exemple la sécante sera donc 1,15.
32 Calculez la distance horizontale (D).33 RÉGLAGE DE LA CORRECTION DE
DÉCLINAISON34 REMARQUE : S‘applique uniquement
aux modèles D. 35 Vérifiez la correction de déclinaison à
effectuer sur la carte ou sur un site Web de confiance.
36 Insérez l‘outil d‘ajustement de la déclinaison dans l‘ouverture située sur le côté de l‘instrument.
37 Est - Ouest38 En regardant à travers l‘optique avec
un œil fermé, maintenez la ligne de visée fixe sur un repère de relèvement et déplacez la ligne de visée ajustable pour une correction vers l‘est ou l‘ouest.
39 Correction de 3 degrés vers l‘ouest40 Visez depuis la ligne de visée ajustée
afin d‘effectuer des relèvements corrects.
41 DÉTERMINATION D‘UN ANGLE SPATIAL42 Visez le relèvement connu du
satellite avec la boussole et vérifiez que vous disposez des dégagements nécessaires à l‘est et à l‘ouest.
43 Tout en maintenant le relèvement, visez l‘angle connu (inclinaison) du satellite avec le clinomètre et vérifiez que vous disposez des dégagements nécessaires des deux côtés de l‘angle.
44 CONSEIL : On pourra utiliser la même procédure pour aligner des panneaux solaires, pour installer des équipements de réseau mobile, pour agencer un éclairage d‘extérieur pour des prises de vue, pour cartographier des grottes, etc.
45 ENTRETIEN46 N‘utilisez que de l‘eau et un détergent
doux pour le nettoyage.47 Pour le nettoyage des optiques, dévissez
la molette d‘optique jusqu‘à démontage complet. Rincez la cavité interne à l‘eau. Retirez la poussière et l‘eau en excès avec un coton-tige. Laissez sécher complètement l‘instrument avant remontage.
48 EN SAVOIR PLUS
1 AJUSTAR EL ENFOQUE2 Cierre un ojo y mire por el ocular.3 Gire el mando del ocular hasta que los
números se vean claramente. 4 NOTA: Para una visualización óptima, la
apertura con forma ovalada debe estar alineada con la línea de mira (vertical u horizontal, en función del dispositivo).
5 OBTENER LA LECTURA6 Mantenga abiertos los dos ojos y mire
a través del ocular hacia el objeto a medir. Una ilusión óptica hace que el objeto y la línea de mira se vean superpuestas, lo que permite una lectura exacta.
7 Lea el valor de la línea de mira.8 Brújula (KB-14, Tandem): la escala
principal es la orientación entre usted y el objeto. En función de su modelo, la escala secundaria es la orientación en una graduación diferente, o bien la orientación inversa entre el objeto y usted.
9 NOTA: Si tiene una declinación ajustable, observe desde la línea de mira ajustada.
10 Inclinómetro (PM-5, Tandem): la escala o escalas muestran el ángulo vertical y/o la altura. Si tiene dudas acerca del tipo de escala, mueva el instrumento hacia arriba o hacia abajo para hallar el indicador.
11 DETERMINAR LA PROPIA POSICIÓN MEDIANTE TRIANGULACIÓN
12 Tome la orientación inversa de al menos dos objetos visibles desde su punto de vista y que estén indicados en su mapa.
13 Con un transportador y un objeto recto, trace líneas en el mapa desde la posición de los objetos y de acuerdo con las orientaciones medidas.
14 Estime su posición actual basándose en el punto en el que se cortan las líneas.
15 MEDIR LA ALTURA CON UNA ESCALA DE DISTANCIA FIJA (15 m, 20 m, 66 pies)
16 NOTA: Sólo es válido para los modelos cuyo nombre contiene 15, 20 ó 66.
17 Sitúese a la distancia (con respecto al
objeto a medir) que se corresponda con la escala de altura utilizada.
18 Si el suelo es llano, realice una lectura hasta la parte superior del objeto y súmele su propia altura a nivel de los ojos para obtener la altura total.
19 Si se encuentra en una pendiente moderada, realice tres lecturas y suma o reste según sea necesario.
20 NOTA: Si no se puede medir la distancia horizontal (D) por estar el suelo en pendiente, utilice un nomograma para calcular la altura.
21 MEDIR LA ALTURA DESDE UNA DISTANCIA VARIABLE CON UNA ESCALA DE PORCENTAJE
22 NOTA: Sólo es válido para los modelos cuyo nombre contiene PC.
23 Mida la distancia al objeto. 24 Realice la lectura de ángulo (c) hasta la
parte superior del objeto.25 Calcule la altura medida (h).26 Súmele su propia altura a nivel de los
ojos (i) para obtener la altura total (H) del objeto.
27 MEDIR LA DISTANCIA HORIZONTAL CON UNA ESCALA DE SECANTE
28 NOTA: Sólo es válido para los modelos cuyo nombre contiene S.
29 Mida la distancia de la pendiente (d). 30 Realice la lectura de secante (c).31 NOTA: La escala de secante de Suunto es
x100, de modo que la secante es en este ejemplo de 1,15.
32 Calcule la distancia horizontal (D).33 AJUSTAR LA CORRECCIÓN DE
DECLINACIÓN34 NOTA: Sólo es válido para los modelos D. 35 Compruebe la corrección de la
declinación desde su mapa o página web de confianza.
36 Inserte la herramienta de ajuste de la declinación en la abertura situada en un lado del instrumento.
37 Este - Oeste38 Mientras mira a través del ocular con
un ojo cerrado, mantenga la línea de mira fija en cualquier indicador de orientación y mueva la línea de mira ajustable para la corrección este u oeste.
39 Corrección oeste de 3 grados
40 Observe desde la línea de mira ajustada para obtener una lectura de orientación corregida.
41 DETERMINAR UN ÁNGULO EN EL ESPACIO42 Observe la orientación conocida del
satélite con la brújula y compruebe la separación deseada al este y el oeste de la orientación.
43 Mientras mantiene la orientación, observe el ángulo conocido (la inclinación) del satélite con el inclinómetro y compruebe la separación deseada a ambos lados del ángulo.
44 SUGERENCIA: Es posible seguir el mismo procedimiento para la alineación del panel solar, instalación de equipos móviles de red, disposición de iluminación en exteriores para fotografía y filmación, mapas de cuevas, etc.
45 CUIDADO Y MANTENIMIENTO46 Utilice únicamente agua y un jabón
suave para la limpieza.47 Para limpiar el ocular, desenrosque el
anillo del ocular hasta extraerlo completamente. Aclare la cavidad interior con agua. Elimine el polvo y el exceso de agua con un bastoncillo con puntas de algodón. Deje que la unidad se seque completamente antes de montarla de nuevo.
48 PARA SABER MÁS
1 REGOLAZIONE FUOCO2 Chiudere un occhio e guardare
attraverso l‘oculare.3 Ruotare la manopola fino a che la
visione dei numeri non sia nitida. 4 NOTA: Per una visione ottimale,
l‘apertura ovale deve essere allineata con la linea di puntamento (verticale o orizzontale, a seconda del dispositivo).
5 LETTURA RILEVAMENTI6 Tenere entrambi gli occhi aperti e
guardare attraverso l‘oculare in direzione dell‘obiettivo. Un‘illusione ottica crea una corrispondenza tra obiettivo e linea di puntamento consentendo una lettura precisa.
7 Leggere il valore indicato dalla linea di puntamento.
8 Bussola (KB-14, Tandem): la scala principale fornisce il rilevamento dalla propria posizione verso l‘obiettivo, A seconda del modello, la scala secondaria indica il rilevamento in una diversa graduazione o il rilevamento inverso dall‘obiettivo verso la propria posizione.
9 NOTA: In caso di declinazione regolabile, eseguire il rilevamento dalla linea di puntamento regolata.
10 Clinometro (PM-5, Tandem): la scala o le scale mostrano l‘angolo verticale e/o l‘altezza. In caso di incertezza sul tipo di scala, spostare in alto o in basso lo strumento per trovare l‘indicatore.
11 DETERMINAZIONE DELLA PROPRIA POSIZIONE TRAMITE TRIANGOLAZIONE
12 Eseguire il rilevamento inverso di almeno due oggetti visibili dalla propria posizione ed indicati sulla mappa.
13 Con goniometro e righello, tracciare sulla mappa le due linee direzionali dalla posizione degli oggetti in base alle misurazioni effettuate.
14 Valutare la propria posizione in base al punto di intersezione delle due linee.
15 MISURAZIONE ALTEZZA CON SCALA A DISTANZA FISSA (15m, 20m, 66’)
16 NOTA: Riferibile solo a modelli con 15, 20 o 66 nel nome.
17 Posizionarsi ad una distanza dall‘oggetto da misurare che corrisponda alla scala in uso.
18 Se il terreno è piano, eseguire il rilevamento fino alla sommità dell‘oggetto ed aggiungere la distanza dai propri occhi al terreno per ottenere l‘altezza totale.
19 Se il terreno è in leggera pendenza, effettuare tre letture ed aggiungere o sottrarre, secondo i casi, i valori ottenuti.
20 NOTA: Se la distanza orizzontale (D) non può essere misurata a causa del terreno in pendenza, utilizzare un nomogramma per calcolare l‘altezza.
21 MISURAZIONE ALTEZZA DA DISTANZA VARIABILE CON SCALA PERCENTUALE
22 NOTA: Riferibile solo a modelli con PC nel nome.
23 Misurare la distanza verso l‘oggetto. 24 Misurare l‘angolo (c) fino alla sommità
dell‘oggetto.25 Calcolare l‘altezza rilevata (h).26 Aggiungere la distanza dai propri occhi
(i) per ottenere l‘altezza totale (H) dell‘oggetto.
27 MISURAZIONE DISTANZA ORIZZONTALE CON SCALA SECANTE
28 NOTA: Riferibile solo a modelli con S nel nome.
29 Misurare la distanza in pendenza (d). 30 Misurare il valore della secante (c).31 NOTA: La scala secante Suunto è x100,
quindi il valore della secante in questo esempio è 1,15.
32 Calcolare la distanza orizzontale (D).33 IMPOSTAZIONE CORREZIONE
DECLINAZIONE34 NOTA: Riferibile solo a modelli D. 35 Verificare la correzione della
declinazione da mappa o sito Web affidabile.
36 Inserire la chiave per la regolazione della declinazione nell‘apertura
laterale dello strumento.37 Est - Ovest38 Guardando attraverso l‘oculare con
un occhio chiuso, mantenere la linea di puntamento fissa su un qualsiasi indicatore di rilevamento e spostare la linea di puntamento regolabile per la correzione verso est o verso ovest.
39 Correzione 3 gradi ovest40 Eseguire il rilevamento dalla linea di
puntamento regolata per ottenere la corretta lettura.
41 ORIENTAMENTO E INCLINAZIONE42 Puntare con la bussola in direzione
del satellite in base alle coordinate note e valutare l‘eventuale presenza di ostacoli ad est e ad ovest del rilevamento.
43 Mantenendo il rilevamento, traguardare l‘angolazione (inclinazione) nota del satellite con il clinometro e valutare l‘eventuale presenza di ostacoli su entrambi i lati di angolazione.”
44 SUGGERIMENTO: La stessa procedura può essere utilizzata per l‘allineamento di pannelli solari, l‘installazione di reti di telefonia mobile, la predisposizione di illuminazione esterna per realizzare filmati e fotografie, la mappatura di grotte, ecc.
45 CURA E MANUTENZIONE46 Per la pulizia, usare solo acqua e
sapone neutro.47 Per pulire l‘oculare, svitare la manopola
fino ad estrarla completamente. Sciacquare la cavità interna con acqua. Eliminare la polvere e l‘acqua in eccesso con un bastoncino di ovatta. Lasciare asciugare completamente l‘unità prima di riassemblarla.
48 MAGGIORI INFORMAZIONi
1 SCHARF STELLEN2 Schließen Sie ein Auge, und blicken Sie
mit dem anderen durch die Optik.3 Drehen Sie am Optik-Einstellknopf,
bis die Zahlen klar und deutlich erscheinen.
4 HINWEIS: Zum optimalen Anvisieren sollte die ovale Öffnung mit der Visierlinie (vertikal oder horizontal, je nach Gerät) ausgerichtet sein.
5 MESSWERT ABLESEN6 Halten Sie beide Augen offen, und
schauen Sie durch die Optik in Richtung Zielobjekt. Durch eine optische Täuschung überlappen Objekt und Visierlinie, so dass eine genaue Messung ermöglicht wird.
7 Lesen Sie den Wert an der Visierlinie ab.8 Kompass (KB-14, Tandem): Die
Hauptskala dient der Peilung von Ihrem Standpunkt aus zu dem Objekt. Je nach Modell ist eine zweite Skala für die Peilung mit einer anderen Teilung oder für die umgekehrte Peilung vom Objekt zu Ihrem Standpunkt vorhanden.
9 HINWEIS: Wenn Ihr Instrument über eine Missweisungskorrektur verfügt, peilen Sie mit der eingestellten Visierlinie.
10 Klinometer (PM-5, Tandem): Skala zeigt Vertikalwinkel und/oder Höhe an. Wenn Sie sich über den Skalentyp unsicher sind, bewegen Sie das Instrument nach oben oder unten, um die Anzeige zu finden.
11 EIGENE POSITION DURCH TRIANGULATION BESTIMMEN
12 Bestimmen Sie durch umgekehrte Peilung mindestens zwei Objekte, die von Ihrem Standpunkt aus sichtbar und auf Ihrer Karte angegeben sind.
13 Ziehen Sie entsprechend der gemessenen Peilung mithilfe von Winkelmesser und Lineal auf der Karte Linien von der Position der Objekte.
14 Dort, wo sich die Linien schneiden, ist Ihre geschätzte Position.
15 HÖHE MIT FESTABSTANDSSKALA MESSEN (15 m, 20 m, 66‘)
16 HINWEIS: Gilt nur für Modelle mit 15, 20 oder 66 in der Modellbezeichnung.
17 Stellen Sie sich in einer Entfernung von dem zu messenden Objekt auf, die der Höhe der verwendeten Skala entspricht.
18 Wenn der Boden eben ist, messen Sie an der Spitze des Objektes, und addieren Sie zu dem Messwert Ihre Körpergröße in Augenhöhe, um die Gesamthöhe zu ermitteln.
19 Wenn Sie sich an einer mäßigen Steigung befinden, nehmen Sie drei Messungen vor, und addieren bzw. subtrahieren Sie die Werte, je nach Fall (siehe Abbildungen).
20 HINWEIS: Wenn die horizontale Entfernung (E) wegen abschüssigen Untergrundes nicht gemessen werden kann, ist ein Nomogramm für die Höhenberechnung anzuwenden.
21 HÖHE VOM VARIABLEN ABSTAND AUS MIT DER PROZENTSKALA ERMITTELN
22 HINWEIS: Gilt nur für Modelle mit „PC“ in der Modellbezeichnung.
23 Messen Sie den Abstand zum Objekt. 24 Messen Sie den Winkel (c) zur Spitze
des Objekts.25 Berechnen Sie die gemessene Höhe (h).26 Addieren Sie zu dem Wert Ihre
Körpergröße auf Augenhöhe (i), um die Gesamthöhe (H) des Objekts zu ermitteln.
27 HORIZONTALEN ABSTAND MIT SEKANSSKALA ERMITTELN
28 HINWEIS: Gilt nur für Modelle mit „S“ in der Modellbezeichnung.
29 Messen Sie den Abstand mit der Steigung (d).
30 Lesen Sie den Sekans (c).31 HINWEIS: Die Suunto-Sekansskala zeigt
die Messwerte mit dem Faktor x100 an. Der Sekans in diesem Beispiel beträgt demnach 1,15.
32 Ermitteln Sie den horizontalen Abstand (D).
33 MISSWEISUNGSKORREKTUR EINSTELLEN34 HINWEIS: Gilt nur für D-Modelle. 35 Prüfen Sie die Missweisungskorrektur
auf Ihrer Karte oder auf einer vertrauenswürdigen Website.
36 Stecken Sie das Werkzeug zur Missweisungskorrektur in die Öffnung an der Seite des Instruments ein.
37 Osten – Westen38 Schließen Sie ein Auge, und blicken
Sie mit dem anderen durch die Optik. Halten Sie die feste Visierlinie auf eine beliebige Peilmarke, und bewegen Sie die verstellbare Visierlinie auf den korrigierten Wert für Osten oder Westen.
39 3 Grad West-Korrektur40 Peilen Sie von der eingestellten
Visierlinie aus, um den berichtigten Messwert zu erhalten.
41 RAUMWINKEL ERMITTELN42 Peilen Sie die bekannte Richtung
des Satelliten mit dem Kompass an, und überprüfen Sie gewünschten Abstand östlich und westlich der Peilung.
43 Unter Beibehaltung der Richtung peilen Sie den angegebenen Winkel (Neigung) des Satelliten mit dem Klinometer an, und überprüfen Sie den gewünschten Abstand zu beiden Seiten des Winkels.
44 TIPP: Derselbe Vorgang kann bei der Ausrichtung von Solarpaneelen, bei der Installation der technischen Ausstattung für mobile Netzwerke, für die Außenbeleuchtung für den Film- und Fotobereich, für die Höhlenvermessung und mehr durchgeführt werden.
45 WARTUNG UND PFLEGE46 Verwenden Sie zur Reinigung nur
Wasser und milde Seife.47 Zur Reinigung der Optik schrauben Sie
den Optik-Einstellknopf vollständig heraus. Spülen Sie den Innenraum mit Wasser. Entfernen Sie Staub und überschüssiges Wasser mit Wattestäbchen. Lassen Sie das Gerät vor dem Zusammenbau vollständig trocknen.
48 WEITERE INFOS
1 FOCUS AANPASSEN2 Sluit één oog en kijk door de opening.3 Draai aan de knop totdat de cijfers
scherp zijn. 4 NB: het scherpste zicht wordt bereikt
door de ovaalvormige opening uit te lijnen met de zichtlijn (verticaal of horizontaal, afhankelijk van het apparaat).
5 UITLEZING VERKRIJGEN6 Kijk met beide ogen geopend door de
opening naar het doelobject. Een optische techniek zorgt er voor dat het object en de zichtlijn elkaar lijken te overlappen waardoor een nauwkeurige uitlezing ontstaat.
7 Lees de waarde uit op de zichtlijn.8 Kompas (KB-14, Tandem): hoofdschaal
is uw peiling ten opzichte van het object. Afhankelijk van het model is de tweede schaal de peiling in een andere schaalverdeling of de omgekeerde peiling (van het object naar u toe).
9 NB: als u een instelbare afwijking hebt, peilt u vanaf de ingestelde zichtlijn.
10 Hellingmeter (PM-5, Tandem): schaal geeft verticale hoek en/of hoogte aan. Als het schaaltype niet weet, beweegt u het instrument op of neer om de indicator te vinden.
11 UW EIGEN POSITIE MET EEN DRIEHOEKSMETING BEPALEN
12 Neem een omgekeerde peiling van ten minste twee objecten die vanaf uw gezichtspunt zichtbaar zijn en op uw kaart aangegeven zijn.
13 Gebruik een gradenboog en liniaal om lijnen op de kaart vanaf de posities van de objecten te tekenen volgens de gemeten peilingen.
14 Schat uw huidige positie in aan de hand van het snijpunt van de lijnen.
15 HOOGTE MET VASTE AFSTANDSCHAAL METEN (15 m, 20 m, 66’)
16 NB: alleen van toepassing op modellen met 15, 20 of 66 in de naam.
17 Ga op een afstand van het te meten object staan die overeenkomt met de gebruikte hoogteschaal.
18 Als het terrein vlak is, neemt u één
uitlezing tot de bovenkant van het object en telt u daarbij uw lengte op ooghoogte op om de totale hoogte te verkrijgen.
19 Als u zich op een matige helling bevindt, neemt u drie uitlezingen en telt u op of trekt u af zoals nodig is.
20 NB: Als de horizontale afstand (D) niet kan worden gemeten vanwege een helling, dient een nomogram te worden gebruikt om de hoogte te berekenen.
21 HOOGTE VANAF EEN VARIABLE AFSTAND MET EEN PERCENTAGESCHAAL METEN
22 NB: alleen van toepassing op modellen met PC in de naam.
23 Meet de afstand tot het object. 24 Neem een uitlezing van de hoek (c) tot
de bovenkant van het object.25 Bereken de gemeten hoogte (h).26 Tel hierbij uw lengte op ooghoogte (i)
op om de totale hoogte (H) van het object te verkrijgen.
27 HORIZONTALE AFSTAND MET SECANSSCHAAL METEN
28 NB: alleen van toepassing op modellen met S in de naam.
29 Meet de afstand van de helling (d). 30 Neem een uitlezing van de secans (c).31 NB: de Suunto-secansschaal is x100. De
secans in dit voorbeeld is dus 1,15.32 Bereken de horizontale afstand (D).33 DECLINATIECORRECTIE INSTELLEN34 NB: alleen van toepassing op
D-modellen. 35 Controleer de declinatiecorrectie op
uw kaart of op een betrouwbare website.
36 Steek het declinatiecorrectiehulpmiddel in de opening aan de zijkant van het instrument.
37 Oost - West38 Kijk met één oog gesloten door de
opening, houd de vaste zichtlijn op een peilingmarkering en beweeg de ingestelde zichtlijn voor een oost- of westcorrectie.
39 3 graden westcorrectie40 Peil vanaf de ingestelde zichtlijn om
een gecorrigeerde peiluitlezing te verkrijgen.
41 RUIMTEHOEK BEPALEN42 Peil een bekende peiling van
een satelliet met een kompas en controleer de gewenste speling oost en west van de peiling.
43 Houd de peiling vast, peil een bekende hoek (inclinatie) van de satelliet met de hellingmeter en controleer de gewenste speling aan beide zijden van de hoek.”
44 TIP: Dezelfde procedure kan worden gebruikt voor uitlijning van een zonnepaneel, installatie van apparatuur voor mobiele netwerken, buitenverlichting voor film en fotografie, het in kaart brengen van grotten, etc.
45 ZORG EN ONDERHOUD46 Alleen met water en milde zeep
reinigen.47 Om de opening te reinigen, draait u
de knop helemaal los. Spoel de binnenruimte met water. Verwijder stof en overvloedig water met een wattenstaafje. Laat de eenheid helemaal drogen voordat u deze weer in elkaar zet.
48 MEER INFORMATIE
1 AJUSTE DA FOCAGEM2 Feche um olho e olhe através
da óptica.3 Rode o botão da óptica até os
números ficarem nítidos. 4 NOTA: para melhor visualização, a
abertura oval deve ficar alinhada com a linha de mira (vertical ou horizontal, consoante o dispositivo).
5 OBTENÇÃO DA LEITURA6 Mantenha os olhos abertos e olhe
através da óptica na direcção do objecto alvo. Uma ilusão de óptica faz parecer que o objecto e a linha de mira se sobrepõem, permitindo uma leitura precisa.
7 Leia o valor a partir da linha de mira.
8 Bússola (KB-14, Tandem): a escala principal é a orientação desde o utilizador até ao objecto. Consoante o seu modelo, a escala secundária é a orientação numa graduação diferente ou a orientação inversa desde o objecto até ao utilizador.
9 NOTA: se tiver declinação ajustável, faça mira a partir da linha de mira ajustada.
10 Clinómetro (PM-5, Tandem): a(s) escala(s) indica(m) ângulo vertical e/ou altura. Se não estiver certo sobre o tipo de escala, mova o instrumento para cima ou para baixo para determinar o indicador.
11 LOCALIZAÇÃO DA PRÓPRIA POSIÇÃO POR TRIANGULAÇÃO
12 Obtenha orientação inversa de pelo menos dois objectos visíveis a partir do seu ponto de vista e indicados no seu mapa.
13 Usando um transferidor e uma ferramenta linear, marque as linhas no mapa desde a posição dos objectos de acordo com as orientações medidas.
14 Faça a estimativa da sua posição actual com base no local de intersecção das linhas.
15 MEDIÇÃO DE ALTURA COM ESCALA DE DISTÂNCIA FIXA (15 m, 20 m, 66’)
16 NOTA: aplicável apenas a modelos com designação 1520 ou 66.
17 Coloque-se a uma distância do objecto a medir que corresponda à escala de altura utilizada.
18 Se o solo for nivelado, faça uma leitura até ao topo do objecto e adicione a sua altura até ao nível dos olhos para obter a altura total.
19 Se estiver numa encosta moderada, faça três leituras e adicione ou subtraia conforme necessário.
20 NOTA: Se a distância horizontal (D) não puder ser medida, devido à inclinação do solo, use um nomograma para calcular a altura.
21 MEDIÇÃO DA ALTURA DE DISTÂNCIAS VARIÁVEIS COM ESCALA DE PERCENTAGEM
22 NOTA: aplicável apenas a modelos com designação PC.
23 Meça a distância ao objecto. 24 Faça a leitura de ângulo (c) para o
topo do objecto.25 Calcule a altura medida (h).26 Adicione a sua altura até ao nível
dos olhos (i) para obter a altura total (H) do objecto.
27 MEDIÇÃO DE DISTÂNCIA HORIZONTAL COM ESCALA SECANTE
28 NOTA: aplicável apenas a modelos com designação S.
29 Meça a distância da encosta (d). 30 Faça a leitura secante (c).31 NOTA: a escala secante Suunto é
x100, pelo que a secante neste exemplo é 1.15.
32 Calcule a distância horizontal (D).33 DEFINIÇÃO DE CORRECÇÃO DA
DECLINAÇÃO34 NOTA: aplicável apenas a modelos D. 35 Verifique a correcção da declinação
a partir do seu mapa ou Website de confiança.
36 Insira a ferramenta de ajuste da declinação na abertura lateral do seu instrumento.
37 Este - Oeste38 Olhando através da óptica com um
olho fechado, mantenha a linha de mira fixa em qualquer marcador
de orientação e mova a linha de mira ajustável para correcção de este ou oeste.
39 Correcção oeste de 3 graus40 Mire a partir da linha de mira
ajustada para obter a leitura de orientação correcta.
41 DETERMINAÇÃO DE ÂNGULO ESPACIAL
42 Mire para a orientação conhecida do satélite com a bússola e verifique o espaço pretendido a este e oeste da orientação.
43 Enquanto mantém a orientação, mire para o ângulo conhecido (inclinação) do satélite com o clinómetro e verifique o espaço pretendido em ambos os lados do ângulo.
44 DICA: O mesmo procedimento pode ser usado para o alinhamento do painel solar, a instalação de equipamentos de rede móvel, a disposição de iluminação exterior para filmagens e fotografia, o mapeamento de cavernas, etc.
45 CUIDADOS E MANUTENÇÃO46 Só deve utilizar água e um
detergente suave para a limpeza.47 Para limpar a óptica, desaperte
o botão da óptica até que saia completamente. Enxagúe a cavidade interior com água. Remova o pó e o excesso de água com uma cotonete. Permita que a unidade seque completamente antes de a voltar a montar.
48 OBTER MAIS
1 ZAOSTŘENÍ2 Zavřete jedno oko a druhým se
podívejte optikou. 3 Otáčejte nastavovacím kolečkem, dokud
číslice neuvidíte ostře. 4 POZNÁMKA: Pro zajištění nejlepšího
výsledku by měl být oválný otvor vyrovnán se záměrnou ryskou (svislá nebo vodorovná, podle použitého přístroje).
5 PŘEČTENÍ MĚŘENÝCH HODNOT6 Otevřete obě oči a podívejte se optikou
směrem na cílový objekt. Optická iluze způsobí, že se objekt a záměrná ryska překryjí a umožní přesné změření.
7 Přečtěte hodnotu u záměrné rysky.8 Kompas (KB-14, Tandem): na hlavní
stupnici je azimut od vás směrem k objektu. V závislosti na modelu je na sekundární stupnici azimut v jiném měřítku nebo reverzní azimut od objektu směrem k vám.
9 POZNÁMKA: Pokud máte nastavitelnou deklinaci, podívejte se přes nastavenou záměrnou rysku.
10 Sklonoměr (PM-5, Tandem): stupnice ukazuje(í) svislý úhel a/nebo výšku. Nejste-li si jisti typem stupnice, pohybujte přístrojem nahoru nebo dolů a vyhledejte indikátor.
11 VYHLEDÁNÍ VLASTNÍ POLOHY POMOCÍ TRIANGULACE
12 Zjistěte reverzní azimuty od nejméně dvou objektů viditelných z vašeho stanoviště, které jsou uvedeny na mapě.
13 S využitím změřených azimutů nakreslete pomocí úhloměru a pravítka na mapu čáry vedoucí od zvolených objektů.
14 Vaše stanoviště se nachází přibližně v místě křížení obou čar.
15 MĚŘENÍ VÝŠKY POMOCÍ STUPNICE PRO PEVNOU VZDÁLENOST (15m, 20m, 66’)
16 POZNÁMKA: Použitelné pouze pro modely, které mají v názvu 15, 20 nebo 66.
17 Postavte se od měřeného objektu ve vzdálenosti, která odpovídá použité stupnici.
18 Je-li plocha rovná, proveďte jedno
měření k vrcholu objektu a přičtěte svou výšku k úrovni očí. Tak získáte celkovou výšku objektu.
19 Jste-li na mírném svahu, proveďte tři měření a přičtěte nebo odečtěte hodnoty podle potřeby.
20 POZNÁMKA: Pokud nelze změřit vodorovnou vzdálenost (D) z důvodu svažitosti terénu, použijte pro výpočet výšky nomogram.
21 MĚŘENÍ VÝŠKY Z LIBOVOLNÉ VZDÁLENOSTI POMOCÍ PROCENTNÍ STUPNICE
22 POZNÁMKA: Použitelné pouze pro modely, které mají v názvu PC.
23 Změřte vzdálenost k objektu. 24 Změřte úhel (c) k vrcholu objektu.25 Vypočítejte měřenou výšku (h).26 Pro získání celkové výšky (H) objektu
připočítejte k vypočítané hodnotě svou výšku k úrovni očí (i).
27 MĚŘENÍ VODOROVNÉ VZDÁLENOSTI POMOCÍ STUPNICE SEKANS
28 POZNÁMKA: Použitelné pouze pro modely, které mají v názvu S.
29 Změřte délku svahu (d). 30 Změřte sekans (c).31 POZNÁMKA: Stupnice sekans u přístrojů
Suunto je x100, takže sekans v tomto příkladě je 1,15.
32 Vypočítejte vodorovnou vzdálenost (D).33 NASTAVENÍ OPRAVY DEKLINACE34 POZNÁMKA: Použitelné pouze pro
modely D. 35 Z mapy nebo spolehlivé webové
stránky zjistěte hodnotu pro opravu deklinace.
36 Vložte nástroj pro úpravu deklinace do otvoru na boku přístroje.
37 Východ - Západ38 Zavřete jedno oko a druhým se
podívejte optikou. Držte pevnou záměrnou rysku na libovolný azimut a pohybem nastavitelné záměrné rysky proveďte úpravu ve směru východ-západ.
39 Oprava o + 3 stupňů na západ40 Podívejte se přes nastavenou záměrnou
rysku a získejte opravenou hodnotu azimutu.
41 URČENÍ ÚHLU V PROSTORU42 Kompasem pozorujte známý azimut
satelitu a zjistěte požadovanou
změnu azimutu východním a západním směrem.
43 Udržujte azimut a změřte známý úhel (inklinaci) satelitu pomocí sklonoměru. Zjistěte požadovanou změnu v obou směrech tohoto úhlu.
44 TIP: Stejný postup lze použít pro nastavení solárních panelů, instalaci zařízení mobilní sítě, uspořádání venkovního osvětlení pro filmování a fotografování, mapování jeskyní apod.
45 PÉČE A ÚDRŽBA46 Pro čištění používejte pouze vodu a
mýdlový roztok.47 Při čištění optiky zcela vyšroubujte
nastavovací kolečko. Vypláchněte vnitřní prostor vodou. Bavlněným vytěrákem odstraňte prach a vodu. Před sestavením nechte zařízení zcela vyschnout.
48 ZÍSKEJTE VÍCE
© Suunto Oy 6/2013, 3/2014, 6/2014, 11/2014, 3/2015, 2/2017. All rights reserved.Suunto is a registered trademark of Suunto Oy.
CAUTION: DO NOT APPLY SOLVENT OF ANY KIND.
CAUTION: DO NOT KNOCK OR DROP.
CAUTION: DO NOT APPLY INSECT REPELLENT.
en ENGLISH
NOTE: IF YOUR EYES ARE NOT PARALLEL, AS IN THE CASE OF HETEROPHORIA, YOU MAY NEED TO SIGHT WITH ONE EYE. CHECK BY FIRST TAKING A READING WITH BOTH EYES OPEN. THEN CLOSE THE EYE LOOKING AT THE OBJECT. IF YOUR READING CHANGES SIGNIFICANTLY, USE JUST ONE EYE TO SIGHT OBJECT AND TAKE READING.
TECHNICAL SPECIFICATIONS• Operating temperature: -30C ... +60C / -22° F ... +140° F• Storage temperature: -30° C ... +60° C / -22° F ... +140° FKB-14• Weight: 93g• Dimensions: 74 x 52 x 15 mm / 2 3/4” x 2” x 5/8”.• Scales and resolutions: One or two of the following scales are implemented
depending on the model; not all combinations are available. - Scale: 360°, resolution ½° - Scale: reversed 360°, resolution ½° - Scale: quadrant degrees, resolution ½° - Scale: 400 g, resolution 1 g - Scale: 6400 mils, resolution 10 mils. • Accuracy: 1/3°PM-5• Weight: 94 g / 3.3 oz.• Dimensions: 74 x 52 x 15 mm / 2 3/4” x 2” x 5/8”.• Scales and resolutions: Two to three of the following scales are implemented
depending on model; not all combinations are available. - Scale: 0 to ±35m (15m distance scale), resolution ¼-½m depending on reading - Scale: 0 to ±50m (20m distance scale), resolution ¼-1m depending on reading - Scale: 0 to ±200’ (66’ distance scale), resolution 1-5’ depending on reading - Scale: 0 to ±90°, resolution 1° - Scale: 0 to ±150%, resolution 1-2% depending on reading - Scale: 0 to ±100g, resolution 1 g - Scale: 0 to ±1600 mils, resolution 10 mils - Scale: 1 to 5 secant (note that reading is secant x 100) , resolution 0.5 secants to
1 secant depending on reading • Accuracy: height scales ±2%, clinometer scales ¼°Tandem• Weight: 177g• Dimensions: 126 x 76 x 15 mm• Scales, resolutions and accuracy: see KB-14 and PM-5
INTERNATIONAL LIMITED WARRANTYSuunto warrants that during the Warranty Period Suunto or a Suunto Authorized Service Center (hereinafter Service Center) will, at its sole discretion, remedy defects in materials or workmanship free of charge either by a) repairing, or b) replacing, or c) refunding, subject to the terms and conditions of this International Limited Warranty. This International Limited Warranty is valid and enforceable regardless of the country of purchase. The International Limited Warranty does not affect your legal rights, granted under mandatory national law applicable to the sale of consumer goods.
Warranty PeriodThe International Limited Warranty Period starts at the date of original retail purchase.The Warranty Period is two (2) years for Products and Dive transmitters unless otherwise specified.The Warranty Period is one (1) year for accessories including but not limited to wireless sensors and transmitters, chargers, cables, rechargeable batteries, straps, bracelets and hoses.
Exclusions and LimitationsThis International Limited Warranty does not cover:1. a) normal wear and tear such as scratches, abrasions, or alteration of the color and/
or material of non-metallic straps, b) defects caused by rough handling, or c) defects or damage resulting from use contrary to intended or recommended use, improper care, negligence, and accidents such as dropping or crushing;
2. printed materials and packaging;3. defects or alleged defects caused by use with any product, accessory, software and/
or service not manufactured or supplied by Suunto;4. non-rechargeable batteries.Suunto does not warrant that the operation of the Product or accessory will be uninterrupted or error free, or that the Product or accessory will work with any hardware or software provided by a third party.This International Limited Warranty is not enforceable if the Product or accessory:1. has been opened beyond intended use;2. has been repaired using unauthorized spare parts; modified or repaired by
unauthorized Service Center;3. serial number has been removed, altered or made illegible in any way, as
determined at the sole discretion of Suunto; or4. has been exposed to chemicals including but not limited to sunscreen and
mosquito repellents.
Access to Suunto warranty serviceYou must provide proof of purchase to access Suunto warranty service. You must also register your product online at www.suunto.com/mysuunto in order to be eligible to international warranty services globally. For instructions how to obtain warranty service, visit www.suunto.com/warranty, contact your local authorized Suunto retailer, or call Suunto Contact Center.
Limitation of LiabilityTo the maximum extent permitted by applicable mandatory laws, this International Limited Warranty is your sole and exclusive remedy and is in lieu of all other warranties, expressed or implied. Suunto shall not be liable for special, incidental, punitive or consequential damages, including but not limited to loss of anticipated benefits, loss of data, loss of use, cost of capital, cost of any substitute equipment or facilities, claims of third parties, damage to property resulting from the purchase or use of the item or arising from breach of the warranty, breach of contract, negligence, strict tort, or any legal or equitable theory, even if Suunto knew of the likelihood of such damages. Suunto shall not be liable for delay in rendering warranty service.
SUUNTO CUSTOMER SUPPORT
1. www.suunto.com/supportwww.suunto.com/mysuunto
2. AUSTRALIA (24/7) +61 1800 240 498AUSTRIA +43 720 883 104CANADA (24/7) +1 855 624 9080CHINA +86 400 661 1646CHINA - Hong Kong +852 58060687FINLAND +358 9 4245 0127 FRANCE +33 4 81 68 09 26GERMANY +49 89 3803 8778ITALY +39 02 9475 1965JAPAN +81 3 4520 9417 NETHERLANDS +31 1 0713 7269NEW ZEALAND (24/7) +64 9887 5223RUSSIA +7 499 918 7148SPAIN +34 91 11 43 175SWEDEN +46 8 5250 0730SWITZERLAND +41 44 580 9988UK (24/7) +44 20 3608 0534USA (24/7) +1 855 258 0900
ACHTUNG: LASSEN SIE DAS GERÄT NICHT FALLEN, UND SETZEN SIE ES KEINEN STÖSSEN AUS.
ATTENTION : NE HEURTEZ PAS L’APPAREIL. NE LE FAITES PAS TOMBER.
PRECAUCIÓN: NO GOLPEE NI DEJE CAER EL DISPOSITIVO.
ATTENZIONE: EVITARE URTI E CADUTE.
LET OP: NIET TEGEN SLAAN OF LATEN VALLEN.
CUIDADO: NÃO SUJEITAR A EMBATES OU QUEDAS.
POZOR: ZABRAŇTE ÚDERŮM NEBO PÁDU.
de DEUTSCH
HINWEIS: WENN IHRE AUGEN (ZUM BEISPIEL BEI HETEROPHORIE) NICHT PARALLEL AUSGERICHTET SIND, KÖNNEN SIE AUCH MIT EINEM AUGE ANVISIEREN. VERSUCHEN SIE ZUERST, MIT BEIDEN AUGEN ABZULESEN. SCHLIESSEN SIE DANN DAS AUGE, MIT DEM SIE AUF DAS OBJEKT BLICKEN. WENN SICH IHRE LESEFÄHIGKEIT DABEI BEDEUTEND ÄNDERT, VERWENDEN SIE ZUM ANVISIEREN DES OBJEKTES UND ZUM ABLESEN DES MESSWERTES NUR EIN AUGE.
TECHNISCHE DATEN• Betriebstemperatur: -30 °C ... +60 °C / -22 °F ... +140 °F• Aufbewahrungstemperatur: -30 °C ... +60 °C / -22 °F ... +140 °FKB-14• Gewicht: 93 g• Maße: 74 x 52 x 15 mm / 2 3/4” x 2” x 5/8”.• Skalen und Teilungen: Je nach Modell verfügt das Instrument über eine oder zwei
der folgenden Skalen. Nicht alle Kombinationen sind möglich. - Skala: 360°, Teilung ½° - Skala: 360° umgekehrt, Teilung ½° - Skala: Gradeinteilung pro Quadrant, Teilung ½° - Skala: 400 gon, Teilung 1 gon - Skala: 6400 mil, Teilung: 10 mil • Genauigkeit: 1/3°PM-5• Gewicht: 94 g / 3,3 oz• Maße: 74 x 52 x 15 mm / 2 3/4” x 2” x 5/8”.• Skalen und Teilungen: Je nach Modell verfügt das Instrument über zwei oder drei
der folgenden Skalen. Nicht alle Kombinationen sind möglich. - Skala: 0 bis ±35 m (15 m Entfernungsskala), Teilung ¼ bis ½ m je nach Messung - Skala: 0 bis ±50 m (20 m Entfernungsskala), Teilung ¼ bis 1 m je nach Messung - Skala: 0 bis ±200’ (66’ Entfernungsskala), Teilung 1 bis 5’ je nach Messung - Skala: 0 bis ±90°, Teilung 1° - Skala: 0 bis ±150%, Teilung 1 bis 2% je nach Messung - Skala: 0 bis ±100 gon, Teilung 1 gon - Skala: 0 bis ±1600 mil, Teilung: 10 mil - Skala: 1 bis 5 Sekans (mit Faktor Sekans x100) , Teilung 0,5 Sekans bis 1 Sekans je
nach Messung
• Genauigkeit: Höhenskalen ±2%, Klinometer-Skalen ¼°Tandem• Gewicht: 177g• Maße: 126 x 76 x 15 mm• Skalen, Einteilungen und Genauigkeit: siehe KB-14 und PM-5
EINGESCHRÄNKTE INTERNATIONALE GARANTIESuunto garantiert, dass Suunto oder ein von Suunto autorisiertes Servicezentrum (im Folgenden Servicezentrum“) Material- oder Verarbeitungsfehler, die während des Garantiezeitraums aufgetreten sind, gemäß den Bedingungen dieser eingeschränkten internationalen Garantie nach eigenem Ermessen kostenlos durch a) Reparatur, b) Ersatz oder c) Rückerstattung des Kaufpreises behebt. Diese eingeschränkte internationale Garantie ist unabhängig vom Erwerbungsland des Produkts gültig und durchsetzbar. Diese eingeschränkte internationale Garantie schränkt Ihre Rechtsansprüche nicht ein, die Ihnen gemäß einer verpflichtenden nationalen Rechtsprechung im Zusammenhang mit dem Verkauf von Verbrauchsgütern zustehen.
GarantiefristDie eingeschränkte internationale Garantiefrist beginnt mit dem ursprünglichen Kaufdatum.Die Garantiefrist für Produkte und kabellose Dive Sender beträgt 2 (zwei) Jahre, sofern dies nicht anders angegeben ist.Für Zubehör einschließlich, aber nicht darauf beschränkt, kabellose Sensoren und Sender, Ladegeräte, Kabel, aufladbare Batterien, Riemen, Armbänder und Schläuche gilt eine Garantiefrist von 1 (einem) Jahr.
Ausschlüsse und EinschränkungenDiese eingeschränkte internationale Garantie gilt nicht für:1. a) normale Abnutzung wie Kratzer, Abrieb, oder Farb- bzw. Materialveränderungen
bei nicht-metallischen Riemen, b) Defekte, die durch groben Umgang entstanden sind, oder c) Defekte oder Schäden infolge von Handhabung entgegen dem vorgesehenen oder empfohlenen Verwendungszweck, aufgrund unsachgemäßer Pflege, aufgrund von Fahrlässigkeit oder Unfällen, wie Fallenlassen oder Stoßen;
2. bedruckte Materialien und Verpackungen;3. Schäden oder angebliche Schäden, die durch Verwendung des Produkts mit
Produkten, Zubehör, Software und/oder Serviceleistungen entstanden sind, die nicht von Suunto hergestellt oder geliefert wurden;
4. nicht wiederaufladbare Batterien.Suunto garantiert nicht, dass das Produkt oder Zubehör unterbrechungs- oder fehlerfrei funktioniert, oder, dass das Produkt oder Zubehör in Verbindung mit der Soft- oder Hardware von Fremdfirmen funktioniert.Diese eingeschränkte internationale Garantie ist nicht für Produkte oder Zubehör einklagbar:1. die über die bestimmungsgemäße Verwendung hinausgehend geöffnet wurden;2. die mit nicht zugelassenen Ersatzteilen repariert bzw. durch ein nicht autorisiertes
Servicezentrum verändert oder repariert wurden;3. deren Seriennummer, wie von Suunto im alleinigen Ermessen festgestellt, in
irgendeiner Weise entfernt, verändert oder unleserlich gemacht wurde; oder4. wenn sie Chemikalien ausgesetzt waren, einschließlich unter anderem
Sonnenschutz- und Insektenschutzmitteln.
Nutzung des Garantieservice von SuuntoUm eine Garantieleistung von Suunto beantragen zu können, müssen Sie den entsprechenden Kaufbeleg vorlegen. Um weltweit Dienstleistungen im Rahmen der internationalen Garantie in Anspruch nehmen zu können, müssen Sie Ihr Produkt online unter www.suunto.com/mysuunto registrieren. Weitere Informationen zur Inanspruchnahme von Garantieleistungen erhalten Sie unter www.suunto.com/ warranty, bei Ihrem autorisierten örtlichen Suunto Händler oder telefonisch beim Suunto Contact Center.
HaftungsbeschränkungIn dem gemäß den geltenden Gesetzen maximal zulässigen Umfang ist diese eingeschränkte internationale Garantie Ihr einziges und ausschließliches Rechtsmittel. Sie ersetzt alle stillschweigenden oder ausdrücklichen sonstigen Garantien. Suunto übernimmt keinerlei Haftung für besondere und zusätzliche Schadensansprüche, Nebenschäden, Bußzahlungen oder Folgeschäden, einschließlich Verlust von erwarteten Gewinnen, Datenverlust, Nutzungsausfall, Kapitalaufwendungen, Kosten für Ersatzausrüstungen oder -einrichtungen, Ansprüche Dritter, Sachschäden, die sich aus dem Kauf oder Gebrauch des Produkts oder aus einer Garantieverletzung, einem Vertragsbruch, Fahrlässigkeit, Produktfehlern, unerlaubter Handlung oder rechtlichen oder gesetzlichen Umständen ergeben, u.a. Dies gilt auch für den Fall, dass Suunto sich der Wahrscheinlichkeit derartiger Schäden bewusst war. Suunto haftet nicht für Verzögerungen bei der Erbringung von Garantieleistungen.
fr FRANÇAIS
REMARQUE : SI VOS YEUX NE SONT PAS PARALLÈLES, PAR EXEMPLE EN CAS D'HÉTÉROPHORIE, VOUS POURREZ ÊTRE AMENÉ À NE VISER QU'AVEC UN SEUL ŒIL. VÉRIFIEZ D'ABORD EN EFFECTUANT UN RELÈVEMENT AVEC LES DEUX YEUX OUVERTS. FERMEZ ENSUITE L'ŒIL VISANT L'OBJET. SI LE RELÈVEMENT CHANGE NOTABLEMENT, N'UTILISEZ QU'UN ŒIL POUR VISER L'OBJET ET EFFECTUER LE RELÈVEMENT.
CARACTÉRISTIQUES TECHNIQUES• Température d’utilisation : -30 °C ... +60 °C / -22 °F ... +140 °F• Température de stockage : -30 °C ... +60 °C / -22 °F ... +140 °FKB-14• Poids : 93 g• Dimensions : 74 x 52 x 15 mm / 2 3/4” x 2” x 5/8”.• Échelles et résolutions : Une ou deux des échelles suivantes sont utilisées en
fonction du modèle. Toutes les combinaisons ne sont pas disponibles. - Échelle : 360°, résolution ½° - Échelle : inversée 360°, résolution ½° - Échelle : degrés de quadrant, résolution ½° - Échelle : 400 g, résolution 1 g - Échelle : 6400 millièmes, résolution 10 millièmes. • Précision : 1/3°PM-5• Poids : 94 g / 3,3 oz.• Dimensions : 74 x 52 x 15 mm / 2 3/4” x 2” x 5/8”.• Échelles et résolutions : Deux ou trois des échelles suivantes sont utilisées en
fonction du modèle. Toutes les combinaisons ne sont pas disponibles. - Échelle : 0 à ±35 m (échelle de distance à 15 m), résolution ¼-½ m en fonction de la
mesure - Échelle : 0 à ±50 m (échelle de distance à 20 m), résolution ¼-1 m en fonction de la
mesure - Échelle : 0 à ±200’ (échelle de distance à 66’), résolution 1-5’ en fonction de la
mesure - Échelle : 0 à ±90°, résolution 1° - Échelle : 0 à ±150 %, résolution 1-2 % en fonction de la mesure - Échelle : 0 à ±100 g, résolution 1 g - Échelle : 0 à ±1600 millièmes, résolution 10 millièmes - Échelle : 1 à 5 sécantes (notez que l’échelle sécante est au facteur x100), résolution
0,5 sécante à 1 sécante en fonction de la mesure • Précision : échelles de hauteur ±2 %, échelles clinométriques ¼°Tandem• Poids : 177 g• Dimensions : 126 x 76 x 15 mm• Échelles, résolutions et précision : voir KB-14 et PM-5
GARANTIE LIMITÉE INTERNATIONALEPendant la période de garantie, Suunto ou un centre de service après-vente agréé Suunto (appelé ci-après centre de service) s’engage à sa seule discrétion à remédier sans frais aux défauts de matériau ou de fabrication, soit a) en réparant, soit b) en remplaçant ou encore c) en remboursant le produit, conformément aux conditions générales de la présente garantie limitée internationale. La présente garantie limitée internationale est valable et exécutoire quel que soit le pays d’achat. La garantie limitée internationale n’a pas d’incidence sur les droits qui vous sont conférés par la législation nationale applicable à la vente de biens de consommation.
Période de garantieLa période de garantie limitée internationale prend effet à la date de l’achat initial au détail.La période de garantie est de deux (2) ans pour les produits et transmetteurs de plongée sans fil, sauf indication contraire.La période de garantie est d’un (1) an pour les accessoires, incluant sans pour autant s’y limiter, les capteurs et transmetteurs sans fil, chargeurs, câbles, batteries rechargeables, sangles, bracelets et tuyaux.
Exclusions et limitationsLa présente garantie limitée internationale ne couvre pas :1. a) l’usure normale telle que les rayures, l’abrasion, ou la décoloration/ déformation
du matériau des sangles non métalliques, b) les pannes résultant d’une manipulation brutale, ou c) les pannes ou dommages résultant d’une utilisation contraire à celle prévue ou recommandée, un entretien innaproprié, une négligence, et les accidents comme les chutes ou l’écrasement ;
2. les matériaux imprimés et l’emballage ;3. les défauts ou prétendus défauts consécutifs à l’utilisation avec tout autre produit,
accessoire, logiciel ou service non conçu ou fourni par Suunto ;4. les piles non rechargeables.Suunto ne garantit pas que le fonctionnement du produit ou de l’accessoire sera exempt d’erreur ou d’interruption, ni que le produit ou l’accessoire fonctionnera avec des logiciels ou des matériels fournis par un tiers.La présente garantie limitée internationale n’est pas exécutoire si le produit ou
l’accessoire :1. a été ouvert hors de l’utilisation prévue ;2. a été réparé avec des pièces de rechange non autorisées ; modifié ou réparé par un
centre de service non autorisé ;3. a vu son numéro de série supprimé, altéré ou rendu illisible de quelque manière que
ce soit, tel que déterminé à la seule discrétion de Suunto ; 4. a été exposé à des produits chimiques, y compris et de manière non limitative les
crèmes solaires et anti-moustiques.
Accès au service de garantie SuuntoVous devez fournir la preuve d’achat du produit pour accéder au service de garantie Suunto. Vous devez également enregistrer votre produit en ligne sur www.suunto. com/mysuunto pour pouvoir bénéficier des services de la garantie internationale dans le monde entier. Pour savoir comment bénéficier du service de garantie, rendez-vous sur www.suunto.com/warranty, adressez-vous à votre revendeur Suunto local agréé ou appelez le Centre de contact Suunto.
Limitation de responsabilitéDans les limites autorisées par la législation applicable, la présente garantie limitée internationale constitue votre seul et exclusif recours et remplace toute autre garantie, expresse ou implicite. Suunto ne saurait être tenue responsable des dommages spéciaux, indirects, exemplaires ou accessoires, y compris et de manière non limitative la perte de bénéfices anticipés, la perte de données, la perte d’utilisation, le coût du capital, le coût de tout équipement ou moyen de substitution, les plaintes déposées par des tiers, les dommages matériels résultant de l’achat ou de l’utilisation du produit ou découlant du non-respect de la garantie, du non-respect du contrat, d’une négligence, d’un tort strict ou de toute théorie légale ou équitable, même si Suunto avait connaissance de l’éventualité de tels dommages. Suunto ne saurait être tenue responsable des retards liés à l’exécution du service de garantie.
es ESPAÑOL
NOTA: SI SUS OJOS NO ESTÁN PARALELOS, COMO ES EL CASO DE LA HETEROFORIA, ES POSIBLE QUE DEBA OBSERVAR CON UN SOLO OJO. COMPRUÉBELO TOMANDO PRIMERO UNA LECTURA CON LOS DOS OJOS ABIERTOS. A CONTINUACIÓN, CIERRE EL OJO CON EL QUE ESTÁ MIRANDO AL OBJETO. SI SU LECTURA CAMBIA CONSIDERABLEMENTE, UTILICE UN SOLO OJO PARA OBSERVAR EL OBJETO Y TOMAR LA LECTURA.
ESPECIFICACIONES TÉCNICAS• Temperatura de funcionamiento: -30 °C ... +60 °C / -22 °F ... +140 °F• Temperatura de almacenamiento: -30 °C ... +60 °C / -22 °F ... +140 °FKB-14• Peso: 93 g• Dimensiones: 74 x 52 x 15 mm• Escalas y resoluciones: En función del modelo se implementan una de las escalas
siguientes, o ambas; no están disponibles todas las combinaciones. - Escala: 360°, resolución ½° - Escala: inversa 360°, resolución ½° - Escala: grados de cuadrante, resolución ½° - Escala: 400 g, resolución 1 g - Escala: 6400 milésimas, resolución 10 milésimas. • Exactitud: 1/3°PM-5• Peso: 94 g• Dimensiones: 74 x 52 x 15 mm• Escalas y resoluciones: En función del modelo se implementan dos o tres de las
escalas siguientes; no están disponibles todas las combinaciones. - Escala: 0 a ±35 m (escala de distancia de 15 m), resolución ¼-½ m en función de la
lectura - Escala: 0 a ±50 m (escala de distancia de 20 m), resolución ¼-1 m en función de la
lectura - Escala: 0 a ±200 pies (escala de distancia de 66 pies), resolución 1-5 pies en función
de la lectura - Escala: 0 a ±90°, resolución 1° - Escala: 0 a ±150%, resolución 1-2% en función de la lectura - Escala: 0 a ±100 g, resolución 1 g - Escala: 0 a ±1600 milésimas, resolución 10 milésimas - Escala: 1 a 5 secante (recuerde que la lectura es de secante x 100), resolución 0,5
secantes a 1 secante en función de la lectura • Exactitud: escalas de altura ±2%, escalas de inclinómetro ¼°Tandem• Peso: 177 g• Dimensiones: 126 x 76 x 15 mm• Escalas, resoluciones y exactitud: consulte KB-14 y PM-5
GARANTÍA LIMITADA INTERNACIONALSuunto garantiza que, durante la vigencia de la garantía, Suunto o uno de sus Centros de servicio técnico autorizados (en adelante, “centro de servicio técnico”) subsanarán, de la forma que consideren oportuna y sin cargo alguno, cualesquiera desperfectos de materiales o fabricación ya sea mediante a) la reparación, b) la sustitución, o c) el reembolso, con sujeción a los términos y condiciones de la presente Garantía limitada internacional. La presente Garantía limitada internacional será válida y exigible independientemente del país de compra. La Garantía limitada internacional no afecta a sus derechos legales, otorgados por la legislación nacional vigente aplicable a la venta de bienes de consumo.
Periodo de garantíaEl periodo de garantía limitada internacional se computará a partir de la fecha de compra original.El periodo de garantía es de dos (2) años para Productos y transmisores inalámbricos de buceo, salvo que se estipule lo contrario.El periodo de garantía es de un (1) año para accesorios, incluidos a título meramente enumerativo pero no limitativo los transmisores y sensores inalámbricos, cargadores, cables, baterías recargables, correas, brazaletes y latiguillos.
Exclusiones y limitacionesEsta Garantía limitada internacional no cubre:1. a) el desgaste normal como arañazos, abrasiones o alteraciones en el color y/o en el
material de las correas no metálicas, b) los defectos causados por un manejo poco cuidadoso, ni c) los defectos o daños causados por un uso inadecuado o contrario al recomendado o para el que fue concebido, o por accidentes como caídas o golpes fuertes;
2. los materiales impresos ni los paquetes;3. los daños o supuestos menoscabos ocasionados como consecuencia de la
utilización de productos, accesorios, software y/o mantenimiento no realizado o proporcionado por Suunto;
4. las baterías no recargables.Suunto no garantiza el funcionamiento del Producto o los accesorios sin interrupciones o errores repentinos en los mismos, ni tampoco que el Producto o los accesorios funcionen con cualquier otro elemento de hardware o software proporcionado por un tercero.La presente Garantía limitada internacional no será de aplicación en caso de que el Producto o el accesorio:1. haya sido abierto más allá del uso para el que fue concebido;2. haya sido reparado utilizando recambios no autorizados; o bien, modificado o
reparado por un centro de servicio no autorizado; 3. cuando, a criterio de Suunto, el número de serie haya sido eliminado, alterado de
cualquier otra forma, o hubiere devenido ilegible;4. hubiere sido expuesto a productos químicos, incluidos (entre otros) los protectores
solares o los repelentes de mosquitos.
Acceso al servicio de garantía de SuuntoPara acceder al servicio de garantía de Suunto, es necesario presentar la prueba de compra. Asimismo usted deberá registrar su producto en línea en www.suunto.com/ mysuunto para recibir servicios de garantía internacional en cualquier país. Para obtener instrucciones acerca de cómo obtener el servicio de garantía, visite www. suunto.com/warranty, póngase en contacto con su distribuidor autorizado Suunto o llame al Centro de contacto Suunto.
Limitación de responsabilidadLa presente Garantía limitada internacional constituye su única garantía, en sustitución de cualesquiera otras garantías, expresas o implícitas, y en todo caso dentro de los límites de la legislación aplicable. Suunto no se hace responsable de los daños especiales, accidentales, punitorios o consecuentes, incluidos, a título meramente enunciativo pero no limitativo, las pérdidas de beneficios esperados, pérdidas de datos, pérdidas de uso, costes de capital, costes de sustitución de equipamientos o instalaciones, reclamaciones de terceros, cualquier daño causado en una propiedad como consecuencia de la compra o utilización del artículo, o derivado del incumplimiento de las condiciones de la garantía, incumplimiento contractual, negligencia, ilícito civil o cualquier otra figura jurídica análoga o equivalente, aún cuando Suunto tuviera conocimiento de la posibilidad de que tales daños pudieran producirse. Suunto no se hace responsable del retraso ocasionado en la prestación de los servicios cubiertos por la garantía.
it ITALIANO
NOTA: SE I PROPRI OCCHI NON SONO PERFETTAMENTE PARALLELI, COME IN CASO DI ETEROFORIA, POTREBBE ESSERE NECESSARIO PUNTARE CON UN SOLO OCCHIO. VERIFICARE PREVENTIVAMENTE TALE EVENTUALITÀ ESEGUENDO UNA MISURAZIONE CON ENTRAMBI GLI OCCHI APERTI. POI CHIUDERE L'OCCHIO LIBERO MENTRE SI GUARDA L'OGGETTO. SE LA LETTURA CAMBIA NOTEVOLMENTE, USARE UN SOLO OCCHIO PER PUNTARE L'OGGETTO ED EFFETTUARE LA MISURAZIONE.
SPECIFICHE TECNICHE• Temperatura operativa: -30° C ... +60° C / -22° F ... +140° F• Temperatura di conservazione: -30° C ... +60° C / -22° F ... +140° FKB-14• Peso: 93g• Dimensioni: 74 x 52 x 15 mm / 2 3/4” x 2” x 5/8”.• Scale e risoluzioni: A seconda del modello, si adottano una o due delle scale di
seguito elencate; non sono disponibili tutte le combinazioni. - Scala: 360°, risoluzione ½° - Scala: inversa 360°, risoluzione ½° - Scala: quadrante graduato, risoluzione ½° - Scala: 400 g, risoluzione 1 g - Scala: 6400 mil, risoluzione 10 mil. • Precisione: 1/3°PM-5• Peso: 94 g• Dimensioni: 74 x 52 x 15 mm / 2 3/4” x 2” x 5/8”.• Scale e risoluzioni: A seconda del modello, si adottano da due a tre scale tra quelle di
seguito elencate; non sono disponibili tutte le combinazioni. - Scala: da 0 a ±35m (scala distanza 15m), risoluzione ¼-½m a seconda della lettura - Scala: da 0 a ±50m (scala distanza 20m), risoluzione ¼-1m a seconda della lettura - Scala: da 0 a ±200’ (scala distanza 66’), risoluzione 1-5’ a seconda della lettura - Scala: da 0 a ±90°, risoluzione 1° - Scala: da 0 a ±150%, risoluzione 1-2% a seconda della lettura - Scala: da 0 a ±100g, risoluzione 1 g - Scala: da 0 a ±1600 mil, risoluzione 10 mil - Scala: secante da 1 a 5 (si noti che lettura è data dal valore secante x 100),
risoluzione: intervalli da 0,5 a 1, a seconda della lettura • Precisione: scale altezza ±2%, scale clinometro ¼°Tandem• Peso: 177g• Dimensioni: 126 x 85 x 15 mm• Scale, risoluzioni e precisione: vedere KB-14 e PM-5
GARANZIA LIMITATA INTERNAZIONALESuunto garantisce che nel corso del Periodo di garanzia, Suunto o un Centro di assistenza autorizzato Suunto (di seguito “Centro di assistenza”) provvederà, a propria esclusiva discrezione, a eliminare eventuali difetti di materiale o lavorazione gratuitamente tramite a) riparazione, b) sostituzione oppure c) rimborso del prezzo di acquisto, in base ai termini e alle condizioni della presente Garanzia limitata internazionale. La presente Garanzia limitata internazionale è valida ed applicabile indipendentemente dal paese di acquisto. La presente Garanzia limitata internazionale non modifica i diritti legali vigenti ai sensi delle leggi nazionali inderogabili ed applicabili alla vendita di beni di consumo.
Periodo di garanziaIl Periodo di Garanzia limitata internazionale ha inizio dalla data di acquisto del prodotto originale.Il Periodo della Garanzia è di due (2) anni per i Prodotti e Trasmettitori wireless per le immersioni, salvo diversa indicazione.Il Periodo di Garanzia è un (1) anno per gli accessori, inclusi, a titolo esemplificativo e non limitativo, sensori e trasmettitori wireless, caricabatterie, cavi, batterie ricaricabili, cinturini, bracciali e tubi flessibili.
Esclusioni e limitazioniLa presente Garanzia limitata internazionale non copre:1. a) normale usura, come graffi, abrasioni o alterazioni del colore e/o del materiale dei
cinturini non metallici, b) difetti causati da uso maldestro, oc) difetti o danni causati da un uso non corretto e/o contrario alle istruzioni fornite,
manutenzione errata, negligenza e incidenti quali caduta o schiacciamento;2. materiale cartaceo e imballaggio/confezionamento;3. difetti o presunti difetti causati da eventuale utilizzo o collegamento a qualsiasi
prodotto, accessorio, software e/o servizio non prodotto o fornito da Suunto.4. batterie non ricaricabili.Suunto non garantisce che il funzionamento del prodotto o dell’accessorio sarà ininterrotto o privo di errori né che il prodotto o l’accessorio funzionerà con hardware o software forniti da terzi.La presente Garanzia limitata internazionale non è applicabile nei seguenti casi:1. se il prodotto o l’accessorio è stato aperto per fini diversi da quelli previsti;2. se il prodotto o l’accessorio è stato riparato utilizzando parti di ricambio non
omologate; modificato o riparato presso un centro di assistenza non autorizzato da Suunto;
3. se il numero di serie del prodotto o dell’accessorio è stato rimosso, alterato o reso illeggibile in altro modo, cosa che verrà verificata ed accertata da Suunto a sua esclusiva discrezione; oppure
4. se il prodotto o l’accessorio è stato esposto a sostanze chimiche, inclusi, a scopo esemplificativo e non limitativo, repellenti antizanzare o creme solari.
Accesso al servizio di garanzia SuuntoPer richiedere il servizio di garanzia Suunto, è necessario fornire la prova d’acquisto. inoltre necessario registrare il prodotto online su www.suunto.com/mysuunto per avere diritto ai servizi di garanzia internazionale a livello globale. Per istruzioni su come richiedere ed ottenere il servizio di garanzia, visitare il sito www.suunto.com/warranty, contattare il proprio rivenditore autorizzato locale Suunto oppure chiamare il Centro assistenza clienti di Suunto.
Limitazione della responsabilitàNella misura in cui ciò è consentito dalle leggi vigenti, la presente Garanzia limitata internazionale è il solo ed esclusivo rimedio a disposizione dell’acquirente e sostituisce tutte le altre garanzie, siano esse espresse o implicite. Suunto non può essere ritenuta responsabile per danni speciali, accidentali, colposi e consequenziali, ivi compresi, a titolo esemplificativo e non limitativo, mancati benefici, perdita di dati, mancato utilizzo del prodotto, costo del capitale, costi per attrezzature o strumenti sostitutivi, reclami da parte di terzi, danni alla proprietà conseguenti all’acquisto/utilizzo del prodotto oppure causati da violazione della garanzia o del contratto, negligenza, responsabilità oggettiva o altro mezzo giuridico, anche nel caso in cui Suunto fosse consapevole del rischio di danni di questo tipo Suunto non può essere ritenuta responsabile per ritardi nell’erogazione del servizio di cui alla presente garanzia.
nl NEDERLANDS
NB: ALS UW OGEN NIET PARALLEL STAAN, ZOALS BIJ SCHEELZIEN, KAN HET BETER ZIJN OM MAAR ÉÉN OOG TE GEBRUIKEN VOOR HET PEILEN. CONTROLEER DIT DOOR EERST EEN UITLEZING TE MAKEN MET BEIDE OGEN GEOPEND. SLUIT DAN EEN OOG TERWIJL U NAAR HET OBJECT KIJKT. ALS UW UITLEZING SIGNIFICANT VERANDERT, GEBRUIK DAN MAAR ÉÉN OOG OM HET OBJECT TE PEILEN EN EEN UITLEZING TE MAKEN.
TECHNISCHE SPECIFICATIES• Bedrijfstemperatuur: -30°C ... +60°C / -22°F ... +140°F• Opslagtemperatuur: -30°C ... +60°C / -22°F ... +140°FKB-14• Gewicht: 93 g• Afmetingen: 74 x 52 x 15 mm / 2 3/4” x 2” x 5/8”.• Schalen en nauwkeurigheid: één of twee van de volgende schalen zijn
geïmplementeerd afhankelijk van het model. Niet alle combinaties zijn leverbaar. - Schaal: 360°, nauwkeurigheid ½° - Schaal: omgekeerd 360°, nauwkeurigheid ½° - Schaal: graden kwadrant, nauwkeurigheid ½° - Schaal: 400 g, nauwkeurigheid 1 g - Schaal: 6400 mijl, nauwkeurigheid 10 mijl. • Nauwkeurigheid: 1/3°PM-5• Gewicht: 94 g• Afmetingen: 74 x 52 x 15 mm / 2 3/4” x 2” x 5/8”.• Schalen en nauwkeurigheid: Twee of drie van de volgende schalen zijn
geïmplementeerd afhankelijk van het model; niet alle combinaties zijn beschikbaar. - Schaal: 0 tot ± 35 m (15 m afstandschaal), nauwkeurigheid ¼-½ m afhankelijk van
uitlezing - Schaal: 0 tot ± 50 m (20 m afstandschaal), nauwkeurigheid ¼-½ m afhankelijk van
uitlezing - Schaal: 0 tot ± 200’ (66’ afstandschaal), nauwkeurigheid 1-5’ afhankelijk van
uitlezing - Schaal: 0 tot ± 90°, nauwkeurigheid 1° - Schaal: 0 tot ± 150%, nauwkeurigheid 1-2% afhankelijk van uitlezing - Schaal: 0 tot ± 100 g, nauwkeurigheid 1 g
- Schaal: 0 tot ± 1600 mijl, nauwkeurigheid 10 mijl. - Schaal: 1 tot 5 secans (let op dat uitlezing is secans x 100), nauwkeurigheid 0,5
secans tot 1 secans afhankelijk van uitlezing • Nauwkeurigheid: hoogteschalen ± 2%, hellingmeterschalen ¼°Tandem• Gewicht: 177 g• Afmetingen: 126 x 76 x 15 mm• Schalen, resoluties en nauwkeurigheid: zie KB-14 en PM-5
WERELDWIJDE BEPERKTE GARANTIESuunto garandeert dat Suunto of een door Suunto geautoriseerd servicecentrum (hierna te noemen servicecentrum) gedurende de garantieperiode, ter eigen beoordeling, defecten in materialen of uitvoering gratis zal herstellen door a) reparatie, b) vervanging of c) terugbetaling, onderhevig aan de voorwaarden en condities van deze internationale beperkte garantie. Deze wereldwijde beperkte garantie is geldig en afdwingbaar ongeacht het land van aankoop. De wereldwijde beperkte garantie heeft geen invloed op uw juridische rechten, zoals verleend onder dwingend nationaal recht dat van toepassing is op de verkoop van consumentengoederen.
GarantieperiodeDe wereldwijde beperkte garantieperiode begint op de datum van de oorspronkelijke aankoop in de winkel.De garantieperiode is twee (2) jaar voor producten en draadloze duikzenders tenzij anders aangegeven.De garantieperiode is een (1) jaar voor accessoires inclusief, maar niet beperkt tot draadloze sensoren en zenders, opladers, kabels, oplaadbare batterijen, riemen, armbanden en slangen.
Uitsluitingen en beperkingenOnder deze wereldwijde beperkte garantie bestaat geen dekking voor:1. a) normale slijtage zoals krassen, slijtplekken of veranderingen in kleur en/of
materiaal van niet-metallic riemen, b) gebreken veroorzaakt door hardhandige hantering, of c) gebreken of schade die voortvloeien uit gebruik anders dan bedoeld of aanbevolen, slecht onderhoud, nalatigheid, en ongelukken zoals laten vallen of stoten;
2. documentatiemateriaal en verpakking;3. defecten of beweerde defecten die veroorzaakt zijn door het gebruik met een
product, accessoire, softwaretoepassing en/of service die niet is geproduceerd of geleverd door Suunto;
4. niet-oplaadbare batterijen.Suunto garandeert niet dat het product ononderbroken of zonder fouten zal werken, of dat het product zal werken in combinatie met enige hardware of software die door een derde partij wordt geleverd.Deze wereldwijde beperkte garantie is niet afdwingbaar indien het product of de accessoire:1. verder geopend is dan het bedoelde gebruik;2. gerepareerd is met gebruik van niet geautoriseerde reserveonderdelen; aangepast
of gerepareerd is door een niet geautoriseerd servicecentrum;3. het serienummer is verwijderd, is gewijzigd of op enigerlei wijze onleesbaar is
gemaakt, zoals bepaald naar goeddunken van Suunto;4. is blootgesteld aan chemicaliën, inclusief maar niet beperkt tot zonnecrème en
insectenafweermiddel.
Toegang tot de Suunto garantieserviceU kunt alleen aanspraak maken op de garantieservice van Suunto als u in het bezit bent van een aankoopbewijs. U moet tevens uw product online registreren op www.suunto. com/mysuunto om wereldwijd gebruik te maken van internationale garantieservices. Voor instructies over het verkrijgen van de garantieservice gaat u naar www.suunto. com/warranty, neemt u contact op met uw lokale geautoriseerde Suunto-leverancier of belt u het Suunto Contact Center.
Beperkte aansprakelijkheidBinnen het maximale vermogen zoals in de van toepassing zijnde wet- en regelgeving is opgenomen, is deze wereldwijde beperkte garantie uw enige en exclusieve rechtsmiddel en vervangt alle andere garanties zowel impliciet als expliciet. Suunto kan niet aansprakelijk worden gehouden voor bijzondere, incidentele of gevolgschade of schadevergoedingen, inclusief maar niet beperkt tot verlies van verwachte voordelen, verlies van gegevens, kapitaalkosten, kosten van vervangende apparatuur of voorzieningen, claims van derden, schade aan eigendommen als gevolg van de aankoop of het gebruik van het item of als gevolg van garantiebreuk, nalatigheid, benadeling of enige juridische of billijke grondslag, zelfs als Suunto op de hoogte was van de kans op dergelijke schade. Suunto kan niet aansprakelijk worden gehouden voor vertraging bij het verlenen van garantieservice.
pt PORTUGUÊS
NOTA: SE AS SUAS LINHAS VISUAIS NÃO FOREM PARALELAS, COMO NO CASO DA HETEROFORIA, PODERÁ TER DE MIRAR COM UM OLHO. VERIFIQUE COMEÇANDO POR FAZER UMA LEITURA COM OS DOIS OLHOS ABERTOS. DE SEGUIDA FECHE O OLHO OLHANDO PARA O OBJECTO. SE A SUA LEITURA SOFRER UMA ALTERAÇÃO SIGNIFICATIVA, USE APENAS UM OLHO PARA MIRAR O OBJECTO E FAZER A LEITURA.
ESPECIFICAÇÕES TÉCNICAS• Temperatura de funcionamento: -30 °C ... +60° C/-22° F ... +140 °F• Temperatura de armazenamento: -30 °C ... +60° C/-22° F ... +140 °FKB-14• Peso: 93 g• Dimensões: 74 x 52 x 15 mm / 2 3/4” x 2” x 5/8”.• Escalas e resoluções: estão implementadas uma ou duas das seguintes escalas
consoante o modelo; nem todas as combinações estão disponíveis. - Escala: 360°, resolução ½° - Escala: 360° invertida, resolução ½° - Escala: graus quadrantes, resolução ½° - Escala: 400 g, resolução 1 g - Escala: 6400 milésimos, resolução 10 milésimos. • Precisão: 1/3°PM-5• Peso: 94 g/3,3 oz.• Dimensões: 74 x 52 x 15 mm / 2 3/4” x 2” x 5/8”.• Escalas e resoluções: estão implementadas duas ou três das seguintes escalas
consoante o modelo; nem todas as combinações estão disponíveis. - Escala: 0 a ±35 m (escala de distância 15 m), resolução ¼-½ m consoante a leitura - Escala: 0 a ±50 m (escala de distância 20 m), resolução ¼-1 m consoante a leitura - Escala: 0 a ±200’ (escala de distância 66’), resolução 1-5’ consoante a leitura - Escala: 0 a ±90°, resolução 1° - Escala: 0 a ±150%, resolução 1-2% consoante a leitura - Escala: 0 a ±100 g, resolução 1 g - Escala: 0 a ±1600 milésimos, resolução 10 milésimos - Escala: secante 1 a 5 (note que a leitura é secante x100), resolução 0,5 secantes a 1
secante consoante a leitura • Precisão: escalas de altura ±2%, escalas clinómetro ¼°Tandem• Peso: 177 g• Dimensões: 126 x 76 x 15 mm• Escalas, resoluções e precisão: veja KB-14 e PM-5
GARANTIA LIMITADA INTERNACIONALA Suunto garante que durante o Período da Garantia, a Suunto ou um Centro de Assistência Autorizado da Suunto (doravante designado de Centro de Assistência) irá, à sua discrição, reparar defeitos de material ou de mão-de-obra isentos de encargos mediante: a) reparação, b) substituição ou c) reembolso, sujeito aos termos e condições desta Garantia Limitada Internacional. Esta Garantia Limitada Internacional é válida e aplicável, independentemente do país de compra. A Garantia Limitada Internacional não afeta os seus direitos legais garantidos ao abrigo da legislação nacional obrigatória aplicável à venda de bens de consumo.
Período de GarantiaO Período de Garantia Limitada Internacional tem início na data de aquisição original.O Período da Garantia é de dois (2) anos para Produtos e transmissores sem fio de Mergulho, a menos que especificado em contrário.O Período da Garantia é de um (1) ano para acessórios, incluindo mas não limitada a sensores sem fios e transmissores, carregadores, cabos, baterias recarregáveis, alças, braceletes e tubos.
Exclusões e LimitaçõesEsta Garantia Limitada Internacional não abrange:1. a) o desgaste normal como riscos, abrasões ou alteração da cor e/ou material de
alças não metálicas, b) defeitos provocados por manuseamento negligente, ou c) defeitos ou danos resultantes de uma utilização contrária à utilização prevista ou recomendada, cuidados incorrectos, negligência e acidentes, tais como quedas ou esmagamentos;
2. materiais impressos e embalagem;3. defeitos ou alegados defeitos provocados pela utilização com qualquer produto,
acessório, software e/ou serviço não fabricado ou fornecido pela Suunto;4. baterias não recarregáveis.A Suunto não garante que o funcionamento do Produto ou acessório será contínuo ou isento de erros, ou que o Produto ou o acessório funcionará em combinação com qualquer hardware ou software fornecido por terceiros.Esta Garantia Limitada Internacional não se aplica se o Produto ou acessório:1. tiver sido aberto para além da finalidade a que se destina;2. tiver sido reparado com peças sobressalentes não autorizadas; modificado ou
reparado por um Centro de Assistência não autorizado;3. estiver com o número de série removido, alterado ou ilegível por qualquer via, por
determinação à total discrição da Suunto; ou 4. tiver sido exposto a químicos, incluindo mas não se limitando a protectores solares
e repelentes de mosquitos.
Acesso ao serviço de garantia da SuuntoPara acesso ao serviço de garantia da Suunto é necessária a prova de compra. Também deve registar o seu produto online em www.suunto.com/mysuunto para receber os serviços de garantia internacional em todo o mundo. Para saber como obter o serviço de garantia, visite www.suunto.com/warranty ou contacte o revendedor local autorizado da Suunto ou o Centro de Contacto da Suunto.
Limitação da ResponsabilidadeAté à máxima extensão permitida pela legislação obrigatória aplicável, esta Garantia Limitada Internacional é a sua única e exclusiva forma de reparação disponível e substitui todas as outras garantias, expressas ou implícitas. A Suunto não se responsabiliza por danos extraordinários, acidentais, punitivos ou consequenciais, incluindo mas não se limitando à perda de benefícios antecipados, perda de dados, perda de utilização, custo de capital, custo de qualquer equipamento ou funcionalidades de substituição, reclamações de terceiros, danos materiais resultantes da aquisição ou utilização do artigo ou decorrentes da violação da garantia, violação do contrato, negligência, ato ilícito ou qualquer lei ou teoria equitativa, mesmo que a Suunto tivesse conhecimento da probabilidade de tais danos. A Suunto não se responsabiliza por qualquer atraso na prestação do serviço de garantia.
cs ČEŠTINA
POZNÁMKA: V PŘÍPADĚ, ŽE VAŠE OČI NEJSOU ROVNOBĚŽNÉ, JAKO JE TO V PŘÍPADĚ PORUCHY ZVANÉ HETEROFÓRIE, BUDETE SE MUSET DÍVAT POUZE JEDNÍM OKEM. ZKUSTE SE NEJDŘÍVE PODÍVAT OBĚMA OČIMA. POTÉ ZAVŘETE OKO POZORUJÍCÍ OBJEKT. ZMĚNÍ-LI SE MĚŘENÍ VÝRAZNÝM ZPŮSOBEM, POUŽÍVEJTE PRO POZOROVÁNÍ OBJEKTU A MĚŘENÍ POUZE JEDNO OKO.
TECHNICKÉ ÚDAJE• Provozní teplota: -30° C ... +60° C / -22° F ... +140° F• Skladovací teplota: -30° C ... +60° C / -22° F ... +140° FKB-14• Hmotnost: 93 g• Rozměry: 74 x 52 x 15 mm / 2 3/4” x 2” x 5/8”.• Stupnice a rozlišení: V závislosti na modelu je použita jedna nebo dvě následující
stupnice; nejsou k dispozici všechny kombinace. - Stupnice: 360°, rozlišení ½° - Stupnice: reverzní 360°, rozlišení ½° - Stupnice: kvadrantní stupně, rozlišení ½° - Stupnice: 400 g, rozlišení 1 g - Stupnice: 6400 mils, rozlišení 10 mils. • Přesnost: 1/3°PM-5• Hmotnost: 94 g / 3,3 oz.• Rozměry: 74 x 52 x 15 mm / 2 3/4” x 2” x 5/8”.• Stupnice a rozlišení: V závislosti na modelu jsou použity dvě až tři následující
stupnice; nejsou k dispozici všechny kombinace. - Stupnice: 0 až ±35 m (15 m stupnice vzdálenosti), rozlišení ¼ - ½ m v závislosti na
měření - Stupnice: 0 až ±50 m (20 m stupnice vzdálenosti), rozlišení ¼ - 1 m v závislosti na
měření - Stupnice: 0 až ±200’ m (66’ stupnice vzdálenosti), rozlišení 1 - 5’ v závislosti na
měření - Stupnice: 0 až ±90°, rozlišení 1° - Stupnice: 0 až ±150%, rozlišení 1 - 2% v závislosti na měření - Stupnice: 0 až ±100 g, rozlišení 1 g - Stupnice: 0 až ±1600 mils, rozlišení 10 mils - Stupnice: 1 až 5 sekans (upozorňujeme, že hodnoty sekans jsou x 100) , rozlišení
0,5 sekans až 1 sekans v závislosti na měření • Přesnost: stupnice výšky ±2%, stupnice sklonoměru ¼°Tandem• Hmotnost: 177 g• Rozměry: 126 x 76 x 15 mm• Stupnice, rozlišení a přesnost: viz KB-14 a PM-5
OMEZENÁ MEZINÁRODNÍ ZÁRUKAFirma Suunto zaručuje, že v průběhu Záruční doby firma Suunto nebo autorizovaná servisní centra Suunto (dále pouze Servisní centra) v rámci podmínek této Omezené mezinárodní záruky a na základě vlastního uvážení bezplatně napraví vady materiálu nebo zpracování a) opravením, b) výměnou nebo c) náhradou. Tato Omezená mezinárodní záruka platí a je vymahatelná bez ohledu na zemi nákupu. Omezená mezinárodní záruka nemá dopad na vaše zákonná práva, jež vám náleží na základě závazných právních předpisů týkajících se prodeje spotřebního zboží.
Záruční dobaZáruční doba podle této Omezené mezinárodní záruky začíná datem koupě původním kupujícím.Není-li stanoveno jinak, je záruční doba u Výrobků a bezdrátových potápěčských vysílačů dva (2) roky.Záruční doba příslušenství, včetně například bezdrátových senzorů a vysílačů, nabíječek, kabelů, dobíjecích baterií, pásů, náramků a hadic, je jeden (1) rok.
Výluky a omezeníTato Omezená mezinárodní záruka se nevztahuje na:1. a) normální opotřebení, například poškrábání, odřeniny či změny barvy a/nebo
materiálu nekovových pásů, b) závady způsobené nešetrným zacházením nebo c) závady či poškození plynoucí z použití neshodujícího se s použitím zamýšleným či doporučovaným, nesprávné péče, nedbalosti a nehod jako upuštění na zem či rozdrcení;
2. tištěné materiály a obal;3. závady a údajné závady způsobené používáním s jakýmkoli výrobkem,
příslušenstvím, softwarem nebo službou nevyrobenou nebo nedodanou firmou Suunto;
4. nedobíjecí baterie.Společnost Suunto nezaručuje, že Výrobek či příslušenství budou fungovat bez přerušení či bezchybně, ani že Výrobek či příslušenství budou spolupracovat s jiným hardwarem či softwarem dodaným třetí stranou.Tato Omezená mezinárodní záruka není vynutitelná, jestliže u Výrobku nebo příslušenství došlo k následujícímu:1. došlo k otevření mimo zamýšlené použití;2. proběhla oprava pomocí neautorizovaných náhradních součástí; úprava či oprava
neautorizovaným Servisním střediskem;3. došlo k odstranění, úpravě nebo jiné formě zneplatnění výrobního čísla, na základě
výhradního rozhodnutí firmy Suunto;4. došlo k vystavení působení chemikálií, například opalovacích krémů nebo
odpuzovačů hmyzu.
Přístup k záručnímu servisu SuuntoPro přístup k záruční službě Suunto je nutné doložit doklad o koupi. Máte-li zájem o záruční služby kdekoli na světě, musíte svůj výrobek zaregistrovat online na adrese www.suunto.com/mysuunto. Informace o získání záručního servisu získáte na www.suunto.com/warranty, kontaktujte místního autorizovaného prodejce Suunto nebo volejte technickou podporu Suunto Contact Center.
Omezení odpovědnostiTato Omezená mezinárodní záruka v maximální míře, do jaké to povolují platné závazné právní předpisy, představuje jediný a výhradní nápravný prostředek, který vylučuje jakékoli jiné záruky, ať již výslovné či předpokládané. Firma Suunto nebude odpovědná za zvláštní, nahodilé, trestné ani následné škody, mimo jiné za ztráty očekávaných přínosů, ztráty dat, ztráty použití, náklady na kapitál, náklady na náhradní vybavení či zařízení, nároky třetích stran, poškození vlastnictví, vzniklé následkem zakoupení nebo používání výrobku nebo pocházející z porušení záruky, porušení smlouvy, nedbalosti, přečinu, či podle jakékoli teorie zákonného či zvykového práva, i kdyby firma Suunto o možnosti vzniku takových škod věděla. Firma Suunto nebude zodpovědná za zpoždění při provádění záručního servisu.
ACHTUNG: BRINGEN SIE DAS GERÄT NICHT IN KONTAKT MIT LÖSUNGS-MITTELN.
ATTENTION : N’UTILISEZ AUCUN SOLVANT SUR L’APPAREIL.
PRECAUCIÓN: NO APLICAR NINGÚN TIPO DE DISOLVENTE.
ATTENZIONE: NON USARE ALCUN TIPO DI SOLVENTE.
LET OP: GEEN ENKEL OPLOSMIDDEL AANBRENGEN.
CUIDADO: NÃO APLICAR NENHUM TIPO DE SOLVENTE.
POZOR: NEPOUŽÍVEJTE ŽÁDNÁ ROZPOUŠTĚDLA.
ACHTUNG: BRINGEN SIE DAS GERÄT NICHT IN KONTAKT MIT INSEKTENSCHUTZMITTEL.
ATTENTION : N’UTILISEZ PAS DE PRODUIT INSECTICIDE SUR L’APPAREIL
PRECAUCIÓN: NO APLICAR REPELENTE DE INSECTOS.
ATTENZIONE: NON USARE INSETTIFUGHI.
LET OP: GEEN INSECTENWEREND MIDDEL AANBRENGEN.
CUIDADO: NÃO APLICAR REPELENTE DE INSECTOS.
POZOR: NEPOUŽÍVEJTE REPELENT PROTI HMYZU.