Embed Size (px)
Citation preview

Karcher Basic Training 2005 –Instructor Ken Carithers
Karcher Basic Training 2005
www.mymowerparts.com
For Karcher Pressure Washer Parts Call 606-678-9623 or 606-561-4983

Karcher Basic Training 2005 –Instructor Ken Carithers
Agenda
1. Basic Theory2. Troubleshooting3. Tools, Specifications, and Adjustments4. Bulletins5. 32-bit DISIS6. Pump Service Handbooks
www.mymowerparts.com
For Karcher Pressure Washer Parts Call 606-678-9623 or 606-561-4983
Karcher Basic Training 2005 –Instructor Ken Carithers
Water Flow
The water flows from the main water connection with associated backflow check valve (9) to the pump (13).
The pump (13) delivers the water through the high-pressure hose (1), the handgun (16) and the spray lance (17) to the change-over nozzle (18).
Operating pressure and flow rate are adjusted by means of the pressure and flow control (14).
If the change-over nozzle (18) is set to high-pressure, the non-return valve (3) seals off the detergent suction hose (5) so that no water can flow into the detergent reservoir (6).
The injector (2) draws detergent out of the detergent reservoir (6) as soon as the metering valve (4) is opened and the change-over nozzle (18) has been set to low-pressure.
When drawing water from an open tank (7), the water inlet hose (10) must be replaced with a suction hose equipped with a filter and non-return valve (8).
The motor (electric models) is cooled solely by the flow of air created by the fan wheel (11) (air-cooling).
A backflow check valve (9) fitted to the main water connection prevents detergent from entering the supply network.
The water inlet hose should be at least 25 foot long. The elasticity of this hose prevents the recoil that occurs when the handgun isclosed from causing damage to the pump and the supply network.
www.mymowerparts.com
For Karcher Pressure Washer Parts Call 606-678-9623 or 606-561-4983

Karcher Basic Training 2005 –Instructor Ken Carithers
Swash Plate with Axial Bearing
The piston stroke depends upon the angle of inclination of the swash plate (8). The greater the inclination, the longer the stroke. One revolution of the swash plate gives one suction stroke and one pressure stroke.
The pistons (12) are pressed against the axial bearing (9) of the swash plate (8) by powerful springs (11).
Swash plate and pistons are permanently bathed in oil (oil type - SAE 15W40).
The axial bearing (9) greatly reduces the friction between the pistons and the swash plate, so that in spite of their inherently low starting torque, single-phase motors can start up without any difficulty even when the handgun is closed.
The pistons are driven via the swash plate (8) which is directly mounted to the motor shaft (1) with a tolerance ring (2), key, cheese head screw or nut depending on the model.
As soon as the motor shaft rotates, the swash plate rotates as well, and the pistons (12) move backwards and forwards.
www.mymowerparts.com
For Karcher Pressure Washer Parts Call 606-678-9623 or 606-561-4983
Karcher Basic Training 2005 –Instructor Ken Carithers
Pistons with Seals
The piston (11) on higher pressure units (above 2400 psi) is fitted with a high-pressure seal (2) and a low-pressure seal (6). Lower pressure units (2400 psi and under) only have a high-pressure seal (2).
The oil seal (8), mounted in the piston housing, seals the housing and piston and retains the oil in the reservoir.
The 3 pistons are manufactured from tempered, surface-hardened steel and are non-corrosive with regards to detergents and rust.
The pump delivery capacity is determined by
•The rotational speed of the motor
•The diameter of the piston
•The length of the piston stroke.
There are leakage channels (9) in the piston housing through which water or oil can drip out into the open.
A water leakage rate of 1 drop per piston per minute is allowable during high-pressure operation. Oil leakage is not permissible and indicates worn oil seals or defective piston.
www.mymowerparts.com
For Karcher Pressure Washer Parts Call 606-678-9623 or 606-561-4983

Karcher Basic Training 2005 –Instructor Ken Carithers
Suction and Pressure Valves
The sealing surface between the valve plate (4) and the valve seat (5) is flat in the type of construction shown in the illustration. Other types have a conical sealing surface. This brings about a reduction in noise.
Valve plate (3) and valve seat (5) are manufactured from either plastic or stainless steel depending upon the particular unit involved.
Suction and pressure valves are not always constructed the same way, although they may appear very similar.
Valve plate with guide shafts (3) are only used when the flow of water inside the cylinder head is irregular, causing the valve plates to show a tendency to “flutter”.
Careful attention must be paid to the position in which pressure valves are fitted (8) when the direction of flow is lateral, so that the flow resistance is reduced and the working life of the valve cages are increased.
www.mymowerparts.com
For Karcher Pressure Washer Parts Call 606-678-9623 or 606-561-4983

Karcher Basic Training 2005 –Instructor Ken Carithers
Valve Function
www.mymowerparts.com
For Karcher Pressure Washer Parts Call 606-678-9623 or 606-561-4983

Karcher Basic Training 2005 –Instructor Ken Carithers
Pressure and Flow Control, Manual with Overflow Valve
1. Manual pressure and flow control by turning rotary knob
When the handgun is opened, the entire pump capacity flows through the injector (2) to the high-pressure outlet (1).
As a result of the action of the injector (2), the pressure in the control chamber (14) is lower than in the pressure chamber (11).
By turning the rotary knob (3) to move the regulating spindle (4) downwards, the overflow valve can be opened in a continuous movement.
This means that the spindle (16) in the overflow valve remains in the upper position and closes off the path between the pressure chamber (11) and the suction chamber (10).
A part of the pump capacity then flows from the pressure chamber (11) into the suction chamber (10) and the operating pressure and flow rate drop to the amount that has been set by turning the knob.
www.mymowerparts.com
For Karcher Pressure Washer Parts Call 606-678-9623 or 606-561-4983

Karcher Basic Training 2005 –Instructor Ken Carithers
Pressure and Flow Control, Manual with Overflow Valve
2. When the handgun is closed
When the handgun is closed, no water flows through the injector (2). The pressure chamber (11) and the control chamber (14) are linked by a connecting channel (12) and the pressure in both areas are the same.
As the surface of the piston (13) in the control chamber (14) is larger than in the pressure chamber (11), it is pressed downwards together with the overflow valve spindle (16).
This causes the entire pump capacity to flow from the pressure chamber (11) into the suction chamber (10) (circulation mode).
The pump continues to run, but only maintains the circulation pressure.
www.mymowerparts.com
For Karcher Pressure Washer Parts Call 606-678-9623 or 606-561-4983

Karcher Basic Training 2005 –Instructor Ken Carithers
Pressure and Flow Control, Manual with Overflow Valve
3. When the handgun is opened
When the handgun is opened, the pressure in the pressure chamber (11) and in the control chamber (14) drops suddenly.
The spring (15), together with the restricted pressure at the entrance to the injector (2), pushes the piston (13) upwards.
The overflow valve spindle (16) then closes off the circulation of water between the pressure chamber (11) and the suction chamber (10) and the pump builds up the operating pressure once more.
This switchover action will not function if there is no injector fitted or it is worn out.
www.mymowerparts.com
For Karcher Pressure Washer Parts Call 606-678-9623 or 606-561-4983
Karcher Basic Training 2005 –Instructor Ken Carithers
High-Pressure Pump General Information
The high-pressure pump consists of a swash plate and three pistons with powerful springs.
The pistons each have a high-pressure seal, a low-pressure seal (some models), an oil seal, and a suction and high-pressure check valve.
The bearings, swash plate, and pistons w/springs are permanently bathed in oil.
The oil is sealed in the gearbox by a rotary shaft seal on the swash plate shaft and by oil seals on the pistons.
The swash plate is secured directly to the motor shaft hence the term “direct drive”. As soon as it rotates, the pistons are pushed forward one after another (pressure stroke) and forced back by the springs (suction stroke).
www.mymowerparts.com
For Karcher Pressure Washer Parts Call 606-678-9623 or 606-561-4983

Karcher Basic Training 2005 –Instructor Ken Carithers
Suction and Pressure Stroke Illustration
Suction Stroke –When the pistons are forced backwards by the spring, the pressure valve closes and water from the suction chamber/supply line is drawn in through the open suction valve.
Pressure Stroke –when the swash plate pushes the piston forward, the suction valve closes and water is pushed through the open pressure valve to the high-pressure outlet. The pressure that is generated is dependent on the flow rate and the diameter of bore (orifice size) of the high-pressure nozzle.
Suction Stroke –Pressure Stroke –Suction Stroke –Pressure Stroke –Suction Stroke –
www.mymowerparts.com
For Karcher Pressure Washer Parts Call 606-678-9623 or 606-561-4983

Karcher Basic Training 2005 –Instructor Ken Carithers
Overflow Valve with Pressure Switch (Electric Models)
The overflow piston is in the upper position, where it actuates the contact in the pressure switch (9) via the pin (8). The electrical circuit is completed and the motor runs.
1. The handgun has been opened
With the handgun open and the pump running, the injector (1) causes the pressure in the control chamber (5) to be approx. 145 psi lower than in the pressure chamber (2).
www.mymowerparts.com
For Karcher Pressure Washer Parts Call 606-678-9623 or 606-561-4983

Karcher Basic Training 2005 –Instructor Ken Carithers
Overflow Valve with Pressure Switch (Electric Models)
Due to the larger surface of the overflow piston (16) in the control chamber (5) than in the pressure chamber (2), the overflow piston is pressed downwards and opens the connection between the pressure chamber and the suction chamber.
At the same time the contact on the pressure switch (9) is opened by means of the pin (8), the electrical circuit is interrupted and the motor is switched off.
2. The handgun is closed
If the handgun is closed, water no longer flows through the injector (1). As a result the pressure in both the pressure chamber (2) and the control chamber (5) is the same.
When the handgun is closed, the pressure in the pressure chamber rises abruptly for an instant. The non-return valve (17) closes and before the motor comes to a halt, the peak of pressure is dissipated through the connecting channel (11) by the pressure relief valve (10). The cutout pressure remains in the system for as long as the handgun is closed.
www.mymowerparts.com
For Karcher Pressure Washer Parts Call 606-678-9623 or 606-561-4983

Karcher Basic Training 2005 –Instructor Ken Carithers
Overflow Valve with Pressure Switch (Electric Models)
3. The handgun is opened
If the handgun is opened again, the pressure in the high-pressure hose and in the control chamber (5) drops off. The pressure spring (15) underneath the overflow piston (16) pushes the piston upwards and closes the contact in the pressure switch (9) by means of the pin (8). The electrical circuit is completed and the motor starts without any backpressure.
www.mymowerparts.com
For Karcher Pressure Washer Parts Call 606-678-9623 or 606-561-4983

Karcher Basic Training 2005 –Instructor Ken Carithers
Detergent System –Low Pressure
Suction principle
If the change-over nozzle on the spray lance is set for high-pressure operation, the injector does not create any negative pressure, so that no detergent can be taken in.
The entire pump flow rate flows through the injector to the handgun (1).
Detergent can only be taken in by means of the injector when the change-over nozzle on the spray lance has been set to “CHEM”.
This causes the pump pressure to fall to approx. 435 psi (low pressure) and the greatest degree of negative pressure (11.6 psi) is generated at the lateral bore in the injector (12), so that detergent can be taken into the unit.
In this system there is an injector (12) in the high-pressure outlet (11) from the cylinder head (6).
If the length of the high-pressure hose is increased, the negative pressure created by the injector decreases; so that almost no detergent is taken in.
www.mymowerparts.com
For Karcher Pressure Washer Parts Call 606-678-9623 or 606-561-4983
Karcher Basic Training 2005 –Instructor Ken Carithers
Detergent System –Low Pressure
Metering valve
If the metering spindle (5) is rotated clockwise into the cylinder head (6) until it reaches its end stop position, the metering cone (7) closes off the opening at the intake for detergent.
The required dosage can be set by rotating the metering spindle counter-clockwise.
The metering valve consists of the metering spindle with O-ring (5) and the rotary knob (4).
Detergent can then be drawn out of the detergent reservoir (2) via the detergent suction hose (3).
www.mymowerparts.com
For Karcher Pressure Washer Parts Call 606-678-9623 or 606-561-4983
Karcher Basic Training 2005 –Instructor Ken Carithers
Detergent System –Low Pressure
Non-return valve
When operating in the detergent mode, the negative pressure created by the injector causes the ball (9) to be drawn away from the O-ring (8), against the tension of the spring and detergent can then be taken into the unit.
When operating in the high-pressure mode, the ball (9) seals off the detergent connection, so that no water can flow into the detergent reservoir (2).
The non-return valve consists of a small pressure spring (10) with a ball (9) and O-ring (8).
www.mymowerparts.com
For Karcher Pressure Washer Parts Call 606-678-9623 or 606-561-4983

Karcher Basic Training 2005 –Instructor Ken Carithers
Handgun Functions
Purpose
The water outlet is opened and closed with the handgun.
The spray lance and handgun are connected with a bayonet connector (as shown) or a screw on 22mm threaded connector on most gas units.
The safety ratchet is used to prevent the handgun from being unintentionally opened and not for locking during continuous operation.
www.mymowerparts.com
For Karcher Pressure Washer Parts Call 606-678-9623 or 606-561-4983

Karcher Basic Training 2005 –Instructor Ken Carithers
Handgun Functions
Function
By pulling the trigger the valve in the handgun is opened allowing water to flow into the spray lance.
The symbol for the selected spray type is located on the nozzle guard. Detergent can only be drawn in with the nozzle setting “Low-Pressure Flat Spray”.
When the front nozzle guard on the spray lance is rotated, the two spray types (high-pressure flat spray and low-pressure flat spray) can be set.
High-pressure flat spray
Low-pressure flat spray
Gas units will have quick connect nozzles for various spray patterns. The black detergent nozzle must be used to draw detergent.
www.mymowerparts.com
For Karcher Pressure Washer Parts Call 606-678-9623 or 606-561-4983

Karcher Basic Training 2005 –Instructor Ken Carithers
Handgun with No Pressure and Flow Control
With this type of handgun it is only possible to start or stop the flow of water. Pressure and flow control cannot be carried out from the handgun.
When the trigger (2) is depressed, the bolt (11) is pushed upwards against the valve piston (9). As soon as the valve piston is pushed back, water is able to flow through to the outlet.
The safety latch (3) is used to lock the trigger (2) in the closed position so that it cannot be opened unintentionally.
The high-pressure hose (4) is connected to the handgun via a glide bearing (5) so that it can rotate freely.
The handgun is available with either long or short grip covers for bayonet or threaded connection for the spray lance.
www.mymowerparts.com
For Karcher Pressure Washer Parts Call 606-678-9623 or 606-561-4983

Karcher Basic Training 2005 –Instructor Ken Carithers
Troubleshooting - Machine Does Not Come Up to Pressure
Insufficient Water Supply –Water hose too small and pump is starving for water. Recommend ¾ inch hose.
Water Inlet Filter Blocked –Pull out water inlet filter with valve pliers. A partially blocked filter will cause low pressure. Clean or replace filter.
Pump Not Vented of Air –Turn unit “off “and disconnect spray lance from trigger gun. Keep trigger gun open and wait until a steady stream of water emerges. Connect spray lance and switch unit “on”.
Pump Sucking Air –Check water inlet connections for leakage. Check water supply couplings and washers. Replace if necessary.
Spray Lance Nozzle Worn –A worn out nozzle will cause low pressure. Replace nozzle (if available separately) or complete spray lance.
Check the valves for debris –Small pieces of debris can cause the valves not to close. This can be foreign matter such as grass, leaves, or dirt caused from a missing/defective water inlet filter or it can be debris from a worn part such as an o-ring or piece of plastic. Clean valves and reinstall. Fluttering in the HP hose is another symptom when trash is stuck in a high-pressure check valve.
Safety Valve Leaking –A defective safety valve can cause low pressure if leaking. It is located in the water inlet on electric models and on the cylinder head on gas models. If suspected as problem, replace the water inlet assembly (electric models) or the valve seat, ball, and spring on gas models. Note: The safety valve can be adjusted on gas models and can affect the output pressure. See procedure for Safety Valve adjustment following this troubleshooting section.
Non-Return Valve Leaking – Check and/or Replace Valve.
Unloader (Bypass, Spill, or Dump) Valve –An Unloader Valve with worn o-rings or an UnloaderValve stuck in the unloaded position can cause loss of pressure. Inspect o-rings for nicks and cuts and replace if necessary. If the Unloader Valve is stuck, inspect the piston housing for pitting or corrosion, which may contribute to the sticking. Replace Unloader Valve and Piston Housing if pitted or corroded.
High Pressure Seals Defective –If water is leaking at a rate greater than one drop per minute per piston then the high-pressure seals are worn. Replace the seals per instructions in the following Service Manuals.
www.mymowerparts.com
For Karcher Pressure Washer Parts Call 606-678-9623 or 606-561-4983

Karcher Basic Training 2005 –Instructor Ken Carithers
Troubleshooting –Machine Pulsates
Nozzle Too Small or Restricted –If the Spray Lance Nozzle is too small or is restricted due to debris, back pressure will build up and push the Unloader Valve (also called a Bypass Valve, Spill Valve, or Dump Valve) down which will cause the water to re-circulate inside the pump. As soon as the backpressure is relieved, the Unloader Valve will pop back up and allow water to be output again only to build more backpressure until the Unloaderengages again. The process repeats itself over and over causing a pulsating symptom as the Unloaderengages and disengages repeatedly.
Engine RPMs too high - If engine RPMs(revolutions per minute) are to high it will cause the same symptom because more water is being output than the pump was designed for. Most gas engines are set for 3600 RPMs.
Defective or Restricted Hose, Gun, or Lance –These accessories can also cause pulsation problems if there is a restriction due to debris, kinks, damage, or wrong part. To confirm a problem in an accessory, remove all accessories and add one at a time back onto the system until the pulsations reoccur. Replace or clean the accessory that is causing the problem. If machine still pulsates with all accessories removed check the nozzle insert at output of pump for debris. If still pulsating, double check engine RPMs.
www.mymowerparts.com
For Karcher Pressure Washer Parts Call 606-678-9623 or 606-561-4983
Karcher Basic Training 2005 –Instructor Ken Carithers
Troubleshooting –Machine Won’t Draw Chemical
Nozzle Setting - Chemical can only be drawn with the unit set to low-pressure mode. This is accomplished with the black chemical nozzle on quick connect models or the chemical setting on Change Over and Vario Spray Nozzles. Chemical cannot be drawn in high-pressure mode.
Metal Ball at Chemical Inlet Stuck Against Seat –Rinse chemical system with clean water after using chemicals to prevent ball from sticking.
Chemical Suction Hose Defective –A cut, hole, or poor connection can cause air to be drawn in. Replace hose or repair connection.
Chemical Filter Blocked –Clean or Replace Filter
www.mymowerparts.com
For Karcher Pressure Washer Parts Call 606-678-9623 or 606-561-4983

Karcher Basic Training 2005 –Instructor Ken Carithers
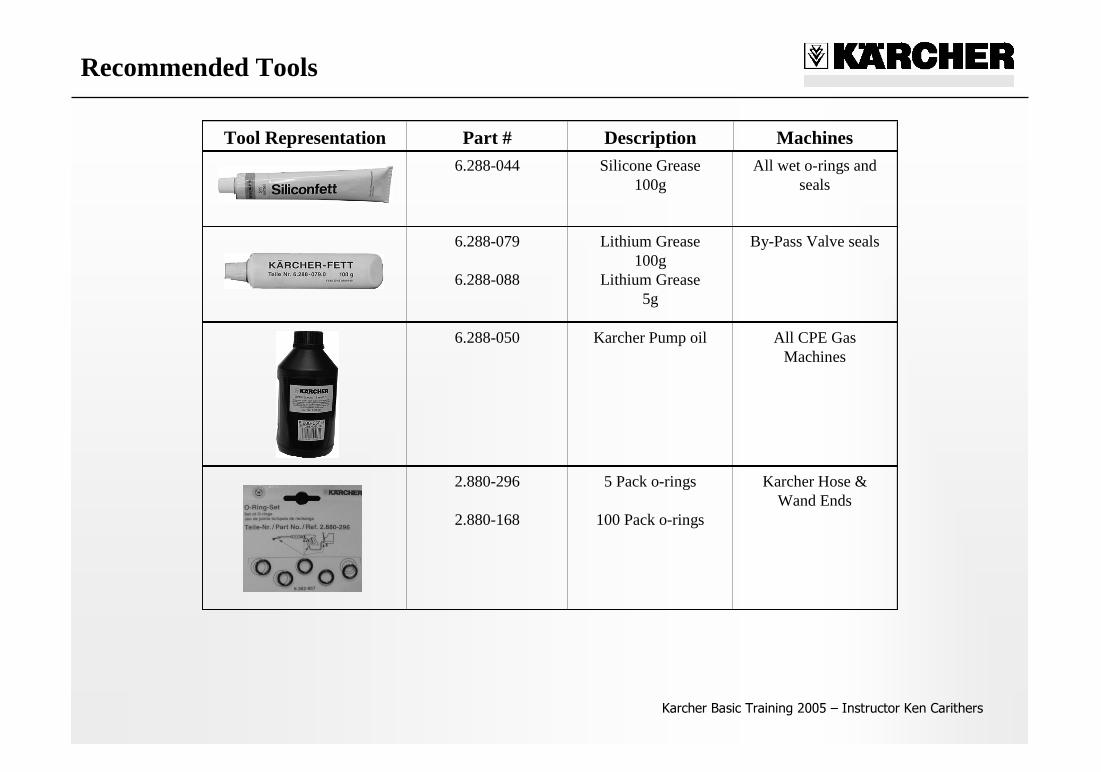
Recommended Tools
4.901-062 Valve Pliers All Machines
4.742-025 Testing pressure gauge
All Karcher Machines
Tool Representation Part # Description Machines
www.mymowerparts.com
For Karcher Pressure Washer Parts Call 606-678-9623 or 606-561-4983

Karcher Basic Training 2005 –Instructor Ken Carithers
Recommended Tools
Tool Representation Part # Description Machines
2.901-031(16 mm)
Tool for mounting high-pressure & oil seals 6.365-322 /
354
K 12000 G, K 14000 G, HD 3500
G/DH/DB, HD 3501, HD 3600 DH
2.901-034(14 mm)
Tool for mounting high-pressure & oil seals 6.365-340 / -
341
K 1500 G, K 1750 G, HD 2600 DK, HD 2700 DB/DH, HD 2701 DR, HD
3000 DH
2.901-036(12 mm)
Tool for mounting high-pressure & oil seals 6.365-393/ -
394 / -414
G 1800 LB, G 2000 QT, G 2301 LT, G 2401 OH, G 2500 HT, G 2600 OR, HD 2500 HK, K
1800 G, K 2200 G, K 2200 IB, K 2300 G, K 2400 HH, K 4000 G, K 5000 G
www.mymowerparts.com
For Karcher Pressure Washer Parts Call 606-678-9623 or 606-561-4983

Karcher Basic Training 2005 –Instructor Ken Carithers
Recommended Tools
4.901-069 Valve seat extraction tool
Small CPE Electric
0.211-400 6”Torx bit (APEX NO.49-C-TX-15)
CPE Electric
6.815-116 Torx screwdriver (TX-15)
CPE Electric
7.304-4037.311-041
8mm Screw8mm Nut
CPE, for removal and installation of
oil housing
7.304-4027.311-003
6mm Screw6mm Nut
CPE, Removal / installation
Tool Representation Part # Description Machines
www.mymowerparts.com
For Karcher Pressure Washer Parts Call 606-678-9623 or 606-561-4983
Karcher Basic Training 2005 –Instructor Ken Carithers
Recommended Tools
6.288-044 Silicone Grease100g
All wet o-rings and seals
6.288-079
6.288-088
Lithium Grease100g
Lithium Grease5g
By-Pass Valve seals
6.288-050 Karcher Pump oil All CPE Gas Machines
2.880-296
2.880-168
5 Pack o-rings
100 Pack o-rings
Karcher Hose & Wand Ends
Tool Representation Part # Description Machines
www.mymowerparts.com
For Karcher Pressure Washer Parts Call 606-678-9623 or 606-561-4983

Karcher Basic Training 2005 –Instructor Ken Carithers
Recommended Torque Specifications
Bolt Description CPE Electric CPE Gas
Check Valve Cap 10 - 12 NM 25 - 30 NM
Cylinder Head 12 - 15 NM 20 - 25 NM
Swash Plate Screw 10 NM 25 - 30 NM
Housing / Covers 1.7 - 2.7 NM 2 - 3 NM
Flow Control Spindle 10 - 12 NM 10 - 12 NM
Motor Mount Bolt 4 - 5 NM
Nozzle Insert 1.5 - 2.5 NM 1.5 - 2.5 NM
Soap Assembly Nipple 2.5 - 3.5 NM 2.5 - 3.5 NM
Soap Adjust Spindle 1.3 - 1.6 NM 1.3 - 1.6 NM
Ground Wire (Eye) 3 - 4 NM
www.mymowerparts.com
For Karcher Pressure Washer Parts Call 606-678-9623 or 606-561-4983

Karcher Basic Training 2005 –Instructor Ken Carithers
Adjustments - Safety Relief Valve
1. You will need a flathead screwdriver.
2. Turn machine on.
3. Trigger the gun to load the machine.
4. Release trigger gun 3 times leaving the machine with no load (by-pass mode).
5. Check if by-pass pressure is within specs. (about 150 psi above normal operating pressure).
6. Turn safety valve counter clockwise to decrease pressure if needed (see illustration above)
7. Turn safety valve clockwise to increase pressure if needed.
8. Repeat steps 3 thru 5.
9. Repeat steps 6 or 7 if needed.
10. Once pressure is within specs make sure to apply tamper proof yellow sealant.

Karcher Basic Training 2005 –Instructor Ken Carithers
Bulletins
1. K 2.97 (1.421-211) See Training Book page 23
Pulsation Problem
2. HD 3600 DH (1.810-934) See Training Book page 24
Frame handle holes drilled in wrong location
3. K 2400 (1.194-301, -302, -303, -304, -305, -307) See Training Book page 25-26
Unloader Valve 4.591-040 Piston Guide Housing 5.060-642
Bulletins can be located on the KarcherService Center Support Site under Technical/Service.
http://www.karcher-usa.com/support/login.php
User name = cpe
Password = support
The bulletins have also been included in the training package for your convenience
Karcher Basic Training 2005 –Instructor Ken Carithers
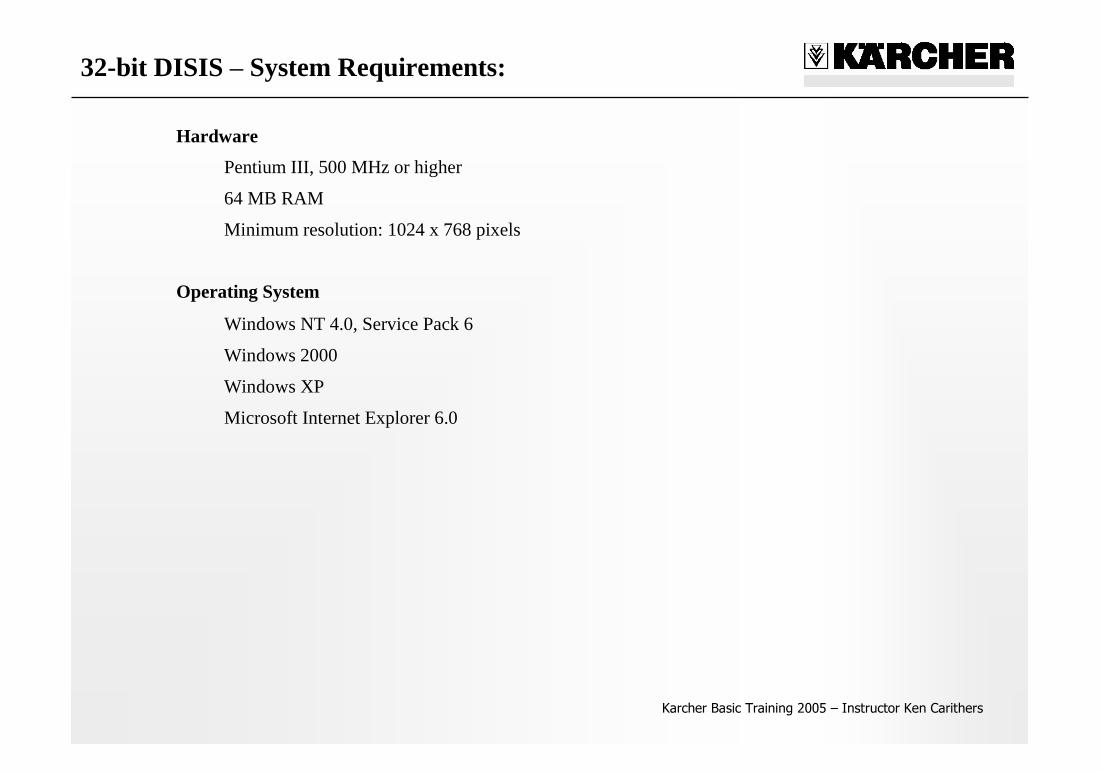
32-bit DISIS –System Requirements:
Hardware
Pentium III, 500 MHz or higher
64 MB RAM
Minimum resolution: 1024 x 768 pixels
Operating System
Windows NT 4.0, Service Pack 6
Windows 2000
Windows XP
Microsoft Internet Explorer 6.0

Karcher Basic Training 2005 –Instructor Ken Carithers
32-bit DISIS –Installation Instructions Steps 1 & 2
1. Delete any previous versions of 32-bit DISIS prior to installing version 11/04.
2. Place the 32-bit DISIS CD2 in the CD ROM drive. If the installation routine does not start automatically, double click the “setup.exe”file on the CD.

Karcher Basic Training 2005 –Instructor Ken Carithers
32-bit DISIS –Installation Instructions Steps 3 & 4
3. Select the language for the installation and click “OK”
4. When the “Welcome Screen”appears, click “Next”.
Karcher Basic Training 2005 –Instructor Ken Carithers
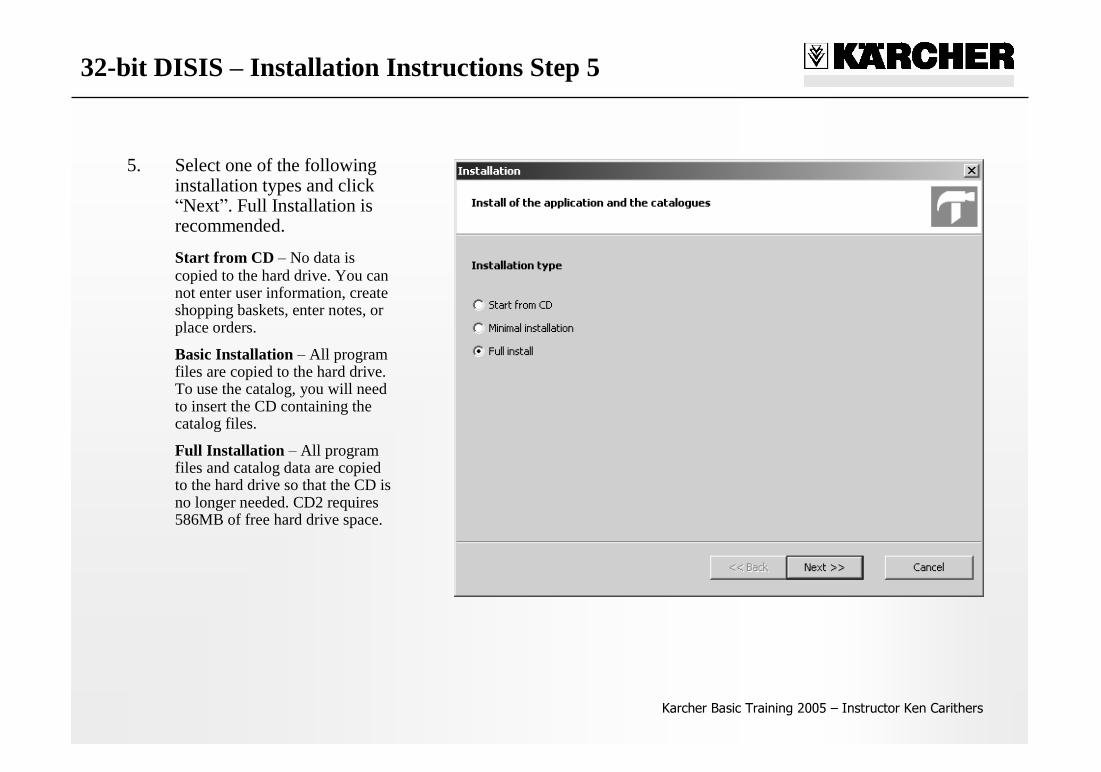
32-bit DISIS –Installation Instructions Step 5
5. Select one of the following installation types and click “Next”. Full Installation is recommended.
Start from CD –No data is copied to the hard drive. You can not enter user information, create shopping baskets, enter notes, or place orders.
Basic Installation –All program files are copied to the hard drive. To use the catalog, you will need to insert the CD containing the catalog files.
Full Installation –All program files and catalog data are copied to the hard drive so that the CD is no longer needed. CD2 requires 586MB of free hard drive space.

Karcher Basic Training 2005 –Instructor Ken Carithers
32-bit DISIS –Installation Instructions Steps 6, 7, 8, & 9
6. Choose destination folder or accept default destination c:\program files\disis and click “Next”
7. Enter your user information and click “Next”. Note: All fields must be completed to proceed.
8. Enter delivery address if different from your user information or click “apply user address”if information is the same and click “Next”.
9. Required disk space is calculated. If the available disk space is sufficient click “Next”to continue. Note: If there is not enough available disk space then click “Cancel”and restart the installation process choosing “Start from CD”in Step 5.

Karcher Basic Training 2005 –Instructor Ken Carithers
32-bit DISIS –Installation Instructions Steps 10, 11, & 12
10. “Accept”the license agreement and click “Next”to continue.
11. The installation process continues and files are copied to the hard drive location chosen in step 5.
12. Installation Complete! Choose “Start Application Now”and click “Next”.

Karcher Basic Training 2005 –Instructor Ken Carithers
32-bit DISIS –Installation Instructions Steps 13, 14 & 15
13. Select Language for Interface and Data and click “Apply”.
14. Input “User Name”and “Password”and click “Login”.
User name = 7501
Password = 7501
15. The DISIS Program window appears. You are now ready to navigate DISIS.
Karcher Basic Training 2005 –Instructor Ken Carithers
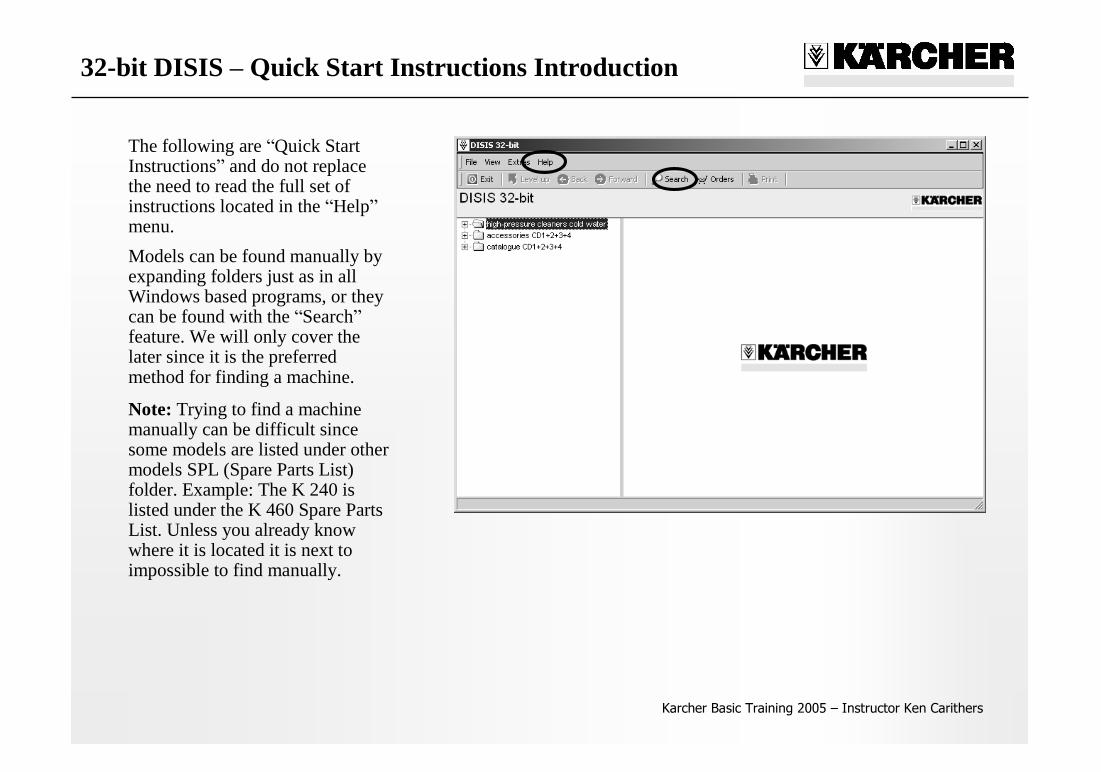
32-bit DISIS –Quick Start Instructions Introduction
The following are “Quick Start Instructions”and do not replace the need to read the full set of instructions located in the “Help”menu.
Models can be found manually by expanding folders just as in all Windows based programs, or they can be found with the “Search”feature. We will only cover the later since it is the preferred method for finding a machine.
Note: Trying to find a machine manually can be difficult since some models are listed under other models SPL (Spare Parts List) folder. Example: The K 240 is listed under the K 460 Spare Parts List. Unless you already know where it is located it is next to impossible to find manually.
Karcher Basic Training 2005 –Instructor Ken Carithers
32-bit DISIS –Quick Start Instructions Steps 1 & 2
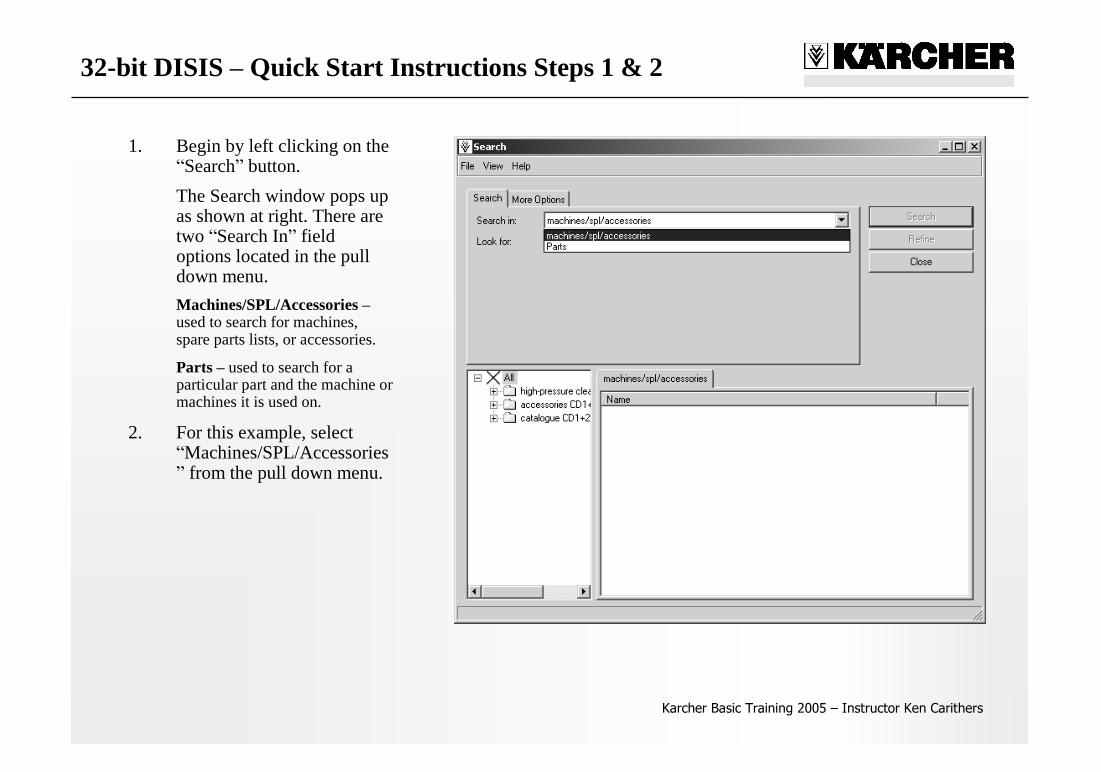
1. Begin by left clicking on the “Search”button.
The Search window pops up as shown at right. There are two “Search In”field options located in the pull down menu. Machines/SPL/Accessories –used to search for machines, spare parts lists, or accessories.
Parts –used to search for a particular part and the machine or machines it is used on.
2. For this example, select “Machines/SPL/Accessories”from the pull down menu.

Karcher Basic Training 2005 –Instructor Ken Carithers
32-bit DISIS –Quick Start Instructions Step 3
3. There are two methods to search for a machine. Method 1 –Enter the machine product ID (example 1.189-107.0) without the dots and dashes in the “Look For”field and click on “Search”. The window at right will pop up with the results of the search.
Method 2 –Enter the machine model number (example K 240) and click on “Search”. This method will find all occurrences of K 240. Since the product ID is now needed to determine which K 240 listed is the one you are looking for, Method 1 is the preferred search method.

Karcher Basic Training 2005 –Instructor Ken Carithers
32-bit DISIS –Quick Start Instructions Step 4
4. Double click on a search resultDISIS expands the proper SPL folder and hi-lites the selection as shown in the window to the right.
Note: The folder that is hi-lited is in the blue device folder. The Device folder lists machines that the main SPL (Spare Parts List) folder supports. As you can see the K 240 is actually listed under the K 460 CDN (59581760) SPL folder. It is for this reason that the “Search”feature is recommended for locating machines.

Karcher Basic Training 2005 –Instructor Ken Carithers
32-bit DISIS –Quick Start Instructions Steps 5 & 6
5. To access pump info for this model it will be necessary to expand the “2.0 Pump Set”folder by clicking on the + sign to the left of the folder and then selecting the sub folder you need. This example uses the “2.1 Housing”folder.
6. To locate the part number for an item in the drawing, point and click on the item number in the drawing and the parts list hi-lites it. To locate a part on the drawing, select the part number from the parts list and the drawing hi-lites it.
Karcher Basic Training 2005 –Instructor Ken Carithers
32-bit DISIS –Quick Start Instructions Steps 7 & 8
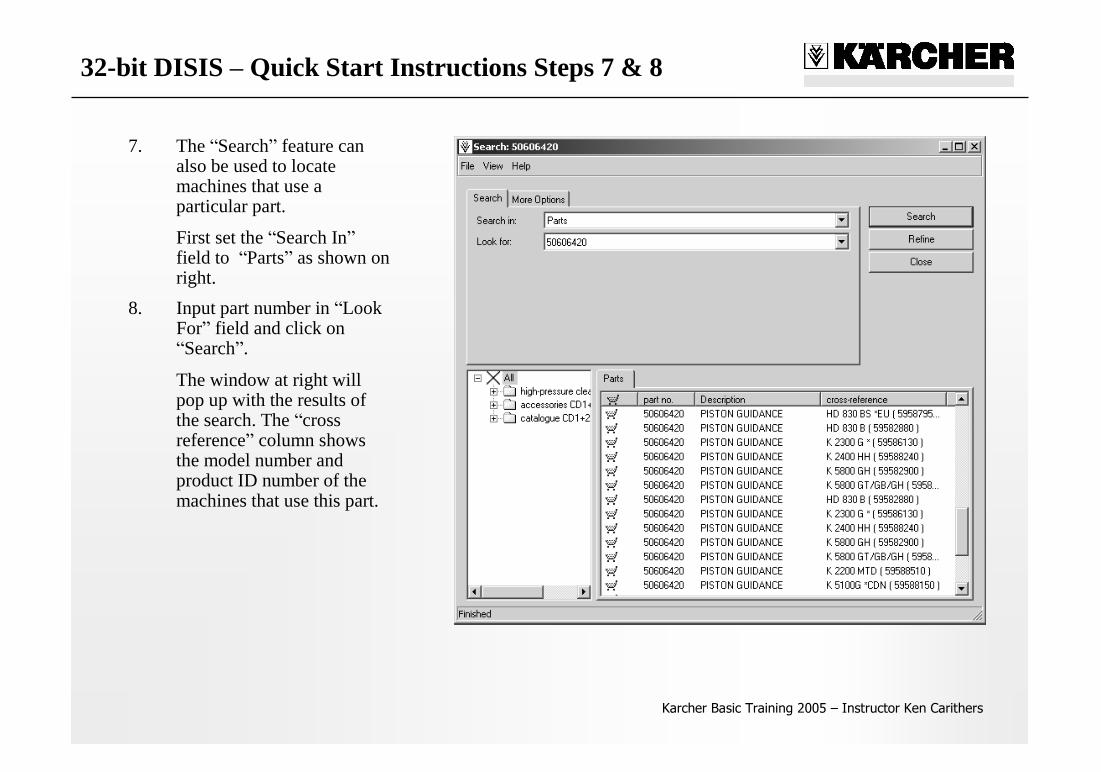
7. The “Search”feature can also be used to locate machines that use a particular part.
First set the “Search In”field to “Parts”as shown on right.
8. Input part number in “Look For”field and click on “Search”.
The window at right will pop up with the results of the search. The “cross reference”column shows the model number and product ID number of the machines that use this part.

Karcher Basic Training 2005 –Instructor Ken Carithers
32-bit DISIS –Quick Start Instructions Steps 9 & 10
9. Double click on a search result and DISIS will jump to that machines’parts break down, hi-liting the part in the drawing as well as in the parts list.
10. This completes the “Quick Start Instructions”for 32-bit DISIS. As mentioned previously a full set of instructions is located in the “Help”menu.
Karcher Basic Training 2005 –Instructor Ken Carithers
Pump Service Handbooks - Introduction
About the Handbooks:
The Pump Service Handbooks are your guide to troubleshooting and repairing Karcher pumps. Although there are four different handbooks they are all the same in their approach to a repair.
The main difference in the pumps is whether or not the pump is equipped with “pressure adjustment”and “detergent metering”controls. Pumps 3532-757 and 3532-785 have these controls as well as an adjustable safety relief valve; Pumps 3532-629 and 3532-777 do not.
How to use the Handbooks:
It is not necessary to read an entire handbook to find a solution to a problem. The handbooks identify four basic ways the pump may malfunction. Find the section that defines the malfunction of the pump. Turn to that section's overview page and identify the specific problem. Then go to the solutions page for that specific problem. If you don't know what the problem is, work your way through the section until you find and correct the problem.
Low Water Pressure Section 1
Water Leaks Section 2
Oil Leaks Section 3
Detergent Delivery Failure Section 4

Karcher Basic Training 2005 –Instructor Ken Carithers
Pump Service Handbooks - Cross Reference Table
Pump Set Model # Machine Part #
3.532-629.0
K 2300 G 1.194-110.0
K 2400 HB 1.194-302.0
K 2400 HH-Q/C 1.194-301.0
K 2401 HB 1.194-303.0
K 2401 HH 1.194-305.0
K 5800 GH 1.194-103.0
3.532-757.0
HD 3500 DB 1.810-998.0
HD 3500 DH 1.810-997.0
HD 3500 DH-Q/C 1.810-996.0
HD 3500 G 1.810-994.0
HD 3501 DK 1.810-999.0
HD 3600 DH 1.810-934.0
3.532-777.0
K 1800 AB 1.133-122.0
K 1800 IB 1.133-121.0
K 1800 G 1.133-114.0
K 2200 G 1.133-115.0
K 2200 IB 1.133-211.0
3.532-785.0
HD 2500 G 1.194-112.0
HD 2500 MTD 1.194-114.0
HD 2600 DK 1.194-122.0
HD 2700 DH 1.194-123.0
HD 2701 DR 1.194-200.0