Embed Size (px)
Citation preview

- 1 -
KANGAROO JOEY Feeding Pump Instructions for use
Key points:
1. Wash your hands with antibacterial soap before handling your
feeding tube and supplies.
2. If you have more than one catheter (example: feeding tube and I.V.), always double check to make sure you are infusing your formula into the feeding tube and not into the I.V. line.
3. Use a new Kangaroo Joey feeding set each day. You may save your last feeding bag and reuse it for one additional day if you have not received your delivery yet. Please contact HomeMed 3-4 days in advance if you think you are going to run out of feeding bags.
4. In case of a pump failure or power outage, refer to page 13 for instructions.
5. Store supplies and formula in a dry, clean area.
6. Do not use supplies if: the seal is broken, the package is torn, or the
inside or outside of the package is wet.
7. Check your formula for expiration dates. Do not use formula if the expiration date has passed. See page 6 for instructions on how much formula you can add to the bag each time your fill.
8. Keep your pump plugged into the wall as much as possible.
9. Unless otherwise directed, never mix your medications in with the
formula. Medicine that needs to be put in your feeding tube should be given separately with a syringe.
10. Always POWER OFF the pump before removing the tubing. Pulling
the tubing out while the pump is ON (or HOLDING) may cause errors.
11. Clean your pump weekly to avoid frequent errors (see page 8).

- 2 -
How to use the Kangaroo Joey Pump
The pump is designed to work like an ATM machine. Any time you want to choose
a function, you push the button next to the words. .
Step 1: Prepare the feeding set
a. Place your feeding set on a clean surface. b. Pull open the plastic cap of the feeding set and pour the
formula into the bag. Close the cap by pushing down on the top and latching the tab. Ask your nutritionist how much formula to add to the feeding bag at a time. Formula can spoil if it hangs in the bag too long.
Note: If you blenderize your formula, let the mixture stand for ten to fifteen minutes before adding to the feeding set. This will decrease the chance of an alarm due to air in the tubing.
c. Hang the bag on the I.V. pole so the bottom of the bag is just above the pump. It is important that you do not hang the bag more than a couple inches above the pump.
d. Remove the plastic protector from the end of the feeding set.
Step 2: Turning on the pump
a. Press the power button . The pump will beep and show 2 kangaroos jumping across the screen.
b. The pump will display “PRIOR SETTINGS” at the top of the screen. c. If this if your first time using the pump choose “CLEAR SETTINGS”. If you have already programmed your pump prior to this, choose “KEEP SETTINGS”.
d. The screen will now display “LOAD A SET”.

- 3 -
Step 3: Attaching the feeding set to the pump
a. With the pump screen facing you, lift up on the blue lid to open the top of the pump.
b. To load the tubing into the pump, grasp the
finger tab on the light purple valve and slide the valve into the front channel of the pump. Make sure to push the valve all the way into the channel. Wrap the tubing around the rotor (wheel) and pull gently until you can slide the black ring into the back channel (DO NOT OVER-STRETCH THE TUBING).
c. Close the blue lid. d. The pump will now display “SET LOADED” on the screen.
NOTE: If you have loaded the pump correctly and it continues to display “LOAD A SET”, you may have a defective bag. See the troubleshooting section of this handout.
black ring rotor
finger tab
valve

- 4 -
Step 4: Priming the tubing
The feeding set must be primed with formula before connecting it to your feeding tube. a. Choose “PRIME PUMP”. b. Choose “AUTO PRIME” and the pump will rapidly fill the tubing with formula. c. If the formula does not reach all the way to the red end of the tubing you may press and hold “HOLD TO PRIME FEED” until the formula reaches the end. d. Choose “DONE”.
.Step 5: Programming the pump for the first time
If you have already programmed your pump prior to this use, check to make sure the FEED RATE is the correct rate for this feeding. If this is correct, you may skip this step.
a. Choose “ADJUST FEED”.
b. Press the buttons to increase each digit separately. As you push each digit, it will increase from 0 to 9 and then start back at 0. c. Choose “ENTER” when you have the correct rate entered.
Step 6: Run the pump
a. Connect the purple tip of the feeding set to the patient’s feeding tube.
b. Choose “RUN” and the pump will begin delivering your formula. The pump will now display “RUNNING” at the top of the screen. A droplet will be moving down the screen to indicate that the pump is running.
c. If you need to pause the feeding at any time, you may choose “HOLD”. Choose
“RUN” when you are ready to re-start the feeding. The pump can be on “HOLD” for 10 minutes before it alarms.
Continues on next page…
- 5 -
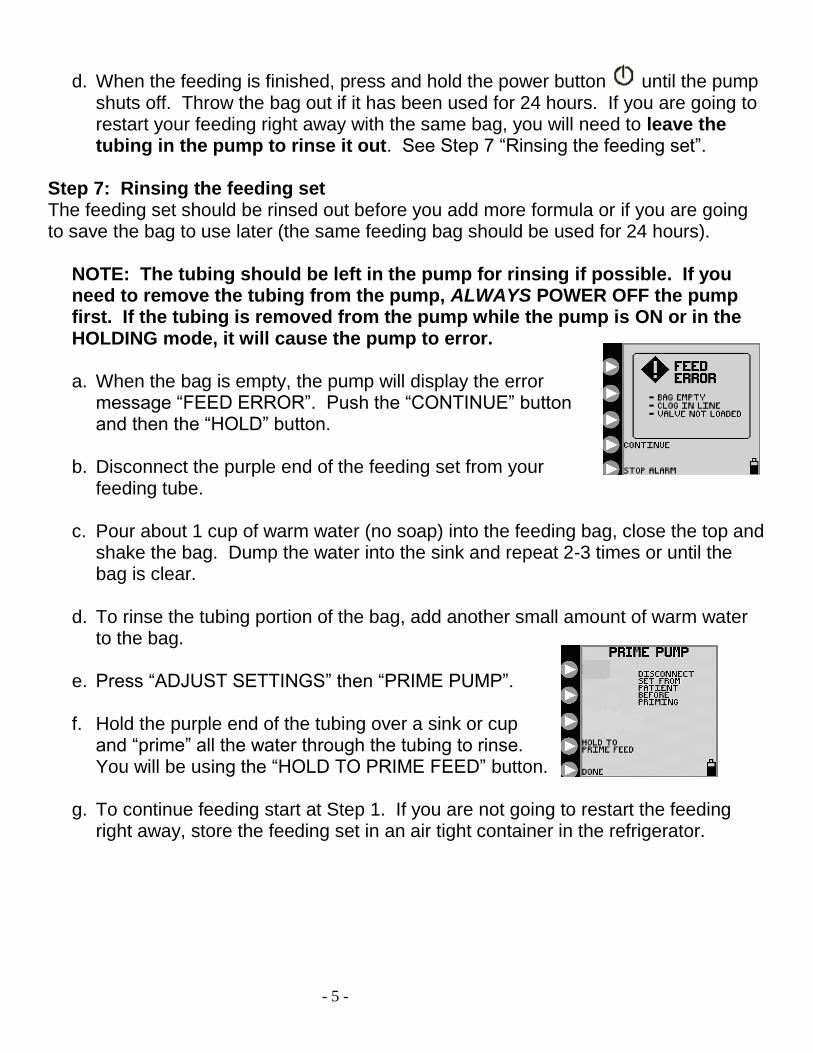
d. When the feeding is finished, press and hold the power button until the pump shuts off. Throw the bag out if it has been used for 24 hours. If you are going to restart your feeding right away with the same bag, you will need to leave the tubing in the pump to rinse it out. See Step 7 “Rinsing the feeding set”.
Step 7: Rinsing the feeding set The feeding set should be rinsed out before you add more formula or if you are going to save the bag to use later (the same feeding bag should be used for 24 hours).
NOTE: The tubing should be left in the pump for rinsing if possible. If you need to remove the tubing from the pump, ALWAYS POWER OFF the pump first. If the tubing is removed from the pump while the pump is ON or in the HOLDING mode, it will cause the pump to error. a. When the bag is empty, the pump will display the error
message “FEED ERROR”. Push the “CONTINUE” button and then the “HOLD” button.
b. Disconnect the purple end of the feeding set from your
feeding tube. c. Pour about 1 cup of warm water (no soap) into the feeding bag, close the top and
shake the bag. Dump the water into the sink and repeat 2-3 times or until the bag is clear.
d. To rinse the tubing portion of the bag, add another small amount of warm water
to the bag.
e. Press “ADJUST SETTINGS” then “PRIME PUMP”.
f. Hold the purple end of the tubing over a sink or cup and “prime” all the water through the tubing to rinse. You will be using the “HOLD TO PRIME FEED” button.
g. To continue feeding start at Step 1. If you are not going to restart the feeding
right away, store the feeding set in an air tight container in the refrigerator.

- 6 -
Formula Hang Time
Formula may spoil if it is left at room temperature for too long after being opened
Different types of formula have different hang times
Only add enough formula to the feeding bag so that it does not hang longer than
recommended (see below)
Type of formula Maximum Hang Time
Ready-to-feed liquid formula in a can
8 hours
Ready-to-feed liquid formula in a can plus added water, oils, protein, carbohydrate, or
electrolytes
4 hours
Powder or liquid concentrate formula with
added water
4 hours
Breastmilk
4 hours (less is better)
Breastmilk plus calorie booster
2 hours
To figure out how much formula you can add to your bag each time you refill,
use this simple calculation:
rate x maximum hang time = mL of formula you can add to the bag
Example: Your pump rate is 40mL/hr and you use powdered formula
with water added (4 hour hang time).
40 mL/hr x 4 hr = 160 mL
That means that you can add up to 160 mL of formula to the bag each time.
ALWAYS RINSE OUT THE FEEDING BAG AND TUBING WITH WATER BEFORE
ADDING MORE FOMULA.

- 7 -
Battery Information
Keep the pump plugged into a wall outlet whenever possible to keep the battery fully charged. The pump will charge whether it is turned off or running.
When using the power cord, make sure the cord adaptor is pushed all the way into the back of the pump for proper charging.
The battery will last for approximately 18 hours if fully charged and takes about 8 hours to re-charge.
The pump displays a battery icon in the lower right corner of the screen to indicate how much battery life is left. A totally black battery icon indicate fully charged battery.
The pump will display “BATTERY LOW” when there is about 15 minutes of battery life remaining. You may continue to run the pump if you plug the power cord into an outlet.
- 8 -
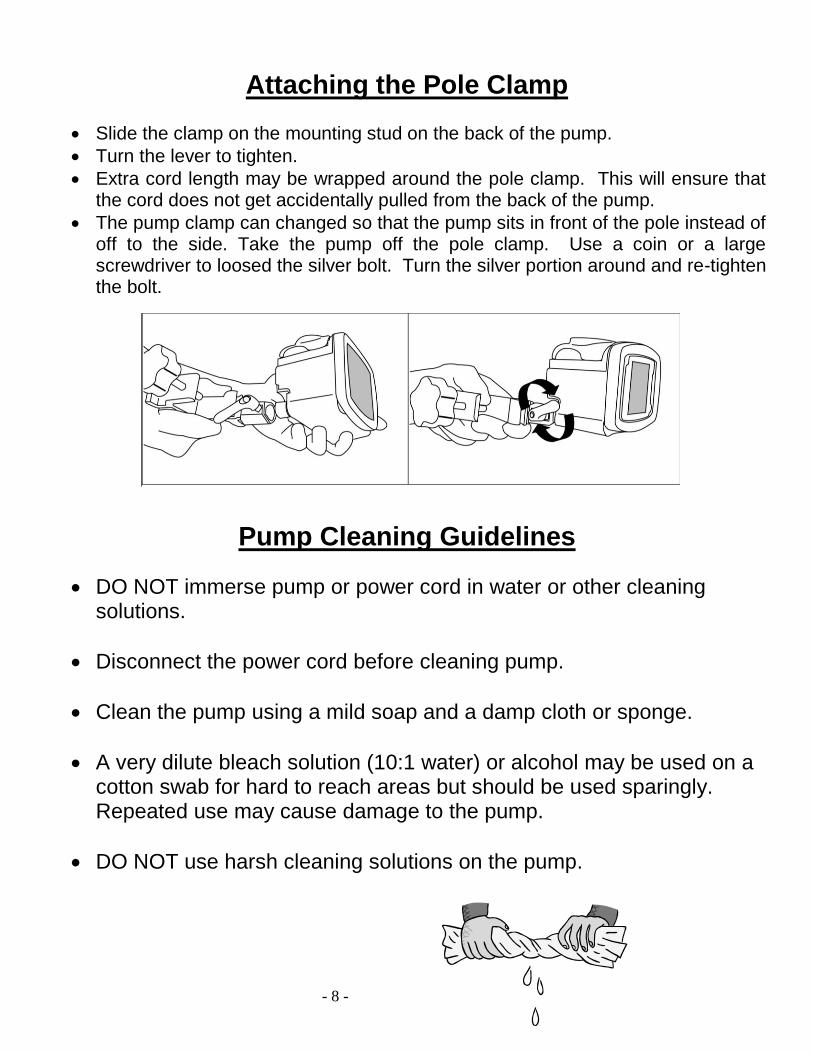
Attaching the Pole Clamp
Slide the clamp on the mounting stud on the back of the pump.
Turn the lever to tighten.
Extra cord length may be wrapped around the pole clamp. This will ensure that the cord does not get accidentally pulled from the back of the pump.
The pump clamp can changed so that the pump sits in front of the pole instead of off to the side. Take the pump off the pole clamp. Use a coin or a large screwdriver to loosed the silver bolt. Turn the silver portion around and re-tighten the bolt.
Pump Cleaning Guidelines
DO NOT immerse pump or power cord in water or other cleaning solutions.
Disconnect the power cord before cleaning pump.
Clean the pump using a mild soap and a damp cloth or sponge.
A very dilute bleach solution (10:1 water) or alcohol may be used on a cotton swab for hard to reach areas but should be used sparingly. Repeated use may cause damage to the pump.
DO NOT use harsh cleaning solutions on the pump.

- 9 -
Pump Safety
AVOID dropping or hitting the pump. If the pump is dropped, always recheck the pump to be sure it is still infusing correctly
Electromagnetic emissions may affect the operation of the feeding pump. However, the Joey will not be affected by most sources. Possible sources of interference include: cell phones, cordless telephones, microwave ovens, security systems etc.
Travel
If you plan to travel for an extended period of time, please make sure you are prepared in advance with enough supplies to take with you.
If you use a pump to give your feedings and you are traveling out of state, we may be able to provide you with a back-up pump to take with you.
If you will be taking your feeding pump on an airplane, please call HomeMed for further instructions.

- 10 -
TROUBLE SHOOTING THE KANGAROO JOEY PUMP
The Joey pump will sound an alarm and display a message on the screen if there is a
problem during use. Refer to the following pages to resolve errors or alarms. Please call HomeMed if you need assistance at 800-862-2731.
HOLD ERROR: The pump has been inactive for 10 minutes and is
waiting for next step. Press “CONTINUE” to return
to the previous screen or “POWER DOWN” to shut
off the pump. If the error does not resolve, press the
power button to turn the pump off and then back on.
ROTOR ERROR: There is a problem with the rotor (black wheel) and
is usually related to the tubing being loading
incorrectly. Remove the tubing from the pump and
inspect the tubing for damage. If no damage, try to
reload the tubing and press “CONTINUE”. If the
error does not resolve, press the power button to
turn the pump off and then back on.
FEED ERROR: The feeding bag may be empty and need to be refilled.
Refer to Step 7 on page 5 and press “CONTINUE” to
resume feeding.
There may be a clog or kink in the tubing between the
bag and the pump. Clear the kink and press
“CONTINUE”. If the error does not resolve, press the
power button to turn off the pump and then back on.
You may need to try a new feeding set.

- 11 -
Troubleshooting continued…
FLOW ERROR: There may be a kink in the tubing between the pump
and the feeding tube. Clear the kink and press
“CONTINUE”. If the problem does not resolve, the
channel which holds the tubing in the pump may be
dirty. Refer to page 8 for “Cleaning the Pump”. If the
error does not resolve, press the power button to turn off
the pump and then back on. You may need to try a new
feeding set.
PUMP SET DISLODGED: The tubing may not be loaded correctly into the pump.
Remove the tubing and re-load. If the error does not
resolve, press the power button to turn off the pump
and then back on. You may need to try a new feeding
set.
FEEDING COMPLETE: The feeding is finished. Refer to Step 7 on page 5 to
continue feeding. Press “POWER DOWN” to shut off
the pump.

- 12 -
Trobleshooting continued…
BATTERY LOW: There is only 15 minutes of battery life remaining.
Plug the power cord into an outlet and press
“CONTINUE”. If the power cord is already plugged
into an outlet, check to make sure the cord adaptor is
pushed all the way into the back of the pump. Check
to make sure your outlet is working by plugging in
another electrical device.
SYSTEM ERROR: The pump has a malfunction and must be turned off.
Press “POWER DOWN” and try to turn the pump
back on. If this does not resolve the problem, call
HomeMed for assistance. You may need a new
pump.
LOAD A SET: This is not actually an error screen but you may
experience a problem where the pump does not
recognize that a set is loaded. Make sure you have
loaded the tubing correctly and that the valve is
pushed all the way in to its slot. If the pump still will
not display “SET LOADED” then you have a
defective set. Try using a different set (bag) and call
HomeMed during regular business hours to replace
the defective feeding set.

- 13 -
In the Event of Pump Failure or Power Outage
1. Feeding with a syringe. (page 14) 2. Feeding with a gravity bag using hourly rate calculations. (page 15-16) NOTE: Pediatric patients with small bowel feedings will not be provided with a gravity bag. Please refer to syringe feeding instructions for back-up.
- 14 -
Syringe Feeding Method
1. Wash your hands with soap and water. 2. Flush feeding tube with water before the feeding. 3. Prepare your formula as instructed by your HomeMed clinician.
– Using a syringe, pull up ¼ of the hourly rate of formula – Slowly push into the feeding tube – Repeat the process every 15 minutes. For example, if the pump rate is 20 ml/hr,
slowly administer 5 mL every 15 minutes.
4. Flush the feeding tube with water after the formula has been given.
If the volume is well tolerated, try giving half the volume of formula every 30 minutes. If formula is usually given at night, the syringe feedings can be given during the following day.

- 15 -
Gravity Administration
THE KANGAROO JOEY FEEDING SET WILL NOT RUN BY GRAVITY. PLEASE USE THE GRAVITY FEEDING SET THAT WAS SENT IN YOUR FIRST DELIVERY
(Pediatric patients with small bowel feedings should refer to syringe instructions on page 14.)
Gather the following supplies: Gravity tube feeding bag Formula A cup of warm water Syringe for flushing
Setting up: 1. Wash your hands with soap and water. 2. Flush your feeding tube with the prescribed amount of water. 3. Prepare your formula as instructed by your HomeMed clinician. 4. Be sure the roller clamp on the tube feeding bag is closed (roll the wheel all the
way down). 5. Pour 1-2 cans of formula into the feeding bag. 6. Place the feeding bag above the level of your chest and stomach. Use something
secure such as an IV pole, hook, nail in the wall, etc. 7. To prime the tubing, squeeze and release the drip chamber until the formula fills to
the line etched in the chamber. Open the roller clamp to allow the formula to flow to the end of the tubing. Close the clamp.
8. Insert the end of the feeding bag into your feeding tube, unroll the roller clamp and
allow formula to flow until the feeding bag is empty (refer to the chart below for rate calculations).
9. Flush your feeding tube with the prescribed amount of water.

- 16 -
Example of Gravity Bag Administration With Hourly Rate Calculations
You can control how fast your formula is administered by gravity by adjusting the roller clamp. Watch the drip chamber and time the drips according to the calculations below.
If pump rate is: Drop rate should be:
60ml per hour
4 drops every 15 seconds
80ml per hour
5 drops every 15 seconds
100ml per hour
6 drops every 15 seconds
120ml per hour
7 drops every 15 seconds
140ml per hour
8 drops every 15 seconds
Executive Officers of the University of Michigan Health System Ora Hirsch Pescovitz, M.D., Executive Vice President for Medical Affairs; James O. Woolliscroft, M.D., Dean, U-M Medical School;
Douglas Strong, Chief Executive Officer, U-M Hospitals and Health Centers; Kathleen Potempa, Dean, School of Nursing.
The Regents of the University of Michigan Julia Donovan Darlow, Laurence B. Deitch, Denise Ilitch, Olivia P. Maynard, Andrea Fischer Newman, Andrew C. Richner, S. Martin Taylor, Katherine E. White, Mary Sue Coleman (ex officio).
Revised: August 2009
© 2009, The Regents of the University of Michigan.