Embed Size (px)
Citation preview

KA Lite DocumentationRelease 0
FLE
July 06, 2015


Contents
1 KA Lite Installation Guides 31.1 Windows Installation . . . . . . . . . . . . . . . . . . . . . . . . . . . . . . . . . . . . . . . . . . . 31.2 Mac Installation . . . . . . . . . . . . . . . . . . . . . . . . . . . . . . . . . . . . . . . . . . . . . 31.3 Linux: Debian/Ubuntu Installation . . . . . . . . . . . . . . . . . . . . . . . . . . . . . . . . . . . . 31.4 Linux: Installing as a PyPI package . . . . . . . . . . . . . . . . . . . . . . . . . . . . . . . . . . . 41.5 Uninstalling . . . . . . . . . . . . . . . . . . . . . . . . . . . . . . . . . . . . . . . . . . . . . . . 41.6 Raspberry Pi . . . . . . . . . . . . . . . . . . . . . . . . . . . . . . . . . . . . . . . . . . . . . . . 41.7 Advanced topics . . . . . . . . . . . . . . . . . . . . . . . . . . . . . . . . . . . . . . . . . . . . . 61.8 Nginx / Apache setup . . . . . . . . . . . . . . . . . . . . . . . . . . . . . . . . . . . . . . . . . . 71.9 Release Notes . . . . . . . . . . . . . . . . . . . . . . . . . . . . . . . . . . . . . . . . . . . . . . 81.10 Supported Browsers . . . . . . . . . . . . . . . . . . . . . . . . . . . . . . . . . . . . . . . . . . . 9
2 User Manual 112.1 Admininistrator User Manual . . . . . . . . . . . . . . . . . . . . . . . . . . . . . . . . . . . . . . 112.2 Coach User Manual . . . . . . . . . . . . . . . . . . . . . . . . . . . . . . . . . . . . . . . . . . . 482.3 Learner User Manual . . . . . . . . . . . . . . . . . . . . . . . . . . . . . . . . . . . . . . . . . . . 502.4 Introduction . . . . . . . . . . . . . . . . . . . . . . . . . . . . . . . . . . . . . . . . . . . . . . . 53
3 Frequently Asked Questions 553.1 How do I install KA Lite? . . . . . . . . . . . . . . . . . . . . . . . . . . . . . . . . . . . . . . . . 553.2 How much does KA Lite cost to install? . . . . . . . . . . . . . . . . . . . . . . . . . . . . . . . . . 553.3 How do I report a problem? . . . . . . . . . . . . . . . . . . . . . . . . . . . . . . . . . . . . . . . 553.4 How do I change KA Lite’s content folder? . . . . . . . . . . . . . . . . . . . . . . . . . . . . . . . 553.5 Is there somewhere I can find Spanish language content organized by topic? . . . . . . . . . . . . . . 553.6 I would like to download the videos for KA Lite via BitTorrent, is this possible? . . . . . . . . . . . 563.7 Do I need the internet to run KA Lite? . . . . . . . . . . . . . . . . . . . . . . . . . . . . . . . . . . 563.8 Is KA Lite involved in getting devices into the hands of students, families, and communities? . . . . 563.9 How do you operate in the field? . . . . . . . . . . . . . . . . . . . . . . . . . . . . . . . . . . . . . 563.10 What are the typical deployment scenarios? . . . . . . . . . . . . . . . . . . . . . . . . . . . . . . . 573.11 What are some possible hardware configurations for deploying KA Lite? . . . . . . . . . . . . . . . 573.12 What sort of processing power is required for KA Lite? . . . . . . . . . . . . . . . . . . . . . . . . 573.13 What are the operating system (OS) and software requirements for running KA Lite? . . . . . . . . . 573.14 What is data syncing? . . . . . . . . . . . . . . . . . . . . . . . . . . . . . . . . . . . . . . . . . . 573.15 Does KA Lite support peer to peer synchronization? . . . . . . . . . . . . . . . . . . . . . . . . . . 573.16 Who maintains the KA Lite project? . . . . . . . . . . . . . . . . . . . . . . . . . . . . . . . . . . . 583.17 What is KA Lite’s affiliation with Khan Academy? . . . . . . . . . . . . . . . . . . . . . . . . . . . 583.18 How can local curriculum be generated? . . . . . . . . . . . . . . . . . . . . . . . . . . . . . . . . 583.19 How is it possible to compress the content into KA Lite? . . . . . . . . . . . . . . . . . . . . . . . . 58
i

3.20 What languages is KA Lite available in? . . . . . . . . . . . . . . . . . . . . . . . . . . . . . . . . 583.21 Can I contribute to KA Lite as a developer? . . . . . . . . . . . . . . . . . . . . . . . . . . . . . . . 583.22 Can I contribute to KA Lite as a translator? . . . . . . . . . . . . . . . . . . . . . . . . . . . . . . . 583.23 Can I contribute even if I don’t know how to code? . . . . . . . . . . . . . . . . . . . . . . . . . . . 583.24 How do I find out more? . . . . . . . . . . . . . . . . . . . . . . . . . . . . . . . . . . . . . . . . . 593.25 What can be done with progress tracking during offline usage? . . . . . . . . . . . . . . . . . . . . . 593.26 How does FLE measure the impact of KA Lite? . . . . . . . . . . . . . . . . . . . . . . . . . . . . . 593.27 Backing up data: is there any easy way to do it locally? . . . . . . . . . . . . . . . . . . . . . . . . . 593.28 I skipped the step for downloading the assessment items during install, how can I do it now? . . . . . 59
4 Contributing and Development 614.1 How can I contribute to... . . . . . . . . . . . . . . . . . . . . . . . . . . . . . . . . . . . . . . . . 61
5 Setting up your development environment 63
6 Developer Docs 656.1 Front End Code . . . . . . . . . . . . . . . . . . . . . . . . . . . . . . . . . . . . . . . . . . . . . . 656.2 Implementing with Backbone . . . . . . . . . . . . . . . . . . . . . . . . . . . . . . . . . . . . . . 656.3 Creating Your Own Backbone View . . . . . . . . . . . . . . . . . . . . . . . . . . . . . . . . . . . 676.4 TL;DR (or 7 quick steps to creating a Backbone View in KA Lite) . . . . . . . . . . . . . . . . . . . 686.5 Purpose and creation of Javascript Unit Tests in KA Lite . . . . . . . . . . . . . . . . . . . . . . . . 686.6 Behavior-Driven Integration Tests . . . . . . . . . . . . . . . . . . . . . . . . . . . . . . . . . . . . 716.7 Profiling KA Lite . . . . . . . . . . . . . . . . . . . . . . . . . . . . . . . . . . . . . . . . . . . . . 726.8 Developer Utility Commands . . . . . . . . . . . . . . . . . . . . . . . . . . . . . . . . . . . . . . 726.9 Logging . . . . . . . . . . . . . . . . . . . . . . . . . . . . . . . . . . . . . . . . . . . . . . . . . . 73
ii

KA Lite Documentation, Release 0
Welcome to the KA Lite Documentation page! Here, you will find all the information needed to set up the KA Litesoftware. Additionally, there’s information on how to manage KA Lite and how to perform role-specific tasks. If youhave any questions that are not addressed by the documentation and you have access to the Internet, please be sure tocheck our FAQ or Forums!
Contents 1

KA Lite Documentation, Release 0
2 Contents
CHAPTER 1
KA Lite Installation Guides
Hello! If you know what OS you’re installing on then click ahead.
1.1 Windows Installation
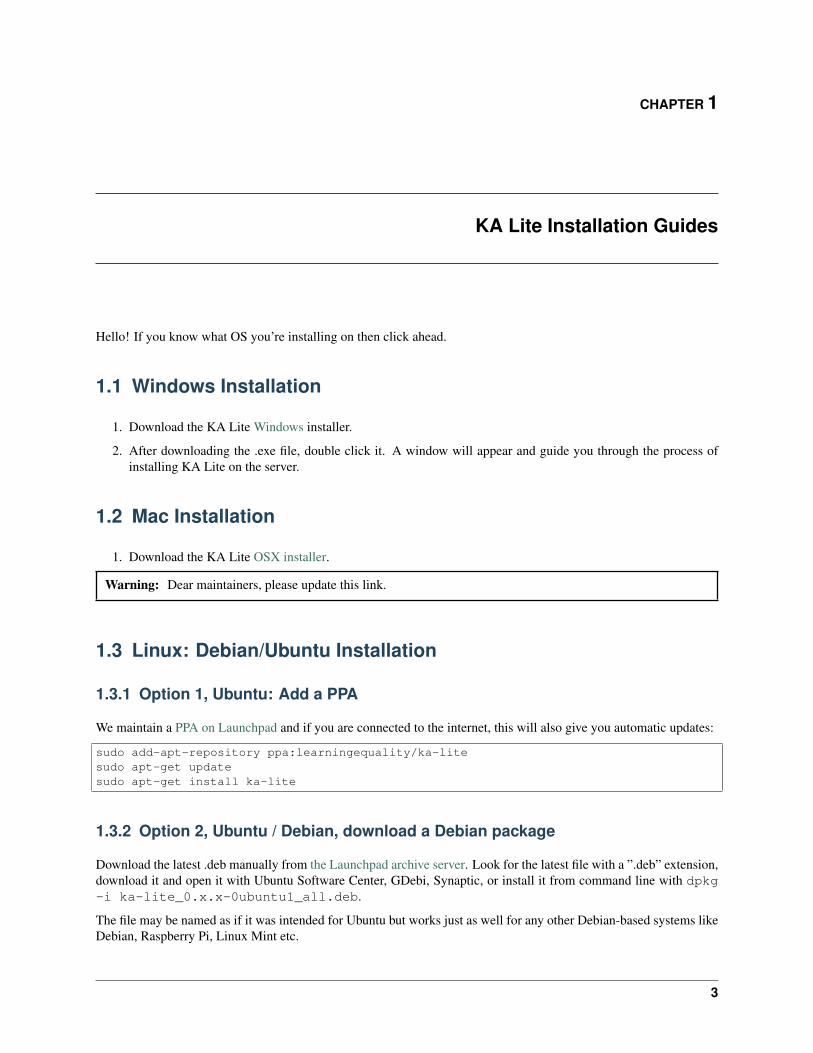
1. Download the KA Lite Windows installer.
2. After downloading the .exe file, double click it. A window will appear and guide you through the process ofinstalling KA Lite on the server.
1.2 Mac Installation
1. Download the KA Lite OSX installer.
Warning: Dear maintainers, please update this link.
1.3 Linux: Debian/Ubuntu Installation
1.3.1 Option 1, Ubuntu: Add a PPA
We maintain a PPA on Launchpad and if you are connected to the internet, this will also give you automatic updates:
sudo add-apt-repository ppa:learningequality/ka-litesudo apt-get updatesudo apt-get install ka-lite
1.3.2 Option 2, Ubuntu / Debian, download a Debian package
Download the latest .deb manually from the Launchpad archive server. Look for the latest file with a ”.deb” extension,download it and open it with Ubuntu Software Center, GDebi, Synaptic, or install it from command line with dpkg-i ka-lite_0.x.x-0ubuntu1_all.deb.
The file may be named as if it was intended for Ubuntu but works just as well for any other Debian-based systems likeDebian, Raspberry Pi, Linux Mint etc.
3

KA Lite Documentation, Release 0
1.3.3 Configuration after installing / updating
Every time you install or update kalite, you should (re)run kalite manage setup to setup the database anddownload assessment items (video descriptions, exercises etc.).
1.4 Linux: Installing as a PyPI package
To install KA Lite from a file, go to our PyPi page and download a .tar.gz or .zip. You can then install the file from asystem by unpacking it and running python setup.py install or pip install ka-lite-static-X.Y.Z.tar.gz.
Alternatively, install with pip using the instructions below:
Note: Type the following commands in a terminal.
1. Install pip (Ubuntu: sudo apt-get install python-pip)
2. (Recommended; essential on slower platforms like Raspberry Pi) Install M2Crypto (sudo apt-getinstall python-m2crypto).
3. Run sudo pip install ka-lite-static (bundled dependencies) or sudo pip installka-lite (normal pip behaviour, dependencies installed to host system).
4. Run kalite manage setup.
For more tips see advanced-installation.
1.4.1 Configuration after installing / updating
Every time you install or update kalite, you should (re)run kalite manage setup to setup the database anddownload assessment items (video descriptions, exercises etc.).
1.5 Uninstalling
You can remove KA Lite (when installed from pip or source distribution) with pip uninstall ka-lite or pip uninstallka-lite-static (static version).
For Ubuntu, use apt-get remove ka-lite.
Downloaded videos and database files are in ~/.kalite. Navigate to the home directory of the user who ran the KA Liteserver and remove that directory to potentially reclaim lots of hard drive space.
1.6 Raspberry Pi
For a Raspberry Pi running a Debian system, you can install the Debian package.
Note: Two Wi-Fi USB modules have been tested with KA Lite on the Raspberry Pi
• Raspberry Pi WiPi adaptor
• Edimax EW-7811Un
4 Chapter 1. KA Lite Installation Guides

KA Lite Documentation, Release 0
In our tests, we found that the WiPi adaptor supported a higher number tablet connections.
Note: The Raspberry Pi may crash if the USB adaptor is inserted or removed while the computer is switched on.
• Make sure to shutdown and remove the power from the Raspberry Pi.
• Afterwards, insert the wireless USB adaptor.
• Lastly, switch the Raspberry Pi on.
1. Make sure the Raspberry Pi operating system is up-to-date.
• Login with the account used to install KA Lite
• Update the Raspberry Pi operating system by:
– sudo apt-get update
– sudo apt-get upgrade
2. Get the installation scripts.
• cd /opt
• sudo git clone https://github.com/learningequality/ka-lite-pi-scripts.git
3. Install and configure the access point.
• cd /opt/ka-lite-pi-scripts
• sudo ./configure.sh
Note: If using the Edimax EW-7811UN, ignore the “hostapdSegmentation fault” error.
4. Install the USB adaptor software.
• If using the WiPi, run this command:
• cd /opt/ka-lite-pi-scripts
• sudo ./use_wipi.sh
• If using the Edimax EW-7811Un, run this command:
– cd /opt/ka-lite-pi-scripts
– sudo ./use_edimax.sh
5. Complete the access point configuration
• sudo python ./configure_network_interfaces.py
• sudo insserv hostapd
6. Finally
• sudo reboot
• A wireless network named “kalite” should be available.
• Connect to this network
• If the KA Lite server is started, browse to 1.1.1.1
1.6. Raspberry Pi 5
KA Lite Documentation, Release 0
1.7 Advanced topics
KA Lite can also be run as a “source distribution” for development purposes. By this, we just mean a git checkout(from ‘our github<https://github.com/learningequality/ka-lite/>‘_).
Note: Running directly from source will also maintain all user data in that same directory! This is convenient forhaving several versions of kalite with different data on the same computer.
If you are able to use pip and install conventional python packages from an online source, then the quickest option toinstall the latest stable release of KA Lite is pip install ka-lite or pip install ka-lite-static.
Apart from Python itself, KA Lite depends on a couple of python applications, mainly from the Django ecology. Theseapplications can be installed in two ways:
• Dynamic: That means that they are automatically installed through PIP as a separate software packageaccessible to your whole system. This is recommended if you run KA Lite and have internet accesswhile installing and updating.
• Static: Static means that KA Lite is installed with all the external applications bundled in. Use this methodif you need to have KA Lite installed from offline media or if KA Lite’s dependencies are in conflict withthe system that you install upon.
You can install KA Lite in its very own separate environment that does not interfere with other Python software onyour machine like this:
$> pip install virtualenv virtualenvwrapper$> mkvirtualenv my-kalite-env$> workon my-kalite-env$> pip install ka-lite
This documentation is preliminary and will be moved and restructured.
For command line users with access to PIP, you can install the following versions of KA Lite:
$> pip install ka-lite
1.7.1 Static version
If you need to run KA Lite with static dependencies bundled and isolated from the rest of your environment, you canrun:
$> pip install ka-lite-static
1.7.2 Portable tarballs / zip files with setup.py
You can also fetch a tarball directly from PyPi <https://pypi.python.org/pypi/ka-lite-static>. Do this for the sake ofcarrying KA Lite on an offline media. You can then unpack the tarball and run python setup.py install.
1.7.3 Developer setup
Developers should consider installing in “editable” mode. That means, create a git clone and from the git cloneddirectory, run:
6 Chapter 1. KA Lite Installation Guides

KA Lite Documentation, Release 0
$> git clone [email protected]:learningequality/ka-lite.git$> cd ka-lite$> # You may wish to create and activate a virtual env here$> pip install -e .
Testing installers
Here’s an overview of the various ways of installing KA Lite as a reference to testers and package maintainers:
• Source code setuptools test: python setup.py install
• Source code setuptools test, static: python setup.py install --static
• Source code pip test: pip install .
• Source code pip test, static: N/A, the --static option can’t be passed through pip.
• Dynamic tarball testing: python setup.py sdist --static + pip installdist/ka-lite-XXXX.tar.gz. * Removal: pip remove ka-lite.
• Static tarball testing: python setup.py sdist --static + pip installdist/ka-lite-static-XXXX.tar.gz * Removal: pip remove ka-lite-static.
• Wheel / whl: Not supported in 0.14.
Those testing scenarios should be sufficient, but there may be small differences encountered that we need to look atonce in a while with pip install -e (editable mode) or unzipping a source “ka-lite.XXX.zip” and run setup.pywith setuptools instead of through pip.
Using pip install and --static: Is not possible, so you cannot install the static version in “editable” mode.This is because pip commands do not pass our user-defined options to setup.py.
1.8 Nginx / Apache setup
This section is written for the Django-knowledgable crowd.
KA Lite includes a web server implemented in pure Python for serving the website, capable of handling hundreds ofsimultaneous users while using very little memory. So you don’t have to run Apache or Nginx for efficiency.
Apache configuration, using mod_wsgi, example would work for an Ubuntu .deb installation:
<VirtualHost *:80>ServerName kalite.comDocumentRoot /var/www/html/
Alias /static /var/www/.kalite/staticAlias /media /var/www/.kalite/media
WSGIScriptAlias / /usr/lib/python2.7/dist-packages/kalite/project/wsgi.py
# Possible values include: debug, info, notice, warn, error, crit,# alert, emerg.LogLevel warn
ErrorLog ${APACHE_LOG_DIR}/kalite-error.logCustomLog ${APACHE_LOG_DIR}/kalite-access.log combined
</VirtualHost>
1.8. Nginx / Apache setup 7

KA Lite Documentation, Release 0
If you are using uwsgi+Nginx, this is the critical part of your uwsgi configuration, provided that you have installedkalite from PyPi or .deb:
module = kalite.project.wsgi
Remember that kalite runs in user space and creates data files in that user’s home directory. A normal Debian/Ubuntusystem has a www-data user for Apache which is the default user for mod_wsgi and will create database files, staticfiles etc. for kalite in /var/www/.kalite/. If you run it as another user, it may be located somewhere else.
Note: Log in as the Django application server’s user, e.g. www-data and initialize the kalite static files and databasebefore anything you can run kalite with uwsgi / mod_wsgi !
Example of setting up kalite for the www-data user:
$> su -s /bin/bash www-data$> kalite manage setup$> exit
1.9 Release Notes
1.9.1 0.14.0
General
Installation from source (using git) is no longer supported for end-users. If you have previously installed from source,in order to upgrade you must first install KA Lite again in a separate location using one of the supported installers.Then you can migrate your data from your old installation to your new one using the command:
kalite manage setup --git-migrate [/path/to/your/old/installation/]
You must use the kalite command that comes with your new installation. The path you should specify is the baseproject directory – it should contain the kalite directory, which should in turn contain the database directory.Follow the on-screen prompts to complete the migration.
1.9.2 0.13.0
General
Interacting with the system through kalite/manage.py has now been deprecated. Please use the kalite executableunder the bin/ folder. Run bin/kalite -h for more details.
If you are pulling the source from git, you will need to run the setup command to complete the upgrade. From the basedirectory run:
bin/kalite manage setup
On Windows, use the bin\windows\kalite.bat in the cmd.exe prompt:
bin\windows\kalite.bat manage setup
When you are asked whether or not to delete your database, you should choose to keep your database! You will alsobe prompted to download an assessment items package, or to specify the location if you have already downloaded it.If you wish to download the package and specify the location during the setup process:
8 Chapter 1. KA Lite Installation Guides

KA Lite Documentation, Release 0
• Download the assessment items package here. Save it in the same folder as the setup script.
• During the setup process you will see the prompt “Do you wish to download the assessment items packagenow?”. Type “no” and press enter to continue.
• You will then see the prompt “Have you already downloaded the assessment items package?”. Type “yes” andpress enter.
• Finally, you will see a prompt that begins with “Please enter the filename of the assessment items package youhave downloaded”. A recommened file may appear in parentheses – if this is the file you downloaded, then pressenter. Otherwise, enter the name of the file you downloaded. (Absolute paths are okay, as are paths relative tothe directory you are running the setup script from.)
Windows
Warning: Internet Explorer 8 is no longer supported in this version. Please use a newer browser, or stick toversion 0.12 to maintain compatibility.
Raspberry Pi
If you’re updating a current Raspberry Pi installation, make sure to put this in your local_settings.py to avoidslow performance:
DO_NOT_RELOAD_CONTENT_CACHE_AT_STARTUP = True
1.10 Supported Browsers
KA Lite is currently not supported on Internet Explorer version 8 or lower. You must use IE9 or later.
1.10. Supported Browsers 9

KA Lite Documentation, Release 0
10 Chapter 1. KA Lite Installation Guides

CHAPTER 2
User Manual
The user manual is organized by the different “user types” within KA Lite. If you know which user manual you’d liketo see, click to jump to a specific manual:
2.1 Admininistrator User Manual
Who is an “administrator”?
A person who :
• helps to plan and oversee a project using KA Lite
• installs and updates KA Lite
• can create coach logins, Learner logins, download videos and language packs
2.1.1 Administrator Glossary
For users that choose to register online, there are some important terms to familiarize yourself with so that you under-stand how the flow of data works between installations and the online data hub.
Sharing Network A sharing network is a group of devices that share data between one another. Data can mean videocontent, access software applications, and certain files.
Organization An organization is a group of people responsible for administering a set of Sharing Networks. Anorganization can have multiple administrators and manage multiple sharing networks.
Facility A facility is the physical space in which a device is located (e.g. a school or a computer lab in a communitycenter). Learner, coach, and admin accounts are associated with a particular facility.
Device A device should be able to run a KA Lite server (most computers) and other devices to be used as clients. Onecommon configuration is using a Raspberry Pi or other inexpensive computer as a server and relatively cheaptablets as client devices. Tablets can access the servers through an access point, such as a Wi-Fi dongle, or someother networking device such as a router.
Web Browser A program that retrieves and presents information resources on the World Wide Web. Popular webbrowsers include Internet Explorer, Google Chrome, Mozilla Firefox, and Safari.
Torrent A file or files sent using the BitTorrent protocol. It can be any type of file, such as a movie, song, game,or application. During the transmission, the file is incomplete and therefore referred to as a torrent. Torrentdownloads that are incomplete cannot be opened as regular files, because they do not have all the necessarydata.
11

KA Lite Documentation, Release 0
Seeder Seeders are users who have a complete version of the file you wish to download. If there are no seeders for aparticular file, you will not be able to download the file. Seeders are extremely important, for they help distributethe file.
Bandwidth The amount of data that an Internet connection can handle in a given time. An Internet connectionwith larger bandwidth can move a certain amount of data much faster than an Internet connection with a lowerbandwidth.
2.1.2 Running the KA Lite Server
After a successful installation of KA Lite, the terminal should give you a command to copy. It will look somethinglike the following:
/PATH/TO/KALITE/bin/kalite start
The first string will vary depending on which folder you installed KA Lite in. Simply copy and paste the providedstring back into the command prompt, and hit enter on your keyboard. You will be asked whether or not you wish torun the KA Lite server in the background automatically every time you start up the computer. Once you answer yes orno, success! The KA Lite server is now running on your computer.
During the process, your operating system might prompt you to allow “Python.app” to accept incoming connections.The message dialogue may look like the following, depending on your operating system:
Please allow the app to run. This will make it possible for the KA Lite application to be accessible.
2.1.3 Accessing KA Lite
Once the server has been started, you will be given a few IP addresses. You can use these addresses to access KA Liteby copying and pasting them into a web browser of your choice.
In order to access KA Lite from another machine, please enter the IP address that does not start withhttp://127.0.0.1:8008 into the web browser on that machine.
2.1.4 Setting up KA Lite
Once you have successfully installed KA Lite, the installation script should give you a URL (http://127.0.0.1:8008/)to visit so that you can open KA Lite and login for the first time.
12 Chapter 2. User Manual

KA Lite Documentation, Release 0
Copy and paste the URL into a web browser. The KA Lite application should show up. Then, login to KA Lite usingthe username and password you created during the installation process.
• If you have forgotten the username/password combination, simply run bin/kalite managecreatesuperuser from the kalite directory and then follow the instructions. If it is critical that you areable to login with your credentials, ../contact and we can help you manually reset your login information.
Once you’ve logged in, the next step in the setup process is registering your device with the KA Lite Hub.
Registering Your Device with the Hub
By registering your device with FLE, you can sync data back with our central data hub. This is useful for manyreasons:
1. a project administrator can manage user accounts and view usage data from afar, without needing to physicallyvisit the offline device.
2. usage data syncing back can inform the FLE team of multiple users in a certain geographic region, and we canconnect people that might be able to help one another
3. it helps FLE and our partners understand where and how the software is being used, so we can keep addingfeatures that support you!
You will have two options:
2.1. Admininistrator User Manual 13

KA Lite Documentation, Release 0
1. One click registration. This is the perfect option for individual users who just want to get KALite up and running fast, and don’t need online access to data. This allows you to get the reg-istration process over in one-click without worrying about creating a login that you’re never goingto use. Caution: if you choose to one-click register, you will unable to register with online ac-cess to data later. (If you chose this option by accident and would like to start over, you can re-run the setup command by navigating to the folder KA Lite is in and rerunning the setup command).
14 Chapter 2. User Manual

KA Lite Documentation, Release 0
2. Register with online access to data. Choose this option if you’re an administrator of larger projects. Thisoption allows you to access your uploaded data and connect multiple installations to the same account.
2.1. Admininistrator User Manual 15

KA Lite Documentation, Release 0
How to register your device with online access to data
Note: You will need Internet access in order to perform these steps.
1. Log into KA Lite with the username and password that you set during set-up.
2. If you have not already registered your device, you will be redirected to a page that shows you your options.Click the “Register with an online account now!” button to get started with the registration process.
16 Chapter 2. User Manual
KA Lite Documentation, Release 0
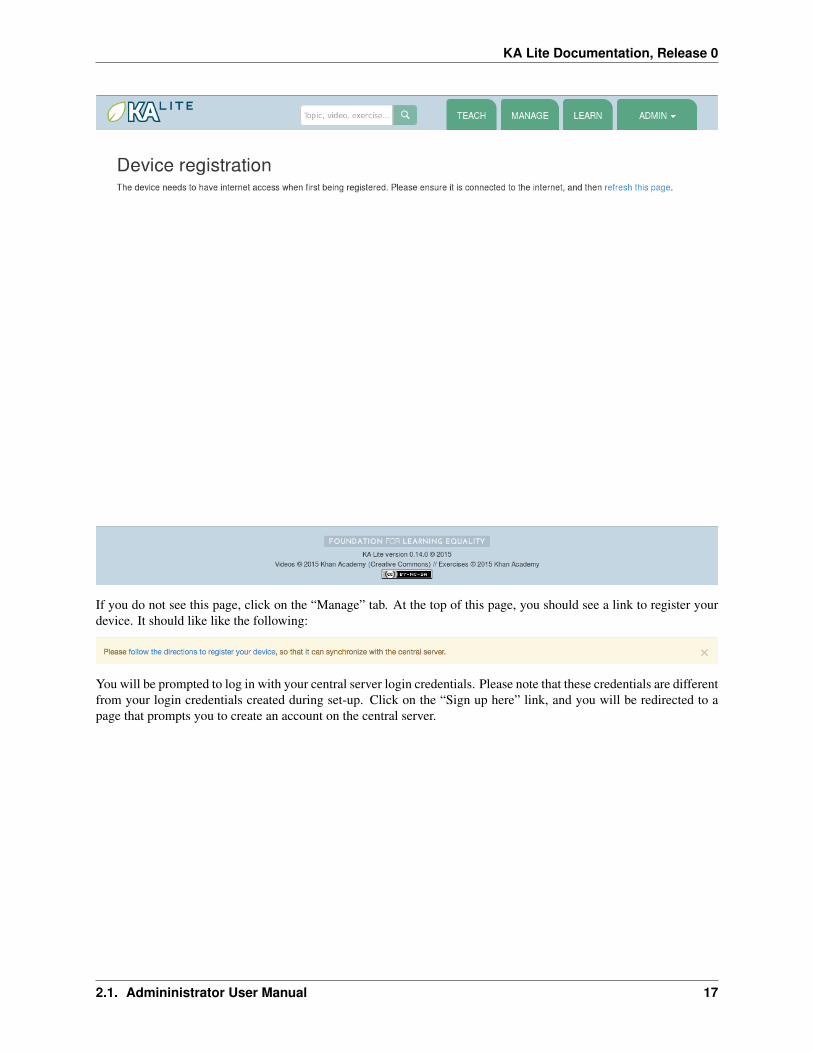
If you do not see this page, click on the “Manage” tab. At the top of this page, you should see a link to register yourdevice. It should like like the following:
You will be prompted to log in with your central server login credentials. Please note that these credentials are differentfrom your login credentials created during set-up. Click on the “Sign up here” link, and you will be redirected to apage that prompts you to create an account on the central server.
2.1. Admininistrator User Manual 17

KA Lite Documentation, Release 0
Once you have filled out the form and submitted it, you will be sent an activation link via the email address yousupplied.
2.1.5 Post Registration Setup
Now that you have registered successfully, it’s time to configure your local KA Lite installation to suit your needs. Ifany terms like ‘facility’ or ‘device’ become confusing, feel free to reference the Administrator Glossary for a quickreminder.
2.1.6 Create a Facility
KA Lite assumes that you are going to be using the software primarily in one place. This could be a school, a home, acommunity center, etc. We call this place a “facility”, and use it to help differentiate users who are syncing back datawith our central data hub. In order to create a facility, follow the steps below.
1. Log in to KA Lite.
2. Click the “Manage” tab at the top of the page.
18 Chapter 2. User Manual

KA Lite Documentation, Release 0
3. Make sure that the “Facilities” tab is selected.
4. Under the Facilities section, click on “Add a new facility...”
2.1. Admininistrator User Manual 19

KA Lite Documentation, Release 0
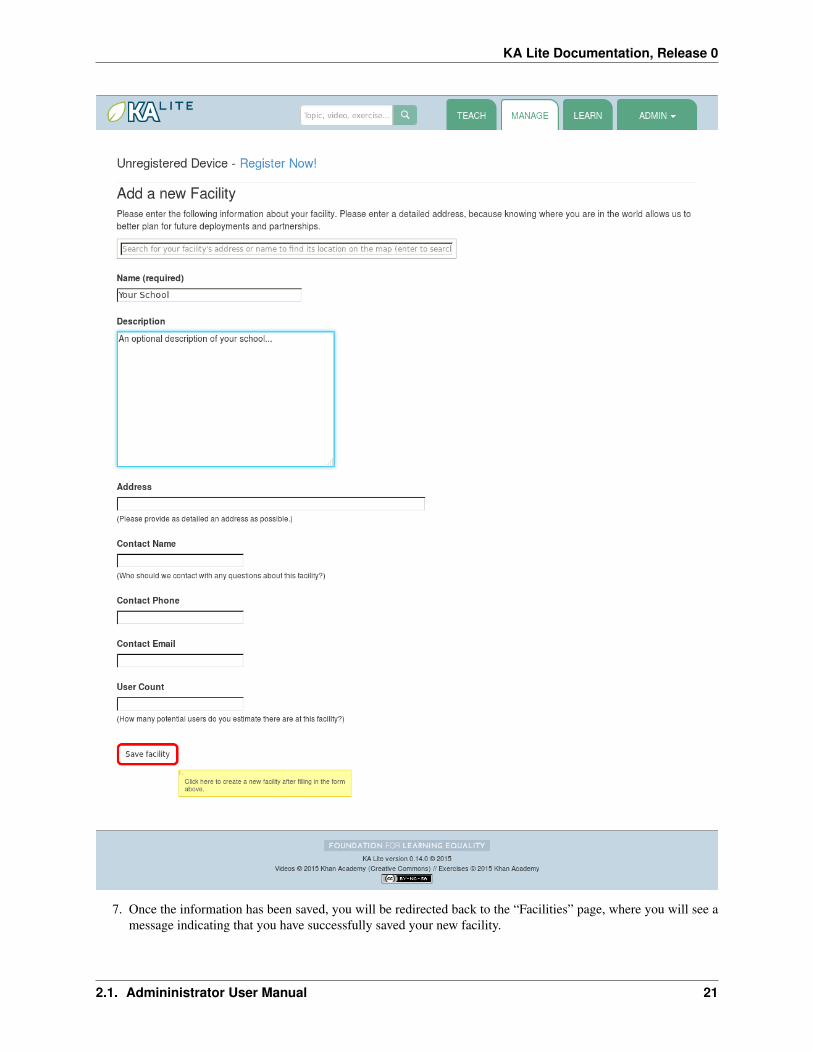
5. Fill in the information for all the fields you find below the map
6. Click the “Save facility” button when you are finished.
20 Chapter 2. User Manual
KA Lite Documentation, Release 0
7. Once the information has been saved, you will be redirected back to the “Facilities” page, where you will see amessage indicating that you have successfully saved your new facility.
2.1. Admininistrator User Manual 21

KA Lite Documentation, Release 0
2.1.7 Delete a Facility
1. Log in to KA Lite.
2. Click the “Manage” tab at the top of the page.
3. Make sure that the “Facilities” tab is selected.
4. Find the facility you would like to delete, and click the trash can icon to delete the facility.
5. You will be prompted to type in the name of the facility you wish to delete for confirmation.
6. If your delete is successful, you will be redirected back to the “Facilities” page, where you will see a messageindicating that you have successfully deleted the facility.
2.1.8 User Management
Coaches and learners are the other types of users that KA Lite supports. In order for them to be able to login, you needto create accounts for them.
22 Chapter 2. User Manual

KA Lite Documentation, Release 0
Adding Learners
1. Log in to KA Lite.
2. Click on the “Manage” tab at the top of the page.
3. Make sure that the “Facilities” tab is selected.
4. Select the facility that the learner will belong to.
5. Under the “Learners” header, click on “Add a new Learner”.
2.1. Admininistrator User Manual 23

KA Lite Documentation, Release 0
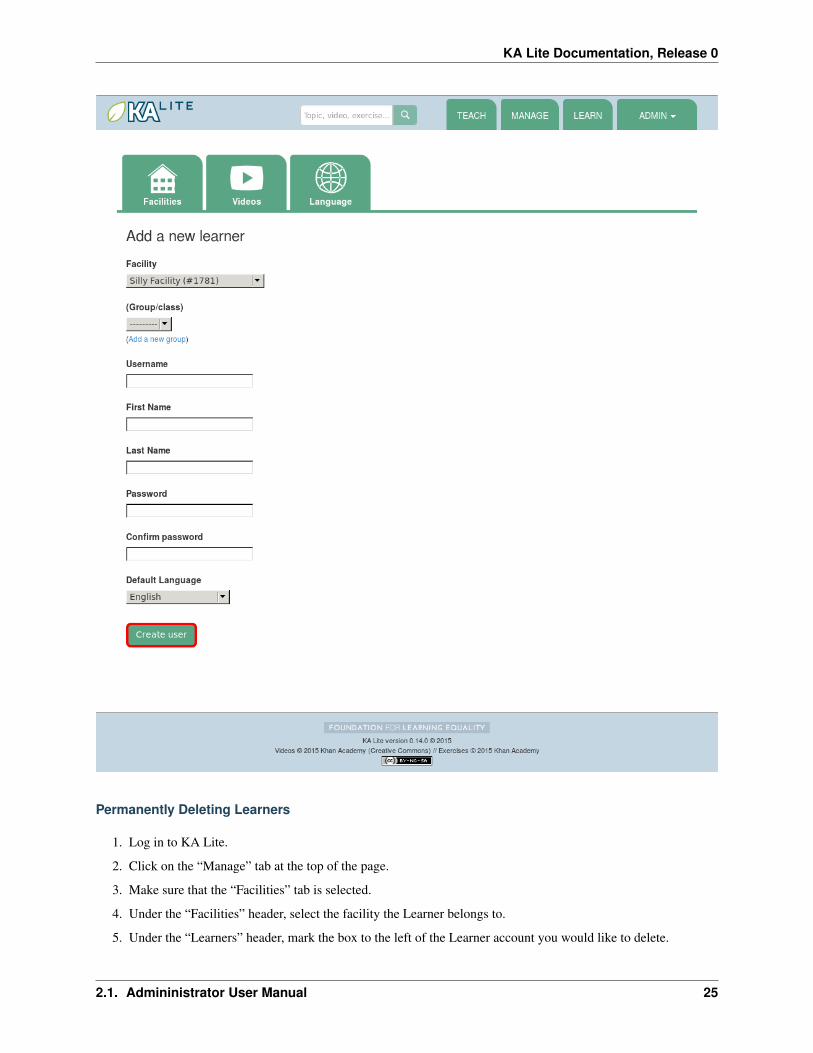
6. You will be redirected to a page that says “Add a new Learner”. Fill in all the information. The facility dropdowndefaults to the facility you selected in the previous steps.
7. Click “Create user”. You should be redirected to the “Facilities” page, where you will see a message indicatingthat you have successfully created a Learner user.
24 Chapter 2. User Manual
KA Lite Documentation, Release 0
Permanently Deleting Learners
1. Log in to KA Lite.
2. Click on the “Manage” tab at the top of the page.
3. Make sure that the “Facilities” tab is selected.
4. Under the “Facilities” header, select the facility the Learner belongs to.
5. Under the “Learners” header, mark the box to the left of the Learner account you would like to delete.
2.1. Admininistrator User Manual 25

KA Lite Documentation, Release 0
6. Press the “Delete Learners” button.
26 Chapter 2. User Manual

KA Lite Documentation, Release 0
7. You will be prompted with a confirmation of your deletion. Press “OK” to proceed with the deletion.
Adding Coaches
1. Log in to KA Lite.
2. Click on the “Manage” tab at the top of the page.
3. Make sure that the “Facilities” tab is selected.
2.1. Admininistrator User Manual 27
KA Lite Documentation, Release 0
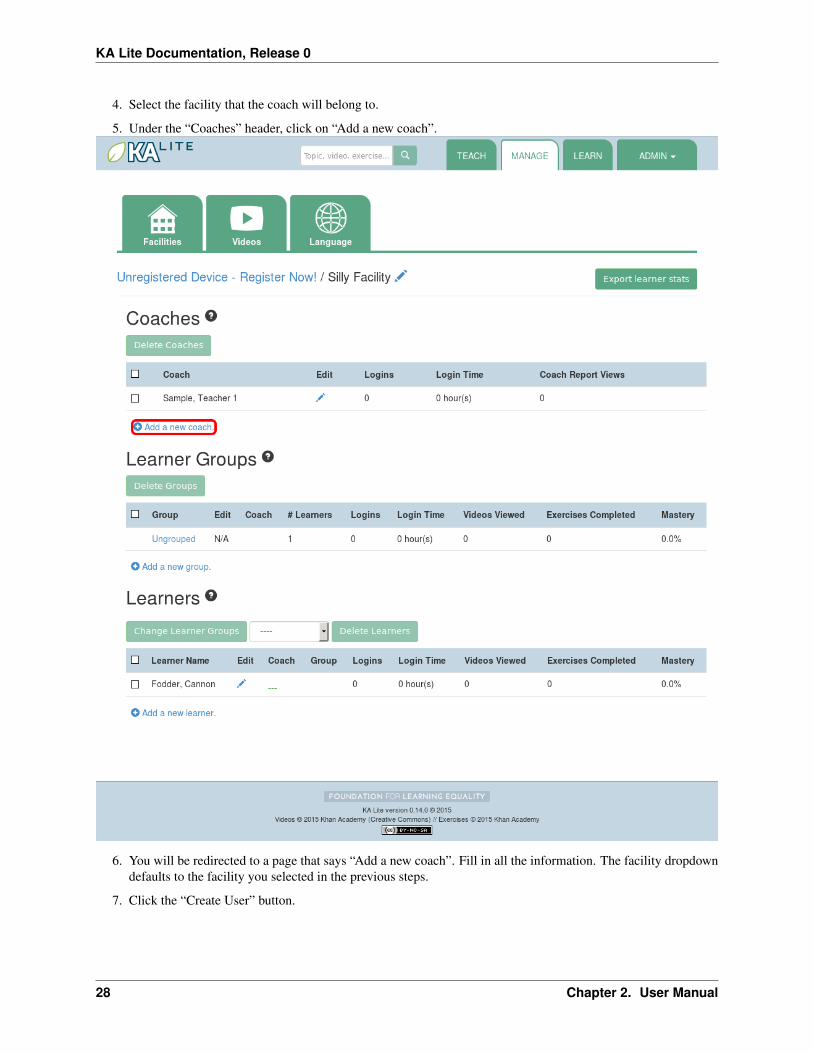
4. Select the facility that the coach will belong to.
5. Under the “Coaches” header, click on “Add a new coach”.
6. You will be redirected to a page that says “Add a new coach”. Fill in all the information. The facility dropdowndefaults to the facility you selected in the previous steps.
7. Click the “Create User” button.
28 Chapter 2. User Manual

KA Lite Documentation, Release 0
8. If the user was successfully created, the page will reload with a message indicating that you have created theuser.
Permanently Deleting Coaches
1. Log in to KA Lite.
2. Click on the “Manage” tab at the top of the page.
3. Make sure that the “Facilities” tab is selected.
4. Under the “Facilities” header, select the facility the coach belongs to.
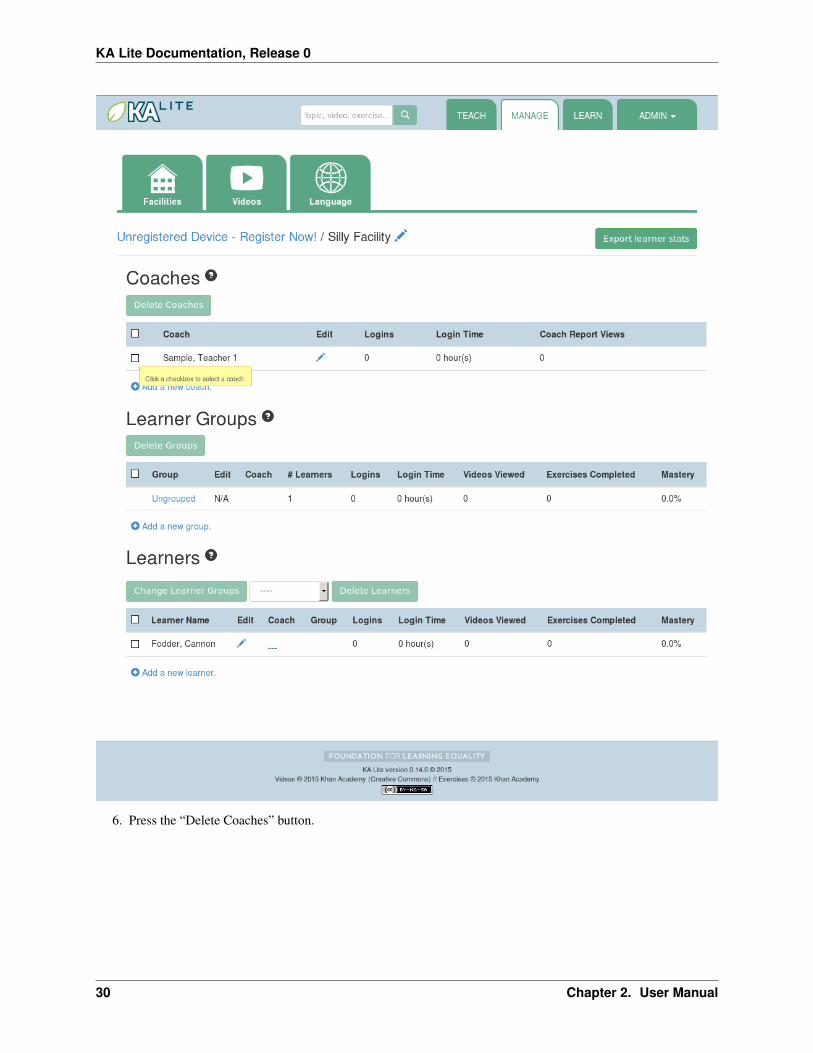
5. Under the “Coaches” header, mark the box to the left of the coach account you would like to delete.
2.1. Admininistrator User Manual 29
KA Lite Documentation, Release 0
6. Press the “Delete Coaches” button.
30 Chapter 2. User Manual

KA Lite Documentation, Release 0
7. You will be prompted with a confirmation of your deletion. Press “OK” to proceed with the deletion.
Adding a Group
You can create groups within a facility. Each group can represent a classroom, a study group, or any other way youwould like to group Learners. To create a group, follow the instructions below:
1. Log in to KA Lite.
2.1. Admininistrator User Manual 31

KA Lite Documentation, Release 0
2. Click on the “Manage” tab at the top of the page.
3. Make sure that the “Facilities” tab is selected.
4. Select the facility that the group will belong to.
5. Under the “Learner Groups” header, click on “Add a new group”.
6. Fill out the name of the group, and provide a description.
7. Click “create group”.
32 Chapter 2. User Manual

KA Lite Documentation, Release 0
8. You should be redirected back to the page for the facility. If the group was successfully created, you will see itlisted under the “Learner Groups” section.
Deleting a Group
1. Log in to KA Lite.
2. Click on the “Manage” tab at the top of the page.
3. Make sure that the “Facilities” tab is selected.
4. Select the facility that the group you would like to delete belongs to.
5. Mark the box to the left of the group you would like to delete.
6. Press the “Delete Groups” button under the “Learner Groups” header.
2.1. Admininistrator User Manual 33

KA Lite Documentation, Release 0
7. You will be prompted with a confirmation of your deletion. Press “OK” to proceed with the deletion.
Moving a User to a New Group
1. Navigate to the page for the facility the user belongs to.
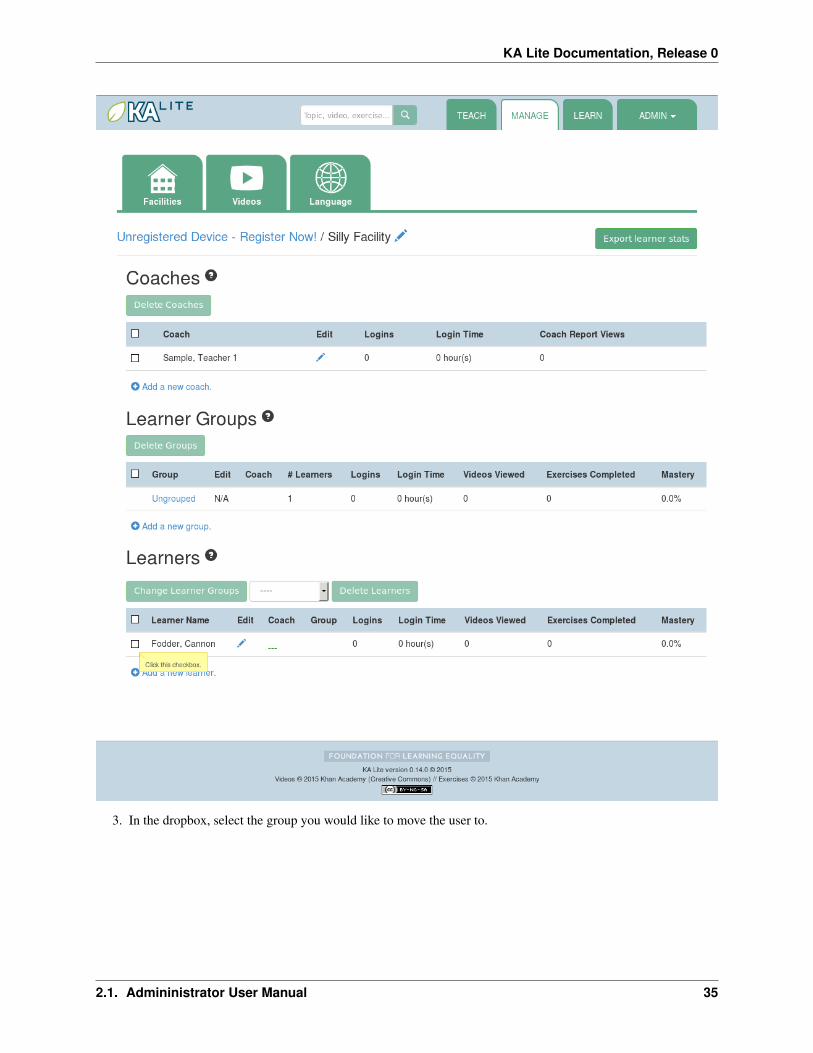
2. Under the “Learners” header, select the Learner you would like to move by clicking in the checkbox to the leftof the Learner name.
34 Chapter 2. User Manual
KA Lite Documentation, Release 0
3. In the dropbox, select the group you would like to move the user to.
2.1. Admininistrator User Manual 35

KA Lite Documentation, Release 0
4. Click the “Change Learner Groups” button.
36 Chapter 2. User Manual

KA Lite Documentation, Release 0
5. The page will refresh, with a message at the top indicating a successful move.
Removing Users from a Group
If you’d like to remove a user from a group without permanently deleting the user, please follow the instructions below:
1. Follow the same instructions as for “Moving a User to a New Group”, but select “Ungrouped” from the drop-down menu.
2.1. Admininistrator User Manual 37

KA Lite Documentation, Release 0
Group Summary Statistics
For each group, you should be able to view some statistics.
1. Navigate to the Learner Groups section of the facility you wish to look at.
2. Click on the group that you wish to view.
3. The statistics for the group should be displayed at the top of the page.
38 Chapter 2. User Manual

KA Lite Documentation, Release 0
Edit User Information
1. Navigate to the page for the facility that the user belongs in.
2. Find the user you would like to edit.
3. Click the blue pencil icon next to the name of the user that you would like to edit.
4. Make all necessary changes on the edit user page, and click “Update user”.
5. You will be redirected to the previous page, with a message at the top indicating that your changes have beensaved.
2.1.9 Allowing Other Users to Connect
In order for other users to be able to connect to the KA Lite server with a different machine, you will need to givethem an IP address with which to access the software. This should be different from the IP address given to you duringsetup (127.0.0.1:8008).
2.1.10 Downloading Videos
Now that you’ve created a facility and user accounts, it’s time to add video content to your local KA Lite installation!Since the videos can take up a large amount of space, you can choose to download only the videos that you need. Ifyour device has enough space and you wish to download all of the videos, we recommend skipping to DownloadingVideos in Bulk .
Downloading Individual Videos
After registering your device: 1. Click the “Manage” tab at the top of the page. 2. Click on the “Videos” tab.
2.1. Admininistrator User Manual 39

KA Lite Documentation, Release 0
3. View subtopics by clicking on the ‘+’ symbol to the left of a subject of your choice. You can close them byclicking on the ‘-‘ symbol.
4. Mark the content you wish to download by clicking the checkbox to the left of the content name.
5. Click the green “Download” button in the top left box of the page. The button should also show you the totalnumber of videos you have selected to download, as well as the total size of the content.
6. Once the download is completed, video content will be ready for Learners to watch!
Downloading Videos in Bulk
If you want to download videos in bulk, your best option is to download the KA Lite videos through the BitTorrentSync client. This will be a much faster process than using the KA Lite app to download all of the videos.
We have made the full set of KA videos (in the format needed by KA Lite) available via BitTorrent Sync (btsync).Note that this is different from BitTorrent; btsync allows us to add new videos or fix problems without issuing a wholenew torrent file, and then having seeders split between the old and new torrent files. Here are the steps to set this up:
1. Download and install BitTorrent Sync.
2. Run btsync. On some platforms, this will bring up a graphical interface. On Linux, you will need to typehttp://127.0.0.1:8888/ into the address bar of your browser to get the interface.
40 Chapter 2. User Manual
KA Lite Documentation, Release 0
3. Click the “Enter a key or link” button, and enter BT7AOITNAIP3X3CSLE2EPQJFXJXMXVGQI
4. Select the “content” folder inside your KA Lite installation as the “location” (unless you want the videos to belocated elsewhere).
5. Allow the videos to sync in there from your peers! It may take a while for now, as we don’t yet have manyseeders on it. On that note – please help seed by keeping it running even after you’ve got all the videos, if youhave bandwidth to spare! This will make it easier for others to download the content as well.
These are resized videos. All in all, this will take around 23 GB of space.
Warning: If you chose to download them to somewhere other than the content folder inside the ka-lite folder asrecommended above, you need to tell KA Lite where to find them. If this is the case, follow the steps below:
1. Make sure all video files are located in a single directory, with .mp4 extensions (KA Lite expects this!)
2. In a text editor, open up ~/.kalite/settings.py (on Windows, locateC:\Users\<username>\.kalite).
3. Add the line CONTENT_ROOT="[full path to your videos directory]", making SURE to include an OS-specific slash at the end (see examples) and encapsulate it in quotes.For example, on Windows: CONTENT_ROOT="C:\\torrented_videos_location\\" Forexample, on Linux: CONTENT_ROOT="/home/me/torrented_videos_location/"
4. Restart your server. If you are unsure on how to do this, please see Restarting Your Server .
Adding assessment items (exercises)
If you skipped the step for adding assessment items during install, run the following command (beware it can take awhile, the download size is over 500 MB):
kalite manage unpack_assessment_zip https://learningequality.org/downloads/ka-lite/0.14/content/assessment.zip-f
As an alternative, you can download the zip file from https://learningequality.org/downloads/ka-lite/0.14/content/assessment.zip and run the command on your local copy. This is useful if you’re deployingKA Lite on multiple computers.
2.1.11 Language Packs
KA Lite supports internationalization. You can download language packs for your language if it is available. Alanguage pack comes with all the available subtitles and user interface translations for that language. When it isinstalled, KA Lite will give you the option to download individual dubbed videos from the language’s Khan AcademyYouTube channel.
Warning: Remember to ‘Restart Your Server‘_ after every language pack download or update.
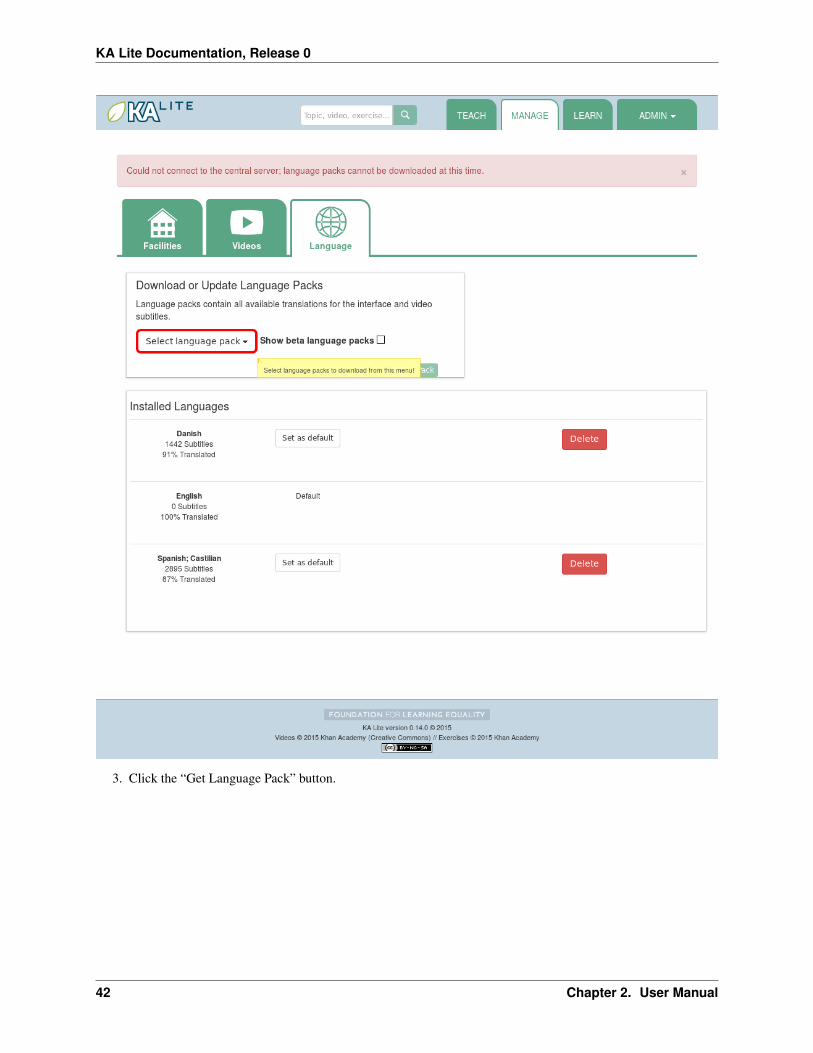
Download Language Packs
To download language packs:
1. From the “Manage” page, click on the “Language” tab.
2. Select the language pack you wish to download by selecting from the drop-down menu.
2.1. Admininistrator User Manual 41
KA Lite Documentation, Release 0
3. Click the “Get Language Pack” button.
42 Chapter 2. User Manual

KA Lite Documentation, Release 0
4. Once the download finishes, you can see your language pack in the list of installed packs, but you MUST restartyour server to make them available for your users. If you are unsure on how to do this, please see RestartingYour Server .
5. After the server restart, learners and coaches will be able to switch their language to any of the installed languagepacks. Their default will be the default that you set by clicking on “Set as default”.
Delete Language Packs
To delete language packs:
1. Log in as the administrator.
2.1. Admininistrator User Manual 43

KA Lite Documentation, Release 0
2. Click the “Languages” link in the navigation bar
3. In the Installed Languages section, there is a button for deletion of each language.
2.1.12 Restarting Your Server
If you have made some configuration changes (such as changing the filepath to your video content to your liking), or ifyou feel the need to reboot your KA Lite system, you may want to restart your server. Please note that this will causeKA Lite to become inaccessible to any users. However, this will not delete any user accounts or information that youhave configured during set up.
This process varies, depending on which OS you are running the KA Lite Server on.
44 Chapter 2. User Manual
KA Lite Documentation, Release 0
Restarting Your Server: Windows
In the system tray, right click on the KA Lite icon. Click the “Stop Server” item in the context menu. Right click onthe KA Lite icon in the system tray again, and click “Start Server”. If the option is not clickable, wait a while and tryagain or restart your computer.
Restarting Your Server: Linux
1. Open up your terminal. For most Linux distributions, you can do this by going to Menu -> Accessories ->Terminal or Applications menu -> System -> Terminal.
2. Navigate to the folder that you downloaded KA Lite in. You can do this by typing cd<PATH/TO/KALITE/FOLDER>. Change the path to the path name of the KA Lite folder on your machine.
3. Type in bin/kalite restart. This should stop the server, then attempt to restart it again. The processmay take up to a few minutes.
4. Once you see the script that begins with To access KA Lite from another connectedcomputer, try the following address(es): .... you will know that your KA Lite server hasbeen successfully restarted.
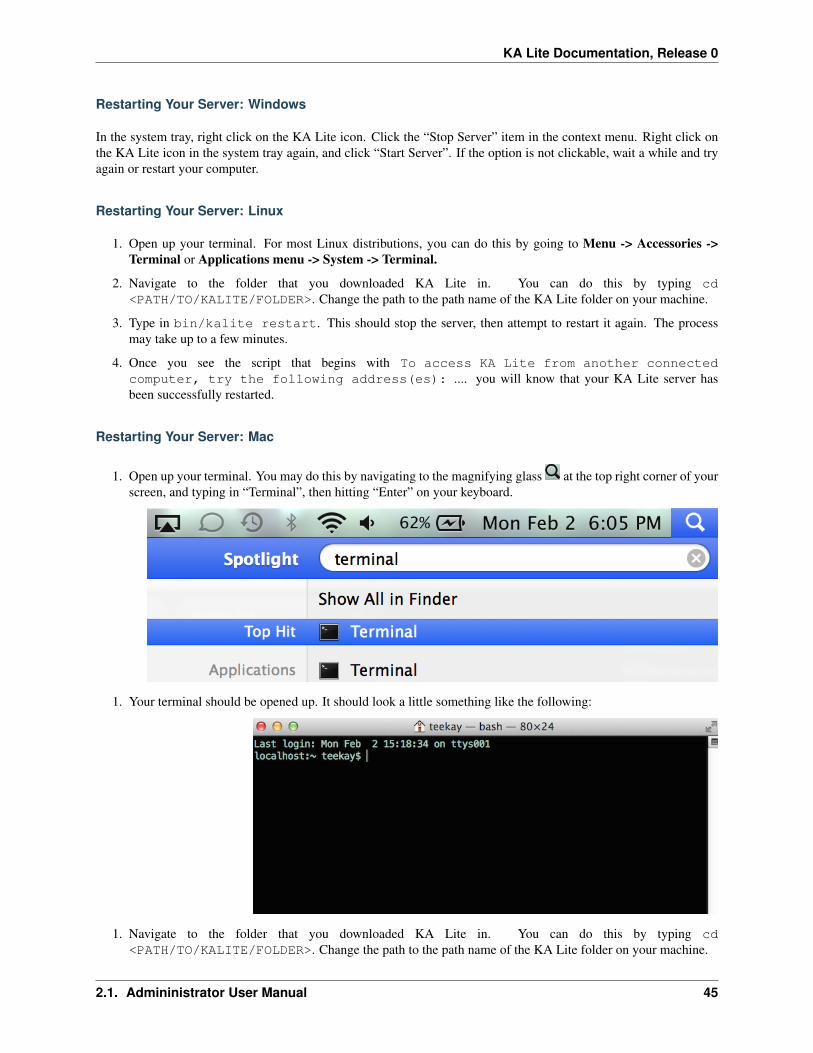
Restarting Your Server: Mac
1. Open up your terminal. You may do this by navigating to the magnifying glass at the top right corner of yourscreen, and typing in “Terminal”, then hitting “Enter” on your keyboard.
1. Your terminal should be opened up. It should look a little something like the following:
1. Navigate to the folder that you downloaded KA Lite in. You can do this by typing cd<PATH/TO/KALITE/FOLDER>. Change the path to the path name of the KA Lite folder on your machine.
2.1. Admininistrator User Manual 45
KA Lite Documentation, Release 0
2. Type in bin/kalite restart. This should stop the server, then attempt to restart it again. The processmay take up to a few minutes.
3. Once you see the script that begins with To access KA Lite from another connectedcomputer, try the following address(es): .... you will know that your KA Lite server hasbeen successfully restarted.
2.1.13 Updating KA Lite
If a new version of KA Lite comes out, you can update to the latest version by following the instructions below.
Updating on Mac OS and Linux
At this time, the only supported way to update is to grab the source and run the setup management command. Followthe instructions in the installation guide to ensure you’re using the latest version.
Updating on Windows
To update on Windows, simply use our Windows installer. You will have the option to update from a prior version.See the Windows installation guide.
2.1.14 Configuration Settings
Once you have deployed KA Lite to a computer, there are a number of ways you can customize the behavior of yourinstallation. Below, you will find a list of these possible customizations with instructions or descriptions on how to doit.
Warning: Please follow these instructions carefully! Customizing the server incorrectly can break your installa-tion. It can be very hard to find and undo the error.
Running KA Lite with your own settings
In a text editor, open up ~/.kalite/settings.py (on Windows, locateC:\Users\<username>\.kalite). That file is where you should put your custom settings, and KA Litewill load them automatically.
You can also run the kalite with a completely different Python settings module by specifying kalite<command> --settings=my_settings_module.
Changing base settings
By default, ~/.kalite/settings.py will load kalite.project.settings.base which are the basicsettings. But you can also load Raspberry Pi settings by changing the file to read something like:
46 Chapter 2. User Manual

KA Lite Documentation, Release 0
2.1.15 Available settings
Most common settings
• DEBUG = <True or False> (default = False) – Enables debug mode. In case you run into technical issues, enablethis setting before troubleshooting / reporting.
• CONTENT_ROOT = “<path to desired content folder>” (default=ka-lite/content) This is the path that KA Litewill use to look for KA Lite video files to play. Change the path to another local directory to get video files fromthat directory. NB! Directory has to be writable for the user running the server in order to download videos.
• TIME_ZONE = <desired time zone> (default = “America/Los_Angeles”) You can set this to be the local timezone for your installation. Choices can be found here.
• LANGUAGE_CODE = “<desired ISO 639-1 Language Code>” (default = “en-us”) You can set this to thedesired language code for this installation (All choices can be found here). If there are translations available,our web server will show them in KA Lite. Soon, we hope to provide support for internationalized content insidethe KA Lite interface.
• USE_I18N = <True or False> (default = True) If you set this to False, our web server will make some opti-mizations so as to avoid loading internationalization tools. Things might run a little faster, but you won’t havesupport for translated content.
• USE_L10N = <True or False> (default = False) By default, this is set to False. If you set this to True, Djangowill format dates, numbers and calendars according to the current locale. For example, January 5, 2000 wouldbe 1/5/2000 if locale = “en-us” and 5/1/2000 if locale = “en-gb”
User restrictions
• LOCKDOWN = <True or False> (default = False) With this setting, users must be logged in order to accessvideos & exercises
• DISABLE_SELF_ADMIN = <True or False> (default = False). Disables user sign ups.
Online Synchronization
• USER_LOG_MAX_RECORDS = <desired maxium for user log records> (default = 0) When this is set to anynon-zero number, we will record (and sync for online tracking) user login activity, summarized for every month(which is configurable, see below). Default is set to 0, for efficiency purposes–but if you want to record this,setting to 1 is enough! The # of records kept are not “summary” records, but raw records of every login. These“raw” data are not synced, but are kept on your local machine only–there’s too many of them. Currently, wehave no specific report to view these data (though we may have for v0.10.1)
• USER_LOG_SUMMARY_FREQUENCY = <desired frequency in the following format (number, amount oftime)> (default = (1, “months”) This determines the granularity of how we summarize and store user log data.One database row is kept for each student, on each KA Lite installation, for the defined time period. Acceptablevalues are: (1, “months”), (2, “months”), (3, “months”), (6, “months”) - separate logged data for every month, 2months, 3 months, or 6 months, respectively (1, “weeks”) - separate logged data for every week ** NOTE THISMAY PRODUCE A LOT OF DATA **
• SYNC_SESSIONS_MAX_RECORDS = <desired max records of sync sessions> (default = 10) Every timeyour installation syncs data, we record the time of the sync, the # of successful logs that were uploaded anddownloaded, and any failures. This setting is how many such records we keep on your local server, for display.When you log in to our online server, you will see a full history of these records.
2.1. Admininistrator User Manual 47

KA Lite Documentation, Release 0
Optimization of storage and system load
• CRONSERVER_FREQUENCY = <desired frequency of cronserver to run in seconds> (default = 10 minutes)This is how frequently KA Lite tries to synchronize user data with other Devices on your Zone. This can bechanged to sync data more often (use a smaller #), or if you’re never online (can be set to a large number)
• CACHE_TIME = <desired length of cache time, in seconds> (default = 5*365*24*60*60) (that’s 5 years!) Ourbasic topic pages, video pages, and exercise pages rarely change–only when you download new videos (changesmade by user logins are made in a different way). Therefore, we can “cache” copies of these pages, to avoidconstantly regenerating them, and speed up KA Lite. We have logic to delete the cached copies, and thereforegenerate new copies, if you download new videos or delete old videos through our interface. If you would liketo disable caching, set CACHE_TIME = 0 . Read a little more about caching on Wikipedia.
• CACHE_LOCATION = ‘<path to cache directory>’ (default= dir named kalite_web_cache in the OS temporarydir) Some operating systems will clear the temporary directories when the system is rebooted. To retain the cachebetween reboots, an alternative location can be specified. (for example on Linix, “/var/tmp/kalite_web_cache”)
• CHERRYPY_THREAD_COUNT = <number of threads> (default=50) The CherryPy Webserver can handlemultiple page requests simultaneously. The default is 50, but for slow or single CPU servers, performancewill be improved if the number of threads is reduced. Minimum number of threads is 10, optimum setting forRaspberry Pi is 18.
Raspberry Pi
• USE_MPLAYER = <True or False> (default = False) With this setting, if the browser is run from the samecomputer as the KA Lite server, then instead of playing the video in the browser, the video will be launchedoutside of the browser and played in mplayer - a light-weight video player that is included with the KA Litesoftware. This is intended for use only on the Raspberry Pi, where no other video player is available.
2.2 Coach User Manual
Who is a “coach”?
A person who :
• adds, manages, and tracks the progress of groups of students.
• has access to student progress data in the form of coach reports
• provides instructions to students
2.2.1 Coach Reports
Coach reports are visualizations of the data generated by your learners. The goal of the coach reports is to put the datainto an easy to understand format, so you can understand how learners are progressing and where they need the mosthelp.
The Report Page displays an overview of the learners and a tabular report.
48 Chapter 2. User Manual
KA Lite Documentation, Release 0
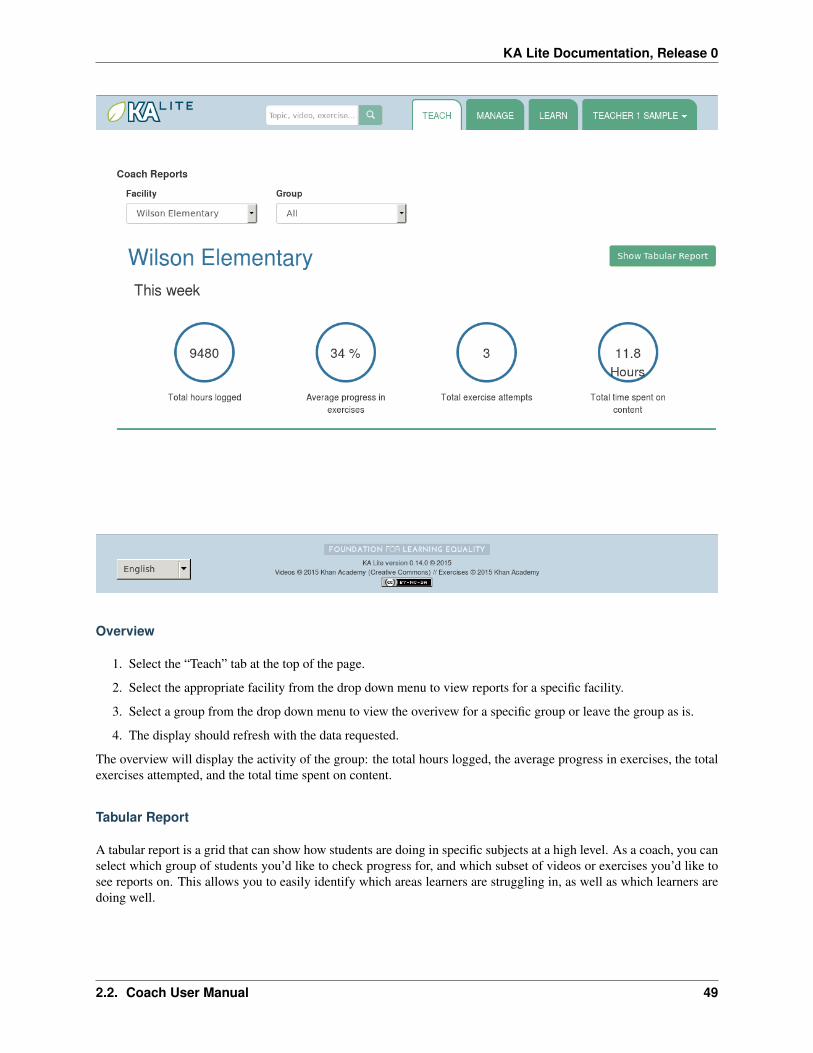
Overview
1. Select the “Teach” tab at the top of the page.
2. Select the appropriate facility from the drop down menu to view reports for a specific facility.
3. Select a group from the drop down menu to view the overivew for a specific group or leave the group as is.
4. The display should refresh with the data requested.
The overview will display the activity of the group: the total hours logged, the average progress in exercises, the totalexercises attempted, and the total time spent on content.
Tabular Report
A tabular report is a grid that can show how students are doing in specific subjects at a high level. As a coach, you canselect which group of students you’d like to check progress for, and which subset of videos or exercises you’d like tosee reports on. This allows you to easily identify which areas learners are struggling in, as well as which learners aredoing well.
2.2. Coach User Manual 49

KA Lite Documentation, Release 0
Progress By Topic
1. Click on the “Show Tabular Report” button.
2. A table should be generated with the data requested.
The color of the rectangles in the table indicate how that student is doing on a particular exercise. The following keyexplains the color code of the table cells (this information will also be available on the Coach Report page):
Not Attempted: The student has not attempted the subtopic.
In Progress: The student has completed a few questions.
Struggling: The student is struggling on the subtopic.
Completed: The student has completed the subtopic.
Detailed View
1. Click on the colored cells.
2. A panel should open up below the cell to reveal the number of questions attempted and the actions made on eachexercise.
3. Click on the same cell to close the panel.
2.3 Learner User Manual
Who is a “learner”?
Anyone who uses KA Lite primarily for learning. Learner accounts will track individual progress through videos andexercises, and learners will only be allowed to view their own data.
2.3.1 Accessing KA Lite
There are two ways KA Lite can be used:
1. Set up on a network with one main server, having machines connect to this server. If this is the setupchosen, installation is not necessary on a learner’s computer, as it can be accessible through a web browser withthe IP address of the server. Simply copy and paste the server’s IP address into your web browser any time you’dlike to access KA Lite. If you are unsure what the address is, please contact your administrator.
50 Chapter 2. User Manual

KA Lite Documentation, Release 0
2. Installed for single user, on one machine. If you are not accessing KA Lite through a network or wish to runKA Lite on your own computer, please follow the KA Lite Installation Guides first before proceeding with thisuser manual. Once you have done so, copy and paste the URL given during the installation process into a webbrowser to access KA Lite (it should be http://127.0.0.1:8008).
2.3.2 How to Sign Up
Learners may receive their account information from their Coaches or Administrators if their account has been pre-configured. However, it is possible for learners to create their own account. To create an account, please follow theinstructions below:
1. Open KA Lite.
2. Click “Sign Up” at the top right of your screen.
3. If you are redirected to a page that asks you to select a facility, please select the facility to which you belong. Ifyou are unsure which facility you belong to, please contact your administrator or coach. Skip this step if you donot see this page.
4. Fill out the information.
5. Click the “Create user” button when you are finished.
2.3.3 How to Log In
1. Open KA lite.
2. Click on the “Log In” tab.
3. Enter your username and password, and then click the “Log in” button.
2.3.4 Navigating through Content
To begin engaging with the Khan Academy videos and exercises, first make sure you are logged into KA Lite. Uponlog in, you should see a green menu on the left that lists the content. If you do not see this green menu, please start byclicking on the “Learn” tab on the home page.
Start by selecting the subject you’d like to explore. This will expand the side menu, displaying subtopics within thatsubject.
The icons to the left of the menu selections describe whether or not it is a video, an exercise, or a menu that can befurther expanded:
• icons designate that the selection can be further expanded into subtopics
• icons designate that the selection is an exercise for that topic.
• icons designate that the selection is a video for that topic.
Once you have found the video or exercise that you’d like to engage with, simply click on that selection.
Content Recommendation
The content recommendations based off of your current progress are on the homepage and becomes visible after youhave made some progress on at least one exercise. After you have made any form of progress, this is the first page you
2.3. Learner User Manual 51

KA Lite Documentation, Release 0
should see after logging in. If at any point you would like to get to your homepage, please click on the KA Lite logoin the top left hand corner.
The homepage now provides you with three cards:
Resume: This card allows you to navigate to the last exercise you were on. This includes both videos and writtenexercises.
Next Steps: This card allows you to navigate to excercises you have begun; you can also to navigate to the over-archingtopic to which that exercise belongs to.
Explore: This card recommends content for you based on topics you have completed and begun. This card alsorecommends random content from our collection of topics to encourage learning from multiple fields.
2.3.5 How to Practice Exercises
First, please log into KA Lite. Then, navigate to the topic that you’d like to practice exercises for.
To answer a question, enter the answer in the box on the top right of the module, or select the bubble next to the answerchoice in the exercise panel. Once you have decided on your answer, click “Check Answer”.
After answering a question, the exercise module will not advance to the next question until you click the “NextQuestion...” button on the right hand side of the module.
The bar on the top right will display your progress as you go through the exercises. After 8 correct answers out of thelast 10 answered, your points for the exercise will be added to our total and you will have mastered the exercise. If youget an answer wrong or ask for a hint, you will be unable to earn points from that question until it is presented again.
Hint: If you are stuck on a problem, you can ask for a hint by clickin on the “Show hints” button! Use your hintswisely, for there are a limited number of them for every section.
Saved Progress
If at any point during an exercise you wish to watch a video to refresh your memory, feel free to navigate to the videoby expanding the green tab which will bring up the content menu. Your progress for that exercise will be saved andyou will not lose your work.
2.3.6 How to View Your Progress
At any point in time, you should be able to view your progress on any topic. In order to do this,
1. Log into KA Lite.
2. Then, click on your name in the top right of the page.
3. It will then show a drop-down menu, from which you can click on “My Progress”.
On the progress page, you will be able to view your progress on each topic. There will be two bars for each topic. Thetop bar represents your progress on the videos for that topic, and the bottom bar will represent your progress on theexercises for that topic.
This guide assumes that you have already downloaded and installed the KA Lite software on your computer. If youhave not yet completed these steps, please see the KA Lite Installation Guides.
52 Chapter 2. User Manual

KA Lite Documentation, Release 0
2.4 Introduction
KA Lite is a lightweight web application software that allows users without Internet access to engage with KhanAcademy videos and exercises in completely offline settings. It brings the flipped classroom model to some of themost remote areas in the world. Users can track their progress through videos and exercises, and coaches can log into check students’ progress, identifying which areas the students need the most help in. If KA Lite ever reaches anInternet connection, it can sync this usage data with the KA Lite Hub – an online data repository that allows projectadministrators to view data and manage accounts remotely of offline deployments.
2.4.1 What are the goals of KA Lite?
Learning is fundamental to human flourishing, and at Foundation for Learning Equality, we strive to support learningopportunities on every front. That’s why we created KA Lite, with the goal of making high-quality educationalresources and tools provided by Khan Academy accessible to the estimated 65% of the world that don’t have accessto Internet.
2.4.2 How KA Lite works
KA Lite can be used in two different ways, depending on your needs:
1. KA Lite can be installed on one local computer which acts as a server, with client devices connecting to thislocal server to watch the Khan Academy videos, and to work on practice problems. A coach/teacher can thencheck on each student’s progress. This method is typically used by schools and other educational institutions.
2. KA Lite can be installed on the client device itself, and be used to download Khan Academy videos for offlineviewing. In this way, KA Lite is almost like a piece of software that you’d install on your computer, except itruns in the Internet browser.
2.4.3 Who can use KA Lite?
Reaching offline or low-bandwidth communities with KA Lite is a team effort, and we find that a wide variety ofpeople come together to make that happen. In a typical KA Lite deployment, there are 3 types of people involved withthe project, which are organized into user types:
1. Administrators Administrators plan out the deployment and logistics, procure the devices and installs KALite, and oversee their delivery and integration into the classroom or community. They can also update thesoftware, add content, customize configuration settings, and manage user accounts.
2. Coaches Coaches (also referred to as ‘facilitators’ or ‘teachers’) are users who add, manage, and track theprogress of groups of students. They have access to student progress data in the form of coach reports, andcan step in and provide individualized instruction when the student needs it.
3. Learners Learners (also referred to as ‘students’) are users who use KA Lite primarily for learning. They earnpoints for watching videos and answering exercises correctly, and their progress is tracked by the system.
2.4. Introduction 53

KA Lite Documentation, Release 0
54 Chapter 2. User Manual
CHAPTER 3
Frequently Asked Questions
3.1 How do I install KA Lite?
Information on how to install KA Lite is available via our user guides.
3.2 How much does KA Lite cost to install?
It is FREE – both free as in “free speech” and free as in “free beer”! To learn more about free software, see this FreeSoftware Foundation article
3.3 How do I report a problem?
Please follow the instructions on our Github Wiki for reporting bugs.
3.4 How do I change KA Lite’s content folder?
If you want to change your installation’s content folder from the default (say, to point to a shared folder across instal-lations), here are the steps you need to do:
1. If it doesn’t already exist, create a file named local_settings.py in the ka-lite/kalite folder (the one containingsettings.py)
2. Add the line CONTENT_ROOT="[full path to your videos directory]", making SURE to include an OS-specific slash at the end (see examples) and encapsulate it in quotes.For example, on Windows: CONTENT_ROOT="C:\\videos_location\\"
For example, on Linux: CONTENT_ROOT="/home/me/videos_location/"
3. Restart your server. If you are unsure on how to do this, please see Restarting Your Server.
3.5 Is there somewhere I can find Spanish language content orga-nized by topic?
Yes! Thanks to the efforts of an awesome volunteer deploying KA Lite and other OER in the Sacred Valley in Peru,you can download blocks of Spanish Lanugage content from his public Google Drive folder. You can also follow his
55

KA Lite Documentation, Release 0
deployment at http://www.huacamayu.org/.
3.6 I would like to download the videos for KA Lite via BitTorrent, isthis possible?
We have made the full set of KA videos (in the format needed by KA Lite) available via BitTorrent Sync (btsync) (notethat this is different from BitTorrent; btsync allows us to add new videos or fix problems without issuing a whole newtorrent file and then having seeders split between the old and new torrent files) Here are the steps to set this up:
• Download and install BitTorrent Sync
• Run btsync. On some platforms, this will bring up a graphical interface. On Linux, you will need to loadhttp://127.0.0.1:8888/ to get the interface.
• Click the “Enter a key or link” button, and enter
BT7AOITNAIP3X3CSLE2EPQJFXJXMXVGQI
• Then select the “content” folder inside your KA Lite installation as the “location” (unless you want the videosgoing somewhere else).
• Allow the videos to sync in there from your peers! It may take a while for now, as we don’t yet have manyseeders on it. On that note – please help seed by keeping it running even after you’ve got all the videos , if youhave the bandwidth to spare! This to will make it easier for others to download the content as well.
• Please note that these are resized videos. All in all, this will take around 23GB of space.
Once you have the videos, you need to tell KA Lite where to find them by following the instructions in the user guidefor your version.
3.7 Do I need the internet to run KA Lite?
No. The only time you need an internet connection is for the initial download of the content (either to the target device,or to a USB stick that can then be carried or mailed). After installation, you can serve the content from a local serveror use it directly on the server device without an internet connection.
3.8 Is KA Lite involved in getting devices into the hands of students,families, and communities?
Currently, KA Lite does not distribute any devices. We are working with partner organizations who do directlydistribute devices to local students and communities, and KA Lite is open to any organization who would liketo help in this regard. If your organization wants to help KA Lite distribute devices, you can contact us [email protected].
3.9 How do you operate in the field?
The FLE team primarily works in our San Diego offices, building software and shaping our roadmap based on ourinteractions with our partners around the world. We work with individual humanitarians and NGOs of all sizes to helpthem distribute KA Lite to offline communities around the world.
56 Chapter 3. Frequently Asked Questions

KA Lite Documentation, Release 0
3.10 What are the typical deployment scenarios?
A typical school deployment varies depending on whether or not a school already has a computer lab.
School with an existing computer lab: In this case, KA Lite would be deployed as a server on one of the existingcomputers. Students would connect using client devices over the local intranet.
School with no existing computer lab: For schools that do not have an existing computer lab, a KA Lite deploymentwould involve obtaining a device that can run as a KA Lite server (most computers) and other devices to be used asclients. One common configuration is using a Raspberry Pi or other inexpensive computer as a server and relativelycheap tablets as client devices.
3.11 What are some possible hardware configurations for deployingKA Lite?
You will need:
1. A computer that is running the KA Lite software (e.g. a desktop computer, laptop, or Raspberry Pi).
2. One or more client devices that have web browsers (laptops, tablets, desktop computers, etc)
Note that for a single-user deployment (1) and (2) can be the same computer, with the browser connecting to thelocally running KA Lite server software. To make the software accessible to multiple client devices, you will need toput them on the same local network as the KA Lite device (1), e.g. through a router.
3.12 What sort of processing power is required for KA Lite?
KA Lite has very low processing requirements, and can be run as a server on devices with processors as low-poweredas the $35 Raspberry Pi, using about 100MB of RAM. There is also low processing power required for client devicesas well, and any browser that supports HTML5 video with h264 encoding or Flash Player should be able to functionas a client device.
3.13 What are the operating system (OS) and software requirementsfor running KA Lite?
KA Lite can run on almost any major operating system: Windows, Linux, and Mac/OSX. The only software depen-dency is the Python 2.7 runtime.
3.14 What is data syncing?
KA Lite is capable to share your student progress data with a central data repository when you are online. This enablesthe system to have an online backup of your data, allows you to view your student progress online, and to share yourdata across multiple KA Lite installations.
3.15 Does KA Lite support peer to peer synchronization?
Not yet. Peer to peer sync is a priority for KA Lite in the near future, but is not available yet.
3.10. What are the typical deployment scenarios? 57
KA Lite Documentation, Release 0
3.16 Who maintains the KA Lite project?
KA Lite is created, maintained, and operated by the Foundation for Learning Equality, Inc, a California-based nonprofitorganization.
3.17 What is KA Lite’s affiliation with Khan Academy?
KA Lite is an independent, open-source project maintained by a distributed team of volunteers, and is not officiallyaffiliated with Khan Academy, although they are (unofficially) very supportive of the KA Lite project.
3.18 How can local curriculum be generated?
Local content creation is something that KA Lite intends to pursue in the future. This feature is not available at thistime, but steps are being taken, as you can read about here. If you would like to be notified when it is available,subscribe for updates on our home page, or if you would like to fund this project, please click here.
3.19 How is it possible to compress the content into KA Lite?
First, users are able to select the amount of videos and exercises they wish to download on the user-interface, allowingthe users to customize the size of the files. Also, we have resized much of the content, and approximately 4,000 videosare around 25 GB if downloaded via BitTorrent and around 70 GB via the user-interface.
3.20 What languages is KA Lite available in?
KA Lite was released with internationalization support on 2014/03/07, including support for a translated interface,dubbed videos, subtitles, and translated exercises. Currently we have varying levels of support Portuguese, Danish,French, Polish, Spanish. Please visit our blog for the latest information about language support.
3.21 Can I contribute to KA Lite as a developer?
Yes! KA Lite is an open source project, and developers are encouraged to contribute! If you are interested in develop-ing for KA Lite, check out the instructions for getting started.
3.22 Can I contribute to KA Lite as a translator?
Yes, absolutely! If you would like to contribute to KA Lite as a translator, you can get started over on our translationsand internationalization page on our GitHub Wiki!
3.23 Can I contribute even if I don’t know how to code?
Yes! There are many ways!
58 Chapter 3. Frequently Asked Questions

KA Lite Documentation, Release 0
3.24 How do I find out more?
To stay up-to-date on all our activities, follow our blog, Twitter, and Facebook!
3.25 What can be done with progress tracking during offline usage?
KA Lite’s built-in coach reports are meant to provide teachers and administrators access to progress tracking offline.When a student connects back up to the server that they sync with, all of their progress data will be uploaded forteachers and administrators to evaluate.
3.26 How does FLE measure the impact of KA Lite?
Because KA Lite is freely available and designed to run offline, we are not in contact with many of our deployments,and collecting impact data can be challenging.
KA Lite is capable to synchronize data with our central data repository when an online connection exists.
For the deployments in which we do have direct involvement, we receive updates from the administrator’s with quan-titative data from the built-in coach reports and attain qualitative data from our on-site visits. For example, we knowthat 20 out of 20 students in the Idaho Department of Corrections deployment have passed their GED using KA Lite.
We are also developing RCTs to start in June for a deployment in India.
3.27 Backing up data: is there any easy way to do it locally?
Yes! Just copy the file:
ka-lite/kalite/database/data.sqlite
to a secure location. To restore, simply copy the backup data file to the same location. If you have changed versions,please run:
python kalite/manage.py migrate --merge
to guarantee your database is compatible with the current version of KA Lite you have installed! Note that online databack-ups occur if you “register” your KA Lite installation with an online account on our website.
3.28 I skipped the step for downloading the assessment items duringinstall, how can I do it now?
Run the following command (beware it can take a while, the download size is over 500 MB):
kalite manage unpack_assessment_zip https://learningequality.org/downloads/ka-lite/0.14/content/assessment.zip-f
As an alternative, you can download the zip file from https://learningequality.org/downloads/ka-lite/0.14/content/assessment.zip and run the command on your local copy. This is useful if you’re deployingKA Lite on multiple computers.
3.24. How do I find out more? 59

KA Lite Documentation, Release 0
60 Chapter 3. Frequently Asked Questions

CHAPTER 4
Contributing and Development
Want to contribute? You can check us out on github, or browse the link(s) below.
4.1 How can I contribute to...
4.1.1 How to contribute to documentation
You can propose changes to the docs directly on github (instructions below) or email your recommendations [email protected].
To propose changes directly, you’ll need to create an account on github and open a pull request. This documentassumes you are somewhat familiar with that process, and will not explain all the steps in detail. For full instructionson how to make a pull request, see Github’s help section. Some guidelines:
• Work from the develop branch.
• From the base directory, the documenation can be found in the sphinx-docs subdirectory. Specific pages of thedocs are each associated with a different .rst file, potentially in a subdirectory of sphinx-docs.
• The documentation is written in ReStructured Text format, so please see the primer!
• After making your changes, try to build the docs to review them. This process can take some time, as an instanceof the server and a browser may need to be started. To build the docs (see README.md in the sphinx-docsdirectory for requirements):
– In Linux, if you have the pyvirtualdisplay package installed you can build in headless mode by runningthe command env SPHINX_SS_USE_PVD=true make html in the sphinx-docs directory.
– In other OSes, or to build in non-headless (headed?) mode, just run the command make html in the sphinx-docs directory. This may launch a browser. Don’t interfere with it!
• You can view the docs in a browser by opening sphinx-docs/_build/html/index.html.
• After you are satisfied with your changes push them to your fork of the ka-lite project, and then open a PR.
For this project we have created an rst directive to take screenshots of the site (in case of UI changes or to buildinternationalized versions of the docs). To read about the use of this directive, see the SCREENSHOT_USAGE.md fileand check out usage in the docs (a good starting point is the ss_examples.rst file).
61

KA Lite Documentation, Release 0
62 Chapter 4. Contributing and Development

CHAPTER 5
Setting up your development environment
KA Lite is like a normal django project, if you have done Django before, you will recognize most of these steps.
1. Check out the project from our github 1. Create a virtual environment “kalite” that you will work in:
1. Install kalite in your virtualenv in “editable” mode, meaning that the source is just linked: ..
cd path/to/repopip install -e .
1. Install additional development tools: ..
pip install -r requirements_dev.txt
1. Run a development server and use development settings like this: ..
kalite manage runserver --settings=kalite.project.settings.dev
You can also change your ~/.kalite/settings.py to point to kalite.project.settings.dev by de-fault, then you do not have to specify –settings=... every time you run kalite.
Now, everytime you work on your development environment, just remember to switch on your virtual environmentwith workon kalite.
63

KA Lite Documentation, Release 0
64 Chapter 5. Setting up your development environment

CHAPTER 6
Developer Docs
Useful stuff our devs think that the rest of our devs ought to know about.
6.1 Front End Code
All of our front end code is written in Javascript, with much of it using Backbone.js (and its dependencies jQuery andUnderscore.js).
All new code, where possible, should be written using Backbone.js to modularize functionality, and allow code to bereused across the site.
Inline Javascript (i.e. Javascript directly in the Django templates inside <script> tags) should be avoided except whereabsolutely necessary (such as to initialize some master object on a page).
For templating on the front end, we use Handlebars.js to render templates with a restricted set of statements and accessto all variables passed into the template context.
6.2 Implementing with Backbone
Most of our front end code uses only three kinds of objects, Backbone Models, Collections, and Views.
Backbone Models contain data that we use to render the page - in the case of a coach report, for example, this mightbe data about each student.
Backbone Collections are groups of Models - so you might have a Collection where each model represents the progressdata for an individual student.
The Views define how this data is displayed in the browser, and also defines responses to user interaction to the currentdisplay.
Most Views also have an associated Handlebars template, which defines the HTML and how the data passed into thetemplate is displayed in the rendered View.
Often the data contained in a Backbone Model can change while the user is still on the same page (for example, astudent’s total points can change while they are interacting with an exercise, so we want their displayed points toupdate whenever the ‘points’ attribute of the model updates too).
Here is an example of a Backbone View in KA Lite that does just that:
var TotalPointView = Backbone.View.extend({
initialize: function() {
65
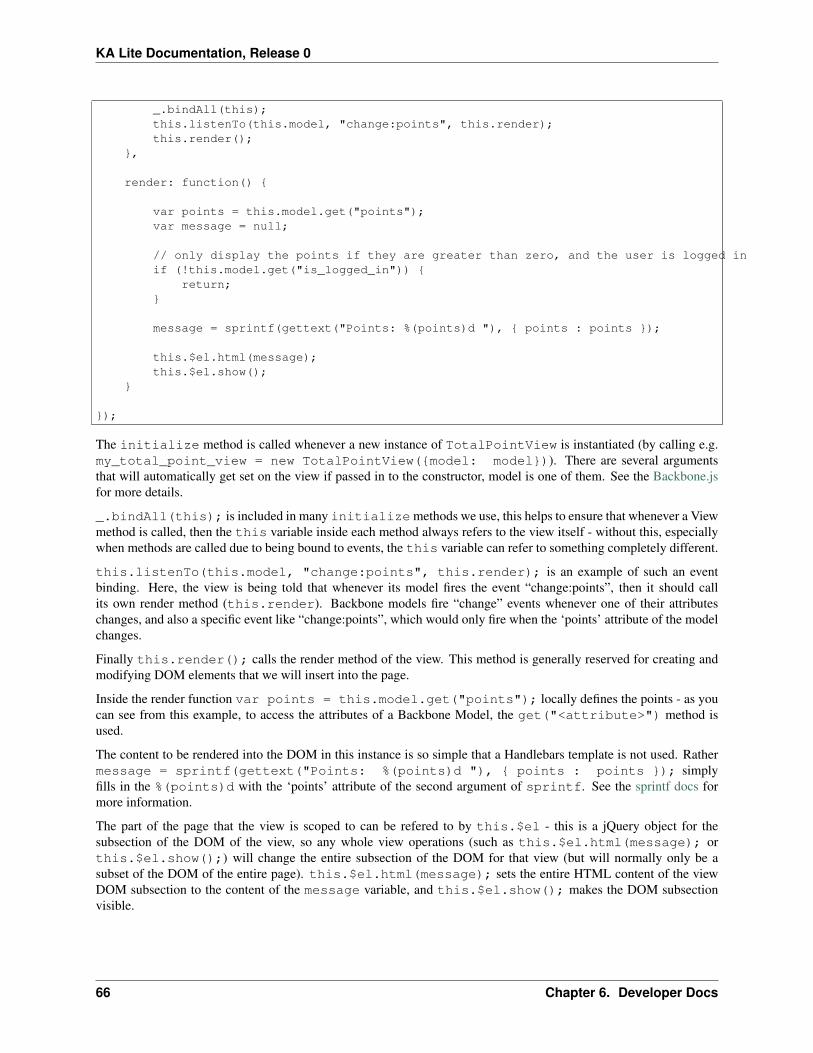
KA Lite Documentation, Release 0
_.bindAll(this);this.listenTo(this.model, "change:points", this.render);this.render();
},
render: function() {
var points = this.model.get("points");var message = null;
// only display the points if they are greater than zero, and the user is logged inif (!this.model.get("is_logged_in")) {
return;}
message = sprintf(gettext("Points: %(points)d "), { points : points });
this.$el.html(message);this.$el.show();
}
});
The initialize method is called whenever a new instance of TotalPointView is instantiated (by calling e.g.my_total_point_view = new TotalPointView({model: model})). There are several argumentsthat will automatically get set on the view if passed in to the constructor, model is one of them. See the Backbone.jsfor more details.
_.bindAll(this); is included in many initializemethods we use, this helps to ensure that whenever a Viewmethod is called, then the this variable inside each method always refers to the view itself - without this, especiallywhen methods are called due to being bound to events, the this variable can refer to something completely different.
this.listenTo(this.model, "change:points", this.render); is an example of such an eventbinding. Here, the view is being told that whenever its model fires the event “change:points”, then it should callits own render method (this.render). Backbone models fire “change” events whenever one of their attributeschanges, and also a specific event like “change:points”, which would only fire when the ‘points’ attribute of the modelchanges.
Finally this.render(); calls the render method of the view. This method is generally reserved for creating andmodifying DOM elements that we will insert into the page.
Inside the render function var points = this.model.get("points"); locally defines the points - as youcan see from this example, to access the attributes of a Backbone Model, the get("<attribute>") method isused.
The content to be rendered into the DOM in this instance is so simple that a Handlebars template is not used. Rathermessage = sprintf(gettext("Points: %(points)d "), { points : points }); simplyfills in the %(points)d with the ‘points’ attribute of the second argument of sprintf. See the sprintf docs formore information.
The part of the page that the view is scoped to can be refered to by this.$el - this is a jQuery object for thesubsection of the DOM of the view, so any whole view operations (such as this.$el.html(message); orthis.$el.show();) will change the entire subsection of the DOM for that view (but will normally only be asubset of the DOM of the entire page). this.$el.html(message); sets the entire HTML content of the viewDOM subsection to the content of the message variable, and this.$el.show(); makes the DOM subsectionvisible.
66 Chapter 6. Developer Docs

KA Lite Documentation, Release 0
6.3 Creating Your Own Backbone View
To create a new Backbone View, you will either add to an existing Javascript file in the project, or create anew file. For example if you were to add a new View to the coachreports app you could create a file underkalite/coachreports/static/js/coachreports/hexagon_report.js. Some boilerplate to startoff with might look something like this:
var HexagonReportView = BaseView.extend({
template: HB.template("reports/hexagon-counting")
initialize: function() {_.bindAll(this);this.listenTo(this.model, "change:number_of_hexagons", this.render);this.render();
},
render: function() {this.$el.html(this.template(this.model.attributes));
}
});
this.$el.html(this.template(this.model.attributes)); this line will insert all the attributes ofthe model into the template for rendering, and then set the HTML of the subsection of the DOM for the view to theresulting HTML.
For this to work, there must be a file kalite/coachreports/hbtemplates/reports/hexagon-counting.handlebarsthat contains the Handlebars.js template for this view. For a simple report, the template might look something likethis:
<div class="hexagon-report"><h3>{{_ "Hexagon Report" }}</h3><p>{{_ "Current number of hexagons:" }}{{number_of_hexagons}}</p>
</div>
To have this render in a particular Django template, both of the above files would need to be imported through<script> tags in the Django template. The relevant tags to add in this case would be:
<script src="{% url 'handlebars_templates' module_name='reports' %}"></script><script type="text/javascript" src="{% static 'js/coachreports/hexagon_report.js' %}"></script>
Note that for the Handlebars importing, only the folder name is necessary to be imported, not each individual template.It is also important that you do not place this script tag inside a Django-Compressor compress block.
Finally, to actually have this render on the page, we would need to have a Backbone Model that is able to fetch thedata from an API endpoint on the server, and when the fetch is successfully completed, prompt the view to be created.Assuming we have a HexagonReportModel already defined, we could insert the following code into the template toinitialize this report:
<script>$(function(){
window.hexagonReportModel = new window.HexagonReportModel();hexagonReportModel.fetch().then(function(){
window.hexagonView = new HexagonReportView({el: $("#student-report-container"),model: hexagonReportModel
});});
6.3. Creating Your Own Backbone View 67

KA Lite Documentation, Release 0
});</script>
Line by line this means - $(function(){<code here>}); wait for the browser to finish ren-dering the HTML before executing the code inside this function. window.hexagonReportModel= new window.HexagonReportModel(); make a new instance of the HexagonReportModel.hexagonReportModel.fetch().then(function(){<code here>}); get the data for this par-ticular model from the server, and when that has finished, then execute the code inside the function.
window.hexagonView = new HexagonReportView({el: $("#student-report-container"),model: hexagonReportModel
});
make a new instance of the HexagonReportView. This will automatically call initialize and so the view will render.In addition, el: $("#student-report-container"), tells the view that it should set its subsection ofthe DOM to be the DOM element selected by $("#student-report-container") (i.e. the element withthe id ‘student-report-container’), and model: hexagonReportModel tells it to set its ‘model’ attribute to thehexagonReportModel we instantiated and fetch before.
6.4 TL;DR (or 7 quick steps to creating a Backbone View in KA Lite)
1. Find the appropriate app folder inside KA Lite - inside <folder>/static/js/<folder>/ either create a folder for yourBackbone files, or find an existing one with a name that fits.
2. Inside this folder either create or open views.js.
3. To start creating a view, type: var MyViewNameView = BaseView.extend({});
4. Define at least an initialize method, and a render method.
5. If you want a Handlebars template for your View, look inside <folder>/hbtemplates/ and either create a folderfor your Handlebars templates, or find an existing one with a name that fits.
6. Inside this folder create a new file for your handlebars template mytemplatename.handlebars.
7. Add this to your View definition code (inside the curly braces and don’t forget commas to separate key/valuepairs!): template: HB.template("<templatefolder>/mytemplatename").
6.5 Purpose and creation of Javascript Unit Tests in KA Lite
6.5.1 Purpose
Our Backbone Models and Views can end up having a lot of methods. It is important that all of those methods observethe correct input output characteristics. Hence it is important that we write tests that guarantee that our methods eithertake the correct input and produce the right output, or, as is often the case, produce the right side effects on models,views, or the DOM.
In pursuit of this lofty goal of having every method and object testable and tested, there will be some requirements ofrefactoring along the way. Some of the code that has already been written for the KA Lite project is not convenientlyparcelled in such a way as to be conducive to testing individual components in an atomic fashion. In order to ensurethat functionality does not break as a result, we have integration tests (which are currently only implemented usingSelenium scripted by Python) - for now we are avoiding writing such integration tests in Javascript as well so as toavoid duplication.
68 Chapter 6. Developer Docs
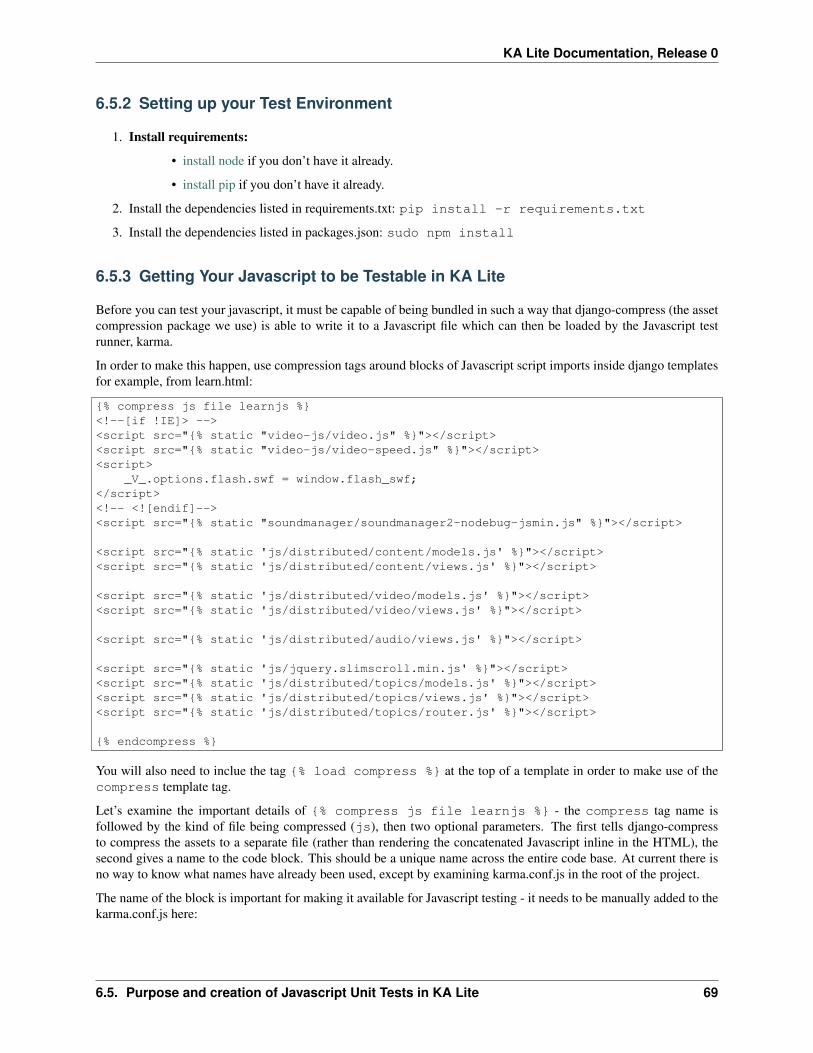
KA Lite Documentation, Release 0
6.5.2 Setting up your Test Environment
1. Install requirements:
• install node if you don’t have it already.
• install pip if you don’t have it already.
2. Install the dependencies listed in requirements.txt: pip install -r requirements.txt
3. Install the dependencies listed in packages.json: sudo npm install
6.5.3 Getting Your Javascript to be Testable in KA Lite
Before you can test your javascript, it must be capable of being bundled in such a way that django-compress (the assetcompression package we use) is able to write it to a Javascript file which can then be loaded by the Javascript testrunner, karma.
In order to make this happen, use compression tags around blocks of Javascript script imports inside django templatesfor example, from learn.html:
{% compress js file learnjs %}<!--[if !IE]> --><script src="{% static "video-js/video.js" %}"></script><script src="{% static "video-js/video-speed.js" %}"></script><script>
_V_.options.flash.swf = window.flash_swf;</script><!-- <![endif]--><script src="{% static "soundmanager/soundmanager2-nodebug-jsmin.js" %}"></script>
<script src="{% static 'js/distributed/content/models.js' %}"></script><script src="{% static 'js/distributed/content/views.js' %}"></script>
<script src="{% static 'js/distributed/video/models.js' %}"></script><script src="{% static 'js/distributed/video/views.js' %}"></script>
<script src="{% static 'js/distributed/audio/views.js' %}"></script>
<script src="{% static 'js/jquery.slimscroll.min.js' %}"></script><script src="{% static 'js/distributed/topics/models.js' %}"></script><script src="{% static 'js/distributed/topics/views.js' %}"></script><script src="{% static 'js/distributed/topics/router.js' %}"></script>
{% endcompress %}
You will also need to inclue the tag {% load compress %} at the top of a template in order to make use of thecompress template tag.
Let’s examine the important details of {% compress js file learnjs %} - the compress tag name isfollowed by the kind of file being compressed (js), then two optional parameters. The first tells django-compressto compress the assets to a separate file (rather than rendering the concatenated Javascript inline in the HTML), thesecond gives a name to the code block. This should be a unique name across the entire code base. At current there isno way to know what names have already been used, except by examining karma.conf.js in the root of the project.
The name of the block is important for making it available for Javascript testing - it needs to be manually added to thekarma.conf.js here:
6.5. Purpose and creation of Javascript Unit Tests in KA Lite 69

KA Lite Documentation, Release 0
// list of files / patterns to load in the browserfiles: [
file_map['basejs'].slice(1),file_map['perseusjs_1'].slice(1),file_map['perseusjs_2'].slice(1),file_map['learnjs'].slice(1),file_map['pdfjs'].slice(1),// INSERT NEW JAVASCRIPT BUNDLES HERE'**/tests/javascript_unit_tests/*.js','testing/testrunner.js'
],
So if you had created a new compression block called ‘exparrotshop’ then you would add the elementfile_map[’exparrotshop’].slice(1) to the array.
6.5.4 Writing a Test
You are now ready to write a test. All Javascript unit tests live inside the appropriate app. For example,if you were writing a unit test for Javascript code for the coachreport app, you would put your test file inkalite/coachreports/tests/javascript_unit_tests/. Call your file the name of the Model, View, or Router you are test-ing, or use an existing test file if you are extending an already tested Model or View. For example, the Session Modeltest file is called:
session_model_test.js
Each test file should start with a definition statement:
module("Session Model Tests", {setup: function() {return this.sessionModel = new SessionModel();
}});
The text gives the name of the suite of tests you will be writing in this file. The setup method defines something thathappens prior to every single test being run. this gets returned to every subsequent test as this also, so anythingset as an attribute of this will be available inside each test.
After the module definition, you can define any number of tests. Here is a simple example:
test("Default values", function() {expect(2);
equal(this.sessionModel.get("SEARCH_TOPICS_URL"), "");equal(this.sessionModel.get("STATUS_URL"), "");
});
This simple test is checking the default values for the Session Model defined during the setup method above. Atthe beginning of the test, we declare how many assertion statements will be made during the course of the test. Notspecifying this number correctly will cause a failure. The tests are written in QUnit whose docs can be referred to fora complete set of assertions.
6.5.5 Running Tests
When you have written your tests, before you can run them, we need to bundle the Javascript for testing. In order todo this, from the root of the project run:
70 Chapter 6. Developer Docs

KA Lite Documentation, Release 0
bin/kalite manage bundleassets
This will bundle all the django-compress tags and make concatenated files. It will also update the file_map that ourKarma config uses to find these files. When this is complete, simply run:
karma start
This will run through all the Javascript tests and report on failures. N.B. Karma is often, and most helpfully, run incontinuous integration mode - our code base does not currently suppor that, but hopefully will in the future.
6.6 Behavior-Driven Integration Tests
Part of our comprehensive testing intiative is to write better integration tests. The goals are to:
1. Stop using browser driven integration tests as unit tests. (Such slow...)
2. Have robust integration tests that don’t fail randomly.
3. Use behavior-driven tests to clarify design goals of features.
We’re using behave 1.2.4 to run our integration tests. Behavior driven tests are specified using the Gherkin specificationlanguage, and then behave builds a test suite from step implementations that are directly mapped to clauses from theGherkin specification.
6.6.1 Running the integration tests
To get the dependencies run ‘pip install -r dev_requirements.txt‘. This should install the correctversion of behave. Selenium is also required but is currently included in our python-packages directory.
To run the tests simply run ‘python kalitectl.py manage test‘ just like you used to. This will automat-ically search out tests using both the unit test framework and the behave framework. You can specify apps, but rightnow there’s no way to just run integration tests.
6.6.2 Anatomy of the integration tests
The test command will look inside each app for a ‘features‘ directory. Inside that directory should be one ormore ‘[name].feature‘ files written in the Gherkin specification language. See the behave docs for more detailson Gherkin, or look in the ‘control_panel‘ app, where your humble author has attempted to provide someexamples.
The test runner will parse the ‘.feature‘ files and attempt to build a test suite from step specifications found inany python files (the name is irrelevant) in the ‘steps‘ subdirectory. There is a 1-to-1 mapping between the clausesyou write in the Gherkin specification and the steps you implement, so it can save you time to reuse clauses. Steps canalso be templated to match clauses that follow a pattern.
You can also set up the test environment at key stages in the testing process by writing hooks inan ‘environment.py‘ file in the ‘features‘ directory. In the ‘control_panel‘ example, the‘before_feature‘ function is defined to log the testing user in as an admin before each feature tagged withthe ‘@as_admin‘ tag in the specification. In ‘testing/base_environment.py‘, the ‘before_all‘and ‘after_all‘ hooks are defined to set up a Selenium WebDriver instance on the context object that is passedaround by the test runner. This file is intended to be used as a base for all the integration tests, so if there is some setupcommon to all integration tests then put it there. You can then import those functions in the ‘environment.py‘of specific apps, and extend or overwrite as necessary.
6.6. Behavior-Driven Integration Tests 71

KA Lite Documentation, Release 0
Finally, in ‘testing/behave_helpers.py‘ you’ll find various functions that should be generally useful for allintegration tests. If you find yourself wishing you had a nice useful function, add it here. In order to avoid reproducingfunctionality while we phase out the old integration tests, if some functionality already exists in the form of a mixin,you should import it into that file and wrap it in a new function. Be very reticent about importing mixin code! Agood rule of thumb is to glance at how something is implemented in the mixins first, and only import it if it’s nottrivial to reproduce. Only re-write if there’s no chance of the new code producing an error! The main goal is to avoidmaintaining two sets of code.
6.6.3 Suggested workflow for writing new features
Ideally you should:
1. Specify your integration tests.
2. Write failing steps.
3. Write code that makes your tests pass.
In practice, at least try to specify the tests first. Then you can seek out assistance implementing the steps.
6.6.4 Selenium gotchas (aka race conditions)
Finding elements on the page can be subject to race conditions if the page is not yet completely loaded, or if the DOMchanges in response to AJAX stuff. Selenium pprovides methods for finding elements with and without explicit waits.When in doubt, use a wait. If your app is AJAX-y, write testable code by putting in events or flags that Selenium canexplicitly wait for. The Selenium ‘get‘ method of browsing will wait for the page to fully load. Do not assume thatfollowing links using e.g. the ‘click‘ method will wait for the page to load – it does not. To summarize:
1. Incorporate explicit flags in your code that Selenium can use in waits.
2. Don’t use unsafe methods that don’t wait unless you’re 100% certain there’s no possibility for a race condition.
6.7 Profiling KA Lite
6.7.1 Getting a general overview of resources used
To get a sense of the resources used by KA Lite over a period of time, run the kalite command with the PROFILEenvironment variable:
PROFILE=yes kalite <command>
Upon normal exit, the program will write to a file called memory_profile.log containing the time and resource utiliza-tion. For now we only log memory usage.
6.8 Developer Utility Commands
6.8.1 Django Management Commands
All Django management commands can be run by typing:
bin/kalite manage <command_name>
in the root directory of the KA Lite project.
72 Chapter 6. Developer Docs

KA Lite Documentation, Release 0
6.8.2 generaterealdata
This function is designed to produce example user data for testing various front end functionality, such as coach reportsand content recommendation. It does take some shortcuts, and will not produce accurate answer data for exercises.This is a Django management command and can be run with the following command:
bin/kalite manage generaterealdata
6.9 Logging
If you wish to view output from the server, you have a few options:
• Start the server using the command kalite manage runserver (this doesn’t start the job scheduler).
• Start the server with kalite start --foreground. This will start the server using CherryPy and a singlethread, with output going to your terminal.
• Run the normal mode kalite start, and check ~/.kalite/server.log for output.
6.9. Logging 73