Embed Size (px)
Citation preview

EmbroideryMachine Appliqué
Just EMBROIDER It!
eBookSERIES
~ Getting started
~ Pattern method
~ Trim-in-place method
~ Helpful tips
© 2014 BERNINA of America

Getting StartedAppliqué created on the embroidery machine takes a time-honored technique to a whole new level. Not only is machine embroidered appliqué fast and easy, you will find that every curve and corner is absolutely precise and perfect.
As an added bonus, using fabric as the background of a design instead of a stitched fill reduces the stitch count of a design drastically, so you can stitch a larger design with fewer stitches. Appliqué designs are also good choices for children’s wear because the low stitch count reduces the amount of bobbin thread on the back of the project that could irritate a child’s delicate skin.
To get started, you will need an appliqué design created specifically for the embroidery machine. There are many choices in the marketplace when it comes to purchasing a commercially digitized design. Many of the BERNINA Exclusive Design Collections have appliqué. You can also create your own appliqué design elements using BERNINA DesignerPlus Embroidery Software 7 or the BERNINA DesignWorks Software.
Commercially prepared appliqué designs differ in the way that the appliqué fabric shape is cut. One of the two methods discussed below will be used, but if you prefer one method over the other, refer to the instructions on the last page to customize the design to your specific preference.
There are two primary methods for cutting the appliqué fabric for the design. They are:
•Pattern Method – the appliqué fabric will be cut prior to stitching
•Trim-in-Place Method – the appliqué fabric will be cut during the stitching process

Pattern MethodPattern Method Steps
1) Placement Line2) Tackdown Stitch3) Cover Stitch
Hoop the background fabric or garment with the proper stabilizer. (Download the Just Embroider It! eBook, All About Stabilizers.)
Placement Line
•Attach the hoop to the machine and stitch the Placement Line. The Placement Line stitches out the shape of the appliqué piece. The machine will then stop.
•Remove the hoop from the machine and place the prepared appliqué fabric shape inside the stitched lines. (See Preparing the Appliqué Fabric Shape Using the Pattern Method on page 4.) Take care to place the piece as precisely inside the lines as possible.
Tackdown Stitch
•Stitch the Tackdown which will tack all the edges down with either a straight stitch or a zigzag. This will hold the appliqué in place until the final Cover Stitching.
BERNINA Exclusive Design Collections or OESD designs call this Cut Line & Tackdown. This gives you the option to either use the Pattern Method or the Trim-in-Place method. See Tips section on page 8 for details.
The Tackdown is usually omitted if the final Cover Stitch is a decorative outline that would allow the Tackdown to be visible behind the stitches (i.e. a blanket stitch).
placement line
tackdown stitch
cover stitch
place appliqué shape
Cover Stitch
•Stitch the Cover Stitch. This may follow immediately after the Tackdown or later in the design’s stitching process. The Cover Stitch is commonly a satin stitch, although other decorative stitches also may be used.
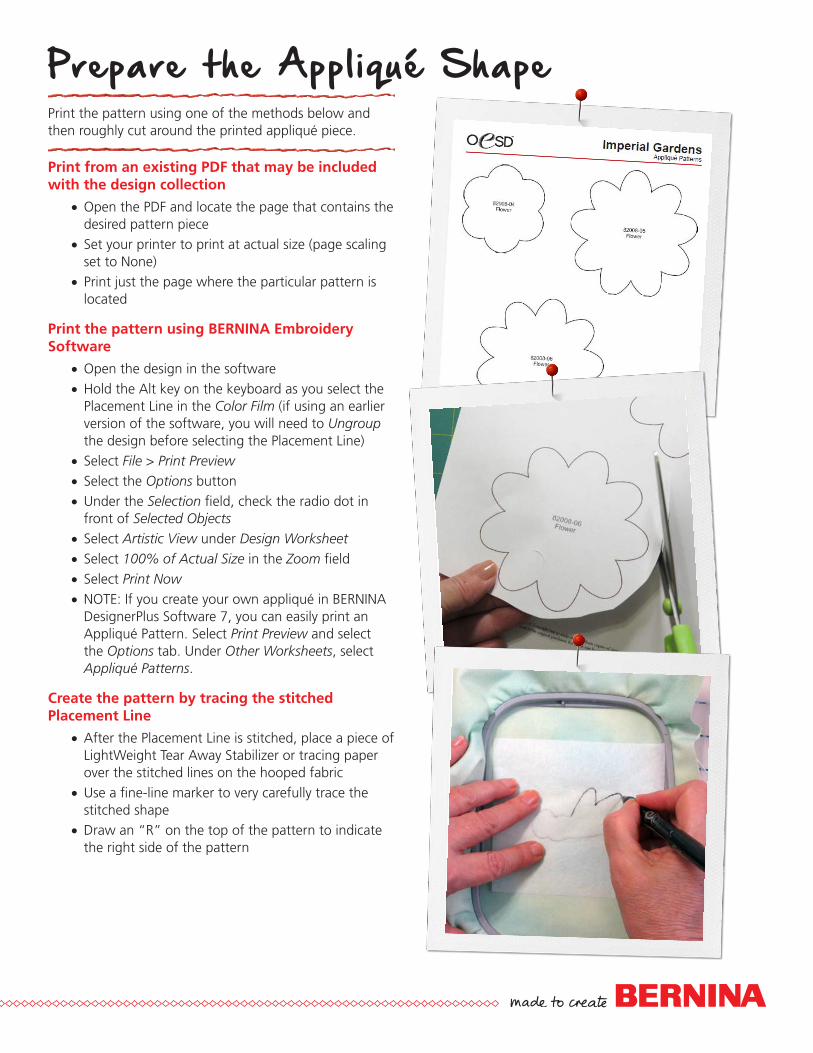
Prepare the Appliqué ShapePrint the pattern using one of the methods below and then roughly cut around the printed appliqué piece.
Print from an existing PDF that may be included with the design collection
•Open the PDF and locate the page that contains the desired pattern piece
•Set your printer to print at actual size (page scaling set to None)
•Print just the page where the particular pattern is located
Print the pattern using BERNINA Embroidery Software
•Open the design in the software•Hold the Alt key on the keyboard as you select the
Placement Line in the Color Film (if using an earlier version of the software, you will need to Ungroup the design before selecting the Placement Line)
•Select File > Print Preview•Select the Options button•Under the Selection field, check the radio dot in
front of Selected Objects•Select Artistic View under Design Worksheet•Select 100% of Actual Size in the Zoom field•Select Print Now•NOTE: If you create your own appliqué in BERNINA
DesignerPlus Software 7, you can easily print an Appliqué Pattern. Select Print Preview and select the Options tab. Under Other Worksheets, select Appliqué Patterns.
Create the pattern by tracing the stitched Placement Line
•After the Placement Line is stitched, place a piece of LightWeight Tear Away Stabilizer or tracing paper over the stitched lines on the hooped fabric
•Use a fine-line marker to very carefully trace the stitched shape
•Draw an “R” on the top of the pattern to indicate the right side of the pattern

Cut the appliqué fabricCut the fabric shapes manually
For best results stiffen the fabric with spray starch or a starch alternative such as Best Press and apply an appliqué backing product such as OESD Fuse & Fix or Steam-a-Seam II.
•Cut the appliqué fabric slightly larger than the pattern piece and back with an appliqué backing product following manufacturer’s guidelines
•Spray the wrong side of the pattern with a small amount of temporary adhesive spray
•Place the pattern RIGHT SIDE UP on the RIGHT side of the fabric and cut out the shape
NOTE: All appliqué patterns from BERNINA Exclusive Design Collections and OESD Collections are placed on the right side of the fabric. Check specific instructions if using an appliqué design from another source.

Cut the appliqué fabric (continued)BERNINA CutWork Tool
Instead of cutting the pattern with scissors as described on page 5, many design collections including all of the recent BERNINA Exclusive Design Collections include ready-to-use CutWork files for each of the appliqué designs. If you have the BERNINA CutWork Tool you can cut out many appliqué fabric layers at one time which saves a lot of time when cutting intricate shapes or stitching multiples of the same design.
You will achieve much better results using the CutWork Tool if you prepare the fabric prior to the cutting process. Stiffen the fabric by spraying with spray starch or a starch alternative such as Best Press and adhere a fusible appliqué product such as OESD Fuse & Fix or Steam-a-Seam II to the back of the fabric following manufacturer’s recommendations prior to cutting the fabric.
•Hoop a heavy stabilizer such as HeavyWeight TearAway Stabilizer or HydroStick Stabilizer by itself in the hoop
•Cut prepared fabric pieces larger than the appliqué design
•With the prepared appliqué fabric right side up, stack the desired number of layers over the hooped stabilizer.
• Import the chosen CutWork design into the machine
•Attach the CutWork plate specific to your machine•Stitch the Basting Stitch to securely hold the fabric
layers to the stabilizer•Remove the needle and thread and attach the
CutWork Tool and Echo Quilting & CutWork Foot #44 to the machine
•Refer to the instructions that came with the CutWork Tool for specifics
•Cut the appliqué pieces, following the prompts on the machine to rotate the CutWork Tool’s blade
•Set the pieces aside until you are ready to place the appliqué pieces inside the stitched Placement Lines of the embroidery design

Trim-in-Place MethodTrim-in-Place Steps
1. Placement Line2. Cutting Line3. Tackdown Stitch4. Cover Stitch
Hoop the background fabric or garment with the proper stabilizer. (Download the Just Embroider It! eBook All About Stabilizers.)
Placement Line
•Attach the hoop to the machine and stitch the Placement Line
•Cut a piece of fabric larger than the stitched Placement Line
•Place the fabric right side up over the Placement Line, ensuring that the fabric covers all the stitches
Cutting Line
•Stitch the Cutting Line•Remove the hoop from the machine but do not
remove the fabric from the hoop•Place the hoop on a flat surface•Using a sharp curved pair of scissors or appliqué
scissors trim away all fabric outside the line, cutting as close to the stitching as possible
Tackdown Stitch
•Reattach the hoop to the machine and stitch the Tackdown
•This will secure the appliqué as the machine stitches by stitching a zigzag stitch or a straight stitch slightly to the inside of the appliqué
Cover Stitch
•Stitch the Cover Stitch•This may follow immediately after the Tackdown or
come later in the design’s stitching process•The Cover Stitch is commonly a satin stitch,
although other decorative stitches also may be used
placementline
tackdownstitch
cutting line
coverstitch

Helpful TipsIf you prefer the Trim-in-Place Method but your design does not have four steps:
•Stitch the Placement Line•Place a rectangle of fabric over the stitched lines •Back the machine up and restitch the Placement
Line. This will now be used as the Cutting Line•Trim away the fabric outside the stitched lines and
finish stitching the design
On some BERNINA Exclusive Design Collections, the Cutting Line and Tackdown are combined into one color change consisting of two stitching lines in the shape of the appliqué. There is no need to back the machine up. If you wish to use the Trim-in-Place Method, you will cut away the excess fabric after this color change.
If you prefer the Pattern Method but your design is created with four steps for the Trim-in-Place Method and does not have a pattern for the appliqué:
•Stitch the Placement Line of the design•Create your own pattern−Open the design in BERNINA Embroidery
Software 7. Select and print the Placement Stitch as described in the Appliqué Pattern section on page 4
OR−Trace over the stitched Placement Line as
described in the Appliqué Pattern section•You can then either stitch or skip the Cutting Line
and finish the design
There are a couple of instances where the Pattern Method is the best choice:
• If the design has very intricate shapes, it will be easier to cut the fabric from a pattern than to try to trim around the details
• If your design has a blanket stitch or other very open stitch for the Cover Stitch, use the pattern method. Otherwise the Tackdown and Cutting Line Stitches may show
Enjoy your next appliqué project!
intricateshapes
opencoverstitch