Embed Size (px)
Citation preview

Junos® OS
Common Criteria Evaluated ConfigurationGuide for EX4300 Devices
ReleasePublished
2020-03-0419.4R1

Juniper Networks, Inc.1133 Innovation WaySunnyvale, California 94089USA408-745-2000www.juniper.net
Juniper Networks, the Juniper Networks logo, Juniper, and Junos are registered trademarks of Juniper Networks, Inc. inthe United States and other countries. All other trademarks, service marks, registered marks, or registered service marksare the property of their respective owners.
Juniper Networks assumes no responsibility for any inaccuracies in this document. Juniper Networks reserves the rightto change, modify, transfer, or otherwise revise this publication without notice.
Junos® OS Common Criteria Evaluated Configuration Guide for EX4300 Devices19.4R1Copyright © 2020 Juniper Networks, Inc. All rights reserved.
The information in this document is current as of the date on the title page.
YEAR 2000 NOTICE
Juniper Networks hardware and software products are Year 2000 compliant. Junos OS has no known time-relatedlimitations through the year 2038. However, the NTP application is known to have some difficulty in the year 2036.
END USER LICENSE AGREEMENT
The Juniper Networks product that is the subject of this technical documentation consists of (or is intended for use with)Juniper Networks software. Use of such software is subject to the terms and conditions of the EndUser License Agreement(“EULA”) posted at https://support.juniper.net/support/eula/. By downloading, installing or using such software, youagree to the terms and conditions of that EULA.
ii

Table of Contents
About the Documentation | vi
Documentation and Release Notes | vi
Documentation Conventions | vi
Documentation Feedback | ix
Requesting Technical Support | ix
Self-Help Online Tools and Resources | x
Creating a Service Request with JTAC | x
Overview1Understanding the Common Criteria Evaluated Configuration | 12
Understanding Common Criteria | 12
Supported Platforms | 12
Understanding Junos OS in FIPS Mode | 13
About the Cryptographic Boundary on Your EX Series Switch | 13
How FIPS Mode Differs from Non-FIPS Mode | 14
Validated Version of Junos OS in FIPS Mode | 14
Understanding Common Criteria and FIPS Terminology and Supported CryptographicAlgorithms | 15
Terminology | 15
Supported Cryptographic Algorithms | 16
Identifying Secure Product Delivery | 18
Understanding Management Interfaces | 19
Configuring Roles and Authentication Methods2Understanding Roles and Services for Junos OS in Common Criteria and FIPS | 21
Security Administrator Role and Responsibilities | 22
FIPS User Role and Responsibilities | 22
iii

What Is Expected of All FIPS Users | 22
Understanding the Operational Environment for Junos OS in FIPS Mode | 23
Hardware Environment for Junos OS in FIPS Mode | 24
Software Environment for Junos OS in FIPS Mode | 24
Critical Security Parameters | 25
Understanding Password Specifications and Guidelines for Junos OS in FIPS Mode | 27
Downloading Software Packages from Juniper Networks | 28
Installing Software on EX Series devices with a Single Routing Engine | 29
Understanding Zeroization to Clear System Data for FIPS Mode | 32
Why Zeroize? | 33
When to Zeroize? | 33
Zeroizing the System | 33
Enabling FIPS Mode | 35
Configuring Security Administrator and FIPS User Identification and Access | 37
Configuring Security Administrator Login Access | 37
Configuring FIPS User Login Access | 38
Configuring Administrative Credentials and Privileges3Understanding the Associated Password Rules for an Authorized Administrator | 42
Configuring a Network Device collaborative Protection Profile for an AuthorizedAdministrator | 44
Configuring Inactivity Timeout Period, and Terminating Local and Remote IdleSession | 46
Configuring Session Termination | 46
Sample Output for Local Administrative Session Termination | 47
Sample Output for Remote Administrative Session Termination | 48
Sample Output for User Initiated Termination | 48
iv

Configuring SSH and Console Connection4Configuring a System Login Message and Announcement | 50
Configuring SSH on the Evaluated Configuration for NDcPPv2.1 | 51
Limiting the Number of User Login Attempts for SSH Sessions | 53
Configuring the Remote Syslog Server5Syslog Server Configuration on a Linux System | 56
Configuring Event Logging to a Remote Server | 57
Configuring Audit Log Options6Configuring Audit Log Options in the Evaluated Configuration | 65
Configuring Audit Log Options for EX4300-48MP devices | 65
Sample Code Audits of Configuration Changes | 66
Configuring Event Logging7Event Logging Overview | 83
Configuring Event Logging to a Local File | 84
Interpreting Event Messages | 84
Logging Changes to Secret Data | 86
Login and Logout Events Using SSH | 86
Logging of Audit Startup | 87
Performing Self-Tests on a Device8Understanding FIPS Self-Tests | 89
Performing Power-On Self-Tests on the Device | 89
Operational Commands9request system zeroize | 93
v
About the Documentation
IN THIS SECTION
Documentation and Release Notes | vi
Documentation Conventions | vi
Documentation Feedback | ix
Requesting Technical Support | ix
Use this guide to configure and evaluate EX4300-48MP switches for Common Criteria (CC) compliance.Common Criteria for information technology is an international agreement signed by several countriesthat permit the evaluation of security products against a common set of standards.
Documentation and Release Notes
To obtain the most current version of all Juniper Networks® technical documentation, see the productdocumentation page on the Juniper Networks website at https://www.juniper.net/documentation/.
If the information in the latest release notes differs from the information in the documentation, follow theproduct Release Notes.
Juniper Networks Books publishes books by Juniper Networks engineers and subject matter experts.These books go beyond the technical documentation to explore the nuances of network architecture,deployment, and administration. The current list can be viewed at https://www.juniper.net/books.
Documentation Conventions
Table 1 on page vii defines notice icons used in this guide.
vi

Table 1: Notice Icons
DescriptionMeaningIcon
Indicates important features or instructions.Informational note
Indicates a situation that might result in loss of data or hardwaredamage.
Caution
Alerts you to the risk of personal injury or death.Warning
Alerts you to the risk of personal injury from a laser.Laser warning
Indicates helpful information.Tip
Alerts you to a recommended use or implementation.Best practice
Table 2 on page vii defines the text and syntax conventions used in this guide.
Table 2: Text and Syntax Conventions
ExamplesDescriptionConvention
To enter configuration mode, typethe configure command:
user@host> configure
Represents text that you type.Bold text like this
user@host> show chassis alarms
No alarms currently active
Represents output that appears onthe terminal screen.
Fixed-width text like this
• A policy term is a named structurethat defines match conditions andactions.
• Junos OS CLI User Guide
• RFC 1997, BGP CommunitiesAttribute
• Introduces or emphasizes importantnew terms.
• Identifies guide names.
• Identifies RFC and Internet drafttitles.
Italic text like this
vii

Table 2: Text and Syntax Conventions (continued)
ExamplesDescriptionConvention
Configure the machine’s domainname:
[edit]root@# set system domain-namedomain-name
Represents variables (options forwhich you substitute a value) incommands or configurationstatements.
Italic text like this
• To configure a stub area, includethe stub statement at the [editprotocols ospf area area-id]hierarchy level.
• The console port is labeledCONSOLE.
Represents names of configurationstatements, commands, files, anddirectories; configuration hierarchylevels; or labels on routing platformcomponents.
Text like this
stub <default-metric metric>;Encloses optional keywords orvariables.
< > (angle brackets)
broadcast | multicast
(string1 | string2 | string3)
Indicates a choice between themutually exclusive keywords orvariables on either side of the symbol.The set of choices is often enclosedin parentheses for clarity.
| (pipe symbol)
rsvp { # Required for dynamic MPLSonly
Indicates a comment specified on thesame line as the configurationstatement to which it applies.
# (pound sign)
community name members [community-ids ]
Encloses a variable for which you cansubstitute one or more values.
[ ] (square brackets)
[edit]routing-options {static {route default {nexthop address;retain;
}}
}
Identifies a level in the configurationhierarchy.
Indention and braces ( { } )
Identifies a leaf statement at aconfiguration hierarchy level.
; (semicolon)
GUI Conventions
viii

Table 2: Text and Syntax Conventions (continued)
ExamplesDescriptionConvention
• In the Logical Interfaces box, selectAll Interfaces.
• To cancel the configuration, clickCancel.
Represents graphical user interface(GUI) items you click or select.
Bold text like this
In the configuration editor hierarchy,select Protocols>Ospf.
Separates levels in a hierarchy ofmenu selections.
> (bold right angle bracket)
Documentation Feedback
We encourage you to provide feedback so that we can improve our documentation. You can use eitherof the following methods:
• Online feedback system—Click TechLibrary Feedback, on the lower right of any page on the JuniperNetworks TechLibrary site, and do one of the following:
• Click the thumbs-up icon if the information on the page was helpful to you.
• Click the thumbs-down icon if the information on the page was not helpful to you or if you havesuggestions for improvement, and use the pop-up form to provide feedback.
• E-mail—Send your comments to [email protected]. Include the document or topic name,URL or page number, and software version (if applicable).
Requesting Technical Support
Technical product support is available through the Juniper Networks Technical Assistance Center (JTAC).If you are a customer with an active Juniper Care or Partner Support Services support contract, or are
ix

covered under warranty, and need post-sales technical support, you can access our tools and resourcesonline or open a case with JTAC.
• JTAC policies—For a complete understanding of our JTAC procedures and policies, review the JTACUserGuide located at https://www.juniper.net/us/en/local/pdf/resource-guides/7100059-en.pdf.
• Productwarranties—For productwarranty information, visit https://www.juniper.net/support/warranty/.
• JTAC hours of operation—The JTAC centers have resources available 24 hours a day, 7 days a week,365 days a year.
Self-Help Online Tools and Resources
For quick and easy problem resolution, Juniper Networks has designed an online self-service portal calledthe Customer Support Center (CSC) that provides you with the following features:
• Find CSC offerings: https://www.juniper.net/customers/support/
• Search for known bugs: https://prsearch.juniper.net/
• Find product documentation: https://www.juniper.net/documentation/
• Find solutions and answer questions using our Knowledge Base: https://kb.juniper.net/
• Download the latest versions of software and review release notes:https://www.juniper.net/customers/csc/software/
• Search technical bulletins for relevant hardware and software notifications:https://kb.juniper.net/InfoCenter/
• Join and participate in the Juniper Networks Community Forum:https://www.juniper.net/company/communities/
• Create a service request online: https://myjuniper.juniper.net
To verify service entitlement by product serial number, use our Serial Number Entitlement (SNE) Tool:https://entitlementsearch.juniper.net/entitlementsearch/
Creating a Service Request with JTAC
You can create a service request with JTAC on the Web or by telephone.
• Visit https://myjuniper.juniper.net.
• Call 1-888-314-JTAC (1-888-314-5822 toll-free in the USA, Canada, and Mexico).
For international or direct-dial options in countries without toll-free numbers, seehttps://support.juniper.net/support/requesting-support/.
x

1CHAPTER
Overview
Understanding the Common Criteria Evaluated Configuration | 12
Understanding Junos OS in FIPS Mode | 13
Understanding CommonCriteria and FIPS Terminology and Supported CryptographicAlgorithms | 15
Identifying Secure Product Delivery | 18
Understanding Management Interfaces | 19

Understanding the Common Criteria EvaluatedConfiguration
This document describes the steps required to configure the device running Junos OS when the device isevaluated. This is referred to as the evaluated configuration. The device has been evaluated based oncollaborative Protection Profile for NetworkDevices, Version 2.1, 24 September 2018 (NDcPPVersion2.1).
This document is available at https://www.commoncriteriaportal.org/files/ppfiles/CPP_ND_V2.1.pdf.
NOTE: On EX4300-48MP, Junos OS Release 19.4R1 is certified for Common Criteria with FIPSmode enabled on the devices.
For regulatory compliance information about Common Criteria, and FIPS for Juniper Networksproducts, see the Juniper Networks Compliance Advisor.
Understanding Common Criteria
Common Criteria for information technology is an international agreement signed by several countriesthat permits the evaluation of security products against a common set of standards. In the CommonCriteriaRecognition Arrangement (CCRA) at https://www.commoncriteriaportal.org/ccra/, the participants agreeto mutually recognize evaluations of products performed in other countries. All evaluations are performedusing a common methodology for information technology security evaluation.
For more information on Common Criteria, see https://www.commoncriteriaportal.org/.
Target of Evaluation (TOE) is a device or a system subjected to evaluation based on the CollaborativeProtection Profile (cPP).
Supported Platforms
For the features described in this document, the following platforms are supported:
12

• The NDcPP Version 2.1 applies to EX4300-48MP devices.
RELATED DOCUMENTATION
Identifying Secure Product Delivery | 18
Understanding Junos OS in FIPS Mode
IN THIS SECTION
About the Cryptographic Boundary on Your EX Series Switch | 13
How FIPS Mode Differs from Non-FIPS Mode | 14
Validated Version of Junos OS in FIPS Mode | 14
Federal Information Processing Standards (FIPS) 140-2 defines security levels for hardware and softwarethat perform cryptographic functions. By meeting the applicable overall requirements within the FIPSstandard, Juniper Networks EX Series switches running the Juniper Networks Junos operating system(Junos OS) in FIPS mode comply with the FIPS 140-2 Level 1 standard.
Operating EX Series Ethernet switches in a FIPS 140-2 Level 1 environment requires enabling andconfiguring FIPS mode on the switches from the Junos OS CLI.
The Security Administrator enables FIPS mode in Junos OS and sets up keys and passwords for the systemand other FIPS users.
About the Cryptographic Boundary on Your EX Series Switch
FIPS 140-2 compliance requires a defined cryptographic boundary around each cryptographic module on aswitch. Junos OS in FIPS mode prevents the cryptographic module from executing any software that isnot part of the FIPS-certified distribution, and allows only FIPS-approved cryptographic algorithms to beused. No critical security parameters (CSPs), such as passwords and keys, can cross the cryptographicboundary of the module in unencrypted form.
13

CAUTION: Virtual Chassis features are not supported in FIPSmode. Do not configurea Virtual Chassis in FIPS mode.
How FIPS Mode Differs from Non-FIPS Mode
Unlike Junos OS in non-FIPS mode, Junos OS in FIPS mode is a non-modifiable operational environment. Inaddition, Junos OS in FIPS mode differs in the following ways from Junos OS in non-FIPS mode:
• Self-tests of all cryptographic algorithms are performed at startup.
• Self-tests of random number and key generation are performed continuously.
• Weak cryptographic algorithms such as Data Encryption Standard (DES) and Message Digest 5 (MD5)are disabled.
• Weak or unencrypted management connections must not be configured.
• Passwords must be encrypted with strong one-way algorithms that do not permit decryption.
• Administrator passwords must be at least 10 characters long.
Validated Version of Junos OS in FIPS Mode
To determine whether a Junos OS release is NIST-validated, see the software download page on theJuniper Networks Web site (https://apps.juniper.net/compliance/) or the National Institute of Standardsand Technology site.
RELATED DOCUMENTATION
Identifying Secure Product Delivery | 18
14

UnderstandingCommonCriteria andFIPSTerminologyand Supported Cryptographic Algorithms
IN THIS SECTION
Terminology | 15
Supported Cryptographic Algorithms | 16
Use the definitions of Common Criteria and FIPS terms, and supported algorithms to help you understandJunos OS.
Terminology
Common Criteria—Common Criteria for information technology is an international agreement signed byseveral countries that permits the evaluation of security products against a common set of standards.
Security Administrator—For Common Criteria, user accounts in the TOE have the following attributes:user identity (user name), authentication data (password), and role (privilege). The Security Administratoris associated with the defined login class “security-admin”, which has the necessary permission set topermit the administrator to perform all tasks necessary to manage the Junos OS.
NDcPP—Collaborative Protection Profile for Network Devices, Version 2.1, dated 05 May 2017.
Critical security parameter (CSP)—Security-related information—for example, secret and privatecryptographic keys and authentication data such as passwords and personal identification numbers(PINs)—whose disclosure or modification can compromise the security of a cryptographic module orthe information it protects. For details, see “Understanding the Operational Environment for JunosOS in FIPS Mode” on page 23.
Cryptographic module—The set of hardware, software, and firmware that implements approved securityfunctions (including cryptographic algorithms and key generation) and is contained within thecryptographic boundary. For fixed-configuration switches, the cryptographic module is the switchcase. For modular switches, the cryptographic module is the Routing Engine.
FIPS—Federal Information Processing Standards. FIPS 140-2 specifies requirements for security andcryptographic modules. Junos OS in FIPS mode complies with FIPS 140-2 Level 1.
15

FIPS maintenance role—The role the Security Administrator assumes to perform physical maintenance orlogical maintenance services such as hardware or software diagnostics. For FIPS 140-2 compliance,the Security Administrator zeroizes the Routing Engine on entry to and exit from the FIPSmaintenancerole to erase all plain-text secret and private keys and unprotected CSPs.
NOTE: The FIPS maintenance role is not supported on Junos OS in FIPS mode.
KATs—Known answer tests. System self-tests that validate the output of cryptographic algorithms approvedfor FIPS and test the integrity of some Junos OS modules. For details, see “Understanding FIPSSelf-Tests” on page 89.
SSH—A protocol that uses strong authentication and encryption for remote access across a nonsecurenetwork. SSH provides remote login, remote program execution, file copy, and other functions. It isintended as a secure replacement for rlogin, rsh, and rcp in a UNIX environment. To secure theinformation sent over administrative connections, use SSHv2 for CLI configuration. In JunosOS, SSHv2is enabled by default, and SSHv1, which is not considered secure, is disabled.
Zeroization—Erasure of all CSPs and other user-created data on a switch before its operation as a FIPScryptographic module—or in preparation for repurposing the switch for non-FIPS operation. TheSecurity Administrator can zeroize the system with a CLI operational command. For details, see“Understanding Zeroization to Clear System Data for FIPS Mode” on page 32.
Supported Cryptographic Algorithms
Table 3 on page 16 summarizes the high level protocol algorithm support.
Table 3: Protocols Allowed in FIPS Mode
IntegrityCipherAuthenticationKey ExchangeProtocol
• HMAC-SHA-1
• HMAC-SHA-256
• HMAC-SHA-512
• AES CTR 128
• AES CTR 256
• AES CBC 128
• AES CBC 256
Host (module):
• ECDSA P-256
• SSH-RSA
Client (user):
• ECDSA P-256
• ECDSA P-384
• ECDSA P-521
• SSH-RSA
• dh-group14-sha1
• ECDH-sha2-nistp256
• ECDH-sha2-nistp384
• ECDH-sha2-nistp521
SSHv2
16

The following cryptographic algorithms are supported in FIPS mode. Symmetric methods use the samekey for encryption and decryption, while asymmetric methods use different keys for encryption anddecryption.
AES—The Advanced Encryption Standard (AES), defined in FIPS PUB 197. The AES algorithm uses keysof 128, 192, or 256 bits to encrypt and decrypt data in blocks of 128 bits.
Diffie-Hellman—A method of key exchange across a nonsecure environment (such as the Internet). TheDiffie-Hellman algorithm negotiates a session key without sending the key itself across the networkby allowing each party to pick a partial key independently and send part of that key to the other. Eachside then calculates a common key value. This is a symmetrical method—keys are typically used onlyfor a short time, discarded, and regenerated.
ECDH—Elliptic Curve Diffie-Hellman. A variant of the Diffie-Hellman key exchange algorithm that usescryptography based on the algebraic structure of elliptic curves over finite fields. ECDH allows twoparties, each having an elliptic curve public-private key pair, to establish a shared secret over an insecurechannel. The shared secret can be used either as a key or to derive another key for encryptingsubsequent communications using a symmetric key cipher.
ECDSA—Elliptic Curve Digital Signature Algorithm. A variant of the Digital Signature Algorithm (DSA) thatuses cryptography based on the algebraic structure of elliptic curves over finite fields. The bit size ofthe elliptic curve determines the difficulty of decrypting the key. The public key believed to be neededfor ECDSA is about twice the size of the security strength, in bits. ECDSA uses the P-256, P-384, andP-521 curves that can be configured under OpenSSH.
HMAC—Defined as “Keyed-Hashing for Message Authentication” in RFC 2104, HMAC combines hashingalgorithms with cryptographic keys for message authentication.
SHA-256, SHA-384, and SHA-512—Secure hash algorithms (SHA) belonging to the SHA-2 standard definedin FIPS PUB 180-2. Developed by NIST, SHA-256 produces a 256-bit hash digest, SHA-384 producesa 384-bit hash digest, and SHA-512 produces a 512-bit hash digest.
3DES (3des-cbc)—Encryption standard based on the original Data Encryption Standard (DES) from the1970s that used a 56-bit key and was cracked in 1997. The more secure 3DES is DES enhanced withthree multiple stages and effective key lengths of about 112 bits. For Junos OS in FIPS mode, 3DESis implemented with cipher block chaining (CBC).
RELATED DOCUMENTATION
Understanding FIPS Self-Tests | 89
Understanding Zeroization to Clear System Data for FIPS Mode | 32
17

Identifying Secure Product Delivery
There are several mechanisms provided in the delivery process to ensure that a customer receives a productthat has not been tampered with. The customer should perform the following checks upon receipt of adevice to verify the integrity of the platform.
• Shipping label—Ensure that the shipping label correctly identifies the correct customer name and addressas well as the device.
• Outside packaging—Inspect the outside shipping box and tape. Ensure that the shipping tape has notbeen cut or otherwise compromised. Ensure that the box has not been cut or damaged to allow accessto the device.
• Inside packaging—Inspect the plastic bag and seal. Ensure that the bag is not cut or removed. Ensurethat the seal remains intact.
If the customer identifies a problem during the inspection, he or she should immediately contact thesupplier. Provide the order number, tracking number, and a description of the identified problem to thesupplier.
Additionally, there are several checks that can be performed to ensure that the customer has received abox sent by Juniper Networks and not a different company masquerading as Juniper Networks. Thecustomer should perform the following checks upon receipt of a device to verify the authenticity of thedevice:
• Verify that the device was ordered using a purchase order. Juniper Networks devices are never shippedwithout a purchase order.
• When a device is shipped, a shipment notification is sent to the e-mail address provided by the customerwhen the order is taken. Verify that this e-mail notification was received. Verify that the e-mail containsthe following information:
• Purchase order number
• Juniper Networks order number used to track the shipment
• Carrier tracking number used to track the shipment
• List of items shipped including serial numbers
• Address and contacts of both the supplier and the customer
• Verify that the shipment was initiated by Juniper Networks. To verify that a shipment was initiated byJuniper Networks, you should perform the following tasks:
• Compare the carrier tracking number of the Juniper Networks order number listed in the JuniperNetworks shipping notification with the tracking number on the package received.
18

• Log on to the Juniper Networks online customer support portal at https://support.juniper.net/support/to view the order status. Compare the carrier tracking number or the Juniper Networks order numberlisted in the Juniper Networks shipment notificationwith the tracking number on the package received.
RELATED DOCUMENTATION
Understanding the Common Criteria Evaluated Configuration | 12
Understanding Management Interfaces
The following management interfaces can be used in the evaluated configuration:
• Local Management Interfaces—The RJ-45 console port on the rear panel of a device is configured asRS-232 data terminal equipment (DTE). You can use the command-line interface (CLI) over this port toconfigure the device from a terminal.
• Remote Management Protocols—The device can be remotely managed over any Ethernet interface.SSHv2 is the only permitted remotemanagement protocol that can be used in the evaluated configuration.The remote management protocols J-Web and Telnet are not available for use on the device in theevaluated configuration.
RELATED DOCUMENTATION
Understanding the Common Criteria Evaluated Configuration | 12
19

2CHAPTER
Configuring Roles and AuthenticationMethods
Understanding Roles and Services for Junos OS in Common Criteria and FIPS | 21
Understanding the Operational Environment for Junos OS in FIPS Mode | 23
Understanding Password Specifications and Guidelines for Junos OS in FIPSMode | 27
Downloading Software Packages from Juniper Networks | 28
Installing Software on EX Series devices with a Single Routing Engine | 29
Understanding Zeroization to Clear System Data for FIPS Mode | 32
Zeroizing the System | 33
Enabling FIPS Mode | 35
Configuring Security Administrator and FIPS User Identification and Access | 37
Understanding Roles and Services for Junos OS inCommon Criteria and FIPS
IN THIS SECTION
Security Administrator Role and Responsibilities | 22
FIPS User Role and Responsibilities | 22
What Is Expected of All FIPS Users | 22
The Security Administrator is associated with the defined login class “security-admin”, which has thenecessary permission set to allow the administrator to perform all tasks necessary to manage the JunosOS. Administrative users (Security Administrator) must provide unique identification and authenticationdata before any administrative access to the system is granted.
Security Administrator roles and responsibilities are as follows:
1. Security Administrator can administer the TOE locally and remotely.
2. Create, modify, and delete administrator accounts, including configuration of authentication failureparameters.
3. Re-enable an Administrator account.
4. Responsible for the configuration and maintenance of cryptographic elements related to theestablishment of secure connections to and from the evaluated product.
The Juniper Networks Junos operating system (Junos OS) running in non-FIPS mode allows a wide rangeof capabilities for users, and authentication is identity-based.
Security Administrator performs all FIPS-mode-related configuration tasks and issue all statements andcommands for Junos OS in FIPS mode.
21

Security Administrator Role and Responsibilities
The Security Administrator is the person responsible for enabling, configuring, monitoring, andmaintainingJunos OS in FIPS mode on a switch. The Security Administrator securely installs Junos OS on the switch,enables FIPS mode, establishes keys and passwords for other users and software modules, and initializesthe switch before network connection.
BEST PRACTICE: We recommend that the Security Administrator administer the system in asecure manner by keeping passwords secure and checking audit files.
The permissions that distinguish the Security Administrator from other FIPS users are secret, security,maintenance, and control. For FIPS compliance, assign the Security Administrator to a login class thatcontains all of these permissions.
Among the tasks related to Junos OS in FIPS mode, the Security Administrator is expected to:
• Set the initial root password. The length of the password should be at least 10 characters.
• Reset user passwords for FIPS-approved algorithms during upgrades from Junos OS.
• Examine log and audit files for events of interest.
• Erase user-generated files, keys, and data by zeroizing the switch.
FIPS User Role and Responsibilities
All FIPS users, including the Security Administrator, can view the configuration. Only the user assigned asthe Security Administrator can modify the configuration.
FIPS user can view status output but cannot reboot or zeroize the device.
What Is Expected of All FIPS Users
All FIPS users, including the Security Administrator, must observe security guidelines at all times.
All FIPS users must:
• Keep all passwords confidential.
• Store switches and documentation in a secure area.
22
• Deploy switches in secure areas.
• Check audit files periodically.
• Conform to all other FIPS 140-2 security rules.
• Follow these guidelines:
• Users are trusted.
• Users abide by all security guidelines.
• Users do not deliberately compromise security.
• Users behave responsibly at all times.
RELATED DOCUMENTATION
Zeroizing the System | 33
Configuring Security Administrator and FIPS User Identification and Access | 37
Understanding theOperational Environment for JunosOS in FIPS Mode
IN THIS SECTION
Hardware Environment for Junos OS in FIPS Mode | 24
Software Environment for Junos OS in FIPS Mode | 24
Critical Security Parameters | 25
EX Series switches running the Junos operating system (Junos OS) in FIPS mode forms a special type ofhardware and software operational environment that is different from the environment of a switch innon-FIPS mode:
23

Hardware Environment for Junos OS in FIPS Mode
Junos OS in FIPS mode establishes a cryptographic boundary in the switch that no critical securityparameters (CSPs) can cross using plain text. Each hardware component of the switch that requires acryptographic boundary for FIPS 140-2 compliance is a separate cryptographic module.
For more information about the cryptographic boundary on your switch, see “Understanding Junos OS inFIPS Mode” on page 13.
Cryptographic methods are not a substitute for physical security. The hardwaremust be located in a securephysical environment. Users of all types must not reveal keys or passwords, or allow written records ornotes to be seen by unauthorized personnel.
Software Environment for Junos OS in FIPS Mode
An EX Series switches running Junos OS in FIPS mode forms a special type of non-modifiable operationalenvironment. To achieve this environment on the switch, the system prevents the execution of any binaryfile that was not part of the certified Junos OS distribution. When a switch is in FIPS mode, it can run onlyJunos OS.
FIPS mode on EX Series switches are available starting with Junos OS Release 19.4R1. The Junos OS inFIPSmode software environment is established after the Security Administrator successfully enables FIPSmode on an EX Series switch.
For FIPS 140-2 compliance, we recommend deleting all user-created files and data from (zeroizing) thesystem immediately before enabling FIPS mode.
Enabling FIPS mode disables many of the usual Junos OS protocols and services. In particular, you cannotconfigure the following services in Junos OS in FIPS mode:
• finger
• ftp
• rlogin
• telnet
• tftp
• xnm-clear-text
Attempts to configure these services, or load configurations with these services configured, result in aconfiguration syntax error.
You can use only SSHv2 as a remote access service.
24

All passwords established for users after upgrading to Junos OS in FIPS mode must conform to Junos OSin FIPS mode specifications. Passwords must be between 10 and 20 characters in length and require theuse of at least three of the five defined character sets (uppercase and lowercase letters, digits, punctuationmarks, and keyboard characters, such as % and &, not included in the other four categories). Attempts toconfigure passwords that do not conform to these rules result in an error. All passwords and keys used toauthenticate peers must be at least 10 characters in length, and in some cases the length must match thedigest size.
NOTE: Do not attach the switch to a network until you, the Security Administrator, completethe configuration from the local console connection.
Critical Security Parameters
Critical security parameters (CSPs) are security-related information such as cryptographic keys andpasswords that can compromise the security of the cryptographicmodule or the security of the informationprotected by the module if they are disclosed or modified.
Zeroization of the system erases all traces of CSPs in preparation for operating the switch or Routing Engineas a cryptographic module.
Table 4 on page 25 lists CSPs on switches running Junos OS.
Table 4: Critical Security Parameters
UseZeroizeDescriptionCSP
Used to identify the host.Zeroize command.ECDSA / RSA key used to identify the host,generated the first time SSH is configured.
SSHv2 private hostkey
Symmetric key used toencrypt data between hostand client.
Power cycle andterminate session.
Session key used with SSHv2 and as aDiffie-Hellman private key.
Encryption: AES-128, AES-256.
MACs: HMAC-SHA-1, HMAC-SHA-2-256,HMAC-SHA2-512.
Key exchange: dh-group14-sha1,ECDH-sha2-nistp256,ECDH-sha2-nistp384, andECDH-sha2-nistp521.
SSHv2 session keys
25
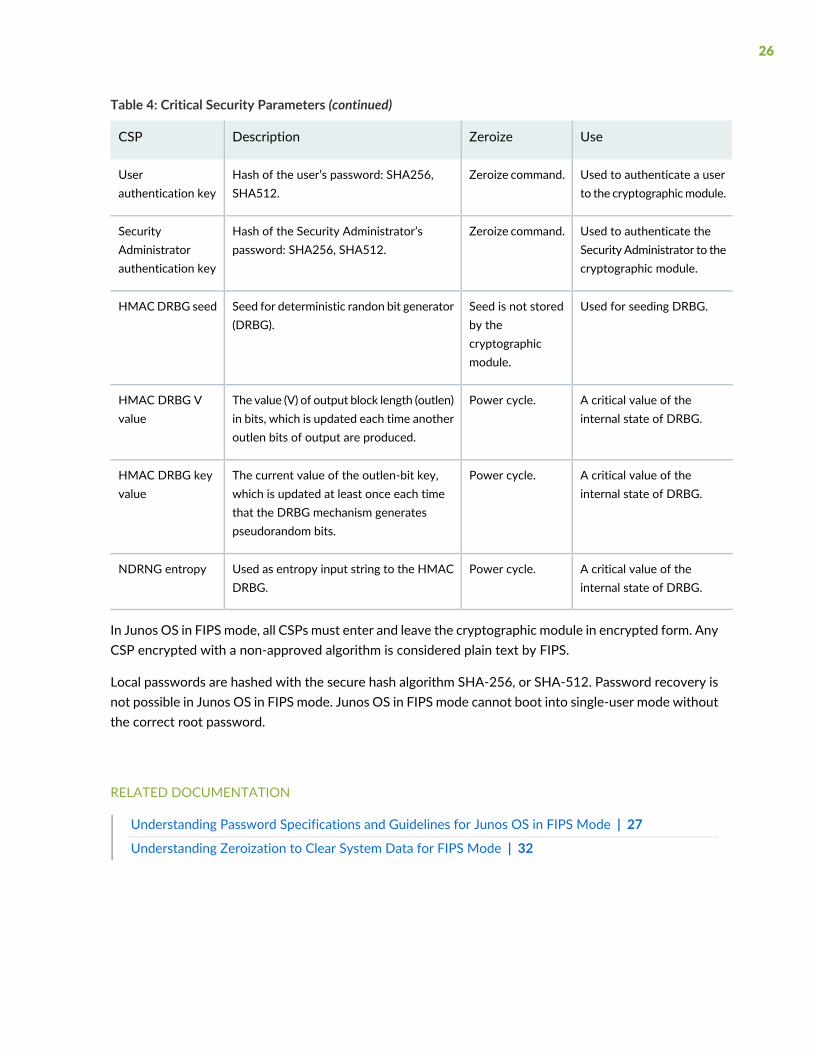
Table 4: Critical Security Parameters (continued)
UseZeroizeDescriptionCSP
Used to authenticate a userto the cryptographicmodule.
Zeroize command.Hash of the user’s password: SHA256,SHA512.
Userauthentication key
Used to authenticate theSecurity Administrator to thecryptographic module.
Zeroize command.Hash of the Security Administrator’spassword: SHA256, SHA512.
SecurityAdministratorauthentication key
Used for seeding DRBG.Seed is not storedby thecryptographicmodule.
Seed for deterministic randon bit generator(DRBG).
HMACDRBG seed
A critical value of theinternal state of DRBG.
Power cycle.The value (V) of output block length (outlen)in bits, which is updated each time anotheroutlen bits of output are produced.
HMAC DRBG Vvalue
A critical value of theinternal state of DRBG.
Power cycle.The current value of the outlen-bit key,which is updated at least once each timethat the DRBG mechanism generatespseudorandom bits.
HMAC DRBG keyvalue
A critical value of theinternal state of DRBG.
Power cycle.Used as entropy input string to the HMACDRBG.
NDRNG entropy
In Junos OS in FIPS mode, all CSPs must enter and leave the cryptographic module in encrypted form. AnyCSP encrypted with a non-approved algorithm is considered plain text by FIPS.
Local passwords are hashed with the secure hash algorithm SHA-256, or SHA-512. Password recovery isnot possible in Junos OS in FIPS mode. Junos OS in FIPS mode cannot boot into single-user mode withoutthe correct root password.
RELATED DOCUMENTATION
Understanding Password Specifications and Guidelines for Junos OS in FIPS Mode | 27
Understanding Zeroization to Clear System Data for FIPS Mode | 32
26

UnderstandingPasswordSpecifications andGuidelinesfor Junos OS in FIPS Mode
Ensure that the switch is in FIPS mode before you configure the Security Administrator or any users. Allpasswords established for users by the Security Administrator must conform to the following Junos OSin FIPS mode requirements. Attempts to configure passwords that do not conform to the followingspecifications result in an error.
• Length. Passwords must contain between 10 and 20 characters.
• Character set requirements. Passwordsmust contain at least three of the following five defined charactersets:
• Uppercase letters
• Lowercase letters
• Digits
• Punctuation marks
• Keyboard characters not included in the other four sets—such as the percent sign (%) and the ampersand(&)
• Authentication requirements. All passwords and keys used to authenticate peers must contain at least10 characters, and in some cases the number of characters must match the digest size—for example,20 characters for SHA-1 authentication.
Guidelines for strong passwords. Strong, reusable passwords can be based on letters from a favorite phraseor word and then concatenated with other unrelated words, along with added digits and punctuation. Ingeneral, a strong password is:
• Easy to remember so that users are not tempted to write it down.
• Made up of mixed alphanumeric characters and punctuation. For FIPS compliance include at least onechange of case, one or more digits, and one or more punctuation marks.
• Changed periodically.
• Not divulged to anyone.
Characteristics of weak passwords. Do not use the following weak passwords:
• Words that might be found in or exist as a permuted form in a system files such as /etc/passwd.
• The hostname of the system (always a first guess).
• Any word or phrase that appears in a dictionary or other well-known source, including dictionaries andthesauruses in languages other than English; works by classical or popular writers; or common wordsand phrases from sports, sayings, movies or television shows.
27

• Permutations on any of the above—for example, a dictionary wordwith letters replacedwith digits (root)or with digits added to the end.
• Any machine-generated password. Algorithms reduce the search space of password-guessing programsand so must not be used.
RELATED DOCUMENTATION
Understanding the Operational Environment for Junos OS in FIPS Mode | 23
Downloading Software Packages from JuniperNetworks
You can download the following Junos OS software packages for EX Series switches from the JuniperNetworks website:
• Junos OS for EX4300-48MP switches, Release 19.4R1
Before you begin to download the software, ensure that you have a Juniper Networks Web account anda valid support contract. To obtain an account, complete the registration form at the Juniper Networkswebsite: https://userregistration.juniper.net/entitlement/setupAccountInfo.do.
To download software packages from Juniper Networks:
1. Using a Web browser, follow the links to the download URL on the Juniper Networks webpage.
https://www.juniper.net/support/downloads/junos.html
2. Log in to the Juniper Networks authentication system using the username (generally your e-mail address)and password supplied by Juniper Networks representatives.
3. Select the software package that youwant to download. You can select software that supports a specificplatform or technology.:
• For Junos OS package, ensure that the name contains the correct switch name and Junos OS release.
For EX4300-48MP, the image is jinstall-host-ex-4300mp-x86-64-19.4R1-secure-signed.tgz.
4. Download the software to a local host or to an internal software distribution site.
5. Install the Junos OS. See “Installing Software on EX Series devices with a Single Routing Engine” onpage 29.
28

RELATED DOCUMENTATION
Installing Software on EX Series devices with a Single Routing Engine | 29
Installing Software on EX Series devices with a SingleRouting Engine
You can use this procedure to upgrade Junos OS on switch with a single Routing Engine.
To install software upgrades on a switch with a single Routing Engine:
1. Download the software package as described in “Downloading Software Packages from JuniperNetworks” on page 28.
2. If you have not already done so, connect to the console port on the switch from your managementdevice, and log in to the Junos OS CLI. (For instructions, see Configuring Junos OS on the EX4300 forEX4300-48MP Series devices.
3. (Optional) Back up the current software configuration to a second storage option. See the Junos OSInstallation and Upgrade Guide for instructions on performing this task.
4. (Optional) Copy the software package to the switch. We recommend that you use FTP to copy the fileto the /var/tmp/ directory.
This step is optional because Junos OS can also be upgraded when the software image is stored at aremote location. These instructions describe the software upgrade process for both scenarios.
5. Install the new package on the switch:
user@switch> request system software add <package>
Replace package with one of the following paths:
• For a software package in a local directory on the switch, use /var/tmp/package.tgz.
• For a software package on a remote server, use one of the following paths, replacing package withthe software package name—for example, jinstall-host-ex-4300mp-x86-64-19.4R1-secure-signed.tgz.
• ftp://hostname/pathname/package.tgz
• http://hostname/pathname/package.tgz
29
6. Reboot the switch to load the installation and start the new software:
user@switch> request system reboot
7. After the reboot has completed, log in and use the show version local command to verify that the newversion of the software is successfully installed.
user@switch:> show version local
Hostname: hostname
Model: ex4300-48mp
Junos: 19.4R1
JUNOS OS Kernel 64-bit [20191115.14c2ad5_builder_stable_11]
JUNOS OS libs [20191115.14c2ad5_builder_stable_11]
JUNOS OS runtime [20191115.14c2ad5_builder_stable_11]
JUNOS OS time zone information [20191115.14c2ad5_builder_stable_11]
JUNOS OS libs compat32 [20191115.14c2ad5_builder_stable_11]
JUNOS OS 32-bit compatibility [20191115.14c2ad5_builder_stable_11]
JUNOS py extensions2 [20191119.064603_builder_junos_194_r1]
JUNOS py extensions [20191119.064603_builder_junos_194_r1]
JUNOS py base2 [20191119.064603_builder_junos_194_r1]
JUNOS py base [20191119.064603_builder_junos_194_r1]
JUNOS OS vmguest [20191115.14c2ad5_builder_stable_11]
JUNOS OS crypto [20191115.14c2ad5_builder_stable_11]
JUNOS network stack and utilities [20191119.064603_builder_junos_194_r1]
JUNOS libs [20191119.064603_builder_junos_194_r1]
JUNOS libs compat32 [20191119.064603_builder_junos_194_r1]
JUNOS runtime [20191119.064603_builder_junos_194_r1]
JUNOS na telemetry [19.4R1.1]
JUNOS Web Management Platform Package [20191119.064603_builder_junos_194_r1]
JUNOS qfx runtime [20191119.064603_builder_junos_194_r1]
JUNOS common platform support [20191119.064603_builder_junos_194_r1]
JUNOS qfx platform support [20191119.064603_builder_junos_194_r1]
JUNOS Openconfig [19.4R1.1]
JUNOS dcp network modules [20191119.064603_builder_junos_194_r1]
JUNOS modules [20191119.064603_builder_junos_194_r1]
JUNOS qfx modules [20191119.064603_builder_junos_194_r1]
JUNOS qfx Data Plane Crypto Support [20191119.064603_builder_junos_194_r1]
JUNOS daemons [20191119.064603_builder_junos_194_r1]
JUNOS qfx daemons [20191119.064603_builder_junos_194_r1]
JUNOS Services URL Filter package [20191119.064603_builder_junos_194_r1]
JUNOS Services TLB Service PIC package [20191119.064603_builder_junos_194_r1]
JUNOS Services Telemetry [20191119.064603_builder_junos_194_r1]
JUNOS Services TCP-LOG [20191119.064603_builder_junos_194_r1]
JUNOS Services SSL [20191119.064603_builder_junos_194_r1]
30

JUNOS Services SOFTWIRE [20191119.064603_builder_junos_194_r1]
JUNOS Services Stateful Firewall [20191119.064603_builder_junos_194_r1]
JUNOS Services RTCOM [20191119.064603_builder_junos_194_r1]
JUNOS Services RPM [20191119.064603_builder_junos_194_r1]
JUNOS Services PCEF package [20191119.064603_builder_junos_194_r1]
JUNOS Services NAT [20191119.064603_builder_junos_194_r1]
JUNOS Services Mobile Subscriber Service Container package
[20191119.064603_builder_junos_194_r1]
JUNOS Services MobileNext Software package [20191119.064603_builder_junos_194_r1]
JUNOS Services Logging Report Framework package
[20191119.064603_builder_junos_194_r1]
JUNOS Services LL-PDF Container package [20191119.064603_builder_junos_194_r1]
JUNOS Services Jflow Container package [20191119.064603_builder_junos_194_r1]
JUNOS Services Deep Packet Inspection package
[20191119.064603_builder_junos_194_r1]
JUNOS Services IPSec [20191119.064603_builder_junos_194_r1]
JUNOS Services IDS [20191119.064603_builder_junos_194_r1]
JUNOS IDP Services [20191119.064603_builder_junos_194_r1]
JUNOS Services HTTP Content Management package
[20191119.064603_builder_junos_194_r1]
JUNOS Services Crypto [20191119.064603_builder_junos_194_r1]
JUNOS Services Captive Portal and Content Delivery Container package
[20191119.064603_builder_junos_194_r1]
JUNOS Services COS [20191119.064603_builder_junos_194_r1]
JUNOS AppId Services [20191119.064603_builder_junos_194_r1]
JUNOS Services Application Level Gateways [20191119.064603_builder_junos_194_r1]
JUNOS Services AACL Container package [20191119.064603_builder_junos_194_r1]
JUNOS SDN Software Suite [20191119.064603_builder_junos_194_r1]
JUNOS Extension Toolkit [20191119.064603_builder_junos_194_r1]
JUNOS Phone-home [20191119.064603_builder_junos_194_r1]
JUNOS Packet Forwarding Engine Support (DC-PFE)
[20191119.064603_builder_junos_194_r1]
JUNOS Packet Forwarding Engine Support (M/T Common)
[20191119.064603_builder_junos_194_r1]
JUNOS Juniper Malware Removal Tool (JMRT)
[1.0.0+20191119.064603_builder_junos_194_r1]
JUNOS J-Insight [20191119.064603_builder_junos_194_r1]
JUNOS jfirmware [20191119.064603_builder_junos_194_r1]
JUNOS Online Documentation [20191119.064603_builder_junos_194_r1]
JUNOS jail runtime [20191115.14c2ad5_builder_stable_11]
JUNOS FIPS mode utilities [20191119.064603_builder_junos_194_r1]
JUNOS Host Software [3.14.52-rt50-WR7.0.0.9_ovp:3.1.0]
JUNOS Host ex-4300mp control-plane package [19.4R1.1]
JUNOS Host ex-4300mp platform package [19.4R1.1]
31

JUNOS Host ex-4300mp data-plane package [19.4R1.1]
JUNOS Host ex-4300mp base package [19.4R1.1]
RELATED DOCUMENTATION
Troubleshooting Software Installation
Understanding Software Installation on EX Series Switches
Understanding Zeroization to Clear System Data forFIPS Mode
IN THIS SECTION
Why Zeroize? | 33
When to Zeroize? | 33
Zeroization completely erases all configuration information on the Routing Engines, including all plain-textpasswords, secrets, and private keys for SSH, local encryption, and local authentication.
The Security Administrator initiates the zeroization process by entering the request system zeroizeoperational command from the CLI after enabling FIPS mode. Use of this command is restricted to theSecurity Administrator.
In reference to cryptographic key destruction, TOE does not support delayed key destruction.
CAUTION: Perform system zeroization with care. After the zeroization process iscomplete, no data is left on the Routing Engine. The switch is returned to the factorydefault state, without any configured users or configuration files.
Zeroization can be time-consuming. Although all configurations are removed in a few seconds, thezeroization process goes on to overwrite all media, which can take considerable time depending on thesize of the media.
32

Why Zeroize?
Your switch is not considered a valid FIPS cryptographic module until all critical security parameters (CSPs)have been entered—or reentered—while the switch is in FIPSmode. Youmust zeroize the system to removesensitive information before disabling FIPS mode on the device.
When to Zeroize?
As Security Administrator, perform zeroization in the following situations:
• Before Enabling FIPS mode of operation: To prepare your switch for operation as a FIPS cryptographicmodule, perform zeroization before enabling FIPS mode.
• Before repurposing to non-FIPS mode of operation: To begin repurposing your switch for non-FIPSmode of operation, perform zeroization before disabling FIPS mode on the switch.
NOTE: Juniper Networks does not support installing non-FIPS software in a FIPS environment,but doing so might be necessary in certain test environments. Be sure to zeroize the systemfirst.
RELATED DOCUMENTATION
Zeroizing the System | 33
Enabling FIPS Mode | 35
Zeroizing the System
To zeroize your switch:
1. Log in to the switch as Security Administrator and from the CLI, enter
security-administrator@switch> request system zeroize
warning: System will be rebooted and may not boot without configuration
Erase all data, including configuration and log files? [yes, no] (no)
33

2. To initiate the zeroization process, type yes at the prompt:
Erase all data, including configuration and log files? [yes, no] (no)
yeswarning: zeroizing localre
The entire operation can take considerable time depending on the size of the media, but all criticalsecurity parameters (CSPs) are removed within a few seconds. The physical environment must remainsecure until the zeroization process is complete.
RELATED DOCUMENTATION
Enabling FIPS Mode | 35
Understanding Zeroization to Clear System Data for FIPS Mode | 32
34

Enabling FIPS Mode
FIPS mode is not automatically enabled when you install Junos OS on the switch.
As Security Administrator, you must establish a root password conforming to the FIPS passwordrequirements in “Understanding Password Specifications and Guidelines for Junos OS in FIPS Mode” onpage 27. When you enable FIPS mode in Junos OS on the device, you cannot configure passwords unlessthey meet this standard.
Local passwords are encrypted with the secure hash algorithm SHA256 or SHA512. Password recoveryis not possible in JunosOS in FIPSmode. JunosOS in FIPSmode cannot boot into single-user modewithoutthe correct root password.
NOTE: To transition to FIPS mode, passwords must be encrypted with a FIPS-compliant hashalgorithm. The encryption format must be SHA-1 or higher. Passwords that do not meet thisrequirement, such as passwords that are hashed with MD5, must be reconfigured or removedfrom the configuration before FIPS mode can be enabled.
To enable FIPS mode in Junos OS on the device:
1. Zeroize the device to delete all CSPs before entering FIPS mode. Refer to “Understanding Zeroizationto Clear System Data for FIPS Mode” on page 32 section for details.
2. After the device comes up in ’Amnesiac mode’, login using username root and password "" (blank).
FreeBSD/amd64 (Amnesiac) (ttyu0)login: rootPassword:
--- JUNOS 19.4R1.1 Kernel 64-bit JNPR-11.0-20191115.14c2ad5_buil
root@:~ # cliroot>
3. Configure root authentication with password at least 10 characters or more.
root> editEntering configuration mode
[edit]root# set system root-authentication plain-text-password
New password:
Retype new password:
35

[edit]root# commit
configuration check succeeds
commit complete
4. Load configuration onto device and commit new configuration.
5. Configure security-administrator and login with security-administrator credentials.
6. Configure chassis boundary fips by setting set system fips level 1 and commit.
NOTE: The devicemight display the Encrypted-passwordmust be re-configured to use FIPScompliant hash warning to delete older CSPs in loaded configuration.
7. After deleting and reconfiguring CSPs, commit will go through and switch needs reboot to enter FIPSmode.
[edit]security-administrator@hostname# commit[edit]
'system’
warning: reboot is required to transition to FIPS level 1
commit complete
[edit]security-administrator@switch# run request system reboot
8. After rebooting the device, FIPS self-tests will run and device enters FIPS mode.
security-administrator@hostname:fips>
NOTE: Use “local” keyword for operational commands in FIPSmode. For example, showversionlocal, and show system uptime local.
RELATED DOCUMENTATION
36
Configuring Security Administrator and FIPS UserIdentification and Access
IN THIS SECTION
Configuring Security Administrator Login Access | 37
Configuring FIPS User Login Access | 38
Security Administrator and FIPS users perform all configuration tasks for Junos OS in FIPS mode and issueall Junos OS in FIPSmode statements and commands. Security Administrator and FIPS user configurationsmust follow Junos OS in FIPS mode guidelines.
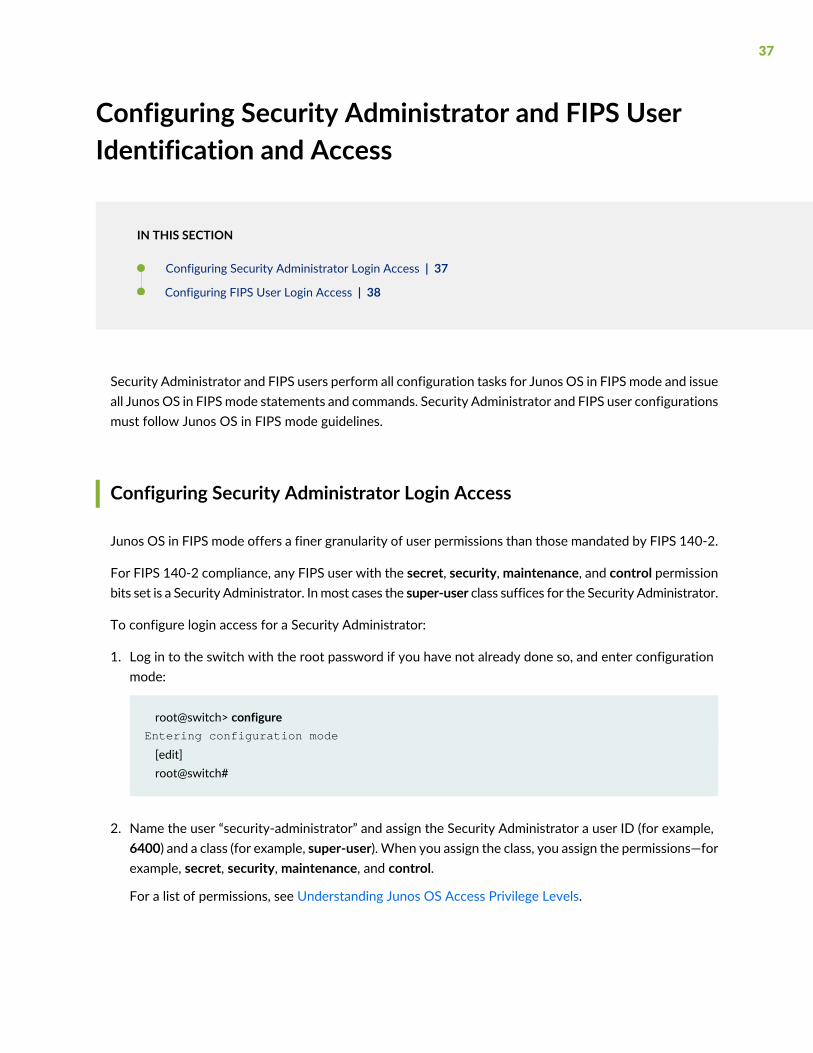
Configuring Security Administrator Login Access
Junos OS in FIPS mode offers a finer granularity of user permissions than those mandated by FIPS 140-2.
For FIPS 140-2 compliance, any FIPS user with the secret, security,maintenance, and control permissionbits set is a Security Administrator. Inmost cases the super-user class suffices for the Security Administrator.
To configure login access for a Security Administrator:
1. Log in to the switch with the root password if you have not already done so, and enter configurationmode:
root@switch> configureEntering configuration mode
[edit]root@switch#
2. Name the user “security-administrator” and assign the Security Administrator a user ID (for example,6400) and a class (for example, super-user). When you assign the class, you assign the permissions—forexample, secret, security, maintenance, and control.
For a list of permissions, see Understanding Junos OS Access Privilege Levels.
37
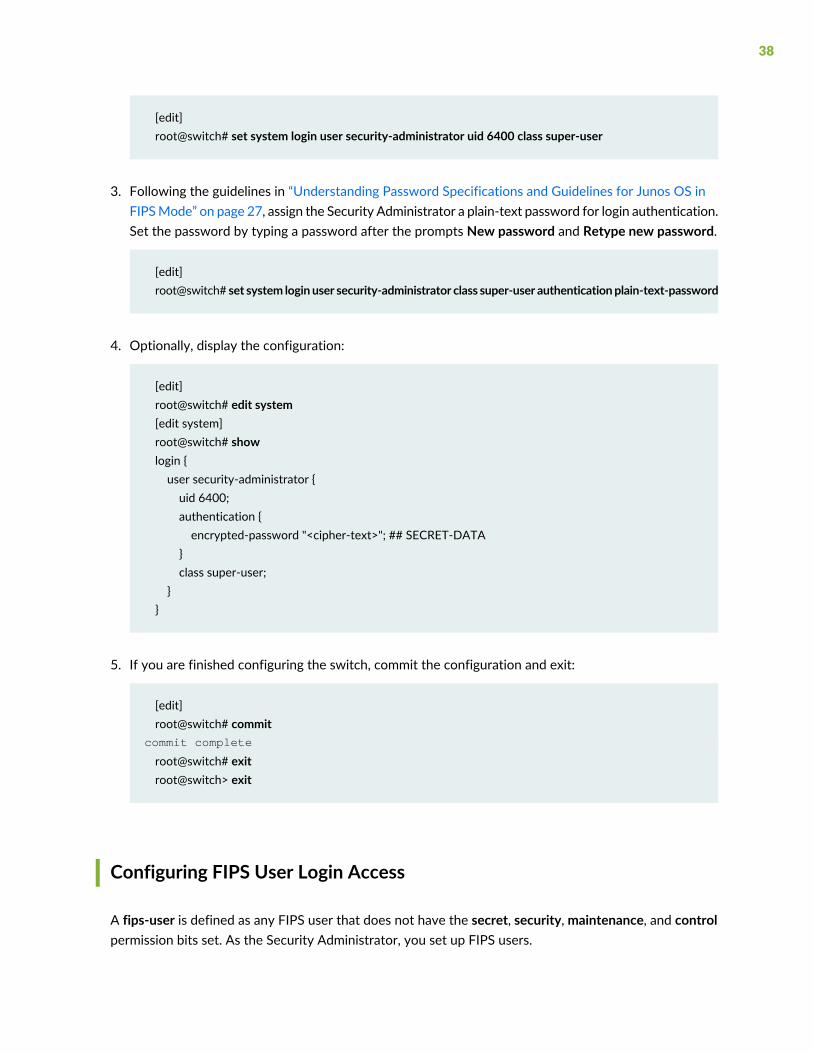
[edit]root@switch# set system login user security-administrator uid 6400 class super-user
3. Following the guidelines in “Understanding Password Specifications and Guidelines for Junos OS inFIPSMode” on page 27, assign the Security Administrator a plain-text password for login authentication.Set the password by typing a password after the prompts New password and Retype new password.
[edit]root@switch# set system login user security-administrator class super-user authenticationplain-text-password
4. Optionally, display the configuration:
[edit]root@switch# edit system[edit system]root@switch# showlogin {user security-administrator {uid 6400;authentication {encrypted-password "<cipher-text>"; ## SECRET-DATA
}class super-user;
}}
5. If you are finished configuring the switch, commit the configuration and exit:
[edit]root@switch# commit
commit complete
root@switch# exitroot@switch> exit
Configuring FIPS User Login Access
A fips-user is defined as any FIPS user that does not have the secret, security,maintenance, and controlpermission bits set. As the Security Administrator, you set up FIPS users.
38

To configure login access for a FIPS user:
1. Log in to the switch with your Security Administrator password if you have not already done so, andenter configuration mode:
security-administrator@switch:fips> configureEntering configuration mode
[edit]security-administrator@switch:fips#
2. Give the user a username, assign the FIPS user a user ID (for example 6401) and a class (for example ,read-only). When you assign the class, you assign the permissions—for example, clear, network,resetview, and view-configuration.
For a list of permissions, see Understanding Junos OS Access Privilege Levels.
[edit]security-administrator@switch:fips# set system login user fips-user1 uid 6401 class read-only
3. Following the guidelines in “Understanding Password Specifications and Guidelines for Junos OS inFIPS Mode” on page 27, assign the FIPS user a plain-text password for login authentication. Set thepassword by typing a password after the prompts New password and Retype new password.
[edit]security-administrator@switch:fips# set system login user fips-user1 class operator authenticationplain-text-password
4. Optionally, display the configuration:
[edit]security-administrator@switch:fips# edit system[edit system]security-administrator@switch:fips# showlogin {user fips-user1 {uid 6401;authentication {encrypted-password "<cipher-text>"; ## SECRET-DATA
}read-only;
}}
39

5. If you are finished configuring the switch, commit the configuration and exit:
[edit]security-administrator@switch:fips# commitsecurity-administrator@switch:fips> exit
RELATED DOCUMENTATION
Understanding Roles and Services for Junos OS in Common Criteria and FIPS | 21
40

3CHAPTER
Configuring Administrative Credentialsand Privileges
Understanding the Associated Password Rules for an Authorized Administrator | 42
Configuring a Network Device collaborative Protection Profile for an AuthorizedAdministrator | 44
Configuring Inactivity Timeout Period, and Terminating Local and Remote IdleSession | 46

Understanding the Associated Password Rules for anAuthorized Administrator
The authorized administrator is associated with a defined login class, and the administrator is assignedwith all permissions. Data is stored locally for fixed password authentication.
NOTE: We recommend that you not use control characters in passwords.
Use the following guidelines and configuration options for passwords and when selecting passwords forauthorized administrator accounts. Passwords should be:
• Easy to remember so that users are not tempted to write it down.
• Changed periodically.
• Private and not shared with anyone.
• Contain a minimum of 10 characters. The minimum password length is 10 characters.
• Include both alphanumeric and punctuation characters, composed of any combination of upper andlowercase letters, numbers, and special characters such as, “!”, “@”, “#”, “$”, “%”, “^”, “&”, “*”, “(“, and “)”.There should be at least a change in one case, one or more digits, and one or more punctuation marks.
• Contain character sets. Valid character sets include uppercase letters, lowercase letters, numbers,punctuation, and other special characters.
[ edit ]security-administrator@switch:fips# set system login password change-type character-sets
• Contain the minimum number of character sets or character set changes. The minimum number ofcharacter sets required in plain-text passwords in Junos FIPS is 3.
[ edit ]security-administrator@switch:fips# set system login password minimum-changes 3
• Contain the minimum number of characters required for a password. By default, Junos OS passwordsmust be at least 10 characters long. The valid range for this option is 10 to 20 characters.
[ edit ]security-administrator@switch:fips# set system login password minimum-length 10
42

The hashing algorithm for user passwords can be either SHA256 or SHA512 (SHA512 is the default hashingalgorithm).
[ edit ]security-administrator@switch:fips# set system login password format sha512
NOTE: The device supports ECDSA (P-256, P-384, and P-521) and RSA (2048, 3072, and 4092modulus bit length) key-types.
NOTE: The new hash algorithm affect only those passwords that are generated after commit.
Weak passwords are:
• Words that might be found in or exist as a permuted form in a system file such as /etc/passwd.
• The hostname of the system (always a first guess).
• Any words appearing in a dictionary. This includes dictionaries other than English, and words found inworks such as Shakespeare, Lewis Carroll, Roget's Thesaurus, and so on. This prohibition includes commonwords and phrases from sports, sayings, movies, and television shows.
• Permutations on any of the above. For example, a dictionary word with vowels replaced with digits (forexample f00t) or with digits added to the end.
• Anymachine-generated passwords. Algorithms reduce the search space of password-guessing programsand so should not be used.
Strong reusable passwords can be based on letters from a favorite phrase or word, and then concatenatedwith other, unrelated words, along with additional digits and punctuation.
NOTE: Passwords should be changed periodically.
RELATED DOCUMENTATION
Identifying Secure Product Delivery | 18
43
Configuring aNetworkDevice collaborativeProtectionProfile for an Authorized Administrator
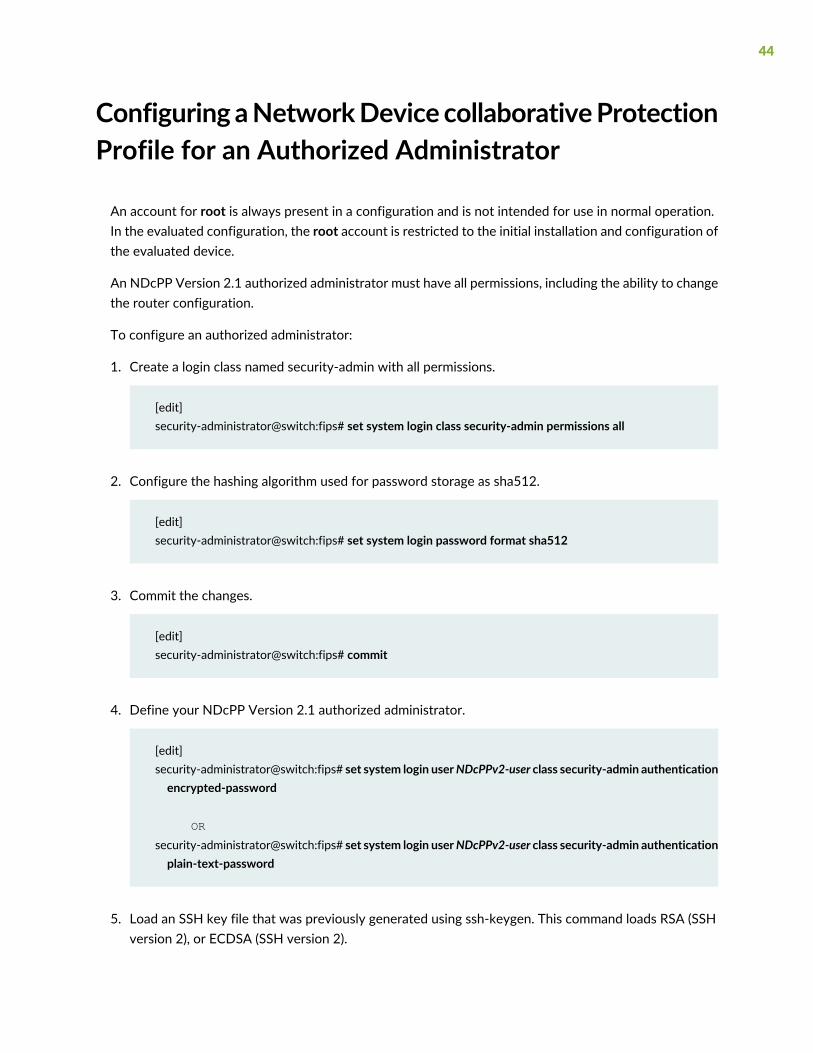
An account for root is always present in a configuration and is not intended for use in normal operation.In the evaluated configuration, the root account is restricted to the initial installation and configuration ofthe evaluated device.
An NDcPP Version 2.1 authorized administrator must have all permissions, including the ability to changethe router configuration.
To configure an authorized administrator:
1. Create a login class named security-admin with all permissions.
[edit]security-administrator@switch:fips# set system login class security-admin permissions all
2. Configure the hashing algorithm used for password storage as sha512.
[edit]security-administrator@switch:fips# set system login password format sha512
3. Commit the changes.
[edit]security-administrator@switch:fips# commit
4. Define your NDcPP Version 2.1 authorized administrator.
[edit]security-administrator@switch:fips# set system login userNDcPPv2-user class security-admin authenticationencrypted-password
OR
security-administrator@switch:fips# set system login userNDcPPv2-user class security-admin authenticationplain-text-password
5. Load an SSH key file that was previously generated using ssh-keygen. This command loads RSA (SSHversion 2), or ECDSA (SSH version 2).
44

[edit]security-administrator@switch:fips# set system root-authentication load-key-file url:filename
6. Set the log-key-changes configuration statement to log when SSH authentication keys are added orremoved.
[edit]security-administrator@switch:fips# set system services ssh log-key-changes
NOTE: When the log-key-changes configuration statement is enabled and committed (withthe commit command in configuration mode), Junos OS logs the changes to the set ofauthorized SSH keys for each user (including the keys that were added or removed). JunosOS logs the differences since the last time the log-key-changes configuration statement wasenabled. If the log-key-changes configuration statement was never enabled, then Junos OSlogs all the authorized SSH keys.
7. Commit the changes.
[edit]security-administrator@switch:fips# commit
NOTE: The root password should be reset following the change to sha256 / sha512 for thepassword storage format. This ensures the new password is protected using a sha256 /sha512 hash. To reset the root password, use set system root-authenticationplain-text-password password command, and confirm the new password when prompted.
RELATED DOCUMENTATION
Understanding the Associated Password Rules for an Authorized Administrator | 42
45

Configuring InactivityTimeoutPeriod, andTerminatingLocal and Remote Idle Session
IN THIS SECTION
Configuring Session Termination | 46
Sample Output for Local Administrative Session Termination | 47
Sample Output for Remote Administrative Session Termination | 48
Sample Output for User Initiated Termination | 48
Configuring Session Termination
Terminate the session after the security administrator specifies inactive timeout period.
1. Set the idle timeout.
[edit]security-administrator@switch:fips# set system login class security-admin idle-timeout 2
2. Configure the login access privileges.
[edit]security-administrator@switch:fips# set system login class security-admin permissions all
3. Commit the configuration.
[edit]security-administrator@switch:fips# commit
commit complete
4. Set the password.
46

[edit]security-administrator@switch:fips#set system login userNDcPPv2-user authentication plain-text-passwordNew password:Retype new password:
5. Define login class.
[edit]security-administrator@switch:fips# set system login user NDcPPv2-user class security-admin
6. Commit the configuration.
[edit]security-administrator@switch:fips# commit
commit complete
Sample Output for Local Administrative Session Termination
con switch
Trying a.b.c.d...
'autologin': unknown argument ('set ?' for help).
Connected to device.example.com
Escape character is '^]'.
Type the hot key to suspend the connection: <CTRL>Z
FreeBSD/amd64 (switch) (ttyu0)
login: NDcPPv2-user
Password:
Last login: Sun Oct 23 22:42:27 from 10.224.33.70
--- JUNOS 19.4R1.4 Kernel 64-bit JNPR-11.0-20190316.df99236_buil
NDcPPv2-user@switch> Warning: session will be closed in 1 minute if there is no
activity
Warning: session will be closed in 10 seconds if there is no activity
Idle timeout exceeded: closing session
47

FreeBSD/amd64 (switch) (ttyu0)
Sample Output for Remote Administrative Session Termination
ssh NDcPPv2-user@switch
Password:
Last login: Sun Oct 23 22:48:05 2019
--- JUNOS 19.4R1.4 Kernel 64-bit JNPR-11.0-20190316.df99236_buil
NDcPPv2-user@switch> exit
Connection to switch closed.
ssh NDcPPv2-user@switch
Password:
Last login: Sun Oct 23 22:50:50 2019 from 10.224.33.70
--- JUNOS 19.4R1.6 Kernel 64-bit JNPR-11.0-20190316.df99236_buil
NDcPPv2-user@switch> Warning: session will be closed in 1 minute if there is no
activity
Warning: session will be closed in 10 seconds if there is no activity
Idle timeout exceeded: closing session
Connection to switch closed.
Sample Output for User Initiated Termination
ssh NDcPPv2-user@switch
Password:
Last login: Sun Oct 23 22:48:05 2019
--- JUNOS 19.4R1.4 Kernel 64-bit JNPR-11.0-20190316.df99236_buil
NDcPPv2-user@switch> exit
Connection to switch closed.
48

4CHAPTER
Configuring SSH and ConsoleConnection
Configuring a System Login Message and Announcement | 50
Configuring SSH on the Evaluated Configuration for NDcPPv2.1 | 51
Limiting the Number of User Login Attempts for SSH Sessions | 53

Configuring a System Login Message andAnnouncement
A login message appears before the user logs in and an announcement appears after the user logs in. Bydefault, no login message or announcement is displayed on the device.
To configure a system loginmessage through console ormanagement interface, use the following command:
[edit]security-administrator@switch:fips# set system login message login-message-banner-text
To configure system announcement, use the following command:
[edit]security-administrator@switch:fips# set system login announcement system-announcement-text
NOTE:• If the message text contains any spaces, enclose it in quotation marks.
• You can format the message using the following special characters:
• \n—New line
• \t—Horizontal tab
• \'—Single quotation mark
• \"—Double quotation mark
• \\—Backslash
RELATED DOCUMENTATION
Configuring SSH on the Evaluated Configuration for NDcPPv2.1 | 51
50
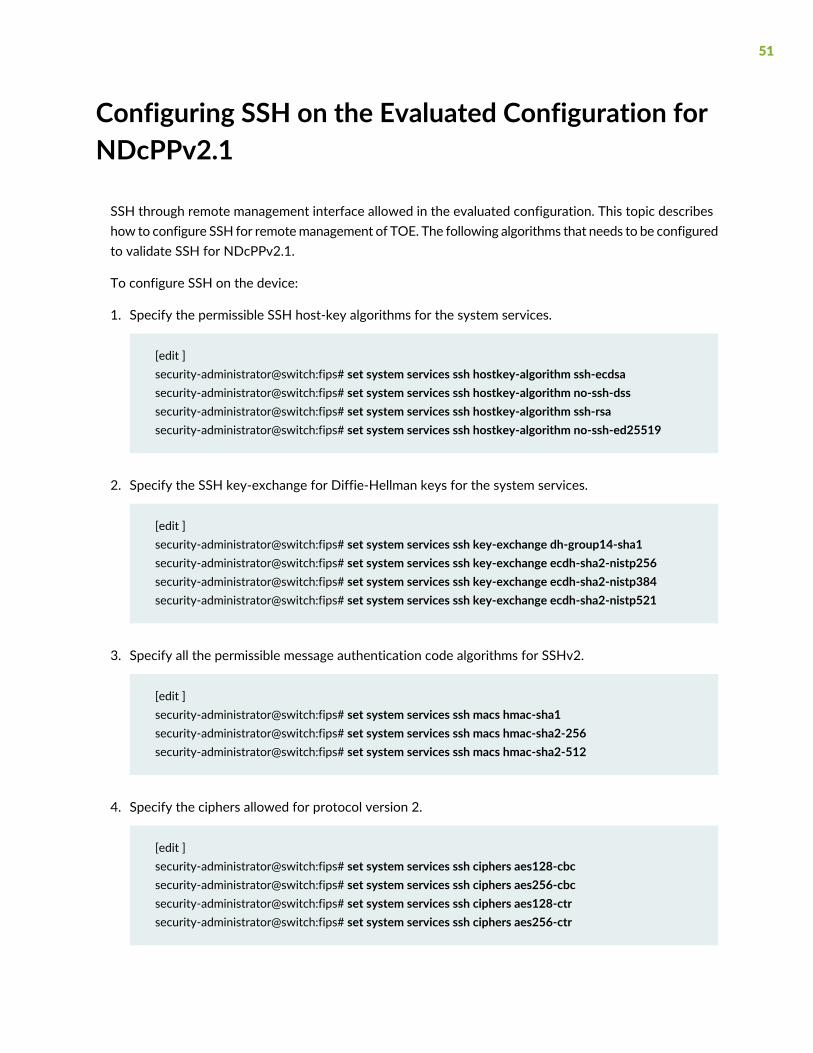
Configuring SSH on the Evaluated Configuration forNDcPPv2.1
SSH through remote management interface allowed in the evaluated configuration. This topic describeshow to configure SSH for remotemanagement of TOE. The following algorithms that needs to be configuredto validate SSH for NDcPPv2.1.
To configure SSH on the device:
1. Specify the permissible SSH host-key algorithms for the system services.
[edit ]security-administrator@switch:fips# set system services ssh hostkey-algorithm ssh-ecdsasecurity-administrator@switch:fips# set system services ssh hostkey-algorithm no-ssh-dsssecurity-administrator@switch:fips# set system services ssh hostkey-algorithm ssh-rsasecurity-administrator@switch:fips# set system services ssh hostkey-algorithm no-ssh-ed25519
2. Specify the SSH key-exchange for Diffie-Hellman keys for the system services.
[edit ]security-administrator@switch:fips# set system services ssh key-exchange dh-group14-sha1security-administrator@switch:fips# set system services ssh key-exchange ecdh-sha2-nistp256security-administrator@switch:fips# set system services ssh key-exchange ecdh-sha2-nistp384security-administrator@switch:fips# set system services ssh key-exchange ecdh-sha2-nistp521
3. Specify all the permissible message authentication code algorithms for SSHv2.
[edit ]security-administrator@switch:fips# set system services ssh macs hmac-sha1security-administrator@switch:fips# set system services ssh macs hmac-sha2-256security-administrator@switch:fips# set system services ssh macs hmac-sha2-512
4. Specify the ciphers allowed for protocol version 2.
[edit ]security-administrator@switch:fips# set system services ssh ciphers aes128-cbcsecurity-administrator@switch:fips# set system services ssh ciphers aes256-cbcsecurity-administrator@switch:fips# set system services ssh ciphers aes128-ctrsecurity-administrator@switch:fips# set system services ssh ciphers aes256-ctr
51

Supported SSH hostkey algorithm:
ssh-ecdsa Allow generation of ECDSA host-key
ssh-rsa Allow generation of RSA host-key
Supported SSH key-exchange algorithm:
dh-group14-sha1 The RFC 4253 mandated group14 with SHA1 hash
ecdh-sha2-nistp256 The EC Diffie-Hellman on nistp256 with SHA2-256
ecdh-sha2-nistp384 The EC Diffie-Hellman on nistp384 with SHA2-384
ecdh-sha2-nistp521 The EC Diffie-Hellman on nistp521 with SHA2-512
Supported MAC algorithm:
hmac-sha1 Hash-based MAC using Secure Hash Algorithm (SHA1)
hmac-sha2-256 Hash-based MAC using Secure Hash Algorithm (SHA2)
hmac-sha2-512 Hash-based MAC using Secure Hash Algorithm (SHA2)
Supported SSH ciphers algorithm:
aes128-cbc 128-bit AES with Cipher Block Chaining
aes128-ctr 128-bit AES with Counter Mode
aes256-cbc 256-bit AES with Cipher Block Chaining
aes256-ctr 256-bit AES with Counter Mode
RELATED DOCUMENTATION
Limiting the Number of User Login Attempts for SSH Sessions | 53
52

Limiting the Number of User Login Attempts for SSHSessions
An administrator may login remotely to a device through SSH. Administrator credentials are stored locallyon the device. If the administrator presents a valid username and password, access to the Target ofEvaluation (TOE) is granted. If the credentials are invalid, the TOE allows the authentication to be retriedafter an interval that starts after 1 second and increases exponentially. If the number of authenticationattempts exceed the configured maximum, no authentication attempts are accepted for a configured timeinterval. When the interval expires, authentication attempts are again accepted.
You configure the amount of time the device gets locked after failed attempts. The amount of time inminutes before the user can attempt to log in to the device after being locked out due to the number offailed login attempts specified in the tries-before-disconnect statement. When a user fails to correctlylogin after the number of allowed attempts specified by the tries-before-disconnect statement, the usermust wait the configured amount of minutes before attempting to log in to the device again. Thelockout-period must be greater than zero. The range at which you can configure the lockout-period isone through 43,200 minutes.
[edit system login]security-administrator@switch:fips# set retry-options lockout-period <number>
You can configure the device to limit the number of attempts to enter a password while logging throughSSH. Using the following command, the connection.
[edit system login]security-administrator@switch:fips# set retry-options tries-before-disconnect <number>
Here, tries-before-disconnect is the number of times a user can attempt to enter a passwordwhen loggingin. The connection closes if a user fails to log in after the number specified. The range is from 1 through10, and the default value is 10.
You can also configure a delay, in seconds, before a user can try to enter a password after a failed attempt.
[edit system login]security-administrator@switch:fips# set retry-options backoff-threshold <number>
Here, backoff-threshold is the threshold for the number of failed login attempts before the user experiencesa delay in being able to enter a password again. The range is from 1 through 3, and the default value is 2seconds.
53

In addition, the device can be configured to specify the threshold for the number of failed attempts beforethe user experiences a delay in entering the password again.
[edit system login]security-administrator@switch:fips# set retry-options backoff-factor <number>
Here, backoff-factor is the length of time, in seconds, before a user can attempt to log in after a failedattempt. The delay increases by the value specified for each subsequent attempt after the threshold. Therange is from 5 through 10, and the default value is 5 seconds.
You can control user access through SSH. By configuring ssh root-login deny , you can ensure the rootaccount remains active and continues to have local administrative privileges to the TOE even if otherremote users are logged off.
[edit system]security-administrator@switch:fips# set services ssh root-login deny
The SSH2 protocol provides secure terminal sessions utilizing the secure encryption. The SSH2 protocolenforces running the key-exchange phase and changing the encryption and integrity keys for the session.Key exchange is done periodically, after specified seconds or after specified bytes of data have passedover the connection. You can configure thresholds for SSH rekeying, FCS_SSHS_EXT.1.8 andFCS_SSHC_EXT.1.8. The TSF ensures that within the SSH connections the same session keys are used fora threshold of no longer than one hour, and no more than one gigabyte of the transmitted data. Wheneither of the thresholds are reached, a rekey must be performed.
RELATED DOCUMENTATION
Configuring SSH on the Evaluated Configuration for NDcPPv2.1 | 51
54

5CHAPTER
Configuring the Remote Syslog Server
Syslog Server Configuration on a Linux System | 56

Syslog Server Configuration on a Linux System
IN THIS SECTION
Configuring Event Logging to a Remote Server | 57
A secure Junos OS environment requires auditing of events and storing them in a local audit file. Therecorded events are simultaneously sent to an external syslog server. A syslog server receives the syslogmessages streamed from the device. The syslog server must have an SSH client with NETCONF supportconfigured to receive the streamed syslog messages.
Use the configuration details to establish session between the target of evaluation (TOE) and the auditserver. Examine the generated audit data transferred to the audit server.
The NDcPP logs capture the following events:
• Changes to secret key data in the configuration.
• Committed changes.
• Login and logout of users.
• System startup.
• Failure to establish an SSH session.
• Establishment or termination of an SSH session.
• Changes to the (system) time.
• Termination of a remote session by the session locking mechanism.
• Termination of an interactive session.
• Changes to modification or deletion of cryptographic keys.
• Password resets.
56

• Capture all changes to the configuration.
• Store logging information remotely.
Configuring Event Logging to a Remote Server
To configure event logging to a remote server when the SSH connection to the ToE is initiated from theremote system log server.
1. Generate an RSA public key on the remote syslog server.
$ ssh-keygen -b 2048 -t rsa -C 'syslog-monitor key pair' -f ~/.ssh/syslog-monitor
You will be prompted to enter the desired pass phrase. The storage locations for the syslog-monitorkey pair is displayed.
2. On the TOE, create a class named monitor that has permission to trace events.
[edit system login]security-administrator@switch:fips# set class monitor permissions trace
3. Create a user named syslog-mon with the class monitor, and with authentication that uses thesyslog-monitor key pair from the key pair file located on the remote syslog server.
[edit system login]security-administrator@switch:fips# set user syslog-mon classmonitor authentication ssh-rsa public key from
syslog-monitor key pair
4. Set up NETCONF with SSH.
[edit system services]security-administrator@switch:fips# set netconf ssh
5. Configure syslog to log all the messages at /var/log/messages..
[edit system]security-administrator@switch:fips# set syslog file messages any anycommit
57

6. On the remote system log server, start up the SSH agent ssh-agent. The start up is required to simplifythe handling of the syslog-monitor key.
$ eval `ssh-agent -s`
7. On the remote syslog server, add the syslog-monitor key pair to the ssh-agent.
$ ssh-add ~/.ssh/syslog-monitor
You will be prompted to enter the desired passphrase. Enter the same passphrase used in Step 1.
8. After logging in to the external_syslog_server session, establish a tunnel to the device and startNETCONF.
security-administrator@switch:fips# $ssh syslog-mon@NDcPP_TOE -s netconf > test.out
9. After NETCONF is established, configure a system log events message stream. This RPC will cause theNETCONF service to start transmitting messages over the SSH connection that is established.
<rpc><get-syslog-events><stream>messages</stream></get-syslog-events></rpc>
10.The examples for syslog messages are listed below. Monitor the event log generated for admin actionson TOE are received on syslog server. Examine the traffic that passes between the audit server andthe TOE, observing that these data are not viewed during this transfer, and that they are successfullyreceived by the audit server. Match the logs between local event logging and remote event logged insyslog server and record the particular software (name, version) used on the audit server during testing.
The following output shows test log results for syslog-server.
switch@ssh-keygen -b 2048 -t rsa -C 'syslog-monitor key pair' -f ~/.ssh/syslog-monitorGenerating public/private rsa key pair.
Enter passphrase (empty for no passphrase):
Enter same passphrase again:
Your identification has been saved in /home/host/.ssh/syslog-monitor.
Your public key has been saved in /home/host/.ssh/syslog-monitor.pub.
The key fingerprint is:
ef:75:d7:68:c5:ad:8d:6f:5e:7a:7e:9b:3d:f1:4d:3f syslog-monitor key pair
The key's randomart image is:
+--[ RSA 2048]----+
| |
| |
58

| |
| ..|
| S +|
| . Bo|
| . . *.X|
| . . o E@|
| . .BX|
+-----------------+
[host@nms5-vm-linux2 ~]$ cat /home/host/.ssh/syslog-monitor.pub
ssh-rsa
AAAAB3NzaC1yc2EAAAADAQABAAABAQCrUREJUBpjwAoIgRrGy9zgt+
D2pikk3Q/Wdf8I5vr+njeqJhCx2bUAkrRbYXNILQQAZbg7kLfi/8TqqL
eon4HOP2e6oCSorKdx/GrOTzLONL4fh0EyuSAk8bs5JuwWNBUokV025
gzpGFsBusGnlj6wqqJ/sjFsMmfxyCkbY+pUWb8m1/A9YjOFT+6esw+9S
tF6Gbg+VpbYYk/Oday4z+z7tQHRFSrxj2G92aoliVDBLJparEMBc8w
LdSUDxmgBTM2oadOmm+kreBUQjrmr6775RJn9H9YwIxKOxGm4SFnX/Vl4
R+lZ9RqmKH2wodIEM34K0wXEHzAzNZ01oLmaAVqT
syslog-monitor key pair
[host@nms5-vm-linux2 ~]$ eval `ssh-agent -s`
Agent pid 1453
[host@nms5-vm-linux2 ~]$ ssh-add ~/.ssh/syslog-monitor
Enter passphrase for /home/host/.ssh/syslog-monitor:
Identity added: /home/host/.ssh/syslog-monitor (/home/host/.ssh/syslog-monitor)
Net configuration channel
switch@nms5-vm-linux2 ~]$ ssh syslog-mon@starfire -s netconf this is NDcPP test device
<!-- No zombies were killed during the creation of this user interface --
<!-- user syslog-mon, class j-monitor -><hello>
<capabilities>
<capability>urn:ietf:params:xml:ns:netconf:base:1.0</capability>
<capability>urn:ietf:params:xml:ns:netconf:capability:candidate:1.0</capability>
<capability>urn:ietf:params:xml:ns:netconf:capability:confirmed-commit:1.0</capability>
<capability>urn:ietf:params:xml:ns:netconf:capability:validate:1.0</capability>
<capability>urn:ietf:params:xml:ns:netconf:capability:url:1.0?protocol=http,ftp,file</capability>
<capability>http://xml.juniper.net/netconf/junos/1.0</capability>
59

<capability>http://xml.juniper.net/dmi/system/1.0</capability>
</capabilities>
<session-id4129/session-id>
</hello>
]]>]]>
The following output shows event logs generated on the TOE that are received on the syslog server.
Jan 20 17:04:51 starfire sshd[4182]: error: Could not load host key:
/etc/ssh/ssh_host_dsa_key
Jan 20 17:04:51 starfire sshd[4182]: error: Could not load host key:
/etc/ssh/ssh_host_ecdsa_key
Jan 20 17:04:53 starfire sshd[4182]: Accepted password for sec-admin from
10.209.11.24 port 55571 ssh2
Jan 20 17:04:53 starfire mgd[4186]: UI_AUTH_EVENT: Authenticated user 'sec-admin'
at permission level 'j-administrator'
Jan 20 17:04:53 starfire mgd[4186]: UI_LOGIN_EVENT: User 'sec-admin' login, class
'j-administrator' [4186], ssh-connection '10.209.11.24 55571 10.209.14.92 22',
client-mode 'cli'
Net configuration channel
switch@nms5-vm-linux2 ~]$ ssh syslog-mon@starfire -s netconfthis is NDcPP test device
<!-- No zombies were killed during the creation of this user interface --
<!-- user syslog-mon, class j-monitor -><hello>
<capabilities>
<capability>urn:ietf:params:xml:ns:netconf:base:1.0</capability>
<capability>urn:ietf:params:xml:ns:netconf:capability:candidate:1.0</capability>
<capability>urn:ietf:params:xml:ns:netconf:capability:confirmed-commit:1.0</capability>
<capability>urn:ietf:params:xml:ns:netconf:capability:validate:1.0</capability>
<capability>urn:ietf:params:xml:ns:netconf:capability:url:1.0?protocol=http,ftp,file</capability>
<capability>http://xml.juniper.net/netconf/junos/1.0</capability>
<capability>http://xml.juniper.net/dmi/system/1.0</capability>
</capabilities>
<session-id4129/session-id>
60

</hello>
]]>]]>
The following output shows that the local syslogs and remote syslogs received were similar.
Local :
Jan 20 17:09:30 starfire mgd[4186]: UI_COMMIT_PROGRESS: Commit operation in progress:
Redundancy interface management process checking new configuration
Jan 20 17:09:30 starfire mgd[4186]: UI_CHILD_START: Starting child '/usr/sbin/rdd'
Jan 20 17:09:30 starfire mgd[4186]: UI_CHILD_STATUS: Cleanup child '/usr/sbin/rdd',
PID 4317, status 0
Jan 20 17:09:30 starfire mgd[4186]: UI_COMMIT_PROGRESS: Commit operation in progress:
Dynamic flow capture service checking new configuration
Jan 20 17:09:30 starfire mgd[4186]: UI_CHILD_START: Starting child '/usr/sbin/dfcd'
Jan 20 17:09:30 starfire mgd[4186]: UI_CHILD_STATUS: Cleanup child '/usr/sbin/dfcd',
PID 4318, status 0
Jan 20 17:09:30 starfire mgd[4186]: UI_COMMIT_PROGRESS: Commit operation in progress:
Connectivity fault management process checking new configuration
Jan 20 17:09:30 starfire mgd[4186]: UI_CHILD_START: Starting child '/usr/sbin/cfmd'
Jan 20 17:09:30 starfire mgd[4186]: UI_CHILD_STATUS: Cleanup child '/usr/sbin/cfmd',
PID 4319, status 0
Jan 20 17:09:30 starfire mgd[4186]: UI_COMMIT_PROGRESS: Commit operation in progress:
Layer 2 address flooding and learning process checking new configuration
Jan 20 17:09:30 starfire mgd[4186]: UI_CHILD_START: Starting child '/usr/sbin/l2ald'
Jan 20 17:09:30 starfire mgd[4186]: UI_CHILD_STATUS: Cleanup child '/usr/sbin/l2ald',
PID 4320, status 0
Jan 20 17:09:30 starfire mgd[4186]: UI_COMMIT_PROGRESS: Commit operation in progress:
Layer 2 Control Protocol process checking new configuration
Jan 20 17:09:30 starfire mgd[4186]: UI_CHILD_START: Starting child '/usr/sbin/l2cpd'
Jan 20 17:09:30 starfire l2cp[4321]: Initializing PNAC state machines
Jan 20 17:09:30 starfire l2cp[4321]: Initializing PNAC state machines complete
Jan 20 17:09:30 starfire l2cp[4321]: Initialized 802.1X module and state machinesJan
20 17:09:30 starfire l2cp[4321]: Read acess profile () config
Jan 20 17:09:30 starfire mgd[4186]: UI_CHILD_STATUS: Cleanup child '/usr/sbin/l2cpd',
PID 4321, status 0
Jan 20 17:09:30 starfire mgd[4186]: UI_COMMIT_PROGRESS: Commit operation in progress:
Multicast Snooping process checking new configuration
Jan 20 17:09:30 starfire mgd[4186]: UI_CHILD_START: Starting child
'/usr/sbin/mcsnoopd'
Jan 20 17:09:30 starfire mgd[4186]: UI_CHILD_STATUS: Cleanup child
'/usr/sbin/mcsnoopd', PID 4325, status 0
Jan 20 17:09:30 starfire mgd[4186]: UI_COMMIT_PROGRESS: Commit operation in progress:
commit wrapup...
61

Jan 20 17:09:30 starfire mgd[4186]: UI_COMMIT_PROGRESS: Commit operation in progress:
activating '/var/etc/ntp.conf'
Jan 20 17:09:30 starfire mgd[4186]: UI_COMMIT_PROGRESS: Commit operation in progress:
start ffp activate
Jan 20 17:09:30 starfire mgd[4186]: UI_CHILD_START: Starting child '/usr/sbin/ffp'
Jan 20 17:09:30 starfire ffp[4326]: "dynamic-profiles": No change to profiles
Jan 20 17:09:30 starfire mgd[4186]: UI_COMMIT_PROGRESS: Commit operation in progress:
Redundancy interface management process checking new configuration
Jan 20 17:09:30 starfire mgd[4186]: UI_CHILD_START: Starting child '/usr/sbin/rdd'
Jan 20 17:09:30 starfire mgd[4186]: UI_CHILD_STATUS: Cleanup child '/usr/sbin/rdd',
PID 4317, status 0
Jan 20 17:09:30 starfire mgd[4186]: UI_COMMIT_PROGRESS: Commit operation in progress:
Dynamic flow capture service checking new configuration
Jan 20 17:09:30 starfire mgd[4186]: UI_CHILD_START: Starting child '/usr/sbin/dfcd'
Jan 20 17:09:30 starfire mgd[4186]: UI_CHILD_STATUS: Cleanup child '/usr/sbin/dfcd',
PID 4318, status 0
Jan 20 17:09:30 starfire mgd[4186]: UI_COMMIT_PROGRESS: Commit operation in progress:
Connectivity fault management process checking new configuration
Jan 20 17:09:30 starfire mgd[4186]: UI_CHILD_START: Starting child '/usr/sbin/cfmd'
Jan 20 17:09:30 starfire mgd[4186]: UI_CHILD_STATUS: Cleanup child '/usr/sbin/cfmd',
PID 4319, status 0
Jan 20 17:09:30 starfire mgd[4186]: UI_COMMIT_PROGRESS: Commit operation in progress:
Layer 2 address flooding and learning process checking new configuration
Jan 20 17:09:30 starfire mgd[4186]: UI_CHILD_START: Starting child '/usr/sbin/l2ald'
Jan 20 17:09:30 starfire mgd[4186]: UI_CHILD_STATUS: Cleanup child '/usr/sbin/l2ald',
PID 4320, status 0
Jan 20 17:09:30 starfire mgd[4186]: UI_COMMIT_PROGRESS: Commit operation in progress:
Layer 2 Control Protocol process checking new configuration
Jan 20 17:09:30 starfire mgd[4186]: UI_CHILD_START: Starting child '/usr/sbin/l2cpd'
Jan 20 17:09:30 starfire l2cp[4321]: Initializing PNAC state machines
Jan 20 17:09:30 starfire l2cp[4321]: Initializing PNAC state machines complete
Jan 20 17:09:30 starfire l2cp[4321]: Initialized 802.1X module and state machinesJan
20 17:09:30 starfire l2cp[4321]: Read acess profile () config
Jan 20 17:09:30 starfire mgd[4186]: UI_CHILD_STATUS: Cleanup child '/usr/sbin/l2cpd',
PID 4321, status 0
Jan 20 17:09:30 starfire mgd[4186]: UI_COMMIT_PROGRESS: Commit operation in progress:
Multicast Snooping process checking new configuration
Jan 20 17:09:30 starfire mgd[4186]: UI_CHILD_START: Starting child
'/usr/sbin/mcsnoopd'
Jan 20 17:09:30 starfire mgd[4186]: UI_CHILD_STATUS: Cleanup child
'/usr/sbin/mcsnoopd', PID 4325, status 0
Jan 20 17:09:30 starfire mgd[4186]: UI_COMMIT_PROGRESS: Commit operation in progress:
commit wrapup...
62

Jan 20 17:09:30 starfire mgd[4186]: UI_COMMIT_PROGRESS: Commit operation in progress:
activating '/var/etc/ntp.conf'
Jan 20 17:09:30 starfire mgd[4186]: UI_COMMIT_PROGRESS: Commit operation in progress:
start ffp activate
Jan 20 17:09:30 starfire mgd[4186]: UI_CHILD_START: Starting child '/usr/sbin/ffp'
Jan 20 17:09:30 starfire ffp[4326]: "dynamic-profiles": No change to profiles
63
6CHAPTER
Configuring Audit Log Options
Configuring Audit Log Options in the Evaluated Configuration | 65
Sample Code Audits of Configuration Changes | 66

Configuring Audit Log Options in the EvaluatedConfiguration
IN THIS SECTION
Configuring Audit Log Options for EX4300-48MP devices | 65
The following section describes how to configure audit log options in the evaluated configuration.
Configuring Audit Log Options for EX4300-48MP devices
To configure audit log options for EX4300-48MP devices:
1. Specify the number of files to be archived in the system logging facility.
[edit system syslog]security-administrator@switch:fips# set archive files 2
2. Specify the file in which to log data.
[edit system syslog]security-administrator@switch:fips# set file Audit_logs any any
3. Specify the size of files to be archived.
[edit system syslog]security-administrator@switch:fips# set file Audit_logs archive size 10m
4. Specify the priority and facility in messages for the system logging facility.
[edit system syslog]security-administrator@switch:fips# set file Audit_logs explicit-priority
65

5. Log system messages in a structured format.
[edit system syslog]security-administrator@switch:fips# set file Audit_logs structured-data
RELATED DOCUMENTATION
Sample Code Audits of Configuration Changes | 66
Sample Code Audits of Configuration Changes
This sample code audits all changes to the configuration secret data and sends the logs to a file namedsyslog:
[edit system]syslog {file syslog {authorization info;change-log info;interactive-commands info;
}}
This sample code expands the scope of the minimum audit to audit all changes to the configuration, notjust secret data, and sends the logs to a file named syslog:
[edit system]syslog {file syslog {any any;authorization info;change-log any;interactive-commands info;kernel info;pfe info;
}}
66

Example: System Logging of Configuration Changes
This example shows a sample configuration and makes changes to users and secret data.
[edit system]location {country-code US;building B1;
}...login {message "UNAUTHORIZED USE OF THIS ROUTER\n\tIS STRICTLY PROHIBITED!";user admin {uid 2000;class super-user;
authentication {encrypted-password “$ABC123”;# SECRET-DATA
}}password {format sha512;
}}radius-server 192.0.2.15 {secret “$ABC123” # SECRET-DATA
}services {ssh;
}syslog {user *{any emergency;
}file syslog {any notice;authorization info;
}file interactive-commands {interactive-commands any;
}}...
67

...
The new configuration changes the secret data configuration statements and adds a new user.
security-administrator@switch:fips# show | compare[edit system login user admin authentication]– encrypted-password “$ABC123”; # SECRET-DATA+ encrypted-password “$ABC123”; # SECRET-DATA[edit system login]+ user admin2 {+ uid 2001;+ class read-only;+ authentication {+ encrypted-password “$ABC123”;
# SECRET-DATA+ }+ }[edit system radius-server 192.0.2.15]– secret “$ABC123”; # SECRET-DATA+ secret “$ABC123”; # SECRET-DATA
Table 5 on page 68 shows sample for syslog auditing for NDcPPv2:
Table 5: Auditable Events
How event generatedAdditional AuditRecord ContentsAuditable EventsRequirement
NoneNoneFAU_GEN.1
NoneNoneFAU_GEN.2
NoneNoneFAU_STG_EXT.1
NoneNoneFAU_STG.1
NoneNoneFCS_CKM.1
NoneNoneFCS_CKM.2
NoneNoneFCS_CKM.4
68

Table 5: Auditable Events (continued)
How event generatedAdditional AuditRecord ContentsAuditable EventsRequirement
NoneNoneFCS_COP.1/DataEncryption
NoneNoneFCS_COP.1/SigGen
NoneNoneFCS_COP.1/Hash
NoneNoneFCS_COP.1/KeyedHash
NoneNoneFCS_COP.1(1)/KeyedHashCMAC
NoneNoneFCS_RBG_EXT.1
NoneNoneFIA_PMG_EXT.1
69

Table 5: Auditable Events (continued)
How event generatedAdditional AuditRecord ContentsAuditable EventsRequirement
Origin of the attempt(e.g., IP address)
All use of identificationand authenticationmechanism.
FIA_UIA_EXT.1
70

Table 5: Auditable Events (continued)
How event generatedAdditional AuditRecord ContentsAuditable EventsRequirement
Successful Local Login
Jan 3 09:59:36login[7637]:LOGIN_INFORMATION:User root logged in fromhost [unknown] on devicettyu0
Jan 3 09:59:36login[7637]:LOGIN_ROOT: User rootlogged in as root fromhost [unknown] on devicettyu0
Unsuccessful Local Login
Jan 3 09:57:52login[7637]:LOGIN_PAM_AUTHENTICATION_ERROR:Failed password for userroot
Jan 3 09:57:52login[7637]:LOGIN_FAILED: Loginfailed for user root fromhost ttyu0
Successful Remote Login
Jan 3 09:32:07mgd[47035]:UI_AUTH_EVENT:Authenticated user 'test1'assigned to class'j-read-only' Jan 309:32:07 mgd[47035]:UI_LOGIN_EVENT: User'test1' login, class'j-read-only' [47035],
71

Table 5: Auditable Events (continued)
How event generatedAdditional AuditRecord ContentsAuditable EventsRequirement
ssh-connection'10.1.5.153 3678410.1.2.68 22', client-mode'cli'
Unsuccessful RemoteLogin
Jan 3 09:26:56 sshd:SSHD_LOGIN_FAILED:Login failed for user'test1' from host'10.1.5.153'
72

Table 5: Auditable Events (continued)
How event generatedAdditional AuditRecord ContentsAuditable EventsRequirement
Origin of the attempt(e.g., IP address)
All use of identificationand authenticationmechanism.
FIA_UAU_EXT.2
73

Table 5: Auditable Events (continued)
How event generatedAdditional AuditRecord ContentsAuditable EventsRequirement
Successful Local Login
Jan 3 09:59:36login[7637]:LOGIN_INFORMATION:User root logged in fromhost [unknown] on devicettyu0 Jan 3 09:59:36login[7637]:LOGIN_ROOT: User rootlogged in as root fromhost [unknown] on devicettyu0
Unsuccessful Local Login
Jan 3 09:57:52login[7637]:LOGIN_PAM_AUTHENTICATION_ERROR:Failed password for userroot
Jan 3 09:57:52login[7637]:LOGIN_FAILED: Loginfailed for user root fromhost ttyu0
Successful Remote Login
Jan 3 09:32:07mgd[47035]:UI_AUTH_EVENT:Authenticated user 'test1'assigned to class'j-read-only' Jan 309:32:07 mgd[47035]:UI_LOGIN_EVENT: User'test1' login, class'j-read-only' [47035],ssh-connection'10.1.5.153 36784
74

Table 5: Auditable Events (continued)
How event generatedAdditional AuditRecord ContentsAuditable EventsRequirement
10.1.2.68 22', client-mode'cli'
Unsuccessful RemoteLogin
Jan 3 09:26:56 sshd:SSHD_LOGIN_FAILED:Login failed for user'test1' from host'10.1.5.153'
NoneNoneFIA_UAU.7
Dec 28 21:51:21mgd[8007]:UI_CMDLINE_READ_LINE:User 'root', command‘request vmhost softwareadd /var/tmp/junos-vmhost-install-mx-x86-64-19.1-20181231.0.tgzno-validate’
NoneAny attempt to initiate amanual update
FMT_MOF.1/ManualUpdate
NoneNoneFMT_MTD.1/CoreData
Refer to the audit eventslisted in this table.
NoneAll management activitiesof TSF data
FMT_SMF.1
NoneNoneFMT_SMR.2
NoneNoneFPT_SKP_EXT.1
NoneNoneFPT_APW_EXT.1
75

Table 5: Auditable Events (continued)
How event generatedAdditional AuditRecord ContentsAuditable EventsRequirement
Enter request system fipsself-test at command linefor on demand self-test.or Reboot the device toview the self-test duringstartup.
NoneNoneFPT_TST_EXT.1
Dec 28 21:51:21mgd[8007]:UI_CMDLINE_READ_LINE:User 'root', command‘request vmhost softwareadd /var/tmp/junos-vmhost-install-mx-x86-64-19.1-20181231.0.tgzno-validate’
NoneInitiation of update; resultof the update attempt(success or failure)
FPT_TUD_EXT.1
Apr 22 15:31:37mgd[11121]:UI_CMDLINE_READ_LINE:User 'root', command 'setdate 201904221532.00
Apr 22 15:32:05mgd[11121]:UI_CMDLINE_READ_LINE:User 'root', command'show system uptime '
For discontinuouschanges to time: The oldand new values for thetime. Origin of theattempt to change timefor success and failure(e.g., IP address).
Discontinuous changes totime - eitherAdministrator actuated orchanged via an automatedprocess. (Note that nocontinuous changes totime need to be logged.See also application noteon FPT_STM_EXT.1)
FPT_STM_EXT.1
Jan 3 11:59:29 cli:UI_CLI_IDLE_TIMEOUT:Idle timeout for user 'root'exceeded and sessionterminated
NoneThe termination of a localinteractive session by thesession lockingmechanism.
FPT_STM_EXT.1FTA_SSL_EXT.1 (if “terminatethe session is selected)
Jan 3 11:26:23 cli:UI_CLI_IDLE_TIMEOUT:Idle timeout for user 'root'exceeded and sessionterminated
NoneThe termination of aremote session by thesession lockingmechanism.
FTA_SSL.3
76

Table 5: Auditable Events (continued)
How event generatedAdditional AuditRecord ContentsAuditable EventsRequirement
Local
Jan 3 11:47:25mgd[52521]:UI_LOGOUT_EVENT:User 'root' logout
Remote
Jan 3 11:43:33sshd[52425]: Receiveddisconnect from10.1.5.153 port36800:11: disconnectedby user
NoneThe termination of aninteractive session.
FTA_SSL.4
NoneNoneFTA_TAB.1
Initiation of the trustedpath
Jan 3 12:09:00sshd[53492]: Acceptedkeyboard-interactive/pamfor root from 10.1.5.153port 36802 ssh2
Termination of the trustedpath
Jan 3 12:09:03sshd[53492]: Receiveddisconnect from10.1.5.153 port36802:11: disconnectedby user Jan 3 12:09:36sshd:
Failure of the trusted path
SSHD_LOGIN_FAILED:Login failed for user 'root'from host '10.1.5.153'
Identification of theinitiator and target offailed trusted channelsestablishment attempt.
Initiation of the trustedchannel. Termination ofthe trusted channel.Failure of the trustedchannel functions.
FTP_ITC.1
77

Table 5: Auditable Events (continued)
How event generatedAdditional AuditRecord ContentsAuditable EventsRequirement
Initiation of the trustedpath
Jan 3 12:09:00sshd[53492]: Acceptedkeyboard-interactive/pamfor root from 10.1.5.153port 36802 ssh2
Termination of the trustedpath
Jan 3 12:09:03sshd[53492]: Receiveddisconnect from10.1.5.153 port36802:11: disconnectedby user Jan 3 12:09:36sshd:
Failure of the trusted path
SSHD_LOGIN_FAILED:Login failed for user 'root'from host '10.1.5.153'
NoneInitiation of the trustedpath. Termination of thetrusted path. Failure ofthe trusted pathfunctions.
FTP_TRP.1/Admin
Dec 17 15:02:12sshd[9842]: Unable tonegotiatewith 10.1.5.153port 43836: no matchingkey exchange methodfound. Their offer:diffie-hellman-group1-sha1,ext-info-c
Reason for failureFailure to establish anSSH session
FCS_SSHS_EXT.1
78

Table 5: Auditable Events (continued)
How event generatedAdditional AuditRecord ContentsAuditable EventsRequirement
Dec 28 22:20:23veriexec[9371]: cannotvalidate/packages/db/pkginst.9286/manifest.ecerts:subject issuer mismatch:/C=US/ST=CA/L=Sunnyvale/O=JuniperNetworks/OU=Juniper CA/CN=PackageProductionTestEc_2017_NO_DEFECTS/[email protected]
Reason for failure ofcertificate validationIdentification ofcertificates added,replaced or removed astrust anchor in the TOE'strust store
Unsuccessful attempt tovalidate a certificate Anyaddition, replacement orremoval of trust anchorsin the TOE's trust store
FIA_X509_EXT.1/Rev
NoneNoneFIA_X509_EXT.2
Dec 28 22:20:23veriexec[9371]: cannotvalidate/packages/db/pkginst.9286/manifest.ecerts:subject issuer mismatch:/C=US/ST=CA/L=Sunnyvale/O=Juniper Networks/OU=Juniper CA/CN=PackageProductionTestEc_2017_NO_DEFECTS/[email protected]
Reason for failure(including identifier ofinvalid certificate)
Failure of updateFPT_TUD_EXT.2
NoneNoneFMT_MOF.1/Functions
NoneNoneFMT_MOF.1/Services
NoneNoneFMT_MTD.1/CryptoKeys
79

Table 5: Auditable Events (continued)
How event generatedAdditional AuditRecord ContentsAuditable EventsRequirement
Apr 10 20:43:35dot1xd[6622]:DOT1XD_MKA_SECURE_CHANNEL_CREATED: Macsecreceive secure channelcreated for 64:87:88:5a:19:30 on interfacexe-0/0/0
Secure Channel Identifier(SCI)
Session establishmentFCS_MACSEC_EXT.1
Apr 10 20:43:38dot1xd[6622]:DOT1XD_MKA_SECURE_ASSOCIATION_ESTABLISHED:Macsec secure associationestablished with an :2 oninterface xe-0/0/0
Connectivity AssociationKey Names
Creation of ConnectivityAssociation
FCS_MACSEC_EXT.1.7
Apr 29 16:01:49 fpc0vsc8584_macsec_rx_sa_create: ifd 148(ge-0/0/0), port_no 0,vsc8584_handle0x1543be98,an 3, key 0x18ccb058,lowest_pn 1, sci0x18ccb044
Creation and updatetimes
Creation and update ofSecure Association Key
FCS_MACSEC_EXT.3.1
Jan 3 08:13:59 sshd:SSHD_LOGIN_ATTEMPTS_THRESHOLD:Threshold forunsuccessfulauthentication attempts(2) reached by user 'test1'
NoneAdministrator lockout dueto excessiveauthentication failures
FIA_AFL.1
80
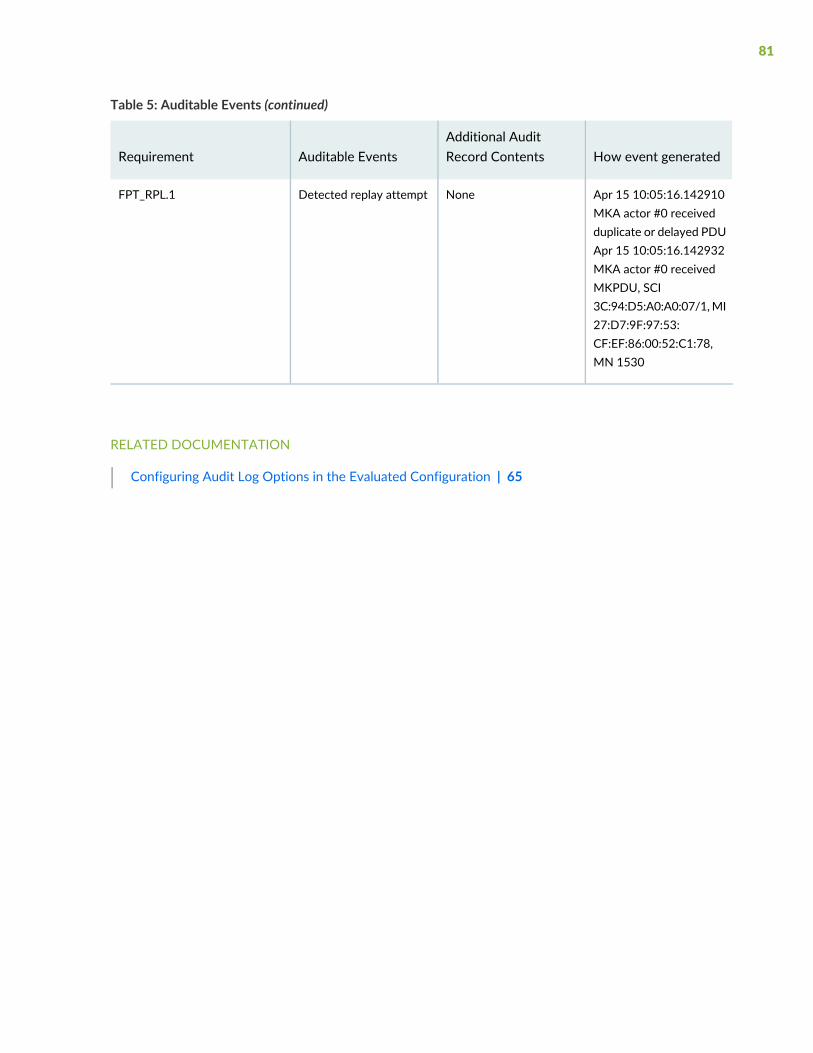
Table 5: Auditable Events (continued)
How event generatedAdditional AuditRecord ContentsAuditable EventsRequirement
Apr 15 10:05:16.142910MKA actor #0 receivedduplicate or delayed PDUApr 15 10:05:16.142932MKA actor #0 receivedMKPDU, SCI3C:94:D5:A0:A0:07/1,MI27:D7:9F:97:53:CF:EF:86:00:52:C1:78,MN 1530
NoneDetected replay attemptFPT_RPL.1
RELATED DOCUMENTATION
Configuring Audit Log Options in the Evaluated Configuration | 65
81

7CHAPTER
Configuring Event Logging
Event Logging Overview | 83
Configuring Event Logging to a Local File | 84
Interpreting Event Messages | 84
Logging Changes to Secret Data | 86
Login and Logout Events Using SSH | 86
Logging of Audit Startup | 87

Event Logging Overview
The evaluated configuration requires the auditing of configuration changes through the system log.
In addition, Junos OS can:
• Send automated responses to audit events (syslog entry creation).
• Allow authorized managers to examine audit logs.
• Send audit files to external servers.
• Allow authorized managers to return the system to a known state.
The logging for the evaluated configuration must capture the events. Some of the logging events are listedbelow:
• Changes to secret key data in the configuration.
• Committed changes.
• Login/logout of users.
• System startup.
• Failure to establish an SSH session.
• Establishment/termination of an SSH session.
• Changes to the (system) time.
• Termination of a remote session by the session locking mechanism.
• Termination of an interactive session.
• Changes to modification or deletion of cryptographic keys.
• Password resets.
In addition, Juniper Networks recommends that logging also:
• Capture all changes to the configuration.
• Store logging information remotely.
RELATED DOCUMENTATION
Interpreting Event Messages | 84
83
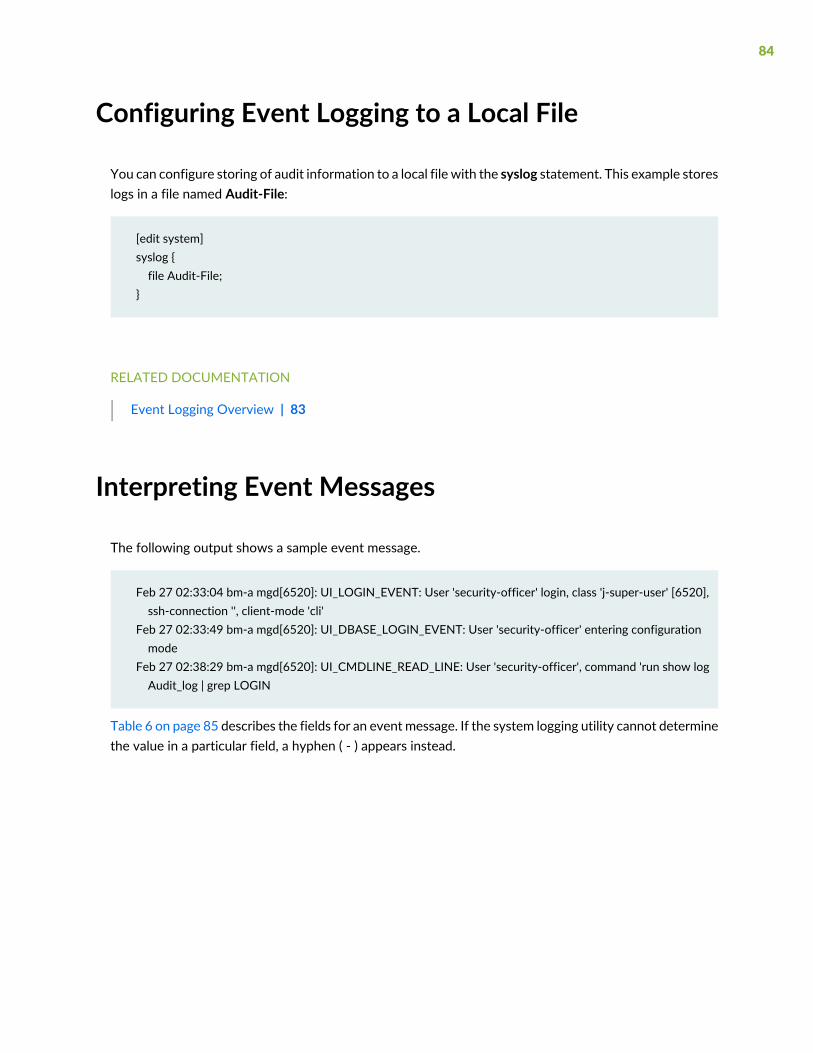
Configuring Event Logging to a Local File
You can configure storing of audit information to a local file with the syslog statement. This example storeslogs in a file named Audit-File:
[edit system]syslog {file Audit-File;
}
RELATED DOCUMENTATION
Event Logging Overview | 83
Interpreting Event Messages
The following output shows a sample event message.
Feb 27 02:33:04 bm-a mgd[6520]: UI_LOGIN_EVENT: User 'security-officer' login, class 'j-super-user' [6520],ssh-connection '', client-mode 'cli'
Feb 27 02:33:49 bm-a mgd[6520]: UI_DBASE_LOGIN_EVENT: User 'security-officer' entering configurationmode
Feb 27 02:38:29 bm-a mgd[6520]: UI_CMDLINE_READ_LINE: User 'security-officer', command 'run show logAudit_log | grep LOGIN
Table 6 on page 85 describes the fields for an event message. If the system logging utility cannot determinethe value in a particular field, a hyphen ( - ) appears instead.
84

Table 6: Fields in Event Messages
ExamplesDescriptionField
Feb 27 02:33:04 is thetimestamp expressed aslocal time in the UnitedStates.
2012-02-27T09:17:15.719Z is2:33 AM UTC on 27 Feb2012.
Time when the message was generated, in one of tworepresentations:
• MMM-DD HH:MM:SS.MS+/-HH:MM, is the month, day,hour, minute, second and millisecond in local time. Thehour andminute that follows the plus sign (+) or minus sign(-) is the offset of the local time zone from CoordinatedUniversal Time (UTC).
• YYYY-MM-DDTHH:MM:SS.MSZ is the year, month, day,hour, minute, second and millisecond in UTC.
timestamp
router1Name of the host that originally generated the message.hostname
mgdName of the Junos OS process that generated the message.process
4153UNIX process ID (PID) of the Junos OS process thatgenerated the message.
processID
UI_DBASE_LOGOUT_EVENTJunos OS system log message tag, which uniquely identifiesthe message.
TAG
“admin”Username of the user initiating the event.username
set: [system radius-server1.2.3.4 secret]
English-language description of the event .message-text
RELATED DOCUMENTATION
Event Logging Overview | 83
85

Logging Changes to Secret Data
The following are examples of audit logs of events that change the secret data.Whenever there is a changein the configuration example, the syslog event should capture the below logs:
Jul 24 17:43:28 router1 mgd[4163]: UI_CFG_AUDIT_SET_SECRET: User 'admin' set:
[system radius-server 1.2.3.4 secret]
Jul 24 17:43:28 router1 mgd[4163]: UI_CFG_AUDIT_SET_SECRET: User 'admin' set:
[system login user admin authentication encrypted-password]
Jul 24 17:43:28 router1 mgd[4163]: UI_CFG_AUDIT_SET_SECRET: User 'admin' set:
[system login user admin2 authentication encrypted-password]
Everytime a configuration is updated or changed, the syslog should capture these logs:
Jul 24 18:29:09 router1 mgd[4163]: UI_CFG_AUDIT_SET_SECRET: User 'admin' replace:
[system radius-server 1.2.3.4 secret]
Jul 24 18:29:09 router1 mgd[4163]: UI_CFG_AUDIT_SET_SECRET: User 'admin' replace:
[system login user admin authentication encrypted-password]
Jul 24 18:29:09 router1 mgd[4163]: UI_CFG_AUDIT_SET_SECRET: User 'admin' replace:
[system login user admin authentication encrypted-password]
RELATED DOCUMENTATION
Interpreting Event Messages | 84
Login and Logout Events Using SSH
System log messages are generated whenever a user successfully or unsuccessfully attempts SSH access.Logout events are also recorded. For example, the following logs are the result of two failed authenticationattempts, then a successful one, and finally a logout:
Dec 20 23:17:35 bilbo sshd[16645]: Failed password for op from 172.17.58.45 port
1673 ssh2
Dec 20 23:17:42 bilbo sshd[16645]: Failed password for op from 172.17.58.45 port
86

1673 ssh2
Dec 20 23:17:53 bilbo sshd[16645]: Accepted password for op from 172.17.58.45
port 1673 ssh2
Dec 20 23:17:53 bilbo mgd[16648]: UI_AUTH_EVENT: Authenticated user 'op' at
permission level 'j-operator'
Dec 20 23:17:53 bilbo mgd[16648]: UI_LOGIN_EVENT: User 'op' login, class
'j-operator' [16648]
Dec 20 23:17:56 bilbo mgd[16648]: UI_CMDLINE_READ_LINE: User 'op', command 'quit
'
Dec 20 23:17:56 bilbo mgd[16648]: UI_LOGOUT_EVENT: User 'op' logout
RELATED DOCUMENTATION
Interpreting Event Messages | 84
Logging of Audit Startup
The audit information logged includes startups of Junos OS. This in turn identifies the startup events ofthe audit system, which cannot be independently disabled or enabled. For example, if JunosOS is restarted,the audit log contains the following information:
Dec 20 23:17:35 bilbo syslogd: exiting on signal 14
Dec 20 23:17:35 bilbo syslogd: restart
Dec 20 23:17:35 bilbo syslogd /kernel: Dec 20 23:17:35 init: syslogd (PID 19128)
exited with status=1
Dec 20 23:17:42 bilbo /kernel:
Dec 20 23:17:53 init: syslogd (PID 19200) started
RELATED DOCUMENTATION
Login and Logout Events Using SSH | 86
87
8CHAPTER
Performing Self-Tests on a Device
Understanding FIPS Self-Tests | 89

Understanding FIPS Self-Tests
The cryptographic module enforces security rules to ensure that a device running the Juniper NetworksJunos operating system (Junos OS) in FIPS mode of operation meets the security requirements of FIPS140-2 Level 1. To validate the output of cryptographic algorithms approved for FIPS and test the integrityof some system modules, the device performs the following series of known answer test (KAT) self-tests:
• md_kats—KAT for libmd and libc
• openssl_kats—KAT for OpenSSL cryptographic implementation
• kernel_kats——KAT for kernel cryptographic routines
The KAT self-tests are performed automatically at startup and reboot when FIPS mode of operation isenabled on the device. Conditional self-tests are also performed automatically to verify digitally signedsoftware packages, generated random numbers, RSA and ECDSA key pairs, and manually entered keys.
On demand, self tests can be executed by entering request system fips self-test at command line.
If the KATs are completed successfully, the system log (syslog) file is updated to display the tests that wereexecuted.
If the device fails a KAT, the device writes the details to a system log file, enters FIPS error state (panic),and reboots.
The file show /var/log/messages command displays the system log.
Performing Power-On Self-Tests on the Device
Each time the cryptographic module is powered on, the module tests that the cryptographic algorithmsstill operate correctly and that sensitive data has not been damaged.
The module displays the following status output while running the power-on self-tests:
@ 1574740128 [2019-11-26 03:48:48 UTC] mgd start
Creating initial configuration: ...
mgd: Running FIPS Self-tests
mgd: Testing kernel KATS:
mgd: NIST 800-90 HMAC DRBG Known Answer Test: Passed
mgd: DES3-CBC Known Answer Test: Passed
mgd: HMAC-SHA1 Known Answer Test: Passed
mgd: HMAC-SHA2-256 Known Answer Test: Passed
mgd: SHA-2-384 Known Answer Test: Passed
89

mgd: SHA-2-512 Known Answer Test: Passed
mgd: AES128-CMAC Known Answer Test: Passed
mgd: AES-CBC Known Answer Test: Passed
mgd: Testing MACSec KATS:
mgd: AES128-CMAC Known Answer Test: Passed
mgd: AES256-CMAC Known Answer Test: Passed
mgd: AES-ECB Known Answer Test: Passed
mgd: AES-KEYWRAP Known Answer Test: Passed
mgd: KBKDF Known Answer Test: Passed
mgd: Testing libmd KATS:
mgd: HMAC-SHA1 Known Answer Test: Passed
mgd: HMAC-SHA2-256 Known Answer Test: Passed
mgd: SHA-2-512 Known Answer Test: Passed
mgd: Testing OpenSSL KATS:
mgd: NIST 800-90 HMAC DRBG Known Answer Test: Passed
mgd: FIPS ECDSA Known Answer Test: Passed
mgd: FIPS ECDH Known Answer Test: Passed
mgd: FIPS RSA Known Answer Test: Passed
mgd: DES3-CBC Known Answer Test: Passed
mgd: HMAC-SHA1 Known Answer Test: Passed
mgd: HMAC-SHA2-224 Known Answer Test: Passed
mgd: HMAC-SHA2-256 Known Answer Test: Passed
mgd: HMAC-SHA2-384 Known Answer Test: Passed
mgd: HMAC-SHA2-512 Known Answer Test: Passed
mgd: AES-CBC Known Answer Test: Passed
mgd: AES-GCM Known Answer Test: Passed
mgd: ECDSA-SIGN Known Answer Test: Passed
mgd: KDF-IKE-V1 Known Answer Test: Passed
mgd: KDF-SSH-SHA256 Known Answer Test: Passed
mgd: KAS-ECC-EPHEM-UNIFIED-NOKC Known Answer Test: Passed
mgd: KAS-FFC-EPHEM-NOKC Known Answer Test: Passed
mgd: Testing QuickSec 7.0 KATS:
mgd: NIST 800-90 HMAC DRBG Known Answer Test: Passed
mgd: DES3-CBC Known Answer Test: Passed
mgd: HMAC-SHA1 Known Answer Test: Passed
mgd: HMAC-SHA2-224 Known Answer Test: Passed
mgd: HMAC-SHA2-256 Known Answer Test: Passed
mgd: HMAC-SHA2-384 Known Answer Test: Passed
mgd: HMAC-SHA2-512 Known Answer Test: Passed
mgd: AES-CBC Known Answer Test: Passed
mgd: AES-GCM Known Answer Test: Passed
mgd: SSH-RSA-ENC Known Answer Test: Passed
mgd: SSH-RSA-SIGN Known Answer Test: Passed
mgd: SSH-ECDSA-SIGN Known Answer Test: Passed
90
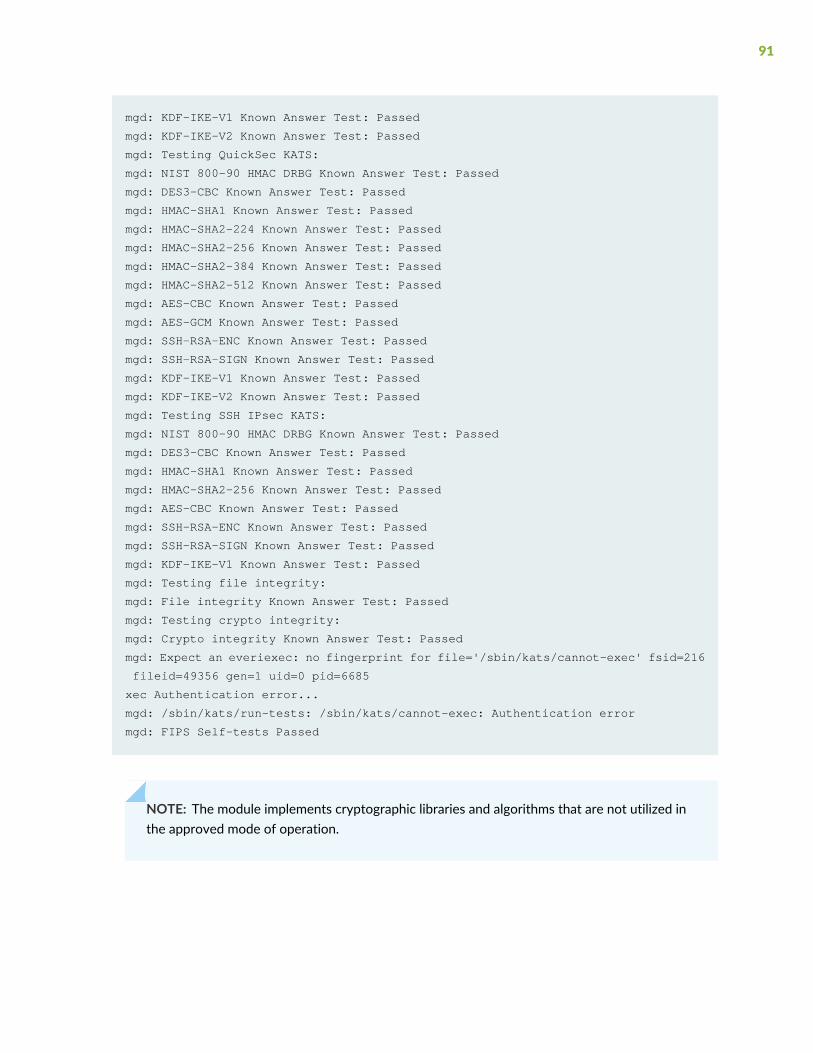
mgd: KDF-IKE-V1 Known Answer Test: Passed
mgd: KDF-IKE-V2 Known Answer Test: Passed
mgd: Testing QuickSec KATS:
mgd: NIST 800-90 HMAC DRBG Known Answer Test: Passed
mgd: DES3-CBC Known Answer Test: Passed
mgd: HMAC-SHA1 Known Answer Test: Passed
mgd: HMAC-SHA2-224 Known Answer Test: Passed
mgd: HMAC-SHA2-256 Known Answer Test: Passed
mgd: HMAC-SHA2-384 Known Answer Test: Passed
mgd: HMAC-SHA2-512 Known Answer Test: Passed
mgd: AES-CBC Known Answer Test: Passed
mgd: AES-GCM Known Answer Test: Passed
mgd: SSH-RSA-ENC Known Answer Test: Passed
mgd: SSH-RSA-SIGN Known Answer Test: Passed
mgd: KDF-IKE-V1 Known Answer Test: Passed
mgd: KDF-IKE-V2 Known Answer Test: Passed
mgd: Testing SSH IPsec KATS:
mgd: NIST 800-90 HMAC DRBG Known Answer Test: Passed
mgd: DES3-CBC Known Answer Test: Passed
mgd: HMAC-SHA1 Known Answer Test: Passed
mgd: HMAC-SHA2-256 Known Answer Test: Passed
mgd: AES-CBC Known Answer Test: Passed
mgd: SSH-RSA-ENC Known Answer Test: Passed
mgd: SSH-RSA-SIGN Known Answer Test: Passed
mgd: KDF-IKE-V1 Known Answer Test: Passed
mgd: Testing file integrity:
mgd: File integrity Known Answer Test: Passed
mgd: Testing crypto integrity:
mgd: Crypto integrity Known Answer Test: Passed
mgd: Expect an everiexec: no fingerprint for file='/sbin/kats/cannot-exec' fsid=216
fileid=49356 gen=1 uid=0 pid=6685
xec Authentication error...
mgd: /sbin/kats/run-tests: /sbin/kats/cannot-exec: Authentication error
mgd: FIPS Self-tests Passed
NOTE: The module implements cryptographic libraries and algorithms that are not utilized inthe approved mode of operation.
91

9CHAPTER
Operational Commands
request system zeroize | 93
request system zeroizeSyntaxrequest system zeroize
Release InformationCommand introduced in Junos OS Release 12.1 for EX Series switches.
DescriptionErase and replace with zeros all user-created data from Routing Engines.
Optionsnone—Zeroize all Routing Engines in Junos OS in FIPS mode. You must verify the request by typing yesto proceed. This command is restricted to Security Administrator because themaintenance permission bitis one of the permission bits, along with secret and control, that distinguishes Crypto Officers from otherFIPS users.
Required Privilege Levelmaintenance
List of Sample Outputrequest system zeroize on page 93
Output FieldsWhen you enter this command, you are provided feedback on the status of your request.
Sample Output
request system zeroize
security-administrator@switch:fips> request system zeroize
warning: System will be rebooted and may not boot without configuration
Erase all data, including configuration and log files? [yes,no] (no) yes
warning: ipsec-key-management subsystem not running - not needed by configuration.
warning: zeroizing localre
93


![Junos® OS Common Criteria and FIPS Evaluated Configuration ... · '/usr/sbin/l2cpd' Jan 20 17:09:30 starfire l2cp[4321]: Initializing PNAC state machines](https://img.dokumen.tips/doc/110x75/5e67d2341d18740af4011d8f/junos-os-common-criteria-and-fips-evaluated-configuration-usrsbinl2cpd.jpg)


![Junos® OS Common Criteria Evaluated Configuration … 25 14:25:51 router1 mgd[4153]: UI_CFG_AUDIT_SET_SECRET: User 'admin' set: [system login user admin authentication encrypted-password]](https://img.dokumen.tips/doc/110x75/5b1d34737f8b9a952f8bff49/junos-os-common-criteria-evaluated-configuration-25-142551-router1-mgd4153.jpg)