Embed Size (px)
Citation preview


Juli Caujapé-Castells and Mario Baccarani-Rosas
2 T r n s f o r m e r - 2 M A N U A L
User’s manual
by
Juli Caujapé-Castells and Mario Baccarani-Rosas
Laboratorio de Biodiversidad Molecular Jardín Botánico Canario “Viera y Clavijo”
Ap. de Correos 14 de Tafira Alta 35017 Las Palmas de Gran Canaria
Canary Islands (Spain)
Jardín Botánico Canario “Viera y Clavijo” Laboratorio de Biodiversidad Molecular Ap. de correos 14 de Tafira Alta 35017 Las Palmas de Gran Canaria Canary Islands (Spain)
Instituto Tecnológico de Canarias Departamento de Software Playa de Pozo Izquierdo s/n 35119 Santa Lucía, Las Palmas de Gran Canaria Canary Islands (Spain)
T r n s f o r m e r - 2

Juli Caujapé-Castells and Mario Baccarani-Rosas
3 T r n s f o r m e r - 2 M A N U A L
ON THE Transformer PROJECT AND Transformer-2
The Transformer project aims at streamlining the generation, storage, interpretation, processing and application of molecular population genetic data, especial ly as related to Biological Conservation. Transformer-2 is one computer program within the Transformer project. It allows the user to concentrate in the accurate interpretation of molecular patterns and in the discussion of quantitative results through automating data transformations and analyses that are otherwise burdensome, complex and prone to error. Through saving research time while increasing accuracy, Transformer-2 permits the effective implementation of urgency in the growing number of practical applications of molecular population genetic information.
CREDITS
The Transformer project was conceived and developed by Juli Caujapé-Castells while he was responsible for the molecular population genetics and phylogenetics laboratories at the Jardín Botánico Canario “Viera y Clavijo” (since 1999 unti l present) and a “Ramón y Cajal” researcher in this institution (since 2001 unti l present). Transformer-2 has been programmed by Mario Baccarani Rosas, and is the result of a collaborative effort between the Jardín Botánico Canario “Viera y Clavijo” and the Departamento de Ingeniería del Software of the Instituto Tecnológico de Canarias (ITC).
The Transformer project received support from the Cabildo Insular de Gran Canaria, the Ministerio de Ciencia y Tecnología (MCYT) and the research projects REN2003-07592/GLO (MCYT) and Pi2003/032 (Dirección General de Universidades e Investigación del Gobierno de Canarias).

Juli Caujapé-Castells and Mario Baccarani-Rosas
4 T r n s f o r m e r - 2 M A N U A L
GENERAL CHARACTERISTICS OF TRANSFORMER-2
Transformer-2 is programmed in visual basic using a Microsoft Excel® sheet, so it wil l run in any computer that can contain the Microsoft Office® package.
This program is suitable for codominant (al lozyme or microsatell ite) data for at least 60 enzyme/primers with up to 10 loci per enzyme/primer (each locus containing a maximum of 10 alleles) in 66,000 diploid individuals.
DISCLAIMER
Transformer-2 can be downloaded from http://www.step.es/jardcan/ (in the l ink “Genética de la Conservación”) without charge, and may be distributed freely if and when (i) it does not undergo any modification, (i i) this manual and the two example fi les “transf-draw.xls” and “transf-gntp.xls” are attached without changes, and (i i i) it is adequately cited in al l papers and communications.
Transformer-2 is provided «as is» without any kind of warranty. In no case will the authors or their supporting institutions be liable for any trouble result ing from the use of this software or of its accompanying documentation.
Suggestions, criticisms and bug reports on Transformer-2 are very much welcome. Address them to [email protected] or to [email protected]
Juli Caujapé-Castells and Mario Baccarani-Rosas
5 T r n s f o r m e r - 2 M A N U A L
PLEASE CITE TRANSFORMER-2 IF YOU USE IT
No one is obliged to download Transformer-2. Therefore, if you use this program, please cite it. This is how: Caujapé-Castells J, Baccarani-Rosas M (2004) Transformer-2: a
program for the analysis of molecular population genetic data. Jardín Botánico Canario “Viera y Clavijo” and Instituto Tecnológico de Canarias, Las Palmas de Gran Canaria, Spain.
The support we receive through your citations is also very important in order to facil itate our seeking the necessary means to improve the program further.
FUTURE RELEASES
Transformer-2 is already being improved to include a much wider range of possibil i t ies. We hope that a new version that wil l al low RAPD and AFLP data analysis will be ready before spring 2005. In a longer term, we plan to have a Transformer that performs most of the calculations involved in the analysis of molecular population genetic data while keeping the versatil ity of the present version.

Juli Caujapé-Castells and Mario Baccarani-Rosas
6 T r n s f o r m e r - 2 M A N U A L
ACKNOWLEDGEMENTS
We thank al l the biologists and students at the Jardín Botánico Canario “Viera y Clavijo”, who were the first to provide data and feedback to improve the program, especially Carolina Suárez-García, Olga Fernández-Palacios, Sara Mora, Blas Vilches, Felicia Oliva-Tejera, Magui Olangua and Juan Luis Sánchez. We also thank the people that have helped us through their continued friendship, support and scientif ic stimulation, especial ly Julia Pérez de Paz, Rosa Febles, Alicia Roca, Bernardo Navarro, Pepe Naranjo, Águedo Marrero and Pepa Navarro (at the Jardín Botánico Canario “Viera y Clavijo”), Miguel González-Pérez and Pedro Sosa (at the Universidad de Las Palmas de Gran Canaria), Pilar Catalán (at the Universidad de Zaragoza), Jerzy T. Puchalski (at the Polish Academy of Sciences) or Juan Mota (at the Universidad de Almería). We are much indebted to Eugenio Reyes for his encouragement and for provoking the first contact between the Transformer project and the ITC. Joaquin Ocón (director of the Departamento de Ingeniería del Software at the ITC) and David Bramwell (director of the Jardín Botánico Canario “Viera y Clavijo”) are acknowledged for their will ingness to allow the collaboration between these institutions. Juan Francisco Rodríguez, Izzat Sabbagh and Gonzalo Piernavieja (at the Departamento de Ingeniería del Software of the ITC) are acknowledged for their receptiveness to the idea of collaborating in the development of this program and for their continued support and interest.

Juli Caujapé-Castells and Mario Baccarani-Rosas
7 T r n s f o r m e r - 2 M A N U A L
PREFACE
The history behind Transformer-2 is, in short, another one of
chance and necessity. Necessity came along with the growing bulk of data analyses related to the population genetic projects under way at the Jardín Botánico Canario «Viera y Clavijo» (JBCVC), that triggered the creation of a Transformer-1 (Caujapé-Castells 2001). That f irst version proved to be suitable enough to bypass a number of burdensome and error-prone aspects of molecular population genetic data analysis, though it was sti l l too tangled to be released without shame. Therefore, Transformer-1 was only operated by Juli Caujapé-Castells in his personal computer. Available time was in very short supply since the creation of Transformer-1, and this alone would have provided an excellent excuse not to pursue a better version; after all, that first program already analysed our molecular population genetic data much faster than usual.
Perhaps the chance to develop a Transformer-2 wouldn't have turned up had it not been by Eugenio Reyes, an educator at the JBCVC who was aware of the Transformer project. This person put Juli in contact with the researchers at the División de Software of the Instituto Tecnológico de Canarias (ITC), who were very receptive at the idea of helping develop a better Transformer. After several meetings, the project was undertaken by Mario Baccarani Rosas, who is the programmer of Transformer-2 and has made possible many ideas that were just starving for opportunity.
In Transformer-2, a lot of effort has been devoted to the entry formats (especially in the drawing matrix) and to the configuration protocols with the purpose of making the most of the data in the shortest possible time. We believe that the use of the program is quite intuitive and user-friendly.
Probably, Transformer-2 wil l be especial ly welcome by those working with allozymes, though it can also be used with microsatel l ite data. Its versatil ity (that we hope to enhance much further very soon) can save a lot of research time and avoid most errors associated with genotyping, formatting and data analysis of molecular population genetic information.
Juli Caujapé-Castells and Mario Baccarani-Rosas Las Palmas de Gran Canaria, August 2004

Juli Caujapé-Castells and Mario Baccarani-Rosas
8 T r n s f o r m e r - 2 M A N U A L
INDEX
WARNING FOR WINDOWS-XP USERS Sect ion 1. Enter ing Data
1.1. General i t ies on the drawing ut i l i ty 1.1.1. Advantages of drawing the interpretat ions 1.1.2. General features of the drawing matrix 1.1.3. Drawing heterozygous indiv iduals 1.1.4. Adding sheets to your drawing project 1.1.5. Phantom bands and missing data
1.2. Drawing your interpretat ions 1.2.1. Gett ing started 1.2.2. Choosing populat ion codes 1.2.3. Define the enzyme/pr imer 1.2.4. Place the al le les in their correct posit ions 1.2.5. Draw the al le les 1.2.6. Insert ing new al leles in the drawing matr ix 1.2.7. Insert ing new loci 1.2.8. Drawing “phantom” bands 1.2.9. Insert ing new indiv iduals 1.2.10. Get the genotypes from the drawing 1.2.11. Tips on drawing the data
1.3. Enter ing a table of genotypes 1.3.1. How to input your genotypes for analys is
Sect ion 2. Conf igur ing the data 2.1. The default conf igurat ion 2.2. Deal ing with groups of populat ions
2.2.1. Analysing populat ion subsets 2.2.2. Comparing independent groups of populat ions 2.2.3. Including populat ions in more than one group
Sect ion 3. Processing the data 3.1. The Biosys format
3.1.1. Obtaining the Biosys format 3.2. The Bott leneck format
3.2.1. Obtaining the Bott leneck format 3.3. The GenePop format
3.3.1. Obtaining the Genepop format 3.4. The GeneStat format
3.4.1. Obtaining the GeneStat format 3.5. The Ntsys format 3.5.1. Ntsys format requirements 3.5.2. Obtaining the Ntsys format 3.6. The PopGene format 3.6.1. Obtaining the PopGene format
3.7. The probabi l i t ies of al le l ic loss 3.7.1. On the probabi l i ty of loss 3.7.2. Obtaining the probabi l i t ies of a l le l ic loss 3.8. Tips on processing the data
LITERATURE CITED APPENDIX: The two example f i les.
Juli Caujapé-Castells and Mario Baccarani-Rosas
9 T r n s f o r m e r - 2 M A N U A L
WARNING FOR WINDOWS XP USERS
If you are using Windows-XP, the macros wil l be probably disabled by default. As Transformer-2 uses macros, you wil l have to change your macros security option from “high” to “medium” (in Tools, Macro, Security) if you want to run the program.
Juli Caujapé-Castells and Mario Baccarani-Rosas
10 T r n s f o r m e r - 2 M A N U A L
Section 1. Entering data
Transformer-2 offers a versati le, interactive data entry interface that makes corrections and manipulations easy to implement. At present, you can feed Transformer-2 with the drawings of the interpretations of your molecular patterns (see section 1.1) or with a matrix of genotypes that you have to type (see section 1.2). 1.1 GENERALITIES ON THE DRAWING UTILITY
Transformer-2 allows you to store your interpretations in an interactive drawing matrix. This tool allows the user
1. To have a permanent record of the interpretations of
molecular patterns that can be easily modified and corrected.
2. To generate a genotype fi le for any combination of loci,
which is the basis for any subsequent data transformations and analyses.
Although we believe that drawing interpretations is advisable in most cases (particularly if using allozymes), it is especially so if you begin to interpret your molecular patterns right when you obtain the first consistent data. Building your database l ittle by l ittle is practically effortless and allows you to track eventual changes and check previous interpretations easily while saving a lot of time and errors.
1.1.1 Advantages of drawing the interpretations
The major advantage of drawing the interpretations is that, once you are done, quantitative data for any possible configuration of populations and loci wil l be a few easy cl icks away (see sections 2 and 3).

Juli Caujapé-Castells and Mario Baccarani-Rosas
11 T r n s f o r m e r - 2 M A N U A L
However, there are at least three more powerful reasons to use this tool of Transformer-2. 1. You can forget about genotyping individuals, as Transformer-
2 will do it for you (see section 1.2.10). Therefore, you are less prone to make the mistakes that are so frequent when you interpret by hand.
2. You may correct or modify your interpretations (see sections
1.2.6 to 1.2.9) by moving, inserting or deleting any number of individuals, al leles, loci or spaces easily at any point of the interpretation process.
3. You wil l have a visual record of the interpretations which is
much easier to scan than a whole table of genotypes and which can be used nicely in presentations (see the attached fi le «transf-draw.xls»).
1.1.2. General features of the drawing matrix
1. The drawing matrix of Transformer-2 is conceived to draw the interpretations so that the fastest alleles appear at the left-hand side of the drawing and the slower ones at the right-hand side. To put it formally, the drawing corresponds to the original gel shuffled back to front and then turned 90º counter-clockwise (see Figure 1 for an i l lustration).
Figure 1. Orig inal p icture of an al lozyme gel for a monomeric enzyme ( left) and how should i t appear in the drawing matr ix of Transformer-2 (r ight). Di f ferent colours stand for di fferent loci (red is locus 1 and black is locus 2) Although this way of drawing may appear counter-intuitive at first, it does not take long to become familiar with it. Its advantages are that it allows the program to have faster analytical algorithms, while
Juli Caujapé-Castells and Mario Baccarani-Rosas
12 T r n s f o r m e r - 2 M A N U A L
the user can «read» the alleles from left to right in several loci for many individuals.
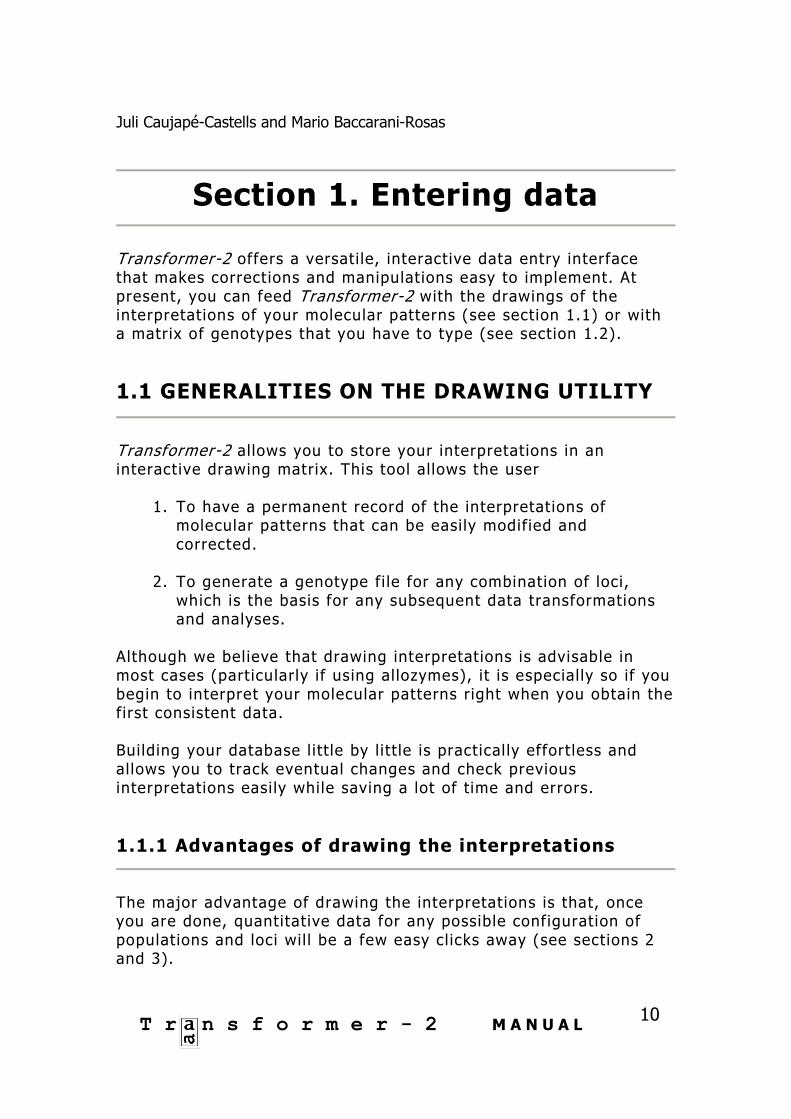
2. For each enzyme/primer, the drawing util ity of Transformer-2
consists of (see Figure 2)
(a) an enzyme/primer header that contains
(i) the name of the enzyme/primer (framed), and
(i i) the positions of the alleles detected
(b) a drawing matrix, where you can insert and delete columns to make it f it your molecular patterns
(c) a genotype area with the label “Gntp”, containing as many
columns as loci you have defined for that enzyme/primer (the l imit is 10 loci per enzyme/primer).
These columns will be coded according to the enzyme/ primer name and wil l remain empty unti l you decide to genotype that locus (see section 1.2.10)
Figure 2. Detai l of the drawing matr ix of Transformer-2. The f i rst four columns of the area coloured in l ight grey correspond to the sample numbers (N), the species names (Species), the populat ion codes (Code) and the sample codes (Sample). The next columns in grey show the enzyme/pr imer header for the enzyme MDH (which, in this case, has two loc i with two and f ive al le les, respect ively) and the genotype area. The white area below the enzyme/pr imer header is the drawing matrix, where the user can draw the interpretat ions of gels fol lowing the indicat ions in the manual. Only a part of the drawing matr ix for MDH is shown.

Juli Caujapé-Castells and Mario Baccarani-Rosas
13 T r n s f o r m e r - 2 M A N U A L
3. The drawing matrix for a given enzyme must have at least 11 columns, so that, if you reach this minimum width, Transformer-2 will not al low you to delete columns (see section 1.2.4), and an error message l ike the one below will appear
4. For the sake of uniformity, Transformer-2 assigns a predefined
colour to all the alleles belonging to a given locus. All the al leles of the first locus within an enzyme/primer wil l be red, those at the second black, those at the third blue, and so on until the tenth, whose alleles are violet (see Figure 3 for the colour codes associated with each locus).
5. Transformer-2 wil l only interpret the alleles in the drawing matrix whose colour and position are defined at the enzyme/locus header (see section 1.2.10). The palette of pre-assigned allele colours for the maximum of ten loci is i l lustrated in Figure 3b.
Fig.3a Fig.3b

Juli Caujapé-Castells and Mario Baccarani-Rosas
14 T r n s f o r m e r - 2 M A N U A L
1.1.3. Drawing heterozygous individuals
Heterozygous individuals in monomeric al lozyme loci and in microsatel l ite loci should be represented by two bands of the same colour (see Figure 4)
Figure 4. Example showing several heterozygous individuals in the monomeric enzyme SKD (from the “transf-example.xls” f i le). Note that only the red locus (SKD-1) and the black locus (SKD-2) have heterozygous indiv iduals for this sect ion of the data. Heterozygous individuals in dimeric and multimeric allozyme loci should be represented by three symbols: the two bands at the extremes should be assigned the corresponding locus colour, and the heterodimer(s) should be a pre-defined symbol (see Figure 5).
After selecting the cell where you want to insert the heterodimer, its symbol can be drawn in one of two ways:
(a) pressing simultaneously “Alt” and “Z”, or (b) pressing the button “heterodimer” in the bar chart menu .
Figure 5. Example of heterozygous indiv iduals in three of the four loci def ined for the d imeric enzyme FDH in the “transf-draw.xls” example f i le (the b lack locus FDH-2) is monomorphic in this sect ion of the f i le.

Juli Caujapé-Castells and Mario Baccarani-Rosas
15 T r n s f o r m e r - 2 M A N U A L
1.1.4. Adding sheets to your drawing
If you have many polymorphic enzyme/primers in your project, it is probable that their interpretations do not fit in a single Excel sheet (Excel has a very short column number l imit). In this case, you can add new sheets selecting the option “sheet” in the button “Add” in the toolbar menu (see Figure 6). The first sheet wil l be named sheet 1, the next one sheet 2, and so on up to (eventually) sheet 10.
Figure 6. Select ing “Add sheet” from the toolbar menu
The contents of the newly added sheet wil l be exactly the same as that of the first one, including the drawings. You have to format the new sheet so that it only keeps the species and population codes for your samples. To do this, select the option “Current sheet” in the button “Format” in the toolbar menu (see Figure 7).
Figure 7. Formatt ing a newly created sheet for drawing new enzyme/primer interpretat ions. Be careful not to select “All sheets” within “Format” unless you want to erase the whole contents of your interpretation fi le.
1.1.5. Phantom bands and missing data
Every locus colour in Transformer-2 has two associated degraded tones (both of them fainter than the corresponding allele colour)

Juli Caujapé-Castells and Mario Baccarani-Rosas
16 T r n s f o r m e r - 2 M A N U A L
that can be used to draw bands that you do not want to include in the final interpretations (Figure 8) [see section 1.2.8. for details].
Figure 8. Example of “phantom bands” in a gel corresponding to the enzyme PGM. There are phantom bands in the three loci def ined for this enzyme (see sect ion 1.2.8. for detai ls) .
Also, if you cannot interpret a given individual for a given locus, you can leave it blank. Transformer-2 will just add a 999 to the corresponding genotype when it interprets the pattern (the fi le “transf-draw.xls” contains many individuals with empty loci). 1.2. DRAWING YOUR INTERPRETATIONS
1.2.1. Getting started
a) Select the option “Species/population” of the button “Add” in the
toolbar menu (Figure 9a).
Figure 9a.

Juli Caujapé-Castells and Mario Baccarani-Rosas
17 T r n s f o r m e r - 2 M A N U A L
b) Introduce the name of the first species you want to include in the
drawing fi le you are about to create, the population code and the number of individuals in that first population in the dialog that will appear (Figure 9b).
Figure 9b. Introducing a populat ion in the Transformer-2 drawing sheet.
Just feed in this box what you have at present, and do not worry if you plan to include more populations in your project or sample more individuals for a given population; you wil l be able to add these at any moment of the interpretation process (see section 1.2.6., 1.2.7., and 1.2.9.).
After fi l l ing in this box, Transformer-2 will write automatically in the drawing sheet the number of individuals that you have assigned to each population using four columns (see Figure 10):
1. The first column is the total number of samples 2. The second column is the name of the species you have input 3. The third column is the population code of your choice 4. The fourth column is a numerical free code that you may
want to assign in order to identify each individual. Write only in the fourth column to introduce the individual codes. It is better not to write anything in the other columns.
Figure 10. Detai l of the drawing sheet after pressing “OK” with the select ion made in Fig. 9b.

Juli Caujapé-Castells and Mario Baccarani-Rosas
18 T r n s f o r m e r - 2 M A N U A L
c) Insert the remaining populations of your project in the
Transformer-2 drawing sheet by selecting “Species” in the “Add” button from the toolbar as many times as needed (see Figure 11a, b and c).
Figure 11. Adding new populat ions to the Transformer-2 drawing sheet. 1.2.2. Choosing population codes
For a population code you can use any string of characters,
including numbers and signs. The only restriction is to choose codes without empty spaces whose symbols (if any) do not confl ict with the entry formats of any of the programs that Transformer-2 generates fi les for (see section 2). Some examples of two population codes that Transformer-2 can deal with are (HILL, LAKE), (HILL1, HILL2), (HILLA, HILLB), (LAKE-SP1, LAKE-SP2), (101-A, 101-B). Have a look at the attached fi le “transf-example.xls” for other examples.
1.2.3. Define the enzyme/primer
After inserting the samples of your project, you have to define the basic traits of your enzymes/primers.
1) Select «enzyme/primer» in the button «Add» from the toolbar (Figure 12a).
Then, you wil l be presented with a menu that asks you to input the basic characteristics of the molecular patterns you're

Juli Caujapé-Castells and Mario Baccarani-Rosas
19 T r n s f o r m e r - 2 M A N U A L
about to introduce (Figure 12b) in order to configure the loci in the Transformer-2 drawing sheet.
Figure 12a. Adding an Enzyme/Pr imer to the drawing sheet.
2) Fil l in the dialog
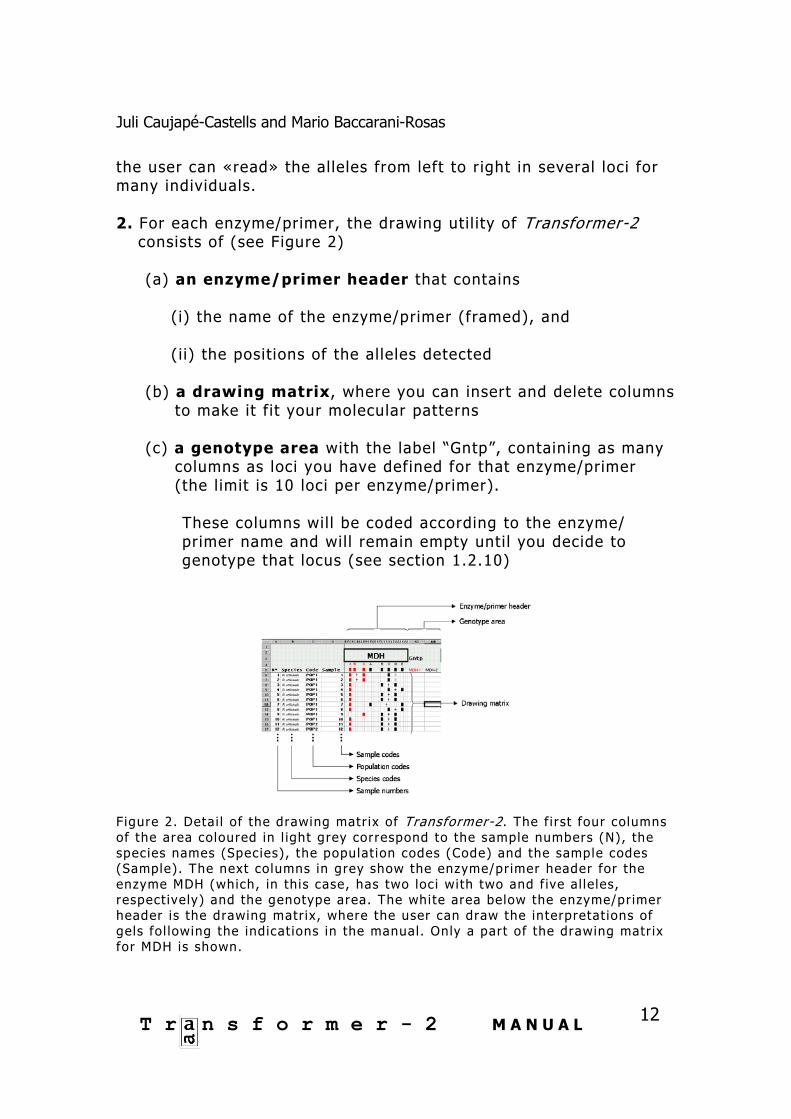
If you are starting the molecular interpretations from scratch, just feed the number of al leles you detected in your first gel. Again, do not worry about new alleles, individuals or loci that you may have to add in the future; you wil l be able to do it easily at any point of the interpretation process (see sections 1.2.6., 1.2.7. and 1.2.9.). In the example in Figure 12b, the enzyme MDH has two loci with 3 and 5 al leles, respectively.
Figure 12b. Defin ing the basic features of the new Enzyme/pr imer. In this case (al lozymes), the enzyme (MDH) has two loc i (MDH-1 and MDH-2) with 3 and 5 al le les, respect ively.
If you are drawing al lozymes, write
a) the code of the enzyme,
b) the number of loci, and
c) the number of alleles for each locus.
Juli Caujapé-Castells and Mario Baccarani-Rosas
20 T r n s f o r m e r - 2 M A N U A L
If you are drawing microsatell ite profi les, just
a) introduce the primer code in the corresponding cell,
b) put a «1» in the box «number of loci», and
c) introduce the number of alleles you're about to draw.
3) press “OK”.
Transformer-2 will then ask you if everything is correct. If you confirm, the number of alleles that you have selected for each locus in a given enzyme/primer wil l appear automatically below the enzyme/primer header, with their corresponding colour and letter codes. Figure 13 i l lustrates the default conformation of the drawing matrix for the selection made in Fig. 8. Since we selected 2 loci with 3 and 5 alleles (respectively), there will be 3 red bands and 5 black ones.
Figure 13. The default conformation of the drawing matr ix for the select ion made in Fig. 8.
Also, at the right of the drawing matrix for each enzyme/ primer there wil l be as many columns as loci you have defined, each of them correspondingly coded and coloured. These columns (two in the example) wil l remain empty unti l you decide to interpret your patterns (see section 1.2.10.).

Juli Caujapé-Castells and Mario Baccarani-Rosas
21 T r n s f o r m e r - 2 M A N U A L
1.2.4. Place the alleles in their correct positions
As you can notice in Figure 13, the separation among alleles and loci is assigned automatically by Transformer-2, and it will probably not correspond to their real separation on the gels. Thus, a first thing you want to do is to adapt the relative positions of the alleles to reflect their positions in the gel. Do it one allele at a time (starting with the one at the far right) as follows:
a) Select the corresponding coloured cel l in the enzyme/primer
header b) Click on «move left» or «move right» in the bar chart menu
unti l you have placed all the al leles in the desired positions Figure 14 il lustrates the end of this process for the default pattern in Figure 13.
Figure 14. Modif icat ion of the pattern in Fig. 13 obtained by moving the al le les to the r ight. The al le le movement began with the black al le le label led “E”, fol lowed with the one label led “D”, and so on unti l the red al le le label led “A” To insert or delete columns within the drawing matrix,
a) place the pointer at the chosen place in the matrix and b) press the button «Insert column» or “delete columns” (as
needed) in the bar chart menu (Figure 15).
Figure 15

Juli Caujapé-Castells and Mario Baccarani-Rosas
22 T r n s f o r m e r - 2 M A N U A L
Adding columns is adequate if you need a bigger matrix for drawing the interpretations of your molecular patterns (new columns will be created at the right of the selected cel l). Deleting columns is an option you may want to take in order not to assign more space than strictly needed to represent your interpretations of a given Enzyme/primer (see Figure 16). However, the minimum number of columns in an enzyme/primer is 11. Once you reach this l imit, Transformer-2 wil l not allow you to delete more columns (see section 1.1.2.3) You can add or delete columns at any point of the interpretation process. Be careful not to delete a column where you defined an allele. Just in case, Tranformer-2 wil l always ask you to confirm the deletion before proceeding. Figure 16 shows the effect of eliminating the spare columns at the left of the first al lele of the red locus in Figure 15.
Figure 16. Modif icat ion of the pattern in Fig. 14 obtained by delet ing columns at the left of the red “A” al le le. For a better visualisation of the patterns, it is advisable to leave at least one blank column between consecutive alleles (see Figure 10). However, Transformer-2 does not have any problem with interpreting contiguous alleles not separated by a blank column (see Figure 17).

Juli Caujapé-Castells and Mario Baccarani-Rosas
23 T r n s f o r m e r - 2 M A N U A L
Figure 17. Example of al lozyme loc i with several cont iguous al le les for the enzyme PGM. 1.2.5. Draw the alleles
There is just one possibil ity to draw an allele for a given individual:
(1) select the cel l where you want that allele and press “Alt”
and “X” simultaneously DO NOT draw alleles by copying the coloured cell from the enzyme/primer header and pasting it in the corresponding individual. Transformer-2 wil l let you do it, but this can give rise to errors in the subsequent interpretations. Just use the described combination of keys.
If you use Transformer-2 for drawing microsatell ite profi les, take into account that, at present, the program does not take “size of the allele” or “number of motive repetitions” as a variable, so it wil l just assign an “A” to the smaller allele, a “B” to the second smaller, and so on. 1.2.6. Inserting new alleles in the drawing matrix
Whenever you detect a new allele in a locus, you have to define it f irst in the enzyme/primer header, or Transformer-2 wil l not recognise it as an allele (see the sections 1.2.3 and 1.2.10). To define the position of a new al lele in one of the already existing loci, fol low these steps: a) Select the cell where you want to place the new allele

Juli Caujapé-Castells and Mario Baccarani-Rosas
24 T r n s f o r m e r - 2 M A N U A L
You can choose any position in the space assigned to alleles in the enzyme/primer it belongs (see Fig. 18a)
b) In the box that wil l appear, select the locus colour where that
allele should be assigned
Transformer-2 asks you this because there are no restrictions on the relative position of any allele within the drawing matrix for a given locus. This means that, for instance, an allele of the first locus (red) can be placed in the middle of two alleles from the third locus (blue) as well as in the middle of two pre-existing alleles for the first locus. Whatever the case, Transformer-2 will automatically recode the old alleles according to their new relative positions (see Figures 18a to f for examples).
Figure 18a. Select the cel l where you want to add a new al lele.
F igure 18b. From the custom toolbar, select “Add...” and then “Al le le”.
Figure 18c. In the dialog box that appears, the new al lele can be assigned either to any of the two f lanking loc i (only red in the example) or to any other exist ing locus by select ing [NONE].

Juli Caujapé-Castells and Mario Baccarani-Rosas
25 T r n s f o r m e r - 2 M A N U A L
Figure 18d. I f we pressed the red button in Fig. 18c, a new al lele would be assigned to the red locus (ADH-1) in the selected posit ion.
Figure 18 e. I f we pressed “NONE” in Figure 18c, a dia log l ike this would appear. Al though al l possib le al le le colours are shown, only select ing the black cel l under “Basic al le le colours” would insert an al le le, because the chosen enzyme (ADH) only has two loc i def ined. If we choose a colour other than black, an error message would appear.
Figure 18 f . After pressing “OK” in 18 e, a new al le le appears at the black locus, and the pre-exist ing al le les at that locus change their codes according to their new posi t ion. Remember that Transformer-2 only understands diploid data, so that a maximum of two different bands with the locus colour can be used for genotyping an individual at that locus. Just in case, if you draw more than two alleles per locus in a given individual, Transformer-2 wil l pop out an error message when it interprets the patterns (see section 1.2.10).

Juli Caujapé-Castells and Mario Baccarani-Rosas
26 T r n s f o r m e r - 2 M A N U A L
1.2.7. Inserting new loci
If you want to assign a new al lele to a new locus that you had not detected in the previous analyses, then just
a) Select the position where you want to place the new locus in the enzyme/primer header (l ike in Fig. 19a).
Figure 19a. Select the posi t ion where you want to def ine a new locus
b) Choose «Add» and then «Locus» in the toolbar menu (see
Figures 19b and 19c).
Figure 19 b. Select “Add” and then “ locus” from the toolbar menu.
Juli Caujapé-Castells and Mario Baccarani-Rosas
27 T r n s f o r m e r - 2 M A N U A L
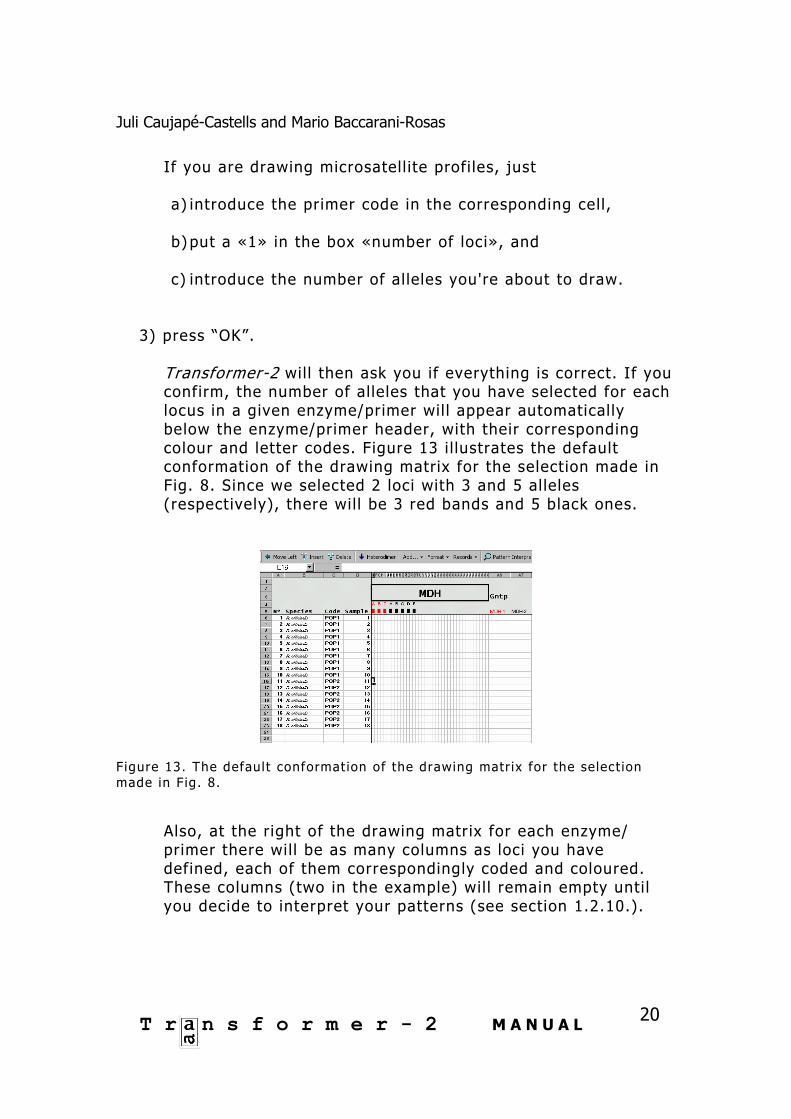
Figure 19c. Transformer automatical ly inserts the new locus with i ts corresponding colour. The new locus can be inserted at any position in the drawing matrix corresponding to a given enzyme/primer. If you place it in the middle of two pre-existing loci, then Transformer-2 will automatically refurbish the colour codes of the loci at the right of the newly inserted one so that they fit the new conformation. The program will also insert a new column in the genotype area. Figure 20 il lustrates the effects of the insertion of a new locus between two pre-existing ones (labelled in red and black). Transformer-2 will re-draw the alleles in black so that they now will belong to the new locus 3 (which should be blue according to the colour code), while those for locus 1 wil l remain untouched, because they are at the lefthand side of the locus and they are not affected by the appearance of the new locus.
Figure 20. Insert ion of a new locus between two pre-exist ing ones. Note that, after insert ing the new locus, i f there were any loc i at the r ight side of i t , the colours of al l their a l le les change automatical ly according to the colour codes in Fig. 3b. In the case of this f igure, the al le les in the locus that was previously black changed to blue after the insert ion.

Juli Caujapé-Castells and Mario Baccarani-Rosas
28 T r n s f o r m e r - 2 M A N U A L
1.2.8. Drawing «phantom» bands
Those working with allozymes are used to come across bands whose interpretation is thorny because they cannot be assigned safely to any locus. In most cases, it is convenient to store these so-called «phantom» bands (Arús and Shields 1983) as qualitative information for eventual consideration in the future. At the JBCVC, students that use molecular population techniques are always requested to draw the phantom bands (if any) to purport a more realistic version of the gel that can set the stage to alternative interpretations. This uti l ity can also be used to represent heterodimers. Transformer-2 offers two degraded versions of the colour codes assigned to each locus to represent these phantom bands (see example in Figure 21).
Figure 21. Palette of possible colours for phantom bands (below the heading “Degraded colors”) for each of the 10 corresponding loci colours. Not ice that each locus colour has two di f ferent associated tones that can be used to represent phantom bands. See sect ions 1.1.5 and 1.2.8 for detai ls on the use of these bands. 1.2.8.1. If you want to insert a phantom band in a position which is defined as an allele in the enzyme/primer header, then
a) Select the position where you want to insert it and b) Press “ALT” and “C” simultaneously.

Juli Caujapé-Castells and Mario Baccarani-Rosas
29 T r n s f o r m e r - 2 M A N U A L
A degraded version of the corresponding locus colour wil l appear in the selected cell. If you press “ALT+C” again, then an even fainter version of the locus colour wil l appear. If you press “ALT+C” a third time, then the first degradation of the allele colour wil l appear, and so on. 1.2.8.2. If the phantom band is not in a position defined as an allele in the enzyme/primer header, then (see Figures 22a to g)
a) Select the position where you want to place the phantom band in the enzyme/primer header (Fig. 22a)
b) Press “Add a” and then “Allele” in the toolbar menu (Fig. 22b) c) Press “none” in the dialog box that wil l appear (Fig 22c) d) Select the corresponding degraded tone you want to assign to
the phantom band (Fig. 22d and e) e) Draw the phantom bands (Fig. 22f and g)
Figure 22. Drawing phantom bands in a posi t ion not def ined at the enzyme/pr imer header. In the example, al though SKD is an al lozyme with uncertain quaternary structure, i t is represented as a dimer.

Juli Caujapé-Castells and Mario Baccarani-Rosas
30 T r n s f o r m e r - 2 M A N U A L
You can draw any number of these «phantom» bands, as Transformer-2 wil l not interpret them (remember it only interprets the alleles whose colours and positions coincide exactly with those defined as alleles at the enzyme/primer header). 1.2.9. Inserting new individuals
You can add new individuals to the drawing matrix at any point of the interpretation process. The only small restriction is that, if the newcomers belong to a population that already has representatives in the drawing, they must be added after the last individual for that population. If a new population is to be added in your project, then Transformer-2 will do it at the end of the existing fi le (select “Species/population” in the button “Add” on the toolbar menu and carry on as described in section 1.2.1). To insert individuals in an already existing population,
a) Select any individual in the population where you want to
add the new samples (see Figure 23a)
b) Click on the option «Add» in the button «Records» on the toolbar menu (see Figure 23b)
c) Just in case, Transformer-2 wil l remind you you're just about
to add new individuals in that population (see Figure 23c) d) Click «OK» and the pointer wil l move to the position where it
wil l insert the first of the new individuals (i.e., right after the last one of the pre-existing ones, see Fig. 23d)
e) Write in the dialog box the number of individuals you want
to add (Figure 23d).
After completing this process, the corresponding number of cel ls wil l appear after the last of the pre-existing individuals in the selected population (see Figure 23e). Notice that, for the newly added
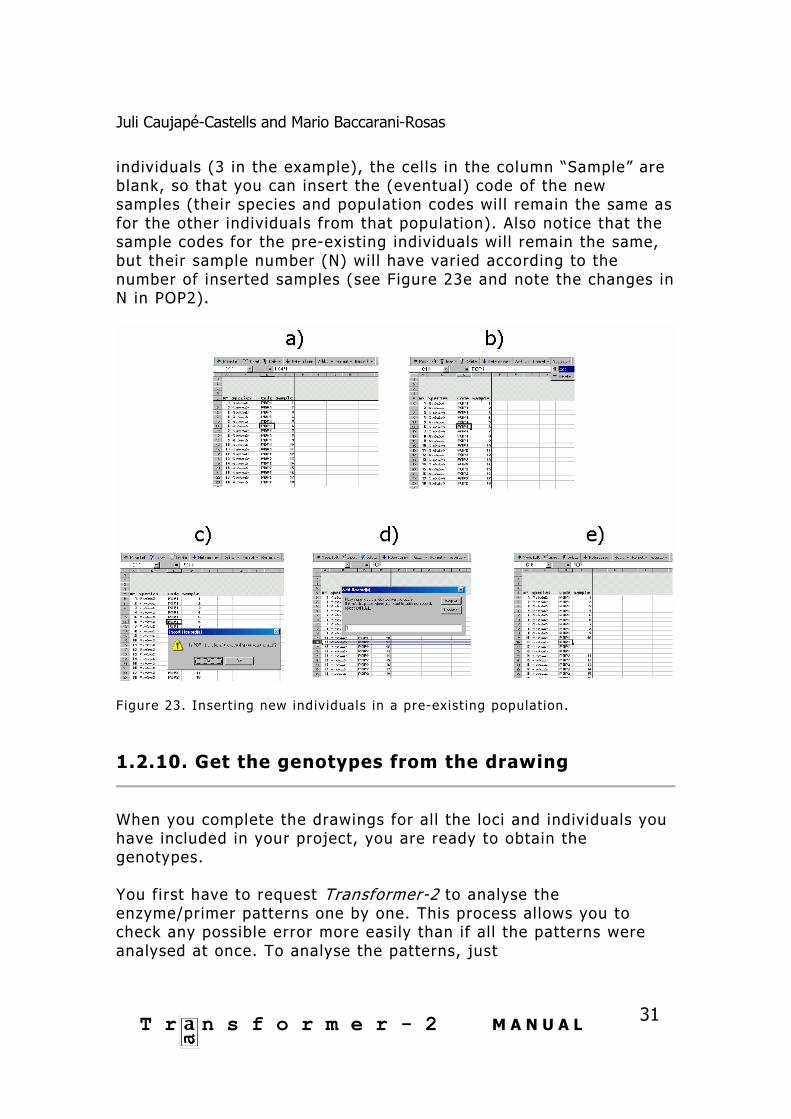
Juli Caujapé-Castells and Mario Baccarani-Rosas
31 T r n s f o r m e r - 2 M A N U A L
individuals (3 in the example), the cells in the column “Sample” are blank, so that you can insert the (eventual) code of the new samples (their species and population codes wil l remain the same as for the other individuals from that population). Also notice that the sample codes for the pre-existing individuals wil l remain the same, but their sample number (N) wil l have varied according to the number of inserted samples (see Figure 23e and note the changes in N in POP2).
Figure 23. Insert ing new indiv iduals in a pre-exist ing populat ion. 1.2.10. Get the genotypes from the drawing
When you complete the drawings for al l the loci and individuals you have included in your project, you are ready to obtain the genotypes. You first have to request Transformer-2 to analyse the enzyme/primer patterns one by one. This process allows you to check any possible error more easily than if all the patterns were analysed at once. To analyse the patterns, just

Juli Caujapé-Castells and Mario Baccarani-Rosas
32 T r n s f o r m e r - 2 M A N U A L
a) Select “Pattern interpretation” in the toolbar menu (Figure 24).
F igure 24
b) Fil l in the box that wil l appear with the name of the
enzyme/primer whose pattern you want to analyse (see Figure 25) [the Enzyme/primer to interpret must be in the active sheet].
Figure 25. Select ing an enzyme/primer for interpretat ion
c) Press “OK” and Transformer-2 wil l genotype that enzyme/primer (Figure 26).
Figure 26. Genotypes appear after pressing OK in the enzyme/primer interpretat ion box.

Juli Caujapé-Castells and Mario Baccarani-Rosas
33 T r n s f o r m e r - 2 M A N U A L
If there are missing data for any of the individuals, Transformer-2 will just assign a “999” to the corresponding genotype. If you have drawn more than two al leles in an individual at the given locus, Transformer-2 wil l warn you (see the error message below) so you can correct it before carrying on.
If you do not correct the mistake(s), the program will continue running, but you will probably generate defective fi les or data (see section 2). Therefore, you are strongly adviced to correct any mistake before passing on to interpret the next pattern. Once you have completed this process for all the enzymes/primers included in your interpretation,
a) Click on the button “Genotype file” in the toolbar and then
select the option “From the drawing” (Figure 27)
Figure 27
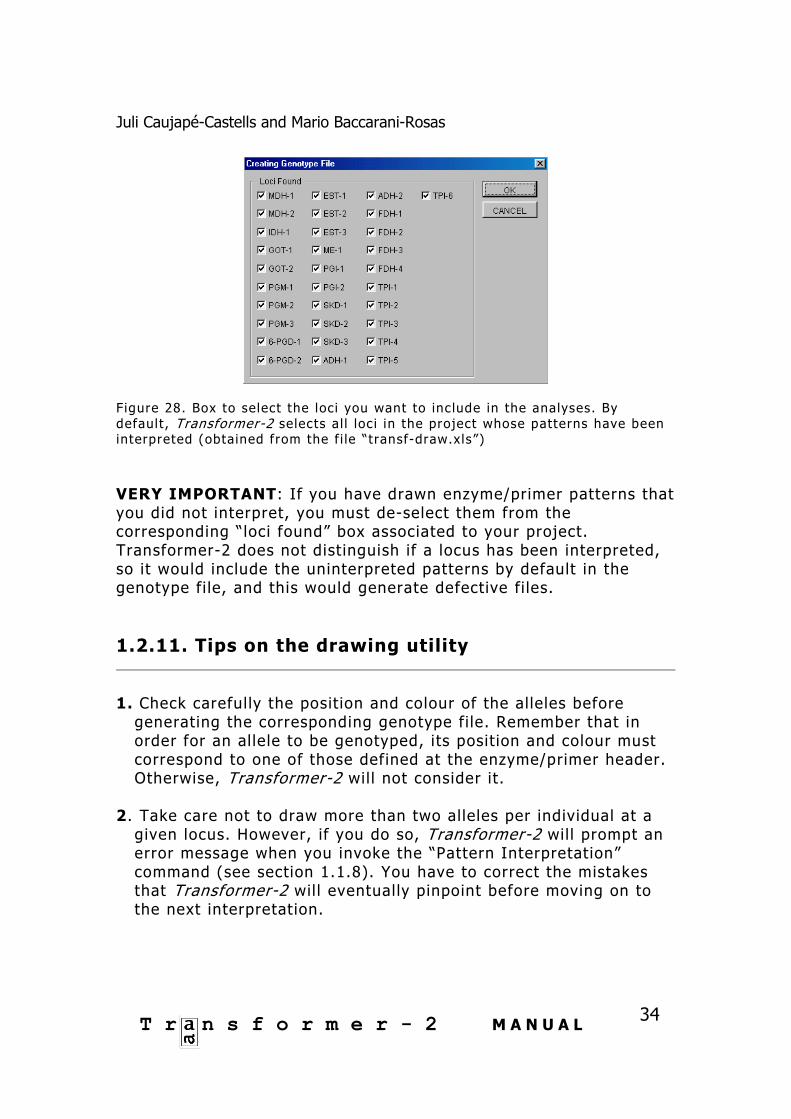
b) Select the loci for which you want to generate the genotype
fi le by ticking on the appropriate boxes (default is all loci) [see Figure 28] and click “OK”.
Transformer-2 wil l then generate a genotype sheet that is the basis for the subsequent calculations and data transformations. If you want to save this genotype workbook, do it now.
The fi le “transf-gntp.xls” was obtained by invoking “Genotype fi le” for al l loci in the fi le called “transf-draw.xls”.
Juli Caujapé-Castells and Mario Baccarani-Rosas
34 T r n s f o r m e r - 2 M A N U A L
Figure 28. Box to select the loci you want to inc lude in the analyses. By default , Transformer-2 selects a l l loc i in the project whose patterns have been interpreted (obtained from the f i le “transf-draw.xls”) VERY IMPORTANT: If you have drawn enzyme/primer patterns that you did not interpret, you must de-select them from the corresponding “loci found” box associated to your project. Transformer-2 does not distinguish if a locus has been interpreted, so it would include the uninterpreted patterns by default in the genotype fi le, and this would generate defective fi les. 1.2.11. Tips on the drawing utility
1. Check carefully the position and colour of the alleles before
generating the corresponding genotype fi le. Remember that in order for an allele to be genotyped, its position and colour must correspond to one of those defined at the enzyme/primer header. Otherwise, Transformer-2 wil l not consider it.
2. Take care not to draw more than two alleles per individual at a
given locus. However, if you do so, Transformer-2 wil l prompt an error message when you invoke the “Pattern Interpretation” command (see section 1.1.8). You have to correct the mistakes that Transformer-2 wil l eventually pinpoint before moving on to the next interpretation.

Juli Caujapé-Castells and Mario Baccarani-Rosas
35 T r n s f o r m e r - 2 M A N U A L
3. The enzyme/primer patterns you interpret must be in the active sheet. If you introduce the code of an enzyme/primer that appears in another sheet of your project, Transformer-2 wil l tel l you that it cannot find that item in the current sheet.
4. If you want to change the posit ion of one or several alleles after
completing the process of pattern interpretation, you can do it, but you wil l have to press “pattern interpretation” for the affected loci and then “genotype fi le” again. Otherwise, the genotype fi le will be the same as the one without the change(s).
1.3. ENTERING A TABLE OF GENOTYPES
Users of Transformer-2 that already have genotype matrices for their data may (rightly) consider that drawing their interpretations would be burdensome and time consuming. For such cases, Transformer-2 offers the option of entering a table of genotypes. 1.3.1. How to input your genotypes for analysis
In the Transformer-2 toolbar menu Select “Input data” on the option “Genotype fi le” (Figure 29)
Figure 29. Select ing the opt ion to enter a genotype Table in Transformer-2. Then, you just need to have a Microsoft Excel genotype table l ike the one in the attached fi le “transf-gntp.xls” (see Figure 30 for an example). In this fi le,
a) The first l ine should contain the headers for the species, populations and loci.
In this l ine, the first column is the sample number, the second is the species name, and the third is the population code. Only make sure that the string of letters in the “population code”

Juli Caujapé-Castells and Mario Baccarani-Rosas
36 T r n s f o r m e r - 2 M A N U A L
column is exactly the same for all the individuals that you want to include in a given population and follows the specifications in section 1.2.2.
b) The second line and the subsequent ones contain the data
(DO NOT start writ ing your data in the first l ine).
Figure 30. Detai l of the format of a genotype sheet for entry in Transformer-2. This image corresponds to the f i rst indiv iduals and loc i in the attached f i le “transf-gntp.ex”.

Juli Caujapé-Castells and Mario Baccarani-Rosas
37 T r n s f o r m e r - 2 M A N U A L
Section 2. Configuring the data
The starting point of the data configuration capabil it ies of Transformer-2 is the matrix of genotypes, either obtained through the drawing sheet or implemented ad hoc. To configure your data for analysis: 1. Cl ick on the button «Configure data» from the toolbar of
Transformer-2 (see below)
2. The big dialog box that wil l appear (see Figure 31) contains the
default options. This box can already be used for data analysis and transformation (see section 2.1), but it also constitutes the basis to implement the different configurations that you may want to give to your data (see section 2.2).
2.1. THE DEFAULT CONFIGURATION
The dialog box that first appears when you click on the option «Configure data» contains the configuration of data that Transformer-2 would analyse by default (see Figure 31).
Figure 31. Default populat ion conf igurat ion for the seven populat ions in the f i le “transf-ex.xls”.

Juli Caujapé-Castells and Mario Baccarani-Rosas
38 T r n s f o r m e r - 2 M A N U A L
This box consists of three parts: 1. The number of groups with the default value, that corresponds to
the number of different populations that Transformer-2 has detected in the table of genotypes (7 in the fi le “transf-draw.xls”)
2. A series of buttons with the name of the options that you can
invoke. For any combination of populations, Transformer-2 can give you the fi le formats needed to run your data in the following six programs:
Biosys [see section 3.1] Bottleneck [see section 3.2] GenePop [see section 3.3] GeneStat-PC 3.31 [see section 3.4] NTSYS-pc 2.02j [see section 3.5] PopGene version 1.32 [see section 3.6]
Furthermore, Transformer-2 calculates the probabilit ies of loss (L) sensu Bengtsson, Weibull and Ghatnekar (1995) [see section 3.7] and a table of al lele frequencies associated with the configuration of populations that you have defined (button “Prob. Loss”)
3. A square matrix where the rows and columns are the populations
that are included in the genotype table (7x7 in the example). Every cell in this matrix (there are 49 cells in the example) can be selected in order to define different configurations for analysis (see section 2.2). The limit for the number of populations is 50.
If you choose any calculation option for this default configuration, the resulting analyses or data fi les that Transformer-2 will generate will correspond to considering all the populations individual ly.
Juli Caujapé-Castells and Mario Baccarani-Rosas
39 T r n s f o r m e r - 2 M A N U A L
2.2. DEALING WITH GROUPS OF POPULATIONS
Many times, the population geneticist is interested in obtaining the values of the genetic polymorphism parameters for different groups in which the data can be subdivided. This uti l ity of Transformer-2 consists of four basic steps:
1) In the box of population selection, choose the number of
groups/populations to be defined. 2) Press «Return»
Then, the default matrix wil l reduce to a new one with the same number of rows as before but with the number of columns equall ing the number of groups you defined.
3) Label the groups with proper names 3) Tick the cell(s) corresponding to the population(s) you want
to include in each group.
In Transformer-2, a group can consist of any number of populations (one population can be a group), and one given population can appear in more than one group at the same time. In the sections below, we discuss several possible options to define population groups. 2.2.1 Analysing population subsets
Suppose you have a data set for a large number of populations but you are only interested in analysing only a certain sub-group of populations within it. This is how to do it: a) Write the number of groups you wish to establish in the
corresponding cell and then press «Return».
In the example below, suppose we want to analyse only the five populations POP1, POP2, POP4, POP5 and POP6. Therefore, we first have to write a «5» in the cell «Populations». After pressing

Juli Caujapé-Castells and Mario Baccarani-Rosas
40 T r n s f o r m e r - 2 M A N U A L
«Return», the original 7x7 matrix has changed into a new 7x5 matrix (see Figure 32).
Figure 32
b) Write the names of the populations you wish to include in this partial analysis in the column headers In the example (Figure 33), we write these names in the cells above the columns of the matrix.
Figure 33.

Juli Caujapé-Castells and Mario Baccarani-Rosas
41 T r n s f o r m e r - 2 M A N U A L
b) Tick on the cells of the new matrix corresponding to the populations you want to analyse under this data configuration. In the example, we have to tick only the cells that correspond to the populations we want to analyse (Figure 34)
Figure 34.
c) Press the button corresponding to the transformation(s) you want
to perform for that conformation of your data, give adequate names to the fi les that wil l be generated and press «save» (see section 3).
After this, Transformer-2 is ready to perform the calculations and obtain the formats for that set (see section 3). 2.2.2. Comparing independent groups of populations
Most of the times, understanding the genetic relationships among the organisms we are analysing entails the comparison of groups defined using different criteria of interest (i. e., geographic distribution, specific ascription, habitat, clade ascription, etc…).
Transformer-2 allows the user to establish groups within the data in the following way:

Juli Caujapé-Castells and Mario Baccarani-Rosas
42 T r n s f o r m e r - 2 M A N U A L
a) Write the number of groups you wish to establish in the corresponding cell and then press «Return».
In the example in the fi le “transf-gntp.ex” (with 7 populations), imagine that populations POP1, POP3A and POP3B belong to a Species 1, and the remaining populations to a Species 2. If we wanted to compare these two species, we would write a «2» in the cell labelled «Groups» (Figure 35)
Figure 35. b) Re-name the matrix column headers in the box to label the
groups you want to define.
In our example, we choose the labels SP1 and SP2 (Figure 36).
Figure 36.

Juli Caujapé-Castells and Mario Baccarani-Rosas
43 T r n s f o r m e r - 2 M A N U A L
c) For each of the groups, tick the boxes that correspond to the populations that they must contain.
In the example, group SP1 consists of the populations POP1, POP3A and POP3B, while group SP2 consists of POP2, POP4, POP5 and POP6. Figure 37 i l lustrates the aspect that the configuration matrix would have in this case.
Figure 37.
d) Press the button corresponding to the transformation(s) you want to perform for that conformation of your data, give adequate names to the fi les that wil l be generated and press «save» (see section 3).
After completing this sequence, the fi les are ready to be run in the specific programs for which they were formatted (see section 3). If you have used the fi le “transf-gntp.xls” to follow this explanation, try some of the options. 2.2.3. Including populations in more than one group
In some cases, the population geneticist might be interested in testing how the values of different parameters change depending on which populations are included/removed from a given group. For

Juli Caujapé-Castells and Mario Baccarani-Rosas
44 T r n s f o r m e r - 2 M A N U A L
these and other similar cases, Transformer-2 allows the user to include any population in different groups in the following way: 1) Select the total number of groups to analyse
In the example of Figure 38, imagine we want to define seven groups with the data in the fi le “transf-gntp.xls”.
Figure 38. 2) Label the groups with a proper name
In Figure 39, we just choose the labels GROUP1 to GROUP7.
Figure 39

Juli Caujapé-Castells and Mario Baccarani-Rosas
45 T r n s f o r m e r - 2 M A N U A L
3) Select the populations to be included in each group
Imagine we want to check the effect of removing sequentially single populations in the value of some parameter that can be calculated using Transformer-2. The selections to make would be l ike in Figure 40.
Figure 40 4) Press the button corresponding to the transformation(s) you want
to perform for that conformation of your data, give adequate names to the fi les that wil l be generated and press «save» (see section 3).
After completing this sequence, the fi les are ready to be run in the specific programs for which they were formatted.

Juli Caujapé-Castells and Mario Baccarani-Rosas
46 T r n s f o r m e r - 2 M A N U A L
Section 3. Processing the data
For each configuration of populations, Transformer-2 generates automatically the necessary fi les to run six population genetic analysis programs and calculates all the parameters related to the probabil it ies of al lel ic loss. 3.1. THE BIOSYS FORMAT
BIOSYS (Swofford and Selander 1989) is a Fortran IV computer program that can be used to calculate the values of most population genetic polymorphism indicators, test for Hardy-Weinberg equilibrium, compute F-statistics, perform heterogeneity chi-square analysis, calculate a variety of genetic distance coefficients, construct phenograms and estimate phylogenies through the distance Wagner procedure. 3.1.1. Obtaining the Biosys format
1) Press on the button «Biosys» in the dialog box 2) Give a proper name to the corresponding data fi le 4) Press «OK» 5) Your data are ready to run in Biosys. By default, the ASCII fi le that Transformer-2 creates for Biosys contains the following command l ines at the end: NEXT END; STEP VARIAB: FULLOUT, PCRIT=2; END;

Juli Caujapé-Castells and Mario Baccarani-Rosas
47 T r n s f o r m e r - 2 M A N U A L
STEP HDYWBG: LEVENE, EXACTP; END; STEP SIMDIS: ALLCOEF, SINGLE=2; END; STEP COEFOUT; BELOW=1, ABOVE=2; END; STEP SINGLE: COEF=1; END; STEP DISTRIB: COEF=8; END; STEP FSTAT: OUTPUT=1; END; STEP WRIGHT78: END; STEP WRIGHT78: NOHRCHY; END; STEP HETXSQ: CONTAB, SUBDIV=1; END; STEP CLUSTER: COEF=1, COPHEN; COEF=9; END; If you wish to remove commands or add new calculations, just do it removing or typing l ines in this ASCII fi le. 3.2. THE BOTTLENECK FORMAT
The program Bottleneck (Piry, Luikart and Cornuet 1998) applies a sign test for heterozygosity excess (Cornuet and Luikart 1996) to detect whether the populations have experienced recent historical bottlenecks. This test compares expected heterozygosity (He) under

Juli Caujapé-Castells and Mario Baccarani-Rosas
48 T r n s f o r m e r - 2 M A N U A L
Hardy-Weinberg expectations to the heterozygosity expected at mutation-drift equil ibrium (Heq) in a sample that has the same size and the same number of al leles as the sample used to measure He (Luikart and Cornuet 1998). The rationale of the test is that, since low frequency alleles are lost at a much faster rate than heterozygosity in a bottleneck situation, bottlenecked populations are expected to have a heterozygote excess. 3.2.1. Obtaining the BOTTLENECK format
The Bottleneck option in Transformer-2 gives you a single fi le that contains the format for all the populations or population groups in the configuration that you defined. To obtain it, 1) Press on the button «Bottleneck» in the dialog box 2) Give a proper name to the corresponding data fi le 4) Press «OK» 5) Your data are ready to run in Bottleneck 3.3. THE GENEPOP FORMAT
GenePop (Raymond and Rousset 1995) is a software package that runs under the DOS operating system. The DOS version is updated periodically and contains a few options not available on the web site of the program (website: http://www.cefe.cnrs-mop.fr/). GenePop allows the user to perform most calculations and tests related to the estimation of population genetic variation from the information contained in molecular markers. 3.3.1. Obtaining the GenePop format
1) Press on the button «GenePop» in the dialog box

Juli Caujapé-Castells and Mario Baccarani-Rosas
49 T r n s f o r m e r - 2 M A N U A L
2) Give a proper name to the corresponding data fi le 4) Press «OK» 5) Your data are ready to run in GenePop 3.4. THE GENESTAT FORMAT
GeneStat-PC 3.31 (Lewis 1993) calculates polymorphism indices, gene diversities, genetic distances and Nei's (1973) population structure statistics (Hs, Ht, Js and Gst). 3.4.1. Obtaining the GeneStat format
1) Press on the button «GeneStat» in the dialog box 2) Give a proper name to the corresponding data fi le 4) Press «OK» 5) Your data are ready to run in GeneStat 3.5. THE NTSYS FORMAT
Ntsys-pc 2.02j (Rohlf, 1998) is a multivariate statistical program that can be used for certain molecular population genetic data analyses. It consists of several different modules, and most procedures require the use of one or several of them. The most frequently used options in Ntsys by the population geneticists are the genetic distance calculations, clustering, multivariate analyses and Mantel tests.

Juli Caujapé-Castells and Mario Baccarani-Rosas
50 T r n s f o r m e r - 2 M A N U A L
3.5.1. Ntsys-PC format requirements
There are various entry formats in Ntsys. For allele frequencies, Transformer-2 generates three fi les that Ntsys requires for this kind of data:
1. A data fi le with the allele frequencies
2. A sample size fi le
3. A locus size f i le
3.5.2. Obtaining the Ntsys format
Transformer-2 gives you the formats for the three different fi les required to run allele frequency data in Ntsys. To obtain these fi les for any of your populations, do this: 1) Press on the button «Ntsys» in the dialog box 3) Give a proper name to each of the three fi les Transformer-2 reminds you what Ntsys fi le you are about to save. The first Ntsys fi le it creates is the allele frequency fi le (the “input f i le” for Ntsys), that appears in the dialog box with the default name “ntsys_frequencies” (Figure 41); just re-name the fi le as you wish.
Figure 41.

Juli Caujapé-Castells and Mario Baccarani-Rosas
51 T r n s f o r m e r - 2 M A N U A L
Once you save this “input fi le”, the second Ntsys fi le that Transformer-2 will create for the configuration of populations you defined is the “loci array” fi le, that contains the number of alleles per locus. This fi le appears in the dialog box with the default name “ntsys_alleles” (Figure 42); just re-name it as you wish.
Figure 42 Finally, the third Ntsys fi le that Transformer-2 creates for the configuration of data you defined is the “N array” f i le, that contains the corresponding sample sizes. This f i le appears in the dialog box with the default name “ntsys_samplesize” (Figure 43); just re-name it as you wish.
Figure 43. 4) Press «OK» 5) Your data are ready to run in Ntsys

Juli Caujapé-Castells and Mario Baccarani-Rosas
52 T r n s f o r m e r - 2 M A N U A L
3.6. THE POPGENE FORMAT
PopGene version 1.32 (Yeh et al. 1997) is a program for the analysis of co-dominant and dominant diploid and haploid molecular markers. It calculates most basic parameters of population genetic variation for different types of population structure and al lows the user to perform many tests bearing on the structure of data (i.e., the homogeneity test, Ewens-Wattersson neutrality tests and the two-locus l inkage disequil ibrium test). 3.6.1. Obtaining the PopGene format
To obtain the PopGene fi le for any configuration of your populations, do this: 1) Press on the button «PopGene» in the dialog box 3) Give a proper name to the fi le 4) Press «OK», and your data are ready to run in PopGene 3.7. THE PROBABILITIES OF ALLELIC LOSS
Rare al leles are important in Conservation Biology because they represent unique evolutionary byproducts that may endow a species with advantageous properties to cope with eventual environmental shifts (Schonewald-Cox et al. 1983; Richter et al. 1994, Bengtsson et al. 1995). Thus, collection designs oriented to sampling rare alleles provide the manager of genetic diversity with adequate tools with which to reinforce declining populations or aid the survival of reintroduced plants. The probability of allel ic loss facil itates a straightforward way to analyse rare alleles and to incorporate them into conservation practice (Caujapé-Castells and Pedrola-Monfort 2004).

Juli Caujapé-Castells and Mario Baccarani-Rosas
53 T r n s f o r m e r - 2 M A N U A L
3.7.1. On the probability of loss
Transformer-2 calculates the probabil ity of loss L (i. e., the probabil ity that a sample of size N fails to include an allele with population frequency p) using the expression (Bengtsson et al. 1995)
L = (1 - p)2N
Because these calculations are only suitable for alleles that are rare in some way (Bengtsson et al 1995), and there is no universally accepted definit ion of “rarity”, Transformer-2 offers two options to select the al leles for the calculation of L:
a) The default option, that we will call «Viera y Clavijo», follows
Caujapé-Castel ls (2004), Caujapé-Castells and Pedrola-Monfort (2004) or Oliva et al. (2004) and calculates L only for the alleles that
1) have an overall frequency ≤ 0.5, and 2) are present in ≤ 50% of the populations considered,
b) The other option, that we wil l cal l “Select” enables the user to
choose the alleles for these calculations by typing a “1” in the column labeled “Select” (Figure 44).
Figure 44: After choosing the opt ion “Prob. Loss”, a table l ike this one appears below the Table of al le le frequencies. By default , the al le les selected are only the ones that ful f i l l the condit ions descr ibed above under the name “Viera y Clavi jo”. However, you can make your own select ions by typing 1 on the column “Select” for any al le le. In this Table, “freq” is the average al le le frequency in the chosen group, “Nobs” is the number of populat ions where the al le le was detected, and “Lo” and “Le” are the observed and expected probabi l i t ies of loss.

Juli Caujapé-Castells and Mario Baccarani-Rosas
54 T r n s f o r m e r - 2 M A N U A L
By default, Transformer-2 obtains the value of both the expected probabil it ies of loss, Le (i. e., assuming that the allele had its overall average frequency at each of the populations considered), and the observed probabilit ies of loss, Lo for all the alleles that fulf i l l the “Viera y Clavijo” conditions. If you press the button “Create chart” that appears below the Table of the probabili ties of loss (Figure 45), the values of Lo and Le are used for two linear regression analyses (Bengtsson et al. 1995) where the average frequency of each allele is the x-axis and -log Lo and -log Le are the respective y-axes (Figure 46). The chart is created only for the alleles that are selected in the column labeled “Selection”.
Figure 45. The button “Create chart” appears at the end of the table that contains the probabi l i t ies of loss.
Figure 46. L inear regression of the average al le le frequencies and the –log(Lo) [b lack ci rcles, cont inuous l ine] and –log(Le) [black c irc les, d iscontinuous l ine] for al l the al le les that ful f i l l the “Viera y Clavi jo” condit ions of rar i ty in the example f i le “transf-gntp.x ls”. At the header of the chart, the program indicates the number of a l le les that are included in the representat ion and calculates the representat iv ity value as descr ibed in the text.

Juli Caujapé-Castells and Mario Baccarani-Rosas
55 T r n s f o r m e r - 2 M A N U A L
Transformer-2 also calculates the value for the representativity (R) of sampling only one population of that group relative to the total sample of rare alleles by dividing the slope of the observed regression line (based on the values of Lo) by the slope of the expected regression line (based on the values of Le) [Bengtsson et al. 1995]. 3.7.2. Obtaining the probabilities of allelic loss
1) Press on the button «Prob. Loss» in the dialog box 2) Select the option that you want to use (see section 3.7.1) 3) Press «OK» 4) Give a proper name to the Excel output f i le The result ing Excel f i le wil l contain: a) a Table of al lele frequencies for each of the groups selected,
b) a Table with the values of L for the al leles that fulf i l led the
conditions of the calculation option that you selected (below the previous one),
d) the graph with the l inear regressions commented in section
2.3.7.1. (if you pressed “Create Chart”), and c) the value of representativity R (if you pressed “Create Chart”).
3.8 TIPS ON PROCESSING THE DATA
After obtaining the datafi les and analyses for a given configuration of populations, you can go back to the original matrix and define another configuration of interest. This way you can get al l f i les you want to analyse for as many configurations you may be interested in before running the corresponding programs or carrying out calculations.

Juli Caujapé-Castells and Mario Baccarani-Rosas
56 T r n s f o r m e r - 2 M A N U A L
LITERATURE CITED
Arús P, Shields CR (1983) Cole crops (Brassica oleracea L.)
Isozymes in Plant Genetics and Breeding, Part B. Elsevier Publishers, Amsterdam.
Bengtsson BO, Weibull P, Ghatnekar L (1995) The loss of alleles by sampling: a study of the common outbreeding grass Festuca ovina over three geographical scales. Hereditas 122, 221-238.
Caujapé-Castells, J. 2001. Transformer 1.0. Un programa de formateado de datos genotípicos individuales para implementación en programas de análisis molecular en genética de poblaciones.
Caujapé-Castells J, Pedrola-Monfort J (2004) A sampling design for the ex-situ genetic conservation of the Ibero-Moroccan endangered endemic Androcymbium gramineum: implications for the assessment of a conservation strategy from a survey of genetic diversity for neutral markers. Conservation Genetics 5: 131-144.
Caujapé-Castells J (2004). Manual para el muestreo genético de poblaciones naturales de plantas vasculares. Jardín Botánico Canario “Viera y Clavijo”. Cabildo de Gran Canaria.
Cornuet JM, Luikart G (1996) Description and evaluation of two tests for detecting recent bottlenecks. Genetics 144, 2001-2014.
Lewis PO (1993) GeneStat-PC 3.31. North Carol ina State University. Raleigh. North Carolina.
Luikart G, Cornuet JM (1998) Empirical evaluation of a test for identifying recently bottlenecked populations from allele frequency data. Conservation Biology 12, 228-237.
Oliva-Tejera F, Caujapé-Castells J, Naranjo-Suárez J, Navarro-Déniz
J, Acebes-Ginovés JR, Bramwell D (2004) Variación genética de los Lotus L. (Fabaceae: Loteae) de pinar de Gran Canaria. Botánica Macaronésica 25: 31-52.
Piry S, Luikart G, Cornuet JM (1998) Bottleneck, a program for detecting recent effective population size reductions from allele frequency data. INRA, URLB, Laboratoire de Modélisation et Biologie Evolutive. Montpell ier, France.
Raymond M, Rousset F (1995) GenePop (version 1.2) population genetic software for exact tests and ecumenicism. Journal of Heredity 86: 248-249. (website: http://www.cefe.cnrs-mop.fr/).

Juli Caujapé-Castells and Mario Baccarani-Rosas
57 T r n s f o r m e r - 2 M A N U A L
Richter TS, Soltis PS, and Soltis DE (1994) Genetic variation within and among populations of the narrow endemic, Delphinium viridescens (Ranunculaceae). American Journal of Botany 81, 1070-1076.
Rohlf FJ (1998). NTSYS-pc. Numerical Taxonomy and Multivariate Analysis version 2.02j. Applied Biostatistics Inc.
Schonewald-Cox CM, Chambers SM, MacBride B, Thomas WL, editors (1983) Genetics and conservation: a reference for managing wild animal and plant populations Benjamin Cummings, Menlo Park, CA.
Swofford DL, Selander RB (1989) BIOSYS-1: a computer program for the analysis of al lel ic variation in genetics. University of I l l inois, Urbana, Il l.
Yeh FC, Yang RC, Boyle TBJ, Ye ZH, Mao JX (1997) PopGene, the user-friendly shareware for population genetic analysis. Molecular Biology and Biotechnology Centre, University of Alberta, Canada.

Juli Caujapé-Castells and Mario Baccarani-Rosas
58 T r n s f o r m e r - 2 M A N U A L
APPENDIX: THE TWO EXAMPLE FILES
Transformer-2 comes with two interrelated example fi les for allozyme data. One of them is an example of drawn interpretations (“transf-draw.xls”) and the other one is a genotype fi le (“transf-gntp.xls”) that corresponds to all loci that appear in the drawn interpretations (you can obtain it by interpreting the patterns and then pressing “Genotype fi le”, as described in this manual). Both fi les consist of data for 12 allozymes (31 loci) in 116 individuals that represent seven populations of the fictitious species R. officinalis. The drawings of these enzymes are distributed in two sheets within the same Excel fi le. Sheet 1 contains the patterns for MDH, IDH, GOT, PGM, 6-PGD, EST, ME and PGI, while sheet 2 contains the patterns for SKD, ADH, FDH and TPI. Rather than to provide the user with a real case, these examples try to account for a panoply of possible situations that the population geneticist might be confronted with when analysing molecular patterns for diploid codominant markers. Although most of the drawings are based on real patterns obtained for different Canarian endemics at the Laboratorio de Biodiversidad Molecular of the Jardín Botánico Canario “Viera y Clavijo”, these examples are a mixture that does not correspond to any real organism. They also incorporate several locus configurations that were drawn on purpose to i l lustrate how Transformer-2 deals with particularly complex situations. There are enzymes with just one associated locus and enzymes with many associated loci, monomorphic loci (ME-1 and PGI-1), moderately polymorphic loci, and extremely polymorphic loci. The patterns for the enzymes also contain missing data and phantom bands for different individuals at different loci, and consider allele positions that would be particularly error-inducing if the molecular patterns were interpreted (or corrected) by hand. Use these fi les to make your first trials with Transformer-2 and to check the versati l i ty of the program. You may want to add new enzymes, loci, al leles or individuals, and then try to perform calculations and generate data fi les for all the configurations of loci and populations you may think of. This way, you wil l get acquainted with the program before you input your own real data.

Juli Caujapé-Castells and Mario Baccarani-Rosas
59 T r n s f o r m e r - 2 M A N U A L