Embed Size (px)
Citation preview

JReport Enterprise Server − User's Guide
Table of ContentsUser's Guide: Organization of This Part.................................................................................................................................................1
Installing and Launching JReport Enterprise Server...........................................................................................................................4System Requirements....................................................................................................................................................................4Installing JReport Enterprise Server with Installer Wizard .........................................................................................................5
On Windows 9x/NT/2000/XP .......................................................................................................................................5On Unix .........................................................................................................................................................................5
Installing JReport Enterprise Server Silently ...............................................................................................................................6Installing JReport Enterprise Server Manually ............................................................................................................................8Uninstalling JReport Enterprise Server ........................................................................................................................................8Trouble−Shooting ........................................................................................................................................................................9
JReport Enterprise Server installer can't find JVM .......................................................................................................9If there is not enough space for the temp directory .......................................................................................................9
Setting up the reporting environment for the Server...................................................................................................................10Report deployment & creation......................................................................................................................................10Data sources..................................................................................................................................................................10Additional classpaths....................................................................................................................................................10
Running JReport Enterprise Server as a Standalone server........................................................................................................10Launchers......................................................................................................................................................................10Full command to run from Wrapping Web Server.......................................................................................................11Sending commands to JReport Enterprise Server via the Wrapping Server ...............................................................12Running Server on Unix without GUI..........................................................................................................................13
Running JReport Enterprise Server as an OS Service................................................................................................................15Service on NT...............................................................................................................................................................16Service on Unix............................................................................................................................................................17Service on Linux...........................................................................................................................................................18
Running with third Party's Servlet−Enabled Web Server...........................................................................................................19Upgrading Issues.........................................................................................................................................................................20
Upgrading from previous versions to Version 7.1........................................................................................................20Upgrading to JReport Enterprise Server 7.0 ................................................................................................................20Upgrading the Resources Using the Migration Tool....................................................................................................21Upgrading from previous versions to Version 6.0 .......................................................................................................21
Configuration of JReport Enterprise Server........................................................................................................................................24Introduction.................................................................................................................................................................................24Remote Configuration.................................................................................................................................................................24Fax...............................................................................................................................................................................................43Local Configuration....................................................................................................................................................................44Configuration with the server.properties File.............................................................................................................................46Configuration with the ConnectionPoolConfig.properties File..................................................................................................47Tuning Performance of JReport Enterprise Server.....................................................................................................................48Using Another Connection as a Substitute of Catalog Connection...........................................................................................49
Configure the datasource.xml file.................................................................................................................................49Username and Password Encryption............................................................................................................................50The Connection Priority...............................................................................................................................................50Reloading datasource.xml.............................................................................................................................................51Case: Using JNDI data source connections of WebLogic Server................................................................................51Case 2: Using JNDI data source connections of JBoss server......................................................................................51
Administrating JReport Enterprise Server..........................................................................................................................................53Introduction.................................................................................................................................................................................53Resource Management................................................................................................................................................................53
Resource Overview.......................................................................................................................................................53Deploying Resources....................................................................................................................................................54Deleting Resources.......................................................................................................................................................59Getting Resources from the Real Path .........................................................................................................................60
I
Table of ContentsChanging Resource and Folder Properties...................................................................................................................62
Version Management..................................................................................................................................................................63Version Overview.........................................................................................................................................................63Creating Versions.........................................................................................................................................................64Browsing Versions........................................................................................................................................................66Applying Archive Policy..............................................................................................................................................66
Security Management.................................................................................................................................................................70Security Overview........................................................................................................................................................70Managing Realms.........................................................................................................................................................73Managing User Accounts.............................................................................................................................................74Managing Groups.........................................................................................................................................................75Managing Roles............................................................................................................................................................76Assigning Permissions..................................................................................................................................................76
Task Management.......................................................................................................................................................................77Task Overview..............................................................................................................................................................77Approaches to the Task Information Tables.................................................................................................................79Managing Tasks in Task Tables...................................................................................................................................79
Server Data Management............................................................................................................................................................81Server Data Overview...................................................................................................................................................81Configuring the Server Database in a Stand−alone Environment ...............................................................................81Configuring Server Database in an Integration Environment .....................................................................................87
Customizing JReport Enterprise Server......................................................................................................................................95Approaches to the Preferences Page.............................................................................................................................95Customizing JReport Enterprise Server........................................................................................................................95Configuring DHTML features......................................................................................................................................97
Accessing JReport Enterprise Server − Browser.................................................................................................................................98Introduction.................................................................................................................................................................................98Logging on to JReport Enterprise Server....................................................................................................................................98Running reports...........................................................................................................................................................................99Scheduling reports.....................................................................................................................................................................100Adding TaskListener ................................................................................................................................................................101
Pipeline delivery.........................................................................................................................................................104Customizing..............................................................................................................................................................................104Logging off and shutting down JReport Enterprise Server.......................................................................................................105Using JSP to Print a Report.......................................................................................................................................................105
Configuration..............................................................................................................................................................105Printing a Report.........................................................................................................................................................106Parameters...................................................................................................................................................................107
Accessing JReport Enterprise Server − JReport Viewer..................................................................................................................108JReport Enterprise Viewer for JREntServer.............................................................................................................................108Client API.................................................................................................................................................................................112JReport (Client) Viewer Bean...................................................................................................................................................112
Installation..................................................................................................................................................................113Two Approaches of Invoking JRViewer Bean...........................................................................................................113Load Viewer Bean from an URL or RandomInputable directly................................................................................115Get Page Orientation...................................................................................................................................................115Export to Multiple File Formats.................................................................................................................................116Where Portion.............................................................................................................................................................118Showing a Report in a New Frame.............................................................................................................................118Proxy Setting..............................................................................................................................................................118Printing a Report.........................................................................................................................................................118Browsing Report Pages ..............................................................................................................................................119Zooming a Report Result............................................................................................................................................120Set Connection Information........................................................................................................................................120
II
Table of ContentsClickActionListener....................................................................................................................................................121Logging out from the Server.......................................................................................................................................121Exiting the Bean.........................................................................................................................................................121Exposing the whole JReport Viewer's GUI................................................................................................................121National Language Support (NLS).............................................................................................................................121Returned Code............................................................................................................................................................122Show Information.......................................................................................................................................................122Set Temporary Path....................................................................................................................................................122Modifying User Information.......................................................................................................................................122Illustrative Examples..................................................................................................................................................122
Accessing a Report Using URL............................................................................................................................................................124Introduction...............................................................................................................................................................................124Accessing a report using URL..................................................................................................................................................124
Protocols/Commands..................................................................................................................................................124Scheduling command and its properties.....................................................................................................................133
JReport DHTML ..................................................................................................................................................................................153Introduction...............................................................................................................................................................................153How to view reports in Dynamic HTML..................................................................................................................................153
Opening Multiple DHTML Reports in One Session..................................................................................................153JReport DHTML Window Screen Elements............................................................................................................................154Controlling the Report Result View in Dynamic HTML.........................................................................................................155Running and Using Master/Detail Report ................................................................................................................................170Configuring DHTML Features.................................................................................................................................................172Tuning DHTML Performance..................................................................................................................................................173
Limiting the Number of DHTML Reports.................................................................................................................173Action Task Manager.................................................................................................................................................173
Web Design − Designing your report on the web.....................................................................................................................175Limitations................................................................................................................................................................................175Web Design − Designing your report on the web.....................................................................................................................175
Create a new report.....................................................................................................................................................175Make simple modifications to report objects..............................................................................................................180Save the report............................................................................................................................................................181
DHTML Tag Library................................................................................................................................................................182Overview.....................................................................................................................................................................182DHTML Tags ............................................................................................................................................................182
JReport DHTML API................................................................................................................................................................184Installation..................................................................................................................................................................185Packages.....................................................................................................................................................................185Main Interfaces and Classes.......................................................................................................................................185Getting Started With JReport DHTML API ..............................................................................................................186Advanced DHTML API application...........................................................................................................................186API Demos..................................................................................................................................................................189Additional References................................................................................................................................................189
Running Multiple Reports in One Session in JReport DHTML...............................................................................................189Overview.....................................................................................................................................................................189API Support Notes......................................................................................................................................................190Displaying Multiple Reports in One or More Browser Windows..............................................................................190Setting Maximum DHTML Reports Per Session.......................................................................................................192Setting Report Buffer Timeout...................................................................................................................................193Close DHTML report buffer.......................................................................................................................................193Running Multiple Reports using URLs......................................................................................................................193
Accessing JReport DHTML from URLs .................................................................................................................................194
JReport Enterprise Server Cluster......................................................................................................................................................195
III
Table of ContentsCluster Overview......................................................................................................................................................................195JReport Enterprise Server Cluster Features..............................................................................................................................196
Administrating Security and Resources Centrally......................................................................................................196Load−Balancing..........................................................................................................................................................196Failover.......................................................................................................................................................................198Public Storage.............................................................................................................................................................198
Setting up a JReport Enterprise Server Cluster.........................................................................................................................198Preparation..................................................................................................................................................................199License........................................................................................................................................................................199Setting up the Cluster..................................................................................................................................................199Launching The Cluster...............................................................................................................................................204 Case 1: Configuring a Simple JReport Enterprise Server Cluster.............................................................................204Case 2: Configuring a JReport Enterprise Server Cluster for a Production Environment.........................................207
Administrating JReport Enterprise Server Cluster....................................................................................................................209Managing Predefined Server List...............................................................................................................................209Testing Performance Weight......................................................................................................................................210Administrating Clustered Servers...............................................................................................................................211Monitoring Clustered Servers.....................................................................................................................................211
Clustering JReport Enterprise Server with IBM WebSphere Server........................................................................................212Purpose.......................................................................................................................................................................212Background.................................................................................................................................................................212Prerequisites................................................................................................................................................................214Installation..................................................................................................................................................................214Integrating JReport Enterprise Server with IBM WebSphere 4.0..............................................................................217Working with server cluster........................................................................................................................................218Testing Loadbalance...................................................................................................................................................226Testing Fail−over........................................................................................................................................................226
Clustering JReport Enterprise Server with BEA WebLogic Server.........................................................................................231Purpose.......................................................................................................................................................................231Background.................................................................................................................................................................231Prerequisite ................................................................................................................................................................233Installation..................................................................................................................................................................233Configuration .............................................................................................................................................................233Deploy War Module to Cluster and Set JReport Server Environment ......................................................................237Evaluate the Whole Cluster........................................................................................................................................237References...................................................................................................................................................................237
Integrating JReport Enterprise Server with a Java Application Server ........................................................................................238General steps and procedures ...................................................................................................................................................238
For integrating JRServlet − Servlet for JReport Enterprise Server ...........................................................................238For Integrating JSP− JSP Report Viewer ..................................................................................................................239
Deploy on Unix ........................................................................................................................................................................239Creating the JReport Enterprise Server War file on Unix .........................................................................................239Deploying JREntServer to IBM WebSphere 5.1 .......................................................................................................241Deploying JREntServer to IBM WebSphere 6 ..........................................................................................................248Deploying JREntServer to JBoss 3.2 .........................................................................................................................257Deploying JREntServer to JBoss 4.0 .........................................................................................................................259Deploying JREntServer to BEA WebLogic 8.1 ........................................................................................................260Deploying JREntServer to Tomcat 4.1 ......................................................................................................................267Deploying JREntServer to Tomcat 5.5 on Unix ........................................................................................................270
Deploy on Windows .................................................................................................................................................................273Creating the JReport Enterprise Server War file on Windows .................................................................................273Deploying JREntServer to IBM WebSphere 5.1 .......................................................................................................275Deploying JREntServer to IBM WebSphere 6.0 .......................................................................................................281Deploying JREntServer to JBoss 3.2 .........................................................................................................................290Deploying JREntServer to JBoss 4.0 .........................................................................................................................292
IV
Table of ContentsDeploying JREntServer to BEA WebLogic 8.1 ........................................................................................................293Deploying JREntServer to Tomcat 4.1 ......................................................................................................................299Deploying JREntServer to Tomcat 5.5 ......................................................................................................................301
Running multiple instances of JReport Enterprise Server .......................................................................................................305Creating the additional Report Home and WAR file .................................................................................................306
Deploying JReport Enterprise Server on Other Web or Application Server...........................................................................306Running with Apache JServ.......................................................................................................................................306Running with WebLogic (v7.0) on NT (or Unix).......................................................................................................324Running with WebLogic (v 6.0 and v 6.1) on NT (or Unix)......................................................................................327Running with WebLogic 5.1 on Unix.........................................................................................................................330Running with WebLogic (v 4.5.1 and v 5.1) on NT...................................................................................................331Running with Netscape Enterprise Server..................................................................................................................334Running with Microsoft IIS using JRun 3.0...............................................................................................................335Running with Microsoft IIS Using JRun 2.3.3...........................................................................................................343Running with Macromedia JRun 4.............................................................................................................................345Integrating with IBM WebSphere 4.0 by a War File..................................................................................................349Running with IBM WebSphere 3.02 and 3.5.............................................................................................................363Running with Tomcat 3.3 on Unix.............................................................................................................................368Running with Tomcat 3.2 + Apache on NT...............................................................................................................371Running with Tomcat 3.2 + Apache on Unix.............................................................................................................374Running with Tomcat 3.3 on Unix.............................................................................................................................380Running with Interprise Application Server...............................................................................................................382Running with vqServer 1.9.55....................................................................................................................................385Running with iPlanet Application Server 6.5 on NT..................................................................................................389Running with iPlanet Web Server 6.0 on Unix..........................................................................................................403Running with iPlanet Web Server 4.1 SP 9 on NT.....................................................................................................404Running with iPlanet Web Server 4.1 on Unix..........................................................................................................406Running with Sun ONE Application Server 7 on NT................................................................................................408Running with SunOne Web Server 6.1 on Windows2000 Server..............................................................................416Running with Borland Enterprise Server 5.0..............................................................................................................419Running with JBoss 2.4 on NT...................................................................................................................................422Running with JBoss 3.2.6 on NT................................................................................................................................425Running with JBoss 3.0.7 on Unix.............................................................................................................................427Running with ColdFusion MX 6.0.............................................................................................................................430Running with ColdFusion MX 6.1.............................................................................................................................432Running with Oracle Application Server Containers for J2EE 10g (OC4J) on NT...................................................433Running with Orion Server 1.5.2 on NT....................................................................................................................436Integrating with ATG DAS 6.1.0 by a War File.........................................................................................................436Sample Solution: Dispatch RMI DHTML Requests in Clustered Server Environment............................................440Integrating Remote JReport Enterprise Server with IBM WebSphere 5.0 by a War File..........................................443Integrating Remote JReport Enterprise Server with WebLogic 7.0 by a War File....................................................446
Deploying JReport Enterprise Server as a Self−Contained WAR/EAR...................................................................................448Introduction.................................................................................................................................................................448Building the Self−Contained War/Ear File ...............................................................................................................449Building JReport Enterprise Server Self−Contained War..........................................................................................450Building JReport Enterprise Server Self−Contained Ear ..........................................................................................452Deploy the Self−Contained War\Ear to an Application Server..................................................................................452Deploying the Self−Contained War to Tomcat 5.5....................................................................................................452Deploying Multiple Instances of a Self−Contained War to Tomcat 5.5....................................................................453Deploying the Self−Contained Ear to WebSphere 6.0...............................................................................................454Deploying the Self−Contained Ear with EJB to WebLogic 8.1.................................................................................455
Using JSP................................................................................................................................................................................................458JSP Specifications for Running as a Wrapping Web Server....................................................................................................458JSP General Guide for Integration Environment......................................................................................................................458
Specific Guide for Some Web Servers.......................................................................................................................460
V
Table of ContentsAppendix I: Jasper Installation Guide.......................................................................................................................................460
Introduction.................................................................................................................................................................460Upgrading ..................................................................................................................................................................460Configuration..............................................................................................................................................................461
JReport Enterprise Server on AS 400.................................................................................................................................................463Standalone Server Accessing DB2 Data Source.......................................................................................................................463
Configure NAWT.......................................................................................................................................................463Installing JReport Enterprise Server to AS/400..........................................................................................................464Designing Reports with IBM Java Toolbox JDBC Driver.........................................................................................465Deploying Reports to JReport Enterprise Server on AS/400.....................................................................................466Using alternative Native DB2 for AS/400 JDBC Driver............................................................................................466
Integrating With IBM WebSphere for iSeries 400 (AS/400)...................................................................................................468Installing JReport Enterprise Server to AS/400 and Setting up DB2 Data Source....................................................469Setting up Java 'Command line arguments' for the Web Server.................................................................................469Adding Needed Class Packages to the Web Application...........................................................................................470Creating JReport Servlets...........................................................................................................................................471Setting up JReport Enterprise Server JSP Pages........................................................................................................473Restarting Your "Default Server" and Verifying the Setup........................................................................................476
Customized Authentication..................................................................................................................................................................477Term Definition.........................................................................................................................................................................477User Authentication..................................................................................................................................................................477
Interface AuthenticationProvider................................................................................................................................477Interface AuthorizationProvider.................................................................................................................................478Implementation...........................................................................................................................................................478Demo...........................................................................................................................................................................478Interface UserAuthenticator........................................................................................................................................479Implementation...........................................................................................................................................................479Demo...........................................................................................................................................................................480
External Authentication − Single Sign On................................................................................................................................480Interface ExternalAuthorized......................................................................................................................................480Interface HttpExternalAuthorized..............................................................................................................................480Implementation...........................................................................................................................................................481Demo...........................................................................................................................................................................481
Seamless Integrated Security Solution .....................................................................................................................................481Two general scenarios of integrated JReport solution................................................................................................481An example of integrated JReport security solution ..................................................................................................483
National Language Support..................................................................................................................................................................486Introduction...............................................................................................................................................................................486Using National Language Support...........................................................................................................................................486NLS for JREntServer................................................................................................................................................................488Appendix I: Language...............................................................................................................................................................490Appendix II: Region..................................................................................................................................................................494
Page Level Security...............................................................................................................................................................................501Introduction...............................................................................................................................................................................501Setting Page Level Security.....................................................................................................................................................501Viewing a Report in JReport Enterprise Server.......................................................................................................................502Scheduling a Report in JReport Enterprise Sever....................................................................................................................503Example: Email Billing Reports...............................................................................................................................................504
Record Level Security and Column Level Security ..........................................................................................................................508Introduction...............................................................................................................................................................................508Catalog Scope Security.............................................................................................................................................................508
VI

Table of ContentsSetting up Security Policy..........................................................................................................................................510Applying a Security Policy to the Report...................................................................................................................517Deploying to JReport Enterprise Server.....................................................................................................................517
Report Scope Security...............................................................................................................................................................518Setting up Record Level Security...............................................................................................................................518Running Reports with RLS on Server.......................................................................................................................523
JReport Enterprise Server API & RMI API......................................................................................................................................524Installation.................................................................................................................................................................................524Packages....................................................................................................................................................................................524Main Interfaces and Classes......................................................................................................................................................525
jet.server.api.admin.....................................................................................................................................................525jet.server.api.admin.cfg...............................................................................................................................................525jet.server.api.admin.monitor.......................................................................................................................................526jet.server.api.cluster....................................................................................................................................................526jet.server.api.engine....................................................................................................................................................526jet.server.api.rmi.........................................................................................................................................................527jet.server.api.rmi.cluster.............................................................................................................................................527
Creating/Getting Instances of ReportEngine............................................................................................................................527Creating/Getting Instances of RptServer or HttpRptServer......................................................................................................527
Method 1.....................................................................................................................................................................528Method 2.....................................................................................................................................................................529Method 3.....................................................................................................................................................................529Method 4.....................................................................................................................................................................530
Examples...................................................................................................................................................................................531Example for JSP.........................................................................................................................................................531Example for Servlet....................................................................................................................................................532
Overall Remote Server APIs & Unified JSPs...........................................................................................................................533Secure RMI Objects and Universal Remote Object Management............................................................................................534
The Authentication file...............................................................................................................................................534Who use authentication file and how to use?.............................................................................................................534Ways to generate authentication information.............................................................................................................535
API Demos................................................................................................................................................................................535RMI Demos...............................................................................................................................................................................536Additional References...............................................................................................................................................................536
Problem Diagnosis Tool − Catalog Doctor..........................................................................................................................................537What are in a Catalog................................................................................................................................................................537
Connection..................................................................................................................................................................537Table/View.................................................................................................................................................................537Field in a Table/View.................................................................................................................................................538Parameter....................................................................................................................................................................538Formula and Summary...............................................................................................................................................538Mapping Field.............................................................................................................................................................538Query..........................................................................................................................................................................538Relationship among Data Objects..............................................................................................................................538
What errors can Catalog Doctor Detect....................................................................................................................................538Errors are Diagnosed Independently..........................................................................................................................538Mapped Table/View and DB−Field...........................................................................................................................539Formulas and Summaries...........................................................................................................................................539Queries........................................................................................................................................................................539
Using Catalog Doctor................................................................................................................................................................539Starting Catalog Doctor..............................................................................................................................................539Loading a Catalog.......................................................................................................................................................539Saving a Catalog.........................................................................................................................................................539Merging Catalogs........................................................................................................................................................539
VII
Table of ContentsDiagnosing and Fixing................................................................................................................................................542
Properties in the server.properties File...............................................................................................................................................551Properties..................................................................................................................................................................................551A Detailed Reference of server.properties................................................................................................................................560
VIII
User's Guide: Organization of This PartUser's Guide provides in−depth coverage of JReport Enterprise Server's features and generally explains how to do different thingswith the product. Browse to the chapters that are of interest to you for the step−by−step instructions. The User's Guide is divided intothe following chapters, and with new features coming out, there will be more chapters added in the future:
Installing and Launching JReport Enterprise Server • Configuring JReport Enterprise Server • Administrating JReport Enterprise Server • Accessing JReport Enterprise Server − Browser • Viewing Report Using URL • Viewing Report in Dynamic HTML Format • Designing Reports on the Web • JReport Enterprise Server Cluster • Integration with a Servlet−Enabled Web Server • Using JSP • JReport Enterprise Server in AS 400 • Customized Authentication • National Language Support • Page Level Security • Record Level Security • Server API and RMI API • Problem Diagnosis − Catalog Doctor • Appendix I: Properties in The SERVER.PROPERTIES File •
JReport Manual Roadmap
The following picture lists the other books in the JReport Designer manual, JReport Enterprise Server manual and JREntViewermanual, and the relationship between them. You are advised to get start with the JReport Designer manual. With some reportdesigning knowledge, it is easy to learn JReport Enterprise Server in the server/client architecture.
JReport Designer manual includes four books: Getting Started, Tutorial, User's Guide, User Reference. For IBM WebsphereSanFrancisco users, we have an individual manual: SanFrancisco Integration Manual.
JReport Enterprise Server (abbreviated as JREntServer) manual has three books: Getting Started, Tutorial, User's Guide. In addition,the JREntViewer manual is for using JREntViewer for JREntServer.
1

For a complete coverage of the features, operations and other information, please refer to the specific book:
JReport Designer Getting StartedAn introduction to JReport. It covers issues associated with installation, setup, and configuration of JReport Designer. It is acombination of informational topics and strategic references to various topics in the Pro User's Guide and Pro User Reference.
JReport Designer TutorialBasic report building instructions. This includes the reporting features that you will find useful. The idea is that after you have walkedthrough this Tutorial, you can easily follow the examples and build your own reports. For in−depth feature coverage like buildingreports on XML, EJB, stored procedure, SQL file, please refer to the User's Guide.
JReport Designer User's GuideIn−depth coverage of JReport Designer's features and generally explains how to do different things with the product. Browse tolocate the chapters that are of interest to you for step−by−step instructions.
JReport Designer User ReferenceSpecifications, providing technical, system and other reference information related to the JReport built−in objects, built−in formulafunctions and APIs.
JREntServer Getting StartedAn introduction to JReport. It covers issues associated with installation, setup, and configuration of JReport Enterprise Server. Itdescribes most informational topics and references in the server User's Guide.
JREntServer TutorialBasic Server configuration, administration and accessing instructions. After walking though the tutorial, you will be able to use theserver for managing the interaction between client and server that enables activities such as scheduling and running reports.
JREntViewer ManualComplete coverage of features and instruction of using JREntViewer against JREntServer. The Client API usage is also introduced inthis book.
User's Guide: Organization of This Part
2

SanFrancisco Integration ManualIntegration notes of JReport with IBM SanFrancisco, making IBM SanFrancisco application data ready/available for reporting,step−by−step instructions on how to wrap SanFrancisco BO or Bean to JReport Printable Object, through which a report is built.
Index
User's Guide: Organization of This Part
3
Installing and Launching JReport Enterprise Server
System Requirements
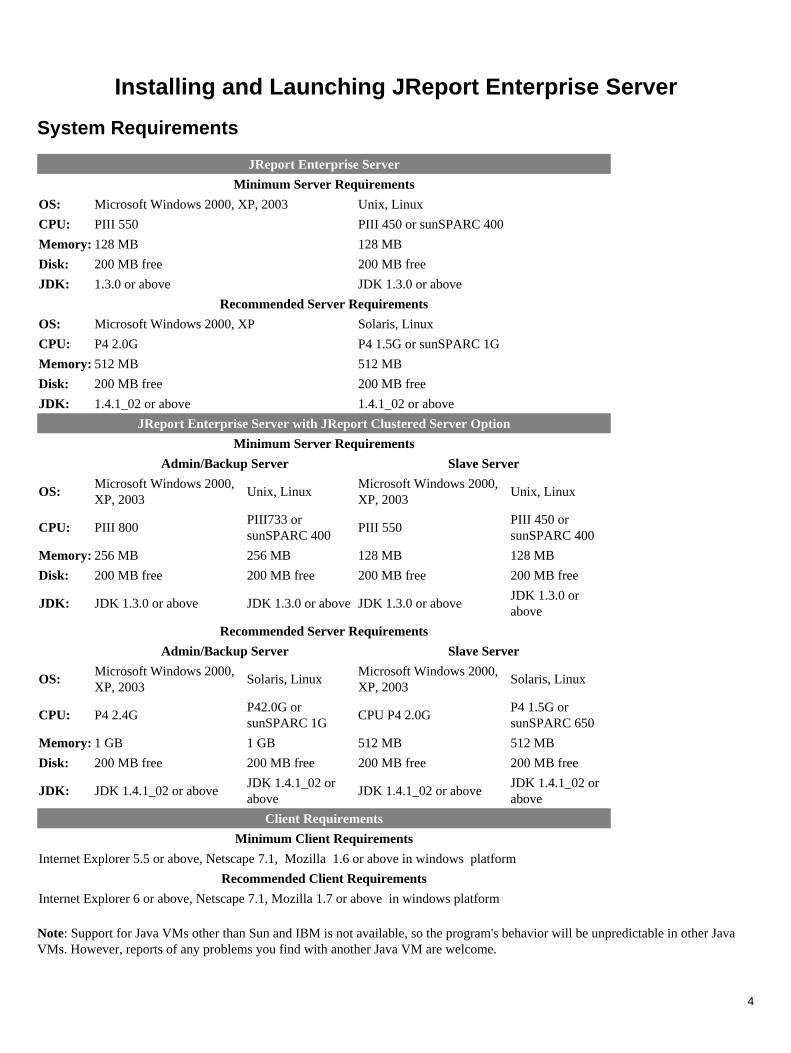
JReport Enterprise Server
Minimum Server Requirements
OS: Microsoft Windows 2000, XP, 2003 Unix, Linux
CPU: PIII 550 PIII 450 or sunSPARC 400
Memory: 128 MB 128 MB
Disk: 200 MB free 200 MB free
JDK: 1.3.0 or above JDK 1.3.0 or above
Recommended Server Requirements
OS: Microsoft Windows 2000, XP Solaris, Linux
CPU: P4 2.0G P4 1.5G or sunSPARC 1G
Memory: 512 MB 512 MB
Disk: 200 MB free 200 MB free
JDK: 1.4.1_02 or above 1.4.1_02 or above
JReport Enterprise Server with JReport Clustered Server Option
Minimum Server Requirements
Admin/Backup Server Slave Server
OS:Microsoft Windows 2000,XP, 2003
Unix, LinuxMicrosoft Windows 2000,XP, 2003
Unix, Linux
CPU: PIII 800PIII733 orsunSPARC 400
PIII 550PIII 450 orsunSPARC 400
Memory: 256 MB 256 MB 128 MB 128 MB
Disk: 200 MB free 200 MB free 200 MB free 200 MB free
JDK: JDK 1.3.0 or above JDK 1.3.0 or above JDK 1.3.0 or aboveJDK 1.3.0 orabove
Recommended Server Requirements
Admin/Backup Server Slave Server
OS:Microsoft Windows 2000,XP, 2003
Solaris, LinuxMicrosoft Windows 2000,XP, 2003
Solaris, Linux
CPU: P4 2.4GP42.0G orsunSPARC 1G
CPU P4 2.0GP4 1.5G orsunSPARC 650
Memory: 1 GB 1 GB 512 MB 512 MB
Disk: 200 MB free 200 MB free 200 MB free 200 MB free
JDK: JDK 1.4.1_02 or above JDK 1.4.1_02 orabove
JDK 1.4.1_02 or above JDK 1.4.1_02 orabove
Client Requirements
Minimum Client Requirements
Internet Explorer 5.5 or above, Netscape 7.1, Mozilla 1.6 or above in windows platform
Recommended Client Requirements
Internet Explorer 6 or above, Netscape 7.1, Mozilla 1.7 or above in windows platform
Note: Support for Java VMs other than Sun and IBM is not available, so the program's behavior will be unpredictable in other JavaVMs. However, reports of any problems you find with another Java VM are welcome.
4
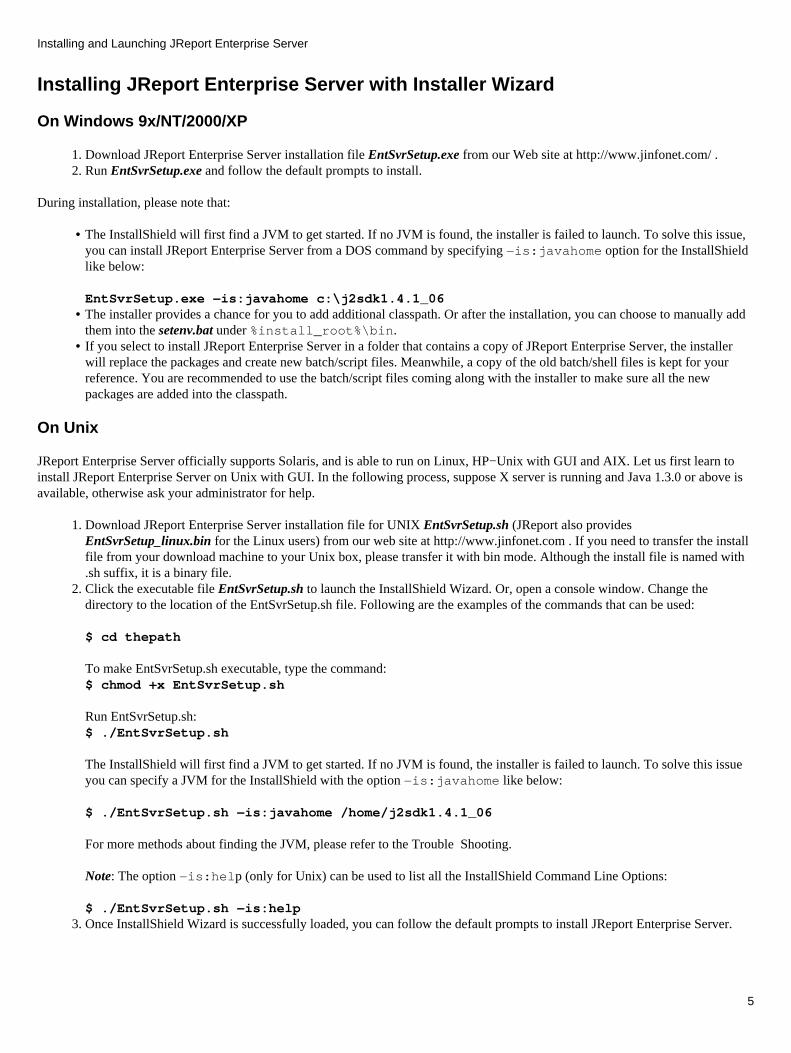
Installing JReport Enterprise Server with Installer Wizard
On Windows 9x/NT/2000/XP
Download JReport Enterprise Server installation file EntSvrSetup.exe from our Web site at http://www.jinfonet.com/ . 1. Run EntSvrSetup.exe and follow the default prompts to install. 2.
During installation, please note that:
The InstallShield will first find a JVM to get started. If no JVM is found, the installer is failed to launch. To solve this issue,you can install JReport Enterprise Server from a DOS command by specifying −is:javahome option for the InstallShieldlike below:
EntSvrSetup.exe −is:javahome c:\j2sdk1.4.1_06
•
The installer provides a chance for you to add additional classpath. Or after the installation, you can choose to manually addthem into the setenv.bat under %install_root%\bin.
•
If you select to install JReport Enterprise Server in a folder that contains a copy of JReport Enterprise Server, the installerwill replace the packages and create new batch/script files. Meanwhile, a copy of the old batch/shell files is kept for yourreference. You are recommended to use the batch/script files coming along with the installer to make sure all the newpackages are added into the classpath.
•
On Unix
JReport Enterprise Server officially supports Solaris, and is able to run on Linux, HP−Unix with GUI and AIX. Let us first learn toinstall JReport Enterprise Server on Unix with GUI. In the following process, suppose X server is running and Java 1.3.0 or above isavailable, otherwise ask your administrator for help.
Download JReport Enterprise Server installation file for UNIX EntSvrSetup.sh (JReport also providesEntSvrSetup_linux.bin for the Linux users) from our web site at http://www.jinfonet.com . If you need to transfer the installfile from your download machine to your Unix box, please transfer it with bin mode. Although the install file is named with.sh suffix, it is a binary file.
1.
Click the executable file EntSvrSetup.sh to launch the InstallShield Wizard. Or, open a console window. Change thedirectory to the location of the EntSvrSetup.sh file. Following are the examples of the commands that can be used:
$ cd thepath
To make EntSvrSetup.sh executable, type the command: $ chmod +x EntSvrSetup.sh
Run EntSvrSetup.sh: $ ./EntSvrSetup.sh
The InstallShield will first find a JVM to get started. If no JVM is found, the installer is failed to launch. To solve this issueyou can specify a JVM for the InstallShield with the option −is:javahome like below:
$ ./EntSvrSetup.sh −is:javahome /home/j2sdk1.4.1_06
For more methods about finding the JVM, please refer to the Trouble Shooting.
Note: The option −is:help (only for Unix) can be used to list all the InstallShield Command Line Options:
$ ./EntSvrSetup.sh −is:help
2.
Once InstallShield Wizard is successfully loaded, you can follow the default prompts to install JReport Enterprise Server. 3.
Installing and Launching JReport Enterprise Server
5

Installing JReport Enterprise Server Silently
For those platforms that do not have GUI (like AIX 400, IBM 390), please follow the steps below to install JReport Enterprise Serversilently:
Download JReport Enterprise Server for UNIX EntSvrSetup.sh from our web site at http://www.jinfonet.com . 1. Get the script file EntSvrSetup.script and edit it as you like. The file is used to create an option file (i.e., response file) forthe Installation wizard. It predefines all the information that is needed in installing.
Or you can create a script file and save it by your own as follow:
2.
################################################################################ # # License Agreement State # # The initial state of the License Agreement panel. Legal values are: # # 0 − Nothing will be selected # 1 − "I &accept the terms of the license agreement." will be selected # 2 − "I &do not accept the terms of the license agreement." will be # selected # # For example, to configure the panel to initially display "I &do not accept the # terms of the license agreement.", use # # −W bean3.selection=2 #
−W bean3.selection=1
################################################################################ # # JReport Enterprise Server Install Location # # The install location of the product. Specify a valid directory into which the # product should be installed. If the directory contains spaces, enclose it in # double−quotes. For example, to install the product to C:\Program Files\My # Product, use # # −P installLocation="C:\Program Files\My Product" #
−P installLocation=/usr/local/JREntServer
################################################################################## Specify Real Path for the Public Reports Node## Specify a valid directory as the real path for the Public Reports node. JReport # Enterprise Server will get dynamic resources from the real path without# deploying the resources to the server.# To specify the Real Path for Public Reports, use # # −W DestinationPanel.enableRealPath=true # −W DestinationPanel.realPath="C:\RealPath"#
Installing and Launching JReport Enterprise Server
6

#When −W DestinationPanel.enableRealPath=false, no real path is specified.
−W DestinationPanel.enableRealPath=true−W DestinationPanel.realPath="C:\work"
################################################################################ # # License Input Panel # # License key for your JReport Enterprise Server. Input the UID and password provided by # Jinfonet Software Inc. You must specify key here, otherwise installer can't # proceed. In most cases, these are provided via email. Please cut and paste # User ID and Install Key into the appropriate fields to avoid typing errors. # If you are installing this product for evaluation purposes, please contact # Jinfonet at 301−838−5560 to obtain an evaluation license. # # −W KeyCheckBean.uid=Paste your UID here # −W KeyCheckBean.key=paste your password here
−W KeyCheckBean.uid=UID −W KeyCheckBean.key=Password
################################################################################ # # Select JDK Home # # Home directory of JDK. Select the home directory of a JDK with which you want # to load JReport Enterprise Server. Only home of JDK is acceptable, and tools.jar must # reside under JDK_HOME\lib directory. For example, if you have a JDK well installed # in C:\j2sdk1.4.2_05, you need to specify the value as: # # −W selectjdk.jdk="C:\j2sdk1.4.2_05"
−W selectjdk.jdk="C:\j2sdk1.4.2_05"
Some built−in demo reports (\hsqlDemo\*.cls) with the HSQLDB as the data source (server\db\demo.script) are provided.At the end of the installation, the installer will go to configure the reports and catalog to the correct data path. This callssome AWT classes which require GUI support.
Therefore, if you have an X server installed, you can set the Display variable so that this step can be done successfully.
$ DISPLAY=hostname(or IP):0.0 $ export DISPLAY
Please note that if you do not have X server or, say, pure text environment, this step will be ignored. You may find the demoreports are not ready to go after you start the JREntServer due to the default wrong data source path. You can always useJReport Designer to deploy some working reports for testing purpose.
3.
Run the following command, and the Server will be installed under the designated path.
$ sh EntSvrSetup.sh −options EntSvrSetup.script −silent
When you use this command to install JReport Enterprise Server silently, you will find that you cannot see the status andcannot anticipate what' s going on after pressing Enter. So we provide another command line to you (see below). By usingthis command, you can do silent installation more intuitively.
$ sh EntSvrSetup.sh −options EntSvrSetup.script −console
4.
Installing and Launching JReport Enterprise Server
7
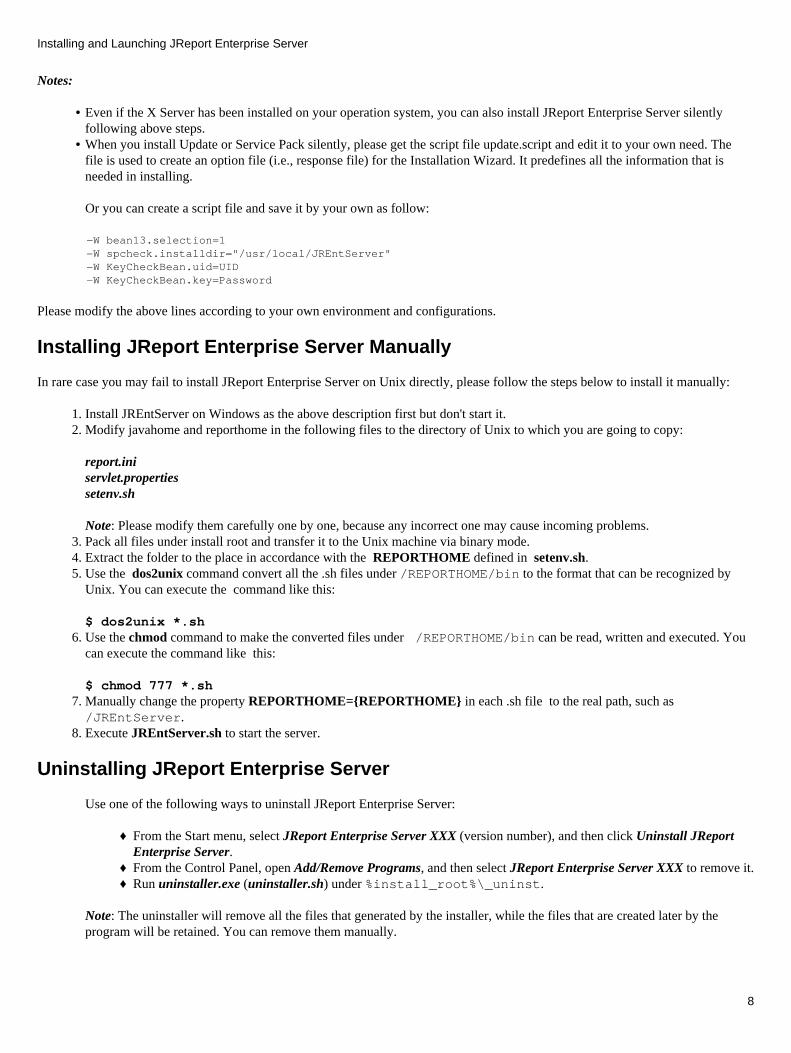
Notes:
Even if the X Server has been installed on your operation system, you can also install JReport Enterprise Server silentlyfollowing above steps.
•
When you install Update or Service Pack silently, please get the script file update.script and edit it to your own need. Thefile is used to create an option file (i.e., response file) for the Installation Wizard. It predefines all the information that isneeded in installing.
Or you can create a script file and save it by your own as follow:
•
−W bean13.selection=1 −W spcheck.installdir="/usr/local/JREntServer" −W KeyCheckBean.uid=UID −W KeyCheckBean.key=Password
Please modify the above lines according to your own environment and configurations.
Installing JReport Enterprise Server Manually
In rare case you may fail to install JReport Enterprise Server on Unix directly, please follow the steps below to install it manually:
Install JREntServer on Windows as the above description first but don't start it. 1. Modify javahome and reporthome in the following files to the directory of Unix to which you are going to copy:
report.ini servlet.propertiessetenv.sh
Note: Please modify them carefully one by one, because any incorrect one may cause incoming problems.
2.
Pack all files under install root and transfer it to the Unix machine via binary mode. 3. Extract the folder to the place in accordance with the REPORTHOME defined in setenv.sh. 4. Use the dos2unix command convert all the .sh files under /REPORTHOME/bin to the format that can be recognized byUnix. You can execute the command like this:
$ dos2unix *.sh
5.
Use the chmod command to make the converted files under /REPORTHOME/bin can be read, written and executed. Youcan execute the command like this:
$ chmod 777 *.sh
6.
Manually change the property REPORTHOME={REPORTHOME} in each .sh file to the real path, such as/JREntServer.
7.
Execute JREntServer.sh to start the server. 8.
Uninstalling JReport Enterprise Server
Use one of the following ways to uninstall JReport Enterprise Server:
From the Start menu, select JReport Enterprise Server XXX (version number), and then click Uninstall JReportEnterprise Server.
♦
From the Control Panel, open Add/Remove Programs, and then select JReport Enterprise Server XXX to remove it.♦ Run uninstaller.exe (uninstaller.sh) under %install_root%\_uninst. ♦
Note: The uninstaller will remove all the files that generated by the installer, while the files that are created later by theprogram will be retained. You can remove them manually.
Installing and Launching JReport Enterprise Server
8
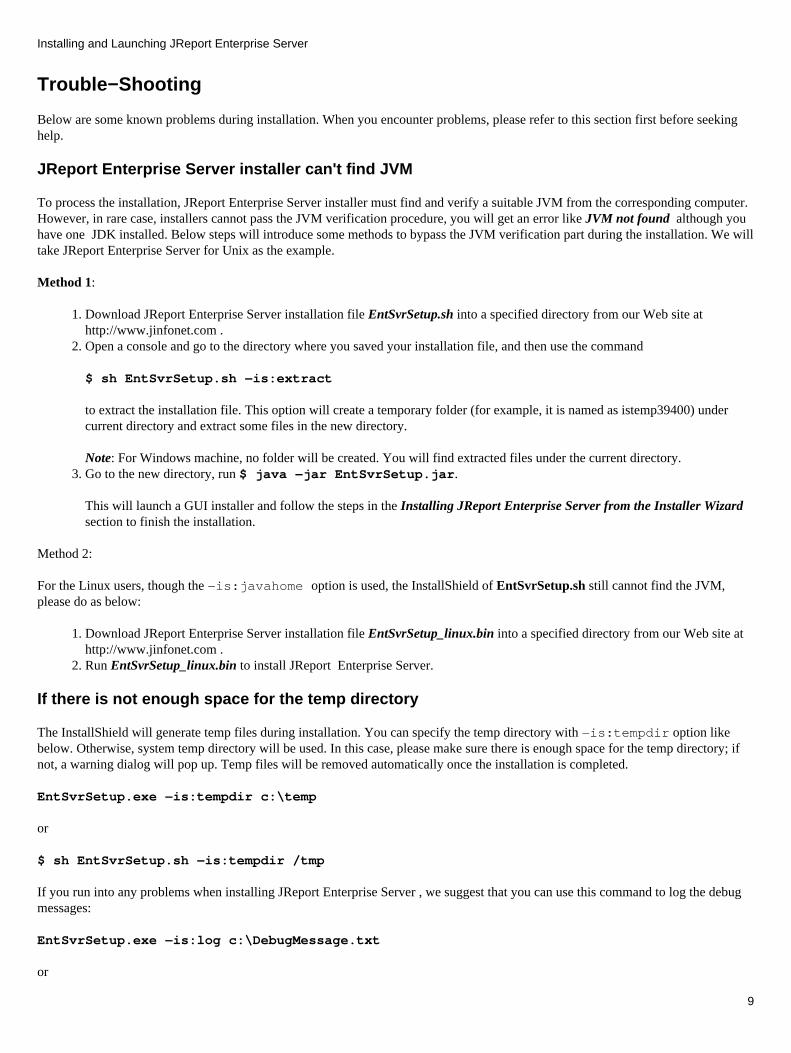
Trouble−Shooting
Below are some known problems during installation. When you encounter problems, please refer to this section first before seekinghelp.
JReport Enterprise Server installer can't find JVM
To process the installation, JReport Enterprise Server installer must find and verify a suitable JVM from the corresponding computer.However, in rare case, installers cannot pass the JVM verification procedure, you will get an error like JVM not found although youhave one JDK installed. Below steps will introduce some methods to bypass the JVM verification part during the installation. We willtake JReport Enterprise Server for Unix as the example.
Method 1:
Download JReport Enterprise Server installation file EntSvrSetup.sh into a specified directory from our Web site athttp://www.jinfonet.com .
1.
Open a console and go to the directory where you saved your installation file, and then use the command
$ sh EntSvrSetup.sh −is:extract
to extract the installation file. This option will create a temporary folder (for example, it is named as istemp39400) undercurrent directory and extract some files in the new directory.
Note: For Windows machine, no folder will be created. You will find extracted files under the current directory.
2.
Go to the new directory, run $ java −jar EntSvrSetup.jar.
This will launch a GUI installer and follow the steps in the Installing JReport Enterprise Server from the Installer Wizardsection to finish the installation.
3.
Method 2:
For the Linux users, though the −is:javahome option is used, the InstallShield of EntSvrSetup.sh still cannot find the JVM,please do as below:
Download JReport Enterprise Server installation file EntSvrSetup_linux.bin into a specified directory from our Web site athttp://www.jinfonet.com .
1.
Run EntSvrSetup_linux.bin to install JReport Enterprise Server.2.
If there is not enough space for the temp directory
The InstallShield will generate temp files during installation. You can specify the temp directory with −is:tempdir option likebelow. Otherwise, system temp directory will be used. In this case, please make sure there is enough space for the temp directory; ifnot, a warning dialog will pop up. Temp files will be removed automatically once the installation is completed.
EntSvrSetup.exe −is:tempdir c:\temp
or
$ sh EntSvrSetup.sh −is:tempdir /tmp
If you run into any problems when installing JReport Enterprise Server , we suggest that you can use this command to log the debugmessages:
EntSvrSetup.exe −is:log c:\DebugMessage.txt
or
Installing and Launching JReport Enterprise Server
9
$ sh EntSvrSetup.sh −is:log /usr/DebugMessage.txt
Please feel free to send your questions to [email protected] .
Setting up the reporting environment for the Server
Now that you have installed JReport Enterprise Server, you can start it. However, it would be better to check its reportingenvironment to see whether you have deployed reports including the catalog files, added the necessary classpaths, and set up datasources etc. In the event that you have not already done this, you can go back and check using the following methods.
Report deployment & creation
The separation of report file (or template file) and data is powerful. It facilitates easy reuse of the report’s layout. Report files builtwith JReport designer can be deployed to JReport Enterprise Server for running in the server/client mode. Today, computing is aservice−based model in which Web services are rapidly replacing monolithic. Fat−client hosted and maintained softwareapplications. JReport Enterprise Server is a high performance server for running reports on demand or on a schedule basisunattended. In this environment, thousands of clients may view, print and generate new reports.
Since report files are the basis for running JReport server, make sure that your report files and catalog files have been deployed toyour server. JReport Enterprise Server has its own resource tree with each node mapping to a folder or file in your physical drive. Sowhen we say deploy the report files to the server, we recommend that you check:
Whether the report files reside somewhere in the server machine. 1. Whether the files are mapped under the resource tree. 2. That not only the report files, but also the catalog files (including the .fml file) exists and are under the same directory as thereport file. In addition, one directory can only contain one catalog.
3.
Reference Notes: User's Guide | Administrating JReport Enterprise Server.
Data sources
You may have had your own catalogs and reports developed, and you want them to be run and distributed by JReport EnterpriseServer. In order to do this, the data sources used by your catalogs should be correctly set to the run−time environment of JReportEnterprise Server.
User Data SourceAppend the classpath of your user class files to the first item of the classpath set in your batch file or command line to start JReportserver.
Additional classpaths
Index
Running JReport Enterprise Server as a Standalone server
JReport Enterprise Server can be started from the wrapping servlet−enabled web server that is contained in the JReport EnterpriseServer package. We will learn how to start JReport Enterprise Server from this wrapping web server, how to send commands to thiswrapping server and how to take advantage of the batch files under the %JREntServerHome%\bin directory.
Launchers
After you have installed JReport Enterprise Server, a set of utilities will be generated automatically under%JREntServerHome%\bin. All of these batch files can be edited to suit different circumstances. However, always do this beforemaking sure of their functions.
Installing and Launching JReport Enterprise Server
10
JREntServer.batRun server with options.Usage: JREntServer [options]Use −? for more detailed information.
•
DJREntServer.batRun server with debug and log information. The output log file is JReport.log under the current directory. In case ofproblems, you may run this batch to reproduce the problem. Open the file to see the detail information and try totroubleshoot yourself first. Send the log file to us if you are unable to resolve the problem.
•
NJREntServer.batRun the server without JIT option. If your server often crashes with JIT option, try this batch file instead of JREntServer.bat.Usage NJREntServer [options]Use −? for more detailed information.
•
CmdSender.batSending command to server.Usage: CmdSender −w:password admin|shutdown|(local:on|off)Use −? for more detailed information.
•
Full command to run from Wrapping Web Server
jet.server.JREntServer is the class of the wrapping web server, you can start it with the following command instead of using thegenerated batch files:
JAVA −classpath <classpath> −Djava.compiler=NONE −Dreporthome=<install_root>jet.server.JREntServer [options]
−Djava.compiler=NONEThat is without JIT. This is not a required option. However, if you encounter problems running the server and you doubt itrelates to Java VM, you may turn off the JIT compiler then run it again.
•
−Djreport.url.encodingSpecify the encoding to encode/decode escape chars in url strings. If not specified, it uses the system default encoding. Forexample: java ... −Djreport.url.encoding=8859−1...
•
−DreporthomeThis is where JReport Enterprise Server is installed. It is what you specified as the Destination Location when you installedJReport Enterprise Server. This option is required. When you set the report home, upon launching, JReport will try to findthe jslc.dat and report.ini files under %JREntServerHome%\bin and check whether they are valid. jslc.dat is the Licensecontrol file. Open report.ini, you will find the configuration information, including the temp path, template path and the helppath. JReport will use the temp path to export the temporary files. Therefore, make sure the temp folder specified inreport.ini exists.
•
−classpathThe classpath must include the following packages originally in your <JREntServerHome>\lib:
•
C:\JREntServer\lib\JRESServlets.jar;
C:\JREntServer\lib\JREntServer.jar;
C:\JREntServer\lib\JREngine.jar;
C:\JREntServer\lib\servlet.jar;
C:\JREntServer\lib\log4j−1.2.8.jar;
[options]• Option Description
−? Print brief help message.
−p port The port that this web server listens on.
−apadminport
The port number that the remote administration uses.
−l backlog Maximum length of queue for incoming connection indications.
Installing and Launching JReport Enterprise Server
11

−m max Maximum number of connection handlers.
−t timeout Connection timeout in milliseconds.
−s filename Servlet property file name.
−v verbose Output.
−realmrealmname
Active realm when the server starts up.
−webdirectory
Web service root directory.
−a Load interactive interface when the server starts up.
−local Administration on local host only.
−vDebugEnables JReport Designer to output debug messages to Console or log file (whenused together with −log).
−vErrorEnable JReport Enterprise Server to output error messages to Console or log file(when used together with −log).
−log[:<file>]Tells JReport Enterprise Server to output debug, error or other messages to thespecified file. If there is no file specified, the file JReport.log will be used.
−env Print environment settings when the server starts up.
−silent Output nothing, even the server start information.
−logallSet all log levels to be TRIVIAL and set all log destinations to FILE. The Engine logfile will be set to <install_root>/logs/report.log. It will log all actions. Its valid valueis "true". This option is a shortcut of vDebug, vError and log.
Notes:
Logging and debugging switchesThe three command switches, −vError, −vDebug, and −log[:<file>], can be used together to track the debug anderror information to console or log file.
•
You can specify the log file format, such as Text or HTML. You can decide whether to append the log files to the existingfile, or create a new file. You can even specify the log layout using the abundant options that JReport provides.
To do this, you need to edit the %JREntServerHOME%\bin\LogConfig.properties file. For detailed informationon how to configure the logging and debugging information, please read the LogConfig.properites file.
We will use some of the common options in the later chapters. In addition, we have automatically generated some batch filesfor you so that you will not have to write a complicated command line.
•
Sending commands to JReport Enterprise Server via the Wrapping Server
After JReport Enterprise Server is started from the wrapping web server, you can send commands to that web server to either shut itdown or pop up the user interactive interface for administrating. All of these can be done through the classjet.server.CommandSender. The full command is as follows:
JAVA −classpath <classpath> −Djava.compiler=NONE [−Dreporthome=<install_root>]jet.server.CommandSender [−s:server −p:port]−w:password [−?]|admin|shutdown|gc|(local:on|off)
−?Print brief help message.
•
−Djava.compiler=NONEThat is without JIT. This is not a required option. However, if you encounter problems running the server and you doubt thatit relates to Java VM, you may turn off the JIT compiler then run it again.
•
Installing and Launching JReport Enterprise Server
12
−DreporthomeThis is where JReport Enterprise Server is installed. It is what you specified as the Destination Location when you wereinstalling JReport Enterprise Server. It is required only if you execute the command from the local host on which JReportEnterprise Server is running.
•
−Dpoperror=trueThis property is used to control whether to pop up a message to show the error info. The default value is false whichindicates that the error message will not be popped up.
•
−ClasspathThe classpath must include the following packages originally in your <JREntServerHome>\lib:C:\JREntServer\lib\JRESServlets.jar;C:\JREntServer\lib\JREntServer.jar;
•
−s:serverHost name on which JReport Enterprise Server is running.
•
−p:portThe port JReport Enterprise Server used for administration. The default value is 8889.
•
−w:passwordPassword of the admin user. Example: −w:admin
•
adminA command sent to the server asking to pop up the user interactive interface for administrating JReport Enterprise Server.
•
shutdownA command sent to the server asking it to shut down.
•
local:onA command sent to the server asking to only allow the administration commands sent by the local machine.
•
local:offA command sent to the server asking to accept administration commands from anywhere.
•
gcA command sent to the wrapping server asking to collect memory garbage.
•
Note: We will use some of the common options in the later chapters. In addition, we have automatically generated the batch fileCmdSender.bat for you so that you will not have to write a complicated command line.
Running Server on Unix without GUI
JReport requires java AWT to layout and render reports at runtime. For example, JReport requires AWT to
Get the font information• Process images in report• Get printer information• So on...•
Due to the above reason, JReport (actually not only JReport, but also any Java Server products that require AWT) would encounterthe X11 relative issue if there were no X Window available. Since V7.2, JReport will check the X environment before starting. If noX server or equivalent X is found, JReport Enterprise Server/Servlets will not be loaded.
Using XVFB
Since Java 1.2's AWT needs support by too many features, for example, certain Java 2D implementations, it is very hard to presentour own Java 1.2 AWT Toolkit to Java VM. We were aware that this bug has been fixed by Sun and we think it would be included innext JDK public release. However, before the next public release of JDK, there is a compromise solution − XVFB. XVFB is acronymof Xserver Virtual Frame Buffer. It can provide a virtual Xserver and release you from the need of real Xserver. It runs without ahead or graphics card. XVFB is freeware and can be gotten from x.org's X11R6 distribution. Compiling it is supposedly verydifficult, but there are some Solaris binaries on certain sites, including:
http://ferret.wrc.noaa.gov/Ferret/FAQ/graphics/Solaris_Xvfb.htmlftp.xfree86.org/pub/XFree86/3.3.6/binaries/Solarisftp.xfree86.org/pub/XFree86/4.0.1/binaries/Solaris
Installing and Launching JReport Enterprise Server
13
ftp.xfree86.org/pub/XFree86/4.0.1/binaries/Solaris−8http://ferret.wrc.noaa.gov/Ferret/FAQ/graphics/Solaris_Xvfb.html (probably run on Solaris 7)
Take the following steps to run JReport Enterprise Server with Xvfb:
Install Xvfb.1. To have Xvfb start up automatically when a workstation boots, you can add the Virtual Framebuffer to the AutomaticStartup. That is, write a script /etc/init.d/xvfb as below, and make it executable.
2.
#!/bin/sh
mode=$1
case "$mode" in'start') # start the X Virtual Framebuffer (Xvfb)if [ −f /usr/X11R6/bin/Xvfb ]; thenecho "***Starting up the Virtual Frame Buffer on Screen 1***"/usr/X11R6/bin/Xvfb :1 −screen 0 1152x900x8 &fi;;
*)echo " Usage: "echo " $0 start (start XVFB)"echo " $0 stop (stop XVFB − not supported)"exit 1;;esacexit 0
Then create a soft link to /etc/rc2.d/S98xvfb:
ln −s /etc/init.d/xvfb /etc/rc2.d/S98xvfb
If you need not to start Xvfb automatically, you can manually start up XVFB:
/usr/X11R6/bin/Xvfb :1 −screen 0 1152x900x8 &3.
Set DISPLAY to screen 1 (assuming that JREntServer is running on machine jaguar).
DISPLAY=jaguar:1.0export DISPLAY
Then, you can start JREntServer. In case of JREntServer shutting down when you close the remote terminal, you can startJREntServer in the background using the command nohup:
nohup ./JREntServer &
Using PJA toolkit
When there is no X Window, or even Xvfb available, a PJA (Pure Java AWT) Toolkit is supported to run JReport Enterprise Server.This is a Java library for drawing graphics developed by eTeks. It supplies a replacement AWT toolkit and eliminates the requirementof an X display. To use it,
2. Install JReport Enterprise Server. For details on installing JReport Enterprise Server, see User's Guide | Installing and LaunchingJReport Enterprise Server | Installing JReport Enterprise Server on Non−GUI Environment.
3. Assuming that EntSvrSetup.sh has been used to install JReport Enterprise Server on a Non−Gui platform. Modify the fileJREntServer under %JREntServerHome%\bin and append /pja_2.4/lib/pjatools.jar to the classpath and add following options:
Installing and Launching JReport Enterprise Server
14
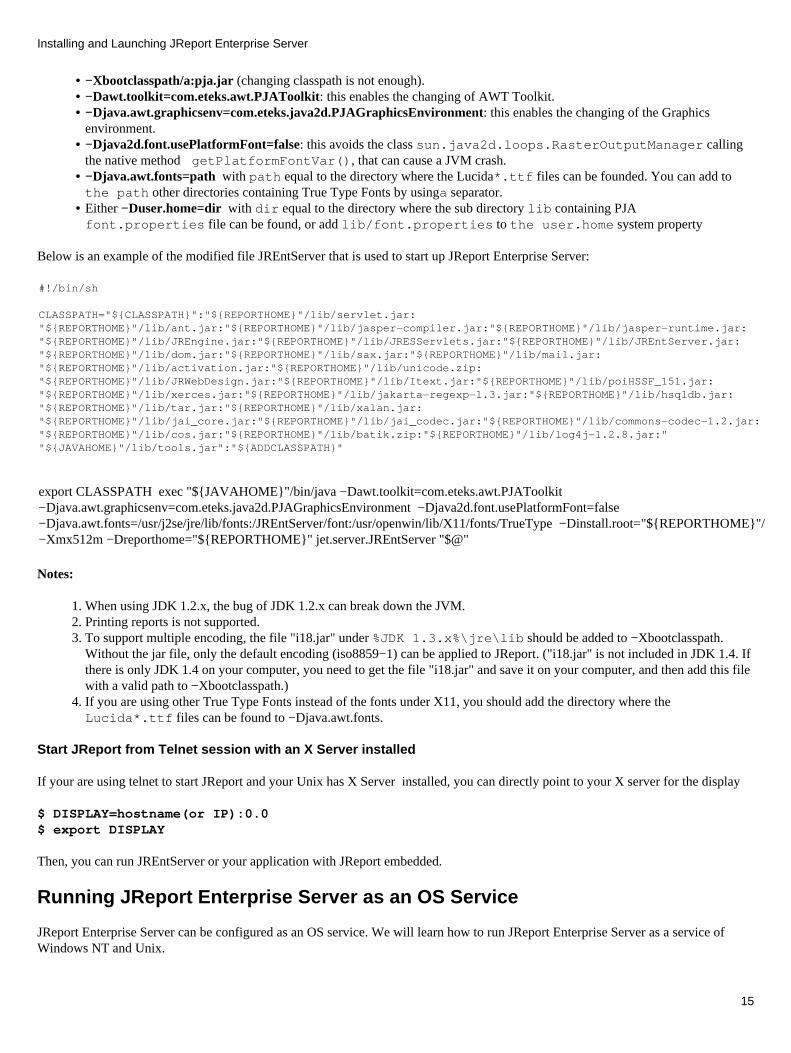
−Xbootclasspath/a:pja.jar (changing classpath is not enough). • −Dawt.toolkit=com.eteks.awt.PJAToolkit: this enables the changing of AWT Toolkit. • −Djava.awt.graphicsenv=com.eteks.java2d.PJAGraphicsEnvironment: this enables the changing of the Graphicsenvironment.
•
−Djava2d.font.usePlatformFont=false: this avoids the class sun.java2d.loops.RasterOutputManager callingthe native method getPlatformFontVar(), that can cause a JVM crash.
•
−Djava.awt.fonts=path with path equal to the directory where the Lucida*.ttf files can be founded. You can add tothe path other directories containing True Type Fonts by usinga separator.
•
Either −Duser.home=dir with dir equal to the directory where the sub directory lib containing PJAfont.properties file can be found, or add lib/font.properties to the user.home system property
•
Below is an example of the modified file JREntServer that is used to start up JReport Enterprise Server:
#!/bin/sh
CLASSPATH="${CLASSPATH}":"${REPORTHOME}"/lib/servlet.jar:"${REPORTHOME}"/lib/ant.jar:"${REPORTHOME}"/lib/jasper−compiler.jar:"${REPORTHOME}"/lib/jasper−runtime.jar:"${REPORTHOME}"/lib/JREngine.jar:"${REPORTHOME}"/lib/JRESServlets.jar:"${REPORTHOME}"/lib/JREntServer.jar:"${REPORTHOME}"/lib/dom.jar:"${REPORTHOME}"/lib/sax.jar:"${REPORTHOME}"/lib/mail.jar:"${REPORTHOME}"/lib/activation.jar:"${REPORTHOME}"/lib/unicode.zip:"${REPORTHOME}"/lib/JRWebDesign.jar:"${REPORTHOME}"/lib/Itext.jar:"${REPORTHOME}"/lib/poiHSSF_151.jar:"${REPORTHOME}"/lib/xerces.jar:"${REPORTHOME}"/lib/jakarta−regexp−1.3.jar:"${REPORTHOME}"/lib/hsqldb.jar:"${REPORTHOME}"/lib/tar.jar:"${REPORTHOME}"/lib/xalan.jar:"${REPORTHOME}"/lib/jai_core.jar:"${REPORTHOME}"/lib/jai_codec.jar:"${REPORTHOME}"/lib/commons−codec−1.2.jar:"${REPORTHOME}"/lib/cos.jar:"${REPORTHOME}"/lib/batik.zip:"${REPORTHOME}"/lib/log4j−1.2.8.jar:""${JAVAHOME}"/lib/tools.jar":"${ADDCLASSPATH}"
export CLASSPATH exec "${JAVAHOME}"/bin/java −Dawt.toolkit=com.eteks.awt.PJAToolkit −Djava.awt.graphicsenv=com.eteks.java2d.PJAGraphicsEnvironment −Djava2d.font.usePlatformFont=false−Djava.awt.fonts=/usr/j2se/jre/lib/fonts:/JREntServer/font:/usr/openwin/lib/X11/fonts/TrueType −Dinstall.root="${REPORTHOME}"/−Xmx512m −Dreporthome="${REPORTHOME}" jet.server.JREntServer "$@"
Notes:
When using JDK 1.2.x, the bug of JDK 1.2.x can break down the JVM.1. Printing reports is not supported.2. To support multiple encoding, the file "i18.jar" under %JDK 1.3.x%\jre\lib should be added to −Xbootclasspath.Without the jar file, only the default encoding (iso8859−1) can be applied to JReport. ("i18.jar" is not included in JDK 1.4. Ifthere is only JDK 1.4 on your computer, you need to get the file "i18.jar" and save it on your computer, and then add this filewith a valid path to −Xbootclasspath.)
3.
If you are using other True Type Fonts instead of the fonts under X11, you should add the directory where theLucida*.ttf files can be found to −Djava.awt.fonts.
4.
Start JReport from Telnet session with an X Server installed
If your are using telnet to start JReport and your Unix has X Server installed, you can directly point to your X server for the display
$ DISPLAY=hostname(or IP):0.0$ export DISPLAY
Then, you can run JREntServer or your application with JReport embedded.
Running JReport Enterprise Server as an OS Service
JReport Enterprise Server can be configured as an OS service. We will learn how to run JReport Enterprise Server as a service ofWindows NT and Unix.
Installing and Launching JReport Enterprise Server
15
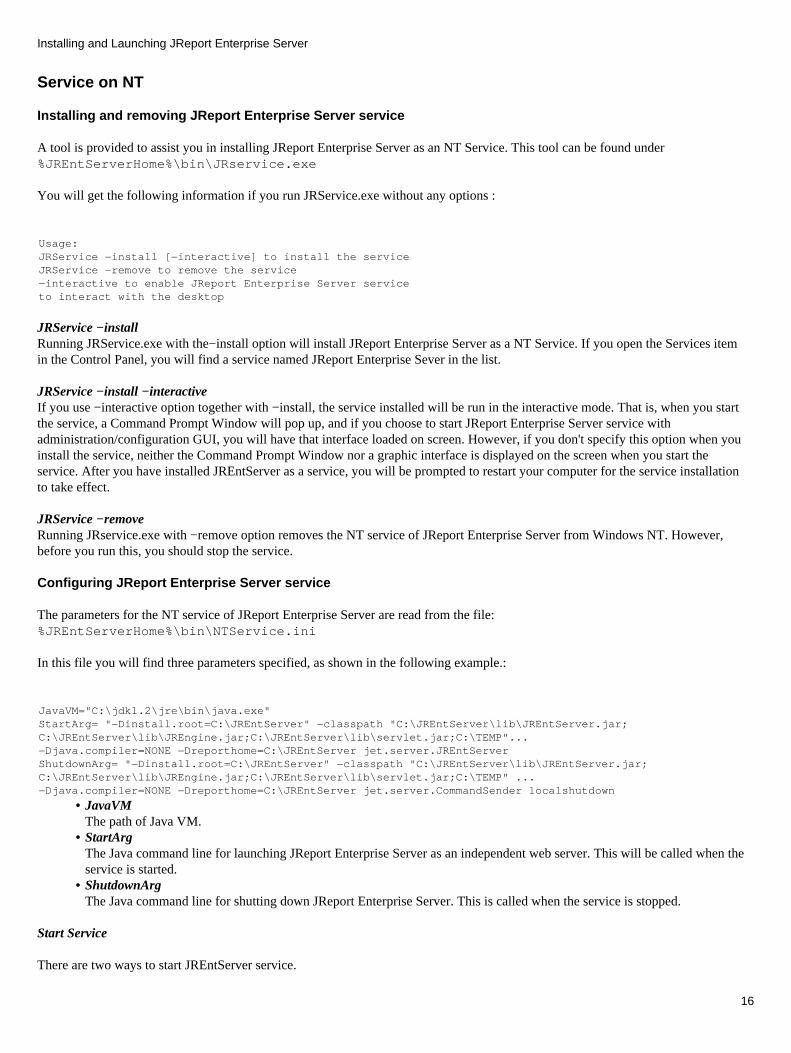
Service on NT
Installing and removing JReport Enterprise Server service
A tool is provided to assist you in installing JReport Enterprise Server as an NT Service. This tool can be found under%JREntServerHome%\bin\JRservice.exe
You will get the following information if you run JRService.exe without any options :
Usage:JRService −install [−interactive] to install the serviceJRService −remove to remove the service−interactive to enable JReport Enterprise Server serviceto interact with the desktop
JRService −installRunning JRService.exe with the−install option will install JReport Enterprise Server as a NT Service. If you open the Services itemin the Control Panel, you will find a service named JReport Enterprise Sever in the list.
JRService −install −interactiveIf you use −interactive option together with −install, the service installed will be run in the interactive mode. That is, when you startthe service, a Command Prompt Window will pop up, and if you choose to start JReport Enterprise Server service withadministration/configuration GUI, you will have that interface loaded on screen. However, if you don't specify this option when youinstall the service, neither the Command Prompt Window nor a graphic interface is displayed on the screen when you start theservice. After you have installed JREntServer as a service, you will be prompted to restart your computer for the service installationto take effect.
JRService −removeRunning JRservice.exe with −remove option removes the NT service of JReport Enterprise Server from Windows NT. However,before you run this, you should stop the service.
Configuring JReport Enterprise Server service
The parameters for the NT service of JReport Enterprise Server are read from the file:%JREntServerHome%\bin\NTService.ini
In this file you will find three parameters specified, as shown in the following example.:
JavaVM="C:\jdk1.2\jre\bin\java.exe" StartArg= "−Dinstall.root=C:\JREntServer" −classpath "C:\JREntServer\lib\JREntServer.jar;C:\JREntServer\lib\JREngine.jar;C:\JREntServer\lib\servlet.jar;C:\TEMP"... −Djava.compiler=NONE −Dreporthome=C:\JREntServer jet.server.JREntServerShutdownArg= "−Dinstall.root=C:\JREntServer" −classpath "C:\JREntServer\lib\JREntServer.jar;C:\JREntServer\lib\JREngine.jar;C:\JREntServer\lib\servlet.jar;C:\TEMP" ...−Djava.compiler=NONE −Dreporthome=C:\JREntServer jet.server.CommandSender localshutdown
JavaVMThe path of Java VM.
•
StartArgThe Java command line for launching JReport Enterprise Server as an independent web server. This will be called when theservice is started.
•
ShutdownArgThe Java command line for shutting down JReport Enterprise Server. This is called when the service is stopped.
•
Start Service
There are two ways to start JREntServer service.
Installing and Launching JReport Enterprise Server
16
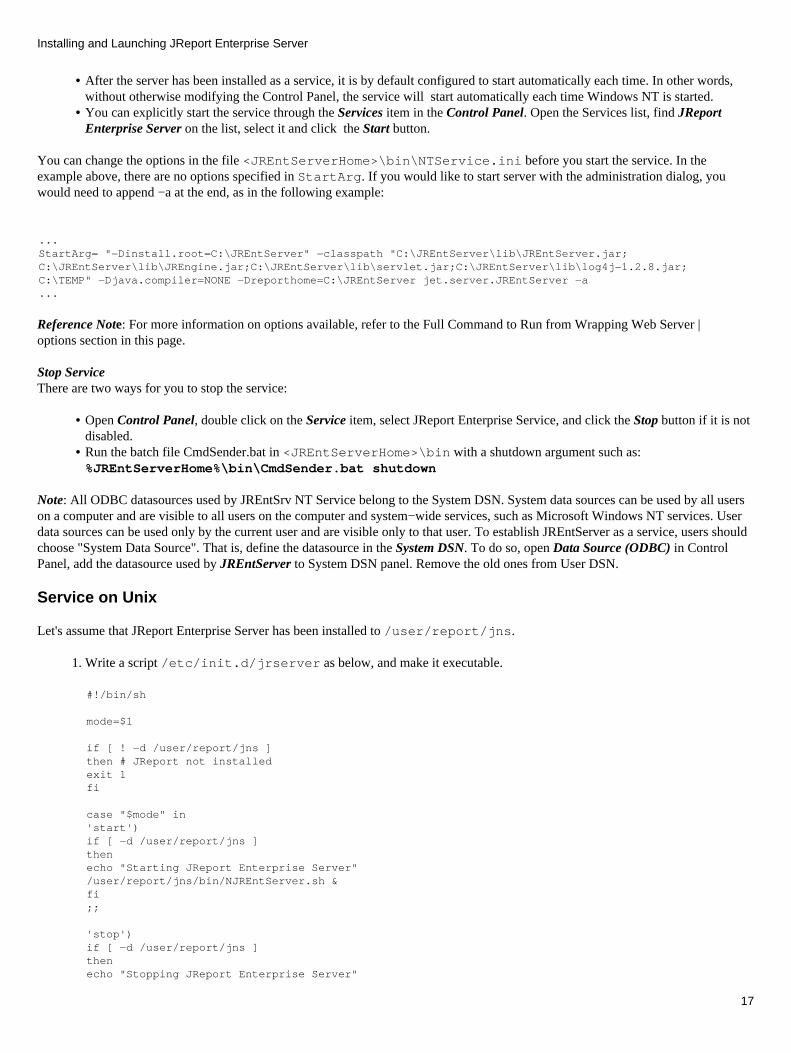
After the server has been installed as a service, it is by default configured to start automatically each time. In other words,without otherwise modifying the Control Panel, the service will start automatically each time Windows NT is started.
•
You can explicitly start the service through the Services item in the Control Panel. Open the Services list, find JReportEnterprise Server on the list, select it and click the Start button.
•
You can change the options in the file <JREntServerHome>\bin\NTService.ini before you start the service. In theexample above, there are no options specified in StartArg. If you would like to start server with the administration dialog, youwould need to append −a at the end, as in the following example:
... StartArg= "−Dinstall.root=C:\JREntServer" −classpath "C:\JREntServer\lib\JREntServer.jar;C:\JREntServer\lib\JREngine.jar;C:\JREntServer\lib\servlet.jar;C:\JREntServer\lib\log4j−1.2.8.jar;C:\TEMP" −Djava.compiler=NONE −Dreporthome=C:\JREntServer jet.server.JREntServer −a...
Reference Note: For more information on options available, refer to the Full Command to Run from Wrapping Web Server |options section in this page.
Stop ServiceThere are two ways for you to stop the service:
Open Control Panel, double click on the Service item, select JReport Enterprise Service, and click the Stop button if it is notdisabled.
•
Run the batch file CmdSender.bat in <JREntServerHome>\bin with a shutdown argument such as:%JREntServerHome%\bin\CmdSender.bat shutdown
•
Note: All ODBC datasources used by JREntSrv NT Service belong to the System DSN. System data sources can be used by all userson a computer and are visible to all users on the computer and system−wide services, such as Microsoft Windows NT services. Userdata sources can be used only by the current user and are visible only to that user. To establish JREntServer as a service, users shouldchoose "System Data Source". That is, define the datasource in the System DSN. To do so, open Data Source (ODBC) in ControlPanel, add the datasource used by JREntServer to System DSN panel. Remove the old ones from User DSN.
Service on Unix
Let's assume that JReport Enterprise Server has been installed to /user/report/jns.
Write a script /etc/init.d/jrserver as below, and make it executable.1.
#!/bin/sh
mode=$1
if [ ! −d /user/report/jns ]then # JReport not installedexit 1fi
case "$mode" in'start')if [ −d /user/report/jns ]thenecho "Starting JReport Enterprise Server"/user/report/jns/bin/NJREntServer.sh &fi;;
'stop')if [ −d /user/report/jns ]thenecho "Stopping JReport Enterprise Server"
Installing and Launching JReport Enterprise Server
17
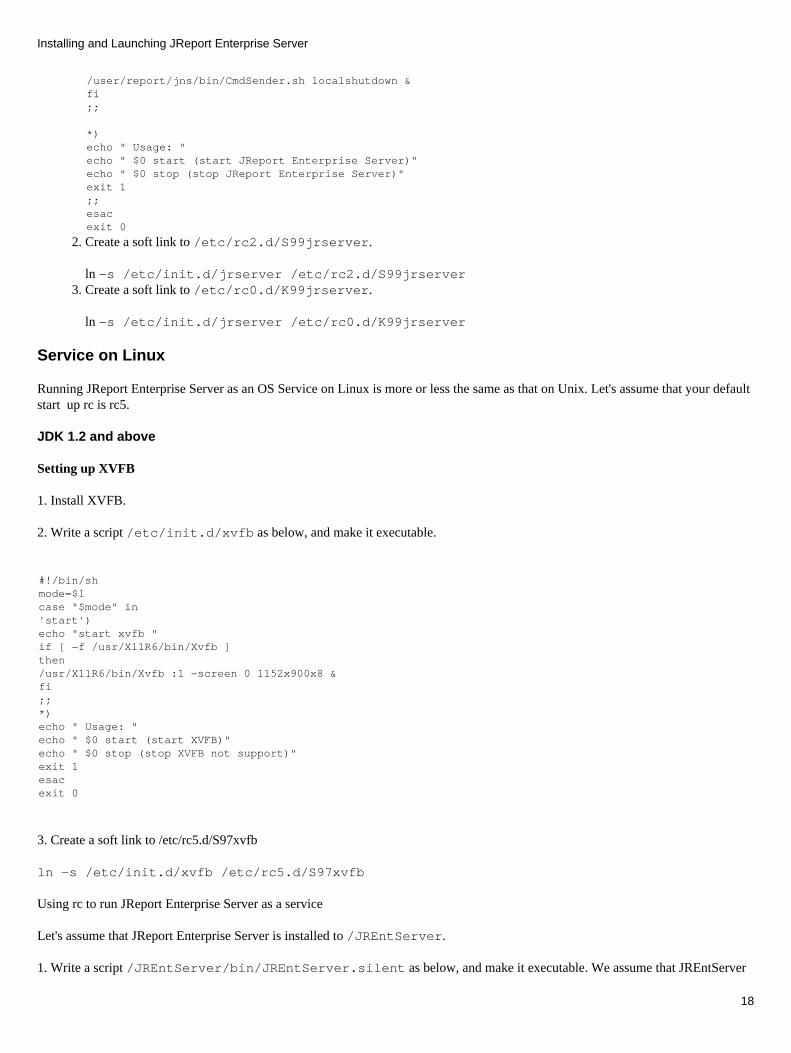
/user/report/jns/bin/CmdSender.sh localshutdown &fi;;
*)echo " Usage: "echo " $0 start (start JReport Enterprise Server)"echo " $0 stop (stop JReport Enterprise Server)"exit 1;;esacexit 0
Create a soft link to /etc/rc2.d/S99jrserver.
ln −s /etc/init.d/jrserver /etc/rc2.d/S99jrserver
2.
Create a soft link to /etc/rc0.d/K99jrserver.
ln −s /etc/init.d/jrserver /etc/rc0.d/K99jrserver
3.
Service on Linux
Running JReport Enterprise Server as an OS Service on Linux is more or less the same as that on Unix. Let's assume that your defaultstart up rc is rc5.
JDK 1.2 and above
Setting up XVFB
1. Install XVFB.
2. Write a script /etc/init.d/xvfb as below, and make it executable.
#!/bin/shmode=$1case "$mode" in'start')echo "start xvfb "if [ −f /usr/X11R6/bin/Xvfb ]then/usr/X11R6/bin/Xvfb :1 −screen 0 1152x900x8 &fi;;*)echo " Usage: "echo " $0 start (start XVFB)" echo " $0 stop (stop XVFB not support)"exit 1esac exit 0
3. Create a soft link to /etc/rc5.d/S97xvfb
ln −s /etc/init.d/xvfb /etc/rc5.d/S97xvfb
Using rc to run JReport Enterprise Server as a service
Let's assume that JReport Enterprise Server is installed to /JREntServer.
1. Write a script /JREntServer/bin/JREntServer.silent as below, and make it executable. We assume that JREntServer
Installing and Launching JReport Enterprise Server
18
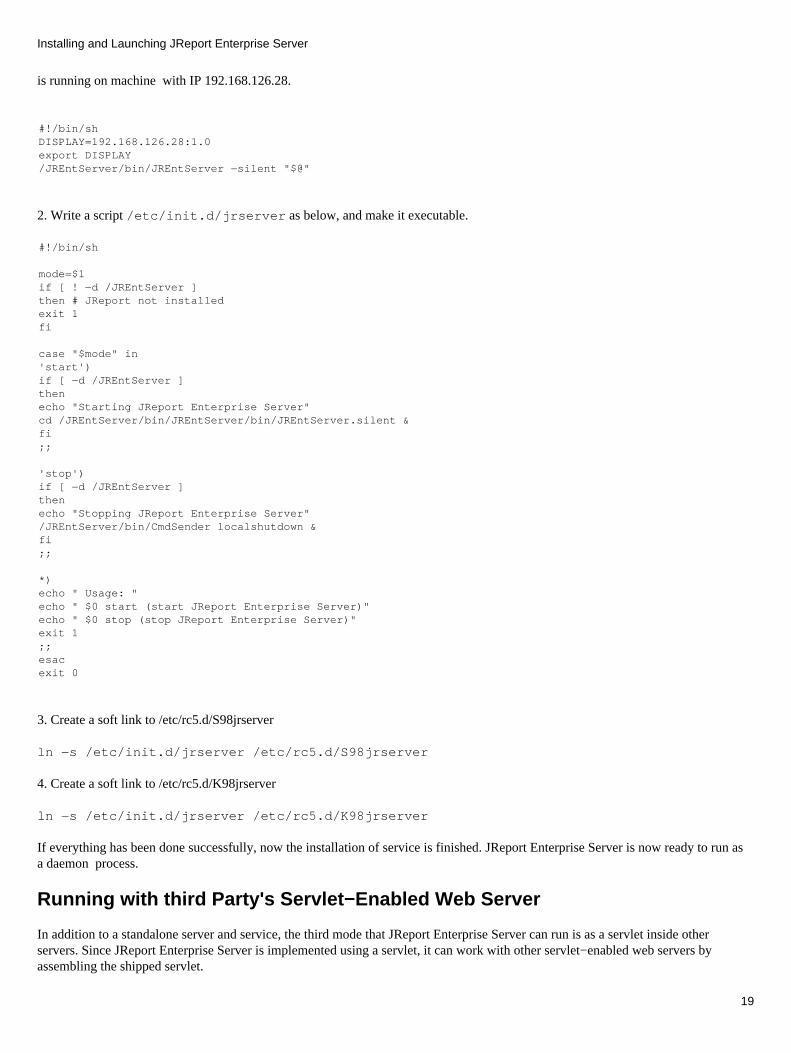
is running on machine with IP 192.168.126.28.
#!/bin/shDISPLAY=192.168.126.28:1.0export DISPLAY/JREntServer/bin/JREntServer −silent "$@"
2. Write a script /etc/init.d/jrserver as below, and make it executable.
#!/bin/sh
mode=$1if [ ! −d /JREntServer ]then # JReport not installedexit 1fi
case "$mode" in'start')if [ −d /JREntServer ]thenecho "Starting JReport Enterprise Server"cd /JREntServer/bin/JREntServer/bin/JREntServer.silent & fi;;
'stop')if [ −d /JREntServer ]thenecho "Stopping JReport Enterprise Server"/JREntServer/bin/CmdSender localshutdown &fi;;
*)echo " Usage: "echo " $0 start (start JReport Enterprise Server)"echo " $0 stop (stop JReport Enterprise Server)"exit 1;;esacexit 0
3. Create a soft link to /etc/rc5.d/S98jrserver
ln −s /etc/init.d/jrserver /etc/rc5.d/S98jrserver
4. Create a soft link to /etc/rc5.d/K98jrserver
ln −s /etc/init.d/jrserver /etc/rc5.d/K98jrserver
If everything has been done successfully, now the installation of service is finished. JReport Enterprise Server is now ready to run asa daemon process.
Running with third Party's Servlet−Enabled Web Server
In addition to a standalone server and service, the third mode that JReport Enterprise Server can run is as a servlet inside otherservers. Since JReport Enterprise Server is implemented using a servlet, it can work with other servlet−enabled web servers byassembling the shipped servlet.
Installing and Launching JReport Enterprise Server
19

Reference:
We have a separate chapter for integration with different web servers. It provides a general way on how to assemble theJRServlet to the third party's servlet enabled web server, and detailed procedures for assembling the servlet to some popularweb servers. Please see User's Guide | Integration with a Servlet Enabled Web Server.
•
In old versions, we had a section to introduce the feature about running JReport Enterprise Server in the mode of hotstandby. However, we do not recommend you to use this feature any more, because it is too old and it has already beenreplaced by Cluster. If you still want to get help about this feature, please refer to the User's Guide | JReport EnterpriseServer Cluster.
•
Upgrading Issues
Upgrading from previous versions to Version 7.1
When upgrading from previous version to V7.1, make sure that you have specified log4j−1.2.8.jar in your classpath runningReport. This new jar is used for JReport logging systems to have a better formatted debug information. You can always get this jarfile under the product's lib directory or the archive file.
Specifically,
For the products JReport Designer (jrpsetup.exe/jrpsetup.sh), JReport Enterprise Server(EntSvrSetup.exe/EntSvrSetup.sh), and JReport Viewer for JReport Enterprise Server(EntViewSetup.exe/EntViewSetup.sh), after installation, the extracted batch/script files for these three products have beenupdated already. The log4j−1.2.8.jar is under the %InstallRoot%\lib directory.
•
For the products Designer API (designAPISetup.exe), Server Designer API (svrdsgAPISetup.exe), Client API(EntViewSetup.exe/EntViewSetup.sh), and Server API (EntSvrSetup.exe/EntSvrSetup.sh), after installation, you can findlog4j−1.2.8.jar under the %InstallRoot%\lib directory. Please add this jar to the classpath of your applicationcalling the above products.
•
For the product JReport Client Viewer Bean, you can find log4j−1.2.8.jar in the following archive file:JREntVBean.zip, JREntVBeanSwing10.zip, JREntVBeanSwing11.zip. Please add this jar to the classpath of yourapplication calling the Viewer Bean.
•
Upgrading to JReport Enterprise Server 7.0
If you choose to install JReport Enterprise Server 7.0 to the folder where the earlier version of JREntServer resides, or, you choose toinstall a fresh copy of JReport Enterprise Server 7.0, but still want to use the resources and reports on the previous version ofJREntServer, these upgrading notes would guide you through the upgrading
The Migration Tool
There is a migration tool that comes with JReport Enterprise Server 7.0 under %JREntServerHome%\bin folder, which can helpyou to convert all the resources on the previouse version before version 6.0 of JREntServer.
File Name Description
MigrationBV52.batThe tool that converts all the resources on JREntServer whose version is lower than v5.2 build 590 to theresources of JREntServer V7. Provide the home path of the existing old version of JREntServer as the parameter.If you install the new version to the same folder and the old one, this parameter can be omitted.
NotesYou should not start JREntServer v7 after it is installed before resource conversion, otherwise resourceconflicts may occur.
•
If the old version and the new version of JREntServer contains the same folder, such as AccessDemo,oojdbcDemo, and SybaseDemo (newly installed products contains only these three demo folders), afterthe conversion, only the content in the old version folder is available on JREntServer v7, say, the old
•
Installing and Launching JReport Enterprise Server
20
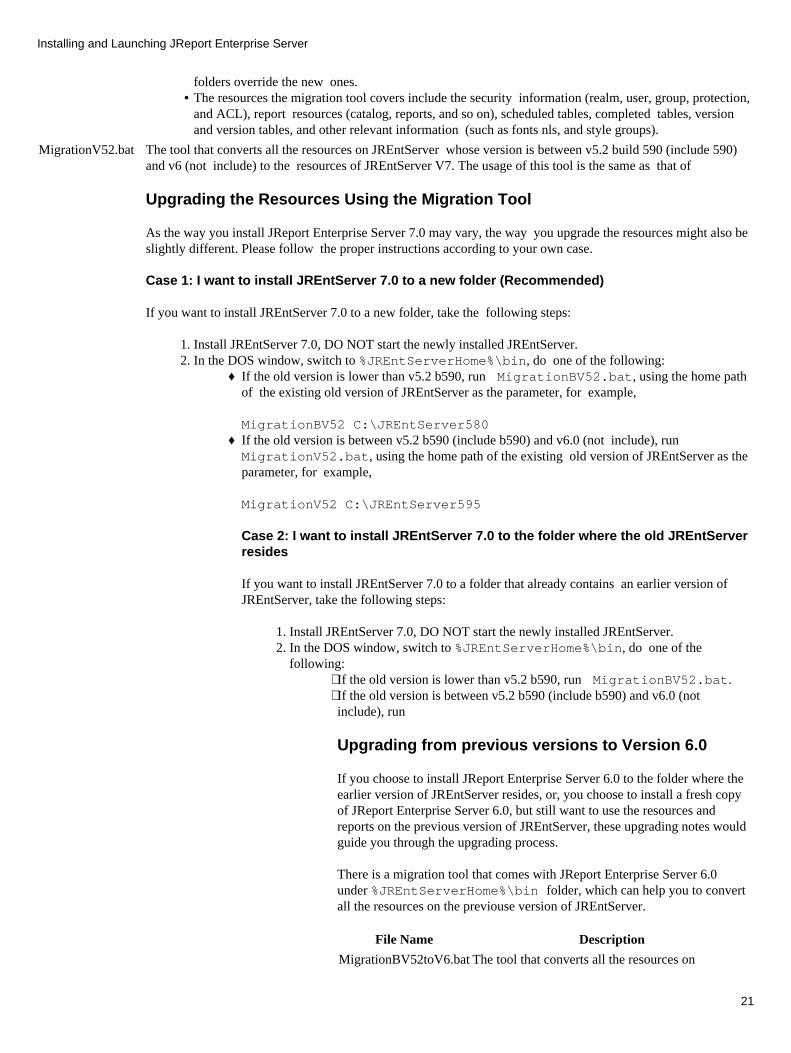
folders override the new ones. The resources the migration tool covers include the security information (realm, user, group, protection,and ACL), report resources (catalog, reports, and so on), scheduled tables, completed tables, versionand version tables, and other relevant information (such as fonts nls, and style groups).
•
MigrationV52.bat The tool that converts all the resources on JREntServer whose version is between v5.2 build 590 (include 590)and v6 (not include) to the resources of JREntServer V7. The usage of this tool is the same as that of
Upgrading the Resources Using the Migration Tool
As the way you install JReport Enterprise Server 7.0 may vary, the way you upgrade the resources might also beslightly different. Please follow the proper instructions according to your own case.
Case 1: I want to install JREntServer 7.0 to a new folder (Recommended)
If you want to install JREntServer 7.0 to a new folder, take the following steps:
Install JREntServer 7.0, DO NOT start the newly installed JREntServer. 1. In the DOS window, switch to %JREntServerHome%\bin, do one of the following:
If the old version is lower than v5.2 b590, run MigrationBV52.bat, using the home pathof the existing old version of JREntServer as the parameter, for example,
MigrationBV52 C:\JREntServer580
♦
If the old version is between v5.2 b590 (include b590) and v6.0 (not include), runMigrationV52.bat, using the home path of the existing old version of JREntServer as theparameter, for example,
MigrationV52 C:\JREntServer595
♦
Case 2: I want to install JREntServer 7.0 to the folder where the old JREntServerresides
If you want to install JREntServer 7.0 to a folder that already contains an earlier version ofJREntServer, take the following steps:
Install JREntServer 7.0, DO NOT start the newly installed JREntServer. 1. In the DOS window, switch to %JREntServerHome%\bin, do one of thefollowing:
If the old version is lower than v5.2 b590, run MigrationBV52.bat. ⋅ If the old version is between v5.2 b590 (include b590) and v6.0 (notinclude), run
⋅
Upgrading from previous versions to Version 6.0
If you choose to install JReport Enterprise Server 6.0 to the folder where theearlier version of JREntServer resides, or, you choose to install a fresh copyof JReport Enterprise Server 6.0, but still want to use the resources andreports on the previous version of JREntServer, these upgrading notes wouldguide you through the upgrading process.
There is a migration tool that comes with JReport Enterprise Server 6.0under %JREntServerHome%\bin folder, which can help you to convertall the resources on the previouse version of JREntServer.
File Name Description
MigrationBV52toV6.batThe tool that converts all the resources on
2.
2.
Installing and Launching JReport Enterprise Server
21
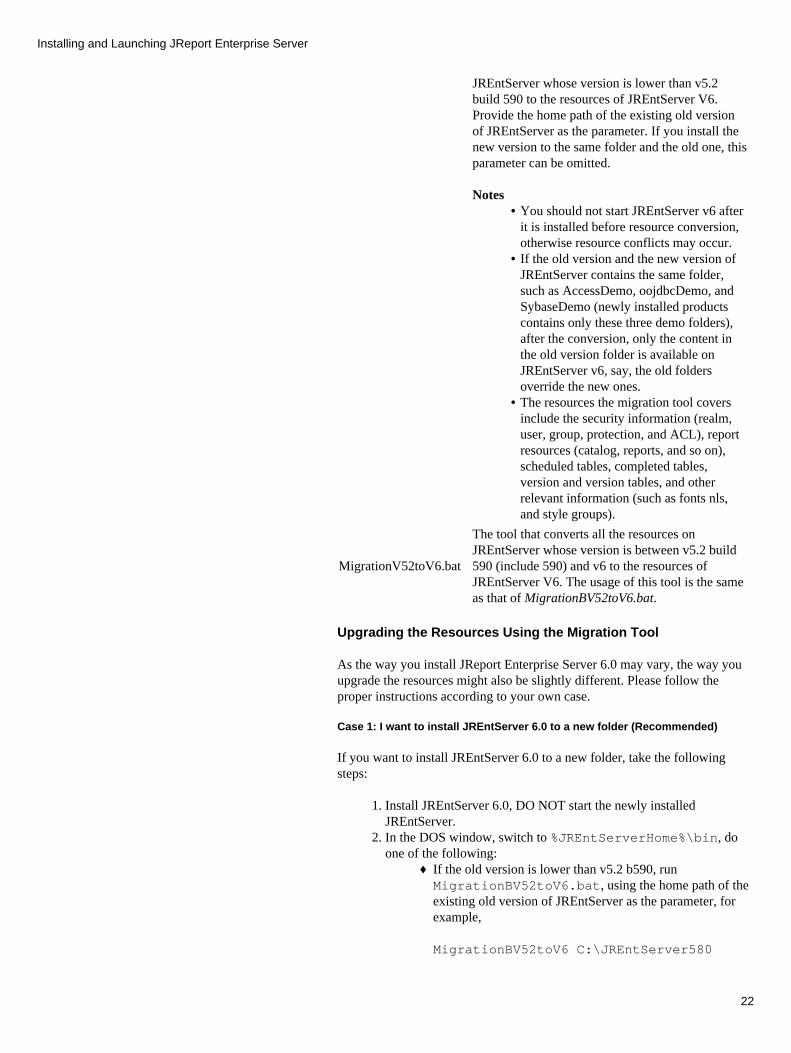
JREntServer whose version is lower than v5.2build 590 to the resources of JREntServer V6.Provide the home path of the existing old versionof JREntServer as the parameter. If you install thenew version to the same folder and the old one, thisparameter can be omitted.
NotesYou should not start JREntServer v6 afterit is installed before resource conversion,otherwise resource conflicts may occur.
•
If the old version and the new version ofJREntServer contains the same folder,such as AccessDemo, oojdbcDemo, andSybaseDemo (newly installed productscontains only these three demo folders),after the conversion, only the content inthe old version folder is available onJREntServer v6, say, the old foldersoverride the new ones.
•
The resources the migration tool coversinclude the security information (realm,user, group, protection, and ACL), reportresources (catalog, reports, and so on),scheduled tables, completed tables,version and version tables, and otherrelevant information (such as fonts nls,and style groups).
•
MigrationV52toV6.bat
The tool that converts all the resources onJREntServer whose version is between v5.2 build590 (include 590) and v6 to the resources ofJREntServer V6. The usage of this tool is the sameas that of MigrationBV52toV6.bat.
Upgrading the Resources Using the Migration Tool
As the way you install JReport Enterprise Server 6.0 may vary, the way youupgrade the resources might also be slightly different. Please follow theproper instructions according to your own case.
Case 1: I want to install JREntServer 6.0 to a new folder (Recommended)
If you want to install JREntServer 6.0 to a new folder, take the followingsteps:
Install JREntServer 6.0, DO NOT start the newly installedJREntServer.
1.
In the DOS window, switch to %JREntServerHome%\bin, doone of the following:
If the old version is lower than v5.2 b590, runMigrationBV52toV6.bat, using the home path of theexisting old version of JREntServer as the parameter, forexample,
MigrationBV52toV6 C:\JREntServer580
♦
2.
Installing and Launching JReport Enterprise Server
22
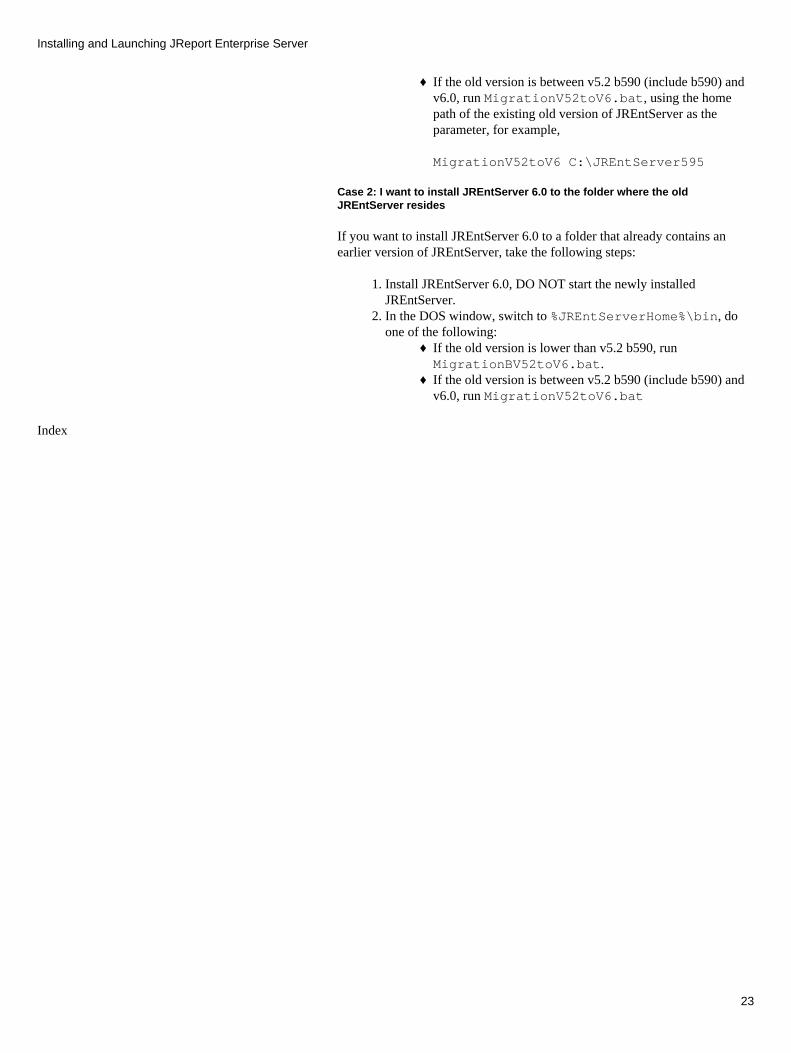
If the old version is between v5.2 b590 (include b590) andv6.0, run MigrationV52toV6.bat, using the homepath of the existing old version of JREntServer as theparameter, for example,
MigrationV52toV6 C:\JREntServer595
♦
Case 2: I want to install JREntServer 6.0 to the folder where the oldJREntServer resides
If you want to install JREntServer 6.0 to a folder that already contains anearlier version of JREntServer, take the following steps:
Install JREntServer 6.0, DO NOT start the newly installedJREntServer.
1.
In the DOS window, switch to %JREntServerHome%\bin, doone of the following:
If the old version is lower than v5.2 b590, runMigrationBV52toV6.bat.
♦
If the old version is between v5.2 b590 (include b590) andv6.0, run MigrationV52toV6.bat
♦
2.
Index
Installing and Launching JReport Enterprise Server
23
Configuration of JReport Enterprise Server
Introduction
Once JReport Enterprise Server is installed and you have prepared the reporting environment, you can start it. However, you mayfind that our default port number conflicts with an existing one in your computer. Or, sometimes you need to generate the log files foranalyzing a problem, etc.. In these cases, you need to configure your server. Before or while running the server, you can configureyour server according to your systems. Configuration work falls into two categories: local and remote. Each category has a set oftools and procedures appropriate to its tasks. Here the instructions are based on JReport Enterprise Server running a standalone serveror a service. For the servlet mode, please refer to the integration chapter User's Guide | Integration with a Servlet Enabled Web Server.
Remote Configuration
Users can configure the server remotely from a client machine through a browser like IE. jet.server.servlets.RcServlet is embedded inthe wrapping web server. It is loaded and started at the same time when wrapping web server is started. An independent port isassigned to this servlet by the wrapping web server to listen to the remote configuring request, and the default port is 8889 (modify itfrom the Advanced tab/option).
Accessing the Service of the JReport Enterprise Server
1. In the Command Prompt, key in the following command to get JReport Enterprise Server ready for service: (Suppose thatyour JReport Enterprise Server is installed under C:\JREntServer)
C:\>cd JREntServer\binC:\JREntServer\bin>JREntServer
2. In the address bar, type http://localhost:8889 ("localhost" can be changed to your IP).
3. Provide the user name and password to access the home page of JReport Enterprise Server.
4. Click Configuration link on the top of the home page, you can see the Configuration page.
There are nine tabs on this page: Cluster, Service, Log, E−Mail, Cache, Performance, Advanced, LDAP and Fax.
Cluster
This tab is available only when Jreport Enterprise Server is installed with a license for cluster.
24
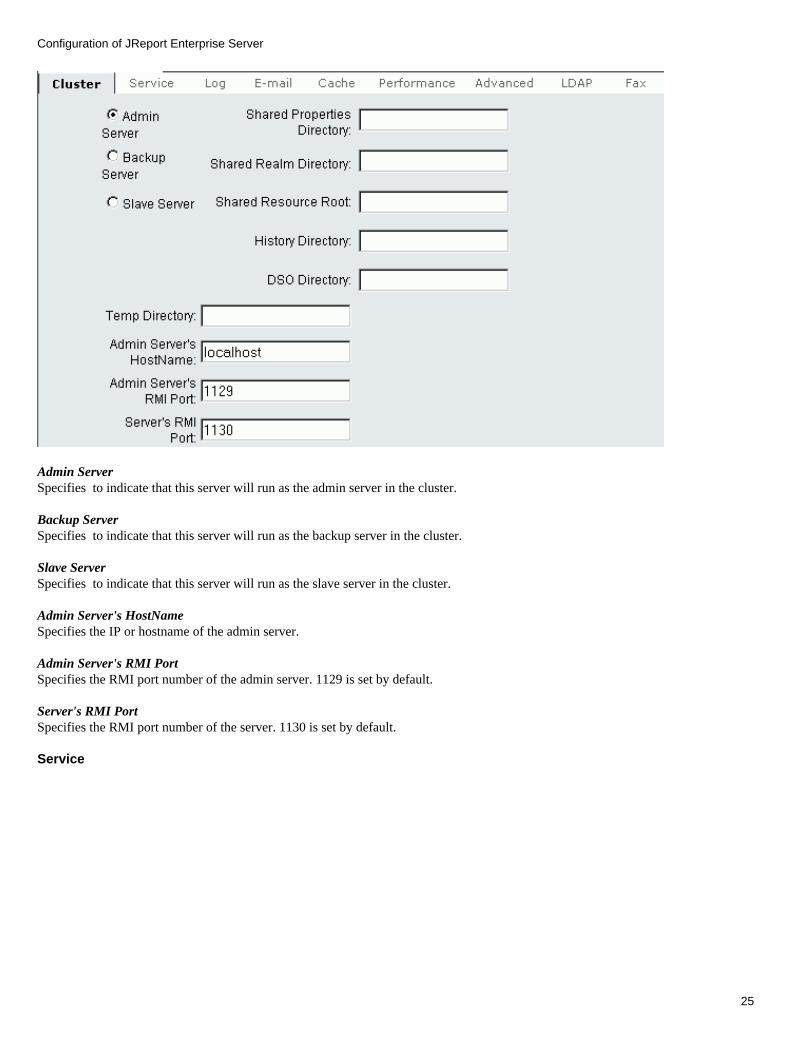
Admin ServerSpecifies to indicate that this server will run as the admin server in the cluster.
Backup ServerSpecifies to indicate that this server will run as the backup server in the cluster.
Slave ServerSpecifies to indicate that this server will run as the slave server in the cluster.
Admin Server's HostName Specifies the IP or hostname of the admin server.
Admin Server's RMI PortSpecifies the RMI port number of the admin server. 1129 is set by default.
Server's RMI PortSpecifies the RMI port number of the server. 1130 is set by default.
Service
Configuration of JReport Enterprise Server
25

PortWhen you start the server, you need to specify it as the TCP port on which JReport server listens. The port could be an integerbetween 1 and 65535, but numbers less than 1024 are usually reserved by system, so numbers larger than 1024 are preferred. JReportEnterprise Server uses 8888 as default.
Max Number of HandlersSpecifies the maximum number of connection handlers.
A connection should be set up between a server−side and a client−side when a request from client−side reaches the server. Themaximum number of requests which can be handled is depended on the maximum number of handlers. When there is a limitation onthe maximum number of connection handlers, a request will be blocked if there are no more free connection handlers. In such a case,the request will either be handled after some connection handlers are set free, or be refused when timeout occurs. A connectionhandler will be set free after the response to the client's request that generates the connection is sent back to the client−side.
Configuration of JReport Enterprise Server
26

Max Number of ConnectionsDefines the maximum number for Http connections between a server−side and a client−side when a request from client−side reachesthe server.
The maximum number of connections depends on the number of requests which can be handled. It should be larger than themaximum number of handlers. For example, the maximum number of handlers is 10, the maximum number of connections is 12,when the eleventh and twelfth requests come, they will be blocked till some handlers get free; when the thirteenth request comes, itwill be refused to be handled.
Connection Timeout(s) in MillisecondsSpecifies the maximum milliseconds that a request from a client−side can be blocked before being refused by the server. As statedabove, a request will be blocked if there are no more free connection handlers in the server, but it cannot be blocked forever. If thereare still no connection handlers free after the maximum milliseconds, then the request will be refused back to the client.
Servlet Properties File NameThe core of JReport Enterprise Server is jet.server.servlets.JRServlet which implements the interface ofjavax.servlet.http.HttpServlet. You can install the jet.server.servlet.JRServlet to any Web server which supports servlets. This turnsthe Web server into a JReport Enterprise Server.
jet.server.servlets.JRServlet looks like the following:servlet.jrserver.code=jet.server.servlets.JRServletservlet.jrserver.initArgs=\temp_dir=temp,\history_dir=history
The following initArgs must be specified:
temp_dirThe temporary path for JReport Enterprise Server. If it is a relative path, it should be relative to where JReport Enterprise Server isinstalled.
Configuration of JReport Enterprise Server
27

history_dirThe path that contains version files. If it is a relative path, it should be relative to where JReport Enterprise Server is installed.
Active RealmSpecifies the realm which takes effect when the server starts up.
Realm is an abstract security concept, which hosts the resources and authentication entities on JReport Enterprise Server. There canbe more than one realm on the server and every realm is independent from others.
At runtime, only one realm can be active and only the users and resources in the active realm are accessible. A realm is identified bya unique name, which can contain any characters other than forward slash (/) and backward slash (\).
The authentication entities consist of user accounts, group accounts and role accounts.
Provide Service onSince the machine that the server runs on could be multi−homed (for example, two interface cards are installed on the machine), todetermine which host is used for client−sides becomes a problem. Fortunately, JReport Enterprise Server can be "multi−homed" too− it can listen to all the hosts in the machine on the same port. The hosts that this server listens to are active hosts.
Log
Some options for generating the log files are provided on this tab. The log files may help you to find the reasons of a problem.
Log Type
• access − Log the access events, including who, when, from where, accessed what etc.
• manage − Log the management operations, including who, modified, added or deleted what entity.
• error − Log the errors that occurred.
•
Configuration of JReport Enterprise Server
28

event − Log the events of JReport Enterprise Server, such as server started, server stopped, service started, service stoppedetc.
• debug − Log the movement of JReport Enterprise Server, such as starting the report, loading the report, exporting the reportetc.
• engine − Log the server performance.
Level
• none − Do not log anything.
• important − Only log the important information.
• considerable − Log the important and the considerable information.
• trivial − Anything will be logged (recommended).
Log to
• file − Save log information to a specific file.
• rolling−logfile − Output log information into a group of files. At most ten files will be involved (recommended).
For example, the basic name of all the rollover files is access.log, and Rollover file size is 10kb. In the beginning, onlyaccess.log.0 will be created in the disk, but when the log information fills up the access.log.0, access.log.0 will be renamedto access.log.1 and a new file will be created as access.log.0 to save further logs. In this way, when access.log.0 is full again,access.log.1 will be renamed to access.log.2, access.log.0 will be renamed to access.log.1, and a new access.log.0 will becreated. So access.log.0 is always the latest log file. When there is an access.log.9, but access.log.0 is full again, theaccess.log.9 will be removed from disk, and access.log.8 will be renamed to access.log.9... a new access.log.0 will becreated.
• socket − Output log information to a socket
• stdout − Output log information to stdout which normally is a console.
• stderr − Output log information to stderr which normally is a console.
E−mail
This tab is to configure for exporting report results to mail.
Configuration of JReport Enterprise Server
29
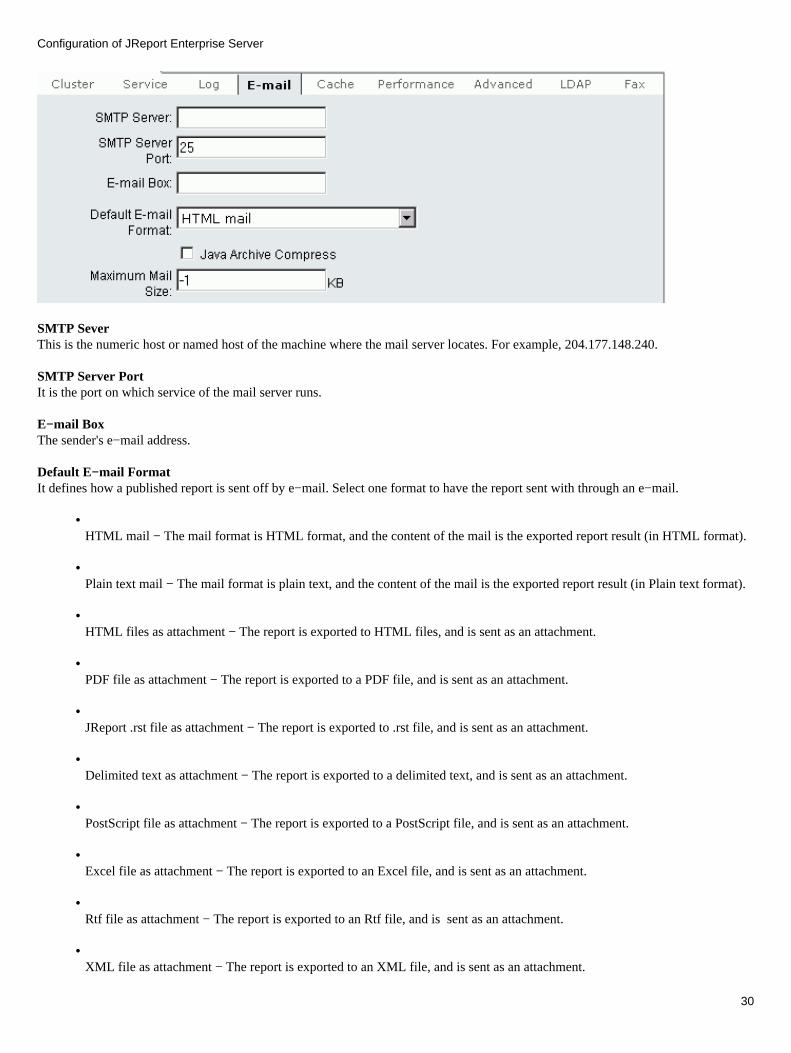
SMTP SeverThis is the numeric host or named host of the machine where the mail server locates. For example, 204.177.148.240.
SMTP Server PortIt is the port on which service of the mail server runs.
E−mail BoxThe sender's e−mail address.
Default E−mail FormatIt defines how a published report is sent off by e−mail. Select one format to have the report sent with through an e−mail.
• HTML mail − The mail format is HTML format, and the content of the mail is the exported report result (in HTML format).
• Plain text mail − The mail format is plain text, and the content of the mail is the exported report result (in Plain text format).
• HTML files as attachment − The report is exported to HTML files, and is sent as an attachment.
• PDF file as attachment − The report is exported to a PDF file, and is sent as an attachment.
• JReport .rst file as attachment − The report is exported to .rst file, and is sent as an attachment.
• Delimited text as attachment − The report is exported to a delimited text, and is sent as an attachment.
• PostScript file as attachment − The report is exported to a PostScript file, and is sent as an attachment.
• Excel file as attachment − The report is exported to an Excel file, and is sent as an attachment.
• Rtf file as attachment − The report is exported to an Rtf file, and is sent as an attachment.
• XML file as attachment − The report is exported to an XML file, and is sent as an attachment.
Configuration of JReport Enterprise Server
30
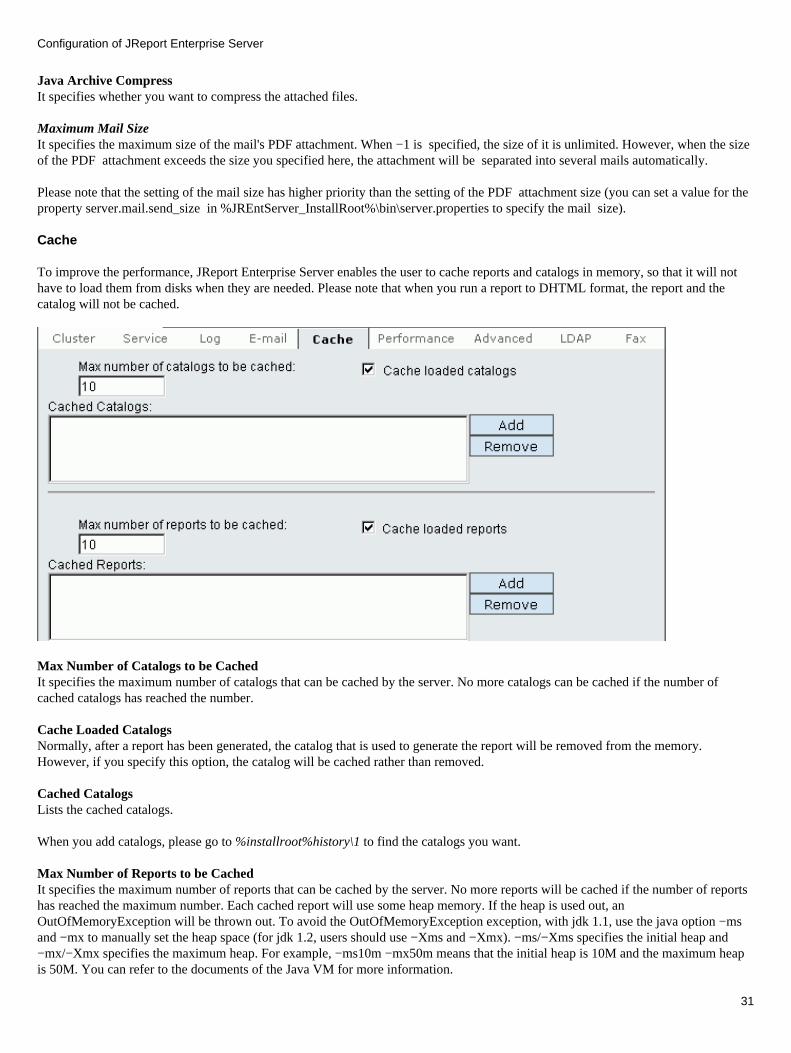
Java Archive CompressIt specifies whether you want to compress the attached files.
Maximum Mail SizeIt specifies the maximum size of the mail's PDF attachment. When −1 is specified, the size of it is unlimited. However, when the sizeof the PDF attachment exceeds the size you specified here, the attachment will be separated into several mails automatically.
Please note that the setting of the mail size has higher priority than the setting of the PDF attachment size (you can set a value for theproperty server.mail.send_size in %JREntServer_InstallRoot%\bin\server.properties to specify the mail size).
Cache
To improve the performance, JReport Enterprise Server enables the user to cache reports and catalogs in memory, so that it will nothave to load them from disks when they are needed. Please note that when you run a report to DHTML format, the report and thecatalog will not be cached.
Max Number of Catalogs to be CachedIt specifies the maximum number of catalogs that can be cached by the server. No more catalogs can be cached if the number ofcached catalogs has reached the number.
Cache Loaded CatalogsNormally, after a report has been generated, the catalog that is used to generate the report will be removed from the memory.However, if you specify this option, the catalog will be cached rather than removed.
Cached CatalogsLists the cached catalogs.
When you add catalogs, please go to %installroot%history\1 to find the catalogs you want.
Max Number of Reports to be CachedIt specifies the maximum number of reports that can be cached by the server. No more reports will be cached if the number of reportshas reached the maximum number. Each cached report will use some heap memory. If the heap is used out, anOutOfMemoryException will be thrown out. To avoid the OutOfMemoryException exception, with jdk 1.1, use the java option −msand −mx to manually set the heap space (for jdk 1.2, users should use −Xms and −Xmx). −ms/−Xms specifies the initial heap and−mx/−Xmx specifies the maximum heap. For example, −ms10m −mx50m means that the initial heap is 10M and the maximum heapis 50M. You can refer to the documents of the Java VM for more information.
Configuration of JReport Enterprise Server
31
Here are some examples, their accuracy depends on your OS and VM:
Cache Size Heap Size
10 reports 18M
30 reports 25M
The default cache size is 10 reports and the default maximum heap space is 16M. When users adjust the number, they should adjustthe heap accordingly. The larger the heap space is, the better the performance is.
Cache Loaded ReportsNormally, after a report has been generated, it will be removed from the memory. However, if you specify this option, it will becached rather than removed.
Cached ReportsLists the cached reports.
When you add reports, please go to %installroot%history\1 to find the reports you want.
Performance
Catalogs to be PreloadedThis configuration specifies the list of catalogs that will be loaded when the server is started.
When you add catalogs, please go to %installroot%history\1 to find the catalogs you want.
Reports to be PreloadedThis configuration specifies the list of reports that will be loaded when the server is started.
When you add reports, please go to %installroot%history\1 to find the reports you want.
Java Classes to be PreloadedIn addition to catalogs and reports, preloading some useful Java classes will be helpful in performance too. Otherwise, the server willtake some time to load Java classes they need when it generates reports. The following Java classes could be preloaded.
• Catalog referred classes − The Java classes that are used for a catalog.
• Report referred classes − The Java classes that are used for a report.
• Engine referred classes − The Java classes that are used for JReport Engine to generate reports.
Advanced
Configuration of JReport Enterprise Server
32

No Security CheckingIf it is checked, any remote requests will be responded to without security checking.
Enable JSPEnable access to server root in jsp page. If you check this check box, the server root will be set into jsp page. If you uncheck thischeck box, the root will be set into servlet. For example: when accessing server 8888 port, the server will redirect access to jsp page ifyou have checked this check box, otherwise, the server will redirect access to servlet.
Enable "Publish to Versioning System" for On−demand ViewIf checked, the link "Publish to Versioning System" will be generated when you view a report. Clicking the link enables to save thereport result as a version.
Connection Keep−aliveThis box is checked by default. When connections are established to JReport Enterprise Server at runtime, you can choose to keep theconnections alive or close them. If uncheck this option, the connection will be disconnected once the HTTP request has beenresponded to. That is, IE or Netscape will not hold the opened connection.
Enable Multiple Login With Same User NameSpecifies whether multiple sessions, which are created by one user, can exist simultaneously. By default, this option is checked andone user can log on to JReport Enterprise Server repeatedly without terminating the former sessions created by the same user until thesession number reaches the allowed number specified by the license. If this option is unchecked, only the newly created session isactive and the all the other former sessions created by the same user will be terminated by the server automatically.
Enable Resource from Real PathSpecifies whether to enable getting resources from real path. By default, this option is not checked. If you need to get resources fromthe real path, make sure this option is checked.
User Session TimeoutGenerally speaking, if several users access JReport server at the same time and among them, a client cannot send requests to JReportEnterprise Server for a period of time, then the server will log the client out after timeout. The default session timeout is 30 minutes.
Configuration of JReport Enterprise Server
33
View Report TimeoutSpecifies the maximum time the server uses to run a report. If a report can not be completed within the time specified here, it will beput into the On−demands page and the server will go on running the report there. If you want to stop running the report, select thereport by checking the corresponding check box and delete it from the On−demands table.
Administration PortIf JReport Enterprise Server is running as a standalone web server, the administrator can specify the port for client users to configureand administrate the server remotely. The port is actually where the servlet for remote administration (jet.server.servlets.RcServlet)listens. The default administration port is 8889.
Report Result LifeBy default it is 86440 seconds (24 hours). The temp file will be deleted in 24 hours after it is generated. Here, you can define thelength of the period as you like.
Engine PriorityFive choices are available here: Lowest Priority, Low Priority, Normal Priority, High Priority and Highest Priority. On the conditionthat multiple tasks are running on your machine, you can decide your engine's priority in the CPU usage by choosing one of them.For example, if you choose Low Priority, JReport Engine will share a comparatively small part of the CPU usage when it is running.Whereas if you choose the High Priority, JReport Engine will occupy more CPU usage. This choice provides you with moreflexibility to adjust the engine's utilization of CPU according to your own requirements. Of course, the higher the priority, the fasterthe performance.
Engine Default LanguageWhen you run a NLS (National Language Support) report, you will be able to choose in which language the report is displayed. Here,you can set the default language type.
LDAP
LDAP (Lightweight Directory Access Protocol) is a lightweight client−server protocol for accessing directory services. With LDAPsupport, JReport Enterprise Server enables you to import those users/groups on directory servers.
Server
You can set different settings to adapt a certain Directory Server. Now six directory servers are supported, such as Novell DirectoryServer, iPlanet Directory Server, Microsoft site Server, OpenLDAP Directory Server, Active Directory on Windows 2000 advancedServer, and Lotus Domino server. To load the settings of the specific server, click the Load Settings button.
Configuration of JReport Enterprise Server
34

Below are the descriptions of the options:
Option Description
Select LDAP ServerSelect a Directory server.
Enable LDAPSupport
If enabled, JReport Enterprise Server will get users from the Directory Server.
Enable AutoImporting LDAPUser
When the user on the LDAP Server has successfully connected to the JReportEnterprise Server, this user will be automatically imported to the local securitysystem.
LDAP URL The URL of the LDAP server.
LDAP Server Port The port of LDAP server.
Root Entry The root of Directory Server. From this root, JReport Enterprise Server searches theobjects in Directory Server.
Directory ManagerDN
The entry path of the Directory Manager, which has the priority to manage the userson the Directory Server.
Password The password of Directory Manager.
Encryption Type There are two types available. None means using plain port to connect to LDAPserver; and SSL refers to connecting LDAP server by SSL.
Import LDAPGroup(s) to
Users can decide whether the LDAP groups will be imported into our securitysystem as local roles or as local groups.
Section − User Schema
Distinguished NameThe name of the organization unit inside that you want to perform a search for users.
Filter The filter criteria that you want to set when searching for users.
Configuration of JReport Enterprise Server
35
Section − Group Schema
Distinguished NameThe name of the organization unit inside that you want to perform a search forgroups.
Filter The filter criteria that you want to set when searching for groups.
Admin Group JReport Enterprise Sever will add the group specified here as a member to theAdmin group.
Samples
Case 1: Configuration for adapting to Novell Directory Server
If you want to get all users and groups in the orgunit organizational unit, you should follow the steps below to configure yourServer tab:
1. Select Novell Directory Server from the Select LDAP Server drop−down list, and then click Load Settings. The settingsof Novell Directory Server will be loaded.
2. Check the Enable LDAP Support check box. Input the following information:
LDAP URL: ldap://Ip address or hostname of your Novell Directory Server. (For example: ldap://192.168.126.54)LDAP Server Port: 389Root Entry: o=the name of the root (For example: o=myorg)Directory Manager DN: cn=user name of the directory manager,o=context (For example: cn=admin,o=context)Password: the password of the Directory Manager (For example: 1234)Encryption Type: None Import LDAP Group(s) to: Group
User Schema:Distinguished Name: ou=the name of the organization unit that you want to perform a search for users (For example:ou=orgunit)Filter: (&(cn=the filter criteria that you want to set )(objectclass=person)) (For example: (&(cn=*)(objectclass=person)))
Group Schema:Distinguished Name: ou=the name of the organization unit that you want to perform a search for groups (For example:ou=orgunit)Filter: (&(cn=the filter criteria that you want to set )(objectclass=groupofuniquenames)) (For example:(&(cn=*)(objectclass=groupofuniquenames)) )Admin Group: The name of the group that you want to add to the Admin group (For example: develop)
3. You can test connection settings by clicking the button Test Connection, get the query result of users specified in the option"Filter" by clicking User Query, and get the query result of groups specified in the option "Filter" by clicking GroupQuery.
4. Click Save to save all the settings.
Case 2: Configuration for adapting to Microsoft site Server
Follow the steps below to configure your Server tab. You can get all users in the members organizational unit and all groups in thegroups organizational unit.
1.
Configuration of JReport Enterprise Server
36
Select Microsoft site Server from the Select LDAP Server drop−down list, and then click Load Settings. The settings ofMicrosoft site Server will be loaded.
2. Make sure that the Enable LDAP Support check box is selected. Input the following information:
LDAP URL: ldap://Ip address or hostname of your Microsoft site Server. (For example: ldap://192.168.126.54 )LDAP Server Port: 1003Root Entry: o=testDirectory Manager DN: cn=administrator,ou=members,o=testPassword: testEncryption Type: NoneImport LDAP Group(s) to: Group
3. You can test connection settings by clicking the button Test Connection, get the query result of users specified in the option"Filter" by clicking User Query, and get the query result of groups specified in the option "Filter" by clicking GroupQuery.
4. Click Save to save all the settings on this tab.
Case3: Configuration for adapting to iPlanet Directory Server
Follow the steps below to configure your Server tab. You can get all users in the people organizational unit and all groups in thegroups organizational unit.
1. Select iPlanet Directory Server from the Select LDAP Server drop−down list, and then click Load Settings. The settingsof iPlanet Directory Server will be loaded.
2. Make sure that the Enable LDAP Support check box is selected. Input the following information:
LDAP URL: ldap://Ip address of your iPlanet Directory ServerLDAP Server Port: 389Root Entry: dc=mailbj,dc=jinfonet,dc=comDirectory Manager DN: cn=directory managerPassword: jinfonetEncryption Type: None Import LDAP Group(s) to: Group
3. You can test connection settings by clicking the button Test Connection, get the query result of users specified in the option"Filter" by clicking User Query, and get the query result of groups specified in the option "Filter" by clicking GroupQuery.
4. Click Save to save all the settings on this tab.
Case 4: Configuration for adapting to Active Directory on Windows 2000 advanced Server
Follow the steps below to configure your Server tab. You can get all users and groups in the myorg organizational unit.
1. Select Current Settings from the Select LDAP Server drop−down list, and then click Load Settings. The settings are
Configuration of JReport Enterprise Server
37
cleared and you can input your information.
2. Make sure that the Enable LDAP Support check box is selected. Input the following information:
LDAP URL: ldap://Ip address of your Windows 2000 advanced ServerLDAP Server Port: 389Root Entry: DC=testad,DC=localDirectory Manager DN: CN=administrator,CN=Users,DC=testad,DC=localPassword: 1234 Encryption Type: None Import LDAP Group(s) to: Group
User Schema:User Attribute Name: cn User Common Name: userPrincipalNameUser Password: userPasswordDistinguished Name: ou=myorgFilter: (&(cn=*)(objectclass=person))
Group Schema:Group Common Name: cnGroup Member Type: memberDistinguished Name: ou=myorgFilter: (&(cn=*)(objectclass=group))
3. You can test connection settings by clicking the button Test Connection, get the query result of users specified in the option"Filter" by clicking User Query, and get the query result of groups specified in the option "Filter" by clicking GroupQuery.
4. Click Save to save all the settings on this tab.
Case 5: Configuration for adapting to Lotus Domino server on NT
Follow the steps below and you can get all users and groups in the developer organization unit.
1. Select Current Settings from the Select LDAP Server drop−down list, and then click Load Settings. The settings arecleared and you can input your information.
2. Make sure that the Enable LDAP Support check box is selected. Input the following information:
LDAP URL: ldap://Ip address of your Lotus DominoLDAP Server Port: 389Root Entry:Directory Manager DN: cn=admin,o=jtotalPassword: 123456Encryption Type: None Import LDAP Group(s) to: Group
User Schema:User Attribute Name: uidUser Common Name: cn
Configuration of JReport Enterprise Server
38

User Password: userPasswordDistinguished Name: ou=developer, o=jtotalFilter: (&(cn=*)(objectclass=person))
Group Schema:Group Common Name: cnGroup Member Type: memberDistinguished Name:Filter: (&(cn=*)(objectclass=groupofnames))
3. You can test connection settings by clicking the button Test Connection, get the query result of users specified in the option"Filter" by clicking User Query, get the query result of groups specified in the option "Filter" by clicking Group Query.
Click Save to save all the settings on this tab.4.
Case 6: Configuration for adapting to OpenLDAP Directory Server
Follow the steps below and you can get all users and groups in the developer organization unit.
Select Current Settings from the Select LDAP Server drop−down list, and then click Load Settings. The settings are clearedand you can input your information.
1.
Make sure that the Enable LDAP Support check box is selected. Input the following information:
LDAP URL: ldap://Ip address of your OpenLDAP Directory Server (For example: ldap://192.168.128.163)LDAP Server Port: 389Root Entry: dc=openldap, dc=ldaptest Directory Manager DN: cn=Manager,dc=openldap,dc=ldaptestPassword: 123456789Encryption Type: NoneImport LDAP Group(s) to: Group
User Schema:User Attribute Name: uidUser Common Name: cnUser Password: userPasswordDistinguished Name: ou=membersFilter: (&(uid=*)(objectclass=person))
Group Common Name: cnGroup Member Type: uniqueMemberDistinguished Name: ou=groupsFilter: (&(cn=*)(objectclass=groupofuniquenames))Admin Group:
2.
You can test connection settings by clicking the button Test Connection, get the query result of users specified in the option"Filter" by clicking User Query, get the query result of groups specified in the option "Filter" by clicking Group Query.
3.
Click Save to save all the settings on this tab. 4.
Import
After LDAP configuration, if you want to use LDAP users and groups in our system, you must import them manually. To importLDAP users to JReport Enterprise Server, you can use the Import settings under LDAP configuration. The organization structure ofusers/groups on LDAP Server will be maintained after importing.
Note: When importing LDAP users to our local, the LDAP user names must be valid.
Configuration of JReport Enterprise Server
39

Option Description
List Users List the LDAP users whose names are the same as the JReport users.
List Groups List the LDAP groups whose names are the same as the JReport groups.
Import Users LDAP users will be imported by clicking this button. If the radio button LDAPServer overwrite Local users is selected, all the LDAP users will be imported andthe JReport Enterprise Server users who have the same names as the LDAP userswill be overwritten. If the radio button Local overwrite LDAP server users isselected, all the LDAP users will be imported but the users who have the samenames as the JReport Enterprise Server users will be overwritten.
Select the check boxes before the users you want and then click the Import button.The specified users will be imported from the LDAP server to JReport EnterpriseServer. If you want to import all the users, click Select All and then click theImport button or click the Import All button directly. Click the Cancel button tocancel the operation. After importing the users, go to the Security page and clickUser. You can see the imported users are listed there.
Import Groups LDAP groups will be imported by clicking this button. If the radio button LDAPServer overwrite Local users is selected, all the LDAP groups will be importedand the JReport Enterprise Server groups who have the same names as the LDAPgroups will be overwritten. If the radio button Local overwrite LDAP serverusers is selected, all the LDAP groups will be imported but the groups who have thesame names as the JReport Enterprise Server groups will be overwritten.
Select the check boxes before the groups you want and then click the Import button.The specified groups will be imported from the LDAP server to JReport EnterpriseServer. If you want to import all the groups, click Select All and then click theImport button or click the Import All button directly. Click the Cancel button tocancel the operation. After importing the groups, go to the Security page and clickRole. You can see the imported users are listed there.
Notes:
• There is an admin group named "Administrators" on the LDAP Server, ifyou perform an Import operation, all groups will be imported except the"Administrators" group.
• There is a non−admin group on the LDAP Server has the same name as anon−admin group on JReport Enterprise Server, if you perform anImport operation, all users in the non−admin group on the LDAP Serverwill be merged into the non−admin group on JReport Enterprise Server.
• If you have imported users/groups from the LDAP server to JReportEnterprise Server once and you want to import again, in order to preventthe information of the users/groups on JReport Enterprise Server frombeing overwritten by the newly imported users/groups, please selected theLocal overwrite LDAP server users radio button first and then import theusers/groups.
Import All All LDAP users and LDAP groups will be imported by clicking this button.
Synchronize
Configuration of JReport Enterprise Server
40
To ensure that you have the most current security information, you can have JReport Enterprise Server synchronize the securityinformation on your local server with that on the LDAP server.
To synchronize local security information, click Synchronize Now.
The synchronization process compares the security information on both local server and the LDAP server first, and, if necessary,update the information on the local server so that both sides are consistent. However, for security reasons, this process doesn'tautomatically import the newly−added users or groups of the LDAP server.
When the synchronization process is completed, some information will be listed to inform you of what has been done by thesynchronization process, such as modified users, removed users, modified roles, removed roles, modified groups or roles, removedgroups or roles. (Whether to synchronize groups or roles depends on the setting of the Import LDAP Group(s) to option whenconfiguring LDAP server.)
You can also schedule a synchronizaition task to run at a specific time, to set up a schedule, click Edit. Information about the last runsynchronization task can be viewed by clicking detail, and is kept when the server is stopped. So when you restart the server, you canalso click on this link to view the task information.
To enable/disable the scheduled synchronization task, click Enable/Disable.
Note: The synchronization process will modify the local security information. For example, if you have an imported LDAP userre−assigned to another imported LDAP group or role, the assignment will be changed according to that on the LDAP server when thesynchronization is finished.
RoleMaps
When an LDAP user account is automatically imported (checking the option Enable Auto Importing LDAP User, see the Servertab), JReport Enterprise Server can automatically assign it to the specific roles according to the role map you pre−defined.
A role map consists of two parts: Search Filter String and Corresponding Role Name. When an imported LDAP user accountmatches the filter condition (specified by Search Filter String), it will automatically be added to a specific role (specified byCorresponding Role Name).
To create a role map,
click Create New Role Map, 1. Compose the search filter criteria, specify the corresponding role to which you want to assign the matching users, and thenclick Submit.
2.
You can create more than one role map by repeating these steps. Use multiple role map to assign the same group of matching users tomore than one role.
LDAP Support Notifications
• If you want to use LDAP server, be sure to check Enable LDAP Support.
• If you check the Enable Auto Importing LDAP User check box, the user will be automatically imported into our systemwhen it logins our system for the first time.
These two options works cooperatively, the first option determines whether the imported LDAP user can be used on JReportEnterprise Server, while the second one determines whether the LDAP users can be imported automatically, as shown in thefollowing table:
=Checked; =Unchecked
Configuration of JReport Enterprise Server
41

¡¡ EnableLDAP
Support
Enable AutoImporting
LDAP User
Canbe
used
Local User
YES
YES
YES
YES
ImportedLDAP User
YES
YES
NO
NO
None−ImportedLDAP User
YES
NO
NO
NO
• You must be sure the Directory Manager DN is a user with the prior permission on LDAP Server, who can get other LDAPusers.
• Be sure that the users and groups you want to query and import to JReport Enterprise Server belong to the organization thatyou type in Distinguished Name field.
When you import users from the LDAP Server, Active Directory Server, Novell Netware Server, and Lotus Domino Server,the users' passwords will be none, you can set passwords for them in the local security system.
•
LDAP( V3) is not supported in this version. •
SSL Support in LDAP
Our LDAP system supports SSL when connecting to LDAP server to get security information. We have implemented a method in oursecurity system to solve the wrong connection port type problem.
Solving the wrong connection port type problem
The wrong connection port type problem in SSL protocol •
If you use an SSL socket to connect to a server on a port that is not using SSL, or if you use a plain socket to connect to a server'sSSL socket, your program will hang. This is a characteristic of the SSL protocol.
Method to avoid the wrong connection port type problem •
Use main thread to create a son thread to connect LDAP server, and the main thread can wait this thread some time−− the sockettimeout time (This time can be set by users). If the son thread creates LDAP connection successfully, it will notify main thread, andthe program will continue to run. But if the son thread hangs for using wrong port type, the main thread will only need wait until thesocket timeout time is up and can continue to run.
A Parameter setting in the method •
There is an important parameter in this method: the socket timeout time. Since the connection time varies with users' netenvironment, it will be better for users to set it in LDAPProperties.xml: modify the element env−socketTime's value before server isstarted. Its default value is 10, which means the socket timeout time is 10 seconds. Users can modify the value according to their netenvironment.
Configuration of JReport Enterprise Server
42
About SSL certificate store in our server
Because the JNDI uses the default SSL provider, the certificates will be checked by JSSE's default TrustManager:X509TrustManager. If the TrustManager does not trust and accept them, our server will store the SSL certificates into another keystore file. This file is placed in %SERVER_HOME%/properties/LDAPKeyStore.keystore, and the password to access the file is"jinfonet". Users can also use −D parameters to specify another file and password. For instance: if you want to add the certificatesinto: C:\certs\certs.keystore, and password is "test", add parameters to our server's startup file like below: "−Djavax.net.ssl.trustStore= C:\certs\certs.keystore" "−Djavax.net.ssl.trustStorePassword=test"
Note:
The LDAP service provider uses JSSE for its SSL support. The JSSE is available as part of the Java 2 SDK, v1.4. As for earlierversions of the Java platform you can turn to http://java.sun.com/products/jsse for information. To use the JSSE on a platform earlierthan the Java 2 SDK, v1.4, first install the JSSE, and then configure a JSSE provider either by updating theJAVA_HOME/lib/security/java.security file with the provider or by adding the provider programmatically. Here JAVA_HOMErefers to the directory where the Java Runtime (JRE) software is installed. Detailed step is described in the JSSE Reference Guide.
Limitations
On the LDAP page, sessions are used to remember password and the status of the remember password checkbox, so when the sessionexceeds the time limit, there will be some limits:
• If the customer click the Load Settings button and at that time the session is expired. The user must log on to JREntServeragain. After that, the retained password will be lost.
• If the customer's session expires because of idling, when he logs on to the server again, the retained password will be lost.
Fax
Since JReport Designer version 7.0, you can export report result to fax. If you want this feature enabled, you need to configure yourrunning environment first.
Download Java Communications API (Version 2.0) from the web site http://java.sun.com/products/javacomm/index.html, and putthe files in the specified locations:
For Windows•
File Name Location
comm.jar %JReportHome%\lib
javax.comm.properties%JavaHome%\jre\lib
Win32Com.dll %JavaHome%\jre\bin
For Solaris•
File Name Location
comm.jar %JReportHome%/lib
javax.comm.properties %JavaHome%/jre/lib
libSolarisSerialParallel.soLD_LIBRARY_PATH
Configuration of JReport Enterprise Server
43
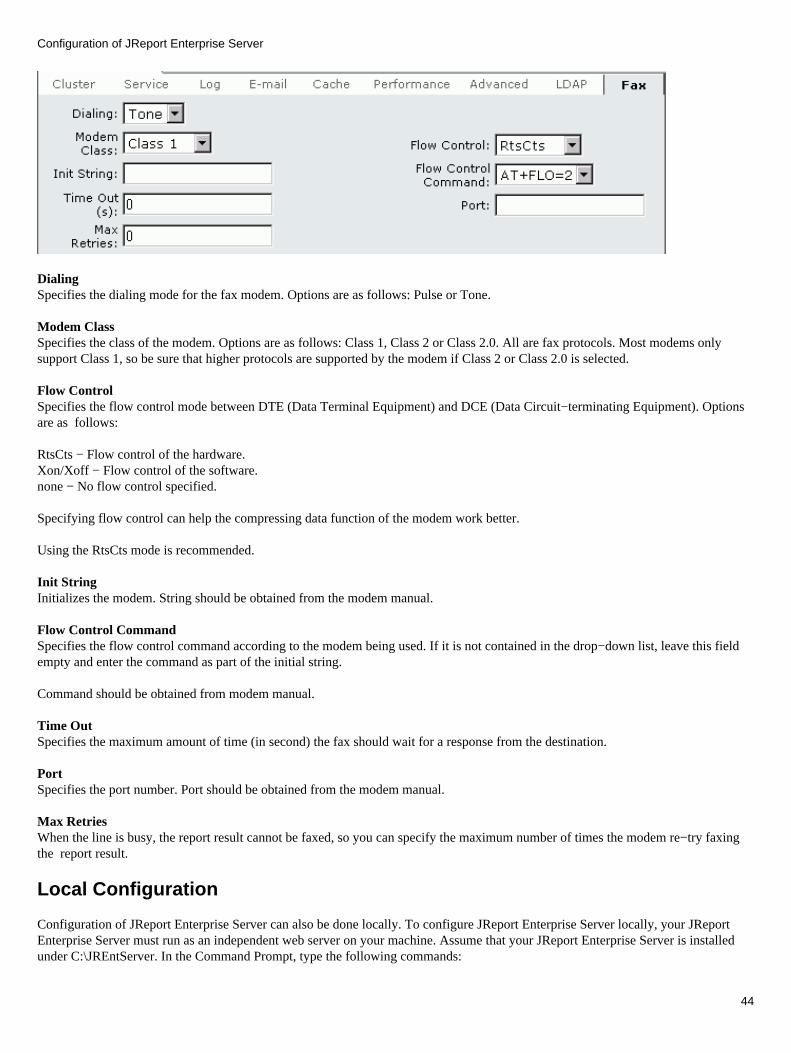
DialingSpecifies the dialing mode for the fax modem. Options are as follows: Pulse or Tone.
Modem ClassSpecifies the class of the modem. Options are as follows: Class 1, Class 2 or Class 2.0. All are fax protocols. Most modems onlysupport Class 1, so be sure that higher protocols are supported by the modem if Class 2 or Class 2.0 is selected.
Flow ControlSpecifies the flow control mode between DTE (Data Terminal Equipment) and DCE (Data Circuit−terminating Equipment). Optionsare as follows:
RtsCts − Flow control of the hardware.Xon/Xoff − Flow control of the software.none − No flow control specified.
Specifying flow control can help the compressing data function of the modem work better.
Using the RtsCts mode is recommended.
Init StringInitializes the modem. String should be obtained from the modem manual.
Flow Control CommandSpecifies the flow control command according to the modem being used. If it is not contained in the drop−down list, leave this fieldempty and enter the command as part of the initial string.
Command should be obtained from modem manual.
Time OutSpecifies the maximum amount of time (in second) the fax should wait for a response from the destination.
PortSpecifies the port number. Port should be obtained from the modem manual.
Max RetriesWhen the line is busy, the report result cannot be faxed, so you can specify the maximum number of times the modem re−try faxingthe report result.
Local Configuration
Configuration of JReport Enterprise Server can also be done locally. To configure JReport Enterprise Server locally, your JReportEnterprise Server must run as an independent web server on your machine. Assume that your JReport Enterprise Server is installedunder C:\JREntServer. In the Command Prompt, type the following commands:
Configuration of JReport Enterprise Server
44
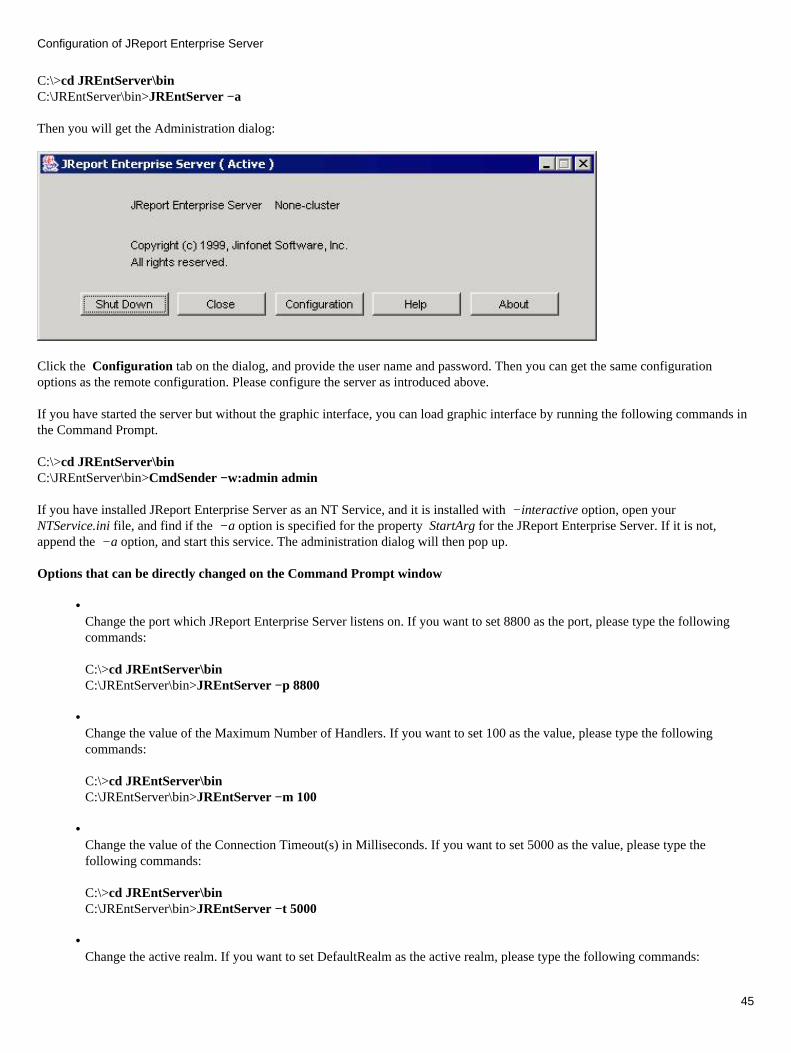
C:\>cd JREntServer\binC:\JREntServer\bin>JREntServer −a
Then you will get the Administration dialog:
Click the Configuration tab on the dialog, and provide the user name and password. Then you can get the same configurationoptions as the remote configuration. Please configure the server as introduced above.
If you have started the server but without the graphic interface, you can load graphic interface by running the following commands inthe Command Prompt.
C:\>cd JREntServer\binC:\JREntServer\bin>CmdSender −w:admin admin
If you have installed JReport Enterprise Server as an NT Service, and it is installed with −interactive option, open yourNTService.ini file, and find if the −a option is specified for the property StartArg for the JReport Enterprise Server. If it is not,append the −a option, and start this service. The administration dialog will then pop up.
Options that can be directly changed on the Command Prompt window
• Change the port which JReport Enterprise Server listens on. If you want to set 8800 as the port, please type the followingcommands:
C:\>cd JREntServer\binC:\JREntServer\bin>JREntServer −p 8800
• Change the value of the Maximum Number of Handlers. If you want to set 100 as the value, please type the followingcommands:
C:\>cd JREntServer\binC:\JREntServer\bin>JREntServer −m 100
• Change the value of the Connection Timeout(s) in Milliseconds. If you want to set 5000 as the value, please type thefollowing commands:
C:\>cd JREntServer\binC:\JREntServer\bin>JREntServer −t 5000
• Change the active realm. If you want to set DefaultRealm as the active realm, please type the following commands:
Configuration of JReport Enterprise Server
45

C:\>cd JREntServer\binC:\JREntServer\bin>JREntServer −realm DefaultRealm
Configuration with the server.properties File
No matter in which way you configure the server, locally or remotely, your settings will be saved in the%JREntServerInstallRoot%\bin\server.properties file. Every time you start the server, the settings in this properties file will beapplied to the server.
Therefore, you will have another approach in configuring the server −− modifying the server.properties file. After you install JReportEnterprise Server, there will be a file named server.properties under %JREntServerInstallRoot%\bin. If you don't want to botheryourself doing the configuration work in the local or remote configuration GUI, you can do so by changing the property of therelevant option in server.properties. What's more, server.properties also includes several options that are not set in the ConfigurationGUI like the following, and you need to edit them in the property file.
Properties not included in configuration GUI:
web.ie.login.use_new_realm_name=true/false (default)This property specifies whether to add a random postfix to the realm name, which is displayed on the log in dialog (appliesto IE), each time you log into the server. This helps to improve the security, since users will be requested for passwords at aproper moment.
•
• performance.commit.thread=true/false (default)The default value is false. When it is false, JReport Enterprise Server will commit every change in the Version list, Schedulelist or Completed list. For example, you deleted a scheduled task in the Schedule list, JReport Enterprise Server will committhe action and refresh the Schedule list. If it is set to be true, server will only commit the changes in the Version list,Schedule list or Completed list in a specified interval which will avoid frequently overwriting the related files in server andachieve a better performance.
• performance.max.reports=0By setting this property value, you can control the number of concurrent reports. For more details, see the section below"Tune Performance of JReport Enterprise Server" −− Using Queue
• server.commit.interval=30 (default)The property is used with the property performance.commit.thread. When you set performance.commit.thread = true,JReport Enterprise Server will commit changes in the Version list, Schedule list or Completed list in a specified interval.Use the property server.commit.interval to set the interval between two commitments of changes in Version list, Schedulelist or Complete list. The default value is 30 seconds.
• server.engine.single_thread=true/false (default)By setting it to be true, you can turn off the multi−thread engine, using single thread JReport Enterprise Server.
• server.get_remote_host=true/false (default)JReport Enterprise Server will record and transmit the IP of the client which delivers the request to the engine automatically.If you don't need JReport Enterprise Server to do so, you can set the value of the option server.get.remote_host to false,which may somewhat improve the performance.
• server.http.output_encoding=Both jrservlet and jsp output the html pages by using the writer with the specified encoding. You can define the encodingyou need with this option to output the html pages if necessary. If it is not specified, jrservlet and jsp will use the defaultone.
•
Configuration of JReport Enterprise Server
46

server.schedule.use_thread_group=true/false (default)This property is used especially when JREntServer is integrated with Webphere server. JReport Enterprise Server uses themulti−thread engine to run report by default when you do the schedule tasks. If you need to use the single−thread, set thevalue of the option server.schedule.use_thread_group as false.
• server.version.retain.paramfile=true/false (default)This property specifies whether to keep the parameter files while deleting versions from version table. The default setting isfalse.
• server.version.show.paramcontents=true/false (default)This property specifies whether to show parameter content in the column Parameter Contents of version table. The defaultvalue is false. The parameter contents will be shown in string format, while if the content is too long, only part of it will beshown to improve performance.
• web.page.option.tasklistenerThe default value is true. When it is true, users can get the option "Add TaskListener to be Invoked" on the Advanced Runpage and New Schedule Form page. If it is set to be false, server will hide the option on the above two pages.
Configuration with the ConnectionPoolConfig.properties File
If you have used a SQL or other similar tool to connect to a database and act on the data, you probably know that getting theconnection and logging in is the part that takes the most time. JReport Enterprise Server can easily spend several seconds every timeit needs to establish a connection. In releases prior to Build 550 ( version4.1.0 ) every database session requires a new connection andlogin even if the previous connection and login used the same table and user account. To improve the performance, JReportEnterprise Server Build 550 supports you to cache the connections instead.
Cached connections are kept in the connection pool and can be used and reused as needed by JReport Enterprise Server. WhenJReport Enterprise Server tries to get a connection from the pool if no connections are available, the pool will be extended if thenumber of connections is less than the maximum. Yet once a free connection becomes available, the connection will be released toensure the minimum number of the connections is active. Connection pool can also suspend communication with the database serverthrough any connection in the pool. When a disabled pool is enabled, the state of each connection is the same as when the pool wasdisabled; clients can continue their database operations right where they left off. Then JReport Enterprise Server will be freed fromcreating the connection to the database which leads to save much time.
The proper connection pool should be uncommented and configured to the database you selected at install time. You may configurethe ConnectionPoolConfig.properties to match the connection pool with your environment. Open theConnectionPoolConfig.properties under the directory %JREntServer_installroot%\bin, you will see the lines as below:A
# jdbcpool configure informationURL1=jdbc:odbc:JinfonetExpire_URL1=0IdleExpire_URL1=1MaxCount_URL1=0MaxShare_URL1=0Attempt_URL1=0Interval_URL1=0
URLthe JDBC URL which can establish a connection to your database.
Expire_URLYou can define how long the active connection will be expired. The value for this property by default is "0" which means that theactive connection will not be expired.
Configuration of JReport Enterprise Server
47
IdleExpire_URLYou can define how long the free connection can idle before being closed. The connection will not be released until the defined timeis out. The value for this property by default is "1" which means the connection will be released after 1 second. If the value is "0", theconnection will be closed right after it starts idling.
MaxCount_URLThe maximum number of the connections based on the URL can be extended in the pool. Once the number of the connectionsreaches the maximum, the new connection will be block until a free connection becomes available. The value for this property bydefault is "0" which means there is no limit for the number of the connections. Generally speaking, the smaller the number of theconnections is, the better the performance of JReport Enterprise Server is.
MaxShare_URLThe maximum number of the requests in one connection can be executed simultaneously. In JReport Enterprise Server, the requestsare equal to the statements. Yet in JReport Designer, the requests will include getting meta data, creating statements and so on. Oncethe number of the requests reaches the maximum, a new connection will be created to connect to the database. The value for thisproperty by default is "0" which means all the requests in the same connection will be executed. As the property MaxCount_URL*,the smaller the number of the requests is, the better the performance of JReport Enterprise Server is. Since the propertyMaxShare_URL* and MaxCount_URL* are incompatible, you should make a balance between these two properties to achieve thebest performance of JReport Enterprise Server.
Attempt_URL1=1This property has the close relation to the property MaxCount_URL*. Once the number of the connections reaches the maximum, thenew connection will be block until a free connection becomes available. Yet it is impossible for the users to judge how soon therewill be a free connection available, therefore to call the engine to establish the new connection at the first time. To make themaximum use of the available connections in the pool, we offer the property Attempt_URL* for you to set how many times theengine can try to establish the new connection. The default value for this property is "1" which means the engine will try only onetime to create the new connection.
Interval_URL1=0The interval of the engine to attempt to create the new connection if the previous try is failed. The default value for this property is"0" which means the engine will start the next attempt at once. Please pay attention that the unit of the property value is millisecond.
Note: You are forced to give the value to the property URL to establish the connection to the database. For the other six propertieswhich are actually the configuration to the URL , you are not necessary to set the property values which means you use the value bydefault.
Tuning Performance of JReport Enterprise Server
Many variables affect the performance of JReport Enterprise Server. For example, the hardware and software environment on whichJReport Enterprise Server runs. You may or may not have any influence in this regard, but you are able to undertake performancetuning to make JReport Enterprise Server efficient, reliable, and fast.
Cache
The process of viewing reports is the combination of loading the reports from the disk and generating report files. It is obvious thatskipping either of two will shorten the elapsed time. JReport Enterprise Server enables the user to cache reports and catalogs inmemory, so that it won't have to load them from disks. Therefore the performance will be improved.
Adjust Maximum Number of Handlers
JReport Enterprise Server can respond to requests from the client−side simultaneously. The number of the executed requests is ininverse proportion to the speed of the response. The more requests that are executed, the slower the speed is. To speed up the running,you can set user handlers to be a comparatively small number.
Configuration of JReport Enterprise Server
48

Adjust Engine Priority
The performance of JReport Enterprise Server is influenced by the usage of CPU that JReport engine can occupy. A larger share ofthe CPU usage will speed up the performance. JReport Enterprise Server provides you with an option entitled Engine Priority toadjust the engine's utilization of CPU to accommodate your own situation. To tune JReport Enterprise Server to the best performance,you can modify this option to enable the engine to share a larger part of the CPU usage when it is running.
Using Queue
JReport Enterprise Server supports Queue control which allows users to customize the number of concurrent reports. Please note thatthe number of concurrent reports can not exceed the license's permission. You can increase or decrease the queue size by setting theproperty value of performance.max.reports in server.properties. Considering your computer's usage, you can set this to a propervalue to lead to marked improvement in performance. For example, if you have a 6−report license and you don't use the queuecontrol, the running speed may be slowed down. To get a better performance, you can set performance.max.reports = 4 to haveonly four reports run at the same time, and other two reports wait in the queue till one of the four reports is finished.
Though the default value is 0, it does not mean that no reports are queued. If you do not change the value, then it depends on thelicense you have purchased. For example, with unlimited−report license, there can be numerous reports running at the same time. Ifyou have 4−report license, it will be up to 4 concurrent active running reports, and other reports wait in the queue.
Index
Using Another Connection as a Substitute of Catalog Connection
Normally, after a report has been created, it is fixed to a certain catalog connection. With the J2EE data source support feature, youcan change to another runtime JDBC or JNDI data source to run reports.
This allows you to control the catalog data source connections on JReport Enterprise Server to connect dynamically to yourproduction data sources.
Configure the datasource.xml file
In order to enable you to conveniently set different connections in JReport Server, a configuration file, datasource.xml, is providedwith which you can define the connection to use at run−time by setting up connection mapping information such as the JDBC driver,URL, or JNDI data source name, user and password, depending on the data source you prefer to use.
The datasource.xml file is located in the <install_root>\bin directory. Change this file according to the data source you wantto use. Two types of connections are supported by JReport Server, they are JNDI data source connection and JDBC connection.
The content of the datasource.xml file is as follows:
<?xml version="1.0" encoding="UTF−8"?><datasource−mapping> <datasource> <catalog−connection−name>Connection1</catalog−connection−name> <connection−type>JNDI</connection−type> <jndi−datasource>Sample</jndi−datasource> </datasource> <datasource> <catalog−connection−name>Connection2</catalog−connection−name> <connection−type>JDBC</connection−type> <driver>sun.jdbc.odbc.JdbcOdbcDriver</driver> <url>jdbc:odbc:jinfonet</url> <user>Username</user> <password>Password</password> </datasource>
Configuration of JReport Enterprise Server
49

</datasource−mapping>
Element Descriptions:
catalog−connection−name: Specifies the name of the catalog connection that you you want to substitute. Note that this isthe connection name that you can see in JReport Catalog Browser.
•
connection−type: Specifies the connection type, which can be either JNDI or JDBC.• jndi−datasource: If you are using a JNDI data source, specify the JNDI data source name you defined in your Javaapplication server which you want to use as the substitute connection.
•
driver & url: If you are using a JDBC data source, specify the JDBC Driver and URL in these two attributes.•
Notes:
There can be multiple<datasource></datasource> tags. Each pair will map one of the connections in your catalog. You candefine mapping connections for multiple connections for more than one catalog. The catalog connection name should beunique in the datasource.xml file, otherwise the latter <datasource> information will overwrite the previous ones.
•
You can choose whether to provide database user and password information for the JNDI connection, using the user andpassword attributes. If the user and password information is provided in this file, it will be used to set up the connectionregardless of the settings defined in your application server. Otherwise, the settings defined in your application server will beused. Specially, for WebLogic users, you should provide user name and password for WebLogic console instead of database.
•
Username and Password Encryption
Once the user and password are provided in the datasource.xml file, they will be encrypted into one line, which will be like thefollowing:
<encrypt−sign>enDkq7srM9cHhoUwzYXJ3NvcDIYk</encrypt−sign>
If you want to change the user name and password information, just remove this line and type the new information again.
After this, you can integrate JReport Server with your application server.
If you are using a self−contained war file, make sure the datasource.xml file is included in the war file, before making theself−contained war file, please modify %JREntServer%/bin/makewar.xml, and add <include name="datasource.xml" /> into<zipfileset dir="${installroot}/bin" prefix="workspace/bin"> section. Before you deploy it to web server, make sure thedatasource.xml is included in the "jreport.war/WEB−INF/lib/jrenv.jar/workspace/bin/datasource.xml".
Reference Note: For more detailed instructions on making self−contained war file, see Deploying JReport Enterprise Server as aSelf−Contained WAR/EAR.
If you are integrating JReport server to web server using a normal war file, usually you need to specify −Dreporthome parameter inthe web server so that the web server can locate and load the resources it needs. Since the datasource.xml is already in the bindirectory, you don't need to do anything specially for this file.
The Connection Priority
If you are using a catalog connection, datasource.xml, and at the same time, you have set new connection information via the serverAPI/URL ((jrs.jdbc_driver, jrs.jdbc_url, jrs.db_user, jrs.db_pswd), the priority of these three are to be like this:
Server API > datasource.xml > catalog connection
Which means if the approach with higher priority fails to get the connection, the one with lower priority will be used.
Configuration of JReport Enterprise Server
50
Reloading datasource.xml
After you have made changes to the datasource.xml file, you need to reload it in JReport Server. This file can be reloaded in thefollowing ways:
Restart JReport Enterprise Server• Call jet.server.api.admin.ConnectionInfoProviderService.reloadFile()•
Case: Using JNDI data source connections of WebLogic Server
Let's take WebLogic as an example, take the following steps:
Start WebLogic server, navigate to <YourProjectName> | Services | JDBC | Connection Pools. On the configuration tab,make sure the connection you are going to use is there and correctly set up.
1.
Browse to <YourProjectName> | Services | JDBC | Data Sources. On the Configuration tab, create a data source using theJNDI name MyJNDISample. Select the correct connection from the Pool Name drop−down list.
2.
Open <install_root>\bin\datasource.xml and add:
<datasource−mapping> <datasource> <catalog−connection−name>default</catalog−connection−name> <connection−type>JNDI</connection−type> <jndi−datasource>MyJNDISample</jndi−datasource> <user>youruserid</user> <password>yourpassword</password> </datasource></datasource−mapping>
3.
Integrate JReport Server to WebLogic.4. Run the report that is using this connection.5.
Case 2: Using JNDI data source connections of JBoss server
Let's take JBoss as an example, in this case, DB2 is used, and suppose JBoss is installed under D:\jboss−4.0.1, take the followingsteps:
Copy DB2 driver to D:\jboss−4.0.1\server\default\lib.1. Create the file db2−ds.xml in D:\jboss−4.0.1\server\default\deploy, add the following content:
<?xml version="1.0" encoding="UTF−8"?>
<datasources> <local−tx−datasource> <jndi−name>DB2DataSource</jndi−name> <connection−url>jdbc:db2://dbs−b/sample</connection−url> <driver−class>COM.ibm.db2.jdbc.net.DB2Driver</driver−class> <user−name>db2admin</user−name> <password>db2admin</password> <min−pool−size>0</min−pool−size> <metadata> <type−mapping>DB2</type−mapping> </metadata> </local−tx−datasource></datasources>
2.
Modify datasource.xml (<install_root>\bin), make sure the followings are included:
<datasource−mapping>
3.
Configuration of JReport Enterprise Server
51
<datasource> <catalog−connection−name>default</catalog−connection−name> <connection−type>JNDI</connection−type> <jndi−datasource>java:/DB2DataSource</jndi−datasource> </datasource></datasource−mapping>Build the self−contained war file using makewar.bat (<install_root>\bin).4. Integrate JReport server to JBoss.5. Run the report that is using this connection.6.
Index
Configuration of JReport Enterprise Server
52
Administrating JReport Enterprise Server
Introduction
The administration task in JReport Enterprise Server consists of five major parts:
Resource Management• Version Management• Security Management• Task Management• Server Data Management•
Resource Management
Resources on JReport Enterprise Server are organized in a tree structure called a Resource Tree. The resource tree consists of foldersunder its root directory, and the resources reside in the folders. Only the resources that are organized in the resource tree can beaccessed and queried by the client.
You can perform basic resource tasks, such as deploying, and deleting resources, getting resources from the real path, and moreadvanced tasks, such as changing resource and folder properties. Moreover, you can also manage the versions and secure yourresources, which are respectively described in sections − Version Management and Security Management of this chapter.
Resource Overview
What is a Resource
Generally, a resource refers to report related material. To be exact, a resource in the JReport reporting system is actually a conceptualnode, which holds a group of archive versions that can be processed or organized on JReport Enterprise Server. There are differenttypes of resources, such as catalogs, reports, and report results. A resource can only hold versions of the same type.
Resource Tree
All the resources are organized in a folder−tree structure. JReport Enterprise Server defines an XML file called admin.xml, and theresource tree conforms to this file.
For example, your company has two departments − Support and Marketing. Each department has its reports on their own machine.There are some report documents that are submitted by the departments located on the machine where JReport Enterprise Serverruns. Now suppose you are the administrator, and you would like to organize these files and folders into the Resource Tree. Thefollowing diagram may help you to visualize the framework on which you should build the resource tree.
53

The resource tree consists of three layers: Folder layer, Resource layer, and Archive layer.
Folder layer: The basic resource tree element that builds the main framework for the resource tree. There are two built−in foldersunder the root of the resource tree −− Public Reports and My Reports. A folder can be mapped to a real file path.
Resource layer: An abstract layer, based on the Folder layer that hosts various types of archive versions and provides user access tothe versions.
Archive layer: A concrete layer, where the archive versions reside for executable reports, report catalogs, and report results, thatfunction as the leaves of the resource tree.
Public Reports and My Reports
There are two built−in folders under the resource tree root −− Public Reports and My Reports. You can create your own folders ineither of them. The Public Reports folder and the My Reports folder cannot be deleted.
The Public Reports folder contains public report documents and executable reports, and can be accessed by everyone. All foldersexcept for the personal folders are public folders.
The My Reports folder is a personal folder. It contains personal report documents and executable reports. Each user has one personalfolder, specified by the administrator when the user account is created. The My Reports folder can only be accessed by its owner, andthe user has full control over his/her personal folder. This folder is the default output location for reports run by the user.
Deploying Resources
Before you can perform any tasks on JReport Enterprise Server, you need to have your own resources deployed and organized. Thereare several ways to deploy resources (catalogs, reports, or folders) that are located outside JReport Server.
Administrating JReport Enterprise Server
54

Deploy reports using JReport Designer
You can directly deploy your reports or catalogs to JReport Enterprise Server from JReport Designer.
For information on how to deploy reports from JReport Designer, please refer to JReport Designer Help Documentation (User'sGuide | Deploying Resources From JReport Designer) or visit our website for the chapter: Deploying Resources From JReportDesigner.
Deploy resources from local or remote computer
You can deploy three types of resources from a local or remote computer. They are reports, catalogs, and folders. Use local deploy ifyou want to deploy resources on the machine where JReport Enterprise Server runs. If you want to deploy resources from a remotemachine to the server, use remote deploy instead.
To deploy resources from a local computer,
Select the folder in the resource tree where you want to deploy resources, then select Local Deploy.1.
Select a resource type from the drop−down list. Choose from the following:
ReportCatalogFolder
2.
Administrating JReport Enterprise Server
55
Folder with ContentsCatalogs, Reports and Folders in FolderCatalogs and Reports in Folder
Please make sure the resource type is consistent with the resource real path.Click the Browse... button to specify the folder from where the resource is to be deployed.3. Specify a name of the resource in JReport Server in the Resource Name box. This name is required and is the display namethe user will see to access the resource.
4.
Type a brief description to describe the resource in the Description box.5. Type a real path in the Real Path box. If no path is specified, the default path will be used.
A real path is a physical path in the directory structure on the system where JReport Server is running, for example, in aWindows system, c:\Temp.
If you are deploying a folder in a clustered environment, please make sure you check the Map shared disk option. Thefolder will be mapped instead of copied.
6.
To apply the archive policy to the resources you are deploying, check the Archive policy option.
If you want the resources to have multiple versions, check the Archive as a new version option, and then specify amaximum number of versions that will be saved. The default value is 0, which means an unlimited versions can be saved.
Please note that a folder by itself does not have versions, the archive policy specified for a folder actually applies to (isinherited by) the resources within the folder.
7.
To enable user permissions, check the Enable user permissions option. Permissions that can be specified to a user or roleinclude: Visible, Read, Write, Delete, Execute, Schedule, and Grant.
8.
Note: If there are a lot of users or roles, the element of User Permission would have a large number of contents which makethe whole HTML page very large. To avoid this, users could set the value of an option, calledweb.page.option.use_permission_dialog, to be true in the file of server.properties. Then, when you restart theserver, the user permissions option on the interface will become hyperlinked. Clicking this link, a User Permissions HTMLpage will pop up.
Click the Browse button to specify a font directory for the resource. 9. Click the Browse button to specify a style directory for the resource. 10. If you want to use advanced deploy, go to next step, otherwise go to step 18.11. Click the Advanced Deploy button. All sub−folders and reports contained within the resource folder will then be displayedin advanced deploy mode.
12.
Administrating JReport Enterprise Server
56

13. Change the resource names if necessary in the Resource Name box by clicking the icon or just enter a new name in the
box.
14. Give a brief description for the resource in the Description box.
15. Click the icon to apply an archive policy to each folder or report.
16. Check the box ahead of the folders or reports to have them deployed.
Click Submit to start deploying the resources.
To clear all the filled contents and reset this tab to its original status, click Reset.
17.
Notes: When deploying resources from a remote computer, the process is similar to that for a local deploy. However, there aredifferences, these are:
Local Deploy deploys resources from the machine where the server runs, while Remote Deploy deploys resources from theclient machine where you access the server to the machine where the server runs.
•
The resource type of Remote Deploy can ONLY be a compressed file, for example, a zip or jar file. You should compressthe report and catalog files in advance.
You have three approaches to build a compressed file, You can compress the resources manually using a third−party tool, such as Winzip.♦ You can use the jar utility (jar.exe or jar on Unix ) that the JSDK provides to build a compressed jar file directly.Use the format as follows:
%JAVAHOME%\bin\jar.exe −cvfM %DEST_JAR_FILE% %SOURCE_RESOURCES%
♦
•
Parameter Description
Administrating JReport Enterprise Server
57
%JAVAHOME% The Java SDK install root.
%DEST_JAR_FILE%The destination file path and file name. The .jar file will be generated to thepath you specify here, using the file name you provide.
%SOURCE_RESOURCES%
The source file path and file name. Please note that specifying a path forthis parameter will cause the generated jar file to contain the same pathinformation. For example, when you extract the jar file that was createdusing myReports\*.* for this parameter, the files will be extracted to afolder called myReports. JReport Server is not able to import acompressed file that contains the path information, so please do not specifya path for this parameter, just specify the resource files only.
To generate a jar file containing no path information, switch to the source folder, and then do the compression.
For example,
C:\myReports>C:\j2sdk1.4.1_02\bin\jar −cvfM c:\temp\aa.jar .
The jar file will be generated to c:\temp, as aa.jar, compressing all the files under c:\myReports, containing no pathinformation.
Always use this method if the folder you are going to compress contains reports with non−ASCII names such as Chinese andJapanese characters in the name.
To deploy resources from a remote computer,
In the folder where you want to deploy resources, click Remote Deploy.1.
Administrating JReport Enterprise Server
58

Click the Browse... button to specify the zipped file from which the resource comes.2. Specify a name of the resource in JReport Server in the Resource Name box. This name is required and is the display namethe user will see to access the resource.
3.
Type a brief description to describe the resource in the Description box.4. Type a real path in the Real Path box. If no path is specified, the default path will be used.
A real path is a physical path in the directory structure on the system where JReport Server is running, for example, in aWindows system, c:\Temp.
5.
To apply the archive policy to the resources you are deploying, check the Archive Policy option. 6. Check the Deploy files and folders in the zipped file to /USERFOLDERPATH/admin without creating a folder with thename of the zipped file box if you want this option.
7.
Click Submit to start deploying the resources.
If you want to use advanced deploy, click the Advanced Deploy button. All sub−folders and reports contained within theresource folder are displayed in advanced deploy mode.
8.
Deleting Resources
To delete a resource or folder, locate the folder that contains the resource or folder you want to delete, click the correspondingDelete link in the Control column.
Administrating JReport Enterprise Server
59

Notes:
The Public Reports folder and My Reports folder cannot be deleted. • Deleting a resource or folder actually removes the resource or folder from disk. The deleted resources and folders cannot beretrieved. The relevant versions belonging to the resource will also be deleted.
•
Getting Resources from the Real Path
You can not only use the deployed resources described above, but also those named as "Dynamic Resources" obtained from the realpath. To do so, you need to specify a real path for a virtual folder in its Properties link in the Control column. Then, you can add orremove resources into or from the Server by adding or removing them into or from the real path directory. This is very convenient ifyou are creating dynamically created or modified catalogs and reports using the Designer API and Catalog API. It is much easier tojust modify the catalog and reports directory in their physical location in the directory rather than modify them in a different locationthen re−deploy them before they can be used.
Notes:
All dynamic resources can be used in the same way as the deployed resources: You can set security permissions and some other properties. ♦ The report result files can be archived as many versions as with statically deployed resource. ♦
•
However, there are also some differences. Dynamic resources cannot be deleted directly from Server User Interface.♦ You cannot deploy resources from the real path. Once a resource is in the real path directory it is deployed.♦ You cannot use dynamic resources as a result location for report result versions. ♦
•
How to Use Resources from the Real Path
To use resources from the real path,
Make sure that the Enable Resource from Real Path check boxes both under the Advanced tab of Configuration on theJReport Admin Console (8889) and under the Properties link of the folder you want to use in the Control column on theServer home page (8888) are checked. In the follwing example, we will set the folder /hsqlDemo as a real path resource soall objects which are deployed there will be dynamic resources.
Note: On the admin page (8889), this function can be realized only after the server has been restarted.
1.
Specify a real path for the demo virtual folder "/hsqlDemo" as "C:\jrentserver\reportbak" to use the dynamic resources.2. Click Submit to save the changes; otherwise, click Cancel.3.
Administrating JReport Enterprise Server
60

In the windows directory C:\jrentserver\reportbak, create three sub directoriesC:\jrentserver\reportbak\report1, C:\jrentserver\reportbak\report2,C:\jrentserver\reportbak\report3 and copy some reports and catalogs into them.
4.
On starting the server, click the virtual folder /hsqlDemo, and you will now see the three sub folders: report1, report2, andreport3 within it, including the reports and catalogs that were copied there before.
5.
Now you can perform operations on the dynamic resources, including running, advanced running, scheduling, viewingversions and setting properties, but you can only delete the reports from the real path rather than deleting directly fromServer UI.
6.
Note: After you use the dynamic resources, under certain special conditions, some used data, invalid dynamic nodes, will begenerated in the server databases. In order to delete the invalid dynamic nodes, administrators can perform the corresponding optionon 8889 to clear these nodes from the databases. For details about checking the system database and clearing unused data fromdatabases, please refer to Server Data Management/Clearing Unused Nodes from the System Database.
Setting Real Path for Public Reports at Server Startup
JReport Server provides a method you can use to specify a real path for the server’s root note, Public Reports, when you start theserver.
To do this,
Create a property file called install.server.properties, and save it to %install_root%\bin. The contents in it are:
server.enableDynamicResource=trueserver.publicReportsRealPath=C:\PublicReports
The value of server.publicReportsRealPath can be any path in your file system.
1.
Administrating JReport Enterprise Server
61
Start JReport Enterprise Server. The server will work as follows: The values in server.properties under %install_root%\bin will be loaded.a. The file install.server.properties under %install_root%\bin will be read, and
The value of the property server.enableDynamicResource in server.properties will be replacedby the value in install.server.properties;
◊
The value of the property server.publicReportRealPath, in this example, it isC:\PublicReports, will be recorded into the server database.
◊
b.
install.server.properties will be deleted automatically when the above settings are completed.c.
2.
Access the server, you will find that: On the administration page of the server (port 8889), the option Enable Resource from Real Path of theAdvanced tab on the Configuration page has been checked.
♦
On the properties page of the Public Reports, the option Enable Resource from Real Path for it has beenchecked, and the real path is C:\PublicReports, which is specified in the install.server.properties file.
♦
3.
Notes:
When you generate the install.server.properties file, as long as you give a path to the propertyserver.publicReportsRealPath, even when you set the propertyserver.enableDynamicResource=false, the real path of the Public Reports node is specified.
However, the real path does not take effect. If you want to use the real path you have specified, please check the EnableResource from Real Path option on both the administration server page and the Public Reports properties page.
•
JReport Server Install Shield also provides a chance to specify a real path for the Public Reports when you install theServer.
•
Changing Resource and Folder Properties
To change the properties of a resource or folder, locate the folder that contains the resource or folder you want to change, and clickthe Properties link in the Control column.
Resource real path
You can set the resource real path for a folder. The real path of a folder is used to provide path information for JReport EnterpriseServer to export report results to a correct location on disk.
When you export your report result to disk, you will be prompted to provide the path and file name information for the result file. Thepath you type in the box should never be an absolute path, for instance, strings such as c:\foldername\filename are invalid. Please usethe path in the resource tree instead, such as /foldername/filename. In the path information you provide, the first slash mark (/) refersto the Public Reports folder in the resource tree, and the folder name (foldername) refers to a folder that actually exists in theresource tree.
The folder real path you specify should be correct and actually exist on disk. Otherwise, when you export report result to disk,JReport Enterprise Server will fail when generating files and prompt you with the information that the real path does not exist.
Notes:
You can also change folder properties by clicking Properties above the resource table. • The relationship of folder real paths does not need to be consistent with that of the resource tree folders, that is, they areindependent of each other. For example, in the resource tree, the folder ABC, whose real path is C:\FolderABC, has asub−folder DEF. The real path of DEF need not necessarily be a folder under C:\FolderABC, it can be any folder.
•
Index
Administrating JReport Enterprise Server
62

Version Management
All the resources in the resource tree are controlled by versions. A version is the fundamental unit in the resource tree.
Version Overview
What is a version
Your resources might be changed over time. JReport Enterprise Server uses a versioning system to create and manage the resourcesthat may have changed their contents and properties owing to updates that may have been issued on them.
All the resources in the resource tree have versions. A great portion of the resource management tasks are done by managing theresource versions.
Different version types
The versions in JReport Enterprise Server fall into the following three major categories accordingly:
Administrating JReport Enterprise Server
63

Report VersionThe version of a report file.
•
Catalog VersionThe version of a report catalog file.
•
Result Version The version of a report result file.
The report result can be generated and maintained in two places − the resource tree and the built−in version folder.
When you schedule to publish a report to versioning system, you can choose an archive location to generate the report result.You can generate the report result to the built−in version folder, or to the My Reports folder or the Public Reports folder inthe resource tree.
The report results generated in the resource tree are stand−alone results, and can have their own versions, while thosegenerated in the built−in version folder can only be bound with their respective reports.
•
Archive policy
JReport Enterprise Server uses archive policy to control the resource versions. You can control whether to use multiple versions forthe specific resource, also, you can set the maximum version amount to be listed in the version table.
Archived policy can be applied to a single resource individually or to many resources in a folder as a whole.
Creating Versions
Normally, report result versions are created when the user runs reports in the Advanced Run or Schedule mode. However, to createa new version for a report resource or catalog resource, you have to deploy a report or catalog respectively from outside JReportEnterprise Server, and then make the old and the new share one common resource node.
When you are making more than one versions share one resource node, you are creating new versions for that resource node. Theway to put archive versions under an existing resource node is very simple − just make the path and name of the version that you arecreating or deploying conform with that of the resource node.
There are three types of resources in JReport Enterprise Server, which are report resource, catalog resource, and report result resource.
Administrating JReport Enterprise Server
64
Create report/catalog versions
The ways to create versions for report resource and catalog resource are completely the same.
To create a new version for a report resource, you will have to deploy a report from outside JReport Enterprise Server,
Log on to JReport Enterprise Server, locate the folder that contains the report resource for which you want to create a newversion.
1.
Click Deploy. 2. Choose Local Deploy or Remote Deploy according to your specific case. 3. Type the name of the resource node for which you are to create new version in the Resource Name box. The name youprovide must be exactly the same as the original resource node name.
4.
Fill up the relevant information to deploy a report. 5. Click Submit when you finish. The report will be added to the resource tree, and serve as a version of that resource.6.
Reference Note:
For assistance on how to deploy resource from local or remote computer, please refer to User Guide | Administrating JReportEnterprise Server | Resource Management | Deploying Resources
Create report result versions
The report result can reside in two places − the resource tree and the built−in version folder.
The report result in the resource tree is a stand−alone result and serves as a resource node, hosting its own versions, while thosegenerated in the built−in version folder can only be bound with their respective reports.
There are two approaches to create a report result version,
Advanced Run:
Log on to JReport Enterprise Server, locate the folder that contains the report for which you are creating result versions. 1. Click the corresponding AdvancedRun link in the Control column. 2. On the Archive tab, check Auto archive after running to expand the Auto archive policy of result doc options. 3. To generate report result version in the built−in folder, select Build−in Version Folder.
To generate report result version under a stand−alone resource node in the resource tree, select My folder or Public folder,and then provide the path and resource name information in the corresponding box.
4.
Finish other relevant information according to your own case, and then click Submit. The report result will be generated tothe corresponding location.
5.
Schedule:
Log on to JReport Enterprise Server, locate the folder that contains the report for which you are creating result versions. 1. Click the corresponding Schedule link in the Control column. 2. On the Publish tab, click the To Version tab, check the Publish to Versioning System option. 3. Set archive location options.
To generate report result version in the built−in folder, select Build−in Version Folder.
To generate report result version under a stand−alone resource node in the resource tree, select My folder or Public folder,and then provide the path and resource name information in the corresponding box.
4.
Finish other relevant information according to your own case, and then click Submit. The report result will be generated tothe corresponding location when the scheduled task is completed.
5.
Notes:
Administrating JReport Enterprise Server
65
The resource path and name refers to that in the resource tree, for instance, /foldername/filename.
For the Public folder option, the first slash mark (/) refers to the Public Reports folder in the resource tree, and the folder name(foldername) refers to a folder that actually exists in the resource tree.
For the My folder option, the first slash mark (/) refers to the My Reports folder in the resource tree, and the folder name(foldername) refers to a folder that actually exists in the resource tree.
Please note, to generate report result version under an existing stand−alone resource node in the resource tree, say, create a newversion for a resource node, please provide the path and name of the existing resource for the Public folder or My folder option.
Browsing Versions
To view the version information, locate the folder that contains the expected resource, and then click the corresponding Versions linkin the Control column.
A report type resource hosts two types of version − report version and report result version (built−in version folder).
The versions that a resource hosts are organized in the version table. You can remove any versions after selecting them in the versiontable.
Version table
Relevant information about the versions that a resource hosts, such as the version date, version number, version properties, and so on,is collected and represented in table form, which is called version table.
You can perform operations such as sorting and viewing properties, output files, and parameters in a version table.
The columns that compose a version table are described as below:
Report/Catalog Version Table
Column Description
ControlProvides the properties link for the users to view the properties of theversion.
Version Date Shows the data and time when the version is generated.
Number Shows the serial ID that identifies a version in the version table.
Result Version Table
Column Description
Control Provides the properties link for the users to view the properties of the version.
Version Date Shows the data and time when the version is generated.
Number Shows the serial ID that identifies a version in the version table.
Output Shows the output file formats and provides links to the output files.
Parameter File Shows the parameter file names and provides links to the parameters.
Creator Shows the ID of the user who creates the version.
Applying Archive Policy
Archive policy can be applied to a single resource individually or to many resources in a folder as a whole. It can also be appliedwhen you run (Advanced Mode) or schedule a report.
Administrating JReport Enterprise Server
66

If there is no archive policy specified for a resource, the resource will inherit the archive policy from its parent object. If afterwardyou specify archive policy for that resource, the new archive policy will override that of the parent object.
Archive policy includes settings for controlling whether to use multiple versions for the specific resource, and the maximum versionamount to be listed in the version table.
Archive as a new versionSpecifies whether to use multiple versions for the specific resource. Available only for the resources in the resource tree.
Max result version amountSpecifies the maximum version amount to be listed in the version table. The default value is 0, which means the version amount isunlimited.
To apply archive policy to the resource in the resource tree, please refer to the table below:
If you want to Then do Result
Apply archive policyto a folder
Locate thefolder thatcontainsthe folderfor whichyou want toset archivepolicy,click thecorrespondingProperties link.
1.
Set thearchivepolicy, andthen clickSubmit.
2.
The archive policy will be applied to all of the foldercontent.Note: This not includes the resources whose archivepolicies are applied individually.
Apply archive policyto a resource
Locate thefolder thatcontainstheresourcefor whichyou want toset archivepolicy,click thecorrespondingProperties link.
1.
Set thearchivepolicy, andthen clickSubmit.
2.
The archive policy will be applied to the resource,overriding its inherited archive policy.Note: If you leave the Apply Archive Policy optionunchecked, the resource will inherit the archive policy fromits parent object, say, the folder it resides in.
Apply archive policywhen running a task inAdvanced mode
Locate thefolder thatcontainstheresourceyou want torun, click
1. You are actually applying the archive policy to a result typeresource. The archive policy will be applied to the resource.Note: If you leave the Apply Archive Policy optionunchecked, the resource will use its old archive policy orinherit the archive policy from its parent object, say, thefolder it resides in, when no archive policy is set for it.
Administrating JReport Enterprise Server
67
thecorrespondingAdvancedRun link. On theArchive tab,check theAutoarchiveafterrunning option.
2.
Finishotherrelevantinformation,make surethe resultlocation isset to theresourcetree folder.
3.
Set thearchivepolicy, andthen clickSubmit.
4.
Apply archive policywhen scheduling a task
Locate thefolder thatcontainstheresourceyou want toschedule,click thecorrespondingSchedule link.
1.
On thePublish tab,click theToVersion sub−tab,check thePublish toVersioningSystem option.
2.
Finishotherrelevantinformation,make surethe resultlocation isset toresourcetree folder.
3.
Set thearchive
4.
You are actually applying the archive policy to a result typeresource. The archive policy will be applied to the resource.Note: If you leave the Apply Archive Policy optionunchecked, the resource will use its old archive policy orinherit the archive policy from its parent object, say, thefolder it resides in, when no archive policy is set for it.
Administrating JReport Enterprise Server
68

policy, andthen clickSubmit.
The above table applies to the resource in the resource tree only. The versions in the built−in version are controlled by its ownarchive policy.
To apply archive policy to the built−in version table, please refer to the table below:
If you want to Then do
Apply archive policy to a built−in version table
Locate the folder thatcontains the resource(report type) whichyou want to setarchive policy for itsresult version table,click thecorrespondingVersions link.
1.
On the ResultVersions tab, checkthe Max versionamount option.
2.
Set the archivepolicy, and then clickSubmit.
3.
Apply archive policy when running a task in Advanced mode
Locate the folder thatcontains the resourceyou want to run, clickthe correspondingAdvancedRun link.
1.
On the Archive tab,check the Autoarchive afterrunning option.
2.
Finish other relevantinformation, makesure the resultlocation is set to thebuilt−in versionfolder.
3.
Set the archivepolicy, and then clickSubmit.
4.
Apply archive policy when scheduling a task Locate the folder thatcontains the resourceyou want to schedule,click thecorrespondingSchedule link.
1.
On the Publish tab,click the ToVersion sub−tab,check the Publish toVersioning
2.
Administrating JReport Enterprise Server
69
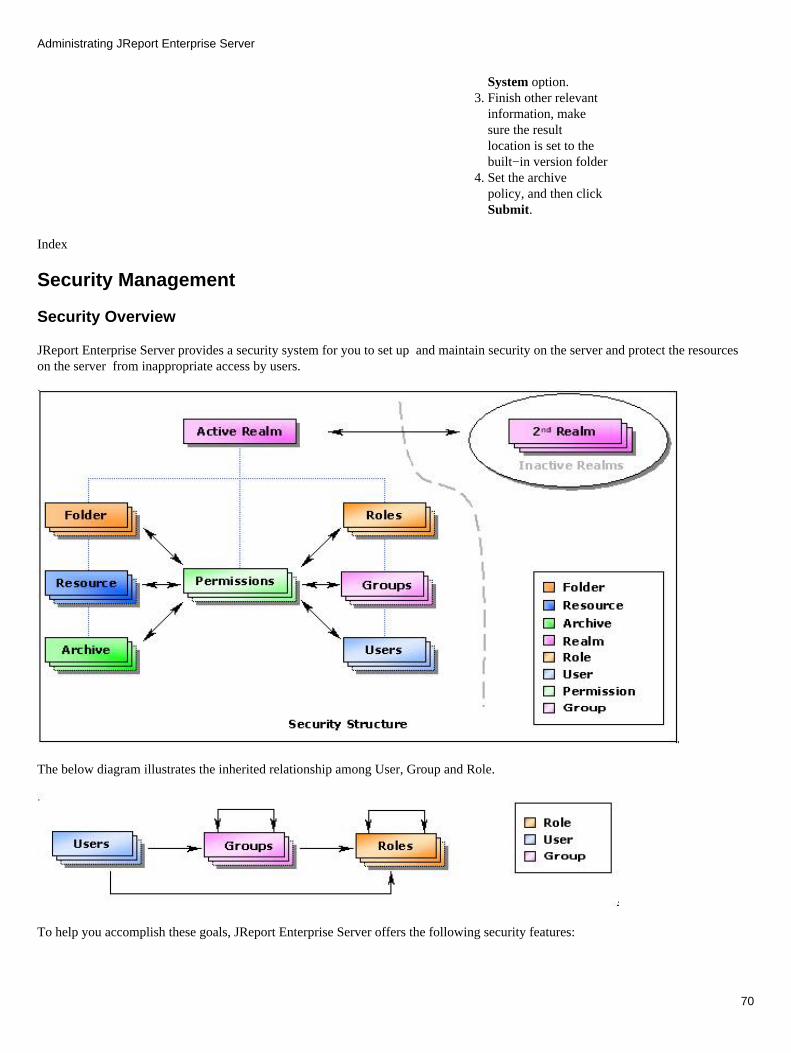
System option.Finish other relevantinformation, makesure the resultlocation is set to thebuilt−in version folder
3.
Set the archivepolicy, and then clickSubmit.
4.
Index
Security Management
Security Overview
JReport Enterprise Server provides a security system for you to set up and maintain security on the server and protect the resourceson the server from inappropriate access by users.
The below diagram illustrates the inherited relationship among User, Group and Role.
To help you accomplish these goals, JReport Enterprise Server offers the following security features:
Administrating JReport Enterprise Server
70
RealmRealm is an abstract security concept, which hosts the resources and authentication entities on JReport Enterprise Server. There canbe more than one realm on the server and every realm is independent from others.
At runtime, only one realm can be active and only the users and resources in the active realm are accessible. A realm is identified bya unique name, which can contain any characters other than forward slash (/) and backward slash (\).
The authentication entities consist of user accounts, group accounts and role accounts.
UserTo use JReport Enterprise Server, you must have a user account, which consists of a unique user name and a password. JReportEnterprise Server verifies your identity when you type your user name and your password and then log on. If your user account hasbeen disabled or deleted, JReport Enterprise Server prevents you from accessing the web services that JReport Enterprise Serverprovides, in order to ensure that only valid users have access.
JReport Enterprise Server comes with two built−in user accounts, which are admin and guest. The built−in user accounts cannot bedeleted. The Admin user account can neither be deleted nor disabled.
Group
The principle group, which represents an organization of user accounts, is available for managing users. Users or groups can be addedinto a group as its sub−members, and therefore inherit the resource and folder permissions from the group.
Role
Users must have certain user rights and permissions to perform tasks on certain resources. Roles, which represent aggregate ofpermissions, help you efficiently assign those user rights and permissions to users. Assigning one or more roles to users gives theusers all of the user rights and permissions the roles have to perform their jobs with. A role can also be assigned to other groups orroles, and hence the groups or roles will inherit the permissions that the role has.
JReport Enterprise Server comes with two built−in role accounts, which are administrators and everyone. The built−in role accountscannot be deleted. The administrators role account can neither be deleted nor disabled.
Note: Circles formed by the inheriting lines should be avoided, namely, there shouldn't be any group or role appearing in aninheriting line twice, because a group or role cannot hold its parent member as its sub member.
Administrating JReport Enterprise Server
71

See the diagram above, group/role A cannot be the sub−group/role of group/role B (or C, D), because group/role A is their progenitor.
PermissionPermissions, associated with resources and folders, are the rules that are granted to users to control their access to resources andfolders.
Permissions in JReport Enterprise Server include:
Permission Description
VisibleAllows or denies viewing object names in the resource tree or version table, such asfolders, resources, and archive versions.
ReadAllows or denies viewing object properties, versions, and, if it is a folder, foldercontent.
WriteAllows or denies deploying folders and resources, changing the properties (notincluding permission settings) of the objects in the resource tree or version table,such as folders, resources, and archive versions, and modifying version table settings.
DeleteAllows or denies deleting objects in the resource tree or version table, such asfolders, resources, and archive versions.
ExecuteAllows or denies running resources in normal and advanced mode (Report typeresources only).
Schedule Allows or denies submitting resources to schedules (Report type resources only).
Grant Allows or denies granting permissions to other users, groups or roles.
Notes:
Security permissions do not apply to the built−in version folders, My Resource folder, and their contents.• To complete a task, you may need to have more than one permission, for example, to view the properties of a report, youmust have both the Visible and Read permissions.
•
Administrating JReport Enterprise Server
72

Some permissions depend on other permissions to work, such as Write, Execute, and Schedule, allow anyone of them willallow the Read permission.
•
Some special permissions, such as Execute and Schedule, only applies to the report type resource.• Only members in the Admin role can offer the Grant permission to other users or groups or roles. The users or groups orroles that are given the Grant permission can grant only the other six permissions − Visible, Read, Write, Delete, Execute,and Schedule.
•
The users that are given the Grant permission can grant other users in the same group. •
Managing Realms
To manage realms, you must be a member of the administrators role to access the administration pages.
Create a new realm
To create a new realm,
Log on to JReport Enterprise Server using the administration port, which is 8889 by default.1. Click Security on the top banner, click Realm.2. Click Create a New Realm.3. Type a name for the realm.4. Select an authentication mode as the scheme, and then click OK.
Basic Authentication uses Base64 encode method. The re−conversion is easy. Digest Authentication uses MD5 digestmethod and its re−conversion is impossible.
5.
When a new realm is created, it will be assigned with the built−in users and groups, default resource tree, and so on. Please rememberto activate the correct realm before letting clients visit this realm.
Activate a realm
The realm must be activated before its content, such as resources, users, groups, and roles, can be accessed by the client users. Theremust be one realm, and should be the only one, that is active at any time.
To activate a realm,
Log on to JReport Enterprise Server using the administration port, which is 8889 by default.1. Click Configuration on the top banner, click Service.2. Select the realm you want to activate from the Activated Realm drop−down list.3. Click OK, and then restart JReport Enterprise Server for the changes to take effect.4.
Manage the users, groups and roles in an inactive realm
The users, groups and roles are available only when the realm they belong to is active. However, the users, groups and roles in theinactive realm still can be managed by the users in the administrators role.
To manage the users, groups and roles in an inactive realm,
Log on to JReport Enterprise Server using the administration port, which is 8889 by default.1. Click Security on the top banner, click Realm.2. Click Select to select the realm you want to manage.
All the realms on JReport Enterprise Server are in the Realm List table. The State column shows the status of the realms.The Active Realm is marked as Active Realm. The selected realm is marked as Selected Realm. If the realm is both activeand selected, it will be marked as Active Realm.
3.
Click the User, Group or Role tab to manage the selected realm.4.
Administrating JReport Enterprise Server
73

The information of the users, groups and roles that are in the selected realm is listed on the User, Group and Role tab.
Delete a realm
To delete a realm,
Log on to JReport Enterprise Server using the administration port, which is 8889 by default.1. Click Security on the top banner, click Realm.2. Click Delete to remove the realm you want to delete.3.
Managing User Accounts
To manage user accounts, you must be a member of the administrators role to access the administration pages.
Create a new user account
To create a new user account,
Log on to JReport Enterprise Server using the administration port, which is 8889 by default.1. Click Security on the top banner, click User.2. Click Create a New User.3.
Modify an existing user account
To modify an existing user account,
Log on to JReport Enterprise Server using the administration port, which is 8889 by default.1. Click Security on the top banner, click User.2. Click the name of the user you want to modify.3.
Add a role to a user
A user can play with more than one role. A user that holds multiple roles have all the privileges that the roles have.
To add a role to a user,
Log on to JReport Enterprise Server using the administration port, which is 8889 by default.1. Click Security on the top banner, click User.2. Click the corresponding Edit Role(s) link.3.
Add a user to a group
A user can play under more than one group. A user that belongs to multiple groups has all the privileges that the groups have.
To add a user to a group,
Log on to JReport Enterprise Server using the administration port, which is 8889 by default. 1. Click Security on the top banner, click User. 2. Click the corresponding Edit Group(s) link. 3.
Audit a specific user
You can audit a user and record user access and management information in the log files.
To audit a user,
Administrating JReport Enterprise Server
74

Log on to JReport Enterprise Server using the administration port, which is 8889 by default.1. Click Security on the top banner, click User.2. Click the corresponding Auditing link.3.
Change password for a user
To change the password for a user,
Log on to JReport Enterprise Server using the administration port, which is 8889 by default.1. Click Security on the top banner, click User.2. Click the corresponding Change Password link.3.
Delete a user account
To delete a user,
Log on to JReport Enterprise Server using the administration port, which is 8889 by default.1. Click Security on the top banner, click User.2. Find the user you want to delete, and then click the corresponding Delete link.3.
Note:
Built−in user accounts, such as admin and guest, and users that hold the other roles than the everyone role or that belong to anygroup, cannot be deleted. A user cannot delete himself from the user list.
Managing Groups
To manage groups, you must be a member of the administrators role to access the administration pages.
Create a new Group
To create a new group,
Log on to JReport Enterprise Server using the administration port, which is 8889 by default.1. Click Security on the top banner, click Group.2. Click Create a New Group.3.
Edit members of a Group
You can edit members of a group, such as adding a new member, or removing a member from the group.
To edit the members in a group,
Log on to JReport Enterprise Server using the administration port, which is 8889 by default.1. Click Security on the top banner, click Group.2. Click the corresponding member(s) link.3.
Notes:
A group can have more than one sub members and parent members. • A parent member cannot be added to the current group as its sub member. •
Delete a Group
To delete a role,
Administrating JReport Enterprise Server
75
Log on to JReport Enterprise Server using the administration port, which is 8889 by default.1. Click Security on the top banner, click Group.2. Find the role you want to delete, and then click the corresponding Delete link.3.
Note: Groups that are not empty, namely, having sub members or parent members, cannot be deleted.
Managing Roles
To manage roles, you must be a member of the administrators role to access the administration pages.
Create a new role
To create a new role,
Log on to JReport Enterprise Server using the administration port, which is 8889 by default.1. Click Security on the top banner, click Role.2. Click Create a New Role.3.
Edit members of a role
You can edit members of a role, such as adding a new user or role, or removing a member from the role.
To edit the members in a role,
Log on to JReport Enterprise Server using the administration port, which is 8889 by default.1. Click Security on the top banner, click Role.2. Click the corresponding member(s) link.3.
Notes:
A role can have more than one sub−groups, sub−roles and parent roles. • A parent role cannot be added to the current role as its sub−role. • Some members cannot be removed from the role it belongs to, such as admin in the administrators role, guest in theeveryone role. The current user cannot remove himself from the administrators role.
•
Delete a role
To delete a role,
Log on to JReport Enterprise Server using the administration port, which is 8889 by default.1. Click Security on the top banner, click Role.2. Find the role you want to delete, and then click the corresponding Delete link.3.
Note:
Built−in roles, such as administrators and everyone, and roles that are not empty, cannot be deleted.
Assigning Permissions
Permissions, associated with resources and folders, are the rules that are granted to users to control their access to resources andfolders.
How inheritance affects resource and folder permissions
After you set permissions on a parent folder, new resources and subfolders created in the folder inherit these permissions. If you donot want them to inherit permissions, enable their user permissions and set their permissions separately. The resources and folders
Administrating JReport Enterprise Server
76
will inherit permission from their parent folder if their user permissions are not enabled.
Change resource and folder permissions
To set, view, change, or remove resource and folder permissions,
Log on to JReport Enterprise Server, locate the resource or folder for which you want to set permissions.1. Click Properties in the Control column, and then check Enable User Permissions, if necessary.2. Do one of the following:
To set up or change permissions for a user, group, or role, select the user, group, or role from the User , Group , or Roledrop−down list. Check or uncheck each permission you want to allow or deny, if necessary.
To remove resource and folder permissions for all the users, groups and roles, uncheck Enable User Permissions.
3.
Task Management
Task Overview
Normally, a task can be a set of operations you perform on JReport Enterprise Server to achieve a goal, such as deploying a folder,deleting a resource, viewing resource properties, and so on. However, tasks that JReport Enterprise Server really cares and managesare those associated with report−running issues, say, the report−running tasks.
JReport Enterprise Server allows you to quick view a report result (Run), view a report result using selected options and parameters(AdvancedRun), and schedule a report to run unattended at a specific time or periodically (Schedule), which are the fundamentalmodes that JReport Enterprise Server performs report−running tasks.
You can track down the status of the report−running tasks, such as the scheduled tasks that are waiting to be performed by JReportEnterprise Server, the tasks that are currently being performed, and the tasks that have already been performed.
JReport Enterprise Server collects the task information and manages it in a set of tables, which includes:
Tasks that are scheduled:
Scheduled tableShows the status information of the scheduled tasks that are waiting to be performed, such as the task ID, whether the task is enabled,previous running time, next running time, and so on.
Active tableShows the status information of the tasks that are currently being performed, such as the task ID, time when the task is started, enginestatus, and so on.
Completed tableShows the status information of the tasks that have already been performed, such as the task ID, time when the task is completed,whether the task is successfully performed, the result files, error message, and so on.
Tasks that are performed in the Run or AdvancedRun mode:
On−demands tableShows the status information of the tasks submitted using the Run or AdvancedRun mode, such as the report path and name, timewhen the task is completed, time elapsed since the task has been performed, time when the task is started, and so on.
Scheduled table
The Scheduled table consists of the following columns:
Administrating JReport Enterprise Server
77

Column Description
Task ID The internal ID for this task, which is a unique time stamp.
Task Name The name of this task, specified by the user who submits the task.
Catalog The catalog path and name that the report belongs to.
Report The report path and name.
Next Run At The time when this task is to be performed for the next time.
Last Run At The time when this task has been performed for the last time.
Task Type The type of this task, such as Versioning System, File System, E−mail, or Printer.
Is Enabled Shows whether this task is enabled. Can be Enabled or Disabled.
Submitter The user who submits this task.
Launch Type The way in which this task is executed, such as Repeatedly and One Time.
Is SuccessfulShows whether this task has been successfully performed. The value true (or false)means the task has been performed successfully (or unsuccessfully). If the column isleft empty, that means the task has not yet been performed.
Active table
The Active table consists of the following columns:
Column Description
Task ID The internal ID for this task, which is a unique time stamp.
Started Time The time when this task starts to be performed.
Catalog The catalog path and name that the report belongs to.
Report The report path and name.
Task Type The type of this task, such as Versioning System, File System, E−mail, or Printer.
Engine StatusThe current status of JReport engine, such as record fetching, grouping, memorypaging, engine initializing, and so on.
Is Enabled Shows whether this task is enabled. Can be Enabled or Disabled.
Launch Type The way in which this task is executed, such as Repeatedly, One Time, and Instant.
Submitter The user who submit this task.
Parameters Files Shows the parameter file names and provides links to the parameters.
Parameters Shows the parameters according to the size that has been specified.
Completed table
The Completed table consists of the following columns:
Column Description
Task ID The internal ID for this task, which is a unique time stamp.
Task Name The name of this task, specified by the user who submits the task.
Completed Time The time when this task is completed.
Catalog The catalog path and name that the report belongs to.
Report The report path and name.
Task Type The type of this task, such as Versioning System, File System, E−mail, or Printer.
Is SuccessfulShows whether this task has been successfully performed. The value true (or false)means the task has been performed successfully (or unsuccessfully). If the column isleft empty, that means the task has not yet been performed.
Parameters File Shows the parameter file names and provides links to the parameters.
Administrating JReport Enterprise Server
78

Parameters Shows the parameters according to the size that has been specified.
Result File(s) Shows the report result files and provides links to the report result files.
Launch Type The way in which this task is executed, such as Repeatedly, One Time, and Instant.
Submitter The user who submit this task.
Error Message Shows the error message when the task fails to perform.
Engine StatusThe JReport engine status when the task is completed, such as record fetching,grouping, memory paging, engine initializing, and so on. If the task fails to perform,shows the engine status when the error occurs.
On−demands table
The On−demands table consists of the following columns:
Column Description
Report The report path and name.
Catalog The path and name of the catalog that the report belongs to.
Completed Time The time when this task is completed.
Time Elapse The elapsed time since the task starts to be performed.
Started Time The time when this task starts to be performed.
Catalog Version Number The version number of the catalog that the report belongs to.
Parameters The parameter of the report.
Report Version Number The version number of the report.
Notes:
Version Number: Each catalog or report type resource can hold a group of archive versions, and each version is given aunique number to distinguish itself from others.
•
Some columns will not be shown by default, to show other columns, use the Preferences page. For details, refer to UserGuide | Administrating JReport Enterprise Server | Customizing JReport Enterprise Server.
•
Approaches to the Task Information Tables
All the task information are collected and managed in tables, on the service page of JReport Enterprise Server (Port 8888 by default).
If you want to Then do
Access the Scheduled table, Click Schedule on the top banner, and then click the Scheduled tab.
Access the Active table, Click Schedule on the top banner, and then click the Active tab.
Access the Completed table, Click Schedule on the top banner, and then click the Completed tab.
Access the On−demands table,Click On demand on the top banner, and then click the On demand tab.
Managing Tasks in Task Tables
JReport Enterprise Server provides you with a set of tables to collect and show task information. You can also manage the tasks inthese tables.
For information on how to run reports in a specific way, see User Guide | Accessing JReport Enterprise Server − Browser.
Common Task Management Operations
Some task management operations are common in most tables, as listed in the following table:
Administrating JReport Enterprise Server
79

If you want to Then do
Select a task, Click the leftmost check box in the row of the task you want to select.
Select all the tasks, Click the Select All button.
Deselect all the tasks, Click the Clear All button.
Remove a task, Select the task you want to remove, and then click the Delete button.
Scheduled table
If you want to Then do
Create a new scheduled task,Click the New button, and then follow the screen prompts.
Run a task at once, Select the task you want to run, and then click the Run Now button.
Duplicate a task, Select the task you want to duplicate, and then click the Copy button.
Enable a task, Select the task you want to enable, and then click the Enable button.
Disable a task,Select the task you want to disable, and then click the Disable button, thedisable tasks will not be performed until you enable it again.
Export a scheduled task to ascript on disk,
Select the task you want to export to script, click the Export ToScript button.
1.
Modify the script text in the box.2. Provide a name for the script.3. Click Save.4.
Import a scheduled task from ascript saved on disk,
Select a script from the Deal Script drop−down list. 1. Click Deal Script. 2. Modify the script text in the box. 3. Click Import from the Script. 4.
Delete a script from disk, Select a script from the Deal Script drop−down list. 1. Click Deal Script. 2. Click Delete the Script. 3.
Notes:
The script file you export will be saved to the folder %JREntServerInstallRoot%\realm\%ActiveRealm%\schedule, using thename you specify. Meanwhile, the name of the exported script will be added to the Import from Script drop−down list.
•
The Import from Script button appears only when there are scripts existing in the%JREntServerInstallRoot%\realm\%ActiveRealm%\schedule folder.
•
The script file name extension is *.script.•
Active table
If you want to Then do
Stop a task from running, Click the corresponding Stop link.
View parameter information, Click the corresponding parameter link on the Parameters File column.
Completed table
If you want to Then do
Delete all completed tasks, Click the Delete All Completed Tasks button.
View detailed task runninginformation,
Click the corresponding Details link on the Is Successful column.
View parameter information, Click the corresponding parameter link on the Parameters File column.
Index
Administrating JReport Enterprise Server
80

Server Data Management
Server Data Overview
While JReport Enterprise Server is running, it keeps track of server information and stores it to its own database for the purpose ofrunning various management and monitoring tasks, such as managing resources on the server, monitoring the running task status, andcollecting server running statistics.
The JReport Server data, which includes system tables and profiling tables, is saved in its own databases individually.
The JReport System database holds information on folders, nodes, versions, the security system, and the completed status table. Theprofiling database holds the server runtime performance related information.
Referrences: systables.sql, profiling.sql
JReport Enterprise Server provides approaches to manage the server data on a stand−alone server or in an integration environment byyourself. In this chapter about Server Data Management, you can achieve the following goals:
Configure the Server database in a stand−alone environment Checking and Warning about System Resource Problems at Startup◊ Configuring the Server database◊ Backing up/restoring Server data◊ Archive Server data and restoring archived data◊ Backup/archive of summary information ◊ Clearing unused nodes in the System database◊
•
Configuring the Server database in an integration environment Configuring the Server database for JDBC ◊ Configuring the Server database for JNDI ◊
•
Configuring the Server Database in a Stand−alone Environment
In a stand−alone environment, all of the following features can be performed on the Administration page (8889) of JReportEnterprise Server to manage your server database.
Checking and Warning about System Resource Problems at Startup
Relationships between the Server Database, Resource Tree, and Physical Folder
The Server database contains all the resources and information used by JReport Enterprise Server, such as catalog and reportinformation, users, and schedules. The server resource tree gets resource information from the server database and structures them onthe tree. Only the resources that are organized in the resource tree can be accessed and queried by the client. Each node of theresource tree has a physical folder in the disk, by default, all the physical folders are contained in <install_root>/history.You can also specify a real path for each resource node by checking the Enable Real Path option.
In abnormal circumstances, the server data may not be saved correctly or completely in the databases. JReport Enterprise Serverallows you to check the integrality of the server data.
Keeping the consistency between resource node and physical folder
To keep the consistency of the server resource database and physical folder, JReport Enterprise Server will do the cleanup work atstartup. The cleanup will be done differently for two cases:
for the resource nodes which are not mapped to any external physical folders.• for the resource nodes that are mapped to external physical folders.•
Administrating JReport Enterprise Server
81
No External Physical Folders are Specified
For the resources that are not be mapped to external physical folders, they will be mapped to <install_root>/history andmanaged by JReport Enterprise Server. Therefore, once you specify to do a cleanup, it will be done automatically without any promptinformation.
Have External Physical Folders Specified
If you have mapped your resources to external physical folders, once you specify to do cleanup, JReport Enterprise Server will checkthe resource nodes against the mapped location, and prompt you if the physical folders do not exist. The warning information will berecorded in error.log in the <install_root>/logs folder.
Specifying to do the Cleanup
Two ways are provided for you to request that JReport Enterprise Server to do the cleanup:
Add the JVM option −Dcheck.systables=true to the start command of JReport Enterprise Server or the JVMsettings for the Java Application Server when using an embedded Server.
•
In Java code using the Server API, add it to the Properties.
Using the following demo code:
System.getProperties().put("check.systables","true"); //Enable CleanupSystem.getProperties().put("logall","true");Properties prop = new Properties();prop.setProperty("server.enableDynamicResource","true"); //Setserver.enableDynamicResource to trueHttpUtil.initEnv(prop);this.rptServer = HttpUtil.getHttpRptServer();
System.out.println(" ========httpRptServer= " + this.rptServer + " starts up!");
Notes: You must set the property server.enableDynamicResource to true before the initEnv() method in order to enablethe mapping folder.
•
The warning information will be saved in error.log, and you need to also specify the JVM property for a higherlevel of JReport Enterprise Server logging in order to see the error (–Dlogall=true).
•
•
Configuring Server Database
JReport Enterprise Server now provides multiple database support, allowing you to configure your own database to store server data,other than the default database that JReport Server uses by default which is Hypersonic (HSQLDB). The following are the two waysto configure your server database: 1) on the admin pages (8889) and 2) in the dbconfig.xml file. This file is automatically createdwhen you install JReport Server. This file is used to store the configuration information of the database used in JReport Server. Thetwo ways are equivalent, so you just need to choose either one of them.
Configure the server database on the Administration page of JReport Enterprise Server (8889): • On the top banner of the page, select the Data link.1. Select the realm from the dropdown list. 2. Click the System DB or the Profiling DB tab. You can configure databases for System and Profiling individually.3. Switch to the Configuration tab.4. Select a DBDriver from the Driver drop down list or type the DBDriver here, and provide the driver class pathinformation in the Driver Class Location field if necessary.
Note: If you select a DBDriver named sun.jdbc.odbc.JdbcOdbcDriver in the Driver drop down list, we can notguarantee that the server can properly access the DBMS driven by it.
5.
Administrating JReport Enterprise Server
82

Type a valid URL that can be used to establish a connection to the database. A valid format of the URL should beprovided by the DBDriver vender.
6.
Provide user ID and password.7. To test the connection, click Test. To update the database configuration to apply the settings, click Update and thenrestart the server to finalize this change.
8.
Configure the server database in the dbconfig.xml file under the <install_root>\bin directory. Here we providesome examples for your reference.
The following example is for Oracle. Please modify the dbconfig.xml file as follows:
•
<?xml version="1.0" encoding="UTF−8"?> <dbconfig><workspace name="defaultRealm"> <database> <database name="systables"> <user>test</user> <url>jdbc:oracle:thin:@192.168.126.35:1521:ora9i</url> <password>1234</password> <driver classpath="D:\DBDriver\Oracle\oracle9i\ojdbc14.jar">oracle.jdbc.driver.OracleDriver</driver> </database></workspace> </dbconfig>
The following example is for DataDirect driver. Please modify the dbconfig.xml file as follows:
<?xml version="1.0" encoding="UTF−8"?><dbconfig> <workspace name="defaultRealm"> <database name="systables"><user>test</user> <url>jdbc:datadirect:sqlserver://192.168.126.35:1433;DatabaseName=sysdb</url><password>1234</password> <driver classpath="D:\DBDriver\connectjdbc\lib\base.jar;D:\DBDriver\connectjdbc\lib\util.jar;D:\DBDriver\connectjdbc\lib\sqlserver.jar">com.ddtek.jdbc.sqlserver.SQLServerDriver</driver><dbtype>Microsoft SQLServer</dbtype></database> </workspace> </dbconfig>
Reference: For more about the DataDirect driver, please refer to the DataDirect documentation. The following are thedrivers for different Databases supported by the DataDirect driver:
com.ddtek.jdbc.db2.DB2Driver com.ddtek.jdbc.informix.InformixDriver com.ddtek.jdbc.oracle.OracleDriver com.ddtek.jdbc.sqlserver.SQLServerDriver com.ddtek.jdbc.sybase.SybaseDriver
The following example is for DB2 database. Please modify the dbconfig.xml file as follows: <?xml version="1.0" encoding="UTF−8"?> <dbconfig><workspace name="defaultRealm"> </database> <database name="systables"> <user>test</user> <url>jdbc:db2://dbs−b/sample</url> <password>1234</password> <driver classpath="D:\DBDriver\DB2\v81\db2java.zip;D:\DBDriver\DB2\v81\db2jcc.jar;">
Administrating JReport Enterprise Server
83

COM.ibm.db2.jdbc.net.DB2Driver</driver><tablespace>tablespace1</tablespace></database></workspace> </dbconfig>
In the configuration information above, the tablespace1 in the tags <tablespace></tablespace> is the name of thetable space, which is defined in the DB2 database. The table space is also supported for the Oracle database.
JReport Enterprise Server supports data source JNDI name and resource reference name in dbconfig.xml. Use the<datasource></datasource> tags to specify the DataSource JNDI name or resource reference name.
<?xml version="1.0" encoding="UTF−8"?><dbconfig><workspace name="defaultRealm"><database name="systables"><datasource>jndi://datasource−name</datasource></database></workspace></dbconfig>
Notes:
After the database is successfully connected, the username and password in the dbconfig.xml file will be encrypted. Sothe nodes
<user>test</user><password>1234</password>
may become something like nodes shown below:
<encrypt−sign>inG0qyMr89c2sIUwwDXN3dycTmeuQW5i</encrypt−sign>
•
Storing the systables and the profiling data into two separate databases is strongly recommended.• For the Access and HSQLDB Server, you don't need to specify the Driver Class Location; while for the other databases,you must provide the driver class path information unless it has already been added to the classpath of theJREntServer.bat file.
•
When you configure the database URL in a clustered environment, please make sure that the setting for both admin andbackup server points to the same database location, so that when the backup server is used instead of the admin server, theserver data will be consistent.
•
Normally, JReport Enterprise Server automatically creates system tables and profile tables the first time it starts. Thedatabase information that JReport Enterprise Server uses is defined in the dbconfig.xml file. However, if the user IDdefined in that file doesn't have permission for creating tables in the database, JReport Enterprise Server will fail to completethe operations. In this case, you can have another user, such as the database administrator, who holds the relevantpermissions, to create a set of empty tables in that user's schema using the SQL files provided, systables.sql andprofiling.sql.
•
Backing up/Restoring Server Data
Backup server data
The server data backup process traverses all tables in the database, collecting data and exporting all table data to a ZipEntry. Forcertain tables, such as the catalog version table, report version table, and result version table, the data also includes relational real filesin the history directory. All server data is compressed to a single Zip file. Every table's data and every relational real file arestored as a ZipEntry in this single file. Use BackUp and Restore to save the entire database and restore the entire database. It does notaffect the size of the database.
You have two alternatives to export the server data:
Through the JReport Server browser user interface.•
Administrating JReport Enterprise Server
84

Through the command line.•
To export the server data through the Server user interface,
On the top banner of the Administration page of JReport Enterprise Server, select the Data link.1. Select a realm from the dropdown list. 2. Click the System DB or Profiling DB tab.3. Type the file path and name in the Backup System DB or Profiling DB in the archive field, or use the Browse button tospecify the file path, and then click Backup. Please note that the file extension should be included.
4.
To export the server data through the command line no Unix or Windows,
In the command line window, switch to the <install_root>\bin folder. 1. Use the DBMaintain command (DBMaintain.sh on Unix) and −Bsystables/−Bprofiling parameter, for example:
C:\JREntServer\bin>DBMaintain −Bsystables:C:\TEMP\cmd_b_systables.zip−Bprofiling:C:\TEMP\cmd_b_profiling.zip
2.
Restore server data
The server data restore process picks up every tables data from the backup file and inserts it into the corresponding table in thedatabase. You can only restore the server data using the DBMaintain tool with the −Rsystables/−Rprofiling parameter.
To import the server data using the command line,
In the command line window, switch to the <install_root>\bin folder.1. Use the DBMaintain command and −Rsystables/−Rprofiling parameter, for example:
C:\JREntServer\bin>DBMaintain −Rsystables:C:\TEMP\cmd_b_systables.zip−Rprofiling:C:\TEMP\cmd_b_profiling.zip
2.
Backup/restore limitations
The backup/restore feature doesn't support cross−platform operation. The backup and restore operations must be done on the sameoperating system. For example, if you backup the server data to a zip file on a Windows platform, you will not be able to restore it ona Unix system. Since it is binary data, there will also be problems switching between different types of Unix systems such as Solarisand Linux.
Archiving and Restoring Server Data
Archiving Server Data
While running JReport server, the sizes of the result version table (DB: systables) and TaskContext table (DB: profiling) grow larger.JReport Enterprise Server allows you to archive and delete data to a single backup file. You can then retrieve the data from thebackup file at a later date. Unlike Backup, when you Archive data the data is removed from the database and when you restore datafrom the archive it just adds the archived data back into the database and does not replace any existing data.
To archive the server data:
On the top banner of the Administration page of JReport Enterprise Server, click Data.1. Select the realm from the dropdown list.2. Click the System DB or Profiling DB tab.3. Switch to the Archive tab.4. Specify a time in the Move to archive data before field, and then type or use the Browse button to specify the file path andname in the To archive field.
If you don't want to backup the archive server data, leave this field blank. The server data will then be removed from the
5.
Administrating JReport Enterprise Server
85
database without saving it to an archive file.Click Archive. Server data prior to the time specified will be removed from the database and saved to the archive file usingthe name specified.
6.
Restoring the Archive Server Data
You can restore server data that has been archived from an archive file. You can only restore it using the server user interface.
To restore the archived server data:
On the top banner of the Administration page of JReport Enterprise Server, click Data.1. Select the realm from the dropdown list.2. Click the System DB or Profiling DB tab.3. Switch to the Archive tab. 4. Type or use the Browse button to provide the archive file name and location in the Restore from archive field, and thenclick Restore.
5.
Archive/Cutdown Summary information
After archiving or backing up files, you can view the archive or backup summary information from the summary tab, which includesArchive, Date, Type, Version, Realm, Database and Scope.
To view the summary information of a specified file,
On the top banner of the Administration page of JReport Enterprise Server, click Data.1. Select the realm from the dropdown list.2. Select the System DB or Profiling DB tab.3. Switch to the Summary tab. 4. Type or use the Browse button to specify an archive or backup file name and location in the Archive field, and then clickSummary.
5.
System DB Check of the System Database
Making operations on dynamic resources may generate garbage unused nodes in the System Database. The unused nodes can becleared through the Administration page.
How unused dynamic nodes are generated
If you do not use the real path option it is unlikely you will need to check the database. If you are using a real path for a folder to geta dynamic resource, and then use advanced run for a report in this folder and archive its version or successfully publish the report tothe version system, it is possible to generate unused nodes. if you do either of the following operations, the unused dynamic nodeswill be generated in the System Database:
Cancel or change the real path setting.• Deploy a resource to replace an existing dynamic resource. •
How to clear invalid dynamic nodes
To clear unused nodes on the Administration page, perform the following steps:
On the top banner of the Administration page of JReport Enterprise Server, click Data. 1. Select the System DB or Profiling DB tab. 2. Select the System DB Check tab. 3. Select the Check button. 4. If any Invalid Nodes are listed, check the check−box on the header of the first column to specify whether you want to selectall or unselect all. Otherwise, you can check the corresponding check−box to select the invalid dynamic nodes that you wantto delete.
5.
Administrating JReport Enterprise Server
86
Selecting the Delete button will delete all selected nodes.6. Select the Cancel button to return to the previous page.7.
Configuring Server Database in an Integration Environment
Here we illustrate two potential environments to configure the server database in an application server environment: first in a JDBCenvironment and second in a JNDI environment. You can go through the following sections to get help. These are just two of manypossible ways you can integrate JReport Server into your application environment.
Configuring Server Database for JDBC
In the JDBC environment, JReport Enterprise Server provides multiple database support, which allows you to configure your owndatabase, rather than just using the default database that JReport Server uses. Before you integrate JReport Server with otherapplication servers, you can generate a web.xml file to specify a different database to use. Here we give you two cases for yourreference.
After you generate a web.xml file, the priority to look for the database connection information is like this: web.xml followed bydbconfig.xml. However, if you do not specify the web.xml files, the dbconfig.xml, which uses the default database −HSQLDB, will be applied.
Case I: Integrating JReport Enterprise Server with JBoss 4.0
Before integrating JReport Enterprise Server with JBoss 4.0, if you want to configure your own database rather than using the defaultdatabase, you can first create a web.xml file as follows:
Here we take the IBM DB2 database db2 as an example:
<web−app><env−entry> <env−entry−name>jreport.datasource.systables</env−entry−name><env−entry−type>java.lang.String</env−entry−type><env−entry−value>jdbc://user:password@jdbc:datadirect:db2://dbs−b/tempdb#driver=COM.ibm.db2.jdbc.net.DB2Driver</env−entry−value></env−entry>...</web−app>
Reference: For more information about how to integrate JReport Enterprise Server with JBoss 4.0, please refer to Integrating JReportEnterprise Server with a Java Application Server.
Note: Under the condition of integrating JReport Enterprise Server with JBoss, if you have modified a web.xml file as the aboveexample to configure your database as DB2, you should also copy db2java.zip and db2jcc.jar into the servlet\WEB−INF\libdirectory.
Case II: Integrating JReport Enterprise Server with WebSphere 5.1
Before integrating JReport Enterprise Server with WebSphere 5.1, if you want to configure your own database rather than using thedefault database, you can first modify a web.xml file as follows.
Here we take the Oracle database as an example:
<web−app> <env−entry><env−entry−name>jreport.datasource.systables</env−entry−name><env−entry−type>java.lang.String</env−entry−type> <env−entry−value>jdbc://test:1234@jdbc:oracle:thin:@OracleHost:1521:orc1#driver=oracle.jdbc.driver.OracleDriver,classpath=D:\DBDriver\Oracle\oracle9i\ojdbc14.zip
Administrating JReport Enterprise Server
87

</env−entry−value> </env−entry> ...</web−app>
Reference: For more information about how to integrate JReport Enterprise Server with WebSphere 5.1, please refer to IntegratingJReport Enterprise Server with a Java Application Server.
Configuring Server Database for JNDI
When JReport Server runs, it will save or retrieve data such as Scheduled Tasks, Complete Tasks, Report/Catalog Versions, andUser/Role information. By default, such information is saved in the built−in DB−−HSQLDB. JReport Server calls the HSQLDBdriver to connect with the database. However, you can specify to save or retrieve the data from different databases or data sources.
As you know JReport Server supports connecting to a RDBMS to access its system data via JDBC. The JDBC configurationinformation is stored in server\bin\dbconfig.xml −− create database connection according to the configuration file. With the J2EEdata source support feature, JReport Server can get the predefined javax.sql.DataSource by JNDI APIs in a J2EE environment.
You can specify a parameter in the web.xml, so that JReport Server uses a predefined data source to interact with the RDBMS in aJ2EE environment. This parameter also can be provided directly to the Java VM using the "−D" parameter or through JReportServer's API.
This feature only works in a J2EE embedded environment, that is, JReport Server is running in a WAR/EAR package which isdeployed to an application server such as JBoss, WebSphere, WebLogic or Tomcat, etc.
We will use the term dsInfo to indicate what JReport Server gets from JDBC connection. It is a key−value pair that should be passedto JReport Server through JVM properties.
The name and value for dsInfo is defined as follows:
The name should be: jreport.datasource.<dbname>. The <dbname> here is JReport Server's inner db name. It must be "systable" or"profiling". For example, the dsInfo name could be:
jreport.datasource.systables
The value should be a URL form; the following protocol is supported by JReport Server:
jndi://[<jdbc−user:jdbc−passoword>@]datasource_name[#<attribute−name=attribute−value>,]
For example: jndi://jdbc/jreport−systables
For the DB2 database, which has defined table spaces:jndi://jdbc/jreport−systables#tablespace=tablespace1
•
JNDI in Embedded J2EE Environment (.war)−−WEB−INF/web.xml
In this mode, the JReport Server works as a WAR package in a J2EE environment.
If we want to let JReport Server use a predefined JNDI DataSource, the dsInfo should be specified in the web application's context.That is, in the WEB−INF/web.xml file, we should add a <env−entry> element like following:
<web−app><env−entry><env−entry−name>jreport.datasource.systables</env−entry−name><env−entry−type>java.lang.String</env−entry−type><env−entry−value>jndi://datasource_name_which_is_predefined</env−entry−value></env−entry>...
Administrating JReport Enterprise Server
88
</web−app>
Then, when the JReport Server's instance is created, it will get this context parameter from WEB−INF/web.xml and look for thespecified datasource to interact with the specified RDBMS.
Case I: Registering JNDI in JBoss 4.0.1
Create a mssql−ds.xml file as follows:1.
<?xml version="1.0" encoding="UTF−8" ?><datasources> <local−tx−datasource> <jndi−name>systables</jndi−name> <connection−url>jdbc:microsoft:sqlserver://servername:1433;DatabaseName=tempdb</connection−url> <driver−class>com.microsoft.jdbc.sqlserver.SQLServerDriver</driver−class> <user−name>sa</user−name> <password>password</password> </local−tx−datasource> </datasources>
2. In WEB−INF/web.xml file it should be defined as follows:
<web−app> <env−entry><env−entry−name>jreport.datasource.systables</env−entry−name><env−entry−type>java.lang.String</env−entry−type><env−entry−value>jndi://jdbc/systables</env−entry−value></env−entry> …</web−app>
Copy the mssql−ds.xml and servlet.war files into C:\jboss−4.0.1\server\default\deploy folder. 3.
Case II: Registering JNDI in WebSphere 5.1
Open http://hostname:9090/admin (port may vary at your installation).1. After successfully logging in, expand the Resources node, and then click JDBC Providers.2. Click the New button.3. Select a JDBC provider − Microsoft JDBC driver for MSSQL Server 2000, then click the OK button. 4. In the Name field, type in test. Specify the classpath, then click the OK button.5.
Administrating JReport Enterprise Server
89
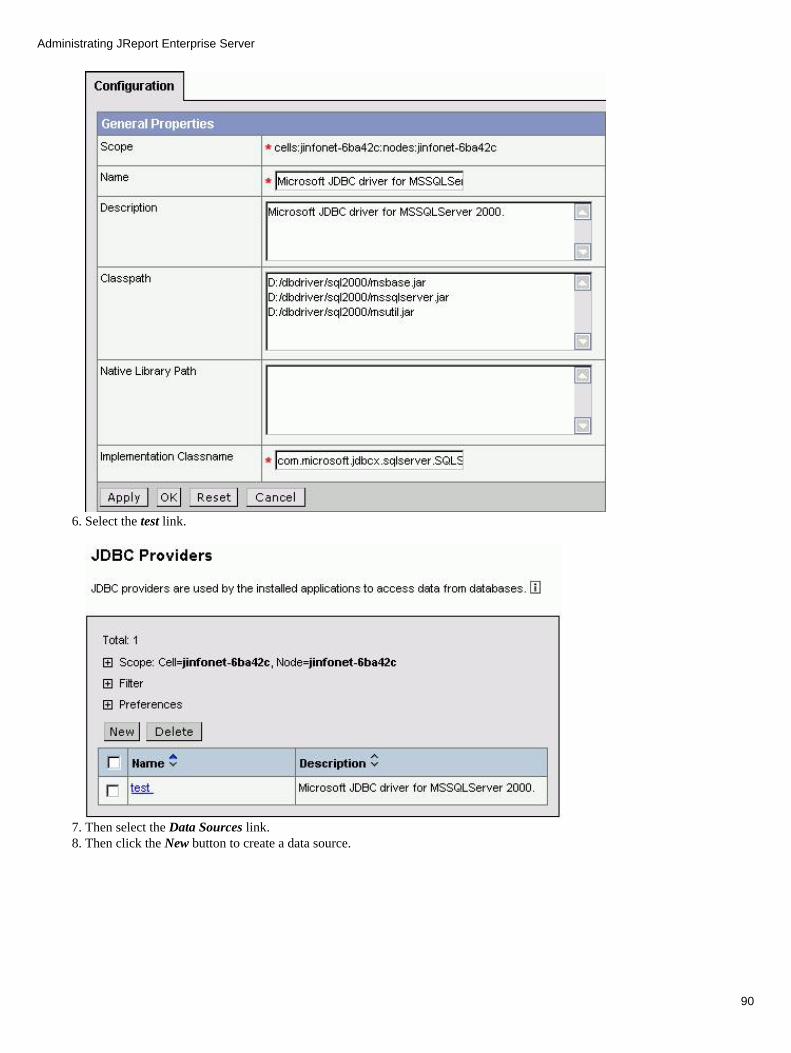
Select the test link.6.
Then select the Data Sources link. 7. Then click the New button to create a data source. 8.
Administrating JReport Enterprise Server
90
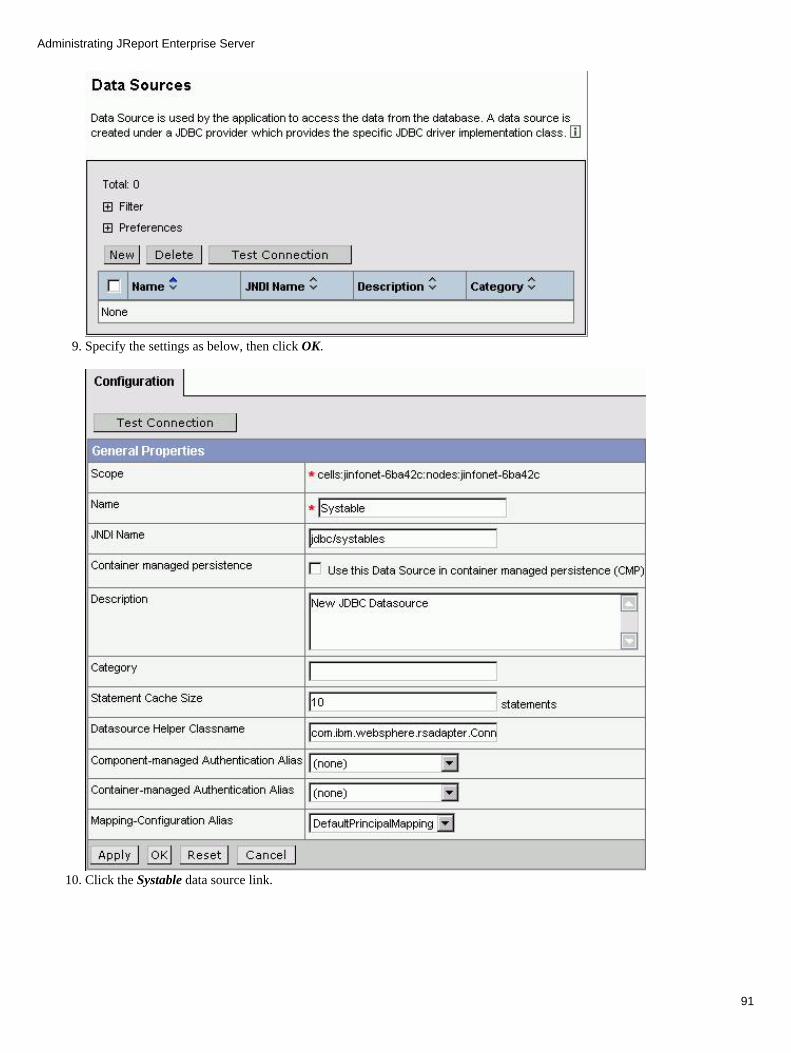
Specify the settings as below, then click OK. 9.
Click the Systable data source link.10.
Administrating JReport Enterprise Server
91
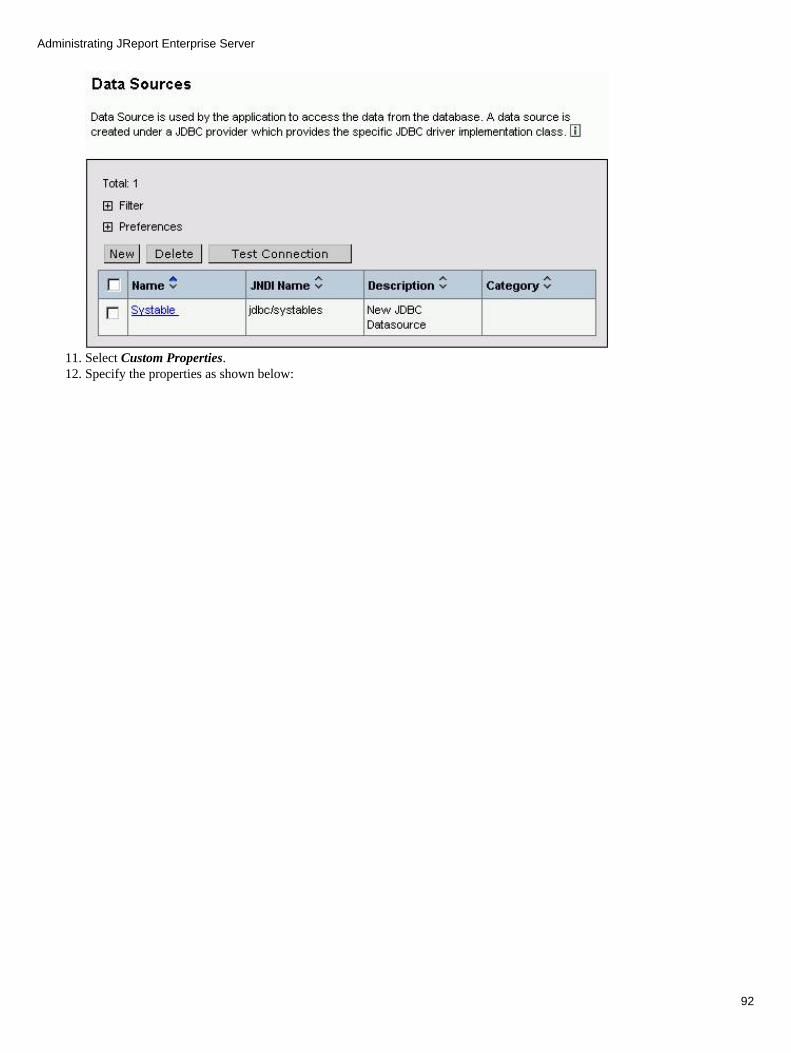
Select Custom Properties.11. Specify the properties as shown below:12.
Administrating JReport Enterprise Server
92
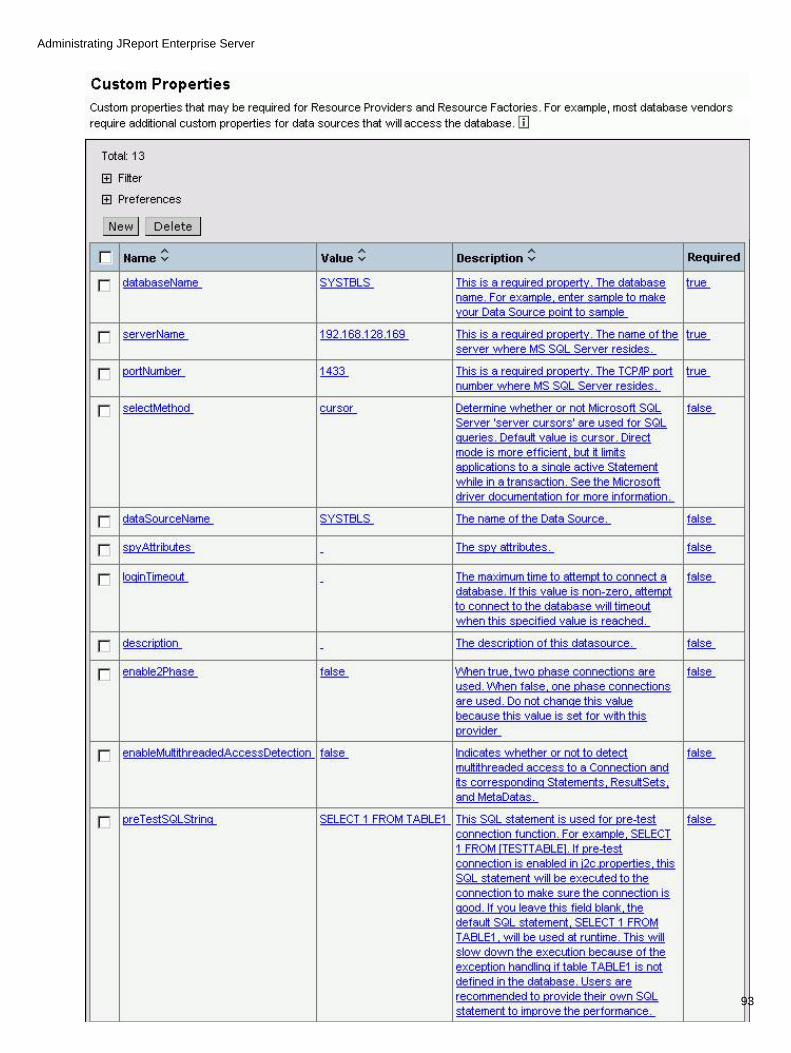
Administrating JReport Enterprise Server
93

Click Save in the top area to apply changes to the master configuration. 13. In the popup dialog, click Save. 14.
To test the connection, first visit the Data Sources page following the sequence: JDBC Providers − test − Data Sources.15.
Select the Systable data source by checking the checkbox, then click Test Connection. 16. Modify the web.xml file. JReport Enterprise Server supports to use resource reference name to look up the databaseinformation. If you want to use the resource reference name, in the the web.xml file, please modify the configuration likethis:
17.
<web−app> <env−entry><env−entry−name>jreport.datasource.systables</env−entry−name><env−entry−type>java.lang.String</env−entry−type><env−entry−value>jndi://jdbc/jreport</env−entry−value></env−entry>
<resource−ref id="resDS"><res−ref−name>jdbc/jreport</res−ref−name><res−type>javax.sql.DataSource</res−type><res−auth>Container</res−auth></resource−ref> …</web−app>
Administrating JReport Enterprise Server
94
Please bind the resource reference name with the data source JNDI name, using the tool WebSphere Studio ApplicationDeveloper (recommended).
Important Notes
The dsInfo can be specified in several places or levels, such as JVM properties, ejb−jar.xml, web.xml andJREntServer\bin\dbconfig.xml. The sequence to load the information is
JVM −− HttpUtil.initEnv(props) −− CustomizedServerEnv −− ejb−jar.xml −− web.xml −−dbconfig.xml
•
Please do not use reporthome, @ or # in JNDI name or Resource name. •
Index
Customizing JReport Enterprise Server
You can customize JReport Enterprise Server according to your specific requirements, such as the way it lists resources and folders,the format in which the report result is shown, and so on.
You can specify default preference settings for all users on JReport Enterprise Server, or, just for yourself.
You use the Preferences page to customize JReport Enterprise Server.
Approaches to the Preferences Page
Customize JReport Enterprise Server for all users
You can specify default preference settings for all users on JReport Enterprise Server. These default settings will be used when userslog on, until they specify their own preference settings.
To customize JReport Enterprise Server for all users,
Log on to JReport Enterprise Server using the administration port, which is 8889 by default.1. Click Preferences on the top banner.2.
Note:
To access the administration pages, you must be a member of the administrators role.
Customize you own JReport Enterprise Server
You can specify your own preference settings, which will override the default settings specified by the administrators.
To customize your own JReport Enterprise Server,
Log on to JReport Enterprise Server using the service port, which is 8888 by default.1. Click Preferences on the top banner.2.
Customizing JReport Enterprise Server
Set the time to keep completed tasks
You can set the time during which JReport Enterprise Server keeps the completed tasks in the Completed table. The completed taskswill be removed from the Completed table once the time you specified has reached.
To set the time to keep the completed tasks,
Administrating JReport Enterprise Server
95

Log on to JReport Enterprise Server using the administration port (8889 by default) or the service port (8888 by default).1. Click Preferences on the top banner, and then click the Customize tab.2. Type a number in the Days to Keep Completed Tasks box. Type 0 if you don't want to remove the completed tasks after aperiod of time.
3.
Click Apply when you finish.4.
Set the default view format
When you run a report on JReport Enterprise Server, normally, the report result will be generated in DHTML format. However, thedefault view format can be changed.
To set the default view format,
Log on to JReport Enterprise Server using the administration port (8889 by default) or the service port (8888 by default).1. Click Preferences on the top banner, and then click the Customize tab.2. Select a view format from the Default View Format drop−down list, the format you specify will be used as the default viewformat when you view a report by clicking Run in the Control column.
3.
Click Apply when you finish.4.
Show/hide columns on pages
You can select to show or hide some specific columns on some certain pages, such as the Reports page, the Scheduled page, theActive page, and so on.
To select to show or hide columns on a specific page,
Log on to JReport Enterprise Server using the administration port (8889 by default) or the service port (8888 by default).1. Click Preferences on the top banner, and then click the Customize tab.2. Select the page you want to customize from the Show Columns on Page drop−down list.3. Check or uncheck each column you want to show or hide, if necessary.4. Click Apply when you finish.5.
Specify the display size of parameters
When there are many parameters, you can make what is displayed shorter and easier to be read by specifying the display size ofparameters. The size will be applied to both completed and active schedules.
To specify the display size of parameters,
Log on to JReport Enterprise Server using the administration port (8889 by default) or the service port (8888 by default). 1. Click Preferences on the top banner, and then click the Customize tab. 2. Type in a number as the display size of parameters. 3. Click Apply to finish. 4.
Specify whether to pop up a new window for DHTML
You can specify whether to view DHTML format report result in a new window or in the same window.
To specify whether to pop up window for DHTML,
Log on to JReport Enterprise Server using the administration port (8889 by default) or the service port (8888 by default).1. Click Preferences on the top banner, and then click the Customize tab.2. Check Pop−up DHTML Window to view DHTML in a new window.3. Click Apply when you finish.4.
Administrating JReport Enterprise Server
96
Configuring DHTML features
You can use the DHTML tab to customize the DHTML features according to your own requirements, say, if you don't need somefeatures of DHTML, you can turn them off.
To configure DHTML features,
Log on to JReport Enterprise Server using the administration port (8889 by default) or the service port (8888 by default).1. Click Preferences on the top banner, and then click the DHTML tab.2. Check the features you want to keep and clear the features you want to switch off.3. Click Apply when you finish. 4.
Index
Administrating JReport Enterprise Server
97
Accessing JReport Enterprise Server − Browser
Introduction
JReport Enterprise Server supports four viewers to browse reports from a client: a common browser, JReport Enterprise Viewer forJREntServer, JReport Client API and JReport Viewer Bean. Since JReport Enterprise Viewer and JReport Viewer Bean are all basedon Client API, strictly speaking there are two viewers: a common browser and JReport Viewer.
In this chapter, we will learn how to access JReport Enterprise Server through a common browser like IE. Actually, when we learn toconfigure and administrate JReport Enterprise Server remotely, we have already used a browser through the administration port(8889 by default). Common users will most often access JReport Enterprise Server using IE through the port 8888. Begin withVersion 5.1, users can access JReport Enterprise Server with Netscape 7 through port 8888.
Logging on to JReport Enterprise Server
Assuming that,
The IP of the machine where the Server runs is 192.168.128.25, and the port where the Server listens is 8888.
Tip: If you don't know the IP of the machine on which the Server runs, and if it is the same machine where you run your Webbrowser, you can use localhost instead of the IP:
In the address bar, type http://192.168.128.25:8888. 1. Type your user name and password as assigned by your administrator.
For first time users, please type admin and admin as the user name and password.
2.
Click OK to log on to the Server.
The homepage of JReport Enterprise Server will appear, as shown below.
3.
98
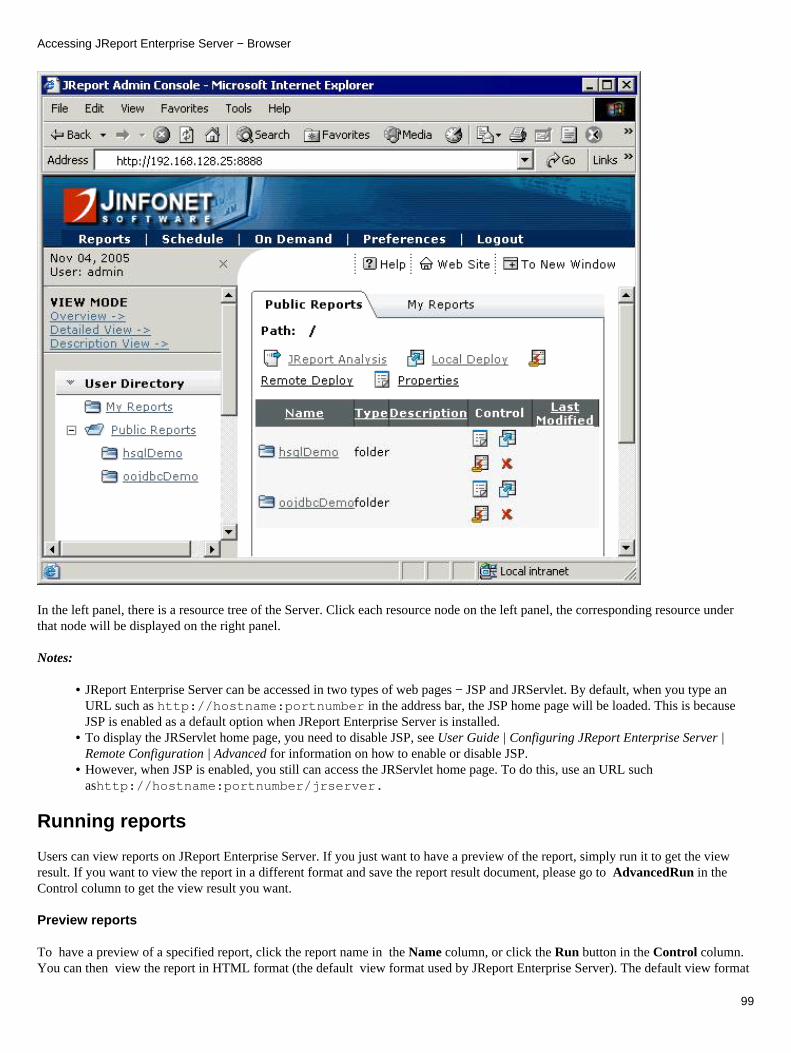
In the left panel, there is a resource tree of the Server. Click each resource node on the left panel, the corresponding resource underthat node will be displayed on the right panel.
Notes:
JReport Enterprise Server can be accessed in two types of web pages − JSP and JRServlet. By default, when you type anURL such as http://hostname:portnumber in the address bar, the JSP home page will be loaded. This is becauseJSP is enabled as a default option when JReport Enterprise Server is installed.
•
To display the JRServlet home page, you need to disable JSP, see User Guide | Configuring JReport Enterprise Server |Remote Configuration | Advanced for information on how to enable or disable JSP.
•
However, when JSP is enabled, you still can access the JRServlet home page. To do this, use an URL suchashttp://hostname:portnumber/jrserver.
•
Running reports
Users can view reports on JReport Enterprise Server. If you just want to have a preview of the report, simply run it to get the viewresult. If you want to view the report in a different format and save the report result document, please go to AdvancedRun in theControl column to get the view result you want.
Preview reports
To have a preview of a specified report, click the report name in the Name column, or click the Run button in the Control column.You can then view the report in HTML format (the default view format used by JReport Enterprise Server). The default view format
Accessing JReport Enterprise Server − Browser
99
can be set in the Preferences page. Please see the Customizing section of this chapter for more details.
To see the running record of the report, please click On−demand on the top banner.
View reports in different formats
Apart from simply running a specified report to view it in default format, JReport Enterprise Server also supports users to view aspecified report in other formats, and save the report result version according to their own requirements. To run the report in theadvanced mode:
Click the AdvancedRun button in the Control column of the report you want to run.1. Archive the report result version by setting the settings on the Archive tab according to your own requirements.2. Go to the Parameters tab to input the values of the parameters (if the report has parameters). You can type the value in thebox or select the default value from the drop−down list.
3.
On the Format tab, choose a format for the report result, and set the other settings.4. Click Submit to view the report in the format that you specified.5.
Note: For the information about options on each tab, please see the Index for JREntServer Dialogs | The Service Pages | AdvancedRun.
Record the running information
JReport Enterprise Server records the running information after you run the report.
To get the record, click On−demands on the top banner, the information is listed in a table. You can remove or add columns in thistable on the Preferences page. Please see the Customizing section of this chapter for more details.
To sort the contents to display in ascending or descending order, click the name of the column you want to sort.
For a description of the On−demands table, please see User Guide | Administrating JReport Enterprise Server | Task Management.
Scheduling reports
JReport Enterprise Server can run reports at a specified time or periodically by scheduling tasks for reports. The scheduled tasks willbe recorded by the Server according to their different executing status.
Schedule tasks
You can schedule tasks for a specified report by clicking the Schedule button in the Control column. The scheduling process isdivided into five steps:
Set the settings for the specified report (the Report tab). 1. Specify the type of the task (the Publish tab).
Five task types are provided by JReport Enterprise Server, publishing to version, publishing to disk, publishing to e−mail,publishing to printer and publishing to fax. Choose the type you want and set the settings for the specified type.
2.
Specify the time when the task is to be performed (the Time tab). You can set whether the task is to be performed at acertain time or periodically by changing the settings provided here.
3.
Notify to someone via e−mail details of : when the task is finished, whether it was successful or unsuccessful (theNotification tab).
4.
Click Submit to make the Server to perform the task.5.
Notes:
For more information about the task type and the options of each tab, please refer to Index for JREntServer Dialogs | TheService Pages | Schedule.
•
Accessing JReport Enterprise Server − Browser
100
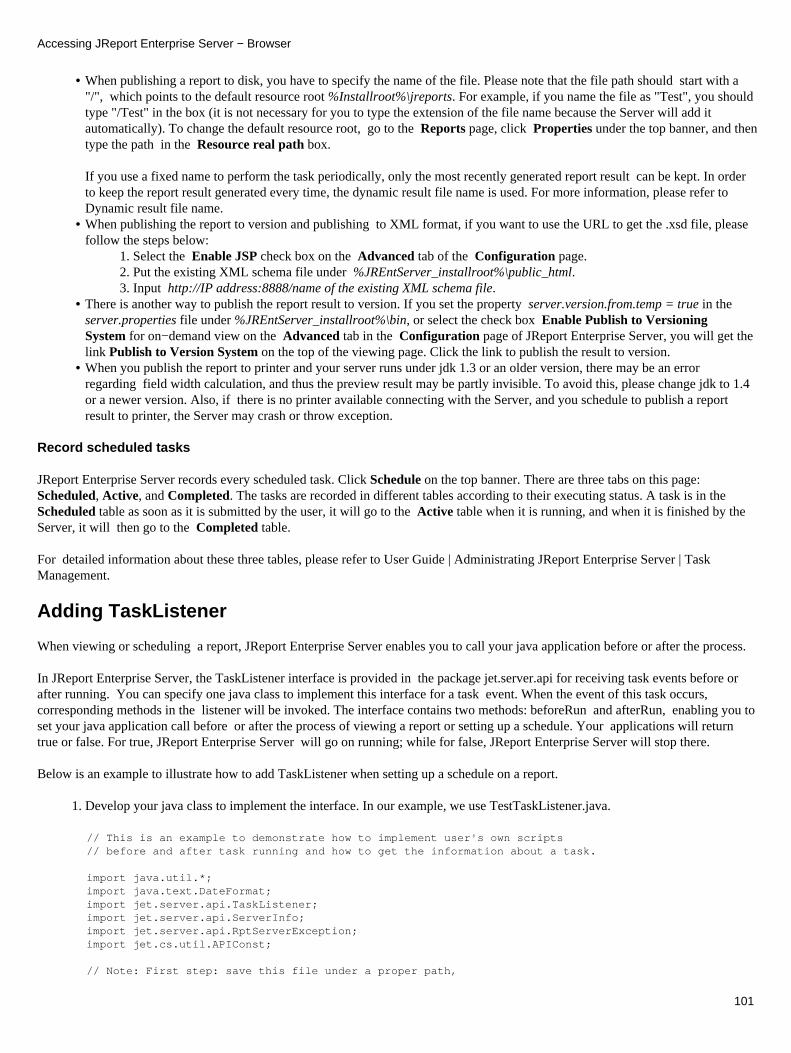
When publishing a report to disk, you have to specify the name of the file. Please note that the file path should start with a"/", which points to the default resource root %Installroot%\jreports. For example, if you name the file as "Test", you shouldtype "/Test" in the box (it is not necessary for you to type the extension of the file name because the Server will add itautomatically). To change the default resource root, go to the Reports page, click Properties under the top banner, and thentype the path in the Resource real path box.
If you use a fixed name to perform the task periodically, only the most recently generated report result can be kept. In orderto keep the report result generated every time, the dynamic result file name is used. For more information, please refer toDynamic result file name.
•
When publishing the report to version and publishing to XML format, if you want to use the URL to get the .xsd file, pleasefollow the steps below:
Select the Enable JSP check box on the Advanced tab of the Configuration page.1. Put the existing XML schema file under %JREntServer_installroot%\public_html.2. Input http://IP address:8888/name of the existing XML schema file.3.
•
There is another way to publish the report result to version. If you set the property server.version.from.temp = true in theserver.properties file under %JREntServer_installroot%\bin, or select the check box Enable Publish to VersioningSystem for on−demand view on the Advanced tab in the Configuration page of JReport Enterprise Server, you will get thelink Publish to Version System on the top of the viewing page. Click the link to publish the result to version.
•
When you publish the report to printer and your server runs under jdk 1.3 or an older version, there may be an errorregarding field width calculation, and thus the preview result may be partly invisible. To avoid this, please change jdk to 1.4or a newer version. Also, if there is no printer available connecting with the Server, and you schedule to publish a reportresult to printer, the Server may crash or throw exception.
•
Record scheduled tasks
JReport Enterprise Server records every scheduled task. Click Schedule on the top banner. There are three tabs on this page:Scheduled, Active, and Completed. The tasks are recorded in different tables according to their executing status. A task is in theScheduled table as soon as it is submitted by the user, it will go to the Active table when it is running, and when it is finished by theServer, it will then go to the Completed table.
For detailed information about these three tables, please refer to User Guide | Administrating JReport Enterprise Server | TaskManagement.
Adding TaskListener
When viewing or scheduling a report, JReport Enterprise Server enables you to call your java application before or after the process.
In JReport Enterprise Server, the TaskListener interface is provided in the package jet.server.api for receiving task events before orafter running. You can specify one java class to implement this interface for a task event. When the event of this task occurs,corresponding methods in the listener will be invoked. The interface contains two methods: beforeRun and afterRun, enabling you toset your java application call before or after the process of viewing a report or setting up a schedule. Your applications will returntrue or false. For true, JReport Enterprise Server will go on running; while for false, JReport Enterprise Server will stop there.
Below is an example to illustrate how to add TaskListener when setting up a schedule on a report.
Develop your java class to implement the interface. In our example, we use TestTaskListener.java.1.
// This is an example to demonstrate how to implement user's own scripts // before and after task running and how to get the information about a task.
import java.util.*; import java.text.DateFormat; import jet.server.api.TaskListener; import jet.server.api.ServerInfo; import jet.server.api.RptServerException;import jet.cs.util.APIConst;
// Note: First step: save this file under a proper path,
Accessing JReport Enterprise Server − Browser
101

// for example, c:\jrentserver\tasklistener, and edit the batch file // %InstallRoot%\bin\JREntServer.bat by adding the path of the class // file (c:\jrentserver\tasklistener) to the classpath. // Second step: start JReport Enterprise Server and schedule // a report. Check "Add TaskListener to be invoked", and input the class // name, in this example, we input TestTaskListener, and then submit the task. // The result will print in the command window before and after the task // is run.
public class TestTaskListener implements TaskListener {
private String toVersion = "jet.server.schedule.jrtasks.UpdateRptTask"; private String toFileSystem = "jet.server.schedule.jrtasks.PublishToDiskTask"; private String toEmail = "jet.server.schedule.jrtasks.SendJRMailTask"; private String toPrinter = "jet.server.schedule.jrtasks.PrintRptTask";
// This method will be called automatically BEFORE a task is run, // which means any scripts added into the method will automatically be executed.
public boolean beforeRun(ServerInfo serverInfo) { System.out.println("−−−−−−−−−−−−− Before Task Running −−−−−−−−−−");
try {
// "taskType" will store the task−type info got from TaskProperties. // It can be used to determine what kind of task will start to run.
String taskType = (String)serverInfo.getTaskProperties().get(APIConst.TAG_TASK_CLASS);
if (taskType.equals(toVersion)) { System.out.println("Task Type is: Publish to Versioning System."); } else if (taskType.equals(toFileSystem)) { System.out.println("Task Type is: Publish to File System."); } else if (taskType.equals(toEmail)) { System.out.println("Task Type is: Publish to Email."); } else if (taskType.equals(toPrinter)) { System.out.println("Task Type is: Publish to Printer."); }
// "lType" will store the launch−type info got from TaskProperties. // It can be use to determine in which launch type the task will be running.
String lType = (String)serverInfo.getTaskProperties().get(APIConst.TAG_LAUNCH_TYPE);
if (lType == null) { System.out.println("Launch Type is: Immediately."); } else if (lType.equals(String.valueOf(APIConst.AT_TIME))) { System.out.println("Launch Type is: At time."); } else if (lType.equals(String.valueOf(APIConst.PERIODICALLY))) { System.out.println("Launch Type is: Repeatedly."); }
System.out.println("TaskID is: " + serverInfo.getTaskProperties().get(APIConst.TAG_TASK_ID)); System.out.println("TaskSubmiter is: " + serverInfo.getTaskProperties().get(APIConst.TAG_UID)); System.out.println("Report is: " + serverInfo.getTaskProperties().get(APIConst.TAG_REPORT)); System.out.println("Catalog is: " + serverInfo.getTaskProperties().get(APIConst.TAG_CATALOG)); System.out.println("Submit time is:" + serverInfo.getTaskProperties().get(APIConst.TAG_SUBMIT_TIME));
// Note: Some information will be created only when the task // who owns them is running. // ExeYear, ExeMonth, ExeDay, ExeHour, ExeMin, and ExeSec // only exist when a periodical task is run.
Accessing JReport Enterprise Server − Browser
102
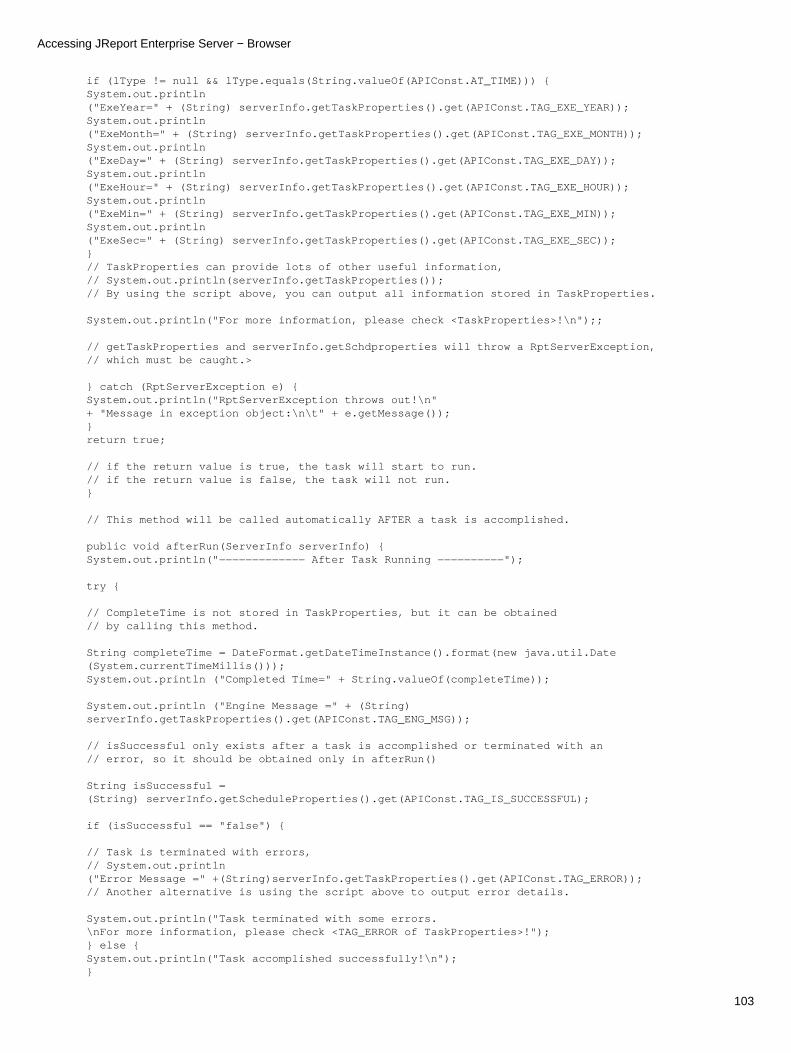
if (lType != null && lType.equals(String.valueOf(APIConst.AT_TIME))) { System.out.println ("ExeYear=" + (String) serverInfo.getTaskProperties().get(APIConst.TAG_EXE_YEAR)); System.out.println ("ExeMonth=" + (String) serverInfo.getTaskProperties().get(APIConst.TAG_EXE_MONTH)); System.out.println ("ExeDay=" + (String) serverInfo.getTaskProperties().get(APIConst.TAG_EXE_DAY)); System.out.println ("ExeHour=" + (String) serverInfo.getTaskProperties().get(APIConst.TAG_EXE_HOUR)); System.out.println ("ExeMin=" + (String) serverInfo.getTaskProperties().get(APIConst.TAG_EXE_MIN)); System.out.println ("ExeSec=" + (String) serverInfo.getTaskProperties().get(APIConst.TAG_EXE_SEC));} // TaskProperties can provide lots of other useful information, // System.out.println(serverInfo.getTaskProperties()); // By using the script above, you can output all information stored in TaskProperties.
System.out.println("For more information, please check <TaskProperties>!\n");;
// getTaskProperties and serverInfo.getSchdproperties will throw a RptServerException, // which must be caught.>
} catch (RptServerException e) { System.out.println("RptServerException throws out!\n" + "Message in exception object:\n\t" + e.getMessage()); } return true;
// if the return value is true, the task will start to run. // if the return value is false, the task will not run. }
// This method will be called automatically AFTER a task is accomplished.
public void afterRun(ServerInfo serverInfo) { System.out.println("−−−−−−−−−−−−− After Task Running −−−−−−−−−−");
try {
// CompleteTime is not stored in TaskProperties, but it can be obtained // by calling this method.
String completeTime = DateFormat.getDateTimeInstance().format(new java.util.Date (System.currentTimeMillis())); System.out.println ("Completed Time=" + String.valueOf(completeTime));
System.out.println ("Engine Message =" + (String) serverInfo.getTaskProperties().get(APIConst.TAG_ENG_MSG));
// isSuccessful only exists after a task is accomplished or terminated with an // error, so it should be obtained only in afterRun()
String isSuccessful = (String) serverInfo.getScheduleProperties().get(APIConst.TAG_IS_SUCCESSFUL);
if (isSuccessful == "false") {
// Task is terminated with errors, // System.out.println("Error Message =" +(String)serverInfo.getTaskProperties().get(APIConst.TAG_ERROR)); // Another alternative is using the script above to output error details.
System.out.println("Task terminated with some errors.\nFor more information, please check <TAG_ERROR of TaskProperties>!"); } else { System.out.println("Task accomplished successfully!\n"); }
Accessing JReport Enterprise Server − Browser
103
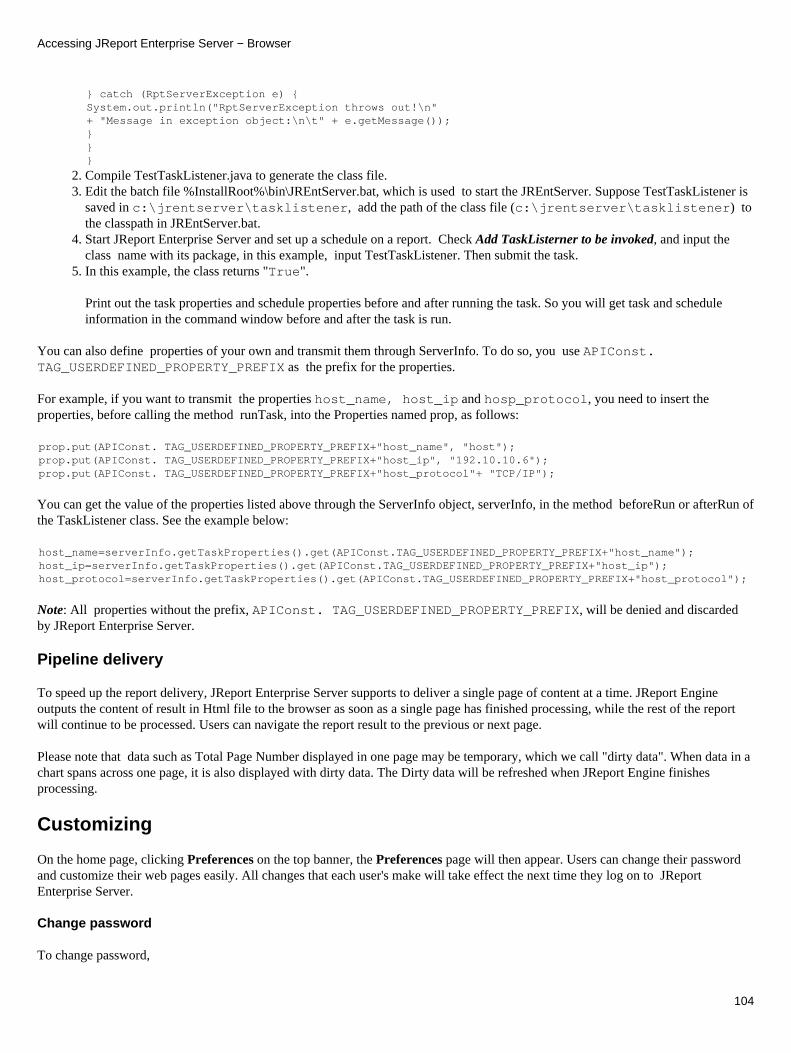
} catch (RptServerException e) { System.out.println("RptServerException throws out!\n" + "Message in exception object:\n\t" + e.getMessage()); } }}
Compile TestTaskListener.java to generate the class file.2. Edit the batch file %InstallRoot%\bin\JREntServer.bat, which is used to start the JREntServer. Suppose TestTaskListener issaved in c:\jrentserver\tasklistener, add the path of the class file (c:\jrentserver\tasklistener) tothe classpath in JREntServer.bat.
3.
Start JReport Enterprise Server and set up a schedule on a report. Check Add TaskListerner to be invoked, and input theclass name with its package, in this example, input TestTaskListener. Then submit the task.
4.
In this example, the class returns "True".
Print out the task properties and schedule properties before and after running the task. So you will get task and scheduleinformation in the command window before and after the task is run.
5.
You can also define properties of your own and transmit them through ServerInfo. To do so, you use APIConst.TAG_USERDEFINED_PROPERTY_PREFIX as the prefix for the properties.
For example, if you want to transmit the properties host_name, host_ip and hosp_protocol, you need to insert theproperties, before calling the method runTask, into the Properties named prop, as follows:
prop.put(APIConst. TAG_USERDEFINED_PROPERTY_PREFIX+"host_name", "host"); prop.put(APIConst. TAG_USERDEFINED_PROPERTY_PREFIX+"host_ip", "192.10.10.6");prop.put(APIConst. TAG_USERDEFINED_PROPERTY_PREFIX+"host_protocol"+ "TCP/IP");
You can get the value of the properties listed above through the ServerInfo object, serverInfo, in the method beforeRun or afterRun ofthe TaskListener class. See the example below:
host_name=serverInfo.getTaskProperties().get(APIConst.TAG_USERDEFINED_PROPERTY_PREFIX+"host_name");host_ip=serverInfo.getTaskProperties().get(APIConst.TAG_USERDEFINED_PROPERTY_PREFIX+"host_ip");host_protocol=serverInfo.getTaskProperties().get(APIConst.TAG_USERDEFINED_PROPERTY_PREFIX+"host_protocol");
Note: All properties without the prefix, APIConst. TAG_USERDEFINED_PROPERTY_PREFIX, will be denied and discardedby JReport Enterprise Server.
Pipeline delivery
To speed up the report delivery, JReport Enterprise Server supports to deliver a single page of content at a time. JReport Engineoutputs the content of result in Html file to the browser as soon as a single page has finished processing, while the rest of the reportwill continue to be processed. Users can navigate the report result to the previous or next page.
Please note that data such as Total Page Number displayed in one page may be temporary, which we call "dirty data". When data in achart spans across one page, it is also displayed with dirty data. The Dirty data will be refreshed when JReport Engine finishesprocessing.
Customizing
On the home page, clicking Preferences on the top banner, the Preferences page will then appear. Users can change their passwordand customize their web pages easily. All changes that each user's make will take effect the next time they log on to JReportEnterprise Server.
Change password
To change password,
Accessing JReport Enterprise Server − Browser
104
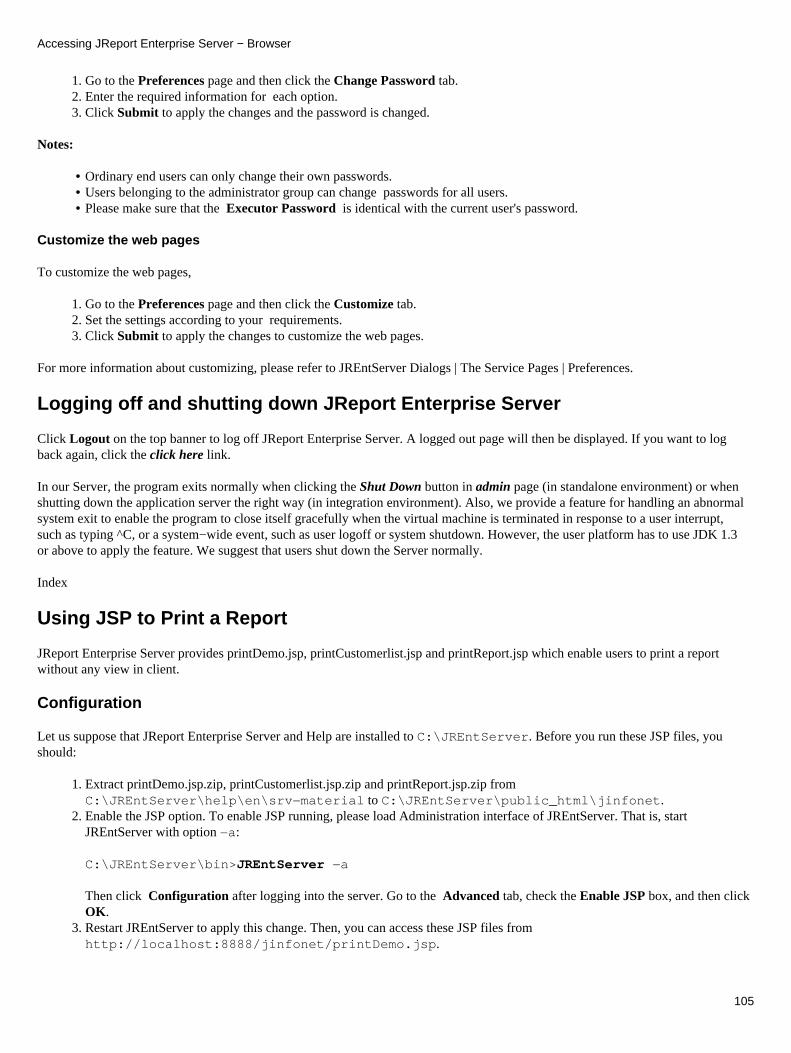
Go to the Preferences page and then click the Change Password tab.1. Enter the required information for each option.2. Click Submit to apply the changes and the password is changed.3.
Notes:
Ordinary end users can only change their own passwords.• Users belonging to the administrator group can change passwords for all users. • Please make sure that the Executor Password is identical with the current user's password.•
Customize the web pages
To customize the web pages,
Go to the Preferences page and then click the Customize tab.1. Set the settings according to your requirements.2. Click Submit to apply the changes to customize the web pages.3.
For more information about customizing, please refer to JREntServer Dialogs | The Service Pages | Preferences.
Logging off and shutting down JReport Enterprise Server
Click Logout on the top banner to log off JReport Enterprise Server. A logged out page will then be displayed. If you want to logback again, click the click here link.
In our Server, the program exits normally when clicking the Shut Down button in admin page (in standalone environment) or whenshutting down the application server the right way (in integration environment). Also, we provide a feature for handling an abnormalsystem exit to enable the program to close itself gracefully when the virtual machine is terminated in response to a user interrupt,such as typing ^C, or a system−wide event, such as user logoff or system shutdown. However, the user platform has to use JDK 1.3or above to apply the feature. We suggest that users shut down the Server normally.
Index
Using JSP to Print a Report
JReport Enterprise Server provides printDemo.jsp, printCustomerlist.jsp and printReport.jsp which enable users to print a reportwithout any view in client.
Configuration
Let us suppose that JReport Enterprise Server and Help are installed to C:\JREntServer. Before you run these JSP files, youshould:
Extract printDemo.jsp.zip, printCustomerlist.jsp.zip and printReport.jsp.zip fromC:\JREntServer\help\en\srv−material to C:\JREntServer\public_html\jinfonet.
1.
Enable the JSP option. To enable JSP running, please load Administration interface of JREntServer. That is, startJREntServer with option −a:
C:\JREntServer\bin>JREntServer −a
Then click Configuration after logging into the server. Go to the Advanced tab, check the Enable JSP box, and then clickOK.
2.
Restart JREntServer to apply this change. Then, you can access these JSP files fromhttp://localhost:8888/jinfonet/printDemo.jsp.
3.
Accessing JReport Enterprise Server − Browser
105
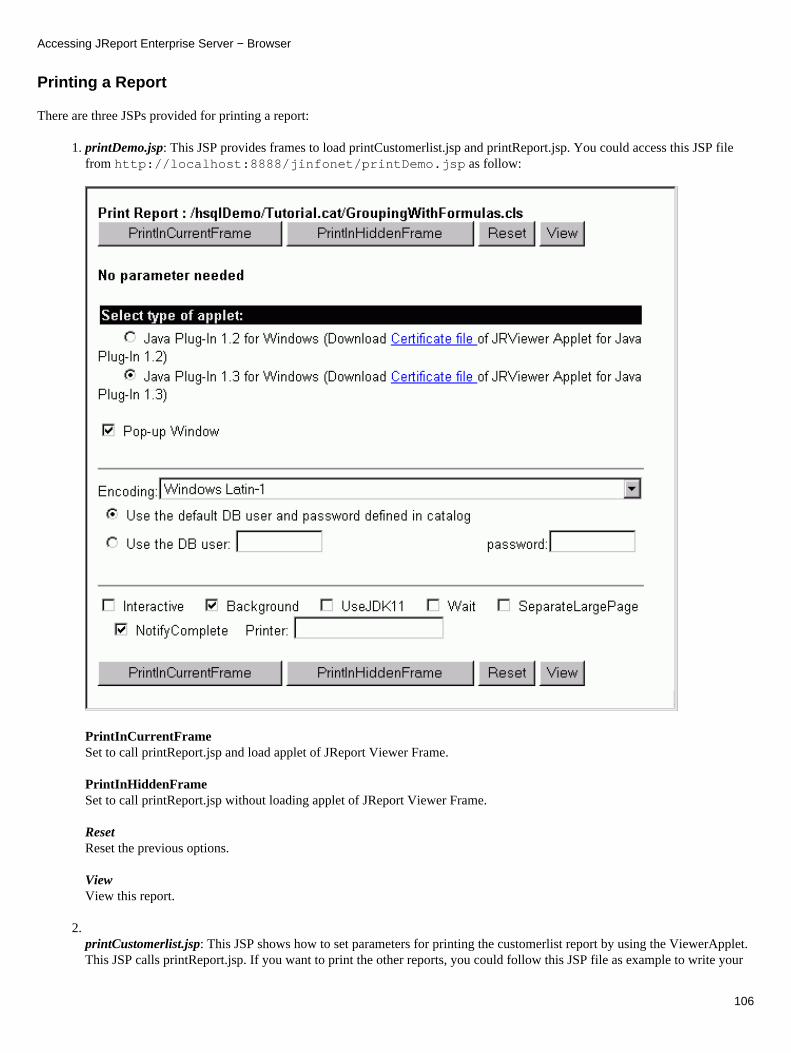
Printing a Report
There are three JSPs provided for printing a report:
printDemo.jsp: This JSP provides frames to load printCustomerlist.jsp and printReport.jsp. You could access this JSP filefrom http://localhost:8888/jinfonet/printDemo.jsp as follow:
PrintInCurrentFrameSet to call printReport.jsp and load applet of JReport Viewer Frame.
1.
PrintInHiddenFrameSet to call printReport.jsp without loading applet of JReport Viewer Frame.
ResetReset the previous options.
ViewView this report.
2. printCustomerlist.jsp: This JSP shows how to set parameters for printing the customerlist report by using the ViewerApplet.This JSP calls printReport.jsp. If you want to print the other reports, you could follow this JSP file as example to write your
Accessing JReport Enterprise Server − Browser
106
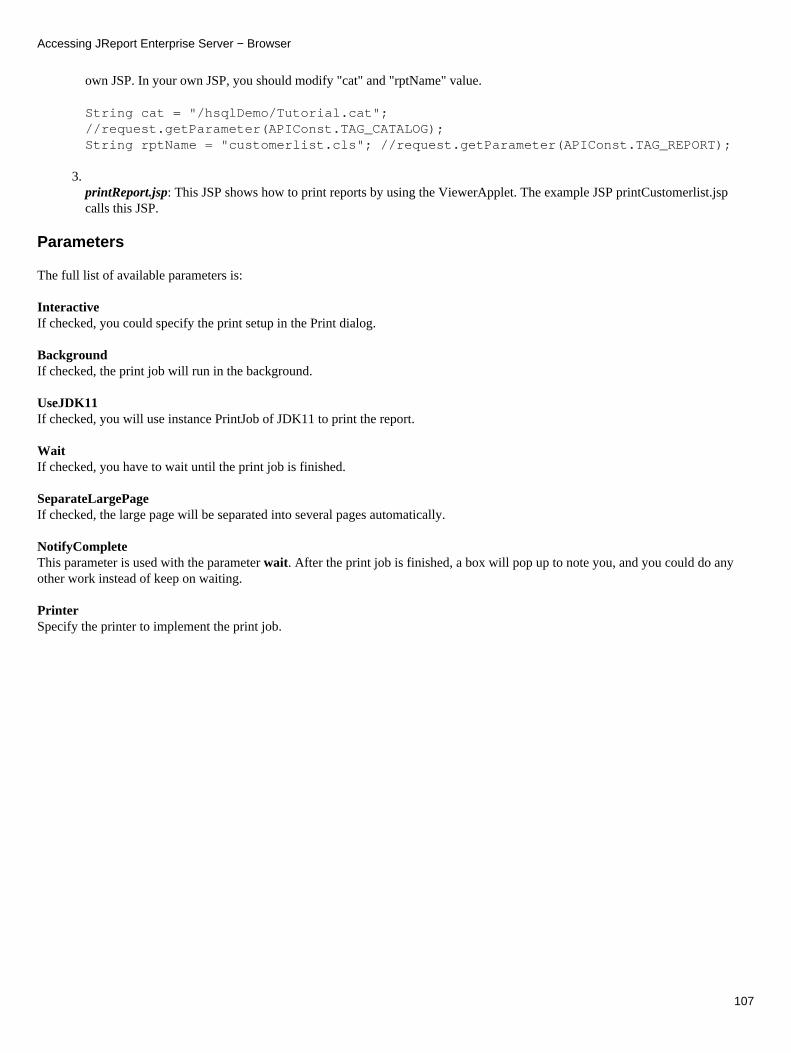
own JSP. In your own JSP, you should modify "cat" and "rptName" value.
String cat = "/hsqlDemo/Tutorial.cat";//request.getParameter(APIConst.TAG_CATALOG);String rptName = "customerlist.cls"; //request.getParameter(APIConst.TAG_REPORT);
3. printReport.jsp: This JSP shows how to print reports by using the ViewerApplet. The example JSP printCustomerlist.jspcalls this JSP.
Parameters
The full list of available parameters is:
InteractiveIf checked, you could specify the print setup in the Print dialog.
BackgroundIf checked, the print job will run in the background.
UseJDK11If checked, you will use instance PrintJob of JDK11 to print the report.
WaitIf checked, you have to wait until the print job is finished.
SeparateLargePageIf checked, the large page will be separated into several pages automatically.
NotifyCompleteThis parameter is used with the parameter wait. After the print job is finished, a box will pop up to note you, and you could do anyother work instead of keep on waiting.
PrinterSpecify the printer to implement the print job.
Accessing JReport Enterprise Server − Browser
107

Accessing JReport Enterprise Server − JReport ViewerJReport Enterprise Server supports four viewers to browse reports from a client: a common browser, JReport Enterprise Viewer forJREntServer, JReport Client API and JReport Viewer Bean. Since JReport Enterprise Viewer and JReport Viewer Bean are all basedon Client API, strictly speaking there are two viewers: a common browser and JReport Viewer.
In this chapter, we will learn three ways of accessing JReport Enterprise Server − JReport Viewer.
JReport Enterprise Viewer for JREntServer
JReport Enterprise Viewer for JREntServer is based on Client API but with GUI. s
Download JREntViewer for JREntServer − EntViewSetup.exe or EntViewSetup.sh (for Unix) from the Jinfonet Web site athttp://www.jinfonet.com.
1.
Follow the Install Wizard, which is easy and straightforward. Assume JREntViewer for JREntServer is installed underc:\JREntViewer. The Viewer is the client accessing the server, and you should use the same version (the same build number)of JREntViewer and JREntServer.
2.
Launch JReport Enterprise Server with the batch under %JREntServerInstallRoot%\bin. We use JREntServer.bat from aDOS command:c:\>cd JREntServer\binc:\JREntServer\bin\>JREntServer.bat −verror
3.
When the server starts up, launch the JREntViewer of the same version as the server. We use the batch%JREntViewer%\bin\JREntViewer.bat from a DOS command:c:\>cd JREntViewer\binc:\JREntViewer\bin\>JREntViewer.bat −verror
4.
In the Connect dialog for the viewer, fill in the host of the server, port number and servlet path. Enter the user name andpassword. Click Connect. If you want to connect to JReport Enterprise Server with SSL support, check the SSL boxaccordingly.
Or, Cancel the dialog, and type the server host name, port number and servlet path in the address bar of the viewer just likeyou do with a browser, and press the Enter key. You will then be prompted to log onto the server with your user name and
5.
108
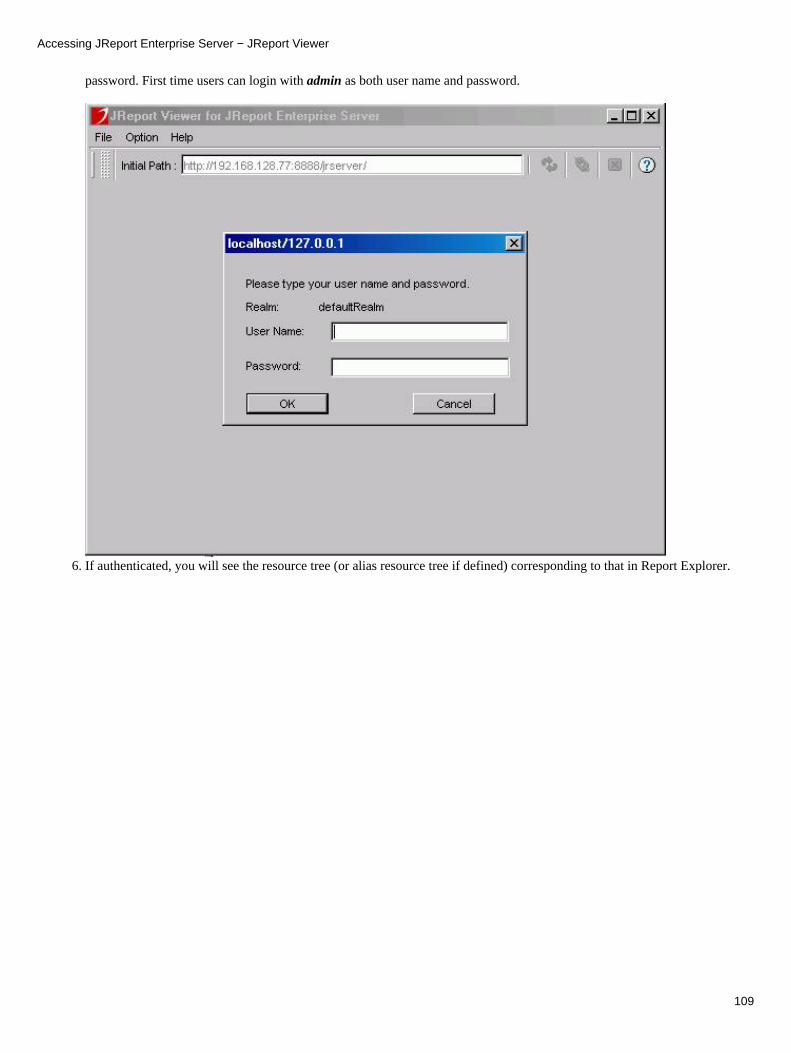
password. First time users can login with admin as both user name and password.
If authenticated, you will see the resource tree (or alias resource tree if defined) corresponding to that in Report Explorer.6.
Accessing JReport Enterprise Server − JReport Viewer
109
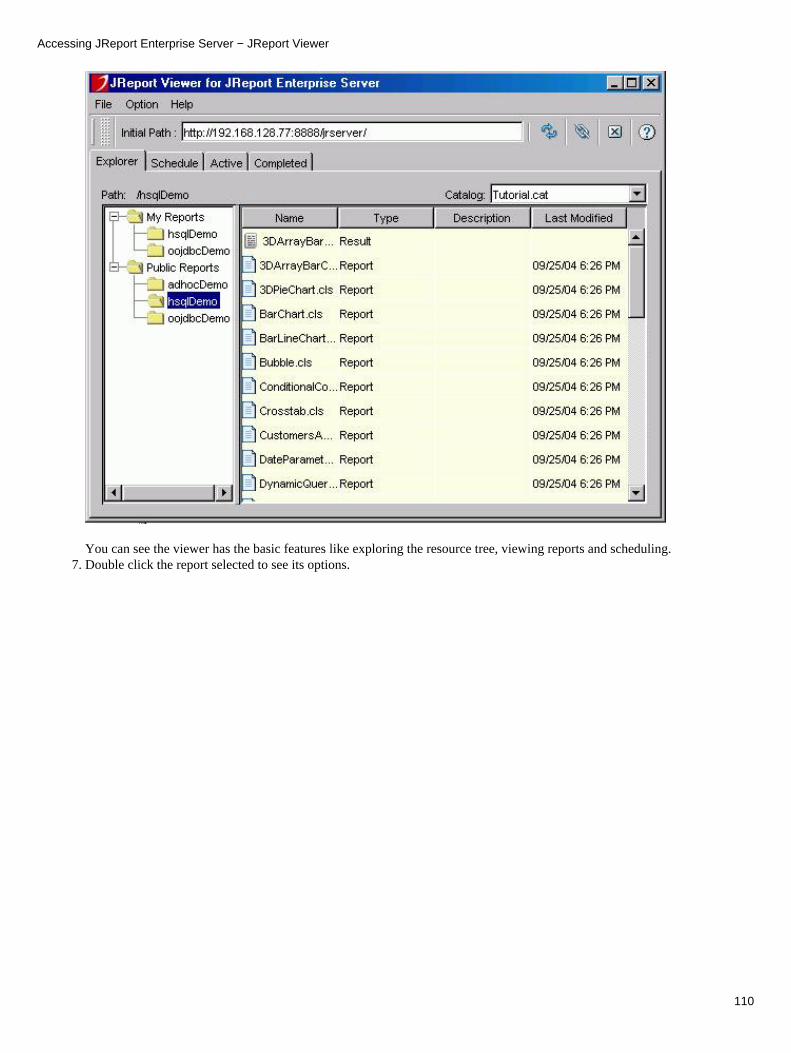
You can see the viewer has the basic features like exploring the resource tree, viewing reports and scheduling.Double click the report selected to see its options.7.
Accessing JReport Enterprise Server − JReport Viewer
110
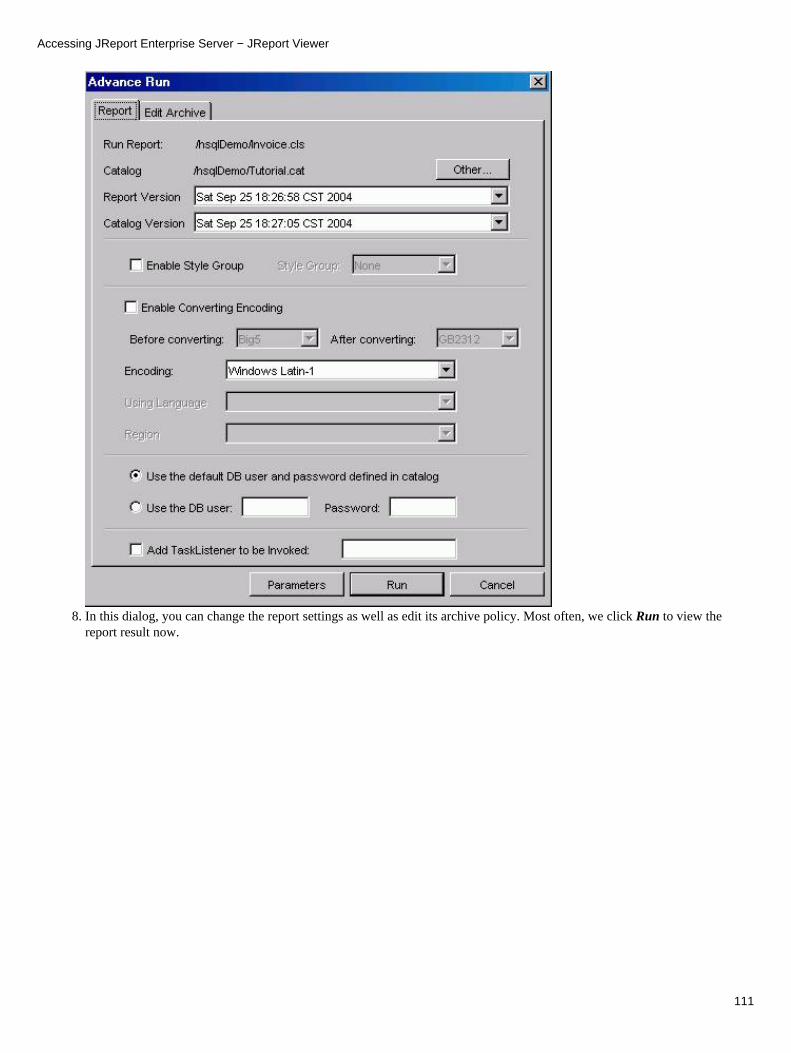
In this dialog, you can change the report settings as well as edit its archive policy. Most often, we click Run to view thereport result now.
8.
Accessing JReport Enterprise Server − JReport Viewer
111

Back in the main window, go to the Schedule, Active, Completed tabs to create a schedule and check its status, just as youdo with a browser, or in your local administration dialog.
9.
Reference Node: There is a separate manual for JREntViewer for JReport Enterprise Server.
Client API
We have used a common browser (like IE) and JREntViewer for JREntServer to connect with JReport Enterprise Server. What aboutif you want to integrate the client viewer in your own applications? You can. Client API is the foundation of JREntViewer forEnterprise Server (with GUI) and JReport Viewer Bean. You can call methods in either Client API or JReport Viewer Bean. JReportViewer Bean is most often used for running reports and exporting report results to other formats or printers. Client API has moreflexibility including the scheduling feature.
When you install JREntViewer for JREntServer, the archive file for Client API is also installed at%JREntViewer%\lib\JREntViewer.zip. There are demo sample code files you can refer to. Please go to the JREntViewer Manual |Client API chapter.
JReport (Client) Viewer Bean
In order to make the Viewer easily embedded in your Java applications, JReport Viewer is now also available as a Java Bean. JReportViewer Bean can send a request from a client workstation to run and view reports on JReport Enterprise Server.
Briefly, JReport Viewer Bean enables one to:
Connect with the server to run reports on the server, and view the report result.• Export the report result run out for the reports on the server to other formats (HTML, PDF, XLS, RTF, Postscript, Text,CSV, Applet, Email) and printer.
•
Accessing JReport Enterprise Server − JReport Viewer
112

Note the difference of JReport Viewer Bean (JRClient Viewer Bean) and Result Viewer Bean (JRResultViewer Bean),JRResultViewer Bean is used to view local JReport result files in the standalone mode, while JRClient Viewer Bean is to connectwith the server in the server/client mode.
Reference Note: JReport Enterprise Server JavaDoc jet.bean package. You can go to http://www.jinfonet.com/docs.htm to browsethe file online. The Java source code used in this page can also be found.
Installation
There are separate zip files for Viewer Bean posted on our Web site http://www.jinfonet.com/download.htm. Please download the file JREntVBean.zip (for JReport Enterprise Server). We provide other versions of viewer bean for swing 1.1(JREntVBeanSwing11.zip) and for swing 1.0 (JREntVBeanSwing10.zip)
The JREntVBean.zip file includes the following files:
Sample1.java, Sample2.java, Sample3.java, Sample4.java, TestClientViewer.java, TestCltPreViewer.java andTestRAStreamInput.java are examples.
•
JRViewer.zip is used during compiling and running your Java program which calls JReport Viewer Bean.• log4j−1.2.8.jar is used for the JReport Engine logging system. • OneStepJRViewer.jar is used instead of JRViewer.zip if you invoke Viewer Bean without supplying report parameters (seebelow).
•
TwoStepsJRViewer.jar is used instead of JRViewer.zip if you invoke Viewer Bean and supply report parameters (seebelow).
•
viewbeanusage.htm is the document you are reading about the viewer bean usage. •
Two Approaches of Invoking JRViewer Bean
The two approaches of invoking JReport Viewer Bean are described in the following sections.
Invoking Viewer Bean without Supplying Report Parameters
In this approach, your Java application calls Java bean JRDirectViewer and provides the following properties:
setServerName ("theServerName"); • setPort ("thePortNumber"); • setFullPath("theFullPath") • setReportName ("theReportName"); • setCatName ("theCatalogName"); • setUserName ("theUserName") • setPassword ("thePassword") • setLoadReport ("Yes/No"); •
When Java bean JRDirectViewer is loaded, it will ask JReport Enterprise Server to run the report and pop up a dialog on the screento ask you to input report parameters if they are required by the report. This approach has the advantage of not requiring your Javaapplication to provide the report parameters. The disadvantage is that it will display a dialog on the screen for you to enter parametervalues.
Note: The catalog name and the report name must have file extensions (such as .cat or .cls). The catalog name must be a full pathname which is relative to the server's root directory in the resource tree, and since v6.0 it is recommended that the report name is alsoa full path name. If you access the JReport Enterprise Servlet, you must set the servlet path also, for example:
JRDirectViewer.setFullPath("/Jinfonet_Sybase/JReport");
For the catalog name and full path string, the first character must be '/', and the last character must not be '/'.
Accessing JReport Enterprise Server − JReport Viewer
113

Invoking Viewer Bean with Report Parameters
The second approach of invoking JReport Viewer Bean has two passes: the first pass obtains information about the parametersrequired by the report and the second pass submits the required parameters. If the user's Java application already knows the requiredparameters, the first pass may be eliminated. In this approach Viewer Bean will not display any dialog on the screen. Your Javaapplication retains the full control to the screen and is responsible for submitting all the required report parameters.
Pass one:
Your Java application calls the Java bean JRPrepareViewer with the following properties:
setServerName ("theServerName") • setPort ("thePortNumber") • setFullPath(''theFullPath") • setReportName ("theReportName") • setCatName ("theCatalogName") • setUserName ("theUserName") • setPassword ("thePassword") • setLoadReport ("Yes/No") •
JRPrepareViewer returns a vector containing the information about the report. The method getReportParams ( ) should be calledafter calling JRPrepareViewer to obtain the vector. The size of the vector is the number of the parameters needed by the report,which can be obtained from the method size(). Each element in the vector contains the type of a parameter, which can be obtainedusing the method getType ( ). The possible parameter types are listed below:
STRING: • NUMBER: • CURRENCY: • BOOLEAN: • DATE: • TIME: • DATETIME: •
Note: While using Prepare Viewer Bean in JReport Enterprise Server, if you want to show the parameter dialog and modify theparameter value in this dialog, you can call the method
setPopupParamDialog( true/false )
where, "true" means the parameter dialog will pop up.
Pass two:
In the second pass your Java application prepares the parameters based on the information provided by the vector. It then calls Javabean JRRunViewer with the following properties:
setServerName ("theServerName") • setPort ("thePortNumber") • setFullPath("theFullPath") • setReportName ("theReportName") • setCatName ("theCatalogName") • setUserName ("theUserName") • setPassword ("thePassword") • setLoadReport ("Yes/No") • setParameters ("Parameters") •
Notes: Parameters −− The string contains the parameter values, separated by commas (',').If more than one parameter is needed in the
Accessing JReport Enterprise Server − JReport Viewer
114

report, you can pass multiple parameters in the paramValues string. The ValuesString format is: paraName1=paraValues1,paraName2=paraValue2 where the paraName1 and paraName2 are the parameter names and paraValue1 and paraValue2 are thevalues. The comma is the separate operator, and the equal sign is to separate the parameter name and parameter value. If theparameter name or parameter value contains the separate operator −− comma or equal sign, it needs escape. We provide the escapeoperator \\. If the escape operator is put before the separate operator, we will not treat it as the separate operator. For example:
the parameter string is: "param1=aaa\\,aa,param2=bbbbb,param3=ccccc", this parameter string will be parsed:the value for param1 is aaa, aathe value for param2 is bbbbcthe value for param3 is ccccc
•
the parameter string is: "pa\\=ram1=aaa\\,aa,param2=bbbbb,param3=ccccc", this parameter string will be parsed,the value for pa=ram1 (name) is aaa, aa (value)the value for param2 is bbbbbthe value for param3 is ccccc
•
Note: You do not necessarily set the values for all the parameters. If you do not set a parameter value, JReport will use the defaultvalue for this parameter.
Load Viewer Bean from an URL or RandomInputable directly
This assumes you have your own server, and build this server with the Engine of JReport Enterprise Server. If you want to load theviewer to view the result file generated in the server side, and you do not want to transport the result file directly, you can use thefollowing methods:
* If your server and client use the HTTP protocol to communicate, then you can call the method setURLAddress("URL address") inJReport Viewer Bean, the URL must be the qualified result file generated using the Engine in the server side. The code is like this:
JRRunViewer viewerBean = new JRRunViewer();viewerBean.setURLAddress("the url address");viewerBean.runReport();
* If your server and client do not use the HTTP protocol to communicate, then you can call the method setRandomInput in JReportViewer Bean. This method has one parameter, it is an instance of interface RandomInputable (see RandomInputable.java andRandomAccessable.java), this interface defines how to transport the result file generated by JReport Engine Bean in the server side tothe client side. You must define a class which implements all methods in the interface RandomInputable, and then pass this class'sinstance to the method setRandomInput as the parameter. The code is like this:
JRRunViewer viewerBean = new JRRunViewer();viewerBean.setRandomInput("the class which implement interface RandomInputable");viewerBean.runReport();
We also provide a class which has already implemented the interface RandomInputable, if you do not want to write a new class, youcan use it. The class is named jet.ie.io.RAStreamInput. It has one constructor:
public RAStreamInput(InputStream in, long totalLength) throws IOException
The first parameter is the input stream opened by the connection, the second is the stream's length. See an examplehereTestRAStreamInput.java.
Note: In this case, you do not need to set other properties of JReport Viewer Bean. In addition, if the server needs to checkpermission for login, you must do this action before calling JReport Viewer Bean.
Get Page Orientation
The method getPageOrientation is used for getting the orientation of the report page. You should call this method after calling therunReport method. The returned is an int value, and it can be LANDSCAPE or PORTRAIT. If it is −1, it makes no sense, and you
Accessing JReport Enterprise Server − JReport Viewer
115
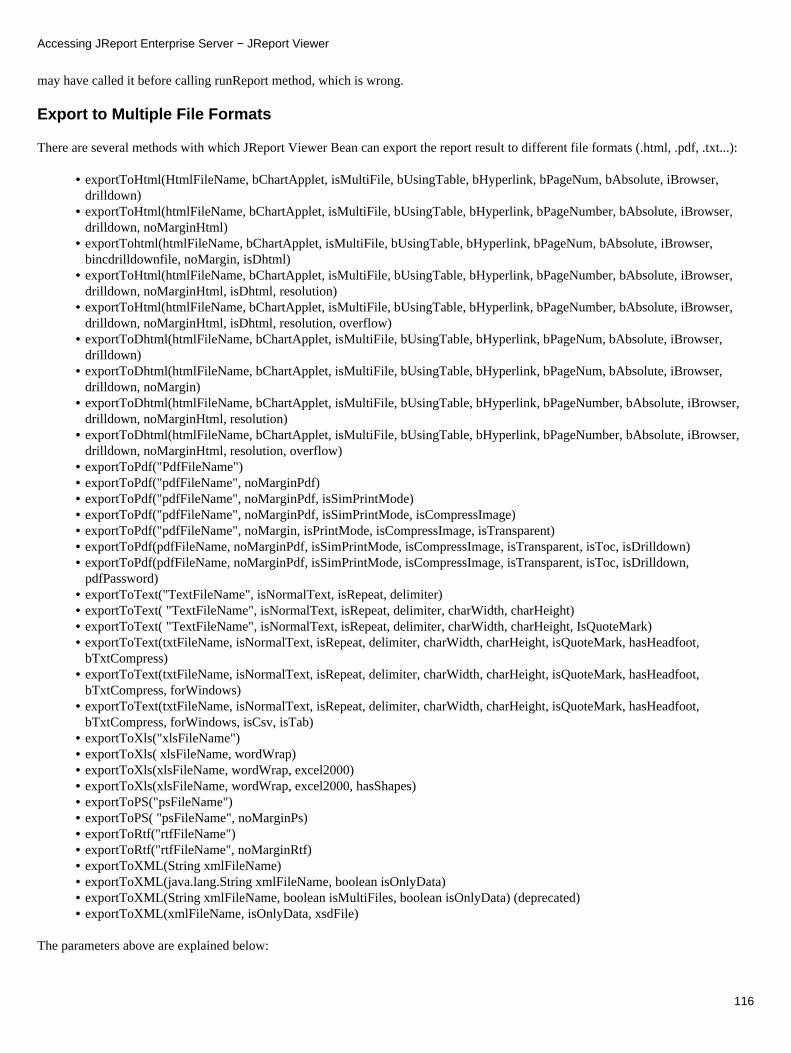
may have called it before calling runReport method, which is wrong.
Export to Multiple File Formats
There are several methods with which JReport Viewer Bean can export the report result to different file formats (.html, .pdf, .txt...):
exportToHtml(HtmlFileName, bChartApplet, isMultiFile, bUsingTable, bHyperlink, bPageNum, bAbsolute, iBrowser,drilldown)
•
exportToHtml(htmlFileName, bChartApplet, isMultiFile, bUsingTable, bHyperlink, bPageNumber, bAbsolute, iBrowser,drilldown, noMarginHtml)
•
exportTohtml(htmlFileName, bChartApplet, isMultiFile, bUsingTable, bHyperlink, bPageNum, bAbsolute, iBrowser,bincdrilldownfile, noMargin, isDhtml)
•
exportToHtml(htmlFileName, bChartApplet, isMultiFile, bUsingTable, bHyperlink, bPageNumber, bAbsolute, iBrowser,drilldown, noMarginHtml, isDhtml, resolution)
•
exportToHtml(htmlFileName, bChartApplet, isMultiFile, bUsingTable, bHyperlink, bPageNumber, bAbsolute, iBrowser,drilldown, noMarginHtml, isDhtml, resolution, overflow)
•
exportToDhtml(htmlFileName, bChartApplet, isMultiFile, bUsingTable, bHyperlink, bPageNum, bAbsolute, iBrowser,drilldown)
•
exportToDhtml(htmlFileName, bChartApplet, isMultiFile, bUsingTable, bHyperlink, bPageNum, bAbsolute, iBrowser,drilldown, noMargin)
•
exportToDhtml(htmlFileName, bChartApplet, isMultiFile, bUsingTable, bHyperlink, bPageNumber, bAbsolute, iBrowser,drilldown, noMarginHtml, resolution)
•
exportToDhtml(htmlFileName, bChartApplet, isMultiFile, bUsingTable, bHyperlink, bPageNumber, bAbsolute, iBrowser,drilldown, noMarginHtml, resolution, overflow)
•
exportToPdf("PdfFileName")• exportToPdf("pdfFileName", noMarginPdf) • exportToPdf("pdfFileName", noMarginPdf, isSimPrintMode) • exportToPdf("pdfFileName", noMarginPdf, isSimPrintMode, isCompressImage) • exportToPdf("pdfFileName", noMargin, isPrintMode, isCompressImage, isTransparent)• exportToPdf(pdfFileName, noMarginPdf, isSimPrintMode, isCompressImage, isTransparent, isToc, isDrilldown)• exportToPdf(pdfFileName, noMarginPdf, isSimPrintMode, isCompressImage, isTransparent, isToc, isDrilldown,pdfPassword)
•
exportToText("TextFileName", isNormalText, isRepeat, delimiter) • exportToText( "TextFileName", isNormalText, isRepeat, delimiter, charWidth, charHeight) • exportToText( "TextFileName", isNormalText, isRepeat, delimiter, charWidth, charHeight, IsQuoteMark)• exportToText(txtFileName, isNormalText, isRepeat, delimiter, charWidth, charHeight, isQuoteMark, hasHeadfoot,bTxtCompress)
•
exportToText(txtFileName, isNormalText, isRepeat, delimiter, charWidth, charHeight, isQuoteMark, hasHeadfoot,bTxtCompress, forWindows)
•
exportToText(txtFileName, isNormalText, isRepeat, delimiter, charWidth, charHeight, isQuoteMark, hasHeadfoot,bTxtCompress, forWindows, isCsv, isTab)
•
exportToXls("xlsFileName")• exportToXls( xlsFileName, wordWrap)• exportToXls(xlsFileName, wordWrap, excel2000) • exportToXls(xlsFileName, wordWrap, excel2000, hasShapes)• exportToPS("psFileName") • exportToPS( "psFileName", noMarginPs) • exportToRtf("rtfFileName") • exportToRtf("rtfFileName", noMarginRtf) • exportToXML(String xmlFileName)• exportToXML(java.lang.String xmlFileName, boolean isOnlyData) • exportToXML(String xmlFileName, boolean isMultiFiles, boolean isOnlyData) (deprecated)• exportToXML(xmlFileName, isOnlyData, xsdFile) •
The parameters above are explained below:
Accessing JReport Enterprise Server − JReport Viewer
116

HtmlFileName −− The name of the HTML format result file with full path. • bChartApplet −− A boolean value indicates whether the chart in html file is an applet. • isMultiFile −− A boolean value indicates whether to generate to one html file or to multiple html files. • bUsingTable −− A boolean value indicates whether to use html table format when exporting html files. • bHyperLink −− A boolean value indicates whether the hyperlink is generated. • bPageNum −− A boolean value indicates whether to generate page number. • bAbsolute −− A boolean value indicates if the font size is absolute or relative. • iBrowser −− A int value indicates whether the html browser is IE or NETSCAPE. • drilldown −− A boolean value indicates whether to generate the drilldown html files in the file list. • isDhtml −− A boolean value indicates whether to export to HTML or DHTML. • PdfFileName −− The name of the PDF format result file with full path.• isSimPrintMode −− A boolean value indicates whether to use simulating print mode when exporting reports to the PDFformat.
•
isComprssImage −− A boolean value indicates whether to compress images when exporting reports to the PDF format.• isTransparent −− A boolean value which indicates whether keep the GIF image transparent background.• TextFileName −− The name of the TEXT format result file with full path. • isNormalText −− A boolean value indicates whether this text file is a normal text format ora Standard Data Format (thestandard data format text file is the text file that each row of it represents each record in the report. It can be used as a textdata source to exchange data with other application).
•
isRepeat −− A boolean value indicates whether the same contents are repeated. • delimiter −− A character which will be used in SDF (Standard Data Format) format. The delimiter will be used only whenthe "true/false" parameter is set to be false. A delimiter could be a ',' (the CSV format) or any other characters. The default is' ' (a blank), that is, the SSV format.
•
IsQuoteMark −− A boolean value indicates whether to mark fields in quotes. • xlsFileName −− The name of the Excel format report result file with full path. • psFileName −− The name of the Postscript format result file with full path. • rtfFileName −− The name of the Rich Text Format file with full path. • noMarginHtml −− A boolean value indicates whether to generate the html files without page margin. • noMarginPdf −− A boolean value indicates whether to generate the pdf file without page margin. • noMarginRtf −− A boolean value indicates whether to generate the Rtf file without page margin. • noMarginPs −− A boolean value indicates whether to generate the PS file without page margin. • charWidth −− An int type value, the width for each unit of the width clearance between columns. • charHeight −− An int type value, the height for each unit of the height clearance between columns. • xmlFileName −− the XML file name.• isMultiFiles −− A boolean value indicates whether XML is generated to one file or to multiple files.• isOnlyData −− A boolean value indicates that only database column information is exported to the XML file, otherwise allreport details, including all the properties will be exported.
•
resolution −− A int type indicates the resolution of the HTML file. • overflow −− A int type indicates the text overflow type of the html file. • isToc −− A boolean value indicates the pdf file has TOC. • isDrilldown −− A boolean value indicates is can drilldown file. • pdfPassword −− A String type indicates the value of password. • hasHeadfoot −− A boolean value indicates wether include Header and footer in the SDF format. • bTxtCompress −− A boolean value indicates compress the file. • forWindows −− A boolean value indicates the text file has \r\n format carriage return. • isCsv −− A boolean value indicates csv format. • isTab −− A boolean value indicates tab delimited. • wordWrap −− A int type indicates the Xls file has word wrap. • excel2000 −− A boolean value indicates the Xls file has excel2000 format. • hasShapes −− A boolean value indicates the Xls file has shapes. • isOnlyData −− A boolean value indicates that only database column information is exported to the XML file, otherwise allreport details, including all the properties will be exported.
•
xsdFile −− A String value indicates the xsd file path. •
Accessing JReport Enterprise Server − JReport Viewer
117

Where Portion
JReport Viewer Bean provides the methods to add, delete, save and get a new WHERE clause in the SQL query (we will provide thelast three methods in the future).Please note that the join relationships of tables will remain in the new where clause. By specifyingthe name of this new WHERE clause, users can pick it out from the catalog:
setNamedWherePortion(queryName) −− Specify the name of a new WHERE clause• setWherePortion(SQL) −− Set the WHERE clause in SQL•
The parameters above are explained below:
queryName −− The name of the WHERE clause in SQL query• SQL −− the specific WHERE clause•
Showing a Report in a New Frame
While viewing a report, if you want to show a report in a new frame that is different from your application window, call the methodsetViewInNewFrame( true/false ) in JRDirectViewer or JRRunViewer. "True" means a report is shown in a new frame.
Proxy Setting
If you use JReport Viewer Bean to access JReport Enterprise Server through a proxy, you should set the proxy with the followingmethods:
setProxyHost("theProxyHost") • setProxyPort("theProxyPort") •
If the proxy server needs to be authenticated, you can set the userName and password with the following methods:
setProxyUser("proxyUserName") • setProxyPassword("proxyPassword") •
Printing a Report
There are four methods provided for printing a report:
printReport ( ) • printReport (Object printJob, Object pageFormat, boolean bInteractive, boolean bInBackground, boolean bUseJDK11) • printReport (Object printJob, Object pageFormat, boolean bInteractive, boolean bInBackground, boolean bUseJDK11,boolean bSeparateLargePage)
•
printReport( java.lang.Object job, boolean bInteractive, java.lang.Object pageFormat, boolean bInBackground,JReportPrintListener jreportprintlistener, int useJDK, java.lang.String jobName, java.util.Vector attributeInfo,java.lang.String printer )
•
getPrintStatus ( ) •
The first method printReport ( ) is called to start printing. It will take the last method using the default parameter values like this:printReport(null, null, true, false, false, false)
The second and third method allows you to pass the parameters −− printJob, pageFormat, bInteractive, bInbackground, bUseJDK11and bSeparateLargePage. Below is the explanation ssof each parameter:
bInteractive −− A boolean value. If you set it to false, the print setup dialog will not show up. • bInBackground −− A boolean value. If you set to true, the printing dialog will not show up. • bUseJDK11 −− A boolean value. If true, it will use JDK1.1.x to print the report. Otherwise if you set false, it will use theJDK which you are running to print the report. The JDK 1.1 printing method is quick in speed but the printing quality is notguaranteed. However, The JDK 1.2 method can return you with a satisfactory result, even for a gif file, but it is slow in
•
Accessing JReport Enterprise Server − JReport Viewer
118
speed. bSeparateLargePage −− A boolean value, if the report page size is larger than the print paper size, and you want to separatethe large report page during printing, you should set this property to true. If the print page size which you choose is less thanthe report page size, then the report will be printed as multiple pages serially, this means we will separate the large page ofthe report automatically. After you set it to true, for JDK1.2 or higher, the page format dialog will be popped up. In thisdialog, you can choose the page format which you want to print with, we will use this page size for printing. For JDK1.1.x,however, you must change the page format which you want to print with in the print dialog (click the property button, thenchoose the page format). Note: This printing method is not recommended, it may cause some unexpected errors, for example, you may get an extrablank page.
•
jreportprintlistener −− A JReportPrintListener is the listener of print. It is a interface which contains two methods thatprintStart() and printEnd(). JeportPrintListener is located in jet.thinview.print package. This interface is useful, when youwant to get the print status −− start or end, for example. Otherwise, you can set it to null.
•
useJDK −− a int value, if you set it to 0, it will use JDK1.1 to print the report. Otherwise if you set it to 1, it will use theJDK1.2 which you are running to print the report.if you set it to 2, it will use the JDK1.4 which you are running to print thereport. The JDK 1.1 printing method is quick in speed but the printing quality is not guaranteed. However, The JDK 1.2method can return you with satisfactory result, even for a gif file, but it is slow in speed.JDK 1.4 provide more options to doprint such as specify tray.
•
jobName − A String value specify print job name. • attributeInfo − is a vector which elements are string. Each String has defined in interface PrintConfig. For example, you canimplement PrintConfig and call its fields like this: attributeInfo.add(TRAY_MANUAL);attributeInfo.add(ORIENTATION_PORTRAIT);
•
printer − specify the printer you want to use. This printer name must be with full path. You can call getAllPrinters() methodfor jdk 1.4 to get the list of system printers. This printReport method is recommend for jdk 1.4 or above only −− a lot offeatures are only supported by jdk 1.4 or above. An example of calling this printReport() method: PrinterJob printJob =PrinterJob.getPrinterJob(); Vector attributeInfo = new Vector(); attributeInfo.add(TRAY_MANUAL);attributeInfo.add(ORIENTATION_PORTRAIT); bean.printReport(printJob, true, printJob.defaultPage(), false,null,2,"JReport", attributeInfo,"\\\\192.168.128.111\\Samsung SCX−5x12 Series PCL 6");
•
Example1: Under JDK1.2 or higher, if you use JDK1.2 printing method (boolean bUseJDK11), you can call the printReport methodlike this:PrinterJob printJob = PrinterJob.getPrinterJob();bean.printReport(printJob, printJob.defaultPage(), false, false, false);
Or, if you do not want to getPrinterJob, simply call:bean.printReport (null, null, false, false, false);
Example2: Under JDK1.2 or higher, if you use JDK1.1 printing method, you are best recommended not to getPrintJob, just call:bean.printReport (null, null, false, false, true);
After the printing is started, the method getPrintStatus ( ) can be used to get the print job status. The returned values of getPrintStatus( ) are:
"No Print Job" • "Busy" • "OK" • Other error message if there is an error. •
Browsing Report Pages
getCurrentPageNumber ( ) • getTotalPageNumber ( ) •
These two methods will return the current page number on the screen and the total number of pages of the current report. These twomethods can be called only after you have called the method JRDirectViewer or JRRunViewer.
Accessing JReport Enterprise Server − JReport Viewer
119
int gotoPage (int pageNumber) •
This method will bring the page specified by the pageNumber on the screen. If the pageNumber is out of the range of the currentreport, the first page (if the pageNumber is less than 0) or the last page will be shown on the screen and the returned value is thecurrent page number.
firstPage ( ) • prevPage ( ) • nextPage ( ) • lastPage ( ) •
These four methods will bring the page specified to the screen. The return value of these methods are strings. The value could be:
"OK" • "No more Page" • other error messages such as "No Report Load". •
Zooming a Report Result
If you want to zoom a report result, the zoom( ) method can satisfy your requirement.
zoom(ratio)
The parameter ratio is of integer type, it stands for a percentage value. If you want to enlarge the report to two times the original size,you can call this method:
zoom(200)
If you want to reduce the report size by half, you can call this method like this:
zoom(50)
To see an example, please refer to Sample2.java and Sample3.java.
Set Connection Information
setConnection (String strURL, String strUID, String strPSWD, String strJdbcDriver)
Where,
String strURL−− the URL of the database. For the format of the URL please refer to the instructions of your JDBC driver. • String strUID−− the user ID for the driver. • String strPSWD−− the user's password for the driver. • String strJdbcDriver−− the full qualified name of class. The class is responsible for connecting to the database and fetch thedata. For example, com.sybase.jdbc.SybDriver or oracle.jdbc.driver.OracleDriver. If not specified, the default one will beused.
•
This method is for JRRunViewer and JRDirectViewer, which enables the user to set the connection information before running thereport. You can let users specify the user id and the password before running a report to ensure the security. Another application ofthis method is that readers can select a different database before running reports, so they can see different report results. Of course,usually in this case, the two databases have the same structure and this will ease the work of building another catalog repeatedly.
For example, this method may be called like this:setConnection("jdbc:Oracle:thin:@204.177.148.30:1521:orcl","scott","tiger","oracle.jdbc.driver.OracleDriver");
Accessing JReport Enterprise Server − JReport Viewer
120

ClickActionListener
When you click a field in the viewer, you can get the entire record of that field. We have an interface in package jet.thinviewer namedClickActionListener, which can implement this function. This interface is defined like this:
interface ClickActionListener{void clickOnField(jet.connect.Record currentRecord);}
If you have a class A which wants to listen to the click event of the field, then this class can implement this interface. Then after youinstantiate a bean, you add this ClickActionListener to the bean (Note: this action must be implemented before running the report).Finally after the report has been shown and you click on a field, we will call the ClickActionListener's method clickOnField, and youwill get the values of all columns in that field from the parameter currentRecord.
To see an example, please refer to Sample2.java and Sample3.java.
Logging out from the Server
After viewing the report, if you do not need to access JReport Enterprise Server again, you can log out from JReport EnterpriseServer to terminate the connection with it.
logout()•
Note: When you turn pages in JReport Viewer Bean, JReport Viewer Bean needs to access JReport Enterprise Server later. In thiscase, you should not call the method logout().
Exiting the Bean
exit ( ) should be called when you want to quit from the JReport Viewer Bean. This method will do some cleaning up work such asdeleting temporary files and release resources. It is important, so do not to forget to call this method.
Exposing the whole JReport Viewer's GUI
JRClientViewerBean exposes the whole JReport Viewer's GUI to a new frame. If you want to use the JReport Viewer's GUI andstart JReport Viewer in a new frame, you can use this bean.
With this approach, your Java application calls the Java bean JRClientViewer and provides the following properties:
setReportHome ("theReportHome") • setServerName ("theServerName") • setPort ("thePortNumber") • setFullPath ("theFullPath") • setUserName ("theUserName") • setPassword ("thePassword") • setLoadReport ("Yes/No") •
The Report Home is the home path of JReport Client Viewer where the report.ini file and other JReport Client Viewer system filesexist. (Note: Up to now, we have only provided JRClientViewer for JReport Enterprise Server.)
National Language Support (NLS)
JReport products support National Language feature. When you design and save a report, the language−dependent text of Labelobject will be abstracted to a resource file(.properties), copy the resource file for another language and modify the text in the file.When JReport is running, JReport Engine will retrieve the language−dependent text according to the current locale, the end user will
Accessing JReport Enterprise Server − JReport Viewer
121
get the report result that matches his locale setting.
For JRCltPreViewer.java and JRPrepareViewer, you can set language and convert to a Locale object.
public void setLanguage(String rptLanguage){loc = LocaleUtil.getLocalebyId(rptLanguage);}
•
For JRDirectViewer and JRRunViewer,
setLanguage(String rptLanguage) • setEncoding(String rptEncoding)•
At run time, clients can specify the encoding and Locale for rendering its report result accordingly. But please make sure that whenyou design the report, you have set to support NLS, also you have generated the property file for the language you hope to use.
Returned Code
The method getStatus ( ) should be called each time after calling the Viewer Java Beans. The return string "OK" means the request isaccepted otherwise an error message will be returned.
Show Information
The two properties showInfoLevel and logFile are used for controlling debugs, errors and other information display. The followingtwo methods are used to set values to these properties:
setShowInfoLevel (vDebug/vError/vOff)• setLogFile ("LogFileName")•
vDebug, vError and vOff are used for showing debugging information, error information and turning off debugging and errorinformation. LogFileName specifies where the debugging, error and other information will go. LogFileName contains both path andfile name information. If no path is specified, the current path is used. If no file name is specified, the file jreport.log will be used.
Set Temporary Path
setTempPath("TempPath")
When JReport Viewer Bean is running, it will generate some temp files. The above method setTempPath() is designed for setting thetemp path. If no temp path is set, the temp file will be written to the directory where the application runs.
Example,setTempPath("c:\\temp");
Modifying User Information
modifyUserInfo(String strUserName, String strPassword)
This method is for JRDirectViewer and JRRunViewer. Obviously, it is to modify user's information: user ID and password.
Illustrative Examples
The example programs Sample1.java and Sample2.java illustrate how to call JReport Viewer Java beans. The example programTestClientViewer.java shows how to call JRClientViewer Bean. Please refer to it for details.
Launching the server which is of the same version of the viewer bean.1.
Accessing JReport Enterprise Server − JReport Viewer
122
Modify the sample code to set the server host name, port number, catalog file etc according to your actual environment.2. Compile and run your code calling the bean. When you call one−step viewer bean, only add in your classpath ofOneStepJRViewer.jar and log4j−1.2.8.jar, and when you call two−step viewer bean, only add in your classpath ofTwoStepsJRViewer.jar and log4j−1.2.8.jar. If you find any problems, you can try archive file JRViewer.zip together withlog4j−1.2.8.jar, which can be used in both the circumstances no matter whether it is for the one−step or two−step viewerbean.
3.
Index
Accessing JReport Enterprise Server − JReport Viewer
123

Accessing a Report Using URL
Introduction
Users sometimes want to reach a specific page by typing a full URL in a Web browser instead of clicking hyperlinks from the Serverhome page. We provide the commands used in URL. These URLs can also be used in your applications. The Scheduling Commandand its Properties section further explain the scheduling task.
Note: Users of the PDF−version manual, some command line examples are too long to be displayed in the pdf file, so please refer tothe html version.
Notes for upgrading to version 6:
In JReport Enterprise Server version 6, the JSP is enabled by default (in the server.properties file, thehttpserver.jsp.enable property is set to true). Terefore, you should use /jrsever in the URL to access theservlet. For example,
Instead of: http://localhost:8888?jrs.cmd=jrs.get_subnodesYou should now write: http://localhost:8888/jrserver?jrs.cmd=jrs.get_subnodes
•
The format to reference the catalog name and report name has been changed. Now the catalog name and report name shouldbe used in jrs.catalog=CATALOG and jrs.report=REPORT. For example,
New:http://localhost:8888/jrserver?jrs.cmd=jrs.get_rst_vers&jrs.catalog=/hsqlDemo/Tutorial.cat&jrs.report=/hsqlDemo/Invoice.cls
•
Deprecated!http://localhost:8888/jrserver/hsqlDemo/Tutorial.cat/Invoice.cls?jrs.cmd=jrs.get_rst_versHowever, the old format is still supported.
•
Accessing a report using URL
Protocols/Commands
With the commands below, you can directly type the whole URL in a browser to access the destination. The HTTP methods GETand POST are available for almost all of the commands.
jrs.get_subnodesDescription: get all the sub nodes of a specified node (deprecated since version 6.0, replaced by jrs.get_cat_rpts_new)HTTP Method: GET/POSTURL Format: http://HOST:PORT/jrserver?jrs.cmd=jrs.get_subnodesURL Example: http://localhost:8888/jrserver?jrs.cmd=jrs.get_subnodesResponse: Resource nodes list
•
jrs.get_cat_rptsDescription: get reports and catalogs (deprecated since version 6.0, replaced by jrs.get_cat_rpts_new)HTTP Method: GET/POSTURL Format: http://HOST:PORT/jrserver?jrs.cmd=jrs.get_cat_rptsURL Example: http://localhost:8888/jrserver?jrs.cmd=jrs.get_cat_rptsResponse: resource nodes list
•
jrs.get_cat_rpts_newDescription: get all resource nodes (folder, catalog, report and result) of a folderHTTP Method: GET/POSTURL Format:http://HOST:PORT/jrserver?jrs.cmd=jrs.get_cat_rpts_new&jrs.path=RESOURCENODEURL Example:http://localhost:8888/jrserver?jrs.cmd=jrs.get_cat_rpts_new&jrs.path=/hsqlDemoResponse: resource nodes list
•
124
jrs.get_node_propDescription: get the properties of a resource nodeHTTP Method: GET/POSTURL Format: http://HOST:PORT/jrserver?jrs.cmd=jrs.get_node_prop&jrs.path=RESOURCENODEURL Example:http://localhost:8888/jrserver?jrs.cmd=jrs.get_node_prop&jrs.path=/hsqlDemo/Tutorial.catResponse: resource node properties
•
jrs.delete_resourceDescription: delete the resource node from resource treeHTTP Method: GET/POSTURL Format:http://HOST:PORT/jrserver?jrs.cmd=jrs.delete_resource&jrs.path=RESOURCENODEURL Example:http://localhost:8888/jrserver?jrs.cmd=jrs.delete_resource&jrs.path=/hsqlDemo/Invoice.cls
•
jrs.get_rst_versDescription: get result versions list of the reportHTTP Method: GET/POSTURLFormat: http://HOST:PORT/jrserver?jrs.cmd=jrs.get_rst_vers&jrs.catalog=CATALOG&jrs.report=REPORT(Deprecated) http://HOST:PORT/jrserver/REPORT?jrs.cmd=jrs.get_rst_versURL Example:http://localhost:8888/jrserver?jrs.cmd=jrs.get_rst_vers&jrs.catalog=/hsqlDemo/Tutorial.cat&jrs.report=/hsqlDemo/Invoice.cls(Deprecated)http://localhost:8888/jrserver/hsqlDemo/Tutorial.cat/Invoice.cls?jrs.cmd=jrs.get_rst_versResponse: result versions list
•
jrs.get_rpt_versDescription: get report versions list of the reportHTTP Method: GET/POSTURL Format: http://HOST:PORT/jrserver?jrs.cmd=jrs.get_rpt_vers&jrs.report=REPORTURL Example:http://localhost:8888/jrserver?jrs.cmd=jrs.get_rpt_vers&jrs.report=/hsqlDemo/Invoice.clsResponse: report versions list
•
jrs.get_cat_versDescription: get catalog versions list of the catalogHTTP Method: GET/POSTURL Format: http://HOST:PORT/jrserver?jrs.cmd=jrs.get_cat_vers&jrs.catalog=CATALOGURL Example:http://localhost:8888/jrserver?jrs.cmd=jrs.get_cat_vers&jrs.catalog=/hsqlDemo/Tutorial.catResponse: catalog versions list
•
jrs.get_rst_doc_versDescription: get result versions list of the result doc, the result doc can be generated by advanced running or scheduling areportHTTP Method: GET/POSTURL Format: http://HOST:PORT/jrserver?jrs.cmd=jrs.get_rst_doc_vers&jrs.result=RESULTURL Example:http://localhost:8888/jrserver?jrs.cmd=jrs.get_rst_doc_vers&jrs.result=/hsqlDemo/InvoiceResponse: result versions list
•
jrs.get_ver_rst_pageDescription: get a result version of the report in the version managerHTTP Method: GET/POSTURL Format: http://HOST:PORT/jrserver?jrs.cmd=jrs.get_ver_rst_page&jrs.file=FILE_NAME(Deprecated)http://HOST:PORT/jrserver/REPORT?jrs.cmd=jrs.get_ver_rst_page&jrs.file=FILE_NAMEURL Example:http://localhost:8888/jrserver?jrs.cmd=jrs.get_ver_rst_page&jrs.file=1%5cadmin1071108105020%5cadmin1071108105020.rst (Deprecated) http://localhost:8888/jrserver/hsqlDemo/Tutorial.cat/Invoice.cls?jrs.cmd=jrs.get_ver_rst_page&jrs.file=1%5cadmin1071108105020%5cadmin1071108105020.rst>Response: the result file in version manager
•
Accessing a Report Using URL
125
jrs.get_ver_rstDescription: get a HTML page to view a result version of the report with the ViewerAppletHTTP Method: GET/POSTURL Format:http://HOST:PORT/jrserver/REPORT?jrs.cmd=jrs.get_ver_rst&jrs.file=FILE_NAMEURL Example:http://localhost:8888/jrserver/hsqlDemo/Tutorial.cat/Invoice.cls?jrs.cmd=jrs.get_ver_rst&jrs.file=1%5cadmin1071108105020%5cadmin1071108105020.rst Response: HTML page to view the result file with the ViewerApplet
•
jrs.get_large_reportsDescription: get the list of large reports. (deprecated since version 6.0, replaced by jrs.get_ondemands)HTTP Method: GET/POSTURL Format: http://HOST:PORT/jrserver?jrs.cmd=jrs.get_large_reportsURL Example: http://localhost:8888/jrserver?jrs.cmd=jrs.get_large_reportsResponse: large report list
•
jrs.get_ondemandsDescription: get the list of on−demand reports.HTTP Method: GET/POSTURL Format: http://HOST:PORT/jrserver?jrs.cmd=jrs.get_ondemandsURL Example: http://localhost:8888/jrserver?jrs.cmd=jrs.get_ondemandsResponse: on−demand report list
•
jrs.view_ver_rstDescription: view a result version of the reportHTTP Method: GET/POSTURL Format:
•
http://HOST:PORT/jrserver/REPORT?jrs.cmd=jrs.view_ver_rst&jrs.hist_file=RESULT_VERSION_FILE_NAME&jrs.result_type=RESULT_TYPE&jrs.applet_type=APPLET_TYPE[&jrs.isjrsapltpg=TRUE/FALSE][&jrs.is_multi_files=TRUE/FALSE][&jrs.is_applet_chart=TRUE/FALSE][&jrs.has_hyperlink=TRUE/FALSE][&jrs.has_page_number=TRUE/FALSE][&jrs.use_table=TRUE/FALSE][&jrs.drilldown=TRUE/FALSE][&jrs.relative_font_size=TRUE/FALSE][&jrs.no_margin_html=TRUE/FALSE][&jrs.web_browser=BROWSER_TYPE][&jrs.no_margin_pdf=TRUE/FALSE][&jrs.is_norm_txt=TRUE/FALSE][&jrs.delimiter=DELIMITER][&jrs.udchar_width=NUMBER][&jrs.udchar_height=NUMBER][&jrs.no_margin_ps=TRUE/FALSE][&jrs.no_margin_rtf=TRUE/FALSE]
URL Example:http://localhost:8888/jrserver/hsqlDemo/Tutorial.cat/Invoice.cls?jrs.cmd=jrs.view_ver_rst&jrs.hist_file=1%5cadmin1071108105020%5cadmin1071108105020.rst&jrs.result_type=1
Note:RESULT_TYPE:0 − To Applet1 − To HTML2 − To PDF3 − To TEXT4 − To Excel5 − To Postscript6 − To Rich Text Format7 − To XML8 − To DHTML
APPLET_TYPE:0 − Normal (deprecated since version 5.2)1 − Java Plug−In 1.1.1 for Windows (deprecated since version 5.2)2 − Java Plug−In 1.2 for Windows3 − Java Plug−In 1.3 for Windows
Accessing a Report Using URL
126

BROWSER_TYPE: 0 − IE1 − Netscapejrs.get_rpt_desc_pageDescription: get an HTML page in order to enter parameter values and choose the result type of the reportHTTP Method: GET/POSTURL Format:http://HOST:PORT/jrserver?jrs.cmd=jrs.get_rpt_desc_page&jrs.catalog=CATALOG&jrs.report=REPORT(Deprecated) http://HOST:PORT/jrserver/REPORT?jrs.cmd=jrs.get_rpt_desc_pageURL Example:http://localhost:8888/jrserver?jrs.cmd=jrs.get_rpt_desc_page&jrs.catalog=/hsqlDemo/Tutorial.cat&jrs.report=/hsqlDemo/Invoice.cls(Deprecated)http://localhost:8888/jrserver/hsqlDemo/Tutorial.cat/Invoice.cls?jrs.cmd=jrs.get_rpt_desc_page
•
jrs.get_rpt_param_pageDescription: get an HTML page in order to enter parameter values of the reportHTTP Method: GET/POSTURL Format:http://HOST:PORT/jrserver?jrs.cmd=jrs.get_rpt_param_page&jrs.catalog=CATALOG&jrs.report=REPORT(Deprecated) http://HOST:PORT/jrserver/REPORT?jrs.cmd=jrs.get_rpt_param_page
URL Example:http://localhost:8888/jrserver?jrs.cmd=jrs.get_rpt_param_page&jrs.catalog=/hsqlDemo/Tutorial.cat&jrs.report=/hsqlDemo/Invoice.cls(Deprecated)http://localhost:8888/jrserver/hsqlDemo/Tutorial.cat/Invoice.cls?jrs.cmd=jrs.get_rpt_param_page
•
jrs.del_rpt_verDescription: delete a result version of the reportHTTP Method: GET/POSTURL Format:http://HOST:PORT/jrserver/REPORT?jrs.cmd=jrs.del_rpt_ver&jrs.version_id=VERSION_IDURL Example:http://localhost:8888/jrserver/hsqlDemo/Tutorial.cat/Invoice.cls?jrs.cmd=jrs.del_rpt_ver&jrs.version_id=103
•
jrs.get_ver_paramDescription: get the parameter file of a report's result versionHTTP Method: GET/POSTURL Format:http://HOST:PORT/jrserver/REPORT?jrs.cmd=jrs.get_ver_param&jrs.version_id=VERSION_IDURL Example:http://localhost:8888/jrserver/hsqlDemo/Tutorial.cat/Invoice.cls?jrs.cmd=jrs.get_ver_param&jrs.version_id=103
•
jrs.web_vwDescription: run the report and view its result in a Web browserHTTP Method: GET/POSTURL Format:
•
http://HOST:PORT/jrserver/REPORT?jrs.cmd=jrs.web_vw&jrs.result_type=RESULT_TYPE[&jrs.param$NAME=VALUE&jrs.param$NAME=VALUE...]&jrs.applet_type=APPLET_TYPE[&jrs.isjrsapltpg=TRUE/FALSE][&jrs.is_multi_files=TRUE/FALSE][&jrs.is_applet_chart=TRUE/FALSE][&jrs.has_hyperlink=TRUE/FALSE][&jrs.has_page_number=TRUE/FALSE][&jrs.use_table=TRUE/FALSE][&jrs.drilldown=TRUE/FALSE][&jrs.relative_font_size=TRUE/FALSE][&jrs.no_margin_html=TRUE/FALSE][&jrs.web_browser=BROWSER_TYPE][&jrs.no_margin_pdf=TRUE/FALSE][&jrs.is_norm_txt=TRUE/FALSE][&jrs.delimiter=DELIMITER][&jrs.udchar_width=NUMBER][&jrs.udchar_height=NUMBER][&jrs.no_margin_ps=TRUE/FALSE][&jrs.no_margin_rtf=TRUE/FALSE][&jrs.use_def_db_user=TRUE/FALSE][&jrs.db_user=DB_USER][&jrs.db_pswd=DB_PASSWORD][&jrs.jdbc_url=JDBC_URL][&jrs.jdbc_driver=JDBC_DRIVER][&jrs.rpt_language=RPT_LANGUAGE][&jrs.rpt_encoding=RPT_ENCODING][&jrs.wp=DBField='value'][&jrs.named_wp=ExistedWhereportion]
URL Example:
Accessing a Report Using URL
127

http://localhost:8888/jrserver/hsqlDemo/Tutorial.cat/Invoice.cls?jrs.cmd=jrs.web_vw&jrs.result_type=1&jrs.param$TERMSDAYS=30&jrs.param$PTODAY=May 21,1998&jrs.is_multi_files=true&jrs.is_applet_chart=true&jrs.use_def_db_user=false&jrs.db_user=dba&jrs.db_pswd=123456&jrs.rpt_language=en
Note:RESULT_TYPE: 0 − To Applet1 − To HTML2 − To PDF3 − To TEXT4 − To Excel5 − To Postscript6 − To Rich Text Format7 − To XML8 − To DHTML
APPLET_TYPE: 0 − Normal (deprecated since version 5.2)1 − Java Plug−In 1.1.1 for Windows (deprecated since version 5.2)2 − Java Plug−In 1.2 for Windows3 − Java Plug−In 1.3 for Windows
BROWSER_TYPE: 0 − IE1 − Netscape
Set parameter values of the report: use jrs.param$NAME=VALUE to set parameter values of the report. The NAME is theparameter name and the VALUE is the URL−encoded parameter value. For Example:jrs.param$TERMSDAYS=30&jrs.param$PTODAY=May 21, 1998
If you want to define a new whereportion from the URL, you can choose the property "jrs.wp". For example, the report has aDBfield "Customer Region", and you want to restrict the field "Customer Region" to "CA" in the URL, then you can set anew whereportion like "...jrs.result_type=1&jrs.is_applet_chart=true&jrs.wp=Customers.Region='CA'..."
If you want to set an existing whereportion in the URL, you should use the property "jrs.named_wp". For example, to setthe existed whereportion "Region" from URL, you can try"...jrs.result_type=1&jrs.is_applet_chart=true&jrs.named_wp=Region...". Here "Region" is the whereportion's name.jrs.try_vwDescription: try to view a report in a web browser. If the report has no parameters then directly run and view the report(similar to the command jrs.web_vw). If the report has parameters then the Server returns the report description page toenter parameter values and choose the result type of the report (similar to the command jrs.get_rpt_desc_page)HTTP Method: GET/POST
URL Format:
•
http://HOST:PORT/jrserver/REPORT?jrs.cmd=jrs.try_vw&jrs.result_type=RESULT_TYPE&jrs.applet_type=APPLET_TYPE[&jrs.isjrsapltpg=TRUE/FALSE][&jrs.is_multi_files=TRUE/FALSE][&jrs.is_applet_chart=TRUE/FALSE][&jrs.has_hyperlink=TRUE/FALSE][&jrs.has_page_number=TRUE/FALSE][&jrs.use_table=TRUE/FALSE]"[&jrs.drilldown=TRUE/FALSE][&jrs.relative_font_size=TRUE/FALSE][&jrs.no_margin_html=TRUE/FALSE][&jrs.web_browser=BROWSER_TYPE][&jrs.no_margin_pdf=TRUE/FALSE][&jrs.is_norm_txt=TRUE/FALSE][&jrsd.elimiter=DELIMITER][&jrs.udchar_width=NUMBER][&jrs.udchar_height=NUMBER][&jrs.no_margin_ps=TRUE/FALSE][&jrs.no_margin_rtf=TRUE/FALSE][&jrs.use_def_db_user=TRUE/FALSE][&jrs.db_user=DB_USER][&jrs.db_pswd=DB_PASSWORD][&jrs.jdbc_url=JDBC_URL][&jrs.jdbc_driver=JDBC_DRIVER][&jrs.rpt_language=RPT_LANGUAGE][&jrs.rpt_encoding=RPT_ENCODING]
Accessing a Report Using URL
128

[&jrs.wp=DBField='value'][&jrs.named_wp=ExistedWhereportion]
URL Example:http://localhost:8888/jrserver/hsqlDemo/Tutorial.cat/customerlist.cls?jrs.cmd=jrs.try_vw&jrs.result_type=1Note:RESULT_TYPE: 0 − To Applet1 − To HTML2 − To PDF3 − To TEXT4 − To Excel5 − To Postscript6 − To Rich Text Format7 − To XML8 − To DHTML
APPLET_TYPE: 0 − Normal (deprecated since version 5.2)1 − Java Plug−In 1.1.1 for Windows (deprecated since version 5.2)2 − Java Plug−In 1.2 for Windows3 − Java Plug−In 1.3 for Windows
BROWSER_TYPE: 0 − IE1 − Netscapejrs.get_schedulesDescription: get the schedules listHTTP Method: GET/POSTURL Format: http://HOST:PORT/jrserver?jrs.cmd=jrs.get_schedulesURL Example: http://localhost:8888/jrserver?jrs.cmd=jrs.get_schedules
•
Another method for getting the result file Description: get the result files through the directory when a report is viewed with a Web browser.HTTP Method: GET/POSTURL Format: http://HOST:PORT/jrserver/REPORT/result/FILENAMEURL Examples: http://localhost:8888/jrserver/hsqlDemo/Tutorial.cat/Invoice.cls/result/10577952770_1.htmlhttp://localhost:8888/jrserver/hsqlDemo/Tutorial.cat/Invoice.cls/result/10577952770_1.pdfhttp://localhost:8888/jrserver/hsqlDemo/Tutorial.cat/Invoice.cls/result/10577952770_1.txt
•
jrs.del_scheduleDescription: delete a scheduleHTTP Method: GET/POSTURL Format: http://HOST:PORT/jrserver?jrs.cmd=jrs.del_schedule&jrs.task_id=TASK_IDURL Example:http://localhost:8888/jrserver?jrs.cmd=jrs.del_schedule&jrs.task_id=2003−12−1111:09:16.455
•
jrs.enable_scheduleDescription: enable a scheduleHTTP Method: GET/POSTURL Format: http://HOST:PORT/jrserver?jrs.cmd=jrs.enable_schedule&jrs.task_id=TASK_IDURL Example:http://localhost:8888/jrserver?jrs.cmd=jrs.enable_schedule&jrs.task_id=2003−12−1111:09:16.455
•
jrs.disable_scheduleDescription: disable a scheduleHTTP Method: GET/POSTURL Format: http://HOST:PORT/jrserver?jrs.cmd=jrs.disable_schedule&jrs.task_id=TASK_IDURL Example:
•
Accessing a Report Using URL
129
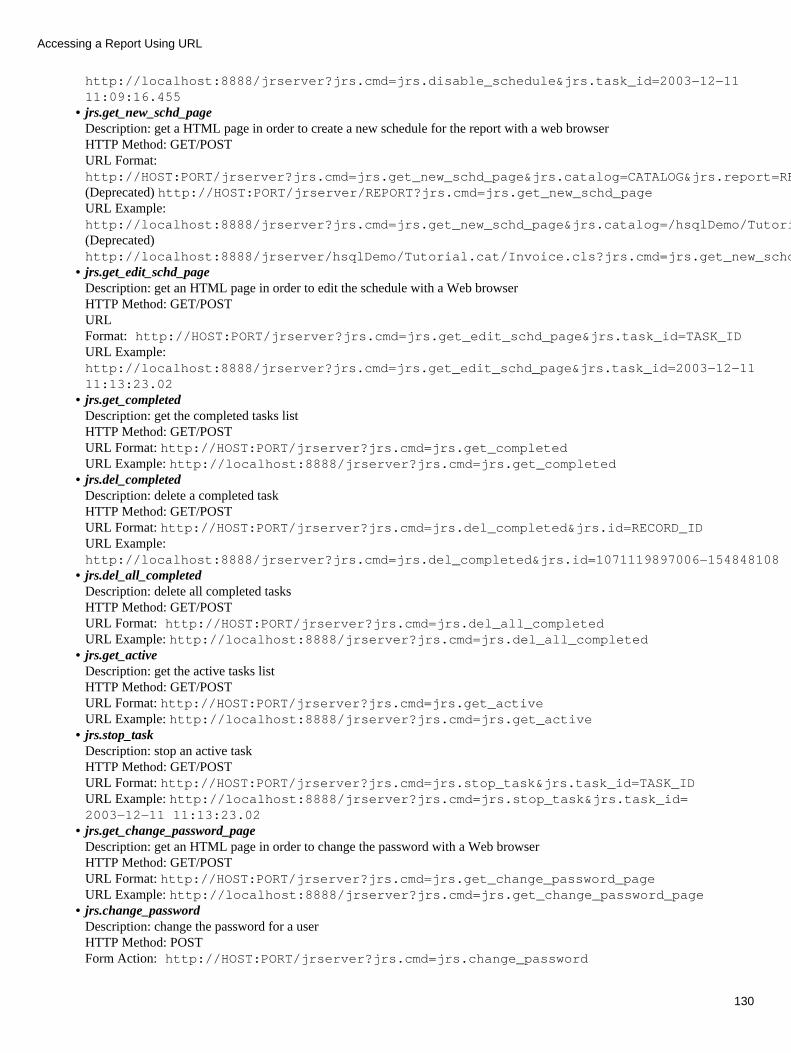
http://localhost:8888/jrserver?jrs.cmd=jrs.disable_schedule&jrs.task_id=2003−12−1111:09:16.455jrs.get_new_schd_pageDescription: get a HTML page in order to create a new schedule for the report with a web browserHTTP Method: GET/POSTURL Format:http://HOST:PORT/jrserver?jrs.cmd=jrs.get_new_schd_page&jrs.catalog=CATALOG&jrs.report=REPORT(Deprecated) http://HOST:PORT/jrserver/REPORT?jrs.cmd=jrs.get_new_schd_pageURL Example:http://localhost:8888/jrserver?jrs.cmd=jrs.get_new_schd_page&jrs.catalog=/hsqlDemo/Tutorial.cat&jrs.report=/hsqlDemo/Invoice.cls(Deprecated)http://localhost:8888/jrserver/hsqlDemo/Tutorial.cat/Invoice.cls?jrs.cmd=jrs.get_new_schd_page
•
jrs.get_edit_schd_pageDescription: get an HTML page in order to edit the schedule with a Web browserHTTP Method: GET/POSTURLFormat: http://HOST:PORT/jrserver?jrs.cmd=jrs.get_edit_schd_page&jrs.task_id=TASK_IDURL Example:http://localhost:8888/jrserver?jrs.cmd=jrs.get_edit_schd_page&jrs.task_id=2003−12−1111:13:23.02
•
jrs.get_completedDescription: get the completed tasks listHTTP Method: GET/POSTURL Format: http://HOST:PORT/jrserver?jrs.cmd=jrs.get_completedURL Example: http://localhost:8888/jrserver?jrs.cmd=jrs.get_completed
•
jrs.del_completedDescription: delete a completed taskHTTP Method: GET/POSTURL Format: http://HOST:PORT/jrserver?jrs.cmd=jrs.del_completed&jrs.id=RECORD_IDURL Example:http://localhost:8888/jrserver?jrs.cmd=jrs.del_completed&jrs.id=1071119897006−154848108
•
jrs.del_all_completedDescription: delete all completed tasksHTTP Method: GET/POSTURL Format: http://HOST:PORT/jrserver?jrs.cmd=jrs.del_all_completedURL Example: http://localhost:8888/jrserver?jrs.cmd=jrs.del_all_completed
•
jrs.get_activeDescription: get the active tasks listHTTP Method: GET/POSTURL Format: http://HOST:PORT/jrserver?jrs.cmd=jrs.get_activeURL Example: http://localhost:8888/jrserver?jrs.cmd=jrs.get_active
•
jrs.stop_taskDescription: stop an active taskHTTP Method: GET/POSTURL Format: http://HOST:PORT/jrserver?jrs.cmd=jrs.stop_task&jrs.task_id=TASK_IDURL Example: http://localhost:8888/jrserver?jrs.cmd=jrs.stop_task&jrs.task_id=2003−12−11 11:13:23.02
•
jrs.get_change_password_pageDescription: get an HTML page in order to change the password with a Web browserHTTP Method: GET/POSTURL Format: http://HOST:PORT/jrserver?jrs.cmd=jrs.get_change_password_pageURL Example: http://localhost:8888/jrserver?jrs.cmd=jrs.get_change_password_page
•
jrs.change_passwordDescription: change the password for a userHTTP Method: POSTForm Action: http://HOST:PORT/jrserver?jrs.cmd=jrs.change_password
•
Accessing a Report Using URL
130
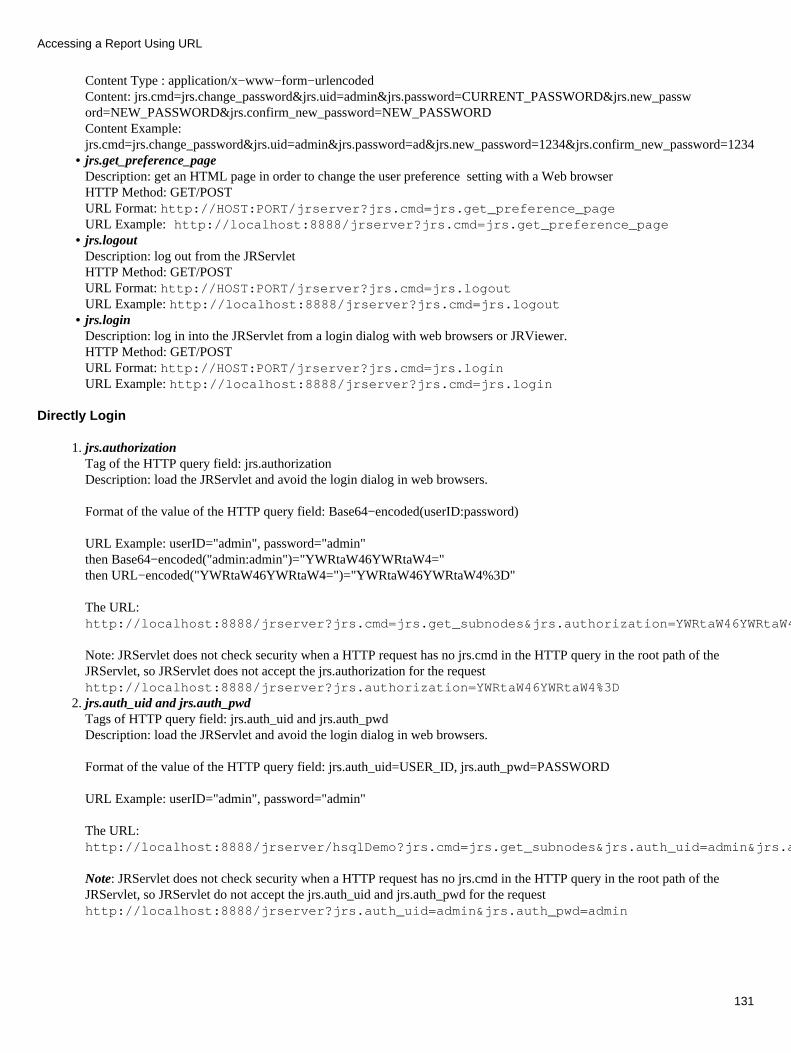
Content Type : application/x−www−form−urlencodedContent: jrs.cmd=jrs.change_password&jrs.uid=admin&jrs.password=CURRENT_PASSWORD&jrs.new_password=NEW_PASSWORD&jrs.confirm_new_password=NEW_PASSWORDContent Example:jrs.cmd=jrs.change_password&jrs.uid=admin&jrs.password=ad&jrs.new_password=1234&jrs.confirm_new_password=1234jrs.get_preference_pageDescription: get an HTML page in order to change the user preference setting with a Web browserHTTP Method: GET/POSTURL Format: http://HOST:PORT/jrserver?jrs.cmd=jrs.get_preference_pageURL Example: http://localhost:8888/jrserver?jrs.cmd=jrs.get_preference_page
•
jrs.logoutDescription: log out from the JRServletHTTP Method: GET/POSTURL Format: http://HOST:PORT/jrserver?jrs.cmd=jrs.logoutURL Example: http://localhost:8888/jrserver?jrs.cmd=jrs.logout
•
jrs.loginDescription: log in into the JRServlet from a login dialog with web browsers or JRViewer.HTTP Method: GET/POSTURL Format: http://HOST:PORT/jrserver?jrs.cmd=jrs.loginURL Example: http://localhost:8888/jrserver?jrs.cmd=jrs.login
•
Directly Login
jrs.authorizationTag of the HTTP query field: jrs.authorizationDescription: load the JRServlet and avoid the login dialog in web browsers.
Format of the value of the HTTP query field: Base64−encoded(userID:password)
URL Example: userID="admin", password="admin"then Base64−encoded("admin:admin")="YWRtaW46YWRtaW4="then URL−encoded("YWRtaW46YWRtaW4=")="YWRtaW46YWRtaW4%3D"
The URL:http://localhost:8888/jrserver?jrs.cmd=jrs.get_subnodes&jrs.authorization=YWRtaW46YWRtaW4%3D
Note: JRServlet does not check security when a HTTP request has no jrs.cmd in the HTTP query in the root path of theJRServlet, so JRServlet does not accept the jrs.authorization for the requesthttp://localhost:8888/jrserver?jrs.authorization=YWRtaW46YWRtaW4%3D
1.
jrs.auth_uid and jrs.auth_pwdTags of HTTP query field: jrs.auth_uid and jrs.auth_pwdDescription: load the JRServlet and avoid the login dialog in web browsers.
Format of the value of the HTTP query field: jrs.auth_uid=USER_ID, jrs.auth_pwd=PASSWORD
URL Example: userID="admin", password="admin"
The URL:http://localhost:8888/jrserver/hsqlDemo?jrs.cmd=jrs.get_subnodes&jrs.auth_uid=admin&jrs.auth_pwd=admin
Note: JRServlet does not check security when a HTTP request has no jrs.cmd in the HTTP query in the root path of theJRServlet, so JRServlet do not accept the jrs.auth_uid and jrs.auth_pwd for the requesthttp://localhost:8888/jrserver?jrs.auth_uid=admin&jrs.auth_pwd=admin
2.
Accessing a Report Using URL
131
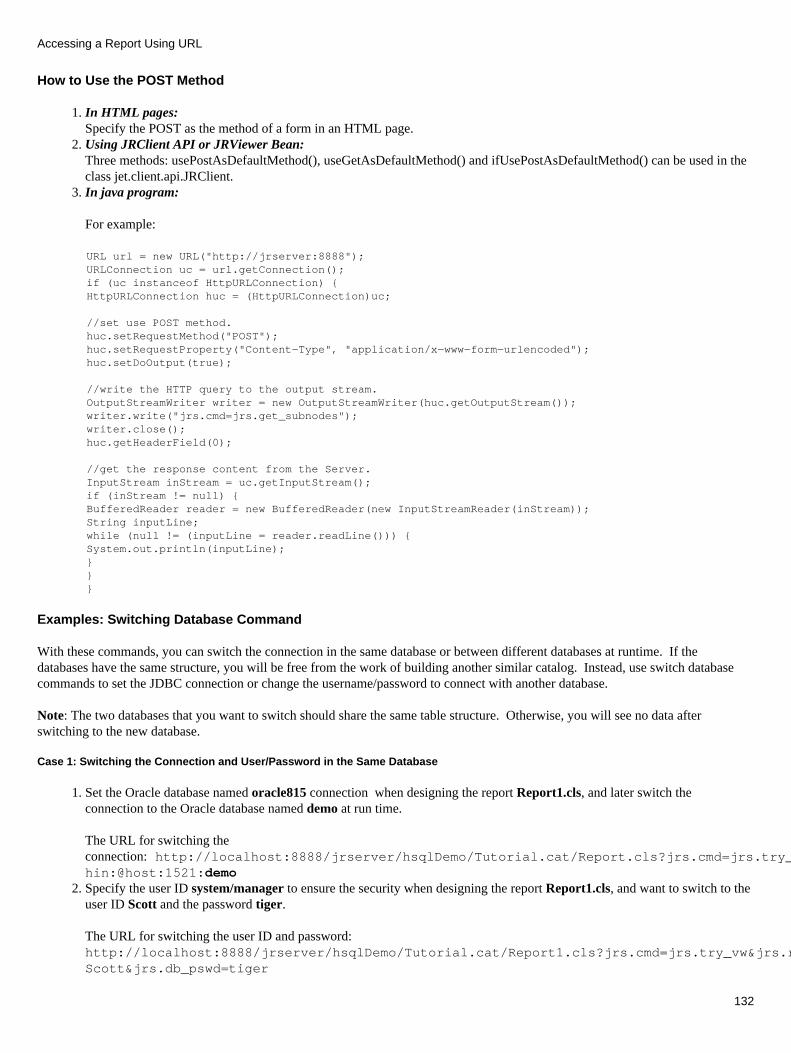
How to Use the POST Method
In HTML pages:Specify the POST as the method of a form in an HTML page.
1.
Using JRClient API or JRViewer Bean:Three methods: usePostAsDefaultMethod(), useGetAsDefaultMethod() and ifUsePostAsDefaultMethod() can be used in theclass jet.client.api.JRClient.
2.
In java program:
For example:
3.
URL url = new URL("http://jrserver:8888");URLConnection uc = url.getConnection();if (uc instanceof HttpURLConnection) {HttpURLConnection huc = (HttpURLConnection)uc;
//set use POST method.huc.setRequestMethod("POST");huc.setRequestProperty("Content−Type", "application/x−www−form−urlencoded");huc.setDoOutput(true);
//write the HTTP query to the output stream.OutputStreamWriter writer = new OutputStreamWriter(huc.getOutputStream());writer.write("jrs.cmd=jrs.get_subnodes");writer.close();huc.getHeaderField(0);
//get the response content from the Server.InputStream inStream = uc.getInputStream();if (inStream != null) {BufferedReader reader = new BufferedReader(new InputStreamReader(inStream));String inputLine;while (null != (inputLine = reader.readLine())) {System.out.println(inputLine);} }}
Examples: Switching Database Command
With these commands, you can switch the connection in the same database or between different databases at runtime. If thedatabases have the same structure, you will be free from the work of building another similar catalog. Instead, use switch databasecommands to set the JDBC connection or change the username/password to connect with another database.
Note: The two databases that you want to switch should share the same table structure. Otherwise, you will see no data afterswitching to the new database.
Case 1: Switching the Connection and User/Password in the Same Database
Set the Oracle database named oracle815 connection when designing the report Report1.cls, and later switch theconnection to the Oracle database named demo at run time.
The URL for switching theconnection: http://localhost:8888/jrserver/hsqlDemo/Tutorial.cat/Report.cls?jrs.cmd=jrs.try_vw&jrs.result_type=1&jrs.jdbc_url=jdbc:oracle:thin:@host:1521:demo
1.
Specify the user ID system/manager to ensure the security when designing the report Report1.cls, and want to switch to theuser ID Scott and the password tiger.
The URL for switching the user ID and password:http://localhost:8888/jrserver/hsqlDemo/Tutorial.cat/Report1.cls?jrs.cmd=jrs.try_vw&jrs.result_type=1&jrs.db_userScott&jrs.db_pswd=tiger
2.
Accessing a Report Using URL
132

Set the Sybase 12 database named master when designing the report Report1.cls, and later switch the connection to theSybase 12 database named product at runtime.
The URL for switching the connection:http://localhost:8888/jrserver/hsqlDemo/Tutorial.cat/Report1.cls?jrs.cmd=jrs.try_vw&jrs.result_type=1&jrs.jdbc_url=jdbc:sybase:Tds:host:5000/product
3.
Set the SQL database named MBA2000 when designing the report Report1.cls, and later switch the connection to theSQL database named JTTest at runtime.
The URL for switching the connection:http://localhost:8888/jrserver/hsqlDemo/Tutorial.cat/Report1.cls?jrs.cmd=jrs.try_vw&jrs.result_type=1&jrs.jdbc_url=jdbc:inetdae:host:1433?database=JTTest&sql7=true
4.
Case 2: Switching the Connection between Different Databases
Set oracle815 connection when designing the report Report1.cls, and want to switch the connection to Access databasewith the JdbcOdbcDriver named products at runtime.
The URL for switching the connection:http://localhost:8888/jrserver/hsqlDemo/Tutorial.cat/Report1.cls?jrs.cmd=jrs.try_vw&jrs.result_type=1&jrs.jdbc_driver=sun.jdbc.odbc.JdbcOdbcDriver&jrs.jdbc_url=jdbc:odbc:products
1.
Set oracle815 connection when designing the report Report1.cls, and want to switch the connection to SQL serverdatabase named products at runtime.
The URL for switching the connection:http://localhost:8888/jrserver/hsqlDemo/Tutorial.cat/Report1.cls?jrs.cmd=jrs.try_vw&jrs.result_type=1&jrs.jdbc_driver=com.inet.tds.TdsDriver&jrs.jdbc_url=jdbc:inetdae:JT_P05:1433?database=products&sql7=true
2.
Scheduling command and its properties
Use the below commands to schedule reports via URL in a Web browser.
jrs.submit_scheduleConstant: jet.cs.util.APIConst.CMD_SUBMIT_SCHEDULEDescription: submit a scheduled task to JReport Enterprise ServerHTTP Method: GET/POSTURL Example:
http://localhost:8888/jrserver?jrs.cmd=jrs.submit_schedule&jrs.catalog=%2fhsqlDemo%2fTutorial.cat&jrs.task_class=jet.server.schedule.jrtasks.UpdateRptTask&jrs.launch_type=0&jrs.param$PToday=May%2021%2c%201998&jrs.uid=admin&jrs.param_file=true&jrs.param$TermsDays=30&jrs.expire_days=30&jrs.report=Invoice.cls
Response: Returns the task ID for JRClient API. Returns the scheduled tasks page for web browsers.
A schedule contains two kinds of properties. The first is about the time information. The second is about the task information.
Properties about launching type
Time:
PropertiesValues Properties Values Properties Values Properties
jrs.launch_type(0, 1, 8)
0−immediately
1−run at time jrs.exe_year(1980−2099)
Accessing a Report Using URL
133
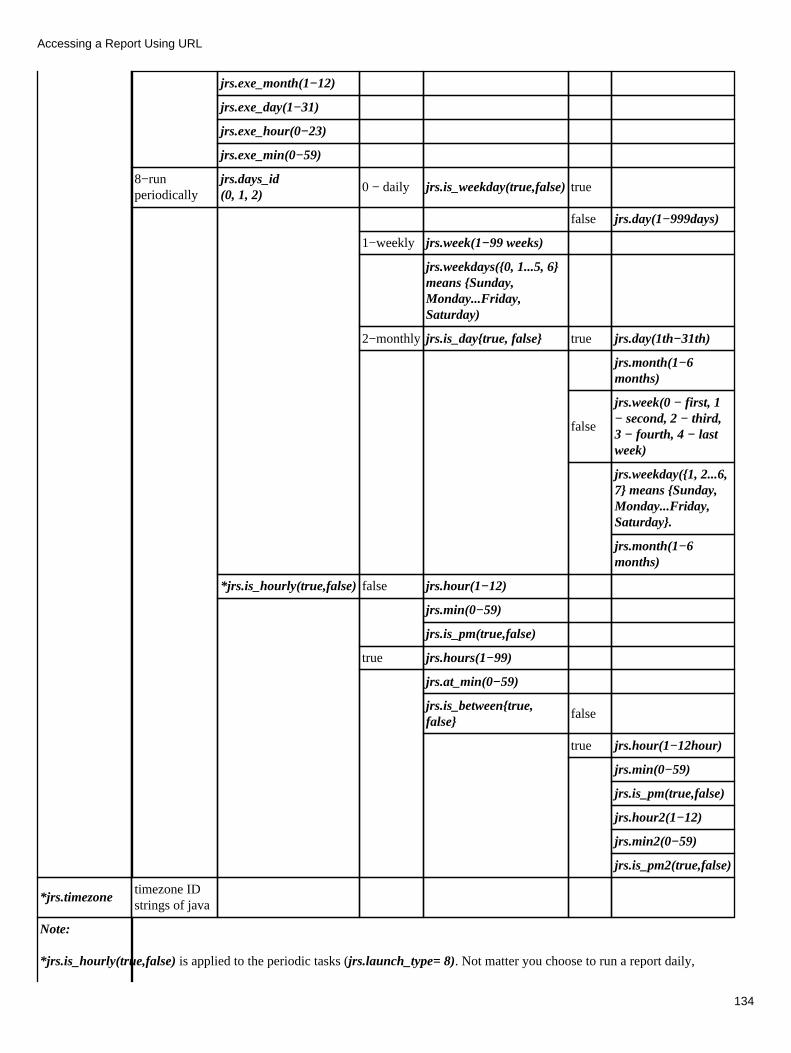
jrs.exe_month(1−12)
jrs.exe_day(1−31)
jrs.exe_hour(0−23)
jrs.exe_min(0−59)
8−runperiodically
jrs.days_id(0, 1, 2)
0 − daily jrs.is_weekday(true,false)true
false jrs.day(1−999days)
1−weekly jrs.week(1−99 weeks)
jrs.weekdays({0, 1...5, 6}means {Sunday,Monday...Friday,Saturday)
2−monthly jrs.is_day{true, false} true jrs.day(1th−31th)
jrs.month(1−6months)
false
jrs.week(0 − first, 1− second, 2 − third,3 − fourth, 4 − lastweek)
jrs.weekday({1, 2...6,7} means {Sunday,Monday...Friday,Saturday}.
jrs.month(1−6months)
*jrs.is_hourly(true,false) false jrs.hour(1−12)
jrs.min(0−59)
jrs.is_pm(true,false)
true jrs.hours(1−99)
jrs.at_min(0−59)
jrs.is_between{true,false}
false
true jrs.hour(1−12hour)
jrs.min(0−59)
jrs.is_pm(true,false)
jrs.hour2(1−12)
jrs.min2(0−59)
jrs.is_pm2(true,false)
*jrs.timezonetimezone IDstrings of java
Note:
*jrs.is_hourly(true,false) is applied to the periodic tasks (jrs.launch_type= 8). Not matter you choose to run a report daily,
Accessing a Report Using URL
134
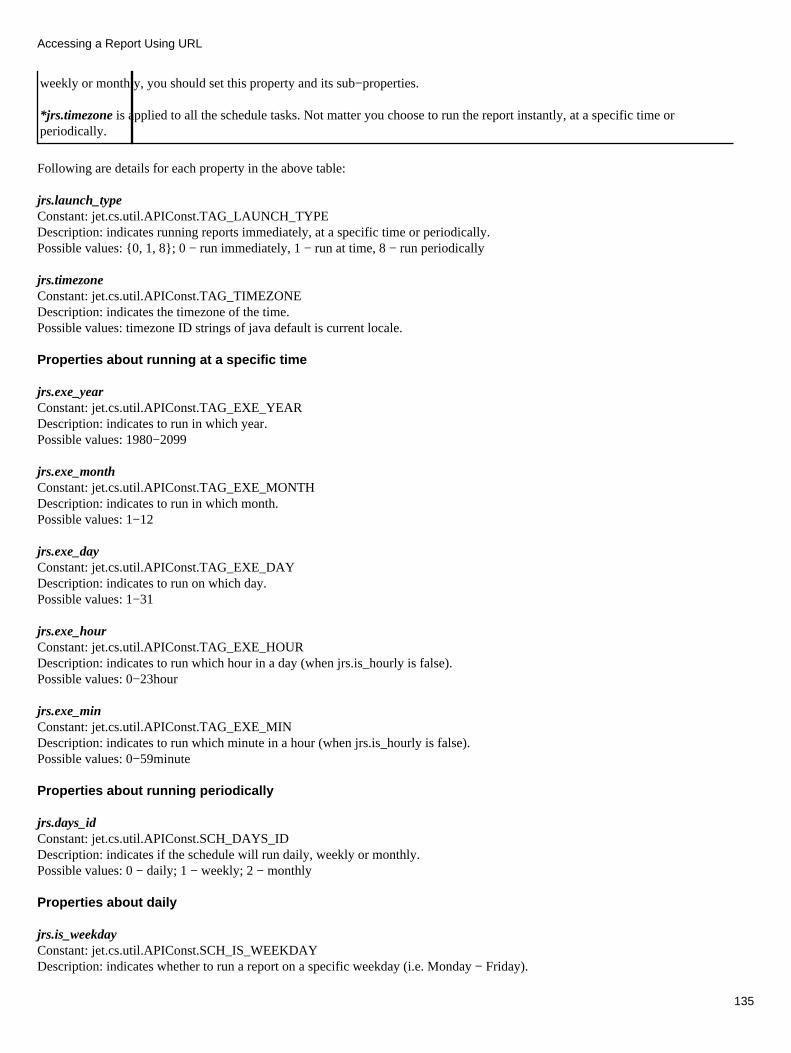
weekly or monthly, you should set this property and its sub−properties.
*jrs.timezone is applied to all the schedule tasks. Not matter you choose to run the report instantly, at a specific time orperiodically.
Following are details for each property in the above table:
jrs.launch_typeConstant: jet.cs.util.APIConst.TAG_LAUNCH_TYPEDescription: indicates running reports immediately, at a specific time or periodically.Possible values: {0, 1, 8}; 0 − run immediately, 1 − run at time, 8 − run periodically
jrs.timezoneConstant: jet.cs.util.APIConst.TAG_TIMEZONEDescription: indicates the timezone of the time.Possible values: timezone ID strings of java default is current locale.
Properties about running at a specific time
jrs.exe_yearConstant: jet.cs.util.APIConst.TAG_EXE_YEARDescription: indicates to run in which year.Possible values: 1980−2099
jrs.exe_monthConstant: jet.cs.util.APIConst.TAG_EXE_MONTHDescription: indicates to run in which month.Possible values: 1−12
jrs.exe_dayConstant: jet.cs.util.APIConst.TAG_EXE_DAYDescription: indicates to run on which day.Possible values: 1−31
jrs.exe_hourConstant: jet.cs.util.APIConst.TAG_EXE_HOURDescription: indicates to run which hour in a day (when jrs.is_hourly is false).Possible values: 0−23hour
jrs.exe_minConstant: jet.cs.util.APIConst.TAG_EXE_MINDescription: indicates to run which minute in a hour (when jrs.is_hourly is false).Possible values: 0−59minute
Properties about running periodically
jrs.days_idConstant: jet.cs.util.APIConst.SCH_DAYS_IDDescription: indicates if the schedule will run daily, weekly or monthly.Possible values: 0 − daily; 1 − weekly; 2 − monthly
Properties about daily
jrs.is_weekdayConstant: jet.cs.util.APIConst.SCH_IS_WEEKDAYDescription: indicates whether to run a report on a specific weekday (i.e. Monday − Friday).
Accessing a Report Using URL
135

Possible values: {true, false} default is false.
jrs.dayConstant: jet.cs.util.APIConst.SCH_DAYDescription: indicates every how many days to run (when daily is selected and jrs.is_weekday is false).Possible values: 1−999
Properties about weekly
jrs.weekConstant: jet.cs.util.APIConst.SCH_WEEKDescription: indicates every how many weeks to run (when weekly is selected).Possible values: 1−99 weeks
jrs.weekdaysConstant: jet.cs.util.APIConst.SCH_WEEKDAYSDescription: indicates on which day to run in a week (when weekly is selected).Possible values: a digit string. {0, 1...5, 6} means {Sunday, Monday...Friday, Saturday}.
Example: jrs.weekdays=05 means running on Sunday and Friday.
Properties about monthly
jrs.is_dayConstant: jet.cs.util.APIConst.SCH_IS_DAYDescription: indicates if to run on xth day in a month (when monthly is selected).Possible values: {true, false} default is true.
jrs.dayConstant: jet.cs.util.APIConst.SCH_DAYDescription: indicates to run on xth day in a month (when monthly is selected and jrs.is_day is true).Possible values: 1th−31th default is 1.
jrs.weekConstant: jet.cs.util.APIConst.SCH_WEEKDescription: indicates to run on xth week in a month (when monthly is selected and jrs.is_day is false).Possible values: 0 − first, 1 − second, 2 − third, 3 − fourth, 4 − last week default is 0.
jrs.weekdayConstant: jet.cs.util.APIConst.SCH_WEEKDAYDescription: indicates to run on which day in a week (when monthly is selected and jrs.is_day is false).Possible values: {1, 2...6, 7} means {Sunday, Monday...Friday, Saturday} default is 7.
jrs.monthConstant: jet.cs.util.APIConst.SCH_MONTHDescription: indicates every how many months to run.Possible values: 1−6 months default is 1.
Properties about hourly
jrs.is_hourlyConstant: jet.cs.util.APIConst.SCH_IS_HOURLYDescription: indicates whether to run the schedule every hour.Possible values: {true, false} default is true.
jrs.hour
Accessing a Report Using URL
136
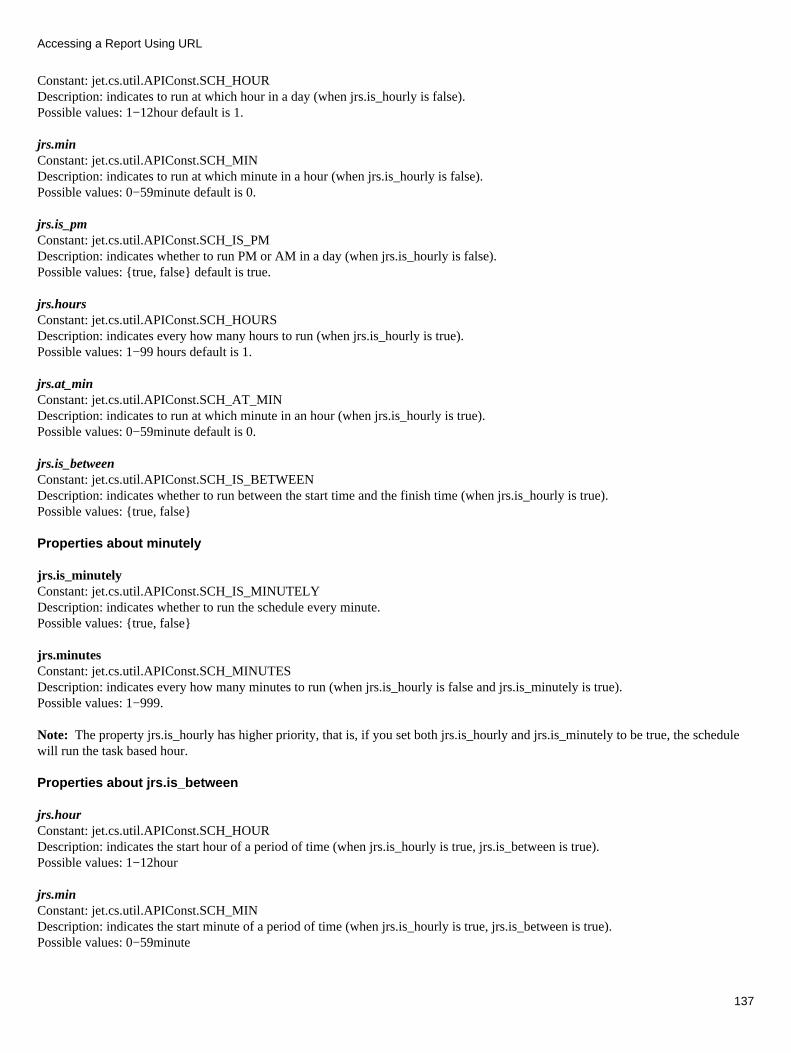
Constant: jet.cs.util.APIConst.SCH_HOURDescription: indicates to run at which hour in a day (when jrs.is_hourly is false).Possible values: 1−12hour default is 1.
jrs.minConstant: jet.cs.util.APIConst.SCH_MINDescription: indicates to run at which minute in a hour (when jrs.is_hourly is false).Possible values: 0−59minute default is 0.
jrs.is_pmConstant: jet.cs.util.APIConst.SCH_IS_PMDescription: indicates whether to run PM or AM in a day (when jrs.is_hourly is false).Possible values: {true, false} default is true.
jrs.hoursConstant: jet.cs.util.APIConst.SCH_HOURSDescription: indicates every how many hours to run (when jrs.is_hourly is true).Possible values: 1−99 hours default is 1.
jrs.at_minConstant: jet.cs.util.APIConst.SCH_AT_MINDescription: indicates to run at which minute in an hour (when jrs.is_hourly is true).Possible values: 0−59minute default is 0.
jrs.is_betweenConstant: jet.cs.util.APIConst.SCH_IS_BETWEENDescription: indicates whether to run between the start time and the finish time (when jrs.is_hourly is true).Possible values: {true, false}
Properties about minutely
jrs.is_minutelyConstant: jet.cs.util.APIConst.SCH_IS_MINUTELYDescription: indicates whether to run the schedule every minute.Possible values: {true, false}
jrs.minutesConstant: jet.cs.util.APIConst.SCH_MINUTESDescription: indicates every how many minutes to run (when jrs.is_hourly is false and jrs.is_minutely is true).Possible values: 1−999.
Note: The property jrs.is_hourly has higher priority, that is, if you set both jrs.is_hourly and jrs.is_minutely to be true, the schedulewill run the task based hour.
Properties about jrs.is_between
jrs.hourConstant: jet.cs.util.APIConst.SCH_HOURDescription: indicates the start hour of a period of time (when jrs.is_hourly is true, jrs.is_between is true).Possible values: 1−12hour
jrs.minConstant: jet.cs.util.APIConst.SCH_MINDescription: indicates the start minute of a period of time (when jrs.is_hourly is true, jrs.is_between is true).Possible values: 0−59minute
Accessing a Report Using URL
137
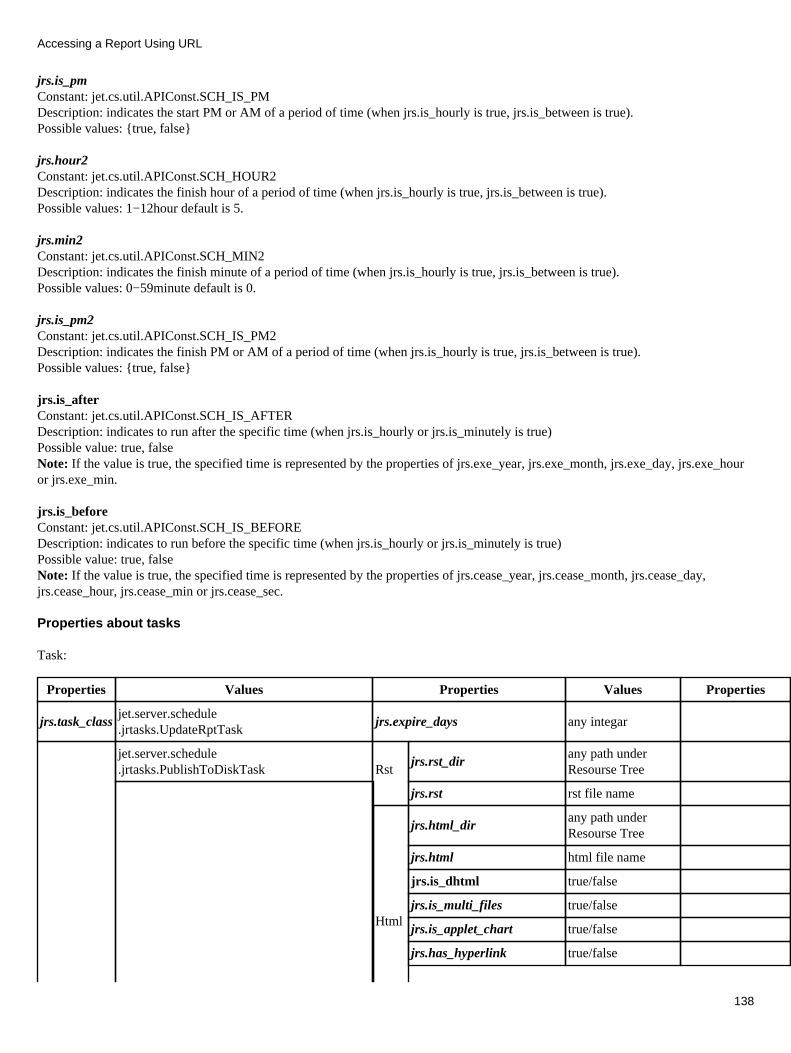
jrs.is_pmConstant: jet.cs.util.APIConst.SCH_IS_PMDescription: indicates the start PM or AM of a period of time (when jrs.is_hourly is true, jrs.is_between is true).Possible values: {true, false}
jrs.hour2Constant: jet.cs.util.APIConst.SCH_HOUR2Description: indicates the finish hour of a period of time (when jrs.is_hourly is true, jrs.is_between is true).Possible values: 1−12hour default is 5.
jrs.min2Constant: jet.cs.util.APIConst.SCH_MIN2Description: indicates the finish minute of a period of time (when jrs.is_hourly is true, jrs.is_between is true).Possible values: 0−59minute default is 0.
jrs.is_pm2Constant: jet.cs.util.APIConst.SCH_IS_PM2Description: indicates the finish PM or AM of a period of time (when jrs.is_hourly is true, jrs.is_between is true).Possible values: {true, false}
jrs.is_afterConstant: jet.cs.util.APIConst.SCH_IS_AFTERDescription: indicates to run after the specific time (when jrs.is_hourly or jrs.is_minutely is true)Possible value: true, falseNote: If the value is true, the specified time is represented by the properties of jrs.exe_year, jrs.exe_month, jrs.exe_day, jrs.exe_houror jrs.exe_min.
jrs.is_before Constant: jet.cs.util.APIConst.SCH_IS_BEFOREDescription: indicates to run before the specific time (when jrs.is_hourly or jrs.is_minutely is true)Possible value: true, falseNote: If the value is true, the specified time is represented by the properties of jrs.cease_year, jrs.cease_month, jrs.cease_day,jrs.cease_hour, jrs.cease_min or jrs.cease_sec.
Properties about tasks
Task:
Properties Values Properties Values Properties Values
jrs.task_classjet.server.schedule.jrtasks.UpdateRptTask
jrs.expire_days any integar
jet.server.schedule.jrtasks.PublishToDiskTask Rst
jrs.rst_dirany path underResourse Tree
jrs.rst rst file name
Html
jrs.html_dirany path underResourse Tree
jrs.html html file name
jrs.is_dhtml true/false
jrs.is_multi_files true/false
jrs.is_applet_chart true/false
jrs.has_hyperlink true/false
Accessing a Report Using URL
138
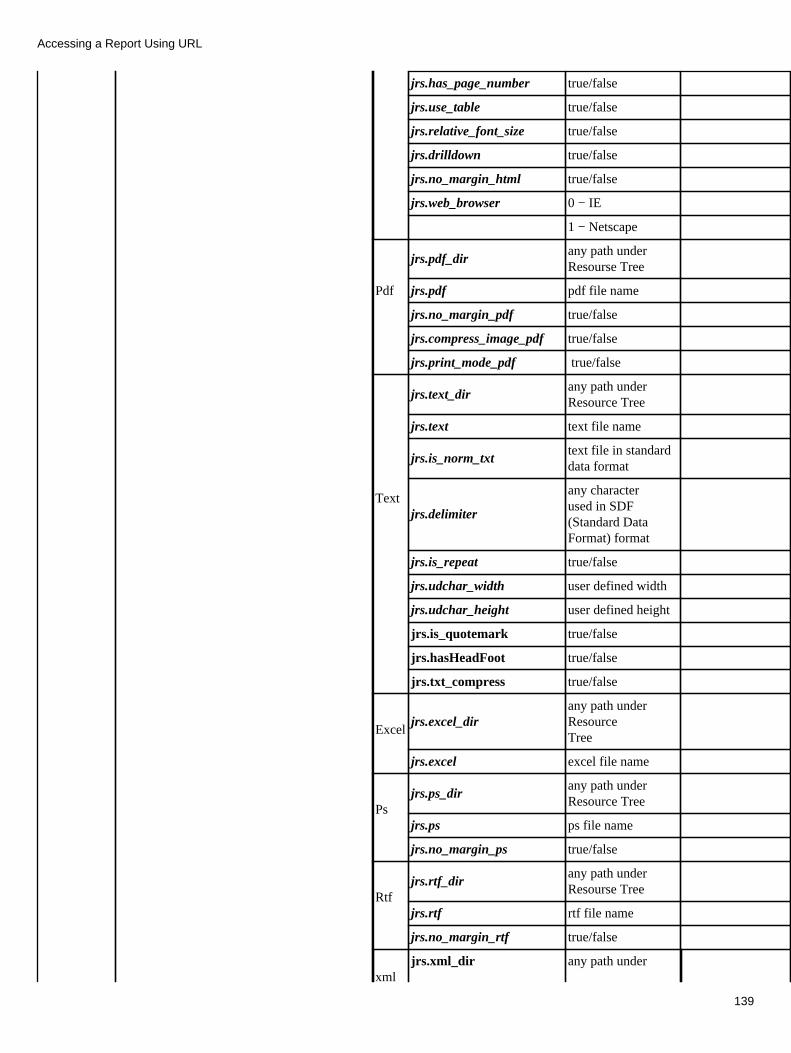
jrs.has_page_number true/false
jrs.use_table true/false
jrs.relative_font_size true/false
jrs.drilldown true/false
jrs.no_margin_html true/false
jrs.web_browser 0 − IE
1 − Netscape
jrs.pdf_dirany path underResourse Tree
jrs.pdf pdf file name
jrs.no_margin_pdf true/false
jrs.compress_image_pdf true/false
jrs.print_mode_pdf true/false
Text
jrs.text_dirany path underResource Tree
jrs.text text file name
jrs.is_norm_txttext file in standarddata format
jrs.delimiter
any character used in SDF(Standard DataFormat) format
jrs.is_repeat true/false
jrs.udchar_width user defined width
jrs.udchar_height user defined height
jrs.is_quotemark true/false
jrs.hasHeadFoot true/false
jrs.txt_compress true/false
Exceljrs.excel_dir
any path underResource Tree
jrs.excel excel file name
Psjrs.ps_dir
any path underResource Tree
jrs.ps ps file name
jrs.no_margin_ps true/false
Rtfjrs.rtf_dir
any path underResourse Tree
jrs.rtf rtf file name
jrs.no_margin_rtf true/false
xmljrs.xml_dir any path under
Accessing a Report Using URL
139

Resourse Tree
jrs.xml xml file name
jrs.is_only_data true/false
jet.server.schedule.jrtasks.SendJRMailTask
jrs.jrmail + NUMBERinteger andfollowed by itsproperties
jrs.mailtomailaddress
jrs.mailccmailaddress
jrs.mailbcc mail address
jrs.mailsubjectsubject for thismail
jrs.mailcommentsany comment forthis mail
jrs.mailformat 0 − HTML mail
1 − Plain text mail
2 − HTML file asattachment
3 − PDF file asattachment
4 − JReport .rstfile as attachment
5 − Delimited textas attachment
6 − PostScript Fileas attachment
7 − Excel file asattachment
8 − RTF file asattachment
9 −XML file asattachment
jrs.mailcompress true/false
jrs.udchar_width integer
jrs.udchar_height integer
jrs.no_margin_mail true/false
jrs.use_table_mail true/false
jet.server.schedule.jrtasks.SendMailTask
jrs.csmail + NUMBERinteger andfollowed by itsproperties
jrs.mailtomailaddress
jrs.mailccmailaddress
jrs.mailbcc mail address
jrs.mailsubject subject for this
Accessing a Report Using URL
140
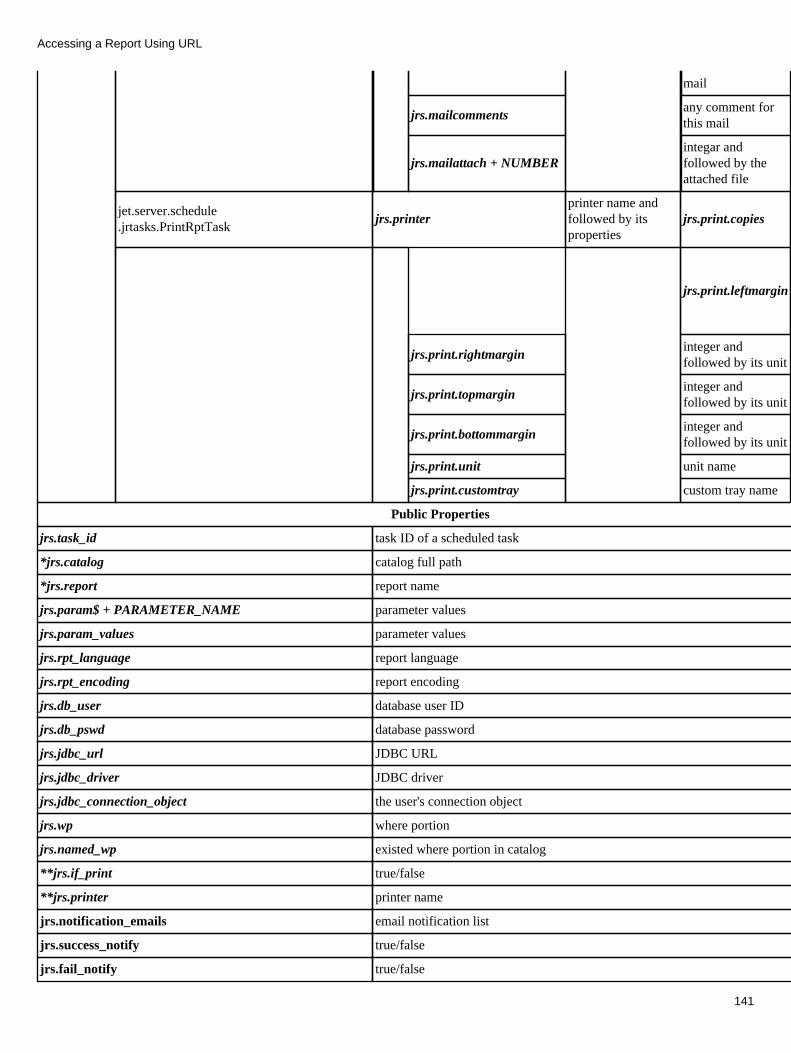
jrs.mailcommentsany comment forthis mail
jrs.mailattach + NUMBERintegar andfollowed by theattached file
jet.server.schedule.jrtasks.PrintRptTask
jrs.printerprinter name andfollowed by itsproperties
jrs.print.copies integer
jrs.print.leftmargin
integerandfollowedby itsunit
jrs.print.rightmargininteger andfollowed by its unit
jrs.print.topmargininteger andfollowed by its unit
jrs.print.bottommargininteger andfollowed by its unit
jrs.print.unit unit name
jrs.print.customtray custom tray name
Public Properties
jrs.task_id task ID of a scheduled task
*jrs.catalog catalog full path
*jrs.report report name
jrs.param$ + PARAMETER_NAME parameter values
jrs.param_values parameter values
jrs.rpt_language report language
jrs.rpt_encoding report encoding
jrs.db_user database user ID
jrs.db_pswd database password
jrs.jdbc_url JDBC URL
jrs.jdbc_driver JDBC driver
jrs.jdbc_connection_object the user's connection object
jrs.wp where portion
jrs.named_wp existed where portion in catalog
**jrs.if_print true/false
**jrs.printer printer name
jrs.notification_emails email notification list
jrs.success_notify true/false
jrs.fail_notify true/false
Accessing a Report Using URL
141
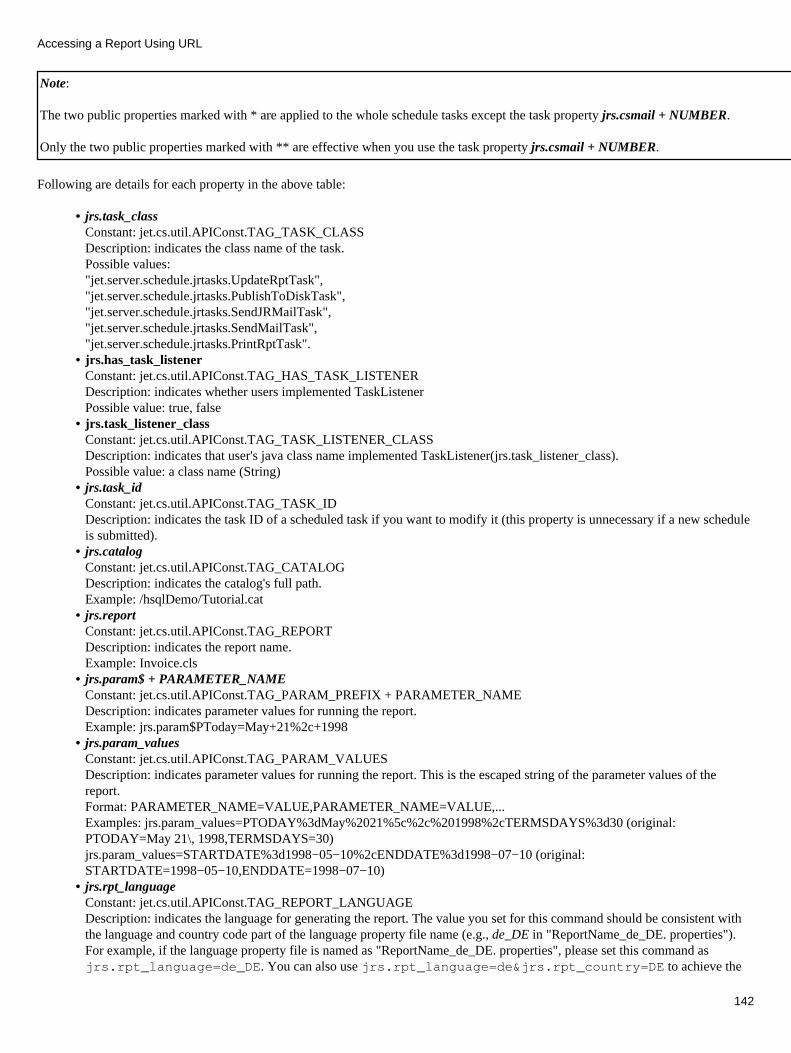
Note:
The two public properties marked with * are applied to the whole schedule tasks except the task property jrs.csmail + NUMBER.
Only the two public properties marked with ** are effective when you use the task property jrs.csmail + NUMBER.
Following are details for each property in the above table:
jrs.task_classConstant: jet.cs.util.APIConst.TAG_TASK_CLASSDescription: indicates the class name of the task.Possible values:"jet.server.schedule.jrtasks.UpdateRptTask","jet.server.schedule.jrtasks.PublishToDiskTask","jet.server.schedule.jrtasks.SendJRMailTask","jet.server.schedule.jrtasks.SendMailTask","jet.server.schedule.jrtasks.PrintRptTask".
•
jrs.has_task_listenerConstant: jet.cs.util.APIConst.TAG_HAS_TASK_LISTENERDescription: indicates whether users implemented TaskListenerPossible value: true, false
•
jrs.task_listener_classConstant: jet.cs.util.APIConst.TAG_TASK_LISTENER_CLASSDescription: indicates that user's java class name implemented TaskListener(jrs.task_listener_class).Possible value: a class name (String)
•
jrs.task_idConstant: jet.cs.util.APIConst.TAG_TASK_IDDescription: indicates the task ID of a scheduled task if you want to modify it (this property is unnecessary if a new scheduleis submitted).
•
jrs.catalogConstant: jet.cs.util.APIConst.TAG_CATALOGDescription: indicates the catalog's full path.Example: /hsqlDemo/Tutorial.cat
•
jrs.reportConstant: jet.cs.util.APIConst.TAG_REPORTDescription: indicates the report name.Example: Invoice.cls
•
jrs.param$ + PARAMETER_NAMEConstant: jet.cs.util.APIConst.TAG_PARAM_PREFIX + PARAMETER_NAMEDescription: indicates parameter values for running the report.Example: jrs.param$PToday=May+21%2c+1998
•
jrs.param_valuesConstant: jet.cs.util.APIConst.TAG_PARAM_VALUESDescription: indicates parameter values for running the report. This is the escaped string of the parameter values of thereport.Format: PARAMETER_NAME=VALUE,PARAMETER_NAME=VALUE,...Examples: jrs.param_values=PTODAY%3dMay%2021%5c%2c%201998%2cTERMSDAYS%3d30 (original:PTODAY=May 21\, 1998,TERMSDAYS=30)jrs.param_values=STARTDATE%3d1998−05−10%2cENDDATE%3d1998−07−10 (original:STARTDATE=1998−05−10,ENDDATE=1998−07−10)
•
jrs.rpt_languageConstant: jet.cs.util.APIConst.TAG_REPORT_LANGUAGEDescription: indicates the language for generating the report. The value you set for this command should be consistent withthe language and country code part of the language property file name (e.g., de_DE in "ReportName_de_DE. properties").For example, if the language property file is named as "ReportName_de_DE. properties", please set this command asjrs.rpt_language=de_DE. You can also use jrs.rpt_language=de&jrs.rpt_country=DE to achieve the
•
Accessing a Report Using URL
142
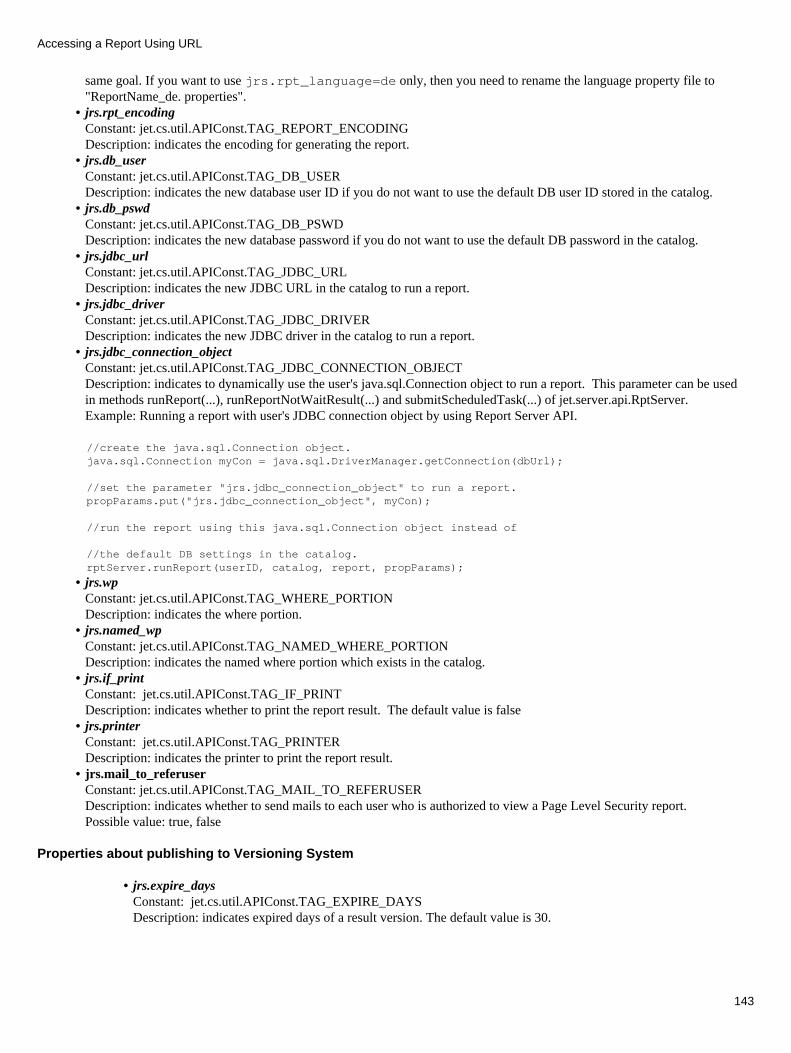
same goal. If you want to use jrs.rpt_language=de only, then you need to rename the language property file to"ReportName_de. properties".jrs.rpt_encodingConstant: jet.cs.util.APIConst.TAG_REPORT_ENCODINGDescription: indicates the encoding for generating the report.
•
jrs.db_userConstant: jet.cs.util.APIConst.TAG_DB_USERDescription: indicates the new database user ID if you do not want to use the default DB user ID stored in the catalog.
•
jrs.db_pswdConstant: jet.cs.util.APIConst.TAG_DB_PSWDDescription: indicates the new database password if you do not want to use the default DB password in the catalog.
•
jrs.jdbc_urlConstant: jet.cs.util.APIConst.TAG_JDBC_URLDescription: indicates the new JDBC URL in the catalog to run a report.
•
jrs.jdbc_driverConstant: jet.cs.util.APIConst.TAG_JDBC_DRIVERDescription: indicates the new JDBC driver in the catalog to run a report.
•
jrs.jdbc_connection_objectConstant: jet.cs.util.APIConst.TAG_JDBC_CONNECTION_OBJECTDescription: indicates to dynamically use the user's java.sql.Connection object to run a report. This parameter can be usedin methods runReport(...), runReportNotWaitResult(...) and submitScheduledTask(...) of jet.server.api.RptServer.Example: Running a report with user's JDBC connection object by using Report Server API.
•
//create the java.sql.Connection object.java.sql.Connection myCon = java.sql.DriverManager.getConnection(dbUrl);
//set the parameter "jrs.jdbc_connection_object" to run a report.propParams.put("jrs.jdbc_connection_object", myCon);
//run the report using this java.sql.Connection object instead of
//the default DB settings in the catalog.rptServer.runReport(userID, catalog, report, propParams);
jrs.wpConstant: jet.cs.util.APIConst.TAG_WHERE_PORTIONDescription: indicates the where portion.
•
jrs.named_wpConstant: jet.cs.util.APIConst.TAG_NAMED_WHERE_PORTIONDescription: indicates the named where portion which exists in the catalog.
•
jrs.if_printConstant: jet.cs.util.APIConst.TAG_IF_PRINTDescription: indicates whether to print the report result. The default value is false
•
jrs.printerConstant: jet.cs.util.APIConst.TAG_PRINTERDescription: indicates the printer to print the report result.
•
jrs.mail_to_referuserConstant: jet.cs.util.APIConst.TAG_MAIL_TO_REFERUSERDescription: indicates whether to send mails to each user who is authorized to view a Page Level Security report.Possible value: true, false
•
Properties about publishing to Versioning System
jrs.expire_daysConstant: jet.cs.util.APIConst.TAG_EXPIRE_DAYSDescription: indicates expired days of a result version. The default value is 30.
•
Accessing a Report Using URL
143
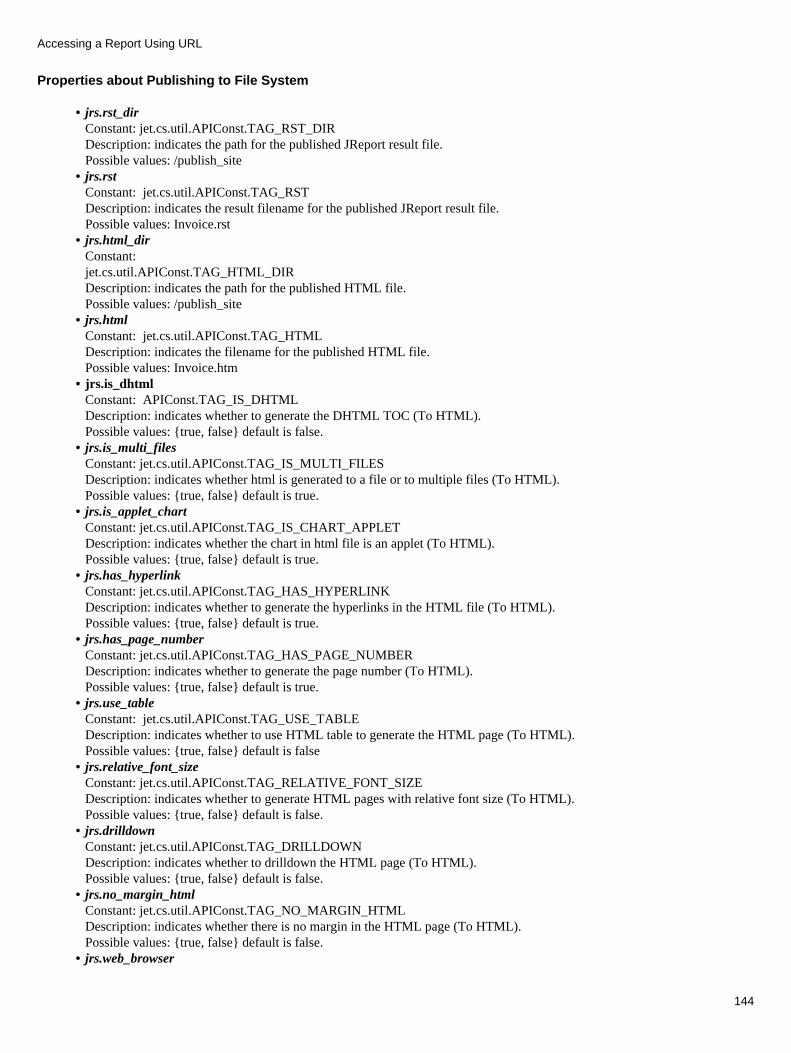
Properties about Publishing to File System
jrs.rst_dirConstant: jet.cs.util.APIConst.TAG_RST_DIRDescription: indicates the path for the published JReport result file.Possible values: /publish_site
•
jrs.rstConstant: jet.cs.util.APIConst.TAG_RSTDescription: indicates the result filename for the published JReport result file.Possible values: Invoice.rst
•
jrs.html_dirConstant:jet.cs.util.APIConst.TAG_HTML_DIRDescription: indicates the path for the published HTML file.Possible values: /publish_site
•
jrs.htmlConstant: jet.cs.util.APIConst.TAG_HTMLDescription: indicates the filename for the published HTML file.Possible values: Invoice.htm
•
jrs.is_dhtmlConstant: APIConst.TAG_IS_DHTMLDescription: indicates whether to generate the DHTML TOC (To HTML). Possible values: {true, false} default is false.
•
jrs.is_multi_filesConstant: jet.cs.util.APIConst.TAG_IS_MULTI_FILESDescription: indicates whether html is generated to a file or to multiple files (To HTML). Possible values: {true, false} default is true.
•
jrs.is_applet_chartConstant: jet.cs.util.APIConst.TAG_IS_CHART_APPLETDescription: indicates whether the chart in html file is an applet (To HTML).Possible values: {true, false} default is true.
•
jrs.has_hyperlinkConstant: jet.cs.util.APIConst.TAG_HAS_HYPERLINKDescription: indicates whether to generate the hyperlinks in the HTML file (To HTML). Possible values: {true, false} default is true.
•
jrs.has_page_numberConstant: jet.cs.util.APIConst.TAG_HAS_PAGE_NUMBERDescription: indicates whether to generate the page number (To HTML).Possible values: {true, false} default is true.
•
jrs.use_tableConstant: jet.cs.util.APIConst.TAG_USE_TABLEDescription: indicates whether to use HTML table to generate the HTML page (To HTML).Possible values: {true, false} default is false
•
jrs.relative_font_sizeConstant: jet.cs.util.APIConst.TAG_RELATIVE_FONT_SIZEDescription: indicates whether to generate HTML pages with relative font size (To HTML).Possible values: {true, false} default is false.
•
jrs.drilldownConstant: jet.cs.util.APIConst.TAG_DRILLDOWNDescription: indicates whether to drilldown the HTML page (To HTML).Possible values: {true, false} default is false.
•
jrs.no_margin_htmlConstant: jet.cs.util.APIConst.TAG_NO_MARGIN_HTMLDescription: indicates whether there is no margin in the HTML page (To HTML).Possible values: {true, false} default is false.
•
jrs.web_browser•
Accessing a Report Using URL
144

Constant: jet.cs.util.APIConst.TAG_WEB_BROWSERDescription: indicates generating HTML pages for which Web browser (To HTML).Possible values: number − 0 means IE, 1 means Netscape default is 0.jrs.pdf_dirConstant: jet.cs.util.APIConst.TAG_PDF_DIRDescription: indicates the path of the published PDF file.Possible values: /publish_site
•
jrs.pdfConstant: jet.cs.util.APIConst.TAG_PDFDescription: indicates the filename of the published PDF file.Possible values: Invoice.rst
•
jrs.no_margin_pdfConstant: jet.cs.util.APIConst.TAG_NO_MARGIN_PDFDescription: indicates whether to display no margin (To PDF).Possible values: {true, false} default is false.
•
jrs.compress_image_pdfConstant: jet.cs.util.APIConst.TAG_COMPRESS_IMAGE_PDF Description: indicates the compression ratio of the imagein the report (To PDF).Possible values: {from 1 to 100}default is 20.
•
jrs.print_mode_pdfConstant: jet.cs.util.APIConst.TAG_PRINT_MODE_PDFDescription: indicates whether to use Simulated Printing Mode (true) orStandard Mode (false) (To PDF). The Standard Mode is supported sinceversion 4.0. By checking it, the exporting speed will be much improved.Possible values: {true, false} default is false.
•
jrs.text_dirConstant: jet.cs.util.APIConst.TAG_TEXT_DIRDescription: indicates the path of the published TXT file.Possible values: /publish_site
•
jrs.textConstant: jet.cs.util.APIConst.TAG_TEXTDescription: indicates the filename of the published PDF file.Possible values: Invoice.rst
•
jrs.is_norm_txtConstant: jet.cs.util.APIConst.TAG_IS_NORMAL_TEXTDescription: indicates whether this text file is a standard data format or not (To TEXT). When it is set to be false, theoutput format is standard data format. Possible values: {true, false} default is true.
•
jrs.delimiterConstant: jet.cs.util.APIConst.TAG_DELIMITERDescription: A character which will be used in SDF (Standard Data Format) format. A delimiter could be a ',' (the CSVformat) or any other characters. The default is ' ' (a blank), that is, the SSV format (To TEXT).
•
jrs.is_repeatConstant: jet.cs.util.APIConst.TAG_IS_REPEATDescription: indicates whether the same content is repeated (To TEXT).Possible values: {true, false} default is false.
•
jrs.udchar_widthConstant: jet.cs.util.APIConst.TAG_CHAR_WIDTHDescription: indicates the user defined width. It would be given up if the value is 0 or less than 0 (To TEXT) default is −1.
•
jrs.udchar_heightConstant: jet.cs.util.APIConst.TAG_CHAR_HEIGHTDescription: indicates the user defined height. It would be given up if the value is 0 or less than 0 (To TEXT) default is −1.
•
jrs.is_quotemarkConstant: jet.cs.util.APIConst.TAG_IS_QUOTEMARKDescription: indicates whether the quotation marks should be placed in the published text file.Possible values: {true, false} default is true.
•
Accessing a Report Using URL
145

jrs.hasHeadFootConstant: jet.cs.util.APIConst.TAG_HASHEADFOOTDescription: indicates whether to generate the page header or footer (To TEXT).Possible values: {true, false} default is true.
•
jrs.txt_compressConstant: jet.cs.util.APIConst.TAG_TXT_COMPRESSDescription: indicates whether to compress the published text file.Possible values: {true, false} default is false.
•
jrs.excel_dirConstant: jet.cs.util.APIConst.TAG_EXCEL_DIRDescription: indicates the path of the published Excel file.Possible values: /publish_site
•
jrs.excelConstant: jet.cs.util.APIConst.TAG_EXCELDescription: indicates the filename of the published Excel file.Possible values: Invoice.rst
•
jrs.ps_dirConstant: jet.cs.util.APIConst.TAG_PS_DIRDescription: indicates the path of the published Postscript file.Possible values: /publish_site
•
jrs.psConstant: jet.cs.util.APIConst.TAG_PSDescription: indicates the result filename of the published Postscript file.Possible values: Invoice.rst
•
jrs.no_margin_psConstant: jet.cs.util.APIConst.TAG_NO_MARGIN_PSDescription: indicates whether no margin (To Postscript).Possible values: {true, false} default is false.
•
jrs.rtf_dirConstant: jet.cs.util.APIConst.TAG_PS_DIRDescription: indicates the path of publishing to Rich Text Format.Possible values: /publish_site
•
rs.rtfConstant: jet.cs.util.APIConst.TAG_RTFDescription: indicates the result filename of publishing to Rich Text Format.Possible values: Invoice.rst
•
jrs.no_margin_rtfConstant: jet.cs.util.APIConst.TAG_NO_MARGIN_RTFDescription: indicates whether no margin (To Rich Text Format).Possible values: {true, false} default is false.
•
jrs.xml_dirConstant: jet.cs.util.APIConst.TAG_XML_DIRDescription: indicates the path of publishing to XML file.Possible values: /publish_site
•
jrs.xmlConstant: jet.cs.util.APIConst.TAG_XMLDescription: indicates the result filename of publishing to XML file.Possible values: Invoice.xml
•
jrs.is_only_dataConstant: jet.cs.util.APIConst.TAG_IS_ONLY_DATADescription: indicates whether contain only data in the published XML file.Possible values: {true, false} default is false.
•
jrs.to_diskConstant: jet.cs.util.APIConst.TAG_TO_DISK
•
Accessing a Report Using URL
146

Description: indicates that the report is scheduled to publish to disk.Possible values: true/falsejrs.to_disk_???_path_type??? indicates the format of the published report, and it can be HTML, PDF and so on. Please see the example below:
jrs.to_disk_pdf_path_typeConstant: jet.cs.util.APIConst.TAG_TO_DISK_PDF_PATH_TYPEDescription: indicate that schedule the report to publish to real disk path or JReport Server resource path in PDF format.Possible values: 0 or 1. By default, it is 0 which means publish to JReport Server resource path. And 1 means publish to realdisk path.
Example 1: Publish a report to real disk path in PDF format
•
http://localhost:8888/jrserver?jrs.cmd=jrs.submit_schedule&jrs.catalog=%2fhsqlDemo%2fTutorial.cat&jrs.report=TableReport.cls&jrs.task_class=jet.server.schedule.jrtasks.PublishRptTask&jrs.to_disk=true&jrs.to_disk_pdf_path_type=1&jrs.result_type=2&jrs.auth_uid=admin&jrs.auth_pwd=admin&jrs.pdf_dir=d:\&jrs.pdf=abc.pdf&jrs.to_pdf=true
Example 2: Publish a report to real disk path in TXT format
http://localhost:8888/jrserver?jrs.cmd=jrs.submit_schedule&jrs.catalog=%2fhsqlDemo%2fTutorial.cat&jrs.report=TableReport.cls&jrs.task_class=jet.server.schedule.jrtasks.PublishRptTask&jrs.to_disk=true&jrs.to_disk_text_path_type=1&jrs.result_type=3&jrs.auth_uid=admin&jrs.auth_pwd=admin&jrs.text_dir=d:\&jrs.text=abc.txt&jrs.to_text=true
Properties about Publishing to Email
jrs.jrmail + NUMBERConstant: jet.cs.util.APIConst.TAG_JRMAIL + NUMBERDescription: indicates one send−mail task for a report. It contains JReport mail properties.Examples:
•
jrs.jrmail0=jrs.mailsubject%3dreport%2520Invoice%26jrs.mailformat%3d0%26jrs.mailto%3dreader1%26jrs.jrmail1=jrs.mailsubject%3dreport%2520Invoice%26jrs.mailformat%3d4%26jrs.mailto%3dreader2%252c%2520reader3%26
jrs.csmail + NUMBERConstant: jet.cs.util.APIConst.TAG_NORMAL_MAIL + NUMBERDescription: indicates one send−mail task for any files in any format. It contains JReport mail properties.Examples:
•
jrs.csmail0=jrs.mailcomments%3dto%2520user1.%26jrs.mailsubject%3dtest%2520sending%2520normal%2520emails%2520without%2520report%26jrs.mailto%3dtim%40support.jinfonet.com&jrs.mailattach1%3dd%3a%5ctest1.txt&jrs.mailattach0%3dd%3a%5ctest0.txtjrs.csmail1=jrs.mailcomments%3dto%2520user2.%26jrs.mailsubject%3dtest%2520sending%2520normal%2520emails%2520without%2520report%26jrs.mailto%3dhelen%40support.jinfonet.com%26jrs.mailattach1%3dd%3a%5ctest2.txt%26jrs.mailattach0%3dd%3a%5ctest3.txt
Properties in jrs.jrmail
jrs.mailfromConstant: jet.cs.util.APIConst.TAG_MAIL_FROMDescription: indicates the mail sender's address.
•
jrs.mailtoConstant: jet.cs.util.APIConst.TAG_MAIL_TODescription: indicates the mail address.
•
jrs.mailccConstant: jet.cs.util.APIConst.TAG_MAIL_CCDescription: indicates the mail address to be carbon copied to.
•
jrs.mailbccConstant: jet.cs.util.APIConst.TAG_MAIL_BCCDescription: indicates the mail address to be blind carbon copied to.
•
Accessing a Report Using URL
147
jrs.mailsubjectConstant: jet.cs.util.APIConst.TAG_MAIL_SUBJECTDescription: indicates the "SUBJECT" of the email.
•
jrs.mailcommentsConstant: jet.cs.util.APIConst.TAG_MAIL_COMMENTDescription: indicates "COMMENTS" field of the email.
•
jrs.mailformatConstant: jet.cs.util.APIConst.TAG_MAIL_FORMATDescription: indicates the mail format.Possible values: 0 − HTML mail, 1 − Plain text mail, 2 − HTML file as attachment, 3 − PDF file as attachment, 4 − JReport.rst file as attachment, 5 − Delimited text as attachment, 6 − PostScript File as attachment, 7 − Excel file as attachment, 8−RTF file as attachment, 9 − XML file as attachment. The default value is 0.
•
jrs.mailcompressConstant: jet.cs.util.APIConst.TAG_MAIL_COMPRESSDescription: indicates Java archive compress.Possible values: {true, false} default is false.
•
jrs.udchar_widthConstant: jet.cs.util.APIConst.TAG_CHAR_WIDTHDescription: indicates the user defined character width. It would be given up if the value is 0 or less than 0 (for TEXTformat) default is −1.
•
jrs.udchar_heightConstant: jet.cs.util.APIConst.TAG_CHAR_HEIGHTDescription: indicates the user defined character height. It would be given up if the value is 0 or less than 0.(for TEXTformat) default is −1.
•
jrs.no_margin_mailConstant: jet.cs.util.APIConst.TAG_NO_MARGIN_MAILDescription: indicates whether no margin for the report in the email.Possible values: {true, false} default is false.
•
jrs.use_table_mail Constant: jet.cs.util.APIConst.TAG_USE_TABLE_MAILDescription: indicates whether to use HTML table to generate the HTML format email. Possible values: {true, false} default is false, which means to generate the HTML table.
•
jrs.mailattach + NUMBERConstant: jet.cs.util.APIConst.TAG_MAIL_ATTACHDescription: indicates the attached file for this mail. You can attach multiple files with one mail.Possible values: the attached file name. Example: jrs.mailattach0=d%3a%5ctest1.txt (where "d%3a%5ctest1.txt" is theURL−encoded string of "d:\test1.txt")
•
jrs.mailencodingConstant: jet.cs.util.APIConst.TAG_MAIL_ENCODINGDescription: indicates encoding of mails.Possible values: UTF−8, UTF−16, ISO8859−1 and so on.
Note: jrs.mailencoding is used to specify the mail encoding in the URL. When sending mails by RMI API, sometimes,wrong characters may be returned in the mail. In order to avoid such problems, please specify a same correct value of−Djreport.url.encoding on both server side and RMI client side.
For example, your web application calls JReport Enterprise Server (stand−alone) via RMI function from WebSphere, andUTF−8 (please use UTF−8 rather than UTF8) will be used as the mail encoding, please do as below:
Sepcify −Djreport.url.encoding=UTF−8 for both JVM running JReport Enterprise Server and WebSphere.♦ Specify jrs.mailencoding=UTF−8.♦
•
Properties about publishing to printer
Users can select printer with the Properties:
Accessing a Report Using URL
148

jrs.printerConstant: jet.cs.util.APIConst.TAG_PRINTERDescription: indicates the printer to print the report result.
•
jrs.print.copiesConstant: jet.cs.util.PrintConst.TAG_PRINT_COPIESDescription: indicates the number of copies to print the report result.
•
jrs.print.leftmarginConstant: jet.cs.util.PrintConst.TAG_PRINT_LEFTMARGIN Description: indicates the length of the leftmargin to print the report result.
•
jrs.print.rightmarginConstant: jet.cs.util.PrintConst.TAG_ PRINT_RIGHTMARGINDescription: indicates the length of the rightmargin to print the report result.
•
jrs.print.topmargin Constant: jet.cs.util.PrintConst.TAG_ PRINT_TOPMARGIN Description: indicates the length of the topmargin to print the report result.
•
jrs.print.bottommarginConstant: jet.cs.util.PrintConst.TAG_PRINT_BOTTOMMARGIN Description: indicates the length of the bottommargin to print the report result.
•
jrs.print.unit Constant: jet.cs.util.PrintConst.TAG_PRINT_UNITDescription: indicates the unit to print the report result. Here are two units for you to choose: mm and inch.Possible values: 1000 or 25400
•
jrs.print.customtray Constant: jet.cs.util.PrintConst.TAG_PRINT_CUSTOMTRAYDescription: indicates the custom tray to put the printing paper.Example:
•
http://localhost:8888/jrserver?jrs.cmd=jrs.submit_schedule&jrs.catalog=/hsqlDemo/Tutorial.cat&jrs.report=/hsqlDemo/3DPieChart.cls&jrs.task_class=jet.server.schedule.jrtasks.PublishRptTask&jrs.launch_type=0&jrs.to_printer=true&jrs.print_usejdk=2&jrs.printer=smartprint&jrs.print.copies=2&jrs.print.customtray=Form−Source&jrs.print.bottommargin=7&jrs.print.leftmargin=8&jrs.print.rightmargin=9&jrs.print.topmargin=7&jrs.print.unit=1000
Note: In this case, you must set the value for the following properties at the same time: jrs.print.leftmargin,jrs.print.rightmargin, jrs.print.topmargin, jrs.print.bottommargin and jrs.print.unit; Otherwise, it can not work smoothly.
Properties about notification
jrs.notification_emailsConstant: jet.cs.util.APIConst.TAG_NOTIFICATION_EMAILSDescription: indicates the email notification list for successful/failed scheduled tasks.
•
jrs.success_notifyConstant: jet.cs.util.APIConst.TAG_SUCCESS_NOTIFYDescription: indicates whether to send email notification for successful reports.Possible values: {true, false} default is false.
•
jrs.fail_notifyConstant: jet.cs.util.APIConst.TAG_FAIL_NOTIFYDescription: indicates whether to send email notification for failed reports.Possible values: {true, false} default is false.
•
Properties about style groups
jrs.has_styleConstant: jet.cs.util.APIConst.TAG_HAS_STYLEDescription: indicates whether to enable style group.Possible values: {true, false} default is false.
•
Accessing a Report Using URL
149

jrs.style_groupConstant: jet.cs.util.APIConst.TAG_STYLE_GROUPDescription: specifies style group.
•
Examples
Submit a schedule to publish the report /hsqlDemo/Tutorial.cat/Invoice.cls to versioning system periodically.
The URL:
1.
http://localhost:8888/jrserver?jrs.cmd=jrs.submit_schedule&jrs.catalog=%2fhsqlDemo%2fTutorial.cat&jrs.hour2=5&jrs.task_class=jet.server.schedule.jrtasks.UpdateRptTask&jrs.is_between=true&jrs.is_weekday=false&jrs.launch_type=8&jrs.min2=0&jrs.is_pm=false&jrs.hour=9&jrs.is_pm2=true&jrs.param$PToday=May%2021%2c%201998&jrs.uid=admin&jrs.hours=1&jrs.is_hourly=true&jrs.at_min=0&jrs.days_id=0&jrs.day=1&jrs.param_file=true&jrs.timezone=CTT&jrs.min=0&jrs.param$TermsDays=30&jrs.expire_days=30&jrs.report=Invoice.cls&jrs.rpt_language=en&
Submit a schedule to publish the report /hsqlDemo/Tutorial.cat/Invoice.cls to versioning system at Sat May 1 12:00:00 CTS2006.
The URL:
2.
http://localhost:8888/jrserver?jrs.cmd=jrs.submit_schedule&jrs.catalog=%2fhsqlDemo%2fTutorial.cat&jrs.task_class=jet.server.schedule.jrtasks.UpdateRptTask&jrs.launch_type=1&jrs.param$PToday=May%2021%2c%201998&jrs.uid=admin&jrs.exe_day=1&jrs.param_file=true&jrs.exe _month=5&jrs.timezone=CTT&jrs.exe_hour=12&jrs.exe_min=00&jrs.exe_year=2006&jrs.param$TermsDays=30&jrs.expire_days=30&jrs.report=Invoice.cls&
Submit a schedule to publish the report /hsqlDemo/Tutorial.cat/Invoice.cls to versioning system immediately.
The URL:
3.
http://localhost:8888/jrserver?jrs.cmd=jrs.submit_schedule&jrs.catalog=%2fhsqlDemo%2fTutorial.cat&jrs.task_class=jet.server.schedule.jrtasks.UpdateRptTask&jrs.launch_type=0&jrs.param$PToday=May%2021%2c%201998&jrs.uid=admin&jrs.param_file=true&jrs.param$TermsDays=30&jrs.expire_days=30&jrs.report=Invoice.cls&jrs.rpt_language=en&
Submit a schedule to publish the report /hsqlDemo/Tutorial.cat/Invoice.cls to file system immediately.
The URL:
4.
http://localhost:8888/jrserver?jrs.cmd=jrs.submit_schedule&jrs.catalog=%2fhsqlDemo%2fTutorial.cat&jrs.pdf_dir=%2fgrp_param&jrs.task_class=jet.server.schedule.jrtasks.PublishToDiskTask&jrs.rst=Invoice.rst&jrs.launch_type=0&jrs.param$PToday=May%2021%2c%201998&jrs.uid=admin&jrs.is_norm_txt=true&jrs.rst_dir=%2fgrp_param&jrs.is_applet_chart=false&jrs.param_file=true&jrs.html=Invoice&jrs.text=Invoice.txt&jrs.delimiter=&jrs.is_multi_files=true&jrs.text_dir=%2fgrp_param&jrs.param$TermsDays=30&jrs.report=Invoice.cls&jrs.pdf=Invoice.pdf&jrs.html_dir=%2fgrp_param&
Submit a schedule to publish the report /hsqlDemo/Tutorial.cat/Invoice.cls to email immediately.
The URL:
5.
http://localhost:8888/jrserver?jrs.cmd=jrs.submit_schedule&jrs.catalog=%2fhsqlDemo%2fTutorial.cat&jrs.jrmail1=jrs.mailsubject%3dreport%2520Invoice%26jrs.mailformat%3d4%26jrs.mailto%3dreader2%252c%2520reader3%26&jrs.task_class=jet.server.schedule.jrtasks.SendJRMailTask&jrs.jrmail0=jrs.mailsubject%3dreport%2520Invoice%26jrs.mailformat%3d0%26jrs.mailto%3dreader1%26&jrs.launch_type=0&jrs.param$PToday=May%2021%2c%201998&jrs.uid=admin&jrs.param_file=true&jrs.param$TermsDays=
Accessing a Report Using URL
150
30&jrs.report=Invoice.cls&jrs.rpt_language=en&
Submit a schedule to publish the report /hsqlDemo/Tutorial.cat/Invoice.cls to printer immediately.
The URL:
6.
http://localhost:8888/jrserver?jrs.cmd=jrs.submit_schedule&jrs.catalog=%2fhsqlDemo%2fTutorial.cat&jrs.task_class=jet.server.schedule.jrtasks.PrintRptTask&jrs.launch_type=0&jrs.param$PToday=May%2021%2c%201998&jrs.uid=admin&jrs.param_file=true&jrs.param$TermsDays=30&jrs.report=Invoice.cls&
Submit a schedule to publish the report /hsqlDemo/Tutorial.cat/Invoice.cls to versioning system immediately, and notify theuser support1, support2, and support3 whenever success or failure.
The URL:
7.
http://localhost:8888/jrserver?jrs.cmd=jrs.submit_schedule&jrs.catalog=%2fhsqlDemo%2fTutorial.cat&jrs.task_class=jet.server.schedule.jrtasks.UpdateRptTask&jrs.launch_type=0&jrs.param$PToday=May%2021%2c%201998&jrs.uid=admin&jrs.param$TermsDays=30&jrs.expire_days=30&jrs.report=Invoice.cls&jrs.success_notify=true&jrs.fail_notify=true&jrs.notification_emails=To%[email protected]%0D%0ACc%[email protected]%0D%0ABcc%[email protected]%0D%0A
When a large report exceeds the specific running time, send the report result by Email when it is finished. JSP parameter specificationjrs.catalog=%2fcatalog path%2fcatalog namejrs.report=report namejrs.timeout_send_email=true/[false]jrs.report_timeout=number (if timeout >number and jrs.timeout_send_email=true, send mail)jrs.mailto=mail addressjrs.mailsubject=mail subjectjrs.result_type=1 (HTML) or 2(PDF) or 3(Text) or 4(Excel) or 5(PostScript) or 6(Rich Text) or 7(Xml)jrs.mailcomments=mail contentjrs.mailfrom=mail address of senderjrs.timeout_sendmail_message=the message which users customize
When you use JSP to run a report without parameter:
♦
http://localhost:8888/jinfonet/tryView.jsp?jrs.cmd=jrs.try_vw&jrs.catalog=%2fhsqlDemo%2fTutorial.cat&jrs.report=employeelist.cls&jrs.timeout_send_email=true&jrs.report_timeout=05&jrs.mail"mailto:[email protected]&jrs.mailsubject=AboutTaskForTimeoutSendEmail&jrs.res">[email protected]&jrs.mailsubject="TaskForTimeoutSendEmail&jrs.result_type=1&jrs.mailcomments=IFTHEREPORTISFINISHEDTHERESULTWILLBESENT
When you use JSP to run a report with parameter:
http://localhost:8888/jinfonet/runReport.jsp?jrs.cmd=jrs.web_vw&jrs.catalog=%2fhsqlDemo/Tutorial.cat&jrs.report=customerorders.cls&jrs.timeout_send_email=true&jrs.report_timeout=0&[email protected]&jrs.mailsubject=AboutTaskForTimeo">mo%2fTutorial.cat&jrs.report=customerorders.cls&jrs.timeout_send_email=true&jrs.report_timeout=5&[email protected]&jrs.mailsubject=TaskForTimeoutSendEmail&jrs.result_type=1
8.
Servlet parameter specificationjrs.cmd=jrs.try_vw (when the report has no parameter)jrs.cmd=jrs.web_vw (when the report has parameter)jrs.timeout_send_email=true/[false]jrs.report_timeout=number (if timeout >number and jrs.timeout_send_email=true, send mail)jrs.mailto=mail addressjrs.mailsubject=mail subjectjrs.result_type=1 (HTML) or 2(PDF) or 3(Text) or 4(Excel) or 5(PostScript) or 6(Rich Text) or 7(Xml)jrs.mailcomments=mail contentjrs.mailfrom=mail address of sender
9.
Accessing a Report Using URL
151
jrs.timeout_sendmail_message=the message which users customize
When you use Servlet to run a report without parameter:
http://localhost:8888/jrserver/hsqlDemo/Tutorial.cat/CountRecorderPerPage.cls?jrs.cmd=jrs.try_vw&jrs.timeout_send_email=true&jrs.report_timeout=1&[email protected]&jrs.mailsubject=AboutTaskForTimeoutSendEmail&jrs.result_type=1&jrs.mailcomments=COUNTRECORDSPERPAGE
When you use Servlet to run a report with parameter:
http://localhost:8888/jrserver/hsqlDemo/Tutorial.cat/customerorders.cls?jrs.cmd=jrs.web_vw&jrs.timeout_send_email=true&jrs.report_timeout=1&[email protected]&jrs.mailsubject=TaskForTimeoutEmail&jrs.result_type=1&jrs.mailcomments=CUSTOMERORDER
Customize your message which will display in browser
You can set your desired message by setting the parameter "jrs.timeout_sendmail_message"
For example, you want to display message as below:
Running <report name> costs more than <Timeout> seconds.The subject is <mail subject> and has been sent to <mailto> from <mailfrom>It is a file whose type is <type>.
Then you can set the parameter in URL:
jrs.timeout_sendmail_message=Running {6} costs more than {0} seconds.<p>The subject is {2} and has been sent to {1}from {5}.<p>It is a file whose type is {3}.
Where
{0} − The report timeout{1} − mail to{2} − mail subject{3} − result type {4} − mail comment{5} − mail from{6} − Catalog name/report<p> − an Enter key
Example:
10.
http://localhost:8888/jrserver/hsqlDemo/Tutorial.cat/customerorders.cls?jrs.cmd=jrs.web_vw&jrs.timeout_send_email=true&jrs.report_timeout=0&[email protected]&jrs.mailsubject=AboutTaskForTimeoutSendEmail&jrs.result_type=1&jrs.mailcomments=Customerorder&[email protected]&jrs.timeout_sendmail_message=
This {6} is a larger report whose runtime is over {0}<p>.I send the report to {1}. <p> I am {5}.The subject of the mail is {2}.<p>It''s type is {3}.
Note: When the sign " ' " is used in the message, you should type the sign twice. For example, the message " Its subject is {2}" willbe displayed as "Its subject is AboutTaskForTimeoutSendEmail".
Index
Accessing a Report Using URL
152
JReport DHTML
Introduction
With JReport Enterprise Server, you may view reports in different formats, such as HTML, PDF, Excel, etc. For HTML format, thereare two viewing modes − pure HTML or dynamic HTML (DHTML). Dynamic HTML provides a dynamic report view at the clientside. You may change some options to get the results to display the way you want.
In versions as early as JReport Enterprise Server 4.5, DHTML was already supported. However, it provided only simple features,such as Table of Contents (TOC) support and a Drill−down feature.
JReport Enterprise Server now provides support for more features, such as Filter, Sort, Drill−to, Drill−down, Drill−up, Navigation(TOC), Search, Save Result, and so on.
Furthermore, JReport DHTML supports web design feature, allowing you to create reports using report oriented data structures, saveyour report, and even save your report as another report.
Topics covered in this chapter:
How to view reports in Dynamic HTML• JReport DHTML Window Screen Elements• Controlling the Report Result View in Dynamic HTML• Running and Using Master/Detail Report• Configuring DHTML Features• Tuning DHTML Performance• Web Design − Designing your report on the web•
How to view reports in Dynamic HTML
To view reports in Dynamic HTML,
Launch JReport Enterprise Server. 1. Log on to the home page of JReport Enterprise Server using the JReport Console port, such as http://localhost:8888 orhttp://<host>:<port>/jreport/jinfonet in an embedded environment.
2.
Browse to the page that contains your report, and then click the AdvancedRun button for that report in the Control column.3. Switch to the Format tab, make sure To DHTML is selected in the Select type of View Format drop−down list.4. Click the Submit button. The JReport DHTML window will appear.5.
Opening Multiple DHTML Reports in One Session
You can open multiple reports in the DHTML window in one session. This means that each time when you run a DHTML report, itwill be opened in a new window. Also, when working in the embedded mode, you can assign frames to the reports, so that more thanone DHTML report can be viewed in one window at the same time.
You are able to specify the maximum number of reports that can be run in one session. To do this,
Click Preferences on the top banner of the Server Administration page (http://localhost:8889), click the DHTML tab. 1. At the bottom of this page, check the Number of Report per Session box, and type in the number in the text box.
If this box is unchecked, you can open an unlimited number of reports.
2.
In order to illustrate how to view multiple frames in one window, a demo is provided for you. Please follow the steps below:
Go to <install_root>\help\en\srv−material to find MultipleReports.zip.1. Extract MutipleReports.zip to <install_root>/public_html.2.
153
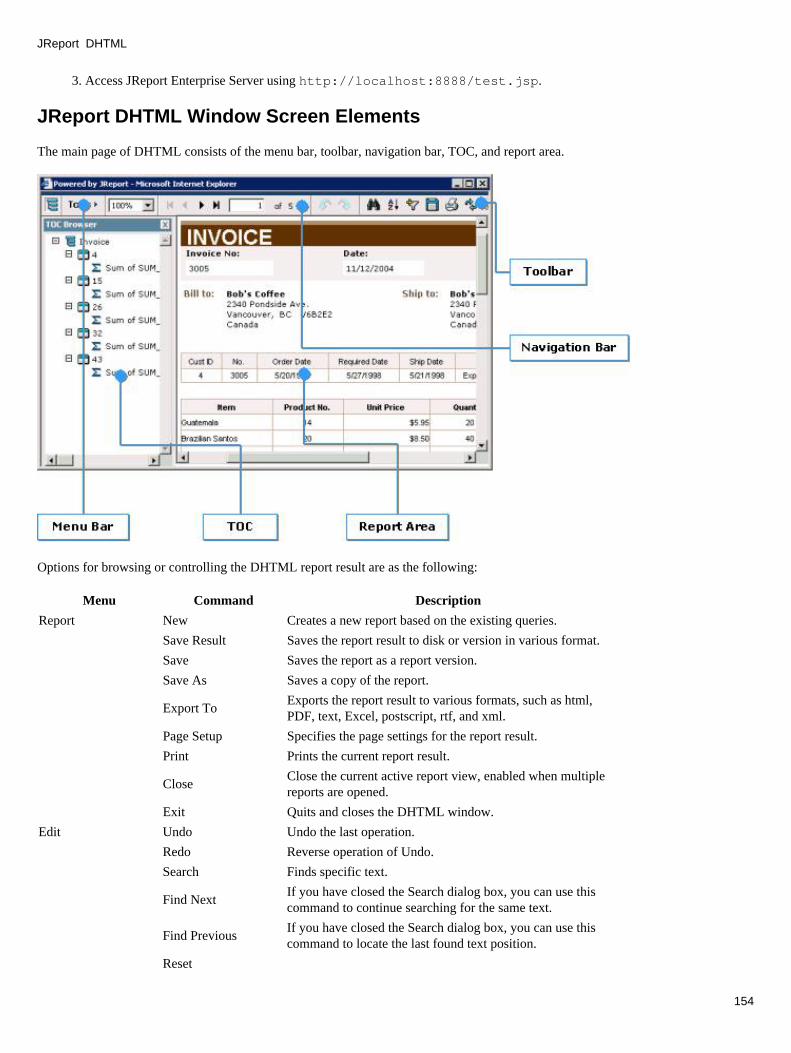
Access JReport Enterprise Server using http://localhost:8888/test.jsp.3.
JReport DHTML Window Screen Elements
The main page of DHTML consists of the menu bar, toolbar, navigation bar, TOC, and report area.
Options for browsing or controlling the DHTML report result are as the following:
Menu Command Description
Report New Creates a new report based on the existing queries.
Save Result Saves the report result to disk or version in various format.
Save Saves the report as a report version.
Save As Saves a copy of the report.
Export ToExports the report result to various formats, such as html,PDF, text, Excel, postscript, rtf, and xml.
Page Setup Specifies the page settings for the report result.
Print Prints the current report result.
CloseClose the current active report view, enabled when multiplereports are opened.
Exit Quits and closes the DHTML window.
Edit Undo Undo the last operation.
Redo Reverse operation of Undo.
Search Finds specific text.
Find NextIf you have closed the Search dialog box, you can use thiscommand to continue searching for the same text.
Find PreviousIf you have closed the Search dialog box, you can use thiscommand to locate the last found text position.
Reset
JReport DHTML
154
Reproduces the report using the data cached in the databuffer.
RefreshRuns the report using the previously provided parameters.The Refresh operation fetches data again.
ViewUser InformationPanel
Shows the User Information Panel, from which you can getthe user name, catalog name and report name.
TOCShows TOC Browser, with which you can navigate thereport data.
Tool Bar Shows the Tool Bar.
Navigation Bar Shows the Navigation Bar.
Sort
If the report is not grouped, click it and the Sort On DetailPanel will show, with which you can sort the report recordsin ascending or descending order on the field(s) you selectfrom the drop−down list. If the report is grouped, it has twosubmenu items − Sort On Groups, and Sort On Detail, withwhich you can sort the groups and the detail recordsrespectively.
FilterShows the Filter Panel, with which you can filter the reportrecords according to the filter criteria you specify.
Customize Allows you to customize the toolbar.
Pop−up Menu Shows the pop−up menu when you right click a DBField ora label.
Skin Allows you to choose one skin color theme.
Navigation First Page Goes to the first page of report.
Prev Page Goes to the previous page.
Next Page Goes to the next page.
Last Page Goes to the last page.
Context Menu Filter Filters the data in your report.
Sort ascending Sorts the selected column in ascending order.
Sort descending Sorts the selected column in descending order.
Sort By OthersSorts the groups by a field, record−level formula, orsummary.
Drill DownDrills down one group level to show the records for aparticular group.
Drill UpDrills up one group level to show the records for aparticular group.
Search Finds text in your report using Search dialog.
Page Specifies the page settings for the report result.
Report Shows the report properties.
Properties Shows the object properties.
Controlling the Report Result View in Dynamic HTML
The major features of controlling the DHTML report result view are:
FilterEnables you to set a series of conditions to re−produce the report by filtering the data buffer where data is cached.
•
SortEnables you to sort records in the data buffer according to the sort settings.
•
JReport DHTML
155

Drill ToEnables you to re−produce the report with records of a certain group shown.
•
Drill DownEnables you to drill down one group level to show the records of a particular group.
•
Drill UpEnables you to drill up one group level to show the records of particular group.
•
NavigationEnables you to navigate the report by using the Table of Contents (TOC) panel.
•
SearchEnables you to search for any text in the report.
•
ExportEnables you to export the report result to various formats, such as PDF, HTML, Text, and so on.
•
Save ResultEnables you to save the report result as a version.
•
Style GroupEnables you to apply style groups to the report.
•
ZoomEnables you to enlarge or reduce the size of the report result.
•
Filter the report data
In DHTML, the data is cached in a data buffer. You can set a series of conditions and apply to a DHTML server to filter the databuffer and reproduce the report. There are three methods that you can use to set the filtering conditions:
Use the Filter panel;• Use the pop−up menu;• Use labels.•
Use the Filter panel
To show the Filter Panel, on the View menu, click Filter, or click the Filter button on the toolbar. You can add, edit, or remove anyfiltering conditions on the Filter panel.
You can finish a filter condition by either selecting the field value from the drop−down list, or typing the values manually in thevalue fields. This is controlled by the button behind the value field. When the button is Input Value, click it to type the valuemanually, and then the button will change to Select Value which means you can select a value from the drop−down list. After youhave finished with the filter condition, click Apply to get the data you want. Click Next or Previous to browse to the next or previouspage of values.
To add a row, select And or Or from the Relationship drop−down list.
To remove a row, click the Delete this condition button.
Note: When you set a condition expression that contains date type field values, please follow the correct date sample that isautomatically provided in the Value field.
Use the pop−up menu
You can also use the Filter command on the pop−up menu to filter the data in your report.
Move your cursor on the column in the Report Area on which you want to filter data, and then click the right mouse button. Choose the Filter command on the pop−up menu. On the sub−menu of Filter, some options and DBField values aredisplayed, select them to filter the data.
AllNo filter.
1. 1.
JReport DHTML
156
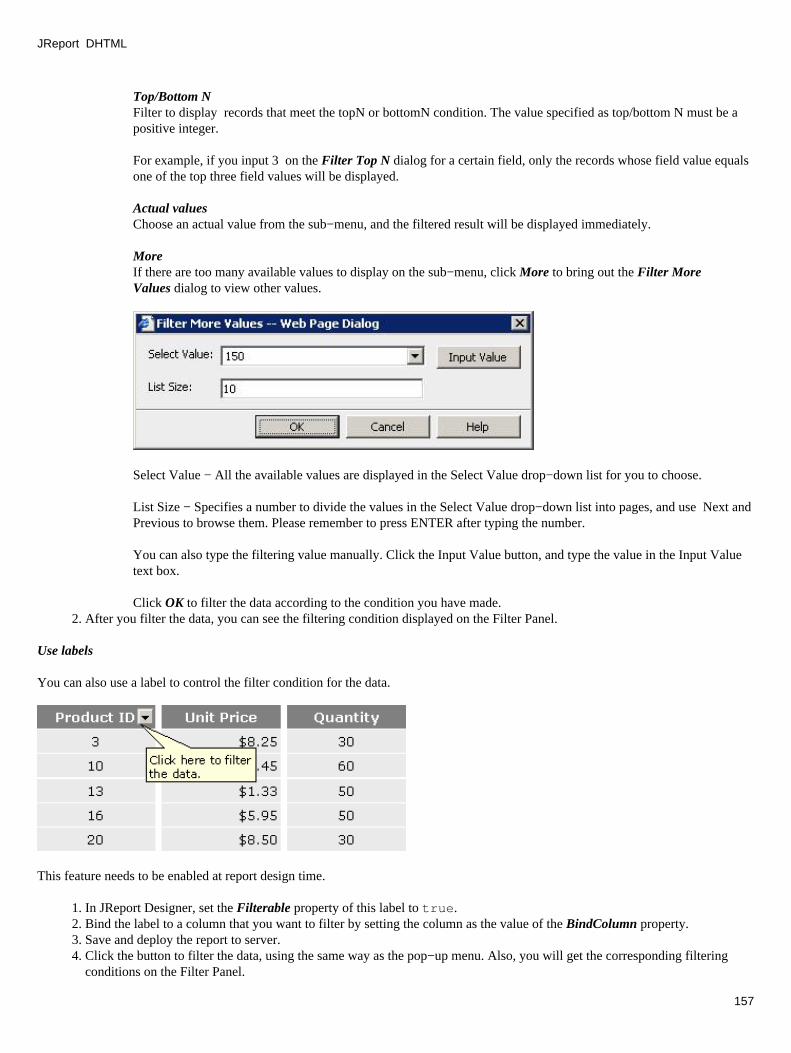
Top/Bottom NFilter to display records that meet the topN or bottomN condition. The value specified as top/bottom N must be apositive integer.
For example, if you input 3 on the Filter Top N dialog for a certain field, only the records whose field value equalsone of the top three field values will be displayed.
Actual valuesChoose an actual value from the sub−menu, and the filtered result will be displayed immediately.
MoreIf there are too many available values to display on the sub−menu, click More to bring out the Filter MoreValues dialog to view other values.
Select Value − All the available values are displayed in the Select Value drop−down list for you to choose.
List Size − Specifies a number to divide the values in the Select Value drop−down list into pages, and use Next andPrevious to browse them. Please remember to press ENTER after typing the number.
You can also type the filtering value manually. Click the Input Value button, and type the value in the Input Valuetext box.
Click OK to filter the data according to the condition you have made.After you filter the data, you can see the filtering condition displayed on the Filter Panel.2.
Use labels
You can also use a label to control the filter condition for the data.
This feature needs to be enabled at report design time.
In JReport Designer, set the Filterable property of this label to true.1. Bind the label to a column that you want to filter by setting the column as the value of the BindColumn property.2. Save and deploy the report to server.3. Click the button to filter the data, using the same way as the pop−up menu. Also, you will get the corresponding filteringconditions on the Filter Panel.
4.
JReport DHTML
157
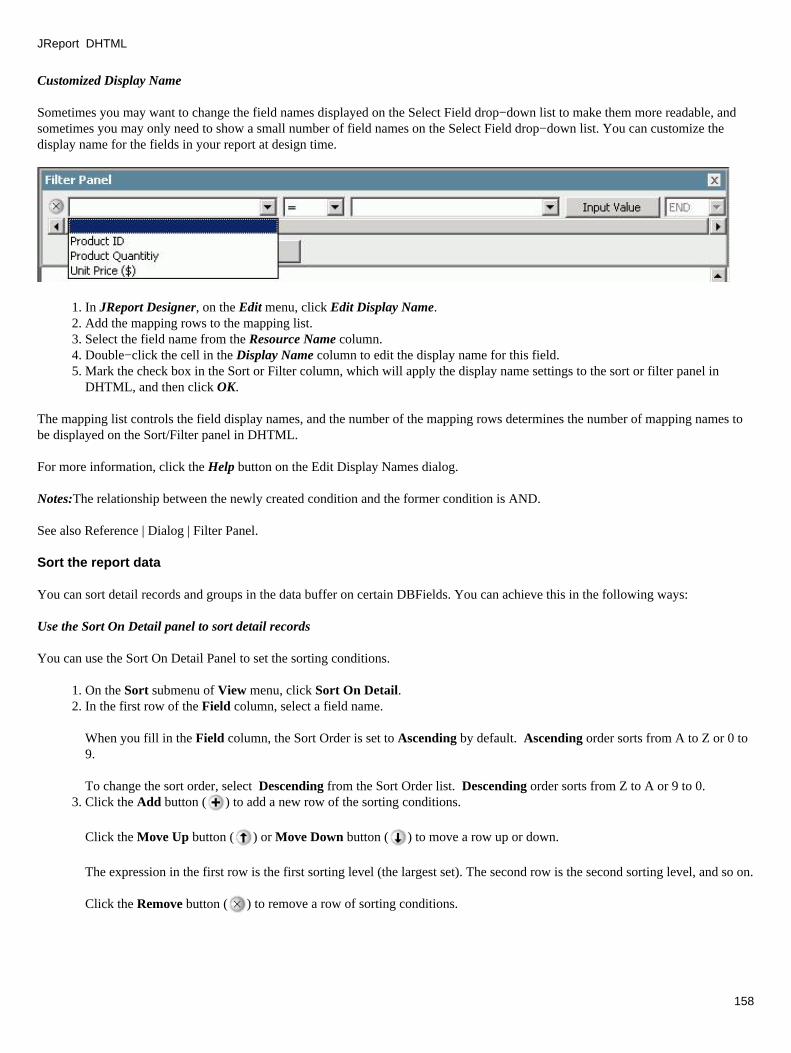
Customized Display Name
Sometimes you may want to change the field names displayed on the Select Field drop−down list to make them more readable, andsometimes you may only need to show a small number of field names on the Select Field drop−down list. You can customize thedisplay name for the fields in your report at design time.
In JReport Designer, on the Edit menu, click Edit Display Name.1. Add the mapping rows to the mapping list.2. Select the field name from the Resource Name column.3. Double−click the cell in the Display Name column to edit the display name for this field.4. Mark the check box in the Sort or Filter column, which will apply the display name settings to the sort or filter panel inDHTML, and then click OK.
5.
The mapping list controls the field display names, and the number of the mapping rows determines the number of mapping names tobe displayed on the Sort/Filter panel in DHTML.
For more information, click the Help button on the Edit Display Names dialog.
Notes:The relationship between the newly created condition and the former condition is AND.
See also Reference | Dialog | Filter Panel.
Sort the report data
You can sort detail records and groups in the data buffer on certain DBFields. You can achieve this in the following ways:
Use the Sort On Detail panel to sort detail records
You can use the Sort On Detail Panel to set the sorting conditions.
On the Sort submenu of View menu, click Sort On Detail.1. In the first row of the Field column, select a field name.
When you fill in the Field column, the Sort Order is set to Ascending by default. Ascending order sorts from A to Z or 0 to9.
To change the sort order, select Descending from the Sort Order list. Descending order sorts from Z to A or 9 to 0.
2.
Click the Add button ( ) to add a new row of the sorting conditions.
Click the Move Up button ( ) or Move Down button ( ) to move a row up or down.
The expression in the first row is the first sorting level (the largest set). The second row is the second sorting level, and so on.
Click the Remove button ( ) to remove a row of sorting conditions.
3.
JReport DHTML
158
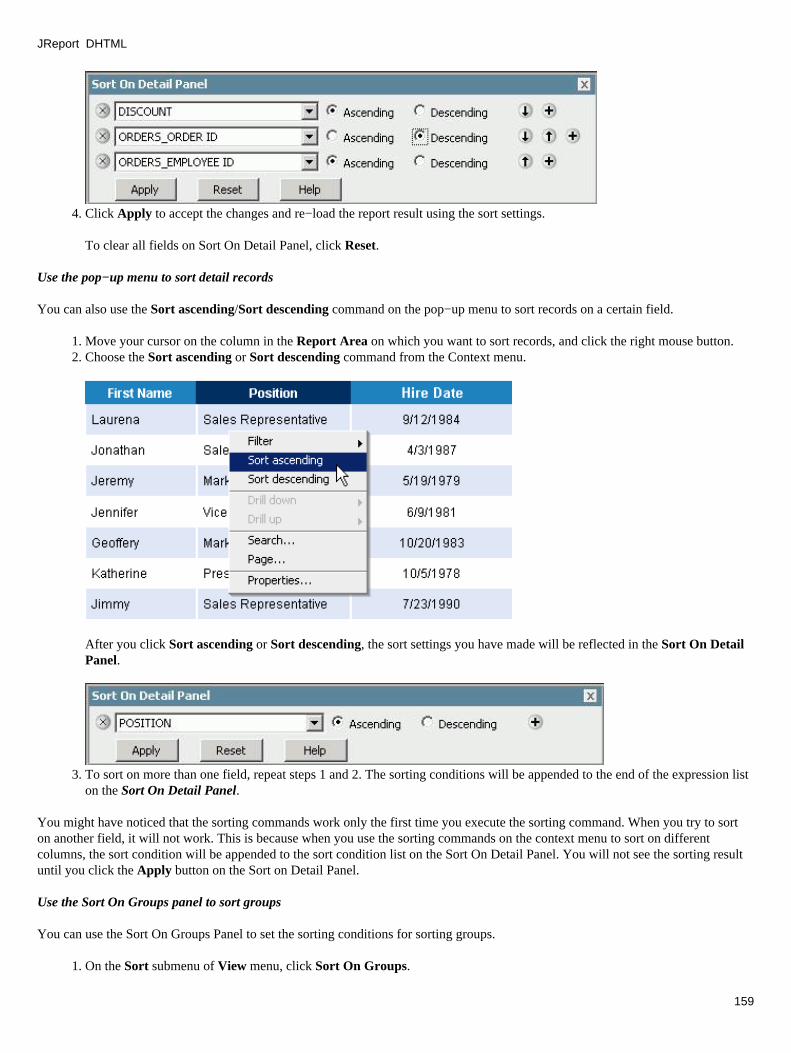
Click Apply to accept the changes and re−load the report result using the sort settings.
To clear all fields on Sort On Detail Panel, click Reset.
4.
Use the pop−up menu to sort detail records
You can also use the Sort ascending/Sort descending command on the pop−up menu to sort records on a certain field.
Move your cursor on the column in the Report Area on which you want to sort records, and click the right mouse button. 1. Choose the Sort ascending or Sort descending command from the Context menu.
After you click Sort ascending or Sort descending, the sort settings you have made will be reflected in the Sort On DetailPanel.
2.
To sort on more than one field, repeat steps 1 and 2. The sorting conditions will be appended to the end of the expression liston the Sort On Detail Panel.
3.
You might have noticed that the sorting commands work only the first time you execute the sorting command. When you try to sorton another field, it will not work. This is because when you use the sorting commands on the context menu to sort on differentcolumns, the sort condition will be appended to the sort condition list on the Sort On Detail Panel. You will not see the sorting resultuntil you click the Apply button on the Sort on Detail Panel.
Use the Sort On Groups panel to sort groups
You can use the Sort On Groups Panel to set the sorting conditions for sorting groups.
On the Sort submenu of View menu, click Sort On Groups.1.
JReport DHTML
159

From the Sorting on drop−down list, select a group to be sorted on.2. Select a field, record−level formula, or summary from the field drop−down list, and then check Ascending or Descending toset the sorting order.
Click the Remove button ( ) to reset the sorting condition.
3.
Click Apply to accept the changes and re−load the report result using the sort settings.
To clear the condition on the Sort On Groups Panel, click Reset.
4.
Use the pop−up menu to sort groups
You can also use the Sort By Others command on the pop−up menu of a group to sort this group on a certain field, record−levelformula, or summary.
Move your cursor to a group header area or a group footer area, and click the right mouse button.1. Choose the Sort By Others command from the Context menu.
After you click Sort By Others, the Sort On Groups Panel will be displayed, and then you can set the sorting conditionaccording to the steps said in Use the Sort On Groups panel to sort groups.
2.
You might have noticed that the Sorting On drop−down list is gray and can not be accessed. This is because you access the Sort OnGroups Panel by right−clicking a certain group, and the system makes the group as the default group to be sorted.
Use labels
You can use a label to control the sorting order for a certain column.
JReport DHTML
160
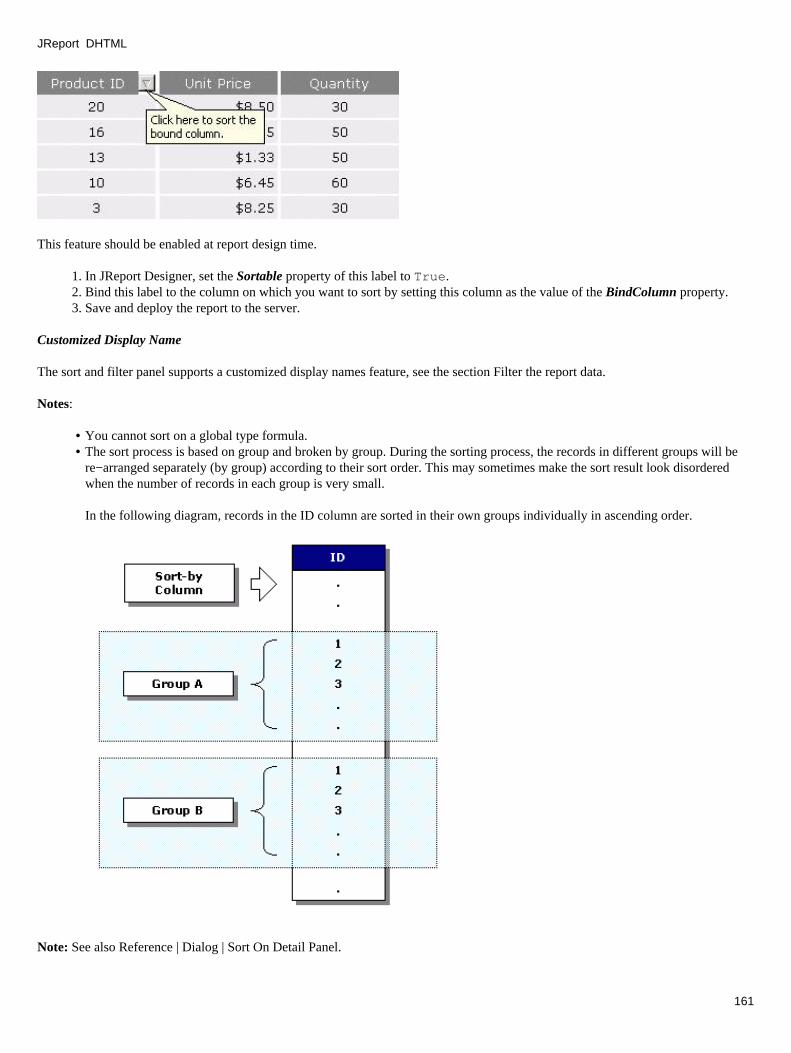
This feature should be enabled at report design time.
In JReport Designer, set the Sortable property of this label to True.1. Bind this label to the column on which you want to sort by setting this column as the value of the BindColumn property.2. Save and deploy the report to the server.3.
Customized Display Name
The sort and filter panel supports a customized display names feature, see the section Filter the report data.
Notes:
You cannot sort on a global type formula.• The sort process is based on group and broken by group. During the sorting process, the records in different groups will bere−arranged separately (by group) according to their sort order. This may sometimes make the sort result look disorderedwhen the number of records in each group is very small.
In the following diagram, records in the ID column are sorted in their own groups individually in ascending order.
•
Note: See also Reference | Dialog | Sort On Detail Panel.
JReport DHTML
161
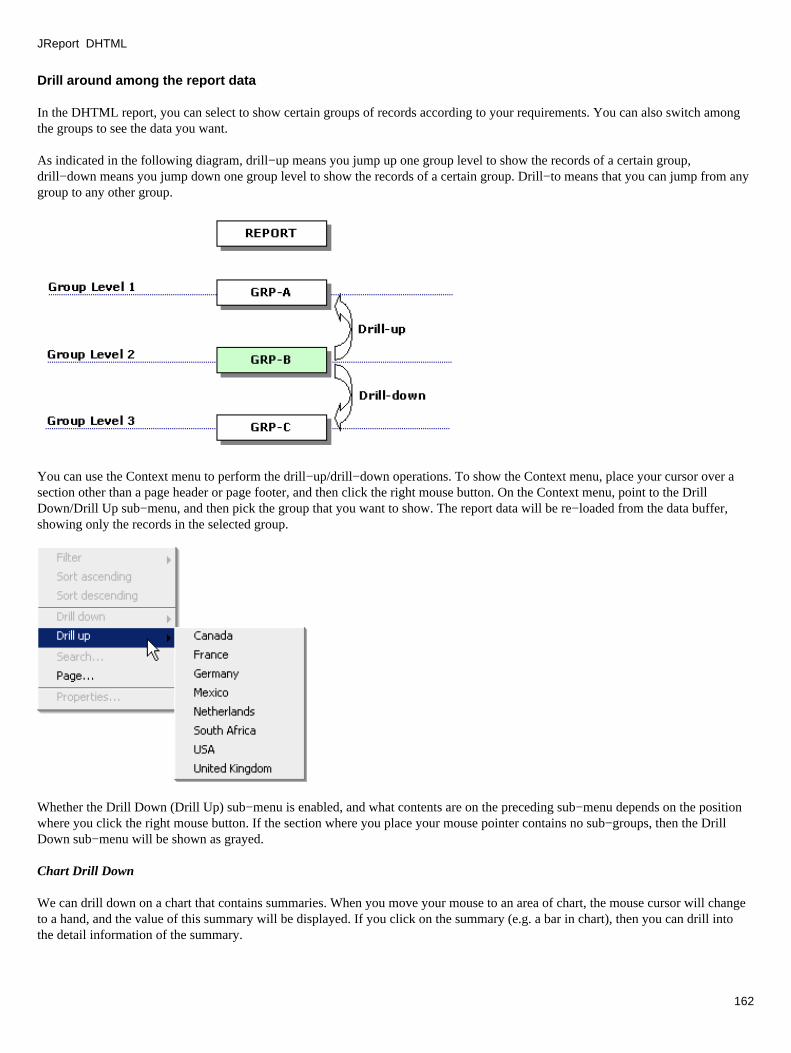
Drill around among the report data
In the DHTML report, you can select to show certain groups of records according to your requirements. You can also switch amongthe groups to see the data you want.
As indicated in the following diagram, drill−up means you jump up one group level to show the records of a certain group,drill−down means you jump down one group level to show the records of a certain group. Drill−to means that you can jump from anygroup to any other group.
You can use the Context menu to perform the drill−up/drill−down operations. To show the Context menu, place your cursor over asection other than a page header or page footer, and then click the right mouse button. On the Context menu, point to the DrillDown/Drill Up sub−menu, and then pick the group that you want to show. The report data will be re−loaded from the data buffer,showing only the records in the selected group.
Whether the Drill Down (Drill Up) sub−menu is enabled, and what contents are on the preceding sub−menu depends on the positionwhere you click the right mouse button. If the section where you place your mouse pointer contains no sub−groups, then the DrillDown sub−menu will be shown as grayed.
Chart Drill Down
We can drill down on a chart that contains summaries. When you move your mouse to an area of chart, the mouse cursor will changeto a hand, and the value of this summary will be displayed. If you click on the summary (e.g. a bar in chart), then you can drill intothe detail information of the summary.
JReport DHTML
162
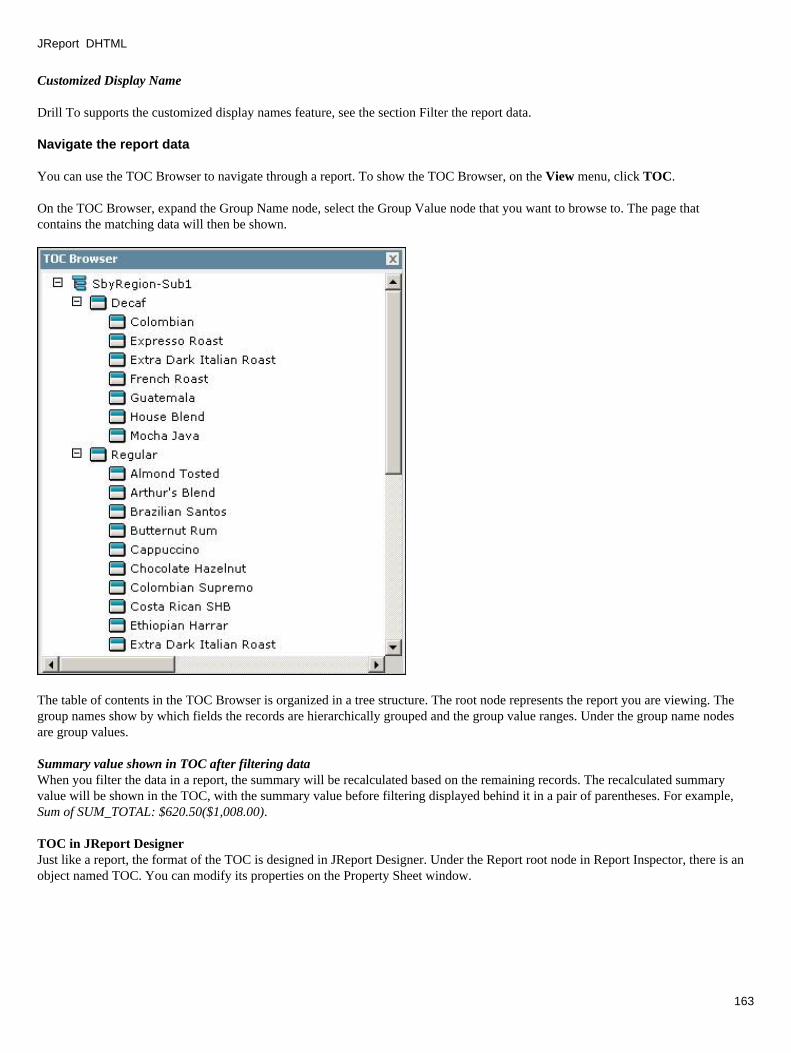
Customized Display Name
Drill To supports the customized display names feature, see the section Filter the report data.
Navigate the report data
You can use the TOC Browser to navigate through a report. To show the TOC Browser, on the View menu, click TOC.
On the TOC Browser, expand the Group Name node, select the Group Value node that you want to browse to. The page thatcontains the matching data will then be shown.
The table of contents in the TOC Browser is organized in a tree structure. The root node represents the report you are viewing. Thegroup names show by which fields the records are hierarchically grouped and the group value ranges. Under the group name nodesare group values.
Summary value shown in TOC after filtering data When you filter the data in a report, the summary will be recalculated based on the remaining records. The recalculated summaryvalue will be shown in the TOC, with the summary value before filtering displayed behind it in a pair of parentheses. For example,Sum of SUM_TOTAL: $620.50($1,008.00).
TOC in JReport DesignerJust like a report, the format of the TOC is designed in JReport Designer. Under the Report root node in Report Inspector, there is anobject named TOC. You can modify its properties on the Property Sheet window.
JReport DHTML
163

TOC AnchorBesides the groups, you can also add your own nodes to the TOC Browser. Most objects in JReport Designer have a property calledTOCAnchor that holds a Boolean value. If the TOCAnchor property is true, a node for this object will be added to the TOC tree.When you click such a node, the page that contains this object will be displayed in the report area.
Some objects, such as group panels, summaries, sub−reports, and data objects hold a true value for the TOCAnchor property bydefault, which also means that by default they will appear in the TOC.
Find text in the report data
You can use the Search dialog to find text in your report. To show the Search dialog, on the Edit menu, click Search, or right clickon a DBField or a label, and on the pop−up menu, click Search. You can find the content you want in two places − in the values ofcertain fields, or in the report content.
To find text in the values of certain fields,
Make sure the Content option is NOT checked.1. Select a field from the Field Name drop−down list.2. Select the field value you want to search for from the Search Value drop−down list. If the value doesn't appear in the list,select another range in the Value Range drop−down list.
3.
Click the Next button. 4.
JReport DHTML
164
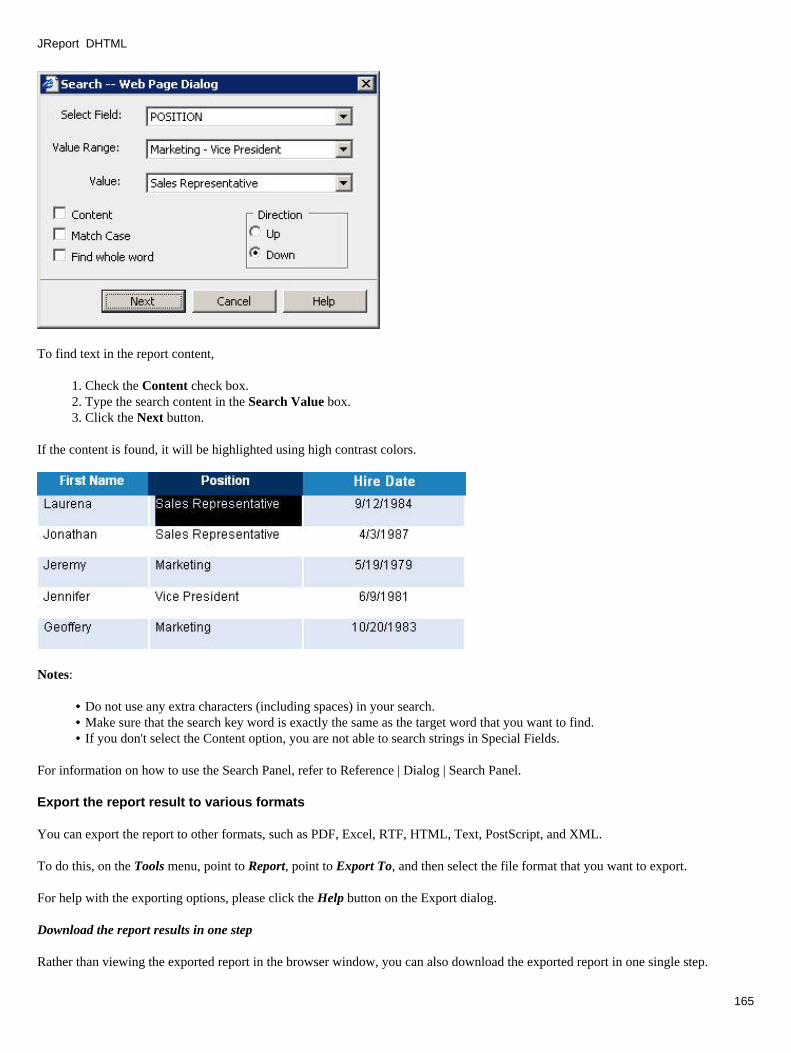
To find text in the report content,
Check the Content check box.1. Type the search content in the Search Value box.2. Click the Next button.3.
If the content is found, it will be highlighted using high contrast colors.
Notes:
Do not use any extra characters (including spaces) in your search.• Make sure that the search key word is exactly the same as the target word that you want to find. • If you don't select the Content option, you are not able to search strings in Special Fields. •
For information on how to use the Search Panel, refer to Reference | Dialog | Search Panel.
Export the report result to various formats
You can export the report to other formats, such as PDF, Excel, RTF, HTML, Text, PostScript, and XML.
To do this, on the Tools menu, point to Report, point to Export To, and then select the file format that you want to export.
For help with the exporting options, please click the Help button on the Export dialog.
Download the report results in one step
Rather than viewing the exported report in the browser window, you can also download the exported report in one single step.
JReport DHTML
165
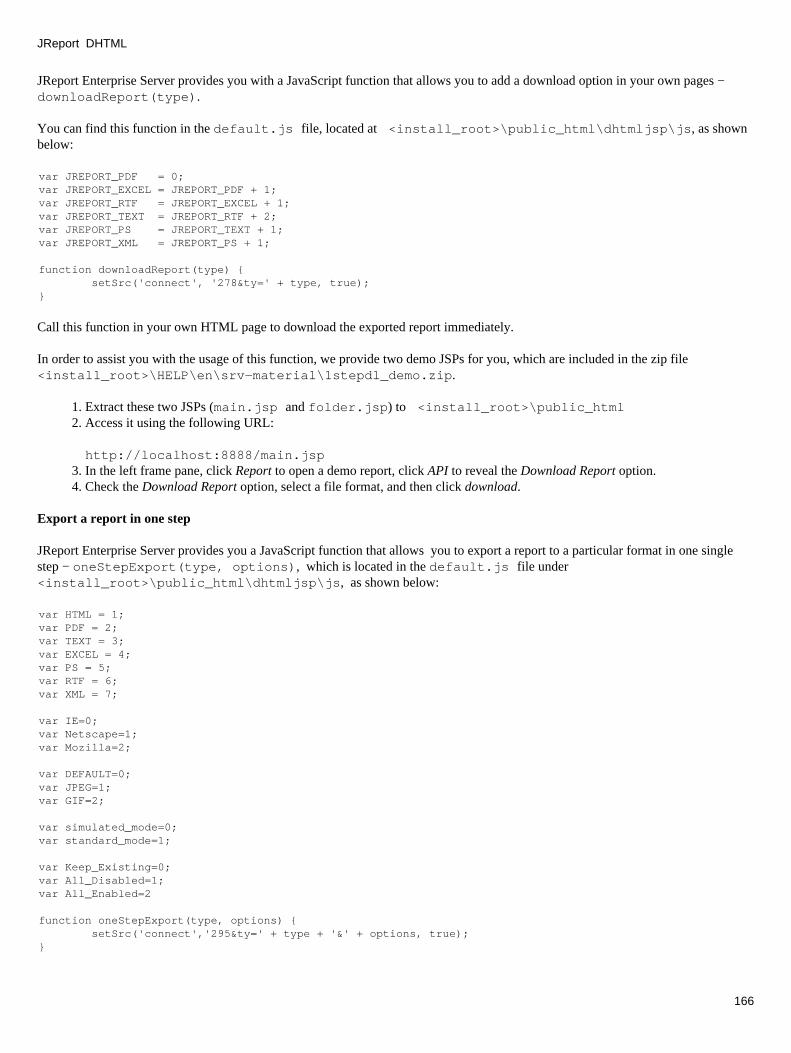
JReport Enterprise Server provides you with a JavaScript function that allows you to add a download option in your own pages −downloadReport(type).
You can find this function in the default.js file, located at <install_root>\public_html\dhtmljsp\js, as shownbelow:
var JREPORT_PDF = 0;var JREPORT_EXCEL = JREPORT_PDF + 1;var JREPORT_RTF = JREPORT_EXCEL + 1;var JREPORT_TEXT = JREPORT_RTF + 2;var JREPORT_PS = JREPORT_TEXT + 1;var JREPORT_XML = JREPORT_PS + 1;
function downloadReport(type) { setSrc('connect', '278&ty=' + type, true);}
Call this function in your own HTML page to download the exported report immediately.
In order to assist you with the usage of this function, we provide two demo JSPs for you, which are included in the zip file<install_root>\HELP\en\srv−material\1stepdl_demo.zip.
Extract these two JSPs (main.jsp and folder.jsp) to <install_root>\public_html1. Access it using the following URL:
http://localhost:8888/main.jsp
2.
In the left frame pane, click Report to open a demo report, click API to reveal the Download Report option. 3. Check the Download Report option, select a file format, and then click download.4.
Export a report in one step
JReport Enterprise Server provides you a JavaScript function that allows you to export a report to a particular format in one singlestep − oneStepExport(type, options), which is located in the default.js file under<install_root>\public_html\dhtmljsp\js, as shown below:
var HTML = 1;var PDF = 2;var TEXT = 3;var EXCEL = 4;var PS = 5;var RTF = 6;var XML = 7;
var IE=0;var Netscape=1;var Mozilla=2;
var DEFAULT=0; var JPEG=1; var GIF=2;
var simulated_mode=0; var standard_mode=1;
var Keep_Existing=0;var All_Disabled=1;var All_Enabled=2
function oneStepExport(type, options) { setSrc('connect','295&ty=' + type + '&' + options, true);}
JReport DHTML
166

Below is the explanation of the two parameters:
type − Specifies the exporting format. It can be HTML, PDF, TEXT, EXCEL, PS, RTF, or XML.• option − Specifies the values of the options of each format. The options and their usage are listed below:
HTMLhtml_single: A boolean value. If it is true, the report will be exported to a single HTML file.html_noHyperlink: A boolean value. If it is true, the exported HTML file will not contain the hyperlinks.html_noPageNumber: A boolean value. If it is true, the exported HTML file will not contain page numbers.html_noMargin: A boolean value. If it is true, the margin which you set while designing a report will be removed,and you can specify a margin in the exported HTML file.html_relative: A boolean value. If it is true, the font size in the exported file can be adjusted in the browser.html_table: A boolean value. If it is true, the format of the exported HTML will be in a table tag.html_applet: A boolean value. If it is true, Java applets will be used to display charts in the exported file.html_drillDown: A boolean value. If it is true, the drill down file will be included in the exported HTML file.int html_resolution: Specifies the resolution you specify. By default, it will be the resolution of your monitor, whichis normally 96 dpi.int html_browser: Specifies the web browser with which you want to view the HTML format result file. It can beIE, Netscape, and Mozilla.int html_imageFormat: Specified the format of the image. It can be DEFAULT, JPEG, and GIF.
♦
PDFpdf_noMargin: A boolean value. If it is true, the margin which you set while designing a report will be removed.pdf_compress: A boolean value. If it is true, the images in the report will be compressed.int pdf_percent: When pdf_compress is true, this option is used to specify the percentage to compress the images inthe report. By default, it is 20%.pdf_toc: A boolean value. If it is true, the report result will be exported to PDF file with a table of contents.pdf_drilldown: A boolean value. If it is true, the report result will be exported to PDF file with the drill−downfeature enabled.pdf_encrypt: A boolean value. Specifies whether to set a password for the exported PDF file.String pdf_password: When pdf_encrypt is true, this option is used to specify a password for the exported PDF file.String pdf_confirmpw: Confirms the password of the exported PDF file.int pdf_simulated: Specifies the mode when exporting the report result to a PDF file. It can be simulated_mode andstandard_mode.
Simulated Printing Mode − When you export to PDF, JReport will take the result of the whole report as graphic totraverse the report by the method of simulating printer and generate a PDF file.
Standard Mode − The result of using Standard Mode is the same as the one using Simulated Printing Mode.However, when you export to PDF using Standard Mode, JReport will take the result of the whole report as a dataset to traverse the report by sequence and generate a PDF file.
♦
Texttext_standard: A boolean value. If it is true, the report result will be exported to a standard text file.text_quoteMark: A boolean value. If it is true, fields in the exported text file will be marked with quotation marks. text_header_footer: A boolean value. If it is true, the exported file will contain all headers and footers in the report,including Report Header/Footer, Page Header/Footer and Group Header/Footer. If it is false, the exported file willonly contain data in the Detail section.text_compress: A boolean value. If it is true, there will be no clearance between columns.int text_hDensity: Specifies the value for each unit of the horizontal density between columns. The density of theresult is direct ratio with the value you specified. That is to say, the greater the value is, the smaller the widthbetween columns. The default value is −1.int text_vDensity: Specifies the value for each unit of the vertical density between columns. The density of theresult is direct ratio with the value you specified. That is to say, the greater the value is, the smaller the heightbetween columns. The default value is −1.String text_delimiter: Specifies the delimiter to separate the fields in the exported text file. The default value is “,”.
♦
Excelexcel_is2k: A boolean value. If it is true, and if you set the ExportToXLS property of a page section (Report HeaderSection, Page Header Section, Detail Section, and so on) to False, all the objects in this section will not be
♦
•
JReport DHTML
167
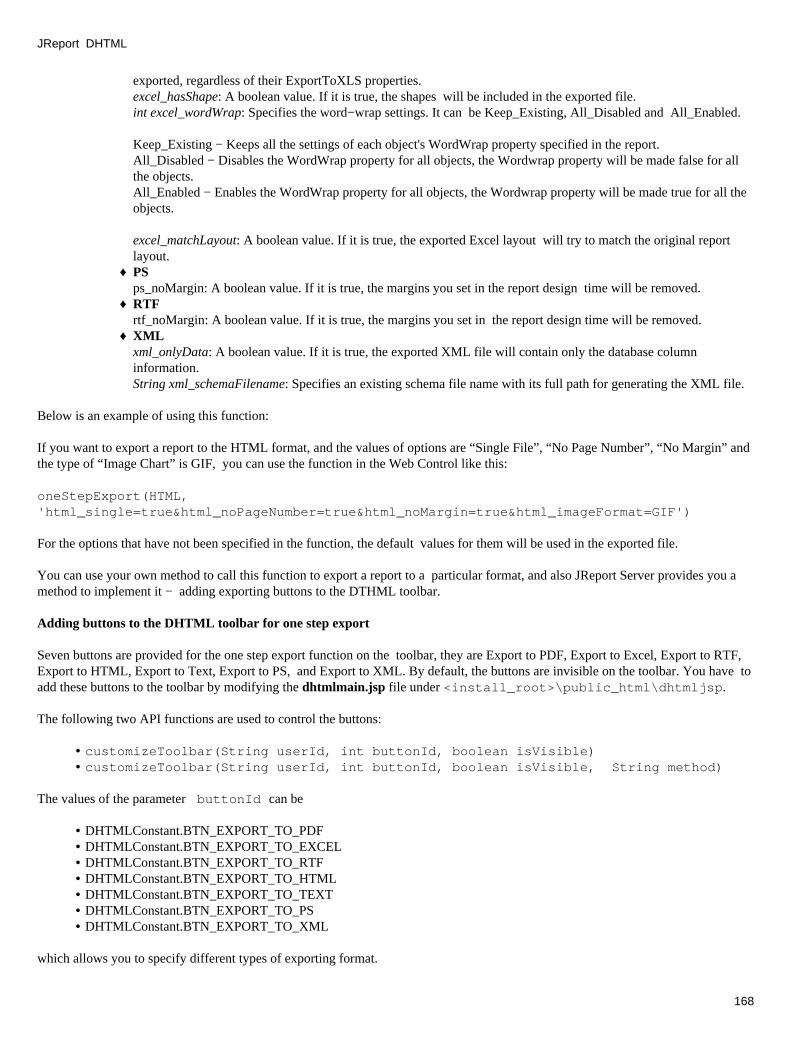
exported, regardless of their ExportToXLS properties.excel_hasShape: A boolean value. If it is true, the shapes will be included in the exported file.int excel_wordWrap: Specifies the word−wrap settings. It can be Keep_Existing, All_Disabled and All_Enabled.
Keep_Existing − Keeps all the settings of each object's WordWrap property specified in the report.All_Disabled − Disables the WordWrap property for all objects, the Wordwrap property will be made false for allthe objects.All_Enabled − Enables the WordWrap property for all objects, the Wordwrap property will be made true for all theobjects.
excel_matchLayout: A boolean value. If it is true, the exported Excel layout will try to match the original reportlayout.PSps_noMargin: A boolean value. If it is true, the margins you set in the report design time will be removed.
♦
RTFrtf_noMargin: A boolean value. If it is true, the margins you set in the report design time will be removed.
♦
XMLxml_onlyData: A boolean value. If it is true, the exported XML file will contain only the database columninformation.String xml_schemaFilename: Specifies an existing schema file name with its full path for generating the XML file.
♦
Below is an example of using this function:
If you want to export a report to the HTML format, and the values of options are “Single File”, “No Page Number”, “No Margin” andthe type of “Image Chart” is GIF, you can use the function in the Web Control like this:
oneStepExport(HTML,'html_single=true&html_noPageNumber=true&html_noMargin=true&html_imageFormat=GIF')
For the options that have not been specified in the function, the default values for them will be used in the exported file.
You can use your own method to call this function to export a report to a particular format, and also JReport Server provides you amethod to implement it − adding exporting buttons to the DTHML toolbar.
Adding buttons to the DHTML toolbar for one step export
Seven buttons are provided for the one step export function on the toolbar, they are Export to PDF, Export to Excel, Export to RTF,Export to HTML, Export to Text, Export to PS, and Export to XML. By default, the buttons are invisible on the toolbar. You have toadd these buttons to the toolbar by modifying the dhtmlmain.jsp file under <install_root>\public_html\dhtmljsp.
The following two API functions are used to control the buttons:
customizeToolbar(String userId, int buttonId, boolean isVisible)• customizeToolbar(String userId, int buttonId, boolean isVisible, String method)•
The values of the parameter buttonId can be
DHTMLConstant.BTN_EXPORT_TO_PDF• DHTMLConstant.BTN_EXPORT_TO_EXCEL• DHTMLConstant.BTN_EXPORT_TO_RTF• DHTMLConstant.BTN_EXPORT_TO_HTML• DHTMLConstant.BTN_EXPORT_TO_TEXT• DHTMLConstant.BTN_EXPORT_TO_PS• DHTMLConstant.BTN_EXPORT_TO_XML•
which allows you to specify different types of exporting format.
JReport DHTML
168
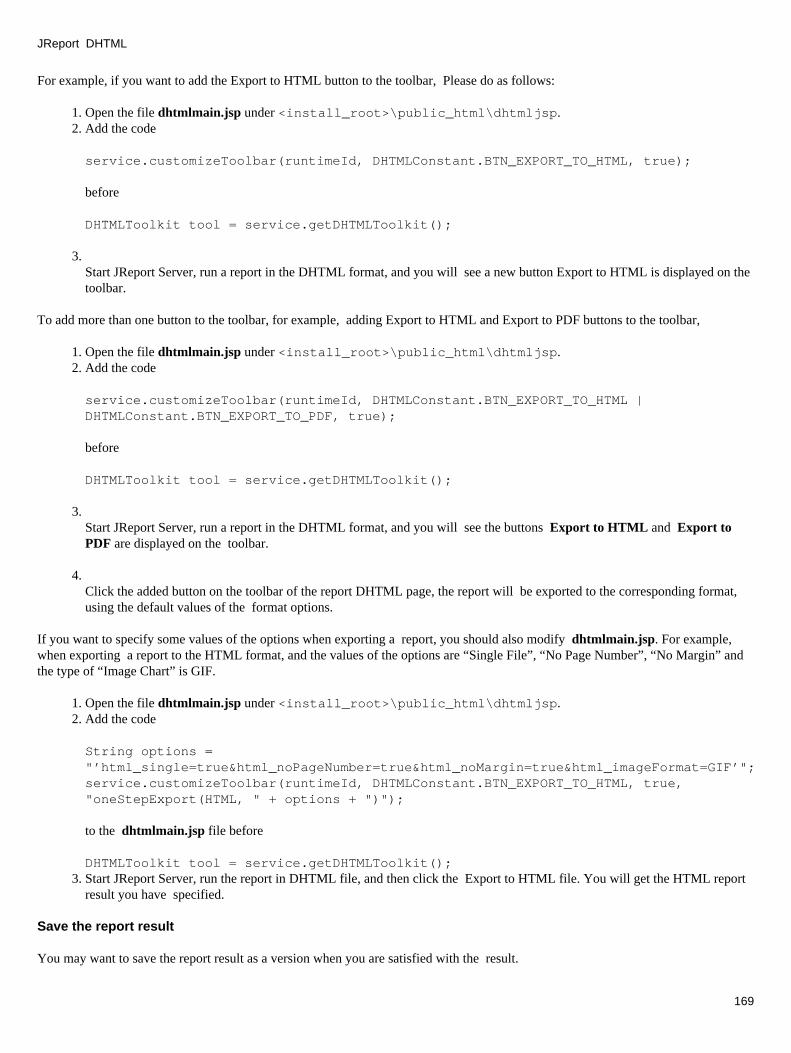
For example, if you want to add the Export to HTML button to the toolbar, Please do as follows:
Open the file dhtmlmain.jsp under <install_root>\public_html\dhtmljsp.1. Add the code
service.customizeToolbar(runtimeId, DHTMLConstant.BTN_EXPORT_TO_HTML, true);
2.
before
DHTMLToolkit tool = service.getDHTMLToolkit();
3. Start JReport Server, run a report in the DHTML format, and you will see a new button Export to HTML is displayed on thetoolbar.
To add more than one button to the toolbar, for example, adding Export to HTML and Export to PDF buttons to the toolbar,
Open the file dhtmlmain.jsp under <install_root>\public_html\dhtmljsp.1. Add the code2.
service.customizeToolbar(runtimeId, DHTMLConstant.BTN_EXPORT_TO_HTML |DHTMLConstant.BTN_EXPORT_TO_PDF, true);
before
DHTMLToolkit tool = service.getDHTMLToolkit();
3. Start JReport Server, run a report in the DHTML format, and you will see the buttons Export to HTML and Export toPDF are displayed on the toolbar.
4. Click the added button on the toolbar of the report DHTML page, the report will be exported to the corresponding format,using the default values of the format options.
If you want to specify some values of the options when exporting a report, you should also modify dhtmlmain.jsp. For example,when exporting a report to the HTML format, and the values of the options are “Single File”, “No Page Number”, “No Margin” andthe type of “Image Chart” is GIF.
Open the file dhtmlmain.jsp under <install_root>\public_html\dhtmljsp.1. Add the code
String options ="’html_single=true&html_noPageNumber=true&html_noMargin=true&html_imageFormat=GIF’"; service.customizeToolbar(runtimeId, DHTMLConstant.BTN_EXPORT_TO_HTML, true,"oneStepExport(HTML, " + options + ")");
to the dhtmlmain.jsp file before
DHTMLToolkit tool = service.getDHTMLToolkit();
2.
Start JReport Server, run the report in DHTML file, and then click the Export to HTML file. You will get the HTML reportresult you have specified.
3.
Save the report result
You may want to save the report result as a version when you are satisfied with the result.
JReport DHTML
169
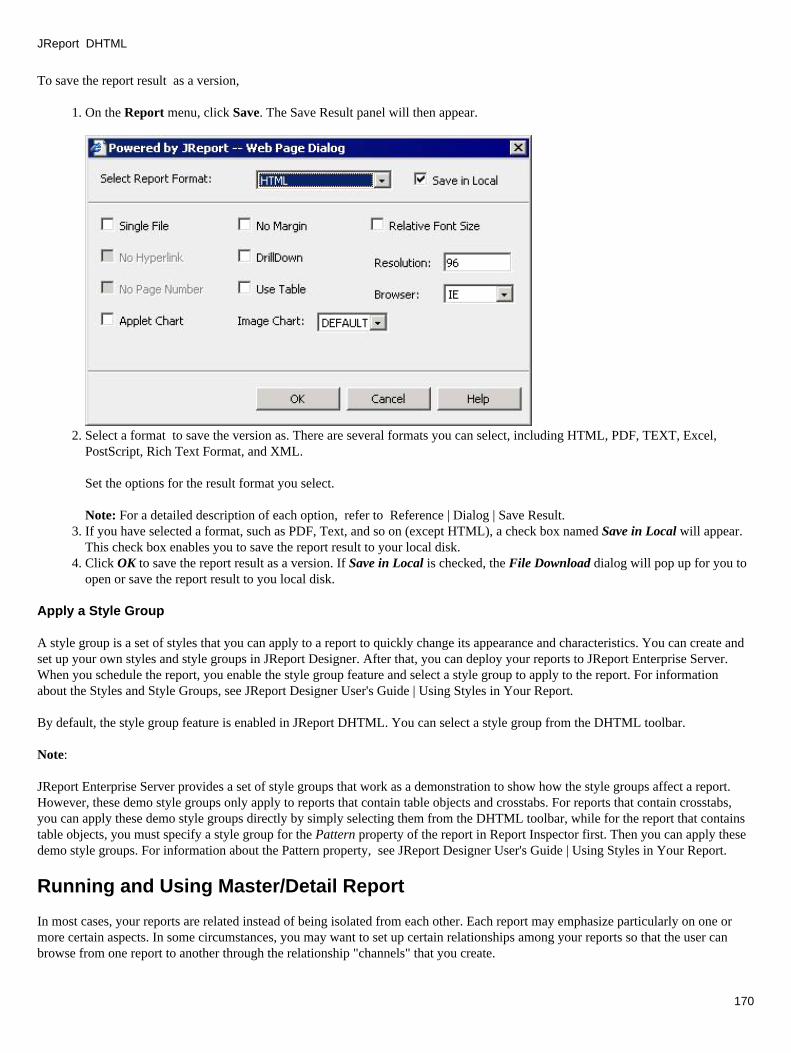
To save the report result as a version,
On the Report menu, click Save. The Save Result panel will then appear.1.
Select a format to save the version as. There are several formats you can select, including HTML, PDF, TEXT, Excel,PostScript, Rich Text Format, and XML.
Set the options for the result format you select.
Note: For a detailed description of each option, refer to Reference | Dialog | Save Result.
2.
If you have selected a format, such as PDF, Text, and so on (except HTML), a check box named Save in Local will appear.This check box enables you to save the report result to your local disk.
3.
Click OK to save the report result as a version. If Save in Local is checked, the File Download dialog will pop up for you toopen or save the report result to you local disk.
4.
Apply a Style Group
A style group is a set of styles that you can apply to a report to quickly change its appearance and characteristics. You can create andset up your own styles and style groups in JReport Designer. After that, you can deploy your reports to JReport Enterprise Server.When you schedule the report, you enable the style group feature and select a style group to apply to the report. For informationabout the Styles and Style Groups, see JReport Designer User's Guide | Using Styles in Your Report.
By default, the style group feature is enabled in JReport DHTML. You can select a style group from the DHTML toolbar.
Note:
JReport Enterprise Server provides a set of style groups that work as a demonstration to show how the style groups affect a report.However, these demo style groups only apply to reports that contain table objects and crosstabs. For reports that contain crosstabs,you can apply these demo style groups directly by simply selecting them from the DHTML toolbar, while for the report that containstable objects, you must specify a style group for the Pattern property of the report in Report Inspector first. Then you can apply thesedemo style groups. For information about the Pattern property, see JReport Designer User's Guide | Using Styles in Your Report.
Running and Using Master/Detail Report
In most cases, your reports are related instead of being isolated from each other. Each report may emphasize particularly on one ormore certain aspects. In some circumstances, you may want to set up certain relationships among your reports so that the user canbrowse from one report to another through the relationship "channels" that you create.
JReport DHTML
170
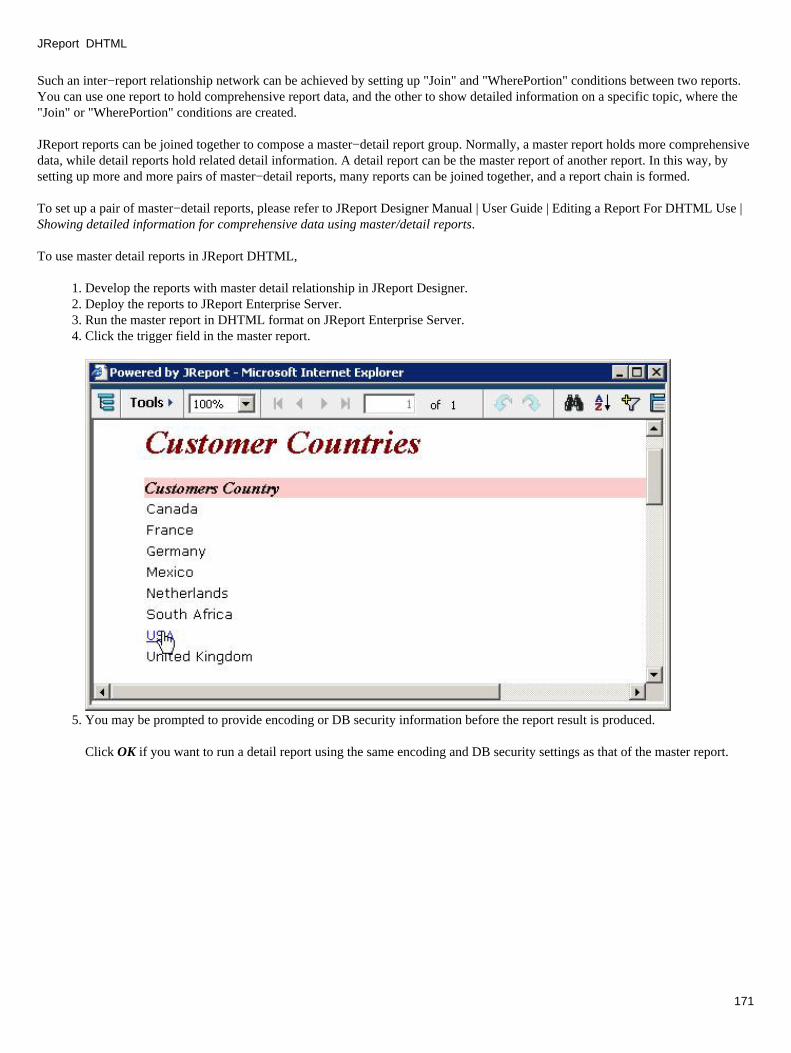
Such an inter−report relationship network can be achieved by setting up "Join" and "WherePortion" conditions between two reports.You can use one report to hold comprehensive report data, and the other to show detailed information on a specific topic, where the"Join" or "WherePortion" conditions are created.
JReport reports can be joined together to compose a master−detail report group. Normally, a master report holds more comprehensivedata, while detail reports hold related detail information. A detail report can be the master report of another report. In this way, bysetting up more and more pairs of master−detail reports, many reports can be joined together, and a report chain is formed.
To set up a pair of master−detail reports, please refer to JReport Designer Manual | User Guide | Editing a Report For DHTML Use |Showing detailed information for comprehensive data using master/detail reports.
To use master detail reports in JReport DHTML,
Develop the reports with master detail relationship in JReport Designer.1. Deploy the reports to JReport Enterprise Server.2. Run the master report in DHTML format on JReport Enterprise Server.3. Click the trigger field in the master report. 4.
You may be prompted to provide encoding or DB security information before the report result is produced.
Click OK if you want to run a detail report using the same encoding and DB security settings as that of the master report.
5.
JReport DHTML
171

The detail report will show only the records in that specific group.6.
Configuring DHTML Features
You can use the DHTML tab to customize DHTML features according to your requirements. If you don't need some of the features,you can turn them off.
To configure DHTML features,
Log on to JReport Enterprise Server using the administration port (8889 by default) or the service port (8888 by default).1. Click Preferences on the top banner, and then click the DHTML tab.2. Check the features you want to keep and clear the features you want to switch off.3. Click Apply when you finish.4.
JReport DHTML
172
For more on this, see JReport Enterprise Server dialogs | The Service (Administration) Pages | Preferences | DHTML.
Tuning DHTML Performance
Limiting the Number of DHTML Reports
Each opened DHTML report holds many resources, whether or not it interacts with server. As a result, many opened reports willdecrease server performance.
You can improve DHTML performance by preventing large numbers of DHTML reports from being opened simultaneously.
To set the maximum number of DHTML reports that can be opened together,
Log on to JReport Enterprise Server using the administration port (8889 by default).1. Click Preferences on the top banner, and then click the DHTML tab.2. Check the Max. No. of Open Reports option and then type a number in the box.3. Click Apply when you finish.4.
Notes:
The Max. No. of Open Reports option controls the maximum number of all the reports open on JReport Server, while theMax. No. of Reports/Session option controls the maximum number of the reports open in one session.
•
The Max. No. of Open Reports option works together with the maximum number of concurrent reports allowed by theproduct license you purchased, and the smaller number is used as the real maximum opened reports limit. For example, ifthe value of the Max. No. of Open Reports option is 10, and the number that the license allows is 20, 10 will be themaximum number of reports that can be open simultaneously. JReport Server uses the smaller number as the maximumnumber of concurrent reports.
•
If the number of opened report exceeds the limit, an error page will be displayed, prompting you to close a report before opening anew report.
For more on this, see JReport Enterprise Server dialogs | The Service (Administration) Pages | Preferences | DHTML.
Action Task Manager
Some of DHTML operations consume a lot of memory space and CPU processing power. The Action Task Manager improvesDHTML service performance by preventing a large number of actions from running simultaneously.
The Action Task Manager coordinates DHTML actions through two fixed−size tables:
Concurrent Processing Table − This registers the requests that are currently being processed by the DHTML service.• Waiting Requests Queue − This registers the requests that are waiting to be processed by the DHTML service.•
Note: Only some operations that consume considerable hardware resources need to be prevented from running at the same time. Youcan define which kind of requests need to be queued before being processed.
JReport DHTML
173
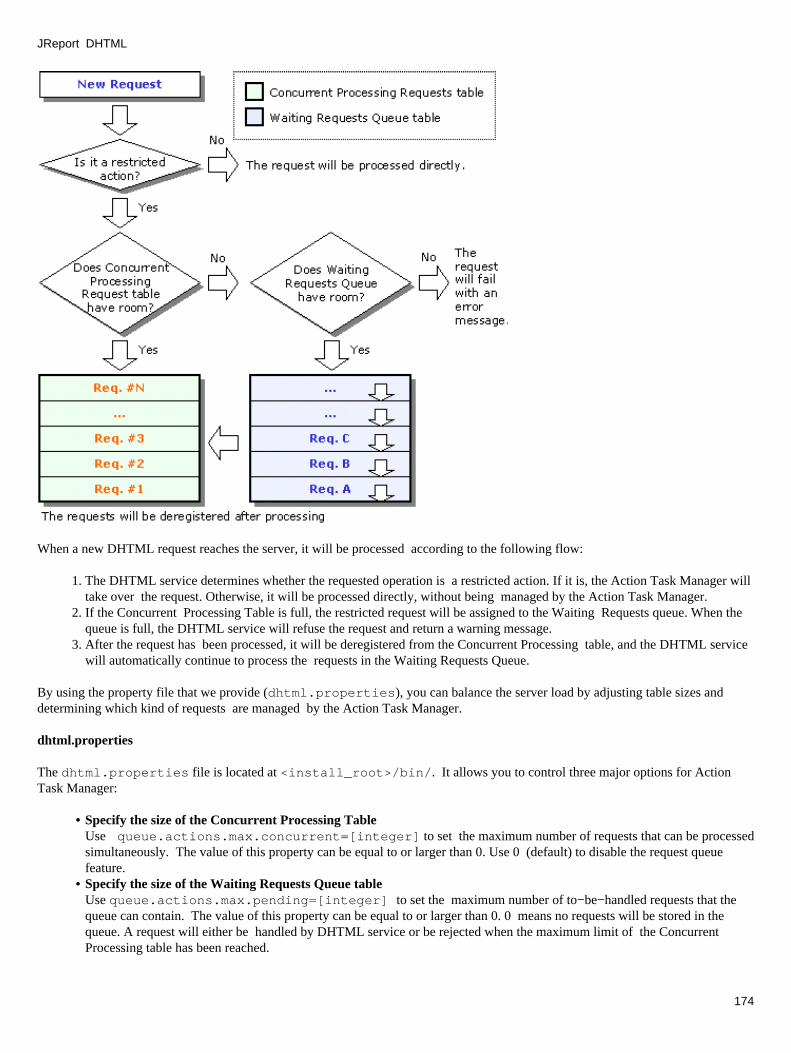
When a new DHTML request reaches the server, it will be processed according to the following flow:
The DHTML service determines whether the requested operation is a restricted action. If it is, the Action Task Manager willtake over the request. Otherwise, it will be processed directly, without being managed by the Action Task Manager.
1.
If the Concurrent Processing Table is full, the restricted request will be assigned to the Waiting Requests queue. When thequeue is full, the DHTML service will refuse the request and return a warning message.
2.
After the request has been processed, it will be deregistered from the Concurrent Processing table, and the DHTML servicewill automatically continue to process the requests in the Waiting Requests Queue.
3.
By using the property file that we provide (dhtml.properties), you can balance the server load by adjusting table sizes anddetermining which kind of requests are managed by the Action Task Manager.
dhtml.properties
The dhtml.properties file is located at <install_root>/bin/. It allows you to control three major options for ActionTask Manager:
Specify the size of the Concurrent Processing TableUse queue.actions.max.concurrent=[integer] to set the maximum number of requests that can be processedsimultaneously. The value of this property can be equal to or larger than 0. Use 0 (default) to disable the request queuefeature.
•
Specify the size of the Waiting Requests Queue tableUse queue.actions.max.pending=[integer] to set the maximum number of to−be−handled requests that thequeue can contain. The value of this property can be equal to or larger than 0. 0 means no requests will be stored in thequeue. A request will either be handled by DHTML service or be rejected when the maximum limit of the ConcurrentProcessing table has been reached.
•
JReport DHTML
174
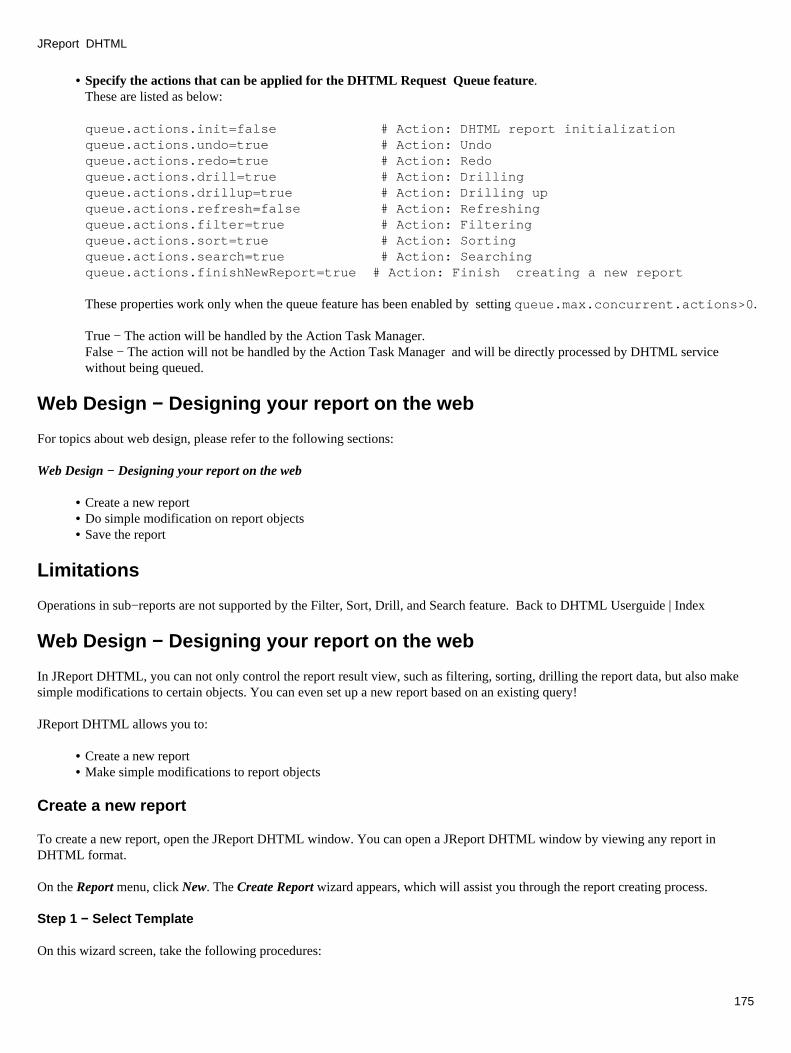
Specify the actions that can be applied for the DHTML Request Queue feature.These are listed as below:
queue.actions.init=false # Action: DHTML report initializationqueue.actions.undo=true # Action: Undoqueue.actions.redo=true # Action: Redoqueue.actions.drill=true # Action: Drillingqueue.actions.drillup=true # Action: Drilling upqueue.actions.refresh=false # Action: Refreshingqueue.actions.filter=true # Action: Filteringqueue.actions.sort=true # Action: Sortingqueue.actions.search=true # Action: Searchingqueue.actions.finishNewReport=true # Action: Finish creating a new report
These properties work only when the queue feature has been enabled by setting queue.max.concurrent.actions>0.
True − The action will be handled by the Action Task Manager.False − The action will not be handled by the Action Task Manager and will be directly processed by DHTML servicewithout being queued.
•
Web Design − Designing your report on the web
For topics about web design, please refer to the following sections:
Web Design − Designing your report on the web
Create a new report• Do simple modification on report objects• Save the report•
Limitations
Operations in sub−reports are not supported by the Filter, Sort, Drill, and Search feature. Back to DHTML Userguide | Index
Web Design − Designing your report on the web
In JReport DHTML, you can not only control the report result view, such as filtering, sorting, drilling the report data, but also makesimple modifications to certain objects. You can even set up a new report based on an existing query!
JReport DHTML allows you to:
Create a new report• Make simple modifications to report objects•
Create a new report
To create a new report, open the JReport DHTML window. You can open a JReport DHTML window by viewing any report inDHTML format.
On the Report menu, click New. The Create Report wizard appears, which will assist you through the report creating process.
Step 1 − Select Template
On this wizard screen, take the following procedures:
JReport DHTML
175
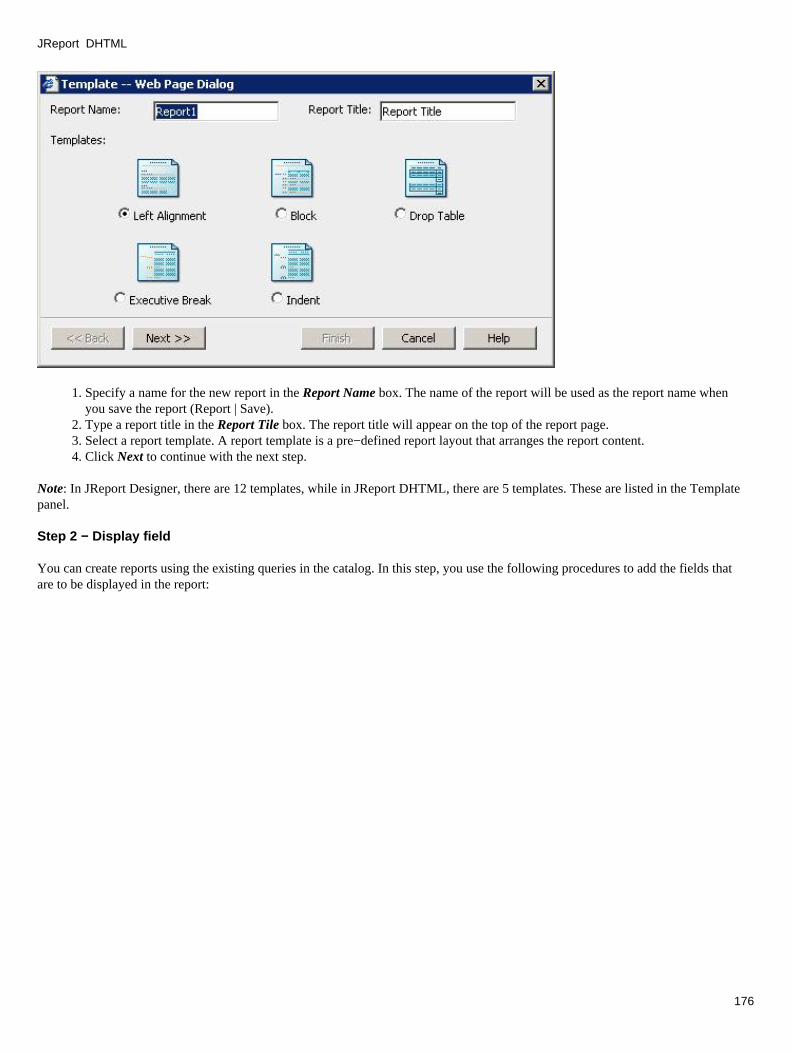
Specify a name for the new report in the Report Name box. The name of the report will be used as the report name whenyou save the report (Report | Save).
1.
Type a report title in the Report Tile box. The report title will appear on the top of the report page. 2. Select a report template. A report template is a pre−defined report layout that arranges the report content.3. Click Next to continue with the next step.4.
Note: In JReport Designer, there are 12 templates, while in JReport DHTML, there are 5 templates. These are listed in the Templatepanel.
Step 2 − Display field
You can create reports using the existing queries in the catalog. In this step, you use the following procedures to add the fields thatare to be displayed in the report:
JReport DHTML
176
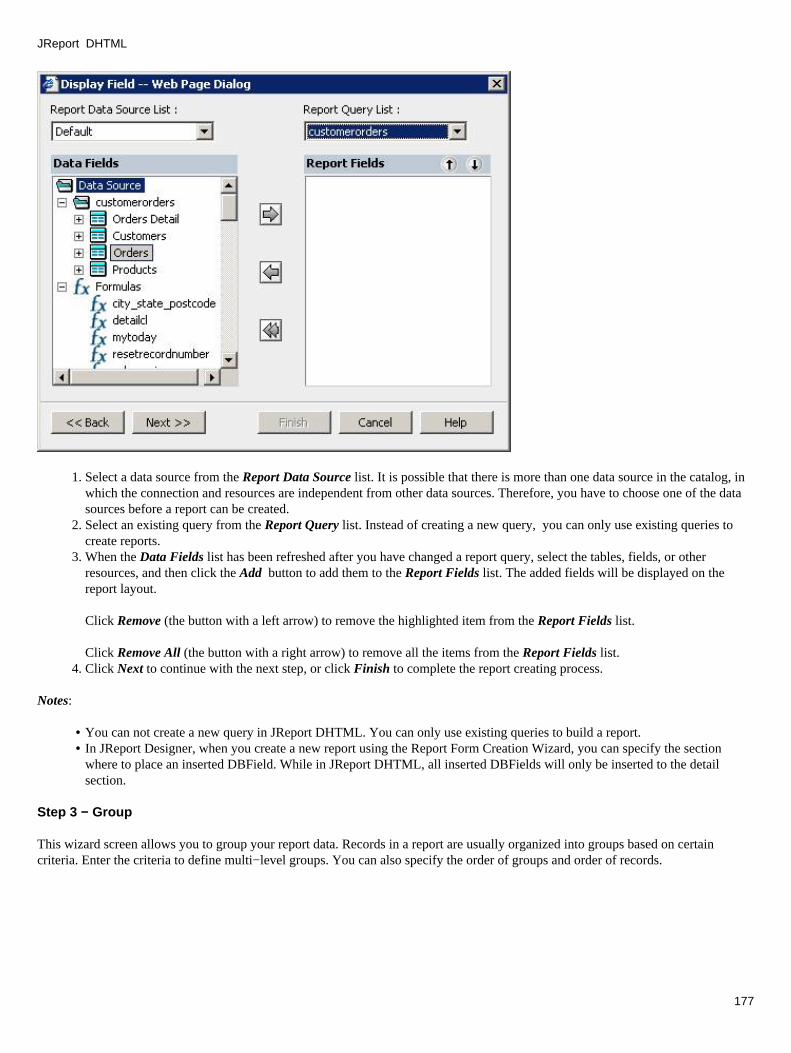
Select a data source from the Report Data Source list. It is possible that there is more than one data source in the catalog, inwhich the connection and resources are independent from other data sources. Therefore, you have to choose one of the datasources before a report can be created.
1.
Select an existing query from the Report Query list. Instead of creating a new query, you can only use existing queries tocreate reports.
2.
When the Data Fields list has been refreshed after you have changed a report query, select the tables, fields, or otherresources, and then click the Add button to add them to the Report Fields list. The added fields will be displayed on thereport layout.
Click Remove (the button with a left arrow) to remove the highlighted item from the Report Fields list.
Click Remove All (the button with a right arrow) to remove all the items from the Report Fields list.
3.
Click Next to continue with the next step, or click Finish to complete the report creating process.4.
Notes:
You can not create a new query in JReport DHTML. You can only use existing queries to build a report.• In JReport Designer, when you create a new report using the Report Form Creation Wizard, you can specify the sectionwhere to place an inserted DBField. While in JReport DHTML, all inserted DBFields will only be inserted to the detailsection.
•
Step 3 − Group
This wizard screen allows you to group your report data. Records in a report are usually organized into groups based on certaincriteria. Enter the criteria to define multi−level groups. You can also specify the order of groups and order of records.
JReport DHTML
177

Select the group by field from the Data Fields list, and then click Add to add it to the Group By list.1. To add more group by fields, repeat step 1. To Remove a certain field from the Group By list, click Remove (the button witha left arrow).
2.
You can change the order of the group by fields by clicking the Move Up button (the button with an upward arrow), or MoveDown button (the button with a downward arrow). The order of the group by fields determines the nested group level, thatis, the top group by field is the outer group, and the bottom group by field is the inner group.
3.
You can also specify the sorting order that the group by field data is arranged by. To do this, pick a sorting order(Ascending, Descending, or No sort) from the Direction drop down list.
4.
If your data type of the group by field you are adding is of Date/Time, you need to specify a special function to determinethe break period of time.
Select an item from the Function drop down list to group the records by each day, each week, each half month, etc: NoneRecords will be grouped by the selected data/time field. All the records that have the same date/time value will bedisplayed together as a group.
♦
for each dayRecords will be grouped by days. The records, of which the field values are in the same day, will be groupedtogether.
♦
for each weekRecords will be grouped by weeks. The records, of which the field values are in the same week, will be groupedtogether.
♦
for each bi−week Records will be grouped by double weeks. The records, of which the field values are in the same bi−week, will begrouped together.
♦
for each half monthRecords will be grouped by half months. The records, of which the field values are in the same half month, will begrouped together.
♦
for each monthRecords will be grouped by months. The records, of which the field values are in the same month, will be groupedtogether.
♦
for each quarterRecords will be grouped by quarters. The records, of which the field values are in the same quarter, will be grouped
♦
5.
JReport DHTML
178
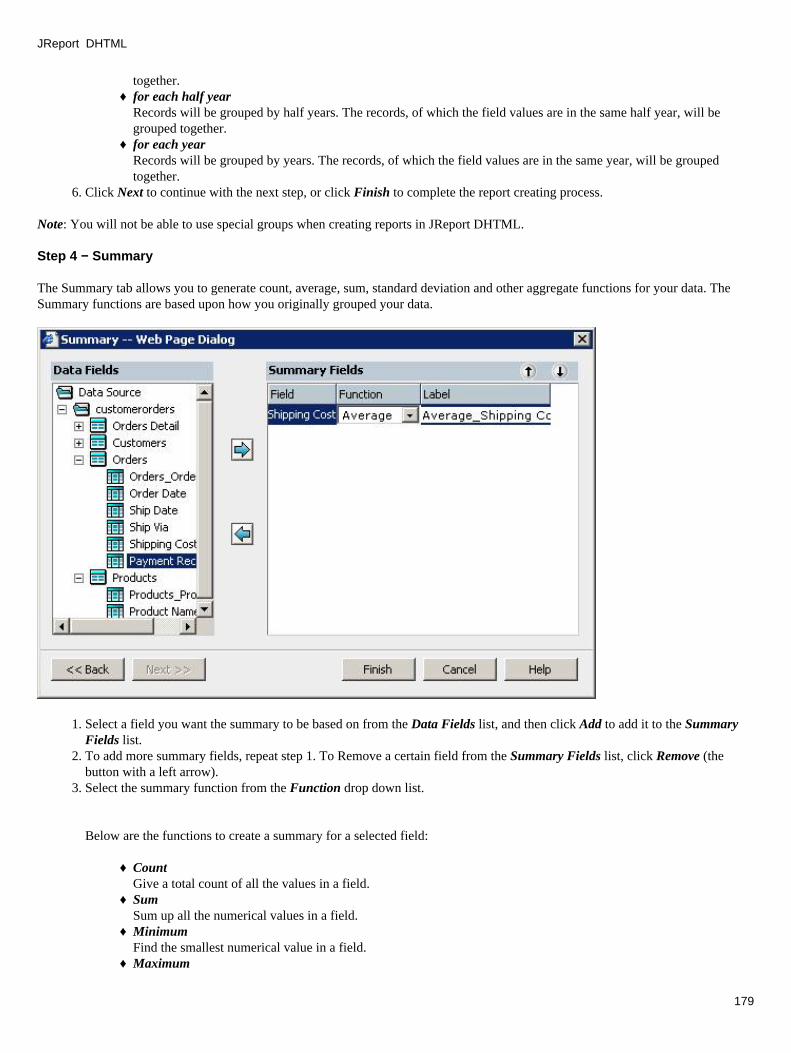
together.for each half yearRecords will be grouped by half years. The records, of which the field values are in the same half year, will begrouped together.
♦
for each yearRecords will be grouped by years. The records, of which the field values are in the same year, will be groupedtogether.
♦
Click Next to continue with the next step, or click Finish to complete the report creating process.6.
Note: You will not be able to use special groups when creating reports in JReport DHTML.
Step 4 − Summary
The Summary tab allows you to generate count, average, sum, standard deviation and other aggregate functions for your data. TheSummary functions are based upon how you originally grouped your data.
Select a field you want the summary to be based on from the Data Fields list, and then click Add to add it to the SummaryFields list.
1.
To add more summary fields, repeat step 1. To Remove a certain field from the Summary Fields list, click Remove (thebutton with a left arrow).
2.
Select the summary function from the Function drop down list.3.
Below are the functions to create a summary for a selected field:
CountGive a total count of all the values in a field.
♦
SumSum up all the numerical values in a field.
♦
MinimumFind the smallest numerical value in a field.
♦
Maximum♦
JReport DHTML
179

Find the largest numerical value in a field. AverageTake the average of all the numerical values in a field.
♦
Distinct CountTake a total count of all the distinct fields in a report.
♦
Population Standard DeviationUse the following equation to compute its value.
♦
Standard DeviationUse the following equation to compute its value.
♦
Population VarianceUse the following equation.
♦
Variance:Use the following equation.
♦
Click Finish to complete the report creating process.4.
Note: Summarizing on formula is not supported in JReport DHTML.
Make simple modifications to report objects
JReport DHTML allows you to make simple modifications to report objects. However, the modifications that can be done aredifferent between the advanced users and the common users.
Common Users
To modify the properties of the objects, such as Label, Cross−tab, Chart, DBField, Formula, Summary, Parameter, Special field, andSection,
Right click on the object, and then select the Properties item on the popup menu.1. Modify the property values on the properties sheet.2.
Advanced Users
Please see the differences below:
JReport DHTML
180
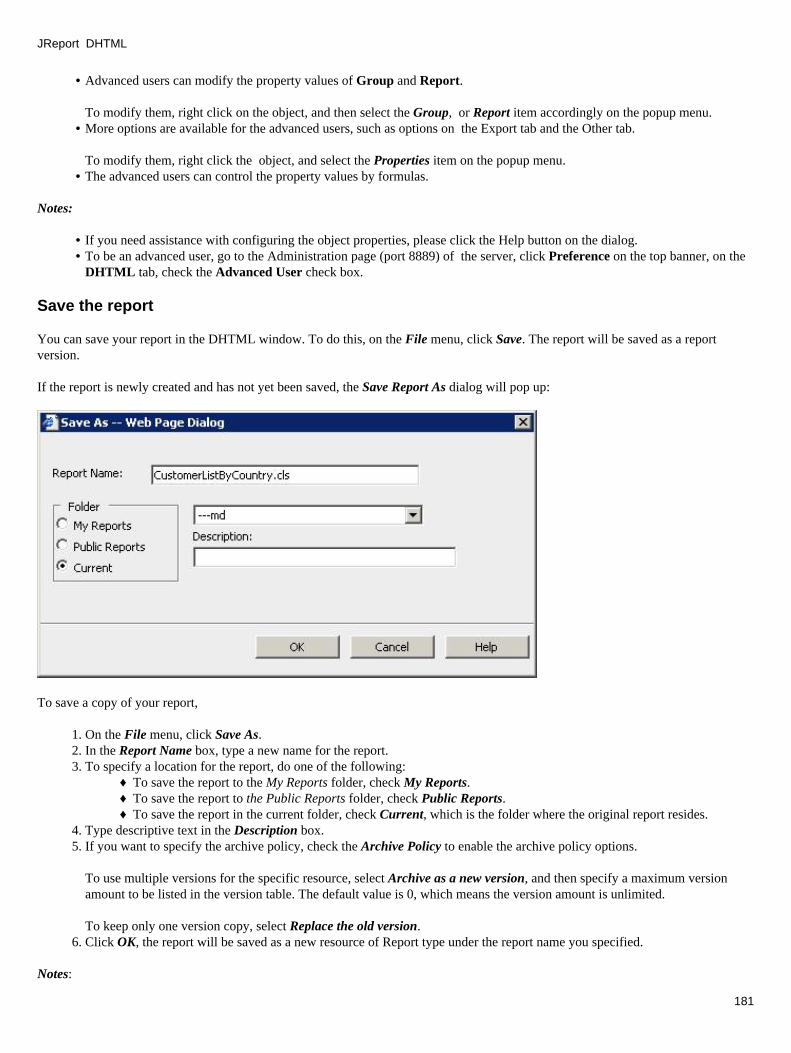
Advanced users can modify the property values of Group and Report.
To modify them, right click on the object, and then select the Group, or Report item accordingly on the popup menu.
•
More options are available for the advanced users, such as options on the Export tab and the Other tab.
To modify them, right click the object, and select the Properties item on the popup menu.
•
The advanced users can control the property values by formulas.•
Notes:
If you need assistance with configuring the object properties, please click the Help button on the dialog.• To be an advanced user, go to the Administration page (port 8889) of the server, click Preference on the top banner, on theDHTML tab, check the Advanced User check box.
•
Save the report
You can save your report in the DHTML window. To do this, on the File menu, click Save. The report will be saved as a reportversion.
If the report is newly created and has not yet been saved, the Save Report As dialog will pop up:
To save a copy of your report,
On the File menu, click Save As.1. In the Report Name box, type a new name for the report. 2. To specify a location for the report, do one of the following:
To save the report to the My Reports folder, check My Reports.♦ To save the report to the Public Reports folder, check Public Reports.♦ To save the report in the current folder, check Current, which is the folder where the original report resides.♦
3.
Type descriptive text in the Description box.4. If you want to specify the archive policy, check the Archive Policy to enable the archive policy options.
To use multiple versions for the specific resource, select Archive as a new version, and then specify a maximum versionamount to be listed in the version table. The default value is 0, which means the version amount is unlimited.
To keep only one version copy, select Replace the old version.
5.
Click OK, the report will be saved as a new resource of Report type under the report name you specified.6.
Notes:
JReport DHTML
181
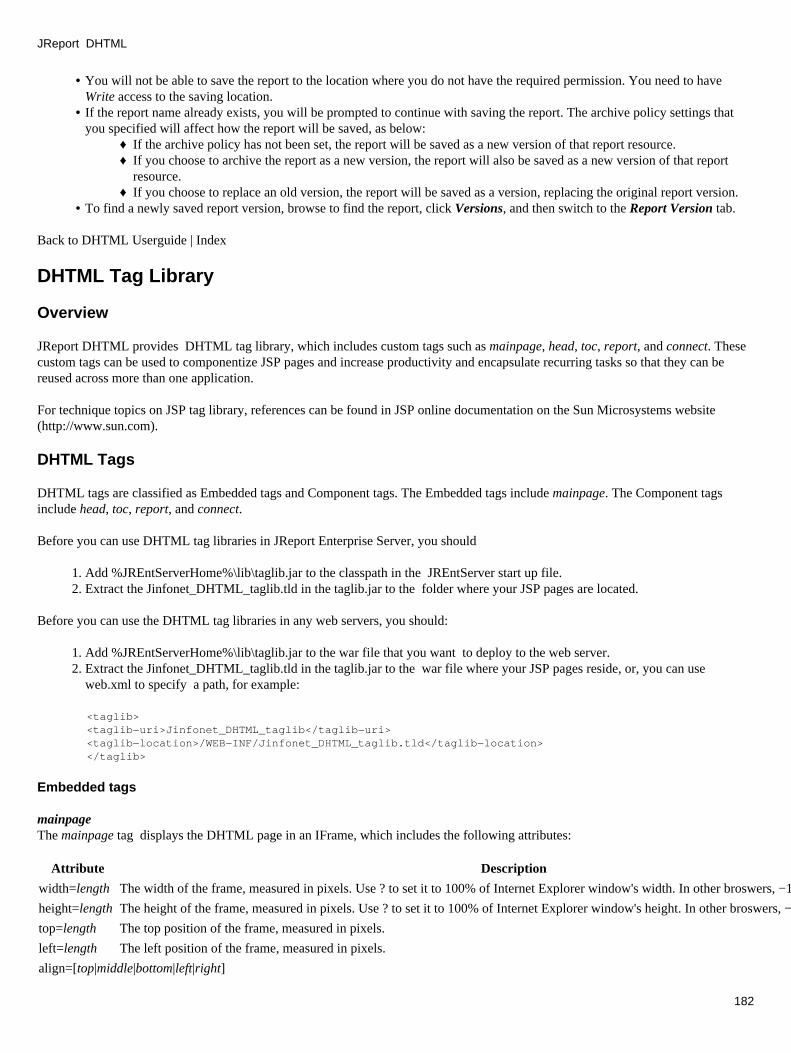
You will not be able to save the report to the location where you do not have the required permission. You need to haveWrite access to the saving location.
•
If the report name already exists, you will be prompted to continue with saving the report. The archive policy settings thatyou specified will affect how the report will be saved, as below:
If the archive policy has not been set, the report will be saved as a new version of that report resource.♦ If you choose to archive the report as a new version, the report will also be saved as a new version of that reportresource.
♦
If you choose to replace an old version, the report will be saved as a version, replacing the original report version.♦
•
To find a newly saved report version, browse to find the report, click Versions, and then switch to the Report Version tab.•
Back to DHTML Userguide | Index
DHTML Tag Library
Overview
JReport DHTML provides DHTML tag library, which includes custom tags such as mainpage, head, toc, report, and connect. Thesecustom tags can be used to componentize JSP pages and increase productivity and encapsulate recurring tasks so that they can bereused across more than one application.
For technique topics on JSP tag library, references can be found in JSP online documentation on the Sun Microsystems website(http://www.sun.com).
DHTML Tags
DHTML tags are classified as Embedded tags and Component tags. The Embedded tags include mainpage. The Component tagsinclude head, toc, report, and connect.
Before you can use DHTML tag libraries in JReport Enterprise Server, you should
Add %JREntServerHome%\lib\taglib.jar to the classpath in the JREntServer start up file.1. Extract the Jinfonet_DHTML_taglib.tld in the taglib.jar to the folder where your JSP pages are located.2.
Before you can use the DHTML tag libraries in any web servers, you should:
Add %JREntServerHome%\lib\taglib.jar to the war file that you want to deploy to the web server.1. Extract the Jinfonet_DHTML_taglib.tld in the taglib.jar to the war file where your JSP pages reside, or, you can useweb.xml to specify a path, for example:
2.
<taglib><taglib−uri>Jinfonet_DHTML_taglib</taglib−uri><taglib−location>/WEB−INF/Jinfonet_DHTML_taglib.tld</taglib−location></taglib>
Embedded tags
mainpageThe mainpage tag displays the DHTML page in an IFrame, which includes the following attributes:
Attribute Description
width=length The width of the frame, measured in pixels. Use ? to set it to 100% of Internet Explorer window's width. In other broswers, −1 means 800 pixels.
height=lengthThe height of the frame, measured in pixels. Use ? to set it to 100% of Internet Explorer window's height. In other broswers, −1 means 600 pixels.
top=length The top position of the frame, measured in pixels.
left=length The left position of the frame, measured in pixels.
align=[top|middle|bottom|left|right]
JReport DHTML
182

Specifies where the frame appears in the browser window.
Top aligns the frame to the top of the browser window. Middle aligns the frame to the middle of the browser window. Bottom aligns the frame tothe left of the browser window. Left aligns the frame to the left of the browser window. Right aligns the frame to the right of the browser window.
frameborder=[1|0]Specifies whether the frame border is shown. Use 1 to show the frame border, or use 0 to hide it.
marginwidth=pixelsSpecifies the left margin and right margin for the frame, measured in pixels, where margin is the space between the frame and the frame border.
marginheight=pixelsSpecifies the top margin and bottom margin for the frame, measured in pixels, where margin is the space between the frame and the frame border.
id−string Specifies the ID of the frame.
name−string Specifies the frame name.
src=uri
Specifies the URI of the frame, which is the URI of the report that you want to display.For example, src="/dhtmljsp/tagmainpage.jsp?jrs.cmd=jrs.web_vw&jrs.report=/hsqlDemo/Crosstab.cls&jrs.catalog=/hsqlDemo/Tutorial.cat&jrs.result_type=8".Note: If you want to get the dialog for inputting parameters, you should call JREntServer's JSP.For example, src=="/jinfonet/tryView.jsp?jrs.cmd=jrs.try_vw&jrs.report=/hsqlDemo/Crosstab.cls&jrs.catalog=/hsqlDemo/Tutorial.cat&jrs.result_type=8".
Example Code for Embedded Tags:
<%@ taglib uri="Jinfonet_DHTML_taglib.tld" prefix="jinfonet" %><!DOCTYPE HTML PUBLIC "−//W3C//DTD HTML 4.01 Transitional//EN"><html><head><title>JReport DHTML</title></head><BODY><jinfonet:mainpage width="1500" height="1500" top="100" left="100" frameborder="1" marginwidth="10" marginheight="10" id="1" name="MyName" src="/dhtmljsp/tagmainpage.jsp?jrs.cmd=jrs.web_vw&jrs.report=/hsqlDemo/Invoice.cls&jrs.catalog=/hsqlDemo/Tutorial.cat&jrs.result_type=8"/></BODY></HTML>
Component tags
headThe head tag is a common tag, which includes required information for the toc, connect and report tag. It is required when you usethe toc, connect and report tag.
This tag must be put between <head> and </head> where you have embedded the web page. You must attach the javascriptevent "onmouseup", "oncontextmenu", "onmousemove", "onresize" and "onload" to the <body> tag in which you embed web page.
The usage is as below:
<HTML><HEAD><TITLE>Tag Libraries</TITLE><jinfonet:head /></HEAD><BODY onmouseup=vsplitbarup(event); oncontextmenu="return false;" onmousemove=resetTimmer();vsplitbarmove(event); onresize=doResize(); onload="tagonload()">?
<jinfonet:connect/><jinfonet:report top="20" left="150" width="800" height="725" isVisible="yes" bgcolor="#FFFFFF" />
JReport DHTML
183

<jinfonet:toc top="30" left="20" width="150" height="600" isVisible="yes" bgcolor="#FFFFFF" />?
</BODY></HTML>
toc
The toc tag is for DHTML toc browser. The connect tag is required if you use the toc tag in web page.
Attribute Description
width=lengthThe width of the TOC browser, measured in pixels. Use −1 to set it to 100% ofInternet Explorer window's width. In other broswers, −1 means 150 pixels.
height=lengthThe height of the TOC browser, measured in pixels. Use −1 to set it to 100% ofInternet Explorer window's height. In other broswers, −1 means 600 pixels.
top=length The top position of the TOC browser, measured in pixels.
left=length The left position of the TOC browser, measured in pixels.
isVisible=[yes|no] Specifies whether the TOC browser's is shown.
bgcolor=Color The background color of the TOC browser.
reportThe report tag is for DHTML report browser.
Attribute Description
width=lengthThe width of the report browser, measured in pixels. Use −1 to set it to 100% ofInternet Explorer window's width. In other broswers, −1 means 650 pixels.
height=lengthThe height of the report browser, measured in pixels. Use −1 to set it to 100% ofInternet Explorer window's height. In other broswers, −1 means 600 pixels.
top=length The top position of the report browser, measured in pixels.
left=length The left position of the report browser, measured in pixels.
isVisible=[yes|no] Specifies whether the report browser's is shown.
bgcolor=Color The background color of the report browser.
connectThe connect tag is for the connect panel of DHTML, which contacts the server.
Attribute Description
width=lengthThe width of the connect panel, measured in pixels. Use −1 to set it to 100% of thebrowser window's width.
height=lengthThe height of the connect panel, measured in pixels. Use −1 to set it to 100% of thebrowser window's height.
top=length The top position of the connect panel, measured in pixels.
left=length The left position of the connect panel, measured in pixels.
Index
JReport DHTML API
The DHTML API is a set of java programming interfaces, which allow you customize the DHTML feature of JReport Enterprise
JReport DHTML
184

Server; so that you can conveniently use the JReport DHTML feature (completely or partially) in your product.
Installation
DHTML API is a part of server API.
When you install JReport Enterprise Server, JReport Server API (including DHTML API) will be installed as well. After installation,you should have the following components under %JREntServerHome%:
lib\JRESServlets.jarlib\JREngine.jarlib\servlet.jarlib\hsqldb.jar (since v5.2, this file must be included)
Server API classes are stored in the archive files − JRESServlets.jar.
You need to set the CLASSPATH environment variable before you compile and run the program. Append the following string toyour CLASSPATH starting the Server API:
For server:%JREntServerHome%\lib\JRESServlets.jar;%JREntServerHome%\lib\JREngine.jar;%JREntServerHome%\lib\servlet.jar;
For DHTML, please also include:%JREntServerHome%\lib\JRWebDesign.jar;
Packages
The DHTML API consists of the following packages:
jet.web.dhtml ..........Contains some interfaces of JReport DHTML, with which you can conveniently use JReport DHTMLfeature in your product, completely or partially.
Main Interfaces and Classes
jet.web.dhtml.DHtmlAPIProvides the major API interface. With DHTML API, you can easily embed the DHTML page or components into the JSPsthemselves.
•
jet.web.dhtml.DHTMLToolkitProvides a set of methods with which you can generate DHTML actions, elements, objects, and components.
•
jet.web.dhtml.SimpleDHtmlAPIThis interface provides the same fundamental functions as jet.web.dhtml.DHtmlAPI; however, some methods thatare not suitable for RMI use are removed from this interface, and some methods are modified to meet the RMI requirement.Generally speaking, this class is provided mainly for RMI use and all the methods in this interface can be invoked by remoteserver (RMI).
Notes:
•
Before using the setter methods that need not pass a ID value, you must call setIgnoreServerSetting(booleanb) and set it to true.
•
Since version 7 build 723 sp1, multi−report running in one session is supported, consequently the session id is insufficientfor you to get a specific report. Therefore, the runtimeId is provided (the report runtime id), which can be used to get aspecific report. To be compatible with early versions, we also allow you to get a report by session id, if you use session id toopen more than one report, only the last opened report can work normally. Using session id to open multiple report is notrecommended.
•
JReport DHTML
185
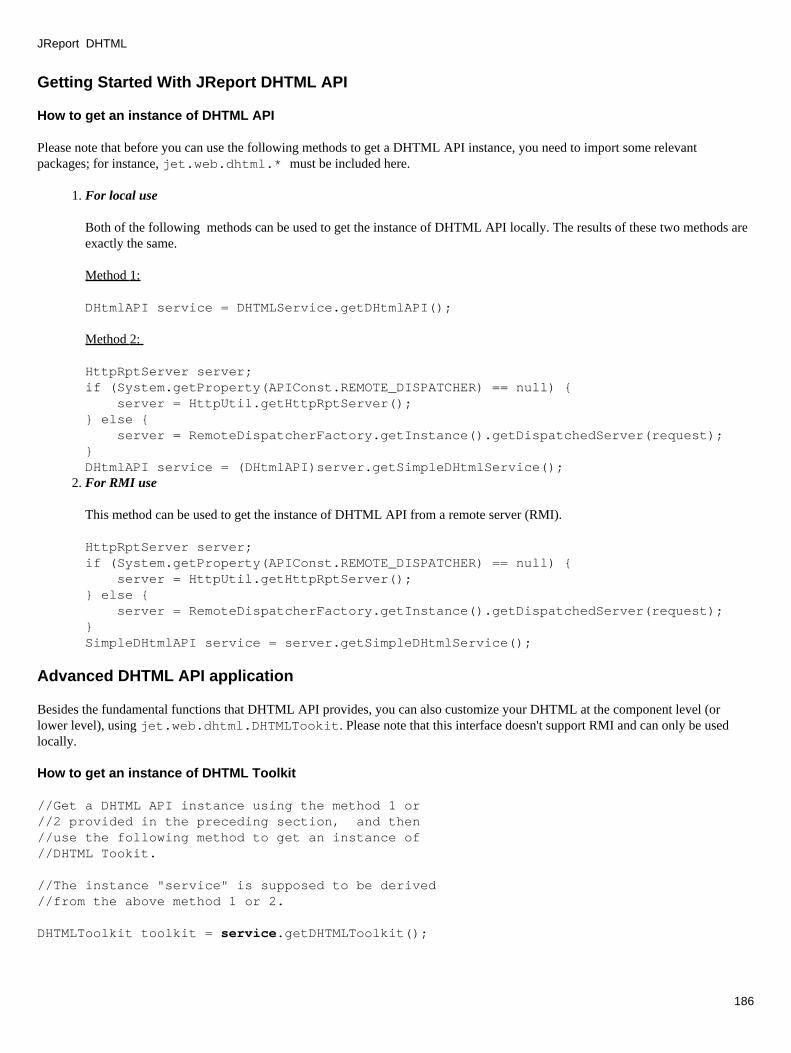
Getting Started With JReport DHTML API
How to get an instance of DHTML API
Please note that before you can use the following methods to get a DHTML API instance, you need to import some relevantpackages; for instance, jet.web.dhtml.* must be included here.
For local use
Both of the following methods can be used to get the instance of DHTML API locally. The results of these two methods areexactly the same.
Method 1:
DHtmlAPI service = DHTMLService.getDHtmlAPI();
Method 2:
HttpRptServer server;if (System.getProperty(APIConst.REMOTE_DISPATCHER) == null) { server = HttpUtil.getHttpRptServer(); } else { server = RemoteDispatcherFactory.getInstance().getDispatchedServer(request);}DHtmlAPI service = (DHtmlAPI)server.getSimpleDHtmlService();
1.
For RMI use
This method can be used to get the instance of DHTML API from a remote server (RMI).
HttpRptServer server;if (System.getProperty(APIConst.REMOTE_DISPATCHER) == null) { server = HttpUtil.getHttpRptServer(); } else { server = RemoteDispatcherFactory.getInstance().getDispatchedServer(request);}SimpleDHtmlAPI service = server.getSimpleDHtmlService();
2.
Advanced DHTML API application
Besides the fundamental functions that DHTML API provides, you can also customize your DHTML at the component level (orlower level), using jet.web.dhtml.DHTMLTookit. Please note that this interface doesn't support RMI and can only be usedlocally.
How to get an instance of DHTML Toolkit
//Get a DHTML API instance using the method 1 or //2 provided in the preceding section, and then //use the following method to get an instance of //DHTML Tookit.
//The instance "service" is supposed to be derived //from the above method 1 or 2.
DHTMLToolkit toolkit = service.getDHTMLToolkit();
JReport DHTML
186

Use DHTML Toolkit to customize your DHTML
Component Customization
<% try { //Gets DHTML API instance and DHTMLToolkit instance. DHtmlAPI service = DHTMLService.getDHtmlAPI(); DHTMLToolkit toolkit=service.getDHTMLToolkit(); String id=service.getUserID(request);
String[][] js={{"dialog.js", "skinjs"},{"DHTML.js", null},{"dmpage.js",null},{"connect.js", null},{"DHTMLapi.js",null},{"dragOverlayer.js",null},{"tree.js",null},{"util.js",null},{"layout.js",null}}; String[][] css={{"dialog.css","skincss"},{"classic.css",null},{"ie.css",null}};
//The two parameters "null" must be set, otherwise //the customization will not take effect.
toolkit.setLayoutFunction(null,null);
//You can also use getMainPage() as a substitute //of the following two lines of code. //Gets the content of DHTML header. response.getWriter().write(toolkit.getHeader("Header","GBK",null,js,css).toString());
//For print, this method must be called. response.getWriter().write(toolkit.getPrintObject("",0).toString());
//Gets the content of DHTML mainpage body. response.getWriter().write(toolkit.getBody("",0,0,"#FF0000",0,"initOPCount(6)","","",id).toString()); //Gets the content of DHTML connect frame. response.getWriter().write(toolkit.getConnectFrame(id,"",0,0,0,720,1).toString());
//Gets the content of DHTML menu. response.getWriter().write(toolkit.getMenu(id, "", 0, 60).toString()); //Gets the content of DHTML navigation bar. response.getWriter().write(toolkit.getNavibar(id, "", 0, 20).toString()); //Gets the content of DHTML Toolbar. response.getWriter().write(toolkit.getToolbar(id, "", 0, 40) .toString()); //Gets the content of DHTML user information panel. service.setUserbarVisible(id, true); response.getWriter().write(toolkit.getUserbar(id, "", 0, 90).toString()); //Gets the content of DHTML Sort Panel. response.getWriter().write(toolkit.getSortPanel(id, "", 0, 0, 160, 900,20).toString()); //Gets the content of DHTML Filter Panel. response.getWriter().write(toolkit.getFilterPanel(id, "", 0, 0, 200, 900,20).toString()); //Gets the content of DHTML Table Of Content. service.setTocVisible(id, true); response.getWriter().write(toolkit.getTOCBrowser(id, "", 0, 10, 110, 150,
1.
JReport DHTML
187
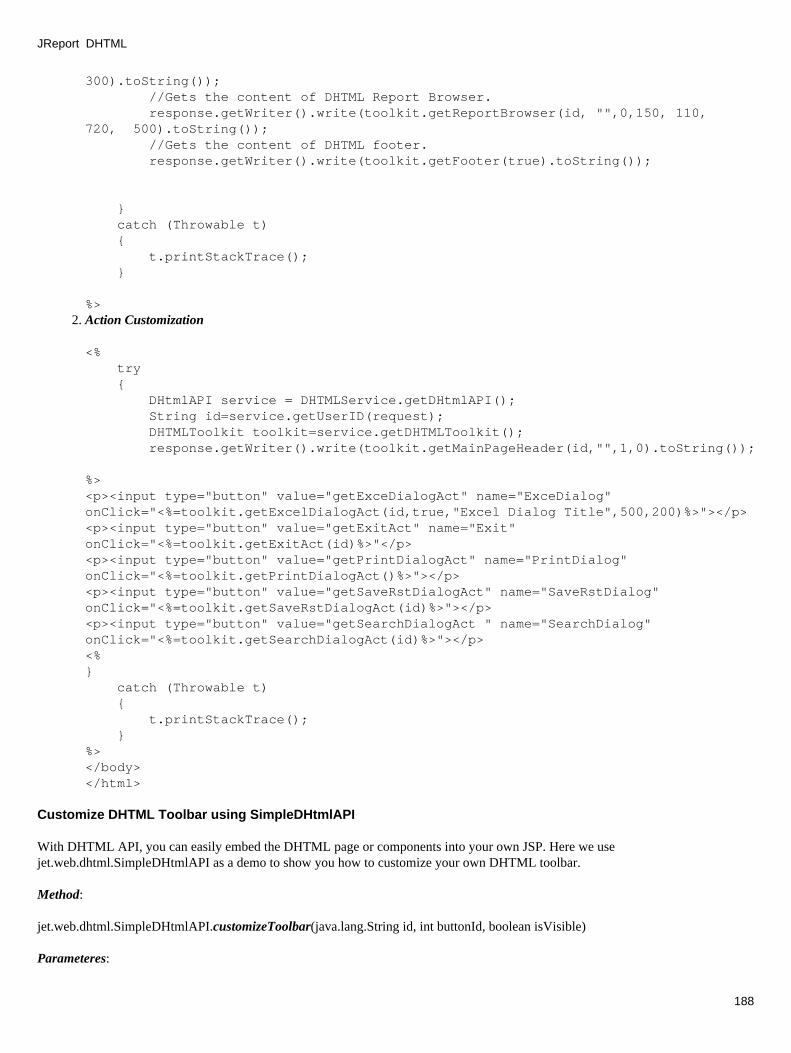
300).toString()); //Gets the content of DHTML Report Browser. response.getWriter().write(toolkit.getReportBrowser(id, "",0,150, 110,720, 500).toString()); //Gets the content of DHTML footer. response.getWriter().write(toolkit.getFooter(true).toString());
} catch (Throwable t) { t.printStackTrace(); }
%>Action Customization
<% try { DHtmlAPI service = DHTMLService.getDHtmlAPI(); String id=service.getUserID(request); DHTMLToolkit toolkit=service.getDHTMLToolkit(); response.getWriter().write(toolkit.getMainPageHeader(id,"",1,0).toString());
%><p><input type="button" value="getExceDialogAct" name="ExceDialog"onClick="<%=toolkit.getExcelDialogAct(id,true,"Excel Dialog Title",500,200)%>"></p><p><input type="button" value="getExitAct" name="Exit"onClick="<%=toolkit.getExitAct(id)%>"</p><p><input type="button" value="getPrintDialogAct" name="PrintDialog"onClick="<%=toolkit.getPrintDialogAct()%>"></p><p><input type="button" value="getSaveRstDialogAct" name="SaveRstDialog"onClick="<%=toolkit.getSaveRstDialogAct(id)%>"></p><p><input type="button" value="getSearchDialogAct " name="SearchDialog"onClick="<%=toolkit.getSearchDialogAct(id)%>"></p><% } catch (Throwable t) { t.printStackTrace(); } %></body></html>
2.
Customize DHTML Toolbar using SimpleDHtmlAPI
With DHTML API, you can easily embed the DHTML page or components into your own JSP. Here we usejet.web.dhtml.SimpleDHtmlAPI as a demo to show you how to customize your own DHTML toolbar.
Method:
jet.web.dhtml.SimpleDHtmlAPI.customizeToolbar(java.lang.String id, int buttonId, boolean isVisible)
Parameteres:
JReport DHTML
188
id−
Can be the report runtime ID or the user session ID. When it is the user session ID, the method will affect both all openedreports in session and the following ones. when it is the report runtime ID, it only affects the report specified by thisruntime ID.
buttonId−
The buttonId constant for the toolbar. The buttonId argument is an integer bitmask that can beDHTMLConstant.BTN_UNDO, DHTMLConstant.BTN_REDO, DHTMLConstant.BTN_SEARCH,DHTMLConstant.BTN_PREVIOUS_SEARCH, DHTMLConstant.BTN_NEXT_SEARCH,DHTMLConstant.BTN_FILTER, DHTMLConstant.BTN_SORT, DHTMLConstant.BTN_SAVE,DHTMLConstant.BTN_PRINT, DHTMLConstant.BTN_REFRESH, DHTMLConstant.BTN_RESET,DHTMLConstant.BTN_EXIT, DHTMLConstant.BTN_HELP, and DHTMLConstant.BTN_ALL, or a bitwise union ofthem (for example, DHTMLConstant.BTN_UNDO | DHTMLConstant.BTN_REDO)
isVisible− True if the buttons are visible
Examples:
//Gets an instance of SimpleDHtmlAPI ServiceSimpleDHtmlAPI service = server.getSimpleDHtmlService();//Gets report runtime IDString runtimeId = request.getParameter("rptId");//By default, all toolbar buttons will be shown on DHTML toolbar, unless you set them invisible. The following code hides//the buttons: Search, Previous Search, Next Search, Filter, Sort, Save, Print, Refresh, and Reset.//Keep in mind that the customizeToolbar method changes only the toolbar appearance,//if you want to enable a function, you can use service.setXXXEnabled() method.service.customizeToolbar(runtimeId, DHTMLConstant.BTN_SEARCH, false);service.customizeToolbar(runtimeId, DHTMLConstant.BTN_PREVIOUS_SEARCH, false);service.customizeToolbar(runtimeId, DHTMLConstant.BTN_NEXT_SEARCH, false);service.customizeToolbar(runtimeId, DHTMLConstant.BTN_FILTER, false);service.customizeToolbar(runtimeId, DHTMLConstant.BTN_SORT, false);service.customizeToolbar(runtimeId, DHTMLConstant.BTN_SAVE, false);service.customizeToolbar(runtimeId, DHTMLConstant.BTN_PRINT, false);service.customizeToolbar(runtimeId, DHTMLConstant.BTN_REFRESH, false); service.customizeToolbar(runtimeId, DHTMLConstant.BTN_RESET, false);//For example, use the following code to disable the SAVE feature.service.setSaveEnabled(runtimeId, false);
For more information on this topic, you can check out Javadoc.
API Demos
Additional References
Refer to JREntServer Java Doc for DHTML API Specifications.•
Index
Running Multiple Reports in One Session in JReport DHTML
Overview
You can open multiple reports in a DHTML window in one session. This means that each time when you run a DHTML report, itwill be opened in a new window. Also, when working in the embedded mode, you can assign frames to the reports, so that more thanone DHTML report can be viewed in one window at the same time.
The following diagram shows the architecture of the DHTML service:
JReport DHTML
189
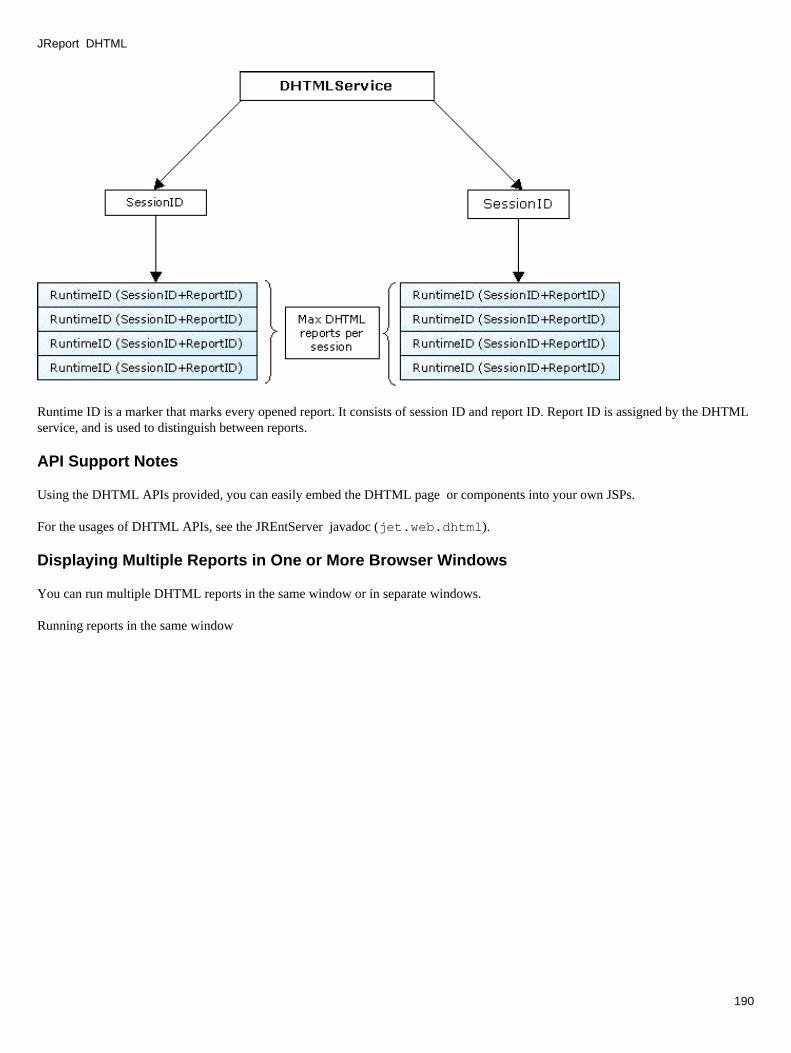
Runtime ID is a marker that marks every opened report. It consists of session ID and report ID. Report ID is assigned by the DHTMLservice, and is used to distinguish between reports.
API Support Notes
Using the DHTML APIs provided, you can easily embed the DHTML page or components into your own JSPs.
For the usages of DHTML APIs, see the JREntServer javadoc (jet.web.dhtml).
Displaying Multiple Reports in One or More Browser Windows
You can run multiple DHTML reports in the same window or in separate windows.
Running reports in the same window
JReport DHTML
190
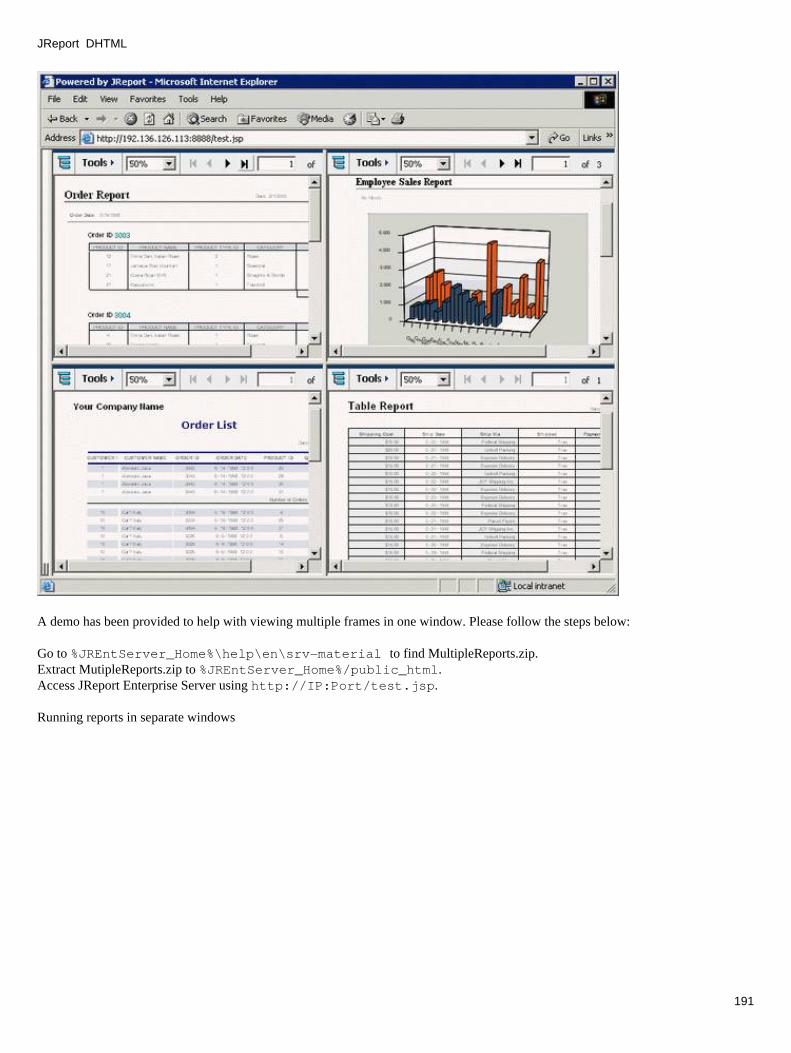
A demo has been provided to help with viewing multiple frames in one window. Please follow the steps below:
Go to %JREntServer_Home%\help\en\srv−material to find MultipleReports.zip. Extract MutipleReports.zip to %JREntServer_Home%/public_html. Access JReport Enterprise Server using http://IP:Port/test.jsp.
Running reports in separate windows
JReport DHTML
191
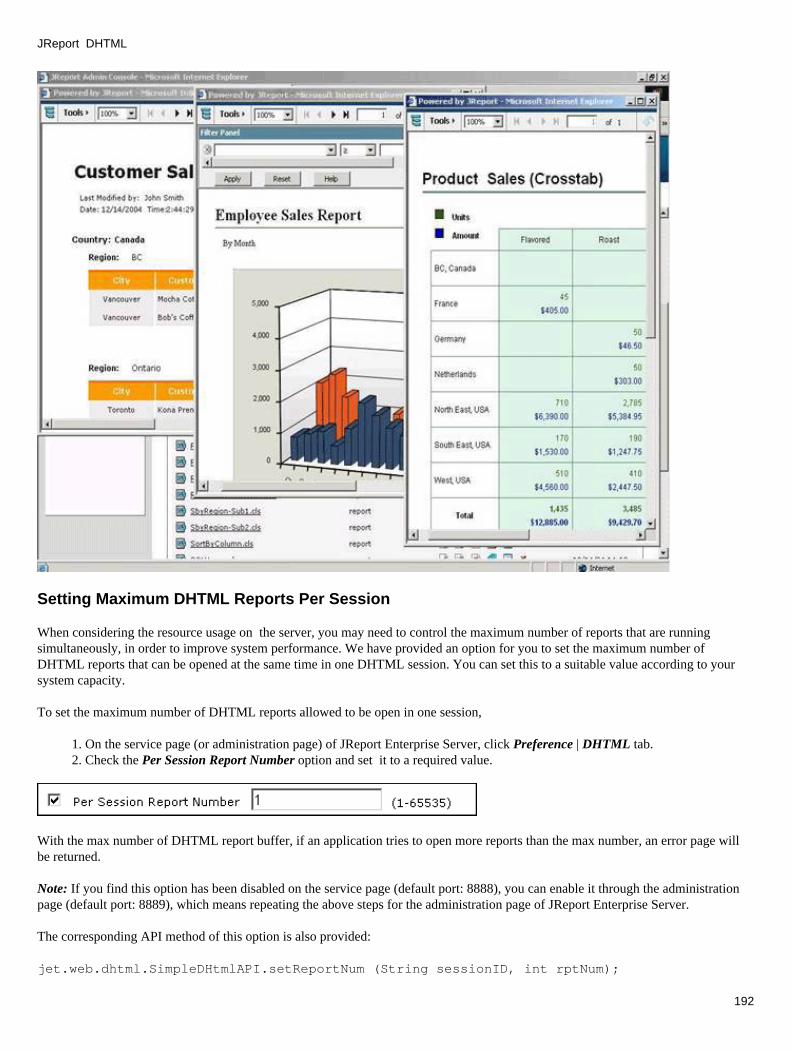
Setting Maximum DHTML Reports Per Session
When considering the resource usage on the server, you may need to control the maximum number of reports that are runningsimultaneously, in order to improve system performance. We have provided an option for you to set the maximum number ofDHTML reports that can be opened at the same time in one DHTML session. You can set this to a suitable value according to yoursystem capacity.
To set the maximum number of DHTML reports allowed to be open in one session,
On the service page (or administration page) of JReport Enterprise Server, click Preference | DHTML tab.1. Check the Per Session Report Number option and set it to a required value.2.
With the max number of DHTML report buffer, if an application tries to open more reports than the max number, an error page willbe returned.
Note: If you find this option has been disabled on the service page (default port: 8888), you can enable it through the administrationpage (default port: 8889), which means repeating the above steps for the administration page of JReport Enterprise Server.
The corresponding API method of this option is also provided:
jet.web.dhtml.SimpleDHtmlAPI.setReportNum (String sessionID, int rptNum);
JReport DHTML
192

Setting Report Buffer Timeout
Even web applications can use the close method to close a report buffer specifically, sometimes, it still cannot make sure thatend−users will be always remembering to click on Close button to close the report. JReport Enterprise Server provides you with anoption to set a report buffer fade−out time, with which the server will automatically close the report buffer when the timeout periodhas been reached.
To set the report buffer timeout,
On the service page (or administration page) of JReport Enterprise Server, click Preference | DHTML tab.1. Check the Report Buffer Timeout option and set it to a required value.2.
Note: If you find that this option has been disabled on the service page (default port: 8888), you can enable it through theadministration page (default port: 8889), which means repeating the above steps for the administration page of JReport EnterpriseServer.
The corresponding API method of this option is also provided:
jet.web.dhtml.SimpleDHtmlAPI.setReportTimeout(String sessionID, int time);jet.web.dhtml.SimpleDHtmlAPI.getReportTimeout(String sessionID);
Close DHTML report buffer
A DHTML API to close a report buffer on the server is provided as the following:
jet.web.dhtml.SimpleDHtmlAPI.closeDHTMLReport (String sessionID, String reportID)
With the close method, an application can actively manipulate the report buffers to keep itself working with a good performance.
Running Multiple Reports using URLs
In order to support multiple DHTML reports per session, more than one DHTML reports will be buffered in one session by theDHTML service. Each report buffer is identified with a unique report ID.
Report ID is a unique string that works as a KEY of the Hashtable (java) to get the real DHTML report buffer. Each report ID isnamed when the DHTML report is executed:
http://host:port/dhtmljsp/dhtml.jsp?jrs.report=/hsqlDemo/invoice.cls&jrs.cata log=/hsqlDemo/Tutorial.cat&jrs.path=/test/invoice.cls& jrs.report_id=report1
report1 is a variable assigned by the user. This value can have any name. If a report ID is already used in the current session, the server will drop the running report from session and rename the new reportwith this name. The report id should not include nonlicet characters: " − ", " _ ", " = ", " ' ", " " ", " . "
Notes:
If you want to run multiple reports in one DHTML session, you must make sure that each report ID is unique in the session.If you open more than one report using the same report ID, only the last opened report will work normally.
•
If you do not set the report ID, it will automatically be assigned by the JReport DHTML servlet.•
Index
JReport DHTML
193
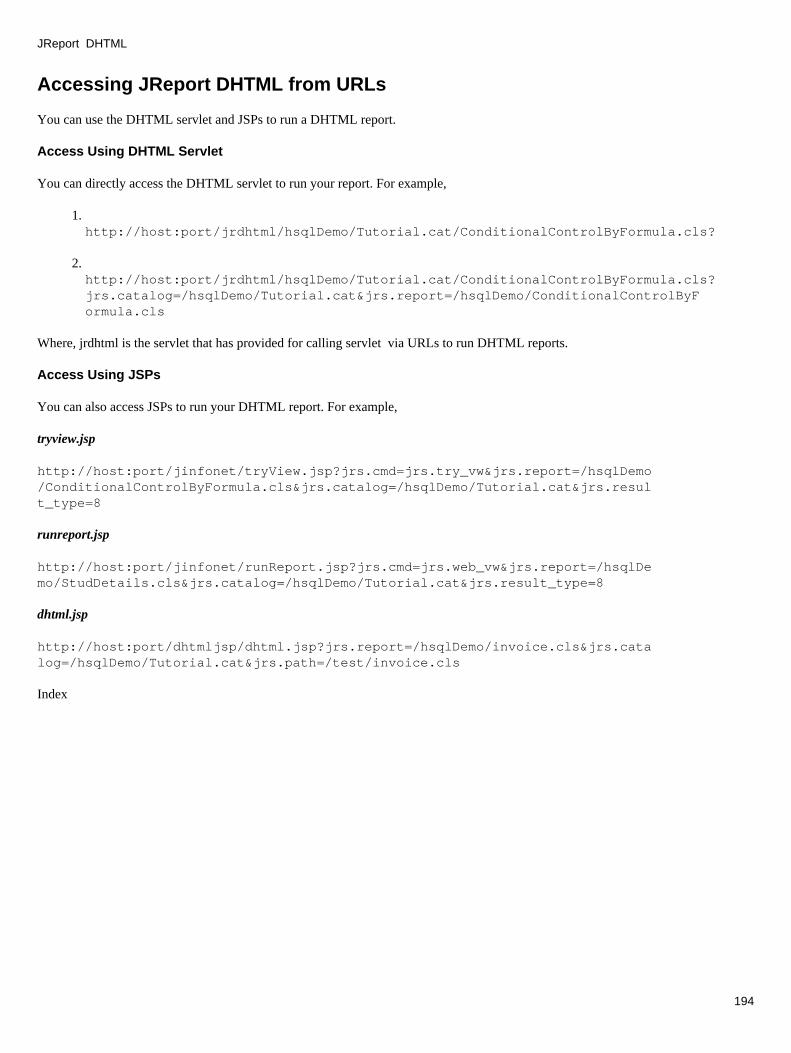
Accessing JReport DHTML from URLs
You can use the DHTML servlet and JSPs to run a DHTML report.
Access Using DHTML Servlet
You can directly access the DHTML servlet to run your report. For example,
1. http://host:port/jrdhtml/hsqlDemo/Tutorial.cat/ConditionalControlByFormula.cls?
2. http://host:port/jrdhtml/hsqlDemo/Tutorial.cat/ConditionalControlByFormula.cls? jrs.catalog=/hsqlDemo/Tutorial.cat&jrs.report=/hsqlDemo/ConditionalControlByF ormula.cls
Where, jrdhtml is the servlet that has provided for calling servlet via URLs to run DHTML reports.
Access Using JSPs
You can also access JSPs to run your DHTML report. For example,
tryview.jsp
http://host:port/jinfonet/tryView.jsp?jrs.cmd=jrs.try_vw&jrs.report=/hsqlDemo /ConditionalControlByFormula.cls&jrs.catalog=/hsqlDemo/Tutorial.cat&jrs.resul t_type=8
runreport.jsp
http://host:port/jinfonet/runReport.jsp?jrs.cmd=jrs.web_vw&jrs.report=/hsqlDe mo/StudDetails.cls&jrs.catalog=/hsqlDemo/Tutorial.cat&jrs.result_type=8
dhtml.jsp
http://host:port/dhtmljsp/dhtml.jsp?jrs.report=/hsqlDemo/invoice.cls&jrs.cata log=/hsqlDemo/Tutorial.cat&jrs.path=/test/invoice.cls
Index
JReport DHTML
194

JReport Enterprise Server Cluster
Cluster Overview
A JReport Enterprise Server Cluster is a group of servers that work together to provide cluster−wide shared resource, security,schedule and version services. There will be one admin server, one or more backup servers, and one or more slave servers in aJReport Enterprise Server Cluster.
JReport Enterprise Server Cluster provides the following major features:
Manageability: All users and resources can be controlled from a central place, remotely. • High−Availability: When one server fails to perform, the tasks running on it will be reallocated to other servers. If oneserver has already been fully utilized, the tasks sent to it will be allocated to other servers.
•
Scalability: You can add or remove servers dynamically according to your requirement. •
Infrastructure
There can be three roles in a JReport Enterprise Server Cluster, such as admin server, backup server, and slave server.
Each server has its own responsibility. You can set a server to play a specific role in a JReport Enterprise Server Cluster byconfiguring its properties. The following list shows all the tasks each server in the server cluster can complete.
Business tasks Administrative tasks
RunReports
SubmitScheduled Tasks
Load−BalancingFail−overLoad−BalancingAdministration
SecurityAdministration
ResourceAdministration
AdminServer
Y Y Y Y Y Y Y
BackupServer
Y Y Y Y − − −
195

SlaveServer
Y Y Y − − − −
Admin Server
There should be one and only one admin server in a JReport Enterprise Server Cluster. In a JReport Enterprise Server Cluster, adminserver maintains the shared resources and perform security administrative tasks. Admin server automatically detects the overloadedmember servers and repartition tasks among all servers in the JReport Enterprise Server Cluster. You can monitor and administrateall the servers in the cluster using the admin server.
Backup Server
There should be at least one backup server in a JReport Enterprise Server Cluster. If the current admin server is shut down or breaksdown, the backup server with the highest priority in the cluster will promote itself to be an admin server and take over all theadministrative tasks.
Slave Server
There can be none or several slave servers in a JReport Enterprise Server Cluster. On a slave server, you can accomplish the task suchas run a report, or submit a scheduled tasks. Slave servers can receive tasks directly from users or from the admin server. When thenumber of concurrent reports that running on a server is equal to the number of concurrent reports that is permitted by its license, theserver will inform admin server. If another task is submitted on this server, it will be sent to admin server and admin serverreallocates it to other server.
JReport Enterprise Server Cluster Features
This chapter describes the main features of JReport Enterprise Server Cluster. Some of these features are also available on API.
Administrating Security and Resources Centrally
In a cluster, users can accomplish all administrative tasks from a central place: the admin server.
When logging on to the cluster from the admin server as an administrator, there are some security administrative tasks that you cancomplete:
Create, remove and edit users, groups, realms, protections and ACLs.• Edit resource nodes and sub−resource nodes. Add reachable virtual resource nodes.• Customize the default page appearance for users.•
Load−Balancing
Here are the benefits for deploying load−balancing in JReport Enterprise Server Cluster.
Automatically allocates tasks to suitable servers according to their current load and performance.• Makes sure all of the servers in the cluster are fully utilized.• Automatically rebalances the network load when there are one server be added or removed.•
Load−balancing process
When a server in a cluster receives a view task or a scheduled task, it will send a load balancing request to admin server. Theonly difference between these two types of task is that, for the view task the first server will be treated as local server whilefor the scheduled task admin server will be treated as local server.
1.
Admin server selects a server in the cluster according to the load−balancing settings, and then sends IP address of theselected cluster server to the first server.
2.
The first server sends the task to the selected server.3.
JReport Enterprise Server Cluster
196

Note:
The load−balancer can be bypassed if you prefer in some circumstances, you can directly specify a server in the cluster to perform ascheduled task or advanced−run task.
For information on how to specify a server manually instead of using the load−balancing feature for a task, please see
JREntServer Dialogs | The Service Pages | Advanced Run | Format • JREntServer Dialogs | The Service Pages | Schedule | Report•
For how to enable or disable this feature, see
EntServer Dialogs | The Service Pages | Preferences | Customize•
Session−level and Component−level load−balancing
When JReport Enterprise Server Cluster is integrated into a web server, it will support session−level and component−levelload−balancing.
Load Balancing for Clustered Servers
Build−in load balancing algorithm
JReport Enterprise Server Clusters support several algorithms for load balancing clustered servers. Configurable algorithms for loadbalancing clustered servers are:
Round RobinAdmin server will check each server in a circle one by one, and allocates the task to a server whose number of concurrentlyrunning reports is less than the number of concurrent reports that is permitted by its license.
1.
Least Concurrent Reports (Min−load)Firstly, admin server will select all cluster servers whose number of concurrently running reports is less than the number ofconcurrent reports that is permitted by their license, and then among those servers, select the one that has the least number ofconcurrently running reports. If the local server is one of the qualified servers, it will be given high priority.
2.
Weighted Least Concurrent Reports (Weighted Min−load)Firstly, admin server will select all cluster servers whose number of concurrently running reports is less than the number ofconcurrent reports that is permitted by their license, and then among those servers, select the one that has the least Weightednumber of concurrently running reports. If the local server is one of the qualified servers, it will be given high priority.
Reference Note: For more details about Performance weight, please refer to User's Guide | JReport Enterprise ServerCluster | Cluster Weight
3.
RandomBesides the first three load balancing algorithms, JReport Enterprise Server also supports randomly allocating tasks.
4.
Note: You can choose the load balancing type by setting the property loadbalance.type in the server.properties file(%JREntServerInstallRoot%\bin).
Customizable load balancing based on the API
Users can write their own load−balancing based on the API included in JReport Enterprise Server. Please note that if you setload−balancing with API, it will take effect in place of other build−in load balance algorithms that you have set.
JReport Enterprise Server Cluster
197

Load Balancer API Demo: We provide you with a demo (DemoLoadBalancer.java) to illustrate how to customize load balancingusing APIs.
Suppose that your server has been configured to be an admin server, and you have several clustered servers.
Please take the following steps:
Download DemoLoadBalancer.java from Jinfonet website.1. Compile this file. Before you compile this file, please add JRESServlets.jar to the classpath.2.
Add DemoLoadBalancer.class to the classpath in JREntServer.bat.3. In server.properties, set loadbalance.custom_class=DemoLoadBalancer (if there is no such property entry, add one). Or, inthe command line set −Dloadbalance.custom_class=DemoLoadBalancer.
4.
Launch JREntServer.bat, the customized loadbalancer DemoLoadBalancer will be applied.5. Submit some tasks to run, you will find that these tasks are randomly allocated to the clustered servers.6.
Reference Note: For more details, please refer to JReport Javadoc jet.server.api.cluster.LoadBalancer Interface.
Failover
Only one admin server takes charge of a cluster, we can make some servers in the cluster run as backup servers.
JReport Enterprise Server Cluster guards against the following failures:
Member server failure: All tasks running previously on this server will be reallocated to other servers.• Admin server failure: The backup server with the highest priority will be promoted to an admin server, and it will take overall administrative tasks in the cluster. All tasks running previously on the admin server will be reallocated to other servers.When the previous admin server recovers, it will join to the cluster automatically either as a backup server or a slave server,which depends on your settings.
•
Public Storage
You can use a disk (disk array) on a computer that does not play a role in a cluster as shared disk. All the temporary files and resultfiles will be stored in this disk and they can be accessed from the servers in the cluster. This can improve the performance in runningreports.
Here are the resources that can be stored in the shared disk:
Temp DirectoryWhen viewing reports from any server in the JReport Enterprise Server Cluster, some temporary files will be generated. Allthe temporary files will be saved in the temp directory.
•
History DirectoryWhen publishing reports to versioning system from any server in the JReport Enterprise Server Cluster, all result files willbe saved in the history directory.
•
Index
Setting up a JReport Enterprise Server Cluster
This section introduces the explanations and the steps for setting up a JReport Enterprise Server Cluster, which assumes that you havethe general idea of the infrastructure of JReport Enterprise Server Cluster and knows the roles and functions of the clustered servers,such as admin server, backup server, and slave server.
JReport Enterprise Server Cluster
198

Preparation
To set up a JReport Enterprise Server Cluster, you must determine the following factors:
• How many servers will be included in the cluster?The maximum number of servers will be unlimited so long as you install JReport Enterprise Server with the license key forcluster.
• Which server will run as the admin server?There should be one and only one admin server in a JReport Enterprise Server Cluster.
• Whether a backup server is needed in the cluster?With at least one backup server in the cluster, you can reduce the risk that the whole cluster is interrupted or crashes down.
• Whether the shared disk feature will be used in the cluster?Using the shared disk in your cluster will improve the performance in running reports.
License
JReport Enterprise Server Cluster uses different license from other licenses you use for JReport Enterprise Server. When installingJReport Enterprise server to run in a JReport Enterprise Server Cluster, you should use the special license key only for JReportEnterprise Server Cluster. Please contact JReport sales to get the special license key for cluster.
Setting up the Cluster
The setup process of JReport Enterprise Server Cluster falls into the following procedures:
Set up the shared disk (disk array).Skip this step if you do not want a shared disk.
1.
Install JReport Enterprise Server on every target computer that will join the cluster, using the appropriate license key forcluster.
2.
Configure the clustered servers individually.You should configure each server one by one respectively, start from admin server, then backup servers, and finally theslave servers.
3.
Notes:
All servers in a JReport cluster should be set up on one platform.• To use the old result files under the %installroot%\history, install the new JReport Enterprise Server to the same directorywith a new license key, overriding the existing program files.
•
Set up the shared disk
Shared DiskJReport Enterprise Server Cluster needs a place to store some files generated or needed when the cluster is functioning, such astemporary files, result files, history files, resource information files, and so on. To accomplish this goal, you can use a shared disk,which can be one of any network disks (or directories) that can be accessed by the servers in the cluster. The shared disk shares acommon drive letter on all clustered servers.
Since the shared disk is actually a mapped network disk (or directory) with a common drive letter on all clustered servers, you haveto map the shared network disk (or directory) on each machine individually.
JReport Enterprise Server Cluster
199

To set up a shared disk,
Share the disk (or directory) that you want to use as a shared disk, which can be on any computer in the network, so that thisdisk (or directory) can be mapped to a drive letter by the clustered server. A reliable and stable system is recommended forthe shared disk (or directory), because a lot of file−accessing operations will take place on the shared disk (or directory).
1.
On each clustered server, map the shared directory to a drive letter. Please keep in mind that all the mapped drive lettersshould be the same among the clustered servers. If K, for example, is used as the drive letter for the mapped drive, all theservers in the cluster should use K as the drive letter for the mapped drive as well.
Tip:To map a network drive, open a My Computer window, on the Tools menu, click Map Network Drive.
2.
Install JReport Enterprise Server
On each computer that will join the cluster, install JReport Enterprise Server using the appropriate license key for cluster. Forinstructions on installing JReport Enterprise Server, see User Guide | Installing and Launching JReport Enterprise Server.
modify the properties in the Administration pages,
Launch JReport Enterprise Server on admin server. In the address bar of the IE browser, type: http://localhost:8889.1. Click Configuration, Click the Cluster tab.2. Check the Admin Server option, to indicate that this server will run as the admin server in the cluster.3. In the Admin Server's HostName box, type the IP of the admin server, or localhost.4. Specify port numbers for the Admin Server's RMI Port box (1129 by default) and the Server's RMI Port box (1130 bydefault).
5.
Specify the paths of the shared directories on the shared disk (mapped network drive), such as shared properties directory,shared realm directory, shared resource root directory, shared temporary directory, and shared history directory.
6.
Shut down JReport Enterprise Server on the admin server. 7.
To modify the properties in the server.properties files,
Launch JReport Enterprise Server on admin server for the very first time, and then shut it down.1. Open the server.properties file created by JReport Enterprise Server under %JREntServerHome%\bin.2. Modify the properties file as below.
cluster.admin.host=localhostSpecify the IP address or hostname of the admin server.
cluster.admin.rmi.port=1129Specify the admin RMI (remote method invocation) port. The default value is 1129.
cluster.local.rmi.port=1130Specify the RMI port that will be used by the backup and slave server. The default value is 1130.
cluster.server.admin=trueSpecify whether the server is the admin server. The default value is true.
cluster.server.backup=falseSpecify whether the server is a backup server. The default value is false.
loadbalance=booleanSpecify whether to enable the load−balancing feature. The default value is true.
loadbalance.type=integerSpecify the load−balancing algorithm type.
3.
Value Description
JReport Enterprise Server Cluster
200
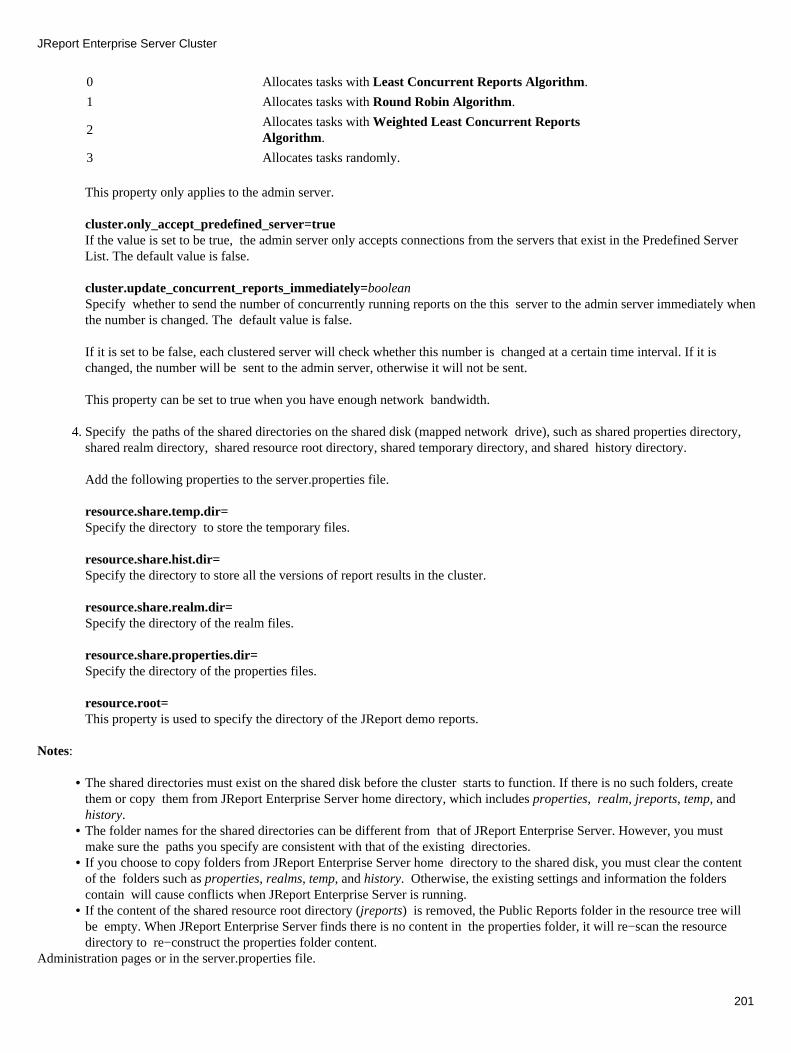
0 Allocates tasks with Least Concurrent Reports Algorithm.
1 Allocates tasks with Round Robin Algorithm.
2Allocates tasks with Weighted Least Concurrent ReportsAlgorithm.
3 Allocates tasks randomly.
This property only applies to the admin server.
cluster.only_accept_predefined_server=trueIf the value is set to be true, the admin server only accepts connections from the servers that exist in the Predefined ServerList. The default value is false.
cluster.update_concurrent_reports_immediately=booleanSpecify whether to send the number of concurrently running reports on the this server to the admin server immediately whenthe number is changed. The default value is false.
If it is set to be false, each clustered server will check whether this number is changed at a certain time interval. If it ischanged, the number will be sent to the admin server, otherwise it will not be sent.
This property can be set to true when you have enough network bandwidth.
Specify the paths of the shared directories on the shared disk (mapped network drive), such as shared properties directory,shared realm directory, shared resource root directory, shared temporary directory, and shared history directory.
Add the following properties to the server.properties file.
resource.share.temp.dir=Specify the directory to store the temporary files.
resource.share.hist.dir=Specify the directory to store all the versions of report results in the cluster.
resource.share.realm.dir=Specify the directory of the realm files.
4.
resource.share.properties.dir=Specify the directory of the properties files.
resource.root=This property is used to specify the directory of the JReport demo reports.
Notes:
The shared directories must exist on the shared disk before the cluster starts to function. If there is no such folders, createthem or copy them from JReport Enterprise Server home directory, which includes properties, realm, jreports, temp, andhistory.
•
The folder names for the shared directories can be different from that of JReport Enterprise Server. However, you mustmake sure the paths you specify are consistent with that of the existing directories.
•
If you choose to copy folders from JReport Enterprise Server home directory to the shared disk, you must clear the contentof the folders such as properties, realms, temp, and history. Otherwise, the existing settings and information the folderscontain will cause conflicts when JReport Enterprise Server is running.
•
If the content of the shared resource root directory (jreports) is removed, the Public Reports folder in the resource tree willbe empty. When JReport Enterprise Server finds there is no content in the properties folder, it will re−scan the resourcedirectory to re−construct the properties folder content.
•
Administration pages or in the server.properties file.
JReport Enterprise Server Cluster
201
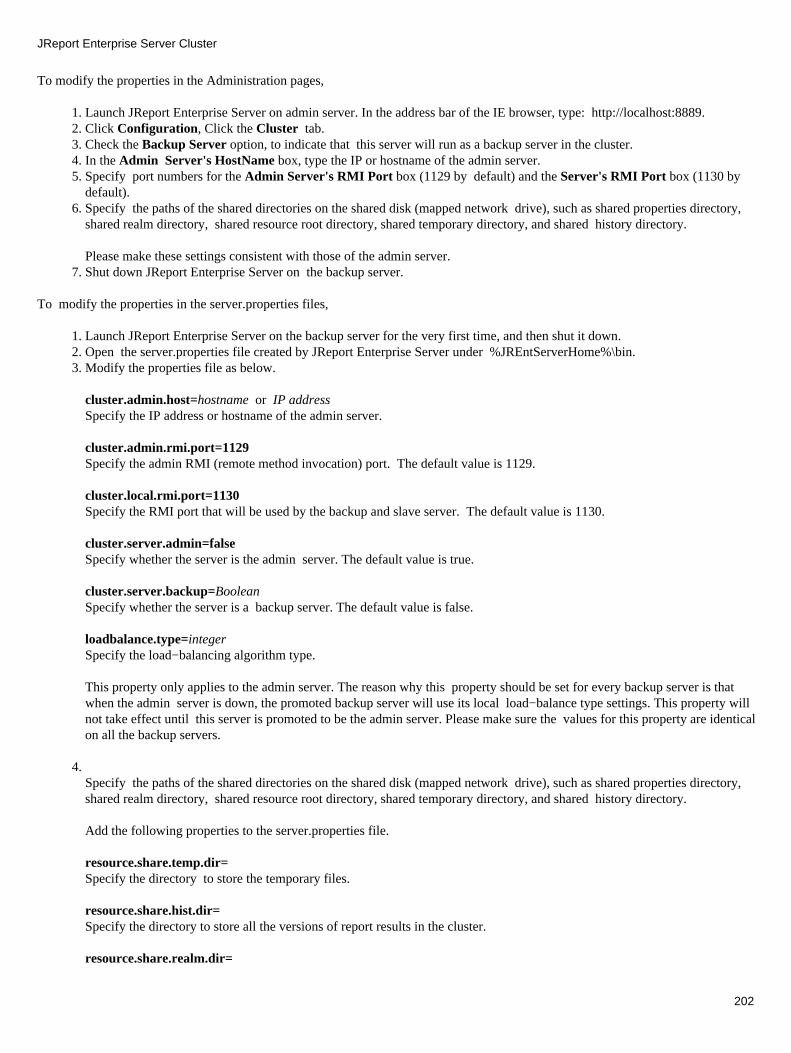
To modify the properties in the Administration pages,
Launch JReport Enterprise Server on admin server. In the address bar of the IE browser, type: http://localhost:8889.1. Click Configuration, Click the Cluster tab.2. Check the Backup Server option, to indicate that this server will run as a backup server in the cluster.3. In the Admin Server's HostName box, type the IP or hostname of the admin server.4. Specify port numbers for the Admin Server's RMI Port box (1129 by default) and the Server's RMI Port box (1130 bydefault).
5.
Specify the paths of the shared directories on the shared disk (mapped network drive), such as shared properties directory,shared realm directory, shared resource root directory, shared temporary directory, and shared history directory.
Please make these settings consistent with those of the admin server.
6.
Shut down JReport Enterprise Server on the backup server.7.
To modify the properties in the server.properties files,
Launch JReport Enterprise Server on the backup server for the very first time, and then shut it down.1. Open the server.properties file created by JReport Enterprise Server under %JREntServerHome%\bin.2. Modify the properties file as below.3.
cluster.admin.host=hostname or IP addressSpecify the IP address or hostname of the admin server.
cluster.admin.rmi.port=1129Specify the admin RMI (remote method invocation) port. The default value is 1129.
cluster.local.rmi.port=1130Specify the RMI port that will be used by the backup and slave server. The default value is 1130.
cluster.server.admin=falseSpecify whether the server is the admin server. The default value is true.
cluster.server.backup=BooleanSpecify whether the server is a backup server. The default value is false.
loadbalance.type=integerSpecify the load−balancing algorithm type.
This property only applies to the admin server. The reason why this property should be set for every backup server is thatwhen the admin server is down, the promoted backup server will use its local load−balance type settings. This property willnot take effect until this server is promoted to be the admin server. Please make sure the values for this property are identicalon all the backup servers.
4. Specify the paths of the shared directories on the shared disk (mapped network drive), such as shared properties directory,shared realm directory, shared resource root directory, shared temporary directory, and shared history directory.
Add the following properties to the server.properties file.
resource.share.temp.dir=Specify the directory to store the temporary files.
resource.share.hist.dir=Specify the directory to store all the versions of report results in the cluster.
resource.share.realm.dir=
JReport Enterprise Server Cluster
202

Specify the directory of the realm files.
resource.share.properties.dir=Specify the directory of the properties files.
resource.root=This property is used to specify the directory of the JReport demo reports.
Please make these settings consistent with those of the admin server.
Notes:
The shared directories must exist on the shared disk before the cluster starts to function. If there is no such folders, createthem or copy them from JReport Enterprise Server home directory, which includes properties, realm, jreports, temp, andhistory.
•
The folder names for the shared directories can be different from that of JReport Enterprise Server. However, you mustmake sure the paths you specify are consistent with that of the existing directories.
•
If you choose to copy folders from JReport Enterprise Server home directory to the shared disk, you must clear the contentof the folders such as properties, realms, temp, and history. Otherwise, the existing settings and information the folderscontain will cause conflicts when JReport Enterprise Server is running.
•
If the content of the shared resource root directory (jreports) is removed, the Public Reports folder in the resource tree willbe empty. When JReport Enterprise Server finds there is no content in the properties folder, it will re−scan the resourcedirectory to re−construct the properties folder content.
•
Administration pages or in the server.properties file.
To modify the properties in the Administration pages,
Launch JReport Enterprise Server on admin server. In the address bar of the IE browser, type: http://localhost:8889.1. Click Configuration, Click the Cluster tab.2. Check the Slave Server option, to indicate that this server will run as the slave server in the cluster.3. In the Admin Server's HostName box, type the IP or hostname of the admin server.4. Specify port numbers for the Admin Server's RMI Port box (1129 by default) and the Server's RMI Port box (1130 bydefault).
5.
Specify the paths of the shared directories on the shared disk (mapped network drive), such as shared temporary directory,and shared history directory.
Please make these settings consistent with those of the admin server.
6.
Shut down JReport Enterprise Server on the slave server.7.
To modify the properties in the server.properties files,
Launch JReport Enterprise Server on the backup server for the very first time, and then shut it down.1. Open the server.properties file created by JReport Enterprise Server under %JREntServerHome%\bin.2. Modify the properties file as below.
cluster.server.backup=false
3.
cluster.server.admin=false
cluster.admin.host= hostname or IP address
cluster.admin.rmi.port=1129
cluster.local.rmi.port=1130
cluster.update_concurrent_reports_immediately=Boolean
JReport Enterprise Server Cluster
203
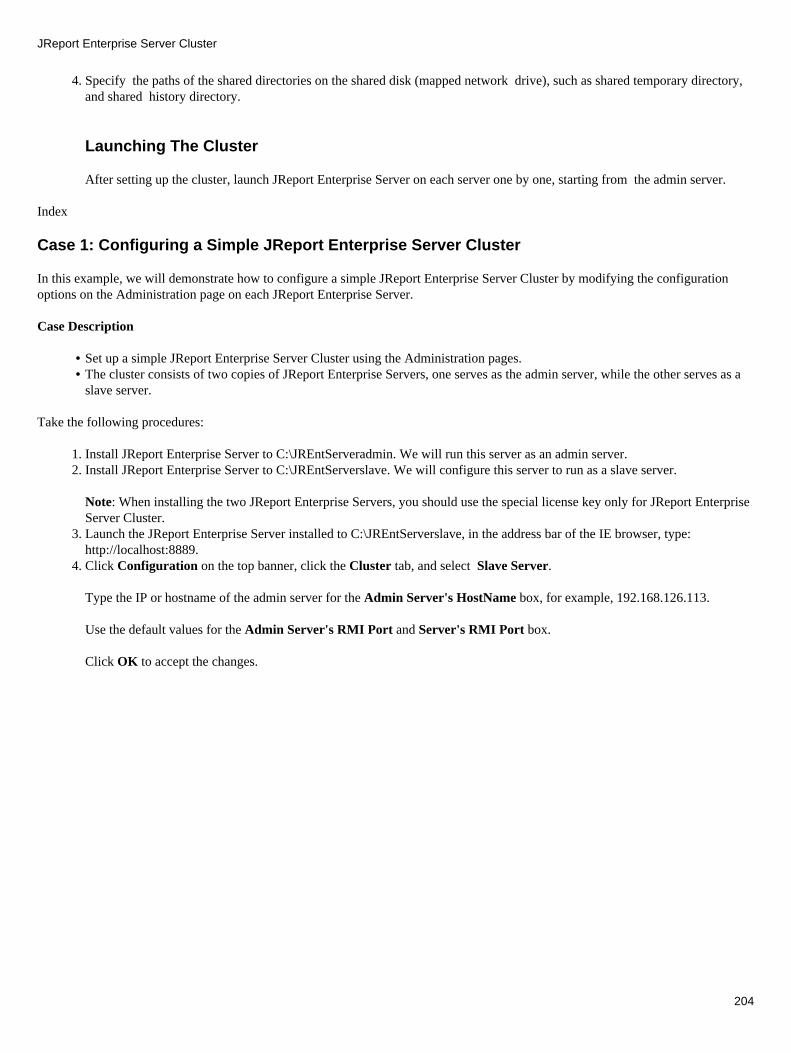
Specify the paths of the shared directories on the shared disk (mapped network drive), such as shared temporary directory,and shared history directory.
4.
Launching The Cluster
After setting up the cluster, launch JReport Enterprise Server on each server one by one, starting from the admin server.
Index
Case 1: Configuring a Simple JReport Enterprise Server Cluster
In this example, we will demonstrate how to configure a simple JReport Enterprise Server Cluster by modifying the configurationoptions on the Administration page on each JReport Enterprise Server.
Case Description
Set up a simple JReport Enterprise Server Cluster using the Administration pages.• The cluster consists of two copies of JReport Enterprise Servers, one serves as the admin server, while the other serves as aslave server.
•
Take the following procedures:
Install JReport Enterprise Server to C:\JREntServeradmin. We will run this server as an admin server. 1. Install JReport Enterprise Server to C:\JREntServerslave. We will configure this server to run as a slave server.
Note: When installing the two JReport Enterprise Servers, you should use the special license key only for JReport EnterpriseServer Cluster.
2.
Launch the JReport Enterprise Server installed to C:\JREntServerslave, in the address bar of the IE browser, type:http://localhost:8889.
3.
Click Configuration on the top banner, click the Cluster tab, and select Slave Server.
Type the IP or hostname of the admin server for the Admin Server's HostName box, for example, 192.168.126.113.
Use the default values for the Admin Server's RMI Port and Server's RMI Port box.
Click OK to accept the changes.
4.
JReport Enterprise Server Cluster
204
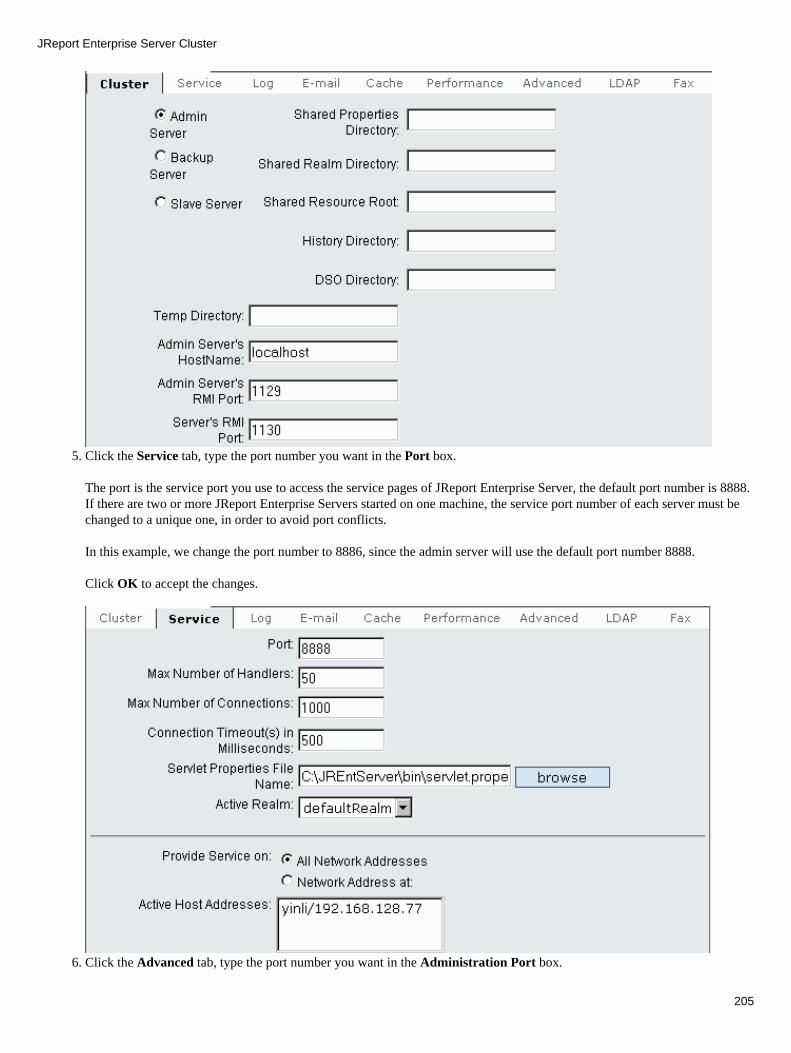
Click the Service tab, type the port number you want in the Port box.
The port is the service port you use to access the service pages of JReport Enterprise Server, the default port number is 8888.If there are two or more JReport Enterprise Servers started on one machine, the service port number of each server must bechanged to a unique one, in order to avoid port conflicts.
In this example, we change the port number to 8886, since the admin server will use the default port number 8888.
Click OK to accept the changes.
5.
Click the Advanced tab, type the port number you want in the Administration Port box.6.
JReport Enterprise Server Cluster
205

The reason why the port number should be changed here is the same as that of step 5.
In this example, we use 8887.
Click OK to accept the changes.
Shut down this JReport Enterprise Server. 7. Launch the JReport Enterprise Server installed to C:\JREntServeradmin.
Please note that, when installing a JReport Enterprise Server with a special license key for cluster, the server will be anadmin server by default.
In this case, we do not use the shared disk and load balance feature, so we don't need to configure the admin server.
8.
Launch the slave server.
The following information will appear in the Command Prompt window.
Connecting to admin server [192.168.126.113:1129].Connect to admin server [192.168.126.113:1129] successfully.
It means that the JReport Enterprise Server Cluster has been configured and started successfully.
9.
Access the service pages of the admin server using port 8888 as an administrator.
Submit a scheduled task. Click Scheduled, you will see the new scheduled task.
Access the service pages of the admin server using port 8886 as Tom, and then submit another scheduled task.
Please note that, a user can only view the scheduled tasks submitted by himself.
Scheduled task submitted by admin:
10.
JReport Enterprise Server Cluster
206
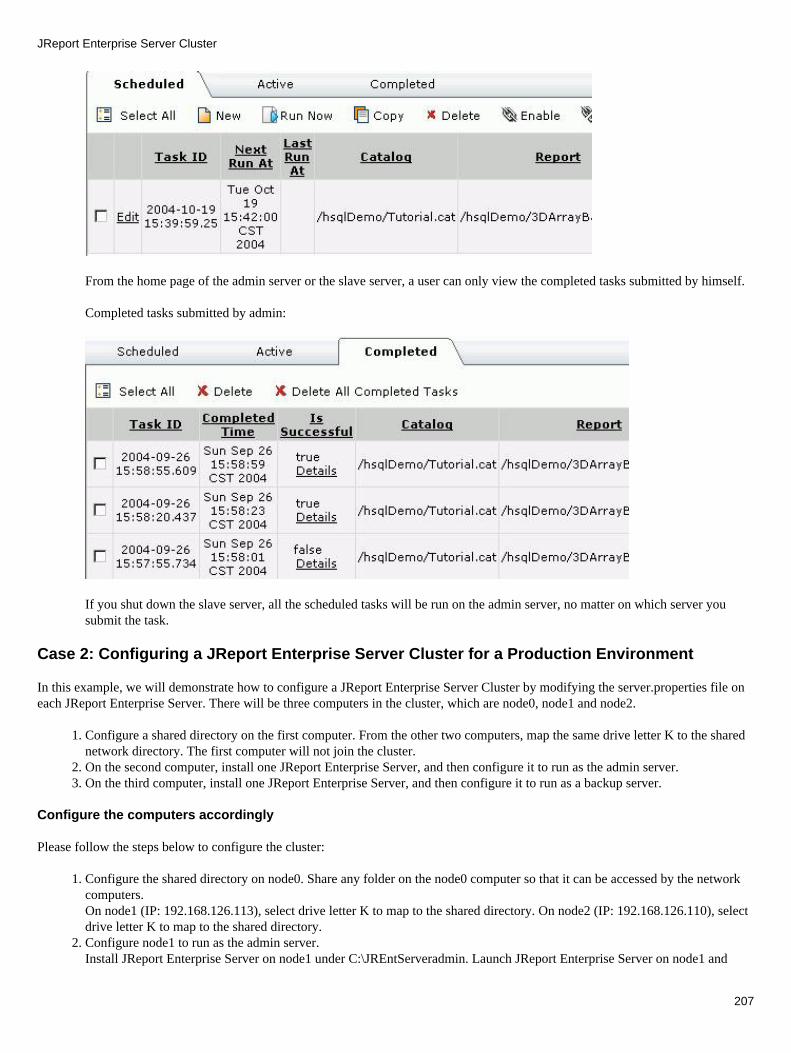
From the home page of the admin server or the slave server, a user can only view the completed tasks submitted by himself.
Completed tasks submitted by admin:
If you shut down the slave server, all the scheduled tasks will be run on the admin server, no matter on which server yousubmit the task.
Case 2: Configuring a JReport Enterprise Server Cluster for a Production Environment
In this example, we will demonstrate how to configure a JReport Enterprise Server Cluster by modifying the server.properties file oneach JReport Enterprise Server. There will be three computers in the cluster, which are node0, node1 and node2.
Configure a shared directory on the first computer. From the other two computers, map the same drive letter K to the sharednetwork directory. The first computer will not join the cluster.
1.
On the second computer, install one JReport Enterprise Server, and then configure it to run as the admin server.2. On the third computer, install one JReport Enterprise Server, and then configure it to run as a backup server.3.
Configure the computers accordingly
Please follow the steps below to configure the cluster:
Configure the shared directory on node0. Share any folder on the node0 computer so that it can be accessed by the networkcomputers.On node1 (IP: 192.168.126.113), select drive letter K to map to the shared directory. On node2 (IP: 192.168.126.110), selectdrive letter K to map to the shared directory.
1.
Configure node1 to run as the admin server.Install JReport Enterprise Server on node1 under C:\JREntServeradmin. Launch JReport Enterprise Server on node1 and
2.
JReport Enterprise Server Cluster
207
then shut it down. Open the Server.properties file under C:\JREntServeradmin\bin. Modify the server.properties file asbelow:
cluster.admin.host=192.168.126.113 (IP address of the admin server, localhost actually)cluster.server.backup=falsecluster.server.admin=truecluster.admin.rmi.port=1129cluster.local.rmi.port=1130
Add the following properties:
server.loadbalancer.type=1resource.share.temp.dir=K:\tempresource.share.hist.dir=K:\historyresource.share.realm.dir=K:\realmresource.share.properties.dir=K:\propertiesresource.root=K:\jreportsConfigure node2 to run as a backup server.Install JReport Enterprise Server on node2 under C:\JREntServerbackup. Launch JReport Enterprise Server on node2 andthen shut it down. Open the Server.properties file under C:\JREntServerbackup\bin. Modify the server.properties file asbelow:
3.
cluster.server.backup=truecluster.server.admin=falsecluster.admin.rmi.port=1129server.rmi.port=1130cluster.admin.host=192.168.126.113 (IP address of the admin server)
Add the following properties:
server.loadbalancer.type=1resource.share.temp.dir=K:\tempresource.share.hist.dir=K:\historyresource.share.realm.dir=K:\realmresource.share.properties.dir=K:\propertiesresource.root=K:\jreports
4. Copy the five folders (temp, history, realm, properties and jreports) under C:\JREntServeradmin on node1 to the networkdrive K. Please empty the folders such as temp, history, realm, and properties. Keep the jreports folder intact, since theresources in this folder will be used in the next few steps.
5. Launch the admin server on node1. In the Command Prompt window, you will see the following information:
JReport Enterprise Server is ready for service.
Launch the backup server on node2. In the Command Prompt window, you will see the following information:
Connecting to admin server [192.168.126.113:1129].Connected to admin server [192.168.126.113:1129] successfully.
It means that the cluster has been configured and launched successfully.
Log on to the administration pages of the admin server, click Cluster on the top banner, click the Config tab, and then clickAdd a Server. Provide the server information as the following:
6.
JReport Enterprise Server Cluster
208
Server Name: B1 (The server name can be any string you prefer, need not to be the computer network ID)Host Address: 192.168.126.110 (The IP address of the backup server)RMI Port: 1130Backup Priority: 1 (The backup priority can be any integer. However, it must be unique among the backup servers. A slaveserver doesn't need to set this property.)
Only after a server is added to the predefined server list, can it be tracked and monitored by JReport Monitor Server.
Index
Administrating JReport Enterprise Server Cluster
Administration page on JReport Enterprise Server Cluster allows you to configure, monitor, weight and administrate the servers in acluster, where you can:
Add cluster members to the predefined server list. • Set and track cluster server. • Track the status of one specified cluster server. • Set the shared parameters of cluster server; • Stop the cluster servers.•
To access the administration pages on JReport Enterprise Server Cluster using internet browser, please provide url likehttp://hostname:adminport (for example, http://10.66.24.31:8889) and then click Cluster on the top banner, which is available onlywhen the license is for cluster.
Managing Predefined Server List
Predefined Server ListA predefined server list, stored in the server.list file, is a list that records the relevant information of the clustered servers, such asserver name, server IP address, server RMI port, and server backup priority.
The predefined server list is used for two main purposes:
Determine the priority that a backup server switches its role to run as the admin server when the server is shut down orcrashes down.
In a cluster environment, there can be more than one backup server. When the admin server fails to function, one of thebackup servers will promote itself to run as the admin server. Which backup server should do this is determined by thebackup priority settings defined in the server.list file (jrs.cluster.server.backup.priority property).
•
Monitor the status of the servers in the cluster.
JReport Server Monitor can monitor the clustered server status and allows you to perform some administrative tasks.However, only when a server is added to the predefined server list, can it be tracked and monitored by JReport MonitorServer.
•
If in the server.properties file, the property cluster.only_accept_predefined_server is set to true, then before a server can join thecluster, it must be included in this predefined server list first. If you are logged on to the Admin server as an administrator, you canmanage the server list in the cluster in the Predefined Server List.
To get the predefined server list, click Cluster on the top banner on the administration page of JReport Enterprise Server, and clickthe Config tab.
To add a server to the list, click Add a Server and supply the relevant information about the server in the dialog, such as servername, host address, RMI port, and backup priority.
JReport Enterprise Server Cluster
209
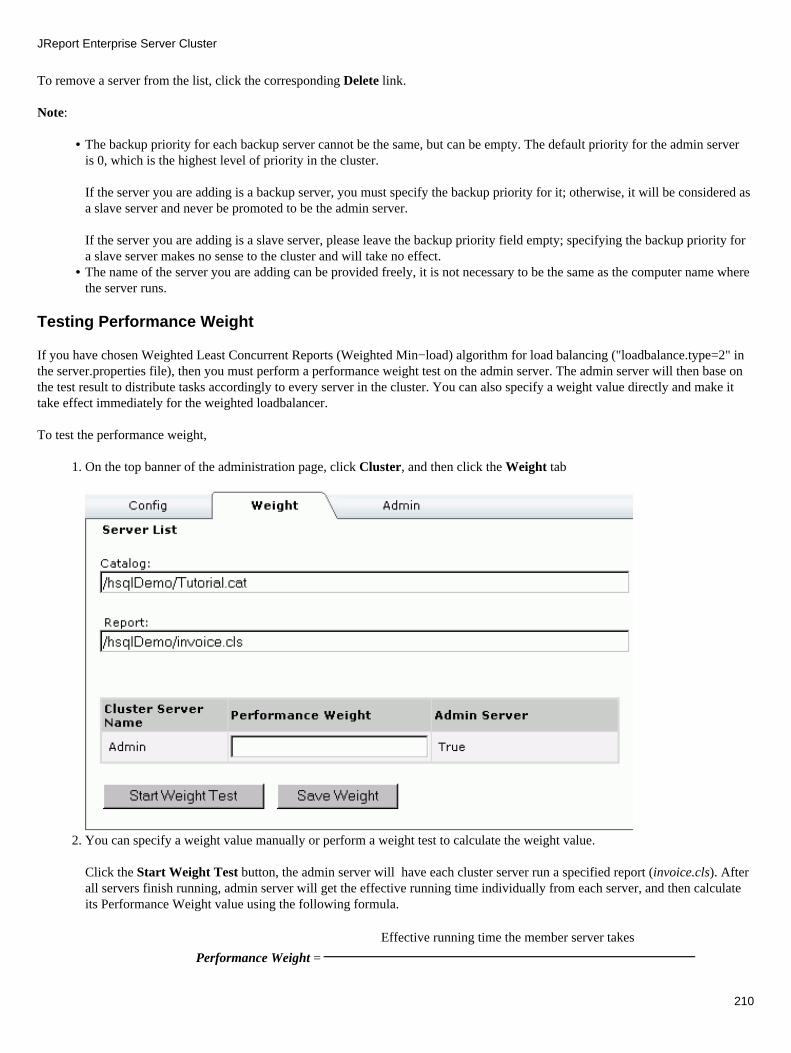
To remove a server from the list, click the corresponding Delete link.
Note:
The backup priority for each backup server cannot be the same, but can be empty. The default priority for the admin serveris 0, which is the highest level of priority in the cluster.
If the server you are adding is a backup server, you must specify the backup priority for it; otherwise, it will be considered asa slave server and never be promoted to be the admin server.
If the server you are adding is a slave server, please leave the backup priority field empty; specifying the backup priority fora slave server makes no sense to the cluster and will take no effect.
•
The name of the server you are adding can be provided freely, it is not necessary to be the same as the computer name wherethe server runs.
•
Testing Performance Weight
If you have chosen Weighted Least Concurrent Reports (Weighted Min−load) algorithm for load balancing ("loadbalance.type=2" inthe server.properties file), then you must perform a performance weight test on the admin server. The admin server will then base onthe test result to distribute tasks accordingly to every server in the cluster. You can also specify a weight value directly and make ittake effect immediately for the weighted loadbalancer.
To test the performance weight,
On the top banner of the administration page, click Cluster, and then click the Weight tab1.
You can specify a weight value manually or perform a weight test to calculate the weight value.
Click the Start Weight Test button, the admin server will have each cluster server run a specified report (invoice.cls). Afterall servers finish running, admin server will get the effective running time individually from each server, and then calculateits Performance Weight value using the following formula.
2.
Effective running time the member server takes
Performance Weight =
JReport Enterprise Server Cluster
210
Effective running time admin server takes
The value of Performance Weight for admin server will be set to 1.
Finally, admin server will show a list of Performance Weight values for all cluster servers. Click Save Weight to save theweight values.
Notes: Whenever you add or remove a cluster server, you need to perform the performance weight test again to re−evaluate theirperformance weight.
Administrating Clustered Servers
Click Cluster on the top banner on the administration page of JReport Enterprise Server, click the Admin tab.1. From the Shut down server drop−down list, select the server you want to shut down or select All.2. Click Shut down.3.
To set whether to notify somebody via email when a server is down,
Click Cluster on the top banner on the administration page of JReport Enterprise Server, click the Admin tab.1. Check the Enable notification after a server down option if you want the cluster to send a notification mail to the mailaddress you specify.
2.
Fill in the e−mail address in the E−mail Address box.3.
Note: This option is applied only to JReport Enterprise Server Cluster environment for the reason that it needs at least one runningserver to send the mail when other server's down.
Monitoring Clustered Servers
JReport Server Monitor is a stand−alone web−based application used to monitor the overall performance of JReport EnterpriseServer. JReport Server Monitor should be used together with JReport Enterprise Server.
JReport Server Monitor has the following main features:
Inspects the status of JReport Enterprise Server. • Shows the server performance statistics in Graph/Text mode. • Maintains JReport Enterprise Server. • Creates profiling reports: performance reports and statistic reports.•
From JReport Enterprise Server version 6.0, the monitor services have been split out from JReport Enterprise Server, served as astand−alone server monitor.
Before you can use JReport Server Monitor, the following major procedures must be taken:
Download and install JReport Server Monitor.1. Modify the server.properties file under %MonitorServerRoot%\bin to configure admin server IP and port information.2. Start JReport Enterprise Server.3. Launch MonitorServer.bat under %MonitorServerRoot%\bin to start JReport Server Monitor.4. Access JReport Server Monitor using http://adminhost:serverport or click the Monitor link on the home page ofJReport Enterprise Server.
5.
Note: The Monitor link will not be displayed on JREntServer's home page when the web.monitor.link.enable property inthe server.properties file (%JREntServerRoot%\bin) is set to false.
For information and assistance about the server monitor, please see relevant documentation for JReport Server Monitor on ourwebsite.
JReport Enterprise Server Cluster
211
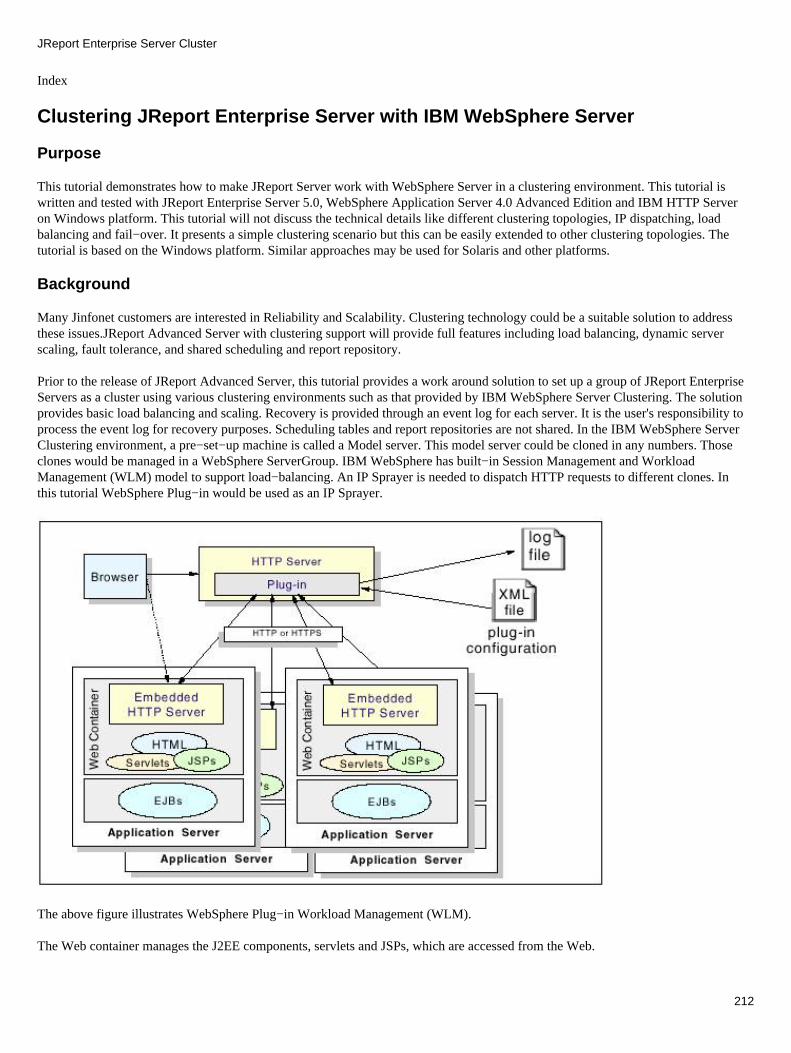
Index
Clustering JReport Enterprise Server with IBM WebSphere Server
Purpose
This tutorial demonstrates how to make JReport Server work with WebSphere Server in a clustering environment. This tutorial iswritten and tested with JReport Enterprise Server 5.0, WebSphere Application Server 4.0 Advanced Edition and IBM HTTP Serveron Windows platform. This tutorial will not discuss the technical details like different clustering topologies, IP dispatching, loadbalancing and fail−over. It presents a simple clustering scenario but this can be easily extended to other clustering topologies. Thetutorial is based on the Windows platform. Similar approaches may be used for Solaris and other platforms.
Background
Many Jinfonet customers are interested in Reliability and Scalability. Clustering technology could be a suitable solution to addressthese issues.JReport Advanced Server with clustering support will provide full features including load balancing, dynamic serverscaling, fault tolerance, and shared scheduling and report repository.
Prior to the release of JReport Advanced Server, this tutorial provides a work around solution to set up a group of JReport EnterpriseServers as a cluster using various clustering environments such as that provided by IBM WebSphere Server Clustering. The solutionprovides basic load balancing and scaling. Recovery is provided through an event log for each server. It is the user's responsibility toprocess the event log for recovery purposes. Scheduling tables and report repositories are not shared. In the IBM WebSphere ServerClustering environment, a pre−set−up machine is called a Model server. This model server could be cloned in any numbers. Thoseclones would be managed in a WebSphere ServerGroup. IBM WebSphere has built−in Session Management and WorkloadManagement (WLM) model to support load−balancing. An IP Sprayer is needed to dispatch HTTP requests to different clones. Inthis tutorial WebSphere Plug−in would be used as an IP Sprayer.
The above figure illustrates WebSphere Plug−in Workload Management (WLM).
The Web container manages the J2EE components, servlets and JSPs, which are accessed from the Web.
JReport Enterprise Server Cluster
212
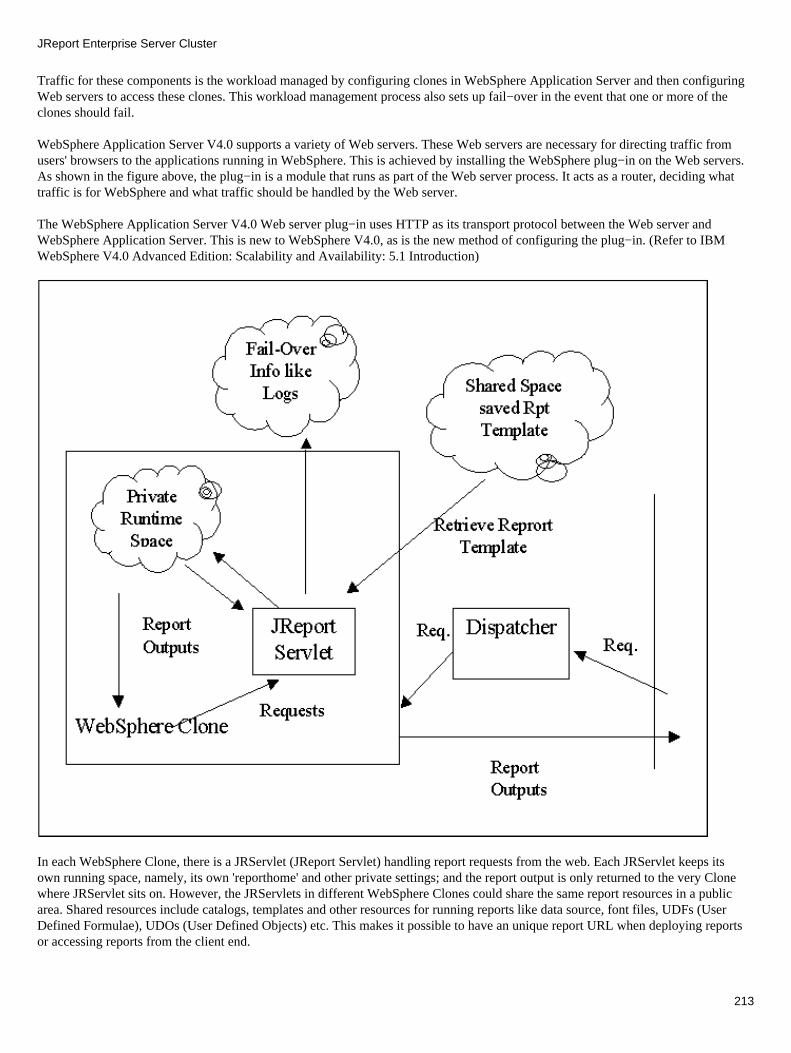
Traffic for these components is the workload managed by configuring clones in WebSphere Application Server and then configuringWeb servers to access these clones. This workload management process also sets up fail−over in the event that one or more of theclones should fail.
WebSphere Application Server V4.0 supports a variety of Web servers. These Web servers are necessary for directing traffic fromusers' browsers to the applications running in WebSphere. This is achieved by installing the WebSphere plug−in on the Web servers.As shown in the figure above, the plug−in is a module that runs as part of the Web server process. It acts as a router, deciding whattraffic is for WebSphere and what traffic should be handled by the Web server.
The WebSphere Application Server V4.0 Web server plug−in uses HTTP as its transport protocol between the Web server andWebSphere Application Server. This is new to WebSphere V4.0, as is the new method of configuring the plug−in. (Refer to IBMWebSphere V4.0 Advanced Edition: Scalability and Availability: 5.1 Introduction)
In each WebSphere Clone, there is a JRServlet (JReport Servlet) handling report requests from the web. Each JRServlet keeps itsown running space, namely, its own 'reporthome' and other private settings; and the report output is only returned to the very Clonewhere JRServlet sits on. However, the JRServlets in different WebSphere Clones could share the same report resources in a publicarea. Shared resources include catalogs, templates and other resources for running reports like data source, font files, UDFs (UserDefined Formulae), UDOs (User Defined Objects) etc. This makes it possible to have an unique report URL when deploying reportsor accessing reports from the client end.
JReport Enterprise Server Cluster
213
In this tutorial, The JReport Enterprise Servers have been installed using the "Stand−alone option" in the two computers with thesame folder locations. Next, on each of these computers, an application server will be configured with WebSphere 4.0 with JRServletSolution. This results in a Model Server. This Model server will then be cloned to other computer(s). In the Model Server,'reporthome' is set to a private space, say, the install path. But the report resources maintained in the JRServlet are in a public areawith a public shared path. Under WLM when a request is dispatched to the cloned application server, it can access the reportresources defined in 'Resources' which is in a public area. JRSerlet will run the report in accordance with the request. The reportoutput will be returned to WebSphere Clone and in turn to the client.
Prerequisites
General knowledge in Operation System (Windows 2000) is assumed. • General knowledge in WebSphere Server and Clustering technology is assumed. • General knowledge in JReport and its Sever technology is assumed. •
To walk through this tutorial, the following prerequisites are assumed.
At least 3 computers are pre−installed with Windows 2000. These 3 computers will perform as clones. We assume thatnames are node1, node2 and node3.
•
Oracle 8.1.7 client is pre−installed on each clone computer. We assume that it is installed under C:\oracle. We also assumethat there is a database named 'oracle8'.
•
JReport Enterprise Server is pre−installed on each clone. The 'reporthome' is specified to be the local install path, assumedto be C:\JREntServer. The 'Report Resources' are located in a public area with shared access.
•
One more computer is pre−installed with Windows 2000. This one will be the HTTP Server and WebSphere Plug−in asnetwork dispatcher. We assume that the name is MyWebServer.
•
WebSphere Application Server 4.0 Advanced Edition installation CD−ROM. The software will be installed in this tutorial. • IBM HTTP Server and WebSphere Plug−in, an installable copy likes installation CD−ROM. The software will be installedin this tutorial.
•
Installation
Assume that you have four computers named Dispatcher, node1, node2, node3 in the server cluster.
The major steps to configure a JReport Enterprise Server with IBM WebSphere Server Cluster:
Install and configure JReport Enterprise Server on node1, node2 and node3. • Install and configure HTTP Server on Dispatcher. Assume it is installed under C:\IBM HTTP Server • Install and configure Oracle 8i and WebSphere Server in node1, node2 and node3. • Integrate JRServlet,RCServlet,JSP into node1, it Performs as the Model Server • Create ServerGroup in Model Machine • Create two clones from Model Server • Start Entire Environment and Evaluate the Whole Installation. •
Configuring JReport Enterprise Server Accordingly
You need install JReport Enterprise Server on node1, node2 and node3 and configure the server.properties file on each computeraccording to their roles. If you want to use the shared disk feature of JReport Server Cluster, then you need to configure a disk (diskarray) on another computer.
Reference Note: For the details about how to configure the server.properties files on each computer, please refer to JReportEnterprise Server Manual | User's Guide |Configuring a JReport Enterprise Server Cluster
Configuring an Oracle 8i database
In this tutorial, Oracle 8i is used as the backend DB server of WebSphere. Similar integration can be done with different databaseservers. To use an Oracle database with WebSphere Application Server, you must configure the database first:
1.
JReport Enterprise Server Cluster
214

Add the following line to the initialization file:open_cursors = 220On Windows NT or 2000, the initialization file is typically located at\Oracle\Ora81\database\Initxxx.ora, where xxx is your SID (example, oracle8).
2. Using Services Panel in Windows Control Panel, stop and restart the Oracle services OracleServiceORCL andOracleOraHome81TNSListener.
3. This setup procedure is using WepSphere Advanced Edition. WebSphere administration ID is defined without DatabaseAuthority. In order to do so, create an Oracle user EJSADMIN using the commands as follows. EJSADMIN_password is thepassword for EJSADMIN; or define an ID for use in deploying entity beans, EJB_password is the password for EJB.
sqlplus system/managercreate user EJSADMIN identified by EJSADMIN_password quota 100M on SYSTEM;grant connect,resource to EJSADMIN;create user EJB identified by EJB_password quota 100M on USERS;grant connect,resource to EJB;quit
4. Test access to the new database using user EJSADMIN:
sqlplus ejsadmin/ejsadmin
When a message displays indicating a successful connection, enter exit.
Installing WebSphere 4.0 Advance Server
This tutorial assumes that you have not yet installed WebSphere 4.1 Advanced Server. If you have already installed WebSphere,please read this section as a reference. The settings in this install procedure will be used subsequently in the rest of this tutorial.
To install WebSphere Application Server on each clone computer, please follow steps below:
1. Run setup.exe in WebSphere Server Advanced Edition CD.
2. Select English as the Language Options and click OK.
3. Click Next to pass the introductory page.
4. On the Installation Options dialog, select Typical Installation, then click Next.
5. On the Security Options dialog, enter your valid username and password to log in to Windows 2000. Click Next.
6. The Product Directory dialog pops up. You could either specify the destination directories for the Websphere ApplicationServer and the IBM HTTP Server or take the default paths. Click Next.
JReport Enterprise Server Cluster
215

7. On the Database Options dialog, do the following:For Database Type, select Oracle. If the Application Server will be using a database installed in a machine other than the onewhere you are installing WebSphere Application Server, select the Remote Database check box.For Database Name, specify the name of the database, i.e., oracle8.For Database User ID and Password, specify your user name and you password for the database.For Path, specify the path for the database program.For URL, specify the URL for accessing the database.For Server, specify the server containing the database program.For Port, specify the port for the database.Click Next.Below shows what are used in this tutorial.
JReport Enterprise Server Cluster
216
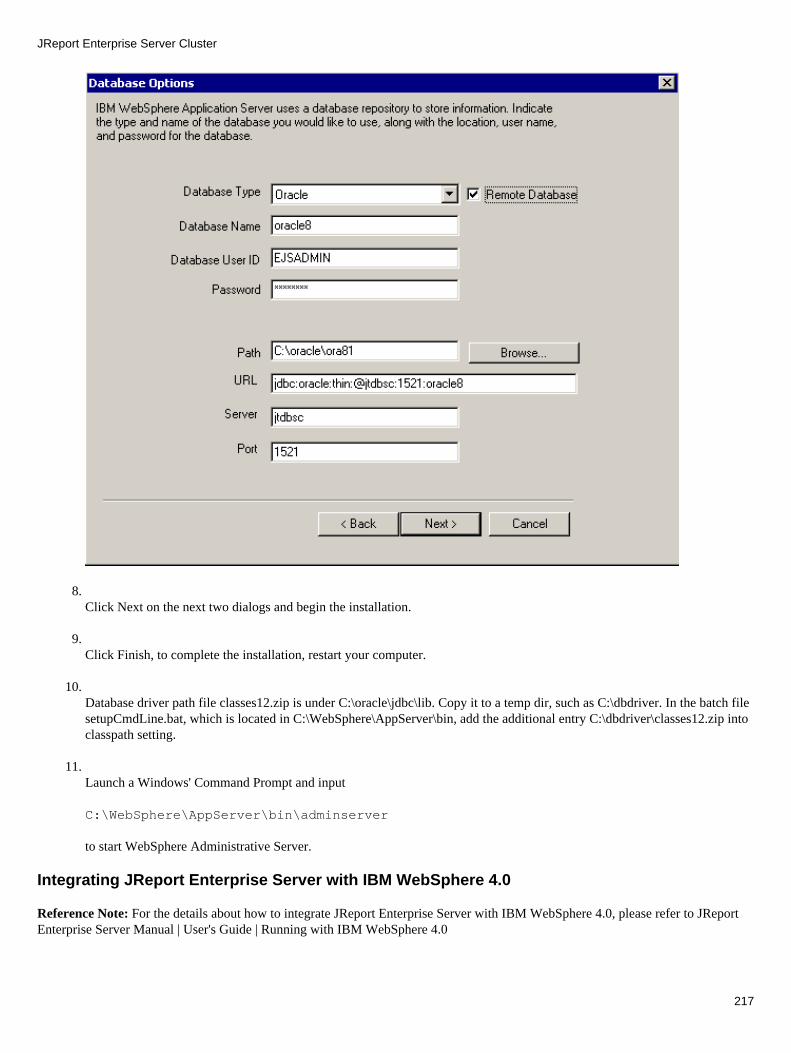
8. Click Next on the next two dialogs and begin the installation.
9. Click Finish, to complete the installation, restart your computer.
10. Database driver path file classes12.zip is under C:\oracle\jdbc\lib. Copy it to a temp dir, such as C:\dbdriver. In the batch filesetupCmdLine.bat, which is located in C:\WebSphere\AppServer\bin, add the additional entry C:\dbdriver\classes12.zip intoclasspath setting.
11. Launch a Windows' Command Prompt and input
C:\WebSphere\AppServer\bin\adminserver
to start WebSphere Administrative Server.
Integrating JReport Enterprise Server with IBM WebSphere 4.0
Reference Note: For the details about how to integrate JReport Enterprise Server with IBM WebSphere 4.0, please refer to JReportEnterprise Server Manual | User's Guide | Running with IBM WebSphere 4.0
JReport Enterprise Server Cluster
217

Working with server cluster
Assume HTTP Server is installed under C:\IBM HTTP Server on a computer named Dispatcher. And you have another threecomputers named node1,node2 and node3. Node1 was configured to an admin server, Node2 was configured to a backup server andNode3 was configured to a slave server. All of these three computers have Oracle Client, IBM WebSphere 4.0 and JReport EnterpriseServer installed.
Restart the HTTP Server, start WebSphere on node1, node2, node3.
Please take the following steps on node1.
1. Open the administrative console.
2. Create a new server group from Console −> Wizards −> Create Server Group. Suppose the group name is clonegroup.
3. Click Next.
JReport Enterprise Server Cluster
218
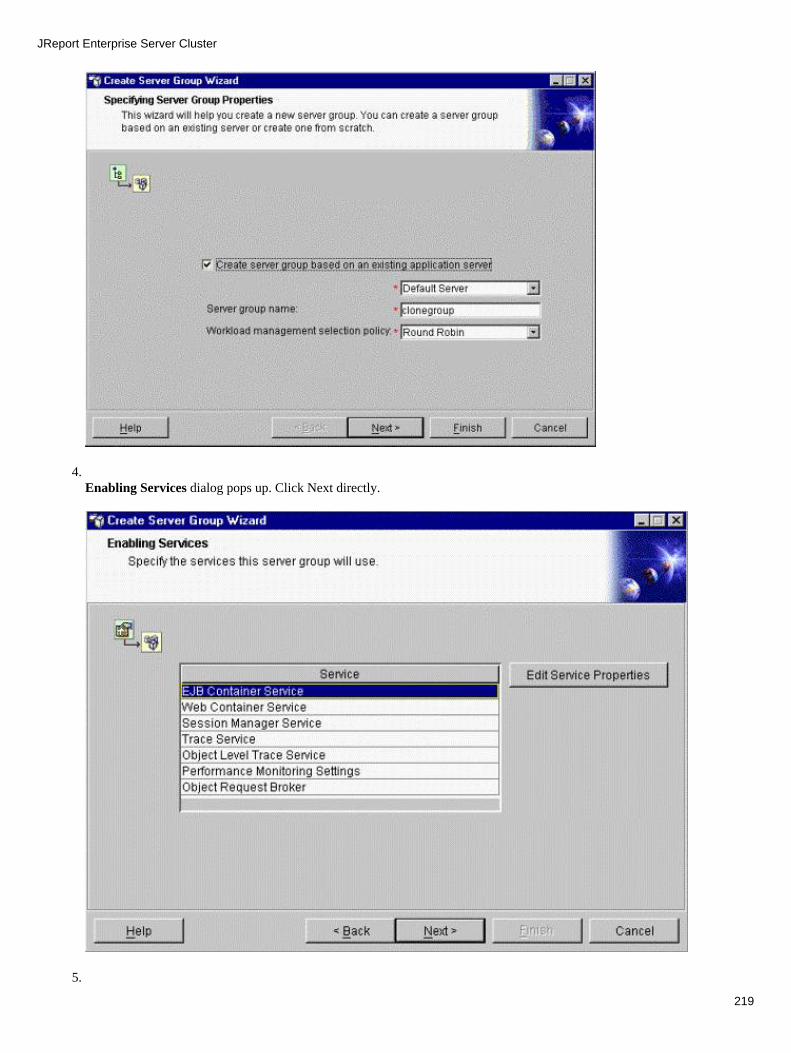
4. Enabling Services dialog pops up. Click Next directly.
5.
JReport Enterprise Server Cluster
219
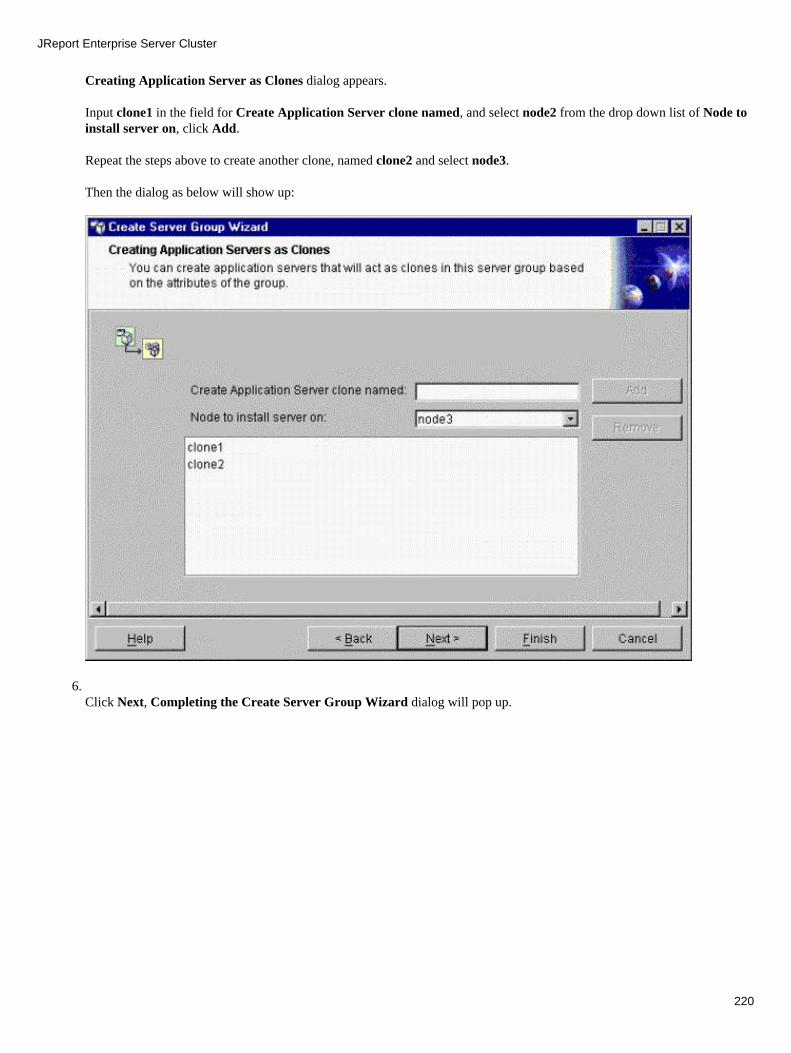
Creating Application Server as Clones dialog appears.
Input clone1 in the field for Create Application Server clone named, and select node2 from the drop down list of Node toinstall server on, click Add.
Repeat the steps above to create another clone, named clone2 and select node3.
Then the dialog as below will show up:
6. Click Next, Completing the Create Server Group Wizard dialog will pop up.
JReport Enterprise Server Cluster
220

7. Click Finish.
8. Select clone2 under node3, on the Services tab, select Web Container Services, then click Edit Properties. The WebContainer Services dialog will pop up. Change the port number to 9082.
JReport Enterprise Server Cluster
221
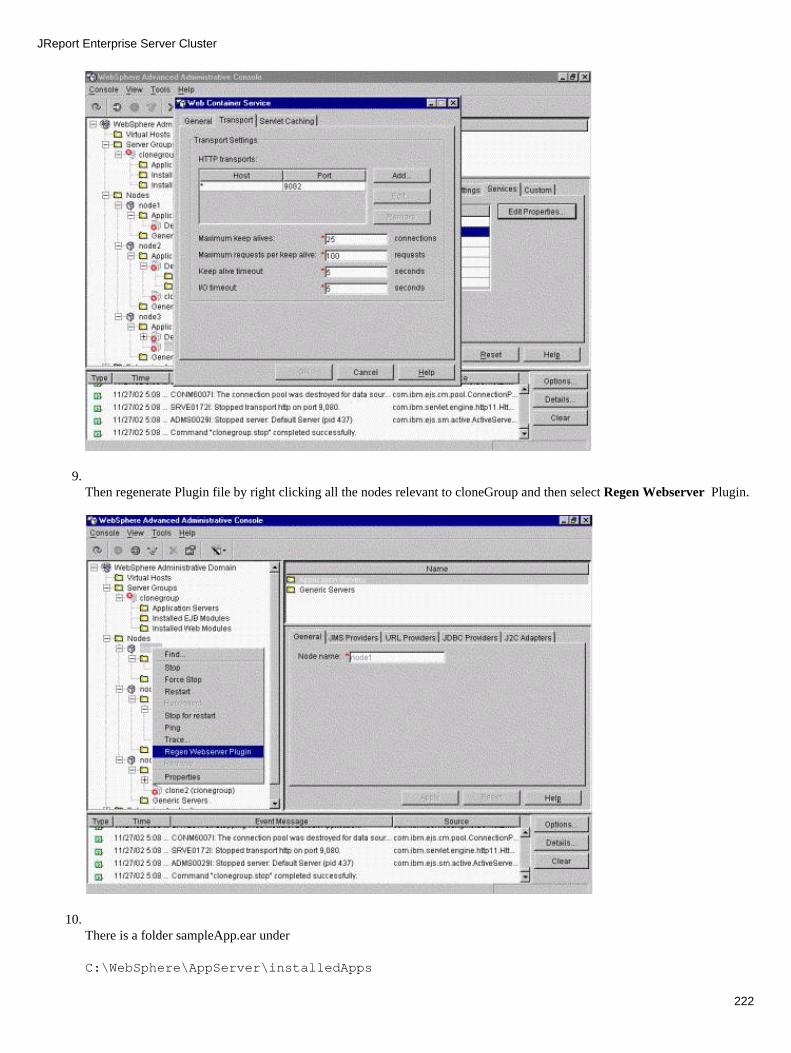
9. Then regenerate Plugin file by right clicking all the nodes relevant to cloneGroup and then select Regen Webserver Plugin.
10. There is a folder sampleApp.ear under
C:\WebSphere\AppServer\installedApps
JReport Enterprise Server Cluster
222

Rename sampleApp.ear to node1_sampleApp.ear. Copy this folder to the
C:\WebSphere\AppServer\installedApps
of node2 and node3.
Note: The following steps should be taken on Dispatcher.
11. Copy the fileplugin−cfg.xmlfrom the directory C:\WebSphere\AppServer\appserver\config\of node1 to a temp directory(such as C:\mytmp) of Dispatcher, then modify it.
The original plugin−cfg.xml is:
<?xml version="1.0" ?>− <Config><Log LogLevel="Error" Name="C:\WebSphere\AppServer\logs\native.log" />− <VirtualHostGroup Name="default_host"><VirtualHost Name="*:80" /><VirtualHost Name="*:9080" /></VirtualHostGroup>− <UriGroup Name="node1_sampleApp/default_app_URIs"><Uri Name="/servlet/snoop/*" /><Uri Name="/servlet/snoop" /><Uri Name="/servlet/snoop2/*" /><Uri Name="/servlet/snoop2" /><Uri Name="/servlet/hello" /><Uri Name="/ErrorReporter" /><Uri Name="/servlet/jrserver" /><Uri Name="/servlet/jradmin" /><Uri Name="/servlet/sendfile" /><Uri Name="*.jsp" /><Uri Name="*.jsv" /><Uri Name="*.jsw" /><Uri Name="/j_security_check" /><Uri Name="/servlet/*" /></UriGroup>− <UriGroup Name="node1_sampleApp/examples_URIs"><Uri Name="/webapp/examples" /></UriGroup><Route ServerGroup="clonegroup" UriGroup="node1_sampleApp/default_app_URIs"VirtualHostGroup="default_host" /><Route ServerGroup="clonegroup" UriGroup="node1_sampleApp/examples_URIs"VirtualHostGroup="default_host" />− <ServerGroup Name="node2/Default Server">− <Server CloneID="u6sfrm99" Name="Default Server"><Transport Hostname="node2" Port="9080" Protocol="http" /></Server></ServerGroup>− <UriGroup Name="node2_sampleApp/default_app_URIs"><Uri Name="/servlet/snoop/*" /><Uri Name="/servlet/snoop" /><Uri Name="/servlet/snoop2/*" /><Uri Name="/servlet/snoop2" />
JReport Enterprise Server Cluster
223
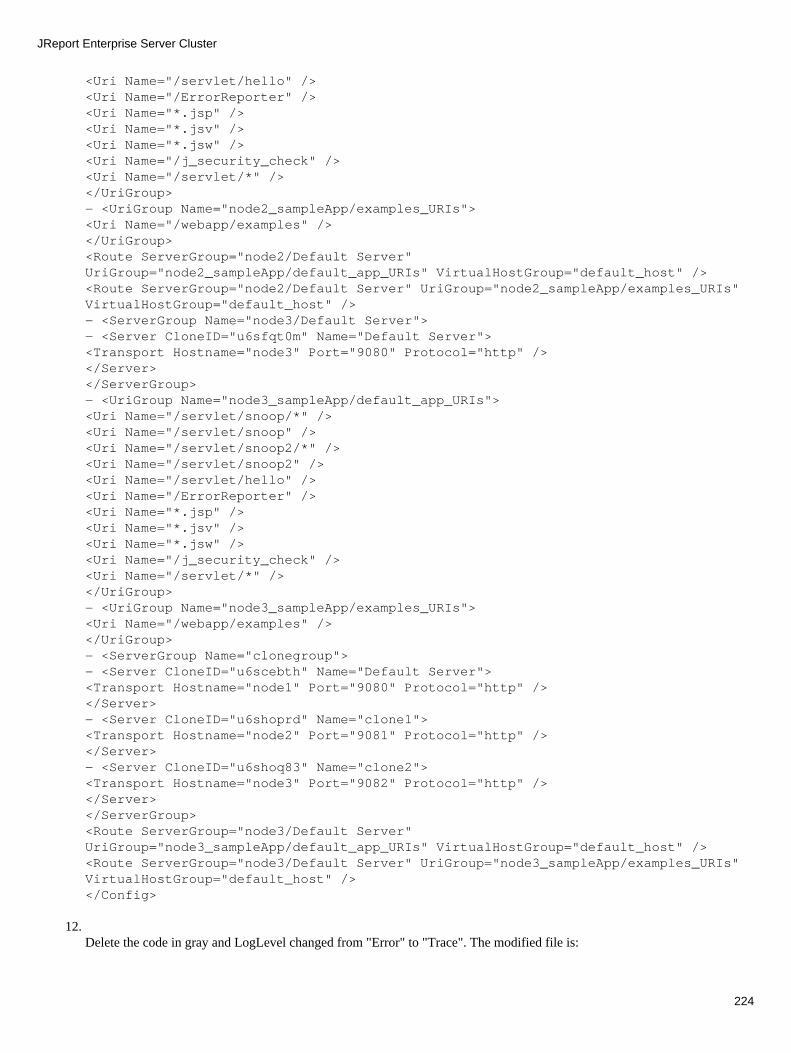
<Uri Name="/servlet/hello" /><Uri Name="/ErrorReporter" /><Uri Name="*.jsp" /><Uri Name="*.jsv" /><Uri Name="*.jsw" /><Uri Name="/j_security_check" /><Uri Name="/servlet/*" /></UriGroup>− <UriGroup Name="node2_sampleApp/examples_URIs"><Uri Name="/webapp/examples" /></UriGroup><Route ServerGroup="node2/Default Server"UriGroup="node2_sampleApp/default_app_URIs" VirtualHostGroup="default_host" /><Route ServerGroup="node2/Default Server" UriGroup="node2_sampleApp/examples_URIs"VirtualHostGroup="default_host" />− <ServerGroup Name="node3/Default Server">− <Server CloneID="u6sfqt0m" Name="Default Server"><Transport Hostname="node3" Port="9080" Protocol="http" /></Server></ServerGroup>− <UriGroup Name="node3_sampleApp/default_app_URIs"><Uri Name="/servlet/snoop/*" /><Uri Name="/servlet/snoop" /><Uri Name="/servlet/snoop2/*" /><Uri Name="/servlet/snoop2" /><Uri Name="/servlet/hello" /><Uri Name="/ErrorReporter" /><Uri Name="*.jsp" /><Uri Name="*.jsv" /><Uri Name="*.jsw" /><Uri Name="/j_security_check" /><Uri Name="/servlet/*" /></UriGroup>− <UriGroup Name="node3_sampleApp/examples_URIs"><Uri Name="/webapp/examples" /></UriGroup>− <ServerGroup Name="clonegroup">− <Server CloneID="u6scebth" Name="Default Server"><Transport Hostname="node1" Port="9080" Protocol="http" /></Server>− <Server CloneID="u6shoprd" Name="clone1"><Transport Hostname="node2" Port="9081" Protocol="http" /></Server>− <Server CloneID="u6shoq83" Name="clone2"><Transport Hostname="node3" Port="9082" Protocol="http" /></Server></ServerGroup><Route ServerGroup="node3/Default Server"UriGroup="node3_sampleApp/default_app_URIs" VirtualHostGroup="default_host" /><Route ServerGroup="node3/Default Server" UriGroup="node3_sampleApp/examples_URIs"VirtualHostGroup="default_host" /></Config>
12. Delete the code in gray and LogLevel changed from "Error" to "Trace". The modified file is:
JReport Enterprise Server Cluster
224
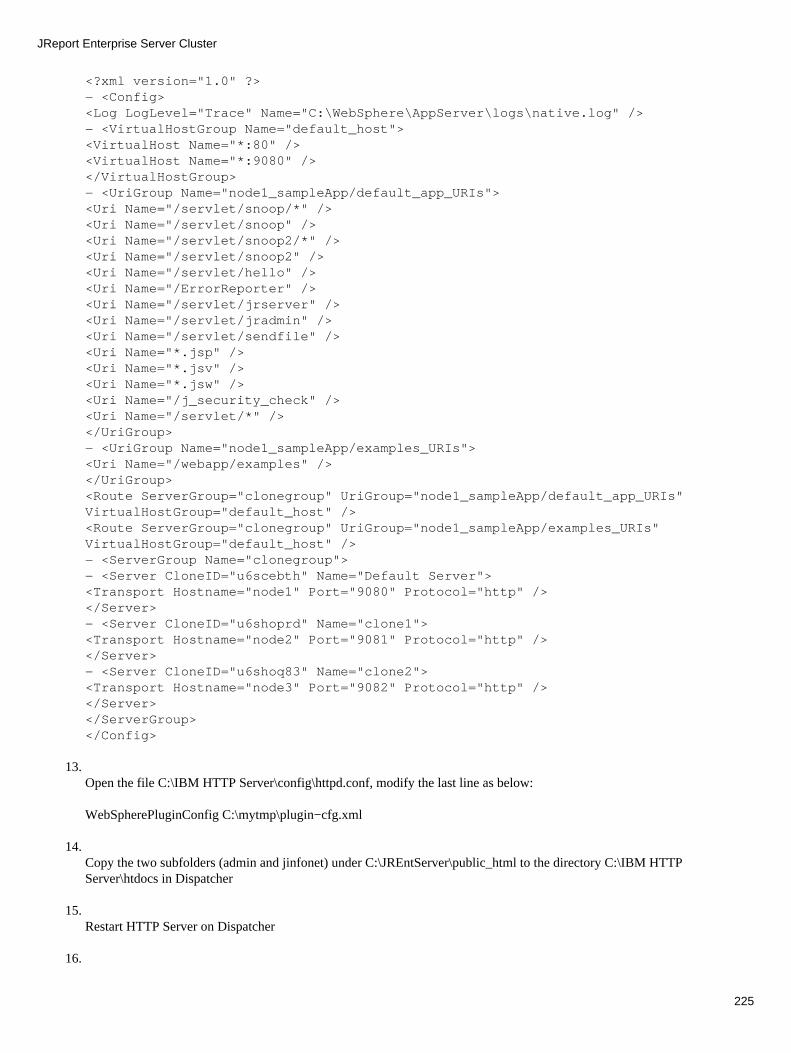
<?xml version="1.0" ?>− <Config><Log LogLevel="Trace" Name="C:\WebSphere\AppServer\logs\native.log" />− <VirtualHostGroup Name="default_host"><VirtualHost Name="*:80" /><VirtualHost Name="*:9080" /></VirtualHostGroup>− <UriGroup Name="node1_sampleApp/default_app_URIs"><Uri Name="/servlet/snoop/*" /><Uri Name="/servlet/snoop" /><Uri Name="/servlet/snoop2/*" /><Uri Name="/servlet/snoop2" /><Uri Name="/servlet/hello" /><Uri Name="/ErrorReporter" /><Uri Name="/servlet/jrserver" /><Uri Name="/servlet/jradmin" /><Uri Name="/servlet/sendfile" /><Uri Name="*.jsp" /><Uri Name="*.jsv" /><Uri Name="*.jsw" /><Uri Name="/j_security_check" /><Uri Name="/servlet/*" /></UriGroup>− <UriGroup Name="node1_sampleApp/examples_URIs"><Uri Name="/webapp/examples" /></UriGroup><Route ServerGroup="clonegroup" UriGroup="node1_sampleApp/default_app_URIs"VirtualHostGroup="default_host" /><Route ServerGroup="clonegroup" UriGroup="node1_sampleApp/examples_URIs"VirtualHostGroup="default_host" />− <ServerGroup Name="clonegroup">− <Server CloneID="u6scebth" Name="Default Server"><Transport Hostname="node1" Port="9080" Protocol="http" /></Server>− <Server CloneID="u6shoprd" Name="clone1"><Transport Hostname="node2" Port="9081" Protocol="http" /></Server>− <Server CloneID="u6shoq83" Name="clone2"><Transport Hostname="node3" Port="9082" Protocol="http" /></Server></ServerGroup></Config>
13. Open the file C:\IBM HTTP Server\config\httpd.conf, modify the last line as below:
WebSpherePluginConfig C:\mytmp\plugin−cfg.xml
14. Copy the two subfolders (admin and jinfonet) under C:\JREntServer\public_html to the directory C:\IBM HTTPServer\htdocs in Dispatcher
15. Restart HTTP Server on Dispatcher
16.
JReport Enterprise Server Cluster
225

In Node1, expand Server Groups, right click cloneGroup, select Start.
You can access JRServlet as follows:http://ip of dispatcher/servlet/jrserver
You can access RcServlet as follows:http://Ip address of the admin server:9080/servlet/jradmin
Access JSPs with this URL:http://ip of dispatcher/jinfonet/index.jsphttp://Ip address of the admin server:9080/admin/index.jsp
17.
Testing Loadbalance
JReport Enterprise Server Cluster offers report level loadbalance in the cluster.
For example, several requests are sending to the web server, the web Server will distribute the requests to JReport Enterprise Server.If there is one computer overload, the request will be redistributed to the other computers.
Testing Fail−over
The purpose of the test is to show Manage Affinity and Failover of Sessions.
Sessions can only be accessed by a single Web application. After a session has been created, all requests need to go to theapplication server, which created the session. This Session Affinity is provided by the plug−in.
In a cloned environment, there will be more than one application server that can serve the client requests. The plug−in needsto read a request and be able to identify which clone should handle it. Session identifiers are used to do this.
The session identifiers are made up of the following pieces:
JReport Enterprise Server Cluster
226
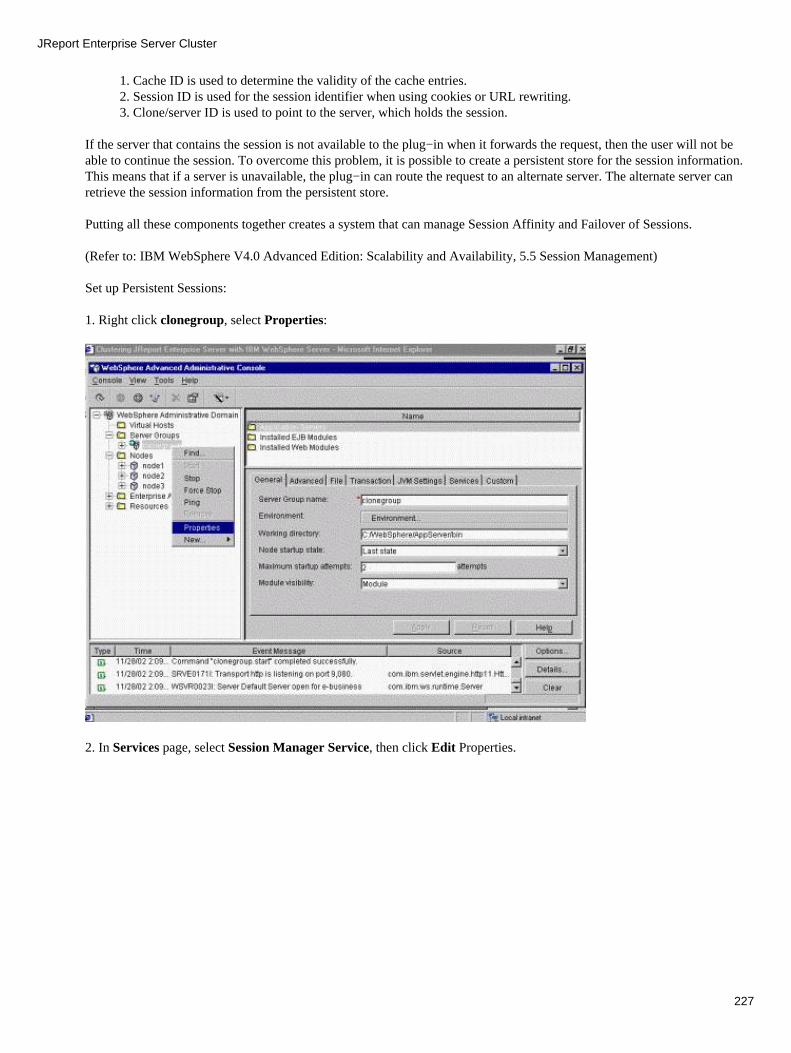
Cache ID is used to determine the validity of the cache entries.1. Session ID is used for the session identifier when using cookies or URL rewriting.2. Clone/server ID is used to point to the server, which holds the session.3.
If the server that contains the session is not available to the plug−in when it forwards the request, then the user will not beable to continue the session. To overcome this problem, it is possible to create a persistent store for the session information.This means that if a server is unavailable, the plug−in can route the request to an alternate server. The alternate server canretrieve the session information from the persistent store.
Putting all these components together creates a system that can manage Session Affinity and Failover of Sessions.
(Refer to: IBM WebSphere V4.0 Advanced Edition: Scalability and Availability, 5.5 Session Management)
Set up Persistent Sessions:
1. Right click clonegroup, select Properties:
2. In Services page, select Session Manager Service, then click Edit Properties.
JReport Enterprise Server Cluster
227
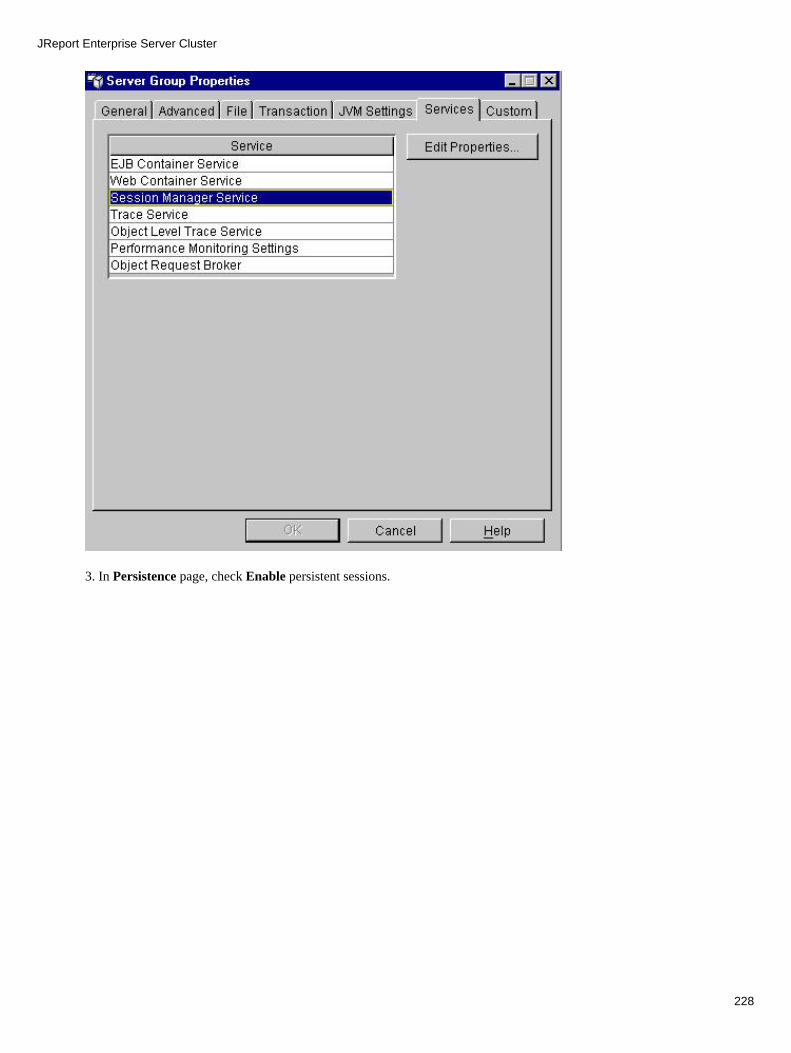
3. In Persistence page, check Enable persistent sessions.
JReport Enterprise Server Cluster
228

4. In Database page, choose SampleDataSource for Data source, and both Username and Password are EJSADMIN.
JReport Enterprise Server Cluster
229
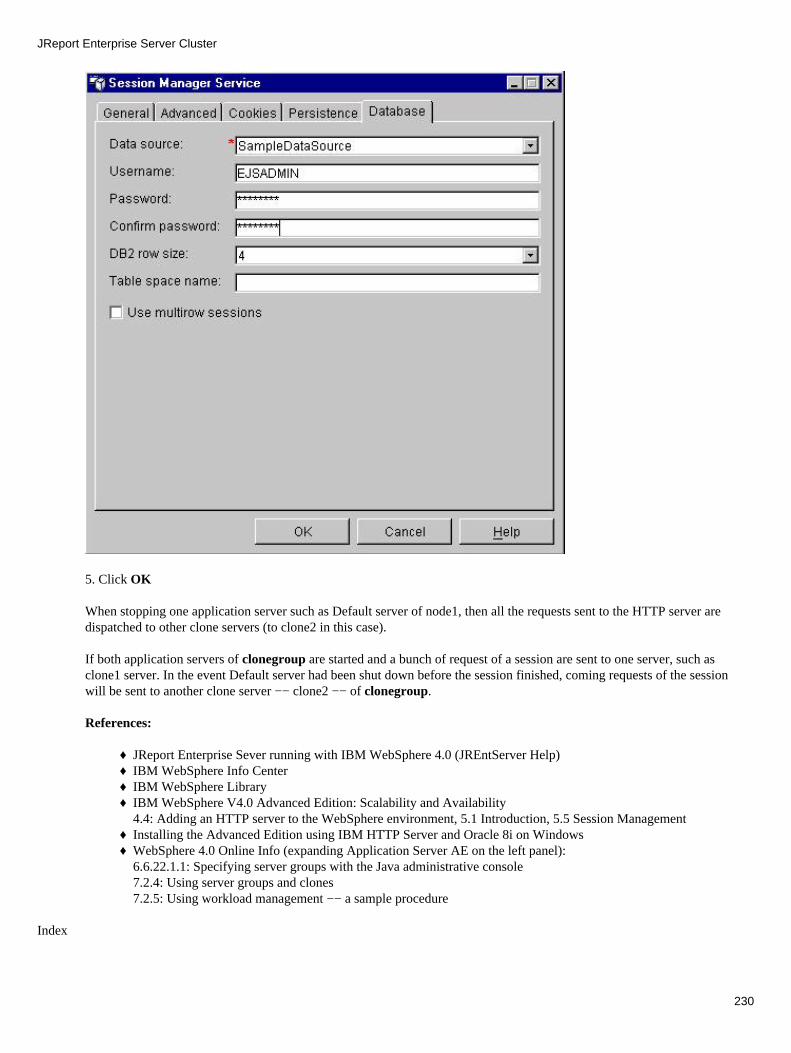
5. Click OK
When stopping one application server such as Default server of node1, then all the requests sent to the HTTP server aredispatched to other clone servers (to clone2 in this case).
If both application servers of clonegroup are started and a bunch of request of a session are sent to one server, such asclone1 server. In the event Default server had been shut down before the session finished, coming requests of the sessionwill be sent to another clone server −− clone2 −− of clonegroup.
References:
JReport Enterprise Sever running with IBM WebSphere 4.0 (JREntServer Help)♦ IBM WebSphere Info Center♦ IBM WebSphere Library♦ IBM WebSphere V4.0 Advanced Edition: Scalability and Availability4.4: Adding an HTTP server to the WebSphere environment, 5.1 Introduction, 5.5 Session Management
♦
Installing the Advanced Edition using IBM HTTP Server and Oracle 8i on Windows♦ WebSphere 4.0 Online Info (expanding Application Server AE on the left panel):6.6.22.1.1: Specifying server groups with the Java administrative console7.2.4: Using server groups and clones7.2.5: Using workload management −− a sample procedure
♦
Index
JReport Enterprise Server Cluster
230
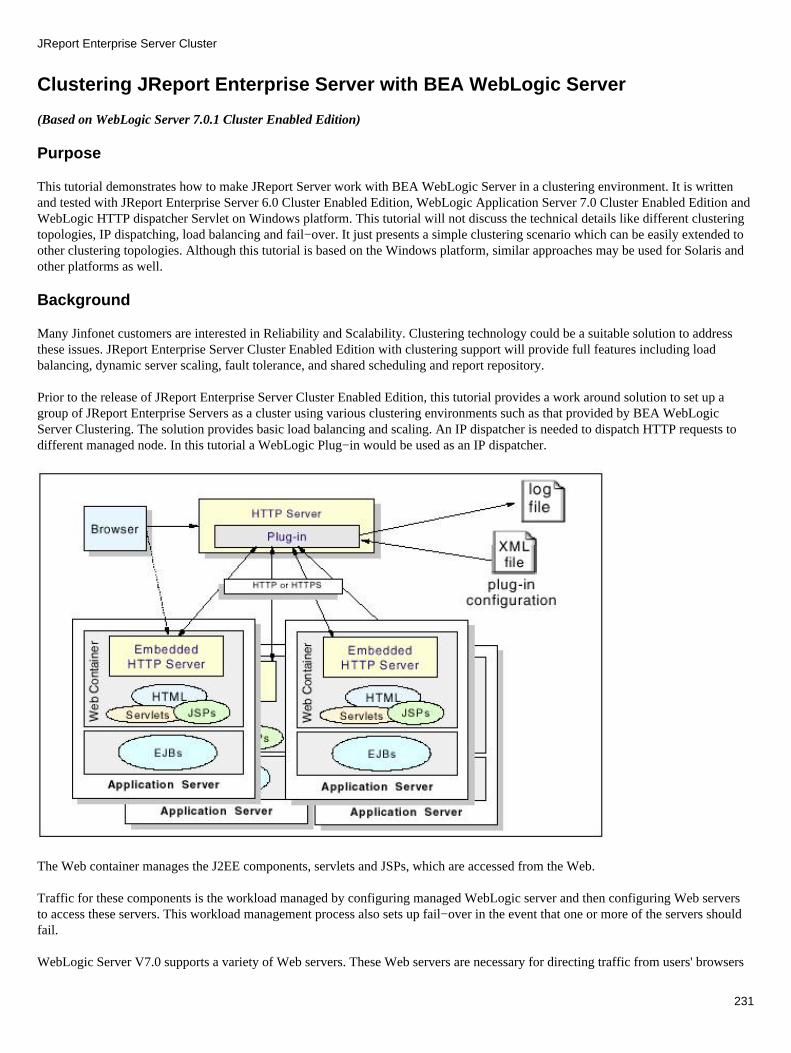
Clustering JReport Enterprise Server with BEA WebLogic Server
(Based on WebLogic Server 7.0.1 Cluster Enabled Edition)
Purpose
This tutorial demonstrates how to make JReport Server work with BEA WebLogic Server in a clustering environment. It is writtenand tested with JReport Enterprise Server 6.0 Cluster Enabled Edition, WebLogic Application Server 7.0 Cluster Enabled Edition andWebLogic HTTP dispatcher Servlet on Windows platform. This tutorial will not discuss the technical details like different clusteringtopologies, IP dispatching, load balancing and fail−over. It just presents a simple clustering scenario which can be easily extended toother clustering topologies. Although this tutorial is based on the Windows platform, similar approaches may be used for Solaris andother platforms as well.
Background
Many Jinfonet customers are interested in Reliability and Scalability. Clustering technology could be a suitable solution to addressthese issues. JReport Enterprise Server Cluster Enabled Edition with clustering support will provide full features including loadbalancing, dynamic server scaling, fault tolerance, and shared scheduling and report repository.
Prior to the release of JReport Enterprise Server Cluster Enabled Edition, this tutorial provides a work around solution to set up agroup of JReport Enterprise Servers as a cluster using various clustering environments such as that provided by BEA WebLogicServer Clustering. The solution provides basic load balancing and scaling. An IP dispatcher is needed to dispatch HTTP requests todifferent managed node. In this tutorial a WebLogic Plug−in would be used as an IP dispatcher.
The Web container manages the J2EE components, servlets and JSPs, which are accessed from the Web.
Traffic for these components is the workload managed by configuring managed WebLogic server and then configuring Web serversto access these servers. This workload management process also sets up fail−over in the event that one or more of the servers shouldfail.
WebLogic Server V7.0 supports a variety of Web servers. These Web servers are necessary for directing traffic from users' browsers
JReport Enterprise Server Cluster
231

to the applications running in WebLogic. This is achieved by installing the WebLogic plug−in on the Web servers. As shown in thefigure above, the plug−in is a module that runs as part of the Web server process. It acts as a router, deciding what traffic is forWebLogic and what traffic should be handled by the Web server.
In each WebLogic managed node, there is a JRServlet (JReport Servlet) handling report requests from the web. Each JRServlet keepsits own running space, namely, its own 'reporthome' and other private settings; and the report output is only returned to the very nodewhere JRServlet sits on. However, the JRServlets in different WebLogic node could share the same report resources in a public area.Shared resources include catalogs, templates and other resources for running reports like data source, font files, UDFs (User DefinedFormulae), UDOs (User Defined Objects) etc. This makes it possible to have a unique report URL when deploying reports oraccessing reports from the client end.
In this tutorial, The JReport Enterprise Servers have been installed using the "Stand−alone option" in the two computers with thesame folder locations. Next, on each of these computers, an application server will be configured with WebLogic Server 7.0 withJRServlet Solution. This results in a managed Server. This managed server will then be cloned to other computer(s). In the managedServer, 'reporthome' is set to a private space, say, the install path. But the report resources maintained in the JRServlet are in a publicarea with a public shared path. JRSerlet will run the report in accordance with the request. The report output will be returned toWebLogic managed server and in turn to the client.
JReport Enterprise Server Cluster
232
Prerequisite
General knowledge in Operation System (Windows 2000) is assumed. ♦ General knowledge in WebLogic Server and Clustering technology is assumed. ♦ General knowledge in JReport and its Sever technology is assumed. ♦
To walk through this tutorial, the following prerequisites are assumed.
At least 3 computers are pre−installed with Windows 2000. These 3 computers will perform as clones. We assumetheir names are node1, node2 and node3.
1.
ODBC User DSN is pre−installed on each WebLogic managed server. We named them jinfonet and navySample.2. JReport Enterprise Server is pre−installed on each managed server. The 'reporthome' is specified to be the localinstall path, assumed to be D:\JREntServer. The 'Report Resources' are located in a public area with shared access.
3.
One computer is pre−installed with Windows 2000. This one will be the WebLogic plug−in HTTP dispatcher. Weassume its name is httproxy.
4.
WebLogic Server 7.0 Cluster Enabled Edition installation package. The software will be installed in this tutorial. 5. WebLogic plug−in HTTP dispatcher Servelet. May be you should build it by yourself with WebLogic Builder.6.
Installation
The major steps to install and configure JReport Enterprise Server integrated with WebLogic cluster:
Install the same version of BEA WebLogic servers on distributed machines.• Install JReport Enterprise Servers on the machines.• Create HTTP Dispatcher Server.•
Below is a detailed description of each step:
Install BEA WebLogic Servers on Distributed Machines
You can refer to BEA online document about Cluster (Click here). Install WebLogic server on node1, node2, node3.
Note: You must use the same cluster enabled copy to build an application server cluster. Refer to related information in BEA onlinedocuments.
Install JReport Enterprise Servers on the Machines
Install JReport Enterprise Server to node2 and node3 as standalone server.
Note: Please Install JReport Enterprise Server to the same path under node2 and node3. For the details about how to install JReportServer, please refer to JReport Enterprise Server Manual | User�s Guide | Installing and Launching JReport Enterprise Server
Create HTTP Dispatcher Server
Use WebLogic Domain Configuration Wizard to create managed server on node1. Set the same domain as node1, node2, node3.
Configuration
Configure a BEA Weblogic Cluster
Use WebLogic Domain Configuration Wizard to set node1 as administrate server. Node2 and node3 are set as managed servers. Startadmin server, configure admin server with browser console. Configure WebLogic load balance and fail−over feature, start them.
Reference: Please refer to BEA WebLogic 7.0 online documents.(Click here)
JReport Enterprise Server Cluster
233

Configure JReport Enterprise Server Cluster
Start JReport Enterprise Server on node1 and node2. Edit server.properties file to configure load balance and fail−over features ofJReport Server. Refer to User�s Guide | JReport Enterprise Server Cluster | JReport Enterprise Server Cluster Features
Configure JReport Demo ODBC Data Source
Set up ODBC Data Source for Demo Reports. Refer to JREntServer Tutorial | Setting up the ODBC Driver
Configure HTTP Dispatcher
Start admin server and configure cluster environment by browser console. Create a HTTP dispatcher server and add it to WebLogicDomain (Please refer to WebLogic Server Examples Clustering Guide under the path:%Weblogic7Home%\samples\server\src\examples\cluster.html
Create a directory. Let's call it, httproxy. Within this directory create another one called WEB−INF. Create a file called web.xml inthis WEB−INF directory and open it with an editor. Paste the following text to the web.xml file. However, you must modify thevalues in blue to match the server names and ports of the managed servers you specified when you created your cluster.
<!DOCTYPE web−app PUBLIC "−//Sun Microsystems, Inc.//DTD Web Application 2.3//EN""http://java.sun.com/dtd/web−app_2_3.dtd"><web−app>
<servlet><servlet−name>HttpClusterServlet</servlet−name><servlet−class>weblogic.servlet.internal.HttpClusterServlet</servlet−class><init−param><param−name>defaultServers</param−name><param−value>node2_IP:node2_port|node3_IP:node3_port</param−value></init−param><init−param><param−name>verbose</param−name><param−value>true</param−value></init−param><init−param><param−name>DebugConfigInfo</param−name><param−value>ON</param−value></init−param></servlet>
<servlet−mapping><servlet−name>HttpClusterServlet</servlet−name><url−pattern>/</url−pattern></servlet−mapping>
<servlet−mapping><servlet−name>HttpClusterServlet</servlet−name><url−pattern>*.jsp</url−pattern></servlet−mapping>
<servlet−mapping><servlet−name>HttpClusterServlet</servlet−name><url−pattern>*.htm</url−pattern></servlet−mapping>
<servlet−mapping>
JReport Enterprise Server Cluster
234

<servlet−name>HttpClusterServlet</servlet−name><url−pattern>*.html</url−pattern></servlet−mapping>
<login−config><auth−method></auth−method></login−config>
</web−app>
Note: The value in the section marked with blue color depends on your specific environment.
When all are finished, open the httproxy directory by WebLogic Builder, and build the httproxy.war file. As how to useWebLogic Builder, please refer to WebLogic Builder online help.
Select JReport Integrating Components and Build a Deployment Module
Create a directory. Let's call it jreport (in the following text we use %jreport_dir% to refer to this directory). Within thisdirectory create another one called WEB−INF. Create a file called web.xml in this WEB−INF directory and open it with an editor.Paste the following text to web.xml file.
<!DOCTYPE web−app PUBLIC "−//Sun Microsystems, Inc.//DTD Web Application 2.3//EN""http://java.sun.com/dtd/web−app_2_3.dtd"><web−app>
<servlet><servlet−name>jradmin</servlet−name><servlet−class>jet.server.servlets.RcServlet</servlet−class><init−param><param−name>reporthome</param−name><param−value>D:\JREntServer</param−value></init−param></servlet>
<servlet><servlet−name>jrserver</servlet−name><servlet−class>jet.server.servlets.JRServlet</servlet−class><init−param><param−name>reporthome</param−name><param−value>D:\JREntServer</param−value></init−param></servlet>
<servlet><servlet−name>sendfile</servlet−name><servlet−class>jet.server.servlets.SendFileServlet</servlet−class></servlet>
<servlet><servlet−name>webreporting</servlet−name><servlet−class>jet.web.design.Designlet</servlet−class><init−param><param−name>reporthome</param−name><param−value>D:\JREntServer</param−value></init−param></servlet>
JReport Enterprise Server Cluster
235
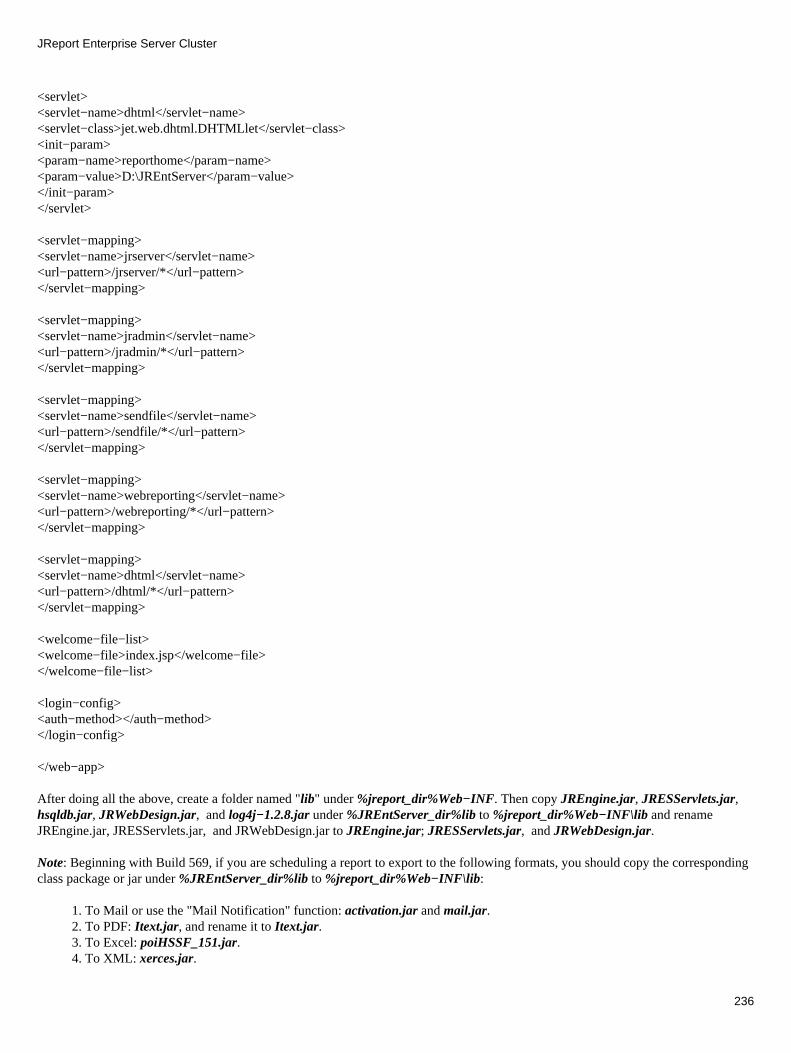
<servlet><servlet−name>dhtml</servlet−name><servlet−class>jet.web.dhtml.DHTMLlet</servlet−class><init−param><param−name>reporthome</param−name><param−value>D:\JREntServer</param−value></init−param></servlet>
<servlet−mapping><servlet−name>jrserver</servlet−name><url−pattern>/jrserver/*</url−pattern></servlet−mapping>
<servlet−mapping><servlet−name>jradmin</servlet−name><url−pattern>/jradmin/*</url−pattern></servlet−mapping>
<servlet−mapping><servlet−name>sendfile</servlet−name><url−pattern>/sendfile/*</url−pattern></servlet−mapping>
<servlet−mapping><servlet−name>webreporting</servlet−name><url−pattern>/webreporting/*</url−pattern></servlet−mapping>
<servlet−mapping><servlet−name>dhtml</servlet−name><url−pattern>/dhtml/*</url−pattern></servlet−mapping>
<welcome−file−list><welcome−file>index.jsp</welcome−file></welcome−file−list>
<login−config><auth−method></auth−method></login−config>
</web−app>
After doing all the above, create a folder named "lib" under %jreport_dir%Web−INF. Then copy JREngine.jar, JRESServlets.jar,hsqldb.jar, JRWebDesign.jar, and log4j−1.2.8.jar under %JREntServer_dir%lib to %jreport_dir%Web−INF\lib and renameJREngine.jar, JRESServlets.jar, and JRWebDesign.jar to JREngine.jar; JRESServlets.jar, and JRWebDesign.jar.
Note: Beginning with Build 569, if you are scheduling a report to export to the following formats, you should copy the correspondingclass package or jar under %JREntServer_dir%lib to %jreport_dir%Web−INF\lib:
To Mail or use the "Mail Notification" function: activation.jar and mail.jar.1. To PDF: Itext.jar, and rename it to Itext.jar.2. To Excel: poiHSSF_151.jar.3. To XML: xerces.jar.4.
JReport Enterprise Server Cluster
236
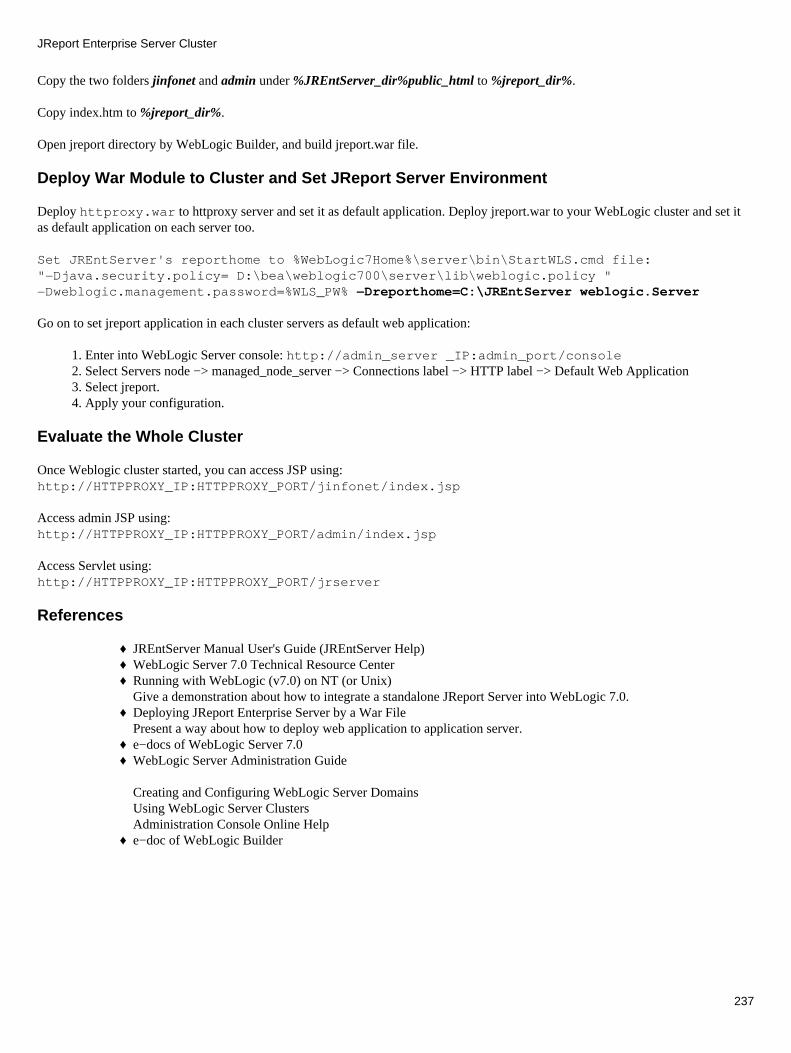
Copy the two folders jinfonet and admin under %JREntServer_dir%public_html to %jreport_dir%.
Copy index.htm to %jreport_dir%.
Open �jreport� directory by WebLogic Builder, and build jreport.war file.
Deploy War Module to Cluster and Set JReport Server Environment
Deploy httproxy.war to httproxy server and set it as default application. Deploy jreport.war to your WebLogic cluster and set itas default application on each server too.
Set JREntServer's reporthome to %WebLogic7Home%\server\bin\StartWLS.cmd file:"−Djava.security.policy= D:\bea\weblogic700\server\lib\weblogic.policy "−Dweblogic.management.password=%WLS_PW% −Dreporthome=C:\JREntServer weblogic.Server
Go on to set jreport application in each cluster servers as default web application:
Enter into WebLogic Server console: http://admin_server _IP:admin_port/console1. Select �Servers� node −> managed_node_server −> �Connections� label −> �HTTP� label −> �Default Web Application�2. Select �jreport�.3. Apply your configuration.4.
Evaluate the Whole Cluster
Once Weblogic cluster started, you can access JSP using:http://HTTPPROXY_IP:HTTPPROXY_PORT/jinfonet/index.jsp
Access admin JSP using:http://HTTPPROXY_IP:HTTPPROXY_PORT/admin/index.jsp
Access Servlet using:http://HTTPPROXY_IP:HTTPPROXY_PORT/jrserver
References
JREntServer Manual User's Guide (JREntServer Help)♦ WebLogic Server 7.0 Technical Resource Center♦ Running with WebLogic (v7.0) on NT (or Unix)Give a demonstration about how to integrate a standalone JReport Server into WebLogic 7.0.
♦
Deploying JReport Enterprise Server by a War FilePresent a way about how to deploy web application to application server.
♦
e−docs of WebLogic Server 7.0♦ WebLogic Server Administration Guide
Creating and Configuring WebLogic Server DomainsUsing WebLogic Server ClustersAdministration Console Online Help
♦
e−doc of WebLogic Builder♦
JReport Enterprise Server Cluster
237
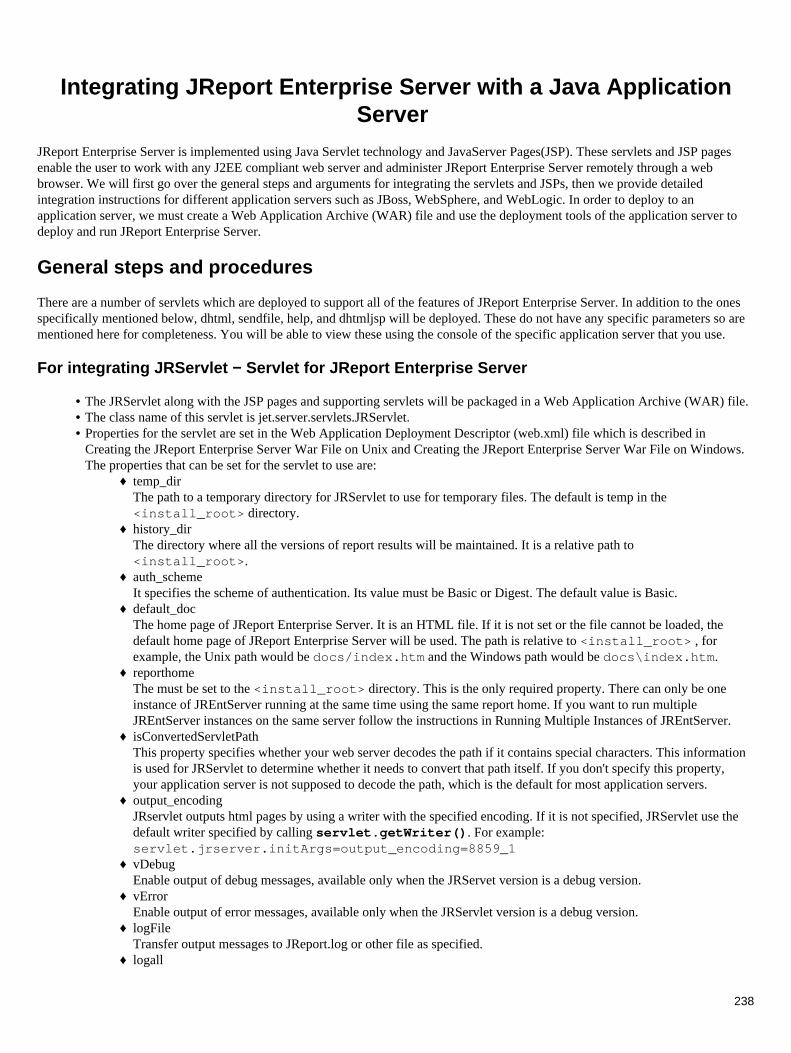
Integrating JReport Enterprise Server with a Java ApplicationServer
JReport Enterprise Server is implemented using Java Servlet technology and JavaServer Pages(JSP). These servlets and JSP pagesenable the user to work with any J2EE compliant web server and administer JReport Enterprise Server remotely through a webbrowser. We will first go over the general steps and arguments for integrating the servlets and JSPs, then we provide detailedintegration instructions for different application servers such as JBoss, WebSphere, and WebLogic. In order to deploy to anapplication server, we must create a Web Application Archive (WAR) file and use the deployment tools of the application server todeploy and run JReport Enterprise Server.
General steps and procedures
There are a number of servlets which are deployed to support all of the features of JReport Enterprise Server. In addition to the onesspecifically mentioned below, dhtml, sendfile, help, and dhtmljsp will be deployed. These do not have any specific parameters so arementioned here for completeness. You will be able to view these using the console of the specific application server that you use.
For integrating JRServlet − Servlet for JReport Enterprise Server
The JRServlet along with the JSP pages and supporting servlets will be packaged in a Web Application Archive (WAR) file. • The class name of this servlet is jet.server.servlets.JRServlet. • Properties for the servlet are set in the Web Application Deployment Descriptor (web.xml) file which is described inCreating the JReport Enterprise Server War File on Unix and Creating the JReport Enterprise Server War File on Windows.The properties that can be set for the servlet to use are:
temp_dir The path to a temporary directory for JRServlet to use for temporary files. The default is temp in the<install_root> directory.
♦
history_dir The directory where all the versions of report results will be maintained. It is a relative path to<install_root>.
♦
auth_scheme It specifies the scheme of authentication. Its value must be Basic or Digest. The default value is Basic.
♦
default_doc The home page of JReport Enterprise Server. It is an HTML file. If it is not set or the file cannot be loaded, thedefault home page of JReport Enterprise Server will be used. The path is relative to <install_root> , forexample, the Unix path would be docs/index.htm and the Windows path would be docs\index.htm.
♦
reporthome The must be set to the <install_root> directory. This is the only required property. There can only be oneinstance of JREntServer running at the same time using the same report home. If you want to run multipleJREntServer instances on the same server follow the instructions in Running Multiple Instances of JREntServer.
♦
isConvertedServletPath This property specifies whether your web server decodes the path if it contains special characters. This informationis used for JRServlet to determine whether it needs to convert that path itself. If you don't specify this property,your application server is not supposed to decode the path, which is the default for most application servers.
♦
output_encoding JRservlet outputs html pages by using a writer with the specified encoding. If it is not specified, JRServlet use thedefault writer specified by calling servlet.getWriter(). For example:servlet.jrserver.initArgs=output_encoding=8859_1
♦
vDebug Enable output of debug messages, available only when the JRServet version is a debug version.
♦
vError Enable output of error messages, available only when the JRServlet version is a debug version.
♦
logFile Transfer output messages to JReport.log or other file as specified.
♦
logall ♦
•
238
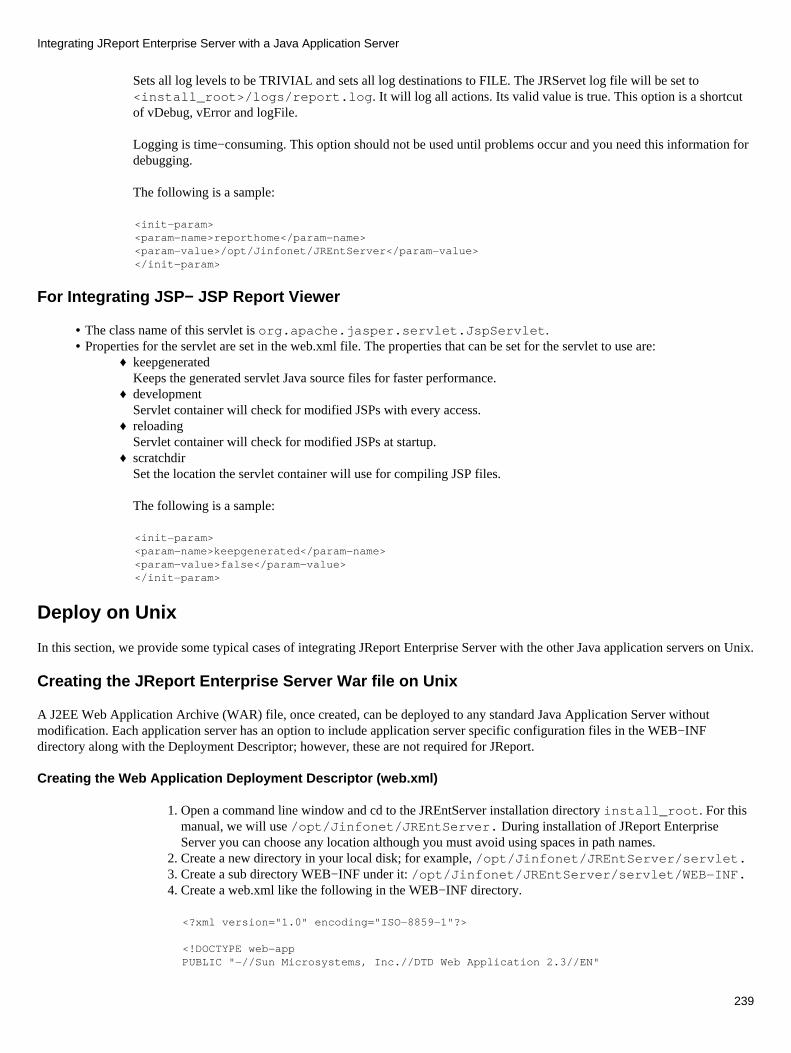
Sets all log levels to be TRIVIAL and sets all log destinations to FILE. The JRServet log file will be set to<install_root>/logs/report.log. It will log all actions. Its valid value is true. This option is a shortcutof vDebug, vError and logFile.
Logging is time−consuming. This option should not be used until problems occur and you need this information fordebugging.
The following is a sample:
<init−param><param−name>reporthome</param−name><param−value>/opt/Jinfonet/JREntServer</param−value></init−param>
For Integrating JSP− JSP Report Viewer
The class name of this servlet is org.apache.jasper.servlet.JspServlet. • Properties for the servlet are set in the web.xml file. The properties that can be set for the servlet to use are:
keepgenerated Keeps the generated servlet Java source files for faster performance.
♦
development Servlet container will check for modified JSPs with every access.
♦
reloading Servlet container will check for modified JSPs at startup.
♦
scratchdir Set the location the servlet container will use for compiling JSP files.
The following is a sample:
♦
<init−param> <param−name>keepgenerated</param−name><param−value>false</param−value> </init−param>
•
Deploy on Unix
In this section, we provide some typical cases of integrating JReport Enterprise Server with the other Java application servers on Unix.
Creating the JReport Enterprise Server War file on Unix
A J2EE Web Application Archive (WAR) file, once created, can be deployed to any standard Java Application Server withoutmodification. Each application server has an option to include application server specific configuration files in the WEB−INFdirectory along with the Deployment Descriptor; however, these are not required for JReport.
Creating the Web Application Deployment Descriptor (web.xml)
Open a command line window and cd to the JREntServer installation directory install_root. For thismanual, we will use /opt/Jinfonet/JREntServer. During installation of JReport EnterpriseServer you can choose any location although you must avoid using spaces in path names.
1.
Create a new directory in your local disk; for example, /opt/Jinfonet/JREntServer/servlet.2. Create a sub directory WEB−INF under it: /opt/Jinfonet/JREntServer/servlet/WEB−INF.3. Create a web.xml like the following in the WEB−INF directory. 4.
<?xml version="1.0" encoding="ISO−8859−1"?>
<!DOCTYPE web−app PUBLIC "−//Sun Microsystems, Inc.//DTD Web Application 2.3//EN"
Integrating JReport Enterprise Server with a Java Application Server
239

"http://java.sun.com/dtd/web−app_2_3.dtd">
<web−app>
<servlet><servlet−name>jrserver</servlet−name> <servlet−class>jet.server.servlets.JRServlet</servlet−class><init−param> <param−name>reporthome</param−name> <param−value>/opt/Jinfonet/JREntServer</param−value> </init−param> <load−on−startup>1</load−on−startup> </servlet>
<servlet> <servlet−name>sendfile</servlet−name> <servlet−class>jet.server.servlets.SendFileServlet</servlet−class> </servlet>
<servlet> <servlet−name>dhtml</servlet−name><servlet−class>jet.web.dhtml.DHTMLlet</servlet−class> </servlet>
<servlet> <servlet−name>help</servlet−name> <servlet−class>jet.web.dhtml.JHelplet</servlet−class> </servlet>
<servlet−mapping> <servlet−name>jrserver</servlet−name><url−pattern>/jrserver/*</url−pattern> </servlet−mapping>
<servlet−mapping><servlet−name>sendfile</servlet−name><url−pattern>/sendfile/*</url−pattern> </servlet−mapping>
<servlet−mapping> <servlet−name>dhtml</servlet−name> <url−pattern>/dhtml/*</url−pattern> </servlet−mapping>
<servlet−mapping> <servlet−name>help</servlet−name> <url−pattern>/help/*</url−pattern> </servlet−mapping>
</web−app>
If you want to support start/stop/restart of the report server in an integrated environment, add the followinglines to the XML code above. (Note: This feature is based on Servlet2.3 specification. The<listener> sections should be ahead to the first <servlet> sections.)
5.
<listener> <listener−class> jet.server.servlets.JRServerContextListener </listener−class> </listener>
Reference: Integrating JReport with a Java Application Server | General Steps and Procedures Create a directory named lib in the servlet/WEB−INF directory.
mkdir lib
6.
Create a directory named pages in the servlet/WEB−INF/lib directory. 7.
Integrating JReport Enterprise Server with a Java Application Server
240
mkdir lib/pages Copy all of the files in /opt/Jinfonet/JREntServer/lib/pages to theservlet/WEB−INF/lib/pages directory.
cp /opt/Jinfonet/JRentServer/lib/pages/* lib/pages
8.
Copy JREngine.jar, JRESServlets.jar, JRWebDesign.jar, hsqldb.jar, tar.jar, log4j−1.2.8.jar,xerces.jar, jai_codec.jar, jai_core.jar, commons−codec−1.2.jar, and jakarta−regexp−1.3.jar from/opt/Jinfonet/JREntServer/lib to the servlet/WEB−INF/lib directory.
If you are creating reports in the following formats, you should copy the corresponding jar to theservlet/WEB−INF/lib directory:
To use Mail or use the Mail Notification function, copy activation.jar and mail.jar.• To use PDF and DHTML, copy Itext.jar. • To use Excel, copy poiHSSF_151.jar. • To use DHTML tag libraries, copy taglib.jar •
9.
Copy the file index.htm and the folders jinfonet, admin, and dhtmljsp from/opt/Jinfonet/JREntServer/public_html to the/opt/Jinfonet/JREntServer/servlet directory.
cp −r /opt/Jinfonet/JREntServer/public_html/*/opt/Jinfonet/JREntServer/servlet
Note: The jsp files within the admin folder are used by the JReport Enterprise Server Administration.Those within the dhtmljsp folder are used when viewing reports in DHTML format.
•
If you copy index.htm and these folders mentioned above to a sub−folder under/opt/Jinfonet/JREntServer/servlet, for example,/opt/Jinfonet/JREntServer/servlet/jreport, to view reports in DHTML format,you must modify service.setMainPage("/dhtmljsp/dhtmlmain.jsp"); toservice.setMainPage("/jreport/dhtmljsp/dhtmlmain.jsp"); in/dhtmljsp/dhtml.jsp.
•
10.
Edit the index.htm file and add the context path /jreport to the src tag. The result should look like: <FRAME name="ind" src="/jreport/jinfonet/index.jsp" frameborder="0">
11.
Using the following command, create a WAR file named jreport.war:
jar −cvf jreport.war index.htm jinfonet admin dhtmljsp WEB−INF
Note: The jar utility is in the Java home bin directory. If it is not on your path you must call jar with theentire path; for example, /opt/j2sdk1.4.2_07/bin/jar.
12.
Index
Deploying JREntServer to IBM WebSphere 5.1
The example directory paths listed below are based on a typical Solaris or Linux (referred to as Unix) installation of JReportEnterprise Server and WebSphere. Before starting these tasks, you should already have reviewed Integrating JReport EnterpriseServer with a Java Application Server.
Note: You must start the standalone JReport Enterprise Server successfully before you can deploy JREntServer as a Web Applicationas this will create server.properties and other important files and directories. Start the server using/opt/JREntServer/bin/JREntServer.sh.
For example:
WebSphere 5 is installed in the /opt/IBM/WebSphere/AppServer directory.•
Integrating JReport Enterprise Server with a Java Application Server
241

JReport Enterprise Server is installed in the /opt/Jinfonet/JREntServer directory. • JReport jreport.war file is located in the /opt/Jinfonet/JREntServer/servlet directory. You must create theWAR file before proceeding. To create the WAR file refer to the instructions in Creating the JReport Enterprise Server WarFile on Unix.
•
To integrate JReport Enterprise Server with IBM WebSphere 5.1:
Start IBM WebSphere 5. Use the shell script/opt/IBM/WebSphere/AppServer/bin/startServer.sh <servername> to start theserver. The default server name is server1.
1.
Open the Administrative Console in your browser. Open the url: http://hostname:9090/admin/,where the hostname is host name or IP address, and 9090 is the port number. The 9090 port is the defaultfor Unix installations although it may be different on your installation.
2.
To login, create a User ID that contains only letters and numbers. It can be any ID that you want use toidentify your changes such as admin.
3.
After successfully logging in, expand the Applications node, and then click Install New Application. 4. Click Browse to select your War file. For information on how to generate the War file, refer to Creatingthe JReport Enterprise Server War File on Unix .
In the Context Root field, type "/jreport/".
Click Next.
5.
Integrating JReport Enterprise Server with a Java Application Server
242
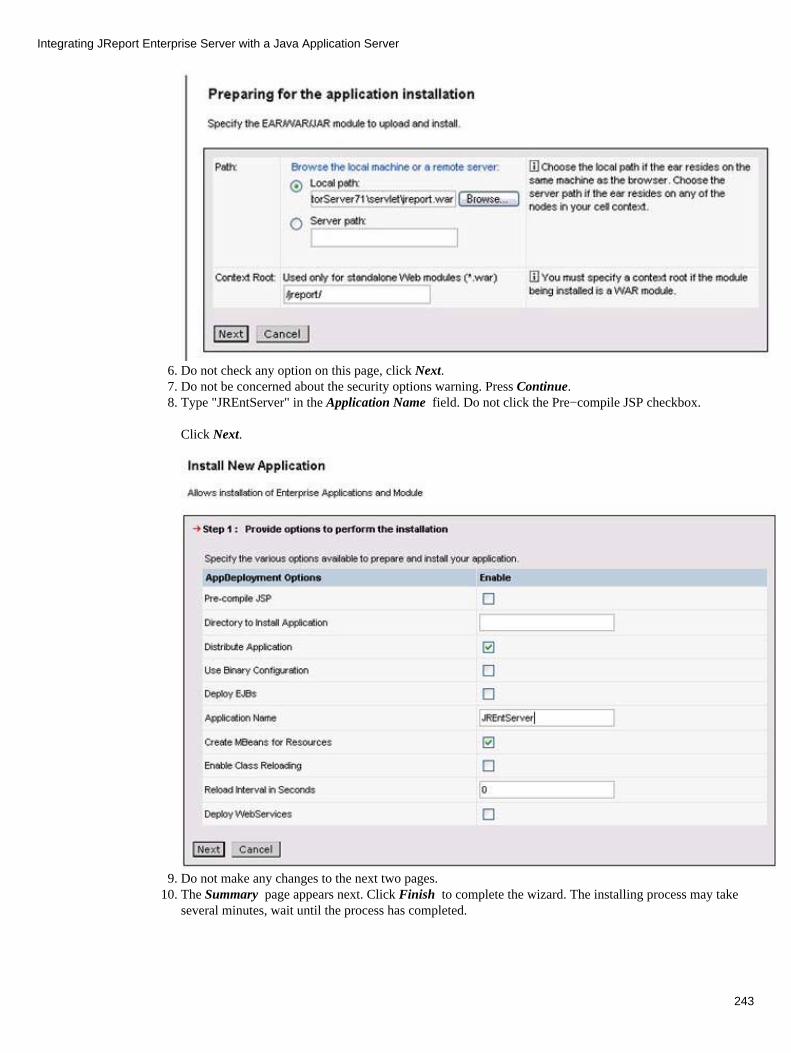
Do not check any option on this page, click Next. 6. Do not be concerned about the security options warning. Press Continue. 7. Type "JREntServer" in the Application Name field. Do not click the Pre−compile JSP checkbox.
Click Next.
8.
Do not make any changes to the next two pages. 9. The Summary page appears next. Click Finish to complete the wizard. The installing process may takeseveral minutes, wait until the process has completed.
10.
Integrating JReport Enterprise Server with a Java Application Server
243
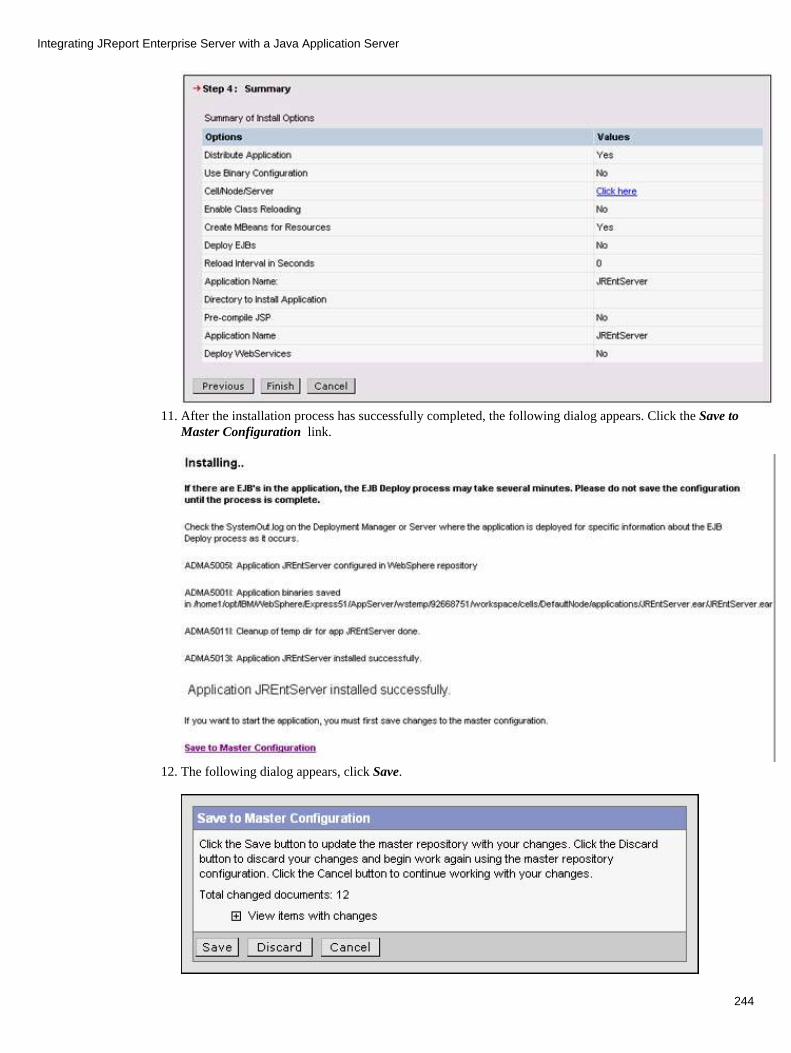
After the installation process has successfully completed, the following dialog appears. Click the Save toMaster Configuration link.
11.
The following dialog appears, click Save. 12.
Integrating JReport Enterprise Server with a Java Application Server
244
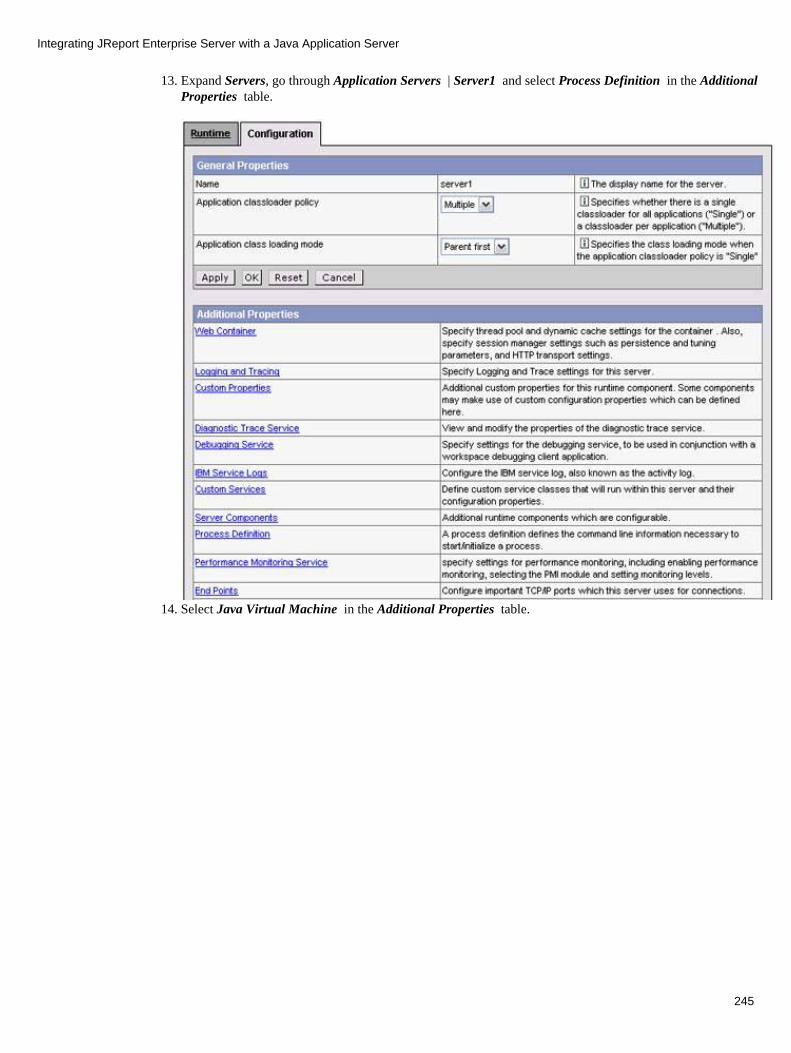
Expand Servers, go through Application Servers | Server1 and select Process Definition in the AdditionalProperties table.
13.
Select Java Virtual Machine in the Additional Properties table. 14.
Integrating JReport Enterprise Server with a Java Application Server
245

In the Generic JVM arguments field enter Dreporthome=/opt/Jinfonet/JREntServer (the JReportEnterprise Server installation folder).
Click OK, save the changes.
Integrating JReport Enterprise Server with a Java Application Server
246
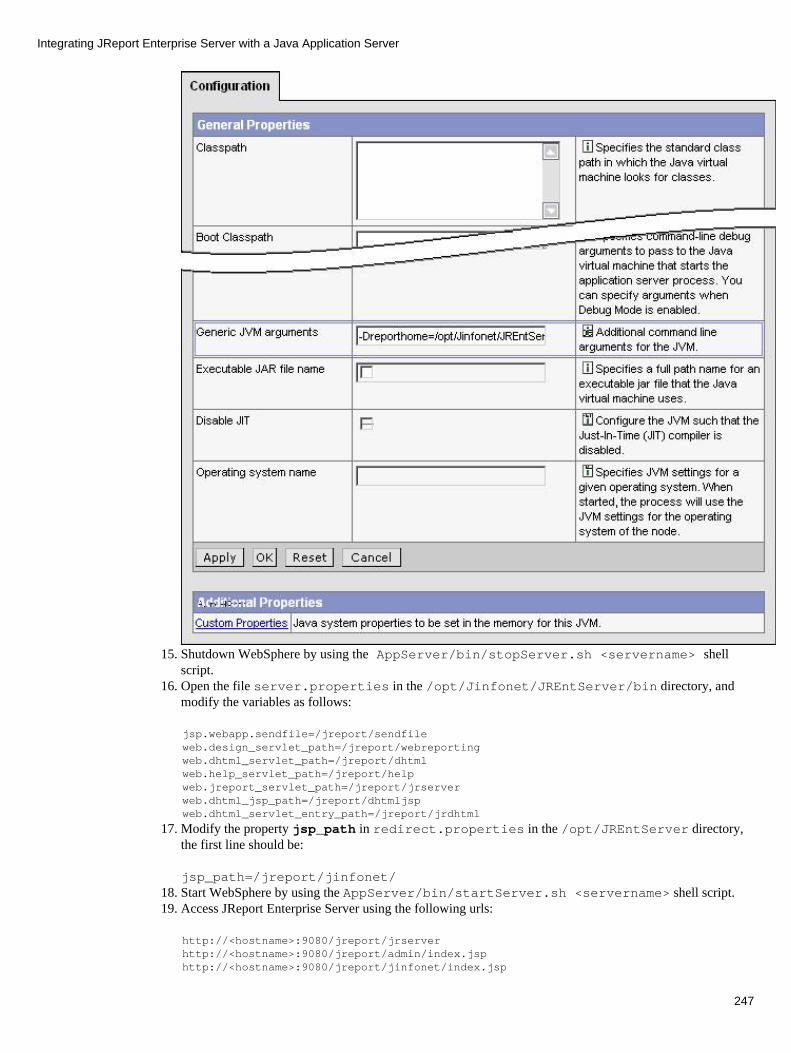
Shutdown WebSphere by using the AppServer/bin/stopServer.sh <servername> shellscript.
15.
Open the file server.properties in the /opt/Jinfonet/JREntServer/bin directory, andmodify the variables as follows:
16.
jsp.webapp.sendfile=/jreport/sendfile web.design_servlet_path=/jreport/webreporting web.dhtml_servlet_path=/jreport/dhtml web.help_servlet_path=/jreport/help web.jreport_servlet_path=/jreport/jrserverweb.dhtml_jsp_path=/jreport/dhtmljspweb.dhtml_servlet_entry_path=/jreport/jrdhtml
Modify the property jsp_path in redirect.properties in the /opt/JREntServer directory,the first line should be:
jsp_path=/jreport/jinfonet/
17.
Start WebSphere by using the AppServer/bin/startServer.sh <servername> shell script. 18. Access JReport Enterprise Server using the following urls: 19.
http://<hostname>:9080/jreport/jrserver http://<hostname>:9080/jreport/admin/index.jsp http://<hostname>:9080/jreport/jinfonet/index.jsp
Integrating JReport Enterprise Server with a Java Application Server
247
Troubleshooting
If you run into problems when using JREntServer in IBM WebSphere, send the log files of JREntServer to [email protected] following procedure illustrates how to generate the log files:
Type −Dlogall=true in the Generic JVM arguments field. For how to find this field, see step 10.
Restart the application server, and try to reproduce the problem. After reproducing the problem, send us the log filesunder/opt/Jinfonet/JREntServer/logs.
The WebSphere log files may also help to identify the problem. The most useful one is in/opt/IBM/WebSphere/AppServer/logs/server1/SystemErr.log.
Index
Deploying JREntServer to IBM WebSphere 6
The example directory paths listed below are based on a typical Solaris or Linux (referred to as Unix) installation of JReportEnterprise Server and WebSphere. Before starting these tasks, you should already have reviewed Integrating JReport with a JavaApplication Server.
Note: You must start the standalone JReport Enterprise Server successfully before you can deploy JREntServer as a Web Applicationas this will create server.properties and other important files and directories. Start the server using/opt/JREntServer/bin/JREntServer.sh.
For example:
WebSphere 6 is installed in the /opt/IBM/WebSphere6/AppServer directory. • JReport Enterprise Server is installed in the /opt/Jinfonet/JREntServer directory. • JReport jreport.war file is located in the /opt/Jinfonet/JREntServer/servlet directory. You must create theWAR file before proceeding. To create the WAR file refer to the instructions in Creating the JReport Enterprise Server WarFile on Unix.
•
To integrate JReport Enterprise Server with IBM WebSphere 6:
Start IBM WebSphere 6. Use the shell script/opt/IBM/WebSphere6/AppServer6/bin/startServer.sh <servername> to start theserver. The default server name is server1.
1.
Open the Administrative Console in your browser. Open the url: http://hostname:9060/admin/,where the hostname is host name or IP address, and 9060 is the port number. The 9060 port is the defaultfor Unix installations although it may be different on your installation.
2.
To login, create a User ID that contains only letters and numbers. It can be any ID that you want use toidentify your changes such as admin.
3.
Integrating JReport Enterprise Server with a Java Application Server
248
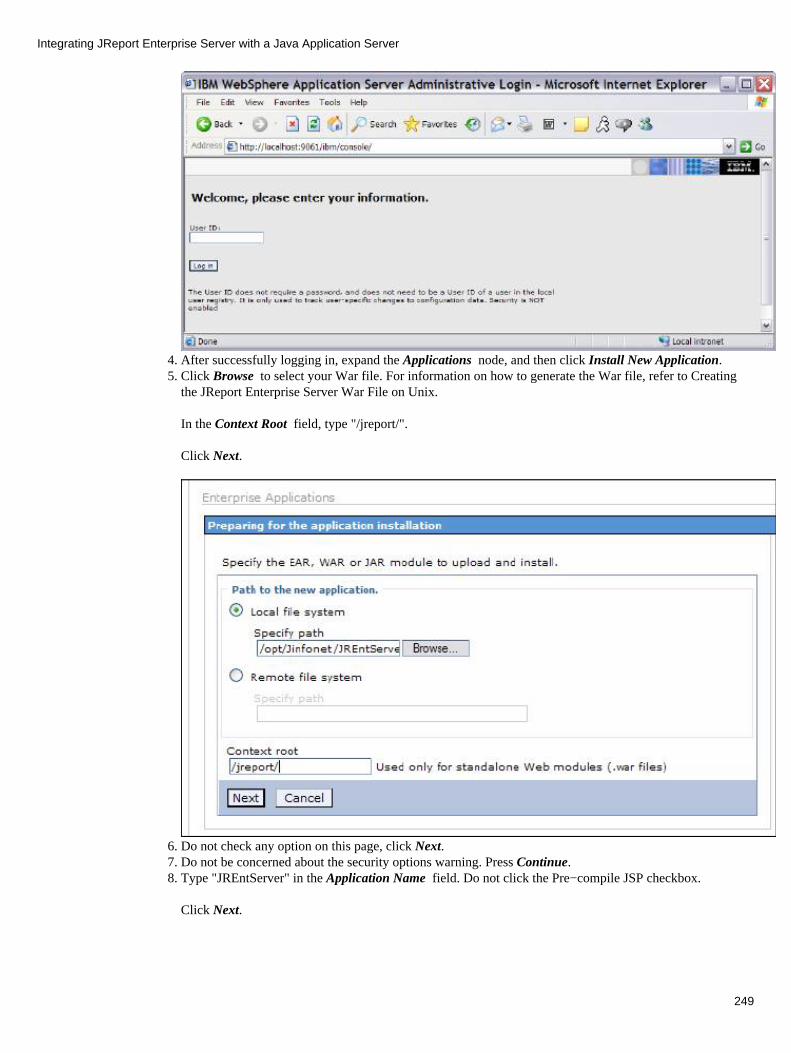
After successfully logging in, expand the Applications node, and then click Install New Application. 4. Click Browse to select your War file. For information on how to generate the War file, refer to Creatingthe JReport Enterprise Server War File on Unix.
In the Context Root field, type "/jreport/".
Click Next.
5.
Do not check any option on this page, click Next. 6. Do not be concerned about the security options warning. Press Continue. 7. Type "JREntServer" in the Application Name field. Do not click the Pre−compile JSP checkbox.
Click Next.
8.
Integrating JReport Enterprise Server with a Java Application Server
249
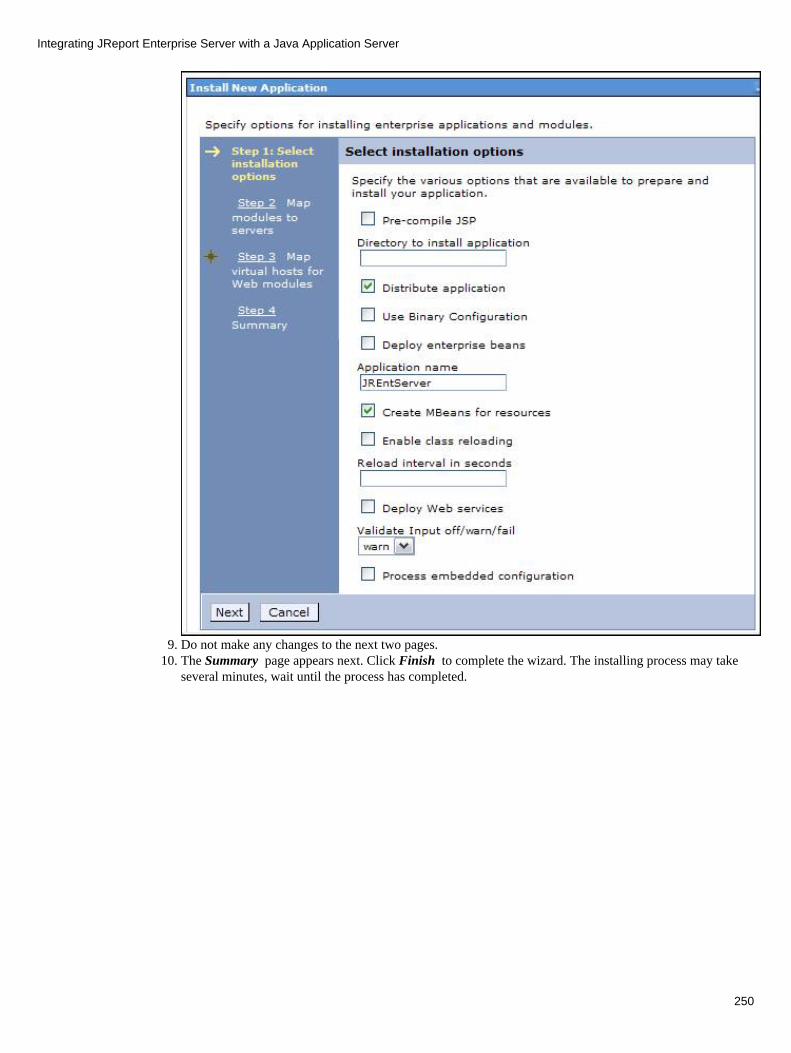
Do not make any changes to the next two pages. 9. The Summary page appears next. Click Finish to complete the wizard. The installing process may takeseveral minutes, wait until the process has completed.
10.
Integrating JReport Enterprise Server with a Java Application Server
250
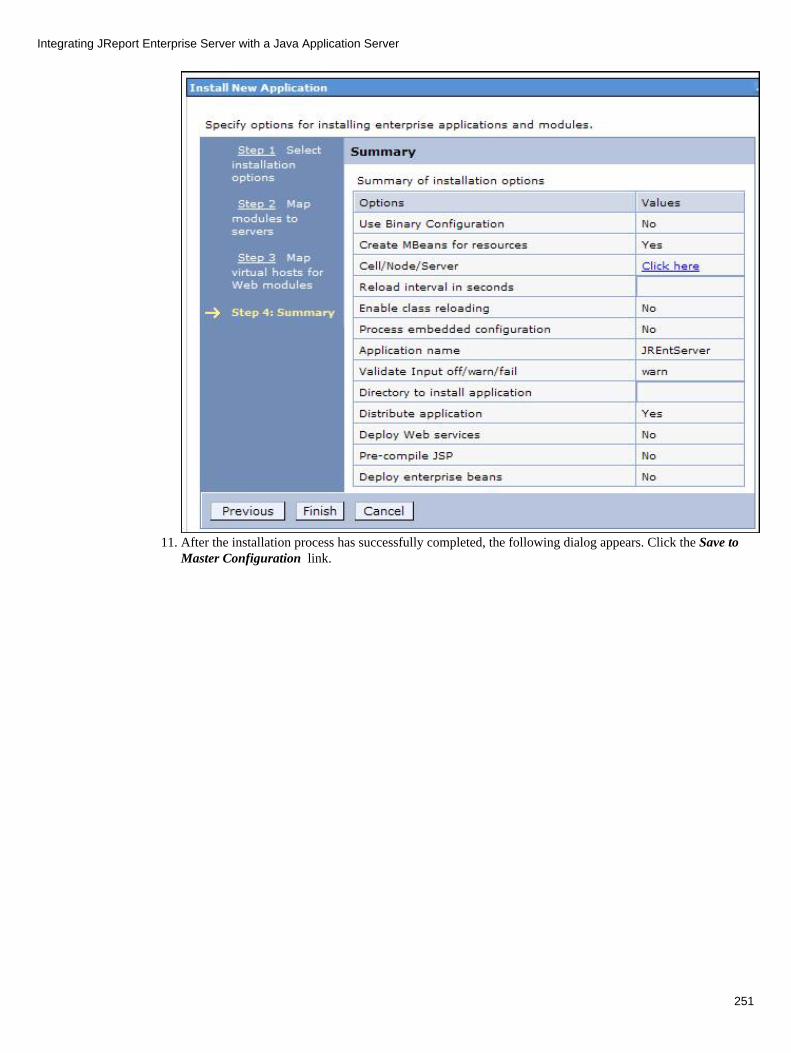
After the installation process has successfully completed, the following dialog appears. Click the Save toMaster Configuration link.
11.
Integrating JReport Enterprise Server with a Java Application Server
251
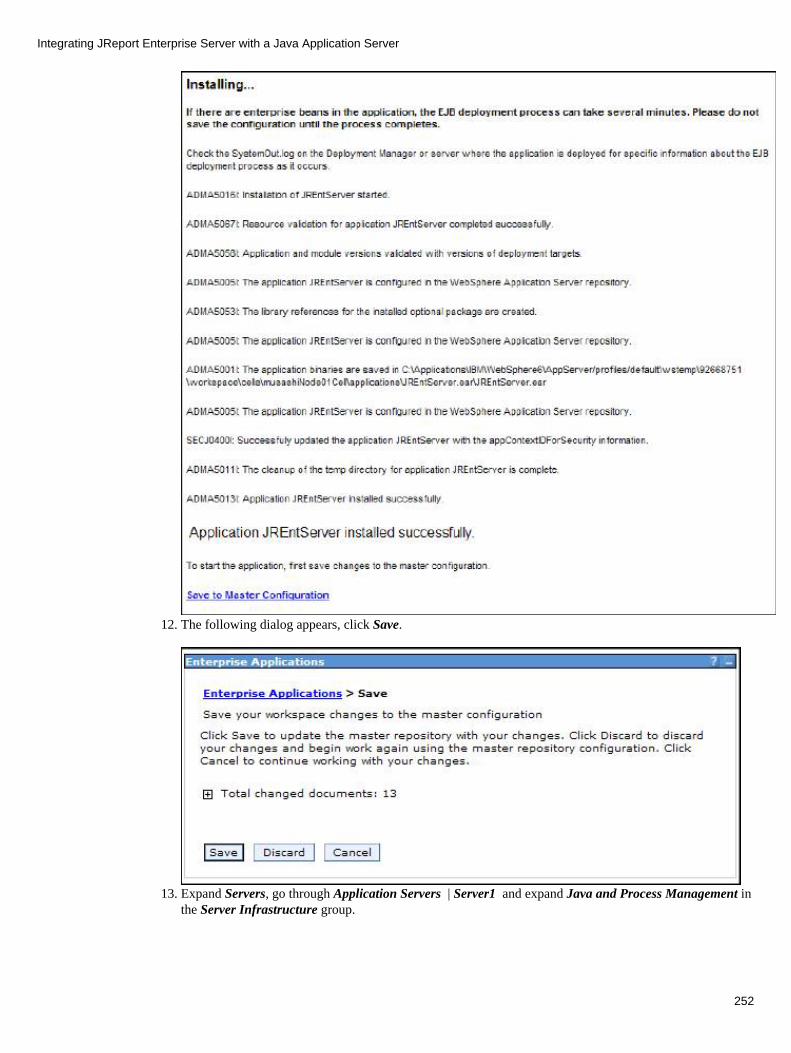
The following dialog appears, click Save. 12.
Expand Servers, go through Application Servers | Server1 and expand Java and Process Management inthe Server Infrastructure group.
13.
Integrating JReport Enterprise Server with a Java Application Server
252
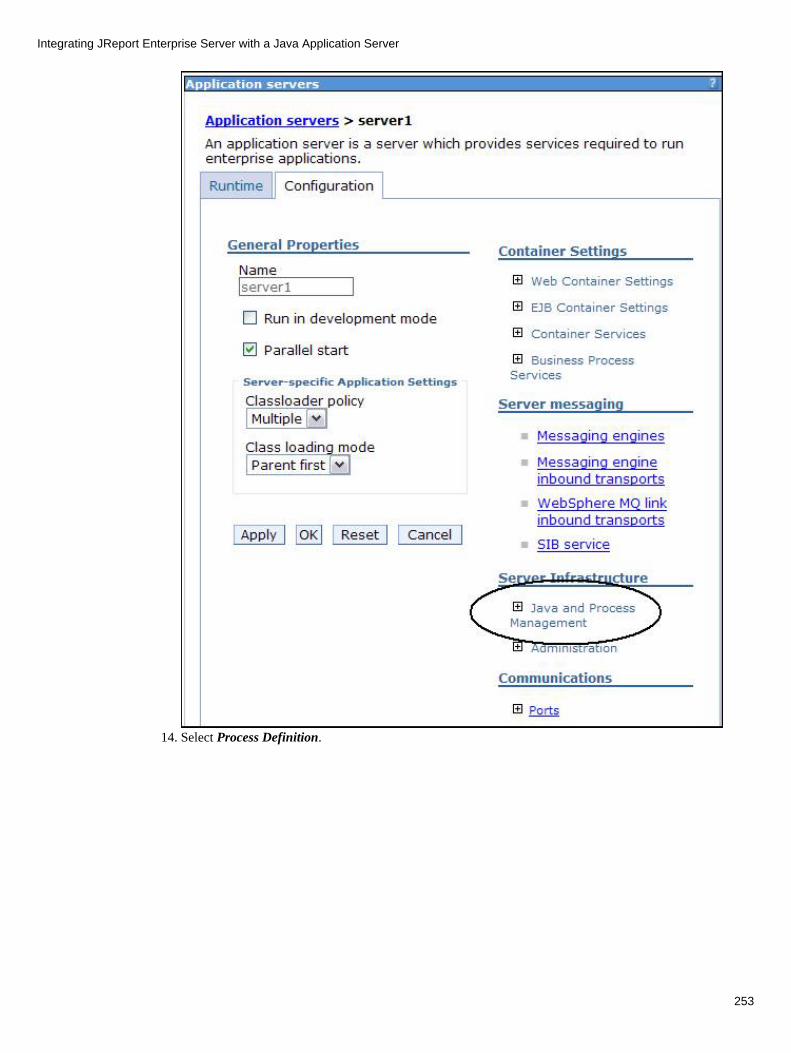
Select Process Definition. 14.
Integrating JReport Enterprise Server with a Java Application Server
253
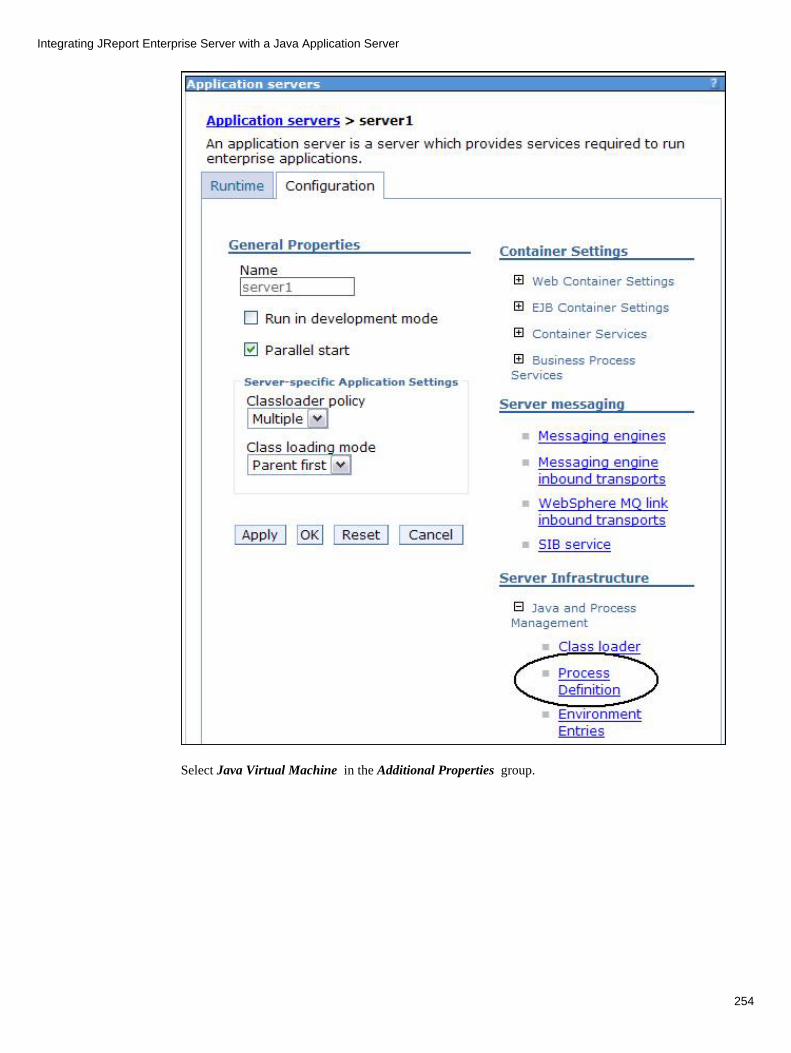
Select Java Virtual Machine in the Additional Properties group.
Integrating JReport Enterprise Server with a Java Application Server
254
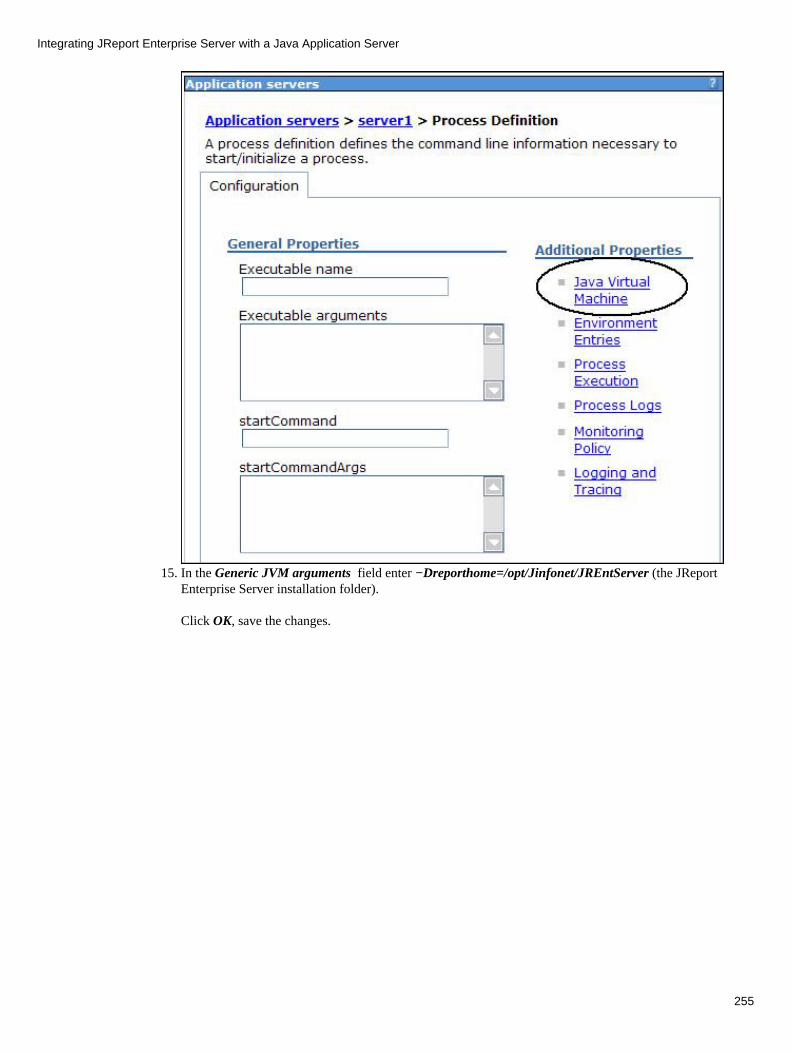
In the Generic JVM arguments field enter −Dreporthome=/opt/Jinfonet/JREntServer (the JReportEnterprise Server installation folder).
Click OK, save the changes.
15.
Integrating JReport Enterprise Server with a Java Application Server
255
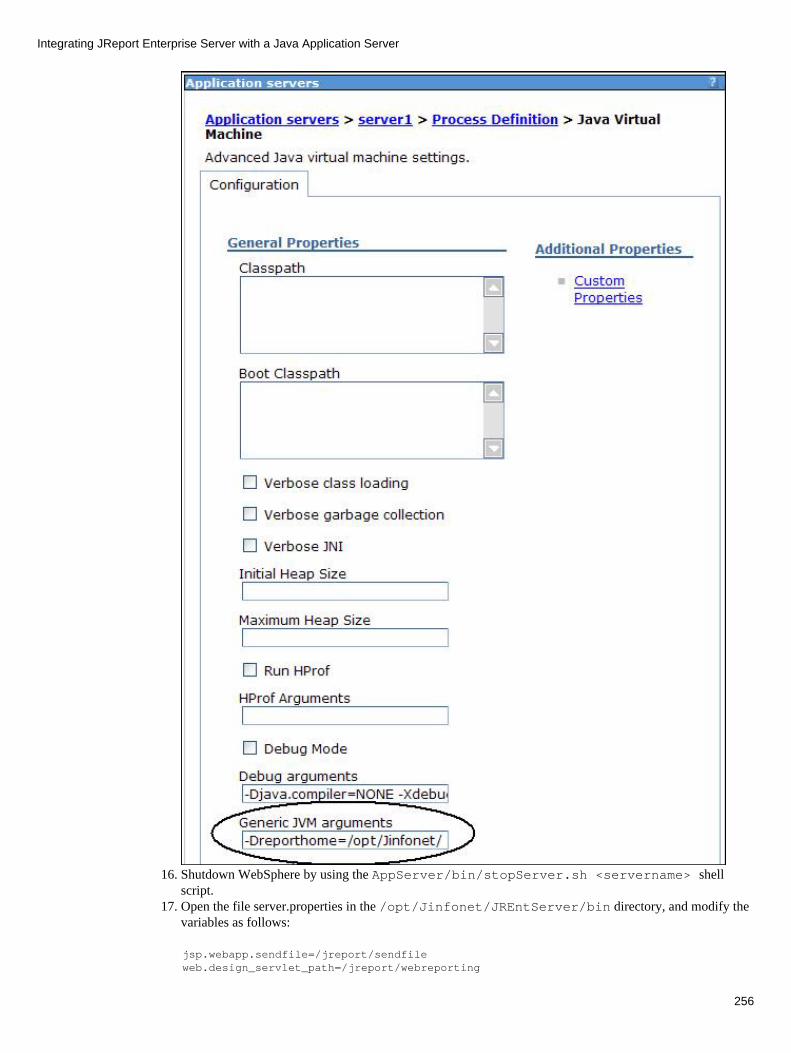
Shutdown WebSphere by using the AppServer/bin/stopServer.sh <servername> shellscript.
16.
Open the file server.properties in the /opt/Jinfonet/JREntServer/bin directory, and modify thevariables as follows:
17.
jsp.webapp.sendfile=/jreport/sendfile web.design_servlet_path=/jreport/webreporting
Integrating JReport Enterprise Server with a Java Application Server
256

web.dhtml_servlet_path=/jreport/dhtml web.help_servlet_path=/jreport/help web.jreport_servlet_path=/jreport/jrserverweb.dhtml_jsp_path=/jreport/dhtmljspweb.dhtml_servlet_entry_path=/jreport/jrdhtml
Modify the property jsp_path in redirect.properties in the /opt/JREntServer directory,the first line should be:
jsp_path=/jreport/jinfonet/
18.
Start WebSphere by using the AppServer/bin/startServer.sh <servername> shell script. 19. Access JReport Enterprise Server using the following urls: 20.
http://<hostname>:9080/jreport/jrserver http://<hostname>:9080/jreport/admin/index.jsp http://<hostname>:9080/jreport/jinfonet/index.jsp
Troubleshooting
If you run into problems when using JREntServer in IBM WebSphere, send the log files of JREntServer to [email protected] following procedure illustrates how to generate the log files:
Type −Dlogall=true in the Generic JVM arguments field. For how to find this field, see step 10.
Restart the application server, and try to reproduce the problem. After reproducing the problem, send us the log files under/opt/Jinfonet/JREntServer/logs.
The WebSphere log files may also help to identify the problem. The most useful one is in/opt/IBM/WebSphere6/AppServer/logs/server1/SystemErr.log.
Index
Deploying JREntServer to JBoss 3.2
The example directory paths listed below are based on a typical Solaris or Linux (referred to as Unix) installation of JReportEnterprise Server and JBoss. Before starting these tasks, you should already have reviewed Integrating JReport Enterprise Serverwith a Java Application Server.
Note: You must start the standalone JReport Enterprise Server successfully before you can deploy JREntServer as a Web Applicationas this will create server.properties and other important files and directories. Start the server using/opt/Jinfonet/JREntServer/bin/JREntServer.sh.
For example:
JBoss 3.2 is installed in the /opt/jboss−3.2.7 directory. • JReport Enterprise Server is installed in the /opt/Jinfonet/JREntServer directory. • JReport Web Application Archive (jreport.war) file is located in the/opt/Jinfonet/JREntServer/servletdirectory. You must create the WAR file before proceeding. To create the WAR file refer to the instructions in Creating theJReport Enterprise Server War File on Unix.
•
Take the following steps before you start the integration process. Because the version of Hypersonic DBMS (hsqldb.jar) inJREntServer may be different from that in JBoss, you need to replace the hsqldb.jar in JREntServer with the one in JBoss 3.2 to avoidclass loading conflicts.
Open a shell window and cd to the /opt/Jinfonet/JREntServer/properties directory. Deletesystable.defaultRealm.backup, systable.defaultRealm.data, systable.defautRealm.properties, andsystable.defaultRealm.script.
1.
In the /opt/Jinfonet/JREntServer directory delete the history and profiling directories. 2.
Integrating JReport Enterprise Server with a Java Application Server
257

Copy hsqldb.jar from /opt/jboss−3.2.7/server/default/lib to /opt/Jinfonet/JREntServer/lib,replacing the existing file.
3.
Launch JREntServer (/opt/Jinfonet/JREntServer/bin/JREntServer.sh) to re−generate the deleted files andconfigure the new archive.
4.
You must re−create the WAR file after copying the new hsqldb.jar to servlet/WEB−INF/lib before proceeding. Tocreate the WAR file refer to the instructions in Creating the JReport Enterprise Server War File on Unix.
5.
To integrate JReport Enterprise Server with JBoss 3.2:
Ensure that JBoss is shutdown by running the script /opt/jboss−3.2.7/bin/shutdown.sh −S. 1. Copy the Web Application Archive file (jreport.war) to/opt/jboss−3.2.7/server/default/deploy.
2.
Open the file server.properties in the/opt/Jinfonet/JREntServer/bin directory, andmodify the variables:
3.
jsp.webapp.sendfile=/jreport/sendfile web.design_servlet_path=/jreport/webreporting web.dhtml_servlet_path=/jreport/dhtml web.help_servlet_path=/jreport/help web.jreport_servlet_path=/jreport/jrserverweb.dhtml_jsp_path=/jreport/dhtmljspweb.dhtml_servlet_entry_path=/jreport/jrdhtml
The Servlet Context Path /jreport/ is determined automatically by JBoss based on the name of theWAR file so if you did not name the file jreport.war use the appropriate name. Open the file redirect.properties in the /opt/Jinfonet/JREntServer/bin directory, andmodify the variable:
jsp_path=/jreport/jinfonet/
4.
Add Report Home to the JBoss startup script.
Modify the batch file run.sh in the /opt/jboss−3.2.7/bin directory. Search for "Execute the JVM". Add −Dreporthome=/opt/Jinfonet/JREntServer to thestartup script as follows:
5.
# Execute the JVM"$JAVA" $JAVA_OPTS \−classpath "$JBOSS_CLASSPATH" −Dreporthome=/opt/Jinfonet/JREntServer \ org.jboss.Main "$@"
Start JBoss by running the run.sh script. 6. Access JReport Enterprise Server using the following URLs: 7.
http://localhost:8080/jreport/jrserver http://localhost:8080/jreport/admin/index.jsp http://localhost:8080/jreport/jinfonet/index.jsp
Troubleshooting
If you run into problems when using JREntServer in JBoss, send the log files of JREntServer to [email protected]. Thefollowing procedure illustrates how to generate the log files:
Modify the batch files run.sh under /opt/jboss−3.2.7/bin.
In the file run.sh, add −Dlogall=true after the reporthome definition:
1.
"$JAVA" $JAVA_OPTS \ −classpath "$JBOSS_CLASSPATH" \ −Dreporthome=/opt/Jinfonet/JREntServer \ −Dlogall=true \ org.jboss.Main "$@"
Integrating JReport Enterprise Server with a Java Application Server
258
After editing run.sh, start JBoss using the modified batch file. 2. After reproducing the problem, send us the log files under /opt/Jinfonet/JREntServer/logs.
The JBoss log files may also help to identify the problem. The most useful one is/opt/jboss−3.2.7/server/default/log/server.log.
3.
Index
Deploying JREntServer to JBoss 4.0
The example directory paths listed below are based on a typical Solaris or Linux (referred to as Unix) installation of JReportEnterprise Server and JBoss. Before starting these tasks, you should already have reviewed Integrating JReport Enterprise Serverwith a Java Application Server.
Note: You must start the standalone JReport Enterprise Server successfully before you can deploy JREntServer as a Web Applicationas this will create server.properties and other important files and directories. Start the server using/opt/Jinfonet/JREntServer/bin/JREntServer.sh.
For example:
JBoss 4.0 is installed in the /opt/jboss−4.0.1 directory. • JReport Enterprise Server is installed in the /opt/Jinfonet/JREntServer directory. • JReport Web Application Archive (jreport.war) file is located in the/opt/Jinfonet/JREntServer/servlet directory. You must create the WAR file before proceeding. To create theWAR file refer to the instructions in Creating the JReport Enterprise Server War File on Unix.
Note: If JBoss 4.0.2 or higher version is used, please make sure the file log4j−1.2.8.jar is not included in the JReport WebApplication Archive (jreport.war) file. Because since JBoss 4.0.2, log4j.jar in JBoss and log4j−1.2.8.jar in JReport Serverconflict from each other.
•
Take the following steps before you start the integration process. Because the version of Hypersonic DBMS (hsqldb.jar) inJREntServer may be different from that in JBoss, you need to replace the hsqldb.jar in JREntServer with the one in JBoss 4.0 to avoidclass loading conflicts.
Open a shell window and cd to the /opt/JREntServer/properties directory. Deletesystable.defaultRealm.backup, systable.defaultRealm.data, systable.defautRealm.properties, andsystable.defaultRealm.script.
1.
In the /opt/JREntServer directory delete the history and profiling directories. 2. Copy hsqldb.jar from /opt/jboss−4.0.1/server/default/lib to /opt/Jinfonet/JREntServer/lib,replacing the existing file.
3.
Launch JREntServer (/opt/Jinfonet/JREntServer/bin/JREntServer.sh) to re−generate the deleted files andconfigure the new archive.
4.
You must re−create the WAR file after copying the new hsqldb.jar to servlet/WEB−INF/lib before proceeding. Tocreate the WAR file refer to the instructions in Creating the JReport Enterprise Server War File on Unix.
5.
To integrate JReport Enterprise Server with JBoss 4.0:
Ensure that JBoss is shutdown by running the script /opt/jboss¡ª4.0.1/bin/shutdown.sh −S. 1. Copy the Web Application Archive (jreport.war) to/opt/jboss−4.0.1/server/default/deploy.
2.
Open the file server.properties in the /opt/Jinfonet/JREntServer/bin directory, andmodify the variables:
3.
jsp.webapp.sendfile=/jreport/sendfile web.design_servlet_path=/jreport/webreporting web.dhtml_servlet_path=/jreport/dhtml web.help_servlet_path=/jreport/help
Integrating JReport Enterprise Server with a Java Application Server
259

web.jreport_servlet_path=/jreport/jrserverweb.dhtml_jsp_path=/jreport/dhtmljspweb.dhtml_servlet_entry_path=/jreport/jrdhtml
The Servlet Context Path /jreport/ is determined automatically by JBoss based on the name of theWAR file so if you did not name the file jreport.war use the appropriate name. Open the file redirect.properties in the /opt/Jinfonet/JREntServer/bin directory,and modify the variable:
jsp_path=/jreport/jinfonet/
4.
Add Report Home to the JBoss startup script.
Modify the batch file run.sh in the /opt/jboss−4.0.1/bin directory. Search for "Execute the JVM". Add −Dreporthome=/opt/Jinfonet/JREntServer to thestartup script as follows:
5.
# Execute the JVM "$JAVA" $JAVA_OPTS \ −classpath "$JBOSS_CLASSPATH" −Dreporthome=/opt/Jinfonet/JREntServer \ org.jboss.Main "$@"
Start JBoss by running the run.sh script. 6. Access JReport Enterprise Server using the following urls: 7.
http://localhost:8080/jreport/jrserver http://localhost:8080/jreport/admin/index.jsp http://localhost:8080/jreport/jinfonet/index.jsp
Troubleshooting
If you run into problems when using JREntServer in JBoss, send the log files of JREntServer to [email protected]. Thefollowing procedure illustrates how to generate the log files:
Modify the batch files run.sh under /opt/jboss−4.0.1/bin.
In the file run.sh, add −Dlogall=true after the reporthome definition:
1.
"$JAVA" $JAVA_OPTS \ −classpath "$JBOSS_CLASSPATH" −Dreporthome=/opt/Jinfonet/JREntServer \ −Dlogall=true \ org.jboss.Main "$@"
After editing run.sh, start JBoss using the modified batch file. 2. After reproducing the problem, send us the log files under /opt/Jinfonet/JREntServer/logs.
The JBoss log files may also help to identify the problem. The most useful oneis /opt/jboss−4.0.1/server/default/log/server.log.
3.
Index
Deploying JREntServer to BEA WebLogic 8.1
The example directory paths listed below are based on a typical Solaris or Linux (referred to as Unix) installation of JReportEnterprise Server and WebLogic 8.1. Before starting these tasks, you should already have reviewed Integrating JReport EnterpriseServer with a Java Application Server.
Note: You must start the standalone JReport Enterprise Server successfully before you can deploy JREntServer as a Web Applicationas this will create server.properties and other important files and directories. On Unix, start the server using/opt/Jinfonet/JREntServer/bin/JREntServer.sh.
Integrating JReport Enterprise Server with a Java Application Server
260
For example:
WebLogic 8.1 is installed in the /opt/BEA directory. This is referred to as BEA_HOME in the WebLogic documentation. • JReport Enterprise Server is installed in the /opt/Jinfonet/JREntServer directory. • JReport jreport.war file is located in the /opt/Jinfonet/JREntServer/servlet directory. You must create theWAR file before proceeding. To create the WAR file refer to the instructions in Creating the JRreport Enterprise Server WarFile on Unix.
•
To integrate JReport Enterprise Server with BEA WebLogic 8.1:
If you have not already created a WebLogic Domain for JReport Enterprise Server you must create onebefore starting the integration. If you already have a domain that you want to use for JReport EnterpriseServer, skip to Step 2.
1.
Create a new WebLogic Domain Change directories to /opt/BEA/weblogic81/common/bin and run the script config.sh. 1. Select Create a new WebLogic configuration and click the Next button. 2. Depending on the WebLogic 8.1 installation options, a selection of Configuration Templates willbe displayed. Select Basic WebLogic Server Domain and click on the Next button.
3.
Choose the Express option unless you are an expert in WebLogic and want to make changes tothe standard template settings. Click on the Next button.
4.
Select a user name and password for this domain. For this example we will use weblogic for boththe User name and User password. Click on the Next button.
5.
Select Production Mode and keep the default BEA Supplied SDKs. Click on the Next button. 6. In the bottom right corner enter the Configuration Name you want to use. For this example wewill use reporting. Click on the Create button.
7.
Note the location of the new domain is/opt/BEA/user_projects/domains/reporting. Click on the Done button to exit theConfig application.
8.
2.
Start WebLogic by executing the script /startWebLogic.sh. You will be prompted for the login andpassword you created such as Username weblogic and Password weblogic. You should see a message thatthe server started in RUNNING mode and that it is listening on port 7001.
3.
Open the Administrative Console in your browser. Open the url:http://hostname:7001/console/, where the hostname is host name or IP address, and 7001 isthe port number. The 7001 port is the default although it may be different on your installation. The portnumber was specified when you created your WebLogic domain.
To login, use a user with the Administrator role. If you didn't change the default for the domain it isUsername weblogic and Password weblogic.
4.
Integrating JReport Enterprise Server with a Java Application Server
261
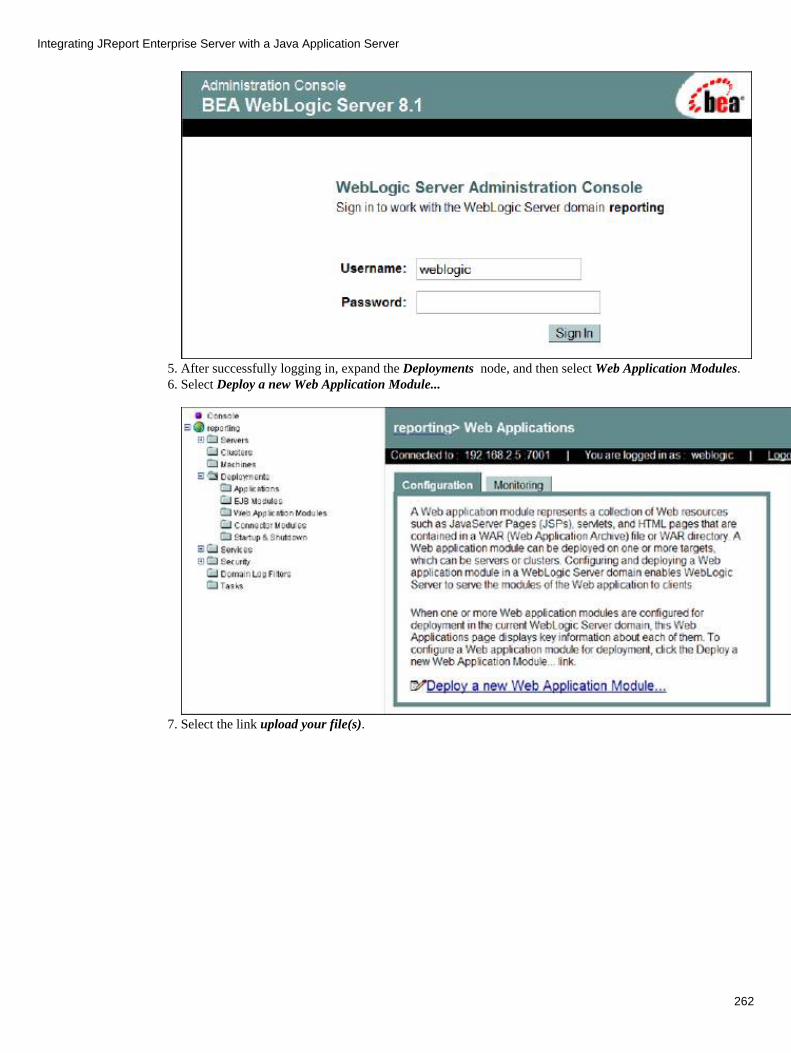
After successfully logging in, expand the Deployments node, and then select Web Application Modules. 5. Select Deploy a new Web Application Module...6.
Select the link upload your file(s). 7.
Integrating JReport Enterprise Server with a Java Application Server
262
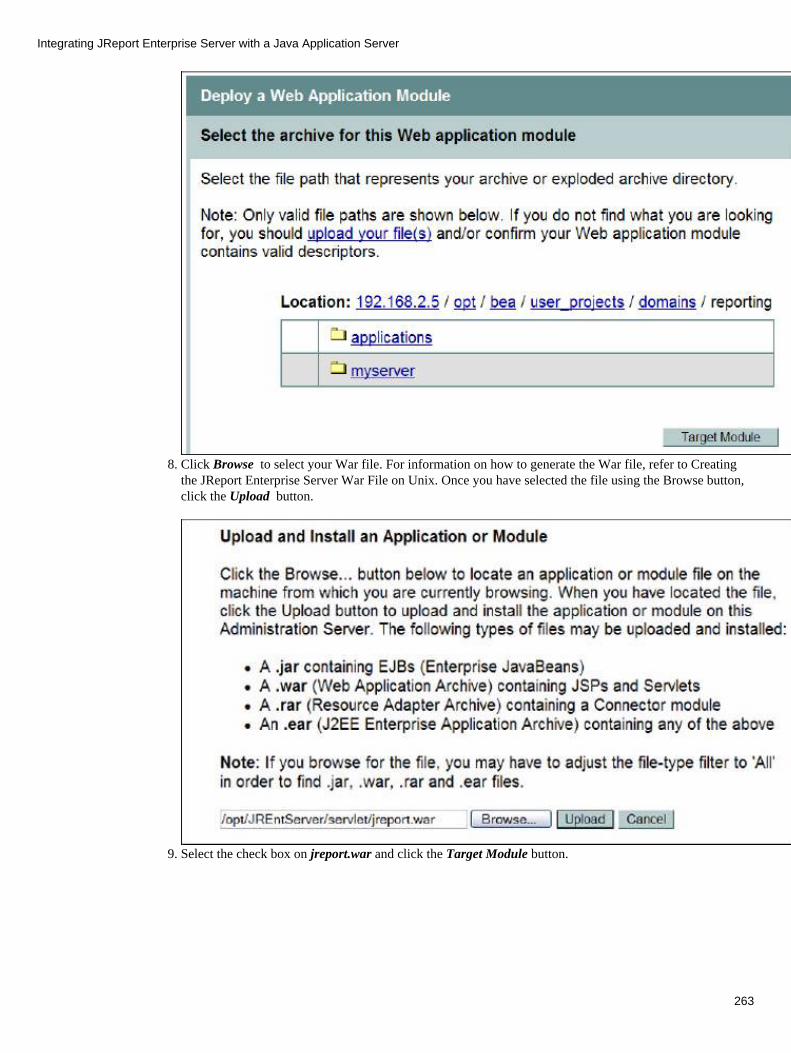
Click Browse to select your War file. For information on how to generate the War file, refer to Creatingthe JReport Enterprise Server War File on Unix. Once you have selected the file using the Browse button,click the Upload button.
8.
Select the check box on jreport.war and click the Target Module button. 9.
Integrating JReport Enterprise Server with a Java Application Server
263
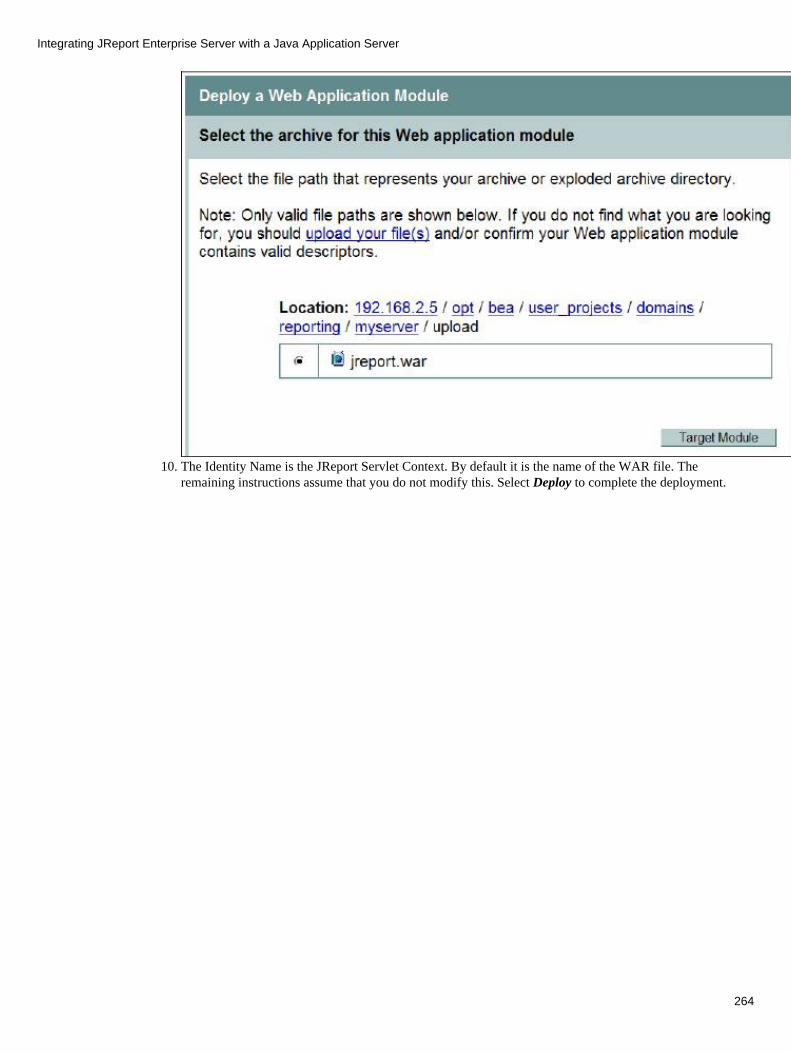
The Identity Name is the JReport Servlet Context. By default it is the name of the WAR file. Theremaining instructions assume that you do not modify this. Select Deploy to complete the deployment.
10.
Integrating JReport Enterprise Server with a Java Application Server
264
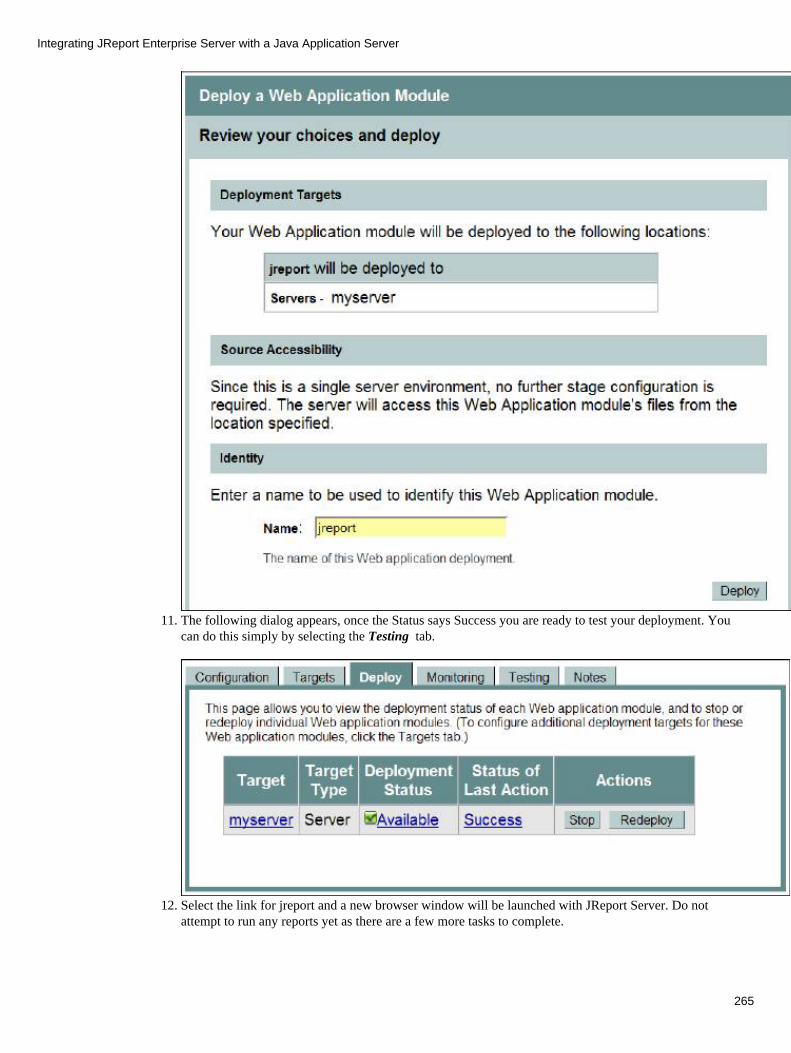
The following dialog appears, once the Status says Success you are ready to test your deployment. Youcan do this simply by selecting the Testing tab.
11.
Select the link for jreport and a new browser window will be launched with JReport Server. Do notattempt to run any reports yet as there are a few more tasks to complete.
12.
Integrating JReport Enterprise Server with a Java Application Server
265
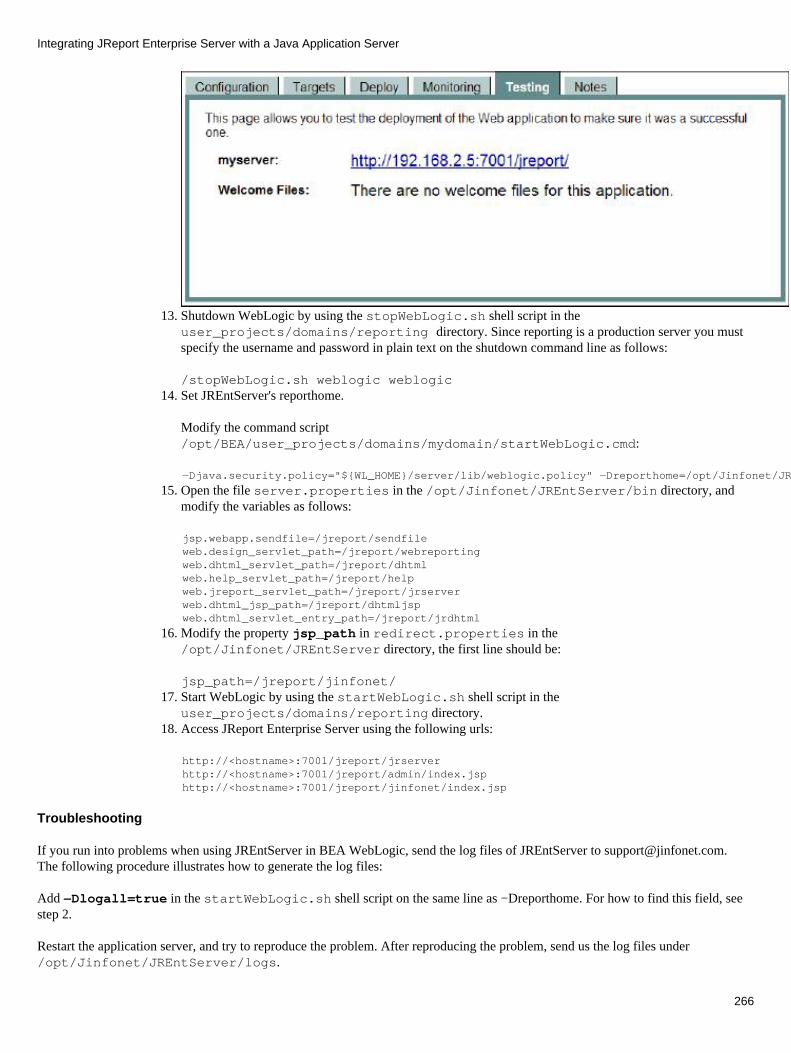
Shutdown WebLogic by using the stopWebLogic.sh shell script in theuser_projects/domains/reporting directory. Since reporting is a production server you mustspecify the username and password in plain text on the shutdown command line as follows:
/stopWebLogic.sh weblogic weblogic
13.
Set JREntServer's reporthome.
Modify the command script/opt/BEA/user_projects/domains/mydomain/startWebLogic.cmd:
14.
−Djava.security.policy="${WL_HOME}/server/lib/weblogic.policy" −Dreporthome=/opt/Jinfonet/JREntServer weblogic.Server
Open the file server.properties in the /opt/Jinfonet/JREntServer/bin directory, andmodify the variables as follows:
15.
jsp.webapp.sendfile=/jreport/sendfile web.design_servlet_path=/jreport/webreporting web.dhtml_servlet_path=/jreport/dhtml web.help_servlet_path=/jreport/help web.jreport_servlet_path=/jreport/jrserverweb.dhtml_jsp_path=/jreport/dhtmljspweb.dhtml_servlet_entry_path=/jreport/jrdhtml
Modify the property jsp_path in redirect.properties in the/opt/Jinfonet/JREntServer directory, the first line should be:
jsp_path=/jreport/jinfonet/
16.
Start WebLogic by using the startWebLogic.sh shell script in theuser_projects/domains/reporting directory.
17.
Access JReport Enterprise Server using the following urls: 18.
http://<hostname>:7001/jreport/jrserver http://<hostname>:7001/jreport/admin/index.jsp http://<hostname>:7001/jreport/jinfonet/index.jsp
Troubleshooting
If you run into problems when using JREntServer in BEA WebLogic, send the log files of JREntServer to [email protected] following procedure illustrates how to generate the log files:
Add −Dlogall=true in the startWebLogic.sh shell script on the same line as −Dreporthome. For how to find this field, seestep 2.
Restart the application server, and try to reproduce the problem. After reproducing the problem, send us the log files under/opt/Jinfonet/JREntServer/logs.
Integrating JReport Enterprise Server with a Java Application Server
266
The WebLogic log file may also help to identify the problem. The log file is/opt/BEA/user_projects/domains/reporting/reporting.log.
Index
Deploying JREntServer to Tomcat 4.1
The example directory paths listed below are based on a typical Solaris or Linux (referred to as Unix) installation of JReportEnterprise Server and Tomcat. The instructions are applicable to both Unix installations and Windows installations; however, theformat of the paths for Windows would use the Windows format, i.e., C:\JREntServer instead of /opt/JREntServer. Before startingthese tasks, you should already have reviewed Integrating JReport Enterprise Server with a Java Application Server.
Note: You must start the standalone JReport Enterprise Server successfully before you can deploy JREntServer as a Web Applicationas this will create server.properties and other important files and directories. Start the server using/opt/Jinfonet/JREntServer/bin/JREntServer.sh.
For example:
Tomcat 4.1 is installed in the /opt/jakarta−tomcat−4.1 directory. • JReport Enterprise Server is installed in the /opt/Jinfonet/JREntServer directory. • JReport Web Application Archive (jreport.war) file is located in the /opt/JREntServer/servlet directory. Youmust create the WAR file before proceeding. To create the WAR file refer to the instructions in Creating the JReportEnterprise Server War File on Unix.
•
To integrate JReport Enterprise Server with Tomcat 4.1:
Ensure that Tomcat is shutdown by running the script/opt/jakarta−tomcat−4.1/bin/shutdown.sh.
1.
Open the file server.properties in the /opt/Jinfonet/JREntServer/bin directory, andmodify the variables:
2.
jsp.webapp.sendfile=/jreport/sendfile web.design_servlet_path=/jreport/webreporting web.dhtml_servlet_path=/jreport/dhtml web.jreport_servlet_path=/jreport/jrserverweb.dhtml_jsp_path=/jreport/dhtmljspweb.dhtml_servlet_entry_path=/jreport/jrdhtml cluster.admin.rmi.port= Any free port (For example: cluster.admin.rmi.port=1129 )
The Servlet Context Path /jreport/ is determined automatically by Tomcat based on the name of theWar file so if you did not name the file jreport.war use the appropriate name. Open the file redirect.properties in the /opt/Jinfonet/JREntServer/bin directory,and modify the jsp_path variable:
jsp_path=/jreport/jinfonet/
3.
Add Report Home to the Tomcat startup script.
Modify the batch file catalina.sh in the /opt/jakarta−tomcat−4.1/bin directory. Searchfor "catalina.startup", there are 8 locations. Add−Dreporthome=/opt/Jinfonet/JREntServerto the startup script as follows:
4.
exec "$_RUNJAVA" $JAVA_OPTS $CATALINA_OPTS \ −Djava.endorsed.dirs="$JAVA_ENDORSED_DIRS" −classpath "$CLASSPATH" \ −Dcatalina.base="$CATALINA_BASE" \ −Dcatalina.home="$CATALINA_HOME" \ −Djava.io.tmpdir="$CATALINA_TMPDIR" \ −Dreporthome="/opt/Jinfonet/JREntServer" \ org.apache.catalina.startup.Embedded "$@"
Integrating JReport Enterprise Server with a Java Application Server
267
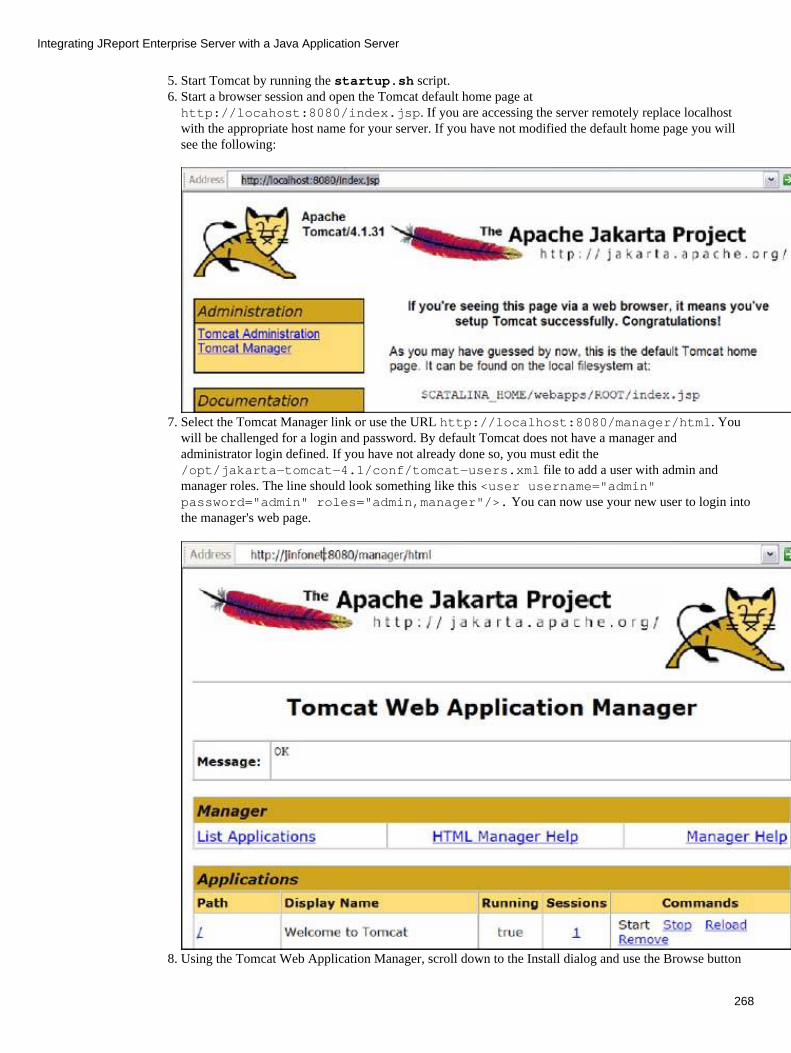
Start Tomcat by running the startup.sh script. 5. Start a browser session and open the Tomcat default home page athttp://locahost:8080/index.jsp. If you are accessing the server remotely replace localhostwith the appropriate host name for your server. If you have not modified the default home page you willsee the following:
6.
Select the Tomcat Manager link or use the URL http://localhost:8080/manager/html. Youwill be challenged for a login and password. By default Tomcat does not have a manager andadministrator login defined. If you have not already done so, you must edit the/opt/jakarta−tomcat−4.1/conf/tomcat−users.xml file to add a user with admin andmanager roles. The line should look something like this <user username="admin"password="admin" roles="admin,manager"/>. You can now use your new user to login intothe manager's web page.
7.
Using the Tomcat Web Application Manager, scroll down to the Install dialog and use the Browse button8.
Integrating JReport Enterprise Server with a Java Application Server
268

to select the Web Application Archive file. The JReport Web Application Archive (jreport.war) file islocated in the /opt/Jinfonet/JREntServer/servlet directory. You must create the WAR filebefore proceeding. To create the WAR file refer to the instructions in Creating the JReport EnterpriseServer War File on Unix.
Access JReport Enterprise Server using the following urls: 9.
http://localhost:8080/jreport/jrserver http://localhost:8080/jreport/admin/index.jsp http://localhost:8080/jreport/jinfonet/index.jsp
You can also access JReport by selecting the /jreport link on the Tomcat Manager web page:
Troubleshooting
If you run into problems when using JREntServer in Tomcat, send the log files of JREntServer to [email protected]. Thefollowing procedure illustrates how to generate the log files:
Modify the startup script under /opt/jakarta−tomcat−4.1/bin.1. In the file catalina.sh, add −Dlogall=true after the reporthome definition: 2.
"$JAVA" $JAVA_OPTS \ −classpath "$JBOSS_CLASSPATH" −Dreporthome=/opt/Jinfonet/JREntServer\ −Dlogall=true \ org.jboss.Main "$@"
After editing catalina.sh, start Tomcat using the startup.sh batch file. 3. To get the information about the JREntServer environment, you can accesshttp://localhost:8080/jreport/admin/info.jsp?cmd=info.
4.
Save the output to a file.5. After reproducing the problem, send us the log files under /opt/Jinfonet/JREntServer/logs.
The Tomcat log files may also help to identify the problem. The most useful one is/opt/jakarta−tomcat−4.1/logs/catalina.out.
6.
Index
Integrating JReport Enterprise Server with a Java Application Server
269
Deploying JREntServer to Tomcat 5.5 on Unix
The example directory paths listed below are based on a typical Solaris or Linux (referred to as Unix) installation of JReportEnterprise Server and Tomcat. The instructions are applicable to both Unix installations and Windows installations; however, theformat of the paths for Windows would use the Windows format, i.e., C:\JREntServer instead of/opt/JREntServer. Before starting these tasks, you should already have reviewed Integrating JReport Enterprise Server with aJava Application Server.
Note: You must start the standalone JReport Enterprise Server successfully before you can deploy JREntServer as a Web Applicationas this will create server.properties and other important files and directories. Start the server using/opt/Jinfonet/JREntServer/bin/JREntServer.sh.
For example:
Tomcat 5.5 is installed in the /opt/jakarta−tomcat−5.5 directory. • JReport Enterprise Server is installed in the /opt/Jinfonet/JREntServer directory. • JReport Web Application Archive (jreport.war) file is located in the /opt/JREntServer/servlet directory. Youmust create the WAR file before proceeding. To create the WAR file refer to the instructions in Creating the JReportEnterprise Server War File on Unix.
•
To integrate JReport Enterprise Server with Tomcat 5.5:
Ensure that Tomcat is shutdown by running the script/opt/jakarta−tomcat−5.5/bin/shutdown.sh.
1.
Open the file server.properties in the /opt/Jinfonet/JREntServer/bin directory, andmodify the variables:
2.
jsp.webapp.sendfile=/jreport/sendfile web.design_servlet_path=/jreport/webreporting web.dhtml_servlet_path=/jreport/dhtml web.jreport_servlet_path=/jreport/jrserverweb.dhtml_jsp_path=/jreport/dhtmljspweb.dhtml_servlet_entry_path=/jreport/jrdhtml cluster.admin.rmi.port= Any free port (For example: cluster.admin.rmi.port=1129 )
The Servlet Context Path /jreport/ is determined automatically by Tomcat based on the name of theWAR file so if you did not name the file jreport.war use the appropriate name. Open the file redirect.properties in the /opt/Jinfonet/JREntServer/bin directory, andmodify the jsp_path variable:
jsp_path=/jreport/jinfonet/
3.
Add Report Home to the Tomcat startup script.
Modify the batch file catalina.sh in the /opt/jakarta−tomcat−5.5/bin directory. Search for"catalina.startup", there are 6 locations. Add −Dreporthome=/opt/Jinfonet/JREntServer tothe startup script as follows:
4.
exec "$_RUNJAVA" $JAVA_OPTS $CATALINA_OPTS \ −Djava.endorsed.dirs="$JAVA_ENDORSED_DIRS" −classpath "$CLASSPATH" \ −Dcatalina.base="$CATALINA_BASE" \ −Dcatalina.home="$CATALINA_HOME" \ −Djava.io.tmpdir="$CATALINA_TMPDIR" \ −Dreporthome="/opt/Jinfonet/JREntServer" \ org.apache.catalina.startup.Bootstrap "$@" start
Start Tomcat by running the startup.sh script. 5. Start a browser session and open the Tomcat default home page athttp://locahost:8080/index.jsp. If you are accessing the server remotely replace localhostwith the appropriate host name for your server. If you have not modified the default home page you will
6.
Integrating JReport Enterprise Server with a Java Application Server
270

see the following:
Select the Tomcat Manager link or use the URL http://localhost:8080/manager/html. Youwill be challenged for a login and password. By default Tomcat does not have a manager andadministrator login defined. If you have not already done so, you must edit the/opt/jakarta−tomcat−4.1/conf/tomcat−users.xml file to add a user with admin andmanager roles. The line should look something like this <user username="admin"password="admin" roles="admin,manager"/>. You can now use your new user to login intothe manager's web page.
7.
Using the Tomcat Web Application Manager, scroll down to the Install dialog and use the Browse buttonto select the Web Application Archive file. The JReport Web Application Archive (jreport.war) file islocated in the /opt/Jinfonet/JREntServer/servlet directory. You must create the WAR filebefore proceeding. To create the WAR file refer to the instructions in Creating the JReport EnterpriseServer War File on Unix.
8.
Integrating JReport Enterprise Server with a Java Application Server
271
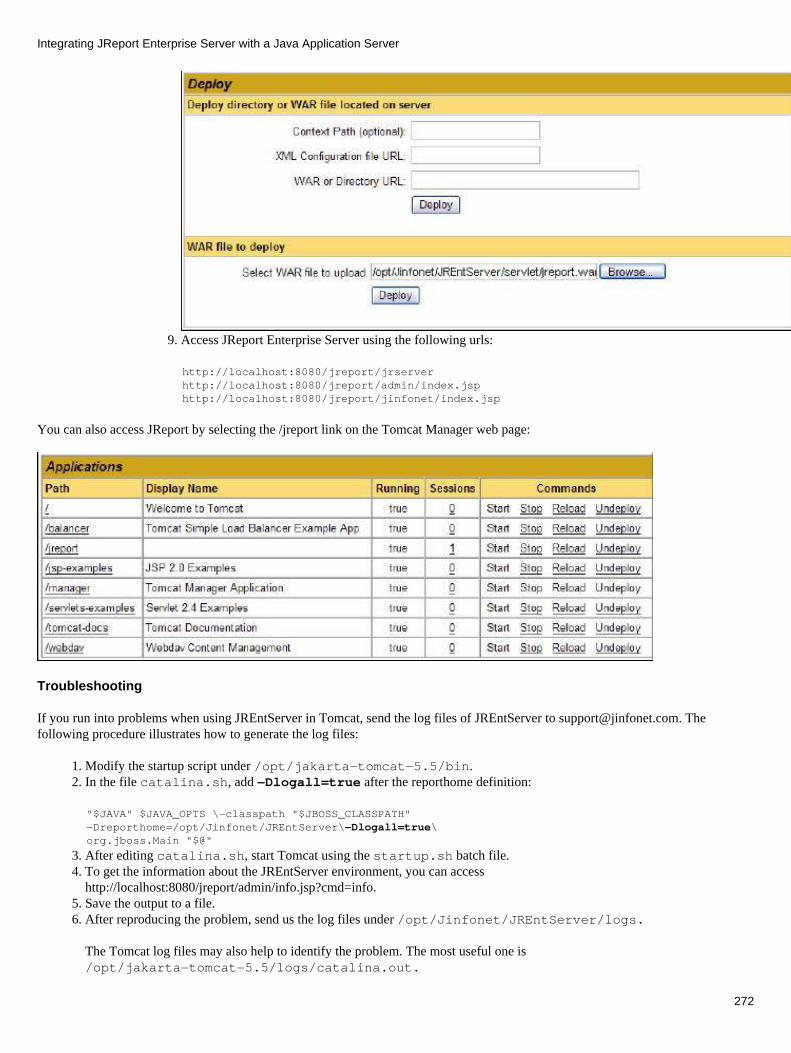
Access JReport Enterprise Server using the following urls: 9.
http://localhost:8080/jreport/jrserver http://localhost:8080/jreport/admin/index.jsp http://localhost:8080/jreport/jinfonet/index.jsp
You can also access JReport by selecting the /jreport link on the Tomcat Manager web page:
Troubleshooting
If you run into problems when using JREntServer in Tomcat, send the log files of JREntServer to [email protected]. Thefollowing procedure illustrates how to generate the log files:
Modify the startup script under /opt/jakarta−tomcat−5.5/bin. 1. In the file catalina.sh, add −Dlogall=true after the reporthome definition: 2.
"$JAVA" $JAVA_OPTS \−classpath "$JBOSS_CLASSPATH"−Dreporthome=/opt/Jinfonet/JREntServer\−Dlogall=true\org.jboss.Main "$@"
After editing catalina.sh, start Tomcat using the startup.sh batch file. 3. To get the information about the JREntServer environment, you can accesshttp://localhost:8080/jreport/admin/info.jsp?cmd=info.
4.
Save the output to a file.5. After reproducing the problem, send us the log files under /opt/Jinfonet/JREntServer/logs.
The Tomcat log files may also help to identify the problem. The most useful one is/opt/jakarta−tomcat−5.5/logs/catalina.out.
6.
Integrating JReport Enterprise Server with a Java Application Server
272
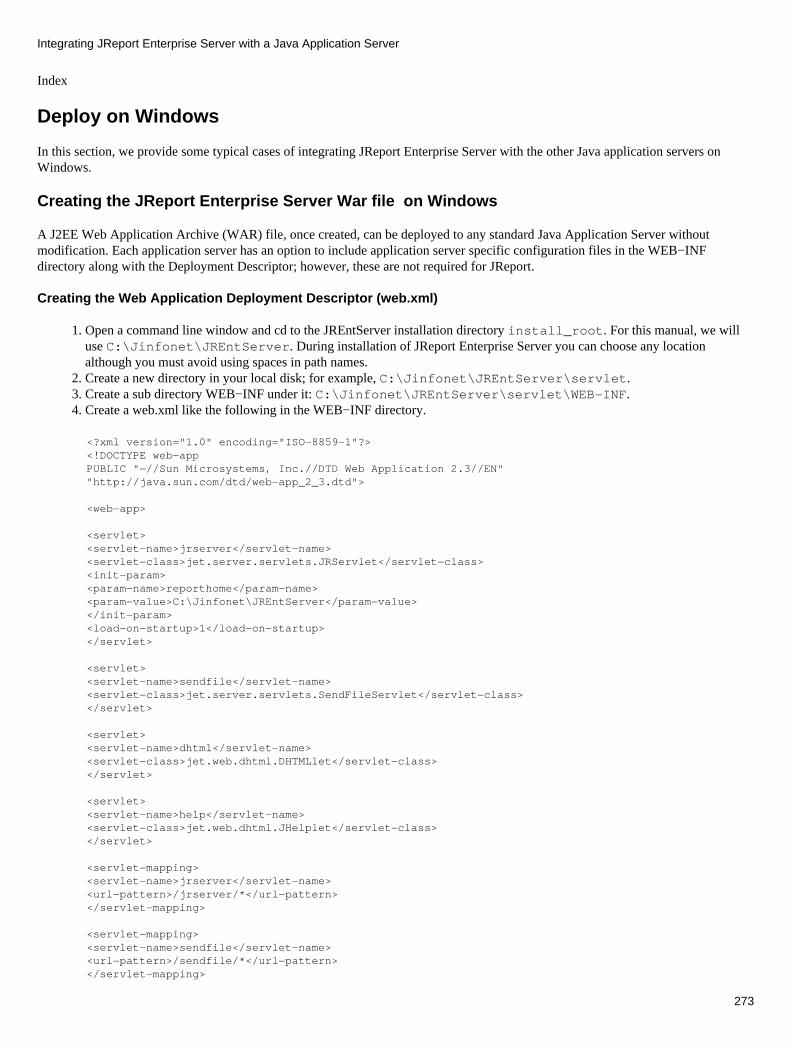
Index
Deploy on Windows
In this section, we provide some typical cases of integrating JReport Enterprise Server with the other Java application servers onWindows.
Creating the JReport Enterprise Server War file on Windows
A J2EE Web Application Archive (WAR) file, once created, can be deployed to any standard Java Application Server withoutmodification. Each application server has an option to include application server specific configuration files in the WEB−INFdirectory along with the Deployment Descriptor; however, these are not required for JReport.
Creating the Web Application Deployment Descriptor (web.xml)
Open a command line window and cd to the JREntServer installation directory install_root. For this manual, we willuse C:\Jinfonet\JREntServer. During installation of JReport Enterprise Server you can choose any locationalthough you must avoid using spaces in path names.
1.
Create a new directory in your local disk; for example, C:\Jinfonet\JREntServer\servlet. 2. Create a sub directory WEB−INF under it: C:\Jinfonet\JREntServer\servlet\WEB−INF. 3. Create a web.xml like the following in the WEB−INF directory. 4.
<?xml version="1.0" encoding="ISO−8859−1"?><!DOCTYPE web−app PUBLIC "−//Sun Microsystems, Inc.//DTD Web Application 2.3//EN" "http://java.sun.com/dtd/web−app_2_3.dtd">
<web−app>
<servlet> <servlet−name>jrserver</servlet−name> <servlet−class>jet.server.servlets.JRServlet</servlet−class> <init−param> <param−name>reporthome</param−name> <param−value>C:\Jinfonet\JREntServer</param−value> </init−param> <load−on−startup>1</load−on−startup> </servlet>
<servlet> <servlet−name>sendfile</servlet−name> <servlet−class>jet.server.servlets.SendFileServlet</servlet−class> </servlet>
<servlet> <servlet−name>dhtml</servlet−name> <servlet−class>jet.web.dhtml.DHTMLlet</servlet−class> </servlet>
<servlet> <servlet−name>help</servlet−name> <servlet−class>jet.web.dhtml.JHelplet</servlet−class> </servlet>
<servlet−mapping> <servlet−name>jrserver</servlet−name> <url−pattern>/jrserver/*</url−pattern> </servlet−mapping>
<servlet−mapping> <servlet−name>sendfile</servlet−name> <url−pattern>/sendfile/*</url−pattern> </servlet−mapping>
Integrating JReport Enterprise Server with a Java Application Server
273

<servlet−mapping> <servlet−name>dhtml</servlet−name> <url−pattern>/dhtml/*</url−pattern> </servlet−mapping>
<servlet−mapping> <servlet−name>help</servlet−name> <url−pattern>/help/*</url−pattern> </servlet−mapping>
</web−app>
If you want to support start/stop/restart of the report server in an integrated environment, add the following lines to the XMLcode above. (Note: This feature is based on Servlet2.3 specification. The <listener> sections should be ahead to the first<servlet> sections.)
5.
<listener> <listener−class> jet.server.servlets.JRServerContextListener</listener−class> </listener>
Reference: User's Guide | Integrating with a Java Application Server | General Steps and Procedures Create a directory named lib in the servlet/WEB−INF directory.6. Create a directory named pages in the servlet/WEB−INF/lib directory7. Copy all of the files in C:\Jinfonet\JREntServer\lib\pages to the servlet\WEB−INF\lib\pagesdirectory.
8.
Copy JREngine.jar, JRESServlets.jar, JRWebDesign.jar, hsqldb.jar, tar.jar, log4j−1.2.8.jar, xerces.jar,jai_codec.jar, jai_core.jar, commons−codec−1.2.jar, and jakarta−regexp−1.3.jar fromC:\Jinfonet\JREntServer\lib to the servlet\WEB−INF\lib directory.
If you are creating reports in the following formats, you should copy the corresponding jar to theservlet\WEB−INF\lib directory:
To use Mail or use the Mail Notification function, copy activation.jar and mail.jar. ♦ To use PDF and DHTML, copy Itext.jar.♦ To use Excel, copy poiHSSF_151.jar.♦ To use DHTML tag libraries, copy taglib.jar.♦
9.
Copy the file index.htm and the folders jinfonet, admin, and dhtmljsp fromC:\Jinfonet\JREntServer\public_html to the C:\Jinfonet\JREntServer\servlet directory.
Note: The jsp files within the admin folder are used by the JReport Enterprise Server Administration. Those within thedhtmljsp folder are used when viewing reports in the DHTML format.
♦
If you copy index.htm and these folders mentioned above to a sub−folder underC:\Jinfonet\JREntServer\servlet, for example,C:\Jinfonet\JREntServer\servlet\jreport, to view reports in DHTML format, you must modifyservice.setMainPage("/dhtmljsp/dhtmlmain.jsp"); toservice.setMainPage("/jreport/dhtmljsp/dhtmlmain.jsp"); in \dhtmljsp\dhtml.jsp.
♦
10.
Edit the index.htm file and add the context path /jreport to the src tag. Note that the path separator character is the Unix style"/" when referencing JSP. The result should look like:
<FRAME name="ind" src="/jreport/jinfonet/index.jsp" frameborder="0">
11.
Using the following command, create a WAR file named jreport.war:
jar −cvf jreport.war index.htm jinfonet admin dhtmljsp WEB−INF
Note: The jar utility is in the Java home bin directory of the Java SDK. If it is not on your path you must call jar with theentire path; for example, C:\Java\j2sdk1.4.2\bin\jar.exe.
12.
Integrating JReport Enterprise Server with a Java Application Server
274
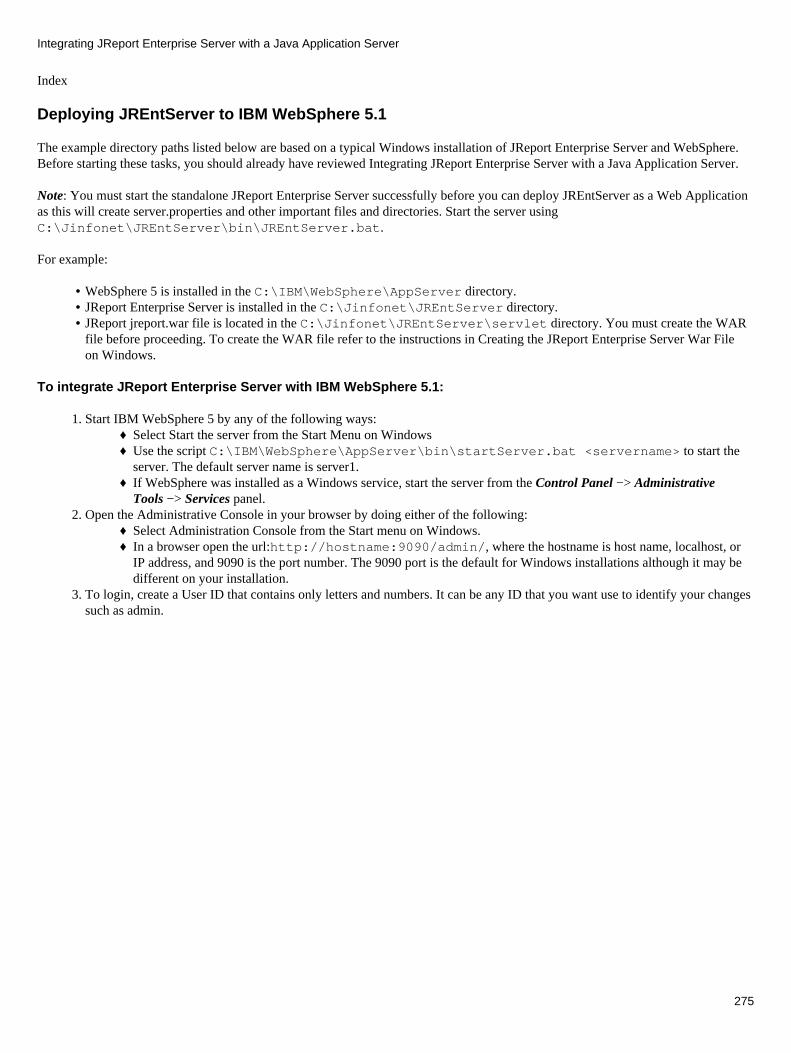
Index
Deploying JREntServer to IBM WebSphere 5.1
The example directory paths listed below are based on a typical Windows installation of JReport Enterprise Server and WebSphere.Before starting these tasks, you should already have reviewed Integrating JReport Enterprise Server with a Java Application Server.
Note: You must start the standalone JReport Enterprise Server successfully before you can deploy JREntServer as a Web Applicationas this will create server.properties and other important files and directories. Start the server usingC:\Jinfonet\JREntServer\bin\JREntServer.bat.
For example:
WebSphere 5 is installed in the C:\IBM\WebSphere\AppServer directory. • JReport Enterprise Server is installed in the C:\Jinfonet\JREntServer directory. • JReport jreport.war file is located in the C:\Jinfonet\JREntServer\servlet directory. You must create the WARfile before proceeding. To create the WAR file refer to the instructions in Creating the JReport Enterprise Server War Fileon Windows.
•
To integrate JReport Enterprise Server with IBM WebSphere 5.1:
Start IBM WebSphere 5 by any of the following ways: Select Start the server from the Start Menu on Windows ♦ Use the script C:\IBM\WebSphere\AppServer\bin\startServer.bat <servername> to start theserver. The default server name is server1.
♦
If WebSphere was installed as a Windows service, start the server from the Control Panel −> AdministrativeTools −> Services panel.
♦
1.
Open the Administrative Console in your browser by doing either of the following: Select Administration Console from the Start menu on Windows. ♦ In a browser open the url:http://hostname:9090/admin/, where the hostname is host name, localhost, orIP address, and 9090 is the port number. The 9090 port is the default for Windows installations although it may bedifferent on your installation.
♦
2.
To login, create a User ID that contains only letters and numbers. It can be any ID that you want use to identify your changessuch as admin.
3.
Integrating JReport Enterprise Server with a Java Application Server
275
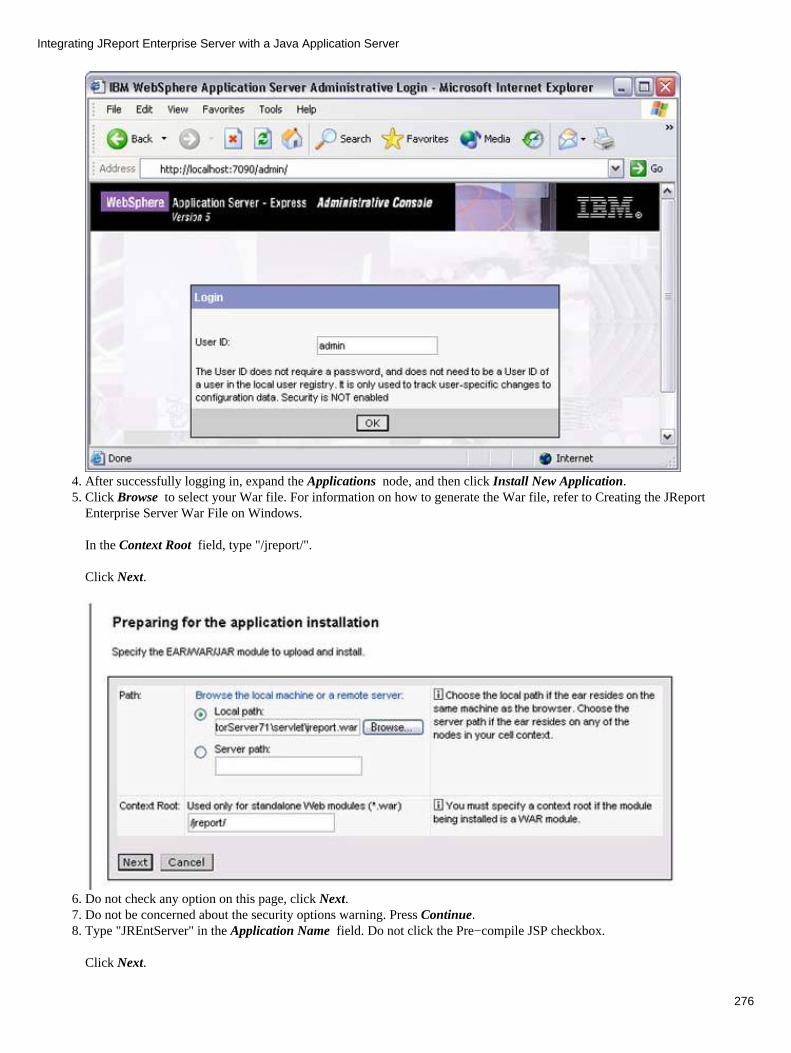
After successfully logging in, expand the Applications node, and then click Install New Application. 4. Click Browse to select your War file. For information on how to generate the War file, refer to Creating the JReportEnterprise Server War File on Windows.
In the Context Root field, type "/jreport/".
Click Next.
5.
Do not check any option on this page, click Next. 6. Do not be concerned about the security options warning. Press Continue. 7. Type "JREntServer" in the Application Name field. Do not click the Pre−compile JSP checkbox.
Click Next.
8.
Integrating JReport Enterprise Server with a Java Application Server
276

Do not make any changes to the next two pages. 9. The Summary page appears next. Click Finish to complete the wizard. The installing process may take several minutes,wait until the process has completed.
10.
After the installation process has successfully completed, the following dialog appears. Click the Save to MasterConfiguration link.
11.
Integrating JReport Enterprise Server with a Java Application Server
277

The following dialog appears, click Save. 12.
Expand Servers, go through Application Servers | Server1 and select Process Definition in the Additional Properties table. 13.
Integrating JReport Enterprise Server with a Java Application Server
278

Select Java Virtual Machine in the Additional Properties table. 14.
Integrating JReport Enterprise Server with a Java Application Server
279

In the Generic JVM arguments field enter −Dreporthome=C:\Jinfonet\JREntServer (the JReport Enterprise Serverinstallation folder).
Click OK to save the changes.
Stop the IBM WebSphere 5 server by any of the following ways: Select Stop the server from the Start menu on Windows. ♦ Use the script C:\IBM\WebSphere\AppServer\bin\stopServer.bat <servername> to stop theserver. The default server name is server1.
♦
If WebSphere was installed as a Windows service, stop the server from the Control Panel −> AdministrativeTools −> Services panel.
♦
15.
Open the file server.properties in the C:\Jinfonet\JREntServer\bin directory, and modify the variables asfollows:
16.
jsp.webapp.sendfile=/jreport/sendfile web.design_servlet_path=/jreport/webreporting web.dhtml_servlet_path=/jreport/dhtml web.help_servlet_path=/jreport/help web.jreport_servlet_path=/jreport/jrserverweb.dhtml_jsp_path=/jreport/dhtmljspweb.dhtml_servlet_entry_path=/jreport/jrdhtml
Integrating JReport Enterprise Server with a Java Application Server
280

Modify the property jsp_path in redirect.properties in the C:\Jinfonet\JREntServer directory, the firstline should be:
jsp_path=/jreport/jinfonet/
17.
Start IBM WebSphere 5 by any of the following ways: Select Start the server from the Start Menu on Windows Use thescript C:\IBM\WebSphere\AppServer\bin\startServer.bat <servername> to start the server. Thedefault server name is server1. If WebSphere was installed as a Windows service, start the server from the Control Panel −>Administrative Tools −> Services panel.
18.
Access JReport Enterprise Server using the following urls:19.
http://<hostname>:9080/jreport/jrserver http://<hostname>:9080/jreport/admin/index.jsp http://<hostname>:9080/jreport/jinfonet/index.jsp
Troubleshooting
If you run into problems when using JREntServer in IBM WebSphere, send the log files of JREntServer to [email protected] following procedure illustrates how to generate the log files:
Type −Dlogall=true in the Generic JVM arguments field. For how to find this field, see step 10.
Restart the application server, and try to reproduce the problem. After reproducing the problem, send us the log files underC:\Jinfonet\JREntServer\logs.
The WebSphere log files may also help to identify the problem. The most useful one is inC:\IBM\WebSphere\AppServer\logs\server1\SystemErr.log.
Index
Deploying JREntServer to IBM WebSphere 6.0
The example directory paths listed below are based on a typical Windows installation of JReport Enterprise Server and WebSphere.Before starting these tasks, you should already have reviewed Integrating JReport with a Java Application Server.
Note: You must start the standalone JReport Enterprise Server successfully before you can deploy JREntServer as a Web Applicationas this will create server.properties and other important files and directories. Start the server usingC:\Jinfonet\JREntServer\bin\JREntServer.bat.
For example:
WebSphere 6 is installed in the C:\IBM\WebSphere\AppServer directory. • JReport Enterprise Server is installed in the C:\Jinfonet\JREntServer directory. • JReport jreport.war file is located in the C:\Jinfonet\JREntServer\servlet directory. You must create the WARfile before proceeding. To create the WAR file refer to the instructions in Creating the JReport Enterprise Server War Fileon Windows.
•
To integrate JReport Enterprise Server with IBM WebSphere 6:
Start IBM WebSphere 6 by any of the following ways: Select Start the server from the Start Menu on Windows ♦ Use the script C:\IBM\WebSphere\AppServer\bin\startServer.bat <servername> to start theserver. The default server name is server1.
♦
If WebSphere was installed as a Windows service, start the server from the Control Panel −> AdministrativeTools −> Services panel.
♦
1.
Open the Administrative Console in your browser by doing either of the following: Select Administration Console from the Start Menu on Windows. ♦
2.
Integrating JReport Enterprise Server with a Java Application Server
281
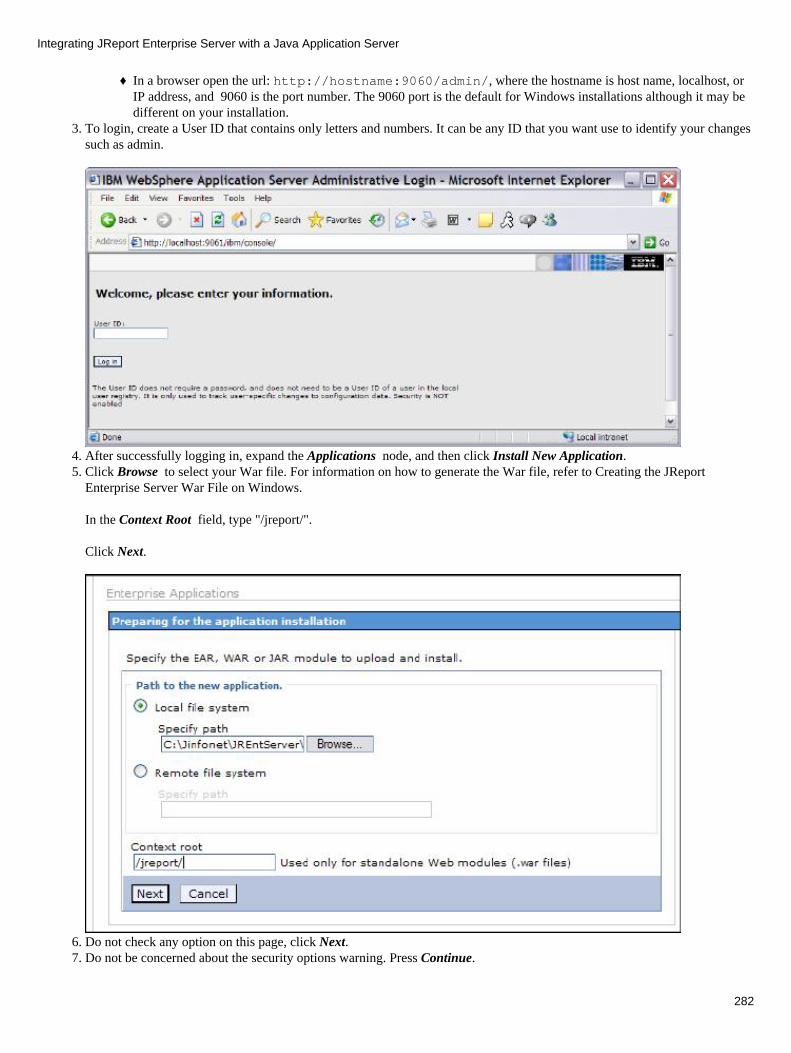
In a browser open the url: http://hostname:9060/admin/, where the hostname is host name, localhost, orIP address, and 9060 is the port number. The 9060 port is the default for Windows installations although it may bedifferent on your installation.
♦
To login, create a User ID that contains only letters and numbers. It can be any ID that you want use to identify your changessuch as admin.
3.
After successfully logging in, expand the Applications node, and then click Install New Application. 4. Click Browse to select your War file. For information on how to generate the War file, refer to Creating the JReportEnterprise Server War File on Windows.
In the Context Root field, type "/jreport/".
Click Next.
5.
Do not check any option on this page, click Next. 6. Do not be concerned about the security options warning. Press Continue. 7.
Integrating JReport Enterprise Server with a Java Application Server
282

Type "JREntServer" in the Application Name field. Do not click the Pre−compile JSP checkbox.
Click Next.
8.
Do not make any changes to the next two pages. 9. The Summary page appears next. Click Finish to complete the wizard. The installing process may take several minutes,wait until the process has completed.
10.
Integrating JReport Enterprise Server with a Java Application Server
283
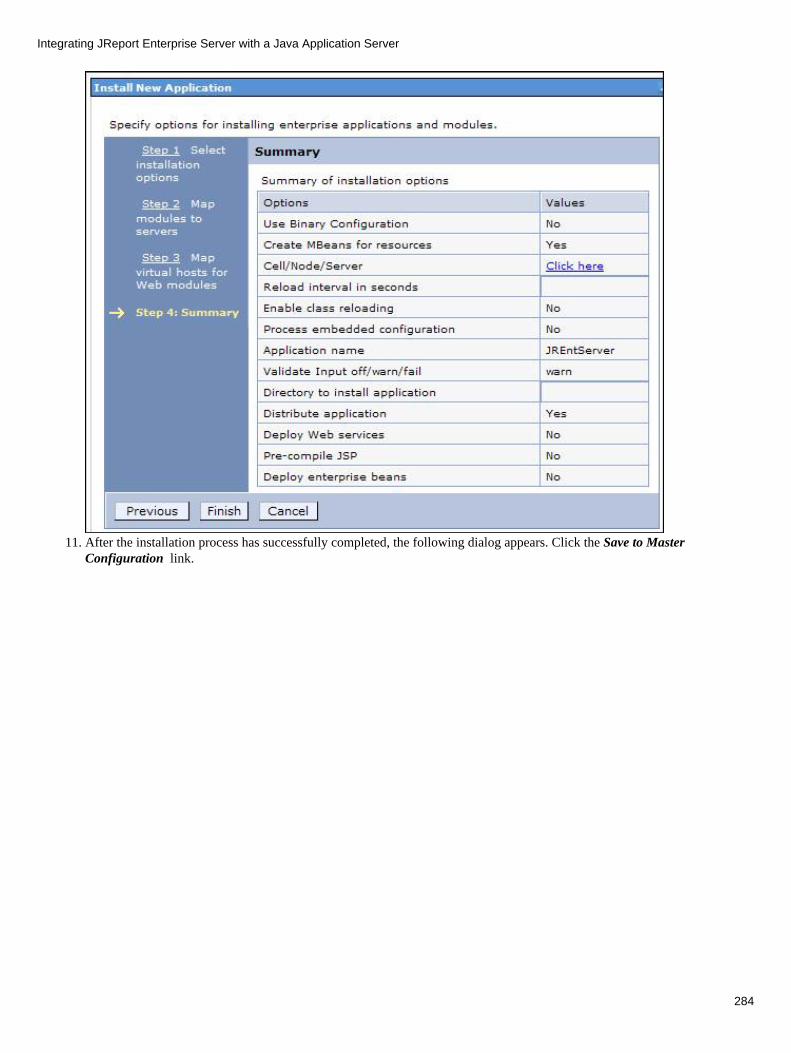
After the installation process has successfully completed, the following dialog appears. Click the Save to MasterConfiguration link.
11.
Integrating JReport Enterprise Server with a Java Application Server
284

The following dialog appears, click Save. 12.
Expand Servers, go through Application Servers | Server1 and expand Java and Process Management in the ServerInfrastructure group.
13.
Integrating JReport Enterprise Server with a Java Application Server
285
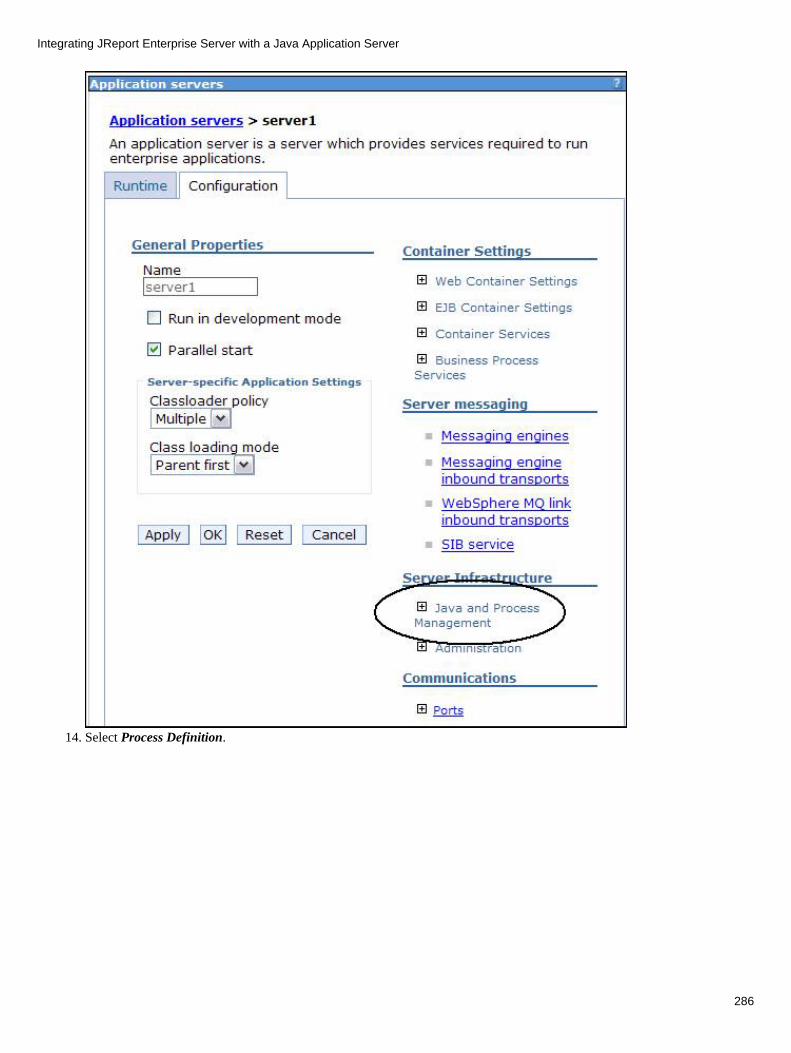
Select Process Definition. 14.
Integrating JReport Enterprise Server with a Java Application Server
286

Select Java Virtual Machine in the Additional Properties group. 15.
Integrating JReport Enterprise Server with a Java Application Server
287
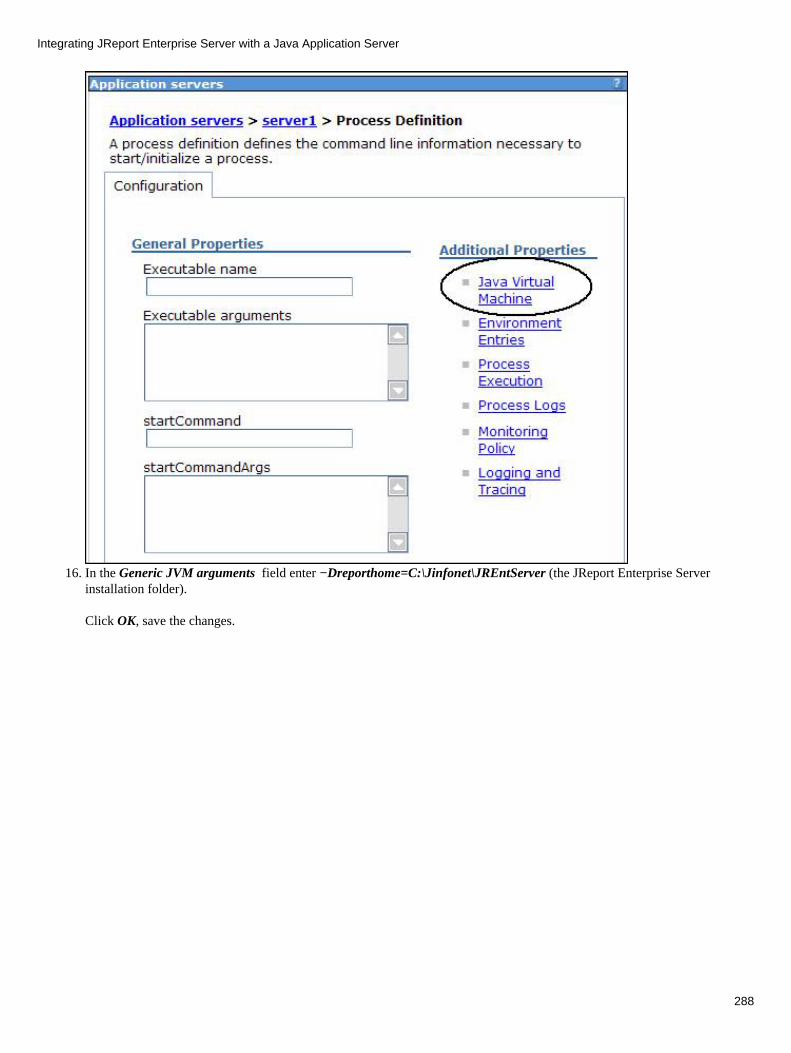
In the Generic JVM arguments field enter −Dreporthome=C:\Jinfonet\JREntServer (the JReport Enterprise Serverinstallation folder).
Click OK, save the changes.
16.
Integrating JReport Enterprise Server with a Java Application Server
288
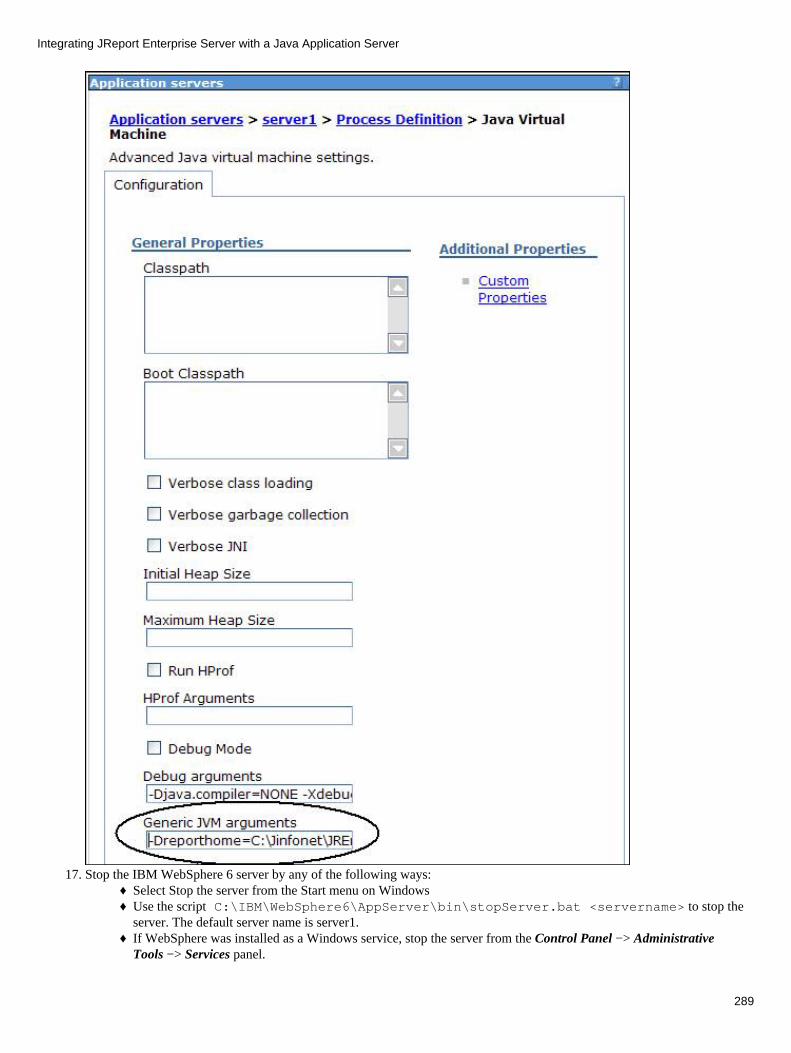
Stop the IBM WebSphere 6 server by any of the following ways: Select Stop the server from the Start menu on Windows ♦ Use the script C:\IBM\WebSphere6\AppServer\bin\stopServer.bat <servername> to stop theserver. The default server name is server1.
♦
If WebSphere was installed as a Windows service, stop the server from the Control Panel −> AdministrativeTools −> Services panel.
♦
17.
Integrating JReport Enterprise Server with a Java Application Server
289

Open the file server.properties in the C:\Jinfonet\JREntServer\bin directory, and modify the variables as follows: 18.
jsp.webapp.sendfile=/jreport/sendfile web.design_servlet_path=/jreport/webreporting web.dhtml_servlet_path=/jreport/dhtml web.help_servlet_path=/jreport/help web.jreport_servlet_path=/jreport/jrserverweb.dhtml_jsp_path=/jreport/dhtmljspweb.dhtml_servlet_entry_path=/jreport/jrdhtml
Modify the property jsp_path in redirect.properties in the C:\Jinfonet\JREntServer directory, the firstline should be:
jsp_path=/jreport/jinfonet/
19.
Start IBM WebSphere 6 by any of the following ways: Select Start the server from the Start menu on Windows ♦ Use the script C:\IBM\WebSphere6\AppServer\bin\startServer.bat <servername> to start theserver. The default server name is server1.
♦
If WebSphere was installed as a Windows service, start the server from the Control Panel −> AdministrativeTools −> Services panel.
♦
20.
Access JReport Enterprise Server using the following urls: 21.
http://<hostname>:9080/jreport/jrserver http://<hostname>:9080/jreport/admin/index.jsp http://<hostname>:9080/jreport/jinfonet/index.jsp
Troubleshooting
If you run into problems when using JREntServer in IBM WebSphere, send the log files of JREntServer to [email protected] following procedure illustrates how to generate the log files:
Type −Dlogall=true in the Generic JVM arguments field. For how to find this field, see step 10.
Restart the application server, and try to reproduce the problem. After reproducing the problem, send us the log filesunder C:\Jinfonet\JREntServer\logs.
The WebSphere log files may also help to identify the problem. The most useful one isin C:\IBM\WebSphere6\AppServer\logs\server1\SystemErr.log.
Index
Deploying JREntServer to JBoss 3.2
The example directory paths listed below are based on a typical Windows installation of JReport Enterprise Server and JBoss. Beforestarting these tasks, you should already have reviewed Integrating JReport Enterprise Server with a Java Application Server.
Note: You must start the standalone JReport Enterprise Server successfully before you can deploy JREntServer as a Web Applicationas this will create server.properties and other important files and directories. Start the server usingC:\Jinfonet\JREntServer\bin\JREntServer.bat.
For example:
JBoss 3.2 is installed in the C:\jboss−3.2.7 directory. • JReport Enterprise Server is installed in the C:\Jinfonet\JREntServer directory. • JReport Web Application Archive (jreport.war) file is located in theC:\Jinfonet\JREntServer\servlet directory. You must create the WAR file before proceeding. To create theWAR file refer to the instructions in Creating the JReport Enterprise Server War File on Windows.
•
Integrating JReport Enterprise Server with a Java Application Server
290
Take the following steps before you start the integration process. Because the version of Hypersonic DBMS (hsqldb.jar) inJREntServer may be different from that in JBoss, you need to replace the hsqldb.jar in JREntServer with the one in JBoss 3.2 to avoidclass loading conflicts.
Open a shell window and cd to the C:\Jinfonet\JREntServer\properties directory. Deletesystable.defaultRealm.backup, systable.defaultRealm.data, systable.defautRealm.properties, andsystable.defaultRealm.script.
1.
In the C:\Jinfonet\JREntServer directory delete the history and profiling directories. 2. Copy hsqldb.jar from C:\jboss−3.2.7\server\default\lib to C:\Jinfonet\JREntServer\lib,replacing the existing file.
3.
Launch JREntServer (C:\Jinfonet\JREntServer\bin\JREntServer.bat) to re−generate the deleted files andconfigure the new archive.
4.
You must re−create the WAR file after copying the new hsqldb.jar to servlet\WEB−INF\lib before proceeding. Tocreate the WAR file refer to the instructions in Creating the JReport Enterprise Server War File on Windows.
5.
To integrate JReport Enterprise Server with JBoss 3.2:
Ensure that JBoss is shutdown by running the script C:\jboss−3.2.7\bin\shutdown.bat −S.1. Copy the Web Application Archive file (jreport.war) to C:\jboss−3.2.7\server\default\deploy.2. Open the file server.properties in the C:\Jinfonet\JREntServer\bin directory, and modify the variables:3.
jsp.webapp.sendfile=/jreport/sendfile web.design_servlet_path=/jreport/webreporting web.dhtml_servlet_path=/jreport/dhtml web.help_servlet_path=/jreport/help web.jreport_servlet_path=/jreport/jrserverweb.dhtml_jsp_path=/jreport/dhtmljspweb.dhtml_servlet_entry_path=/jreport/jrdhtml
The Servlet Context Path /jreport/ is determined automatically by JBoss based on the name of the WAR file so if youdid not name the file jreport.war use the appropriate name.Open the file redirect.properties in the C:\Jinfonet\JREntServer\bin directory, and modify thevariable:
jsp_path=/jreport/jinfonet/
4.
Add Report Home to the JBoss startup script.
Modify the batch file run.bat in the C:\jboss−3.2.7\bin directory. Search for "Setup JBoss". Add −Dreporthome=C:\Jinfonet\JREntServer to the startup script as follows:
5.
rem Setup JBoss specific properties set JAVA_OPTS=%JAVA_OPTS% −Dprogram.name=%PROGNAME% set JAVA_OPTS=%JAVA_OPTS% −Dreporthome=C:\Jinfonet\JREntServerset JBOSS_HOME=%DIRNAME%\..
Start JBoss by running the run.bat script. 6. Access JReport Enterprise Server using the following URLs: 7.
http://localhost:8080/jreport/jrserver http://localhost:8080/jreport/admin/index.jsp http://localhost:8080/jreport/jinfonet/index.jsp
Troubleshooting
If you run into problems when using JREntServer in JBoss, send the log files of JREntServer to [email protected]. Thefollowing procedure illustrates how to generate the log files:
Modify the batch files run.bat under C:\jboss−3.2.7\bin. 1.
Integrating JReport Enterprise Server with a Java Application Server
291

In the file run.bat, add −Dlogall=true after the reporthome definition:
rem Setup JBoss specific properties set JAVA_OPTS=%JAVA_OPTS% −Dprogram.name=%PROGNAME% set JAVA_OPTS=%JAVA_OPTS% −Dreporthome=C:\Jinfonet\JREntServer set JAVA_OPTS=%JAVA_OPTS% −Dlogall=true set JBOSS_HOME=%DIRNAME%\..
After editing run.bat, start JBoss using the modified batch file. 2. After reproducing the problem, send us the log files under C:\Jinfonet\JREntServer\logs.
The JBoss log files may also help to identify the problem. The most useful one isC:\jboss−3.2.7\server\default\log\server.log.
3.
Index
Deploying JREntServer to JBoss 4.0
The example directory paths listed below are based on a typical Windows installation of JReport Enterprise Server and JBoss. Beforestarting these tasks, you should already have reviewed Integrating JReport Enterprise Server with a Java Application Server.
Note: You must start the standalone JReport Enterprise Server successfully before you can deploy JREntServer as a Web Applicationas this will create server.properties and other important files and directories. Start the server usingC:\Jinfonet\JREntServer\bin\JREntServer.bat.
For example:
JBoss 4.0 is installed in the C:\jboss−4.0.1 directory. • JReport Enterprise Server is installed in the C:\Jinfonet\JREntServer directory. • JReport Web Application Archive (jreport.war) file is located in theC:\Jinfonet\JREntServer\servlet directory. You must create the WAR file before proceeding. To create theWAR file refer to the instructions in Creating the JReport Enterprise Server War File on Windows.
Note: If JBoss 4.0.2 or higher version is used, please make sure the file log4j−1.2.8.jar is not included in the JReport WebApplication Archive (jreport.war) file. Because since JBoss 4.0.2, log4j.jar in JBoss and log4j−1.2.8.jar in JReport Serverconflict from each other.
•
Take the following steps before you start the integration process. Because the version of Hypersonic DBMS (hsqldb.jar) inJREntServer may be different from that in JBoss, you need to replace the hsqldb.jar in JREntServer with the one in JBoss 4.0 to avoidclass loading conflicts.
Open a shell window and cd to the C:\Jinfonet\JREntServer\properties directory. Deletesystable.defaultRealm.backup, systable.defaultRealm.data, systable.defautRealm.properties, andsystable.defaultRealm.script.
1.
In the C:\Jinfonet\JREntServer directory delete the history and profiling directories. 2. Copy hsqldb.jar from C:\jboss−4.0.1\server\default\lib toC:\Jinfonet\JREntServer\lib,replacing the existing file.
3.
Launch JREntServer (C:\Jinfonet\JREntServer\bin\JREntServer.bat) to re−generate the deleted files andconfigure the new archive.
4.
You must re−create the WAR file after copying the new hsqldb.jar to servlet\WEB−INF\lib before proceeding. Tocreate the WAR file refer to the instructions in Creating the JReport Enterprise Server War File on Windows.
5.
To integrate JReport Enterprise Server with JBoss 4.0:
Ensure that JBoss is shutdown by running the script C:\jboss−4.0.1\bin\shutdown.bat −S.1. Copy the Web Application Archive file (jreport.war) to C:\jboss−4.0.1\server\default\deploy.2. Open the file server.properties in the C:\Jinfonet\JREntServer\bin directory, and modify the variables: 3.
Integrating JReport Enterprise Server with a Java Application Server
292

jsp.webapp.sendfile=/jreport/sendfile web.design_servlet_path=/jreport/webreporting web.dhtml_servlet_path=/jreport/dhtml web.help_servlet_path=/jreport/help web.jreport_servlet_path=/jreport/jrserverweb.dhtml_jsp_path=/jreport/dhtmljspweb.dhtml_servlet_entry_path=/jreport/jrdhtml
The Servlet Context Path /jreport/ is determined automatically by JBoss based on the name of the WAR file so if youdid not name the file jreport.war use the appropriate name. Open the file redirect.properties in the C:\Jinfonet\JREntServer\bin directory, and modify the variable:
jsp_path=/jreport/jinfonet/
4.
Add Report Home to the JBoss startup script.
Modify the batch file run.bat in the C:\jboss4.0.1\bin directory. Search for "RESTART". Add −Dreporthome=C:\Jinfonet\JREntServer to the startup script as follows:
5.
:RESTART "%JAVA%" %JAVA_OPTS% "−Djava.endorsed.dirs=%JBOSS_ENDORSED_DIRS%" −classpath "%JBOSS_CLASSPATH%" −Dreporthome=C:\Jinfonet\JREntserver org.jboss.Main %*
Start JBoss by running the run.bat script. 6. Access JReport Enterprise Server using the following urls: 7.
http://localhost:8080/jreport/jrserver http://localhost:8080/jreport/admin/index.jsp http://localhost:8080/jreport/jinfonet/index.jsp
Troubleshooting
If you run into problems when using JREntServer in JBoss, send the log files of JREntServer to [email protected]. Thefollowing procedure illustrates how to generate the log files:
Modify the batch files run.bat under C:\jboss−4.0.1\bin.
In the file run.bat, add −Dlogall=true after the reporthome definition:
1.
"$JAVA" $JAVA_OPTS \ −classpath "$JBOSS_CLASSPATH" −Dreporthome=C:\Jinfonet\JREntServer−Dlogall=true \ org.jboss.Main "$@"
After editing run.bat, start JBoss using the modified batch file. 2. After reproducing the problem, send us the log files under C:\Jinfonet\JREntServer\logs.
The JBoss log files may also help to identify the problem. The most useful one isC:\jboss−4.0.1\server\default\log\server.log.
3.
Index
Deploying JREntServer to BEA WebLogic 8.1
The example directory paths listed below are based on a typical Windows installation of JReport Enterprise Server and WebLogic8.1. Before starting these tasks, you should already have reviewed Integrating JReport Enterprise Server with a Java ApplicationServer.
Note: You must start the standalone JReport Enterprise Server successfully before you can deploy JREntServer as a Web Applicationas this will create server.properties and other important files and directories. Start the server usingC:\Jinfonet\JREntServer\bin\JREntServer.bat.
Integrating JReport Enterprise Server with a Java Application Server
293
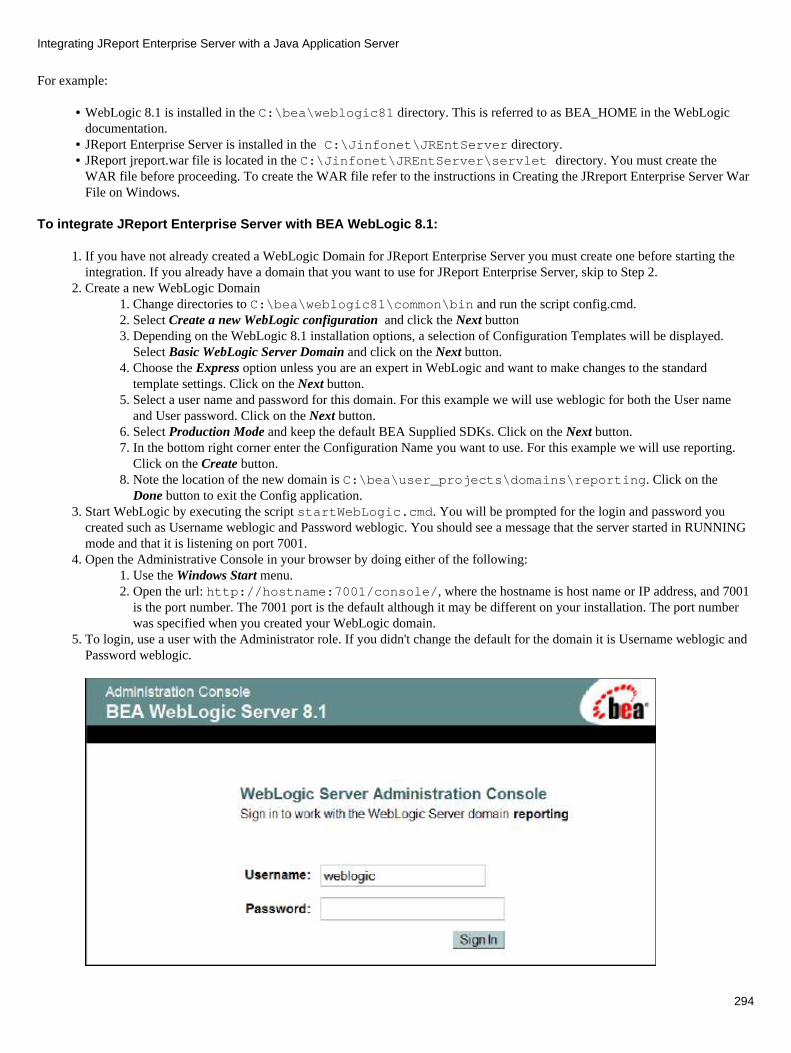
For example:
WebLogic 8.1 is installed in the C:\bea\weblogic81 directory. This is referred to as BEA_HOME in the WebLogicdocumentation.
•
JReport Enterprise Server is installed in the C:\Jinfonet\JREntServer directory. • JReport jreport.war file is located in the C:\Jinfonet\JREntServer\servlet directory. You must create theWAR file before proceeding. To create the WAR file refer to the instructions in Creating the JRreport Enterprise Server WarFile on Windows.
•
To integrate JReport Enterprise Server with BEA WebLogic 8.1:
If you have not already created a WebLogic Domain for JReport Enterprise Server you must create one before starting theintegration. If you already have a domain that you want to use for JReport Enterprise Server, skip to Step 2.
1.
Create a new WebLogic Domain Change directories to C:\bea\weblogic81\common\bin and run the script config.cmd.1. Select Create a new WebLogic configuration and click the Next button2. Depending on the WebLogic 8.1 installation options, a selection of Configuration Templates will be displayed.Select Basic WebLogic Server Domain and click on the Next button.
3.
Choose the Express option unless you are an expert in WebLogic and want to make changes to the standardtemplate settings. Click on the Next button.
4.
Select a user name and password for this domain. For this example we will use weblogic for both the User nameand User password. Click on the Next button.
5.
Select Production Mode and keep the default BEA Supplied SDKs. Click on the Next button. 6. In the bottom right corner enter the Configuration Name you want to use. For this example we will use reporting.Click on the Create button.
7.
Note the location of the new domain is C:\bea\user_projects\domains\reporting. Click on theDone button to exit the Config application.
8.
2.
Start WebLogic by executing the script startWebLogic.cmd. You will be prompted for the login and password youcreated such as Username weblogic and Password weblogic. You should see a message that the server started in RUNNINGmode and that it is listening on port 7001.
3.
Open the Administrative Console in your browser by doing either of the following: Use the Windows Start menu.1. Open the url: http://hostname:7001/console/, where the hostname is host name or IP address, and 7001is the port number. The 7001 port is the default although it may be different on your installation. The port numberwas specified when you created your WebLogic domain.
2.
4.
To login, use a user with the Administrator role. If you didn't change the default for the domain it is Username weblogic andPassword weblogic.
5.
Integrating JReport Enterprise Server with a Java Application Server
294
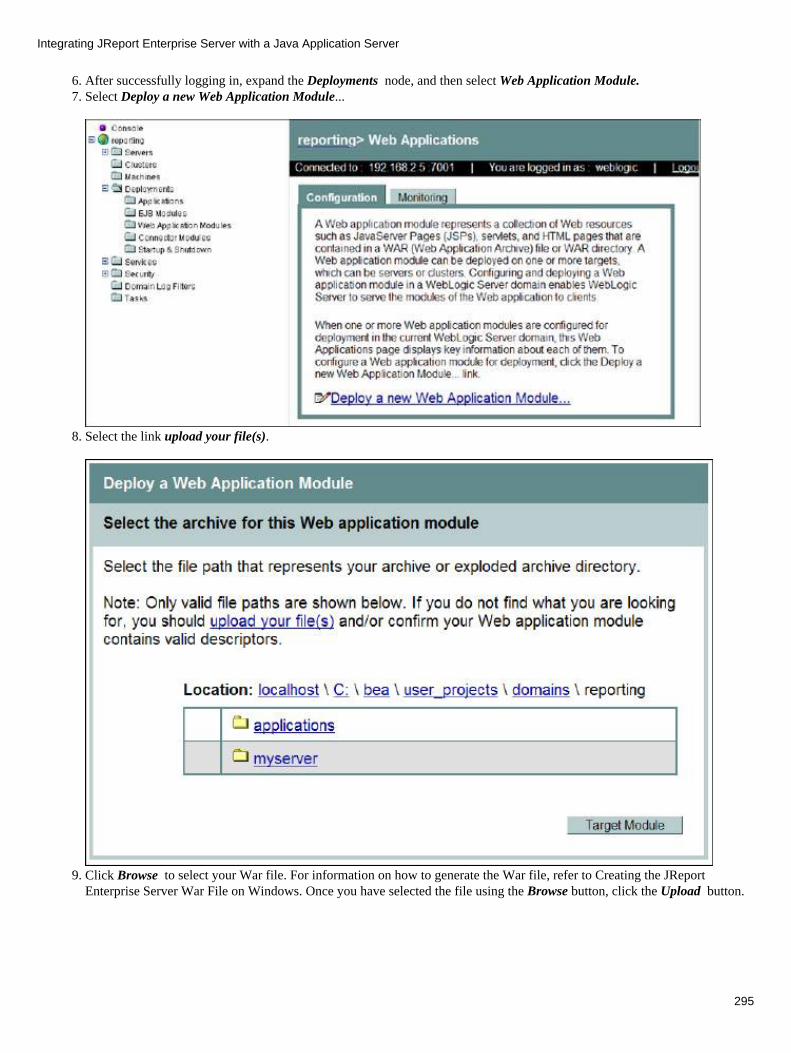
After successfully logging in, expand the Deployments node, and then select Web Application Module.6. Select Deploy a new Web Application Module... 7.
Select the link upload your file(s). 8.
Click Browse to select your War file. For information on how to generate the War file, refer to Creating the JReportEnterprise Server War File on Windows. Once you have selected the file using the Browse button, click the Upload button.
9.
Integrating JReport Enterprise Server with a Java Application Server
295

Select the check box on jreport.war and click the Target Module button. 10.
The Identity Name is the JReport Servlet Context. By default it is the name of the WAR file. The remaining instructionsassume that you do not modify this. Select Deploy to complete the deployment.
11.
Integrating JReport Enterprise Server with a Java Application Server
296
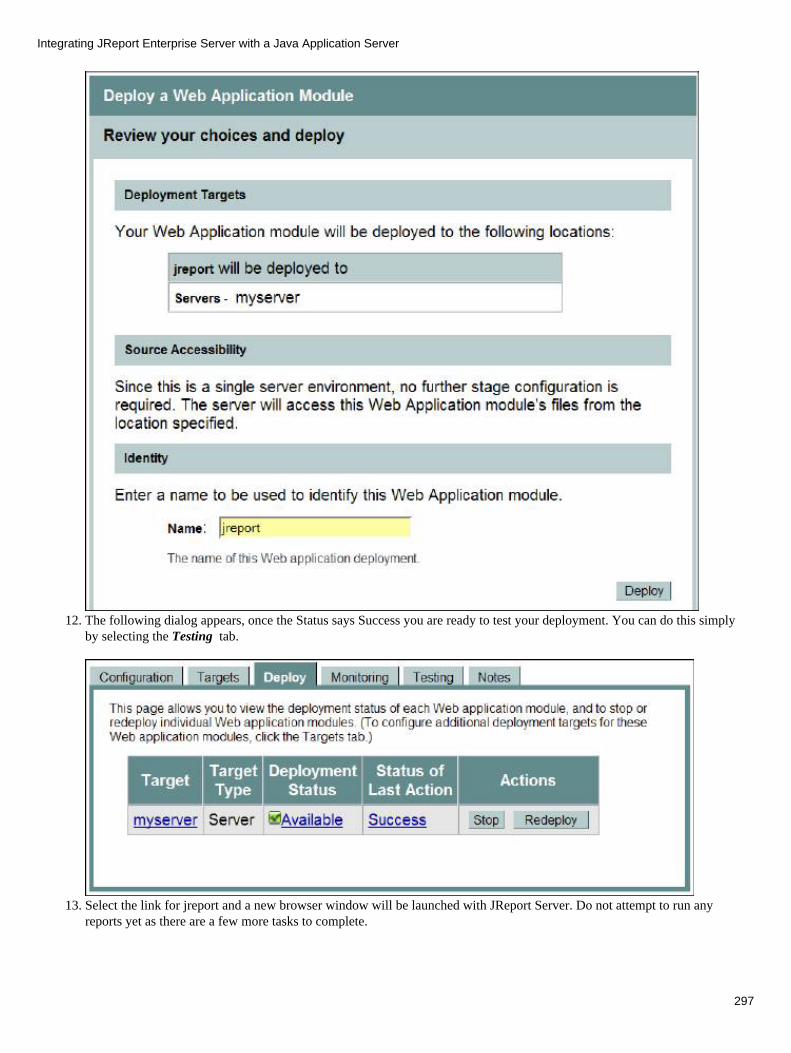
The following dialog appears, once the Status says Success you are ready to test your deployment. You can do this simplyby selecting the Testing tab.
12.
Select the link for jreport and a new browser window will be launched with JReport Server. Do not attempt to run anyreports yet as there are a few more tasks to complete.
13.
Integrating JReport Enterprise Server with a Java Application Server
297

Shutdown WebLogic by using the stopWebLogic.cmd shell script in theuser_projects\domains\reporting directory. Since reporting is a production server you must specify theusername and password in plain text on the shutdown command line as follows:
/stopWebLogic.cmd weblogic weblogic
14.
Set JREntServer's reporthome.
Modify the command script C:\bea\user_projects\domains\mydomain\startWebLogic.cmd:
15.
−Djava.security.policy="%WL_HOME%\server\lib\weblogic.policy" −Dreporthome=C:\Jinfonet\JREntServer
Open the file server.properties in the C:\Jinfonet\JREntServer\bin directory, and modify the variables as follows:16.
jsp.webapp.sendfile=/jreport/sendfile web.design_servlet_path=/jreport/webreporting web.dhtml_servlet_path=/jreport/dhtml web.help_servlet_path=/jreport/help web.jreport_servlet_path=/jreport/jrserverweb.dhtml_jsp_path=/jreport/dhtmljspweb.dhtml_servlet_entry_path=/jreport/jrdhtml
Modify the property jsp_path in redirect.properties in the C:\Jinfonet\JREntServer directory, the firstline should be:
jsp_path=/jreport/jinfonet/
17.
Start WebLogic by using the startWebLogic.cmd shell script in the user_projects\domain\reporting directory. 18. Access JReport Enterprise Server using the following urls: 19.
http://<hostname>:7001/jreport/jrserver http://<hostname>:7001/jreport/admin/index.jsp http://<hostname>:7001/jreport/jinfonet/index.jsp
Troubleshooting
If you run into problems when using JREntServer in BEA WebLogic, send the log files of JREntServer to [email protected] following procedure illustrates how to generate the log files:
Add −Dlogall=true in the startWebLogic.cmd shell script on the same line as −Dreporthome. For how to find this field,see step 2.
Restart the application server, and try to reproduce the problem. After reproducing the problem, send us the log files underC:\Jinfonet\JREntServer\logs.
The WebLogic log file may also help to identify the problem. The log file isC:\bea\user_projects\domains\reporting\reporting.log.
Integrating JReport Enterprise Server with a Java Application Server
298

Index
Deploying JREntServer to Tomcat 4.1
The example directory paths listed below are based on a typical Windows installation of JReport Enterprise Server and Tomcat.Before starting these tasks, you should already have reviewed Integrating JReport Enterprise Server with a Java Application Server.
Note: You must start the standalone JReport Enterprise Server successfully before you can deploy JREntServer as a Web Applicationas this will create server.properties and other important files and directories. Start the server usingC:\Jinfonet\JREntServer\bin\JREntServer.bat.
For example:
Tomcat 4.1 is installed in the C:\Program Files\Apache Group\Tomcat 4.1 directory. • JReport Enterprise Server is installed in the C:\Jinfonet\JREntServer directory. • JReport Web Application Archive (jreport.war) file is located in theC:\Jinfonet\JREntServer\servlet directory. You must create the WAR file before proceeding. To create theWAR file refer to the instructions in Creating the JReport Enterprise Server War File on Windows.
•
To integrate JReport Enterprise Server with Tomcat 4.1:
Ensure that Tomcat is shutdown by any of the following ways: Select Stop Tomcat from the Start Menu on Windows ♦ Run the script C:\Program Files\Apache Group\Tomcat 4.1\bin\shutdown.bat.♦ If Tomcat was installed as a Windows service, stop the server from the Control Panel −> Administrative Tools −>Services panel.
♦
1.
Open the file server.properties in the C:\Jinfonet\JREntServer\bin directory, and modify the variables: 2.
jsp.webapp.sendfile=/jreport/sendfile web.design_servlet_path=/jreport/webreporting web.dhtml_servlet_path=/jreport/dhtml web.jreport_servlet_path=/jreport/jrserverweb.dhtml_jsp_path=/jreport/dhtmljspweb.dhtml_servlet_entry_path=/jreport/jrdhtml cluster.admin.rmi.port= Any free port (For example: cluster.admin.rmi.port=1129)
The Servlet Context Path /jreport/ is determined automatically by Tomcat based on the name of the WAR file so if youdid not name the file jreport.war use the appropriate name. Open the file redirect.properties in the C:\Jinfonet\JREntServer\bin directory, and modify thejsp_path variable:
jsp_path=/jreport/jinfonet/
3.
Add Report Home to the Tomcat startup script.
Modify the batch file catalina.bat in the C:\Program Files\Apache Group\Tomcat 4.1\bin directory.Search for "Execute Java ". Add −Dreporthome=C:\Jinfonet\JREntServer to the startup script as follows:
4.
goto setArgs :doneSetArgs
set CATALINA_OPTS=%CATALINA_OPTS% −Dreporthome=C:\Jinfonet\JREntServerrem Execute Java with the applicable properties
Start Tomcat by one of the following methods: Select Start Tomcat from the Windows Start menu. ♦ Run the script C:\Program Files\Apache Group\Tomcat 4.1\bin\startup.bat.♦ If Tomcat was installed as a Windows service, start the server from the Control Panel −> Administrative Tools −>Services panel.
♦
5.
Integrating JReport Enterprise Server with a Java Application Server
299
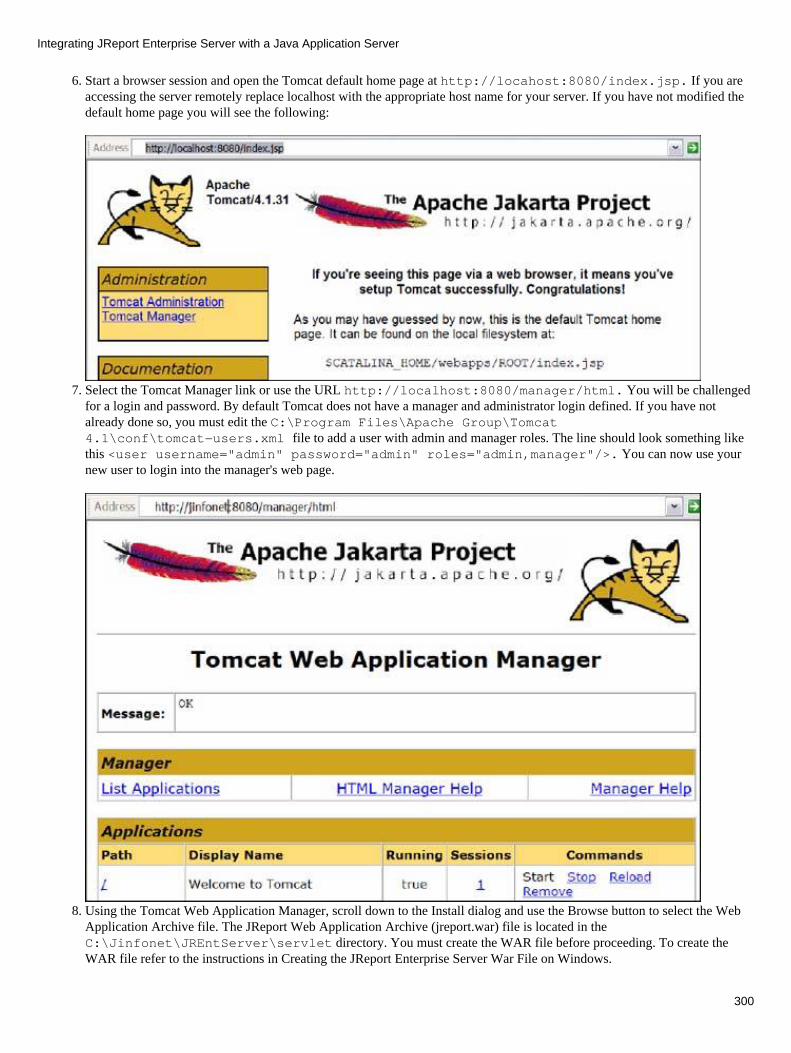
Start a browser session and open the Tomcat default home page at http://locahost:8080/index.jsp. If you areaccessing the server remotely replace localhost with the appropriate host name for your server. If you have not modified thedefault home page you will see the following:
6.
Select the Tomcat Manager link or use the URL http://localhost:8080/manager/html. You will be challengedfor a login and password. By default Tomcat does not have a manager and administrator login defined. If you have notalready done so, you must edit the C:\Program Files\Apache Group\Tomcat4.1\conf\tomcat−users.xml file to add a user with admin and manager roles. The line should look something likethis <user username="admin" password="admin" roles="admin,manager"/>. You can now use yournew user to login into the manager's web page.
7.
Using the Tomcat Web Application Manager, scroll down to the Install dialog and use the Browse button to select the WebApplication Archive file. The JReport Web Application Archive (jreport.war) file is located in theC:\Jinfonet\JREntServer\servlet directory. You must create the WAR file before proceeding. To create theWAR file refer to the instructions in Creating the JReport Enterprise Server War File on Windows.
8.
Integrating JReport Enterprise Server with a Java Application Server
300
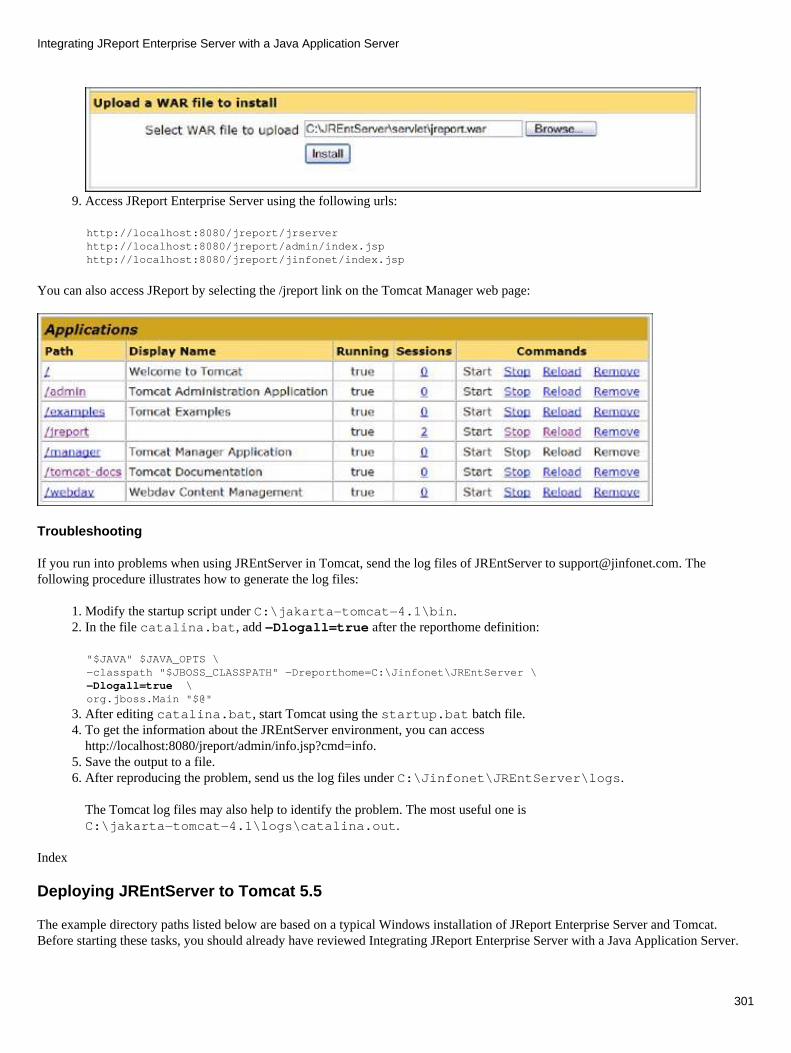
Access JReport Enterprise Server using the following urls: 9.
http://localhost:8080/jreport/jrserver http://localhost:8080/jreport/admin/index.jsp http://localhost:8080/jreport/jinfonet/index.jsp
You can also access JReport by selecting the /jreport link on the Tomcat Manager web page:
Troubleshooting
If you run into problems when using JREntServer in Tomcat, send the log files of JREntServer to [email protected]. Thefollowing procedure illustrates how to generate the log files:
Modify the startup script under C:\jakarta−tomcat−4.1\bin. 1. In the file catalina.bat, add −Dlogall=true after the reporthome definition: 2.
"$JAVA" $JAVA_OPTS \ −classpath "$JBOSS_CLASSPATH" −Dreporthome=C:\Jinfonet\JREntServer \ −Dlogall=true \ org.jboss.Main "$@"
After editing catalina.bat, start Tomcat using the startup.bat batch file. 3. To get the information about the JREntServer environment, you can accesshttp://localhost:8080/jreport/admin/info.jsp?cmd=info.
4.
Save the output to a file.5. After reproducing the problem, send us the log files under C:\Jinfonet\JREntServer\logs.
The Tomcat log files may also help to identify the problem. The most useful one isC:\jakarta−tomcat−4.1\logs\catalina.out.
6.
Index
Deploying JREntServer to Tomcat 5.5
The example directory paths listed below are based on a typical Windows installation of JReport Enterprise Server and Tomcat.Before starting these tasks, you should already have reviewed Integrating JReport Enterprise Server with a Java Application Server.
Integrating JReport Enterprise Server with a Java Application Server
301

Note: You must start the standalone JReport Enterprise Server successfully before you can deploy JREntServer as a Web Applicationas this will create server.properties and other important files and directories. Start the server usingC:\Jinfonet\JREntServer\bin\JREntServer.bat.
For example:
Tomcat 5.5 is installed in the C:\Program Files\Apache Software Foundation\Tomcat 5.5 directory. • JReport Enterprise Server is installed in the C:\Jinfonet\JREntServer directory. • JReport Web Application Archive (jreport.war) file is located in theC:\Jinfonet\JREntServer\servlet directory. You must create the WAR file before proceeding. To create theWAR file refer to the instructions in Creating the JReport Enterprise Server War File on Windows.
•
To integrate JReport Enterprise Server with Tomcat 5.5:
Ensure that Tomcat is shutdown by stopping the Apache Tomcat service from the Control Panel > Administrative Tools >Services panel. Ensure in the Windows Task Manager that tomcat5.exe is not running. If it is still running, use the TaskManager to end the process.
1.
Open the file server.properties in the C:\Jinfonet\JREntServer\bin directory, and modify the variables: 2.
jsp.webapp.sendfile=/jreport/sendfile web.design_servlet_path=/jreport/webreporting web.dhtml_servlet_path=/jreport/dhtml web.jreport_servlet_path=/jreport/jrserver web.dhtml_jsp_path=/jreport/dhtmljspweb.dhtml_servlet_entry_path=/jreport/jrdhtmlcluster.admin.rmi.port= Any free port (For example: cluster.admin.rmi.port=1129)
The Servlet Context Path /jreport/ is determined automatically by Tomcat based on the name of the WAR file so if youdid not name the file jreport.war use the appropriate name. Open the file redirect.properties in the C:\Jinfonet\JREntServer\bin directory, and modify thejsp_path variable:
jsp_path=/jreport/jinfonet/
3.
Edit the Java options variable using Start > All Programs > Apache Tomcat 5.5 > Configure Tomcat. Select the Java tab andappend −Dreporthome=C:\Jinfonet\JREntServer to the Java Options text field and OK to save.
4.
Integrating JReport Enterprise Server with a Java Application Server
302
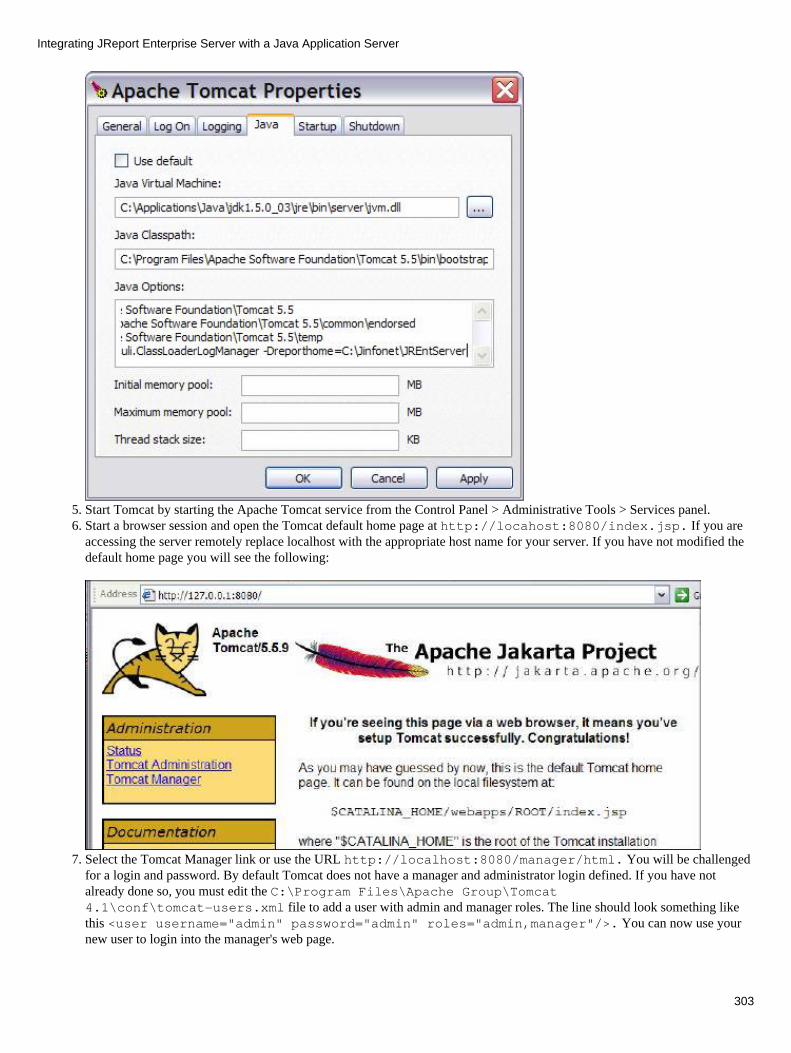
Start Tomcat by starting the Apache Tomcat service from the Control Panel > Administrative Tools > Services panel. 5. Start a browser session and open the Tomcat default home page at http://locahost:8080/index.jsp. If you areaccessing the server remotely replace localhost with the appropriate host name for your server. If you have not modified thedefault home page you will see the following:
6.
Select the Tomcat Manager link or use the URL http://localhost:8080/manager/html. You will be challengedfor a login and password. By default Tomcat does not have a manager and administrator login defined. If you have notalready done so, you must edit the C:\Program Files\Apache Group\Tomcat4.1\conf\tomcat−users.xml file to add a user with admin and manager roles. The line should look something likethis <user username="admin" password="admin" roles="admin,manager"/>. You can now use yournew user to login into the manager's web page.
7.
Integrating JReport Enterprise Server with a Java Application Server
303
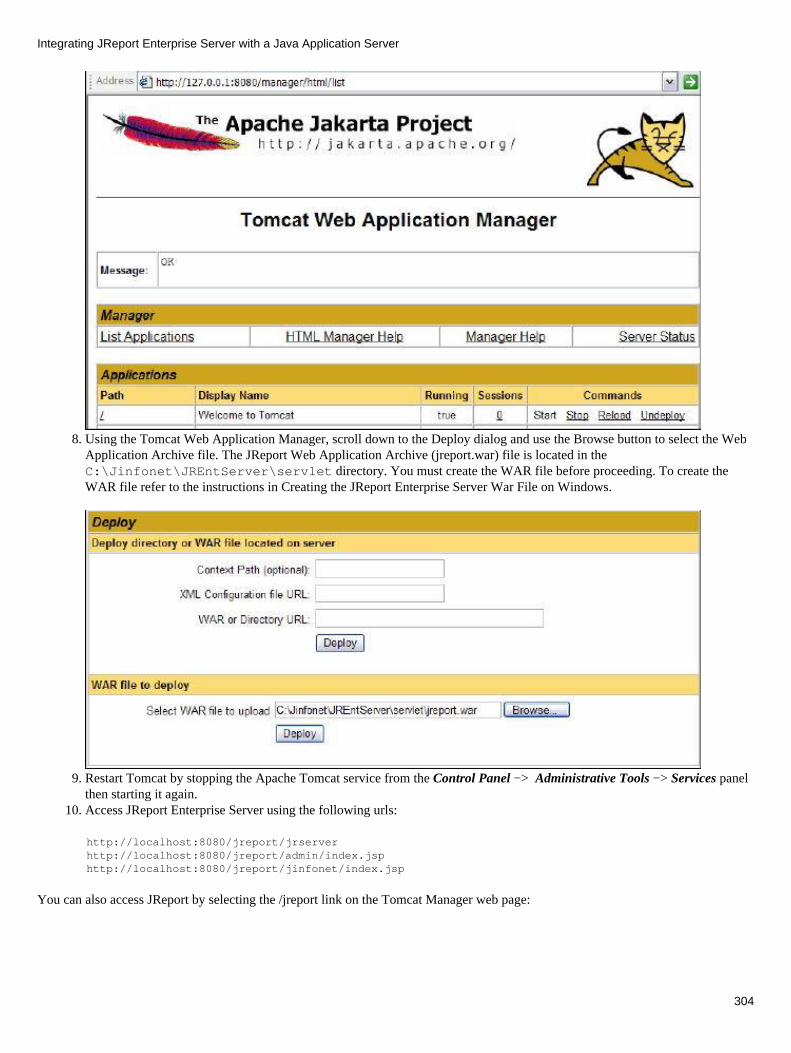
Using the Tomcat Web Application Manager, scroll down to the Deploy dialog and use the Browse button to select the WebApplication Archive file. The JReport Web Application Archive (jreport.war) file is located in theC:\Jinfonet\JREntServer\servlet directory. You must create the WAR file before proceeding. To create theWAR file refer to the instructions in Creating the JReport Enterprise Server War File on Windows.
8.
Restart Tomcat by stopping the Apache Tomcat service from the Control Panel −> Administrative Tools −> Services panelthen starting it again.
9.
Access JReport Enterprise Server using the following urls: 10.
http://localhost:8080/jreport/jrserver http://localhost:8080/jreport/admin/index.jsp http://localhost:8080/jreport/jinfonet/index.jsp
You can also access JReport by selecting the /jreport link on the Tomcat Manager web page:
Integrating JReport Enterprise Server with a Java Application Server
304

Troubleshooting
If you run into problems when using JREntServer in Tomcat, send the log files of JREntServer to [email protected]. Thefollowing procedure illustrates how to generate the log files:
Modify the startup script under C:\jakarta−tomcat−5.5\bin. 1. In the file catalina.bat, add −Dlogall=true after the reporthome definition: 2.
"$JAVA" $JAVA_OPTS \−classpath "$JBOSS_CLASSPATH" −Dreporthome=C:\Jinfonet\JREntServer\−Dlogall=true\org.jboss.Main "$@"
After editing catalina.bat, start Tomcat using the startup.bat batch file. 3. To get the information about the JREntServer environment, you can accesshttp://localhost:8080/jreport/admin/info.jsp?cmd=info.
4.
Save the output to a file.5. After reproducing the problem, send us the log files under C:\Jinfonet\JREntServer\logs.
The Tomcat log files may also help to identify the problem. The most useful one isC:\jakarta−tomcat−5.5\logs\catalina.out.
6.
Index
Running multiple instances of JReport Enterprise Server
Only one instance of JREntServer can run on a single server unless each instance points to a unique Report Home directory. If youare using a Java Application Server, such as WebSphere, on a multi−cpu system, you may want to create multiple WebSphereservers. You can deploy the JREntServer WAR file on each server as long as <reporthome> on each server points to a uniquedirectory.
To create these unique directories for each server you will need to copy the following files:
%JREntServer%\bin\*.properties %JREntServer%\bin\*.ini %JREntServer%\bin\*.dat %JREntServer%\bin\*.xml %JREntServer%\profiling\*.* (include subfolders and files) %JREntServer%\template\*.* (include subfolders and files)
The following files are not needed since they are only used for the standalone server.
mapping.properties servlet.properties
Integrating JReport Enterprise Server with a Java Application Server
305

Creating the additional Report Home and WAR file
Open a command line window and cd to the JREntServer installation directory. For this example, on Unix we will use/opt/JREntServer. For Windows systems your install_root directory could be C:\JREntServer .
1.
Create a new directory in your local disk. e.g. /opt/JREntServer/server2.2. Copy the files and directories listed above into this directory. 3. Change directories to the /opt/JREntServer/servlet/WEB−INF directory. 4. Modify the web.xml in the WEB−INF directory. 5.
<servlet><servlet−name>jrserver</servlet−name><servlet−class>jet.server.servlets.JRServlet</servlet−class> <init−param> <param−name>reporthome</param−name> <param−value>/opt/JREntServer/server2</param−value></init−param></servlet>
Using the following command, create a WAR file named server1_servlet.war:
jar −cvf server2_jreport.war index.htm jinfonet admin dhtmljsp WEB−INF
6.
Deploy the WAR file on your second application server instance as you did the first server.7.
Deploying JReport Enterprise Server on Other Web or Application Server
Running with Apache JServ
For Windows NTFor UnixAppendix I − Installing Apache and JServ on UnixAppendix II − jinfonet.propertiesAppendix III − jserv.propertiesAppendix IV − jserv.confAppendix V − httpd.confAppendix VI − Start, Restart and Stop Apache
For Windows NT
Assuming that
Apache 1.3.6 is installed to C:\Program Files\Apache Group\Apache\.• Apache JServ 1.0 is installed to C:\Program Files\Apache Group\Apache JServ.• JSDK2.0 is installed to c:\jsdk2.0 (JServ 1.0 can only work with JSDK 2.0). • JReport Enterprise Server is installed to c:\JREntServer. • The host name of the Server is myhost.• JVM is located at c:\jdk.•
Steps
Edit C:\Program Files\Apache Group\Apache\conf\httpd.conf
ServerName myhost
1.
Edit C:\Program Files\Apache Group\Apache JServ\conf\jserv.properties to add the followinglines:
2.
wrapper.classpath=C:\JREntServer\lib\JRESServlets.jar wrapper.classpath=C:\JREntServer\lib\JREngine.jarwrapper.classpath=C:\JREntServer\lib\hsqldb.jar
Integrating JReport Enterprise Server with a Java Application Server
306

wrapper.classpath=C:\JREntServer\lib\tar.jarwrapper.classpath=C:\jsdk2.0\lib\jsdk.jarwrapper.classpath=C:\jdk\lib\classes.zip (JDK 1.1 need it)wrapper.classpath=C:\JREntServer\lib\gnujsp10.jarwrapper.classpath=C:\JREntServer\lib\servlet−2.0−plus.jar
wrapper.bin.parameters=−Dreporthome=c:\\JREntServer
Notes: If you are scheduling a report to export to the following formats, you should add the corresponding class package orjar with a valid path to the jserv.properties file:
To Mail or use the "Mail Notification" function: wrapper.classpath=C:\JREntServer\lib\activation.jarwrapper.classpath=C:\JREntServer\lib\mail.jar
1.
To PDF: wrapper.classpath=C:\JREntServer\lib\Itext.jar
2.
To Excel: wrapper.classpath=C:\JREntServer\lib\poiHSSF_151.jar
3.
To XML: wrapper.classpath=C:\JREntServer\lib\xerces.jar
4.
To DHTML:wrapper.classpath=C:\JREntServer\lib\JRWebDesign.jar
5.
♦
If you are using DHTML tag libraries, please add the following jar with valid paths to the jserv.properties file:
wrapper.classpath=C:\JREntServer\lib\taglib.jar
♦
Edit C:\Program Files\Apache Group\Apache JServ\conf\zone.properties and add the following lines:3.
servlet.jrserver.code=jet.server.servlets.JRServlet servlet.jrserver.initArgs=temp_dir=temp,history_dir=history servlet.jrserver.initArgs=reporthome=C:\JREntServerservlet.jrserver.initArgs=auth_scheme=Basicservlet.jradmin.code=jet.server.servlets.RcServletservlet.jradmin.initArgs=reporthome=C:\JREntServer (these two lines can be ignored)servlet.webview.code=jet.server.servlets.WebViewServletservlet.sendfile.code=jet.server.servlets.SendFileServlet servlet.jspservlet.code=org.gjt.jsp.JspServlet servlet.jspservlet.initArgs=scratchdir=c:\\JREntServer\\public_html, checkclass=true, pagebase=C:\\Program Files\\Apache Group\\Apache\\htdocs
Edit C:\Program Files\Apache Group\Apache JServ\conf\jserv.conf and add the following lines:ApJServAction .jsp/servlets/jspservlet
4.
Copy c:\JREntServer\public_html\jinfonet to C:\Program Files\ApacheGroup\Apache\htdocs
5.
Now you can run JReport Enterprise Server from an internet browser. You need to input an URL such as the following (The defaultport for Apache Server is 80):http://myhost/servlet/jrserver/
Access JSPs byhttp://myhost/jinfonet/index.htm
If the mount point is not /servlet, you need to change all /servlet/sendfile and /servlet/webview to the real webpath of SendFileServlet and WebViewServlet in all JSPs. If the mount point is /jinfonet, you must renameC:\Program Files\Apache Group\Apache\htdocs\jinfonet to avoid conflict of the mount point.
Reference: User's Guide | Using JSP
Integrating JReport Enterprise Server with a Java Application Server
307
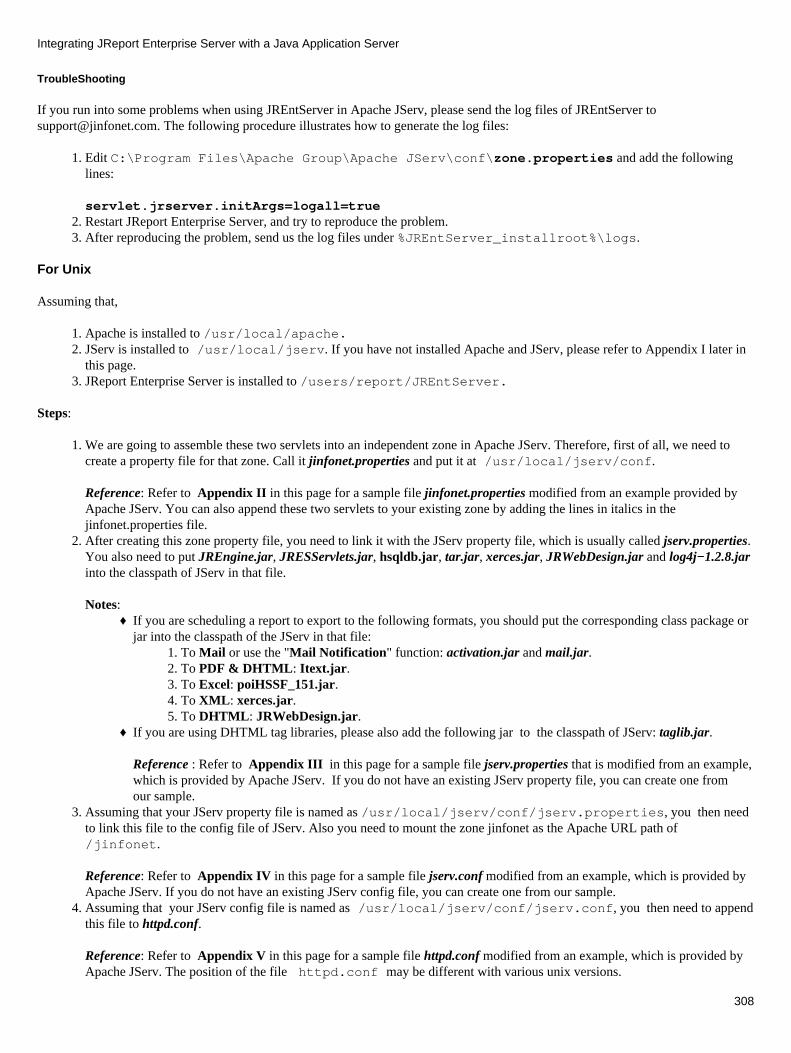
TroubleShooting
If you run into some problems when using JREntServer in Apache JServ, please send the log files of JREntServer [email protected]. The following procedure illustrates how to generate the log files:
Edit C:\Program Files\Apache Group\Apache JServ\conf\zone.properties and add the followinglines:
servlet.jrserver.initArgs=logall=true
1.
Restart JReport Enterprise Server, and try to reproduce the problem. 2. After reproducing the problem, send us the log files under %JREntServer_installroot%\logs.3.
For Unix
Assuming that,
Apache is installed to /usr/local/apache.1. JServ is installed to /usr/local/jserv. If you have not installed Apache and JServ, please refer to Appendix I later inthis page.
2.
JReport Enterprise Server is installed to /users/report/JREntServer.3.
Steps:
We are going to assemble these two servlets into an independent zone in Apache JServ. Therefore, first of all, we need tocreate a property file for that zone. Call it jinfonet.properties and put it at /usr/local/jserv/conf.
Reference: Refer to Appendix II in this page for a sample file jinfonet.properties modified from an example provided byApache JServ. You can also append these two servlets to your existing zone by adding the lines in italics in thejinfonet.properties file.
1.
After creating this zone property file, you need to link it with the JServ property file, which is usually called jserv.properties.You also need to put JREngine.jar, JRESServlets.jar, hsqldb.jar, tar.jar, xerces.jar, JRWebDesign.jar and log4j−1.2.8.jarinto the classpath of JServ in that file.
Notes: If you are scheduling a report to export to the following formats, you should put the corresponding class package orjar into the classpath of the JServ in that file:
To Mail or use the "Mail Notification" function: activation.jar and mail.jar.1. To PDF & DHTML: Itext.jar.2. To Excel: poiHSSF_151.jar.3. To XML: xerces.jar.4. To DHTML: JRWebDesign.jar.5.
♦
If you are using DHTML tag libraries, please also add the following jar to the classpath of JServ: taglib.jar.
Reference : Refer to Appendix III in this page for a sample file jserv.properties that is modified from an example,which is provided by Apache JServ. If you do not have an existing JServ property file, you can create one fromour sample.
♦
2.
Assuming that your JServ property file is named as /usr/local/jserv/conf/jserv.properties, you then needto link this file to the config file of JServ. Also you need to mount the zone jinfonet as the Apache URL path of/jinfonet.
Reference: Refer to Appendix IV in this page for a sample file jserv.conf modified from an example, which is provided byApache JServ. If you do not have an existing JServ config file, you can create one from our sample.
3.
Assuming that your JServ config file is named as /usr/local/jserv/conf/jserv.conf, you then need to appendthis file to httpd.conf.
Reference: Refer to Appendix V in this page for a sample file httpd.conf modified from an example, which is provided byApache JServ. The position of the file httpd.conf may be different with various unix versions.
4.
Integrating JReport Enterprise Server with a Java Application Server
308
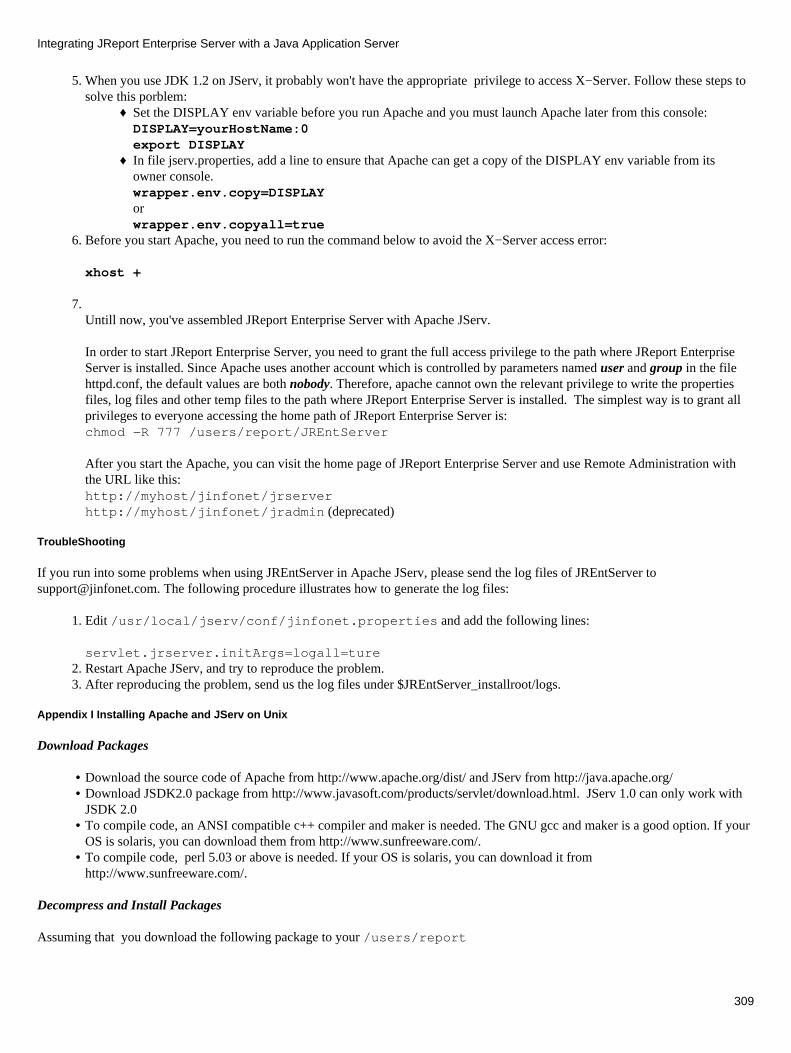
When you use JDK 1.2 on JServ, it probably won't have the appropriate privilege to access X−Server. Follow these steps tosolve this porblem:
Set the DISPLAY env variable before you run Apache and you must launch Apache later from this console:DISPLAY=yourHostName:0export DISPLAY
♦
In file jserv.properties, add a line to ensure that Apache can get a copy of the DISPLAY env variable from itsowner console.wrapper.env.copy=DISPLAYorwrapper.env.copyall=true
♦
5.
Before you start Apache, you need to run the command below to avoid the X−Server access error: 6.
xhost +
7. Untill now, you've assembled JReport Enterprise Server with Apache JServ.
In order to start JReport Enterprise Server, you need to grant the full access privilege to the path where JReport EnterpriseServer is installed. Since Apache uses another account which is controlled by parameters named user and group in the filehttpd.conf, the default values are both nobody. Therefore, apache cannot own the relevant privilege to write the propertiesfiles, log files and other temp files to the path where JReport Enterprise Server is installed. The simplest way is to grant allprivileges to everyone accessing the home path of JReport Enterprise Server is:chmod −R 777 /users/report/JREntServer
After you start the Apache, you can visit the home page of JReport Enterprise Server and use Remote Administration withthe URL like this:http://myhost/jinfonet/jrserverhttp://myhost/jinfonet/jradmin (deprecated)
TroubleShooting
If you run into some problems when using JREntServer in Apache JServ, please send the log files of JREntServer [email protected]. The following procedure illustrates how to generate the log files:
Edit /usr/local/jserv/conf/jinfonet.properties and add the following lines:
servlet.jrserver.initArgs=logall=ture
1.
Restart Apache JServ, and try to reproduce the problem. 2. After reproducing the problem, send us the log files under $JREntServer_installroot/logs.3.
Appendix I Installing Apache and JServ on Unix
Download Packages
Download the source code of Apache from http://www.apache.org/dist/ and JServ from http://java.apache.org/• Download JSDK2.0 package from http://www.javasoft.com/products/servlet/download.html. JServ 1.0 can only work withJSDK 2.0
•
To compile code, an ANSI compatible c++ compiler and maker is needed. The GNU gcc and maker is a good option. If yourOS is solaris, you can download them from http://www.sunfreeware.com/.
•
To compile code, perl 5.03 or above is needed. If your OS is solaris, you can download it fromhttp://www.sunfreeware.com/.
•
Decompress and Install Packages
Assuming that you download the following package to your /users/report
Integrating JReport Enterprise Server with a Java Application Server
309
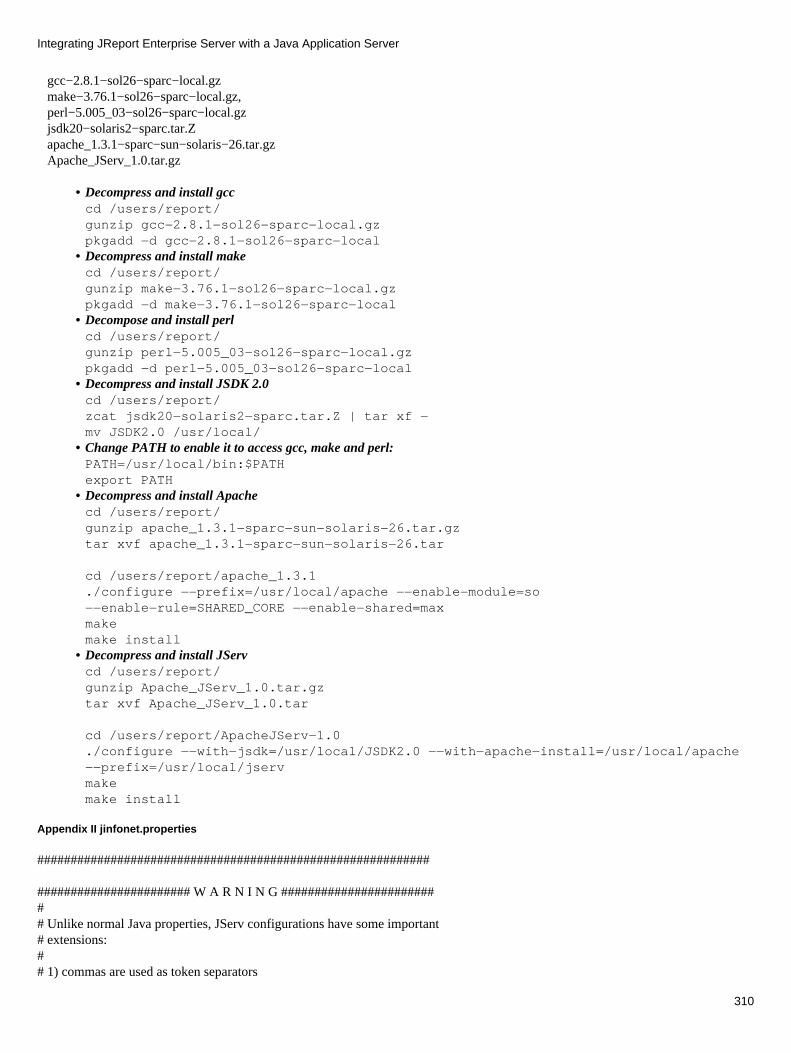
gcc−2.8.1−sol26−sparc−local.gz make−3.76.1−sol26−sparc−local.gz, perl−5.005_03−sol26−sparc−local.gz jsdk20−solaris2−sparc.tar.Z apache_1.3.1−sparc−sun−solaris−26.tar.gz Apache_JServ_1.0.tar.gz
Decompress and install gcccd /users/report/gunzip gcc−2.8.1−sol26−sparc−local.gzpkgadd −d gcc−2.8.1−sol26−sparc−local
•
Decompress and install makecd /users/report/gunzip make−3.76.1−sol26−sparc−local.gzpkgadd −d make−3.76.1−sol26−sparc−local
•
Decompose and install perl cd /users/report/gunzip perl−5.005_03−sol26−sparc−local.gzpkgadd −d perl−5.005_03−sol26−sparc−local
•
Decompress and install JSDK 2.0 cd /users/report/zcat jsdk20−solaris2−sparc.tar.Z | tar xf −mv JSDK2.0 /usr/local/
•
Change PATH to enable it to access gcc, make and perl: PATH=/usr/local/bin:$PATHexport PATH
•
Decompress and install Apachecd /users/report/gunzip apache_1.3.1−sparc−sun−solaris−26.tar.gz tar xvf apache_1.3.1−sparc−sun−solaris−26.tar
cd /users/report/apache_1.3.1./configure −−prefix=/usr/local/apache −−enable−module=so−−enable−rule=SHARED_CORE −−enable−shared=maxmakemake install
•
Decompress and install JServcd /users/report/gunzip Apache_JServ_1.0.tar.gztar xvf Apache_JServ_1.0.tar
cd /users/report/ApacheJServ−1.0./configure −−with−jsdk=/usr/local/JSDK2.0 −−with−apache−install=/usr/local/apache−−prefix=/usr/local/jservmakemake install
•
Appendix II jinfonet.properties
###########################################################
####################### W A R N I N G ######################### Unlike normal Java properties, JServ configurations have some important # extensions:## 1) commas are used as token separators
Integrating JReport Enterprise Server with a Java Application Server
310
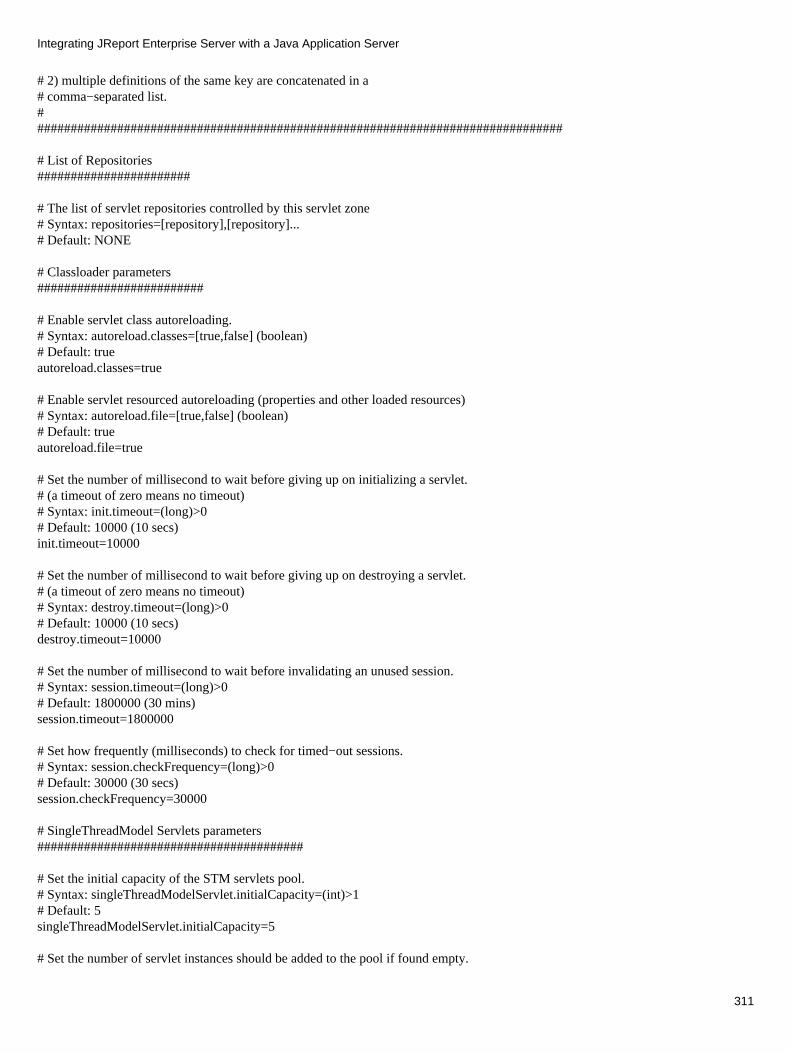
# 2) multiple definitions of the same key are concatenated in a # comma−separated list.################################################################################
# List of Repositories#######################
# The list of servlet repositories controlled by this servlet zone# Syntax: repositories=[repository],[repository]...# Default: NONE
# Classloader parameters#########################
# Enable servlet class autoreloading.# Syntax: autoreload.classes=[true,false] (boolean)# Default: trueautoreload.classes=true
# Enable servlet resourced autoreloading (properties and other loaded resources)# Syntax: autoreload.file=[true,false] (boolean)# Default: trueautoreload.file=true
# Set the number of millisecond to wait before giving up on initializing a servlet.# (a timeout of zero means no timeout)# Syntax: init.timeout=(long)>0# Default: 10000 (10 secs)init.timeout=10000
# Set the number of millisecond to wait before giving up on destroying a servlet.# (a timeout of zero means no timeout)# Syntax: destroy.timeout=(long)>0# Default: 10000 (10 secs)destroy.timeout=10000
# Set the number of millisecond to wait before invalidating an unused session.# Syntax: session.timeout=(long)>0# Default: 1800000 (30 mins)session.timeout=1800000
# Set how frequently (milliseconds) to check for timed−out sessions.# Syntax: session.checkFrequency=(long)>0# Default: 30000 (30 secs)session.checkFrequency=30000
# SingleThreadModel Servlets parameters########################################
# Set the initial capacity of the STM servlets pool.# Syntax: singleThreadModelServlet.initialCapacity=(int)>1# Default: 5singleThreadModelServlet.initialCapacity=5
# Set the number of servlet instances should be added to the pool if found empty.
Integrating JReport Enterprise Server with a Java Application Server
311
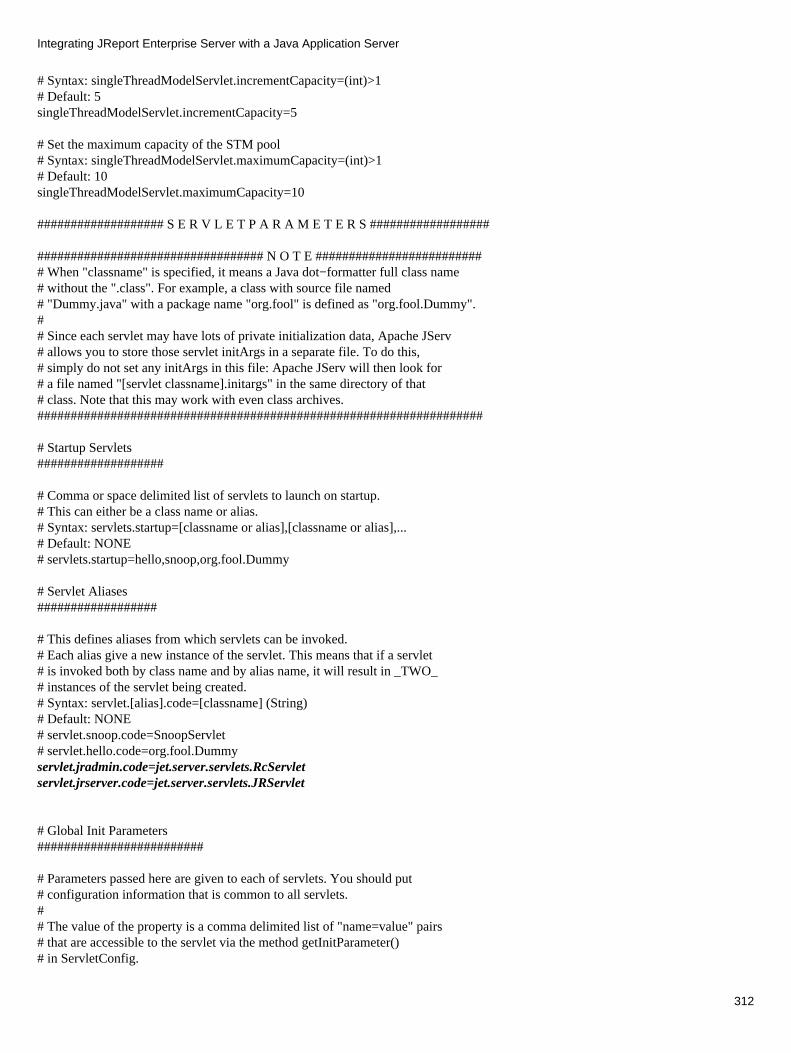
# Syntax: singleThreadModelServlet.incrementCapacity=(int)>1# Default: 5singleThreadModelServlet.incrementCapacity=5
# Set the maximum capacity of the STM pool# Syntax: singleThreadModelServlet.maximumCapacity=(int)>1# Default: 10singleThreadModelServlet.maximumCapacity=10
################### S E R V L E T P A R A M E T E R S ##################
################################## N O T E ########################## When "classname" is specified, it means a Java dot−formatter full class name# without the ".class". For example, a class with source file named # "Dummy.java" with a package name "org.fool" is defined as "org.fool.Dummy".## Since each servlet may have lots of private initialization data, Apache JServ# allows you to store those servlet initArgs in a separate file. To do this,# simply do not set any initArgs in this file: Apache JServ will then look for# a file named "[servlet classname].initargs" in the same directory of that # class. Note that this may work with even class archives.###################################################################
# Startup Servlets###################
# Comma or space delimited list of servlets to launch on startup.# This can either be a class name or alias.# Syntax: servlets.startup=[classname or alias],[classname or alias],...# Default: NONE# servlets.startup=hello,snoop,org.fool.Dummy
# Servlet Aliases##################
# This defines aliases from which servlets can be invoked.# Each alias give a new instance of the servlet. This means that if a servlet # is invoked both by class name and by alias name, it will result in _TWO_ # instances of the servlet being created.# Syntax: servlet.[alias].code=[classname] (String)# Default: NONE# servlet.snoop.code=SnoopServlet# servlet.hello.code=org.fool.Dummyservlet.jradmin.code=jet.server.servlets.RcServletservlet.jrserver.code=jet.server.servlets.JRServlet
# Global Init Parameters#########################
# Parameters passed here are given to each of servlets. You should put # configuration information that is common to all servlets.## The value of the property is a comma delimited list of "name=value" pairs # that are accessible to the servlet via the method getInitParameter() # in ServletConfig.
Integrating JReport Enterprise Server with a Java Application Server
312

# Syntax: servlets.default.initArgs=[name]=[value],[name]=[value],...# Default: NONE# servlets.default.initArgs=common.to.everybody=Hi everybody!
# Servlet Init Parameters##########################
# These properties define init parameters for each servlet that is invoked # by its classname.# Syntax: servlet.[classname].initArgs=[name]=[value],[name]=[value],...# Default: NONE# servlet.org.fool.Dummy.initArgs=message=I'm a dummy servlet
# Aliased Servlet Init Parameters##################################
# These properties define init parameters for each servlet that is invoked # by its alias.# Syntax: servlet.[alias].initArgs=[name]=[value],[name]=[value],...# Default: NONE# servlet.snoop.initArgs=message=I'm a snoop servlet# servlet.hello.initArgs=message=I say hello world to everyoneservlet.jradmin.initArgs=reporthome=/users/report/JREntServerservlet.jrserver.initArgs=temp_dir=temp,history_dir=history,auth_scheme=Basicservlet.jrserver.initArgs=reporthome=/users/report/JREntServer,secure=true
Notes:
The text in italics shows what we have added to the sample property file.• Go to User's Guide | Integrating with a Servlet Enabled Web Server | General Steps and Arguments to see the meaning ofinit arguments of JRServlet and RcServlet.
•
All the servlets about jradmin can be deleted.•
Appendix III jserv.properties
#################################### Apache JServ Configuration File ####################################
########################### WARNING ###################### Unlike normal java properties, JServ configurations# have some important extensions:## 1) commas are used as token separators# 2) multiple definitions of the same key# are concatenated in a comma separated list.###########################################################
# Execution parameters#######################
# The Java Virtual Machine interpreter# Syntax: wrapper.bin=[filename]# Default: "/usr/bin/java" for Unix systems# "c:\jdk\bin\java.exe" for Win32 systemswrapper.bin=/bin/java
Integrating JReport Enterprise Server with a Java Application Server
313

# Arguments passed to java interpreter (optional)# Syntax: wrapper.bin.parameters=[string]# Default: NONE
# Apache JServ entry point class# Syntax: wrapper.class=[classname]# Default: "org.apache.jserv.JServ"wrapper.class=org.apache.jserv.JServ
# Arguments passed to main class after the properties filename# Syntax: wrapper.class.parameters=[string]# Default: NONE# Note: currently not used
# PATH environment value passed to the JVM# Syntax: wrapper.path=[path]# Default: "/bin:/usr/bin:/usr/local/bin" for Unix systems# "c:\(windows−dir);c:\(windows−system−dir)" for Win32 systems# Notes: if more than one line is supplied these will be concatenated using# ":" or ";" (depending wether Unix or Win32) characters# Under Win32 (windows−dir) and (windows−system−dir) will be# automatically evaluated to match your system requirements
# CLASSPATH environment value passed to the JVM# Syntax: wrapper.classpath=[path]# Default: NONE (Sun's JDK/JRE already have a default classpath)# Notes: if more than one line is supplied these will be concatenated using# ":" or ";" (depending wether Unix or Win32) characters.# JVM must be able to find JSDK and JServ classes and any# utility classes used by your servlets.#wrapper.classpath=/usr/java/lib/classes.zipwrapper.classpath=/usr/local/jserv/lib/ApacheJServ.jarwrapper.classpath=/usr/local/JSDK2.0/lib/jsdk.jarwrapper.classpath=/users/report/JREntServer/lib/JRESServlets.jarwrapper.classpath=/users/report/JREntServer/lib/JREngine.jarwrapper.classpath=/users/report/JREntServer/lib/hsqldb.jarwrapper.classpath=/users/report/JREntServer/lib/tar.jar
# An environment name with value passed to the JVM# Syntax: wrapper.env=[name]=[value]# Default: NONE on Unix Systems# SystemDrive and SystemRoot with appropriate values on Win32 systems
# An environment name with value copied from caller to JAVA Virtual Machine# Syntax: wrapper.env.copy=[name]# Default: NONE
# Copies all environment from caller to JAVA Virtual Machine# Syntax: wrapper.env.copyall=[true,false]# Default: false
# Protocol used for signal handling# Syntax: wrapper.protocol=[name]# Default: ajpv11
Integrating JReport Enterprise Server with a Java Application Server
314

# General parameters######################
# Set the port JServ will listen to.# Syntax: port=[1024,65535] (int)# Default: 8007port=8007
# Servlet Zones parameters###########################
# List of servlet zones JServ manages# Syntax: zones=<servlet zone>,<servlet zone>... (Comma separated list of String)# Default: <empty>zones=jinfonet
# Configuration file for each servlet zone# Syntax: <servlet zone name as on the zones list>.properties=<full path to configFile> (String)# Default: <empty>jinfonet.properties=/usr/local/jserv/conf/jinfonet.properties
# Security parameters#####################
# Enable/disable the execution of org.apache.jserv.JServ as a servlet.# This is disabled by default because it may give informations that should# be restricted.# Note that the execution of JServ as a servlet is filtered by mod_jserv# by default so that both sides should be enabled to let this service work.# This service is useful for installation and configuration since it gives # feedback about the exact configurations JServ is set with, but it should# be disabled when both installation and configuration processes are done.# Syntax: security.selfservlet=[true,false] (boolean)# Default: false#security.selfservlet=true
# Set the maximum number of socket connections JServ may handle simultaneously.# (this number does not identify the maximum number of concurrent servlet # requests: see the JServ protocol specification for more info on this)# Syntax: security.maxConnections=(int)>1# Default: 50security.maxConnections=50
# List of IP addresses allowed to connect to JServ. This is a first security# filtering to reject possibly unsecure connections and avoid the overhead# of connection authentication.# Syntax: security.allowedAddresses=<IP address>,<IP Address>... (Comma separated list of IP adresses)# Default: <empty list>security.allowedAddresses=127.0.0.1
# Enable/disable connection authentication. # NOTE: unauthenticated connections are a little faster since authentication # handshake is not performed at connection creation.# WARNING: disable authentication only if you can protect the intrusion on# the port JServ listens on with other systems or do it at your own risk.# Syntax: security.authentication=[true,false] (boolean)
Integrating JReport Enterprise Server with a Java Application Server
315
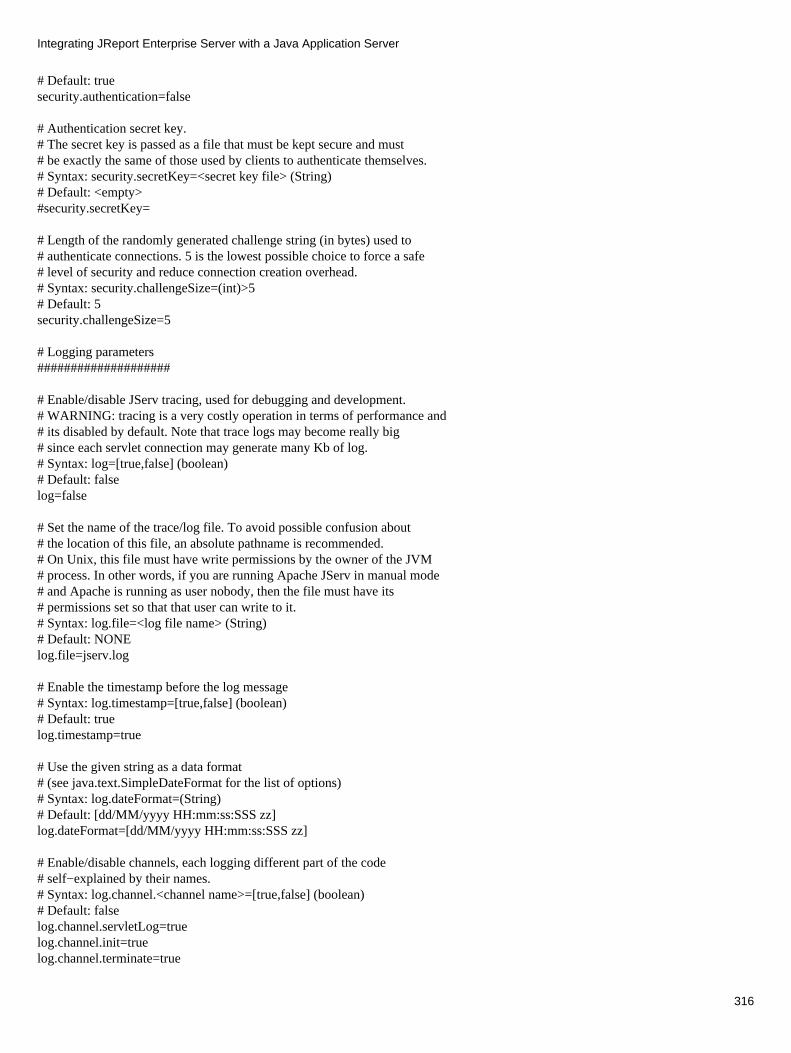
# Default: truesecurity.authentication=false
# Authentication secret key.# The secret key is passed as a file that must be kept secure and must# be exactly the same of those used by clients to authenticate themselves.# Syntax: security.secretKey=<secret key file> (String)# Default: <empty>#security.secretKey=
# Length of the randomly generated challenge string (in bytes) used to# authenticate connections. 5 is the lowest possible choice to force a safe# level of security and reduce connection creation overhead.# Syntax: security.challengeSize=(int)>5# Default: 5security.challengeSize=5
# Logging parameters####################
# Enable/disable JServ tracing, used for debugging and development.# WARNING: tracing is a very costly operation in terms of performance and# its disabled by default. Note that trace logs may become really big# since each servlet connection may generate many Kb of log.# Syntax: log=[true,false] (boolean)# Default: falselog=false
# Set the name of the trace/log file. To avoid possible confusion about# the location of this file, an absolute pathname is recommended.# On Unix, this file must have write permissions by the owner of the JVM# process. In other words, if you are running Apache JServ in manual mode# and Apache is running as user nobody, then the file must have its # permissions set so that that user can write to it.# Syntax: log.file=<log file name> (String)# Default: NONElog.file=jserv.log
# Enable the timestamp before the log message# Syntax: log.timestamp=[true,false] (boolean)# Default: truelog.timestamp=true
# Use the given string as a data format # (see java.text.SimpleDateFormat for the list of options)# Syntax: log.dateFormat=(String)# Default: [dd/MM/yyyy HH:mm:ss:SSS zz]log.dateFormat=[dd/MM/yyyy HH:mm:ss:SSS zz]
# Enable/disable channels, each logging different part of the code# self−explained by their names.# Syntax: log.channel.<channel name>=[true,false] (boolean)# Default: falselog.channel.servletLog=truelog.channel.init=truelog.channel.terminate=true
Integrating JReport Enterprise Server with a Java Application Server
316

log.channel.serviceRequest=truelog.channel.authentication=truelog.channel.requestData=truelog.channel.responseHeaders=truelog.channel.signal=truelog.channel.exceptionTracing=truelog.channel.servletManager=true
Note: The text in italics shows changes that we made to the sample property file.
Appendix IV jserv.conf
########################################################## Apache JServ Configuration File ##########################################################
# Note: this file should be appended to httpd.conf# Tell Apache on win32 to load the Apache JServ communication moduleLoadModule jserv_module libexec/mod_jserv.so
# Whether Apache must start JVM or not (On=Manual Off=Autostart)# Syntax: ApJServManual [on/off]# Default: "Off"ApJServManual off
# Properties filename for Apache JServ in Automatic Mode. # In manual mode this directive is ignored# Syntax: ApJServProperties [filename]# Default: "./conf/jserv.properties"ApJServProperties /usr/local/jserv/conf/jserv.properties
# Log file for this module operation relative to Apache root directory. # Syntax: ApJServLogFile [filename]# Default: "./logs/mod_jserv.log"# Note: when set to "DISABLED", the log will be redirected to Apache error logApJServLogFile /usr/local/jserv/conf/jserv.log
# Protocol used by this host to connect to Apache JServ# (see documentation for more details on available protocols)# Syntax: ApJServDefaultProtocol [name]# Default: "ajpv11"ApJServDefaultProtocol ajpv11
# Default host on which Apache JServ is running# Syntax: ApJServDefaultHost [hostname]# Default: "localhost"#ApJServDefaultHost
# Default port that Apache JServ is listening to# Syntax: ApJServDefaultPort [number]# Default: protocol−dependant (for ajpv11 protocol this is "8007")ApJServDefaultPort 8007
# Passes parameter and value to specified protocol.# Syntax: ApJServProtocolParameter [name] [parameter] [value]# Default: NONE# Note: Currently no protocols handle this. Introduced for future protocols.
Integrating JReport Enterprise Server with a Java Application Server
317
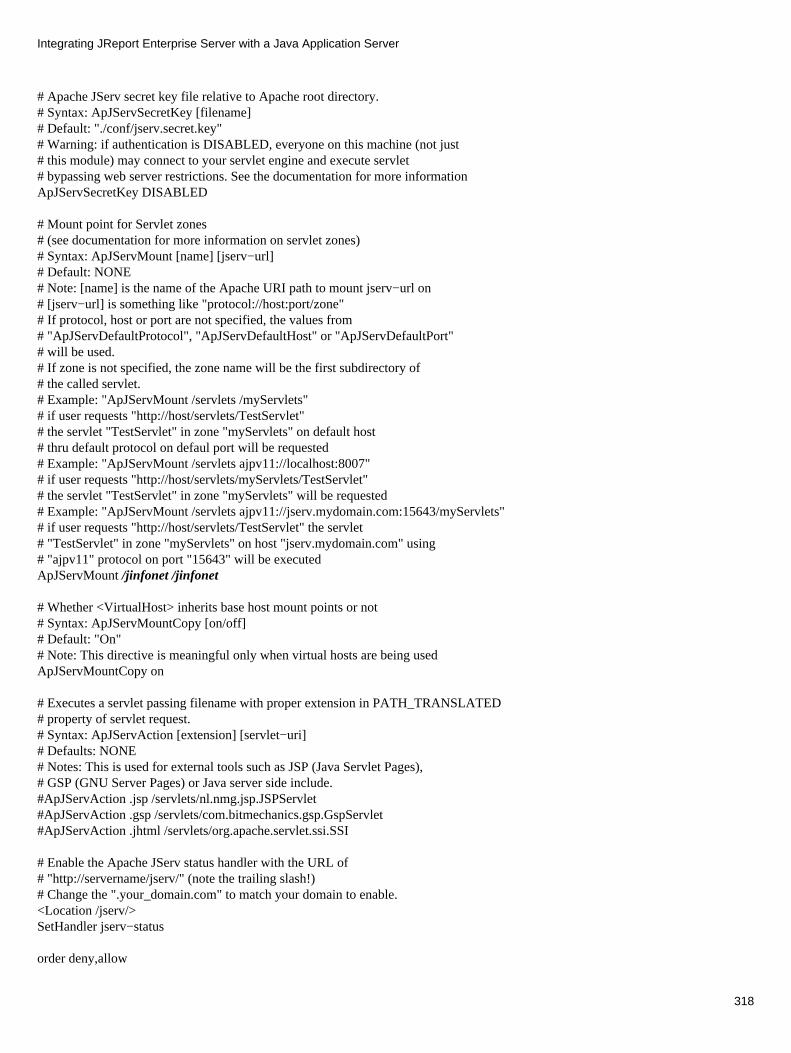
# Apache JServ secret key file relative to Apache root directory.# Syntax: ApJServSecretKey [filename]# Default: "./conf/jserv.secret.key"# Warning: if authentication is DISABLED, everyone on this machine (not just# this module) may connect to your servlet engine and execute servlet # bypassing web server restrictions. See the documentation for more informationApJServSecretKey DISABLED
# Mount point for Servlet zones# (see documentation for more information on servlet zones)# Syntax: ApJServMount [name] [jserv−url]# Default: NONE# Note: [name] is the name of the Apache URI path to mount jserv−url on# [jserv−url] is something like "protocol://host:port/zone"# If protocol, host or port are not specified, the values from # "ApJServDefaultProtocol", "ApJServDefaultHost" or "ApJServDefaultPort" # will be used. # If zone is not specified, the zone name will be the first subdirectory of# the called servlet.# Example: "ApJServMount /servlets /myServlets"# if user requests "http://host/servlets/TestServlet"# the servlet "TestServlet" in zone "myServlets" on default host# thru default protocol on defaul port will be requested# Example: "ApJServMount /servlets ajpv11://localhost:8007"# if user requests "http://host/servlets/myServlets/TestServlet"# the servlet "TestServlet" in zone "myServlets" will be requested# Example: "ApJServMount /servlets ajpv11://jserv.mydomain.com:15643/myServlets"# if user requests "http://host/servlets/TestServlet" the servlet # "TestServlet" in zone "myServlets" on host "jserv.mydomain.com" using # "ajpv11" protocol on port "15643" will be executedApJServMount /jinfonet /jinfonet
# Whether <VirtualHost> inherits base host mount points or not# Syntax: ApJServMountCopy [on/off]# Default: "On"# Note: This directive is meaningful only when virtual hosts are being usedApJServMountCopy on
# Executes a servlet passing filename with proper extension in PATH_TRANSLATED # property of servlet request.# Syntax: ApJServAction [extension] [servlet−uri]# Defaults: NONE# Notes: This is used for external tools such as JSP (Java Servlet Pages), # GSP (GNU Server Pages) or Java server side include.#ApJServAction .jsp /servlets/nl.nmg.jsp.JSPServlet#ApJServAction .gsp /servlets/com.bitmechanics.gsp.GspServlet#ApJServAction .jhtml /servlets/org.apache.servlet.ssi.SSI
# Enable the Apache JServ status handler with the URL of # "http://servername/jserv/" (note the trailing slash!)# Change the ".your_domain.com" to match your domain to enable.<Location /jserv/>SetHandler jserv−status
order deny,allow
Integrating JReport Enterprise Server with a Java Application Server
318
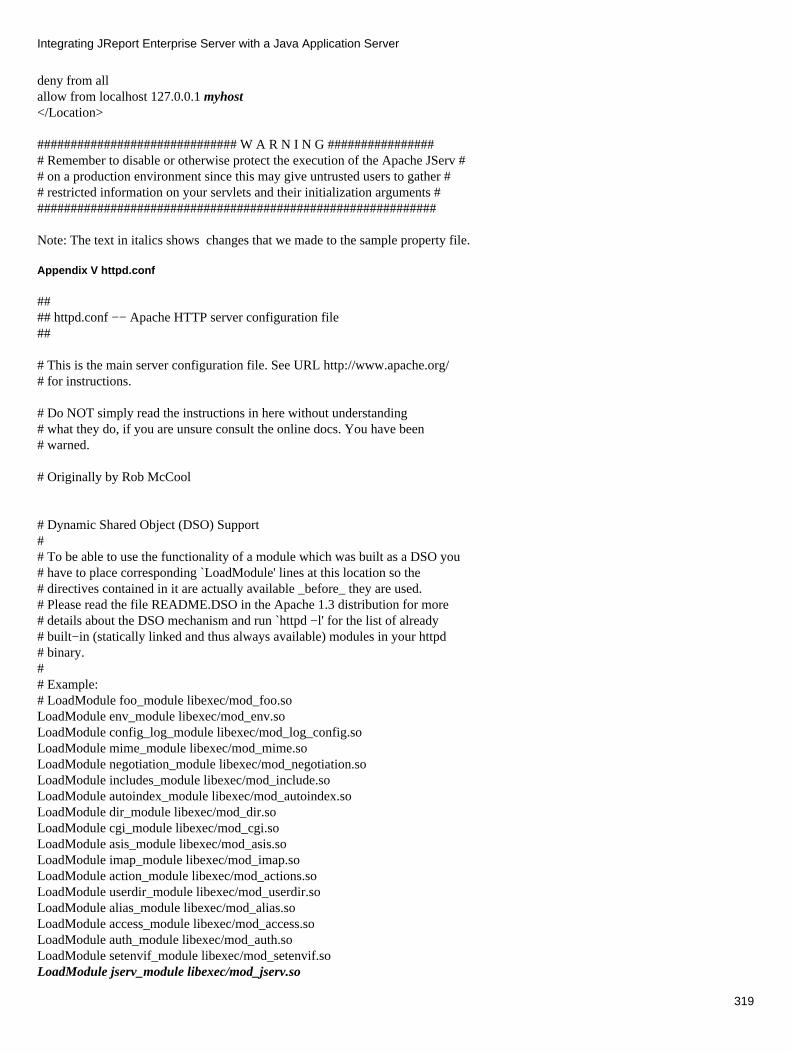
deny from allallow from localhost 127.0.0.1 myhost</Location>
############################## W A R N I N G ################# Remember to disable or otherwise protect the execution of the Apache JServ ## on a production environment since this may give untrusted users to gather ## restricted information on your servlets and their initialization arguments #############################################################
Note: The text in italics shows changes that we made to the sample property file.
Appendix V httpd.conf
#### httpd.conf −− Apache HTTP server configuration file##
# This is the main server configuration file. See URL http://www.apache.org/# for instructions.
# Do NOT simply read the instructions in here without understanding# what they do, if you are unsure consult the online docs. You have been# warned.
# Originally by Rob McCool
# Dynamic Shared Object (DSO) Support## To be able to use the functionality of a module which was built as a DSO you# have to place corresponding `LoadModule' lines at this location so the# directives contained in it are actually available _before_ they are used.# Please read the file README.DSO in the Apache 1.3 distribution for more# details about the DSO mechanism and run `httpd −l' for the list of already# built−in (statically linked and thus always available) modules in your httpd# binary.## Example:# LoadModule foo_module libexec/mod_foo.soLoadModule env_module libexec/mod_env.soLoadModule config_log_module libexec/mod_log_config.soLoadModule mime_module libexec/mod_mime.soLoadModule negotiation_module libexec/mod_negotiation.soLoadModule includes_module libexec/mod_include.soLoadModule autoindex_module libexec/mod_autoindex.soLoadModule dir_module libexec/mod_dir.soLoadModule cgi_module libexec/mod_cgi.soLoadModule asis_module libexec/mod_asis.soLoadModule imap_module libexec/mod_imap.soLoadModule action_module libexec/mod_actions.soLoadModule userdir_module libexec/mod_userdir.soLoadModule alias_module libexec/mod_alias.soLoadModule access_module libexec/mod_access.soLoadModule auth_module libexec/mod_auth.soLoadModule setenvif_module libexec/mod_setenvif.soLoadModule jserv_module libexec/mod_jserv.so
Integrating JReport Enterprise Server with a Java Application Server
319

# Reconstruction of the complete module list from all available modules# (static and shared ones) to achieve correct module execution order.# [WHENEVER YOU CHANGE THE LOADMODULE SECTION ABOVE UPDATE THIS, TOO]ClearModuleListAddModule mod_env.cAddModule mod_log_config.cAddModule mod_mime.cAddModule mod_negotiation.cAddModule mod_include.cAddModule mod_autoindex.cAddModule mod_dir.cAddModule mod_cgi.cAddModule mod_asis.cAddModule mod_imap.cAddModule mod_actions.cAddModule mod_userdir.cAddModule mod_alias.cAddModule mod_access.cAddModule mod_auth.cAddModule mod_so.cAddModule mod_setenvif.cAddModule mod_jserv.c
# ServerType is either inetd, or standalone.
ServerType standalone
# If you are running from inetd, go to "ServerAdmin".
# Port: The port the standalone listens to. For ports < 1023, you will# need httpd to be run as root initially.
Port 80
# HostnameLookups: Log the names of clients or just their IP numbers# e.g. www.apache.org (on) or 204.62.129.132 (off)# The default is off because it'd be overall better for the net if people# had to knowingly turn this feature on.
HostnameLookups off
# If you wish httpd to run as a different user or group, you must run# httpd as root initially and it will switch.
# User/Group: The name (or #number) of the user/group to run httpd as.# On SCO (ODT 3) use User nouser and Group nogroup# On HPUX you may not be able to use shared memory as nobody, and the# suggested workaround is to create a user www and use that user.# NOTE that some kernels refuse to setgid(Group) or semctl(IPC_SET)# when the value of (unsigned)Group is above 60000; # don't use Group nogroup on these systems!
User nobodyGroup nogroup
Integrating JReport Enterprise Server with a Java Application Server
320
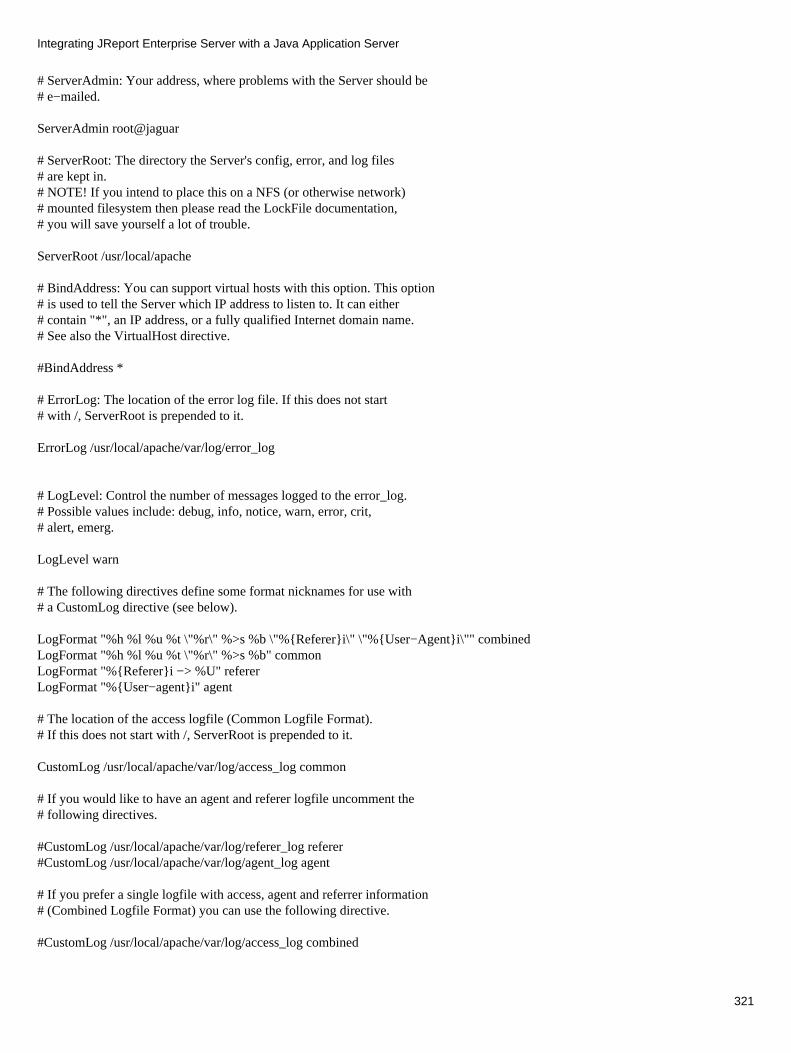
# ServerAdmin: Your address, where problems with the Server should be# e−mailed.
ServerAdmin root@jaguar
# ServerRoot: The directory the Server's config, error, and log files# are kept in.# NOTE! If you intend to place this on a NFS (or otherwise network)# mounted filesystem then please read the LockFile documentation,# you will save yourself a lot of trouble.
ServerRoot /usr/local/apache
# BindAddress: You can support virtual hosts with this option. This option# is used to tell the Server which IP address to listen to. It can either# contain "*", an IP address, or a fully qualified Internet domain name.# See also the VirtualHost directive.
#BindAddress *
# ErrorLog: The location of the error log file. If this does not start# with /, ServerRoot is prepended to it.
ErrorLog /usr/local/apache/var/log/error_log
# LogLevel: Control the number of messages logged to the error_log.# Possible values include: debug, info, notice, warn, error, crit,# alert, emerg.
LogLevel warn
# The following directives define some format nicknames for use with# a CustomLog directive (see below).
LogFormat "%h %l %u %t \"%r\" %>s %b \"%{Referer}i\" \"%{User−Agent}i\"" combinedLogFormat "%h %l %u %t \"%r\" %>s %b" commonLogFormat "%{Referer}i −> %U" refererLogFormat "%{User−agent}i" agent
# The location of the access logfile (Common Logfile Format).# If this does not start with /, ServerRoot is prepended to it.
CustomLog /usr/local/apache/var/log/access_log common
# If you would like to have an agent and referer logfile uncomment the# following directives.
#CustomLog /usr/local/apache/var/log/referer_log referer#CustomLog /usr/local/apache/var/log/agent_log agent
# If you prefer a single logfile with access, agent and referrer information# (Combined Logfile Format) you can use the following directive.
#CustomLog /usr/local/apache/var/log/access_log combined
Integrating JReport Enterprise Server with a Java Application Server
321
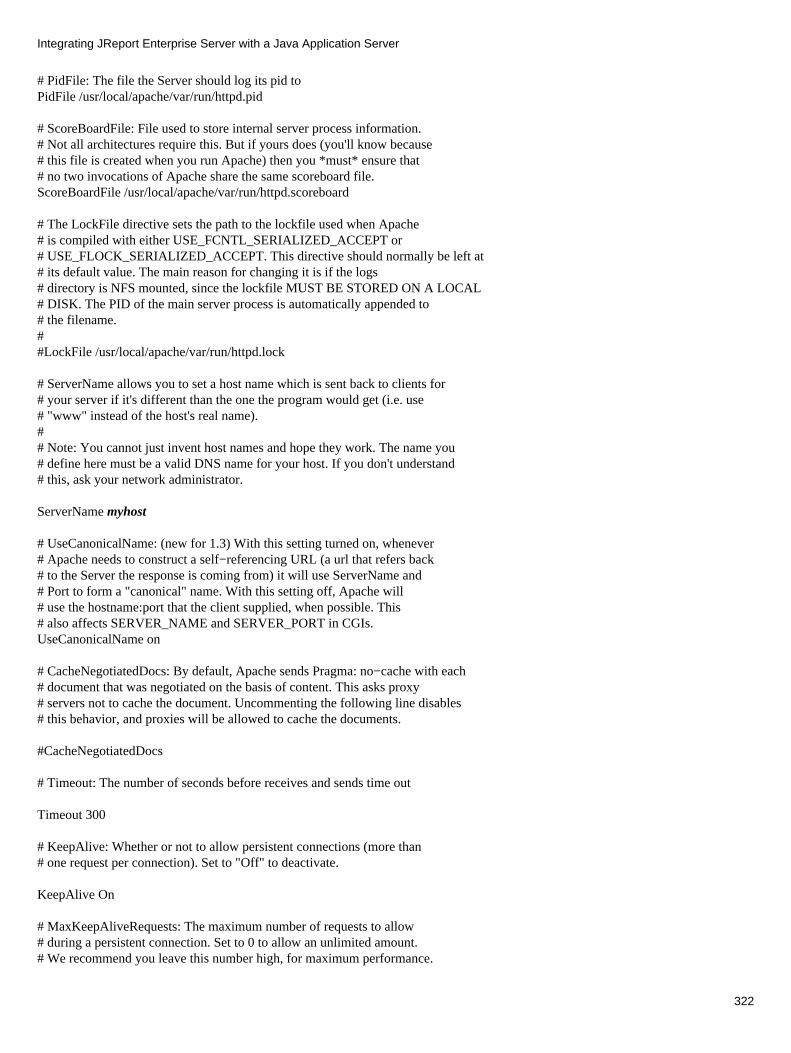
# PidFile: The file the Server should log its pid toPidFile /usr/local/apache/var/run/httpd.pid
# ScoreBoardFile: File used to store internal server process information.# Not all architectures require this. But if yours does (you'll know because# this file is created when you run Apache) then you *must* ensure that# no two invocations of Apache share the same scoreboard file.ScoreBoardFile /usr/local/apache/var/run/httpd.scoreboard
# The LockFile directive sets the path to the lockfile used when Apache# is compiled with either USE_FCNTL_SERIALIZED_ACCEPT or# USE_FLOCK_SERIALIZED_ACCEPT. This directive should normally be left at# its default value. The main reason for changing it is if the logs# directory is NFS mounted, since the lockfile MUST BE STORED ON A LOCAL# DISK. The PID of the main server process is automatically appended to# the filename. ##LockFile /usr/local/apache/var/run/httpd.lock
# ServerName allows you to set a host name which is sent back to clients for# your server if it's different than the one the program would get (i.e. use# "www" instead of the host's real name).## Note: You cannot just invent host names and hope they work. The name you # define here must be a valid DNS name for your host. If you don't understand# this, ask your network administrator.
ServerName myhost
# UseCanonicalName: (new for 1.3) With this setting turned on, whenever# Apache needs to construct a self−referencing URL (a url that refers back# to the Server the response is coming from) it will use ServerName and# Port to form a "canonical" name. With this setting off, Apache will# use the hostname:port that the client supplied, when possible. This# also affects SERVER_NAME and SERVER_PORT in CGIs.UseCanonicalName on
# CacheNegotiatedDocs: By default, Apache sends Pragma: no−cache with each# document that was negotiated on the basis of content. This asks proxy# servers not to cache the document. Uncommenting the following line disables# this behavior, and proxies will be allowed to cache the documents.
#CacheNegotiatedDocs
# Timeout: The number of seconds before receives and sends time out
Timeout 300
# KeepAlive: Whether or not to allow persistent connections (more than# one request per connection). Set to "Off" to deactivate.
KeepAlive On
# MaxKeepAliveRequests: The maximum number of requests to allow# during a persistent connection. Set to 0 to allow an unlimited amount.# We recommend you leave this number high, for maximum performance.
Integrating JReport Enterprise Server with a Java Application Server
322

MaxKeepAliveRequests 100
# KeepAliveTimeout: Number of seconds to wait for the next request
KeepAliveTimeout 15
# Server−pool size regulation. Rather than making you guess how many# server processes you need, Apache dynamically adapts to the load it# sees −−− that is, it tries to maintain enough server processes to# handle the current load, plus a few spare servers to handle transient# load spikes (e.g., multiple simultaneous requests from a single# Netscape browser).
# It does this by periodically checking how many servers are waiting# for a request. If there are fewer than MinSpareServers, it creates# a new spare. If there are more than MaxSpareServers, some of the# spares die off. These values are probably OK for most sites −−−
MinSpareServers 5MaxSpareServers 10
# Number of servers to start −−− should be a reasonable ballpark figure.
StartServers 5
# Limit on total number of servers running, i.e., limit on the number# of clients who can simultaneously connect −−− if this limit is ever# reached, clients will be LOCKED OUT, so it should NOT BE SET TOO LOW.# It is intended mainly as a brake to keep a runaway server from taking# Unix with it as it spirals down...
MaxClients 150
# MaxRequestsPerChild: the number of requests each child process is# allowed to process before the child dies.# The child will exit so as to avoid problems after prolonged use when# Apache (and maybe the libraries it uses) leak. On most systems, this# isn't really needed, but a few (such as Solaris) do have notable leaks# in the libraries.
MaxRequestsPerChild 30
# Proxy Server directives. Uncomment the following line to# enable the proxy server:
#ProxyRequests On
# To enable the cache as well, edit and uncomment the following lines:
#CacheRoot /usr/local/apache/var/proxy#CacheSize 5#CacheGcInterval 4#CacheMaxExpire 24#CacheLastModifiedFactor 0.1#CacheDefaultExpire 1
Integrating JReport Enterprise Server with a Java Application Server
323
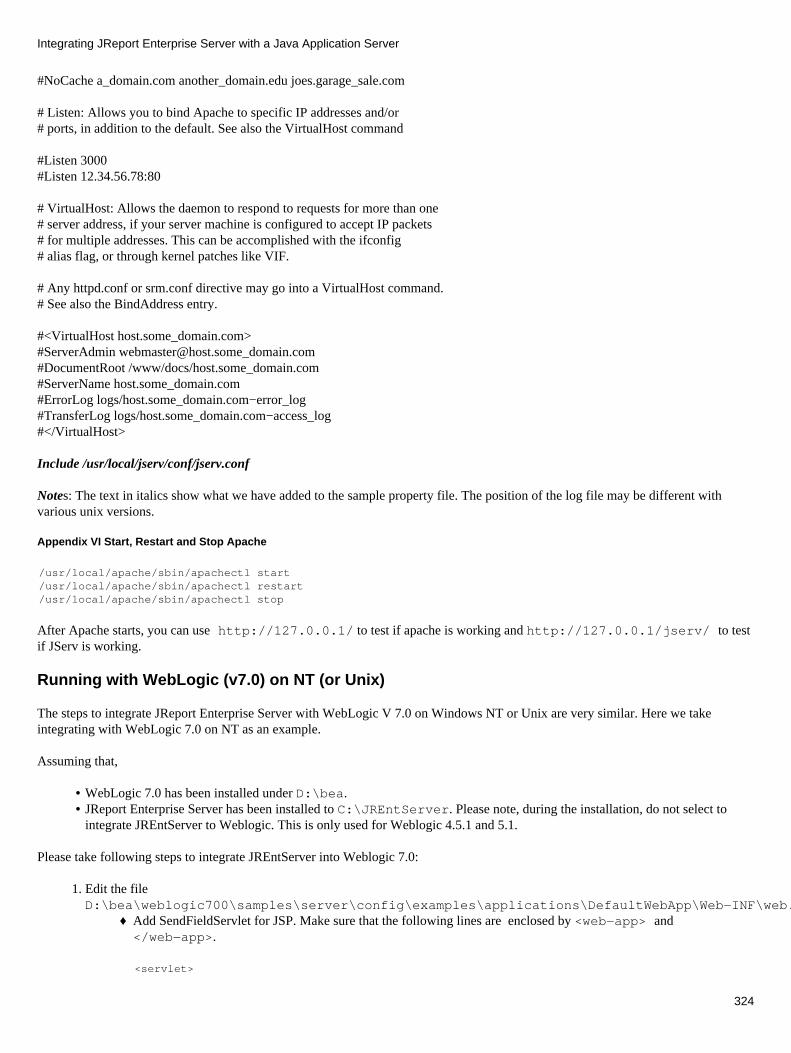
#NoCache a_domain.com another_domain.edu joes.garage_sale.com
# Listen: Allows you to bind Apache to specific IP addresses and/or# ports, in addition to the default. See also the VirtualHost command
#Listen 3000#Listen 12.34.56.78:80
# VirtualHost: Allows the daemon to respond to requests for more than one# server address, if your server machine is configured to accept IP packets# for multiple addresses. This can be accomplished with the ifconfig # alias flag, or through kernel patches like VIF.
# Any httpd.conf or srm.conf directive may go into a VirtualHost command.# See also the BindAddress entry.
#<VirtualHost host.some_domain.com>#ServerAdmin [email protected]_domain.com#DocumentRoot /www/docs/host.some_domain.com#ServerName host.some_domain.com#ErrorLog logs/host.some_domain.com−error_log#TransferLog logs/host.some_domain.com−access_log#</VirtualHost>
Include /usr/local/jserv/conf/jserv.conf
Notes: The text in italics show what we have added to the sample property file. The position of the log file may be different withvarious unix versions.
Appendix VI Start, Restart and Stop Apache
/usr/local/apache/sbin/apachectl start/usr/local/apache/sbin/apachectl restart/usr/local/apache/sbin/apachectl stop
After Apache starts, you can use http://127.0.0.1/ to test if apache is working and http://127.0.0.1/jserv/ to testif JServ is working.
Running with WebLogic (v7.0) on NT (or Unix)
The steps to integrate JReport Enterprise Server with WebLogic V 7.0 on Windows NT or Unix are very similar. Here we takeintegrating with WebLogic 7.0 on NT as an example.
Assuming that,
WebLogic 7.0 has been installed under D:\bea.• JReport Enterprise Server has been installed to C:\JREntServer. Please note, during the installation, do not select tointegrate JREntServer to Weblogic. This is only used for Weblogic 4.5.1 and 5.1.
•
Please take following steps to integrate JREntServer into Weblogic 7.0:
Edit the fileD:\bea\weblogic700\samples\server\config\examples\applications\DefaultWebApp\Web−INF\web.xml:
Add SendFieldServlet for JSP. Make sure that the following lines are enclosed by <web−app> and</web−app>.
♦
<servlet>
1.
Integrating JReport Enterprise Server with a Java Application Server
324

<servlet−name>sendfile</servlet−name><servlet−class>jet.server.servlets.SendFileServlet</servlet−class></servlet>
<servlet−mapping><servlet−name>sendfile</servlet−name><url−pattern>/sendfile/*</url−pattern></servlet−mapping>
Add JRServlet2.
<servlet> <servlet−name>jrserver</servlet−name> <servlet−class>jet.server.servlets.JRServlet</servlet−class> <init−param> <param−name>reporthome</param−name> <param−value>C:\JREntServer</param−value> </init−param> </servlet>
<servlet−mapping> <servlet−name>jrserver</servlet−name> <url−pattern>/jrserver/*</url−pattern> </servlet−mapping>
Notes: If you are scheduling to export a report to DHTML format, please add the following lines to the file above:♦
<servlet><servlet−name>dhtml</servlet−name><servlet−class>jet.web.dhtml.DHTMLlet</servlet−class></servlet>
<servlet−mapping><servlet−name>dhtml</servlet−name><url−pattern>/dhtml/*</url−pattern></servlet−mapping>
<servlet><servlet−name>help</servlet−name><servlet−class>jet.web.dhtml.JHelplet</servlet−class></servlet>
servlet−mapping><servlet−name>help</servlet−name><url−pattern>/help/*</url−pattern></servlet−mapping>
<servlet><servlet−name>jrdhtml</servlet−name><servlet−class>jet.web.dhtml.DHTMLRunReportlet</servlet−class></servlet>
<servlet−mapping><servlet−name>jrdhtml</servlet−name><url−pattern>/jrdhtml/*</url−pattern></servlet−mapping>
If you want to support start/stop/restart report server in integration environment, please add the following lines tothe XML code above: (Note : This feature is based on Servlet2.3 specification. The <listener> part should be aheadto the <servlet> part.)
♦
<listener><listener−class>jet.server.servlets.JRServerContextListener </listener−class> </listener>
Integrating JReport Enterprise Server with a Java Application Server
325
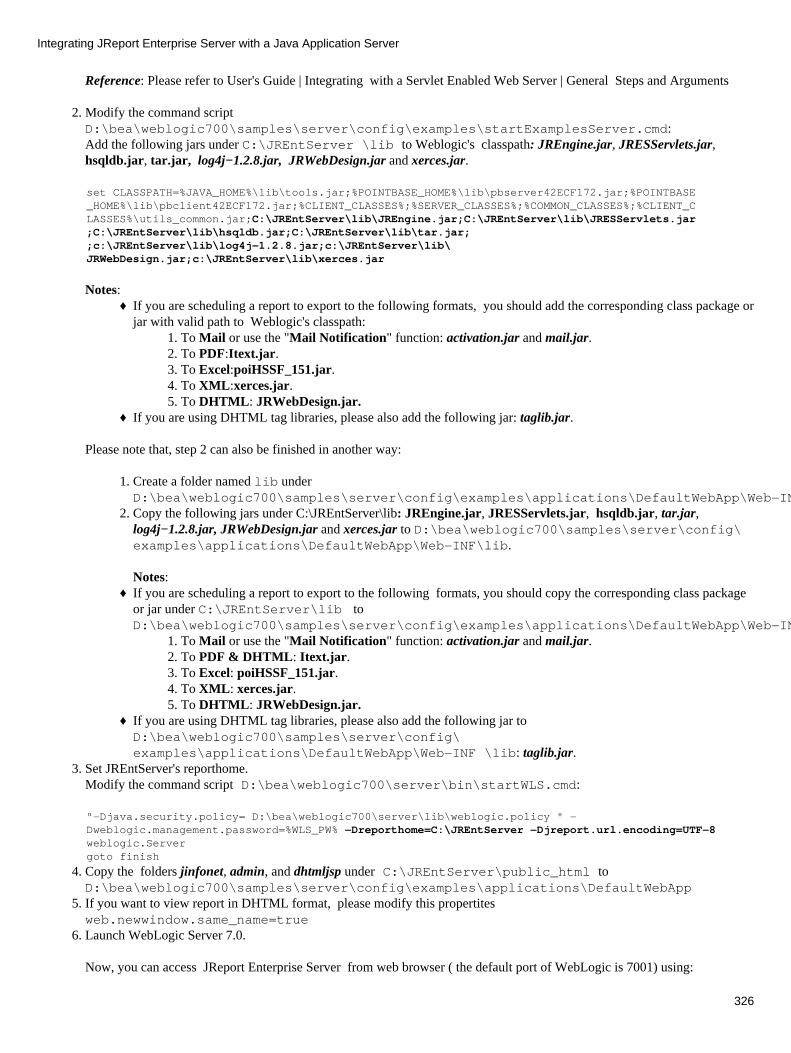
Reference: Please refer to User's Guide | Integrating with a Servlet Enabled Web Server | General Steps and Arguments
Modify the command scriptD:\bea\weblogic700\samples\server\config\examples\startExamplesServer.cmd: Add the following jars under C:\JREntServer \lib to Weblogic's classpath: JREngine.jar, JRESServlets.jar,hsqldb.jar, tar.jar, log4j−1.2.8.jar, JRWebDesign.jar and xerces.jar.
2.
set CLASSPATH=%JAVA_HOME%\lib\tools.jar;%POINTBASE_HOME%\lib\pbserver42ECF172.jar;%POINTBASE_HOME%\lib\pbclient42ECF172.jar;%CLIENT_CLASSES%;%SERVER_CLASSES%;%COMMON_CLASSES%;%CLIENT_CLASSES%\utils_common.jar;C:\JREntServer\lib\JREngine.jar;C:\JREntServer\lib\JRESServlets.jar;C:\JREntServer\lib\hsqldb.jar;C:\JREntServer\lib\tar.jar;;c:\JREntServer\lib\log4j−1.2.8.jar;c:\JREntServer\lib\JRWebDesign.jar;c:\JREntServer\lib\xerces.jar
Notes: If you are scheduling a report to export to the following formats, you should add the corresponding class package orjar with valid path to Weblogic's classpath:
To Mail or use the "Mail Notification" function: activation.jar and mail.jar.1. To PDF:Itext.jar.2. To Excel:poiHSSF_151.jar.3. To XML:xerces.jar.4. To DHTML: JRWebDesign.jar.5.
♦
If you are using DHTML tag libraries, please also add the following jar: taglib.jar.♦
Please note that, step 2 can also be finished in another way:
Create a folder named lib underD:\bea\weblogic700\samples\server\config\examples\applications\DefaultWebApp\Web−INF.
1.
Copy the following jars under C:\JREntServer\lib: JREngine.jar, JRESServlets.jar, hsqldb.jar, tar.jar,log4j−1.2.8.jar, JRWebDesign.jar and xerces.jar to D:\bea\weblogic700\samples\server\config\examples\applications\DefaultWebApp\Web−INF\lib.
Notes:
2.
If you are scheduling a report to export to the following formats, you should copy the corresponding class packageor jar under C:\JREntServer\lib toD:\bea\weblogic700\samples\server\config\examples\applications\DefaultWebApp\Web−INF\lib:
To Mail or use the "Mail Notification" function: activation.jar and mail.jar.1. To PDF & DHTML: Itext.jar.2. To Excel: poiHSSF_151.jar.3. To XML: xerces.jar.4. To DHTML: JRWebDesign.jar.5.
♦
If you are using DHTML tag libraries, please also add the following jar toD:\bea\weblogic700\samples\server\config\examples\applications\DefaultWebApp\Web−INF \lib: taglib.jar.
♦
Set JREntServer's reporthome. Modify the command script D:\bea\weblogic700\server\bin\startWLS.cmd:
3.
"−Djava.security.policy= D:\bea\weblogic700\server\lib\weblogic.policy " −Dweblogic.management.password=%WLS_PW% −Dreporthome=C:\JREntServer −Djreport.url.encoding=UTF−8weblogic.Servergoto finish
Copy the folders jinfonet, admin, and dhtmljsp under C:\JREntServer\public_html toD:\bea\weblogic700\samples\server\config\examples\applications\DefaultWebApp
4.
If you want to view report in DHTML format, please modify this propertites web.newwindow.same_name=true
5.
Launch WebLogic Server 7.0.
Now, you can access JReport Enterprise Server from web browser ( the default port of WebLogic is 7001) using:
6.
Integrating JReport Enterprise Server with a Java Application Server
326
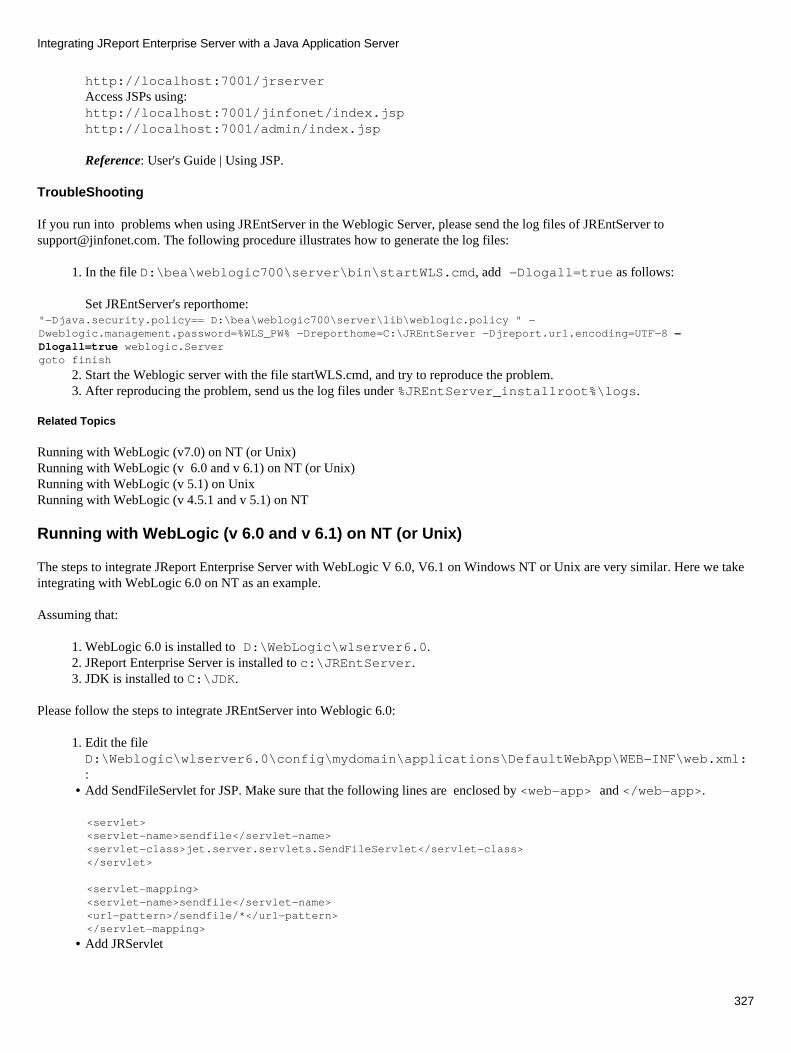
http://localhost:7001/jrserverAccess JSPs using:http://localhost:7001/jinfonet/index.jsphttp://localhost:7001/admin/index.jsp
Reference: User's Guide | Using JSP.
TroubleShooting
If you run into problems when using JREntServer in the Weblogic Server, please send the log files of JREntServer [email protected]. The following procedure illustrates how to generate the log files:
In the file D:\bea\weblogic700\server\bin\startWLS.cmd, add −Dlogall=true as follows:
Set JREntServer's reporthome:
1.
"−Djava.security.policy== D:\bea\weblogic700\server\lib\weblogic.policy " −Dweblogic.management.password=%WLS_PW% −Dreporthome=C:\JREntServer −Djreport.url.encoding=UTF−8 −Dlogall=true weblogic.Servergoto finish
Start the Weblogic server with the file startWLS.cmd, and try to reproduce the problem.2. After reproducing the problem, send us the log files under %JREntServer_installroot%\logs.3.
Related Topics
Running with WebLogic (v7.0) on NT (or Unix)Running with WebLogic (v 6.0 and v 6.1) on NT (or Unix)Running with WebLogic (v 5.1) on Unix Running with WebLogic (v 4.5.1 and v 5.1) on NT
Running with WebLogic (v 6.0 and v 6.1) on NT (or Unix)
The steps to integrate JReport Enterprise Server with WebLogic V 6.0, V6.1 on Windows NT or Unix are very similar. Here we takeintegrating with WebLogic 6.0 on NT as an example.
Assuming that:
WebLogic 6.0 is installed to D:\WebLogic\wlserver6.0.1. JReport Enterprise Server is installed to c:\JREntServer. 2. JDK is installed to C:\JDK.3.
Please follow the steps to integrate JREntServer into Weblogic 6.0:
Edit the fileD:\Weblogic\wlserver6.0\config\mydomain\applications\DefaultWebApp\WEB−INF\web.xml::
1.
Add SendFileServlet for JSP. Make sure that the following lines are enclosed by <web−app> and </web−app>.•
<servlet><servlet−name>sendfile</servlet−name><servlet−class>jet.server.servlets.SendFileServlet</servlet−class></servlet>
<servlet−mapping><servlet−name>sendfile</servlet−name><url−pattern>/sendfile/*</url−pattern></servlet−mapping>
Add JRServlet•
Integrating JReport Enterprise Server with a Java Application Server
327

<servlet> <servlet−name>jrserver</servlet−name> <servlet−class>jet.server.servlets.JRServlet</servlet−class> <init−param> <param−name>reporthome</param−name> <param−value>C:\JREntServer</param−value> </init−param> </servlet>
<servlet−mapping> <servlet−name>jrserver</servlet−name> <url−pattern>/jrserver/*</url−pattern> </servlet−mapping>
If you are scheduling to export a report to the DHTML format, please add the following lines to the XML code above:
<servlet><servlet−name>dhtml</servlet−name><servlet−class>jet.web.dhtml.DHTMLlet</servlet−class></servlet>
<servlet−mapping><servlet−name>dhtml</servlet−name><url−pattern>/dhtml/*</url−pattern></servlet−mapping>
<servlet><servlet−name>help</servlet−name><servlet−class>jet.web.dhtml.JHelplet</servlet−class></servlet>
servlet−mapping><servlet−name>help</servlet−name><url−pattern>/help/*</url−pattern></servlet−mapping>
<servlet><servlet−name>jrdhtml</servlet−name><servlet−class>jet.web.dhtml.DHTMLRunReportlet</servlet−class></servlet>
<servlet−mapping><servlet−name>jrdhtml</servlet−name><url−pattern>/jrdhtml/*</url−pattern></servlet−mapping>
If you want to support start/stop/restart report server in integration environment, please add the folloeing lines to the XMLcode above. (Note: This feature is based on Servlet2.3 specification. The <listener> part should be ahead to the <servlet>part.)
<listener><listener−class>jet.server.servlets.JRServerContextListener </listener−class> </listener>
Reference: Please refer to User's Guide | Integrating with a Servlet Enabled Web Server | General Steps and ArgumentsCreate a subdirectory namedlib under D:\Weblogic\wlserver6.0\config\mydomain\applications\DefaultWebApp\WEB−INF.Copy JREngine.jar, JRESServlets.jar, hsqldb.jar, tar.jar, log4j−1.2.8.jar, JRWebDesign.jar and xerces.jar underC:\JREntServer\lib to:D:\Weblogic\wlserver6.0\config\mydomain\applications\DefaultWebApp\WEB−INF\lib.
Notes:
2.
Integrating JReport Enterprise Server with a Java Application Server
328
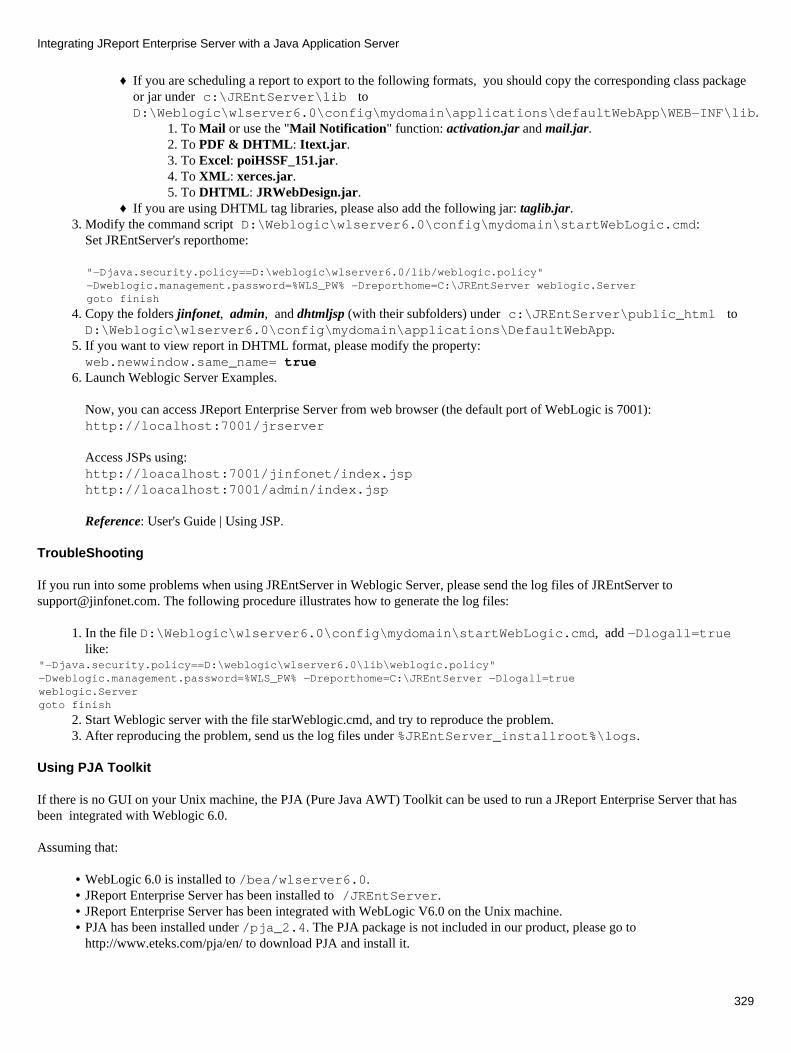
If you are scheduling a report to export to the following formats, you should copy the corresponding class packageor jar under c:\JREntServer\lib toD:\Weblogic\wlserver6.0\config\mydomain\applications\defaultWebApp\WEB−INF\lib.
To Mail or use the "Mail Notification" function: activation.jar and mail.jar.1. To PDF & DHTML: Itext.jar.2. To Excel: poiHSSF_151.jar.3. To XML: xerces.jar.4. To DHTML: JRWebDesign.jar. 5.
♦
If you are using DHTML tag libraries, please also add the following jar: taglib.jar.♦ Modify the command script D:\Weblogic\wlserver6.0\config\mydomain\startWebLogic.cmd: Set JREntServer's reporthome:
3.
"−Djava.security.policy==D:\weblogic\wlserver6.0/lib/weblogic.policy" −Dweblogic.management.password=%WLS_PW% −Dreporthome=C:\JREntServer weblogic.Servergoto finish
Copy the folders jinfonet, admin, and dhtmljsp (with their subfolders) under c:\JREntServer\public_html toD:\Weblogic\wlserver6.0\config\mydomain\applications\DefaultWebApp.
4.
If you want to view report in DHTML format, please modify the property:web.newwindow.same_name= true
5.
Launch Weblogic Server Examples.
Now, you can access JReport Enterprise Server from web browser (the default port of WebLogic is 7001):http://localhost:7001/jrserver
Access JSPs using:http://loacalhost:7001/jinfonet/index.jsphttp://loacalhost:7001/admin/index.jsp
Reference: User's Guide | Using JSP.
6.
TroubleShooting
If you run into some problems when using JREntServer in Weblogic Server, please send the log files of JREntServer [email protected]. The following procedure illustrates how to generate the log files:
In the file D:\Weblogic\wlserver6.0\config\mydomain\startWebLogic.cmd, add −Dlogall=truelike:
1.
"−Djava.security.policy==D:\weblogic\wlserver6.0\lib\weblogic.policy" −Dweblogic.management.password=%WLS_PW% −Dreporthome=C:\JREntServer −Dlogall=true weblogic.Servergoto finish
Start Weblogic server with the file starWeblogic.cmd, and try to reproduce the problem. 2. After reproducing the problem, send us the log files under %JREntServer_installroot%\logs.3.
Using PJA Toolkit
If there is no GUI on your Unix machine, the PJA (Pure Java AWT) Toolkit can be used to run a JReport Enterprise Server that hasbeen integrated with Weblogic 6.0.
Assuming that:
WebLogic 6.0 is installed to /bea/wlserver6.0.• JReport Enterprise Server has been installed to /JREntServer.• JReport Enterprise Server has been integrated with WebLogic V6.0 on the Unix machine.• PJA has been installed under /pja_2.4. The PJA package is not included in our product, please go tohttp://www.eteks.com/pja/en/ to download PJA and install it.
•
Integrating JReport Enterprise Server with a Java Application Server
329

Please follow the steps to make PJA Support available:
Modify startWebLogic.sh under $WL_HOME/config/mydomain. Append /pja_2.4/lib/pjatools.jar to theclasspath as below:
1.
CLASSPATH=$WL_HOME:$WL_HOME/lib/weblogic_sp.jar:$WL_HOME/lib/weblogic.jar:/pja_2.4/lib/pjatools.jar:/bea/jdk130/lib/tools.jar
PATH=$WL_HOME/bin:$JAVA_HOME/jre/bin:$JAVA_HOME/bin:$PATHjava $JAVA_OPTIONS −classpath $CLASSPATH −Xbootclasspath:/usr/java1.3/j2sdk1_3_0/jre/lib/rt.jar:/pja_2.4/lib/pja.jar −Duser.home=/pja_2.4 \−Dawt.toolkit=com.eteks.awt.PJAToolkit \−Djava.awt.graphicsenv=com.eteks.java2d.PJAGraphicsEnvironment \−Djava2d.font.usePlatformFont=false \−Djava.awt.fonts=/usr/java1.3/j2sdk1_3_0/jre/lib/fonts:/JREntServer/font:/usr/openwin/lib/X11/fonts/TrueType \−Dreporthome="/JREntServer"
Start Weblogic Server by executing the following command:
$WL_HOME/config/mydomain/startWebLogic.sh
2.
Related Topics
Running with WebLogic (v7.0) on NT (or Unix)Running with WebLogic (v 5.1) on Unix Running with WebLogic (v 4.5.1 and v 5.1) on NT
Running with WebLogic 5.1 on Unix
Assuming that,
jdk 1.3 or above has been installed on your UNIX machine.
Please follow the steps below:
Install the Weblogic Web Server. Assuming that you have downloaded the file weblogic510.zip, please transfer this zip toyour Unix box, unzip this file and follow the steps in http://www.weblogic.com/docs51/install/install_weblogic.html toinstall Weblogic Web Server. Here, we assume that you install it to /usr/weblogic.
1.
Install JREntServer with the downloaded file EntSvrSetup.sh. If you are using FTP, make sure that you set binary modewhen transfering the file. During the installation, select to integrate into the Weblogic Web Server. We assume that you willinstall JREntServer to /usr/JREntServer.
2.
If you want to pop up a new window after integration on the Server, edit the property in server.properties under%JREntServer_InstallRoot%\bin and set it to true, as follows:
web.newwindow.same_name=true
3.
After integration, start Weblogic Web Server: 4.
#cd usr#cd weblogic#./startWebLogic.sh
JREntServer will be started automatically as a servlet.
Once Weblogic is started,you can access JRServlet from a web browser (the default port of WebLogic is 7001): http://host:7001/jrserver
5.
Access JSPs using:http://host:7001/jinfonet/index.jsp
Integrating JReport Enterprise Server with a Java Application Server
330

TroubleShooting
Due to the problematic weblogic ClassLoader, users sometimes get the exception ClassCircularityError or NoSuchMethodError. Herewe give a work−around solution for the problem.
Open the file /usr/weblogic/weblogic.properties, remove packages JRESServlets.jar, JREngine.jar,hsqldb.jar, tar.jar, xerces.jar, JRWebDesign.jar and log4j−1.2.8.jar from lineweblogic.httpd.servlet.classpath as below:
From
1.
weblogic.httpd.servlet.classpath=/usr/weblogic/myserver/servletclasses:/usr/JREntServer/lib/JRESServlets.jar:/usr/JREntServer/lib/JREngine.jar:/usr/JREntServer/lib/hsqldb.jar:/usr/JREntServer/lib/tar.jar;c:\JREntServer\lib\xerces.jar;c:\JREntServer\lib\JRWebDesign.jar;c:\JREntServer\lib\log4j−1.2.8.jar
Toweblogic.httpd.servlet.classpath=/usr/weblogic/myserver/servletclassesOpen file /usr/weblogic/startWebLogic.sh, add packages JRESServlets.jar, JREngine.jar, hsqldb.jar, tar.jar,Log4j−1.2.8.jar, JRWebDesign.jar, and xerces.jar to POST_CLASSPATH as below:
Fromset POST_CLASSPATH=
To
2.
set POST_CLASSPATH=/usr/JREntServer/lib/JRESServlets.jar:/usr/JREntServer/lib/JREngine.zip:/usr/JREntServer/lib/hsqldb.jar:/usr/JREntServer/lib/tar.jar;c:\JREntServer\lib\xerces.jar;c:\JREntServer\lib\JRWebDesign.jar;c:\JREntServer\lib\log4j−1.2.8.jar
If you have added activation.jar, mail.jar, Itext.jar, poiHSSF_151.jar in the classpath of weblogic.properties, please alsoremove them from the classpath and append them to the POST_CLASSPATH.
3.
If you are using DHTML tag libraries, please also add the following jar to POST_CLASSPATH: taglib.jar.4. After the modification, please start the Weblogic Server using this file startWebLogic.sh.5.
If you run into other problems when using JREntServer in Weblogic Server, please send the log files of JREntServer [email protected]. The following procedure illustrates how to generate the log files:
In the file /usr/weblogic/startWebLogic.sh, add −Dlogall=true like:1. java $JAVA_OPTIONS −classpath $CLASSPATH...−Dreporthome="/JREntServer" −Djreport.url.encoding=UTF−8 −Dlogall=true −Dweblogic.Domain=mydomain −Dweblogic.Name=myserver −Dbea.home=//bea −Djava.security.policy==/bea/wlserver6.0/lib/weblogic.policy −Dweblogic.management.password=$WLS_PW weblogic.Server
Start the Weblogic server with the file startWebLogic.sh, and try to reproduce the problem. 2. After reproducing the problem, send us the log files under $JREntServer_installroot/logs3.
Related Topics
Running with WebLogic (v7.0) on NT (or Unix)Running with WebLogic (v 6.0 and v 6.1) on NT (or Unix)Running with WebLogic (v 4.5.1 and v 5.1) on NT
Running with WebLogic (v 4.5.1 and v 5.1) on NT
Assuming that,
Integrating JReport Enterprise Server with a Java Application Server
331
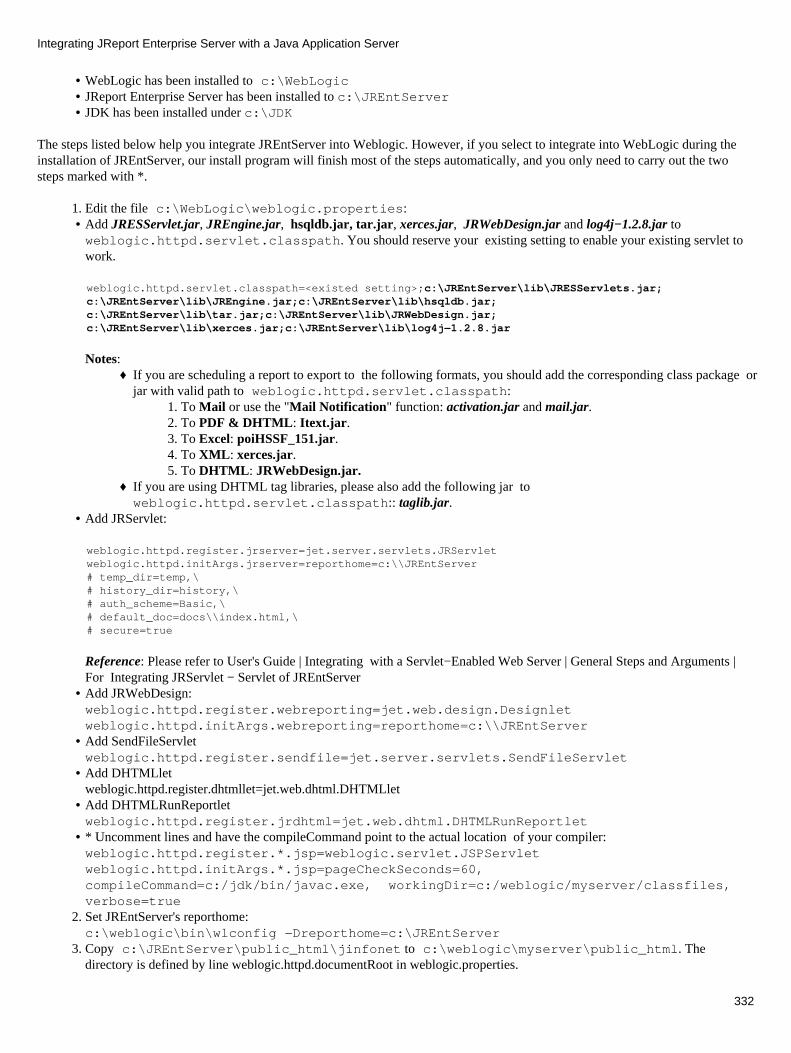
WebLogic has been installed to c:\WebLogic• JReport Enterprise Server has been installed to c:\JREntServer• JDK has been installed under c:\JDK•
The steps listed below help you integrate JREntServer into Weblogic. However, if you select to integrate into WebLogic during theinstallation of JREntServer, our install program will finish most of the steps automatically, and you only need to carry out the twosteps marked with *.
Edit the file c:\WebLogic\weblogic.properties: 1. Add JRESServlet.jar, JREngine.jar, hsqldb.jar, tar.jar, xerces.jar, JRWebDesign.jar and log4j−1.2.8.jar toweblogic.httpd.servlet.classpath. You should reserve your existing setting to enable your existing servlet towork.
•
weblogic.httpd.servlet.classpath=<existed setting>;c:\JREntServer\lib\JRESServlets.jar; c:\JREntServer\lib\JREngine.jar;c:\JREntServer\lib\hsqldb.jar;c:\JREntServer\lib\tar.jar;c:\JREntServer\lib\JRWebDesign.jar;c:\JREntServer\lib\xerces.jar;c:\JREntServer\lib\log4j−1.2.8.jar
Notes: If you are scheduling a report to export to the following formats, you should add the corresponding class package orjar with valid path to weblogic.httpd.servlet.classpath:
To Mail or use the "Mail Notification" function: activation.jar and mail.jar. 1. To PDF & DHTML: Itext.jar. 2. To Excel: poiHSSF_151.jar.3. To XML: xerces.jar. 4. To DHTML: JRWebDesign.jar.5.
♦
If you are using DHTML tag libraries, please also add the following jar toweblogic.httpd.servlet.classpath:: taglib.jar.
♦
Add JRServlet:•
weblogic.httpd.register.jrserver=jet.server.servlets.JRServletweblogic.httpd.initArgs.jrserver=reporthome=c:\\JREntServer# temp_dir=temp,\# history_dir=history,\# auth_scheme=Basic,\# default_doc=docs\\index.html,\# secure=true
Reference: Please refer to User's Guide | Integrating with a Servlet−Enabled Web Server | General Steps and Arguments |For Integrating JRServlet − Servlet of JREntServerAdd JRWebDesign:weblogic.httpd.register.webreporting=jet.web.design.Designletweblogic.httpd.initArgs.webreporting=reporthome=c:\\JREntServer
•
Add SendFileServlet weblogic.httpd.register.sendfile=jet.server.servlets.SendFileServlet
•
Add DHTMLletweblogic.httpd.register.dhtmllet=jet.web.dhtml.DHTMLlet
•
Add DHTMLRunReportletweblogic.httpd.register.jrdhtml=jet.web.dhtml.DHTMLRunReportlet
•
* Uncomment lines and have the compileCommand point to the actual location of your compiler:weblogic.httpd.register.*.jsp=weblogic.servlet.JSPServletweblogic.httpd.initArgs.*.jsp=pageCheckSeconds=60,compileCommand=c:/jdk/bin/javac.exe, workingDir=c:/weblogic/myserver/classfiles,verbose=true
•
Set JREntServer's reporthome:c:\weblogic\bin\wlconfig −Dreporthome=c:\JREntServer
2.
Copy c:\JREntServer\public_html\jinfonet to c:\weblogic\myserver\public_html. Thedirectory is defined by line weblogic.httpd.documentRoot in weblogic.properties.
3.
Integrating JReport Enterprise Server with a Java Application Server
332
Replace all /servlet/sendfile with /sendfile and /servlet/webview with /webview in all JSPs underc:\weblogic\myserver\public_html/jinfonet.
4.
* In the file C:\weblogic\StartWeblogic.cmd, add −Dreporthome=c:\jrentserver as follows:
%JAVA_HOME%\bin\java −ms64m −mx64m −classpath %JAVA_CLASSPATH%−Dreporthome=c:\jrentserver −Dweblogic.class.path=%WEBLOGIC_CLASSPATH%
5.
If you want to pop up a new window after the integration on the Server, please edit the property in theserver.properties under %JREntServer_InstallRoot%\bin and set it to true, as follows:
web.newwindow.same_name=true
6.
Now, start the Weblogic server with the file StarWeblogic.cmd, you can access JRServlet from a web browser (the default port ofWebLogic is 7001):http://host:7001/jrserver
Access JSPs using:http://host:7001/jinfonet/index.jsp
Reference: User's Guide | Using JSP.
TroubleShooting
Due to the problematic weblogic ClassLoader, you may sometimes get the exception ClassCircularityError or NoSuchMethodError.Here we give a work−around solution for this problem:
Open file c:\weblogic\weblogic.properties, remove packages JRESServlets.jar, JREngine.jar, hsqldb.jar,tar.jar, Log4j−1.2.8.jar, JRWebDesign.jar, and xerces.jar from line weblogic.httpd.servlet.classpath asbelow:
From:
1.
weblogic.httpd.servlet.classpath=c:\weblogic\myserver\servletclasses;c:\JREntServer\lib\ JRESServlets.jar;c:\JREntServer\lib\JREngine.jar;c:\JREntServer\lib\hsqldb.jar;c:\JREntS erver\lib\tar.jar;c:\JREntServer\lib\JRWebDesign.jar;c:\JREntServer\lib\xerces.jar;c:\JREntServer\lib\JRWebDesign.jar;c:\JREntServer\lib\log4j−1.2.8.jar
To: weblogic.httpd.servlet.classpath=c:\weblogic\myserver\servletclasses
Open file c:\weblogic\startWebLogic.cmd, and add packages JRESServlets.jar, JREngine.jar, hsqldb.jar, tar.jar,xerces.jar, JRWebDesign.jar, and log4j−1.2.8.jar to POST_CLASSPATH as below:fromset POST_CLASSPATH=to
2.
set POST_CLASSPATH=c:\JREntServer\lib\JRESServlets.jar;c:\JREntServer\lib\JREngine.jar;c:\JREntServer\lib\hsqldb.jar;c:\JREntServer\lib\tar.jar;c:\JREntServer\lib\xerces.jar;c:\JREntServer\lib\JRWebDesign.jar;c:\JREntServer\lib\log4j−1.2.8.jar
If you have added activation.jar, mail.jar, Itext.jar, poiHSSF_151.jar in the classpath of weblogic.properties, please alsoremove them from the classpath and append them to the POST_CLASSPATH.
After the modification, please start Weblogic Server using this file startWebLogic.cmd.
3.
If you run into other problems when using JREntServer in Weblogic Server, please send the log files of JREntServer [email protected]. The following procedure illustrates how to generate the log files:
In the file C:\weblogic\StartWeblogic.cmd, add −Dlogall=true as follows:
4.
Integrating JReport Enterprise Server with a Java Application Server
333
%JAVA_HOME%\bin\java −ms64m −mx64m −classpath %JAVA_CLASSPATH%−Dreporthome=c:\jrentserver −Djreport.url.encoding=UTF−8−Dlogall=true −Dweblogic.class.path=%WEBLOGIC_CLASSPATH%Start the Weblogic server with the file StarWeblogic.cmd, and try to reproduce the problem. 5. After reproducing the problem, send us the log files under %JREntServer_installroot%\logs.6.
Related Topics
Running with WebLogic (v7.0) on NT (or Unix)Running with WebLogic (v 6.0 and v 6.1) on NT (or Unix)Running with WebLogic (v 5.1) on Unix
Running with Netscape Enterprise Server
Netscape Enterprise Server 3.5/3.6 provides basic support for the Servlet API through the use of Sun's reference implementation, theJava Servlet Development Kit (JSDK). However, through this means, support is only provided for JSDK1.0. To use JSDK2.0 orJSDK2.1, it needs the help of products such as Allaire JRun and IBM WebSphere, which support servlets. We have tested JRun andwill detail the steps of using it with Netscape Enterprise Server. You can download JRun 2.3.3 (free) for Windows fromhttp://www.allaire.com
Assuming that JReport Enterprise Server has been installed to c:\JREntServer. Below are the steps to use JRun with NetscapeEnterprise Server.
Steps:
Install Netscape Enterprise Server.1. Install JRun by referring to JRunSetupGuide.pdf. Let's suppose, you installed JRun to c:\jrun.2. Edit c:\jrun\jsm−default\services\jse\properties\servlets.properties. Append the lines below:3.
servlet.jrserver.code=jet.server.servlets.JRServlet servlet.jrserver.args=reporthome=c:\\JREntServerservlet.jrserver.preload=false
servlet.webview.code=jet.server.servlets.WebViewServlet servlet.webview.preload=false servlet.sendfile.code=jet.server.servlets.SendFileServlet servlet.sendfile.preload=false
Reference : Please refer to User's Guide | Integrating with a Servlet Enabled Web Server | General Steps and Arguments. Edit c:\jrun\jsm−default\properties\jsm.properties. Add the below to java.classpath:4.
c:/JREntServer/lib/JREngine.jar;c:/JREntServer/lib/JRESServlets.jar;c:/JREntServer/lib/hsqldb.jar;c:/JREntServer/lib/tar.jar;c:/JREntServer/lib/JRWebDesign.jar;c:/JREntServer/lib/xerces.jar; c:/JREntServer/lib/log4j−1.2.8.jar
In addition, add java.args=−Dreporthome=c:\\JREntServer
Notes: If you are scheduling a report to export to the following formats, you should add the corresponding class package orjar with a valid path to the java.classpath:
To Mail or use the "Mail Notification" function: activation.jar and mail.jar.1. To PDF & DHTML: Itext.jar.2. To Excel: poiHSSF_151.jar.3. To XML: xerces.jar.4. To DHTML: JRWebDesign.jar. 5.
♦
If you are using DHTML tag libraries, please also add the following jar with valid paths to the java.classpath:taglib.jar.
♦
Integrating JReport Enterprise Server with a Java Application Server
334
Copy c:\JREntServer\public_html\jinfonet, c:\JREntServer\public_html\admin, andc:\JREntServer\public_html\dhtmljsp to c:\Netscape\SuiteSpot\docs.
5.
Start JRun Server and Netscape Enterprise Server.6.
Now you can access JRServlet and RcServlet as below (default port is 80):http://host:port/servlet/jrserver
Access JSPs with:http://host:port/jinfonet/index.jsp
Reference: User's Guide | Using JSP.
TroubleShooting
If you run into some problems when using JREntServer with Netscape Enterprise Server, please send the log files of JREntServer [email protected]. The following procedure illustrates how to generate the log files:
Edit c:\jrun\jsm−default\properties\jsm.properties. Add the below to java.classpath:java.args=−Dlogall=true
1.
Restart Netscape Enterprise Server, and try to reproduce the problem.2. After reproducing the problem, send us the log files under %JREntServer_installroot%\logs.3.
Running with Microsoft IIS using JRun 3.0
Microsoft IIS does not support servlets directly. To use servlets, it needs the help of a third party product such as Allaire JRun andIBM WebSphere, which support servlets. We have tested JReport Enterprise Server working on IIS 4.0 with the help of JRun, andobtaineda a satisfactory result. You can download JRun 3.0 for windows from http://www.allaire.com
Assuming that JReport Enterprise Server has been installed to E:\JREntServer. Below are the steps for using JRun with Microsoft IIS.
Install Microsoft IIS to C:\InetPub. 1. Install JRun 3.0 and configure it to be connected to the IIS server. 2. Make sure that the JRun Admin Server is started (from Control Panel | Services) and load the JRun ApplicationManagement Console using http://localhost:8001/index.jsp. The first time you install JRun, the followingpage will pop up automatically:
3.
Integrating JReport Enterprise Server with a Java Application Server
335

On the left panel, expand JRun Default Server, click on Java Settings. Then, you will see the Java Virtual Machine settings:4.
Integrating JReport Enterprise Server with a Java Application Server
336

Select the Classpath setting, and append JREngine.jar, JRESServlets.jar, hsqldb.jar, tar.jar, JRWebDesign.jar,log4j−1.2.8.jar and xerces.jar to the Server's classpath, as follows:
5.
Integrating JReport Enterprise Server with a Java Application Server
337
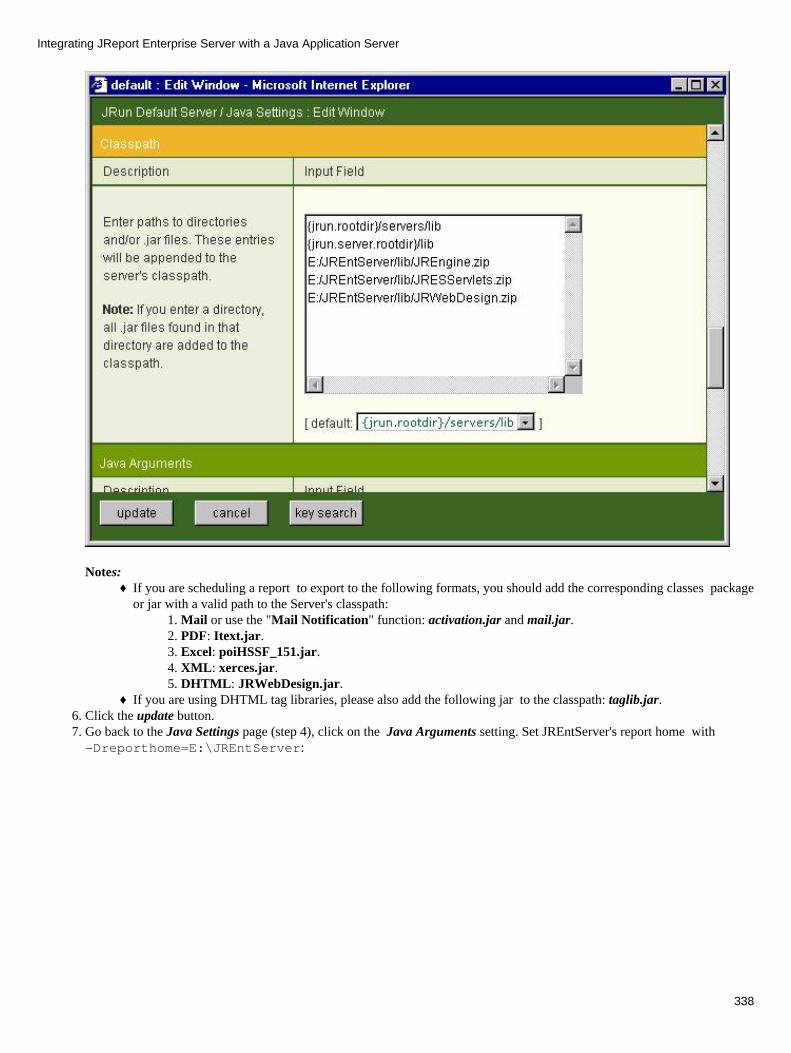
Notes: If you are scheduling a report to export to the following formats, you should add the corresponding classes packageor jar with a valid path to the Server's classpath:
Mail or use the "Mail Notification" function: activation.jar and mail.jar.1. PDF: Itext.jar.2. Excel: poiHSSF_151.jar.3. XML: xerces.jar.4. DHTML: JRWebDesign.jar.5.
♦
If you are using DHTML tag libraries, please also add the following jar to the classpath: taglib.jar. ♦ Click the update button. 6. Go back to the Java Settings page (step 4), click on the Java Arguments setting. Set JREntServer's report home with−Dreporthome=E:\JREntServer:
7.
Integrating JReport Enterprise Server with a Java Application Server
338
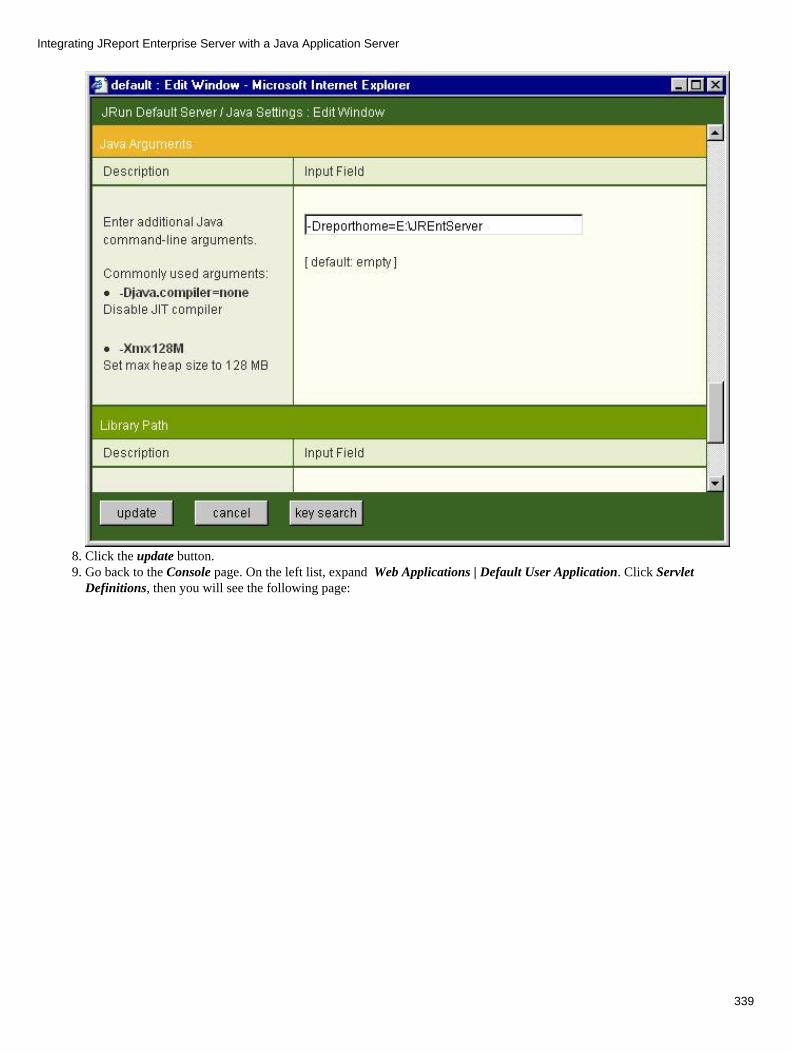
Click the update button. 8. Go back to the Console page. On the left list, expand Web Applications | Default User Application. Click ServletDefinitions, then you will see the following page:
9.
Integrating JReport Enterprise Server with a Java Application Server
339
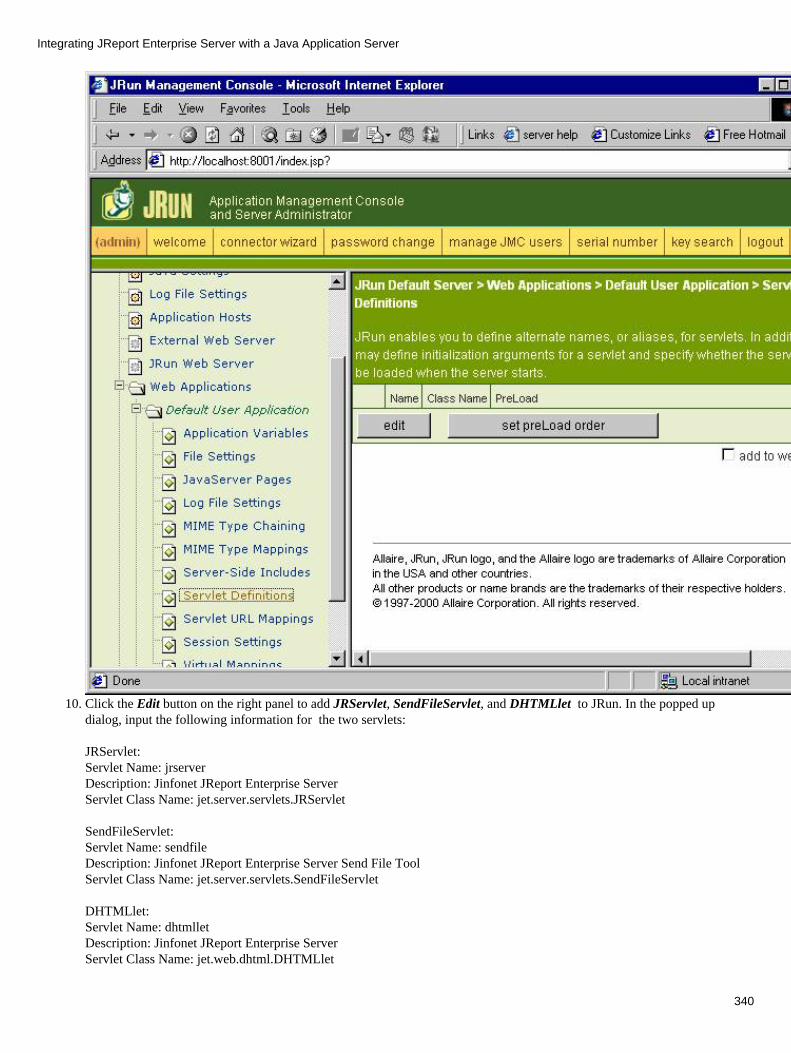
Click the Edit button on the right panel to add JRServlet, SendFileServlet, and DHTMLlet to JRun. In the popped updialog, input the following information for the two servlets:
JRServlet:Servlet Name: jrserverDescription: Jinfonet JReport Enterprise ServerServlet Class Name: jet.server.servlets.JRServlet
SendFileServlet:Servlet Name: sendfileDescription: Jinfonet JReport Enterprise Server Send File ToolServlet Class Name: jet.server.servlets.SendFileServlet
DHTMLlet:Servlet Name: dhtmllet Description: Jinfonet JReport Enterprise ServerServlet Class Name: jet.web.dhtml.DHTMLlet
10.
Integrating JReport Enterprise Server with a Java Application Server
340
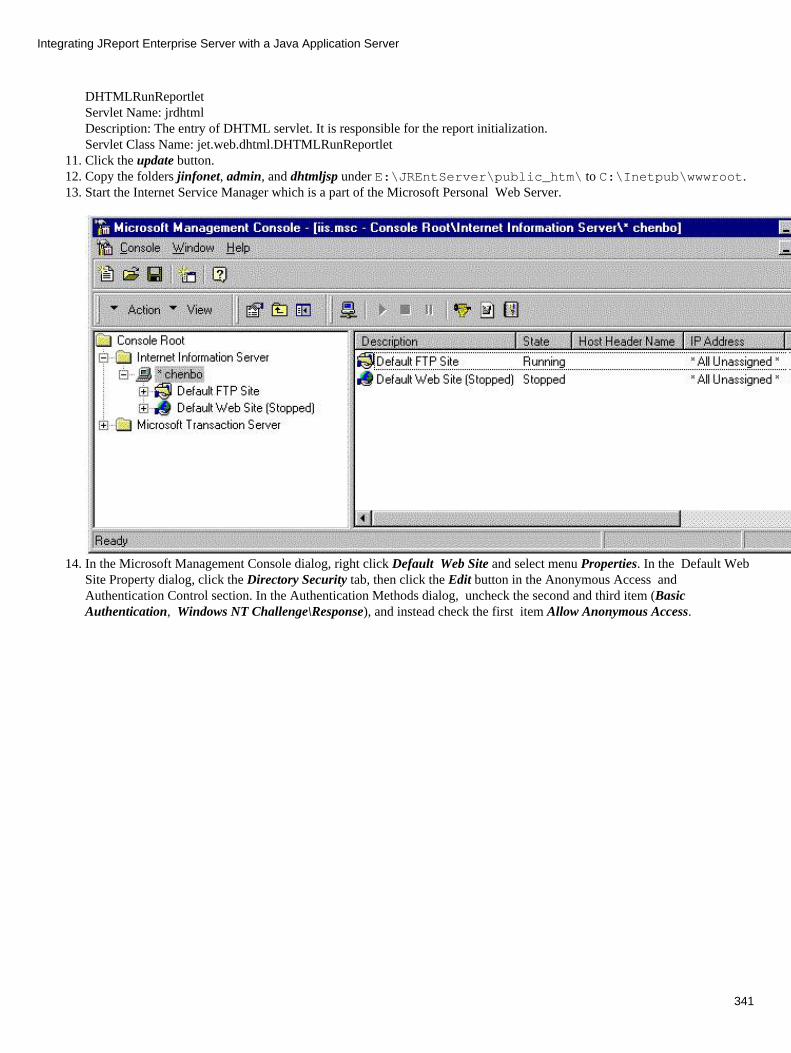
DHTMLRunReportletServlet Name: jrdhtmlDescription: The entry of DHTML servlet. It is responsible for the report initialization.Servlet Class Name: jet.web.dhtml.DHTMLRunReportletClick the update button. 11. Copy the folders jinfonet, admin, and dhtmljsp under E:\JREntServer\public_htm\ to C:\Inetpub\wwwroot.12. Start the Internet Service Manager which is a part of the Microsoft Personal Web Server.13.
In the Microsoft Management Console dialog, right click Default Web Site and select menu Properties. In the Default WebSite Property dialog, click the Directory Security tab, then click the Edit button in the Anonymous Access andAuthentication Control section. In the Authentication Methods dialog, uncheck the second and third item (BasicAuthentication, Windows NT Challenge\Response), and instead check the first item Allow Anonymous Access.
14.
Integrating JReport Enterprise Server with a Java Application Server
341

Modify properties.
Modify the variables web.jreport_servlet_path in server.properties under E:\JREntServer\bin to:
web.jreport_servlet_path=/servlet/jrserver
If you are scheduling a report to DHTML format, please modify two more properties, they are:
15.
web.dhtml_servlet_path=/servlet/dhtmlweb.dhtml_servlet_entry_path=/servlet/jrdhtmlweb.dhtml_jsp_path=/servlet/dhtmljsp
Start the IIS Admin Service, World Wide Web Publishing Service and the JRun Default Server from Control Panel |Services.
16.
Now, you can access the JRServlet as below (default port is 80):http://host:port/servlet/jrserver
Access JSPs as below:http://host:port/jinfonet/index.htm
Reference: User's Guide | Using JSP.
17.
TroubleShooting
If you run into some problems when using JREntServer in JRun 3.0, please send the log files of JREntServer [email protected]. The following procedure illustrates how to generate the log files:
Integrating JReport Enterprise Server with a Java Application Server
342
Make sure that the JRun Admin Server is started (from Control Panel | Services) and load the JRun ApplicationManagement Console by http://localhost:8001/index.jsp.
1.
On the left panel, expand JRun Default Server, click on Java Settings. Then, you will see Java Virtual Machine settings. 2. Click on the Java Arguments setting. Input the following line: −Dlogall=true
3.
Click the update button.4. Restart JRun Default Server from Control Panel | Services.5. Reproduce the problem.6. After reproducing the problem, send us the log files under %JREntServer_installroot%\logs.7.
Running with Microsoft IIS Using JRun 2.3.3
Microsoft IIS does not support servlets directly. To use servlets, it needs the help of a third party product such as Allaire JRun andIBM WebSphere, which support servlets. We have tested JReport Enterprise Server working on IIS 4.0 with the help of JRun, andobtained a satisfactory result. You can download JRun 2.3.3(free) for windows from http://www.allaire.com.
Assuming that JReport Enterprise Server has been installed to c:\JREntServer. Below are the steps for using JRun withMicrosoft IIS.
Install Microsoft IIS. 1. Install JRun by referring to JRunSetupGuide.pdf. Let's suppose, you installed JRun to c:\jrun. 2. Edit c:\jrun\jsm−default\services\jse\properties\servlets.properties. Append the lines below:3.
servlet.jrserver.code=jet.server.servlets.JRServletservlet.jrserver.args=reporthome=c:\\JREntServerservlet.jrserver.preload=falseservlet.sendfile.code=jet.server.servlets.SendFileServletservlet.sendfile.preload=false
Reference: Please refer to User's Guide | Integrating with a Servlet Enabled Web Server | General Steps and Arguments forthe arguments of JRServlet and RcServlet. Edit c:\jrun\jsm−default\properties\jsm.properties. Add below to java.classpath:4. c:/JREntServer/lib/JREngine.jar;c:/JREntServer/lib/JRESServlets.jar;c:/JREntServer/lib/hsqldb.jar;c:/JREntServer/lib/tar.jar;c:/JREntServer/lib/JRWebDesign.jar;c:/JREntServer/lib/xerces.jar; c:/JREntServer/lib/log4j−1.2.8.jar;
In addition, append the line below:java.args=−Dreporthome=c:\\JREntServer
Notes: If you are scheduling a report to export to the following formats, you should add the classes package or jar withvalid path to java.classpath:
To Mail or use the "Mail Notification" function: activation.jar and mail.jar.1. To PDF & DHTML: Itext.jar.2. To Excel: poiHSSF_151.jar.3. To XML: xerces.jar.4. To DHTML: JRWebDesign.jar. 5.
♦
If you are using DHTML tag libraries, please also add the following jar: taglib.jar. ♦ Copy the folders jinfonet, admin, and dhtmljsp under C:\JREntServer\public_htm\ to C:\Inetpub\wwwroot. 5. Start Internet Service Manager which is a part of Microsoft Personal Web Server.6.
Integrating JReport Enterprise Server with a Java Application Server
343

In the Microsoft Management Console dialog, right click Default Web Site and select menu Properties. In the Default WebSite Property dialog. Click the Directory Security tab, then click the Edit button in the Anonymous Access andAuthentication Control section. In the Authentication Methods dialog, uncheck the second and third item (BasicAuthentication, Windows NT Challenge\Response), instead check the first item Allow Anonymous Access.
7.
Integrating JReport Enterprise Server with a Java Application Server
344
Modify properties.
Open the file server.properties under C:\JREntServer\bin, and modify the variables web.jreport_servlet_path to:
web.jreport_servlet_path=/servlet/jrserver
If you are scheduling a report to DHTML format, please modify two more properties in server.properties underC:\JREntServer\bin, they are:
8.
web.dhtml_servlet_path=/servlet/dhtmlweb.dhtml_servlet_entry_path=/servlet/jrdhtmlweb.dhtml_jsp_path=/servlet/dhtmljsp
Start JRun Server. 9. Start Default Web Site. In the Microsoft Management Console dialog, right click Default Web Site and select menu Start.10.
Now you can you can use http://host:port/default.html to test if IIS is working and access JRServlet as below (defaultport is 80):http://host:port/servlet/jrserver
Access JSPs with:http://host:port/jinfonet/index.jsphttp://host:port/admin/index.jsp
Reference : User's Guide | Using JSP.
TroubleShooting
If you run into problems when using JREntServer in JRun 2.3.3, please send the log files of JREntServer to [email protected] following procedure illustrates how to generate the log files:
Edit c:\jrun\jsm−default\properties\jsm.properties. Append the line below:java.args=−Dlogall=true
1.
Restart JRun 2.3.3. 2. Reproduce the problem. 3. After reproducing the problem, send us the log files under %JREntServer_installroot%\logs.4.
Running with Macromedia JRun 4
Install JReport Enterprise Server. We will assume that you will install JReport Enterprise Server to C:\JREntServer. 1. Install Macromedia JRun 4 (Standalone). We will assume that you will install it to C:\JRun4.2. Modify C:\JRun4\servers\default\default−ear\default−war\WEB−INF\web.xml as below:3.
<?xml version="1.0" encoding="ISO−8859−1"?>
<!DOCTYPE web−app PUBLIC "−//Sun Microsystems, Inc.//DTD Web Application 2.3//EN" "http://java.sun.com/dtd/web−app_2_3.dtd">
<web−app>
<display−name>JRun Default Web Application</display−name><description>The default web application for JRun</description>
<error−page><error−code>404</error−code><location>/errorPages/404.jsp</location></error−page>
<welcome−file−list><welcome−file>index.jsp</welcome−file>
Integrating JReport Enterprise Server with a Java Application Server
345
</welcome−file−list><servlet><servlet−name>jrserver</servlet−name><servlet−class>jet.server.servlets.JRServlet</servlet−class><init−param><param−name>reporthome</param−name><param−value>C:\JREntServer</param−value></init−param></servlet>
<servlet><servlet−name>sendfile</servlet−name><servlet−class>jet.server.servlets.SendFileServlet</servlet−class></servlet>
<servlet−mapping><servlet−name>jrserver</servlet−name><url−pattern>/jrserver/*</url−pattern></servlet−mapping>
<servlet−mapping><servlet−name>sendfile</servlet−name><url−pattern>/servlet/sendfile/*</url−pattern></servlet−mapping>
</web−app>
Notes: If you are scheduling to export a report to the DHTML format, please add the following lines into the file above:♦
<servlet><servlet−name>dhtml</servlet−name><servlet−class>jet.web.dhtml.DHTMLlet</servlet−class></servlet>
<servlet−mapping><servlet−name>dhtml</servlet−name><url−pattern>/dhtml/*</url−pattern></servlet−mapping>
<servlet> <servlet−name>help</servlet−name> <servlet−class>jet.web.dhtml.JHelplet</servlet−class></servlet>
<servlet−mapping> <servlet−name>help</servlet−name> <url−pattern>/help/*</url−pattern> </servlet−mapping>
<servlet><servlet−name>jrdhtml</servlet−name><servlet−class>jet.web.dhtml.DHTMLRunReportlet</servlet−class></servlet>
<servlet−mapping> <servlet−name>jrdhtml</servlet−name><url−pattern>/jrdhtml/*</url−pattern> </servlet−mapping
If you want to support start/stop/restart report server in integration environment, please add the following lines tothe XML code above. (Note: This feature is based on Servlet2.3 specification. The <listener> part should beahead to the <servlet> part.)
♦
<listener><listener−class>jet.server.servlets.JRServerContextListener</listener−class></listener>
Integrating JReport Enterprise Server with a Java Application Server
346
Reference: Please refer to User's Guide | Integrating with a Servlet Enabled Web Server | General Steps and Arguments Create a subdirectory named lib under C:\JRun4\servers\default\default−ear\default−war\WEB−INF. Copy JREngine.jar, JRESServlets.jar,hsqldb.jar, tar.jar, log4j−1.2.8.jar, JRWebDesign.jar and xerces.jar underC:\JREntServer\lib\C:\JREntServer\lib\ toC:\JRun4\servers\default\default−ear\default−war\WEB−INF\lib.
Notes: If you are scheduling a report to export to the following formats, you should copy the corresponding class packageor jar under C:\JREntServer\lib toC:\JRun4\servers\default\default−ear\default−war\WEB−INF\lib:
To Mail or use the "Mail Notification" function: activation.jar and mail.jar.1. To PDF & DHTML: Itext.jar.2. To Excel: poiHSSF_151.jar.3. To XML: xerces.jar.4. To DHTML: JRWebDesign.jar.5.
♦
If you are using DHTML tag libraries, please also add the following jar toC:\JRun4\servers\default\default−ear\default−war\WEB−INF\lib: taglib.jar.
♦
4.
In the file jvm.config under C:\JRun4\bin, append java.args=Xmx128M −Xms32m−Dreporthome=C:\\JREntServer
5.
Copy the folders jinfonet, admin, and dhtmljsp under C:\JREntServer\public_html (with their subfolders) toC:\JRun4\servers\default\default−ear\default−war.
6.
Restart JRun server. 7. Access JReport Entprise Server from web browser (default server port is 8100): http://localhost:8100/jrserver
Access JSPs as below:http://localhost:8100/jinfonet/index.jsphttp://localhost:8100/admin/index.jsp
8.
TroubleShooting
If you run into some problems when using JREntServer in JRun 4, please send the log files of JREntServer to [email protected] following procedure illustrates how to generate the log files:
Start the JRun admin server, and access JRun admin server as below: http://Ip address of the admin server:8000
1.
Under the default node, expand Settings, and then click JVM Settings. 2. In the VM Arguments pane, append −Dlogall=true like: −Dreporthome=/JREntServer −Dlogall=true
3.
Click the update button.4. Restart JRun Default Server, and try to reproduce the problem. After reproducing the problem, send us the log files under%JREntServer_installroot%\logs.
5.
Using PJA Toolkit
If there is no GUI on your Unix machine, the PJA (Pure Java AWT) Toolkit can be used to run the JReport Enterprise Server that hasalready been integrated with JRun4.
Assuming that:
JDK has been installed to /usr/js2e.• JRun 4 has been installed to /JRun4. • JReport Enterprise Server has been installed to /JREntServer. • JReport Enterprise Server has been integrated with JRun 4 on the Unix machine.• PJA has been installed under /pja_2.4. The PJA package is not included in our product, please go to•
Integrating JReport Enterprise Server with a Java Application Server
347
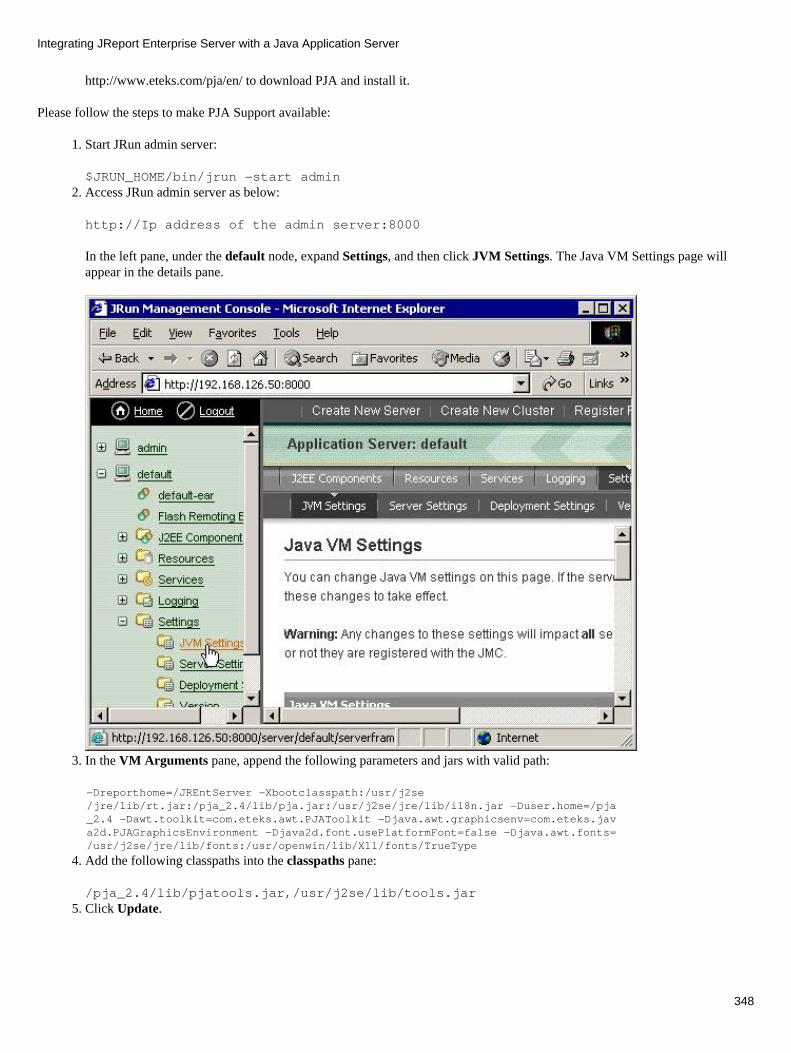
http://www.eteks.com/pja/en/ to download PJA and install it.
Please follow the steps to make PJA Support available:
Start JRun admin server:
$JRUN_HOME/bin/jrun −start admin
1.
Access JRun admin server as below:
http://Ip address of the admin server:8000
In the left pane, under the default node, expand Settings, and then click JVM Settings. The Java VM Settings page willappear in the details pane.
2.
In the VM Arguments pane, append the following parameters and jars with valid path:3.
−Dreporthome=/JREntServer −Xbootclasspath:/usr/j2se/jre/lib/rt.jar:/pja_2.4/lib/pja.jar:/usr/j2se/jre/lib/i18n.jar −Duser.home=/pja_2.4 −Dawt.toolkit=com.eteks.awt.PJAToolkit −Djava.awt.graphicsenv=com.eteks.java2d.PJAGraphicsEnvironment −Djava2d.font.usePlatformFont=false −Djava.awt.fonts=/usr/j2se/jre/lib/fonts:/usr/openwin/lib/X11/fonts/TrueType
Add the following classpaths into the classpaths pane:
/pja_2.4/lib/pjatools.jar,/usr/j2se/lib/tools.jar
4.
Click Update.5.
Integrating JReport Enterprise Server with a Java Application Server
348

Note: After update the JVM Settings, you could check the configure file jvm.config under $JRUN_HOME/bin/. All of thechanges that you made on the JVM Settings page will be saved there. Start JRun Default server:
$JRUN_HOME/bin/jrun −start default
Access JReport Enterprise Server as below:
http://localhost:8100/servlet/jrserver
6.
Integrating with IBM WebSphere 4.0 by a War File
Assuming that
WebSphere 4.0 works as a plug−in of the IBM HTTP Server. • JReport Enterprise Server has been installed under C:\JREntServer. • WebSphere 4.0 has been installed under C:\WebSphere.•
Integrating by using a new .ear file
Creating a WAR file
Create a new directory in your local disk. e.g. D:\servlet. 1. Create a sub directory "WEB−INF" under it: D:\servlet\WEB−INF. 2. Generate a web.xml as follows and put it under D:\servlet\WEB−INF. 3.
<?xml version="1.0" encoding="UTF−8"?> <!DOCTYPE web−app PUBLIC "−//Sun Microsystems, Inc.//DTD Web Application 2.2//EN" "http://java.sun.com/j2ee/dtds/web−app_2_2.dtd">
Integrating JReport Enterprise Server with a Java Application Server
349

<web−app id="WebApp_1"> <servlet id="Servlet_1"> <servlet−name>jrserver</servlet−name> <servlet−class>jet.server.servlets.JRServlet</servlet−class> <init−param id="InitParam_1"> <param−name>reporthome</param−name> <param−value>c:\JREntServer</param−value> </init−param> </servlet>
<servlet id="Servlet_2"> <servlet−name>sendfile</servlet−name> <servlet−class>jet.server.servlets.SendFileServlet</servlet−class> </servlet>
<servlet−mapping id="ServletMapping_1"> <servlet−name>jrserver</servlet−name> <url−pattern>/jrserver/*</url−pattern> </servlet−mapping>
<servlet−mapping id="ServletMapping_2"> <servlet−name>sendfile</servlet−name> <url−pattern>/sendfile/*</url−pattern> </servlet−mapping>
Notes: If you are scheduling to export a report to DHTML format, please add the following lines into the file above:♦
<servlet id="Servlet_3"> <servlet−name>dhtml</servlet−name> <servlet−class>jet.web.dhtml.DHTMLlet</servlet−class> </servlet>
<servlet−mapping id="ServletMapping_3"> <servlet−name>dhtml</servlet−name> <url−pattern>/dhtml/*</url−pattern> </servlet−mapping>
<servlet><servlet−name>help</servlet−name><servlet−class>jet.web.dhtml.JHelplet</servlet−class></servlet>
<servlet−mapping><servlet−name>help</servlet−name><url−pattern>/help/*</url−pattern></servlet−mapping>
<servlet><servlet−name>jrdhtml</servlet−name><servlet−class>jet.web.dhtml.DHTMLRunReportlet</servlet−class></servlet>
<servlet−mapping><servlet−name>jrdhtml</servlet−name><url−pattern>/jrdhtml/*</url−pattern></servlet−mapping>
If you want to support start/stop/restart report server in integration environment, please add the following lines tothe XML code above. (Note : This feature is based on Servlet2.3 specification. The <listener> part should be aheadto the <servlet> part.)
♦
<listener><listener−class>jet.server.servlets.JRServerContextListener</listener−class> </listener>
Integrating JReport Enterprise Server with a Java Application Server
350
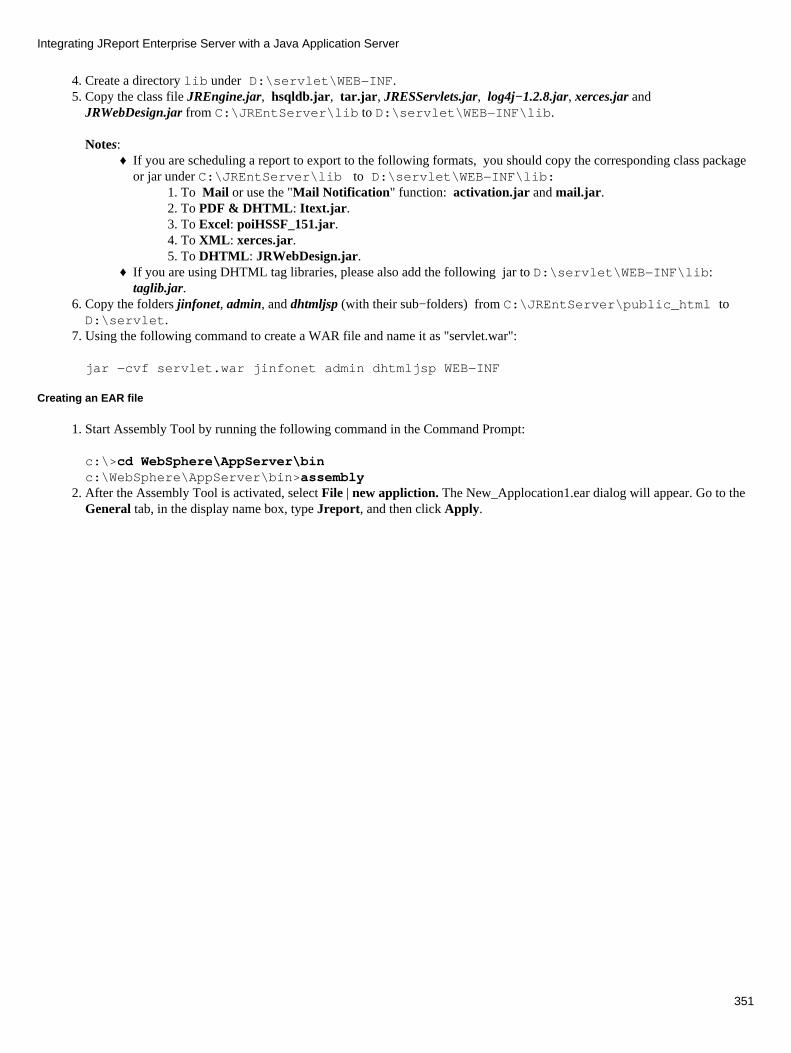
Create a directory lib under D:\servlet\WEB−INF.4. Copy the class file JREngine.jar, hsqldb.jar, tar.jar, JRESServlets.jar, log4j−1.2.8.jar, xerces.jar andJRWebDesign.jar from C:\JREntServer\lib to D:\servlet\WEB−INF\lib.
Notes: If you are scheduling a report to export to the following formats, you should copy the corresponding class packageor jar under C:\JREntServer\lib to D:\servlet\WEB−INF\lib:
To Mail or use the "Mail Notification" function: activation.jar and mail.jar.1. To PDF & DHTML: Itext.jar.2. To Excel: poiHSSF_151.jar.3. To XML: xerces.jar.4. To DHTML: JRWebDesign.jar.5.
♦
If you are using DHTML tag libraries, please also add the following jar to D:\servlet\WEB−INF\lib:taglib.jar.
♦
5.
Copy the folders jinfonet, admin, and dhtmljsp (with their sub−folders) from C:\JREntServer\public_html toD:\servlet.
6.
Using the following command to create a WAR file and name it as "servlet.war":
jar −cvf servlet.war jinfonet admin dhtmljsp WEB−INF
7.
Creating an EAR file
Start Assembly Tool by running the following command in the Command Prompt:
c:\>cd WebSphere\AppServer\binc:\WebSphere\AppServer\bin>assembly
1.
After the Assembly Tool is activated, select File | new appliction. The New_Applocation1.ear dialog will appear. Go to theGeneral tab, in the display name box, type Jreport, and then click Apply.
2.
Integrating JReport Enterprise Server with a Java Application Server
351
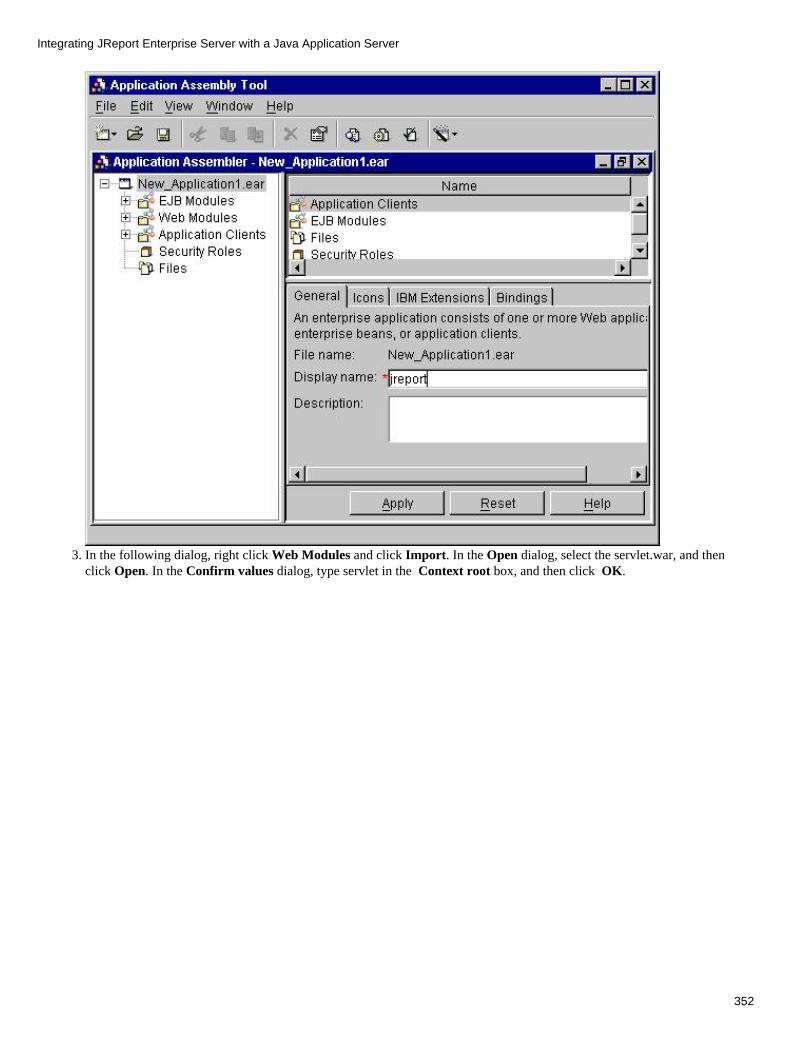
In the following dialog, right click Web Modules and click Import. In the Open dialog, select the servlet.war, and thenclick Open. In the Confirm values dialog, type servlet in the Context root box, and then click OK.
3.
Integrating JReport Enterprise Server with a Java Application Server
352
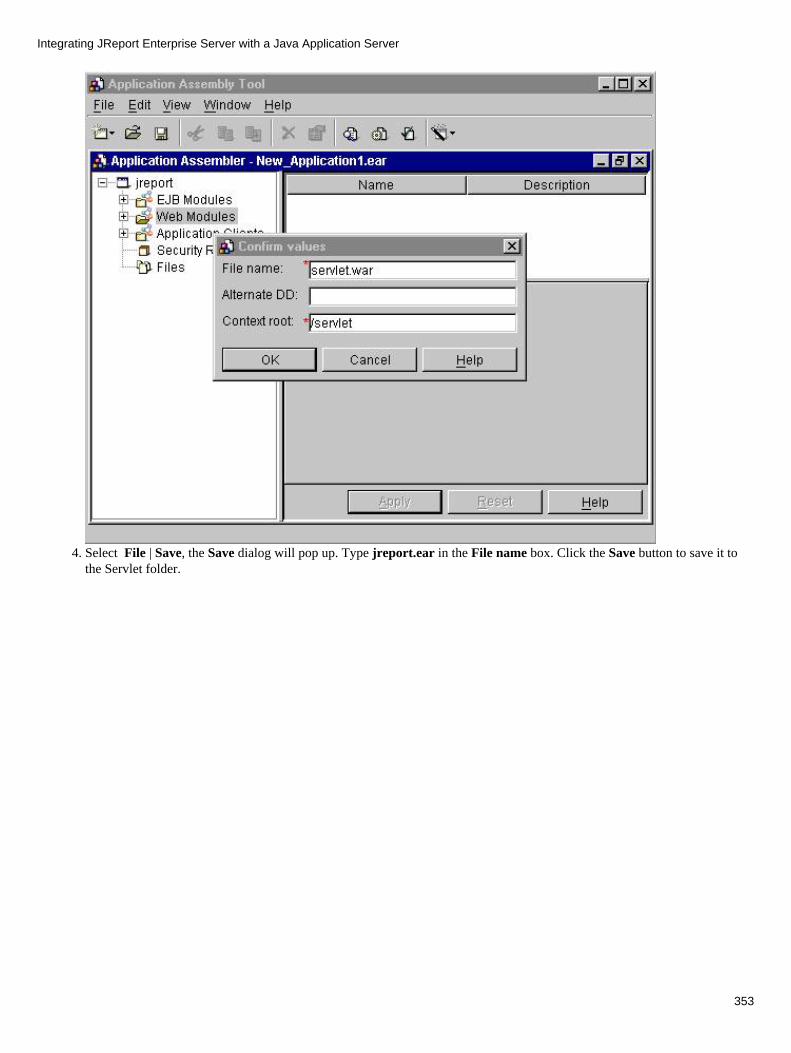
Select File | Save, the Save dialog will pop up. Type jreport.ear in the File name box. Click the Save button to save it tothe Servlet folder.
4.
Integrating JReport Enterprise Server with a Java Application Server
353

In the Assembly Tool, select File | Generate Code for Deployment, the following dialog pops up, click GenerateNow. After the Save prompt appears in the bottom panel, click Close and exit the Assembly Tool.
5.
Integrating JReport Enterprise Server with a Java Application Server
354
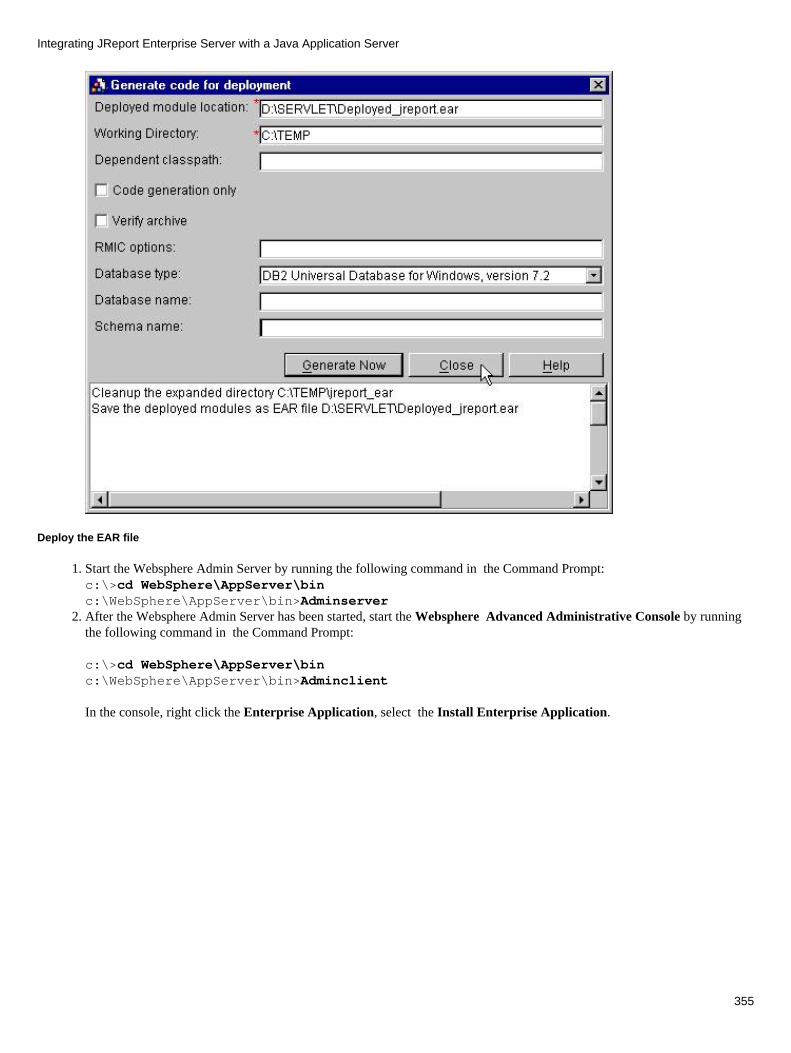
Deploy the EAR file
Start the Websphere Admin Server by running the following command in the Command Prompt: c:\>cd WebSphere\AppServer\binc:\WebSphere\AppServer\bin>Adminserver
1.
After the Websphere Admin Server has been started, start the Websphere Advanced Administrative Console by runningthe following command in the Command Prompt:
c:\>cd WebSphere\AppServer\binc:\WebSphere\AppServer\bin>Adminclient
In the console, right click the Enterprise Application, select the Install Enterprise Application.
2.
Integrating JReport Enterprise Server with a Java Application Server
355

In the Specify the Application or Module dialog, select the Application Server which you are using from the drop downlist after the Browse for file on node, click the Browse button to locate the file Deployed_jreport. ear, click Next.
3.
Integrating JReport Enterprise Server with a Java Application Server
356

Click Next continually until the Selecting Virtual Hosts for Web Modules dialog pops up. Accept the default name of theVirtual Host, click Next.
4.
Integrating JReport Enterprise Server with a Java Application Server
357

In the Select Application Servers dialog, click the Select Server button, the Select a Server or Server Group dialog willappear. Select the Application Server that you are using, and then click OK.
5.
Integrating JReport Enterprise Server with a Java Application Server
358

Click the Finish button in the Completing the Application Installation Wizard dialog. The following information dialogwill pop up.
6.
In the console, expand the Nodes node, right click the Application server that you are using, select Regen WebserverPlugin. After the process has finished, the information will appear at the bottom of the dialog to indicate that you aresuccessful.
7.
Integrating JReport Enterprise Server with a Java Application Server
359
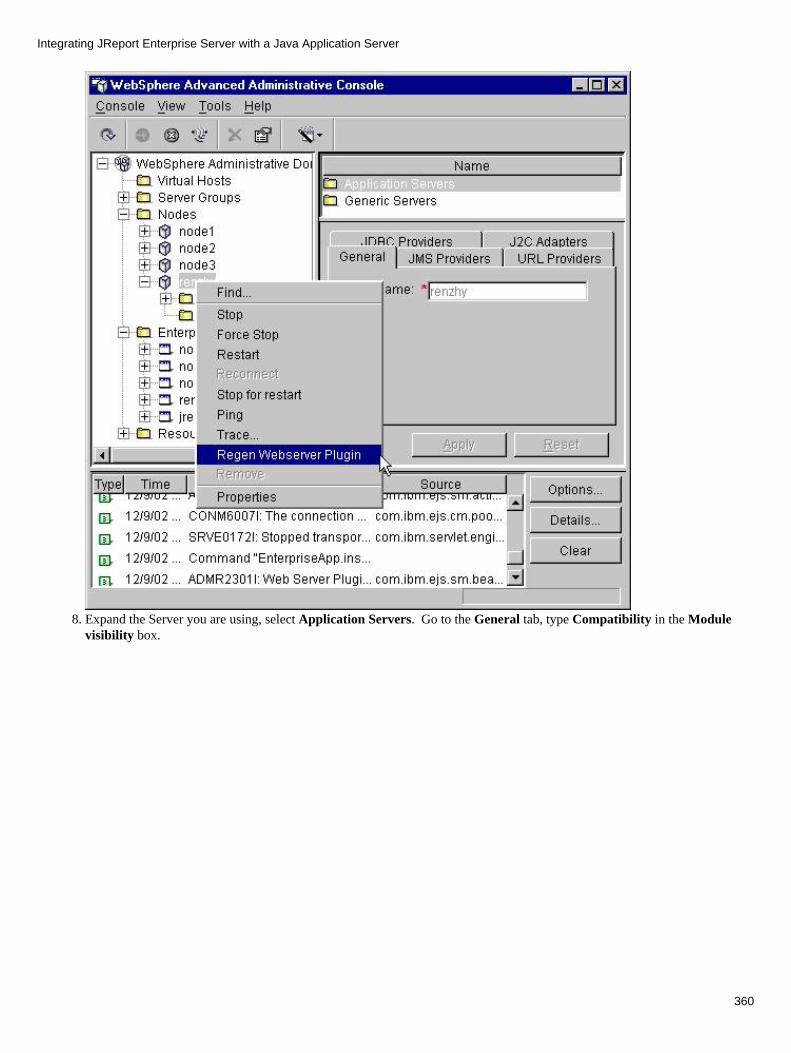
Expand the Server you are using, select Application Servers. Go to the General tab, type Compatibility in the Modulevisibility box.
8.
Integrating JReport Enterprise Server with a Java Application Server
360

If you want to use JSP, please go to the JVM Settings tab, in the System Properties panel, input the following information:Name: reporthomeValue: C:\JREntServer
9.
Click Add.
Integrating JReport Enterprise Server with a Java Application Server
361
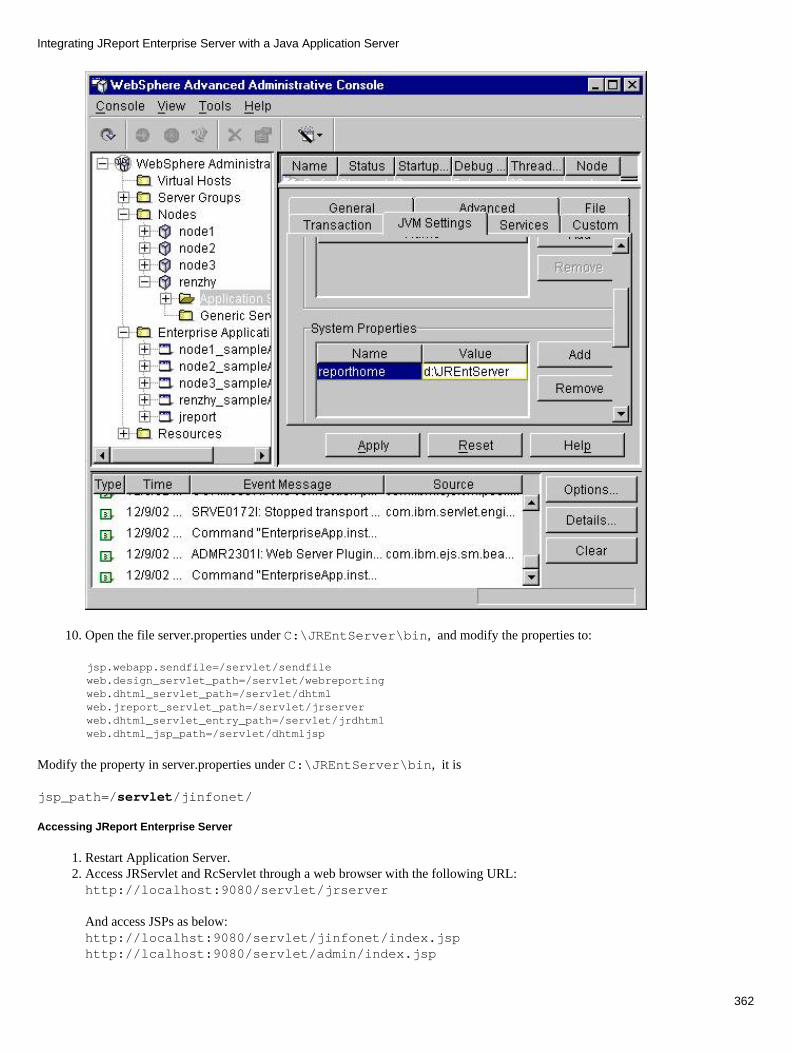
Open the file server.properties under C:\JREntServer\bin, and modify the properties to: 10.
jsp.webapp.sendfile=/servlet/sendfile web.design_servlet_path=/servlet/webreporting web.dhtml_servlet_path=/servlet/dhtml web.jreport_servlet_path=/servlet/jrserverweb.dhtml_servlet_entry_path=/servlet/jrdhtml web.dhtml_jsp_path=/servlet/dhtmljsp
Modify the property in server.properties under C:\JREntServer\bin, it is
jsp_path=/servlet/jinfonet/
Accessing JReport Enterprise Server
Restart Application Server.1. Access JRServlet and RcServlet through a web browser with the following URL:http://localhost:9080/servlet/jrserver
And access JSPs as below:http://localhst:9080/servlet/jinfonet/index.jsphttp://lcalhost:9080/servlet/admin/index.jsp
2.
Integrating JReport Enterprise Server with a Java Application Server
362
TroubleShooting
If you run into problems when using JREntServer in IBM WebSphere, please send the log files of JREntServer [email protected]. The following procedure illustrates how to generate the log files:
Launch IBM WebSphere Administrator's Console. Expand the Server you are using, select Application Servers. 1. Select JVM Setting, then go to System Properties. Add a new System Property as below:Name: logallValue: true
2.
Click File | Save to save the configuration result.3. Restart the application server, and try to reproduce the problem.4. After reproducing the problem, send us the log files under %JREntServer_installroot%\logs.5.
Running with IBM WebSphere 3.02 and 3.5
IBM WebSphere can work as a plugin for Microsoft IIS 4.0, Netscape Enterprise Server 3.51/3.6, IBM HTTP Server 1.3.6 andApache 1.3.6 to enable them to support servlets. We will detail the steps for integrating JReport Enterprise Server with IBMWebSphere.
Assuming that,
JReport Enterprise Server has been installed to c:\JREntServer. Below are the steps to use WebSphere.
Below are the steps to use WebSphere:
Install IBM JDK 1.1.7.1. Install your web server (Microsoft IIS, Netscape Enterprise Server, IBM HTTP Server and/or Apache). 2. Restart Windows and stop all web servers. 3. Install WebSphere. Select Custom Installation, then select the web server(s) that you want to plug in. 4. Restart Windows and start your web sever (Microsoft IIS, Netscape Enterprise Server, IBM HTTP Server or Apache). 5. Start the IBM WS AdminServer and launch IBM WebSphere Administrator's Console. 6. Set up the class path for JReport Enterprise Server.
Append JREngine.jar, JRWebDesign.jar, hsqldb.jar, tar.jar, JRESServlets.jar, xerces.jar and log4j−1.2.8.jar to theclasspath of default_app as below.
Notes: If you are scheduling a report to export to the following formats, you should add the corresponding class package orjar with a valid path to the classpath of default_app:
To Mail or use the "Mail Notification" function: activation.jar and mail.jar.1. To PDF & DHTML: Itext.jar.2. To Excel: poiHSSF_151.jar.3. To XML: xerces.jar.4. To DHTML: JRWebDesign.jar.5.
♦
If you are using DHTML tag libraries, also add the following jar to the classpath of default_app: taglib.jar. ♦
7.
Integrating JReport Enterprise Server with a Java Application Server
363

Add JRServlet, SendFileServlet, DHTMLlet, and jrdhtml to WebSphere: Right click default_app.1. Select Create Servlet. 2. In the pop−up dialog, input the following information for the servlets:
JRServletServlet Name: jrserver Description: Jinfonet JReport Enterprise Server Servlet Class Name: jet.server.servlets.JRServlet Servlet Web Path: /servlet/jrserver Init ParameterInit Parm Name: reporthome Init Parm Value: c:/JREntServer
SendFileServletServlet Name: sendfile Description: Jinfonet JReport Enterprise Server Send File Tool Servlet Class Name: jet.server.servlets.SendFileServlet Servlet Web Path: /servlet/sendfile
DHTMLletServlet Name: dhtmlletDescription: Jinfonet JReport Enterprise Server Send File Tool Servlet Class Name: jet.web.dhtml.DHTMLletServlet Web Path: /servlet/dhtmllet
3.
8.
Integrating JReport Enterprise Server with a Java Application Server
364
DHTMLRunReportletServlet Name: jrdhtmlDescription: The entry of DHTML servlet. It is responsible for report initialization.Servlet Class Name: jet.web.dhtml.DHTMLRunReportletServlet Web Path: /servlet/jrdhtml
Start the Default Server.9. Copy the directory c:\JREntServer\public_html\jinfonet, c:\JREntServer\public_html\admin,and c:\JREntServer\public_html\dhtmljsp (all jsp files are located here) to the directory C:\ProgramFiles\IBM Http Server\htdocs.
10.
Steps12 and 13 are required only if JSP support is not complete. Open all jsp files under C:\Program Files\IBMHttp Server\htdocs\jinfonet, replace the line
<%@ include file="AuthCheck.jsp" %>
With:
11.
<%try{if( !HttpUtil.checkLogin(request, response) )return;}catch(TooManyUsersException e){%>Too many users!<%return;}catch(TooManyTimesException e){%>Too many times to try to login!<%return;}
if( !HttpUtil.checkPermission(request) ){%>Access denied!<%return;}%>
Change all <%@ page import to <%@ import, <%@ page errorPage to <%@ errorPage in all JSPs. 12. Define system variable reporthome as c:/JREntServer.13.
Integrating JReport Enterprise Server with a Java Application Server
365

Open the file server.properties under C:\JREntServer\bin, and modify the variable web.jreport_servlet_path to: 14.
web.jreport_servlet_path=/servlet/jrserver
If you are scheduling a report to DHTML format, please modify the property in server.properties underC:\JREntServer\bin, it is
web.dhtml_servlet_path=/servlet/dhtmlweb.dhtml_servlet_entry_path=/servlet/jrdhtml web.dhtml_jsp_path=/servlet/dhtmljsp
Restart IBM WS AdminServer.
Now you can access JRServlet as below (default port is 80):http://host:port/servlet/jrserver
Access JSPs as below:http://host:port/jinfonet/index.htmhttp://host:port/admin/index.htm
Reference: User's Guide | Using JSP.
Notes: Before installing WebSphere 3.02, please uninstall JDK1.2 and remove it from disk completely. ♦ Netscape Enterprise Server 3.51/3.6 provides basic support for the Servlet API through the use of Sun's referenceimplementations, the Java Servlet Development Kit (JSDK). However, it only supports only JSDK1.0. To use
♦
15.
Integrating JReport Enterprise Server with a Java Application Server
366
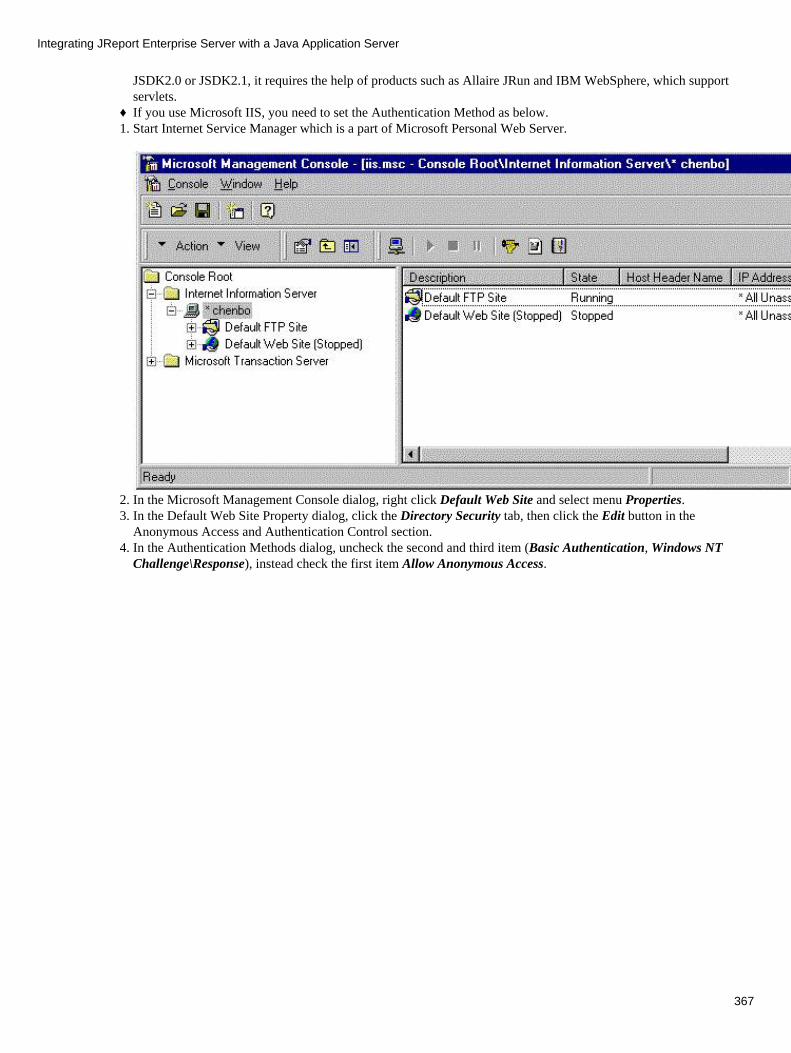
JSDK2.0 or JSDK2.1, it requires the help of products such as Allaire JRun and IBM WebSphere, which supportservlets. If you use Microsoft IIS, you need to set the Authentication Method as below.♦ Start Internet Service Manager which is a part of Microsoft Personal Web Server.1.
In the Microsoft Management Console dialog, right click Default Web Site and select menu Properties.2. In the Default Web Site Property dialog, click the Directory Security tab, then click the Edit button in theAnonymous Access and Authentication Control section.
3.
In the Authentication Methods dialog, uncheck the second and third item (Basic Authentication, Windows NTChallenge\Response), instead check the first item Allow Anonymous Access.
4.
Integrating JReport Enterprise Server with a Java Application Server
367

Steps 12 and 13 are needed only if JSP support is not complete.16.
TroubleShooting
If you run into problems when using JREntServer in IBM WebSphere, please send the log files of JREntServer [email protected]. The following procedure illustrates how to generate the log files:
Start IBM WS AdminServer and launch IBM WebSphere Administor's Console. 1. On the topology tab, select the application server that you are using. Append −Dlogall=true to the Commend linearguments.
2.
Restart IBM WS AdminServer, and try to reproduce the problem. 3. After reproducing the problem, send us the log files under %JREntServer_installroot%\logs.4.
Running with Tomcat 3.3 on Unix
Assuming that,
JReport Enterprise Server has been installed under /JREntServer.
To integrate JReport Enterprise Server with Tomcat 3.3, please take the following steps:
Download JReport Enterprise Server on Unix. For details, please refer to User's Guide | Installing and Launching JReportEnterprise Server. Here we assume JReport Enterprise Server is installed under /JREntServer.
1.
Create a new sub−directory under /<TOMCAT_HOME>/webapps/ as servlet. 2. Copy all our demo JSP files from <JREntServer_HOME>/public_html/jinfonetto /<TOMCAT_HOME>/webapps/servlet.
3.
Integrating JReport Enterprise Server with a Java Application Server
368
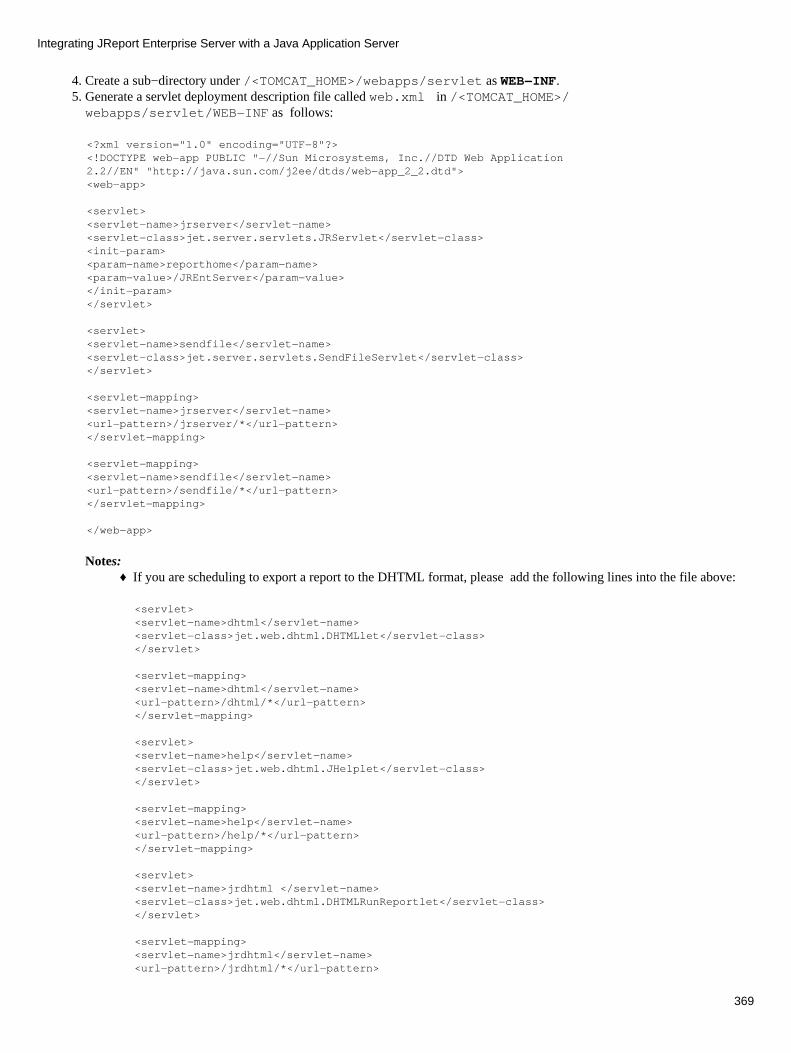
Create a sub−directory under /<TOMCAT_HOME>/webapps/servlet as WEB−INF. 4. Generate a servlet deployment description file called web.xml in /<TOMCAT_HOME>/webapps/servlet/WEB−INF as follows:
5.
<?xml version="1.0" encoding="UTF−8"?><!DOCTYPE web−app PUBLIC "−//Sun Microsystems, Inc.//DTD Web Application 2.2//EN" "http://java.sun.com/j2ee/dtds/web−app_2_2.dtd"><web−app>
<servlet><servlet−name>jrserver</servlet−name><servlet−class>jet.server.servlets.JRServlet</servlet−class><init−param><param−name>reporthome</param−name><param−value>/JREntServer</param−value></init−param></servlet>
<servlet><servlet−name>sendfile</servlet−name><servlet−class>jet.server.servlets.SendFileServlet</servlet−class></servlet>
<servlet−mapping><servlet−name>jrserver</servlet−name><url−pattern>/jrserver/*</url−pattern></servlet−mapping>
<servlet−mapping><servlet−name>sendfile</servlet−name><url−pattern>/sendfile/*</url−pattern></servlet−mapping>
</web−app>
Notes:If you are scheduling to export a report to the DHTML format, please add the following lines into the file above:♦
<servlet><servlet−name>dhtml</servlet−name><servlet−class>jet.web.dhtml.DHTMLlet</servlet−class></servlet>
<servlet−mapping><servlet−name>dhtml</servlet−name><url−pattern>/dhtml/*</url−pattern></servlet−mapping>
<servlet><servlet−name>help</servlet−name><servlet−class>jet.web.dhtml.JHelplet</servlet−class></servlet>
<servlet−mapping><servlet−name>help</servlet−name><url−pattern>/help/*</url−pattern></servlet−mapping>
<servlet><servlet−name>jrdhtml </servlet−name><servlet−class>jet.web.dhtml.DHTMLRunReportlet</servlet−class></servlet>
<servlet−mapping><servlet−name>jrdhtml</servlet−name><url−pattern>/jrdhtml/*</url−pattern>
Integrating JReport Enterprise Server with a Java Application Server
369

</servlet−mapping>
If you want to support start/stop/restart report server in integration environment, please add the following lines tothe XML code above. (Note: This feature is based on Servlet2.3 specification. The <listener> part should be aheadto the <servlet> part.)
♦
<listener><listener−class>jet.server.servlets.JRServerContextListener</listener−class> </listener>
Reference: Please refer to User's Guide | Integrating with a Servlet Enabled Web Server | General Steps and ArgumentsCreate a sub−directory under /<TOMCAT_HOME>/webapps/servlet/WEB−INF as lib. Copy the following filesunder <JREntServer_HOME>\lib to /<TOMCAT_HOME>/webapps/servlet/WEB−INF/lib.
activation.jarmail.jartools.jarhsqldb.jar tar.jar JREngine.jarJRESServlets.jarJRWebDesign.jarxerces.jarLog4j−1.2.8.jar
Notes:If you are scheduling a report to export to the following formats, you should add the corresponding class package orjar with valid path to the classpath:
To PDF & DHTML: Itext.jar.1. To Excel: poiHSSF_151.jar.2. To XML: xerces.jar.3. To DHTML: JRWebDesign.jar4.
♦
If you are using DHTML tag libraries, please also add the following jar to/<TOMCAT_HOME>/webapps/servlet/WEB−INF/lib: taglib.jar.
♦
6.
Modify the file tomcat.sh to set −Dreporthome as below:7.
...
elif [ "$1" = "start" ] ; then shift
if [ −f ${TOMCAT_HOME}/conf/ajp12.id ] ; then rm −f ${TOMCAT_HOME}/conf/ajp12.idfi
MAX_WAIT=360WAIT=0if [ "$1" = "−wait" ] ; thenshift# wait at least 6 min WAIT=${MAX_WAIT}fi
if [ "$1" = "−noout" ] ; thenshift$JAVACMD $TOMCAT_OPTS −Dtomcat.home=${TOMCAT_HOME} $MAIN start $@ >${TOMCAT_HOME}/logs/stdout.log 2>&1 &elseecho Using classpath: ${CLASSPATH}echo Using JAVA_HOME: ${JAVA_HOME}echo Using TOMCAT_HOME: ${TOMCAT_HOME}$JAVACMD $TOMCAT_OPTS −Dtomcat.home=${TOMCAT_HOME} −Dreporthome=/JREntServer $MAIN start $@ &
Integrating JReport Enterprise Server with a Java Application Server
370
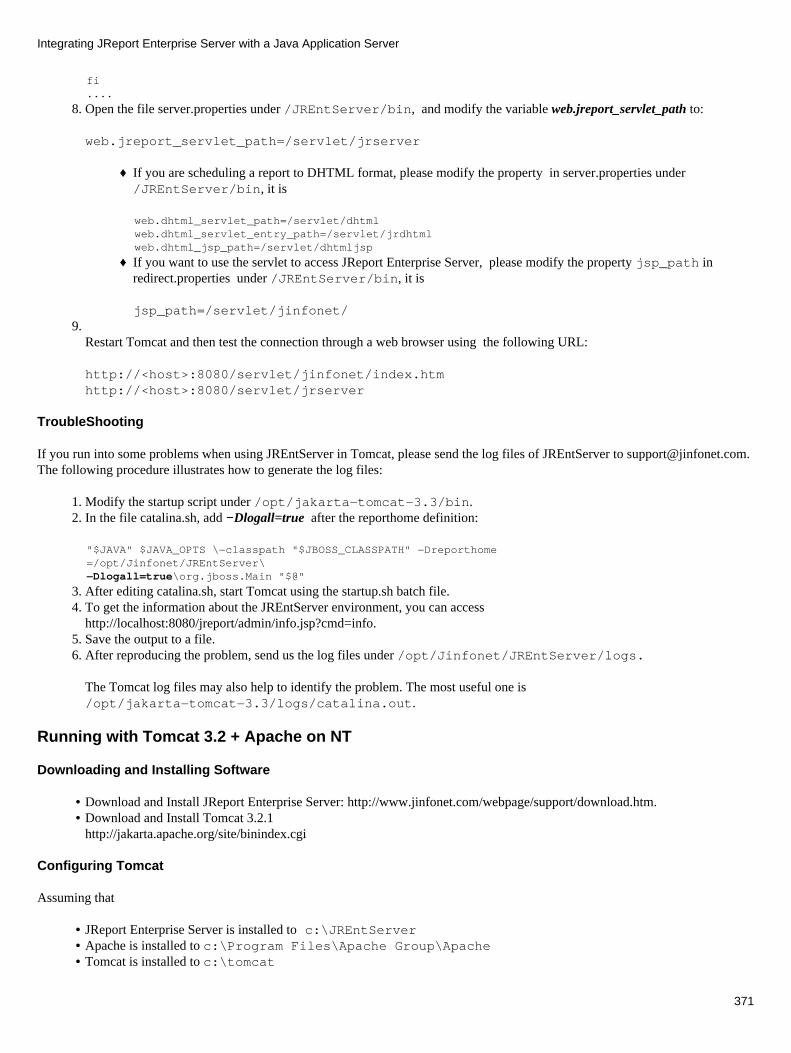
fi....
Open the file server.properties under /JREntServer/bin, and modify the variable web.jreport_servlet_path to:8.
web.jreport_servlet_path=/servlet/jrserver
If you are scheduling a report to DHTML format, please modify the property in server.properties under/JREntServer/bin, it is
♦
web.dhtml_servlet_path=/servlet/dhtmlweb.dhtml_servlet_entry_path=/servlet/jrdhtmlweb.dhtml_jsp_path=/servlet/dhtmljsp
If you want to use the servlet to access JReport Enterprise Server, please modify the property jsp_path inredirect.properties under /JREntServer/bin, it is
jsp_path=/servlet/jinfonet/
♦
9. Restart Tomcat and then test the connection through a web browser using the following URL:
http://<host>:8080/servlet/jinfonet/index.htmhttp://<host>:8080/servlet/jrserver
TroubleShooting
If you run into some problems when using JREntServer in Tomcat, please send the log files of JREntServer to [email protected] following procedure illustrates how to generate the log files:
Modify the startup script under /opt/jakarta−tomcat−3.3/bin.1. In the file catalina.sh, add −Dlogall=true after the reporthome definition: 2.
"$JAVA" $JAVA_OPTS \−classpath "$JBOSS_CLASSPATH" −Dreporthome=/opt/Jinfonet/JREntServer\ −Dlogall=true\org.jboss.Main "$@"
After editing catalina.sh, start Tomcat using the startup.sh batch file. 3. To get the information about the JREntServer environment, you can accesshttp://localhost:8080/jreport/admin/info.jsp?cmd=info.
4.
Save the output to a file.5. After reproducing the problem, send us the log files under /opt/Jinfonet/JREntServer/logs.
The Tomcat log files may also help to identify the problem. The most useful one is/opt/jakarta−tomcat−3.3/logs/catalina.out.
6.
Running with Tomcat 3.2 + Apache on NT
Downloading and Installing Software
Download and Install JReport Enterprise Server: http://www.jinfonet.com/webpage/support/download.htm.• Download and Install Tomcat 3.2.1http://jakarta.apache.org/site/binindex.cgi
•
Configuring Tomcat
Assuming that
JReport Enterprise Server is installed to c:\JREntServer• Apache is installed to c:\Program Files\Apache Group\Apache• Tomcat is installed to c:\tomcat•
Integrating JReport Enterprise Server with a Java Application Server
371

Create a subdirectory servlet in c:\tomcat\webapps. 1. Create subdirectory web−inf under c:\tomcat\webapps\servlet. Save the following contents as a file with thename web.xml in the directory c:\tomcat\webapps\servlet\web−inf:
2.
<?xml version="1.0" encoding="ISO−8859−1"?>
<!DOCTYPE web−appPUBLIC "−//Sun Microsystems, Inc.//DTD Web Application 2.3//EN""http://java.sun.com/dtd/web−app_2_3.dtd">
<web−app>
<servlet><servlet−name>jrserver</servlet−name><servlet−class>jet.server.servlets.JRServlet</servlet−class><init−param><param−name>reporthome</param−name><param−value>c:\JREntServer</param−value></init−param></servlet>
<servlet><servlet−name>sendfile</servlet−name><servlet−class>jet.server.servlets.SendFileServlet</servlet−class></servlet>
<servlet−mapping><servlet−name>jrserver</servlet−name><url−pattern>/jrserver/*</url−pattern></servlet−mapping>
<servlet−mapping><servlet−name>sendfile</servlet−name><url−pattern>/sendfile/*</url−pattern></servlet−mapping>
Notes: If you are scheduling to export a report to the DHTML format, please add the following lines into the file above:♦
<servlet><servlet−name>dhtml</servlet−name><servlet−class>jet.web.dhtml.DHTMLlet</servlet−class></servlet>
<servlet−mapping><servlet−name>dhtml</servlet−name><url−pattern>/dhtml/*</url−pattern></servlet−mapping>
<servlet><servlet−name>help</servlet−name><servlet−class>jet.web.dhtml.JHelplet</servlet−class></servlet>
<servlet−mapping><servlet−name>help</servlet−name><url−pattern>/help/*</url−pattern></servlet−mapping>
<servlet><servlet−name>jrdhtml</servlet−name><servlet−class>jet.web.dhtml.DHTMLRunReportlet</servlet−class></servlet>
<servlet−mapping><servlet−name>jrdhtml</servlet−name><url−pattern>/jrdhtml/*</url−pattern></servlet−mapping>
Integrating JReport Enterprise Server with a Java Application Server
372
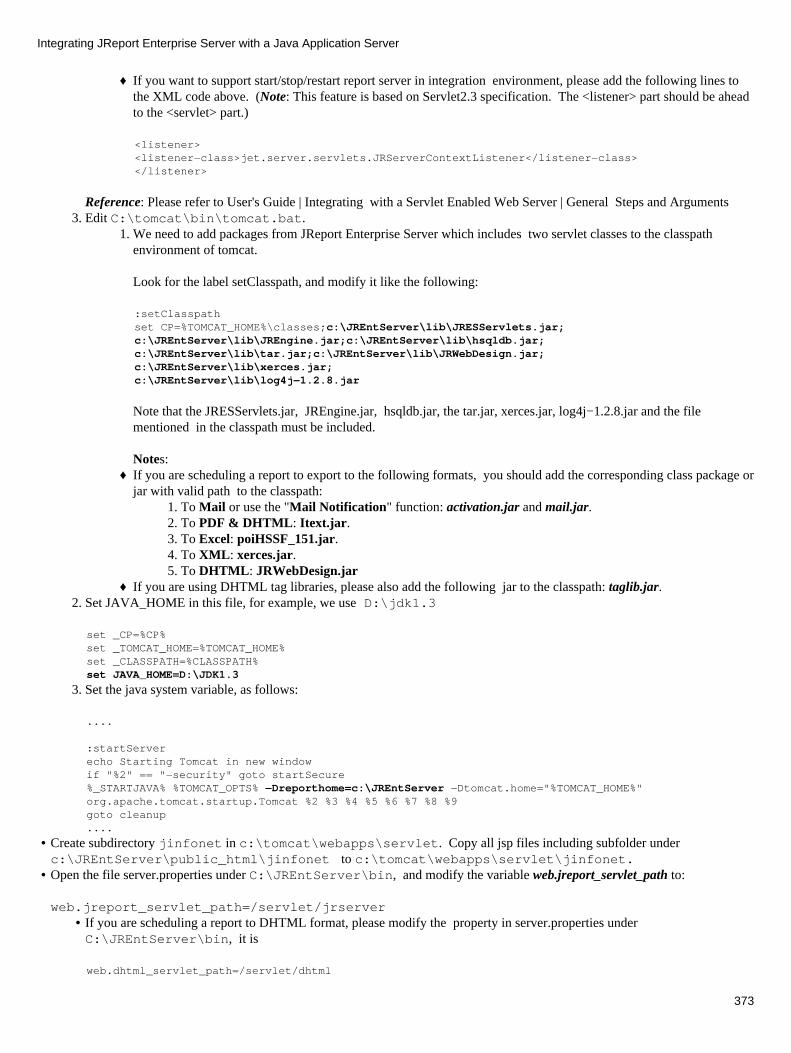
If you want to support start/stop/restart report server in integration environment, please add the following lines tothe XML code above. (Note: This feature is based on Servlet2.3 specification. The <listener> part should be aheadto the <servlet> part.)
♦
<listener><listener−class>jet.server.servlets.JRServerContextListener</listener−class> </listener>
Reference: Please refer to User's Guide | Integrating with a Servlet Enabled Web Server | General Steps and ArgumentsEdit C:\tomcat\bin\tomcat.bat.
We need to add packages from JReport Enterprise Server which includes two servlet classes to the classpathenvironment of tomcat.
Look for the label setClasspath, and modify it like the following:
1.
:setClasspathset CP=%TOMCAT_HOME%\classes;c:\JREntServer\lib\JRESServlets.jar;c:\JREntServer\lib\JREngine.jar;c:\JREntServer\lib\hsqldb.jar;c:\JREntServer\lib\tar.jar;c:\JREntServer\lib\JRWebDesign.jar;c:\JREntServer\lib\xerces.jar;c:\JREntServer\lib\log4j−1.2.8.jar
Note that the JRESServlets.jar, JREngine.jar, hsqldb.jar, the tar.jar, xerces.jar, log4j−1.2.8.jar and the filementioned in the classpath must be included.
Notes:
3.
If you are scheduling a report to export to the following formats, you should add the corresponding class package orjar with valid path to the classpath:
To Mail or use the "Mail Notification" function: activation.jar and mail.jar.1. To PDF & DHTML: Itext.jar.2. To Excel: poiHSSF_151.jar.3. To XML: xerces.jar.4. To DHTML: JRWebDesign.jar5.
♦
If you are using DHTML tag libraries, please also add the following jar to the classpath: taglib.jar.♦ Set JAVA_HOME in this file, for example, we use D:\jdk1.32.
set _CP=%CP%set _TOMCAT_HOME=%TOMCAT_HOME%set _CLASSPATH=%CLASSPATH%set JAVA_HOME=D:\JDK1.3
Set the java system variable, as follows:3.
....
:startServerecho Starting Tomcat in new windowif "%2" == "−security" goto startSecure%_STARTJAVA% %TOMCAT_OPTS% −Dreporthome=c:\JREntServer −Dtomcat.home="%TOMCAT_HOME%" org.apache.tomcat.startup.Tomcat %2 %3 %4 %5 %6 %7 %8 %9goto cleanup....
Create subdirectory jinfonet in c:\tomcat\webapps\servlet. Copy all jsp files including subfolder underc:\JREntServer\public_html\jinfonet to c:\tomcat\webapps\servlet\jinfonet.
•
Open the file server.properties under C:\JREntServer\bin, and modify the variable web.jreport_servlet_path to:
web.jreport_servlet_path=/servlet/jrserver
•
If you are scheduling a report to DHTML format, please modify the property in server.properties underC:\JREntServer\bin, it is
•
web.dhtml_servlet_path=/servlet/dhtml
Integrating JReport Enterprise Server with a Java Application Server
373

web.dhtml_servlet_entry_path=/servlet/jrdhtml web.dhtml_jsp_path=/servlet/dhtmljsp
If you want to use the servlet to access JReport Enterprise Server, please modify the property jsp_path inredirect.properties under C:\JREntServer\bin, it is
jsp_path=/servlet/jinfonet/
•
Launching Tomcat and Apache
Start Tomcat using c:\tomcat\bin\startup.1. Load default page of JReport using http://localhost:8080/servlet/jrserver2. Load jsp pages using http://localhost:8080/servlet/jinfonet/index.jsp. Reference: User's Guide | Using JSP.
3.
TroubleShooting
If you run into problems when using JREntServer in Tomcat, please send the log files of JREntServer to [email protected]. Thefollowing procedure illustrates how to generate the log files:
Edit C:\tomcat\bin\tomcat.bat. 1. Set the java system variable, as follows:2.
....
:startServer echo Starting Tomcat in new window if "%2" == "−security" goto startSecure %_STARTJAVA% %TOMCAT_OPTS% −Dreporthome=c:\JREntServer −Dlogall=true −Dtomcat.home="%TOMCAT_HOME%" org.apache.tomcat.startup.Tomcat %2 %3 %4 %5 %6 %7 %8 %9 goto cleanup ....
Restart Tomcat, and try to reproduce the problem. 3. After reproducing the problem, send us the log files under %JREntServer_installroot%\logs. 4.
Running with Tomcat 3.2 + Apache on Unix
Setting up CLASSPATH Environment
According to Tomcat 3.2 documentation, all packages in the TOMCAT_HOME>/LIB directory will be appended to Tomcat'sCLASSPATH. So in order to have Tomcat find out the classes that JReport Enterprise Server may use, please copy the followingfiles to <TOMCAT_HOME>/LIB:
<JREntServer_HOME>/lib/JRESServlets.jar, <JREntServer_HOME>/lib/JJREngine.jar, <JREntServer_HOME>/lib/hsqldb.jar, <JREntServer_HOME>/lib/tar.jar, <JREntServer_HOME>/lib/xerces.jar;<JREntServer_HOME>/lib/JRWebDesign.jar;<JREntServer_HOME>/lib/log4j−1.2.8.jar
Java_home>/lib/tools.jar. • JDBC Driver classes package for your reports if it is necessary.•
For example, in our demo environment, we have the following class packages in <TOMCAT_HOME>/lib:
activation.jarmail.jartools.jarhsqldb.jartar.jarJREngine.jarJRESServlets.jarJRWebDesign.jar
Integrating JReport Enterprise Server with a Java Application Server
374

xerces.jarlog4j−1.2.8.jar
Notes:
If you are scheduling a report to export to the following formats, you should add the corresponding class package or jar with a validpath to the classpath:
To PDF & DHTML: Itext.jar.1. To Excel: poiHSSF_151.jar.2. To XML: xerces.jar.3. To DHTML: JRWebDesign.jar4.
If you are using DHTML tag libraries, also add the following jar with valid path to the classpath: taglib.jar.
Setting up Servlets
JReport Enterprise Server is integrated with the Tomcat by servlets. According to the documentation of Tomcat 3.2, all the apps inwebapps/ will be initialized. So here are the steps that you need to follow:
Download and install JReport Enterprise Server on Unix, please refer to User's Guide | Installing and Launching JReportEnterprise Server.
1.
Create a new sub−directory under webapps/ as jinfonet. 2. Copy all the files from <JREntServer_HOME>/public_html/jinfonet to webapps/jinfonet. These are ourdemo JSP pages.
3.
Replace all the string /servlet from the JSP files with /jinfonet/servlet.4. Create a sub−directory in wabapps/jinfonet as WEB−INF. 5. Generate a servlet deployment description file called web.xml in webapps/jinfonet/WEB−INF as follows:6.
<?xml version="1.0" encoding="ISO−8859−1"?>
<!DOCTYPE web−app PUBLIC "−//Sun Microsystems, Inc.//DTD Web Application 2.2//EN" "http://java.sun.com/j2ee/dtds/web−app_2_2.dtd">
<web−app> <servlet> <servlet−name>jrserver</servlet−name> <servlet−class>jet.server.servlets.JRServlet</servlet−class> <init−param> <param−name>reporthome</param−name> <param−value>/usr/JREntServer</param−value> </init−param> <load−on−startup>1</load−on−startup> </servlet>
<servlet> <servlet−name>sendfile</servlet−name> <servlet−class>jet.server.servlets.SendFileServlet</servlet−class> </servlet>
</web−app>
JRServlet is the basic servlet for JSP pages. That is to say, without JRServlet, JSP pages cannot work. So here we choose to load it onserver startup.
Note: If you want to schedule to export a report to the DHTML format, please add the following lines into the file above:
<servlet><servlet−name>dhtml</servlet−name><servlet−class>jet.web.dhtml.DHTMLlet</servlet−class>
Integrating JReport Enterprise Server with a Java Application Server
375

</servlet>
<servlet><servlet−name>jrdhtml</servlet−name><servlet−class>jet.web.dhtml.DHTMLRunReportlet</servlet−class></servlet>
<servlet−mapping><servlet−name>jrdhtml</servlet−name><url−pattern>/jrdhtml/*</url−pattern></servlet−mapping>
Testing
Now you can restart Tomcat and Apache and then test the connection through a web browser using the following URLs:
http://<host>/jinfonet/index.htmhttp://<host>/jinfonet/servlet/jrserver
TroubleShooting
If you run into some problems when using JREntServer in Tomcat, please send the log files of JREntServer to [email protected] following procedure illustrates how to generate the log files:
Modify the file web.xml in webapps/jinfonet/WEB−INF as follows:1. <?xml version="1.0" encoding="ISO−8859−1"?>
<!DOCTYPE web−app PUBLIC "−//Sun Microsystems, Inc.//DTD Web Application 2.2//EN" "http://java.sun.com/j2ee/dtds/web−app_2_2.dtd">
<web−app> <servlet> <servlet−name>jrserver</servlet−name> <servlet−class>jet.server.servlets.JRServlet</servlet−class> <init−param> <param−name>reporthome</param−name> <param−value>/usr/JREntServer</param−value> </init−param> <init−param> <param−name>logall</param−name> <param−value>true</param−value> </init−param><load−on−startup>1</load−on−startup> </servlet>
<servlet> <servlet−name>sendfile</servlet−name> <servlet−class>jet.server.servlets.SendFileServlet</servlet−class> </servlet>
</web−app>
Restart Tomcat, and try to reproduce the problem. 2. After reproducing the problem, send us the log files under $JREntServer_installroot/logs.3.
Appendix I Integrating Tomcat with Apache (Unix)
System Information
Apache 1.3, downloaded from http://www.apache.org/dist• Tomcat 3.2.2, downloaded from http://jakarta.apache.org/tomcat/•
Integrating JReport Enterprise Server with a Java Application Server
376
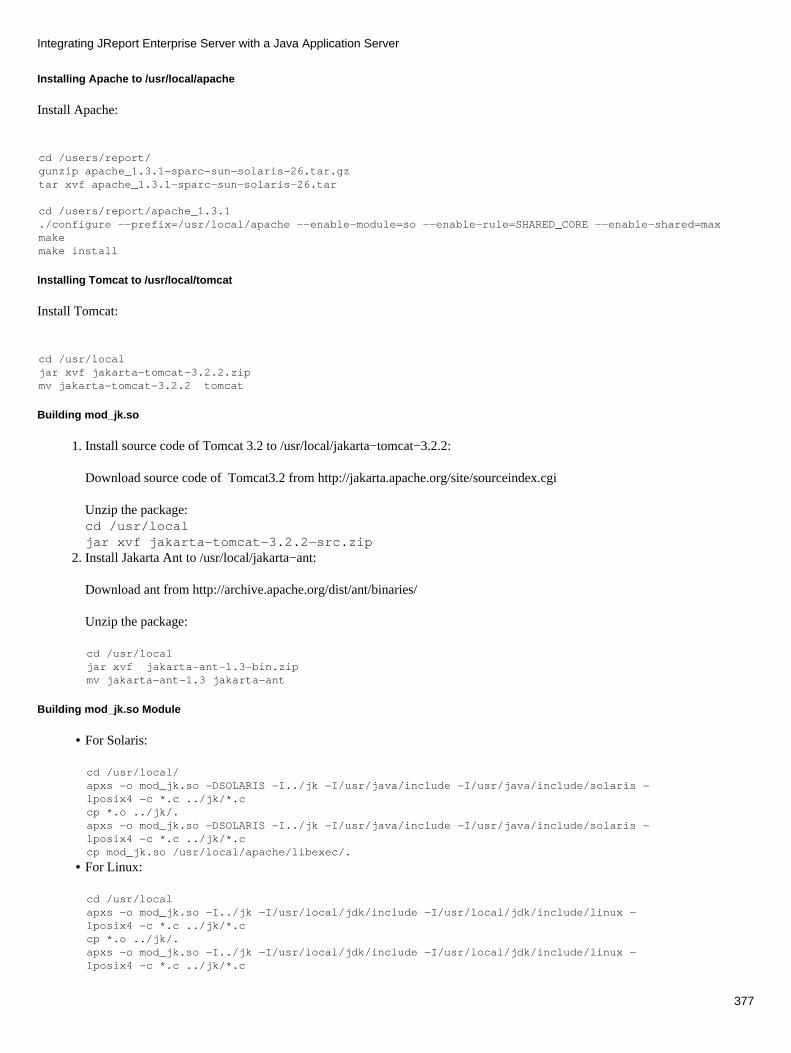
Installing Apache to /usr/local/apache
Install Apache:
cd /users/report/ gunzip apache_1.3.1−sparc−sun−solaris−26.tar.gz tar xvf apache_1.3.1−sparc−sun−solaris−26.tar
cd /users/report/apache_1.3.1 ./configure −−prefix=/usr/local/apache −−enable−module=so −−enable−rule=SHARED_CORE −−enable−shared=max make make install
Installing Tomcat to /usr/local/tomcat
Install Tomcat:
cd /usr/local jar xvf jakarta−tomcat−3.2.2.zip mv jakarta−tomcat−3.2.2 tomcat
Building mod_jk.so
Install source code of Tomcat 3.2 to /usr/local/jakarta−tomcat−3.2.2:
Download source code of Tomcat3.2 from http://jakarta.apache.org/site/sourceindex.cgi
Unzip the package:cd /usr/localjar xvf jakarta−tomcat−3.2.2−src.zip
1.
Install Jakarta Ant to /usr/local/jakarta−ant:
Download ant from http://archive.apache.org/dist/ant/binaries/
Unzip the package:
2.
cd /usr/localjar xvf jakarta−ant−1.3−bin.zipmv jakarta−ant−1.3 jakarta−ant
Building mod_jk.so Module
For Solaris: •
cd /usr/local/ apxs −o mod_jk.so −DSOLARIS −I../jk −I/usr/java/include −I/usr/java/include/solaris −lposix4 −c *.c ../jk/*.c cp *.o ../jk/. apxs −o mod_jk.so −DSOLARIS −I../jk −I/usr/java/include −I/usr/java/include/solaris −lposix4 −c *.c ../jk/*.c cp mod_jk.so /usr/local/apache/libexec/.
For Linux: •
cd /usr/local apxs −o mod_jk.so −I../jk −I/usr/local/jdk/include −I/usr/local/jdk/include/linux −lposix4 −c *.c ../jk/*.c cp *.o ../jk/. apxs −o mod_jk.so −I../jk −I/usr/local/jdk/include −I/usr/local/jdk/include/linux −lposix4 −c *.c ../jk/*.c
Integrating JReport Enterprise Server with a Java Application Server
377

cp mod_jk.so /usr/local/apache/libexec/.
Configuring Apache
Modify the httpd.conf in <APACHE_HOME>/conf.
Remove:LoadModule jserv_module libexec/mod_jserv.soAddModule mod_jk.c
•
Add:LoadModule jk_module libexec/mod_jk.soAddModule mod_jk.
•
Add Other New Lines at The End of httpd.conf:• JkWorkersFile /usr/local/tomcat/conf/workers.propertiesJkLogFile /usr/local/apache/logs/mod_jk.logJkLogLevel warn
JkMount /* ajp12JkMount /*.jsp ajp12JkMount /servlet/* ajp12
Configuring Tomcat
Modify the worders.properties file in /usr/local/tomcat/conf by changing the following lines:
workers.tomcat_home=/usr/local/tomcatworkers.java_home=/usr/bin/javaps=/
Testing Integration
Start Tomcat:cd /usr/local/tomcat/bin./startup.sh
•
Start Apache:cd /usr/local/apache/bin./apachectl start
•
Requesting Sample Servlet (Snoop) from Web Browser
Refer to: http://<host>/examples/snoop
Referred Documentations
http://jakarta.apache.org/tomcat/tomcat−3.2−doc/tomcat−apache−howto.html
http://jakarta.apache.org/tomcat/tomcat−3.2−doc/mod_jk−howto.html
Appendix II Running JReport Enterprise Server without X−Window
Installing XVFB (Xserver Virtual Frame Buffer) on UNIX box
XVFB is acronym of Xserver Virtual Frame Buffer. It can provide you with a virtual Xserver and free you from the need of a realXserver. It runs without a head or graphics card.
XVFB is freeware and can be obtained from x.org's X11R6 distribution. Compiling it is supposed to be rather difficult but there areSolaris binaries for it on some sites. The following are some examples:
http://ferret.wrc.noaa.gov/Ferret/FAQ/graphics/Solaris_Xvfb.html
Integrating JReport Enterprise Server with a Java Application Server
378
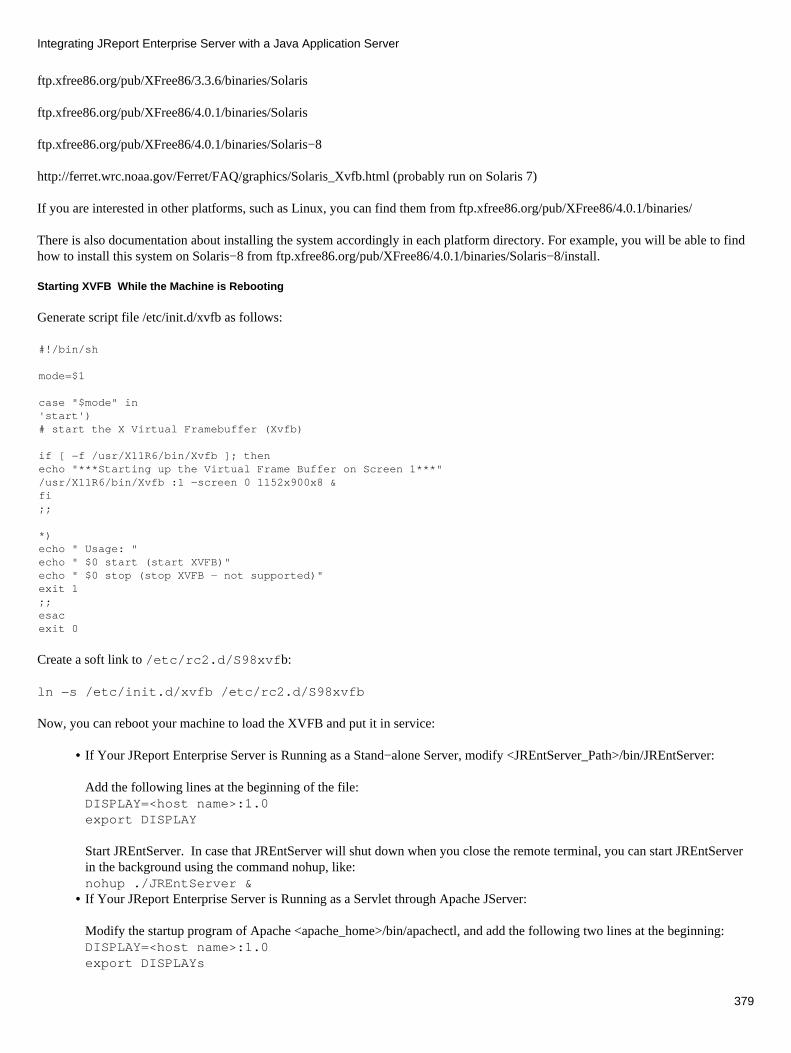
ftp.xfree86.org/pub/XFree86/3.3.6/binaries/Solaris
ftp.xfree86.org/pub/XFree86/4.0.1/binaries/Solaris
ftp.xfree86.org/pub/XFree86/4.0.1/binaries/Solaris−8
http://ferret.wrc.noaa.gov/Ferret/FAQ/graphics/Solaris_Xvfb.html (probably run on Solaris 7)
If you are interested in other platforms, such as Linux, you can find them from ftp.xfree86.org/pub/XFree86/4.0.1/binaries/
There is also documentation about installing the system accordingly in each platform directory. For example, you will be able to findhow to install this system on Solaris−8 from ftp.xfree86.org/pub/XFree86/4.0.1/binaries/Solaris−8/install.
Starting XVFB While the Machine is Rebooting
Generate script file /etc/init.d/xvfb as follows:
#!/bin/sh
mode=$1
case "$mode" in 'start') # start the X Virtual Framebuffer (Xvfb)
if [ −f /usr/X11R6/bin/Xvfb ]; then echo "***Starting up the Virtual Frame Buffer on Screen 1***" /usr/X11R6/bin/Xvfb :1 −screen 0 1152x900x8 & fi ;;
*) echo " Usage: " echo " $0 start (start XVFB)" echo " $0 stop (stop XVFB − not supported)" exit 1 ;; esac exit 0
Create a soft link to /etc/rc2.d/S98xvfb:
ln −s /etc/init.d/xvfb /etc/rc2.d/S98xvfb
Now, you can reboot your machine to load the XVFB and put it in service:
If Your JReport Enterprise Server is Running as a Stand−alone Server, modify <JREntServer_Path>/bin/JREntServer:
Add the following lines at the beginning of the file:DISPLAY=<host name>:1.0export DISPLAY
Start JREntServer. In case that JREntServer will shut down when you close the remote terminal, you can start JREntServerin the background using the command nohup, like:nohup ./JREntServer &
•
If Your JReport Enterprise Server is Running as a Servlet through Apache JServer:
Modify the startup program of Apache <apache_home>/bin/apachectl, and add the following two lines at the beginning:DISPLAY=<host name>:1.0export DISPLAYs
•
Integrating JReport Enterprise Server with a Java Application Server
379
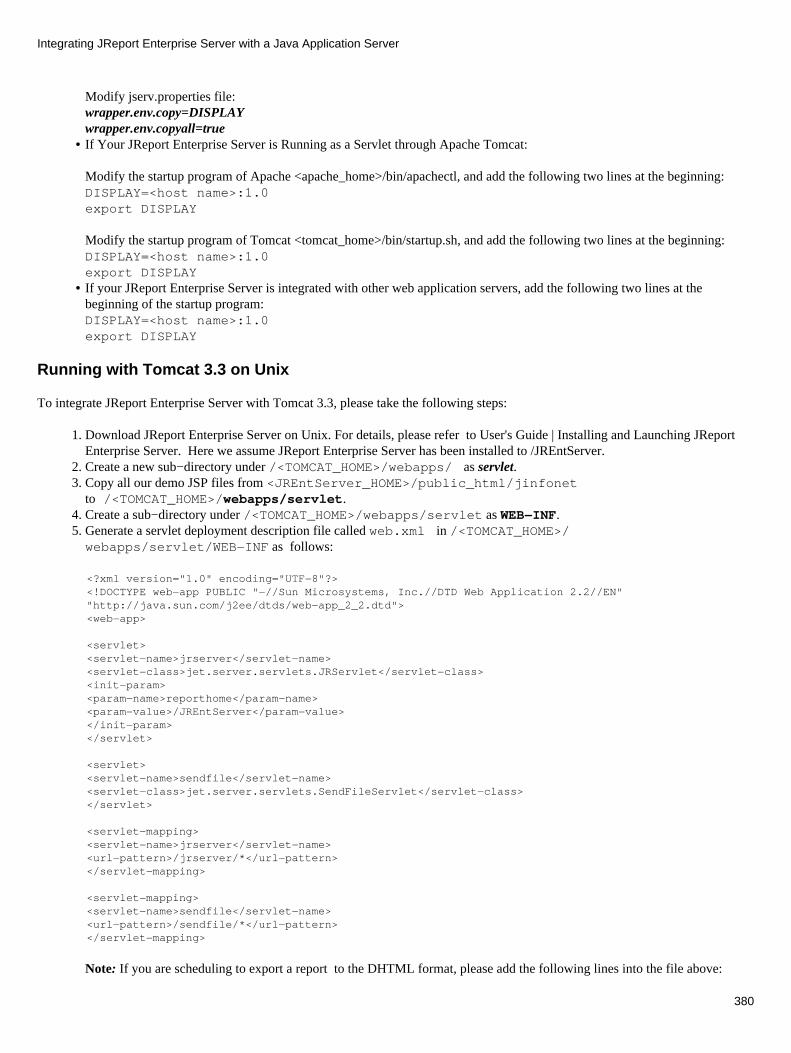
Modify jserv.properties file:wrapper.env.copy=DISPLAYwrapper.env.copyall=true If Your JReport Enterprise Server is Running as a Servlet through Apache Tomcat:
Modify the startup program of Apache <apache_home>/bin/apachectl, and add the following two lines at the beginning:DISPLAY=<host name>:1.0export DISPLAY
Modify the startup program of Tomcat <tomcat_home>/bin/startup.sh, and add the following two lines at the beginning:DISPLAY=<host name>:1.0export DISPLAY
•
If your JReport Enterprise Server is integrated with other web application servers, add the following two lines at thebeginning of the startup program:DISPLAY=<host name>:1.0export DISPLAY
•
Running with Tomcat 3.3 on Unix
To integrate JReport Enterprise Server with Tomcat 3.3, please take the following steps:
Download JReport Enterprise Server on Unix. For details, please refer to User's Guide | Installing and Launching JReportEnterprise Server. Here we assume JReport Enterprise Server has been installed to /JREntServer.
1.
Create a new sub−directory under /<TOMCAT_HOME>/webapps/ as servlet. 2. Copy all our demo JSP files from <JREntServer_HOME>/public_html/jinfonetto /<TOMCAT_HOME>/webapps/servlet.
3.
Create a sub−directory under /<TOMCAT_HOME>/webapps/servlet as WEB−INF. 4. Generate a servlet deployment description file called web.xml in /<TOMCAT_HOME>/webapps/servlet/WEB−INF as follows:
5.
<?xml version="1.0" encoding="UTF−8"?><!DOCTYPE web−app PUBLIC "−//Sun Microsystems, Inc.//DTD Web Application 2.2//EN" "http://java.sun.com/j2ee/dtds/web−app_2_2.dtd"><web−app>
<servlet><servlet−name>jrserver</servlet−name><servlet−class>jet.server.servlets.JRServlet</servlet−class><init−param><param−name>reporthome</param−name><param−value>/JREntServer</param−value></init−param></servlet>
<servlet><servlet−name>sendfile</servlet−name><servlet−class>jet.server.servlets.SendFileServlet</servlet−class></servlet>
<servlet−mapping><servlet−name>jrserver</servlet−name><url−pattern>/jrserver/*</url−pattern></servlet−mapping>
<servlet−mapping><servlet−name>sendfile</servlet−name><url−pattern>/sendfile/*</url−pattern></servlet−mapping>
Note: If you are scheduling to export a report to the DHTML format, please add the following lines into the file above:
Integrating JReport Enterprise Server with a Java Application Server
380
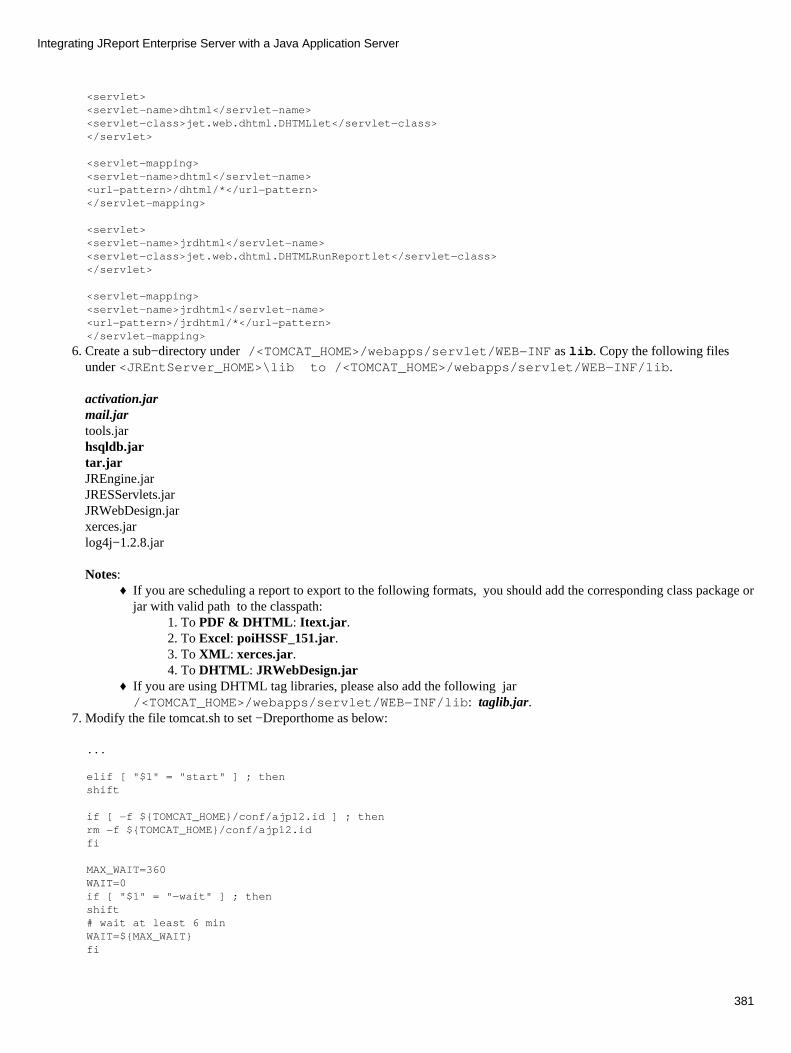
<servlet><servlet−name>dhtml</servlet−name><servlet−class>jet.web.dhtml.DHTMLlet</servlet−class></servlet>
<servlet−mapping><servlet−name>dhtml</servlet−name><url−pattern>/dhtml/*</url−pattern></servlet−mapping>
<servlet><servlet−name>jrdhtml</servlet−name><servlet−class>jet.web.dhtml.DHTMLRunReportlet</servlet−class></servlet>
<servlet−mapping><servlet−name>jrdhtml</servlet−name><url−pattern>/jrdhtml/*</url−pattern></servlet−mapping>
Create a sub−directory under /<TOMCAT_HOME>/webapps/servlet/WEB−INF as lib. Copy the following filesunder <JREntServer_HOME>\lib to /<TOMCAT_HOME>/webapps/servlet/WEB−INF/lib.
activation.jarmail.jartools.jarhsqldb.jar tar.jar JREngine.jarJRESServlets.jarJRWebDesign.jarxerces.jarlog4j−1.2.8.jar
Notes: If you are scheduling a report to export to the following formats, you should add the corresponding class package orjar with valid path to the classpath:
To PDF & DHTML: Itext.jar.1. To Excel: poiHSSF_151.jar.2. To XML: xerces.jar.3. To DHTML: JRWebDesign.jar4.
♦
If you are using DHTML tag libraries, please also add the following jar/<TOMCAT_HOME>/webapps/servlet/WEB−INF/lib: taglib.jar.
♦
6.
Modify the file tomcat.sh to set −Dreporthome as below:7.
...
elif [ "$1" = "start" ] ; then shift
if [ −f ${TOMCAT_HOME}/conf/ajp12.id ] ; then rm −f ${TOMCAT_HOME}/conf/ajp12.idfi
MAX_WAIT=360WAIT=0if [ "$1" = "−wait" ] ; thenshift# wait at least 6 min WAIT=${MAX_WAIT}fi
Integrating JReport Enterprise Server with a Java Application Server
381

if [ "$1" = "−noout" ] ; thenshift$JAVACMD $TOMCAT_OPTS −Dtomcat.home=${TOMCAT_HOME} $MAIN start $@ >${TOMCAT_HOME}/logs/stdout.log 2>&1 &elseecho Using classpath: ${CLASSPATH}echo Using JAVA_HOME: ${JAVA_HOME}echo Using TOMCAT_HOME: ${TOMCAT_HOME}$JAVACMD $TOMCAT_OPTS −Dtomcat.home=${TOMCAT_HOME} −Dreporthome=/JREntServer $MAIN start $@ &fi....
Open the file server.properties under /JREntServer/bin, and modify the variable web.jreport_servlet_path to: 8.
web.jreport_servlet_path=/servlet/jrserver
If you are scheduling a report to DHTML format, please modify the property in server.properties under/JREntServer/bin, it is
♦
web.dhtml_servlet_path=/servlet/dhtmlweb.dhtml_servlet_entry_path=/servlet/jrdhtml web.dhtml_jsp_path=/servlet/dhtmljsp
If you want to use the servlet to access JReport Enterprise Server, please modify the property jsp_path inredirect.properties under /JREntServer/bin, it is
jsp_path=/servlet/jinfonet/
♦
9. Restart Tomcat and then test the connection through web browser by the following URL:
http://<host>:8080/servlet/jinfonet/index.jsphttp://<host>:8080/servlet/jrserver
TroubleShooting
If you run into problems when using JREntServer in Tomcat, please send the log files of JREntServer to [email protected]. Thefollowing procedure illustrates how to generate the log files:
Modify the startup script under /opt/jakarta−tomcat−3.2/bin.1. In the file catalina.sh, add −Dlogall=true after the reporthome definition: 2.
"$JAVA" $JAVA_OPTS\−classpath "$JBOSS_CLASSPATH" −Dreporthome=/opt/Jinfonet/JREntServer\−Dlogall=true\ org.jboss.Main "$@"
After editing catalina.sh, start Tomcat using the startup.sh batch file. 3. To get the information about the JREntServer environment, you can accesshttp://localhost:8080/jreport/admin/info.jsp?cmd=info.
4.
Save the output to a file.5. After reproducing the problem, send us the log files under /opt/Jinfonet/JREntServer/logs.
The Tomcat log files may also help to identify the problem. The most useful one is/opt/jakarta−tomcat−3.2/logs/catalina.out.
6.
Running with Interprise Application Server
Note: Steps marked with * are applied only when you run Apache as the web server.
Install a standalone JReport Enterprise Server to d:\JREntServer.1. Install Interprise Application Server (version 4.5). 2. *Install Apache web server. Append line IncludeIAS_home\var\servers\your_ias_server_name\adm\tomcat3\conf\mod_jk.conf−auto into the file
3.
Integrating JReport Enterprise Server with a Java Application Server
382

Aparche_home\conf\httpd.conf. Copy the file ias_home\bin\mod_jk.dll intoaparche_home\modules. Modify the fileIAS_home\var\servers\your_ias_server_name\adm\properties\tomcat3\javaservice.properties:
Append JRESServlet.jar, JREngine.jar, hsqldb.jar, tar.jar, JRWebDesign.jar, xerces.jar, and log4j−1.2.8.jar.1. Define the reporthome2. javaservice.jvm.classpath=d:\JRServer\lib\JRESServlets.jard:\JRServer\lib\JREngine.jar d:\JRServer\lib\hsqldb.jar d:\JRServer\lib\tar.jar ../../../lib/tomcat3/jasper.jar ../../../lib/tomcat3/jaxp.jar ../../../lib/tomcat3/parser.jar ../../../lib/tomcat3/servlet.jar ../../../lib/tomcat3/webserver.jar ../../../lib/jsse.jar ../../../lib/jcert.jar ../../../lib/jnet.jarjavaservice.jvm.params=−Dreporthome=d:\jrserver
4.
Notes:
• If you are scheduling a report to export to the following formats, you should add the corresponding class package or jar withvalid path to the classpath:
To Mail or use the "Mail Notification" function: activation.jar and mail.jar.♦ To PDF & DHTML: Itext.jar.♦ To Excel: poiHSSF_151.jar.♦ To XML: xerces.jar.♦ To DHTML: JRWebDesign.jar.♦
If you are using DHTML tag libraries, please also add the following jar: taglib.jar.• Drag the directory jinfonet under jrserver_home\public_html intoIAS_home\var\servers\your_ias_server_name\wars\tomcat3. Then, replace all strings/servlet/sendfile with /jinfonet/servlet/sendfile respectively in all jsp files.
5.
Create directoryweb−inf under ias_home\var\servers\your_ias_server_name\wars\tomcat3\jinfonet. Then,under this directory create a file named web.xmlas follows:
6.
<?xml version="1.0" encoding="ISO−8859−1"?>
<!DOCTYPE web−appPUBLIC "−//Sun Microsystems, Inc.//DTD Web Application 2.2//EN""http://java.sun.com/j2ee/dtds/web−app_2_2.dtd">
<web−app>
<servlet><servlet−name>jrserver</servlet−name><servlet−class>jet.server.servlets.JRServlet</servlet−class><init−param><param−name>reporthome</param−name><param−value>d:\JRServer</param−value></init−param></servlet>
<servlet><servlet−name>sendfile</servlet−name><servlet−class>jet.server.servlets.SendFileServlet</servlet−class></servlet>
</web−app>
Note:
If you are scheduling to export a report to the DHTML format, please add the following lines into the file above:
<servlet>
Integrating JReport Enterprise Server with a Java Application Server
383
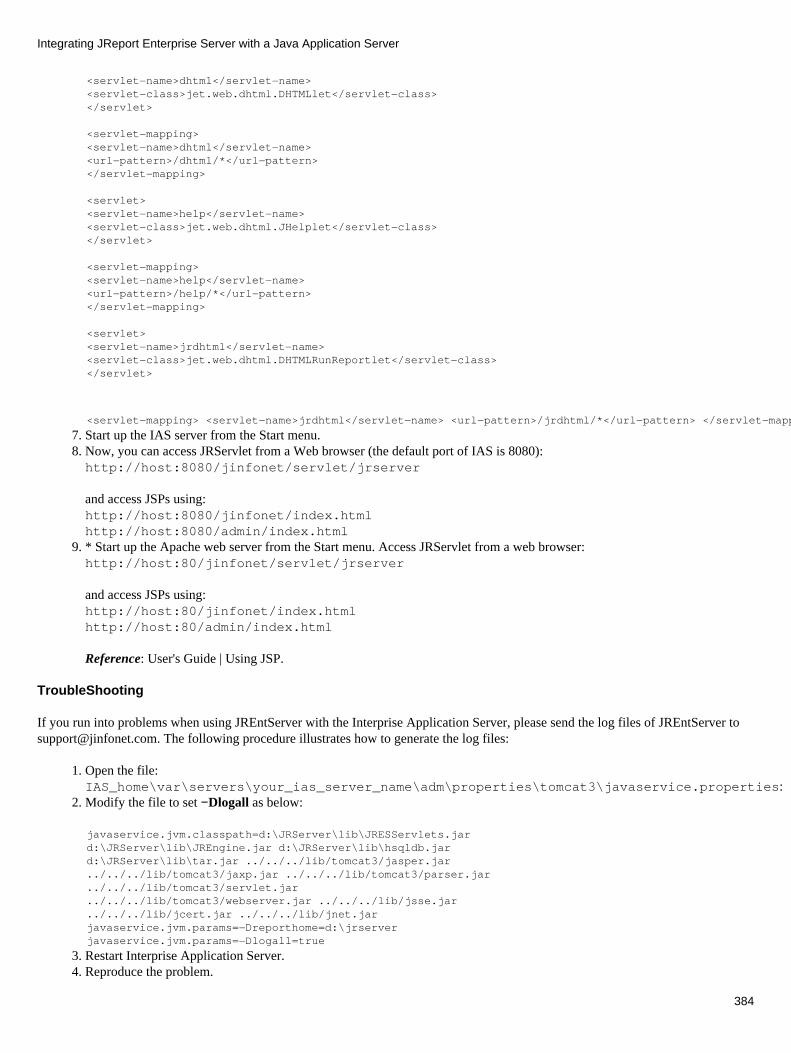
<servlet−name>dhtml</servlet−name><servlet−class>jet.web.dhtml.DHTMLlet</servlet−class></servlet>
<servlet−mapping><servlet−name>dhtml</servlet−name><url−pattern>/dhtml/*</url−pattern> </servlet−mapping>
<servlet><servlet−name>help</servlet−name> <servlet−class>jet.web.dhtml.JHelplet</servlet−class> </servlet>
<servlet−mapping> <servlet−name>help</servlet−name> <url−pattern>/help/*</url−pattern> </servlet−mapping>
<servlet><servlet−name>jrdhtml</servlet−name><servlet−class>jet.web.dhtml.DHTMLRunReportlet</servlet−class></servlet>
<servlet−mapping> <servlet−name>jrdhtml</servlet−name> <url−pattern>/jrdhtml/*</url−pattern> </servlet−mapping>
Start up the IAS server from the Start menu. 7. Now, you can access JRServlet from a Web browser (the default port of IAS is 8080):http://host:8080/jinfonet/servlet/jrserver
and access JSPs using:http://host:8080/jinfonet/index.htmlhttp://host:8080/admin/index.html
8.
* Start up the Apache web server from the Start menu. Access JRServlet from a web browser: http://host:80/jinfonet/servlet/jrserver
and access JSPs using:http://host:80/jinfonet/index.htmlhttp://host:80/admin/index.html
Reference: User's Guide | Using JSP.
9.
TroubleShooting
If you run into problems when using JREntServer with the Interprise Application Server, please send the log files of JREntServer [email protected]. The following procedure illustrates how to generate the log files:
Open the file:IAS_home\var\servers\your_ias_server_name\adm\properties\tomcat3\javaservice.properties:
1.
Modify the file to set −Dlogall as below:2.
javaservice.jvm.classpath=d:\JRServer\lib\JRESServlets.jard:\JRServer\lib\JREngine.jar d:\JRServer\lib\hsqldb.jard:\JRServer\lib\tar.jar ../../../lib/tomcat3/jasper.jar ../../../lib/tomcat3/jaxp.jar ../../../lib/tomcat3/parser.jar ../../../lib/tomcat3/servlet.jar ../../../lib/tomcat3/webserver.jar ../../../lib/jsse.jar ../../../lib/jcert.jar ../../../lib/jnet.jar javaservice.jvm.params=−Dreporthome=d:\jrserver javaservice.jvm.params=−Dlogall=true
Restart Interprise Application Server.3. Reproduce the problem. 4.
Integrating JReport Enterprise Server with a Java Application Server
384

After reproducing the problem, send us the log files under %JREntServer_installroot%\logs.5.
Running with vqServer 1.9.55
Installation
Install vqServer 1.9.55 to D:\vqserver.1. Install JReport Enterprise Server to C:\JREntServer.
Reference: User's Guide | Installing and Launching JReport Enterprise Server.
2.
Copy C:\JREntServer\lib\JRESServlets.jar to D:\vqserver\servlets.3. Set the system classpath as:4.
c:\JREntServer\lib\JRESServlets.jar;c:\JREntServer\lib\JREngine.jar;c:\JREntServer\lib\hsqldb.jar;c:\JREntServer\lib\tar.jar;c:\JREntServer\lib\servlet.jar;c:\JREntServer\lib\JRWebDesign.jar;c:\JREntServer\lib\log4j−1.2.8.jar;c:\JREntServer\lib\xerces.jar
Please note that the hsqldb.jar file, the tar.jar file, the JRESServlets.jar file, the JREngine file, the servlet.jar, thelog−4j1.2.8.jar in the above classpath must be included.
Notes: If you are scheduling a report to export to the following formats, you should add the corresponding class package orjar with valid path to the classpath:
To Mail or use the "Mail Notification" function: activation.jar and mail.jar.1. To PDF & DHTML: Itext.jar.2. To Excel: poiHSSF_151.jar.3. To XML: xerces.jar.4. To DHTML: JRWebDesign.jar.5.
♦
If you are using DHTML tag libraries, add the following jar with valid paths to the classpath: taglib.jar. ♦
Creating servlet aliases
Start up vqServer. 1. Use a web browser to connect to the control center http://hostname:9090. 2. Expend Servers−>Main web server and select Aliases node. On the top of the page, click on the link New alias. 3. Define the servlet as below:
Alias: /servlets/jrserverReal name: servlets/JRESServlets.jar/jet.server.servlets.JRServletAction: Run java servletAccess control list: Anyone
4.
Integrating JReport Enterprise Server with a Java Application Server
385
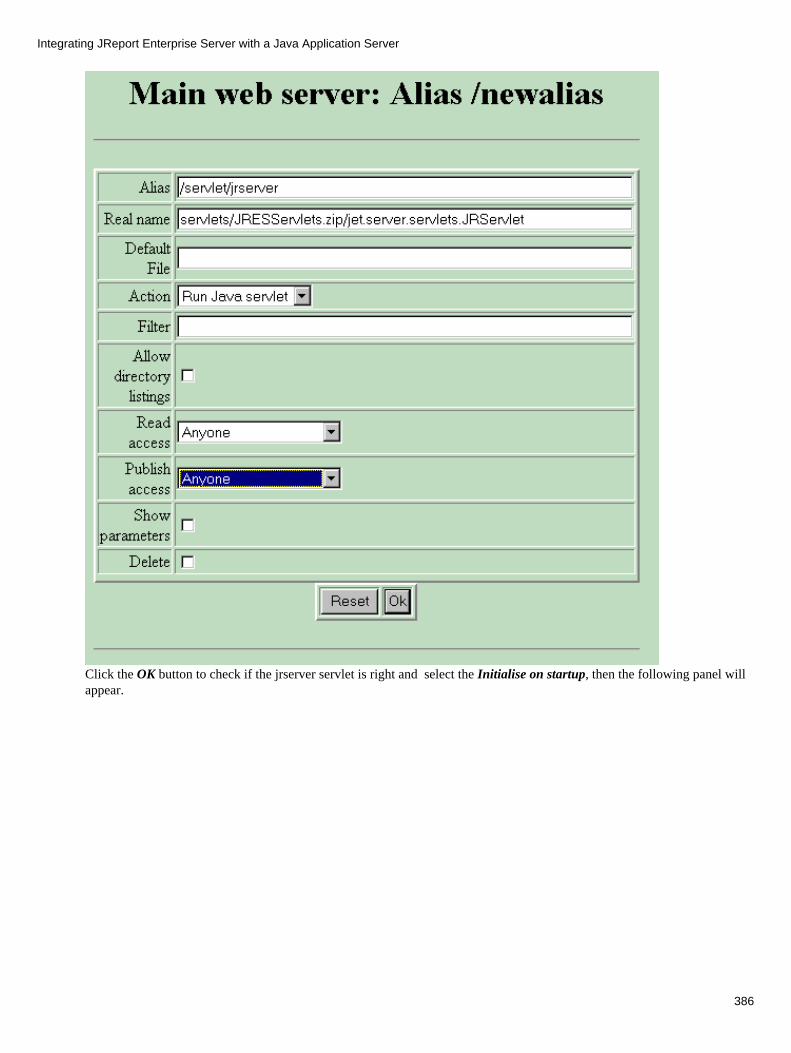
Click the OK button to check if the jrserver servlet is right and select the Initialise on startup, then the following panel willappear.
Integrating JReport Enterprise Server with a Java Application Server
386

Click the OK button to create the jrserver servlet, then you will find the jrserver servlet in the Alias list. Click theParameters of the jrserver servlet and then click on the link New parameter on the top of the page.
5.
Define the parameter as below:Name: reporthomeValue: c:\JREntServer
6.
Integrating JReport Enterprise Server with a Java Application Server
387
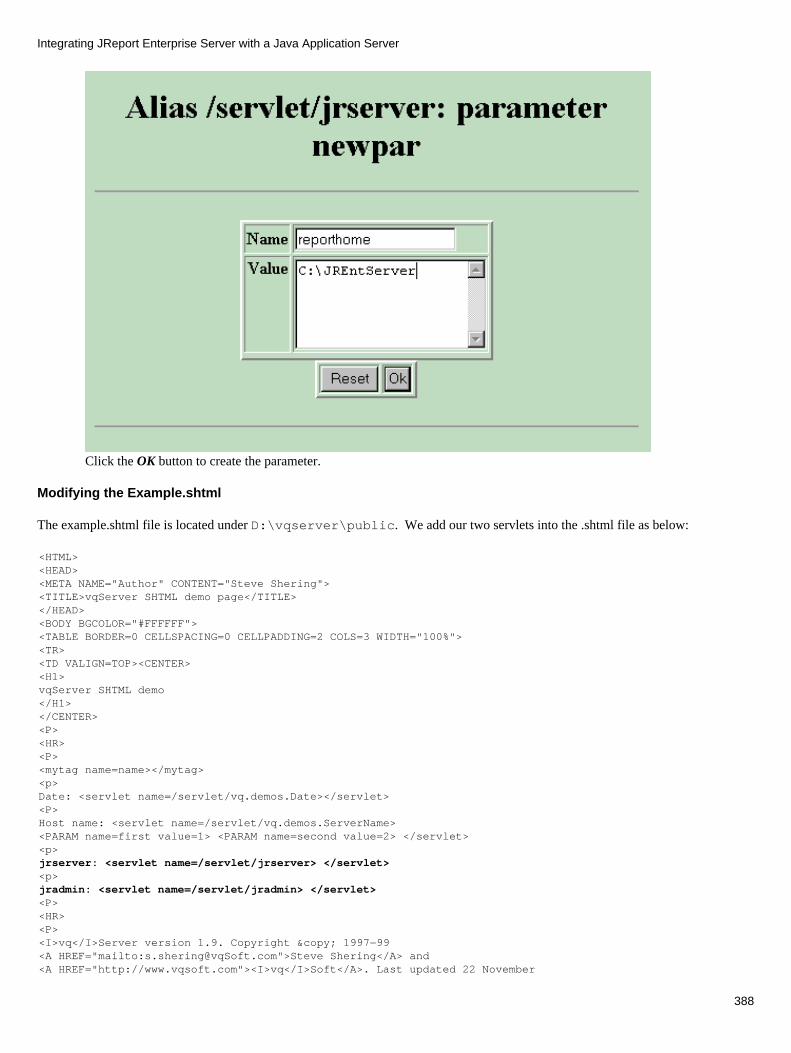
Click the OK button to create the parameter.
Modifying the Example.shtml
The example.shtml file is located under D:\vqserver\public. We add our two servlets into the .shtml file as below:
<HTML><HEAD><META NAME="Author" CONTENT="Steve Shering"><TITLE>vqServer SHTML demo page</TITLE></HEAD><BODY BGCOLOR="#FFFFFF"><TABLE BORDER=0 CELLSPACING=0 CELLPADDING=2 COLS=3 WIDTH="100%"><TR><TD VALIGN=TOP><CENTER><H1>vqServer SHTML demo</H1></CENTER><P><HR><P><mytag name=name></mytag><p>Date: <servlet name=/servlet/vq.demos.Date></servlet><P>Host name: <servlet name=/servlet/vq.demos.ServerName><PARAM name=first value=1> <PARAM name=second value=2> </servlet><p>jrserver: <servlet name=/servlet/jrserver> </servlet> <p>jradmin: <servlet name=/servlet/jradmin> </servlet><P><HR><P><I>vq</I>Server version 1.9. Copyright © 1997−99<A HREF="mailto:[email protected]">Steve Shering</A> and<A HREF="http://www.vqsoft.com"><I>vq</I>Soft</A>. Last updated 22 November
Integrating JReport Enterprise Server with a Java Application Server
388
1999.</TD><TD WIDTH="20"></TD><TD VALIGN=TOP WIDTH="150"><A HREF="index.html"><IMG SRC="../vq/server/icons/utab.gif"WIDTH="15" HEIGHT="15" BORDER="0">Home</A><BR><BR></TD></TR></TABLE></BODY></HTML>
Restarting the vqServer
You need to restart the vqServer to initialize the two servlets.
Accessing servlets
Now you can access JReport Enterprise Server and remote administration through an Internet browser. Try the following URLs:
http://hostname:80/servlet/jrserverhttp://hostname/servlet/jrserver
or
http://hostname:80/servlet/jradmin (deprecated)http://hostname/servlet/jradmin (deprecated).
Running with iPlanet Application Server 6.5 on NT
Installation
Assuming that
The iPlanet Application Server 6.5 has been installed to G:\iplanet. When we install iPlanet Application Server 6.5, weselect Web server4.0 has been selected to associate with the iPlanet Application Server.
1.
JReport Enterprise Server has been installed to G:\JREntServer.2.
Setting up Servlet
Please follow the steps to integrate JREntServer with iPlanet Application Server 6.5:
Extract these jar files JREngine.jar, JRESServlets.jar, tar.jar, JRWebDesign.jar, xerces.jar, log4j−1.2.8.jar andhsqldb.jar under G:\JREntServer\lib into a temp folder, for example G:\assemble.
Notes: If you are scheduling a report to export to the following formats, you should also extract the corresponding classpackage or jar into a temp folder:
To Mail or use the "Mail Notification" function: activation.jar and mail.jar.1. To PDF & DHTML: Itext.jar.2. To Excel: poiHSSF_151.jar.3. To XML: xerces.jar.4. To DHTML: JRWebDesign.jar.5.
♦
If you are using DHTML tag libraries, please also extract the following jar: taglib.jar. ♦
1.
Launch the iPlanet Deployment Tool by selecting Start | Programs | iPlanet Application Server 6.5 | iAs Deploymenttool.
Click File | New to open the New Application or Module dialog. Select Web Application (.war). Type servlet in theFileName field. Click Browse to change the Directory to G:\assemble. Click OK.
2.
Integrating JReport Enterprise Server with a Java Application Server
389
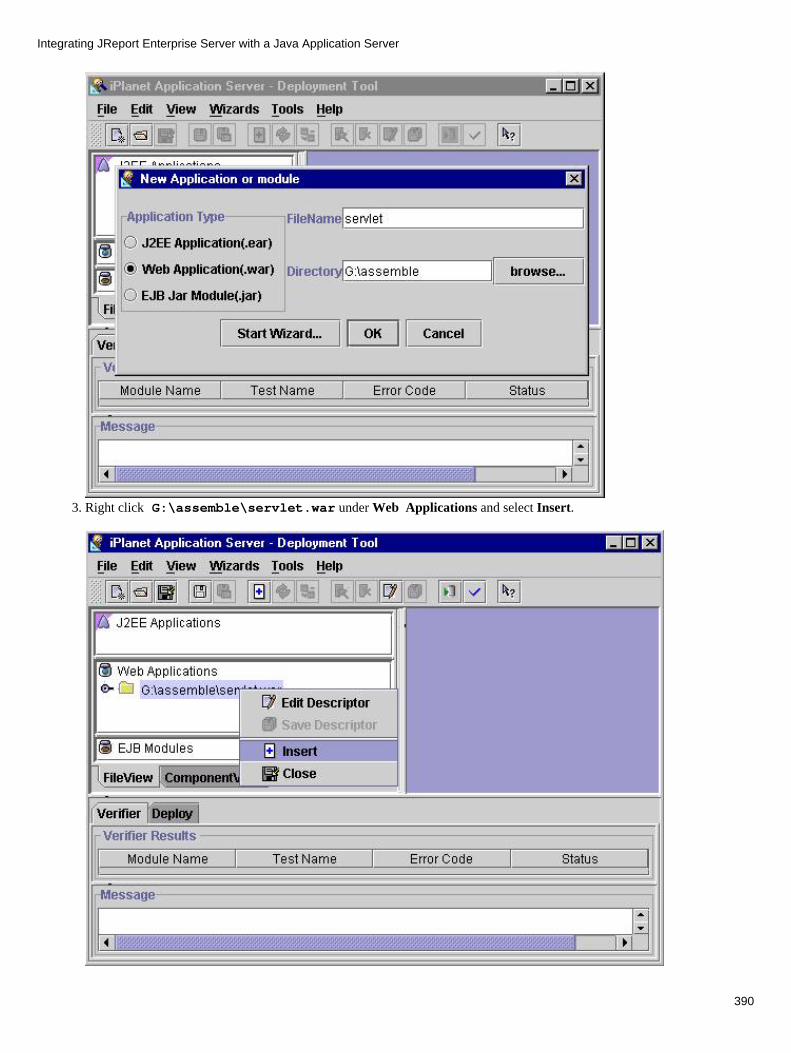
Right click G:\assemble\servlet.war under Web Applications and select Insert. 3.
Integrating JReport Enterprise Server with a Java Application Server
390

The Insert dialog will pop up. In the left panel, double click assemble. The contents of the assemble folder will appear.Select all files and folders except the resource folder. Click to insert them into the Web Application (servlet.war).
4.
Click Resolve to open the Update Dest. Paths dialog. Select the file in the top panel and inputcom\jinfonet\awt\font\truetype\ in the Update Dest. Paths field. Click Update and then OK.
5.
Integrating JReport Enterprise Server with a Java Application Server
391
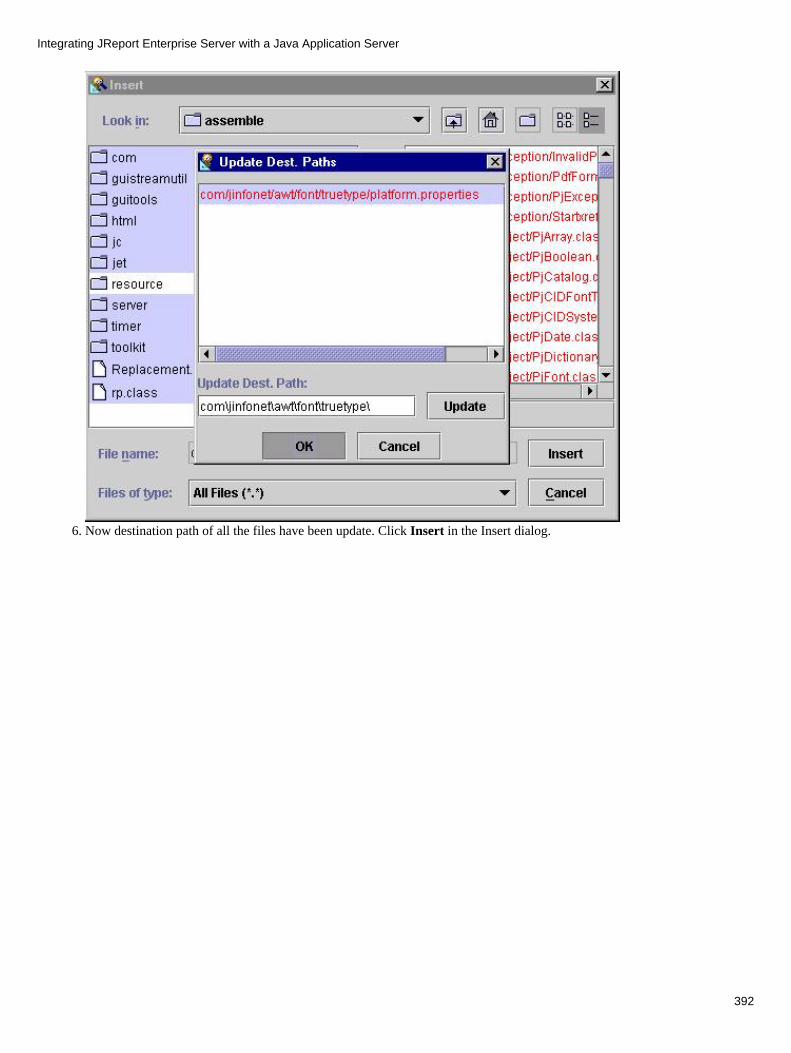
Now destination path of all the files have been update. Click Insert in the Insert dialog.6.
Integrating JReport Enterprise Server with a Java Application Server
392

At the bottom of the Applications panel, click on the ComponentView tab. In the above panel, expand the servlet node.Right click JRServlet, select Edit Descriptor.
7.
Integrating JReport Enterprise Server with a Java Application Server
393
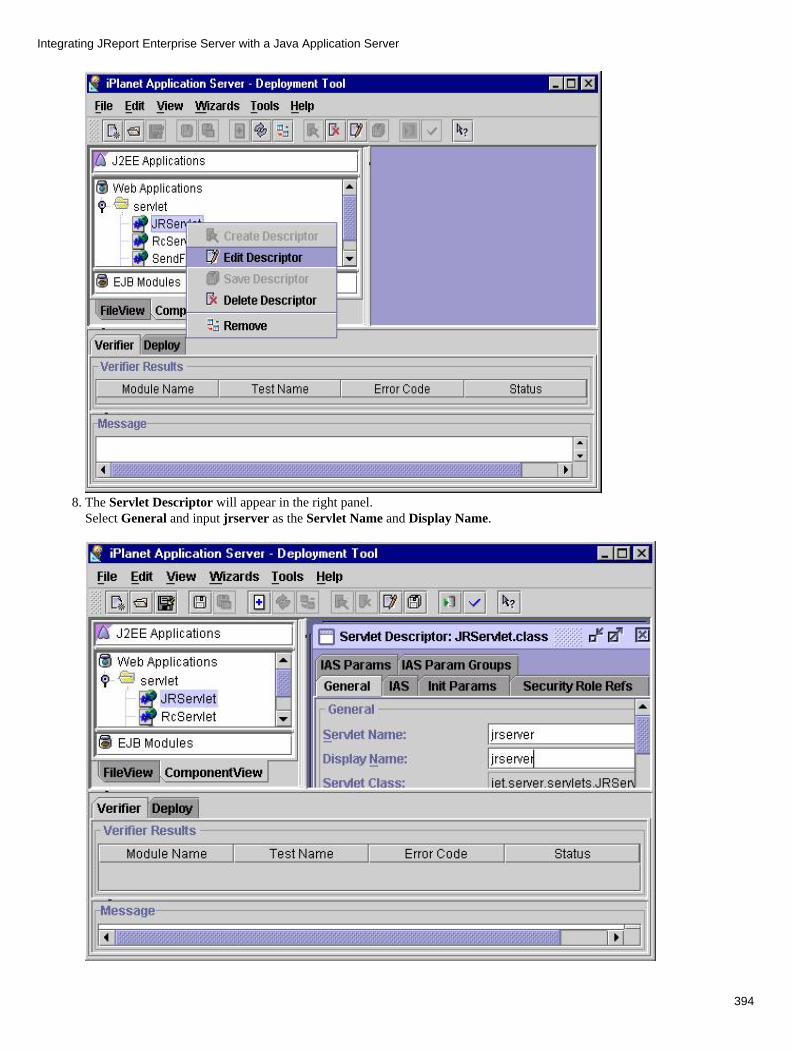
The Servlet Descriptor will appear in the right panel.Select General and input jrserver as the Servlet Name and Display Name.
8.
Integrating JReport Enterprise Server with a Java Application Server
394

Select Init Params, then click the New Parameter button at the bottom of the right panel. Input reporthome as its nameand G:\JREntServer as its value. Click at the right top right of the Servlet Descriptor panel to close and save thesettings.
9.
Go back to the right panel. Select RcServlet, and repeat the above three steps. At the bottom of the Applications panel, clickon the FileView tab. Right click G:\assemble\servlet.war and select Close. Click Yes to close the ConfirmSave window.
10.
Select File | New to create an .ear file, for example jreport.ear. In the New Application or Module dialog, select J2EEApplication(.ear). Type jreport in the File Name field. Click Browse to change the Directory to G:\assemble.
11.
Integrating JReport Enterprise Server with a Java Application Server
395
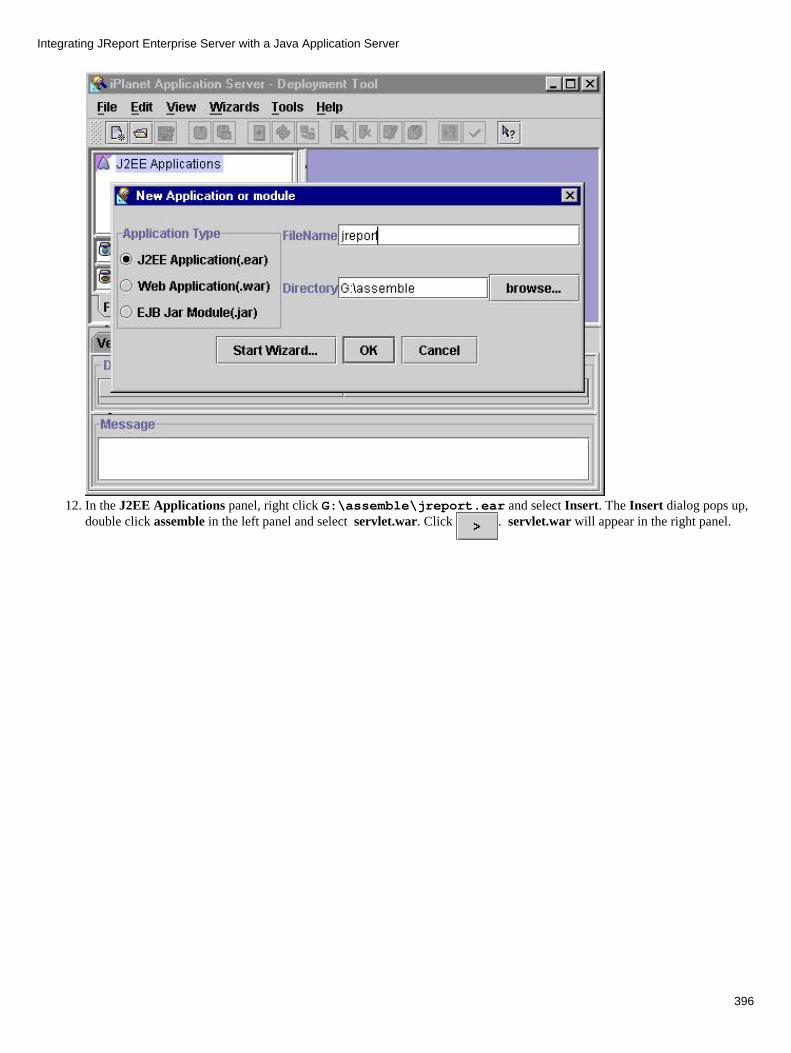
In the J2EE Applications panel, right click G:\assemble\jreport.ear and select Insert. The Insert dialog pops up,double click assemble in the left panel and select servlet.war. Click . servlet.war will appear in the right panel.
12.
Integrating JReport Enterprise Server with a Java Application Server
396
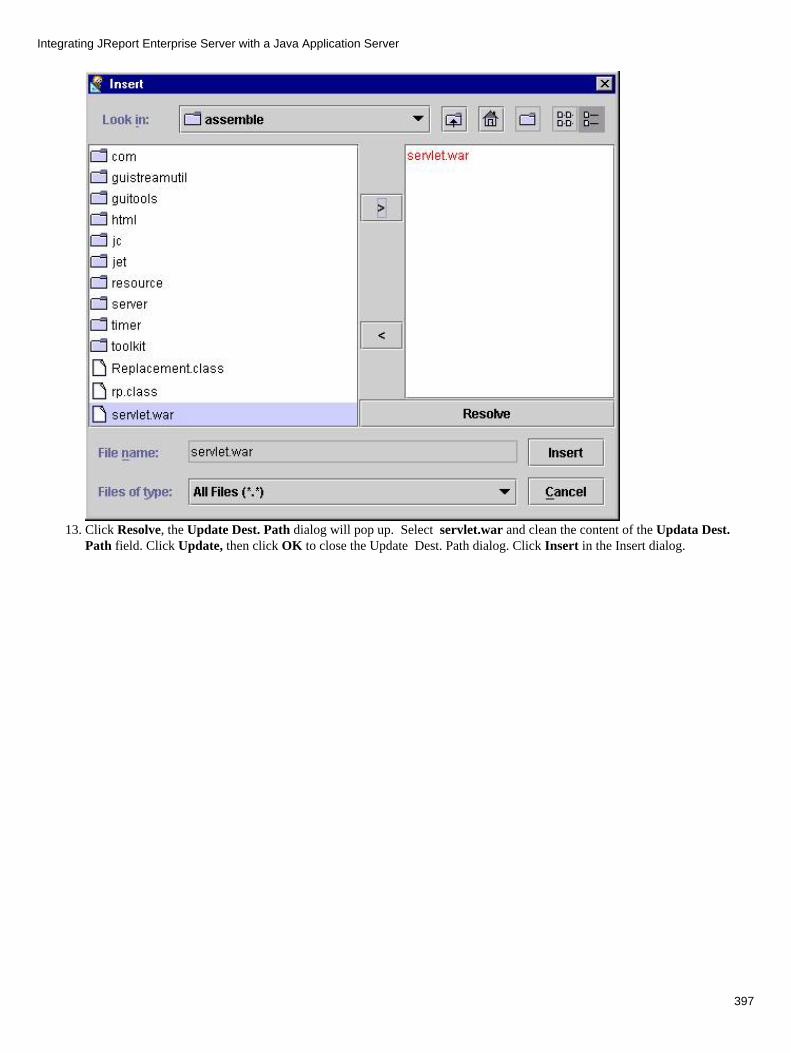
Click Resolve, the Update Dest. Path dialog will pop up. Select servlet.war and clean the content of the Updata Dest.Path field. Click Update, then click OK to close the Update Dest. Path dialog. Click Insert in the Insert dialog.
13.
Integrating JReport Enterprise Server with a Java Application Server
397

Select G:\assemble\jreport.ear and select File | Deploy. Click Yes to close the Confirm Save window. TheDeploy dialog will pop up, click Register.
14.
Integrating JReport Enterprise Server with a Java Application Server
398
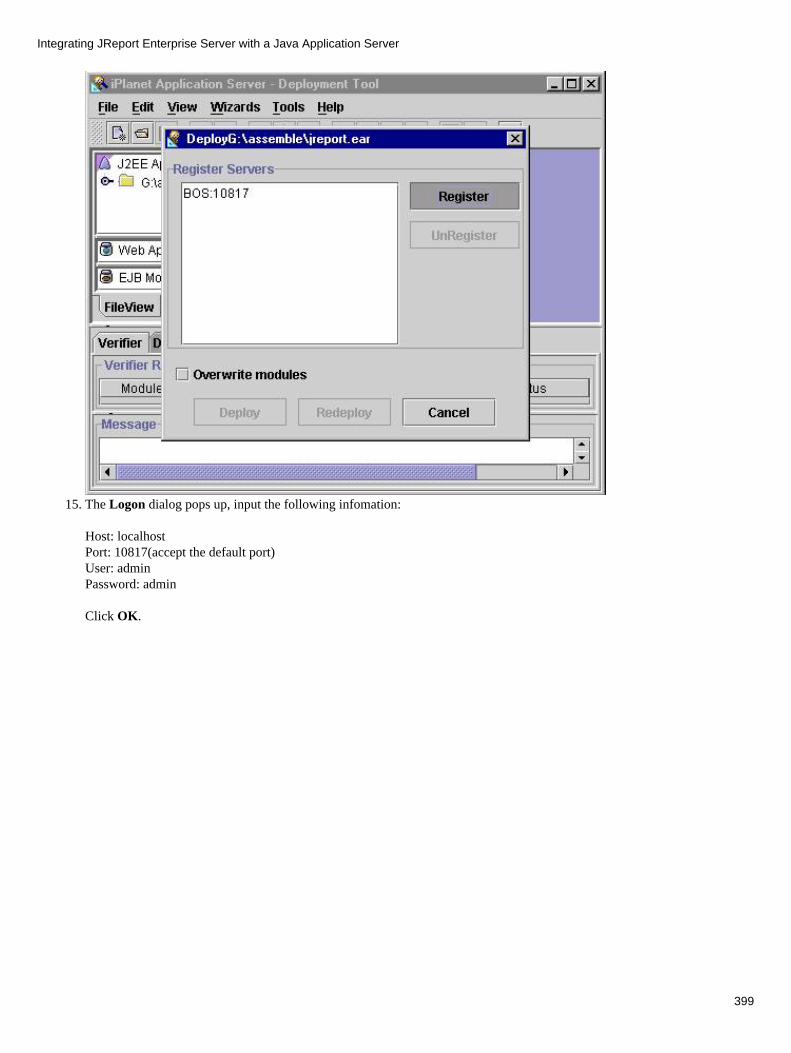
The Logon dialog pops up, input the following infomation:
Host: localhostPort: 10817(accept the default port)User: adminPassword: admin
Click OK.
15.
Integrating JReport Enterprise Server with a Java Application Server
399

Select localhost:10817 in the Register Servers panel, then click Deploy.16.
At the bottom of the Deployment tool dialog, in the Message panel, there is a message to show you that the deployment has17.
Integrating JReport Enterprise Server with a Java Application Server
400
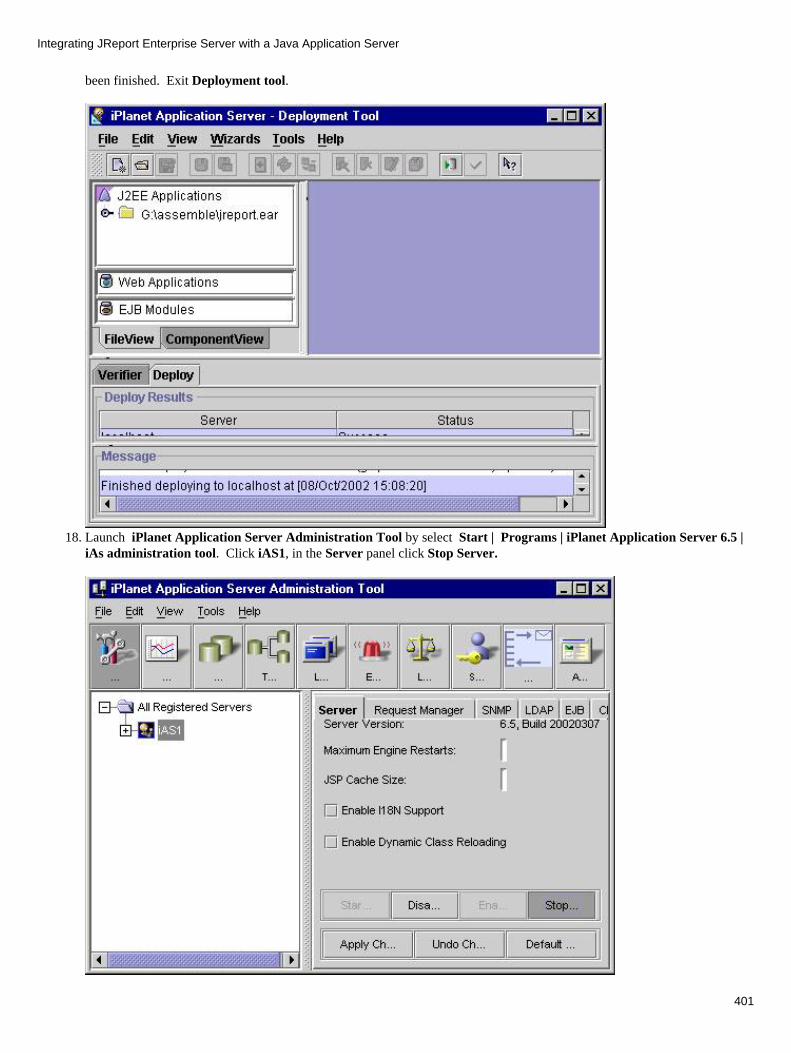
been finished. Exit Deployment tool.
Launch iPlanet Application Server Administration Tool by select Start | Programs | iPlanet Application Server 6.5 |iAs administration tool. Click iAS1, in the Server panel click Stop Server.
18.
Integrating JReport Enterprise Server with a Java Application Server
401

Move G:\iplanet\ias6\ias\APPS\jreport\servlet\com toG:\iplanet\ias6\ias\APPS\jreport\servlet\WEB−INF\classes.
Copy G:\assemble\resource and its subfolders toG:\iplanet\ias6\ias\APPS\jreport\servlet\WEB−INF\classes.
In the Administration Tool dialog, select iAS1. In the Server panel click Start Server.
19.
Accessing servlets
Now you can access the homepage of JReport Enterprise Server by type the following URL in the address field:http://localhost/NASApp/servlet/jrserver.
Type http://localhost/NASApp/servlet/jradmin in the address field to get the Remote Administration page (this URLis deprecated).
Note: When you create ODBC data resource, you should create a SystemDSN instead of UserDSN.
TroubleShooting
If you run into problems when using JREntServer with the iPlanet Application Server 6.5, please send the log files of JREntServer [email protected]. The following procedure illustrates how to generate log files:
Launch the iPlanet Deployment Tool.1. At the bottom of the Applications panel, click on the ComponentView tab. In the above panel, expand the servlet node.Right click JRServlet, select Edit Descriptor. The Servlet Descriptor will appear in the right panel. Select Init Params,click the New Parameter button at the bottom of the right panel. Input logall as its name and true as its value. Click atthe top right of the Servlet Descriptor panel to close and save the settings.
2.
Restart iPlanet Application Server 6.5.3. Reproduce the problem.4.
Integrating JReport Enterprise Server with a Java Application Server
402

After reproducing the problem, send us the log files under %JREntServer_installroot%\log.5.
Running with iPlanet Web Server 6.0 on Unix
Assuming that
iPlanet web server 6.0 has been installed to /usr/iplanet/servers. • JReport Enterprise Server has been installed to /JREntServer. • JDK is installed to /usr/java/j2sdk1.4.2. •
To integrate JReport Enterprise Server with the iPlanet Web, please take the following steps:
Add /JREntServer/lib/JRESServlets.jar, /JREntServer/lib/JREngine.jar,/JREntServer/lib/tar.jar, /JREntServer/lib/hsqldb.jar and/JREntServer/lib/xerces.jar to the classpath and set JREntServer's reporthome. Modify jvm12.conf under folder/usr/iplanet/servers/https−SPARC/config as below:
1.
jvm.classpath=/usr/iplanet/servers/plugins/servlets/examples/legacy/beans.10/SDKBeans10.jar:/usr/java/j2sdk1.4.2/lib/tools.jar:/usr/java/j2sdk1.4.2/jre/lib/rt.jar:/JREntServer/lib/JRESServlets.jar:/JREntServer/lib/JREngine.jar:/JREntServer/lib/hsqldb.jar:/JREntServer/lib/tar.jar:reporthome=/JREntServer
Notes: If you are scheduling a report to export to the following formats, you should add the corresponding class package orjar with valid path to the classpath:
To Mail or use the "Mail Notification" function: activation.jar and mail.jar.1. To PDF & DHTML: Itext.jar.2. To Excel: poiHSSF_151.jar.3. To XML: xerces.jar.4. To DHTML: JRWebDesign.jar. 5.
♦
If you are using DHTML tag libraries, please also add the following jar to the classpath: taglib.jar. ♦ 2.
Add servlets of JReport Enterprise Server. Open servlet.properties under folder/usr/iplanet/servers/https−SPARC/config, enter:
servlet.jrserver.code=jet.server.servlets.JRServletservlet.sendfile.code=jet.server.servlets.SendFileservlet.dhtml.code=jet.web.dhtml.DHTMLletservlet.jrdhtml.code=jet.web.dhtml.DHTMLRunReportlet
Open rules.properties under folder /usr/iplanet/servers/https−SPARC/config, enter:3. /jrserver=jrserver/servlet/sendfile=sendfile/dhtml=dhtml/jrdhtml=jrdhtml
Copy the folders jinfonet, admin, dhtmljsp from /JREntServer/public_html to/usr/iplanet/servers/docs.
4.
Change the file mode to 777 for /JREntServer and /JREntServer/temp folder andJREntServer/logs/* files. Set them to be accessed with READ and WRITE permission.
5.
Execute " xhost +" to enable all clients to the connect to iPlanet server. 6. Go to /usr/iplanet/servers/https−SPARC, then enter ./start to start iPlanet. 7. From web browser access our JReport Enterprise Server using the following URLs: http://localhost:/jrserver
And access JSPs as below:http://localhost/jinfonet/index.jsp http://localhost/admin/index.jsp
8.
Integrating JReport Enterprise Server with a Java Application Server
403
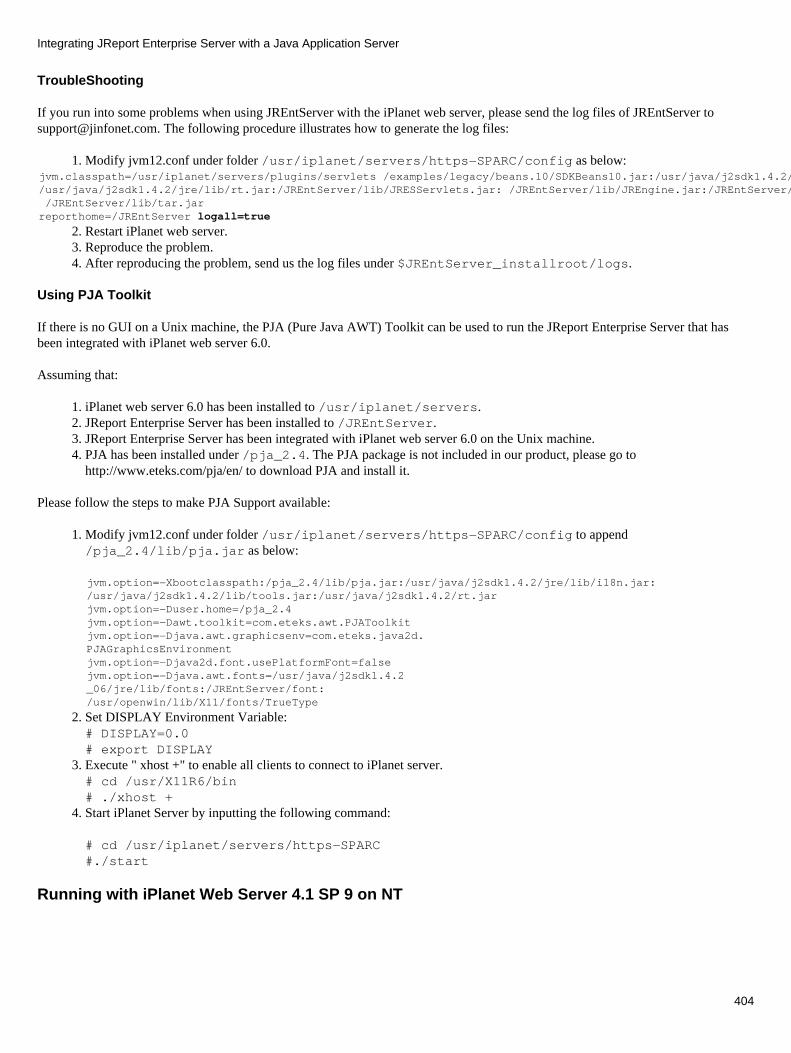
TroubleShooting
If you run into some problems when using JREntServer with the iPlanet web server, please send the log files of JREntServer [email protected]. The following procedure illustrates how to generate the log files:
Modify jvm12.conf under folder /usr/iplanet/servers/https−SPARC/config as below:1. jvm.classpath=/usr/iplanet/servers/plugins/servlets /examples/legacy/beans.10/SDKBeans10.jar:/usr/java/j2sdk1.4.2/lib/tools.jar: /usr/java/j2sdk1.4.2/jre/lib/rt.jar:/JREntServer/lib/JRESServlets.jar: /JREntServer/lib/JREngine.jar:/JREntServer/lib/hsqldb.jar: /JREntServer/lib/tar.jar reporthome=/JREntServer logall=true
Restart iPlanet web server.2. Reproduce the problem. 3. After reproducing the problem, send us the log files under $JREntServer_installroot/logs.4.
Using PJA Toolkit
If there is no GUI on a Unix machine, the PJA (Pure Java AWT) Toolkit can be used to run the JReport Enterprise Server that hasbeen integrated with iPlanet web server 6.0.
Assuming that:
iPlanet web server 6.0 has been installed to /usr/iplanet/servers.1. JReport Enterprise Server has been installed to /JREntServer. 2. JReport Enterprise Server has been integrated with iPlanet web server 6.0 on the Unix machine.3. PJA has been installed under /pja_2.4. The PJA package is not included in our product, please go tohttp://www.eteks.com/pja/en/ to download PJA and install it.
4.
Please follow the steps to make PJA Support available:
Modify jvm12.conf under folder /usr/iplanet/servers/https−SPARC/config to append/pja_2.4/lib/pja.jar as below:
1.
jvm.option=−Xbootclasspath:/pja_2.4/lib/pja.jar:/usr/java/j2sdk1.4.2/jre/lib/i18n.jar:/usr/java/j2sdk1.4.2/lib/tools.jar:/usr/java/j2sdk1.4.2/rt.jar jvm.option=−Duser.home=/pja_2.4jvm.option=−Dawt.toolkit=com.eteks.awt.PJAToolkitjvm.option=−Djava.awt.graphicsenv=com.eteks.java2d.PJAGraphicsEnvironment jvm.option=−Djava2d.font.usePlatformFont=false jvm.option=−Djava.awt.fonts=/usr/java/j2sdk1.4.2 _06/jre/lib/fonts:/JREntServer/font: /usr/openwin/lib/X11/fonts/TrueType
Set DISPLAY Environment Variable:# DISPLAY=0.0# export DISPLAY
2.
Execute " xhost +" to enable all clients to connect to iPlanet server.# cd /usr/X11R6/bin# ./xhost +
3.
Start iPlanet Server by inputting the following command:
# cd /usr/iplanet/servers/https−SPARC#./start
4.
Running with iPlanet Web Server 4.1 SP 9 on NT
Integrating JReport Enterprise Server with a Java Application Server
404
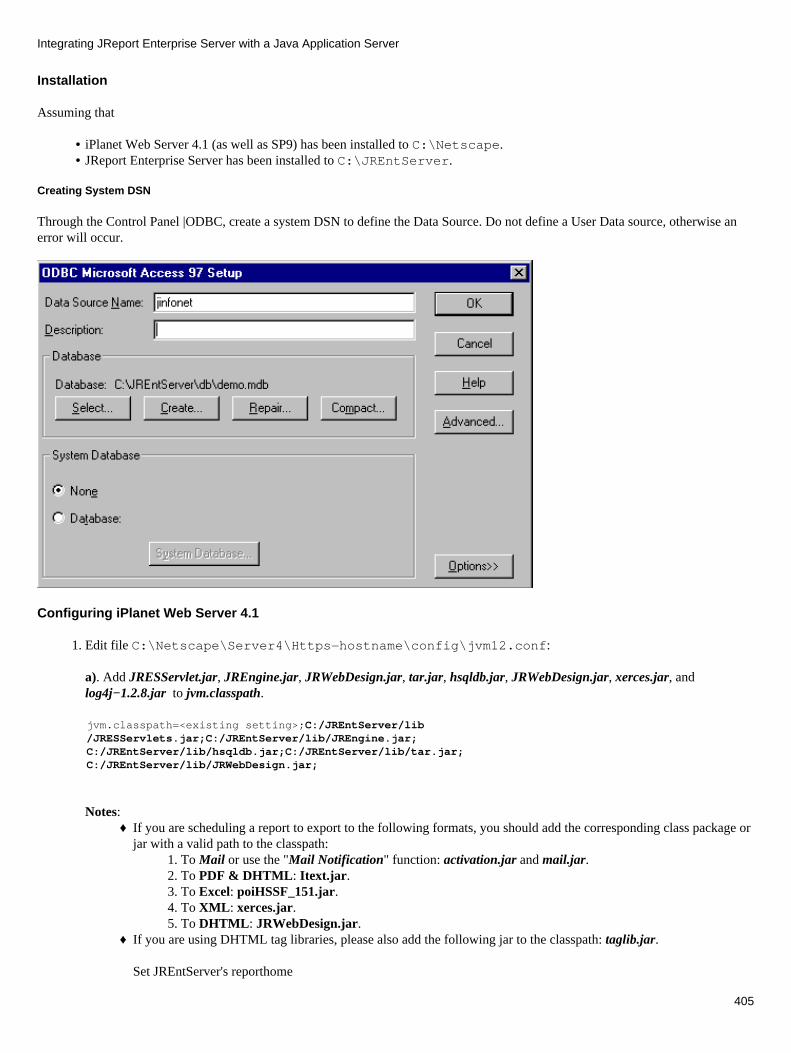
Installation
Assuming that
iPlanet Web Server 4.1 (as well as SP9) has been installed to C:\Netscape.• JReport Enterprise Server has been installed to C:\JREntServer.•
Creating System DSN
Through the Control Panel |ODBC, create a system DSN to define the Data Source. Do not define a User Data source, otherwise anerror will occur.
Configuring iPlanet Web Server 4.1
Edit file C:\Netscape\Server4\Https−hostname\config\jvm12.conf:
a). Add JRESServlet.jar, JREngine.jar, JRWebDesign.jar, tar.jar, hsqldb.jar, JRWebDesign.jar, xerces.jar, andlog4j−1.2.8.jar to jvm.classpath.
1.
jvm.classpath=<existing setting>;C:/JREntServer/lib/JRESServlets.jar;C:/JREntServer/lib/JREngine.jar;C:/JREntServer/lib/hsqldb.jar;C:/JREntServer/lib/tar.jar;C:/JREntServer/lib/JRWebDesign.jar;
Notes: If you are scheduling a report to export to the following formats, you should add the corresponding class package orjar with a valid path to the classpath:
To Mail or use the "Mail Notification" function: activation.jar and mail.jar.1. To PDF & DHTML: Itext.jar.2. To Excel: poiHSSF_151.jar.3. To XML: xerces.jar.4. To DHTML: JRWebDesign.jar. 5.
♦
If you are using DHTML tag libraries, please also add the following jar to the classpath: taglib.jar.
Set JREntServer's reporthome
♦
Integrating JReport Enterprise Server with a Java Application Server
405
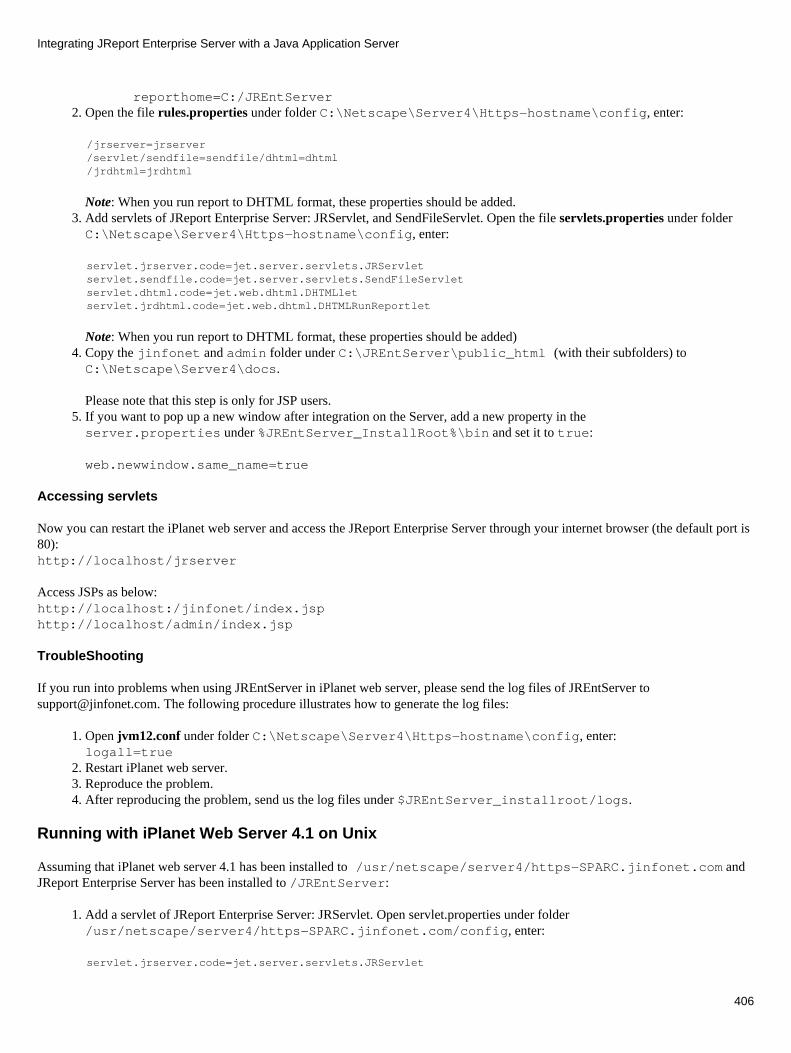
reporthome=C:/JREntServerOpen the file rules.properties under folder C:\Netscape\Server4\Https−hostname\config, enter:2.
/jrserver=jrserver/servlet/sendfile=sendfile/dhtml=dhtml/jrdhtml=jrdhtml
Note: When you run report to DHTML format, these properties should be added.Add servlets of JReport Enterprise Server: JRServlet, and SendFileServlet. Open the file servlets.properties under folderC:\Netscape\Server4\Https−hostname\config, enter:
3.
servlet.jrserver.code=jet.server.servlets.JRServletservlet.sendfile.code=jet.server.servlets.SendFileServletservlet.dhtml.code=jet.web.dhtml.DHTMLletservlet.jrdhtml.code=jet.web.dhtml.DHTMLRunReportlet
Note: When you run report to DHTML format, these properties should be added) Copy the jinfonet and admin folder under C:\JREntServer\public_html (with their subfolders) toC:\Netscape\Server4\docs.
Please note that this step is only for JSP users.
4.
If you want to pop up a new window after integration on the Server, add a new property in theserver.properties under %JREntServer_InstallRoot%\bin and set it to true:
web.newwindow.same_name=true
5.
Accessing servlets
Now you can restart the iPlanet web server and access the JReport Enterprise Server through your internet browser (the default port is80):http://localhost/jrserver
Access JSPs as below:http://localhost:/jinfonet/index.jsphttp://localhost/admin/index.jsp
TroubleShooting
If you run into problems when using JREntServer in iPlanet web server, please send the log files of JREntServer [email protected]. The following procedure illustrates how to generate the log files:
Open jvm12.conf under folder C:\Netscape\Server4\Https−hostname\config, enter:logall=true
1.
Restart iPlanet web server.2. Reproduce the problem.3. After reproducing the problem, send us the log files under $JREntServer_installroot/logs.4.
Running with iPlanet Web Server 4.1 on Unix
Assuming that iPlanet web server 4.1 has been installed to /usr/netscape/server4/https−SPARC.jinfonet.com andJReport Enterprise Server has been installed to /JREntServer:
Add a servlet of JReport Enterprise Server: JRServlet. Open servlet.properties under folder/usr/netscape/server4/https−SPARC.jinfonet.com/config, enter:
1.
servlet.jrserver.code=jet.server.servlets.JRServlet
Integrating JReport Enterprise Server with a Java Application Server
406
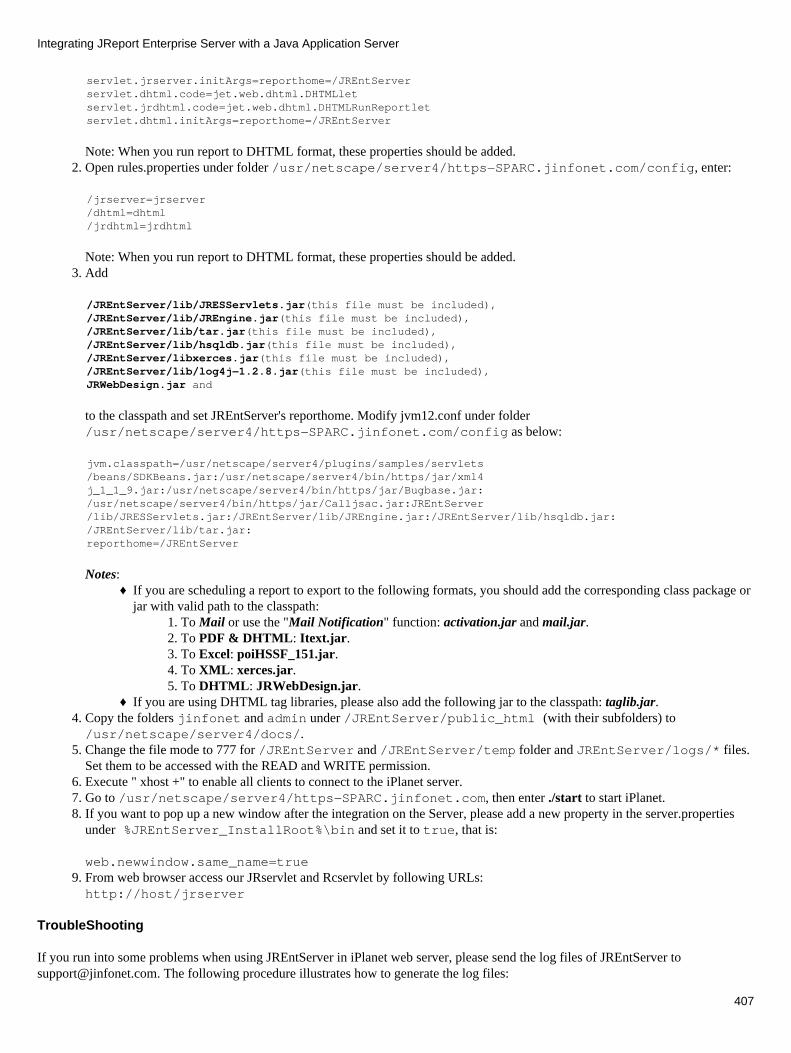
servlet.jrserver.initArgs=reporthome=/JREntServerservlet.dhtml.code=jet.web.dhtml.DHTMLletservlet.jrdhtml.code=jet.web.dhtml.DHTMLRunReportletservlet.dhtml.initArgs=reporthome=/JREntServer
Note: When you run report to DHTML format, these properties should be added.Open rules.properties under folder /usr/netscape/server4/https−SPARC.jinfonet.com/config, enter:2.
/jrserver=jrserver/dhtml=dhtml/jrdhtml=jrdhtml
Note: When you run report to DHTML format, these properties should be added.Add 3.
/JREntServer/lib/JRESServlets.jar(this file must be included),/JREntServer/lib/JREngine.jar(this file must be included), /JREntServer/lib/tar.jar(this file must be included), /JREntServer/lib/hsqldb.jar(this file must be included), /JREntServer/libxerces.jar(this file must be included),/JREntServer/lib/log4j−1.2.8.jar(this file must be included),JRWebDesign.jar and
to the classpath and set JREntServer's reporthome. Modify jvm12.conf under folder/usr/netscape/server4/https−SPARC.jinfonet.com/config as below:
jvm.classpath=/usr/netscape/server4/plugins/samples/servlets/beans/SDKBeans.jar:/usr/netscape/server4/bin/https/jar/xml4j_1_1_9.jar:/usr/netscape/server4/bin/https/jar/Bugbase.jar:/usr/netscape/server4/bin/https/jar/Calljsac.jar:JREntServer/lib/JRESServlets.jar:/JREntServer/lib/JREngine.jar:/JREntServer/lib/hsqldb.jar:/JREntServer/lib/tar.jar:reporthome=/JREntServer
Notes: If you are scheduling a report to export to the following formats, you should add the corresponding class package orjar with valid path to the classpath:
To Mail or use the "Mail Notification" function: activation.jar and mail.jar.1. To PDF & DHTML: Itext.jar.2. To Excel: poiHSSF_151.jar.3. To XML: xerces.jar.4. To DHTML: JRWebDesign.jar. 5.
♦
If you are using DHTML tag libraries, please also add the following jar to the classpath: taglib.jar.♦ Copy the folders jinfonet and admin under /JREntServer/public_html (with their subfolders) to/usr/netscape/server4/docs/.
4.
Change the file mode to 777 for /JREntServer and /JREntServer/temp folder and JREntServer/logs/* files.Set them to be accessed with the READ and WRITE permission.
5.
Execute " xhost +" to enable all clients to connect to the iPlanet server. 6. Go to /usr/netscape/server4/https−SPARC.jinfonet.com, then enter ./start to start iPlanet. 7. If you want to pop up a new window after the integration on the Server, please add a new property in the server.propertiesunder %JREntServer_InstallRoot%\bin and set it to true, that is:
web.newwindow.same_name=true
8.
From web browser access our JRservlet and Rcservlet by following URLs: http://host/jrserver
9.
TroubleShooting
If you run into some problems when using JREntServer in iPlanet web server, please send the log files of JREntServer [email protected]. The following procedure illustrates how to generate the log files:
Integrating JReport Enterprise Server with a Java Application Server
407
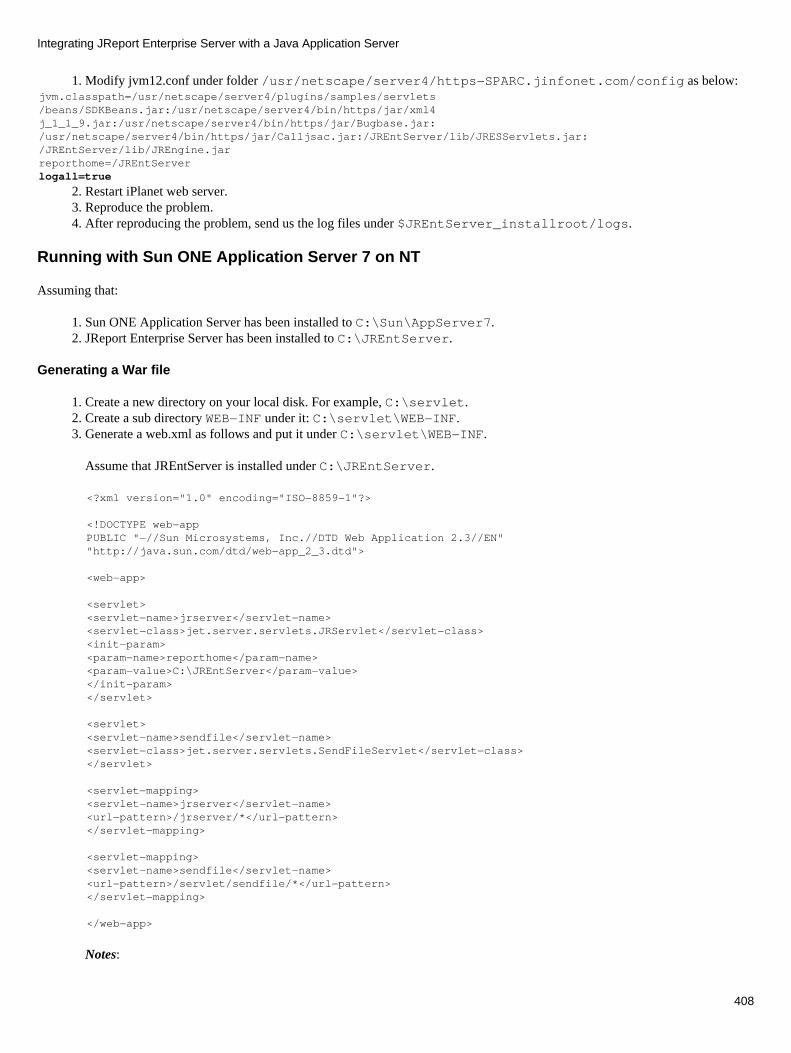
Modify jvm12.conf under folder /usr/netscape/server4/https−SPARC.jinfonet.com/config as below:1. jvm.classpath=/usr/netscape/server4/plugins/samples/servlets/beans/SDKBeans.jar:/usr/netscape/server4/bin/https/jar/xml4j_1_1_9.jar:/usr/netscape/server4/bin/https/jar/Bugbase.jar:/usr/netscape/server4/bin/https/jar/Calljsac.jar:/JREntServer/lib/JRESServlets.jar:/JREntServer/lib/JREngine.jarreporthome=/JREntServerlogall=true
Restart iPlanet web server.2. Reproduce the problem. 3. After reproducing the problem, send us the log files under $JREntServer_installroot/logs.4.
Running with Sun ONE Application Server 7 on NT
Assuming that:
Sun ONE Application Server has been installed to C:\Sun\AppServer7.1. JReport Enterprise Server has been installed to C:\JREntServer.2.
Generating a War file
Create a new directory on your local disk. For example, C:\servlet. 1. Create a sub directory WEB−INF under it: C:\servlet\WEB−INF. 2. Generate a web.xml as follows and put it under C:\servlet\WEB−INF.
Assume that JREntServer is installed under C:\JREntServer.
3.
<?xml version="1.0" encoding="ISO−8859−1"?>
<!DOCTYPE web−appPUBLIC "−//Sun Microsystems, Inc.//DTD Web Application 2.3//EN""http://java.sun.com/dtd/web−app_2_3.dtd">
<web−app>
<servlet><servlet−name>jrserver</servlet−name><servlet−class>jet.server.servlets.JRServlet</servlet−class><init−param><param−name>reporthome</param−name><param−value>C:\JREntServer</param−value></init−param></servlet>
<servlet><servlet−name>sendfile</servlet−name><servlet−class>jet.server.servlets.SendFileServlet</servlet−class></servlet>
<servlet−mapping><servlet−name>jrserver</servlet−name><url−pattern>/jrserver/*</url−pattern></servlet−mapping>
<servlet−mapping><servlet−name>sendfile</servlet−name><url−pattern>/servlet/sendfile/*</url−pattern></servlet−mapping>
</web−app>
Notes:
Integrating JReport Enterprise Server with a Java Application Server
408
If you are scheduling to export a report to the DHTML format, please add the following lines into the file above:• <servlet><servlet−name>dhtml</servlet−name><servlet−class>jet.web.dhtml.DHTMLlet</servlet−class></servlet>
<servlet−mapping><servlet−name>dhtml</servlet−name><url−pattern>/dhtml/*</url−pattern></servlet−mapping>
<servlet><servlet−name>help</servlet−name><servlet−class>jet.web.dhtml.JHelplet</servlet−class></servlet>
<servlet−mapping><servlet−name>help</servlet−name><url−pattern>/help/*</url−pattern></servlet−mapping>
<servlet><servlet−name>jrdhtml</servlet−name><servlet−class>jet.web.dhtml.DHTMLRunReportlet</servlet−class></servlet>
<servlet−mapping><servlet−name>jrdhtml</servlet−name><url−pattern>/jrdhtml/*</url−pattern></servlet−mapping>
Create a directory lib under C:\servlet\WEB−INF.4. Copy JREngine.jar, JRESServlets.jar, hsqldb.jar, tar.jar, JRWebDesign.jar, log4j−1.2.8.jar and xerces.jar fromC:\JREntServer\lib to C:\servlet\WEB−INF\lib.
Notes: If you are scheduling a report to export to the following formats, you should add the corresponding class package orjar to C:\servlet\WEB−INF\lib:
To Mail or use the "Mail Notification" function:activation.jar and mail.jar.1. To PDF:Itext.jar.2. To Excel:poiHSSF_151.jar.3. To XML:xerces.jar.4. To DHTML: JRWebDesign.jar5.
♦
If you are using DHTML tag libraries, please also add the following jar to C:\servlet\WEB−INF\lib:taglib.jar.
♦
5.
Copy the folders jinfonet, admin, and dhtmljsp under C:\JREntServer\public_html to C:\servlet. 6. Using the following command to create a WAR and name it as "jreport.war":
jar −cvf jreport.war admin jinfonet WEB−INF
7.
Deploying the War file
Start the Sun ONE Application Server by selecting Start | Programs | Sun Microsystems | Sun One Application Server7 |Start Application Server.
1.
Launch Admin Console by selecting Start | Programs | Sun Microsystems | Sun One Application Server7 | StartAdmin Console.
2.
Integrating JReport Enterprise Server with a Java Application Server
409
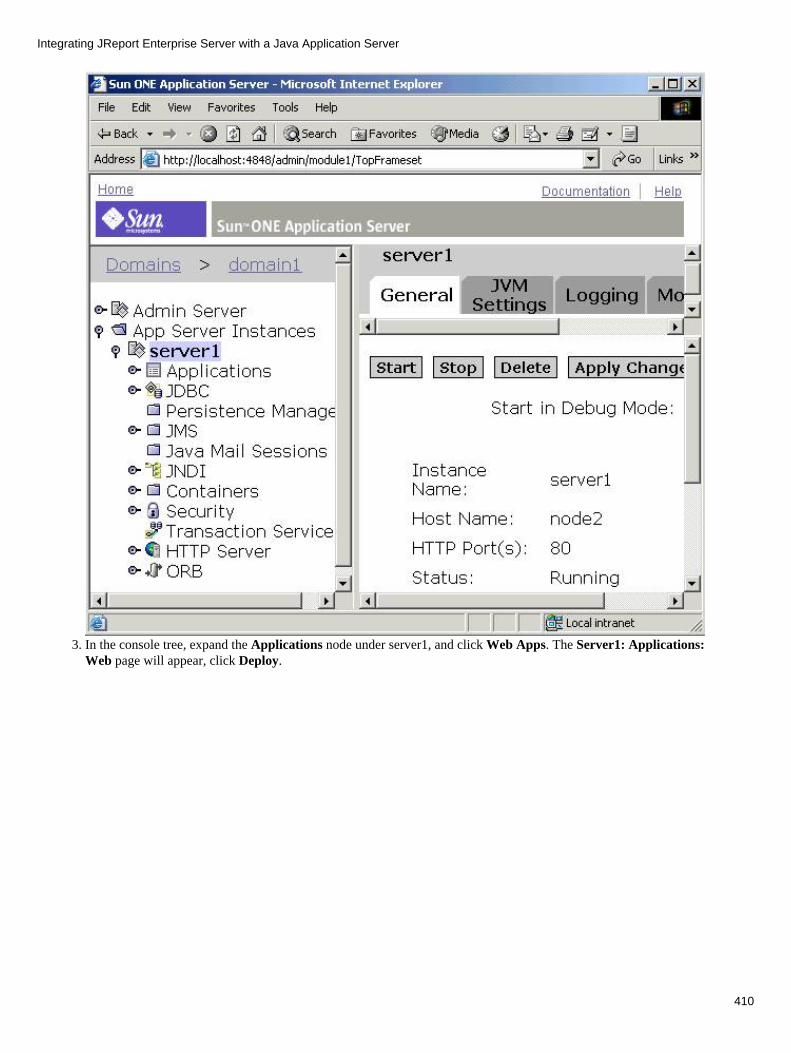
In the console tree, expand the Applications node under server1, and click Web Apps. The Server1: Applications:Web page will appear, click Deploy.
3.
Integrating JReport Enterprise Server with a Java Application Server
410
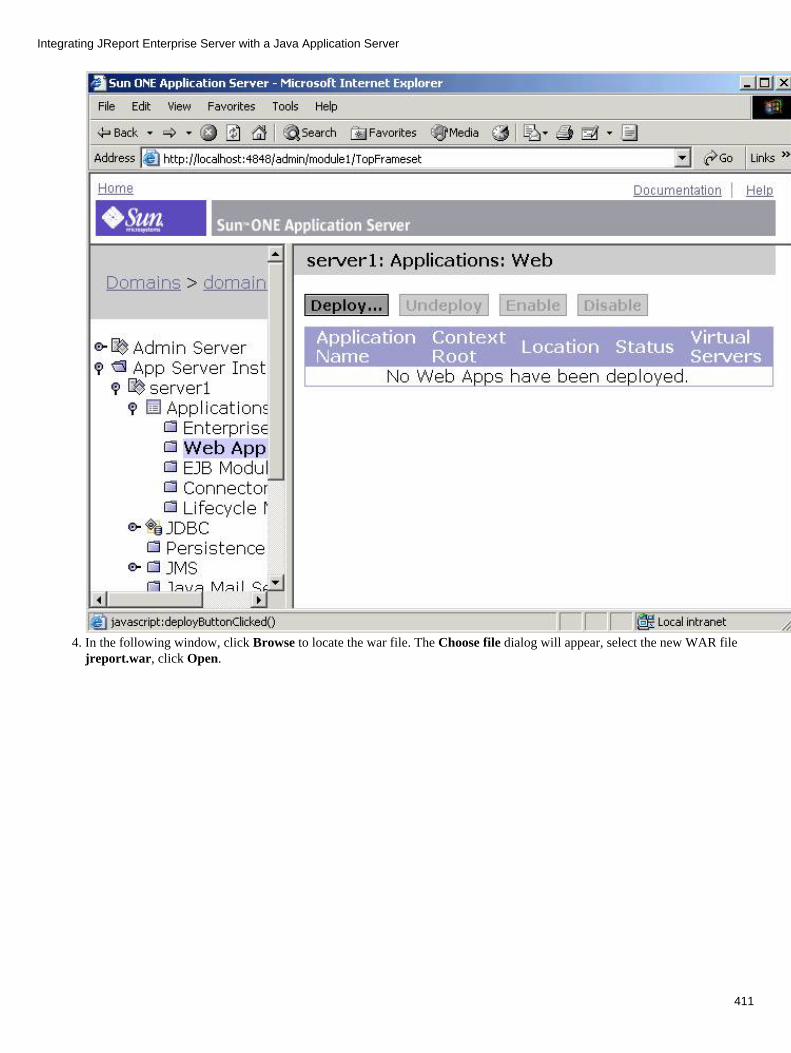
In the following window, click Browse to locate the war file. The Choose file dialog will appear, select the new WAR filejreport.war, click Open.
4.
Integrating JReport Enterprise Server with a Java Application Server
411
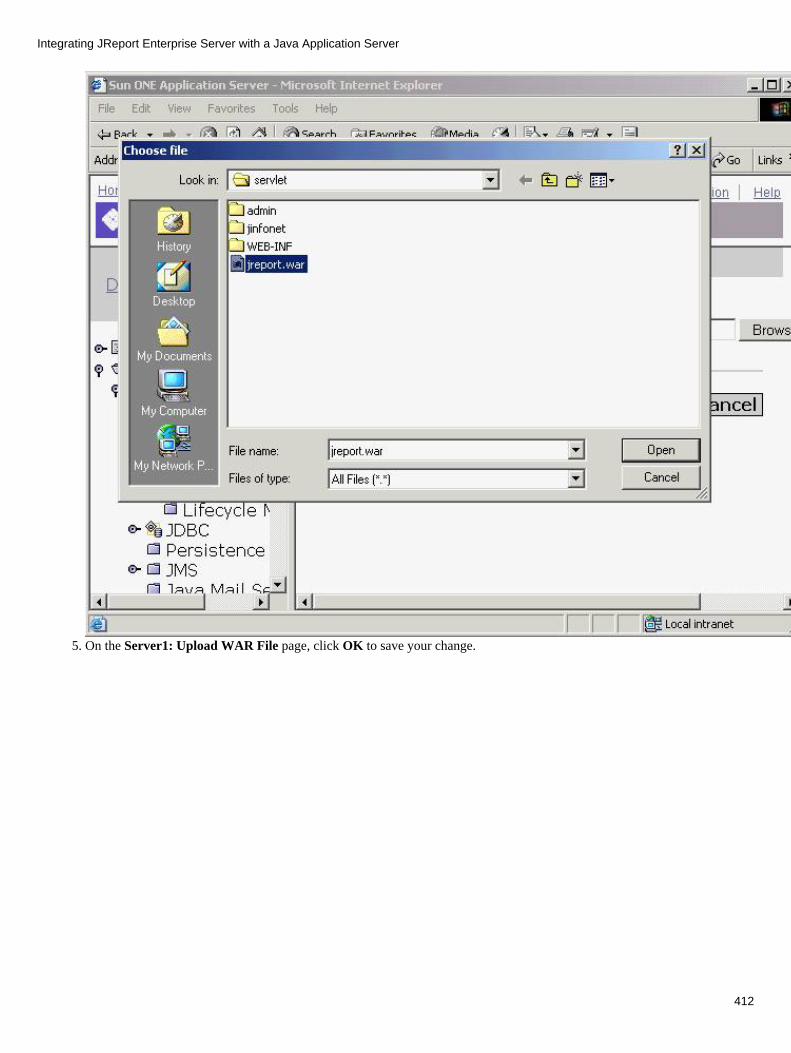
On the Server1: Upload WAR File page, click OK to save your change.5.
Integrating JReport Enterprise Server with a Java Application Server
412
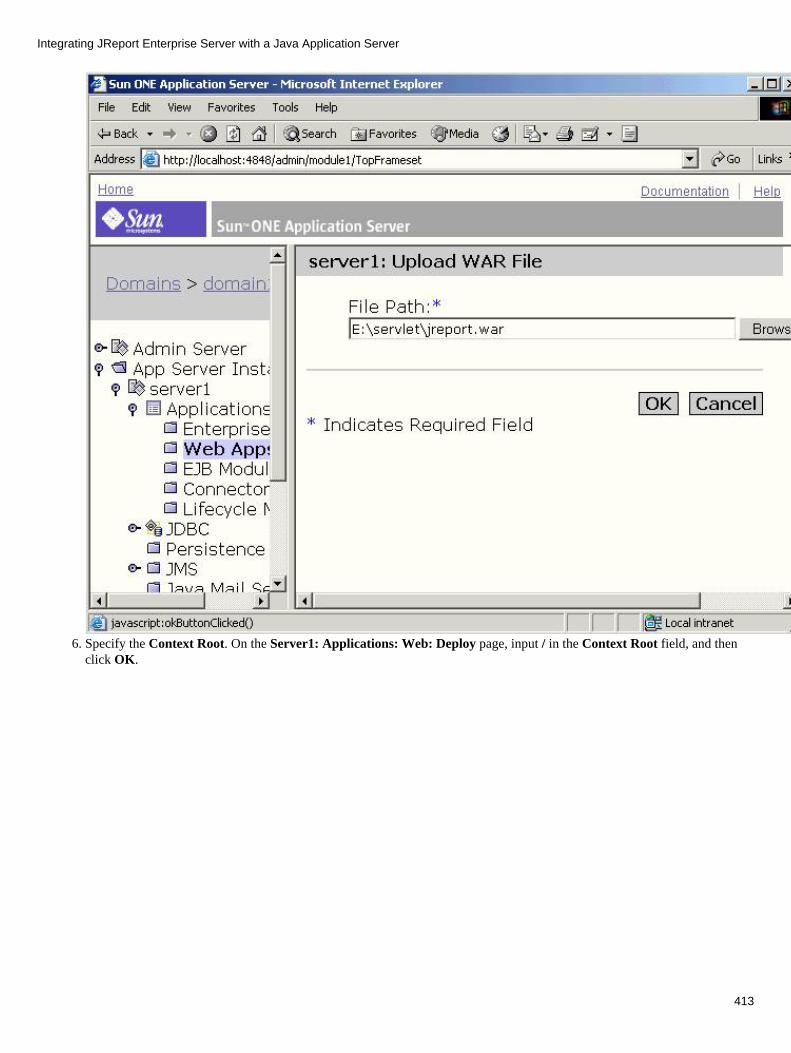
Specify the Context Root. On the Server1: Applications: Web: Deploy page, input / in the Context Root field, and thenclick OK.
6.
Integrating JReport Enterprise Server with a Java Application Server
413
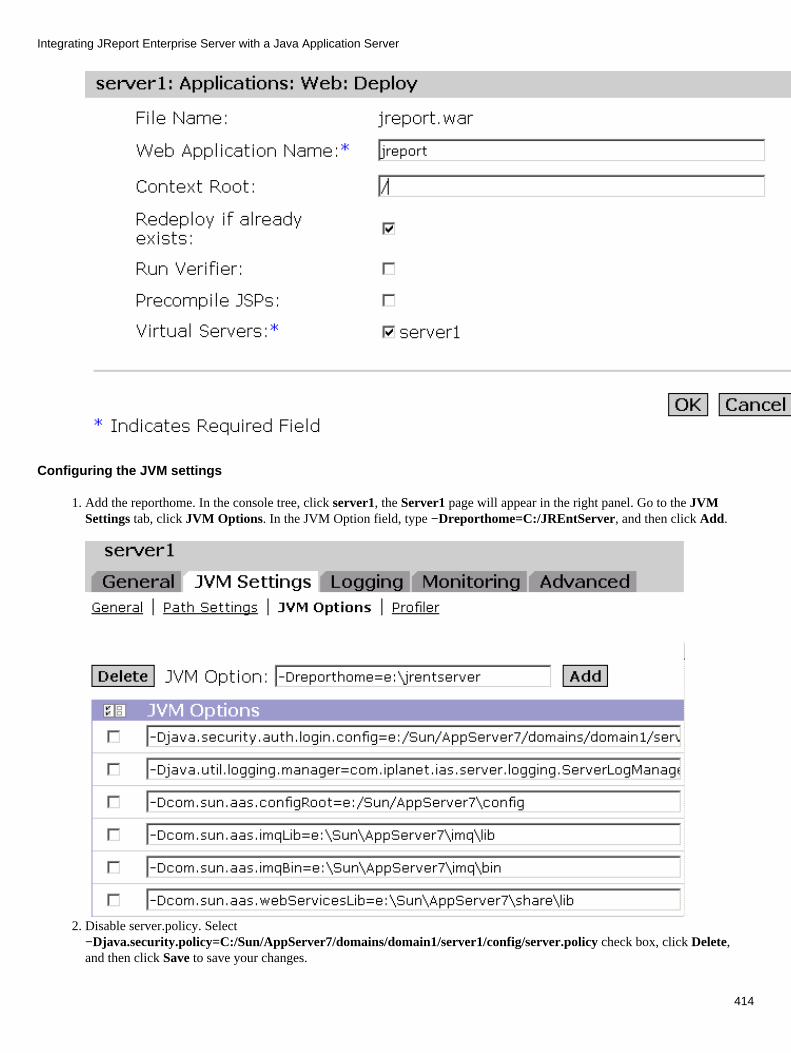
Configuring the JVM settings
Add the reporthome. In the console tree, click server1, the Server1 page will appear in the right panel. Go to the JVMSettings tab, click JVM Options. In the JVM Option field, type −Dreporthome=C:/JREntServer, and then click Add.
1.
Disable server.policy. Select−Djava.security.policy=C:/Sun/AppServer7/domains/domain1/server1/config/server.policy check box, click Delete,and then click Save to save your changes.
2.
Integrating JReport Enterprise Server with a Java Application Server
414

Apply changes. Go to the General tab, click Apply Changes to apply all changes that you made, and then click Stop. Whenthe Instance Stopped prompt appears, click Start.
Note: If you don't want to disable server.policy in step 2, you can modify the server.policy file instead. By modifying theserver.policy, you can add new permissions that are needed by JReport Enterprise Server.For example, you can modify the server.policy file underC:\Sun\AppServer7\domains\domain1\server1\config as below:
3.
...
// Basic set of required permissions granted to all remaining code grant { permission java.lang.RuntimePermission "loadLibrary.*"; permission java.lang.RuntimePermission "queuePrintJob"; permission java.net.SocketPermission "*", "connect,accept,resolve"; permission java.io.FilePermission "<<ALL FILES>>", "read,write,delete"; permission java.util.PropertyPermission "*", "read,write"; permission java.lang.RuntimePermission "*";
permission java.lang.RuntimePermission "modifyThreadGroup"; };
...
Integrating JReport Enterprise Server with a Java Application Server
415

Accessing JReport Enterprise Server
Access JReport Enterprise Server through a web browser with the following URLs: http://host/jrserver
And access JSPs as below:http://host/jinfonet/index.jsphttp://host/admin/index.jsp
TroubleShooting
If you run into some problems when use the Sun ONE Application Server 7, please send the log files of JREntServer [email protected]. The following procedure illustrates how to generate the log files:
Start the Sun ONE Application Server, and then Launch Admin Console.1. In the console tree, click server1, the Server1 page will appear in the right panel. Go to the JVM Settings tab, click JVMOptions. In the JVM Option field, type −Dlogall=true, click Add, and then click Save to save your changes.
2.
Restart Sun ONE Application Server 7, and try to reproduce the problem. 3. After reproducing the problem, send us the log files under %JREntServer_installroot%\log.4.
Running with SunOne Web Server 6.1 on Windows2000 Server
Installation
Install SunOne Web Server 6.1 is installed with the following information:1.
Hostname: 4cpu
User Name: admin
Password: admin
Admin Interface URL: http://4cpu:8800
HTTP Port: 81
After installation, go to Service to start both the admin and http server.
You should be able to access the default admin page and http page:
http://4cpu:8800http://4cpu:81
We will deploy our servlet through the 8800 admin interface.
2.
Generating a War file
To generate a war file, follow the instructions on http://www.jinfonet.com/manualsrv/en/userguide/deploywar.htm or User Guide |Integration with a Servlet Enabled Web Server | Deploying JReport Enterprise Server by a War file.
Deploying the War file
Once the war file is created, we can deploy it now. Go to http://4cpu:8800, select the Server from the drop−down list,and then click Manage.
1.
Integrating JReport Enterprise Server with a Java Application Server
416
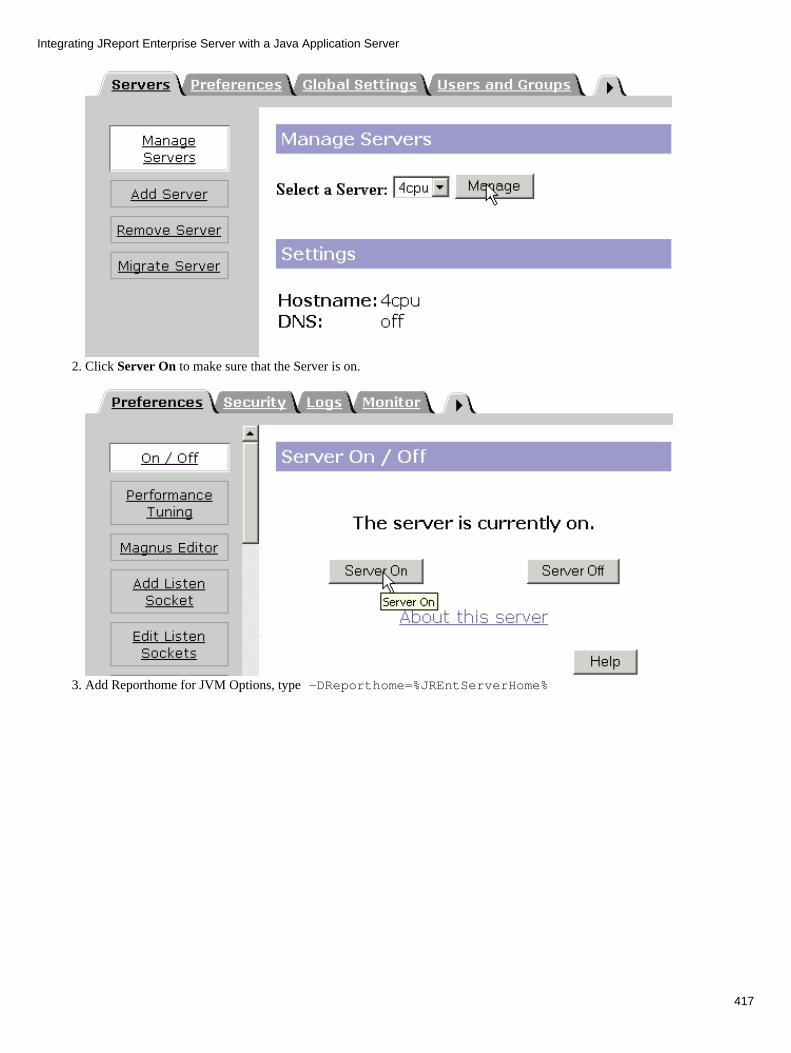
Click Server On to make sure that the Server is on.2.
Add Reporthome for JVM Options, type −DReporthome=%JREntServerHome%3.
Integrating JReport Enterprise Server with a Java Application Server
417
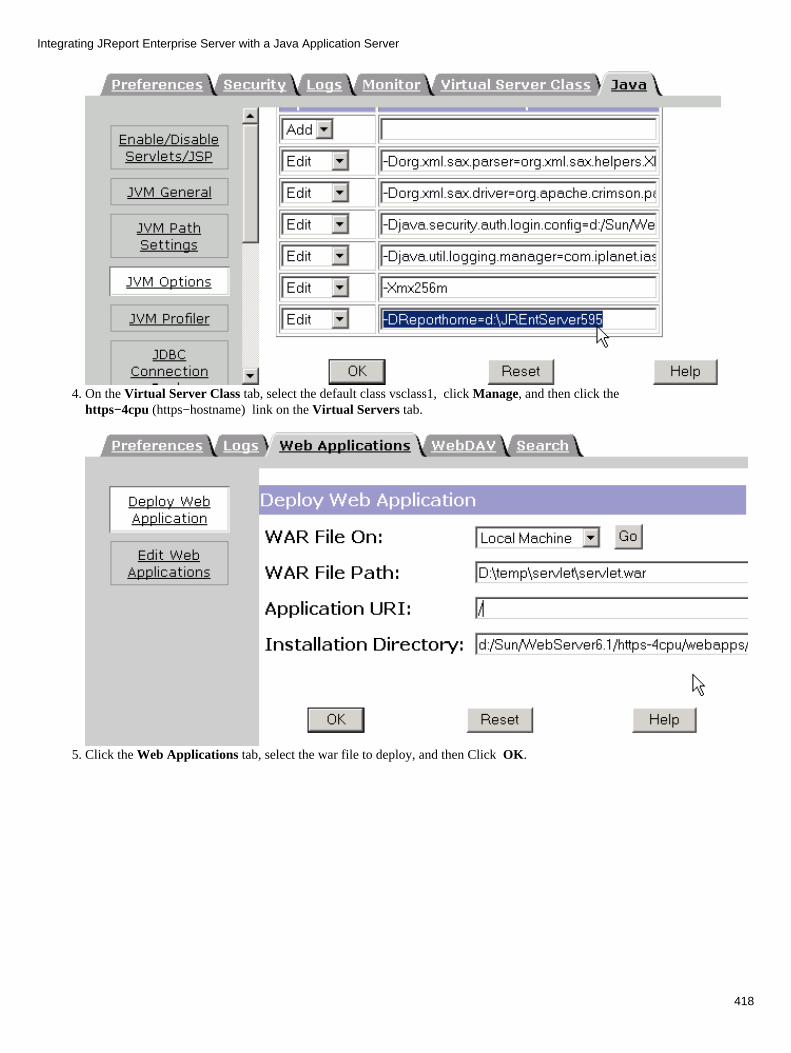
On the Virtual Server Class tab, select the default class vsclass1, click Manage, and then click thehttps−4cpu (https−hostname) link on the Virtual Servers tab.
4.
Click the Web Applications tab, select the war file to deploy, and then Click OK.5.
Integrating JReport Enterprise Server with a Java Application Server
418
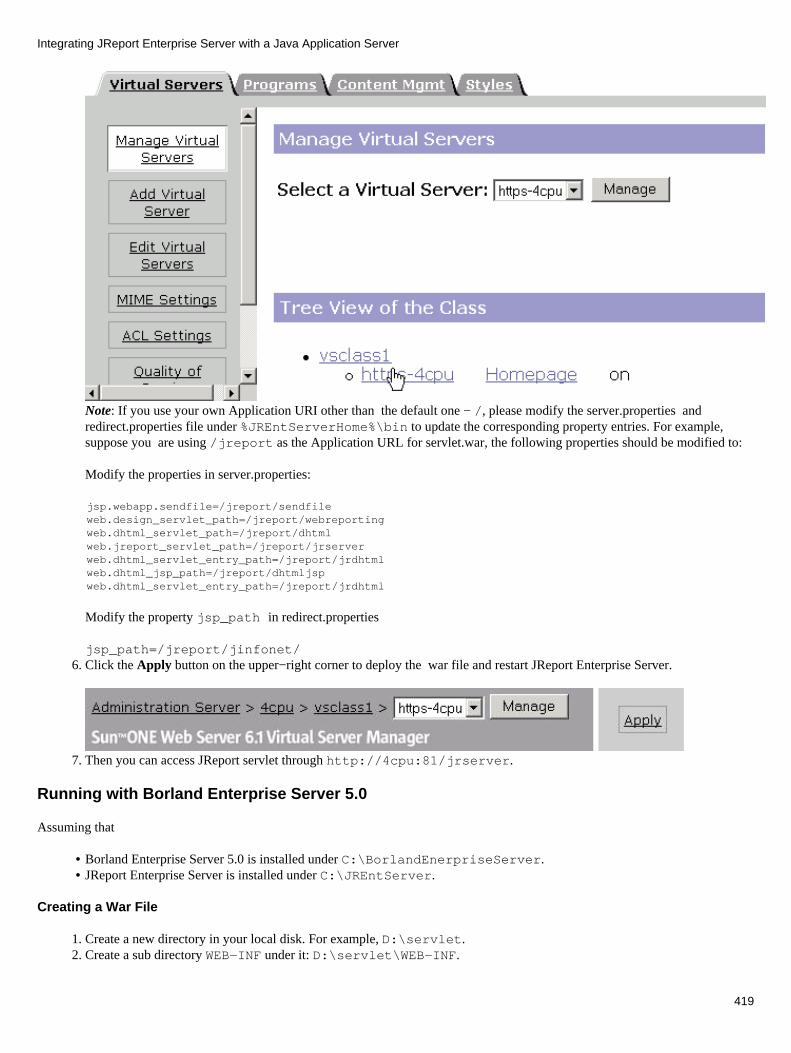
Note: If you use your own Application URI other than the default one − /, please modify the server.properties andredirect.properties file under %JREntServerHome%\bin to update the corresponding property entries. For example,suppose you are using /jreport as the Application URL for servlet.war, the following properties should be modified to:
Modify the properties in server.properties:
jsp.webapp.sendfile=/jreport/sendfileweb.design_servlet_path=/jreport/webreportingweb.dhtml_servlet_path=/jreport/dhtml web.jreport_servlet_path=/jreport/jrserverweb.dhtml_servlet_entry_path=/jreport/jrdhtmlweb.dhtml_jsp_path=/jreport/dhtmljspweb.dhtml_servlet_entry_path=/jreport/jrdhtml
Modify the property jsp_path in redirect.properties
jsp_path=/jreport/jinfonet/Click the Apply button on the upper−right corner to deploy the war file and restart JReport Enterprise Server.6.
Then you can access JReport servlet through http://4cpu:81/jrserver.7.
Running with Borland Enterprise Server 5.0
Assuming that
Borland Enterprise Server 5.0 is installed under C:\BorlandEnerpriseServer.• JReport Enterprise Server is installed under C:\JREntServer.•
Creating a War File
Create a new directory in your local disk. For example, D:\servlet. 1. Create a sub directory WEB−INF under it: D:\servlet\WEB−INF. 2.
Integrating JReport Enterprise Server with a Java Application Server
419
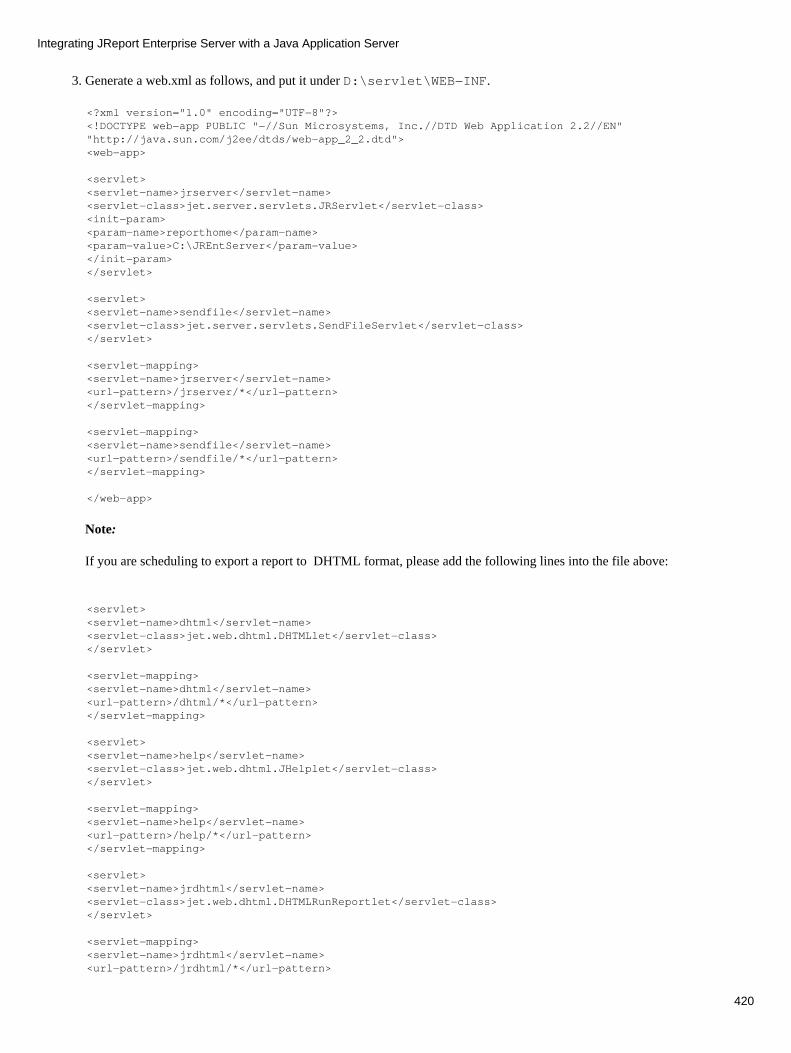
Generate a web.xml as follows, and put it under D:\servlet\WEB−INF.3.
<?xml version="1.0" encoding="UTF−8"?><!DOCTYPE web−app PUBLIC "−//Sun Microsystems, Inc.//DTD Web Application 2.2//EN" "http://java.sun.com/j2ee/dtds/web−app_2_2.dtd"><web−app>
<servlet><servlet−name>jrserver</servlet−name><servlet−class>jet.server.servlets.JRServlet</servlet−class><init−param><param−name>reporthome</param−name><param−value>C:\JREntServer</param−value></init−param></servlet>
<servlet><servlet−name>sendfile</servlet−name><servlet−class>jet.server.servlets.SendFileServlet</servlet−class></servlet>
<servlet−mapping><servlet−name>jrserver</servlet−name><url−pattern>/jrserver/*</url−pattern></servlet−mapping>
<servlet−mapping><servlet−name>sendfile</servlet−name><url−pattern>/sendfile/*</url−pattern></servlet−mapping>
</web−app>
Note:
If you are scheduling to export a report to DHTML format, please add the following lines into the file above:
<servlet><servlet−name>dhtml</servlet−name><servlet−class>jet.web.dhtml.DHTMLlet</servlet−class></servlet>
<servlet−mapping><servlet−name>dhtml</servlet−name><url−pattern>/dhtml/*</url−pattern></servlet−mapping>
<servlet><servlet−name>help</servlet−name><servlet−class>jet.web.dhtml.JHelplet</servlet−class></servlet>
<servlet−mapping><servlet−name>help</servlet−name><url−pattern>/help/*</url−pattern></servlet−mapping>
<servlet><servlet−name>jrdhtml</servlet−name><servlet−class>jet.web.dhtml.DHTMLRunReportlet</servlet−class></servlet>
<servlet−mapping><servlet−name>jrdhtml</servlet−name><url−pattern>/jrdhtml/*</url−pattern>
Integrating JReport Enterprise Server with a Java Application Server
420

</servlet−mapping>
Create a directory lib under D:\servlet\WEB−INF. 4. Copy the class file JREngine.jar, JRESServlets.jar, tar.jar, hsqldb.jar, JRWebDesign.jar, xerces.jar, and log4j−1.2.8.jarfrom C:\JREntServer\lib to D:\servlet\WEB−INF\lib.
Notes: If you are scheduling a report to export to the following formats, you should copy the corresponding class packageor jar to D:\servlet\WEB−INF\lib:
To Mail or use the "Mail Notification" function: activation.jar and mail.jar.1. To PDF & DHTML: Itext.jar.2. To Excel: poiHSSF_151.jar.3. To XML: xerces.jar.4. To DHTML: JRWebDesign.jar. 5.
♦
If you are using DHTML tag libraries, add the following jar to D:\servlet\WEB−INF\lib: taglib.jar. ♦
5.
Copy folders jinfonet and admin from C:\JREntServer\public_html to D:\servlet. 6. Use the following command to create a WAR file that contains all the files under the jinfonet, admin andWEB−INF folders, and name it as "servlet.war":
jar −cvf servlet.war jinfonet admin WEB−INF
7.
Deploying the War file
Start Borland Enterprise Server and Console from the Start menu. 1. Select Deployment | Deploy J2EE modules to a partition from the Tasks menu. 2. In the J2EE Deployment Wizard, click the Add button, and select servlet.war under D:\servlet. Then click OK.3.
After the deploying has completed, click OK.4.
Integrating JReport Enterprise Server with a Java Application Server
421

Accessing JReport Enterprise Server
Exit Borland Enterprise Server Console and restart Borland Enterprise Server.1. Modify properties.
Modify the variables web.jreport_servlet_path in server.properties under C:\JREntServer\bin to:
web.jreport_servlet_path=/servlet/jrserver
If you are scheduling a report to DHTML format, please modify two more properties, they are:
2.
web.dhtml_servlet_path=/servlet/dhtmlweb.dhtml_servlet_entry_path=/servlet/jrdhtml web.dhtml_jsp_path=/servlet/dhtmljsp
If you want to use the servlet to access JReport Enterprise Server, please modify the property jsp_path inredirect.properties under C:\JREntServer\bin, it is
jsp_path=/servlet/jinfonet/
Access the JRServlet through a web browser using the following URL: http://host:8080/servlet/jrserver
And access JSPs as below: http://host:8080/servlet/jinfonet/index.jsp
3.
Running with JBoss 2.4 on NT
To integrate with JBoss 2.4 on NT, please take the following steps:
Download and install JBoss and JReport Enterprise Server. 1. Add servlets of JReport Enterprise Server.
First create a directory.1. Create servlet in d:\ and create a subdirectory named WEB−INF under d:\servlet. Please note that inTomcat 4.0.1, the letter should be in upper case, i.e. WEB−INF.
2.
Save the following contents as a file with the name web.xml in d:\servlet\WEB−INF:3.
2.
Integrating JReport Enterprise Server with a Java Application Server
422

<?xml version="1.0" encoding="UTF−8"?><!DOCTYPE web−app PUBLIC "−//Sun Microsystems, Inc.//DTD Web Application 2.2//EN" "http://java.sun.com/j2ee/dtds/web−app_2_2.dtd"><web−app>
<servlet><servlet−name>jrserver</servlet−name><servlet−class>jet.server.servlets.JRServlet</servlet−class><init−param><param−name>reporthome</param−name><param−value>d:\JREntServer</param−value></init−param></servlet>
<servlet><servlet−name>sendfile</servlet−name><servlet−class>jet.server.servlets.SendFileServlet</servlet−class></servlet><servlet−mapping><servlet−name>jrserver</servlet−name><url−pattern>/jrserver/*</url−pattern></servlet−mapping>
<servlet−mapping><servlet−name>sendfile</servlet−name><url−pattern>/sendfile/*</url−pattern></servlet−mapping>
</web−app>
Notes:
You must specify the reporthome correctly as the example above, otherwise you will get servlet initial error whenyou try to load servlets though a web browser.
♦
If you are scheduling to export a report to the DHTML format, please add the following lines into the file above:♦
<servlet><servlet−name>dhtml</servlet−name><servlet−class>jet.web.dhtml.DHTMLlet</servlet−class></servlet>
<servlet−mapping><servlet−name>dhtml</servlet−name><url−pattern>/dhtml/*</url−pattern></servlet−mapping>
<servlet><servlet−name>jrdhtml</servlet−name><servlet−class>jet.web.dhtml.DHTMLRunReportlet</servlet−class></servlet>
<servlet−mapping>servlet−name>jrdhtml</servlet−name><url−pattern>/jrdhtml/*</url−pattern></servlet−mapping>
Import JReport jar files. Create the directory lib under D:\servlet\WEB−INF. 1. Copy the jar files JRESServlets.jar, JREngine.jar, JRWebDesign.jar, Log4j−1.2.8.jar, tar.jar, and hsqldb.jar tod:\servlet\WEB−INF\lib.
2.
3.
Note:
If you are scheduling a report to export to the following formats, you should copy the corresponding class package or jar to
Integrating JReport Enterprise Server with a Java Application Server
423
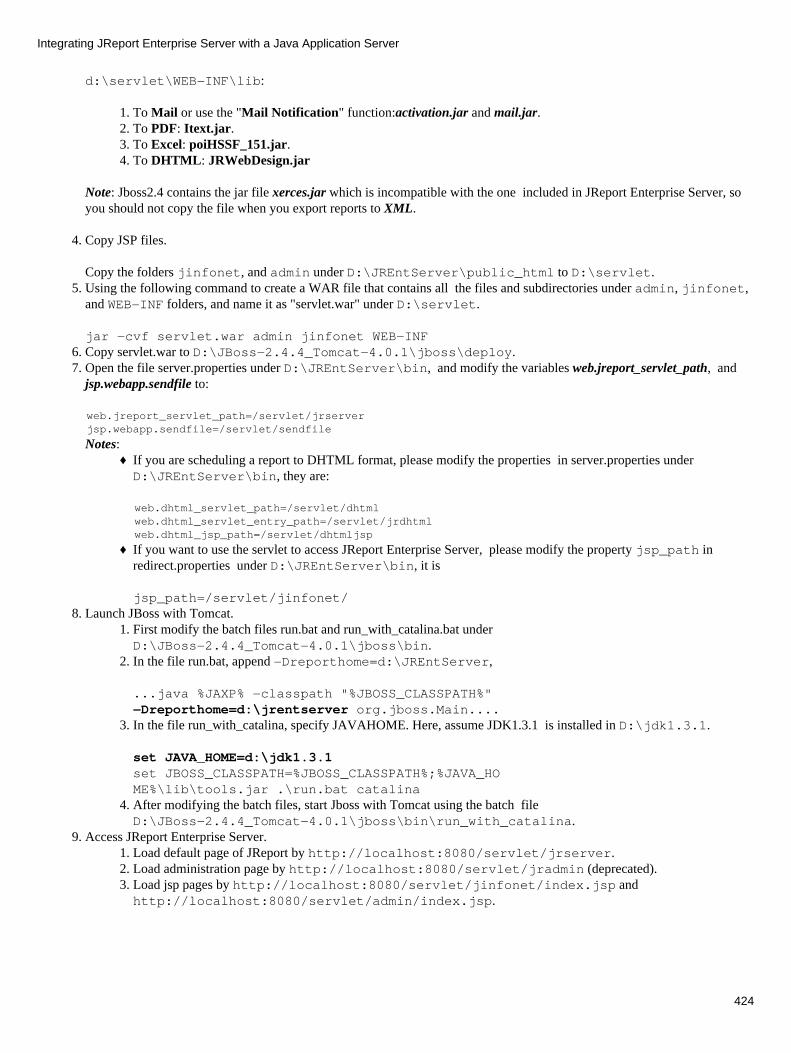
d:\servlet\WEB−INF\lib:
To Mail or use the "Mail Notification" function:activation.jar and mail.jar.1. To PDF: Itext.jar.2. To Excel: poiHSSF_151.jar.3. To DHTML: JRWebDesign.jar4.
Note: Jboss2.4 contains the jar file xerces.jar which is incompatible with the one included in JReport Enterprise Server, soyou should not copy the file when you export reports to XML.
Copy JSP files.
Copy the folders jinfonet, and admin under D:\JREntServer\public_html to D:\servlet.
4.
Using the following command to create a WAR file that contains all the files and subdirectories under admin, jinfonet,and WEB−INF folders, and name it as "servlet.war" under D:\servlet.
jar −cvf servlet.war admin jinfonet WEB−INF
5.
Copy servlet.war to D:\JBoss−2.4.4_Tomcat−4.0.1\jboss\deploy. 6. Open the file server.properties under D:\JREntServer\bin, and modify the variables web.jreport_servlet_path, andjsp.webapp.sendfile to:
7.
web.jreport_servlet_path=/servlet/jrserverjsp.webapp.sendfile=/servlet/sendfile
Notes: If you are scheduling a report to DHTML format, please modify the properties in server.properties underD:\JREntServer\bin, they are:
♦
web.dhtml_servlet_path=/servlet/dhtml web.dhtml_servlet_entry_path=/servlet/jrdhtmlweb.dhtml_jsp_path=/servlet/dhtmljsp
If you want to use the servlet to access JReport Enterprise Server, please modify the property jsp_path inredirect.properties under D:\JREntServer\bin, it is
jsp_path=/servlet/jinfonet/
♦
Launch JBoss with Tomcat. First modify the batch files run.bat and run_with_catalina.bat underD:\JBoss−2.4.4_Tomcat−4.0.1\jboss\bin.
1.
In the file run.bat, append −Dreporthome=d:\JREntServer,
...java %JAXP% −classpath "%JBOSS_CLASSPATH%"−Dreporthome=d:\jrentserver org.jboss.Main....
2.
In the file run_with_catalina, specify JAVAHOME. Here, assume JDK1.3.1 is installed in D:\jdk1.3.1.
set JAVA_HOME=d:\jdk1.3.1set JBOSS_CLASSPATH=%JBOSS_CLASSPATH%;%JAVA_HOME%\lib\tools.jar .\run.bat catalina
3.
After modifying the batch files, start Jboss with Tomcat using the batch fileD:\JBoss−2.4.4_Tomcat−4.0.1\jboss\bin\run_with_catalina.
4.
8.
Access JReport Enterprise Server. Load default page of JReport by http://localhost:8080/servlet/jrserver.1. Load administration page by http://localhost:8080/servlet/jradmin (deprecated).2. Load jsp pages by http://localhost:8080/servlet/jinfonet/index.jsp andhttp://localhost:8080/servlet/admin/index.jsp.
3.
9.
Integrating JReport Enterprise Server with a Java Application Server
424
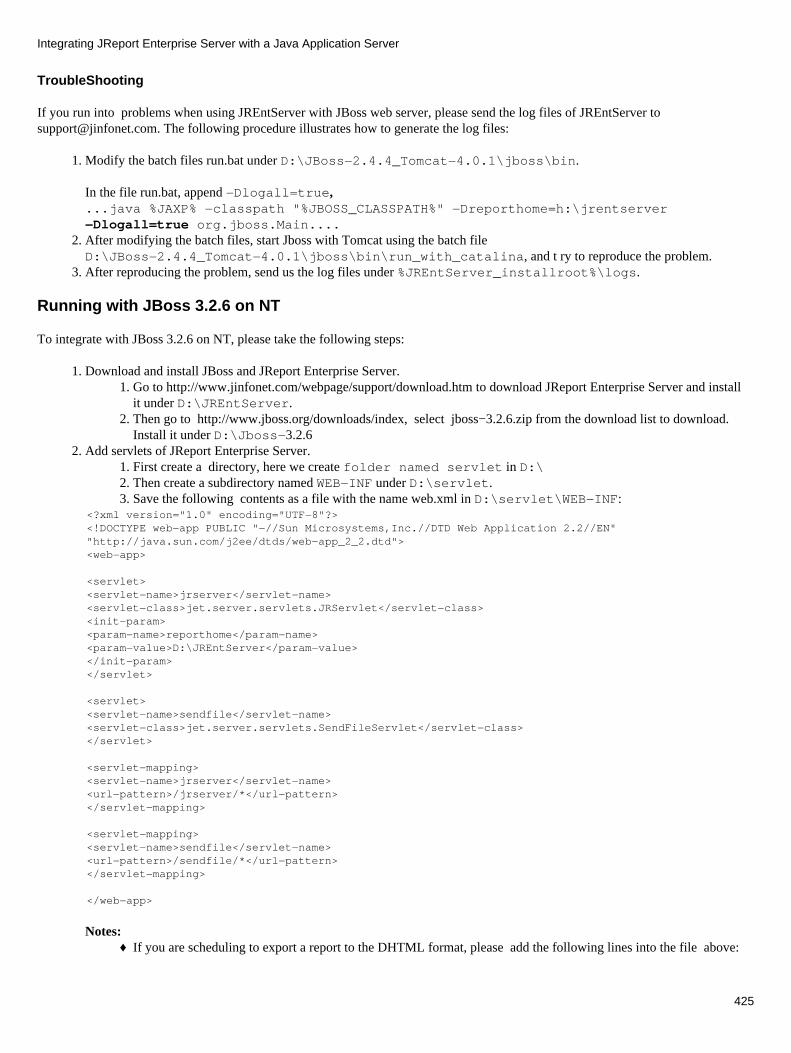
TroubleShooting
If you run into problems when using JREntServer with JBoss web server, please send the log files of JREntServer [email protected]. The following procedure illustrates how to generate the log files:
Modify the batch files run.bat under D:\JBoss−2.4.4_Tomcat−4.0.1\jboss\bin.
In the file run.bat, append −Dlogall=true,...java %JAXP% −classpath "%JBOSS_CLASSPATH%" −Dreporthome=h:\jrentserver−Dlogall=true org.jboss.Main....
1.
After modifying the batch files, start Jboss with Tomcat using the batch fileD:\JBoss−2.4.4_Tomcat−4.0.1\jboss\bin\run_with_catalina, and t ry to reproduce the problem.
2.
After reproducing the problem, send us the log files under %JREntServer_installroot%\logs.3.
Running with JBoss 3.2.6 on NT
To integrate with JBoss 3.2.6 on NT, please take the following steps:
Download and install JBoss and JReport Enterprise Server. Go to http://www.jinfonet.com/webpage/support/download.htm to download JReport Enterprise Server and installit under D:\JREntServer.
1.
Then go to http://www.jboss.org/downloads/index, select jboss−3.2.6.zip from the download list to download.Install it under D:\Jboss−3.2.6
2.
1.
Add servlets of JReport Enterprise Server. First create a directory, here we create folder named servlet in D:\1. Then create a subdirectory named WEB−INF under D:\servlet. 2. Save the following contents as a file with the name web.xml in D:\servlet\WEB−INF: 3.
2.
<?xml version="1.0" encoding="UTF−8"?><!DOCTYPE web−app PUBLIC "−//Sun Microsystems,Inc.//DTD Web Application 2.2//EN" "http://java.sun.com/j2ee/dtds/web−app_2_2.dtd"><web−app>
<servlet><servlet−name>jrserver</servlet−name><servlet−class>jet.server.servlets.JRServlet</servlet−class> <init−param><param−name>reporthome</param−name><param−value>D:\JREntServer</param−value></init−param></servlet>
<servlet><servlet−name>sendfile</servlet−name><servlet−class>jet.server.servlets.SendFileServlet</servlet−class></servlet>
<servlet−mapping><servlet−name>jrserver</servlet−name><url−pattern>/jrserver/*</url−pattern></servlet−mapping>
<servlet−mapping><servlet−name>sendfile</servlet−name><url−pattern>/sendfile/*</url−pattern></servlet−mapping>
</web−app>
Notes:If you are scheduling to export a report to the DHTML format, please add the following lines into the file above:♦
Integrating JReport Enterprise Server with a Java Application Server
425
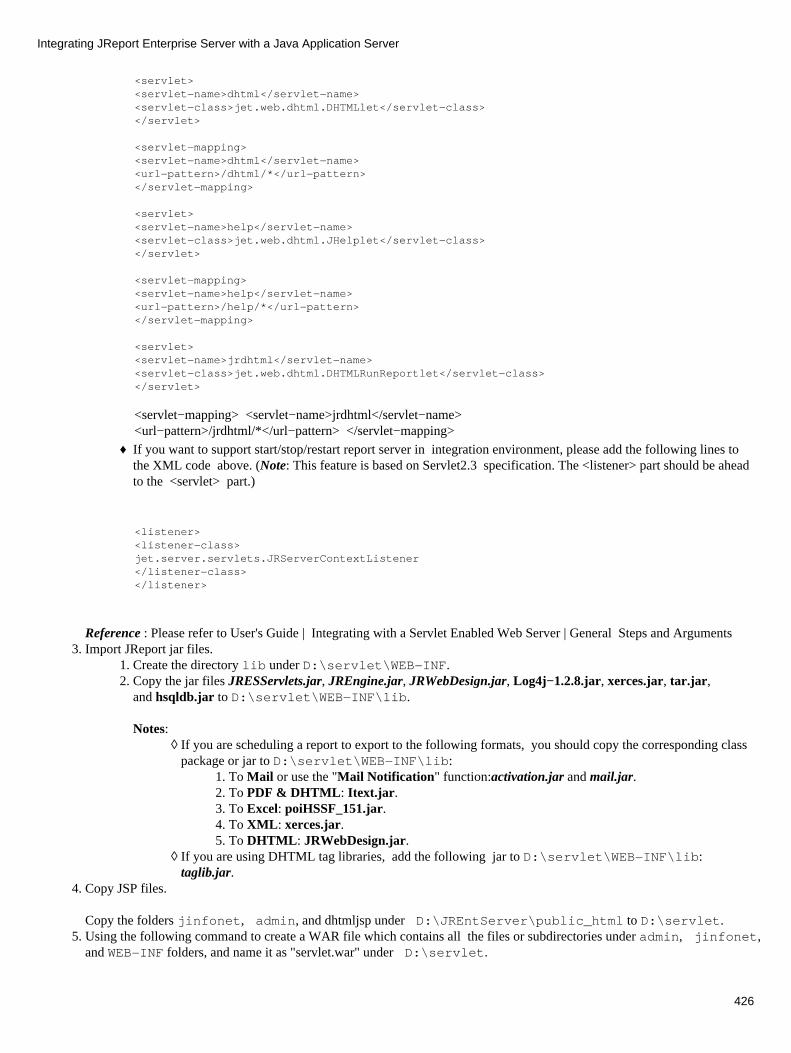
<servlet><servlet−name>dhtml</servlet−name><servlet−class>jet.web.dhtml.DHTMLlet</servlet−class></servlet>
<servlet−mapping><servlet−name>dhtml</servlet−name><url−pattern>/dhtml/*</url−pattern></servlet−mapping>
<servlet><servlet−name>help</servlet−name><servlet−class>jet.web.dhtml.JHelplet</servlet−class></servlet>
<servlet−mapping><servlet−name>help</servlet−name><url−pattern>/help/*</url−pattern></servlet−mapping>
<servlet><servlet−name>jrdhtml</servlet−name><servlet−class>jet.web.dhtml.DHTMLRunReportlet</servlet−class></servlet>
<servlet−mapping> <servlet−name>jrdhtml</servlet−name><url−pattern>/jrdhtml/*</url−pattern> </servlet−mapping>
If you want to support start/stop/restart report server in integration environment, please add the following lines tothe XML code above. (Note: This feature is based on Servlet2.3 specification. The <listener> part should be aheadto the <servlet> part.)
♦
<listener><listener−class>jet.server.servlets.JRServerContextListener</listener−class></listener>
Reference : Please refer to User's Guide | Integrating with a Servlet Enabled Web Server | General Steps and ArgumentsImport JReport jar files.
Create the directory lib under D:\servlet\WEB−INF. 1. Copy the jar files JRESServlets.jar, JREngine.jar, JRWebDesign.jar, Log4j−1.2.8.jar, xerces.jar, tar.jar,and hsqldb.jar to D:\servlet\WEB−INF\lib.
Notes: If you are scheduling a report to export to the following formats, you should copy the corresponding classpackage or jar to D:\servlet\WEB−INF\lib:
To Mail or use the "Mail Notification" function:activation.jar and mail.jar.1. To PDF & DHTML: Itext.jar.2. To Excel: poiHSSF_151.jar.3. To XML: xerces.jar.4. To DHTML: JRWebDesign.jar. 5.
◊
If you are using DHTML tag libraries, add the following jar to D:\servlet\WEB−INF\lib:taglib.jar.
◊
2.
3.
Copy JSP files.
Copy the folders jinfonet, admin, and dhtmljsp under D:\JREntServer\public_html to D:\servlet.
4.
Using the following command to create a WAR file which contains all the files or subdirectories under admin, jinfonet,and WEB−INF folders, and name it as "servlet.war" under D:\servlet.
5.
Integrating JReport Enterprise Server with a Java Application Server
426
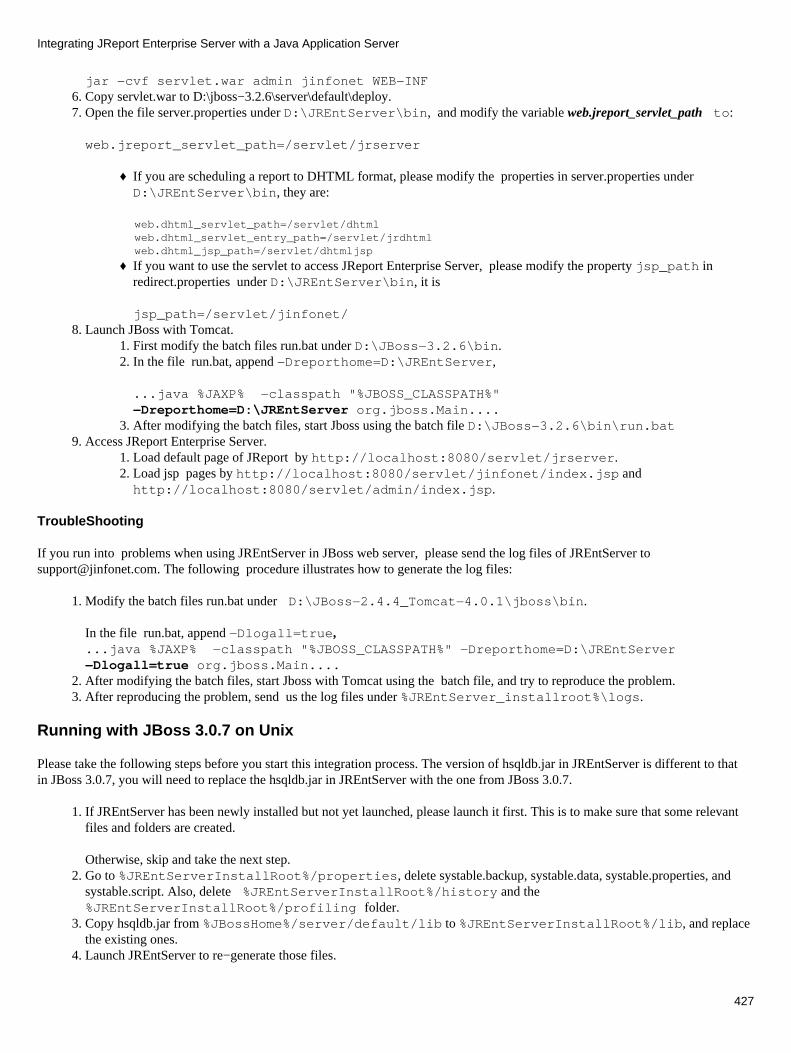
jar −cvf servlet.war admin jinfonet WEB−INFCopy servlet.war to D:\jboss−3.2.6\server\default\deploy. 6. Open the file server.properties under D:\JREntServer\bin, and modify the variable web.jreport_servlet_path to: 7.
web.jreport_servlet_path=/servlet/jrserver
If you are scheduling a report to DHTML format, please modify the properties in server.properties underD:\JREntServer\bin, they are:
♦
web.dhtml_servlet_path=/servlet/dhtmlweb.dhtml_servlet_entry_path=/servlet/jrdhtml web.dhtml_jsp_path=/servlet/dhtmljsp
If you want to use the servlet to access JReport Enterprise Server, please modify the property jsp_path inredirect.properties under D:\JREntServer\bin, it is
jsp_path=/servlet/jinfonet/
♦
Launch JBoss with Tomcat. First modify the batch files run.bat under D:\JBoss−3.2.6\bin.1. In the file run.bat, append −Dreporthome=D:\JREntServer,
...java %JAXP% −classpath "%JBOSS_CLASSPATH%"−Dreporthome=D:\JREntServer org.jboss.Main....
2.
After modifying the batch files, start Jboss using the batch file D:\JBoss−3.2.6\bin\run.bat3.
8.
Access JReport Enterprise Server. Load default page of JReport by http://localhost:8080/servlet/jrserver.1. Load jsp pages by http://localhost:8080/servlet/jinfonet/index.jsp andhttp://localhost:8080/servlet/admin/index.jsp.
2.
9.
TroubleShooting
If you run into problems when using JREntServer in JBoss web server, please send the log files of JREntServer [email protected]. The following procedure illustrates how to generate the log files:
Modify the batch files run.bat under D:\JBoss−2.4.4_Tomcat−4.0.1\jboss\bin.
In the file run.bat, append −Dlogall=true,...java %JAXP% −classpath "%JBOSS_CLASSPATH%" −Dreporthome=D:\JREntServer−Dlogall=true org.jboss.Main....
1.
After modifying the batch files, start Jboss with Tomcat using the batch file, and try to reproduce the problem. 2. After reproducing the problem, send us the log files under %JREntServer_installroot%\logs.3.
Running with JBoss 3.0.7 on Unix
Please take the following steps before you start this integration process. The version of hsqldb.jar in JREntServer is different to thatin JBoss 3.0.7, you will need to replace the hsqldb.jar in JREntServer with the one from JBoss 3.0.7.
If JREntServer has been newly installed but not yet launched, please launch it first. This is to make sure that some relevantfiles and folders are created.
Otherwise, skip and take the next step.
1.
Go to %JREntServerInstallRoot%/properties, delete systable.backup, systable.data, systable.properties, andsystable.script. Also, delete %JREntServerInstallRoot%/history and the%JREntServerInstallRoot%/profiling folder.
2.
Copy hsqldb.jar from %JBossHome%/server/default/lib to %JREntServerInstallRoot%/lib, and replacethe existing ones.
3.
Launch JREntServer to re−generate those files. 4.
Integrating JReport Enterprise Server with a Java Application Server
427

To integrate with JBoss 3.0.7 on Unix or Linux, please take the following steps: Download and install JBoss and JReport Enterprise Server. 1. Add servlets of JReport Enterprise Server.
First create a directory: servlet in / and then create a subdirectory named WEB−INF under /servlet. Pleasenote that in Tomcat, the letter should be in upper case, i.e. WEB−INF. Save the following contents as a file with thename web.xml in /servlet/WEB−INF:
2.
<?xml version="1.0" encoding="ISO−8859−1"?>
<!DOCTYPE web−app PUBLIC "−//Sun Microsystems, Inc.//DTD Web Application 2.3//EN""http://java.sun.com/dtd/web−app_2_3.dtd"><web−app>
<servlet>servlet−name>jrserver</servlet−name><servlet−class>jet.server.servlets.JRServlet</servlet−class><init−param><param−name>reporthome</param−name><param−value>/JREntServer</param−value></init−param></servlet>
<servlet><servlet−name>sendfile</servlet−name><servlet−class>jet.server.servlets.SendFileServlet</servlet−class></servlet>
<servlet−mapping><servlet−name>jrserver</servlet−name><url−pattern>/jrserver/*</url−pattern><servlet−mapping><servlet−name>sendfile</servlet−name><url−pattern>/sendfile/*</url−pattern></servlet−mapping>
</web−app>
Notes:
You must specify the reporthome correctly as the example above, otherwise you will get servlet initial error when you try toload servlets though a web browser.
•
If you are scheduling to export a report to the DHTML format, please add the following lines into the file above: •
<servlet><servlet−name>dhtml</servlet−name><servlet−class>jet.web.dhtml.DHTMLlet</servlet−class></servlet>
<servlet−mapping><servlet−name>dhtml</servlet−name><url−pattern>/dhtml/*</url−pattern></servlet−mapping>
<servlet> <servlet−name>help</servlet−name><servlet−class>jet.web.dhtml.JHelplet</servlet−class></servlet>
<servlet−mapping><servlet−name>help</servlet−name><url−pattern>/help/*</url−pattern> </servlet−mapping>
<servlet><servlet−name>jrdhtml</servlet−name>
Integrating JReport Enterprise Server with a Java Application Server
428
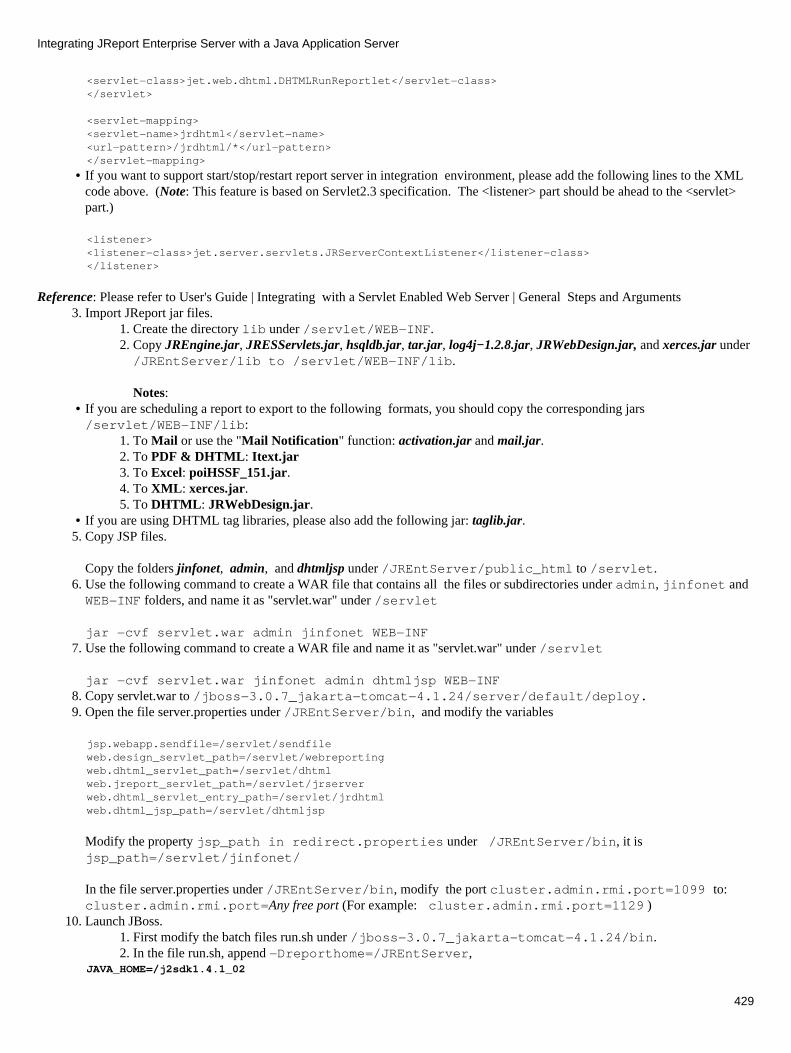
<servlet−class>jet.web.dhtml.DHTMLRunReportlet</servlet−class></servlet>
<servlet−mapping><servlet−name>jrdhtml</servlet−name><url−pattern>/jrdhtml/*</url−pattern></servlet−mapping>
If you want to support start/stop/restart report server in integration environment, please add the following lines to the XMLcode above. (Note: This feature is based on Servlet2.3 specification. The <listener> part should be ahead to the <servlet>part.)
•
<listener><listener−class>jet.server.servlets.JRServerContextListener</listener−class></listener>
Reference: Please refer to User's Guide | Integrating with a Servlet Enabled Web Server | General Steps and ArgumentsImport JReport jar files.
Create the directory lib under /servlet/WEB−INF.1. Copy JREngine.jar, JRESServlets.jar, hsqldb.jar, tar.jar, log4j−1.2.8.jar, JRWebDesign.jar, and xerces.jar under/JREntServer/lib to /servlet/WEB−INF/lib.
Notes:
2.
3.
If you are scheduling a report to export to the following formats, you should copy the corresponding jars/servlet/WEB−INF/lib:
To Mail or use the "Mail Notification" function: activation.jar and mail.jar.1. To PDF & DHTML: Itext.jar2. To Excel: poiHSSF_151.jar.3. To XML: xerces.jar.4. To DHTML: JRWebDesign.jar. 5.
•
If you are using DHTML tag libraries, please also add the following jar: taglib.jar. • Copy JSP files.
Copy the folders jinfonet, admin, and dhtmljsp under /JREntServer/public_html to /servlet.
5.
Use the following command to create a WAR file that contains all the files or subdirectories under admin, jinfonet andWEB−INF folders, and name it as "servlet.war" under /servlet
jar −cvf servlet.war admin jinfonet WEB−INF
6.
Use the following command to create a WAR file and name it as "servlet.war" under /servlet
jar −cvf servlet.war jinfonet admin dhtmljsp WEB−INF
7.
Copy servlet.war to /jboss−3.0.7_jakarta−tomcat−4.1.24/server/default/deploy. 8. Open the file server.properties under /JREntServer/bin, and modify the variables 9.
jsp.webapp.sendfile=/servlet/sendfileweb.design_servlet_path=/servlet/webreportingweb.dhtml_servlet_path=/servlet/dhtml web.jreport_servlet_path=/servlet/jrserverweb.dhtml_servlet_entry_path=/servlet/jrdhtmlweb.dhtml_jsp_path=/servlet/dhtmljsp
Modify the property jsp_path in redirect.properties under /JREntServer/bin, it is jsp_path=/servlet/jinfonet/
In the file server.properties under /JREntServer/bin, modify the port cluster.admin.rmi.port=1099 to:cluster.admin.rmi.port=Any free port (For example: cluster.admin.rmi.port=1129 )Launch JBoss.
First modify the batch files run.sh under /jboss−3.0.7_jakarta−tomcat−4.1.24/bin.1. In the file run.sh, append −Dreporthome=/JREntServer, 2.
10.
JAVA_HOME=/j2sdk1.4.1_02
Integrating JReport Enterprise Server with a Java Application Server
429
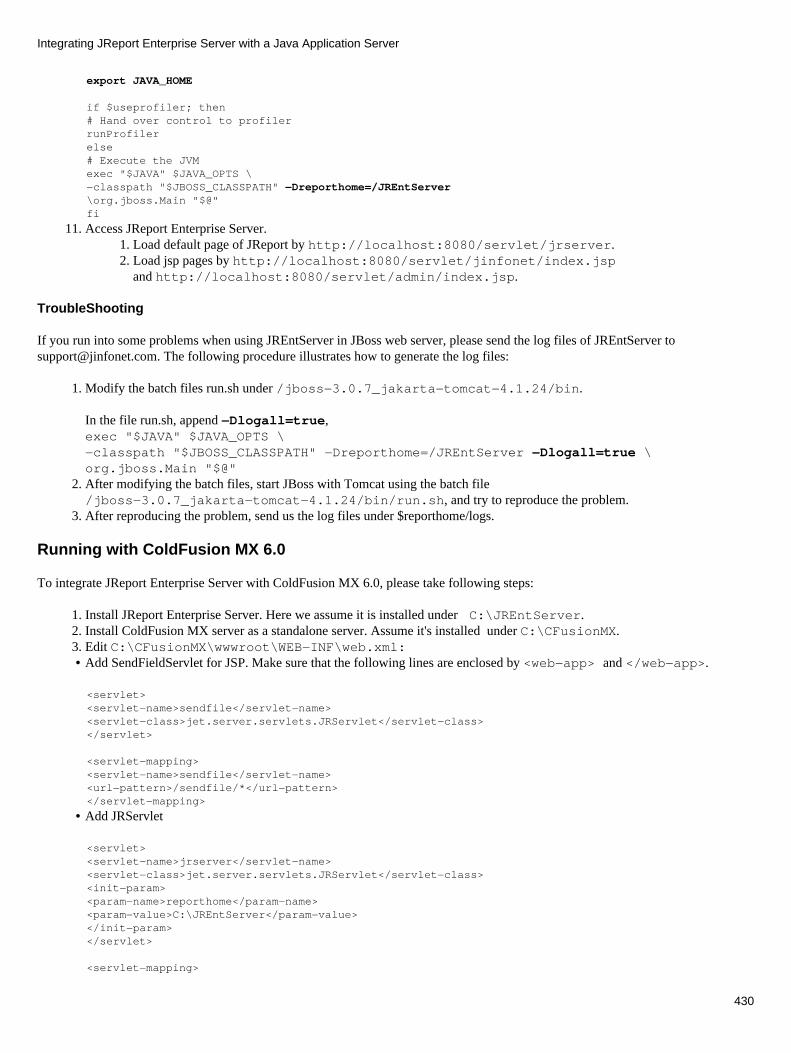
export JAVA_HOME
if $useprofiler; then# Hand over control to profilerrunProfilerelse# Execute the JVMexec "$JAVA" $JAVA_OPTS \−classpath "$JBOSS_CLASSPATH" −Dreporthome=/JREntServer\org.jboss.Main "$@"fi
Access JReport Enterprise Server. Load default page of JReport by http://localhost:8080/servlet/jrserver.1. Load jsp pages by http://localhost:8080/servlet/jinfonet/index.jspand http://localhost:8080/servlet/admin/index.jsp.
2.
11.
TroubleShooting
If you run into some problems when using JREntServer in JBoss web server, please send the log files of JREntServer [email protected]. The following procedure illustrates how to generate the log files:
Modify the batch files run.sh under /jboss−3.0.7_jakarta−tomcat−4.1.24/bin.
In the file run.sh, append −Dlogall=true,exec "$JAVA" $JAVA_OPTS \−classpath "$JBOSS_CLASSPATH" −Dreporthome=/JREntServer −Dlogall=true \org.jboss.Main "$@"
1.
After modifying the batch files, start JBoss with Tomcat using the batch file/jboss−3.0.7_jakarta−tomcat−4.1.24/bin/run.sh, and try to reproduce the problem.
2.
After reproducing the problem, send us the log files under $reporthome/logs.3.
Running with ColdFusion MX 6.0
To integrate JReport Enterprise Server with ColdFusion MX 6.0, please take following steps:
Install JReport Enterprise Server. Here we assume it is installed under C:\JREntServer. 1. Install ColdFusion MX server as a standalone server. Assume it's installed under C:\CFusionMX. 2. Edit C:\CFusionMX\wwwroot\WEB−INF\web.xml:3. Add SendFieldServlet for JSP. Make sure that the following lines are enclosed by <web−app> and </web−app>. •
<servlet><servlet−name>sendfile</servlet−name><servlet−class>jet.server.servlets.JRServlet</servlet−class></servlet>
<servlet−mapping><servlet−name>sendfile</servlet−name><url−pattern>/sendfile/*</url−pattern></servlet−mapping>
Add JRServlet•
<servlet><servlet−name>jrserver</servlet−name><servlet−class>jet.server.servlets.JRServlet</servlet−class><init−param><param−name>reporthome</param−name><param−value>C:\JREntServer</param−value></init−param> </servlet>
<servlet−mapping>
Integrating JReport Enterprise Server with a Java Application Server
430

<servlet−name>jrserver</servlet−name><url−pattern>/jrserver/*</url−pattern> </servlet−mapping>
Notes: If you are scheduling to export a report to DHTML format, please add the following lines to the file above:♦
<servlet><servlet−name>dhtml</servlet−name><servlet−class>jet.web.dhtml.DHTMLlet</servlet−class></servlet>
<servlet−mapping><servlet−name>dhtml</servlet−name><url−pattern>/dhtml/*</url−pattern></servlet−mapping>
<servlet> <servlet−name>help</servlet−name> <servlet−class>jet.web.dhtml.JHelplet</servlet−class></servlet>
<servlet−mapping> <servlet−name>help</servlet−name><url−pattern>/help/*</url−pattern> </servlet−mapping>
<servlet><servlet−name>jrdhtml</servlet−name><servlet−class>jet.web.dhtml.DHTMLRunReportlet</servlet−class></servlet>
<servlet−mapping> <servlet−name>jrdhtm</servlet−name><url−pattern>/jrdhtml/*</url−pattern></servlet−mapping>
If you want to support start/stop/restart report server in integration environment, please add the following lines tothe XML code above. (Note: This feature is based on Servlet2.3 specification. The <listener> part should be aheadto the <servlet> part. )
♦
<listener><listener−class>jet.server.servlets.JRServerContextListener</listener−class></listener>
Copy C:\JREntServer\lib\JREngine.jar, C:\JREntServer\lib\JRESServlets.jar,C:\JREntServer\lib\tar.jar, C:\JREntServer\lib\hsqldb.jar,C:\JREntServer\lib\xerces.jar, C:\JREntServer\lib\JRWebDesign.jar,C:\JREntServer\lib\log4j−1.2.8.jar to C:\CFusionMX\wwwroot\WEB−INF\lib.
Notes: If you are scheduling a report to export to the following formats, you should copy the class package or jar toC:\CFusionMX\wwwroot\WEB−INF\lib:
1. To Mail or use the "Mail Notification" function: activation.jar and mail.jar.2. To PDF & DHTML: Itext.jar.3. To Excel: poiHSSF_151.jar.4. To XML: xerces.jar.5. To DHTML: JRWebDesign.jar.
♦
If you are using DHTML tag libraries, please also add the following jar toC:\CFusionMX\wwwroot\WEB−INF\lib: taglib.jar.
♦
4.
Copy the folders jinfonet and admin under C:\JREntServer\public_html (with its subfolder) toC:\CFusionMX\wwwroot.
5.
Integrating JReport Enterprise Server with a Java Application Server
431
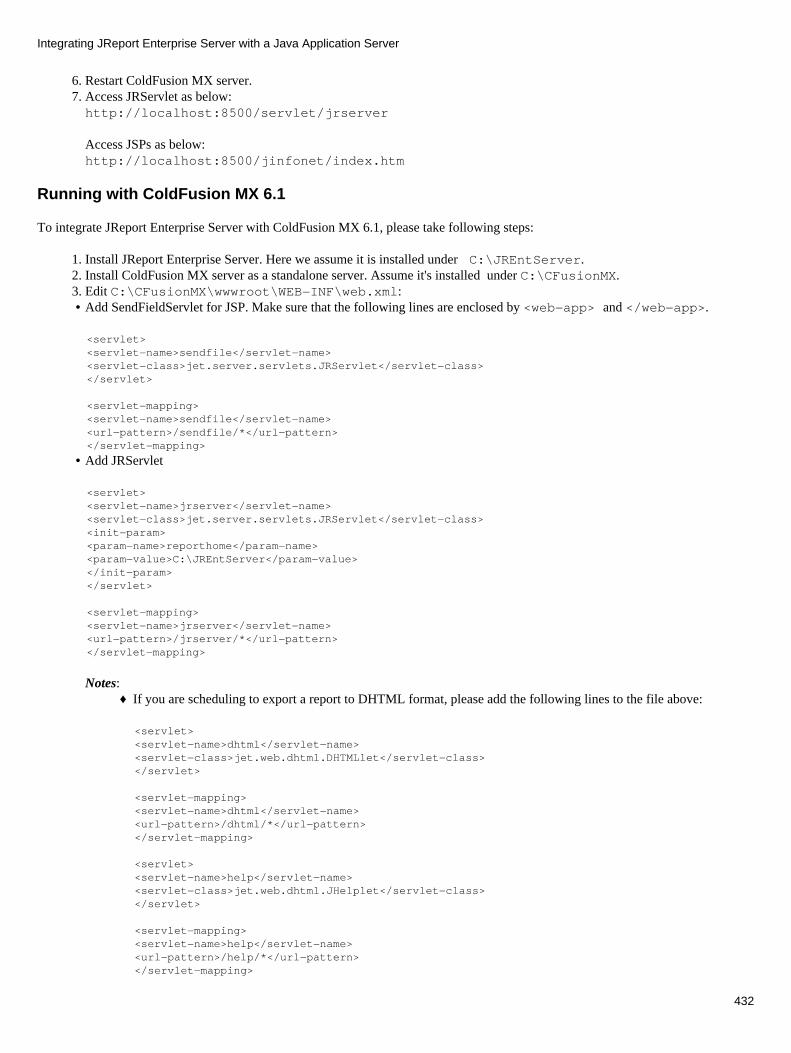
Restart ColdFusion MX server. 6. Access JRServlet as below: http://localhost:8500/servlet/jrserver
Access JSPs as below: http://localhost:8500/jinfonet/index.htm
7.
Running with ColdFusion MX 6.1
To integrate JReport Enterprise Server with ColdFusion MX 6.1, please take following steps:
Install JReport Enterprise Server. Here we assume it is installed under C:\JREntServer. 1. Install ColdFusion MX server as a standalone server. Assume it's installed under C:\CFusionMX. 2. Edit C:\CFusionMX\wwwroot\WEB−INF\web.xml:3. Add SendFieldServlet for JSP. Make sure that the following lines are enclosed by <web−app> and </web−app>. •
<servlet><servlet−name>sendfile</servlet−name><servlet−class>jet.server.servlets.JRServlet</servlet−class></servlet>
<servlet−mapping><servlet−name>sendfile</servlet−name><url−pattern>/sendfile/*</url−pattern></servlet−mapping>
Add JRServlet•
<servlet><servlet−name>jrserver</servlet−name><servlet−class>jet.server.servlets.JRServlet</servlet−class><init−param><param−name>reporthome</param−name><param−value>C:\JREntServer</param−value></init−param></servlet>
<servlet−mapping><servlet−name>jrserver</servlet−name><url−pattern>/jrserver/*</url−pattern></servlet−mapping>
Notes: If you are scheduling to export a report to DHTML format, please add the following lines to the file above:♦
<servlet><servlet−name>dhtml</servlet−name><servlet−class>jet.web.dhtml.DHTMLlet</servlet−class></servlet>
<servlet−mapping><servlet−name>dhtml</servlet−name><url−pattern>/dhtml/*</url−pattern></servlet−mapping>
<servlet><servlet−name>help</servlet−name><servlet−class>jet.web.dhtml.JHelplet</servlet−class></servlet>
<servlet−mapping><servlet−name>help</servlet−name><url−pattern>/help/*</url−pattern> </servlet−mapping>
Integrating JReport Enterprise Server with a Java Application Server
432

<servlet><servlet−name>jrdhtml</servlet−name><servlet−class>jet.web.dhtml.DHTMLRunReportlet</servlet−class></servlet>
<servlet−mapping> <servlet−name>jrdhtml</servlet−name><url−pattern>/jrdhtml/*</url−pattern> </servlet−mapping>
If you want to support start/stop/restart report server in integration environment, please add the following lines tothe XML code above. (Note: This feature is based on Servlet2.3 specification. The <listener> part should be aheadto the <servlet> part. )
♦
<listener><listener−class>jet.server.servlets.JRServerContextListener</listener−class></listener>
Copy JREngine.jar, JRESServlets.jar, JRWebDesign.jar, hsqldb.jar, tar.jar, log4j−1.2.8.jar and xerces.jar underC:\JREntServer\lib to C:\CFusionMX\wwwroot\WEB−INF\lib.
Notes:
4.
If you are scheduling a report to export to the following formats, you should copy the class package or jar underc:\JREntServer\lib to C:\CFusionMX\wwwroot\WEB−INF\lib:
To Mail or use the "Mail Notification" function: activation.jar and mail.jar.1. To PDF & DHTML: Itext.jar.2. To Excel: poiHSSF_151.jar.3. To XML: xerces.jar.4. To DHTML: JRWebDesign.jar.5.
♦
If you are using DHTML tag libraries, please also add the following jar: taglib.jar. ♦ Copy the folders jinfonet, admin, and dhtmljsp under C:\JREntServer\public_html toC:\CFusionMX\wwwroot.
5.
Add −Dreporthome=C:\JREntServer to JVM Arguments on the Java and JVM Settings page of ColdFusionAdministrator.
6.
Restart ColdFusion MX server. 7. Access JRServlet as below: http://localhost:8500/servlet/jrserver
Access JSPs as below: http://localhost:8500/jinfonet/index.jsphttp://localhost:8500/admin/index.jsp
8.
Running with Oracle Application Server Containers for J2EE 10g (OC4J) on NT
Assuming that,
JReport Enterprise Server is installed under C:\JREntServer• Oralce oc4j under C:\oc4j• JDK under c:\j2sdk1.4.1_04. •
To integrate with Oracle oc4j on NT, please take the following steps:
Under c:\oc4j\j2ee\home, create a batch file −− "start_oc4j.bat" as below:
set JAVAHOME=c:\j2sdk1.4.1_04 %JAVAHOME%\bin\java −Xmx512m −Dreporthome=c:\JREntServer −jar oc4j.jar
1.
Copy the folders jinfonet, admin and dhtmljsp under C:\JREntServer\public_html toC:\oc4j\j2ee\home\default−web−app.
2.
Add servlets of JReport Enterprise Server. To do this, edit web.xml underC:\oc4j\j2ee\home\default−web−app\WEB−INF\web.xml as below:
3.
Integrating JReport Enterprise Server with a Java Application Server
433
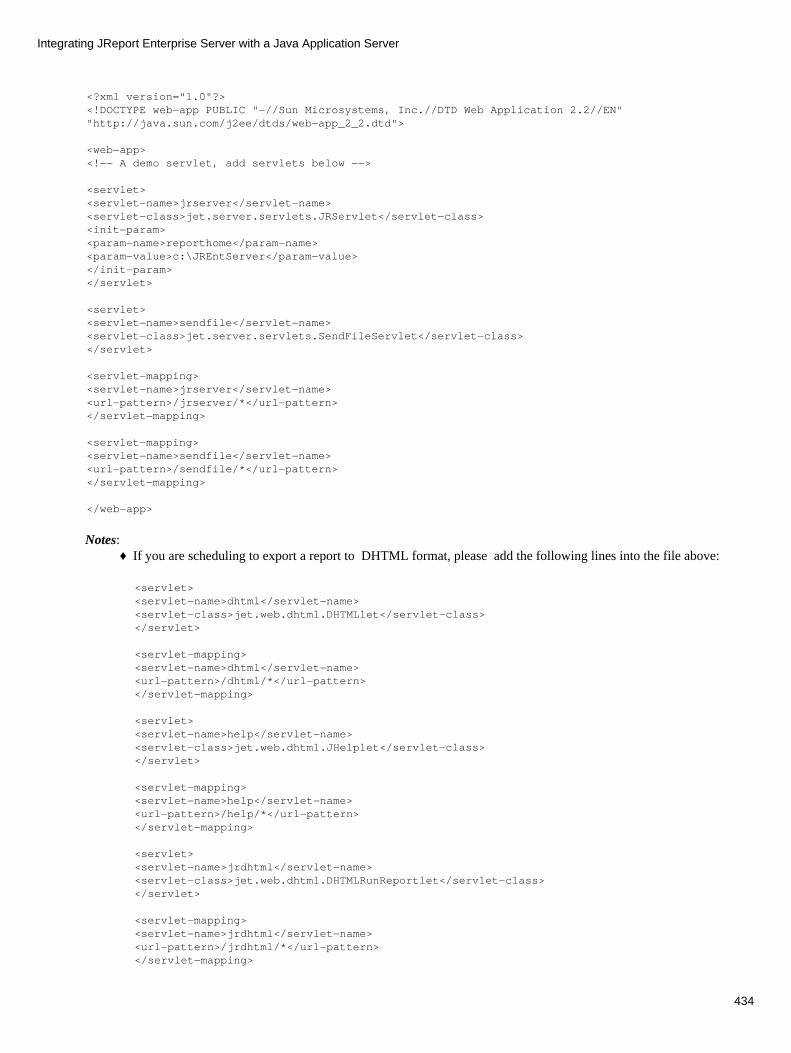
<?xml version="1.0"?><!DOCTYPE web−app PUBLIC "−//Sun Microsystems, Inc.//DTD Web Application 2.2//EN" "http://java.sun.com/j2ee/dtds/web−app_2_2.dtd">
<web−app> <!−− A demo servlet, add servlets below −−>
<servlet> <servlet−name>jrserver</servlet−name> <servlet−class>jet.server.servlets.JRServlet</servlet−class><init−param> <param−name>reporthome</param−name> <param−value>c:\JREntServer</param−value> </init−param> </servlet>
<servlet> <servlet−name>sendfile</servlet−name> <servlet−class>jet.server.servlets.SendFileServlet</servlet−class> </servlet>
<servlet−mapping> <servlet−name>jrserver</servlet−name> <url−pattern>/jrserver/*</url−pattern> </servlet−mapping>
<servlet−mapping> <servlet−name>sendfile</servlet−name> <url−pattern>/sendfile/*</url−pattern> </servlet−mapping>
</web−app>
Notes: If you are scheduling to export a report to DHTML format, please add the following lines into the file above:♦
<servlet> <servlet−name>dhtml</servlet−name> <servlet−class>jet.web.dhtml.DHTMLlet</servlet−class> </servlet>
<servlet−mapping> <servlet−name>dhtml</servlet−name> <url−pattern>/dhtml/*</url−pattern> </servlet−mapping>
<servlet> <servlet−name>help</servlet−name> <servlet−class>jet.web.dhtml.JHelplet</servlet−class> </servlet>
<servlet−mapping> <servlet−name>help</servlet−name> <url−pattern>/help/*</url−pattern> </servlet−mapping>
<servlet><servlet−name>jrdhtml</servlet−name><servlet−class>jet.web.dhtml.DHTMLRunReportlet</servlet−class></servlet>
<servlet−mapping><servlet−name>jrdhtml</servlet−name><url−pattern>/jrdhtml/*</url−pattern></servlet−mapping>
Integrating JReport Enterprise Server with a Java Application Server
434

If you want to support start/stop/restart report server in the integration environment, please add the following linesto the XML code above. (Note : This feature is based on Servlet2.3 specification. The <listener> part should beahead to the <servlet> part.)
♦
<listener><listener−class>jet.server.servlets.JRServerContextListener</listener−class></listener>
Reference: User's Guide | Integration with a Servlet Enabled Web Server | General Steps and Arguments.
Import JReport jar files.
Copy JREngine.jar, JRESServlets.jar, hsqldb.jar, tar.jar, JRWebDesign.jar, xerces.jar and log4j−1.2.8.jar underC:\JREntServer\lib to C:\oc4j\j2ee\home\default−web−app\WEB−INF\lib.
Notes: If you are scheduling a report to export to the following formats, you should copy the corresponding class packageor jar to C:\oc4j\j2ee\home\default−web−app\WEB−INF\lib:
To Mail or use the " Mail Notification " function: activation.jar and mail.jar.1. To PDF & DHTML: Itext.jar. 2. To Excel: poiHSSF_151.jar. 3. To XML: xerces.jar . 4. To DHTML: JRWebDesign.jar. 5.
♦
If you are using DHTML tag libraries, please also add the following jar toC:\oc4j\j2ee\home\default−web−app\WEB−INF\lib: taglib.jar.
♦
4.
Start oc4j using c:\oc4j\j2ee\home\start_oc4j.bat5. Access JReport Enterprise Server (default port is 8888).
Load JReport default page by http://localhost:8888/jrserver
Access jsp using http://localhost:8888/jinfonet/index.jsphttp://localhost:8888/admin/index.jsp
6.
TroubleShooting
If you run into some problems when using JREntServer with the Oracleoc4j Application Server, please send the log files ofJREntServer to [email protected] .The following procedure illustrates how to generate the log files:
Edit web.xml under C:\oc4j\j2ee\home\default−web−app\WEB−INF as below: 1.
<?xml version="1.0"?> <!DOCTYPE web−app PUBLIC "−//Sun Microsystems, Inc.//DTD Web Application 2.2//EN" "http://java.sun.com/j2ee/dtds/web−app_2_2.dtd">
<web−app> <!−− A demo servlet, add servlets below −−> <servlet> <servlet−name>snoop</servlet−name> <servlet−class>SnoopServlet</servlet−class> </servlet>
<servlet> <servlet−name> jrserver </servlet−name> <servlet−class> jet.server.servlets.JRServlet </servlet−class> <init−param>
Integrating JReport Enterprise Server with a Java Application Server
435

<param−name>reporthome</param−name> <param−value>c:\JREntServer</param−value> <param−name>logall</param−name> <param−value>true</param−value></init−param> </servlet>
<servlet−mapping> <servlet−name> jrserver </servlet−name> <url−pattern> /jrserver/* </url−pattern> </servlet−mapping>
Restart oc4j, and try to reproduce the problem. 2. After reproducing the problem, send us the log files under %JREntServer_installroot%\logs. 3.
Running with Orion Server 1.5.2 on NT
To integrate with the Orion Server 1.5.2 on NT, please take the following steps:
Download and install Orion Server and JReport Enterprise Server. Go to http://www.jinfonet.com/webpage/support/download.htm to download JReport Enterprise Server and installit.
1.
Then go to http://www.orionserver.com and download the Orion Server ZIP. Install it under D:\orionserver. 2.
1.
Create a WAR archive servlet.war as described in the chapter Deploying JReport Enterprise Server by a War file of User'sGuide.
2.
Copy servlet.war into D:\orionserver and start orionserver with the following command:
java −jar orion.jar
3.
Access JReport Enterprise Server.
Load default page of JReport Enterprise Server using http://localhost:8040/servlet/jrserver,
Load jsp pages byhttp://localhost:8040/jinfonet/index.jsphttp://localhost:8040/admin/index.jsp
4.
Integrating with ATG DAS 6.1.0 by a War File
Assuming that
JReport Enterprise Server 7.1 is installed under C:\JREntServer. • ATG DAS 6.1.0 is installed under C:\ATG.•
Integrating by Using A New .ear File
Creating a War File
Create a new directory in your local disk. For example, D:\servlet. 1. Create a sub directory WEB−INF under it: D:\servlet\WEB−INF. 2. Generate a web.xml as follows, and put it under D:\servlet\WEB−INF. 3.
<?xml version="1.0" ?><!DOCTYPE web−app PUBLIC "−//Sun Microsystems, Inc.//DTD Web Application 2.3//EN""http://java.sun.com/dtd/web−app_2_3.dtd"><web−app>
Integrating JReport Enterprise Server with a Java Application Server
436

<servlet><servlet−name>jrserver</servlet−name><servlet−class>jet.server.servlets.JRServlet</servlet−class><init−param><param−name>reporthome</param−name><param−value>C:\JREntServer</param−value></init−param></servlet>
<servlet><servlet−name>sendfile</servlet−name><servlet−class>jet.server.servlets.SendFileServlet</servlet−class></servlet>
<servlet−mapping><servlet−name>jrserver</servlet−name><url−pattern>/jrserver/*</url−pattern></servlet−mapping>
<servlet−mapping><servlet−name>sendfile</servlet−name><url−pattern>/sendfile/*</url−pattern></servlet−mapping>
</web−app>
Notes:
If you are scheduling to export a report to DHTML format, please add the following lines into the file above:♦
<servlet><servlet−name>dhtml</servlet−name><servlet−class>jet.web.dhtml.DHTMLlet</servlet−class></servlet>
<servlet−mapping><servlet−name>dhtml</servlet−name><url−pattern>/dhtml/*</url−pattern></servlet−mapping>
<servlet><servlet−name>help</servlet−name> <servlet−class>jet.web.dhtml.JHelplet</servlet−class></servlet>
<servlet−mapping> <servlet−name>help</servlet−name> <url−pattern>/help/*</url−pattern></servlet−mapping>
<servlet><servlet−name>jrdhtml</servlet−name><servlet−class>jet.web.dhtml.DHTMLRunReportlet</servlet−class></servlet>
<servlet−mapping> <servlet−name>jrdhtml</servlet−name><url−pattern>/jrdhtml/*</url−pattern> </servlet−mapping>
If you want to support start/stop/restart report server in an integration environment, please add the following linesto the XML code above. (Note: This feature is based on Servlet2.3 specification. The <listener> part should beahead to the <servlet> part.)
♦
<listener><listener−class>jet.server.servlets.JRServerContextListener</listener−class></listener>
Integrating JReport Enterprise Server with a Java Application Server
437
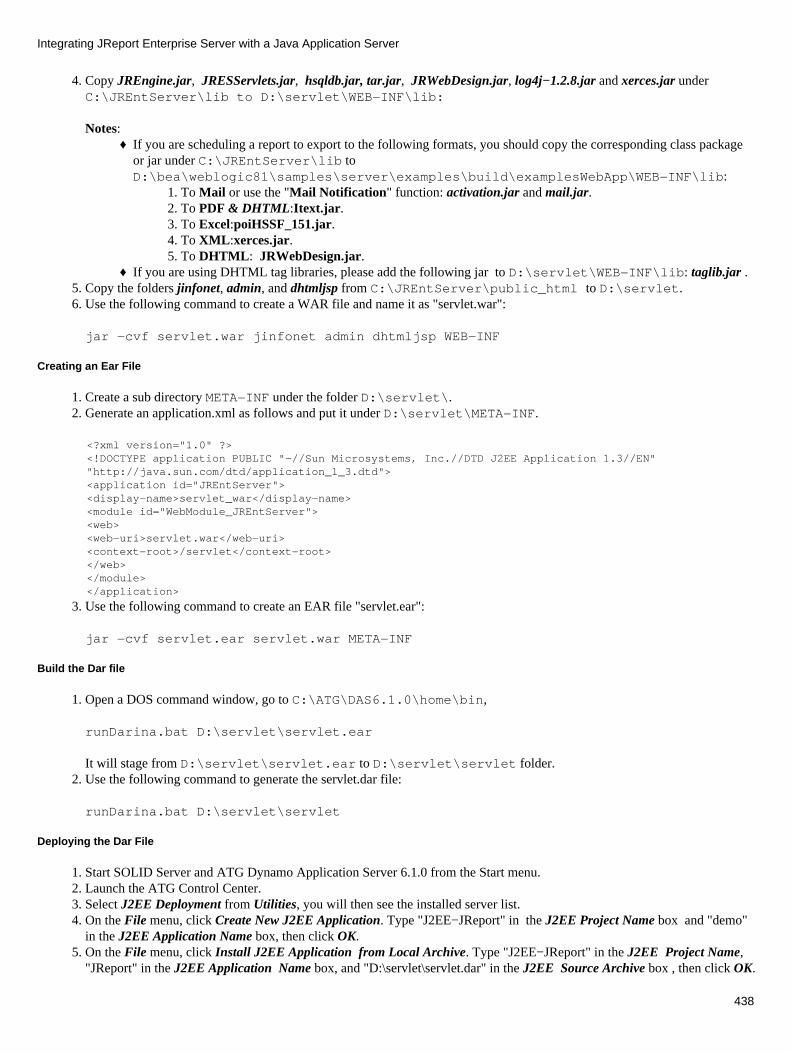
Copy JREngine.jar, JRESServlets.jar, hsqldb.jar, tar.jar, JRWebDesign.jar, log4j−1.2.8.jar and xerces.jar underC:\JREntServer\lib to D:\servlet\WEB−INF\lib:
Notes:
4.
If you are scheduling a report to export to the following formats, you should copy the corresponding class packageor jar under C:\JREntServer\lib toD:\bea\weblogic81\samples\server\examples\build\examplesWebApp\WEB−INF\lib:
To Mail or use the "Mail Notification" function: activation.jar and mail.jar.1. To PDF & DHTML:Itext.jar.2. To Excel:poiHSSF_151.jar.3. To XML:xerces.jar.4. To DHTML: JRWebDesign.jar. 5.
♦
If you are using DHTML tag libraries, please add the following jar to D:\servlet\WEB−INF\lib: taglib.jar . ♦ Copy the folders jinfonet, admin, and dhtmljsp from C:\JREntServer\public_html to D:\servlet.5. Use the following command to create a WAR file and name it as "servlet.war":
jar −cvf servlet.war jinfonet admin dhtmljsp WEB−INF
6.
Creating an Ear File
Create a sub directory META−INF under the folder D:\servlet\. 1. Generate an application.xml as follows and put it under D:\servlet\META−INF.2.
<?xml version="1.0" ?><!DOCTYPE application PUBLIC "−//Sun Microsystems, Inc.//DTD J2EE Application 1.3//EN" "http://java.sun.com/dtd/application_1_3.dtd"><application id="JREntServer"><display−name>servlet_war</display−name><module id="WebModule_JREntServer"><web><web−uri>servlet.war</web−uri><context−root>/servlet</context−root></web></module></application>
Use the following command to create an EAR file "servlet.ear":
jar −cvf servlet.ear servlet.war META−INF
3.
Build the Dar file
Open a DOS command window, go to C:\ATG\DAS6.1.0\home\bin,
runDarina.bat D:\servlet\servlet.ear
It will stage from D:\servlet\servlet.ear to D:\servlet\servlet folder.
1.
Use the following command to generate the servlet.dar file:
runDarina.bat D:\servlet\servlet
2.
Deploying the Dar File
Start SOLID Server and ATG Dynamo Application Server 6.1.0 from the Start menu. 1. Launch the ATG Control Center.2. Select J2EE Deployment from Utilities, you will then see the installed server list.3. On the File menu, click Create New J2EE Application. Type "J2EE−JReport" in the J2EE Project Name box and "demo"in the J2EE Application Name box, then click OK.
4.
On the File menu, click Install J2EE Application from Local Archive. Type "J2EE−JReport" in the J2EE Project Name,"JReport" in the J2EE Application Name box, and "D:\servlet\servlet.dar" in the J2EE Source Archive box , then click OK.
5.
Integrating JReport Enterprise Server with a Java Application Server
438

Right−click "j2ee−apps/demo" and click Delete J2EE Application or Project to remove "j2ee−apps/demo", and then closeATG Control Center.
6.
Modifying dynamoEnv.bat File
Open dynamoEnv.bat under C:\ATG\DAS6.1.0\home\bin, add−Dreporthome=%JREPORT_HOME% like
:: Only set these JAVA_ARGS if we are not using another 3rd party server :: (e.g.weblogic) for our application server
If DEFINED THIRD_PARTY_APP_SERVER goto :modulePathset JAVA_ARGS=−Djava.security.policy="%DYNAMO_HOME%/lib/java.policy"−Dreporthome=C:\JREntServer −Datg.j2eeserver.root="%DAS_ROOT%" %JAVA_ARGS%
Modifying the properties of JReport Enterprise Server
Modify the properties in server.properties under C:\JREntServer\bin
jsp.webapp.sendfile=/servlet/sendfileweb.design_servlet_path=/servlet/webreportingweb.dhtml_servlet_path=/servlet/dhtmlweb.jreport_servlet_path=/servlet/jrserverweb.dhtml_servlet_entry_path=/servlet/jrdhtmlweb.dhtml_jsp_path=/servlet/dhtmljsp
Note: If you want to view report in DHTML format, please modify this property:
web.newwindow.same_name=true
Modify the redirect.properties under C:\JREntServer\bin.
jsp_path=/servlet/jinfonet/
Set RMI Service
By default, the ATG server will start its own RMI server, which may conflict with JReport Enterprise servers RMI service. We havethree methods to modify the RMI service, and you can choose one to implement:
Use ATG servers default RMI registry.
By default, ATG server will start its own RMI server at port 8860. We can use this RMI registry. Open the fileC:\ATG\DAS6.1.0\home\bin\j2eeEnv.bat, in the last line, add
set CLASSPATH=%CLASSPATH%;C:\JREntServer\lib\JREngine.jar;C:\JREntServer\lib\JRESServlets.jar;C:\JREntserver\lib\hsqldb.jar;C:\JREntServer\lib\log4j−1.2.8.jar;C:\JREntServer\lib\JRWebDesign.jar;C:\JREntServer\lib\xerces.jar;
then, edit the server.properties file, change cluster.admin.rmi.port to 8860.
Drawback: We add our .jar files into the classpath of the ATG server. It is not a standard way to integrate an application to an Appserver, since our .jar files may affect other applications.
Disable RMI server of the ATG server
Go to ATG Dynamo Administration: http://hostname:8830. Click Configuration Manager > default configuration > RMIServer, uncheck "Enable RMI Service".
Integrating JReport Enterprise Server with a Java Application Server
439
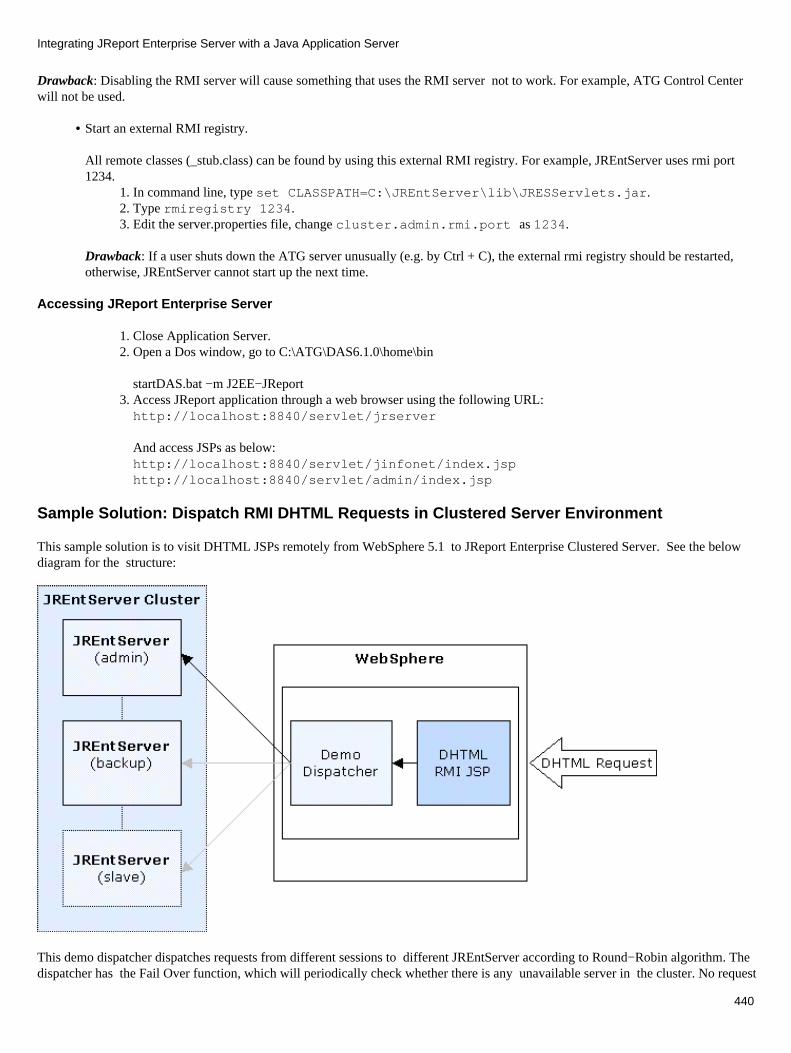
Drawback: Disabling the RMI server will cause something that uses the RMI server not to work. For example, ATG Control Centerwill not be used.
Start an external RMI registry.
All remote classes (_stub.class) can be found by using this external RMI registry. For example, JREntServer uses rmi port1234.
In command line, type set CLASSPATH=C:\JREntServer\lib\JRESServlets.jar.1. Type rmiregistry 1234.2. Edit the server.properties file, change cluster.admin.rmi.port as 1234.3.
•
Drawback: If a user shuts down the ATG server unusually (e.g. by Ctrl + C), the external rmi registry should be restarted,otherwise, JREntServer cannot start up the next time.
Accessing JReport Enterprise Server
Close Application Server. 1. Open a Dos window, go to C:\ATG\DAS6.1.0\home\bin
startDAS.bat −m J2EE−JReport
2.
Access JReport application through a web browser using the following URL: http://localhost:8840/servlet/jrserver
And access JSPs as below: http://localhost:8840/servlet/jinfonet/index.jsp http://localhost:8840/servlet/admin/index.jsp
3.
Sample Solution: Dispatch RMI DHTML Requests in Clustered Server Environment
This sample solution is to visit DHTML JSPs remotely from WebSphere 5.1 to JReport Enterprise Clustered Server. See the belowdiagram for the structure:
This demo dispatcher dispatches requests from different sessions to different JREntServer according to Round−Robin algorithm. Thedispatcher has the Fail Over function, which will periodically check whether there is any unavailable server in the cluster. No request
Integrating JReport Enterprise Server with a Java Application Server
440

will be dispatched to the unavailable server until the server is checked to be available again.
In general, the solution can be categorized into the below major steps:
Set up the Server cluster.1. Generate a War file containing DHTML RMI JSP and Dispatcher for WebSphere.2. Deploy the War file to WebSphere.3. Configure cluster JReport Enterprise Server4.
In the following part, we will explain clearly what exact operations you are expected to make in each of the main steps.
Setting up the Server Cluster
You can go to the JReport Enterprise Server Cluster chapter for the background knowledge of JReport cluster concepts andconfigurations. Click here for the specific steps of setting up JREntServer in a cluster. In this example we will set up two JReportEnterprise Servers into the cluster using the Round Robin algorithm.
192.168.126.116
192.168.126.115
Generating a War file containing DHTML RMI JSP and Dispatcher for Websphere
Create a new directory in your local disk. e.g. d:\servlet. 1. Create a sub directory WEB−INF under it: d:\servlet\WEB−INF. 2. Generate a web.xml like following and put it under d:\servlet\WEB−INF.3.
<?xml version="1.0" encoding="ISO−8859−1"?> <!DOCTYPE web−appPUBLIC "−//Sun Microsystems, Inc.//DTD Web Application 2.3//EN""http://java.sun.com/dtd/web−app_2_3.dtd">
<web−app>
<servlet><servlet−name>sendfile</servlet−name><servlet−class>jet.server.servlets.SendFileServlet</servlet−class></servlet>
<servlet><servlet−name>remotedhtml</servlet−name><servlet−class>jet.web.dhtml.SimpleDHTMLlet</servlet−class></servlet>
<servlet><servlet−name>help</servlet−name><servlet−class>jet.web.dhtml.RemoteJHelplet</servlet−class></servlet>
<servlet−mapping><servlet−name>sendfile</servlet−name><url−pattern>/sendfile/*</url−pattern></servlet−mapping>
<servlet−mapping><servlet−name>remotedhtml</servlet−name>
Integrating JReport Enterprise Server with a Java Application Server
441
<url−pattern>/remotedhtml/*</url−pattern></servlet−mapping><servlet−mapping>
<servlet−name>help</servlet−name><url−pattern>/help/*</url−pattern></servlet−mapping>
</web−app>
4. Create a directory lib under d:\servlet\WEB−INF.
Copy the class file JREngine.jar, JRESServlets.jar, log4j−1.2.8.jar, and JRWebDesign.jarfrom JREntServer\lib to d:\servlet\WEB−INF\lib.
5.
Compile the dispatcher with server\lib\JRESServlets.jar and server\lib\servlet.jar. Then underd:\servlet\WEB−INF, create folder and subfolder d:\servlet\WEB−INF\classes\demodispatch. Copythe dispather class − demoRemoteDispatcher.class to this folder.
Note: DemoRemoteDispatcher.java and DemoRemoteDispatcher.class is located under%serverhome%\help\en\srv−material.
6.
Copy folder jinfonet, and dhtmljsp from JREntServer\public_html to d:\servlet. 7. Modify d:\servlet\dhtmljsp\dhtml.jsp page as follows:
Remark following lines
8.
String strUrl = (String)HttpUtil.getJSPWebAppName(APIConst.APPNAME_DHTML);if( (strUrl != null) && ( strUrl.indexOf("/dhtml") != −1)strUrl = strUrl.substring(0,strUrl.indexOf("/dhtml"));}
Changeservice.setURI(HttpUtil.getJSPWebAppName(APIConst.APPNAME_DHTML));service.setErrorPage((String)request.getContextPath()+"/dhtmljsp/errorpage.jsp");
to service.setURI("/remotedhtml");service.setErrorPage("/dhtmljsp/errorpage.jsp");
Using the following command to create a WAR file, name it as servlet.war:
d:\servlet>jar −cvf servlet.war *
9.
Deploying the War file to Websphere
Start IBM WebSphere 5.1. (WebSphere 5.0 is also ok for the solution). 1. Open Administrative Console. You can open Administrative Console by using the Start Menu, or by using the URL:http://hostname:9090/admin/, where the hostname is host name or IP address, and 9090 is the port number.
2.
After successfully log in, expand the Applications node, and then click Install New Application. 3. Click Browse to select your .war file. In the Context Root field, type "/servlet/" ("/servlet" is also ok). Click Next. 4. Do not check any option on this page, and then click Next. 5. Type "RMI_DHTML" in the Application Name field. DO NOT check the Pre−compile JSP option. Click Next. 6. Do not make any changes in the next two pages. 7. Click Finish on the Summary page. The installing process may take several minutes, please wait until the process iscompleted.
8.
After the installation process is completed, click Save to Master Configuration. Then in the Save to Master Configurationdialog, click Save.
9.
This step is to configure the dispatcher and cluster server. Go to WebSphere Admin Control to add some properties for thisdispatcher. Expand Servers, go through Application Servers | Server1 | Process Definition (in the AdditionalProperties table) | Java Virtual Machine | Custom Properties (in the Additional Properties table).
10.
Integrating JReport Enterprise Server with a Java Application Server
442
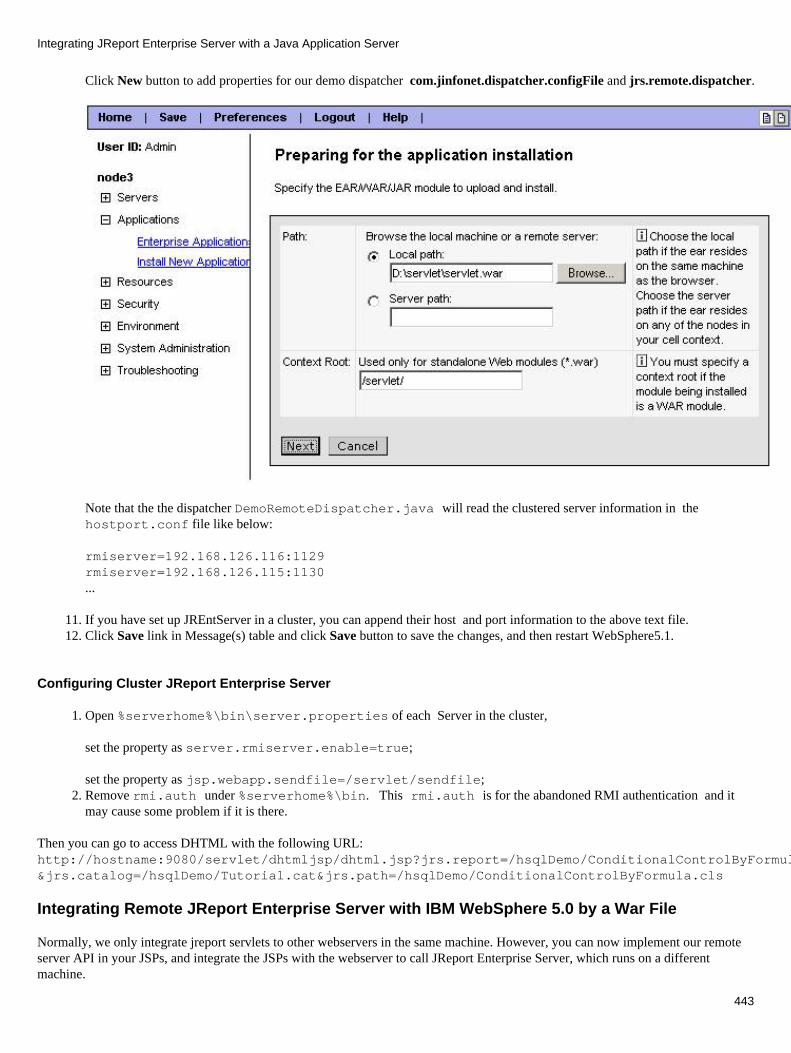
Click New button to add properties for our demo dispatcher com.jinfonet.dispatcher.configFile and jrs.remote.dispatcher.
Note that the the dispatcher DemoRemoteDispatcher.java will read the clustered server information in thehostport.conf file like below:
rmiserver=192.168.126.116:1129rmiserver=192.168.126.115:1130...
If you have set up JREntServer in a cluster, you can append their host and port information to the above text file.11. Click Save link in Message(s) table and click Save button to save the changes, and then restart WebSphere5.1.12.
Configuring Cluster JReport Enterprise Server
Open %serverhome%\bin\server.properties of each Server in the cluster,
set the property as server.rmiserver.enable=true;
set the property as jsp.webapp.sendfile=/servlet/sendfile;
1.
Remove rmi.auth under %serverhome%\bin. This rmi.auth is for the abandoned RMI authentication and itmay cause some problem if it is there.
2.
Then you can go to access DHTML with the following URL:http://hostname:9080/servlet/dhtmljsp/dhtml.jsp?jrs.report=/hsqlDemo/ConditionalControlByFormula.cls&jrs.catalog=/hsqlDemo/Tutorial.cat&jrs.path=/hsqlDemo/ConditionalControlByFormula.cls
Integrating Remote JReport Enterprise Server with IBM WebSphere 5.0 by a War File
Normally, we only integrate jreport servlets to other webservers in the same machine. However, you can now implement our remoteserver API in your JSPs, and integrate the JSPs with the webserver to call JReport Enterprise Server, which runs on a differentmachine.
Integrating JReport Enterprise Server with a Java Application Server
443

Here is an example illustrating the case of using JSPs based on remote server APIs to integrate with IBM WebSphere 5.0.
Assuming that
WebSphere 5.0 is installed under C:\WebSphere. • JReport Enterprise Server is installed under C:\JREntServer. • JReport jsp.war file is located under C:\jsp. •
To integrate remote JReport Enterprise Server with IBM WebSphere 5.0, please take the following steps:
Generate a War file.1. Deploying the War file.2. Configure JReport Enterprise Server.3.
Below show the details for each step:
Generating the War fileCreate a new directory in your local disk. e.g. c:\jsp. 1. Create a sub directory WEB−INF under it: c:\jsp\WEB−INF. 2. Generate a web.xml like following and put it under c:\jsp\WEB−INF.3.
1.
<?xml version="1.0" encoding="ISO−8859−1"?>
<!DOCTYPE web−app PUBLIC "−//Sun Microsystems, Inc.//DTD Web Application 2.3//EN" "http://java.sun.com/dtd/web−app_2_3.dtd">
<web−app>
<servlet><servlet−name>sendfile</servlet−name> <servlet−class>jet.server.servlets.SendFileServlet</servlet−class></servlet>
<servlet><servlet−name>remotedhtml</servlet−name><servlet−class>jet.web.dhtml.SimpleDHTMLlet</servlet−class></servlet>
<servlet><servlet−name>help</servlet−name><servlet−class>jet.web.dhtml.RemoteJHelplet</servlet−class></servlet>
<servlet−mapping><servlet−name>sendfile</servlet−name><url−pattern>/sendfile/*</url−pattern></servlet−mapping>
<servlet−mapping><servlet−name>remotedhtml</servlet−name><url−pattern>/remotedhtml/*</url−pattern></servlet−mapping>
<servlet−mapping><servlet−name>help</servlet−name><url−pattern>/help/*</url−pattern></servlet−mapping>
Integrating JReport Enterprise Server with a Java Application Server
444

</web−app>
Create a directory lib under c:\jsp\WEB−INF. 4. Copy the class file JREngine.jar, JRESServlets.jar, log4j−1.2.8.jar, and JRWebDesign.jar fromC:\JREntServer\lib to C:\jsp\WEB−INF\lib.
5.
Copy folders jinfonet, and dhtmljsp from C:\JREntServer\public_html to c:\jsp. 6. In the dhtmljsp folder, open and modify dhtml.jsp as follows:7.
Remove the following lines: 1. String strUrl = (String)HttpUtil.getJSPWebAppName(APIConst.APPNAME_DHTML);if( (strUrl != null) && ( strUrl.indexOf("/dhtml") != −1) ) { strUrl = strUrl.substring(0,strUrl.indexOf("/dhtml")); }
Modify the lines below:
Change
service.setURI(HttpUtil.getJSPWebAppName(APIConst.APPNAME_DHTML));
to
service.setURI("/remotedhtml");
And, change
service.setErrorPage((String)request.getContextPath()+"/dhtmljsp/errorpage.jsp");
to
service.setErrorPage("/dhtmljsp/errorpage.jsp");
2.
Using the following command to create a WAR file, and name it as "jsp.war":
C:\jsp>jar −cvf jsp.war *
8.
Deploying the War fileStart IBM WebSphere 5.0.1. Open Administrative Console. You can open Administrative Console by using the Start Menu, or by using the url:http://hostname:9090/admin/, where the hostname is host name or IP address, and 9090 is the portnumber.
2.
After successfully log in, expand the Applications node, and then click Install New Application. 3. Click Browse to select your .war file, in the Context Root field, type "/jsp/", and then click Next. 4. Do not check any option on this page, click Next. 5. On the Step 1: Provide options to perform the installation page, type "JReport JSP " in the Application Namefield, and then click Next.
6.
Do not make any changes to the next two pages. 7. Click Finish on the Summary page. The installing process may take several minutes, please wait until the processis completed.
8.
After the installation process successfully completed, click Save to Master Configuration, and then click Save. 9. Expand Servers, go through Application Servers | Server1 | Process Definition (in the Additional Propertiestable) | Java Virtual Machine (in the Additional Properties table), click Custom Properties, add two parameters,
Name: jrs.remote.hostValue: server hostnameName: jrs.remote.rmiportValue: server rmi port
Name: jrs.rmi.auth_fileValue: Full path name of JREntServer authentication file (normally named "rmi.auth"). Please refer to User Guide |Server API and RMI API | Secure RMI Objects and Universal Remote Object Management.
10.
2.
Integrating JReport Enterprise Server with a Java Application Server
445

Click OK, save the changes, and then restart WebSphere5.Configure JReport Enterprise Server
Open %serverhome%\bin\server.properties,
set the property as server.rmiserver.enable=true;
set the property as jsp.webapp.sendfile=/jsp/sendfile;
1.
Start JReport Enterprise Server.
Access JReport Enterprise Server using the following urls:
http://localhost:9080/jsp/jinfonet/index.jsp
2.
3.
Integrating Remote JReport Enterprise Server with WebLogic 7.0 by a War File
Normally, we only integrate JReport servlets to other webservers in the same machine. However, you can now implement our remoteserver API in your JSPs, and integrate the JSPs with the webserver to call JReport Enterprise Server, which runs on a differentmachine.
Here is an example illustrating the case of using JSPs based on remote server APIs to integrate with WebLogic 7.0.
Assuming that
WebLogic 7.0 is installed under C:\bea.• JReport Enterprise Server is installed under C:\JREntServer.• JReport jsp.war file is located under C:\jsp.•
To integrate remote JReport Enterprise Server with WebLogic 7.0, please take the following steps:
Generate a War file. 1. Deploy the War file. 2. Configure JReport Enterprise Server.3.
Below show the details of each step:
Generate a War fileCreate a new directory in your local disk, e.g. C:\jsp.a. Create a sub directory WEB−INF under it: C:\jsp\WEB−INF.b. Generate a web.xml file like following and put it under C:\jsp\WEB−INF.c.
<?xml version="1.0" encoding="ISO−8859−1"?>
<!DOCTYPE web−appPUBLIC "−//Sun Microsystems, Inc.//DTD Web Application 2.3//EN""http://java.sun.com/dtd/web−app_2_3.dtd">
<web−app>
<servlet><servlet−name>sendfile</servlet−name><servlet−class>jet.server.servlets.SendFileServlet</servlet−class></servlet>
<servlet><servlet−name>remotedhtml</servlet−name><servlet−class>jet.web.dhtml.SimpleDHTMLlet</servlet−class>
1.
Integrating JReport Enterprise Server with a Java Application Server
446

</servlet>
<servlet−mapping><servlet−name>sendfile</servlet−name><url−pattern>/sendfile/*</url−pattern></servlet−mapping>
<servlet−mapping><servlet−name>remotedhtml</servlet−name><url−pattern>/remotedhtml/*</url−pattern></servlet−mapping>
<servlet><servlet−name>help</servlet−name><servlet−class>jet.web.dhtml.RemoteJHelplet</servlet−class></servlet>
<servlet−mapping><servlet−name>help</servlet−name><url−pattern>/help/*</url−pattern></servlet−mapping>
</web−app>
Create a directory lib under C:\jsp\WEB−INF.2. Copy the class file JREngine.jar, JRESServlets.jar, log4j−1.2.8.jar, and JRWebDesign.jar fromC:\JREntServer\lib to C:\jsp\WEB−INF\lib.
3.
Copy folder jinfonet, and dhtmljsp from C:\JREntServer\public_html to C:\jsp.4. In the dhtmljsp folder, open and modify dhtml.jsp as follows:
Remove the following lines:• String strUrl = (String)HttpUtil.getJSPWebAppName(APIConst.APPNAME_DHTML);if( (strUrl != null) && ( strUrl.indexOf("/dhtml") != −1) ) { strUrl = strUrl.substring(0,strUrl.indexOf("/dhtml")); }
5.
Modify the lines below:
Change
service.setURI(HttpUtil.getJSPWebAppName(APIConst.APPNAME_DHTML));
to
service.setURI("/remotedhtml");
Change
service.setMainPage(strUrl+"/dhtmljsp/dhtmlmain.jsp");
to
service.setMainPage("/dhtmljsp/dhtmlmain.jsp");
And, change
service.setErrorPage((String)request.getContextPath()+"/dhtmljsp/errorpage.jsp");
to
6.
Integrating JReport Enterprise Server with a Java Application Server
447
service.setErrorPage("/dhtmljsp/errorpage.jsp");Using the following command to create a WAR file, and name it as jsp.war:
C:\jsp>jar −cvf jsp.war *
7.
Deploy the War fileStart WebLogic 7.0.a. Open the Administrative Console.
You can open the Administrative Console by using URL http://hostname:7001/console/, where thehostname is host name or IP address, and 7001 is the port number.
b.
After your successful login, in the Domain Configurations panel, click Web Applications node, and then clickConfigure a new Web Application.
c.
Click upload it through your browser, select your .war file by clicking the Browse button, and then click Upload.d. Click Select before jsp.war, choose the Target Server, and then click Configure and Deploy.e. Click Deploy All, to make the status of Deployed to be true.f. Edit the file startWLS.cmd under C:\bea\weblogic700\server\bin.
Add −Djrs.remote.host=server hostname −Djrs.remote.rmiport=server rmi port to the file,like:
−Dweblogic.ProductionModeEnabled=%STARTMODE%−Djava.security.policy="%WL_HOME%\server\lib\weblogic.policy"−Djrs.remote.host=192.168.126.114 −Djrs.remote.rmiport=1129 weblogic.Server
g.
•
Configure JReport Enterprise ServerOpen %serverhome%\bin\server.properties, set the properties as below:
server.rmiserver.enable=truejsp.webapp.sendfile=/jsp/sendfileweb.help_servlet_path=/jsp/help
a.
Delete the rmi.auth under %serverhome%\bin.b. Start JReport Enterprise Server.
Access JReport Enterprise Server using the following URL:
http://localhost:7001/jsp/jinfonet/index.jsp
c.
•
Deploying JReport Enterprise Server as a Self−Contained WAR/EAR
Introduction
JReport Enterprise Server is implemented using Java Servlet technology and Java Server Pages (JSP). These servlets and JSP pagesenable the user to work with any J2EE compliant application server and administer JReport Enterprise Server remotely through a webbrowser. In order to deploy to an application server, you must create a Web Application Archive (WAR) file or EnterpriseApplication Archive (EAR) file and use the deployment tools of the application server to deploy JReport Enterprise Server.
You do not need to install a standalone JReport Enterprise Server on the machine where the application server runs and specifyJReport Enterprise Server's installation root as the reporthome to put all JReport runtime environment, such as properties files,configuration files and resources.
A tool based on the Apache Ant project is provided by JReport Enterprise Server to build JReport Enterprise Server self−containedWAR/EAR files which contain the full JReport Server runtime environment. The self−contained WAR/EAR file can be deployed toany J2EE compliant application server without specifying a JReport Enterprise Server installation root as the reporthome.
Integrating JReport Enterprise Server with a Java Application Server
448
Building the Self−Contained War/Ear File
Introduction
JReport Enterprise Server provides a tool to build a self−contained WAR or EAR file. The tool is makewar.bat on Windows andmakewar.sh on Unix and uses the makewar.xml file under <install_root>\bin.
makewar.bat/makewar.sh: The batch/script file used to build the Server self−contained WAR/EAR according to the taskspecified in makewar.xml.
•
makewar.xml: The usage of this file are listed as follows: Tasks specified to build the War/Ear file. The task name will start with the tag <target name="xxx"...>.You can modify the task names; by default, the main tasks in the makewar.xml are:
making the server runtime environment◊ making the War file◊ making the Ear file◊
♦
Temp directories. The temp directory which is used to save the temp files when building the War/Ear (by default it is<install_root>\bin\distribute\temp)
◊
The directory which is used to store the generated War/Ear folder (by default it is<install_root>\bin\distribute).
◊
♦
The deployment descriptors, such as web.xml and application.xml. The configuration information, such as thedatabase connection information for the War/Ear file will be stored in these files.
♦
•
Usage of the tool
You can execute the batch/script file as follows:
makewar.bat/makewar.sh [−Dpredeploy=ReportFolder] [Task Name]
Meaning of the parameters:
−Dpredeploy=ReportFolder: Allows you to deploy the reports and catalogs under ReportFolder to the War/Ear file.• Task Name: Specifies whether to build the self−contained War or Ear. It can be buildWar or buildEar.•
See the examples of executing the file below:
Build the self−contained War file, and save the generated War file jreport.war at the default directory<install_root>\bin\distribute.
makewar.bat buildWar
•
Build the self−contained Ear file, and save the generated Ear file jreport.ear at the default directory<install_root>\bin\distribute.
makewar.bat buildEar
•
Build the the self−contained Ear file, and deploy the reports and catalogs under C:\myReport to the War file as well. Thegenerated War file jreport.war will be saved at the default directory <install_root>\bin\distribute.
makewar.bat −Dpredeploy=c:\myReport buildWar
•
Build the self−contained War file which is defined by makewar.xml (the default task), and the generated War file will besaved at the default directory <install_root>\bin\distribute.
makewar.bat
•
Integrating JReport Enterprise Server with a Java Application Server
449
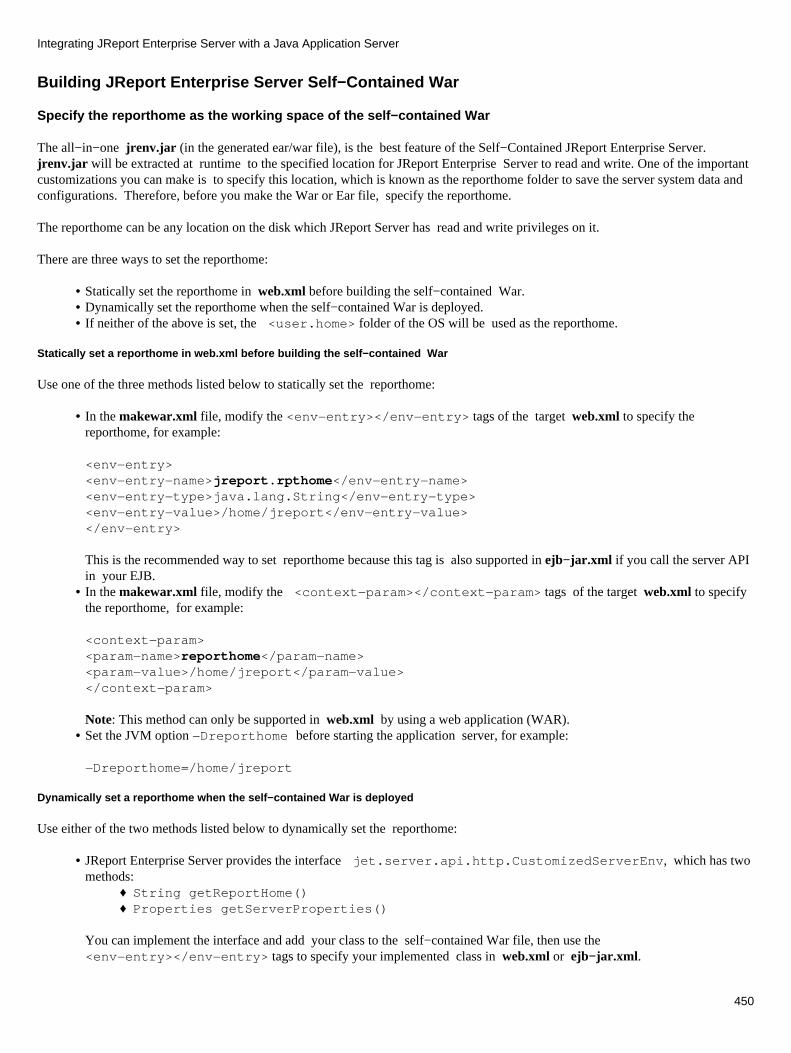
Building JReport Enterprise Server Self−Contained War
Specify the reporthome as the working space of the self−contained War
The all−in−one jrenv.jar (in the generated ear/war file), is the best feature of the Self−Contained JReport Enterprise Server.jrenv.jar will be extracted at runtime to the specified location for JReport Enterprise Server to read and write. One of the importantcustomizations you can make is to specify this location, which is known as the reporthome folder to save the server system data andconfigurations. Therefore, before you make the War or Ear file, specify the reporthome.
The reporthome can be any location on the disk which JReport Server has read and write privileges on it.
There are three ways to set the reporthome:
Statically set the reporthome in web.xml before building the self−contained War.• Dynamically set the reporthome when the self−contained War is deployed.• If neither of the above is set, the <user.home> folder of the OS will be used as the reporthome.•
Statically set a reporthome in web.xml before building the self−contained War
Use one of the three methods listed below to statically set the reporthome:
In the makewar.xml file, modify the <env−entry></env−entry> tags of the target web.xml to specify thereporthome, for example:
<env−entry><env−entry−name>jreport.rpthome</env−entry−name><env−entry−type>java.lang.String</env−entry−type><env−entry−value>/home/jreport</env−entry−value></env−entry>
This is the recommended way to set reporthome because this tag is also supported in ejb−jar.xml if you call the server APIin your EJB.
•
In the makewar.xml file, modify the <context−param></context−param> tags of the target web.xml to specifythe reporthome, for example:
<context−param><param−name>reporthome</param−name><param−value>/home/jreport</param−value></context−param>
Note: This method can only be supported in web.xml by using a web application (WAR).
•
Set the JVM option −Dreporthome before starting the application server, for example:
−Dreporthome=/home/jreport
•
Dynamically set a reporthome when the self−contained War is deployed
Use either of the two methods listed below to dynamically set the reporthome:
JReport Enterprise Server provides the interface jet.server.api.http.CustomizedServerEnv, which has twomethods:
String getReportHome()♦ Properties getServerProperties()♦
•
You can implement the interface and add your class to the self−contained War file, then use the<env−entry></env−entry> tags to specify your implemented class in web.xml or ejb−jar.xml.
Integrating JReport Enterprise Server with a Java Application Server
450

for example:
<env−entry><env−entry−name>jreport.servenv</env−entry−name> <!−− must be jreport.servenv −−> <env−entry−type>java.lang.String</env−entry−type><env−entry−value>my.JReportServerEnv</env−entry−value> <!−− your class name −−> </env−entry>
Notes:
JReport Enterprise Server will get the reporthome and properties from your implemented class when the War file isdeployed.
♦
The Properties returned from getServerProperties() can be properties listed in<install_root>\bin\server.properties, JVM System properties, or your self−defined ones.
♦
JReport Enterprise Server also provides an internally implemented class of the above interface −jet.server.MultipleInstanceServerEnv to support multiple JReport Enterprise Server instances in one J2EEapplication server, and the reporthome of each instance can be assigned by the above class automatically. To do this, followthe steps below:
In the file makewar.xml, use the <env−entry></env−entry> tags to specifyjet.server.api.http.CustomizedServerEnv in the target web.xml. For example:
<env−entry><env−entry−name>jreport.servenv</env−entry−name><env−entry−type>java.lang.String</env−entry−type><env−entry−value>jet.server.MultipleInstanceServerEnv</env−entry−value></env−entry>
1.
Because different JReport instances can't access the same JReport Server System Database at the same time, youneed to create a dbconfig.xml file to store the connection information, and put it under workspace\bin inJREnv.jar (you can find this file after extracting jreport.war) for each self−contained War.
For detailed information about modifying the dbconfig.xml, please refer to JReport Enterprise Server ManualUser's Guide | Administrating JReport Enterprise Server | Server Data Management.
2.
When the self−contained War is deployed, JReport will create a file .jreportrc under <user.home>, and eachJReport instance will read each reporthome from this file. This file must be created by JReport Enterprise Server,but you can edit the file to change the reporthome after this file is created.
3.
•
Use the default reporthome
If neither of the above methods is used to set the reporthome, the default reporthome will be used. It is<user.home>/jreport/default, where <user.home> is the system property user.home of the Java VM and JReportEnterprise Server has read and write privileges on this directory. Different OSs have different real paths for <user.home>, forexample:
For Windows: C:\Documents and Settings\usernameFor Unix/Linux: /home/username
Notes:
user.home is a system property of the Java VM (−Duser.home=xxx). So you can also specify different folders for thisJVM option.
•
If JReport Enterprise Server is running on Windows as a service, the username is the user who installed the service or thelogon user you specified for the service.
•
If JReport Enterprise Server is running as a Unix/Linux Daemon, you can specify the JVM system property−Duser.home in the script file which starts JReport Enterprise Server.
•
Integrating JReport Enterprise Server with a Java Application Server
451
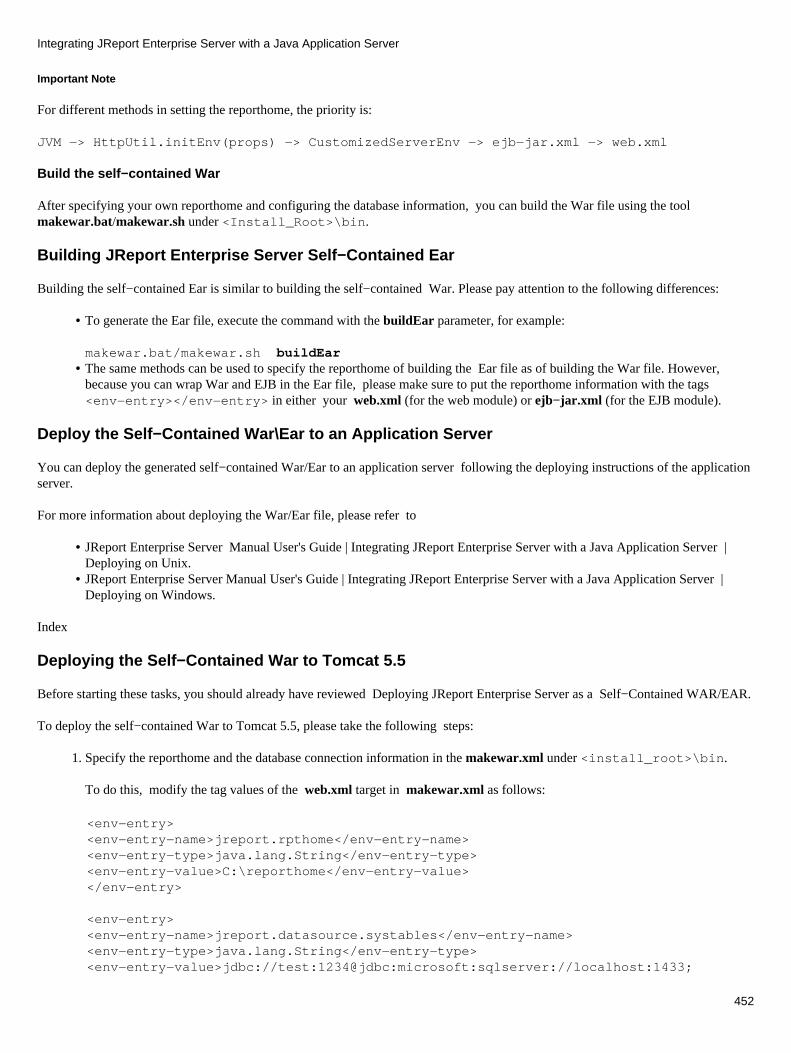
Important Note
For different methods in setting the reporthome, the priority is:
JVM −> HttpUtil.initEnv(props) −> CustomizedServerEnv −> ejb−jar.xml −> web.xml
Build the self−contained War
After specifying your own reporthome and configuring the database information, you can build the War file using the toolmakewar.bat/makewar.sh under <Install_Root>\bin.
Building JReport Enterprise Server Self−Contained Ear
Building the self−contained Ear is similar to building the self−contained War. Please pay attention to the following differences:
To generate the Ear file, execute the command with the buildEar parameter, for example:
makewar.bat/makewar.sh buildEar
•
The same methods can be used to specify the reporthome of building the Ear file as of building the War file. However,because you can wrap War and EJB in the Ear file, please make sure to put the reporthome information with the tags<env−entry></env−entry> in either your web.xml (for the web module) or ejb−jar.xml (for the EJB module).
•
Deploy the Self−Contained War\Ear to an Application Server
You can deploy the generated self−contained War/Ear to an application server following the deploying instructions of the applicationserver.
For more information about deploying the War/Ear file, please refer to
JReport Enterprise Server Manual User's Guide | Integrating JReport Enterprise Server with a Java Application Server |Deploying on Unix.
•
JReport Enterprise Server Manual User's Guide | Integrating JReport Enterprise Server with a Java Application Server |Deploying on Windows.
•
Index
Deploying the Self−Contained War to Tomcat 5.5
Before starting these tasks, you should already have reviewed Deploying JReport Enterprise Server as a Self−Contained WAR/EAR.
To deploy the self−contained War to Tomcat 5.5, please take the following steps:
Specify the reporthome and the database connection information in the makewar.xml under <install_root>\bin.
To do this, modify the tag values of the web.xml target in makewar.xml as follows:
1.
<env−entry><env−entry−name>jreport.rpthome</env−entry−name><env−entry−type>java.lang.String</env−entry−type><env−entry−value>C:\reporthome</env−entry−value></env−entry>
<env−entry><env−entry−name>jreport.datasource.systables</env−entry−name><env−entry−type>java.lang.String</env−entry−type><env−entry−value>jdbc://test:1234@jdbc:microsoft:sqlserver://localhost:1433;
Integrating JReport Enterprise Server with a Java Application Server
452
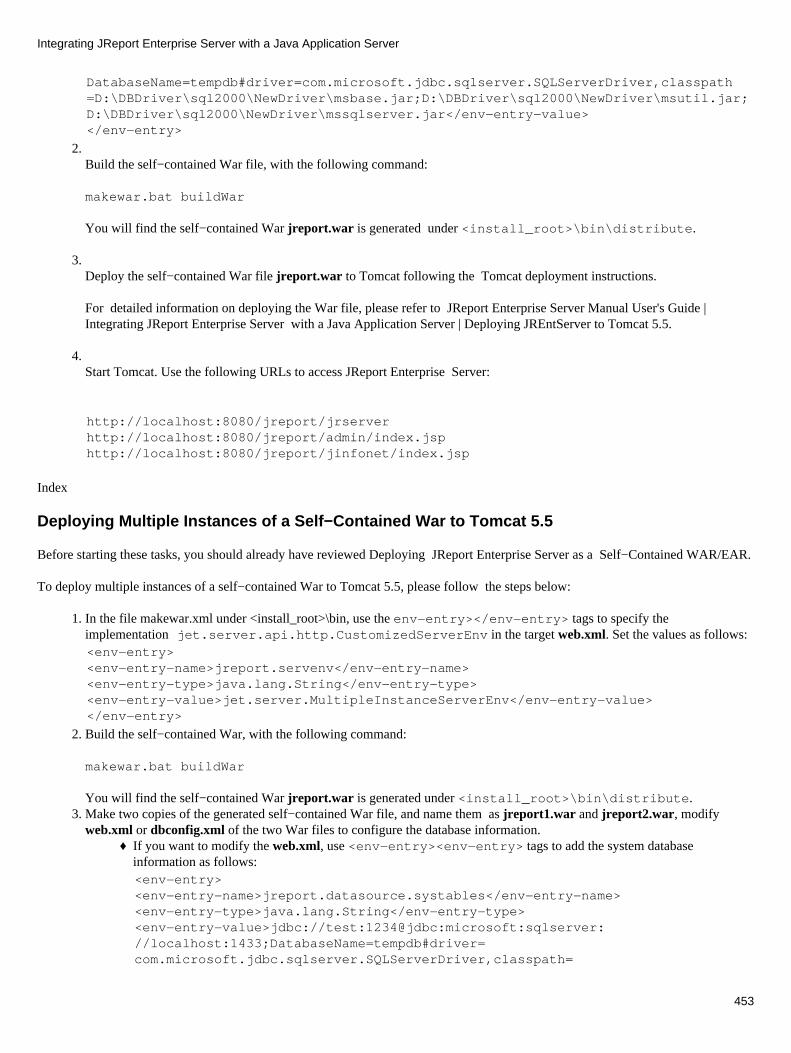
DatabaseName=tempdb#driver=com.microsoft.jdbc.sqlserver.SQLServerDriver,classpath=D:\DBDriver\sql2000\NewDriver\msbase.jar;D:\DBDriver\sql2000\NewDriver\msutil.jar;D:\DBDriver\sql2000\NewDriver\mssqlserver.jar</env−entry−value></env−entry>
2. Build the self−contained War file, with the following command:
makewar.bat buildWar
You will find the self−contained War jreport.war is generated under <install_root>\bin\distribute.
3. Deploy the self−contained War file jreport.war to Tomcat following the Tomcat deployment instructions.
For detailed information on deploying the War file, please refer to JReport Enterprise Server Manual User's Guide |Integrating JReport Enterprise Server with a Java Application Server | Deploying JREntServer to Tomcat 5.5.
4. Start Tomcat. Use the following URLs to access JReport Enterprise Server:
http://localhost:8080/jreport/jrserver http://localhost:8080/jreport/admin/index.jsp http://localhost:8080/jreport/jinfonet/index.jsp
Index
Deploying Multiple Instances of a Self−Contained War to Tomcat 5.5
Before starting these tasks, you should already have reviewed Deploying JReport Enterprise Server as a Self−Contained WAR/EAR.
To deploy multiple instances of a self−contained War to Tomcat 5.5, please follow the steps below:
In the file makewar.xml under <install_root>\bin, use the env−entry></env−entry> tags to specify theimplementation jet.server.api.http.CustomizedServerEnv in the target web.xml. Set the values as follows:
1.
<env−entry><env−entry−name>jreport.servenv</env−entry−name><env−entry−type>java.lang.String</env−entry−type><env−entry−value>jet.server.MultipleInstanceServerEnv</env−entry−value></env−entry>
Build the self−contained War, with the following command:
makewar.bat buildWar
You will find the self−contained War jreport.war is generated under <install_root>\bin\distribute.
2.
Make two copies of the generated self−contained War file, and name them as jreport1.war and jreport2.war, modifyweb.xml or dbconfig.xml of the two War files to configure the database information.
If you want to modify the web.xml, use <env−entry><env−entry> tags to add the system databaseinformation as follows:
♦
<env−entry><env−entry−name>jreport.datasource.systables</env−entry−name><env−entry−type>java.lang.String</env−entry−type><env−entry−value>jdbc://test:1234@jdbc:microsoft:sqlserver://localhost:1433;DatabaseName=tempdb#driver=com.microsoft.jdbc.sqlserver.SQLServerDriver,classpath=
3.
Integrating JReport Enterprise Server with a Java Application Server
453
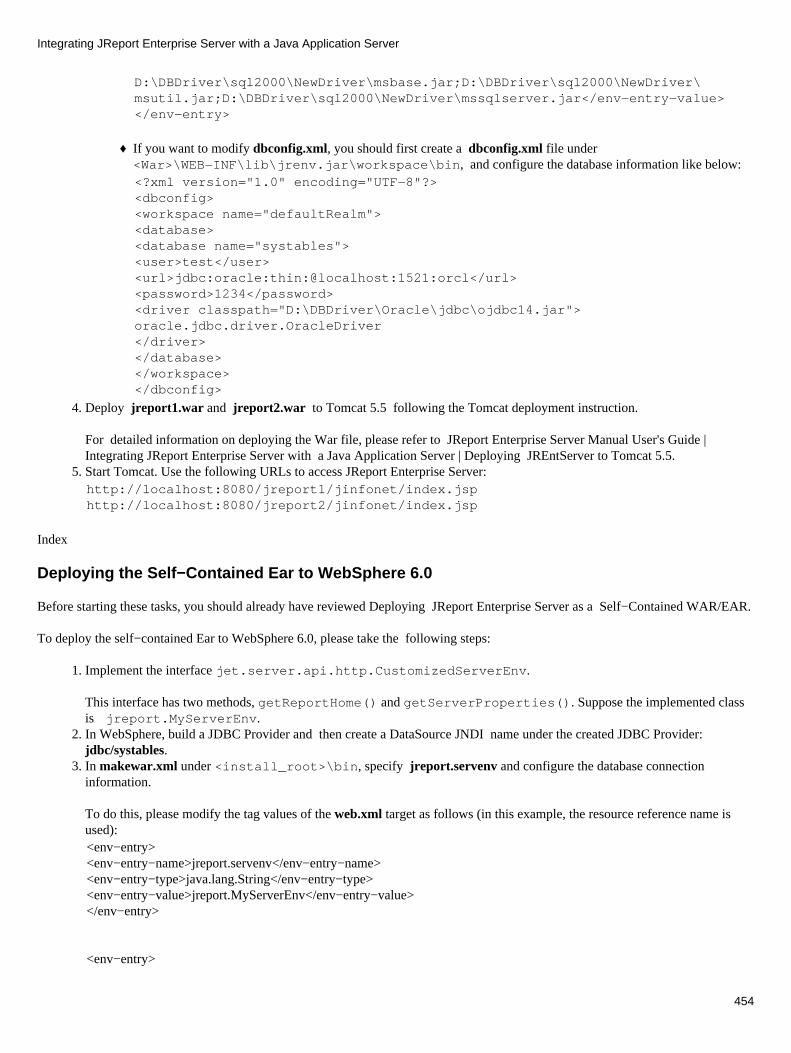
D:\DBDriver\sql2000\NewDriver\msbase.jar;D:\DBDriver\sql2000\NewDriver\msutil.jar;D:\DBDriver\sql2000\NewDriver\mssqlserver.jar</env−entry−value></env−entry>
If you want to modify dbconfig.xml, you should first create a dbconfig.xml file under<War>\WEB−INF\lib\jrenv.jar\workspace\bin, and configure the database information like below:
♦
<?xml version="1.0" encoding="UTF−8"?> <dbconfig><workspace name="defaultRealm"> <database> <database name="systables"> <user>test</user> <url>jdbc:oracle:thin:@localhost:1521:orcl</url> <password>1234</password> <driver classpath="D:\DBDriver\Oracle\jdbc\ojdbc14.jar">oracle.jdbc.driver.OracleDriver</driver> </database></workspace> </dbconfig>
Deploy jreport1.war and jreport2.war to Tomcat 5.5 following the Tomcat deployment instruction.
For detailed information on deploying the War file, please refer to JReport Enterprise Server Manual User's Guide |Integrating JReport Enterprise Server with a Java Application Server | Deploying JREntServer to Tomcat 5.5.
4.
Start Tomcat. Use the following URLs to access JReport Enterprise Server:5. http://localhost:8080/jreport1/jinfonet/index.jsphttp://localhost:8080/jreport2/jinfonet/index.jsp
Index
Deploying the Self−Contained Ear to WebSphere 6.0
Before starting these tasks, you should already have reviewed Deploying JReport Enterprise Server as a Self−Contained WAR/EAR.
To deploy the self−contained Ear to WebSphere 6.0, please take the following steps:
Implement the interface jet.server.api.http.CustomizedServerEnv.
This interface has two methods, getReportHome() and getServerProperties(). Suppose the implemented classis jreport.MyServerEnv.
1.
In WebSphere, build a JDBC Provider and then create a DataSource JNDI name under the created JDBC Provider:jdbc/systables.
2.
In makewar.xml under <install_root>\bin, specify jreport.servenv and configure the database connectioninformation.
To do this, please modify the tag values of the web.xml target as follows (in this example, the resource reference name isused):
3.
<env−entry><env−entry−name>jreport.servenv</env−entry−name><env−entry−type>java.lang.String</env−entry−type><env−entry−value>jreport.MyServerEnv</env−entry−value></env−entry>
<env−entry>
Integrating JReport Enterprise Server with a Java Application Server
454
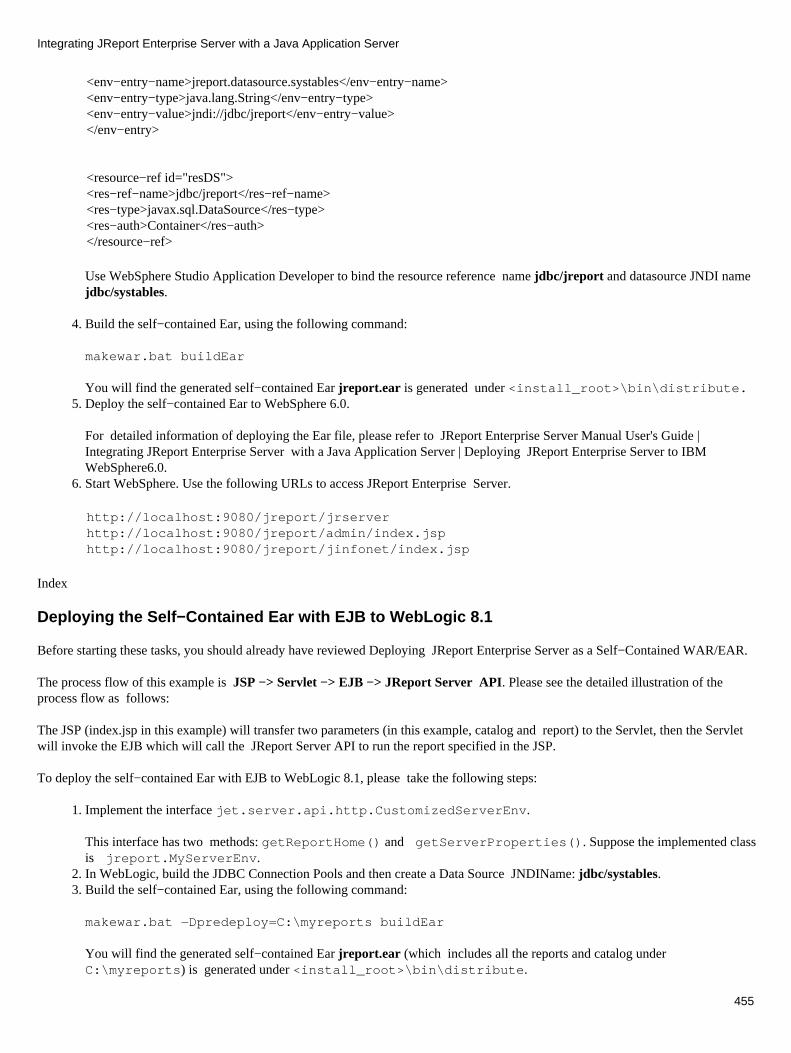
<env−entry−name>jreport.datasource.systables</env−entry−name><env−entry−type>java.lang.String</env−entry−type><env−entry−value>jndi://jdbc/jreport</env−entry−value></env−entry>
<resource−ref id="resDS"><res−ref−name>jdbc/jreport</res−ref−name><res−type>javax.sql.DataSource</res−type><res−auth>Container</res−auth></resource−ref>
Use WebSphere Studio Application Developer to bind the resource reference name jdbc/jreport and datasource JNDI namejdbc/systables.
Build the self−contained Ear, using the following command:
makewar.bat buildEar
You will find the generated self−contained Ear jreport.ear is generated under <install_root>\bin\distribute.
4.
Deploy the self−contained Ear to WebSphere 6.0.
For detailed information of deploying the Ear file, please refer to JReport Enterprise Server Manual User's Guide |Integrating JReport Enterprise Server with a Java Application Server | Deploying JReport Enterprise Server to IBMWebSphere6.0.
5.
Start WebSphere. Use the following URLs to access JReport Enterprise Server.6.
http://localhost:9080/jreport/jrserver http://localhost:9080/jreport/admin/index.jsp http://localhost:9080/jreport/jinfonet/index.jsp
Index
Deploying the Self−Contained Ear with EJB to WebLogic 8.1
Before starting these tasks, you should already have reviewed Deploying JReport Enterprise Server as a Self−Contained WAR/EAR.
The process flow of this example is JSP −> Servlet −> EJB −> JReport Server API. Please see the detailed illustration of theprocess flow as follows:
The JSP (index.jsp in this example) will transfer two parameters (in this example, catalog and report) to the Servlet, then the Servletwill invoke the EJB which will call the JReport Server API to run the report specified in the JSP.
To deploy the self−contained Ear with EJB to WebLogic 8.1, please take the following steps:
Implement the interface jet.server.api.http.CustomizedServerEnv.
This interface has two methods: getReportHome() and getServerProperties(). Suppose the implemented classis jreport.MyServerEnv.
1.
In WebLogic, build the JDBC Connection Pools and then create a Data Source JNDIName: jdbc/systables.2. Build the self−contained Ear, using the following command:
makewar.bat −Dpredeploy=C:\myreports buildEar
You will find the generated self−contained Ear jreport.ear (which includes all the reports and catalog underC:\myreports) is generated under <install_root>\bin\distribute.
3.
Integrating JReport Enterprise Server with a Java Application Server
455
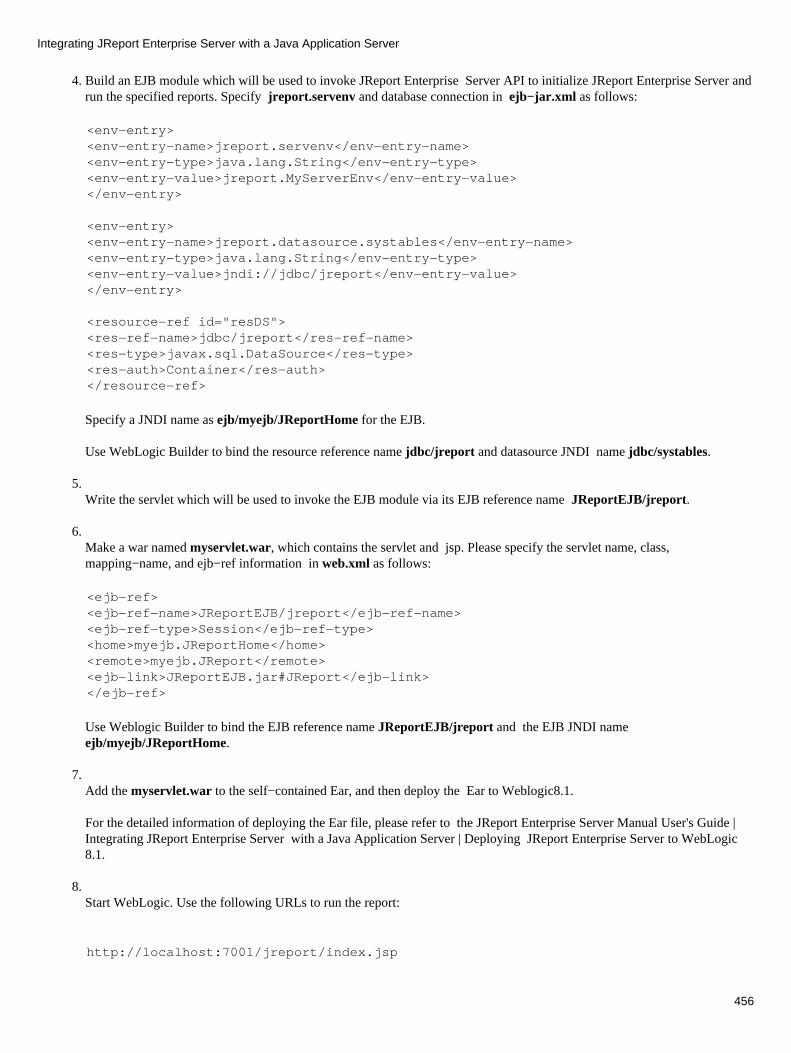
Build an EJB module which will be used to invoke JReport Enterprise Server API to initialize JReport Enterprise Server andrun the specified reports. Specify jreport.servenv and database connection in ejb−jar.xml as follows:
4.
<env−entry><env−entry−name>jreport.servenv</env−entry−name><env−entry−type>java.lang.String</env−entry−type><env−entry−value>jreport.MyServerEnv</env−entry−value></env−entry>
<env−entry><env−entry−name>jreport.datasource.systables</env−entry−name><env−entry−type>java.lang.String</env−entry−type><env−entry−value>jndi://jdbc/jreport</env−entry−value></env−entry>
<resource−ref id="resDS"><res−ref−name>jdbc/jreport</res−ref−name><res−type>javax.sql.DataSource</res−type><res−auth>Container</res−auth></resource−ref>
Specify a JNDI name as ejb/myejb/JReportHome for the EJB.
Use WebLogic Builder to bind the resource reference name jdbc/jreport and datasource JNDI name jdbc/systables.
5. Write the servlet which will be used to invoke the EJB module via its EJB reference name JReportEJB/jreport.
6. Make a war named myservlet.war, which contains the servlet and jsp. Please specify the servlet name, class,mapping−name, and ejb−ref information in web.xml as follows:
<ejb−ref><ejb−ref−name>JReportEJB/jreport</ejb−ref−name><ejb−ref−type>Session</ejb−ref−type><home>myejb.JReportHome</home><remote>myejb.JReport</remote><ejb−link>JReportEJB.jar#JReport</ejb−link></ejb−ref>
Use Weblogic Builder to bind the EJB reference name JReportEJB/jreport and the EJB JNDI nameejb/myejb/JReportHome.
7. Add the myservlet.war to the self−contained Ear, and then deploy the Ear to Weblogic8.1.
For the detailed information of deploying the Ear file, please refer to the JReport Enterprise Server Manual User's Guide |Integrating JReport Enterprise Server with a Java Application Server | Deploying JReport Enterprise Server to WebLogic8.1.
8. Start WebLogic. Use the following URLs to run the report:
http://localhost:7001/jreport/index.jsp
Integrating JReport Enterprise Server with a Java Application Server
456
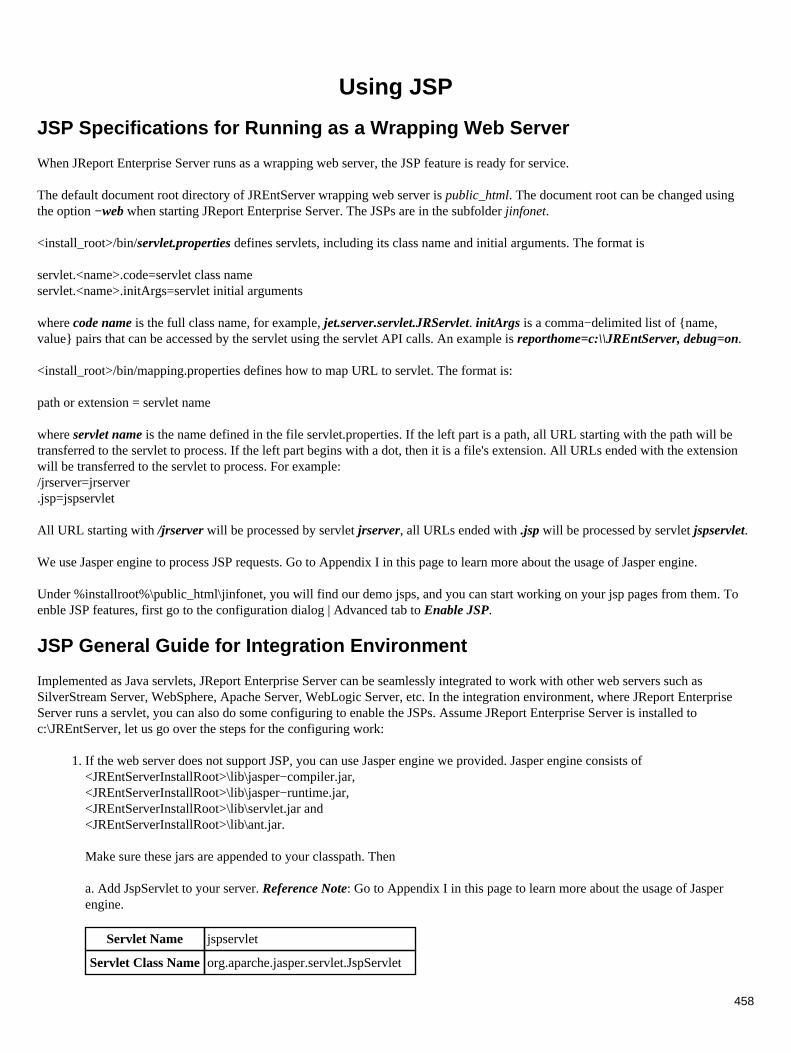
Using JSP
JSP Specifications for Running as a Wrapping Web Server
When JReport Enterprise Server runs as a wrapping web server, the JSP feature is ready for service.
The default document root directory of JREntServer wrapping web server is public_html. The document root can be changed usingthe option −web when starting JReport Enterprise Server. The JSPs are in the subfolder jinfonet.
<install_root>/bin/servlet.properties defines servlets, including its class name and initial arguments. The format is
servlet.<name>.code=servlet class nameservlet.<name>.initArgs=servlet initial arguments
where code name is the full class name, for example, jet.server.servlet.JRServlet. initArgs is a comma−delimited list of {name,value} pairs that can be accessed by the servlet using the servlet API calls. An example is reporthome=c:\\JREntServer, debug=on.
<install_root>/bin/mapping.properties defines how to map URL to servlet. The format is:
path or extension = servlet name
where servlet name is the name defined in the file servlet.properties. If the left part is a path, all URL starting with the path will betransferred to the servlet to process. If the left part begins with a dot, then it is a file's extension. All URLs ended with the extensionwill be transferred to the servlet to process. For example:/jrserver=jrserver.jsp=jspservlet
All URL starting with /jrserver will be processed by servlet jrserver, all URLs ended with .jsp will be processed by servlet jspservlet.
We use Jasper engine to process JSP requests. Go to Appendix I in this page to learn more about the usage of Jasper engine.
Under %installroot%\public_html\jinfonet, you will find our demo jsps, and you can start working on your jsp pages from them. Toenble JSP features, first go to the configuration dialog | Advanced tab to Enable JSP.
JSP General Guide for Integration Environment
Implemented as Java servlets, JReport Enterprise Server can be seamlessly integrated to work with other web servers such asSilverStream Server, WebSphere, Apache Server, WebLogic Server, etc. In the integration environment, where JReport EnterpriseServer runs a servlet, you can also do some configuring to enable the JSPs. Assume JReport Enterprise Server is installed toc:\JREntServer, let us go over the steps for the configuring work:
If the web server does not support JSP, you can use Jasper engine we provided. Jasper engine consists of<JREntServerInstallRoot>\lib\jasper−compiler.jar,<JREntServerInstallRoot>\lib\jasper−runtime.jar,<JREntServerInstallRoot>\lib\servlet.jar and<JREntServerInstallRoot>\lib\ant.jar.
1.
Make sure these jars are appended to your classpath. Then
a. Add JspServlet to your server. Reference Note: Go to Appendix I in this page to learn more about the usage of Jasperengine.
Servlet Name jspservlet
Servlet Class Nameorg.aparche.jasper.servlet.JspServlet
458

Servlet Web Path /servlet/jspservlet
Init Parameter
Init ParmName
Init Parm Value
scratchdir c:/JREntServer/scratchdir
keepgenerated false
development false
reloading true
b. Associate the extension ".jsp" with the Jasper servlet.
Add c:\JREntServer\lib\JRESServlets.jar, c:\JREntServer\lib\JREngine.jar and c:\JREntServer\lib\log4j−1.2.8.jar to the webserver's classpath.
2.
Copy c:\JREntServer\public_html\jinfonet to the root directory of server's document. 3. The JSPs use servlet SendFileServlet and WebViewServlet. Add these servlets to the server as below:
SendFileServlet:
4.
Servlet Name sendfile
Servlet Class Namejet.server.servlets.SendFileServlet
Servlet Web Path /servlet/sendfile
WebViewServlet:
Servlet Name webview
Servlet Class Namejet.server.servlets.WebViewServlet
Servlet Web Path /servlet/webview
Init Parameter
Init ParmName
Init Parm Value
rstPage /jinfonet/rsthtml.jsp
WebViewServlet has an initial parameter rstPage which is the web path of rsthtml.jsp.The default value is/jinfonet/rsthtml.jsp.
If the servlet web paths of SendFileServlet and WebViewServlet are not the default /servlet/sendfile and /servlet/webview,find all occurrences of /servlet/sendfile and /servlet/webview in the JSPs and change them to match the real servlet web path.If the web path of rsthtml.jsp is not /jinfonet/rsthtml.jsp, set the initial parameter of WebViewServlet.
5.
In left.jsp, change the linkage "Home" to your home page, the default value is index.htm. 6. In getEditSchedPage.jsp, edit the web path of getNewSchPage.jsp if needed. The default value is/jinfonet/getNewSchPage.jsp
7.
Notes:
After you have modified our jsp pages (under %installroot−JREntServer%\public_html\jinfonet), or youhave added your own jsp files into this directory, you should modify the file<JREntServerInstallRoot>\bin\servlet.properties so that the modified/added jsp files can be compiledsuccessfully:
Set developement=true.◊ Uncomment the line compiler="C:\\ProgramFiles\\DevStudio\\SharedIDE\\bin\\jvc.exe" −g −nowarn −nologo −cp, or you
◊
•
Using JSP
459
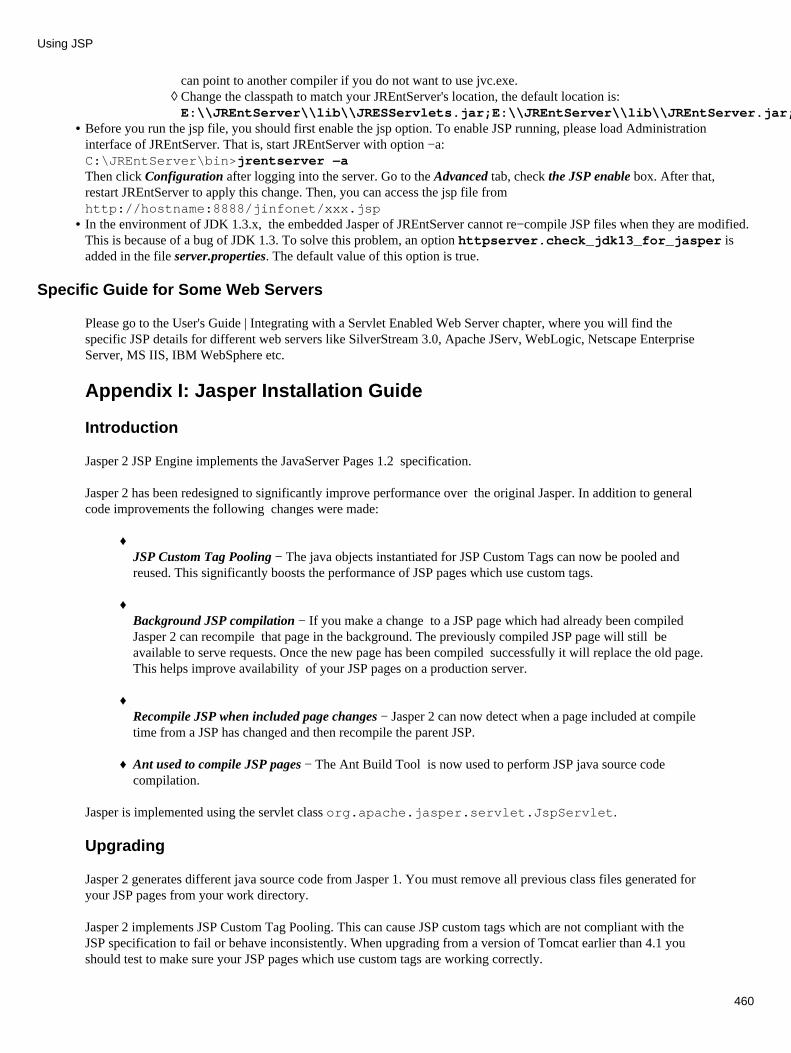
can point to another compiler if you do not want to use jvc.exe. Change the classpath to match your JREntServer's location, the default location is:E:\\JREntServer\\lib\\JRESServlets.jar;E:\\JREntServer\\lib\\JREntServer.jar;....
◊
Before you run the jsp file, you should first enable the jsp option. To enable JSP running, please load Administrationinterface of JREntServer. That is, start JREntServer with option −a:C:\JREntServer\bin>jrentserver −aThen click Configuration after logging into the server. Go to the Advanced tab, check the JSP enable box. After that,restart JREntServer to apply this change. Then, you can access the jsp file fromhttp://hostname:8888/jinfonet/xxx.jsp
•
In the environment of JDK 1.3.x, the embedded Jasper of JREntServer cannot re−compile JSP files when they are modified.This is because of a bug of JDK 1.3. To solve this problem, an option httpserver.check_jdk13_for_jasper isadded in the file server.properties. The default value of this option is true.
•
Specific Guide for Some Web Servers
Please go to the User's Guide | Integrating with a Servlet Enabled Web Server chapter, where you will find thespecific JSP details for different web servers like SilverStream 3.0, Apache JServ, WebLogic, Netscape EnterpriseServer, MS IIS, IBM WebSphere etc.
Appendix I: Jasper Installation Guide
Introduction
Jasper 2 JSP Engine implements the JavaServer Pages 1.2 specification.
Jasper 2 has been redesigned to significantly improve performance over the original Jasper. In addition to generalcode improvements the following changes were made:
♦ JSP Custom Tag Pooling − The java objects instantiated for JSP Custom Tags can now be pooled andreused. This significantly boosts the performance of JSP pages which use custom tags.
♦ Background JSP compilation − If you make a change to a JSP page which had already been compiledJasper 2 can recompile that page in the background. The previously compiled JSP page will still beavailable to serve requests. Once the new page has been compiled successfully it will replace the old page.This helps improve availability of your JSP pages on a production server.
♦ Recompile JSP when included page changes − Jasper 2 can now detect when a page included at compiletime from a JSP has changed and then recompile the parent JSP.
Ant used to compile JSP pages − The Ant Build Tool is now used to perform JSP java source codecompilation.
♦
Jasper is implemented using the servlet class org.apache.jasper.servlet.JspServlet.
Upgrading
Jasper 2 generates different java source code from Jasper 1. You must remove all previous class files generated foryour JSP pages from your work directory.
Jasper 2 implements JSP Custom Tag Pooling. This can cause JSP custom tags which are not compliant with theJSP specification to fail or behave inconsistently. When upgrading from a version of Tomcat earlier than 4.1 youshould test to make sure your JSP pages which use custom tags are working correctly.
Using JSP
460
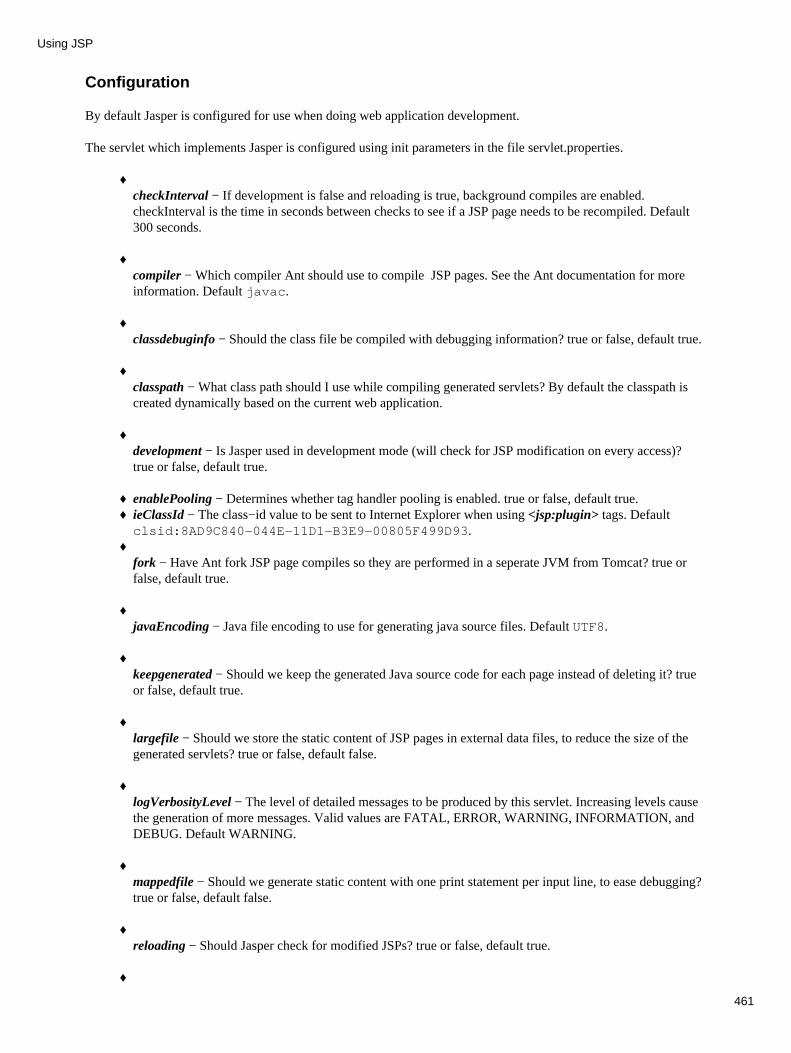
Configuration
By default Jasper is configured for use when doing web application development.
The servlet which implements Jasper is configured using init parameters in the file servlet.properties.
♦ checkInterval − If development is false and reloading is true, background compiles are enabled.checkInterval is the time in seconds between checks to see if a JSP page needs to be recompiled. Default300 seconds.
♦ compiler − Which compiler Ant should use to compile JSP pages. See the Ant documentation for moreinformation. Default javac.
♦ classdebuginfo − Should the class file be compiled with debugging information? true or false, default true.
♦ classpath − What class path should I use while compiling generated servlets? By default the classpath iscreated dynamically based on the current web application.
♦ development − Is Jasper used in development mode (will check for JSP modification on every access)?true or false, default true.
enablePooling − Determines whether tag handler pooling is enabled. true or false, default true. ♦ ieClassId − The class−id value to be sent to Internet Explorer when using <jsp:plugin> tags. Defaultclsid:8AD9C840−044E−11D1−B3E9−00805F499D93.
♦
♦ fork − Have Ant fork JSP page compiles so they are performed in a seperate JVM from Tomcat? true orfalse, default true.
♦ javaEncoding − Java file encoding to use for generating java source files. Default UTF8.
♦ keepgenerated − Should we keep the generated Java source code for each page instead of deleting it? trueor false, default true.
♦ largefile − Should we store the static content of JSP pages in external data files, to reduce the size of thegenerated servlets? true or false, default false.
♦ logVerbosityLevel − The level of detailed messages to be produced by this servlet. Increasing levels causethe generation of more messages. Valid values are FATAL, ERROR, WARNING, INFORMATION, andDEBUG. Default WARNING.
♦ mappedfile − Should we generate static content with one print statement per input line, to ease debugging?true or false, default false.
♦ reloading − Should Jasper check for modified JSPs? true or false, default true.
♦
Using JSP
461

scratchdir − What scratch directory should we use when compiling JSP pages? Default is the workdirectory for the current web application.
Using JSP
462
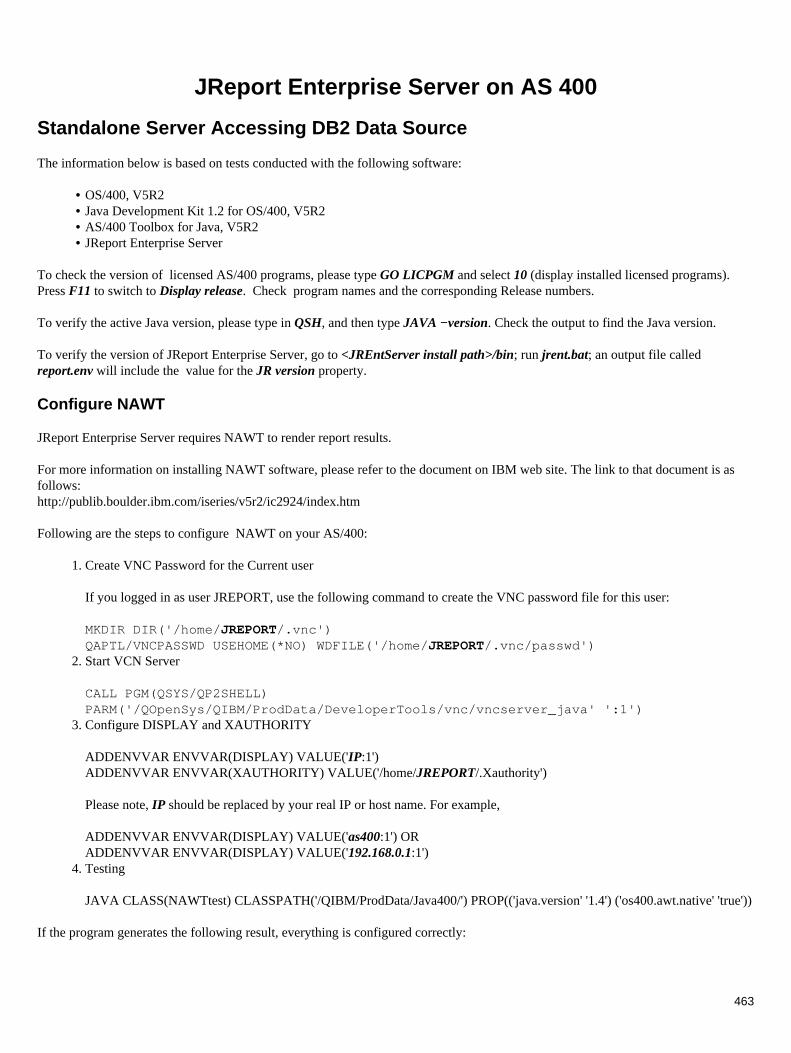
JReport Enterprise Server on AS 400
Standalone Server Accessing DB2 Data Source
The information below is based on tests conducted with the following software:
OS/400, V5R2• Java Development Kit 1.2 for OS/400, V5R2 • AS/400 Toolbox for Java, V5R2• JReport Enterprise Server•
To check the version of licensed AS/400 programs, please type GO LICPGM and select 10 (display installed licensed programs). Press F11 to switch to Display release. Check program names and the corresponding Release numbers.
To verify the active Java version, please type in QSH, and then type JAVA −version. Check the output to find the Java version.
To verify the version of JReport Enterprise Server, go to <JREntServer install path>/bin; run jrent.bat; an output file calledreport.env will include the value for the JR version property.
Configure NAWT
JReport Enterprise Server requires NAWT to render report results.
For more information on installing NAWT software, please refer to the document on IBM web site. The link to that document is asfollows:http://publib.boulder.ibm.com/iseries/v5r2/ic2924/index.htm
Following are the steps to configure NAWT on your AS/400:
Create VNC Password for the Current user
If you logged in as user JREPORT, use the following command to create the VNC password file for this user:
MKDIR DIR('/home/JREPORT/.vnc')QAPTL/VNCPASSWD USEHOME(*NO) WDFILE('/home/JREPORT/.vnc/passwd')
1.
Start VCN Server
CALL PGM(QSYS/QP2SHELL)PARM('/QOpenSys/QIBM/ProdData/DeveloperTools/vnc/vncserver_java' ':1')
2.
Configure DISPLAY and XAUTHORITY
ADDENVVAR ENVVAR(DISPLAY) VALUE('IP:1')ADDENVVAR ENVVAR(XAUTHORITY) VALUE('/home/JREPORT/.Xauthority')
Please note, IP should be replaced by your real IP or host name. For example,
ADDENVVAR ENVVAR(DISPLAY) VALUE('as400:1') ORADDENVVAR ENVVAR(DISPLAY) VALUE('192.168.0.1:1')
3.
Testing
JAVA CLASS(NAWTtest) CLASSPATH('/QIBM/ProdData/Java400/') PROP(('java.version' '1.4') ('os400.awt.native' 'true'))
4.
If the program generates the following result, everything is configured correctly:
463
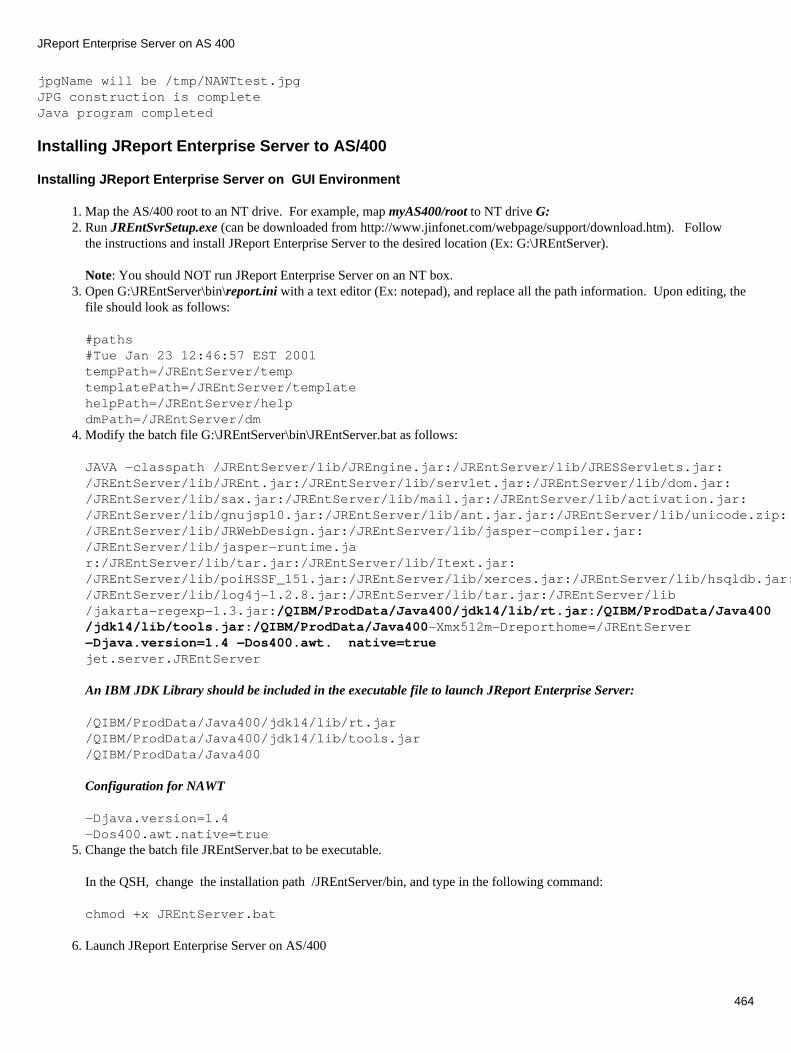
jpgName will be /tmp/NAWTtest.jpgJPG construction is complete Java program completed
Installing JReport Enterprise Server to AS/400
Installing JReport Enterprise Server on GUI Environment
Map the AS/400 root to an NT drive. For example, map myAS400/root to NT drive G: 1. Run JREntSvrSetup.exe (can be downloaded from http://www.jinfonet.com/webpage/support/download.htm). Followthe instructions and install JReport Enterprise Server to the desired location (Ex: G:\JREntServer).
Note: You should NOT run JReport Enterprise Server on an NT box.
2.
Open G:\JREntServer\bin\report.ini with a text editor (Ex: notepad), and replace all the path information. Upon editing, thefile should look as follows:
#paths#Tue Jan 23 12:46:57 EST 2001tempPath=/JREntServer/temptemplatePath=/JREntServer/templatehelpPath=/JREntServer/help dmPath=/JREntServer/dm
3.
Modify the batch file G:\JREntServer\bin\JREntServer.bat as follows:
JAVA −classpath /JREntServer/lib/JREngine.jar:/JREntServer/lib/JRESServlets.jar:/JREntServer/lib/JREnt.jar:/JREntServer/lib/servlet.jar:/JREntServer/lib/dom.jar:/JREntServer/lib/sax.jar:/JREntServer/lib/mail.jar:/JREntServer/lib/activation.jar:/JREntServer/lib/gnujsp10.jar:/JREntServer/lib/ant.jar.jar:/JREntServer/lib/unicode.zip:/JREntServer/lib/JRWebDesign.jar:/JREntServer/lib/jasper−compiler.jar:/JREntServer/lib/jasper−runtime.jar:/JREntServer/lib/tar.jar:/JREntServer/lib/Itext.jar:/JREntServer/lib/poiHSSF_151.jar:/JREntServer/lib/xerces.jar:/JREntServer/lib/hsqldb.jar:/JREntServer/lib/log4j−1.2.8.jar:/JREntServer/lib/tar.jar:/JREntServer/lib/jakarta−regexp−1.3.jar:/QIBM/ProdData/Java400/jdk14/lib/rt.jar:/QIBM/ProdData/Java400/jdk14/lib/tools.jar:/QIBM/ProdData/Java400−Xmx512m−Dreporthome=/JREntServer−Djava.version=1.4 −Dos400.awt. native=true jet.server.JREntServer
An IBM JDK Library should be included in the executable file to launch JReport Enterprise Server:
/QIBM/ProdData/Java400/jdk14/lib/rt.jar/QIBM/ProdData/Java400/jdk14/lib/tools.jar/QIBM/ProdData/Java400
Configuration for NAWT
−Djava.version=1.4−Dos400.awt.native=true
4.
Change the batch file JREntServer.bat to be executable. 5.
In the QSH, change the installation path /JREntServer/bin, and type in the following command:
chmod +x JREntServer.bat
Launch JReport Enterprise Server on AS/4006.
JReport Enterprise Server on AS 400
464

Launch QSH on AS/400, and execute the following commands:
cd /JREntServer/bin./JREntServer.bat
Installing JReport Enterprise Server on Non−GUI Environment
To install JReport Enterprise Server on non−GUI environment, please refer to JREntServer Manual User's Guide | Installing andLaunching JReport Enterprise Server | Installing JReport Enterprise Server on Non−GUI Environment.
Designing Reports with IBM Java Toolbox JDBC Driver
According to an IBM document regarding DB2 connectivity, basically there are two different JDBC drivers available from IBM.
IBM provides two different JDBC drivers for the AS/400 database:
The "native" JDBC driver. This is shipped as part of the AS/400 Developer Kit for Java (57xxJV1). It is implemented bymaking native method calls to the SQL CLI (Call Level Interface). Consequently, it only runs on the AS/400 JVM. Theclass name to register is com.ibm.db2.jdbc.app.DB2Driver. The URL subprotocol is db2.
•
The "toolbox" JDBC driver. This is shipped as part of the AS/400 Toolbox for Java (57xxJC1) athttp://www.as400.ibm.com/toolbox/. It is implemented by making direct socket connections to the database host server. This happens to be the same route that the Client Access/400 ODBC driver takes. However, Client Access/400 is NOTrequired. The toolbox has been certified 100% Pure Java and runs on any JVM. The class name to register iscom.ibm.as400.access.AS400JDBCDriver. The URL subprotocol is as400.
•
You can also use a 3rd JDBC driver or access the AS/400 database without JDBC. For more information, please visit the followingIBM pages or contact IBM support staff.
http://www.as400.ibm.com/developer/jdbc/Faqs/JDBCFAQ.htmlhttp://www.as400.ibm.com/developer/java/qanda.htmlhttp://publib.boulder.ibm.com/pubs/html/as400/v4r5/ic2924/info/java/rzahh/jdbc.htm
The 'toolbox' JDBC driver is suitable for all platforms besides AS/400. The 'native' JDBC driver is only for the applications runningon AS/400. Since you design reports with JReport Designer only on NT platform rather than AS/400, in this case you can only usethe 'toolbox' JDBC driver. But later when you deploy well−designed reports to AS/400, you can switch the JDBC configuration touse the 'native' JDBC driver.
To use the 'toolbox' JDBC driver, you have to download and set up AS/400 Toolbox for Java. For details, please visit thefollowing IBM online entry:http://publib.boulder.ibm.com/pubs/html/as400/v4r5/ic2924/info/java/rzahh/toolbox.htm
After you set up the toolbox, please add the path referring to the file "jt400Access.zip" to your JReport.bat. If youinstalled a local copy of 'toolbox', the path may be "C:\AS400Toolkit\lib\jt400Access.zip". If you refer to a copy on amapped AS/400 drive, the path may be "G:\QIBM\ProdData\HTTP\Public\jt400\lib\jt400Access.zip".
1.
Create a data source referring to your DB2 located on AS/400 with JReport Designer. To do so, follow the steps below. 2. Create a new catalog file by selecting the menu item 'File'−>'New Catalog' 3. Open Catalog Browser by selecting the menu item 'View'−>'Catalog Browser' 4. Create a new 'Connection' by right clicking on 'Connection' and selecting 'New Connection' from the popup menu. 5. On the 'Get JDBC Connection Information' dialog, fill in the needed information:a. Check on 'JDBC Driver' and fill in with 'com.ibm.as400.access.AS400JDBCDriver'.b. Fill in 'JDBC URL' with the value in pattern 'jdbc:as400://mySys2/mySchema'. As for how to set up for this value, referto the IBM document: http://publib.boulder.ibm.com/pubs/html/as400/v4r5/ic2924/info/java/rzahh/jdbccon.htmc. Fill in the 'User name' and 'Password' with your AS/400 account that can reach DB2 on AS/400.d. Select '2−Part Names' in 'Qualified Name' tab to indicate using '2−Part Names' to generate SQL statement.e. Click on the 'OK' button to accomplish this step.
6.
An 'Add Table' dialog will pop up, please select the tables you will use and click 'OK' to end this step. 7.
JReport Enterprise Server on AS 400
465
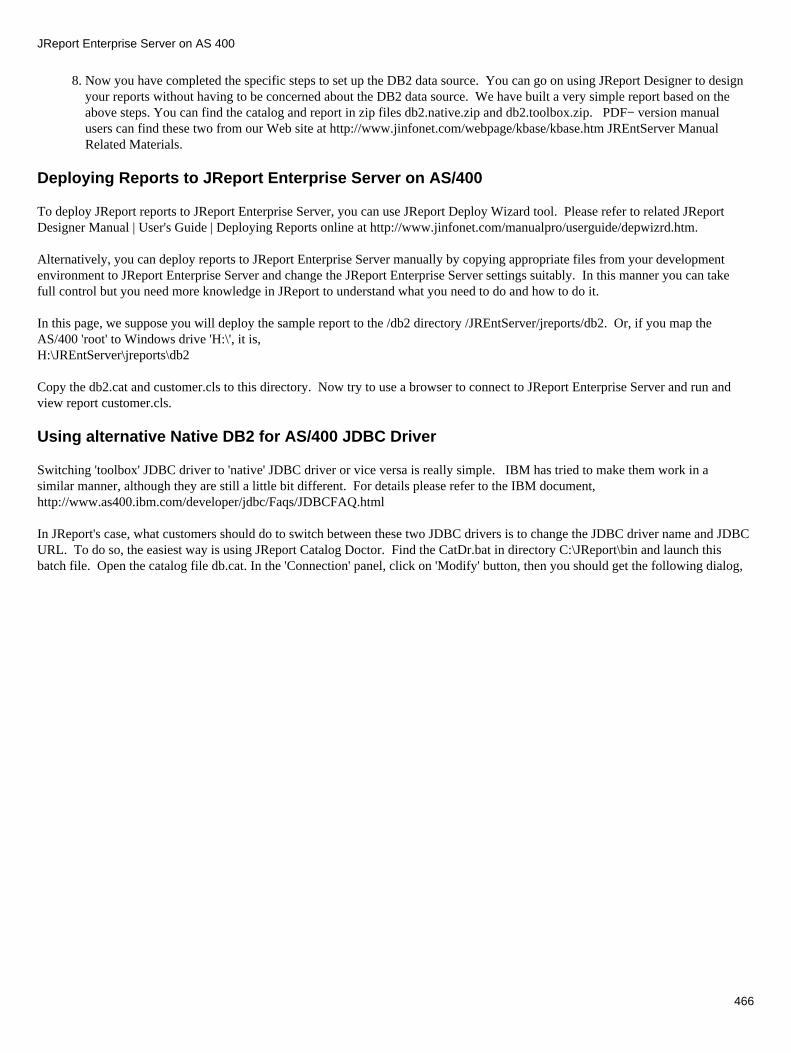
Now you have completed the specific steps to set up the DB2 data source. You can go on using JReport Designer to designyour reports without having to be concerned about the DB2 data source. We have built a very simple report based on theabove steps. You can find the catalog and report in zip files db2.native.zip and db2.toolbox.zip. PDF− version manualusers can find these two from our Web site at http://www.jinfonet.com/webpage/kbase/kbase.htm JREntServer ManualRelated Materials.
8.
Deploying Reports to JReport Enterprise Server on AS/400
To deploy JReport reports to JReport Enterprise Server, you can use JReport Deploy Wizard tool. Please refer to related JReportDesigner Manual | User's Guide | Deploying Reports online at http://www.jinfonet.com/manualpro/userguide/depwizrd.htm.
Alternatively, you can deploy reports to JReport Enterprise Server manually by copying appropriate files from your developmentenvironment to JReport Enterprise Server and change the JReport Enterprise Server settings suitably. In this manner you can takefull control but you need more knowledge in JReport to understand what you need to do and how to do it.
In this page, we suppose you will deploy the sample report to the /db2 directory /JREntServer/jreports/db2. Or, if you map theAS/400 'root' to Windows drive 'H:\', it is,H:\JREntServer\jreports\db2
Copy the db2.cat and customer.cls to this directory. Now try to use a browser to connect to JReport Enterprise Server and run andview report customer.cls.
Using alternative Native DB2 for AS/400 JDBC Driver
Switching 'toolbox' JDBC driver to 'native' JDBC driver or vice versa is really simple. IBM has tried to make them work in asimilar manner, although they are still a little bit different. For details please refer to the IBM document,http://www.as400.ibm.com/developer/jdbc/Faqs/JDBCFAQ.html
In JReport's case, what customers should do to switch between these two JDBC drivers is to change the JDBC driver name and JDBCURL. To do so, the easiest way is using JReport Catalog Doctor. Find the CatDr.bat in directory C:\JReport\bin and launch thisbatch file. Open the catalog file db.cat. In the 'Connection' panel, click on 'Modify' button, then you should get the following dialog,
JReport Enterprise Server on AS 400
466

Change the JDBC driver name from com.ibm.as400.access.AS400JDBCDriver to com.ibm.db2.jdbc.app.DB2Driver.
Change the JDBC URL from jdbc:as400://209.99.215.51 to jdbc:db2:localhost//adtlib. Here 209.99.215.51 is a sample IP addressand adtlib is the data schema used by the sample code in this page. Please replace it with the value corresponding to the correctvalue for you.
JReport Enterprise Server on AS 400
467
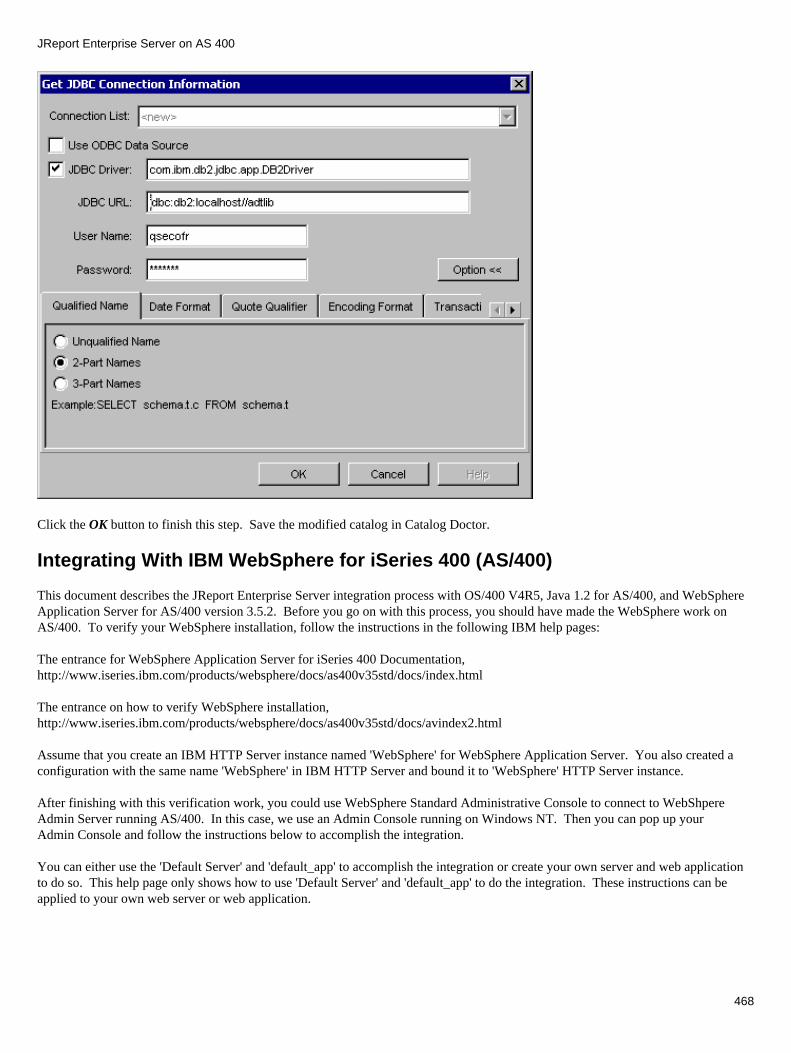
Click the OK button to finish this step. Save the modified catalog in Catalog Doctor.
Integrating With IBM WebSphere for iSeries 400 (AS/400)
This document describes the JReport Enterprise Server integration process with OS/400 V4R5, Java 1.2 for AS/400, and WebSphereApplication Server for AS/400 version 3.5.2. Before you go on with this process, you should have made the WebSphere work onAS/400. To verify your WebSphere installation, follow the instructions in the following IBM help pages:
The entrance for WebSphere Application Server for iSeries 400 Documentation,http://www.iseries.ibm.com/products/websphere/docs/as400v35std/docs/index.html
The entrance on how to verify WebSphere installation,http://www.iseries.ibm.com/products/websphere/docs/as400v35std/docs/avindex2.html
Assume that you create an IBM HTTP Server instance named 'WebSphere' for WebSphere Application Server. You also created aconfiguration with the same name 'WebSphere' in IBM HTTP Server and bound it to 'WebSphere' HTTP Server instance.
After finishing with this verification work, you could use WebSphere Standard Administrative Console to connect to WebShpereAdmin Server running AS/400. In this case, we use an Admin Console running on Windows NT. Then you can pop up yourAdmin Console and follow the instructions below to accomplish the integration.
You can either use the 'Default Server' and 'default_app' to accomplish the integration or create your own server and web applicationto do so. This help page only shows how to use 'Default Server' and 'default_app' to do the integration. These instructions can beapplied to your own web server or web application.
JReport Enterprise Server on AS 400
468

Installing JReport Enterprise Server to AS/400 and Setting up DB2 Data Source
Please refer to the section above Standalone Server Accessing DB2 Data Source to install JReport Enterprise Server and set up theDB2 data source.
Setting up Java 'Command line arguments' for the Web Server
You need to add the following additional Java VM command line arguments to 'Default Server',
−Djava.version=1.2 −Dos400.class.path.rawt=1 −DRmtAwtServer=192.168.0.7 −Dos400.class.path.system=POST −Dreporthome=/JREntServer
Due to lack of AWT support in Java 1.2 for AS/400, JReport Enterprise Server could not work with Java 1.2 for AS/400 directly. There is an alternative to solve this issue. IBM provides Remove AWT Toolkit (RAWT) for Java 1.2 for AS/400. With thatJReport Enterprise Server can work properly. To set up RAWT, you should specify the following Java system properties,
JReport Enterprise Server on AS 400
469
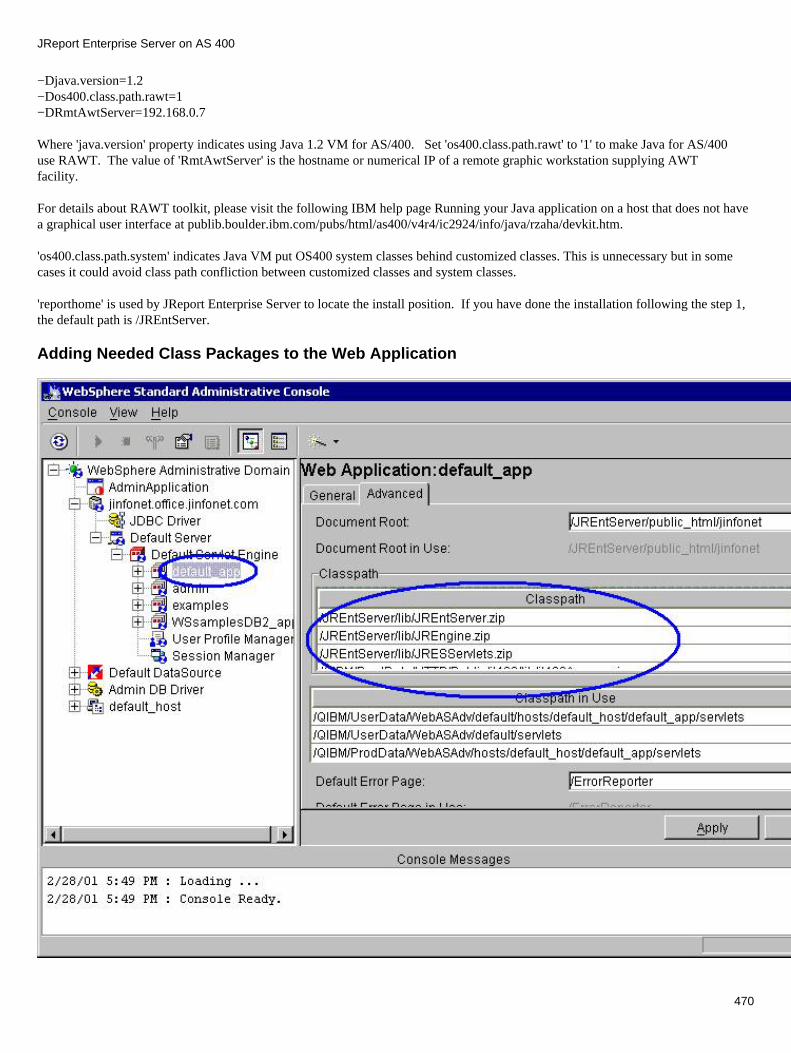
−Djava.version=1.2 −Dos400.class.path.rawt=1 −DRmtAwtServer=192.168.0.7
Where 'java.version' property indicates using Java 1.2 VM for AS/400. Set 'os400.class.path.rawt' to '1' to make Java for AS/400use RAWT. The value of 'RmtAwtServer' is the hostname or numerical IP of a remote graphic workstation supplying AWTfacility.
For details about RAWT toolkit, please visit the following IBM help page Running your Java application on a host that does not havea graphical user interface at publib.boulder.ibm.com/pubs/html/as400/v4r4/ic2924/info/java/rzaha/devkit.htm.
'os400.class.path.system' indicates Java VM put OS400 system classes behind customized classes. This is unnecessary but in somecases it could avoid class path confliction between customized classes and system classes.
'reporthome' is used by JReport Enterprise Server to locate the install position. If you have done the installation following the step 1,the default path is /JREntServer.
Adding Needed Class Packages to the Web Application
JReport Enterprise Server on AS 400
470
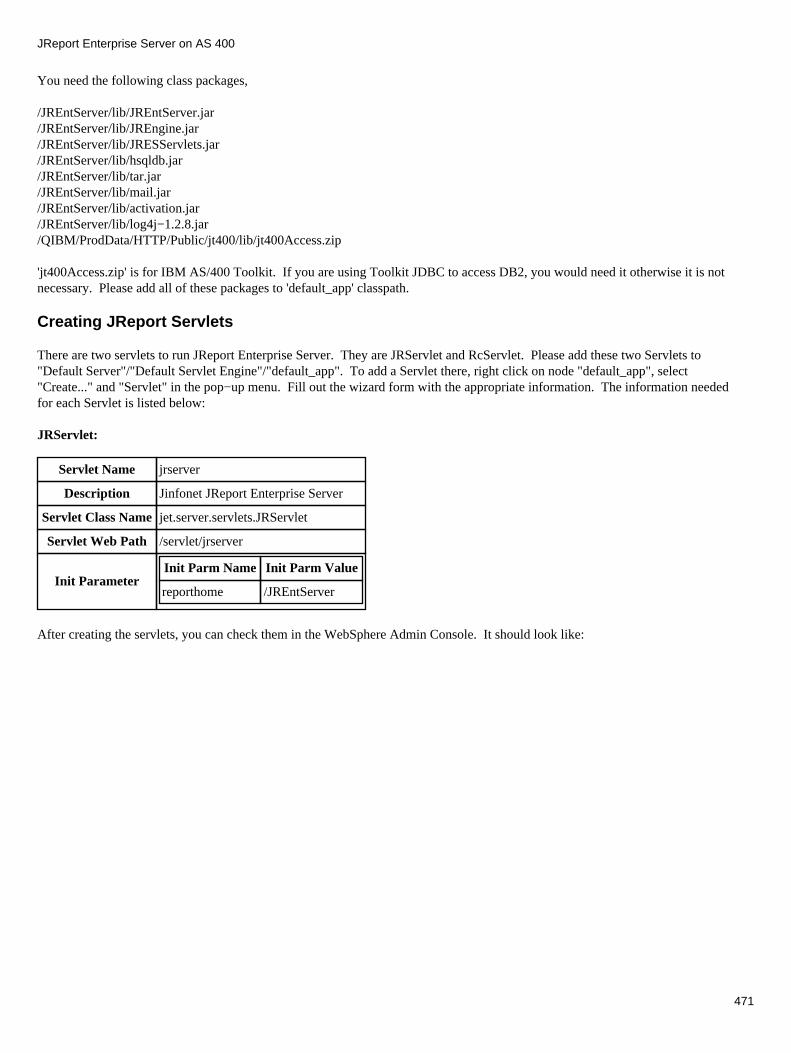
You need the following class packages,
/JREntServer/lib/JREntServer.jar/JREntServer/lib/JREngine.jar/JREntServer/lib/JRESServlets.jar/JREntServer/lib/hsqldb.jar/JREntServer/lib/tar.jar/JREntServer/lib/mail.jar/JREntServer/lib/activation.jar/JREntServer/lib/log4j−1.2.8.jar/QIBM/ProdData/HTTP/Public/jt400/lib/jt400Access.zip
'jt400Access.zip' is for IBM AS/400 Toolkit. If you are using Toolkit JDBC to access DB2, you would need it otherwise it is notnecessary. Please add all of these packages to 'default_app' classpath.
Creating JReport Servlets
There are two servlets to run JReport Enterprise Server. They are JRServlet and RcServlet. Please add these two Servlets to"Default Server"/"Default Servlet Engine"/"default_app". To add a Servlet there, right click on node "default_app", select"Create..." and "Servlet" in the pop−up menu. Fill out the wizard form with the appropriate information. The information neededfor each Servlet is listed below:
JRServlet:
Servlet Name jrserver
Description Jinfonet JReport Enterprise Server
Servlet Class Namejet.server.servlets.JRServlet
Servlet Web Path /servlet/jrserver
Init ParameterInit Parm Name Init Parm Value
reporthome /JREntServer
After creating the servlets, you can check them in the WebSphere Admin Console. It should look like:
JReport Enterprise Server on AS 400
471
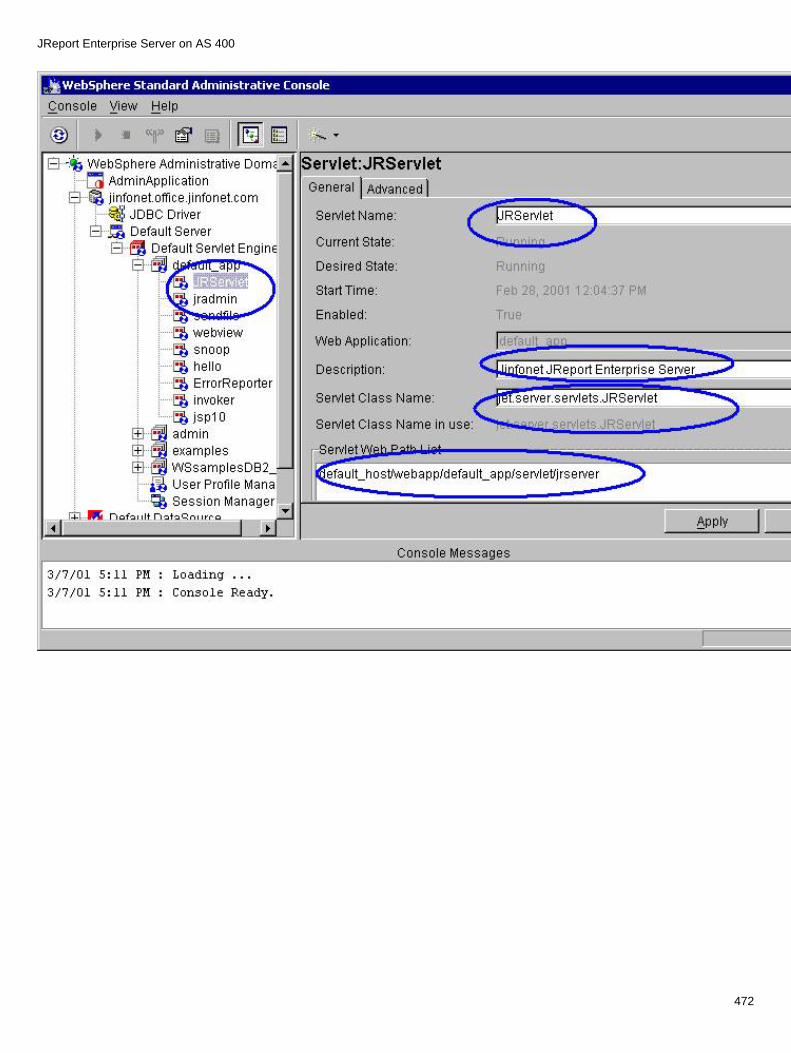
JReport Enterprise Server on AS 400
472
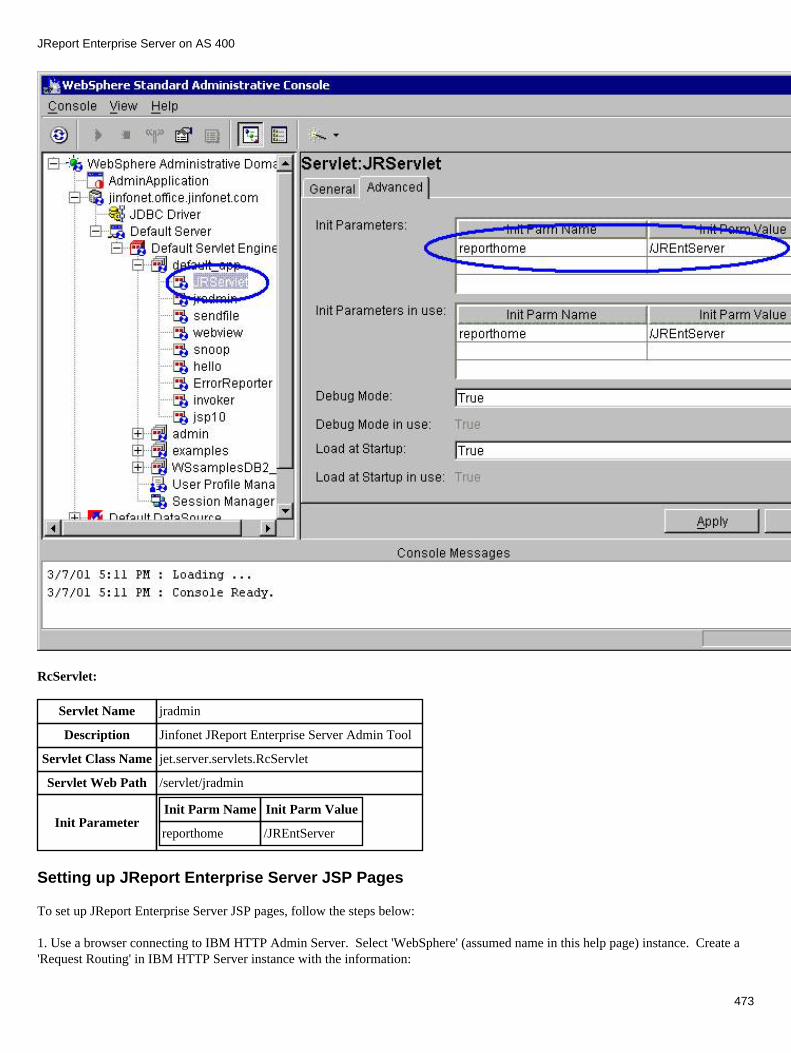
RcServlet:
Servlet Name jradmin
Description Jinfonet JReport Enterprise Server Admin Tool
Servlet Class Namejet.server.servlets.RcServlet
Servlet Web Path /servlet/jradmin
Init ParameterInit Parm Name Init Parm Value
reporthome /JREntServer
Setting up JReport Enterprise Server JSP Pages
To set up JReport Enterprise Server JSP pages, follow the steps below:
1. Use a browser connecting to IBM HTTP Admin Server. Select 'WebSphere' (assumed name in this help page) instance. Create a'Request Routing' in IBM HTTP Server instance with the information:
JReport Enterprise Server on AS 400
473

Action Pass
URL Template /webapp/default_app/*
Replacement file path /JREntServer/public_html/jinfonet/*
Where 'URL Template' is the web path to 'Default Server'/'default_app'. 'Replacement file path' refers to the JREntServer's path thatincludes JSP pages.
2. In the WebSphere Admin panel, open 'default_app' node, set 'Document root' to '/JREntServer/public_html/jinfonet'.
JReport Enterprise Server on AS 400
474
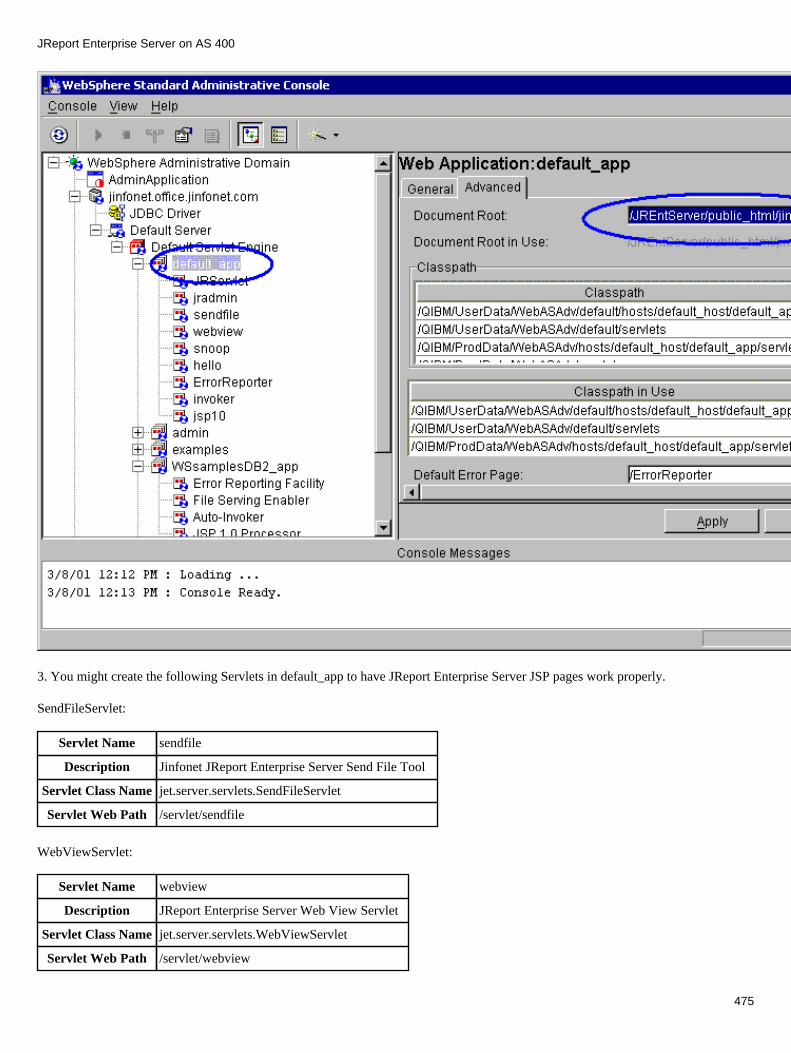
3. You might create the following Servlets in default_app to have JReport Enterprise Server JSP pages work properly.
SendFileServlet:
Servlet Name sendfile
Description Jinfonet JReport Enterprise Server Send File Tool
Servlet Class Namejet.server.servlets.SendFileServlet
Servlet Web Path /servlet/sendfile
WebViewServlet:
Servlet Name webview
Description JReport Enterprise Server Web View Servlet
Servlet Class Namejet.server.servlets.WebViewServlet
Servlet Web Path /servlet/webview
JReport Enterprise Server on AS 400
475
Restarting Your "Default Server" and Verifying the Setup
Right click on "Default Server", select "Stop" from the pop−up menu. Then you will receive the response 'Command "DefaultServer.stop completed successfully'.
Because JRServlet will need the RAWT to get started, do not forget to start your RAWT daemon in the remote GUI workstation thatyou have configured in the Set up Java 'Command line arguments' for the Web Server section above. Right click on "DefaultServer" again and this time select "Start". It could take minutes to start 'Default Server'. Eventually you should get the followinginformation: "Default Server.start completed successfully".
To verify JREntServer Servlets setup, open a browser, type in the URL:
http://<AS/400 host>/wepapp/default_app/servlet/jrserver
If everything goes smoothly, you should see the JReport home page in the browser screen.
To verify JREntServer's JSP pages, open a browser, type in the URL:
http://<AS/400 host>/webapp/default_app/index.htm
Index
JReport Enterprise Server on AS 400
476

Customized AuthenticationJReport Enterprise Server uses its special access control method to authenticate user requests. But JReport Enterprise Server alsoprovides a mechanism to use customized authentication. This mechanism is realized with interfacesjet.server.api.custom.security.AuthenticationProvider and jet.server.api.custom.security.AuthorizationProvider.
Reference Notes: JREntServer Javadoc jet.server.userman.UserAuthenticator, jet.server.api.http.HttpExternalAuthorized andjet.server.api.ExternalAuthorized. You can go to http://www.jinfonet.com/webpage/kbase/kbase.htm to browse the server javadoconline.
Term Definition
UserUser is an individual. A user has properties: name and password. User name cannot contain characters "/" and "\".
ResourceResource is the path of a file. In JReport Enterprise Sever, the resource is declared by Resource Manager and is accessible via URL.A URL refers to a resource that can be mapped to a real physical path by calling some server APIs.
SessionWhen a client tries to connect and log in to JReport Enterprise Server, our server authenticates the username and password of thatclient. If the authentication is OK, JReport Enterprise Server will create a session and assign session−id to that client. For thesubsequent requests from that client with the assigned session−id, the server will not authenticate the username and password anymore. The session will end when the client closes that session or by time−out.
RealmRealm is an abstract security concept, which hosts the resources and authentication entities on JReport Enterprise Server. There canbe more than one realm on the server and every realm is independent from others.
At runtime, only one realm can be active and only the users and resources in the active realm are accessible. A realm is identified bya unique name, which can contain any characters other than forward slash (/) and backward slash (\).
The authentication entities consist of user accounts, group accounts and role accounts.
User Authentication
JReport Enterprise Server provides the ability to use customized user authentication scheme by the implementation of the twointerfaces AuthenticationProvider and AuthorizationProvider.
Interface AuthenticationProvider
JReport Enterprise Server invokes the methods in AuthenticationProvider implementation to authenticate user. Here are the methodsin this interface:
isValidUserThis method is called to authenticate the user when he/she logs into JReport Enterprise Server for normal access. Thismethod must be implemented.
•
isAdminUserThis method is called to authenticate the user when he logs into JReport Enterprise Server for administration purposes. Theuser should be an administrator or one who has administrator privileges. This method must be implemented.
•
changePasswordChange user's password. This method is called when users want to change their passwords. If you just have one realm,simply ignore the realmName argument in your implementation. You can ignore this method if you do not permit users tochange passwords via JReport Enterprise Server.
•
477
Interface AuthorizationProvider
JReport Enterprise Server invokes the methods in AuthorizationProvider implementation to check user permission and privilege.Here are the methods in this interface:
isPermissionOKThis method checks whether the user has the proper permission to complete an action to resources or folders. It is calledwhenever the user invokes an action. If you just have one realm, simply ignore the realmName argument in yourimplementation.
•
CheckPrivilegeThis method checks whether the user has the privilege of Deploy.
•
Reference Note: See also User's Guide | JReport Enterprise Server API.
Implementation
Implement the two interfaces AuthenticationProvider and AuthorizationProvider.1. Add the customized classes in the classpath of the batch file used to start JReport Enterprise Server.2. To apply customized security API, either of the following two ways can be used:
Edit server.properties file under %install_root%\bin directory
Add two name/value pairs to specify customized security API. Name ''custom.security.AuthenticationProvider"should correspond to value representing implementation of the interfacejet.server.api.custom.security.AuthenticationProvider, and name "custom.security.AuthorizationProvider" shouldcorrespond to value representing implementation of the interfacejet.server.api.custom.security.AuthorizationProvider.
♦
Specify �D parameters of JVM in the batch file used to start JReport Enterprise Server
Add two name/value pairs by �D to specify customized security API. Parameter name"com.jinfonet.AuthenticationProvider" should correspond to value representing implementation of interfacejet.server.api.custom.security.AuthenticationProvider, and parameter name "com.jinfonet.AuthorizationProvider"should correspond to value representing implementation of interfacejet.server.api.costom.security.AuthorizationProvider.
♦
3.
Restart JReport Enterprise Server.4.
Notes:
There are two interfaces in security API. If users have only implemented one interface, system will apply theimplementation of the other interface automatically. In these implementations, every method needs boolean value return�true�, and method �AuthenticationProvider.changePassword()� will return null.
•
The old security API, say, interface jet.server.userman.UserAuthenticator is supported still. Users can apply implementationof the old security API just like before.
•
During server startup, system checks −D parameters for new security API(jet.server.api.custom.security.AuthenticationProvider and jet.server.api.custom.security.AuthorizationProvider) first. If notset, then check server.properties for customized new security API implementation. If still not set, system checks if usershave set implementation of the old security API (jet.server.userman.UserAuthenticator). If all above are not set, server willuse built−in security system.
•
Demo
The following demo programs are provided to illustrate the implementation of two interfaces:
DemoAuthenticationProvider.java: Demo for implementation of the AuthenticationProvider interface.
DemoAuthorizationProvider.java: Demo for implementation of the AuthorizationProvider interface.
Customized Authentication
478
Interface UserAuthenticator
JReport Enterprise Server also enables the ability to use customized user authentication scheme by the implementation of theinterface UserAuthenticator, which is a method provided before. The following will give a description of the implementation.
JReport Enterprise Server invokes the methods in UserAuthenticator implementation to authenticate users' requests. Here are themethods in this interface:
isValidUserThis method is called to authenticate the user when he/she logs into JReport Enterprise Server for normal access. Thismethod must be implemented.
•
isValidAdminUserThis method is called to authenticate the user when he logs into JReport Enterprise Server for administration purposes. Theuser should be an administrator or one who has administrator privileges. This method must be implemented.
•
isPermissionOkThis method checks whether the user has the proper permission to complete an action. It is called whenever the user invokesan action. If you just have one realm, simply ignore the realm Name argument in your implementation. Reference Note: Thedescriptions of protocols/commands are in the User's Guide | Clients Accessing JReport Enterprise Server − Browser | UsingURL to Access a Report | Protocols/Commands. For example, if you want to verify the 'run report' action, you may checkthe following commands "jrs.web_vw", "jrs.run_vw" and "jrs.submit_schedule". This method must be implemented.
•
getRealmNamesGet realm names. If the customized implementation has no realm concept, return whatever name (cannot contains char "/"and "\") you like as your realm name. For example:
Vector v = new Vector().v.addElement("defaultRealm");
return v.elements();
This method must be implemented.
•
getUserNamesGet the list of user names in a realm. This method must be implemented if you want to use Alias feature applied to differentusers. You can return an empty vector if you do not use Alias feature.
•
getAuditStateGet audit setting. These audit settings can point out whether JReport Enterprise Server logs users' MANAGE and/orACCESS actions. If those settings are disabled (say, set to false), the actions of that user will not be logged. You can simplyreturn true.
•
changePasswordChange user's password. This method is called when users want to change their passwords. If you just have one realm,simply ignore the realmName argument in your implementation. You can ignore this method if you do not permit users tochange passwords via JReport Enterprise Server.
•
getPasswordReturn user's password. If customized implementation has no realm concept, the realmName may be ignored.
•
Reference Note: See also User's Guide | JReport Enterprise Server API.
Implementation
Write your UserAuthenticator implementation. 1. Compile those java classes. The compiling needs the library JRESServlets.jar which can be found under <JREntServerhome>/lib directory.
2.
Modify the classpath used by JReport Enterprise Server to include your user authenticator classes so that JReport EnterpriseServer can access them.
3.
Change JREntServer.bat to define system property com.jinfonet.authenticator with your implementation.
For example:
4.
Customized Authentication
479
The implementation class is auth.ReportUserAuthenticatorjava−Dcom.jinfonet.authenticator=auth.ReportUserAuthenticator ...Shut down the server and restart it.5.
Demo
Demo 1: If you want to use JReport Enterprise Server as a servlet in your system, the demo consists of the following file:Demo1UserAuthenticator.java. PDF manual users can go to http://www.jinfonet.com/webpage/kbase/kbase.htm page for the JREntServer Manual Related Materials.
Demo 2:If you want to use your user data, you need load your data in the structural method. The demo consists of the following files:Demo2UserAuthenticator.javaDemo2Realm.javaDemo2User.javademo2data.txtPDF manual users can go to http://www.jinfonet.com/webpage/kbase/kbase.htm page for the JREntServer Manual Related Materials.
External Authentication − Single Sign On
When JReport Enterprise Server is integrated into your system, it will implement the security check. If your system also checks thesecurity, you have to pass the authentication twice. To avoid having to login two times, you can either disable JReport server securitycheck or customize security for JReport server by implementing the interface − jet.server.api.http.HttpExternalAuthorized.
Interface ExternalAuthorized
The interface jet.server.api.ExternalAuthorized maintains external authorized user sessions.
It has the following methods:
getExternalAuthorizedUserGets the external authorized user ID and returns the external authorized user ID. The user ID should be a valid user ID of thereport server. Null will be returned if the authorized user info can not be got from the userInfo object.
•
askInvalidateAsks if to invalidate an external authorized user session (i.e. the session is expired). The report server calls this methodbefore the session is invalidated. The server would not call this method if a user logout.
•
notifyLogoutNotifies an external authorized user session logout. The report server calls this method after user logout.
•
Interface HttpExternalAuthorized
This interface extends jet.server.api.ExternalAuthorized. By this interface, the report server gets the user ID who was authorized byan external authenticator.
It has the following method:
getExternalAuthorizedUserGets the external authorized user ID. Returns null if the authorized user info can not get from the HttpServletRequest object.The user ID should be a valid user ID of the report server.
•
handleUnAuthenticatedRequestHandle unauthenticated requests. The report server calls this method before sending the HTTP unauthorized response(HTTP 401) to the client. In this method, can send your response to the client to handle the unauthenticated request. If thismethod return true, the report server will send the HTTP unauthorized response (HTTP 401) to the client. Else the reportserver does nothing.
•
Customized Authentication
480

Implementation
Write your HttpExternalAuthorized implementation. 1. Compile those java classes. The compiling needs the library JRESServlets.jar which can be found under <JREntServerhome>/lib directory.
2.
Modify the classpath used by JReport Enterprise Server to include your external authentication classes so that JReportEnterprise Server can access them.
3.
Change JREntServer.bat to define system property "jrs.httpExternalAuthorized" with your implementation.
For example: Suppose the implementation of this interface is com.mycorp.HttpExternalAuthorizedImpl.class. Then use the command lineto start the report server:java −Djrs.httpExternalAuthorized=com.mycorp.HttpExternalAuthorizedImpl ...
4.
Restart the server. 5.
Demo
The following demo programs are provided to illustrate the implementation of the HttpExternalAuthorized interface.
CustomHttpExternalAuthorized.java: Demo for implementation of HttpExternalAuthorized.CustomServlet.java: Demo to set implementation of HttpExternalAuthorized into the report server.customNoAuth.jsp: Demo to set implementation of HttpExternalAuthorized into the report server. No external authorized user nameis submitted in this demo.customParamAuth.jsp: Demo to set implementation of HttpExternalAuthorized into the report server. External authorized user nameis submitted by parameter in this demo.customSessionAuth.jsp: Demo to set implementation of HttpExternalAuthorized into the report server. External authorized user nameis submitted by http session in this demo.customViewReport.jsp: Demo to work together with customNoAuth.jsp, customParamAuth.jsp and customSessionAuth.jsp to view areport.
PDF manual users can go to http://www.jinfonet.com/webpage/kbase/kbase.htm page for the JREntServer Manual Related Materials.
Index
Seamless Integrated Security Solution
As a reporting server, JReport Enterprise Server protects information via an authentication and authorization process. Furthermore,JReport allows a web application to embed this reporting solution in it seamlessly not only in the UI but also with J2EE technology,thus the seamlessly integrated security solution becomes one of the key features of JReport Enterprise Server.
Two general scenarios of integrated JReport solution
There are all kinds of scenarios on using JReport Server; however, we can categorize them into two general types according to wherethe JReport Enterprise Server instance is.
JReport Enterprise Server Instance is in the same JVM as the Web Application
Customized Authentication
481
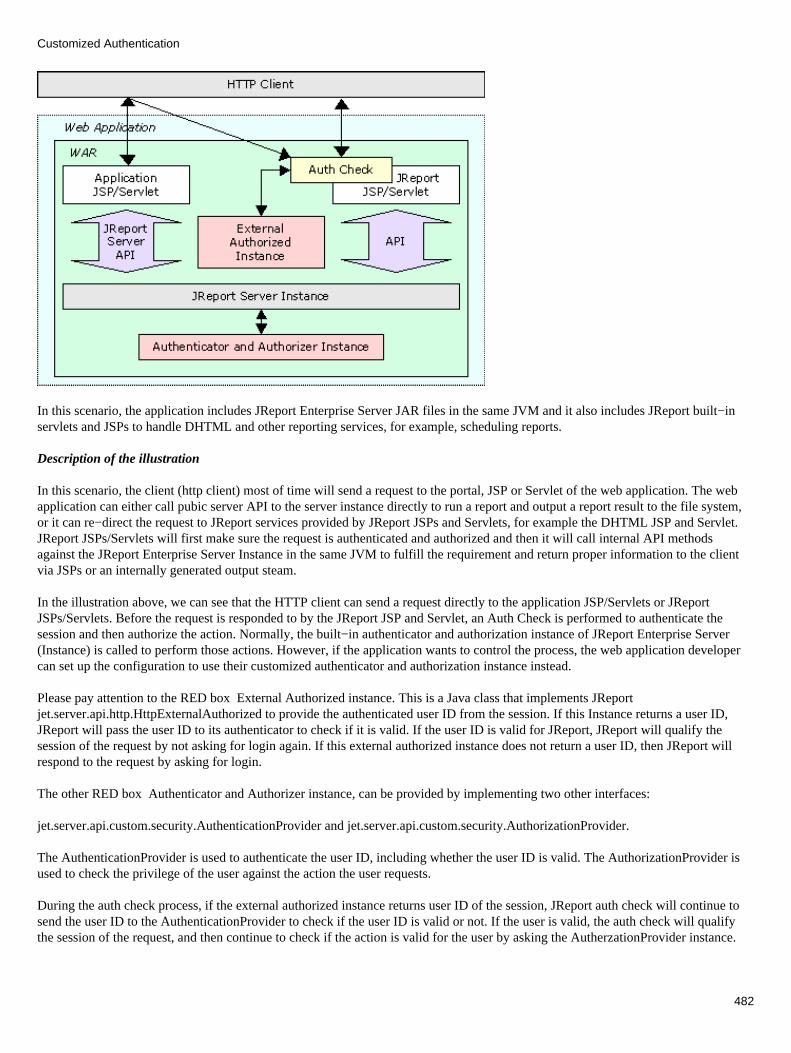
In this scenario, the application includes JReport Enterprise Server JAR files in the same JVM and it also includes JReport built−inservlets and JSPs to handle DHTML and other reporting services, for example, scheduling reports.
Description of the illustration
In this scenario, the client (http client) most of time will send a request to the portal, JSP or Servlet of the web application. The webapplication can either call pubic server API to the server instance directly to run a report and output a report result to the file system,or it can re−direct the request to JReport services provided by JReport JSPs and Servlets, for example the DHTML JSP and Servlet.JReport JSPs/Servlets will first make sure the request is authenticated and authorized and then it will call internal API methodsagainst the JReport Enterprise Server Instance in the same JVM to fulfill the requirement and return proper information to the clientvia JSPs or an internally generated output steam.
In the illustration above, we can see that the HTTP client can send a request directly to the application JSP/Servlets or JReportJSPs/Servlets. Before the request is responded to by the JReport JSP and Servlet, an Auth Check is performed to authenticate thesession and then authorize the action. Normally, the built−in authenticator and authorization instance of JReport Enterprise Server(Instance) is called to perform those actions. However, if the application wants to control the process, the web application developercan set up the configuration to use their customized authenticator and authorization instance instead.
Please pay attention to the RED box External Authorized instance. This is a Java class that implements JReportjet.server.api.http.HttpExternalAuthorized to provide the authenticated user ID from the session. If this Instance returns a user ID,JReport will pass the user ID to its authenticator to check if it is valid. If the user ID is valid for JReport, JReport will qualify thesession of the request by not asking for login again. If this external authorized instance does not return a user ID, then JReport willrespond to the request by asking for login.
The other RED box Authenticator and Authorizer instance, can be provided by implementing two other interfaces:
jet.server.api.custom.security.AuthenticationProvider and jet.server.api.custom.security.AuthorizationProvider.
The AuthenticationProvider is used to authenticate the user ID, including whether the user ID is valid. The AuthorizationProvider isused to check the privilege of the user against the action the user requests.
During the auth check process, if the external authorized instance returns user ID of the session, JReport auth check will continue tosend the user ID to the AuthenticationProvider to check if the user ID is valid or not. If the user is valid, the auth check will qualifythe session of the request, and then continue to check if the action is valid for the user by asking the AutherzationProvider instance.
Customized Authentication
482
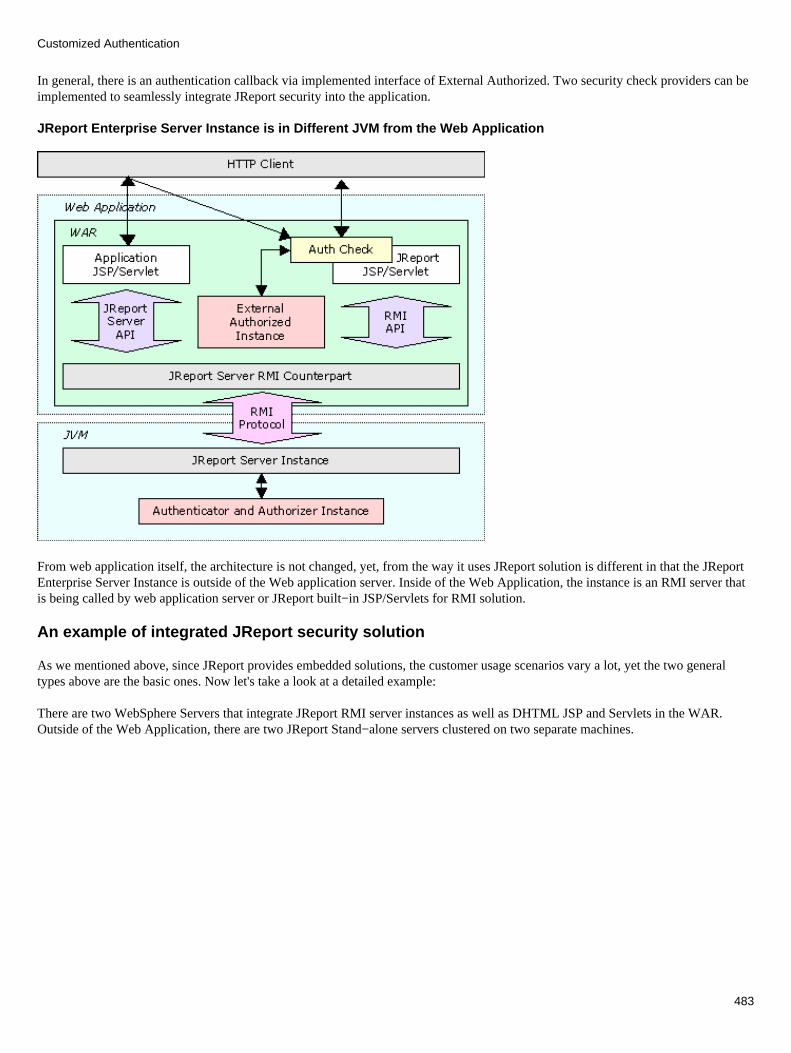
In general, there is an authentication callback via implemented interface of External Authorized. Two security check providers can beimplemented to seamlessly integrate JReport security into the application.
JReport Enterprise Server Instance is in Different JVM from the Web Application
From web application itself, the architecture is not changed, yet, from the way it uses JReport solution is different in that the JReportEnterprise Server Instance is outside of the Web application server. Inside of the Web Application, the instance is an RMI server thatis being called by web application server or JReport built−in JSP/Servlets for RMI solution.
An example of integrated JReport security solution
As we mentioned above, since JReport provides embedded solutions, the customer usage scenarios vary a lot, yet the two generaltypes above are the basic ones. Now let's take a look at a detailed example:
There are two WebSphere Servers that integrate JReport RMI server instances as well as DHTML JSP and Servlets in the WAR.Outside of the Web Application, there are two JReport Stand−alone servers clustered on two separate machines.
Customized Authentication
483
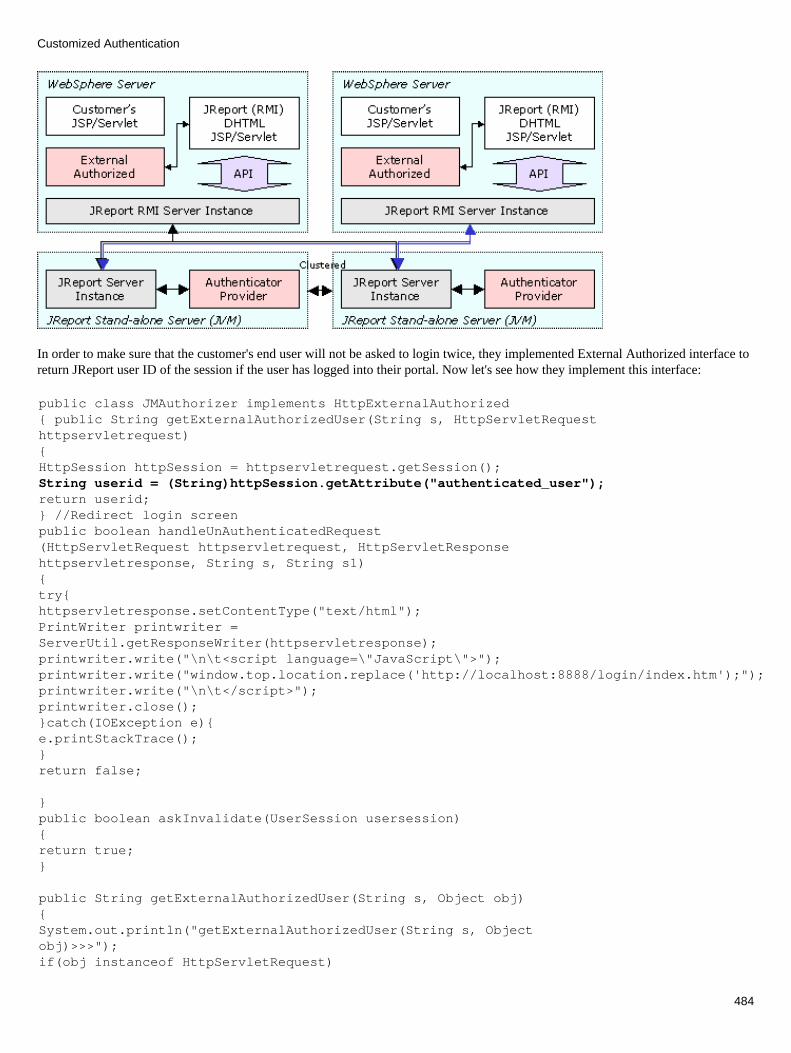
In order to make sure that the customer's end user will not be asked to login twice, they implemented External Authorized interface toreturn JReport user ID of the session if the user has logged into their portal. Now let's see how they implement this interface:
public class JMAuthorizer implements HttpExternalAuthorized{ public String getExternalAuthorizedUser(String s, HttpServletRequesthttpservletrequest){HttpSession httpSession = httpservletrequest.getSession();String userid = (String)httpSession.getAttribute("authenticated_user");return userid;} //Redirect login screenpublic boolean handleUnAuthenticatedRequest(HttpServletRequest httpservletrequest, HttpServletResponsehttpservletresponse, String s, String s1){try{httpservletresponse.setContentType("text/html");PrintWriter printwriter =ServerUtil.getResponseWriter(httpservletresponse);printwriter.write("\n\t<script language=\"JavaScript\">");printwriter.write("window.top.location.replace('http://localhost:8888/login/index.htm');");printwriter.write("\n\t</script>");printwriter.close();}catch(IOException e){e.printStackTrace();}return false;
} public boolean askInvalidate(UserSession usersession){return true;}
public String getExternalAuthorizedUser(String s, Object obj){System.out.println("getExternalAuthorizedUser(String s, Objectobj)>>>");if(obj instanceof HttpServletRequest)
Customized Authentication
484

return getExternalAuthorizedUser(s, (HttpServletRequest)obj);elsereturn null;} public void notifyLogout(UserSession usersession){}}
From the implementation above, we can see that the method getExternalAuthorizedUser() gets the authentication information fromthe request, if it can find the authentication information, it will return the user ID accordingly. If the attribute is not in the session,then NULL will be returned. JReport will not qualify the request as well. When NULL is returned, another methodhandleUnAuthenticatedRequst() will be called. In this sample, the method handleUnAuthenticatedRequst() will return a different website in this case false is simply returned to prevent the login dialog to be displayed.
Once the user ID is returned by External Authorized instance it will be passed to the Authentication Provider via RMI methods to theremote JReport Enterprise Server instance to check if the User ID is valid or not. Here is the way the customer implemented thisauthenticator provider interface:
public class DemoAuthenticationProvider implements AuthenticationProvider {
public boolean isValidUser(String realmName, String userName, String password) {
return true;
}
public boolean isAdminUser(String realmName, String userName) {
if (userName.equals("admin")) {
return true;
}
return false;
}
public String changePassword
(String realmName, String implUserName, String userName, String oldPwd, String newPwd) {
return null;
}
}
Basically, the above implementation assumes that every user ID is a valid user ID and only user admin is the valid admin user. Itworks without security problem because the customer's end user will not be able to connect to the stand−alone server directly.
Customized Authentication
485
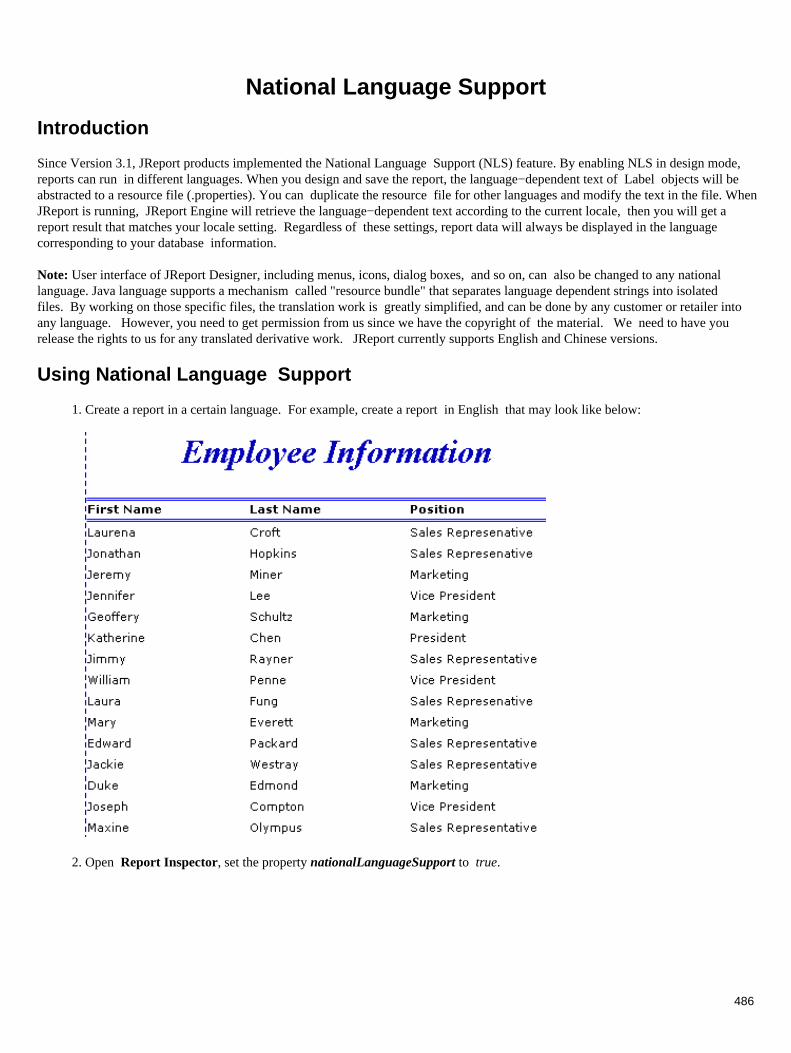
National Language Support
Introduction
Since Version 3.1, JReport products implemented the National Language Support (NLS) feature. By enabling NLS in design mode,reports can run in different languages. When you design and save the report, the language−dependent text of Label objects will beabstracted to a resource file (.properties). You can duplicate the resource file for other languages and modify the text in the file. WhenJReport is running, JReport Engine will retrieve the language−dependent text according to the current locale, then you will get areport result that matches your locale setting. Regardless of these settings, report data will always be displayed in the languagecorresponding to your database information.
Note: User interface of JReport Designer, including menus, icons, dialog boxes, and so on, can also be changed to any nationallanguage. Java language supports a mechanism called "resource bundle" that separates language dependent strings into isolatedfiles. By working on those specific files, the translation work is greatly simplified, and can be done by any customer or retailer intoany language. However, you need to get permission from us since we have the copyright of the material. We need to have yourelease the rights to us for any translated derivative work. JReport currently supports English and Chinese versions.
Using National Language Support
Create a report in a certain language. For example, create a report in English that may look like below:1.
Open Report Inspector, set the property nationalLanguageSupport to true.2.
486

On the File menu, click Save NLS to save this report, you will find that a new property file with the nameReportName_LocaleID.properties is automatically generated under the directory where the report is saved.
For example, suppose that English (United States) is set as the default system locale, a file namedReportName_en_US.properties will be generated.
3.
Open this property file using any text editor, you will see all the label text has been extracted as below:
#JReport Reports Resources#Thu Nov 16 17:16:23 CST 2000LBL_TXT_Last_sName=Last\ NameLBL_TXT_Position=PositionLBL_TXT_First_sName=First\ NameLBL_TXT_Employee_sInformation=Employee\ Information
4.
If you want to display the report in German, you should make a copy of the properties file above in the same directory,rename the new file as ReportName_de_DE.properties, and then modify its content as below, note that at the end of theproperty file, you should write the encoding you use.
#JReport Reports Resources#Thu Nov 16 17:16:23 CST 2000LBL_TXT_Last_sName=Letzter NameLBL_TXT_Position=in Position bringenLBL_TXT_First_sName=VornameLBL_TXT_Employee_sInformation=AngestelltInformationen
encoding=Cp1252
5.
National Language Support
487

Save the file. Start JReport Designer. JReport Engine automatically bundles the report with the property fileReportName_de_DE.properties and the report will be displayed in German if your current locale is set to German.
6.
Note: To view the report in the language you specified in JReport Designer, please make sure that default system locale is set to thecorresponding language.
NLS for JREntServer
If National Language Support is enabled for your report in design mode, it will also be available after the report has been deployed toJReport Enterprise Server. On JReport Enterprise Server, reports are running in the client/server scenario, where different clientsselect different languages for the corresponding rendering of the report.
To use NLS for JReport Enterprise Server, you should:
Create and design a report in JReport Designer as mentioned in preceding procedure. 1. Deploy the report and catalog to JReport Enterprise Server using Deployment Wizard in JReport Designer, and the NLSproperties files will be deployed to the server as well.
2.
Start JReport Enterprise Server, and then access the catalog and reports using the IE browser.
Click Advanced Run or Schedule of the deployed report, you will see that there is a new option called UsingLanguage. This option will list all the available languages of this report in the drop−down list, the number of whichdepends on how many types of locale properties file you defined for this report. In this example, because there are only twolanguages defied, you will only see two languages list in the drop−down list, en and de.
3.
Select Language, Region, select ISO 8859−1 as the Encoding. Meanwhile, on the View menu of IE browser, selectcorresponding Encoding.
4.
National Language Support
488

5. Click the Submit button, then you will see the report displayed in English:
6. Select de as the language and Windows Eastern European as the encoding, and then click the Submit button, the report willbe displayed in German:
National Language Support
489
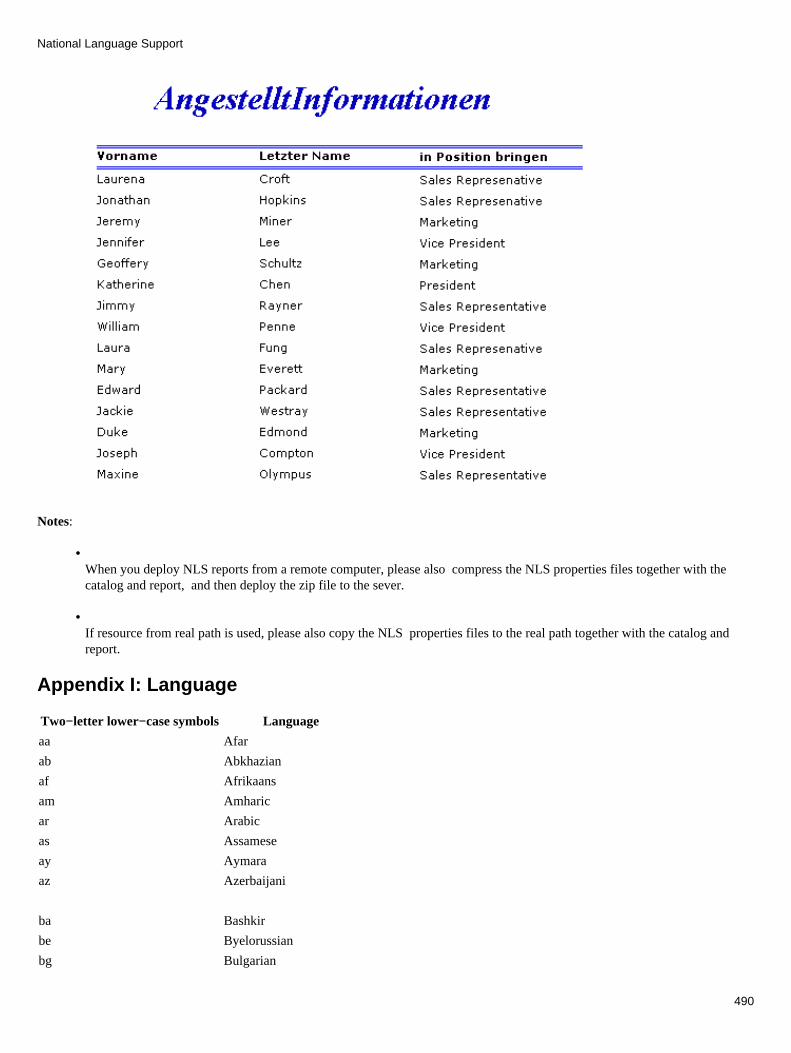
Notes:
• When you deploy NLS reports from a remote computer, please also compress the NLS properties files together with thecatalog and report, and then deploy the zip file to the sever.
• If resource from real path is used, please also copy the NLS properties files to the real path together with the catalog andreport.
Appendix I: Language
Two−letter lower−case symbols Language
aa Afar
ab Abkhazian
af Afrikaans
am Amharic
ar Arabic
as Assamese
ay Aymara
az Azerbaijani
ba Bashkir
be Byelorussian
bg Bulgarian
National Language Support
490

bh Bihari
bi Bislama
bn Bengali; Bangla
bo Tibetan
br Breton
ca Catalan
co Corsican
cs Czech
cy Welsh
da Danish
de German
dz Bhutani
el Greek
en English
eo Esperanto
es Spanish
et Estonian
eu Basque
fa Persian
fi Finnish
fj Fiji
fo Faroese
fr French
fy Frisian
ga Irish
gd ScotsGaelic
gl Galician
gn Guarani
gu Gujarati
ha Hausa
he Hebrew (formerly iw)
hi Hindi
hr Croatian
hu Hungarian
hy Armenian
ia Interlingua
id Indonesian (formerly in)
ie Interlingue
National Language Support
491

ik Inupiak
is Icelandic
it Italian
iu Inuktitut
ja Japanese
jw Javanese
ka Georgian
kk Kazakh
kl Greenlandic
km Cambodian
kn Kannada
ko Korean
ks Kashmiri
ku Kurdish
ky Kirghiz
la Latin
ln Lingala
lo Laothian
lt Lithuanian
lv Latvian, Lettish
mg Malagasy
mi Maori
mk Macedonian
ml Malayalam
mn Mongolian
mo Moldavian
mr Marathi
ms Malay
mt Maltese
my Burmese
na Nauru
ne Nepali
nl Dutch
no Norwegian
oc Occitan
om (Afan) Oromo
or Oriya
pa Punjabi
National Language Support
492

pl Polish
ps Pashto, Pushto
pt Portuguese
qu Quechua
rm Rhaeto−Romance
rn Kirundi
ro Romanian
ru Russian
rw Kinyarwanda
sa Sanskrit
sd Sindhi
sg Sangho
sh Serbo−Croatian
si Sinhalese
sk Slovak
sl Slovenian
sm Samoan
sn Shona
so Somali
sq Albanian
sr Serbian
ss Siswati
st Sesotho
su Sundanese
sv Swedish
sw Swahili
ta Tamil
te Telugu
tg Tajik
th Thai
ti Tigrinya
tk Turkmen
tl Tagalog
tn Setswana
to Tonga
tr Turkish
ts Tsonga
tt Tatar
tw Twi
ug Uighur
National Language Support
493

uk Ukrainian
ur Urdu
uz Uzbek
vi Vietnamese
vo Volapuk
wo Wolof
xh Xhosa
yi Yiddish (formerly ji)
yo Yoruba
za Zhuang
zh Chinese
zu Zulu
Appendix II: Region
Region A2
AFGHANISTAN AF
ALBANIA AL
ALGERIA DZ
AMERICAN SAMOA AS
ANDORRA AD
ANGOLA AO
ANGUILLA AI
ANTARCTICA AQ
ANTIGUA AND BARBUDA AG
ARGENTINA AR
ARMENIA AM
ARUBA AW
AUSTRALIA AU
AUSTRIA AT
AZERBAIJAN AZ
BAHAMAS BS
BAHRAIN BH
BANGLADESH BD
BARBADOS BB
BELARUS BY
BELGIUM BE
BELIZE BZ
BENIN BJ
National Language Support
494
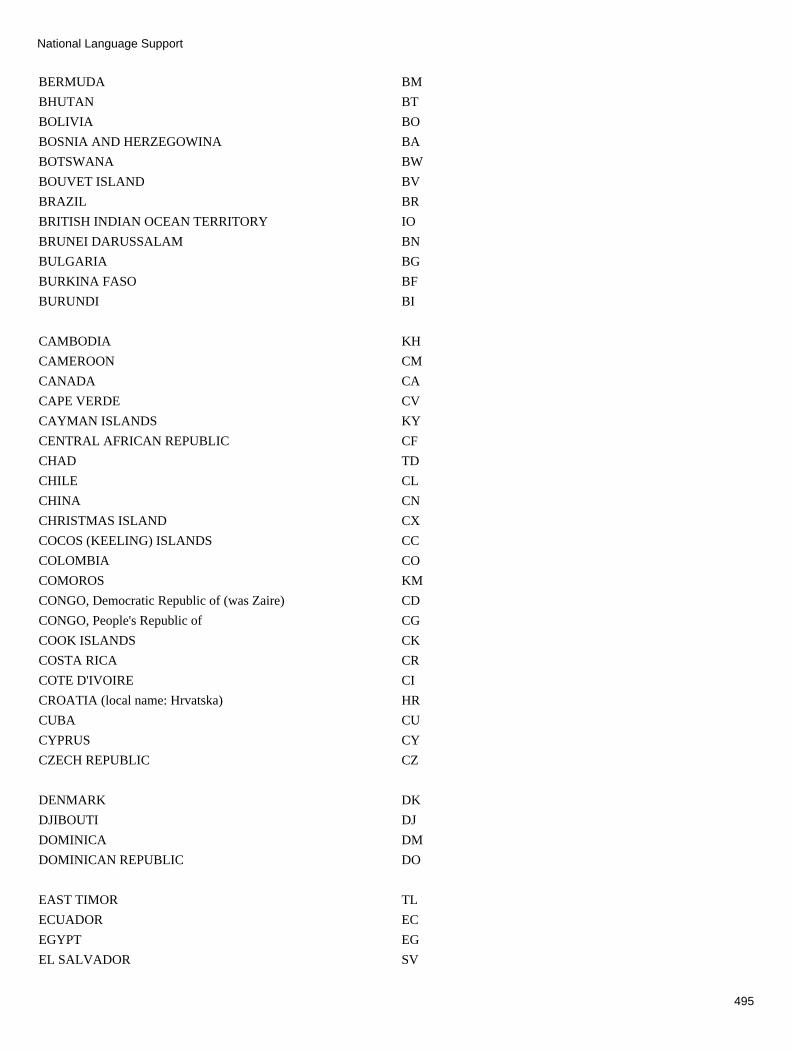
BERMUDA BM
BHUTAN BT
BOLIVIA BO
BOSNIA AND HERZEGOWINA BA
BOTSWANA BW
BOUVET ISLAND BV
BRAZIL BR
BRITISH INDIAN OCEAN TERRITORY IO
BRUNEI DARUSSALAM BN
BULGARIA BG
BURKINA FASO BF
BURUNDI BI
CAMBODIA KH
CAMEROON CM
CANADA CA
CAPE VERDE CV
CAYMAN ISLANDS KY
CENTRAL AFRICAN REPUBLIC CF
CHAD TD
CHILE CL
CHINA CN
CHRISTMAS ISLAND CX
COCOS (KEELING) ISLANDS CC
COLOMBIA CO
COMOROS KM
CONGO, Democratic Republic of (was Zaire) CD
CONGO, People's Republic of CG
COOK ISLANDS CK
COSTA RICA CR
COTE D'IVOIRE CI
CROATIA (local name: Hrvatska) HR
CUBA CU
CYPRUS CY
CZECH REPUBLIC CZ
DENMARK DK
DJIBOUTI DJ
DOMINICA DM
DOMINICAN REPUBLIC DO
EAST TIMOR TL
ECUADOR EC
EGYPT EG
EL SALVADOR SV
National Language Support
495

EQUATORIAL GUINEA GQ
ERITREA ER
ESTONIA EE
ETHIOPIA ET
FALKLAND ISLANDS (MALVINAS) FK
FAROE ISLANDS FO
FIJI FJ
FINLAND FI
FRANCE FR
FRANCE, METROPOLITAN FX
FRENCH GUIANA GF
FRENCH POLYNESIA PF
FRENCH SOUTHERN TERRITORIES TF
GABON GA
GAMBIA GM
GEORGIA GE
GERMANY DE
GHANA GH
GIBRALTAR GI
GREECE GR
GREENLAND GL
GRENADA GD
GUADELOUPE GP
GUAM GU
GUATEMALA GT
GUINEA GN
GUINEA−BISSAU GW
GUYANA GY
HAITI HT
HEARD AND MC DONALD ISLANDS HM
HONDURAS HN
HONG KONG HK
HUNGARY HU
ICELAND IS
INDIA IN
INDONESIA ID
IRAN (ISLAMIC REPUBLIC OF) IR
IRAQ IQ
IRELAND IE
ISRAEL IL
ITALY IT
National Language Support
496

JAMAICA JM
JAPAN JP
JORDAN JO
KAZAKHSTAN KZ
KENYA KE
KIRIBATI KI
KOREA, DEMOCRATIC PEOPLE'S REPUBLIC OF KP
KOREA, REPUBLIC OF KR
KUWAIT KW
KYRGYZSTAN KG
LAO PEOPLE'S DEMOCRATIC REPUBLIC LA
LATVIA LV
LEBANON LB
LESOTHO LS
LIBERIA LR
LIBYAN ARAB JAMAHIRIYA LY
LIECHTENSTEIN LI
LITHUANIA LT
LUXEMBOURG LU
MACAU MO
MACEDONIA, THE FORMER YUGOSLAV REPUBLIC OF MK
MADAGASCAR MG
MALAWI MW
MALAYSIA MY
MALDIVES MV
MALI ML
MALTA MT
MARSHALL ISLANDS MH
MARTINIQUE MQ
MAURITANIA MR
MAURITIUS MU
MAYOTTE YT
MEXICO MX
MICRONESIA, FEDERATED STATES OF FM
MOLDOVA, REPUBLIC OF MD
MONACO MC
MONGOLIA MN
MONTSERRAT MS
MOROCCO MA
MOZAMBIQUE MZ
MYANMAR MM
National Language Support
497

NAMIBIA NA
NAURU NR
NEPAL NP
NETHERLANDS NL
NETHERLANDS ANTILLES AN
NEW CALEDONIA NC
NEW ZEALAND NZ
NICARAGUA NI
NIGER NE
NIGERIA NG
NIUE NU
NORFOLK ISLAND NF
NORTHERN MARIANA ISLANDS MP
NORWAY NO
OMAN OM
PAKISTAN PK
PALAU PW
PALESTINIAN TERRITORY, Occupied PS
PANAMA PA
PAPUA NEW GUINEA PG
PARAGUAY PY
PERU PE
PHILIPPINES PH
PITCAIRN PN
POLAND PL
PORTUGAL PT
PUERTO RICO PR
QATAR QA
REUNION RE
ROMANIA RO
RUSSIAN FEDERATION RU
RWANDA RW
SAINT KITTS AND NEVIS KN
SAINT LUCIA LC
SAINT VINCENT AND THE GRENADINES VC
SAMOA WS
SAN MARINO SM
SAO TOME AND PRINCIPE ST
SAUDI ARABIA SA
National Language Support
498
SENEGAL SN
SEYCHELLES SC
SIERRA LEONE SL
SINGAPORE SG
SLOVAKIA (Slovak Republic) SK
SLOVENIA SI
SOLOMON ISLANDS SB
SOMALIA SO
SOUTH AFRICA ZA
SOUTH GEORGIA AND THE SOUTH SANDWICH ISLANDSGS
SPAIN ES
SRI LANKA LK
ST. HELENA SH
ST. PIERRE AND MIQUELON PM
SUDAN SD
SURINAME SR
SVALBARD AND JAN MAYEN ISLANDS SJ
SWAZILAND SZ
SWEDEN SE
SWITZERLAND CH
SYRIAN ARAB REPUBLIC SY
TAIWAN TW
TAJIKISTAN TJ
TANZANIA, UNITED REPUBLIC OF TZ
THAILAND TH
TOGO TG
TOKELAU TK
TONGA TO
TRINIDAD AND TOBAGO TT
TUNISIA TN
TURKEY TR
TURKMENISTAN TM
TURKS AND CAICOS ISLANDS TC
TUVALU TV
UGANDA UG
UKRAINE UA
UNITED ARAB EMIRATES AE
UNITED KINGDOM GB
UNITED STATES US
UNITED STATES MINOR OUTLYING ISLANDS UM
URUGUAY UY
UZBEKISTAN UZ
National Language Support
499
VANUATU VU
VATICAN CITY STATE (HOLY SEE) VA
VENEZUELA VE
VIET NAM VN
VIRGIN ISLANDS (BRITISH) VG
VIRGIN ISLANDS (U.S.) VI
WALLIS AND FUTUNA ISLANDS WF
WESTERN SAHARA EH
YEMEN YE
YUGOSLAVIA YU
ZAMBIA ZM
ZIMBABWE ZW
National Language Support
500

Page Level Security
Introduction
Security in the report is a kind of privileged control. Beginning with Version 4.0, we support page level security which creates asecurity mechanism for controlling access to the report.
Page Level Security is implemented with two security properties on the group panel: Grant and Cascade. By utilizing these twoproperties, you can specify which group should be displayed in your reports. The feature enables different users to view differentgroups according to their access privilege. It also applies to the nested group.
Setting Page Level Security
The Grant and Cascade properties are provided to build a report with Page Level Security. The Grant property is a string typevariable, which can be controlled by a formula. Its value contains one or more security identifiers (SID). The Cascade property is aboolean type variable. If it is true, the group's Detail or sub−groups can be viewed according to the SID. Otherwise display groupheader and footer .
Below we will follow an example to illustrate how to set Page Level Security.
Start up JReport Designer. Create a report for customer information. Group the report by the Customer_Region field. 1. Create a formula to control the Grant property value. The formula will return a string value, which indicates which user hasthe privilege to access the JReport Enterprise Server.
For example, we write the following formula named "security" to set the SID.
"admin" and "jennifer" are two users assigned by the server administrator. By the above formula, the user "admin" isauthorized to view only the CA group and MN group, and the user "jennifer" can only view the BC group. If the formula iswritten as below:
2.
501
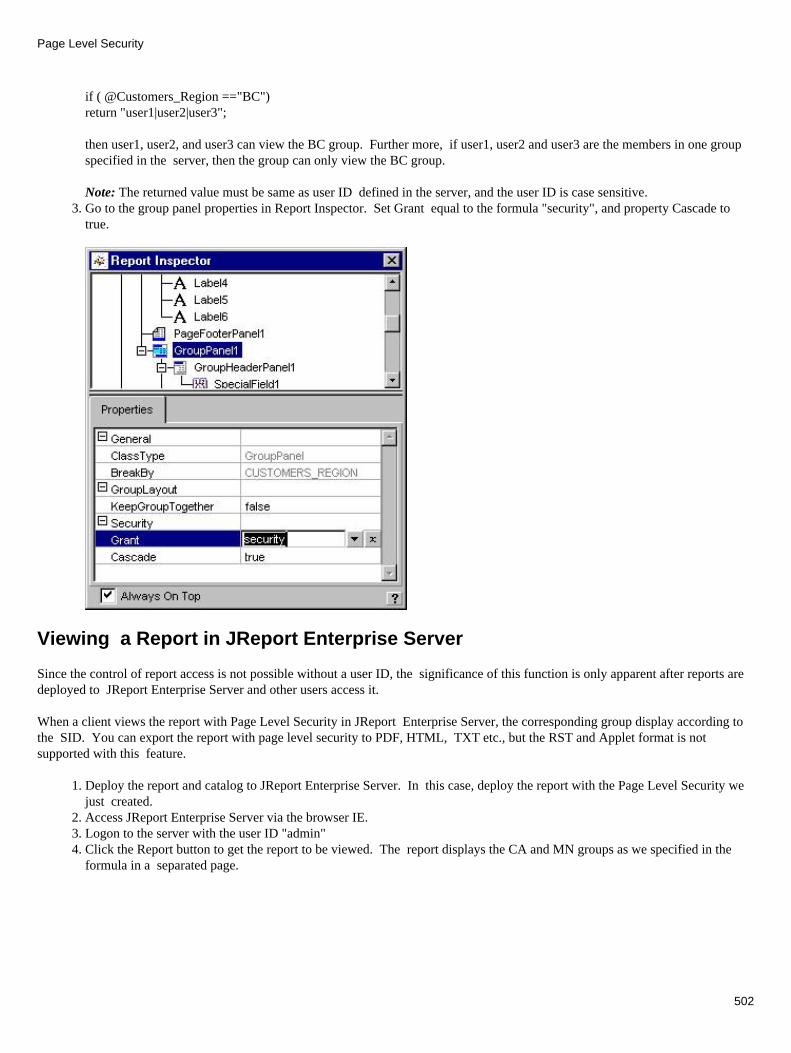
if ( @Customers_Region =="BC")return "user1|user2|user3";
then user1, user2, and user3 can view the BC group. Further more, if user1, user2 and user3 are the members in one groupspecified in the server, then the group can only view the BC group.
Note: The returned value must be same as user ID defined in the server, and the user ID is case sensitive. Go to the group panel properties in Report Inspector. Set Grant equal to the formula "security", and property Cascade totrue.
3.
Viewing a Report in JReport Enterprise Server
Since the control of report access is not possible without a user ID, the significance of this function is only apparent after reports aredeployed to JReport Enterprise Server and other users access it.
When a client views the report with Page Level Security in JReport Enterprise Server, the corresponding group display according tothe SID. You can export the report with page level security to PDF, HTML, TXT etc., but the RST and Applet format is notsupported with this feature.
Deploy the report and catalog to JReport Enterprise Server. In this case, deploy the report with the Page Level Security wejust created.
1.
Access JReport Enterprise Server via the browser IE. 2. Logon to the server with the user ID "admin" 3. Click the Report button to get the report to be viewed. The report displays the CA and MN groups as we specified in theformula in a separated page.
4.
Page Level Security
502
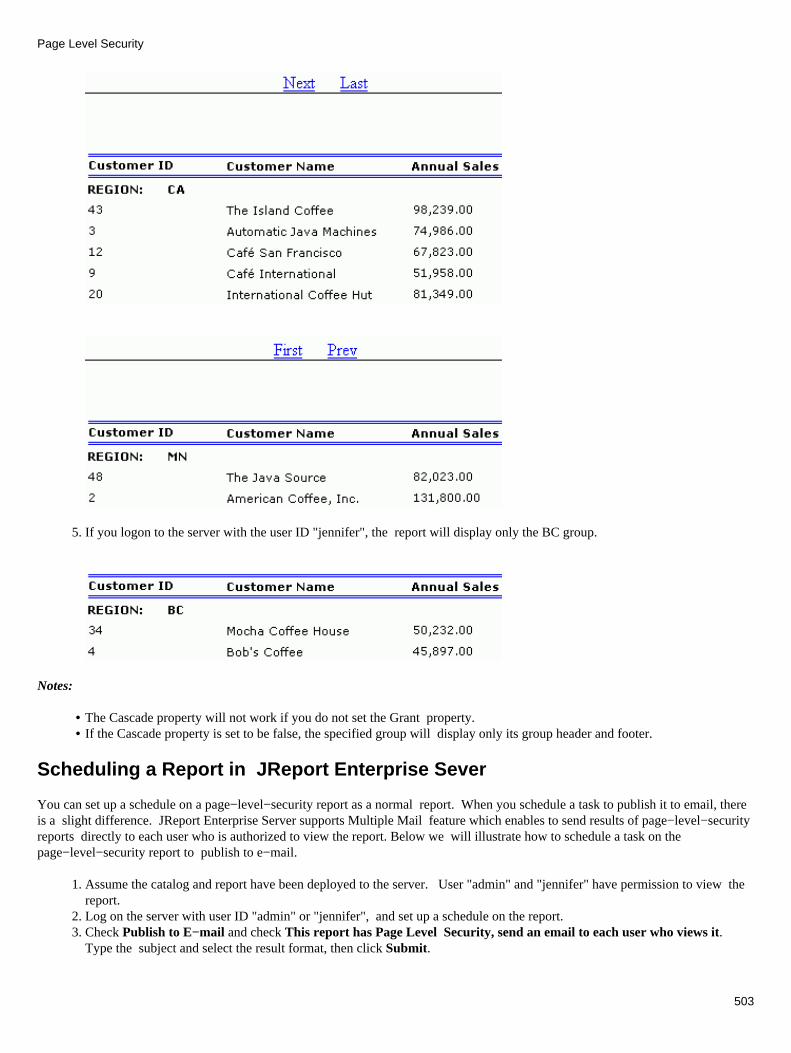
If you logon to the server with the user ID "jennifer", the report will display only the BC group.5.
Notes:
The Cascade property will not work if you do not set the Grant property.• If the Cascade property is set to be false, the specified group will display only its group header and footer.•
Scheduling a Report in JReport Enterprise Sever
You can set up a schedule on a page−level−security report as a normal report. When you schedule a task to publish it to email, thereis a slight difference. JReport Enterprise Server supports Multiple Mail feature which enables to send results of page−level−securityreports directly to each user who is authorized to view the report. Below we will illustrate how to schedule a task on thepage−level−security report to publish to e−mail.
Assume the catalog and report have been deployed to the server. User "admin" and "jennifer" have permission to view thereport.
1.
Log on the server with user ID "admin" or "jennifer", and set up a schedule on the report. 2. Check Publish to E−mail and check This report has Page Level Security, send an email to each user who views it. Type the subject and select the result format, then click Submit.
3.
Page Level Security
503

JReport Enterprise Server will get e−mail addresses from the user accounts and send the report result to user "admin" and"jennifer" with the contents according to their access right to the report.
Note: Before publishing to e−mail, make sure you have input the e−mail addresses of users when configuring the server. To do this,access JReport Enterprise Server with port 8889 (default port of remote administration). On the Security page, click User tab. Choosethe user name which you want to edit in the User ID column and click it. Then you can type in the e−mail address of the user.
Example: Email Billing Reports
Sometimes, sending pertinent report data to corresponding mail recipient is required. JReport Enterprise Server allows you to sendthe scheduled report result to the e−mail addresses accordingly, based on the page level security settings of the report and the userinformation stored on JReport Enterprise Server (e.g., e−mail address information). Therefore, each recipient will be able to viewonly certain part of the report data. However, using email information of server users is not reliable, because the user ID that is ok forthe report doesn't always exist in JReport Enterprise Server, and in cases like this, mails will not be sent successfully. The best way tosolve this is to use external e−mail information source, using the UserMailList API that JReport provides.
JReport provides two interfaces for you to retrieve user and e−mail information from a customized source:
jet.server.api.UserMailListFactoryUsed to get the UserMailList instance implemented by the user.
•
jet.server.api.UserMailListUsed to get e−mail information from a customized source.
•
You can implement multiple classes of interface UserMailList, each of them may refer to a particular report. By using thegetInstance() method in the jet.server.api.UserMailListFactory interface, you can get one implementation ofUserMailList. For more information on these two interfaces, please refer to JReport Enterprise Server API Documentation.
Let's take the following simple example:.
Here, we have a Customers table with customer names and their e−mail addresses, as illustrated below. You can design areport this table and others. Then apply the page level security for this report, so that later in the server side, we can schedulethis report and send the pertinent data to different recepients saved in this Customers table.
1.
Page Level Security
504
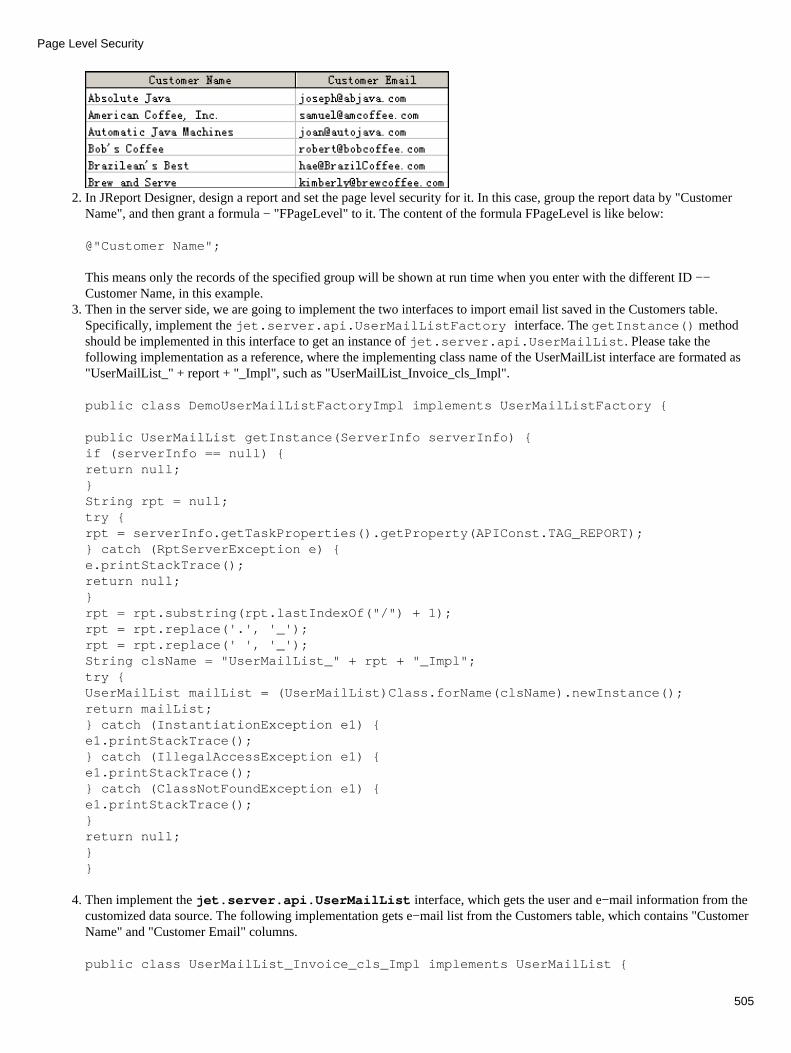
In JReport Designer, design a report and set the page level security for it. In this case, group the report data by "CustomerName", and then grant a formula − "FPageLevel" to it. The content of the formula FPageLevel is like below:
@"Customer Name";
This means only the records of the specified group will be shown at run time when you enter with the different ID −−Customer Name, in this example.
2.
Then in the server side, we are going to implement the two interfaces to import email list saved in the Customers table.Specifically, implement the jet.server.api.UserMailListFactory interface. The getInstance() methodshould be implemented in this interface to get an instance of jet.server.api.UserMailList. Please take thefollowing implementation as a reference, where the implementing class name of the UserMailList interface are formated as"UserMailList_" + report + "_Impl", such as "UserMailList_Invoice_cls_Impl".
public class DemoUserMailListFactoryImpl implements UserMailListFactory {
3.
public UserMailList getInstance(ServerInfo serverInfo) {if (serverInfo == null) {return null;}String rpt = null;try {rpt = serverInfo.getTaskProperties().getProperty(APIConst.TAG_REPORT);} catch (RptServerException e) {e.printStackTrace();return null;}rpt = rpt.substring(rpt.lastIndexOf("/") + 1);rpt = rpt.replace('.', '_');rpt = rpt.replace(' ', '_');String clsName = "UserMailList_" + rpt + "_Impl";try {UserMailList mailList = (UserMailList)Class.forName(clsName).newInstance();return mailList;} catch (InstantiationException e1) {e1.printStackTrace(); } catch (IllegalAccessException e1) {e1.printStackTrace();} catch (ClassNotFoundException e1) {e1.printStackTrace();}return null;}}
Then implement the jet.server.api.UserMailList interface, which gets the user and e−mail information from thecustomized data source. The following implementation gets e−mail list from the Customers table, which contains "CustomerName" and "Customer Email" columns.
public class UserMailList_Invoice_cls_Impl implements UserMailList {
4.
Page Level Security
505
public static Hashtable userEmails = new Hashtable();private String curRealmName = "defaultRealm";
public UserMailList_Invoice_cls_Impl(){loadData();}
private void loadData (){try{ String jdbcDriver = "sun.jdbc.odbc.JdbcOdbcDriver";DriverManager.registerDriver((Driver)Class.forName(jdbcDriver).newInstance()); Connection conn = DriverManager.getConnection("jdbc:odbc:jinfonet4");Statement stmt = conn.createStatement();ResultSet rs = stmt.executeQuery("select * from Customers");String userName = null;String userEmail = null;while(rs.next()){userName = rs.getString("Customer Name");userEmail = rs.getString("Customer Email");if (userEmail != null) {userEmails.put(userName, userEmail);}}}catch(Exception e){e.printStackTrace();}
}public java.util.Enumeration getAllMailAddresses(String realmName){if (realmName.equals(curRealmName)) {return userEmails.elements();}else{return null;} }
public java.util.Enumeration getGroupMailAddresses(String realmName, StringgroupName) { if (realmName.equals(curRealmName) && userEmails.containsKey(groupName)) {Vector groupEmails = new Vector();groupEmails.addElement(userEmails.get(groupName)); return groupEmails.elements() ;}else{return null;}}
public java.lang.String getMailAddress(String realmName, String userName) { if (realmName.equals(curRealmName) && userEmails.containsKey(userName)) { return (String)userEmails.get(userName);}else{return null;}}
Page Level Security
506
}
Register the above classes to the server before JReport Enterprise Server is started: Add the −Dcom.jinfonet.mailListFactory=UserMailListFactoryImplName parameter to thecommand line/batch file that starts JReport Enterprise Server, where the UserMailListFactoryImplNameindicates the implementation of the jet.server.api.UserMailListFactory interface.
In this case, the parameter should be−Dcom.jinfonet.mailListFactory=DemoUserMailListFactoryImpl.
♦
Add the path of the implementation classes to the classpath of the command line/batch file.♦
5.
Start JReport Enterprise Server and then deploy the report and catalog.6. Schedule the report, publish to e−mail, check the option This report has Page Level Security. Send an email to each userwho views it. Provide the necessary information and then submit the schedule.
7.
The report will be processed and sent to the corresponding recipients with pertinent report data.
Index
Page Level Security
507

Record Level Security and Column Level Security
Introduction
Record level security (RLS) and Column Level Security (CLS) of JReport Designer allow you to control the user access to differentsubsets of data, which ensures that people only see what they are supposed to see. This lets you provide different users withaccordingly different, but appropriate contents.
What are record level security & column level security?In short, record level security allows you to define what records are to be revealed to a certain user, while column level securityallows you to define which report column is revealed to a certain user.
No matter to whom you need to provide information, a plant manager or thousands of customers, JReport Designer allows you tocontrol the access to information according to your needs.
Both record level security and column level security of JReport Designer are based on catalog, in this way, you don't need to setsecurity information for every report.
JReport products have two types of the security policies, one is the security policies based on catalog (Catalog Scope SecurityPolicy), while the other is the security policies based on single report (Report Scope Security Policy):
Catalog Scope Security PolicyYou can build your catalog scope security policy, with each security policy referring to a data source in the catalog, so that ifyou want to implement the same security policy in a group of reports, you can simply apply an existing security policy to thereport, without repeatedly building the security information for each report. Both RLS and CLS can be catalog scopesecurity.
•
Report Scope Security Policy Additionally, the record level security can be report scope, which is based on security information file, say, you can usesecurity information file to set the security policies for a report. Report scope security policy doesn't support column levelsecurity.
•
Both of these two types of policies (for record level security only) can be applied simultaneously in the catalog and report. Pleasenote, if a report scope security policy has already been applied to a report, it will override the catalog security policy applied to thecatalog, say, the report scope security policies have higher priorities than the catalog security policies.
User, Role, and Group ManagementYou can both import the users/groups/roles from JReport Enterprise Server and define new user/group/role in designer.
Import/export Security Policy to XMLSecurity policy information can be imported from TXT (for Report Scope Security only) and XML (for Catalog Scope Security)formats. You can export the security policy to XML files.
Catalog Scope Security
You can build your catalog scope security policy, with each security policy referring to a data source in the catalog, so that if youwant to implement the same security policy in a group of reports, you can simply apply an existing security policy to the report,without repeatedly building the security information for each report.
508

UserThe users for catalog scope security falls into two categories: UserDefiend and Server. The user defined user is created in JReportDesigner, while the Server user is imported from JReport Enterprise Server.
RoleThe roles for catalog scope security falls into two categories: UserDefiend and Server. The user defined role is created in JReportDesigner, while the Server role is imported from JReport Enterprise Server.
GroupThe groups for catalog scope security falls into two categories: UserDefiend and Server. The user defined role is created in JReportDesigner, while the Server role is imported from JReport Enterprise Server.
Security PolicyThe permissions can be assigned to users, roles, and groups. A role/group can have more than one user, and a user can belong to morethan one role/group. The permissions that a user may have depends on the permissions of the roles/groups it belongs to and its ownpermissions. The inheritance relationship is logic OR.
For example, if a user U1 belongs to two roles, two groups, such as R1, R2, G1, and G2, the permissions the user U1 will eventuallyhave are the permission collection of the roles and itself, which is P1, P2, P3, P4, and P5, as shown in the following diagram.
Record Level Security and Column Level Security
509
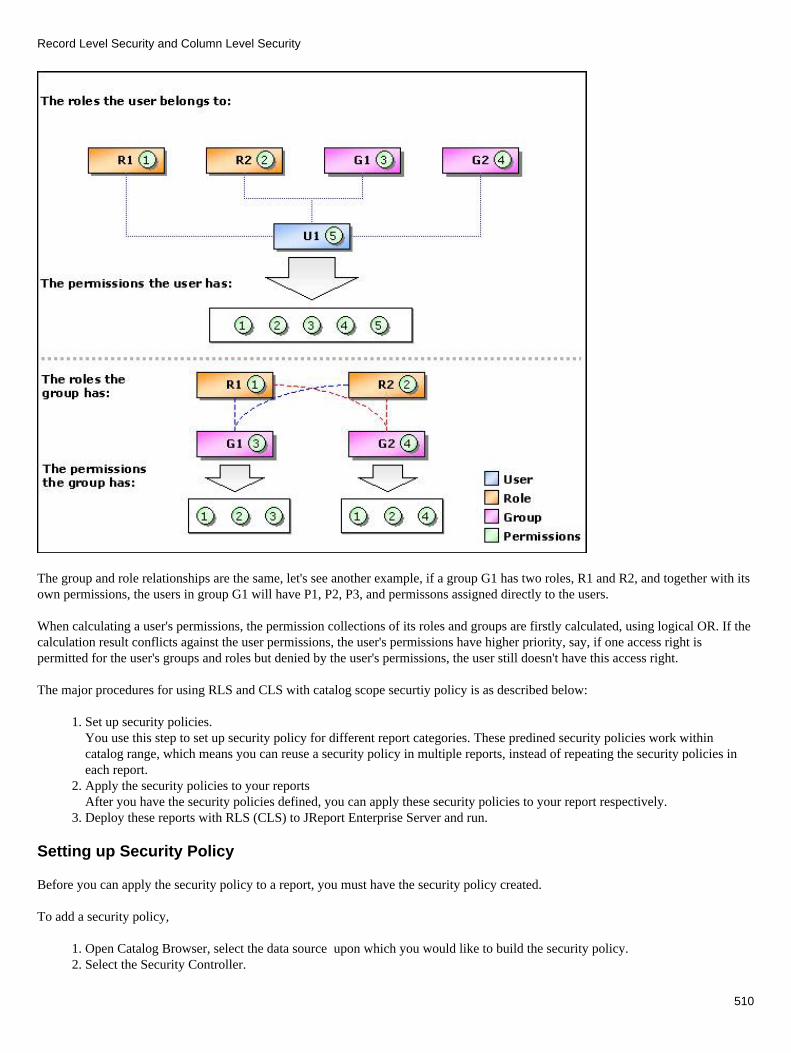
The group and role relationships are the same, let's see another example, if a group G1 has two roles, R1 and R2, and together with itsown permissions, the users in group G1 will have P1, P2, P3, and permissons assigned directly to the users.
When calculating a user's permissions, the permission collections of its roles and groups are firstly calculated, using logical OR. If thecalculation result conflicts against the user permissions, the user's permissions have higher priority, say, if one access right ispermitted for the user's groups and roles but denied by the user's permissions, the user still doesn't have this access right.
The major procedures for using RLS and CLS with catalog scope securtiy policy is as described below:
Set up security policies. You use this step to set up security policy for different report categories. These predined security policies work withincatalog range, which means you can reuse a security policy in multiple reports, instead of repeating the security policies ineach report.
1.
Apply the security policies to your reportsAfter you have the security policies defined, you can apply these security policies to your report respectively.
2.
Deploy these reports with RLS (CLS) to JReport Enterprise Server and run.3.
Setting up Security Policy
Before you can apply the security policy to a report, you must have the security policy created.
To add a security policy,
Open Catalog Browser, select the data source upon which you would like to build the security policy.1. Select the Security Controller.2.
Record Level Security and Column Level Security
510
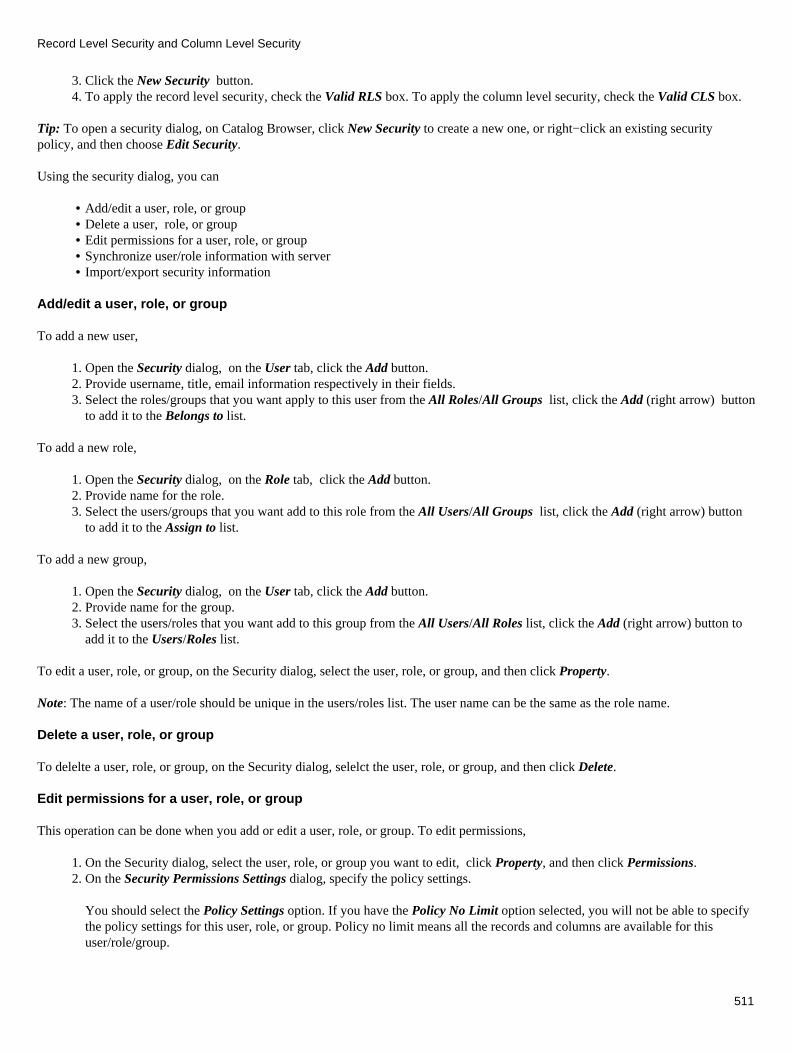
Click the New Security button.3. To apply the record level security, check the Valid RLS box. To apply the column level security, check the Valid CLS box. 4.
Tip: To open a security dialog, on Catalog Browser, click New Security to create a new one, or right−click an existing securitypolicy, and then choose Edit Security.
Using the security dialog, you can
Add/edit a user, role, or group• Delete a user, role, or group• Edit permissions for a user, role, or group• Synchronize user/role information with server• Import/export security information•
Add/edit a user, role, or group
To add a new user,
Open the Security dialog, on the User tab, click the Add button.1. Provide username, title, email information respectively in their fields.2. Select the roles/groups that you want apply to this user from the All Roles/All Groups list, click the Add (right arrow) buttonto add it to the Belongs to list.
3.
To add a new role,
Open the Security dialog, on the Role tab, click the Add button.1. Provide name for the role.2. Select the users/groups that you want add to this role from the All Users/All Groups list, click the Add (right arrow) buttonto add it to the Assign to list.
3.
To add a new group,
Open the Security dialog, on the User tab, click the Add button.1. Provide name for the group.2. Select the users/roles that you want add to this group from the All Users/All Roles list, click the Add (right arrow) button toadd it to the Users/Roles list.
3.
To edit a user, role, or group, on the Security dialog, select the user, role, or group, and then click Property.
Note: The name of a user/role should be unique in the users/roles list. The user name can be the same as the role name.
Delete a user, role, or group
To delelte a user, role, or group, on the Security dialog, selelct the user, role, or group, and then click Delete.
Edit permissions for a user, role, or group
This operation can be done when you add or edit a user, role, or group. To edit permissions,
On the Security dialog, select the user, role, or group you want to edit, click Property, and then click Permissions. 1. On the Security Permissions Settings dialog, specify the policy settings.
You should select the Policy Settings option. If you have the Policy No Limit option selected, you will not be able to specifythe policy settings for this user, role, or group. Policy no limit means all the records and columns are available for thisuser/role/group.
2.
Record Level Security and Column Level Security
511
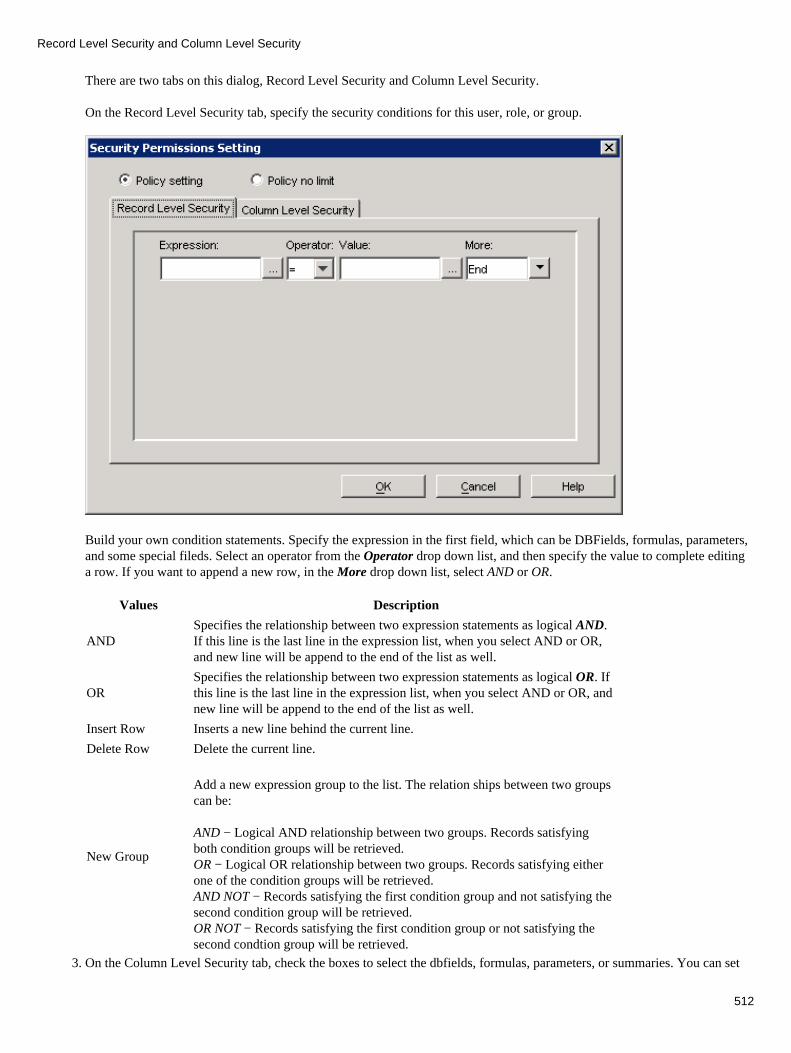
There are two tabs on this dialog, Record Level Security and Column Level Security.
On the Record Level Security tab, specify the security conditions for this user, role, or group.
Build your own condition statements. Specify the expression in the first field, which can be DBFields, formulas, parameters,and some special fileds. Select an operator from the Operator drop down list, and then specify the value to complete editinga row. If you want to append a new row, in the More drop down list, select AND or OR.
Values Description
ANDSpecifies the relationship between two expression statements as logical AND.If this line is the last line in the expression list, when you select AND or OR,and new line will be append to the end of the list as well.
ORSpecifies the relationship between two expression statements as logical OR. Ifthis line is the last line in the expression list, when you select AND or OR, andnew line will be append to the end of the list as well.
Insert Row Inserts a new line behind the current line.
Delete Row Delete the current line.
New Group
Add a new expression group to the list. The relation ships between two groupscan be:
AND − Logical AND relationship between two groups. Records satisfyingboth condition groups will be retrieved. OR − Logical OR relationship between two groups. Records satisfying eitherone of the condition groups will be retrieved. AND NOT − Records satisfying the first condition group and not satisfying thesecond condition group will be retrieved. OR NOT − Records satisfying the first condition group or not satisfying thesecond condtion group will be retrieved.
On the Column Level Security tab, check the boxes to select the dbfields, formulas, parameters, or summaries. You can set3.
Record Level Security and Column Level Security
512
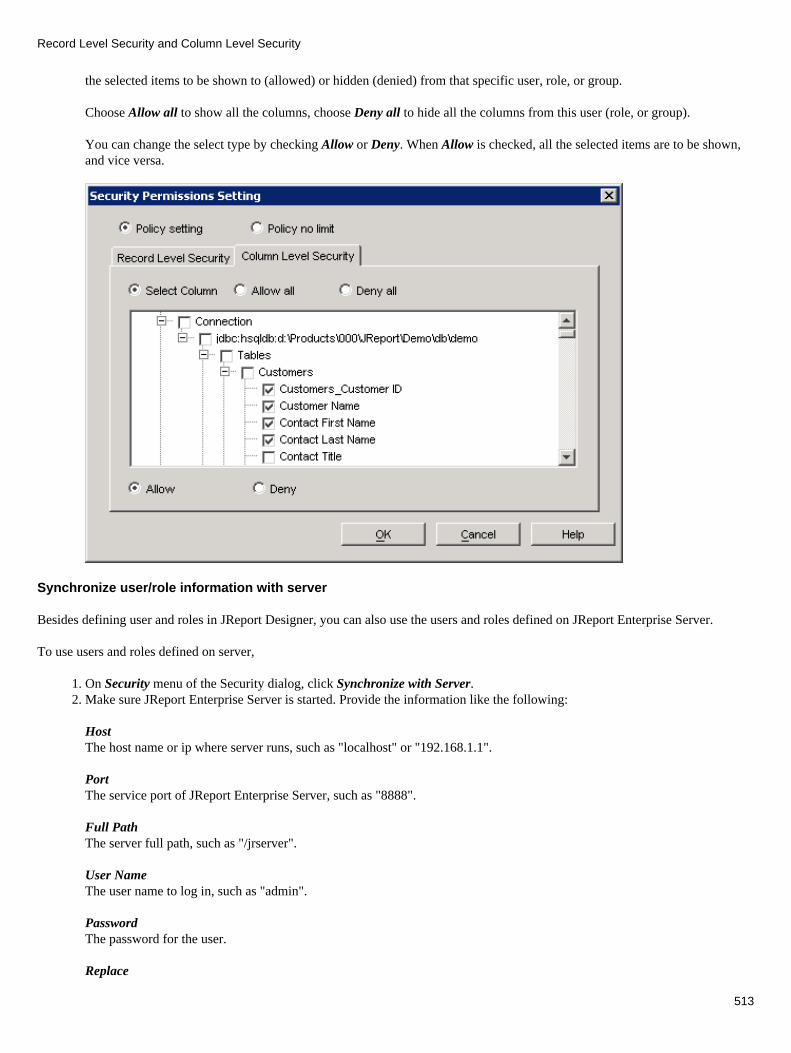
the selected items to be shown to (allowed) or hidden (denied) from that specific user, role, or group.
Choose Allow all to show all the columns, choose Deny all to hide all the columns from this user (role, or group).
You can change the select type by checking Allow or Deny. When Allow is checked, all the selected items are to be shown,and vice versa.
Synchronize user/role information with server
Besides defining user and roles in JReport Designer, you can also use the users and roles defined on JReport Enterprise Server.
To use users and roles defined on server,
On Security menu of the Security dialog, click Synchronize with Server.1. Make sure JReport Enterprise Server is started. Provide the information like the following:
HostThe host name or ip where server runs, such as "localhost" or "192.168.1.1".
PortThe service port of JReport Enterprise Server, such as "8888".
Full PathThe server full path, such as "/jrserver".
User NameThe user name to log in, such as "admin".
PasswordThe password for the user.
Replace
2.
Record Level Security and Column Level Security
513

Use the server users/roles to override the user defined ones, if the names of the user/role are the same on both server andlocal. Note: Your permission settings for the user defined users or roles will be lost once they are replaced.
MergeMerge the server user/roles with the user defined ones, the permission settings for the user defined users or roles will beretained after synchronization even though the user/role names of both server and local are the same.Click OK to start synchronization.3.
Notes:
You must use a user in the administrators group to log in can you do the synchronization.• The users/roles from server will be marked as Server in the Source field on the Security dialog, while others defined inJReport Designer are marked UserDefined.
•
A user from server can't be reassigned to (or removed from) a role from server. Similarly, a role from server can't bere−assigned to (or removed from) a user from server. Namely, if both users and roles are obtained from server, you will notbe able to change their parental relationships. The only way to do this is to synchronize with server.
A role from server is not able to be assigned to a local user (UserDefined), while a user from server can be assigned to alocal role.
•
During synchronization, if the users/ roles, whose source names are Server, have the same names with those on server, theirproperties will be refreshed using new information on server, such as user, role, or group information and parentalrelationships. However, their permission settings will be reserved. Specially, if a user from server has been assigned to someroles defined in Designer, these roles will be reserved in its members list.
•
Import/export security information
You can import or export your security information from/to external XML files (*.acl.xml). To do this, on the Security menu, clickImport or Export.
Record Level Security and Column Level Security
514
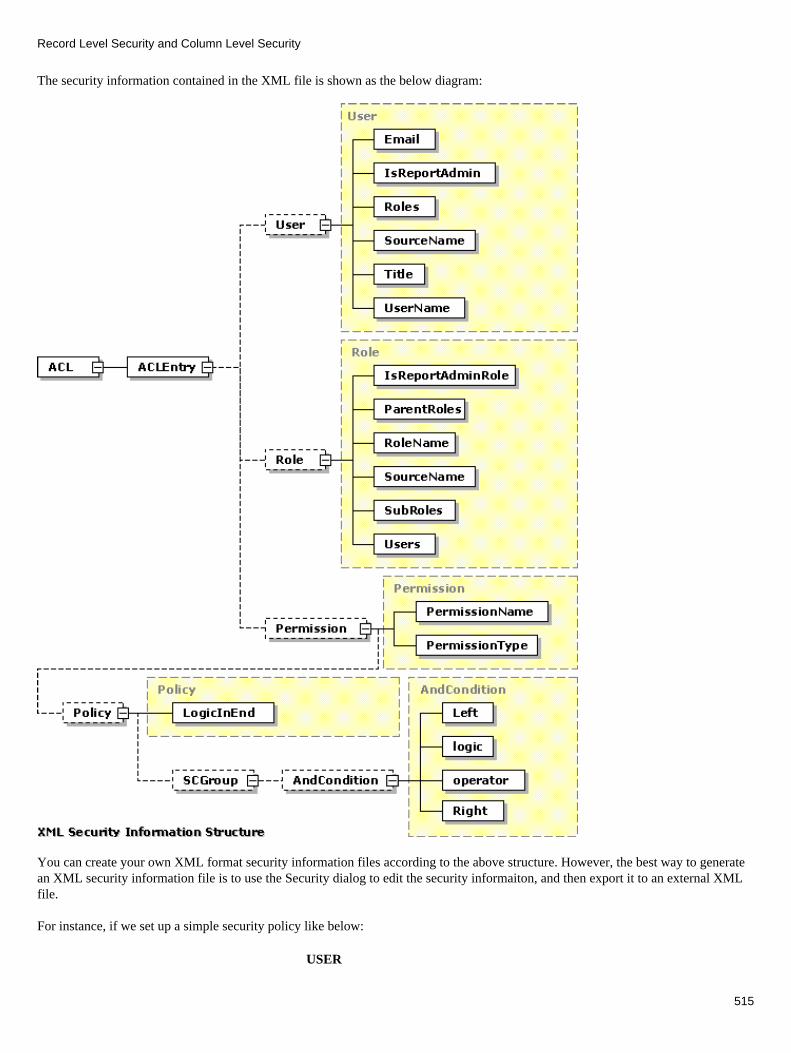
The security information contained in the XML file is shown as the below diagram:
You can create your own XML format security information files according to the above structure. However, the best way to generatean XML security information file is to use the Security dialog to edit the security informaiton, and then export it to an external XMLfile.
For instance, if we set up a simple security policy like below:
USER
Record Level Security and Column Level Security
515

User Name: d_d_u1
Belongs to Role: d_d_r1
Permissions: (@"Customer ID">=5 AND @"Customer ID"<=10) AND @"Annual Sales"<=65000
ROLE
Role Name: d_d_r1
Belongs to User: d_d_u1
The corresponding XML code will be:
<ACL version="1.2" xmlns:xsi="http://www.w3.org/2001/XMLSchema−instance" xsi:noNamespaceSchemaLocation="C:/JReport/template/Acl.xsd"> <ACLEntry> <User> <Roles>d_d_r1</Roles> <UserName>d_d_u1</UserName> <SourceName>UserDefined</SourceName> </User> <Permission> <PermissionType>RLS</PermissionType> <PermissionName>visible</PermissionName> <Policy> <SCGroup> <AndCondition> <logic>AND</logic> <Left>@"Customer ID"</Left> <operator>>=</operator> <Right>5</Right> </AndCondition> <AndCondition> <logic>AND</logic> <Left>@"Customer ID"</Left> <operator><=</operator> <Right>10</Right> </AndCondition> </SCGroup> <SCGroup> <AndCondition> <logic>End</logic> <Left>@"Annual Sales"</Left> <operator><=</operator> <Right>65000</Right> </AndCondition> </SCGroup> </Policy> </Permission> </ACLEntry> <ACLEntry> <Role> <RoleName>d_d_r1</RoleName> <Users>d_d_u1</Users> <SourceName>UserDefined</SourceName> </Role> <Permission> <PermissionType>RLS</PermissionType> <PermissionName>visible</PermissionName> <Policy></Policy>
Record Level Security and Column Level Security
516
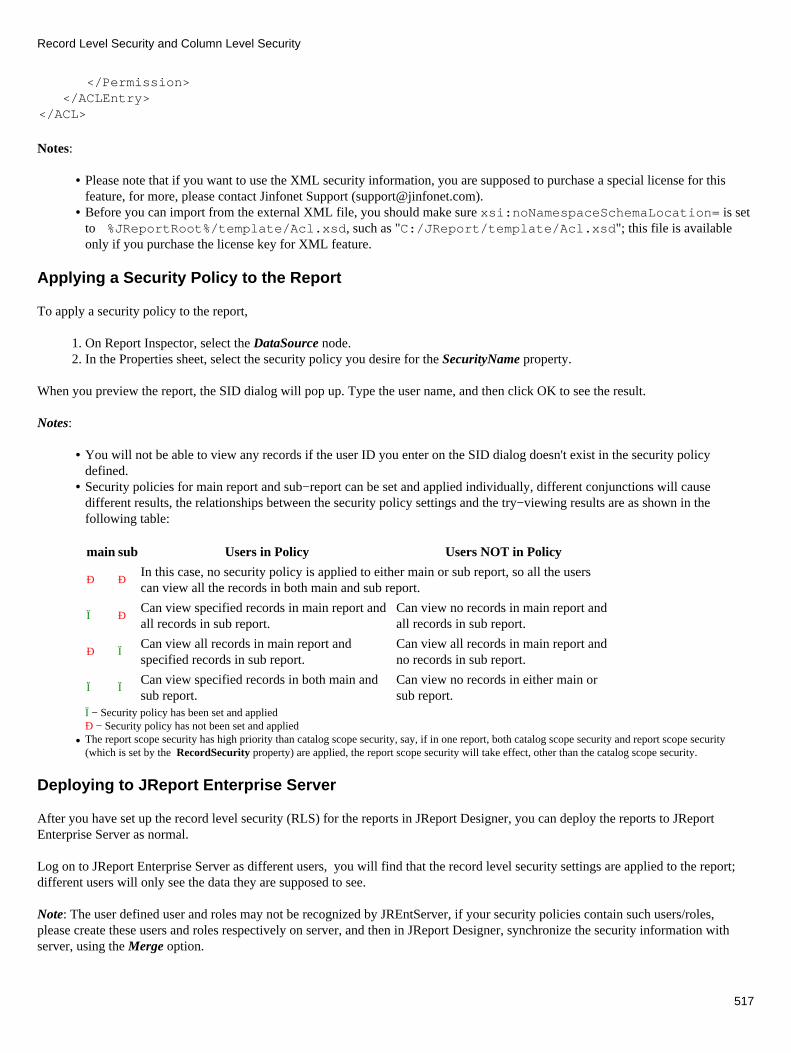
</Permission> </ACLEntry></ACL>
Notes:
Please note that if you want to use the XML security information, you are supposed to purchase a special license for thisfeature, for more, please contact Jinfonet Support ([email protected]).
•
Before you can import from the external XML file, you should make sure xsi:noNamespaceSchemaLocation= is setto %JReportRoot%/template/Acl.xsd, such as "C:/JReport/template/Acl.xsd"; this file is availableonly if you purchase the license key for XML feature.
•
Applying a Security Policy to the Report
To apply a security policy to the report,
On Report Inspector, select the DataSource node.1. In the Properties sheet, select the security policy you desire for the SecurityName property.2.
When you preview the report, the SID dialog will pop up. Type the user name, and then click OK to see the result.
Notes:
You will not be able to view any records if the user ID you enter on the SID dialog doesn't exist in the security policydefined.
•
Security policies for main report and sub−report can be set and applied individually, different conjunctions will causedifferent results, the relationships between the security policy settings and the try−viewing results are as shown in thefollowing table:
•
main sub Users in Policy Users NOT in Policy
Ð ÐIn this case, no security policy is applied to either main or sub report, so all the userscan view all the records in both main and sub report.
Ï ÐCan view specified records in main report andall records in sub report.
Can view no records in main report andall records in sub report.
Ð ÏCan view all records in main report andspecified records in sub report.
Can view all records in main report andno records in sub report.
Ï ÏCan view specified records in both main andsub report.
Can view no records in either main orsub report.
Ï − Security policy has been set and appliedÐ − Security policy has not been set and appliedThe report scope security has high priority than catalog scope security, say, if in one report, both catalog scope security and report scope security(which is set by the RecordSecurity property) are applied, the report scope security will take effect, other than the catalog scope security.
•
Deploying to JReport Enterprise Server
After you have set up the record level security (RLS) for the reports in JReport Designer, you can deploy the reports to JReportEnterprise Server as normal.
Log on to JReport Enterprise Server as different users, you will find that the record level security settings are applied to the report;different users will only see the data they are supposed to see.
Note: The user defined user and roles may not be recognized by JREntServer, if your security policies contain such users/roles,please create these users and roles respectively on server, and then in JReport Designer, synchronize the security information withserver, using the Merge option.
Record Level Security and Column Level Security
517

Report Scope Security
The report scope security applies to record level security (RLS) only.
Setting up Record Level Security
Since the record−level−security rules are file−based, you do not need to do extra work on your current reports; just create a new .txtfile, add security settings, and then link the file to your report.
Set up the security information
You can set up the security information in JReport Designer using the Record Level Security Info dialog.
To set up the security information,
Open a report file in JReport Designer. Here we open the report file customerlist.cls. 1. Open Report Inspector, select the DataSource node. 2. Click the ... button to the right of the RecordSecurity property entry.3.
Edit the security information on the dialog, or you can import a .txt file that contains the same information. For example, thesecurity info may be like the following. Click OK to dismiss the dialog.
4.
Record Level Security and Column Level Security
518
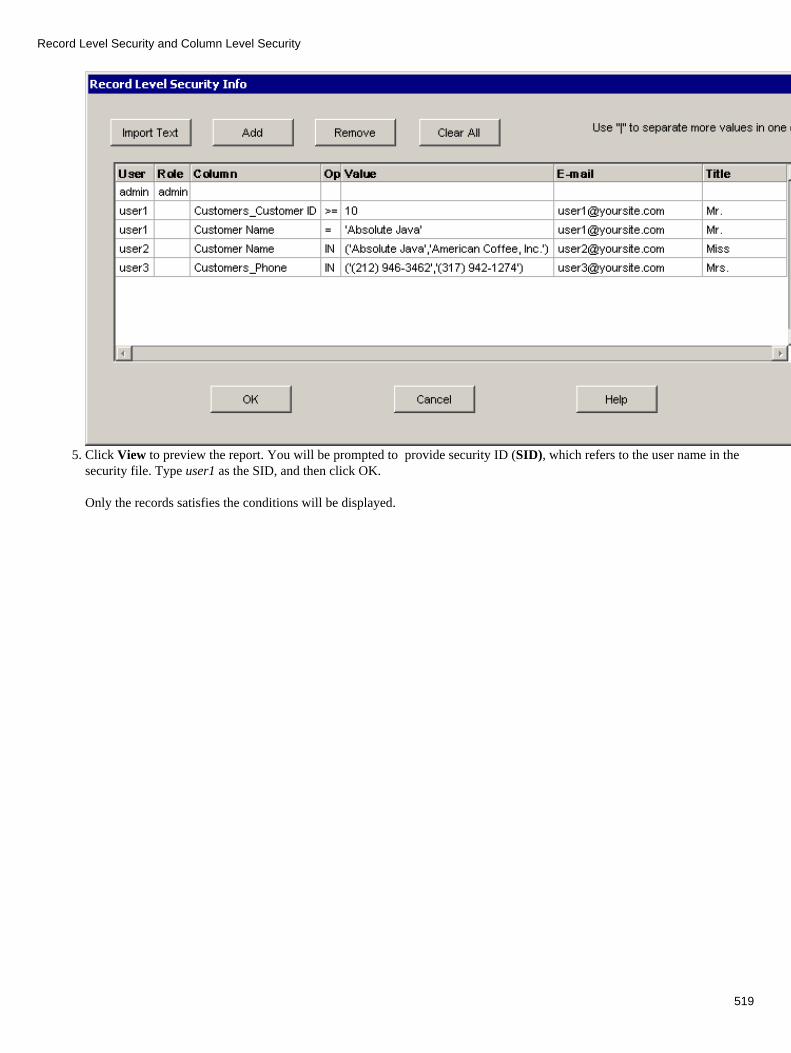
Click View to preview the report. You will be prompted to provide security ID (SID), which refers to the user name in thesecurity file. Type user1 as the SID, and then click OK.
Only the records satisfies the conditions will be displayed.
5.
Record Level Security and Column Level Security
519
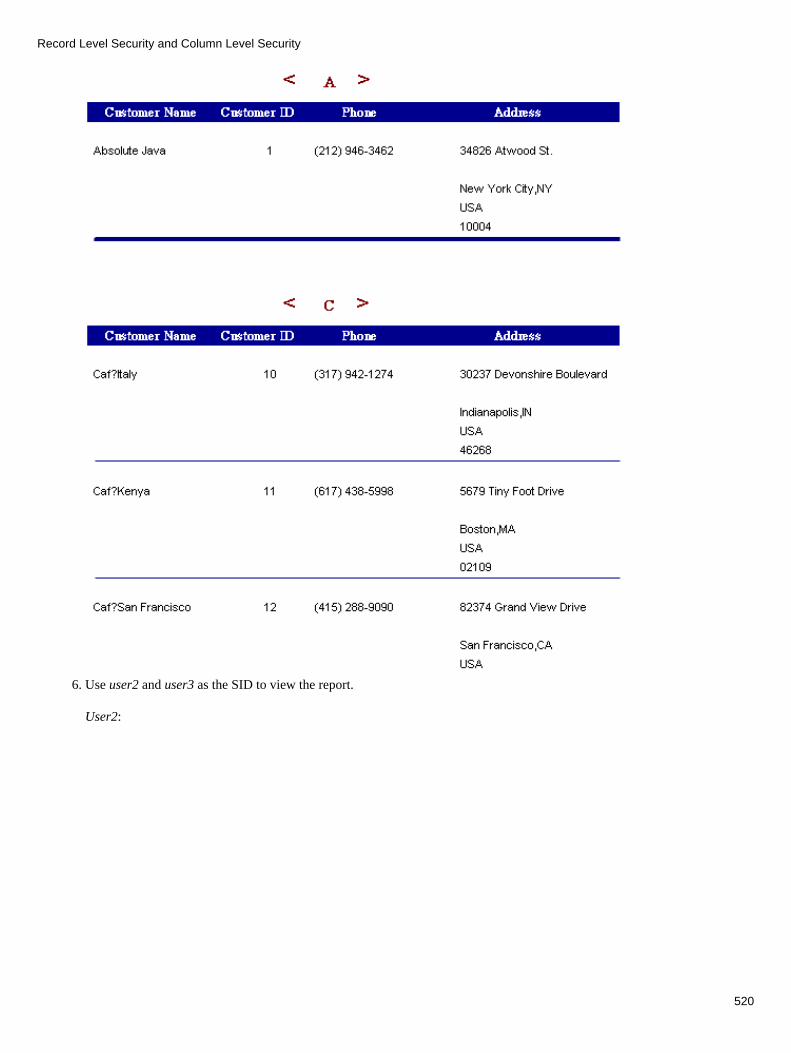
Use user2 and user3 as the SID to view the report.
User2:
6.
Record Level Security and Column Level Security
520
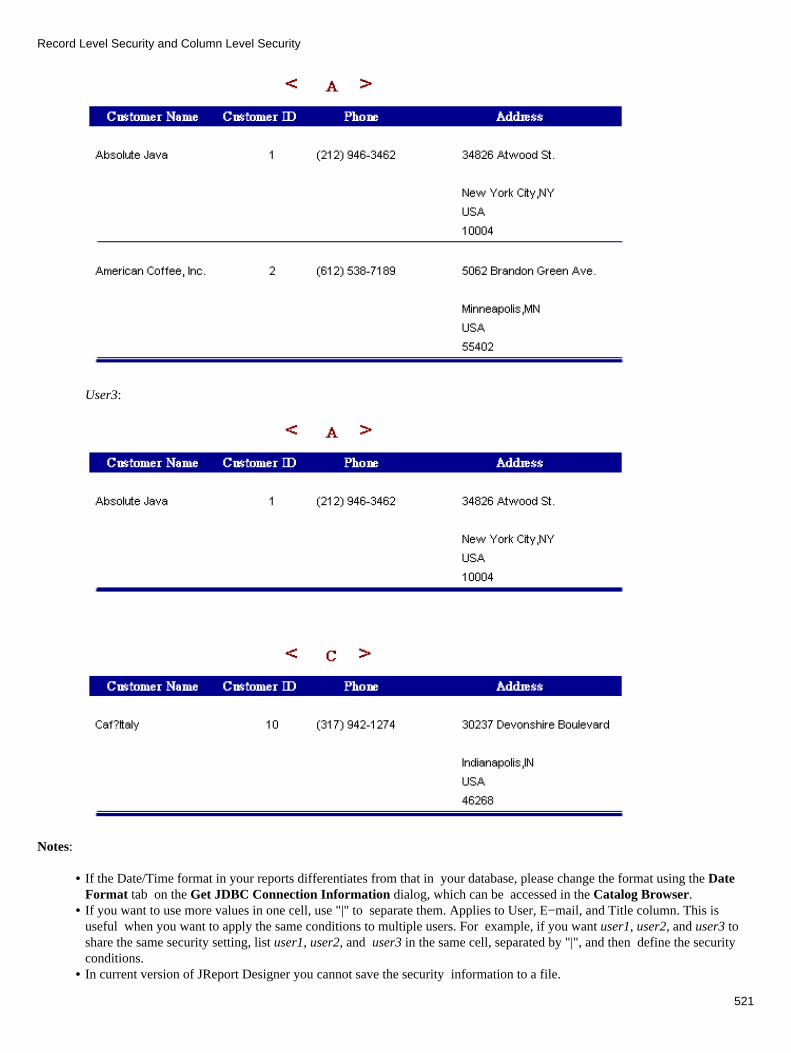
User3:
Notes:
If the Date/Time format in your reports differentiates from that in your database, please change the format using the DateFormat tab on the Get JDBC Connection Information dialog, which can be accessed in the Catalog Browser.
•
If you want to use more values in one cell, use "|" to separate them. Applies to User, E−mail, and Title column. This isuseful when you want to apply the same conditions to multiple users. For example, if you want user1, user2, and user3 toshare the same security setting, list user1, user2, and user3 in the same cell, separated by "|", and then define the securityconditions.
•
In current version of JReport Designer you cannot save the security information to a file. •
Record Level Security and Column Level Security
521

The relationship between each condition line (if they are possessed by one user) is logic OR. • For information about each column headings, please refer to JReport Designer User Reference | JReport Windows andDialogs | Record Level Security Info dialog
•
Edit the security information in a text file
You can also import the security information from a text file. Use TAB to separate each column. Please always keep the headings(User, Role, Column, and so on) in the first line of the text file.
The relationship between each condition line (if they are possessed by one user) is logic OR.
The text file used in the preceding example is like below:
User Role Column Operator Value Email Title
adminadmin
user1Customers_CustomerID
>= 10 [email protected].
user1 Customer Name = 'Absolute Java'
user2 Customer Name IN('Absolute Java','American Coffee,Inc.')
user3 Customers_Phone IN('(212) 946−3462','(317)942−1274')
UserThe user ID to whom the security settings will be applied.
RoleThe role of the user. More than one user can share one role; for one role, you only need to define once, and other users can share thisrole without type the same conditions again.
If a role should contain more than one condition, append the conditions in multiple lines, and then add the role name in front of eachline.
In the case below, RoleA contains two conditions, user1 and user2 share RoleA. The two users has the same permissions, and neitherof them can see the record where Customers_Customer ID=10.
User Role Column Operator Value
user1 RoleA Customers_Customer ID > 10
user2 RoleA Customers_Customer ID < 10
ColumnThe condition expression is comprised of three parts − Column, Operator, and Value.
The column name, can be the name of a DBField in the current query, the name of a formula (summary) based on any DBField in thecurrent query, and the name of a parameter. You do not need to quote the name when the name contains spaces. However, you mustmake sure the names you type actually exist.
OperatorThe operator can be one of the following operators: =, <>, <, >, <=, >=, and IN.
ValueThe value part of the condition expression.
For String type values, use single quotation mark (') to quote the values, e.g., 'Absolute Java';
Record Level Security and Column Level Security
522

For Boolean type values, use 0 (false) or 1 (true).For Date type values, please make sure the format of the value you enter is consistent with that of your database.
Note: On the Record Level Security Info dialog, the date values provided on the drop down list may not be valid for your actualdatabase, because they are date values that have already been reformatted using your date format settings in JReport. For detailedinformation on how to set the date format in JReport Designer, please refer to the Date Format section of the document athttp://www.jinfonet.com/manualpro/userguide/connect.htm.
For the values of other types, type them in their original form.
E−mailThe e−mail address of the user. A user can have only one E−mail address. If there are more than one E−mail address defined for oneuser, the first one will be actually used.
TitleThe title for the user. A user can have only one title. If there are more than one title defined for one user, the first one will be actuallyused.
Compound conditions
If you want to apply more than one condition expression to one user, edit the condition expressions in several individual lines, typingthe same user name for each line. For such compound conditions, the relationships among them are logical OR.
For example, Customer_Customer ID >= 10 and Customer Name = 'Absolute Java' together will cause JReport Designer to bringback records whose customer ID is larger than or equals to 10 and the record whose customer name is Absolute Java together.
If you want to use logical AND for the relationship between each condition expression, please use a formula that returns a Boolean value to filter the records. To specify the formula name for the report, open Report Inspector, select Data Source node, select ortype the formula name in the Function property entry.
For example, if user1 should only see the records satisfying the condition Customers_Region = 'CO' and Customers_Customer ID >=10, the formula should be like below:
if ( @Customers_Region == 'CO' && @"Customers_Customer ID">= 10 )return "user1"
If both Record Level Security Info dialog and formula are used to control the security information, both of the two will take effect,and the relationship between them is logical OR.
Running Reports with RLS on Server
After you have set up the record level security (RLS) for the reports in JReport Designer, you can deploy the reports to JReportEnterprise Server as normal.
Log on to JReport Enterprise Server as different users, you will find that the record level security settings are applied to the report;different users will only see the data they are supposed to see.
Index
Record Level Security and Column Level Security
523

JReport Enterprise Server API & RMI APIThe report server API is a set of java programming interfaces to run reports, explore report resources, provide access control and soon for report servers. It is mainly used for writing servlets, JSPs and Java applications with report server features.
Installation
When you install JReport Enterprise Server, JReport Server API will be installed as well. After installation, you should have thecomponents under %JREntServerHome%:
lib\JRESServlets.jarlib\JREngine.jarlib\servlet.jarlib\hsqldb.jarlib\log4j−1.2.8.jar
Server API classes are stored in the archive files − JRESServlets.jar.
You need to set the CLASSPATH environment variable before you compile and run the program. Append the following string toyour CLASSPATH starting the Server API:
%JREntServerHome%\lib\JRESServlets.jar;%JREntServerHome%\lib\JREngine.jar; %JREntServerHome%\lib\servlet.jar;%JREntServerHome%\lib\log4j−1.2.8.jar
Note: If you want to export to the following formats, you should add the corresponding class package or jar with valid path to theclasspath:
To Mail or use the " Mail Notification " function: activation.jar and mail.jar.• To PDF & DHTML: Itext.jar.• To Excel : poiHSSF_151.jar.• To XML : xerces.jar.• To DHTML : JRWebDesign.jar.•
Packages
The report server API consists of three Java packages:
jet.server.api ..........contains some core interfaces of report server API.
jet.server.api.http ..........contains some HTTP wrapper interfaces of report server API.
jet.cs.util ..........contains some constant defines and utilities of report server API.
jet.server.api.admin ..........contains resource, security, cluster administration interfaces.
jet.server.api.admin.cfg..........contains configuration interfaces.
jet.server.api.exception..........contains exceptions used by the admin API.
jet.server.api.cluster ..........contains cluster member info and load balancer interfaces.
jet.server.api.engine ..........contains interface ReportEngine, which can do some operations with engine, such as run and exportreport, set connection, etc.
jet.server.api.monitor ..........contains server monitor interfaces.
jet.server.api.rmi ..........contains server remote method invocation (RMI) interfaces.
jet.server.api.rmi.cluster..........contains RMI cluster interfaces.
524
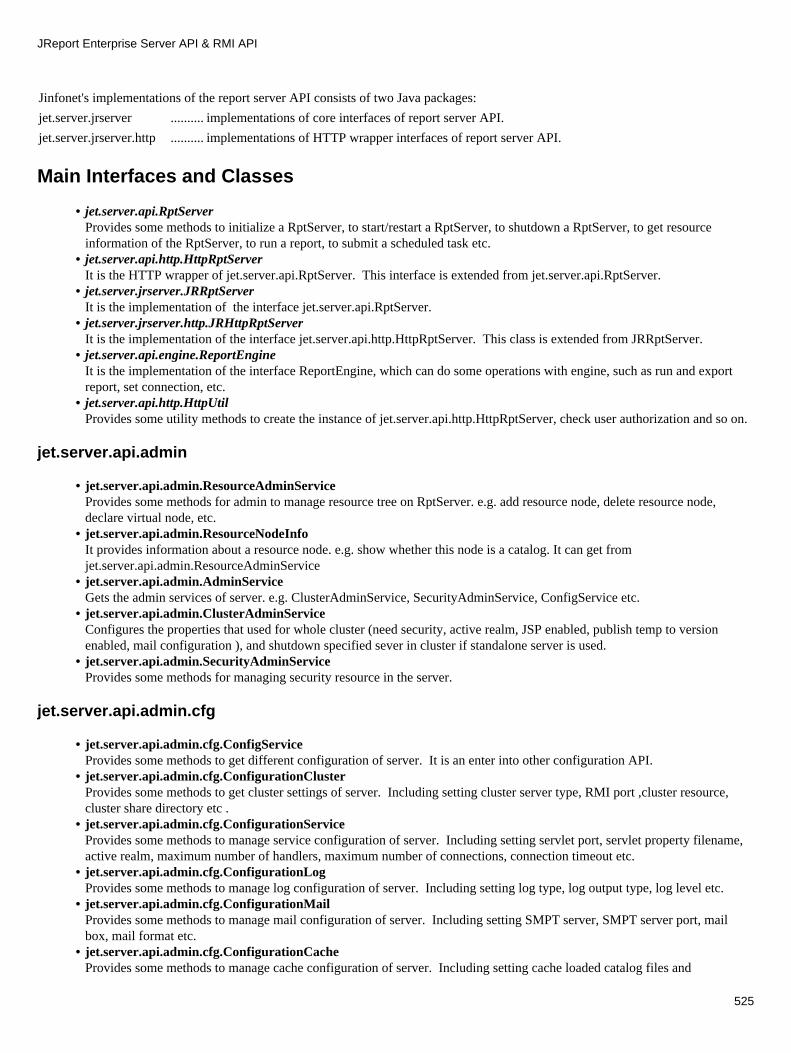
Jinfonet's implementations of the report server API consists of two Java packages:
jet.server.jrserver ..........implementations of core interfaces of report server API.
jet.server.jrserver.http ..........implementations of HTTP wrapper interfaces of report server API.
Main Interfaces and Classes
jet.server.api.RptServerProvides some methods to initialize a RptServer, to start/restart a RptServer, to shutdown a RptServer, to get resourceinformation of the RptServer, to run a report, to submit a scheduled task etc.
•
jet.server.api.http.HttpRptServerIt is the HTTP wrapper of jet.server.api.RptServer. This interface is extended from jet.server.api.RptServer.
•
jet.server.jrserver.JRRptServerIt is the implementation of the interface jet.server.api.RptServer.
•
jet.server.jrserver.http.JRHttpRptServerIt is the implementation of the interface jet.server.api.http.HttpRptServer. This class is extended from JRRptServer.
•
jet.server.api.engine.ReportEngineIt is the implementation of the interface ReportEngine, which can do some operations with engine, such as run and exportreport, set connection, etc.
•
jet.server.api.http.HttpUtilProvides some utility methods to create the instance of jet.server.api.http.HttpRptServer, check user authorization and so on.
•
jet.server.api.admin
jet.server.api.admin.ResourceAdminServiceProvides some methods for admin to manage resource tree on RptServer. e.g. add resource node, delete resource node,declare virtual node, etc.
•
jet.server.api.admin.ResourceNodeInfoIt provides information about a resource node. e.g. show whether this node is a catalog. It can get fromjet.server.api.admin.ResourceAdminService
•
jet.server.api.admin.AdminServiceGets the admin services of server. e.g. ClusterAdminService, SecurityAdminService, ConfigService etc.
•
jet.server.api.admin.ClusterAdminServiceConfigures the properties that used for whole cluster (need security, active realm, JSP enabled, publish temp to versionenabled, mail configuration ), and shutdown specified sever in cluster if standalone server is used.
•
jet.server.api.admin.SecurityAdminServiceProvides some methods for managing security resource in the server.
•
jet.server.api.admin.cfg
jet.server.api.admin.cfg.ConfigServiceProvides some methods to get different configuration of server. It is an enter into other configuration API.
•
jet.server.api.admin.cfg.ConfigurationClusterProvides some methods to get cluster settings of server. Including setting cluster server type, RMI port ,cluster resource,cluster share directory etc .
•
jet.server.api.admin.cfg.ConfigurationServiceProvides some methods to manage service configuration of server. Including setting servlet port, servlet property filename,active realm, maximum number of handlers, maximum number of connections, connection timeout etc.
•
jet.server.api.admin.cfg.ConfigurationLogProvides some methods to manage log configuration of server. Including setting log type, log output type, log level etc.
•
jet.server.api.admin.cfg.ConfigurationMailProvides some methods to manage mail configuration of server. Including setting SMPT server, SMPT server port, mailbox, mail format etc.
•
jet.server.api.admin.cfg.ConfigurationCacheProvides some methods to manage cache configuration of server. Including setting cache loaded catalog files and
•
JReport Enterprise Server API & RMI API
525
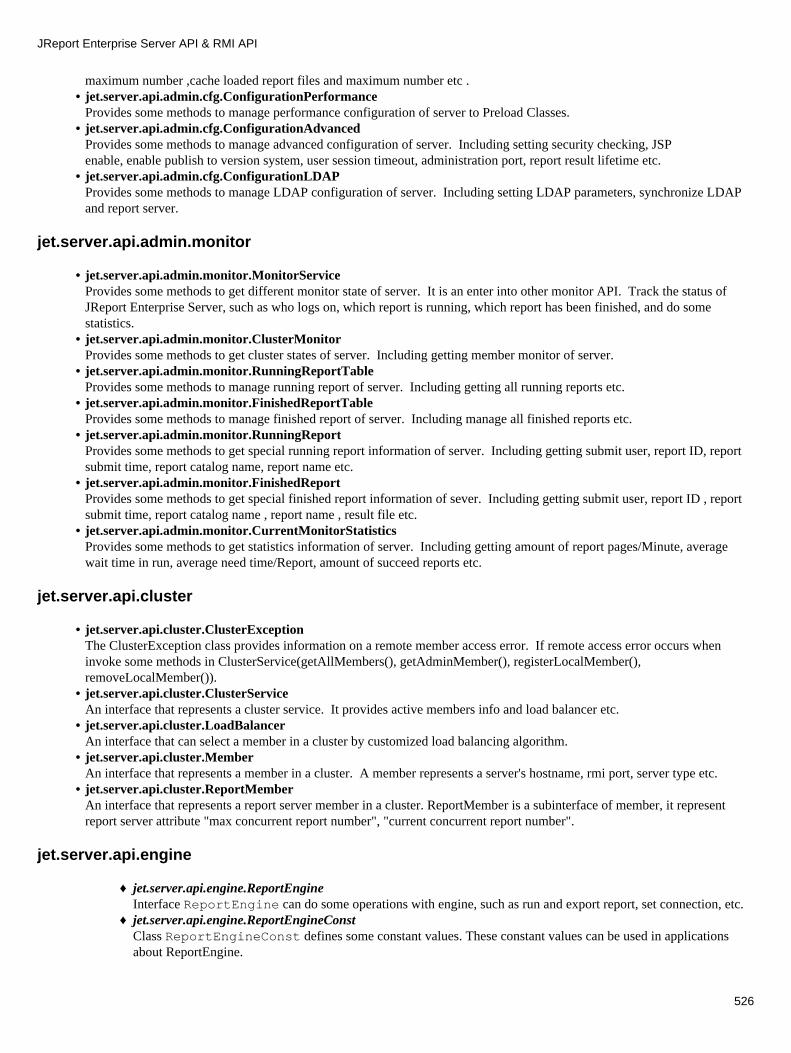
maximum number ,cache loaded report files and maximum number etc . jet.server.api.admin.cfg.ConfigurationPerformanceProvides some methods to manage performance configuration of server to Preload Classes.
•
jet.server.api.admin.cfg.ConfigurationAdvancedProvides some methods to manage advanced configuration of server. Including setting security checking, JSPenable, enable publish to version system, user session timeout, administration port, report result lifetime etc.
•
jet.server.api.admin.cfg.ConfigurationLDAPProvides some methods to manage LDAP configuration of server. Including setting LDAP parameters, synchronize LDAPand report server.
•
jet.server.api.admin.monitor
jet.server.api.admin.monitor.MonitorServiceProvides some methods to get different monitor state of server. It is an enter into other monitor API. Track the status ofJReport Enterprise Server, such as who logs on, which report is running, which report has been finished, and do somestatistics.
•
jet.server.api.admin.monitor.ClusterMonitorProvides some methods to get cluster states of server. Including getting member monitor of server.
•
jet.server.api.admin.monitor.RunningReportTableProvides some methods to manage running report of server. Including getting all running reports etc.
•
jet.server.api.admin.monitor.FinishedReportTableProvides some methods to manage finished report of server. Including manage all finished reports etc.
•
jet.server.api.admin.monitor.RunningReportProvides some methods to get special running report information of server. Including getting submit user, report ID, reportsubmit time, report catalog name, report name etc.
•
jet.server.api.admin.monitor.FinishedReportProvides some methods to get special finished report information of sever. Including getting submit user, report ID , reportsubmit time, report catalog name , report name , result file etc.
•
jet.server.api.admin.monitor.CurrentMonitorStatisticsProvides some methods to get statistics information of server. Including getting amount of report pages/Minute, averagewait time in run, average need time/Report, amount of succeed reports etc.
•
jet.server.api.cluster
jet.server.api.cluster.ClusterExceptionThe ClusterException class provides information on a remote member access error. If remote access error occurs wheninvoke some methods in ClusterService(getAllMembers(), getAdminMember(), registerLocalMember(),removeLocalMember()).
•
jet.server.api.cluster.ClusterServiceAn interface that represents a cluster service. It provides active members info and load balancer etc.
•
jet.server.api.cluster.LoadBalancerAn interface that can select a member in a cluster by customized load balancing algorithm.
•
jet.server.api.cluster.MemberAn interface that represents a member in a cluster. A member represents a server's hostname, rmi port, server type etc.
•
jet.server.api.cluster.ReportMemberAn interface that represents a report server member in a cluster. ReportMember is a subinterface of member, it representreport server attribute "max concurrent report number", "current concurrent report number".
•
jet.server.api.engine
jet.server.api.engine.ReportEngineInterface ReportEngine can do some operations with engine, such as run and export report, set connection, etc.
♦
jet.server.api.engine.ReportEngineConstClass ReportEngineConst defines some constant values. These constant values can be used in applicationsabout ReportEngine.
♦
JReport Enterprise Server API & RMI API
526

jet.server.api.engine.ReportEngineFactoryThis interface defines a factory to get a ReportEngine instance of a implementation class.
♦
jet.server.api.rmi
jet.server.api.rmi.RemoteAuthenticatorThis RMI interface provides methods to RemoteAuthenticate valid users and actions.
•
jet.server.api.rmi.RemoteCompletedTaskTableInterface RemoteCompletedTaskTable contains records of completed tasks in the report server.
•
jet.server.api.rmi.RemoteLargeReportManager Interface RemoteLargeReportManager It supplies a remote manager for a large report.
•
jet.server.api.rmi.RemoteParamInfoInterface RemoteParamInfo contains description of parameters of a report.
•
jet.server.api.rmi.RemoteReportInfoInterface RemoteReportInfo contains information of a report in the server.
•
jet.server.api.rmi.RemoteResourceManagerThis RMI interface defines methods to explore the resources in the report server.
•
jet.server.api.rmi.RemoteResultVersionTableInterface RemoteResultVersionTable contains result version records in the report server.
•
jet.server.api.rmi.RemoteRptServerInterface RemoteRptServer is the report server that implements the remote method invocations.
•
jet.server.api.rmi.RemoteTempResultOwnerManagerInterface RemoteTempResultOwnerManager manages the owners of temporary results.
•
jet.server.api.rmi.RemoteUserPreferenceManagerInterface RemoteUserPrefernceManager manages the user preferences.
•
jet.server.api.rmi.RemoteUserSessionManagerInterface RemoteUserSessionManager manages the user sessions.
•
jet.server.api.rmi.RemoteVersionAmountLimitTableInterface RemoteVersionAmountTable contains version amount records in the report server.
•
jet.server.api.rmi.cluster
jet.server.api.rmi.cluster.RemoteClusterServiceA RMI interface which represent a cluster service. It provides active members info and load balancer etc.
•
jet.server.api.rmi.cluster.RemoteLoadBalancerA RMI interface can select a member in a cluster by customized load balancing algorithm.
•
Creating/Getting Instances of ReportEngine
To get the instance of ReportEngine, you can use the getInstance() or getInstance(boolean setDebugLevel) in thejet.server.api.engine.ReportEngienFactory.
For example,
bean = ReportEngineFactory.getInstance();
or,
bean = ReportEngineFactory.getInstance(true);
Please refer to JReport Enterprise Server API Java Doc for the usages of methods of ReportEngine.
Creating/Getting Instances of RptServer or HttpRptServer
You can use the following three methods to get the instances of RptServer or HttpRptServer. Please note that only one server can
JReport Enterprise Server API & RMI API
527

exist in the system, and in most of circumstances, you should get the instance of server instead of creating a new one.
Method 1
Use jet.server.api.http.HttpUtil.initEnv(Properties props).
The method jet.server.api.http.HttpUtil.initEnv(...) creates and initializes the HttpRptServer object. If theHttpRptServer has already been started, it will use the existing HttpRptServer instance. Use this method to avoid creating more thanone HttpRptServer instance.
//prepare report server initial properties.
//The property "reporthome" must be set. For example: c:/JREntServer.
//Other properties are optional. They are:
//jrs.isMyServer: Indicates if the HTTP server is JReport standalone server. The defaultvalue is "false".
//temp_dir or jrs.dir.temp: The path of temp directory. The default value is"<reporthome>/temp".
//history_dir or jrs.dir.history: The directory where all the versions of report resultswill be maintained. The default value is"<reporthome>/history".
//auth_scheme: It specifies the scheme of authentication. Its value must be Basic orDigest. The default value is Basic.
//default_doc: The home page of JReport Enterprise Server It is an HTML file. If it isnot set or the file set to it cannot be loaded, the default home page of JReportEnterprise Server will be used. The path is relative to <install_root>, for example,docs/index.html.
//isConvertedServletPath: This property specifies whether your web server decodes thepath if it contains special characters. This information is used for JRServlet todetermine whether it needs to convert that path. If you don't specify this property,your web server is not supposed to decode the path.
//vError: Enable output of error messages of JReport Engine, this is available only whenthe version is a debug version.
//vDebug: Enable output of debug messages of JReport Engine, this is available only whenthe version is a debug version.
//logFile: Transfer output message of JReport engine to JReport.log or another file asspecified.
Properties props = System.getProperties();
//get an initialized instance of HttpRptServer
HttpUtil.initEnv(props);
//also can get the instance of HttpRptServer by using HttpUtil.getHttpRptServer()// after called HttpUtil.initEnv(props)
JReport Enterprise Server API & RMI API
528

jet.server.api.http.HttpRptServer httpRptServer = HttpUtil.getHttpRptServer();
//demo cast HttpRptServer to RptServer
jet.server.api.RptServer rptServer = httpRptServer;
Method 2
Call HttpUtil.checkLogin(HttpServletRequest req, HttpServletResponse res).
The method jet.server.api.http.HttpUtil.checkLogin(...) implicitly calls HttpUtil.initEnv(...) ifnecessary. So one can get the HttpRptServer after calling HttpUtil.checkLogin(...).
// check login at firstif (HttpUtil.checkLogin(request, response)) {
// get the instance of HttpRptServer jet.server.api.http.HttpRptServer httpRptServer = HttpUtil.getHttpRptServer();
// do something}
Method 3
Directly create instance of HttpRptServer.
Demo 1://create an instance of HttpRptServerjet.server.api.http.HttpRptServer httpRptServer = newjet.server.jrserver.http.JRHttpRptServer();
// initialize the HttpRptServer.//The property "reporthome" must be set. For example: c:/JREntServer.
//Other properties are optional. The properties are:
//jrs.isMyServer : Indicates if the HTTP server is JReport standalone server. Thedefault value is "false".
//temp_dir or jrs.dir.temp : The path of temp directory. The default value is"<reporthome>/temp".
//history_dir or jrs.dir.history : The directory where all the versions of reportresults will be maintained. The default value is"<reporthome>/history".
//auth_scheme : It specifies the scheme of authentication. Its value must be Basic orDigest. The default value is Basic.
//default_doc : The home page of JReport Enterprise Server. It is an HTML file. If itis not set or the file set to it cannot be loaded, the default home page of JReportEnterprise Server will be used. The path is relative to <intall_root>, for example,docs/index.html.
//isConvertedServletPath : This property specifies whether your web server decodes the
JReport Enterprise Server API & RMI API
529

path if it contains special characters. This information is used for JRServlet todetermine whether it needs to convert that path. If you don't specify this property,your web server is not supposed to decode the path.
//vError : Enable output of error messages of JReport Engine, this is available onlywhen the version is a debug version.
//vDebug : Enable output of debug messages of JReport Engine, this is available onlywhen the version is a debug version.
//logFile : Transfer output message of JReport engine to JReport.log or other file asspecified.
// at least the property "reporthome" should be set. httpRptServer.init(System.getProperties()); httpRptServer.start();
Demo 2://create an instance of RptServerjet.server.api.RptServer rptServer = new jet.server.jrserver.JRRptServer();
// initialize the RptServer.// at least the property "reporthome" should be set. rptServer.init(System.getProperties()); rptServer.start();
Method 4
Each time when you start JReport Enterprise Server, the initialization configurations in server.properties will be read, such as loglevels, RMI, http server properties. You can change the properties in this file before start up the Server.
However, the server.properties file is generated the first time when you start JREntServer. So for the first time, you have noopportunity to specify your own customized configuration.
To solve this issue, you can specify the properties in your servlet/jsp calling server API which will be automatically saved to theserver.properties file.
Demo
System.getProperties().put("reporthome", "c:\\JREntServer"); System.getProperties().put("vError","true");System.getProperties().put("vDebug","true");System.getProperties().put("logFile","c:\\JREntServer\\logs\\engine.log");
//Set values for those properties of server.propertiesProperties props = new Properties();props.put("log.access.destination", "rolling_logfile");props.put("log.access.file.filename", "testaccess.log");props.put("log.access.formatclass", "jet.server.log.TraceLog");props.put("log.access.level", "3");props.put("log.access.rolling_logfile.buffer", "1024");props.put("log.access.rolling_logfile.filename", "testaccess.log");props.put("log.access.rolling_logfile.flush", "60000");props.put("log.access.rolling_logfile.rollover", "102400");HttpUtil.initEnv(props);RptServer server = HttpUtil.getHttpRptServer();
JReport Enterprise Server API & RMI API
530
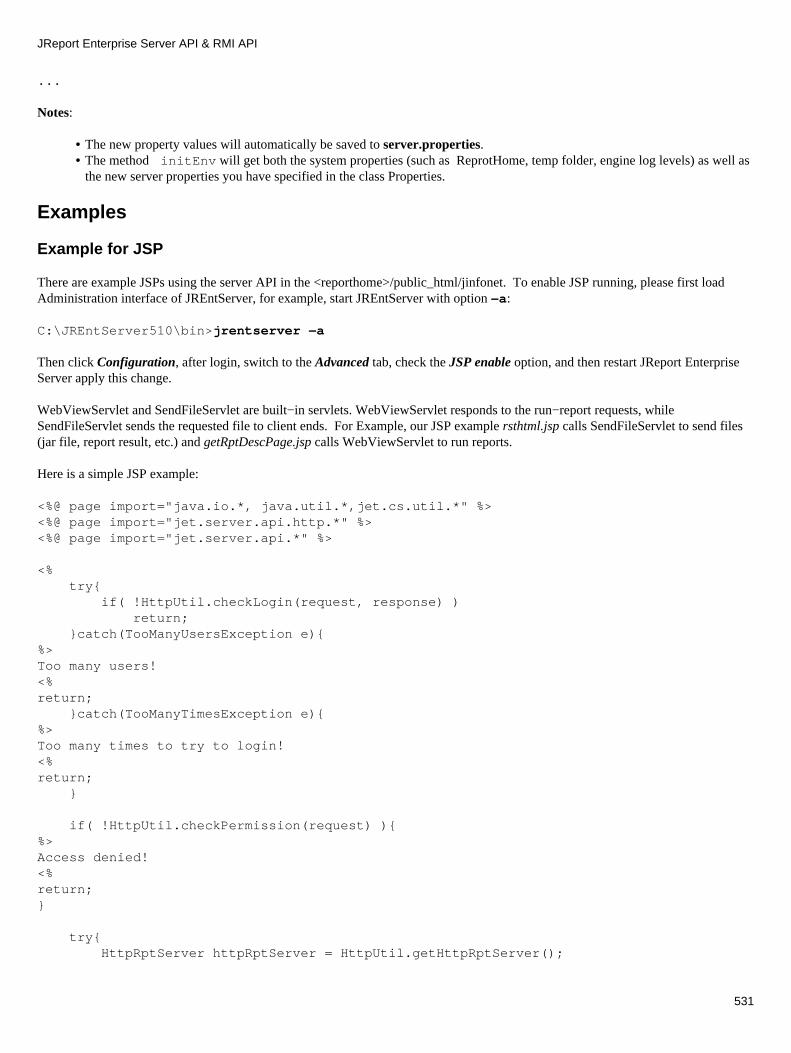
...
Notes:
The new property values will automatically be saved to server.properties.• The method initEnv will get both the system properties (such as ReprotHome, temp folder, engine log levels) as well asthe new server properties you have specified in the class Properties.
•
Examples
Example for JSP
There are example JSPs using the server API in the <reporthome>/public_html/jinfonet. To enable JSP running, please first loadAdministration interface of JREntServer, for example, start JREntServer with option −a:
C:\JREntServer510\bin>jrentserver −a
Then click Configuration, after login, switch to the Advanced tab, check the JSP enable option, and then restart JReport EnterpriseServer apply this change.
WebViewServlet and SendFileServlet are built−in servlets. WebViewServlet responds to the run−report requests, whileSendFileServlet sends the requested file to client ends. For Example, our JSP example rsthtml.jsp calls SendFileServlet to send files(jar file, report result, etc.) and getRptDescPage.jsp calls WebViewServlet to run reports.
Here is a simple JSP example:
<%@ page import="java.io.*, java.util.*,jet.cs.util.*" %><%@ page import="jet.server.api.http.*" %><%@ page import="jet.server.api.*" %>
<% try{ if( !HttpUtil.checkLogin(request, response) ) return; }catch(TooManyUsersException e){%>Too many users!<%return; }catch(TooManyTimesException e){%> Too many times to try to login!<%return; }
if( !HttpUtil.checkPermission(request) ){%> Access denied!<%return;}
try{ HttpRptServer httpRptServer = HttpUtil.getHttpRptServer();
JReport Enterprise Server API & RMI API
531
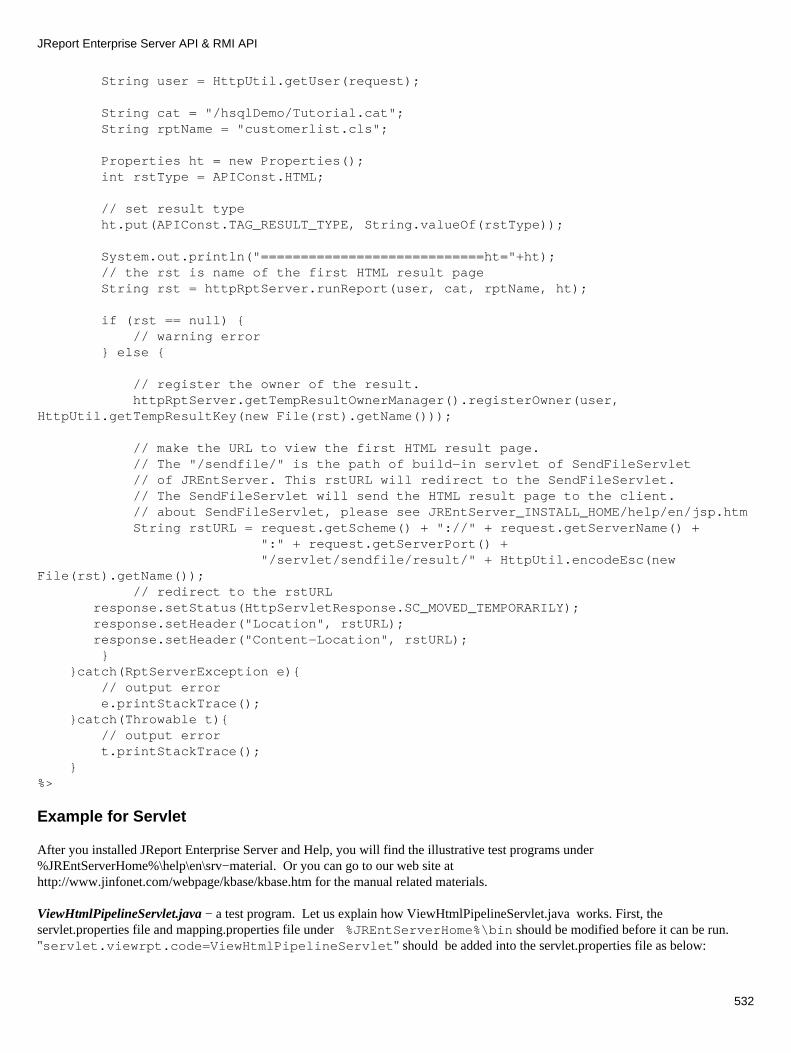
String user = HttpUtil.getUser(request);
String cat = "/hsqlDemo/Tutorial.cat"; String rptName = "customerlist.cls";
Properties ht = new Properties(); int rstType = APIConst.HTML;
// set result type ht.put(APIConst.TAG_RESULT_TYPE, String.valueOf(rstType));
System.out.println("============================ht="+ht); // the rst is name of the first HTML result page String rst = httpRptServer.runReport(user, cat, rptName, ht);
if (rst == null) { // warning error } else {
// register the owner of the result. httpRptServer.getTempResultOwnerManager().registerOwner(user,HttpUtil.getTempResultKey(new File(rst).getName()));
// make the URL to view the first HTML result page. // The "/sendfile/" is the path of build−in servlet of SendFileServlet // of JREntServer. This rstURL will redirect to the SendFileServlet. // The SendFileServlet will send the HTML result page to the client. // about SendFileServlet, please see JREntServer_INSTALL_HOME/help/en/jsp.htm String rstURL = request.getScheme() + "://" + request.getServerName() + ":" + request.getServerPort() + "/servlet/sendfile/result/" + HttpUtil.encodeEsc(newFile(rst).getName()); // redirect to the rstURL response.setStatus(HttpServletResponse.SC_MOVED_TEMPORARILY); response.setHeader("Location", rstURL); response.setHeader("Content−Location", rstURL); } }catch(RptServerException e){ // output error e.printStackTrace(); }catch(Throwable t){ // output error t.printStackTrace(); }%>
Example for Servlet
After you installed JReport Enterprise Server and Help, you will find the illustrative test programs under%JREntServerHome%\help\en\srv−material. Or you can go to our web site athttp://www.jinfonet.com/webpage/kbase/kbase.htm for the manual related materials.
ViewHtmlPipelineServlet.java − a test program. Let us explain how ViewHtmlPipelineServlet.java works. First, theservlet.properties file and mapping.properties file under %JREntServerHome%\bin should be modified before it can be run."servlet.viewrpt.code=ViewHtmlPipelineServlet" should be added into the servlet.properties file as below:
JReport Enterprise Server API & RMI API
532
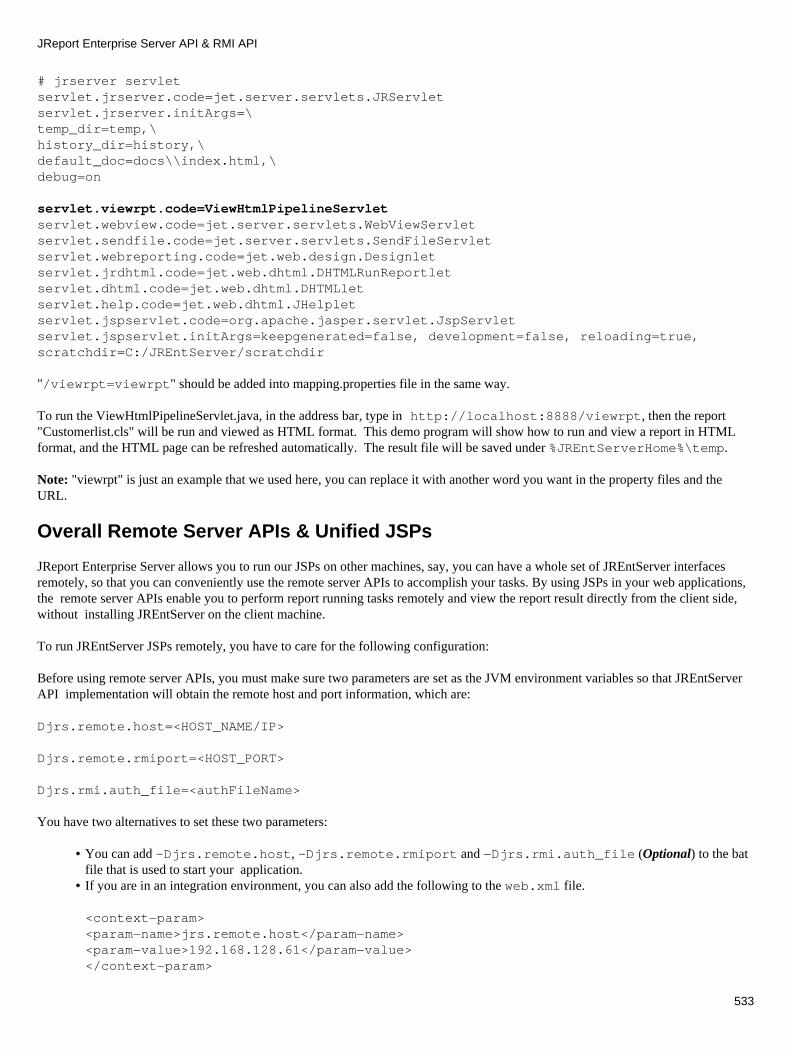
# jrserver servletservlet.jrserver.code=jet.server.servlets.JRServletservlet.jrserver.initArgs=\temp_dir=temp,\history_dir=history,\default_doc=docs\\index.html,\debug=on
servlet.viewrpt.code=ViewHtmlPipelineServletservlet.webview.code=jet.server.servlets.WebViewServletservlet.sendfile.code=jet.server.servlets.SendFileServletservlet.webreporting.code=jet.web.design.Designletservlet.jrdhtml.code=jet.web.dhtml.DHTMLRunReportletservlet.dhtml.code=jet.web.dhtml.DHTMLletservlet.help.code=jet.web.dhtml.JHelpletservlet.jspservlet.code=org.apache.jasper.servlet.JspServletservlet.jspservlet.initArgs=keepgenerated=false, development=false, reloading=true,scratchdir=C:/JREntServer/scratchdir
"/viewrpt=viewrpt" should be added into mapping.properties file in the same way.
To run the ViewHtmlPipelineServlet.java, in the address bar, type in http://localhost:8888/viewrpt, then the report"Customerlist.cls" will be run and viewed as HTML format. This demo program will show how to run and view a report in HTMLformat, and the HTML page can be refreshed automatically. The result file will be saved under %JREntServerHome%\temp.
Note: "viewrpt" is just an example that we used here, you can replace it with another word you want in the property files and theURL.
Overall Remote Server APIs & Unified JSPs
JReport Enterprise Server allows you to run our JSPs on other machines, say, you can have a whole set of JREntServer interfacesremotely, so that you can conveniently use the remote server APIs to accomplish your tasks. By using JSPs in your web applications,the remote server APIs enable you to perform report running tasks remotely and view the report result directly from the client side,without installing JREntServer on the client machine.
To run JREntServer JSPs remotely, you have to care for the following configuration:
Before using remote server APIs, you must make sure two parameters are set as the JVM environment variables so that JREntServerAPI implementation will obtain the remote host and port information, which are:
Djrs.remote.host=<HOST_NAME/IP>
Djrs.remote.rmiport=<HOST_PORT>
Djrs.rmi.auth_file=<authFileName>
You have two alternatives to set these two parameters:
You can add –Djrs.remote.host, –Djrs.remote.rmiport and −Djrs.rmi.auth_file (Optional) to the batfile that is used to start your application.
•
If you are in an integration environment, you can also add the following to the web.xml file.
<context−param><param−name>jrs.remote.host</param−name><param−value>192.168.128.61</param−value></context−param>
•
JReport Enterprise Server API & RMI API
533

<context−param><param−name>jrs.remote.rmiport</param−name><param−value>1129</param−value></context−param>
<!−− The third param(jrs.rmi.auth_file) is optional. "authFileName" includes theauth file's realpath and auth file name. For example:C:\JREntServer0927\bin\rmi.auth−−>
<context−param><param−name>jrs.rmi.auth_file</param−name><param−value>C:\JREntServer0927\bin\rmi.auth</param−value></context−param>
Please refer to JREntServer User's Guide | Integration with a Servlet Enabled Web Server | Integrating Remote JReport EnterpriseServer with IBM WebSphere 5.0 by a War File
Secure RMI Objects and Universal Remote Object Management
RMI is used commonly in JReport Enterprise Server, such as clustering, event system, remote API, and monitoring system. To avoidsecurity risk and the mess of using RMI registry (All the remote objects being bound to RMI registry directly can cause the remoteobjects to be unmanageable), the universal remote object management is introduced to JReport Enterprise Server.
In the universal remote object management system, if to gain a remote object to perform certain operation in anywhere, either on aserver (local or remote) or in an 3rd−party application (via remote API), a request must be sent to the remote object management toget that special remote object, and authentication is required before any request for a remote object can be processed.
The Authentication file
The authentication process needs a remote authentication file that contains the authentication information to accomplish the securitycheck. The remote authentication file (%JREntServerRoot%\bin\rmi.auth) is generated by JReport Enterprise Serverautomatically during the server installation process. You can protect your authentication file by moving it to a safe place afterinstallation.
Who use authentication file and how to use?
The authentication file is commonly used in the following circumstances:
In JReport Enterprise Server, the remote object management system will use authentication file, which resides in directory%JREntServerRoot%\bin.
•
In JReport Enterprise Server Cluster, you must make sure the authentication files on all the clustered servers are the same. Ifuser want to add a new JReport server that has a different authentication file to the server cluster, you should firstly backupthe authentication file of this server, and then copy the authentication file from the admin server in that JReport servercluster to %reporthome%\bin,
•
In JReport Enterprise Monitor Server, this file can be used, you must copy the authentication file, which is generated byJReport Enterprise Server installation process, to the directory %monitor.home%\bin, and then the monitor server willget it from %monitor.home%\bin to build the authInfo object.
•
If the remote APIs are used, you must specify the authentication file when launching the application that contains the remoteAPIs invocations, for example:
java –cp ... −Djrs.rmi.auth_file=”%authFileName%” mainClass
Or you can specify a string, just put the content of the authentication file.
java –cp ... −Djrs.rmi.auth_string=”µ´‚[¬ d2,q?s?¢]” mainClass
•
JReport Enterprise Server API & RMI API
534

Alternatively, you can also specify the authentication string by yourself arbitrarily. So long as the authentication string thatthe local and remote server hold are the same, can you pass the authentication check.
java –cp ... −Djrs.rmi.auth_string=”my_auth_info” mainClass
Note: On JReport Enterprise Server and JReport Enterprise Monitor Server, you can also use −Djrs.rmi.auth_file or−Djrs.rmi.auth_string in the server startup file. Actually, JREntServer/Monitor Server looks up these threelocations in turn (−Djrs.rmi.auth_string => −Djrs.rmi.auth_file => %JREntServerRoot%\bin) tocheck the authentication information; the information found first will be used to do authentication check in the remote objectmanagement system.
Ways to generate authentication information
The authentication information can be any bytes, so long as the authInfo objects are matching between local server and remoteserver. There are some ways to specify the authentication information:
You can get the authentication file (rmi.auth) generated when installing server.• You can use the RMIAuthFileCreator.bat file (%JREntServerRoot%\bin) to generate the authentication file(rmi.auth).
•
You can compose any string into auth file by any text editors.• You can compose any string as the value of system property −Djrs.rmi.auth_file or −Djrs.rmi.auth to specifyauthentication information.
•
API Demos
Here are some demo programs JReport offers:
APIDemoPublishToDiskCompleted.java An example of publishing a report to file system.
APIDemoRunAndExportReport.java An example of exporting a report to some formats and saving them to local disk.
APIDemoRunReport.java An example of running a report.
APIDemoVersionCompleted.java An example of publishing a report to versioning system.
APIDemoSendEMail.java An example of publishing a report to e−mail.
APIDemoSendNormalEMailWithoutReport.javaAn example of publishing a file to e−mail. The file can be in any format.
APIDemoRunTask.java An example of scheduling a report to run immediately. This example is similar tothe APIDemoPublishToDiskCompleted.java, but it calls a new method runTask() torun reports, with which there is no need to call getCompletedTaskTable() to waitfor the task to be completed.
APIDemoReportEngine.java An example of using ReportEngine to run report, export, print report and set whereportion.
getRptDescPage2.jsp A page enabling the user to export the report result to various formats (except forapplet)
runReport2.jsp Called by the getRptDescPage2.jsp to run a report. To run jsp pages, you can putthem under the directory <reporthome>/public_html/jinfonet. Then access themfrom a Web browser http://host:8888/jinfonet/XXX.jsp
Note: All the demo files above can be accessed in the JREntServer Manual Related Material on our web site:http://www.jinfonet.com/manualsrv/en/srv−material. Please note that we renamed getRptDescPage2.jsp and runReport2.jsp togetRptDescPage2.java and runReport2.java to allow you to access the code from web browser.
JReport Enterprise Server API & RMI API
535
RMI Demos
Here are some demo RMI programs JReport offers:
Before running these demos, please remember to do the following:
Modify the server.properties file in the %JREntServerHome%\bin directory − changeserver.rmiserver.enable to true.
1.
Add −Djrs.rmi.auth_file="%authFileName%" to command line that you start the program. Please refer to thesection “Secure RMI Objects and Universal Remote Object Management” of this document.
2.
Add the classpath of servlet.jar to the command line that you start the program, such asC:\JREntServer\lib\servlet.jar.
3.
RemoteAPIDemoPublishRpt.java A demo about publishing reports. You can submit a schedule to export a report toversion, disk, and email.
RemoteAPIDemoRunAndExportReport.javaA demo about running reports and exporting report result to other formats.
RemoteAPIDemoRunReportWithTimeout.javaA demo about Large Report Manager. This demo runs a report and marks it as a largereport by setting the timeout value, and then returns the large report information.
Additional References
Refer to JREntServer Java doc jet.server.api package, jet.server.api.http package and jet.cs.util package. You can go tohttp://www.jinfonet.com/webpage/kbase/kbase.htm to browse the server java doc online.
•
Refer to User's Guide | Accessing JReport Enterprise Server − Browser | Accessing a Report Using URL | SchedulingCommand and its Properties.
•
Refer to User's Guide | Using JSPs for using server JSPs. • JReport Server Designer APIJReport Server Designer API is a program interface to create new reports or modify existing reports. Beginning withversion 5, JReport Enterprise Server contains full package of JReport Server Designer API. It allows concurrent users tocreate or modify multiple reports at a time. For more details, please refer to JReport Designer manual | User's Guide |JReport Designer API or go to http://www.jinfonet.com/manualpro/userguide/designapi.htm.
•
Index
JReport Enterprise Server API & RMI API
536

Problem Diagnosis Tool − Catalog Doctor
What are in a Catalog
Even if you are already very familiar with the Catalog, we recommend that you still read this page. It is important to know the basicsabout how Catalog Doctor works.
There are two kinds of objects defined in a catalog. They are:
Data Objects − including connections, tables/views, queries, etc. • Class − including text−fields, cross−tabs, etc. •
Data objects are those diagnosed by Catalog Doctor.
Connection
A connection defines the raw database information from which a catalog gets the raw data. For example, it specifies the driver suchas JDBC−ODBC Bridge, the Data Source name (for JDBC−ODBC bridge), the user ID, and the password for connecting to the rawdata. As the figure above illustrates, a connection is the gate to the raw database.
Table/View
Tables/views in JReport catalog are mapped objects of those in the raw database that a connection refers to.
Mapped objects have mapped names that are probably different from their names in the raw database. A catalog stores theinformation about the real tables/views mapped, such as the table name, qualifier, and owner, etc.
Since tables/views are only mapped objects, they could be mapped and remapped. That is, the information of the real tables/viewsstored in a catalog is changeable. This is useful when you change the connection, say from an Access database to an Interbase
537
(usually under the condition that the two databases share similar table structure). You only need to re−map all the tables/views in thecatalog rather than creating a new catalog and all the reports over again.
Field in a Table/View
Fields/columns in JReport Catalog are mapped objects of columns in the raw database. We will refer to the fields of a table/view in acatalog as DB−Fields.
You can specify a new name for the fields (mapped field names) which is different from the name of the real columns in the rawdatabase. But this means that you need to remap all the objects in the catalog which use this column.
Parameter
A Parameter is a variable whose value is an input value at the run time. Please refer to User's Guide | JReport Parameter and itsApplications for its usage.
Formula and Summary
Formula and summary are objects to be computed at run time. They only depend on the information from DB−Fields and parametersin the catalog, rather than the real columns that DB−Fields refer to. Therefore, formulas and summaries are independent from the rawdatabase. This means when a connection is changed (say, from Access database to Interbase ), you don’t need to re−create theformulas and summaries. However, if you re−map a DB−Field, formulas and summaries using that field will generate errors.
Mapping Field
DB−Fields, formulas, summaries as well as parameters are all called mapping fields. They share the same naming domain.
Query
Query is a higher−level object in a catalog. Its concept is similar to that in the database. The columns a query can select includeDB−Field, formula, and computed column. The tables/views it selects from are mapped tables/views defined in the catalog. So aquery is also independent from the raw database.
Relationship among Data Objects
As illustrated by the figure above, data objects in a catalog are constructed one after another: In a query, the connection is the basicobject, tables/views come next, then the DB−Fields together with parameters, and last come formulas together with summaries. Inother words, changes in a formula will not change the validity of any DB−Field, but may change the validity of a query.
What errors can Catalog Doctor Detect
With Catalog Doctor you can diagnose and validate data objects in a catalog.
Errors are Diagnosed Independently
Since data objects in a catalog are constructed one after another, Catalog Doctor diagnoses each type of data object independently.For example, when it checks formulas, it only looks into the definition of parameters and DB−Fields in the current catalog. Thesystem does not check if the DB−Fields exist in the connected database. When the system checks the queries, it will only look for themapping fields currently in the catalog and does not confirm whether the formulas are valid.
For your convenience, in the following statements database refers to the raw database connected to via JDBC or ODBC, mappedtable/view refers to the table/view in the catalog, raw table/view refers to the table/view in the raw database, and raw column refersto the columns in the raw database.
Problem Diagnosis Tool − Catalog Doctor
538

Mapped Table/View and DB−Field
Check to see if the raw table/view of the mapped table/view exists in the database.
Check to see if the raw column of the DB−Field exists in the database. If it exists, then check to see if the stored information such asSQL date type matches the raw column in the database.
Formulas and Summaries
Check to see if formulas and summaries have correct syntax. That is to check whether it needs to re−map parameters and DB−Fieldswhich have been remapped.
Queries
Check to see if the mapped tables/views referenced by the query exist in the catalog.
Check to see if the mapping fields are valid:
The DB−fields of the table/view match that saved in the query; • The formulas and parameters can be found in the catalog. •
Other errors are caused by the two above.
Using Catalog Doctor
Starting Catalog Doctor
When you install JReport Designer, JReport Catalog Doctor is also installed. Under %installroot%\bin, there is a batch file namedcatdr.bat. Catalog Doctor can be started by running the batch file CatDr.bat.
From the desktop, double click My Computer, then go to %installroot%\bin\catdr.bat, run cardr.bat
Or, from an MS−DOS command prompt, issue the following commands:
c:\> cd\jreport\binc:\jreport\bin\>catdr
Loading a Catalog
To load a catalog into Catalog Doctor for diagnosing,
Go to the File menu, and click Open to bring out the Open Catalog File menu.1. Select a catalog file and click Open.2.
Saving a Catalog
To save the loaded catalog to its file, go to the File menu, and then click Save.
To save the loaded catalog to another file, go to the File menu, and then click Save As.
Merging Catalogs
You can merge the resources in two catalogs into one in Catalog Doctor. To do so,
Problem Diagnosis Tool − Catalog Doctor
539

Go to the File menu, open the target catalog, and then select Import. Select the catalog to be imported, the Import FromCatalog dialog appears. Select the resources from the catalog, and click OK.
1.
The selected resources may conflict with those in the target catalog, they are marked with red question marks.
Click the Rename button to rename them, or the Replace button to replace, or click the Skip button to ignore.
2.
Problem Diagnosis Tool − Catalog Doctor
540
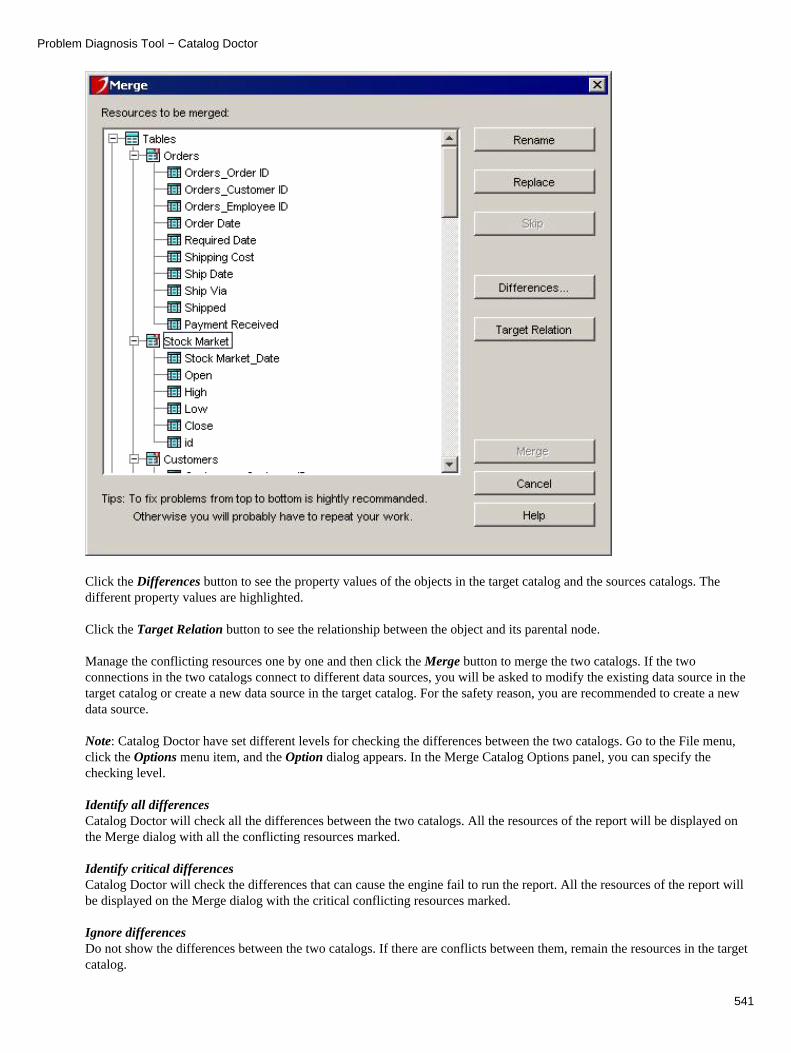
Click the Differences button to see the property values of the objects in the target catalog and the sources catalogs. Thedifferent property values are highlighted.
Click the Target Relation button to see the relationship between the object and its parental node.
Manage the conflicting resources one by one and then click the Merge button to merge the two catalogs. If the twoconnections in the two catalogs connect to different data sources, you will be asked to modify the existing data source in thetarget catalog or create a new data source in the target catalog. For the safety reason, you are recommended to create a newdata source.
Note: Catalog Doctor have set different levels for checking the differences between the two catalogs. Go to the File menu,click the Options menu item, and the Option dialog appears. In the Merge Catalog Options panel, you can specify thechecking level.
Identify all differencesCatalog Doctor will check all the differences between the two catalogs. All the resources of the report will be displayed onthe Merge dialog with all the conflicting resources marked.
Identify critical differencesCatalog Doctor will check the differences that can cause the engine fail to run the report. All the resources of the report willbe displayed on the Merge dialog with the critical conflicting resources marked.
Ignore differencesDo not show the differences between the two catalogs. If there are conflicts between them, remain the resources in the targetcatalog.
Problem Diagnosis Tool − Catalog Doctor
541
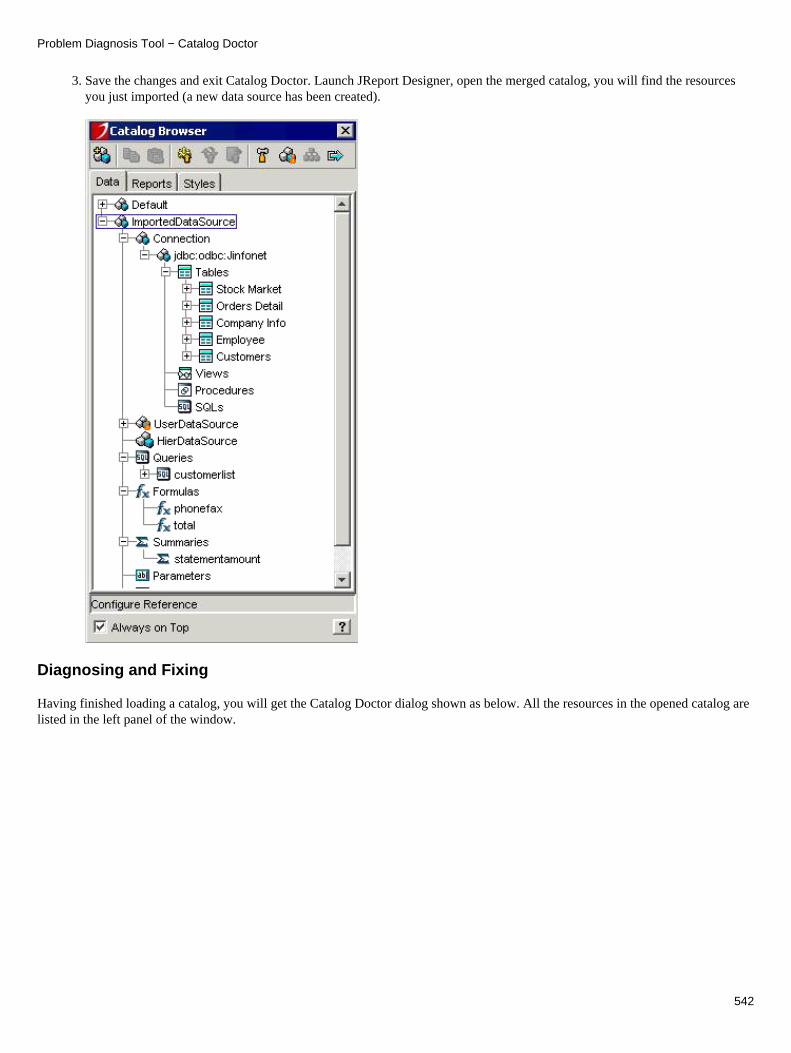
Save the changes and exit Catalog Doctor. Launch JReport Designer, open the merged catalog, you will find the resourcesyou just imported (a new data source has been created).
3.
Diagnosing and Fixing
Having finished loading a catalog, you will get the Catalog Doctor dialog shown as below. All the resources in the opened catalog arelisted in the left panel of the window.
Problem Diagnosis Tool − Catalog Doctor
542
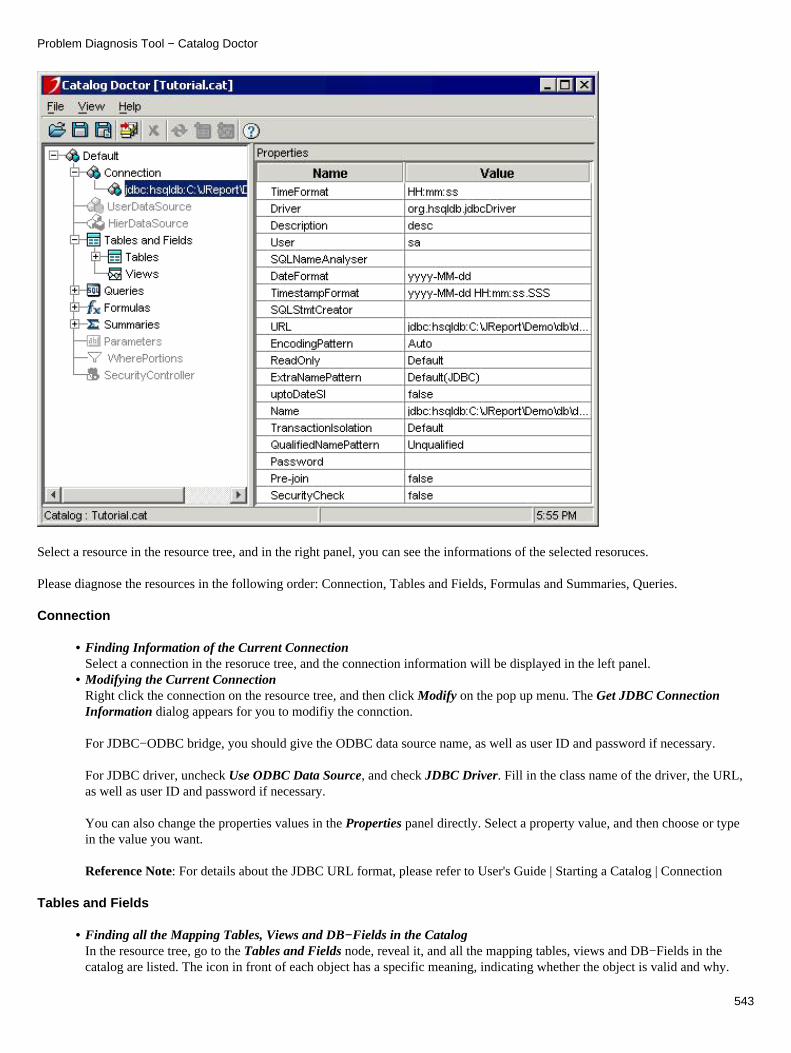
Select a resource in the resource tree, and in the right panel, you can see the informations of the selected resoruces.
Please diagnose the resources in the following order: Connection, Tables and Fields, Formulas and Summaries, Queries.
Connection
Finding Information of the Current ConnectionSelect a connection in the resoruce tree, and the connection information will be displayed in the left panel.
•
Modifying the Current ConnectionRight click the connection on the resource tree, and then click Modify on the pop up menu. The Get JDBC ConnectionInformation dialog appears for you to modifiy the connction.
For JDBC−ODBC bridge, you should give the ODBC data source name, as well as user ID and password if necessary.
For JDBC driver, uncheck Use ODBC Data Source, and check JDBC Driver. Fill in the class name of the driver, the URL,as well as user ID and password if necessary.
You can also change the properties values in the Properties panel directly. Select a property value, and then choose or typein the value you want.
Reference Note: For details about the JDBC URL format, please refer to User's Guide | Starting a Catalog | Connection
•
Tables and Fields
Finding all the Mapping Tables, Views and DB−Fields in the CatalogIn the resource tree, go to the Tables and Fields node, reveal it, and all the mapping tables, views and DB−Fields in thecatalog are listed. The icon in front of each object has a specific meaning, indicating whether the object is valid and why.
•
Problem Diagnosis Tool − Catalog Doctor
543

The icon in front of each object has its specific meaning.
: Table
: Table which does not exist in the database
: Table which has invalid fields
: View
: View which does not exist in the database
: View which has invalid fields
: Field
: Field which does not exist
: Field whose name can be found in the database, but type mismatchFinding the Stored Information of a Mapping Table/View or a DB−Field
Select the resource for which you would like to find the stored properties on the resource tree, and the information will belisted in the Properties panel.
•
Finding all the Raw Tables/Views
Select a table/view under the Tables and Fields node, and all the raw tables/views will be shown in the Choose from
•
Problem Diagnosis Tool − Catalog Doctor
544
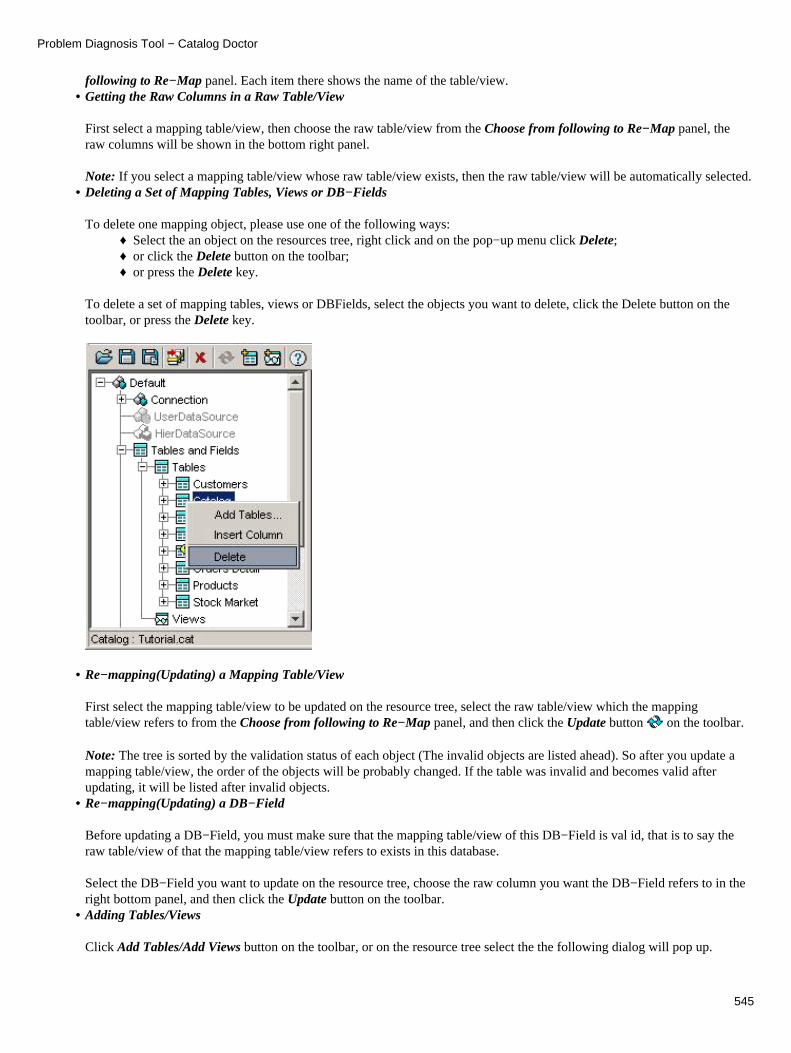
following to Re−Map panel. Each item there shows the name of the table/view.Getting the Raw Columns in a Raw Table/View
First select a mapping table/view, then choose the raw table/view from the Choose from following to Re−Map panel, theraw columns will be shown in the bottom right panel.
Note: If you select a mapping table/view whose raw table/view exists, then the raw table/view will be automatically selected.
•
Deleting a Set of Mapping Tables, Views or DB−Fields
To delete one mapping object, please use one of the following ways: Select the an object on the resources tree, right click and on the pop−up menu click Delete;♦ or click the Delete button on the toolbar;♦ or press the Delete key.♦
•
To delete a set of mapping tables, views or DBFields, select the objects you want to delete, click the Delete button on thetoolbar, or press the Delete key.
Re−mapping(Updating) a Mapping Table/View
First select the mapping table/view to be updated on the resource tree, select the raw table/view which the mappingtable/view refers to from the Choose from following to Re−Map panel, and then click the Update button on the toolbar.
Note: The tree is sorted by the validation status of each object (The invalid objects are listed ahead). So after you update amapping table/view, the order of the objects will be probably changed. If the table was invalid and becomes valid afterupdating, it will be listed after invalid objects.
•
Re−mapping(Updating) a DB−Field
Before updating a DB−Field, you must make sure that the mapping table/view of this DB−Field is val id, that is to say theraw table/view of that the mapping table/view refers to exists in this database.
Select the DB−Field you want to update on the resource tree, choose the raw column you want the DB−Field refers to in theright bottom panel, and then click the Update button on the toolbar.
•
Adding Tables/Views
Click Add Tables/Add Views button on the toolbar, or on the resource tree select the the following dialog will pop up.
•
Problem Diagnosis Tool − Catalog Doctor
545
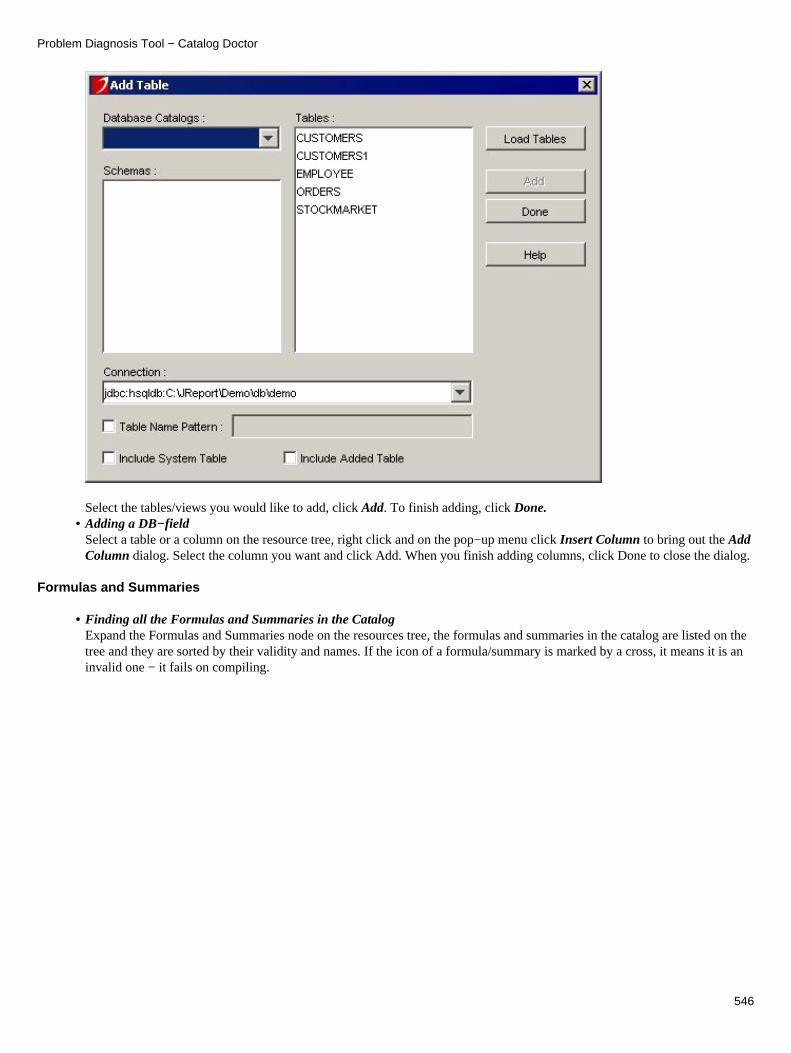
Select the tables/views you would like to add, click Add. To finish adding, click Done.Adding a DB−fieldSelect a table or a column on the resource tree, right click and on the pop−up menu click Insert Column to bring out the AddColumn dialog. Select the column you want and click Add. When you finish adding columns, click Done to close the dialog.
•
Formulas and Summaries
Finding all the Formulas and Summaries in the CatalogExpand the Formulas and Summaries node on the resources tree, the formulas and summaries in the catalog are listed on thetree and they are sorted by their validity and names. If the icon of a formula/summary is marked by a cross, it means it is aninvalid one − it fails on compiling.
•
Problem Diagnosis Tool − Catalog Doctor
546

Finding the Compile Error Message of a Formula/SummarySelect the formula/summary to be checked and the compile error messages are displayed in the Error panel.
•
Replacing a Mapping Field with Another in Formulas and SummariesThe common error is caused because some mapping fields cannot be found in the catalog. In this case, you may need toreplace this mapped field in formulas/summaries with another one.
To do this, please follow the steps below: Select the formula/summary which contains unknown fields on the resource tree. 1. Click the Replace All button under the Error panel. The Replace dialog appears.2.
Input the field name to be replaced in the Mapping Name text box.
Click the Browse button, the Mapping Fields Browse dialog pops up.
3.
•
Problem Diagnosis Tool − Catalog Doctor
547

On the Tree View tab, you can select an existing field to replace the unknown field.
On the List View tab, you can get the following information. This view organizes mapping fields by name. You canget the type for each mapping field. If the mapping field is a DB−Field, you can see the tables/views it belongs to.Select the field you wish to use as a replacement and click OK.
Problem Diagnosis Tool − Catalog Doctor
548

Click Replace button on the Replace dialog. 4. Editing a Formula/SummarySelect the formula/summary to be edited, click the Edit button under the Error panel.
•
Removing Formulas/SummariesSelect the formulas/summaries to be removed, right click and on the pop−up menu, click Delete, or click the Delete buttonon the toolbar.
•
Query
Finding all the Queries in the CatalogExpand the Queries node, all the queries are listed on the resources tree.
•
Problem Diagnosis Tool − Catalog Doctor
549

Finding the Tables/Views Selected in a QuerySelect a query and expand it, all the tables/views will be listed.
•
Finding the DB−Fields Selected from a Table/View in a QuerySelect a query and expand it, then click on a table/view and expand it, all the DB−Fields in the table or view will be listed.
•
Finding the Formulas or Computed Columns Selected in a QueryFormulas and computed columns are listed before mapping tables/views.
•
Editing a QuerySelect the query to be edited, click the Edit button under the Error panel, or right click and on the pop−up menu click EditQuery.
•
Deleting Queries, DB−Fields, Formulas and Computed Columns Selected in a Query and a Table/View Selected in aQuerySelect the objects to be deleted, click Delete.
•
Saving a Query as a Cached Query ResultSelect the query to be saved as a cached query result, click Run, or right click a query, and on the pop−up menu, clickCreate Cached Query Result. Usually, this is for our internal use and you may not be interested.
•
Index
Problem Diagnosis Tool − Catalog Doctor
550
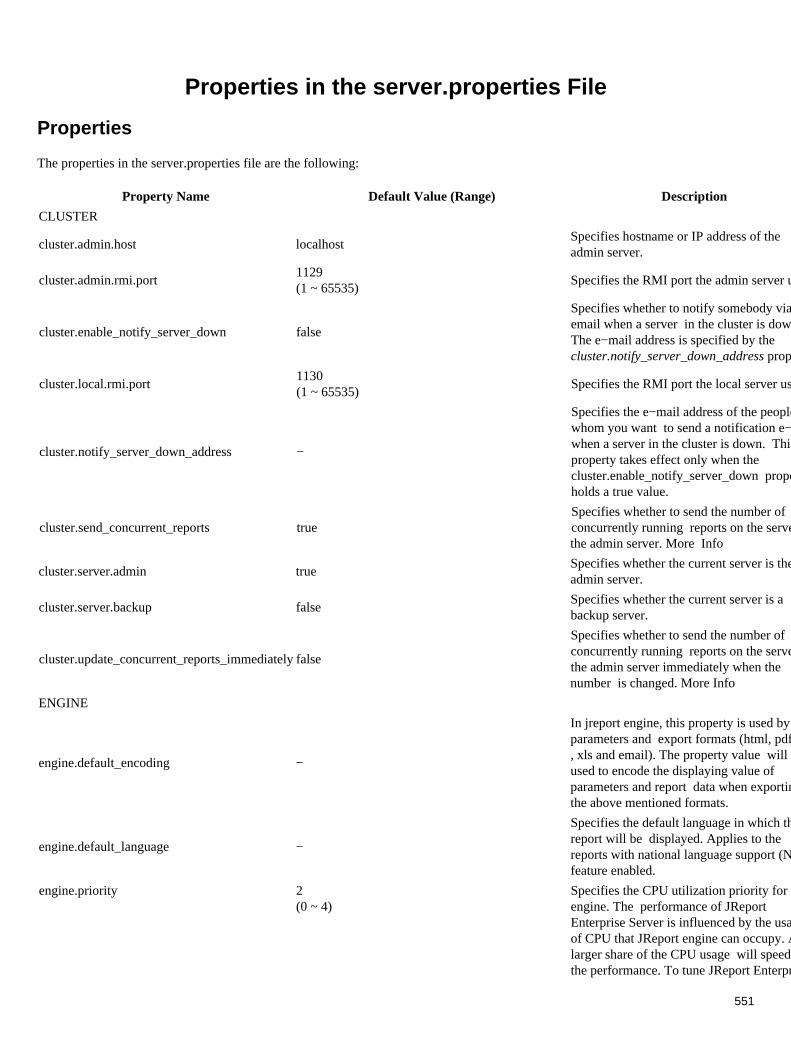
Properties in the server.properties File
Properties
The properties in the server.properties file are the following:
Property Name Default Value (Range) Description
CLUSTER
cluster.admin.host localhostSpecifies hostname or IP address of theadmin server.
cluster.admin.rmi.port1129(1 ~ 65535)
Specifies the RMI port the admin server uses.
cluster.enable_notify_server_down false
Specifies whether to notify somebody viaemail when a server in the cluster is down.The e−mail address is specified by thecluster.notify_server_down_address property.
cluster.local.rmi.port1130(1 ~ 65535)
Specifies the RMI port the local server uses.
cluster.notify_server_down_address −
Specifies the e−mail address of the people towhom you want to send a notification e−mailwhen a server in the cluster is down. Thisproperty takes effect only when thecluster.enable_notify_server_down propertyholds a true value.
cluster.send_concurrent_reports trueSpecifies whether to send the number ofconcurrently running reports on the server tothe admin server. More Info
cluster.server.admin trueSpecifies whether the current server is theadmin server.
cluster.server.backup falseSpecifies whether the current server is abackup server.
cluster.update_concurrent_reports_immediatelyfalse
Specifies whether to send the number ofconcurrently running reports on the server tothe admin server immediately when thenumber is changed. More Info
ENGINE
engine.default_encoding −
In jreport engine, this property is used byparameters and export formats (html, pdf, rtf, xls and email). The property value will beused to encode the displaying value ofparameters and report data when exporting tothe above mentioned formats.
engine.default_language −
Specifies the default language in which thereport will be displayed. Applies to thereports with national language support (NLS)feature enabled.
engine.priority 2(0 ~ 4)
Specifies the CPU utilization priority for theengine. The performance of JReportEnterprise Server is influenced by the usageof CPU that JReport engine can occupy. Alarger share of the CPU usage will speed upthe performance. To tune JReport Enterprise
551

Server to the best performance, you canmodify this option to enable the engine toshare a larger part of the CPU usage when itis running.
engine.single_thread trueSpecifies whether the engine threaditself can create additional threads or not.
HTTPSERVER
httpserver.admin.port8889(1 ~ 65535)
The port for client users to configure andadministrate the server remotely. The port isactually where the servlet for remoteadministration (jet.server.servlets.RcServlet)listens.
httpserver.backlog 50The maximum length of the queue to acceptthe socket.
httpserver.host.all trueSpecifies whether to use all host names toindicate the server host name.
httpserver.max.connections1000(1 ~ 2147483647)
The maximum number of connections that astandalone server can accept. The newrequest sent to a standalone server will berefused when the amount of connections thatthe server holds exceeds this number.
httpserver.max.handlers50(1 ~ 2147483647)
The maximum number of user handlers thatJReport Enterprise Server can hold. JReportEnterprise Server can respond to the requests from the client−sidesimultaneously. The number of the executedrequests is in inverse proportion to the speedof the response. The more requests that areexecuted, the slower the speed will be. Toimprove the running speed, you can set userhandlers to a comparatively small number.
httpserver.name JREntServer/1.1 Specifies the HTTP Server name.
httpserver.port8888(1 ~ 65535)
Specifies the TCP port on which JReportserver listens when the server is started. Theport can be an integer between 1 and 65535,but numbers less than 1024 are usuallyreserved by system, so numbers that arelarger than 1024 are recommended.
httpserver.servlet.admin.propfile%InstallRoot%\bin\admin.properties
Specifies the path and file name of theRcServlet property file.
httpserver.servlet.propfile%InstallRoot%\bin\servlet.properties
Specifies the path and file name of servletproperty file. The core of JReport EnterpriseServer is jet.server.servlets.JRServlet, whichimplements the interface ofjavax.servlet.http.HttpServlet. You can installthe the jet.server.servlet.JRServlet to any webserver that supports servlets. This will turnthe web server into a JReport EnterpriseServer.
httpserver.shutdown.timeout 0 Specifies shut−down time limit for the HTTPServer, in seconds. When the time exceedsthe specified number when shutting down theHTTP Server, it will be forced to terminate.
Properties in the server.properties File
552
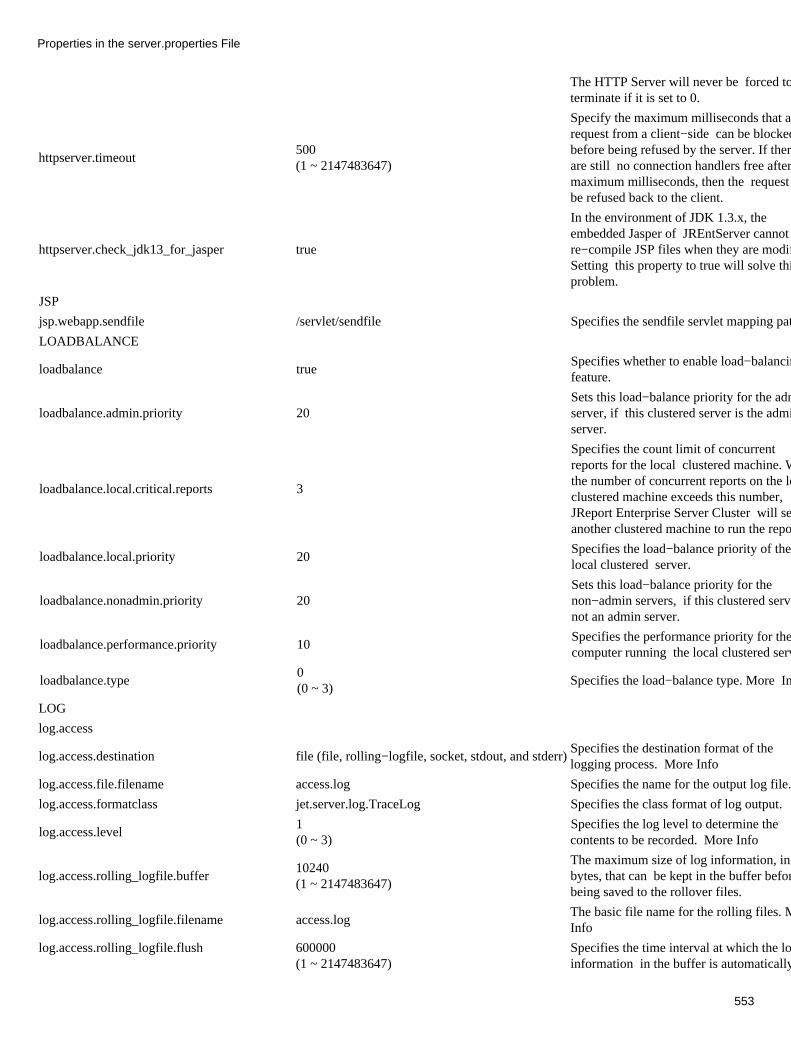
The HTTP Server will never be forced toterminate if it is set to 0.
httpserver.timeout500(1 ~ 2147483647)
Specify the maximum milliseconds that arequest from a client−side can be blockedbefore being refused by the server. If thereare still no connection handlers free after themaximum milliseconds, then the request willbe refused back to the client.
httpserver.check_jdk13_for_jasper true
In the environment of JDK 1.3.x, theembedded Jasper of JREntServer cannotre−compile JSP files when they are modified.Setting this property to true will solve thisproblem.
JSP
jsp.webapp.sendfile /servlet/sendfile Specifies the sendfile servlet mapping path.
LOADBALANCE
loadbalance trueSpecifies whether to enable load−balancingfeature.
loadbalance.admin.priority 20Sets this load−balance priority for the adminserver, if this clustered server is the adminserver.
loadbalance.local.critical.reports 3
Specifies the count limit of concurrentreports for the local clustered machine. Whenthe number of concurrent reports on the localclustered machine exceeds this number,JReport Enterprise Server Cluster will selectanother clustered machine to run the report.
loadbalance.local.priority 20Specifies the load−balance priority of thelocal clustered server.
loadbalance.nonadmin.priority 20Sets this load−balance priority for thenon−admin servers, if this clustered server isnot an admin server.
loadbalance.performance.priority 10Specifies the performance priority for thecomputer running the local clustered server.
loadbalance.type0(0 ~ 3)
Specifies the load−balance type. More Info
LOG
log.access
log.access.destination file (file, rolling−logfile, socket, stdout, and stderr)Specifies the destination format of thelogging process. More Info
log.access.file.filename access.log Specifies the name for the output log file.
log.access.formatclass jet.server.log.TraceLog Specifies the class format of log output.
log.access.level1(0 ~ 3)
Specifies the log level to determine thecontents to be recorded. More Info
log.access.rolling_logfile.buffer10240(1 ~ 2147483647)
The maximum size of log information, inbytes, that can be kept in the buffer beforebeing saved to the rollover files.
log.access.rolling_logfile.filename access.logThe basic file name for the rolling files. MoreInfo
log.access.rolling_logfile.flush 600000(1 ~ 2147483647)
Specifies the time interval at which the loginformation in the buffer is automatically
Properties in the server.properties File
553

saved to disk, in milliseconds.
log.access.rolling_logfile.rollover1024000(1 ~ 2147483647)
The maximum size of each log file.
log.debug
log.debug.destination file (file, rolling−logfile, socket, stdout, and stderr)Specifies the destination format of thelogging process. More Info.
log.debug.file.filename debug.log Specifies the name for the output log file.
log.debug.formatclass jet.server.log.TraceLog Specifies the class format of log output.
log.debug.level1(0 ~ 3)
Specifies the log level to determine thecontents to be recorded. More Info
log.debug.rolling_logfile.buffer10240(1 ~ 2147483647)
The maximum size of log information, inbytes, that can be kept in the buffer beforebeing saved to the rollover files.
log.debug.rolling_logfile.filename debug.logThe basic file name for the rolling files. MoreInfo
log.debug.rolling_logfile.flush600000(1 ~ 2147483647)
Specifies the time interval at which the loginformation in the buffer is automaticallysaved to disk, in milliseconds.
log.debug.rolling_logfile.rollover1024000(1 ~ 2147483647)
The maximum size of each log file.
log.engine
log.engine.destination rolling_logfileSpecifies the destination format of thelogging process. More Info.
log.engine.file.filename performance.log Specifies the name for the output log file.
log.engine.formatclass jet.server.log.TraceLog Specifies the class format of log output.
log.engine.level0(0 ~ 3)
Specifies the log level to determine thecontents to be recorded. More Info
log.engine.rolling_logfile.buffer10240(1 ~ 2147483647)
The maximum size of log information, inbytes, that can be kept in the buffer beforebeing saved to the rollover files.
log.engine.rolling_logfile.filename performance.logThe basic file name for the rolling files. MoreInfo
log.engine.rolling_logfile.flush 600000(1 ~ 2147483647)
Specifies the time interval at which the loginformation in the buffer is automaticallysaved to disk, in milliseconds.
log.engine.rolling_logfile.rollover 1024000(1 ~ 2147483647)
The maximum size of each log file.
log.error
log.error.destination rolling_logfileSpecifies the destination format of thelogging process. More Info.
log.error.file.filename error.log Specifies the name for the output log file.
log.error.formatclass jet.server.log.TraceLog Specifies the class format of log output.
log.error.level 1(0 ~3)
Specifies the log level to determine thecontents to be recorded. More Info
log.error.rolling_logfile.buffer 10240(1 ~ 2147483647)
The maximum size of log information, inbytes, that can be kept in the buffer beforebeing saved to the rollover files.
log.error.rolling_logfile.filename error.logThe basic file name for the rolling files. MoreInfo
log.error.rolling_logfile.flush
Properties in the server.properties File
554

600000(1 ~ 2147483647)
Specifies the time interval at which the loginformation in the buffer is automaticallysaved to disk, in milliseconds.
log.error.rolling_logfile.rollover 1024000(1 ~ 2147483647)
The maximum size of each log file.
log.event
log.event.destination rolling_logfileSpecifies the destination format of thelogging process. More Info.
log.event.file.filename event.log Specifies the name for the output log file.
log.event.formatclass jet.server.log.TraceLog Specifies the class format of log output.
log.event.level 1(0 ~3)
Specifies the log level to determine thecontents to be recorded. More Info
log.event.rolling_logfile.buffer 10240(1 ~ 2147483647)
The maximum size of log information, inbytes, that can be kept in the buffer beforebeing saved to the rollover files.
log.event.rolling_logfile.filename event.logThe basic file name for the rolling files. MoreInfo
log.event.rolling_logfile.flush 600000(1 ~ 2147483647)
Specifies the time interval at which the loginformation in the buffer is automaticallysaved to disk, in milliseconds.
log.event.rolling_logfile.rollover 1024000(1 ~ 2147483647)
The maximum size of each log file.
log.manage
log.manage.destination rolling_logfileSpecifies the destination format of thelogging process. More Info.
log.manage.file.filename manage.log Specifies the name for the output log file.
log.manage.formatclass jet.server.log.TraceLog Specifies the class format of log output.
log.manage.level 1(0 ~3)
Specifies the log level to determine thecontents to be recorded. More Info
log.manage.rolling_logfile.buffer 10240(1 ~ 2147483647)
The maximum size of log information, inbytes, that can be kept in the buffer beforebeing saved to the rollover files.
log.manage.rolling_logfile.filename manage.logThe basic file name for the rolling files. MoreInfo
log.manage.rolling_logfile.flush 600000(1 ~ 2147483647)
Specifies the time interval at which the loginformation in the buffer is automaticallysaved to disk, in milliseconds.
log.manage.rolling_logfile.rollover 1024000(1 ~ 2147483647)
The maximum size of each log file.
log.time
log.time local(local and GMT)
Specifies the time stamp format in the logfiles.
MONITOR
monitor.cluster.refresh.interval10000(1 ~ 9223372036854775807)
Specifies the time interval at which themonitor statistics of the clustered server isupdated , in milliseconds.
monitor.interval 60(1 ~ 9223372036854775807)
Specifies the time interval for monitor thread,in milliseconds.
monitor.maxminute.savereport 2(1 ~ 2147483647)
Specifies the maximum time limit that areport status is shown on the Finished tab, in
Properties in the server.properties File
555
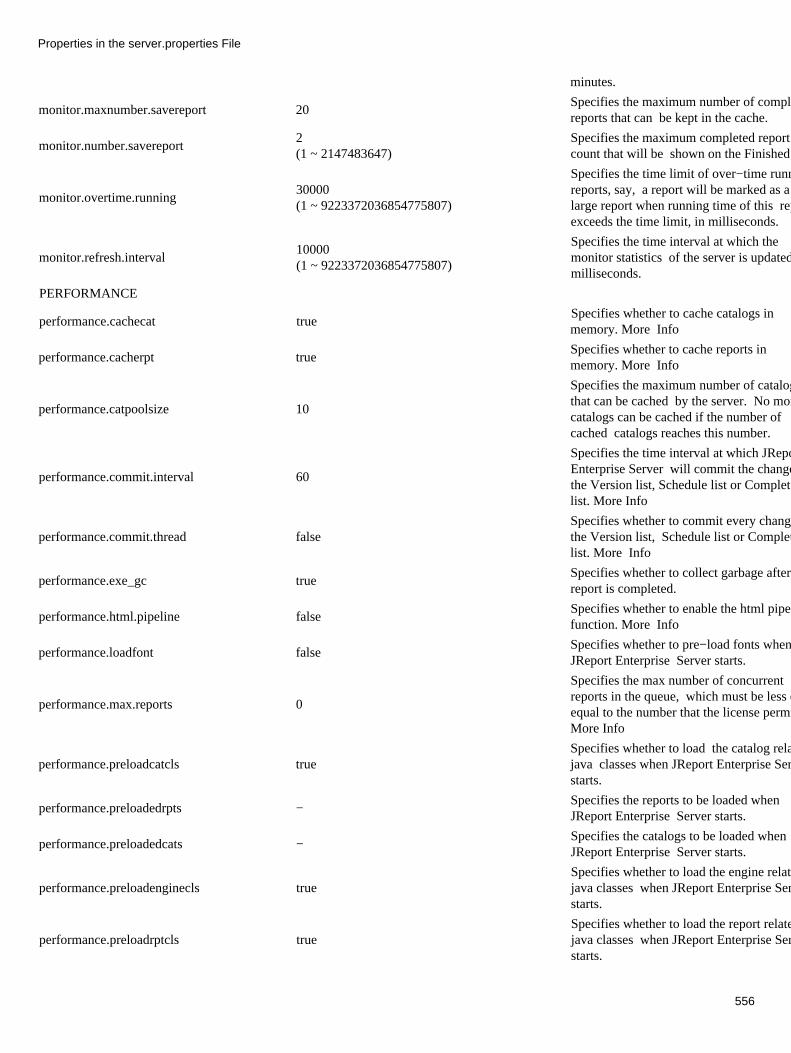
minutes.
monitor.maxnumber.savereport 20Specifies the maximum number of completedreports that can be kept in the cache.
monitor.number.savereport 2(1 ~ 2147483647)
Specifies the maximum completed reportcount that will be shown on the Finished tab.
monitor.overtime.running 30000(1 ~ 9223372036854775807)
Specifies the time limit of over−time runningreports, say, a report will be marked as alarge report when running time of this reportexceeds the time limit, in milliseconds.
monitor.refresh.interval 10000(1 ~ 9223372036854775807)
Specifies the time interval at which themonitor statistics of the server is updated, inmilliseconds.
PERFORMANCE
performance.cachecat trueSpecifies whether to cache catalogs inmemory. More Info
performance.cacherpt trueSpecifies whether to cache reports inmemory. More Info
performance.catpoolsize 10
Specifies the maximum number of catalogsthat can be cached by the server. No morecatalogs can be cached if the number ofcached catalogs reaches this number.
performance.commit.interval 60
Specifies the time interval at which JReportEnterprise Server will commit the changes inthe Version list, Schedule list or Completedlist. More Info
performance.commit.thread falseSpecifies whether to commit every change inthe Version list, Schedule list or Completedlist. More Info
performance.exe_gc trueSpecifies whether to collect garbage after areport is completed.
performance.html.pipeline falseSpecifies whether to enable the html pipelinefunction. More Info
performance.loadfont falseSpecifies whether to pre−load fonts whenJReport Enterprise Server starts.
performance.max.reports 0
Specifies the max number of concurrentreports in the queue, which must be less orequal to the number that the license permits.More Info
performance.preloadcatcls trueSpecifies whether to load the catalog relatedjava classes when JReport Enterprise Serverstarts.
performance.preloadedrpts −Specifies the reports to be loaded whenJReport Enterprise Server starts.
performance.preloadedcats −Specifies the catalogs to be loaded whenJReport Enterprise Server starts.
performance.preloadenginecls trueSpecifies whether to load the engine relatedjava classes when JReport Enterprise Serverstarts.
performance.preloadrptcls trueSpecifies whether to load the report relatedjava classes when JReport Enterprise Serverstarts.
Properties in the server.properties File
556
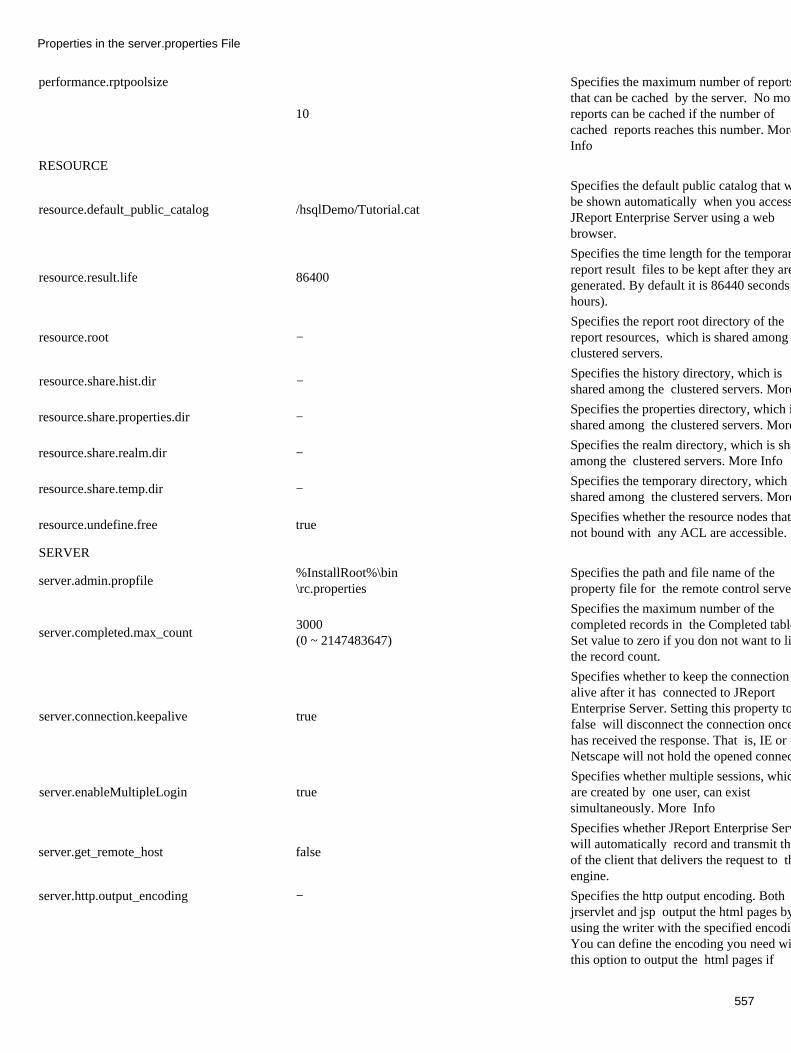
performance.rptpoolsize
10
Specifies the maximum number of reportsthat can be cached by the server. No morereports can be cached if the number ofcached reports reaches this number. MoreInfo
RESOURCE
resource.default_public_catalog /hsqlDemo/Tutorial.cat
Specifies the default public catalog that willbe shown automatically when you accessJReport Enterprise Server using a webbrowser.
resource.result.life 86400
Specifies the time length for the temporaryreport result files to be kept after they aregenerated. By default it is 86440 seconds (24hours).
resource.root −Specifies the report root directory of thereport resources, which is shared among theclustered servers.
resource.share.hist.dir −Specifies the history directory, which isshared among the clustered servers. More Info
resource.share.properties.dir −Specifies the properties directory, which isshared among the clustered servers. More Info
resource.share.realm.dir −Specifies the realm directory, which is sharedamong the clustered servers. More Info
resource.share.temp.dir −Specifies the temporary directory, which isshared among the clustered servers. More Info
resource.undefine.free trueSpecifies whether the resource nodes that arenot bound with any ACL are accessible.
SERVER
server.admin.propfile %InstallRoot%\bin\rc.properties
Specifies the path and file name of theproperty file for the remote control server.
server.completed.max_count 3000(0 ~ 2147483647)
Specifies the maximum number of thecompleted records in the Completed table.Set value to zero if you don not want to limitthe record count.
server.connection.keepalive true
Specifies whether to keep the connectionalive after it has connected to JReportEnterprise Server. Setting this property tofalse will disconnect the connection once ithas received the response. That is, IE orNetscape will not hold the opened connection.
server.enableMultipleLogin trueSpecifies whether multiple sessions, whichare created by one user, can existsimultaneously. More Info
server.get_remote_host false
Specifies whether JReport Enterprise Serverwill automatically record and transmit the IPof the client that delivers the request to theengine.
server.http.output_encoding − Specifies the http output encoding. Bothjrservlet and jsp output the html pages byusing the writer with the specified encoding.You can define the encoding you need withthis option to output the html pages if
Properties in the server.properties File
557

necessary. If it is not specified, jrservlet andjsp will use the default one.
server.invalidate_httpsession_when_logout trueSpecifies whether to invalidate the sessionwhen user logs out.
server.language en Specifies the language the server uses.
server.mail.send_size 2000Specifies the maximum size of the mail sentby server. When −1 is specified, the size ofthe mail is unlimited.
server.ondemandlist.user_max_records 100
Specifies the max records in the user's OnDemand list. The oldest records will beremoved when records exceed the specifiednumber. When it is set to 0, unlimited recordswill be allowed in the user's On−DemandList.
server.realm.active defaultRealmSpecifies the realm that takes effect when theserver starts up.
server.restore.task falseSpecifies whether to save to a file whenstarting a report.
server.rmiserver.enable falseSpecifies whether to enable the remotemethod invocation server.
server.security true
Specifies whether to enable security checkingon remote requests. When it is set to false,responses will be made without any securitychecking. However, this does not applies toRemote Configuration and Administration.
server.session.timeout 1800
Specifies the time limit for a Generallyspeaking, if several users access JReportserver at the same time and among them, aclient cannot send requests to JReportEnterprise Server for a period of time, thenthe server will log the client out after timeout.The default session timeout is 30 minutes.
server.url.help http://www.jinfonet.com/manualsrv/en/userguide/
Specifies the help documentation url the Helpbutton links to, which is located on theupper−right corner of the service pages ofJReport Enterprise Server (port 8888 bydefault).
server.url.website http://www.jinfonet.com
Specifies the website url the Website buttonlinks to, which is located on the upper−rightcorner of the service pages of JReportEnterprise Server (port 8888 by default).
server.version.from.temp falseSpecifies whether to enable "Publish toVersion System" option when previewing areport result. More Info
server.version.max_amount_per_subfolder 3000Specifies the maximum amount of subfoldersunder each subfolder in the history folder.More Info
server.version.retain.paramfile false
Specifies whether to retain the parameter file(if there is any) when an archive version isremoved from the version table. Theparameter file will be kept in the historyfolder, if it is set to true.
server.version.show.paramcontents false
Properties in the server.properties File
558
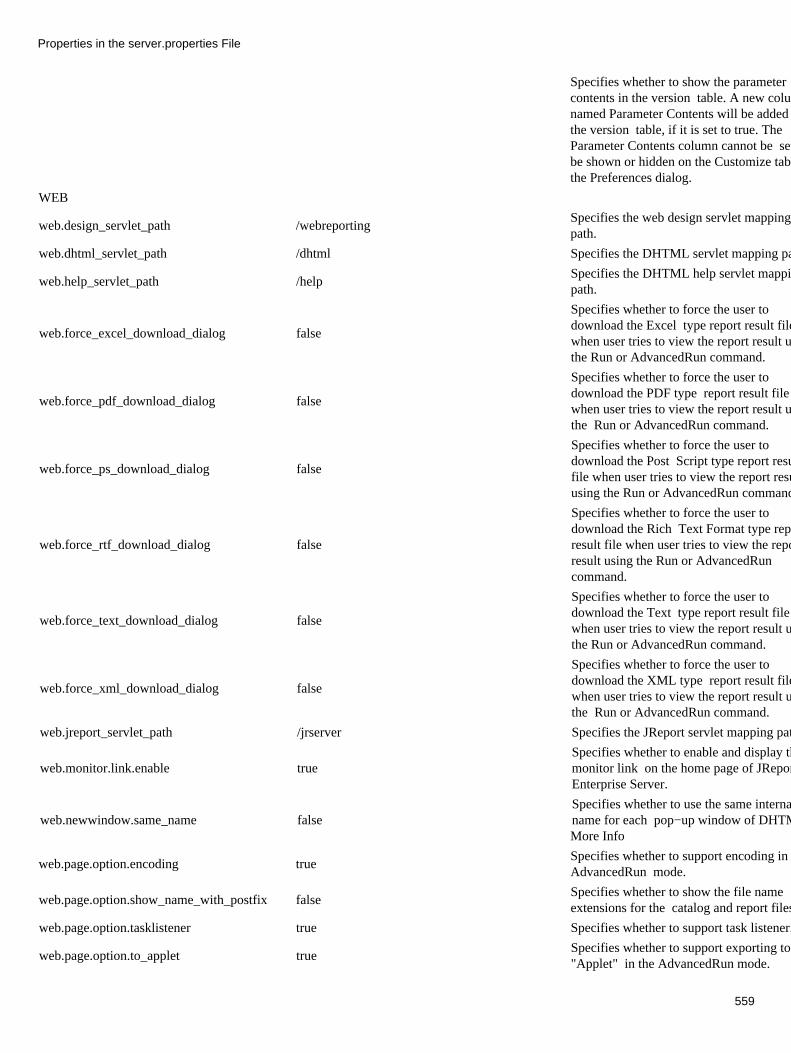
Specifies whether to show the parametercontents in the version table. A new columnnamed Parameter Contents will be added tothe version table, if it is set to true. TheParameter Contents column cannot be set tobe shown or hidden on the Customize tab onthe Preferences dialog.
WEB
web.design_servlet_path /webreportingSpecifies the web design servlet mappingpath.
web.dhtml_servlet_path /dhtml Specifies the DHTML servlet mapping path.
web.help_servlet_path /helpSpecifies the DHTML help servlet mappingpath.
web.force_excel_download_dialog false
Specifies whether to force the user todownload the Excel type report result filewhen user tries to view the report result usingthe Run or AdvancedRun command.
web.force_pdf_download_dialog false
Specifies whether to force the user todownload the PDF type report result filewhen user tries to view the report result usingthe Run or AdvancedRun command.
web.force_ps_download_dialog false
Specifies whether to force the user todownload the Post Script type report resultfile when user tries to view the report resultusing the Run or AdvancedRun command.
web.force_rtf_download_dialog false
Specifies whether to force the user todownload the Rich Text Format type reportresult file when user tries to view the reportresult using the Run or AdvancedRuncommand.
web.force_text_download_dialog false
Specifies whether to force the user todownload the Text type report result filewhen user tries to view the report result usingthe Run or AdvancedRun command.
web.force_xml_download_dialog false
Specifies whether to force the user todownload the XML type report result filewhen user tries to view the report result usingthe Run or AdvancedRun command.
web.jreport_servlet_path /jrserver Specifies the JReport servlet mapping path.
web.monitor.link.enable trueSpecifies whether to enable and display themonitor link on the home page of JReportEnterprise Server.
web.newwindow.same_name falseSpecifies whether to use the same internalname for each pop−up window of DHTML.More Info
web.page.option.encoding trueSpecifies whether to support encoding in theAdvancedRun mode.
web.page.option.show_name_with_postfix falseSpecifies whether to show the file nameextensions for the catalog and report files.
web.page.option.tasklistener true Specifies whether to support task listener.
web.page.option.to_applet trueSpecifies whether to support exporting to"Applet" in the AdvancedRun mode.
Properties in the server.properties File
559
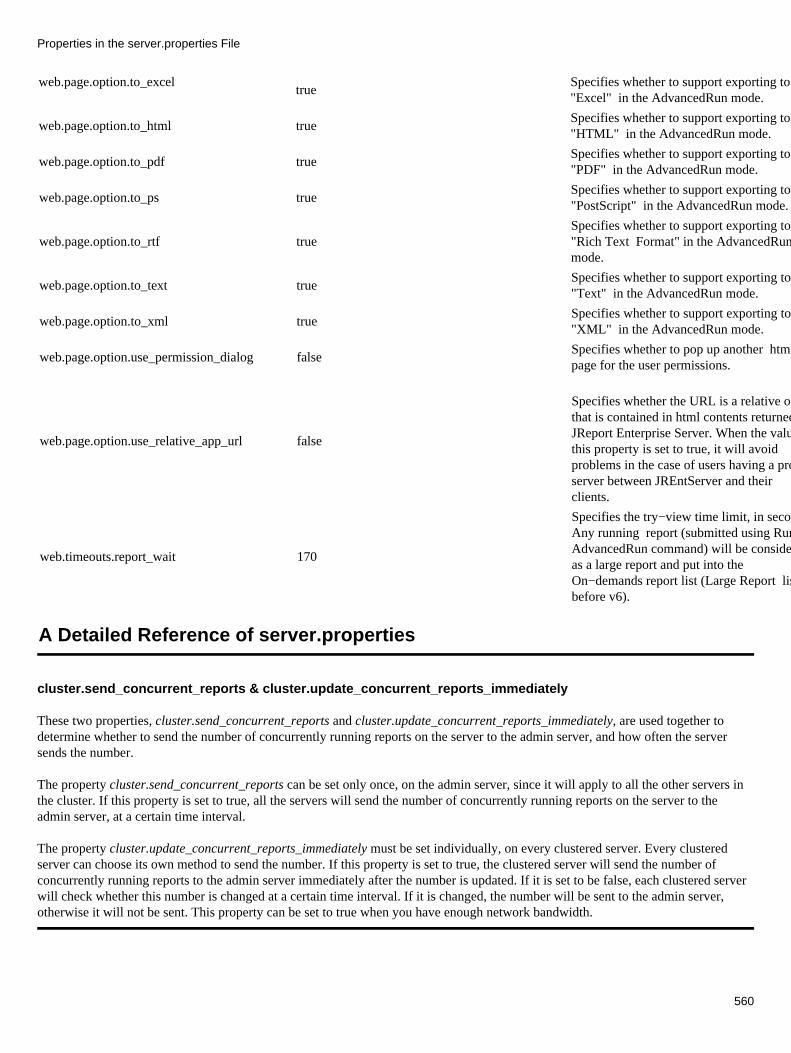
web.page.option.to_excel true
Specifies whether to support exporting to"Excel" in the AdvancedRun mode.
web.page.option.to_html trueSpecifies whether to support exporting to"HTML" in the AdvancedRun mode.
web.page.option.to_pdf trueSpecifies whether to support exporting to"PDF" in the AdvancedRun mode.
web.page.option.to_ps trueSpecifies whether to support exporting to"PostScript" in the AdvancedRun mode.
web.page.option.to_rtf trueSpecifies whether to support exporting to"Rich Text Format" in the AdvancedRunmode.
web.page.option.to_text trueSpecifies whether to support exporting to"Text" in the AdvancedRun mode.
web.page.option.to_xml trueSpecifies whether to support exporting to"XML" in the AdvancedRun mode.
web.page.option.use_permission_dialog falseSpecifies whether to pop up another htmlpage for the user permissions.
web.page.option.use_relative_app_url false
Specifies whether the URL is a relative onethat is contained in html contents returned byJReport Enterprise Server. When the value ofthis property is set to true, it will avoidproblems in the case of users having a proxyserver between JREntServer and theirclients.
web.timeouts.report_wait 170
Specifies the try−view time limit, in seconds.Any running report (submitted using Run orAdvancedRun command) will be consideredas a large report and put into theOn−demands report list (Large Report listbefore v6).
A Detailed Reference of server.properties
cluster.send_concurrent_reports & cluster.update_concurrent_reports_immediately
These two properties, cluster.send_concurrent_reports and cluster.update_concurrent_reports_immediately, are used together todetermine whether to send the number of concurrently running reports on the server to the admin server, and how often the serversends the number.
The property cluster.send_concurrent_reports can be set only once, on the admin server, since it will apply to all the other servers inthe cluster. If this property is set to true, all the servers will send the number of concurrently running reports on the server to theadmin server, at a certain time interval.
The property cluster.update_concurrent_reports_immediately must be set individually, on every clustered server. Every clusteredserver can choose its own method to send the number. If this property is set to true, the clustered server will send the number ofconcurrently running reports to the admin server immediately after the number is updated. If it is set to be false, each clustered serverwill check whether this number is changed at a certain time interval. If it is changed, the number will be sent to the admin server,otherwise it will not be sent. This property can be set to true when you have enough network bandwidth.
Properties in the server.properties File
560
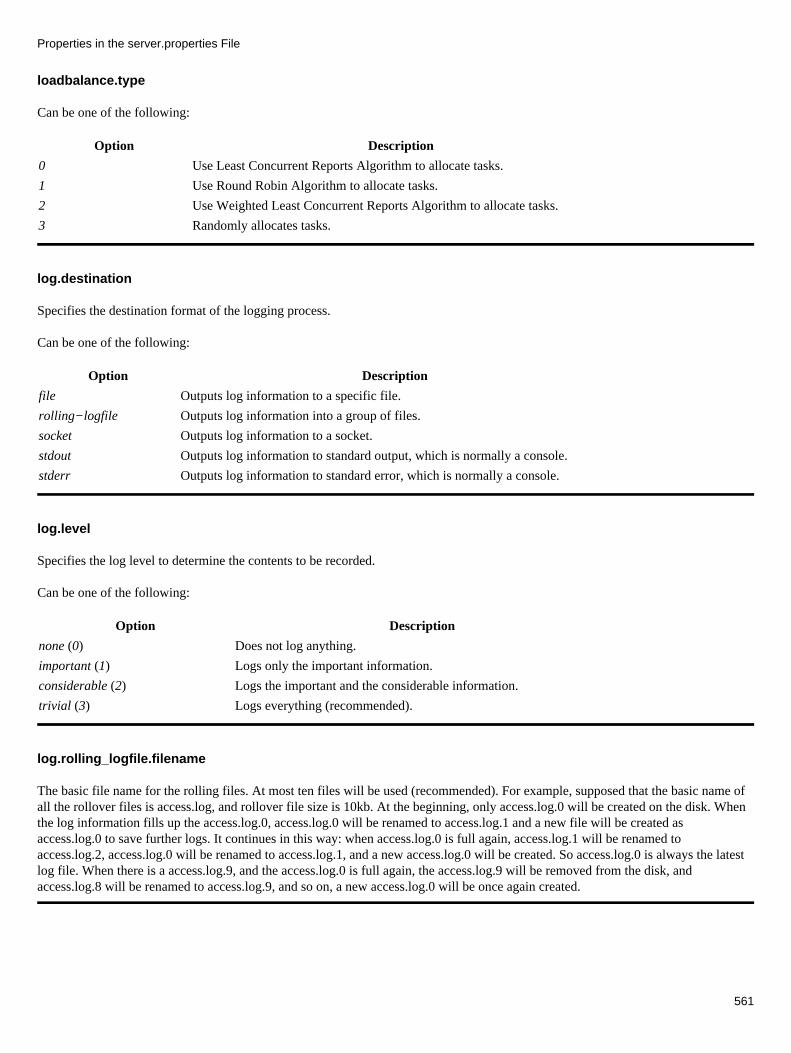
loadbalance.type
Can be one of the following:
Option Description
0 Use Least Concurrent Reports Algorithm to allocate tasks.
1 Use Round Robin Algorithm to allocate tasks.
2 Use Weighted Least Concurrent Reports Algorithm to allocate tasks.
3 Randomly allocates tasks.
log.destination
Specifies the destination format of the logging process.
Can be one of the following:
Option Description
file Outputs log information to a specific file.
rolling−logfile Outputs log information into a group of files.
socket Outputs log information to a socket.
stdout Outputs log information to standard output, which is normally a console.
stderr Outputs log information to standard error, which is normally a console.
log.level
Specifies the log level to determine the contents to be recorded.
Can be one of the following:
Option Description
none (0) Does not log anything.
important (1) Logs only the important information.
considerable (2) Logs the important and the considerable information.
trivial (3) Logs everything (recommended).
log.rolling_logfile.filename
The basic file name for the rolling files. At most ten files will be used (recommended). For example, supposed that the basic name ofall the rollover files is access.log, and rollover file size is 10kb. At the beginning, only access.log.0 will be created on the disk. Whenthe log information fills up the access.log.0, access.log.0 will be renamed to access.log.1 and a new file will be created asaccess.log.0 to save further logs. It continues in this way: when access.log.0 is full again, access.log.1 will be renamed toaccess.log.2, access.log.0 will be renamed to access.log.1, and a new access.log.0 will be created. So access.log.0 is always the latestlog file. When there is a access.log.9, and the access.log.0 is full again, the access.log.9 will be removed from the disk, andaccess.log.8 will be renamed to access.log.9, and so on, a new access.log.0 will be once again created.
Properties in the server.properties File
561

performance.cachecat & performance.cacherpt
The process of viewing reports is the combination of loading reports from disk and generating report files. It is obvious that skippingeither one of the two will shorten the elapsed time. JReport Enterprise Server enables the user to cache reports and catalogs inmemory, so that it will not have to load them from disks. Therefore the performance will be improved.
performance.commit.thread & performance.commit.interval
When the value of the performance.commit.thread property is false, JReport Enterprise Server will commit every change in theVersion list, Schedule list or Completed list immediately. For example, you deleted a scheduled task in the Schedule list, JReportEnterprise Server will commit the action and refresh the Schedule list. If it is set to True, server will only commit the changes in theVersion list, Schedule list or Completed list in a specified interval, set by the performance.commit.interval property, which will avoidfrequently overwriting the related files in server and achieve a better performance.
The performance.commit.interval property takes effect only when the performance.commit.thread property is set to True.
performance.max.reports
JReport Enterprise Server supports Queue control which allows users to customize the number of concurrent reports. Please note thatthe number of concurrent reports can not exceed the license's permission. You can increase or decrease the queue size by setting theproperty value of performance.max.reports in server.properties. Considering your computer's usage, you can set this to a proper valueto lead to marked improvement in performance. For example, if you have a 6−report license and you don't use the queue control, therunning speed may be slowed down. To get a better performance, you can set performance.max.reports = 4 to have only four reportsrun at the same time, and other two reports wait in the queue till one of the four reports is finished.
Though the default value is 0, it does not mean that no reports are queued. If you do not change the value, then it depends on thelicense you have purchased. For example, with unlimited−report license, there can be numerous reports queued. If you have 4−reportlicense, it will be up to 4 reports can be queued.
performance.html.pipeline
To speed up the report delivery, JReport Enterprise Server supports to delivery a single page of content at a time. JReport Engineoutputs the content of result in HTML file to the browser as soon as a single page is finished processing, the rest of the report willcontinue to be processed. Users can navigate the report result to the previous or next page.
Please note that some data such as Total Page Number displayed in one page may be temporary, which is called "dirty data". Whendata in a chart span across one page, they are also displayed as "dirty data". The dirty data will be refreshed when JReport Enginefinishes the entire processing operation.
performance.rptpoolsize
Each cached report will use some heap memory. If the heap memory is used up, an OutOfMemoryException will be thrown.
To avoid the OutOfMemoryException exception, for JDK 1.1, use the java option −ms and −mx to manually set the heap size (for jdk1.2, users should use −Xms and −Xmx). Flag −ms/−Xms specifies the initial heap size and flag −mx/−Xmx specifies the maximumheap size. For example, −ms10m −mx50m means that the initial heap size is 10M and the maximum heap size is 50M.
You can refer to the documents of the Java Virtual Machine for more information.
Properties in the server.properties File
562
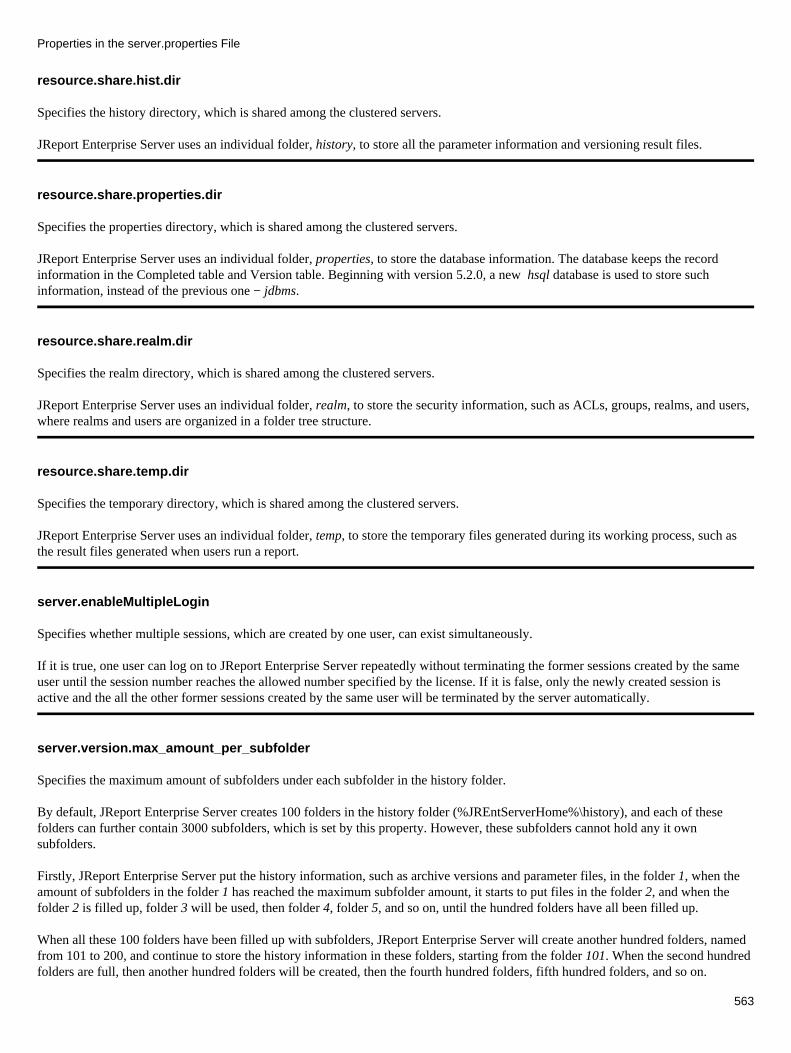
resource.share.hist.dir
Specifies the history directory, which is shared among the clustered servers.
JReport Enterprise Server uses an individual folder, history, to store all the parameter information and versioning result files.
resource.share.properties.dir
Specifies the properties directory, which is shared among the clustered servers.
JReport Enterprise Server uses an individual folder, properties, to store the database information. The database keeps the recordinformation in the Completed table and Version table. Beginning with version 5.2.0, a new hsql database is used to store suchinformation, instead of the previous one − jdbms.
resource.share.realm.dir
Specifies the realm directory, which is shared among the clustered servers.
JReport Enterprise Server uses an individual folder, realm, to store the security information, such as ACLs, groups, realms, and users,where realms and users are organized in a folder tree structure.
resource.share.temp.dir
Specifies the temporary directory, which is shared among the clustered servers.
JReport Enterprise Server uses an individual folder, temp, to store the temporary files generated during its working process, such asthe result files generated when users run a report.
server.enableMultipleLogin
Specifies whether multiple sessions, which are created by one user, can exist simultaneously.
If it is true, one user can log on to JReport Enterprise Server repeatedly without terminating the former sessions created by the sameuser until the session number reaches the allowed number specified by the license. If it is false, only the newly created session isactive and the all the other former sessions created by the same user will be terminated by the server automatically.
server.version.max_amount_per_subfolder
Specifies the maximum amount of subfolders under each subfolder in the history folder.
By default, JReport Enterprise Server creates 100 folders in the history folder (%JREntServerHome%\history), and each of thesefolders can further contain 3000 subfolders, which is set by this property. However, these subfolders cannot hold any it ownsubfolders.
Firstly, JReport Enterprise Server put the history information, such as archive versions and parameter files, in the folder 1, when theamount of subfolders in the folder 1 has reached the maximum subfolder amount, it starts to put files in the folder 2, and when thefolder 2 is filled up, folder 3 will be used, then folder 4, folder 5, and so on, until the hundred folders have all been filled up.
When all these 100 folders have been filled up with subfolders, JReport Enterprise Server will create another hundred folders, namedfrom 101 to 200, and continue to store the history information in these folders, starting from the folder 101. When the second hundredfolders are full, then another hundred folders will be created, then the fourth hundred folders, fifth hundred folders, and so on.
Properties in the server.properties File
563
server.version.from.temp
Specifies whether to enable "Publish to Version System" option when previewing a report result.
The corresponding option to the Enable "Publish to Versioning System" for on−demand view option on the Advanced tab in theConfiguration pages of JReport Enterprise Server.
If it is set to true, a link "Publish to Version System" will be added to the upper−left corner of the report preview page (preview areport result using the Run command). Click the link to publish the result to version, whose format is specified by the Default ViewFormat option on the Customize tab of the Preferences page.
web.newwindow.same_name
Specifies whether to use the same internal name for each pop−up window of DHTML.
You can choose to pop up a new window to view report in DHTML format on JReport Enterprise Server, which can be set on theCustomize tab of the Preferences dialog on JReport Enterprise Server.
If you choose to pop−up a new window, when you choose view a report in DHTML format, JReport Enterprise Server will create anew DHTML window for you to show the report result. However, if this property is set to true, and there is an existing windowshowing DHTML report, when you do this, that existing window will be re−used to show the newly opened DHTML report. Toavoid using the same pop−up window for all DHTML reports, set this property to false.
Using different name for every DHTML window might cause problems in popping up DHTML windows when JReport EnterpriseServer is in an integration environment, such as with Weblogic system. In cases like this, set this property to true.
Properties in the server.properties File
564