Embed Size (px)
Citation preview

Java Web Programming
n + 1, Inc
Feb 2009

Copyright (c) 2008 n+ 1, Inc. Permission is granted to copy, distribute and/ormodify this documentunder the terms of the GNU FreeDocumentation License, Version 1.3 or any later version publishedby the Free Software Foundation; with no Invariant Sections, no Front-Cover Texts, and no Back-Cover Texts. A copy of the license is included in the section entitled ”GNU Free DocumentationLicense”.
Page 2 c©2009 n + 1, Inc All Rights Reserved
Dipee.info

Contents
1 Java Web Programming Introduction 15
1.1 Introduction . . . . . . . . . . . . . . . . . . . . . . . . . . . . . . . . . . . . . . . . . . 16
2 HTML and HTTP Protocol 17
2.1 HTTP Protocol . . . . . . . . . . . . . . . . . . . . . . . . . . . . . . . . . . . . . . . . . 18
2.1.1 URLs . . . . . . . . . . . . . . . . . . . . . . . . . . . . . . . . . . . . . . . . . . 19
2.1.2 HTTP . . . . . . . . . . . . . . . . . . . . . . . . . . . . . . . . . . . . . . . . . . 20
2.2 HTML . . . . . . . . . . . . . . . . . . . . . . . . . . . . . . . . . . . . . . . . . . . . . 25
2.2.1 Structure Tags . . . . . . . . . . . . . . . . . . . . . . . . . . . . . . . . . . . . . 26
2.2.2 Simple HTML Formatting Tags . . . . . . . . . . . . . . . . . . . . . . . . . . . 27
2.2.3 Lists . . . . . . . . . . . . . . . . . . . . . . . . . . . . . . . . . . . . . . . . . . 31
2.2.4 Tables . . . . . . . . . . . . . . . . . . . . . . . . . . . . . . . . . . . . . . . . . 32
2.2.5 Form Tag . . . . . . . . . . . . . . . . . . . . . . . . . . . . . . . . . . . . . . . . 37
2.3 Lab Activity . . . . . . . . . . . . . . . . . . . . . . . . . . . . . . . . . . . . . . . . . . 44
3 Servlets 45
3.1 Servlets . . . . . . . . . . . . . . . . . . . . . . . . . . . . . . . . . . . . . . . . . . . . . 46
3.1.1 How Servlet Container Works . . . . . . . . . . . . . . . . . . . . . . . . . . . 47
3.1.2 Life Cycle of Servlets . . . . . . . . . . . . . . . . . . . . . . . . . . . . . . . . . 48
3.1.3 Complete Servlet Example . . . . . . . . . . . . . . . . . . . . . . . . . . . . . 53
3.2 Deploying Web Applications . . . . . . . . . . . . . . . . . . . . . . . . . . . . . . . . 57
3
Dipee.info

CONTENTS
3.2.1 Structure of WAR file . . . . . . . . . . . . . . . . . . . . . . . . . . . . . . . . . 58
3.2.2 Deployment Descriptor . . . . . . . . . . . . . . . . . . . . . . . . . . . . . . . 59
3.3 Building War File With Ant . . . . . . . . . . . . . . . . . . . . . . . . . . . . . . . . . 65
3.3.1 Ant Configuration File . . . . . . . . . . . . . . . . . . . . . . . . . . . . . . . . 66
3.3.2 Ant Variables . . . . . . . . . . . . . . . . . . . . . . . . . . . . . . . . . . . . . 67
3.3.3 Printing Information To Screen . . . . . . . . . . . . . . . . . . . . . . . . . . . 70
3.3.4 Compiling Java Files . . . . . . . . . . . . . . . . . . . . . . . . . . . . . . . . . 71
3.3.5 Packaging a WAR File . . . . . . . . . . . . . . . . . . . . . . . . . . . . . . . . 72
3.3.6 Deploying a WAR File . . . . . . . . . . . . . . . . . . . . . . . . . . . . . . . . 73
3.3.7 Cleaning Workspace . . . . . . . . . . . . . . . . . . . . . . . . . . . . . . . . . 74
3.3.8 Example build.xml File . . . . . . . . . . . . . . . . . . . . . . . . . . . . . . . 75
3.3.9 Running Ant Build . . . . . . . . . . . . . . . . . . . . . . . . . . . . . . . . . . 77
3.4 Lab Activity . . . . . . . . . . . . . . . . . . . . . . . . . . . . . . . . . . . . . . . . . . 78
4 Servlet Request and Response 79
4.1 Servlet Response . . . . . . . . . . . . . . . . . . . . . . . . . . . . . . . . . . . . . . . 80
4.1.1 Sending Data To The Client . . . . . . . . . . . . . . . . . . . . . . . . . . . . . 81
4.1.2 Error Codes . . . . . . . . . . . . . . . . . . . . . . . . . . . . . . . . . . . . . . 83
4.1.3 Response Header . . . . . . . . . . . . . . . . . . . . . . . . . . . . . . . . . . . 86
4.1.4 Response Forward . . . . . . . . . . . . . . . . . . . . . . . . . . . . . . . . . . 87
4.2 Servlet Request . . . . . . . . . . . . . . . . . . . . . . . . . . . . . . . . . . . . . . . . 88
4.2.1 HTMLWeb Form . . . . . . . . . . . . . . . . . . . . . . . . . . . . . . . . . . . 89
4.2.2 Processing Web Form Data . . . . . . . . . . . . . . . . . . . . . . . . . . . . . 90
4.2.3 Handling GET Data . . . . . . . . . . . . . . . . . . . . . . . . . . . . . . . . . 93
4.2.4 HTTP Header Data . . . . . . . . . . . . . . . . . . . . . . . . . . . . . . . . . . 94
4.2.5 URL Elements . . . . . . . . . . . . . . . . . . . . . . . . . . . . . . . . . . . . . 96
4.2.6 Servlet Context . . . . . . . . . . . . . . . . . . . . . . . . . . . . . . . . . . . . 98
4.2.7 Forwards And Includes . . . . . . . . . . . . . . . . . . . . . . . . . . . . . . . 99
Page 4 c©2009 n + 1, Inc All Rights Reserved
Dipee.info
JAVAWEB PROGRAMMING
4.3 Lab Activity . . . . . . . . . . . . . . . . . . . . . . . . . . . . . . . . . . . . . . . . . . 103
5 Session Management 105
5.1 Session Management . . . . . . . . . . . . . . . . . . . . . . . . . . . . . . . . . . . . . 106
5.1.1 HttpSession Object . . . . . . . . . . . . . . . . . . . . . . . . . . . . . . . . . . 107
5.1.2 HttpSession Methods . . . . . . . . . . . . . . . . . . . . . . . . . . . . . . . . 108
5.1.3 Guessing Game Example . . . . . . . . . . . . . . . . . . . . . . . . . . . . . . 110
5.2 Cookies . . . . . . . . . . . . . . . . . . . . . . . . . . . . . . . . . . . . . . . . . . . . . 117
5.2.1 Creating New Cookie . . . . . . . . . . . . . . . . . . . . . . . . . . . . . . . . 118
5.2.2 Retrieving Cookie Values . . . . . . . . . . . . . . . . . . . . . . . . . . . . . . 119
5.3 Lab Activity . . . . . . . . . . . . . . . . . . . . . . . . . . . . . . . . . . . . . . . . . . 120
6 JavaServer Pages 121
6.1 JavaServer Pages . . . . . . . . . . . . . . . . . . . . . . . . . . . . . . . . . . . . . . . 122
6.1.1 Mechanics of JSP . . . . . . . . . . . . . . . . . . . . . . . . . . . . . . . . . . . 123
6.1.2 JSP Basics . . . . . . . . . . . . . . . . . . . . . . . . . . . . . . . . . . . . . . . 124
6.1.3 Implicit Variables . . . . . . . . . . . . . . . . . . . . . . . . . . . . . . . . . . . 131
6.1.4 Include Directive . . . . . . . . . . . . . . . . . . . . . . . . . . . . . . . . . . . 134
6.1.5 Page Directive . . . . . . . . . . . . . . . . . . . . . . . . . . . . . . . . . . . . . 136
6.1.6 JSP Error Handling . . . . . . . . . . . . . . . . . . . . . . . . . . . . . . . . . . 137
6.1.7 How JSPs Are Converted To Servlets . . . . . . . . . . . . . . . . . . . . . . . . 139
6.2 Expression Language . . . . . . . . . . . . . . . . . . . . . . . . . . . . . . . . . . . . . 141
6.2.1 EL Basics . . . . . . . . . . . . . . . . . . . . . . . . . . . . . . . . . . . . . . . . 142
6.2.2 Accessing Data From Complex Variables . . . . . . . . . . . . . . . . . . . . . 143
6.2.3 Variables as Maps, Lists, and Arrays . . . . . . . . . . . . . . . . . . . . . . . . 147
6.2.4 Implicit Objects . . . . . . . . . . . . . . . . . . . . . . . . . . . . . . . . . . . . 149
6.2.5 EL Operators . . . . . . . . . . . . . . . . . . . . . . . . . . . . . . . . . . . . . 150
6.3 Lab Activity . . . . . . . . . . . . . . . . . . . . . . . . . . . . . . . . . . . . . . . . . . 152
Page 5 c©2009 n + 1, Inc All Rights Reserved
Dipee.info
CONTENTS
7 Tag Libraries 153
7.1 Tag Libraries . . . . . . . . . . . . . . . . . . . . . . . . . . . . . . . . . . . . . . . . . . 154
7.2 JSTL . . . . . . . . . . . . . . . . . . . . . . . . . . . . . . . . . . . . . . . . . . . . . . . 155
7.2.1 Including JSTL Libraries . . . . . . . . . . . . . . . . . . . . . . . . . . . . . . . 156
7.2.2 Core Tags . . . . . . . . . . . . . . . . . . . . . . . . . . . . . . . . . . . . . . . 157
7.2.3 Format Tags . . . . . . . . . . . . . . . . . . . . . . . . . . . . . . . . . . . . . . 170
7.3 Custom Tag Libraries . . . . . . . . . . . . . . . . . . . . . . . . . . . . . . . . . . . . . 177
7.3.1 Simple Tag Files . . . . . . . . . . . . . . . . . . . . . . . . . . . . . . . . . . . . 178
7.3.2 Tag With Body . . . . . . . . . . . . . . . . . . . . . . . . . . . . . . . . . . . . 185
7.4 Lab Activity . . . . . . . . . . . . . . . . . . . . . . . . . . . . . . . . . . . . . . . . . . 190
8 Java Web Programming Best Practices 193
8.1 Best Practices . . . . . . . . . . . . . . . . . . . . . . . . . . . . . . . . . . . . . . . . . 194
8.1.1 Goals For Web Framework . . . . . . . . . . . . . . . . . . . . . . . . . . . . . 195
8.1.2 MVC Pattern . . . . . . . . . . . . . . . . . . . . . . . . . . . . . . . . . . . . . 196
8.2 Front Controller Servlet Pattern . . . . . . . . . . . . . . . . . . . . . . . . . . . . . . . 197
8.2.1 Creating The Front Controller Servlet . . . . . . . . . . . . . . . . . . . . . . . 198
8.2.2 Handling Incoming Requests and Displaying The View . . . . . . . . . . . . . 200
8.3 Application Controller Pattern . . . . . . . . . . . . . . . . . . . . . . . . . . . . . . . 204
8.3.1 Actions . . . . . . . . . . . . . . . . . . . . . . . . . . . . . . . . . . . . . . . . . 205
8.3.2 Action Factory . . . . . . . . . . . . . . . . . . . . . . . . . . . . . . . . . . . . 206
8.3.3 Application Controller Code . . . . . . . . . . . . . . . . . . . . . . . . . . . . 208
8.3.4 Lookup The View . . . . . . . . . . . . . . . . . . . . . . . . . . . . . . . . . . . 209
8.4 Concrete Example Using The Framework . . . . . . . . . . . . . . . . . . . . . . . . . 210
8.4.1 Mapping Todo URL . . . . . . . . . . . . . . . . . . . . . . . . . . . . . . . . . 211
8.4.2 Creating TodoList Action . . . . . . . . . . . . . . . . . . . . . . . . . . . . . . 212
8.4.3 Mapping Todo View . . . . . . . . . . . . . . . . . . . . . . . . . . . . . . . . . 213
8.4.4 Todo View . . . . . . . . . . . . . . . . . . . . . . . . . . . . . . . . . . . . . . . 214
Page 6 c©2009 n + 1, Inc All Rights Reserved

JAVAWEB PROGRAMMING
8.4.5 Adding A Task . . . . . . . . . . . . . . . . . . . . . . . . . . . . . . . . . . . . 215
8.4.6 Creating AddTask . . . . . . . . . . . . . . . . . . . . . . . . . . . . . . . . . . 216
8.4.7 View Lookup . . . . . . . . . . . . . . . . . . . . . . . . . . . . . . . . . . . . . 217
8.4.8 Add Task View . . . . . . . . . . . . . . . . . . . . . . . . . . . . . . . . . . . . 218
8.4.9 Processing New Tasks . . . . . . . . . . . . . . . . . . . . . . . . . . . . . . . . 219
8.4.10 Creating ProcessTask . . . . . . . . . . . . . . . . . . . . . . . . . . . . . . . . . 220
8.4.11 Final Thoughts . . . . . . . . . . . . . . . . . . . . . . . . . . . . . . . . . . . . 221
8.5 Lab Activity . . . . . . . . . . . . . . . . . . . . . . . . . . . . . . . . . . . . . . . . . . 222
9 Best Practices: Intercepting Filters 223
9.1 Intercepting Filters . . . . . . . . . . . . . . . . . . . . . . . . . . . . . . . . . . . . . . 224
9.2 Context Filter . . . . . . . . . . . . . . . . . . . . . . . . . . . . . . . . . . . . . . . . . 225
9.2.1 ContextFilter Class . . . . . . . . . . . . . . . . . . . . . . . . . . . . . . . . . . 226
9.2.2 RequestContext . . . . . . . . . . . . . . . . . . . . . . . . . . . . . . . . . . . . 226
9.2.3 Incoming Filter . . . . . . . . . . . . . . . . . . . . . . . . . . . . . . . . . . . . 229
9.2.4 Outgoing Filter . . . . . . . . . . . . . . . . . . . . . . . . . . . . . . . . . . . . 235
9.2.5 Modifying Framework . . . . . . . . . . . . . . . . . . . . . . . . . . . . . . . . 241
9.3 Security Filtering . . . . . . . . . . . . . . . . . . . . . . . . . . . . . . . . . . . . . . . 242
9.3.1 Authentication Filter . . . . . . . . . . . . . . . . . . . . . . . . . . . . . . . . . 243
9.3.2 Authorization Filter . . . . . . . . . . . . . . . . . . . . . . . . . . . . . . . . . 249
9.4 Lab Activity . . . . . . . . . . . . . . . . . . . . . . . . . . . . . . . . . . . . . . . . . . 261
Appendices 265
A Lab Results . . . . . . . . . . . . . . . . . . . . . . . . . . . . . . . . . . . . . . . . . . . 265
A.1 Lab 2 . . . . . . . . . . . . . . . . . . . . . . . . . . . . . . . . . . . . . . . . . . 265
A.2 Lab 3 . . . . . . . . . . . . . . . . . . . . . . . . . . . . . . . . . . . . . . . . . . 270
A.3 Lab 4 . . . . . . . . . . . . . . . . . . . . . . . . . . . . . . . . . . . . . . . . . . 275
A.4 Lab 5 . . . . . . . . . . . . . . . . . . . . . . . . . . . . . . . . . . . . . . . . . . 284
Page 7 c©2009 n + 1, Inc All Rights Reserved

CONTENTS
A.5 Lab 6 . . . . . . . . . . . . . . . . . . . . . . . . . . . . . . . . . . . . . . . . . . 289
A.6 Lab 7 . . . . . . . . . . . . . . . . . . . . . . . . . . . . . . . . . . . . . . . . . . 296
A.7 Lab 8 . . . . . . . . . . . . . . . . . . . . . . . . . . . . . . . . . . . . . . . . . . 303
A.8 Lab 9 . . . . . . . . . . . . . . . . . . . . . . . . . . . . . . . . . . . . . . . . . . 312
B GNU Free Documentation License . . . . . . . . . . . . . . . . . . . . . . . . . . . . . 321
Page 8 c©2009 n + 1, Inc All Rights Reserved

List of Tables
2.1 HTTP Request Types . . . . . . . . . . . . . . . . . . . . . . . . . . . . . . . . . . . . . 23
2.2 Common Table Attributes . . . . . . . . . . . . . . . . . . . . . . . . . . . . . . . . . . 32
3.1 Eight Protocol Specific Methods . . . . . . . . . . . . . . . . . . . . . . . . . . . . . . . 51
3.2 WAR File Structure . . . . . . . . . . . . . . . . . . . . . . . . . . . . . . . . . . . . . . 58
3.3 Pattern Matches . . . . . . . . . . . . . . . . . . . . . . . . . . . . . . . . . . . . . . . . 69
4.1 Response Content Types . . . . . . . . . . . . . . . . . . . . . . . . . . . . . . . . . . . 81
4.2 Result Codes . . . . . . . . . . . . . . . . . . . . . . . . . . . . . . . . . . . . . . . . . . 83
4.3 Error Code Attributes . . . . . . . . . . . . . . . . . . . . . . . . . . . . . . . . . . . . . 84
5.1 Cookie Methods . . . . . . . . . . . . . . . . . . . . . . . . . . . . . . . . . . . . . . . . 117
6.1 Implicit Variables And Their Corresponding Classes . . . . . . . . . . . . . . . . . . . 131
6.2 Implicit EL Variables . . . . . . . . . . . . . . . . . . . . . . . . . . . . . . . . . . . . . 149
7.1 URIs For JSTL . . . . . . . . . . . . . . . . . . . . . . . . . . . . . . . . . . . . . . . . . 156
7.2 URIs For JSTL . . . . . . . . . . . . . . . . . . . . . . . . . . . . . . . . . . . . . . . . . 159
7.3 Date / Time Types . . . . . . . . . . . . . . . . . . . . . . . . . . . . . . . . . . . . . . . 175
7.4 Date Pattern Symbols . . . . . . . . . . . . . . . . . . . . . . . . . . . . . . . . . . . . . 176
9

LIST OF TABLES
Page 10 c©2009 n + 1, Inc All Rights Reserved

List of Figures
8.1 Basic MVC Framework . . . . . . . . . . . . . . . . . . . . . . . . . . . . . . . . . . . . 197
9.1 Intercepting Filters . . . . . . . . . . . . . . . . . . . . . . . . . . . . . . . . . . . . . . 224
11

LIST OF FIGURES
Page 12 c©2009 n + 1, Inc All Rights Reserved

List of Programs
1 Example Servlet Part 1 . . . . . . . . . . . . . . . . . . . . . . . . . . . . . . . . . . . . 532 Example Servlet Part 2 . . . . . . . . . . . . . . . . . . . . . . . . . . . . . . . . . . . . 543 Example Output Servlet . . . . . . . . . . . . . . . . . . . . . . . . . . . . . . . . . . . 824 Example Output Servlet . . . . . . . . . . . . . . . . . . . . . . . . . . . . . . . . . . . 855 Program To Process A Web Form . . . . . . . . . . . . . . . . . . . . . . . . . . . . . . 906 Display List of Headers . . . . . . . . . . . . . . . . . . . . . . . . . . . . . . . . . . . . 957 Displays Different Segments of URI . . . . . . . . . . . . . . . . . . . . . . . . . . . . . 978 Servlet A . . . . . . . . . . . . . . . . . . . . . . . . . . . . . . . . . . . . . . . . . . . . 1089 Servlet B . . . . . . . . . . . . . . . . . . . . . . . . . . . . . . . . . . . . . . . . . . . . 10810 Guessing Game Part 1 . . . . . . . . . . . . . . . . . . . . . . . . . . . . . . . . . . . . 11511 Guessing Game Part 2 . . . . . . . . . . . . . . . . . . . . . . . . . . . . . . . . . . . . 11612 Front Controller Servlet . . . . . . . . . . . . . . . . . . . . . . . . . . . . . . . . . . . 20213 Action Interface . . . . . . . . . . . . . . . . . . . . . . . . . . . . . . . . . . . . . . . . 20514 Action Factory . . . . . . . . . . . . . . . . . . . . . . . . . . . . . . . . . . . . . . . . . 20615 View Lookup . . . . . . . . . . . . . . . . . . . . . . . . . . . . . . . . . . . . . . . . . 20916 Application Controller . . . . . . . . . . . . . . . . . . . . . . . . . . . . . . . . . . . . 21017 Request Context . . . . . . . . . . . . . . . . . . . . . . . . . . . . . . . . . . . . . . . . 22718 Final Request Context Part 1 . . . . . . . . . . . . . . . . . . . . . . . . . . . . . . . . . 23719 Final Request Context Part 2 . . . . . . . . . . . . . . . . . . . . . . . . . . . . . . . . . 23820 Context Filter Part 1 . . . . . . . . . . . . . . . . . . . . . . . . . . . . . . . . . . . . . . 23921 Context Filter Part 2 . . . . . . . . . . . . . . . . . . . . . . . . . . . . . . . . . . . . . . 24022 Security Filter . . . . . . . . . . . . . . . . . . . . . . . . . . . . . . . . . . . . . . . . . 246
13

LIST OF PROGRAMS
Page 14 c©2009 n + 1, Inc All Rights Reserved

Chapter 1
Java Web Programming Introduction
15

CHAPTER 1. JAVAWEB PROGRAMMING INTRODUCTION
1.1 Introduction
Java Web Programming provides an in depth look at web based development using the Javaprogramming environment. The course is broken into three sections. The first provides a quickoverview of the HTTP protocol and review of basic HTML. The purpose of this section is to providean understanding of the foundational elements of basic HTML development. The goal is not toprovide intimate details of HTML, but to provide a basic background of HTML elements in orderto create simple web pages.
The second part of the course focuses on the building blocks for developing a Javaweb application.The primary concern will be on understanding and using Servlets and Java Server pages to developweb based applications. The class concentrates on the core elements of each technology withoutdelving into every nuance of the interface.
The final section takes the the foundational building blocks and combines them to develop apowerful web framework. One that is both robust and flexible. It provides a tour of the importantweb design patterns and how they are applied to create a workable web framework.
Page 16 c©2009 n + 1, Inc All Rights Reserved

Chapter 2
HTML and HTTP Protocol
Objectives
• Understand the basics of the HTTP protocol
• Learn URL naming conventions
• Learn basics of how a HTTP Server works
• Understand core HTML tags
17

CHAPTER 2. HTML AND HTTP PROTOCOL
2.1 HTTP Protocol
The HTTP protocol provides a mechanism for transmitting MIME encapsulated files from onemachine to another. MIME is an acronym for Multipurpose Internet Mail Extensions. MIMEprovides the format for basic Internet transmission. It doesn’t modify basic ASCII text messages,but it provides a scheme for encoding binary data binary data as ASCII characters to simplifytransmission of data. Since the discussion on HTTP and HTML only uses the ASCII character setsa further exploration of MIME is unwarranted.
Page 18 c©2009 n + 1, Inc All Rights Reserved

JAVAWEB PROGRAMMING
2.1.1 URLs
Uniform Resource Locators, URLs, are used to describe the location of a networked resource. TheURL can be broken into four distinct parts for describing a location. The first part defines theprotocol necessary to access the resource. The second part defines the address of the service onthe network. This information is generally provided as a DNS name but the direct IP addresscan be used. The third section is optional and is used to tell what port or application needs to beaccessed for the resource. Lastly, the URL provides information about retrieving the resource fromthe server’s application.
The last part is known as the uniform resource identifier or URI. Below is an example URL whichincorporates each of these elements.
http://nplus1.net:8080/some/location/myfile.txt
The protocol used to access the resource is the HTTP protocol. The service is located at theDNS name nplus1.net and can be found on port 8080. The resource, myfile.txt, is located at the“/some/location/” path.
It is possible to add parameters to the end of the URL that can be used by the server for processing.Parameters are added to the end of the URL by first appending a “?”. Then the parameters areadded as a series of name value pairs that are separated by the equal sign. Each name pair istokenized by using the & character. The series of parameters are known as the query string. Belowis an example of a URL with a query string.
http://nplus1.net:8080/servlet/myPage.html?name=foo&val=bar
In this case, there are two sets of name value pairs after the “?”. They are “name = foo” and “val =bar”. Most server side programming languages allow the developer to access these variables. Javais no exception. In fact these are integral to web based programming. It is important to note thatthe URI defined above does not include the query string parameters.
Page 19 c©2009 n + 1, Inc All Rights Reserved

CHAPTER 2. HTML AND HTTP PROTOCOL
2.1.2 HTTP
HTTP is the protocol used to transfer resources defined by a URL. While the HTTP protocol is usedto facilitate transmission it does not actually transfer the resource. The actual transfer of the file ishandled by the network protocol such as TCP/IP. HTTP is a protocol that piggy backs on top of thetransfer protocols to send the actual data.
Because it uses other transmission protocols there is no way to maintain state between requests.HTTP is at its most basic a simple request/response protocol between a server and a client. Theserver receives the request and sends a response back to the client.
Page 20 c©2009 n + 1, Inc All Rights Reserved

JAVAWEB PROGRAMMING
How A HTTP Server Works
The basics of handling the HTTP protocol are simple. The first step is for a client application tomake a HTTP request upon the server. The most common form of client application is the webbrowser such as Firefox or Internet Explorer. The client will make a network connection to theHTTP server and sends a HTTP request over the connection.
Inside of the HTTP request there are several pieces of information. The name of the resource beingrequested along with meta data about the request itself. The HTTP server receives the request,locates the resource, and returns it back to the client in a HTTP response. If the resource can’tbe located the server will send back an error message within the HTTP response. Once the clientreceives the response, the connection is closed between the client and server.
The client is then responsible for displaying the resource. In the case of HTML, the browser willrender the page based upon the tags within the HTML document.
Page 21 c©2009 n + 1, Inc All Rights Reserved

CHAPTER 2. HTML AND HTTP PROTOCOL
The HTTP Request
The HTTP request that is sent to the server has three distinct sections. The first is the requestline. It tells the server what type of request is being made, what resource is requested, and whatversion of the protocol is being used. The second part is the header information. This contains metainformation about the request. The final part is the body. It contains any parameters that are beingpassed to the server resource.
The best way to understand the request is to take a look at a simple example. Below is a URL wherea request is made.
http://nplus1.net/foo/myimage.png?name=foo&value=bar
The resulting request would look similar to the following:
Request Line GET /foo/myimage.png HTTP 1.0
Header Connection: Keep-Alive
Referrer: http://nplus1.net/foo.html
User-Agent: Mozilla/4.0
Host: nplus1.net
Content-Type: application/x-www-form-urlencoded
Content-Length: 17
Body name=foo&value=bar
The GET in the request line tells the HTTP server to retrieve the request resource for the client.There are various request types that will be described in detail later. The URI follows the typeand tells the server what and where the resource to retrieve resides. In this instance the resourcemyimage.png is located in the name space /foo/.
In addition to the request line, the request contains header data. Headers provide meta data aboutthe incoming request. Generally, it contains information specific to the request such as length ofmessage and the MIME encoding used. In addition, it contains information about the client suchas browser type and what page linked to it.
The body contains the parameters passed to the resource. These are the name value pairs that showup after the ? in the URL. For a basic web server these values are meaningless. For web servers thatcan provide dynamic content these values can be parsed and used to affect the resulting resourcethat is returned.
Page 22 c©2009 n + 1, Inc All Rights Reserved

JAVAWEB PROGRAMMING
HTTP Request Types
The GETmethod introduced last section is a request for a single resource. It is one of seven differentrequest types that are defined by the HTTP protocol. Table 2.1 provides a brief description of eachtype.
Tool Description
GET Retrieves a single resource
POST Transfers client information to server
PUT Transfers a resource to be stored on the server
DELETE Removes resource from specified URL
HEAD Requests header information only for a resource
OPTIONS Returns a list of the server’s supported HTTP methods
TRACE Returns the entire network route from client to server and back
Table 2.1: HTTP Request Types
Most of the options shown in the table are either not useful or major security holes in the protocol.Two examples of security problems are the PUT and DELETE types. Neither are supported byservers or browsers because they represent a severe break in security. Clients should not be ableto either put files on a web server or delete them. The HEAD, OPTIONS, and TRACE types aresupported by web servers, but are not used by modern web browsers. GET and POST are the onesmost often used.
GET is a simple request of a resource. When a client enters a URL into a browser a GET is madeupon the destination server and the HTML page is returned. If any images are needed to render theHTML page, they are requested using the GET mechanism to complete the assembling of the page.
The POST method is used to submit form data. Whenever a client provides a user with an HTMLform for filling out multiple fields, the data is generally submitted as a POST. The POST adds thedata to the request without adding it as parameters to the URL. The data becomes embedded in thebody of the request instead of in the URL.
Page 23 c©2009 n + 1, Inc All Rights Reserved

CHAPTER 2. HTML AND HTTP PROTOCOL
HTTP Response
The HTTP response, like the request, has the three distinct parts. The first is the status line whichprovides the return code. The code can be used to determine if the call succeeded or failed. Thecode also tells why the request failed. The second part is the header. It contains meta data aboutthe server and the response. The last section is the body of the response. The requested resource isembedded within the body of the returned message.
Below is an example of an HTTP response.
Status Line HTTP/1.0 200 OK
Header Date: Tue 13 Feb 2003 09:18:43 GMT
Server: Apache/1.3.23
Content-Type: text/html
Content-Length: 1256
Last-Modified: Fri, 8 Feb 2003 22:05:49 GMT
Body <html>
<header>
<title>Test Page</title>
</header>
<body>
<h2>Hello World</h2>
This is a simple test page.
</body>
</html>
That status line in the example above has a code of 200. 200 is a successful request. Other commonreturn codes are 404 (page not found) and 500 (server error). The header contains information aboutthe server and the response. In this instance the server is Apache v1.3.23. The context type of thebody is text/html, the length of the message is 1256 bytes and it was send February 8, 2003. Thebody of the message contains the simple HTML page.
Page 24 c©2009 n + 1, Inc All Rights Reserved

JAVAWEB PROGRAMMING
2.2 HTML
XML, the eXtensible Markup Language, is a generic specification for creatingmarkup languages. Itallows developers to define custom tags in order to develop a language for structuring data. HTMLis a subset of XML that was created to define the structure for displaying web content. The browserrenders the page based upon the tags within the HTML page.
The purpose of this section is to briefly discuss the major elements of the HTML specification andexplain how they are renderedwithin a browser. The section does not provide in depth coverage ofthe topic of HTML. It is designed to give the student enough information to be able to create simpleHTML pages for the purpose of learning Java web programming.
Page 25 c©2009 n + 1, Inc All Rights Reserved

CHAPTER 2. HTML AND HTTP PROTOCOL
2.2.1 Structure Tags
A web page must follow the basic structure for a well formed page. The initial tag within a pageis the <html> tag . It is the root tag for all HTML pages. Embedded within the html tag is the<body> tag . The information contained within body is what gets rendered by the client’s browser.The basic layout for the page is shown below.
<html>
<body>
...
</body>
</html>
The first <html> tag is considered the opening tag. According to the XML standard, all open tagsmust have an associated close tag. A “/” is used to define a closing tag. Thus </html> is the closingtag that matches the opening tag. All content must be within the opening and closing tags. Noticethe body tag has its opening and closing tags enclosed within the html tag.
The HTML framework provides a mechanism for defining meta-data about an HTML page. Thatinformation can be placed withing a <head> tag . The head tag goes before the body tag withinthe html tag. Common tags within the head are the <title> and <link> tags. The title tag is usedto define the name of the page. The value placed within the tag will show up in the title bar of thebrowser. The link tag is used for including JavaScript and style sheets.
It is also possible to put comments into a web page. The <!– –> symbols are used to bracketcomments. Anything between the two tags are ignored by client browser. Putting all of theelements together, the code below shows the basic structure of a simple web page.
<html>
<head>
<title>The Page Title</title>
</head>
<body>
<!-- formatting HTML goes here -->
</body>
</html>
The example above demonstrates the basic elements that need to be in place before the formattingelements of HTML can be utilized.
Page 26 c©2009 n + 1, Inc All Rights Reserved

JAVAWEB PROGRAMMING
2.2.2 Simple HTML Formatting Tags
HTMLprovides a collection of tags that can be used to organize, format, and display content withina browser. The simplest tags are stand alone tags that provide simple formatting.
The simplest of these tags are the bold and italic tags. The <b> (bold tag) is used to display thecurrent font using its boldface version. The <i> (italics) tag is used to provide emphasis to thecurrent font. The text in between the open and close tag will be text effected.
At this point it is important to note another XML rule. Tags can be nested inside one another , butthey can not span into each other. Check out the following two examples.
Valid:
This is <b>ok <i>to do</i></b>
Invalid:
This is <b>not <i>ok</b> to do</i>
The first is valid because the italics tag is contained within the bold tag. The second is invalidbecause the italics tag spans across the close of the bold tag.
Page 27 c©2009 n + 1, Inc All Rights Reserved
CHAPTER 2. HTML AND HTTP PROTOCOL
White Space And HTML
HTML iswhite space insensitive. Thatmeans any consecutivewhite space is translated into a singlespace. Consecutive white space is any order space, tab, or carriage return characters.
Below is a passage from Mark Twain’s Tom Sawyer without using any formatting tags.
"Tom, it was middling warm in school, warn’t it?"
"Yes’m."
"Powerful warm, warn’t it?"
"Yes’m."
"Didn’t you want to go in a-swimming, Tom?"
A bit of a scare shot through Tom a touch
of uncomfortable suspicion. He searched
Aunt Polly’s face, but it told
him nothing. So he said:
"No’m well, not very much."
It would appear like this on the web page.
"Tom, it was middling warm in school, warn’t it?" "Yes’m." "Powerful
warm, warn’t it?" "Yes’m." "Didn’t you want to go in a-swimming,
Tom?" A bit of a scare shot through Tom a touch of uncomfortable
suspicion. He searched Aunt Polly’s face, but it told him nothing.
So he said: "No’m well, not very much."
Not exactly the result that one might have expected.
To handle the issue of proper spacing within a page, HTML provides two simple tags that canhelp manipulate the spacing of text. The <p> (paragraph) tag is used to demarcate a paragraph.Everything between the open and close tag are placed into their own text block that is separated bya double spaced line on either side. The <br/> (line break) tag is a standalone tag that inserts a linebreak at the current point in the text. Text after the line break shows up on the following line.
Page 28 c©2009 n + 1, Inc All Rights Reserved

JAVAWEB PROGRAMMING
Below is a passage from Mark Twain’s Tom Sawyer using the tags to properly format the page.
<p>"Tom, it was middling warm in school, warn’t it?"</p>
<p>"Yes’m."</p>
<p>"Powerful warm, warn’t it?"</p>
<p>"Yes’m."</p>
<p>"Didn’t you want to go in a-swimming, Tom?"</p>
<p>
A bit of a scare shot through Tom a touch of<br/>
uncomfortable suspicion. He searched Aunt Polly’s <br/>
face, but it told him nothing. So he said:
</p>
<p>"No’m well, not very much."</p>
The resulting format within the web page is shown below.
"Tom, it was middling warm in school, warn’t it?"
"Yes’m."
"Powerful warm, warn’t it?"
"Yes’m."
"Didn’t you want to go in a-swimming, Tom?"
A bit of a scare shot through Tom a touch of
uncomfortable suspicion. He searched Aunt Polly’s
face, but it told him nothing. So he said:
"No’m well, not very much."
Page 29 c©2009 n + 1, Inc All Rights Reserved

CHAPTER 2. HTML AND HTTP PROTOCOL
Hyper-Links
One of the primary reasons the Internet is useful is the concept of the hyper-link. The hyper-linkallows text within a page to be marked in such a way as to be selectable by the end user. Thetext is linked to another HTML page through the use of URLs. Therefore once the user selectsthe hyper-linked text, the page specified by the URL is queried and the resulting HTML page isdisplayed to the user.
The tag used to hyperlink various URLs is the <a> tag . The href attribute is used to define the URLwith which to link. Any text between the opening and closing <a> tags are selectable by the enduser and will link them to the new page.
Go to <a href="http://cnn.com">CNN</a> to find the latest news.
In this example the word CNN would be underlined and clicking on it would take one to CNN’sweb site.
Page 30 c©2009 n + 1, Inc All Rights Reserved

JAVAWEB PROGRAMMING
2.2.3 Lists
HTML provides a simple mechanism for building a list of objects. First the developer must deter-mine what type of list to use. The unordered list, <ul> tag, creates a bulleted list of elements. Theordered list, <ol> tag, provides a list ordered from numeric 1. After the developer has decidedupon a list a series of list elements <li> tags are used to define each item to be listed. Each <li> tagset would be nested within the outer tag type.
An example of an ordered list is shown below.
<ol>
<li>First Entry</li>
<li>Second Entry</li>
<li>Third Entry</li>
</ol>
In this case the ordered list is selected with three items in the list. Each item (First Entry, SecondEntry, and Third Entry) are encapsulated within separate list entry tags. The example would resultin the following display.
1. First Entry
2. Second Entry
3. Third Entry
Page 31 c©2009 n + 1, Inc All Rights Reserved

CHAPTER 2. HTML AND HTTP PROTOCOL
2.2.4 Tables
Tables are one of the more complicated HTML widget structures available to a developer and arealso the most flexible. A table is composed of three parts. The table definition, rows in the table,and columns within a row.
The table is defined with the <table> tag. It demarcates the start of the table along with providinginformation about the characteristics of the table. Table 2.2. shows the most common attributesthat are associated with the table.
Attribute Description
border Determines the thickness of the table’s border
width Determines width of the table
cellspacing Determines amount of space between cells in the table
cellpadding Determines howmuch space to place between cell wall and cell’scontent
Table 2.2: Common Table Attributes
The border attribute is used to determine the thickness of the table’s border. The default bordervalue for a table is 1. To remove borders from a table set the border’s value to 0.
The width attribute determines the width of the table. The most common form of measurement isin pixels. Any numeric value for the attribute will be assumed as screen pixels. A monitor imageconsists of thousands of little dots which taken together compromise the picture. Each little dot iscalled a pixel. Therefore on a screen where the resolution is set to 800x600 the table width can beset up to a size of 800 to fit on the screen1. Therefore width="700" would instruct the table to bedisplayed within 700 pixels on the screen.
Another option for width is to use a percentage. A percentage value will use that percentage ofthe available screen space for the size of the table. Thus width="80%"would set the table to eightypercent of the available screen size available within the browser.
cellspacing and cellpadding are two more options that are used in helping with managing whitespace within a table. Cellspacing is an attribute that determines the space between cells in a table.Cellpadding is used to determine the space between the edge of the cell and the data within thecell.
1This is not technically true. One must take in the pixels used by the browser’s border into account when determiningmaximum displayable width
Page 32 c©2009 n + 1, Inc All Rights Reserved

JAVAWEB PROGRAMMING
Below is an example of using the table tab to set a table’s attributes.
<table border="0" cellspacing="0" cellpadding="2" width="500">
</table>
When generating the elements that make up a table it is important to understand how tablespopulate themselves. There is no way to explicitly state how to populate a cell within a table.Instead the user must build the table one row at a time. For example if one was creating a tablewith two rows and three columns, the person would have to create the first row and populate thethree columns and then go to the next row and populate those columns. Rows are defined with the<tr> (table row) tag. Columns within a row are defined using the <td> (table data) tag. The rowtags are nested inside the table tag and the data tags are nested inside the row tags.
The best way to understand the table is to look at an example. Take the table shown below.
Name Phone Number
Doe, Jane 555-1233
Smith, Beth 555-1236
The first step is to define the table.
<table border="1" cellspacing="0" cellpadding="2">
</table>
The next step is to define the first row for the table.
<table border="0" cellspacing="0" cellpadding="2">
<tr>
</tr>
</table>
Page 33 c©2009 n + 1, Inc All Rights Reserved

CHAPTER 2. HTML AND HTTP PROTOCOL
Now that the row has been created it is possible to fill out each column in the row with theappropriate data.
<table border="0" cellspacing="0" cellpadding="2">
<tr>
<td>Name</td>
<td>Phone Number</td>
</tr>
</table>
This process will continue until all 3 rows of data within the table are filled.
<table border="0" cellspacing="0" cellpadding="2">
<tr>
<td>Name</td>
<td>Phone Number</td>
</tr>
<tr>
<td>Doe, Jane</td>
<td>555-1233</td>
</tr>
<tr>
<td>Smith, Beth</td>
<td>555-1236</td>
</tr>
</table>
Page 34 c©2009 n + 1, Inc All Rights Reserved

JAVAWEB PROGRAMMING
One final note about tables. The <td> tag has attributes that can be used to adjust the cell’salignment. The align attribute is used to determine justification. The valid values for align are left,right, and center. By default cells are left aligned. The valign attribute is used to determine verticalalignment of a cell. If a cell contains multiple lines of data the vertical property might need to beadjusted. The valign property can be either top, bottom, or center. Center is the default value.Below is an example of using both forms of alignment
<table border="0" cellspacing="0" cellpadding="0">
<tr>
<td align="center">Name</td>
<td align="center">Phone Number</td>
</tr>
<tr>
<td valign="top">Doe, Jane</td>
<td>
555-1233<br/>
555-1234<br/>
555-1235<br/>
</td>
</tr>
<tr>
<td>Smith, Beth</td>
<td>555-1236</td>
</tr>
</table>
Page 35 c©2009 n + 1, Inc All Rights Reserved

CHAPTER 2. HTML AND HTTP PROTOCOL
It would create the following table
Name Phone Number
Doe, Jane 555-1233
555-1234
555-1235
Smith, Beth 555-1236
Page 36 c©2009 n + 1, Inc All Rights Reserved

JAVAWEB PROGRAMMING
2.2.5 Form Tag
In HTML, forms provide developers with the means to interact with the end user. It allows thedeveloper to prompt the end user for information. The base tag for a form is the <form> tag. Itdenotes the beginning of the form along with some basic information about how the form willsubmit data to the server. Specifically it allows the developer to set the type of HTML request usedto submit the form and where the form should be submitted.
The form’s attribute method is used to determine the request type. This can be set to either POSTor GET. Case sensitivity is not important for the method. The action determines the URL where theform data will be sent. The action can be either a fully qualified URL or a relative URL. Their aretwo types of relative URLs. One form is a URL that is relative to the current URL. An example isshown below.
<form method="post" action="proccess.jsp">
</form>
The method is set to post which means it will make an HTTP POST call to the process.jsp URL. Therest of the URL will be determined by the URL that returned the form.
The second type of relative URL is one that begins with a leading “/” character. These are relativeto the root URL of either the web application or the domain name.
Page 37 c©2009 n + 1, Inc All Rights Reserved

CHAPTER 2. HTML AND HTTP PROTOCOL
Input Tag
The <input> tag allows for the creation of data entry widgets within the browser. The purposeof these tags are to collect data from the end user. Input widgets come in six forms, a simple textfield, a password field, a hidden field, a checkbox, a radio button, or a button. The type attributedetermines which type of input widget will be displayed within the browser.
Text Field The text widget field creates a single line field that allows the user to input simple textdata. Setting the value of the input tag to “text” will create the text box. The size and feel of the textfield is controlled by the size and maxlength attributes.
The size attribute determines the initial size of the control. The size value represents the number of“W” characters that will fit within the textbox. The maxlength attribute determines the maximumnumber of characters that can be entered inside the textbox. The box will not allow any additionalcharacters to be typed into it.
The textbox can be pre-populated using the value attribute. By setting the value, the browser willinitialize the textbox widget with the value associated to the value attribute.
The most important attribute is the name field. This attribute associates a name with the widget.The name can be referenced through a dynamic web application to retrieve the data entered by theend user.
Year: <input type="text" size="5" maxlength="4" name="year" value="2008/>
Password Field The password field extends the concept of the text box by providing a specialfunction. Any characters typed into the field will be hidden by “*” characters. It allows end usersto enter sensitive data such as a password without it being displayed on the screen.
Password: <input type="password" size="10" name="passwd"/>
Hidden Field The hidden field is a special field that does not show up to the end user. It allowsthe developer to embed immutable name value pairs into a form. It is generally used to passinformation like an ID field along with form data for processing without displaying it to the enduser. It is generally done to ease server processing of data.
<input type="hidden" name="sku" value="552-234562"/>
Page 38 c©2009 n + 1, Inc All Rights Reserved

JAVAWEB PROGRAMMING
Checkbox The checkbox widget is a simple binary selection box. The item is either selected ornot. The name attribute is the same as other input boxes. It allows a name to be associated with theinput. The value field is different than the textbox. It assigns the value only if the box is selectedby the user. If the box is not selected then no value will be associated with the name. The checkedattribute2 is used to pre-select the checkbox.
Onunique feature of the checkbox is the ability to associate the samenamewithmultiple checkboxes.In that case all of the selectedvalueswill be associatedwith thename. Lookat the following example.
Check Which Pets You Own:<br/>
<input type="checkbox" name="pet" value="cat" checked="true"/> Cat<br/>
<input type="checkbox" name="pet" value="dog"/> Dog<br/>
<input type="checkbox" name="pet" value="goat"/> Goat<br/>
In this case the Cat checkbox is selected while the other two are blank. If the user selects Goat andCat the the value associated with pet will be cat and goat. Being able to work with multiple valueswill be discussed in the form processing parts of the course.
Radio Button The radio button, like the checkbox, is a binary selection widget. Unlike thecheckbox, radio buttons can be grouped into an exclusive OR combination. Therefore only one itemin the group may be selected at any single time. The groupings are based on the name of the inputline. Thus all radio buttons with the same name are grouped into the same radio group and onlyone of them can be selected at a time.
Check Which Pet You Would Own Next:<br/>
<input type="radio" name="pet" value="cat"/> Cat<br/>
<input type="radio" name="pet" value="dog" checked="true"/> Dog<br/>
<input type="radio" name="pet" value="goat"/> Goat<br/>
Submit Button The submit button is used to post the values from the form to the URL specifiedin the action attribute of the form tag. The submit tag creates a button widget on the page. Thetext on the button is supplied by the value attribute. If a name is associated with the tag then thename value pair is submitted with the form. It provides a way to identify between multiple submitbuttons on the form. If no value is associated with the widget the value “Submit” will show up onthe button.
<input type="submit" value="Press To Submit Form"/>
Reset Button The reset button is a special widget that resets all of the forms fields to their originalvalues. The value attribute determines what text shows up on the button.
<input type="reset" value="Reset All Fields"/>
2The checked attribute does not technically have to be set to checked=”true”. The word checked is all that is necessaryinside the tag for the widget to be selected. checked=”true” is used to ensure XML compliance for tag attributes.
Page 39 c©2009 n + 1, Inc All Rights Reserved

CHAPTER 2. HTML AND HTTP PROTOCOL
Here is a complete example of using input tags within a form.
<h2>Update Personal Information</h2>
<form method="post" action="http://nplus1.net/myapp/processForm.html">
<input type="hidden" name="id" value="5415/>
<table border="0" cellspacing="3" cellpadding="0">
<tr>
<td>First Name:</td>
<td><input type="text" name="firstName" value="Beth"/></td>
</tr>
<tr>
<td>Last Name:</td>
<td><input type="text" name="lastName" value="Smith"/></td>
</tr>
<tr>
<td valign="top">Favorite Pet:</td>
<td>
<input type="text" name="pet" value="cat"/> Cat<br/>
<input type="text" name="pet" value="dog"/> Dog<br/>
<input type="text" name="pet" value="goat"
checked="true"/> Goat
</td>
</tr>
<tr>
<td>Over 21?</td>
<td><input type="checkbox" name="over21" value="yes"/></td>
</tr>
<tr>
<td align="right"><input type="reset" value="Reset Form"/></td>
<td><input type="submit" value="Update Data"/></td>
</tr>
</table>
</form>
Page 40 c©2009 n + 1, Inc All Rights Reserved

JAVAWEB PROGRAMMING
Select Tag
The select tag allows developers to use drop down boxes within a web form. The <select> and<option> tags are used in conjunction to create drop down boxes. The select tag determines thename to associate with the drop down. The option tag is used determine both the value to submitwith form along with the value to put in the drop down box. Below is a simple example of a dropdown box.
<select name="pet">
<option value="cat">Cat</option>
<option value="dog">Dog</option>
<option value="goat">Goat</option>
</select>
In this instance the name of the drop down box is pet. There are three options that show up in thedrop down box. They are Cat, Dog, and Goat. The values submitted for those selections are cat,dog, and goat respectively. Thus if the end user selects Goat from the drop down the name valuepair pet=goat will be submitted to the server.
The selected attribute3 can be used to pre-select an option within the select block.
<select name="pet">
<option value="cat">Cat</option>
<option value="dog" selected="true">Dog</option>
<option value="goat">Goat</option>
</select>
The select block can also be adapted to generate a multi-select box. One where the end user canselect multiple entries within the box. The multiple attribute is used to modify the select box intoallowing multiple selections.
<select name="pet" multiple="true">
<option value="bird">Bird</option>
<option value="cat">Cat</option>
<option value="dog" selected="true">Dog</option>
<option value="goat">Goat</option>
</select>
3The selected attribute does not technically have to be set to selected=”true”. The word selected is all that is neededinside the tag for the widget to be pre-selected. The selected=”true” is used to ensure XML compliance for tag attributes.
Page 41 c©2009 n + 1, Inc All Rights Reserved

CHAPTER 2. HTML AND HTTP PROTOCOL
How can one make multiple selections from a simple drop down box? The select box can beexpanded beyond a single line drop down into a multi-line selection box. The number of linesdisplayed by the box is modified using the size attribute. By default the value is set to one. Settingthis value greater than one will create a selection box instead of a drop down.
<select name="pet" size="4" multiple="true">
<option value="bird">Bird</option>
<option value="cat" selected="true">Cat</option>
<option value="dog">Dog</option>
<option value="duck">Duck</option>
<option value="goat" selected="true">Goat</option>
<option value="rabbit">Rabbit</option>
</select>
Page 42 c©2009 n + 1, Inc All Rights Reserved

JAVAWEB PROGRAMMING
Text Areas
All of the widgets up to this point have dealt with collecting short pieces of information from theend user. What happens if a developer wants to collect paragraphs worth of data? What if theywant to be able to collect comments or detailed descriptions from end users? HTML provides a textarea widget for collecting multiple lines of data. The <textarea> tag is used for this purpose.
<textarea></textarea>
The name attribute is used to associate a name with the widget. The other two important attributesare rows and cols. These are used to determine the size of the widget. Rows determine how manyrows will make up the text box while the columns determine how many “W” characters will fit ineach row. Below is an example of text area that uses these attributes.
<textarea name="comments" rows="8" cols="60"></textarea>
The one attribute that textarea does not have is the value attribute. If a developer wants to pre-populate the text field the information must be placed between the open and close textarea tags.
<textarea name="comments" rows="8" cols="60">This is a test</textarea>
The data between the textarea tags is space sensitive. Therefore do not place unnecessary spaces orthey will show up within the text box. The following is a classic example of what not to do.
<textarea name="comments" rows="8" cols="60">
This is a test
</textarea>
In this case the “This is a test” will be placed on the second line of the text box and 4 characters tothe right of the left margin.
Page 43 c©2009 n + 1, Inc All Rights Reserved

CHAPTER 2. HTML AND HTTP PROTOCOL
2.3 Lab Activity
The goal of this lab is to develop anHTML form that allows a user to input data into a web browser.
Part 1.
Develop a form that asks the user to provide the following inputs:
Label Field Notes
First Name Text box
Last Name Text box
City Text box
State Drop down box Use 4 states
Sex Use radio buttons
Pets Use check boxes Create 4 options
Comments Text area 50 columns wide and 6 rows tall
Submit Button button Button text should read “Save”
Part 2.
Place the form inside of a table that is 2 columns by 9 rows. The input labels should be in the firstcolumn and right aligned. The second column should contain the various input fields and be leftaligned. The labels should be aligned to the top of each table row. The submit button should go inthe second column of the ninth row.
Part 3.
Preset the value of the city with your current city. Pre-select one of the pets to be checked. Inaddition make one of the states be selected for the user. Preset the comments field to read ”EnterComments Here”.
Page 44 c©2009 n + 1, Inc All Rights Reserved

Chapter 3
Servlets
Objectives
• Understand how servlets work
• Understand the life cycle of servlets
• Learn how to code a servlet
• Understand the format of a WAR deployment file
• Learn how to create a WAR file for deployment
45

CHAPTER 3. SERVLETS
3.1 Servlets
The HTTP protocol is a protocol that is used to transfer resources based upon a simple request andresponse procedure. The client requests a resource from the server and the server responds withthe requested resource. The process is known as aptly as the request/response model. The JavaServlet technology is an implementation of this model.
The Servlet technology is bundled within the J2EE environment. All J2EE servers provide a servletcontainer to handle Servlet services. It is provided as a JAR file by the server. The implementationAPI for the servlets can be found within the javax.servlet package. The central class within thepackage is the Servlet interface. It provides a set of methods for processing the request/responsemodel. The javax.servlet.http package provides a concrete implementation of the Servlet interface.The implementation is one specific to the HTTP protocol.
It is important to note that the javax.servlet and javax.servlet.http packages are not part of the coreJ2SE. In order to use classes during development, the classes that form the core of the servlettechnology must be added to the CLASSPATH.
They are generally supplied as a JAR file by the J2EE container utilized. In the case of JBoss the jarfile is servlet-api.jar and can be found in the client directory of the distribution.
Page 46 c©2009 n + 1, Inc All Rights Reserved

JAVAWEB PROGRAMMING
3.1.1 How Servlet Container Works
While servlets are used to handle incoming requests, they must be deployed within a servletcontainer. The servlet container provides the infrastructure necessary for handling the HTTPprotocol. Extending upon the concept of Java’s platform independence, servlets can be deployedto any of the available servlet containers1.
The process is simple. A developer deploys an implementation of the servlet interface to the server.As part of the deployment, the developer maps a URL to the servlet. When a HTTP request comesinto the container, the container finds the appropriate servlet based upon the requested URL. Theincoming request is converted into a ServletRequest object. In addition a ServletResponse objectwhich represents the response is created and together the ServletRequest and ServletResponse arepassed to the servlet for processing.
The servlet is responsible for handling the incoming request and fill out out the response object tobe returned to the client. Once the servlet is done processing, the container takes the informationfrom the ServletResponse and uses it to generate a HTTP response. Which in turn is delivered backto the client application by the container.
1Servlet containers include JBoss, IBM’s Websphere, BEA’s Web Logic
Page 47 c©2009 n + 1, Inc All Rights Reserved
CHAPTER 3. SERVLETS
3.1.2 Life Cycle of Servlets
The Servlet interface defines all of the methods necessary to handle the entire life cycle for a servletwithin a container. The life cycle for the servlet can be broken into three phases: the start of theservlet’s life, the handling of HTTP requests, and the end of the servlet’s life. The upcoming sectionsdescribe each of the cycles in greater detail.
Page 48 c©2009 n + 1, Inc All Rights Reserved

JAVAWEB PROGRAMMING
Start Of Servlet Life
The Servlet interface defines an init() method that initiates the start of a servlet’s life cycle. Whenan incoming HTTP request for the URL mapped to the servlet comes into the web container, itinstantiates an instance of the servlet and calls the init() method. The init() method is where thedeveloper can add any initialization code for the servlet. Since the it is only called once at creation, itis a perfect candidate for code to initialize variables, connections to a database, or open file streams.Another common activity is to retrieve parameters from various configuration files such as theweb.xml2 file.
Below is an example of using the init()method to read application properties into a servlet.
private Properties props;
public void init() {
try {
FileInputStream fis = new FileInputStream("/tmp/myapp.prop");
props = new Properties();
props.load(fis);
fis.close();
}
catch (IOException e) {
// log error
}
}
2The web.xml file will be described in greater detail later in the module.
Page 49 c©2009 n + 1, Inc All Rights Reserved

CHAPTER 3. SERVLETS
Handling Servlet Requests
The primary function of a servlet is to be able to handle a HTTP request. The container takesthe incoming HTTP request and creates a ServletRequest object that contains header and bodyinformation from the request. The servlet container also creates a ServletResponse object that hasattributes and methods for creating a response that can be returned by the container. The requestand response objects are passed to the servlet’s service()method for processing.
void service(ServletRequest request, ServletResponse response)
The servletAPIprovides aHTTPspecific implementationof the servlet interface. It ismade to specif-ically handle the HTTP protocol. TheHttpServlet class provides this functionality. In addition, theServletRequest and ServletResponse interfaces are implemented by the HttpServletRequest andHttpServletResponse classes respectively.
To be able to handle the HTTP protocol, the servlet API provides a HTTP specific implementationof the servlet interfaces. Therefore the Servlet interface is implemented by the HttpServlet class andthe ServletResponse and ServletRequest interfaces are implemented by the HttpServletRequest andHttpServletResponse classes.
Page 50 c©2009 n + 1, Inc All Rights Reserved

JAVAWEB PROGRAMMING
HttpServlet Methods
The HttpServlet class provides an implementation of the Servlet’s service() method. It dividesincoming calls into separatemethod calls based upon the type of the request made upon the server.The HttpServlet class has eight methods for each type of HTTP request. They are shown in table3.1.
Eight HTTP Methods
public void doGet(HttpServletRequest req, HttpServletResponse resp)
public void doPost(HttpServletRequest req, HttpServletResponse resp)
public void doPut(HttpServletRequest req, HttpServletResponse resp)
public void doDelete(HttpServletRequest req, HttpServletResponse resp)
public void doOptions(HttpServletRequest req, HttpServletResponse resp)
public void doPut(HttpServletRequest req, HttpServletResponse resp)
public void doTrace(HttpServletRequest req, HttpServletResponse resp)
public void doHead(HttpServletRequest req, HttpServletResponse resp)
Table 3.1: Eight Protocol Specific Methods
Each of these eight methods can throw either a ServletException or an IOException. The imple-mentations provided by the HttpServlet servlet for each of these methods do nothing.
Developers are expected to extend the HttpServlet class and then override the methods they wishto implement. An example of overriding methods to handle GET and POST methods are shownbelow.
public class MyServlet extends HttpServlet {
public void doGet(HttpServletRequest req, HttpServletResponse resp)
throws ServletException, IOException {
\\ implementation to handle HTTP GET request goes here
}
public void doPost(HttpServletRequest req, HttpServletResponse resp)
throws ServletException, IOException {
\\ implementation to handle HTTP POST request goes here
}
}
Page 51 c©2009 n + 1, Inc All Rights Reserved
CHAPTER 3. SERVLETS
End of Servlet Life
When it is time for the servlet engine to shut down, it attempts to unload servlets that have beeninstantiated. Part of the process is the call the servlet’s destroy()method.
The user implements the destroy() method to close any resources that were opened in the init()method. Once the destroy()method has been called, the servlet is no longer accessible to the outsideworld and is marked for garbage collection.
Page 52 c©2009 n + 1, Inc All Rights Reserved
JAVAWEB PROGRAMMING
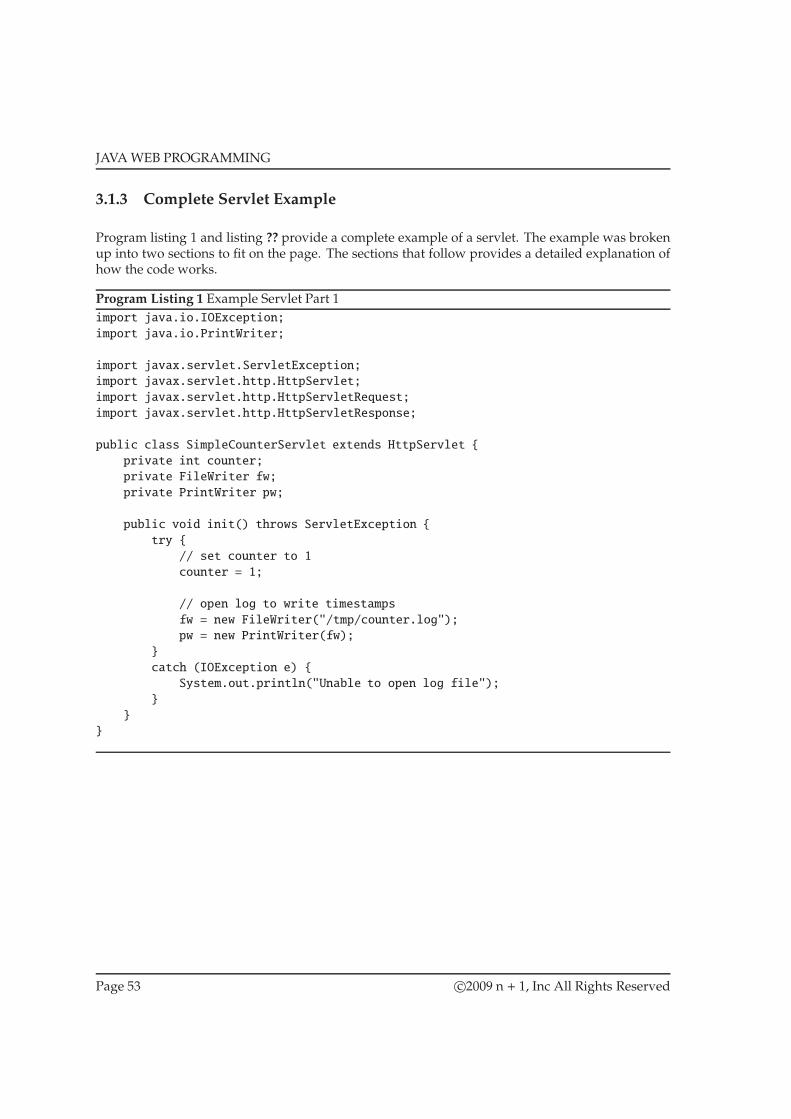
3.1.3 Complete Servlet Example
Program listing 1 and listing ?? provide a complete example of a servlet. The example was brokenup into two sections to fit on the page. The sections that follow provides a detailed explanation ofhow the code works.
Program Listing 1 Example Servlet Part 1
import java.io.IOException;
import java.io.PrintWriter;
import javax.servlet.ServletException;
import javax.servlet.http.HttpServlet;
import javax.servlet.http.HttpServletRequest;
import javax.servlet.http.HttpServletResponse;
public class SimpleCounterServlet extends HttpServlet {
private int counter;
private FileWriter fw;
private PrintWriter pw;
public void init() throws ServletException {
try {
// set counter to 1
counter = 1;
// open log to write timestamps
fw = new FileWriter("/tmp/counter.log");
pw = new PrintWriter(fw);
}
catch (IOException e) {
System.out.println("Unable to open log file");
}
}
}
Page 53 c©2009 n + 1, Inc All Rights Reserved

CHAPTER 3. SERVLETS
Program Listing 2 Example Servlet Part 2
public void doGet(HttpServlet request, HttpServletResponse response)
throws ServletException, IOException {
// log entry
Date now = new Date();
this.pw.println("Hit " + counter + " occurred at " + now);
// send back the number of hits for servlet
response.setContentType("text/html");
PrintWriter out = response.getWriter();
out.println("<html><body>");
out.println(counter + " hits");
out.println("</body></html>");
// increment counter
counter++;
}
public void destroy() {
// close down log file
try {
if ( pw != null ) {
pw.close();
}
if ( fw != null ) {
fw.close();
}
}
catch (IOException e) {
System.out.println("Could not close log file");
}
}
}
Page 54 c©2009 n + 1, Inc All Rights Reserved

JAVAWEB PROGRAMMING
Program 1 and 2 provide an implementation of a simple counter servlet that employs all threephases of the servlet’s life cycle. The SimpleCounterServlet is created by extending the HttpServletclass and overriding three methods to provide the servlet’s functionality.
The first method is the init()method. It initializes the counter to 1 and opens a file to write loggingmessages. The FileWriter opens the file /tmp/counter.log for writing. The PrintWriter wraps theFileWriter to provide a high level writer making it easier to write String data to the log file.
The doGet() method provides the business logic of the servlet. The initial thing it does is write outto the log file the hit count and what time it occurred. The rest of the method is used to create aHTML to display the web page and increment the counter. The HttpServletResponse object is usedto provide a response to the client.
The PrintWriter is a high level writer that is used to return data to the client. In this instance thePrintWriter is used to return the HTML response to the client.
The destroy() method is the final method. Since the method is called at the end of the servlet’s lifecycle it is used to close the PrintWriter and FileWriter.
Page 55 c©2009 n + 1, Inc All Rights Reserved

CHAPTER 3. SERVLETS
Threading And Servlets
Servlet containers are multi-threaded application servers that can handle multiple request at thesame time. Servlets on the other hand are only created one time by the servlet engine. Thus theservlet is shared between the various running threads of the servlet container.
Special care must be given to make sure that a developers servlet is thread safe. The previousexample shown is not thread safe because nothing guarantees that the counter is only accessed andmodified by one servlet request at a time. In theory two requests could return the same result if thethreads switch contexts before the counter could be incremented.
The best way to avoid threading issues is to avoid the use of private member variables within aservlet or if they are necessary to make them read only. If the servlet doesn’t have an internalstate then it is most likely to be thread safe. Future sections will discuss better methods for storingapplication state.
Page 56 c©2009 n + 1, Inc All Rights Reserved

JAVAWEB PROGRAMMING
3.2 Deploying Web Applications
Web applications are the amalgamation of servlets, Java server pages, tag libraries, third partylibraries, static content, and images. Java introduced the WAR file as a means of simplify theprocess of organizing all of the elements and deploying them as web applications.
AWAR file is a standard Java JAR file with a .war extension. The war file is used to group all of thevaried elements of the web application into a single distributable unit. What uniquely identifiesa WAR file from a normal JAR file is its adherence to a predefined structure. In addition, a WARfile will contain deployment descriptors that are used to initialize the application within the servletcontainer.
Page 57 c©2009 n + 1, Inc All Rights Reserved

CHAPTER 3. SERVLETS
3.2.1 Structure of WAR file
WAR files adhere to a very specific structure. They all must contain a /WEB-INF directory whichhouses the executable classes and any configuration files. The main configuration file, web.xml,goes directly in the WEB-INF directory. It provides the configuration for the web application andall servlets. The web.xml file will be described in greater detail later.
Under the WEB-INF directory are the class and lib sub-directories. The classes directory is whereany server side classes are archived. The lib directory is used to store any third party libraries.
All static content and JSP pages can be placed anywhere off the root directory with the exception ofthe WEB-INF directory. Table 3.2 provides an outline of the WAR structure
Tool Description
/ Root directory which contains JSPs, images, and other static re-sources
/WEB-INF Contains executable classes and configuration files
/WEB-INF/web.xml Deployment configuration file
/WEB-INF/classes Server side executable classes are stored in this directory
/WEB-INF/lib Third party JAR file libraries are stored in this directory
Table 3.2: WAR File Structure
Page 58 c©2009 n + 1, Inc All Rights Reserved

JAVAWEB PROGRAMMING
3.2.2 Deployment Descriptor
The web.xml file is the deployment descriptor for Java web applications. It is an XML documentthat contains information about the web applications configuration and set up information for eachservlet.
Below is a an example of a typical web.xml file.
<web-app>
<servlet>
<servlet-name>Dummy</servlet-name>
<servlet-class>net.nplus1.acme.DummyServlet</servlet-class>
<init-param>
<param-name>filePath</param-name>
<param-values>/tmp/myFile.txt</param-values>
</init-param>
</servlet>
<servlet>
<servlet-name>TestServlet</servlet-name>
<servlet-class>net.nplus1.acme.TestServlet</servlet-class>
</servlet>
<servlet-mapping>
<servlet-name>Dummy</servlet-name>
<url-pattern>/test/dummy.html</url-pattern>
</servlet-mapping>
<servlet-mapping>
<servlet-name>TestServlet</servlet-name>
<url-pattern>/testing/*</url-pattern>
</servlet-mapping>
<session-config>
<session-timeout>3600</session-timeout>
</session-config>
<welcome-file-list>
<welcome-file>index.html</welcome-file>
<welcome-file>index.jsp</welcome-file>
</welcome-file-list>
</web-app>
The configuration file in this instance is broken up into 4 distinct sections. The servlet sectiondefines the class path of each servlet along with any initialization information for the servlet. Theservlet mapping section maps servlets to a specific URL. The session config is used to define thesession time out value which will be described in greater detail later. Lastly, the welcome file listtells the servlet container what file to use when a user requests a directory as a URL.
Page 59 c©2009 n + 1, Inc All Rights Reserved

CHAPTER 3. SERVLETS
Servlet Tags
The<servlet> tag alerts the servlet container to the availability of a servlet class. Inside the<servlet>tag is the <servlet-name> and <servlet-class> tags. The servlet name is used to provide a uniqueidentifier for the servlet class that is identified. The name is later referenced in the servlet mappingtag set to map the servlet class to a particular URL. The servlet class must provide the full packagename for the servlet. The identified class must be found within the WEB-INF/classses directory orwithin a JAR file in the WEB-INF/libs directory. If it is not found then the deployment will fail.Every servlet must have its own set of <servlet> tags.
<servlet>
<servlet-name>TestServlet</servlet-name>
<servlet-class>net.nplus1.acme.TestServlet</servlet-class>
</servlet>
In addition the <servlet> tag supports the passing of initial parameter data to the servlet. Thesevalues are made available at run time.
<servlet>
<servlet-name>Dummy</servlet-name>
<servlet-class>net.nplus1.acme.DummyServlet</servlet-class>
<init-param>
<param-name>filePath</param-name>
<param-values>/tmp/myFile.txt</param-values>
</init-param>
</servlet>
The <init-param> tag shown above allows the developer to pass parameters to the servlet at runtime. The parameters are grouped into name / value pairs that can be accessed by the servletthrough the ServletConfig object. The ServletConfig object is created and maintained by the baseimplementation of HttpServlet. Therefore a local servlet call to getServletConfig() allows access tothe object. Below is an example of retrieving initial parameters from within a servlet.
public class MyServlet extends HttpServlet {
public void init() throws ServletException {
ServletConfig config = this.getServletConfig();
String filePath = config.getInitParameter("filePath");
...
}
...
}
The initial parameter value is retrieved using the getInitParameter(String name) method from theServletConfig. In the case of the deployment descriptor shown above “filePath” will return thevalue of “/tmp/myFile.txt”.
Page 60 c©2009 n + 1, Inc All Rights Reserved
JAVAWEB PROGRAMMING
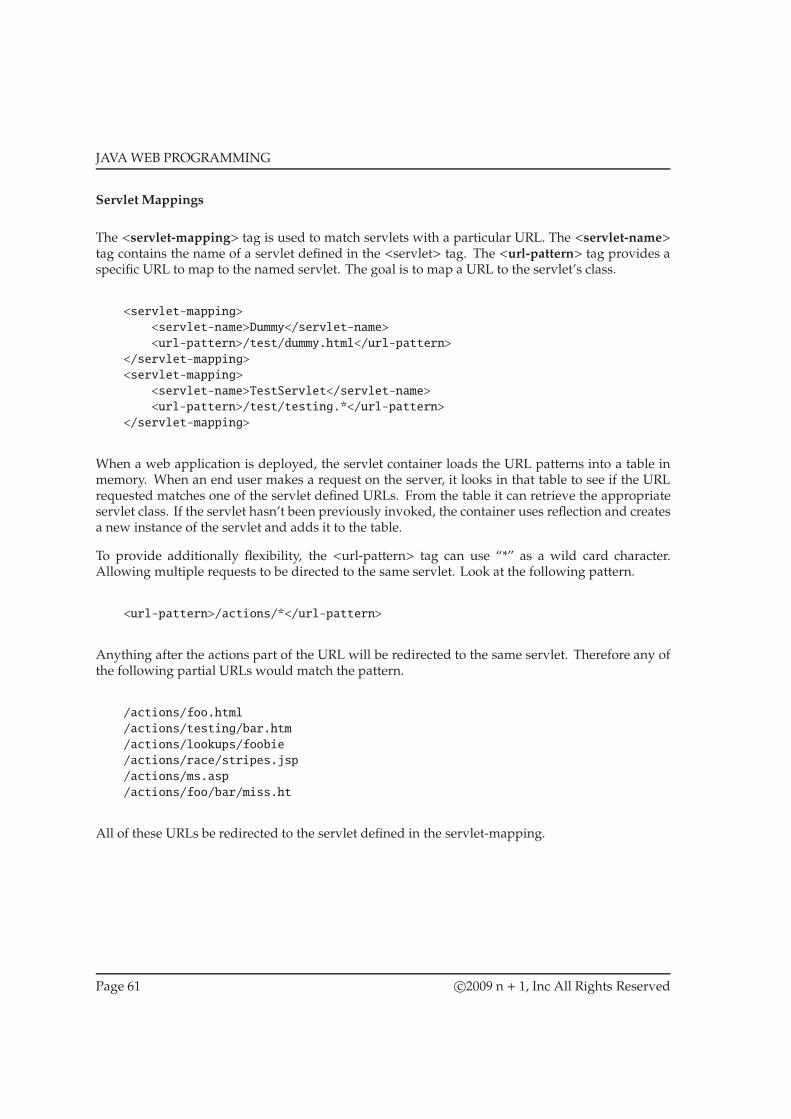
Servlet Mappings
The <servlet-mapping> tag is used to match servlets with a particular URL. The <servlet-name>tag contains the name of a servlet defined in the <servlet> tag. The <url-pattern> tag provides aspecific URL to map to the named servlet. The goal is to map a URL to the servlet’s class.
<servlet-mapping>
<servlet-name>Dummy</servlet-name>
<url-pattern>/test/dummy.html</url-pattern>
</servlet-mapping>
<servlet-mapping>
<servlet-name>TestServlet</servlet-name>
<url-pattern>/test/testing.*</url-pattern>
</servlet-mapping>
When a web application is deployed, the servlet container loads the URL patterns into a table inmemory. When an end user makes a request on the server, it looks in that table to see if the URLrequested matches one of the servlet defined URLs. From the table it can retrieve the appropriateservlet class. If the servlet hasn’t been previously invoked, the container uses reflection and createsa new instance of the servlet and adds it to the table.
To provide additionally flexibility, the <url-pattern> tag can use “*” as a wild card character.Allowing multiple requests to be directed to the same servlet. Look at the following pattern.
<url-pattern>/actions/*</url-pattern>
Anything after the actions part of the URL will be redirected to the same servlet. Therefore any ofthe following partial URLs would match the pattern.
/actions/foo.html
/actions/testing/bar.htm
/actions/lookups/foobie
/actions/race/stripes.jsp
/actions/ms.asp
/actions/foo/bar/miss.ht
All of these URLs be redirected to the servlet defined in the servlet-mapping.
Page 61 c©2009 n + 1, Inc All Rights Reserved
CHAPTER 3. SERVLETS
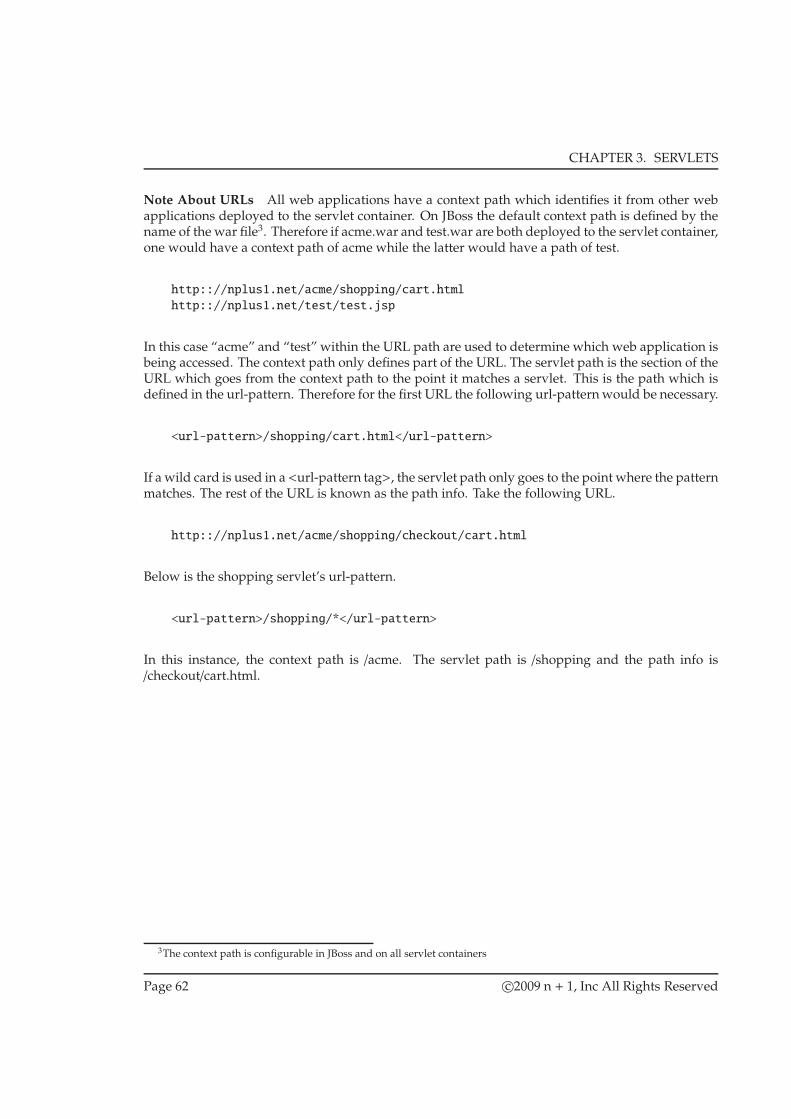
Note About URLs All web applications have a context path which identifies it from other webapplications deployed to the servlet container. On JBoss the default context path is defined by thename of the war file3. Therefore if acme.war and test.war are both deployed to the servlet container,one would have a context path of acme while the latter would have a path of test.
http:://nplus1.net/acme/shopping/cart.html
http:://nplus1.net/test/test.jsp
In this case “acme” and “test” within the URL path are used to determine which web application isbeing accessed. The context path only defines part of the URL. The servlet path is the section of theURL which goes from the context path to the point it matches a servlet. This is the path which isdefined in the url-pattern. Therefore for the first URL the following url-patternwould be necessary.
<url-pattern>/shopping/cart.html</url-pattern>
If a wild card is used in a<url-pattern tag>, the servlet path only goes to the point where the patternmatches. The rest of the URL is known as the path info. Take the following URL.
http:://nplus1.net/acme/shopping/checkout/cart.html
Below is the shopping servlet’s url-pattern.
<url-pattern>/shopping/*</url-pattern>
In this instance, the context path is /acme. The servlet path is /shopping and the path info is/checkout/cart.html.
3The context path is configurable in JBoss and on all servlet containers
Page 62 c©2009 n + 1, Inc All Rights Reserved

JAVAWEB PROGRAMMING
Session Config
As noted before, the HTTP protocol is a stateless protocol. There is noway to tell if any two requestsare coming from the same user. To be able to maintain state between multiple client requests, Javacontainers provides a session object. The session object is mapped to a cookie stored on the client’sbrowser. The concept of sessions will be studied later.
The web.xml deployment descriptor provides a section, <session-config>, for configuring thebehavior of the session object. It allows a <session-timeout> value to be configured.
<session-config>
<session-timeout>3600</session-timeout>
</session-config>
The session timeout is used to determine how long the cookie on the browser side is valid. Thetimer starts at the time the last request wasmade on the server. When a user makes a future request,the container checks to see if the user has exceeded the allotted time. If so the session is invalidatedand resource are released back to the system.
The timeout of a session is experienced by people who use on-line banking solutions. If one doesn’tcontinue using the service frequently, the service logs the user out of the system. In this case thesession has expired and the user must log in again to create a new session.
The <session-timeout> in the configuration file is marked in seconds. Therefore a session timeoutof 3600 is the equivalent to 1 hour.
Page 63 c©2009 n + 1, Inc All Rights Reserved

CHAPTER 3. SERVLETS
Welcome File List
Not all URL requestsmade by the end user point to an exact resource. Sometimes theURLwill pointto a directory structure. Since a directory is not a resource which can be returned, the container willsearch for a default file within the directory.
The file the container searches for is defined in the deployment descriptor within the <welcome-file-list> tag.
<welcome-file-list>
<welcome-file>index.html</welcome-file>
<welcome-file>index.jsp</welcome-file>
</welcome-file-list>
Each file is separated by a welcome-file tag. The servlet container will search for each file in theorder inwhich they appearwithin the file list. In the example above the servlet container will searchfor the index.html file first. If it doesn’t find the file, it searches for the index.jsp file. If neither file isfound then the system will return the contents of the directory or an error page depending on theconfiguration of the servlet container.
Page 64 c©2009 n + 1, Inc All Rights Reserved

JAVAWEB PROGRAMMING
3.3 Building War File With Ant
The generation of the WAR file can be automated with a build utility called Ant. Ant will compilethe Java classes and package all of the components into a working WAR file.
Traditional build tools like make and nmake are shell based tools that are dependent upon theplatform for which they are written. Ant is different from those tools in that it was written usingJava. That makes it a platform independent tool for building applications. It goes beyond a simplebuild tool by allowing developers to package applications, deploy applications, create javadoc, andeven run unit tests.
The Ant build process is driven by a XML build file named build.xml.
Page 65 c©2009 n + 1, Inc All Rights Reserved

CHAPTER 3. SERVLETS
3.3.1 Ant Configuration File
The Ant configuration file is an XML file that uses a series of tags to create a build plan. The defaultname for an Ant build file is build.xml, but ant can be configured to use other build files. Inside thebuild.xml a project is defined as the root element. Inside the project a series of targets are created.Each target represents a set of tasks to complete a step in the build process.
Below is an example outline of a build.xml file.
<project name="My Project" default="deploy" basedir=".">
<!-- setup stuff goes first -->
<target name="build">
...
</target>
<target name="package" depends="build">
...
</target>
<target name="deploy" depends="package">
...
</target>
<target name="clean">
...
</target>
</project>
The <project> tag is the root tag and it represents the project being build. It has three attributesassociated with it. The name attribute is a marker that serves little purpose for the build, but is aplace holder used by IDE’s such as eclipse that encorporate Ant into its build environment. Thebasedir attribute tells Ant what directory to run the build. In this case the current directory is usedfor building. The default attribute tells which target to run if none are specifiedwhenAnt is invoked.
Each <target> contains a series of tasks to perform. The target has a couple of attributes. The nameattribute is used to uniquely identify the target. The depends attribute is an optional attribute thatinforms Ant of a precondition before running the target.
In the example above, the depends attribute for the “deploy” target is “package”. This means thatthe package target must be executed before deploy can be run. Since the package target dependson the build target, build would have to be run first, package second, and finally the deploy target.
A note about comments. Since the Ant configuration file is XML it uses XML style comments asshown in the example above.
Page 66 c©2009 n + 1, Inc All Rights Reserved

JAVAWEB PROGRAMMING
3.3.2 Ant Variables
Ant uses variable to be able to either retrieve values from an external source or to create customvariable for local use. The most common way to create and manage variables is through an Antproperty file.
Page 67 c©2009 n + 1, Inc All Rights Reserved

CHAPTER 3. SERVLETS
Ant Property File
The Ant property file is used to store platform or deployment specific information about the build.Most of the time it is used to define path information about the layout of the project source files.Property files follow the Java Properties file standard. They are a text file with multiple name/valuepairs that exist one per line.
jboss.home=/opt/jboss
jboss.server.lib=/opt/jboss/server/default/lib
jboss.deploy=/opt/jboss/server/default/deploy
web.dist=./dist
web.src=./src
web.build=./build
web.conf=./conf/web
web.jsp=./web/jsp
web.static=./web/static
third.party.utils=./third-party/nplus1-utils/lib
The standard method for defining property names is to separate words or concepts with periodsin a name. The above example uses a number of variables to represent directories within the filesystem and the project. In this case both absolute and relative paths are defined. Relative paths arebased upon the project root directory. The property file can be loaded using the <property> tag.
<property file="./conf/build.properties"/>
Ant variables are referenced using special ${} identifiers. To reference the variable jboss.server.libwithin an Ant configuration file, the following would be used.
${jboss.server.lib}
In this case the variable would be replaced by the value “/opt/jboss/server/default/lib” within theproperty file.
Page 68 c©2009 n + 1, Inc All Rights Reserved

JAVAWEB PROGRAMMING
Ant Path Variables
Another use for ant variables is to pre-define a set of “paths” that can be used by the compiler torepresent the classpath. Below is an example of defining a path element.
<path id="jboss.classpath">
<fileset dir="${jboss.server.lib}">
<include name="**/*.jar"/>
</fileset>
</path>
The <path> tag has an id attribute that represents the name of the path variable being created. Thenext step is to add all of the path elements to the path. This is done by adding one or more file sets.Each file set is represented by the <fileset> tag. The dir attribute tells us which directory to includein the fileset.
The selection of files within the directory can be determined using <include> or <exclude> tags.The <include> tag is an inclusive set while the <exclude> tag determines what is excluded fromthe set. The name attribute associated with the <include> tag determines what file to include in thefileset.
Wild card character “*” can be used to select multiple files to include or exclude from the set. The* matches any set of characters in the pattern. Table 3.3 provides example of how to use the * wildcard character to create patterns.
Pattern Matches
* matches all files within a directory
*.jar matches all files within directory that have .jar extension
jboss* matches all files in directory that start with jboss
*jboss* matches all files in directory that have jboss as part of the name
jboss*.jar matches all files in directory that start with jboss and have a .jarextension
Table 3.3: Pattern Matches
The special “**” wild card includes the current directory along with any sub-directories whensearching for file matches. Therefore “**/*.jar” shown in the example above would mean all jar filesin the ${jboss.sever.lib} directory and any sub directories.
Page 69 c©2009 n + 1, Inc All Rights Reserved

CHAPTER 3. SERVLETS
3.3.3 Printing Information To Screen
It is important for the build process to be able to provide feedback to the individual in charge of aproject’s compilation process. The <echo> tag is used to print information to the screen.
One use of the <echo> tag is to create a target that contains a list of the other actionable build targetsto run. Below is an example of such a target.
<target name="build-targets">
<echo>My Build System Targets</echo>
<echo>build - builds servlets and custom classes</echo>
<echo>package - package web app into war file</echo>
<echo>deploy - copy war file to deploy directory</echo>
<echo>clean - cleans build and dist directories</echo>
</target>
The project’s default target can be changed to “build-targets” and when the Ant is invoked withouta build target the list of possible build targets will be displayed to the end user.
Page 70 c©2009 n + 1, Inc All Rights Reserved

JAVAWEB PROGRAMMING
3.3.4 Compiling Java Files
One of the core responsibilities of Ant is to compilation of Java source code. The <javac> tag isused to compile source code into byte code. Below is an example of compiling source code.
<target name="build">
<mkdir dir="${web.build}"/>
<javac srcdir="${web.src}" destdir="${web.build}">
<classpath>
<path refid="jboss.classpath"/>
</classpath>
</javac>
</target>
An important part of the build process is the ability to separate .java files from .class files. Runningjavac from the command line by default will create .class file in the same directory as the .javafile. The problem with this is it becomes tricky trying to separate them apart when building anapplication. The application only needs the .class files. Therefore it is nice to separate them intodifferent directories. A standard that is commonly used is to put the java files in a src directory andthe class files in a build directory.
When building an application, the build directory might not exist. Therefore the first step is tomake sure the directory exists and if it doesn’t create it. The <mkdir> tag does just this. The dirattribute is used to tell Ant which directory to create.
The next step is the actual compilation of the source code into byte code. Here is where the <javac>tag is used. To help in the separation of source and compiled code, the <javac> tag providesan attribute to define where the source code resides, srcdir. It also provides a place to put thebytecode, destdir. The <javac> command will compile all .java files in the source directory and allsub-directories.
What happens if the compilation process needs external jar files not included in the core language?When working with web applications, servlets are not part of the core application. The compilerneeds access to the HttpServlet and other classes that are part of web development. These need tobe added to the compiler’s classpath at build time.
The <classpath> tag is used to create the necessary classpath. In the <classpath> tag the developermust define a <path> tag. This can be done as shown when creating variables or the developer canaccess a previously defined path element. In the example above the refid attribute is used to recalla previously set path variable.
Page 71 c©2009 n + 1, Inc All Rights Reserved

CHAPTER 3. SERVLETS
3.3.5 Packaging a WAR File
Once all of the source code is compiled, it needs to be gathered into a distributable WAR file. Antprovides a<war> tag for creating theweb application’sWARfile. The<war> tag has two attributes.The destfile attribute defines the name of the WAR file and where to create it. The most commondestination for WAR files is into a distribution directory named dist. The <mkdir> tag can be usedto make sure the destination exists before placing the file there. Below is an example of a target thatcreates a WAR file.
<target name="package-web" depends="build-web">
<mkdir dir="${web.dist}"/>
<war destfile="${web.dist}/myapp.war"
webxml="${web.conf}/web.xml">
<classes dir="${web.build}"/>
<lib dir="${third.party.utils}"/>
<webinf dir="${web.conf}">
<exclude name="web.xml"/>
</webinf>
<zipfileset dir="${web.static}"/>
<zipfileset dir="${web.jsp}" prefix="dynamic"/>
</war>
</target>
The second attribute of the <war> tag is webxml. It tells the task where the web.xml deploymentdescriptor resides. Ant takes the web.xml file and puts it into the WEB-INF directory of the WARfile.
Four nested tags are available for the <war> tag. The first is the <classes> tag. The dir attribute tellswhere to find Java class files to put into the WEB-INF/classes directory of the war file. It will takethe directory specified and any sub-directories and place them into the WEB-INF/classes directoryof the WAR file. Multiple <classes> tags can be used for multiple class file locations. The <lib> tagworks in similar fashion to the <classes> tag. Instead of putting class files into a web application itis used to add JAR files to the application. It takes all of the files within the directory specified bythe dir attribute and places them into the WEB-INF/lib directory of the WAR file.
Both of these tags work like the <filest> tag and can have <include> and <exclude> tags associatedwith them.
The <webinf> tag is used to add additional files to the WEB-INF directory inside the war file.Again it takes all of the files from the specified directory and puts them into theWEB-INF directory.In the example above the <exclude> tag is used to keep from the web.xml from being added sinceit is already being placed there by the war tag’s webxml attribute.
The last tag is the <zipfileset> tag. It is used to put a set of files into the root directory of the WARfile. The prefix attribute creates a directory within the root of the war file. It then puts the files fromthe dir directory within that sub-directory. In the example above the files in the web.static directorywill be placed in the root of the WAR file while the contents of the web.jsp directory will be placedin the /dynamic directory of the WAR file.
Page 72 c©2009 n + 1, Inc All Rights Reserved

JAVAWEB PROGRAMMING
3.3.6 Deploying a WAR File
Depending on the application server, it could provide amechanism for deploying aweb applicationto the server. JBoss is a J2EE server where it is possible to have Ant deploy the application. JBossuses a deploy directory for deployment. Any newWARfile placed into this directorywill be loadedby the server.
<target name="deploy" depends="package-web">
<copy file="${dist}/myapp.war" todir="${jboss.server.deploy}"/>
</target>
An Ant deployment can be accomplished with the <copy> tag. It will copy a file to a specifieddirectory. The file attribute determines what file to copy while the todir attribute tells where to copythe file.
Page 73 c©2009 n + 1, Inc All Rights Reserved

CHAPTER 3. SERVLETS
3.3.7 Cleaning Workspace
The <javac> tag will check to see if a .java file needs to be compiled before going through thecompilation process. It checks to determine if the .java file is newer than the already existing .classfile. If so then it compiles the file. The <war> tag behaves in the same way. If nothing has changedsince the last war file nothing will be created.
To avoid relying on thismechanism, it is useful to clean the development environment so everythingcan be rebuilt. The easiest way to do this is to delete the build directory that contain the .class filesand .war files. Since the build file has isolated the build and deployment directories it is a simpletask to delete these files. Below is an example target to perform this task.
<target name="clean">
<delete dir="${base.build}"/>
<delete dir="${base.dist}"/>
</target>
The <delete> tag is used to delete a directory. The dir attribute tells Ant which directory to delete.Obviously, all the sub-directories will be deleted along with the primary directory.
Page 74 c©2009 n + 1, Inc All Rights Reserved

JAVAWEB PROGRAMMING
3.3.8 Example build.xml File
<project name="My Project" default="build-targets" basedir=".">
<property file="./conf/build.properties"/>
<path id="jboss.classpath">
<fileset dir="${jboss.server.lib}">
<include name="**/*.jar"/>
</fileset>
</path>
<target name="build-targets">
<echo>My Build System Targets</echo>
<echo>build - builds servlets and custom classes</echo>
<echo>package - package web app into war file</echo>
<echo>deploy - copy war file to deploy directory</echo>
<echo>clean - cleans build and dist directories</echo>
</target>
<target name="build">
<mkdir dir="${web.build}"/>
<javac srcdir="${web.src}" destdir="${web.build}">
<classpath>
<path refid="jboss.classpath"/>
</classpath>
</javac>
</target>
Page 75 c©2009 n + 1, Inc All Rights Reserved
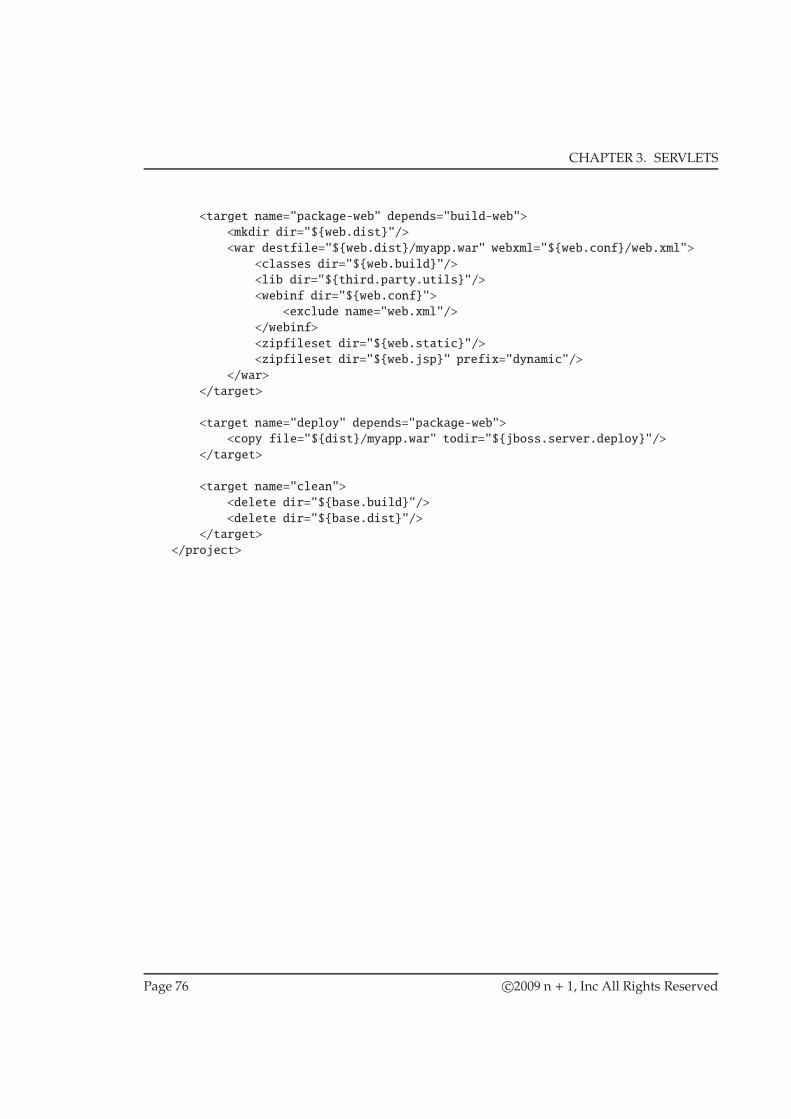
CHAPTER 3. SERVLETS
<target name="package-web" depends="build-web">
<mkdir dir="${web.dist}"/>
<war destfile="${web.dist}/myapp.war" webxml="${web.conf}/web.xml">
<classes dir="${web.build}"/>
<lib dir="${third.party.utils}"/>
<webinf dir="${web.conf}">
<exclude name="web.xml"/>
</webinf>
<zipfileset dir="${web.static}"/>
<zipfileset dir="${web.jsp}" prefix="dynamic"/>
</war>
</target>
<target name="deploy" depends="package-web">
<copy file="${dist}/myapp.war" todir="${jboss.server.deploy}"/>
</target>
<target name="clean">
<delete dir="${base.build}"/>
<delete dir="${base.dist}"/>
</target>
</project>
Page 76 c©2009 n + 1, Inc All Rights Reserved
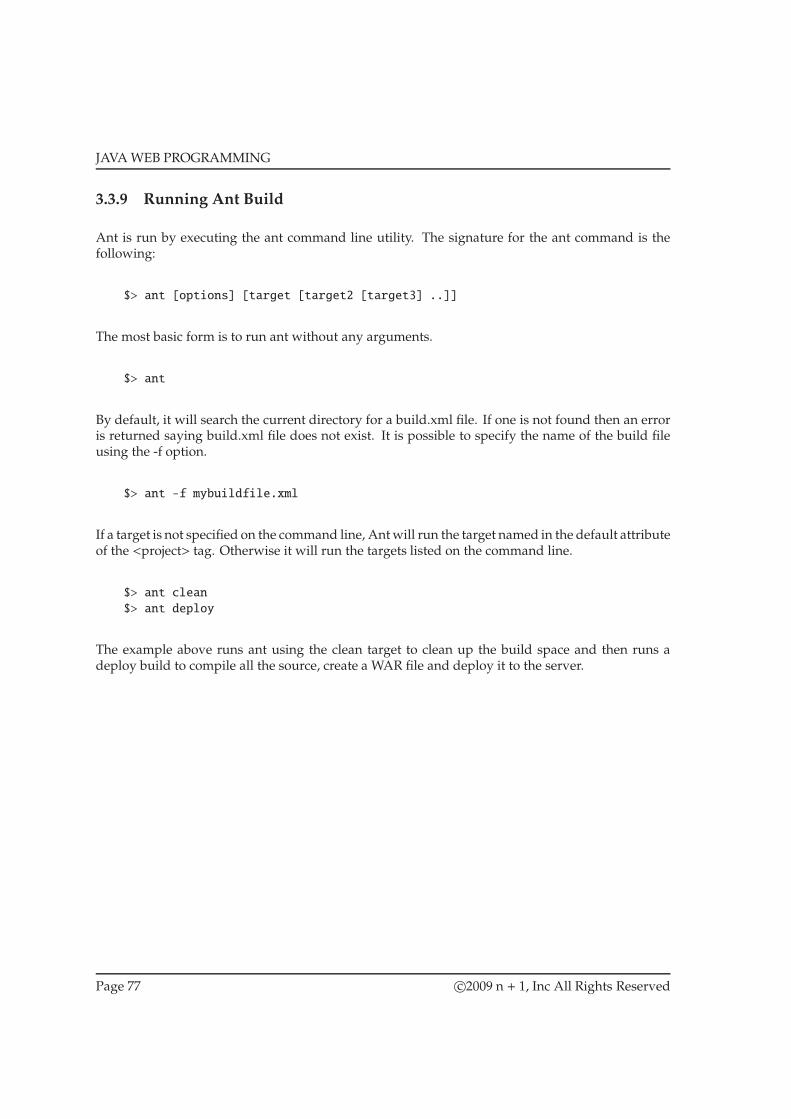
JAVAWEB PROGRAMMING
3.3.9 Running Ant Build
Ant is run by executing the ant command line utility. The signature for the ant command is thefollowing:
$> ant [options] [target [target2 [target3] ..]]
The most basic form is to run ant without any arguments.
$> ant
By default, it will search the current directory for a build.xml file. If one is not found then an erroris returned saying build.xml file does not exist. It is possible to specify the name of the build fileusing the -f option.
$> ant -f mybuildfile.xml
If a target is not specified on the command line, Antwill run the target named in the default attributeof the <project> tag. Otherwise it will run the targets listed on the command line.
$> ant clean
$> ant deploy
The example above runs ant using the clean target to clean up the build space and then runs adeploy build to compile all the source, create a WAR file and deploy it to the server.
Page 77 c©2009 n + 1, Inc All Rights Reserved

CHAPTER 3. SERVLETS
3.4 Lab Activity
Part 1.
Create a simple servlet that will countdown from 10 to 1. The page should have a heading whichreads countdown and display the numbers 10 to 1 on the web page. Each number should be on itsown line. Use a for loop to create the numbers.
Part 2.
Create an ant file that will build servlets and place them into a WAR file for deployment. Have theant file build a WAR file with the servlet from Part 1. Deploy the resulting WAR file to the J2EEcontainer.
Part 3.
Modify the servlet in Part 2 to only display odd numbers in the count down.
Part 4. (Optional)
Create a new servlet that displays a form within a table that queries the user for their first name,last name, and phone number.
Page 78 c©2009 n + 1, Inc All Rights Reserved

Chapter 4
Servlet Request and Response
Objectives
• Understanding the Response Object
• Knowing how to use response error codes
• Learn about response header data
• Learn how to process web form data
• Understand how to get request header data
• Understand the elements of a URL
• Learn about the ServletContext
• Understand how to use forwards and includes
79

CHAPTER 4. SERVLET REQUEST AND RESPONSE
4.1 Servlet Response
Before it is possible to dealwith incoming user requests, it is important to understand how responsesare handled within servlets. When working with the response it is important to remember that theservlet container handles the actual communication between the servlet and the browser. Incomingrequests are converted into concrete implementations of the ServletRequest interface and outgoingresponses are created from a ServletResponse instance.
The servlet container is responsible for converting the incoming HTTP message into a request ob-ject that implements the ServletRequest interface. It will generate a HttpServletRequest object.The servlet container creates the HTTP response by taking information provided to the concreteimplementation of the ServletResponse. In this case, the concrete implementation is theHttpServle-tResponse object.
The goal of this section is to better understand the HttpServletResponse object. the response objectenjoys multiple roles. It determines the type of content that is to be transferred both character andbinary data. In addition, it can set error codes to return to the client or provide custom headermeta-information about the response. The response can also redirect the client to a new URL. Italso has a role in the distribution and use of cookies. 1.
1Cookies will be discussed in the session management module.
Page 80 c©2009 n + 1, Inc All Rights Reserved

JAVAWEB PROGRAMMING
4.1.1 Sending Data To The Client
When creating a response for the client, two things must happen for a successful response. The firststep is to set the content type of the data being returned. The task can be accomplished by callingthe response object’s setContentType(String type)method.
response.setContentType("text/html");
The type value represents the type of data which is being returned. Table 4.1 shows a few commontypes.
Common Content Types Description
text/html HTML content
text/xml XML content
image/png PNG image
application/pdf PDF document
Table 4.1: Response Content Types
The second step is to fill the responsewith the content to return to the browser. There are two outputmechanisms for sending data. One is a writer and the other is an output stream. The writer, beingcharacter based, is used to pass text data such as HTML to the client. The output stream is used forbinary data such as images or PDF files. Only one or the other can be used for output. Using bothwill result in an exception. any data passed to one of these output sourceswill be placed in the bodyof the outgoing HTTP response. The methods for retrieving the two sources are getOutputStream()and getWriter(). The signatures are shown below.
OutputStream getOutputStream()
PrintWriter getWriter()
It is worth repeating that the OutputStream is useful for sending binary data while the PrintWriteris generally used to send string based text such as HTML.
Page 81 c©2009 n + 1, Inc All Rights Reserved

CHAPTER 4. SERVLET REQUEST AND RESPONSE
Using Response To Send HTML
What steps would be necessary to send the following HTML back to the requesting client?
<html>
<body>
<h2>Test Output</h2>
<p>
Something would go here
</p>
</body>
</html>
The first step would be to set the content type. Since the data is HTML, the value should be set to“text/html”. The next step would be to get an output source and pass data to it. The PrintWriteris the best choice because the data being sent is character based. The HTML shown above can bepassed to the writer which in turn gets translated into the body of the HTTP response.
Program Listing 3 Example Output Servlet
public class MyServlet extends HttpServlet {
public void doGet(HttpServletRequest request,
HttpServletResponse response)
throws ServletException, IOException {
response.setContentType("text/html");
PrintWriter out = response.getWriter();
out.println("<html>");
out.println(" <body>");
out.println(" <h3>Test Output</h3>");
out.println(" <p>;");
out.println(" Something would go here");
out.println(" </p>;");
out.println(" </body>;");
out.println("</html>");
}
}
Program 3 creates a class that extends the HttpServlet class. It overrides the doGet(...) method tosend backHTML to the client. The content type is set to “text/html” for the HTML data. The HTMLdata is passed to the PrintWriter which the container uses to complete the HTTP response.
Page 82 c©2009 n + 1, Inc All Rights Reserved

JAVAWEB PROGRAMMING
4.1.2 Error Codes
The HTTP protocol includes a mechanism for returning the status for each server response. HTTPprovides a numeric code known as result codes that represents the type of response that is returnedto the client. The best known is 404 page not found. But not all of the codes mean an error occurred.A 200means that the request was able to successfully return the requested resource. Table 4.2 showsthe most common result codes2.
Common Result Codes Description
200 Successful response
320 Content has been cached on the client
404 Page not found on the server
500 Server error. Request could not be processed
Table 4.2: Result Codes
2Full list of result codes can be found in the HTTP RFC http://www.w3.org/Protocols/rfc2616/rfc2616-sec10.html#sec10
Page 83 c©2009 n + 1, Inc All Rights Reserved

CHAPTER 4. SERVLET REQUEST AND RESPONSE
Handling Error Codes
When an error code is either invoked by a servlet or by the server, the servlet engine uses a defaulterror page to return to the user. The page is very generic and not very descriptive of the error.Since a web site designer doesn’t necessarily want an ugly generic error page, it is possible toreplace the default page with a custom page. The custom pagemust be definedwithin the web.xmlconfiguration file. It is used to map the error code with an appropriate HTML/JSP page.
<error-page>
<error-code>404</error-code>
<location>/page_not_found.html</location>
</error-page>
In the example above, an error page is defined for a 404 error code. The path of the location isdetermined from the root of the web application. If a 404 error occurs trying to reach a resource,the page defined within the web.xml will be returned and not the default 404 error page.
A 404 is an error normally generated by the servlet container. It is possible for servlets to generatetheir own error codes. The sendError(...) methods are used to invoke run time HTTP errors.
void sendError(int errorCode)
void sendError(int errorCode, String message)
All of the various HTTP error codes have been defined within the servlet API. The HttpServletRe-sponse object has static attributes for each of these error codes. Table 4.3 shows the attributes for a404 and 500 server error.
Error Code Attributes Description
404 HttpServletResponse.SC NOT FOUND
500 HttpServletResponse.SC INTERNAL SERVER ERROR
Table 4.3: Error Code Attributes
Invoking the sendError(...) method will set the error code for the response. In addition it will causethe servlet container to stop processing the current servlet. It will ignore any data that has beenadded to the HttpServletResponse object. Only the error page is returned to the end user.
Page 84 c©2009 n + 1, Inc All Rights Reserved
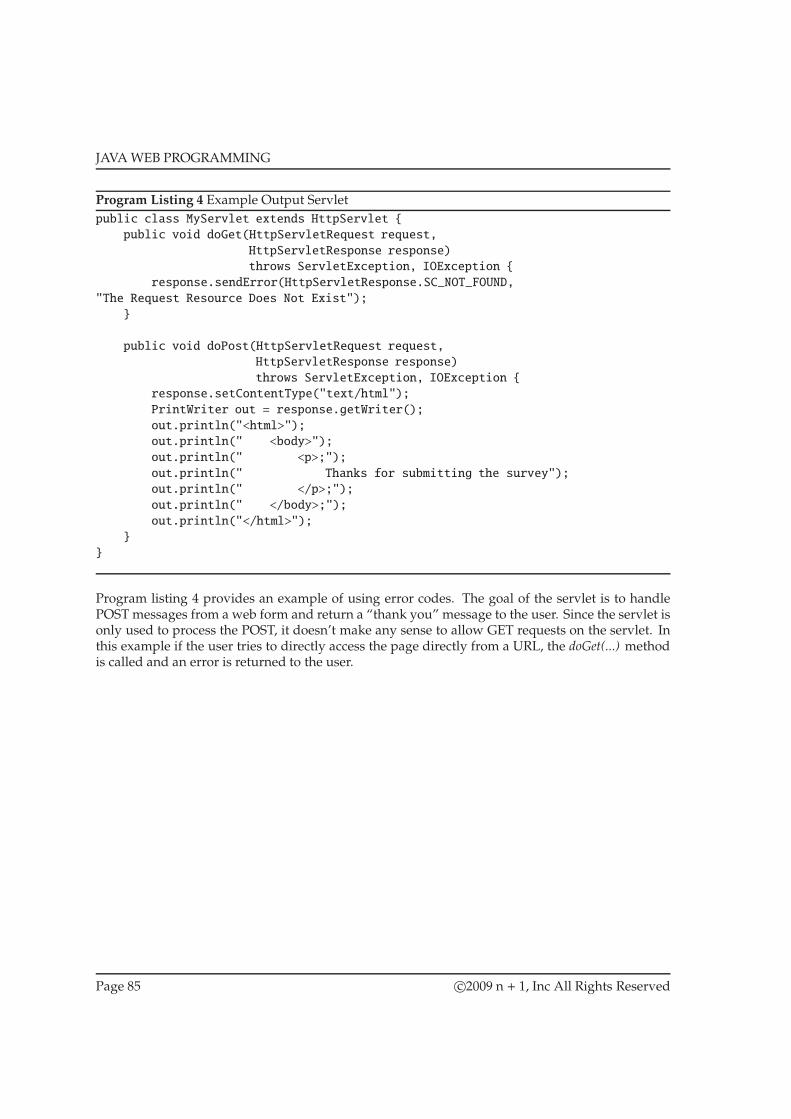
JAVAWEB PROGRAMMING
Program Listing 4 Example Output Servlet
public class MyServlet extends HttpServlet {
public void doGet(HttpServletRequest request,
HttpServletResponse response)
throws ServletException, IOException {
response.sendError(HttpServletResponse.SC_NOT_FOUND,
"The Request Resource Does Not Exist");
}
public void doPost(HttpServletRequest request,
HttpServletResponse response)
throws ServletException, IOException {
response.setContentType("text/html");
PrintWriter out = response.getWriter();
out.println("<html>");
out.println(" <body>");
out.println(" <p>;");
out.println(" Thanks for submitting the survey");
out.println(" </p>;");
out.println(" </body>;");
out.println("</html>");
}
}
Program listing 4 provides an example of using error codes. The goal of the servlet is to handlePOST messages from a web form and return a “thank you” message to the user. Since the servlet isonly used to process the POST, it doesn’t make any sense to allow GET requests on the servlet. Inthis example if the user tries to directly access the page directly from a URL, the doGet(...) methodis called and an error is returned to the user.
Page 85 c©2009 n + 1, Inc All Rights Reserved

CHAPTER 4. SERVLET REQUEST AND RESPONSE
4.1.3 Response Header
The HTTP response packet has a header section3 to send meta data back to the client browser. Metadata can include items such as time stamps, server information, and message size. There are fourmethods for adding and setting header information.
void addHeader(String name, String value)
void setHeader(String name, String value)
void addDateHeader(String name, long time)
void setDateHeader(String name, long time)
The addHeader(...) and setHeader(...) methods are used for setting non date/time based headerinformation. The name parameter is used to determine which header is being set and the valueparameter specifies the string to associate with the header.
What is the difference between add and set methods? The set method will perform one of twoactions. If a header is being initially set then it will associate the value with the header. If the headervalue had already been defined then it will overwrite the previous value with the new value. Addis different in how it treats values that are already set. Instead of overriding the value, it adds asecond value associated with the header. It can be used to attach multiple values to a header.
The addDateHeader(...) and setDateHeader(...) methods are used to set a date/time value for thespecified header. The name parameter specifies which header to set. The time parameter is usedto specify the time in seconds from epoch time. This value can be retrieved from any java.util.Dateobject by calling its getTime()method.
Below is an example of using these methods
response.setHeader("Refresh", "30");
response.setDateHeader("Last-Modified", lastDate.getTime());
The first line sets the header “Refresh” to the value of 30. This tells the browser to refresh the pageafter 30 seconds. Every 30 seconds it will request a new version of the current page. The secondline sets the “Last-Modified” header to the time stored in the lastDate variable. “Last-Modified”tells the browser the last time the requested resource was modified on the server.
3To learn of the different header values read the HTTP RFC2616 Section 14. It can be found at the following URLhttp://www.w3.org/Protocols/rfc2616/rfc2616-sec14.html
Page 86 c©2009 n + 1, Inc All Rights Reserved

JAVAWEB PROGRAMMING
4.1.4 Response Forward
One thing a response can do is to tell the receiving browser to request another URL. When thisoccurs the browser will fetch the resource at the newURL and use it as a replacement for the originalrequested resource. It serves the function of redirecting the browser to a new URL.
response.sendRedirect("http://nplus1.net/foobie.html");
This is useful in development when a programmer needs to process POSTed data from a web formbut doesn’t want the processing page to show any results. Take a simple task list manager webapplication as an example. The page addNewTask.html displays a form that the user can fill out toadd a new task. The web form’s action POSTs the user input to the page processNewTask.html. Theprocess new task page could add the new task and display all of the tasks, but their is already alistTasks.html page which displays all of the tasks. Instead of duplicating the logic, the process newtask can add the task to the list and then redirect the client to the list tasks page for displaying thecontents of the list including the newly added task.
Page 87 c©2009 n + 1, Inc All Rights Reserved

CHAPTER 4. SERVLET REQUEST AND RESPONSE
4.2 Servlet Request
With a basic understanding of the servlet response, it is time to turn attention to the handlingof incoming request. As noted previously, the incoming HTTP request is encapsulated by theHttpServletRequest object which implements the ServletRequest interface. The request can be usedby the developer for any of the following tasks 4.
• Retrieve parameter data from URL or Web Forms
• Retrieve HTTP header information
• Get URL path elements
• Provide medium for communicating between servlets
• Retrieve cookie information
• Retrieve session object
The most common use of the request object is to collect data from a GET or POST request. The nextsection looks at handling POST data from web forms.
4Cookies and Sessions are covered in detail in the Session module
Page 88 c©2009 n + 1, Inc All Rights Reserved

JAVAWEB PROGRAMMING
4.2.1 HTML Web Form
HTMLprovides a set of graphical widgets that can be used to gather information from the end user.These widgets are cobbled together to create web forms that can be filled out by the end user andsubmitted to the server. Below is a simple example of such a web form.
<html>
<body>
<h2>Enter Your Pet Information</h2>
<form method="post" action="myservlet.html">
<input type="text" name="petName"/><p/>
<input type="radio" name="petType" value="cat"/> Cat<br/>
<input type="radio" name="petType" value="dog"/> Dog<br/>
<input type="radio" name="petType" value="goat"/> Goat<br/>
<input type="submit" value="Submit Data"/>
</form>
</body>
</html>
In this example, the web form is going to POST the data to the myservlet.html URL. The form itselfincludes three widgets. One is a pet name text box. Another is the radio button which is used toselect the type of pet. The final widget is the submit button for the form. The pet’s name typedinto the text box is associated with the name petName. The pet type selected by the radio buttons isassociated with the variable petType. When the user submits the form, the data supplied is put intoname value pairs based upon widget name and values selected. These name/value pairs are passedto the server for processing.
Since the form is a POST the name value pairs will be placed in the body of the HTTP packet.
Page 89 c©2009 n + 1, Inc All Rights Reserved

CHAPTER 4. SERVLET REQUEST AND RESPONSE
4.2.2 Processing Web Form Data
The HttpServletRequest object provides multiple methods for retrieving parameter data from asubmitted form. The most commonly uses method is the getParameter(...) method.
String getParameter(String name)
The getParamter method retrieves the value entered by the client. The value retrieved is basedupon the widget’s name. Once the values from the form are retrieved the data can be consumed bythe developer. Program 5 is an example of processing the web form from the previous section andcreating a dynamic HTML response.
Program Listing 5 Program To Process A Web Form
public class MyServlet extends HttpServlet {
public void doPost(HttpServletRequest request, HttpServletResponse response)
throws ServletException, IOException {
// retrieve the name value pairs from request object
String name = request.getParameter("petName");
String type = request.getParameter("petType");
// create an HTML response
response.setContentType("text/html");
PrintWriter out = response.getWriter();
out.println("<html><body>");
out.println("<h3>Pet Stuff</h3>");
out.println("<p>;");
out.println(name + " is a pretty name for a " + type");
out.println("</p>;");
out.println("</body>;</html>");
}
In this example the pet name and pet type are retrieved from the text widget and radio widgetrespectively. Notice that the value passed into the getParameter(...) matches the name of theindividual widgets. These values are used as part of the HTML output.
Instead of retrieving each value from the request object, a java.util.Map can be used to contain all ofthe name/value pairs. The map can be retrieved using the getParameterMap()method.
Map getParameterMap()
All of the name value pairs are stored within the map and can be retrieved from it one at a time.The example above can be modified to use the map object.
Map nameValues = request.getParameterMap()
Page 90 c©2009 n + 1, Inc All Rights Reserved

JAVAWEB PROGRAMMING
String name = (String)nameValues.get("petName");
String type = (String)nameValues.get("petType");
The getParamter(...) method is perfect for working with widgets that provide a single piece of data.The text box, text area, and radio buttons are examples of single value data. Some of the HTMLwidgets, the multi-select box and checkbox widget, will support multiple values for a selection.Below is an example of a checkbox form.
What news letters would you like to receive:<br/>
<input type="checkbox" name="news" value="Developer"/> Developer Tips<br/>
<input type="checkbox" name="news" value="SysAdmin"/> SysAdmin Tips<br/>
<input type="checkbox" name="news" value="Management"/> Management Tips<br/>
Since each element is a checkbox, it is possible to select none, one, two, or all of the differentcheckboxes when a form is submitted. It is possible to check any combination of the three boxes,but there is only one variable associatedwith all of the values. The question is howdoes one retrieveall of the values. The request object has a getParameterValues(...) method for these instances wheremultiple values are possible.
String [] getParameterValues(String name)
The getParameterValues()method returns all of the values associatedwith the name as a String array.The developer can iterate over the array to get all of the values associated with the name. Below isan example of using the method to process the previous checkboxes.
String [] newsletters = request.getParameter("news");
// create an HTML response
response.setContentType("text/html");
PrintWriter out = response.getWriter();
out.println("<html><body>");
out.println("<h3>Thank You</h3>");
out.println("<p>;");
out.println("Thank you for selecting the following newsletters: ");
for ( int x = 0; x < newsletters.length; x++ ) {
out.print(newsletters[x] + " Tips ";
}
out.println("</p>;");
out.println("</body>;</html>");
In addition to the various ways for retrieving values, the request object provides a method, getPa-rameterNames(...), for retrieving the names from the name/value pairs.
Enumeration getParameterNames()
Page 91 c©2009 n + 1, Inc All Rights Reserved

CHAPTER 4. SERVLET REQUEST AND RESPONSE
It returns an java.util.Enumeration with all of the widget names. The enumeration can be traversedto return each name.
Page 92 c©2009 n + 1, Inc All Rights Reserved

JAVAWEB PROGRAMMING
4.2.3 Handling GET Data
POSTing isn’t the only way to send data to the server for processing. The GETmethod also providesa means for sending parameter data. All parameter data for GET method get tacked to the end ofthe URL as a series of simple name value pairs.
http://nplus1.net/myapp/editItem.html?primaryId=5256&category=Sports
The name value pairs are preceded by a question mark. It marks the end of the URL and the begin-ning of the parameters. Each parameter is separated by an equal sign and each set of parametersare separated by an ampersand. In the example above there are two sets of parameters. The first isthe primaryId which has a value of 5256. The second is the category which has a value of “Sports”.These values can be processed like any web form data. Below is an example of processing theseparameters.
String recreation = request.getParameter("recreation");
// note that number data is capture as a string
String idData = request.getParameter("id");
// convert data to numerical primitive
int id = Integer.parseInt(idData);
It is important to remember that all parameters are Strings. If a developer needs for the value of aparameter to be a primitive data type, then they must convert from String to that type.
Page 93 c©2009 n + 1, Inc All Rights Reserved

CHAPTER 4. SERVLET REQUEST AND RESPONSE
4.2.4 HTTP Header Data
The HTTP request header contains meta data about the browser which submitted the request. Themeta data is generally known as the request headers. There are two methods for retrieving requestheader data.
String getHeader(String name)
long getDateHeader(String name)
The first method, getHeader(...) returns a String representation of the header. The second method,getDateHeader(...), returns the date value as an integer which can easily be converted into ajava.util.Date object. There are a wide number of possible headers available5. The example belowretrieves two of these headers, the “User-Agent” and “Date”.
String browser = request.getHeader("User-Agent");
int dateValue = request.getDateHeader("Date");
java.util.Date date = new java.util.Date(dateValue);
The “User-Agent” header returns the type of browser which submitted the request while the“Date” header returns the timestamp of when the request was sent by the client. The exampleabove converts the timestamp integer into a java.util.Date object.
5More information on available headers can be found in a quick guide to HTTP headers http://www.cs.tut.fi/ jkor-pela/http.html
Page 94 c©2009 n + 1, Inc All Rights Reserved

JAVAWEB PROGRAMMING
A list of available headers can be retrieved programmatically by using the getHeaderNames()method.
Enumeration getHeaderNames()
The method returns an java.util.Enumeration of all the headers that the client sent to the server.Program listing 6 shows how to create a servlet that will display all of the HTTP’s header namesand associated values.
Program Listing 6 Display List of Headers
public class HeaderServlet extends HttpServlet {
public void doGet(HttpServletRequest request, HttpServletResponse response)
throws ServletException, IOException {
// get list of header names
Enumeration headers = request.getHeaderNames();
// create an HTML response
response.setContentType("text/html");
PrintWriter out = response.getWriter();
out.println("<html><body>");
out.println("<h3>Header Information</h3>");
out.println("<p>;");
// loop over names and print out the name / value pairs
while ( headers.hasMoreElements() ) {
String headerName = headers.nextElement();
String headerValue = request.getHeader(headerName);
out.println(headerName + "=" + headerValue + "<br/>;");
}
out.println("</p>;");
out.println("</body>;</html>");
}
}
Page 95 c©2009 n + 1, Inc All Rights Reserved

CHAPTER 4. SERVLET REQUEST AND RESPONSE
4.2.5 URL Elements
The request object allows developers to retrieve information about the URL’s uniform resourceidentifier. The URI is the section of the URL that appears after the server destination The URI for aJava web application is made up of three parts, the context , the servlet , and the path information.
The context path defines which web application is being accessed. The servlet path comes after thecontext path and identifies what servlet or JSP page is being accessed. The remaining portion ofthe URI is considered the path information. The best way to understand the parts of the URI is toreview a few examples. The first example is a web application called “acme”. It has the followingservlet mapping within the web.xml.
<servlet-mapping>
<servlet-name>Dummy</servlet-name>
<url-pattern>/test/dummy.html</url-pattern>
</servlet-mapping>
Next look at the following URL which access the servlet
http://www.nplus1.net/acme/test/dummy.html?dummyId=369
Non URI: http://www.nplus1.net
Context Path: /acme
Servlet Path: /test/dummy.html
Path Information: ?dummyId=369
In this example the URL before the URI is the address of the server. The context path is the paththat maps to the web application. The servlet path is the information from the context to the desiredresource. In this instance the servlet path is /test/dummy.html. The path information is everythingafter the path. In this case it is the URL parameters “?dummyId=369”. The next example is a servletmapping that uses a wildcard character.
<servlet-mapping>
<servlet-name>My Servlet</servlet-name>
<url-pattern>/test/myservlet/*</url-pattern>
</servlet-mapping>
The following example reviews the URL and breaks the URI into its three components.
http://www.nplus1.net/acme/test/myservlet/magic/foobie.html"
Non URI: http://www.nplus1.net
Context Path: /acme
Servlet Path: /test/myservlet
Path Information: /magic/foobie.html
Page 96 c©2009 n + 1, Inc All Rights Reserved

JAVAWEB PROGRAMMING
In this instance the servlet path only covers the portion of the URL up til it matches the wild cardcharacter. Everything after the wild card match is the path information. All three elements of theURI can be retrieved from the request object using the following methods.
String getContextPath()
String getServletPath()
String getPathInfo()
Program 7 is an example of a simple servlet that displays URI information.
Program Listing 7 Displays Different Segments of URI
public class URIServlet extends HttpServlet {
public void doGet(HttpServletRequest request,
HttpServletResponse response)
throws ServletException, IOException {
// create an HTML response
response.setContentType("text/html");
PrintWriter out = response.getWriter();
out.println("<html><body>");
out.println("<h3>Header Information</h3>");
out.println("<p>;");
out.println("Context Path = " + request.getContextPath() + "<br/>");
out.println("Servlet Path = " + request.getServletPath() + "<br/>");
out.println("Path Info = " + request.getPathInfo() + "<br/>");
out.println("</p>;");
out.println("</body>;</html>");
}
}
Page 97 c©2009 n + 1, Inc All Rights Reserved

CHAPTER 4. SERVLET REQUEST AND RESPONSE
4.2.6 Servlet Context
The ServletContext is a mechanism by which developers can communicate with the servlet con-tainer. Eachweb application is assigned a ServletContext and can be retrieved from the HttpServletby calling the getServletContext()method.
public void doGet(HttpServletRequest request, HttpServletResponse response)
throws ServletException, IOException {
ServletContext context = this.getServletContext();
}
Since only one ServletContext is created by the application, it can be used as warehouse for globaldata within an application. It provides two methods for this purpose. One for setting a name valuepair. Another for retrieving the value based upon the name.
void setAttribute(String name, Object value)
Object getAttribute(String name)
Below is a contrived example for getting and setting attributes within a context.
public void doGet(HttpServletRequest request, HttpServletResponse response)
throws ServletException, IOException {
ServletContext context = this.getServletContext();
context.setAttribute("tempPath", "/var/tmp/myapp");
...
String path = (String)context.getAttribute("tempPath");
}
Page 98 c©2009 n + 1, Inc All Rights Reserved

JAVAWEB PROGRAMMING
4.2.7 Forwards And Includes
Another use for the ServletContext is the ability to retrieve and utilize the RequestDispatcher. Thedispatcher provides a wrapper for resources on the server and can be used to direct a request to thespecified resource.
The RequestDispatcher is retrieved from the context by passing the URI of the resource to bewrapped.
public void doGet(HttpServletRequest request, HttpServletResponse response)
throws ServletException, IOException {
ServletContext context = this.getServletContext();
RequestDispatcher dispatch =
context.getRequestDispatcher("/anotherplace.html");
}
In this example the dispatcher is created to wrap the “/anotherplace.html” resource. The path startswith the root of the web application. The developer has two options for working with the resource.It can be included within the current request or control can be forwarded to the resource specified.
Page 99 c©2009 n + 1, Inc All Rights Reserved

CHAPTER 4. SERVLET REQUEST AND RESPONSE
Includes A call to an include(...) takes the output from the wrapped resource and merges theresults into the current servlet’s output. The resource is literally dropped into the current locationwithin the servlet. Traditionally includes have been used for things like web page headers andfooters. Things that are used onmultiple web pages. Rather than duplicate the sections of the page,it is possible to just include the common code into the current servlet.
Below is an example of including an outside resource. Notice that the include call must pass in therequest and response objects. These objects can be accessed and modified by the included resource.
public void doGet(HttpServletRequest request, HttpServletResponse response)
throws ServletException, IOException {
PrintWriter out = response.getWriter();
ServletContext context = this.getServletContext();
RequestDispatcher dispatch =
context.getRequestDispatcher("/anotherservlet.html");
out.println("line before include<br/>");
dispatch.include(request, response);
out.println("line after include<br/>");
}
In this example a dispatchwrapper to another servlet is created. After the line “line before include”is created. Control leaves the current servlet and is passed to anotherservlet.html. Output fromanotherservlet.html is inserted into the main servlet’s output stream. After anotherservlet runs,control is returned to the main servlet. The main servlet finishes by printing “line after include”. Ineffect, the anotherservlet.html’s content is bracketed by the two lines from the primary servlet
Page 100 c©2009 n + 1, Inc All Rights Reserved

JAVAWEB PROGRAMMING
Forwards A call to forward(...) takes control from the current servlet and passes it to the wrappedresource. In the process, any output that was created by the current servlet is flushed and no longerused. Traditionally forwards are used to pass control to a UI servlet after processing data froma web form. Below is an example of forwarding to another resource. Like the include(...) call,forwards must include the request and response object.
public void doGet(HttpServletRequest request, HttpServletResponse response)
throws ServletException, IOException {
String data = request.getParameter("someData");
// do something with form data and send user to a results page
ServletContext context = this.getServletContext();
RequestDispatcher dispatch =
context.getRequestDispatcher("/results.html");
dispatch.forward(request, response);
}
This provides an excellent example of separating responsibilities. The servlet above is used toprocess the data while another servlet is used to manage the user interface.
Page 101 c©2009 n + 1, Inc All Rights Reserved

CHAPTER 4. SERVLET REQUEST AND RESPONSE
Communicating Between Servlets
When doing a forward or include the request and response objects are included in the call. Asalready noted, these objects become available to the forwarded or included resource. This fact canbe leveraged to provide a mechanism for transferring data between servlets. The request object hastwo methods to set name/value pairs that are identical to the ones from the ServletContext object.
void setAttribute(String name, Object value)
Object getAttribute(String name)
These can be used by the developer to set and retrieve name value pairs. Thus, he can set a requestattribute in servlet A and retrieve the attribute in servlet B using the include(...) or forward(...) method.Below is an example of servlet A.
public void doGet(HttpServletRequest request, HttpServletResponse response)
throws ServletException, IOException {
String data = request.getParameter("someData");
// store the data as a request attribute
request.setAttribute("magicalData", data);
ServletContext context = this.getServletContext();
RequestDispatcher dispatch =
context.getRequestDispatcher("/servletB.html");
dispatch.forward(request, response);
}
In this case the request’s attribute “magicalData” is filled with parameter data from the incomingrequest. Since the attribute is associated with the request object, it is passed to servlet B when thedispatch is called to forward processing. Therefore, the attribute “magicalData” can be accessedwithin servlet B. Below is an example of servlet B retrieving the data.
public void doGet(HttpServletRequest request, HttpServletResponse response)
throws ServletException, IOException {
String data = (String)request.getAttribute("magicalData");
PrintWriter out = response.getWriter();
out.println("<h2>The magical data is " + data + "</h2>");
}
Page 102 c©2009 n + 1, Inc All Rights Reserved

JAVAWEB PROGRAMMING
4.3 Lab Activity
Part 1.
Create a servlet that creates a HTML form that prompts the user for the following information: firstname, last name, and phone number.
Part 2.
Create a second servlet to handle the POST of the form created in the part 1. It should thank theuser for filling out the form and then display the user’s name and phone number.
Part 3.
Modify the servlet from part 2 to perform error handling. If the user doesn’t enter a valid name ora phone number that is not 10 digits then forward the client to the form servlet created in part 1.The servlet should be modified to display an error message telling the user what fields were filledout incorrectly. This should be done with inter-servlet communication.
Part 4.
Modify the servlet from part 2 modify how the errors are handled. The servlet should redirect theuser to the URL of the form servlet. Create a parameter to pass on the URL to tell the first servletwhat error occurred. Modify the first servlet to display the appropriate error based upon this errorcode.
Notice how the URLs the client sees differs between part 3 and part 4.
Part 5. (Optional)
If the client tries to enter the URL of the processing servlet created in part 2 using a GET requesthave the servlet send a 404 error.
Part 6. (Optional)
Create a custom page not found HTML error page to display when a 404 error is returned by theservlet container.
Page 103 c©2009 n + 1, Inc All Rights Reserved

CHAPTER 4. SERVLET REQUEST AND RESPONSE
Page 104 c©2009 n + 1, Inc All Rights Reserved

Chapter 5
Session Management
Objectives
• Understand basics of session state management
• Learn how to retrieve and use the HttpSession object
• Understand how cookies work
• Learn how to set and retrieve cookie values
105

CHAPTER 5. SESSIONMANAGEMENT
5.1 Session Management
As noted previously, the HTTP protocol is a stateless protocol. Each request is handled indepen-dently of any other request. The communication protocol doesn’t provide any mechanism fortracking a user across multiple requests.
Since the protocol doesn’t provide state management, it is up to the web container to create amechanism from the tools available. The meta information transferred in the header of a HTTPmessage can be manipulated to create a state system allowing users to be tracked across multiplerequests. The key is to force a unique identifier into the header information of the client’s request.
If the same identifier is used with every request, then it is possible for the servlet engine to tracka particular client. The way state is managed by the container is simple. The engine creates aHttpSession object and associates it with a unique identifier. The unique identifier is passed to theclient and told to use it for every request. Since each session object is associated with a uniqueidentifier, it is guaranteed to be a unique object which can be associated with a user. Therefore, thesession object can be utilized to maintain state information between HTTP requests.
How does the client learn about the unique identifier? How does it know to place it within theHTTP header. The process is done with cookies. Cookies are domain specific name/value pairs.Which means that the name/value pair is associated with a particular domain. When the clientmakes a request upon that particular domain, it will place all of the cookie information associatedwith the domain name into the HTTP header.
Cookies were originally meant as a mechanism for storing state about the client. The problem is thestate information would have to be sent every time a request on the server is made. A lot of cookieinformation could create significant overhead when making a request upon the server. The sessionobject relieves this problem by storing all of the information associated with the client on the serverside. All that is needed to get the session information is the unique identifier.
Page 106 c©2009 n + 1, Inc All Rights Reserved

JAVAWEB PROGRAMMING
5.1.1 HttpSession Object
TheHttpSession object is created and managed by the servlet container. The container is in chargeof creating the unique identifier and sending the cookie to the server. The name of the cookie isJSSESSIONID and it is guaranteed to be unique for the servlet container. In addition the containermanages the mappings of session id’s to the actual HttpSession object simplifying the means inwhich developers retrieve the object. All the developer has to do is retrieve the session object fromthe HttpServletRequest object.
HttpSession getSession(boolean value)
The HttpSession object is not created until specifically told by the developer. The programmermust tell the request object when to create the session. The boolean argument in the getSession(...)method call is used to determine if the session should be created. If the session already exists it willbe returned regardless of the boolean value. Otherwise if the value is “true” then a new sessionwill be created. If the value is “false” then the call will return “null”.
Once created, the HttpSession object allows the developer to track a user across multiple HTTPrequests. The object maintains state and allows for a fluid session with the end user. One note, theserver will not store these session objects indefinitely. The server will release the session object if aclient doesn’t make a new request with an allotted amount of time. The time is defined within theweb.xml configuration using the session tags.
Page 107 c©2009 n + 1, Inc All Rights Reserved

CHAPTER 5. SESSIONMANAGEMENT
5.1.2 HttpSession Methods
Once the HttpSession object is established, the developer has a number of methods to manipulatethe session data. The biggest use for the session object is to store data associated with the end user.The HttpSession object has three methods for storing and retrieving data.
Object getAttribute(String name)
void setAttribute(String name, Object value)
void removeAttribute(String name)
Program 8 is an example of creating a session object and populating it with a value.
Program Listing 8 Servlet A
public class ServletA extends HttpServlet {
public void doGet(HttpServletRequest request, HttpServletResponse response)
throws ServletException, IOException {
String data = (String)request.getAttribute("magicalData");
int value = Integer.parseInt(data);
HttpSession session = request.getSession(true);
session.setAttribute("magicData", new Integer(value));
}
}
The value stored in the session can be retrieved in a later call to a different servlet. Program 9 showshow to retrieve a session value.
Program Listing 9 Servlet B
public class ServletB extends HttpServlet {
public void doGet(HttpServletRequest request, HttpServletResponse response)
throws ServletException, IOException {
HttpSession session = request.getSession(true);
int magicNumber = (Integer)session.getAttribute("magicData");
PrintWriter out = response.getWriter();
out.println("<h2>The magical data is " + data + "</h2>");
}
}
Page 108 c©2009 n + 1, Inc All Rights Reserved

JAVAWEB PROGRAMMING
In addition the developer can force the invalidation of a session with a call to the invalidate()method.
HttpSession session = request.getSession(true);
session.invalidate();
This function is mostly used in the real world to log a person off of a system so someone using thecomputer after him doesn’t use the same session variable.
Page 109 c©2009 n + 1, Inc All Rights Reserved
CHAPTER 5. SESSIONMANAGEMENT
5.1.3 Guessing Game Example
A guessing game is a simple game. The computer randomly picks a number between 1 and 100.The client makes a guess in that range. If the number they guesses is lower than the computer’snumber then the machine returns amessage with those sentiments. If the number guessed is higherthan the computer’s number an appropriate message is given back to the client. This continuesuntil the client guesses the correct number.
When he or she guess the computer’s random number, the program returns a message saying theuser guessed it and how many attempts it took for the correct guess. The computer can then askthe end user if he or she wants to play again. The computer generates another random number andthe game is played again.
For this game to be developed as a web application, it is important to be able to maintain state foreach user. Somehow the random number needs to be retained as well as the number of guesses thatare attempted. The HttpSession object is perfect for maintaining this type of state. The next coupleof sections walk through the development of a web based guessing game.
Page 110 c©2009 n + 1, Inc All Rights Reserved

JAVAWEB PROGRAMMING
Servlet Overview
The game can be broken down into two components, the user interface and the business layer. Thebusiness logic must manage the random number, determine if the guess is correct, and keep trackof the number of guesses made by the client. The goal of the application will be to separate theseelements within a single servlet.
The first step is deciding how to handle the business logic. There are two methods availablefor handling requests, the doGet(...) and doPost(...) methods. The doGet(...) method is executedwhenever a GET request is made upon the servlet. Since that only occurs when the user is firstconnecting to the servlet, it provides an excellent opportunity to initialize the random number, resetthe counter, and greet the user.
The doPost(...) method is called when a POST request is made. POSTs are made when forms aresubmitted. This method can be used to handle guesses by the end user. If the guess is not equalto the random number a hint is provide to the client telling them if the guess was too high or toolow. If the number is guessed then a message needs to be displayed informing the end user of theircorrect guess and the number of attempts it took. The user should also be given the chance to playagain.
Now that the business logic has been divided, it is time to turn the focus to the user interface. TheUI functionality can be isolated by creating a showPage(...) method.
To make the showPage(...) method work it will need a some parameters passed to it. First, aPrintWriter from the HttpServletResponse is needed to generate the HTML. A message parameterwould be useful as well. It can be used to greet the user and tell him about the results of his guess.Another useful parameter would be a boolean that would display a link to give the end user achance to play again.
Below is an outline of the GuessingGame servlet.
public class GuessingGame extends HttpServlet {
public void doGet(HttpServletRequest req, HttpServletResponse resp)
throws ServletException, IOException {
// code for get goes here
}
public void doPost(HttpServletRequest req, HttpServletResponse resp)
throws ServletException, IOException {
// code for post goes here
}
private void showPage(PrintWriter out, String message, boolean again) {
// code for show page goes here
}
}
Page 111 c©2009 n + 1, Inc All Rights Reserved

CHAPTER 5. SESSIONMANAGEMENT
doGet Method
The doGet(...) method is responsible for three things. Creating a random number, resetting theguess counter, and providing an initial welcoming message. Below is an example of the doGet(...)method.
public void doGet(HttpServletRequest req, HttpServletResponse resp)
throws ServletException, IOException {
HttpSession session = req.getSession(true);
int randomNumber = (int)Math.round(Math.random() * 100);
session.setAttribute("randomNumber", randomNumber);
session.setAttribute("guessNumber", 1);
PrintWriter out = resp.getWriter();
this.showPage(out, "Guess a number between 1 and 100", false);
}
The first thing that is necessary is to get a session object so state can be stored. A random number isgenerated using the java.util.Math functions and stored in the session object . In addition, a counter“guessNumber” is added to the session.
The writer is retrieved from the response object and passed to the showPage(...) method along witha greeting message. The last element tells the showPage(...) method that a link to replay the game isnot necessary.
Page 112 c©2009 n + 1, Inc All Rights Reserved

JAVAWEB PROGRAMMING
showPage Method
The showPage(...) method is responsible for creating the HTML used to generate the client’s userinterface.
private void showPage(PrintWriter out, String message, boolean again) {
out.println("<html><body>");
out.println("<h2>Guessing Game</h2>");
out.println("<b>" + message + "</b>");
if ( again ) {
out.println("<p/><a href=\"\">Play Again?</a>");
}
else {
out.println("<form method=\"post\" action=\"game.html\">");
out.println("Guess: <input type=\"text\" name=\"guess\"/>");
out.println("<input type=\"submit\" value=\"Submit Guess\"/>");
out.println("</form>");
}
out.println("</body></html>");
}
The first thing it does is generate the necessary HTML elements to display a web page. The nextstep is to show the message passed into the method followed by a link to play again depending onthe boolean value again. If the user isn’t asked to play again, a HTML form is displayed to allowthe client to guess a value and submit it.
Page 113 c©2009 n + 1, Inc All Rights Reserved

CHAPTER 5. SESSIONMANAGEMENT
doPost Method
The doPost(...) method is in charge of handling user guesses.
public void doPost(HttpServletRequest req, HttpServletResponse resp)
throws ServletException, IOException {
HttpSession session = req.getSession();
int randomNumber = (Integer)session.getAttribute("randomNumber");
int guessNumber = (Integer)session.getAttribute("guessNumber");
String guessValue = req.getParameter("guess");
int guess = Integer.parseInt(guessValue);
PrintWriter out = resp.getWriter();
if ( guess < randomNumber ) {
this.showPage(out, "Your guess was too low", false);
}
else if ( guess > randomNumber ) {
this.showPage(out, "Your guess was too high", false);
}
else {
String msg = "You guessed right in " + guessNumber + " trys";
this.showPage(out, msg, true);
}
session.setAttribute("guessNumber", ++guessNumber);
}
The first step is to get the random number from the session. The user’s input is converted to an intand compared to the random number. If the guess is less than the random number then a messageis returned to the user that the guess was too low. If the guess is higher than the random numberthen a messages is returned that the guess was too high. If the numbers are equal then the user istold they had guessed correctly along with the number of guesses it took them. The boolean againis set to “true” so a link will be included to allow the user an opportunity to play again.
Page 114 c©2009 n + 1, Inc All Rights Reserved

JAVAWEB PROGRAMMING
Complete Example
Program Listing 10 Guessing Game Part 1
import java.io.IOException;
import java.io.PrintWriter
import javax.servlet.ServletException;
import javax.servlet.http.HttpServlet;
import javax.servlet.http.HttpSession;
import javax.servlet.http.HttpServletRequest;
import javax.servlet.http.HttpServletResponse;
public class GuessingGame extends HttpServlet {
public void doGet(HttpServletRequest req, HttpServletResponse resp)
throws ServletException, IOException {
HttpSession session = req.getSession();
int randomNumber = (int)Math.round(Math.random() * 100);
session.setAttribute("randomNumber", randomNumber);
session.setAttribute("guessNumber", 1);
PrintWriter out = resp.getWriter();
this.showPage(out, "Guess a number between 1 and 100", false);
}
Page 115 c©2009 n + 1, Inc All Rights Reserved

CHAPTER 5. SESSIONMANAGEMENT
Program Listing 11 Guessing Game Part 2
public void doPost(HttpServletRequest req, HttpServletResponse resp)
throws ServletException, IOException {
HttpSession session = req.getSession();
int randomNumber = (Integer)session.getAttribute("randomNumber");
int guessNumber = (Integer)session.getAttribute("guessNumber");
String guessValue = req.getParameter("guess");
int guess = Integer.parseInt(guessValue);
PrintWriter out = resp.getWriter();
if ( guess < randomNumber ) {
this.showPage(out, "Your guess was too low", false);
}
else if ( guess > randomNumber ) {
this.showPage(out, "Your guess was too high", false);
}
else {
String msg = "You guessed right in " + guessNumber + " trys";
this.showPage(out, msg, true);
}
session.setAttribute("guessNumber", ++guessNumber);
}
private void showPage(PrintWriter out, String message, boolean again) {
out.println("<html><body>");
out.println("<h2>Guessing Game</h2>");
out.println("<b>" + message + "</b>");
if ( again ) {
out.println("<p/><a href=\"\">Play Again?</a>");
}
else {
out.println("<form method=\"post\" action=\"game.html\">");
out.println("Guess: <input type=\"text\" name=\"guess\"/>");
out.println("<input type=\"submit\" value=\"Submit Guess\"/>");
out.println("</form>");
}
out.println("</body></html>");
}
}
Page 116 c©2009 n + 1, Inc All Rights Reserved
JAVAWEB PROGRAMMING
5.2 Cookies
The HttpSession object is a powerful tool for create web applications. The session can be used tomaintain conversational state with a client browser. It allows the developer to associate any Javaobject with a particular user. Even though the session object is vital for maintaining conversationalstate, it does have its limitations.
For one thing the state is maintained for a very limited period of time. The web.xml defines atimeout value. Once this value is exceeded between request the session is invalidated and nolonger available. Because the cookie value for the SESSIONID is stored within the browser’smemory, the session dies when the user closes down the browser.
Cookies are a means of associating information with the client for extended periods of time. Theinformation is stored as name value pairs on the file system. Cookies are organized by domainname. When a request is made upon a particular domain, any cookies associated with the domainare passed along with the request.
Since cookies are stored on the client’s machine they can last well beyond the lifespan of thebrowser. In Java, cookies are represented by the Cookie object. The management of cookies in theweb container is simple. Cookies are created by passing in the name/value pair to the constructor.
Cookie cookie = new Cookie("userId", "johnd");
The cookie provides a number of methods for manipulating the cookie. Table 5.1 provides a list ofcookie methods.
Tool Description
String getName() Retrieves the unique identifier associated with cookie
String getValue() Retrieves the cookie’s value
int getMaxAge() Returns the maximum time a cookie is valid in seconds
void setValue(String value) Sets the cookie’s value
void setMaxAge(int seconds) Sets the maximum time cookie is valid in seconds
Table 5.1: Cookie Methods
Notice there is no setName(...) method in the Table 5.1. That is because once the name is set in theconstructor it can not be changed after. If a new name is desired, a new cookie must be created.
Page 117 c©2009 n + 1, Inc All Rights Reserved

CHAPTER 5. SESSIONMANAGEMENT
5.2.1 Creating New Cookie
Once cookies are created and defined they have to be sent back to the client’s browser for storage.This process is done by adding the cookie to the response object using the addCookie(...) methoddefined below.
void addCookie(Cookie cookie)
Below is an example of creating a cookie and associating it with the response object.
public void doGet(HttpServletRequest req, HttpServletResponse resp)
throws ServletException, IOException {
String userId = "johnd";
Cookie userCookie = new Cookie("userId", userId);
Cookie ageCookie = new Cookie("age", "29");
response.addCookie(userCookie);
response.addCookie(ageCookie);
}
Page 118 c©2009 n + 1, Inc All Rights Reserved

JAVAWEB PROGRAMMING
5.2.2 Retrieving Cookie Values
After cookies are associatedwith the client browser, every requestmade by the browser will includethose cookie name value pairs. That means the cookies should be available from the request object.They are made available by the getCookies()method defined below.
Cookie [] getCookies()
All of the cookies sent by the browser are included in the array of cookies returned by the call. Itis up to the developer to find the proper cookie based upon the cookie’s name attribute. The valueattribute can then be retrieved from the cookie. The example below shows how this can be done toretrieve the values set in the previous section.
public void doGet(HttpServletRequest req, HttpServletResponse resp)
throws ServletException, IOException {
String userId = "";
int age = 0;
Cookie [] cookies = request.getCookies();
for ( Cookie cookie : cookies ) {
if ( cookie.getName().equals("userId") ) {
userId = cookie.getValue();
}
else if { cookie.getName().equals("age") ) {
String value = cookie.getValue();
age = Integer.parseInt(age);
}
}
}
Note that the user must loop through all of the cookies to find the one based on the name attributeof the cookie.
Page 119 c©2009 n + 1, Inc All Rights Reserved

CHAPTER 5. SESSIONMANAGEMENT
5.3 Lab Activity
Part 1.
The goal of the lab is to create a simple task list application. The first step is the creation of a servletwhich will display the contents of the task list. The task list should be stored in the HttpSessionobject. After the task list, display a HTML form that allows the person to add a new task. A taskshould be composed of a priority, a due date, and text describing the task.
Part 2.
Modify the servlet in part 1 to process the submission of the add task form to add a new task to thetask list. The new task should be displayed at the end of the task list.
Part 3.
Modify the servlet in part 1 to display check boxes next to each task item. A button should be addedto the bottom of the list that allows the user to delete the tasks.
Part 4.
Implement the delete process by removing the selected items from the task list. Redisplay the listwithout the deleted task items.
Part 5. (Optional)
Modify the servlet in part 1 to add a link to the text of the task. The link should go to a new servletthat will display the task and allow the user to edit the task.
Part 6. (Optional)
Implement the process to edit the task and the redirect the user to the task list so it can display thelist with the newly modified task in it.
Page 120 c©2009 n + 1, Inc All Rights Reserved

Chapter 6
JavaServer Pages
Objectives
• Understand mechanics of JSP
• Learn how to use JSP scriptlets and expressions
• Know how to use implicit JSP variable
• Understand the various JSP directives
• Learn how to use JSP error handling
• Understand the JSP expression language
121

CHAPTER 6. JAVASERVER PAGES
6.1 JavaServer Pages
JavaServer Pages, known as JSP, is a simplification of the Servlet platform. It allows developersan environment to quickly generate dynamic content without the overhead of developing withServlets. JSP is a set of special tags which allow server based Java code to be embedded within anHTML page. The code is executed on the server side and the resulting HTML is returned to theclient.
JSPs have the ability to communicate to the entire range of Java technologies, including interactionwith Servlets, Enterprise Java Beans, Databases, and other server based resources. These resourcescan be accessed at run time to create dynamic HTML content for the end user. While it is possibleto develop entire web application with JSP, the technology is generally used only to provide thepresentation layer for the web application.
Page 122 c©2009 n + 1, Inc All Rights Reserved

JAVAWEB PROGRAMMING
6.1.1 Mechanics of JSP
With Servlets, the URL of the dynamic page is mapped in a web.xml file. The servlet containeris responsible for making sure the request is submitted to the appropriate Servlet. JSPs workdifferently. The URL for a JSP is not defined in the web.xml file. It is based upon the the directorystructure within the WAR file. The servlet container looks within the structure of the WAR file forthe specific JSP file.
Once the file is discovered for the first time, it is loaded into memory and converted into a Servlet.The generated Servlet is compiled on the fly and the JSP URL is mapped to the newly generatedServlet. Once the Servlet class is compiled an instance of the resulting class is loaded into memory.The incoming request is passed to the newly created Servlet for processing.
The second time the URL is called, the container checks to see if the time stamp on the JSP fileis newer than the mapped URL within the container. If the time stamp is unchanged, then thepreviously created Servlet is used to handle the new request.
With a JSP, the first time the page is accessed it will take longer for the server to respond becausethe underlying servlet must be created and loaded into memory. All subsequent requests on theJSP will be much faster because the servlet has already been generated and loaded into memory.The process can be sped up by pre-compilation of the JSP pages. A process which converts all ofthe JSP pages into servlets and compiles them into class files. A process which will greatly increasethe speed of first access.
Page 123 c©2009 n + 1, Inc All Rights Reserved

CHAPTER 6. JAVASERVER PAGES
6.1.2 JSP Basics
A JSP page is a mixture of server side coding along with HTML mixed into a single web page.When a request for a JSP is made, the server side Java within the page is executed on the server andthe resulting HTML is returned to the end user. There are three basic tags used to denote JSP code.They are the scriptlet, expression tags, and directive tags. The following sections will focus on thefirst two types of tags.
Page 124 c©2009 n + 1, Inc All Rights Reserved

JAVAWEB PROGRAMMING
JSP Scriptlet Tags
Scriptlets allow developers to embed Java commands within a JSP page. These commands areexecuted on the server and are used to create the resulting dynamic HTML page. The scriptlet tagsare specified using the <% and %> symbols. The Java commands are embedded within these twotags.
Any valid Java statements can be placed with the scriptlet tags. Typically, the Java code is used tocreate conditionals, looping constructs, manipulate HTML header data, connect to databases, andinterface with Enterprise Java Beans. Anything that can be done within the Java language can beplaced within these tags.
Java code is generally used to create conditionals and looping constructs, manipulate HTMLheaderdata, connect todatabases, or interfacewithEnterprise JavaBeans. Anything that canbedonewithinthe Java language can be done in between these tags. Below is an example of Java code embeddedwithin an HTML page.
<html>
<%
String data = "foobie";
int x = 2;
if ( x < 5 ) {
data = "more foobies";
}
%>
<body>
<h2>This is a test</h2>
</body>
</html>
The example above is not very interesting because the code doesn’t interact with the HTML. Whatmakes scriptlets interesting is how they can be interspersed between HTML tags to create dynamicHTML. The concept is most prevalent with looping and conditional constructs. The followingexample uses looping to generate dynamic HTML.
<ul>
<%
for ( int x = 0; x < 5; x++ ) {
%>
<li>this is a bullet point</li>
<%
}
%>
</ul>
Page 125 c©2009 n + 1, Inc All Rights Reserved

CHAPTER 6. JAVASERVER PAGES
Here the for loop is split between two scriptlet tags. This is not only legal , but is in fact desired.It allows the HTML in between the scriptlets to be repeated multiple times. The output from thiscode is shown below.
<ul>
<li>this is a bullet point</li>
<li>this is a bullet point</li>
<li>this is a bullet point</li>
<li>this is a bullet point</li>
<li>this is a bullet point</li>
</ul>
Study this example until it makes sense. It is important to grasp the concept of code spread acrossmultiple scriptlet tags intermingled within HTML. The previous example can be expanded upon touse conditionals for determining the HTML to display.
<ul>
<%
for ( int x = 0; x < 5; x++ ) {
if ( x % 2 == 0 ) {
%>
<li>this is an even bullet point</li>
<%
}
else {
%>
<li>this is an odd bullet point</li>
<%
}
}
%>
</ul>
In this case the code iterates the value of x between 0 and 4. The value of x during each loopdetermines what HTML value is generated. In this example the resulting output is shown below.
<ul>
<li>this is an even bullet point</li>
<li>this is an odd bullet point</li>
<li>this is an even bullet point</li>
<li>this is a odd bullet point</li>
<li>this is an even bullet point</li>
</ul>
Why does the even bullet point come first? Looking at the code above the value of x is first set to0. When the first conditional is evaluated it is determined that 0 is an even value and thus the evenbullet point is embedded into the resulting HTML.
Page 126 c©2009 n + 1, Inc All Rights Reserved
JAVAWEB PROGRAMMING
JSP Expressions Tags
The JSP scriptlet tags are nice for embedding Java logic within a web page, but what if a developerwants to embed a dynamic value in the HTML? The JSP expression tags provides the developerwith a mechanism to accomplish the task. Expression tags take any valid Java expression andevaluates the expression to find its string value. Primitives are automatically converted to strings.The resulting String replaces the expression tag within the final HTML returned to the client.
The expression tag is opened with <%= and closed with a %>. In between, is where the Javaexpression is placed. Below are two simple examples of using the expression tag.
<p>This is a <%= "simple string" %></p>
<p>The value of 45 + 23 = <%= 45 + 23 %></p>
The first line embeds the String “simple string” within the HTML and the second line evaluates 45+ 23 and converts the resulting value into a string and embeds it. Below is the output from theexample.
<p>This is a simple string</p>
<p>The value of 45 + 23 = 68</p>
One important note about expressions is the lack of semicolon. Semicolons in Java are used to definea statement. A statement can be composed of an expression, but an expression is not a statement.An expression must evaluate to a value and is not a statement of code. Thus the semicolon can notbe used within an expression tag. The reason for this becomes apparent later when the process ofconverting JSPs to Java Servlets is explained.
Page 127 c©2009 n + 1, Inc All Rights Reserved

CHAPTER 6. JAVASERVER PAGES
On top of simple expressions, the JSP expression tag can use previously defined variables. Thevariables are normally defined within previous JSP scriptlets. Below is an example of a usingvalues defined in a scriptlet within a series of expressions.
<%
int x = 7;
int y = 2;
%>
<html>
<body>
<h2>Example of Expressions</h2>
<%= x %><br/>
<%= y %><br/>
<%= x * y %><br/>
<%= x - 18 + y %><br/>
<%= "x = " + x %><br/>
</body>
</html>
In this example a scriptlet tag is used to define the values of x and y. The rest of the page usesvarious expression tags to generate various outputs using these variables. The resulting HTML isshown below.
<html>
<body>
<h2>Example of Expressions</h2>
7<br/>
2<br/>
14<br/>
-9<br/>
x = 7<br/>
</body>
</html>
Page 128 c©2009 n + 1, Inc All Rights Reserved

JAVAWEB PROGRAMMING
In addition, expression tags can be embeddedwithin scriptlet conditionals and loops. The followingexample extends the previous section’s looping example. It puts the value of “odd” or “even” nextto the value of the loop.
<ul>
<%
String oddEven = "";
for ( int x = 0; x < 5; x++ ) {
if ( x % 2 == 0 ) {
oddEven = "even";
}
else {
oddEven = "odd"
}
%>
<li><%= x %> is an <%= value %> number</li>
<%
}
%>
</ul>
In this instance the loop goes from zero to four. Each time through the loop the value of loopvariable is evaluated to see if it is an odd or even value. The String value of odd or even is placedwithin String variable oddEven. The value of x and the value of oddEven are then placed within theresulting HTML The process is repeated until the loop is exhausted. The resulting HTML is shownbelow.
<ul>
<li>0 is an even number</li>
<li>1 is an odd number</li>
<li>2 is an even number</li>
<li>3 is an odd number</li>
<li>4 is an even number</li>
</ul>
Page 129 c©2009 n + 1, Inc All Rights Reserved

CHAPTER 6. JAVASERVER PAGES
Comments
This is a good point to talk about embedding comments within a JSP page. The <%- - and - -%>tags are used to indicate comments.
<%-- Example of a JSP comment --%>
<%--
Example of a multi line JSP comment
--%>
Comments are notes that can be attached to a JSP page to provide information about the dynamicportions of the page, but do not show upwithin theHTML. JSP comments are removed at the serverlevel and thus never appear in the resulting HTML. They are only available within the JSP sourcecode.
Page 130 c©2009 n + 1, Inc All Rights Reserved

JAVAWEB PROGRAMMING
6.1.3 Implicit Variables
When working with Servlets all of the business logic for the page was placed inside either thedoGet(...) or doPost(...) methods. Each method had a HttpServletRequest and HttpServletResponseobject passed into it. As studied previously, these objects are used to get data from the incomingrequest and place information into the outgoing request. They are an integral part of developmentof web applications.
These objects are necessary within a JSP page. How else could one get parameter data from theincoming request without it? How else can one access the HttpSession object? The problem issolved in JSP by creating a set of implicit or predefined variables. Table 6.1 provides a list of implicitvariables that are available within a JSP page. The table maps each variable to the object type theyrepresent.
Implicit Variable Object Class
request HttpServletRequest
response HttpServletResponse
out PrintWriter from HttpServletResponse
application ServletContext
session HttpSession from HttpServletRequest
config ServletConfig
page this
exception JspException
Table 6.1: Implicit Variables And Their Corresponding Classes
Twoof the variablesout and session are special in that they arederived from theHttpServletRequestandHttpServletResponse objects. The out variable is created from a call to the response’s getWriter()method. The session variables is created from a call to the request’s getSession() method.
PrintWriter out = response.getWriter();
HttpSession session = request.getSession();
Each of these variables are available within any JSP scriptlet or JSP expression tag. These variablesare created and initialized by the JSP engine.
Page 131 c©2009 n + 1, Inc All Rights Reserved

CHAPTER 6. JAVASERVER PAGES
Below is an example of using implicit variables within a JSP page.
<%
response.setContentType("text/html");
String iters = reqeust.getParameter("iterations");
String name = (String)session.getAttribute("name");
%>
<html>
<body>
<h3>Say Hello</h3>
<%
int iterations = Integer.parseInt(iters);
for ( int x = 0; x < iterations; x++ ) {
out.println("Hello " + name + "<br>");
}
%>
</body>
</html>
The example above uses the response, request, session, and out objects. The response object is used toset the content type of the page. The request object is used to get the submitted parameter “iterations”and uses the value to set the number of times to loop. The session object is used to retrieve the nameof the user from the client’s session. The out variable is used to place the “Hello <name>” stringinto the HTML output stream. Generally, the expression tags are used for including data withinHTML rather than the out variable.
The next example removes the out variable from the previous sample and replaces it with anexpression tag.
<%
response.setContentType("text/html");
String iters = reqeust.getParameter("iterations");
%>
<html>
<body>
<h3>Say Hello</h3>
<%
int iterations = Integer.parseInt(iters);
for ( int x = 0; x < iterations; x++ ) {
%>
<p>Hello <%= session.getAttribute("name") %></p>
<%
}
%>
</body>
</html>
Page 132 c©2009 n + 1, Inc All Rights Reserved

JAVAWEB PROGRAMMING
It is worth noting that the session.getAttribute(...) method returns the value of “name” as an objectand not a String. The reason the expression works is that the Object’s toString()method is called tofind the String value to place within the HTML.
Page 133 c©2009 n + 1, Inc All Rights Reserved

CHAPTER 6. JAVASERVER PAGES
6.1.4 Include Directive
Java provides a number of directives for performing special operations upon the JSP page. Eachdirective uses the <%@ %> tags to inform the JSP page it is a special operation. The includedirective allows the developer to incorporate external files into the current JSP. The syntax for theimperative tag is shown below.
<%@ include file="include/header.html" %>
<%@ include file="/mystuff/include/stuff.jsp" %>
Files are inserted into the JSP page at the point where the directive is defined. In fact, they areimported before server processing begins. Thus any JSP page that is included will be processed asif they were part of the original JSP page.
In the example above, there are two different path types used for the included file. The first,without a leading “/”, is known as a relative path. It is found in relationship to the calling JSP.The header.html would be within the include directory. The include directory must be in the samedirectory as the JSP page which calls the include.
The second example, the one with the leading “/” is a full path. The stuff.jsp file is found off the rootof the web application in the “mystuff” and “include” directories.
A common practice for using the include directive is separate web page creation. A header andfooter elements can be designed to provide a framework for the web page. These elements can beincluded in each JSP to provide a consistent look and feel for the web application. Since most of thelook and feel is controlled in these two files, it is easier tomaintain and update the site’s appearance.
Below is an example of a header.jsp page.
<%
String header = "Guest Account"
String user = (String) user.getAttribute("user");
if ( user != null ) {
header = "User " + user;
}
%>
<html>
<body>
<h2><%= header %></h2>
And here is an example of a footer.html page.
© n + 1, Inc.
</body>
</html>
Page 134 c©2009 n + 1, Inc All Rights Reserved

JAVAWEB PROGRAMMING
These can now be included into any page on the site to combine all of the elements into a page witha consistent look and feel.
<%@ include="header.jsp" @>
<b>Counter Stuff</b><br/>
<%
for ( int x = 0 ; x < 11; x++ ) {
%>
<%= x %>ˆ3 = <%= x * x * x %><br/>
<%
}
%>
<%@ include="footer.html" @>
This is the equivalent of creating the following JSP page.
<%
String header = "Guest Account"
String user = (String) user.getAttribute("user");
if ( user != null ) {
header = "User " + user;
}
%>
<html>
<body>
<h2><%= header %></h2>
<b>Counter Stuff</b><br/>
<%
for ( int x = 0 ; x < 11; x++ ) {
%>
<%= x %>ˆ3 = <%= x * x * x %><br/>
<%
}
%>
© n + 1, Inc.
</body>
</html>
What makes the include useful is the ability to remove duplicated code between JSP pages.
Page 135 c©2009 n + 1, Inc All Rights Reserved

CHAPTER 6. JAVASERVER PAGES
6.1.5 Page Directive
The page directive is used to apply attributes to a JSP page. It has the following format.
<%@ page [attributes] %>
There are a number of different attributes that can be associated with a JSP page. Two of the mostcommon are the import and contentType attributes. contentType is used to set type of content returnedby the JSP page. If the content is HTML then the type should be set to “text/html”. Below is anexample of setting it for a page.
<%@ page contentType="text/html" %>
Another common page element is the import option. It allows elements in any Java package beimported into the current page. It performs the same function as the import statement in a Java classfile. The only difference is multiple imports can be set at one time. Below is an example of usingthe import attribute.
<%@ page import="java.util.LinkedList, java.sql.*" %>
What follows is an example of using these elements inside a JSP page.
<%@page contentType="text/html"%>
<%@page import="java.util.LinkedList, java.util.Iterator"%>
<%
LinkedList<String> myList = new LinkedList<String>();
myList.add("one");
myList.add("two");
myList.add("three");
%>
<html>
<body>
<h2>List of elements</h2>
<%
Iterator<String> iterator = myList.iterator();
while ( iterator.hasNext() ) {
%>
<%= iterator.next() %><br/>
<%
}
%>
</body>
</html>
Page 136 c©2009 n + 1, Inc All Rights Reserved

JAVAWEB PROGRAMMING
6.1.6 JSP Error Handling
It is possible to use try / catch blocks to handle errors within JSP scriptlet tags. But what happensif an exception occurs that isn’t within a try / catch block? The JSP engine can’t allow an exceptionto go uncaught. Otherwise the servlet engine would crash. Therefore the JSP engine must catch allpossible exceptions. In fact all exceptions are caught and the thrown exception is wrapped withina JspException.
The creator’s of Java Server Pages added a mechanism to work with these unhandled exceptions.The page directive has an errorPage attribute that allows the developer to specify a JSP page todesignate as an error page. If an uncaught exception occurs then the JSP engine will redirect to thespecified error page. Below is an example of telling the JSP where to direct errors.
<%@page errorPage="my_error.jsp"%>
<html>
<body>
<h2>List of elements</h2>
<%
int [] nums = { 5, 2, 4 };
for ( int y = 0 ; y < 5; y++ ) {
%>
<%= nums[y] %><br/>
<%
}
%>
</body>
</html>
Not any page can be designated as an error page. A JSP that is going to be used as an error pagemust define itself as an error page. That is accomplished by using the page directive with theisErrorPage attribute. In the previous example, my error.jsp was defined as the error page. Thatmeans that the top of the my error.jsp must contain the page directive with isErrorPage set to “true”otherwise an error will occur and the engine will return a 500 server error. Below is an exampleoutline of an error page.
<%@page isErrorPage="true"%>
<html>
<body>
...
</body>
</html>
Page 137 c©2009 n + 1, Inc All Rights Reserved

CHAPTER 6. JAVASERVER PAGES
Once a page is defined as an error page, it gains the use of the implicit variable exception. Theexception variable is only available on error pages. It represents the JspException that occurredwithin the main page. Below is an example of creating an error page that shows what type ofexception and shows the elements of the stack trace.
<%@ page isErrorPage="true" %>
<html>
<body>
<h2>Error Page</h2>
An error has occurred with the system. <br>
<hr>
<h3><%= exception.getMessage() %></h3>
<b>Debugging Information</b> -
Time Stamp (<%= new java.util.Date() %>)
<% StackTraceElement [ ] ste = exception.getStackTrace(); %>
<table border="1" cellspacing="0" cellpadding="4">
<tr>
<th>Class</th>
<th>Method</th>
</tr>
<%
for ( int i = 0; i < ste.length ; i++ ) {
%>
<tr>
<td><%= ste[i].getClassName() %></td>
<td><%= ste[i].getMethodName() %></td>
</tr>
<% } %>
</table>
</body>
</html>
While the example above will display the stack trace for the error, it is not a good idea to have anerror page in production that shows the stack trace. It provides hackers with information they canuse to potentially penetrate the system. A developer should log the error and return a friendly errormessage to the user.
Page 138 c©2009 n + 1, Inc All Rights Reserved

JAVAWEB PROGRAMMING
6.1.7 How JSPs Are Converted To Servlets
One thing that can provide better insight into how a JSP page works is by understanding how JSPpages are converted into Servlets. Take the following JSP page used in a previous example.
<%
response.setContentType("text/html");
String iters = request.getParameter("iterations");
%>
<html>
<body>
<h3>Say Hello</h3>
<%
int iterations = Integer.parseInt(iters);
for ( int x = 0; x < iterations; x++ ) {
%>
<p>Hello <%= session.getAttribute("name") %></p>
<%
}
%>
</body>
</html>
The web container takes the page and converts it into a Servlet. It starts by using a template for aServlet and merging the content of the JSP into the template. Rather than supply a doGet(...) anddoPost(...) implementation, the JSP implements the servlet interface’s service(...) method.
public void service(HttpServlet request, HttpServletResponse response) {
HttpSession session = request.getHttpSession();
PrintWriter out = response.getWriter();
// JSP page is converted here
}
Notice how implicit variable are “created” for the JSP page. The request and response variables areprovided by the method signature. The session and out implicit variables are generated at the topof the method.
Page 139 c©2009 n + 1, Inc All Rights Reserved

CHAPTER 6. JAVASERVER PAGES
The conversion process is simple. Each line ofHTML is placedwithin an out.println(). The lineswithscriptlet tags are just copied into the servlet as is. The expression tags are placed within out.print()lines. Therefore the example above would be converted into the following servlet.
public void service(HttpServletRequest request,
HttpServletResponse response) {
HttpSession session = request.getHttpSession();
PrintWriter out = response.getWriter();
// JSP page is converted here
response.setContentType("text/html");
String iters = request.getParameter("iterations");
out.println("<html>");
out.println("<body>");
out.println("<h3>Say Hello</h3>");
int iterations = Integer.parseInt(iters);
for ( int x = 0; x < iterations; x++ ) {
out.print("<p>Hello ");
out.print( session.getAttribute("name") );
out.println("</p>");
}
out.println("</body>");
out.println("</html>");
}
The resulting servlet is compiled, deployed and mapped to the original JSP page.
Page 140 c©2009 n + 1, Inc All Rights Reserved

JAVAWEB PROGRAMMING
6.2 Expression Language
Now that the reader has a basic understanding of JSP pages, it is time to turn attention to a quirkyfeature that has become an integral part of managing user interfaces. The feature is known as theexpression language or EL for short.
The expression language was introduced with the Java Standard Template Library, JSTL. It wasmeant as an easy method for accessing data from objects known as Java Beans. The hope was toreduce the amount of scriptlet and expression tags used within a web page. The primary goals ofEL was to create a simple language that was quick to write, simple to learn, and easy to maintain(especially for non-Java programmers).
As time went on, the benefits of EL delivered and it turned out to be a very popular tool. So popularthat it was added to JSP 2.0 specification.
Page 141 c©2009 n + 1, Inc All Rights Reserved

CHAPTER 6. JAVASERVER PAGES
6.2.1 EL Basics
A section of EL within a JSP page is designated by using a dollar sign and braces ${ }. Inside ofthe braces, a simple expression is defined for evaluation. Any variable used within the expressionis known as an identifier. An identifier can be either an implicit object or a variable.
If it is a variable, a special series of steps are preformed to find the value of the variable. Theexpressionmanager searches different scopes within the JSP page to find the value to associate withthe variable. It searches in order the page object, request object, session object, and applicationcontext to find a value for the variable. It does this by performing a request upon each object’sgetAttribute(...) method. It returns the first value that it finds.
For example, take the variable foobie.
${foobie}
JSP would make a call to the page object’s getAttribute(...) method and see if a value exists. If itdoesn’t it would move on to the request object and so on until the application level variable isreached.
page.getAttribute("foobie");
request.getAttribute("foobie");
session.getAttribute("foobie");
Once the object is found, it returns the object to the expression for evaluation. The results of theexpression’s evaluation is then displayed within the JSP page. If the returned value is a primitiveor a String the value can be displayed directly. Complex objects that hold multiple values providespecial nomenclature for accessing the various values.
Page 142 c©2009 n + 1, Inc All Rights Reserved
JAVAWEB PROGRAMMING
6.2.2 Accessing Data From Complex Variables
The EL searches through the various scopes to find an object associated with the name. The datacontained in the object can then be accessed directly fromEL. The “.” operator allows EL to evaluatea property of the object. Properties are accessed using the rules for creating JavaBeans.
Page 143 c©2009 n + 1, Inc All Rights Reserved

CHAPTER 6. JAVASERVER PAGES
JavaBeans
JavaBeans are Java objects that conform to a certain specification. First they must all have a defaultconstructor. Secondly, the class must access its properties using get/set methods. Lastly the objectmust be serializable. EL really only cares about the second rule. The “.” operator is used to accessproperties that use the get/set methods.
Below is a simple example of a JavaBean like object.
public class Person {
private String firstName;
private String lastName;
private int age;
public String getFirstName() {
return this.firstName;
}
public String getLastName() {
return this.lastName;
}
public int getAge() {
return this.age;
}
public void setFirstName(String name) {
this.firstName = name;
}
public void setLastName(String name) {
this.lastName = name;
}
public void setAge(int age) {
this.age = age;
}
}
Page 144 c©2009 n + 1, Inc All Rights Reserved

JAVAWEB PROGRAMMING
Accessing Data
As previously noted, the properties are accessed using the “.” operator. Below is an example ofaccessing values from a Person object within a JSP. In the example the Person is stored as a variableperson within a session object.
<html>
<body>
<h2>Personal Info</h2>
${person.firstName} ${person.lastName}
is ${person.age} years old.<br/>
</body>
</html>
The same code using scriptlet and expression tags is shown below.
<%
Person person = (Person)session.getAttribute("person");
%>
<html>
<body>
<h2>Personal Info</h2>
<%= person.getFirstName() %> <%= person.getLastName() %> is
<%= person.getAge() %> years old.<br/>
</body>
</html>
Which version is cleaner? The ease of understanding is the primary reason EL has made its wayinto the JSP standard.
Page 145 c©2009 n + 1, Inc All Rights Reserved

CHAPTER 6. JAVASERVER PAGES
Accessing Objects With Objects
It is possible to access objects with objects using the “.” operator. Each “.” accesses propertiesof the previous object. The best way to understand this concept is through an example. What ifthe Person object was used to define the president of a professional group object. The professionalgroup might look like the following.
public class ProfessionalGroup {
private String name;
private Person president;
public String getName() {
return this.name;
}
public Person getPresident() {
return this.president;
}
public void setName(String name) {
this.name = name;
}
public void setPresident(Person president) {
this.president = president;
}
}
Below is an example of a JSP that takes the group and displays the name of the group’s president.
<html>
<body>
<h2>${group.name} Directory</h2>
President: ${group.president.firstName}
${group.president.lastName}<br/>
</body>
</html>
In this example, group represents aProfessionalGroupobject. Take the expressiongroup.president.firstName:The first “.” operator accesses the president property which is a Person object. Since the result is anobject, it is possible to access its properties. The second “.” operator does exactly this and accessesthe person’s firstName property.
Page 146 c©2009 n + 1, Inc All Rights Reserved

JAVAWEB PROGRAMMING
6.2.3 Variables as Maps, Lists, and Arrays
Some of the common data types a developer might use areMaps, Lists, and Arrays. Unfortunately,none of these data types use JavaBean standards for storing and retrieving data. Fortunately, ELprovides amechanism for accessing these data types. Each are treated in similar fashion to accessingan array in Java.
Lists and Arrays are treated identically by EL. They are both accessed as if they were Java arrays.Which means they use indexes within brackets to access individual elements of the list. The indexis zero based. The example below shows how EL accesses a list.
<%@ page import="java.util.*" %>
<%
ArrayList<Person> peeps = new ArrayList<Person>();
Person person1 = new Person();
person1.setFirstName("John");
person1.setLastName("Doe");
Person person2 = new Person();
person2.setFirstName("Beth");
person2.setLastName("Smith");
peeps.add(person1);
peeps.add(person2);
request.setAttribute("somePeeps", peeps);
%>
<html>
<body>
<h2>List of People</h2>
<p>
Person 1: ${somePeeps[0].firstName}
${somePeeps[0].lastName}<br/>
Person 2: ${somePeeps[1].firstName}
${somePeeps[1].lastName}<br/>
</p>
</body>
</html>
Like embedded JavaBeans, it is possible to access properties from the list. The example aboveretrieves each element from the list and accesses the properties from the element using a “.”.
The other data type used frequently is the map. Since a map is not a list, elements within the mapcan’t be accessed using a simple integer based index. Instead the user can use the ”key” value inthe map within the brackets to get back the value associated with the key.
Below is a simple example that populates a map and then displays it using EL. It is worth notingthat string values in EL are usually surrounded with single quotes.
Page 147 c©2009 n + 1, Inc All Rights Reserved

CHAPTER 6. JAVASERVER PAGES
<%@ page import="java.util.*" %>
<%
HashMap<String,String> person = new HashMap<String,String>();
person.put("first name", "Beth");
person.put("last name", "Smith");
request.setAttribute("person", person);
%>
<html>
<body>
<h2>List of People</h2>
<p>
Person: ${person[’first name’]} ${person[’last name’]}<br/>
</p>
</body>
</html>
Of course it is possible to embed one data types within another. The internal object would beaccessed using the brackets as if it where a single entity. Thus the result would have the appearanceof a multi-dimensional array. The final examples shows embedding a map within a list.
<%@ page import="java.util.*" %>
<%
ArrayList<Person> peeps = new ArrayList<Person>();
HashMap<String,String> person = new HashMap<String,String>();
person.put("first", "John");
person.put("last", "Doe");
peeps.add(person);
person = new HashMap<String,String>();
person.put("first", "Beth");
person.put("last", "Smith");
peeps.add(person);
request.setAttribute("somePeeps", peeps);
%>
<html>
<body>
<h2>List of People</h2>
<p>
Person 1: ${somePeeps[0][’first’]} ${somePeeps[0][’last’]}<br/>
Person 2: ${somePeeps[1][’first’]} ${somePeeps[1][’last’]}<br/>
</p>
</body>
</html>
Page 148 c©2009 n + 1, Inc All Rights Reserved

JAVAWEB PROGRAMMING
6.2.4 Implicit Objects
EL has the ability to access the implicit objects of a JSP page. Table 6.2 provides a list of implicitobjects along with their JSP equivalents.
Implicit Variable JSP Equivalent
${param.name} request.getParameter(”name”)
${paramValues} request.getParameters()
${header.name} request.getHeader(”name”)
${headerValues} request.getHeaders()
${cookie.name} request.getCookie(”name”)
${initParam.name} config.getInitiParameter(”name”)
Table 6.2: Implicit EL Variables
Below is an example of a simple HTML form that allows the user to input a first name, last name,and phone number. The data is sent to the results.jsp page.
<form method="post" action="results.jsp">
First Name: <input type="text" name="firstName"/><br/>
Last Name: <input type="text" name="lastName"/><br/>
Phone Number: <input type="text" name="phone"/><br/>
<input type="submit" value="Show Results"/>
</form>
The result.jsp page below shows how to use the EL implicit object to display the first name, lastname, and phone number.
<h2>Form Information</h2>
<ul>
<li>First Name: ${param.firstName}</li>
<li>Last Name: ${param.lastName}</li>
<li>Phone Number: ${param.phone}</li>
</ul>
Page 149 c©2009 n + 1, Inc All Rights Reserved

CHAPTER 6. JAVASERVER PAGES
6.2.5 EL Operators
EL can domore than just retrieve data from an object or a variable. It can be used to perform simplecalculations and comparisons. First off, it can perform all of the math operators supported by Java.These include addition, subtraction, multiplication, division, and the modulus operator. Below arethree example of using math operations within an EL statement.
<p>5 + 8 = ${5 + 8}</p>
<p>x - y = ${x + y}</p>
<p>x + 3 = ${x * 3}</p>
On top of simple math operations, EL can be used to perform comparison operations. All of thebasic Java comparison operators are available in EL. The <, >, <=, >=, ==, !=, &&, — —, ! call allbe used. An additional empty operator is available. It is used to check to see if the variable exists.It is similar to checking to see if an object is null or an empty string.
At this point there is not much use for EL comparison operators. The result of the operation is“true” or “false” which isn’t useful to place within a web page. Comparative expressions showtheir use when dealing with the Java Standard Template Library or JSTL. It is used for conditionalcomparisons within a web page. JSTL is covered in a future module. Another thing to note. The== and != comparison can be used to compare String values.
Another conditional operator that can be used is the tertiary operator.
a = <comparison> ? x : y
The tertiary operator can be used to assign a value based upon the results of the comparison. Belowis an example of a select box the allows the user to select “Dog”, “Cat”, and “Fish”.
<select name="pet" size="1">
<option value="none">-- None --</option>
<option value="dog">Dog</option>
<option value="cat" selected>Cat</option>
<option value="fish">Fish</option>
</select>
Page 150 c©2009 n + 1, Inc All Rights Reserved

JAVAWEB PROGRAMMING
In this example the “cat” option is preselected. The selection can also be made based upon asimple comparison using the tertiary operator. In the example below the parameter value is usedto determine which option are selected.
<select name="pet" size="1">
<option value="none" ${param.petType == ’none’ ?
’selected’ : ’’}>-- None --</option>
<option value="dog" ${param.petType == ’dog’ ?
’selected’ : ’’}>Dog</option>
<option value="cat" ${param.petType == ’cat’ ?
’selected’ : ’’}>Cat</option>
<option value="fish" ${param.petType == ’fish’ ?
’selected’ : ’’}>Fish</option>
</select>
In the first option line the EL makes a call to request.getParameter(”petType”) to get the value fromthe header. If the value is true then the String value ’selected’ is placed into the option tag. If itfalse then an empty string is placed into the option tag. The comparison is made for each parametertype.
Page 151 c©2009 n + 1, Inc All Rights Reserved

CHAPTER 6. JAVASERVER PAGES
6.3 Lab Activity
Part 1.
The goal of the lab is to create a simple task list application using JSP pages. The first step is thecreation of a JSP which will display the contents of the task list. The task list should be stored in theHttpSession object. Use EL to display the contents of the list.
After the task list, display a HTML form that allows the person to add a new task. A task shouldbe composed of a priority, a due date, and text describing the task. Use a task object bean to storethis data.
Part 2.
Modify the JSP from part 1 to use an include for the header and footer of the page. Create aheader.jsp and footer.jsp to provide the header and footer respectively.
Part 3.
Create a add task JSP page that handles the submission of the add task form. The JSP should takethe data from the form and create a new task to add to the task list. Redirect back to the task listJSP to display the modified task list.
Part 4.
Modify the JSP in part 1 to display check boxes next to each task item. A button should be addedto the bottom of the list that allows the user to delete the tasks.
Part 5.
Create a delete tasks JSP that removes the selected items from the task list. Redirect the user backto the task list JSP to display the task list without the deleted task items.
Part 6. (Optional)
Modify the JSP in part 1 to add a link to the text of the task. The link should take the user to a newJSP that will display the task and allow the user to edit the task’s information.
Part 7. (Optional)
Implement a process task JSP that edits the entry in the task list and redirects the user back to thetask list which should display the list with the freshly modified task within it.
Page 152 c©2009 n + 1, Inc All Rights Reserved

Chapter 7
Tag Libraries
Objectives
• Understand what a tag library is
• Understand JSTL
• Learn how to use core tag libraries
• Leran how to use format tag libraries
• Learn how to create custom tag libraries
153

CHAPTER 7. TAG LIBRARIES
7.1 Tag Libraries
What is a Tag Library? Technically it is a set of tags that are logically grouped by functionality toform a library of tags. Functionally, a tag is an extension of the JSP concept. It allows a user todefine a JSP XML element that is embedded within a JSP page. The element provides a containerfor programming logic to be applied to the page. The tag will not only simplify the creation of theJSP pages, but if used properly will remove the need for JSP scriptlets within a page.
Since tags are XML elements, they take on all of the characteristics of any XML tag. A namespace ismatched with the tag to tell which tag library the tag is associated. Attributes can also be assignedto the tags to allow for the passing of dynamic values for processing by the tag. In addition toattributes, the tags can access data from both the implicit and explicit objects defined within a JSPpage.
Generally, tags are used for two functions. First and foremost they are used to display data to theend user. The second function is the ability for tags to intercommunicate with each other so thatmore complex solutions can be developed.
The basic format of a Java Tag follows.
<ns:tagName attr1="value1" attr2="value2"> </ns:tagName>
In this format, ns represents the namespace of the tag. The tagName is the name associated with thetag’s functionality. attr1 and attr2 are two attributes associated with the tag. Below is an exampleof a simple tag.
<c:out name="count" value="3"></c:out>
In this example, the namespace is c. The tag’s name is out and it has two attributes, name and valuewhose values are count and 3 respectively. Since the tag is a stand alone tag, the closing tag can beincorporated into the body of the start tag.
<c:out name="count" value="3"/>
Page 154 c©2009 n + 1, Inc All Rights Reserved

JAVAWEB PROGRAMMING
7.2 JSTL
The first version of JSP made it difficult to format and display data easily within a web page. TheJSTL, Java Standard Template Library, was created to make the process of formatting output easier.In addition JSTL added libraries that would simplify working with databases and XML documents.It was the first technology to deploy the EL, expression language. In JSP 2.0 EL was added to theJSP standard. The JSTL was soon to follow. JSTL was renamed JSP Standard Tag Library and isnow part of the JSP standard.
The JSTL is composed of 4 sets of libraries that perform different tasks. They are Core, Format,XML, and SQL.
The Core library is used to simplify the output of data within a web page. It provides mechanismsfor flow control, outputting data, and URL management.
The Format library is used for internationalization. It makes it easy to output data based uponlocality. In addition, it provides an easy mechanism for formatting dates and numbers.
TheXML library providesmethods for reading andmanipulating XMLdocuments. The SQL libraryis used to query the database to update the database and pull results.
The Core and Format libraries are the ones that will be the focus of the class. They are the ones usedto simplify the output of data to the end user. The other libraries have uses but they are beyond thescope of this course.
Page 155 c©2009 n + 1, Inc All Rights Reserved

CHAPTER 7. TAG LIBRARIES
7.2.1 Including JSTL Libraries
The first step in using JSTL within a JSP page is to use the taglib directive to include the librarywithin the page. Below are the taglib statements for each of the four JSTLs.
<%@ taglib uri="http://java.sun.com/jsp/jstl/core" prefix="c" %>
<%@ taglib uri="http://java.sun.com/jsp/jstl/fmt" prefix="fmt" %>
<%@ taglib uri="http://java.sun.com/jsp/jstl/xml" prefix="xml" %>
<%@ taglib uri="http://java.sun.com/jsp/jstl/sql" prefix="sql" %>
The taglib directive takes two arguments, the uri and the prefix. The URI for a custom taglib isdefined within the web.xml file. It is used to map back to a particular library. Since the JSTL is partof the core language, the URI shown above will point to the correct library. Table 7.1 shows the URIto use for each JSTL.
URI Library
http://java.sun.com/jsp/jstl/core Core Library
http://java.sun.com/jsp/jstl/fmt Format Library
http://java.sun.com/jsp/jstl/xml XML Library
http://java.sun.com/jsp/jstl/sql SQL Library
Table 7.1: URIs For JSTL
The prefix’s shown above can be set to whatever value desired, but it is standard practice to definethe core library as c, format library as fmt, etc.
Page 156 c©2009 n + 1, Inc All Rights Reserved

JAVAWEB PROGRAMMING
7.2.2 Core Tags
The core library provides a set of mechanisms for displaying data and controlling the flow of theuser interface. They introduce the ability to provide conditionals and loops into theweb applicationwithin a tag set. The following sections provides a tour of the most commonly used core tags.
Page 157 c©2009 n + 1, Inc All Rights Reserved

CHAPTER 7. TAG LIBRARIES
Set Tag
The set tag is used to define a variable and associate a value with it. The tag extends the conceptof a variable by allowing it to be associated with any of the web scopes: page, request, session, orapplication. Below is a simple example of setting a variable within a JSP page.
<c:set var="counter" value="10" scope="request"/>
The tag has three attributes available. The var attribute is the name of the variable to create. Thevalue attribute associates the value with the variable name. It can be a constant as shown in theexample above or it canbe the result of anELevaluation. The scope determineswhat objectwill holdthe variable. In this case the HttpServletReqeust object. That does it by calling the setAttribute(...)method on the request object.
The page scope associates the variable with the current page object. request scope associates withthe HTTP request and is the same as calling request.setAttribute(...). The session scope associates thevariable with the HttpSession object. It is the same as calling session.setAttribute(). The applicationscope associates the variable with the application’s context. The most common values for the scopeis request and session. The page scope can be used for local variables that are not passed to includetags.
The nice thing about the set tag is the variable can be accessed by a JSP EL statement. Below is anexample of displaying the content from a set.
<c:set var="counter" value="10" scope="page"/>
<p>
The value of the counter is ${counter}.
</p>
In this example the variable is access and displayed on the web page using standard EL constructs.It will generate the following HTML.
<p>
The value of the counter is 10.
</p>
Set can be used multiple times for a single variable. A new set will replace the current valueassociatedwith the variable to the new one. It works in a similar fashion to the assignment operatorin Java. Below is an example of using EL to set a variable to a new value.
<c:set var="counter" value="10" scope="page"/>
<c:set var="counter" value="${counter + 2}" scope="page"/>
<p>
The value of the counter is ${counter}.
</p>
Page 158 c©2009 n + 1, Inc All Rights Reserved

JAVAWEB PROGRAMMING
forEach Tag
The forEach tag provides a simple tag based looping mechanism for a JSP page. It works byrepeating the content between the open and closing tags a defined set of iterations. The iterationscan be defined as a set number of iterations or it can be told to loop through all the elements of anyclass that implements the Collection interface or a Java array.
The ability of the forEach tag to loop through the elements of any class that implements theCollectioninterface makes it ideal for looping through Lists, Sets, and Enumerations. It makes the taginvaluable for displaying a list of data within a JSP. It removes the need for JSP scriptlets to managelooping which can be unwieldy.
Table 7.2 shows the list of attributes that are used by the forEach tag.
Attribute Description
var Name associated with the object that is currently the focus of the iteration
items The Collection or array of items to be iterated over
begin Alternate to items that defines the start number for a known loop size
end The end number for a known loop size
step The size of increment for a known loop size
Table 7.2: URIs For JSTL
When dealing with the forEach tag there are really two different looping mechanisms. One is forloops with a known size and one for iterating over the contents of an entire collection. The knownloop uses the begin and end attributes to set up the boundaries of the loop with the step functioncapability provided by the step attribute. In the case of Collections or arrays, the items attribute isused to define what list is going to be traversed. In both cases the var attribute assigns a variable tohold the value from the current loop iteration.
The easier to understand is the forEach that uses a known loop size. Below is an example of a simplelooping mechanism that iterates between 2 and 7.
<c:forEach var="counter" begin="2" end="7">
The counter is at ${counter}<br/>
</c:forEach>
Page 159 c©2009 n + 1, Inc All Rights Reserved

CHAPTER 7. TAG LIBRARIES
This example would result in the following HTML.
The counter is at 2<br/>
The counter is at 3<br/>
The counter is at 4<br/>
The counter is at 5<br/>
The counter is at 6<br/>
The counter is at 7<br/>
Compare this example to the same solution using JSP scriptlets.
<%
for ( int x = 2; x <= 7; x++ ) {
%>
The counter is at <%= x %><br/>
<%
}
%>
Which one is easier to read? Which one can be managed without knowing anything about Java?The answer is obvious. The real purpose for the JSTL is tomake it easier tomanage the user interfaceusing JSPs.
The mechanism for looping over collections of data is a bit more complicated to explain but easyto use. The items attribute is used to define the collection using EL. This means that the collectionmust be visible from EL. It must be an attribute of either the page, request, session, or applicationobjects.
The best way to understand the process is to go through an example.
<%
java.util.ArrayList list = new java.util.ArrayList();
list.add("Test 1");
list.add("Test 2");
list.add("Test 3");
list.add("Test Over");
request.setAttribute("myList", list);
%>
<c:forEach var="entry" items="${myList}">
${entry}<br/>
</c:forEach>
The first step is the construction of the list. It needs to be accessible from EL. This is accomplishedby adding it as an attribute to the request object with the name myList. The name can be used bythe EL to reference the collection.
Page 160 c©2009 n + 1, Inc All Rights Reserved

JAVAWEB PROGRAMMING
When the code gets to the forEach tag, it begins a loop with the first element in the list. Each itemin the collection is traversed. The value associated to the entry variable will be different for eachloop. It will hold the current iteration of the loop. In this instance, the following HTML would begenerated.
Test 1<br/>
Test 2<br/>
Test 3<br/>
Test Over<br/>
The real power of using the forEach loop with EL is in the ability to loop through and display datafrom a list of objects. The final example of the section uses the following Employee object.
public class Employee {
private int id;
private String firstName;
private String lastName;
public Employee(int id, String firstName, String lastName) {
this.id = id;
this.firstName = firstName;
this.lastName = lastName;
}
public void setId(int id) {
this.id = id;
}
public void setFirstName(String name) {
this.firstName = name;
}
public void setLastName(String name) {
this.lastName = name;
}
public int getId() {
return id;
}
public String getFirstName() {
return firstName;
}
public String getLastName() {
return lastName;
}
}
Page 161 c©2009 n + 1, Inc All Rights Reserved

CHAPTER 7. TAG LIBRARIES
This time the example will create a list of objects and iterate over the objects using the forEach tag.Each element will be accessed using EL to pull data directly from the bean / data object.
<%
Employee one = new Employee(1, "Jane", "Doe");
Employee two = new Employee(13, "Beth", "Smith");
Employee three = new Employee(7, "Sarah", "Johnson");
java.util.LinkedList list = new java.util.LinkedList();
list.add(one);
list.add(two);
list.add(three);
request.setAttribute("employees", list);
%>
<table border="1" cellspacing="0" cellpadding="4">
<tr>
<td>Employee ID</td>
<td>First Name</td>
<td>Last Name</td>
</tr>
<c:forEach var="employee" items="${employees}">
<tr>
<td>${employee.id}</td>
<td>${employee.firstName}</td>
<td>${employee.lastName}</td>
</tr>
</c:forEach>
</table>
Page 162 c©2009 n + 1, Inc All Rights Reserved

JAVAWEB PROGRAMMING
In this case each iteration of the loop grabs individual objects from the list and uses the “.” in EL toaccess the attributes of each object. The resulting HTML is shown below.
<table border="1" cellspacing="0" cellpadding="4">
<tr>
<td>Employee ID</td>
<td>First Name</td>
<td>Last Name</td>
</tr>
<tr>
<td>1</td>
<td>Jane</td>
<td>Doe</td>
</tr>
<tr>
<td>13</td>
<td>Beth</td>
<td>Smith</td>
</tr>
<tr>
<td>7</td>
<td>Sarah</td>
<td>Johnson</td>
</tr>
</table>
Page 163 c©2009 n + 1, Inc All Rights Reserved

CHAPTER 7. TAG LIBRARIES
if Tag
The if tag can be used for simple conditional tests. It has one attribute, test, which is used to performthe expression test using EL. The results of the expression must be “true” or “false” otherwise anerror will occur.
Below is an example using the if tag.
<c:forEach var="counter" begin="1" end="10">
${counter}</br>
<c:if test="${counter == 5}">
We are half way!</br>
</c:if>
</c:forEach>
It would result in the following HTML
1</br>
2</br>
3</br>
4</br>
5</br>
We are half way!</br>
6</br>
7</br>
8</br>
9</br>
10</br>
The only drawback to using the if tag is the lack of an else or else if tag. Thatmeans the if tag can onlybe used in a situation where a single comparison is needed. If the more common multi-conditionalimplementation is needed then the choose tag is used.
Page 164 c©2009 n + 1, Inc All Rights Reserved

JAVAWEB PROGRAMMING
choose Tag
The choose tag is the conditional tag for developer wanting to domultiple choice conditionals. Themain choose tag is a wrapper tag for the multiple conditionals and has no attributes. The two innertags that are used to perform each of the conditionals are when and otherwise tags. The when taghas a test attribute for providing an expression test. It is possible to use multiple when tags withinthe choose. The code will use the first conditional that evaluates to true. The otherwise tag is theequivalent of the else in an if/else command. It will be selected for execution if none of the otherchoose tags evaluate to true.
Below is a simple example to provide a better understanding of how to use the choose tag.
<%
Person person = new Person();
person.setName("Beth Smith");
person.setAge(23);
request.setAttribute("beth", person);
%>
<c:choose>
<c:when test="${beth.age > 20}">
Come on in ${beth.name}, you are old enough to enter the club.
</c:when>
<c:when test="${beth.age < 1}">
That is not a real age.
</c:when>
<c:otherwise>
Sorry ${beth.name}, I can’t allow you into the club. You are
not old enough.
</c:otherwise>
</c:choose>
The choose tag denotes that a conditional decision is being made. Inside the tag, the developer musthave at least onewhen tag. In this example, twowhen tags are used to provide different conditionals.The first test to make sure the user is 21 or older. The second checks to see if the age is zero or anegative value. If neither tag’s conditions are met then the value from the default otherwise tag willbe chosen.
Page 165 c©2009 n + 1, Inc All Rights Reserved
CHAPTER 7. TAG LIBRARIES
url Tag
The url tag is a handy tag that can be used to properly encode URLs. It can be used as a standalong tag to create a URL or it can be used in conjunction with the param tag to build more complexURLs.
The basic url tag has two attributes associated with it. The var attribute is used to assign the URLto a variable that can be displayed at a later time. The second is the value attribute. It allows theuser to define the URL to create . It can be either a full URL, a relative URL, or one based uponthe application root. A full URL is one that contains the “http://” moniker at the beginning. A rootbased URL is one that begins with a leading “/” character. Relative paths are ones that do no beginwith either a “/” or an “http://” and are based upon the path of the currently accessed URL.
The following example shows how the three different types are used. For the purpose of theexample, the URL of the current page is http://nplus1.net/foobie/employee/benefits.html. In this instancethe application root is foobie. The first example uses the full URL type.
<a href="<c:url value="http://cnn.com"/>">Test URL 1</a>
It would result in the following HTML.
<a href="http://cnn.com">Test URL 1</a>
The full URL is never used within a URL tag because it is an unnecessary step. The next exampleuses the application root as a starting position for creating the URL.
<a href="<c:url value="/work/timesheet.html"/>">Test URL 1</a>
It would result in the following HTML.
<a href="http://nplus1.net/foobie/work/timesheet.html">Test URL 1</a>
In this case the root application is foobie therefore the URL in the example would be expanded fromthe application root. The final example is relative paths.
<a href="<c:url value="healthplan.html"/>">Test URL 1</a>
Since it is a relative path, the value is based upon the path of the previous URL. It would generatethe following HTML.
<a href="http://nplus1.net/foobie/employee/healthplan.html">Test URL 1</a>
Page 166 c©2009 n + 1, Inc All Rights Reserved

JAVAWEB PROGRAMMING
Notice that the path used “http://nplus1.net/foobie/employee/” is the same path for the currentURL.
The url tag does not have to be used solely for simple URL generation. It can be used for URLs thatinclude request parameters. For example:
http://nplus1.net/foobie/work/timesheet.html?id=42&day=13&month=January
In this case three parameters are being passed along with the URL. The first is the id whose valueis 42. The second and third are used to pass the value for the day and month respectively.
It is possible to build this type of complex URL using a url tag. But it can only be accomplished withthe help of the param tag. The param tag has two attributes for this function, name and value. Thename/value pair represents a parameter formed at the end of the URL. The previous URL could beconstructed with the url tag is shown below.
<c:url value="/work/timesheet.html" var="timeUrl">
<c:param name="id" value="42"/>
<c:param name="day" value="13"/>
<c:param name="month" value="January"/>
</c:url>
In this case it is associated with the variable timeUrl. The value can be placed within a HREF tagusing EL.
<a href="${timeUrl}">Edit timesheet for Jan 13th</a>
The following URL would result.
<a href="http://nplus1.net/foobie/work/timesheet.html?id=42&
day=13&month=January">Edit timesheet for Jan 13th</a>
This concept can be extended by using EL in the value portion of the param tag. An action whichmakes it easy to generate dynamic URLs. Below is an example using the forEach loop to generatemultiple dynamic URLs.
<%
ArrayList<Employee> employees = new ArrayList<Employee>();
employees.add(new Employee(101, "John", "Doe"));
employees.add(new Employee(102, "Jane", "Doe"));
employees.add(new Employee(103, "Beth", "Smith"));
employees.add(new Employee(104, "Sarah", "Johnson"));
request.setAttribute("employeeList", employees);
Page 167 c©2009 n + 1, Inc All Rights Reserved

CHAPTER 7. TAG LIBRARIES
%>
<table border="0" cellspacing="0" cellpadding="4">
<tr>
<td>Last Name</td>
<td>First Name</td>
<td> </td>
</tr>
<c:forEach var="employee" items="${employeeList}">
<c:url value="editName.html" var="editUrl">
<c:param name="employeeId" value="${employee.id}"/>
</c:url>
<tr>
<td>${employee.lastName}</td>
<td>${employee.firstName}</td>
<td> <a href="$editUrl">Edit Name</a> </td>
</tr>
</c:forEach>
</table>
Page 168 c©2009 n + 1, Inc All Rights Reserved

JAVAWEB PROGRAMMING
In this example, four Employee objects are added to an ArrayList named employees. It in turn isadded to the request as an attribute named employeeList. The forEach tag within the page loopsover each element from the ArrayList and assigns it to the variable employee. Each employee’s id isassociated with the editUrl variable and then used within a HREF tag to dynamically create a URLbased upon the employee’s id. The example above would generate the following HTML.
<table border="0" cellspacing="0" cellpadding="4">
<tr>
<td>Last Name</td>
<td>First Name</td>
<td> </td>
</tr>
<tr>
<td>Doe</td>
<td>John</td>
<td>
<a href="http://nplus1.net/foobie/editName.html?employeeId=101">
Edit Name</a>
</td>
</tr>
<tr>
<td>Doe</td>
<td>Jane</td>
<td>
<a href="http://nplus1.net/foobie/editName.html?employeeId=102">
Edit Name</a>
</td>
</tr>
<tr>
<td>Smith</td>
<td>Beth</td>
<td>
<a href="http://nplus1.net/foobie/editName.html?employeeId=103">
Edit Name</a>
</td>
</tr>
<tr>
<td>Johnson</td>
<td>Sarah</td>
<td>
<a href="http://nplus1.net/foobie/editName.html?employeeId=104">
Edit Name</a>
</td>
</tr>
</table>
Page 169 c©2009 n + 1, Inc All Rights Reserved

CHAPTER 7. TAG LIBRARIES
7.2.3 Format Tags
The Format librarywasmeant to handle internationalization issues that arisewhen developingwebapplications. While this course doesn’t have time to delve into the concepts behind international-ization, it can look at two useful tags for displaying numeric and date data.
Page 170 c©2009 n + 1, Inc All Rights Reserved

JAVAWEB PROGRAMMING
formatNumber Tag
The format number tag can be a relief for people who have had to display formatted numberson a web page. The biggest pain in working with Java numbers is the proper display of floatingpoint numbers. By default Java will print out all of the decimal places it has for a number. Thatcould be zero to many. The formatNumber tag has two attributes to deal with this problem. ThemaxFractionDigits and the minFractionDigits.
What if a developer needed to display 5 floating point numbers on the page and only wanted toshow them to three decimal places? How could they use the formatNumber tag to accomplish thistask. The example below is one possible solution.
<%
double [] numbers = { 4.2521, 4.2567, 4.0, 4.2, 4.13 };
request.setAttribute("results", numbers);
%>
<table border="0" cellspacing="0" cellpadding="4">
<tr>
<td>Year</td>
<td>Results</td>
<c:set var="year" value="2003"/>
</tr>
<c:forEach var="result" items="${results}">
<tr>
<td>${year}</td>
<td align="right">
<fmt:formatNumber maxFractionDigits="3" value="${result}"/>
</td>
</tr>
<c:set var="year" value="${year + 1}"/>
</c:forEach>
</table>
Page 171 c©2009 n + 1, Inc All Rights Reserved

CHAPTER 7. TAG LIBRARIES
This would result in the following HTML
<table border="0" cellspacing="0" cellpadding="4">
<tr>
<td>Year</td>
<td>Results</td>
</tr>
<tr>
<td>2003</td>
<td align="right">4.252</td>
</tr>
<tr>
<td>2004</td>
<td align="right">4.257</td>
</tr>
<tr>
<td>2005</td>
<td align="right">4.0</td>
</tr>
<tr>
<td>2006</td>
<td align="right">4.2</td>
</tr>
<tr>
<td>2007</td>
<td align="right">4.13</td>
</tr>
</table>
The only problem with the output is that the numbers will not line up on the page by decimalplace. This problem can be resolved by changing the formatNumber tag to add a value for theminFractionDigits. It will ensure that the defined number of decimal places will be displayed.
<fmt:formatNumber minFractionDigits="3" maxFractionDigits="3"
value="${result}"/>
Page 172 c©2009 n + 1, Inc All Rights Reserved

JAVAWEB PROGRAMMING
It would generate the revised HTML where all the numbers have the same number of decimalplaces and would line up neatly on the screen.
<table border="0" cellspacing="0" cellpadding="4">
<tr>
<td>Year</td>
<td>Results</td>
</tr>
<tr>
<td>2003</td>
<td align="right">4.252</td>
</tr>
<tr>
<td>2004</td>
<td align="right">4.257</td>
</tr>
<tr>
<td>2005</td>
<td align="right">4.000</td>
</tr>
<tr>
<td>2006</td>
<td align="right">4.200</td>
</tr>
<tr>
<td>2007</td>
<td align="right">4.130</td>
</tr>
</table>
The attributes maxIntegerDigits and minIntegerDigits work in the same fashion, but they deal withthe number of digits to the left of the decimal place or whole numbers. Another attribute that isuseful for dealing with large whole number is the groupingsUsed attribute. This will break up largenumbers into 3 digit groupings. In the US those groups are separated by a ,. For example thenumber 10000000000.12 can be displayed as 10,000,000,000.12.
<fmt:formatNumber value="10000000000.12" groupingsUsed="true"/>
Here is where the internationalization part comes into play. If the locale of the server is somewherein Europe the previous example would be shown using European standards and the value wouldbe shown as 10.000.000.000,12.
Page 173 c©2009 n + 1, Inc All Rights Reserved

CHAPTER 7. TAG LIBRARIES
Another useful feature of the formatNumber tag is the ability to assign a type value to a number. Thetype attribute allows the developer to set the type. By default all numbers are treated as the type“number”. Two other types are available the “percent” and “currency” types. Both of which usethe locale for determining what to display. Below is an example of using the currency type.
<fmt:formatNumber type="currency" value="12342.12"/>
It would display the value as $12,342.12.
Page 174 c©2009 n + 1, Inc All Rights Reserved

JAVAWEB PROGRAMMING
formatDate Tag
The formatDate tag can be used to format both dates and times. The tag supports five differentattributes. The value attribute holds the date or time to be formatted. The type attribute is usedto determine what time representation to used. The valid entries are “date”, “time” or “both”.Date and time are used to show either the date or the time respectively while both will displaythe time and the date in a combined format. The next attribute to define is the dateStyle andthe timeStyle. These are predefined output formats for each date/time type. Valid values include“short”, “medium”, “long” or “full”. The output for each type is the same as those defined by thejava.text.DateFormat object within the Java API. Table 7.3 shows example formating for each type.
Type Date Example Time Example
short 1.13.72 5:08am
medium Jan 13, 1972 5:08am
long January 13, 1972 5:08:12am
full Thursday, January 13, 1972 AD 5:08:12am EDT
Table 7.3: Date / Time Types
Below are three examples of using the formatDate followed by the HTML output that would beproduced.
<%
Date date = new Date();
request.setAttribute("rightNow", date);
%>
<fmt:formatDate type="date" value="${rightNow}" dateStyle="medium"/><br/>
<fmt:formatDate type="time" value="${rightNow}" timeStyle="long"/><br/>
<fmt:formatDate type="both" value="${rightNow}" dateStyle="short"
timeStyle="short""/>
The HTML:
Jan 23, 2009<br/>
2:18:03pm<br/>
1.23.2009 2:18pm
Page 175 c©2009 n + 1, Inc All Rights Reserved

CHAPTER 7. TAG LIBRARIES
While these generic types are handy in many cases, it doesn’t come close to handling all of theneeds for a developer. Instead of using the dateStyle and timeStyle the developer can create a customformatting pattern. The allowed patterns are defined in the java.text.SimpleDateFormat object.
These symbols can be combined in various combinations to create a wide variety of date and timetypes for display. Table 7.4 provides a list of common formatting options.
Character Description
y year
M month in year
d day in month
E day in week (ex Monday, Tue)
H Hour in day (24 hour)
h hour in AM / PM
m minute in hour
s second in minute
a AM / PM
z time zone (ex EDT, CST)
Table 7.4: Date Pattern Symbols
Below are three examples of using the patterns from Table 7.4 to create custom date output.
<fmt:formatDate value="${rightNow}" patten="M/d/yyyy"/><br/>
<fmt:formatDate value="${rightNow}" patten="HH:mm:ss"/><br/>
<fmt:formatDate value="${rightNow}" patten="MMM d, yyyy hh:mm:ss a"/><br/>
The results of these patterns are shown below.
1/25/2009<br/>
14:25:42<br/>
Jan 25, 2009 2:25:42 pm<br/>
Page 176 c©2009 n + 1, Inc All Rights Reserved

JAVAWEB PROGRAMMING
7.3 Custom Tag Libraries
The JSTL is an excellent tool for assisting the developer in the creation of the visual elements insideof a JSP page. Unfortunately, it doesn’t easily meet all of the needs for a developer. In thoseinstances, a more custom solution to the user interface is appropriate. This is where the creation ofcustom tag libraries prove useful.
Tags can be lumped into two categories when discussing the creation of a custom tag library. Thereare simple tags that do not contain a body. They are self contained tags that perform a singularoperation. Below is an example of a body-less tag.
Multiplying 5 and 10 leads to a result of <tag:multiply x="5" y="10"/><br/>
The more complicated group of tags are those that have a body. Tags that allow data to beencompassed within the start and end tags. Below is an example of a customized tag that hascontent between the tags.
<tag:loop start="2" iterations="5">
${loopValue}<br/>
</tag:loop>
The section that follows goes through the basic steps necessary for the construction of a simplebody-less tag file and then expands upon it to encompass more complicated tags which containcontent.
Page 177 c©2009 n + 1, Inc All Rights Reserved

CHAPTER 7. TAG LIBRARIES
7.3.1 Simple Tag Files
The first step in creating a custom tag is to the generation of the business logic for the tag. It isaccomplished by creating a .tag file which contains all of the coding associated with the tag. A .tagfile is nothing more than a JSP fragment. Since it is JSP based, it has all of the properties available toa JSP page. This includes the implicit objects. The only thing that differentiates it from a JSP pageis that it must be marked with a JSP tag directive at the top of the page.
Once the tag is coded, the tag stub must be made available to the web application. This is done bysticking the stub into the war files’s WEB-INF/tag directory. At deployment time, the applicationserver will sift through the war file and find all of the custom tags. All that remains to do is toinvoke the custom tag from within other JSP pages.
Page 178 c©2009 n + 1, Inc All Rights Reserved

JAVAWEB PROGRAMMING
Directives
There are two directives that are specifically assigned to the creation of tags. The tag directiveinforms the container that the fragment is a custom tag. The body-content attribute of the directiveis used to tell the container which type of tag it is. A value of “empty” tells the container that thetag is body-less. If the tag is a complex tag with a body then the value of “scriptless” is used.
<%@ tag body-content="empty" %>
<%@ tag body-content="scriptless" %>
It is important to note that the tag directive must be the first line within the tag fragment.
The second directive reserved for tags is the attribute directive. It defines the attributes that can beassociated with a tag. In the example previously, the multiply tag had two attributes associatedwith it. They were the values of x and y. For these attributes to be available to the tag they must bedefined within the tag fragment using the attribute directive.
Attributes must define three properties. First and foremost they must have a name to associate tothe tag. This is the name of the tag’s attribute. The attribute must also have a data type associatedwith it. This value can be either a String or any of the primitive wrapper classes. Lastly, a requiredvalue is used to determine if the tag’s attribute is a required attribute or not. This value can be either“true” or “false”. Below are some example of defining tag attributes.
<%@ attribute name="firstName" required="true" type="java.lang.String" %>
<%@ attribute name="age" required="true" type="java.lang.Integer" %>
<%@ attribute name="weight" required="false" type="java.lang.Double" %>
The initial attribute, firstName, is a required attribute whose value will be a String. The secondattribute, age, is also required and the value must be an integer. The final attribute, weight, is notrequired but if it is it must be a double value.
The fragment below brings the two directives together into a cohesive example.
<%@ tag body-content="empty" %>
<%@ attribute name="firstName" required="true" type="java.lang.String" %>
<%@ attribute name="age" required="true" type="java.lang.Integer" %>
<%@ attribute name="weight" required="false" type="java.lang.Double" %>
Page 179 c©2009 n + 1, Inc All Rights Reserved

CHAPTER 7. TAG LIBRARIES
If this fragment is placed within a person.tag file, then the following examples would be validinvocations of the tag file. Notice how the attributes defined above translate into the invocation ofthe tag.
<tag:person firstName="Beth" age="23"/>
<tag:person firstName="John" age="24" weight="172.4"/>
The next set of tag invocations will fail. Why?
<tag:person firstName="Beth" weight="101.4"/>
<tag:person age="24" weight="172.4"/>
<tag:person firstName="Beth"/>
The first and third exampleswould fail because the required field agewas not supplied. The secondwould fail because the required field firstName was not defined as an attribute of the tag.
One final note before moving on to tag creation is the additional attribute rtexprvalue. rtexprvaluedetermines whether or not a attribute can include a run time expression. By default attributes allowrtexprvalue. Thatmeans that a JSP expression scriptlet can be used for the assignment of an attribute.Below is an example of using a JSP expression scriptlet when defining an attribute for a custom tag.
<tag:person firstName="<%= session.getAttribute("name") %>"/>
Page 180 c©2009 n + 1, Inc All Rights Reserved

JAVAWEB PROGRAMMING
Creating The Tag’s Business Logic
Once the tag is defined, it is time to embed the tag logic. A tag can contain almost any elementwhich can be found in a normal JSP page. It can use the taglib directive, page directive, and any ofthe implicit variables defined by JSP.
Below is a solution of the multiply tag used in previous examples.
<%@ tag body-content="empty" %>
<%@ attribute name="x" required="true" type="java.lang.Integer" %>
<%@ attribute name="y" required="true" type="java.lang.Integer" %>
${x * y}
In this case the tag is being defined alongwith two attributes, x and y. The values from the attributesare multiplied in the EL statement on the last line to show the results of the operation.
While the simple example is effective, it is not very illustrative of what can be done within a tag.Let’s embellish the example a bit and add a third variable which is optional. In addition, theexample will get the user information from the session object and display it along with the results.
<%@ tag body-content="empty" %>
<%@ attribute name="x" required="true" type="java.lang.Integer" %>
<%@ attribute name="y" required="true" type="java.lang.Integer" %>
<%@ attribute name="z" required="false" type="java.lang.Integer" %>
<%@ taglib uri="http://java.sun.com/jsp/jstl/core" prefix="c" %>
<c:set var="results" value="${x * y}"/>
<c:if test="${!empty z}">
<c:set var="results" value="${results * z}"/>
</c:if>
<%
String name = (String)session.getAttribute("userName");
out.print(name + ", the answer to the problem ");
%>
${x} * ${y}
<c:if test="${!empty z}">
* ${z}
</c:if>
is ${results}
In this example the results are first calculated for x times y. A test is next done to see if the z attributewas supplied. If it is then the multiplication includes the z value to calculate the results. Once theresult is tabulated, the code retrieves the name from the session object and uses the out variable
Page 181 c©2009 n + 1, Inc All Rights Reserved

CHAPTER 7. TAG LIBRARIES
to display the user’s name. This was done to provide an example of using scriptlets and implicitvariables within the tag. In the real world the JSP scriptlet would have been replaced with an ELexpression shown below.
${userName}, the answer to the problem
Once the userName is outputted, a test is done to see if the z attribute was supplied. If z is definedthen the display of the formula and results will include the value of z.
Page 182 c©2009 n + 1, Inc All Rights Reserved

JAVAWEB PROGRAMMING
Adding Tag Files To WARWith Ant
Now that the simple tag fragment has been coded, how does a developer add the tag into the WARfile generated at compile time? The task can be accomplished through a simple modification to theANT build.xml file.
The .tag file needs to be added to the WEB-INF/tags directory within the war file. The zipfileset tagthat was used to put all of the JSP, HTML, and other resources into the root of the war file can beused to accomplish the task of putting the tag fragmentswithin a tag directorywithin theWEB-INF.
Below is a modified version the ANT file to include tags.
<war destfile="${dist}/course.war" webxml="${conf.web}/web.xml">
<classes dir="${build}"/>
<lib dir="${web.lib}"/>
<zipfileset dir="${web.jsp}"/>
<zipfileset dir="${web.tags}" prefix="WEB-INF/tags/"/>
</war>
The line below is what was added to the build.xml file for the inclusion of tags.
<zipfileset dir="${web.tags}" prefix="WEB-INF/tags/"/>
The zipfileset task takes all of the tags that reside within the web.tags directory and zip them into asingle directory. The prefix attribute is defines what directory within the WAR file in which theywill be placed. In this case they are included in the WEB-INF/tags directory.
Page 183 c©2009 n + 1, Inc All Rights Reserved

CHAPTER 7. TAG LIBRARIES
Invoking Tag Files
The next step after adding the tag files to the WAR file is to import them into JSP pages. The stepsfor using custom tag libraries are the same for using JSTL. All a developer needs is the proper taglibdirective and the custom tag will be available. Below is an example of importing a tag library.
<%@ taglib prefix="bs" tagdir="/WEB/INF/tags" %>
The directive does two things. It points to the WEB-INF/tags directory to look for the appropriatetag information. Secondly, It uses the XML prefix “bs” to provide a unique namespace for tag calls.It associates the namespace with the set of custom libraries. The name of the tag to invoke mustmatch the name defined in the JSP tag fragment. Below is an example of invoking the multiply tagdefined earlier.
<%@ taglib prefix="bs" tagdir="/WEB/INF/tags" %>
<html>
<body>
<h2>Multiply Numbers</h2>
<p>
5 * 4 = <bs:multiply x="5" y="4"/><br/>
8 * 7 = <bs:multiply x="8" y="7"/>
</p>
<h2>Squares</h2>
<p>
<c:forEach var="num" begin="1" end="10">
Square of ${num} is
<bs:multiply x="${num}" y="${num}"/><br/>
</c:forEach>
</p>
</body>
</html>
Page 184 c©2009 n + 1, Inc All Rights Reserved

JAVAWEB PROGRAMMING
7.3.2 Tag With Body
It is possible to extend the basic functionality of the body-less tag to include working with theinformation placed between the opening and closing of the custom tag. Below is an example of anXML tag that contains a body.
<b>This is a test</b>
In this case the XML tag is a HTML bold tag. The body of the bold tag is the text in between theopening and closing of the bold tag. In this instance the data is “This is a test”. In HTML, thebrowser would take the data between these tags and use a bold font for the display of the text.
When working with custom tags that contain a body, the body-content of the tab must be changedfrom “empty” to “scriptless”. Otherwise the definition of the tag doesn’t change.
The next step would be to add the internal logic for the tag. In this case the <jsp:doBody/> tag canbe used to represent the content between the tags.
The simplest example of using the body is a simple looping mechanism. The sample tag is set toshow the body of the tag “x” number of times. The number of iterations is defined by the requiredattribute iterations. In this instance the tag will add the text “Iteration x:” before the body.
<%@ tag body-content="scriptless"%>
<%@ attribute name="iterations" required="true" type="java.lang.Integer"%>
<%@ taglib prefix="c" uri="http://java.sun.com/jsp/jstl/core" %>
<c:forEach var="iter" begin="1" end="${iterations}">
Iteration ${iter}: <jsp:doBody />
</c:forEach>
Once the tag is coded, it uses the same process as defined for the body-less tag for using the customtag within a JSP page.
<%@ taglib prefix="n" tagdir="/WEB-INF/tags" %>
<%@ taglib uri="http://java.sun.com/jsp/jstl/core" prefix="c" %>
<html>
<body>
<h2>Looping</h2>
<n:loop iterations="5">
My Loop!
</n:loop>
</body>
</html>
The example would generate the following HTML.
Page 185 c©2009 n + 1, Inc All Rights Reserved
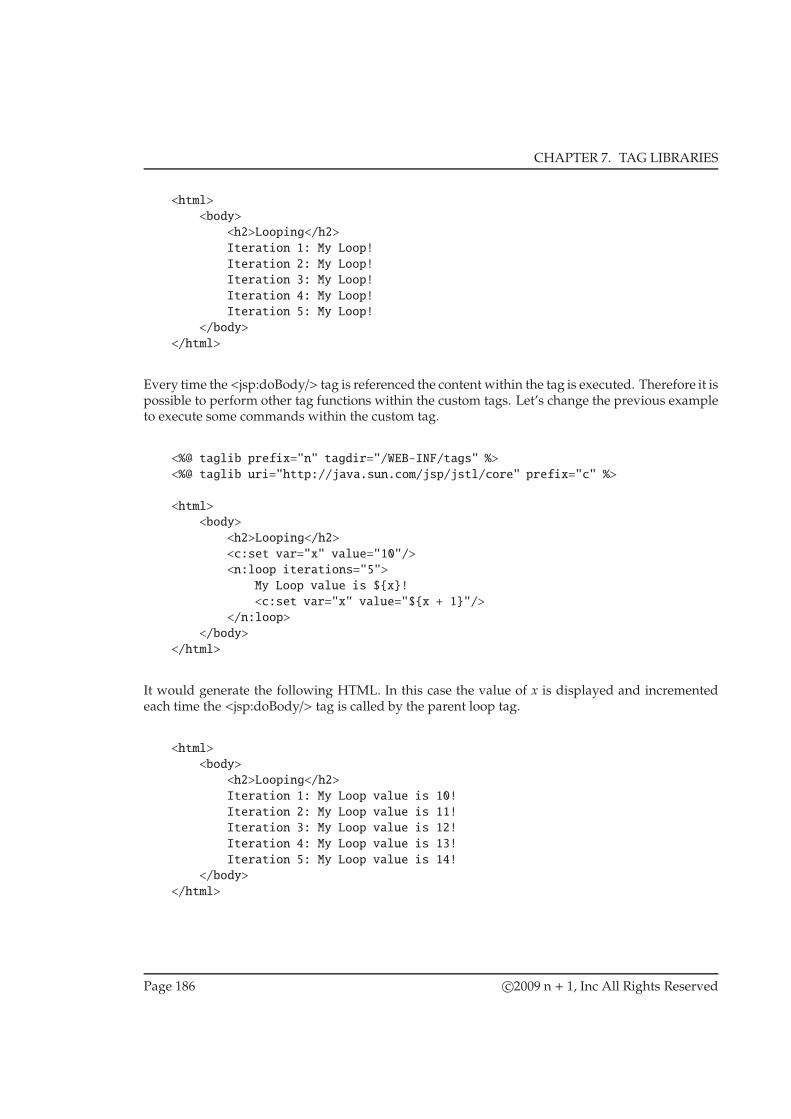
CHAPTER 7. TAG LIBRARIES
<html>
<body>
<h2>Looping</h2>
Iteration 1: My Loop!
Iteration 2: My Loop!
Iteration 3: My Loop!
Iteration 4: My Loop!
Iteration 5: My Loop!
</body>
</html>
Every time the<jsp:doBody/> tag is referenced the content within the tag is executed. Therefore it ispossible to perform other tag functions within the custom tags. Let’s change the previous exampleto execute some commands within the custom tag.
<%@ taglib prefix="n" tagdir="/WEB-INF/tags" %>
<%@ taglib uri="http://java.sun.com/jsp/jstl/core" prefix="c" %>
<html>
<body>
<h2>Looping</h2>
<c:set var="x" value="10"/>
<n:loop iterations="5">
My Loop value is ${x}!
<c:set var="x" value="${x + 1}"/>
</n:loop>
</body>
</html>
It would generate the following HTML. In this case the value of x is displayed and incrementedeach time the <jsp:doBody/> tag is called by the parent loop tag.
<html>
<body>
<h2>Looping</h2>
Iteration 1: My Loop value is 10!
Iteration 2: My Loop value is 11!
Iteration 3: My Loop value is 12!
Iteration 4: My Loop value is 13!
Iteration 5: My Loop value is 14!
</body>
</html>
Page 186 c©2009 n + 1, Inc All Rights Reserved

JAVAWEB PROGRAMMING
What about the possibility of naming conflicts. What if the looping tag used the variable x as well?
<%@ tag body-content="scriptless"%>
<%@ attribute name="iterations" required="true" type="java.lang.Integer"%>
<%@ taglib prefix="c" uri="http://java.sun.com/jsp/jstl/core" %>
<c:forEach var="x" begin="1" end="${iterations}">
Iteration ${x}: <jsp:doBody />
</c:forEach>
In this case, we would get the same results as before. Why? Because the variable x within the tagis a local variable and therefore it doesn’t affect the content of “x” within the body of the tag. Thereare no naming conflicts.
Page 187 c©2009 n + 1, Inc All Rights Reserved

CHAPTER 7. TAG LIBRARIES
Tag Variables
One final aspect of custom tags is the ability to share internal tag variables outside of the tag. Thevariable directive is used to define tag level variables that are accessible to the outside world. Thereare three variable scopes that can be applied to the tag. Each one will be explained in a moment.For now look at the format for the variable directive.
<%@ variable name-given="mySpiffyVariable" scope="AT_BEGIN" %>
The name-given attributedefines the name of the variablewhile the scope defineswhere the variableis accessible. There three scopes available are AT BEGIN, NESTED, and AT END. The list belowdefines each of these scopes.
• AT BEGIN – The variable is set before the body of the tag is evaluated. The variable usedwithin the body will be set to that new value. The final value of the variable will be visiblefor the entire page.
• NESTED – The variable is set before the body of the tag and can be used within the body ofthe tag. The variable is reset once tag scope has passed.
• AT END – The variable is not set before the body of the tag is evaluated. The variablemaintains it’s previous value during the body of the tag. Once the tag is processed the valueset by the tag will be visible for the entire page.
Normally this is not a good idea because variable names inside the tag are exposed to the externalcalling page. Such functionality makes it very difficult to re-use the tag because one must have anintimate knowledge of the tag’s internals before using it.
The only exception to the rule is when you pass in the name of the variable to create from the tag.This allows the JSP developer to define the name of the variable to be created and used by the page.Two new attributes to the variable directive are necessary to make this happen. The first is calledname-from-attribute. It associates a variable to the value from one of the tag’s attributes. In additionthe alias attribute is used to give the variable a local value to use within the tag. It may soundconfusing, but is easily understood from an example.
<%@ tag body-content="empty" %>
<%@ attribute name="squareVar" required="true" type="java.lang.String"
rtexprvalue="false" %>
<%@ attribute name="x" required="true" type="java.lang.Integer" %>
<%@ variable name-from-attribute="squareVar"
variable-class="java.lang.Integer"
alias="myvar" scope="AT_END" %>
<%@ taglib prefix="c" uri="http://java.sun.com/jsp/jstl/core" %>
<c:set var="myvar" value="${x * x}"/>
Page 188 c©2009 n + 1, Inc All Rights Reserved

JAVAWEB PROGRAMMING
In the example above the tag is given two attributes, squareVar and x. The squareVar attribute isgoing to be the name of the variable to create. For it to be used as a variable, the type must be aString and the rtexprvalue must be set to false. Next comes the variable definition. The squareVarattribute is assigned to a local variable with an alias of myvar.
The tag then defines myvar to be the square of the value of the attribute x.
The JSP page to use the new square tag would look like the following.
<%@ taglib prefix="n" tagdir="/WEB-INF/tags" %>
<%@ taglib uri="http://java.sun.com/jsp/jstl/core" prefix="c" %>
<html>
<body>
<h2>Squaring Stuff</h2>
<c:set var="myX" value="100"/>
<n:square squareVar="var1" x="10"/>
<n:square squareVar="var2" x="${myX}"/>
The number 10 squared is ${var1}<br/>
The number ${myX} squared is ${var2}<br/>
</body>
</html>
Here the square tag is called and the value passed into squareVar is var1 and the value is 10. Thetag associates the value of 10 squared to the variable var1 and makes it available to the rest of thepage. Thus when ${var1} is accessed later the value supplied is 100. The same principle holds forthe second square tag, but this time it uses a predefined variable to supply the x value.
It would result in the following HTML
<%@ taglib prefix="n" tagdir="/WEB-INF/tags" %>
<%@ taglib uri="http://java.sun.com/jsp/jstl/core" prefix="c" %>
<html>
<body>
<h2>Squaring Stuff</h2>
The number 10 squared is 100<br/>
The number 100 squared is 10000<br/>
</body>
</html>
Page 189 c©2009 n + 1, Inc All Rights Reserved

CHAPTER 7. TAG LIBRARIES
7.4 Lab Activity
Part 1.
The goal of the lab is to create an application that will list employee data. An employee has anemployee number, first name, last name, city, state, and a salary. The employee list will be storedin the HttpSession object.
The first step is to create a JSP page to display the contents of the employee list. Use JSTL core tagsand EL to populate the page. There should be no JSP scriptlets used in the creation of the page.
Provide a link at the bottom of the page to add a new employee.
Part 2.
Create a JSP page that only contains HTML widgets necessary to enter an employee’s data. Itshould have a widget for id, first name, last name, city, state, salary, and a submit button. Do notdefine the form tag within this page.
Part 3.
Next create an add employee JSP. The page should inform the user to add a new employee andprovide a form for the user to fill out the employee’s information. Use the import function of thecore library to import the HTML widgets created in part 2. The form tag should be defined in theadd employee JSP.
Part 4.
Create a JSP that processes the addition of a new user to the list and redirects the user to the listingJSP from part 1.
Part 5.
Modify the JSP in part 1 to display the salary as a monetary value using the format tag. Provide ahref around the employee number that links to an edit employee page. Use core url tag to createedit link tag.
Part 6.
Create an edit employee JSP that informs the user to edit data for an employee. Two things mustbe done to make this work. First edit the JSP created in part 2 to prepopulate the forms. Use theJSP in creating the edit task.
Secondly, use the core tags to identify the employee to edit. There should be no scriptlet tags withinthe edit employee JSP.
Part 7.
Create a JSP that processes the editing of the existing user and redirects the user to the listing JSPfrom part 1.
Page 190 c©2009 n + 1, Inc All Rights Reserved

JAVAWEB PROGRAMMING
Part 8. (Optional)
Create a custom tag that generates a dropdownbox for displaying states. It should have a parameterthat allows the developer to preset a particular state as selected. Populate the state box with 4 states.
Page 191 c©2009 n + 1, Inc All Rights Reserved

CHAPTER 7. TAG LIBRARIES
Page 192 c©2009 n + 1, Inc All Rights Reserved

Chapter 8
Java Web Programming Best Practices
Objectives
• Understand the MVC pattern
• Learn how to implement a Front Controller
• Learn how to implement an Application Controller
193

CHAPTER 8. JAVAWEB PROGRAMMING BEST PRACTICES
8.1 Best Practices
After learning the basic building blocks of Java web programming, it is now time to explore how touse the basic elements ofweb programming to develop high quality applications. One of the earliestdesign methodologies most considered good practice was the three tier development model. Inthis case the logic of an application is broken down into three separate tiers, presentation, business,and data.
The presentation tier is dedicated to the user interfaces experience. It is this tier were all ofthe coding logic is dedicated towards displaying information to or collecting data from the enduser. This includes things like input validation, user authentication and authorization, and statemanagement. The presentation tier is a combination of the attractive user interface interwovenwiththe security and stubs that talk to the application’s business tier.
The business tier is where all of the business logic in an application resides. This is where aprogrammer would implement the business rules for the application. It is the layer where data getsmanipulated as it flows between the user interface and the data store. It bridges the presentationtier and data tier. The data tier is where the data is stored andmaintained. Usually it takes the formof a database.
In the case of web applications, Servlets and JSP represent the presentation tier of an application.They canbeused in conjunction toprovide anattractiveuser interface,basic security, and a bridge fortalking with the business tier. The rest of the chapter outlines and develops a re-usable frameworkfor building a presentation tier.
Page 194 c©2009 n + 1, Inc All Rights Reserved

JAVAWEB PROGRAMMING
8.1.1 Goals For Web Framework
When creating a framework for web development, it is important to keep in mind a few goals fordevelopment. The first step is to look for known solutions to the problem to see if they can beapplied to the web framework. The best thing to do is look through known design patterns to seeif any are applicable to the development of a web framework.
Secondly, it is important that any solution properly implements the n-tier solution. It must separatethe user interface from the business rules in the middle tier. It is important that presentation tierdata objects are not used within the business tier. Doing so would tightly couple the presentationtier to the business tier.
The third thing to keep in mind is the necessity of avoiding unmanageable code blocks. Theframework being developed should encourage smaller block of code. Classes with over twohundred lines of code can prove unwieldy and difficult to manage over a long time. Part of theframework solutions is to isolate responsibilities.
If each role is separated then two good things happen. The code is more manageable and moreimportantly it reduces dependency problems in development. Dependency problems occur whentwo pieces of code are tightly coupled. Thus a change in one code block automatically affectsthe other block. Tightly coupled code makes it very difficult to deal with functional requirementchanges in an orderly way. Because changes to requirements make changes to tightly coupledsystems propagate throughout the project. If the framework is properly decoupled then changes toproject requirements are not as big of an issue. The inherit flexibility of the system makes it easierto handle the constant forces of change that inflict all projects.
Page 195 c©2009 n + 1, Inc All Rights Reserved

CHAPTER 8. JAVAWEB PROGRAMMING BEST PRACTICES
8.1.2 MVC Pattern
The first patten that is applicable to the web framework is the model/view/controller pattern orMVC for short. It is a pattern that has been used for developing user interfaces for many years. Themodel/view/controller pattern gets its name from the three components that make up the pattern.Themodel represents the data to be displayed to the end user. The view represents the user interfacethat the client sees. The controller is used to take user interface interactions to update the model orto view the state of the model. In short the controller is the middle man between the data and theclient.
It utilizes a known pattern to separate the user view from the business rules and data. So howdo Servlets and JSP elements fit into this model? The view is represented by the HTML that isdelivered to the client’s browser. The controller is going to be the web framework being developedand the model is represented by the business tier of the application. In effect the web framework isthe controller between the HTML delivered to end user and the business layer of the application.
The framework outlined in this courseware breaks the controller into two parts. The front controllerfor managing the view and the application controller that is used to manage interactions with thebusiness tier.
Page 196 c©2009 n + 1, Inc All Rights Reserved

JAVAWEB PROGRAMMING
8.2 Front Controller Servlet Pattern
HTML is a request based protocol, which means that all requests on a web application consist ofa series of URLs. If each URL is treated as a unique access point into the system it would be verydifficult to maintain consistency in the management of these requests. Think about security for asecond. If each URL was unique then each URL would have to force some sort of authorization.Thatmeans the system could introducemultiple forms of authorization or worse could accidentallyleave out authorization.
The idea behind the front controller servlet is to centralize where all incoming URLs are directed.Remembering back, serlvets could define wild cards for their servlet-pattern in the web.xml. Atthe time it was pointed out that the wild card allowed a servlet to be able to handle multiple URLs.This function can be exploited to create the front servlet. It would provide a central location for allincoming URL requests.
The pattern reduces the need for duplicate control logic and begins the process of separating thebusiness tier from the view. The front controller takes incoming URL requests and passes the valueto the action controller. The action controller is responsible for the request’s action logic. Theaction returns the view to display. The front controller is responsible for managing the display andreturning it to the end user’s browser.
Below is a graphical illustration of this concept.
Browser Front Controller Application Controller
JSP View
Business Tier
ActionFactory
Action
Concrete Action
CreateAction
Create
Figure 8.1: Basic MVC Framework
The HTML request comes into the front controller. Responsibility is handed to the applicationcontroller to handle the request. The application controller returns the view in the form of a URLto a JSP. The front controller is then responsible for forwarding control the JSP which creates theHTML returned to the client browser.
Page 197 c©2009 n + 1, Inc All Rights Reserved

CHAPTER 8. JAVAWEB PROGRAMMING BEST PRACTICES
8.2.1 Creating The Front Controller Servlet
The creating of a front controller servlet is a two step process. Start by creating the the servletclass and then create an entry in the web.xml file to associate a URL with the class. The examplebelow shows what needs to be added to the web.xml file to create a servlet that will handlemultiplerequests.
<servlet>
<servlet-name>FrontController</servlet-name>
<servlet-class>net.nplus1.web.FrontControllerServlet</servlet-class
</servlet>
<servlet-mapping>
<servlet-name>FrontController</servlet-name>
<url-pattern>/action/*</url-pattern>
</servlet-mapping>
When talking about the web.xml it is important to remember that there are two parts to defininga servlet. The servlet section which associates a name with the class file and the mapping whichmaps the class to a particular url pattern. In this case the url pattern utilizes the “*” wild card toindicate any URL to the web application that begins with a /action/. If the web applications rootcontext is foobie then all of the following URLs would match the pattern and be redirected to theservlet.
http://foobie.nplus1.net/foobie/action/myurl.html
http://foobie.nplus1.net/foobie/action/play/test.htm
http://foobie.nplus1.net/foobie/action/foo/bar/mine.jsp
http://foobie.nplus1.net/foobie/action/test/fun
Now that the web.xml file is defined, the next step is to create the class file. In this case, the classnet.nplus1.web.FrontControllerServletneeds to be defined.
package net.nplus1.web;
import javax.servlet.http.HttpServlet;
public class FrontControllerServlet extends HttpServlet {
}
Page 198 c©2009 n + 1, Inc All Rights Reserved
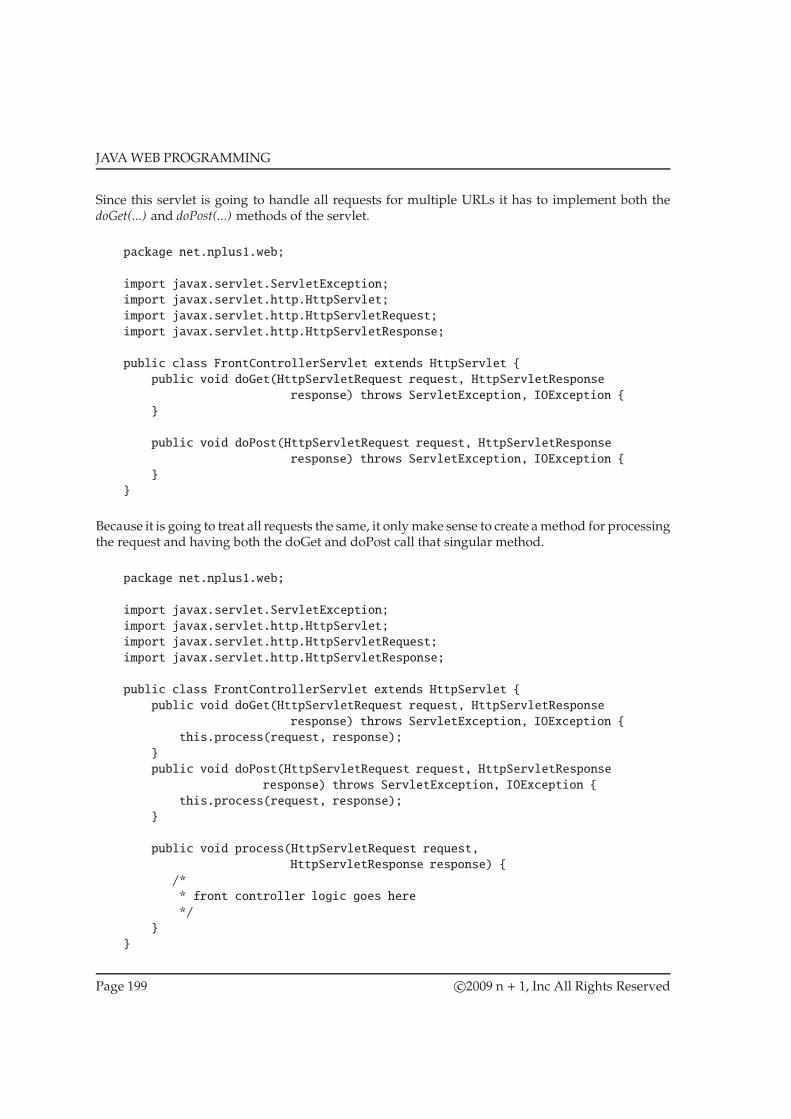
JAVAWEB PROGRAMMING
Since this servlet is going to handle all requests for multiple URLs it has to implement both thedoGet(...) and doPost(...) methods of the servlet.
package net.nplus1.web;
import javax.servlet.ServletException;
import javax.servlet.http.HttpServlet;
import javax.servlet.http.HttpServletRequest;
import javax.servlet.http.HttpServletResponse;
public class FrontControllerServlet extends HttpServlet {
public void doGet(HttpServletRequest request, HttpServletResponse
response) throws ServletException, IOException {
}
public void doPost(HttpServletRequest request, HttpServletResponse
response) throws ServletException, IOException {
}
}
Because it is going to treat all requests the same, it onlymake sense to create amethod for processingthe request and having both the doGet and doPost call that singular method.
package net.nplus1.web;
import javax.servlet.ServletException;
import javax.servlet.http.HttpServlet;
import javax.servlet.http.HttpServletRequest;
import javax.servlet.http.HttpServletResponse;
public class FrontControllerServlet extends HttpServlet {
public void doGet(HttpServletRequest request, HttpServletResponse
response) throws ServletException, IOException {
this.process(request, response);
}
public void doPost(HttpServletRequest request, HttpServletResponse
response) throws ServletException, IOException {
this.process(request, response);
}
public void process(HttpServletRequest request,
HttpServletResponse response) {
/*
* front controller logic goes here
*/
}
}
Page 199 c©2009 n + 1, Inc All Rights Reserved

CHAPTER 8. JAVAWEB PROGRAMMING BEST PRACTICES
8.2.2 Handling Incoming Requests and Displaying The View
An incoming request is sent to the Front Controller servlet’s doGet(...) or doPost(...) method and thecall is forward to the process(...) method. Since any number of possible URLs are directed to thismethod, the first task is to find out what URL the user has requested. This can be retrieved fromthe path information.
public void process(HttpServletRequest request,
HttpServletResponse response) {
String url = request.getPathInfo();
}
It is at this point that the Application Controller mentioned earlier comes into play. It takes the urland request information and processes the logic for the incoming request. It returns a view back tothe Front Controller for display. Rather than creating a newApplicationController on every requestthis is one of those times where it is acceptable to have a private member variable within a servlet.The Application Controller doesn’t hold any state so it won’t run into any problems running in athreaded environment.
TheApplicationController should bemade aprivatemember variable and initialized in the servlet’sinit()method.
private ApplicationController appController;
public void init() {
this.appController = new ApplicationController();
}
Now the url and request can be passed to the Application Controller and the view can be receivedback from the controller.
String view = appController.processRequest(url, request);
What view is returned? It returns the path to a particular JSP page that holds the displayableHTML.Once the view is returned, it is the job of the Front Controller to pass control to the designated JSP.This can be accomplished using the RequestDispatcher and the forward(...) method.
RequestDispatcher dispatcher =
this.getServletContext().getRequestDispatcher(view);
dispatcher.forward(request, response);
The JSP is responsible for the HTML view that is sent back the the browser. This makes sensebecause JSP pages are better than servlets for managing HTML information. At this point, the view
Page 200 c©2009 n + 1, Inc All Rights Reserved

JAVAWEB PROGRAMMING
should only contain display logic and should contain no control logic. The control logic should havebeen handled by the Application Controller. Any data returned from the business tier is placed intothe HttpServletRequest object by the Application Controller. Thus it is accessible from within theJSP view.
At this point it is time to think about error handling. What if the requested URL doesn’t have anaction associated with it? No view could be created and the value returnedwould be null. It is easyto check to see if the view is null. If it is then a 404 error can be returned to the user.
if ( view == null ) {
response.sendError(HttpServletResponse.SC_NOT_FOUND);
}
else {
RequestDispatcher dispatcher =
this.getServletContext().getRequestDispatcher(view);
dispatcher.forward(request, response);
}
Program 12 provides the code for the complete Front Controller.
Page 201 c©2009 n + 1, Inc All Rights Reserved

CHAPTER 8. JAVAWEB PROGRAMMING BEST PRACTICES
Program Listing 12 Front Controller Servlet
package net.nplus1.web;
import javax.servlet.RequestDispatcher;
import javax.servlet.ServletException;
import javax.servlet.http.HttpServlet;
import javax.servlet.http.HttpServletRequest;
import javax.servlet.http.HttpServletResponse;
public class FrontControllerServlet extends HttpServlet {
private ApplicationController appController;
public void init() {
this.appController = new ApplicationController();
}
public void doGet(HttpServletRequest request, HttpServletResponse
response) throws ServletException, IOException {
this.process(request, response);
}
public void doPost(HttpServletRequest request, HttpServletResponse
response) throws ServletException, IOException {
this.process(request, response);
}
public void process(HttpServletRequest request,
HttpServletResponse response) {
String url = request.getPathInfo();
String view = appController.processRequest(url, request);
if ( view == null ) {
response.sendError(HttpServletResponse.SC_NOT_FOUND);
}
else {
RequestDispatcher dispatcher =
this.getServletContext().getRequestDispatcher(view);
dispatcher.forward(request, response);
}
}
}
The code accomplishes something very important. It decouples the control logic from the viewlogic in the web application. The control logic is handled by the Application Controller while theview logic is handled by the JSP page. All the while the Front Controller knows nothing about
Page 202 c©2009 n + 1, Inc All Rights Reserved

JAVAWEB PROGRAMMING
how the Application Controller or JSP view operates. It is just a simple yet elegant mechanism forbridging the gap between the view and the controller.
Page 203 c©2009 n + 1, Inc All Rights Reserved

CHAPTER 8. JAVAWEB PROGRAMMING BEST PRACTICES
8.3 Application Controller Pattern
Now it is time to shift focus to the Application Controller. The goal of the Application Controller isto centralize and modularize action and view management. The first step is to take the incomingrequest which is associated with a particular URL and redirect it to an isolated action. The purposeof which is to make each URL action discrete from other actions. Each action is executed and returna view for display. The view is returned to he front controller for dispatch.
By breaking down each URL request into separate actions, the system allows incremental develop-ment based on use case functionality. Which means that each use case will have its own discretesegment of the code that is decoupled from the rest of the system. A system which will makeit easier to test individual functionality without fear of affecting other parts of the system. Thediagram below provides a visual representation of the web framework including the ApplicationController.
Page 204 c©2009 n + 1, Inc All Rights Reserved

JAVAWEB PROGRAMMING
8.3.1 Actions
The command pattern can be used to provide the action functionality for the ApplicationController.The command pattern allows the developer to create discrete functionality that is decoupled fromthe Application Controller framework. The first step in implementing the command pattern is tocreate an interface for handling request from the server. Program 13 provides the code for an actioninterface that accomplishes this task.
Program Listing 13 Action Interface
package net.nplus1.web;
import javax.servlet.http.HttpServletRequest;
public interface WebAction {
public String process(HttpServletRequest request) throws Exception;
}
The first thing to notice is that the method call used is similar to the doGet(...) and doPost(...)methods of the servlet. It is done on purpose because the frameworkmust allow generic processingof incoming requests. The only difference between the methods is the action interface does not needaccess to the HttpServletResponse object because the action is not responsible for the user interfaceoutput.
Since all of the actions implement the same interface, it is easy to build a generic mechanism forprocessing WebActions. The Application Controller essentially becomes that generic mechanism.But what should be done about the creation of all of the concrete action classes?
Page 205 c©2009 n + 1, Inc All Rights Reserved

CHAPTER 8. JAVAWEB PROGRAMMING BEST PRACTICES
8.3.2 Action Factory
The factory pattern is a perfect fit for this task. It can be used to create the concrete implementationof the WebAction interface based upon the requesting URL. The factory is in charge of mapping theURL to the concrete implementation. Once the appropriate action is found it passes it back by theinterface.
The easiest way to map URLs to instances is by using an if block of code within the controller. IfURL A then create B. Once B is created it can be sent to the controller for processing;
Program Listing 14 Action Factory
package net.nplus1.web;
import net.nplus1.web.actions.TodoList;
import net.nplus1.web.actions.AddTask;
import net.nplus1.web.actions.ProcessTask;
public class WebActionFactory {
public static WebAction createAction(String url) {
WebAction action = null;
if ( url.equals("/todo.html") {
action = new TodoList();
}
else if ( url.equals("/add_task.html") {
action = new AddTask();
}
else if ( url.equals("/process_task.html") {
action = new ProcessTask();
}
return action;
}
}
Notice two things aboutprogram listing 14. The concrete implementationof theWebAction interfaceis based upon the request URL. If the URL is not found then action returned is null. Secondly, noticethat each implementation class is associated with its interface. This means that the ApplicationController only has to deal with WebAction interface and not have to worry about knowing abouteach concrete implementation. Thus it is easy to generate a simple generic WebAction handlerwithin the Application Controller.
Before looking at the implementation of the Application Controller it is worth noting at this pointthat the use of an if/else block for the factory is not a good idea for two reasons. First, it is necessaryto modify and recompile the factory every time a new action is added. Secondly, the size of theif/else block would become unwieldy for larger applications. A better approach would be to useeither a property or XMLfile for the lookup conversion and then uses reflection to create an instance
Page 206 c©2009 n + 1, Inc All Rights Reserved

JAVAWEB PROGRAMMING
of the concrete class. That way all of the mappings are handled outside of the code base. The Strutsframework works in a similar fashion and uses XML files for the mappings.
Page 207 c©2009 n + 1, Inc All Rights Reserved
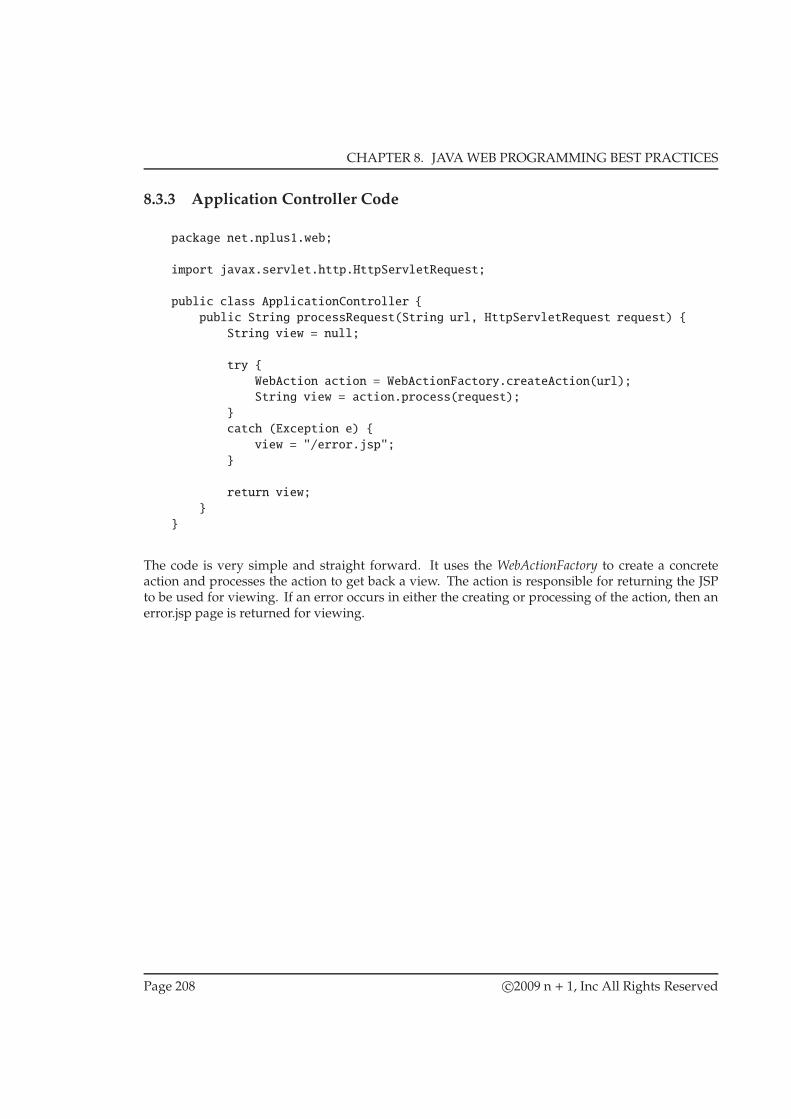
CHAPTER 8. JAVAWEB PROGRAMMING BEST PRACTICES
8.3.3 Application Controller Code
package net.nplus1.web;
import javax.servlet.http.HttpServletRequest;
public class ApplicationController {
public String processRequest(String url, HttpServletRequest request) {
String view = null;
try {
WebAction action = WebActionFactory.createAction(url);
String view = action.process(request);
}
catch (Exception e) {
view = "/error.jsp";
}
return view;
}
}
The code is very simple and straight forward. It uses the WebActionFactory to create a concreteaction and processes the action to get back a view. The action is responsible for returning the JSPto be used for viewing. If an error occurs in either the creating or processing of the action, then anerror.jsp page is returned for viewing.
Page 208 c©2009 n + 1, Inc All Rights Reserved

JAVAWEB PROGRAMMING
8.3.4 Lookup The View
The Application Controller’s functionality can be extended beyond what is shown here. One of theproblems with having the action return the JSP page is that it provides little flexibility for wherethe JSP pages reside. If they need to be moved then all of the actions would have to be modifiedto handle the change. Another option is to return a name for the view and then have a lookupmechanism for mapping the name to a particular JSP URL.
Program Listing 15 View Lookup
package net.nplus1.web;
public class LookupJSP {
public static String lookup(String view) {
String jsp = null;
if ( view.equals("todo") {
jsp = "/todo_list.jsp";
}
else if ( view.equals("addForm") {
jsp = "/add_entry.jsp";
}
return jsp;
}
}
Once again, the if block used in this example is not ideal. It would be better to use an outsideresource such as a property or XML file to lookup these values. Regardless of the mechanism used,it is easy to update the controller to include the lookup step. In this case if no view is found then thereturning view is null and the front controller will send back a page not found return code. Listing16 shows the final Application Controller.
Page 209 c©2009 n + 1, Inc All Rights Reserved

CHAPTER 8. JAVAWEB PROGRAMMING BEST PRACTICES
Program Listing 16 Application Controller
package net.nplus1.web;
import javax.servlet.http.HttpServletRequest;
public class ApplicationController {
public String processRequest(String url, HttpServletRequest request) {
String view = null;
try {
WebAction action = WebActionFactory.createAction(url);
if ( action != null ) {
String viewName = action.process(request);
view = LookupJSP.lookup(viewName);
}
}
catch (Exception e) {
view = "jsp/error.jsp";
}
return view;
}
}
8.4 Concrete Example Using The Framework
Once the framework is developed, it is time to go through the creation of a simple application usingthe framework. The section below uses the framework to generate a simple task list application.One that will display the task list and allow users to add new tasks.
For the application to work the developermust handle three different URL requests. One to displaythe task list, todo.html, one to show the add task form, add task.html, and one to add the new task tothe task list, process task.html. The application will store the task list in the session variable.
Page 210 c©2009 n + 1, Inc All Rights Reserved

JAVAWEB PROGRAMMING
8.4.1 Mapping Todo URL
These URLsmust be mapped to actions by the ActionFactory. The first URL tomap is the todo.htmlpage.
package net.nplus1.web;
import net.nplus1.web.actions.TodoList;
public class WebActionFactory {
public static WebAction createAction(String url) {
WebAction action = null;
if ( url.equals("/todo.html") {
action = new TodoList();
}
return action;
}
}
Page 211 c©2009 n + 1, Inc All Rights Reserved

CHAPTER 8. JAVAWEB PROGRAMMING BEST PRACTICES
8.4.2 Creating TodoList Action
The next step is to create the TodoList WebAction to associate with the todo.html URL. The actionbegins by retrieving the task list from the session object. If the list doesn’t exist then it needs to beinstantiated. Lastly, the view must be returned by the action resulting in the following class.
package net.nplus1.web;
import java.util.List;
import java.util.LinkedList;
import javax.servlet.http.HttpServletRequest;
import javax.servlet.http.HttpSession;
public class TodoList implements WebAction {
public String process(HttpServletRequest request) throws Exception {
HttpSession session = request.getSession();
List<String> values = (List<String>)session.getAttribute("list");
if ( values == null ) {
values = LinkedList<String>();
session.setAttribute("list",values);
}
return "todo";
}
}
Page 212 c©2009 n + 1, Inc All Rights Reserved

JAVAWEB PROGRAMMING
8.4.3 Mapping Todo View
The view todo needs to be mapped to a JSP view in the LookupJSP.
package net.nplus1.web;
public class LookupJSP {
public static String lookup(String view) {
String jsp = null;
if ( view.equals("todo") {
jsp = "/todo_list.jsp";
}
return jsp;
}
}
Page 213 c©2009 n + 1, Inc All Rights Reserved

CHAPTER 8. JAVAWEB PROGRAMMING BEST PRACTICES
8.4.4 Todo View
The JSP view, todo list.jsp needs to be created to display the items in the task list. Since the task listis stored in the HttpSession under the name “list” it is available to the view using EL. Thereforeit is simple to create a forEach loop to show all of the tasks. A link for adding a new task is alsonecessary.
<html>
<body>
<h2>Todo List</h2>
<ul>
<c:forEach var="task" items="${list}">
<li>${task}</li>
</c:forEach>
</ul>
<a href="add_task.html">Add New Task</a>
</body>
</html>
Page 214 c©2009 n + 1, Inc All Rights Reserved

JAVAWEB PROGRAMMING
8.4.5 Adding A Task
The next step is to create the add task action. First the URL mapping must be added to the actionfactory.
package net.nplus1.web;
import net.nplus1.web.actions.TodoList;
import net.nplus1.web.actions.AddTask;
public class WebActionFactory {
public static WebAction createAction(String url) {
WebAction action = null;
if ( url.equals("/todo.html") {
action = new TodoList();
}
else if ( url.equals("/add_task.html") {
action = new AddTask();
}
return action;
}
}
Page 215 c©2009 n + 1, Inc All Rights Reserved

CHAPTER 8. JAVAWEB PROGRAMMING BEST PRACTICES
8.4.6 Creating AddTask
Now the AddTask action can be created. It only has two purposes. The first is to reset the errormessage mechanism and the second is to return the JSP view to display. The error message is beingassociated with the request so it can be accessible from the JSP using EL.
package net.nplus1.web;
import javax.servlet.http.HttpServletRequest;
public class AddTask implements WebAction {
public String process(HttpServletRequest request) throws Exception {
request.setAttribute("errorMessage", ""); // set value to empty
return "addForm";
}
}
Page 216 c©2009 n + 1, Inc All Rights Reserved

JAVAWEB PROGRAMMING
8.4.7 View Lookup
The view, addForm, needs to be mapped to the JSP view add entry.jsp in the LookupJSP.
package net.nplus1.web;
public class LookupJSP {
public static String lookup(String view) {
String jsp = null;
if ( view.equals("todo") {
jsp = "/todo_list.jsp";
}
else if ( view.equals("addForm") {
jsp = "/add_entry.jsp";
}
return jsp;
}
}
Page 217 c©2009 n + 1, Inc All Rights Reserved
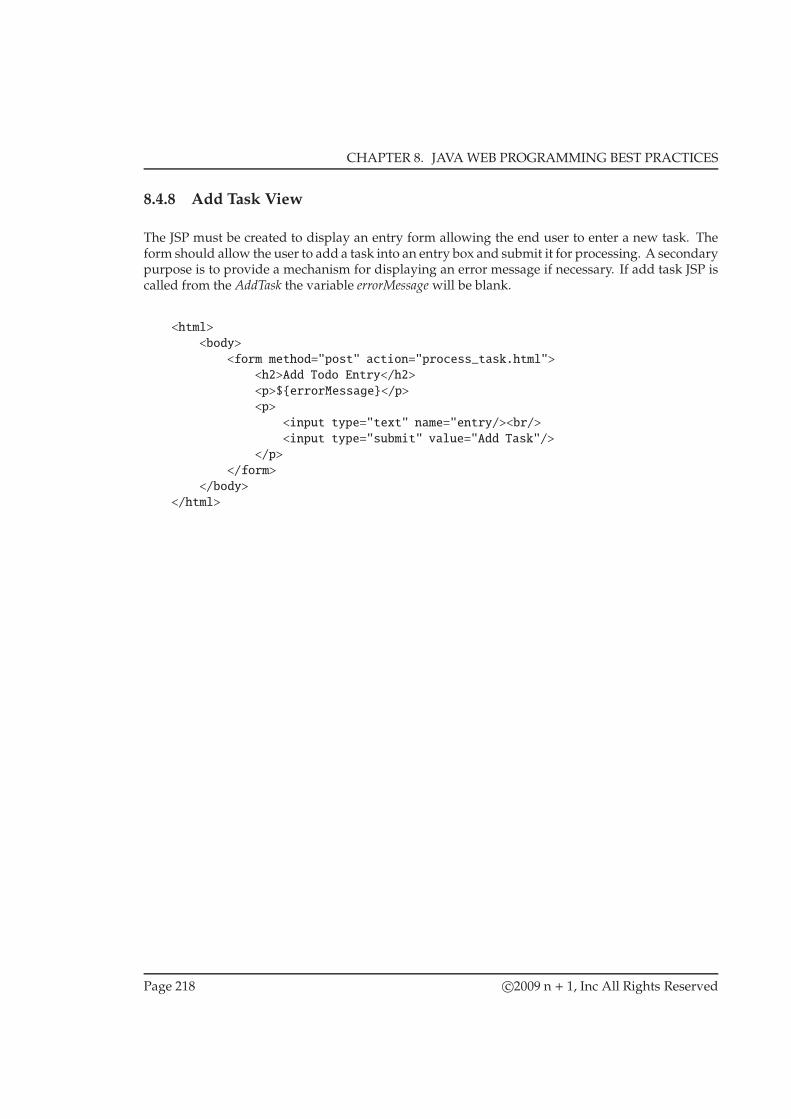
CHAPTER 8. JAVAWEB PROGRAMMING BEST PRACTICES
8.4.8 Add Task View
The JSP must be created to display an entry form allowing the end user to enter a new task. Theform should allow the user to add a task into an entry box and submit it for processing. A secondarypurpose is to provide a mechanism for displaying an error message if necessary. If add task JSP iscalled from the AddTask the variable errorMessage will be blank.
<html>
<body>
<form method="post" action="process_task.html">
<h2>Add Todo Entry</h2>
<p>${errorMessage}</p>
<p>
<input type="text" name="entry/><br/>
<input type="submit" value="Add Task"/>
</p>
</form>
</body>
</html>
Page 218 c©2009 n + 1, Inc All Rights Reserved

JAVAWEB PROGRAMMING
8.4.9 Processing New Tasks
The final step in the creation of the simple application is an action for processing the data fromthe add task form. Before working on the processing of the task, the URL must be mapped in theWebActionFactory.
package net.nplus1.web;
import net.nplus1.web.actions.TodoList;
import net.nplus1.web.actions.AddTask;
import net.nplus1.web.actions.ProcessTask;
public class WebActionFactory {
public static WebAction createAction(String url) {
WebAction action = null;
if ( url.equals("/todo.html") {
action = new TodoList();
}
else if ( url.equals("/add_task.html") {
action = new AddTask();
}
else if ( url.equals("/process_task.html") {
action = new ProcessTask();
}
return action;
}
}
Page 219 c©2009 n + 1, Inc All Rights Reserved

CHAPTER 8. JAVAWEB PROGRAMMING BEST PRACTICES
8.4.10 Creating ProcessTask
Below is an implementation of the ProcessTask action. The action has two jobs. The first is to makesure the end user entered a value into the form. If not then the form needs to be re-displayed alongwith an error message telling the user to fill out the form. If the user entered data then the list mustbe retrieved from the HttpSession object and the new task appended to the list. The view shouldbe directed to the JSP which displays the list of tasks.
package net.nplus1.web;
import javax.servlet.http.HttpServletRequest;
public class ProcessTask implements WebAction {
public String process(HttpServletRequest request) throws Exception {
String value = request.getParameter("entry");
if ( value == null || value.trim().isEmpty() ) {
request.setAttribute("errorMessage","You must enter a value");
return "addForm";
}
HttpSession session = request.getSession();
List values = (List)session.getAttribute("list");
if ( values != null) {
values.add(value);
}
return "todo";
}
}
Two things are going on in this action. If the value of the form is null or is empty then the errormessage is set and the user is taken to the addForm view. This view will show the add task formagain along with the newly defined error message. If the value is not null then the list is retrievedform the session. If the list exists then the value entered by the client is appended to the list. Theview returned will be the todo view which was created previously. It will show the list of tasks.The new task will show up at the end of the list.
Page 220 c©2009 n + 1, Inc All Rights Reserved

JAVAWEB PROGRAMMING
8.4.11 Final Thoughts
There are four steps required for processing a new URL request. The first is to map the URL to anaction. Then the action can be created. The action determines the view that must be mapped backto a JSP page. The final step is to create the JSP view. If the mappings occur in a XML document,then all that is necessary is one class, one JSP and two quick modifications to XML documents.
Why go through the process of developing this particular framework? The first reason is that theframework separates the views from the control logic. There are no longer any need for scriptletsinside JSP pages. Everything can be handled by tags and EL. Secondly, it creates the possibility ofre-usable views. In the example above the todo view is used by the TodoList and the ProcessTasktasks. Meanwhile the tasks are an independent bridge to the business layer of the application andhave no direct tie-ins to the view.
Secondly, the framework creates a series of discrete actions. Each is independent of the other. Thatmeansmodifying one does not affect the behavior of another. Thereforemodifications to each actionis guaranteed not to affect any other code. Making it easier to modify and test code generation. Notto mention the fact that request can bemapped directly to use cases in a development document. Inthe end the solution is more flexible allowing for better changemanagement and codemaintenance.
Page 221 c©2009 n + 1, Inc All Rights Reserved

CHAPTER 8. JAVAWEB PROGRAMMING BEST PRACTICES
8.5 Lab Activity
Part 1.
The goal of the lab is to create a simple task list application using the framework developed in thischapter.
The task list should be stored in the HttpSession object. A task should consist of a priority, a duedate, and text describing the task. Use a task object bean to store this data.
The first step is to create the web framework.
Part 2.
Create a view task list action and an associated JSP view. The JSP view should have no JSP scriptlets.It should only use JSTL and EL.
Part 3.
Create action to add task along with a view to add tasks.
Part 4.
Create action to process the adding of a task and then display the task list JSP view.
Part 5.
Modify list view to provide link to edit task. Create an edit task action. Use the same view that wascreated in add task to display data to be edited.
Part 6.
Create action to process the editing of a task and then display the task list JSP view.
Page 222 c©2009 n + 1, Inc All Rights Reserved

Chapter 9
Best Practices: Intercepting Filters
Objectives
• Learn how to modify framework to include filters
• Understand how to use the RequestContext filter
• Understand how to implement a security filter
223

CHAPTER 9. BEST PRACTICES: INTERCEPTING FILTERS
9.1 Intercepting Filters
The framework developed in the section on best practices is a starting point for a usable web appli-cation framework. This module will extend the framework enabling it to intercept and manipulaterequests before and after they are processed by the web actions.
Since all controller logic goes through the application controller it a key placewhere data comes intoand out of the system. Since everything flows through the controller it is possible for the developerto filter the content on the way in or out.
One task which can utilize this single point of entry is system security. The choke point in theapplication controller makes it an ideal candidate for providing authentication and authorizationservices. Logging services and HTML form processing are additional services that can take advan-tage of filtering.
The developer is not limited to only one filter. It is possible to chain multiple filters together andprovide a filtering pipeline for incoming and outgoing requests.
Browser Front Controller Application Controller
JSP View
Business Tier
ActionFactory
Action
Concrete Action
CreateAction
Create
Filters
Figure 9.1: Intercepting Filters
Page 224 c©2009 n + 1, Inc All Rights Reserved

JAVAWEB PROGRAMMING
9.2 Context Filter
The initial framework that has been developed does an excellent job separating the view from thecontroller logic. While the controller action is separated from the view logic, the action is still tiedto the web platform. Examine the web action interface again.
package net.nplus1.web;
import javax.servlet.http.HttpServletRequest;
public interface WebAction {
public String process(HttpServletRequest request) throws Exception;
}
Notice that anything implementing the WebAction interface has to use the HttpServletRequestobject. The HttpServletRequest object is tied directly to the web container. It means the action cannot be used independently of the web server. It is therefore directly tied to HTTP and the Servletplatform. One of the goals when developing the web frameworkwas to isolate web tier data objectsfrom the business tier. It makes no sense to use Servlet constructs within a WebAction. Whatthe developer needs is a mechanism to convert objects from the platform specific data type to anindependent data type which can be used by the business layer.
An interceptionfilter can be used to provide a clean break from thewebplatform. The name for sucha filter is the context filter. The goal of the context filter is to decouple the protocol dependent datastructure (HTTP specific) from the action layer. It will translate to and from the HttpServletRequestobject to a neutral context object usable in the action layer.
Page 225 c©2009 n + 1, Inc All Rights Reserved

CHAPTER 9. BEST PRACTICES: INTERCEPTING FILTERS
9.2.1 ContextFilter Class
The ContextFilterwill be an extension of the web framework to provide the context filtering. Therewill be two filters associated with the context. The first filter must take information in the requestand transfer it to the context object for processing by the action. The second filter will take datafrom the context and use it to populate the request object after processing by the action. This wayany data from the action will be available by the view for display.
For this to happen, the filter must be broken into two distinct phases. A pre action task to createthe context and a post action task to deconstruct the context. The first step is the constructionof the protocol independent data type named the RequestContext. In the pre action filter, theContextFilter is used to create the context from the platform specific class HttpServletRequest. Thepost action filter’s job is to take data from the context and update the HttpServletRequest object’sattributes. These two methods are outlined in the code shown below.
package net.nplus1.web.filter;
import javax.servlet.http.HttpServletRequest;
public class ContextFilter {
public static RequestContext buildContext(HttpServletRequest request) {
...
}
public static void updateRequest(RequestContext context,
HttpServletRequest request) {
...
}
}
The buildContext(...) method is used to create the request context while the updateRequest(...) methodtakes the context and updates the HttpServletRequest object.
9.2.2 RequestContext
The RequestContext object must be a platform independent data type for handling requests. Forit to be useful for a web application it must be able to hold data from the HttpServletRequest. Itmust be able to handle the request parameters and session data from the HttpServletRequest object.Of secondary importance the context can be made to handle the request’s header information. Inaddition, the context must be able to store data being transferred from the business layer to the userinterface.
All of the parameter and session data1 used by the HttpServletRequest stores the data inside ofmaps. Since maps are already used for these two data types it only makes sense to store the data
1Header data also is stored as a name value pair even though it isn’t used in this example
Page 226 c©2009 n + 1, Inc All Rights Reserved

JAVAWEB PROGRAMMING
using the same method. It is possible to store data from the business layer using a map constructas well. Therefore we need three different maps to store all of the necessary data. The only thingleft is to create accessor and mutator methods to store and retrieve the context’s data. Program 17creates the three maps and provides a way to access and changes the values of the map.
Program Listing 17 Request Context
package net.nplus1.web.filter;
import java.util.HashMap;
public class RequestContext {
private HashMap<String,Object> parameterMap;
private HashMap<String,Object> sessionMap;
private HashMap<String,Object> dataMap;
public RequestContext() {
this.parameterMap = new HashMap<String,Object>();
this.sessionMap = new HashMap<String,Object>();
this.dataMap = new HashMap<String,Object>();
}
public void setParameter(String key, Object value) {
this.parameterMap.put(key, value);
}
public Object getParameter(String key) {
return this.parameterMap.get(key);
}
public void setAttribute(String key, Object value) {
this.dataMap.put(key, value);
}
public Object getAttribute(String key) {
return this.dataMap.get(key);
}
public void setSessionAttribute(String key, Object value) {
this.sessionMap.put(key, value);
}
public Object getSessionAttribute(String key) {
return this.sessionMap.get(key);
}
}
Notice that the solution shown above uses no classes that are not already part of the base Java lan-
Page 227 c©2009 n + 1, Inc All Rights Reserved

CHAPTER 9. BEST PRACTICES: INTERCEPTING FILTERS
guage. Using the RequestContext as the data transfer object between the user interface and businesslayer removes the protocol dependency problem that existed when using the HttpServletRequestobject.
Page 228 c©2009 n + 1, Inc All Rights Reserved

JAVAWEB PROGRAMMING
9.2.3 Incoming Filter
When a HttpServletRequest comes into the Application Controller the ContextFilter is applied tothe request. The buildContext() method is called to perform the filtering. The method’s job is toretrieve the request parameters and session attributes. These values are added to the context. Theheader information could be retrieved at this point as well, but will be skipped to simplify thesolution.
Page 229 c©2009 n + 1, Inc All Rights Reserved

CHAPTER 9. BEST PRACTICES: INTERCEPTING FILTERS
Converting Request Parameters
The most common way for developers to access request parameters is to use the getParameter(...)method. It returns the String value based upon the supplied key. This method works for all nonmulti-value parameters. Most forget the availability of the getParameterValues(...) method whichwill return a String array from the supplied key. The method will return a single entry array fornormal parameters and will return all the values from a multi-value form in the HTML.
Since the single value fields can be accessed with the getParameterValues(...) method, the filtersolution should use it for processing request elements. The first step before accessing the val-ues is to determine the name of the parameters. The getParameterNames() method provides ajava.util.Enumeration of the available parameter names. Between using getParameterNames() andgetParameterValues(...) it is possible to populate the RequestContext.
RequestContext context = new RequestContext();
Enumeration list = request.getParameterNames();
while ( list.hasMoreElements() ) {
String name = (String)list.nextElement();
String [] values = request.getParameterValues(name);
if ( values == null ) {
context.setParameter(name, null);
}
if (values.length == 1) {
context.setParameter(name, values[0]);
}
else {
context.setParameter(name, values);
}
}
In this case the RequestContext is instantiated and the Enumeration is obtained from the requestobject. The name is retrieved from the enumeration and a call is made to getParamteterValues(...).If the array length is 1 then it is a single value and should be set as a single String. If the value islarger than 1 then it is a multi-value field and should be added to the context as a multi-value array.The details of storing and retrieving data from the context will be explored next.
Page 230 c©2009 n + 1, Inc All Rights Reserved

JAVAWEB PROGRAMMING
Handling Request Parameters
The next step is to re-work the context to better take advantage of the multi-value parameters. Thestoring of data will not change, it is only how the data is retrieved that should matter. Thereforethe setParameter(...) method won’t change.
public void setParameter(String key, Object value) {
this.parameterMap.put(key, value);
}
Instead, there needs to be two new methods for getting parameter data from the request. The bestway to do this is to mimic the behavior of the request object itself and provide two methods. Onefor single value parameters and one for multi-value parameters.
First, look at the single getParameter(...) method. While the method returns a single value, it has noidea what data type is stored in the map. It could be a String or a String array. Therefore it must beable to handle both types of data in a singular fashion.
public String getParameter(String key) {
String value = null;
Object data = this.parameterMap.get(key);
if ( data != null && data instanceof String ) {
value = (String)data;
}
else if ( data != null && data instanceof String [] ) {
String [] stringData = (String [])data;
value = stringData[0];
}
return value;
}
It solves the problem with a simple conditional. If the element in the map is a single String thenreturn the value. If the element is an array what is the best way to return a single String? Themost reasonable method is to either return the first element from the array or throw an error. In theexample above the method returns the first element from the array.
Page 231 c©2009 n + 1, Inc All Rights Reserved

CHAPTER 9. BEST PRACTICES: INTERCEPTING FILTERS
HandlingMulti-Valued Parameters
If the developer is retrieving data from a multi-value form field then a method must be available tocollect the data from the context’s map. It can be accomplished by adding a getParameterValues(...)method. The method would take the key and return the array associated in with the key.
public String [] getParameterValues(String key)
Again the logic is simple. If the value stored is an array then return the array. If the value isn’t anarray then it must be a single String object. The best way to resolve this problem is to convert theString into an array with a single element.
public String [] getParameterValues(String key) {
String [] values = null;
Object data = this.parameterMap.get(key);
if ( data != null && data instanceof String [] ) {
values = (String [])data;
}
else if (data != null ) {
values = new String[1];
values[0] = (String)data;
}
return values;
}
Page 232 c©2009 n + 1, Inc All Rights Reserved

JAVAWEB PROGRAMMING
Converting Session Data
Up to this point, the conversion filter has been focused on the request parameters. Another sourcefor conversion is the session data. Data stored in the client’s session object must be transposed inthe same way as parameter data. The session is simpler because there is not need to worry aboutthe data type being used. Since all session attributes are Objects, they can be directly copied to thecontext.
HttpSession session = request.getSession(true);
Enumeration list = session.getAttributeNames();
while ( list.hasMoreElements() ) {
String name = (String)list.nextElement();
context.setSessionAttribute(name, session.getAttribute(name));
}
Page 233 c©2009 n + 1, Inc All Rights Reserved

CHAPTER 9. BEST PRACTICES: INTERCEPTING FILTERS
The code above gets added to the ContextFilter to complete the buildContext(...) method.
package net.nplus1.web.filter;
import java.util.Enumeration;
import javax.servlet.http.HttpServletRequest;
import javax.servlet.http.HttpSession;
public class ContextFilter {
public static RequestContext buildContext(HttpServletRequest request) {
RequestContext context = new RequestContext();
Enumeration list = request.getParameterNames();
while ( list.hasMoreElements() ) {
String name = (String)list.nextElement();
String [] values = request.getParameterValues(name);
if ( values == null ) {
context.setParameter(name, null);
}
else if (values.length == 1) {
context.setParameter(name, values[0]);
}
else {
context.setParameter(name, values);
}
}
HttpSession session = request.getSession(true);
list = session.getAttributeNames();
while ( list.hasMoreElements() ) {
String name = (String)list.nextElement();
context.setSessionAttribute(name, session.getAttribute(name));
}
}
public static void updateRequest(RequestContext context,
HttpServletRequest request) {
...
}
}
Page 234 c©2009 n + 1, Inc All Rights Reserved

JAVAWEB PROGRAMMING
9.2.4 Outgoing Filter
Once the framework’s action class has finished, the data stored within the context must be returnedto the request object. It allows the JSP view access to the data stored in the context. It is the role ofthe outgoing filter to provide a way to refresh the request and session data.
Two tasks need to be accomplished by the outgoing filter. Any updates to the session need to betransferred to the HttpSession object. Any data added to the context must be transferred to therequest object. The request parameters aren’t affected because they can not be modified.
When the web action executes it has the ability to add data to the context using the setAttribute()method. The framework needs to make this data accessible to the JSP view. Ideally it would beaccessible from the EL language. It can be accomplished by taking the attributes added to the contextand add them to the request object as attributes. By adding them there, they will be accessible fromEL within the JSP view.
For the developer to be able to transfer the data from the context to the request object, the contextmust be modified to return the set of keys associated with the attributes.
public Set<String> keySet() {
return dataMap.keySet();
}
The key set can be used to find all of the values associated with the context and copy them over tothe request.
Set keySet = context.keySet();
Iterator iter = keySet.iterator();
while (iter.hasNext()) {
String key = (String)iter.next();
request.setAttribute(key, context.getAttribute(key));
}
The same process can be used for refreshing the session object. The key set of the session data storedin the context must be made available to the filter.
public Set<String> sessionKeySet() {
return sessionMap.keySet();
}
Page 235 c©2009 n + 1, Inc All Rights Reserved

CHAPTER 9. BEST PRACTICES: INTERCEPTING FILTERS
The session object can be retrieved from the request and the key set can be used to update thesession with data from the context.
HttpSession session = request.getSession(true);
Enumeration keySet = context.sessionKeySet();
iter = keySet.iterator();
while (iter.hasNext()) {
String key = (String)iter.next();
session.setAttribute(key,
context.getSessionAttribute(key));
}
Since all of the session data is copied to the context during the incoming filter, all of the sessiondata is available to the web action. During the process of applying the outgoing filter the data inthe context is copied back to the session object. All changes made to the session data or any newattributes will be reflected in the session object.
Page 236 c©2009 n + 1, Inc All Rights Reserved

JAVAWEB PROGRAMMING
Listing 18 and 19 provides the code for the final context object that incorporates all of the changesdiscussed.
Program Listing 18 Final Request Context Part 1
package net.nplus1.web.filter;
import java.util.HashMap;
public class RequestContext {
private HashMap<String,Object> parameterMap;
private HashMap<String,Object> dataMap;
private HashMap<String,Object> sessionMap;
public void setParameter(String key, Object value) {
this.parameterMap.put(key, value);
}
public String getParameter(String key) {
String value = null;
Object data = this.parameterMap.get(key);
if ( data != null && data instanceof String ) {
value = (String)data;
}
else if ( data != null && data instanceof String [] ) {
String [] stringData = (String [])data;
value = stringData[0];
}
return value;
}
public String [] getParameterValues(String key) {
String [] values = null;
Object data = this.parameterMap.get(key);
if ( data != null && data instanceof String [] ) {
values = (String [])data;
}
else if (data != null ) {
values = new String[1];
values[0] = (String)data;
}
return values;
}
Page 237 c©2009 n + 1, Inc All Rights Reserved

CHAPTER 9. BEST PRACTICES: INTERCEPTING FILTERS
Program Listing 19 Final Request Context Part 2
public void setAttribute(String key, Object value) {
this.dataMap.put(key, value);
}
public Object getAttribute(String key) {
return this.dataMap.get(key);
}
public void setSessionAttribute(String key, Object value) {
this.sessionMap.put(key, value);
}
public Object getSessionAttribute(String key) {
return this.sessionMap.get(key);
}
public Set<String> keySet() {
return dataMap.keySet();
}
public Set<String> sessionKeySet() {
return sessionMap.keySet();
}
}
Page 238 c©2009 n + 1, Inc All Rights Reserved

JAVAWEB PROGRAMMING
Lastly, a look at the complete ContextFilter in Program listing 20 and 21.
Program Listing 20 Context Filter Part 1
package net.nplus1.web.filter;
import java.util.Enumeration;
import javax.servlet.http.HttpServletRequest;
import javax.servlet.http.HttpSession;
public class ContextFilter {
public static RequestContext buildContext(HttpServletRequest request) {
RequestContext context = new RequestContext();
Enumeration<String> list = request.getParameterNames();
while ( list.hasMoreElements() ) {
String name = (String)list.nextElement();
String [] values = request.getParameterValues(name);
if ( values == null ) {
context.setParameter(name, null);
}
else if (values.length == 1) {
context.setParameter(name, values[0]);
}
else {
context.setParameter(name, values);
}
}
HttpSession session = request.getSession(true);
list = session.getAttributeNames();
while ( list.hasMoreElements() ) {
String name = (String)list.nextElement();
context.setSessionAttribute(name, session.getAttribute(name));
}
}
Page 239 c©2009 n + 1, Inc All Rights Reserved

CHAPTER 9. BEST PRACTICES: INTERCEPTING FILTERS
Program Listing 21 Context Filter Part 2
public static void updateRequest(RequestContext context,
HttpServletRequest request) {
Set<String> keySet = context.keySet();
Iterator iter = keySet.iterator();
for ( String key : keySet ) {
request.setAttribute(key, context.getAttribute(key));
}
HttpSession session = request.getSession(true);
Set<String> sessionKeySet = context.sessionKeySet();
iter = keySet.iterator();
for ( String key : sessionKeySet ) {
session.setAttribute(key, context.getSessionAttribute(key));
}
}
}
Page 240 c©2009 n + 1, Inc All Rights Reserved
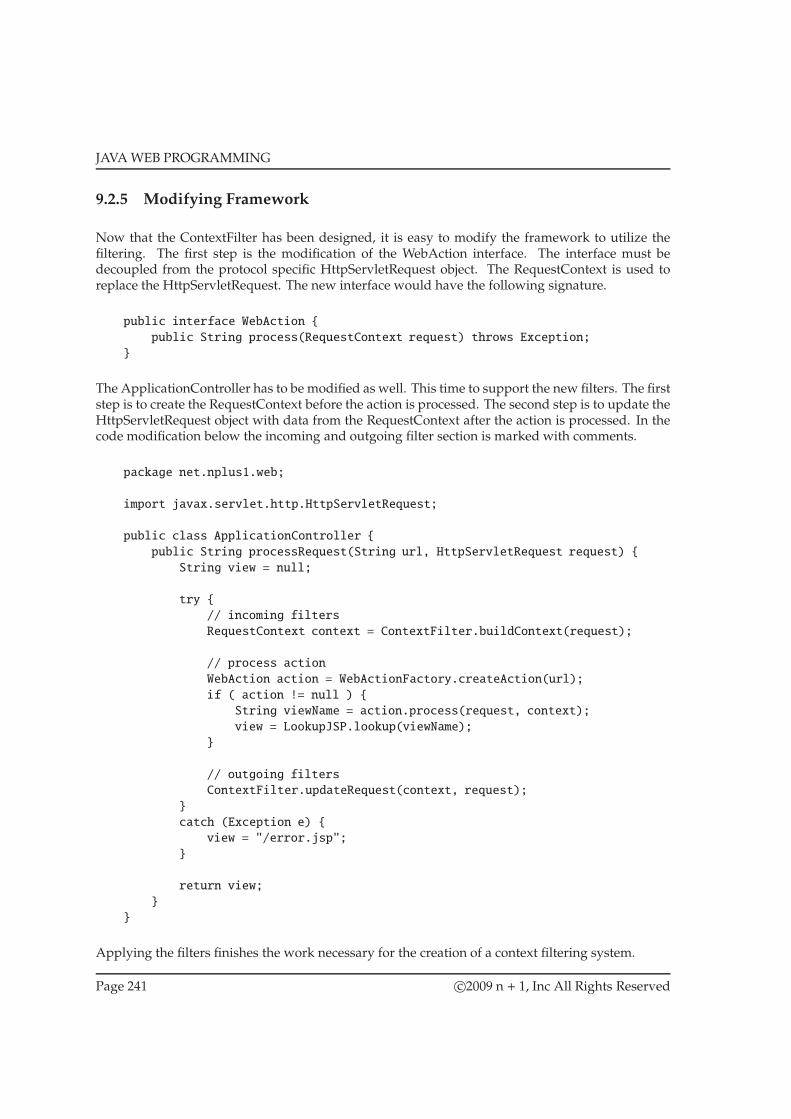
JAVAWEB PROGRAMMING
9.2.5 Modifying Framework
Now that the ContextFilter has been designed, it is easy to modify the framework to utilize thefiltering. The first step is the modification of the WebAction interface. The interface must bedecoupled from the protocol specific HttpServletRequest object. The RequestContext is used toreplace the HttpServletRequest. The new interface would have the following signature.
public interface WebAction {
public String process(RequestContext request) throws Exception;
}
The ApplicationController has to be modified as well. This time to support the new filters. The firststep is to create the RequestContext before the action is processed. The second step is to update theHttpServletRequest object with data from the RequestContext after the action is processed. In thecode modification below the incoming and outgoing filter section is marked with comments.
package net.nplus1.web;
import javax.servlet.http.HttpServletRequest;
public class ApplicationController {
public String processRequest(String url, HttpServletRequest request) {
String view = null;
try {
// incoming filters
RequestContext context = ContextFilter.buildContext(request);
// process action
WebAction action = WebActionFactory.createAction(url);
if ( action != null ) {
String viewName = action.process(request, context);
view = LookupJSP.lookup(viewName);
}
// outgoing filters
ContextFilter.updateRequest(context, request);
}
catch (Exception e) {
view = "/error.jsp";
}
return view;
}
}
Applying the filters finishes the work necessary for the creation of a context filtering system.
Page 241 c©2009 n + 1, Inc All Rights Reserved

CHAPTER 9. BEST PRACTICES: INTERCEPTING FILTERS
9.3 Security Filtering
Since all requests go through the application controller it becomes the perfect location to providesecurity for the system. This singular location can act as a traffic cop to determine authorizationand authentication.
Authentication is the first priority. If the user is not authenticated to access the system the trafficcop can redirect the user to a login page to challenge their credentials. Authorization is the secondpriority. If the user is not authorized to access theweb action then the traffic cop can log the violationand redirect the user to an illegal access page.
A custom SecurityFilter can fill the role of the traffic cop. It can be added to the framework toprovide authentication and authorization services. The centrality of the security code makes iteasier to maintain and makes it easier to apply it consistently across the system. It could even beintegrated with the JAAS API to provide a more solid security model.
At this point, it is important to note that the discussion and examples that follow provide a rudi-mentary security system. The goal is to show how to implement a security mechanism within theweb framework. There isn’t time to go into all of the security concerns with web applications. Thesystem outline below should be considered a minimal security measure. In a production environ-ment a more robust and tested security system should be implemented. Integrating JAAS wouldbe a step in the right direction.
Page 242 c©2009 n + 1, Inc All Rights Reserved
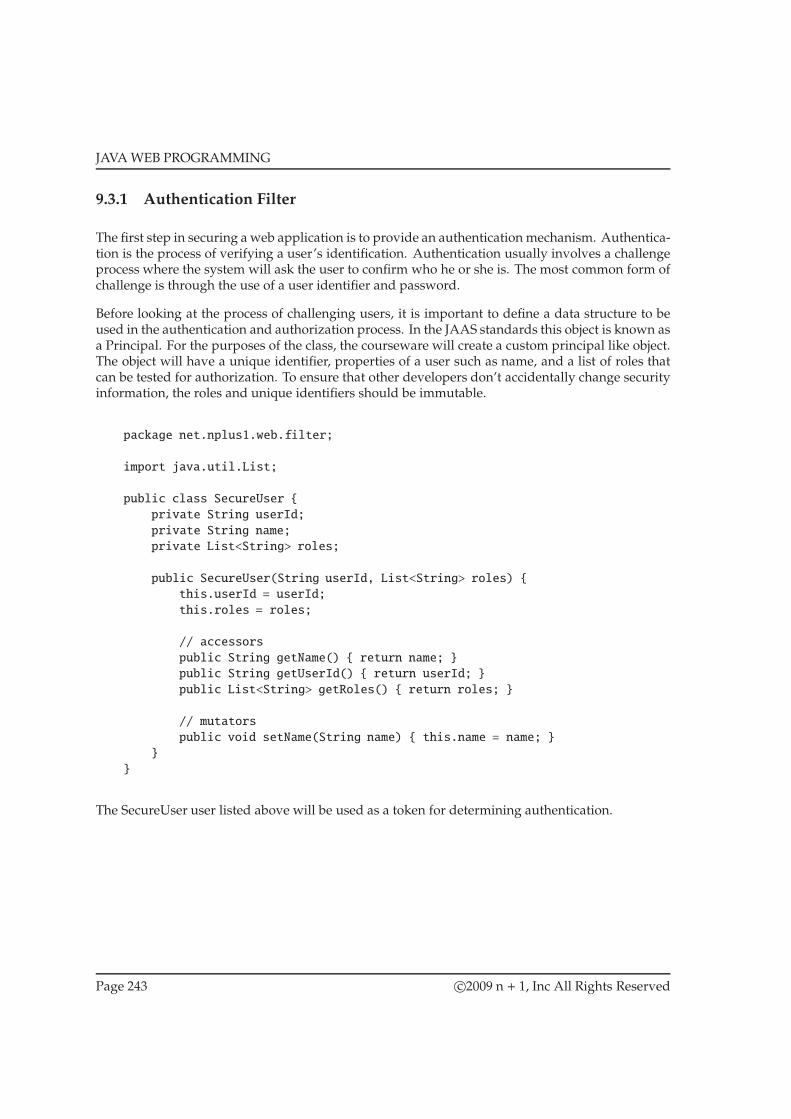
JAVAWEB PROGRAMMING
9.3.1 Authentication Filter
The first step in securing a web application is to provide an authentication mechanism. Authentica-tion is the process of verifying a user’s identification. Authentication usually involves a challengeprocess where the system will ask the user to confirm who he or she is. The most common form ofchallenge is through the use of a user identifier and password.
Before looking at the process of challenging users, it is important to define a data structure to beused in the authentication and authorization process. In the JAAS standards this object is known asa Principal. For the purposes of the class, the courseware will create a custom principal like object.The object will have a unique identifier, properties of a user such as name, and a list of roles thatcan be tested for authorization. To ensure that other developers don’t accidentally change securityinformation, the roles and unique identifiers should be immutable.
package net.nplus1.web.filter;
import java.util.List;
public class SecureUser {
private String userId;
private String name;
private List<String> roles;
public SecureUser(String userId, List<String> roles) {
this.userId = userId;
this.roles = roles;
// accessors
public String getName() { return name; }
public String getUserId() { return userId; }
public List<String> getRoles() { return roles; }
// mutators
public void setName(String name) { this.name = name; }
}
}
The SecureUser user listed above will be used as a token for determining authentication.
Page 243 c©2009 n + 1, Inc All Rights Reserved

CHAPTER 9. BEST PRACTICES: INTERCEPTING FILTERS
Challenging The User
When the user successfully passes the challenge stage, the authenticated token can be added tothe session object. Generally a mechanism should be employed to make sure the token is notaccidentally overridden by the application. One means of accomplishing this is by using a specialsignature for framework calls. In this case a double is used to mark the token.
public static boolean challengeUser(HttpServletRequest request) {
String userId = request.getParameter("userId");
String password = request.getParameter("password");
boolean authenticated = false;
SecureUser user = null;
// code to check authentication against a user store
// create new SecureUser based upon that data
if ( authenticated ) {
HttpSession session = request.getSession();
session.setAttribute("__secureUser__", user);
}
return authenticated;
}
The code above omits the process of checking the user’s credentials against some form of user storefor a simple reason. Most user stores are either stored in databases or LDAP like mechanisms. Thecode for attaching to either of these destinations is beyond the scope of this class.
Page 244 c©2009 n + 1, Inc All Rights Reserved
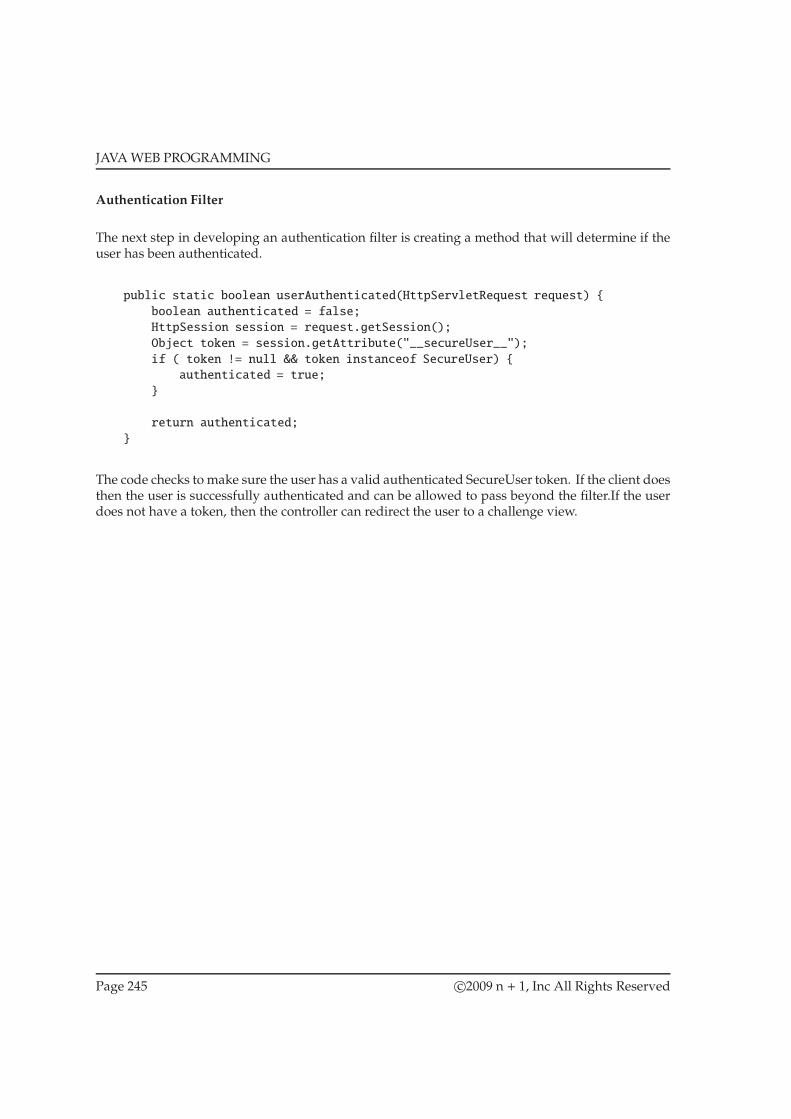
JAVAWEB PROGRAMMING
Authentication Filter
The next step in developing an authentication filter is creating a method that will determine if theuser has been authenticated.
public static boolean userAuthenticated(HttpServletRequest request) {
boolean authenticated = false;
HttpSession session = request.getSession();
Object token = session.getAttribute("__secureUser__");
if ( token != null && token instanceof SecureUser) {
authenticated = true;
}
return authenticated;
}
The code checks to make sure the user has a valid authenticated SecureUser token. If the client doesthen the user is successfully authenticated and can be allowed to pass beyond the filter.If the userdoes not have a token, then the controller can redirect the user to a challenge view.
Page 245 c©2009 n + 1, Inc All Rights Reserved

CHAPTER 9. BEST PRACTICES: INTERCEPTING FILTERS
The complete SecurityFilter is shown in Listing 22.
Program Listing 22 Security Filter
package net.nplus1.web.filter;
import javax.servlet.http.HttpSession;
import javax.servlet.http.HttpServletRequest;
public class SecurityFilter {
public static boolean challengeUser(HttpServletRequest request) {
String userId = request.getParameter("userId");
String password = request.getParameter("password");
boolean authenticated = false;
SecureUser user = null;
// code to check authentication against a user store
// create new SecureUser based upon that data
if ( authenticated ) {
HttpSession session = request.getSession();
session.setAttribute("__secureUser__", user);
}
return authenticated;
}
public static boolean userAuthenticated(HttpServletRequest request) {
boolean authenticated = false;
HttpSession session = request.getSession();
Object token = session.getAttribute("__secureUser__");
if ( token != null && token instanceof SecureUser) {
authenticated = true;
}
return authenticated;
}
}
Page 246 c©2009 n + 1, Inc All Rights Reserved

JAVAWEB PROGRAMMING
Modifying The Framework
The next step is to integrate the SecruityFilter into the framework. The filter needs to address twoissues. First it needs to check to see if the user is submitting a challenge. This can be done bylooking at the incoming URL. If the challenge is not successful the user needs to be redirected tothe login along with an error message.
if ( url.equals("process_login.html") ) {
if ( !SecurityFilter.challengeUser(request) ) {
request.setAttribute("error", "Invalid Login");
return LookupJSP.lookup("login");
}
}
The second task guarantees the authentication of the user. If the user is not authenticated thenre-direct the user to the login page.
if ( !SecurityFilter.userAuthenticated(request) ) {
return LookupJSP.lookup("login");
}
Page 247 c©2009 n + 1, Inc All Rights Reserved

CHAPTER 9. BEST PRACTICES: INTERCEPTING FILTERS
The new controller code is shown below.
package net.nplus1.web;
import net.nplus1.web.filter.RequestContext;
import net.nplus1.web.filter.ContextFilter;
import net.nplus1.web.filter.SecurityFilter;
import javax.servlet.http.HttpServletRequest;
public class ApplicationController {
public String processRequest(String url, HttpServletRequest request) {
String view = null;
try {
// security filter
if ( url.equals("process_login.html") ) {
if ( !SecurityFilter.challengeUser(request) ) {
request.setAttribute("error", "Invalid Login");
return LookupJSP.lookup("login");
}
}
if ( !SecurityFilter.userAuthenticated(request) ) {
return LookupJSP.lookup("login");
}
// context filter
RequestContext context = ContextFilter.buildContext(request);
// process action
WebAction action = WebActionFactory.createAction(url);
if ( action != null ) {
String viewName = action.process(context);
view = LookupJSP.lookup(viewName);
}
// outgoing filters
ContextFilter.updateRequest(context, request);
}
catch (Exception e) {
view = "jsp/error.jsp";
}
return view;
}
}
Page 248 c©2009 n + 1, Inc All Rights Reserved

JAVAWEB PROGRAMMING
9.3.2 Authorization Filter
Once the user’s credentials have been established, a system for providing authorization can becreated. In this instance, the courseware will develop a role based access for the system. Amechanism that allows users to be added to roles and the roles are granted access to resources.
There are a number of different ways to implement role based authorization. The best way tocontrol access is to do it at the web action level. Since each action is an independent entity withinthe system, it makes sense to provide access control at this level. One method for accomplishingthis task is to map actions to roles using an XML file. Below is an example of a partial XML file thatperforms this mapping.
<role-security>
<action>AddTodoList</action>
<roles>
<role>client</role>
<role>admin</role>
</roles>
</role-security>
Another way to handle role to action mapping is to associate the role information with the actualweb action. It can be done in one of two ways. One is to associated a role annotation to the actionclass. Annotations are a way to associated meta data with code. Roles would just be a form of metainformation to associate with a class.
public class AddTodoList implements WebAction {
@SecureWebaction(roles="client,admin")
public String process(RequestContext context) throws Exception {
...
}
}
While annotations are an elegant way to accomplish this task, the solution involves the processingof annotations which goes beyond the scope of this class. Instead a simpler mechanismwill be usedto perform the same function. It will be done with the use of tagging interfaces. Where each rolehas an associated tagging interface. The action would then implement the tagging interfaces forthe roles that have access to the system.
public class AddTodoList implements WebAction, ClientRole, AdminRole {
public String process(RequestContext context) throws Exception {
...
}
}
Page 249 c©2009 n + 1, Inc All Rights Reserved

CHAPTER 9. BEST PRACTICES: INTERCEPTING FILTERS
Tagging Interfaces
What is a tagging interface? It is an interface that has no methods associated with it.
public interface Client {}
public interface Admin {}
When associating an interface with a class two things happen. The class must implement themethods of the interface and the class can be polymorphically treated as the interface. Since thetagging interface doesn’t have any methods, the class doesn’t have to do anything to implementthe interface. In addition the class can be treated as the interface. Since the interface doesn’t haveany methods this feature can have limited value.
The one thing the tagging interface provides is a way to mark a class. It is possible using theinstanceof operator to determine if a class implements a particular interface. Thus it can be used todetermine if the web action implements one of the role interfaces.
WebAction action = new (WebAction)AddTodoList();
if ( action instanceof ClientRole ) {
System.out.println("Client has access to this web action");
}
Page 250 c©2009 n + 1, Inc All Rights Reserved
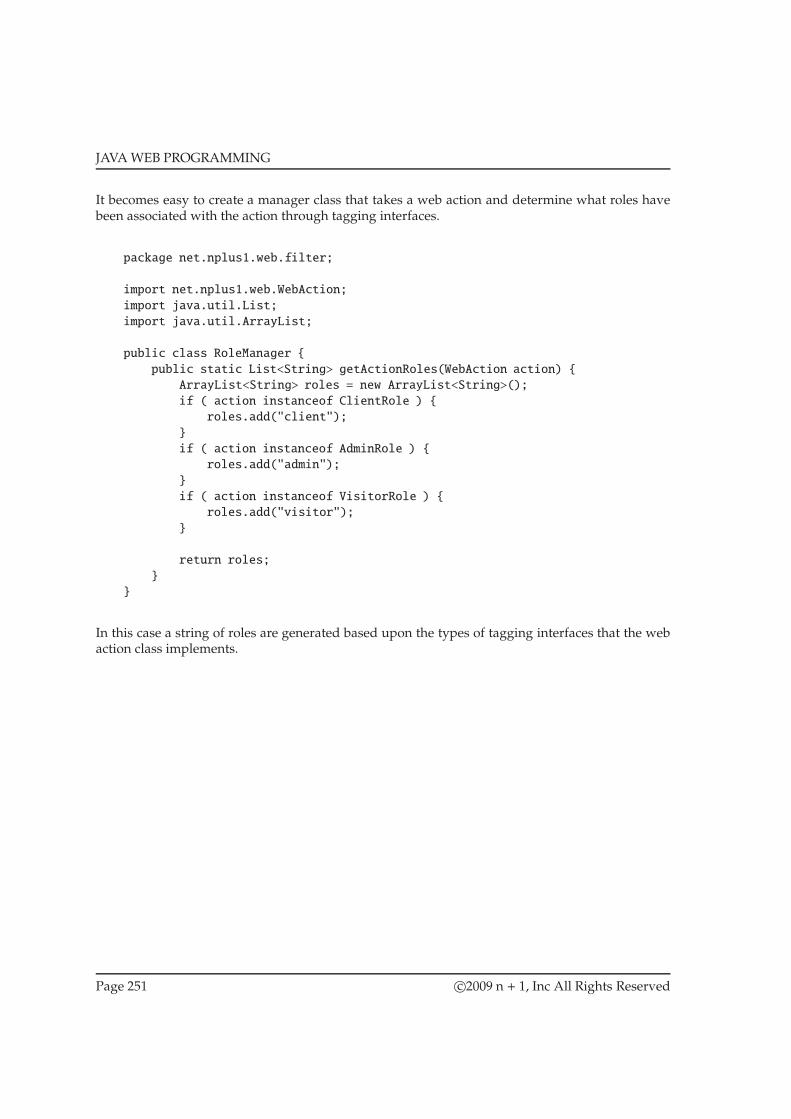
JAVAWEB PROGRAMMING
It becomes easy to create a manager class that takes a web action and determine what roles havebeen associated with the action through tagging interfaces.
package net.nplus1.web.filter;
import net.nplus1.web.WebAction;
import java.util.List;
import java.util.ArrayList;
public class RoleManager {
public static List<String> getActionRoles(WebAction action) {
ArrayList<String> roles = new ArrayList<String>();
if ( action instanceof ClientRole ) {
roles.add("client");
}
if ( action instanceof AdminRole ) {
roles.add("admin");
}
if ( action instanceof VisitorRole ) {
roles.add("visitor");
}
return roles;
}
}
In this case a string of roles are generated based upon the types of tagging interfaces that the webaction class implements.
Page 251 c©2009 n + 1, Inc All Rights Reserved

CHAPTER 9. BEST PRACTICES: INTERCEPTING FILTERS
Authorization Code
Once amethod is created to determine the roles associatedwith an action, the next step is to comparethe user’s roles with the action’s roles. If they overlap then access to the action is granted. If notthen the user should be directed to a message informing them that access has been denied an theirattempt was logged.
A method can be added to the SecurityFilter class to test to see if the user is authorized to access anaction.
package net.nplus1.web.filter;
import net.nplus1.web.WebAction;
import java.util.List;
import javax.servlet.http.HttpServletRequest;
public class SecurityFilter {
public static boolean authorizeUser(WebAction action,
HttpServletRequest request) {
boolean validUser = false;
// get action roles
List<String> actionRoles = RoleManager.getActionRoles(action);
// get user roles
HttpSession session = request.getSession();
SecureUser user = (SecureUser)session.getAttribute("__secureUser");
if ( user != null ) {
List<String> userRoles = user.getRoles();
for ( String userRole : userRoles ) {
for ( String actionRole : actionRoles ) {
if ( userRole.equalsIgnoreCase(actionRole) ) {
validUser = true;
break;
}
}
if ( validUser ) {
break;
}
}
}
}
}
In this case the list of roles associated with the action are retrieved along with the user’s list of roles.
Page 252 c©2009 n + 1, Inc All Rights Reserved
JAVAWEB PROGRAMMING
They are compared to see if there is any match of roles. If so then the user is authorized.
Page 253 c©2009 n + 1, Inc All Rights Reserved

CHAPTER 9. BEST PRACTICES: INTERCEPTING FILTERS
Adding User Information To Context
Web developers frequently need access to information about the user who has been authorizedto use the system. Rather than force programmers to retrieve the SecureUser directly from theHttpSession object, it is easier to add the secure user to the context.
This can be accomplished with two quick changes to the filtering process. The first step is to modifythe context to allow the addition of a SecureUser.
public class RequestContext {
private SecureUser user;
public void setSecureUser(SecureUser user) {
this.user = user;
}
public SecureUser getSecureUser() {
return user;
}
}
Once the context is retro-fitted for the SecureUser, a method can be added to the SecurityFitler toput the secure user into the context.
public static void setUserContext(HttpServletRequest, request,
RequestContext context) {
HttpSession session = request.getSession();
SecureUser user = (SecureUser)session.getAttribute("__secureUser__");
context.setSecureUser(user);
}
Page 254 c©2009 n + 1, Inc All Rights Reserved

JAVAWEB PROGRAMMING
Since the SecureUser is being added to the RequestContext, the SecurityFilter can be re-written touse the RequestContext instead of the HttpSession object. The final security manager looks like thefollowing.
package net.nplus1.web.filter;
import net.nplus1.web.WebAction;
import java.util.List;
import javax.servlet.http.HttpSession;
import javax.servlet.http.HttpServletRequest;
public class SecurityFilter {
/*
* AUTHORIZATION CODE
*/
public static boolean userAuthorized(WebAction action,
RequestContext context) {
boolean validUser = false;
// get action roles
List<String> actionRoles = RoleManager.getActionRoles(action);
// get user roles
SecureUser user = context.getSecureUser();
if ( user != null ) {
List<String> userRoles = user.getRoles();
for ( String userRole : userRoles ) {
for ( String actionRole : actionRoles ) {
if ( userRole.equalsIgnoreCase(actionRole) ) {
validUser = true;
break;
}
}
if ( validUser ) {
break;
}
}
}
}
Page 255 c©2009 n + 1, Inc All Rights Reserved

CHAPTER 9. BEST PRACTICES: INTERCEPTING FILTERS
public static void setUserContext(HttpServletRequest, request,
RequestContext context) {
HttpSession session = request.getSession();
SecureUser user = (SecureUser)session.getAttribute("__secureUser__");
context.setSecureUser(user);
}
/*
* AUTHENTICATION CODE
*/
public static boolean challengeUser(HttpServletRequest request) {
String userId = request.getParameter("userId");
String password = request.getParameter("password");
boolean authenticated = false;
SecureUser user = null;
// code to check authentication against a user store
// create new SecureUser based upon that data
if ( authenticated ) {
HttpSession session = request.getSession();
session.setAttribute("__secureUser__", user);
}
return authenticated;
}
public static boolean userAuthenticated(HttpServletRequest request) {
boolean authenticated = false;
HttpSession session = request.getSession();
Object token = session.getAttribute("__secureUser__");
if ( token != null && token instanceof SecureUser) {
authenticated = true;
}
return authenticated;
}
}
Page 256 c©2009 n + 1, Inc All Rights Reserved

JAVAWEB PROGRAMMING
Modifying The Framework
The last step is modifying the framework to use the SecurityFilter. The first thing the frameworkmust do is add the secure user to the request context after authentication. Once the user is added tothe context and the web action is created, the security filter can be applied to determine if the useris authorized to execute the requested action.
If the user is not authorized to use the system, then the framework must provide an invalid accesserror message to the end user. This is where any security logging might take place. In the examplebelow the user is shown the “invalid access” page.
Page 257 c©2009 n + 1, Inc All Rights Reserved

CHAPTER 9. BEST PRACTICES: INTERCEPTING FILTERS
package net.nplus1.web;
import net.nplus1.web.filter.RequestContext;
import net.nplus1.web.filter.ContextFilter;
import net.nplus1.web.filter.SecurityFilter;
import javax.servlet.http.HttpServletRequest;
public class ApplicationController {
public String processRequest(String url, HttpServletRequest request) {
String view = null;
try {
// security filter
if ( url.equals("process_login.html") ) {
if ( !SecurityFilter.challengeUser(request) ) {
request.setAttribute("error", "Invalid Login");
return LookupJSP.lookup("login");
}
}
if ( !SecurityFilter.userAuthenticated(request) ) {
return LookupJSP.lookup("login");
}
// context filter creation
RequestContext context = ContextFilter.buildContext(request);
// add secure user to context
SecurityFilter.setUserContext(request, context);
// create action
WebAction action = WebActionFactory.createAction(url);
if ( action != null ) {
// authorization filter
if ( !SecurityFilter.userAuthorized(action, request) ) {
return LookupJSP.lookup("invalid access");
}
// process action
String viewName = action.process(context);
view = LookupJSP.lookup(viewName);
}
// outgoing filters
ContextFilter.updateRequest(context, request);
}
catch (Exception e) {
view = "jsp/error.jsp";
Page 258 c©2009 n + 1, Inc All Rights Reserved

JAVAWEB PROGRAMMING
}
return view;
}
}
Page 259 c©2009 n + 1, Inc All Rights Reserved

CHAPTER 9. BEST PRACTICES: INTERCEPTING FILTERS
Final Thoughts On Authorization
The tagging interfacemechanismwas chosen because of its simplicity. It was the easiest mechanismfor showing how to apply authorization for a user. In a production system either the XML orannotation method should be utilized depending on needs. If a developer wants to centralize roleaccess then the XML file should be used. If the user wants amethod for associating roles with actionin a decentralized manner the annotation method should be used. Annotations are preferable totagging interfaces because they are not compiled as the source code. The role data is meta data thatneeds to be associated with the class. A perfect fit for annotations.
Page 260 c©2009 n + 1, Inc All Rights Reserved

JAVAWEB PROGRAMMING
9.4 Lab Activity
Part 1.
Modify the framework developed in the best practices lab to use the Context Filter.
Part 2.
Modify the actions from solution in the best practices lab to use the context instead of the HttpSerl-vetRequest object.
Part 3.
Add the ability to delete tasks from the task list.
Page 261 c©2009 n + 1, Inc All Rights Reserved

APPENDIX
Page 262 c©2009 n + 1, Inc All Rights Reserved

Appendices
263


JAVAWEB PROGRAMMING
A Lab Results
The results from the labs are shown below.
A.1 Lab 2
Part 1
<html>
<body>
<h2>Enter Data</h2>
<form method="post" action="">
First Name: <input type="text" name="firstName"/></br>
Last Name: <input type="text" name="lastName"/></br>
City: <input type="text" name="city"/></br>
State:
<select name="state" size="1">
<option value="IN">IN</option>
<option value="KY">KY</option>
<option value="OH">OH</option>
<option value="TN">TN</option>
</select><br/>
Sex:
<input type="radio" name="sex" value="m"/> Male
<input type="radio" name="sex" value="f"/> Female<br/>
Pets: <input type="checkbox" name="pet" value="cat"/> Cat
<input type="checkbox" name="pet" value="cat"/> Dog
<input type="checkbox" name="pet" value="cat"/> Goat
<input type="checkbox" name="pet" value="cat"/> Llama
</br>
Comments:
<textarea name="comments" cols="50" rows="6"></textarea></br>
<input type="submit" value="Save"/></br>
</form>
</body>
</html>
Page 265 c©2009 n + 1, Inc All Rights Reserved

APPENDIX
Part 2
<html>
<body>
<h2>Enter Data</h2>
<form method="post" action="">
<table border="0" cellspacing="0" cellpadding="4">
<tr>
<td align="right"> First Name: </td>
<td> <input type="text" name="firstName"/> </td>
</tr>
<tr>
<td align="right"> Last Name: </td>
<td> <input type="text" name="lastName"/> </td>
</tr>
<tr>
<td align="right"> City: </td>
<td> <input type="text" name="city"/> </td>
</tr>
<tr>
<td align="right"> State: </td>
<td>
<select name="state" size="1">
<option value="IN">IN</option>
<option value="KY">KY</option>
<option value="OH">OH</option>
<option value="TN">TN</option>
</select>
</td>
</tr>
<tr>
<td align="right"> Sex: </td>
<td>
<input type="radio" name="sex" value="m"/> Male
<input type="radio" name="sex" value="f"/> Female
</td>
</tr>
<tr>
<td align="right"> Pets: </td>
<td>
<input type="checkbox" name="pet" value="cat"/> Cat
<input type="checkbox" name="pet" value="cat"/> Dog
<input type="checkbox" name="pet" value="cat"/> Goat
<input type="checkbox" name="pet" value="cat"/> Llama
</td>
</tr>
<tr>
<td align="right" valign="top"> Comments: </td>
Page 266 c©2009 n + 1, Inc All Rights Reserved

JAVAWEB PROGRAMMING
<td>
<textarea name="comments" cols="50" rows="6"></textarea>
</td>
</tr>
<tr>
<td></td>
<td align="right"> <input type="submit" value="Save"/> </td>
</tr>
</table>
</form>
</body>
</html>
Page 267 c©2009 n + 1, Inc All Rights Reserved

APPENDIX
Part 3
<html>
<body>
<h2>Enter Data</h2>
<form method="post" action="">
<table border="0" cellspacing="0" cellpadding="4">
<tr>
<td align="right"> First Name: </td>
<td> <input type="text" name="firstName"/> </td>
</tr>
<tr>
<td align="right"> Last Name: </td>
<td> <input type="text" name="lastName"/> </td>
</tr>
<tr>
<td align="right"> City: </td>
<td> <input type="text" name="city" value="Waddy"/> </td>
</tr>
<tr>
<td align="right"> State: </td>
<td>
<select name="state" size="1">
<option value="IN">IN</option>
<option value="KY" selected="true">KY</option>
<option value="OH">OH</option>
<option value="TN">TN</option>
</select>
</td>
</tr>
<tr>
<td align="right"> Sex: </td>
<td>
<input type="radio" name="sex" value="m"/> Male
<input type="radio" name="sex" value="f"/> Female
</td>
</tr>
<tr>
<td align="right"> Pets: </td>
<td>
<input type="checkbox" checked="true"
name="pet" value="cat"/> Cat
<input type="checkbox" name="pet" value="cat"/> Dog
<input type="checkbox" name="pet" value="cat"/> Goat
<input type="checkbox" name="pet" value="cat"/> Llama
</td>
</tr>
<tr>
Page 268 c©2009 n + 1, Inc All Rights Reserved
JAVAWEB PROGRAMMING
<td align="right" valign="top"> Comments: </td>
<td>
<textarea name="comments" cols="50"
rows="6">Enter Comments Here</textarea>
</td>
</tr>
<tr>
<td></td>
<td align="right"> <input type="submit" value="Save"/> </td>
</tr>
</table>
</form>
</body>
</html>
Page 269 c©2009 n + 1, Inc All Rights Reserved

APPENDIX
A.2 Lab 3
Part 1 - Countdown.java and web.xml
package net.nplus1.javaweb.lab3;
import java.io.IOException;
import java.io.PrintWriter;
import javax.servlet.ServletException;
import javax.servlet.http.HttpServlet;
import javax.servlet.http.HttpServletRequest;
import javax.servlet.http.HttpServletResponse;
public class Countdown extends HttpServlet {
public void doGet(HttpServletRequest request, HttpServletResponse response)
throws IOException, ServletException {
PrintWriter out = response.getWriter();
out.println("<html>");
out.println("<body>");
out.println("<h2>Countdown</h2>");
for ( int x = 10; x > 0; x-- ) {
out.println(x + "<br/>");
}
out.println("</body>");
out.println("</html>");
}
}
<?xml version="1.0" encoding="UTF-8"?>
<web-app xmlns="http://java.sun.com/xml/ns/j2ee"
xmlns:xsi="http://www.w3.org/2001/XMLSchema-instance"
xsi:schemaLocation="http://java.sun.com/xml/ns/j2ee/web-app_2_4.xsd"
version="2.4">
<servlet>
<servlet-name>Countdown</servlet-name>
<servlet-class>net.nplus1.javaweb.lab3.Countdown</servlet-class>
</servlet>
<servlet-mapping>
<servlet-name>Countdown</servlet-name>
<url-pattern>/lab3/countdown.html</url-pattern>
</servlet-mapping>
</web-app>
Page 270 c©2009 n + 1, Inc All Rights Reserved

JAVAWEB PROGRAMMING
Part 2 - build.xml
<project name="courseware" default="deploy-web" basedir=".">
<!-- import property file -->
<property file="./build.properties"/>
<!-- set path information -->
<path id="jboss.server.classpath">
<fileset dir="${jboss.server.lib}">
<include name="**/*.jar"/>
</fileset>
</path>
<path id="jboss.client.classpath">
<fileset dir="${jboss.client.lib}">
<include name="**/*.jar"/>
</fileset>
</path>
<target name="build">
<mkdir dir="${build}"/>
<javac srcdir="${src}" destdir="${build}">
<classpath>
<path refid="jboss.server.classpath"/>
<path refid="jboss.client.classpath"/>
</classpath>
</javac>
</target>
<target name="package-web" depends="build">
<mkdir dir="${dist}"/>
<war destfile="${dist}/course.war" webxml="${conf.web}/web.xml">
<classes dir="${build}"/>
<zipfileset dir="${web.tags}" prefix="WEB-INF/tags"/>
<zipfileset dir="${web.jsp}"/>
</war>
</target>
<target name="deploy-web" depends="package-web">
<copy todir="${jboss.server.deploy}" file="${dist}/course.war"/>
</target>
<target name="remove-web">
<delete file="${jboss.server.deploy}/course.war"/>
</target>
<target name="clean">
<delete dir="${build}"/>
Page 271 c©2009 n + 1, Inc All Rights Reserved
APPENDIX
<delete dir="${dist}"/>
</target>
</project>
Page 272 c©2009 n + 1, Inc All Rights Reserved

JAVAWEB PROGRAMMING
Part 3 - OddCountdown.java
public class OddCountdown extends HttpServlet {
public void doGet(HttpServletRequest request, HttpServletResponse response)
throws IOException, ServletException {
PrintWriter out = response.getWriter();
out.println("<html>");
out.println("<body>");
out.println("<h2>Countdown</h2>");
for ( int x = 10; x > 0; x-- ) {
if ( x % 2 == 1 ) {
out.println(x + "<br/>");
}
}
out.println("</body>");
out.println("</html>");
}
}
Page 273 c©2009 n + 1, Inc All Rights Reserved

APPENDIX
Part 4 - PhoneForm.java
package net.nplus1.javaweb.lab3;
import java.io.IOException;
import java.io.PrintWriter;
import javax.servlet.ServletException;
import javax.servlet.http.HttpServlet;
import javax.servlet.http.HttpServletRequest;
import javax.servlet.http.HttpServletResponse;
public class PhoneForm extends HttpServlet {
public void doGet(HttpServletRequest request, HttpServletResponse response)
throws IOException, ServletException {
PrintWriter out = response.getWriter();
out.println("<html>");
out.println("<body>");
out.println("<h2>Phone Numbers</h2>");
out.println("<form method=\"post\" action=\"\">");
out.println("<table border=\"0\" cellpadding=\"4\" cellspacing=\"0\">");
out.println("<tr>");
out.println("<td>First Name:</td>");
out.println("<td><input type=\"text\" name=\"firstName\"/></td>");
out.println("</tr>");
out.println("<tr>");
out.println("<td>Last Name:</td>");
out.println("<td><input type=\"text\" name=\"lastName\"/></td>");
out.println("</tr>");
out.println("<tr>");
out.println("<td>Phone Number:</td>");
out.println("<td><input type=\"text\" name=\"phone\"/></td>");
out.println("</tr>");
out.println("<tr>");
out.println("<td></td>");
out.println("<td><input type=\"submit\" value=\"Enter\"/></td>");
out.println("</tr>");
out.println("</table>");
out.println("</form>");
out.println("</body>");
out.println("</html>");
}
}
Page 274 c©2009 n + 1, Inc All Rights Reserved

JAVAWEB PROGRAMMING
A.3 Lab 4
Part 1 - PhoneEntry.java
package net.nplus1.javaweb.lab4;
import java.io.IOException;
import java.io.PrintWriter;
import javax.servlet.ServletException;
import javax.servlet.http.HttpServlet;
import javax.servlet.http.HttpServletRequest;
import javax.servlet.http.HttpServletResponse;
public class PhoneEntry extends HttpServlet {
public void doPost(HttpServletRequest request, HttpServletResponse response)
throws IOException, ServletException {
this.doGet(request, response);
}
public void doGet(HttpServletRequest request, HttpServletResponse response)
throws IOException, ServletException {
PrintWriter out = response.getWriter();
out.println("<html>");
out.println("<body>");
out.println("<h2>Enter Phone Number</h2>");
String error = (String)request.getAttribute("errorMessage");
if ( error != null && !error.isEmpty() ) {
out.println("<p>Error occured:<br/> " + error + " </p>");
}
out.println("<form method=\"post\" action=\"process_phone.html\">");
out.println("<table border=\"0\" cellpadding=\"4\" cellspacing=\"0\">");
out.println("<tr>");
out.println("<td>First Name:</td>");
out.println("<td><input type=\"text\" name=\"firstName\"/></td>");
out.println("</tr>");
out.println("<tr>");
out.println("<td>Last Name:</td>");
out.println("<td><input type=\"text\" name=\"lastName\"/></td>");
out.println("</tr>");
out.println("<tr>");
out.println("<td>Phone Number:</td>");
out.println("<td><input type=\"text\" name=\"phone\"/></td>");
out.println("</tr>");
out.println("<tr>");
Page 275 c©2009 n + 1, Inc All Rights Reserved

APPENDIX
out.println("<td></td>");
out.println("<td><input type=\"submit\" value=\"Enter\"/></td>");
out.println("</tr>");
out.println("</table>");
out.println("</form>");
out.println("</body>");
out.println("</html>");
}
}
Page 276 c©2009 n + 1, Inc All Rights Reserved

JAVAWEB PROGRAMMING
Part 2 - ProcessPhone.java
package net.nplus1.javaweb.lab4;
import java.io.IOException;
import java.io.PrintWriter;
import javax.servlet.RequestDispatcher;
import javax.servlet.ServletException;
import javax.servlet.http.HttpServlet;
import javax.servlet.http.HttpServletRequest;
import javax.servlet.http.HttpServletResponse;
public class ProcessPhone extends HttpServlet {
public void doGet(HttpServletRequest request, HttpServletResponse response)
throws IOException, ServletException {
response.sendError(HttpServletResponse.SC_NOT_FOUND);
}
public void doPost(HttpServletRequest request, HttpServletResponse response)
throws IOException, ServletException {
String firstName = request.getParameter("firstName");
String lastName = request.getParameter("lastName");
String phone = request.getParameter("phone");
String errorMessage = "";
if ( firstName.trim().isEmpty() ) {
errorMessage += "First name is missing<br/>";
}
if ( lastName.trim().isEmpty() ) {
errorMessage += "Last name is missing<br/>";
}
String testPhone = phone.replaceAll("-", "");
if (testPhone.length() != 10) {
errorMessage += "Invalid number of digits";
}
else {
try {
Long.parseLong(testPhone);
}
catch (NumberFormatException e) {
errorMessage += "Invalid phone number";
}
}
Page 277 c©2009 n + 1, Inc All Rights Reserved

APPENDIX
if ( !errorMessage.isEmpty() ) {
request.setAttribute("errorMessage", errorMessage);
RequestDispatcher dispatch =
this.getServletContext().getRequestDispatcher(
"/lab4/phone_entry.html");
dispatch.forward(request, response);
}
PrintWriter out = response.getWriter();
out.println("<html>");
out.println("<body>");
out.println("<h2>Survey Completed</h2>");
out.println("Thank you " + firstName + " " + lastName + " for " +
"filling out the survey.<br/>");
out.println("We have recorded your phone number as " + phone);
out.println("</body>");
out.println("</html>");
}
}
Page 278 c©2009 n + 1, Inc All Rights Reserved

JAVAWEB PROGRAMMING
Part 3, 4, 5 - PhoneEntryTwo.java and ProcessPhoneTwo.java
PhoneEntryTwo.java
package net.nplus1.javaweb.lab4;
import java.io.IOException;
import java.io.PrintWriter;
import javax.servlet.ServletException;
import javax.servlet.http.HttpServlet;
import javax.servlet.http.HttpServletRequest;
import javax.servlet.http.HttpServletResponse;
public class PhoneEntryTwo extends HttpServlet {
public void doPost(HttpServletRequest request, HttpServletResponse response)
throws IOException, ServletException {
this.doGet(request, response);
}
public void doGet(HttpServletRequest request, HttpServletResponse response)
throws IOException, ServletException {
PrintWriter out = response.getWriter();
out.println("<html>");
out.println("<body>");
out.println("<h2>Enter Phone Number</h2>");
String error = (String)request.getParameter("error");
if ( error != null && !error.isEmpty() ) {
int errorMessage = Integer.parseInt(error);
out.println("<p>Error occured:<br/> ");
if ( errorMessage > 7 ) {
out.println("No first name entered<br/>");
errorMessage -= 8;
}
if ( errorMessage > 3 ) {
out.println("No last name entered<br/>");
errorMessage -= 4;
}
if ( errorMessage > 1 ) {
out.println("Not enough numbers in phone number<br/>");
errorMessage -= 2;
}
if ( errorMessage == 1 ) {
out.println("Invalid phone number<br/>");
}
out.println("</p>");
}
Page 279 c©2009 n + 1, Inc All Rights Reserved

APPENDIX
out.println("<form method=\"post\" action=\"process_phone2.html\">");
out.println("<table border=\"0\" cellpadding=\"4\" cellspacing=\"0\">");
out.println("<tr>");
out.println("<td>First Name:</td>");
out.println("<td><input type=\"text\" name=\"firstName\"/></td>");
out.println("</tr>");
out.println("<tr>");
out.println("<td>Last Name:</td>");
out.println("<td><input type=\"text\" name=\"lastName\"/></td>");
out.println("</tr>");
out.println("<tr>");
out.println("<td>Phone Number:</td>");
out.println("<td><input type=\"text\" name=\"phone\"/></td>");
out.println("</tr>");
out.println("<tr>");
out.println("<td></td>");
out.println("<td><input type=\"submit\" value=\"Enter\"/></td>");
out.println("</tr>");
out.println("</table>");
out.println("</form>");
out.println("</body>");
out.println("</html>");
}
}
Page 280 c©2009 n + 1, Inc All Rights Reserved

JAVAWEB PROGRAMMING
ProcessPhoneTwo.java
package net.nplus1.javaweb.lab4;
import java.io.IOException;
import java.io.PrintWriter;
import javax.servlet.ServletException;
import javax.servlet.http.HttpServlet;
import javax.servlet.http.HttpServletRequest;
import javax.servlet.http.HttpServletResponse;
public class ProcessPhoneTwo extends HttpServlet {
public void doGet(HttpServletRequest request, HttpServletResponse response)
throws IOException, ServletException {
response.sendError(HttpServletResponse.SC_NOT_FOUND);
}
public void doPost(HttpServletRequest request, HttpServletResponse response)
throws IOException, ServletException {
String firstName = request.getParameter("firstName");
String lastName = request.getParameter("lastName");
String phone = request.getParameter("phone");
int errorMessage = 0;
if ( firstName.trim().isEmpty() ) {
errorMessage += 8;
}
if ( lastName.trim().isEmpty() ) {
errorMessage += 4;
}
String testPhone = phone.replaceAll("-", "");
if (testPhone.length() != 10) {
errorMessage += 2;
}
else {
try {
Long.parseLong(testPhone);
}
catch (NumberFormatException e) {
errorMessage += 1;
}
}
if ( errorMessage > 0 ) {
response.sendRedirect("phone_entry2.html?error=" + errorMessage);
Page 281 c©2009 n + 1, Inc All Rights Reserved
APPENDIX
}
PrintWriter out = response.getWriter();
out.println("<html>");
out.println("<body>");
out.println("<h2>Survey Completed</h2>");
out.println("Thank you " + firstName + " " + lastName +
" for filling out the survey.<br/>");
out.println("We have recorded your phone number as " + phone);
out.println("</body>");
out.println("</html>");
}
}
Page 282 c©2009 n + 1, Inc All Rights Reserved

JAVAWEB PROGRAMMING
Part 6 - web.xml and error.html
web.xml
<error-page>
<error-code>404</error-code>
<location>/lab4/error.html</location>
</error-page>
error.html
<html>
<body>
<h2>The Page You Requested is Not Available</h2>
</body>
</html>
Page 283 c©2009 n + 1, Inc All Rights Reserved

APPENDIX
A.4 Lab 5
Task.java
package net.nplus1.javaweb.lab5;
public class Task {
private int priority;
private String dueDate;
private String task;
public int getPriority() {
return priority;
}
public void setPriority(int priority) {
this.priority = priority;
}
public String getDueDate() {
return dueDate;
}
public void setDueDate(String dueDate) {
this.dueDate = dueDate;
}
public String getTask() {
return task;
}
public void setTask(String task) {
this.task = task;
}
}
Page 284 c©2009 n + 1, Inc All Rights Reserved

JAVAWEB PROGRAMMING
ViewTaskList.java
package net.nplus1.javaweb.lab5;
import java.io.IOException;
import java.io.PrintWriter;
import java.util.ArrayList;
import java.util.List;
import javax.servlet.ServletException;
import javax.servlet.http.HttpServlet;
import javax.servlet.http.HttpServletRequest;
import javax.servlet.http.HttpServletResponse;
import javax.servlet.http.HttpSession;
public class ViewTaskList extends HttpServlet {
protected void doGet(HttpServletRequest req, HttpServletResponse resp)
throws ServletException, IOException {
HttpSession session = req.getSession();
List<Task> tasks = (List<Task>)session.getAttribute("taskList");
if ( tasks == null ) {
tasks = new ArrayList<Task>();
session.setAttribute("taskList", tasks);
}
PrintWriter out = resp.getWriter();
out.println("<html><body>");
out.println("<h2>Task List</h2>");
out.println("<form method=\"post\" action=\"task_list.html\">");
out.println("<input type=\"submit\" value=\"Delete Tasks\"/>");
out.println("<input type=\"hidden\" name=\"action\" value=\"delete\"/>");
out.println("<p><table border=\"1\" cellpadding=\"4\">");
out.println("<tr><td>x</td><td>Pri</td><td>Due</td><td>Task</td></tr>");
for ( int x = 0; x < tasks.size(); x++ ) {
Task task = tasks.get(x);
out.println("<tr>");
out.println("<td><input type=\"checkbox\" name=\"id\" value=\""
+ x + "\"></td>");
out.println("<td>" + task.getPriority() + "</td>");
out.println("<td>" + task.getDueDate() + "</td>");
out.print("<td>");
out.print("<a href=\"edit_task.html?id=" + x + "\">"
+ task.getTask() + "</a>");
out.println("</td>");
out.println("</tr>");
}
out.println("</table></p>");
Page 285 c©2009 n + 1, Inc All Rights Reserved

APPENDIX
out.println("</form>");
out.println("<form method=\"post\" action=\"task_list.html\">");
out.println("<input type=\"hidden\" name=\"action\" value=\"add\"/>");
out.println("Priority: <input type=\"text\" name=\"priority\"/><br/>");
out.println("Due Date: <input type=\"text\" name=\"dueDate\"/><br/>");
out.println("Task: <input type=\"text\" name=\"task\"/><br/>");
out.println("<input type=\"submit\" name=\"Add Task\"/><br/>");
out.println("</form>");
out.println("</body></html>");
}
protected void doPost(HttpServletRequest req, HttpServletResponse resp)
throws ServletException, IOException {
String action = req.getParameter("action");
HttpSession session = req.getSession();
List<Task> tasks = (List<Task>)session.getAttribute("taskList");
if ( action.equals("add") ) {
String priority = req.getParameter("priority");
String dueDate = req.getParameter("dueDate");
String task = req.getParameter("task");
int pri = Integer.parseInt(priority);
Task newTask = new Task();
newTask.setDueDate(dueDate);
newTask.setPriority(pri);
newTask.setTask(task);
tasks.add(newTask);
}
if ( action.equals("delete") ) {
String [] indexes = req.getParameterValues("id");
for ( int x = indexes.length - 1; x >= 0; x-- ) {
int index = Integer.parseInt(indexes[x]);
tasks.remove(index);
}
}
this.doGet(req, resp);
}
}
Page 286 c©2009 n + 1, Inc All Rights Reserved

JAVAWEB PROGRAMMING
EditTask.java
package net.nplus1.javaweb.lab5;
import java.io.IOException;
import java.io.PrintWriter;
import java.util.List;
import javax.servlet.ServletException;
import javax.servlet.http.HttpServlet;
import javax.servlet.http.HttpServletRequest;
import javax.servlet.http.HttpServletResponse;
import javax.servlet.http.HttpSession;
public class EditTask extends HttpServlet {
public void doGet(HttpServletRequest req, HttpServletResponse resp)
throws ServletException, IOException {
HttpSession session = req.getSession();
List<Task> tasks = (List<Task>)session.getAttribute("taskList");
String id = req.getParameter("id");
int index = Integer.parseInt(id);
Task task = tasks.get(index);
PrintWriter out = resp.getWriter();
out.println("<html><body>");
out.println("<h2>Edit Task</h2>");
out.println("<form method=\"post\" action=\"edit_task.html\">");
out.println("<input type=\"hidden\" name=\"id\" value=\"" + id
+ "\"/>");
out.println("Priority: <input type=\"text\" name=\"priority\" value=\""
+ task.getPriority() + "\"/><br/>");
out.println("Due Date: <input type=\"text\" name=\"dueDate\" value=\""
+ task.getDueDate() + "\"/><br/>");
out.println("Task: <input type=\"text\" name=\"task\" value=\""
+ task.getTask() + "\"/><br/>");
out.println("<input type=\"submit\" value=\"Edit Task\"/><br/>");
out.println("</form>");
out.println("</body></html>");
}
public void doPost(HttpServletRequest req, HttpServletResponse resp)
throws ServletException, IOException {
HttpSession session = req.getSession();
List<Task> tasks = (List<Task>)session.getAttribute("taskList");
String id = req.getParameter("id");
int index = Integer.parseInt(id);
Page 287 c©2009 n + 1, Inc All Rights Reserved
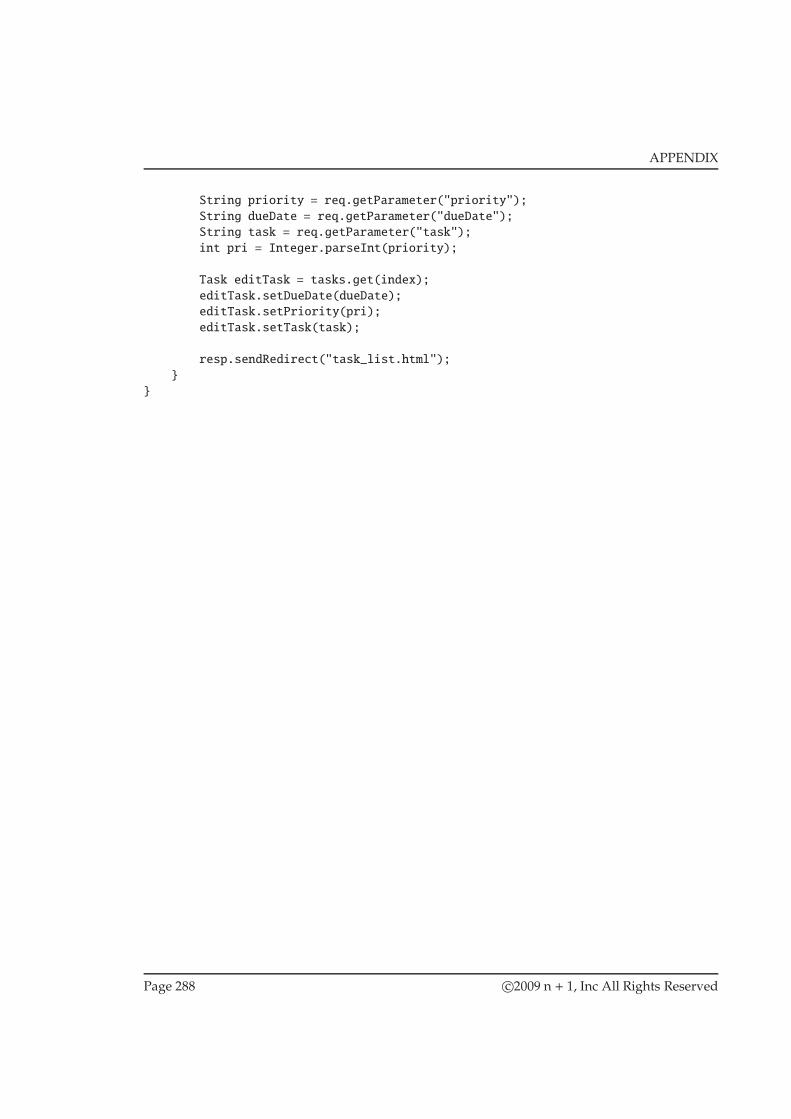
APPENDIX
String priority = req.getParameter("priority");
String dueDate = req.getParameter("dueDate");
String task = req.getParameter("task");
int pri = Integer.parseInt(priority);
Task editTask = tasks.get(index);
editTask.setDueDate(dueDate);
editTask.setPriority(pri);
editTask.setTask(task);
resp.sendRedirect("task_list.html");
}
}
Page 288 c©2009 n + 1, Inc All Rights Reserved

JAVAWEB PROGRAMMING
A.5 Lab 6
header.jsp
<html>
<body>
<h2>Todo List</h2>
<p>
footer.jsp
</p>
</body>
</html>
Page 289 c©2009 n + 1, Inc All Rights Reserved

APPENDIX
todo list.jsp
<%@ page import="net.nplus1.javaweb.lab5.Task,java.util.*" %>
<%
List<Task> tasks = (List<Task>)session.getAttribute("taskList");
if ( tasks == null ) {
tasks = new ArrayList<Task>();
session.setAttribute("taskList", tasks);
}
%>
<%@ include file="header.jsp" %>
<p>
<form method="post" action="delete_tasks.jsp">
<table border="1" cellspacing="0" cellpadding="4">
<tr>
<td>x</td>
<td>Pri</td>
<td>Due</td>
<td>Task</td>
</tr>
<%
for ( int x = 0; x < tasks.size(); x++ ) {
Task task = tasks.get(x);
%>
<tr>
<td>
<input type="checkbox" name="id" value="<%= x %>"/>
</td>
<td><%= task.getPriority() %></td>
<td><%= task.getDueDate() %></td>
<td>
<a href="edit_task.jsp?id=<%= x %>">
<%= task.getTask() %>
</a>
</td>
</tr>
<%
}
%>
</table>
<input type="submit" value="Delete Selected Tasks"/>
</form>
</p>
<p>
<form method="post" action="add_task.jsp">
<table border="0" cellspacing="0" cellpadding="4">
<tr>
Page 290 c©2009 n + 1, Inc All Rights Reserved

JAVAWEB PROGRAMMING
<td>Priority:</td>
<td><input type="text" name="priority"/></td>
</tr>
<tr>
<td>Due Date:</td>
<td><input type="text" name="dueDate"/></td>
</tr>
<tr>
<td>Task:</td>
<td><input type="text" name="task"/></td>
</tr>
<tr>
<td> </td>
<td><input type="submit" value="Add Task"/></td>
</tr>
</table>
</form>
</p>
<%@ include file="footer.jsp" %>
Page 291 c©2009 n + 1, Inc All Rights Reserved
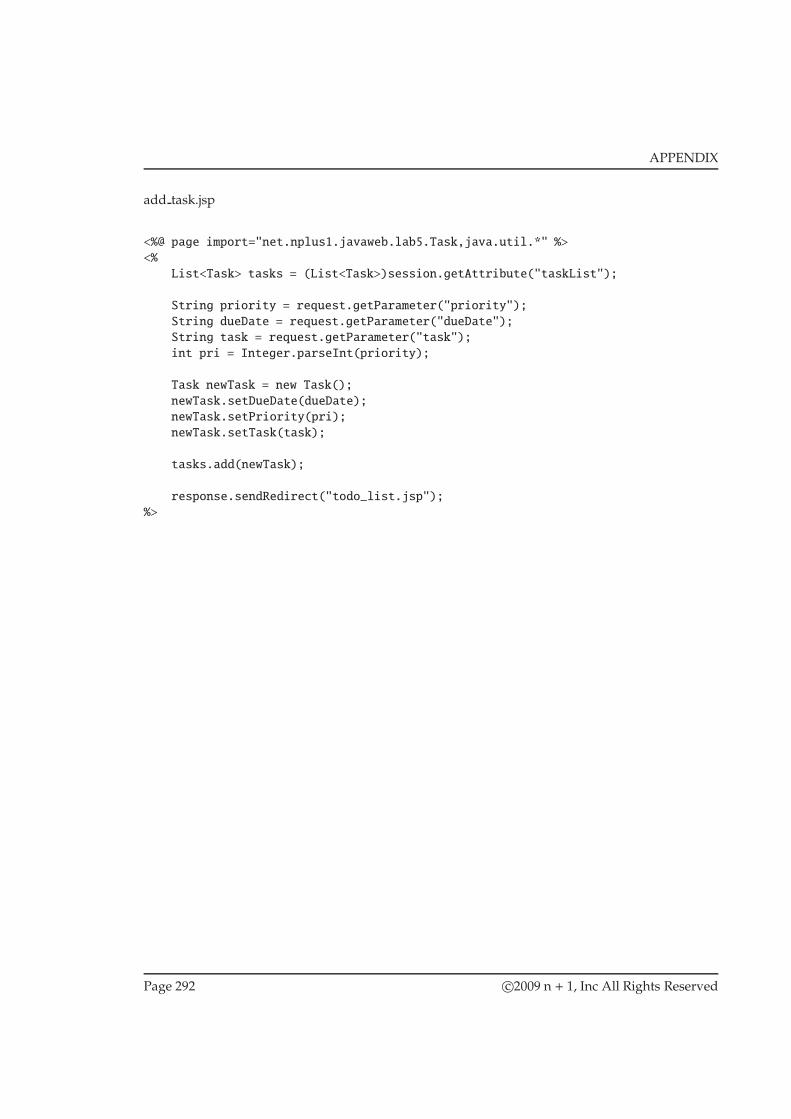
APPENDIX
add task.jsp
<%@ page import="net.nplus1.javaweb.lab5.Task,java.util.*" %>
<%
List<Task> tasks = (List<Task>)session.getAttribute("taskList");
String priority = request.getParameter("priority");
String dueDate = request.getParameter("dueDate");
String task = request.getParameter("task");
int pri = Integer.parseInt(priority);
Task newTask = new Task();
newTask.setDueDate(dueDate);
newTask.setPriority(pri);
newTask.setTask(task);
tasks.add(newTask);
response.sendRedirect("todo_list.jsp");
%>
Page 292 c©2009 n + 1, Inc All Rights Reserved

JAVAWEB PROGRAMMING
delete task.jsp
<%@ page import="net.nplus1.javaweb.lab5.Task,java.util.*" %>
<%
List<Task> tasks = (List<Task>)session.getAttribute("taskList");
String [] indexes = request.getParameterValues("id");
for ( int x = indexes.length - 1; x >= 0; x-- ) {
int index = Integer.parseInt(indexes[x]);
tasks.remove(index);
}
response.sendRedirect("todo_list.jsp");
%>
Page 293 c©2009 n + 1, Inc All Rights Reserved

APPENDIX
edit task.jsp
<%@ page import="net.nplus1.javaweb.lab5.Task,java.util.*" %>
<%
List<Task> tasks = (List<Task>)session.getAttribute("taskList");
String id = request.getParameter("id");
int index = Integer.parseInt(id);
Task task = tasks.get(index);
%>
<%@ include file="header.jsp" %>
<p>
<form method="post" action="process_task.jsp">
<input type="hidden" name="id" value="<%= id %>"/>
<table border="0" cellspacing="0" cellpadding="4">
<tr>
<td>Priority:</td>
<td><input type="text" name="priority"
value="<%= task.getPriority() %>"/></td>
</tr>
<tr>
<td>Due Date:</td>
<td><input type="text" name="dueDate"
value="<%= task.getDueDate() %>"/></td>
</tr>
<tr>
<td>Task:</td>
<td><input type="text" name="task"
value="<%= task.getTask() %>"/></td>
</tr>
<tr>
<td> </td>
<td><input type="submit" value="Update Task"/></td>
</tr>
</table>
</form>
</p>
<%@ include file="footer.jsp" %>
Page 294 c©2009 n + 1, Inc All Rights Reserved

JAVAWEB PROGRAMMING
process task.jsp
<%@ page import="net.nplus1.javaweb.lab5.Task,java.util.*" %>
<%
List<Task> tasks = (List<Task>)session.getAttribute("taskList");
String id = request.getParameter("id");
int index = Integer.parseInt(id);
String priority = request.getParameter("priority");
String dueDate = request.getParameter("dueDate");
String task = request.getParameter("task");
int pri = Integer.parseInt(priority);
Task editTask = tasks.get(index);
editTask.setDueDate(dueDate);
editTask.setPriority(pri);
editTask.setTask(task);
response.sendRedirect("todo_list.jsp");
%>
Page 295 c©2009 n + 1, Inc All Rights Reserved

APPENDIX
A.6 Lab 7
Part 1, 4 - Employee.java and employee list.jsp
package net.nplus1.javaweb.lab7;
public class Employee {
private int id;
private String firstName;
private String lastName;
private String city;
private String state;
private double salary;
public int getId() {
return id;
}
public String getFirstName() {
return firstName;
}
public String getLastName() {
return lastName;
}
public String getCity() {
return city;
}
public String getState() {
return state;
}
public double getSalary() {
return salary;
}
public void setId(int id) {
this.id = id;
}
public void setFirstName(String firstName) {
this.firstName = firstName;
}
public void setLastName(String lastName) {
this.lastName = lastName;
}
public void setCity(String city) {
this.city = city;
}
public void setState(String state) {
this.state = state;
}
Page 296 c©2009 n + 1, Inc All Rights Reserved
JAVAWEB PROGRAMMING
public void setSalary(double salary) {
this.salary = salary;
}
}
Page 297 c©2009 n + 1, Inc All Rights Reserved

APPENDIX
employee list.jsp
<%@ taglib uri="http://java.sun.com/jsp/jstl/core" prefix="c" %>
<%@ taglib uri="http://java.sun.com/jsp/jstl/fmt" prefix="fmt" %>
<html>
<body>
<h2>Employee List</h2>
<table border="0" cellspacing="0" cellpadding="4">
<tr>
<td>Id</td>
<td>First Name</td>
<td>Last Name</td>
<td>City</td>
<td>State</td>
<td>Salary</td>
</tr>
<c:forEach var="employee" items="${employeeList}">
<tr>
<td>
<c:url value="edit_employee.jsp" var="editUrl">
<c:param name="id" value="${employee.id}"/>
</c:url>
<a href="${editUrl}"> ${employee.id} </a>
</td>
<td>${employee.firstName}</td>
<td>${employee.lastName}</td>
<td>${employee.city}</td>
<td>${employee.state}</td>
<td>
<fmt:formatNumber value="${employee.salary}"
type="currency"/>
</td>
</tr>
</c:forEach>
</table>
<p>
<a href="add_employee.jsp">Add New Employee</a>
</p>
</body>
</html>
Page 298 c©2009 n + 1, Inc All Rights Reserved

JAVAWEB PROGRAMMING
Part 2, 6 - employee widget.jsp , states.tag
employee widget.jsp
<%@ taglib prefix="bs" tagdir="/WEB-INF/tags" %>
<table border="0" cellspacing="0" cellpadding="4">
<tr>
<td>Employee ID</td>
<td><input type="text" name="id" value="${employee.id}"/></td>
</tr>
<tr>
<td>First Name</td>
<td>
<input type="text" name="firstName" value="${employee.firstName}"/>
</td>
</tr>
<tr>
<td>Last Name</td>
<td>
<input type="text" name="lastName" value="${employee.lastName}"/>
</td>
</tr>
<tr>
<td>City</td>
<td><input type="text" name="city" value="${employee.city}"/></td>
</tr>
<tr>
<td>State</td>
<td>
<bs:states name="state" state="${employee.state}"/>
</td>
</tr>
<tr>
<td>Salary</td>
<td><input type="text" name="salary" value="${employee.salary}"/></td>
</tr>
<tr>
<td> </td>
<td align="right"><input type="submit" value="Save Employee"/></td>
</tr>
</table>
Page 299 c©2009 n + 1, Inc All Rights Reserved

APPENDIX
states.tag
<%@ tag body-content="scriptless"%>
<%@ attribute name="state" required="false" type="java.lang.String" %>
<%@ attribute name="name" required="true" type="java.lang.String" %>
<%@ taglib prefix="c" uri="http://java.sun.com/jsp/jstl/core" %>
<select name="${name}" size="1">
<option value="IN" ${state == ’IN’ ? ’selected="true"’ : ’’}>IN</option>
<option value="KY" ${state == ’KY’ ? ’selected="true"’ : ’’}>KY</option>
<option value="OH" ${state == ’OH’ ? ’selected="true"’ : ’’}>OH</option>
<option value="TN" ${state == ’TN’ ? ’selected="true"’ : ’’}>TN</option>
</select>
Page 300 c©2009 n + 1, Inc All Rights Reserved

JAVAWEB PROGRAMMING
Part 3 - add employee.jsp and process add.jsp
add employee.jsp
<html>
<body>
<h2>Add Employee</h2>
<form method="post" action="process_add.jsp">
<%@ include file="employee_widgets.jsp" %>
</form>
</body>
</html>
process add.jsp
<%@ page import="net.nplus1.javaweb.lab7.Employee,java.util.*" %>
<%
List<Employee> employees = (List<Employee>)session.getAttribute("employeeList");
if ( employees == null ) {
employees = new ArrayList<Employee>();
session.setAttribute("employeeList", employees);
}
String id = request.getParameter("id");
int employeeId = Integer.parseInt(id);
String firstName = request.getParameter("firstName");
String lastName = request.getParameter("lastName");
String city = request.getParameter("city");
String state = request.getParameter("state");
String salary = request.getParameter("salary");
double employeeSalary = Double.parseDouble(salary);
Employee emp = new Employee();
emp.setId(employeeId);
emp.setFirstName(firstName);
emp.setLastName(lastName);
emp.setCity(city);
emp.setState(state);
emp.setSalary(employeeSalary);
employees.add(emp);
response.sendRedirect("employee_list.jsp");
%>
Page 301 c©2009 n + 1, Inc All Rights Reserved

APPENDIX
Part 5
edit employee.jsp
<%@ taglib uri="http://java.sun.com/jsp/jstl/core" prefix="c" %>
<html>
<body>
<h2>Edit Employee</h2>
<c:forEach var="employee" items="${employeeList}">
<c:if test="${employee.id == param.id}">
<form method="post" action="process_edit.jsp">
<%@ include file="employee_widgets.jsp" %>
</form>
</c:if>
</c:forEach>
</body>
</html>
process edit.jsp
<%@ page import="net.nplus1.javaweb.lab7.Employee,java.util.*" %>
<%
List<Employee> employees = (List<Employee>)session.getAttribute("employeeList");
String id = request.getParameter("id");
int employeeId = Integer.parseInt(id);
String firstName = request.getParameter("firstName");
String lastName = request.getParameter("lastName");
String city = request.getParameter("city");
String state = request.getParameter("state");
String salary = request.getParameter("salary");
double employeeSalary = Double.parseDouble(salary);
for ( Employee employee : employees ) {
if ( employee.getId() == employeeId ) {
employee.setId(employeeId);
employee.setFirstName(firstName);
employee.setLastName(lastName);
employee.setCity(city);
employee.setState(state);
employee.setSalary(employeeSalary);
}
}
response.sendRedirect("employee_list.jsp");
%>
Page 302 c©2009 n + 1, Inc All Rights Reserved

JAVAWEB PROGRAMMING
A.7 Lab 8
FrontControllerServlet.java
package net.nplus1.javaweb.lab8;
import java.io.IOException;
import javax.servlet.RequestDispatcher;
import javax.servlet.ServletException;
import javax.servlet.http.HttpServlet;
import javax.servlet.http.HttpServletRequest;
import javax.servlet.http.HttpServletResponse;
public class FrontControllerServlet extends HttpServlet {
private ApplicationController appController;
public void init() {
this.appController = new ApplicationController();
}
public void doGet(HttpServletRequest request, HttpServletResponse response)
throws ServletException, IOException {
this.process(request, response);
}
public void doPost(HttpServletRequest request, HttpServletResponse response)
throws ServletException, IOException {
this.process(request, response);
}
private void process(HttpServletRequest request,
HttpServletResponse response)
throws ServletException, IOException {
String url = request.getPathInfo();
String view = appController.processRequest(url, request);
if ( view == null ) {
response.sendError(HttpServletResponse.SC_NOT_FOUND);
}
else {
RequestDispatcher dispatcher =
this.getServletContext().getRequestDispatcher(view);
dispatcher.forward(request, response);
}
}
}
Page 303 c©2009 n + 1, Inc All Rights Reserved

APPENDIX
ApplicationController.java
package net.nplus1.javaweb.lab8;
import javax.servlet.http.HttpServletRequest;
public class ApplicationController {
public String processRequest(String url, HttpServletRequest request) {
String view = null;
try {
WebAction action = WebActionFactory.createAction(url);
if ( action != null )
{
String viewName = action.process(request);
view = LookupJSP.lookup(viewName);
}
}
catch (Exception e) {
view = "/lab8/error.jsp";
}
return view;
}
}
Page 304 c©2009 n + 1, Inc All Rights Reserved

JAVAWEB PROGRAMMING
WebAction.java
package net.nplus1.javaweb.lab8;
import javax.servlet.http.HttpServletRequest;
public interface WebAction {
public String process(HttpServletRequest request) throws Exception;
}
WebActionFactory.java
package net.nplus1.javaweb.lab8;
public class WebActionFactory {
public static WebAction createAction(String url) {
WebAction action = null;
if ( url.equals("/todo.html") ) {
action = new TodoList();
}
else if ( url.equals("/add_task.html") ) {
action = new AddTask();
}
else if ( url.equals("/process_task.html") ) {
action = new ProcessTask();
}
else if ( url.equals("/edit_task.html") ) {
action = new EditTask();
}
else if ( url.equals("/delete_tasks.html") ) {
action = new DeleteTasks();
}
return action;
}
}
Page 305 c©2009 n + 1, Inc All Rights Reserved

APPENDIX
LookupJsp.java
package net.nplus1.javaweb.lab8;
public class LookupJSP {
public static String lookup(String view) {
String jsp = null;
if ( view.equals("todo list") ) {
jsp = "/lab8/todo_list.jsp";
}
else if ( view.equals("task form") ) {
jsp = "/lab8/task_form.jsp";
}
return jsp;
}
}
TodoList.java
package net.nplus1.javaweb.lab8;
import java.util.LinkedList;
import java.util.List;
import javax.servlet.http.HttpServletRequest;
import javax.servlet.http.HttpSession;
import net.nplus1.javaweb.lab5.Task;
public class TodoList implements WebAction {
public String process(HttpServletRequest request) throws Exception {
HttpSession session = request.getSession();
List<Task> tasks = (List<Task>)session.getAttribute("todoList");
if ( tasks == null )
{
tasks = new LinkedList<Task>();
session.setAttribute("todoList", tasks);
}
return "todo list";
}
}
Page 306 c©2009 n + 1, Inc All Rights Reserved

JAVAWEB PROGRAMMING
AddTask.java
package net.nplus1.javaweb.lab8;
import javax.servlet.http.HttpServletRequest;
import net.nplus1.javaweb.lab5.Task;
public class AddTask implements WebAction {
public String process(HttpServletRequest request) throws Exception {
Task task = new Task();
request.setAttribute("action", "Add");
request.setAttribute("task", task);
return "task form";
}
}
EditTask.java
package net.nplus1.javaweb.lab8;
import java.util.List;
import javax.servlet.http.HttpServletRequest;
import javax.servlet.http.HttpSession;
import net.nplus1.javaweb.lab5.Task;
public class EditTask implements WebAction {
public String process(HttpServletRequest request) throws Exception {
String id = request.getParameter("id");
int index = Integer.parseInt(id);
HttpSession session = request.getSession();
List<Task> tasks = (List<Task>)session.getAttribute("todoList");
Task task = tasks.get(index);
request.setAttribute("action", "Edit");
request.setAttribute("task", task);
return "task form";
}
}
Page 307 c©2009 n + 1, Inc All Rights Reserved

APPENDIX
ProcessTask.java
package net.nplus1.javaweb.lab8;
import java.util.List;
import javax.servlet.http.HttpServletRequest;
import javax.servlet.http.HttpSession;
import net.nplus1.javaweb.lab5.Task;
public class ProcessTask implements WebAction {
public String process(HttpServletRequest request) throws Exception {
String action = request.getParameter("action");
HttpSession session = request.getSession();
List<Task> tasks = (List<Task>)session.getAttribute("todoList");
Task task = null;
if ( action.equals("Add") )
{
task = new Task();
tasks.add(task);
}
else if ( action.equals("Edit") )
{
String id = request.getParameter("id");
int index = Integer.parseInt(id);
task = tasks.get(index);
}
String priority = request.getParameter("priority");
task.setPriority(Integer.parseInt(priority));
task.setDueDate(request.getParameter("dueDate"));
task.setTask(request.getParameter("task"));
return "todo list";
}
}
Page 308 c©2009 n + 1, Inc All Rights Reserved

JAVAWEB PROGRAMMING
DeleteTasks.java
package net.nplus1.javaweb.lab8;
import java.util.List;
import javax.servlet.http.HttpServletRequest;
import javax.servlet.http.HttpSession;
import net.nplus1.javaweb.lab5.Task;
public class DeleteTasks implements WebAction {
public String process(HttpServletRequest request) throws Exception {
HttpSession session = request.getSession();
List<Task> tasks = (List<Task>)session.getAttribute("todoList");
String [] indexes = request.getParameterValues("id");
for ( int x = indexes.length - 1; x >= 0; x-- ) {
int index = Integer.parseInt(indexes[x]);
tasks.remove(index);
}
return "todo list";
}
}
Page 309 c©2009 n + 1, Inc All Rights Reserved

APPENDIX
todo list.jsp
<%@ taglib uri="http://java.sun.com/jsp/jstl/core" prefix="c" %>
<html>
<body>
<h2>Todo List</h2>
<form method="post" action="delete_tasks.html">
<table border="1" cellspacing="0" cellpadding="4">
<tr>
<td>x</td>
<td>Pri</td>
<td>Due</td>
<td>Task</td>
</tr>
<c:set var="id" value="0"/>
<c:forEach var="task" items="${todoList}">
<tr>
<td><input type="checkbox" name="id" value="${id}"/></td>
<td>${task.priority}</td>
<td>${task.dueDate}</td>
<td>
<c:url var="editUrl" value="edit_task.html">
<c:param name="id" value="${id}"/>
</c:url>
<a href="${editUrl}">${task.task}</a>
</td>
</tr>
<c:set var="id" value="${id + 1}"/>
</c:forEach>
</table>
<input type="submit" value="Delete Tasks"/>
</form>
<p>
<a href="add_task.html">Add New Task</a>
</p>
</body>
</html>
Page 310 c©2009 n + 1, Inc All Rights Reserved

JAVAWEB PROGRAMMING
error.jsp
<html>
<body>
<h2>Error Occurred</h2>
<p>
Error occurred trying to access the page.
</p>
</body>
</html>
task form.jsp
<html>
<body>
<h2>${action} Task</h2>
<form method="post" action="process_task.html">
<input type="hidden" name="action" value="${action}"/>
<input type="hidden" name="id" value="${param.id}"/>
<table border="0" cellspacing="0" cellpadding="4">
<tr>
<td>Priority:</td>
<td><input type="text" name="priority" value="${task.priority}"/></td>
</tr>
<tr>
<td>Due Date:</td>
<td><input type="text" name="dueDate" value="${task.dueDate}"/></td>
</tr>
<tr>
<td>Task:</td>
<td><input type="text" name="task" value="${task.task}"/></td>
</tr>
<tr>
<td> </td>
<td><input type="submit" value="Save"/></td>
</tr>
</table>
</form>
</body>
</html>
Page 311 c©2009 n + 1, Inc All Rights Reserved

APPENDIX
A.8 Lab 9
ApplicationController.java
package net.nplus1.javaweb.lab9;
import javax.servlet.http.HttpServletRequest;
public class ApplicationController {
public String processRequest(String url, HttpServletRequest request) {
String view = null;
try {
// incoming filters here
RequestContext context = ContextFilter.buildContext(request);
WebAction action = WebActionFactory.createAction(url);
if ( action != null )
{
String viewName = action.process(context);
view = LookupJSP.lookup(viewName);
}
// outgoing filters here
ContextFilter.updateRequest(context, request);
}
catch (Exception e) {
view = "/lab8/error.jsp";
}
return view;
}
}
RequestContext.java
Page 312 c©2009 n + 1, Inc All Rights Reserved

JAVAWEB PROGRAMMING
package net.nplus1.javaweb.lab9;
import java.util.HashMap;
import java.util.Set;
public class RequestContext {
private HashMap<String,Object> parameterMap;
private HashMap<String,Object> dataMap;
private HashMap<String,Object> sessionMap;
public RequestContext() {
this.parameterMap = new HashMap<String, Object>();
this.dataMap = new HashMap<String, Object>();
this.sessionMap = new HashMap<String, Object>();
}
public void setParameter(String key, Object value) {
this.parameterMap.put(key, value);
}
public String getParameter(String key) {
String value = null;
Object data = this.parameterMap.get(key);
if ( data != null && data instanceof String) {
value = (String)data;
}
else if ( data != null && data instanceof String [] ) {
String [] stringData = (String[])data;
value = stringData[0];
}
return value;
}
public String [] getParameterValues(String key) {
String [] values = null;
Object data = this.parameterMap.get(key);
if ( data != null && data instanceof String [] ) {
values = (String [])data;
}
else if (data != null ) {
values = new String[1];
values[0] = (String)data;
}
return values;
}
public void setAttribute(String key, Object value) {
Page 313 c©2009 n + 1, Inc All Rights Reserved

APPENDIX
this.dataMap.put(key, value);
}
public Object getAttribute(String key) {
return this.dataMap.get(key);
}
public void setSessionAttribute(String key, Object value) {
this.sessionMap.put(key, value);
}
public Object getSessionAttribute(String key) {
return this.sessionMap.get(key);
}
public Set<String> keySet() {
return dataMap.keySet();
}
public Set<String> sessionKeySet() {
return sessionMap.keySet();
}
}
Page 314 c©2009 n + 1, Inc All Rights Reserved
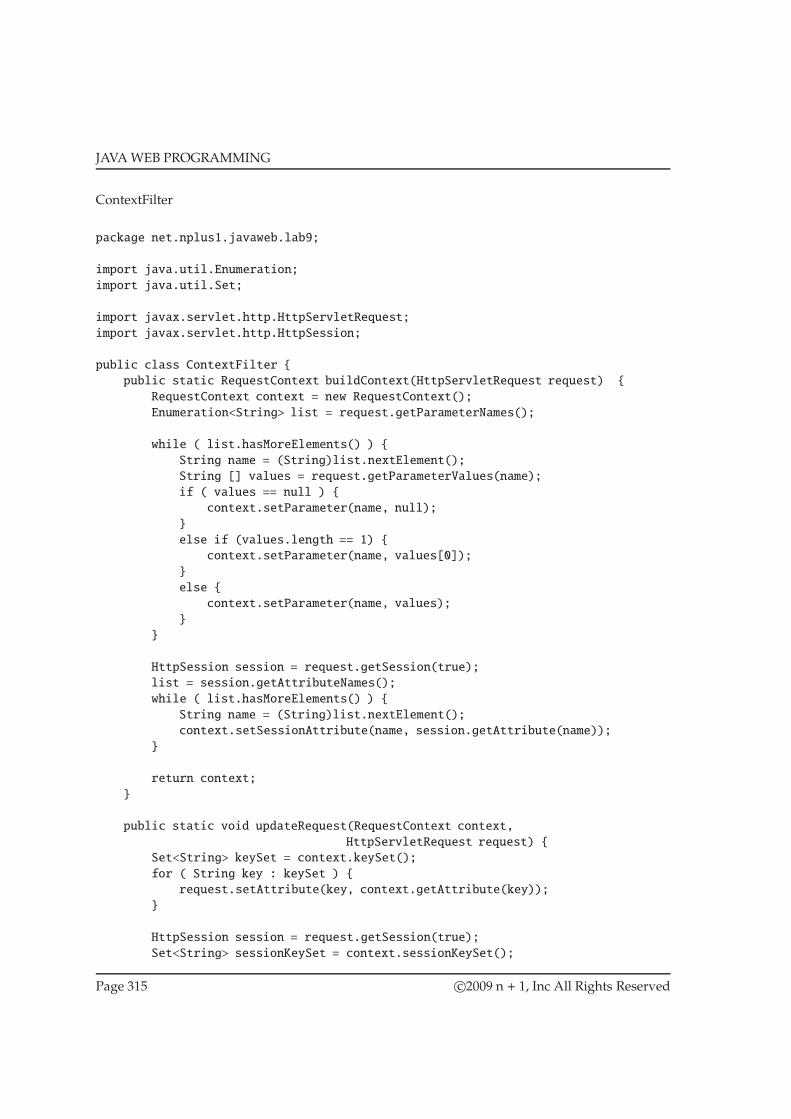
JAVAWEB PROGRAMMING
ContextFilter
package net.nplus1.javaweb.lab9;
import java.util.Enumeration;
import java.util.Set;
import javax.servlet.http.HttpServletRequest;
import javax.servlet.http.HttpSession;
public class ContextFilter {
public static RequestContext buildContext(HttpServletRequest request) {
RequestContext context = new RequestContext();
Enumeration<String> list = request.getParameterNames();
while ( list.hasMoreElements() ) {
String name = (String)list.nextElement();
String [] values = request.getParameterValues(name);
if ( values == null ) {
context.setParameter(name, null);
}
else if (values.length == 1) {
context.setParameter(name, values[0]);
}
else {
context.setParameter(name, values);
}
}
HttpSession session = request.getSession(true);
list = session.getAttributeNames();
while ( list.hasMoreElements() ) {
String name = (String)list.nextElement();
context.setSessionAttribute(name, session.getAttribute(name));
}
return context;
}
public static void updateRequest(RequestContext context,
HttpServletRequest request) {
Set<String> keySet = context.keySet();
for ( String key : keySet ) {
request.setAttribute(key, context.getAttribute(key));
}
HttpSession session = request.getSession(true);
Set<String> sessionKeySet = context.sessionKeySet();
Page 315 c©2009 n + 1, Inc All Rights Reserved

APPENDIX
for ( String key : sessionKeySet ) {
session.setAttribute(key, context.getSessionAttribute(key));
}
}
}
Page 316 c©2009 n + 1, Inc All Rights Reserved
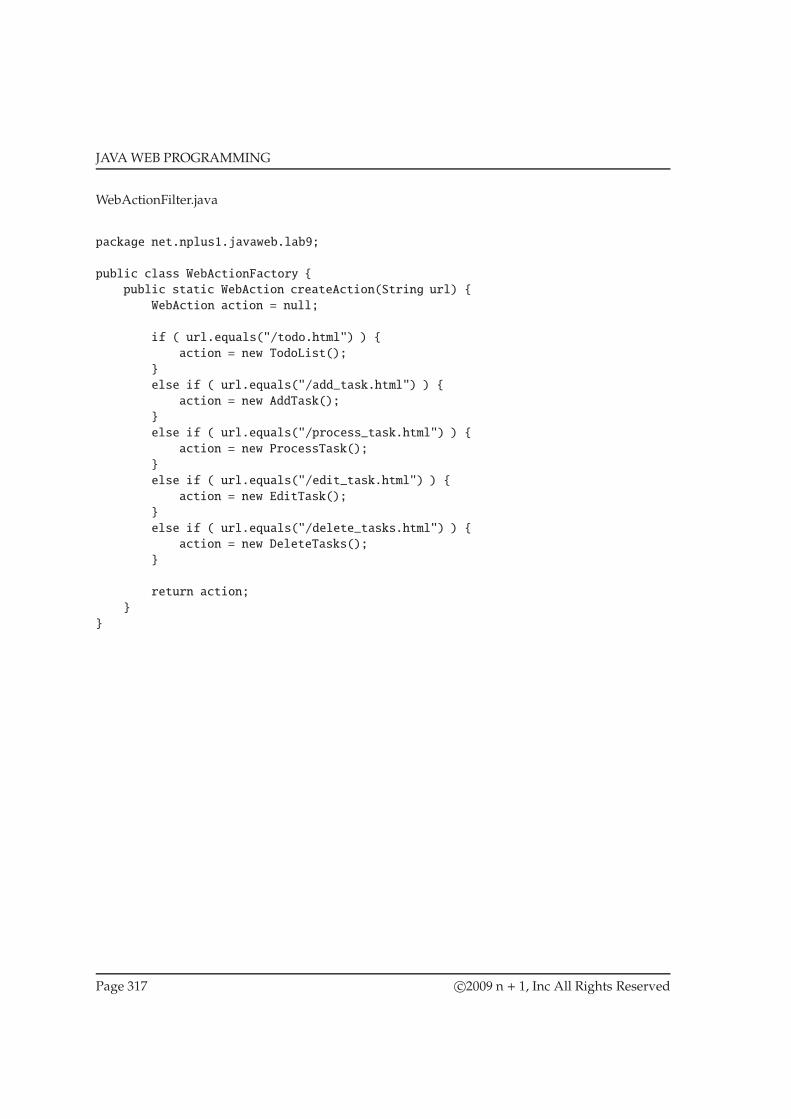
JAVAWEB PROGRAMMING
WebActionFilter.java
package net.nplus1.javaweb.lab9;
public class WebActionFactory {
public static WebAction createAction(String url) {
WebAction action = null;
if ( url.equals("/todo.html") ) {
action = new TodoList();
}
else if ( url.equals("/add_task.html") ) {
action = new AddTask();
}
else if ( url.equals("/process_task.html") ) {
action = new ProcessTask();
}
else if ( url.equals("/edit_task.html") ) {
action = new EditTask();
}
else if ( url.equals("/delete_tasks.html") ) {
action = new DeleteTasks();
}
return action;
}
}
Page 317 c©2009 n + 1, Inc All Rights Reserved
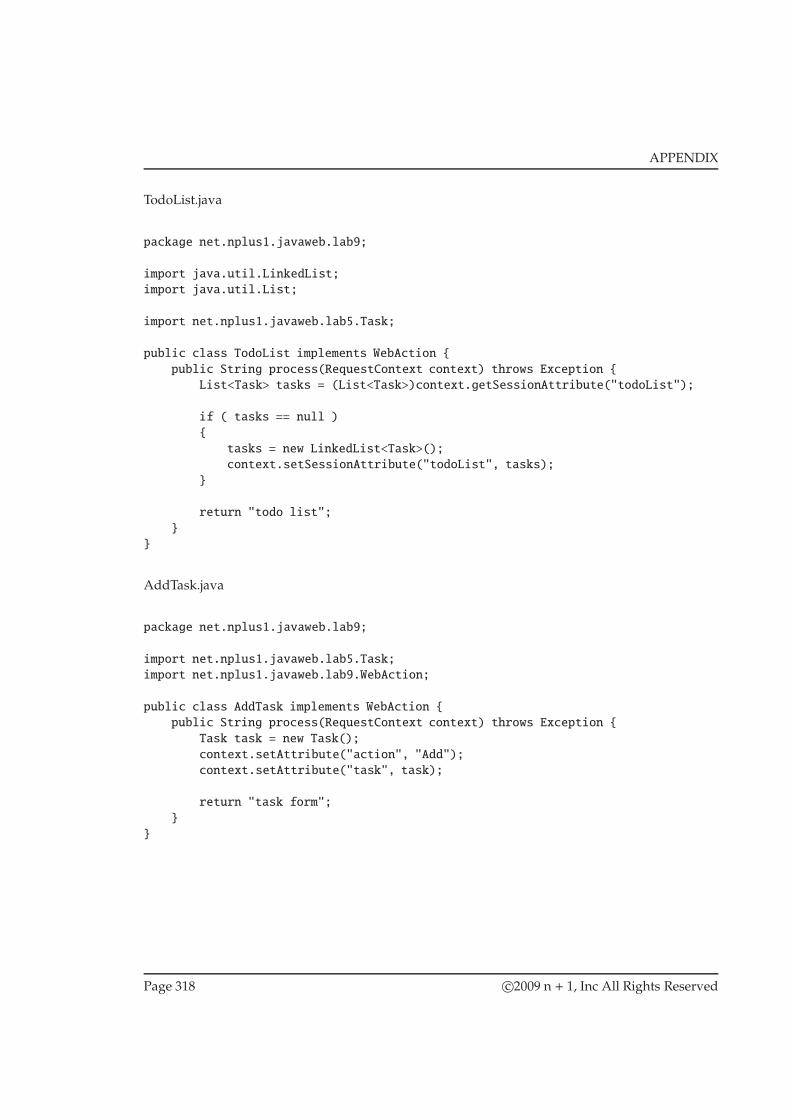
APPENDIX
TodoList.java
package net.nplus1.javaweb.lab9;
import java.util.LinkedList;
import java.util.List;
import net.nplus1.javaweb.lab5.Task;
public class TodoList implements WebAction {
public String process(RequestContext context) throws Exception {
List<Task> tasks = (List<Task>)context.getSessionAttribute("todoList");
if ( tasks == null )
{
tasks = new LinkedList<Task>();
context.setSessionAttribute("todoList", tasks);
}
return "todo list";
}
}
AddTask.java
package net.nplus1.javaweb.lab9;
import net.nplus1.javaweb.lab5.Task;
import net.nplus1.javaweb.lab9.WebAction;
public class AddTask implements WebAction {
public String process(RequestContext context) throws Exception {
Task task = new Task();
context.setAttribute("action", "Add");
context.setAttribute("task", task);
return "task form";
}
}
Page 318 c©2009 n + 1, Inc All Rights Reserved

JAVAWEB PROGRAMMING
EditTask.java
package net.nplus1.javaweb.lab9;
import java.util.List;
import net.nplus1.javaweb.lab5.Task;
public class EditTask implements WebAction {
public String process(RequestContext context) throws Exception {
String id = context.getParameter("id");
int index = Integer.parseInt(id);
List<Task> tasks = (List<Task>)context.getSessionAttribute("todoList");
Task task = tasks.get(index);
context.setAttribute("action", "Edit");
context.setAttribute("task", task);
return "task form";
}
}
DeleteTasks.java
package net.nplus1.javaweb.lab9;
import java.util.List;
import net.nplus1.javaweb.lab5.Task;
public class DeleteTasks implements WebAction {
public String process(RequestContext context) throws Exception {
List<Task> tasks = (List<Task>)context.getSessionAttribute("todoList");
String [] indexes = context.getParameterValues("id");
for ( int x = indexes.length - 1; x >= 0; x-- ) {
int index = Integer.parseInt(indexes[x]);
tasks.remove(index);
}
return "todo list";
}
}
Page 319 c©2009 n + 1, Inc All Rights Reserved

APPENDIX
ProcessTask.java
package net.nplus1.javaweb.lab9;
import java.util.List;
import net.nplus1.javaweb.lab5.Task;
public class ProcessTask implements WebAction {
public String process(RequestContext context) throws Exception {
String action = context.getParameter("action");
List<Task> tasks = (List<Task>)context.getSessionAttribute("todoList");
Task task = null;
if ( action.equals("Add") )
{
task = new Task();
tasks.add(task);
}
else if ( action.equals("Edit") )
{
String id = context.getParameter("id");
int index = Integer.parseInt(id);
task = tasks.get(index);
}
String priority = context.getParameter("priority");
task.setPriority(Integer.parseInt(priority));
task.setDueDate(context.getParameter("dueDate"));
task.setTask(context.getParameter("task"));
return "todo list";
}
}
Page 320 c©2009 n + 1, Inc All Rights Reserved
JAVAWEB PROGRAMMING
B GNU Free Documentation License
Version 1.3, 3 November 2008
Copyright c© 2000, 2001, 2002, 2007, 2008 Free Software Foundation, Inc.
<http://fsf.org/>
Everyone is permitted to copy and distribute verbatim copies of this license document, butchanging it is not allowed.
Preamble
The purpose of this License is to make a manual, textbook, or other functional and useful document“free” in the sense of freedom: to assure everyone the effective freedom to copy and redistributeit, with or without modifying it, either commercially or noncommercially. Secondarily, this Licensepreserves for the author and publisher away to get credit for their work, while not being consideredresponsible for modifications made by others.
This License is a kind of “copyleft”, which means that derivative works of the document mustthemselves be free in the same sense. It complements the GNU General Public License, which is acopyleft license designed for free software.
We have designed this License in order to use it for manuals for free software, because free softwareneeds free documentation: a free program should comewithmanuals providing the same freedomsthat the software does. But this License is not limited to software manuals; it can be used forany textual work, regardless of subject matter or whether it is published as a printed book. Werecommend this License principally for works whose purpose is instruction or reference.
1. APPLICABILITY AND DEFINITIONS
This License applies to any manual or other work, in any medium, that contains a notice placed bythe copyright holder saying it can be distributed under the terms of this License. Such anotice grantsa world-wide, royalty-free license, unlimited in duration, to use that work under the conditionsstated herein. The “Document”, below, refers to any such manual or work. Any member of thepublic is a licensee, and is addressed as “you”. You accept the license if you copy, modify ordistribute the work in a way requiring permission under copyright law.
A “Modified Version” of the Document means any work containing the Document or a portion ofit, either copied verbatim, or with modifications and/or translated into another language.
A “Secondary Section” is a named appendix or a front-matter section of the Document that dealsexclusively with the relationship of the publishers or authors of the Document to the Document’soverall subject (or to relatedmatters) and contains nothing that could fall directlywithin that overall
Page 321 c©2009 n + 1, Inc All Rights Reserved

APPENDIX
subject. (Thus, if the Document is in part a textbook of mathematics, a Secondary Section may notexplain any mathematics.) The relationship could be a matter of historical connection with thesubject or with related matters, or of legal, commercial, philosophical, ethical or political positionregarding them.
The “Invariant Sections” are certain Secondary Sections whose titles are designated, as being thoseof Invariant Sections, in the notice that says that the Document is released under this License. Ifa section does not fit the above definition of Secondary then it is not allowed to be designated asInvariant. The Document may contain zero Invariant Sections. If the Document does not identifyany Invariant Sections then there are none.
The “Cover Texts” are certain short passages of text that are listed, as Front-Cover Texts or Back-Cover Texts, in the notice that says that the Document is released under this License. A Front-CoverText may be at most 5 words, and a Back-Cover Text may be at most 25 words.
A “Transparent” copy of the Document means a machine-readable copy, represented in a formatwhose specification is available to the general public, that is suitable for revising the documentstraightforwardly with generic text editors or (for images composed of pixels) generic paint pro-grams or (for drawings) some widely available drawing editor, and that is suitable for input to textformatters or for automatic translation to a variety of formats suitable for input to text formatters.A copy made in an otherwise Transparent file format whose markup, or absence of markup, hasbeen arranged to thwart or discourage subsequent modification by readers is not Transparent. Animage format is not Transparent if used for any substantial amount of text. A copy that is not“Transparent” is called “Opaque”.
Examples of suitable formats for Transparent copies include plain ASCII without markup, Texinfoinput format, LaTeX input format, SGML or XML using a publicly available DTD, and standard-conforming simple HTML, PostScript or PDF designed for human modification. Examples oftransparent image formats include PNG, XCF and JPG.Opaque formats include proprietary formatsthat can be read and edited only by proprietaryword processors, SGML or XML for which the DTDand/or processing tools are not generally available, and the machine-generated HTML, PostScriptor PDF produced by some word processors for output purposes only.
The “Title Page” means, for a printed book, the title page itself, plus such following pages as areneeded to hold, legibly, the material this License requires to appear in the title page. For worksin formats which do not have any title page as such, “Title Page” means the text near the mostprominent appearance of the work’s title, preceding the beginning of the body of the text.
The “publisher” means any person or entity that distributes copies of the Document to the public.
A section “Entitled XYZ” means a named subunit of the Document whose title either is pre-cisely XYZ or contains XYZ in parentheses following text that translates XYZ in another language.(Here XYZ stands for a specific section name mentioned below, such as “Acknowledgements”,“Dedications”, “Endorsements”, or “History”.) To “Preserve the Title” of such a section whenyou modify the Document means that it remains a section “Entitled XYZ” according to this defini-tion.
The Document may include Warranty Disclaimers next to the notice which states that this Licenseapplies to the Document. TheseWarranty Disclaimers are considered to be included by reference inthis License, but only as regards disclaiming warranties: any other implication that these Warranty
Page 322 c©2009 n + 1, Inc All Rights Reserved

JAVAWEB PROGRAMMING
Disclaimers may have is void and has no effect on the meaning of this License.
2. VERBATIM COPYING
You may copy and distribute the Document in any medium, either commercially or noncommer-cially, provided that this License, the copyright notices, and the license notice saying this Licenseapplies to the Document are reproduced in all copies, and that you add no other conditions whatso-ever to those of this License. You may not use technical measures to obstruct or control the readingor further copying of the copies you make or distribute. However, you may accept compensationin exchange for copies. If you distribute a large enough number of copies you must also follow theconditions in section 3.
You may also lend copies, under the same conditions stated above, and you may publicly displaycopies.
3. COPYING IN QUANTITY
If you publish printed copies (or copies in media that commonly have printed covers) of theDocument, numbering more than 100, and the Document’s license notice requires Cover Texts, youmust enclose the copies in covers that carry, clearly and legibly, all these Cover Texts: Front-CoverTexts on the front cover, and Back-Cover Texts on the back cover. Both covers must also clearlyand legibly identify you as the publisher of these copies. The front cover must present the full titlewith all words of the title equally prominent and visible. You may add other material on the coversin addition. Copying with changes limited to the covers, as long as they preserve the title of theDocument and satisfy these conditions, can be treated as verbatim copying in other respects.
If the required texts for either cover are too voluminous to fit legibly, you should put the first oneslisted (as many as fit reasonably) on the actual cover, and continue the rest onto adjacent pages.
If you publish or distribute Opaque copies of the Document numbering more than 100, you musteither include a machine-readable Transparent copy along with each Opaque copy, or state in orwith each Opaque copy a computer-network location fromwhich the general network-using publichas access to download using public-standard network protocols a complete Transparent copy oftheDocument, free of addedmaterial. If youuse the latter option, youmust take reasonablyprudentsteps, when you begin distribution of Opaque copies in quantity, to ensure that this Transparentcopy will remain thus accessible at the stated location until at least one year after the last time youdistribute anOpaque copy (directly or through your agents or retailers) of that edition to the public.
It is requested, but not required, that you contact the authors of the Document well before redis-tributing any large number of copies, to give them a chance to provide you with an updated versionof the Document.
4. MODIFICATIONS
You may copy and distribute a Modified Version of the Document under the conditions of sections2 and 3 above, provided that you release the Modified Version under precisely this License, with
Page 323 c©2009 n + 1, Inc All Rights Reserved

APPENDIX
the Modified Version filling the role of the Document, thus licensing distribution and modificationof the Modified Version to whoever possesses a copy of it. In addition, you must do these things inthe Modified Version:
A. Use in the Title Page (and on the covers, if any) a title distinct from that of the Document,and from those of previous versions (which should, if there were any, be listed in the Historysection of the Document). You may use the same title as a previous version if the originalpublisher of that version gives permission.
B. List on the Title Page, as authors, one or more persons or entities responsible for authorship ofthe modifications in the Modified Version, together with at least five of the principal authorsof the Document (all of its principal authors, if it has fewer than five), unless they release youfrom this requirement.
C. State on the Title page the name of the publisher of the Modified Version, as the publisher.
D. Preserve all the copyright notices of the Document.
E. Add an appropriate copyright notice for your modifications adjacent to the other copyrightnotices.
F. Include, immediately after the copyright notices, a license notice giving the public permis-sion to use the Modified Version under the terms of this License, in the form shown in theAddendum below.
G. Preserve in that license notice the full lists of Invariant Sections and required Cover Textsgiven in the Document’s license notice.
H. Include an unaltered copy of this License.
I. Preserve the section Entitled “History”, Preserve its Title, and add to it an item stating atleast the title, year, new authors, and publisher of the Modified Version as given on the TitlePage. If there is no section Entitled “History” in the Document, create one stating the title,year, authors, and publisher of the Document as given on its Title Page, then add an itemdescribing the Modified Version as stated in the previous sentence.
J. Preserve the network location, if any, given in the Document for public access to a Transparentcopy of the Document, and likewise the network locations given in theDocument for previousversions it was based on. These may be placed in the “History” section. You may omit anetwork location for a work that was published at least four years before the Document itself,or if the original publisher of the version it refers to gives permission.
K. For any section Entitled “Acknowledgements” or “Dedications”, Preserve the Title of thesection, and preserve in the section all the substance and tone of each of the contributoracknowledgements and/or dedications given therein.
L. Preserve all the Invariant Sections of the Document, unaltered in their text and in their titles.Section numbers or the equivalent are not considered part of the section titles.
M. Delete any section Entitled “Endorsements”. Such a section may not be included in theModified Version.
Page 324 c©2009 n + 1, Inc All Rights Reserved

JAVAWEB PROGRAMMING
N. Do not retitle any existing section to be Entitled “Endorsements” or to conflict in title withany Invariant Section.
O. Preserve any Warranty Disclaimers.
If the Modified Version includes new front-matter sections or appendices that qualify as SecondarySections and contain no material copied from the Document, you may at your option designatesome or all of these sections as invariant. To do this, add their titles to the list of Invariant Sectionsin the Modified Version’s license notice. These titles must be distinct from any other section titles.
You may add a section Entitled “Endorsements”, provided it contains nothing but endorsements ofyour Modified Version by various parties—for example, statements of peer review or that the texthas been approved by an organization as the authoritative definition of a standard.
You may add a passage of up to five words as a Front-Cover Text, and a passage of up to 25 wordsas a Back-Cover Text, to the end of the list of Cover Texts in the Modified Version. Only one passageof Front-Cover Text and one of Back-Cover Text may be added by (or through arrangements madeby) any one entity. If the Document already includes a cover text for the same cover, previouslyadded by you or by arrangement made by the same entity you are acting on behalf of, you may notadd another; but you may replace the old one, on explicit permission from the previous publisherthat added the old one.
The author(s) and publisher(s) of the Document do not by this License give permission to use theirnames for publicity for or to assert or imply endorsement of any Modified Version.
5. COMBININGDOCUMENTS
Youmay combine the Documentwith other documents released under this License, under the termsdefined in section 4 above for modified versions, provided that you include in the combination allof the Invariant Sections of all of the original documents, unmodified, and list them all as InvariantSections of your combined work in its license notice, and that you preserve all their WarrantyDisclaimers.
The combined work need only contain one copy of this License, and multiple identical InvariantSections may be replaced with a single copy. If there are multiple Invariant Sections with the samename but different contents, make the title of each such section unique by adding at the end of it, inparentheses, the name of the original author or publisher of that section if known, or else a uniquenumber. Make the same adjustment to the section titles in the list of Invariant Sections in the licensenotice of the combined work.
In the combination, you must combine any sections Entitled “History” in the various originaldocuments, forming one section Entitled “History”; likewise combine any sections Entitled “Ac-knowledgements”, and any sections Entitled “Dedications”. You must delete all sections Entitled“Endorsements”.
6. COLLECTIONS OF DOCUMENTS
Page 325 c©2009 n + 1, Inc All Rights Reserved

APPENDIX
You may make a collection consisting of the Document and other documents released under thisLicense, and replace the individual copies of this License in the various documents with a singlecopy that is included in the collection, provided that you follow the rules of this License for verbatimcopying of each of the documents in all other respects.
You may extract a single document from such a collection, and distribute it individually under thisLicense, provided you insert a copy of this License into the extracted document, and follow thisLicense in all other respects regarding verbatim copying of that document.
7. AGGREGATIONWITH INDEPENDENTWORKS
A compilation of the Document or its derivatives with other separate and independent documentsor works, in or on a volume of a storage or distribution medium, is called an “aggregate” if thecopyright resulting from the compilation is not used to limit the legal rights of the compilation’susers beyond what the individual works permit. When the Document is included in an aggregate,this License does not apply to the other works in the aggregate which are not themselves derivativeworks of the Document.
If the Cover Text requirement of section 3 is applicable to these copies of the Document, then if theDocument is less than one half of the entire aggregate, the Document’s Cover Texts may be placedon covers that bracket the Document within the aggregate, or the electronic equivalent of covers ifthe Document is in electronic form. Otherwise they must appear on printed covers that bracket thewhole aggregate.
8. TRANSLATION
Translation is considered a kind of modification, so you may distribute translations of the Docu-ment under the terms of section 4. Replacing Invariant Sections with translations requires specialpermission from their copyright holders, but you may include translations of some or all InvariantSections in addition to the original versions of these Invariant Sections. You may include a trans-lation of this License, and all the license notices in the Document, and any Warranty Disclaimers,provided that you also include the original English version of this License and the original versionsof those notices and disclaimers. In case of a disagreement between the translation and the originalversion of this License or a notice or disclaimer, the original version will prevail.
If a section in the Document is Entitled “Acknowledgements”, “Dedications”, or “History”, therequirement (section 4) to Preserve its Title (section 1) will typically require changing the actualtitle.
9. TERMINATION
You may not copy, modify, sublicense, or distribute the Document except as expressly providedunder this License. Any attempt otherwise to copy, modify, sublicense, or distribute it is void, andwill automatically terminate your rights under this License.
Page 326 c©2009 n + 1, Inc All Rights Reserved

JAVAWEB PROGRAMMING
However, if you cease all violation of this License, then your license from a particular copyrightholder is reinstated (a) provisionally, unless and until the copyright holder explicitly and finallyterminates your license, and (b) permanently, if the copyright holder fails to notify you of theviolation by some reasonable means prior to 60 days after the cessation.
Moreover, your license from a particular copyright holder is reinstated permanently if the copyrightholder notifies you of the violation by some reasonablemeans, this is the first time you have receivednotice of violation of this License (for any work) from that copyright holder, and you cure theviolation prior to 30 days after your receipt of the notice.
Termination of your rights under this section does not terminate the licenses of parties who havereceived copies or rights from you under this License. If your rights have been terminated and notpermanently reinstated, receipt of a copy of some or all of the same material does not give you anyrights to use it.
10. FUTURE REVISIONS OF THIS LICENSE
The Free Software Foundation may publish new, revised versions of the GNU Free DocumentationLicense from time to time. Such new versions will be similar in spirit to the present version, butmay differ in detail to address new problems or concerns. See http://www.gnu.org/copyleft/.
Each version of the License is given a distinguishing version number. If the Document specifiesthat a particular numbered version of this License “or any later version” applies to it, you have theoption of following the terms and conditions either of that specified version or of any later versionthat has been published (not as a draft) by the Free Software Foundation. If the Document doesnot specify a version number of this License, you may choose any version ever published (not asa draft) by the Free Software Foundation. If the Document specifies that a proxy can decide whichfuture versions of this License can be used, that proxy’s public statement of acceptance of a versionpermanently authorizes you to choose that version for the Document.
11. RELICENSING
“Massive Multiauthor Collaboration Site” (or “MMC Site”) means any World Wide Web serverthat publishes copyrightable works and also provides prominent facilities for anybody to editthose works. A public wiki that anybody can edit is an example of such a server. A “MassiveMultiauthor Collaboration” (or “MMC”) contained in the site means any set of copyrightableworks thus published on the MMC site.
“CC-BY-SA” means the Creative Commons Attribution-Share Alike 3.0 license published by Cre-ative Commons Corporation, a not-for-profit corporation with a principal place of business in SanFrancisco, California, as well as future copyleft versions of that license published by that sameorganization.
“Incorporate” means to publish or republish a Document, in whole or in part, as part of anotherDocument.
Page 327 c©2009 n + 1, Inc All Rights Reserved

APPENDIX
An MMC is “eligible for relicensing” if it is licensed under this License, and if all works that werefirst published under this License somewhere other than thisMMC, and subsequently incorporatedin whole or in part into the MMC, (1) had no cover texts or invariant sections, and (2) were thusincorporated prior to November 1, 2008.
The operator of an MMC Site may republish an MMC contained in the site under CC-BY-SA on thesame site at any time before August 1, 2009, provided the MMC is eligible for relicensing.
ADDENDUM: How to use this License for your documents
To use this License in a document you have written, include a copy of the License in the documentand put the following copyright and license notices just after the title page:
Copyright c© YEAR YOUR NAME. Permission is granted to copy, distribute and/ormodify this document under the terms of theGNUFreeDocumentation License, Version1.3 or any later version published by the Free Software Foundation; with no InvariantSections, no Front-Cover Texts, and no Back-Cover Texts. A copy of the license isincluded in the section entitled “GNU Free Documentation License”.
If you have Invariant Sections, Front-CoverTexts andBack-CoverTexts, replace the “with . . . Texts.”line with this:
with the Invariant Sections being LIST THEIR TITLES, with the Front-Cover Texts beingLIST, and with the Back-Cover Texts being LIST.
If you have Invariant Sections without Cover Texts, or some other combination of the three, mergethose two alternatives to suit the situation.
If your document contains nontrivial examples of program code, we recommend releasing theseexamples in parallel under your choice of free software license, such as the GNU General PublicLicense, to permit their use in free software.
Page 328 c©2009 n + 1, Inc All Rights Reserved

Index
a, 30ant
build.xml, 66classpath, 71copy, 73delete, 74echo, 70fileset, 69, 72exclude, 72include, 72
include, 69javac, 71mkdir, 71, 72path, 69project, 66property, 68running, 77target, 66war, 72zipfileset, 72
ApplicationController, 204, 208, 209, 241, 248,258
b, 27body, 26br, 28build.xml, 66
c, 156choose, 165comments
html, 26JSP, 130
context filter, 225ContextFilter, 226converting multi-value parameters, 232converting request parameters, 230converting session data, 233, 234modifying framework, 241
outgoing filter, 235RequestContext, 226, 227
ContextFilter, 226, 239, 240cookies, 117–119
creating, 118retrieving, 119
custom tag libraries, 177adding to WAR with Ant, 183invoking tag files, 184tag directive, 179tags variables, 188tags with bodies, 185
EL, see Expression Languageempty, 150Expression Language, 141
accessing JavaBeans, 143accessing maps, lists, and arrays, 147implicit objects, 149operators, 150
fmt, 156forEach, 159form, 37formatDate, 175formatNumber, 171FrontController, 197–202
creating, 198, 199display view, 200handling request, 200
FrontControllerServlet, 198
head, 26html, 26html forms
form, 37input, 38, 40checkbox, 39hidden field, 38password field, 38
329

INDEX
radio button, 39reset button, 39submit button, 39text field, 38
select boxoption, 41, 42select, 41, 42
text area, 43html tags
body, 26bold, 27comments, 26head, 26html, 26hyperlink, 30italics, 27line break, 28link, 26list element, 31ordered list, 31paragraph, 28tablestable, 32table data, 33, 35table row, 33
title, 26unordered list, 31
HttpServlet, 50HttpServletRequest, 50, 80, 88, 90, 91, 93–95, 97
header data, 94, 95retrieving parameters, 90, 91, 93URL elements, 97
HttpServletResponse, 50, 80–84, 86, 87error codes, 83forwarding, 87headers, 86OutputStream, 81PrintWriter, 81returning errors, 84set content type, 81
HttpSession, 107–109
i, 27if, 164input, 38–40
Java Standard Template Library, 155core, 157
choose, 165forEach, 159–163if, 164otherwise, 165set, 158url, 166, 167, 169when, 165
format, 170format date, 175, 176format number, 171–174
including in JSP, 156JavaBeans, 144JSP
comments, 130converting to servlets, 139error handling, 137, 138expressions, 127–129implicit variables, 131, 132include directive, 134, 135page directive, 136scriptlet tags, 125, 126
jsp:doBody, 185JspException, 137JSTL, see Java Standard Template Library
li, 31link, 26LookupJSP, 209, 213LookupJsp, 217
Model/View/Controller, 196MVC, 196
ol, 31option, 41, 42otherwise, 165
p, 28page, 136param, 166PrintWriter, 81
RequestContext, 226, 227, 237, 238RequestDispatcher, 99–101
security filtering, 242adding user information to context, 254authentication, 243, 245authorization, 249, 252
Page 330 c©2009 n + 1, Inc All Rights Reserved

JAVAWEB PROGRAMMING
challenging the user, 244modifying the framework, 247, 257
select, 41, 42Servlet, 48–52ServletContext, 98ServletRequest, 47, 80ServletResponse, 47, 80servlets
destroy method, 52init method, 49service method, 50, 51
table, 32tag, 179tagging interface, 250td, 33, 35textarea, 43title, 26tr, 33
ul, 31url, 166
web.xml, 58–64error-code, 84error-page, 84init-param, 60location, 84servlet, 60servlet-mapping, 61session-config, 63session-timeout, 63url-pattern, 61welcome-file, 64welcome-file-list, 64
WebAction, 205, 241WebActionFactory, 206, 211, 215when, 165
Page 331 c©2009 n + 1, Inc All Rights Reserved


![Java Web Programming [9/9] : Web Application Security](https://img.dokumen.tips/doc/110x75/5562ec3fd8b42a213b8b4c27/java-web-programming-99-web-application-security.jpg)


![Java Web Programming [3/9] : Servlet Advanced](https://img.dokumen.tips/doc/110x75/54625ed5af7959a4058b49d8/java-web-programming-39-servlet-advanced.jpg)


![Java Web Programming [7/9] : Struts2 Basics](https://img.dokumen.tips/doc/110x75/5560c93fd8b42a3c158b47b7/java-web-programming-79-struts2-basics.jpg)


![Java Web Programming [8/9] : JSF and AJAX](https://img.dokumen.tips/doc/110x75/5562f893d8b42a62598b484e/java-web-programming-89-jsf-and-ajax.jpg)

![Java Web Programming [6/9] : MVC](https://img.dokumen.tips/doc/110x75/5489b1b2b47959dd0c8b5a3c/java-web-programming-69-mvc.jpg)

![Java Web Programming [1/9] : Introduction to Web Application](https://img.dokumen.tips/doc/110x75/5481aec5b4af9fed178b4618/java-web-programming-19-introduction-to-web-application.jpg)

![Java Web Programming [4/9] : JSP Basic](https://img.dokumen.tips/doc/110x75/54625f0ab1af9fba388b4dee/java-web-programming-49-jsp-basic.jpg)

