Embed Size (px)
Citation preview


Anthony Potts
David H. Friedel, Jr.
PROGRAMMING LANGUAGEHANDBOOK

Publisher Keith Weiskamp
Editor Keith Weiskamp
Proofreader Kirsten Dewey
Cover Design Gary Smith
Interior Design Michelle Stroup
Layout Production Kim Eoff
Indexer Kirsten Dewey
Trademarks: Java is a registered trademark of Sun Microsystems, Inc. All otherbrand names and product names included in this book are trademarks, registeredtrademarks, or trade names of their respective holders.
Copyright © 1996 by The Coriolis Group, Inc.
All rights reserved.
Reproduction or translation of any part of this work beyond that permitted bysection 107 or 108 of the 1976 United States Copyright Act without the writtenpermission of the copyright owner is unlawful. Requests for permission orfurther information should be addressed to The Coriolis Group.
The Coriolis Group7339 E. Acoma Drive, Suite 7Scottsdale, AZ 85260Phone: (602) 483-0192Fax: (602) 483-0193Web address: www.coriolis.com
ISBN 1-883577-77-2 : $24.99
Printed in the United States of America
10 9 8 7 6 5 4 3 2 1

To my wife who has been there through it all.Anthony Potts
To my sister Beth, who has helped make this book possible.Dave Friedel
AcknowledgmentsTo Keith Weiskamp who really should be listed as a co-author for all the devel-opmental and editorial work he did for this book.
To John Rodley for helping us get started with Java.
To Neil Bartlett, Alex Leslie, and Steve Simkin for all their help and for lettingus have a sneak peek at their book, Java Programming EXplorer.
And, to Sun for creating a really cool alternative!

ContentsForeword The Crazy Years are
Here Again xv
Chapter 1 Introducing Java 1The World of Java 4
The Java Development Platform 7
The Roots of Java 8The Power of Distributed Software 10
The Challenges of Security 12
Java and C++ 12Object-Oriented Quick Tour 12What’s Missing? 13Gone: Pointers 13Gone: Header Files 13Gone: Multiple Inheritance 14What’s New? 14Garbage Collection 15Security 15Exceptions 15Strings versus Character Arrays 16The Super Class 16New Modifiers 16The instanceof Operator 17Helper Programs 17
Chapter 2 Writing Your FirstJava Applet 19
Introducing the TickerTape Applet 22Running the Applet 25Where’s the Main Program? 27Introducing Java Comments 30
v

vi Contents
What’s in a Package? 30Classes, Inheritance, and Interfaces 32Types, Objects, and Constructors 35Thank Goodness for Garbage Collection 37Using Methods 38Methods and Method Overriding 43Graphic Methods 46Working with Threads 49Processing User Input 52
One Last Thing 53That’s It—Run It 54
Chapter 3 Java LanguageFundamentals 55
What Makes a Java Program? 58Lexical Structure 58
Comments 59Identifiers 65Keywords 68Literals 71Operators 74Separators 75
Types and Variables 76byte 76short 76int 77long 77float 78double 78boolean 78char 79string 79
Variable Declarations 79Using Arrays 82
Declaring Arrays 82Sizing Arrays 83Accessing Array Elements 83Multidimensional Arrays 85
Using Command-Line Arguments 86
Contents vii
Passing Arguments 87Reading in Arguments 87Accessing Arguments 88Dealing with Numeric Arguments 89
Chapter 4 Operators,Expressions, and ControlStructures 91
Using Java Operators 93Operator Precedence 93Assignment Operators 95Integer Operators 97Boolean Operators 100Floating-Point Number Operators 102
Using Casts 103Writing Expressions and Statements 104Control Flow Statements 106
if..else 106while and do..while 108switch 109for 110labels 111Moving Ahead 112
Chapter 5 Java Classesand Methods 113
Understanding Classes 115Declaring a Class 116
Using a Class 117
Components of a Class Declaration 118Documentation Comment 119Class Modifiers 119Class Identifiers 124Extending Classes 124Using the implements Clause to Create
Class Interfaces 126

viii Contents
Class Body 128
Methods 130Declaring a Method 130
Components of a Method Declaration 130Method Modifiers 131Return Type of a Method 133Parameter Lists for a Method 133Method Throws 133Method Body 134Using the this and super Keywords 135Overloading and Overriding Methods 137
Constructors—The Special Methods 138Components of a Constructor Declaration 140Parameter List and Throws Clause 146Constructor Body 146Object Creation 148
Variables for Classes 148The Art of Casting with Classes 150
Chapter 6 Interfaces andPackages 155
Understanding Interfaces 158Declaring an Interface 161Implementing an Interface 161The Art of Casting with Interfaces 165Tips on Implementing Interfaces 167
Creating and Using Packages 168Naming and Referencing Packages 170Declaration for Creating Packages 171
Using Packages 174Declaration for Importing Packages 176Standard Java Packages 177Hiding Classes Using the Wild Card 177
Chapter 7 Java Exceptions 179Understanding Exceptions 182Do You Really Need Exceptions? 183
Defining a Try Clause 186

Contents ix
Using the catch Statement 187When to Use the finally Statement 189The Hierarchy of Exceptions 190Declaring a Method Capable
of Throwing Exceptions 194Throwing Exceptions 197When to Catch and When to Throw 198
Knowing When to Create YourOwn Exceptions 200
Chapter 8 Threads 203What Is a Thread? 205
Creating a Thread 210Subclassing the Thread Class 210Implementing the Runnable Interface 211
Initializing a Thread 213Who Goes First; Who Finishes Last? 214Priority versus FIFO Scheduling 215
Controlling the Life of a Thread 216The start() Method 216The run() Method 217The sleep() Method 218The suspend() Method 218The resume() Method 218The yield() Method 219The stop() Method 219The destroy() Method 220
Multiple Objects Interactingwith One Source 220Synchronizing Revisited 220
Wait() a Second... Notify() Me When... 222Grouping Your Threads 223
Chapter 9 The Java AWT 225Introducing the AWT 227
Introducing the Layout Manager 228What About Menus? 229
The AWT Hierarchy 229
x Contents
The Component Class 231Key Component Class Methods 231
The Frame Class 235Hierarchy for Frame 235Declaration for Frame 235Methods for the Frame Class 237
The Panel Class 238Hierarchy for Panel 240Declaration for Panel 240Methods for Panel 241
The Label Class 241Hierarchy for Label 241Declaration for Label 241Methods for Label 242
Button Class 243Hierarchy for Button 243Declaration for Button 243Methods for Button 244
The Canvas Class 244Hierarchy for Canvas 244Declaration for Canvas 245Methods for Canvas 245
The Checkbox Class 245Hierarchy for Checkbox 246Methods for Checkbox 247
The Choice Class 247Hierarchy for Choice 248Declaration for Choice 248Methods for Choice 248
The List Class 250Hierarchy for List 250Declaration for List 251Methods for List 251
TextField and TextArea Classes 253Hierarchy for TextField and TextArea 254Declaration for TextField and TextArea 254Methods for TextField and TextArea 255
The Scrollbar Class 258Hierarchy for Scrollbar 260
Contents xi
Declaration for Scrollbar 260Methods for Scrollbar 260
Building Menus 261The MenuBar Class 262
Hierarchy for MenuBar 262Declaration for MenuBar 262Methods for MenuBar 262
The Menu Class 263Hierarchy for Menu 263Declaration for Menu 264Methods for Menu 264
The MenuItem Class 265Hierarchy for MenuItem 266Declaration for MenuItem 266Methods for MenuItem 267
Creating a Sample Menu Application 268Working with the Layout Manager 270The FlowLayout Class 271
Declaration for FlowLayout 271Methods for FlowLayout 273
The BorderLayout Class 274Declaration for BorderLayout 275Methods for BorderLayout 275
The GridLayout Class 276Declaration for GridLayout 277Methods for GridLayout 277
The GridBagLayout Class 278Declaration for GridBagLayout 281Methods for GridBagLayout 281
The CardLayout Class 282Declaration for CardLayout 282Methods for CardLayout 282
Chapter 10 Java AppletProgramming Techniques 285
Applet Basics 287Hiererachy of the Applet Class 288

xii Contents
Applet Drawbacks 291Let’s Play 293
Interacting with the Browser 294Changing the Status Bar 296Playing Sounds 297Displaying Images 298
Chapter 11 Event Handling 301Introducing Events 303
Event Types 304
The Event Class 304Mouse Events 307Keyboard Events 311Hierarchy of Events 313Processing System Events 315
Chapter 12 Streams andFile I/O 319
Introducing the System Class 321Different Flavors of Streams 323
InputStream and OutputStream Classes 324BufferedInputStream and
BufferedOutputStream Classes 326ByteArrayInputStream and ByteArrayOutputStream Classes 328DataInputStream and DataOutputStream Classes 330FileInputStream and FileOutputStream Classes 333FilterInputStream and
FilterOutputStream Classes 335LineNumberInputStream Class 337PipedInputStream and
PipedOutputStream Classes 339PrintStream Class 340PushbackInputStream Class 342
SequenceInputStream Class 342StringBufferInputStream Class 343

Contents xiii
Chapter 13 Networking withJava 345
Understanding the Basics of Networking 347TCP/IP 348SMTP 348FTP 349HTTP 349NNTP 349Finger 349WhoIs 349The Client/Server Model 350Ports of Interest 350
Introducing the java.net Package 352Networking Applications 353
Working with Internet Addressing 353
The Role of the Client 355Creating a Socket 355Using Sockets 355Creating a Sample Client Application 356
Bring on the Server 360Creating a Sample Server Application 361
Web Content Only Please 364Using the URLConnection Class 366
Networking between Applets 367Passing Information to a Fellow Applet 367
Appendix A Online JavaResources 375
Appendix B Java DatabaseConnectivity (JDBC) 387
Index 403


ForewordThe Crazy Years AreHere AgainBy Jeff Duntemann
As a brand new magazine editor at the end of 1984, I surveyed the IBM PC fieldand commented under my breath, “These are the Crazy Years.” The IBM PCworld had begun exploding in 1983; PC Magazine hit 800 pages; new compa-nies were forming every minute and spending huge amounts of money launch-ing new products into an astonishingly hungry and immature market. Themachines of the time were almost unimaginably underpowered. 5Mhz. 8 bits.256K of RAM. Only rich people had hard drives. And yet everyone spoke oftheir miserable little IBM PCs as though they could do the work of mainframes—we just hadn’t yet figured out quite how.
History doesn’t repeat itself—but it echoes, it echoes. Here we sit, eleven yearslater, I’m still a magazine editor (though not nearly as new) and the Crazy Yearsare back again. This time, plug the Internet into the place the IBM PC occupiedin 1984. Our PCs really are mainframes now; those 166 Mhz Pentiums that wetake for granted can handle anything we throw at them. What we’re enrapturedwith today is the ability to connect to a server and bounce around the world likemanic pinballs, grabbing a Web page here, a shareware file there, a picture ofCindy Crawford somewhere else. New Internet magazines are appearing weekly,enormous sums of money are being spent and earned on Internet technologycompanies, and Internet books have crowded almost everything else off of thecomputer book shelves at the superstores. The Internet will become the OS ofthe future. Applications will be fragmented and distributed around the world; apiece in Britain, a piece in Finland; a piece in Rio. Faithful agent software willwander around the globe, sniffing out what we want and paying for it withdigital cash. Our Internet boxes will be our phones, our faxes, our stereos, ourgame platforms, and our personal bank machines.
xv

xvi Foreword
Yikes! Aren’t we getting maybe just a little bit ahead of ourselves?
Sure. But admitting we’re ahead of ourselves doesn’t mean that we won’t catch up.
And that’s why things are so crazy. Somewhere south of our conscious mindswe understand that this is the way the world is going, even if the results in thehere and now fall just a touch short of spectacular. We’re making this up as wego along—there’s no established body of technical knowledge to fall back on—so everything’s being tried, and everything’s being trumpeted as the ultimateMagic Bullet.
The trick, of course, is to get behind the right bullet. (Which is always betterthan being in front of it...) The game is far from over (especially with that BigRich Guy still knocking around in the upper left corner of the country, makingtrouble) but if you want my penny and a half, the bullet to get behind for theInternet game is Java.
You can look at Java in a number of different ways, from C++ with all the barbedwire stripped out of it, to the ultimate global cross-platform integration script-ing language. That’s a strong element of its success: Good magic bullets arenever too specific, or the Atari personal computers (which were muscular gameboxes) would have knocked the underpowered but protean IBM PC right out ofthe ring. Again, there is that never-quite-fully-expressed feeling that Java wascreated with exactly the right balance of power and specificity, and that it canrise to whatever challenges we might put in front of it, given time for us to prythe devil out of the details and toss him in the junk drawer.
No, there isn’t enough bandwidth on the Internet to do all we want to do. Thisyear.
No, the majority of people do not have fast, always-there connections to theInternet. This year.
No, there is no clean, standard, and acceptably secure way for people to pay forelectronic deliverables over the Internet. This year.
Care to place bets on next year? Or (for higher stakes yet) the year after that?
I didn’t think so.
Whatever you do, avoid the Clifford Stoll Trap. Stoll, one of the original archi-tects of the Internet, wrote an entire book about how the Internet was a major

Foreword xvii
shuck, that it was ruining all our lives, that he was giving it up forever, and don’texpect him to come back and rescue us from ourselves, farewell, good bye for-ever, I’m leaving and I’m serious, don’t try to stop me, and on and on and on.
We waved good-bye. Now he’s gone. And not only is he not especially missed, Idoubt that one person in a hundred even remembers who he was. That’s howour business works. If you stand back and let the train go by, you will not bemissed, and the train generally passes through your station only once.
That’s why I encourage you to stick with this stuff, no matter how crazy it gets. Asbest we can tell right now, Java is the brand of pipe that we’ll be using to plumbglobal communications software for the foreseeable future. No, we don’t have thewhole foundation poured, and no, we don’t have a stack of plans to go by. Still,without the pipes in place, it won’t work. You have to develop the skills you’ll needto do the work next year and the year after. What better time than now?
You’ve got the book in hand to take you through the Java language and make itstick. So do it!
Or heads will bounce.


Chapter 1IntroducingJava


3
1IntroducingJavaJava has swept the computer industry withits promise to deliver executable content tothe vast sea of computers connected to theWorld Wide Web. Here’s a look at whyyou’ll want to start developing with thislanguage as soon as you can.
In just a few months, Java has moved from the R&D labs at Sun Microsystemsto the center stage of the World Wide Web. Never before had a simple program-ming language garnered so much attention and captured the imaginations of somany software developers and computer users alike so quickly. Some cynics thinkthat the best part about Java is its name, which is also the reason they think Javagets so much attention in the press. But most experts who follow Web develop-ment think that Java is the most significant thing that has been developed orannounced for the Web.
Why has Java taken over so quickly? The short answer is found in its platformindependence and potential to turn the Web into a much more dynamic andinteractive environment—something that is badly needed. Other reasons arebecause of Java’s similarity to C++ and its support of popular object-orientedprogramming techniques, making it easier for hundreds of thousands of C andC++ programmers to quickly master Java’s powerful features.
Our goal in this chapter is to set the stage for Java, exploring where this languagehas come from and where it is going. We’ll introduce the key features of Java,give you some insight into why Java was developed in the first place, and exam-ine some of the key similarities between Java and C++. We think it is importantto spend as much time as possible looking at Java through the lenses of a C++programmer because the syntax and object-oriented features are very similar.
4 Chapter 1
The World of Java“Java may be overhyped, but it also may be as significant to the computer worldas television was to broadcasting.”—U.S. News and World Report
In the old days of computer languages (less than six months ago), programs weredesigned to run under a single operating system, more or less, and the name ofthe game was to create programs that could run as fast as possible. Almost over-night, the World Wide Web and Java have changed this notion of operatingsystem-based language environments to platform independent network-drivenlanguages and systems. Java represents the sea change of distributed program-ming and application development that is taking place in the computer industrytoday. Languages like Java are radically shifting the computing burden fromlocal desktop computers to servers that deliver executable content to users.
Programmers have accepted Java very quickly because it provides everythingthat is needed in a modern day language including:
• Object-Oriented Features
• Multithreading
• Garbage Collection (Automatic Memory Management)
• Networking and Security Features
• Platform Independence (Architecture Neutral)
• Internet/Web Development Features
(If you are unfamiliar with some of this terminology, make sure you read theJava Jargon Survival Guide included in this chapter.) Popular languages likeSmalltalk and C++ have been moving programmers away from top-down struc-tured programming methods and into the more flexible and adaptable object-oriented paradigm for years. Java greatly contributes to this evolution and evenenhances some of the shortcomings found in object-oriented languages like C++.
What is most remarkable about Java is that it is the first language that allowsdevelopers to create robust cross-platform networked software for the Internet.Once you start using Java, you can throw away the notion that all software mustfirst be developed on a specific platform to be run on the same platform andthen ported if it needs to run on other systems.
Introducing Java 5
If you have seen Java in action by using your Web browser to view Web pagesthat contain Java applets, you already know some of the types of programs youcan write. But Java applets are only half of the story. The Java language can beused to write both applets and standalone applications. Applets are incorporatedinto Web pages using a special <APPLET> HTML tag and they are downloadedand launched automatically when their pages are displayed by a Java-enabledWeb browser. This process is similar to the way in which a Web browser mightprocess and display other elements such as images and hyperlinked text. The bigdifference with an applet is that the browser processes dynamic executable contentinstead of static data.
A Java application, on the other hand, looks suspiciously like a C++ program. Itcan run on its own and perform a myriad of tasks from performing calculationsto specialized file I/O operations. The only problem with writing Java applica-tions at the moment is that Java is an interpreted language, and thus programswritten in Java require the Java Virtual Machine in order to execute. Fortu-nately, work is underway to develop compilers that enable Java applications torun quicker and more independently.
Java Jargon Survival Guide
Architecture-Natural This is a term language designersuse to describe languages like Java that are truly portable acrossdifferent operating systems. Programs written in architecture-natural languages typically run under bytecode interpreters thatare capable of running on any type of computer.
Bytecodes The entire language design of Java is based onthe notion of bytecode interpreters, which can efficiently run(“interpret”) programs at runtime and perform operations likeerror handling and memory management. To create and usebytecodes, a compiler must first translate a program into a se-ries of codes which are then executed by an interpreter whichconverts the general bytecode instructions into local actions.
Classes Java utilizes the basic object technology found inC++, which in turn was heavily influenced by Smalltalk. Object-oriented features are implemented in these languages using basicbuilding blocks called classes. Essentially, a class is a structure

6 Chapter 1
that allows you to combine data and the code that must operateon the data under one roof. Once classes have been defined,they can easily be used to derive other classes.
Distributed Programming This emerging field of softwaredevelopment involves the techniques of writing programs thatcan be executed across networks like the Internet. In traditionalprogramming, applications run on a single computer and onlydata is distributed across networks. In distributed programming,programs can be downloaded from networks and executed atthe same time. As you might guess, this approach opens thedoor wide for ways in much software can be shared and distrib-uted.
Garbage Collection This is the memory management tech-nique that Java programs use to handle dynamic memory allo-cation. In traditional compiled languages like C and C++,memory for dynamic variables and objects (pointers), must beallocated and deallocated manually by the programmer. In Java,memory allocation is handled by the Java runtime environment,thus eliminating the need for explicit memory allocation andpointers. Garbage collection is one key feature that many pro-grammers claim make “Java a better and safer C++.”
HotJava This is Sun’s Web browser written in the Java lan-guage. It contains the Java Virtual Machine and can downloadand play any Java applet. Originally, HotJava was the rage onthe Web but since Netscape has licensed and incorporated theJava Virtual Machine into Netscape Navigator, most Web usershave forgotten about HotJava.
Java Applet These are small programs written in Java thatcan execute remotely over networks. They are downloaded fromthe Web via a Java-enabled Web browser and then they areexecuted from within the shell of the browser. An applet can beanything from animations to search engines to games. In theshort time that Java has been available, hundreds of appletshave appeared on the Web written by programmers from allaround the world.
Java Virtual Machine This is the code that serves as theengine or interpreter for Java programs. Any application that iscapable of running Java programs requires the use of the Java

Introducing Java 7
Virtual Machine (VM). The process for running a Java appletinvolves compiling the applet into a sequence of bytecodes whichare then interpreted by the Java VM at runtime. Sun has aggres-sively licensed the Java VM to many companies, such asNetscape, Oracle, and Borland, to help expand the developerbase for Java.
Java-Enabled A term used to indicate if Internet applica-tions like Web browsers are capable of running Java applica-tions, in particular, Java applets.
JavaScript This is an object-oriented scripting language de-veloped by both Sun and Netscape. The language was designedto be used as a scripting language to customize Netscape brows-ers and control Java applets running under Netscape. Origi-nally, Netscape called their scripting language “LiveScript” butthe name was changed to JavaScript. Rumor has it that Netscape’sstock rose $20 per share in one day after announcing the namechange. You can think of JavaScript as the “glue” between Javaapplets and Netscape browser features such as plug-ins, HTML,and special events.
Just-in-Time Compiler This is new compiler technology thatis being developed for Java so that Java applications can becustom compiled for a particular platform as they are down-loaded from networks.
Methods These are the functions (operations) that are includedin Java classes to operate on data.
Multithreading To allow Java applications and applets torun efficiently even tough they must be executed by a Java inter-preter, Java supports a technique called multithreading that al-lows different processes to execute at the same time.
The Java Development PlatformAs we’ve mentioned, a Java-enabled browser such as HotJava or Netscape 2 isneeded in order to run Java applets. You can also use the appletviewer utilitywhich is provided with Sun’s Java Development Kit (JDK). For any Java pro-gramming that you wish to do, you’ll need the JDK because it provides thecompiler for compiling Java applets and applications (javac), an interpreter for

8 Chapter 1
running standalone Java applications (java), and a debugger (jdbg). But don’t besurprised to find that each of these development tools are somewhat primitiveand must be run from the command line. In the near future, we should havemuch better Java visual development tools. If you don’t currently have the JDK,you can visit Sun’s Java Web site to download a copy (http://www.javasoft.com/).The syntax and command options for using the tools in the JDK are presentedwith the Java Programming Language reference card included at the end of thisbook.
All of the tools included in the JDK are designed to support Sun’s notion ofwhat the Java language is all about including:
• A compiler for the Java language that generates architecture-neutral bytecodes
• The Java Virtual Machine that interprets bytecodes at runtime.
• A set of class libraries to help Java programmers create applications. Some ofthese libraries include interface tools, I/O, applet development, networking,and so on.
• A Java runtime environment that supports bytecode verification,multithreading, and garbage collection
• Java development support tools including a debugger, documentation gen-erator, and so on.
The Roots of Java“Java has become perhaps the first programming language to move the stockmarket.”—Application Development Trends
Whether or not you believe all the hype surrounding Java, no one will deny thatJava is going places. Already numerous major software and hardware companieshave licensed Java, including Netscape, IBM (Lotus), Borland, Adobe, Fujitsu,Mitsubishi, Symantec, Spyglass, Macromedia, and even Microsoft. But beforewe look at the key elements of Java and where it is going, let’s explore its roots togive you some perspective. Like many great technological creations, Java’s devel-opment progressed with a number of twists and turns in the road.
The origins of Java began in April 1991 with a small development team at Sunheaded by James Gosling. Gosling had developed quite a reputation in the pastas a legendary Unix programmer for creating the first C version of a popular

Introducing Java 9
Unix editor named Emacs. He also developed the innovative Postscript-basedwindowing environment for Sun OS called NEWS. In the early days, Gosling’steam operated as an independent unit from Sun. They went by the name “theGreen group” and Sun eventually set this group up as a separate company calledFirst Person. (Don’t you wish you owned stock in this company?) Their initialcharter was to develop software that could be sold to consumer electronics com-panies. Sun felt that many consumer-driven technologies, such as PDAs, set-topboxes, and so on, were up and coming technologies worth pursuing to enhancetheir base of software sales.
Soon after the Green group set up shop, they discovered that the success ofcreating widely-distributed software for consumer products would only come ifa platform-independent development environment were created. They beganwork in this area by trying to extend existing C++ development tools and com-pilers but this turned out to be a dead end of sorts because of the complexity ofC++. C and C++ have always been promoted as highly portable languages, butwhen it comes right down to it, trying to create general purpose, portable, androbust code in these languages is not so easy.
When you run into a wall in software development, the best thing to do is developa language that provides the solutions you need. And that’s exactly what Goslingand the Green group did. Their new language was originally called Oak—namedafter a tree outside Gosling’s office. Because Oak could not be trademarked bySun, a new name emerged—Java—after a brainstorming session or two.
The overriding goal of Java’s developers was simple but ambitious: Design a pro-gramming language that can run on anything connected to a network. This wouldinclude Sun workstations, PCs, Macs, PDAs, and even television sets and toasters.To meet these goals, they borrowed heavily from existing languages such as C++,Objective-C, Smalltalk, Eiffel, and Cedar-Mesa. Java’s developers also wanted tomake sure their language achieved an entirely new level of robustness, not foundin languages like C++ because of all the dangerous features like pointers, operatoroverloading, and dynamic memory allocation. One writer in a popular computerdeveloper’s journal summed this goal up nicely when he wrote that Java’s develop-ers wanted to “get rid of all the complicated, dangerous, and/or stupid crud inC++.” The end result is that you won’t find features like the following in Java:
• Header files
• #defines

10 Chapter 1
• typedefs or structs
• Pointer arithmetic
• Multiple inheritance of classes
• General functions (Only methods are supported)
On May 23, 1995, Sun introduced the Java language and its correspondingbrowser HotJava. The language and its associated development tools only tookabout four years to create, but as the Green group proved, four years was ampletime to create a new standard for the rest of the world to follow. Soon after theannouncement of Java, alpha versions of the language started appearing acrossthe World Wide Web. Another noteworthy date to mark on your calendar isDecember 7, 1995—the date Microsoft agreed to license Java, an endorsementthat has helped to accelerate Java’s popularity. (If you owned any of Sun’s stock,you probably noticed that their stock increased by $336 million on that day!)
The Power of Distributed Software“I have seen the future of the World Wide Web, and it is executable content.”—Ray Valdes, Dr Dobb’s Developer Update
Before Java was unleashed on the world, most Web development and interactivitywas accomplished using Common Gateway Interface (CGI) scripting. For thepast year, the key scripting contender has been Perl. The processing model forCGI is completely client-server based. For example, a user on a client computerrunning a software program like Netscape fills out a form on a Web page and thedata is sent to a server. Then, the server reads and processes the data and sends aresponse back to the client. The disadvantage of this approach is that the clientoperates almost like a dumb terminal; most of the key processing tasks are per-formed by a central computer—the server. And if the server is busy (whichhappens a lot in the Web world), the client must wait and wait and wait.
In the world of distributed software, networks are used to send executable code,often called executable content, to client computers which are capable of runningthe software locally. For many software developers and users, this is a dreamcome true. In fact over the past year, many leading software development com-panies have been trying to create standards for delivering executable content.Some of the more noteworthy attempts include Macromedia’s Shockwave,NEXT’s WebObjects, and Microsoft’s new ActiveX controls.

Introducing Java 11
The visual benefits of running distributed software like Java applets are only thetip of the iceberg. Of course, it is impressive to see a well-designed animated appletdance across a Web page as its code is being downloaded across a network andexecuted locally, but Java programmers are already looking forward to the day inthe not so distant future when they can develop major applications that can runacross networks. This dynamic flexibility will open up new possibilities for bothupdatable entertainment and business-related software. And the best part is thatprogrammers will no longer have to write applications that they have to port tomultiple platforms. The same program written in Java can run on any type ofcomputer that can connect to a network and run the Java Virtual Machine.
But the best part is that you can use Java today in its current form and takeadvantage of some of the key benefits the distributed software paradigm hasover the CGI client-server approach:
Develop Interactive Web Interfaces With Java you can create much more in-teractive interfaces to the Web than you can with CGI languages like Perl. Appletsthat you customize for Web pages can allow users to move objects on the screen,view animations, and control multimedia features, such as sound and music.
Utilize Local Resources With the CGI model, a server is limited to processingthe data it has on hand. With Java, on the other hand, you can write applica-tions that truly take advantage of resources available on a user’s local system. Forexample, a Java program might use local hardware features in a way that a CGIprogram never could. The Java approach allows the local computer to take fullcontrol over how and where code is executed.
Greater Internet/Web Access One of the biggest problems with the Internetand the Web is that content is scattered all over the place in a somewhat chaoticfashion. Using Java, you can write better front-ends to the Web, such as agentsand search engines, to better access the Web.
Reduce the Cost of Distributing Software The software industry has rapidlyturned into a “hits” based business, which means that computer software outletstypically only carry the major blockbuster products. One of the reasons this hasoccurred is that the cost and risks of selling and distributing software have greatlyincreased over the past five years. With distributed software, users can purchaseand download the software they need instead of having to order from a directmail catalog or buying it in a store. This approach of getting software from apublisher or developer to a user also is ideal for updating software. If you need anew version of your favorite tax program to get your taxes done by April 15, youcan simply point to the right place on the Web and quickly access the software

12 Chapter 1
you need.
The Challenges of SecurityAlong with the promises and opportunities of distributed software, come therisks of security. Think about it. The programs you run on your desktop com-puter are ones that you’ve decided to buy or download. Once you install them,you can check them for viruses and remove them if they cause problems on yoursystem. Distributed programs such as Java applets, on the other hand, reside onsomeone else’s computer. When you run them you are essentially downloadingexecutable code from another computer, of which you have no control over.
Fortunately, the underlying philosophy behind Java’s design is security. Bytecodesthat are downloaded from a network are passed to a bytecode verifier which attemptsto weed out bad code that could damage a local computer. Because Java has nopointers or programmer-driven memory allocation routines, Java code is less likelyto go off track and crash a local computer due to illegal memory access operations.The absence of pointers also keeps troublesome hackers from writing code that ac-cesses a local computer’s system memory to get unauthorized privileges.
By design, the Java Virtual Machine assumes that code downloaded from a net-work should be trusted less than code that is resident on a local computer. Toenhance security, Java provides built-in classes that check for security relatedconflicts. As a final measure, Java allows its user layer of security to be configurable.For example, a user can specify exactly which directories applets can read fromand write to. Applets can also be limited to accessing sockets on other machines.
Java and C++If you haven’t noticed already, Java is very similar to C++. If you are an accom-plished C++ programmer, moving to Java will be easy for you. However, thereare a few important things you should know that we will present in this chapter.If you are new to both C++ and Java, you may have a little more catching up todo to understand the object-oriented nature of the Java language.
Object-Oriented Quick TourLet’s start by looking at some key object-oriented programming issues. First ofall, C++ is not a “true” object-oriented (OO) language but Java is much closer.Why? Because everything in Java is a class and all method calls are done via a

Introducing Java 13
method invocation of a Java class object. In C++ you can use stand-alone func-tions, header files, global variables, and so on. This is an extremely importantpoint, so don’t gloss over it. The only thing in Java not placed in a class is inter-faces, although they are used like classes but without implementations.
This strict OO nature means that you won’t be able to port C++ code as easily.You will need to change the basic structure of your C++ applications, althoughyou should be able to keep the logic as long as you are not using any of thefeatures that have been removed.
What’s Missing?As we’ve mentioned, one of big goals for the developers of Java was to look at allthe other programming languages and pull the best features of each and dump therest. Since C/C++ has such a large installed base of programmers, it is obvious whythey chose to mimic so much of its syntax and structure. There are, however,several features that C++ has that Java does not implement. Many of these subtrac-tions were made for security reasons, since Java was designed as a Web language.Other features were left out because the Java creators thought they were to difficultto use or just plain useless. Let’s look at some of the important subtractions.
Gone: PointersPointer arithmetic is the bane of everyone who hates C++. For the few program-mers who have mastered pointers, we salute you. For the rest of us, good riddance.The major reason pointers are not used with Java is security. If a Java applet hadthe ability to access memory directly, it could easily cause some real problems. Byforcing the Java interpreter to handle memory allocation and garbage collection, itrelieves you of a big burden and lessens the chance that anyone can do bad thingsto your computer through a Java program.
There are a few areas where pointers seem necessary for performing certain op-erations. But since we don’t have them in Java, we need to find a way aroundthem. In Java, objects are passed as arguments directly instead of passing a pointerto an object’s memory space. You must also use indices to manipulate arraysrather than accessing the values directly.
Gone: Header FilesTo C++ users, header files are a mainstay of programming life. However, if youlook closely at how most programmers use header files, you’ll find that the big-

14 Chapter 1
gest use is for prototyping and documentation. To examine the interface to acertain member function, you can read a header file and find the function. Byjust looking at the header files from a C++ class, you can figure out a lot aboutwhat that class does—without ever seeing any of the implementation.
In Java there is no way to do this since the implementation for classes and meth-ods must reside in the same place. The implementation always follows the dec-laration in Java. Of course, you can add all the comments you want to aid inunderstanding your code, but your code may run on for pages and pages. It isnot always easy to look at a Java class and understand how it can be used.
So, why doesn’t Java use header files? There are two reasons. First, it is not pos-sible to use a library that declares a method but does not implement it. Second,it is more difficult to program using files that are out of synchronization withthe implementation.
Gone: Multiple InheritanceVery often in object-oriented programming, an object needs to inherit the func-tionality of more than one class. In C++ this is accomplished using multipleinheritance, a technique allowing a single class to subclass as many classes as itneeds. Multiple inheritance can get extremely complicated and is one of theleading causes of C++ bugs (and programmer suicide). Java’s answer to multipleinheritance is interfaces. Interfaces are the only item in Java that are not a class.They are simply templates for a class to follow. They list method declarationswith no implementation (no guts). Any class that implements an interface mustuse the methods declared in the interface.
Interfaces work well, but they do have some limitations. The big drawback isthat you must write the code for each method that an interface declares. Mul-tiple inheritance in C++ allows you to override the methods that you chose andthen you can just use the parent’s implementation of the methods for the others.
Interfaces are much easier to understand and master than multiple inheritance.Check Chapter 6 for an in-depth look at interfaces. With the right program-ming strategy, you can get almost all of the functionality of multiple inherit-ance. And hopefully, you won’t have all the problems.
What’s New?Since Java is supposed to be the next step in the evolution of programminglanguages you would expect some advancements. Most of the new features focus
Introducing Java 15
on security and making programming easier.
Garbage CollectionWhen you finish using a resource in a C++ program, you must explicitly tell thecomputer when to release the memory it was using. This is accomplished withpointers. Since Java does not use pointers for security reasons, it needs a way toclean up resources when they are not needed any more. That’s where garbagecollection comes in.
Garbage collection is a threaded run-time environment that keeps track of allthe parts of your program and automatically de-allocates the memory used whenthe memory is no longer needed. For example, when you declare a variable,memory is allocated to store its value. The garbage collection engine looks atwhat scope of the program is seen by this variable. When the program leavesthat scope, the memory is cleared.
Lets look at a specific example. Here is a simple for loop:
for (int x; x < 10; ++x) System.out.println(x);
The integer we are using to count to ten is actually declared within the declara-tion of the loop. As soon as the expression is met and the loop ends, the xvariable’s memory space is cleared and put back into the shared memory pool.This same idea works at all levels of the Java environment.
SecuritySecurity was an issue that the creators of C++ did not have to deal with—theyleft that up to individual programmers. However, since Java is designed to be adistributed programming language, security is a prime concern. Java includesmany features that aid in preventing security problems. The omission of point-ers is a key issue that reduces security risks. The functionality you lose is madeup for in the robustness of your applications and applets. Now, it’s just up tobrowser creators to develop programs that can’t be hacked!
ExceptionsExceptions are not really new—they were used in C++. However, using them wasdifficult at best. In Java, exceptions are used heavily. Exceptions are error condi-tions that are not expected during the course of a standard program run. Situa-

16 Chapter 1
tions like missing files will result in exceptions in Java.
In Java, exceptions are actually part of the language; they have their own classes,interfaces, and so on. In C++, exceptions were more of an add-on that was neverfully implemented. Look at Chapter 7 for a detailed look at exceptions.
Strings versus Character ArraysIn C++, strings are simply arrays of characters. In Java, strings can be handled asstrings. They are not officially a primitive type but are in fact a class which isinstanced as an object whenever you use strings. So, whenever you handle strings,you are actually handling a String object that has its own methods. Instead ofcalling methods that act upon your string (C++), you are actually calling meth-ods of your string object that act upon itself.
If you choose to, you could still use an array of chars to act like a string, but youwould lose much of the easy functionality built in to the String class.
The Super ClassIf you have used C++ much, you are familiar with the this keyword that is used toreference the current object. Java implements the this operator to, but also adds thesuper operator, which tells Java to find the class that our current class extended. Youcan use super to make explicit calls to the superclass of the current class.
New ModifiersIn C++, modifiers are used quite heavily. Java takes many of the C++ modifiersand adds new ones. Most of the new modifiers are needed to help support secu-rity issues. Table 1.1 provides a list of the new modifiers:Table 1.1 Some of the New Java Modifiers
Modifier Descriptions
abstract Used to define classes and methods that must be subclassed or overridden to be useful.
synchronized Tells Java that a method can only be called by one object at a time.
native Used to create calls to languages like C.
final Tells Java that a class cannot be subclassed.

Introducing Java 17
The instanceof OperatorThe instanceof operator is an extremely handy operator to use when you aredealing with objects and you are not sure of their type. You will probably findyourself using this operator most often in conjunction with the Abstract Win-dows Toolkit (AWT).
Helper ProgramsThe Java Developer’s Kit (JDK) ships with two helpful programs: javadoc andjavap. javadoc is an automatic documentation program that creates HTML filesautomatically to list your classes methods, interfaces, variables, and so on. Wediscuss this program in greater detail in Chapter 3 so we won’t repeat it here.The entire API documentation that shipped with the 1.0 JDK was created usingthis program. Javadoc can only be used with source files.
Another useful utility is javap, a disassembler program that prints class signa-tures. javap is used with the compiled class files. When javap is run, it outputs asimple listing of a classes public methods and variables. Here is an example:
Compiled from /home/weisblat/C.java private class C extends java/lang/Object { static int a; static int b; public static void main(java/lang/String []); public C(); static void (); }
As you can see, this program can be very useful when trying to figure out how touse a class that has little documentation or that you do not have the source for.


Chapter2Writing Your FirstJava Applet


21
Writing YourFirst JavaAppletThe best way to learn the elements of theJava language is to dive in head first andcreate a real-world applet.
2Before we get into the down and dirty details behind the Java language, let’screate a simple program that will introduce you to many of the basic conceptsof Java.
Once we decided to put a tutorial program at the beginning of this book, we triedto find one that included many of the major programming elements that you willencounter while coding your own programs. We had to decide if the programwould be an application or an applet. Applications and applets are very differentthings. Creating one over the other is not as simple as changing a couple of lines ofcode and recompiling. Java applications are free-standing programs; therefore, theymust create their own “space” to work within. Java applets, on the other hand, arerun from within another program, usually a Web browser. Applets have manyparts of their code already written for them and ready to go. For example, if youwanted to display a graphic in a stand-alone Java application, you would first haveto create a window to run the program in, a frame, then the graphics you mightneed. With an applet, most of that work is done for you. A simple call to a graphicmethod can load an image into your applet’s space.
Does that mean that applets are better? Not necessarily, they are simply “differ-ent.” Both applets and applications have their place in the programming world.The one you use depends on your needs and the needs of the people who willuse your programs.

22 Chapter 2
We decided to use an applet as a tutorial mostly because of their emerging popu-larity. Java applets are popping up on the Web faster than Trekies show up at a StarTrek convention. The concepts and programming techniques we present as wediscuss our applet can be used in any program you create. We’ll start out by show-ing you the code for the applet and then we’ll take it apart, piece-by-piece. As wedissect it, you’ll begin to see how straightforward the Java language really is.
Introducing the TickerTape AppletOur first applet is called TickerTape. It scrolls a custom message across the appletspace (like a ticker tape). You will be able to specify a couple of parameters,including the text that is displayed and the speed at which the text moves acrossthe screen.
The best part about this applet is that it will introduce you to a number of Javaprogramming language features all at once, including:
• Comments
• Packages
• Classes
• Class Inheritance
• Variables
• Parameters
• Constructors
• Threads
• Overriding Methods
• Graphic Double-Buffering
• Basic Operators
• Interfaces
• Exceptions
And, here is the moment we’ve been waiting for—the applet itself:
// TickerTape Applet
import java.applet.*;import java.awt.*;

Writing Your First Java Applet 23
// TickerTape Classpublic class TickerTape extends Applet implements Runnable { // Declare Variables String inputText; String animSpeedString; Color color = new Color(255, 255, 255); int xpos; int fontLength; int fontHeight; int animSpeed; Font font; Thread ttapeThread = null; Image im; Graphics osGraphics; boolean suspended = false;
// Initialize Applet public void init(){ inputText = getParameter("TEXT"); animSpeedString = getParameter("SPEED"); animSpeed = Integer.parseInt(animSpeedString); im=createImage(size().width, size().height); osGraphics = im.getGraphics(); xpos = size().width; fontHeight = 4 * size().height / 5; font = new Font("Helvetica", 1, fontHeight); }
// Override Applet Class' paint method public void paint(Graphics g){ paintText(osGraphics); g.drawImage(im, 0, 0, null); }
// Draw background and text on buffer image public void paintText(Graphics g){ g.setColor(Color.black); g.fillRect(0, 0, size().width, size().height); g.clipRect(0, 0, size().width, size().height); g.setFont(font); g.setColor(color); FontMetrics fmetrics = g.getFontMetrics(); fontLength = fmetrics.stringWidth(inputText); fontHeight = fmetrics.getHeight(); g.drawString(inputText, xpos, size().height - fontHeight / 4); }

24 Chapter 2
// Start Applet as thread public void start(){ if(ttapeThread == null){ ttapeThread = new Thread(this); ttapeThread.start(); } }
// Animate coordinates for drawing text public void setcoord(){ xpos = xpos - animSpeed; if(xpos <- fontLength){ xpos = size().width; } }
// Change coordinates and repaint public void run(){ while(ttapeThread != null){ try {Thread.sleep(50);} catch (InterruptedException e){} setcoord(); repaint(); } }
// Re-paint when buffer is updated public void update(Graphics g) { paint(g); }
// Handle mouse clicks public boolean handleEvent(Event evt) { if (evt.id == Event.MOUSE_DOWN) { if (suspended) { ttapeThread.resume(); } else { ttapeThread.suspend(); } suspended = !suspended; } return true; }
// Stop thread then clean up before close public void stop(){ if(ttapeThread != null)

Writing Your First Java Applet 25
ttapeThread.stop(); ttapeThread = null; }
} // End TickerTape
Before we discuss how the program works, why don’t you try it out and see howit looks. You can type the code in for yourself and compile it or head up to theCoriolis Group Web site at http://coriolis.com and download this applet as well asall the other code examples listed in this book (look in the “What’s Free” sec-tion). You can also view this entire chapter on-line by going into the Coriolisbooks section on the site and searching for this book. There you can choose the“sample chapter” option where you will see this chapter.
Running the AppletBecause our program is set up to be an applet, it cannot run on its own. It needsthe help of a Web browser. To run the program from your personal system,you’ll need to follow these steps:
1. Use a text editor to type in the applet code. Save the file as TickerTape.java.
2. Compile the program. This will create the file TickerTape.class. To compilethe program, you’ll need access to the Java Developer’s Kit.
3. Move the file into the same directory where you store your HTML files.
4. Create an HTML (HyperText Markup Language) file or edit an existingone, and add the following instructions:
<APPLET CODE=TickerTape.class WIDTH=600 HEIGHT=50><PARAM NAME=TEXT VALUE="The Java TickerTape Applet..."><PARAM NAME=SPEED VALUE="4"></APPLET>
Recall that HTML is the language used to create Web pages. Each statementin the language specifies one specific formatting, file processing or hypertext(linking) operation, such as loading and displaying a graphic image, defin-ing a hypertext link, displaying a word or sentence in bold, or loading andplaying a Java applet. (We’ll look at the HTML instructions for playing ourapplet in much more detail in a moment.) If you are creating a new HTMLfile, you might want to name it TTAPE.HTML.

26 Chapter 2
5. Start a Web browser like Netscape 2 that is capable of running Java applets.Then, load in the HTML file you just created. Keep in mind that not allWeb browsers can run Java applets. If nothing happens after you load inthe HTML file, first check to make sure that you entered the HTMLinstructions carefully. Then, check to make sure that you are using a Java-playable browser.
After you open the HTML file that includes the required instructions, you shouldsee a screen similar to one shown in Figure 2.1. Once you get the applet to run,you can experiment with it by changing the text and speed parameters. Justreplace the strings listed after each VALUE statement. For example, if you changedthe third HTML statement to be:
<PARAM NAME=TEXT VALUE="Buy stock in Java">
You would see the string “Buy stock in Java” scrolled across the screen. For theSPEED parameter, lower numbers produce slower but smoother animation andhigher numbers create faster but sometimes jerky animation.
Even if you have created Web pages using HTML instructions, you might beunfamiliar with the Java applet-specific HTML tags. (If you need to brush upon the general techniques of creating Web pages with HTML, we suggest youget a copy of a good tutorial book such as The Coriolis Group’s Netscape and
Figure 2.1The TickerTape applet in action.
Writing Your First Java Applet 27
HTML Explorer.) The <APPLET> ... </APPLET> tag pair tells a Java-enabledWeb browser, such as Netscape 2, that a specified applet should be loaded andplayed. Notice that in our example, one HTML line does this work for us:
<APPLET CODE=TickerTape.class WIDTH=600 HEIGHT=50>
The CODE parameter specifies the name of the applet—in this case it is thename of our file, TickerTape.class. If you used a different filename, you wouldneed to change this instruction. The WIDTH and HEIGHT parameters specifythe width and height of the window or “space” that will be used to play theapplet. The dimensions are specified in units of screen pixels. Since our appletneeds to simulate a ticker tape-like device, we’ve defined it to be very wide butshort. The other HTML instructions, <PARAM>, are used to specify the pa-rameters for our applet:
<PARAM NAME=TEXT VALUE="The Java TickerTape Applet..."><PARAM NAME=SPEED VALUE="4">
Notice that each parameter has a name and a value. The name must correspondwith the name of the parameter used in the Java applet. The VALUE clausehandles the work of assigning the parameter a default value. Later in this chapterwe’ll show you how parameters are processed using special Java functions. If youchange the values for either of these parameters and reload the HTML file,you’ll see the effect of the changes immediately.
Where’s the Main Program?After taking a quick look at our applet, the first question you might have iswhere the heck is the main program? That is, which code is executed first? If youhave experience programming with a language like C/C++ or Pascal, you’re prob-ably looking for a program entry point like this:
main() // The starting point for a C++ program{ inputText = getParameter("TEXT"); animSpeedString = getParameter("SPEED"); animSpeed = Integer.parseInt(animSpeedString); im=createImage(size().width, size().height); ... }

28 Chapter 2
Don’t look too hard because you won’t find such a “main function” in a Javaapplet. Instead, Java applets really are designed to run “inside” another applica-tion—in our case the Netscape browser. You can think of an applet as if it werea plug-in or component. This means that the routines and methods in a Javaapplet are executed by the controlling program (the browser). Let’s step throughour applet to better understand how this process works.
The TickerTape applet contains a number of functions, which are actually calledmethods in Java. (This terminology is borrowed directly from C++.) Take amoment to look over the applet and you’ll find methods like init(), paintText(),start(), run(), stop(), and so on. Some of these are standard Java applet methods(they have names and perform operations that are pre-defined); and others areuser-defined (we made them up). When the applet runs, the browser runningthe applet knows which methods are used and in which order to call them.Figure 2.2 shows the order of how the methods are called. Notice, first that thebrowser calls the init() method. Each statement in init() executes until the method
Figure 2.2How the methods are controlled in the Java applet.
getParameter()
ttapeThread.start();
Thread.sleep(50)
ttapeThread.resume()
ttapeThread.suspend()
ttapeThread.stop()
repaint()
setcoord()
paintText()
init()
start()
run()
paint()
stop()
handleEvent()
Applet Methods
New Methods
Applet(TickerTape)
Overidden Methods
Browser

Writing Your First Java Applet 29
finishes. If you look closely, you’ll see that init() doesn’t call any of the otherTickerTape class methods. What gives?
To understand what happens next, keep in mind that the browser is the control-ling program—not the applet itself. After init() is called, the start() method isthen called by the Web browser. start() sets up TickerTape as a thread. You’lllearn more about threads later on, but for now you can think of a thread as amechanism for handing off control. If the applet were not set up as a thread, itwould run inefficiently and the browser performance would suffer as well. Oncethe TickerTape applet is set up as a thread, the browser will know what to dowhen events occur such as the mouse button being clicked, a window beingmoved, and so on.
After start() has done its job of setting up the thread, typically the run() methodwould be called next by the browser. This methods acts as a loop that keeps theprogram in motion—in other words, it drives the operations to make our textmove across the screen. Table 2.1 provides a summary of each of the key meth-ods used in the TickerTape applet. The methods like paint(), which are standardJava applet methods, can be redefined to perform different operations. For ex-
Table 2.1 Methods Used in the TickerTape Applet
Method Description
init() A standard Java applet method that is used to initialize variables and objectsdefined for the TickerTape applet.
paint() A standard Java applet method that is called whenever a browser has recognizedthat something has changed, such as a window being moved or resized, textbeing drawn on a window, and so on.
paintText() A user defined method that refreshes text for the ticker tape in a buffer.
start() A standard Java applet method that turns the applet into a thread.
setcoord() A user defined method that is called by the run() method at every program cycleto update the position of the text.
run() A standard Java applet method that serves as the heart of the program. Withoutthe run() method, the applet would not perform any actions.
update() A standard Java applet method that calls the paint() method to update the screen.
handleEvent() A standard Java applet method that process mouse activity.
stop() A standard Java applet method that stops the thread, which in turn terminates theexecution of the applet.

30 Chapter 2
ample, in our TickerTape applet we redefine paint() to process updates to thescreen in a more efficient way. We could add additional features (code) to thismethod to handle other tasks such as adding a border around the ticker tape,adding a frame counter, and so on.
Introducing Java CommentsLike any good programming language, Java allows you to include comments alongwith your programming statements. You can see Java’s connection to C/C++ rightoff, since it supports both the C and C++ comment styles. For example:
int i; /* This is a C-style comment */
int i; // This is a C++-style comment
Java also provides a new type of comment syntax that can be used to automati-cally generate formatted documentation. This new syntax looks like this:
/** Documentation comment. Comments listed between these symbols will beused to automatically create documentation. */
Back to our program, the first line of the code is actually just a comment thattells us about the program:
// TickerTape Applet
Although Java allows us to use any or all of these styles within a single program,we will only use the // notation in our TickerTape program. After all, we don’twant to make things more complicated than they need to be.
What’s in a Package?The next two lines of our applet are used to reference packages that containclasses that contain the methods we wish to use. This may sound like a mouthful,but the concepts involved are actually quite simple. Here’s the code in question:
import java.applet.*;import java.awt.*;

Writing Your First Java Applet 31
Packages are used to group related classes for use in other programs. This is adirect extension of the object-oriented techniques that languages like C++ pro-vide for programmers.
There are several class packages that come with Java. Table 2.2 provides thecurrent set of them.
By default, every Java application imports the classes contained within thejava.lang package, so you do not have to manually import this package.
The Import Statement for C UsersUsing the import statement to include packages is similar inconcept to using the include statement in C to include headerfiles.
If you look closely at our import statements in the TickerTape program, you’llnotice that the * character is used. This character tells the Java byte-code com-piler to use all the classes stored within the package. You could also specify whichclasses to use; but since you usually need many classes within a single package, itis easier to simply use the asterisk. Also, the Java compiler is smart enough tofigure out which classes are used and which ones aren’t so that using the asteriskdoes not eat up any additional memory.
In our program we import the applet package because we are creating an applet.We also need to import the awt package because we want to use its graphics
Table 2.2 Standard Java Classes
Java Class Description
java.lang Contains essential Java classes.
java.io Contains classes used to perform input/output to different sources.
java.util Contains utility classes for items such as tables and vectors.
java.net Contains classes that aid in connecting over networks. These can be used inconjunction with java.io to read and write information to files over a network.
java.awt Contains classes that let you write platform-independent graphic applications. Itincludes classes for creating buttons, panels, text boxes, and so on.
java.applet Contains classes that let you create Java applets that will run within Java-enabled browsers.

32 Chapter 2
capabilities. This package contains the classes we need so that we can display ourticker tape-like graphics.
The AWT package was developed to aid in creating windowed applications andapplets. It does for Java what Visual C++ does for C. Instead of having to manu-ally define graphical user elements like buttons, windows, and menus, and thenmanually having to write code to handle mouse events, the AWT package takescare of it for you.
The Mystery of the AWT Package
Now that you know a bit about the Java programming lan-guage, it’s time for a little quiz. What does AWT stand for?
A. Another Window Toolkit
B. Abstract Window Types
C. Abstract Window Toolkit
D. Advanced Window Toolikit
E. Abstract Windowing Toolkit
The answer is C. (If you guessed right, you may have a future inJava programming after all.) According to the official AWT tu-torial, this acrynom stands for the Abstract Window Toolkit. (An-other Window Toolkit came in a close second.) We think all theextra names came about because the name got passed on fromprogrammer to programmer without the aid of any official docu-mentation. As people referred to the package, using differentnames, no one knew who was correct anymore.
Classes, Inheritance, and InterfacesIf you have done any programming in C++, you already know how importantclasses are. Java is no exception. Most of the Java programming work you will bedoing involves writing classes from scratch and deriving more powerful classesfrom your existing classes.
To see how classes are defined in Java, let’s return to our TickerTape program.After the two key packages have been included, we define our first class:

Writing Your First Java Applet 33
// TickerTape Classpublic class TickerTape extends Applet implements Runnable { // Declare Variables String inputText; String animSpeedString; Color color = new Color(255, 255, 255); int xpos; ...
We’re not showing the complete class here but it contains the following compo-nents:
• Definition
• Variables
• Methods
The first line of code that actually sets up the class definition is illustrated inFigure 2.3. Let’s take a close look at each section.
Class Modifier A class modifier tells the Java compiler how and where a classcan be used. The two main types of classes are called public and private. A publicclass can be accessed from other packages, either directly or by using an importstatement. If you omit the public modifier at the beginning of the class defini-tion, the class would become private and use of the class would be limited to thepackage in which it is declared.
The two other modifiers that can be used to define classes are abstract and final.We’ll cover these class modifiers in detail in Chapter 4.
Figure 2.3Setting up a class definition in Java.
public class TickerTape extends Applet implements Runnable {
Class ModifierName Space
Superclass SpecificationInterface
34 Chapter 2
Name Space The name space in a class declaration is simply the name of theclass. In our case the name space is “TickerTape.”
Superclass The keyword extends indicates that we are inheriting all of themethods, variables, and field declarations from the Applet class. Applet becomesthe superclass of our TickerTape class. This means that we can use any of themethods and variables from the Applet class.
If we did not include the superclass specifier, the program would derive itselffrom the Object class by default.
Applet Package vs. Applet ClassDon’t get confused by the applet package and the Applet class.At the beginning of the program we imported the applet pack-age with the import command. This gave us access to all theclasses within the package, which in turn means that we canthen subclass the Applet class.
The applet package has other classes in it that help in creatingapplets. The Applet class has methods in it that we must use inall applets.
Interface An interface is a collection of method declarations, but without imple-mentations. An interface simply sets up a template that all classes that use itmust follow. For instance, if we set up an interface that has two methods, startand stop, then any class that implements that interface must have start and stopmethods within it.
The interface Runnable is used here via the implements keyword. Interfacessolves some of the same problems that are solved by multiple-inheritance inC++. You can implement many interfaces if you want. Here’s an example:
TickerTape extends Applet implements Runnable, Stoppable, Pausable
Once again, you must implement every method in the interface you are using.Interface Runnable contains only the method run().

Writing Your First Java Applet 35
Types, Objects, and ConstructorsNow that we have declared the class for our TickerTape applet we need to set upa few variables that we will need to store various strings, numbers, dimensions,and so on. Table 2.3 lists the basic types supported by the Java language.
Let’s now use a few of these data types to declare our variables. These variableswill be the ones that are used throughout our class, so we place them directlyafter the class declaration as shown here:
public class TickerTape extends Applet implements Runnable { String inputText; String animSpeedString; Color color = new Color(255, 255, 255); int xpos; int fontLength; int fontHeight; 2int animSpeed; Font font; Thread ttapeThread = null; Image im; Graphics osGraphics; boolean suspended = false;
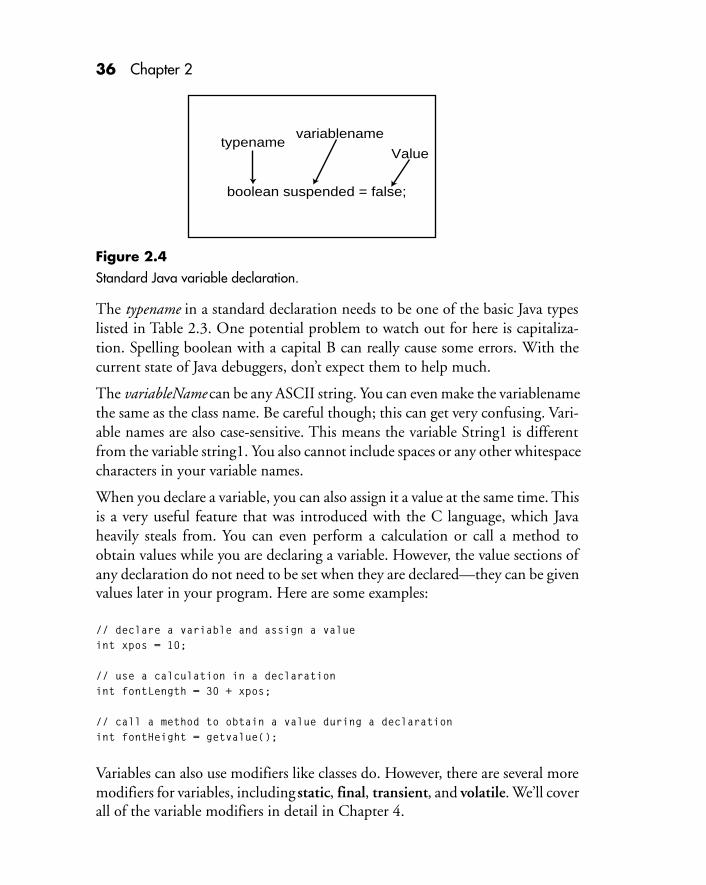
Let’s take a few of these variable declarations and break them down into theircomponents. As shown in Figure 2.4, a standard variable declaration consists ofa data type, variable name, and optional value.
Table 2.3 The Basic Data Types Supported by Java
Data Type Description
boolean A true or false value. You cannot convert between booleans and any other basictypes.
byte 8-bit signed value
short 16-bit signed value
char 16-bit unicode character
int 32-bit signed value
float 32-bit IEEE754 floating-point
double 64-bit IEEE754 floating-point
long 64-bit signed value
36 Chapter 2
The typename in a standard declaration needs to be one of the basic Java typeslisted in Table 2.3. One potential problem to watch out for here is capitaliza-tion. Spelling boolean with a capital B can really cause some errors. With thecurrent state of Java debuggers, don’t expect them to help much.
The variableName can be any ASCII string. You can even make the variablenamethe same as the class name. Be careful though; this can get very confusing. Vari-able names are also case-sensitive. This means the variable String1 is differentfrom the variable string1. You also cannot include spaces or any other whitespacecharacters in your variable names.
When you declare a variable, you can also assign it a value at the same time. Thisis a very useful feature that was introduced with the C language, which Javaheavily steals from. You can even perform a calculation or call a method toobtain values while you are declaring a variable. However, the value sections ofany declaration do not need to be set when they are declared—they can be givenvalues later in your program. Here are some examples:
// declare a variable and assign a valueint xpos = 10;
// use a calculation in a declarationint fontLength = 30 + xpos;
// call a method to obtain a value during a declarationint fontHeight = getvalue();
Variables can also use modifiers like classes do. However, there are several moremodifiers for variables, including static, final, transient, and volatile. We’ll coverall of the variable modifiers in detail in Chapter 4.
Figure 2.4Standard Java variable declaration.
typenamevariablename
Value
boolean suspended = false;

Writing Your First Java Applet 37
VARIABLE DECLARATIONS USING A CONSTRUCTOR
If you look closely at the variable declarations in the TickerTape class, you’ll seethat most of them are quite simple. But there is one that looks a little different:
Color color = new Color(255, 255, 255);
In this declaration, a device called a constructor is used. The constructor actu-ally serves as a special type of method that is responsible for initializing newobjects. Constructors are used to create custom and/or complex objects otherthan the basic types. In this case, the Color constructor (a method in the AWTpackage) is passed the three integers (255,255,255). Then a value“java.awt.Color[r=255,g=255,b=255]” is returned to the variable color. The ac-tual components used in this type of declaration are illustrated in Figure 2.5.
This constructor initializes an instance of the variable color that represents acolor by its RGB values.
Thank Goodness for Garbage CollectionOne of the biggest headaches in creating large programs with languages like Cor C++ is keeping track of resources and disposing of them when they are notneeded. An unruly C program that does not properly clean up after itself canquickly eat up a lot of memory (and a lot of your time trying to debug it). Forexample, if you write a C++ program that allocates a big block of memory for adynamic data structure, but you forget to release the memory after the datastructure is no longer used, your program could make a mess of things. Or if youuse pointers in a program and you don’t allocate, access, manage, or release themproperly, you could end up spending a number of late nights debugging yourcode. The trouble with these type of resource allocation problems is that they
Figure 2.5Using a constructor in a variable declaration.
typenamevariablename
ObjectValue
Color color = new Color(255, 255, 255);

38 Chapter 2
are very difficult to detect. Anyone who is active in the software developmentindustry is keenly aware of intermittent errors in their software that can causetheir release dates to slip. Every year millions of dollars are spent and lost be-cause of extensive software testing that is required to find the errors caused bytroublesome pointers and mismanaged memory allocation.
So is there is a solution to this crippling problem? The answer is garbage collection.Garbage collection is not a new invention, recently created for Java programmers.It has been around for years; in fact, programmers who have used languages likeLisp, Smalltalk, and Prolog, have been writing amazing programs that really pushthis technology to the limit. The basic idea behind garbage collection is to offloadthe work of managing memory and other resources to the program itself. If memoryis needed for a new data structure or object, the program automatically takes careof this task and automatically releases the resources when they are no longer needed.This frees the programmer from a number of complex tasks, such as declaringpointers to access memory, passing pointers as arguments to functions, setting upmemory buffers to swap the contents of data structures, and so on.
Of course there is a price to pay for all of this convenience. Programming lan-guages that use garbage collection tend to be bigger and run slower than programswritten in “the programmer does it all by hand” languages such as C and C++.
In developing Java, the language designers at Sun wanted to make it as flexibleyet robust as possible. They reasoned that a smart compiler, even for a languagethat has a syntax like C++, could figure out for itself which program elementsrequire memory allocation and perform memory management operations auto-matically. In Java, memory taken up by objects, methods, and variables is allo-cated and then cleared when those items are no longer needed. This garbagecollection was designed not only to make life easier for programmers but be-cause it is required for creating programs that can run on many different plat-forms and allocate memory in the same way.
Using MethodsNow we’re ready to get into the meat of our program by exploring the imple-mentation section of the applet:
public void init(){ inputText = getParameter("TEXT");

Writing Your First Java Applet 39
animSpeedString = getParameter("SPEED"); animSpeed = Integer.parseInt(animSpeedString); im=createImage(size().width, size().height); osGraphics = im.getGraphics(); xpos = size().width; fontHeight = 4 * size().height / 5; font = new Font("Helvetica", 1, fontHeight);}
We learned earlier that this code actually shows the definition of what is calleda method. (We’ll be looking at methods in more detail a little later.) The methoddefined here is named init(). As we discussed earlier, it is the starting point forall applets. Remember that it is called by the browser whenever the applet is firstloaded. You can think of this method as serving a similar role to the one carriedout by a main() function in a C program. When the applet is first loaded into aruntime environment like a Web browser, the program execution will beginwith the first statement in the init() method.
The public modifier in front of this method tells us that this method may becalled from any object, and the void modifier states that the applet will notreturn any values.
Init() performs a number of tasks. First, it loads in the two parameters used bythe applet. Then, it calculates the animation speed for the ticker tape using theSPEED parameter. The remaining statements in this method are needed to setup variables to support the graphics and text fonts used in the applet. Let’s lookat all of this code in a little more detail.
PROCESSING PARAMETERSMany times when you create applets you will want the user to be able to specifyoptions such as font size or animation speed. If we were creating an application,instead of an applet, these values could be passed as command line arguments.Applets do not have command line arguments, but they do have parameters. Aswe introduced earlier, parameters are embedded in HTML tags that reside be-tween the opening and closing <APPLET> tags like this:
<APPLET CODE=TickerTape.class Width=600 Height=50><PARAM NAME=TEXT VALUE="The Java TickerTape Applet..."><PARAM NAME=SPEED VALUE="4"></APPLET>

40 Chapter 2
The idea behind parameters is very similar to arguments, but parameters allowyou a little more flexibility. Since parameters have a name associated with them,they can be put in any order. It is also easier to determine if a parameter has beenleft out and if so, which one.
When a getParameter() method executes in a applet, the method searches aparameter list to locate a parameter with the corresponding NAME field. In ourapplet, we need to read in the text that will be displayed in the applet and aspeed setting that effects how fast the text scrolls across the screen. Thus, noticethat the init() method contains two calls to getParameter():
inputText = getParameter("TEXT");animSpeedString = getParameter("SPEED");
After these methods are called, the variable inputText will contain the string “TheJava TickerTape Applet...” and animSpeedString will contain the value “4.” Butthere is one catch: All parameters must be read in as strings. Since the variable wedeclared for animation speed animSpeed in the TickerTape class is an integer
int animSpeed;
we need to convert the speed parameter from a string to its integer representa-tion. To perform the conversion, we use the parseInt() method of the Integerclass that resides in the java.lang package. (Make sure that you use the correctcapitalization here, or you will get errors when you try and compile the pro-gram.) The code that performs this operation looks like this:
animSpeed = Integer.parseInt(animSpeedString);
Notice that the syntax for calling this method involves using the name of theInteger class. The parseInt() method takes a string as its argument and returns a32-bit signed integer. For larger numbers you could use the parseLong() methodthat can return a 64-bit signed integer. The value of the converted string, 4, isstored in the variable animSpeed—right where we want it.
COMPLETING THE INITIALIZATIONSTo code our applet so that it provides smooth animation, we use a popularprogramming trick called buffering. The idea is that we don’t want to write everypixel on the screen as changes occur. With buffering, we send data to a hold-

Writing Your First Java Applet 41
ing area that is constructed until we are ready to update the screen. Then, weblast the entire contents of the image buffer to the screen at once. To under-stand how this process works in more detail, see the sidebar Double Buffering.
Fortunately, an image buffer is easy to set in a Java applet. In fact, we only needa few lines of code. The following two lines in init() perform the work of settingup the image buffer component that will store all the changes we make to thegraphics until we want to blast it onto the screen:
im=createImage(size().width, size().height);osGraphics = im.getGraphics();
This code creates a graphics object called im with a width and height equal tothe size of the applet. We use the size().width and size().height objects to returninformation about the applet’s client space. In this case, size().width andsize().height will always be equal to the width and height values we used whenwe called the applet in our HTML file:
<APPLET CODE=TickerTape.class Width=600 Height=50>
Our final bit of business for creating the buffer is to use the getGraphics() methodto initialize the graphics and clear the buffer.
The next two lines of code in init() are used to set the values of the xpos andfontHeight variables.
xpos = size().width;fontHeight = 4 * size().height / 5;
The xpos variable will be used to track the current position of the left side of thetext. We start the applet with xpos equal to the width of the applet (size().width)so that as it starts, the text begins scrolling from off of the applet. Figure 2.6shows how this process works for scrolling the text to the left.
The fontHeight variable is used to store the height of the text. In this case, weare setting the height of the text to be 80% of the height of the applet. By doingthis, we allow the HTML programmer to change the size of the applet and havethe size of the text reflect that change. You could also use another parameter toinput the size of the text, but our method is simpler and saves a step or two. Figure2.7 shows you how all the applet and text sizes correspond with each other.

42 Chapter 2
The final line of code in init() is used to initialize our font object:
font = new Font("Helvetica", 1, fontHeight);
Recall that we already created this variable in our declaration section at the be-ginning of the applet (the TickerTape class) but we gave it no value. Here we aresetting up the name of the font (Helvetica), the style (sum of constants PLAIN,BOLD, and/or ITALIC), and the size (points or pixels).
Notice also that we are using a constructor again. Recall that the new statementtells Java that we want a “new” object, in this case with all the characteristics ofthe standard Font class.
Figure 2.7Coordinates in our applet.
Have a cup of Java
size().height
fontheight= 80% of size ().height
Figure 2.6Starting the text off of the visible part of the applet.
Have a cup of Java
Applet spaceText string

Writing Your First Java Applet 43
Using Fonts with Java AppletsHere is something you should keep in mind when using dif-ferent fonts with your Java applets: Not all fonts will work withJava. Be careful when you choose a font name that it is a stan-dard font. You may have strange fonts on your system that arenot available to everyone else, so choose them wisely. If yourapplet requests a font that is not present on the user’s system,it will use a default font.
Methods and Method OverridingAs we’ve seen, methods are the object-oriented equivalent to functions in C. Theyare much more powerful, however, because they allow you to access the internalcomponents of an object. For example, in our TickerTape applet, we use methodslike init(), paint(), and paintText() to access some of the key data elements likeanimSpeed (the animation speed for a ticker tape), font (the font used to displaytext), and xpos (the position of the ticker tape text). Because of the object-orientednature of the Java language, we are able to organize our programs in such a waythat details can be hidden away and protected from being accessed by only thoseparts of the program that need to have access. In the world of object-orientedprogramming, this technique is called encapsulation.
But hiding details and controlling access is only part of the story. The real powerof object-oriented programming comes from the ability to take existing codeand derive new code from it. Most programmers spend way too much timewriting the same functions or routines over and over again, changing them everso slightly so that they can be used in different applications.
To take advantage of the potential of object-oriented programming, Java, like itsC++ counterpart, supports a concept called method overriding. The idea behindmethod overriding is that you can take an existing method and derive a new onefrom it. The new method would have the same name as the original but itsbehavior—the actions it performs—could be entirely different.
As you’ve learned already, Java applets provide a number of methods that arepredefined for you. Some of these include init(), paint(), start(), and stop().When you create an applet, it becomes your job to decide which methods tooverride and how to make them do what you need.

44 Chapter 2
Method Overriding with Classes
The technique of method overriding has quite an impact on howyou use classes in Java to derive other classes. Whenever you“subclass” a class, you also have access to all the original class’methods. Many times though, the whole point of subclassing isto change how the class interacts or responds to certain events.For example, let’s say you created a class to process mouseevents. In particular, you could define a class that responds to amouse click by performing the action of playing a sound, amongother things. Now, maybe you want another class that will per-form another action, such as displaying a graphic, when a mousebutton is clicked. You could either create a new class and dupli-cate your work or use the sound class as a base class and sim-ply use method overriding to create a new method to respond tothe user input.
In the new class, all you have to do is create a method with thesame name as the corresponding method in the superclass. Ofcourse, you must change its behavior (how it reacts to the userinput—displaying a graphic instead of playing sound).
When working with applets, you will be doing a lot of methodoverriding because the Applet class that you extend alreadyhas many methods built into it. Many of these methods performlittle, if anything; but they need to be there to capture all thepossible calls the browser may send.
INTRODUCING THE PAINT() METHODNow that you know a little about method overriding, we are ready to dig in andlook at the paint() method. This method is called by the browser whenever thebrowser thinks something needs to be repainted. Events that might trigger thepaint() method include displaying text or graphics, re-sizing a component, andso on. Since we don’t “write” directly to our applet, it will never initiate thepaint() method on its own; so we will call it later. We use method overriding tocreate our own paint() method that will handle all the painting chores thatwould usually be handled automatically by Java.
For our applet we only need two calls in the paint() method:
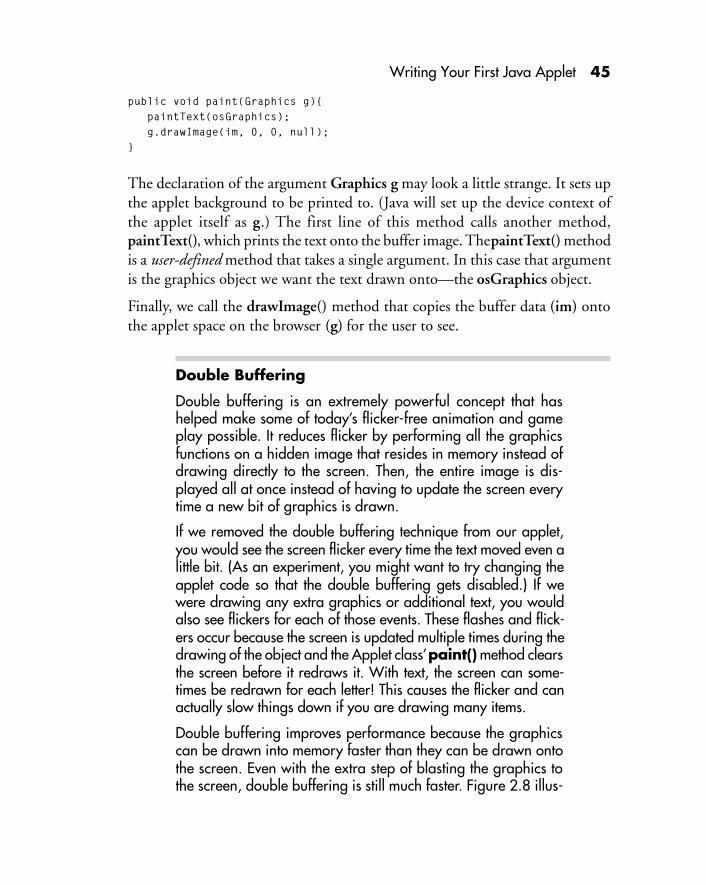
Writing Your First Java Applet 45
public void paint(Graphics g){ paintText(osGraphics); g.drawImage(im, 0, 0, null);}
The declaration of the argument Graphics g may look a little strange. It sets upthe applet background to be printed to. (Java will set up the device context ofthe applet itself as g.) The first line of this method calls another method,paintText(), which prints the text onto the buffer image. The paintText() methodis a user-defined method that takes a single argument. In this case that argumentis the graphics object we want the text drawn onto—the osGraphics object.
Finally, we call the drawImage() method that copies the buffer data (im) ontothe applet space on the browser (g) for the user to see.
Double Buffering
Double buffering is an extremely powerful concept that hashelped make some of today’s flicker-free animation and gameplay possible. It reduces flicker by performing all the graphicsfunctions on a hidden image that resides in memory instead ofdrawing directly to the screen. Then, the entire image is dis-played all at once instead of having to update the screen everytime a new bit of graphics is drawn.
If we removed the double buffering technique from our applet,you would see the screen flicker every time the text moved even alittle bit. (As an experiment, you might want to try changing theapplet code so that the double buffering gets disabled.) If wewere drawing any extra graphics or additional text, you wouldalso see flickers for each of those events. These flashes and flick-ers occur because the screen is updated multiple times during thedrawing of the object and the Applet class’ paint() method clearsthe screen before it redraws it. With text, the screen can some-times be redrawn for each letter! This causes the flicker and canactually slow things down if you are drawing many items.
Double buffering improves performance because the graphicscan be drawn into memory faster than they can be drawn ontothe screen. Even with the extra step of blasting the graphics tothe screen, double buffering is still much faster. Figure 2.8 illus-

46 Chapter 2
trates how double-buffering speeds display by reducing calls tothe paint() method.
The double buffering technique we used in our TickerTape appletis very general, and you can apply it to many of the applets thatyou write that need to perform flicker free animation. We sug-gest you experiment with these concepts—you may come upsome of your own for writing optimized applets.
Graphic MethodsNow that we are aware of the basics involved in overriding methods, let’s re-turn to our applet and explore the other methods used to perform all of thegraphics drawing operations. Our next step is to see how the applet will printour text onto the image buffer. This work is accomplished by the user-definedpaintText() method:
Figure 2.8Double buffering the applet display to reduce flicker.

Writing Your First Java Applet 47
public void paintText(Graphics g){ g.setColor(Color.black); g.fillRect(0, 0, size().width, size().height); g.clipRect(0, 0, size().width, size().height); g.setFont(font); g.setColor(color); FontMetrics fmetrics = g.getFontMetrics(); fontLength = fmetrics.stringWidth(inputText); fontHeight = fmetrics.getHeight(); g.drawString(inputText, xpos, size().height - fontHeight / 4); }
First, keep in mind that paintText() is a method that we created from scratch. Inother words, we did not create this method by overriding one that already existswith Java.
This set of method calls found in paintText() start by setting the current pencolor to black by using the setColor() method. Then, we call the fillRect() methodto draw a filled rectangle that fills the applet. Next, comes the clipRect() methodthat tells Java to clip any data or graphics that are written outside the givenboundaries, which in this case is the same as the size of the black rectangle. Thisset of initializations is illustrated in Figure 2.9.
Next we set the font of the graphics buffer equal to the font we set up in the init()method. We also need to change the pen color to something other than black sothat our text shows up. For this task, we use the color object we set up earlier.
Figure 2.9Setting up the rectangle for displaying the ticker tape text.
Have a cup of Java(width, height)
1) Set pen color to black
2) Fill rectangle with black color
(0,0)
3) Set clipping regions

48 Chapter 2
g.setFont(font);g.setColor(color);
Now that we are set to print, we need to determine where to print. Recall thatwe previously initialized a variable named xpos to keep track of the text posi-tion. Thus, we can use this variable to tell us where to begin printing. Now weneed to find out how tall and long the text we want to print is. We will use thisdata to center the text vertically and to tell us how long the text is so we can resetthe location of the text when it is done scrolling.
To accomplish these tasks, we use the FontMetrics constructor. Using font metricsis an easy way to gather information about the physical characteristics of text asit is related to certain components at certain font sizes, types, and so on:
FontMetrics fmetrics = g.getFontMetrics();fontLength = fmetrics.stringWidth(inputText);fontHeight = fmetrics.getHeight();
To actually print the text onto the graphics buffer, we use the drawString()method. This method takes several arguments as shown:
g.drawString(inputText, xpos, size().height - fontHeight / 4);
First, we must tell drawString() what string we want to print. In this case, inputText.Next, we tell it where to start printing along the x-coordinate. Finally we send itthe vertical component to tell it where the bottom of the text should be. Figure2.10 illustrates how drawString() sets up the required components. Here, we wantthe height to be a quarter of the difference of the height of the applet and theheight of the text. This does a nice job of centering at any applet size.
Figure 2.10Placing text in the buffer with drawString().
Have a cup of Java
size().heightfontHeight
xpos

Writing Your First Java Applet 49
In looking over the call to the drawString() method, don’t get confused by theuse of g as the name of our graphic object. In the paint() method we used the gvariable to reference the applet’s device context. Here you should notice that g isreferencing the osGraphics object we created to act as an image buffer. This is anexample of how scoping works with variables in Java. Scoping is basically thesame as it is in other languages but we wanted to make sure you were aware ofwhat is going on here. Since the g variable is not declared anywhere outside themethods, but simply declared within the method declaration as an argument, itis available only to the method where it was created.
Working with ThreadsNow we get to a complex but powerful part of Java—threads. As we mentionedearlier, a thread is a special type of process that is used by a Java interpreter tocontrol how a particular applet is executed. Fortunately, our TickerTape appletonly needs a single thread to run smoothly, so our job is easy here. In Chapter 8 wewill cover threads in much more detail, but for now we need to cover some basicsso that you can follow the magic that is occurring in our TickerTape applet.
Here are the three methods that are responsible for handling our thread:
public void start(){ if(ttapeThread == null){ ttapeThread = new Thread(this); ttapeThread.start(); }}
public void run(){ while(ttapeThread != null){ try {Thread.sleep(50);} catch (InterruptedException e){} setcoord(); repaint(); }}
public void stop(){ if(ttapeThread != null) ttapeThread.stop(); ttapeThread = null;}

50 Chapter 2
As you might have guessed, each of these methods is predefined in Java and theyhave been overridden by our applet. The start() method is called after the init()method finishes; start() actually belongs to the applet. It is called whenever theapplet is started, such as when the Web page the applet is assigned to is firstloaded and every time the page is referenced again from a Web browser.
The start() method checks to see if the thread for the applet has been created byasking if the thread is equal to a null value. (A null value indicates that it has notbeen created.) If the thread has not been created, Java creates a new thread usingthe this keyword to tell Java to turn the current applet class we are running intoa thread. Then, start() calls the start() method of the thread to initiate its execu-tion. We know this sounds weird! But make sure you understand that this start()method is different then the start() method of the applet. Otherwise, you mightthink this call will create an infinite loop.
The run() thread method is called repeatedly as the thread runs. It is the onlymethod that we were required to have because of the use of the runnable interface:
public void run(){ while(ttapeThread != null){ try {Thread.sleep(50);} catch (InterruptedException e){} setcoord(); repaint(); }}
We use the sleep() method to pause the thread for a few milliseconds to slow itdown a little. This gives us a refresh rate of ten frames per second maximum. Italso gives the thread time to check for mouse clicks.
We then increment the xpos object to facilitate animation by calling the user-defined setcoord() method. Here we also need to stop and check to see if thetext has gone completely off the left edge of the applet. We do this by checkingto see if xpos is less than negative fontLength:
public void setcoord(){ xpos = xpos - animSpeed; if(xpos < -fontLength){ xpos = size().width; }}

Writing Your First Java Applet 51
Finally, we come to the stop() thread method, which is called whenever some-one leaves the current Web page the applet is assigned to or otherwise closes theapplet.
public void stop(){ if(ttapeThread != null) ttapeThread.stop(); ttapeThread = null;}
In stop(), we check again to see if the thread is equal to null. If the thread isactive, we stop it using the thread’s stop() method. Then, we kill the thread bysetting it equal to null. You may think that garbage collection would take care ofkilling the thread for us, but this is one case where you would not want to relyon garbage collection. Why? There may be situations where you want to keep athread active as people move from page to page in the browser (of course, clos-ing the browser will kill all applet threads).
At this point, the applet is ready to run. However, it would be nice to be able to startand stop the TickerTape with a mouse click, so let’s add support for user input.
Threading Java Applets
Trying to understand, not to mention program, multitasking andthreaded applications is tricky until you get a good grasp of thebasics. One good place to start is to try to understand why thread-ing is required in the first place.
Making your applets use threads is extremely important. If youdon’t use them and your applets are not very “friendly,” thebrowser’s performance can suffer dramatically. What causes this?Current browsers like Netscape 2.0 give applets as much of thesystem resources it can. So, if you create an applet that uses aloop to control its operations, the applet would suck up all theprocessing time the browser can give it. The net effect is that thebrowser becomes very unresponsive.
If you are creating a sample applet that only performs a singleoperation and requires little or no interaction, you may not needto use threading. For example, assume you are creating an appletthat simply plays a sound when you click on something. When

52 Chapter 2
this applet is not playing a sound, it is not doing anything otherthan waiting. Thus, it is not using resources and it does not needto be a thread. However, if the same program had a loop thatchecked to see when the sound stopped playing, then displayeda message, the loop used to wait for the end of the sound coulduse considerable resources no matter how simple it is. Instead ofusing a controlling loop, you would want to set up the applet asa thread—just as we’ve done with the TickerTape applet.
In setting up threads the method you will use most is run(). Thismethod is called by the browser every cycle. If you have mul-tiple applets or multiple classes, each with its own run() method,they will all be called at the same time.
How does the browser know to call the run() method? That’swhere interfaces come in. If you want the run() method to becalled by the browser then you must implement the runnableinterface, as we’ve done with our TickerTape applet. By doingthis, the browser can query the applet to see if it has imple-mented the runnable interface. If it has, the browser knows itcan call the run() method of the applet.
Processing User InputAllowing people to gain control over a program is a very powerful means ofinteracting with users. Simply being able to start and stop the TickerTape appletis enough to give people the feeling of interactivity rather than passive viewing.
Here is the code that adds user interaction to our applet:
public boolean handleEvent(Event evt) { if (evt.id == Event.MOUSE_DOWN) { if (suspended) { ttapeThread.resume(); } else { ttapeThread.suspend(); } suspended = !suspended; } return true;}

Writing Your First Java Applet 53
This handleEvent() method can be used for everything from mouse clicks tokey presses, to drag and drop functions. It is automatically called by the browserwhenever it senses that the user is trying to interact with the applet. The argu-ment evt is the crucial part of this method. It tells us what event has occurredand allows us to react accordingly.
Since we are filtering for all mouse clicks, we simply use an if..then statement tocheck and see it the evt argument ever equals Event.MOUSE_DOWN. Whenit does, we know that a button has been pressed. Since Java is a cross-platformlanguage, we do not have the ability to determine which button was pressed,just that one was indeed pressed. If you are a Windows programmer only, it maybe possible to create code in C that detects the other mouse button clicks andthen passes that on to a Java program, but that’s more than we can get into here.
When we receive the word that a button has been pressed, we check to see if theTickerTape is in motion (suspended is False or True). If it is not in motion, westart it by calling the thread’s suspend() method. If it is already suspended, weuse the thread’s resume() method to start it back up again. Finally, we switch thesuspended Boolean object to be the opposite of what it was before the mousebutton was pressed.
One Last ThingIf this is your first time working with Java, we need to fill you in on how tocompile your applet. The process of compiling takes your source code (.java file)and turns it into bytecodes (.class file). The bytecodes are an interim form of thecode that can be read by many different operating systems. The bytecodes willthen be used by the Java Virtual Machine (VM) built in to the Web browser thatactually interprets the code and runs the program.
The Java compiler is activated by executing the JAVAC program. You also needto supply a few arguments including the name of the file you are compiling andwhether or not you want to use the debugger.
Here are a few different compile commands that will all work for the TickerTapeapplet:
javac TickerTape // Standard compilejavac TickerTape -g // Compile with debugging information onjavac TickerTape -d c:\java // Compiles the file to the c:\java directory// Overrides your default classpathjavac TickerTape -classpath .;c:\java\classes

54 Chapter 2
If you do not have the Java Development Kit (JDK), check the Javasoft site(http://www.javasoft.com). Read the online instructions to learn how to installthe JDK. Check out the resource guide from Appendix A for more information.
That’s It—Run ItGo ahead and compile the complete program, then run it. How does it look?Try changing the parameters and the applet size. Does the text scale to the heightof the applet? If something does not work correctly go back and verify that allyour code is correct, recompile, and run the applet again. Make sure that whenyou recompile an applet that you restart your browser. Many browsers, includ-ing Netscape 2.0, do not reload Java applets when you hit the reload button.They do however reread the HTML file. So, if you only made changes to theparameters or size of the applet then you do not need to restart the browser.
Well, what do you think? Is Java going to rule the world? We can’t answer that,but in just a few pages we have shown you how to create a fairly useful appletthat can be put to use immediately.
Now that we have hit many of the basics of Java programming, let’s look at thedetails of the language. Over the next several chapters we will delve into the Javalanguage and explore the details of its structure and syntax.

Chapter3Java LanguageFundamentals


57
3Java LanguageFundamentalsThe language building blocks of Java aresimilar to those found in C++, but keep aclose eye out because there are some subtledifferences.
After following the ticker tape adventure in the previous chapter, you shouldnow have a basic understanding of the Java language and its grammar—at leastyou’ll know how to write a simple applet that can scroll text across the screen!Unfortunately, we covered a number of Java programming features very quickly,and we didn’t get a chance to explain the main language features in sufficientdetail. In this chapter and the ones that follow, we’ll slow down the pace a little anduncover the key Java language features that you’ll need to know to write useful Javaprograms. In particular, we’ll explain the basic Java language components in thischapter—everything from comments to variable declarations. Then we’ll moveahead and cover operators, expressions, and control structures in Chapter 4.
For those of you who are already familiar with programming, especially C orC++ programming, this chapter and Chapter 4 should serve as a good hands-onreview. As we discuss Java, we’ll point out the areas in which Java differs fromother languages. If you don’t have much experience using structured program-ming languages, this chapter will give you a good overview of the basic compo-nents required to make programming languages like Java come alive.
The actual language components featured in this chapter include:
• Comments
• Identifiers
• Keywords
• Data types
• Variable declarations

58 Chapter 3
What Makes a Java Program?Before we get into the details of each Java language component, let’s stand backten steps and look at how many of the key language components are used in thecontext of a Java program. Figure 3.1(shown later) presents a complete visualguide. Here we’ve highlighted components such as variable declarations, Javakeywords, operators, literals, expressions, and control structures. As we workour way through the next two chapters, you’ll learn how these components aredefined and used.
In case you’re wondering, the output for this program looks like this:
Hello John my name is AnthonyThat's not my name!Let's count to ten....1 2 3 4 5 6 7 8 9 10Now down to zero by two.10 8 6 4 2 0Finally, some arithmetic:10 * 3.09 = 30.910 * 3.09 = 30 (integer cast)10 / 3,09 = 3.2362510 / 3.09 = 3 (integer cast)
Lexical StructureThe lexical structure of a language refers to the elements of code that make thecode easy for us to understand, but have no effect on the compiled code. Forexample, all the comments you place in a program to help you understandhow it works are ignored by the Java compiler. You could have a thousandlines of comments for a twenty line program and the compiled bytecodes forthe program would be the same size if you took out all the comments. Thisdoes not mean that all lexical structures are optional. It simply means thatthey do not effect the bytecodes.
The lexical structures will discuss include:
• Comments
• Identifiers
• Keywords
• Separators

Java Language Fundamentals 59
CommentsComments make your code easy to understand, modify, and use. But addingcomments to an application only after it is finished is not a good practice. Moreoften than not, you won’t remember what the code you write actually does afteryou get away from it for a while. Unfortunately, many programmers follow thistime-honored tradition. We suggest you try to get in the habit of adding com-ments as you write your code.
Java supports three different types of comment styles. The first two are takendirectly from C and C++. The third type of comment is a new one that can beused to automatically create class and method documentation.
COMMENT STYLE #1
/* Comments here... */
This style of commenting comes to us directly from C. Everything between theinitial slash-asterisk and ending asterisk-slash is ignored by the Java compiler. Thisstyle of commenting can be used anywhere in a program, even in the middle ofcode (not a good idea). This style of commenting is useful when you have multiplelines of comments because your comment lines can wrap from one line to thenext, and you only need to use one set of the /* and */ symbols. Examples:
/*This program was written by Joe Smith.It is the greatest program ever written!*/
while (i <= /* comments can be placed here */ maxnum){ total += i; i++;}
In the second example, the comment line is embedded within the program state-ment. The compiler skips over the comment text, and thus the actual line ofcode would be processed as:
while (i <= maxnum)...
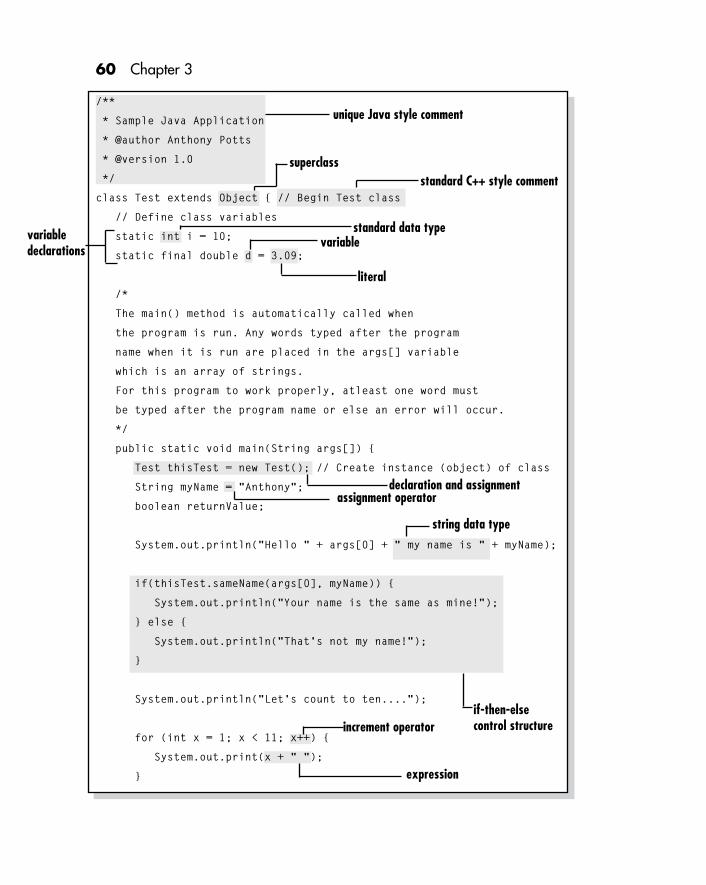
60 Chapter 3
/**
* Sample Java Application
* @author Anthony Potts
* @version 1.0
*/
class Test extends Object { // Begin Test class
// Define class variables
static int i = 10;
static final double d = 3.09;
/*
The main() method is automatically called when
the program is run. Any words typed after the program
name when it is run are placed in the args[] variable
which is an array of strings.
For this program to work properly, atleast one word must
be typed after the program name or else an error will occur.
*/
public static void main(String args[]) {
Test thisTest = new Test(); // Create instance (object) of class
String myName = "Anthony";
boolean returnValue;
System.out.println("Hello " + args[0] + " my name is " + myName);
if(thisTest.sameName(args[0], myName)) {
System.out.println("Your name is the same as mine!");
} else {
System.out.println("That's not my name!");
}
System.out.println("Let's count to ten....");
for (int x = 1; x < 11; x++) {
System.out.print(x + " ");
}
unique Java style comment
standard C++ style comment
standard data typevariable
literal
variabledeclarations
declaration and assignmentassignment operator
string data type
if-then-elsecontrol structureincrement operator
expression
superclass

Java Language Fundamentals 61
Figure 3.1A visual guide to the key Java language components.
System.out.println("\nNow down to zero by two.");
while ( i > -1) {
System.out.print(i + " ");
i -= 2;
}
System.out.println("\nFinally, some arithmetic:");
thisTest.doArithmetic();
}
// This method compares the two names sent to it and
// returns true if they are the same and false if they are not
public boolean sameName(String firstName, String secondName) {
if (firstName.equals(secondName)) {
return true;
} else {
return false;
}
}
// This method performs a few computations and prints the result
public void doArithmetic(){
i = 10;
System.out.println(i + " * " + d + " = " + (i * d));
System.out.println(i + " * " + d + " = " +
(int)(i * d) + " (Integer)");
System.out.println(i + " / " + d + " = " + (i / d));
System.out.println(i + " / " + d + " = " +
(int)(i / d) + " (Integer)");
}
} // End of class
logical expressionwhile controlstatement
assignment expression
method call
returns value tocalling class
methodmodifier

62 Chapter 3
Programmers occasionally use this style of commenting while they are testing and de-bugging code. For example, you could comment out part of an equation or expression:
sum = i /* + (base - 10) */ + factor;
COMMENT STYLE #2
// Comment here...
This style of commenting is borrowed from C++. Everything after the doubleslash marks is ignored by the Java compiler. The comment is terminated by aline return, so you can’t use multiple comment lines unless you start each linewith the double-slash. Examples:
// This program was written by Joe Smith.// It is the greatest program ever written!
while (i <= // this won't work maxnum){ total += i; i++;}
base = 20;// This comment example also won't work because the Java compiler will treat this second line as a line of codevalue = 50;
The comment used in the second example won’t work like you might intendbecause the remainder of the line of code would be commented out (everythingafter i <=). In the third example, the second comment line is missing the start-ing // symbols, and the Java compiler will get confused because it will try toprocess the comment line as if it were a line of code. Believe it or not, this typeof commenting mistake occurs often—so watch out for it!
COMMENT STYLE #3
/** Doc Comment here... */
This comment structure may look very similar to the C style of commenting,but that extra asterisk at the beginning makes a huge difference. Of course,remember that only one asterisk must be used as the comment terminator. The

Java Language Fundamentals 63
Java compiler still ignores the comment; but another program calledJAVADOC.EXE that ships with the Java Development Kit uses these commentsto construct HTML documentation files that describe your packages, classes,and methods as well as all the variables they use.
Let’s look at the third style of commenting in more detail. If implemented cor-rectly and consistently, this style of commenting can provide you with numer-ous benefits. Figure 3.2 shows what the output of the JAVADOC program lookslike when run on a typical Java source file.
Figure 3.2Sample output from the JAVADOC program.

64 Chapter 3
If you have ever looked at the Java API documentation on Sun’s Web site, Figure3.2 should look familiar to you. In fact, the entire API documentation was cre-ated this way.
JAVADOC will work if you have created comments or not. Figure 3.3 shows theoutput from this simple application:
class HelloWorld { public static void main(String args[]) { System.out.println("Hello World"); }}
To add a little more information to our documentation, all we have to do is addthis third style of comments. If we change the little HelloWorld application andadd a few key comments, the code will look like this:
Figure 3.3Simple output from the JAVADOC program.

Java Language Fundamentals 65
/** * Welcome to HelloWorld * @author Anthony Potts * @version 1.1 * @see java.lang.System */class helloworld { /** * Main method of helloworld */ public static void main(String args[]) { System.out.println("Hello World!"); }}
If you now run JAVADOC, the browser will display what you see in Figure 3.4.As you can see, this gives us much more information. This system is great forproducing documentation for public distribution. Just like all comments though,it is up to you to make sure that the comments are accurate and plentiful enoughto be helpful. Table 3.1 lists the tags you can use in your class comments.
IdentifiersIdentifiers are the names used for variables, classes, methods, packages, and in-terfaces to distinguish them to the compiler. In the sample program from Chap-ter 2 the identifier for the applet’s class was TickerTape. We also used identifierslike fontHeight and fontWidth to name some of the variables.
Identifiers in the Java language should always begin with a letter of the alphabet,either upper or lower case. The only exceptions to this rule are the underscoresymbol (_) and the dollar sign ($), which may also be used. If you try to use anyother symbol or a numeral as the initial character, you will receive an error.
After the initial character you are allowed to use numbers, but not all symbols.You can also use almost all of the characters from the Unicode character set. Ifyou are not familiar with the Unicode character set or you get errors, we suggestthat you stick with the standard alphabetic characters.
The length of an identifier is basically unlimited. We managed to get up to a fewthousand characters before we got bored. It’s doubtful you will ever need nearlythat many characters, but it is nice to know that the Java compiler won’t limit

66 Chapter 3
you if you want to create long descriptive names. The only limit you may en-counter involves creating class names. Since class names are also used as filenames, you need to create names that will not cause problems with your operat-ing system or anyone who will be using your program.
You must also be careful not to use any of the special Java keywords listed in thenext section. Here are some examples of valid identifiers:
HelloWorld $Money TickerTape_ME2 Chapter3 ABC123
Figure 3.4The new JAVADOC output.
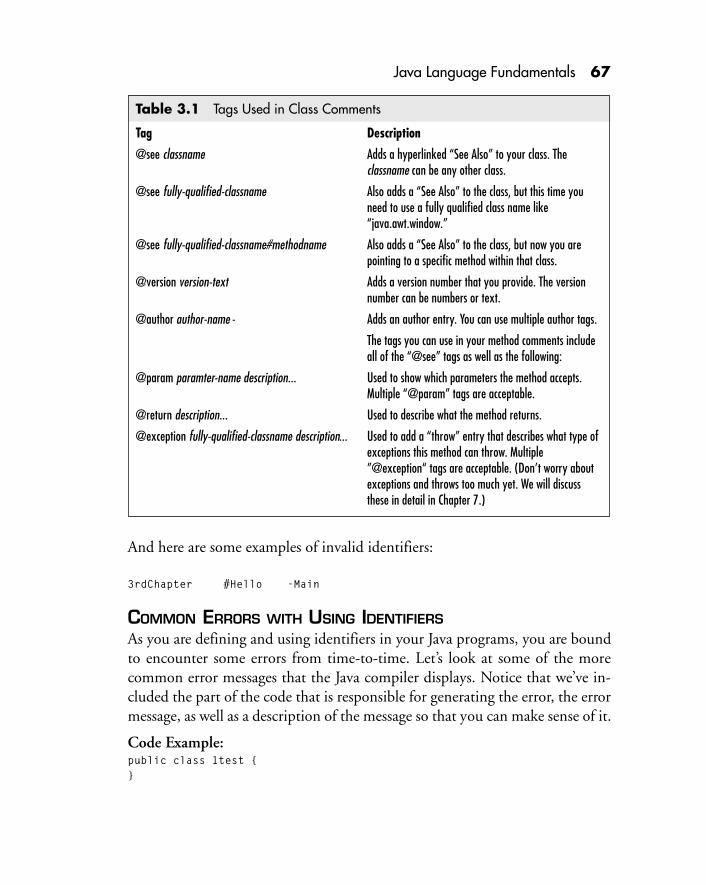
Java Language Fundamentals 67
And here are some examples of invalid identifiers:
3rdChapter #Hello -Main
COMMON ERRORS WITH USING IDENTIFIERSAs you are defining and using identifiers in your Java programs, you are boundto encounter some errors from time-to-time. Let’s look at some of the morecommon error messages that the Java compiler displays. Notice that we’ve in-cluded the part of the code that is responsible for generating the error, the errormessage, as well as a description of the message so that you can make sense of it.
Code Example:public class 1test {}
Table 3.1 Tags Used in Class Comments
Tag Description
@see classname Adds a hyperlinked “See Also” to your class. Theclassname can be any other class.
@see fully-qualified-classname Also adds a “See Also” to the class, but this time youneed to use a fully qualified class name like“java.awt.window.”
@see fully-qualified-classname#methodname Also adds a “See Also” to the class, but now you arepointing to a specific method within that class.
@version version-text Adds a version number that you provide. The versionnumber can be numbers or text.
@author author-name - Adds an author entry. You can use multiple author tags.
The tags you can use in your method comments includeall of the “@see” tags as well as the following:
@param paramter-name description... Used to show which parameters the method accepts.Multiple “@param” tags are acceptable.
@return description... Used to describe what the method returns.
@exception fully-qualified-classname description... Used to add a “throw” entry that describes what type ofexceptions this method can throw. Multiple”@exception“ tags are acceptable. (Don’t worry aboutexceptions and throws too much yet. We will discussthese in detail in Chapter 7.)

68 Chapter 3
Error Message:D:\java\lib\test.java:1: Identifier expected.
Description:An invalid character has been used in the class identifier. You will see this errorwhen the first character is invalid (especially when it is a number).
Code Example:public class te?st {}
Error Message:D:\java\lib\test.java:1: '{' Expected
Description:This is a common error that occurs when you have an invalid character in themiddle of an identifier. In this case, the question mark is invalid, so the compilergets confused where the class definition ends and its implementation begins.
Code Example:public class #test {}
Error Message:D:\java\lib\test.java:1: Invalid character in input.
Description:
Here, the error stems from the fact that the initial character is invalid.
Code Example:public class catch {}
Error Message:D:\java\lib\test.java:1: Identifier expected.
Description:This error shows up when you use a protected keyword as an identifier.
KeywordsIn Java, like other languages, there are certain keywords or “tokens” that are re-served for system use. These keywords can’t be used as names for your classes,variables, packages, or anything else. The keywords are used for a number of taskssuch as defining control structures (if, while, and for) and declaring data types (int,char, and float). Table 3.2 provides the complete list of the Java keywords.

Java Language Fundamentals 69
Table 3.2 Java Language Keywords
Keyword Description
abstract Class modifier
boolean Used to define a boolean data type
break Used to break out of loops
byte Used to define a byte data type
byvalue * Not implemented yet
cast Used to translate from type to type
catch Used with error handling
char Used to define a character data type (16-bit)
class Used to define a class structure
const * Not implemented yet
continue Used to continue an operation
default Used with the switch statement
do Used to create a do loop control structure
Double Used to define a floating-point data type (64-bit)
else Used to create an else clause for an if statement
extends Used to subclass
final Used to tell Java that this class can not be subclassed
finally Used with exceptions to determine the last option before exiting. It guaranteesthat code gets called if an exception does or does not happen.
float Used to define a floating-point data type (32-bit)
for Used to create a for loop control structure
future * Not implemented yet
generic * Not implemented yet
goto * Not implemented yet
if Used to create an if-then decision-making control structure
implements Used to define which interfaces to use
import Used to reference external Java packages
inner Used to create control blocks
instanceof Used to determine if an object is of a certain type
int Used to define an integer data type (32-bit values)
interface Used to tell Java that the code that follows is an interface
continued
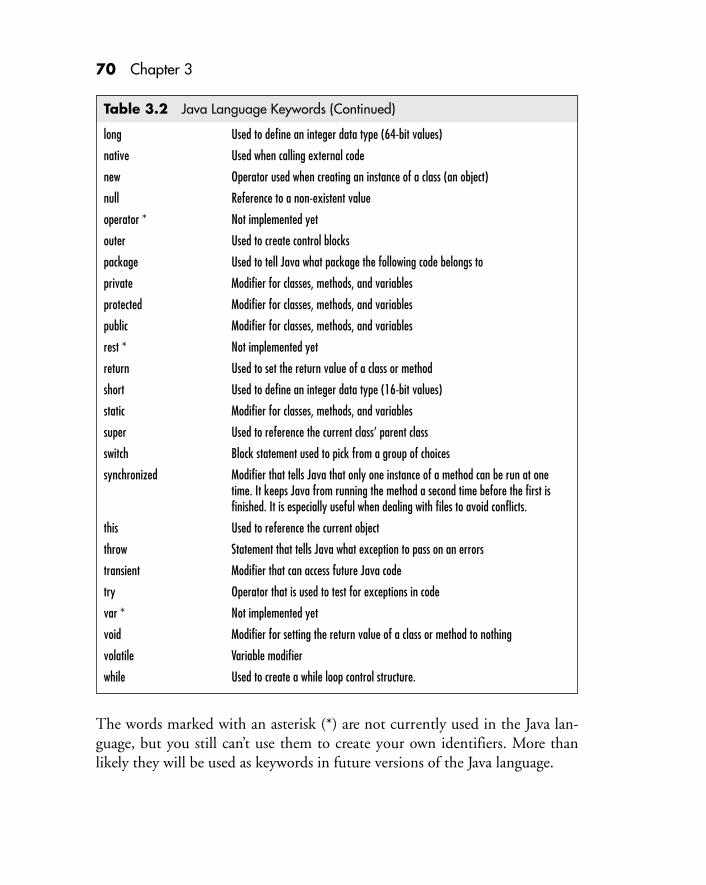
70 Chapter 3
Table 3.2 Java Language Keywords (Continued)
long Used to define an integer data type (64-bit values)
native Used when calling external code
new Operator used when creating an instance of a class (an object)
null Reference to a non-existent value
operator * Not implemented yet
outer Used to create control blocks
package Used to tell Java what package the following code belongs to
private Modifier for classes, methods, and variables
protected Modifier for classes, methods, and variables
public Modifier for classes, methods, and variables
rest * Not implemented yet
return Used to set the return value of a class or method
short Used to define an integer data type (16-bit values)
static Modifier for classes, methods, and variables
super Used to reference the current class’ parent class
switch Block statement used to pick from a group of choices
synchronized Modifier that tells Java that only one instance of a method can be run at onetime. It keeps Java from running the method a second time before the first isfinished. It is especially useful when dealing with files to avoid conflicts.
this Used to reference the current object
throw Statement that tells Java what exception to pass on an errors
transient Modifier that can access future Java code
try Operator that is used to test for exceptions in code
var * Not implemented yet
void Modifier for setting the return value of a class or method to nothing
volatile Variable modifier
while Used to create a while loop control structure.
The words marked with an asterisk (*) are not currently used in the Java lan-guage, but you still can’t use them to create your own identifiers. More thanlikely they will be used as keywords in future versions of the Java language.

Java Language Fundamentals 71
LiteralsLiterals are the values that you assign when entering explicit values. For ex-ample, in an assignment statement like this:
i = 10;
the value 10 is a literal. But do not get literals confused with types. Even thoughthey usually go hand in hand, literals and types are not the same.
Types are used to define what type of data a variable can hold, while literals arethe values that are actually assigned to those variables.
Literals come in three flavors: numeric, character, and boolean. Boolean literalsare simply True and False
NUMERIC LITERALSNumeric literals are just what they sound like—numbers. We can subdivide thenumeric literals further into integers and floating-point literals.
Integer literals are usually represented in decimal format although you can usethe hexadecimal and octal format in Java. If you want to use the hexadecimalformat, your numbers need to begin with an 0x or 0X. Octal integers simplybegin with a zero (0).
Integer literals are stored differently depending on their size. The int data type isused to store 32-bit integer values ranging from -2,147,483,648 to 2,147,483,648(decimal). If you need to use even larger numbers, Java switches over to the long datatype, which can store 64 bits of information for a range of - 9.223372036855e+18to 9.223372036855e+18. This would give you a number a little larger than 9 mil-lion trillion—enough to take care of the national debt! To specify a long integer, youwill need to place an “l” or “L” at the end of the number. Don’t get confused by ouruse of the terms int and long. There are many other integer data types used by Java,but they all use int or longliterals to assign values. Table 3.3 provides a summary ofthe two integer literals.
Table 3.3 Summary of Integer Literals
Integer Literals Ranges Negative Minimum Positive Maximum
int data type -2,147,483,648 2,147,483,648
long data type -9.223372036855e+18 9.223372036855e+18
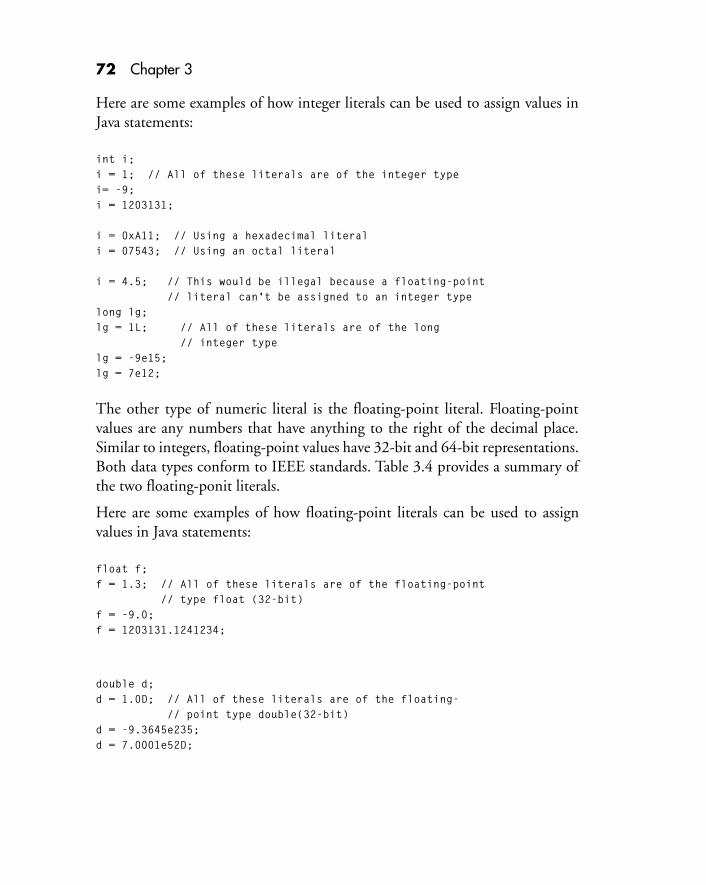
72 Chapter 3
Here are some examples of how integer literals can be used to assign values inJava statements:
int i;i = 1; // All of these literals are of the integer typei= -9;i = 1203131;
i = 0xA11; // Using a hexadecimal literali = 07543; // Using an octal literal
i = 4.5; // This would be illegal because a floating-point // literal can't be assigned to an integer typelong lg;lg = 1L; // All of these literals are of the long // integer typelg = -9e15;lg = 7e12;
The other type of numeric literal is the floating-point literal. Floating-pointvalues are any numbers that have anything to the right of the decimal place.Similar to integers, floating-point values have 32-bit and 64-bit representations.Both data types conform to IEEE standards. Table 3.4 provides a summary ofthe two floating-ponit literals.
Here are some examples of how floating-point literals can be used to assignvalues in Java statements:
float f;f = 1.3; // All of these literals are of the floating-point // type float (32-bit)f = -9.0;f = 1203131.1241234;
double d;d = 1.0D; // All of these literals are of the floating- // point type double(32-bit)d = -9.3645e235;d = 7.0001e52D;

Java Language Fundamentals 73
Table 3.5 Special Character Combinations in Java
Character Standard DescriptionCombination Designation
\ <newline> Continuation
\n NL or LF New Line
\b BS Backspace
\r CR Carriage Return
\f FF Form Feed
\t HT Horizontal Tab
\\ \ Backslash
\’ ‘ Single Quote
\” “ Double Quote
\xdd 0xdd Hex Bit Pattern
\ddd 0ddd Octal Bit Pattern
\uddd 0xdddd Unicode Character
CHARACTER LITERALS
The second type of literal that you need to know about is the character literal. Char-acter literals include single characters and strings. Single character literals are en-closed in single quotation marks while string literals are enclosed in double quotes.
Single characters can be any one character from the Unicode character set. Thereare also a few special two-character combinations that are non-printing charactersbut perform important functions. Table 3.5 shows these special combinations.
The string character literal are any number of characters enclosed in The charac-ter combinations from Table 3.5 also apply to strings. Here are some examplesof how character and string literals can be used in Java statements:
Table 3.4 Summary of Floating-Point Literals
Floating-Point Ranges Negative Minimum Positive Maximum
float data type 1.40239846e-45 3.40282347e38
double data type 4.94065645841246544e-324 1.79769313486231570e308

74 Chapter 3
char ch;ch = 'a'; // All of these literals are charactersch = \n; // Assign the newline characterch = \'; // Assign a single quotech = \x30; // Assign a hexadecimal character code
String str;str = "Java string";
OperatorsOperators are used to perform computations on one or more variables or ob-jects. You use operators to add values, comparing the size of two numbers, as-signing a value to a variable, incrementing the value of a variable, and so on.Table 3.6 lists the operators used in Java. Later in this chapter, we’ll explain indetail how each operator works; and we’ll also explain operator precedence.
continued
Table 3.6 Operators Used in Java
Operator Description
+ Addition
- Subtraction
* Multiplication
/ Division
% Modulo
++ Increment
— Decrement
> Greater than
>= Greater than or equal to
< Less than
<= Less than or equal to
== Equal to
!= Not equal to
! Logical NOT
&& Logical AND
|| Logical OR
& Bitwise AND
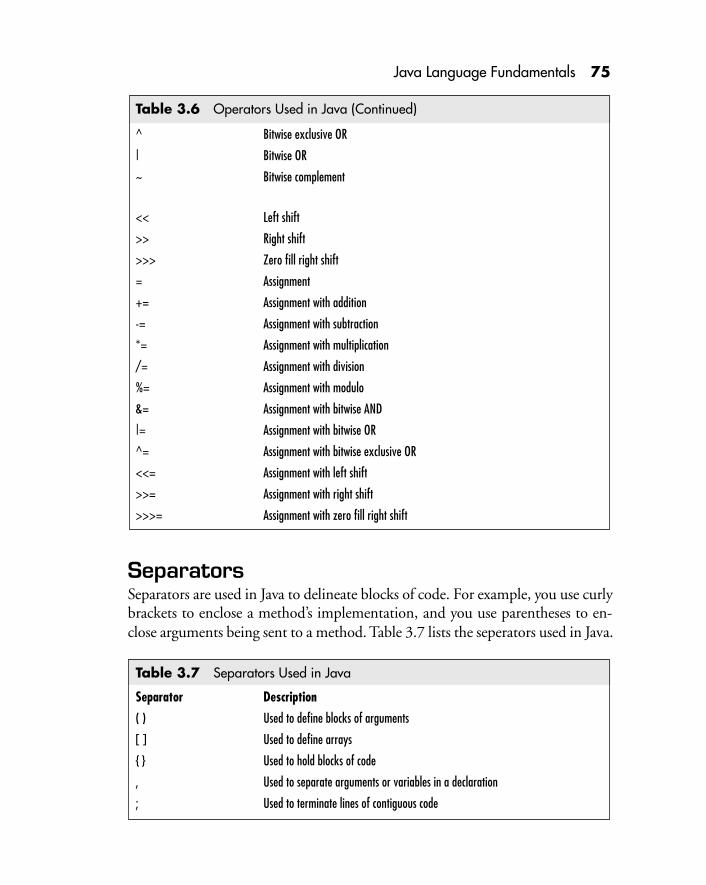
Java Language Fundamentals 75
SeparatorsSeparators are used in Java to delineate blocks of code. For example, you use curlybrackets to enclose a method’s implementation, and you use parentheses to en-close arguments being sent to a method. Table 3.7 lists the seperators used in Java.
Table 3.6 Operators Used in Java (Continued)
^ Bitwise exclusive OR
| Bitwise OR
~ Bitwise complement
<< Left shift
>> Right shift
>>> Zero fill right shift
= Assignment
+= Assignment with addition
-= Assignment with subtraction
*= Assignment with multiplication
/= Assignment with division
%= Assignment with modulo
&= Assignment with bitwise AND
|= Assignment with bitwise OR
^= Assignment with bitwise exclusive OR
<<= Assignment with left shift
>>= Assignment with right shift
>>>= Assignment with zero fill right shift
Table 3.7 Separators Used in Java
Separator Description
( ) Used to define blocks of arguments
[ ] Used to define arrays
{ } Used to hold blocks of code
, Used to separate arguments or variables in a declaration
; Used to terminate lines of contiguous code

76 Chapter 3
Types and VariablesMany people confuse the terms types and variables, and use them synonymously.They are, however, not the same. Variables are basically buckets that hold infor-mation, while types describe what type of information is in the bucket.
A variable must have both a type and an identifier. Later in this chapter we willcover the process of declaring variables. For now, we just want to guide you throughthe details of how you decide which types to use and how to use them properly.
Similar to literals, types can be split into several different categories including the nu-meric types—byte, short, int, long, float, and double—and the char and booleantypes. We will also discuss the string type. Technically, the string type is not a type—itis a class. However, it is used so commonly that we decided to include it here.
All of the integer numeric types use signed two’s-complement integers for storingdata. Table 3.8 provides a summary of the ranges for each of the key Java data types.
byteThe byte type can be used for variables whose value falls between -256 and 255.byte types have an 8-bit length. Here are some examples of byte values:
-7 5 238
shortThe short numeric type can store values ranging from -32768 to 32767. It has a16-bit depth. Here are some examples:
-7 256 -29524
Table 3.8 Summary of the Java Data Types
Data Type Negative Minimal Positive Maximal
byte -256 255
short -32768 32767
int -2147483648 2147483647
long -9223372036854775808 9223372036854775807
float 1.40239846e-45 3.40282347e38
double 4.94065645841246544e-324 1.79769313486231570e308
boolean False True

Java Language Fundamentals 77
intThe int data type takes the short type to the next level. It uses a 32-bit signedinteger value that takes our minimal and maximal value up to over 2 billion.Because of this tremendous range, it is one of the most often used data typesfor integers.
Often, unskilled programmers will use the int data type even though theydon’t need the full resolution that this data type provides. If you are usingsmaller integers, you should consider using the short data type. The rule ofthumb to follow is if you know exactly the range of values a certain variable willstore, use the smallest data type possible. This will let your program use less memoryand therefore run faster, especially on slower machines or machines with lim-ited RAM.
Here are some examples of int values:
-7 256 -29523234 1321412422
longThe long data type is the mother of all integer types. It uses a full 64-bit datapath to store values that reach up to over 9 million trillion. But be extremelycareful when using variables of the long type. If you start using many of them orGod forbid, an array of longs, you can quickly eat up a ton of resources.
The Danger of Using longJava provides useful garbage collection tools, so when you aredone with these large data types, they will be disposed of andtheir resources reclaimed. But if you are creating large arraysof long integers you could really be asking for trouble. Forexample, if you created a two-dimensional array of long inte-gers that had a 100x100 grid, you would be using up about100 kilobytes of memory.
Here are some examples of long values:
-7 256 -29523234 1.835412e15 -3e18

78 Chapter 3
floatThe float data type is one of two types used to store floating-point values. Thefloat type is compliant with the IEEE 754 conventions. The floating-point typesof Java can store gargantuan numbers. We do not have enough room on the pageto physically show you the minimal and maximal values the float data type canstore, so we will use a little bit of tricky sounding lingo taken from the Java manual.
“The finite nonzero values of type float are of the form s * m * 2e , where s is +1or -1, m is a positive integer less than 2^24 and e is an integer between -149 and104, inclusive.”
Whew, that’s a mouthful. Here are a few examples to show you what the floattype might look like in actual use:
-7F 256.0 -23e34 23e100
doubleAs if the float type could not hold enough, the double data type gives you evenbigger storage space. Let’s look again at Sun’s definition of the possible values fora double.
“The finite nonzero values of type float are of the form s * m * 2e , where s is +1or -1, m is a positive integer less than 2^53 and e is an integer between -1045and 1000, inclusive.”
Again, you can have some truly monstrous numbers here. But when you startdealing with hard core programming, this type of number becomes necessaryfrom time to time, so it is wise to understand its ranges. Here are a few examples:
-7.0D 256.0D -23e424 23e1000
booleanIn other languages, the boolean data type has been represented by an integerwith a nonzero or zero value to represent True and False, respectively. This methodworks well because it gives the user the ability to check for all kinds of values andperform expression like this:
x=2;if x then...

Java Language Fundamentals 79
This can be handy when performing parsing operations or checking string lengths.In Java, however, the boolean data type has its own True and False literals thatdo not correspond to other values. In fact, as you will learn later in this chapter,Java does not even allow you to perform casts between the boolean data typeand any others. There are ways around this limitation that we will discuss in afew pages when we talk about conversion methods.
charThe char data type is used to store single characters. Since Java uses the Unicodecharacter set, the char type needs to be able to store the thousands of characters,so it uses a 16-bit signed integer. The char data type has the ability to be cast orconverted to almost all of the others, as we will show you in the next section.
stringThe string type is actually not a primitive data type; it is a class all its own. Wedecided to talk about it a little here because it is used so commonly that it mightas well be considered a primitive. In C and C++, strings are stored in arrays ofchars. Java does not use the char type for this but instead has created its ownclass that handles strings. In Chapter 5, when we get into the details of declaringvariables within classes, you will see the difference between declaring a primitivevariable and declaring an instance of a class type.
One big advantage to using a class instead of an array of char types is that we aremore or less unlimited in the amount of information we want to place in a stringvariable. In C++, the array of chars was limited, but now that limitation is takencare of within the class, where we do not care how it is handled.
Variable DeclarationsDeclaring variables in Java is very similar to declaring variables in C/C++ as longas you are using the primitive data types. As we said before, almost everything inJava is a class—except the primitive data types. We will show you how to instan-tiate custom data types (including strings) in Chapter 5. For now, let’s look athow primitive data types are declared.
Here is what a standard declaration for a primitive variable might look like:
int i;

80 Chapter 3
We have just declared a variable “i” to be an integer. Here are a few moreexamples:
byte i, j;int a=7, b = a;float f = 1.06;String name = "Tony";
These examples illustrate some of the things you can do while declaring vari-ables. Let’s look at each one individually.
int i;
This is the most basic declaration, with the data type followed by the variableyou are declaring.
byte i, j;
In this example, we are declaring two byte variables at one time. There is nolimit to the number of variables you can declare this way. All you have to do isadd a comma between each variable you wish to declare of the given type, andJava takes care of it for you.
You also have the ability to assign values to variables as you declare them. You caneven use a variable you are declaring as part of an expression for the declaration ofanother variable in the same line. Before we confuse you more, here is an example:
int i = 1;int j = i, k= i + j;
Here we have first declared a variable i as int and assigned it a value of 1. In thenext line, we start by declaring a variable j to be equal to i. This is perfectly legal.Next, on the same line, we declare a variable k to be equal to i plus j. Once again,Java handles this without a problem. We could even shorten these two state-ments to one line like this:
int i = 1, j = i, k= i + j;
One thing to watch out for is using variables before they have been declared.Here’s an example:

Java Language Fundamentals 81
int j = i, k= i + j; // i is not defined yetint i = 1;
This would cause an “undefined variable” error because Java does not know tolook ahead for future declarations. Let’s look at another example:
float f = 1.06;
Does this look correct? Yes, but it’s not. This is a tricky one. By default, Javaassumes that numbers with decimal points are of type double. So, when you tryand declare a float to be equal to this number, you receive the following error:
Incompatible type for declaration. Explicit cast needed to convert doubleto float.
Sounds complicated, but all this error message means is that you need to explicitlytell Java that the literal value 1.06 is a float and not a double. There are two waysto accomplish this. First, you can cast the value to a float like this:
float f = (float)1.06;
This works fine, but can get confusing. Java also follows the convention used byother languages of placing an “f” at the end of the literal value to indicate explicitlythat it is a float. This also works for the double data type, except that you woulduse a “d.” (By the way, capitalization of the f and d does not make a difference.)
float f = 1.06f;double d = 1.06d;
You should realize that the “d” is not needed in the double declaration becauseJava assumes it. However, it is better to label all of your variables when possible,especially if you are not sure.
We will cover variables and declarations in more detail in Chapter 5, but youshould have enough knowledge now to be able to run a few basic programs andwill delve deeper into the Java fundamentals and look at operators, expressions,and control statements.

82 Chapter 3
Using ArraysIt’s difficult to imagine creating any large application or applet without havingan array or two. Java uses arrays in a much different manner than other lan-guages. Instead of being a structure that holds variables, arrays in Java are actu-ally objects that can be treated just like any other Java object.
The powerful thing to realize here is that because arrays are objects that arederived from a class, they have methods you can call to retrieve informationabout the array or to manipulate the array. The current version of the Java lan-guage only supports the length method, but you can expect that more methodswill be added as the language evolves.
One of the drawbacks to the way Java implements arrays is that they are onlyone dimensional. In most other languages, you can create a two-dimensionalarray by just adding a comma and a second array size. In Java, this does notwork. The way around this limitation is to create an array of arrays. Because thisis easy to do, the lack of built-in support for multi-dimensional arrays shouldn’thold you back.
Declaring ArraysSince arrays are actually instances of classes (objects), we need to use construc-tors to create our arrays much like we did with strings. First, we need to pick avariable name and declare it as an array object and also specify which data typethe array will hold. Note that an array can only hold a single data type—youcan’t mix strings and integers within a single array. Here are a few examples ofhow array variables are declared:
int intArray[];String Names[];
As you can see, these look very similar to standard variable declarations, exceptfor the brackets after the variable name. You could also put the brackets after thedata type if you think this approach makes your declarations more readable:
int[] intArray;String[] Names;

Java Language Fundamentals 83
Sizing ArraysThere are three ways to set the size of arrays. Two of them require the use of thenew operator. Using the new operator initializes all of the array elements to adefault value. The third method involves filling in the array elements with val-ues as you declare it.
The first method involves taking a previously declared variable and setting thesize of the array. Here are a few examples:
int intArray[]; // Declare the arraysString Names[];
intArray[] = new int[10]; // Size each arrayNames[] = new String[100];
Or, you can size the array object when you declare it:
int intArray[] = new int[10];String Names[] = new String[100];
Finally, you can fill in the array with values at declaration time:
String Names[] = {"Tony", "Dave", "Jon", "Ricardo"};int[] intArray = {1, 2, 3, 4, 5};
Accessing Array ElementsNow that you know how to initialize arrays, you’ll need to learn how to fill themwith data and then access the array elements to retrieve the data. We showed youa very simple way to add data to arrays when you initialize them, but often this justis not flexible enough for real-world programming tasks. To access an array value,you simply need to know its location. The indexing system used to access arrayelements is zero-based, which means that the first value is always located at posi-tion 0. Let’s look at a little program that first fills in an array then prints it out:
public class powersOf2 {
public static void main(String args[]) { int intArray[] = new int[20]; for (int i = 0; i < intArray.length; i++) {

84 Chapter 3
intArray[i] = 1; for(int p = 0; p < i; p++) intArray[i] *= 2 ; } for (int i = 0; i < intArray.length; i++) System.out.println("2 to the power of " + i + " is " + intArray[i]); }}
The output of this program looks like this:
2 to the power of 0 is 12 to the power of 1 is 22 to the power of 2 is 42 to the power of 3 is 82 to the power of 4 is 162 to the power of 5 is 322 to the power of 6 is 642 to the power of 7 is 1282 to the power of 8 is 2562 to the power of 9 is 5122 to the power of 10 is 10242 to the power of 11 is 20482 to the power of 12 is 40962 to the power of 13 is 81922 to the power of 14 is 163842 to the power of 15 is 327682 to the power of 16 is 655362 to the power of 17 is 1310722 to the power of 18 is 2621442 to the power of 19 is 524288
So, how does the program work? We first create our array of integer values andassign it to the intArray variable. Next, we begin a loop that goes from zero tointArray.length. By calling the length method of our array, we find the numberof indexes in the array. Then, we start another loop that does the calculation andstores the result in the index specified by the i variable from our initial loop.
Now that we have filled in all the values for our array, we need to step backthrough them and print out the result. We could have just put the print state-ment in the initial loop, but the approach we used gives us a chance to useanother loop that references our array.

Java Language Fundamentals 85
Here is the structure of an index call:
arrayName[index];
Pretty simple. If you try and use an index that is outside the boundaries of thearray, a run-time error occurs. If we change the program to count to an index of21 instead of the actual array length of 20, we would end up getting an errormessage like this:
java.lang.ArrayIndexOutOfBoundsException: 20 at powersOf2.main(powersOf2.java:10)
This is a pretty common error in any programming language. You need to usesome form of exception handling to watch for this problem unless you are posi-tive you can create code that never does this (in your dreams). See Chapter 7 foradditional information on exception handling.
Multidimensional ArraysMultidimensional arrays are created in Java in using arrays of arrays. Here are afew examples of how you can implement multidimensional arrays:
int intArray[][];String Names[][];
We can even do the same things we did with a single dimension array. We canset the array sizes and even fill in values while we declare the arrays:
int intArray[][] = new int[10][5];String Names[][] = new String[25][3];
int intArray[][] = {{2, 3, 4} {1, 2, 3}};String Names[][] = {{"Jon", "Smith"}{"Tony", "Potts"}{"Dave", "Friedel"}};
We can also create arrays that are not “rectangular” in nature. That is, each array withinthe main array can have a different number of elements. Here are a few examples:
int intArray[][] = {{1, 2} {1, 2, 3} {1, 2, 3, 4}};String Names[][] = {{"Jon", "Smith"} {"Tony","A", "Potts"} {"Dave", "H", "Friedel", "Jr."}};

86 Chapter 3
Accessing the data in a multidimensional array is not much more difficult thanaccessing data in a single-dimensional array. You just need to track the values foreach index. Be careful though, as you add dimensions, it becomes increasinglyeasy to create out of bounds errors. Here are a few examples of how you candeclare multidimensional arrays, assign values, and access array elements:
int intArray[][] = new int[10][5]; // Declare the arraysString Names[][] = new String[25][3];
intArray[0][0] = 5; // Assign valuesintArray[7][2] = 37;intArray[7][9] = 37; // This will cause an out of bounds error!Names[0][0] = "Bill Gates";// Access an array element in a Java statementSystem.out.println(Names[0][0]);
We will cover variables and declarations in more detail in Chapter 5, but youshould have enough knowledge now to be able to run a few basic programs andget the feel for Java programming.
Using Command-Line ArgumentsProgramming with command-line arguments is not a topic you’d typically ex-pect to see in a chapter on basic data types and variable declarations. However,because we’ve been using command-line arguments with some of the sampleprograms we’ve been introducing, we thought it would be important to discusshow this feature works in a little more detail.
Command-line arguments are only used with Java applications. They provide amechanism so that the user of an application can pass in information to be usedby the program. Java applets, on the other hand, read in parameters using HTMLtags as we learned in Chapter 2. Command-line arguments are common withlanguages like C and C++, which were originally designed to work with com-mand-line operating systems like Unix.
The advantage of using command-line arguments is that they are passed to aprogram when the program first starts, which keeps the program from having toquery the user for more information. Command-line arguments are great forpassing custom initialization data.

Java Language Fundamentals 87
Passing ArgumentsThe syntax for passing arguments themselves to a program is extremely simple.Just start your programs as you usually would and add any number of argu-ments to the end of the line with each one separated by a space. Here is a samplecall to a program named “myApp”:
Java myApp open 640 480
In this case, we are calling the Java run-time interpreter and telling it to run he classfile “myApp.” We then are passing in three arguments: “open,” “640,” and “480.”
If you wanted to pass in a longer string with spaces as an argument, you could.In this case, you enclose the string in quotation marks and Java will treat it as asingle argument. Here is an example:
Java myApp "Nice program!" "640x480"
Once again the name of the program is “myApp.” However, this time we areonly sending it two arguments: “Nice program!” and “640x480.” Note that thequotes themselves are not passed, just the string between the quotes.
Reading in ArgumentsNow that we know how to pass arguments, where are they stored? How can wesee them in our application? If you’ll recall, all applications have a main() method.You should also notice that this method has an interesting argument structure:
public static void main(String args[]) { ...}
Here, main() indicates that it takes an array named args[] of type String. Javatakes any command-line arguments and puts them into the args[] string array.The array is dynamically resized to hold just the number of arguments passed,or zero if none are passed. Note that the use of the args identifier is completelyarbitrary. You can use any word you want as long as it conforms to the Javanaming rules. You can even get a little more descriptive, like this:

88 Chapter 3
public static void main(String commandLineArgumentsArray[]) { ...
That may be a bit much, but you will never get confused as to what is in the array!
Accessing ArgumentsOnce we’ve passed in the arguments to an application and we know where theyare stored, how do we get to them? Since the arguments are stored in an array,we can access them just like we would access strings in any other array. Let’s lookat a simple application that takes two arguments and prints them out:
class testArgs { public static void main(String args[]) { System.out.println(args[0]); System.out.println(args[1]); }}
If we use this command line statement to run the application
java testArgs hello world
we’d get this output:
helloworld
Now, try this command line:
java testArgs onearg
Here is the result:
oneargjava.lang.ArrayIndexOutOfBoundsException: 1 at testArgs.main(testArgs.java:4)
What happened? Since we only were passing a single argument, the reference toargs[1] is illegal and produces an error.

Java Language Fundamentals 89
So, how do we stop from getting an error? Instead of calling each argument inline, we can use a for loop to step through each argument. We can check theargs.length variable to see if we have reached the last item. Our new code willalso recognize if no arguments have been passed and will not try and access thearray at all. Enough talking, here is the code:
class testArgs { public static void main(String args[]) { for (int i = 0; i < args.length; i++) { System.out.println(args[i]); } }}
Now, no matter how many arguments are passed (or none) the application canhandle it.
Indexing Command-Line ArgumentsDon’t forget that Java arrays are zero based, so the first com-mand-line argument is stored at position 0 not position 1.This is different than some other languages like C where thefirst argument would be at position 1. In C, position 0 wouldstore the name of the program.
Dealing with Numeric ArgumentsOne more thing we should cover here is how to deal with numeric arguments. Ifyou remember, all arguments are passed into an array of strings so we need toconvert those values into numbers.
This is actually very simple. Each data type has an associated class that pro-vides methods for dealing with that data type. Each of these classes has a methodthat creates a variable of that type from a string. Table 3.9 presents a list ofthose methods.
Make sure you understand the difference between the parse*() methods andthe valueOf() methods. The parsing methods return just a value that can beplugged into a variable or used as part of an expression. The valueOf() meth-ods return an object of the specified type that has an initial value equal to thevalue of the string.
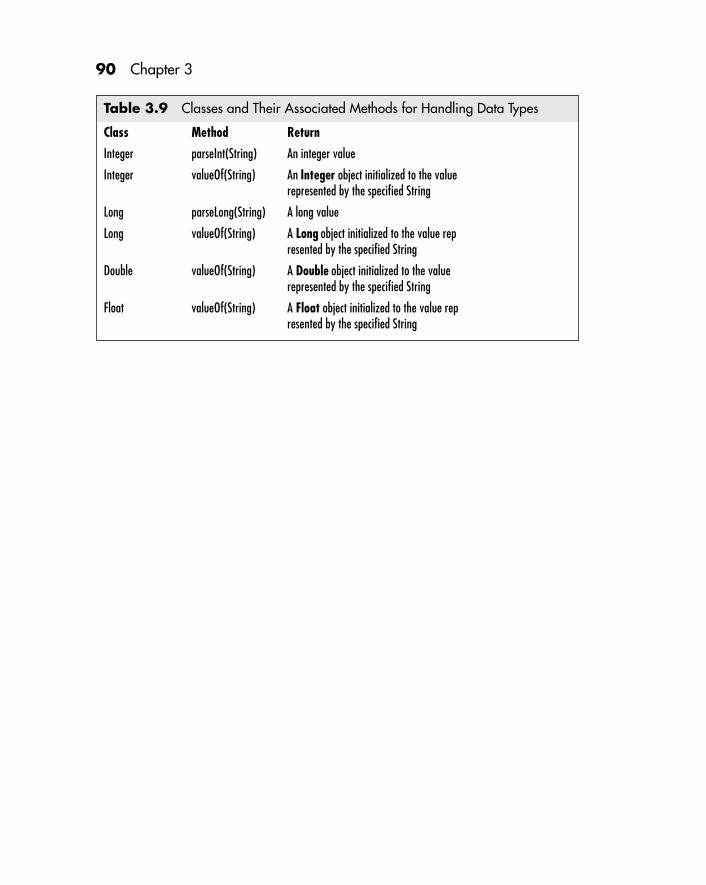
90 Chapter 3
Table 3.9 Classes and Their Associated Methods for Handling Data Types
Class Method Return
Integer parseInt(String) An integer value
Integer valueOf(String) An Integer object initialized to the valuerepresented by the specified String
Long parseLong(String) A long value
Long valueOf(String) A Long object initialized to the value represented by the specified String
Double valueOf(String) A Double object initialized to the valuerepresented by the specified String
Float valueOf(String) A Float object initialized to the value represented by the specified String

Chapter4Operators,Expressions,and ControlStructures


93
Operators,Expressions,and ControlStructuresTo build useful Java programs you’ll need tomaster the art of using operators, expres-sions, and control structures.
4N ow that you know about the types of data you can use in Java, you need tolearn how to manipulate your data. The tools for manipulating data fall intothree categories—operators, expressions, and control structures—each playing amore powerful role as you move up the ladder. In this chapter, we’ll discuss eachof the key Java operators—everything from assignment statements to bitwiseoperators. Although Java operators are very similar to C/C++ operators, thereare a few subtle differences which we’ll point out. Next, we’ll show you thebasics for creating expressions with Java. Finally, in the last part of the chapter,we’ll investigate the world of Java control structures.
Using Java OperatorsOperators allow you to perform tasks such as addition, subtraction, multiplica-tion, and assignment. Operators can be divided into three main categories: assign-ment, integer, and boolean operators. We’ll explore each Java operator in detail byexamining each of the three categories. But first, let’s cover operator precedence.
Operator PrecedenceAs you are writing your code, you need to keep in mind which operators haveprecedence over the others—the order in which operators take effect. If you are

94 Chapter 4
an experienced programmer or you can remember some of the stuff you learnedin your high school algebra classes, you shouldn’t have any problem with under-standing the principles of operator precedence. The basic idea is that the out-come or result of an expression like this
x = 5 * (7+4) - 3;
is determined by the order in which the operators are evaluated by the Java com-piler. In general, all operators that have the same precedence are evaluated fromleft to right. If the above expression were handled in this manner, the resultwould be 36 (multiply 5 by 7, add 4, and then subtract 3). Because of prece-dence, we know that some operators, such as (), are evaluated before operatorssuch as *. Therefore, the real value of this expression would be 52 (add 7 and 4,multiply by 5, and then subtract 3).
The actual rules for operator precedence in Java are nearly identical to thosefound in C/C++. The only difference is that C/C++ includes a few operators,such as ->, that are not used in Java. Table 4.1 lists the major operators in orderof precedence. Notice that some operator symbols such as (-) show up twice.
Table 4.1 Operator Precedence with Java
Operators Operator Type
() [] . Expression
++ -- ! - ~ Unary
* / % Multiplicative
+ - Additive
<< >> >>> Shift
< <= > >= Relational (inequality)
== != Relational (equality)
& Bitwise ADD
^ Bitwise XOR
| Bitwise OR
&& Logical AND
|| Logical OR
?: Conditional
= *= /= %= += -= <<= >>= &= |= ^= Assignment

Operators, Expressions, and Control Structures 95
The reason for this is because the operator has different meanings depending onhow it is used in an expression. For example, in an expression like this
x = 7 + -3;
the (-) operator is used as a unary operator to negate the value 3. In this case, itwould have a higher precedence than a standard additive operator (+ or -). In anexpression like this, on the other hand,
x = 7 - 3 + 5;
the (-) operator is used as a binary additive operator, and it shares the sameprecedence with the (+) operator.
Which Operators Are Missing?If you are an experienced C/C++ programmer, you’re prob-ably wondering what operators used in C/C++ are not avail-able in Java. The ones missing are the four key data access andsize operators shown in Table 4.2. These operators are notneeded because Java does not support pointers and does notallow you to access memory dynamically. As we learned inChapter 2, Java uses garbage collection techniques to provideits own internal system of memory management.
Assignment OperatorsThe most important and most often used operator is the assignment operator(=). This operator does just what it looks like it should do; it takes whatevervariable is on the left and sets it equal to the expression on the right:
i = 35;
Table 4.2 C/C++ Operators Missing from Java
Operator Description
* Performs pointer indirection
& Calculates the memory address of a variable
-> Allows a pointer to select a data structure
sizeof Determines the size of an allocated data structure

96 Chapter 4
The expression on the right can be any valid Java expression—a literal, an equa-tion with operands and operators, a method call, and so on. When using anassignment operator, you must be careful that the variable you are using to re-ceive the expression is the correct size and type to receive the result of the expres-sion on the right side. For example, statements like the following could causeyou a lot of headaches:
short count;// This number is way too big for a short type!count = 500000000000;
char ch;// Oops! We should be assigning a character herech = 100;
In the first example, the variable count is declared as a short, which means thatthe variable can only hold a number as large as 32767. Obviously, the numberbeing assigned to the variable is way too large. In the second example, the vari-able ch expects to receive a character but in reality is assigned something elseentirely.
If you look closely at the last line in Table 4.1, you’ll see that Java offers a num-ber of variations of the standard assignment statement. They are all borrowedfrom the C language. An assignment statement like this
num *= 5;
would be equivalent to this expression:
num = num * 5;
The combination assignment operators turn out to be very useful for writingexpressions inside loops that perform counting operations. Here’s an example:
While (i <= count){ i += 2; // Increment the counting variable ...}

Operators, Expressions, and Control Structures 97
In this case i is used as the loop “counting” control variable, and it is incrementedby using a combination assignment statement.
Integer OperatorsIn the category of integer operators, there are two flavors to choose from: unaryand binary. A unary operator performs a task on a single variable at a time.Binary operators, on the other hand, must work with two variables at a time.Let’s start with the unary operators.
UNARY OPERATORSThere are four integer unary operators: negation, bitwise complement, increment,and decrement. They are used without an assignment operation. They simplyperform their operation on a given variable, changing its value appropriately.
NEGATION (-)Unary negation changes the sign of an integer. You must be careful when reach-ing the lower limits of integer variables because the negative limit is always onegreater than the positive limit. So, if you had a variable of type byte with a valueof -256 and you performed a unary negation on it, an error will occur becausethe byte data type has a maximum positive value of 255. Here are some ex-amples of how this operator can be used:
- k;-someInt;x = -50 + 10;
As we learned earlier, the negation operator is at the top end of the precedencefood chain; thus, you can count on operands that use it to be evaluated first.
BITWISE COMPLEMENT (~)Performing a bitwise complement on a variable flips each bit of the variable—all1s become 0s and all 0s become 1s. For strict decimal calculations, this operatoris not used very often. But if you are working with values that represent bitsettings, such as an index into a color palette, this type of operator is invaluable.Here is an example of the unary complement operator in action:
// input: byte type variable bitInt = 3 (00000011 in binary)~bitInt;// Output: bitInt = 252 (11111100 in binary)

98 Chapter 4
INCREMENT (++) AND DECREMENT (- -)The increment and decrement operators are very simple operators that simplyincrease or decrease an integer variable by 1 each time they are used. Theseoperators were created as a shortcut to saying x=x+1. As we’ve already men-tioned, they are often used in loops where you want a variable incremented ordecremented by one each time a loop is completed. Here is an example of howeach operator is used:
++intIncrement;--intDecrement;
BINARY OPERATORSWhen you need to perform operations that involve two variables, you will bedealing with binary operators. Simple addition and subtraction are prime ex-amples of binary operators. These operators do not change the value of either ofthe operands, instead they perform a function between the two operands that isplaced into a third. Table 4.3 lists the complete set of the binary integer opera-tors. Let’s look at each of these operators in detail.
ADDITION, SUBTRACTION, MULTIPLICATION, AND DIVISIONThese operators are the standard binary operators that we have all used sincewe started programming. We won’t explain the theory behind algebra be-
Table 4.3 The Binary Integer Operators
Operator Description
+ Addition
- Subtraction
* Multiplication
/ Division
% Modulus
& Bitwise AND
| Bitwise OR
^ Bitwise XOR
<< Left Shift
>> Right Shift
>>> Zero-Fill Right Shift

Operators, Expressions, and Control Structures 99
cause we assume you already know this stuff. We will, however, give you afew examples:
// X=12 and Y=4Z = X + Y; // Answer = 16Z = X - Y; // Answer = 8Z = X * Y; // Answer = 48Z = X / Y; // Answer = 3
MODULUSThe modulus operator divides the first operand by the second operand andreturns the remainder:
// X=11 and Y=4Z = X % Y; // Answer = 3
BITWISE OPERATORSThe bitwise binary operators perform operations at the binary level on integers.They act much like custom if..then statements. They compare the respective bitsfrom each of the operands and set the corresponding bit of the return variable toa 1 or 0 depending on which operator is used. The AND operator works asfollows: “if both bits are 1 then return a 1, otherwise return a 0.” The ORoperators works like this: “if either bit is a 1 then return a 1, otherwise return a0.” Finally, the XOR operator works like this: “if the bits are different return a 1,if they are the same return a 0.” Table 4.4 provides a set of examples that illus-trate how each bitwise operator works.
And here are some code examples to show you how to incorporate bitwise op-erators into your Java statements:
// X=3 (00000011)// Y=2 (00000010)Z = X & Y; // Answer: Z = 2X 00000011
// Y 00000010 // Z 00000010
Z = X | Y; // Answer: Z = 3X 00000011 // Y 00000010 // Z 00000011
Z = X ^ Y; // Answer: Z = 1X 00000011 // Y 00000010 // Z 00000001

100 Chapter 4
Boolean OperatorsThe boolean data type adds several new operators to the mix. All of the opera-tors that can be used on boolean values are listed in Table 4.5.
BOOLEAN NEGATION (!)Negation of a boolean variable simply returns the opposite of the boolean value.As you might have guessed, boolean negation is a unary operation. Here’s anexample:
// Bool1 = True!Bool1; // Answer: Bool1 = False
LOGICAL AND (&), OR (|), & XOR (^)The AND, OR, and XOR operators work identically to the way they do withinteger values. However, they only have a single bit to worry about:
Bool2 = true;Bool3 = true;
Table 4.4 Using the Java Bitwise Operators
Operand 1 Operand 2 Bitwise Operator Return
1 1 AND True
1 0 AND False
0 1 AND False
0 0 AND False
1 1 OR True
1 0 OR True
0 1 OR True
0 0 OR False
1 1 XOR False
1 0 XOR True
0 1 XOR True
0 0 XOR False

Operators, Expressions, and Control Structures 101
Bool4 = False;Bool5 = False;Bool1 = Bool2 & Bool3; // Answer: Bool1 = TrueBool1 = Bool2 & Bool4; // Answer: Bool1 = FalseBool1 = Bool2 | Bool3; // Answer: Bool1 = FalseBool1 = Bool2 | Bool4; // Answer: Bool1 = TrueBool1 = Bool3 ^ Bool4; // Answer: Bool1 = FalseBool1 = Bool4 ^ Bool5; // Answer: Bool1 = True
EVALUATION AND (&&) AND OR (||)The evaluation AND and OR are a little different than the logical versions. Usingthese operators causes Java to avoid evaluation of the righthand operands if it isnot needed. In other words, if the answer can be derived by only reading the firstoperand, Java will not bother to read the second. Here are some examples:
// op1 = True op2 = Falseresult = op1 && op2; // result=False-both ops are evaluatedresult = op2 && op1; // result=False-only first op is evaluated
result = op1 || op2; // result=True-only first op is evaluatedresult = op2 || op1; // result=True-both ops are evaluated
Table 4.5 Java Boolean Operators
Operator Operation
! Negation
& Logical AND
| Logical OR
^ Logical XOR
&& Evaluation AND
|| Evaluation OR
== Equal to
!= Not Equal to
&= And Assignment
|= OR Assignment
^= XOR Assignment
?: Ternary (Conditional)

102 Chapter 4
EQUAL TO (==) AND NOT EQUAL TO (!=)These operators are used to simply transfer a boolean value or transfer the oppo-site of a boolean value. Here are a few examples:
op1 = True;if (result == op1); // Answer: result = trueif (result != op1); // Answer: result = false
ASSIGNMENT BOOLEAN OPERATORS (&=), (|=), (^=)Boolean assignment operators are a lot like the assignment operators for inte-gers. Here is an example of an assignment being used on both an integer and aboolean so that you can compare the two:
i += 5; // Same as int = int + 5bool &= true; // Same as bool = bool & truebool |= true; // Same as bool = bool | truebool ^= false; // Same as bool = bool ^ false
TERNARY OPERATOR
This powerful little operator acts like an extremely condensed if..then statement. Ifyou look at the example below you will see that if the operand is True, the expres-sion before the colon is evaluated. If the operand is False, the expression after thecolon is evaluated. This type of coding may look a little strange at first. But onceyou understand the logic, you’ll begin to see just how useful this operator can be.In the following example, the parentheses are not actually needed, but when youuse more complicated expressions they will make the code much easier to follow:
// op1 = True op2 = Falseop1 ? (x=1):(x=2); // Answer: x=1op2 ? (x=1):(x=2); // Answer: x=2
Floating-Point Number OperatorsAlmost all of the integer operators work on floating-point numbers as well, with afew minor changes. Of course, all the standard arithmetic operators (+, -, *, /)work as well as the assignment operators (+=, -=, *=, /=). Modulus (%) also works;however, it only evaluates the integer portion of the operands. The increment anddecrement operators work identically by adding or subtracting 1.0 from the inte-ger portion of the numbers. Be careful when using relational operators on float-ing-point numbers. Do not make assumptions about how the numbers will

Operators, Expressions, and Control Structures 103
behave just because integers behave a certain way. For example, just because anexpression like a==b may be true for two floating-point values, don’t assume thatan expression like a<b || a>b will be true. This is because floating-point valuesare not ordered like integers. You also have to deal with the possibility of afloating-point variable being equal to negative or positive infinity, -Inf and Inf,respectively. You can get a positive or negative Inf when you perform an opera-tion that returns an overflow.
Using CastsIn some applications you may need to transfer one type of variable to another.Java provides us with casting methods to accomplish this. Casting refers to theprocess of transforming one variable of a certain type into another data type.
Casting is accomplished by placing the name of the data type you wish to cast aparticular variable into in front of that variable in parentheses. Here is an ex-ample of how a cast can be set up to convert a char into an int:
int a;char b;b = 'z';a = (int) b;
Since the variable a is declared as an int, it expects to be assigned an int value.The variable b, on the other hand, is declared as a char. To assign the contents ofb to a, the cast is used on the right side of the assignment statement. The con-tents of b, the numeric value of the character ‘z’ is safely assigned to the variablea as an integer. If you wanted to, you could perform the cast in reverse:
short a;char b;a = 40;b = (char) a; // Convert value 40 into a character
Casting is extremely simple when you are using the primitive data types—int,char, short, double, and so on. You can also cast classes and interfaces in Java,which we’ll show you how to do in Chapter 5.
The most important thing to remember when using casts is the space each vari-able has to work with. Java will let you cast a variable of one data type into a

104 Chapter 4
variable of a different data type if the size of the data type of the target variable issmaller than the other data type, but you may not like the result. Does this soundconfusing? Let’s explain this a little better. If you had a variable of type long, youshould only cast it into another variable of type float or double because these datatypes are the only other two primitives with at least 64-bits of space to handle yournumber. On the other hand, if you had a variable of type byte, then you could castit into any of the other primitives except boolean because they all have more spacethan the lowly byte. When you are dealing with double variables, you are stuck,since no other data type offers as much space as the double.
If you have to cast a variable into another variable having less space, Java will doit. However, any information in the extra space will be lost. On the plus sidethough, if the value of a larger variable is less than the maximum value of thevariable you are casting into, no information will be lost.
Writing Expressions and StatementsSo far we’ve been more or less looking at operators, literals, and data types in avacuum. Although we’ve used these components to write expressions, we haven’tformally defined what Java expressions are. Essentially, expressions are the Javastatements that make your code work; they are the guts of your programs. A basicexpressions contains operands and operators. For example, in this expression
i = x + 10;
the variable x and the literal 10 are the operands and + is the operator. The evalu-ation of an expression performs one or more operations that return a result. Thedata type of the result is always determined by the data types of the operands(s).
When multiple operands are combined, they are referred to as a compound ex-pression. The order in which the operators are evaluated is determined by theprecedence of the operators that act upon them. We discussed precedence earlierand showed you the relative precedence of each Java operator.
The simplest form of expression is used to calculate a value, which in turn isassigned to a variable in an assignment statement. Here are a few assignmentstatements that use expressions that should look very familiar to you by now:
i = 2;thisString = "Hello";

Operators, Expressions, and Control Structures 105
Here are a few assignment statements that are a little more involved:
Bool1 != Bool2;i += 2;d *= 1.9Byte1 ^= Byte2;
An assignment expression involves a variable that will accept the result, followedby a single assignment operator, followed by the operand that the assignmentoperator is using.
The next step up the ladder is to create expressions that use operators like thearithmetic operators we have already discussed:
i = i + 2;thisString = "Hello";
Expressions with multiple operands are probably the most common type of ex-pressions. They still have a variable that is assigned the value of the result pro-duced by evaluating the operands and operators to the right of the equal sign.You can also have expressions with many operators and operands like this:
i = i + 2 - 3 * 9 / 3;thisString = "Hello" + "World, my name is " + myName;
The art of programming in Java involves using operators and operands to buildexpressions, which are in turn used to build statements. Of course, the assign-ment statement is just one type of statement that can be constructed. You canalso create many types of control statements, such as while and for loops, if-thendecision making statements, and so on. (We’ll look at all of the control state-ments that can be written in Java in the last part of this chapter.)
There are essentially two types of statements you can write in Java: simple and com-pound. A simple statement performs a single operation. Here are some examples:
int i; // Variable declarationi = 10 * 5; // Assignment statementif (i = 50) x = 200; // if-then decision statement
The important thing to remember about simple statements in Java is that theyare always completed with a semicolon (;). (Some of the others like class declara-
106 Chapter 4
tions and compound if..else statements don’t need semicolons, but if you leave itoff the end of an expression, you’ll get an error.)
Compound statements involve the grouping of simple statements. In this case,the characters ({ }) are used to group the separate statements into one compoundstatement. Here are a few examples:
while (x < 10){ ++x; if (sum < x) printline();}
if (x < 10){ i = 20; p = getvalue(i);}
Notice that the (;) terminating character is not used after the final (}). The bracestake care of this for us.
Control Flow StatementsControl flow is what programming is all about. What good are basic data types,variables, and casting if you don’t have any code that can make use of them? Javaprovides several different types of control flow structures. These structures pro-vide your application with direction. They take an input, decide what to dowith it and how long to do it, and then let expressions handle the rest.
Let’s look at each of these structures in detail. If you have done any program-ming before, all of these should look familiar. Make sure you study the syntax sothat you understand exactly how they work in Java as compared to how theywork in other languages.
Table 4.6 lists all of the standard control flow structures, and it shows you whatthe different parts of their structure represent.
if..elseThe if..else control structure is probably used more than all the others com-bined. How many programs have you written that didn’t include one? Not verymany, we’ll wager.

Operators, Expressions, and Control Structures 107
In its simplest terms, the if..else structure performs this operation: if this is truethen do that otherwise do something else. Of course, the “otherwise” portion isoptional. Since you probably already know what if..else statements are used for,we will just show you a few examples so you can see how they work in Java.
Here is the structure labeled with standard terms:
if (boolean) statementelse statement;
Here is a sample of what an if..else statement might look like with actual code:
if (isLunchtime) { Eat = true; Hour = 12;}else { Eat = False; Hour = 0;}
Table 4.6 Control Flow Structures
Structure Expression
if..else if (boolean = true) statement
else statement;
while while (boolean = true) statement;
do..while do statement while (boolean = true);
switch switch (expression) {
case expression: statement;
case expression: statement;
...
default: statement;
}
for for (expression1; expression2; expression3)
statement;
label label: statement
break label;
continue label;

108 Chapter 4
You can also use nested if..else statements:
if (isLunchtime) { Eat = true; Hour = 12;}else if (isBreakfast) { Eat = true; Hour = 6; } else if (isDinner) { Eat = true; Hour = 18; } else { Eat = false; Hour = 0; }
The curly braces are used when multiple statements need to take place for eachoption. If we were only performing a single operation for each part of the if..elsestatement, we would not need the braces. Here is an example of an if..else state-ment that uses curly braces for one part but not the other:
if (isLunchtime) { Eat = true; Hour = 12;}else Eat = False;
while and do..whileThe while and do..while loops perform the same function. The only differenceis that the while loop verifies the expression before executing the statement, andthe do..while loop verifies the expression after executing the statement. This is amajor difference that can be extremely helpful if used properly.
Here are the structures labeled with standard terms:
while (boolean) { statement;}

Operators, Expressions, and Control Structures 109
do { statement} while(boolean);
while and do..while loops are used if you want to repeat a certain statement orblock of statements until a certain expression becomes false. For example, as-sume you wanted to send e-mail to all of the people at a particular Web site. Youcould set up a while loop that stepped through all the people, one-by-one, send-ing them e-mail until you reached the last person. When the last person is reached,the loop is terminated and the program control flow moves on to the statementfollowing the loop. Here is what that loop might look like in very simple terms:
boolean done = false;
while (!done){ emailUser(); goNextuser(); if (noNewuser) done = true;}
switchThe switch control flow structure is useful when you have a single expressionwith many possible options. The same thing can be done using recursed if..elsestatments, but that can get very confusing when you get past just a few options.The if..else structure is also difficult to change when it becomes highly nested.
The swtich statement is executed by comparing the value of an initial expressionor variable with other variables or expressions. Let’s look at the labeled structure:
switch(expression) { case expression: statement; case expression: statement; case expression: statement; default: statement;}
Now let’s look at a real piece of code that uses the switch structure:
char age;

110 Chapter 4
System.out.print("How many computers do you own? ");age = System.in.read();switch(age) { case '0': System.out.println("\nWhat are you waiting for?"); break; case '1': System.out.println("\nIs that enough these days?"); break; case '2': System.out.println("\nPerfect!"); break; default: System.out.println("\nToo much free time on you hands!");}
The break statement is extremely important when dealing with switch struc-tures. If the switch finds a case that is true, it will execute the statements for thatcase. When it is finished with that case, it will move on to the next one. Thisprocess continues until a match is found or the default statement is reached.The break statement tells the switch “OK, we found a match, let’s move on.”
The default clause serves as the “catch-all” statement. If all of the other cases fail,the default clause will be executed.
forfor loops are another programming standard that would be tough to live with-out. The idea behind a for loop is that we want to step through a sequence ofnumbers until a limit is reached. The loop steps through our range in whateverstep increment we want, checking at the beginning of each loop to see if we havecaused our “quit” expression to become true.
Here is the labeled structure of a for loop:
for (variable ; expression1 ; expression2);
The variable we use can either be one we have previously created, or it can bedeclared from within the for structure. Expression1 from the above example isthe expression we need to stay true until the loop is finished. More often thannot, this expression is something like x<10 which means that we will step through

Operators, Expressions, and Control Structures 111
the loop until x is equal to 10 at which time the expression (x<10) becomse falseand drops us out of the loop.
Here is an example of a for loop that actually works:
for (int x = 0 ; x < 10 ; x++) {System.out.println(x);
}
If you put this code into an empty main method you should get the followingoutput:
0123456789
For loops are used for many different applications. They are a necessity when dealingwith arrays and can really help when creating lookup tables or indexing a database.
labelsJava labels provide a means of controlling different kinds of loops. Sometimes,when you create a loop, you need to be able to break out of it before it finisheson its own and satisfies its completion expression. This is where labels come invery handy.
The key to labels is the break statement that you learned to use with the switchstatement. You can also use the break statement to exit out of any loop. It isgreat for breaking out of for loops and while loops especially.
However, sometimes you have embedded loops and you need to be able to breakout of a certain loop. A great example of this is two embedded for loops that aresetting values in an array. If an error occurs or you get a strange value, you maywant to be able to break out of one loop or another. It gets confusing if you have
112 Chapter 4
all these embedded loops and break statements all over with no apparent link toone loop or another. labels rectify this situation.
To use a label, you simply place an identifier followed by a colon at the beginningof the line that initiates a loop. Let’s look at an example before we go further:
outer: for (int x = 0 ; x < 10 ; x++) { inner: for (int y = 0 ; y < 10 ; y++) {
System.out.println(x + y); if (y=9) { break outer: } else { continue outer: } }}
Labels are probably new to most of you, so you may not see a need for themright away. However, as your programs become more complicated you shouldthink about using lables where appropriate to make your code simple andmore readable.
Moving AheadWe covered a lot of ground in this chapter and the previous one. If you arenew to Java programming and have little C or C++ background, make sureyou understand these concepts well so that you do not get confused in theupcoming chapters.
Let’s now move on and discuss another basic structure of Java programming. Infact, we would have to call it the basic structure of Java programming—the class.

Chapter5Java Classesand Methods


115
5Java Classesand MethodsClasses are the key Java components thatgive the language its object-orientedpersonality.
If you have some experience programming in a language like C++, you areprobably familiar with the power and flexibility that classes provide. They areideal for plugging general information into a template-like structure for reusingover and over. For example, if you are developing an interactive drawing pack-age, you could create standard classes for some of the fundamental drawingoperations and then use those classes to create more sophisticated drawing tasks.If you are new to the world of object-oriented programming (OOP), you’ll soondiscover that classes are the essential building blocks for writing OOP applica-tions. At first glance, Java classes look and operate like C++ classes; but there aresome key differences which we’ll address in this chapter.
We’ll start by looking at the basics of classes. You’ll quickly learn how classes aredefined and used to derive other classes. The second half of the chapter coversmethods—the components used to breathe life into classes.
Understanding ClassesIn traditional structured programming languages like C or Pascal, everythingrevolves around the concepts of algorithms and data structures. The algorithmsare kept separate from the data structures, and they operate on the data to per-form actions and results. To help divide programming tasks into separate units,components like functions and procedures are defined. The problem with thisprogramming paradigm is that it doesn’t allow you to easily create code that canbe reused and expanded to create other code.

116 Chapter 5
To solve this problem, object-oriented programming languages like Smalltalkand C++ were created. These languages introduced powerful components calledclasses so that programmers could combine functions (operations) and data underone roof. This is a technique called encapsulation in the world of object-orientedprogramming. Every language that uses classes defines them in a slightly differentway; however, the basics concepts for using them remain the same. The mainadvantages of classes are:
• They can be used to define abstract data types
• Data is protected or hidden inside a class so other classes cannot access it
• Classes can be used to derive other classes
• New classes derived from existing classes can inherit the data and methodsalready defined—a concept called inheritance.
As you’ll learn in this chapter, the techniques for defining and using Java classes areadapted from techniques found in the C++ language. In some cases, the Java syn-tax will look very similar to C++ syntax, but in other cases you’ll find a number ofdifferences, including new keywords that have been added to Java for declaringclasses and methods; restrictions, such as the elimination of pointers; and differentscoping rules that determine how classes can be used in an application.
Declaring a ClassIf you recall from Chapter 2, we created a class named TickerTape, which con-trolled how text scrolled across the screen. Let’s take a step back and look at thefull declaration used to define classes in Java:
[Doc Comment] [Modifier] class Identifier[extends Superclassname][implements Interfaces] { ClassBody;}
Of course, keep in mind that you won’t always use all of the clauses, such as DocComment, Modifier, extends, and so on. For example, here’s an example of theworld’s smallest class definition:
class Atom_ant { int a = 1;}
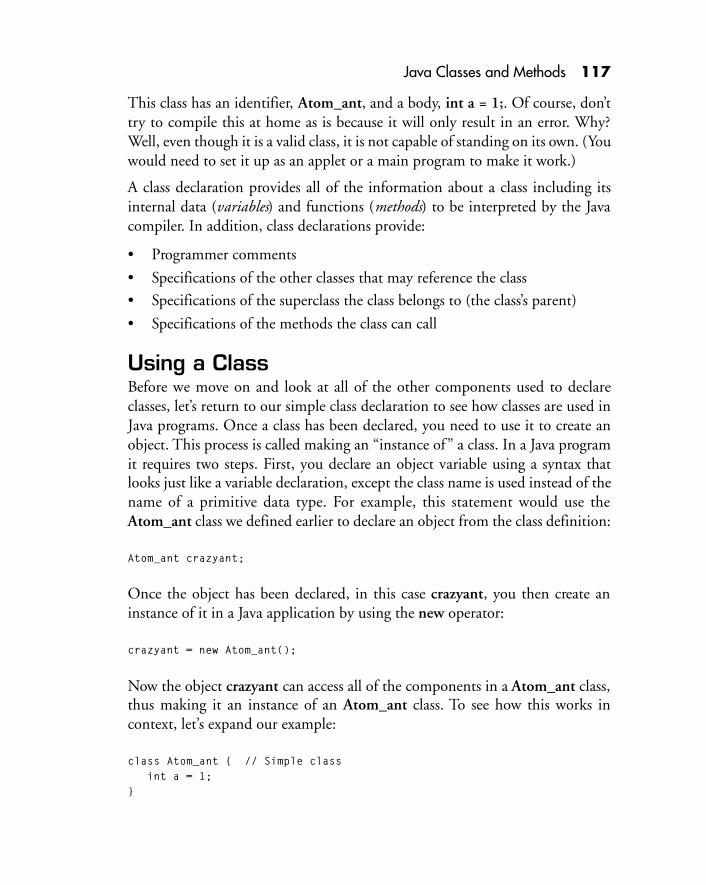
Java Classes and Methods 117
This class has an identifier, Atom_ant, and a body, int a = 1;. Of course, don’ttry to compile this at home as is because it will only result in an error. Why?Well, even though it is a valid class, it is not capable of standing on its own. (Youwould need to set it up as an applet or a main program to make it work.)
A class declaration provides all of the information about a class including itsinternal data (variables) and functions (methods) to be interpreted by the Javacompiler. In addition, class declarations provide:
• Programmer comments
• Specifications of the other classes that may reference the class
• Specifications of the superclass the class belongs to (the class’s parent)
• Specifications of the methods the class can call
Using a ClassBefore we move on and look at all of the other components used to declareclasses, let’s return to our simple class declaration to see how classes are used inJava programs. Once a class has been declared, you need to use it to create anobject. This process is called making an “instance of” a class. In a Java programit requires two steps. First, you declare an object variable using a syntax thatlooks just like a variable declaration, except the class name is used instead of thename of a primitive data type. For example, this statement would use theAtom_ant class we defined earlier to declare an object from the class definition:
Atom_ant crazyant;
Once the object has been declared, in this case crazyant, you then create aninstance of it in a Java application by using the new operator:
crazyant = new Atom_ant();
Now the object crazyant can access all of the components in a Atom_ant class,thus making it an instance of an Atom_ant class. To see how this works incontext, let’s expand our example:
class Atom_ant { // Simple class int a = 1;}

118 Chapter 5
public class Bug { int i = 10; Atom_ant crazyant; // Declare an object
public static void main (String args[]) { // Create an instance of Atom_ant called crazyant crazyant = new Atom_ant(); System.out.println("There are " + bug.i + " bugs here but only " +
crazyant.i + " atom ant."); }
The output produced by this example would be:
There are 10 bugs here but only 1 atom ant.
The main class, Bug, creates an instance of the Atom_ant class—the crazyantobject. Then it uses the object to access the data member, a, which is assigned avalue in the Atom_ant class. Notice that the dot operator (.) is used to access amember of a class.
Object Declaration Time SaverIn Java, you can both declare an object variable and create aninstance all in one statement. Here’s an example of how it is done:
Atom_ant crazyant = new Atom_ant();
Notice that the class Atom_ant is used to declare the objectvariable crazyant and then the new operator is used to createan instance of Atom_ant.
Components of a Class DeclarationLet’s look at the components of the class declaration in a little more detail. Asyou recall from our first example, the only really necessary part of a class decla-ration is its name or identifier. However, whenever you need to reference yourclass in your program to reuse it, you’ll need to reference it by its fully qualifiedname. This name is the package name, or group of classes from which it came,followed by the identifier. For example, if Atom_ant is the class name and itbelongs to a package named molecule, its fully qualified name would bemolecule.Atom_ant.

Java Classes and Methods 119
Documentation CommentThe Doc Comment clause of the class declaration is provided as an aid to helpother programmers who might need to use your class. It allows you to write yourdocumentation while you’re writing the code. The comments you include aspart of this clause can easily be converted into easy to read HTML pages. How-ever, keep in mind that your HTML pages will only be as good as your com-ments. (To brush up on how to write comments for Java programs, make sureyou read Chapter 3.)
Let’s look at an example to see how the Doc Comment feature works. This classdefinition
/*** Atom ant is the world's smallest super hero, so we gave him a class by himself.* @author Dave Friedel*/class Atom_ant { int i = 1;}
uses Doc Comment style comments to produce the HTML page shown in Figure5.1. Notice how the comments are formatted and used to document the class.In this case, Atom_ant is a subclass under the java.lang.Object class—the de-fault parent for all classes.
In case you’re wondering, the @author notation is a special type of comment tagthat allows you to personalize your class. These tags are explained in more detailin Chapter 3.
Class ModifiersModifiers define the rules for how classes are used in Java applications. Theydetermine how other packages, or classes of other groups can interact withthe current class. There are three kinds of modifiers that can be used in aclass declaration:
• public• abstract
• final

120 Chapter 5
If you don’t use one of these modifiers when declaring a class, Java will auto-matically decide that only other classes in the current package may access theclass. Let’s look at how each of these modifiers are used.
PUBLIC CLASSThe public modifier is used to define a class that can have the greatest amountof access by other classes. By declaring a class as public, you allow all otherclasses and packages to access its variables, methods, and subclasses. However,
Figure 5.1The HTML documentation created for the Atom_ant class.

Java Classes and Methods 121
only one public class is allowed in any single Java applet or a single source code file.You can think of the one public class in an applet as serving the role that themain() function does in a C/C++ program.
The source code for an applet must be saved as ClassName.java, where ClassNameis the name of the single public class defined in the applet. Recall that when wecreated the TickerTape applet in Chapter 2, the single public class was defined as
public class TickerTape extends Applet implements Runnable {...
and the name of the file was TickerTape.java.
Let’s look at another example of how the public modifier is used to define aJava class:
// Filename: Atom_ant.javapublic class Atom_ant { public static void main (String args[]) { System.out.println("Hello World"); }}
In this case, Atom_ant is the name of the class and the filename for the applet isAtom_ant.java.
ABSTRACT CLASS
The abstract modifier is used to declare classes that serve as a shell or place-holder for implementing methods and variables. When you construct a hierar-chy of classes, your top most class will contain the more general data definitionsand method implementations that represent your program’s features. As youwork your way down the class hierarchy, your classes will start to implementmore specific data components and operations. As you build your hierarchy,you may need to create more general classes and defer the actual implementationto later stages in the class hierarchy. This is where the abstract class comes in.This approach allows you to reference the operations that you need to includewithout having to restructure your entire hierarchy.
The technique of using abstract classes in Java is commonly referred to as singleinheritance by C++ programmers. (By the way, limited multiple inheritance tech-niques can also be implemented in Java by using interfaces. We’ll cover thistopic in more detail in Chapter 6.)
122 Chapter 5
Any class that is declared as an abstract class must follow certain rules:
• No objects can be instantiated from an abstract class
• Abstract classes must contain at least one declaration of an abstract methodor variable
• All abstract methods that are declared in an abstract class must be imple-mented in one of the subclasses beneath it
• Abstract classes cannot be declared as final or private classes
Let’s look at an example of how an abstract class is defined and used to helpcreate other classes:
abstract class Quark extends Atom_ant { ... abstract void abstract_method1(); abstract void abstract_method2(); void normal_method(); ...}
public class Aparticles extends Quark { public void abstract_method1() { ... // Definition of the method }}
public class Bparticles extends Quark { public void abstract_method2() {
... // Definition of the method }}
Here, the class Quark is declared as an abstract class and it contains two meth-ods that are declared as abstract methods. The subclasses Aparticles and Bparticlesare located beneath the class Quark in the hierarchy of classes. Each one definesa method based on one of the abstract methods found in the Quark class. Acompile-time error would occur if we had failed to define both of the abstractmethods in the Quark class. All abstract methods must be defined in the sub-classes that are derived from abstract classes.

Java Classes and Methods 123
Restrictions in Declaring Abstract ClassesAn abstract class cannot be defined as a final class (using thefinal keyword) because the Java compiler will always assumethat the abstract class will be used to derive other classes—other subclasses will follow it. (As you’ll see in the next sec-tion, a final class defines the end of the line for a class hierarchy.)Furthermore, you cannot used a private modifier in an ab-stract class’s method declarations because this modifier restrictsmethods from being used by any other classes except the classthey are defined in.
FINAL CLASS
The final modifier is used to declare a class that will not be used to derive anyother classes. The final class is like the last station on a railway line. By its posi-tion in a class hierarchy, a final class cannot have any subclasses beneath it. Infinal class declarations, you cannot use the extends clause because the Java com-piler always assumes that a final class cannot be extended. Here’s an example ofwhat would happen if you tried to declare a final class and then use it in anotherclass declaration:
final class Molecule extends Element { static String neutron = "molecule";}
class Atom_ant extends Molecule { static String proton = "atom_ant";}
Compiling...E:\java\jm\element.javaE:\java\jm\element.java:12: Can't subclass final classes: classMoleculeclass Atom_ant extends Molecule { ^1 errorsCompile Ended.
In this case, Molecule has been defined as a final class. But notice that the sec-ond class definition, Atom_ant, attempts to use Molecule as its parent. The Javacompiler catches this illegal declaration and provides the appropriate warning.

124 Chapter 5
Class IdentifiersEach class you define in a Java program must have its own unique identifier. Theclass’s identifier or name directly follows the class keyword. The rules for nam-ing classes are the same as those used to name variables. To refresh your memory,identifiers should always begin with a letter of the alphabet, either upper orlower case. The only exception to this rule is the underscore symbol (_) and thedollar sign ($), which may also be used. The rest of the name can be definedusing characters, numbers, and some symbols.
Since class names are also used as file names, you need to create names that willnot cause problems with your operating system or anyone who will be usingyour program.
Extending ClassesIn most Java applets and programs you write, you will have a number of classesthat need to interact each other—in many cases classes will be derived from otherclasses creating hierarchies. The keyword that handles the work of helping youextend classes and create hierarchies is named appropriately enough, extends.
In a class hierarchy, every class must have a parent—except the class that is atthe top. The class that serves as a parent to another class is also called the super-class of the class it derives—the class that takes the position immediately abovethe class. Let’s look at an example. As Figure 5.2 indicates, the classes 911, 944,and 928 all belong to the superclass Porsche. And Porsche belongs to the super-class sportscar, which in turn belongs to the superclass automobile.
When you derive a class from a superclass, it will inherit the superclass’s data andmethods. (For example, 911 has certain characteristics simply because it is derivedfrom Porsche.) To derive a class from a superclass in a class declaration hierarchy,you will need to use the extend clause followed by the name of the superclass. If nosuperclass is defined, the Java compiler assumes that you are deriving a class usingJava’s top-level superclass named Object. Here is an example:
public class Element extends Object { public static void main() { Atom_ant ATOMOBJ = new Atom_ant(); Molecule MOLEOBJ = new Molecule(); System.out.println(ATOMOBJ.proton);

Java Classes and Methods 125
}}
class Molecule extends Element { static String neutron = "molecule";}
class Atom_ant extends Molecule { static String proton = "atom_ant";}
In this class declaration section, the top-level class defined is Element. Noticethat it is derived or “extended” from Object—the built-in Java class. The firstline of the declaration of Element could have also been written as
public class Element {...
since the Java compiler will assume that a class is automatically derived from theObject class if the extends clause is omitted. The second class, Molecule, isderived from Element and the third class, Atom_ant, is derived from Molecule.As Figure 5.3 shows, both Molecule and Atom_ant inherit the components ofthe Element class.
Figure 5.2A sample class hierarchy.
Porsche
911 944 928
Automobile
Sports car

126 Chapter 5
Using the implements Clause to CreateClass InterfacesWhen classes are used to derive other classes, the derived classes can access thedata and methods of the classes higher up in the hierarchy chain. Fortunately,Java provides a mechanism called interfaces so that classes that are not part of ahierarchy can still access components of other classes. An interface is created fora class by using the implements clause. A class can implement as many inter-faces as it wishes, but all the interfaces introduced must have all their methodsdefined in the body of the class implementing it. Thus, all the subclasses thatfollow from that point on will inherit the methods and variables defined.
Let’s develop the Atom_ant class we introduced in the previous section to seehow an interface can be coded:
Figure 5.3Using the extends keyword to derive a series of classes.
Element
Atom_antMolecule

Java Classes and Methods 127
class Atom_ant extends Molecule implements Protons, Neutrons, Electrons { static int proton = 45378444; void Proton_function() { ... // definition of the Proton_function() }
void Neutron_function() { ... // definition of the Neutron_function() }
void Electron_function() { ... // definition of the Electron_function() }}
Here we are making the assumption that the interfaces Protons, Neutrons, andElectrons only have one method declared in each of the interfaces. For example,Protons may be set up as follows:
Public interface Protons {
void Proton_function(); // declares the method that will be used}
As you can see, setting up the interface is a two step process. The class where themethods are defined uses the implements clause to indicate which interfacescan have access to the methods. Then, interface statements are used to declarethe method that will be used.
If you recall from Chapter 2, the TickerTape class implemented the interfaceRunnable from the package java.lang. The Runnable interface has only onemethod declared in it, which is run(). This method is then defined in the classthat is implementing it. In this case, the applet TickerTape has defined run() toinstruct the thread to sleep, call the setcoord() method, and rerun the paint()method every time the applet calls the run() method. This happens in situationswhere the screen is resized or, in this case, where the applet is instructed to movethe text across the screen and the run() method is called.
// TickerTape Applet
import java.applet.*;import java.awt.*;

128 Chapter 5
// TickerTape Classpublic class TickerTape extends Applet implements Runnable { ... public void run() { while(ttapeThread != null){ // verifies the thread is still active try {Thread.sleep(50);} catch (InterruptedException e){} setcoord(); // changes the placement of the text repaint(); // repaints the screen by activating the paint()
// method } }
...
} // End TickerTape
This allows the ability to effectively encapsulate(hide) the classes and all its meth-ods that actually support the run() method. Interfaces allow for distinct behav-iors, defined by the programmer, to be used without exposing the class(es) toeveryone. We’ll discuss these techniques in more detail in Chapter 6.
Class BodyThe class body contains the code that implements the class. This is where youprovide the detail for the actions the class needs to perform (methods) and thedata it needs to use (variables). The body can also contain constructors (specialmethods) and initializers. The basic format for a class body is:
{ Variable-declarations; Method-declarations; }
The variable declarations can be any standard Java declaration (see Chapter 3and the material presented at the end of this chapter if you need a review). Laterin this chapter we’ll discuss how methods are declared and used. Here’s an ex-ample of a class with a body:
public class TickerTape extends Applet implements Runnable {// Beginning of class body String inputText; String animSpeedString; Color color = new Color(255, 255, 255);

Java Classes and Methods 129
int xpos; ... // Methods public void paint(Graphics g) { paintText(osGraphics); g.drawImage(im, 0, 0, null); } ...// End of Class Body
}
NAME SPACE
Every method and variable defined in a class is recorded into an area called aname space. This name space is then inherited by the other classes in a classhierarchy which are derived from the class. If a variable or method has beenpreviously defined elsewhere in the structure with the same name, a shadowingeffect occurs for that level. To access the value of a variable that supersedes thecurrent value, you need to put the prefix clause super in front of the variablename. This clause instructs the expression to take the value of the superclass.To access the value of the current variable, you use the prefix this. Let’s look atan example:
public class House extends Object { static int tvamount = 8; // Variable void main() { Room(); }}
public class Room extends House { static int tvamount = 5; // Variable int Child = this.tvamount; // Child equals 5—same as saying tvamount int Parent = super.tvamount; // Parent equals 8}
In this example the House class is derived from the standard Object class. Then,the Room class is derived from House. Now notice that each class defines avariable named tvamount and assigns it a value. In the second assignment state-ment in Room, the variable Child is assigned the value 5 because this is used toaccess the class’s local copy of the tvamount variable. In the next assignmentstatement, notice how super is used to access the value tvamount was assignedin House—the superclass.

130 Chapter 5
MethodsAs we’ve seen, the mechanisms used to implement operations in classes are calledmethods. This terminology is borrowed directly from object-oriented languageslike Smalltalk and C++. Methods define the behavior of a class and the objectscreated from the class. A method can send, receive, and alter information toperform a task in an application. Java requires that every method be definedwithin a class or interface, unlike C++ where methods (functions) can be imple-mented outside of classes.
Let’s refer to the car class hierarchy we presented earlier in this chapter to get abetter understanding of the role methods play. All of the cars we introducedhave doors and we could define two methods to operate on these doors: openand close. These same methods could be designed to perform operations onother car components such as windows, trunks, hoods, and so on. A componentlike a door can be viewed as an object. Of course, a car would be made up ofmany objects and many methods would be required to process all of the objects.As a programmer, it would be up to you to decide how to arrange the objectsyou need and what methods must be implemented.
Declaring a MethodIf you recall from Chapter 2, our TickerTape applet included a number of meth-ods. The first one defined was the init() method, which was responsible forinitializing the applet upon loading. Let’s take a step back and look at the fulldeclaration used to define a Java method:
[Modifier] ReturnType Identifier([ParameterList]) [Throws]{ MethodBody;}
The Modifier and Throws clauses are optional. They are used to specify how themethod needs to be accessed and which exceptions should be checked for. (Formore information on exceptions and how to catch errors, refer to Chapter 7.)
Components of a Method DeclarationIf you were to break down the method declaration, you would find it performsthree main tasks:
Java Classes and Methods 131
• It determines who may call the method
• It determines what the method can receive (the parameters)
• It determines how the method returns information
Method ModifiersEarlier in this chapter, you learned that a set of modifiers are available for defin-ing how classes can be accessed. Methods also can be defined using modifiers,although the method modifiers only affect how methods are used, not the classthey are defined in. Java provides eight modifiers for defining methods, but onlyone modifier from each of the groups listed next may be used in a methoddeclaration. For example, you cannot use a public and private modifier in thesame declaration. Here is the complete set of method modifiers:
• public, protected, private• static
• abstract, final, native, synchronized
Keep in mind that it doesn’t make sense to use some modifiers in one group withmodifiers from another group. For example, a method that is defined using theprivate and abstract modifiers contradicts itself. An abstract method is one thatrequires its actual code to be defined in the subclasses that follow, whereas a privatemethod is one that can only be accessed in the class it is defined in. The rule ofthumb when choosing and combining modifiers is that you need to make surethat they are complementary rather than contradictory. If a modifier is not used,the method may be accessed only by the classes that are in the current package.
PUBLIC METHODA method declared as public can be accessed by any class in the same package. Itcan also be accessed by other classes from other packages. This modifier gives amethod the most freedom.
PROTECTED METHODA method declared as protected can only be used by other classes within thesame package. All the subclasses beneath the class the method is defined in mayaccess the method unless shadowing occurs. Shadowing involves naming a methodusing a name that already exists in a superclass above the class the method isdefined in.

132 Chapter 5
PRIVATE METHOD
A method declared as private is one that can only be accessed by the class it isdefined in. This modifier gives a method the least amount of freedom.
STATIC METHODA method declared as static is one that cannot be changed. This type of methodis also referred to as a class method, because it belongs explicitly to a particularclass. When an instance of the class that defines the method is created, the staticmethod cannot be altered. For this reason, a static method can refer to any otherstatic methods or variables by name. Limitations of static methods to keep inmind are that they cannot be declared as final, and they cannot be overridden.
ABSTRACT METHODA method declared as abstract is one that must be defined in a subclass of thecurrent class. However, an abstract method must be declared in the current classwith a (;) semicolon in place of the method’s block of code. Methods that aredeclared abstract are not required to be implemented in every subclass.
FINAL METHODA method declared as final is one that ends the hierarchical tree. No methodshaving the same name can be defined in subclasses that exist below the class thatdeclares the method as final.
NATIVE METHODA method declared as native is one that will be implemented using outside code—code that is written in another language, to be used in conjunction with yourcurrent program. This limits you to a specific platform and restricts you fromcreating Java applets. Native methods are declared by leaving out the methodbody and placing a semicolon at the end of the method declaration.
SYNCHRONIZED METHOD
A method declared as synchronized limits it from being executed by multipleobjects at the same time. This is useful when you are creating Java applets and youcould have more than one thread running at the same time accessing one centralpiece of data. If the method is static (e.g., a class method), the whole class wouldbe locked. If you just declare a particular method as synchronized, the object con-taining the method would only be locked until the method finishes executing.
Java Classes and Methods 133
Return Type of a MethodAny information that is returned from a method is declared as the return type.This assures that the information that is returned from a method call will be ofthe correct type; otherwise, a compile-time error will be generated. If no infor-mation will be returned by a method, the void keyword should be placed infront of the method name. The different data types that may be returned bymethods are covered in Chapter 4.
Parameter Lists for a MethodThe parameter list consists of the ordered set of data elements passed to a method.You can pass zero, one, or multiple parameters by listing them between theparentheses, with each type and variable name being separated by a comma. Ifno parameters are passed, the parentheses should be empty. All variables that arepassed become local for that instance of the method. Here’s an example of howmethods can be declared with and without parameters:
public static void MyFirstMethod(String Name, int Number) { ... // the String variable Name is assigned whatever is passed to it // the integer variable Number is assigned whatever is passed to it ...}
public static void MyFirstMethod() { ... // Nothing is passed to it. ...}
Method ThrowsThe throws clause is used to specify the type of error(s) that will be handled withina method. In effect, it is used to help you set up an automatic error-handler. In theevent of an error, the error must be assignable to one of the exceptions in either theError, RunTimeException, or Exception classes. (These are special classes thatJava provides for catching compile-time and run-time errors. We’ll cover them inmore detail in Chapter 7.) Each method you declare does not need to use thethrows clause in its declaration, but in the event of an error, the omission of thisclause will leave the error handling up to the Java compiler or the Java interpreter.Let’s look at an example of how the throws clause is used.

134 Chapter 5
In the following method declaration, the Java exception namedArrayOutOfBoundsException is specified so that in the event an array rangeerror occurs, the method will know how to handle the error:
public class Array_check() { String arr[5];
public static void main(void) throws ArrayOutOfBoundsException { int i=0; char ch;
// Specify which code should be tested try { while (i <= 5) ch = arr[i++]; } // An error has occurred—display a message catch { System.out.println("Array out of bounds"); } } }
At some point main() will try to access a location outside the legal range of thearray arr[]. When this happens, an exception will be “thrown” and the catchclause will handle it. Also notice the use of the try clause which is needed tospecify which code in the method should be tested. In our case, we want tocheck each iteration of the while loop.
Method BodyAll executable code for Java classes is contained in the body of the methods.Unless a method is declared as abstract, native, or is declared in the body of aninterface, the code for the method is placed between a pair of curly braces. Thiscode can be any valid Java statements including variable declarations, assign-ment statements, method calls, control statements, and so on.
Here’s an example of how a basic method is defined:
public int SimpleMethod(int Number) {
// The integer variable Number is assigned whatever is passed to it
int lowrange = 1; // Local declarations for the method

Java Classes and Methods 135
int highrange = 10;
if (Number <= lowrange) return -1; if (Number >= highrange) return 100 else return 50;}
In this case, the method’s name is SimpleMethod(). Because it is declared aspublic, it can be used by any class in the package in which the method is de-fined. The return type for the method is int and it accepts one int parameter.The method body contains a few local declarations and a set of if-then decision-making statements.
For a method declared as abstract, native, or one that is declared in an interface,the body is left blank and the declaration is terminated with a semicolon. Thebodies are then defined elsewhere depending on how they are declared. Here’san example:
abstract class Aparticles extends Quark {
abstract int abstract_method(); // Defined in the subclasses of the class
native void native_method (); // Defined in an external process
public String normal_method() { ... // Definition of the method }}
Using the this and super KeywordsTo access class variables and methods from within an object, you can referencethem by using the keywords this and super. When the Java compiler encountersthe this keyword in the body of a method, it knows that you are accessing othermethods and variables defined within the scope of the class the method is de-fined in. On the other hand, variables and methods that are available for access-ing in the parent class (superclass) to the current class are referenced using thesuper keyword. Here’s an example of how each of these keywords can be used:
class Atom_ant extends Molecule { int Number; ...}
136 Chapter 5
class Quark extends Atom_ant { int Proton; int Neutron; String Electon = "Negative attraction"; ... void Count() { System.out.println(this.Proton + " is the number of Protons"); // Correct System.out.println(Neutron + " is the number of Neutrons"); // Correct System.out.println(super.Number + " is the number of Atoms"); // Correct System.out.println(Atom_ant.Number + " is the number of Atoms");
// Correct ... }}
In this example, this.Proton references the local variable Proton defined in theclass Quark. But take a look at the second method call in the Count() method.Here, the variable Neutron, which is also declared in Quark, is referenced with-out the use of the this keyword. What gives? Actually, since both of these vari-ables are defined within Quark, the this keyword is not really needed.
As for the two following lines of code, they each reference the Number vari-able declared in the Atom_ant class, which serves as the parent to the Quarkclass. Notice that the keyword super is placed in front of the variable Numberto allow it to be accessed. This is the same as using the superclass name in thestatement Atom_ant.Number to reference the value of Number. Superclassnames can be referenced further up the hierarchical tree but the super key-word can only be used to access class members that reside one level above thecurrent class. If the Molecule class contained a variable named M1, and wewanted to reference it from the Quark class, a statement like this would berequired:
Proton = Molecule.M1;
Here the superclass named Molecule is included in the assignment statement. Ifit was omitted or the super keyword was used instead,
Proton = super.M1;
the Java compiler would return an error because it would try to locate the M1variable in the class that is directly above the Quark class.

Java Classes and Methods 137
Overloading and Overriding MethodsA method may be declared with multiple declarations, each specifying differenttypes and arguments that may be passed to the method. The context in which themethod is called will determine which actual method code is used. The techniques ofusing a method’s name more than once to define an operation in a class involvesoverloading and overriding methods. As long as you can define each method hav-ing the same name so that it can be distinguished from the others sharing the samename, the Java compiler will not give you an error. The technique for creatingoverridden methods involves using different parameters (types and numbers) andreturn types. Methods that are inherited from a superclass may be overridden butthe overriding method must provide at least the same access.
Let’s look at some examples of how we can override methods:
class Atom_ant extends Molecule { int Number; protected void Count(String Astring, int Number) {
... }}
class Quark extends Atom_ant { int Proton; int Neutron; String Electon = "Negative attraction"; ... public void Count(int Number, String Astring) { // Correct ... }
protected void Count() { // Correct ... }}
Here we’ve declared two classes: Atom_ant and Quark. Atom_ant serves as thesuperclass. The method that is overridden is Count(). It is first introduced as aprotected method in the Atom_ant class. Notice that it is declared here as takingtwo parameters: Astring and Number. Because Atom_ant is declared as a pro-tected method, it is restricted from being called by other classes outside of thepackage Atom_ant is declared in.

138 Chapter 5
The Quark class, which is derived from Atom_ant, provides two new variationsof the Count() method, each one being overridden from the base method de-fined in Atom_ant. Notice that each of the overridden methods uses differentparameters and/or return types than the original method.
To see how the different versions of the Count() method can be called, let’sexpand the Quark class a little:
class Atom_ant extends Molecule { int Number; protected void Count(String Astring, int Number) { ... }}
class Quark extends Atom_ant { int Proton; ... public void Count(int Number, String Astring) { // Correct
... }
void check() { Atom_ant.Count("Hello", 5); //Correct refer to superclass method super.Count("GoodBye", 5); //Correct same as previous Molecule.Count("Hello World"); //Correct as long as it exists Count(5, "World"); //Correct same as this.Count }}
The first two calls to the Count() method result in calling the Count() methoddefined in Atom_ant. For the third call, we are making the assumption that theclass Molecule, which Atom_ant is derived from, contains a Count() method. Ifit doesn’t, a compiler error will occur. The last call to Count() accesses the methodof the same name defined in Quark.
Constructors—The Special MethodsAlthough constructors are identified as special methods, it is important to distin-guish between the two. Methods define an object’s behavior in terms of what opera-tions the object can perform. A constructor, on the other hand, determines how anobject is initialized by creating a new instance of a class with specified parameters.

Java Classes and Methods 139
Methods and constructors actually differ in three ways. First, constructors donot have their own unique names; they must be assigned the same name as theirclass name. Second, constructors do not have a return type—Java assumes thatthe return type for a constructor is void. And third, constructors are not inher-ited by subclasses, as are methods.
To understand how constructors work conceptually, let’s return to the car anal-ogy we introduced earlier in this chapter. Each car in our hierarchy represents anobject and the blueprint for each car is a class structure. Also recall that opera-tions such as opening and closing car doors were considered to be our methods.
Now, imagine that we have a subclass, called BodyShop, which defines thebody style for a car. This class could be inserted under the general car class inthe class hierarchy. An object could be created from this class calledFrameCreation, which is responsible for making body frames for cars. Theprocess of building a frame could involve first calling a constructor to do thedirty work of “setting up the shop” for building a particular car frame. Themanner in which the different classes are defined in the hierarchy will deter-mine what frame a particular car gets at the BodyShop from the FrameCreationteam. (The FrameCreation team is responsible for initializing an “object” de-pending on the information passed to a constructor. )
Now let’s assume we have three choices for making body frames:
• 4 Door(integer) Falcon(String)
• 3 Door(integer) Pinto(String)
• 2 Door(integer) Mustang(String), which is the default.
We could just say 2, 3, or 4 doors, but the FrameCreation team insists on a certainformat for each. The Falcon requires (integer Doors, String Name), the Pinto re-quires (String Name, integer Doors), and the Mustang doesn’t require any values(). When you pass these values, known as types to the FrameCreation team, theyimmediately know which frame to create, or initialize, by the arrangement of theinformation passed to them (data types and number of parameters). By passing theinformation in a distinct pattern FrameCreation(Doors, Name), FrameCreation(Name,Doors), or FrameCreation() to create an object, we are using a constructor.
A constructor is a special method that determines how an object is initalizedwhen created. The constructor is named the same as the class it follows. Thecode for our example could be written like this:

140 Chapter 5
class FrameCreation extends BodyShop { // ** Initializing the object newcar ** FrameCreation newcar = FrameCreation(4 , Falcon);
// ** The Beginning of the Constructor ** FrameCreation { // ** An example of Overloading the Constructor ** FrameCreation(int, String) {
// Creates the FALCON }// ** An example of Overloading the Constructor ** FrameCreation(String, int) {
// Creates the Pinto }
FrameCreation() { // ** An example of Overloading the Constructor **// Creates the Mustang
}// ** The End of the Constructor **}
FrameCreation is the constructor, which is declared multiple times—each takingdifferent parameter configurations. When it is called with a configuration (anumber, a word), the constructor with the matching configuration is used.
In calling a constructor, you need to disregard the rules for calling methods.Methods are called directly; constructors are called automatically by Java. Whenyou create a new instance of a class, Java will automatically initialize the object’sinstance variables, and then call the class’s constructors and methods. Definingconstructors in a class can do several things, including:
• Setting initial values of the instance variables
• Calling methods based on the initial variables
• Calling methods from other objects
• Calculating the initial properties of the object
• Creating an object that has specific properties outlined in the new argumentthrough overloading
Components of a Constructor DeclarationThe basic format for declaring a constructor is:

Java Classes and Methods 141
[ConstructorModifier] ConstructorIdentifier([ParameterList]) [Throws] { ConstructorBody;}
As with the other declarations we’ve introduced in previous sections, only theidentifier and body are necessary. Both the modifier and the throws clause areoptional. The identifier is the name of the constructor; however, it is importantto remember that the name of the constructor must be the same as the classname it initializes. You may have many constructors (of the same name) in aclass, as long as each one takes a different set of parameters. (Because the differ-ent constructors in a class must have the same name, the type, number, andorder of the parameters being passed are used as the distinguishing factors.) Forexample, all constructors for a class named Atom_ant, must be named Atom_ant,and each one must have different set of parameters.
In addition to having a unique declaration from that of a method, a specialformat is used for calling a constructor:
Typename([ParameterList]);
The only required element is Typename, which names the class containingthe constructor declaration. Here’s an example of a constructor, with theclass Atom_ant and a constructor that uses the new operator to initializeinstance variables:
class Atom_ant { String superhero; int height;
Atom_ant(String s, int h) { // Declare a constructor superhero = s; height = h; }
void printatom_ant() { System.out.print("Up and attam, " + superhero); System.out.println("! The world's only " + height + " inch Superhero!"); }
public static void main(String args[]) { Atom_ant a;

142 Chapter 5
a = new Atom_ant("Atom Ant" , 1); // Call the constructor a.printatom_ant(); System.out.println("------");
a = new Atom_ant("Grape Ape", 5000); a.printatom_ant(); System.out.println("------"); }}
The output for this program looks like this:
Up and attam, Atom Ant! The world's only 1 inch Superhero! ------ Up and attam, Grape Ape! The world's only 5000 inch Superhero! ------
Notice that each constructor call is combined with the new operator. This op-erator is responsible for making sure a new instance of a class is created andassigned to the object variable a.
USING JAVA’S DEFAULT CONSTRUCTORIf you decide not to declare a constructor in a class, Java will automaticallyprovide a default constructor that takes no arguments. The default constructorsimply calls the superclass constructor super() with no arguments and initializesthe instance variable. If the superclass does not have a constructor that takes noarguments, you will encounter a compile-time error. You can also set a class’sinstance variables or call other methods so that an object can be initialized.Here is an example of a Java class that does not use a constructor but insteadallows Java to initialize the class variables:
class Atom_ant2 { String superhero; int height; Boolean villain; void printatom_ant() { System.out.print("Up and attam, " + superhero); System.out.println("! The world's only " + height +
" inch Superhero!"); }
public static void main(String args[]) { Atom_ant2 a;

Java Classes and Methods 143
a = new Atom_ant2(); a.printatom_ant(); System.out.println("------") ; }}
Because no constructor is defined for this example program, the Java compilerwill initialize the class variables by assigning them default values. The variablesuperhero is set to null, height is initialized to zero, and villain is set to false.The variable a, in the main() method, could have been initialized at the time theconstructor was called by substituting the code a = new Atom_ant2(); forAtom_ant2 a = new Atom_ant2();. Either statement provides an acceptablemeans of creating an instance of a class—the object a. Once this object is inhand, the method printatom_ant() can be called.
The output for this program looks like this:
Up and attam, The world's only 0 inch Superhero! ------
CONSTRUCTOR MODIFIERS
Java provides three modifiers that can be used to define constructors:
• public
• protected
• private
These modifiers have the same restrictions as the modifiers used to declare stan-dard methods. Here is a summary of the guidelines for using modifiers withconstructor declarations:
• A constructor that is declared without the use of one of the modifiers mayonly be called by one of the classes defined in the same package as the construc-tor declaration.
• A constructor that is declared as public may be called from any class that hasthe ability to access the class containing the constructor declaration.
• A constructor that is declared as protected may only be called by the sub-classes of the class that contains the constructor declaration.
• A constructor that is declared as private may only be called from within theclass it is declared in.
144 Chapter 5
Let’s look at an example of how each of these modifiers can be used:
class Atom_ant2 { String superhero; int height; String villain; int numberofsuperheros;
Atom_ant2() { this("Dudley Do Right", 60); }
public Atom_ant2(String s, int h) { superhero = s; height = h; }
protected Atom_ant2(int s, int h) { numberofsuperheros = s; height = h; }
private Atom_ant2(String s, int h, String v) { superhero = s; height = h; villain = v; }
void printatom_ant() { System.out.print("Up and attam, " + superhero); System.out.println("! The world's only " + height + " inch Superhero!"); } public static void main(String args[]) { Atom_ant2 a;
a = new Atom_ant2(); a.printatom_ant();
a = new Atom_ant2("Grape Ape", 5000); a.printatom_ant(); }}
class Molecule_mole extends Atom_ant2 { String superhero; int height;

Java Classes and Methods 145
public static void main(String args[]) { Atom_ant2 a;
a = new Atom_ant2(); // Compile-time Error a.printatom_ant();
a = new Atom_ant2("Atom Ant", 1); // Correct a.printatom_ant();
a = new Atom_ant2(5, 5); // Correct a.printatom_ant();
// Compile-time Error a = new Atom_ant2("Atom Ant", 1 , "Dudley Do Right"); a.printatom_ant(); }}
In this example, the Atom_ant2 class uses constructors with all three of themodifiers: public, protected, and private. In addition, a constructor is declaredthat does not use a modifier. Notice how the constructors are called from theMolecule_mole class. Each constructor type is both defined and called using adifferent parameter configuration. (This is how the Java compiler knows whichconstructor to use.)
The first constructor call, Atom_ant2(), produces a compiler error because ofJava’s scoping rules—the declaration of this constructor is outside of the range ofthe Molecule_mole class, and the constructor was not declared as public or pro-tected. Also notice that the call to the fourth constructor produces a compilererror. In this case, the constructor was declared in the Atom_ant class as private,which limits the constructor from being called by the class it is declared in.
As this example illustrates, you need to make sure you understand the restric-tions that modifiers can place on method declarations. For example, here is anexample of a compile-time error you will encounter if you try to access a con-structor from another class when its modifier has been declared as private:
Compiling...E:\java\jm\Molecule_mole.javaE:\java\jm\Molecule_mole.java:8: No constructor matching _ Atom_ant2(java.lang.String, int, java.lang.String) found in class Atom_ant2. a = new Atom_ant2("Atom ant",5,"Dudley");^1 errorCompile Ended.

146 Chapter 5
Parameter List and Throws ClauseBoth the parameter list and throws clause follow the same rules used for declar-ing and calling methods; after all, a constructor is just a special method. Whencalling a constructor, different parameter configurations (type of parameters andquantity) can be used as long as you have a matching declaration that uses thesame parameter configuration.
Constructor BodyThe body of the constructor is essentially the same as the body of a method. Theonly difference occurs in the first statement. If the constructor is going to call“itself” (an alternate constructor for the same class having the same name) or callthe constructor of its superclass, it must do this in the first statement. To access itsown class, the this() statement is used as a placeholder for the class’s identifier. Torefer to the class’s superclass, the super() statement is used. Following each of theclauses are parentheses containing the parameter list to be passed to the construc-tor, identified by the keyword. Here is an example of how both the this() andsuper() statements are used within the constructors defined for Atom_ant2:
class Atom_ant2 extends Quark { String superhero; int height; String villain; int numberofsuperheros;
Atom_ant2() { this("Atom Ant", 1); // Call another Atom_ant2() constructor
}
public Atom_ant2(String s, int h) { superhero = s; height = h; }
Atom_ant2(String s, int h, String v) { super(s, h); // Call the superclass's constructor
}
protected Atom_ant2(int s, int h) { numberofsuperheros = s; height = h; }
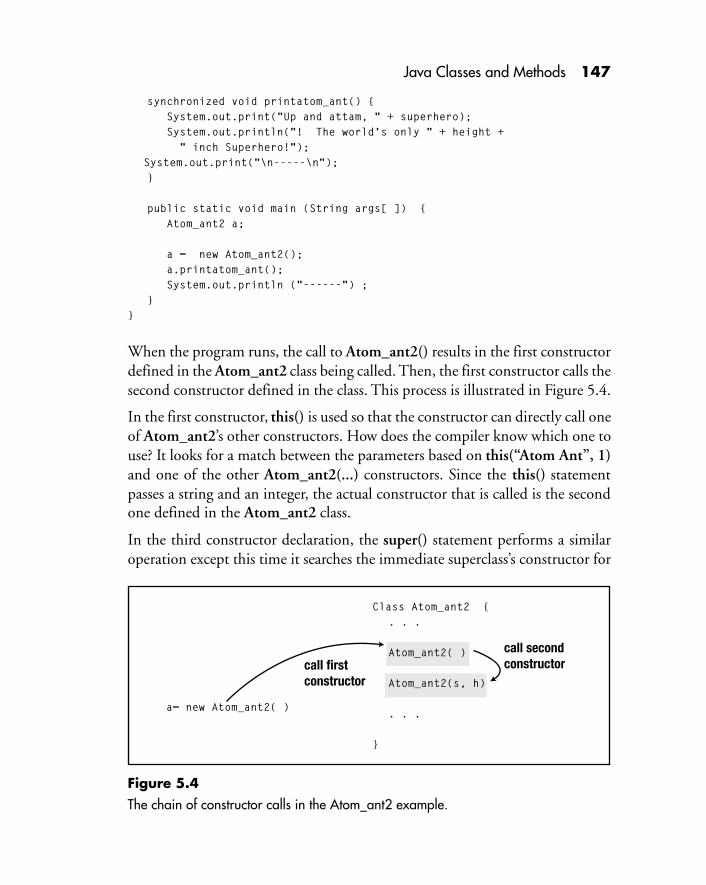
Java Classes and Methods 147
synchronized void printatom_ant() { System.out.print("Up and attam, " + superhero); System.out.println("! The world's only " + height + " inch Superhero!");
System.out.print("\n-----\n"); }
public static void main (String args[ ]) { Atom_ant2 a;
a = new Atom_ant2(); a.printatom_ant(); System.out.println ("------") ; }}
When the program runs, the call to Atom_ant2() results in the first constructordefined in the Atom_ant2 class being called. Then, the first constructor calls thesecond constructor defined in the class. This process is illustrated in Figure 5.4.
In the first constructor, this() is used so that the constructor can directly call oneof Atom_ant2’s other constructors. How does the compiler know which one touse? It looks for a match between the parameters based on this(“Atom Ant”, 1)and one of the other Atom_ant2(...) constructors. Since the this() statementpasses a string and an integer, the actual constructor that is called is the secondone defined in the Atom_ant2 class.
In the third constructor declaration, the super() statement performs a similaroperation except this time it searches the immediate superclass’s constructor for
Figure 5.4The chain of constructor calls in the Atom_ant2 example.
h)
call second constructor
Class Atom_ant2 {. . .
Atom_ant2( )
Atom_ant2(s, h)
. . .
}
a= new Atom_ant2( )
A A
A
call first constructor
148 Chapter 5
a match. It is important to remember that when using either of these state-ments, you may not directly call instance variables of the object being created.Furthermore, an instance variable cannot be dependent upon another variablethat has not yet been defined, or is defined after it.
Here’s an example:
class Foo { int variableNow = variableLater + 10; int variableLater = 20;}
As you can see, variableNow is trying to initialize itself before variableLater isassigned a value.
Object CreationThere are two ways to create an instance of a class: use a literal, specific to theString class or use the new operator. The new operator is placed in front of theconstructor. The parameter list of the constructor determines what constructoris used to create an instance of an object.
...public static void main(String args[]) { Atom_ant2 a;
a = new Atom_ant2(); a.printatom_ant() ; System.out.println ("------");}...
Here, the new operator initializes Atom_ant2 with an empty parameter list, initial-izes the variable to create an instance of the class Atom_ant2, and assigns it to a.
Variables for ClassesIf you’ve read Chapter 3, you should already be familiar with the basics of de-claring variables in Java. Let’s refresh your memory: A variable is a named stor-age location that can hold various values, depending on the data type of thevariable. The basic format for declaring a variable is as follows:

Java Classes and Methods 149
VariableModifiers Type Indentifier = [VariableInitializer];
Only the Type and Identifier components are necessary. The modifiers are optional.
As with all the identifiers we’ve used throughout this chapter, the variable iden-tifier simply names the variable. However, you can name any number of vari-ables in the declaration by naming them in the identifier position and separatingthem with commas. If you decide to declare multiple variables, also realize thatthe modifiers and Type apply to all the variables that are named. For example, inthese declarations
int paul, david, kelly;static String henry, diana;
the variables paul, david, and kelly are declared as integers, and the variableshenry and diana are declared as static strings.
VARIABLE MODIFIERS
Java provides seven different modifiers for declaring variables within classes. How-ever, you can only use two of them—one from each group—in a declaration.Also, you can’t use two modifiers that contradict each other in the same declara-tion. The two groups of modifiers are:
• public, protected, private
• static, final, transient, volatile
The public, protected, and private modifiers are discussed under the modifierssections of class, method, and constructors.
STATIC MODIFIERSA static variable is also known as a class variable. This is because there is only onevariable of that name, no matter how many instances of the class are created.Here’s an example of how the static modifier can be used:
Atom_ant2() { static int Doug = 9; this("Atom Ant", 1);}

150 Chapter 5
...public static void main(String args[]) { Atom_ant2 a, b, c, d;
a = new Atom_ant2(); b = new Atom_ant2(); c = new Atom_ant2(); d = new Atom_ant2(); a.printatom_ant() ; System.out.println("------") ;}...
Here, no matter how many objects we create, there is exactly one variable Dougfor every instance of Atom_ant().
FINAL MODIFIERWhen a variable is assigned final, it acts as a constant throughout the instance ofthe class. They must be declared at time of initialization of the class or method.
TRANSIENT MODIFIERThis is a modifier that has been reserved by Java virtual machine language forlow level segments that do not pertain to the persistent state of an object. Otherimplementations will follow for this modifier in future versions.
VOLATILE MODIFIERThese are modifiers that are processed through the multi-processor in an asyn-chronous manner. The variables are reloaded from and stored to memory everytime the variables are used.
The Art of Casting with ClassesWhen we introduced the fundamental data types in Chapter 3, we showed youhow to use casting techniques to convert the values assigned to variables of pre-defined data types to other data types. For example, in a set of statements like this
int i;short s;

Java Classes and Methods 151
s = 10;i = (int) s;
the contents of the variable s—originally defined to be of the short type—isconverted to an int type by using a cast in the assignment statement. Whencasting variable types from one to another, no information will be lost as long asthe receiver is larger than the provider. Java also allows you to cast instances of aclass, known as objects, to instances of other classes. The declaration for anexplicit cast to a class is as follows:
(Classname)reference
The Classname is the name of the class you wish to cast to the receiving object.The reference specifies the object that is to receive the cast. When applying anarrowing effect to a class, as you will read about later, this type of cast is re-quired by the Java compiler. Figure 5.5 illustrates this concept.
If a superclass attempts to cast an instance of itself to a subclass beneath it, aruntime error will occur even though this type of cast will be accepted by theJava compiler. The technique of passing object references down a class hierarchyis referred to as widening. As a class is located at lower levels in a hierarchy itbecomes more specific and thus it contains more information than the classesabove it in the hierarchy. Superclasses, on the other hand, are usually more gen-eral than the classes beneath them. Conversions that occur when you pass thereferences up the hierarchy are thus referred to a narrowing because not all theinformation is passed along to the receiving object. Furthermore, all instancevariables of the same name in the receiving object are set to the class variablesthat are being casted.
Casting an Object vs. Creating an ObjectWhen casting between instances of a class, an object only as-sumes reference of the class. A new instance of the class is notcreated; the object merely points to the methods and variablesof the casting class. It is important not to confuse the processof casting a object with the process of creating an object. Justas you pass the value of a variable through different types (e.g,int, float, double, and so on), you can pass an object throughdifferent classes, as long as the class is in the current hierarchy.

152 Chapter 5
Not Allowed:
Objects Classes
Parent
Child
Parent
Child
Allowed:
Narrowing
Widening
Figure 5.5Widening and narrowing an instance of a class by using casts.
Here is an example of how you can cast references to objects between class types:
public class atom_ant {
String superhero = "Atom Ant"; int height = 10;

Java Classes and Methods 153
atom_ant() { }
void print() { System.out.print (superhero + " is " + height + "\n"); }
public static void main(String arg[]) {
atom_ant a1; a1 = new atom_ant(); a1.print();
proton_pal p1, p2; p1 = (proton_pal) a1; // Runtime error due to casting error p1.print(); // Unable to execute because of the previous line
electron_enemy e1; e1 = (electron_enemy) p2; // Compile-time error due to casting to a // sibling class e1.print(); // Unable to execute because of the previous line
atom_ant a2; a2 = (atom_ant) p2; a2.print(); }}
class proton_pal extends atom_ant {
String superhero = "Proton Pal"; int height = 1;
proton_pal() { }
void print() { System.out.print (superhero + " is " + height + "\n"); }}
class electron_enemy extends atom_ant{
String superhero = "Electron Enemy"; int height = -1;

154 Chapter 5
electron_enemy() { }
void print() { System.out.print (superhero + " is " + height + "\n"); }}
Here we’ve modified our previous atom_ant class to illustrate the basics of cast-ing. Notice that two of the casts used will produce a runtime and compile-timeerror, respectively. (Thus, don’t try to compile the code unless you remove thetwo illegal casts.) The first cast used in the main() method, p1 = (proton_pal)a1, produces a widening effect. Although this statement will compile, it pro-duces a runtime error because the object a1 cannot be expected to grow to ac-commodate the new variables and methods it references in proton_pal. Thesecond casting statement used is a sibling cast: e1 = (electron_enemy) p2. Itgenerates a compile-time error because an illegal reference to a sibling class,electron_enemy is used. This is due to the fact that the classes can have com-pletely different variables and methods not related to each other. The last formof casting that is addressed in the atom_ant class produces a narrowing effect. Inthe statement, (a2 = (atom_ant) p2), the object p2 references variables that aredefined in the class, atom_ant, that is being casted. The reference is then past tothe variable a2.

Chapter6Interfaces andPackages


157
6Interfaces andPackagesIf you’re ready to move beyond the stages of writ-ing applets and simple standalone applications andapplets, you’ll find that Java’s flexible interfacesand packages provide a welcome relief.
After writing a few applets and applications, you’ll probably notice that thedirectory your classes are written to will start to become obscenely large. This isthe downside of the way Java processes classes; but the good news is that Javaprovides two key features called interfaces and packages to help you organize yourcode. We put these two topics in a chapter by themselves instead of covering indetail in the previous chapter to emphasize how important they are. (Many Javabooks simply lump interfaces and packages in with classes, or they just skimover them—shameful!) As you start to work more with interfaces and packages,you’ll discover a myriad of important program design issues that come into playwhich you’ll need to master to use interfaces and packages effectively.
In this chapter you’ll learn about:
• The basics of interfaces
• Techniques for implementing interfaces
• The hierarchical structure related to interfaces themselves
• Techniques for using casts with interfaces
• The basics of packages
• Techniques for creating packages
• Techniques for using Java’s predefined packages
The underlying goal of this chapter is to help you transition from writing smallstandalone Java applications and applets to creating classes that can be used over

158 Chapter 6
and over. As you start to adopt this style of programming, you’ll need the flex-ibility that interfaces and packages provide.
Understanding InterfacesAn interface is a collection of methods and variables that are declared as a unitbut they are not implemented until a later stage. Basically this means that the codedeclarations placed in an interface serve as a shell so that you can create a trulyabstract class. The goal behind an abstract class is to provide a mechanism so thatyou can define the protocols for a class—how a class should essentially communi-cate with other classes—early on in the development cycle. The upshot is thatwhen you create your interfaces or abstract classes, you don’t have to specify all ofthe details of how they will be implemented. This is saved for a later stage.
Before we jump in and start writing Java code for declaring interfaces, let’s ex-plore a few conceptual examples. The concept of abstract classes and interfacesis tricky to grasp at first. In fact, many experienced object-oriented program-mers will tell you that they didn’t quite master the concepts until they had writ-ten a number of programs. Fortunately, we can help you understand and use thetechniques much quicker by providing the background information and con-ceptual models you’ll need to apply them.
The simplest form of an interface involves adding methods and/or variables thatare necessary to a particular class, but would disrupt the hierarchy of the classstructure you are currently building for an application. If you chose to actuallyimplement these elements in your class, they could limit how you planned touse the class to derive other classes. To make your classes more flexible, you canadd interfaces to your classes in your hierarchy early on, so that the interfacescan be used in multiple ways to help construct the “behavior” of other classesthat appear elsewhere in your class hierarchy. (If this discussion sounds like weare talking in circles—welcome to the world of interfaces! Hopefully these finepoints will start to make sense to you in a moment when we look at a specificexample.)
Let’s assume that we need to develop an application that processes informationabout different forms of transportation. Figure 6.1 shows the hierarchy thatcould be used along with the list of components that could be implemented asinterfaces.

Interfaces and Packages 159
As with typical class hierarchies, the classes shown in Figure 6.1 become morespecific as they appear further down in the hierarchy tree. The interface compo-nents are advantageous when you have operations that are to be performed inone section of the hierarchy and not in the other areas. For example, the classCar has two subclasses: Solar and Gas. Let’s assume you need to calculate theliters of gas that a gas car will use. You could include the methods and variablesfor performing this operation in the Car superclass, or even better, up two levelsin the Transportation class, so that the Powered|Boats and Powered|Airplanes classescould use this code also.
Unfortunately, when you consider the scope of the application and all of thesubclasses that inherit this useless information, you’d probably agree that thisdesign approach is flawed. After all, the Solar|Car class would never calculate theliters of gas used and neither would the Sail|Boats or Gliders|Airplanes classes. Aclass that handles the gas calculating operation would be an incredible pain to
Figure 6.1The hierarchy of classes for the transportation example.
Transportation
Automobiles Boats Airplanes
Truck Car Sail Powered
Solar Gas
Gliders Powered
Battery
battery_life weight liters gas_type diameter brand_name
Gasoline Tires
Interfaces
Class Hierarchy
160 Chapter 6
incorporate at the Transportation level so that it could be designed into the hier-archy, and thus forcing all the subclasses to inherit all of its methods. If we werecreating a small application that only required a few classes, this approach couldbe used. But if you are building an application that uses lots of classes from thebeginning or you are expecting to expand the application in the future, thisapproach could quickly become a programmer’s nightmare because limitationscould arise from placing such restrictions early on.
In applications that have class hierarchies like our transportation example, inter-faces become priceless because they allow us to “mix-in” classes into the applica-tion, adding them only where they become absolutely necessary. Another featurethat enhances the interface’s capabilities is the use of multiple implementationsof interfaces per class. For example, in our transportation application, theoreti-cally the Car class would be interested in the Gasoline interface, but the Tireinterface could also be of use. An abstract class could incorporate both of theseinterfaces (the methods and variables that define them) at the Transportationlevel, but the Boat class would also be forced to inherit them. The Boat classnever would have any use for the Tire’s methods or variables.
Design Issues with Interfaces
Interfaces will usually fall into a class hierarchy without any prob-lems when you are creating small scale applications. They alsohelp separate the design process from the implementation pro-cess because they keep you from having to combine the moreabstract design issues with implementation details in one com-ponent. They also allow you to derive classes without relying onthe more limited technique of single inheritance. If you recallfrom Chapter 5, a single inheritance model requires you to cre-ate class hierarchy trees by deriving one class from a singleparent or superclass. Each class in the tree is created by usingonly data and operations that were defined in the levels abovethe current class.
Interfaces help you build class hierarchies that use more power-ful object-oriented techniques like multiple inheritance. With in-terfaces, you can define classes that have multiple parents. Youcan incorporate interfaces into a hierarchical class tree to in-clude new methods and variables without having to worry aboutdisrupting your current implementation tree.

Interfaces and Packages 161
Declaring an InterfaceLet’s look at the basic declaration for an interface and then we’ll show you thesyntax for implementing an interface. After that, we’ll introduce some code toillustrate how the transportation example we presented in the previous sectioncould be set up. The basic syntax for declaring an interface looks similar to thesyntax used for defining a Java class:
public interface InterfaceName { StaticVariables; AbstractMethods;}
In this case, however, the class keyword is not used; the keyword interface takes itsplace. The InterfaceName serves as the interface indentifier name and the rules forspecifying this name are the same as those used to name classes. The body of theinterface declaration simply consists of the declaration of static variables and thenames of one or more methods. Here’s an example of an interface declaration:
public interface Gasoline {// This variable is defined as a constant public static final int Feet_in_Miles = 7245;
// A Method that is to be defined in a class void gas_type(String Name);// Another method to be defined later void liters(int Amount);}
Note that the variable Feet_in_Miles is declared as both static and final. This isrequired because all variables in interfaces cannot be changed. This type of declara-tion essentially turns the variable into a constant. If you leave out the static andfinal keywords, Java will force the variable to be declared as a constant. The twomethods listed include both the method name and the method’s parameter list.The actual code for the method will come when the interface is implemented.
Implementing an InterfaceDeclaring an interface is only half of the work. At some point, the interfacemust be implemented. This is accomplished by using the interface definition (orabstract class) to create a class. In a sense, a class can be “derived” using theinterface shell. The syntax for implementing an interface is:

162 Chapter 6
modifier class Identifier extends Superclassimplements InterfaceName [, InterfaceList ] { ClassBody;}
In implementing an interface, you are essentially defining a special type of class.First, the class modifier is needed, followed by the class keyword. Then, thename of the class is provided. Next, the extends keyword is used followed by asuperclass name to indicate that the class being defined is derived from a parentclass. The implements keyword followed by the name of one or more interfaces,tells the Java compiler which interfaces will be used to implement the class. It isimportant to keep in mind that a class can implement more than one interface.
The class body consists of all of the variables and method definitions for theclass. This is where all of the code must be placed for the methods that are listedin the interface declarations that are used. Using the Gasoline interface we de-clared earlier, here is a class called Gas that “implements” the Gasoline interface:
public class Gas extends Car implements Gasoline { int Miles; // Variable declarations ... void gas_type(String Name) { ... // Add code for this method }
void liters(int Amount) { ... // Add code for this method }}
Notice that this class is derived from a superclass named Car.
Now that we’ve covered the basics of declaring and implementing an interface,let’s return to the transportation example we presented earlier. The first thing weneed to do is declare the interfaces for the ones listed in Figure 6.1—Gasoline,Batteries, and Tire:
public interface Gasoline {// This variable is now a constant public static final int Feet_in_Miles = 7245;
// A Method that is to be defined in a calling class void gas_type(String Name);

Interfaces and Packages 163
// Another method to be defined later void liters(int Amount);}
public interface Batteries {// A Method that is to be defined in a calling class void battery_life(int Time);// Another method to be defined later void weight(int Amount);}
public interface Tires {// A Method that is to be defined in a calling class void diameter(int Distance);// Another method to be defined later void brand_name(int Name);}
With these interfaces in hand, we’re ready to create the two classes—Gas andPowered—each one will implement some of the interfaces in different ways. Theywill also show you how multiple interfaces can be used in a class definition:
public class Gas extends Car implements Gasoline, Batteries, Tires {
int Feet_Traveled; int Miles_Traveled = 20;
Feet_Traveled = Miles_Traveled * Feet_in_Miles;
public static gas_type(String Name) { ... // Any functions that are to be performed with gas_type if(Name.equals("Diesel")) System.out.println("Ah, good power"); if(Name.equals("Unleaded")) System.out.println("ok power"); if(Name.equals("Leaded")) System.out.println("eh, clogged injectors"); }
public static liters(int Amount) { ... // Any functions that are to be performed with liters }
public static battery_life(int Time) { ... // Any functions that are to be performed with battery_life }

164 Chapter 6
public static weight(int Amount) { ... // Any functions that are to be performed with weight }
public static diameter(int Distance) { ... // Any functions that are to be performed with diameter }
public static brand_name(int Name) { ... // Any functions that are to be performed with brand_name }}
public class Powered extends Boat implements Gasoline, Batteries {
int Feet_Traveled; int Miles_Traveled = 20;
Feet_Traveled = Miles_Traveled * Feet_in_Miles;
public static gas_type(String Name) { ... // Any functions that are to be performed with gas_type if(Name.equals("Diesel")) System.out.println("Required"); if(Name.equals("Unleaded")) System.out.println("Not applicable"); if(Name.equals("Leaded")) System.out.println("Not applicable"); }
public static liters(int Amount) { ... // Any functions that are to be performed with liters }
public static battery_life(int Time) { ... // Any functions that are to be performed with battery_life }
public static weight(int Amount) { ... // Any functions that are to be preformed with weight }}
Notice that the Gas class is extended from the superclass Car and implements theinterfaces Gasoline, Batteries, and Tires. In the class body of Gas, the methods

Interfaces and Packages 165
declared for these interfaces are coded as well as other variables that the classneeds, such as Feet_Traveled and Miles_Traveled. The Boat class, on the otherhand, only implements two interfaces: Gasoline and Batteries. Notice that theBoat class implementation for the gas_type() method (declared in the Gasolineinterface) differs from the version implemented in the Gas class.
Tips on Using InterfacesThe implements clause lists all of the interfaces that are to beincluded in the class definition. By referencing the interface, theclass implementing it must restate the methods and their defini-tions in the body of the class. Constructors—the special meth-ods that initialize new objects—may not be included in theinterface declaration because interfaces can not instantiate newobjects. Interfaces reference an object that is an instance of aclass. By doing this they state that the object being referenced
includes all the methods in the class that created the object.
The Art of Casting with InterfacesIf you recall from Chapter 5, where we covered casting between class types, wediscussed how a cast can be used to change a reference to an object and not theactual object itself. We also showed you how instance variables are created andinitialized to reflect the current reference to an object. This occurs when thenames of the variable are the same in two classes—the one casting the object andthe object the variable references. (If this is beginning to sound Greek to you,refer back to Chapter 5 for a refresher.) When we first introduced casting tech-niques for classes, this may have seemed to be a negative because a cast can relateto different instances of the same variable name, but actually a cast works to ouradvantage when used with interfaces.
Let’s return to our Gas class example to see how we can use casts with interfaces.This time around Gas will reference the interfaces Gasoline, Tires, and Batter-ies; and Gas will create objects that reference the interfaces in different ways.Some of the references are correct and some of them will produce compile-timeerrors. We’ve included line numbers at the start of each line of code so that youcan easily refer to the example in the discussion that follows:
1 public class Gas extends Car implements Gasoline, Tires, Batteries {2

166 Chapter 6
3 Gas aCar = makeGasCar();4 Gasoline aGasCar = (Gasoline) makeGasCar(); // Use cast5 Tires aTireCar = (Tires) makeGasCar(); // Use cast67 aGasCar.gas_type(Diesel); // Valid8 aGasCar.liters(5.8); // Valid910 aTireCar.diameter(6.9); // Valid11 aTireCar.gas_type(Unleaded); // Not Valid1213 aCar.gas_type(Diesel); // Valid14 aCar.weight(12.7); // Valid15 aCar.diameter(6.9); // Valid16 aCar.brand_name(Bridgestone); // Valid1718 . . . // Any functions that you would perform on the Cars created19}
Let’s break down what is going on here so that you can better understand someof the important and subtle Java programming techniques that are being used.Our example is only missing one thing that is not shown in the code—a methodnamed makeGasCar() that creates and returns an object. Line 3 shows that anobject is returned from the makeGasCar() method and is named aCar of typeGas. By assigning the returned value of makeGasCar() to an object variable ofthe type Gas, the object inheirits all the methods pertaining to the Gas class.This means it acquires all the methods relating to the class, its superclass, and theinterfaces the class implements. In line 4, we acquire an object from themakeGasCar() method, but this time we cast it as type Gasoline from the inter-face Gasoline. This means that the object, aGasCar, inheirits all the methodsthat relate to the Gas class, its superclass, and only the methods and variablesdeclared in the interface Gasoline. As we’ll see in a second, this means no meth-ods or variables from the other interfaces are available for the object to reference.The next line does the same as the previous line, but the Tires interface is usedin place of Gasoline.
Lines 7 and 8 both have the object aGasCar call the methods gas_type() andliters(), which were originally declared in the Gasoline interface. These methodcalls are valid because the correct parameters are used and the object aGasCarhas access to both of these methods because of the cast that was used. In line 10,the aTireCar object references the diameter() method which is also valid

Interfaces and Packages 167
because this object was created using the (Tires) cast and the diameter() methodis declared within the Tires interface. But in line 11, the aTireCar object tries tocall a method that is declared in the Gasoline interface. This produces a com-pile-time error because the object does not implement the interface Gasoline.Only the methods declared in the Tires interface are available from the object.
In the last section of the Gas class, lines 13 through 16, the object aCar may callany of the methods available to the interfaces because this object is an instanceof the class Gas and is not casted to any particular class. This shows you theversatility possible in creating objects using interfaces.
Tips on Implementing InterfacesIf you refer back to our ticker tape applet in Chapter 2, you’ll notice that itimplements an interface named Runnable for the explicit function of moving(actually redrawing) text across the screen. When the applet is loaded into abrowser, the browser checks to see if the object ttapeThread, which is an in-stance of the class Thread from a package that is imported into our classTickerTape, implements the Runnable interface. In this case, the browser de-tects the interface and uses the run() method declared in the class Thread dur-ing the operation of the applet:
// TickerTape Classpublic class TickerTape extends Applet implements Runnable{ ... // Change coordinates and repaint public void run(){ while(ttapeThread != null){ try {Thread.sleep(50);} catch (InterruptedException e){} setcoord(); repaint(); } } ...}
This is a powerful feature for creating methods and variables in classes that canbe set up with interfaces for future use, as long as the interface explains howinformation will be transferred to and from it. You don’t need to allow othersaccess to your original classes.

168 Chapter 6
Using the instanceof OperatorTo detect if an object implements an interface, you can use theinstanceof operator. This operator allows you to look at a groupof objects to pick out which ones can perform certain opera-tions. Here’s an example:
if (ttapeThread iinstanceof Runnable) {((Runnable)ttapeThread).run(); // performs this function only // if the object ttape implements // the Runnable interface}
In this case the if statement checks to see if the objectttapeThread is an instance of the Runnable interface. If it is,the run() method defined in the Runnable interface is called.
Creating and Using PackagesAs you begin to design and code Java applications and applets that use multipleclasses and interfaces, you’ll need a way to organize your code so that you caneasily update and reuse your growing library of classes and interfaces. Becausethe Java language is specifically designed to allow you to use classes and inter-faces over and over, it’s likely that you’ll end up getting some of your class andinterface names mixed up.
Furthermore, another programmer may design an excellent class that performsoperations that you may want to use. Incorporating this class into one of yourapplications that already uses a number of classes could become difficult, espe-cially if the class name conflicts with the name of a class you are already using.For example, you may have a custom print class named Print that performscertain functions for printing to the screen. After you’ve developed the class,another programmer might provide you with a class having the same name thatprints a certain format to a printer that you need to support. You could actuallyuse both of these classes even if they shared the name “Print”; however, theymust be packaged in different groups so that the Java compiler can easily deter-mine which one you want to use.
To help us combine classes into unique groups, Java supports the concept ofpackages. A package is essentially a device for grouping classes that you want tobe labeled as a unit. You can actually combine any classes that you want into a

Interfaces and Packages 169
single group. Usually, classes that share a common goal are combined in a class.For example, if you were creating a set of classes to handle drawing-related func-tions for a design application, you might create a package called Draw and placeall of the related classes in this package.
You might have noticed back in Chapter 2 that some of the methods we imple-mented in the ticker tape applet were borrowed from classes or interfaces be-longing to other packages. For example, one of the packages used was the Appletpackage—a package that Java provides, which contains all the necessary classesfor creating an applet. A package is introduced to a class by using the importkeyword in the beginning of a source code file. This will be covered in moredetail later in the chapter. As you will see, classes and packages are segregatedaccording to the functions they perform. This reduces the risk of having meth-ods that share the same name interfere with each other. Here is a simple exampleof how you can implement methods that belong to different packages into acommon class:
// TickerTape Applet
import java.applet.*;import java.awt.*;
// TickerTape Classpublic class TickerTape extends Applet implements Runnable { ... public void init(){ ... } public void start(){ ... } public void run(){
... } public void graphics() {
... } public void stop(){ ... } ...} // End TickerTape

170 Chapter 6
This is the same applet that was used in Chapter 2. All of the methods declaredin this example come from somewhere other than the current class. They havebeen overridden to perform a certain function specific to the operation of thisapplet. For example, the methods init(), start(), and stop() are defined in theApplet class that is contained in the java.applet package. The run() method isdefined in the Runnable interface contained in the package java.lang.
Naming and Referencing PackagesBesides the fact that you may want to repeat a simple class name over and over,you’ll want to create packages so that you can distribute your classes to otherJava programmers. As with files on your computer, you list the directories inwhich they are contained to reference them. This creates a “path” for the Javacompiler to follow so that it can locate designated classes and interfaces in yourpackages. Figure 6.2 shows an example of the directory hierarchy used to refer-ence the package java.awt.image.
By convention, the first level of the hierarchy has been reserved for the name ofthe company that develops it. An example of this is sun.audio.AudioData—a
Figure 6.2A graphical image of the hierarchy of java.awt.image and a call to the (import)java.awt.image on the other side.
java
lang
io
net
util
awt
peer
image

Interfaces and Packages 171
package developed by Sun Microsystems. (Of course, as with every program-ming language, Java provides certain exceptions—one being the guideline fornaming and referencing packages. For example, java.io.File was developed bySun Microsystems, but this package is intended to be implemented by othercompanies as a foundation for building additional I/O packages.) The sectionslisted beneath the company name reference subdirectories that further specifywhere the class is located. For example java.io.File is a subdirectory that containsclasses that relate to the input/output functions of Java. The extension .class hasbeen omitted from the reference to the File class because interfaces and classesare the only format contained in a package and both end in the .class extension.
Uppercase vs. Lowercase Package NamesA specific format should be followed for naming packages andthe classes that are contained within them. All package namesand the directories that follow them should be specified usinglowercase letters. On the other hand, the class and interfacenames you wish to reference within a package should be speci-fied using an uppercase letter as the first character. This allowsother programmers who use your packages to easily determinewhich components are directory names and which ones areclass and interface names.
Declaration for Creating PackagesTo create a package, the following statement should be placed at the beginningof a source file that contains a set of class definitions:
package PackageName;
Each class defined in the source file will automatically be added to the packagehaving the name specified by PackageName. The PackageName will be createdunder the subdirectory you have defined in the CLASSPATH variable set inyour environment. (The instructions for setting this environment variable arepresented in the sidebar, Setting Your CLASSPATH Environment Variable.) As anexample, assume that you have a source file that contains a set of classes thatimplement different types of airplanes. These classes could be combined into asingle package named airplanes by placing the package statement at the begin-ning of each source file that defines a public class:

172 Chapter 6
package airplanes; // This statement must come first
// Provide source code for Glider class
public class Glider { ... // Class definition}// The end of this source file
package airplanes; // This statement must come first
// Provide source code for Single_engine class
public class Single_engine { ... // Class definition}// The end of this source file
package airplanes; // This statement must come first
// Provide source code for Twin_engine class
public class Twin_engine { ... // Class definition}// The end of this source file
The actual PackageName is extended by the Java compiler by preceding it withthe CLASSPATH. (Each subdirectory included in the path name is separatedby a period.) The nice part is that you don’t need to create the path for thepackage you define yourself; it is generated by the compiler at compile-timeautomatically.
Interfaces and Public ClassesIf you recall from Chapter 5, only one public class may bedeclared in any one source file. Only classes defined as publicmay be referenced from outside the current package. Other-wise, the classes not defined as public are used to support thepublic classes in the package.

Interfaces and Packages 173
In another example, if the package coriolis.books.programming.javais declared, the directory structure will turn out like this:c:\java\lib\coriolis\books\programming\java
Essentially, what the Java compiler does when it encountersa statement like package coriolis.books.programming.java is cre-ate a new directory structure for coriolis.books.programming.javausing the directory path specified by the CLASSPATH environ-ment variable. It then places all of the compiled class code definedin the source file in the java directory. As the example above illus-trates, the CLASSPATH would be:c:\java\lib;
When the package is later referenced by a Java application, thecompiler will know exactly where to look for each class that isreferenced in the package.
Saving Java Source Code FilesIt is wise to save your Java source code in the directories contain-ing your compiled class. This will allow you to later edit yoursource code if you wish, but more importantly, you won’t have toworry about your class definitions being overwritten with identi-cal names in the default directory where you create and save yoursource code (.java extension). You’ll want to save the different ver-sions of your source files because as you create more and moreclasses, the chance for repeating a class name becomes more com-mon. For example, assume you have a Spreadsheet class that con-tains two classes; one that prints a graph and the other that printsa data sheet. Both classes perform very different operations, butboth of them could be assigned the name Print.class. In doing so,you must take two steps in generating source code with identicalclass names because the classes will share the same working direc-tory in most instances. If you placed a statement like this in thebeginning of your source codepackage acme.spreadsheet.graph;
the Java compiler would automatically place the Print.class inthe directory graph but the original source file (Print.java)

174 Chapter 6
would still be paced in the working directory. The next stepwould be to place the source file in the same directory. This isbecause the next Print.java source file created (for example,the class responsible for printing the data sheet) will be savedin the working directory, causing the old file to be overwrit-ten. If you later need to modify the class file, you will still havethe original source code. The next source file should providethe statementpackage acme.spreadsheet.datasheet;
at the beginning. Remember, you are required to manuallymove the source file to the appropriate directory.
Setting Your CLASSPATH Environment Variable
When your source code is compiled, the CLASSPATH environ-ment variable specifies the default base directory for the pack-ages you create. It also tells the compiler which directory path tosearch for the classes that are predefined. The order of directo-ries defined by CLASSPATH determines the order in which theJava compiler will search for your classes. When a class is foundthat meets the requirements of the calling class, the compilerstops searching for a match. You should define the path of thedefault package that accompanies the Java Development Kit (JDK)and the temporary directory that you work from in this order.Here’s an example:CLASSPATH = c:\java\lib;.
The period sets the current directory you are compiling from.The first directory listed in the CLASSPATH also specifies whereyour package structure will begin.
Using PackagesThe one feature that makes the Java language very powerful is that it lets you usethe same code (classes) over and over countless times. This is accomplished byreferencing classes that are contained in packages. To use classes that have al-ready been created by you or other Java programmers, you need to reference thepackage(s) the classes are grouped in. You can do this in one of three ways:
Interfaces and Packages 175
• Specify the full package reference each time a class is used that is defined inan outside package. This approach is the most cumbersome and least oftenused. Here’s an example:
airplanes.Twin_engine twin = new airplanes.Twin_engine("Beach", 1100);
In this case, the object variable twin is declared and initialized as an instance ofa Twin_engine class which is included in the airplanes package. With this ap-proach, each time a Twin_engine class is accessed, its corresponding packagename must also be included.
• Import the actual class needed from the package it is defined in. As an ex-ample, we could rewrite the previous example by using this code:
import airplanes.Twin_engine;...Twin_engine twin = new Twin_engine("Beach", 1100);
Notice that once the desired class is imported, the name of the airplanes pack-age is not needed to reference the Twin_engine class.
• Import all of the classes defined in a package. The syntax for doing this isillustrated with this statement:
import airplanes.*;
In this case, all of the public classes combined in the airplanes class, such asGlider, Single_engine, and Twin_engine, would be included.
Importing Packages Is Like Including C/C++ Header FilesIf you are an experienced C / C++ programmer, you can thinkof the technique of importing a package as you would the tech-nique of using an include file. Typically, you would use aninclude file to specify the names of function prototypes youwish to call that are defined in external files.
Every class defined in an external package that you want to reference by a class inyour Java application or applet must be called directly or with a wild card (*) in

176 Chapter 6
the immediate directory. For example, if you refer back to our ticker tape appletpresented in Chapter 2, we called an instance of the class FontMetrics that iscontained in the java.awt package (directory). The Applet class imports thejava.awt package with a wild card in the beginning of the code (e.g., importjava.awt.*;). The wild card tells the Java compiler to import all of the publicclasses in the java.awt directory into the TickerTape class. The compiler won’t,however, import any of the classes that are contained in the peer or image direc-tories beneath java.awt. To include the classes in those directories, you mustreference the directories directly (e.g., import java.awt.peer.*; or importjava.awt.image.*;).
// TickerTape Applet
import java.applet.*;import java.awt.*;
// TickerTape Classpublic class TickerTape extends Applet implements Runnable {
// Draw background and text on buffer image public void paintText(Graphics g){ ... FontMetrics fmetrics = g.getFontMetrics(); ... }}
Declaration for Importing PackagesWhen importing a package into a class, the declaration must appear before anyclass declarations. The format for declaring a package is as follows:
import PackageName;
The PackageName represents the hierarchy tree separating the directories of thepackage with decimals. The java.lang package is automatically imported intoevery class that is created. If you look at the ticker tape applet presented inChapter 2, you will notice that it does not import the java.lang package but usesmany of the classes that are contained in the package. The classes String, Inte-ger, and Thread are just a few of the classes that are called from this package.

Interfaces and Packages 177
// TickerTape Classpublic class TickerTape extends Applet implements Runnable { // Declare Variable String inputText; String animSpeedString; int xpos; int fontLength; int fontHeight; int animSpeed; boolean suspended = false; ...}
Standard Java PackagesSince we created our first applet in Chapter 2, we have been using packagesalready defined by other developers including Sun Microsystems. These pack-ages have been arranged by their category of usage. Table 6.1 shows the packagescurrently being distributed with the JDK.
Hiding Classes Using the Wild CardWe mentioned before that the Java wild card (*) will only allow you to bring inthe public classes from an imported package. The benefit of this feature is thatyou can hide the bulk of your classes that perform support operations for yourpublic classes. Users who use the public classes won’t be able to look at the codeor directly access the internal support classes.
Table 6.1 Packages Distributed with the Java Development Kit
Package Description
java.lang Contains essential Java classes for performing basic functions. This package is automaticallyimported into every class that is created in Java.
java.io Contains classes used to perform input/output functions to different sources.
java.util Contains utility classes for items such as tables and vectors.
java.net Contains classes that aid in connecting over networks. These classes can be used inconjunction with java.io to read/write information to files over a network.
java.awt Contains classes that let you write platform-independent graphics applications. It includesclasses for creating buttons, panels, text boxes, and so on.
java.applet Contains classes that let you create Java applets that will run within Java-enabled browsers.


Chapter 7Java Exceptions


181
7JavaExceptionsAre you tired of writing applications thatmysteriously crash, leaving the user to giveup in frustration? If so, you’ll be glad tolearn that Java provides a powerful featurecalled exceptions that automates the work ofcatching and handling compile-time andruntime errors.
One of the most difficult and time-consuming tasks of developing softwareinvolves finding and fixing bugs. Fortunately, Java provides some built-in fea-tures that lend a hand in the debugging process. As errors occur in a Java pro-gram, and we all know they will, you can use Java exceptions to provide specialcode for handling them.
Java programs can detect certain errors on their own and instruct the Java run-time system to take some predefined action. If you don’t like the default opera-tions that Java performs when it encounters certain errors, you can write yourown custom error handling routines.
In this chapter we’ll start by explaining the basics of exceptions. Then, we’llshow you
• Why exceptions are important
• How to use try clauses to setup exceptions
• How to use catch clauses to trap exceptions
• When and how to use your own exceptions
182 Chapter 7
Understanding ExceptionsExceptions catch your errors and handle them gracefully so that your programscan continue to operate. In Java, this process is called throwing an error. Thistype of error handling can greatly benefit both you and the user of your applica-tion. After all, nobody likes an application that just crashes out of the blue.Unlike other languages, such as C, C++, and Pascal, where error detection andreporting can often double and even triple the size of an application, Java pro-vides the means to detect and handle errors and at the same time reduce theoverall size of your applications. The best part is that error handling in Javareplaces the multiple “if this occurs then do this” statements so often found inprograms written in languages like C.
Java’s exceptions allow you to effectively code the main sections of your applica-tions without you having to spend too much time writing code to detect andhandle potential errors. As you’ll learn in this chapter, exceptions create an ob-ject when an error occurs. The exception, which is a subclass of the Throwableclass, throws an object, which is passed up through the hierarchy of the callingclasses. The object will continue up through the classes until an exception han-dler—a method that deals with the exception—catches the object. This processis illustrated in Figure 7.1. If no exception handler is defined, a default excep-tion handler is used to handle the error. This causes the error to be printed to thecommand line and the program will cease running.
Using Java’s Throwable ClassFor a class to throw an error or catch one, it must be declaredas a subclass of the Java Throwable class. All of the classes inthe java package have incorporated the Throwable class in thepackage. This is why you don’t see the Throwable class im-ported at the beginning of Java source code files. Although ifyou wish to refer to this class, you can directly import it intoan application by including the statement:
import java.lang.Throwable;
Having error checking and error handling features in Java is important becauseJava programs, especially applets, run in multitasking environments. Often whenan applet is executed in a Web browser like Netscape 2, other applets will berunning at the same time. Each applet will have its own thread that the system

Java Exceptions 183
will control. If one applet causes a fatal error, the system could crash. Withexceptions, on the other hand, critical errors are caught; and the Java runtimeenvironment will know how to handle each thread that it must manage.
Do You Really Need Exceptions?Even the smallest program can quickly evolve into a programmer’s nightmare whenyou are trying to locate and fix a troublesome error. Why should you waste yourtime handling the possible errors that can occur? The fact is, you should onlyhandle errors that you can do something useful with. Grabbing every little error ina program is useless if you do nothing intelligent with them. The best reason todeclare exceptions is to provide a means for you and others that follow to under-stand where your code is having problems during critical operations.
method throw
throw
method throw
throw
method
catch(Exception);
method throws
throw new Exception
try{call method( );}
}
me
ssa
ge
. .
.
. . .
Figure 7.1The process of throwing and catching an error in Java.

184 Chapter 7
For example, assume you have created a class to write data to a disk file. As yourprogram is running, a number of errors could occur such as your hard diskbeing full, a file being corrupted, and so on. If you didn’t have a way to catcherrors like these at some point, the program might crash, leaving the user withnothing except a cryptic error message. Here’s a Java program that performs acritical file operation but doesn’t provide any error handling:
// This program will not compile because an IOException handler is// expected by the Java compilerimport java.io.*;
public class WriteAFile extends Object {
WriteAFile(String s) { write(s); }
// Writes to a file public void write(String s) { // I/O errors could occur here FileOutputStream writeOut = null; DataOutputStream dataWrite = null;
// Begin to Write file out writeOut = new FileOutputStream(s); dataWrite = new DataOutputStream(writeOut); dataWrite.writeChars("This is a Test"); dataWrite.close(); }
// Where execution begins in a stand-alone executable public static void main(String args[]) { new WriteAFile(args[0]); }}
(Actually, this program won’t compile just yet because the Java compiler ex-pects to find an exception named IOException. We’ll explain this in a mo-ment.) The part of the code that could get you into trouble is the write()method. This method creates a new file output stream and attempts to write acharacter string to the stream. If the operation fails for one reason or another,a runtime error would occur, although an exception has not been setup tohandle such an error.
Java Exceptions 185
To catch potential I/O problems, Java provides a built-in exception calledIOException. This exception gets “thrown” whenever an I/O error occurs during atransfer to a device, such as a printer, disk drive, and so on. In our sample program,the Java compiler knows you must declare the exception because the write() methodcalls other methods that have declared an IOException to be thrown to callingmethods. To remedy this, we could alter the write() method as shown here:
// Begin to Write file out try { writeOut = new FileOutputStream(s); dataWrite = new DataOutputStream(writeOut); dataWrite.writeChars("This is a Test"); dataWrite.close();} catch(IOException e) {}
Notice that two changes have been made. First, the entire block of code hasbeen placed in a try { } clause. Essentially, this tells the Java environment to beon the “lookout” for errors that might occur as each method call is executed.The second change is the addition of the catch() method. This block of codeperforms the job of handling an I/O error that could occur with any of the callscontained in the try section. In our example, we are letting Java handle the workof processing an I/O error on its own by using the built-in IOException, andthat’s why no other code is provided with the catch statement.
These changes allow the code to compile and run. Unfortunately, they do not ad-dress any problems that could arise from actually writing a file to disk. In a perfectworld, this code would be sufficient for our needs, but we don’t live in a perfectworld. For example, what if an error occurred while we were opening the file to bewritten because the disk is full or not even present? And even if the file could beopened, what would happen if an error occurred while we were writing the data tothe file. All of these conditions are valid exceptions to writing a file to a disk. Unfortu-nately, you or others who use your classes might not detect them until it is too late.Remember, the advantage of using a language like Java or other flexible object-ori-ented languages is the ability to create robust code that can be reused by others.
Now, let’s change the WriteAFile class once more to make it more robust. Don’tworry about the syntax right now, we will discuss the details of implementingexceptions in the sections to follow.

186 Chapter 7
// Writes to a filepublic void write(String s) { FileOutputStream writeOut = null; DataOutputStream dataWrite = null;
try { writeOut = new FileOutputStream(s); dataWrite = new DataOutputStream(writeOut); } catch (Throwable e) { System.out.println("Error in opening file"); return; } try { dataWrite.writeChars("This is a Test"); dataWrite.close(); } catch(IOException e) { System.out.println("Error in writing to file"); }}
This time around, we’ve included two try clauses. The first one checks the methodsused to open the file, and the second one tests the methods used to write to thefile and close the file. Notice how each of the catch statements specifies the typeof object that it will catch or the exception that is thrown. We’ll show you how tocreate custom error-handling routines later when we discuss the topic of catch-ing. For now it is important to realize that we have separated the possible errorswe want to catch into two separate cases, opening and writing. By catching theseerrors, we have prevented the program from crashing as a result of not being ableto open or write to a file. If errors like these are found, we could possibly ask theuser to change disks or try again instead of having the user loose his or her data.In our case, we have simply written a message to the command-line telling theuser where the operation has failed if an error occurs.
Defining a Try ClauseThe try statement is responsible for indicating which section of code in a Javaapplet or application will most likely throw an exception. The syntax for usingthis statement is as follows:
try { statement;

Java Exceptions 187
statement; } catch (Throwable-subclass e) { statement; statement; }
For every try section, you must include at least one catch block that follows thetry section. If an exception is thrown in the try section during the execution ofthe code, control flow is transferred to the matching section defined in the catchstatement. If no match is found, the exception is passed up through the hierar-chy of method calls. This allows each level to either handle the exception or passit on. We’ll cover this more when we present exception throws.
Using the catch StatementIf an exception is thrown during the execution of a try section, the flow of theprogram is immediately transferred to the corresponding catch block. The ob-ject, which is a reference to an instance of the exception class being thrown, iscompared to the catch’s parameter type, also known as an Exception Handler.Here is the declaration for the catch block:
catch (ExceptionType ExceptionObject) { statement; statement; }
The ExceptionObject reference parameter is a subclasses of the Throwable class.In most code, this reference is declared as e to distinguish it as a reference to anexception. In the event of an error, a subclass of the Throwable class is thrown,which is triggered by a violation of one of the procedures. This violation createsan object of the class type that the error originated from and is compared to theException Handler listed in each of the catch blocks that immediately follow thetry section. The following code example illustrates how this process works:
import java.io.*;
// Reads from a filepublic class ReadAFile extends Object {

188 Chapter 7
ReadAFile(String s) { String line; FileInputStream fileName = null; BufferedInputStream bufferedInput = null; DataInputStream dataIn = null;
try { fileName = new FileInputStream(s); bufferedInput = new BufferedInputStream(fileName); dataIn = new DataInputStream(bufferedInput); }
catch(FileNotFoundException e) { System.out.println("File Not Found"); return; } catch(Throwable e) { System.out.println("Error in opening file"); return; }
try { while ((line = dataIn.readLine()) != null) { System.out.println(line + "\n"); } fileName.close(); } catch(IOException e) { System.out.println("Error in reading file"); } }
// Where execution begins in a stand-alone executable public static void main(String args[]) { new ReadAFile(args[0]); }}
Here, the try block instructs the code to watch for an exception to be thrownfrom one of the methods contained in the block. The initializer that creates aninstance of the class type FileInputStream named fileName is capable of throw-ing an exception in the event of an error. More specifically, the method con-tained in the class FileInputStream declares that an exception is to be thrown tothe calling method. The topic of throwing exceptions will be covered later in thechapter, but for now you just need to know that you are required to address all

Java Exceptions 189
exceptions thrown by handling them or passing them on. You handle the excep-tion being thrown by placing exception handlers, declared in catch statementsthat the errors are then compared to. In the event of an error, the code will breakfrom the normal flow of the code and immediately jump to the first exceptionhandler that matches the class type defined in the catch. In the ReadAFile()method, the first catch identifies the FileNotFoundException class as a typethat may be thrown upon instance of an error. This is followed by another catchidentifying the Throwable class, which will act as a “catch all” for the exceptionsbeing thrown. This match occurs because all exception classes are derived fromthe Throwable parent class.
When to Use the finally StatementWhen an exception is “thrown,” the compiler does not necessarily return to theexact spot it left off. The developers of Java realized that some procedures needto perform additional routines after an exception is handled, so they defined afinally statement. This statement instructs the Java Virtual Machine to returnand finish any code after handling the exception before moving on. Here is thesyntax required for using the finally statement:
try { statement; statement; } catch (Exception Handler) { statement; statement; } finally { statement; statement; }
The finally statement is not necessary to handle an exception, but it can beuseful when you wish to handle an operation specific to a class. To see how it isused, let’s expand our WriteAFile class to incorporate a finally statement thatwill create a backup file whether or not an exception occurs:
import java.io.*;
public class WriteAFile {

190 Chapter 7
WriteAFile(String s) { write(s);}
// Writes to a filepublic void write(String s) { FileOutputStream writeOut = null; DataOutputStream dataWrite = null;
try { writeOut = new FileOutputStream(s); dataWrite = new DataOutputStream(writeOut); dataWrite.writeChars("This is a Test"); dataWrite.close(); } catch(IOException e) { System.out.println("Error in writing to file"); } catch(Throwable e) { System.out.println("Error in writing to file"); } finally { System.out.println("\n\n.....creating a backup file."); try { writeOut = new FileOutputStream("MyBackup.sav"); dataWrite = new DataOutputStream(writeOut); dataWrite.writeChars("This is a Test"); dataWrite.close(); } catch (IOException e) { System.out.println("Error in writing backup file"); } }} // Where execution begins in a stand-alone executable public static void main(String args[]) { new WriteAFile(args[0]); }}
The Hierarchy of ExceptionsLike any other built-in Java classes you use in your applications, the standardexceptions are designed around a class hierarchy. Every exception is derived fromthe superclass Throwable as shown in Figure 7.2. The first subdivision is wherethe class splits into two categories: Errors and Exceptions. The Exceptions cat-

Java Exceptions 191
egory consists of the more common exceptions that you will want to “catch.”The Errors category, on the other hand, consists of the low level exceptions thatmost programmers won’t need to deal with.
The next major split occurs with the Run-Time Exception category, which is asubclass of Exception. Sun has arranged the hierarchy like this because they real-ized that by separating commonly used exceptions from specific exceptions, pro-grammers would not be forced to include tons of handlers in their code.
ERROR CLASSThe exceptions included in the Error class are problems such as Linkage Error,ThreadDeaths, and other catastrophes that result in fatal errors. For the most part,these exceptions will not be handled by most applications. They are reserved forlower level programming tasks that require you to get into the internal workings ofthe language. For that reason, it is not a good idea to derive your own exceptionclasses from Error unless you have a good working knowledge of Java. Table 7.1provides a list of the key exceptions that are provided. All of the exceptions aredefined in the Java Language Package java.lang, expect for AWTError, which isdefined in the Advanced Windowing Toolkit Package, java.awt.
Figure 7.2The Hierarchy of the Throwable class.
Throwable
Errors Exception
RunTimeException

192 Chapter 7
Table 7.1 Exceptions Included in the Error Class
Exception Description
AbstractMethodError This exception is thrown when your code attempts to call an abstract method.
AWTError This exception is thrown when an error occurs in the Advanced Windowing Toolkit.
ClassCircularityError This exception is thrown when a class hierarchy tries to establish a circle bylinking itself to a parent class and the parent links itself to the child class or oneof the children classes beneath it.
ClassFormatError This exception is thrown as a result of an invalid file format being implemented.
IllegalAccessError This exception occurs when an illegal access has been triggered.
IncompatibleClassChangeError This exception is thrown when a class of incompatible types is changed.
InstantiationError This exception occurs when a program attempts to instaniate an object from anabstract class or interface.
InternalError This exception is thrown when an internal error occurs in the Java Virtual Machine.
LinkageError This exception is thrown when the current class is dependant on another class, butthe other class is not compatible with the current class.
NoClassDefFoundError This exception is thrown when a class cannot be found by checking the pathspecified by the CLASSPATH environment variable or the current directory.
NoSuchFieldError This exception is thrown when a specific field cannot be found.
NoSuchMethodError This exception is thrown when a particular method cannot be found in the currentclass or one of its superclasses.
OutOfMemoryError This exception is thrown in the event that no more memory can be allocated.
StackOverflowError This exception signals that the stack has overflowed.
ThreadDeath This exception is thrown in the thread that is being terminated. It should behandled when additional procedures are needed to be carried out before thestop() method has finished executing. If the exception is caught, it must be“rethrown” to actually finish killing off the thread. Because the exception is notrequired to be caught, it will not produce a command line message when it cyclesup to the base class.
UnknownError Bearing a close relation to mystery meat, this exception is triggered when aseriously unknown error occurs.
UnsatisfiedLinkError This exception is thrown when a link to a library is unsuccessful.
VerifyError This exception is thrown when the Java compiler is unable to verify if a linkagebetween classes is valid.
VirtualMachineError This exception is thrown when the Virtual Machine has depleted its resources.
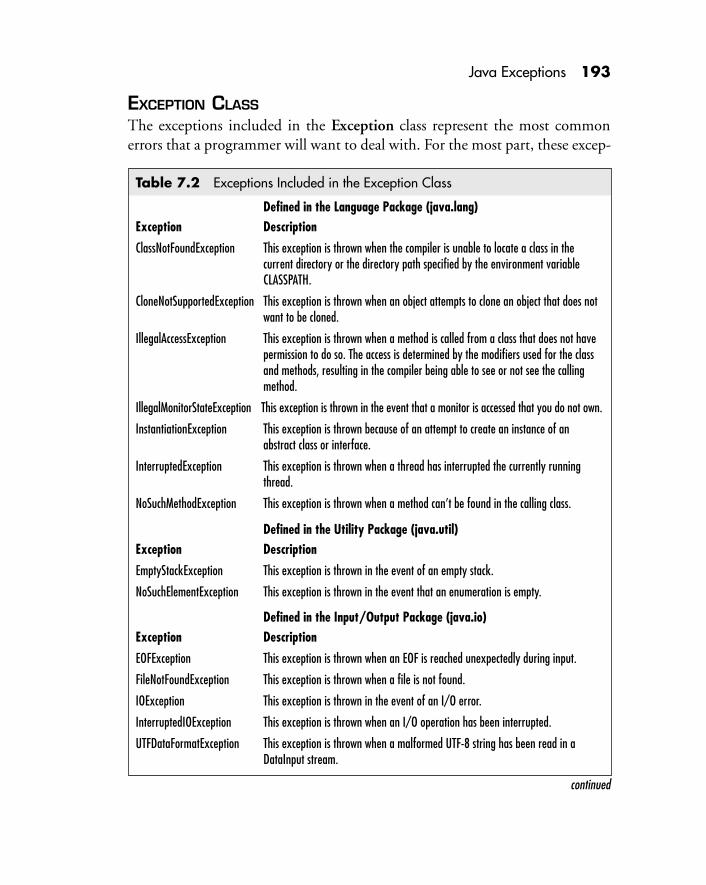
Java Exceptions 193
EXCEPTION CLASS
The exceptions included in the Exception class represent the most commonerrors that a programmer will want to deal with. For the most part, these excep-
Table 7.2 Exceptions Included in the Exception Class
Defined in the Language Package (java.lang)Exception Description
ClassNotFoundException This exception is thrown when the compiler is unable to locate a class in thecurrent directory or the directory path specified by the environment variableCLASSPATH.
CloneNotSupportedException This exception is thrown when an object attempts to clone an object that does notwant to be cloned.
IllegalAccessException This exception is thrown when a method is called from a class that does not havepermission to do so. The access is determined by the modifiers used for the classand methods, resulting in the compiler being able to see or not see the callingmethod.
IllegalMonitorStateException This exception is thrown in the event that a monitor is accessed that you do not own.
InstantiationException This exception is thrown because of an attempt to create an instance of anabstract class or interface.
InterruptedException This exception is thrown when a thread has interrupted the currently runningthread.
NoSuchMethodException This exception is thrown when a method can’t be found in the calling class.
Defined in the Utility Package (java.util)Exception Description
EmptyStackException This exception is thrown in the event of an empty stack.
NoSuchElementException This exception is thrown in the event that an enumeration is empty.
Defined in the Input/Output Package (java.io)Exception Description
EOFException This exception is thrown when an EOF is reached unexpectedly during input.
FileNotFoundException This exception is thrown when a file is not found.
IOException This exception is thrown in the event of an I/O error.
InterruptedIOException This exception is thrown when an I/O operation has been interrupted.
UTFDataFormatException This exception is thrown when a malformed UTF-8 string has been read in aDataInput stream.
continued
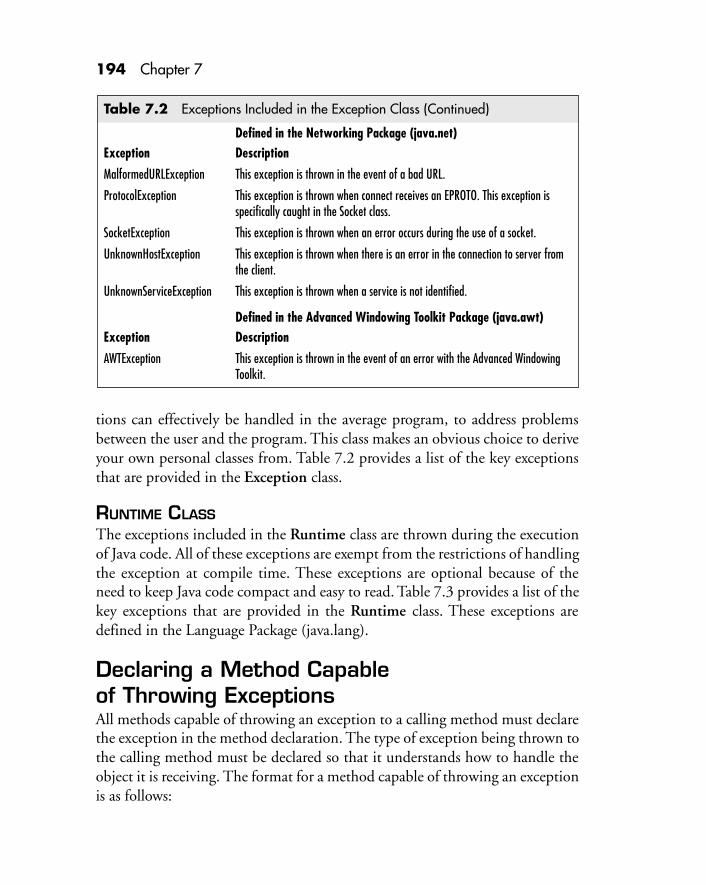
194 Chapter 7
Table 7.2 Exceptions Included in the Exception Class (Continued)
Defined in the Networking Package (java.net)Exception Description
MalformedURLException This exception is thrown in the event of a bad URL.
ProtocolException This exception is thrown when connect receives an EPROTO. This exception isspecifically caught in the Socket class.
SocketException This exception is thrown when an error occurs during the use of a socket.
UnknownHostException This exception is thrown when there is an error in the connection to server fromthe client.
UnknownServiceException This exception is thrown when a service is not identified.
Defined in the Advanced Windowing Toolkit Package (java.awt)Exception Description
AWTException This exception is thrown in the event of an error with the Advanced WindowingToolkit.
tions can effectively be handled in the average program, to address problemsbetween the user and the program. This class makes an obvious choice to deriveyour own personal classes from. Table 7.2 provides a list of the key exceptionsthat are provided in the Exception class.
RUNTIME CLASSThe exceptions included in the Runtime class are thrown during the executionof Java code. All of these exceptions are exempt from the restrictions of handlingthe exception at compile time. These exceptions are optional because of theneed to keep Java code compact and easy to read. Table 7.3 provides a list of thekey exceptions that are provided in the Runtime class. These exceptions aredefined in the Language Package (java.lang).
Declaring a Method Capableof Throwing ExceptionsAll methods capable of throwing an exception to a calling method must declarethe exception in the method declaration. The type of exception being thrown tothe calling method must be declared so that it understands how to handle theobject it is receiving. The format for a method capable of throwing an exceptionis as follows:

Java Exceptions 195
[Modifier] Return-type Identifier ([Parameter List]) [throws ExceptionName]{ Body;}
The throws clause may list as many exceptions as will be thrown to it by separat-ing each of them with a comma. For an example, let’s take our ReadAFileAFileclass to the next level and introduce a throws method:
import java.io.*;
public class wordProcessor extends Object {
Table 7.3 Exceptions Included in the Runtime Class
Exception Description
ArithmeticException This exception is thrown when an integer is divided by zero.
ArrayIndexOutOfBoundsException This exception is thrown when an array is referenced outside the legalrange.
ArrayStoreException This exception is thrown when you attempt to store an incompatible class or` type in an array.
ClassCastException This exception occurs when you attempt to cast an instance of a class to asubclass or a sibling class.
IllegalArgumentException This exception is thrown when an invalid parameter is passed to a methodthat is outside the legal range or value.
IllegalThreadStateException This exception occurs when a thread state is changed to an invalid state orone that the thread is currently in.
IndexOutOfBoundsException This exception is thrown when an index to an array is outside the legalrange.
NegativeArraySizeException This exception occurs when an array of negative size is to allocated.
NullPointerException This exception is thrown in the event that an object contains a nullreference.
NumberFormatException This exception is thrown when an invalid string to a number or a number toa string is encountered.
SecurityException This exception is thrown when an applet attempts to breach the securitydefined by the browser.
StringIndexOutOfBoundsException This exception occurs when a string is accessed outside the legal length of astring.
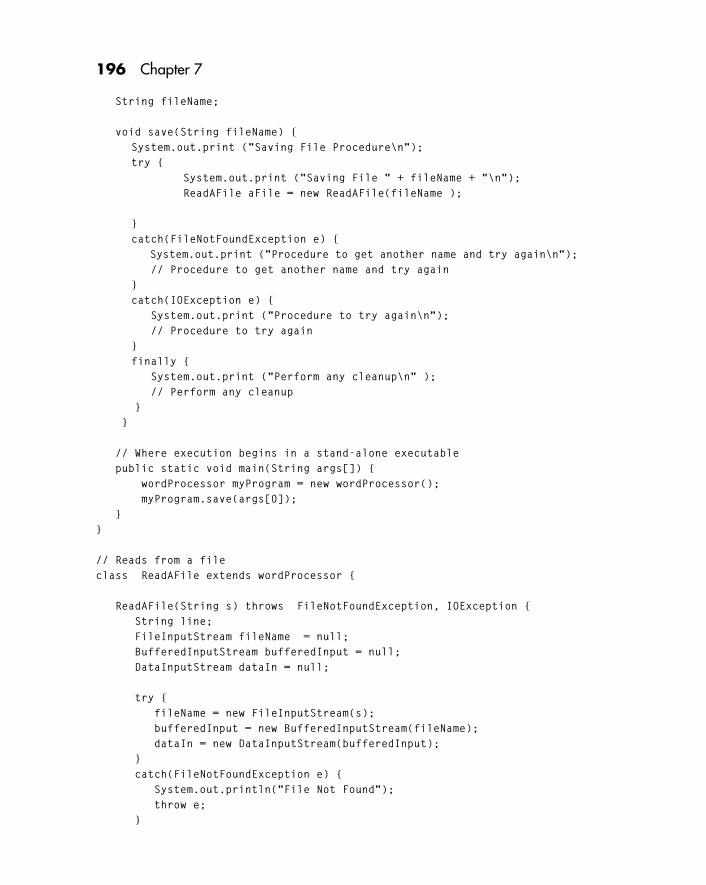
196 Chapter 7
String fileName;
void save(String fileName) { System.out.print ("Saving File Procedure\n"); try { System.out.print ("Saving File " + fileName + "\n"); ReadAFile aFile = new ReadAFile(fileName );
} catch(FileNotFoundException e) { System.out.print ("Procedure to get another name and try again\n"); // Procedure to get another name and try again } catch(IOException e) { System.out.print ("Procedure to try again\n"); // Procedure to try again } finally { System.out.print ("Perform any cleanup\n" ); // Perform any cleanup
} }
// Where execution begins in a stand-alone executable public static void main(String args[]) { wordProcessor myProgram = new wordProcessor(); myProgram.save(args[0]); }}
// Reads from a fileclass ReadAFile extends wordProcessor {
ReadAFile(String s) throws FileNotFoundException, IOException { String line; FileInputStream fileName = null; BufferedInputStream bufferedInput = null; DataInputStream dataIn = null;
try { fileName = new FileInputStream(s); bufferedInput = new BufferedInputStream(fileName); dataIn = new DataInputStream(bufferedInput); } catch(FileNotFoundException e) { System.out.println("File Not Found"); throw e; }

Java Exceptions 197
catch(Throwable e) { System.out.println("Error in opening file"); }
try { while ((line = dataIn.readLine()) != null) { System.out.println(line + "\n"); } fileName .close(); } catch(IOException e) { System.out.println("Error in reading file"); throw e; } }}
Notice that we didn’t need to make many changes to the ReadAFile class used inthis application. This class can quickly be made to pass exceptions as well ashandle the ones that apply specifically to the class. The object myProgram, whichis an instance of the class wordProcessor, calls the method save(). This methodthen calls the ReadAFile() method which declares that it will pass an exceptionto the calling method in the event of an error. Because the ReadAFile() methoddeclares that it throws an exception, save() is required to address the exceptionthat is being passed to it. If the method will not handle the exception, it mustdeclare that it passes the particular exception on to the method that derived it:
ReadAFile(String s) throws FileNotFoundException, IOException {...
In our example, this line of code tells the method, ReaAFile(), that two excep-tions, FileNotFoundException and IOException, can be thrown from the tryblock. This requires the save() method to handle them or declare the exceptionsto be passed on to the method main() to deal with them.
Throwing ExceptionsThe throw operator declares a particular exception may be thrown from thecurrent method on to the calling method. This effectively passes the exceptionto the next method for it to deal with. In our previous example, the ReadAFileclass declared that the method save() would pass two exceptions. In the codethat follows, the example identifies which exceptions will be thrown.

198 Chapter 7
try { fileName = new FileInputStream(s); bufferedInput = new BufferedInputStream(fileName); dataIn = new DataInputStream(bufferedInput); } catch(FileNotFoundException e) { System.out.println("File Not Found"); throw e; } catch(Throwable e) { System.out.println("Error in opening file"); }
try { while ((line = dataIn.readLine()) != null) { System.out.println(line + "\n"); } fileName .close(); } catch(IOException e) { System.out.println("Error in reading file"); throw e; }
The statement throw e specifies that the exception will be passed on for thecalling method to deal with. Furthermore, much like error codes in other lan-guages, messages can be passed along with the object to identify particular de-tails to help process the exception. The following line of code shows how tothrow an exception with a message attached:
throw new FileNotFoundException("MyFile.txt");
To reference the message in the calling method, you could simply call agetMessage() method to read the message attached to the file. The followingcode presents an example of this method:
catch(FileNotFoundException e) { System.out.println("The file " + e.getMessage + " was unable to be located.");}
When to Catch and When to ThrowThe issue of knowing when to catch an exception versus when to throw it to thecalling method is typically a factor of what the exception does. If you refer back

Java Exceptions 199
to our WriteAFile example, you’ll see that we deal with a couple of exceptions.One of them caught an error that occurs in the event of an IOException byprinting a message to the command line. This notifies the user of an error whenwriting to a file; but suppose WriteAFile class was a subclass in the hierarchy ofthe class wordProcessor. Here is a new version of our example that has beenexpanded to handle this:
import java.io.*;
public class WriteAFile extends wordProcessor{
WriteAFile(String s) throws IOException { write(s);}
// Writes to a filepublic void write(String s) throws IOException { FileOutputStream writeOut = null; DataOutputStream dataWrite = null;
try { writeOut = new FileOutputStream(s); dataWrite = new DataOutputStream(writeOut); } catch (Throwable e) { System.out.println("Error in opening file"); return; } try { dataWrite.writeChars("This is a Test"); dataWrite.close(); } catch(IOException e) { System.out.println("Error in writing to file"); throw e; }}
}
import java.io.*;
public class wordProcessor extends Object { wordProcessor(String s) { new WriteAFile(s); }

200 Chapter 7
wordProcessor() { System.out.println("Create a backup file"); }
// Where execution begins in a stand-alone executable public static void main(String args[]) throws IOException { new wordProcessor(args[0]); }}
Now, lets suppose we pass a filename to the write() method and it triggers theIOException. The IOException again writes a message to the command line,but notice it re-throws the exception to the calling method wordProcessor().This method then allows for an additional message to be printed, in this case“Create a backup file.” In place of the message, we could write an additional fileto another location or do some other operation specific to the class wordProcessor.In addition, any other class could call the method and use it to fit its needswithout being forced to perform an operation specific to wordProcessor.
Knowing When to Create YourOwn ExceptionsThe process of creating your own exceptions in Java is similar to creating othertypes of classes. Knowing when to create an exception is sometimes trickier thanwriting the exception itself. Here are some guidelines to help you create yourown exceptions:
• Make sure you derive your new exception from the correct class. For ex-ample, if you create an exception that detects the corruption of a file, you’dwant to subclass it beneath an IOException. Deriving the new exceptionfrom an exception like ArrayOutOfBoundsException would be pointless.
• If your code generates an error condition, you should handle it unless thereis an obvious exception already created. For example, in the ReadAFile classwe coded in this chapter, we used an exception to detect if a file cannot befound. On the other hand, if you created a class that determines whether afile has a virus or not, an IOException wouldn’t necessarily be a wise choice.This would be a good place to subclass, however.
• Exceptions created in most applications should be derived from the Excep-tions class. Only specific (lower-level) situations should require exceptionsthat need to be derived from the Errors or RunTime classes.
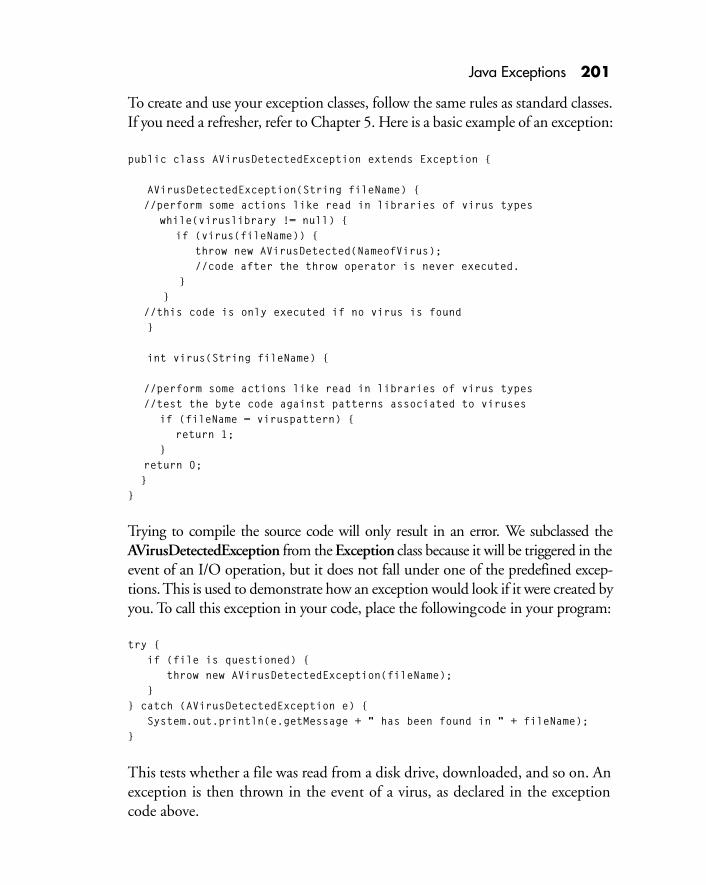
Java Exceptions 201
To create and use your exception classes, follow the same rules as standard classes.If you need a refresher, refer to Chapter 5. Here is a basic example of an exception:
public class AVirusDetectedException extends Exception {
AVirusDetectedException(String fileName) {//perform some actions like read in libraries of virus types
while(viruslibrary != null) {if (virus(fileName)) { throw new AVirusDetected(NameofVirus); //code after the throw operator is never executed.
} }//this code is only executed if no virus is found
}
int virus(String fileName) {
//perform some actions like read in libraries of virus types//test the byte code against patterns associated to viruses
if (fileName = viruspattern) {return 1;
}return 0;
}}
Trying to compile the source code will only result in an error. We subclassed theAVirusDetectedException from the Exception class because it will be triggered in theevent of an I/O operation, but it does not fall under one of the predefined excep-tions. This is used to demonstrate how an exception would look if it were created byyou. To call this exception in your code, place the following code in your program:
try { if (file is questioned) { throw new AVirusDetectedException(fileName); }} catch (AVirusDetectedException e) { System.out.println(e.getMessage + " has been found in " + fileName);}
This tests whether a file was read from a disk drive, downloaded, and so on. Anexception is then thrown in the event of a virus, as declared in the exceptioncode above.


Chapter8Threads


205
8Threads
Imagine what our lives would be like if we could only do one thing at a time.You wouldn’t be able to listen to music and program at the same time; and youdefinitely couldn’t cook dinner, watch TV, and carry on a conversation with afriend. Although programming languages don’t need to perform tasks like these,newer operating systems and environments like the Web are placing greater de-mands on programs, requiring them to handle multiple processes at the same time.
Java offers an advantage over most other languages because it was designed fromthe ground up to support multiple processes. When a Java applet runs in anenvironment like a Web browser, the browser can determine which parts of theprogram are separate processes and manage them to keep the program fromdraining the available system resources. As you gain more experience writingJava programs, you’ll learn how to structure your programs to take advantage ofthe flexibility that multiple processes provide.
In this chapter we’ll examine how threads are used to create multiple processesin Java programs. You’ll learn how to create threads using either the pre-definedThread class or the Runnable interface.
What Is a Thread?One of the key jobs performed by the Java runtime system is to be able to handleprograms that contain multiple processes called threads. If you’ve done any pro-gramming for an operating system such as Windows 95 or Windows NT, you’ve
To create Java applets and applications thatwon’t turn into system resource hogs, you’llneed to arrange your programs into separateprocesses, which are called threads.

206 Chapter 8
probably come across the concept called multithreading. The idea is to createapplications that can handle different tasks at the same time, or at least be ableto convince the user that multiple tasks are being performed. For example, amultithreaded version of an application that monitors the stock market wouldbe able to download data from a central computer network, perform calcula-tions in the background, and accept input from the user. Although only onethread can be executed at a time, the operating system that runs the programexpertly divides up the different processes or threads, runs pieces of them, andjumps from thread to thread.
If you have ever loaded a Web page that contains multiple applets, you can see theprocess of multithreading at work. Assuming each applet is coded properly, yourWeb browser will make it look like each one is running at the same time. Ofcourse, since most computers have only a single processor, the Web browser mustbe able to juggle each process so that each one gets its share of processing time.
To better understand how threads are coded, let’s start with a simple examplethat contains a single process. Then we’ll add to it so that you can see the effectthat using threads has on the execution of the program. In the followingHi3Person class, the code executes in a linear fashion until the last line is reached,and the process ends:
public class Hi3Person {
public static void main(String args[]) { Hi3Person people = new Hi3Person();
people.hi("Person"); people.hi("Person 2"); people.hi("Person 3");
System.out.println("Hello Everyone"); }
void hi(String who) { System.out.println("Hi " + who); }}
Code execution begins by creating an instance of the class Hi3Person. Next, thethree hi() methods are called. Each of these is executed one at a time, returning

Threads 207
control back to the main body of the code. The final statement in main() writesthe text “Hello Everyone” before the program ends.
As we introduce the concept of threads to Hi3Person, the linear path of execu-tion will be disrupted. The program will be split into multiple processes, eachresponsible for writing to the screen. Let’s look at the new version of our code tosee what is going on behind the scenes:
public class Hi3People implements Runnable {
public static void main(String args[]) throws InterruptedException {
int i = 0;
Hi3People person = new Hi3People(); // Create thread #1 Thread aThread = new Thread(person, "Person 1"); // Create thread #2 Thread anotherThread = new Thread(person, "Person 2");
aThread.start(); // Start the first thread anotherThread.start(); // Start the second thread
// Body of main program while ((aThread.isAlive()) || (anotherThread.isAlive())) { i++; }
// Executes after both threads have finished System.out.println(i + "\n"); System.out.println("Hello Everyone");
aThread.stop(); // Stop the first thread anotherThread.stop(); // Stop the second thread }
public void run() { System.out.println("Hi " + Thread.currentThread().getName()); }}
(For now, don’t worry about the syntax used to create the threads that are used.We’ll explain the techniques for implementing threads a little later in this chap-ter.) Notice that the Hi3People class initiates two threads that run concurrentlyas our application continues on. After each thread has been created, the start()
208 Chapter 8
method of the thread is called, which tells the Java interpreter to begin process-ing this thread. The main() method is responsible for setting up each thread anddetermining when the threads are finished. This is necessary because our pro-gram needs to know when it is safe to execute the code starting with the line:
System.out.println(i + "\n");
Otherwise, the program will end before the threads have finished and it willhang. In this case, we have placed a while loop to count continuously during theexecution of the threads:
while ((aThread.isAlive()) || (anotherThread.isAlive())) { i++;}
If you compile and run this example, you will notice that the value stored in thevariable i will change after each execution of the code. This variable stores thenumber of times the while loop repeats during the life of both threads. The factthat this value changes illustrates the control that Java can have as it executesprograms that are divided up into separate processes. Running a single- or multi-threaded program is not the only task that the Java runtime system must per-form. Java also has its own internal threads that it must perform to manage taskssuch as garbage collection.
To Thread or Not to ThreadThe trick to programming with threads is knowing when youneed to use them. Threads have the ability to hinder as well ashelp the execution of programs. You should only use threadswhen two or more processes need to exist at the same time.For example, in a windows environment, multiple windowscan be opened at once to give the impression that two opera-tions are occurring at the same time. These are examples ofthreads being implemented into real world application. MostJava programmers implement threads for building interfacecomponents by using the AWT package, which we’ll explorein Chapter 9.

Threads 209
Keep in mind that when an application runs, multiple pro-cesses don’t actually run at the same time. It’s the operatingsystem’s job to give the user the impression that everythinghappens at once. Even in a multithreading environment likeUnix, processes do not occur at the same time. As Figure 8.1shows, the illusion of processes running concurrently is cre-ated by carefully and quickly cycling instructions through achannel. The Java Virtual Machine handles its own type ofprocessor management by determining what executions willoccur and in what order.
When you add multiple threads to your program, you effec-tively set up an events manager. You must manage how theinstructions from your application are handled. You determinewhat process receives more or less time and when to changethe focus of the program. As you will see later in this chapter,you can make your application appear transparent or pain-fully slow just by the way you schedule your threads.
Figure 8.1The technique of managing multiple processes.
ProcessorProcessor
Process
Pro
cess
Process
Pro
cess

210 Chapter 8
Creating a ThreadBefore you can create a thread, you must set up a class to handle the thread. Thisis done in either of two ways: extending a class (subclassing the Thread class) orimplementing an interface. As you’ll see in the next two sections, the approachyou use will depend on your own needs.
Subclassing the Thread ClassThe most obvious way to create a thread is to subclass the Thread class that Javaprovides. This approach allows you to override the methods in the Thread classto perform the functions you define for your program. Here is the syntax forcreating a class using the Thread class.
[Modifier] class ClassName extends Thread { ClassBody;}
Here’s an example Java application that utilizes the Thread class as a superclass:
public class Hiagain extends Thread {
public static void main(String args[]) {
int i =0;
Hiagain tony = new Hiagain(); // Create a new object Thread t1 = new Thread(tony); // Create each thread of the object type Thread t2 = new Thread(tony);
t1.start(); // Start each thread t2.start();
while ((t1.isAlive()) || (t2.isAlive())) { i++; }
System.out.println("Hello Everyone"); t1.stop(); // End the threads t2.stop(); }
public void run() { System.out.println("Hi"); }}
Threads 211
The class Hiagain subclasses the Thread class and overrides the run() methoddefined by the Thread class. Because Hiagain is derived from Thread, it inher-its all of the methods defined in Thread including start(), run(), and stop().The original versions of these methods defined in Thread are used except in thecase of the run() method, which has been overridden. Because this method tellsthe thread which operations to perform after the thread has been started, ittypically needs to be overridden. The key methods that are defined in the Threadclass will be presented later in this chapter.
Implementing the Runnable InterfaceWhen designing class hierarchies for your Java applications or applets, situa-tions arise where subclassing from the Threads class is just not possible. In suchcases, you can implement the Runnable interface to avoid a conflict. To declarea class Runnable, follow the template shown here:
[Modifier] class ClassName extends SuperClass implements Runnable { ClassBody;}
The advantage of this approach is that you can create a new class that is bothderived from another class and uses the methods defined by the Runnable inter-face. Of course, you will then be required to go along with the implementationcreated by the designers of this interface. Let’s revisit our ticker tape applet in-troduced in Chapter 2 because it provides a good example of an implementationof the Runnable interface:
// TickerTape Classpublic class TickerTape extends Applet implements Runnable{
....
// Initialize Applet public void init(){ .... }
....// Start Applet as thread public void start(){ if(ttapeThread == null){ ttapeThread = new Thread(this);

212 Chapter 8
ttapeThread.start(); } } ... // Change coordinates and repaint public void run(){ while(ttapeThread != null){ try {Thread.sleep(50);} catch (InterruptedException e){} setcoord(); repaint(); } }....// Stop thread then clean up before close public void stop(){ if(ttapeThread != null) ttapeThread.stop(); ttapeThread = null; }
} // End TickerTape
As with all applets, you must use the Runnable interface to implement threads.(You are forced to subclass the Applet class to perform the basic operations ofinitializing and starting your applet.) The reason you would wantto implement threads in an applet is to reduce the processor load for perform-ing operations that occur over and over. One example would be the graphicsroutine in our ticker tape applet that updates the screen to make the text appearas if it floats across the screen. The run() method is coded to redraw the screenand then set the thread to sleep for a specified amount of time:
// Change coordinates and repaintpublic void run() { while(ttapeThread != null) { try { Thread.sleep(50); } catch (InterruptedException e) {} setcoord(); repaint(); }}
The reason for putting the thread to sleep is covered in more detail later in thechapter. The two methods responsible for moving the text are setcoord() andrepaint(). They are executed as long as the thread exists.

Threads 213
Initializing a ThreadBefore you can use a thread, you must initialize it by creating an instance of theThread class. The best way to do this is to use the constructor for the Threadclass. The simple form of this constructor is:
Thread Identifier = new Thread();
A few other variations of this constructor are also supported:
Thread(ObjectReference);Thread(StringName);Thread(ObjectReference, StringName);
In the first example, a parameter that references the object to be used to createthe thread for is provided. We actually used this type of constructor in the Hiagainclass example presented earlier:
Hiagain tony = new Hiagain(); // Create a new objectThread t1 = new Thread(tony); // Create a thread of the object type
The next two constructors allow you to pass a string to create references toindividual threads, which can then be used as symbolic references. We’ll showyou how to use this feature later in this chapter to keep track of multiple threadscreated from the same class instance.
If you return to the ticker tape applet outlined above, you’ll see that the thread iscreated in the start() method for the applet:
// Start Applet as threadpublic void start() { if(ttapeThread == null) { ttapeThread = new Thread(this); ttapeThread.start(); }}
In this case, notice the Thread() constructor is passed the this parameter. Usingthis allows us to tell the constructor the name of the class that implements theRunnable interface. The new thread object that is created is assigned to the

214 Chapter 8
variable ttapeThread. Once the thread has been initialized, the start() methodfor the thread can be called by using the statement ttapeThread.start().
Who Goes First; Who Finishes Last?Although only one thread can be started at a time, don’t expect the first onecalled to always be the one that finishes first. In fact, the order in which threadsare called won’t necessarily determine the order in which they finish. In mostcases, it is impossible to determine which thread will finish first. Let’s return toour simple Hi3People class introduced in the beginning of this chapter, to seehow the execution of threads can be hard to predict:
public class Hi3People implements Runnable { public static void main(String args[]) throws InterruptedException {
int i1 = 0; int i2 = 0;
Hi3People person = new Hi3People(); Thread aThread = new Thread(person, "Person 1"); Thread anotherThread = new Thread(person, "Person 2"); aThread.start(); anotherThread.start(); while ((aThread.isAlive()) || (anotherThread.isAlive())) { if (aThread.isAlive()) { ++i1;} // Counter for the first thread if (anotherThread.isAlive()) { ++i2;} // Counter for the second thread }
System.out.println("The time for Person1 is " + i1 + "\n"); System.out.println("The time for Person2 is " + i2 + "\n");
aThread.stop(); anotherThread.stop(); }
public void run() { System.out.println("Hi " + Thread.currentThread().getName()); }}
First, notice the types of constructors that are used:
Hi3People person = new Hi3People();Thread aThread = new Thread(person, "Person 1");Thread anotherThread = new Thread(person, "Person 2");

Threads 215
Both the object name (person) and a unique string is passed to each call toThread(). Since both threads are created using the same object, the string ispassed to assign each thread its own unique name. In the run() method of theprogram, the getName() method is used to display the name of the currentthread. A companion method named setName() is provided in the Thread classfor setting the name of a thread.
Next, by changing a few lines of code, we converted our while loop to count thetime it takes to process each thread instead of counting the time it takes toprocess the two together. You would need to run this code about 10 to 15 timesbefore running across an instance where the first person beats the second one.This is due to the fact that Java’s scheduler is still in a beta version. (Hopefully,Sun will consider implementing a method for determining the order in whichthreads are processed.) The scheduler is responsible for determining what threadsmay run and which ones must wait in the queue. This process is determined ineither one of two methods: priority or first in first out (FIFO).
Priority versus FIFO SchedulingWhen a thread is processed, it is automatically thrown into a queue. Then, thethread must wait until its turn is up. This process of waiting is called blocking.The implementation of the thread that is ahead of the one waiting will deter-mine if a thread will wait until the current thread has completed. This methodof waiting is referred to as First in First Out (FIFO). Like everything in thisworld, there are exceptions to the rules. If a thread has priority over anotherthread, it switches places with the thread. This process continues up the queueuntil a thread reaches an equal or greater priority or it is executed. The threadsthat were pushed aside may not continue their operation until all the higherpriority threads either step aside or finish. The most common case of this isthe Garbage Collector, the thread that runs in the background and has thelowest priority.
To control how the priority is set for a thread, the Thread class provides thefollowing three variables:
• MAX_PRIORITY
• NORM_PRIORITY
• MIN_PRIORITY

216 Chapter 8
Each of these variables holds integer values that specify a thread’s priority level.For example, MAX_PRIORITY stores a number that indicates the maximumallowable value for a thread’s priority. To set or retrieve the current priority set-ting of a thread, the Thread class provides the setPriority() and getPriority()methods. In setting priorities, you can use one of the three priority instancevariables. For example, the following method call would set a thread’s priority tothe value contained in the NORM_PRIORITY variable:
Thread aThread = new Thread(person, "Person 1");aThread.setPriority(aThread.NORM_PRIORITY);
Controlling the Life of a ThreadA thread is like a human or plant life form; it has a beginning, middle, and anending. During these stages, a thread will take many different paths dependingon the objective to be reached. Figure 8.2, shows the cycle of life that a threadcan possibly take.
The stages of life of a thread are determined by a set of pre-defined methods thatcan be overridden to perform certain tasks.
The start() MethodThis method starts the “birthing” process for a thread. By default, it sets up afew initializations and calls the start() method. You can override it to initializeyour own variables and then call the start() method:
// Start Applet as a thread public void start() { if(ttapeThread == null) { ttapeThread = new Thread(this); ttapeThread.start(); } }
In this example the start() method checks to see if the thread ttapeThread ex-ists. If it doesn’t, it creates an instance of the Thread class and assigns the vari-able ttapeThread to it.

Threads 217
The run() MethodThis method defines the actions to take place during the life of a thread. Here’san example:
// Change coordinates and repaint public void run() { while(ttapeThread != null) { try {Thread.sleep(50);} catch (InterruptedException e) {} setcoord(); repaint(); } }
In this example, the run() method makes the process sleep for 50 millisecondswhile the instance of the class named ttapeThread is not equal to null. Then,the setcoord() method is called followed by the repaint() method.
Figure 8.2The cycle of life pertaining to a thread.
Blocked Running
DEAD
Runnable
NEW BORN
218 Chapter 8
The sleep() MethodThis method releases control of a thread from the processor for a specified amountof time. The syntax for calling this method is:Thread.sleep(Miliseconds);
In the run() method we just presented, the sleep() method is called to allow otherthreads to be processed while the ttapeThread is put on hold. This allows the browserto accept other input and not redraw the screen every instance of the thread.
The suspend() MethodThis method suspends execution of a thread. As the following example shows, itrequires no parameters:
// Handle mouse clicks public boolean handleEvent(Event evt) { if (evt.id == Event.MOUSE_DOWN) { if (suspended) { ttapeThread.resume(); } else { ttapeThread.suspend(); } suspended = !suspended; } return true; }
This line of code states that in the event of a mouse click and the thread isrunning, the thread will be suspended from operation. This allows other threadsin the queue to be processed; but as soon as the thread is reactivated, it willresume its place in the queue as long as a higher priority thread is not executing.
The resume() MethodThis method resumes a suspended thread. Here’s an example of how it is used:
// Handle mouse clicks public boolean handleEvent(Event evt) { if (evt.id == Event.MOUSE_DOWN) { if (suspended) { ttapeThread.resume(); } else { ttapeThread.suspend();

Threads 219
} suspended = !suspended; } return true; }
The resume() method is responsible for reactivating a method that is asleep.This allows for the thread to re-enter the queue.
The yield() MethodThis method causes the current thread to move to the end of the queue and lets thenext thread take control of the processor. Here’s an example of how it can be used:
// Change coordinates and repaint public void run() { while(ttapeThread != null) { setcoord(); repaint(); yield(); } }
If the thread exists, the setcoord() method is executed followed by the repaint()method. Then the yield() method is called to permit the next thread in line toexecute. Unfortunately, this is not wise if we are to depend on a scheduled re-paint(). We could fall victim to the mercy of the threads that will be placedbefore the current thread that is moved to the end of the queue.
The stop() MethodThis method ceases the life of a thread and performs the required cleanup operations:
// Stop thread then clean up before close public void stop(){ if(ttapeThread != null) ttapeThread.stop(); ttapeThread = null; }
In the event that the end of the process is reached, this method is called to cleanup after the thread and perform any final procedures before closing out.

220 Chapter 8
The destroy() MethodThis method causes a thread to die without any cleanup operations being per-formed:
// Stop thread then clean up before close public void stop(){ if(ttapeThread != null) ttapeThread.destroy(); ttapeThread = null; }
In the event that the stop() method of the applet is called, the thread ttapeThreadwill be destroyed and no further lines of code for that object will be executed.
Multiple Objects Interactingwith One SourceWhen you have multiple threads in your application running all at once, theneed for limiting access to devices that write data and perform other criticaltasks becomes absolutely necessary. After all, there is no way of telling whenobjects may try to update a storage device like a file at the same time. As a result,data may become corrupt or false information may be extracted from a device.
Synchronizing RevisitedIf you recall from Chapter 5, we showed you how to declare a synchronizedmethod. If you don’t remember, here is the syntax.
synchronized ReturnType Identifier([ParameterList]) [Throws]{ MethodBody;}
The synchronized modifier is used to declare a method of which only one ob-ject can execute at any one time. This is accomplished by the Java Virtual Ma-chine setting up an object monitor for every portion of code that declares itselfas synchronized. In order for the code to run, the object must attain this moni-tor. In the event that a thread wants to run a synchronized section of code, it is

Threads 221
blocked until the thread ahead of it finishes executing the particular section ofcode. Let’s look at an example of how the synchronized techniques works:
import java.awt.*;import java.lang.*;
public class MyApp2 extends Frame implements Runnable {
static TextArea t1; static TextArea t2;
MyApp2() { // Calls the parent constructor Frame(string title) // Same as setTitle("Duck Duck Goose"); super("Counting example");
// A new panel to the south that 4 buttons and 1 choice t1 = new TextArea(); t2 = new TextArea(); add("East", t1); add("West", t2);
pack(); show(); }
public static void main(String args[]) {
int i = 0;
MyApp2 game = new MyApp2(); Thread person1 = new Thread(game, "duck"); Thread person2= new Thread(game, "goose");
person1.start(); person2.start();
while ((person1.isAlive()) || (person2.isAlive())) { ++i; t2.setText(Integer.toString(i)); }
t2.appendText("\n Time through the loop \n\nYour It"); person1.stop(); person2.stop();
}

222 Chapter 8
public synchronized void run() { int d = 0; int change = 0;
while(d < 100) { t1.appendText("\n " + Thread.currentThread().getName() + " " + d ); ++d; } }
public boolean handleEvent(Event evt) {
switch(evt.id) { case Event.WINDOW_DESTROY: { System.exit(0); return true; }
default: return false;
} }}
The above code initiates two threads that cycle through the synchronized run()method. When you compile this program, you will see the first thread, per-son1, count up to 99, followed by the next thread, person2, count up to 99and end. The thread person2 must wait until the monitor is released by theprevious thread before executing. While this process is occurring, notice thatthe counter timing the execution of the synchronized threading event is run-ning alongside.
Wait() a Second... Notify() Me When...Running a thread through a synchronized method is perfectly fine if you don’tneed any additional information from the outside. But let’s suppose you wish toexecute a thread within a synchronized method, and half way through you needto collect information from an additional thread. The first thread establishes afoundation, perhaps opening a file. Then, the following thread will enter themethod and write the information and leave. Finally, the original thread willperform the cleanup necessary for closing the file. Well, this is all great, butremember we synchronized the method to permit only one thread to execute at

Threads 223
any one time. This is easily remedied by using the wait() method, which causesthe currently executing method to release the monitor to the next thread. Thethread that released the monitor can then reacquire the monitor when the no-tify() method is called from within the same method. The thread waiting thenpicks up right from the point where it began waiting. Let’s modify our previousexample MyApp2 to utilize the wait() and notify() methods:
public synchronized void run() { int d = 0; int change = 0;
while(d < 100) { t1.appendText("\n " + Thread.currentThread().getName() + " " +
Integer.toString(d) ); ++d; if( d == 50) { try { if (Thread.currentThread().getName().equals("duck")) { this.wait(); } } catch(InterruptedException e) { } } } if (Thread.currentThread().getName().equals("goose")) { this.notify(); }}
After compiling the class again and running it, you will notice that the firstthread counts to 50. The thread person1 then releases the monitor to the nextthread, person2. The thread then counts up to 99 and notifies the previousthread to begin executing from where it left off.
Grouping Your ThreadsOnce you have created your threads, they are like children who run loose in themall. No matter how often you call them, they will go off into their own littleworld. Just like children, threads themselves can have parents. These parents areestablished by assigning them to a ThreadGroup. The ThreadGroup is actually
224 Chapter 8
a class just like the one the threads are derived from. You can create aThreadGroup the same way you initialize any class in Java:
ThreadGroup parentAuthor = new ThreadGroup( " The Potts ");
This statement sets up a ThreadGroup named “ The Potts ” with a reference tothe object parentAuthor. From here we can assign threads to this group by pass-ing the name of the ThreadGoup with the initialization of the thread. For ex-ample, if we wish to add to threads to the ThreadGroup parentAuthor, wewould enter the following:
Thread child1 = new Thread( parentAuthor, "Angela");Thread child2 = new Thread( parentAuthor, "Anthony");
Creating hierarchies of these groups is just as easy as assigning threads to thegroup. For example, let’s suppose that the parentAuthor ThreadGroup also wantsto have a subgroup underneath it named petsAuthor. To accomplish this wewould simply use the following code:
ThreadGroup petsAuthor = new ThreadGroup( parentAuthor, "Our Pets");
This allows for quick subgrouping of like threads. There are three main advan-tages to subgrouping threads:
• Controlling the states of all the threads contained within the group withouthaving to individually set each one.
• Retrieving all the threads in the group easily so that you can identify a threadquickly.
• Setting the priority of all the threads within the group with one commandto the group.
Note: Setting the priority of the ThreadGroup only effects the threads of lesspriority than the calling method. If a thread is currently set at a high prior-ity, it will continue at this level until it dies.

Chapter 9The Java AWT


227
9The JavaAWTIf you’re wondering where to look for infor-mation on creating interface components forJava programs, you’ve come to the right place.The AWT provides a treasure chest of power-ful interface classes.
No one would use a programming language these days if it did not have built-in support for common user interface objects like windows, menus, dialogs, andbuttons. Fortunately, the designers of Java did not overlook this. They created apackage called the Abstract Window Toolkit or AWT, which allows Java program-mers to build GUIs very easily. Although AWT is very flexible and powerful, itsshear size will overwhelm you until you understand how it is organized and thebasics for using it.
To help you get more out of the AWT, we’ll look at how the AWT is arranged.Then we’ll present each of the key AWT classes. We’ll show you how to use thelayout manager, and we’ll present the basics for creating interface componentssuch as menus. If we tried to cover the AWT in a lot of detail, we could easilyturn this chapter into an entire book. However, since Java is still a very younglanguage and much of the AWT is still being solidified, we will only cover enoughof this library to get you started with the AWT so that you can use it effectively.You’ll want to keep your browser tuned to Sun’s Java site for the latest informa-tion on this powerful package.
Introducing the AWTWhen you first start to work with the AWT, you may notice that it lacks manyof the features that you would find in other graphical user interface (GUI) li-

228 Chapter 9
braries. This is because Java is a cross-platform language, and the tools providedwith any Java library must be designed so that they can work with all systems.
As you build more complex applets and applications, you will find it difficult tonot use the AWT because of its extreme flexibility. If a component such as awindow or menu doesn’t do what you need, you can simply subclass it and addyour own custom features.
To use the AWT in a Java applet or program, you must first import the AWTpackage by using the import statement as shown here:
import java.awt.*; // Include the AWT
The asterisk (*) is used with the import statement to tell the Java compiler toinclude all classes in the immediate subdirectory. Once you include this pack-age, you can use any of the AWT controls or packages to derive your own. Withjust a little bit of programming effort, you’ll be amazed at the types of interfacecomponents you can create for your Java applications—everything from scrollablewindows to fully functional pop-up menus.
Here’s an example of a simple Java program that displays a window that containsa text message:
import java.awt.*; // Include the AWT
public class testWin extends Frame { // Use the Frame class
public testWin(){} // Constructor
public static void main(String args[]) { testWin Test = new testWin(); // Display a line of text Test.setText("This text will be displayed in the window"); // Add a second line Test.appendText(" Add this text to the next line in the window"); Test.show(); // Display the frame }}
Introducing the Layout ManagerCreating applications with a visual programming language like Visual Basicand Delphi can simply involve choosing from a selection of custom compo-
The Java AWT 229
nents written by other programmers and then dragging a component onto aform. Visual programmers like to refer to this practice as “drop-and-drag”programming. Unfortunately, Java programming is not quite this easy (althoughJava development is headed in this direction). When you place controls onforms to build applications with visual languages, you usually specify absolutepositions. In other words, you tell your development environment exactly whereyou want to place a control—right down to the pixel. The problem with thisapproach is that different operating systems use different methods to displaygraphical components. So, a form that looks good on a PC may not look righton a Mac screen.
If you have only programmed for an environment like Windows, many of theseproblems are not as apparent because Windows takes care of specific system andinterface related details for you. To provide this type of flexibility, Java providesa development tool called the layout manager, which works in conjunction withthe AWT.
Java’s layout manager helps you control where items will appear on the screen.The layout manager is actually an abstract class itself that you can use to createcustom layouts. There are several custom layout methods that come with theJava Development Kit. As we present the AWT in this chapter, you’ll learn moreabout the layout manager.
What About Menus?You can’t create a good user interface without implementing some form of menus.The Macintosh and Windows environments are filled with menus. Computerusers expect your applications to present them with some sort of menuing sys-tem so that they can access the available features. When creating applets, menusare not as important and can be confusing because your Web browser alreadyhas its own menu system. But when you are creating Java applications, you’llmore than likely want to add menus to your programs—and that’s where theAWT comes in. The AWT can help you create menus very easily. However, it’sup to you to make them functional and intuitive.
The AWT HierarchyThe AWT package consists of many classes and subclasses. Most of the controls,like buttons and text fields, are derived from the Component class. Since all of the
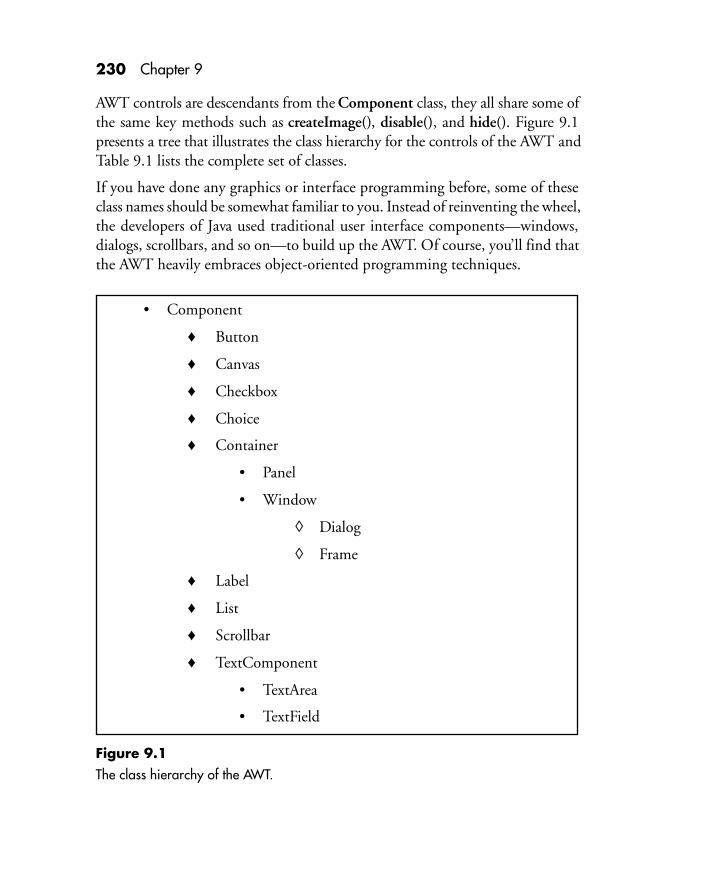
230 Chapter 9
AWT controls are descendants from the Component class, they all share some ofthe same key methods such as createImage(), disable(), and hide(). Figure 9.1presents a tree that illustrates the class hierarchy for the controls of the AWT andTable 9.1 lists the complete set of classes.
If you have done any graphics or interface programming before, some of theseclass names should be somewhat familiar to you. Instead of reinventing the wheel,the developers of Java used traditional user interface components—windows,dialogs, scrollbars, and so on—to build up the AWT. Of course, you’ll find thatthe AWT heavily embraces object-oriented programming techniques.
• Component
♦ Button
♦ Canvas
♦ Checkbox
♦ Choice
♦ Container
• Panel
• Window
◊ Dialog
◊ Frame
♦ Label
♦ List
♦ Scrollbar
♦ TextComponent
• TextArea
• TextField
Figure 9.1The class hierarchy of the AWT.
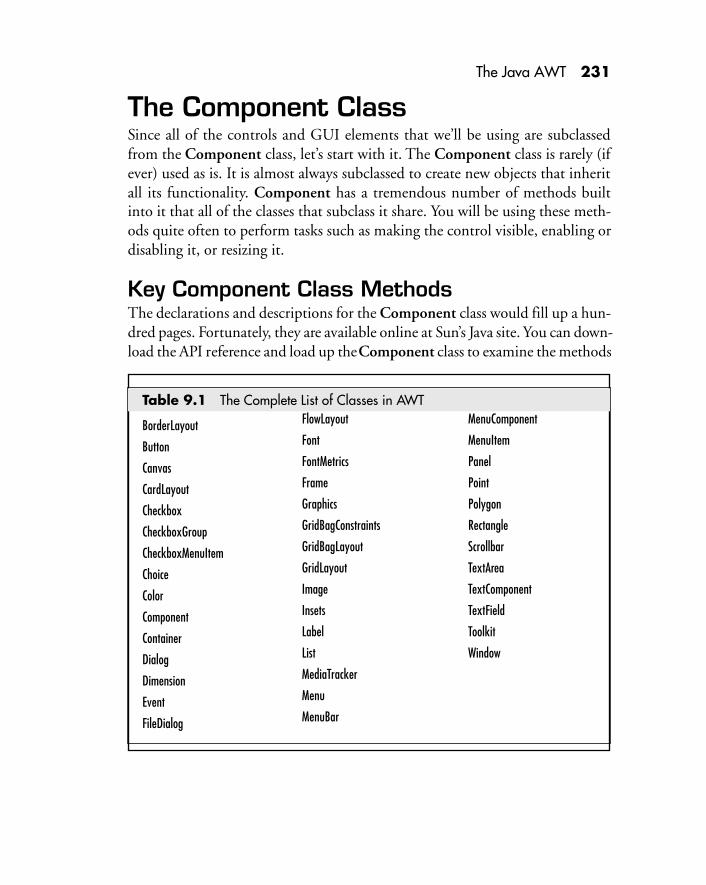
The Java AWT 231
The Component ClassSince all of the controls and GUI elements that we’ll be using are subclassedfrom the Component class, let’s start with it. The Component class is rarely (ifever) used as is. It is almost always subclassed to create new objects that inheritall its functionality. Component has a tremendous number of methods builtinto it that all of the classes that subclass it share. You will be using these meth-ods quite often to perform tasks such as making the control visible, enabling ordisabling it, or resizing it.
Key Component Class MethodsThe declarations and descriptions for the Component class would fill up a hun-dred pages. Fortunately, they are available online at Sun’s Java site. You can down-load the API reference and load up the Component class to examine the methods
FlowLayout
Font
FontMetrics
Frame
Graphics
GridBagConstraints
GridBagLayout
GridLayout
Image
Insets
Label
List
MediaTracker
Menu
MenuBar
MenuComponent
MenuItem
Panel
Point
Polygon
Rectangle
Scrollbar
TextArea
TextComponent
TextField
Toolkit
Window
Table 9.1 The Complete List of Classes in AWT
BorderLayout
Button
Canvas
CardLayout
Checkbox
CheckboxGroup
CheckboxMenuItem
Choice
Color
Component
Container
Dialog
Dimension
Event
FileDialog

232 Chapter 9
available in this class. However, there are a few methods that are important, andyou will probably use them for all the controls that subclass the Componentclass. We’ll introduce these methods next, and we’ll examine some of the keyevent handling methods in Chapter 10.
BOUNDS()This method returns the current rectangular bounds of the component.
DISABLE()This method disables a component.
ENABLE([BOOLEAN])This method enables a component. You can pass zero arguments, or a Booleanargument to enable or disable a control. Here’s a few examples of how this methodcan be called:
myComponent.enable();myComponent.enable(x==1);
GETFONTMETRICS()This method gets the font metrics for the component. It returns null if thecomponent is currently not on the screen.
GETGRAPHICS()This method gets a graphics context for the component. This method returnsnull if the component is currently not on the screen. This method is an absolutenecessity for working with graphics.
GETPARENT()This method gets the parent of the component.
HANDLEEVENT(EVENT EVT)This method handles all window events. It returns true if the event is handledand should not be passed to the parent of the component. The default eventhandler calls some helper methods to make life easier on the programmer. Thismethod is used to handle messages from the operating system.
The Java AWT 233
HIDE()This method hides the component. It performs the opposite operation of show().
INSIDE(INT X, INT Y)This method checks to see if a specified x,y location is “inside” the component.By default, x and y are inside a component if they fall within the bounding boxof that component.
ISENABLED()This method checks to see if the component is enabled. Components are ini-tially enabled.
ISSHOWING()This method checks to see if the component is showing on screen. This meansthat the component must be visible, and it must be in a container that is visibleand showing.
ISVISIBLE()This method checks to see if the component is visible. Components are initiallyvisible (with the exception of top level components such as Frame).
LOCATE(INT X, INT Y)This method returns the component or subcomponent that contains the x,ylocation. It is very useful for checking for mouse movement or mouse clicks.
LOCATION()This method returns the current location of the component. The location willbe specified in the parent’s coordinate space.
MOVE(INT X, INT Y)This method moves the component to a new location. The x and y coordinatesare in the parent’s coordinate space.
REPAINT([TIME])This method repaints the component. This will result in a call to the update()method as soon as possible. You can specify a time argument so that Java knows thatyou want the component repainted within a specified number of milliseconds. You

234 Chapter 9
can also update just a certain portion of a control by sending the x and y coordi-nates that specify where you want to start the update and a width and heightthat specify how much to update. Here are some examples:
// Regular updatemyComponent.update();
// Update within 250 millisecondsmyComponent.update(250);
// Update rectanglemyComponent.update(50, 50, 200, 200);
// Update same rectangle within 250 millisecondsmyComponent.update(250, 50, 50, 200, 200);
RESIZE(INT WIDTH, INT HEIGHT)This method resizes the component to the specified width and height. Youcould also pass it a dimension object instead of the two integers. Here are afew examples:
myComponent.resize(300, 200);
myComponent.show(new dim(300, 200));
SETFONT(FONT)This method sets the font of the component. The argument passed is a Fontobject. For example, this method call
myComponent.setFont(new Font("Helvetica", Font.PLAIN, 12);
would change the font of myComponent to a Helvetica type face with no boldingor italics or underline and a point size of 12.
SHOW([BOOLEAN])This method “shows” the component. By calling this method you make acontrol visible or not. It can also be passed a conditional statement. Here are afew examples:
myComponent.show();myComponent.show(x==1);

The Java AWT 235
SIZE()This method returns the current size of the component. The size is returned indimensions of width and height.
The Frame ClassThe Frame class is used to create standard application windows. It is a directdescendant of the Window class and is used to create windows that automati-cally include the menu bar, title bar, control elements, and so on. Frame lookslike a standard window that you would expect to see running under most oper-ating systems like Windows or Macintosh OS.
You will probably use the Frame class to create window interface componentsfor the majority of your applications. However, when you need to create customwindows for special situations, you may need to use the Window class instead.
Hierarchy for Framejava.lang.Object
java.awt.Componentjava.awt.Container
java.awt.Windowjava.awt.Frame
Declaration for FrameTo create a frame, you need to use a constructor to initialize your class. Theconstructor method does not even need to have any code in it; the method justneeds to be provided so that you can instantiate your object. The followinglisting shows a complete Java application that uses a frame:
import java.awt.*; // Include the AWT
public class testWin extends Frame { // Use the Frame class
public testWin(){} // Constructor
public static void main(String args[]) { testWin Test = new testWin(); Test.show(); // Display a window }}
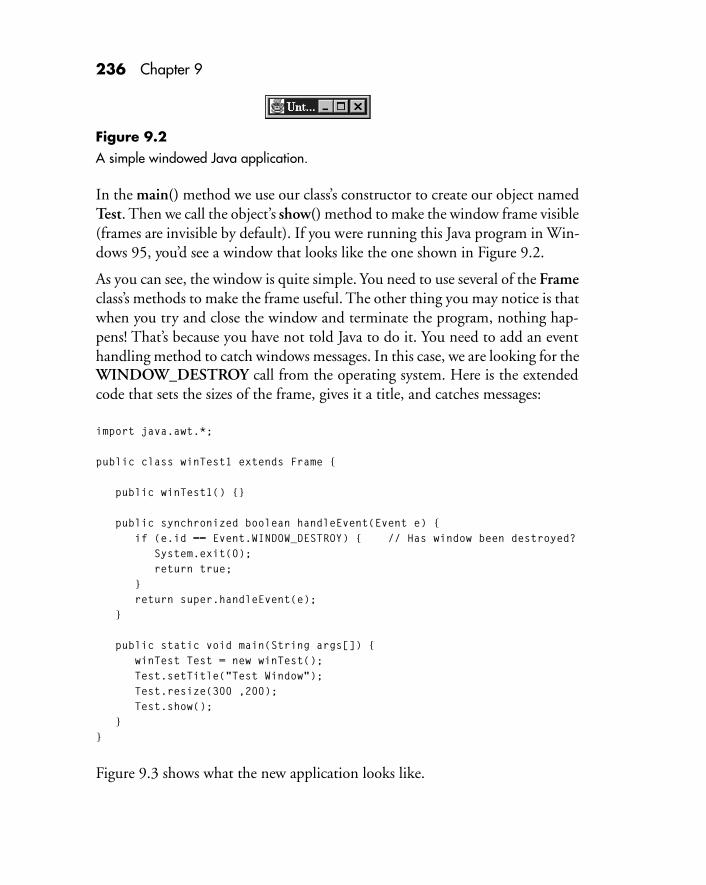
236 Chapter 9
In the main() method we use our class’s constructor to create our object namedTest. Then we call the object’s show() method to make the window frame visible(frames are invisible by default). If you were running this Java program in Win-dows 95, you’d see a window that looks like the one shown in Figure 9.2.
As you can see, the window is quite simple. You need to use several of the Frameclass’s methods to make the frame useful. The other thing you may notice is thatwhen you try and close the window and terminate the program, nothing hap-pens! That’s because you have not told Java to do it. You need to add an eventhandling method to catch windows messages. In this case, we are looking for theWINDOW_DESTROY call from the operating system. Here is the extendedcode that sets the sizes of the frame, gives it a title, and catches messages:
import java.awt.*;
public class winTest1 extends Frame {
public winTest1() {}
public synchronized boolean handleEvent(Event e) { if (e.id == Event.WINDOW_DESTROY) { // Has window been destroyed? System.exit(0); return true; } return super.handleEvent(e); }
public static void main(String args[]) { winTest Test = new winTest(); Test.setTitle("Test Window"); Test.resize(300 ,200); Test.show(); }}
Figure 9.3 shows what the new application looks like.
Figure 9.2A simple windowed Java application.

The Java AWT 237
We are gong to discuss event handling in more detail in the next chapter, sodon’t get worried if you do not understand that part of the above code.
What you should notice is the two new calls to two of the frames methods:setTitle() and resize(). These methods perform the function they are namedafter; they set the title of our application and resize it respectively.
Let’s look at the methods that are specific to the Frame class.
Methods for the Frame Class
DISPOSE()This method removes the frame. It must be called to release the resources thatare used to create the frame. This method should be called when you exit awindow in an applet. In an application, you would usually use the System.exit()method to terminate the program and release all memory used by the applica-tion. This method overrides the dispose() method from the Window class.
GETICONIMAGE()This method returns the icon image for the frame.
GETMENUBAR()This method gets the menu bar for the frame.
GETTITLE()This method gets the title of the frame.
Figure 9.3A fully functioning application using a frame.

238 Chapter 9
ISRESIZABLE()This method returns true if the user can resize the frame.
REMOVE(MENUCOMPONENT M)This method removes the specified menu bar from the frame.
SETCURSOR(IMAGE IMG)This method sets the current cursor image that will be used while the cursor iswithin the frame.
SETICONIMAGE(IMAGE IMG)This method sets the image to display when the frame is iconized. Note that notall platforms support the concept of iconizing a window. The icon will also bedisplayed in the title window in Windows 95.
SETMENUBAR(MENUBAR MB)This method sets the menu bar for the frame to the specified MenuBar.
SETRESIZABLE(BOOLEAN BOOL)This method sets the resizable flag.
SETTITLE(STRING TITLE)This method sets the title for the frame to the specified title.
The Panel ClassPanels are probably one of the most useful components that no one will ever see.Most of the time, panels are just used as storage containers for other components.You could also use a panel for drawing or to hold images, but panels are notusually used for these tasks.
Panels are important because they offer you a way to gain very strict control overthe layout of the other interface controls in your program. Unless you have avery simple application, you will need multiple controls on the screen at once.Usually these controls will not all fit where you want them using one layout classor another. Panels provide a mechanism so that you can mix and match.

The Java AWT 239
Let’s look at an example. Assume you have a frame that you want to fill with atext field in the upper part of the frame, and three buttons lined up along thebottom. If you only used a single layout class for the entire form, you would nothave enough control to do this. Figure 9.4 illustrates what we want the frame tolook like. Figure 9.5 and 9.6 shows the best you can achieve using a single layoutclass. This is not bad, but if you resize the frame the layout gets pretty ugly.
What we need to be able to do is use one type of layout class for the upper partof the frame, and another for the bottom. We can do this by using a pair ofpanels, one for the top using a border style layout and another panel for thebottom using a flow style layout. Now, when we add our controls, we add themto their respective panels instead of the frame, and everything is taken care of for
Figure 9.4Creating a window using the Panel class.
Figure 9.5A close approximation with a single layout class.
Figure 9.6Resizing the Panel.
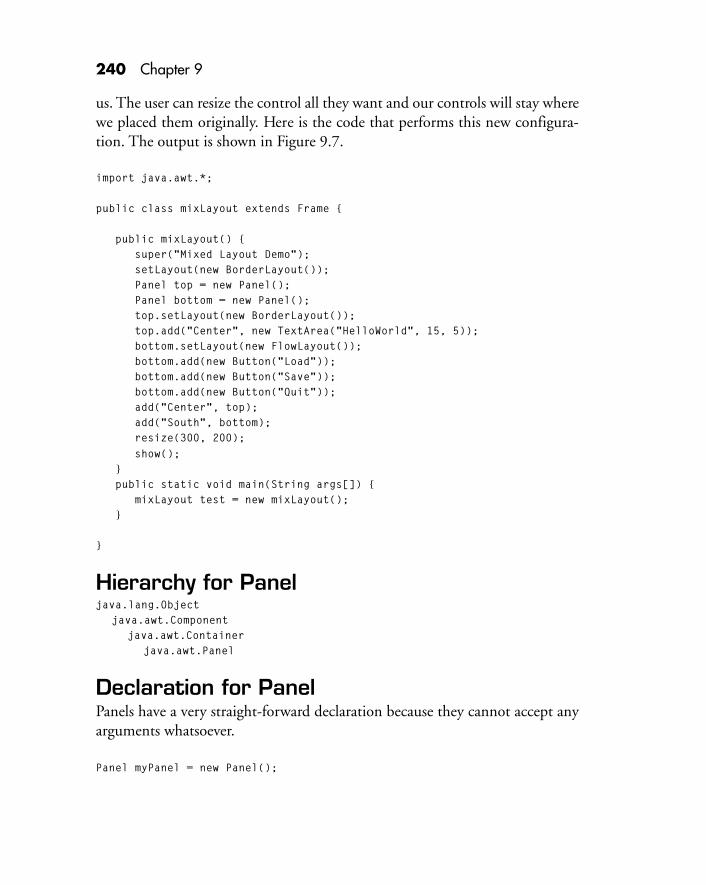
240 Chapter 9
us. The user can resize the control all they want and our controls will stay wherewe placed them originally. Here is the code that performs this new configura-tion. The output is shown in Figure 9.7.
import java.awt.*;
public class mixLayout extends Frame {
public mixLayout() { super("Mixed Layout Demo"); setLayout(new BorderLayout()); Panel top = new Panel(); Panel bottom = new Panel(); top.setLayout(new BorderLayout()); top.add("Center", new TextArea("HelloWorld", 15, 5)); bottom.setLayout(new FlowLayout()); bottom.add(new Button("Load")); bottom.add(new Button("Save")); bottom.add(new Button("Quit")); add("Center", top); add("South", bottom); resize(300, 200); show(); } public static void main(String args[]) { mixLayout test = new mixLayout(); }
}
Hierarchy for Paneljava.lang.Object
java.awt.Componentjava.awt.Container
java.awt.Panel
Declaration for PanelPanels have a very straight-forward declaration because they cannot accept anyarguments whatsoever.
Panel myPanel = new Panel();
The Java AWT 241
Methods for PanelPanels have very few new methods ouside of the ones inherited from the Con-tainer class. The key new method that is introduced is setlayout().
SETLAYOUT(LAYOUTMANAGER)As you have already seen, the setlayout() method is used to define which layoutmanager will be used to place controls on the panel. If you do not set a layoutmanager, the panel control defaults to flowLayout().
The Label ClassThe Label class defines a very simple control that is simply used to display a textstring. This text string is usually used to indicate what tasks are controlled byanother user interface control. For example, if you had a group of radio buttons,a label control might be used to tell the user what the group is about.
Hierarchy for Labeljava.lang.Object
java.awt.Componentjava.awt.Label
Declaration for LabelThe most common declaration for a label is to assign the text string as the con-trol is being declared. Here’s an example:
new Label("Fruits of the world:");
Figure 9.7The new two-panel program with different layout methods.
242 Chapter 9
We can also assign the text string to an object variable like this:
Label fruitLabel = new Label("Fruits of the world:");
Table 9.2 shows the three ways you can declare a Label class.
Methods for LabelLabels have very little functionality of their own—they can’t even process mouseclicks. They are not intended to do much more than sit there and display theirstring. There are, however, a few methods you should know about.
GETALIGNMENT()This method returns the current alignment of the label.
GETTEXT()This method does what it sounds like—it returns the text the label is displaying.
SETALIGNMENT(INT)This method changes the alignment of the label. The argument is the same asthe one used with Label.LEFT, Label. CENTER, and Label.RIGHT (see Table9.2 for more information).
Figure 9.8 shows a few labels with different alignments. Here is the code used toproduce them:
add(new Label("Left")); // no need to specify alignment because it // defaults to leftadd(new Label("Center", Label.CENTER));add(new Label("Right", Label.RIGHT));
Table 9.2 Options for Declaring a Label Class
Declaration Description
Label() This constructor will create an empty label.
Label(String) This constructor will create a label with the given string.
Label(String, int) This constructor will create a label with the given string as well as define thealignment of the string. The int part of the declaration is represented by settingit to Label.LEFT, Label.CENTER, or Label.RIGHT. (These labels should bepretty self-explanatory.) Remember though, that if you do not assign analignment, the label control will default to left-justified.

The Java AWT 243
SETTEXT(STRING)This method sets or changes the displayed text.
Button ClassThe Button class is one of the most often used classes, for obvious reasons.How often do you see Windows or Mac programs without some sort ofbutton somewhere?
Buttons are UI components that trigger actions when they are pressed. Theyhave multiple states to provide feedback to the user. The neat thing about but-tons (and all the UI elements for that matter) is that a button you create for aJava program will change its appearance depending on the operating system.That’s one of the benefits of cross-platform. A button on your application orapplet will look like a standard Windows button on a PC. Or, it will look like astandard Mac button on a Mac. The disadvantage here is that if you create otherelements that are dependent on the size and/or shape of the graphics for yourbutton, then you will run into trouble.
Figure 9.9 illustrates a few different buttons. Notice that the size of the buttonsdepends on the length of the caption.
Hierarchy for Buttonjava.lang.Object
java.awt.Componentjava.awt.Button
Declaration for ButtonButtons have two different constructor options. The first one simply createsa blank button. The second option creates a button that you assign a stringto display.
Figure 9.8The Label component.

244 Chapter 9
new Button(); // Empty buttonnew Button(String); // Button with "String" as the caption
Methods for ButtonThere are only two methods specific to the button component.
GETLABEL()This method returns the current caption of the button.
SETLABEL()This method changes the caption of the button.
The real power behind buttons is realized when you handle the events a buttontriggers. This is usually handled in the handleEvent() method that we will beshowing you how to use in the next chapter.
The Canvas ClassThe Canvas class is a very simple component. It is designed to be subclassed andused as a container for graphics methods, much like an artist’s canvas.
Hierarchy for Canvasjava.lang.Object
java.awt.Componentjava.awt.Canvas
Figure 9.9A few Button components.

The Java AWT 245
Declaration for CanvasThe Canvas component has only a single constructor:
new Canvas();
Methods for CanvasThe only method that is used with the Canvas component is the paint() methodwhich is called to update the contents. If you do not override this method, theCanvas component is pretty much worthless because it has very little function-ality of its own.
When you subclass a Canvas component, you can really have some fun. Over-ride the paint() method and add in calls to painting and geometric methods.Or, you can create a Canvas object and make up your own calls to it that react tobutton clicks, mouse movements, and so on.
The Checkbox ClassThe Checkbox class is actually two controls in one. Along with checkboxes youalso can implement the functionality of radio buttons by grouping multiplecheckbox controls. Checkboxes are great for giving yes/no options. Radio but-tons are good for multiple choice questions.
Figure 9.10 shows a couple of individual checkboxes on the left and a singlegroup of checkboxes on the right. Here is the code that produced them:
import java.awt.*;
public class testMe extends Frame {
public testMe() { super("Checkbox Demo"); Panel P1 = new Panel(); Panel P2 = new Panel(); CheckboxGroup G1 = new CheckboxGroup(); setLayout(new GridLayout(1,2)); add(P1); add(P2); P1.setLayout(new FlowLayout()); P1.add(new Checkbox("E-Mail Tom")); P1.add(new Checkbox("E-Mail Jack")); P2.setLayout(new FlowLayout());
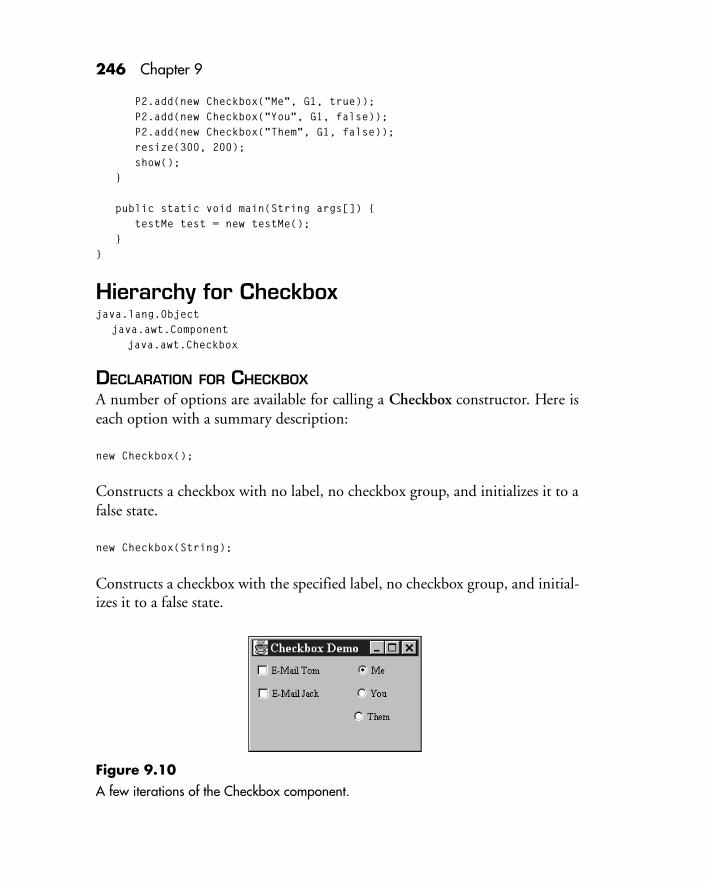
246 Chapter 9
P2.add(new Checkbox("Me", G1, true)); P2.add(new Checkbox("You", G1, false)); P2.add(new Checkbox("Them", G1, false)); resize(300, 200); show(); }
public static void main(String args[]) { testMe test = new testMe(); }}
Hierarchy for Checkboxjava.lang.Object
java.awt.Componentjava.awt.Checkbox
DECLARATION FOR CHECKBOXA number of options are available for calling a Checkbox constructor. Here iseach option with a summary description:
new Checkbox();
Constructs a checkbox with no label, no checkbox group, and initializes it to afalse state.
new Checkbox(String);
Constructs a checkbox with the specified label, no checkbox group, and initial-izes it to a false state.
Figure 9.10A few iterations of the Checkbox component.
The Java AWT 247
new Checkbox(String, boolean);
Constructs a checkbox with the specified label, no checkbox group, and initial-izes it to a specified boolean state.
new Checkbox(String, CheckboxGroup, boolean);
Constructs a checkbox with the specified label, specified checkbox group, andinitializes it to a specified boolean state.
Methods for CheckboxAlthough checkboxes are simple UI components, they offer us a lot of optionsand therefore provide a few custom methods we can use to control them.
GETCHECKBOXGROUP()This method returns the checkbox group that this checkbox belongs to.
GETLABEL()This method gets the label of the button.
GETSTATE()This method returns the boolean state of the checkbox.
SETCHECKBOXGROUP(CHECKBOXGROUP)This method sets the CheckboxGroup of the check box.
SETLABEL(STRING)This method changes the label of the checkbox.
SETSTATE(BOOLEAN)This method sets the checkbox to the specified boolean state.
The Choice ClassThe Choice class implements a pop-up menu that shows the currently chosenoption normally; but when it has the focus, it opens up and displays all theoptions a user can select from. Figure 9.11 shows a Choice component at restand Figure 9.12 shows the same component in action.

248 Chapter 9
Here is the code that creates the Choice component shown in Figures 9.11and 9.12:
import java.awt.*;
public class testMe extends Frame {
public testMe() { super("Choice Demo"); Choice C1 = new Choice(); setLayout(new FlowLayout()); add(C1); C1.addItem("You"); C1.addItem("Me"); C1.addItem("Them"); C1.addItem("Us"); C1.addItem("Everyone"); resize(300, 200); show(); }
public static void main(String args[]) { testMe test = new testMe(); }}
Hierarchy for Choicejava.lang.Object
java.awt.Componentjava.awt.Choice
Declaration for ChoiceWhen you are creating a Choice component, you cannot set any options. All theoptions must be set after the object is created. The call for initializing Choice issimply:
new Choice();
Methods for ChoiceThe set of special methods available for the Choice class include:

The Java AWT 249
Figure 9.12The Choice component with the focus.
Figure 9.11The Choice component without the focus.
ADDITEM(STRING)This method adds an item to the list of choices.
COUNTITEMS()This method returns the number of items.
GETITEM(INT)This method returns the item at the specified index.
GETSELECTEDINDEX()This method returns the index of the currently selected item.
GETSELECTEDITEM()This method returns a string representation of the current choice.
SELECT(INT)This method selects the item with the specified index position.
250 Chapter 9
SELECT(STRING)This method selects the item with the specified String if present.
The List ClassThe List class is actually very similar to Choice except that it allows you todisplay multiple items and scroll through the ones not displayed. It also givesyou the ability to select multiple items.
Figure 9.13 shows a form that contains a simple list with multiple elements.Here is the code that created these lists:
import java.awt.*;
public class testMe extends Frame {
public testMe() { super("List Demo"); List L1 = new List(); setLayout(new FlowLayout()); add(L1); L1.addItem("You"); L1.addItem("Me"); L1.addItem("Them"); L1.addItem("Us"); L1.addItem("Everyone"); resize(300, 200); show(); }
public static void main(String args[]) { testMe test = new testMe(); }}
Hierarchy for Listjava.lang.Object
java.awt.Componentjava.awt.List

The Java AWT 251
Figure 9.13Create lists with the List class.
Declaration for ListHere are the two constructors you can call to initialize a List class:
new List();
Creates a scrolling list initialized with no visible lines and multiple selectionsdisabled.
new List(int, boolean);
Creates a new scrolling list initialized with the specified number of visible linesand a boolean stating if multiple selections are allowed or not.
Methods for ListYou’ll find a number of methods for this class because of all the different optionsit offers.
ADDITEM(STRING)This method adds the specified item to the end of list.
ALLOWSMULTIPLESELECTIONS()This method returns true if the list allows multiple selections.
CLEAR()This method clears the list.

252 Chapter 9
COUNTITEMS()This method returns the number of items in the list.
DELITEM(INT)This method deletes an item from the list at the specified index.
DELITEMS(INT, INT)This method deletes multiple items from the list. Items are deleted from theindex position specified by the first parameter to the index position specified bythe second parameter.
DESELECT(INT)This method deselects the item at the specified index.
GETITEM(INT)This method gets the item associated with the specified index.
GETROWS()This method returns the number of visible lines in the list.
GETSELECTEDINDEX()This method returns the selected item in the list or -1 if no item is selected.
GETSELECTEDINDEXES()This method returns the selected indexes in the list in the form of an array.
GETSELECTEDITEM()This method returns the selected item in the list or null if no item is selected, orit returns the first selected item if multiple items are selected.
GETSELECTEDITEMS()This method returns the selected items in the list into an array of strings.
GETVISIBLEINDEX()This method gets the index of the item that was last made visible by the methodmakeVisible().
The Java AWT 253
ISSELECTED(INT)This method returns true if the item at the specified index has been selected;false otherwise.
MAKEVISIBLE(INT)This method forces the item at the specified index to be visible. The methodautomatically scrolls the list to display the specified index.
MINIMUMSIZE()This method returns the minimum dimensions needed for the list.
MINIMUMSIZE(INT)This method returns the minimum dimensions needed for the number of rowsin the list.
PREFERREDSIZE()This method returns the preferred dimensions needed for the list.
PREFERREDSIZE(INT)This method returns the preferred dimensions needed for the list with the speci-fied amount of rows.
SELECT(INT)This method selects the item at the specified index.
SETMULTIPLESELECTIONS(BOOLEAN)This method sets up a list to allow for multiple selections or not.
TextField and TextArea ClassesThe TextField and TextArea classes implement other controls that you will useoften. They are often accompanied with Label controls that tell the user what atext entry box is used for. Text fields can only have a single line of text, while textareas can have multiple lines like a word processor. One of the nice things aboutthe TextField and TextArea components is that they interact with both thekeyboard and the mouse. You can enter text by typing it on the keyboard. Then,you can use the mouse to place the cursor within that text. If you are a Windows
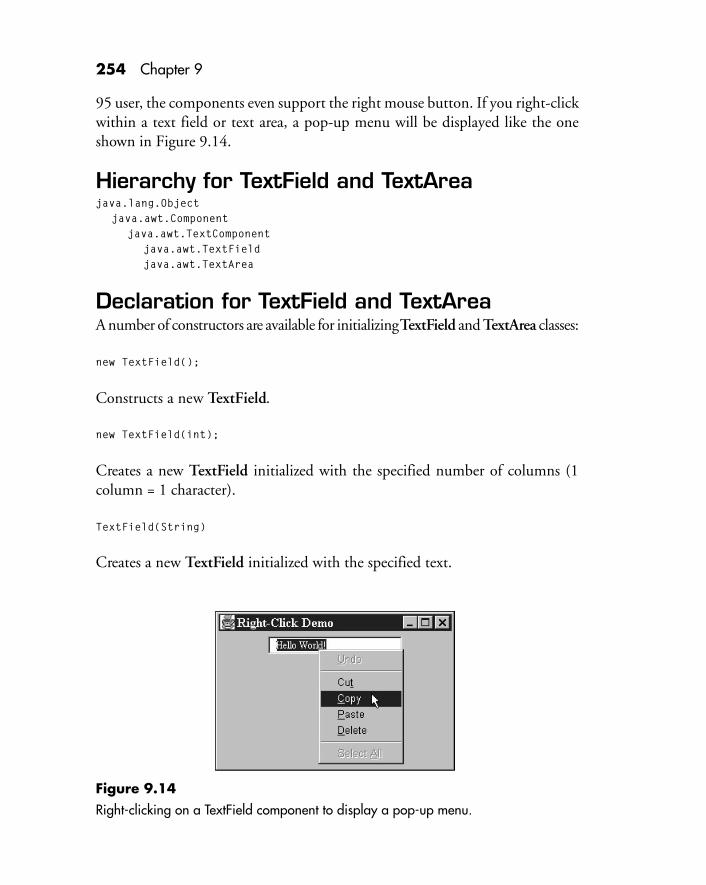
254 Chapter 9
Figure 9.14Right-clicking on a TextField component to display a pop-up menu.
95 user, the components even support the right mouse button. If you right-clickwithin a text field or text area, a pop-up menu will be displayed like the oneshown in Figure 9.14.
Hierarchy for TextField and TextAreajava.lang.Object
java.awt.Componentjava.awt.TextComponent
java.awt.TextFieldjava.awt.TextArea
Declaration for TextField and TextAreaA number of constructors are available for initializing TextField and TextArea classes:
new TextField();
Constructs a new TextField.
new TextField(int);
Creates a new TextField initialized with the specified number of columns (1column = 1 character).
TextField(String)
Creates a new TextField initialized with the specified text.

The Java AWT 255
new TextField(String, int);
Creates a new TextField initialized with the specified text and number of columns.
new TextArea();
Creates a new TextArea.
new TextArea(int, int);
Creates a new TextArea with the specified number of rows and columns.
new TextArea(String);
Constructs a new TextArea with the specified text displayed.
new TextArea(String, int, int);
Creates a new TextArea with the specified text and the specified number of rowsand columns.
Methods for TextField and TextAreaMany of the methods used with these two classes are actually methods of theTextComponent class which both of these classes subclass. Let’s look at thesemethods first.
GETSELECTIONEND()This method returns the selected text’s end position.
GETSELECTEDTEXT()This method returns the selected text contained in the text component.
GETSELECTIONSTART()This method returns the start position of the selected text. If no text is selected,the method returns -1.
GETTEXT()This method returns the text contained in the text component.

256 Chapter 9
ISEDITABLE()This method returns a boolean value that tells us if the text component is editableor not. Text components are editable by default.
SELECT(INT, INT)This method selects the text found between the specified start and end loca-tions.
SELECTALL()This method causes all of the text in the text component to be selected.
SETEDITABLE(BOOLEAN)This method sets whether or not this text component can be edited.
SETTEXT(STRING)This method changes the text of the text component to the specified text.
Now, let’s look at a few methods that are specific to the TextField component:
ECHOCHARISSET()This method returns true if the TextField has a character set for echoing. Echo-ing is used for situations where you do not want the text people are typing to bedisplayed.
GETCOLUMNS()This method returns the number of columns in the TextField.
GETECHOCHAR()This method returns the character to be used for echoing. The character is notreturned in a String format, just a simple char.
MINIMUMSIZE()This method returns the minimum size dimensions needed for the TextField incolumns.
MINIMUMSIZE(INT)This method is used to request a minimum size for the text box. The parameterspecifies the number of columns for the text box. The method returns the mini-

The Java AWT 257
mum size dimensions needed for the TextField with the specified amount ofcolumns.
PREFERREDSIZE()This method returns the preferred size dimensions needed for the TextField class.
PREFERREDSIZE(INT)This method returns the preferred size dimensions needed for the TextFieldwith the specified amount of columns being passed to it.
SETECHOCHARACTER(CHAR)This method sets the echo character for the TextField. Most often you’ll want toset this character to the asterisk symbol, especially if you are working with pass-word boxes.
Now, we need to look at the methods specific to the TextArea class:
GETCOLUMNS()This method returns the number of columns in the TextArea.
GETROWS()This method returns the number of rows in the TextArea.
INSERTTEXT(STRING, INT)This method inserts the specified text at the specified position. The position tellsJava the number of characters it needs to move over before it inserts the string.
PREFERREDSIZE()This method returns the preferred size dimensions of the TextArea.
PREFERREDSIZE(INT, INT)This method returns the row and column dimensions of the TextArea.
MINIMUMSIZE()This method returns the minimum size dimensions of the TextArea.
MINIMUMSIZE(INT, INT)This method returns the specified minimum size dimensions of the TextArea.

258 Chapter 9
Figure 9.15A typical Java scrollbar.
REPLACETEXT(STRING, INT, INT)This method replaces text from the indicated start to end positions with thespecified new text.
The Scrollbar ClassSeveral of the Java components we’ve been discussing in this chapter automati-cally use scrollbars when needed. For example, the TextArea control we justdescribed will automatically create scrollbars when the text runs off the edge orthe bottom. Scrollbars can also be created as standalone components. Scrollbarsare useful when you need a user to pick a value. They offer a graphical interfacerather than a simple text box where a user would usually have to type in a value.
Scrollbars are implemented using the concepts of a minimum, maximum, andcurrent value. A scrollbar can be moved in three ways: small increments, largeincrements, or to an absolute position. The small increment occurs when theuser clicks on the arrows at the top or bottom of the scrollbar. The large changesoccur when the user clicks on the space between the current position and eitherarrow. Finally, the absolute change occurs when the user drags the current loca-tion indicator (sometimes called an elevator) and drags it to a specific spot withinthe scrollbar. Figure 9.15 shows a standard scrollbar and labels each part.
Let’s consider a very typical use of a scrollbar. In this case, we have two compo-nents, a Textfield control and a Scrollbar control. We want to display the cur-rent value of the Scrollbar in the text box. Also, when the user changes the valuein the text box, the scrollbar should match the change. Figure 9.16 shows whatthis simple application looks like.

The Java AWT 259
Figure 9.16A Scrollbar control and a Textfield control with linked values.
And, here is the code for the entire application. Type it in and give it a try:
import java.awt.*;
public class ScrollTest extends Frame { TextField text; Scrollbar scroll; public ScrollTest() { super("Scroll-Text Test"); text = new TextField(5); scroll = new Scrollbar(Scrollbar.VERTICAL, 0, 10, 0, 100); setLayout(new FlowLayout()); add(text); add(scroll); resize(300, 200); show(); } public boolean handleEvent(Event evt) { if (evt.target.equals(scroll)) { text.setText("" + scroll.getValue()); } else if (evt.target.equals(text)) {scroll.setValue(Integer.parseInt(text.getText())); } else if (evt.id == Event.WINDOW_DESTROY) { System.exit(0); return true; } return super.handleEvent(evt); } public static void main(String args[]) { ScrollTest test = new ScrollTest(); }}

260 Chapter 9
Keep in mind that the scrollbar, like all the other controls, will change its ap-pearance to match the operating system. Obviously, you would not want Win-dows 95 style scrollbars being displayed on a Macintosh. That would sure causea commotion!
Hierarchy for Scrollbarjava.lang.Object
java.awt.Componentjava.awt.Scrollbar
Declaration for ScrollbarThe three constructors provided for initializing scrollbars include:
new Scrollbar();
Constructs a new vertical Scrollbar.
new Scrollbar(int);
Constructs a new Scrollbar with the specified orientation. You can specifyScrollbar.HORIZONTAL or Scrollbar.VERTICAL. Scrollbars are verticalby default.
new Scrollbar(int, int, int, int, int);
Creates a new Scrollbar with the specified orientation, current value, large changesize, minimum value, and maximum value.
Methods for ScrollbarHere are the set of specialized methods for the Scrollbar class:
GETMAXIMUM()This method returns an integer representing the maximum value of the scrollbar.
GETMINIMUM()This method returns an integer representing the minimum value of the scrollbar.

The Java AWT 261
GETORIENTATION()This method returns an integer that gives us the orientation for the scrollbar.You can check the returned integer against Scrollbar.HORIZONTAL andScrollbar.VERTICAL to determine the scrollbar’s orientation.
GETVALUE()This method returns an integer representing the current value of the scrollbar.
GETVISIBLE()This method returns the visible amount of the scrollbar.
SETVALUE(INT)This method sets the value of the scrollbar to the specified value. If you try to setthe current value to a number that is greater than the maximum or less than theminimum, the number becomes the new maximum or minimum, respectively.
SETVALUES(INT, INT, INT, INT)This method changes the values for the scrollbar. The arguments in order ofappearance include:
• value - the position in the current window
• large change - the value that will be moved each time the user clicks in thearea between the elevator and the arrows. This value is also called the amountvisible per page.
• minimum - the minimum value of the scrollbar
• maximum - the maximum value of the scrollbar
Building MenusMenus in Java are as easy to build and manage as the other visual components.Every part of a menu, from the menu bar to individual items is represented as aseparate class, each having specialized properties and methods. Let’s start ourinvestigation of menus with the main component—the menu bar. Then, we’llwork our way down into the other more specialized components, such as a menuitself and menu items.

262 Chapter 9
The MenuBar ClassEach window or frame you create in a Java application or applet can have itsown menu bar. The standard menu bar is always displayed along the top of thewindow. You are not allowed to have multiple menu bars within a single win-dow unless you create the entire system yourself (but why would you want to!).
The MenuBar class itself provides little functionality. By itself it looks like ablank bar across the top of your window. To give your menuing system func-tionality, you need to add Menu and MenuItem components, which we willdiscuss later.
Hierarchy for MenuBarjava.lang.Object
java.awt.MenuComponentjava.awt.MenuBar
Declaration for MenuBarOnly a single constructor is provided for initializing a MenuBar class. This con-structor creates a menu object but does not display it. You must first assign theMenuBar to a frame for it to be displayed:
new MenuBar();
Methods for MenuBar
ADD(MENU)This method adds the specified menu to the menu bar.
COUNTMENUS()This menu returns an integer representing the number of menus on themenu bar.
GETHELPMENU()This method returns the name of the menu component on the current menubar that has been designated as the “Help” menu. Help menus are discussed inthe next section in more detail.

The Java AWT 263
Figure 9.17Examples of menus created with the Menu class.
GETMENU(INT)This menu gets the specified menu. Input is an integer representing the indexposition of a menu and it returns a Menu object.
REMOVE(INT)This method removes the menu located at the specified index from the menu bar.
REMOVE(MENU)This method removes the specified menu from the menu bar.
SETHELPMENU(MENU)This method sets the current help menu to the specified menu on the menu bar.
The Menu ClassThe Menu class is used to implement the selections for the section headings foreach type of menu. Typical Menu components will be labeled “File,” “Options,”and “Help.” Figure 9.17 shows a few menus.
Menu classes are always children of a single MenuBar class. They usually haveMenuItem classes as children. However, a Menu class does not need to have menuitems under it; it can react to events on its own. In Figure 9.17, you could click onthe Menu component labeled “File” to expose its MenuItem children. However, ifyou were to click on the “Help” Menu item, it would not display any childMenuItem components because it does not have any. It acts on its own.
Hierarchy for Menujava.lang.Object
java.awt.MenuComponentjava.awt.MenuItem
java.awt.Menu

264 Chapter 9
Declaration for MenuHere are the two constructors provided for the Menu class:
new Menu(String);
Constructs a new Menu with the specified string as the label. This menu willnot be able to be “torn off.” Tear-off menus are menus that will still appear onthe screen after the mouse button has been released.
new Menu(String, boolean);
Constructs a new Menu with the specified label. The menu will be able to betorn off if the boolean value is set to true.
Methods for MenuThe specialized methods for the Menu class include:
ADD(MENUITEM)This method adds the specified item to the menu.
ADD(STRING)This method adds an item with the specified label to the menu.
ADDSEPARATOR()This method adds a separator line to the menu at the current position.
COUNTITEMS()This method returns the number of elements in the menu as an integer.
GETITEM(INT)This method returns the menu item located at the specified index of the menu.
ISTEAROFF()This method returns true if the menu is a tear-off menu.
REMOVE(INT)This method deletes the item at the specified index from the menu.
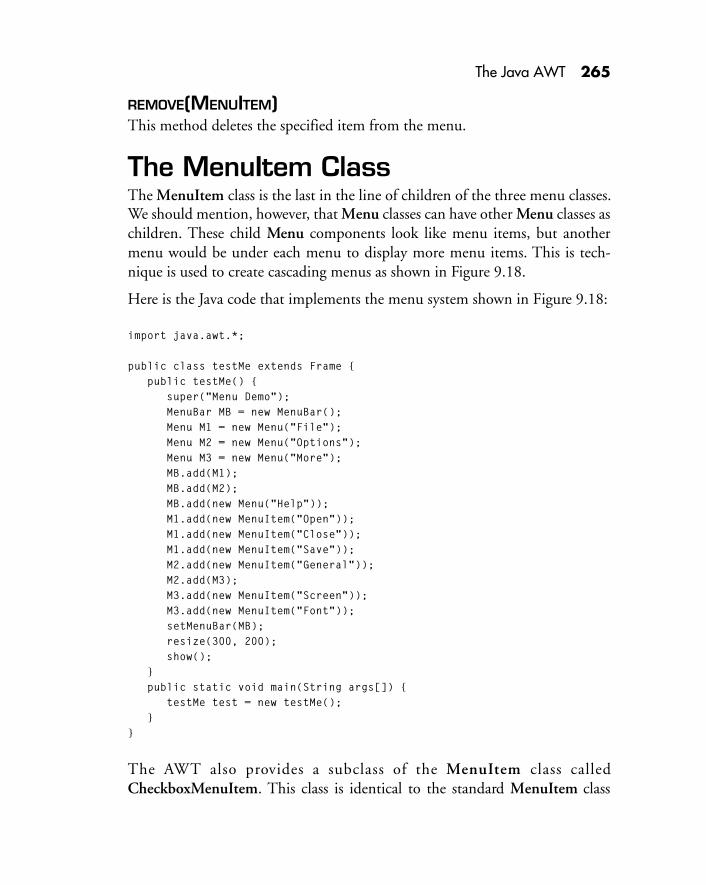
The Java AWT 265
REMOVE(MENUITEM)This method deletes the specified item from the menu.
The MenuItem ClassThe MenuItem class is the last in the line of children of the three menu classes.We should mention, however, that Menu classes can have other Menu classes aschildren. These child Menu components look like menu items, but anothermenu would be under each menu to display more menu items. This is tech-nique is used to create cascading menus as shown in Figure 9.18.
Here is the Java code that implements the menu system shown in Figure 9.18:
import java.awt.*;
public class testMe extends Frame { public testMe() { super("Menu Demo"); MenuBar MB = new MenuBar(); Menu M1 = new Menu("File"); Menu M2 = new Menu("Options"); Menu M3 = new Menu("More"); MB.add(M1); MB.add(M2); MB.add(new Menu("Help")); M1.add(new MenuItem("Open")); M1.add(new MenuItem("Close")); M1.add(new MenuItem("Save")); M2.add(new MenuItem("General")); M2.add(M3); M3.add(new MenuItem("Screen")); M3.add(new MenuItem("Font")); setMenuBar(MB); resize(300, 200); show(); } public static void main(String args[]) { testMe test = new testMe(); }}
The AWT also provides a subclass of the MenuItem class calledCheckboxMenuItem. This class is identical to the standard MenuItem class

266 Chapter 9
Figure 9.19Using the CheckboxMenuItem to check and uncheck menu items.
Figure 9.18Creating cascading menus using Menus as subclasses.
except that it provides the ability to be “checked” or “unchecked” when the userclicks on a menu item. Figure 9.19 shows an example of this component.
Hierarchy for MenuItemjava.lang.Object
java.awt.MenuComponentjava.awt.MenuItem
Declaration for MenuItemThe MenuItem class provides a single constructor that takes one argument:
new MenuItem(String);

The Java AWT 267
This class constructs a new MenuItem with the specified String displayed as themenu component’s label. Note that the hyphen symbol (-) is reserved to mean aseparator between menu items. Separators should do nothing except delineatedifferent sections of a menu.
Methods for MenuItemThe specialized methods for the MenuItem class include:
DISABLE()This method makes the menu item “unselectable” by the user and grays it out.
ENABLE()This method makes the menu item “selectable” by the user. The user is given avisual cue when the menu is disabled because it is grayed out.
ENABLE(BOOLEAN)This method conditionally enables a component.
GETLABEL()This method gets the label for the menu item. The value is returned as a string.
ISENABLED()This method checks to see if the menu item is enabled. The return value is aboolean value.
SETLABEL()This method sets the label to be the specified string.
The following two methods are used only with the CheckboxMenuItem component.
GETSTATE()This method returns a boolean value that represents the state of the menu item.
SETSTATE(BOOLEAN)This method sets the state of the menu item.
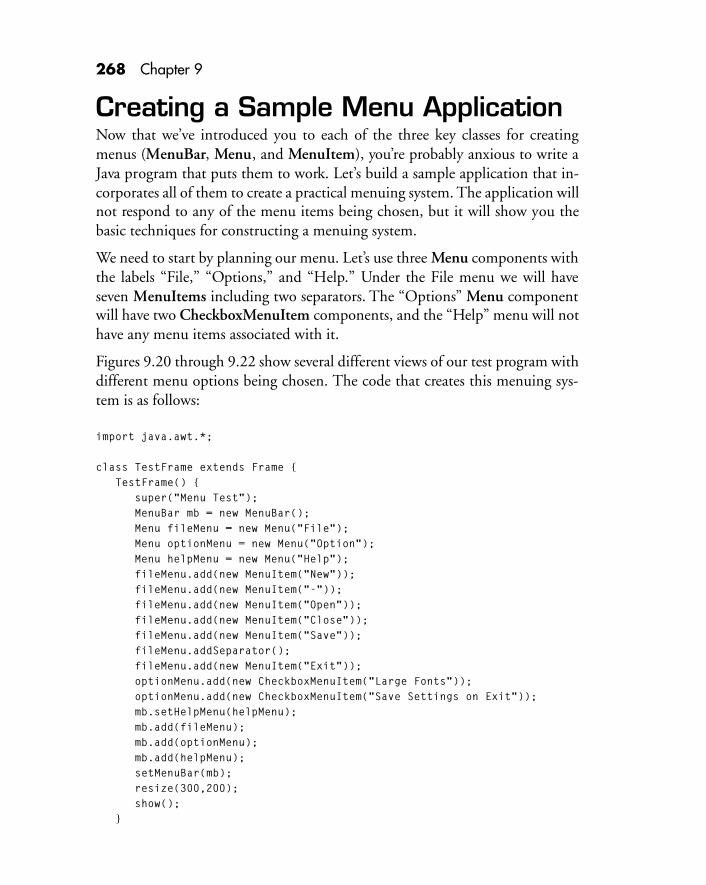
268 Chapter 9
Creating a Sample Menu ApplicationNow that we’ve introduced you to each of the three key classes for creatingmenus (MenuBar, Menu, and MenuItem), you’re probably anxious to write aJava program that puts them to work. Let’s build a sample application that in-corporates all of them to create a practical menuing system. The application willnot respond to any of the menu items being chosen, but it will show you thebasic techniques for constructing a menuing system.
We need to start by planning our menu. Let’s use three Menu components withthe labels “File,” “Options,” and “Help.” Under the File menu we will haveseven MenuItems including two separators. The “Options” Menu componentwill have two CheckboxMenuItem components, and the “Help” menu will nothave any menu items associated with it.
Figures 9.20 through 9.22 show several different views of our test program withdifferent menu options being chosen. The code that creates this menuing sys-tem is as follows:
import java.awt.*;
class TestFrame extends Frame { TestFrame() { super("Menu Test"); MenuBar mb = new MenuBar(); Menu fileMenu = new Menu("File"); Menu optionMenu = new Menu("Option"); Menu helpMenu = new Menu("Help"); fileMenu.add(new MenuItem("New")); fileMenu.add(new MenuItem("-")); fileMenu.add(new MenuItem("Open")); fileMenu.add(new MenuItem("Close")); fileMenu.add(new MenuItem("Save")); fileMenu.addSeparator(); fileMenu.add(new MenuItem("Exit")); optionMenu.add(new CheckboxMenuItem("Large Fonts")); optionMenu.add(new CheckboxMenuItem("Save Settings on Exit")); mb.setHelpMenu(helpMenu); mb.add(fileMenu); mb.add(optionMenu); mb.add(helpMenu); setMenuBar(mb); resize(300,200); show(); }

The Java AWT 269
Figure 9.20Menu test app view #1.
public boolean action(Event evt, Object obj) { String label = (String)obj; if (evt.target instanceof MenuItem) { if (label.equals("Exit")) { System.exit(0); return true; } } return true; }
public boolean handleEvent(Event evt) { if (evt.id == Event.WINDOW_DESTROY) { System.exit(0); return true; } return super.handleEvent(evt); } public static void main(String args[]) { TestFrame tf = new TestFrame(); }}
You my notice that we used two different methods for creating the two separa-tors in the “File” menu. The addSeparator() method is probably easier. How-ever, if using the standard add() method with the hyphen character, you cancreate a full-fledged menu item that you can then change options for and set upso that it can respond to mouse clicks. Now that you’ve seen the basics forcreating menus and GUI objects, you’ll need a way to position them within theframes you build. And that’s where the layout manager comes in.

270 Chapter 9
Figure 9.22Menu test app view #3.
Figure 9.21Menu test app view #2.
Working with the Layout ManagerTo most programmers, the layout manager is a pretty strange concept. Insteadof telling Java exactly where you want components to be located within a win-dow, you use the layout manager to actively place interface components de-pending on the container size, shape, and on a few variables you set.
All controls you create for a Java application must always use the layout man-ager. Even if you do not implicitly tell Java what to do, it defaults to using aparticular version of the layout manager. The layout manager comes in different“flavors” for different situations. At this point in the evolution of Java, five dif-ferent layout managers are provided:

The Java AWT 271
• FlowLayout
• BorderLayout
• GridLayout
• GridBagLayout
• CardLayout
The layout manager is actually just an Interface. You then create classes thatimplement the LayoutManager interface. These classes are used by the AWTand your program to get the look and feel you want for the user. Let’s look ateach of the layout manager classes in detail.
Any component that is a container in Java can use a different layout. So, youcould have a Frame that uses one class to lay out two panels which each havetheir own layouts, and so on.
The FlowLayout ClassThe FlowLayout class is the default layout for all containers in Java. This classtries to lay out components in a very orderly fashion that is much like a wordprocessor that wraps your words and centers them. The order in which you addcomponents to a container using FlowLayout is vital. The first component youadd is the first in line and the last will be placed at the end. It is possible to goback and insert and remove components, but it is much easier to do it all cor-rectly at the beginning.
Figure 9.23 shows several buttons on a panel. As you can see, they are centeredas a group within the panel. If we resize the panel, the buttons automaticallyalign themselves again to be centered. If we continue to shrink the panel so thatall the buttons no longer fit across the panel, the last button will be “wrapped”to the next row as shown in Figure 9.24.
Declaration for FlowLayoutTo set the layout for a container, you use the setLayout() method. This methodhas a single argument which is an instance of one of the layout classes. Let’s lookat an example. The code shown here is used to create the arrangements shown inFigures 9.23 and 9.24:

272 Chapter 9
Figure 9.24The same panel resized so that the buttons wrap to the next row.
Figure 9.23Using the FlowLayout class to lay out some buttons.
import java.awt.*;
class LayoutFrame extends Frame {
LayoutFrame() { super("Layout Test"); setLayout(new FlowLayout()); add(new Button("Button 1")); add(new Button("Button 2")); add(new Button("Button 3")); add(new Button("Button 4")); add(new Button("Button 5")); resize(300,200); show(); }

The Java AWT 273
public static void main(String args[]) { LayoutFrame lf = new LayoutFrame(); }}
Here we call the setLayout() method of the Frame we have extended, sending ita new instance of the FlowLayout class. The frame will then query the FlowLayoutobject where to position each component. This query happens whenever thewindow needs to be refreshed, such as when it is resized or uncovered.
Methods for FlowLayoutThe specialized methods for FlowLayout include:
LAYOUTCONTAINER(CONTAINER)This method lays out the container. It will actually reshape the components inthe target container to satisfy the constraints of the FlowLayout object.
MINIMUMLAYOUTSIZE (CONTAINER)This method returns the minimum dimensions needed to lay out the compo-nents contained in the specified target container. These dimensions are extremelyuseful because they can help you ensure that the user will not shrink the con-tainer to such a small size that it forces some of the UI components to slip off thevisible screen.
PREFERREDLAYOUTSIZE(CONTAINER)This method returns the preferred dimensions for this layout given the compo-nents in the specified target container. The return value is a Dimension variableconsisting of two values representing the width and height of the layout.
TOSTRING()This method returns a string representation of this FlowLayout’s values, includ-ing: (in this order) X position, Y position, container dimensions, layout classbeing used, whether or not the container can be resized, and the title ofthe container.

274 Chapter 9
Figure 9.25The BorderLayout() class in action.
The BorderLayout ClassThe BorderLayout class creates a unique layout scheme that is useful for work-ing with components that need to maintain their position relative to an edge ofyour container. Border layouts use a compass analogy to allow you to specifywhich side of the container to attach your control to.
The controls you use for border layouts are automatically sized to take up asmuch space as possible. Figure 9.25 shows a sample container with five panels,one in each area of the container that the border layout allows.
To create this sample, we used the same code from the previous figure and madea few very minor changes. In fact, all the changes take place in the constructorfor the class, so we will only show you that:
LayoutFrame() { super("Layout Test"); setLayout(new BorderLayout()); add("North", new Button("North")); add("East", new Button("East")); add("South", new Button("South")); add("West", new Button("West")); add("Center", new Button("Center")); resize(300,200); show(); }
The first change is obviously the switch to specifying the BordeLayout() class asour layout scheme. The other changes occur in the add() method. What are

The Java AWT 275
those extra strings doing there? They specify which side of the container to placethe new control. In this case, we are using buttons with labels that match theposition names (North, East, South, West, and Center). We used buttons herefor clarity sake, but you would probably not use them for any real projects.Panel components are probably the best for this type of layout. You would specifya few panels using a border style layout and then use a different layout schemefor the individual panels. Since panels are for design purposes mostly—they donot show up since they default to the same color as the background of the frame—they blend in perfectly and bring the whole thing together.
Declaration for BorderLayoutThere are two ways to declare a border layout. You can use the simple constructor weused in the sample application or you can also specify a vertical and horizontal space.
new BorderLayout();
The simple way. Constructs a new BorderLayout.
new BorderLayout(int, int);
Constructs a BorderLayout with the specified gaps. The first integer representsthe horizontal gap to be placed between components and the second integerrepresents the vertical gap to be used.
Methods for BorderLayoutThe specialized methods for BorderLayout include:
ADDLAYOUTCOMPONENT(STRING, COMPONENT)This method adds the specified named component to the layout. The Stringargument gives us a name to refer to the component within the layout. Thecomponent can be any type of interface component we want to add.
LAYOUTCONTAINER(CONTAINER)This method lays out the specified container. It will actually reshape the compo-nents in the specified target container to satisfy the constraints of theBorderLayout object.

276 Chapter 9
Figure 9.26Using the GridLayout() class to create a sample frame.
MINIMUMLAYOUTSIZE(CONTAINER)This method returns the minimum dimensions needed to lay out the compo-nents contained in the specified target container. The return value is a dimen-sion variable.
PREFERREDLAYOUTSIZE(CONTAINER)This method returns the preferred dimensions for the layout given the compo-nents in the specified target container. The method also returns a dimensionstyle variable.
REMOVELAYOUTCOMPONENT(COMPONENT)This method removes the specified component from the layout.
TOSTRING()This method returns the string representation of the BorderLayout’s values. Atthis point in the development of Java, this method only returns the size of thehorizontal and vertical gaps.
The GridLayout ClassThe grid style layout works just like it sounds; it creates a grid pattern for layingout components. You can control the number of rows and columns as well as thespace between the components and the space between the components and theedge of the container. Figure 9.26 shows a sample frame using a grid layout.

The Java AWT 277
Declaration for GridLayoutLike the BorderLayout class, GridLayout gives you a few constructor options. Ifthe number of rows or columns is invalid, you will get an error (i.e., no negativenumbers). Also, if you specify more columns than you need, the columns willnot be used and your grid will appear as if you’ve specified fewer columns. How-ever, if you specify more rows than you need, they will show up as blank spacewith enough space that matches the amount of space taken up by a componentin this layout. We think this is a bug in Java, so you should experiment with thisphenomenon if you plan on using this layout style.
new GridLayout(int, int);
Creates a grid layout with the specified rows and columns.
new GridLayout (int, int, int ,int);
Creates a grid layout with the specified rows, columns, horizontal gap, and ver-tical gap.
Methods for GridLayoutThe specialized methods for GridLayout include:
ADDLAYOUTCOMPONENT(STRING, COMPONENT)This method adds the specified named component to the layout. The Stringargument gives us a name to refer to the component within terms of the layout.The component can be any interface component you want to add.
LAYOUTCONTAINER(CONTAINER)This method lays out the specified container. It will actually reshape the compo-nents in the specified target container to satisfy the constraints of the GridLayoutobject.
MINIMUMLAYOUTSIZE(CONTAINER)This method returns the minimum dimensions needed to lay out the componentscontained in the specified target container. The return value is a dimension variable.

278 Chapter 9
PREFERREDLAYOUTSIZE(CONTAINER)This method returns the preferred dimensions for this layout given the compo-nents in the specified target container. It also returns a dimension style variable.
REMOVELAYOUTCOMPONENT(COMPONENT)This method removes the specified component from the layout.
TOSTRING()This method returns the string representation of the GridLayout’s values. Atthis point in the development of Java, this method only returns the size of thehorizontal and vertical gaps.
The GridBagLayout ClassThe GridBagLayout class is one of the most versatile of all the layout classes. Itallows you to create a grid of an arbitrary size and use it to create componentswithin the grid that are of variable size.
You use this layout method to align components vertically and horizontally,without requiring that the components be the same size or without them beingsized for you in ways you may not want. Each GridBagLayout uses a rectangulargrid of cells, with each component occupying one or more cells.
Each component that resides in a container that is using a GridBagLayout hasan associated GridBagConstraints instance that specifies how the component islaid out within the grid. How a GridBagLayout places a set of componentsdepends on each component’s GridBagConstraints, minimum size, and pre-ferred size.
To use a GridBagLayout effectively, you must customize one or more of itscomponent’s GridBagConstraints. Here are some of the variables you need tocustomize to create a layout:
• gridx, gridy Specifies the cell in the grid at the upper left of the compo-nent. The upper-left-most cell of a container has address gridx=0, gridy=0.
• gridwidth, gridheight Specifies the width and height of our component in gridspace terms. You can set either of these to GridBagConstraints.REMAINDER tomake the component be the last one in its row or column.

The Java AWT 279
• fill Used when the component’s display area is larger than the component’srequested size to determine whether (and how) to resize the component.
• ipadx, ipady Specifies the internal padding. Padding represents the amountof space to add to the minimum size of the component. The width of thecomponent will be at least its minimum width plus ipadx*2 pixels (since thepadding applies to both sides of the component). Similarly, the height of thecomponent will be at least the minimum height plus ipady*2 pixels.
• insets Sets the external padding of the component—the minimum amountof space between the component and the edges of its display area.
• anchor Used when the component is smaller than its display area to deter-mine where to place the component. Valid values are:
GridBagConstraints.CENTER (the default)GridBagConstraints.NORTHGridBagConstraints.NORTHEASTGridBagConstraints.EASTGridBagConstraints.SOUTHEASTGridBagConstraints.SOUTHGridBagConstraints.SOUTHWESTGridBagConstraints.WESTGridBagConstraints.NORTHWEST
• weightx, weighty Used to determine how to distribute space; this is impor-tant for specifying resizing behavior. Unless you specify a weight for at leastone component in a row and column, all the components clump together inthe center of their container. This is because when the weight is zero (thedefault), the GridBagLayout puts any extra space between its grid of cellsand the edges of the container.
Figure 9.27Sample program using the GridBagLayout class.
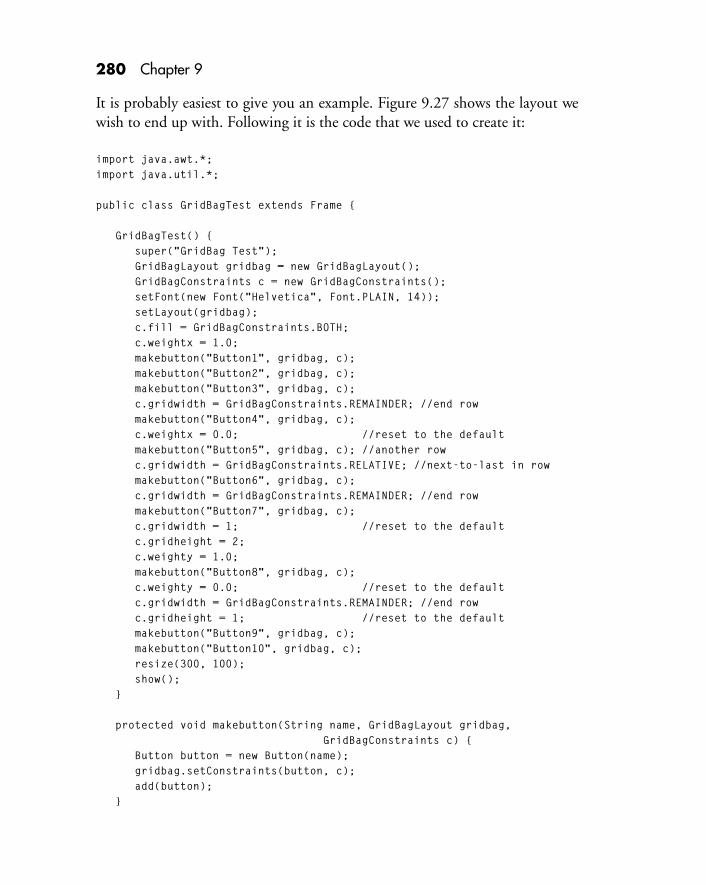
280 Chapter 9
It is probably easiest to give you an example. Figure 9.27 shows the layout wewish to end up with. Following it is the code that we used to create it:
import java.awt.*;import java.util.*;
public class GridBagTest extends Frame {
GridBagTest() { super("GridBag Test"); GridBagLayout gridbag = new GridBagLayout(); GridBagConstraints c = new GridBagConstraints(); setFont(new Font("Helvetica", Font.PLAIN, 14)); setLayout(gridbag); c.fill = GridBagConstraints.BOTH; c.weightx = 1.0; makebutton("Button1", gridbag, c); makebutton("Button2", gridbag, c); makebutton("Button3", gridbag, c); c.gridwidth = GridBagConstraints.REMAINDER; //end row makebutton("Button4", gridbag, c); c.weightx = 0.0; //reset to the default makebutton("Button5", gridbag, c); //another row c.gridwidth = GridBagConstraints.RELATIVE; //next-to-last in row makebutton("Button6", gridbag, c); c.gridwidth = GridBagConstraints.REMAINDER; //end row makebutton("Button7", gridbag, c); c.gridwidth = 1; //reset to the default c.gridheight = 2; c.weighty = 1.0; makebutton("Button8", gridbag, c); c.weighty = 0.0; //reset to the default c.gridwidth = GridBagConstraints.REMAINDER; //end row c.gridheight = 1; //reset to the default makebutton("Button9", gridbag, c); makebutton("Button10", gridbag, c); resize(300, 100); show(); }
protected void makebutton(String name, GridBagLayout gridbag, GridBagConstraints c) { Button button = new Button(name); gridbag.setConstraints(button, c); add(button); }

The Java AWT 281
public static void main(String args[]) { GridBagTest test = new GridBagTest(); }}
Declaration for GridBagLayoutSince most of the work of setting up a GridBagLayout is achieved using aGridBagConstraints class, the constructor for GridBagLayout is very simple, infact, it requires no arguments at all:
new GridBagLayout();
Methods for GridBagLayoutThe specialized methods for GridBagLayout include:
DUMPCONSTRAINTS(GRIDBAGCONSTRAINTS)This method prints the layout constraints to the System object. It is useful fordebugging.
GETCONSTRAINTS(COMPONENT)This method returns a copy of the GridBagConstraints object for the specifiedcomponent.
LAYOUTCONTAINER(CONTAINER)This method lays out the specified container. This method will actually reshapethe components in the specified target container to satisfy the constraints of theGridBagLayout object.
LOOKUPCONSTRAINTS(COMPONENT)This method retrieves the constraints for the specified component. The returnvalue is not a copy, but is the actual constraints class used by the layout mecha-nism. The object returned by this method can then be altered to affect the looksof the component.
MINIMUMLAYOUTSIZE(CONTAINER)This method returns the minimum dimensions needed to lay out the compo-nents contained in the specified target container. The return value is a dimen-sion variable.

282 Chapter 9
PREFERREDLAYOUTSIZE(CONTAINER)This method returns the preferred dimensions for this layout given the compo-nents in the specified target container. It also returns a dimension style variable.
SETCONSTRAINTS(COMPONENT, GRIDBAGCONSTRAINTS)This method sets the constraints for the specified component.
TOSTRING()This method returns the string representation of the GridBagLayout’s values.At this point in the development of Java, this method only returns the size of thehorizontal and vertical gaps.
The CardLayout ClassThe card layout style is much different than the previous four. Instead of usingthis class to lay out your controls, you use it like a layering system to specifywhich layer certain controls appear on. The most common use for this class is tosimulate tabbed dialogs. You can create a card layout containing several panelsthat each use their own layout method and controls. Then, you can make a callto the class to specify which card to display and therefore which panel and re-spective components to show.
Declaration for CardLayoutTwo versions of the CardLayout() constructor are available—one requires noparameters. To add extra cards, you simply use the add() method and the layoutmanager automatically handles the extra cards. Optionally, you can specify thehorizontal and vertical gaps that surround your cards.
new CardLayout();// Creates a new card layout.new CardLayout(int, int);
Creates a card layout with the specified horizontal and vertical gaps.
Methods for CardLayoutThe specialized methods for CardLayout include:

The Java AWT 283
ADDLAYOUTCOMPONENT(STRING, COMPONENT)This method adds the specified named component to the layout. The Stringargument gives us a name to refer to the component within terms of the layout.The component can be any interface component you want to add.
FIRST(CONTAINER)This method flips to the first card. The argument is the parent container thatyou assigned the layout style to.
LAST (CONTAINER)This method flips to the last card of the specified container.
LAYOUTCONTAINER(CONTAINER)This method lays out the specified container. This method will actually reshapethe components in the specified target container to satisfy the constraints of theCardLayout object.
MINIMUMLAYOUTSIZE(CONTAINER)This method returns the minimum dimensions needed to layout the compo-nents contained in the specified target container. The return value is a dimen-sion variable.
NEXT(CONTAINER)This method flips to the next card in the stack.
PREFERREDLAYOUTSIZE(CONTAINER)This method returns the preferred dimensions for the layout given the com-ponents in the specified target container. This also returns a dimension stylevariable.
PREVIOUS(CONTAINER)This method flips to the previous card.
REMOVELAYOUTCOMPONENT(COMPONENT)This method removes the specified component from the layout.

284 Chapter 9
SHOW(CONTAINER, STRING)This method flips to the specified component name in the specified container.This method is best used when you cannot use any of the previous four methodsand/or you want to switch directly to a specified card. The Container argumentspecifies the owner of the card layout and the string is the name of the compo-nent you wish to switch to.
TOSTRING()This method returns the string representation of the CardLayout’s values. Atthis point in the development of Java, this method only returns the size of thehorizontal and vertical gaps.

Chapter10Java AppletProgrammingTechniques


287
10Java AppletProgrammingTechniquesOnce you master the basics of using the Javalanguage, you’ll want to learn as much asyou can about writing powerful applets.
The Java language offers a unique option—to be able to create programs thatrun as a “stand-alone” applications or as applets that are dependent on a control-ling program such as a Web browser. The big difference between applicationsand applets is that applications contain enough code to work on their own andapplets need a controlling program to tell the applet when to do what.
By itself, an applet has no means of starting execution because it does not have amain() method. In an application, the main() method is the place where execu-tion starts. Any classes that are not accessed directly or indirectly through themain() method of an application are ignored.
If you have programmed in a visual environment before, the concept of an appletshould be easy to understand. You can think of an applet as you would a type ofcustom control. When a custom control is used, you don’t have to create code tomake it go; that is handled for you. All you have to do is respond to events. Withapplets, you do not have to create the code that makes it go; you only need towrite code to respond to events that the parent program calls—usually the browser.
Applet BasicsLet’s look closely at some of the key areas you need to be aware of when creatingapplets. To start, you need to subclass the Applet class. By doing this, you in-herit quite a bit of applet functionality that is built-in to the Applet class.

288 Chapter 10
This listing shows the hierarchy of the Applet class and Table 10.1 provides adetailed look at the components of the Applet class that are inherited when youimplement it.
Hiererachy of the Applet Classjava.lang.Object java.awt.Component java.awt.Container java.awt.Panel java.applet.Applet
Table 10.1 Methods Available in the Applet Class
Method Description
destroy() Cleans up whatever resources are being held. If the applet is active, it is firststopped.
getAppletContext() Returns a handle to the applet context. The applet context is the parent object—either a browser or applet viewer. By knowing this handle, you can control theenvironment and perform operations like telling a browser to download a file orjump to another Web page.
getAppletInfo() Returns a string containing information about the author, version, and copyrightof the applet.
getAudioClip(URL) Returns the data of an audio clip that is located at the given URL. The sound is notplayed until the play() method is called.
getAudioClip(URL, String) Returns the data of an audio clip that is located at the given location relative tothe document’s URL. The sound is not played until the play() method is called.
getCodeBase() Returns the URL of the applet itself.
getDocumentBase () Gets the URL of the document that the applet is embedded in. If the applet staysactive as the browser goes from page to page, this method will still return theURL of the original document the applet was called from.
getImage(URL) Gets an image at the given URL. This method always returns an image objectimmediately even if the image does not exist. The actual image details are loadedwhen the image is first needed and not at the time it is loaded. If no image exists,an exception is thrown.
getImage(URL, String) Gets an image at a URL relative to the document’s URL. This method alwaysreturns an image object immediately even if the image does not exist. The actualimage details are loaded when the image is first needed and not at the time it isloaded. If no image exists, an exception is thrown.
getParameter(String) Returns a parameter that matches the value of the argument string.
continued

Java Applet Programming Techniques 289
If you return to Chapter 2 and walk through the ticker tape applet we presented,you should get a good overview of the order in which key methods are calledand why. As the listing illustrates, the Applet class is a descendant of the
Table 10.1 Methods Available in the Applet Class (Continued)
Method Description
getParameterInfo() Returns an array of strings describing the parameters that are understood by thisapplet. The array consists of sets of three strings: name, type, and description.Often, the description string will be empty.
init() Initializes the applet. You never need to call this method directly; it is calledautomatically by the system once the applet is created. The init() method isempty so you need to override it if you need anything initialized at the time yourapplet is loaded.
isActive() Returns true if the applet is active. An applet is marked active just before thestart() method is called.
play(URL) This method plays an audio clip that can be found at the given URL. Nothinghappens if the audio clip cannot be found.
play(URL, String) This method plays an audio clip that resides at a location relative to the currentURL. Nothing happens if the audio clip is not found.
resize(int, int) Requests that an applet be resized. The first integer is height and the second iswidth. This method overrides the resize() method of the Component class thatis part of the Applet class’s hierarchy.
showStatus(String) Shows a status message in the Applet’s context. This method allows you to displaya message in the applet context’s status bar, usually a browser. This is very usefulfor displaying URL’s when an action the user is about to do will result in a jump toa new Web page.
start() Starts the applet. You never need to call this method directly; it is called when theapplet’s document is visited. Once again, this method is empty and you need tooverride it to make it useful. This is usually where you would put the guts of yourcode. However, be aware that this method is called every time the page thatembeds the applet is called. So make sure that the applet is being destroyed ifnecessary.
stop() This method is called when the browser leaves the page the applet is embeddedin. It is up to you to take this opportunity to use the destroy() method toterminate your applet. There may be times, however, when you do not want todestroy it here and instead wait until a “Quit” button is pressed, or until thebrowser itself closes (then everything is dumped rather ungraciously). stop() isguaranteed to be called before the destroy() method is called. You never needto call this method directly because the browser will call it for you.

290 Chapter 10
Container class; thus, it can hold other objects. You do not need to create a panelfirst to place objects on because the Applet class extends the Panel class. Finally,because the Container class is derived from the Component class, we have theability to respond to events, grab and display images, and display text amongmany other things. Table 10.2 presents some of the key methods you have accessto because of all the classes that have been extended to get to the Applet class.
continued
Table 10.2 Key Methods That the Applet Class Can Use
Derived from the Component class:Method Description
getBackground() Gets the background color. If the component does not have a background color,the background color of its parent is returned.
getFont() Gets the font of the component. If the component does not have a font, the fontof its parent is returned.
getFontMetrics(Font) Gets the font metrics for this component. It will return null if the component iscurrently not on the screen. Font metrics tell you things like the height and widthof a string using the given font on the current component.
getForeground() Gets the foreground color. If the component does not have a foreground color, theforeground color of its parent is returned.
getGraphics() Gets a Graphics context for this component. This method will return null if thecomponent is currently not visible on the screen.
handleEvent(Event) Handles all events. Returns true if the event is handled and should not be passedto the parent of this component. The default event handler calls some helpermethods to make life easier on the programmer.
hide() Hides the component.
inside(int, int) Checks if a specified x,y location is inside this component.
locate(int, int) Returns the component or subcomponent that contains the x,y location.
location() Returns the current location of this component. The location will be in the parent’scoordinate space. The return value is a point object which is simply an x and yinteger value.
move(int, int) Moves the component to a new location. The integers are the x and y coordinatesand are in the parent’s coordinate space.
repaint() Repaints the component. This will result in a call to update as soon as possible.The screen will also be cleared resulting in a brief flicker.
repaint(long) Repaints the component. However, the extra argument is a long value thatinstructs Java that it must perform the update within that value in milliseconds.

Java Applet Programming Techniques 291
Applet DrawbacksApplets can really eat up system resources. If you do not use threads and youcreate loops in an applet, you may run into serious performance problems withyour browser. The browser can get so busy working with the applet that it doesnot have time to respond to Web page events such as refreshes, scrolls, andmouse clicks.
When some developers first heard about applets and their ability to run onmany types of machines, there first response was, “That’s dangerous!” Manywere concerned that applets would be used for mischievous causes. To prevent
Table 10.2 Key Methods That the Applet Class Can Use (Continued)
Method Description
reshape(int, int, int, int) Reshapes the component to the specified bounding box. The first two integersrepresent the new x an y coordinates the component should be moved to, and thesecond set of integers represent the new width and height.
resize(int, int) Resizes the component to the specified width and height.
setBackground(Color) Sets the background color.
setFont(Font) Sets the font of the component.
setForeground(Color) Sets the foreground color.
show() Shows the component.
size() Returns the current size of the component. The return value is a dimension objectthat has two integer values representing the width and height.
update(graphics) Updates the component. This method is called in response to a call to repaint().If you override this method and call it instead of the paint() method, the screenwill not be cleared first.
Derived from the Container class:
add(Component) Adds the specified component to this container.
countComponents() Returns the number of components in this panel.
getComponents() Gets all the components in this container. The return value is actually an array ofComponent objects.
getLayout() Returns the layout manager for the container.
remove(Component) Removes the specified component from the container.
removeAll() Removes all the components from the container. It is dangerous to use if you arenot careful.
setLayout(LayoutManager) Sets the layout manager for the container.
292 Chapter 10
applets from causing problems on machines, there are several built-in securitymeasures you can take advantage of.
LIMITED FILE ACCESSApplets cannot read from or write to files on an end user’s hard drive. They canonly read files that reside on the machine the applet was called from. Eventually,a user will be able to set up specific directories that an applet can have access to,but that functionality is not very robust yet and may not be implemented on allbrowsers, so don’t count on it.
NATIVE METHODSThe other option or loop-hole (depending on how you look at it) is the use ofnative methods. You can create methods in C++ that can be called directly fromJava. This is a very powerful option, especially if you are creating platform-specific programs that need the extra speed that you can get from natively com-piled code. However, it can also be a potential gateway for mischievous programs.This feature may or may not be disabled, depending on the browser, so be cau-tious of how you use it.
FILE EXECUTIONJava applets are not allowed to execute programs on a user’s system. So, you can’tjust run the Format program and wipe a hard drive.
NETWORK COMMUNICATIONApplets are only allowed to communicate with the server from which they weredownloaded. This is another one of the security features that may or not be ineffect depending on the browser. So, once again, do not program for it. This isactually one security option we would like to see go away or at least be able tohave the user override it. The ability to talk with multiple servers could be in-credibly powerful if implemented well. Just think of a large company with serv-ers all over the world. You could create a little applet that could converse withthem all and gather information for the end users.
A DISCLAIMERJust because Java provides a few security features does not mean that it is com-pletely secure. Java is a language that is still very much in its infancy and some-one, somewhere will find a way to hack the system. However, since Java was

Java Applet Programming Techniques 293
produced to be an Internet friendly language (one of the first), it is much moresecure than other languages. The problem is that it is also getting much moreattention than all the others combined. Attention from users, programmers,and hackers!
Let’s PlayNow that you have seen all the methods that you can use and learned a littleabout applet security, let’s create an applet that uses some of these features. Wewon’t explain every line of code as we did for the ticker tape applet in Chapter 2,but we will show you a few cool things you can do in your applets.
The applet we’ll create is a simple navigation applet that will offer the user sev-eral buttons with URLs as labels. When the user clicks on a button, the browserwill be instructed to go to a particular site. We have also included some soundsupport just for the fun of it. Lets see the code first:
import java.applet.*;import java.awt.*;import java.net.*;
// testNav Classpublic class testNav extends Applet { AudioClip startClip; AudioClip linkClip; AudioClip stopClip;
public testNav() { setLayout(new GridLayout(4, 1)); add(new Button("http://www.coriolis.com")); add(new Button("http://www.javasoft.com")); add(new Button("http://www.gamelan.com")); add(new Button("http://www.microsoft.com")); }
public boolean action(Event evt, Object arg) { if (evt.target instanceof Button) { linkClip.play(); fetchLink((String)arg); return true; } return super.handleEvent(evt); }

294 Chapter 10
void fetchLink(String s) { URL tempURL = null; try { tempURL = new URL(s); } catch(MalformedURLException e) { showStatus("Malformed URL Exception has been thrown!"); } getAppletContext().showDocument(tempURL); }
public void init(){ startClip = getAudioClip(getCodeBase(), "start.au"); linkClip = getAudioClip(getCodeBase(), "link.au"); stopClip = getAudioClip(getCodeBase(), "stop.au"); }
public void start(){ testNav TN = new testNav(); startClip.play(); }
public void stop(){ stopClip.play(); }
} // End testNav
Figure 10.1 shows the testNav applet running in the Netscape browser.
Interacting with the BrowserQuite often, you may want your applet to interact with the host browser. Thatinteraction will usually come in the form of asking the browser to go to anotherWeb site, or changing the text displayed in the status bar at the bottom of thebrowser. Let’s look at how to switch Web pages now, then we’ll show you how tocontrol the status bar.
For our little demo program, we need the browser to change pages whenever abutton is pushed. To accomplish this, we need to use an event handling method.The action() method is the best place to do this, so let’s look at that method inmore detail:
public boolean action(Event evt, Object arg) { if (evt.target instanceof Button) {
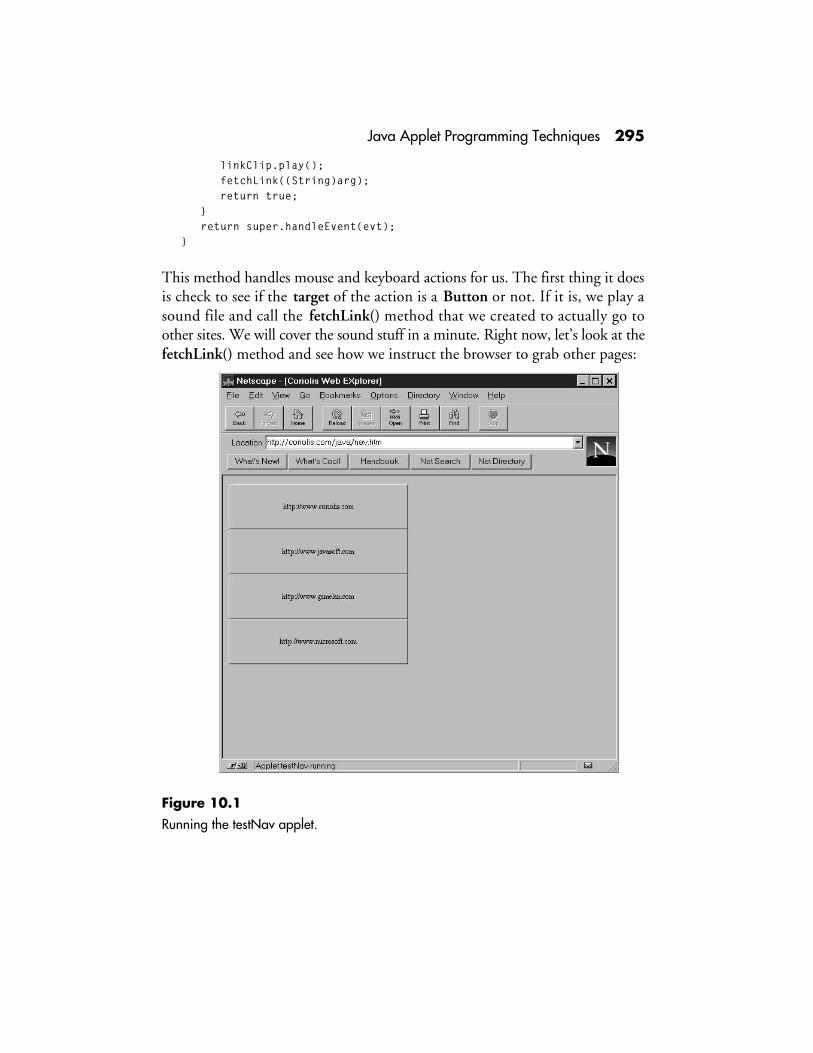
Java Applet Programming Techniques 295
linkClip.play(); fetchLink((String)arg); return true; } return super.handleEvent(evt); }
This method handles mouse and keyboard actions for us. The first thing it doesis check to see if the target of the action is a Button or not. If it is, we play asound file and call the fetchLink() method that we created to actually go toother sites. We will cover the sound stuff in a minute. Right now, let’s look at thefetchLink() method and see how we instruct the browser to grab other pages:
Figure 10.1Running the testNav applet.

296 Chapter 10
void fetchLink(String s) { URL tempURL = null; try { tempURL = new URL(s); } catch(MalformedURLException e) { showStatus("Malformed URL Exception has been thrown!"); } getAppletContext().showDocument(tempURL); }
This method accepts a string representation of a URL, changes it into a URLobject, then calls the showDocument() method that really does the work. Weare forced to use a try...catch operation when we are creating a URL because itthrows exceptions. In particular, it throws the MalformedURLException. Basi-cally, if the URL string you are trying to turn into a URL object is poorly con-structed, you will get an error. For example, if you leave off the “http://” part,you will get this error.
Once the URL is properly created, we call the showDocument() method thatactually belongs to the browser. This is not an applet method. You can figurethis out because we are calling the getAppletContext() method at the beginningof the line. This method returns the object representation of the browser whichhas its own methods, variables, and so on.
Changing the Status BarIf you look at the action() method again, you will notice that we make an inter-esting method call whenever there is an error. Here is that line:
showStatus("Malformed URL Exception has been thrown!");
You can also code this operation like this:
getAppletContext().showStatus("Malformed URL Exception has been thrown!");
To some people, this is easier to read because it becomes immediately apparentwhich object is accepting the showStatus() method.
Changing this text at key times is a great way to interact with the user because thestatus bar is a consistent object across many applications so they expect it to bethere and they expect useful information from it. For a little test, try and make thestatus bar display the link for any button that the mouse pointer is moving over.

Java Applet Programming Techniques 297
Playing SoundsFor loading and playing sounds from within an applet we have two options.First, we can use the play() method of the applet that loads and plays the givensound right away. Second, we can load an applet into an AudioClip object usingthe getAudioClip() method and play the sound whenever we want. It’s up toyou to decide if the sounds should be loaded before they are played, or loadedand played at the same time.
To use the play() method, you invoke the method, sending the URL of thesound file you want as an argument. Or, you can split the URL into two pieces.The first piece would be a URL representing the code base, and the secondargument would be the file name and directory relative to the code base. Hereare the declarations for these methods:
play(URL); // This is the full URL of the sound file you want to playplay(URL, String); // This is the call that uses a base URL and a string // representing the file name.
The other option we have for playing sounds is to load them into an object first.To do this we will create an AudioClip object and use the getAudioClip() methodto load the sound file into the audio object. Once the sound file is loaded, wecall the play() method of the AudioClip object to hear the sound. Here are thedeclarations and calls to handle sounds in this manner:
getAudioClip(URL); // This requires a fully-qualified URL that points to a // sound filegetAudioClip(URL, String); // This is the call that uses a base URL and a // string representing the file name.
To declare an AudioClip object, just follow this code:
AudioClip myClip;
Then, to load in the image do this:
myClip = getAudioClip(soundURL);
Finally, here’s the call needed to play the file:
myClip.play();

298 Chapter 10
You can also stop or loop the sound clip with these methods:
myClip.stop();myClip.loop();
If a sound file being requested cannot be found, the AudioClip object will be setto null. No exception will be raised, but if you then try to play, stop, or loop thefile, an exception will be thrown.
Displaying ImagesOne other key area we need to cover is the quick and painless use of imageswithin applets. Images are just as easy to download as sounds. Here is a littlesample applet that downloads an image and blasts it onto the screen:
import java.awt.*;import java.applet.*;
public class testImg extends Applet { Image testImage;
public void paint(Graphics g) { g.drawImage(testImage, 0, 0, this); }
public void init() { testImage = getImage(getDocumentBase(), "sample.gif"); }}
This is an extremely simple program but it illustrates how easy downloadingimages is. The syntax for downloading images is almost identical to what weused for downloading sounds.
The syntax for declaring an image object is :
Image myImage;
And the syntax for the getImage() method is:
getImage(URL); // Downloads the image that resides at the given // fully-qualified URL

Java Applet Programming Techniques 299
getImage(URL, String); // The URL is the code or document base, // and the string is the directory and file name // for the image relative to the code base
These image methods will support whatever format the browser supports.


Chapter11Event Handling


303
11EventHandlingWhether you use Java to write applicationsor applets, you’ll need to master the art ofhandling events.
Every time you perform an action while running a Java application, such asclicking a mouse button or dragging a window, an event occurs. But, of course,events can also be triggered by internal actions that occur within a program.Many of the common events that occur in Java programs are handled by classesin the AWT package we discussed in Chapter 9. However, we decided to giveevents a chapter of their own because of their importance. This way, we canfocus on events without being sidetracked by GUI creation issues.
We’ll start by introducing the basics of how events are handled in Java. Thenwe’ll present the Events class, which is used to derive objects for handling eventsin Java programs. As you’ll see, this class defines a number of instance variablesand methods to help process the different types of events that can occur in a Javaprogram. After we cover the essentials of the Events class, we’ll dig in and look atsome of the specific methods that are triggered when events occur. As we exploredifferent types of events, we’ll present a number of programming examples toillustrate different techniques available for processing events.
Introducing EventsIn the ticker tape applet we created in Chapter 2, the program scrolled a line oftext across the applet space. If you click the mouse button on top of the appletwhile it is running, the scrolling text will stop and then start when the mouse isclicked again. These mouse clicks cause events to occur. In our applet, the event

304 Chapter 11
was caused by pressing down the mouse button. Here is the portion of coderesponsible for halting the scrolling text:
// Handle mouse clicks public boolean handleEvent(Event evt) { if (evt.id == Event.MOUSE_DOWN) { if (suspended) { ttapeThread.resume(); } else { ttapeThread.suspend(); } suspended = !suspended; } return true; }
The key to the inner workings of this error handler method (handleEvent()) isthe argument evt. It is declared as an object of the Event class, a special class thatJava provides for processing events. In our code, we simply check the id instancevariable to make sure a MOUSE_DOWN event has occurred. If so, we eitherresume or suspend the applet.
Event TypesEvents in Java can be split into three main groups: mouse, keyboard, and systemevents. All of these events can be handled very similarly. Java events are actuallyobjects derived from their own classes, as we saw in the applet example we justdiscussed. This method of handling events makes perfect sense when you realizethe power you gain from being able to manipulate an event as an object. In otherprogramming languages, events only trigger certain methods, which limits you toreceiving very little information about the current state of the system. You alsocannot pass the event on to another handler, which you can do with Java.
The Event ClassLet’s take a close look at the Event class so we can use it throughout this chapter. Thisclass has many variables and methods that can be used for finding out informationabout an event that has occurred, such as where and when the event has happened,and who it has happened to. Many of the variables give us status information, suchas if the Shift or Page Up key was pressed when the event has occurred.

Event Handling 305
Table 11.1 presents the variables defined in the Event class and Table 11.2 pre-sents the methods. Later in this chapter you’ll learn more about how to applythem. The variables that are listed in all capital letters represent static values that
Table 11.1 Variables Defined in the Events Class
Variable Description
SHIFT_MASK The shift modifier constant. This is an integer that indicates if the Shift key was downwhen the event occurred. This variable is used to process keyboard events.
CTRL_MASK The control modifier constant. This is an integer that indicates if the Ctrl key was downwhen the event occurred. This variable is used to process keyboard events.
ALT_MASK The alt modifier constant. This is an integer that indicates if the Alt key was downwhen the event occurred. This variable is used to process keyboard events.
HOME Represents the Home key.
END Represents the End key.
PGUP Represents the Page Up key.
PGDN Represents the Page Down key.
UP Represents the Up arrow key.
DOWN Represents the Down arrow key.
LEFT Represents the left arrow key.
RIGHT Represents the right arrow key.
F1 ... F12 Represents one of the function keys.
ESC Represents the escape key.
WINDOW_DESTROY Represents the event that occurs when a user tries to close a frame or window.
WINDOW_EXPOSE Represents the event that occurs when part of your application has been covered byanother application and the second app is removed.
WINDOW_ICONIFY Represents the event that occurs when a window is minimized.
WINDOW_DEICONIFY Represents the event that occurs when a window is restored from a minimized state.
WINDOW_MOVED Represents the event that occurs when the window is moved.
KEY_PRESS Represents the event that occurs when any key on the keyboard is pressed down.
KEY_RELEASE Represents the event that occurs when any key on the keyboard is released.
MOUSE_DOWN Represents the event that occurs when a mouse button is pressed down.
MOUSE_UP Represents the event that occurs when a mouse button is released.
MOUSE_MOVE Represents the event that occurs when a mouse button is moved across a part of theapplication or applet.
continued
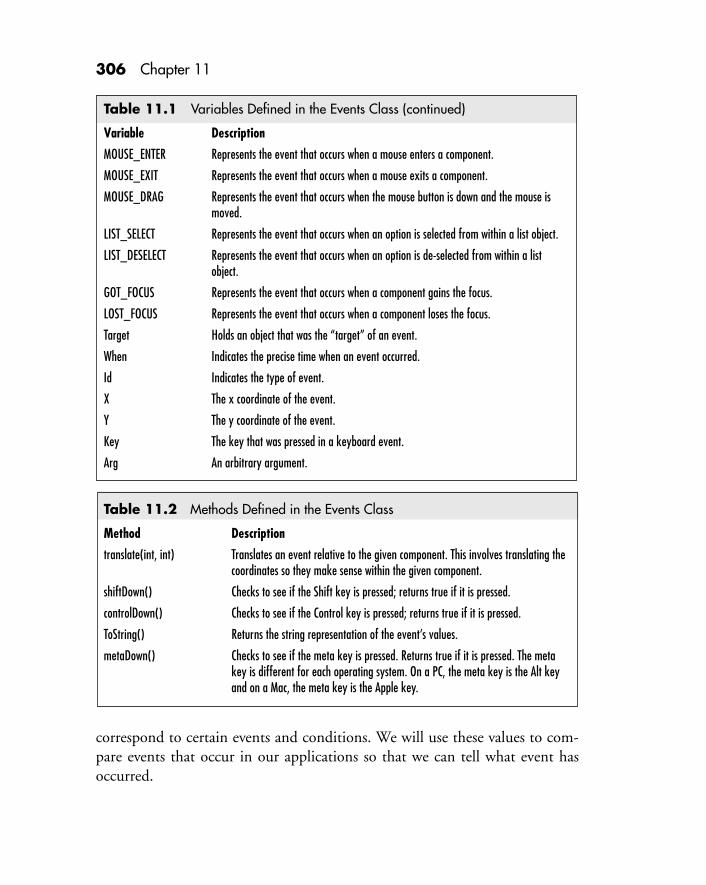
306 Chapter 11
Table 11.1 Variables Defined in the Events Class (continued)
Variable Description
MOUSE_ENTER Represents the event that occurs when a mouse enters a component.
MOUSE_EXIT Represents the event that occurs when a mouse exits a component.
MOUSE_DRAG Represents the event that occurs when the mouse button is down and the mouse ismoved.
LIST_SELECT Represents the event that occurs when an option is selected from within a list object.
LIST_DESELECT Represents the event that occurs when an option is de-selected from within a listobject.
GOT_FOCUS Represents the event that occurs when a component gains the focus.
LOST_FOCUS Represents the event that occurs when a component loses the focus.
Target Holds an object that was the “target” of an event.
When Indicates the precise time when an event occurred.
Id Indicates the type of event.
X The x coordinate of the event.
Y The y coordinate of the event.
Key The key that was pressed in a keyboard event.
Arg An arbitrary argument.
correspond to certain events and conditions. We will use these values to com-pare events that occur in our applications so that we can tell what event hasoccurred.
Table 11.2 Methods Defined in the Events Class
Method Description
translate(int, int) Translates an event relative to the given component. This involves translating thecoordinates so they make sense within the given component.
shiftDown() Checks to see if the Shift key is pressed; returns true if it is pressed.
controlDown() Checks to see if the Control key is pressed; returns true if it is pressed.
ToString() Returns the string representation of the event’s values.
metaDown() Checks to see if the meta key is pressed. Returns true if it is pressed. The metakey is different for each operating system. On a PC, the meta key is the Alt keyand on a Mac, the meta key is the Apple key.

Event Handling 307
Mouse EventsNow that you are familiar with the Event class, let’s look at some of the methodsthat are triggered when an event happens. The first ones we’ll discuss are themouse events. These events are probably the most common ones that you willneed to check for. The methods for processing these events can be placed inseveral different places in your program. At the highest level, you can overridethe events of the GUI elements themselves. For example, you can create yourown button class by extending the Button class. Then, you can override thedefault mouse events with your own code. The next option is to place a buttonor multiple buttons on a panel and override a button’s mouse events. With thisscenario, you must use if or switch statements to detect which button is pressed.
The final option is to override the mouse events of the applet or frame you areusing for the entire program. This method gets difficult when you have complexUI environments. Let’s take a close look at each of the mouse events in detail.
MOUSEDOWN()Clicking on a mouse button creates two distinct events, mouseDown andmouseUp. The mouseDown event occurs when a button is initially pressed andthe mouseUp event occurs when a button is released. Why are two events re-quired? Often, you will want to perform different tasks when a button is pressedand when it is released. For example, consider a standard screen button. If youpress a mouse button while you are over the screen button, the button shouldlook like it has been depressed. The button would remain in this “down” stateuntil the mouse button is released.
The mouseDown() method accepts three arguments:
public boolean mouseDown(Event, int, int) {}
The first argument is an Event object that holds all the information about the eventthat has occurred. The second and third arguments are the x and y coordinatesrepresenting where the event took place. The values stored in these arguments arethe same as the values stored in the x and y variables found in the Events class.
Here is an example that uses the mouseDown() method. It illustrates that thex,y coordinate values set by this method are the same as the values stored in thex,y instance variables contained in the Events class:

308 Chapter 11
import java.awt.*;
class testEvents extends Frame { Panel P1;
testEvents() { super("Test Events"); P1 = new Panel(); setLayout(new FlowLayout()); P1.setBackground(new Color(255,255,255)); add(P1); resize(300,200); show(); }
public boolean mouseDown(Event evt, int x, int y) { System.out.println("X, Y = " + x + ", " + y); System.out.println("Event X, Y = " + evt.x + ", " + evt.y); return true; }
public static void main(String args[]) { testEvents TE = new testEvents(); }}
MOUSEUP()The mouseUp() event method is implemented in the exact same way as themouseDown() event method. When you are creating routines that respond tosimple mouse clicks this is usually the place to put the code. Why here instead ofin a mouseDown event method? Well, think about how people use an interface.Is it more natural for a mouse click event to occur the instant the button ispressed, or when it is released? If you look at how other programs work, you willnotice that most, if not all, don’t respond until the mouse button is released.
You should follow this paradigm for two reasons. First, it represents the standard wayof processing mouse clicks and you do not want to create an interface that seemsinconsistent to the user. Second, it gives the user an opportunity to change his or hermind. After all, how many times have you started to press a button in a programonly to change your mind, move the mouse off the button, and then let go?
Here is the declaration for the mouseUp() method:
public boolean mouseUp(Event, int, int) {}

Event Handling 309
Once again, we are given three arguments—an Event object, and two integersthat give us the x and y coordinates of the event.
MOUSEMOVE() AND MOUSEDRAG()The mouseMove() event method is used to constantly give feedback when themouse pointer is over a component. The mouseDrag() event method tells us thesame thing, but only while one of the mouse buttons is pressed. Whenever themouse is being moved over your component, one of these methods will constantlybe called. Be careful not to put code in these methods that takes too long toexecute. If you do, you may see some performance degradation in your program.
Here are the declarations for the mouseMove() and mouseDrag() event methods:
public boolean mouseMove(Event, int, int) {}public boolean mouseDrag(Event, int, int) {}
Again, three arguments are used; an Event object, and two integers that repre-sent the x and y coordinates where the event occurs.
Here is a very simple program that responds to mouse movement and draggingby displaying the location of the event in the title bar:
import java.awt.*;
class testEvents extends Frame {
testEvents() { super("Test Events"); resize(300,200); show(); }
public boolean mouseMove(Event evt, int x, int y) { setTitle("mouseMove at: " + x + ", " + y); return true; }
public boolean mouseDrag(Event evt, int x, int y) { setTitle("mouseDrag at: " + x + ", " + y); return true; }
public static void main(String args[]) { testEvents TE = new testEvents();

310 Chapter 11
}}
As you can see, it is extremely easy to respond to mouse events. You may noticethat in this example and in the previous one, you cannot exit out of the pro-gram. Basically, what you need to do is check for another event, a system eventthat tells you that the user is trying to close the window. This is a very easy thingto look for, but we did not want to confuse the code with extra methods. Laterin this chapter we’ll show you how to check for system events.
MOUSEENTER() AND MOUSEEXIT()These two events come in handy for certain situations. For example, if you wantto provide feedback to the user when he or she moves the mouse pointer into orout of your components, you may want to display a message in a status bar. Youcan get basically the same effect by checking for the mouseMove() method, butthis method gets called many times while the mouse is over a component andthe mouseEnter() and mouseExit() methods get called only once. The declara-tions for these event methods are:
public boolean mouseEnter(Event, int, int) {}public boolean mouseExit(Event, int, int) {}
These methods are also useful for keeping track of how long a person keeps theirmouse over a certain component. For example, assume you were creating a gameand you wanted to cause an event to occur if the player keeps the pointer overthe “fire” button for too long. You could then respond with a sound or message.Here is an example that checks the time at which the user moves the mouse ontothe applet and if the user stays for more than two seconds, the status bar displaysan error message. When the user leaves the applet space and returns, the messagereturns to normal.
import java.applet.*;import java.awt.*;import java.util.*;
// testNav Classpublic class testTime extends Applet { Button B1; long downTime;

Event Handling 311
public testTime() { setLayout(new FlowLayout()); B1 = new Button("Click Me!"); add("Center", B1); }
public boolean mouseEnter(Event evt, int x, int y) { downTime = evt.when; return true; }
public boolean mouseExit(Event evt, int x, int y) { downTime = 0; return true; }
public boolean mouseMove(Event evt, int x, int y) { if ((evt.when - downTime) > 2000) { B1.setLabel("Too Long!"); } else { B1.setLabel("Click Me!"); } return true; }
public void init(){ testTime TT = new testTime(); }
} // End testNav
Keyboard EventsHandling keyboard events is similar to handling mouse events. The big differ-ence is that when you process a mouse event, you have only one mouse buttonto work. On the other hand, the user can press one of many possible keys, soprocessing keyboard events requires an extra step. The two methods you canuse, keyDown() and keyUp(), are very similar to the mouseDown() andmouseUp() event methods. The only difference is that the keyboard events donot generate a location where the event has occurred. Instead, they generate aninteger value representing the key that was pressed.
KEYDOWN() AND KEYUP()Here are the declaration statements for the keyDown() and keyUp() event methods:

312 Chapter 11
public boolean keyDown(Event, int) {}public boolean keyUp(Event, int) {}
The integer argument stores the numeric value of each key on the keyboard—the ASCII equivalent of a key. Java offers us a simple technique for convertingthis ASCII value to a character representation; we simply cast the integer to achar and there we have it. Here is a simple example:
public boolean keyDown(Event evt, int key) { System.out.println("Value = " + key + ", character = " + (char)key);}
This little code snippet simply waits for a key to be pressed then prints thenumeric value of the key and the character representation of that value.
If you look back at the variables defined in the Event class (Table 11.1), you’llnotice all of the key representations. These values represent the keys that do notbelong to the standard ASCII character set, including keys like Home, Page Up,and the function keys. Here’s a simple code example that waits for you to pressthe F1 key to get help and the Ctrl-x combination to quit the program:
import java.awt.*;
class testKeys extends Frame {
testKeys() { super("Test Keys"); resize(300,200); show(); }
public boolean keyDown(Event evt, int key) { if (evt.controlDown()) { if (key == 24) { System.exit(0); return true; } } if (key == Event.F1) { setTitle("No help here!"); return true; } return false; }

Event Handling 313
public boolean keyUp(Event evt, int key) { if (key == Event.F1) { setTitle("Test Keys"); return true; } return false; }
public static void main(String args[]) { testKeys TK = new testKeys(); }}
Hierarchy of EventsNow that you’ve seen how to create event handlers for specific events, let’s lookat how you can create event handlers that capture everything in one centrallocation. Why would you want to do that? Assume that you have an applet thatuses a set of buttons that perform related operations. You can create separateevent handlers for each control individually, or you can create an event handlerthat captures all the events at one location and then uses the information in theEvent object to determine what happened to a certain control.
If you recall from Chapter 9, we created an applet with four buttons. Eachbutton had a caption that represented a URL for a Web site. When a button ispressed, the event handler of the applet, not the buttons themselves, processesthe event. This “centralized” approach makes the events easier to process; how-ever, sometimes it can get a little crowded, especially if you have many compo-nents that must respond differently to certain events. In these cases it is up toyou to decide where to handle the events.
If you do not handle an event at the component level, make sure that a system isin place to hand that event off to the container the particular control resides in.Let’s create a little program that has two buttons in a frame. In the first examplewe will use a standard button and catch its events with the frame. In the secondexample we will create our own button by subclassing the Button class andadding our own event handler to that button. Here is the first example:
import java.awt.*;
class testEvents extends Frame { myButton B1; myButton B2;

314 Chapter 11
testEvents() { super("Test Keys"); setLayout(new FlowLayout()); add(new Button("Hello!"); add(new Button("Goodbye!"); resize(300,200); show(); }
public boolean mouseDown(Event evt, int x, int y) { if (evt.target instanceof Button) { System.out.println((String)evt.arg); return true; } else { return super.mouseDown(evt, x, y); } }
public static void main(String args[]) { testEvents TK = new testEvents(); }}
In the second example we create our own event handler:
import java.awt.*;
class testEvents extends Frame { myButton B1; myButton B2;
testEvents() { super("Test Keys"); setLayout(new FlowLayout()); B1 = new myButton("Hello!"); B2 = new myButton("Goodbye!"); add(B1); add(B2); resize(300,200); show(); }
public static void main(String args[]) { testEvents TK = new testEvents(); }}

Event Handling 315
class myButton extends Button {
myButton(String s) { super(s); }
public boolean mouseDown(Event evt, int x, int y) { System.out.println((String)evt.arg); return true; }}
Processing System EventsNot only can you decide where to place your event handlers, Java also gives youoptions for capturing events. Instead of creating separate event handlers for eachtype of event, you can also create a single centralized event handler that acceptsall events and then figures out what they are and which components are respon-sible for generating them.
For processing system-related events, Java provides handleEvent() and action().The action() method captures all of the standard mouse and keyboard events.The handleEvent() method handles all of those and more. It can also catch allthe system messages that might be sent to your program.
If you have several different methods in your code that all catch the same event,you need to know what order the methods will be fired in. For example, assumeyou have a class that has a mouseDown() method, an action() method, and ahandleEvent() method. If the user clicks the mouse button, which method willget called? The first method to get called will be the handleEvent() method—the mother of all event handlers. If it does not handle the event, the event will bepassed on to the action() method. Finally, if the action() method does nothingwith the event, the event is passed on to the mouseDown() method.
With this knowledge in hand, you can better direct the flow of operations inyour code. You can even handle events in multiple locations. The key here is todo something with the event, then pass it on as if it were never processed. In thecase of the event methods, you would usually return a value of true at the end ofa method where you handled an event. If you change the return value to false,you will see that the event continues down the chain. Here is a sample appletthat illustrates this technique:

316 Chapter 11
import java.applet.*;import java.awt.*;
public class testEvents4 extends Applet { Label L1 = new Label(); Label L2 = new Label(); Label L3 = new Label();
public testEvents4() { setLayout(new GridLayout(2, 3)); add(new Label("handleEvent()")); add(new Label("action()")); add(new Label("mouseMove()")); add(L1); add(L2); add(L3); }
public boolean handleEvent(Event evt) { if (evt.id == Event.MOUSE_MOVE) { L1.setText("" + evt.when); this.action(evt, evt.target); return super.handleEvent(evt); } else { return false; } }
public boolean action(Event evt, Object arg) { L2.setText("" + evt.when); return true; } public boolean mouseMove(Event evt, int x, int y) { L3.setText("" + evt.when); return true; }
public void init(){ testEvents TN = new testEvents(); }} // End Application
Try switching some of the return statements and see what happens. Figure 11.1shows the applet in action. The applet consists of six Label controls. They arearranged in a grid. The top three labels list the three methods we are handling.The three lower labels show the time at which the last event of the respectivetype took place.

Event Handling 317
ACTION() METHOD
The action() method is useful for responding to a multitude of user actions. Itwill capture any events that are caused directly by the user. For example, it willcatch mouse clicks, but it will not catch system calls. Here is the declaration forthe action() method:
public boolean action(Event, Object) {}
HANDLEEVENT() METHODThe handleEvent() method is probably the most versatile of the event handlingmethods. It can catch all the standard user interface events as well as systemevents. The ability to catch system events is crucial to larger, more complexprograms. It is also essential to applications. Without the ability to catch systemevents, applications would never know when the user has pressed any of the titlebar buttons or selected any of the title bar options.
Here is the declaration for the handleEvent() method:
public boolean handleEvent(Event) {}
Figure 11.1The sample events applet.

318 Chapter 11
You probably have seen this method in use in several of our example programs.When the user of an application clicks on the close icon for your application, itsends a message indicating that the close icon has been pressed. This messagecomes in the form of WINDOW_DESTROY. We need to catch this event andthen tell the application to quit. Here is a code snippet that will do just that:
public boolean handleEvent(Event evt) { if (evt.id == Event.WINDOW_DESTROY) { System.exit(0); return true; } else { super. HandleEvent(evt); return false; }}
This simply checks the event id variable to see if it equals the static variableWINDOW_DESTROY defined in the Event class. If we receive this eventmessage, we tell the application to close by calling the exit() method of theSystem class.
Problems with Processing EventsJava does not handle all events very well yet. In particular, thecurrent Java interpreters often make mistakes or do not re-spond correctly to all events. The most common errors in-volve the mouse event methods. Sometimes the parent objectsdo not receive any stimulation when they should. For example,if you place a button in the middle of an applet, you should beable to catch all the mouse events that happen to the buttonwith an event handler belonging to the applet. This shouldwork, but in practice it is a little flaky.

Chapter12Streams andFile I/O


321
12Streams andFile I/OIt’s now time to learn the ins and outs ofhow streams are used in Java to performa variety of I/O operations.
What good is a program that has no means of communicating with the outsideworld? If you think about it, most programs you write follow a simple pattern ofgetting data from a user, processing the data, and presenting the user with theresults in one format or another. Java arranges the world of input/output (I/O)into a system of byte streams. A byte stream is essentially an unformatted sequenceof data which can come from or be sent to a number of different sources includingthe keyboard, screen, file, and so on. To help you process input and output streamsin your programs, Java provides special streams in the System class as well as othercustom classes including InputStream and OutputStream.
In this chapter we’ll show you how to use the System class and the java.io packageto perform different types of stream I/O from reading strings typed in at the key-board to writing data to files. After we introduce the three streams supported bythe System class we’ll examine the other key stream processing classes includingInputStream, OutputStream, BufferedInputStream, BufferedOutputStream,ByteArrayInputStream, ByteArrayOutputStream, DataInputStream,DataOutputStream, FileInputStream, FileOutputStream, and others.
Introducing the System ClassThe System class is responsible for providing access to the three main streams:System.in, System.out, and System.error. All input streams are derived fromSystem.in, which is responsible for reading data. All of the output streams arederived from System.out, which is responsible for sending out data in one form

322 Chapter 12
or another. The last stream is System.error, which is an output stream derivedfrom System.out. As its name implies, System.out handles the errors that occurwhile I/O operations are performed.
To use the streams implemented by the System class, you must import the javio.iopackage:
import java.io.*;
Here’s a simple program that uses System.in and System.out to read and write astring of text:
import java.io.*;
public class ProcessALine { public static void main(String arg[]) { // Bring in the stream from the keyboard and pipe it to DataInput DataInputStream aDataInput = new DataInputStream(System.in); String aString;
try { // Continue to read lines from the keyboard until ^Z is pressed while ((aString = aDataInput.readLine()) != null) { // Print the line out to the screen System.out.println(aString); } } catch (IOException e) { // Check for I/O errors System.out.println("An IOException has occurred"); } }}
The System.in stream is used to create an input stream object called aDataInput.This object is created as an instance of the DataInputStream class. The advantageof this class is that it contains methods like readLine() for processing input streams.In fact the work of reading a string is accomplishing using a single line of code:
while ((aString = aDataInput.readLine()) != null) ...
The readLine() method will continue to read characters from the input streamuntil a Ctrl-Z character is encountered, which terminates the input stream. (Thus,when you run this program, make sure that you enter a Ctrl-Z at some point totell the program to stop reading characters from the input stream.)

Streams and File I/O 323
Checking for ErrorsOne important feature you’ll find in our sample program issimple error handling code implemented with the try ... catchclause. When performing I/O stream operations, you mustcheck for possible I/O errors. Notice that in our program, atry clause is used to check both the stages of reading and writ-ing to a stream. If an error occurs, an IOException error isthrown and the catch clause will be executed.
Different Flavors of StreamsWith the multitude of possible forms your data can come in and be sent out with,it’s no wonder that Java offers a variety of stream handlers that can be imple-mented. Each stream type is capable of combining other stream types to handleunique situations. For example, if you want to buffer data that is being read froma file so that it may be read all at once, you could use a statement like this:
InputStream aStream = new BufferedInputStream(new FileInputStream("C:\foobar.txt"));
This line would bring in the data from a file, buffering it in a stream calledaStream. Then, the data could be accessed all at once by using aStream. Thistechnique could be very valuable in applications that need to read data all atonce instead of having to read chunks and perform multiple read operations.
Understanding the Basics of Inputting and OutputtingAll data that you manipulate in the form of strings and num-bers, be it an integer or a double, must be transformed into astream (bytes) in order for the information to be interpretedby the computer and the devices that use the data. This isconsidered outputting the data verses inputting the data. Like-wise, if a user needs to understand the data, unless they readmachine language, we need to convert it to a useful format bymanipulating it with one of the input streams. Figure 12.1shows the process of how data is converted and processed withboth input and output streams.

324 Chapter 12
InputStream and OutputStream ClassesIn addition to the System class, Java provides other classes for handling streaminput and output including InputStream and OutputStream, which are ab-stract classes responsible for the basic declarations of all the input and outputstreams that we’ll be exploring next. All streams created from these classes arecapable of throwing an IOException that must be dealt with by “re-throwing” itor handling it. To declare and create an object using InputStream orOutputStream you would use statements like the following:
InputStream aStream = getStreamFromASource();OutputStream aStream = getStreamToASource();
In both declarations, the methods getStreamFromSource() andgetStreamToASource() are any methods that returns a stream. The stream returnedby the method will be assigned to the object aStream. All information passed toand from the streams must be in the form of bytes. Table 12.1 presents the keymethods defined in InputStream and Table 12.2 presents the methods definedin OutputStream.
Figure 12.1A graphical example of converting data for input and output streams.
1 0 1 1 0 1 1
1 1 0 0 1 1 0 1
Input Stream
Output Stream
Bye Everyone
56798432
1010010001
Hi Everyone
5678432
1010010001

Streams and File I/O 325
Here’s an example of an application that uses the OutputStream class to deriveanother class for performing a simple output operation:
import java.io.*;import java.net.*;import java.awt.*;
public class mrsServer extends Frame { TextArea serverScreen;
mrsServer() { super("Server Application"); serverScreen = new TextArea("mrsServer's Screen:\n", 10, 40); add("Center", serverScreen); pack(); show();
Table 12.1 Key Methods Defined in the InputStream Class
Method Description
available() Returns the number of bytes available in the stream without invoking a block.
close() Closes the stream.
mark(int) Marks the current position in the stream.
markSupported() Returns a true/false value to indicate if the stream supports marking capabilities.
read() Reads bytes from the stream.
read(byte[]) Reads bytes from the stream and places them in an array.
read(byte[], int, int) Reads a specified number of bytes from the stream and places them in an arraystarting at a specified index position.
reset() Sets the stream to the last mark.
skip(long) Skips a designated number of bytes in the stream.
Table 12.2 Key Methods Defined in the OutputStream Class
Method Description
close() Closes the stream.
flush() Clears the stream, forcing any buffered bytes to be written out.
write(int) Writes n number of bytes to the stream.
write(byte[]) Writes an array of bytes to the stream.
write(byte[], int, int) Writes an array of bytes of a specified size, starting at a specified index position.

326 Chapter 12
ServerSocket mrsServer = null; Socket socketReturn = null; // Assigns the variable rawDataOut to the class OutputStream OutputStream rawDataOut = null;
try { mrsServer = new ServerSocket( 10, 2 ); socketReturn = mrsServer.accept(); serverScreen.appendText( "Connected to the mrsServer" );
// Creates an instanceof the class OutputStream named // rawDataOut // rawDataOut receives the stream from the Socket socketReturn rawDataOut = socketReturn.getOutputStream(); DataOutputStream DataOut = new DataOutputStream(rawDataOut);
DataOut.write( 5 ); } catch( UnknownHostException e ) { } catch( IOException e ) { } }
BufferedInputStream andBufferedOutputStream ClassesThese classes are used to implement streams responsible for collecting data froma source that brings in data at a slower rate than the recipient. Then, the chunksof data collected may be delivered in larger, more manageable blocks than in themanner they were received. This proves beneficial for file systems and networks,where the connection depends on a device for transmission.
Here are the declarations for these classes:
InputStream aStream = new BufferedInputStream(getStreamFromASource());OutputStream aStream = new BufferedInputStream(getStreamToASource());
In both declarations, a stream is returned to the parent class, InputStream orOutputStream depending if it is incoming or outgoing. The methodsgetStreamFromSource() and getStreamToASource() can be any methods that re-turn a stream. The stream that the method returns will be buffered as the infor-mation comes in and is appended to the object aStream. All information passedto and from the streams must be in the form of bytes. Table 12.3 presents the
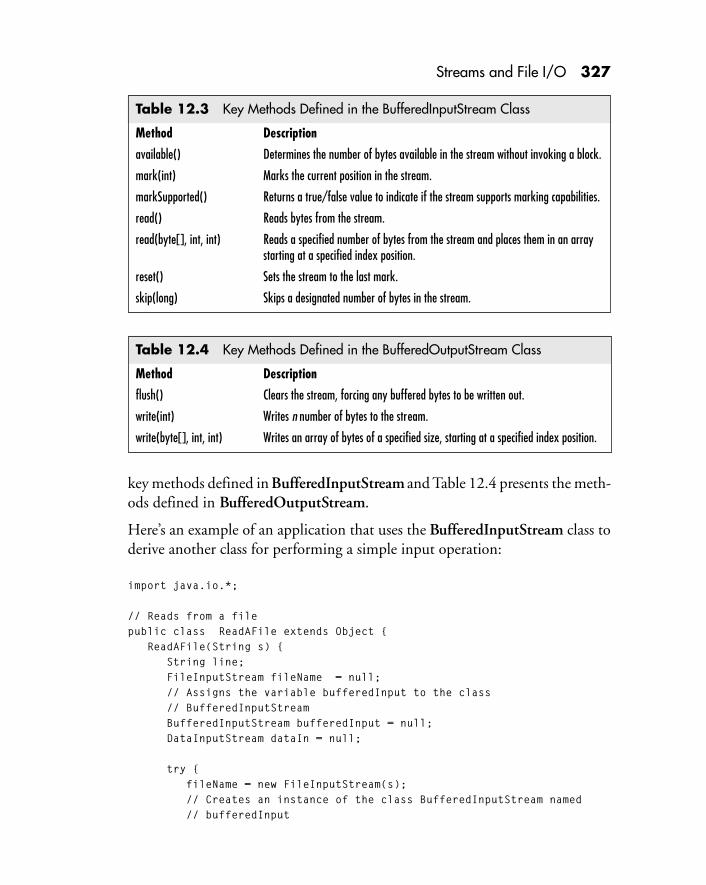
Streams and File I/O 327
key methods defined in BufferedInputStream and Table 12.4 presents the meth-ods defined in BufferedOutputStream.
Here’s an example of an application that uses the BufferedInputStream class toderive another class for performing a simple input operation:
import java.io.*;
// Reads from a filepublic class ReadAFile extends Object { ReadAFile(String s) { String line; FileInputStream fileName = null; // Assigns the variable bufferedInput to the class // BufferedInputStream BufferedInputStream bufferedInput = null; DataInputStream dataIn = null;
try { fileName = new FileInputStream(s); // Creates an instance of the class BufferedInputStream named // bufferedInput
Table 12.4 Key Methods Defined in the BufferedOutputStream Class
Method Description
flush() Clears the stream, forcing any buffered bytes to be written out.
write(int) Writes n number of bytes to the stream.
write(byte[], int, int) Writes an array of bytes of a specified size, starting at a specified index position.
Table 12.3 Key Methods Defined in the BufferedInputStream Class
Method Description
available() Determines the number of bytes available in the stream without invoking a block.
mark(int) Marks the current position in the stream.
markSupported() Returns a true/false value to indicate if the stream supports marking capabilities.
read() Reads bytes from the stream.
read(byte[], int, int) Reads a specified number of bytes from the stream and places them in an arraystarting at a specified index position.
reset() Sets the stream to the last mark.
skip(long) Skips a designated number of bytes in the stream.

328 Chapter 12
// bufferedInput receives the stream from the FileInputStream // fileName as it is read bufferedInput = new BufferedInputStream(fileName); dataIn = new DataInputStream(bufferedInput); } catch(FileNotFoundException e) { System.out.println("File Not Found"); return; } catch(Throwable e) { System.out.println("Error in opening file"); return; }
try { while ((line = dataIn.readLine()) != null) { System.out.println(line + "\n"); } fileName .close(); } catch(IOException e) { System.out.println("Error in reading file"); } }
// Where execution begins in a stand-alone executable public static void main(String args[]) { new ReadAFile(args[0]); }}
ByteArrayInputStream andByteArrayOutputStream ClassesThese streams create a new stream from an array of bytes to be processed. Theyare used to perform the reverse operations of what most of the streams do. Todeclare and create an object from these classes you would use statements like thefollowing:
InputStream aStream = new ByteArrayInputStream(getStreamFromASource());OutputStream aStream = new ByteArrayInputStream(getStreamToASource());
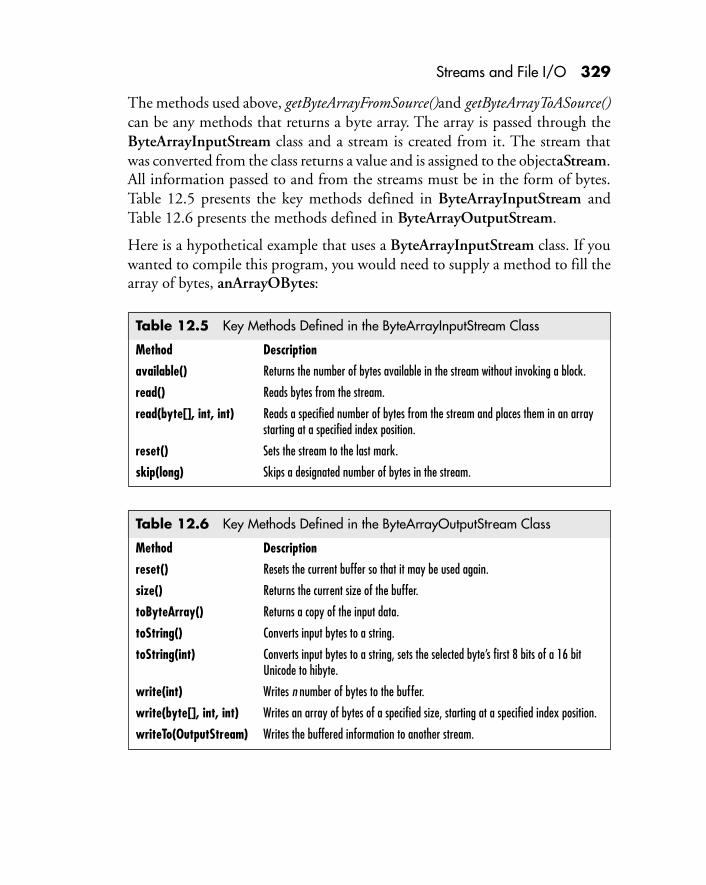
Streams and File I/O 329
The methods used above, getByteArrayFromSource()and getByteArrayToASource()can be any methods that returns a byte array. The array is passed through theByteArrayInputStream class and a stream is created from it. The stream thatwas converted from the class returns a value and is assigned to the object aStream.All information passed to and from the streams must be in the form of bytes.Table 12.5 presents the key methods defined in ByteArrayInputStream andTable 12.6 presents the methods defined in ByteArrayOutputStream.
Here is a hypothetical example that uses a ByteArrayInputStream class. If youwanted to compile this program, you would need to supply a method to fill thearray of bytes, anArrayOBytes:
Table 12.6 Key Methods Defined in the ByteArrayOutputStream Class
Method Description
reset() Resets the current buffer so that it may be used again.
size() Returns the current size of the buffer.
toByteArray() Returns a copy of the input data.
toString() Converts input bytes to a string.
toString(int) Converts input bytes to a string, sets the selected byte’s first 8 bits of a 16 bitUnicode to hibyte.
write(int) Writes n number of bytes to the buffer.
write(byte[], int, int) Writes an array of bytes of a specified size, starting at a specified index position.
writeTo(OutputStream) Writes the buffered information to another stream.
Table 12.5 Key Methods Defined in the ByteArrayInputStream Class
Method Description
available() Returns the number of bytes available in the stream without invoking a block.
read() Reads bytes from the stream.
read(byte[], int, int) Reads a specified number of bytes from the stream and places them in an arraystarting at a specified index position.
reset() Sets the stream to the last mark.
skip(long) Skips a designated number of bytes in the stream.

330 Chapter 12
import java.io.*;
// Reads from a filepublic class Byte2String extends Object { Byte2String(String s) { byte[] anArrayOBytes; … //fills the anArrayOBytes with data … try { // Creates an instanceof the class InputStream named byteDataIn // byteDataIn receives the stream from the ByteArrayInputStream // anArrayOBytes InputStream byteDataIn = new ByteArrayInputStream(anArrayOBytes); } catch(IOException e) { } … // perform some process with the stream }
// Where execution begins in a stand-alone executable public static void main(String args[]) { new Byte2String(args[0]); }}
DataInputStream and DataOutputStream ClassesAll methods defined in these classes are actually declared in an interface namedDataInput. To declare and create a DataInputStream or DataOutputStreamobject you would use statements like the following:
DataInputStream aStream = new DataInputStream(getStreamFromASource());DataOutputStream aStream = new DataOutputStream(getStreamToASource());
Notice in both declarations the need to declare the class type, DataInputStreamor DataOutputStream, instead of type InputStream or OutputStream. Themethods getStreamFromSource() and getStreamToASource() can be any methodsthat return a stream. Once the stream is passed to the DataInputStream orDataOutputStream object, the methods declared in the interface can be appliedto the stream. Table 12.7 presents the key methods defined in DataInputStreamand Table 12.8 presents the methods defined in DataOutputStream.

Streams and File I/O 331
Table 12.7 Key Methods Defined in the DataInputStream Class
Method Description
read(byte[]) Reads an array of bytes from the stream.
read(byte[], int, int) Reads a specified number of bytes from the stream and places them in an arraystarting at a specified index position.
readBoolean() Reads a boolean from the stream.
readByte() Reads a 8-bit byte from the stream.
readChar() Reads a 16-bit character from the stream.
readDouble() Reads a 64-bit double from the stream.
readFloat() Reads a 32-bit float from the stream.
readFully(byte[]) Reads bytes from the stream, blocking until all bytes are read.
readFully(byte[], int, int) Reads bytes from the stream, blocking until all bytes are read. The starting pointto begin reading and the maximum number of bytes to read are passed asparameters.
readInt() Reads a 32-bit integer from the stream.
readLine() Reads a line from the stream until an \n,\r,\n\r \, or EOF is reached.
readLong() Reads a 64-bit long from the stream.
readShort() Reads a 16-bit short from the stream.
readUTF() Reads a UTF formatted string from the stream.
readUTF(DataInput) Reads a UTF formatted string from a specific stream.
readUnsignedByte() Reads an unsigned 8-bit byte from the stream.
readUnsignedShort() Reads an unsigned 8-bit short from the stream.
skipBytes(int) Skips a designated number of bytes in the stream, blocking until finished.
Table 12.8 Key Methods Defined in the DataOutputStream Class
Method Description
flush() Clears the stream, forcing any buffered bytes to be written out.
size() Returns the number of bytes in the stream.
write(int) Writes n number of bytes to the stream.
write(byte[], int, int) Writes an array of bytes of a specified size, starting at a specified index position.
writeBoolean(boolean) Writes a boolean to the stream.
writeByte(int) Writes an 8-bit byte to the stream.
writeBytes(String) Writes a string of bytes to the stream.
continued

332 Chapter 12
Let’s revisit our example of the client application once more to demonstrate theuse of a DataInputStream:
import java.io.*;import java.net.*;import java.awt.*;
public class mrClient extends Frame { mrClient() { super("Client Application"); TextArea clientScreen = new TextArea("mrClient's Screen:\n", 10, 40); add("Center", clientScreen); pack(); show(); Socket mrClient = null; InputStream rawDataIn = null;
try { mrClient = new Socket( InetAddress.getLocalHost(), 10 );
rawDataIn = mrClient.getInputStream(); // reads in the stream for the InputStream rawDataIn and pipes // it to DataIn DataInputStream DataIn = new DataInputStream(rawDataIn); // the array of bytes is then read from the stream clientScreen.appendText( "mrClient receives - " + DataIn.read() ); } catch( UnknownHostException e ) { } catch( IOException e ) { } }
Table 12.8 Key Methods Defined in the DataOutputStream Class (Continued)
Method Description
writeChar(int) Writes a 16-bit character to the stream.
writeChars(String) Writes a string of chars to the stream.
writeDouble(double) Writes a 64-bit double to the stream.
writeFloat(float) Writes a 32-bit float to the stream.
writeInt(int) Writes a 32-bit integer to the stream.
writeLong(long) Writes a 64-bit long to the stream.
writeShort(int) Writes a 16-bit short to the stream.
writeUTF(String) Writes a UTF formatted string to the stream.

Streams and File I/O 333
Here the stream used with the Socket object, mrClient, is piped from theInputStream to the DataInputStream. The bytes are then read from the stream,DataIn, and appended to the text box with this line:
clientScreen.appendText("mrClient receives - " + DataIn.read());
By simply changing the method, we can read any type of data that resides in thestream. For example, if we wanted to read a stream of chars, we would use astatement like this:
clientScreen.appendText("mrClient receives - " + DataIn.readChar());
FileInputStream and FileOutputStream ClassesThe most common use for these streams is to apply them to a file to be readfrom and written to. Here are the declarations for these classes.
InputStream aStream = getStreamFromASource();OutputStream aStream = getStreamToASource();
In both declarations, the methods getStreamFromSource() and getStreamToASource()can be any methods that return a stream. The stream that the method returns isassigned to the object aStream. All information passed to and from the streams mustbe in the form of bytes. Table 12.9 presents the key methods defined inFileInputStream and Table 12.10 presents the methods defined in FileOutputStream.
Table 12.9 Key Methods Defined in the FileInputStream Class
Method Description
available() Returns the number of bytes available in the stream without invoking a block.
close() Closes the stream.
finalize() Closes the stream when the garbage collector is invoked.
getFD() Returns the file descriptor of the file associated with the stream.
read() Reads bytes from the stream.
read(byte[]) Reads into an array of bytes from the stream.
read(byte[], int, int) Reads a specified number of bytes from the stream and places them in an arraystarting at a specified index position.
skip(long) Skips a designated number of bytes in the stream.

334 Chapter 12
Here is a practical example of how you can use the FileOutputStream andFileInputStream classes:
import java.io.*;
public class WriteAFile { WriteAFile(String s) { write(s); }
// Writes to a file public void write(String s) { // Assigns the variable writeOut to the class FileOutputStream FileOutputStream writeOut = null; DataOutputStream dataWrite = null;
try { // Creates an instanceof the class FileOutputStream named writeOut // writeOut receives the stream from the File designated in the // variables writeOut = new FileOutputStream(s); dataWrite = new DataOutputStream(writeOut); dataWrite.writeChars("This is a Test"); dataWrite.close(); } catch(IOException e) { System.out.println("Error in writing to file"); } catch(Throwable e) { System.out.println("Error in writing to file"); } finally { System.out.println("\n\n.....creating a backup file.");
Table 12.10 Key Methods Defined in the FileOutputStream Class
Method Description
close() Closes the stream.
finalize() Closes the stream when the garbage collector is invoked.
getFD() Returns the file descriptor of the file associated with the stream.
write(int) Writes n number of bytes to the stream.
write(byte[]) Writes an array of bytes to the stream.
write(byte[], int, int) Writes an array of bytes of a specified size, starting at a specified index position.
Streams and File I/O 335
try { // Recreates an instanceof the class FileOutputStream named // writeOut // writeOut receives the stream from the File named // "MyBackup.sav" writeOut = new FileOutputStream("MyBackup.sav"); dataWrite = new DataOutputStream(writeOut); dataWrite.writeChars("This is a Test"); dataWrite.close(); } catch (IOException e) { System.out.println("Error in writing backup file"); } } } // Where execution begins in a stand-alone executable public static void main(String args[]) { new WriteAFile(args[0]); }}
The variable writeOut, which is of type DataOutputStream, is actually usedtwice in this example: once to write the file specified by the user and again towrite a file MyBackup.sav.
FilterInputStream andFilterOutputStream ClassesThese are classes that act as channels for streams to be passed through. As astream is passed through the shell, a hierarchy of stream containers are created toperform some processing of bytes as the methods are passed along with it. Thisstructure allows for a chaining effect of shells to break up a complicated task intosmall steps. Here are the declarations for these classes:
FilterInputStream anotherStream = new FilterInputStream(aStream);FilterOutputStream anotherStream = new FilterOutputStream(aStream);
In both declarations, the methods FilterInputStream() and FilterOutputStream()require that a stream be passed to each method. In return, a stream is assigned tothe object named anotherStream. Table 12.11 presents the key methods definedin FilterInputStream and Table 12.12 presents the methods defined inFilterOutputStream.
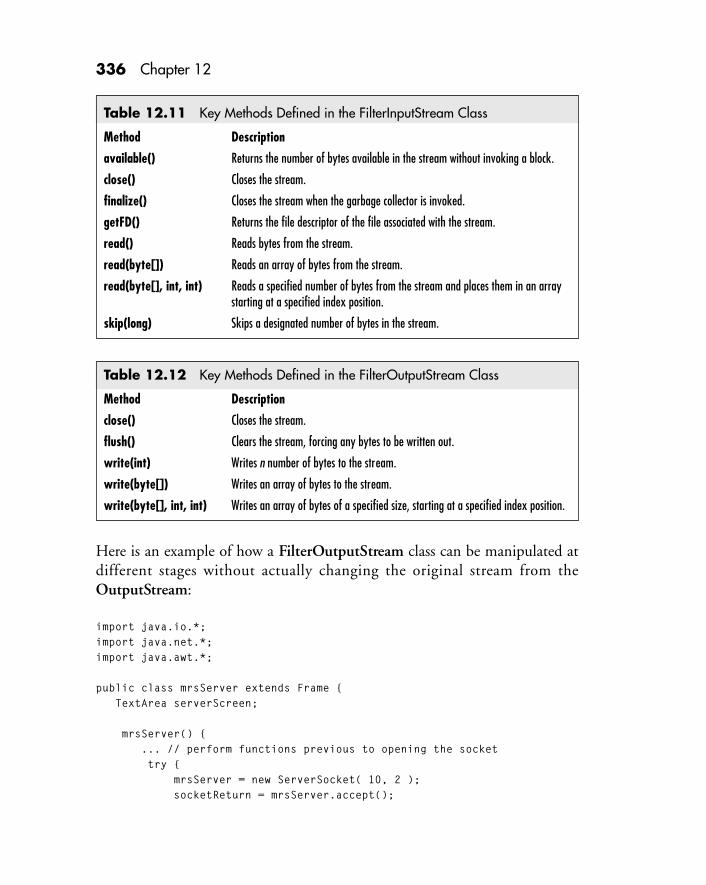
336 Chapter 12
Here is an example of how a FilterOutputStream class can be manipulated atdifferent stages without actually changing the original stream from theOutputStream:
import java.io.*;import java.net.*;import java.awt.*;
public class mrsServer extends Frame { TextArea serverScreen;
mrsServer() { ... // perform functions previous to opening the socket try { mrsServer = new ServerSocket( 10, 2 ); socketReturn = mrsServer.accept();
Table 12.11 Key Methods Defined in the FilterInputStream Class
Method Description
available() Returns the number of bytes available in the stream without invoking a block.
close() Closes the stream.
finalize() Closes the stream when the garbage collector is invoked.
getFD() Returns the file descriptor of the file associated with the stream.
read() Reads bytes from the stream.
read(byte[]) Reads an array of bytes from the stream.
read(byte[], int, int) Reads a specified number of bytes from the stream and places them in an arraystarting at a specified index position.
skip(long) Skips a designated number of bytes in the stream.
Table 12.12 Key Methods Defined in the FilterOutputStream Class
Method Description
close() Closes the stream.
flush() Clears the stream, forcing any bytes to be written out.
write(int) Writes n number of bytes to the stream.
write(byte[]) Writes an array of bytes to the stream.
write(byte[], int, int) Writes an array of bytes of a specified size, starting at a specified index position.

Streams and File I/O 337
OutputStream stageOneDataOut = socketReturn.getOutputStream(); FilterOutputStream stageTwoDataOut = new FilterOutputStream(stageOneDataOut); // perform some operations on stageTwoDataOut stream ... FilterOutputStream stageThreeDataOut = new FilterOutputStream(stageTwoDataOut); // perform some operations on stageThreeDataOut stream ... FilterOutputStream stageFourDataOut = new FilterOutputStream(stageThreeDataOut); // write the data from stageFourDataOut ...
} catch( UnknownHostException e ) { } catch( IOException e ) { } ... }
LineNumberInputStream ClassThis class allows for line numbering of each line processed through the stream.It is useful for determining which lines errors have occurred on. To declare andcreate an object from this class, you use a statement like the following:
LineNumberInputStream aStream = LineNumberInputStream(getStreamFromASource());
In the declaration above, the method getStreamAFromSource() retrieves a sourcestream that is assigned line numbers. The stream that the methodLineNumberInputStream() returns is assigned to the object aStream. Table 12.13presents the key methods defined in LineNumberInputStream.
Here is a real world example of how the LineNumberInputStream class can be used:
import java.io.*;
// Reads from a filepublic class ReadAFile extends Object { ReadAFile(String s) { String line; FileInputStream fileName = null; // Assigns the variable bufferedInput to the class

338 Chapter 12
BufferedInputStream BufferedInputStream bufferedInput = null; DataInputStream dataIn = null;
try { fileName = new FileInputStream(s); // Creates an instanceof the class LineNumberInputStream named // parsedData // parsedData receives the stream from the FileInputStream // fileName as it is read LineNumberInputStream parsedData = new LineNumberInputStream(fileName); dataIn = new DataInputStream(parsedData); } catch(FileNotFoundException e) { System.out.println("File Not Found"); return; } catch(Throwable e) { System.out.println("Error in opening file"); return; }
try { while ((line = dataIn.readLine()) != null) { // adds the current line number to the beginning of every line System.out.println(parsedData.getLineNumber() + ": " + line + "\n"); } fileName .close(); } catch(IOException e) { System.out.println("Error in reading file"); } }
// Where execution begins in a stand-alone executable public static void main(String args[]) { new ReadAFile(args[0]); }}
As the stream is passed to the parsedData stream, a line number is assigned toeach line in the stream. The line number is then added to the line before print-ing the line to the browser.
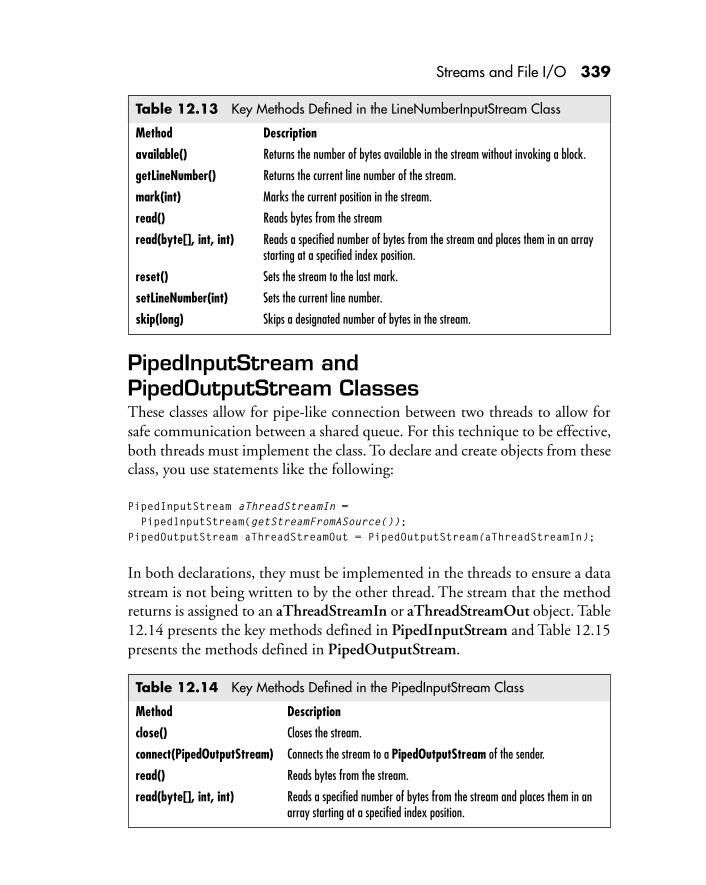
Streams and File I/O 339
PipedInputStream andPipedOutputStream ClassesThese classes allow for pipe-like connection between two threads to allow forsafe communication between a shared queue. For this technique to be effective,both threads must implement the class. To declare and create objects from theseclass, you use statements like the following:
PipedInputStream aThreadStreamIn = PipedInputStream(getStreamFromASource());PipedOutputStream aThreadStreamOut = PipedOutputStream(aThreadStreamIn);
In both declarations, they must be implemented in the threads to ensure a datastream is not being written to by the other thread. The stream that the methodreturns is assigned to an aThreadStreamIn or aThreadStreamOut object. Table12.14 presents the key methods defined in PipedInputStream and Table 12.15presents the methods defined in PipedOutputStream.
Table 12.13 Key Methods Defined in the LineNumberInputStream Class
Method Description
available() Returns the number of bytes available in the stream without invoking a block.
getLineNumber() Returns the current line number of the stream.
mark(int) Marks the current position in the stream.
read() Reads bytes from the stream
read(byte[], int, int) Reads a specified number of bytes from the stream and places them in an arraystarting at a specified index position.
reset() Sets the stream to the last mark.
setLineNumber(int) Sets the current line number.
skip(long) Skips a designated number of bytes in the stream.
Table 12.14 Key Methods Defined in the PipedInputStream Class
Method Description
close() Closes the stream.
connect(PipedOutputStream) Connects the stream to a PipedOutputStream of the sender.
read() Reads bytes from the stream.
read(byte[], int, int) Reads a specified number of bytes from the stream and places them in anarray starting at a specified index position.

340 Chapter 12
PrintStream ClassThis class is most commonly used to create an instance of the System class,where the methods print() and println() are referenced as class variables for usein the System.out and System.err calls. The most common output device forthis class is the screen. The declaration for the PrintStream class is:
PrintStream aStream = new PrintStream( getStreamFromASource());
Along with this class accepting the write(), flush(), and close() methods, it sup-ports a slew of print methods that will handle just about every I/O operationyou will need to perform. Most often, an object created from this class will beused like this:
System.out.print(aStream);System.out.println(aStream);
The only difference between the two calls is that the second call appends a returncharacter to the end of the stream. Table 12.16 presents the key methods defined inPrintStream. Here is a simple example of how the PrintStream class can be usedto return a line that was typed in by the user:
import java.io.*;
public class ProcessALine { public static void main(String arg[]) { DataInputStream aDataInput = new DataInputStream(System.in); String aString;
try { // A Control Z exits while ((aString = aDataInput.readLine()) != null) {
Table 12.15 Key Methods Defined in the PipedOutputStream Class
Method Description
close() Closes the stream.
connect(PipedInputStream) Connects the stream to a PipedInputStream of the intended recipient.
write(int) Writes n number of bytes to the stream.
write(byte[], int, int) Writes an array of bytes of a specified size, starting at a specified indexposition.
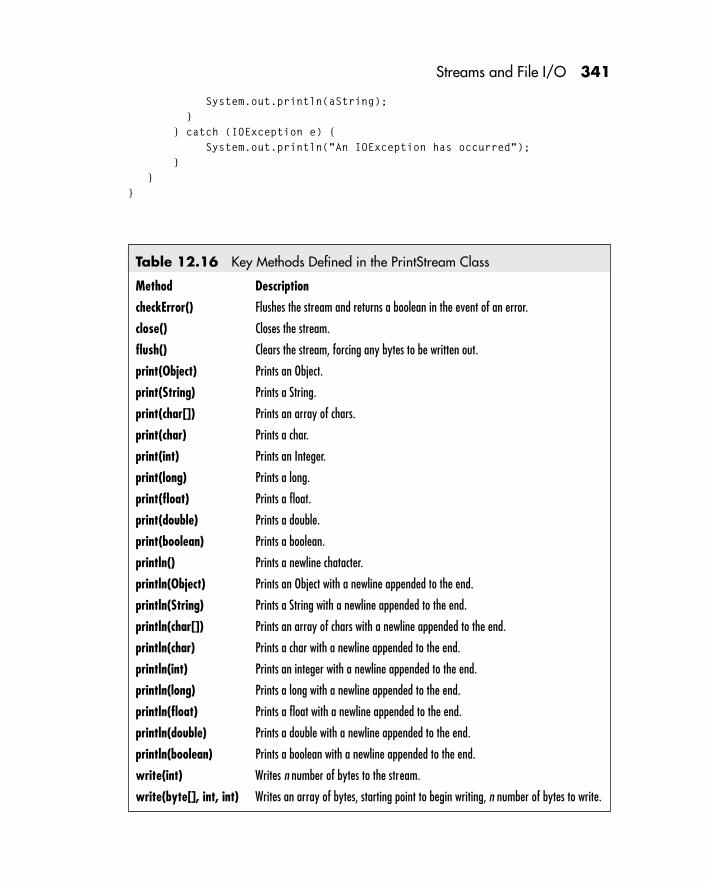
Streams and File I/O 341
System.out.println(aString); } } catch (IOException e) { System.out.println("An IOException has occurred"); } }}
Table 12.16 Key Methods Defined in the PrintStream Class
Method Description
checkError() Flushes the stream and returns a boolean in the event of an error.
close() Closes the stream.
flush() Clears the stream, forcing any bytes to be written out.
print(Object) Prints an Object.
print(String) Prints a String.
print(char[]) Prints an array of chars.
print(char) Prints a char.
print(int) Prints an Integer.
print(long) Prints a long.
print(float) Prints a float.
print(double) Prints a double.
print(boolean) Prints a boolean.
println() Prints a newline chatacter.
println(Object) Prints an Object with a newline appended to the end.
println(String) Prints a String with a newline appended to the end.
println(char[]) Prints an array of chars with a newline appended to the end.
println(char) Prints a char with a newline appended to the end.
println(int) Prints an integer with a newline appended to the end.
println(long) Prints a long with a newline appended to the end.
println(float) Prints a float with a newline appended to the end.
println(double) Prints a double with a newline appended to the end.
println(boolean) Prints a boolean with a newline appended to the end.
write(int) Writes n number of bytes to the stream.
write(byte[], int, int) Writes an array of bytes, starting point to begin writing, n number of bytes to write.

342 Chapter 12
PushbackInputStream ClassThis class causes the stream to reaccept a byte that was passed to it by theInputStream. By forcing the byte back to the delivering InputStream, you canreread the byte as if it had never been read. To declare a stream asPushbackInputStream and instaniate it, you could type the following:
PushbackInputStream aStream = new PushbackInputStream (getStreamFromASource());
The getStreamFromASource() method can be any method that returns a stream.The stream that the method is assigned to the object aStream. All informationpassed to and from the streams must be in the form of bytes. Table 12.17 pre-sents the key methods that are defined in PushbackInputStream.
SequenceInputStream ClassThis class allows for two streams to be seamlessly joined. This is especially usefulwhen creating an exception that would pick up where it left off last in a transfer.To declare a stream as type SequenceInputStream and instaniate it, you wouldtype the following:
InputStream aStream = new SequenceInputStream(firstStream, secondStream);
In the declaration, firstStream is appended to the secondStream to create asingle seamless stream, aStream. Table 12.18 presents the key methods definedin SequenceInputStream.
Table 12.17 Key Methods Defined in the PushbackInputStream Class
Method Description
available() Returns the number of bytes available in the stream without invoking a block.
markSupported() Returns a true/false value to indicate if the stream supports marking capabilities.
read() Reads bytes from the stream.
read(byte[], int, int) Reads a specified number of bytes from the stream and places them in an arraystarting at a specified index position.
unread(int) Returns a char to the stream as if it had not been read in the first place.

Streams and File I/O 343
StringBufferInputStream ClassThis class is very similiar to the ByteArrayInputStream class. The difference isthat it combines an array of char types into a stream. Note, an array of chars isactually a string. To declare and create an object from this class, you use a state-ment like the following:
InputStream aStream = new StringBufferInputStream(String);
The classes declared here passes a string through the StringBufferInputStreamclass and a stream is created from it. The stream that was converted from theclass returns a value and is assigned to the object aStream. Table 12.19 presentsthe key methods defined in StringBufferInputStream.
Here is another hypothetical example, but this time a StringBufferInputStreamclass is used. (You may have recognized this example earlier when we introducedthe ByteArrayInputStream class. We decided to reuse the sample program be-cause of the similarity between the two classes.)
Table 12.18 Key Methods Defined in the SequenceInputStream Class
Method Description
close() Closes the stream.
read() Reads bytes from the stream.
read(byte[], int, int) Reads a specified number of bytes from the stream and places them in an arraystarting at a specified index position.
Table 12.19 Key Methods Defined in the StringBufferInputStream Class
Method Description
available() Returns the number of bytes available in the stream without invoking a block.
read() Reads bytes from the stream.
read(byte[], int, int) Reads a specified number of bytes from the stream and places them in an arraystarting at a specified index position.
reset() Sets the stream to the last mark.
skip(long) Skips a designated number of bytes in the stream.

344 Chapter 12
import java.io.*;
// Reads from a filepublic class Char2Stream extends Object {
Char2Stream(String s) { String aCommonString = "The quick brown fox jumped over the lazy dog"; try { // Creates an instanceof the class InputStream named charDataIn // charDataIn receives the stream from the // StringBufferInputStream aCommonString InputStream charDataIn = new StringBufferInputStream(aCommonString); } catch(IOException e) { } … // perform some process with the stream }
// Where execution begins in a stand-alone executable public static void main(String args[]) { new Char2Stream(args[0]); }}
The stream is piped through the StringBufferInputStream class before beingsent to the InputStream object, charDataIn. This technique converts the stringof characters into a sequence of bytes so that they can be used in a stream. Thestream then can be passed to any of the InputStreams to be manipulated later inthe program.

Index
AAbstract classes, 33, 121, 158Abstract methods, 132Abstract Window Toolkit, 32Action( ) method, 294Add method, 274Addition, 98Addressing
Internet, 353Animation
buffering, 40speed, 26
API documentation, 64Applet class
hierarchy, 288methods available, 288methods derived, 290
Applets, 5, 6browser interaction, 294class, 287closing, 51compiling, 53defined, 21drawbacks, 291file access, 292file execution, 292fonts, 43images, 298navigation sample, 293network communication, 292package, 31
parameters, 39passing information, 367sounds, 297tags, 39threading, 51ticker tape sample, 22vs. applications, 21
Appletviewer, 7Applications
command line arguments, 86defined, 21networking, 353sample menu, 268vs. applets, 21
Architecture natural, 5Arguments
accessing, 88indexing, 89numeric, 89passing, 87reading, 87
Arrays, 16, 82accessing data, 86declaring, 82elements, 83indexing, 85multidimensional, 85sizing, 83
Assignment boolean operators, 102Assignment operators, 93, 95Audio clips, 297AWT, 31, 227
AWTError, 191
403

404 Index
class hierarchy, 230components, 229defined, 32importing, 228layout manager, 228menus, 229
BBandwidth considerations, 360Binary, 97Binary integer operators, 99Binary operators, 98Bitwise complement, 97Bitwise operators, 99Blocking, 217Body (class), 128Boolean data type, 78Boolean operators
assignment, 102evaluation, 101logical, 100negation, 100ternary, 102
BorderLayout class, 274declaration, 275methods, 275
Break statement, 110Browsers
HotJava, 6Netscape, 26
BufferedInput Stream class, 327BufferedOutputStream class, 327Buffering, 40, 45Button class
declaration, 243getLabel( ), 244hierarchy, 243setLabel( ), 244
Buttons, 32Byte streams, 321Byte type, 76ByteArrayInputStream class, 328
ByteArrayOutputStream class, 328Bytecodes, 5, 53
CCanvas class
declaration, 245hierarchy, 244paint( ), 245
CardLayout class, 282declaration, 282methods, 282
Case-sensitivitydeclarations, 36package names, 171parameters, 40variable names, 36
Castinginterfaces, 165vs. creating, 151
Casts, 103Catch statements, 187Catch( ) method, 185Catching errors, 186CGI. See Common Gateway
InterfaceChar data type, 79Character arrays, 16Character literals, 73Checkbox class, 245
declaration, 246getCheckboxGroup( ), 247getLabel( ), 247getState( ), 247hierarchy, 246setCheckboxGroup( ), 247setLabel( ), 247setState( ), 247
Choice class, 247addItem( ), 249countItems( ), 249declaration, 248, 251getItem( ), 249

Index 405
getSelectedIndex( ), 249getSelectedItem( ), 249hierarchy, 248, 250methods, 251select( ), 250
Classes, 5abstract, 33, 121, 158advantages, 116applet, 287body, 128bufferedInputStream, 328bufferedOutputStream, 327button, 243byteArrayInputStream, 328byteArrayOutputStream, 328canvas, 244casting, 150checkbox, 245choice, 247component, 290container, 290dataInputStream, 330dataOutputStream, 330declaring, 116defined, 32documenting, 63error, 191event, 304exception, 193extending, 124fileInputStream, 333fileOutputStream, 333filterInputStream, 335filterOutputStream, 335final, 33, 123flowLayout, 271frame, 235fully qualified name, 118hiding, 177identifiers, 124importing packages, 176InetAddress, 354inputStream, 325label, 241
lineNumberInputStream, 337list, 250menuItem, 265modifiers, 33, 119name space, 34, 129naming, 124networking, 353object, 34outputStream, 325panel, 238pipedInputStream, 339pipedOutputStream, 339printStream, 340private, 33protocols, 158public, 33, 120pushbackInputStream, 342runtime, 194scrollbar, 258sequenceInputStream, 342socket, 355stringBufferInputStream, 343super( ), 142superclass, 34System, 321textArea, 253textField, 253throwable, 182URL, 364variables, 148WriteAFile, 185
CLASSPATH, 171, 173, 174Client, 350Client/server technology, 350Code parameter, 27Color method, 37Command line arguments, 86
indexing, 89numeric, 89passing arguments, 87reading, 87
Comments, 30styles, 59tags, 67

406 Index
Common Gateway Interface, 10Compilers, 7, 53Component class
bounds( ), 232disable( ), 232enable([Boolean]), 232getFontMetrics( ), 232getGraphics( ), 232getParent, 232handleEvent(Event evt), 232hide( ), 233inside(int x, int y), 233isEnabled( ), 233isShowing( ), 233isVisible( ), 233locate(int x, int y), 233location( ), 233move(int x, int y), 233repaint( ), 233resize( ), 234setFont( ), 234show([Boolean]), 234size( ), 235
Components, 60Compound expressions, 104Compound statements, 106Constructors, 37, 138
body, 146calling, 140declaring, 140FontMetrics, 48Java default, 142modifiers, 143object creation, 148protected, 143public, 143return type, 139
Container class, 290Control flow, 106Control structures
do...while, 108for, 110if...else, 106labels, 111
list of, 107switch, 109while, 108
Controls, 229buttons, 243canvas, 244checkbox, 245components, 231frame, 235label, 241layout manager, 270lists, 250menus, 229, 263panel, 238pop-up menus, 247scrollbar, 258text areas, 253text fields, 253
Converting valuescasting, 150
DData types, 35
boolean, 78byte, 76casting, 103char, 79double, 78float, 78int, 71, 77long, 71, 77separators, 75short, 76string, 79variables, 76
DataInputStream class, 330DataOutputStream class, 330Debugging, 181Decrement operator, 98Destroy( ) method, 222Developers Kit, 17Directories

Index 407
search path, 174Disassembler program, 17Distributed programming, 6Distributed software, 10Division, 98Do...while, 108Doc comment clauses, 119Documenting classes, 63Double buffering, 45Double data type, 78
EEncapsulation, 43Equal to operators, 102Error handling, 181Errors
catching, 186checking, 323file not found, 189input/output, 185throws, 133try clauses, 186
Evaluation operators, 101Event class, 304
methods, 306variables, 305
Event handling, 53Events
hierarchy, 313processing problems, 318system, 315types, 304
Exceptions, 15, 181, 182class, 193creating, 200error, 191file not found, 189finally statements, 189handler, 182IOException, 185try clauses, 186URL, 364
Executable content, 10Export statement, 228Expressions
assignment, 105writing, 104
Extending classes, 124Extends keyword, 34
FFatal errors, 191File
access, 292execution, 292input/output, 321saving, 173
File Transfer Protocol. See FTPFileInputStream class, 333FileOutputStream class, 333FilterInputStream, 335FilterOutputStream class, 335Final classes, 33Final methods, 132Finally statement, 189Finger protocol, 349Float data type, 78Floating-point, 72
operators, 102FlowLayout class, 271
declaration, 271methods, 273
Font metrics, 48Fonts, 43For loops, 110Frame class, 235
declaration, 235dispose( ), 237getIconImage( ), 237getMenuBar, 237getTitle( ), 237hierarchy, 235isResizable( ), 238remove( ), 238

408 Index
setCursor( ), 238setIconImage( ), 238setMenuBar( ), 238setResizeable( ), 238setTitle( ), 238
FTP, 349
GGarbage collection, 6, 15, 37Gateways, 355Graphical User Interface
button class, 243canvas class, 244checkbox class, 245choice class, 247component class, 231frame class, 235label class, 241lists, 250menu class, 263menu items, 265menuBar class, 261panel class, 238scrollbar class, 258text areas, 253text fields, 253
Graphics methods, 46GridBagLayout class, 278
declaration, 281methods, 281variables to customize, 278
GridLayout class, 276declaration, 277methods, 277
HHeader files, 13Height parameter, 27Helper programs, 17Hexadecimal format, 71
History of Java, 8HotJava, 6, 10HTML. See Hyper Text Markup
Languageapplet tags, 39
HTTP, 349Hyper Text Markup Language, 25Hyper Text Transfer Protocol. See HTTP
IIdentifiers, 65
class, 118classes, 124errors, 67
If...else, 106Image buffer, 41Images, 298Implements clause, 126Implements keywords, 34Import statements, 31, 228Including packages, 31Increment operator, 98Index, 84InetAddress class, 354Init( ), 130Input streams, 321, 324InputStream class, 325
methods, 325Instanceof operator, 17, 168Int data type, 77Integers, 71
literals, 72operators, 93, 97
Interfaces, 34, 158casting, 165class, 126declaring, 161design issues, 160implementation tips, 167implementing, 161implements clauses, 126keyword, 161

Index 409
layout manager, 271runnable, 34tips on using, 165
Internetaddressing, 353java.net package, 352Request for Comments, 351
IOException, 324
JJava language
advantages, 4benefits, 11compared to C++, 9developer’s kit, 7, 17history, 8interfaces, 158jargon, 5tools, 8virtual machine, 6
JAVAC, 7, 53JAVADOC.EXE, 63Java-enabled, 7JAVAP, 17JavaScript, 7Just-in-Time compiler, 7
KKeyboard events, 311
keyDown( ), 311keyUp( ), 311
Keywords, 68class, 124extends, 34, 124implements, 34, 162interface, 161list of keywords, 69super, 135this, 50, 135
LLabel class, 241
declaration, 241getAlignment( ), 242getText( ), 242hierarchy, 241setAlignment( ), 242setText( ), 243
Labels, 111Layout manager, 228, 270
borderLayout class, 274cardLayout class, 282flowLayout class, 271gridBagLayout class, 278gridLayout class, 276
Lexical structures, 58comments, 59identifiers, 65keywords, 68separators, 75
LineNumberInputStream class, 337List class, 250Literals, 71
character, 73numeric, 71
Logical operators, 100Long data type, 77Long integers, 71
MMain programs, 27Menu class, 263
declaration, 264hierarchy, 263methods, 264
MenuBar class, 262declaration, 262hierarchy, 262methods, 262
MenuItem class, 265

410 Index
declaration, 266hierarchy, 266methods, 267
Menus, 32creating, 229
Methods, 7, 38, 130abstract, 132action( ), 294add( ), 274applet class, 288body, 134catch( ), 185color, 37constructors, 138createImage( ), 230declaring, 130defined, 28destroy( ), 222disable( ), 230documenting, 63drawString( ), 48final, 132getGraphics( ), 41getMessage, 198getParameter( ), 40graphics, 46handleEvent( ), 53hide( ), 230init( ), 28, 130main( ), 87modifiers, 131native, 132, 292overloading, 137overriding, 43, 137, 170paint( ), 29, 44parameter lists, 133parse( ), 89private, 132protected, 131public, 131resume( ), 220return type, 133Run( ), 29, 214
sleep( ), 50start( ), 29static, 132stop( ), 51, 221suspend( ), 220synchronized, 132throwing an exception, 194throws, 133valueOf( ), 89write( ), 184yield, 221
Modifiersabstract, 121constructor, 143final, 123, 150method, 131modifiers, 33, 119public, 120transient, 150volatile, 150
Modulus operator, 99Mouse events, 304, 307
mouseDown( ), 307mouseDrag( ), 309mouseEnter( ), 310mouseExit( ), 310mouseMove( ), 309mouseUp( ), 308
Multidimensional arrays, 85Multiple inheritance, 14Multiplication, 98Multithreading, 7, 208
grouping, 226synchronizing, 222
NName space, 129Native methods, 132, 292Negation operator, 97Netscape
applet, 294Network communication, 292

Index 411
Network News Transfer Protocol.See NNTP
Networking, 347between applets, 367classes, 353client/server, 350concerns, 360java.net, 352ports, 350protocols, 348sockets, 355URLs, 364
New lines, 356NNTP, 349Not equal to operators, 102Numeric literals, 71
OObject-oriented programming, 12Objects
arrays, 82class, 34creation, 148declaring, 118
Octal integers, 71Operators, 74, 93
addition, 98assignment, 95, 102binary, 98binary integer, 99bitwise, 99bitwise complement, 97boolean negation, 100compound expressions, 104decrement, 98division, 98equal to, 102evaluation, 101floating-point, 102increment, 98instanceof, 17, 168integer, 97
logical AND, 100modulus, 99multiplication, 98negation, 97not equal, 102precedence, 93subtraction, 98ternary, 102
Output streams, 324class, 325
Overloading methods, 137Overriding methods, 137
PPackages, 30
applet, 31awt, 31case sensitivity, 171classes, 30creating, 168documenting, 63import keyword, 169java.io, 322java.lang, 30java.net, 352naming, 170public classes, 172standard Java, 177
Paint( ) method, 44Panel class, 238
declaration, 240hierarchy, 240setlayout( ), 241
Parameter listsconstructor, 146
Parameters, 39code, 27height, 27speed, 26values, 27width, 27
Parsing, 89

412 Index
Performance issuesthreading, 51
PipedInputStream class, 339PipedOutputStream class, 339Pointers, 13Ports, 350
Internet, 351numbers, 350
Precedence (operators), 93PrintStream class, 340Private
constructors, 143methods, 132
Processing parameters, 39Protected
constructors, 143methods, 131
Protocolsclass, 158finger, 349FTP, 349Internet, 351NNTP, 349Request for Comments, 351SMTP, 348TCP/IP, 348WhoIs, 349
Publicclasses, 33, 120constructors, 143keyword, 162method, 131
PushbackInputStream class, 342
RRequest for Comments. See Request for
CommentsResizing, 239Resource allocation, 37Resume( ) method, 220Return type, 133Returns, 356
RFCs. See Request for CommentsRun method, 214Runnable interface, 213Runtime class, 194
SSavings files, 173Scripting language, 7Scrollbar class, 258
hierarchy, 260methods, 260
Security, 12, 15, 292Seprators, 75SequenceInputStream class, 342Servers, 350
sample, 361setting up, 360
ServerSocket class, 360Shadowing, 129Short type, 76Simple Mail Transfer Protocol.
See SMTPSimple statements, 105Single inheritance, 121Sleep( ) method, 50, 219Socket class, 360Sockets, 355Sounds, 297Source code
saving, 173Statements, 105
catch, 187compound, 106control flow, 106finally, 189simple, 105switch, 109using semi-colons, 106writing, 104
Static methods, 132Status bar, 296Stop( ) method, 221

Index 413
Streams, 321inputStream, 324outputStream, 324
String arrays, 16String type, 79StringBufferInputStream class, 343Subclasses, 44Subtraction, 98Super classes, 16Super keyword, 135Super( ), 142Suspend( ) method
suspending execution, 220Switch, 109Synchronized methods, 132System class, 321
system.in, 322System events, 315
action( ), 317handleEvent( ), 317
TTags, 67TCP/IP, 348Ternary operators, 102TextArea class, 253
declaration, 254hierarchy, 254methods, 255
TextField class, 253declaration, 254hierarchy, 254methods, 255
This keyword, 50, 135ThreadGroup, 226Threads, 29, 49, 182, 207, 212
blocking, 217creating, 211destroy( ) method, 222first in first out, 217grouping, 226initializing, 215
life cycle, 218priority, 217resuming, 220run( ) method, 219runnable interface, 213sleep( ) method, 219start( ) method, 219stop( ) method, 221subclassing, 212suspending execution, 220synchronizing, 222when to use, 210while loops, 210yield( ) method, 221
Throws, 133constructor, 146exceptions, 194
Transient modifiers, 150Transmission Control Protocol.
See TCP/IPTry clauses, 186Types, 76
UUnary, 97Unicode, 73Uniform Resource Locator. See URLsURLs, 364User input, 52User interface
component class, 231layout manager, 271menus, 229
VVariable declarations, 35Variables
constructors, 37declarations, 79modifiers, 149naming, 36

414 Index
static, 149variables, 148vs. types, 76
Virtual machine, 6, 210Volatile modifiers, 150
WWeb sites
Coriolis, 25Javasoft, 54
While, 108
While loops, 210WhoIs protocol, 349Widening, 151Width parameter, 27Wild cards
hiding classes, 177Windows, 32
YYield( ) method, 221


![[G] Java Programming Language Handbook](https://img.dokumen.tips/doc/110x75/577ccf5e1a28ab9e788f84a4/g-java-programming-language-handbook.jpg)