Embed Size (px)
Citation preview
4
1 INTRODUCTION TO JAVA
Unit Structure: 1. Objectives
2. History and Introduction to Java
3. Java Features
4. Different types of Java Programs
5. Differentiate Java with C and C++
6. Sample Java Program
7. Java Variables and Data Types
8. Type Conversion and Casting
9. Summary
10. Unit end exercise
11. Further Reading
1. OBJECTIVES
The objectives of this chapter are to learn the history of Java and basic of the Java language. Here we will learn why Java was created and features of the Java language that makes it a popular language.
2. HISTORY AND INTRODUCTION TO JAVA History
Java is related to C++, which is a direct descendent of C. Much of the features of Java are inherited from these two languages. Each innovation in language design was driven by the need to solve a fundamental problem that the preceding languages could not solve. Java was conceived by James Gosling, Patrick Naughton, Chris Warth, Ed Frank, and Mike Sheridan at Sun Microsystems, Inc. in 1991. This language was initially called "Oak" but was renamed "Java" in 1995.
The primary motivation was the need for a platform-
independent language that could be used to create software to be embedded in various consumer electronic devices, such as microwave ovens and remote controls. Java derives much of its character from C and C++. This is by intent. The Java designers
www.educlash.com
5
knew that using the familiar syntax of C and echoing the object- oriented features of C++ would make their language appealing to the C/C++ programmers.
Introduction to Java
Java is a modern, evolutionary computing language that
combines an elegant language design with powerful features that were previously available primarily in specialty languages. In addition to the core language components, Java software distributions include many powerful, supporting software libraries for tasks such as database, network, and graphical user interface (GUI) programming. In this chapter, we focus on the core Java language features.
Java is a true object-oriented (OO) programming language. The main implication of this statement is that in order to write programs with Java, you must work within its object-oriented structure.
Object-oriented languages provide a framework for designing programs that represent real-world entities such as cars, employees, insurance policies, and so on. Representing real-world entities with non object-oriented languages is difficult because it's necessary to describe entities such as a truck with rather primitive language constructs such as Pascal's record, C's struct, and others that represent data only.
The behavior of an entity must be handled separately with language constructs such as procedures and/or functions, hence, the term procedural programming languages. Given this separation, the programmer must manually associate a data structure with the appropriate procedures that operate on, that is, manipulate, the data.
Java can be used to create two types of programs:
applications and applets. An application is a program that runs on your computer, under the operating system of that computer. An applet is an application designed to be transmitted over the Internet and executed by a Java-compatible Web browser. An applet is actually a tiny Java program, dynamically downloaded across the network, just like an image, sound file, or video clip.
1.2 JAVA FEATURES
The Java programming language is a high-level language that can be characterized by:
www.educlash.com
6
Simple - Java was designed to be easy for the professional
programmer to learn and use effectively. Because Java inherits the C/C++ syntax and many of the object-oriented features of C++, most programmers have little trouble learning Java.
Secure - Java does not use memory pointers explicitly. All the
programs in java are run under an area known as the sand box. Security manager determines the accessibility options of a class like reading and writing a file to the local disk.
Portable - The feature Write-once-run-anywhere makes the
java language portable provided that the system must have interpreter for the JVM. Java also has the standard data size irrespective of operating system or the processor. These features make the java as a portable language.
Object-oriented - The object model in Java is simple and easy
to extend, while simple types, such as integers, are kept as high performance non-objects. It is a fully Object Oriented language because object is at the outer most level of data structure in java. No stand alone methods, constants, and variables are there in java. Everything in java is object even the primitive data types can also be converted into object by using the wrapper class.
Robust - Java restricts you in a few key areas, to force you to
find your mistakes early in program development. At the same time, Java frees you from having to worry about many of the most common causes of programming errors. Java has the strong memory allocation and automatic garbage collection mechanism. It provides the powerful exception handling and type checking mechanism as compare to other programming languages. All of the above features make the java language robust.
Multithreaded - Java supports multithreaded programming,
which allows you to write programs that do many things simultaneously. Multiple threads execute instructions according to the program code in a process or a program. Multithreading works the similar way as multiple processes run on one computer.
Architecture-neutral - The Java compiler supports this feature
by generating byte code instructions, to be easily interpreted on any machine and to be easily translated into native machine code on the fly. The compiler generates an architecture-neutral object file format to enable a Java application to execute anywhere on the network and then the compiled code is
www.educlash.com
7
executed on many processors, given the presence of the Java runtime system.
Interpreted - Java enables the creation of cross-platform
programs by compiling into an intermediate representation called Java bytecode. This code can be interpreted on any system that provides a Java Virtual Machine.
High performance - Java uses native code usage, and
lightweight process called threads. In the beginning interpretation of bytecode resulted the performance slow but the advance version of JVM uses the adaptive and just in time compilation technique that improves the performance.
Distributed - Java is designed for the distributed environment
of the Internet, because it handles TCP/IP protocols. Internet programmers can call functions on these protocols and can get access the files from any remote machine on the internet rather than writing codes on their local system.
Dynamic - Java programs carry with them substantial amounts
of run-time type information that is used to verify and resolve accesses to objects at run time. While executing the java program the user can get the required files dynamically from a local drive or from a computer thousands of miles away from the user just by connecting with the Internet.
Check Your Progress 1) Java is a true _ _ programming language.
2) Java does not use memory pointers .
1.3 DIFFERENT TYPES OF JAVA PROGRAMS
Java is a programming language that’s used to build programs that can work on the local machine and on the internet as well. So there are various categories of programs that can be developed in Java.
STAND-ALONE APPLICATIONS - Console Applications - An
application is a program that runs on the computer under the operating system of your computer. Creating an application in java is similar to doing so in any other computer language. The application can either be GUI based or console based.
WEB APPLICATIONS - These are the applications which are
web-based in nature and require a web browser for execution. The Web applications makes use of a Server to store the data,
www.educlash.com
8
and every time a user requests to execute that application, the request is passed on to the server for suitable reply. E.g. Applet and Servlet. Applets are Java programs that are created specially to work on the internet. In Servlets, the client sends a request to a server. The server processes the request and sends a response back to the client.
DISTRIBUTED APPLICATIONS - It requires a server to run
these applications. A number of servers are used simultaneously for backup to prevent any data losses.
CLIENT SERVER APPLICATIONS - These applications too
make use of web technology for their execution. They follow simple Client-Server model, where a client makes requests directly to the server.
1.4 DIFFERENTIATE JAVA WITH C AND C++ Major differences between C and JAVA are
JAVA is Object-Oriented while C is procedural - Most
differences between the features of the two languages arise due to the use of different programming paradigms. C is more procedure-oriented while JAVA is data-oriented.
Java is an Interpreted language while C is a compiled language-
A C compiler takes your code & translates it into something the machine can understand. While with JAVA, the code is first transformed to what is called the bytecode. This bytecode is then executed by the JVM(Java Virtual Machine). For the same reason, JAVA code is more portable.
C is a low-level language while JAVA is a high-level language.
C uses the top-down approach while JAVA uses the bottom-up
approach - In C, formulating the program begins by defining the whole and then splitting them into smaller elements. JAVA follows the bottom-up approach where the smaller elements combine together to form the whole.
Pointer go backstage in JAVA while C requires explicit handling
of pointers - When it comes to JAVA, we don't need the *'s & &'s to deal with pointers & their addressing. More formally, there is no pointer syntax required in JAVA. It does what it needs to do. While in JAVA, we do create references for objects.
JAVA supports Method Overloading while C does not support
overloading at all - JAVA supports function or method
www.educlash.com

9
overloading-that is we can have two or more functions with the same name.
The standard Input & Output Functions - Although this
difference might not hold any conceptual significance, but it's maybe just the tradition. C uses the printf & scanf functions as its standard input & output while JAVA uses the System. out. print & System. In .read functions.
Exception Handling in JAVA And the errors & crashes in C -
When an error occurs in a Java program it results in an exception being thrown. It can then be handled using various exception handling techniques. While in C, if there's an error, there IS an error.
Major differences between C++ and JAVA are
C++ was mainly designed for systems programming and Java
was created initially to support network computing. C++ supports pointers whereas Java does not pointers.
At compilation time Java Source code converts into byte code
.The interpreter execute this byte code at run time and gives output. C++ run and compile using compiler which converts source code into machine level languages so C++ is plate from dependents
Java is platform independent language but C++ is depends
upon operating system machine etc.
Java uses compiler and interpreter both and in C++ their is only
compiler
C++ supports operator overloading multiple inheritance but java
does not.
Java does is a similar to C++ but not have all the complicated
aspects of C++ (ex: Pointers, templates, unions, operator overloading, structures etc..)
Thread support is built-in Java but not in C++.
Internet support is built-in Java but not in C++.
Java does not support header file, include library files just like
C++ .Java use import to include different Classes and methods.
www.educlash.com

10
Java does not support default arguments like C++.
Exception and Auto Garbage Collector handling in Java is
different because there are no destructors into Java.
Java has method overloading, but no operator overloading just
like C++.
Check Your Progress 1) JAVA is a high-level language (True/False)
2) Java does not support pointers (True/False)
1.5 SAMPLE JAVA PROGRAM
Let us start Java programming with a small example. This program will show the output “Hello World” class HelloWorld {
public static void main(String args[]) {
System.out.println(“Hello World”); }
} Now let us understand the program line by line. Class Declaration – This line declares a class. class is an
object-oriented construct and a keyword which states that the class declaration follows. HelloWorld is the name of the class.
Opening and Closing Brace - The entire class definition, including all of its members, will be between the opening curly brace ({) and the closing curly brace (}). The use of the curly braces in Java is identical to the way they are used in C and C++.
Main Line – The main() function is similar to the the main() in C/C++. Every Java application program must include the main() method. The keyword public is an access specifier that declares the main method accessible to all other classes. The next keyword static states that this method belongs to the entire class. The keyword static allows main() to be called without having to instantiate a particular instance of the class. main() is the method called when a Java application begins. In main(), there is only one parameter, String args[ ] declares a parameter named args, which is an array of instances of the class String. The type modifier void states that the main() method does not return any value.
www.educlash.com
11
Output Line – This line is similar to the printf() of C or cout <<
of C++. The println() method is a member of the out object, which is a static data member of System class. System is a predefined class that provides access to the system, and out is the output stream that is connected to the console.
Output:
Hello World
1.6 JAVA VARIABLES AND DATA TYPES
The Java programming language defines the following kinds of variables: Instance Variables (Non-Static Fields) Non-static fields are
also known as instance variables because their values are unique to each instance of a class (to each object, in other words).
Class Variables (Static Fields) A class variable is any field
declared with the static modifier; this tells the compiler that there is exactly one copy of this variable in existence, regardless of how many times the class has been instantiated.
Local Variables - Similar to how an object stores its state in
fields, a method will often store its temporary state in local variables. The syntax for declaring a local variable is similar to declaring a field (for example, int count = 0;).
Parameters - The important thing to remember is that
parameters are always classified as "variables" not "fields". This applies to other parameter-accepting constructs as well (such as constructors and exception handlers) that you'll learn about later.
The rules and conventions for naming your variables can be
summarized as follows:
Variable names are case-sensitive. A variable's name can be
any legal identifier — an unlimited-length sequence of Unicode letters and digits, beginning with a letter, the dollar sign "$", or the underscore character "_". The convention, however, is to always begin your variable names with a letter, not "$" or "_".
Subsequent characters may be letters, digits, dollar signs, or
underscore characters. When choosing a name for your variables, use full words instead of cryptic abbreviations. Doing so will make your code easier to read and understand. Also
www.educlash.com

12
keep in mind that the name you choose must not be a keyword or reserved word.
If the name you choose consists of only one word, spell that
word in all lowercase letters. If it consists of more than one word, capitalize the first letter of each subsequent word. The names getText and currentValue are prime examples of this convention. If your variable stores a constant value, such as static final int NUM_SUBJECTS = 6, the convention changes slightly, capitalizing every letter and separating subsequent words with the underscore character. By convention, the underscore character is never used elsewhere.
Primitive Data Types
The Java programming language is statically-typed, which
means that all variables must first be declared before they can be used. A primitive type is predefined by the language and is named by a reserved keyword. Primitive values do not share state with other primitive values. The eight primitive data types supported by the Java programming language are:
byte: The byte data type is an 8-bit signed two's complement
integer. It has a minimum value of -128 and a maximum value of 127 (inclusive).
short: The short data type is a 16-bit signed two's complement
integer. It has a minimum value of -32,768 and a maximum value of 32,767 (inclusive).
int: The int data type is a 32-bit signed two's complement
integer. It has a minimum value of -2,147,483,648 and a maximum value of 2,147,483,647 (inclusive). For integral values, this data type is generally the default choice unless there is a reason to choose something else.
long: The long data type is a 64-bit signed two's complement
integer. It has a minimum value of -9,223,372,036,854,775,808 and a maximum value of 9,223,372,036,854,775,807 (inclusive).
float: The float data type is a single-precision 32-bit IEEE 754
floating point. Use a float (instead of double) if you need to save memory in large arrays of floating point numbers. This data type should never be used for precise values, such as currency.
double: The double data type is a double-precision 64-bit IEEE
754 floating point. For decimal values, this data type is generally the default choice. As mentioned above, this data type should never be used for precise values, such as currency.
www.educlash.com
13
boolean: The boolean data type has only two possible values:
true and false. Use this data type for simple flags that track true/false conditions.
char: The char data type is a single 16-bit Unicode character. It has a minimum value of '\u0000' (or 0) and a maximum value of '\uffff' (or 65,535 inclusive).
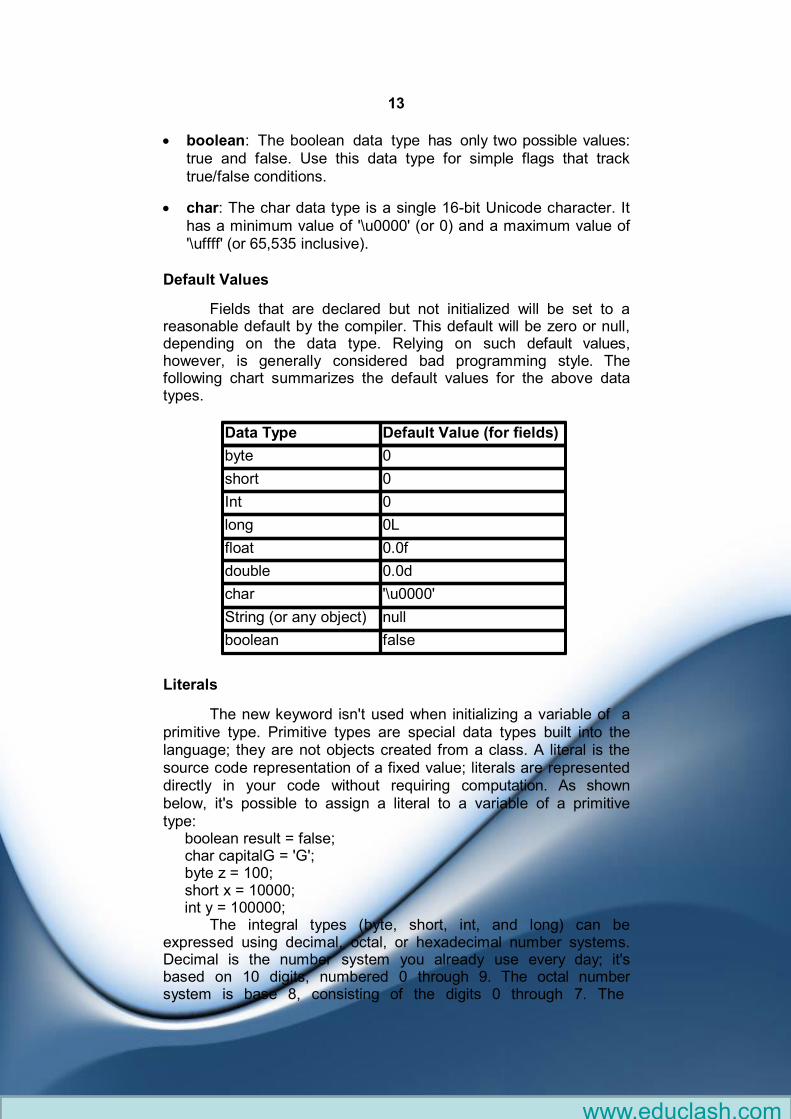
Default Values
Fields that are declared but not initialized will be set to a reasonable default by the compiler. This default will be zero or null, depending on the data type. Relying on such default values, however, is generally considered bad programming style. The following chart summarizes the default values for the above data types.
Literals
The new keyword isn't used when initializing a variable of a primitive type. Primitive types are special data types built into the language; they are not objects created from a class. A literal is the source code representation of a fixed value; literals are represented directly in your code without requiring computation. As shown below, it's possible to assign a literal to a variable of a primitive type:
boolean result = false; char capitalG = 'G'; byte z = 100; short x = 10000; int y = 100000;
The integral types (byte, short, int, and long) can be expressed using decimal, octal, or hexadecimal number systems. Decimal is the number system you already use every day; it's based on 10 digits, numbered 0 through 9. The octal number system is base 8, consisting of the digits 0 through 7. The
Data Type Default Value (for fields)
byte 0
short 0
Int 0
long 0L
float 0.0f
double 0.0d
char '\u0000'
String (or any object) null
boolean false
www.educlash.com
14
hexadecimal system is base 16, whose digits are the numbers 0 through 9 and the letters A through F.
The floating point types (float and double) can also be expressed using E or e (for scientific notation), F or f (32-bit float literal) and D or d (64-bit double literal; this is the default and by convention is omitted).
double d1 = 123.4; double d2 = 1.234e2; //same value as in scientific notation float f1 = 123.4f;
The Java programming language also supports a few special
escape sequences for char and String literals: \b (backspace), \t (tab), \n (line feed), \f (form feed), \r (carriage return), \" (double quote), \' (single quote), and \\ (backslash).
There's also a special null literal that can be used as a value for any reference type. null may be assigned to any variable, except variables of primitive types. Finally, there's also a special kind of literal called a class literal, formed by taking a type name and appending ".class"; for example, String.class. This refers to the object (of type Class) that represents the type itself.
Check Your Progress 1) The int data type is a _ -bit signed two's complement integer.
2) A _ is the source code representation of a fixed value.
1.6 TYPE CONVERSION AND CASTING
It is fairly common to assign a value of one type to a variable of another type. If the two types are compatible, then Java will perform the conversion automatically. For example, it is always possible to assign an int value to a long variable. However, not all types are compatible, and thus, not all type conversions are implicitly allowed. For instance, there is no conversion defined from double to byte. To do so, you must use a cast, which performs an explicit conversion between incompatible types. Java's Automatic Conversions - When one type of data is assigned to another type of variable, an automatic type conversion will take place if the following two conditions are met: • Two types are compatible. • Destination type is larger than the source type.
www.educlash.com
15
When these two conditions are met, a widening conversion
takes place. For example, the int type is always large enough to hold all valid byte values, so no explicit cast statement is required.
For widening conversions, the numeric types, including integer and floating-point types, are compatible with each other. However, the numeric types are not compatible with char or boolean. Also, char and boolean are not compatible with each other. Java also performs an automatic type conversion when storing a literal integer constant into variables of type byte, short, or long. Casting Incompatible Types - Although the automatic type conversions are helpful, they will not fulfill all needs. For example, what if you want to assign an int value to a byte variable? This conversion will not be performed automatically, because a byte is smaller than an int. To create a conversion between two incompatible types, you must use a cast. A cast is simply an explicit type conversion. It has this general form:
(target-type) value Here, target-type specifies the desired type to convert the specified value to. For example, the following fragment casts an int to a byte. If the integer's value is larger than the range of a byte, it will be reduced modulo (the remainder of an integer division by the) byte's range.
int x; byte y; // ... y = (byte) x;
A different type of conversion will occur when a floating-point
value is assigned to an integer type: truncation. As you know, integers do not have fractional components. Thus, when a floating- point value is assigned to an integer type, the fractional component is lost. For example, if the value 1.23 is assigned to an integer, the resulting value will simply be 1.
The following program demonstrates some type conversions
that require casts: class Conversion{
public static void main(String args[]) { byte x; int y = 257; double z = 323.142; System.out.println("\\nConversion of int to byte."); x = (byte) y;
www.educlash.com
16
System.out.println("y and x " + y + " " + x); System.out.println("\\nConversion of double to int."); y = (int) z; System.out.println("z and y " + z + " " + y); System.out.println("\\nConversion of double to byte."); x = (byte) z; System.out.println("z and x " + z + " " + x);
} } Output:
Conversion of int to byte. y and x 257 1 Conversion of double to int. z and y 323.142 323 Conversion of double to byte. z and x 323.142 67
7. SUMMARY
The Java programming language uses both "fields" and "variables" as part of its terminology. Instance variables (non-static fields) are unique to each instance of a class. Class variables (static fields) are fields declared with the static modifier; there is exactly one copy of a class variable, regardless of how many times the class has been instantiated. Local variables store temporary state inside a method. Parameters are variables that provide extra information to a method; both local variables and parameters are always classified as "variables" (not "fields"). When naming your fields or variables, there are rules and conventions that you should (or must) follow.
The eight primitive data types are: byte, short, int, long, float, double, boolean, and char. The java.lang.String class represents character strings. The compiler will assign a reasonable default value for fields of the above types; for local variables, a default value is never assigned. A literal is the source code representation of a fixed value. An array is a container object that holds a fixed number of values of a single type. The length of an array is established when the array is created. After creation, its length is fixed.
8. UNIT END EXERCISE 1) Why is java known as platform-neutral language? 2) List at least five major differences between Java and C.
www.educlash.com

17
3) List at least five major C++ features that were intentionally
removed from Java. 4) Write a short note on Type Casting? 5) Explain with an example rules and conventions for naming
variables.
1.9 FURTHER READING
Java2: The Complete Reference - by Patrick Naughton &
Herbert Schildt, Fifth Edition Programming with Java A primer - by E. Balagurusamy Third
Edition
www.educlash.com
18
2
OPERATORS & CONTROLS
Unit Structure:
1. Objectives
2. Assignment, Arithmetic, and Unary Operators
3. Equality and Relational Operators
4. Bitwise and Bit Shift Operators
5. Expressions, Statements, and Blocks
6. Control Statements
7. Summary
8. Unit end exercise
9. Further Reading
1. OBJECTIVES
The objectives of this chapter are to learn the various types
of Operators, Control and Loop Statements. Here we will learn relational, logical, conditional and bitwise operator and some more. Also we will be covering the basic constructs of programming here: Control statements
2. ASSIGNMENT, ARITHMETIC AND UNARY OPERATORS
When you think of a computer program, you often think of
computations. Operators are the mechanism that allows programs to perform computations on various values. There are three types of operators. A unary operator acts on one operand; a binary operator acts on two operands; and a ternary operator acts on three operands. Operators tell Java to perform a task using one, two, or three values. For example, consider this bit of code:
a = b + c;
This statement uses two operators. The + operator tells Java to add variables b and c. The = operator puts the result into the a variable.
www.educlash.com
19 The Simple Assignment Operator
One of the most common operators that you'll encounter is the simple assignment operator "=", it assigns the value on its right to the operand on its left: int bike= 0; int rate = 0; int interest = 1;
This operator can also be used on objects to assign object references, as discussed in Creating Objects.
The Arithmetic Operators
The Java programming language provides operators that perform addition, subtraction, multiplication, and division. The only symbol that might look new to you is "%", which divides one operand by another and returns the remainder as its result.
The following program, ArithmeticDemo, operators.
tests the arithmetic
class ArithmeticDemo {
public static void main (String[] args){
int result = 1 + 2; // result is now 3 System.out.println(result);
result = result - 1; // result is now 2 System.out.println(result);
result = result * 2; // result is now 4 System.out.println(result);
result = result / 2; // result is now 2 System.out.println(result);
result = result + 8; // result is now 10 result = result % 7; // result is now 3 System.out.println(result);
}
}
+ additive operator - subtraction operator * multiplication operator / division operator % remainder operator
www.educlash.com
20
You can also combine the arithmetic operators with the
simple assignment operator to create compound assignments. For example, x+=1; and x=x+1; both increment the value of x by 1. The + operator can also be used for concatenating (joining) two strings together, as shown in the following ConcatDemo program: class ConcatDemo {
public static void main(String[] args){ String fString = "This is"; String sString = " a concatenated string."; String tString = fString+sString; System.out.println(thirdString);
} } By the end of this program, the variable thirdString contains "This is a concatenated string.", which gets printed to standard output.
The Unary Operators
The unary operators require only one operand; they perform
various operations such as incrementing/decrementing a value by one, negating an expression, or inverting the value of a boolean.
The following program, UnaryDemo, tests the unary operators: class UnaryDemo {
public static void main(String[] args){ int result = +1; // result is now 1 System.out.println(result); result--; // result is now 0 System.out.println(result); result++; // result is now 1 System.out.println(result); result = -result; // result is now -1 System.out.println(result); boolean success = false; System.out.println(success); // false System.out.println(!success); // true
} }
The increment/decrement operators can be applied before (prefix) or after (postfix) the operand. The code result++; and ++result; will both end in result being incremented by one. The only
+ Unary plus operator; indicates positive value - Unary minus operator; negates an expression ++ Increment operator; increments a value by 1 -- Decrement operator; decrements a value by 1 ! Logical complement operator; inverts the value of a boolean
www.educlash.com
21
difference is that the prefix version (++result) evaluates to the incremented value, whereas the postfix version (result++) evaluates to the original value. The following program, PrePostDemo, illustrates the prefix/postfix unary increment operator: class PrePostDemo {
public static void main(String[] args){ int i = 3;
i++; System.out.println(i); ++i; System.out.println(i); System.out.println(++i); System.out.println(i++); System.out.println(i);
// "4"
// "5" // "6" // "6" // "7"
} }
2.2 EQUALITY AND RELATIONAL OPERATORS
The equality and relational operators determine if one operand is greater than, less than, equal to, or not equal to another operand. The majority of these operators will probably look familiar to you as well. Keep in mind that you must use "==", not "=", when testing if two primitive values are equal.
Relational operators are those that compare two values (for example, == and < are relational operators). These operators produce a true or false result. You could store these Boolean values in a variable of type boolean. For example:
if (x==10) System.out.println("X is 10");
You can change the sense of any Boolean value (including a
relational operator) by using the unary ! operator. This operator turns true into false and vice versa. So writing a<b is the same as writing !(a>=b). You can also join relational operators by using the && or || operators (&& is a logical AND; || is a logical OR). One point about these operators: These operators evaluate values from left to right and stop processing as soon as the result is clear. A common error is mixing up the equality operator (==) with an assignment operator (=). The equality expression is a test returning
== equal to != not equal to > greater than >= greater than or equal to < less than <= less than or equal to
www.educlash.com
22
true or false . The assignment expression copies what is on the right to the left. Testing for Equality
How do you test for equality? For the primitive data types, you use the == operator, like so: int a = 1; int b = 2; int c = 1; System.out.println(a==b); // returns false System.out.println(a==c); // returns true
The char data type is treated as an integer internally, so it also uses the == operator. Strings and objects are more complicated. For example, if two different string variables contain the same sequence of characters, we say they are lexicographically equal. They hold equivalent strings, but these two string objects are held in two separate memory locations. The Conditional Operators
The && and || operators perform Conditional-AND and
Conditional-OR operations on two boolean expressions. These operators exhibit "short-circuiting" behavior, which means that the second operand is evaluated only if needed.
The following program, ConditionalDemo1, tests these operators: class ConditionalDemo1 {
public static void main(String[] args){ int value1 = 1; int value2 = 2; if((value1 == 1) && (value2 == 2))
System.out.println("value1 is 1 AND value2 is 2"); if((value1 == 1) || (value2 == 1))
System.out.println("value1 is 1 OR value2 is 1");
} }
Another conditional operator is ?:, which can be thought of
as shorthand for an if-then-else statement. This operator is also known as the ternary operator because it uses three operands. In the following example, this operator should be read as: "If someCondition is true, assign the value of value1 to result. Otherwise, assign the value of value2 to result."
&& Conditional-AND || Conditional-OR
www.educlash.com
23
The following program, ConditionalDemo2, tests the ?: operator:
class ConditionalDemo2 {
public static void main(String[] args){
int value1 = 1;
int value2 = 2;
int result;
boolean someCondition = true;
result = someCondition ? value1 : value2;
System.out.println(result);
}
}
Because someCondition is true, this program prints "1" to the screen. Use the ?: operator instead of an if-then-else statement if it makes your code more readable.
2.3 BITWISE AND BIT SHIFT OPERATORS
The Java programming language also provides operators that perform bitwise and bit shift operations on integral types. These operators are less commonly used. Therefore, their coverage is brief; the intent is to simply make you aware that these operators exist.
The unary bitwise complement operator "~" inverts a bit pattern; it can be applied to any of the integral types, making every "0" a "1" and every "1" a "0". For example, a byte contains 8 bits; applying this operator to a value whose bit pattern is "00000000" would change its pattern to "11111111".
The signed left shift operator "<<" shifts a bit pattern to the left, and the signed right shift operator ">>" shifts a bit pattern to the right. The bit pattern is given by the left-hand operand, and the number of positions to shift by the right-hand operand. The unsigned right shift operator ">>>" shifts a zero into the leftmost position, while the leftmost position after ">>" depends on sign extension.
The bitwise & operator performs a bitwise AND operation.
The bitwise ^ operator performs a bitwise exclusive OR operation. The bitwise | operator performs a bitwise inclusive OR operation. The following program, BitDemo, uses the bitwise AND operator to print the number "2" to standard output.
www.educlash.com
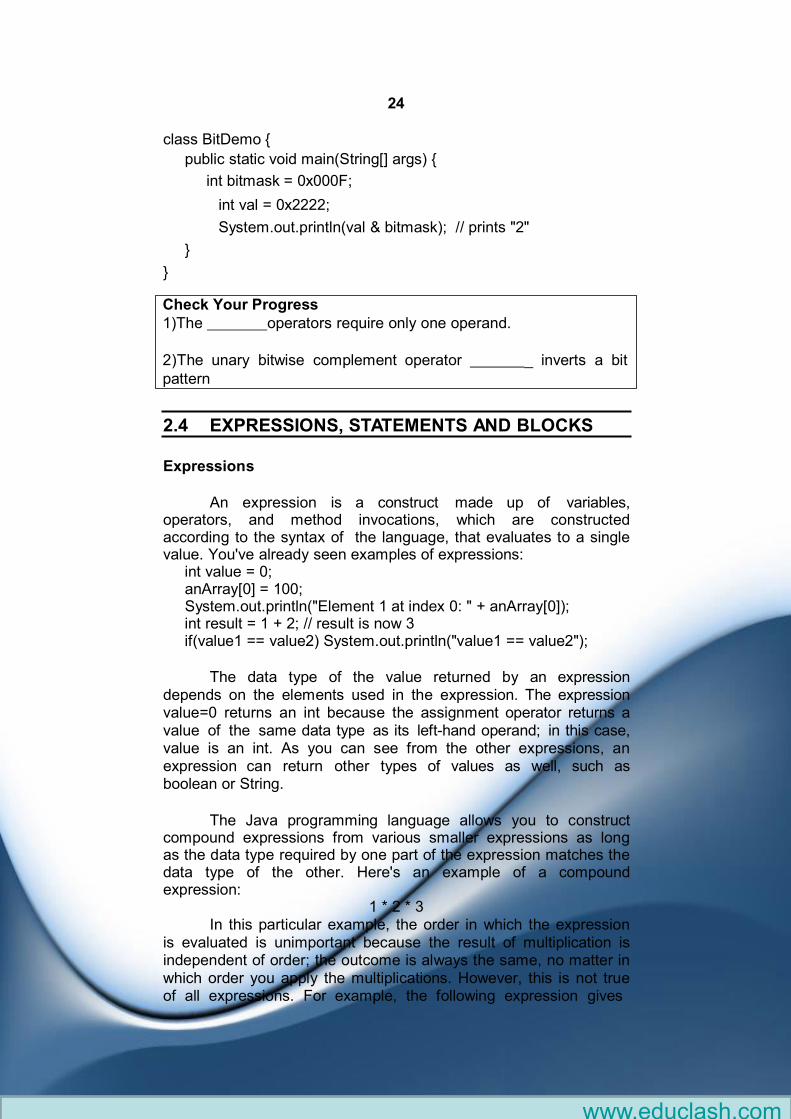
24 class BitDemo {
public static void main(String[] args) {
int bitmask = 0x000F;
int val = 0x2222;
System.out.println(val & bitmask); // prints "2"
}
}
Check Your Progress 1)The operators require only one operand.
2)The unary bitwise complement operator _ inverts a bit pattern
2.4 EXPRESSIONS, STATEMENTS AND BLOCKS Expressions
An expression is a construct made up of variables,
operators, and method invocations, which are constructed according to the syntax of the language, that evaluates to a single value. You've already seen examples of expressions:
int value = 0; anArray[0] = 100; System.out.println("Element 1 at index 0: " + anArray[0]); int result = 1 + 2; // result is now 3 if(value1 == value2) System.out.println("value1 == value2");
The data type of the value returned by an expression
depends on the elements used in the expression. The expression value=0 returns an int because the assignment operator returns a value of the same data type as its left-hand operand; in this case, value is an int. As you can see from the other expressions, an expression can return other types of values as well, such as boolean or String.
The Java programming language allows you to construct
compound expressions from various smaller expressions as long as the data type required by one part of the expression matches the data type of the other. Here's an example of a compound expression:
1 * 2 * 3 In this particular example, the order in which the expression
is evaluated is unimportant because the result of multiplication is independent of order; the outcome is always the same, no matter in which order you apply the multiplications. However, this is not true of all expressions. For example, the following expression gives
www.educlash.com
25
different results, depending on whether you perform the addition or the division operation first:
x + y / 100 // ambiguous
You can specify exactly how an expression will be evaluated
using balanced parenthesis: ( and ). For example, to make the previous expression unambiguous, you could write the following:
(x + y) / 100 // unambiguous, recommended
When writing compound expressions, be explicit and indicate with parentheses which operators should be evaluated first. This practice makes code easier to read and to maintain.
Statements
Statements are roughly equivalent to sentences in natural languages. A statement forms a complete unit of execution. The following types of expressions can be made into a statement by terminating the expression with a semicolon (;). Assignment expressions Any use of ++ or -- Method invocations Object creation expressions
Such statements are called expression statements. Here are
some examples of expression statements.
aValue = 8933.234; aValue++;
// assignment statement // increment statement
System.out.println("Hello World!"); // method invocation statement Bicycle myBike = new Bicycle(); // object creation statement
In addition to expression statements, there are two other kinds of statements: declaration statements and control flow statements. A declaration statement declares a variable. You've seen many examples of declaration statements already:
double aValue = 8933.234; //declaration statement
Finally, control flow statements regulate the order in which statements get executed. You'll learn about control flow statements in the next section, Control Flow Statements
Blocks
A block is a group of zero or more statements between balanced braces and can be used anywhere a single statement is allowed. The following example, BlockDemo, illustrates the use of blocks:
www.educlash.com

26 class BlockDemo {
public static void main(String[] args) {
boolean condition = true;
if (condition) { // begin block 1
System.out.println("Condition is true.");
} // end block one
else { // begin block 2
System.out.println("Condition is false.");
} // end block 2
}
}
2.5 CONTROL STATEMENTS
A programming language uses control statements to cause
the flow of execution to advance and branch based on changes to the state of a program. Selection statements allow your program to choose different paths of execution based upon the outcome of an expression or the state of a variable.
The statements are generally executed from top to bottom,
in the order that they appear. Control flow statements break up the flow of execution by employing decision making, looping, and branching, enabling your program to conditionally execute particular blocks of code. This section describes the decision- making statements (if-then, if-then-else, switch), and in the next chapter you will learn the looping statements (for, while, do-while), and the branching statements (break, continue, return).
The if-then Statement
The if-then statement is the most basic of all the control flow statements. It tells your program to execute a certain section of code only if a particular test evaluates to true. For example, the MotorBike class could allow the brakes to decrease the bike's speed only if the bike is already in motion. One possible implementation of the applyBrakes method could be as follows: void applyBrakes(){
if (isMoving){ // the "if" clause: bike must be moving currentSpeed--; // the "then" clause: decrease current speed
} }
If this test evaluates to false (meaning that the bike is not in motion), control jumps to the end of the if-then statement. In addition, the opening and closing braces are optional, provided that the "then" clause contains only one statement:
www.educlash.com

27 void applyBrakes(){
if (isMoving) currentSpeed--; // same as above, but w/o braces }
Deciding when to omit the braces is a matter of personal
choice. Omitting them can make the code more brittle. If a second statement is later added to the "then" clause, a common mistake would be forgetting to add the newly required braces. The compiler cannot catch this sort of error; you'll just get the wrong results.
The if-then-else Statement
The if-then-else statement provides a secondary path of execution when an "if" clause evaluates to false. You could use an if-then-else statement in the applyBrakes method to take some action if the brakes are applied when the bike is not in motion. In this case, the action is to simply print an error message stating that the bike has already stopped. void applyBrakes(){
if (isMoving) { currentSpeed--;
} else { System.err.println("The bike has already stopped!");
} }
The following program assigns a grade based on the value of a test score: an A for a score of 75% or above, a B for a score of 60% or above, and so on. class IfElseDemo {
public static void main(String[] args) {
int testscore = 76; char grade; if (testscore >= 75) {
grade = 'A'; } else if (testscore >= 60) {
grade = 'B'; } else if (testscore >= 45) {
grade = 'C'; } else if (testscore >= 35) {
grade = 'D'; } else {
grade = 'F'; } System.out.println("Grade = " + grade);
} }
www.educlash.com
28
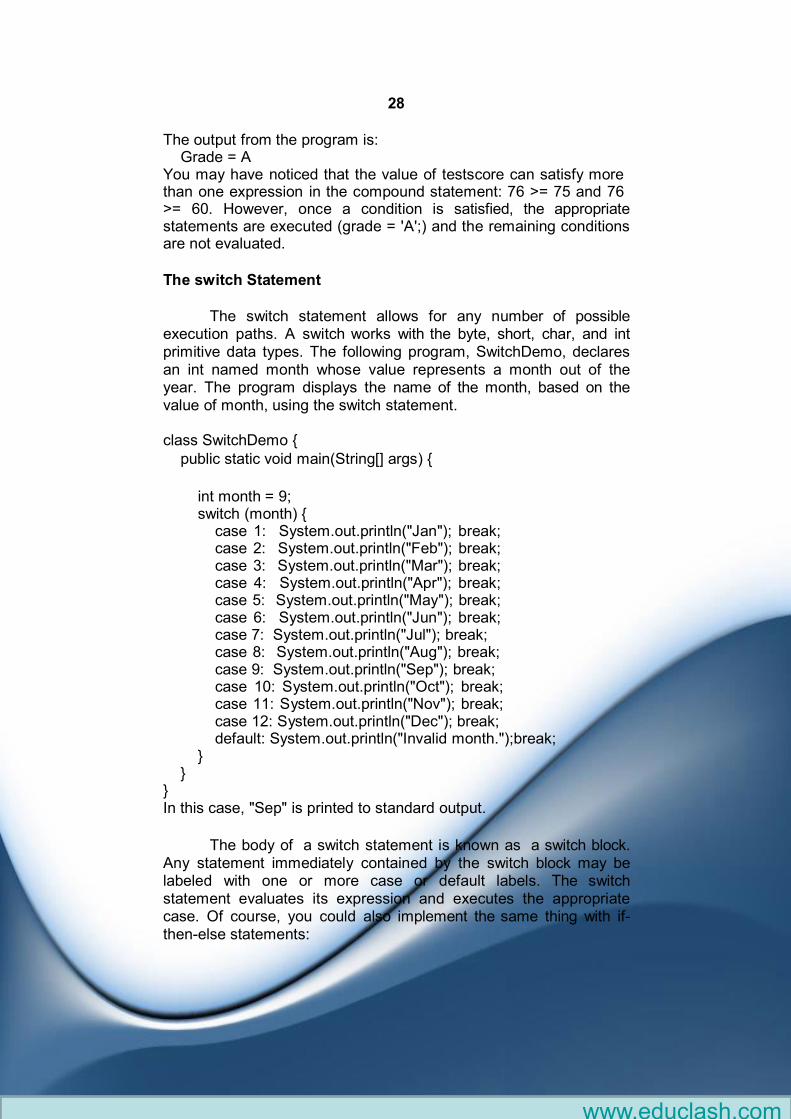
The output from the program is:
Grade = A You may have noticed that the value of testscore can satisfy more than one expression in the compound statement: 76 >= 75 and 76 >= 60. However, once a condition is satisfied, the appropriate statements are executed (grade = 'A';) and the remaining conditions are not evaluated.
The switch Statement
The switch statement allows for any number of possible execution paths. A switch works with the byte, short, char, and int primitive data types. The following program, SwitchDemo, declares an int named month whose value represents a month out of the year. The program displays the name of the month, based on the value of month, using the switch statement. class SwitchDemo {
public static void main(String[] args) {
int month = 9; switch (month) {
case 1: System.out.println("Jan"); break; case 2: System.out.println("Feb"); break; case 3: System.out.println("Mar"); break; case 4: System.out.println("Apr"); break; case 5: System.out.println("May"); break; case 6: System.out.println("Jun"); break; case 7: System.out.println("Jul"); break; case 8: System.out.println("Aug"); break; case 9: System.out.println("Sep"); break; case 10: System.out.println("Oct"); break; case 11: System.out.println("Nov"); break; case 12: System.out.println("Dec"); break; default: System.out.println("Invalid month.");break;
} }
} In this case, "Sep" is printed to standard output.
The body of a switch statement is known as a switch block.
Any statement immediately contained by the switch block may be labeled with one or more case or default labels. The switch statement evaluates its expression and executes the appropriate case. Of course, you could also implement the same thing with if- then-else statements:
www.educlash.com
29
int month = 8; if (month == 1) {
System.out.println("Jan"); } else if (month == 2) {
System.out.println("Feb"); } . . . // and so on
Deciding whether to use if-then-else statements or a switch
statement is sometimes a judgment call. You can decide which one to use based on readability and other factors. An if-then-else statement can be used to make decisions based on ranges of values or conditions, whereas a switch statement can make decisions based only on a single integer or enumerated value.
Another point of interest is the break statement after each case. Each break statement terminates the enclosing switch statement. Control flow continues with the first statement following the switch block. The break statements are necessary because without them, case statements fall through; that is, without an explicit break, control will flow sequentially through subsequent case statements. The default section handles all values that aren't explicitly handled by one of the case sections. There are three important features of the switch statement to note:
The switch differs from the if in that switch can only test for equality, whereas if can evaluate any type of Boolean expression. That is, the switch looks only for a match between the value of the expression and one of its case constants.
No two case constants in the same switch can have identical values. Of course, a switch statement enclosed by an outer switch can have case constants in common.
A switch statement is usually more efficient than a set of nested ifs.
Check Your Progress 1)A statement forms a complete unit of execution. (True/False)
2)The statements are generally executed from bottom to top. (True/False)
2.6 SUMMARY
The following operators are supported by the Java programming language: Simple Assignment Operator, Arithmetic Operators, Unary Operators, Equality and Relational Operators, Conditional Operators, Type Comparison Operator.
www.educlash.com
30
The if-then statement is the most basic of all the control flow
statements. It tells your program to execute a certain section of code only if a particular test evaluates to true. The if-then-else statement provides a secondary path of execution when an "if" clause evaluates to false. Unlike if-then and if-then-else, the switch statement allows for any number of possible execution paths.
2.7 UNIT END EXERCISE 1) Explain the Unary operators in Java.
2) List all the relational and conditional operators and explain with an example.
3) Write a short note on Bitwise operators. 4) In what ways does a switch statement differs from an if
statement? 5) Write a program to find the number of and sum of all integers
greater than 50 and less than 100 that are divisible by 5.
2.8 FURTHER READING
Java2: The Complete Reference - by Patrick Naughton &
Herbert Schildt, Fifth Edition
Programming with Java A primer - by E. Balagurusamy Third
Edition
www.educlash.com

31
3 LOOPS, ARRAYS & STRINGS
Unit Structure:
1. Objectives
2. The while and do-while Statements
3. The for Statement
4. Branching Statements
5. Arrays
6. Strings
7. Summary
8. Unit end exercise
9. Further Reading
1. OBJECTIVES
The objectives of this chapter are to learn the various loop
statements and how to use arrays and String objects. Here we will get to know the importance of arrays and get introduced to the various string classes from the Java API.
2. THE WHILE AND DO-WHILE STATEMENTS The while Statement
The while statement continually executes a block of
statements while a particular condition is true. Its syntax can be expressed as: while(expression) {
statement(s) }
The while statement evaluates expression, which must return a boolean value. If the expression evaluates to true, the while statement executes the statement(s) in the while block. The while statement continues testing the expression and executing its block until the expression evaluates to false. Using the while statement to print the values from 100 through 110 can be accomplished as in the following WhileDemo program:
www.educlash.com

32 class WhileDemo {
public static void main(String[] args){ int count = 100; while (count < 111) {
System.out.println("Count is: " + count); count++;
} }
}
Since the while loop evaluates its conditional expression at
the top of the loop, the body of the loop will not execute even once if the condition is false to begin with.
The do-while statement
Sometimes it is desirable to execute the body of a while loop
at least once, even if the conditional expression is false to begin with. In other words, there are times when you would like to test the termination expression at the end of the loop rather than at the beginning. Java supplies a loop that does just that: the do-while. The do-while loop always executes its body at least once, because its conditional expression is at the bottom of the loop. Its general form is do { // body of loop } while (condition);
Each iteration of the do-while loop first executes the body of
the loop and then evaluates the conditional expression. If this expression is true, the loop will repeat. Otherwise, the loop terminates. The condition must be a Boolean expression. Here is a program that demonstrates the do-while loop. // Demonstrate the do-while loop. class DoWhile { public static void main(String args[]) { int n = 10; do { System.out.println(n); n--; } while(n > 0); } }
The do-while loop is especially useful when you process a
menu selection, because you will usually want the body of a menu loop to execute at least once.
www.educlash.com
33
3.2 THE FOR STATEMENTS
You should use the for statement when you have a definite
number of times you want to execute a loop. This statement includes three sections: initialization, condition, and update. A for statement should have the following form: for(initialization; condition; update) {
statements; }
When Java first encounters a for statement, it executes the initialization clause. This can set an initial value for a loop variable (i=0, for example), or you can declare a unique variable for the loop and initialize it (int i=0). If you declare a variable here, its scope is just the body of the loop.
The next step is to evaluate the condition expression. If the condition is false, the loop does not execute. Java repeats this test when the loop repeats. If the body of the loop executes, the update clause evaluates at the end of the block, and then Java tries the condition expression again. If the condition is true, the block repeats. If the expression is false, the loop is over; Java skips the block and continues execution. This loop will print the numbers 1 to 10 on the console: for (int i=1; i<=10; i++) {
System.o ut.println(i); }
When the loop control variable will not be needed elsewhere,
most programmers declare it inside the for. For example, here is a simple program that tests for prime numbers. Notice that the loop control variable, i, is declared inside the for since it is not needed elsewhere. // Test for primes. class FindPrime { public static void main(String args[]) {
int n; boolean flag = true; n = 53; for(int i=2; i < n/2; i++) {
if((n % i) == 0) {
flag = false; break;
}
www.educlash.com
34
} if(flag)
System.out.println(n + " is Prime"); else
System.out.println(n + " is Not Prime"); } }
Check Your Progress 1)The while statement evaluates expression, which must return a value.
2)Each iteration of the _ loop first executes the body of the loop and then evaluates the conditional expression.
3.3 BRANCHING STATEMENTS The break Statement
The break statement has two forms: labeled and unlabeled.
You saw the unlabeled form in the previous discussion of the switch statement. You can also use an unlabeled break to terminate a for, while, or do-while loop, as shown in the following
BreakDemo program:
class BreakDemo {
public static void main(String[] args) {
int[] array = { 23, 78, 30, 987, 17, 761,500, 172 };
int searchfor = 17;
int i;
boolean flag = false;
for (i = 0; i < array.length; i++) {
if (arrayOfInts[i] == searchfor) {
flag = true;
break;
}
}
if (flag) {
System.out.println("Found " + searchfor
+ " at index " + i);
www.educlash.com
35
} else {
System.out.println(searchfor
+ " not in the array");
}
}
}
This program searches for the number 12 in an array. The
break statement terminates the for loop when that value is found. Control flow then transfers to the print statement at the end of the program. This program's output is:
Found 12 at index 4
An unlabeled break statement terminates the innermost switch, for, while, or do-while statement, but a labeled break terminates an outer statement. The following program, BreakWithLabelDemo, is similar to the previous program, but uses nested for loops to search for a value in a two-dimensional array. When the value is found, a labeled break terminates the outer for loop (labeled "search"): class BreakWithLabelDemo {
public static void main(String[] args) {
int[][] arrayOfInts = { { 32, 87, 3, 589 }, { 12, 1076, 2000, 8 }, { 622, 127, 77, 955 }
}; int searchfor = 12;
int i; int j = 0; boolean foundIt = false;
search:
for (i = 0; i < arrayOfInts.length; i++) { for (j = 0; j < arrayOfInts[i].length; j++) {
if (arrayOfInts[i][j] == searchfor) { foundIt = true; break search;
} }
}
if (foundIt) {
System.out.println("Found " + searchfor + " at " + i + ", " + j);
} else {
www.educlash.com
36
System.out.println(searchfor + " not in the array");
} }
} This is the output of the program.
Found 12 at 1, 0
The break statement terminates the labeled statement; it
does not transfer the flow of control to the label. Control flow is transferred to the statement immediately following the labeled (terminated) statement.
The continue Statement
The continue statement skips the current iteration of a for,
while, or do-while loop. The unlabeled form skips to the end of the innermost loop's body and evaluates the boolean expression that controls the loop. The following program, ContinueDemo, steps through a String, counting the occurrences of the letter "p". If the current character is not a p, the continue statement skips the rest of the loop and proceeds to the next character. If it is a "p", the program increments the letter count. class ContinueDemo {
public static void main(String[] args) {
String searchMe =
"peter piper picked a peck of pickled peppers"; int max = searchMe.length(); int numPs = 0;
for (int i = 0; i < max; i++) {
//interested only in p's if (searchMe.charAt(i) != 'p')
continue;
//process p's numPs++;
} System.out.println("Found " + numPs + " p's in the string.");
} } Here is the output of this program: Found 9 p's in the string.
www.educlash.com
37
To see this effect more clearly, try removing the continue
statement and recompiling. When you run the program again, the count will be wrong, saying that it found 35 p's instead of 9.
A labeled continue statement skips the current iteration of an outer loop marked with the given label. The following example program, ContinueWithLabelDemo, uses nested loops to search for a substring within another string. Two nested loops are required: one to iterate over the substring and one to iterate over the string being searched. The following program, ContinueWithLabelDemo, uses the labeled form of continue to skip an iteration in the outer loop. class ContinueWithLabelDemo { public
static void main(String[] args) {
String searchMe = "Look for a substring in me"; String substring = "sub"; boolean foundIt = false;
int max = searchMe.length() - substring.length();
test:
for (int i = 0; i <= max; i++) { int n = substring.length(); int j = i; int k = 0; while (n-- != 0) {
if (searchMe.charAt(j++) != substring.charAt(k++)) {
continue test; }
} foundIt = true;
break test; } System.out.println(foundIt ? "Found it" :
"Didn't find it"); }
} Here is the output from this program.
Found it The return Statement
The last of the branching statements is the return statement.
The return statement exits from the current method, and control flow returns to where the method was invoked. The return statement has two forms: one that returns a value, and one that
www.educlash.com

38
doesn't. To return a value, simply put the value (or an expression that calculates the value) after the return keyword.
return ++count;
The data type of the returned value must match the type of
the method's declared return value. When a method is declared void, use the form of return that doesn't return a value. return;
Check Your Progress 1)The break statement has one form. (True/False)
2)The data type of the returned value must match the type of the method's declared return value. (True/False)
3.4 ARRAYS
An array is a structure that holds multiple values of the same type. An array is a group of like-typed variables that are referred to by a common name. Arrays of any type can be created and may have one or more dimensions. A specific element in an array is accessed by its index. Arrays offer a convenient means of grouping related information.
In Java, arrays are really a form of object. You use the square brackets to indicate an array variable. In the following example, the array has 10 elements ranging from anArrayofIntegers[0] to anArrayofIntegers[9]. For example: int anArrayOfIntegers[10]; // create an array Creating, Initializing, and Accessing an Array
One way to create an array is with the new operator. The next statement in the ArrayDemo program allocates an array with enough memory for ten integer elements and assigns the array to the anArray variable.
class ArrayDemo {
public static void main(String[] args) {
int[] anArray; // declares an array of integers
anArray = new int[5];// allocates memory for 5 integers
anArray[0] = 500; // initialize first element
anArray[1] = 400; // initialize second element
anArray[2] = 300; // etc.
anArray[3] = 200;
anArray[4] = 100;
www.educlash.com

39
System.out.println("Element at index 0: " + anArray[0]);
System.out.println("Element at index 1: " + anArray[1]);
System.out.println("Element at index 2: " + anArray[2]);
System.out.println("Element at index 3: " + anArray[3]);
System.out.println("Element at index 4: " + anArray[4]);
}
} anArray = new int[5]; // create an array of integers
If this statement were missing, the compiler would print an
error like the following, and compilation would fail: ArrayDemo.java:4: Variable anArray may not have been initialized.
The next few lines assign values to each element of the array: anArray[0] = 100; // initialize first element anArray[1] = 200; // initialize second element anArray[2] = 300; // etc. Each array element is accessed by its numerical index: System.out.println("Element 1 at index 0: " + anArray[0]); System.out.println("Element 2 at index 1: " + anArray[1]);
Alternatively, you can use the shortcut syntax to create and initialize an array: int[] anArray = {100, 200, 300, 400, 500}; Here the length of the array is determined by the number of values provided between { and }. You can also declare an array of arrays (also known as a multidimensional array) by using two or more sets of square brackets, such as String[][] names. Each element, therefore, must be accessed by a corresponding number of index values.
In the Java programming language, a multidimensional array is simply an array whose components are themselves arrays. A consequence of this is that the rows are allowed to vary in length, as shown in the following MultiDimArrayDemo program:
class MultiDimArrayDemo {
public static void main(String[] args) {
String[][] names = {{"Mr. ", "Mrs. ", "Ms. "},
{"Sachin", "Tendulkar"}};
System.out.println(names[0][0] + names[1][0]);
System.out.println(names[0][2] + names[1][1]);
}
}
The output from this program is:
Mr. Sachin
www.educlash.com
40
Ms. Tendulkar
Finally, you can use the built-in length property to determine the size of any array. The code
System.out.println(anArray.length);
will print the array's size to standard output.
3.5 STRINGS
Strings, which are widely used in Java programming, are a
sequence of characters. In the Java programming language, strings are objects. The Java platform provides the String class to create and manipulate strings. Creating Strings
The most direct way to create a string is to write:
String str= "Hello"; In this case, "Hello" is a string literal—a series of characters in your code that is enclosed in double quotes. Whenever it encounters a string literal in your code, the compiler creates a String object with its value—in this case, Hello. As with any other object, you can create String objects by using the new keyword and a constructor. The String class has thirteen constructors that allow you to provide the initial value of the string using different sources, such as an array of characters:
char[] helloArray = { 'H', 'e', 'l', 'l', 'o', '.'}; String helloString = new String(helloArray); System.out.println(helloString); The last line of this code snippet displays Hello.
Note: The String class is immutable, so that once it is created a String object cannot be changed. The String class has a number of methods that appear to modify strings. Since strings are immutable, what these methods really do is create and return a new string that contains the result of the operation. String Length
Methods used to obtain information about an object are known as accessor methods. One accessor method that you can use with strings is the length() method, which returns the number of characters contained in the string object. After the following two lines of code have been executed, len equals 17:
String palindrome = "Dot saw I was Tod"; int len = palindrome.length();
A palindrome is a word or sentence that is symmetric—it is
spelled the same forward and backward, ignoring case and
www.educlash.com
41
punctuation. Here is a short and inefficient program to reverse a palindrome string. It invokes the String method charAt(i), which returns the ith character in the string, counting from 0.
public class StringDemo {
public static void main(String[] args) { String
palindrome = "Dot saw I was Tod"; int len
= palindrome.length();
char[] tempCharArray = new char[len];
char[] charArray = new char[len];
// put original string in an array of chars
for (int i = 0; i < len; i++) {
tempCharArray[i] = palindrome.charAt(i);
}
// reverse array of chars
for (int j = 0; j < len; j++) {
charArray[j] = tempCharArray[len - 1 - j];
}
String reversePalindrome = new String(charArray);
System.out.println(reversePalindrome);
}
}
Running the program produces this output:
doT saw I was toD
To accomplish the string reversal, the program had to
convert the string to an array of characters (first for loop), reverse the array into a second array (second for loop), and then convert back to a string. The String class includes a method, getChars(), to convert a string, or a portion of a string, into an array of characters so we could replace the first for loop in the program above with palindrome.getChars(0, len, tempCharArray,0);
Concatenating Strings
The String class includes a method for concatenating two
strings:
string1.concat(string2);
This returns a new string that is string1 with string2 added to it at the end. You can also use the concat() method with string literals, as in:
"My name is ".concat("Rumplestiltskin");
Strings are more commonly concatenated with the + operator, as in
www.educlash.com
42
"Hello," + " world" + "!"
which results in
"Hello, world!"
The + operator is widely used in print statements. For example:
String string1 = "saw I was ";
System.out.println("Dot " + string1 + "Tod");
which prints
Dot saw I was Tod
Such a concatenation can be a mixture of any objects. For each object that is not a String, its toString() method is called to convert it to a String.
Creating Format Strings
You have seen the use of the printf() and format() methods
to print output with formatted numbers. The String class has an equivalent class method, format(), that returns a String object rather than a PrintStream object. Using String's static format() method allows you to create a formatted string that you can reuse, as opposed to a one-time print statement. For example, instead of
System.out.printf("The value of the float variable is %f, while the value of the " + "integer variable is %d, and the string is %s", floatVar, intVar, stringVar);
you can write
String fs;
fs = String.format("The value of the float variable is %f, while the value of the " + "integer variable is %d, and the string is %s", floatVar, intVar, stringVar); System.out.println(fs);
Check Your Progress
1)The Java platform provides the _ class to create and manipulate strings.
2)Using String's static _ method allows you to create a formatted string that you can reuse.
3.6 SUMMARY
The while and do-while statements continually execute a block of statements while a particular condition is true. The difference between do-while and while is that do-while evaluates its expression at the bottom of the loop instead of the top. Therefore,
www.educlash.com

43
the statements within the do block are always executed at least once. The for statement provides a compact way to iterate over a range of values. It has two forms, one of which was designed for looping through collections and arrays.
The String class has many methods to find and retrieve substrings; these can then be easily reassembled into new strings using the + concatenation operator. The String class also includes a number of utility methods, among them split(), toLowerCase(), toUpperCase(), and valueOf(). The latter method is indispensable in converting user input strings to numbers. The Number subclasses also have methods for converting strings to numbers and vice versa.
In addition to the String class, there is also a StringBuilder class. Working with StringBuilder objects can sometimes be more efficient than working with strings. The StringBuilder class offers a few methods that can be useful for strings, among them reverse(). In general, however, the String class has a wider variety of methods.
A string can be converted to a string builder using a
StringBuilder constructor. A string builder can be converted to a string with the toString() method.
3.7 UNIT END EXERCISE 1) Explain the difference between while and do..while loop. 2) With the help of an example explain the syntax of for loop. 3) Write short note on Branching Statements on Java? 4) Write a program which will accept five random numbers and
strore them in an array, display the addition of numbers. 5) Write short note on String class?
3.8 FURTHER READING
Java2: The Complete Reference - by Patrick Naughton &
Herbert Schildt, Fifth Edition
Programming with Java A primer - by E. Balagurusamy Third
Edition
www.educlash.com
44
4 INTRODUCTION TO CLASSES
Unit Structure:
1. Objectives
2. Defining a class
3. Creating Objects
4. Constructors
5. Method Overloading
6. Static Members
7. Visibility Control
8. Summary
9. Unit end exercise
10. Further Reading
1. OBJECTIVES
The objectives of this chapter are to learn how to define a
class and create objects of the class. Here we will also learn how constructor can be used to initialize an object and how Java implements polymorphism through method overloading. At the end of the chapter we will discuss static members of a class and visibility control.
2. DEFINING A CLASS
Although primitive data types and control structures comprise the details of Java programming, classes form the backbone of all Java programs. The class is at the core of Java. It is the logical construct upon which the entire Java language is built because it defines the shape and nature of an object. As such, the class forms the basis for object-oriented programming in Java. Any concept you wish to implement in a Java program must be encapsulated within a class
When you define a class, you declare its exact form and nature. You do this by specifying the data that it contains and the code that operates on that data. While very simple classes may contain only code or only data, most real-world classes contain both. In Java, everything you write (except import and package
www.educlash.com

45
statements) will reside inside a class. A class provides a pattern that you can use to create one or more objects. The basic form of a class definition is: class MyClass [extends MySuperClass] [implements MyInterface] {
[ fields declaration ] [ methods declaration]
}
means that MyClass is a subclass of MySuperClass and that it implements the MyInterface interface.
This is a class declaration. The class body (the area between the braces) contains all the code that provides for the life cycle of the objects created from the class: constructors for initializing new objects, declarations for the fields that provide the state of the class and its objects, and methods to implement the behavior of the class and its objects.
The data, or variables, defined within a class are called
instance variables. The code is contained within methods. Collectively, the methods and variables defined within a class are called members of the class. In most classes, the instance variables are acted upon and accessed by the methods defined for that class. Thus, it is the methods that determine how a class' data can be used. In general, class declarations can include these components, in order: Modifiers such as public, private, and a number of others that
you will encounter later. The class name, with the initial letter capitalized by convention. The name of the class's parent (superclass), if any, preceded by
the keyword extends. A class can only extend (subclass) one parent.
A comma-separated list of interfaces implemented by the class, if any, preceded by the keyword implements. A class can implement more than one interface.
The class body, surrounded by braces, {}.
4.2 CREATING OBJECTS Fields Declaration Field declarations are composed of three components, in order:
Zero or more modifiers, such as public or private. The field's type. The field's name.
www.educlash.com
46
In the example below fields of Rect class are named length and
breadth and are all of data type integer (int). The public keyword identifies these fields as public members, accessible by any object that can access the class. class Rect {
public int length; public int breadth;
} There are several kinds of variables: Member variables in a class—these are called fields. Variables in a method or block of code—these are called local
variables. Variables in method declarations—these are called parameters.
Method Declaration
A class should have methods that are necessary for manipulating the data contained in the class. Immediately after the declaration of instance variables inside the body of the class methods are declared. The general form of a method declaration is:
modifiers type method_name(parameter-list) {
Method-body; }
More generally, method declarations have six components, in order:
Modifiers—such as public, private, and others you will learn about later in this chapter.
The return type—the data type of the value returned by the method, or void if the method does not return a value.
The method name—the rules for field names apply to method names as well, but the convention is a little different.
The parameter list in parenthesis—a comma-delimited list of input parameters, preceded by their data types, enclosed by parentheses, (). If there are no parameters, you must use empty parentheses.
An exception list—to be discussed later.
The method body, enclosed between braces—the method's code, including the declaration of local variables, goes here.
www.educlash.com
47 Example: class Rect {
public int length; public int breadth;
void getValues(int p,int q) {
length=p; breadth=q;
} int area() {
int ans=length*breadth; return (ans);
} } Program Explanation:
The method getValues() has a return type of void because it
does not return any values. Two integer values are passed which are then assigned to the instance variables length and breadth. This method is added to provide values to the class instance variables.
The method area() computes the area of a rectangle and returns the result with the ‘return’ keyword. Note that the parameter list is empty. Since the result would be an integer the return type of the method is specified as int. Creating Objects
A typical Java program creates many objects, which as you
know, interact by invoking methods. Through these object interactions, a program can carry out various tasks, such as implementing a GUI, running an animation, or sending and receiving information over a network. Once an object has completed the work for which it was created, its resources are recycled for use by other objects. A class provides the blueprint for objects; you create an object from a class. Each of the following statements creates an object.
Rect rectOne = new Rect(); Rect rectTwo = new Rect();
Each of the above statements has three parts (discussed in detail below):
www.educlash.com
48
Declaration: The code set in bold are all variable declarations
that associate a variable name with an object type.
Instantiation: The new keyword is a Java operator that creates the object.
Initialization: The new operator is followed by a call to a constructor, which initializes the new object.
1) Declaring a Variable to Refer to an Object:
Previously, you learned that to declare a variable, you write:
type name; e.g. int value;
This notifies the compiler that you will use value to refer to
data whose type is int. With a primitive variable, this declaration also reserves the proper amount of memory for the variable. You can also declare a reference variable on its own line. For example:
Rect rectTwo;
If you declare rectTwo like this, its value will be
undetermined until an object is actually created and assigned to it. Simply declaring a reference variable does not create an object. For that, you need to use the new operator. You must assign an object to rectTwo before you use it in your code. Otherwise, you will get a compiler error.
2) Instantiating a Class:
The new operator instantiates a class by allocating memory
for a new object and returning a reference to that memory. The phrase "instantiating a class" means the same thing as "creating an object." When you create an object, you are creating an "instance" of a class, therefore "instantiating" a class.
The new operator returns a reference to the object it created. This reference is usually assigned to a variable of the appropriate type, like:
Rect rectTwo = new Rect(); way 3) Initializing an Object:
After we have created an object of the class, we can initialize
the object in two ways. We can use the “.” dot operator to provide values to the instance variables. Also we can call some method of the class which will help us in setting the values of the object variables.
www.educlash.com
49
E.g. Rect rectTwo=new Rect(); rectTwo.length=10;rectTwo.breadth=20;
or rectTwo.setData(10,20);
Using Objects
Once you've created an object, you probably want to use it
for something. You may need to use the value of one of its fields, change one of its fields, or call one of its methods to perform an action.
1) Referencing an Object's Fields
Object fields are accessed by their name. You must use a name that is unambiguous. You may use a simple name for a field within its own class. For example, we can add a statement within the Rect class that prints the length and breadth:
System.out.println("Length and breadth are: "
+ length + ", " + breadth); In this case, length and breadth are simple names. Code that is outside the object's class must use an object reference or expression, followed by the dot (.) operator, followed by a simple field name, as in:
objectReference.fieldName For example, the code in the Rect class, we can refer to the length and breadth fields within the Rect object named rectOne, the class must use the names rectOne.length and rectOne.breadth, respectively. The program uses two of these names to display the length and the breadth of rectOne: System.out.println("Lenght of rectOne: " + rectOne.length); System.out.println("Breadth of rectOne: " + rectOne.breadth);
2) Calling an Object's Methods
You also use an object reference to invoke an object's method. You append the method's name to the object reference, with an dot operator (.). Also, you provide, within enclosing parentheses, any arguments to the method. If the method does not require any arguments, use empty parentheses.
objectReference.methodName(argumentList); or
objectReference.methodName();
www.educlash.com

50
The Rect class has a method: area() to compute the
rectangle's area. Here's the code that invokes this method: System.out.println("Area of rectOne: " + rectOne.area());
Some methods, such as area(), return a value. For methods
that return a value, you can use the method invocation in expressions. You can assign the return value to a variable, use it to make decisions, or control a loop. This code assigns the value returned by area() to the variable areaOfRectangle:
int areaOfRectangle = rectOne.area(); 3) The Garbage Collector
Managing memory explicitly is tedious and error-prone. The Java platform allows you to create as many objects as you want, and you don't have to worry about destroying them. The Java runtime environment deletes objects when it determines that they are no longer being used. This process is called garbage collection.
An object is eligible for garbage collection when there are no
more references to that object. References that are held in a variable are usually dropped when the variable goes out of scope. Remember that a program can have multiple references to the same object; all references to an object must be dropped before the object is eligible for garbage collection.
The Java runtime environment has a garbage collector that periodically frees the memory used by objects that are no longer referenced. The garbage collector does its job automatically when it determines that the time is right.
Check Your Progress 1)In Java, everything you write will reside inside a _
2)A class should have _ that are necessary for manipulating the data contained in the class.
4.3 CONSTRUCTORS
Until now we have seen three ways to initialize values to the variables declared in the class. First of all we can assign default values to the variables when we declare them in the class
E.g. int p=10,q=20.
Another way to provide values to the instance variables is after the object is created in the main() method.
E.g. Rect rectTwo=new Rect();
www.educlash.com

51
rectTwo.length=10;
rectTwo.breadth=20;
Last technique we have used is, to create a separate method to set the data for the instance variable.
E.g. void setData(int x,int y){
length=x;
breadth=y;
}
....
....
Rect rectTwo=new Rect();
rectTwo.setData(10,20);
Each of the above three approach has its drawbacks, in the first way we have to give new values while coding and dynamic values cannot be passed to the class. In the second means if we create more objects of a class then the lines of code would also increase as per the number of instance variable. The last mode has a drawback that the method has to be called explicitly each time we need to initialize the object.
There is a better way on initializing an object and that is through the use of constructor. A constructor initializes an object immediately upon creation. It has the same name as the class and is syntactically similar to a method. The constructor is automatically called immediately after the object is created. Constructors have no return type, not even void. It is the constructor's job to initialize the internal state of an object so that the code creating an instance will have a fully initialized, usable object immediately.
You cannot write two constructors that have the same number and type of arguments for the same class, because the platform would not be able to tell them apart. Doing so causes a compile-time error. You don't have to provide any constructors for your class, but you must be careful when doing this. The compiler automatically provides a no-argument, default constructor for any class without constructors. This default constructor will call the no- argument constructor of the superclass. If your class has no explicit superclass, then it has an implicit superclass of Object, which does have a no-argument constructor. E.g.
class Rect {
int length,breadth; Rect() {
www.educlash.com
52
length=0; breadth=0; } Rect(int x, int y) {
length=x; breadth=y; }
}
In the above example, we have created two constructors,
one with no arguments and the second with two arguments. The constructors can be used in the following manner:
The above two statements will call the no argument constructor and two argument constructor respectively. The values of the instance variable will be as follows:
rectOne.length=0; rectOne.breadth=0; rectTwo.length=10; rectTwo.breadth=20;
The “this” keyword
The keyword this is useful when you need to refer to instance of the class from its method. The keyword helps us to avoid name conflicts. In the program we have declare the name of instance variable and local variables same. Now to avoid the confliction between them we use this keyword. In the example, this.length and this.breadth refers to the instance variable length and breadth while length and breadth refers to the arguments passed in the method.
class Rect2{
int length,breadth;
void show(int length,int breadth){
this.length=length;
this.breadth=breadth;
}
int calculate(){
return(length*breadth);
}
}//class Rect2
public class UseOfThisOperator{
public static void main(String[] args){
Rect2 rectangle=new Rect2();
rectangle.show(5,6);
E.g. Rect rectOne = new Rect(); //zero parameter
Rect rectTwo = new Rect(10,20); //Two parameters
www.educlash.com
53
int area = rectangle.calculate();
System.out.println("The area of a Rectangle is : " + area);
}//main
}//class UseOfThisOperator
4.4 METHOD OVERLOADING
It is possible to create methods that have the same name,
but different number of parameters and different types of parameters. When this is the case, the methods are said to be overloaded, and the process is referred to as method overloading. Method overloading is one of the ways that Java implements polymorphism. When an overloaded method is invoked, Java uses the type and/or number of arguments as its guide to determine which version of the overloaded method to actually call. When Java encounters a call to an overloaded method, it simply executes the version of the method whose parameters match the arguments used in the call. class OverloadDemo {
void add(int x, int y) { int sum=x+y; System.out.println("Sum = "+sum");
} void add(int x, int y, int z) {
int sum=x+y+z; System.out.println("Sum = "+sum");
} }//class OverloadDemo class Overload {
public static void main(String args[]) { OverloadDemo ob = new OverloadDemo(); ob.add(10,20); ob.add(10,20,30);
}//main }//class Overload
Here we are overloading the method add(). In the main
method there are two calls to the add() method. First call is with two int values (10,20) so the first add() will be called and then the second call has three int values (10,20,30) so the second add() will be called.
www.educlash.com

54
Check Your Progress
1)A constructor initializes an object immediately upon creation. (True/False)
2)Java does not allow two methods to have the same name. (True/False)
4.5 STATIC MEMBERS
Sometime we want a class member to be independent of any object of that class. Normally a class member must be accessed only in conjunction with an object of its class. It is possible to create a member that can be used by itself, without reference to a specific instance.
To create such a member, precede its declaration with the keyword static. When a member is declared static, it can be accessed before any objects of its class are created, and without reference to any object. You can declare both methods and variables to be static. The most common example of a static member is main(). main() is declared as static because it must be called before any objects exist.
Instance variables declared as static are, essentially, global variables. When objects of its class are declared, no copy of a static variable is made. Instead, all instances of the class share the same static variable. Methods declared as static have several restrictions: They can only call other static methods.
They must only access static data. They cannot refer to this or super in any way.
Outside of the class in which they are defined, static methods
and variables can be used independently of any object. To do so, you need only specify the name of their class followed by the dot operator. For example, if you wish to call a static method from outside its class, you can do so using the following general form:
classname.method( )
Here, classname is the name of the class in which the static method is declared. As you can see, this format is similar to that used to call non-static methods through object reference variables. A static variable can be accessed in the same way—by use of the dot operator on the name of the class. This is how Java implements a controlled version of global functions and global variables.
www.educlash.com

55 class StaticDemo {
static int add(int x, int y) {
return x+y;
}
static int sub(int x, int y) {
return x-y;
}
}
class StaticByName {
public static void main(String args[]) {
int a=StaticDemo.add(45,5);
int b=StaticDemo.sub(50,25);
System.out.println("Sum = " +a);
System.out.println("Sub = " +b);
}
}
4.6 VISIBILITY CONTROL
Access level modifiers determine whether other classes can use a particular field or invoke a particular method. There are two levels of access control: At the top level—public, or package-private.
At the member level—public, private, protected, or package- private.
A class may be declared with the modifier public, in which case
that class is visible to all classes everywhere. If a class has no modifier (the default, also known as package-private), it is visible only within its own package (packages are named groups of related classes—you will learn about them later.)
At the member level, you can also use the public modifier or no modifier (package-private) just as with top-level classes, and with the same meaning. For members, there are two additional access modifiers: private and protected. The private modifier specifies that the member can only be accessed in its own class. The protected modifier specifies that the member can only be accessed within its own package (as with package-private) and, in addition, by a subclass of its class in another package. The following table shows the access to members permitted by each modifier.
www.educlash.com
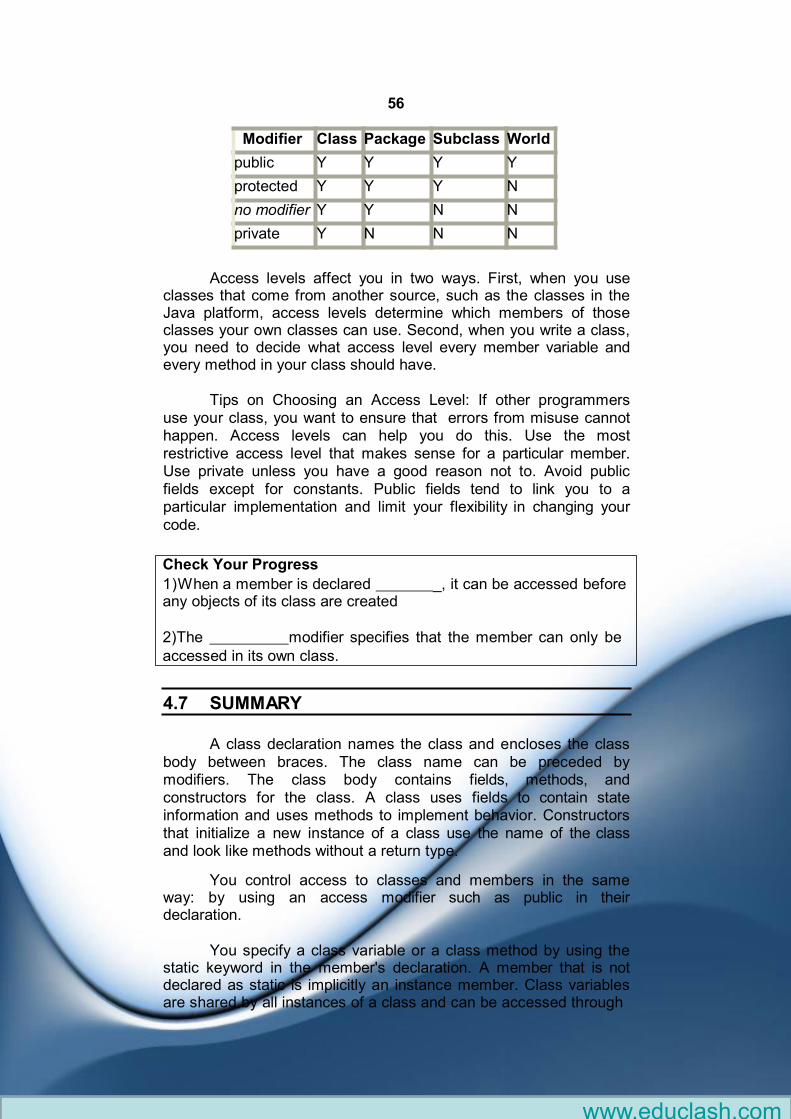
56
Access levels affect you in two ways. First, when you use classes that come from another source, such as the classes in the Java platform, access levels determine which members of those classes your own classes can use. Second, when you write a class, you need to decide what access level every member variable and every method in your class should have.
Tips on Choosing an Access Level: If other programmers use your class, you want to ensure that errors from misuse cannot happen. Access levels can help you do this. Use the most restrictive access level that makes sense for a particular member. Use private unless you have a good reason not to. Avoid public fields except for constants. Public fields tend to link you to a particular implementation and limit your flexibility in changing your code.
Check Your Progress
1)When a member is declared _, it can be accessed before any objects of its class are created
2)The modifier specifies that the member can only be accessed in its own class.
4.7 SUMMARY
A class declaration names the class and encloses the class body between braces. The class name can be preceded by modifiers. The class body contains fields, methods, and constructors for the class. A class uses fields to contain state information and uses methods to implement behavior. Constructors that initialize a new instance of a class use the name of the class and look like methods without a return type.
You control access to classes and members in the same way: by using an access modifier such as public in their declaration.
You specify a class variable or a class method by using the static keyword in the member's declaration. A member that is not declared as static is implicitly an instance member. Class variables are shared by all instances of a class and can be accessed through
Modifier Class Package Subclass World
public Y Y Y Y
protected Y Y Y N
no modifier Y Y N N
private Y N N N
www.educlash.com
57
the class name as well as an instance reference. Instances of a class get their own copy of each instance variable, which must be accessed through an instance reference.
You create an object from a class by using the new operator and a constructor. The new operator returns a reference to the object that was created. You can assign the reference to a variable or use it directly.
Instance variables and methods that are accessible to code outside of the class that they are declared in can be referred to by using a qualified name. The qualified name of an instance variable looks like this:
objectReference.variableName
The qualified name of a method looks like this: objectReference.methodName(argumentList)
or: objectReference.methodName()
The garbage collector automatically cleans up unused
objects. An object is unused if the program holds no more references to it. You can explicitly drop a reference by setting the variable holding the reference to null.
4.8 UNIT END EXERCISE 1) What is a class? How does it accomplish data hiding? 2) How is a method defined? 3) How do we invoke a constructor? 4) Discuss the different levels of access protection available in
Java? 5) Design a class to represent a bank account.
4.9 FURTHER READING
Java2: The Complete Reference - by Patrick Naughton &
Herbert Schildt, Fifth Edition
Programming with Java A primer - by E. Balagurusamy Third
Edition
www.educlash.com
58
5 INTERFACES & INHERITANCE
Unit Structure:
1. Objectives
2. Defining an Interface
3. Implementing an Interface
4. Types of inheritance
5. Method Overriding
6. Using Final
7. Abstract methods and classes
8. Summary
9. Unit end exercise
10. Further Reading
1. OBJECTIVES
The objectives of this chapter are to learn how to declare an
Interface and implement it. In addition to that we will be learning the different types of Inheritance in Java and how they are implemented.
2. DEFINING AN INTERFACE
In the Java programming language, an interface is a
reference type, similar to a class that can contain only constants, method signatures, and nested types. There are no method bodies. Interfaces cannot be instantiated—they can only be implemented by classes or extended by other interfaces. That is, using interface, you can specify what a class must do, but not how it does it. Interfaces are syntactically similar to classes, but they lack instance variables, and their methods are declared without any body.
To implement an interface, a class must create the complete
set of methods defined by the interface. However, each class is free to determine the details of its own implementation. By providing the interface keyword, Java allows you to fully utilize the "one interface, multiple methods" aspect of polymorphism.
www.educlash.com

59
An interface is defined much like a class. This is the general form of an interface: access interface interfaceName {
variables declaration; methods declaration;
} E.g. public interface Area {
final static float PI=3.1415; float calculate(float x, float y);
} Note that the method signature has no braces and is terminated with a semicolon.
Variables can be declared inside of interface declarations. They are implicitly final and static, meaning they cannot be changed by the implementing class. They must also be initialized with a constant value. All methods and variables are implicitly public if the interface, itself, is declared as public.
The public access specifier indicates that the interface can be used by any class in any package. If you do not specify that the interface is public, your interface will be accessible only to classes defined in the same package as the interface.
5.2 IMPLEMENTING AN INTERFACE
Once an interface has been defined, one or more classes can implement that interface. To implement an interface, include the implements clause in a class definition, and then create the methods defined by the interface. The general form of a class that includes the implements clause looks like this:
access class classname [extends superclass] [implements interface [,interface...]] { // class-body }
An interface can extend other interfaces, just as a class can
extend or subclass another class. However, whereas a class can extend only one other class, an interface can extend any number of interfaces. The interface declaration includes a comma-separated list of all the interfaces that it extends.
www.educlash.com

60 class Rect implements Area{
public float calculate(float x, float y) {
return (x*y) }
}//class Rect class Square implements Area{
public float calculate(float x, float y) {
return (x*x) }
}//class Square class InterfaceTest{ public static void main(String args[]) { Rect r=new Rect(); Area a1; a1=r; System.out.println(“Area of rectangle = ”+ a1.calculate(10,10)); Area a2=new Square(); System.out.println(“Area of Square = ”+ a2.calculate(10,0)); }//main }//class InterfaceTest
In the above example we have implemented the interface
Area declared in the previous section. We have declared two classes which are Rect and Square, which have implemented the interface. Inside the main() we can see two ways how the interface methods can be called. First way is to declare an object of the class and the interface, and then we assign the class object to the interface. Second means of using the interface is to directly assign the class object to the instance of the interface. Any one of the above method can be used in Java programming.
Check Your Progress 1) An interface is a _ _ type.
2) An interface cannot extend other interfaces. (True/False)
5.3 TYPES OF INHERITANCE
The use of abstract data types is intended to reduce code-
duplication and encourage code-reuse and separate compilation of components of a large software system. To this end, most object- oriented languages provide two different facilities for this purpose,
www.educlash.com
61 1. Polymorphism by which a form of generic programming is
supported. Generic components may be instantiated to specialized ones by initializing the type parameters of the generic program.
2. Inheritance by which new classes of objects may be derived
from existing generic ones and customized by new and special functions, methods or properties not present in the generic class. The derived class is said to be a sub-class of the generic class. Equivalently the generic class A is said to be a super- class of the derived class.
The above features of object-oriented languages do encourage
code-reuse and discourage code-duplication. However, a closer look at inheritance is required as it raise various issues. If a class A is specialized to class B, then it should be possible to avoid duplication of code from class A into class B, by merely establishing a relationship to that effect. Class B may then be said to inherit all the functions and methods of class A.
There exists basically four types of inheritance. Single inheritance Multilevel inheritance Multiple inheritance Hierarchical inheritance
In single inheritance, one class extends one class only. In
multilevel inheritance, the ladder of single inheritance increases. In multiple inheritance, one class directly extends more than one class and in hierarchical inheritance one class is extended by more than one class. Multilevel Inheritance - In multilevel, one-to-one ladder increases. Multiple classes are involved in inheritance, but one class extends only one. The lowermost subclass can make use of all its super classes' members. Multilevel inheritance is an indirect way of implementing multiple inheritance. Multiple Inheritance - In multiple inheritance, one class extends multiple classes. Java does not support multiple inheritance but C++ supports. Hierarchical Inheritance - In hierarchical type of inheritance, one class is extended by many subclasses. It is one-to-many relationship. Defining a Subclass: A subclass is defined as follows
www.educlash.com
62 class subclassname extends superclassname {
variables declarations; methods declarations;
}
The keyword extends signifies that the properties of superclassname are extended to the subclassname. The subclass now will have access to super class variables and methods in addition to its owns variable and methods.
A subclass inherits all of the public and protected members of its parent, no matter what package the subclass is in. If the subclass is in the same package as its parent, it also inherits the package-private members of the parent. You can use the inherited members as is, replace them, hide them, or supplement them with new members:
The inherited fields can be used directly, just like any other fields.
You can declare a field in the subclass with the same name as the one in the superclass, thus hiding it (not recommended).
You can declare new fields in the subclass that are not in the superclass.
The inherited methods can be used directly as they are.
You can write a new instance method in the subclass that has the same signature as the one in the superclass, thus overriding it.
You can write a new static method in the subclass that has the same signature as the one in the superclass, thus hiding it.
You can declare new methods in the subclass that are not in the superclass.
You can write a subclass constructor that invokes the constructor of the superclass, either implicitly or by using the keyword super.
// This program uses inheritance to extend Box.
class Box {
double width, height, depth;
// construct clone of an object
Box(Box ob) { // pass object to constructor
width = ob.width; height = ob.height; depth = ob.depth;
}
www.educlash.com

63
// constructor used when all dimensions specified
Box(double w, double h, double d) {
width = w; height = h; depth = d;
}
// compute and return volume
double volume() {
return width * height * depth;
}
}
// Here, Box is extended to include weight.
class BoxWeight extends Box {
double weight; // weight of box
// constructor for BoxWeight
BoxWeight(double w, double h, double d, double m) { width = w;
depth = d;
height = h;
weight = m;
}
}
class DemoBoxWeight {
public static void main(String args[]) {
BoxWeight mybox1 = new BoxWeight(10, 20, 15, 34.3);
BoxWeight mybox2 = new BoxWeight(2, 3, 4, 0.076);
double vol;
vol = mybox1.volume();
System.out.println("Volume of mybox1 is " + vol);
System.out.println("Weight of mybox1 is " + mybox1.weight);
System.out.println();
vol = mybox2.volume();
System.out.println("Volume of mybox2 is " + vol);
System.out.println("Weight of mybox2 is " + mybox2.weight);
}//main
}//class
The output from this program is shown here:
Volume of mybox1 is 3000.0
Weight of mybox1 is 34.3
Volume of mybox2 is 24.0
Weight of mybox2 is 0.076
www.educlash.com
64
Check Your Progress 1)Java supports multiple inheritance. (True/False)
2)A subclass inherits all of the public and protected members of its parent. (True/False)
5.4 METHOD OVERRIDING
In a class hierarchy, when a method in a subclass has the
same name and type signature as a method in its superclass, then the method in the subclass is said to override the method in the superclass. When an overridden method is called from within a subclass, it will always refer to the version of that method defined
p = x;
q = y;
}
// display p and q
void show() {
System.out.println("p and q: " + p + " " + q);
}
}
class B extends A {
int r;
B(int x, int y, int z) {
super(x, y);
r = z;
}
// display k – this overrides show() in A
void show() {
System.out.println("r: " + r);
}
}
class Override {
public static void main(String args[]) {
B subOb = new B(1, 2, 3);
subOb.show(); // this calls show() in B
by the subclass. The version of the method superclass will be hidden. Consider the following:
defined by the
// Method overriding.
class A {
int p, q;
A(int x, int y) {
www.educlash.com
65 }
}
The output produced by this program is shown here:
r: 3
When show() is invoked on an object of type B, the version of show() defined within B is used. That is, the version of show() inside B overrides the version declared in A. If you wish to access the superclass version of an overridden function, you can do so by using super. For example, in this version of B, the superclass version of show() is invoked within the subclass' version. This allows all instance variables to be displayed.
class B extends A {
int r;
B(int x, int y, int z) {
super(x, y);
r = z;
}
void show() {
super.show(); // this calls A's show()
System.out.println("r: " + r);
}
}
If you substitute this version of A into the previous program, you will see the following
output:
p and q: 1 2 r: 3
Here, super.show( ) calls the superclass version of show( ). Method overriding occurs only when the names and the type signatures of the two methods are identical. If they are not, then the two methods are simply overloaded.
// Example for Method Overriding
class Figure {
double dim1;
double dim2;
Figure(double a, double b) {
dim1 = a;
dim2 = b;
}
double area() {
www.educlash.com
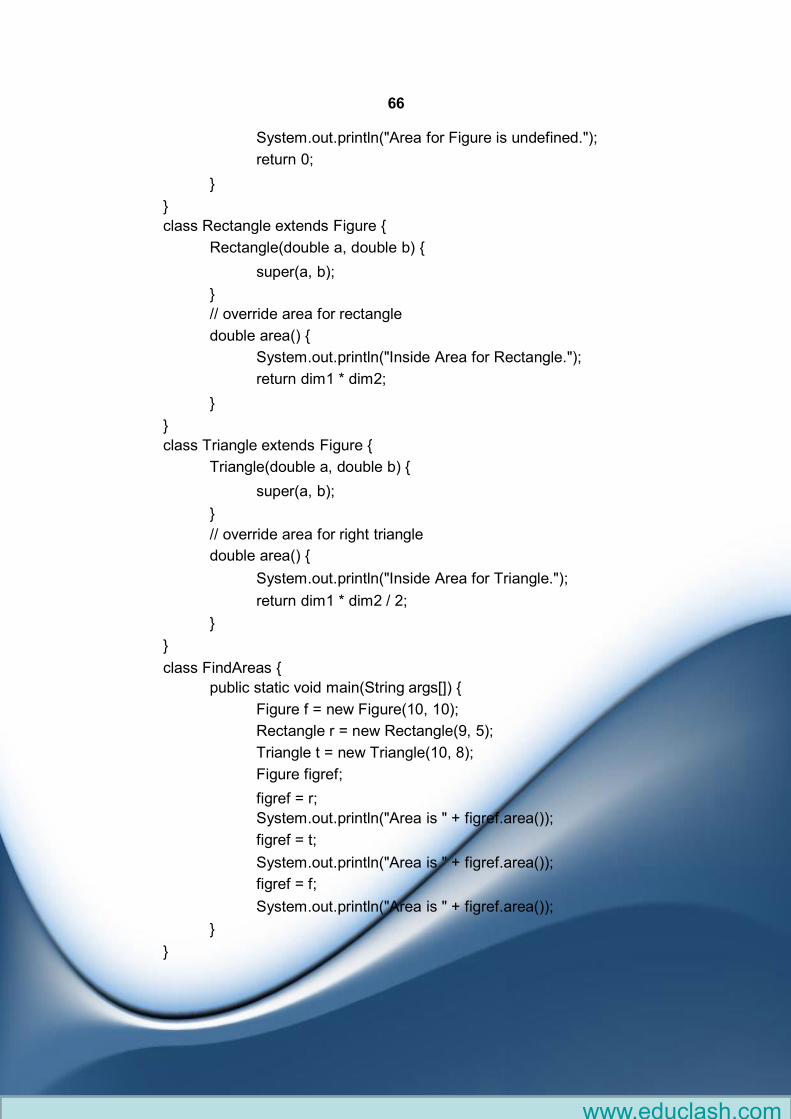
66
System.out.println("Area for Figure is undefined.");
return 0;
}
}
class Rectangle extends Figure {
Rectangle(double a, double b) {
super(a, b);
}
// override area for rectangle
double area() {
System.out.println("Inside Area for Rectangle.");
return dim1 * dim2;
}
}
class Triangle extends Figure {
Triangle(double a, double b) {
super(a, b);
}
// override area for right triangle
double area() {
System.out.println("Inside Area for Triangle.");
return dim1 * dim2 / 2;
}
}
class FindAreas {
public static void main(String args[]) {
Figure f = new Figure(10, 10);
Rectangle r = new Rectangle(9, 5);
Triangle t = new Triangle(10, 8);
Figure figref;
figref = r;
System.out.println("Area is " + figref.area());
figref = t;
System.out.println("Area is " + figref.area());
figref = f;
System.out.println("Area is " + figref.area());
}
}
www.educlash.com
67
The output from the program is shown here:
Inside Area for Rectangle.
Area is 45
Inside Area for Triangle.
Area is 40
Area for Figure is undefined.
Area is 0
5. USING FINAL
We can declare some or all of a class's methods final. We use the final keyword in a method declaration to indicate that the method cannot be overridden by subclasses. The Object class does this—a number of its methods are final.
We might wish to make a method final if it has an implementation that should not be changed and it is critical to the consistent state of the object. For example, you might want to make the displayAnimal method in this Animal class final: class Animal {
… … final displayAnimal() {
….
} ...
}
Methods called from constructors should generally be
declared final. If a constructor calls a non-final method, a subclass may redefine that method with surprising or undesirable results. Note that you can also declare an entire class final — this prevents the class from being subclassed. This is particularly useful, for example, when creating an immutable class like the String class.
6. ABSTRACT METHODS AND CLASSES
An abstract class is a class that is declared abstract—it may
or may not include abstract methods. Abstract classes cannot be instantiated, but they can be subclassed. An abstract method is a method that is declared without an implementation (without braces, and followed by a semicolon), like this:
www.educlash.com

68
abstract void moveTo(double deltaX, double deltaY);
If a class includes abstract methods, the class itself must be
declared abstract, as in: public abstract class GraphicObject {
// declare fields // declare non-abstract methods abstract void draw();
}
When an abstract class is subclassed, the subclass usually provides implementations for all of the abstract methods in its parent class. However, if it does not, the subclass must also be declared abstract.
Any class that contains one or more abstract methods must also be declared abstract. To declare a class abstract, you simply use the abstract keyword in front of the class keyword at the beginning of the class declaration. There can be no objects of an abstract class. That is, an abstract class cannot be directly instantiated with the new operator.
Such objects would be useless, because an abstract class is not fully defined. Also, you cannot declare abstract constructors, or abstract static methods. Any subclass of an abstract class must either implement all of the abstract methods in the superclass, or be itself declared abstract. Here is a simple example of a class with an abstract method, followed by a class which implements that method: // A Simple demonstration of abstract. abstract class A {
abstract void callme(); // concrete methods are still allowed in abstract classes void callmetoo() {
System.out.println("This is a concrete method."); }
} class B extends A {
void callme() { System.out.println("B's implementation of callme.");
} } class AbstractDemo {
public static void main(String args[]) { B b = new B(); b.callme(); b.callmetoo();
}//main }//class
www.educlash.com
69
Check Your Progress
1)We use the _ keyword in a method declaration to indicate that the method cannot be overridden by subclasses.
2)Abstract classes cannot be , but they can be subclassed.
5.7 SUMMARY An interface defines a protocol of communication between two objects. An interface declaration contains signatures, but no implementations, for a set of methods, and might also contain constant definitions. A class that implements an interface must implement all the methods declared in the interface. An interface name can be used anywhere a type can be used.
Except for the Object class, a class has exactly one direct superclass. A class inherits fields and methods from all its superclasses, whether direct or indirect. A subclass can override methods that it inherits, or it can hide fields or methods that it inherits. (Note that hiding fields is generally bad programming practice.) The table in Overriding and Hiding Methods section shows the effect of declaring a method with the same signature as a method in the superclass.
The Object class is the top of the class hierarchy. All classes are descendants from this class and inherit methods from it. Useful methods inherited from Object include toString(), equals(), clone(), and getClass(). You can prevent a class from being subclassed by using the final keyword in the class's declaration. Similarly, you can prevent a method from being overridden by subclasses by declaring it as a final method. An abstract class can only be subclassed; it cannot be instantiated. An abstract class can contain abstract methods—methods that are declared but not implemented. Subclasses then provide the implementations for the abstract methods.
www.educlash.com
70
5.8 UNIT END EXERCISE 1) What is an Interface?
2) Describe the various forms of implementing interfaces. Give example of Java code for each case?
3) What is the major difference between interface and a class? 4) Write a short note on Abstract Classes? 5) Write a program with an interface Shape which has a method
draw(). Write two classes Circle and Triangle which implement the interface. Test the classes created.
5.9 FURTHER READING
Java2: The Complete Reference - by Patrick Naughton &
Herbert Schildt, Fifth Edition
Programming with Java A primer - by E. Balagurusamy Third
Edition
www.educlash.com
71
6 PACKAGES
Unit Structure:
1. Objectives
2. Creating a Package
3. Naming a Package
4. Accessing a package
5. Using a Package
6. Summary
7. Unit end exercise
8. Further Reading
1. OBJECTIVES
The objectives of this chapter are to explains how to bundle
classes and interfaces into packages, how to use classes that are in packages, and how to arrange your file system so that the compiler can find your source files.
2. CREATING A PACKAGE
Packages are containers for classes that are used to keep the class name space compartmentalized. For example, a package allows you to create a class named List, which you can store in your own package without concern that it will collide with some other class named List stored elsewhere. Packages are stored in a hierarchical manner and are explicitly imported into new class definitions.
You should bundle these classes and the interface in a
package for several reasons, including the following:
You and other programmers can easily determine that these types are related.
You and other programmers know where to find types that can provide graphics-related functions.
www.educlash.com
72
The names of your types won't conflict with the type names in
other packages because the package creates a new namespace.
You can allow types within the package to have unrestricted access to one another yet still restrict access for types outside the package.
To create a package simply include a package command as
the first statement in a Java source file. Any classes declared within that file will belong to the specified package. The package statement defines a name space in which classes are stored. If you omit the package statement, the class names are put into the default package, which has no name. Most of the time, you will define a package for your code. This is the general form of the package statement:
package pack; Here, pack is the name of the package. For example, the
following statement creates a package called MyPack. package MyPack;
Java uses file system directories to store packages. For
example, the .class files for any classes you declare to be part of MyPack must be stored in a directory called MyPack. The directory name must match the package name exactly, case is significant. More than one file can include the same package statement. The package statement simply specifies to which package the classes defined in a file belong.
You can create a hierarchy of packages. To do so, simply separate each package name from the one above it by use of a period. The general form of a multileveled package statement is shown here:
package pack1[.pack2[.pack3]];
6.2 NAMING A PACKAGE
It is likely that many programmers will use the same name for different types. For example we can define a Rectangle class when there is already a Rectangle class in the java.awt package. Still, the compiler allows both classes to have the same name if they are in different packages. The fully qualified name of each Rectangle class includes the package name. That is, the fully qualified name of the Rectangle class in the graphics package is graphics.Rectangle, and the fully qualified name of the Rectangle class in the java.awt package is java.awt.Rectangle.
www.educlash.com
73 Naming Conventions
Package names are written in all lowercase to avoid conflict with
the names of classes or interfaces.
Companies use their reversed Internet domain name to begin
their package names—for example, com.example.orion for a package named orion created by a programmer at example.com.
Name collisions that occur within a single company need to be
handled by convention within that company, perhaps by including the region or the project name after the company name (for example, com.company.region.package).
Packages in the Java language itself begin with java. or javax.
In some cases, the internet domain name may not be a valid
package name. This can occur if the domain name contains a hyphen or other special character, if the package name begins with a digit or other character that is illegal to use as the beginning of a Java name, or if the package name contains a reserved Java keyword, such as "int". In this event, the suggested convention is to add an underscore.
Check Your Progress
1)The statement defines a name space in which classes are stored.
2)Package names are written in all case to avoid conflict with the names of classes or interfaces
6.3 ACCESSING A PACKAGE
There are no core Java classes in the unnamed default package; all of the standard classes are stored in some named package. Since classes within packages must be fully qualified with their package name or names, it could become tedious to type in the long dot-separated package path name for every class you want to use. For this reason, Java includes the import statement to bring certain classes, or entire packages, into visibility. Once imported, a class can be referred to directly, using only its name. The import statement is a convenience to the programmer and is not technically needed to write a complete Java program. If you are going to refer to a few dozen classes in your application, however, the import statement will save a lot of typing.
www.educlash.com

74
To use a public package member from outside its package, you
must do one of the following: 1) Refer to the member by its fully qualified name 2) Import the package member 3) Import the member's entire package
Each is appropriate for different situations, as explained in the below.
1) Referring to a Package Member by Its Qualified Name
So far, most of the examples in this book have referred to types by their simple names, such as StaticDemo and OverloadDemo. You can use a package member's simple name if the code you are writing is in the same package. However, if you are trying to use a member from a different package and that package has not been imported, you must use the member's fully qualified name, which includes the package name. Here is the fully qualified name for the Rectangle class declared in the graphics package in the previous example.
graphics.Rectangle 2) Importing a Package Member
To import a specific member into the current file, put an
import statement at the beginning of the file before any type definitions. For example you would import the Rectangle class from the graphics package created like this:
import graphics.Rectangle; Now you can refer to the Rectangle class by its simple
name. Rectangle myRectangle = new Rectangle();
This approach works well if you use just a few members
from the graphics package. But if you use many types from a package, you should import the entire package.
3) Importing an Entire Package
To import all the types contained in a particular package, use
the import statement with the asterisk (*) wildcard character. import graphics.*;
Now you can refer to any class or interface in the graphics package by its simple name.
Circle myCircle = new Circle(); Rectangle myRectangle = new Rectangle();
The asterisk in the import statement can be used only to
specify all the classes within a package, as shown here. It cannot
www.educlash.com
75
be used to match a subset of the classes in a package. For example, the following does not match all the classes in the graphics package that begin with A. import graphics.A*; //does not work
Instead, it generates a compiler error. With the import statement, you generally import only a single package member or an entire package. For convenience, the Java compiler automatically imports three entire packages for each source file: (1) the package with no name, (2) the java.lang package, and (3) the current package (the package for the current file).
Check Your Progress
1)All of the standard classes are stored in some named package. (True/False)
2)The import statement can be written anywhere in the program. (True/False)
6.4 USING A PACKAGE
When a package is imported, only those items within the package declared as public will be available to non-subclasses in the importing code. For example, if you want the MyBalance class of the package MyPack to be available as a stand-alone class for general use outside of MyPack, then you will need to declare it as public and put it into its own file, as shown here:
package MyPack;
public class MyBalance
{
String name;
double bal;
public MyBalance(String n, double b) {
name = n;
bal = b;
}
public void show() {
if(bal<0)
System.out.print("—> ");
System.out.println(name + ": $" + bal);
}
}
www.educlash.com
76
The MyBalance class is now public. Also, its constructor and its show() method are public, too. This means that they can be accessed by any type of code outside the MyPack package. For example, here TestBalance imports MyPack and is then able to make use of the MyBalance class:
import MyPack.*;
class TestBalance
{
public static void main(String args[])
{
MyBalance test = new MyBalance("S. R. Tendulkar", 77.88);
test.show(); // you may also call show()
}
}
As an experiment, remove the public specifier from the MyBalance class and then try compiling TestBalance. As explained, errors will result.
6.5 SUMMARY
To create a package for a type, put a package statement as the
first statement in the source file that contains the type (class, interface, enumeration, or annotation type).
To use a public type that's in a different package, you have
three choices: (1) use the fully qualified name of the type, (2) import the type, or (3) import the entire package of which the type is a member.
The path names for a package's source and class files mirror
the name of the package.
You might have to set your CLASSPATH so that the compiler
and the JVM can find the .class files for your types.
6.6 UNIT END EXERCISE 1) What is a package? 2) How do we design a package? 3) How do we add a class or interface to a package? 4) How do we tell Java that we want to use a particular package in
file? 5) Define a package My Pack; in which you will write a class
‘Balance’, The class ‘Balance’ will have data member as string
www.educlash.com
77
name; & double bal; write a constructor for ‘Balance’ class which will initialize name & bal; write a function void show ( ) in you will display name & bal. Now this MyPack package is now ready to import. Import this package in your class & use ‘Balance’ class.
6.7 FURTHER READING
Java2: The Complete Reference - by Patrick Naughton &
Herbert Schildt, Fifth Edition
Programming with Java A primer - by E. Balagurusamy Third
Edition
www.educlash.com
78
7 EXCEPTION HANDLING
Unit Structure:
1. Objectives
2. What Is an Exception?
3. Exception Types
4. Catching and Handling Exceptions
5. Using Finally Statement
6. How to Throw Exceptions
7. User Defined Exceptions
8. Summary
9. Unit end exercise
10. Further Reading
1. OBJECTIVES
The objective of this chapter is to examine Java's exception-
handling mechanism. Here we will learn the types of exception, how to catch and handle an exception. Also we will discover how to throw an exception and to define our own exception.
2. WHAT ARE EXCEPTIONS
An exception is an abnormal condition that arises in a code
sequence at run time. In other words, an exception is a runtime error. In computer languages that do not support exception handling, errors must be checked and handled manually—typically through the use of error codes, and so on. This approach is as cumbersome as it is troublesome. Java's exception handling avoids these problems and, in the process, brings run-time error management into the object-oriented world.
An exception can be defined as an event which occurs
during the execution of a program that disrupts the normal flow of the program's instructions. A Java exception is an object that describes an exceptional (that is, error) condition that has occurred in a piece of code. When an exceptional condition arises, an object representing that exception is created and thrown in the method that caused the error. That method may choose to handle the
www.educlash.com
79
exception itself, or pass it on. Either way, at some point, the exception is caught and processed.
Exceptions can be generated by the Java run-time system, or they can be manually generated by your code. Exceptions thrown by Java relate to fundamental errors that violate the rules of the Java language or the constraints of the Java execution environment. Manually generated exceptions are typically used to report some error condition to the caller of a method.
Java exception handling is managed via five keywords: try, catch, throw, throws, and finally. Briefly, here is how they work. Program statements that you want to monitor for exceptions are contained within a try block. If an exception occurs within the try block, it is thrown. Your code can catch this exception (using catch) and handle it in some rational manner.
System-generated exceptions are automatically thrown by
the Java runtime system. To manually throw an exception, use the keyword throw. Any exception that is thrown out of a method must be specified as such by a throws clause. Any code that absolutely must be executed before a method returns is put in a finally block.
7.2 EXCEPTION TYPES 1) Checked exception
These are exceptional conditions that a well-written
application should anticipate and recover from. For example, suppose an application prompts a user for an input file name, then opens the file by passing the name to the constructor for java.io.FileReader. Normally, the user provides the name of an existing, readable file, so the construction of the FileReader object succeeds, and the execution of the application proceeds normally. But sometimes the user supplies the name of a nonexistent file, and the constructor throws java.io.FileNotFoundException. A well- written program will catch this exception and notify the user of the mistake, possibly prompting for a corrected file name.
Checked exceptions are subject to the Catch or Specify Requirement. All exceptions are checked exceptions, except for those indicated by Error, RuntimeException, and their subclasses.
2) Error
These are exceptional conditions that are external to the application, and that the application usually cannot anticipate or recover from. For example, suppose that an application
www.educlash.com

80
successfully opens a file for input, but is unable to read the file because of a hardware or system malfunction. The unsuccessful read will throw java.io.IOError. An application might choose to catch this exception, in order to notify the user of the problem — but it also might make sense for the program to print a stack trace and exit. Errors are not subject to the Catch or Specify Requirement. Errors are those exceptions indicated by Error and its subclasses.
3) Runtime Exception
These are exceptional conditions that are internal to the application, and that the application usually cannot anticipate or recover from. These usually indicate programming bugs, such as logic errors or improper use of an API. For example, consider the application described previously that passes a file name to the constructor for FileReader. If a logic error causes a null to be passed to the constructor, the constructor will throw NullPointerException. The application can catch this exception, but it probably makes more sense to eliminate the bug that caused the exception to occur.
Runtime exceptions are not subject to the Catch or Specify
Requirement. Runtime exceptions are those indicated by RuntimeException and its subclasses. Errors and runtime exceptions are collectively known as unchecked exceptions.
Check Your Progress 1)An exception is a _ error.
2)Any exception that is thrown out of a method must be specified as such by a _ clause.
7.3 CATCHING & HANDLING EXCEPTIONS
This section describes how to use the three exception handler components — the try, catch, and finally blocks — to write an exception handler. The following example defines and implements a class named NumbersList. When constructed, NumbersList creates an ArrayList that contains 10 Integer elements with sequential values 0 through 9. The NumbersList class also defines a method named writeList, which writes the list of numbers into a text file called OutFile.txt. This example uses output classes defined in java.io, which are covered in Basic I/O. // Note: This class won't compile import java.io.*; import java.util.List; import java.util.ArrayList;
www.educlash.com
81 public class NumbersList {
private List<Integer> list; private static final int SIZE = 10;
public NumbersList() {
list = new ArrayList<Integer>(SIZE); for (int i = 0; i < SIZE; i++) {
list.add(new Integer(i)); }
}
public void writeList() { PrintWriter out = new PrintWriter(new FileWriter("OutFile.txt"));
for (int i = 0; i < SIZE; i++) {
out.println("Value at: " + i + " = " + list.get(i)); } out.close();
} }
The first line is a call to a constructor. The constructor
initializes an output stream on a file. If the file cannot be opened, the constructor throws an IOException. The second boldface line is a call to the ArrayList class's get method, which throws an IndexOutOfBoundsException if the value of its argument is too small (less than 0) or too large (more than the number of elements currently contained by the ArrayList).
If you try to compile the NumbersList class, the compiler prints an error message about the exception thrown by the FileWriter constructor. However, it does not display an error message about the exception thrown by get. The reason is that the exception thrown by the constructor, IOException, is a checked exception, and the one thrown by the get method, IndexOutOfBoundsException, is an unchecked exception.
The try Block
The first step in constructing an exception handler is to enclose the code that might throw an exception within a try block. In general, a try block looks like the following: try {
code } catch and finally blocks . . .
www.educlash.com
82
The segment in the example labeled code contains one or
more legal lines of code that could throw an exception. If an exception occurs within the try block, that exception is handled by an exception handler associated with it. To associate an exception handler with a try block, you must put a catch block after it. Sample Code: PrintWriter out = null; try {
System.out.println("Entered try statement"); out = new PrintWriter(new FileWriter("OutFile.txt")); for (int i = 0; i < SIZE; i++) {
out.println("Value at: " + i + " = " + list.get(i)); }
} catch and finally statements . . .
The catch Blocks
We can associate exception handlers with a try block by providing one or more catch blocks directly after the try block. No code can be between the end of the try block and the beginning of the first catch block. try { } catch (ExceptionType name) { } catch (ExceptionType name) { }
Each catch block is an exception handler and handles the type of exception indicated by its argument. The argument type, ExceptionType, declares the type of exception that the handler can handle and must be the name of a class that inherits from the Throwable class. The handler can refer to the exception with name.
The catch block contains code that is executed if and when
the exception handler is invoked. The runtime system invokes the exception handler when the handler is the first one in the call stack whose ExceptionType matches the type of the exception thrown. The system considers it a match if the thrown object can legally be assigned to the exception handler's argument.
www.educlash.com
83 Sample Code: try {
. . . .
. . . . } catch (FileNotFoundException e) {
System.err.println("FileNotFoundException: " + e.getMessage()); throw new SampleException(e);
} catch (IOException e) {
System.err.println("Caught IOException: " + e.getMessage()); }
Example: The following program includes a try block and a catch clause which processes the ArithmeticException generated by the division-by-zero error: class E2 {
public static void main(String args[]) { int d, a; try { // monitor a block of code.
d = 0; a = 42 / d; System.out.println("This will not be printed.");
} catch (ArithmeticException e) { System.out.println("Division by zero.");
} System.out.println("After catch statement.");
} } This program generates the following output: Division by zero. After catch statement.
Check Your Progress
1)To associate an exception handler with a try block, you must put a _ block after it.
2)The catch block contains code that is executed always. (True/False)
7.4 USING FINALLY STATEMENTS
The finally block always executes when the try block exits. This ensures that the finally block is executed even if an unexpected exception occurs. But finally is useful for more than just exception handling — it allows the programmer to avoid having cleanup code accidentally bypassed by a return, continue, or break.
www.educlash.com
84
Putting cleanup code in a finally block is always a good practice, even when no exceptions are anticipated.
The try block of the writeList method that you've been working with here opens a PrintWriter. The program should close that stream before exiting the writeList method. This poses a somewhat complicated problem because writeList's try block can exit in one of three ways. 1. The new FileWriter statement fails and throws an IOException. 2. The vector.elementAt(i) statement fails and throws an
ArrayIndexOutOfBoundsException. 3. Everything succeeds and the try block exits normally.
The runtime system always executes the statements within the finally block regardless of what happens within the try block. So it's the perfect place to perform cleanup. The following finally block for the writeList method cleans up and then closes the PrintWriter. finally {
if (out != null) { System.out.println("Closing PrintWriter"); out.close();
} else { System.out.println("PrintWriter not open");
} }
7.5 HOW TO THROW EXCEPTIONS 1) throw
So far, we have only been catching exceptions that are thrown by the Java run-time system. However, it is possible for your program to throw an exception explicitly, using the throw statement. The general form of throw is shown here:
throw ThrowableInstance;
Here, ThrowableInstance must be an object of type
Throwable or a subclass of Throwable. There are two ways you can obtain a Throwable object: using a parameter into a catch clause, or creating one with the newoperator. The flow of execution stops immediately after the throw statement; any subsequent statements are not executed. The nearest enclosing try block is inspected to see if it has a catch statement that matches the type of the exception. If it does find a match, control is transferred to that statement. If not, then the next enclosing try statement is inspected, and so on. If no matching catch is found, then the default exception handler halts the program and prints the stack trace.
www.educlash.com
85
Let's look at the throw statement in context. The following
pop method is taken from a class that implements a common stack object. The method removes the top element from the stack and returns the object.
public Object pop() {
Object obj;
if (size == 0) {
throw new EmptyStackException();
}
obj = objectAt(size - 1);
setObjectAt(size - 1, null);
size--;
return obj;
}
The pop method checks to see whether any elements are on the stack. If the stack is empty (its size is equal to 0), pop instantiates a new EmptyStackException object (a member of java.util) and throws it. 2) throws
If a method is capable of causing an exception that it does not handle, it must specify this behavior so that callers of the method can guard themselves against that exception. You do this by including a throws clause in the method's declaration. A throws clause lists the types of exceptions that a method might throw. This is necessary for all exceptions, except those of type Error or RuntimeException, or any of their subclasses. All other exceptions that a method can throw must be declared in the throws clause. If they are not, a compile-time error will result. This is the general form of a method declaration that includes a throws clause:
type method-name(parameter-list) throws exception-list {
// body of method }
Following is an example of an incorrect program that tries to
throw an exception that it does not catch. Because the program does not specify a throws clause to declare this fact, the program will not compile.
www.educlash.com
86
// This program contains an error and will not compile. class ThrowsDemo {
static void throwOne() { System.out.println("Inside throwOne."); throw new IllegalAccessException("demo");
} public static void main(String args[]) {
throwOne(); } }
To make this example compile, you need to make two
changes. First, you need to declare that throwOne( ) throws IllegalAccessException. Second, main( ) must define a try/catch statement that catches this exception. The corrected example is shown here:
// This is now correct.
class ThrowsDemo
{
static void throwOne() throws IllegalAccessException
{
System.out.println("Inside throwOne.");
throw new IllegalAccessException("demo");
}
public static void main(String args[]) {
try {
throwOne();
} catch (IllegalAccessException e) {
System.out.println("Caught " + e);
}
}
}
Here is the output generated by running this example program:
inside throwOne
caught java.lang.IllegalAccessException: demo
7.6 USER DEFINED EXCEPTIONS
We can create our own exceptions in Java. Keep the following points in mind when writing our own exception classes:
www.educlash.com

87
All exceptions must be a child of Throwable.
If you want to write a checked exception that is automatically enforced by the Handle or Declare Rule, you need to extend the Exception class.
If you want to write a runtime exception, you need to extend the RuntimeException class.
We can define our own Exception class as below:
class MyException extends Exception { }
You just need to extend the Exception class to create your own Exception class. These are considered to be checked exceptions. The following InsufficientFundsException class is a user-defined exception that extends the Exception class, making it a checked exception. An exception class is like any other class, containing useful fields and methods.
Example:
// File Name InsufficientFundsException.java
import java.io.*;
public class InsufficientFundsException extends Exception
{
private double amount;
public InsufficientFundsException(double amount)
{
this.amount = amount;
}
public double getAmount()
{
return amount;
}
}
To demonstrate using our user-defined exception, the following CheckingAccount class contains a withdraw() method that throws an InsufficientFundsException.
// File Name CheckingAccount.java
import java.io.*;
public class CheckingAccount
{
private double balance;
private int number;
www.educlash.com

88
public CheckingAccount(int number)
{
this.number = number;
}
public void deposit(double amount)
{
balance += amount;
}
public void withdraw(double amount) throws
InsufficientFundsException
{
if(amount <= balance)
{
balance -= amount;
}
else
{
double needs = amount - balance;
throw new InsufficientFundsException(needs);
}
}
public double getBalance()
{
return balance;
}
public int getNumber()
{
return number;
}
}
The following BankDemo program demonstrates invoking the deposit() and withdraw() methods of CheckingAccount.
// File Name BankDemo.java
public class BankDemo
{
public static void main(String [] args)
{
CheckingAccount c = new CheckingAccount(101);
System.out.println("Depositing $500...");
c.deposit(500.00);
www.educlash.com

89
try
{
System.out.println("\nWithdrawing $100...");
c.withdraw(100.00);
System.out.println("\nWithdrawing $600...");
c.withdraw(600.00);
}catch(InsufficientFundsException e)
{
System.out.println("Sorry, but you are short $"
+ e.getAmount());
e.printStackTrace();
}
}
}
Compile all the above three files and run BankDemo, this would produce following result:
Depositing $500...
Withdrawing $100...
Withdrawing $600...
Sorry, but you are short $200.0
InsufficientFundsException
at CheckingAccount.withdraw(CheckingAccount.java:25)
at BankDemo.main(BankDemo.java:13)
Check Your Progress
1)The finally block is the perfect place to perform cleanup. (True/False)
2) All exceptions must be a child of Throwable. (True/False)
7.7 SUMMARY A program can use exceptions to indicate that an error occurred. To throw an exception, use the throw statement and provide it with an exception object — a descendant of Throwable — to provide information about the specific error that occurred. A method that throws an uncaught, checked exception must include a throws clause in its declaration.
www.educlash.com
90
A program can catch exceptions by using a combination of the try, catch, and finally blocks.
The try block identifies a block of code in which an exception
can occur. The catch block identifies a block of code, known as an
exception handler that can handle a particular type of exception. The finally block identifies a block of code that is guaranteed to
execute, and is the right place to close files, recover resources, and otherwise clean up after the code enclosed in the try block.
The try statement should contain at least one catch block or a finally block and may have multiple catch blocks.
The class of the exception object indicates the type of exception thrown. The exception object can contain further information about the error, including an error message. With exception chaining, an exception can point to the exception that caused it, which can in turn point to the exception that caused it, and so on.
7.8 UNIT END EXERCISE 1) What is an exception? 2) How do we define a try..catch block? 3) How many catch blocks can be used with one try block? 4) Write a program that throws an exception whenever an attempt
is made to divide a given number in a loop, which runs from 1 to 10.
5) Define an exception “NoMatchFound” that is thrown when a string is not equal to “SYBSC”. Write a program that uses this exception.
7.9 FURTHER READING
Java2: The Complete Reference - by Patrick Naughton &
Herbert Schildt, Fifth Edition
Programming with Java A primer - by E. Balagurusamy Third
Edition
www.educlash.com
91
8 STREAMS & FILES
Unit Structure:
1. Objectives
2. File I/O
3. Streams
4. Byte Streams
5. Character Streams
6. Random Access Files
7. Summary
8. Unit end exercise
9. Further Reading
1. OBJECTIVES
The objective of this chapter is to learn the Java platform
classes used for basic I/O. It first focuses on I/O Streams, a powerful concept that greatly simplifies I/O operations. Then the lesson looks at file I/O and file system operations, including random access files.
2. FILE I/O The File Class
The File class is Java's representation of a file or directory path name. Because file and directory names have different formats on different platforms, a simple string is not adequate to name them.
The File class contains several methods for working with the path name, deleting and renaming files, creating new directories, listing the contents of a directory, and determining several common attributes of files and directories. Creating a File Object
You create a File object by passing in a String that represents the name of a file, and possibly a String or another File object. By default, the JVM will use the directory in which the application was executed as the "current path". You can override
www.educlash.com
92 this default behavior by specifying the user.dir system property.
File c = new File("c:\\windows\\system\\smurf.gif"); File d = new File("system\\smurf.gif");
Note the double backslashes. Because the backslash is a
Java String escape character, you must type two of them to represent a single, "real" backslash. The above specifications are not very portable. The problem is that the direction of the slashes and the way the "root" of the path is specified is specific for the platform in question. First, Java allows either type of slash to be used on any platform, and translates it appropriately. This means that you could type
File e = new File("c:/windows/system/smurf.gif"); and it will find the same file on Windows.
1) File Attribute Methods
The File object has several methods that provide information on the current state of the file.
boolean canRead() - Returns true if the file is readable boolean canWrite() - Returns true if the file is writeable boolean exists() - Returns true if the file exists boolean isAbsolute() - Returns true if the file name is an
absolute path name
boolean isDirectory() - Returns true if the file name is a directory boolean isFile() - Returns true if the file name is a "normal" file boolean isHidden() - Returns true if the file is marked "hidden" long lastModified() - Returns a long indicating the last time the
file was
modified long length() - Returns the length of the contents of the file
2) File Name Methods
The following list shows the methods of the File class that relate to getting the file name, or part of it.
boolean equals(Object) - Compares the file names to see if they are equivalent
File getAbsoluteFile() - Gets an abstract file name that represents resolution of the absolute file name for this File
String getAbsolutePath() - Resolves the absolute file name for this File
String getName() - Returns the name for the file without any preceding path information.
String getParent() - Returns the path to the file name, without the actual file name.
String getPath() - Returns the path used to construct this object.
www.educlash.com
93 3) File System Modification Methods
boolean delete() - Deletes the file specified by this file name.
void deleteOnExit() - Sets up processing to delete this file when the JVM exits (via System.exit() or when only daemon threads are left running.).
boolean mkdir() - Creates this directory. All parent directories must already exist.
boolean mkdirs() - Creates this directory and any parent directories that do not exist.
boolean renameTo(File) - Renames the file.
4) Directory List Methods
String[] list() - Returns an array of Strings that represent the names of the files contained within this directory. Returns null if the file is not a directory.
File[] listFiles() - Similar to list(), but returns an array of File objects.
// Demonstrate File.
import java.io.File;
class FileDemo {
static void p(String s) {
System.out.println(s);
}
public static void main(String args[]) {
File f1 = new File("/java/COPYRIGHT");
p("File Name: " + f1.getName());
p("Path: " + f1.getPath());
p("Parent: " + f1.getParent());
p(f1.exists() ? "exists" : "does not exist");
p(f1.canWrite() ? "is writeable" : "is not writeable");
p(f1.canRead() ? "is readable" : "is not readable"); p("is
" + (f1.isDirectory() ? "" : "not" + " a directory"));
p(f1.isFile() ? "is normal file" : "might be a named pipe");
p(f1.isAbsolute() ? "is absolute" : "is not absolute");
}//main
}//class
When you run this program, you will see something similar to the following:
File Name: COPYRIGHT
Path: /java/COPYRIGHT
www.educlash.com
94
Parent: /java
exists
is writeable
is readable
is not a directory
is normal file
is absolute
2. STREAMS
Most fundamental I/O in Java is based on streams. A stream
represents a flow of data, or a channel of communication with (at least conceptually) a writer at one end and a reader at the other. When you are working with the java.io package to perform terminal input and output, reading or writing files, or communicating through sockets in Java, you are using various types of streams.
An I/O Stream represents an input source or an output destination. A stream can represent many different kinds of sources and destinations, including disk files, devices, other programs, and memory arrays. Streams support many different kinds of data, including simple bytes, primitive data types, localized characters, and objects. Some streams simply pass on data; others manipulate and transform the data in useful ways.
No matter how they work internally, all streams present the same simple model to programs that use them: A stream is a sequence of data. A program uses an input stream to read data from a source, one item at a time. A program uses an output stream to write data to a destination, one item at time.
3. BYTE STREAM
InputStream and OutputStream are abstract classes that define the lowest-level interface for all byte streams. They contain methods for reading or writing an unstructured flow of byte-level data. Because these classes are abstract, you can't create a generic input or output stream. Java implements subclasses of these for activities such as reading from and writing to files and communicating with sockets. Because all byte streams inherit the structure of InputStream or OutputStream, the various kinds of byte streams can be used interchangeably. A method specifying an InputStream as an argument can, of course, accept any subclass of InputStream. Specialized types of streams can also be layered to provide features, such as buffering, filtering, or handling higher- level data types.
www.educlash.com

95 1) InputStream
InputStream is an abstract class that defines Java's model of streaming byte input. All of the methods in this class will throw an IOException on error conditions.
Method & Description
int available( ) - Returns the number of bytes of input currently available for reading.
void close( ) - Closes the input source. Further read attempts will generate an IOException.
int read( ) - Returns an integer representation of the next available byte of input. –1 is returned when the end of the file is encountered.
int read(byte buffer[ ]) - Attempts to read up to buffer.length bytes into buffer and returns the actual number of bytes that were successfully read. –1 is returned when the end of the file is encountered.
int read(byte buffer[ ], int offset, int numBytes) - Attempts to read up to numBytes bytes into buffer starting at buffer[offset], returning the number of bytes successfully read. –1 is returned when the end of the file is encountered.
2) OutputStream
OutputStream is an abstract class that defines streaming byte output. All of the methods in this class return a void value and throw an IOException in the case of errors.
Method & Description
void close( ) - Closes the output stream. Further write attempts will generate an IOException.
void flush( ) - Finalizes the output state so that any buffers are cleared. That is, it flushes the output buffers.
void write(int b) - Writes a single byte to an output stream. Note that the parameter is an int, which allows you to call write( ) with expressions without having to cast them back to byte.
void write(byte buffer[ ]) - Writes a complete array of bytes to an output stream.
void write(byte buffer[ ], int offset, int numBytes) - Writes a subrange of numBytes bytes from the array buffer, beginning at buffer[offset].
www.educlash.com

96 3) FileInputStream
The FileInputStream class creates an InputStream that you can use to read bytes from a file. Its two most common constructors are shown here:
FileInputStream(String filepath) FileInputStream(File fileObj)
Either can throw a FileNotFoundException. Here, filepath is the full path name of a file, and fileObj is a File object that describes the file. The following example creates two FileInputStreams that use the same disk file and each of the two constructors:
FileInputStream f0 = new FileInputStream("/autoexec.bat") File f = new File("/autoexec.bat"); FileInputStream f1 = new FileInputStream(f);
4) FileOutputStream
FileOutputStream creates an OutputStream that you can use to write bytes to a file. Its most commonly used constructors are shown here:
FileOutputStream(String filePath) FileOutputStream(File fileObj) FileOutputStream(String filePath, boolean append)
They can throw an IOException or a SecurityException. Here, filePath is the full path name of a file, and fileObj is a File object that describes the file. If append is true, the file is opened in append mode. Example: To use Byte Stream Classes
import java.io.FileInputStream; import java.io.FileOutputStream; import java.io.IOException; public class CopyBytes {
public static void main(String[] args) throws IOException { FileInputStream in = null; FileOutputStream out = null; try {
in = new FileInputStream("abc.txt"); out = new FileOutputStream("pqr.txt"); int c; while ((c = in.read()) != -1) {
out.write(c); }
} finally {
if (in != null) { in.close();
}
www.educlash.com
97
if (out != null) { out.close();
} }
}//main }//class
Check Your Progress 1) A represents a flow of data.
2) InputStream and OutputStream are _ classes.
8.4 CHARACTER STREAM
Reader and Writer are very much like InputStream and
OutputStream, except that they deal with characters instead of bytes. As true character streams, these classes correctly handle Unicode characters, which was not always the case with byte streams. Often, a bridge is needed between these character streams and the byte streams of physical devices, such as disks and networks. InputStreamReader and OutputStreamWriter are special classes that use a character-encoding scheme to translate between character and byte streams. 1) Reader
Reader is an abstract class that defines Java's model of streaming character input. All of the methods in this class will throw an IOException on error conditions.
Method & Description
abstract void close( ) - Closes the input source. Further read attempts will generate an IOException.
int read( ) - Returns an integer representation of the next available character from the invoking input stream. –1 is returned when the end of the file is encountered.
int read(char buffer[ ]) - Attempts to read up to buffer.length characters into buffer and returns the actual number of characters that were successfully read. –1 is returned when the end of the file is encountered.
abstract int read(char buffer[],int offset,int numChars) - Attempts to read up to numChars characters into buffer starting at buffer[offset], returning the number of characters successfully read. –1 is returned when the end of the file is encountered.
www.educlash.com
98 2) Writer
Writer is an abstract class that defines streaming character output. All of the methods in this class return a void value and throw an IOException in the case of errors.
Method & Description
abstract void close( ) - Closes the output stream. Further write attempts will generate an IOException.
abstract void flush( ) - Finalizes the output state so that any buffers are cleared. That is, it flushes the output buffers.
void write(int ch) - Writes a single character to the invoking output stream. Note that the parameter is an int, which allows you to call write with expressions without having to cast them back to char.
void write(char buffer[ ]) - Writes a complete array of characters to the invoking output stream.
abstract void write(char buffer[ ], int offset, int numChars) - Writes a subrange of numChars characters from the array buffer, beginning at buffer[offset] to the invoking output stream.
void write(String str) - Writes str to the invoking output stream.
void write(String str, int offset, int numChars) - Writes a subrange of numChars characters from the array str, beginning at the specified offset.
3) FileReader
The FileReader class creates a Reader that you can use to read the contents of a file. Its two most commonly used constructors are shown here:
FileReader(String filePath) FileReader(File fileObj)
Either can throw a FileNotFoundException. Here, filePath is the full path name of a file, and fileObj is a File object that describes the file. 4) FileWriter
FileWriter creates a Writer that you can use to write to a file. Its most commonly used constructors are shown here:
FileWriter(String filePath) FileWriter(String filePath, boolean append) FileWriter(File fileObj)
They can throw an IOException or a SecurityException.
Here, filePath is the full path name of a file, and fileObj is a File object that describes the file. If append is true, then output is appended to the end of the file.
www.educlash.com
99 Example: To use Character Stream Classes
import java.io.FileReader; import java.io.FileWriter; import java.io.IOException; public class CopyCharacters {
public static void main(String[] args) throws IOException { FileReader inputStream = null; FileWriter outputStream = null;
try {
inputStream = new FileReader("abc.txt"); outputStream = new FileWriter("xyz.txt"); int c; while ((c = inputStream.read()) != -1) {
outputStream.write(c); }
} finally {
if (inputStream != null) { inputStream.close();
} if (outputStream != null) {
outputStream.close(); }
} }//main }//class
Check Your Progress
1)We can use the read method after the source is closed. (True/False)
2) FileReader is used to write data to the file. (True/False)
8.5 RANDOM ACCESS FILES RandomAccessFile provides two-way communication with a file- system file to and from specific locations in that file. Before describing this any further, a few things are important to note: You can use RandomAccessFile to work only with physical
devices that provide random-access support. For instance, you cannot open a tape-drive stream as a random-access file.
www.educlash.com

100
RandomAccessFile does not extend InputStream,
OutputStream, Reader, or Writer. This means that you cannot wrap it in a filter!
You are responsible for correct read positioning! If you write an
int at position 42 in the file, you must make sure you are at position 42 when attempting to read that int!
RandomAccessFile implements DataInput and DataOutput; it acts like a combination of DataInputStream and DataOutputStream. You can read and write primitive and String data at any position in the stream. Of course you can also read and write bytes as you do when using InputStream and OutputStream.
To work with a RandomAccessFile, you create a new instance passing the name of the file (a String or File object) and the mode in which you want to work with the file. The mode is a String that can be either:
"r" - the file will be opened in "read" mode. If you try to use any
output methods an exception will be thrown. If the file does not exist, a FileNotFoundException will be thrown. (More on I/O exceptions later!)
"rw" - the file will be opened in "read/write" mode. If the file does
not exist, it will try to create it.
In either mode, you can use the read() methods as well as methods like readInt(), readLong() and readUTF(). In read/write mode you can use the corresponding write() methods.
The big differences with RandomAccessFile are the positioning methods. You can call getFilePointer() (which returns a long) at any time to determine the current position within the file. This method is useful if you want to track positions as you write data to a file, possibly to write a corresponding index.
You can jump to any location in the file as well, by calling
seek() (passing a long value) to position the file pointer.
As an example, we present a simple address book lookup program. There are two parts to this example:
Address data creation - address-listing objects are created and their data stored in a RandomAccessFile, and a sequential index file tracks the position of each record.
Address data lookup - user inputs a name to seek, the index is
determined for that name, and the name record is read from the RandomAccessFile.
www.educlash.com

102
9 APPLETS
Unit Structure:
1. Objectives
2. Introduction to Applets 3. Difference between Applets and Applications 4. Applet Life Cycle 5. Creating Applets 6. Passing parameters 7. Summary 8. Unit end exercise 9. Further Reading
1. OBJECTIVES
The objectives of this chapter are to learn about Applets,
What are the advantages, disadvantages; How an Applet is created and executed. Here we will also know about the life cycle of an Applet and how to pass parameters to an Applet.
2. INTRODUCTION TO APPLETS
An applet is a Java program that runs in a Web browser. An
applet can be a fully functional Java application because it has the entire Java API at its disposal. All applets are subclasses of Applet. Thus, all applets must import java.applet.
Applets are not executed by the console-based Java run-
time interpreter. Rather, they are executed by either a Web browser or an applet viewer. The Applet class is contained in the java.applet package. Applet contains several methods that give you detailed control over the execution of your applet. In addition, java.applet also defines three interfaces: AppletContext, AudioClip, and AppletStub.
The Applet Class
The Applet class defines the methods shown in table below.
Applet provides all necessary support for applet execution, such as starting and stopping. It also provides methods that load and display images, and methods that load and play audio clips.
www.educlash.com
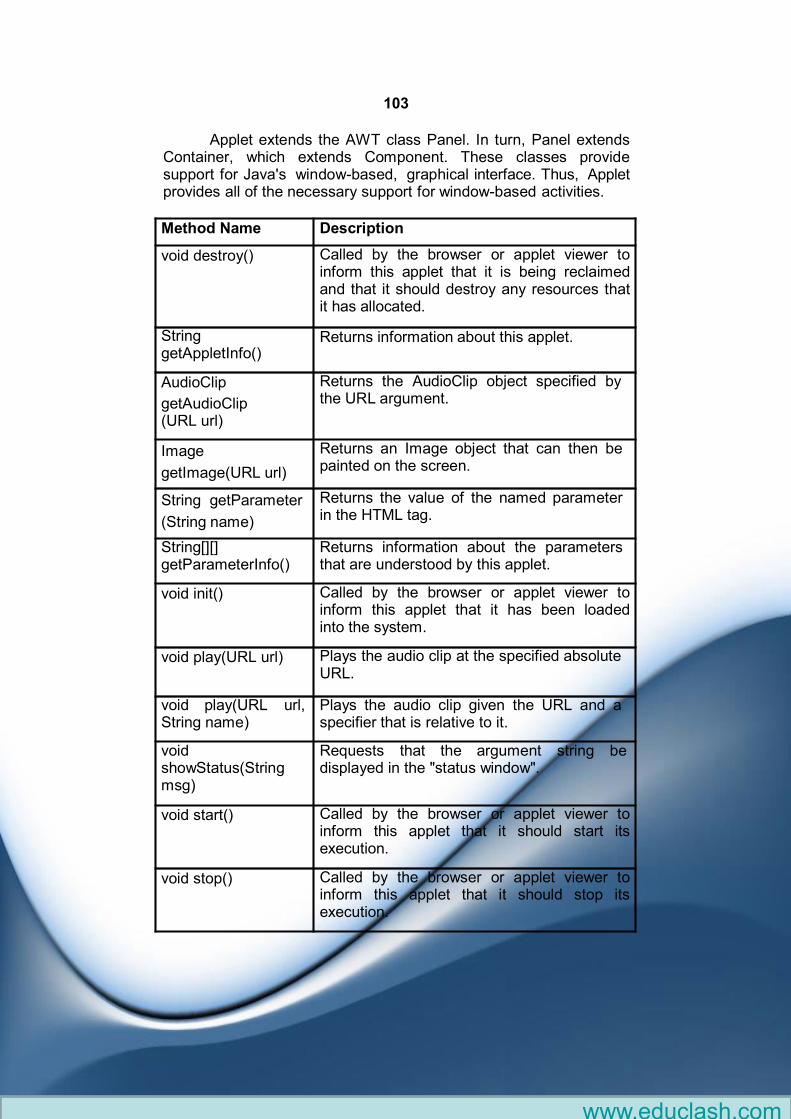
103
Applet extends the AWT class Panel. In turn, Panel extends
Container, which extends Component. These classes provide support for Java's window-based, graphical interface. Thus, Applet provides all of the necessary support for window-based activities.
Method Name Description
void destroy() Called by the browser or applet viewer to inform this applet that it is being reclaimed and that it should destroy any resources that it has allocated.
String getAppletInfo()
Returns information about this applet.
AudioClip
getAudioClip (URL url)
Returns the AudioClip object specified by the URL argument.
Image
getImage(URL url)
Returns an Image object that can then be painted on the screen.
String getParameter
(String name)
Returns the value of the named parameter in the HTML tag.
String[][] getParameterInfo()
Returns information about the parameters that are understood by this applet.
void init() Called by the browser or applet viewer to inform this applet that it has been loaded into the system.
void play(URL url) Plays the audio clip at the specified absolute URL.
void play(URL url, String name)
Plays the audio clip given the URL and a specifier that is relative to it.
void showStatus(String msg)
Requests that the argument string be displayed in the "status window".
void start() Called by the browser or applet viewer to inform this applet that it should start its execution.
void stop() Called by the browser or applet viewer to inform this applet that it should stop its execution.
www.educlash.com
104 Advantages of Applets:
Automatically integrated with HTML; hence, resolved virtually all
installation issues.
Can be accessed from various platforms and various java-
enabled web browsers.
Can provide dynamic, graphics capabilities and visualizations
Implemented in Java, an easy-to-learn OO programming
language
Alternative to HTML GUI design
Safe! Because of the security built into the core Java language
and the applet structure, you don’t have to worry about bad
code causing damage to someone’s system
Can be launched as a standalone web application independent
of the host web server
Disadvantages of Applets:
Applets can’t run any local executable programs
Applets can’t talk with any host other than the originating server
Applets can’t read/write to local computer’s file system
Applets can’t find any information about the local computer
All java-created pop-up windows carry a warning message
Stability depends on stability of the client’s web server
Performance directly depend on client’s machine
Check Your Progress
1) An applet is a Java program that runs in a _.
2) Applet extends the AWT class .
9.2 DIFFERENCE BETWEEN APPLETS AND
APPLICATION
Although both the Applets and stand-alone applications are
Java programs, there are certain restrictions are imposed on Applets due to security concerns:
www.educlash.com
105
Applets don’t use the main() method, but when they are load,
automatically call certain methods (init, start, paint, stop,destroy).
They are embedded inside a web page and executed in browsers.
They cannot read from or write to the files on local computer.
They cannot communicate with other servers on the network.
They cannot run any programs from the local computer.
They are restricted from using libraries from other languages. The above restrictions ensures that an Applet cannot do any damage to the local system.
9.3 APPLET LIFE CYCLE
Four methods in the Applet class give you the framework on
which you build any serious applet:
init: This method is intended for whatever initialization is needed
for your applet. It is called after the param tags inside the applet tag have been processed.
start: This method is automatically called after the browser calls
the init method. It is also called whenever the user returns to the page containing the applet after having gone off to other pages.
stop: This method is automatically called when the user moves
off the page on which the applet sits. It can, therefore, be called repeatedly in the same applet.
destroy: This method is only called when the browser shuts
down normally. Because applets are meant to live on an HTML page, you should not normally leave resources behind after a user leaves the page that contains the applet.
paint: Invoked immediately after the start() method, and also
any time the applet needs to repaint itself in the browser. The paint() method is actually inherited from the java.awt.
Check Your Progress
1)Start method has to be called explicitly after the browser calls the init method. (True/False)
2)The applet calls the paint() if it needs to repaint itself in the browser. (True/False)
www.educlash.com

106
9.4 CREATING AN APPLET
A "Hello, World" Applet:
The following is a simple applet named HelloWorld.java:
import java.applet.Applet;
import java.awt.Graphics; public class HelloWorld extends Applet {
public void paint (Graphics gr) {
gr.drawString ("Hello World", 25, 50); }
}
The Applet class provides default implementations of each of
these methods. Those implementations may be overridden as necessary. The "Hello, World" applet is complete as it stands. The only method overridden is the paint method.
Invoking an Applet:
An applet may be invoked by embedding directives in an HTML file and viewing the file through an applet viewer or Java- enabled browser. The <applet> tag is the basis for embedding an applet in an HTML file. Below is an example that invokes the "Hello, World" applet: <html>
<title>The Hello, World Applet</title> <hr> <applet code="HelloWorld.class" width="150" height="150"> </applet> <hr> </html>
The code attribute of the <applet> tag is required. It specifies
the Applet class to run. Width and height are also required to specify the initial size of the panel in which an applet runs. The applet directive must be closed with a </applet> tag.
Attribute Explanation Example
Code Name of class file Code=“MyApplet.class”
Width Width of applet Width=150
height Height of applet Height=150
www.educlash.com

107
If an applet takes parameters, values may be passed for the parameters by adding <param> tags between <applet> and </applet>. The browser ignores text and other tags between the applet tags.
If an applet resides in a package other than the default, the
holding package must be specified in the code attribute using the period character (.) to separate package/class components. For example: <applet code="mypackage.subpackage.TestApplet.class"
width="320" height="120">
9.5 PASSING PARAMETERS
Getting Applet Parameters:
/ /HelloAppletMsg.java
import java.applet.Applet;
import java.awt.* ;
public class HelloAppletMsg extends Applet
{
String str;
public void init()
{
str = getParameter("Greetings");
if( str = = null)
str = "Hello";
}
public void paint(Graphics g)
{
g.drawString (str,10, 100);
}
}
Codebase Applet’s Directory Codebase=“/applets”
alt Alternate text if applet not available
Alt=“menu applet”
name Name of the applet Name=“appletExam”
Align
(top,left,right,bottom)
Justify the applet with text
Align=“right”
www.educlash.com

108
The example above demonstrates how to make an applet
respond to setup parameters specified in the document. This applet displays a message, the message can be specified as parameters to the applet within the html document.
The applet viewer or browser calls the init() method of each
applet it runs. The viewer calls init() once, immediately after loading the applet. The Applet.getParameter() method fetches a parameter given the parameter's name (the value of a parameter is always a string). If the value is numeric or other non-character data, the string must be parsed.
Specifying Applet Parameters:
The following is an example of an HTML file with a
HelloAppletMsg embedded in it. The HTML file specifies parameter to the applet by means of the <param> tag.
<html><head><title>
Hello World Applet
< /title>< /head>
< body>
< h1>My First Applet on the Web with PARAM TAG!</h1>
<applet CODE= "HelloAppletMsg.class" width= 500 height= 400>
<param NAME= "Greetings" VALUE= "Hello, How are
you?">< /applet>< /body>< /html>
Note: Parameter names are not case sensitive.
Check Your Progress
1)The _ attribute of the <applet> tag is compulsory.
2)The _ method fetches a parameter given in the parameter's name.
9.6 SUMMARY
An applet is a Java program that runs in a Web browser. An
applet can be a fully functional Java application because it has the entire Java API at its disposal.
Applet provides all necessary support for applet execution, such
as starting and stopping. It also provides methods that load and display images, and methods that load and play audio clips
www.educlash.com

109
An applet may be invoked by embedding directives in an HTML
file and viewing the file through an applet viewer or Java- enabled browser.
If an applet takes parameters, values may be passed for the
parameters by adding <param> tags between <applet> and </applet>. The browser ignores text and other tags between the applet tags.
9.7 UNIT END EXERCISE
1) Write a short note on the Applet class?
2) List the advantages and disadvantages of Applets? 3) Explain the Applet Life Cycle.
4) Write a program to create an applet, which will display a logo on the screen.
9.8 FURTHER READING
Java2: The Complete Reference - by Patrick Naughton &
Herbert Schildt, Fifth Edition
Programming with Java A primer - by E. Balagurusamy Third
Edition
www.educlash.com
110
10 GRAPHICS, FONTS & COLOR
Unit Structure
10.0
10.1
10.2
10.3
10.4
10.5
10.6
Objectives
Graphics class Font
class Working with
colors Summary
Unit end exercise
Further Reading
1. OBJECTIVES
The objectives of this chapter are to learn how the graphics
system works in Java: the Graphics class, the coordinate system used to draw to the screen, and how applets paint and repaint. Using the Java graphics primitives, including drawing and filling lines, rectangles, ovals, and arcs. Creating and using fonts, including how to draw characters and strings. All about color in Java, including the Color class and how to set the foreground (drawing) and background color for your applet
2. GRAPHIC CLASS
1) The Graphics Coordinate System
To draw an object on the screen, you call one of the drawing methods available in the Graphics class. All the drawing methods have arguments representing endpoints, corners, or starting locations of the object as values in the applet’s coordinate system—for example, a line starts at the points 10,10 and ends at the points 20,20.
Java’s coordinate system has the origin (0,0) in the top left
corner. Positive x values are to the right, and positive y values are down. All pixel values are integers; there are no partial or fractional pixels. Figure below shows how you might draw a simple square by using this coordinate system.
www.educlash.com
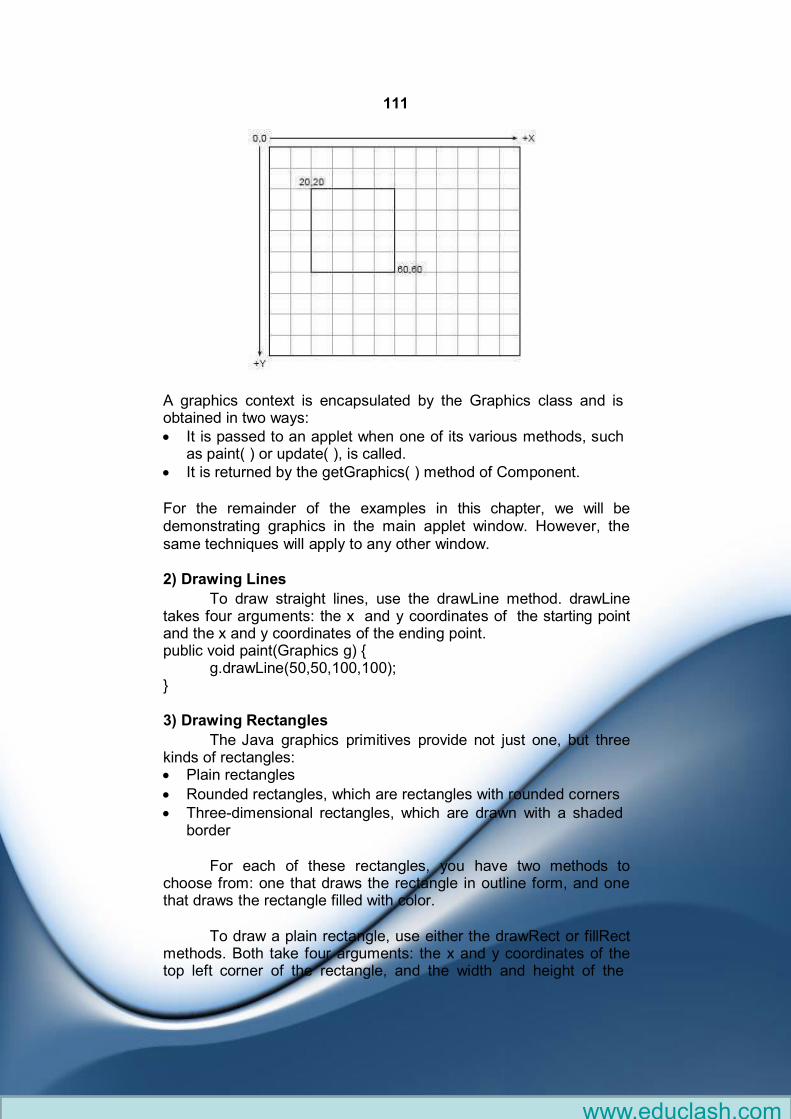
111
A graphics context is encapsulated by the Graphics class and is obtained in two ways:
It is passed to an applet when one of its various methods, such as paint( ) or update( ), is called.
It is returned by the getGraphics( ) method of Component.
For the remainder of the examples in this chapter, we will be demonstrating graphics in the main applet window. However, the same techniques will apply to any other window. 2) Drawing Lines
To draw straight lines, use the drawLine method. drawLine takes four arguments: the x and y coordinates of the starting point and the x and y coordinates of the ending point. public void paint(Graphics g) {
g.drawLine(50,50,100,100); } 3) Drawing Rectangles
The Java graphics primitives provide not just one, but three kinds of rectangles: Plain rectangles
Rounded rectangles, which are rectangles with rounded corners
Three-dimensional rectangles, which are drawn with a shaded border
For each of these rectangles, you have two methods to
choose from: one that draws the rectangle in outline form, and one that draws the rectangle filled with color.
To draw a plain rectangle, use either the drawRect or fillRect
methods. Both take four arguments: the x and y coordinates of the top left corner of the rectangle, and the width and height of the
www.educlash.com
112
rectangle to draw. For example, the following paint() method draws two squares: the left one is an outline and the right one is filled: public void paint(Graphics g) {
g.drawRect(20,20,60,60); g.fillRect(120,20,60,60);
}
The drawRoundRect and fillRoundRect methods to draw
rounded rectangles are similar to regular rectangles except that rounded rectangles have two extra arguments for the width and height of the angle of the corners. public void paint(Graphics g) {
g.drawRoundRect(20,20,60,60,10,10); g.fillRoundRect(120,20,60,60,20,20);
}
Three-dimensional rectangles have four arguments for the x
and y of the start position and the width and height of the rectangle. The fifth argument is a boolean indicating whether the 3D effect is to raise the rectangle (true) or indent it (false). public void paint(Graphics g) {
g.draw3DRect(20,20,60,60,true); g.draw3DRect(120,20,60,60,false);
} 4) Drawing Ellipses and Circles
To draw an ellipse, use drawOval( ). To fill an ellipse, use fillOval( ). These methods are shown here:
void drawOval(int top, int left, int width, int height) void fillOval(int top, int left, int width, int height)
The ellipse is drawn within a bounding rectangle whose upper-left corner is specified by top,left and whose width and height are specified by width and height. To draw a circle, specify a square as the bounding rectangle.
public void paint(Graphics g) {
g.drawOval(10, 10, 50, 50); g.fillOval(100, 10, 75, 50); g.drawOval(190, 10, 90, 30); g.fillOval(70, 90, 140, 100);
} }
5) Drawing Arcs
Arcs can be drawn with drawArc( ) and fillArc( ), shown here: void drawArc(int top, int left, int width, int height,
int startAngle,int sweepAngle)
www.educlash.com
113
void fillArc(int top, int left, int width, int height,
int startAngle,int sweepAngle)
The arc is bounded by the rectangle whose upper-left corner is specified by top,left and whose width and height are specified by width and height. The arc is drawn from startAngle through the angular distance specified by sweepAngle. Angles are specified in degrees. Zero degrees is on the horizontal, at the three o'clock position. The arc is drawn counterclockwise if sweepAngle is positive, and clockwise if sweepAngle is negative. Therefore, to draw an arc from twelve o'clock to six o'clock, the start angle would be 90 and the sweep angle 180. public void paint(Graphics g) {
g.drawArc(10, 40, 70, 70, 0, 75); g.fillArc(100, 40, 70, 70, 0, 75); g.drawArc(10, 100, 70, 80, 0, 175); g.fillArc(100, 100, 70, 90, 0, 270); g.drawArc(200, 80, 80, 80, 0, 180); }
}
6) Drawing Polygons
Polygons are shapes with an unlimited number of sides. To draw a polygon, you need a set of x and y coordinates, and the drawing method then starts at one, draws a line to the second, then a line to the third, and so on.
As with rectangles, you can draw an outline or a filled polygon (the drawPolygon and fillPolygon methods, respectively). You also have a choice of how you want to indicate the list of coordinates—either as arrays of x and y coordinates or as an instance of the Polygon class.
Using the first method, the drawPolygon and fillPolygon
methods take three arguments: (1) An array of integers representing x coordinates, (2) An array of integers representing y coordinates and (3) An integer for the total number of points. The x and y arrays should, of course, have the same number of elements. Here’s an example of drawing a polygon’s outline by using this method public void paint(Graphics g) {
int xs[] = { 39,94,97,142,53,58,26 }; int ys[] = { 33,74,36,70,108,80,106 }; int pts = xs.length; g.drawPolygon(xs,ys,pts);
}
www.educlash.com
114
Check Your Progress
1)Java’s coordinate system has the origin (0, 0) in the _ corner.
2) Polygons are shapes with an _ number of sides.
10.2 FONT CLASS
The Graphics class enables you to print text on the screen,
in conjunction with the Font class. The Font class represents a given font—its name, style, and point size. Note that the text here is static text, drawn to the screen once and intended to stay there.
Creating Font Objects
To draw text to the screen, first you need to create an instance of the Font class. Font objects represent an individual font—that is, its name, style (bold, italic), and point size. Font names are strings representing the family of the font, for example, “TimesRoman”, “Courier”, or “Helvetica”. Font styles are constants defined by the Font class; you can get to them using class variables—for example, Font.PLAIN, Font.BOLD, or Font.ITALIC. Finally, the point size is the size of the font, as defined by the font itself; the point size may or may not be the height of the characters.
To create an individual font object, use these three
arguments to the Font class’s new constructor: Font f = new Font(“TimesRoman”, Font.BOLD, 24);
This example creates a font object for the TimesRoman BOLD font, in 24 points. Note that like most Java classes, you have to import this class before you can use it. //Example to Display different styles of text import java.awt.Font; import java.awt.Graphics; public class ManyFonts extends java.applet.Applet { public void paint(Graphics g) {
Font f = new Font(“TimesRoman”, Font.PLAIN, 18); Font fb = new Font(“TimesRoman”, Font.BOLD, 18); Font fi = new Font(“TimesRoman”, Font.ITALIC, 18); Font fbi = new Font(“TimesRoman”, Font.BOLD + Font.ITALIC, 18); g.setFont(f);
g.drawString(“This is a plain font”, 10, 25);
g.setFont(fb);
g.drawString(“This is a bold font”, 10, 50);
www.educlash.com

115 g.setFont(fi);
g.drawString(“This is an italic font”, 10, 75);
g.setFont(fbi);
g.drawString(“This is a bold italic font”, 10, 100); } }
10.3 WORKING WITH COLORS
Java provides methods and behaviors for dealing with color
in general through the Color class, and also provides methods for setting the current foreground and background colors so that you can draw with the colors you created.
Java’s abstract color model uses 24-bit color, wherein a
color is represented as a combination of red, green, and blue values. Each component of the color can have a number between 0 and 255. 0,0,0 is black, 255,255,255 is white, and Java can represent millions of colors between as well.
Using Color Objects
To draw an object in a particular color, you must create an instance of the Color class to represent that color. The Color class defines a set of standard color objects, stored in class variables that enable you quickly to get a color object for some of the more popular colors. For example, Color.red gives you a
Color object representing red (RGB values of 255, 0, and 0), Color.white gives you a white color (RGB values of 255, 255, and 255), and so on.
If the color you want to draw in is not one of the standard color objects, fear not. You can create a color object for any combination of red, green, and blue, as long as you have the values of the color you want. Just create a new color object:
Color c = new Color(140,140,140);
Standard colors.
Color Name RGB Value
Color.white 255,255,255
Color.black 0,0,0
Color.gray 128,128,128
Color.darkGray 64,64,64
Color.red 255,0,0
Color.green 0,255,0
Color.blue 0,0,255
Color.yellow 255,255,0
www.educlash.com
116
This line of Java code creates a color object representing a
dark grey. You can use any combination of red, green, and blue values to construct a color object.
Testing and Setting the Current Colors
To draw an object or text using a color object, you have to set the current color to be that color object, just as you have to set the current font to the font in which you want to draw. Use the setColor method (a method for Graphics objects) to do this:
g.setColor(Color.green);
After setting the current color, all drawing operations will
occur in that color.
In addition to setting the current color for the graphics context, you can also set the background and foreground colors for the applet itself by using the setBackground and setForeground methods. Both of these methods are defined in the java.awt.Component class. The setBackground method sets the background color of the applet, which is usually a dark grey. It takes a single argument, a color object:
setBackground(Color.white);
The setForeground method also takes a single color as an
argument, and affects everything that has been drawn on the applet, regardless of the color in which it has been drawn. You can use setForeground to change the color of everything in the applet at once, rather than having to redraw everything:
setForeground(Color.black);
Check Your Progress
1) A Font objects represent all fonts. (True/False)
2) Java’s abstract color model uses 256-bit color. (True/False)
10.4 SUMMARY
A graphics context is encapsulated by the Graphics class and
can be obtained by one of the methods: update(), paint() and getGraphics().
To draw straight lines, use the drawLine(). To draw a plain
rectangle, use either the drawRect() or fillRect(). To draw an ellipse, use drawOval(). Arcs can be drawn with drawArc() and fillArc().
www.educlash.com
117
The Font class represents a given font—its name, style, and
point size. Java’s abstract color model uses 24-bit color, wherein a color is represented as a combination of red, green, and blue values
10.5 UNIT END EXERCISE
1) Write a short note on Graphics Coordinate System?
2) How to create a Font object?
3) Explain with an example how different Colors are created?
4) Write an applet by giving different colors to display (i) a rectangle inside circle, (ii) circle inside rectangle, (iii) a tangent to a circle, (iv) two intersecting tangents to a circle
5) Write an applet to display a) a face of a person. b) a slick person standing on a table. And c) the lines intersecting at one point of different colors.
10.6 FURTHER READING
Java2: The Complete Reference - by Patrick Naughton &
Herbert Schildt, Fifth Edition
Programming with Java A primer - by E. Balagurusamy Third
Edition
www.educlash.com
118
11
AWT CONTROLS
Unit Structure:
11.0
11.1
11.2
11.3
11.4
11.5
Objectives AWT
Containers AWT
Controls
Summary
Unit end exercise
Further Reading
1. OBJECTIVES
The objectives of this chapter are to learn the basics of
AWT, understand the various containers available and use the user interface controls provided in the java.awt package.
2. AWT CONTAINERS
The Java programming language provides a class library
called the Abstract Window Toolkit (AWT) that contains a number of common graphical widgets. You can add these widgets to your display area and position them with a layout manager.
www.educlash.com
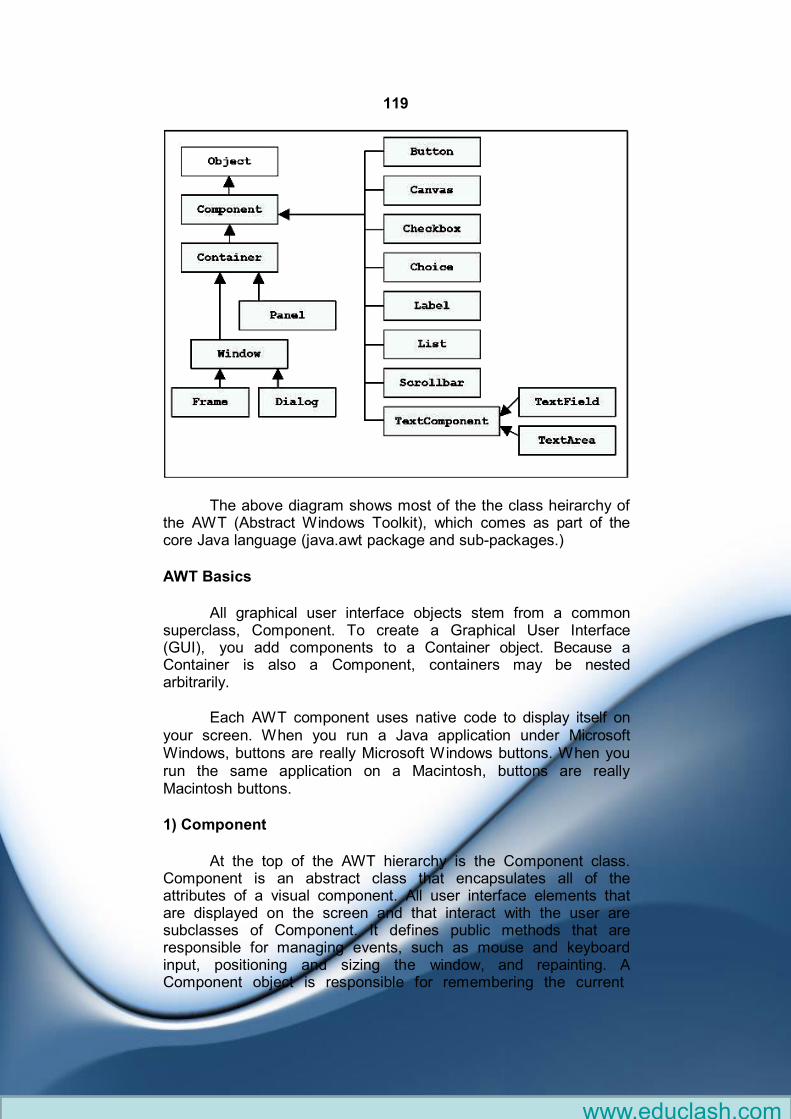
119
The above diagram shows most of the the class heirarchy of the AWT (Abstract Windows Toolkit), which comes as part of the core Java language (java.awt package and sub-packages.)
AWT Basics
All graphical user interface objects stem from a common
superclass, Component. To create a Graphical User Interface (GUI), you add components to a Container object. Because a Container is also a Component, containers may be nested arbitrarily.
Each AWT component uses native code to display itself on your screen. When you run a Java application under Microsoft Windows, buttons are really Microsoft Windows buttons. When you run the same application on a Macintosh, buttons are really Macintosh buttons. 1) Component
At the top of the AWT hierarchy is the Component class.
Component is an abstract class that encapsulates all of the attributes of a visual component. All user interface elements that are displayed on the screen and that interact with the user are subclasses of Component. It defines public methods that are responsible for managing events, such as mouse and keyboard input, positioning and sizing the window, and repainting. A Component object is responsible for remembering the current
www.educlash.com
120
foreground and background colors and the currently selected text font.
A component is an object having a graphical representation
that can be displayed on the screen and that can interact with the user. Examples of components are the buttons, checkboxes, and scrollbars of a typical graphical user interface. Class Component can also be extended directly to create a lightweight component. A lightweight component is a component that is not associated with a native opaque window.
2) Container
The Container class is a subclass of Component. It has
additional methods that allow other Component objects to be nested within it. Other Container objects can be stored inside of a Container This makes for a multileveled containment system. A container is responsible for laying out any components that it contains. It does this through the use of various layout managers
Container is a generic Abstract Window Toolkit(AWT)
container object is a component that can contain other AWT components. Components added to a container are tracked in a list. The order of the list will define the components' front-to-back stacking order within the container. If no index is specified when adding a component to a container, it will be added to the end of the list.
3) Panel
Panel is the simplest container class. A panel provides
space in which an application can attach any other component, including other panels. The default layout manager for a panel is the FlowLayout layout manager.
The Panel class is a concrete subclass of Container. It
doesn't add any new methods; it simply implements Container. A Panel may be thought of as a recursively nestable, concrete screen component. In essence, a Panel is a window that does not contain a title bar, menu bar, or border. Other components can be added to a Panel object by its add() method. Once these components have been added, you can position and resize them manually using the setLocation(), setSize(), or setBounds() methods defined by Component.
4) Window
A Window object is a top-level window with no borders and no
menubar. The default layout for a window is BorderLayout. A
www.educlash.com
121
window must have a frame, dialog, or another window defined as its owner when it's constructed.
A top-level window is not contained within any other object; it
sits directly on the desktop. Generally, you won't create Window objects directly. Instead, you will use a subclass of Window called Frame.
1) Frame
A Frame is a top-level window with a title and a border. The size
of the frame includes any area designated for the border. Frame encapsulates what is commonly thought of as a "window." It is a subclass of Window and has a title bar, menu bar, borders, and resizing corners. When a Frame window is created by a program rather than an applet, a normal window is created. 2) Canvas
Canvas encapsulates a blank window upon which you can
draw. A Canvas component represents a blank rectangular area of the screen onto which the application can draw or from which the application can trap input events from the user. An application must subclass the Canvas class in order to get useful functionality such as creating a custom component. The paint method must be overridden in order to perform custom graphics on the canvas.
Check Your Progress
1)Each AWT component uses code to display itself on your screen.
2) The Container class is a subclass of .
11.2 AWT CONTROLS
All AWT components extend class Component. Think of
Component as the "root element" for AWT. Having this single class is rather useful, as the library designers can put a lot of common code into it. Next we examine each of the AWT components below. Most, but not all, directly extend Component.
1) Label
A Label object is a component for placing text in a container.
A label displays a single line of read-only text. The text can be changed by the application, but a user cannot edit it directly. It is usually used to help indicate what other parts of the GUI do, such as the purpose of a neighboring text field.
www.educlash.com
122 Constructor Summary
Label(String text) - Constructs a new label with the specified string of text, left justified.
Label(String text, int alignment) - Constructs a new label that presents the specified string of text with the specified alignment.
Method Summary
String getText() - Gets the text of this label.
void setText(String text) - Sets the text for this label to the specified text.
Example:
import java.awt.*;
import java.applet.Applet;
public class LabelTest extends Applet {
public void init() { add(new Label("A label")); // right justify next label add(new Label("Another label", Label.RIGHT));
} }
2) Buttons
A Button has a single line label and may be "pushed" with a
mouse click. This class creates a labeled button. The application can cause some action to happen when the button is pushed. The gesture of clicking on a button with the mouse is associated with one instance of ActionEvent, which is sent out when the mouse is both pressed and released over the button.
Constructor Summary
Button() - Constructs a Button with no label.
Button(String label) - Constructs a Button with the specified label.
Method Summary
void addActionListener(ActionListener l) - Adds the specified action listener to receive action events from this button.
String getActionCommand() - Returns the command name of the action event fired by this button.
String getLabel() - Gets the label of this button.
void removeActionListener(ActionListener l) - Removes the specified action listener so that it no longer receives action events from this button.
www.educlash.com
123
void setActionCommand(String command) - Sets the command
name for the action event fired by this button.
void setLabel(String label) - Sets the button's label to be the specified string.
Example:
import java.awt.*;
import java.applet.Applet;
public class ButtonTest extends Applet {
public void init() { Button button = new Button("OK"); add(button);
} }
3) TextField
A TextField object is a text component that allows for the
editing of a single line of text. Every time the user types a key in the text field, one or more key events are sent to the text field. A TextField is a scrollable text display object with one row of characters. The preferred width of the field may be specified during construction and an initial string may be specified.
Constructor Summary
TextField() - Constructs a new text field.
TextField(int columns) - Constructs a new empty text field with the specified number of columns.
TextField(String text) - Constructs a new text field initialized with the specified text.
TextField(String text, int columns) - Constructs a new text field initialized with the specified text to be displayed, and wide enough to hold the specified number of columns.
Method Summary
void addActionListener(ActionListener l) - Adds the specified action listener to receive action events from this text field.
void removeActionListener(ActionListener l) - Removes the specified action listener so that it no longer receives action events from this text field.
String getText() - Returns the text that is presented by this text component.
www.educlash.com

124
void setText(String t) - Sets the text that is presented by this text
component to be the specified text.
Example:
import java.awt.*;
import java.applet.Applet;
public class TextFieldSimpleTest extends Applet {
public void init() { TextField f1 = new TextField("type something"); add(f1);
} }
4) TextArea
A TextArea is a multi-row text field that displays a single
string of characters, where newline ends each row. The width and height of the field is set at construction, but the text can be scrolled up/down and left/right. There is a four-argument constructor that accepts a fourth parameter of a scrollbar policy. The different settings are the class constants: SCROLLBARS_BOTH, SCROLLBARS_HORIZONTAL_ONLY, SCROLLBARS_NONE, and SCROLLBARS_VERTICAL_ONLY. When the horizontal (bottom) scrollbar is not present, the text will wrap.
Constructor Summary
TextArea() - Constructs a new text area with the empty string as text.
TextArea(int rows, int columns) - Constructs a new text area with the specified number of rows and columns and the empty string as text.
TextArea(String text) - Constructs a new text area with the specified text.
TextArea(String text, int rows, int columns, int scrollbars) - Constructs a new text area with the specified text, and with the rows, columns, and scroll bar visibility as specified.
Method Summary
void append(String str) - Appends the given text to the text area's current text.
int getColumns() - Returns the number of columns in this text area.
int getRows() - Returns the number of rows in the text area.
www.educlash.com
125
void setColumns(int columns) - Sets the number of columns for
this text area.
void setRows(int rows) - Sets the number of rows for this text area.
void insert(String str, int pos) - Inserts the specified text at the specified position in this text area.
void replaceRange(String str, int start, int end) - Replaces text between the indicated start and end positions with the specified replacement text.
String getText() - Returns the text that is presented by this text component.
void setText(String t) - Sets the text that is presented by this text component to be the specified text.
Example:
import java.awt.*;
import java.applet.Applet;
public class TextAreaScroll extends Applet {
String s =
"This is a very long message " +
"It should wrap when there is " +
"no horizontal scrollbar.";
public void init() {
add(new TextArea (s, 4, 15,
TextArea.SCROLLBARS_NONE));
add(new TextArea (s, 4, 15,
TextArea.SCROLLBARS_BOTH));
add(new TextArea (s, 4, 15,
TextArea.SCROLLBARS_HORIZONTAL_ONLY));
add(new TextArea (s, 4, 15,
TextArea.SCROLLBARS_VERTICAL_ONLY));
}
} 5) Checkbox
A check box is a graphical component that can be in either an "on" (true) or "off" (false) state. Clicking on a check box changes its state from "on" to "off," or from "off" to "on." A Checkbox is a label with a small pushbutton. The state of a Checkbox is either true (button is checked) or false (button not checked). The default initial state is false.
www.educlash.com
126 Constructor Summary
Checkbox(String label) - Creates a check box with the specified label.
Checkbox(String label, boolean state) - Creates a check box with the specified label and sets the specified state.
Method Summary
void addItemListener(ItemListener l) - Adds the specified item listener to receive item events from this check box.
String getLabel() - Gets the label of this check box.
Object[] getSelectedObjects() - Returns an array (length 1) containing the checkbox label or null if the checkbox is not selected.
boolean getState() - Determines whether this check box is in the "on" or "off" state.
void removeItemListener(ItemListener l) - Removes the specified item listener so that the item listener no longer receives item events from this check box.
void setLabel(String label) - Sets this check box's label to be the string argument.
void setState(boolean state) - Sets the state of this check box to the specified state.
Example:
import java.awt.*;
import java.applet.Applet;
public class CheckboxSimpleTest2 extends Applet {
public void init() {
Checkbox m = new Checkbox("Label", true);
add(m);
}
} 6) CheckboxGroup
A CheckboxGroup is used to control the behavior of a group of Checkbox objects (each of which has a true or false state). Exactly one of the Checkbox objects is allowed to be true at one time. Checkbox objects controlled with a CheckboxGroup are usually referred to as "radio buttons".
www.educlash.com
127 Constructor Summary
Checkbox(String label, boolean state, CheckboxGroup group) - Constructs a Checkbox with the specified label, set to the specified state, and in the specified check box group.
Checkbox(String label, CheckboxGroup group, boolean state) - Creates a check box with the specified label, in the specified check box group, and set to the specified state.
Method Summary
Checkbox getSelectedCheckbox() - Gets the current choice from this check box group.
void setSelectedCheckbox(Checkbox box) - Sets the currently selected check box in this group to be the specified check box.
String toString() - Returns a string representation of this check box group, including the value of its current selection.
Example:
import java.awt.*;
import java.applet.Applet;
public class CheckboxGroupTest extends Applet {
public void init() {
// create button controller
CheckboxGroup cbg = new CheckboxGroup();
Checkbox cb1 =
new Checkbox("Show lowercase only", cbg, true);
Checkbox cb2 =
new Checkbox("Show uppercase only", cbg, false);
add(cb1);
add(cb2);
}
} 7) Choice
Choice objects are drop-down lists. The visible label of the
Choice object is the currently selected entry of the Choice. The Choice class presents a pop-up menu of choices. The current choice is displayed as the title of the menu.
www.educlash.com
128 Constructor Summary
Choice() - Creates a new choice menu.
Method Summary
void add(String item) - Adds an item to this Choice menu.
void addItemListener(ItemListener l) - Adds the specified item listener to receive item events from this Choice menu.
String getItem(int index) - Gets the string at the specified index in this Choice menu.
int getItemCount() - Returns the number of items in this Choice menu.
int getSelectedIndex() - Returns the index of the currently selected item.
String getSelectedItem() - Gets a representation of the current choice as a string.
void insert(String item, int index) - Inserts the item into this choice at the specified position.
void remove(int position) - Removes an item from the choice menu at the specified position.
void remove(String item) - Removes the first occurrence of item from the Choice menu.
void removeAll() - Removes all items from the choice menu.
Example:
import java.awt.*;
import java.applet.Applet;
public class ChoiceSimpleTest extends Applet {
public void init() {
Choice rgb = new Choice();
rgb.add("Red");
rgb.add("Green");
rgb.add("Blue");
add(rgb);
}
}
www.educlash.com

129 8) List
A List is a scrolling list box that allows you to select one or
more items. Multiple selections may be used by passing true as the second argument to the constructor. Clicking on an item that isn't selected selects it. Clicking on an item that is already selected deselects it. When an item is selected or deselected by the user, AWT sends an instance of ItemEvent to the list. When the user double-clicks on an item in a scrolling list
Constructor Summary
List() - Creates a new scrolling list.
List(int rows) - Creates a new scrolling list initialized with the specified number of visible lines.
List(int rows, boolean multipleMode) - Creates a new scrolling list initialized to display the specified number of rows.
Method Summary
void add(String item) - Adds the specified item to the end of scrolling list.
void add(String item, int index) - Adds the specified item to the the scrolling list at the position indicated by the index.
void addActionListener(ActionListener l) - Adds the specified action listener to receive action events from this list.
void addItemListener(ItemListener l) - Adds the specified item listener to receive item events from this list.
String getItem(int index) - Gets the item associated with the specified index.
int getItemCount() - Gets the number of items in the list.
int[] getSelectedIndexes() - Gets the selected indexes on the list.
String getSelectedItem() - Gets the selected item on this scrolling list.
String[] getSelectedItems() - Gets the selected items on this scrolling list.
void remove(int position) - Remove the item at the specified position from this scrolling list.
void remove(String item) - Removes the first occurrence of an item from the list.
void removeAll() - Removes all items from this list.
www.educlash.com
130 Example:
import java.awt.*;
import java.applet.Applet;
public class ListSimpleTest extends Applet {
public void init() {
List list = new List(5, false);
list.add("Seattle");
list.add("Washington");
list.add("New York");
list.add("Chicago");
list.add("Miami");
list.add("San Jose");
list.add("Denver");
add(list);
}
}
Check Your Progress
1)A label displays a multiple lines of read-only text. (True/False)
2)A TextField is a scrollable text display object with one row of characters. (True/False)
11.3 SUMMARY
The Java programming language provides a class library called
the Abstract Window Toolkit (AWT) that contains a number of common graphical widgets.
A component is an object having a graphical representation that
can be displayed on the screen and that can interact with the user.
The Container class is a subclass of Component. It has
additional methods that allow other Component objects to be nested within it.
Panel is the simplest container class. A panel provides space in
which an application can attach any other component, including other panels.
A Label object is a component for placing text in a container. A
label displays a single line of read-only text. A Button has a single line label and may be "pushed" with a mouse click.
www.educlash.com

131
A TextField object is a text component that allows for the editing
of a single line of text. A TextArea is a multi-row text field that displays a single string of characters, where newline ends each row.
A check box is a graphical component that can be in either an
"on" (true) or "off" (false) state. A CheckboxGroup is used to control the behavior of a group of Checkbox objects (each of which has a true or false state).
Choice objects are drop-down lists. The visible label of the
Choice object is the currently selected entry of the Choice. A List is a scrolling list box that allows you to select one or more items.
11.4 UNIT END EXERCISE
1) Write a short note on Component Class?
2) Explain with an example: a. Label b. Buttons c. TextArea d. Checkbox e. List
11.5 FURTHER READING
Java2: The Complete Reference - by Patrick Naughton &
Herbert Schildt, Fifth Edition
Programming with Java A primer - by E. Balagurusamy Third
Edition
www.educlash.com
132
12 LAYOUT & EVENT HANDLING
Unit Structure:
12.0
12.1
12.2
12.3
12.4
12.5
12.6
Objectives
Layout Managers
Delegation Event Model
Event Classes and Listeners
Summary
Unit end exercise
Further Reading
1. OBJECTIVES
The objectives of this chapter are to learn the various layout
managers which are available to make the user interface to look good, also we will learn about the Events and Event Listener which are used for the user interaction.
2. LAYOUT MANAGERS
A layout manager is an object that implements the
LayoutManager interface and determines the size and position of the components within a container. Although components can provide size and alignment hints, a container's layout manager has the final say on the size and position of the components within the container. A layout manager automatically arranges all the controls within a window. They adjust for factors such as different scree resoulution, platform to platform variations in the apperance of components and font sizes.
In the java platform 2 interfaces – LayoutManager and LayoutManager2 – provides the base for all layout manager classes. The LayoutManager2 is an extension of LayoutManager. It has additional layout management methods to support layout constraints that are typically used in more complicated layout management. The layout manager is set by the method setLayout(). If for a Container no call to the setLayout() is made then the default LayoutManager is used.
www.educlash.com

133 FlowLayout
The FlowLayout class puts components in a row, sized at their preferred size. If the horizontal space in the container is too small to put all the components in one row, the FlowLayout class uses multiple rows. If the container is wider than necessary for a row of components, the row is, by default, centered horizontally within the container. To specify that the row is to aligned either to the left or right, use a FlowLayout constructor that takes an alignment argument. Another constructor of the FlowLayout class specifies how much vertical or horizontal padding is put around the components.
Example:
import java.awt.*;
import java.applet.*;
//<applet code=FlowDemo height=320 width=140></applet>
public class FlowDemo extends Applet
{
Label l1,l2;
TextField name;
TextArea add;
Button ok,cancel;
Constructor Purpose
FlowLayout() Constructs a new FlowLayout object with a centered alignment and horizontal and vertical gaps with the default size of 5 pixels.
FlowLayout(int align)
Creates a new flow layout manager with the indicated alignment and horizontal and vertical gaps with the default size of 5 pixels. The alignment argument can be FlowLayout.LEADING, FlowLayout.CENTER, or FlowLayout.TRAILING. When the FlowLayout object controls a container with a left-to right component orientation (the default), the LEADING value specifies the components to be left-aligned and the TRAILING value specifies the components to be right-aligned.
FlowLayout (int align, int hgap, int vgap)
Creates a new flow layout manager with the indicated alignment and the indicated horizontal and vertical gaps. The hgap and vgap arguments specify the number of pixels to put between components.
www.educlash.com
134
public void init()
{
setLayout(new FlowLayout(FlowLayout.CENTER));
l1=new Label("Name :");
l2=new Label("Address :");
name=new TextField(10);
add=new TextArea(10,8);
ok=new Button("Ok");
cancel=new Button("Cancel");
add(l1); add(name);
add(l2); add(add);
add(ok); add(cancel);
}//init
}//class BorderLayout
A border layout lays out a container, arranging and resizing its components to fit in five regions: north, south, east, west, and center. Each region may contain no more than one component, and is identified by a corresponding constant: NORTH, SOUTH, EAST, WEST, and CENTER. When adding a component to a container with a border layout, use one of these five constants, for example:
JPanel p = new JPanel(); p.setLayout(new BorderLayout()); p.add(new Button("Okay"), BorderLayout.SOUTH);
The components are laid out according to their preferred
sizes and the constraints of the container's size. The NORTH and SOUTH components may be stretched horizontally; the EAST and WEST components may be stretched vertically; the CENTER component may stretch both horizontally and vertically to fill any space left over.
Constructor or Method Purpose
BorderLayout(int horizontalGap, int verticalGap)
Defines a border layout with specified gaps between components.
setHgap(int) Sets the horizontal gap between components.
setVgap(int) Sets the vertical gap between components
www.educlash.com

135 Example:
import java.awt.*;
import java.applet.*;
//<applet code=BorderDemo height=300 width=300></applet>
public class BorderDemo extends Applet
{
public void init()
{
setLayout(new BorderLayout());
add(new Button("Top Button"),BorderLayout.NORTH);
add(new Label("Footer",Label.CENTER), BorderLayout.SOUTH);
add(new Button("Right"),BorderLayout.EAST);
add(new Button("Left"),BorderLayout.WEST);
add(new TextArea("XYZ",55,55),BorderLayout.CENTER);
}
public Insets getInsets()
{
return new Insets(20,20,20,20);
}
} GridLayout
The GridLayout class is a layout manager that lays out a
container's components in a rectangular grid. The container is divided into equal-sized rectangles, and one component is placed in each rectangle. When both the number of rows and the number of columns have been set to non-zero values, either by a constructor or by the setRows and setColumns methods, the number of columns specified is ignored. Instead, the number of columns is determined from the specified number or rows and the total number of components in the layout. So, for example, if three rows and two columns have been specified and nine components are added to the layout, they will be displayed as three rows of three columns. Specifying the number of columns affects the layout only when the number of rows is set to zero.
www.educlash.com
136
Example:
import java.awt.*;
import java.applet.*;
//<applet code=GridDemo height=500 width=500></applet>
public class GridDemo extends Applet
{
public void init()
{
setLayout(new GridLayout(10,10));
setFont(new Font("sanserif",Font.BOLD,24));
for(int i=1;i<=10;i++)
{
for(int j=1;j<=10;j++)
{
add(new Button(""+i*j));
}//for2
}//for1
}//init
}//class
Check Your Progress
1) The LayoutManager2 is an extension of .
2) A border layout lays out a container and its components to fit in
regions.
Constructor Purpose
GridLayout(int rows, int cols)
Creates a grid layout with the specified number of rows and columns. All components in the layout are given equal size. One, but not both, of rows and cols can be zero, which means that any number of objects can be placed in a row or in a column.
GridLayout(int rows, int cols, int hgap, int vgap)
Creates a grid layout with the specified number of rows and columns. In addition, the horizontal and vertical gaps are set to the specified values. Horizontal gaps are places between each of columns. Vertical gaps are placed between each of the rows.
www.educlash.com
137
2. DELEGATION EVENT MODEL
A source generates an event and sends it to one or more
listeners. The listener waits until it recieves an event notification, once recieved the listener processes the events and then returns. A user interface element is able to delegate the processing of an event to a separate piece of code. In the delegation event model listeners must register with a source in order to recieve an event notification. Here notifications are only send to listeners that want to receive them. Events :
An event is an object that describes a state change in a source. It can be generated as a consequence of a person interacting with the elements in a GUI. E.g pressing a button (ActionEvent), clicking a mouse (MouseEvent), entering a character (KeyEvent) etc.
Event Source :
A source is an object that generates an event. This occurs when the internal state of that object changes. Source may generate more than one type of event. A source must register in order for the listeners to recieve notifications about a specific type of event. The general form is
public void addTypeListener(TypeListener tl)
Here type is the name of the event and tl is reference to the event listener. A source must also provide a method that allows a listener to unregister in a specific type of event. the general form is
public void removeTypeListener(TypeListener tl). Event Listeners :
A listener is an object that is notified when an event occurs. It has two major requirements:
It must have been registered with one or more sources t recieve notification.
It must implement methods to recieve and process these notifications.
3. EVENT CLASSES AND LISTENERS
EventObject : EventObject is the superclass for all the events. It contains two methods :
getSource() – which returns the source of an event.
toString() – which returns the string equivalent of the event.
www.educlash.com
138 1) ActionEvent and ActionListener
Action listeners are probably the easiest — and most
common — event handlers to implement. You implement an action listener to define what should be done when an user performs certain operation.
An action event occurs, whenever an action is performed by
the user. Examples: When the user clicks a button, chooses a menu item, presses Enter in a text field. The result is that an actionPerformed message is sent to all action listeners that are registered on the relevant component.
The ActionListener Interface
Because ActionListener corresponding adapter class.
has only one method, it has no
The ActionEvent Class
Example:Write a program with three buttons on click of which a message should be displayed.
import java.awt.*;
import java.awt.event.*;
import java.applet.*;
Method Purpose
actionPerformed(actionEvent) Called just after the user performs an action.
Method Purpose
String getActionCommand()
Returns the string associated with this action. Most objects that can fire action events support a method called setActionCommand that lets you set this string.
int getModifiers() Returns an integer representing the modifier keys the user was pressing when the action event occurred. You can use the ActionEvent-defined constants SHIFT_MASK, CTRL_MASK, META_MASK, and ALT_MASK to determine which keys were pressed. For example, if the user Shift-selects a menu item, then the following expression is nonzero: actionEvent.getModifiers() & ActionEvent.SHIFT_MASK
Object getSource() Returns the object that fired the event.
www.educlash.com

139
//<applet code=ActionDemo height=300 width=300></applet>
public class ActionDemo extends Applet
implements ActionListener
{
String msg="";
public ActionDemo()
{
Button b1=new Button("Yes");
Button b2=new Button("No"); Button
b3=new Button("Undecided");
setLayout(new FlowLayout());
add(b1);
add(b2);
add(b3);
b1.addActionListener(this);
b2.addActionListener(this);
b3.addActionListener(this);
}
public void actionPerformed(ActionEvent e)
{
String str=e.getActionCommand();
if(str.equals("Yes"))
msg = "You have clicked Yes";
else if(str.equals("No"))
msg = "You have clicked No";
else
msg = "You have clicked Undecided";
repaint();
}
public void paint(Graphics g)
{
g.drawString(msg,20,100);
}
} 2) FocusEvent and FocusListener
Focus events are fired whenever a component gains or
loses the keyboard focus. This is true whether the change in focus occurs through the mouse, the keyboard, or programmatically.
www.educlash.com
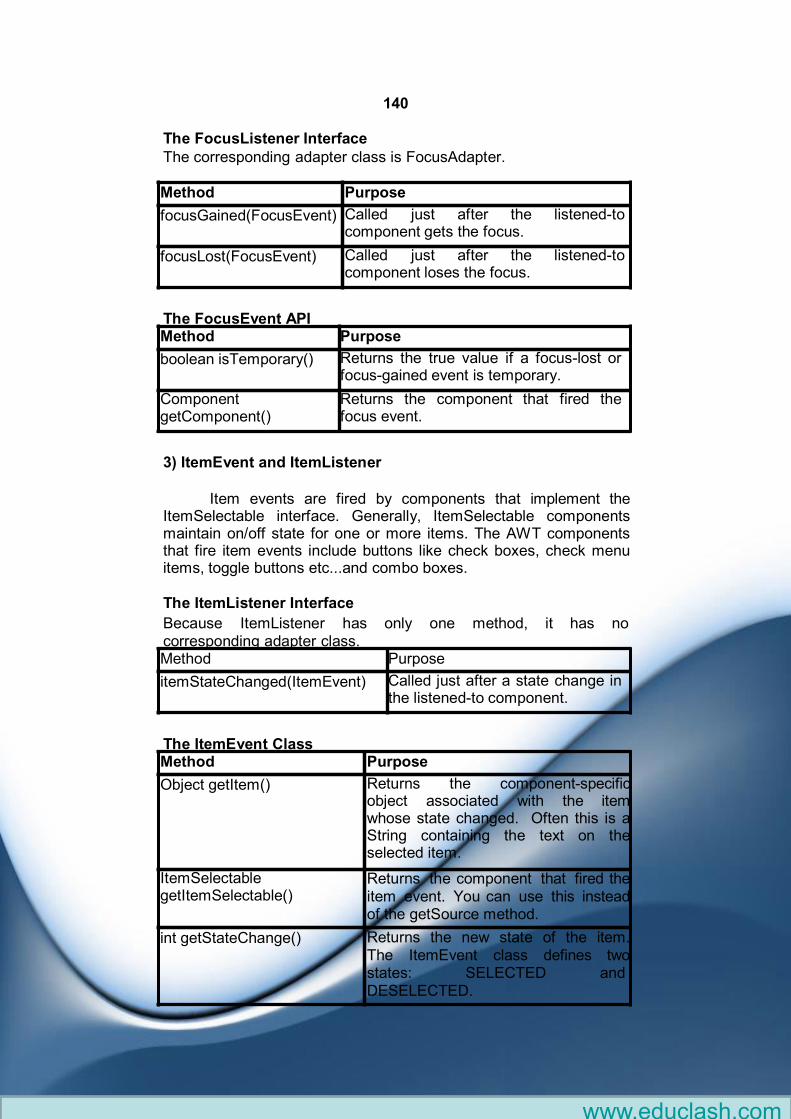
140 The FocusListener Interface
The corresponding adapter class is FocusAdapter.
The FocusEvent API
3) ItemEvent and ItemListener
Item events are fired by components that implement the
ItemSelectable interface. Generally, ItemSelectable components maintain on/off state for one or more items. The AWT components that fire item events include buttons like check boxes, check menu items, toggle buttons etc...and combo boxes.
The ItemListener Interface
Because ItemListener has only one method, it has no corresponding adapter class.
The ItemEvent Class
Method Purpose
focusGained(FocusEvent) Called just after the listened-to component gets the focus.
focusLost(FocusEvent) Called just after the listened-to component loses the focus.
Method Purpose
boolean isTemporary() Returns the true value if a focus-lost or focus-gained event is temporary.
Component getComponent()
Returns the component that fired the focus event.
Method Purpose
itemStateChanged(ItemEvent) Called just after a state change in the listened-to component.
Method Purpose
Object getItem() Returns the component-specific object associated with the item whose state changed. Often this is a String containing the text on the selected item.
ItemSelectable getItemSelectable()
Returns the component that fired the item event. You can use this instead of the getSource method.
int getStateChange() Returns the new state of the item. The ItemEvent class defines two states: SELECTED and DESELECTED.
www.educlash.com
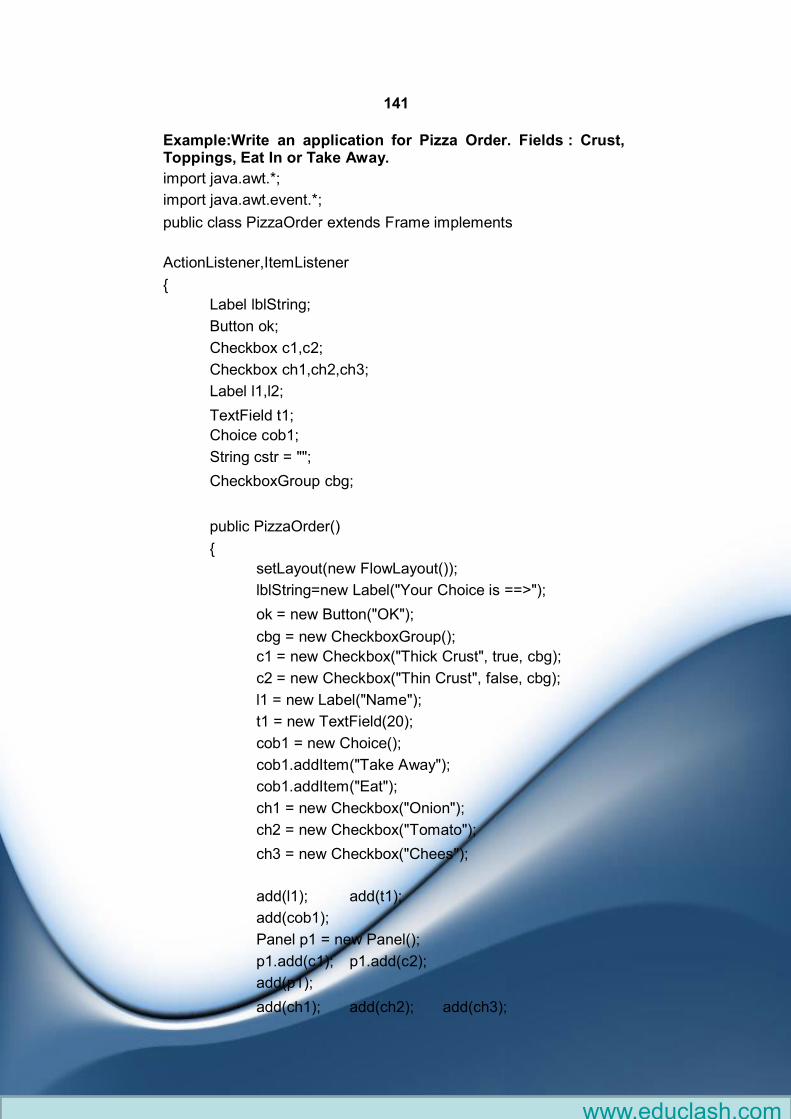
141
Example:Write an application for Pizza Order. Fields : Crust, Toppings, Eat In or Take Away.
import java.awt.*;
import java.awt.event.*;
public class PizzaOrder extends Frame implements
ActionListener,ItemListener
{
Label lblString;
Button ok;
Checkbox c1,c2;
Checkbox ch1,ch2,ch3;
Label l1,l2;
TextField t1;
Choice cob1;
String cstr = "";
CheckboxGroup cbg;
public PizzaOrder()
{
setLayout(new FlowLayout());
lblString=new Label("Your Choice is ==>");
ok = new Button("OK");
cbg = new CheckboxGroup();
c1 = new Checkbox("Thick Crust", true, cbg);
c2 = new Checkbox("Thin Crust", false, cbg);
l1 = new Label("Name");
t1 = new TextField(20);
cob1 = new Choice();
cob1.addItem("Take Away");
cob1.addItem("Eat");
ch1 = new Checkbox("Onion");
ch2 = new Checkbox("Tomato");
ch3 = new Checkbox("Chees");
add(l1); add(t1);
add(cob1);
Panel p1 = new Panel();
p1.add(c1); p1.add(c2);
add(p1);
add(ch1); add(ch2); add(ch3);
www.educlash.com
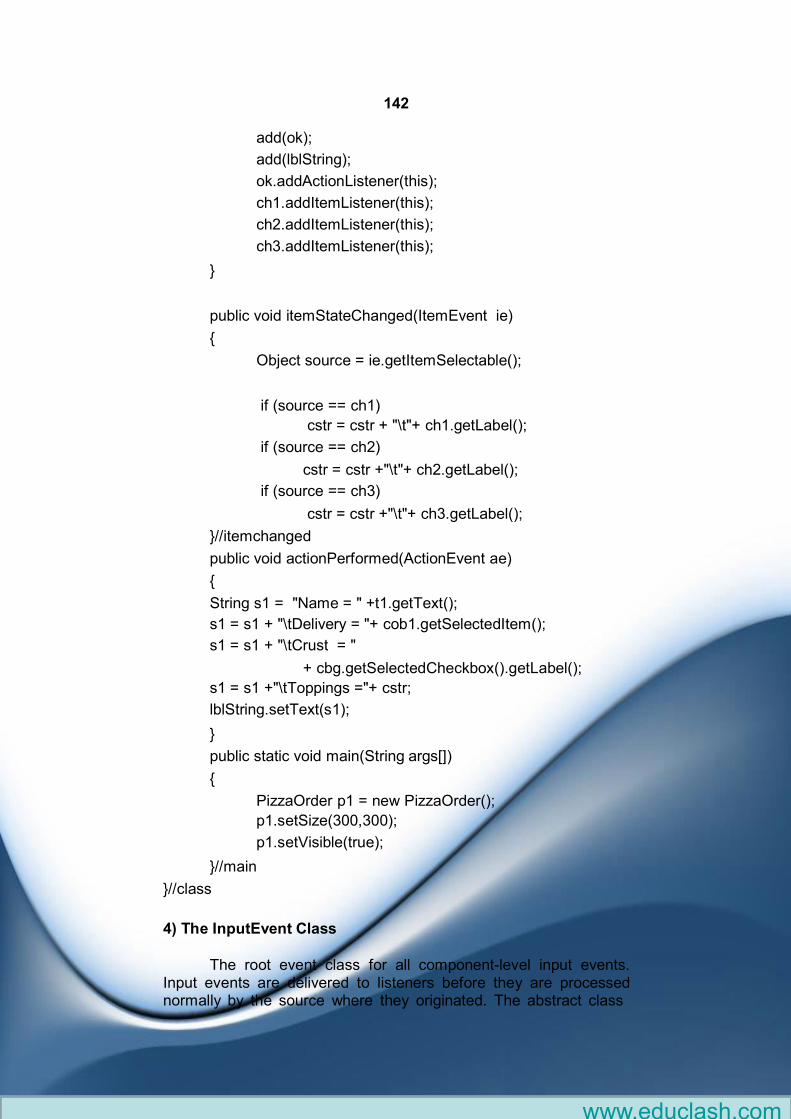
142
add(ok);
add(lblString);
ok.addActionListener(this);
ch1.addItemListener(this);
ch2.addItemListener(this);
ch3.addItemListener(this);
}
public void itemStateChanged(ItemEvent ie)
{
Object source = ie.getItemSelectable();
if (source == ch1)
cstr = cstr + "\t"+ ch1.getLabel();
if (source == ch2)
cstr = cstr +"\t"+ ch2.getLabel();
if (source == ch3)
cstr = cstr +"\t"+ ch3.getLabel();
}//itemchanged
public void actionPerformed(ActionEvent ae)
{
String s1 = "Name = " +t1.getText();
s1 = s1 + "\tDelivery = "+ cob1.getSelectedItem();
s1 = s1 + "\tCrust = "
+ cbg.getSelectedCheckbox().getLabel();
s1 = s1 +"\tToppings ="+ cstr;
lblString.setText(s1);
}
public static void main(String args[])
{
PizzaOrder p1 = new PizzaOrder();
p1.setSize(300,300);
p1.setVisible(true);
}//main
}//class
4) The InputEvent Class
The root event class for all component-level input events.
Input events are delivered to listeners before they are processed normally by the source where they originated. The abstract class
www.educlash.com

143
InputEvent is a subclass of ComponentEvent and is the superclass for component input events. Its subclasses are KeyEvent and MouseEvent. 5) KeyEvent and KeyListener
Key events indicate when the user is typing at the keyboard.
Specifically, key events are fired by the component with the keyboard focus when the user presses or releases keyboard keys.Notifications are sent about two basic kinds of key events:
The typing of a Unicode character
The pressing or releasing of a key on the keyboard
The first kind of event is called a key-typed event. The
second kind is either a key-pressed or key-released event. In general, you react to only key-typed events unless you need to know when the user presses keys that do not correspond to characters. For example, to know when the user types a Unicode character — whether by pressing one key such as 'a' or by pressing several keys in sequence — you handle key-typed events. On the other hand, to know when the user presses the F1 key, or whether the user pressed the '3' key on the number pad, you handle key- pressed events.
The KeyListener Interface
The corresponding adapter class is KeyAdapter.
Method Purpose
keyTyped(KeyEvent) Called just after the user types a Unicode character into the listened-to component.
keyPressed(KeyEvent) Called just after the user presses a key while the listened-to component has the focus.
keyReleased(KeyEvent) Called just after the user releases a key while the listened-to component has the focus.
www.educlash.com

144 The KeyEvent Class
6) MouseEvent and Listeners
Mouse events notify when the user uses the mouse to
interact with a component. Mouse events occur when the cursor enters or exits a component's onscreen area and when the user presses or releases one of the mouse buttons. Tracking the cursor's motion involves significantly more system overhead than tracking other mouse events. That is why mouse-motion events are separated into Mouse Motion listener type. The MouseEvent Class
Method Purpose
int getKeyChar() Obtains the Unicode character associated with this event. Only rely on this value for key-typed events.
int getKeyCode() Obtains the key code associated with this event. The key code identifies the particular key on the keyboard that the user pressed or released. The KeyEvent class defines many key code constants for commonly seen keys. For example, VK_A specifies the key labeled A, and VK_ESCAPE specifies the Escape key.
String getKeyText(int) String getKeyModifiersText(int)
Return text descriptions of the event's key code and modifier keys, respectively.
boolean isActionKey() Returns true if the key firing the event is an action key. Examples of action keys include Cut, Copy, Paste, Page Up, Caps Lock, the arrow and function keys. This information is valid only for key-pressed and key- released events.
Method Purpose
int getClickCount() Returns the number of quick, consecutive clicks the user has made (including this event). For example, returns 2 for a double click.
int getX() int getY() Point getPoint()
Return the (x,y) position at which the event occurred, relative to the component that fired the event.
www.educlash.com
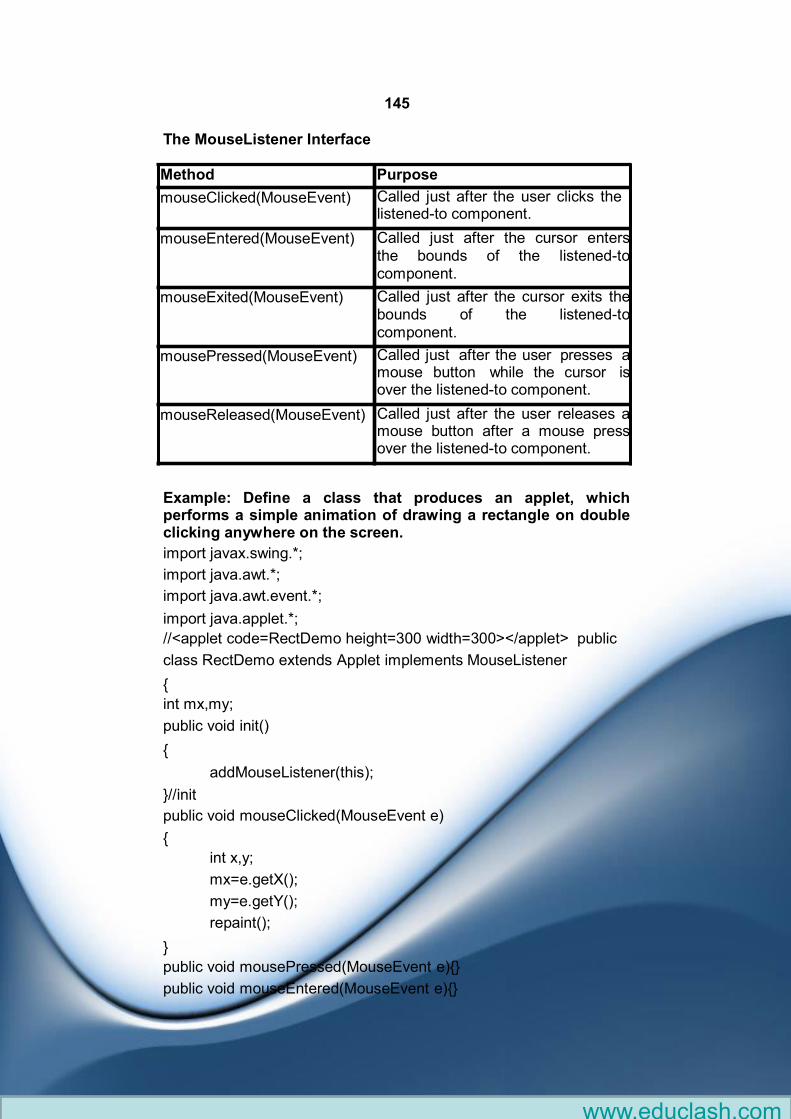
145 The MouseListener Interface
Example: Define a class that produces an applet, which performs a simple animation of drawing a rectangle on double clicking anywhere on the screen.
import javax.swing.*;
import java.awt.*;
import java.awt.event.*;
import java.applet.*;
//<applet code=RectDemo height=300 width=300></applet> public
class RectDemo extends Applet implements MouseListener
{
int mx,my;
public void init()
{
addMouseListener(this);
}//init
public void mouseClicked(MouseEvent e)
{
int x,y;
mx=e.getX();
my=e.getY();
repaint();
}
public void mousePressed(MouseEvent e){}
public void mouseEntered(MouseEvent e){}
Method Purpose
mouseClicked(MouseEvent) Called just after the user clicks the listened-to component.
mouseEntered(MouseEvent) Called just after the cursor enters the bounds of the listened-to component.
mouseExited(MouseEvent) Called just after the cursor exits the bounds of the listened-to component.
mousePressed(MouseEvent) Called just after the user presses a mouse button while the cursor is over the listened-to component.
mouseReleased(MouseEvent) Called just after the user releases a mouse button after a mouse press over the listened-to component.
www.educlash.com

146
public void mouseExited(MouseEvent e){}
public void mouseReleased(MouseEvent e){}
public void paint(Graphics g)
{
g.drawRect(mx,my,50,100);
}
}//class The MouseMotionListener Interface
The corresponding adapter classes are MouseMotionAdapter and MouseAdapter.
Example: Create an applet that displays the current position of the mouse in its status bar. e. g. [20,30]. As mouse is moved these numbers go on changing.
import java.applet.*;
import java.awt.*;
import java.awt.event.*;
//<applet code=MouseStatus height=300 width=300></applet>
public class MouseStatus extends Applet
implements MouseMotionListener
{
public void init()
{
addMouseMotionListener(this);
}//init
public void mouseDragged(MouseEvent a){}
public void mouseMoved(MouseEvent e)
{
Method Purpose
mouseDragged(MouseEvent) Called in response to the user moving the mouse while holding a mouse button down. This event is fired by the component that fired the most recent mouse-pressed event, even if the cursor is no longer over that component.
mouseMoved(MouseEvent) Called in response to the user moving the mouse with no mouse buttons pressed. This event is fired by the component that's currently under the cursor.
www.educlash.com
147
int x,y;
x=e.getX();
y=e.getY();
showStatus("Mouse Coordinates"+x+","+y);
}
}//class The MouseWheelListener interface
The listener interface for receiving mouse wheel events on a
component. The class that is interested in processing a mouse wheel event implements this interface. The listener object created from that class is then registered with a component using the component's addMouseWheelListener method. A mouse wheel event is generated when the mouse wheel is rotated. When a mouse wheel event occurs, that object's mouseWheelMoved method is invoked.
7) TextEvent and TextListener
Instances of this class describe text events. These are
generated by text fields and text areas when characters are entered by a user or program. TextEvent defines the integer constant TEXT_VALUE_CHANGED.
The TextEvent Class
The TextListener Interface
8) WindowEvent and WindowListener
When the window listener has been registered on a window (such as a frame or dialog), window events are fired just after the window activity or state has occurred. A window is considered as a
Method Purpose
mouseWheelMoved(MouseWheelEvent) Invoked when the mouse wheel is rotated.
Method Purpose
paramString() Returns a parameter string identifying this text event.
Method Purpose
textValueChanged(TextEvent) Invoked when the value of the text has changed.
www.educlash.com
148
"focus owner", if this window receives keyboard input. The following window activities or states can precede a window event:
Opening a window - Showing a window for the first time.
Closing a window - Removing the window from the screen.
Iconifying a window - Reducing the window to an icon on the desktop.
Deiconifying a window - Restoring the window to its original size.
Focused window - The window which contains the "focus owner".
Activated window (frame or dialog) - This window is either the focused window, or owns the focused window.
Deactivated window - This window has lost the focus.
Maximizing the window - Increasing a window's size to the maximum allowable size, either in the vertical direction, the horizontal direction, or both directions.
The WindowListener interface defines methods that handle most window events, such as the events for opening and closing the window, activation and deactivation of the window, and iconification and deiconification of the window.
The WindowListener Interface
Method Purpose
windowOpened(WindowEvent) Called just after the listened-to window has been shown for the first time.
windowClosing(WindowEvent) Called in response to a user request for the listened-to window to be closed. To actually close the window, the listener should invoke the window's dispose or setVisible(false) method.
windowClosed(WindowEvent) Called just after the listened-to window has closed.
windowIconified(WindowEvent) windowDeiconified(WindowEvent)
Called just after the listened-to window is iconified or deiconified, respectively.
windowActivated(WindowEvent) windowDeactivated(WindowEvent)
Called just after the listened-to window is activated or deactivated, respectively. These methods are not sent to
www.educlash.com

149
windows that are not frames or dialogs. For this reason, we
prefer the 1.4
and windowGainedFocus windowLostFocus methods to determine when a window gains or loses the focus.
The WindowEvent Class
Example:
import java.awt.*;
import java.awt.event.*;
public class AppFrame extends Frame
implements WindowListener {
public AppFrame(String title) {
super(title);
addWindowListener(this);
}
public void windowClosing(WindowEvent e) {
setVisible(false);
dispose();
System.exit(0);
}
public void windowClosed(WindowEvent e) {}
public void windowDeactivated(WindowEvent e) {}
public void windowActivated(WindowEvent e) {}
public void windowDeiconified(WindowEvent e) {}
public void windowIconified(WindowEvent e) {}
public void windowOpened(WindowEvent e) {}
}
Check Your Progress
1)A source is an object that generates an event. (True/False)
2)InputEvent class is the root event class for all component-level input events. (True/False)
Method Purpose
Window getWindow() Returns the window that fired the event. You can use this instead of the getSource method.
www.educlash.com
150
12.4 SUMMARY
A layout manager is an object that implements the
LayoutManager interface and determines the size and position of the components within a container.
The FlowLayout class puts components in a row, sized at their
preferred size. A border layout lays out a container, arranging and resizing its components to fit in five regions: north, south, east, west, and center. The GridLayout class is a layout manager that lays out a container's components in a rectangular grid.
An event is an object that describes a state change in a source.
It can be generated as a consequence of a person interacting with the elements in a GUI. A source is an object that generates an event. This occurs when the internal state of that object changes.
12.5 UNIT END EXERCISE
1) Write a short note on BorderLayout?
2) Explain with an example GridLayout? 3) Describe the Event Delegation Model? 4) Explain with an example:
a. ItemEvent and ItemListener b. MouseEvent and Listeners
5) Write a program to design a simple calculator application.
6) Write a program to accept student data. (Name, Add, Mobile No. etc)
12.6 FURTHER READING
Java2: The Complete Reference - by Patrick Naughton &
Herbert Schildt, Fifth Edition
Programming with Java A primer - by E. Balagurusamy Third
Edition
www.educlash.com