Embed Size (px)
Citation preview

IT Motore - MANUALE DI ISTRUZIONIATTENZIONE: prima di usare la macchina, leggere attentamente il presente libretto.
EN Engine - OPERATOR’S MANUALWARNING: read thoroughly the instruction booklet before using the machine.
171520229/3T 02/2020
ENGINES
WBE120WBE120TIWBE140WBE170WBE170LS


ITALIANO - Istruzioni Originali ................................................................................................... IT
БЪЛГАРСКИ - Инструкция за експлоатация ............................................................................ BG
BOSANSKI - Prijevod originalnih uputa ......................................................................................... BS
ČESKY - Překlad původního návodu k používání .......................................................................... CS
DANSK - Oversættelse af den originale brugsanvisning ............................................................... DA
DEUTSCH - Übersetzung der Originalbetriebsanleitung ............................................................... DE
ENGLISH - Translation of the original instruction ........................................................................... EN
ΕΛΛΗΝΙΚΑ - Μεταφραση των πρωτοτυπων οδηγιων .................................................................. EL
ESPAÑOL - Traducción del Manual Original ................................................................................. ES
EESTI - Algupärase kasutusjuhendi tõlge ..................................................................................... ET
SUOMI - Alkuperäisten ohjeiden käännös .................................................................................... FI
FRANÇAIS - Traduction de la notice originale ............................................................................... FR
HRVATSKI - Prijevod originalnih uputa .......................................................................................... HR
MAGYAR - Eredeti használati utasítás fordítása ............................................................................ HU
LIETUVIŠKAI - Originalių instrukcijų vertimas ............................................................................... LT
LATVIEŠU - Instrukciju tulkojums no oriģināl valodas .................................................................... LV
МАКЕДОНСКИ - Превод на оригиналните упатства ................................................................ MK
NEDERLANDS - Vertaling van de oorspronkelijke gebruiksaanwijzing ......................................... NL
NORSK - Oversettelse av den originale bruksanvisningen ........................................................... NO
POLSKI - Tłumaczenie instrukcji oryginalnej ................................................................................. PL
PORTUGUÊS - Tradução do manual original ................................................................................ PT
ROMÂN - Traducerea manualului fabricantului ............................................................................. RO
РУССКИЙ - Перевод оригинальных инструкций ...................................................................... RU
SLOVENSKY - Preklad pôvodného návodu na použitie ................................................................ SK
SLOVENŠČINA - Prevod izvirnih navodil ...................................................................................... SL
SRPSKI - Prevod originalnih uputstva ........................................................................................... SR
SVENSKA - Översättning av bruksanvisning i original .................................................................. SV
TÜRKÇE - Orijinal Talimatların Tercümesi ..................................................................................... TR

A
EB
C D
F
AA
A
B
WBE120, WBE120TI, WBE140
WBE170
WBE120, WBE120TI WBE140
WBE170, WBE170LS
AB
C
A
B
WBE170LS
AE
BC
D C
CC
A
EB
C D
F G
1
2 3
4 5
B D
E
C
F
A B
AB C
D
A
B
A
C
D
B
A A
6
8
10
9
7

[1] DATI TECNICI model WBE120 - WBE120TIWBE140 WBE170 - WBE170LS
[2] Carburante (benzina senza piombo) tipo 90 RON
[3] Olio motore tipo 5 ÷ 40 °C SAE 30
[4] Capacità del serbatoio carburante l 0,75 1
[5] Contenuto della coppa dell’olio l 0,5
[6] Candela tipo K7RTC (ST.) Champion RC12YC
[7] Distanza fra gli elettrodi mm 0,6 - 0,8 0,6 - 0,8[8a] CO₂
922,38[8b]
Questo è il valore di misurazione del CO₂ risultato da un ciclo di prova fisso eseguito in condizioni di laboratorio su un motore (capostipite) rappresentativo del tipo di motore (della famiglia di motori) e non comporta alcuna garanzia implicita o esplicita o delle prestazioni di un particolare motore
g/kWh
[1] BG - ТЕХНИЧЕСКИ ДАННИ[2] Гориво (безоловен бен-
зин)[3] Моторно масло[4] Вместимост на резерво-ара за гориво[5] Вместимост на картера[6] Запалителна свещ[7] Разстояние между елек-
тродите[8a] CO₂[8b] Това измерване на CO₂
е направено в хода на изпитване в рамките на фиксиран цикъл на изпитване при лабора-торни условия на (базов) двигател, представи-телен за типа двигател (фамилията двигатели), и не означава косвена или изрична гаранция за работата на конкретен двигател.
[1] BS - TEHNIČKI PODACI[2] Gorivo (bezolovni benzin)[3] Motorno ulje[4] Zapremina spremnika go-
riva[5] Sadržaj posude[6] Svjećica[7] Razdaljina između elek-
troda[8a] CO₂[8b] Ovo mjerenje CO₂ nastalo
je na temelju testiranja provedenog tokom fiksnog ciklusa testiranja u labora-torijskim uvjetima i pred-stavlja vrstu motora (serija motora) te ne uključuje i ne izražava bilo kakvu garan-ciju performansi određe-nog motora.
[1] CS - TECHNICKÉ PARAME-TRY
[2] Palivo (bezolovnatý benzín)[3] Motorový olej[4] Kapacita palivové nádrže[5] Obsah klikové skříně motoru [6] Svíčka[7] Vzdálenost mezi elektro-
dami [8a] CO₂[8b] Toto měření CO₂ je vý-
sledkem zkoušek o stano-veném počtu zkušebních cyklů v laboratorních pod-mínkách na (základním) motoru reprezentativním pro typ motoru (rodinu mo-torů) a nepředstavuje ani nevyjadřuje záruku výkon-nosti konkrétního motoru.

[1] DA - TEKNISKE DATA[2] Brændstof (blyfri benzin)[3] motorolie[4] Brændstofstankens kapa-
citet[5] Indhold af oliefanger[6] Tændrør[7] Afstand mellem elektro-
derne[8a] CO₂[8b] Denne CO₂-måling hi-
drører fra prøvning ved en fast prøvningscyklus under laboratorieforhold af en (stam)motor, der er repræsentativ for motor-typen (motorfamilien), og hverken indebærer eller udtrykker en garanti for en bestemt motors ydelse.
[1] DE - TECHNISCHE DATEN[2] Kraftstoff (bleifreies Benzin)[3] Motoröl[4] Inhalt des Kraftstofftanks[5] Fassungsvermögen der
Wanne[6] Zündkerze[7] Abstand zwischen den
Elektroden[8a] CO₂[8b] Diese CO₂-Messung ist
das Ergebnis der Erpro-bung eines für den Motor-typ bzw. die Motorenfamilie repräsentativen (Stamm-)Motors in einem festen Prüfzyklus unter Laborbe-dingungen und stellt keine ausdrückliche oder impli-zite Garantie der Leistung eines bestimmten Motors dar.
[1] EL - ΤΕΧΝΙΚΑ ΧΑΡΑΚΤΗΡΙΣΤΙΚΑ[2] Καύσιμο (αμόλυβδη
βενζίνη)[3] Λάδι κινητήρα[4] Χωρητικότητα ρεζερβουάρ
καυσίμου[5] Περιεχόμενο του κυπέλλου[6] Μπουζί[7] Απόσταση ηλεκτροδίων[8a] CO₂[8b] Η μέτρηση CO₂ προέρ-
χεται από τη δοκιμή ενός (μητρικού) κινητήρα αντι-προσωπευτικού του τύπου κινητήρων (της σειράς κινητήρων) κατά τη διάρ-κεια ενός προκαθορισμέ-νου κύκλου δοκιμών υπό εργαστηριακές συνθήκες και δεν συνιστά, ρητά ή σιωπηρά, οποιουδήποτε είδους εγγύηση αναφορι-κά με τις επιδόσεις ενός συγκεκριμένου κινητήρα.
[1] EN - TECHNICAL DATA[2] Fuel (Unleaded petrol)[3] Engine oil[4] Fuel tank capacity[5] Oil capacity[6] Spark plug[7] Electrode gap[8a] CO₂[8b] This CO₂ measurement
results from testing over a fixed test cycle under laboratory conditions a(n) (parent) engine representative of the engine type (engine family) and shall not imply or express any guarantee of the performance of a particular engine.
[1] ES - DATOS TÉCNICOS[2] Combustible (gasolina sin plomo)[3] Aceite del motor[4] Capacidad del depósito
carburante[5] Contenido del cárter[6] Bujía[7] Distancia entre los elec-
trodos[8a] CO₂[8b] La presente medición de
CO2 es el resultado de en-sayos realizados durante un ciclo de ensayo fijo en condiciones de laboratorio con un motor (de referen-cia) representativo del tipo de motor (familia de mo-tores) de que se trate y no constituye garantía alguna ni implícita ni expresa del rendimiento de un motor concreto.
[1] ET - TEHNILISED ANDMED[2] Kütus (pliivaba bensiin)[3] Mootoriõli[4] Kütusepaagi maht[5] Kogus[6] Küünal[7] Vahe elektroodide vahel[8a] CO₂[8b] Käesolevad CO₂ mõõtetu-
lemused on saadud labo-ratoorsetes tingimustes pü-sikatsetsüklis sõidukitüüpi (mootoritüüpkonda) esin-dava representatiiv(alg)mootori peal ning ei anna ega väljenda mingit ga-rantiid konkreetse mootori talitluse kohta.
[1] FI - TEKNISET TIEDOT[2] Polttoaine (lyijytön bensiini)[3] Moottoriöljy[4] Polttoainesäiliön tilavuus[5] Öljysäiliön tilavuus[6] Sytytystulppa[7] Elektrodien väli[8a] CO₂[8b] Tämä CO₂-mittaustulos
on saatu moottorityyppiä (moottoriperhettä) edus-tavalle (kanta)moottorille laboratorio-olosuhteissa tehdyssä kiinteässä tes-tisyklissä, eikä se ole tae yksittäisen moottorin suo-rituskyvystä.
[1] FR - CARACTÉRISTIQUES TECH-NIQUES
[2] Carburant (essence sans plomb)
[3] Huile moteur[4] Capacité du réservoir de
carburant[5] Contenu du carter d’ huile[6] Bougie[7] Distance entre les électro-
des[8a] CO₂[8b] Cette mesure du CO2 est
le résultat d’un essai, réa-lisé sur un cycle fixe dans des conditions de labora-toire, portant sur un moteur [parent] représentatif du type de moteurs [de la famille de moteurs], et ne constitue pas une indica-tion ou une garantie des performances d’un moteur particulier.
[1] HR - TEHNIČKI PODACI[2] Gorivo (neosvinčeni bencin)[3] Motorno ulje[4] Kapacitet spremnika goriva[5] Sadržaj posude[6] Svjećica[7] Udaljenost između elek-
troda[8a] CO₂[8b] Ova izmjerena vrijednost
CO2 rezultat je ispitivanja tijekom određenog ispitnog ciklusa u laboratorijskim uvjetima te ne podrazumi-jeva nikakvo implicitno ili izričito jamstvo o sposob-nosti određenog motora.

[1] HU - MŰSZAKI ADATOK[2] Üzemanyag (ólommentes
benzin)[3] Motorolaj[4] Üzemanyagtartály kapa-citása[5] Olajteknő kapacitás[6] Gyertya[7] Elektródok közötti távolság[8a] CO₂[8b] Ez a CO₂-érték a motor-
típust (motorcsaládot) képviselő (alap)motoron, rögzített vizsgálati ciklus alatt, laboratóriumi körül-mények között elvégzett vizsgálatból származik, és sem kifejezetten, sem hallgatólagosan nem jelent garanciát az adott motor teljesítményére vonatko-zóan.
[1] LT - TECHNINIAI DUOMENYS[2] Degalai (bešvinis benzinas)[3] Variklio alyvos[4] Degalų bako talpa [5] Dugninės talpa[6] Žvakės[7] Atstumas nuo elektrodų[8a] CO₂[8b] Šie CO₂ matavimo re-
zultatai gauti atliekant nustatytą bandymų ciklą laboratorinėmis sąlygomis su (pirminiu) varikliu, atitin-kančiu variklių tipą (variklių šeimą), ir jie neužtikrina ir negarantuoja konkretaus variklio eksploatacinių cha-rakteristikų.
[1] LV - TEHNISKIE DATI[2] Degviela (benzīns bez svina)[3] Motoreļļa[4] Degvielas tvertnes tilpums[5] Kausa saturs[6] Svece[7] Attālums starp elektrodiem[8a] CO₂[8b] Šis CO₂ mērījumu
rezultāts iegūts, testējot motora tipu (motoru sai-mi) pārstāvošo (cilmes) motoru fiksētā testa ciklā laboratorijas apstākļos, un nedrīkst netieši norādīt vai izteikt jebkādu garantijas izpildījumu attiecībā uz konkrēto motoru.
[1] MK - ТЕХНИЧКИ ПОДАТОЦИ[2] Гориво (безоловен бензин)[3] Моторно масло[4] Капацитет на резервоарот
за гориво[5] Капацитет на резервоарот
за масло[6] Свеќичка[7] Растојание помеѓу
електродите[8a] CO₂[8b] Ова мерење на CO₂ е
резултат на тестирање преку фиксен циклусен тест во лабораториски услови на (матичен) мотор кој е претставен на типот на моторот (фамилијата на моторот) и не треба да имплицира ниту да изразува каква било гаранција за изведбата на одреден мотор.
[1] NL - TECHNISCHE GEGE-VENS
[2] Brandstof (loodvrije benzine)[3] Motorolie[4] Vermogen brandstofreservoir[5] Inhoud van de carter[6] Bougie[7] Afstand tussen de elek-
troden[8a] CO₂[8b] Deze meetresultaten voor
CO₂ betreffen metingen vol-gens een vaste testcyclus onder laboratoriumomstan-digheden, gedaan op een (basis)motor die represen-tatief is voor het betrokken motortype (de betrokken motorfamilie); zij impliceren of vormen geen enkele ga-rantie voor de prestaties van een bepaalde motor.
[1] NO - TEKNISKE DATA[2] Drivstoff (blyfri bensin)[3] Motorolje[4] Drivstofftankens kapasitet [5] Beholderens volum[6] Tennplugg[7] Avstand mellom elektro-
dene[8a] CO₂[8b] Dette er verdien for måling
av CO₂ resultat av en fast testsyklus utført under forhold som på laboratorium av en motor (overordnet) representativ for motort-ypen (av motorfamilien) og innebærer ingen implisitt eller eksplisitt garanti eller prestasjonene til en gitt motor.
[1] PL - DANE TECHNICZNE[2] Paliwo (benzyna
bezołowiowa)[3] Olej silnikowy[4] Pojemność zbiornika paliwa[5] Pojemność miski olejowej[6] Świeca[7] Odległość między elektro-dami[8a] CO₂[8b] Podany wynik pomiaru
CO₂ pochodzi z badania przeprowadzonego na silniku (macierzystym) bę-dącym przedstawicielem typu (rodziny) silników w czasie stałego cyklu bada-nia w warunkach labora-toryjnych i pomiar ten nie oznacza ani nie stanowi żadnej gwarancji osiągów danego silnika.
[1] PT - DADOS TÉCNICOS[2] Combustível (gasolina sem
chumbo)[3] Óleo do motor[4] Capacidade do tanque de
combustível[5] Conteúdo da taça[6] Vela de ignição[7] Distância entre os elétro-
dos[8a] CO₂[8b] A presente medição de
CO₂ resulta do ensaio, durante um ciclo de en-saio fixo em condições de laboratório, realizado com um motor (precursor) representativo do tipo de motor (família de motores) e não implica nem expres-sa qualquer garantia do desempenho de um motor específico.
[1] RO - DATE TEHNICE[2] Combustibil (benzină fără
plumb)[3] Ulei de motor[4] Conținutul cupei[5] Capacitatea rezervorului de
carburant[6] Bujie[7] Distanța dintre electrozi[8a] CO₂[8b] Aceste rezultate ale măsu-
rărilor emisiilor de CO₂ au fost obținute în urma încer-cării pe durata unui ciclu de încercare fix în condiții de laborator a unui motor re-prezentativ pentru tipul de motor (familie de motoare) și nu sugerează și nici nu exprimă o garanție privind performanța unui anumit motor.

[1] RU - ТЕХНИЧЕСКИЕ ХАРАКТЕРИСТИКИ
[2] Топливо (неэтилированный бензин)
[3] Моторное масло[4] Объем топливного бака[5] Содержимое маслосбор-
ника[6] Свеча[7] Расстояние между элек-
тродами[8a] CO₂[8b] Данное измерение
величины CO₂ было получено в результате фиксированного цикла испытаний в лаборатор-ных условиях двигателя (исходного), который представляет тип (се-мейство) двигателей. Оно не является гаран-тией эксплуатационных характеристик конкрет-ного двигателя.
[1] SK - TECHNICKÉ PARAME-TRE
[2] Palivo (bezolovnatý benzín)[3] Motorový olej[4] Kapacita palivovej nádrže[5] Obsah olejovej vane[6] Sviečka[7] Vzdialenosť medzi elektró-
dami[8a] CO₂[8b] Toto meranie CO₂ sa do-
siahlo pri stálom skúšob-nom cykle v laboratórnych podmienkach na typickom (základnom) motore typu (radu) motorov a nepred-stavuje žiadnu záruku vlastností konkrétneho motora.
[1] SL - TEHNIČNI PODATKI[2] Gorivo (bezolovni benzin)[3] Motorno olje[4] Prostornina rezervoarja za
gorivo[5] Vsebina skledice[6] Svečka[7] Razdalja med elektrodama[8a] CO₂[8b] Ta meritev CO₂ izhaja iz
preskušanja, opravljenega v skladu s toĀno doloĀe-nim preskusnim ciklom v laboratorijskih pogojih na (osnovnem) motorju, ki je reprezentativen za tip motorja (družino motorjev), in ne pomeni nikakršnega implicitnega ali izrecnega jamstva glede znaĀilnosti doloĀenega motorja.
[1] SR - TEHNIČKI PODACI[2] Gorivo (bezolovni benzin)[3] Motorno ulje[4] Prostornina rezervoarja za
gorivo[5] Sadržaj posude[6] Svećica[7] Udaljenost između
elektroda[8a] CO₂[8b] Ovo je izmerena vrednost
ugljen-dioksida koja predstavlja rezultat ciklusa ispitivanja izvršenog u laboratorijskim uslovima na motoru (začetniku serije) koji je predstavnik tipa motora (iz iste serije motora) i ne obuhvata podrazumevanu ili izričitu garanciju performansi za određeni motor.
[1] SV - TEKNISKA SPECIFIKA-TIONER
[2] Bränsle (blyfri bensin)[3] Motorolja[4] Bränsletankens kapacitet[5] Volym i tråget[6] Tändstift[7] Avstånd mellan elektro-
derna[8a] CO₂[8b] Denna CO₂-mätning
kommer från den provade (huvud)motorn i motor-typen (motorfa miljen) och har gjorts under en fast provcykel i laboratorie-förhållanden. Den innebär inte och uttrycker inte någon garanti för prestan-da hos en viss motor.
[1] TR - TEKNİK VERİLER[2] Yakıt (Kurşunsuz benzin)[3] Motor yağı[4] Yakıt deposunun kapasitesi[5] Kap hacmi[6] Buji[7] Elektrodlar arasındaki me-
safe[8a] CO₂[8b] Denna CO₂-mätning
kommer från den provade (huvud)motorn i motor-typen (motorfamiljen) och har gjorts under en fast provcykel i laboratorie-förhållanden. Den innebär inte och uttrycker inte någon garanti för prestan-da hos en viss motor.

1
1. INFORMAZIONI GENERALI
1.1 COME LEGGERE IL MANUALE
Nel testo del manuale, alcuni paragrafi contenenti informazioni di particolare importanza, ai fini della sicurezza o del funzionamento, sono evidenziati in modo diverso, secondo questo criterio:
NOTA oppure IMPORTANTE fornisce precisazioni o altri elementi a quanto già precedentemente indicato, nell’intento di non danneggiare la macchina, o causare danni.
Il simbolo evidenzia un pericolo. Il mancato rispetto dell’avvertenza comporta possibilità di lesioni personali o a terzi e/o danni.
1.2 RIFERIMENTI
1.2.1 Figure
Le figure in queste istruzioni per l’usosono numerate 1, 2, 3, e così via.I componenti indicati nelle figure sonocontrassegnati con le lettere A, B, C, e così via.Un riferimento al componente C nella figura2 viene indicato con la dicitura: “Vederefig. 2.C” o semplicemente “(Fig. 2.C)”.Le figure sono indicative. I pezzi effettivipossono variare rispetto a quelli raffigurati.
1.2.2 Titoli
Il manuale è diviso in capitoli e paragrafi. Iltitolo del paragrafo “2.1 Addestramento” èun sottotitolo di “2. Norme di sicurezza”. Iriferimenti a titoli o paragrafi sono segnalaticon l’abbreviazione cap. o par. e il numerorelativo. Esempio: “cap. 2” o “par. 2.1”.
2. NORME DI SICUREZZA
2.1 ADDESTRAMENTO
Leggere attentamente le presentiistruzioni prima di usare la macchina.
Prendere familiarità con i comandi econ un uso appropriato della macchina.
ATTENZIONE!: PRIMA DI USARE LA MACCHINA, LEGGERE ATTENTAMENTE IL PRESENTE LIBRETTO. Conservare per ogni futura necessità.IT
INDICE1. INFORMAZIONI GENERALI ......................... 12. NORME DI SICUREZZA .............................. 13. CONOSCERE LA MACCHINA ..................... 4 3.1 Descrizione macchina e uso previsto .... 4 3.2 Segnaletica di sicurezza ....................... 4 3.3 Etichetta di identificazione .................... 4 3.4 Componenti del motore ......................... 4 3.5 Condizioni ambientali ............................ 4 3.6 Carburante ............................................ 5 3.7 Olio ....................................................... 5 3.8 Filtro dell’aria ......................................... 5 3.9 Candela ................................................ 5
4. NORME D’USO ............................................ 5 4.1 Prima di ogni utilizzo ............................. 5 4.2 Avviamento del motore ......................... 6 4.3 Arresto del motore al termine del lavoro 6 4.4 Pulizia e rimessaggio ............................ 6 4.5 Inattività prolungata ............................... 6
5. MANUTENZIONE ......................................... 7 5.1 Generalità ............................................. 7 5.2 Tabella manutenzioni ............................ 7 5.3 BATTERIA (se prevista) ........................ 7 5.4 Sostituzione dell’olio ............................. 8 5.5 Pulizia del silenziatore e del motore ...... 8 5.6 Manutenzione del filtro dell’aria ............. 9 5.7 Controllo e manutenzione della candela 9
6. IDENTIFICAZIONE INCONVENIENTI ........ 10

2
Imparare ad arrestare rapidamente il motore.L’inosservanza delle avvertenze e delleistruzioni può causare incendi e/o gravilesioni. Conservare tutte le avvertenze ele istruzioni per consultarle in futuro.
• Non permettere mai che la macchina venga utilizzata da bambini o da persone che non abbiano la necessaria dimestichezza con le istruzioni. Le leggi locali possono fissare un’età minima per l’utilizzatore.
• Non utilizzare mai la macchina se l’utilizzatore è in condizione di stanchezza o malessere, oppure ha assunto farmaci, droghe, alcool o sostanze nocive alle sue capacità di riflessi e attenzione.
• Ricordare che l’operatore o utilizzatore è responsabile di incidenti e imprevisti che si possono verificare ad altre persone o alle loro proprietà.
2.2 OPERAZIONI PRELIMINARI
Dispositivi protezione individuale (DPI)• Non utilizzare la macchina senza indossare gli indumenti adeguati.
• Non indossare indumenti larghi, lacci, gioielli o altri oggetti che potrebbero rimanere impigliati; raccogliere i capelli lunghi e rimanere a distanza di sicurezza durante l’avviamento.
• Indossare cuffie antirumore.
Area di lavoro / Macchina• Prima di avviare il motore, controllare di avere disinserito tutti i comandi che azionano organi in movimento della macchina.
Motori a scoppio: carburante• Avvertenza: il carburante è altamente infiammabile. Maneggiare con cura!
– Conservare sempre il carburante in contenitori idonei.
– Effettuare il rifornimento o il rabbocco utilizzando un imbuto, solo all’aperto e non fumare durante queste operazioni.
– Effettuare il rifornimento prima di accendere il motore. Non aprire il tappo del serbatoio né fare rifornimento quando il motore è acceso o è ancora caldo.
– Se fuoriesce del carburante, non avviare il motore, ma allontanare la macchina dall’area nella quale è stato versato e pulire immediatamente ogni traccia di carburante versato sulla macchina o sul terreno
– Avvitare bene il tappo del serbatoio dei contenitori del carburante.
– Evitare il contatto del carburante con gli indumenti e, in tal caso, cambiarsi gli indumenti prima di avviare il motore.
2.3 DURANTE L’UTILIZZO
Area di Lavoro• Non usare la macchina in ambienti a rischio di esplosione, in presenza di liquidi infiammabili, gas o polvere. Contatti elettrici o sfregamenti meccanici possono generare scintille che possono incendiare la polvere o i vapori.
• Non azionare il motore in spazi chiusi, dove possono accumularsi pericolosi fumi di monossido di carbonio. Le operazioni di avviamento devono avvenire all’aperto o in luogo ben aerato. Ricordare sempre che i gas di scarico sono tossici.
• Allontanare persone, bambini e animali dall’area di lavoro. È necessario che i bambini vengano sorvegliati da un altro adulto.
Comportamenti• Prima di eseguire riparazioni, pulizie, ispezioni, regolazioni, spegnere il motore e staccare il cavo della candela (salvo indicazioni diverse esplicite nelle istruzioni).
• Non toccare le parti del motore che, durante l’uso, si riscaldano. Rischio di ustioni.
Limitazioni all’uso• Non utilizzare la macchina se le protezioni sono insufficienti o se i dispositivi di sicurezza non sono correttamente posizionati.
• Non disinserire o manomettere i sistemi di sicurezza presenti.
• Non alterare le regolazioni del motore, né portarlo a sovraregime. Se il motore viene fatto funzionare ad un numero di giri eccessivo, il rischio di lesioni personali aumenta.
• Non usare fluidi di avviamento o altri prodotti analoghi.
• Non inclinare lateralmente la macchina al punto da provocare fuoriuscite di carburante dal tappo del serbatoio del motore.
• Non far girare il motore senza candela.
2.4 MANUTENZIONE, RIMESSAGGIO E TRASPORTO
Effettuare una regolare manutenzione ed un corretto rimessaggio preservala sicurezza della macchina.
I pezzi guasti o deteriorati devono ssere sostituiti e mai riparati. Usare solo ricambi originali: l’uso di ricambi non originali e/o non correttamente montati compromette la sicurezza della macchina, può causare incidenti o lesioni personali e solleva il Costruttore da ogni obbligo o responsabilità.

3
Manutenzione• Se il serbatoio deve essere vuotato, effettuare questa operazione all’aperto e a motore freddo.
• Per ridurre il rischio di incendi, controllare regolarmente che non vi siano perdite di olio e/o carburante.
Rimessaggio• Non lasciare carburante nel serbatoio se la macchina viene rimessata in un edificio dove i vapori del carburante possono entrare in contatto con fiamme libere, scintille o fonti di calore.
• Lasciare raffreddare prima di rimessare la macchina al chiuso.
Trasporto• Trasportare la macchina a serbatoio vuoto.
2.5 BATTERIA, CARICA BATTERIA (SE PREVISTI)
IMPORTANTE Le seguenti norme di sicurezza integrano le prescrizioni di sicurezza presenti nello specifico libretto della batteria e del carica batteria allegato alla macchina.
• Per caricare la batteria utilizzare solo carica batteria forniti dal produttore. Un carica batteria inadeguato può provocare una scossa elettrica, un surriscaldamento o una fuoriuscita di liquido corrosivo della batteria.
• Utilizzare soltanto le batterie specifiche previste per il vostro utensile. L’uso di altre batterie può provocare lesioni e rischio di incendio.
• Tenere la batteria non utilizzata lontana da fermagli per ufficio, monete, chiavi, chiodi, viti o altri piccoli oggetti metallici che potrebbero provocare un corto circuito dei contatti. Un cortocircuito fra i contatti della batteria può comportare combustioni o incendi.
• Non usare il carica batteria in luoghi con presenza di vapori, sostanze infiammabili o su superfici facilmente infiammabili, come carta, stoffa, ecc. Durante la ricarica, il carica batteria si riscalda e potrebbe provocare un incendio.
• Durante il trasporto degli accumulatori, fare attenzione a che i contatti non vengano collegati fra loro e non usare contenitori metallici per il trasporto.
2.6 TUTELA AMBIENTALE
La tutela dell’ambiente deve essere un aspetto rilevante e prioritario nell’uso della
macchina, a beneficio della convivenza civile e dell’ambiente in cui viviamo. Evitare di essere un elemento di disturbo nei confronti del vicinato. Utilizzare la macchina solamente in orari ragionevoli (non al mattino presto o alla sera tardi quando le persone potrebbero essere disturbate).Seguire scrupolosamente le norme locali per lo smaltimento di imballi, parti deteriorate o qualsiasi elemento a forte impatto ambientale; questi rifiuti non devono essere gettati nella spazzatura, ma devono essere separati e conferiti agli appositi centri di raccolta, che provvederanno al riciclaggio dei materiali.Seguire scrupolosamente le norme locali per lo smaltimento dei materiali di risultaAl momento della messa fuori servizio, non abbandonare la macchina nell’ambiente, ma rivolgersi a un centro di raccolta, secondo le norme locali vigenti.
Non gettare le apparecchiature elettriche tra i rifiuti domestici. Secondo la Direttiva Europea 2012/19/UE sui rifiuti di apparecchiature elettriche ed elettroniche e la sua attuazione in
conformità alle norme nazionali, le apparecchiature elettriche esauste devono essere raccolte separatamente, al fine di essere reimpiegate in modo eco-compatibile. Se le apparecchiature elettriche vengono smaltite in una discarica o nel terreno, le sostanze nocive possono raggiungere la falda acquifera ed entrare nella catena alimentare, danneggiando la vostra salute e benessere. Per informazioni più approfondite sullo smaltimento di questo prodotto, contattare l’Ente competente per lo smaltimento dei rifiuti domestici o il vostro Rivenditore.
Alla fine della loro vita utile, smaltire le batterie con la dovuta attenzione per il nostro ambiente. La batteria contiene materiale che è pericoloso per voi e per l’ambiente. Essa deve essere rimossa e
smaltita separatamente in una struttura che accetta le batterie agli ioni di litio.
La raccolta differenziata di prodotti e imballaggi usati, consente il riciclaggio dei materiali e la riutilizzazione. Il riutilizzo dei materiali riciclati aiuta a prevenire l’inquinamento ambientale e riduce la
domanda di materie prime.
2.7 EMISSIONI
Il processo di combustione genera sostanze tossiche quali monossido di carbonio, ossidi di azoto e idrocarburi.

4
Il controllo di tali sostanze è importante a causa della loro capacità di reagire allo smog fotochimico, quindi all’esposizione diretta della luce solare.Il monossido di carbonio non reagisce allo stesso modo all’esposizione solare, ma è comunque da considerarsi tossico.
Le nostre macchine sono dotate di sistemi di riduzione delle emissioni per le sostanze sopra citate.
3. CONOSCERE LA MACCHINA
3.1 DESCRIZIONE MACCHINA E USO PREVISTO
Questa macchina è un motore a scoppio. Il motore è un’apparecchiatura le cui prestazioni, regolarità di funzionamento e durata sono condizionati da molti fattori, alcuni esterni ed altri strettamente correlati alla qualità dei prodotti impiegati e alla regolarità della manutenzione.Qui di seguito sono riportate alcune informazioni aggiuntive che permettono un utilizzo più consapevole della vostra macchina.Qualsiasi altro impiego, difforme da quelli sopra citati, può rivelarsi pericoloso e causare danni a persone e/o cose.
IMPORTANTE L’uso improprio della macchina comporta il decadimento della garanzia e il declino di ogni responsabilità del Costruttore, riversando sull’utilizzatore gli oneri derivanti da danni o lesioni proprie o a terzi.
3.1.1 Tipologia di utente
Questa macchina è destinata all’utilizzo da parte di consumatori, cioè operatori non professionisti. È destinata ad un “uso hobbistico”.
3.2 SEGNALETICA DI SICUREZZA
Sulla macchina compaiono vari simboli. La loro funzione è quella di ricordare all’operatore i comportamenti da seguire per utilizzarla con l’attenzione e la cautela necessari.Significato dei simboli:
Attenzione! - La benzina è infiammabile. Lasciare raffred-dare il motore per almeno 2 minuti prima di effettuare il rifor-nimento.
Attenzione: Leggere le istruzioni prima di usare la macchina.
Attenzione! - I motori emet-tono monossido di carbonio. NON avviare in uno spazio chiuso.
Pericolo! Tenersi a distanza dalle superfici calde.
3.3 ETICHETTA DI IDENTIFICAZIONE
Scrivete il numero di matricola (S/n) della vostra macchina nell’apposito spazio della etichetta riportata nel retro della copertina.
3.4 COMPONENTI DEL MOTORE
La macchina è costituita dai seguenti componenti principali (fig. 1 ).
A. Tappo riempimento olio con astina di livelloB. CarburatoreC. Coperchio filtro ariaD. Cappuccio candelaE. Numero di matricola del motoreF. Manopola della fune
d’avviamento (se prevista)G. Batteria (se prevista)
3.5 CONDIZIONI AMBIENTALI
Il funzionamento di un motore endotermico a quattro tempi è influenzato da:
a) Temperatura: – Operando a basse temperature si possono verificare difficoltà di avviamento a freddo.
– Operando a temperature molto elevate è possibile riscontrare difficoltà di avviamento a caldo dovute all’evaporazione del carburante nella vaschetta del carburatore o nella pompa.
– In ogni caso occorre adeguare il tipo di olio alle temperature di utilizzo.
b) Altitudine: – La potenza massima di un motore endotermico diminuisce progressivamente con l’aumento dell’altitudine sul livello del mare.
– Aumentando considerevolmente l’altitudine, occorre pertanto ridurre
5
il carico sulla macchina, evitando lavori particolarmente gravosi.
3.6 CARBURANTE
La buona qualità del carburante è fondamentale per il corretto funzionamento del motore.
Il carburante deve rispettare i seguenti requisiti:
a) Utilizzare benzina pulita, fresca e senza piombo, con un minimo di 90 ottani;
b) Non utilizzare carburante con percentuale di etanolo superiore al 10%;
c) Non aggiungere olio;d) Per proteggere il sistema di carburazione dalla
formazione di depositi resinosi, aggiungere uno stabilizzatore di carburante.
L’utilizzo di carburanti non consentiti danneggia le componenti del motore e non rientra nei termini di garanzia. NOTA Usare solo il carburante indicato nella tabella dati tecnici. Non utilizzare altri tipi di carburante. È possibile utilizzare carburanti ecologici, quali la benzina alchilata.La composizione di questa benzina ha un impatto minore su persone e ambiente. Non sono segnalati effetti negativi collegabili all’uso delle stesse. Tuttavia in commercio esistono tipi di benzina alchilata per le quali non è possibile dare indicazioni precise in merito al loro utilizzo.
3.7 OLIO
Usare sempre olii di buona qualità, scegliendo la gradazione in funzione della temperatura di utilizzo.• Usare solo olio detergente di qualità non inferiore a SF-SG.
• Scegliere il grado di viscosità SAE in base alla tabella dei dati tecnici.
• L’uso di olio multigrado può comportare un consumo maggiore nei periodi caldi, pertanto occorre verificare il livello con maggiore frequenza.
• Non mischiare olii di marche e caratteristiche diverse.
• L’uso di olio SAE 30 con temperature inferiori a +5°C può arrecare danni al motore per inadeguatezza della lubrificazione.
3.8 FILTRO DELL’ARIA
L’efficacia del filtro dell’aria è determinante per evitare che detriti e pulviscolo possono essere aspirati dal motore, riducendone le prestazioni e la durata.
• Mantenere l’elemento filtrante libero da detriti e sempre in perfetta efficienza (par. 5.6).
• Se necessario, sostituire l’elemento filtrante con un ricambio originale; elementi filtranti non compatibili possono compromettere l’efficienza e la durata del motore.
• Non avviare mai il motore senza l’elemento filtrante correttamente montato.
3.9 CANDELA
Le candele per motori endotermici non sono tutte uguali.• Usare solo candele del tipo indicato, dotate della giusta gradazione termica.
• Prestare attenzione alla lunghezza del filetto; un filetto di lunghezza maggiore danneggia irrimediabilmente il motore.
• Controllare la pulizia e corretta distanza fra gli elettrodi (par. 5.7)
4. NORME D’USO
4.1 PRIMA DI OGNI UTILIZZO
Prima di ogni utilizzo del motore è bene eseguire una serie di controlli volti ad assicurare la regolarità di funzionamento.
4.1.1 Controllo livello olio
1. Sistemare la macchina in piano.2. Pulire la zona attorno al tappo di riempimento.3. Svitare il tappo (fig. 2.A), pulire
l’estremità dell’astina di livello (fig. 2.B) ed inserirlo appoggiando il tappo sul bocchettone, come illustrato:
– in caso di astina corta, poggiare il tappo senza avvitarlo,
– in caso di astina lunga, riavvitarla con uno scatto per poi svitarla nuovamente,
4. Estrarre nuovamente il tappo con l’astina e controllare il livello dell’olio che deve essere compreso fra le due tacche «MIN» e «MAX».
5. Rabboccare, se necessario, con olio dello stesso tipo, fino a raggiungere il livello «MAX», facendo attenzione a non versare olio fuori dal foro di riempimento
6. Riavvitare a fondo il tappo (fig. 2.A) e ripulire ogni traccia di olio eventualmente versato.
NOTA Rabboccare gradualmente aggiungendo piccole quantità di olio, verificando ogni volta il livello raggiunto. Non rabboccare oltre al livello «MAX»; un livello eccessivo può provocare:• fumosità allo scarico;

6
• imbrattamento della candela o del filtro dell’aria con conseguenti difficoltà nell’avviamento.
NOTA Per il tipo di olio da usare, attenersi alle indicazioni riportate nella tabella dei dati tecnici.
4.1.2 Controllo filtro aria
L’efficacia del filtro dell’aria è condizione indispen-sabile per il corretto funzionamento del motore; non avviare il motore se l’elemento filtrante è mancante, rotto o non sufficientemente imbevuto d’olio.
1. Pulire la zona circostante il coperchio (fig.4.A) del filtro.
2. Togliere il coperchio (fig. 4.A) sganciando le linguette (fig. 4.B);
3. Controllare lo stato dell’elemento filtrante (fig. 4.C o 4.C.1), che deve presentarsi integro, pu-lito e in perfetta efficienza; in caso contrario, provvedere alla sua manutenzione o sostitu-zione (vedi 5.6).
4. Rimontare il coperchio (fig. 4.A).
4.1.3 Rifornimento carburante
Le operazioni di rifornimento carburante sono descritte nel manuale macchina e qui solo richiamate.Per rifornire il carburante:1. Svitare il tappo di chiusura (fig.3.A)
serbatoio e rimuoverlo.2. Inserire l’imbuto. (fig.3.B)3. Rifornire con il carburante e
togliere l’imbuto (fig.3.B)4. Al termine del rifornimento avvitare
bene il tappo del carburante (fig.3.A)e pulire eventuali fuoriuscite.
IMPORTANTE Evitare di versare carburante sulle parti in plastica del motore o della macchina per evitare di danneggiarle, e ripulire immediatamente ogni traccia di carburante eventualmente versata. La garanzia non copre i danni alle parti in plastica causati dal carburante.
4.1.4 Cappuccio candela
Collegare saldamente il cappuccio (fig. 5.A) del cavo alla candela (fig. 5.B), assicurandosi che non vi siano tracce di sporco all’interno del cappuccio stesso e sul terminale della candela.
4.1.5 Controllo dello stato di carica della batteria
Vedi paragrafo 5.3.2
4.2 AVVIAMENTO DEL MOTORE
L’avviamento del motore deve avvenire secondo le modalità indicate nel Manuale di Istruzioni della macchina, avendo sempre l’avvertenza di disinnestare ogni dispositivo (se previsto) in grado di generare l’avanzamento della macchina o di arrestare il motore.
IMPORTANTE Non lavorare su pendenze superiori a 20° per non pregiudicare il corretto funzionamento del motore
IMPORTANTE Per i modelli con avviamento a batteria assicurarsi di inserire correttamente la batteria nell’apposito alloggiamento (par. 5.3.3)
4.3 ARRESTO DEL MOTORE AL TERMINE DEL LAVORO
1. Arrestare il motore secondo le modalità indicate nel Manuale di Istruzioni della macchina.
2. A motore freddo, scollegare il cappuccio (fig. 5.A) della candela e togliere la chiave di avviamento (se prevista).
3. Rimuovere ogni deposito di detriti dal motore e in particolare dalla zona del silenziatore di scarico, per ridurre il rischio di incendio.
4.4 PULIZIA E RIMESSAGGIO
• Non usare getti d’acqua o lance a pressione per la pulizia delle parti esterne del motore.
• Usare preferibilmente una pistola ad aria compressa (max 6 bar) evitando che detriti e pulviscolo penetrino nelle parti interne.
• Riporre la macchina (e il motore) in un luogo asciutto, al riparo dalle intemperie e sufficientemente aerato.
4.5 INATTIVITÀ PROLUNGATA
In caso si preveda un periodo di inutilizzo del motore superiore a 30 giorni (ad esempio a fine stagione), occorre attuare qualche precauzione per favorire la successiva rimessa in servizio.• Svuotare il serbatoio del carburante, per evitare che si formino dei depositi al suo interno, svitando il tappo (fig. 3.A) della vaschetta del carburatore e raccogliendo tutto il carburante in un contenitore adeguato. Al termine dell’operazione, rammentare di riavvitare il tappo (fig. 3.A) serrandolo a fondo.
• Rimuovere la candela e introdurre nel foro della candela circa 3 cl di olio motore pulito, quindi, tenendo chiuso il foro con uno straccio, azionare brevemente il motorino d’avviamento

7
per fare compiere alcuni giri al motore e distribuire l’olio sulla superficie interna del cilindro. Infine rimontare la candela, senza collegare il cappuccio del cavo.
5. MANUTENZIONE
Qualsiasi tentativo di manomissione del sistema del controllo delle emissioni può innalzare il livello di emissioni oltre il limite di legge.Rientrano in tale definizione la rimozione o alterazione di parti quali il sistema di aspirazione, l’impianto di alimentazione e l’impianto di scarico.
5.1 GENERALITÀ
Le norme di sicurezza da seguire durante le operazioni di manutenzione sono descritte al par. 2.4.
Tutti i controlli e gli interventi di manutenzione devono essere effettuati a macchina ferma e motore spento. Scollegare la candela e leggere le relative istruzioni prima di iniziare qualsiasi intervento di pulizia o manutenzione. Indossare indumenti adeguati, guanti ed occhiali prima di effettuare manutenzioni.
• Le frequenze ed i tipi di intervento sono riassunti nella “Tabella manutenzioni”.
• L’utilizzo di ricambi e accessori non originali potrebbe avere effetti negativi sul funzionamento e sulla sicurezza della macchina. Il costruttore declina qualsiasi responsabilità in caso di danni o lesioni causati da detti prodotti.
• I ricambi originali vengono forniti dalle officine di assistenza e dai rivenditori autorizzati.
IMPORTANTE Tutte le operazioni di manutenzione e di regolazione non descritte in questo manuale devono essere eseguite dalvostro Rivenditore o da un Centro specializzato.
5.2 TABELLA MANUTENZIONI
IMPORTANTE È responsabilità del proprietario della macchina di eseguire le operazioni di manutenzione descritte nella tabella sottostante.
IMPORTANTE Pulire più frequentemente in condizioni di lavoro particolarmente gravose o nel caso in cui siano presenti detriti nell’aria.
NOTA I filtri vanno puliti / sostituiti più spesso se la macchina lavora su un terreno molto polveroso.
Operazione
Dop
o le
prim
e 5
ore
Ogn
i 5 o
reo
dopo
ogn
i util
izzo
Ogn
i 50
ore
o fin
e st
agio
ne
Ogn
i 100
ore
Controllo livello olio (par. 4.1.1) - √ - -
Sostituzione olio1 (par. 5.4) √ - √ -Pulizia del silenziatore e del motore (par. 5.5) - √ - -
Controllo e pulizia del filtro aria2 (par. 5.6) - √ - -
Sostituzione del filtro aria (par. 5.6)3 - - - √
Controllo candela (par. 5.7) - - √ -Sostituzione candela (par. 5.7) - - - √
1 Sostituire l’olio ogni 25 ore se il motore lavora a pieno carico o con temperature elevate.
2 Pulire il filtro aria più frequentemente se la macchina lavora in aree polverose.
3 Solo per elemento filtrante in cartuccia.
5.3 BATTERIA (SE PREVISTA)
È fondamentale effettuare un’accurata manutenzione della batteria per garantirne una lunga durata.La batteria della vostra macchina deve essere tassativamente caricata:• prima di utilizzare la macchina per la prima volta dopo l’acquisto;
• prima di ogni prolungato periodo di inattività (superiore a 30 giorni) (par. 4.5);
• prima della messa in servizio dopo un prolungato periodo di inattività.
Se non si rispetta la procedura o non si carica la batteria, si potrebbero verificare danni irreparabili agli elementi della batteria. Una batteria scarica deve essere ricaricata al più presto.
IMPORTANTE La ricarica deve avvenire con una apparecchiatura a tensione costante. Altri sistemi di ricarica possono danneggiare irrimediabilmente la batteria.

8
5.3.1 Rimozione e ricarica della batteria
Per rimuovere:
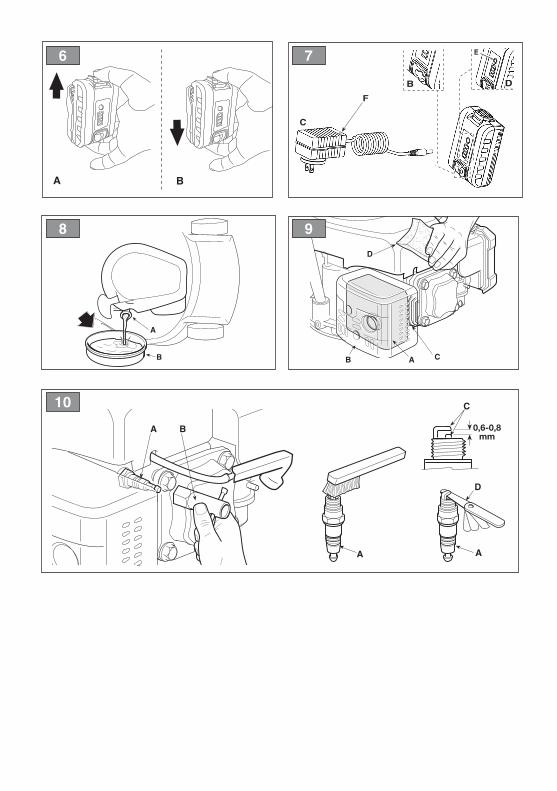
• Premere il pulsante posto sopra la batteria, facendola scorrere verso l’alto (fig. 6.A).
Per ricaricare:
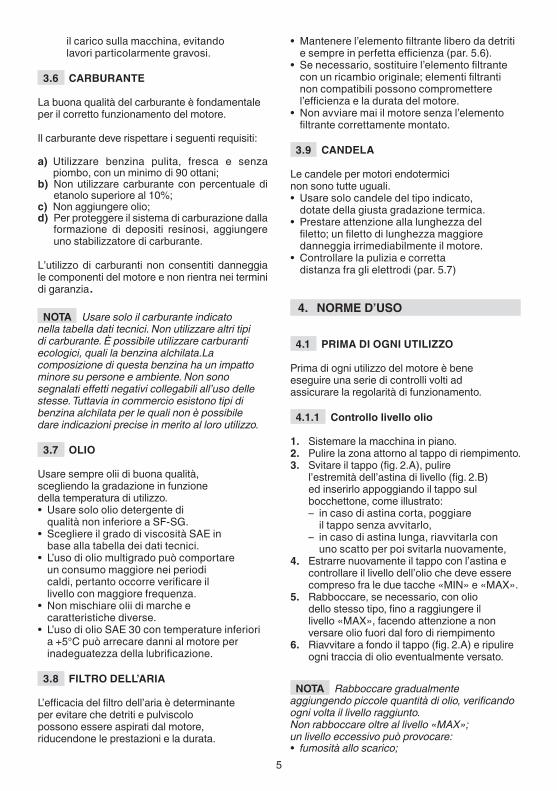
• Rimuovere il tappo in gomma situato nella parte inferiore della batteria (fig 7.B)
• collegare il carica batteria fornito (fig. 7.C) a una presa di corrente, con tensione corrispondente a quella indicata sulla targhetta del carica batteria.
• Una volta collegata la batteria, si accenderà la spia del carica batteria (fig 7.C): se la luce è rossa è in corso la ricarica, se è verde la carica è completa.
NOTA La batteria è dotata di una protezione che impedisce la ricarica se la temperatura ambiente non è compresa fra 0 e +45 °C.
NOTA La batteria può essere ricaricata in ogni momento, anche parzialmente, senza il rischio di danneggiarla.
5.3.2 Controllo dello stato di carica della batteria
La batteria è dotata di un sistema che permette di controllarne lo stato di carica (fig. 7.D).Premendo il pulsante (fig. 7.E) si accenderanno le luci che indicano la carica residua della batteria:
• tre luci verdi e una rossa indicano dal 100% al 78% di carica
• due luci verdi e una rossa indicano dal 77% al 55% di carica
• una luce verde e una rossa indicano dal 54% al 33% di carica
• una luce rossa indica dal 32% al 10% di carica residua.
• una luce rossa lampeggiante indica meno del 10% di carica residua e la necessità di ricaricare al più presto.
5.3.3 Rimontaggio della batteria sulla macchina
Completata la ricarica:1. scollegare la batteria dal carica batteria2. scollegare il carica batteria (fig.
7C) dalla rete elettrica;3. inserire la batteria (fig. 1.G) nel suo
alloggiamento spingendola a fondo verso il basso (fig. 6.B) fino ad avvertire il “clic” che la blocca in posizione e assicura il contatto elettrico;
5.4 SOSTITUZIONE DELL’OLIO
Per il tipo di olio da usare, attenersi alle indicazioni riportate nella tabella dati tecnici.
IMPORTANTE Eseguire lo scarico dell’olio a motore caldo, facendo attenzione a non toccare parti calde del motore o l’olio scaricato.
Per il tipo di olio da usare, attenersi alle indicazioni riportate nel capitolo specifico.
IMPORTANTE Eseguire lo scarico dell’olio a motore caldo, facendo attenzione a non toccare parti calde del motore o l’olio scaricato.
a) Sistemare la macchina in piano.b) Accertarsi che il serbatoio del carburante non sia
pieno e che il tappo sia ben chiuso.c) Pulire la zona attorno al tappo di riempimento (fig.
2.A.).d) Svitare il tappo (fig. 2.A).e) Predisporre un contenitore adeguato (fig. 8.B) per
raccogliere l’olio.f) Coricare la macchina sul fianco destro in modo
da fare fuoriuscire l’olio dal foro di riempimento (fig. 8).
g) Rimettere la macchina in piano rabboccare con nuovo olio (vedi par. 4.1.1).
h) Controllare sull’astina (fig. 2.B) che il livello dell’o-lio raggiunga la tacca «MAX».
j) Richiudere il tappo e ripulire ogni traccia di olio eventualmente versato.
5.5 PULIZIA DEL SILENZIATORE E DEL MOTORE
La pulizia del silenziatore deve essere eseguita a motore freddo.
a) Rimuovere dal silenziatore (fig 9.A) e dalla sua protezione (fig. 9.B) ogni detrito ogni traccia di detriti o sporcizia o quant’altro possa provocare in cen dio, impiegando preferibilmente una spaz-zola o aria compressa.
b) Pulire le alette del cilindro e della testata (fig. 9.C) per agevolare il raffreddamento ed evitare il surri-

9
scaldamento del motore.c) Ripassare le parti in plastica con una spugna (fig.
9.D) imbevuta d’acqua e detersivo.
5.6 MANUTENZIONE DEL FILTRO DELL’ARIA
L’elemento filtrante deve essere sempre mantenuto ben pulito e deve essere sostituito se rotto o dan-neggiato.
a) Pulire la zona circostante il coperchio (fig. 4.A) del filtro.
b) Togliere il coperchio (fig. 4.A) sganciando le lin-guette fig. 4.B).
c) Rimuovere l’elemento filtrante (fig. 4.C oppure 4.C.1).
d) Chiudere con uno straccio il condotto di aspira-zione (fig. 4.E) per evitare che vi possa entrare del lo sporco.
e) Eseguire la manutenzione dell’elemento filtrante come sotto indicato per i diversi tipi.
f) Pulire l’interno dell’alloggiamento (fig. 4.D) del filtro da polvere, detriti o sporcizia, facendo attenzione a non immetterli nel condotto d’aspirazione (fig. 4.E).
g) Sistemare l’elemento filtrante (fig. 4.C o 4.C.1) nel suo alloggiamento e richiudere il coperchio (fig . 4.B).
• Elemento filtrante in spugna (fig. 4.C)L’elemento filtrante deve essere mantenuto ben pu-lito ed imbevuto d’olio e sostituito se rotto, ta glia to o con parti sbriciolate.
IMPORTANTE Non usare aria compressa per la pulizia dell’elemento filtrante.
– Lavare l’elemento filtrante in spugna in acqua e detergente ed asciugarlo con un panno pu lito.
– Impregnare l’elemento filtrante con 2 cucchiai di olio motore pulito e strizzarlo più volte per distribuire uniformemente l’olio.
– Rimuovere l’eventuale olio in eccesso con un panno pulito.
In caso di sostituzione dell’elemento filtrante, oc cor re effettuare l’oliatura del nuovo filtro come sopra de-scritto.
• Elemento filtrante a cartuccia (fig. 4.C.1)– Soffiare con aria compressa dal lato interno per rimuovere polvere e detriti.
5.7 CONTROLLO E MANUTENZIONE DELLA CANDELA
1. Smontare la candela (fig. 10.A) con una chiave a tubo (fig. 10.B).
2. Pulire gli elettrodi (fig. 10.C) con una spazzola metallica rimuovendo eventuali depositi carboniosi.
3. Controllare con uno spessimetro (fig. 10.D) la corretta distanza fra gli elettrodi (0,6 - 0,8 mm).
4. Rimontare la candela (fig. 10.A) e serrare a fondo con una chiave a tubo (fig. 10.B).
Sostituire la candela se gli elettrodi sono bruciati o se la porcellana si presenta rotta o incrinata.
Pericolo di incendio! Non effettuare verifiche dell’impianto di accensione con la candela non avvitata nella sua sede.
IMPORTANTE Impiegare solo candele del tipo indicato (vedi Tabella dati tecnici).

10
6. IDENTIFICAZIONE INCONVENIENTI
INCONVENIENTE CAUSA PROBABILE RIMEDIO
1. Difficoltà di avviamento
Mancanza di carburante Controllare e rabboccare (cap. 5.1.3)Carburante vecchio o depositi nel serbatoio
Svuotare il serbatoio e immettere carburante fresco
Procedura di avviamento non corretta Eseguire correttamente l’avviamento (par. 5.2 e par. 5.3)
Candela scollegata Controllare che il cappuccio sia ben calzato sulla candela (par. 5.1.4)
Candela bagnata o elettrodi della candela sporchi o distanza inadeguata Controllare (par. 6.6)
Filtro aria otturato Controllare e pulire (par. 6.5)Olio inadeguato alla stagione Sostituire con un olio adeguato (par. 6.3)Evaporazione del carburante nel carburatore (vapor lock)a causa di temperature elevate
Attendere qualche minuto poi ritentare l’avviamento (par. 5.3)
Problemi di carburazione Contattare un Centro Assistenza AutorizzatoBatteria scarica Ricaricare la batteria (par 5.3.1)Batteria non inserita correttamente Inserire la batteria correttamente (par. 5.3.3)
2. Funzionamento irregolare.
Elettrodi della candela sporchi o distanza inadeguata Controllare (par. 6.6)
Cappuccio della candela inserito male Controllare che il cappuccio sia inserito stabilmente (par. 5.1.4)
Filtro aria otturato Controllare e pulire (par. 6.5)Problemi di carburazione Contattare un Centro Assistenza Autorizzato
3. Perdita di potenza durante il lavoro
Filtro aria otturato Controllare e pulire (par. 6.5)Problemi di carburazione Contattare un Centro Assistenza Autorizzato
Se gli inconvenienti perdurano dopo aver applicato i rimedi descritti, contattare il vostro Rivenditore.

1
1. GENERAL INFORMATION
1.1 HOW TO READ THIS MANUAL
Some of the paragraphs in this manual contain particularly important information in terms of safety and operation, and are highlighted differently, according to the following criteria:
NOTE or IMPORTANT this paragraph provides details or further information on what has already been said, with the aim of preventing damage to the machine or other damage.
The symbol represents a danger. Failure to observe the warning can lead to possible personal and/or third party injury and/or damage.
1.2 REFERENCES
1.2.1 Figures
The figures in these instructions for use are numbered 1, 2, 3, and so forth.The components identified in the figures aremarked with letters A, B C and so forth.A reference to component C in figure 2 is represented by: “See fig. 2.C” or simply “(Fig. 2.C)”.The figures are provided by way of example. The effective prices can vary in comparison to the ones provided here.
1.2.2 Titles
The manual is arranged in chapters and paragraphs. The title of paragraph “2.1 Training” isa sub-title of “2. Safety regulations”. Thereferences to titles or paragraphs are markedwith the abbreviation chap. or par. and the relativenumber. Example: “chap. 2” or “par. 2.1”.
2. SAFETY REGULATIONS
2.1 TRAINING
Read these instructions carefullybefore using the machine.
Familiarise with the controls andwith appropriate use of the machine.
ATTENTION!: READ THIS MANUAL CAREFULLY BEFORE USING THE MACHINE. Keep safe for future necessity.EN
INDICE1. GENERAL INFORMATION ........................... 12. SAFETY REGULATIONS .............................. 13. ABOUT THE MACHINE ................................ 4
3.1 Machine description and intended use.. 4 3.2 Safety signs .......................................... 4 3.3 Identification label ................................. 4 3.4 Engine components .............................. 4 3.5 Environmental conditions ...................... 4 3.6 Fuel ....................................................... 4 3.7 Oil ......................................................... 5 3.8 Air filter .................................................. 5 3.9 Spark plug ............................................. 5
4. REGULATIONS FOR USE ............................ 5 4.1 Before each use .................................... 5 4.2 Starting the engine ................................ 6 4.3 Stopping the engine at the end of
operation ............................................... 6 4.4 Cleaning and storage ............................ 6 4.5 Prolonged downtime ............................. 6
5. MAINTENANCE ........................................... 6 5.1 General ................................................. 6 5.2 Maintenance table................................. 7 5.3 BATTERY (if applicable) ........................ 7 5.4 Oil change ............................................. 8 5.5 Cleaning the silencer and the engine .... 8 5.6 Air filter maintenance ............................ 8 5.7 Spark plug checks and maintenance .... 9
6. TROUBLESHOOTING .................................. 9

2
Learn how to stop the engine quickly.Failure to observe warnings andinstructions can cause fires and/or seriousinjury. Keep all warnings andinstructions safe for future reference.
• Never allow the machine to be used by children or individuals who are not familiar with the instructions. Local laws may establish a minimum age for users.
• Never use the machine if the user is tired or unwell, or has taken medication, drugs, alcohol or substances that impair reflexes and concentration.
• Remember that the operator or user is responsible for accidents and unexpected events that can occur to other people or property.
2.2 PRELIMINARY OPERATIONS
Personal Protective Equipment (PPE)• Never use the machine without wearing suitable clothing.
• Never wear loose clothing, laces, jewellery of other objects that can get caught; tie back long hair and maintain the safety distance at .
• Wear noise cancelling headphones.
Work / Machine Area• Before starting the engine ensure that all of the controls operating the moving parts of the machine are disconnected.
Internal combustion engine: fuel• Warning: the fuel is highly flammable. Handle with care!
– Always store the fuel in suitable containers. – Fill up or top up using a funnel, only outdoors and never smoke during these operations.
– Fill up before turning the engine on. Never open the tank cap or fill up when the engine is running or still warm.
– If any fuel spills out do not start the engine, rather, move the machine away from the spillage and immediately clean up every trace of fuel that has spilled on to the machine or ground
– Firmly screw the fuel container tank cap back on.
– Avoid getting any fuel or your clothing and, if this should happen, change your clothes before starting the engine.
2.3 DURING USE
Work Area• Do not use the machine in environments that pose the risk of explosion, in the
presence of flammable liquids, gases or powders. Electrical contact or mechanical rubbing can generate sparks that can ignite powder or vapour.
• Do not operate the engine in confined spaces where dangerous carbon monoxide fumes can collect. The start-up operations must be carried out outdoors or in a well-ventilated area. Always remember that the exhaust gases are toxic.
• Keep people, children and animals away from the work area. Children must be supervised by another adult.
Conduct• Before making repairs, cleaning, performing inspections, adjustments, turn the engine off and disconnect the spark plug cable (unless explained otherwise in the instructions).
• Do not touch the parts of the engine that heat up during operation. Risk of burns.
Restrictions of use• Do not use the machine if there are not enough protections or if the safety devices are not set up correctly.
• Do not disconnect or tamper with the installed safety systems.
• Do not change the engine adjustments, or exceed the maximum rpm. If the engine is forced to run at an excessive speed, the risk of personal injury increases.
• Do not use starter fluids or other similar products.
• Do not tilt the machine onto its side to the point where fuel leaks from the fuel tank cap.
• Do not crank the engine without spark plug.
2.4 MAINTENANCE, STORAGE AND TRANSPORT
Servicing the machine on a regular basis and correct storage maintainmachine safety.
Broken or worn parts must be replaced and never repaired. Only use original parts: using parts that are not original or installed incorrectly affects machine safety, and can therefore cause accidents or personal injury and relieve the Manufacturer of all obligations and liability.
Maintenance• If the tank can be emptied, perform this operation outdoors and when the motor is cold.
• To reduce the risk of fire, check for oil and/or fuel leaks on a regular basis.

3
Storage• Never leave fuel in the tank if the machine is stored in a building where the fuel vapours can come into contact with open flames, sparks or sources of heat.
• Let the machine cool down before storing it indoors.
Transport• Transport the machine with an empty tank.
2.5 BATTERY, BATTERY CHARGER (IF APPLICABLE)
IMPORTANT The following safety instructions are in addition to the safety requirements provided in the specific battery and battery charger manual delivered with this machine.
• Only use battery chargers recommended by the manufacturer to recharge batteries. An inadequate battery charger may cause electric shock, overheating or corrosive liquid to leak from the battery.
• Use only batteries specifically designed for your power tool. The use of other batteries may cause injuries and fire risks.
• Keep all unused batteries at a distance from paper clips, coins, keys, nails, screws or other small metal objects as contact with the same can cause short circuits. Short circuits between battery contacts can lead to explosion or fires.
• Never use the battery charger in environments in the presence of vapours, flammable substances or on easily flammable surfaces such as paper, fabric, etc. The battery charger heats up during recharging and may cause a fire.
• When transporting accumulators, make sure the contacts never come into contact with each other and never use metal containers to transport them.
2.6 ENVIRONMENTAL PROTECTION
Protecting the environment must be a significant and top priority for machine use, to the benefit of civil co-habitation and of the environment that we live in. Avoid being an element of disturbance to the surrounding area. Use this machine at reasonable times of the day only (not early morning or late evening when the noise could cause disturbance).Comply with local regulations for the disposal of packaging, deteriorated parts or any elements
with a strong environmental impact; this waste must not be disposed of with regular waste, but must be separated and taken to collection centres, who will recycle the materials.Comply with local regulations for the disposal of waste materialsAt the time of decommissioning, do not leave the machine in the environment, rather, contact a collection centre, in accordance with local regulations in force.
Do not throw electrical equipment away with domestic waste. According to the European Directive 2012/19/EU on electrical and electronic equipment waste and its implementation in
compliance with national standards, old electrical equipment must be collected separately, for eco-compatible recycling. If electrical equipment is disposed of in dumps or in landfills, hazardous substances can leak into the groundwater and contaminate the food chain, damaging your health and well-being. For further information on the disposal of this product, contact your dealer or a domestic waste collection service.
At the end of their working life, dispose of batteries paying due attention to the environment. Batteries contain material classified as hazardous for you and the environment. They must be removed
and disposed of separately at a facility that accepts lithium-ion batteries.
Separate waste collection of the products and packaging used allows the materials to be recycled and reused. Reuse of recycled materials help to prevent environmental pollution and reduces the
demand for raw materials.
2.7 EMISSIONS
The combustion process generates toxic substances such as carbon monoxide, nitrogen oxides and hydrocarbons.It is important to control these substances because they can react with photochemical smog as well as with direct exposure to sunlight.Carbon monoxide does not react in the same way to exposure to sunlight but it must still be considered toxic.
Our machines are equipped with emission reduction systems for the substances mentioned above.

4
3. ABOUT THE MACHINE
3.1 MACHINE DESCRIPTION AND INTENDED USE
This machine is a spark-ignition engine. Engine performance, reliability and life are influenced by many factors, some external and some strictly associated with the quality of the employed products and with the scheduled maintenance.Additional information is provided below for greater awareness of your machine.Any other use that does not comply with the above, can be dangerous and cause damage to people and/or property.
IMPORTANT Improper use of the machine causes the warranty to lapse and relieves the Manufacturer of any liability, placing all responsibility for damage or injury, to him/herself or third parties, on the user.
3.1.1 Type of users
This machine is intended for use by consumers, i.e. non-professional operators. It is intended for "hobby-related activities".
3.2 SAFETY SIGNS
There are various symbols on the machine. Their function is to remind the operator of the correct conduct for use, with due care and caution.Meanings of the symbols:
Warning! - Petrol is flammable. Allow engine to cool at least 2 minutes before refuelling.
Warning: Read the instruc-tions before use.
Warning! - Engines emit car-bon monoxide. DO NOT run in enclosed area.
Danger! Keep away from hot surfaces.
3.3 IDENTIFICATION LABEL
Write the serial number (S/n) of your machine on the space provided on the label at the back of the cover.
3.4 ENGINE COMPONENTS
The machine is comprised of the following main parts (fig. 1 ).
A. Oil filler cap with dipstickB. CarburettorC. Air filter coverD. Spark plug capE. Engine codeF. Knob of the starter rope (if applicable)G. Battery (if applicable)
3.5 ENVIRONMENTAL CONDITIONS
The operation of a four-stroke endothermic engine is affected by:
a) Temperature: – When operating at low temperatures cold starts may be difficult.
– When operating at very high temperatures warm starts may be difficult due to evaporation of the fuel in the float chamber of the carburettor or in the pump.
– In any case the right kind of oil must be used, according to the operating temperatures.
b) Altitude: – The higher the altitude above sea level, the lower the max power developed by an endothermic engine.
– When there is a considerable increase in altitude, the load on the machine should be reduced and particularly heavy work avoided.
3.6 FUEL
A good quality fuel is the major issue for the engine reliability of operation.
Fuel must meet these requirements:
a) Use clean, fresh unleaded gasoline, with a min-imum of 90 octane
b) Do not use fuel formulated with ethanol greater than 10%;
c) Do not add oild) To protect the fuel system from gum formation,
mix a fuel stabilizer into the fuel.

5
Use of unapproved fuels will cause damage to engine components, which will not be covered under warranty. NOTE Only use the fuel named in the technical data table. Do not use other types of fuel. It is possible to use ecological fuels, such as alkylate petrol. The composition of this petrol has less of an impact on people and animals. No negative effects have been reported in connection to their use. Nonetheless, there are types of alkylate petrol on the market for which it is not possible to provide specific indications on their use.
3.7 OIL
Use always high quality oils, choosing their viscosity grade according to the operating temperature.• Only use detergent oil with a quality of no less than SF-SG.
• Choose the SAE viscosity based on the technical data table.
• The use of multigrade oil can lead to greater consumption in hot weather, accordingly it is necessary to check the level more frequently.
• Do not mix oils of different brands and characteristics.
• SAE 30 oil, if used below +5°C, could result in possible engine damage due to inadequate lubrication.
3.8 AIR FILTER
The air filter must always be in perfect working order, to prevent debris and dust from getting sucked into the engine, reducing the efficiency and life of the machine.• Always keep the filtering element free of debris and in perfect working order (par. 5.6).
• If necessary, replace the filtering element with an original spare part Incompatible filtering elements can impair the efficiency and life of the engine.
• Never start the engine without mounting the filtering element properly.
3.9 SPARK PLUG
Not all the spark plugs for endothermic engines are the same.• Use only spark plugs of the recommended type, with the right heat range.
• Check the length of the thread, because - if too long - it will damage the engine beyond repair.
• Make sure that the electrodes are clean and that their gap is correct (par. 5.7)
4. REGULATIONS FOR USE
4.1 BEFORE EACH USE
Before every use, perform the following checking procedures in order to assure a regular operation.
4.1.1 Oil level check
1. Place the machine on a flat surface.2. Clean around the oil fill cap.3. Unscrew the cap(fig. 2.A), clean the end of
the dipstick (fig. 2.B) and slide it back in until the cap is touching the hole, as shown :
– if the dipstick is short, place the cap without fastening it,
– if the dipstick is long, fasten it again with a click and then unscrew it,
4. Remove the cap with the dipstick and check the oil level that must be between the «MIN» and «MAX» marks.
5. If oil is required, add oil of the same kind up to the «MAX» mark, being careful not to spill any outside the oil fill
6. Fully tighten the filler cap (fig. 2.A) and wipe off any spilled oil.
NOTE Top up gradually, adding small amounts of oil, checking the level each time. Do not top up beyond the «MAX» level; an excessive level can cause:• smoking from the exhaust;• soiling of the spark plug or air filter with
subsequent difficulty for ignition.
NOTE For the required type of oil, observe the indications provided in the technical data table.
4.1.2 Air filter control
The efficiency of the air filter is essential to correct engine operation; never start the engine if the filter element is missing, broken or insufficiently saturated with oil.
1. Clean around the filter cover (fig.4.A).2. Remove the cover (fig. 4.A) by releasing the
tabs (fig. 4.B);3. Check the state of the filtering element (fig. 4.C
or 4.C.1), which must be intact, clean and in perfect working order; if not, either carry out maintenance or replace it (see 5.6).
4. Put the cover back in place (fig. 4.A).

6
4.1.3 Refuelling
The refuelling operations are described in the machine manual and are mentioned here.To refuel:1. Unscrew the fuel tank filler cap
(fig.3.A) and remove it.2. Set a funnel on the hole. (fig.3.B)3. Refuel and take the funnel off (fig.3.B)4. At the end of refuelling, screw the cap
back on (fig.3.A) and clean any spillage.
IMPORTANT Avoid getting fuel on the plastic parts of the engine or machine to avoid damaging them, and immediately clean off every trace of spilled fuel. The warranty does not cover damage to plastic parts caused by fuel.
4.1.4 Spark plug cap
Firmly connect the cap (fig. 5.A) of the spark plug cable (fig. 5.B), ensuring that there are no traces of dirt inside the cap or on the spark plug terminal.
4.1.5 Check the battery charge status
See paragraph 5.3.2
4.2 STARTING THE ENGINE
The engine must be started up as described in the machine's Instructions Manual, always being careful to uncouple any device (if applicable) that is capable of making the machine travel forwards or stop the engine.
IMPORTANT Do not work on slopes exceeding 20° to avoid jeopardising correct engine operation
IMPORTANT Make sure the battery is properly inserted inside its housing when dealing with battery start-up models (par. 5.3.3)
4.3 STOPPING THE ENGINE AT THE END OF OPERATION
1. Stop the engine following the instructions contained in the machine's Instructions Manual.
2. With a cold engine, take the cap off the spark plug (fig. 5.A) and take out the starter key (if applicable).
3. Remove any debris from the engine and especially around the exhaust silencer to reduce the risk of fire.
4.4 CLEANING AND STORAGE
• Do not spray with water or use pressure washer wands to clean the exterior of the engine.
• Preferably use a compressed air gun (max. 6 bars), thus preventing debris and dust from penetrating inside.
• Store the lawnmower (and the engine) in a dry place, sheltered from the elements and sufficiently ventilated.
4.5 PROLONGED DOWNTIME
If the engine is not going to be used for more than 30 days (for example, at the end of the season), it will be necessary to take a few precautions so that it will start back up again accordingly.• Empty the fuel tank, to prevent deposits from forming inside, by unscrewing the cap (fig. 3.A) of the fuel tank and collecting all of the fuel in a suitable container. At the end of this operation, remember to screw the cap back on (fig. 3.A) tightly.
• Remove the spark plug and pour about 3 cl of clean engine oil into the spark plug hole, then, having blocked the hole with a rag, run the starter motor briefly to turn the engine for a few revs and distribute the oil over the inner surface of the cylinder. Finally, replace the spark plug without connecting the cable cap.
5. MAINTENANCE
Any attempt to tamper with the emission control system may increase emission levels above legal limits.This definition includes the removal or alteration of parts such as the intake system, the fuel system and the exhaust system.
5.1 GENERAL
The safety regulations that must be followed during maintenance are described in par. 2.4.
All controls and maintenance operations must be carried out with the machine off and the engine off. Disconnect the spark plug and read the relative instructions before starting any cleaning or maintenance procedure. Wear

7
suitable clothing, gloves and glasses before performing any maintenance.
• The frequency and type of procedures are outlined in the "Maintenance table".
• The use of non-original parts and accessories could have negative effects on machine operation and safety. The manufacturer declines any responsibility for damage or injury caused by said products.
• Original parts are supplied by assistance shops and authorised dealers.
IMPORTANT All maintenance and adjustment operations that are not described in this manual must be carried out by your Dealer or by a Specialised Centre.
5.2 MAINTENANCE TABLE
IMPORTANT It is the responsibility of the owner to perform the machine maintenance operations described in the table below.
IMPORTANT Clean more frequently when operating in particularly demanding conditions or when there is debris in the air.
NOTE Filters should be cleaned / replaced more often if the machine is used on very dusty ground.
Operation
Afte
r the
firs
t 5 h
ours
Ever
y 5
hour
sor
afte
r eve
ry u
se
Ever
y 50 h
ours
or a
t the
end
of th
e sea
son
Ever
y 10
0 ho
urs
Oil level check (par. 4.1.1) - √ - -Oil change1 (par. 5.4) √ - √ -Cleaning the silencer and the engine (par. 5.5) - √ - -
Checking and cleaning the air filter 2(par. 5.6) - √ - -
Changing the air filter (par. 5.6)3 - - - √
Spark plug check (par. 5.7) - - √ -
Changing spark plugs (par. 5.7) - - - √
1 Change the oil every 25 hours if the engine is operating under heavy load or in hot weather.
2 Clean the air filter more frequently if the machine is operating in dusty areas.
3 Only for the filtering element provided in the form of a cartridge.
5.3 BATTERY (IF APPLICABLE)
To ensure long life to the battery it is essential to keep it carefully maintained.The machine battery must always be charged:• before using the machine for the first time after purchase;
• before leaving the machine disused for a long period (over 30 days) (par. 4.5);
• before starting up the machine after a prolonged period of inactivity.
Failure in following the procedure or in charging the battery could permanently damage the battery elements. A flat battery must be recharged as soon as possible.
IMPORTANT Recharging must be done using a battery charger at constant voltage. Other recharging systems can irreversibly damage the battery.
5.3.1 Battery removal and recharging
To remove the battery:
• Push the button placed above the battery by making it slide upwards (fig. 6.A).
To recharge the battery:
• Remove the rubber cap placed on the battery's lower side (fig 7.B)
• connect the battery charger (fig. 7.C) to a power socket with the voltage indicated on the rating plate.
• Once the battery is connected the battery charger's light will light up (fig 7.C): a red light means that the battery is recharging, whereas a green light means that the recharging is complete.
NOTE The battery is equipped with a guard that inhibits recharging if the environmental temperature is not between 0 and +45 °C.

8
IMPORTANT The battery can be charged at any time, even partially, with no risk of damaging it.
5.3.2 Check the battery charge status
The battery is equipped with a device allowing the user to check its charge status (fig. 7.D).
By pushing the button (fig. 7.E) the lights showing the battery's residual charge will light up:
• three green lights and one red mean that the charge ranges from 100% to 78%
• two green lights and one red mean that the charge ranges from 77% to 55%
• one green light and one red mean that the charge ranges from 54% to 33%
• a red light means that the residual charge ranges from 32% to 10%.
• a blinking red light means that the charge is lower than 10% and that the battery should be recharged as soon as possible.
5.3.3 Refitting the battery on the machine
When recharging is completed:1. disconnect the battery from
the battery charger2. Disconnect the battery charger (fig.
7C) from the mains power supply;3. insert the battery (fig. 1.G) in its housing
by pushing it downwards (fig. 6.B) until you hear a "click": this sound means that the battery is locked in its position and that the connection is ensured;
5.4 OIL CHANGE
For the required type of oil, observe the indications provided in the technical data table.
IMPORTANT Drain the oil out while the en-gine is warm, being careful not to touch the hot en-gine nor the drained oil.
See the specific chapter for the oil to be used.
IMPORTANT Drain the oil out while the en-gine is warm, being careful not to touch the hot en-gine nor the drained oil.
a) Place engine level.b) Make sure that the fuel tank is not full and that the
cap is properly closed.c) Clean around oil fill (fig. 2.A.).d) Remove the filler cap (fig. 2.A).e) Have a container ready (fig. 8.B) to collect the oil.f) Tip the lawnmower on its right side so that the oil
will drain from the oil fill (fig. 8).g) Place the lawnmower level and top up with new
oil (see 4.1.1).h) Check that the oil level has reached the «MAX»
notch on the dipstick (fig. 2.B).j) Close the filler cap and wipe off any spilled oil.
5.5 CLEANING THE SILENCER AND THE ENGINE
The silencer must be cleaned when the engine is cold.
a) Use a jet of compressed air or a brush to remove any debris and dirt that could cause a fire from the silencer (fig. 9.A) and its protective cover (fig. 9.B).
b) Clean the cylinder and cylinder head fins (fig. 9.C) to ease engine cooling and prevent overheating.
c) Clean the plastic components with a sponge (fig. 9.D) soaked in water and detergent.
5.6 AIR FILTER MAINTENANCE
The filtering element must be kept perfectly clean and must be replaced if it is broken or damaged.
a) Clean around the filter cover (fig. 4.A).b) Remove the cover (fig. 4.A) by releasing the tabs
(fig. 4.B).c) Remove the filtering element (fig. 4.C or 4.C.1).d) Block the inlet duct (fig. 4.E) with a rag to prevent
any dirt from entering.e) Carry out maintenance on the filtering element as
described below for each type.f) Clean inside the filter housing (fig. 4.D) to get rid of any dust, debris or dirt, taking care not to push anything into the induction pipe (fig. 4.E).
g) Place the filtering element (fig. 4.C or 4.C.1) into its housing and close the cover (fig . 4.B).
• Sponge filtering element (fig. 4.C)Keep the filtering element clean and soaked in oil. Replace it if it is disintegrating, cut or broken.
IMPORTANT Do not use compressed air to clean the filtering element.– Clean the sponge filtering element with water and detergent and dry it with a clean cloth.
– Soak the filtering element in 2 tablespoonfuls of clean engine oil and wring it well to distribute the oil evenly.
– Remove any excess oil with a clean cloth.
If you need to replace the filtering element, oil the new filter as described above.
• Cartridge filtering element (fig. 4.C.1)– Blow compressed air from the inside to remove
dust and debris.

9
5.7 SPARK PLUG CHECKS AND MAINTENANCE
1. Take the spark plug down (fig. 10.A) using a socket wrench (fig. 10.B).
2. Clean the electrodes (fig. 10.C) with a metal brush, removing any carbonaceous build-up.
3. Using a thickness gauge (fig. 10.D) ensure the gap between electrodes is correct (0.6 - 0.8 mm).
4. Put the spark plug back in (fig. 10.A) and tighten firmly using a socket wrench (fig. 10.B).
Replace the spark plug if the electrodes are burnt or if the porcelain is broken or damaged.
Fire hazard! Do not check the ignition system when the spark plug is not in place.
IMPORTANT Only use the required type of spark plugs (see Technical data table).
6. TROUBLESHOOTING
PROBLEM PROBABLE CAUSE SOLUTION
1. Difficulty staring the engine
No fuel Check and top up (chap. 5.1.3)Old fuel or deposits in the fuel tank Empty the fuel tank and add fresh fuel
Incorrect starting procedure Perform start-up correctly (par. 5.2 and par. 5.3)
Disconnected spark plug Ensure that the cap is fitted onto the spark plug (par. 5.1.4)
The spark plug is wet or the spark plug electrodes are dirty or placed inadequately
Check (par. 6.6)
Clogged air filter Check and clean (par. 6.5)Incorrect oil for the season Replace with suitable oil (par. 6.3)Fuel evaporation in the carburettor (vapour lock)due to elevated temperatures
Wait a few minutes then try starting it up again (par. 5.3)
Carburetion fault Contact an Authorised Assistance CentreLow battery Recharge the battery (par 5.3.1)Battery is not inserted correctly Insert the battery correctly (par. 5.3.3)
2. Irregular operation.
Dirty spark plug electrodes or incorrect gap Check (par. 6.6)
The spark plug cap inserted incorrectly Ensure that the cap is firmly fitted on (par. 5.1.4)
Clogged air filter Check and clean (par. 6.5)Carburetion fault Contact an Authorised Assistance Centre
3. Loss of power during operation
Clogged air filter Check and clean (par. 6.5)Carburetion fault Contact an Authorised Assistance Centre
If problems persist after implementing the solution, contact your Dealer.
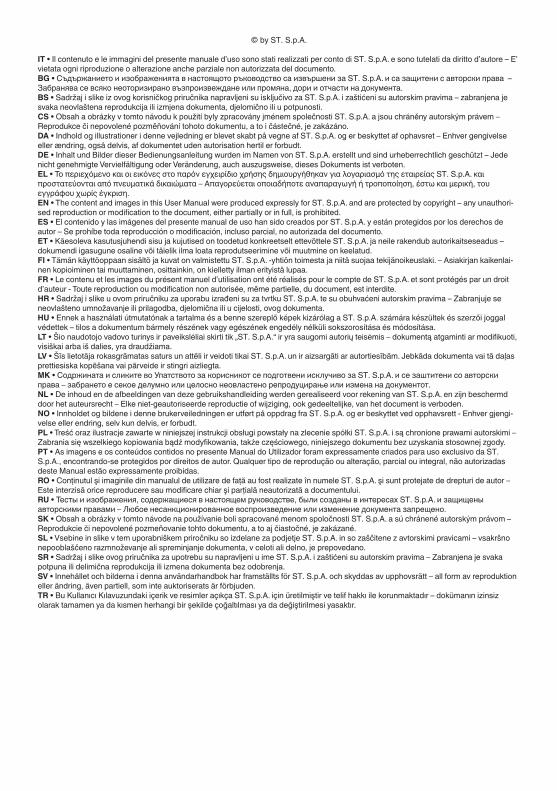
© by ST. S.p.A.
IT • Il contenuto e le immagini del presente manuale d’uso sono stati realizzati per conto di ST. S.p.A. e sono tutelati da diritto d’autore – E’ vietata ogni riproduzione o alterazione anche parziale non autorizzata del documento.BG • Съдържанието и изображенията в настоящото ръководство са извършени за ST. S.p.A. и са защитени с авторски права – Забранява се всяко неоторизирано възпроизвеждане или промяна, дори и отчасти на документа.BS • Sadržaj i slike iz ovog korisničkog priručnika napravljeni su isključivo za ST. S.p.A. i zaštićeni su autorskim pravima – zabranjena je svaka neovlaštena reprodukcija ili izmjena dokumenta, djelomično ili u potpunosti.CS • Obsah a obrázky v tomto návodu k použití byly zpracovány jménem společnosti ST. S.p.A. a jsou chráněny autorským právem – Reprodukce či nepovolené pozměňování tohoto dokumentu, a to i částečné, je zakázáno.DA • Indhold og illustrationer i denne vejledning er blevet skabt på vegne af ST. S.p.A. og er beskyttet af ophavsret – Enhver gengivelse eller ændring, også delvis, af dokumentet uden autorisation hertil er forbudt.DE • Inhalt und Bilder dieser Bedienungsanleitung wurden im Namen von ST. S.p.A. erstellt und sind urheberrechtlich geschützt – Jede nicht genehmigte Vervielfältigung oder Veränderung, auch auszugsweise, dieses Dokuments ist verboten.EL • Το περιεχόμενο και οι εικόνες στο παρόν εγχειρίδιο χρήσης δημιουργήθηκαν για λογαριασμό της εταιρείας ST. S.p.A. και προστατεύονται από πνευματικά δικαιώματα – Απαγορεύεται οποιαδήποτε αναπαραγωγή ή τροποποίηση, έστω και μερική, του εγγράφου χωρίς έγκριση.EN • The content and images in this User Manual were produced expressly for ST. S.p.A. and are protected by copyright – any unauthori-sed reproduction or modification to the document, either partially or in full, is prohibited.ES • El contenido y las imágenes del presente manual de uso han sido creados por ST. S.p.A. y están protegidos por los derechos de autor – Se prohíbe toda reproducción o modificación, incluso parcial, no autorizada del documento.ET • Käesoleva kasutusjuhendi sisu ja kujutised on toodetud konkreetselt ettevõttele ST. S.p.A. ja neile rakendub autorikaitseseadus – dokumendi igasugune osaline või täielik ilma loata reprodutseerimine või muutmine on keelatud.FI • Tämän käyttöoppaan sisältö ja kuvat on valmistettu ST. S.p.A. -yhtiön toimesta ja niitä suojaa tekijänoikeuslaki. – Asiakirjan kaikenlai-nen kopioiminen tai muuttaminen, osittainkin, on kielletty ilman erityistä lupaa.FR • Le contenu et les images du présent manuel d’utilisation ont été réalisés pour le compte de ST. S.p.A. et sont protégés par un droit d’auteur - Toute reproduction ou modification non autorisée, même partielle, du document, est interdite.HR • Sadržaj i slike u ovom priručniku za uporabu izrađeni su za tvrtku ST. S.p.A. te su obuhvaćeni autorskim pravima – Zabranjuje se neovlašteno umnožavanje ili prilagodba, djelomična ili u cijelosti, ovog dokumenta.HU • Ennek a használati útmutatónak a tartalma és a benne szereplő képek kizárólag a ST. S.p.A. számára készültek és szerzői joggal védettek – tilos a dokumentum bármely részének vagy egészének engedély nélküli sokszorosítása és módosítása.LT • Šio naudotojo vadovo turinys ir paveikslėliai skirti tik „ST. S.p.A.“ ir yra saugomi autorių teisėmis – dokumentą atgaminti ar modifikuoti, visiškai arba iš dalies, yra draudžiama.LV • Šīs lietotāja rokasgrāmatas saturs un attēli ir veidoti tikai ST. S.p.A. un ir aizsargāti ar autortiesībām. Jebkāda dokumenta vai tā daļas prettiesiska kopēšana vai pārveide ir stingri aizliegta.MK • Содржината и сликите во Упатството за корисникот се подготвени исклучиво за ST. S.p.A. и се заштитени со авторски права – забрането е секое делумно или целосно неовластено репродуцирање или измена на документот.NL • De inhoud en de afbeeldingen van deze gebruikshandleiding werden gerealiseerd voor rekening van ST. S.p.A. en zijn beschermd door het auteursrecht – Elke niet-geautoriseerde reproductie of wijziging, ook gedeeltelijke, van het document is verboden.NO • Innholdet og bildene i denne brukerveiledningen er utført på oppdrag fra ST. S.p.A. og er beskyttet ved opphavsrett - Enhver gjengi-velse eller endring, selv kun delvis, er forbudt.PL • Treść oraz ilustracje zawarte w niniejszej instrukcji obsługi powstały na zlecenie spółki ST. S.p.A. i są chronione prawami autorskimi – Zabrania się wszelkiego kopiowania bądź modyfikowania, także częściowego, niniejszego dokumentu bez uzyskania stosownej zgody.PT • As imagens e os conteúdos contidos no presente Manual do Utilizador foram expressamente criados para uso exclusivo da ST. S.p.A., encontrando-se protegidos por direitos de autor. Qualquer tipo de reprodução ou alteração, parcial ou integral, não autorizadas deste Manual estão expressamente proibidas.RO • Conţinutul şi imaginile din manualul de utilizare de faţă au fost realizate în numele ST. S.p.A. şi sunt protejate de drepturi de autor – Este interzisă orice reproducere sau modificare chiar şi parţială neautorizată a documentului.RU • Тесты и изображения, содержащиеся в настоящем руководстве, были созданы в интересах ST. S.p.A. и защищены авторскими правами – Любое несанкционированное воспроизведение или изменение документа запрещено.SK • Obsah a obrázky v tomto návode na používanie boli spracované menom spoločnosti ST. S.p.A. a sú chránené autorským právom – Reprodukcie či nepovolené pozmeňovanie tohto dokumentu, a to aj čiastočné, je zakázané.SL • Vsebine in slike v tem uporabniškem priročniku so izdelane za podjetje ST. S.p.A. in so zaščitene z avtorskimi pravicami – vsakršno nepooblaščeno razmnoževanje ali spreminjanje dokumenta, v celoti ali delno, je prepovedano.SR • Sadržaj i slike ovog priručnika za upotrebu su napravljeni u ime ST. S.p.A. i zaštićeni su autorskim pravima – Zabranjena je svaka potpuna ili delimična reprodukcija ili izmena dokumenta bez odobrenja.SV • Innehållet och bilderna i denna användarhandbok har framställts för ST. S.p.A. och skyddas av upphovsrätt – all form av reproduktion eller ändring, även partiell, som inte auktoriserats är förbjuden.TR • Bu Kullanıcı Kılavuzundaki içerik ve resimler açıkça ST. S.p.A. için üretilmiştir ve telif hakkı ile korunmaktadır – dokümanın izinsiz olarak tamamen ya da kısmen herhangi bir şekilde çoğaltılması ya da değiştirilmesi yasaktır.
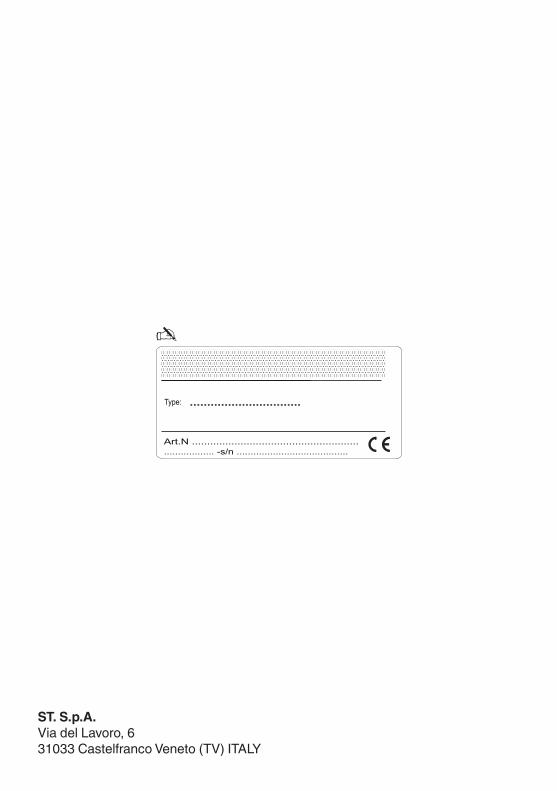
ST. S.p.A.Via del Lavoro, 631033 Castelfranco Veneto (TV) ITALY
Type: ................................
.................. -s/n ........................................ Art.N .......................................................


