Embed Size (px)
Citation preview
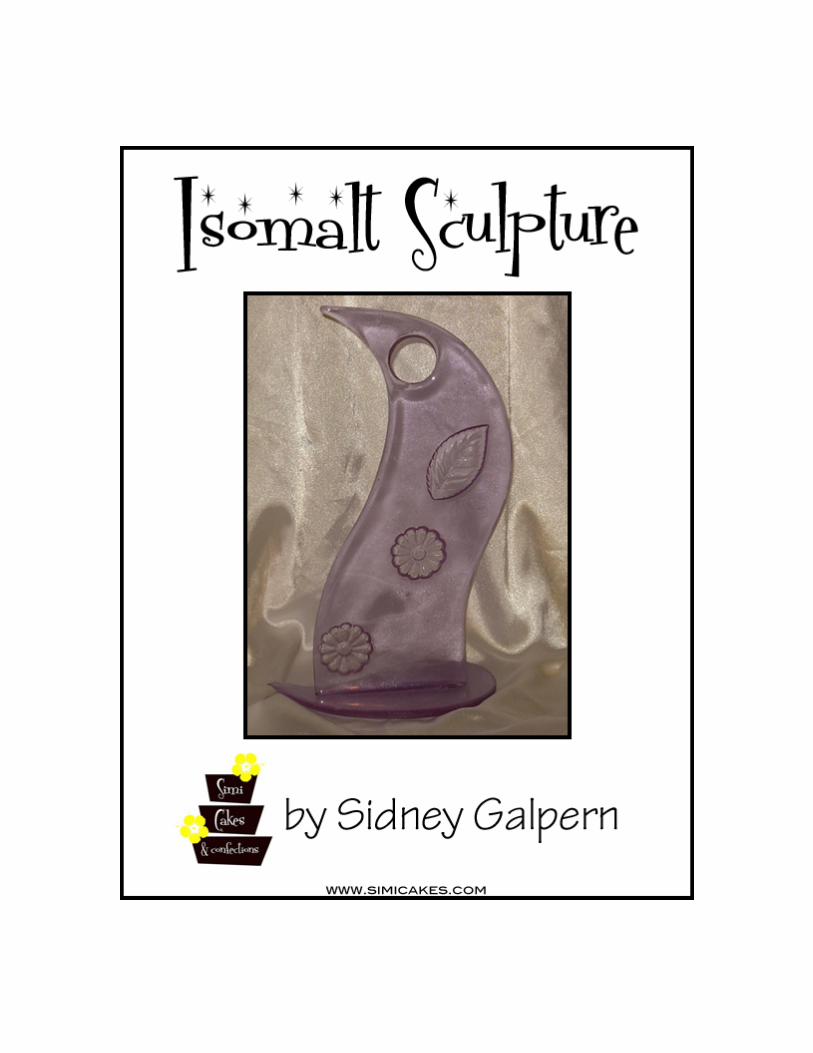

Isomalt Sculpture TutorialWith Simi Flex Form© Molds
By Sidney GalpernOwner, SimiCakes.com
Certified Professional Chocolatier, Sugar Artist, International Sugar Arts Instructor
In this tutorial you will learn how to create custom shapes out of isomalt to use for sculptures, centerpieces, cake toppers, and decorations utilizing the Simi Flex Form© molds. Flex Forms are specially designed rounded strips of silicone that you can bend and arrange into a frame to fill with the medium you are using; in this case isomalt.
Items you will need:Silicone baking mat or silpat matPre-cooked ready to use (Simi) Isomalt in a silicone or Pyrex cupChef torchToothpicksScissorsMicrowaveSimi Flex Forms©Simi silicone inserts
1: For this project I am going to be making a simple cake topper or centerpiece out of isomalt. I arrange the Flex Forms on a silicone mat into a wave design that will be standing up on a base. I want to make sure that all the edges are connected and the isomalt cannot leak out of the seams. If it feels like the ends of the Flex Forms don’t want to stay together, you can use a rolling pin or spatula or any other kind of heave prop to hold the pieces together.
TIP: Isomalt will release from silicone when it’s cool, you don’t have to grease or powder it before use. Make sure you are laying your Flex Forms on either a silicone baking mat, silpat mat, or a piece of food-grade vinyl so that it will release when it’s cool.

2. I am using some of our Simi Inserts inside of my frame to give it a design (it will come out looking like an impression). I place them inside the frame and when I pour the isomalt I will cover over top of them. When the piece is finished they will peel out of the back and leave the etching in the isomalt.

3. Since I am going to make this structure out of isomalt, I heat up my Simi pre-cooked, ready to use isomalt in the microwave for about 30 seconds and then 15 second intervals until it is melted. I colored this isomalt so it will be purple with a little bit of pearl sheen.
TIP: I am using Simi Cakes brand Pre-Cooked Isomalt Tiles, so the isomalt is already cooked and just needs to be reheated in the microwave. If you have isomalt crystals or powder, you need to cook and temper it first before it turns into this glassy texture.
4. When working with isomalt, you have to be really careful because the melted isomalt is EXTREMELY HOT!!! It is about 300 degrees and will cause burns if it comes in contact with your skin. Wear gloves (A cotton glove with a plastic glove overtop will buffer the heat and keep it from sticking) to prevent injuries.
5. I pour the isomalt inside the frame of Flex Forms I made, just pouring enough to cover the mat (I’m not filling it to the top- it will be too heavy). Again, I am filling over the Inserts, making sure there aren’t holes or empty spots anywhere in my piece.
TIP: To prevent bubbles from getting into your piece, let all the bubbles pop out of you isomalt in the bowl before you fill in your frame. If there are any stray bubbles in your piece, you can use a blowtorch and swipe it very lightly over the liquid isomalt in your frame and that should pop them.
6. The Isomalt will take about twenty minutes to cool. To check if it is cool yet, use a toothpick and poke the center of your piece. If it doesn’t make a dent, it’s solid and can be un-molded. If it’s still soft, leave it for a little longer or your piece with sag.
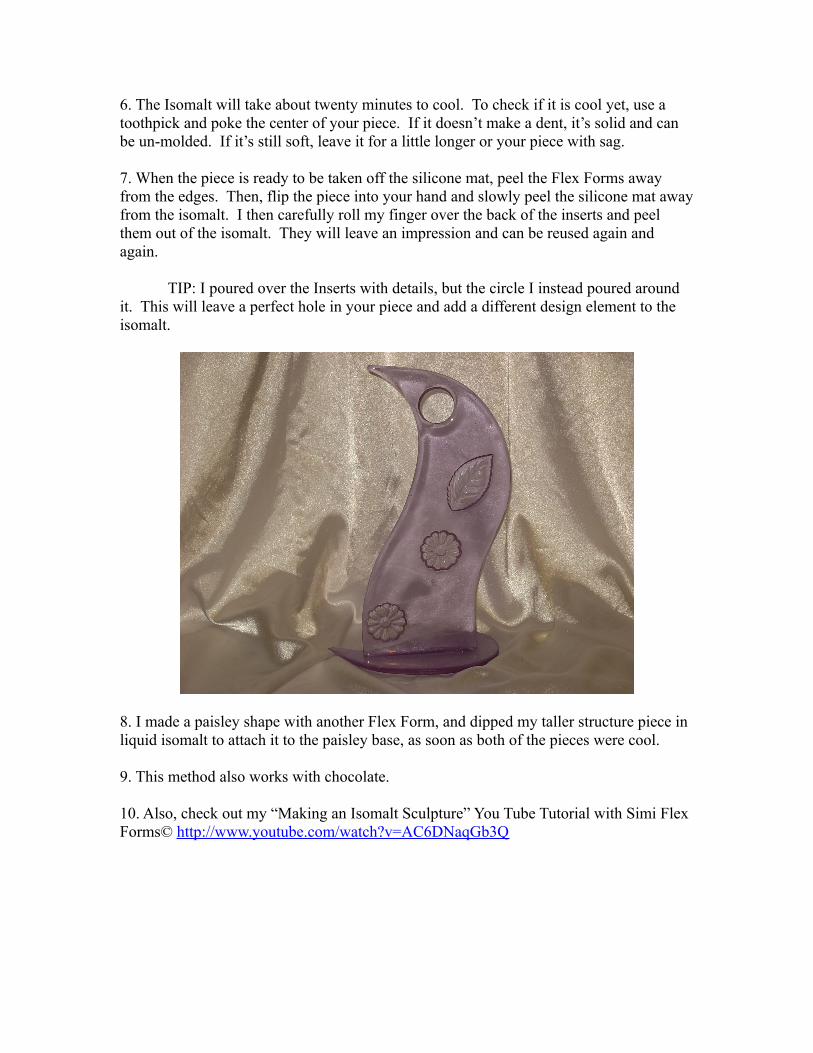
7. When the piece is ready to be taken off the silicone mat, peel the Flex Forms away from the edges. Then, flip the piece into your hand and slowly peel the silicone mat away from the isomalt. I then carefully roll my finger over the back of the inserts and peel them out of the isomalt. They will leave an impression and can be reused again and again.
TIP: I poured over the Inserts with details, but the circle I instead poured around it. This will leave a perfect hole in your piece and add a different design element to the isomalt.
8. I made a paisley shape with another Flex Form, and dipped my taller structure piece in liquid isomalt to attach it to the paisley base, as soon as both of the pieces were cool.
9. This method also works with chocolate.
10. Also, check out my “Making an Isomalt Sculpture” You Tube Tutorial with Simi Flex Forms© http://www.youtube.com/watch?v=AC6DNaqGb3Q

Here are a few more examples: