Embed Size (px)
Citation preview

ISE Tutorial
Using Xilinx ChipScope Pro ILA Core with Project Navigator to Debug FPGA ApplicationsUG750 (v14.3) October 16, 2012

Using Xilinx ChipScope Pro ILA Core with Project Navigator to Debug FPGA Applications
www.xilinx.comUG750 (v14.3) October 16, 2012
Xilinx is disclosing this user guide, manual, release note, and/or specification (the “Documentation”) to you solely for use in the development of designs to operate with Xilinx® hardware devices. You may not reproduce, distribute, republish, download, display, post, or transmit the Documentation in any form or by any means including, but not limited to, electronic, mechanical, photocopying, recording, or otherwise, without the prior written consent of Xilinx. Xilinx expressly disclaims any liability arising out of your use of the Documentation. Xilinx reserves the right, at its sole discretion, to change the Documentation without notice at any time. Xilinx assumes no obligation to correct any errors contained in the Documentation, or to advise you of any corrections or updates. Xilinx expressly disclaims any liability in connection with technical support or assistance that may be provided to you in connection with the Information.
THE DOCUMENTATION IS DISCLOSED TO YOU “AS-IS” WITH NO WARRANTY OF ANY KIND. XILINX MAKES NO OTHER WARRANTIES, WHETHER EXPRESS, IMPLIED, OR STATUTORY, REGARDING THE DOCUMENTATION, INCLUDING ANY WARRANTIES OF MERCHANTABILITY, FITNESS FOR A PARTICULAR PURPOSE, OR NONINFRINGEMENT OF THIRD-PARTY RIGHTS. IN NO EVENT WILL XILINX BE LIABLE FOR ANY CONSEQUENTIAL, INDIRECT, EXEMPLARY, SPECIAL, OR INCIDENTAL DAMAGES, INCLUDING ANY LOSS OF DATA OR LOST PROFITS, ARISING FROM YOUR USE OF THE DOCUMENTATION.
IN NO EVENT WILL XILINX BE LIABLE FOR ANY CONSEQUENTIAL, INDIRECT, EXEMPLARY, SPECIAL, OR INCIDENTAL DAMAGES, INCLUDING ANY LOST DATA AND LOST PROFITS, ARISING FROM OR RELATING TO YOUR USE OF THE DESIGN, EVEN IF YOU HAVE BEEN ADVISED OF THE POSSIBILITY OF SUCH DAMAGES. THE TOTAL CUMULATIVE LIABILITY OF XILINX IN CONNECTION WITH YOUR USE OF THE DESIGN, WHETHER IN CONTRACT OR TORT OR OTHERWISE, WILL IN NO EVENT EXCEED THE AMOUNT OF FEES PAID BY YOU TO XILINX HEREUNDER FOR USE OF THE DESIGN. YOU ACKNOWLEDGE THAT THE FEES, IF ANY, REFLECT THE ALLOCATION OF RISK SET FORTH IN THIS AGREEMENT AND THAT XILINX WOULD NOT MAKE AVAILABLE THE DESIGN TO YOU WITHOUT THESE LIMITATIONS OF LIABILITY.
The Design is not designed or intended for use in the development of on-line control equipment in hazardous environments requiring fail-safe controls, such as in the operation of nuclear facilities, aircraft navigation or communications systems, air traffic control, life support, or weapons systems (“High-Risk Applications” Xilinx specifically disclaims any express or implied warranties of fitness for such High-Risk Applications. You represent that use of the Design in such High-Risk Applications is fully at your risk.
© 2012 Xilinx, Inc. All rights reserved. XILINX, the Xilinx logo, and other designated brands included herein are trademarks of Xilinx, Inc. All other trademarks are the property of their respective owners.
Demo Design License
© 2012 Xilinx, Inc.
This Design is free software; you can redistribute it and/or modify it under the terms of the GNU Lesser General Public License as published by the Free Software Foundation; either version 2.1 of the License, or (at your option) any later version.
This library is distributed in the hope that it will be useful, but WITHOUT ANY WARRANTY; without even the implied warranty of MERCHANTABILITY or FITNESS FOR A PARTICULAR PURPOSE. See the GNU Lesser General Public License for more details.
You should have received a copy of the GNU Library General Public License along with this design file; if not, see:
http://www.gnu.org/licenses/
Revision HistoryThe following table shows the revision history for this document.
Date Revision
01/18/2012 Revalidated for the 13.4 release. Editorial updates only; no technical content updates.
04/24/2012 Revalidated for the 14.1 release. Editorial updates only; no technical content updates.
07/25/2012 Revalidated for the 14.2 release. Editorial updates only; no technical content updates.
10/16/2012 Revalidated for the 14.3 release. Updated Figure 2-3 for CR 657985. No other technical content updates.

UG750 (v14.3) October 16, 2012www.xilinx.com
Using Xilinx ChipScope Pro ILA Core with ProjectNavigator to Debug FPGA Applications
Chapter 1: IntroductionObjectives . . . . . . . . . . . . . . . . . . . . . . . . . . . . . . . . . . . . . . . . . . . . . . . . . . . . . . . . . . . . . . . . . . . 5Lab Exercise Setup . . . . . . . . . . . . . . . . . . . . . . . . . . . . . . . . . . . . . . . . . . . . . . . . . . . . . . . . . . . 6Design Description . . . . . . . . . . . . . . . . . . . . . . . . . . . . . . . . . . . . . . . . . . . . . . . . . . . . . . . . . . 7
Push Button Switches . . . . . . . . . . . . . . . . . . . . . . . . . . . . . . . . . . . . . . . . . . . . . . . . . . . . . . 7Debounce Circuit . . . . . . . . . . . . . . . . . . . . . . . . . . . . . . . . . . . . . . . . . . . . . . . . . . . . . . . . . . 8Control State Machine . . . . . . . . . . . . . . . . . . . . . . . . . . . . . . . . . . . . . . . . . . . . . . . . . . . . . . 8LED Displays . . . . . . . . . . . . . . . . . . . . . . . . . . . . . . . . . . . . . . . . . . . . . . . . . . . . . . . . . . . . . 8
Files Provided for this Lab Exercise . . . . . . . . . . . . . . . . . . . . . . . . . . . . . . . . . . . . . . . . . . . 9Procedure . . . . . . . . . . . . . . . . . . . . . . . . . . . . . . . . . . . . . . . . . . . . . . . . . . . . . . . . . . . . . . . . . . . . 9
Chapter 2: Creating and Implementing a Project in Project NavigatorCreating and Implementing Your RTL Design . . . . . . . . . . . . . . . . . . . . . . . . . . . . . . . 11Questions . . . . . . . . . . . . . . . . . . . . . . . . . . . . . . . . . . . . . . . . . . . . . . . . . . . . . . . . . . . . . . . . . . . 15
Chapter 3: Adding a ChipScope ILA Core to Your DesignAdding a ChipScope ILA Core . . . . . . . . . . . . . . . . . . . . . . . . . . . . . . . . . . . . . . . . . . . . . . 17Questions . . . . . . . . . . . . . . . . . . . . . . . . . . . . . . . . . . . . . . . . . . . . . . . . . . . . . . . . . . . . . . . . . . . 22
Chapter 4: Debugging Your Design using ChipScope Pro AnalyzerDebugging Your Design. . . . . . . . . . . . . . . . . . . . . . . . . . . . . . . . . . . . . . . . . . . . . . . . . . . . . 23Questions . . . . . . . . . . . . . . . . . . . . . . . . . . . . . . . . . . . . . . . . . . . . . . . . . . . . . . . . . . . . . . . . . . . 32
Chapter 5: Tutorial ConclusionConclusion. . . . . . . . . . . . . . . . . . . . . . . . . . . . . . . . . . . . . . . . . . . . . . . . . . . . . . . . . . . . . . . . . . 33Question Answers . . . . . . . . . . . . . . . . . . . . . . . . . . . . . . . . . . . . . . . . . . . . . . . . . . . . . . . . . . 33

Using Xilinx ChipScope Pro ILA Core with Project Navigator to Debug FPGA Applications
www.xilinx.comUG750 (v14.3) October 16, 2012

UG750 (v14.3) October 16, 2012 www.xilinx.com 5
Chapter 1
Introduction
In this lab exercise, you will explore how an Integrated Logic Analyzer (ILA) core can be inserted within the Project Navigator design environment to debug your FPGA designs. You will take advantage of ChipScope™ Pro Analyzer functions to debug and discover some potential root causes of your design, thereby allowing you to address issues quickly as will be shown by this tutorial.
Example RTL designs will be used to illustrate overall integration flows between ChipScope and Xilinx® ISE® Project Navigator. In order to be successful using this tutorial, you should have some basic knowledge of ISE tool flows.
Objectives After completing this lab exercise, you will be able to:
• Validate and debug your design using Project Navigator and ChipScope with ILA core and Analyzer
• Understand how to create an ISE project, probe an ILA core, and implement the design in Project Navigator
• Debug the design using ChipScope Analyzer and iterate the design using Project Navigator design environment and an SP601Platform

6www.xilinx.com
Using Xilinx ChipScope Pro ILA Core with ProjectNavigator to Debug FPGA Applications
Chapter 1: Introduction
Lab Exercise SetupThe following software and hardware are required for this lab:
• Xilinx ISE Design Suite 12.3 (Logic, DSP, Embedded, or System Edition)
• SP601Platform
• JTAG Cables that come with the SP601 PlatformX-Ref Target - Figure 1-1
Figure 1-1: SP-601 Platform

UG750 (v14.3) October 16, 2012 www.xilinx.com 7
Design Description
Design DescriptionThe top-level block diagram for the RTL example design is shown in the figure below. The design is comprised of a simple control state machine, multiple sine wave generators, common Push Button (GPIO_BUTTON), Dip Switch (GPIO_SWITCH), and LED displays (GPIO_LED).
Push Button SwitchesPush Button Switches are used as inputs into the debounce and / or control state machine circuits. A high to low transition pulse is generated when a switch is pushed. Each generated output pulse is then used as an input into the state machine.X-Ref Target - Figure 1-2
Figure 1-2: Dip Switch: Used to enable or disable a debounce circuit
X-Ref Target - Figure 1-3
Figure 1-3: Debounce circuit

8www.xilinx.com
Using Xilinx ChipScope Pro ILA Core with ProjectNavigator to Debug FPGA Applications
Chapter 1: Introduction
Debounce CircuitWhen enabled, the debounce circuit provides a clean pulse or transition from a high to low on this particular example. It eliminates series of spikes or glitches when a button is pressed and released.
Control State MachineThe control state machine is used to capture and decode input pulses from the two Push Button switches.. It provides sine wave selection and indicator circuits, sequencing between 00, 01, 10, and 11 (zero to three).
LED DisplaysGPIO_LED_0 and GPIO_LED_0 are used to display selection status from the state machine outputs, each of which represents a different sine wave frequency - high, medium, and low.X-Ref Target - Figure 1-4
Figure 1-4: LED Displays

UG750 (v14.3) October 16, 2012 www.xilinx.com 9
Files Provided for this Lab Exercise
Files Provided for this Lab ExerciseThe following files and subfolders are provided for this lab exercise:
• debounce.vhdl - Debounce circuit
• fsm.vhdl - Control state machine
• sinegen_demo - Wrapper for Sine wave generators
• sinewave_demo - Top-level wrapper design
• sine_high.xco, sine_mid.xco, sine_low.xco - Xilinx Core Generator files
• sinegen_demo_sp601.ucf - UCF constraint file
Note: This lab also supports other two Xilinx platforms - SP605 and ML605. Use pin-out information provided by the table below to retarget this tutorial to either SP605 or ML605.
Procedure In this tutorial, you will complete three tasks:
1. Creating and Implementing a Project in Project Navigator
2. Adding a ChipScope ILA Core to Your Design
3. Debugging Your Design using ChipScope Pro Analyzer
Table 1-1: Pin-Out Information for Xilinx Platforms
Pin-Out Locations Function
SP601 SP605 ML605
CLK_N K16 K22 H9 Clock
CLK_P K15 K21 J9 Clock
GPIO_BUTTONS0 P4 F3 A19 Reset
GOIP_BUTTONS1 F6 G6 G26 Sequencer
GPIO_SWITCH D14 C18 D22Debounce
circuit selector
GPIO_LED_0 E13 D17 AC22 Selector[0]
GPIO_LED_0 C14 AB4 AC24 Selector[1]

10www.xilinx.com
Using Xilinx ChipScope Pro ILA Core with ProjectNavigator to Debug FPGA Applications
Chapter 1: Introduction
UG750 (v14.3) October 16, 2012 www.xilinx.com 11
Chapter 2
Creating and Implementing a Project in Project Navigator
Creating and Implementing Your RTL DesignIn this tutorial, you will explore how Project Navigator can be used to quickly implement your RTL design. You will learn how to create an ISE® project in Project Navigator targeting the SP601 Platform.
1. Unzip the provided source files in C:\ChipScope_ProjNav\
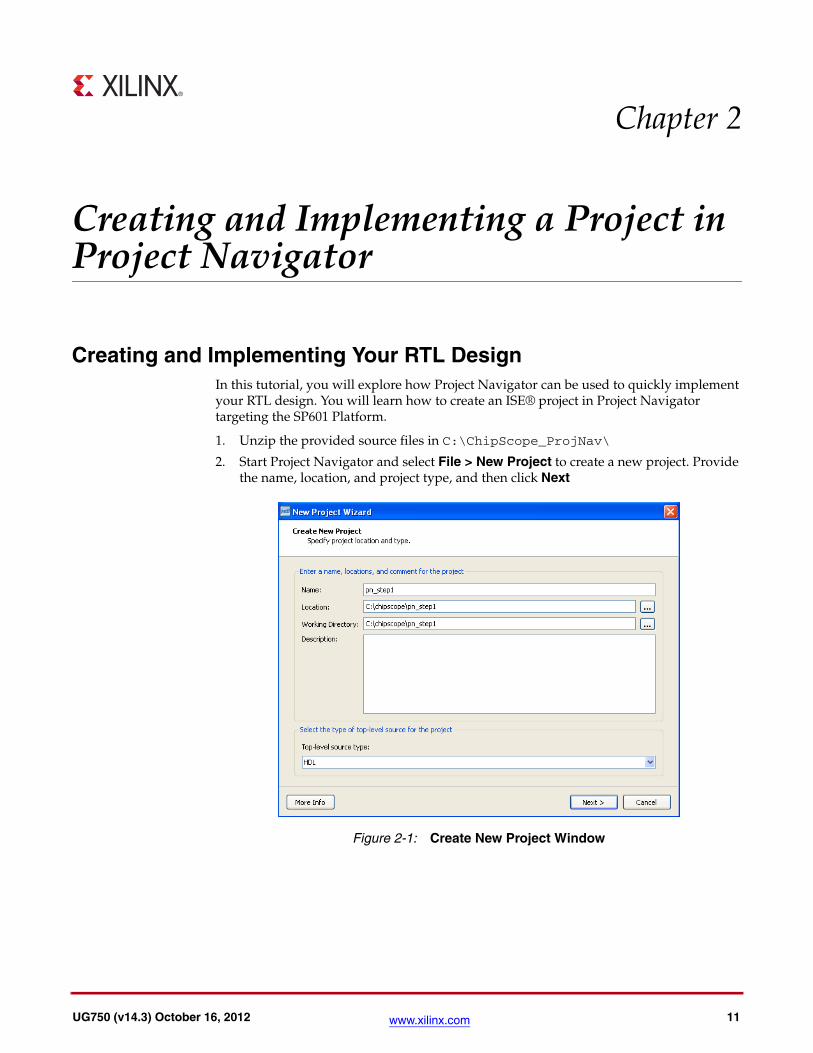
2. Start Project Navigator and select File > New Project to create a new project. Provide the name, location, and project type, and then click Next
X-Ref Target - Figure 2-1
Figure 2-1: Create New Project Window
12www.xilinx.com
Using Xilinx ChipScope Pro ILA Core with ProjectNavigator to Debug FPGA Applications
Chapter 2: Creating and Implementing a Project in Project Navigator
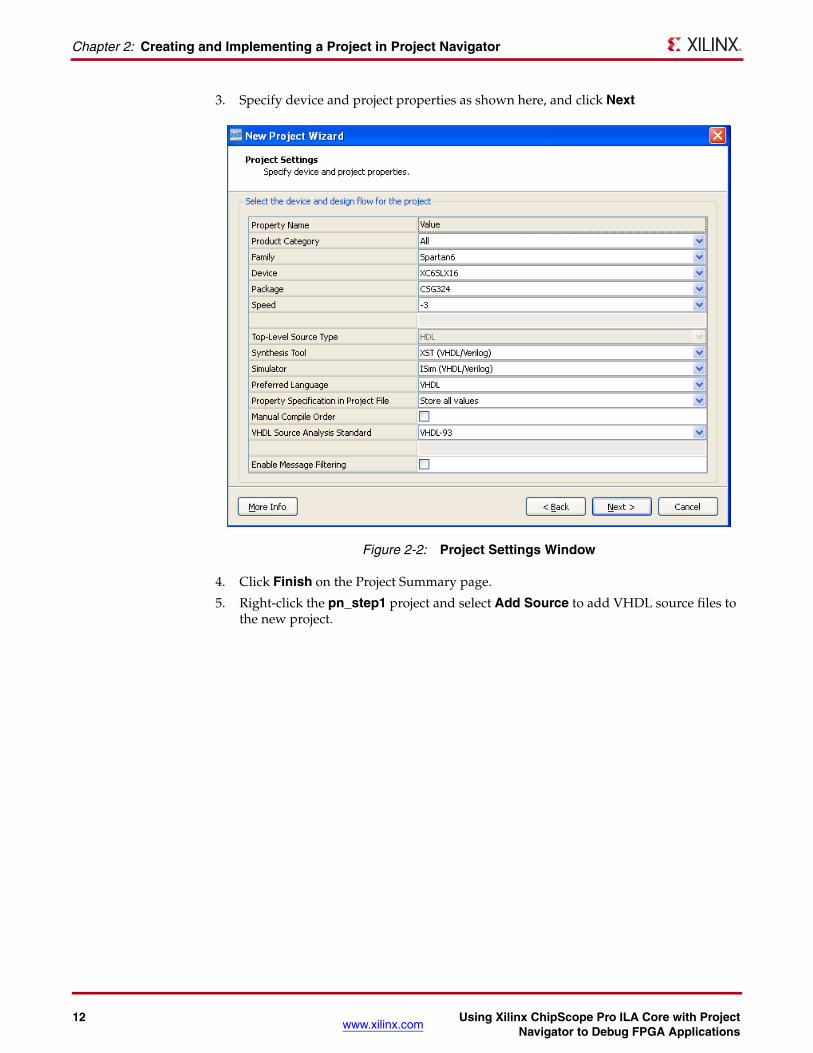
3. Specify device and project properties as shown here, and click Next
4. Click Finish on the Project Summary page.
5. Right-click the pn_step1 project and select Add Source to add VHDL source files to the new project.
X-Ref Target - Figure 2-2
Figure 2-2: Project Settings Window

UG750 (v14.3) October 16, 2012 www.xilinx.com 13
Creating and Implementing Your RTL Design
6. Locate the source files in the src directory, select all VHDL source files, and open them..
7. Review the files listed in the Adding Source Files window and click OK.
X-Ref Target - Figure 2-3
Figure 2-3: Source Files
X-Ref Target - Figure 2-4
Figure 2-4: Adding Source Files Window

14www.xilinx.com
Using Xilinx ChipScope Pro ILA Core with ProjectNavigator to Debug FPGA Applications
Chapter 2: Creating and Implementing a Project in Project Navigator
8. Right-click sinegen_demo and select New Source to add a new definition and connection (.cdc) file to the project.
9. In the Select Source Type window, select ChipScope Defination and Connection File, and then type pn_step1.cdc for the file name and click Finish.
10. Review the information in the Summary dialog box and then click on Finish.
The next step is to generate all three sine wave generator cores.
X-Ref Target - Figure 2-5
Figure 2-5: New Source Selection

UG750 (v14.3) October 16, 2012 www.xilinx.com 15
Questions
11. In the Design window, select all three .xco files listed under U_SINEGEN, and then double-click the Regenerate All Cores process.
12. Prior to synthesizing the design, set the Keep Hierarchy option to Soft to preserve the design hierarchy and prevent the XST from performing hierarchical optimizations. To do this, right-click the Synthesize process and set the -Keep_hierarchy switch to Soft.
13. Click Apply.
Now you are ready to synthesize the design.
14. Click the Synthesize process.
15. Select File > Copy Project to copy the project as pn_step2.
16. Type the project name and location, and then click OK.
At this point, you have successfully created the ISE project and synthesized the design using Project Navigator.
Questions1. Describe briefly of what you did in Step1: _____________________________________
2. What are some major circuits used in this lab?__________________________________
3. Which source file would you have to modify if you were to target other Xilinx® boards? ______________________________________________________
X-Ref Target - Figure 2-6
Figure 2-6: Sine Wave Generator Files in the Design Window

16www.xilinx.com
Using Xilinx ChipScope Pro ILA Core with ProjectNavigator to Debug FPGA Applications
Chapter 2: Creating and Implementing a Project in Project Navigator

UG750 (v14.3) October 16, 2012 www.xilinx.com 17
Chapter 3
Adding a ChipScope ILA Core to Your Design
Adding a ChipScope ILA CoreIn this section of the tutorial, you will add a ChipScope™ ILA core to your design by taking advantage of integration flows between the Project Navigator and ChipScope Pro Core Inserter tools. Traditionally, you had to manually instantiate the ILA core instances into the RTL designs. However, that method requires you to modify your design source files, which can be cumbersome and can increase the chance of potentially making mistakes.
Instead, you will learn here how to add the core, complete the signal connections, and probe the design without modifying the original RTL source files.
1. In the Hierarchy window, double-click the pn_step1.cdc file to open the ChipScope Pro Core Inserter tool.
The first window displays Device Options. Because the target device is already set in Project Navigator, the device options are already set for you. This eliminates some potential conflicts in device selection between ChipScope Pro Core Inserter and Project Navigator.
X-Ref Target - Figure 3-1
Figure 3-1: ChipScope Pro Core Inserter

18www.xilinx.com
Using Xilinx ChipScope Pro ILA Core with ProjectNavigator to Debug FPGA Applications
Chapter 3: Adding a ChipScope ILA Core to Your Design
2. Click Next. The window displays the ICON options.
3. Click Next to add an ILA core.
4. In the Trigger Parameters tab of the ILA Options window, set the trigger parameters.
X-Ref Target - Figure 3-2
Figure 3-2: ICON Options
X-Ref Target - Figure 3-3
Figure 3-3: Trigger Parameters Tab of the ILA Options Window
UG750 (v14.3) October 16, 2012 www.xilinx.com 19
Adding a ChipScope ILA Core
For this example, set the trigger parameters as follows.
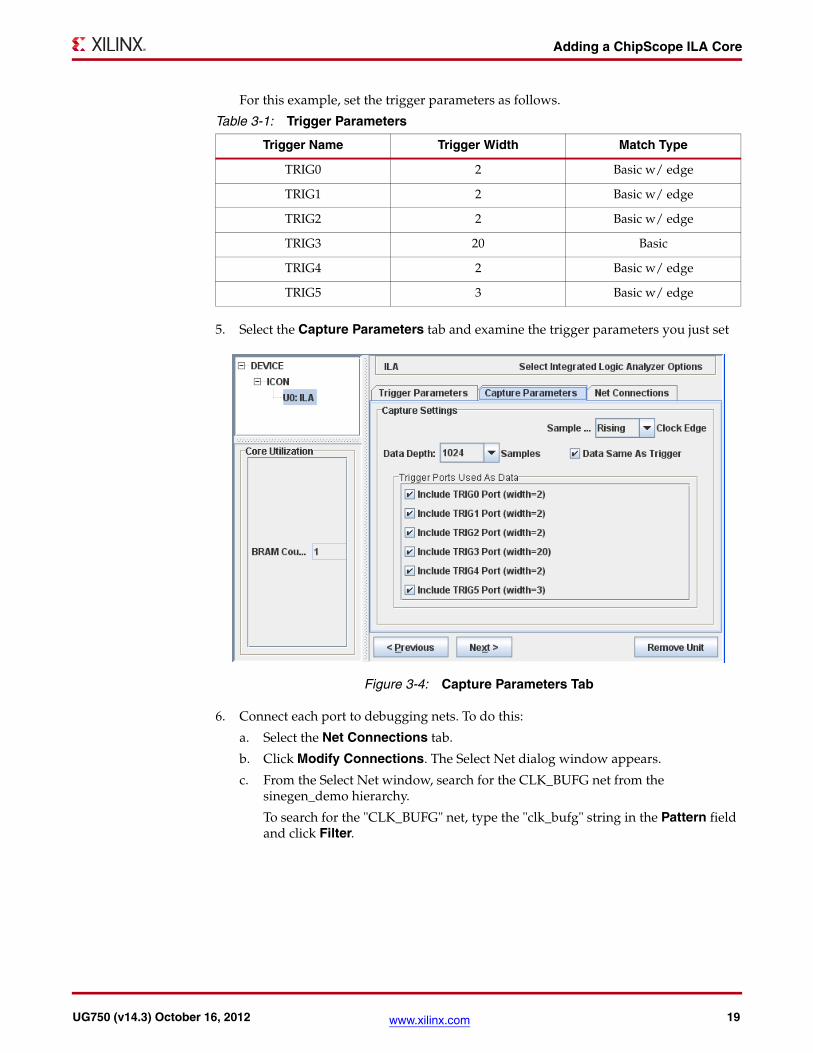
5. Select the Capture Parameters tab and examine the trigger parameters you just set
6. Connect each port to debugging nets. To do this:
a. Select the Net Connections tab.
b. Click Modify Connections. The Select Net dialog window appears.
c. From the Select Net window, search for the CLK_BUFG net from the sinegen_demo hierarchy.
To search for the "CLK_BUFG" net, type the "clk_bufg" string in the Pattern field and click Filter.
Table 3-1: Trigger Parameters
Trigger Name Trigger Width Match Type
TRIG0 2 Basic w/ edge
TRIG1 2 Basic w/ edge
TRIG2 2 Basic w/ edge
TRIG3 20 Basic
TRIG4 2 Basic w/ edge
TRIG5 3 Basic w/ edge
X-Ref Target - Figure 3-4
Figure 3-4: Capture Parameters Tab

20www.xilinx.com
Using Xilinx ChipScope Pro ILA Core with ProjectNavigator to Debug FPGA Applications
Chapter 3: Adding a ChipScope ILA Core to Your Design
d. Select the clk_BUFG net from search results and click Make Connections
7. Repeat Step 6 to connect the rest of trigger ports:
• TRIG0: search for *sel* from the U_SINEGEN hierarchy
• TRIG1: search for *GPIO_BUTTONS_re* from the sinegen_demo hierarchy
• TRIG2: search for *GPIO_BUTTONS_dly* from the sinegen_demo hierarchy
• TRIG3: search for *SINE* from the sinegen_demo hierarchy
• TRIG4: search for *GPIO_BUTTONS_db<0>* from the sinegen_demo hierarchy
• TRIG4: search for *GPIO_BUTTONS_db<1>* * from the sinegen_demo hierarchy
• TRIG5: search for *GPIO_BUTTONS_0_IBUF* from the sinegen_demo hierarchy
• TRIG5: search for *GPIO_BUTTONS_1_IBUF* from the sinegen_demo hierarchy
• TRIG5:search for *GPIO_SWITCH_IBUF* from the sinegen_demo hierarchy
X-Ref Target - Figure 3-5
Figure 3-5: Select Net Window

UG750 (v14.3) October 16, 2012 www.xilinx.com 21
Adding a ChipScope ILA Core
8. Once complete, all ports turn from red to black, indicating that you have finished connecting all the clock and trigger ports to debugging nets.
X-Ref Target - Figure 3-6
Figure 3-6: Trigger/Data Signals
X-Ref Target - Figure 3-7
Figure 3-7: Complete Net Connections
22www.xilinx.com
Using Xilinx ChipScope Pro ILA Core with ProjectNavigator to Debug FPGA Applications
Chapter 3: Adding a ChipScope ILA Core to Your Design
9. Save and close the pn_step1.cdc file
Before you use the ChipScope Pro Analyzer tool to download your bitstream into your device, make sure the bitstream generation options are set properly.
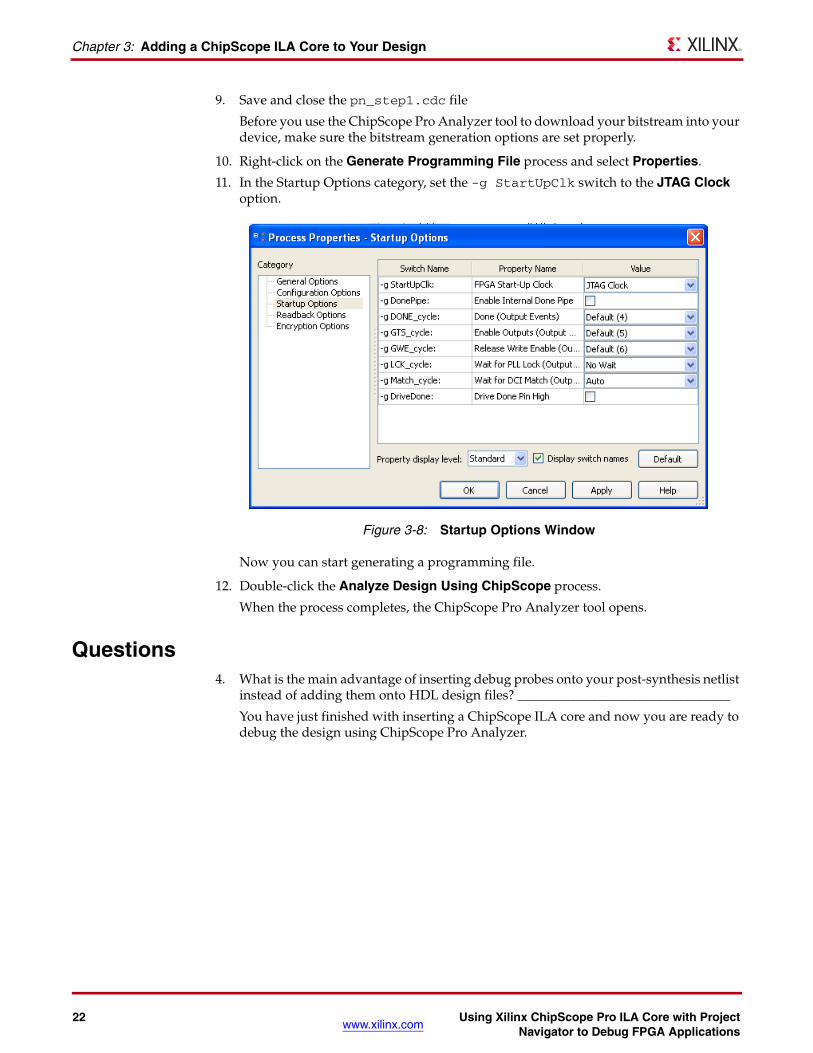
10. Right-click on the Generate Programming File process and select Properties.
11. In the Startup Options category, set the -g StartUpClk switch to the JTAG Clock option.
Now you can start generating a programming file.
12. Double-click the Analyze Design Using ChipScope process.
When the process completes, the ChipScope Pro Analyzer tool opens.
Questions4. What is the main advantage of inserting debug probes onto your post-synthesis netlist
instead of adding them onto HDL design files? ________________________________
You have just finished with inserting a ChipScope ILA core and now you are ready to debug the design using ChipScope Pro Analyzer.
X-Ref Target - Figure 3-8
Figure 3-8: Startup Options Window

UG750 (v14.3) October 16, 2012 www.xilinx.com 23
Chapter 4
Debugging Your Design using ChipScope Pro Analyzer
Debugging Your DesignThis lab exercise shows how to debug a design using Xilinx® ChipScope™ Pro Analyzer and how to iterate the design once you have discovered and fixed errors. This step will also show some useful techniques of how to trigger and capture certain data from your design.
You will be using ChipScope Pro Analyzer to verify that Sine wave generator is working correctly. The two primary objectives will be to verify and check off the following two items.
Verify that all sine wave selections look correct
Verify that selection logic is working correctly
Do the following:
1. Configure JTAG Chain to USB cable and communication parameters by doing the following:
a. Select JTAG Chain > Xilinx Platform USB Cable.
b. In the ChipScope Pro Analyzer dialog box that opens, set the speed and port parameters.
For this tutorial, Speed is 3 MHz and Port is USB21.
c. Click OK.
d. In the ChipScope Pro Analyzer dialog box that opens, verify the device details and then click OK.

24www.xilinx.com
Using Xilinx ChipScope Pro ILA Core with ProjectNavigator to Debug FPGA Applications
Chapter 4: Debugging Your Design using ChipScope Pro Analyzer
2. Confirm the connection to the JTAG chain.
3. Right-click the device name in the Project list and select Configure to configure the device.
4. In the Configuration window, select the default BIT and CDC files from Project Navigator.
X-Ref Target - Figure 4-1
Figure 4-1: JTAG Chain Connection Details

UG750 (v14.3) October 16, 2012 www.xilinx.com 25
Debugging Your Design
5. Verify the device configuration and ILA core.X-Ref Target - Figure 4-2
Figure 4-2: Device Configuration Details

26www.xilinx.com
Using Xilinx ChipScope Pro ILA Core with ProjectNavigator to Debug FPGA Applications
Chapter 4: Debugging Your Design using ChipScope Pro Analyzer
6. Open the Trigger Setup and Waveform windows by double-clicking on each item: Trigger Setup and Waveform.
7. Select rigger Setup > Trigger Immediate.
8. Verify that there is activity on the sine wave.
9. Double-click Bus Plot to open the Bus Plot viewer.
X-Ref Target - Figure 4-3
Figure 4-3: Location of Trigger Setup and Waveform
X-Ref Target - Figure 4-4
Figure 4-4: Sine Wave Activity

UG750 (v14.3) October 16, 2012 www.xilinx.com 27
Debugging Your Design
10. On the Bus Plot window, select /sine to display the sine wave.
Notice that this waveform does not look much like a sine wave. This is because the radix setting needs to be changed to from Hex to Sine Decimal.
11. In the Signal window, right-click /sine and select Bus Radix. Click to select the Signed Decimal check box.
12. Click the Trigger Immediately button and view the high-frequency sine wave bus plot.
X-Ref Target - Figure 4-5
Figure 4-5: Sine Wave Display
X-Ref Target - Figure 4-6
Figure 4-6: High-Frequency Sine Wave Bus Plot

28www.xilinx.com
Using Xilinx ChipScope Pro ILA Core with ProjectNavigator to Debug FPGA Applications
Chapter 4: Debugging Your Design using ChipScope Pro Analyzer
13. On your board, push the Sine Wave Sequencer button (shown in Figure 1-1) until the Sine Wave Selection indicator LEDs on the board display “off,on, 01.”
Note: Sequencer is not working correctly. The expected behavior is a simple 2-bit counter that counts for each press (00, 01, 10, 11...). You will debug the root cause for this later in this tutorial.
14. Click the Trigger Immediately button again, and view the mid-frequency bus plot.
15. Push the Sine Wave Sequencer button on the board until the Sine Wave Selection indicator LEDs on the board display "on, off, 10.”
16. Click the Trigger Immediately button and view the low-frequency bus plot.
17. Push the Sine Wave Sequencer button on the board until the Sine Wave Selection indicator LEDs on the board display "on, on, 11.”
X-Ref Target - Figure 4-7
Figure 4-7: Mid-Frequency Sine Wave Bus Plot
X-Ref Target - Figure 4-8
Figure 4-8: Low-Frequency Sine Wave Bus Plot

UG750 (v14.3) October 16, 2012 www.xilinx.com 29
Debugging Your Design
18. Click the Trigger Immediately button and view the combined sine wave bus plot.
You just verified that all sine wave selections look correct. However, the selection logic circuit is still not working correctly.
Verify that all sine wave selections look correct.
Verify that selection logic is working correctly:
Verify that state machine is transitioning correctly and outputs are correct.
Verify that state machine inputs are correct.
Next, start debugging the selection logic circuit.
19. Set the following parameters:
Match: set TriggerPort1 to RX -- to look for rising edge on GPIO_BUTTONS_re[1] because this is what causes FSM to transition.
Trigger Conditions: M1 -- set up trigger equation to M1
Capture Settings: Windows = 10; Depth = 2
X-Ref Target - Figure 4-9
Figure 4-9: Combined Sine Wave Bus Plot

30www.xilinx.com
Using Xilinx ChipScope Pro ILA Core with ProjectNavigator to Debug FPGA Applications
Chapter 4: Debugging Your Design using ChipScope Pro Analyzer
Note: The actual TriggerPort number for the GPIO_BUTTONS_re[1] net might not be the same as specified on this tutorial.
20. Click the Run Trigger button to arm the trigger and wait for the trigger condition.
Information about the run progress displays at the bottom of the window.
21. Push the Sine Wave Sequencer button on the board.
22. Observe the number of windows captured.
• If only one window was captured, repeat steps 21 and 22.
• If more than one window was captured, go to the next step.
23. Click the Stop Trigger button and view the captured data.
Notice the multiple rising edges each time you pressed the Sine Wave Seqencer button. Also, note the correct transition of sineSel, which indicates that the state machine is working properly.
X-Ref Target - Figure 4-10
Figure 4-10: Trigger Setup Window
X-Ref Target - Figure 4-11
Figure 4-11: Observing the Windows Captured

UG750 (v14.3) October 16, 2012 www.xilinx.com 31
Debugging Your Design
You just verified that sine wave generators are working correctly.
Verify that all sine wave selections look correct.
Verify that selection logic is working correctly:
Verify that state machine is transitioning correctly and outputs are correct.
Verify that state machine inputs are correct.
24. Set the following parameters for trigger modes and conditions:
• Trigger Run Mode: Repetitive
• Match: set TriggerPort5 to XRX -- to look for rising edge on GPIO_BUTTONS_1_IBUF, which is the input buffer for the Sine Wave Sequencer button on the board.
• Trigger Conditions: M5
• Capture Settings:
- Windows = 1
- Depth = 1024
- Position = 512
25. Click the Run Trigger button and press the Sine Wave Sequencer button on the board until you see multiple transitions on the GPIO_BUTTONS_1_IBUF signal.
Note: Your waveform might not display signal glitches at exactly the same location as shown here. This is one of the advantages of the Repetitive triggering feature.
You just verified that sine wave generators are working correctly. However, the state machine inputs are not correct. These inputs are connected directly from Push Button switches.
Verify that all sine wave selections look correct.
Verify that selection logic is working correctly:
Verify that state machine is transitioning correctly and outputs are correct.
Verify that state machine inputs are correct.
X-Ref Target - Figure 4-12
Figure 4-12: View Waveform

32www.xilinx.com
Using Xilinx ChipScope Pro ILA Core with ProjectNavigator to Debug FPGA Applications
Chapter 4: Debugging Your Design using ChipScope Pro Analyzer
As shown in Figure 4-12, the problem seems to point to Push Button switches, which generate glitches every time the Push Button switch is pressed and released. A debounce circuit is required for each push button switch to eliminate these glitches that result in multiple transitions.
The debounce circuits have already been integrated in the provided design. To enable debounce circuits, turn on Dip switch-1, repeat steps 24 and 25, and verify there is only one transition for each button push.
Questions5. Did you have time to resolve the problem on Step 18 for extra credit? ______________
6. Why is a debounce circuit required for this lab?_________________________________

UG750 (v14.3) October 16, 2012 www.xilinx.com 33
Chapter 5
Tutorial Conclusion
ConclusionThis tutorial introduced you to the tightly integrated design flow between ChipScope Pro ILA Core Inserter and Project Navigator. It showed you how to generate IP core netlist in Project Navigator and synthesize the design. Secondly, it illustrated how to add ChipScope ILA core to the design using the ILA Core Inserter. More importantly, this tutorial guides you through a debugging process. It showed you how to validate and debug your design using ChipScope Pro Analyzer using various triggering setups.
You should now be familiar with some basic design flows and integration between Project Navigator and ChipScope Pro.
Question Answers1. Describe briefly of what you did in Step1.
You just created an RTL PlanAhead project, loaded a VHDL ChipScope™ design, and implemented the design.
2. What are some major circuits used in this lab?
• debounce.vhdl - Debounce circuit
• fsm.vhdl - Control state machine
• sinegen_demo - Wrapper for Sine wave generators
3. Which source file would you have to modify if you were to target other Xilinx® boards?
UCF constraint file
4. What is the main advantage of inserting debug probes onto your post-synthesis netlist instead of adding them onto HDL design files?
You don't have to directly touch and / or modify original HDL source files, thereby eliminating the risk of making any unintentional changes
5. Did you have time to resolve the problem on Step 18 for extra credit?
Hint: Judging by the waveform from Analyzer, it appeared that the output Sine wave got truncated possible due to insufficient bit vector specified in "sinegen_demo.vhd and sinegen.vhd" modules. It's currently specified as a 20-bit vector. It should be expanded to 22-bit. Feel free to modify these two modules and iterate the design.
6. Why is a debounce circuit required for this lab?
It provides a clean pulse or transition from a high to low on this particular example. It eliminates series of spikes or glitches when a button is pressed and released.

34www.xilinx.com
Using Xilinx ChipScope Pro ILA Core with ProjectNavigator to Debug FPGA Applications
Chapter 5: Tutorial Conclusion