Embed Size (px)
Citation preview

Ironhand®
TYPE: A1
USER MANUAL

Ironhand2 ®
Contents
Table of Contents
Introduction ........................................................................................... 41.
About this manual ....................................................................... 41.1
About Ironhand ............................................................................ 41.2
Conformity ................................................................................... 41.3
Symbols on Ironhand ................................................................. 51.4
Disposal ........................................................................................ 51.5
Safety ....................................................................................................... 62.
Risk assessment ......................................................................... 62.1
Pre-existing hand injuries or other conditions ..................... 62.2
Warning, caution and note definitions .................................... 62.3
Warnings ....................................................................................... 72.4
Cautions ........................................................................................ 82.5
Product overview .................................................................................. 93.
Ironhand ....................................................................................... 93.1
Ironhand power pack ............................................................... 103.2
Ironhand glove .......................................................................... 113.3
Ironhand remote control ........................................................ 123.4
Charger ....................................................................................... 133.5
To assemble Ironhand ...................................................................... 144.
To charge and insert the battery ........................................... 144.1
To connect the glove to the power pack .............................. 154.2
To prepare the Backpack ........................................................ 154.3
To prepare the Hipcarry .......................................................... 164.4
To use Ironhand ................................................................................. 175.
Wash your hands and use hand sanitizer ............................ 175.1
To put on and start Ironhand .................................................. 175.2
Functionality test ...................................................................... 225.3
To shut down Ironhand ............................................................ 235.4
To change settings in Ironhand .............................................. 235.5
Inspections and service .......................................................... 255.6
Storage ....................................................................................... 255.7
To clean Ironhand .............................................................................. 266.
To clean the glove ..................................................................... 266.1
To clean the arm straps ........................................................... 276.2
To clean the carry solution ..................................................... 276.3
To clean the power pack ......................................................... 276.4
Troubleshooting ................................................................................. 287.

3®Ironhand
Contents
Accessories .......................................................................................... 298.
Technical specifications ................................................................... 309.
Declaration of Conformity ............................................................... 3110.

Ironhand4 ®
Introduction
Introduction1.
About this manual1.1
· Read the entire user manual before you operate or do maintenance on the
product.
· Always keep the user manual in a place where you can easily find it.
· If you lose the user manual, Bioservo can send you a new manual digitally on
request.
About Ironhand1.2
Ironhand is a modular system that consists of a glove, a power pack, a carry
solution and two arm straps. The Ironhand glove mimics the user's grasp
movements and gives extra strength and endurance to the grasp. This relieves
the muscles and conserves the energy of the user.
Ironhand use a function called Smart Assist to learn from the users movements
over time, but can also be configured to meet specific needs of each user. To
get the best user experience from using Ironhand, make sure to adjust carrying
solutions and system configurations.
Ironhand is intended to be used by individuals who are at risk of developing
musculoskeletal disorders (MSD's) or who need extra strength and endurance
in the grasp.
Conformity1.3
See Declaration of Conformity.
For charger, see included charger manual.
For battery, see battery casing.

5®Ironhand
Introduction
Symbols on Ironhand1.4
Symbol Description Symbol Description
CE mark Manufacturer’s reference
number
Do not discard as household
waste
Part that belongs to the
Ironhand system
See user guide for
information
See user guide for
information
Serial number and
manufacturing year
Figure 1: The label on the power pack.
Figure 2: The label on the glove.
Disposal1.5
When Ironhand becomes worn out, recycle it as electronic waste. Recycle the
battery according to local regulations.

Ironhand6 ®
Safety
Safety2.
Risk assessment2.1
· Qualified personnel must do a risk assessment of the work area and the work
environment before Ironhand is used.
· The risk areas include, but are not limited to:
o The risk to get caught in static or moving objects in the work area.
o The risk to interfere with personal protective equipment.
o Possible danger due to malfunction of the product or unintended finger
flexion.
Pre-existing hand injuries or other conditions2.2
· In cases of pre-existing hand injuries or conditions, start at 25% volume and
increase slowly. If use causes pain, consult your physician before further use.
Warning, caution and note definitions2.3
Warning! Risk of injury if instructions are not obeyed.
Caution: Risk of material damage if instructions are not obeyed.
Information for optimal use of equipment.

7®Ironhand
Safety
Warnings2.4
General2.4.1
· Only use Ironhand on the hand it is intended for.
· A protective glove must be worn on top of Ironhand.
· Do not do modifications to Ironhand.
· All service work must be done by an authorized technician.
· Stop using Ironhand if you feel that the use of it causes discomfort.
· If Ironhand malfunctions, pull the red quick stop handle on the remote
control to release the grasp.
· Do not use Ironhand for tasks that can cause injury if Ironhand malfunctions.
· Only carry objects that you would otherwise be capable of carrying.
· Be cautious when operating heavy machinery such as cranes and hoists.
Battery2.4.2
· ELECTRICAL HAZARD. Change in voltage supply can damage the product and
cause a fire. Replace the battery with a battery of the same type and rating.
· Do not short circuit the terminals of the battery.
· Do not expose the battery to fire. This can cause an explosion.
· Do not expose the battery to temperatures above 60°C/140°F.
· Do not dismantle the battery.
· Do not use batteries that show signs of damage.
· Dispose of worn out batteries according to local regulation without delay.

Ironhand8 ®
Safety
Charger2.4.3
· Only use the charger specified in this guide.
· ELECTRICAL HAZARD. Earthed power supply is vital for the safe use of the
battery charger. Never operate the charger without connection to an earthed
power supply outlet.
· Never use the charger with a damaged cable or if it has been dropped or
damaged.
· Always keep charger and batteries clean.
· Do not dismantle the charger.
· If you have any problems with the charger while it is connected to the electric
outlet, disconnect it from the power point immediately to turn off the power.
Cautions2.5
· Use Ironhand according to the instructions. Incorrect handling can cause
discomfort and void the warranty.
· Keep Ironhand clean at all times. Do not touch anything that can cause
resistant stains.
· Keep Ironhand away from liquids and small particles. Liquids can easily go
through the outer glove and cause damage if they enter Ironhand. To clean
Ironhand, see To clean Ironhand.
· Do not use portable RF communications equipment, like mobile phones,
closer than 30 cm (12 inches) to the Ironhand power pack. Otherwise, the
performance of Ironhand can deteriorate.
· Use caution when operating Ironhand in environments with high levels of
radio frequency noise, such as near welding equipment.

9®Ironhand
Product overview
Product overview3.
Ironhand3.1
Figure 3: The components of the Ironhand system.
Item Name Function
1 Carrying solution with
power pack
Protects the power pack
2 Cord clips Holds the cords in place
3 Arm straps Keeps the cord attached to your arm
4 Glove Provides grasp force
5 Sternum straps Connects the shoulder straps
6 Remote control User control
7 Remote control mount Holds the remote control in place
8 Side strap Used to tighten the backpack

Ironhand10 ®
Product overview
Ironhand power pack3.2
A carry solution must always be used to prevent damage to the power
pack.
Figure 4: Ironhand power pack, remote control and battery charger.
Item Name Function
1 Power pack Controls and powers Ironhand
2 Battery compartment Keeps the battery in the power pack
3 Battery Powers the power pack
4 Cord Transmits commands and power between the
power pack and the remote control
5 Battery charger Charges the battery
6 Remote control User control
7 Quick stop Shuts Ironhand down quickly

11®Ironhand
Product overview
Ironhand glove3.3
Figure 5: Ironhand glove and connector.
Item Name Function
1 Connector Connects the glove to the power
pack
2 Cord Transmits sensory data and force
3 Glove Provides grasp force
4 Strap Secures the glove on the hand
5 Buckle Holds and loosens the strap
Name Function
Finger
sensors
Provide data to the power
pack
Figure 6: Sensors on Ironhand.

Ironhand12 ®
Product overview
Ironhand remote control3.4
Figure 7: Ironhand remote control.
Item Name Function
1 LEDs Indicates battery level in white or force level in
blue
2 Force adjustment Press to adjust the force level
3 On/off button Hold for approximately 1 second to turn the
system on or off. Double-click to
enable/disable WiFi/Bluetooth.
4 WiFi/Bluetooth indicator Blinking = WiFi/BLE functionality is turned on.
Steady light = connected to WiFi/BLE.
5 Profile selection
indicator
Off = primary profile, on = secondary profile
6 Profile selection button Press to select profile
7 Glove status indicator Indicates glove errors
8 Power pack status
indicator
Indicates power pack errors

13®Ironhand
Product overview
Charger3.5
Figure 8: Charger.
Item Name Function
1 Battery charger Charges the battery
2 Charger power cable Transmits DC voltage to the charger
3 Battery slot Holds the battery
4 Charging indicator Indicates the status of the charger
5 Mains power cable Transmits AC voltage to the power adapter
6 Power adapter Converts AC to DC
Charger indicators3.5.1
Light indicator Meaning
One blink series
RED/ORANGE/GREEN
Self test: the charger is ready for use.
Blinking RED/GREEN The battery is identified.
Solid ORANGE The battery is charging.
Solid GREEN The battery is fully charged and can be removed.
Blinking RED The battery is too hot or too cold to be charged.
Solid RED The battery is damaged or of a wrong type.

Ironhand14 ®
To assemble Ironhand
To assemble Ironhand4.
To charge and insert the battery4.1
The charger becomes warm during use.
Figure 9: To charge and insert the battery.
Make sure that the battery is fully charged. The four white battery indicators on
the remote control show the battery status, see Ironhand remote control. You
can also check the battery status on the charger.

15®Ironhand
To assemble Ironhand
To connect the glove to the power pack4.2
Figure 10: To connect the glove connector to the power pack.
To prepare the Backpack4.3
Figure 11: To prepare the Backpack

Ironhand16 ®
To assemble Ironhand
To prepare the Hipcarry4.4
Figure 12: To prepare the Hipcarry

17®Ironhand
To use Ironhand
To use Ironhand5.
Warning! Use Ironhand according to the instructions. Incorrect
handling can cause discomfort.
Wash your hands and use hand sanitizer5.1
Figure 13: Before you use Ironhand, wash your hands and use hand sanitizer.
To put on and start Ironhand5.2
If the Ironhand glove malfunctions, pull the red stop handle on the
remote control. This shuts down the system quickly.
Warning! A protective glove must be used on top of the Ironhand
glove.
Caution: The added force can be surprising for a new user. Make sure
you familiarize yourself with this extra force before you start making
full use of Ironhand.

Ironhand18 ®
To use Ironhand
To put on the Backpack5.2.1
Figure 14: To put on and adjust the Backpack.

19®Ironhand
To use Ironhand
To put on the Hipcarry5.2.2
Figure 15: To put on and adjust the Hipcarry.

Ironhand20 ®
To use Ironhand
To put on the glove5.2.3
Figure 16: To put on the glove.
The glove should be tight on your wrist but not hurt. To loosen the strap, lift the
buckle.
Before use, do a functionality test. See Functionality test.

21®Ironhand
To use Ironhand
To put on an outer glove5.2.4
Figure 17: To put on the outer glove.
Put on the outer glove. If you experience problems with getting your fingers
into the glove, try extending the fingertips of the outer glove.
To adjust the length of the cord5.2.5
Figure 18: To adjust the length of the cord.
Slide the cord in the cord clips to adjust the length of the cord.

Ironhand22 ®
To use Ironhand
To start Ironhand5.2.6
Figure 19: To start Ironhand.
Press and hold the on/off button on the remote control for approximately
1 second to start Ironhand.
Functionality test5.3
Before use, do a functionality test:
1. Inspect the Ironhand system. If it is damaged, contact the supplier.
2. Put Ironhand on according to the instructions in To put on and start
Ironhand.
3. Make sure that the glove status indicator and the power pack status
indicator are not lit. If they are lit, Ironhand has detected an error. Contact
the supplier.
4. Hold an object tightly with all your fingers. Make sure that Ironhand reacts
as intended according to installed profiles.
5. Release the object. Ironhand should stop adding force to your hand.
6. If Ironhand does not add force when you hold, or does not stop adding
force when you release, see Troubleshooting or contact the supplier.

23®Ironhand
To use Ironhand
To shut down Ironhand5.4
Press and hold the on/off button on the remote control for approximately
1 second to place Ironhand in stand-by mode, press and hold for 6 seconds to
shut down Ironhand.
Quick stop5.4.1
Figure 20: Quick stop.
If the Ironhand on/off button does not respond, pull the red stop handle on
the remote control. This releases the grip and shuts down the system quickly.
To reset the quick stop, press the red handle to its normal position.
To change settings in Ironhand5.5
To adjust the force level5.5.1
You can increase or decrease the grasp force with the plus and minus buttons
on the remote control.
· Press the plus button to increase the grasp force.
· Press the minus button to decrease the grasp force.
The four blue force level indicators on the remote control show which force
level you have chosen, see section Ironhand remote control.

Ironhand24 ®
To use Ironhand
To switch between profiles5.5.2
Ironhand has two preset profiles are accessed with the profile
selection button on the remote control. Press the profile selection
button to activate the profile you want to use.
By default, Ironhand uses a profile called Smart Assist that learns from the
operator and optimizes the control system based on the user behavior.
A blinking LED indicates that a Smart Assist profile is being used.
The profile selection indicator (blue LED) shows which profile is active:
Off = primary profile
On = secondary profile
The profile settings can be configured by the operator using the
IronConnect App.
To connect to the IronConnect app5.5.3
You can modify the profile settings on Ironhand using the IronConnect app.
Figure 21: Double click to activate/deactivate Bluetooth/Wifi.
The IronConnect App can be downloaded from Google Play Store for Android
devices and the App Store for iOS devices. Install the app and open it. Double
click on the power button to activate/de-activate Bluetooth/Wifi. The System will
appear in the IronConnect app.

25®Ironhand
To use Ironhand
Inspections and service5.6
Warning! All service work must be done by an authorized technician.
Inspect Ironhand with regular intervals to make sure that it functions correctly
and that there are no damages on the system components.
There are no parts in the power pack that can be replaced by the user. Contact
the supplier for all service work.
Storage5.7
Remove the battery if you are not going to use Ironhand for more than one
week. When you keep the battery in Ironhand, it will slowly drain.

Ironhand26 ®
To clean Ironhand
To clean Ironhand6.
No other maintenance of the product than cleaning can be
performed by the user.
To clean the glove6.1
Do not use fabric softener
Always wash the glove in a padded wash bag approved by Bioservo
Technologies AB. This prevents damage to the glove and the washing
machine.
Hand wash or machine wash the glove according to the below instruction.
Spray the glove with isopropanol for disinfection.
Gentle cycle for synthetics
Do not centrifuge
Do not use detergent with bleach
Do not tumble dry
Do not iron
Do not dry clean
Do not wring
Hang dry in room temperature
Before use, make sure that the glove and its parts are completely dry. Straighten
the fingers on the glove by pulling gently at the fingers, and attach the Power
pack. Check the functionality, see Functionality test.

27®Ironhand
To clean Ironhand
To clean the arm straps6.2
Hand wash or machine wash the arm straps in a padded wash bag approved by
Bioservo Technologies AB.
Gentle cycle for synthetics
To clean the carry solution6.3
Clean the carry slotion according to the cleaning instructions on the label of the
carry solution.
To clean the power pack6.4
Clean the power pack and the remote control with a damp cloth. If necessary,
use mild detergent. Do not use any abrasive detergents or cleaning equipment
such as scouring pad.
Ironhand28 ®
Troubleshooting
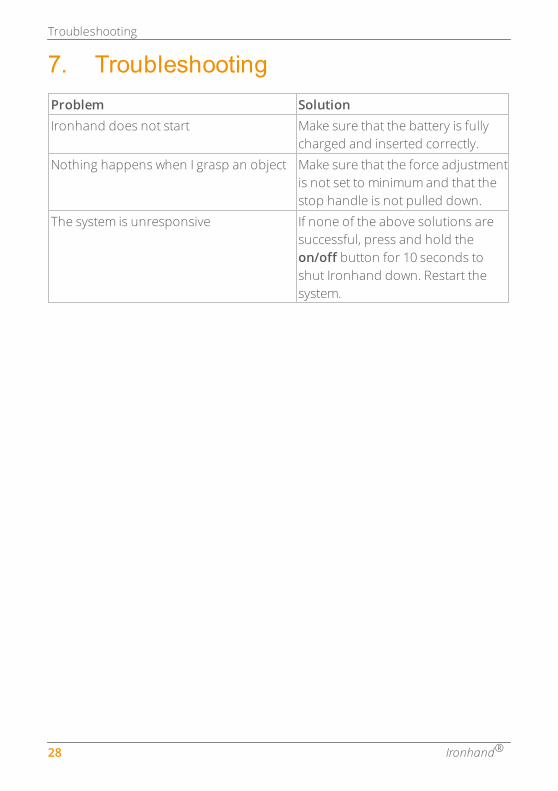
Troubleshooting7.
Problem Solution
Ironhand does not start Make sure that the battery is fully
charged and inserted correctly.
Nothing happens when I grasp an object Make sure that the force adjustment
is not set to minimum and that the
stop handle is not pulled down.
The system is unresponsive If none of the above solutions are
successful, press and hold the
on/off button for 10 seconds to
shut Ironhand down. Restart the
system.

29®Ironhand
Accessories
Accessories8.
You can order these accessories from the supplier:
Name Catalogue
number
Description
Powerpack 041.0 Ironhand Powerpack
Battery RRC2054 Ironhand® Battery
Battery charger RRC-SMB-MBC Ironhand® Battery charger
Connection Straps 046.0 Double Carry System Connection
Straps
Hard Carry Case
Small
045.S For Ironhand® Kit with up to 2 gloves
Hard Carry Case
Large
022.13 For Ironhand® Demokit with up to 6
gloves
Measuring Tape 022.14 Ironhand® branded Measuring Tape
Wash bag 022.9 Ironhand® Wash bag
The below products are ordered in specific sizes:
Name Catalogue
number
Explanation Options
Ironhand glove 040.os o = orientation
s = size
L (left), R (right)
S, M, L, XL
Backpack 042.s s = size S-M, L-XL
Hip Carry 043.s s=size S, M, L
Arm strap 044.s s = size S-M, L-XL
Example: To order a right-hand glove in size M, use the catalogue number
040.RM.

Ironhand30 ®
Technical specifications
Technical specifications9.
Rated voltage 15 V DC
Type of battery 15 V DC Li-ion
Battery life Approx. 8 hours, depending on usage
IP class IP4X
Altitude Max 2 000 m
Weight Power pack, battery & glove 2.1 kg, Backpack 0.6
kg, Hipcarry 0.4kg
Max total added force 80 N
Contact material
Ironhand glove Polyehtylene, polyamide, elastane, viscose,
polyurethane, leather
Powerpack/Remote control Polyamide, polyethylene, polyurethane
Carry Solution&Armstraps Polyamide, Polyurethane, elastane, leather
Ambient temperature
Use –5°C to +40°C
Storage –20°C to +50°C
Ambient humidity
Use 10% to 80% relative humidity, non-condensing
Storage 5% to 90% relative humidity, non-condensing
Expected lifetime
Power pack 2 years or 1 000 000 cycles
Glove 3 months or 100 000 cycles
Charger See separate manual for specifications
Wifi/Bluetooth
Frequency 2.4 to 2.5 GHz
Protocols 802.11 b/g/n / Bluetooth 5.1
FCC ID VPYLB1DX
Radio
Technology 3G/4G/GNSS
FCC ID N7NEM75S

31®Ironhand
Declaration of Conformity
Declaration of Conformity10.

Copyright © 2021 Bioservo Technologies AB
Bioservo, Ironhand® and the Bioservo logotype are trademarks that are registered
to Bioservo Technologies AB.
Document ID: D0003798
Issue: 02
Bioservo Technologies AB
Torshamnsgatan 35
164 40 Kista
Sweden
Distributor:
www.bioservo.com
+46(0)8 211 710