Embed Size (px)
Citation preview

iii
Contents
Safety Information. . . . . . . . . . . . . . . . . . . . . . . . .7
Overview . . . . . . . . . . . . . . . . . . . . . . . . . . . . . . .13Guide Overview. . . . . . . . . . . . . . . . . . . . . . . . .14Phone Overview . . . . . . . . . . . . . . . . . . . . . . . .15Indicators . . . . . . . . . . . . . . . . . . . . . . . . . . . . . .18Accessories . . . . . . . . . . . . . . . . . . . . . . . . . . . .21
Getting Started . . . . . . . . . . . . . . . . . . . . . . . . . .25Attaching the Satellite Antenna . . . . . . . . . . . . .26What Is a SIM Card? . . . . . . . . . . . . . . . . . . . . .27 Installing/Removing the SIM Card . . . . . . . . . .28Installing the Battery . . . . . . . . . . . . . . . . . . . . .30Removing the Battery . . . . . . . . . . . . . . . . . . . .31Charging the Battery . . . . . . . . . . . . . . . . . . . . .33Checking Battery Charge Level . . . . . . . . . . . . .35Battery Information . . . . . . . . . . . . . . . . . . . . . .36
Using Your Phone . . . . . . . . . . . . . . . . . . . . . . . .37Startup Procedures . . . . . . . . . . . . . . . . . . . . . .38Placing a Call. . . . . . . . . . . . . . . . . . . . . . . . . . .42Receiving a Call. . . . . . . . . . . . . . . . . . . . . . . . .45Additional Phone Features . . . . . . . . . . . . . . . .48
Using In-Call Features . . . . . . . . . . . . . . . . . . . .51Muting a Call . . . . . . . . . . . . . . . . . . . . . . . . . . .52
Using the Menus . . . . . . . . . . . . . . . . . . . . . . . . .53Using the Options Menu . . . . . . . . . . . . . . . . . .54Using the Quick Access Menu. . . . . . . . . . . . . .56
Managing the Phone Book . . . . . . . . . . . . . . . . .59Phone Book Menu. . . . . . . . . . . . . . . . . . . . . . .60Organizing Your Phone Book . . . . . . . . . . . . . .61Storing Names and Numbers . . . . . . . . . . . . . .63Entering Names. . . . . . . . . . . . . . . . . . . . . . . . .65Using Pauses in Numbers . . . . . . . . . . . . . . . . .67Using Phone Number Prefixes . . . . . . . . . . . . .69Locating Entries. . . . . . . . . . . . . . . . . . . . . . . . .70Calling, Modifying, or Erasing an Entry . . . . . . .72Checking Phone Book Capacity . . . . . . . . . . . .73
9505A-kgTOC.fm Page iii Wednesday, November 3, 2004 9:33 PM

iv
Preventing Access to the Phone Book . . . . . . . 74Restricting Phone Use . . . . . . . . . . . . . . . . . . . 75Viewing the Last Ten Calls Made or Received . 80Viewing and Modifying Your Phone Numbers. . 81Using One-Touch Dialing . . . . . . . . . . . . . . . . . 83Viewing Service Phone Numbers . . . . . . . . . . . 85
Using Calling Features . . . . . . . . . . . . . . . . . . . 87Call Related Features Menu . . . . . . . . . . . . . . . 88Forwarding Calls When Unavailable . . . . . . . . . 89Forwarding All Your Calls . . . . . . . . . . . . . . . . . 90Using Detailed Call Forwarding . . . . . . . . . . . . 92Canceling All Forwarding . . . . . . . . . . . . . . . . . 94Restricting Calls with Call Barring . . . . . . . . . . 95Viewing the Battery Meter . . . . . . . . . . . . . . . 100Viewing Signal Strength . . . . . . . . . . . . . . . . . 101Deactivating Pending Call Drop Signal . . . . . . 102
Using Message Services . . . . . . . . . . . . . . . . . 103Messages Menu . . . . . . . . . . . . . . . . . . . . . . . 104Checking Your Voicemail . . . . . . . . . . . . . . . . 105Managing Your Received Messages . . . . . . . 106Accessing Received Messages . . . . . . . . . . . 108Managing Outgoing Messages. . . . . . . . . . . . 113Managing Other Message Settings . . . . . . . . 122
Customizing Phone Features . . . . . . . . . . . . . 127Phone Setup Menu. . . . . . . . . . . . . . . . . . . . . 128Managing Phone Ringer Settings. . . . . . . . . . 129Locking and Unlocking Your Phone . . . . . . . . 131Protecting the SIM Card . . . . . . . . . . . . . . . . . 133Managing Other Security Settings . . . . . . . . . 135Activating Extended Menus . . . . . . . . . . . . . . 137Managing Time and Date Settings . . . . . . . . . 138Selecting the Display Language . . . . . . . . . . . 141Turning Lights On and Off. . . . . . . . . . . . . . . . 142Setting Keypad Tones. . . . . . . . . . . . . . . . . . . 142Managing Phone Settings . . . . . . . . . . . . . . . 143
Accessing the Network . . . . . . . . . . . . . . . . . . 147Network Selection Menu. . . . . . . . . . . . . . . . . 148
9505A-kgTOC.fm Page iv Wednesday, November 3, 2004 9:33 PM

v
Registering With the Satellite Network . . . . . .149
Timing Your Calls . . . . . . . . . . . . . . . . . . . . . . .151Call Meters Menu . . . . . . . . . . . . . . . . . . . . . .152Showing Call Timers . . . . . . . . . . . . . . . . . . . .153Setting Audible Call Timers . . . . . . . . . . . . . . .155Showing the In-Call Timer . . . . . . . . . . . . . . . .157Showing the Lifetime Timer . . . . . . . . . . . . . . .158
Customizing the Menu System . . . . . . . . . . . .159Personalizing the Options Menu . . . . . . . . . . .160Personalizing the Quick Access Menu . . . . . .162
Troubleshooting . . . . . . . . . . . . . . . . . . . . . . . .163
Index. . . . . . . . . . . . . . . . . . . . . . . . . . . . . . . . . 167
Patent Information. . . . . . . . . . . . . . . . . . . . . . .179
Declaration of Conformity . . . . . . . . . . . . . . . .180
Warranty Information . . . . . . . . . . . . . . . . . . . .181
9505A-kgTOC.fm Page v Wednesday, November 10, 2004 5:08 PM

vi
9505A-kgTOC.fm Page vi Wednesday, November 3, 2004 9:33 PM

Safety Information 7
Safety Information
Important: Read this information before using your satellite phone.
Exposure to Radio Frequency SignalsYour satellite telephone is a low power radio transmitter and receiver. When it is ON, it receives and also sends out radio frequency (RF) signals.
International agencies have set standards and recommendations for the protection of public exposure to RF electromagnetic energy.
• International Commission on Non-Ionizing Radiation Protection (ICNIRP)1996
• Verband Deutscher Elektrotechniker (VDE) DIN-0848
• United States Federal Commission, Radio Frequency Exposure Guidelines (1996)
• National Radiological Protection Board of the United Kingdom, GS 11,1988
• American National Standards Institute (ANSI) IEEE. C95. 1-1992
• National Council on Radiation Protection and Measurements (NCRP). Report 86
• Department of Health and Welfare Canada. Safety Code 6
These standards are based on extensive scientific review. For example, over 120 scientists, engineers, and physicians from universities, government health agencies, and industry reviewed the available body of research to develop the updated ANSI standard.
The design of your phone complies with these standards when used as described under “Phone Operation” on page 9.
03Safety-kg.fm Page 7 Tuesday, November 9, 2004 9:34 PM

8 Safety Information
Specific Absorption Rate DataThis model phone meets international standards for exposure to radio waves.
Your satellite phone is a radio transmitter and receiver. It is designed and manufactured not to exceed limits for exposure to radio frequency (RF) energy. These limits are part of comprehensive guidelines and established permitted levels of RF energy for the general population. The guidelines are based on standards that we developed by independent scientific organizations through periodic and thorough evaluation of scientific studies. The guidelines include a substantial safety margin designed to assure the safety of all persons, regardless of age and health.
The exposure standard for mobile phones employs a unit of measurement known as the Specific Absorption Rate, or SAR. Under the guidelines for this model, the SAR limit is 2.0 W/kg. *Tests for SAR were conducted in accordance with CENELEC and FCC testing procedures using standard operating positions with the phone transmitting at its highest certified power level in all tested frequency bands. Although the SAR is determined at the highest certified power level, the actual SAR of the phone while operating can be well below the maximum value.
Before a phone model is available for sale to the public, it is tested to confirm compliance with the guidelines. The tests are performed in positions and locations (e.g., at the ear and worn on the body) that conform to a uniform testing methodology determined by an expert standards body. The highest SAR level recorded from this product was 0.357 mW/g for a 1g cube which was below the uncontrolled (i.e. general population) limit. While there may be differences between the SAR levels of various phones and at various positions, they all meet the governmental requirements for safe exposure. Please note that modifications to this product model could cause differences in the SAR value for later products; in all cases, products are designed to be within the guidelines.
Antenna CareUse only the supplied or an approved replacement antenna. Unauthorized antennas, modifications, or attachments could damage the phone and may violate local agency regulations. When using remote mount antenna, mount antenna at least 20 cm away from the user.
03Safety-kg.fm Page 8 Tuesday, November 9, 2004 9:34 PM

Safety Information 9
Phone OperationNormal Operation: Hold the phone as you would any other telephone. Rotate the antenna to either the left or right detent, and make sure the antenna is fully extended. The antenna should be vertical to the ground and have a clear unobstructed view of the sky.
Tips on Efficient Operation: For your phone to operate most efficiently:
• Rotate and extend your antenna fully.
• Make sure the antenna has a clear unobstructed view of the sky.
• Do not touch the antenna unnecessarily when the phone is in use. Contact with the antenna affects call quality and may cause the phone to operate at a higher power level than otherwise needed.
• Do not wear the phone on your body while making calls with the headset accessory. Wearing the phone on the body can interfere with proper phone operation, since the antenna requires a clear unobstructed view of the sky to access the Iridium® satellite network.
BatteriesCaution: All batteries can cause property damage, injury or burns if a conductive material, such as jewelry, keys or beaded chains, touches exposed terminals. The material may complete an electrical circuit and become quite hot. To protect against such unwanted current drain, exercise care in handling any charged battery, particularly when placing it inside your pocket, purse or other container with metal objects. Caution: Risk of explosion if battery is replaced by an incorrect type. Dispose of used batteries according to instructions.
DrivingCheck the laws and regulations on the use of wireless telephones in the areas where you drive. Always obey them. Observe the following guidelines when using your phone while driving.
• Give full attention to driving—driving safely is your first responsibility.
• Use hands-free phone operation, if available.
• Pull off the road and park before making or answering a call if driving conditions so require.
03Safety-kg.fm Page 9 Tuesday, November 9, 2004 9:34 PM

10 Safety Information
Electronic DevicesMost modern electronic equipment is shielded from RF signals. However, certain equipment may not be shielded against the RF signals from your wireless phone.
PacemakersThe Health Industry Manufacturers Association recommends that a minimum separation of six inches (6") be maintained between a handheld wireless phone and a pacemaker to avoid potential interference with the pacemaker. These recommendations are consistent with the independent research by and recommendations of Wireless Technology Research.
Persons with pacemakers:
• should ALWAYS keep the phone more than six inches from their pacemaker when the phone is turned ON
• should not carry the phone in a breast pocket
• should use the ear opposite the pacemaker to minimize the potential for interference
• should turn the phone OFF immediately if you have any reason to suspect that interference is taking place
Hearing AidsSome digital wireless phones may interfere with some hearing aids. In the event of such interference, you may want to consult your hearing aid manufacturer to discuss alternatives.
Other Medical DevicesIf you use any other personal medical device, consult the manufacturer of your device to determine if it is adequately shielded from external RF energy. Your physician may be able to assist you in obtaining this information.
Turn your phone OFF in health care facilities when any regulations posted in these areas instruct you to do so. Hospitals or health care facilities may be using equipment that could be sensitive to external RF energy.
VehiclesRF signals may affect improperly installed or inadequately shielded electronic systems in motor vehicles. Check with the manufacturer or its representative regarding your vehicle. You should also consult the manufacturer of any equipment that has been added to your vehicle.
03Safety-kg.fm Page 10 Wednesday, November 3, 2004 9:35 PM

Safety Information 11
Posted FacilitiesTurn your phone OFF in any facility where posted notices so require.
AircraftAirline regulations prohibit using your phone while in the air. Check and comply with the policy of your airline regarding the use of your phone while the aircraft is on the ground.
Switch OFF your phone before boarding an aircraft.
Blasting AreasTo avoid interfering with blasting operations, turn your phone OFF when in a “blasting area” or in areas posted: “Turn off two-way radio.” Obey all signs and instructions.
Potentially Explosive AtmospheresTurn your phone OFF and do not remove your battery when you are in any area with a potentially explosive atmosphere. Obey all signs and instructions. Sparks from your battery in such areas could cause an explosion or fire resulting in bodily injury or even death.
Areas with a potentially explosive atmosphere are often but not always clearly marked. They include, but are not limited to: fueling areas such as gasoline stations; below deck on boats; fuel or chemical transfer or storage facilities; areas where fuel odors are present (for example, if a gas/propane leak occurs in a car or home); areas where the air contains chemicals or particles, such as grain, dust, or metal powders; and any other area where you normally would be advised to turn off your vehicle engine.
For Vehicles Equipped with an Air BagAn air bag inflates with great force. Do NOT place objects, including both installed or portable wireless equipment, in the area over the air bag or in the air bag deployment area. If in-vehicle wireless equipment is improperly installed and the air bag inflates, serious injury could result.
03Safety-kg.fm Page 11 Wednesday, November 3, 2004 9:35 PM

12 Safety Information
03Safety-kg.fm Page 12 Tuesday, November 9, 2004 9:34 PM

13
Overview
This chapter provides an overview of this user’s guide, your new satellite phone, and available accessories.
Export Compliance InformationThis product is controlled by the export laws and regulations of the United States of America. The U.S. Government may restrict the export or re-export of this product to certain individuals and/or destinations. for further information, contact the U.S. Department of Commerce, Bureau of Industry and Security or visit www.bis.doc.gov.
04Intro-kg.fm Page 13 Wednesday, November 3, 2004 9:35 PM

14 Overview
Guide Overview
Key PressesKey presses are represented in this guide using symbols. A sequence of key presses may be shown as follows:
M O C
This means you should press M followed by O and then C, in sequence, not simultaneously.
Prompts and MessagesYour phone responds to key presses by displaying either a prompt that guides you to the next action or a message confirming that your action is complete. Prompts and messages are represented in this guide in LCD style, for example: Enter PIN or Completed.
TipsIn the margins of this guide are useful hints and ways to improve your phone’s performance.
04Intro-kg.fm Page 14 Wednesday, November 3, 2004 9:35 PM

Overview 15
Phone Overview
Display StatusIndicators
Earpiece
Real-TimeClock
Battery ChargeIndicator
Display
Battery and SIM Compartment
Quick Access Key
Microphone
SatelliteAntenna
Headset Jack
AntennaLock Release
Button
StatusIndicator
Note: Phone shown with antenna in stowed position.
SignalStrengthIndicator
VolumeControl
Keys
MessageKey
AlphanumericKeypad
DataConnector
PowerConnector
Scroll Bar
04Intro-kg.fm Page 15 Tuesday, November 9, 2004 8:20 PM
16 Overview
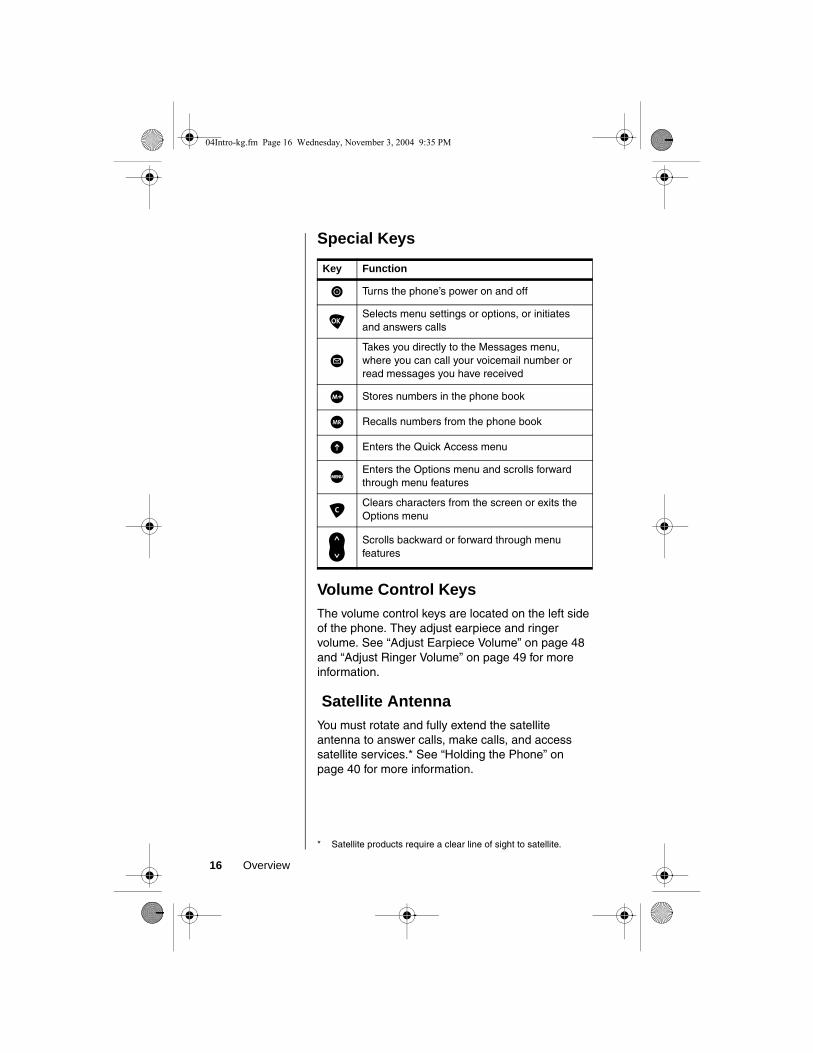
Special Keys
Volume Control KeysThe volume control keys are located on the left side of the phone. They adjust earpiece and ringer volume. See “Adjust Earpiece Volume” on page 48 and “Adjust Ringer Volume” on page 49 for more information.
Satellite Antenna You must rotate and fully extend the satellite antenna to answer calls, make calls, and access satellite services.* See “Holding the Phone” on page 40 for more information.
Key Function
S Turns the phone’s power on and off
O Selects menu settings or options, or initiates and answers calls
? Takes you directly to the Messages menu, where you can call your voicemail number or read messages you have received
I Stores numbers in the phone book
Q Recalls numbers from the phone book
E Enters the Quick Access menu
M Enters the Options menu and scrolls forward through menu features
C Clears characters from the screen or exits the Options menu
< Scrolls backward or forward through menu features
* Satellite products require a clear line of sight to satellite.
04Intro-kg.fm Page 16 Wednesday, November 3, 2004 9:35 PM

Overview 17
Satellite Antenna Lock Release ButtonThis button releases the satellite antenna so you can attach the auxiliary antenna.
DisplayYour phone’s Liquid Crystal Display (LCD) displays as many as four rows of 16 characters.
The LCD on your phone may respond slowly to key presses in extremely cold temperatures. This is normal and does not affect the phone operation in any way.
Headset JackThe headset jack located on the right side of the phone provides a connection for an optional headset.
Power ConnectorThis connector, located at the bottom left of the phone, provides the connection for an external power supply.
Data Connector
This connector, located on the bottom of the phone, provides the connection for a data cable.
04Intro-kg.fm Page 17 Wednesday, November 3, 2004 9:35 PM
18 Overview
Indicators
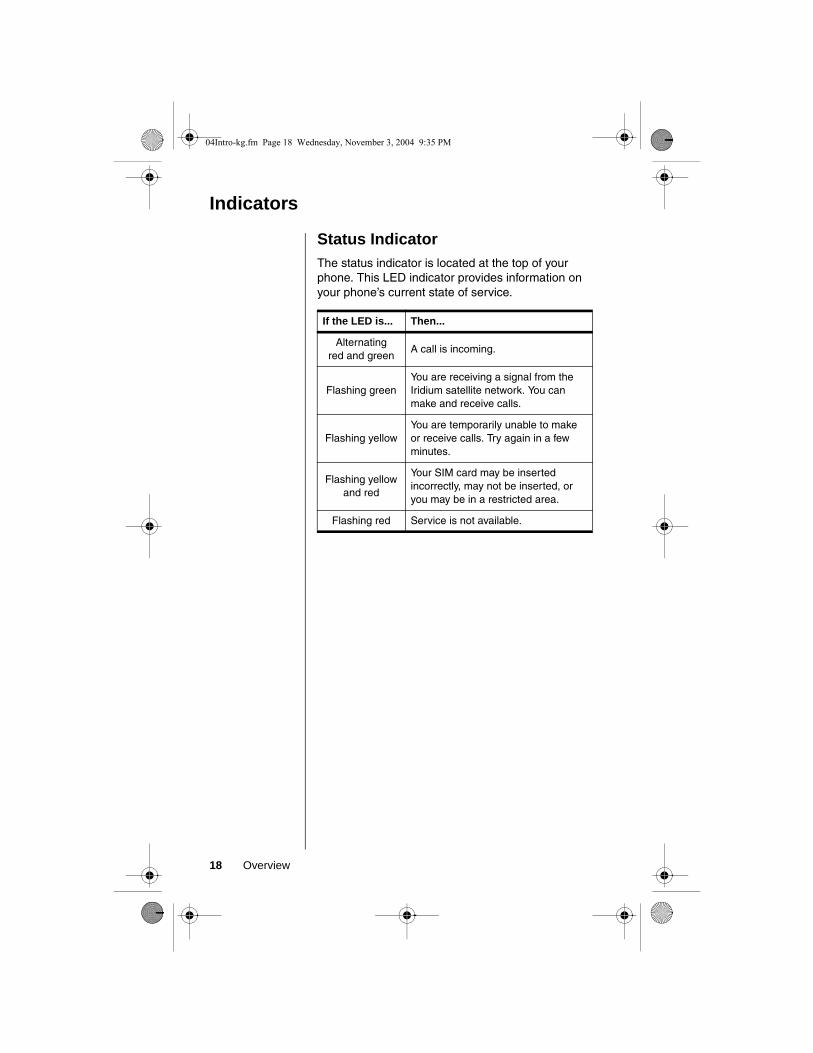
Status IndicatorThe status indicator is located at the top of your phone. This LED indicator provides information on your phone’s current state of service.
If the LED is... Then...
Alternating red and green
A call is incoming.
Flashing greenYou are receiving a signal from the Iridium satellite network. You can make and receive calls.
Flashing yellowYou are temporarily unable to make or receive calls. Try again in a few minutes.
Flashing yellow and red
Your SIM card may be inserted incorrectly, may not be inserted, or you may be in a restricted area.
Flashing red Service is not available.
04Intro-kg.fm Page 18 Wednesday, November 3, 2004 9:35 PM

Overview 19
Display Status Indicators and Icons
Indicator Description
rx
Signal Strength Indicator indicates the strength of the signal from the network. The signal strength indicator appears continuously in the top left hand corner of the display. The more segments displayed in the bar graph, the stronger the signal. Five bars indicate full signal strength. No bars indicate a weak signal.
q
Battery Charge Indicator indicates the strength of the battery charge. The more segments displayed, the greater the battery charge.
You can also check the strength of the charge at any time through the menu. See “Viewing the Battery Meter” on page 100 for more information.
12:00
Real Time Clock Indicator displays the time in either 12-hour or 24-hour format. See “Change the Time Displayed” on page 139 for more information.
o
Message Indicator appears when you receive a new message. It flashes when the SIM card is full. See “Getting to Received Messages...” on page 109 for additional information.
+Satellite Mode Indicator appears when your phone is in satellite mode.
n
Home System Indicator appears when the phone has successfully registered with the Iridium satellite system.
04Intro-kg.fm Page 19 Wednesday, November 3, 2004 9:35 PM

20 Overview
m No Service Indicator appears when your phone is not capable of placing or receiving calls.
k In Use Indicator appears when a call is in progress.
s
Scroll Bar appears on the right of the display when you are in a menu. The button on the scroll bar indicates where you are in the list.
z Check Mark indicates a menu item is currently selected.
w
Hourglass Icon appears in the display when your phone has to request settings from the network.
B...P
Quick Access Menu Icons allow you to easily identify Quick Access features as you scroll through the Quick Access menu.
Indicator Description
04Intro-kg.fm Page 20 Wednesday, November 3, 2004 9:35 PM

Overview 21
Accessories
Product appearance and specifications are subject to change without notice.
Batteries
Lithium Ion Battery
* All talk and standby times are approximate and depend on network configuration, signal strength, and the features selected.
If replacing the battery, the phone should be switched off before removing the battery.
If you want to store the battery for a long period store it in the fully charged state. Batteries that have been stored in a discharged state for longer than 6 months may not be rechargable.
• Provides up to 3.6 hours of talk time or 30 hours of standby time*
• Weighs 2.2 ounces/63 grams
04Intro-kg.fm Page 21 Tuesday, November 9, 2004 8:20 PM

22 Overview
AC Travel Charger and International Plug Kit
The AC travel charger and international plug kit provides rapid charge for optimal performance and can be used to power the phone except when the battery is fully depleted. The battery must be installed
when using charger to power phone.
• Includes five international plug adapters for use in Europe, United States of America and Canada, United Kingdom, Australia and India.
• Allows you to use the 9505A portable phone while recharging the battery *
* The battery should not be allowed to fully discharge.
04Intro-kg.fm Page 22 Wednesday, November 3, 2004 9:35 PM

Overview 23
Auto Accessory AdapterRestores full battery power for portable phone operation from any operating vehicle (using standard 12-volt accessory connector port).
HeadsetThe convenient headset provides both an earphone and microphone in one small piece for simple hands-free and private telephone conversations. The headset plugs directly into the jack on the right side of your phone.
Lanyard Wrist StrapThe lanyard wrist strap is made of nylon. It provides a convenient way to carry your phone.
04Intro-kg.fm Page 23 Wednesday, November 3, 2004 9:35 PM

24 Overview
Portable Auxiliary AntennaFrom one car to another, this compact pocket-sized antenna with convenient magnetic mount goes in every vehicle you do, to provide improved reception.
• Reliable magnetic mount, ceramic patch antenna
• Attached 1.5-meter cable
Note: The use of wireless devices and their accessories may be prohibited or restricted in certain areas. Ensure antenna is mounted 20 cm feet from user or passengers. Always obey the laws and regulations on the use of these devices.
Antenna AdapterThis adapter provides the required external antenna connection to use your 9505A portable phone with the portable auxiliary antenna.
Carry CaseThis high-quality leather case helps protect your phone. It includes a belt clip and a lanyard wrist strap.
04Intro-kg.fm Page 24 Wednesday, November 3, 2004 9:35 PM

25
Getting Started
Getting started with your new satellite phone is easy. Just insert your phone’s SIM (Subscriber Identity Module) card and charge the battery. This chapter shows you how.
05GetStart-kg.fm Page 25 Wednesday, November 3, 2004 9:36 PM

26 Getting Started
Attaching the Satellite Antenna
Attach the Antenna1. Attach the antenna in the down position.
2. Press and hold the lock release button at the top of the phone.
3. Push the antenna until it clicks into place and release the lock release button.
Remove the AntennaYou may want to remove the satellite antenna to attach an auxiliary antenna.
1. Place the antenna in the down position.
2. Press and hold the lock release button at the top of the phone.
3. Remove the antenna by pulling straight out.
32
32
05GetStart-kg.fm Page 26 Wednesday, November 3, 2004 9:36 PM

Getting Started 27
What Is a SIM Card?
Your SIM (Subscriber Identity Module) card is a small smart card that contains your service details and memory for storing Phone Book entries and messages.
Note: Your phone has limited functionality without the SIM card.
SIM Card ProtectionYou may want to keep your SIM card in your wallet or purse when you are not using your satellite phone. This helps keep your personal information secure and gives you access to your service even if your phone is not available. If you forget your phone, insert your SIM card into a friend’s phone to access your personal service.
Caution: Do not bend or scratch your SIM card, and avoid exposing your card to static electricity, water, or dirt.
05GetStart-kg.fm Page 27 Wednesday, November 3, 2004 9:36 PM

28 Getting Started
Installing/Removing the SIM Card
The SIM card is stored in a recess in the battery compartment. It is normally covered by the battery when you use your phone.
Caution: Make sure your phone is powered off before inserting or removing the SIM card. If you don’t, you may damage the memory on your SIM card.
1. Turn your phone off by pressing and holding the S key.
2. Remove the battery cover and battery. (See “Removing the Battery” on page 31.)
3. Slide the SIM card tray to the left and lift up the right side of the tray.
3
05GetStart-kg.fm Page 28 Wednesday, November 3, 2004 9:36 PM

Getting Started 29
4. Insert the SIM card into the tray with the notch up and the gold plate facing out.
or
Remove the SIM card from the tray.
5. Push down the SIM card tray and slide the tray to the right to lock it in place.
6. Replace the battery and battery cover.(See “Insert the Battery” on page 30.)
4
5
05GetStart-kg.fm Page 29 Wednesday, November 3, 2004 9:36 PM

30 Getting Started
Installing the Battery
Insert the Battery1. Remove or rotate the satellite antenna
before installing the battery. (See “Attaching the Satellite Antenna” on page 26.)
Tip: The battery compartment is located on the back of the phone.
2. Press and hold the release latch at the top of the battery compartment cover.
3. Pull the cover upward, and then remove it from the phone.
4. Align the arrows on the battery with the arrows in the battery compartment. Insert the battery, bottom end first, into the compartment, and then press the battery downward until it clicks into place.
5. Insert the bottom end of the battery compartment cover into the slots at the end of the compartment.
6. Snap the cover down into place.
3
2
4
56
05GetStart-kg.fm Page 30 Wednesday, November 3, 2004 9:36 PM

Getting Started 31
Removing the Battery
1. Ensure the phone is switched off.
2. Remove or rotate the satellite antenna before removing the battery. (See “Attaching the Satellite Antenna” on page 26.)
Tip: The battery compartment is located on the back of the phone
3. Press and hold the release latch at the top of the battery compartment cover.
4. Pull the cover upward, and then remove it from the phone.
5. Press and hold the release latch at the base of the battery.
3
4
5
05GetStart-kg.fm Page 31 Monday, November 15, 2004 4:33 PM

32 Getting Started
6. Pull the battery upward and out of the phone.
7. Insert the bottom end of the battery compartment cover into the slots at the end of the compartment.
8. Snap the cover down into place.
6
7
8
05GetStart-kg.fm Page 32 Monday, November 15, 2004 4:33 PM
Getting Started 33
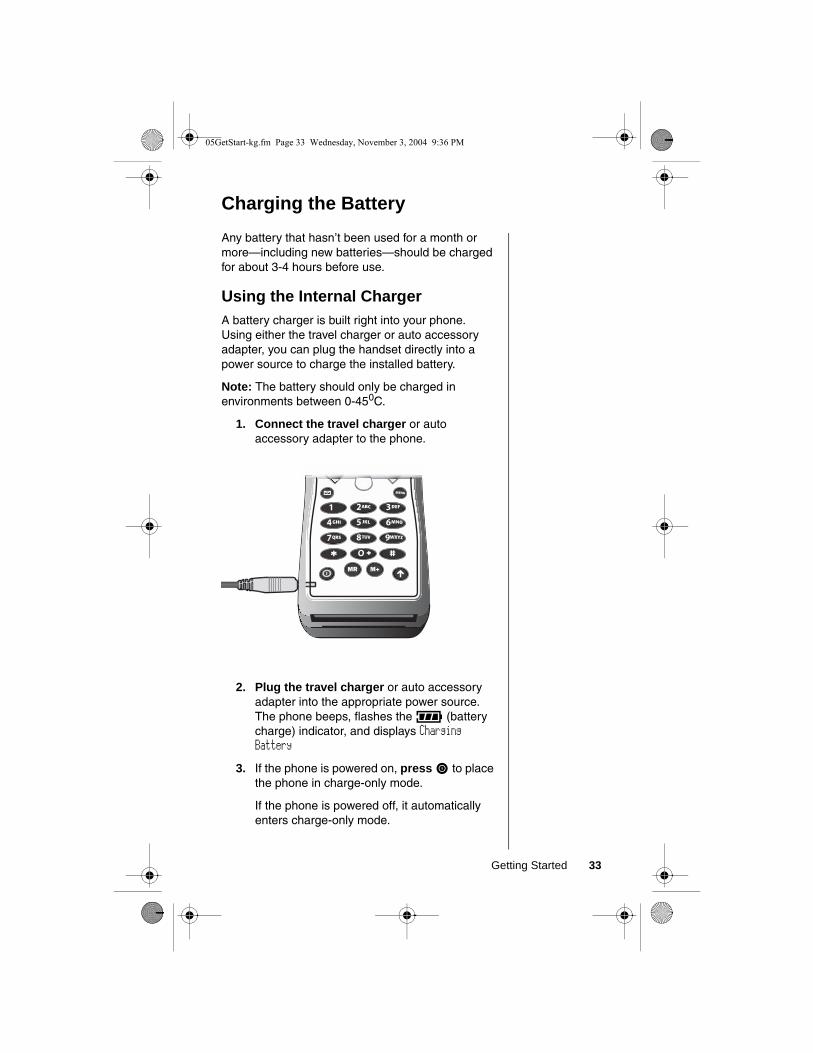
Charging the Battery
Any battery that hasn’t been used for a month or more—including new batteries—should be charged for about 3-4 hours before use.
Using the Internal ChargerA battery charger is built right into your phone. Using either the travel charger or auto accessory adapter, you can plug the handset directly into a power source to charge the installed battery.
Note: The battery should only be charged in environments between 0-450C.
1. Connect the travel charger or auto accessory adapter to the phone.
2. Plug the travel charger or auto accessory adapter into the appropriate power source. The phone beeps, flashes the q (battery charge) indicator, and displays Charging Battery
3. If the phone is powered on, press S to place the phone in charge-only mode.
If the phone is powered off, it automatically enters charge-only mode.
05GetStart-kg.fm Page 33 Wednesday, November 3, 2004 9:36 PM

34 Getting Started
Note: You can still place and answer calls while using the internal charger. If you wish to place or answer a call:
Press S to exit charge-only mode and return to normal operation.
Remember that talking on the phone uses power, so charging takes more time.
05GetStart-kg.fm Page 34 Wednesday, November 3, 2004 9:36 PM

Getting Started 35
Checking Battery Charge Level
Low Battery WarningWhen the battery level is low and only a few minutes of talk-time remains, your phone signals you in two ways:
• Low Battery appears on the display
• A warning tone (two double beeps) sounds
Note: To help maintain the best battery and phone performance, recharge your battery as soon as possible after you receive the low battery warning.
View Battery MeterThe q (battery charge) indicator appears continuously in the upper right corner of the display.
You can also display a more detailed battery meter at any time to check the charge level on your battery. See “Viewing the Battery Meter” on page 100 for more information.
05GetStart-kg.fm Page 35 Wednesday, November 3, 2004 9:36 PM

36 Getting Started
Battery Information
Maximizing Battery LifeCaution: To prevent injuries or burns, do not allow metal objects to contact or short circuit the battery terminals.
Caution: At extreme temperatures (eg., -10°C) battery life capacity is significantly reduced.
To ensure maximum battery life and use your battery to its fullest capacity, observe the following guidelines.
• Always use Iridium approved battery chargers
• Always use Iridium approved batteries
• Maintain the battery at or near room temperature when charging
• When you don’t plan on using a particular battery for a while, store the battery uncharged in a cool, dark, and dry place
• To prolong the life of your batteries, avoid exposing them to temperatures below -10°C (14°F) or above 45°C (113°F)
• Always take your phone with you when you leave your car
Disposing of BatteriesTo dispose of batteries, check with your local recycling center for a battery recycler near you. Never dispose of batteries in fire.
05GetStart-kg.fm Page 36 Wednesday, November 3, 2004 9:36 PM
37
Using Your Phone
Read this chapter to learn how to get up and running with your new satellite phone.
06Using-kg.fm Page 37 Wednesday, November 3, 2004 9:36 PM

38 Using Your Phone
Startup Procedures
Turn the Power On and Off1. Insert your SIM card if necessary. (See
“Installing/Removing the SIM Card” on page 28.)
2. Press and hold S to turn the phone on and off.
When you turn your phone’s power on, you will hear the wakeup tone (or feel a vibration if the vibrate mode is activated) and see the wakeup screen. The wakeup screen displays a short animated sequence that reminds you to rotate and extend the antenna, and shows how to hold the phone for best reception (see illustration). You may see a number of other power-on messages (described on pages 39-40).
When the m (no service) indicator disappears and the n (home system) indicator appears, you are ready to make a call.
06Using-kg.fm Page 38 Wednesday, November 3, 2004 9:36 PM

Using Your Phone 39
Power-On MessagesOnce your phone is powered on, you may see:
Message Description
Searching...
The phone is attempting to establish communications with the satellite network. See “Accessing the Network” on page 147.
Registering...
Your phone is registering with the network. When the process is complete, you will see Registered. See “Accessing the Network” on page 147.
Check Signal
Your phone is unable to establish registration with the satellite network. Move to a location with a clear unobstructed view of the sky.
Invalid Account Contact your service provider.
Enter Phone
Unlock Code
Your phone was locked after the last use. Enter your four-digit unlock code and press O to proceed. See “Locking and Unlocking Your Phone” on page 131.
Enter PIN
Enter the four- to eight-digit SIM card PIN code provided by your service provider and press O to proceed. See “Protecting the SIM Card” on page 133.
Insert Card
Power off your phone, make sure your SIM card is inserted completely, and then power your phone on again.
Check Card The SIM card is damaged or inserted the wrong way.
06Using-kg.fm Page 39 Wednesday, November 3, 2004 9:36 PM

40 Using Your Phone
Holding the Phone1. Rotate the antenna to either the left or right
detent. The antenna will stop here.
Blocked
If the SIM card PIN code is incorrectly entered three times in a row, your phone becomes blocked. See “Unblock the PIN Code” on page 134 for instructions on how to unblock it.
! Blocked
If the SIM card PIN2 code is incorrectly entered three times in a row, some features (e.g., Fixed Dialing) become blocked. See “Unblock the PIN2 Code” on page 136 for instructions on how to unblock PIN2.
Bad Card
See Supplier
Your SIM card has been damaged or incorrectly issued. Contact your service provider for information.
Message Description
Right DetentLeft Detent
06Using-kg.fm Page 40 Wednesday, November 3, 2004 9:36 PM

Using Your Phone 41
2. Extend the antenna by pulling out on the end of it.
The antenna should be vertical to the ground when you talk on the phone (as shown in the following illustration from the wakeup screen animated sequence).
3. Make sure the antenna has a clear unobstructed view of the sky.
Standby ModeTo conserve energy, your phone may turn off its display backlight when you have not pressed a key for several seconds. The light reappears the next time you press a key.
2
1
06Using-kg.fm Page 41 Wednesday, November 3, 2004 9:36 PM

42 Using Your Phone
Placing a Call
To place a call, your phone must be powered on, have a SIM card inserted, be unlocked, and be in contact with the satellite network. See “Accessing the Network” on page 147 for network information.
You can enter a phone number up to a maximum of 20 digits. The digits are displayed in two rows, 16 digits in the top line and four digits in the next line.
Dial a Number1. Rotate and fully extend the satellite
antenna. “See Holding the Phone” on page 40.
Tip: Press and hold 0 to get +
Tip: If you make a mistake, press C once to delete the last digit, or press and hold C to clear all digits.
2. Enter the number using the digit keys. As you begin entering digits, you will see Call?.
You must enter the phone number in international format:[international access code, 00, or +][country code] [phone number]
Note: If you are calling another Iridium satellite subscriber, dial the subscriber’s Iridium number.
3. Press O. You will see Calling followed by the number you dialed.
You will see either the flashing message Calling or the flashing messages Calling, Registering..., and the phone will play a series of setup tones.
If the call connects and is answered, Connected appears on the display for a few seconds, followed by End Call?.
06Using-kg.fm Page 42 Wednesday, November 3, 2004 9:36 PM

Using Your Phone 43
If the call does not connect, you may see one of the following messages:
Automatic RedialIf the number or your network is busy, you will see Redial? for five seconds.
Press O to redial the number automatically.
Note: Your phone makes a maximum of ten redial attempts. If the call cannot be connected within this maximum, you will see the message Redial Failed.
Redial Last Number CalledWhenever your phone is on standby, you can redial the last number called:
1. Press O to display the last number dialed.
2. Press O again to place the call.
Message Description
Busy Try Later
or
Please Try Later
The phone is unable to access the network. Try again in a few minutes.
Restricted Area The phone is unable to access the network. Move to an area where calls are allowed.
Redial?
Press O to redial the number automatically. See “Automatic Redial” on page 43 for more information.
06Using-kg.fm Page 43 Wednesday, November 3, 2004 9:36 PM

44 Using Your Phone
Dial Special CharactersYou can insert special characters in your numbers:
Dial a Number With PausesSee “Using Pauses in Numbers” on page 67 for information on dialing numbers with pauses.
Dial a Number from the Phone BookYour phone contains a phone book that you can use to store names and telephone numbers. Once you have stored information in your phone book, you can save dialing steps by:
• using one-touch dialing (page 83)
• recalling and dialing an entry by location (page 71)
• recalling and dialing an entry by name (page 70)
• recalling and dialing one of the last ten numbers called (page 80)
See “Managing the Phone Book” on page 59 for information on how to store and retrieve names and numbers from the phone book.
To enter... Then...
0 Press 0.
* Press *.
+ (for international calls) Press and hold 0.
® (for pause dialing) Press and hold *.
supplementary service numbers, PINs, and unblocking
Press # or * one or more times as necessary.
06Using-kg.fm Page 44 Wednesday, November 3, 2004 9:36 PM

Using Your Phone 45
End a CallUse one of the following procedures to end a call:
• Press O
• Press C
Receiving a Call
Receive a Phone CallTo receive a call, your phone must be powered on, have a SIM card inserted, be unlocked, and be in contact with the satellite network. See “Accessing the Network” on page 147 for network information.
There are two scenarios for receiving calls depending on the antenna position: (1) antenna raised and fully extended, or (2) antenna stowed or in the down position.
Antenna Raised and Fully Extended
When you receive a call:
Tip: See page 130 to set your phone’s alert.
• Your phone rings and/or vibrates
• The status indicator alternates red and green
• The phone displays Call, Answer? on the next line
To answer the call:
Press O or any digit key (1 - 9, * or #).
You will see Connected.
06Using-kg.fm Page 45 Wednesday, November 3, 2004 9:36 PM

46 Using Your Phone
If the call does not connect properly, you may see one of the following messages:
Antenna Stowed or in the Down Position
When you receive a call:
• The phone chirps up to three times to alert you of an incoming call
• The phone displays Call Attempt
You must rotate and extend the antenna as quickly as possible to receive the call.
Rotate and fully extend the antenna as described in “Holding the Phone” on page 40
You will see Iridium Call Attempt. Do not attempt to answer until the phone rings or vibrates.
After several seconds, your phone will ring or vibrate and display Call followed by Answer? on the next line.
To answer the call:
Press O or any digit key (1 - 9, * or #).
You will see Connected.
Message Description
Orient Antenna
You need to fully extend the antenna upwards with a clear unobstructed view of the sky.
Call Failed The antenna is not properly adjusted or the network signal is not strong enough.
06Using-kg.fm Page 46 Wednesday, November 3, 2004 9:36 PM

Using Your Phone 47
If the call does not connect properly, you may see the following message:
End a CallUse one of the following procedures to end a call:
• Press O
• Press C
Unanswered CallsIf you are away from your phone or choose not to answer a call, your phone displays the message Unanswered Call.
Personal MailboxCallers who are unable to reach you can leave numeric, text, and voice messages. The next time you register with the satellite network you will receive these messages. Then you will have the option of saving the message for later viewing.
For information on retrieving messages, see “Accessing Received Messages” on page 108.
Message Description
Orient Antenna
You need to fully extend the antenna upwards with a clear unobstructed view of the sky.
Call Failed The antenna is not properly adjusted or the network signal is not strong enough.
06Using-kg.fm Page 47 Wednesday, November 3, 2004 9:36 PM

48 Using Your Phone
Additional Phone Features
Lock and Unlock the KeypadTo prevent accidental usage of the phone, press the # and * keys simultaneously to lock the keypad. All keys with the exception of the S key are disabled. You can still answer an incoming call by pressing O when the keypad is locked.
To remove the keypad lock, press # and * simultaneously.
Adjust Earpiece VolumeTo adjust earpiece volume:
Tip: The volume control keys are located on the left side of the phone.
• Increase the volume by pressing the upper volume control key
• Decrease the volume by pressing the lower volume control key
As you press the keys, the phone’s speaker demonstrates the new volume level. The bar graph in the display represents the volume level. The higher the graph, the louder the volume.
Note: You can also use the volume control keys to scroll through Phone Book entries.
Volume
Quit?
06Using-kg.fm Page 48 Wednesday, November 3, 2004 9:36 PM

Using Your Phone 49
Adjust Ringer VolumeTo adjust the ringer volume:
Tip: The volume control keys are located on the left side of the phone.
Press E and then the up or down volume control key
The phone sounds the new volume level as you adjust it.
Note: You can also use the Phone Setup menu to adjust ringer volume. See “Adjust the Ringer Volume” on page 129 for more information.
View Your SIM Card Phone NumberTo retrieve and view your phone number from your SIM card:
Press Q #
Notes: If you do not see your phone number, the number has not been programmed onto your SIM card. You can program your phone number onto your SIM card by following the steps described in “Modify Your Phone Number(s)” on page 82.
You can also use the Phone Book menu to view your phone number. See “View Your SIM Card Phone Number(s)” on page 81 for more information.
06Using-kg.fm Page 49 Wednesday, November 3, 2004 9:36 PM

50 Using Your Phone
06Using-kg.fm Page 50 Tuesday, November 9, 2004 8:27 PM

51
Using In-Call Features
Read this chapter to learn how to use In-Call menu features. The In-Call menu is displayed when you press M during a call.
07InCall-kg.fm Page 51 Wednesday, November 3, 2004 9:36 PM

52 Using In-Call Features
Muting a Call
For privacy during a call, try muting the phone. You hear the party on the other end, but the other party does not hear you.
While in a call:
Tip: You can also mute the phone from the Quick Access menu. See “Using the Quick Access Menu” on page 56.
1. Press M until you see Turn Mute on or off.
2. Press O to select. You will see Mute.
To unmute a call:
1. Press M until you see Turn Mute on or off.
2. Press O to select.
07InCall-kg.fm Page 52 Wednesday, November 3, 2004 9:36 PM

53
Using the Menus
Many of your phone’s features are organized into lists of options called menus. There are three menus:
• The main Options menu lets you select and/or adjust phone features
• The Quick Access menu gives you instant access to the menu features you use most frequently
• The In-Call menu gives you access to call-related features when you are in a call
Some options give you access to additional lists of options called submenus.
08Menus-kg.fm Page 53 Wednesday, November 3, 2004 9:37 PM

54 Using the Menus
Using the Options Menu
The Options menu gives you access to your phone’s features and options. You can not access this menu during a call.
Navigate the Options MenuLearning how to use just a few keys enables you to move freely through the entire menu system.
If you want to... Then...
enter the Options menu
Press M. You will see the first available submenu.
scroll through the Options menu
• Press M to scroll forward.
• Press < to scroll
backward or forward.
select options and submenus
Press O to select a menu option or submenu when that option or submenu name is displayed.
exit features and menus
• Press C to exit the feature or submenu.
• Press and hold C to exit the Options menu.
08Menus-kg.fm Page 54 Wednesday, November 3, 2004 9:37 PM

Using the Menus 55
How the Phone RespondsAs you scroll through the Options menu, you will see one of three questions on the bottom line of the display.
Display Messages and Indicators
Customize the Options MenuTo personalize the Options menu—to hide and move features—see “Move Menu Features” on page 160.
If your phone asks...
Then...
View Options? Press O to enter the submenu.
Select? Press O to select the displayed feature.
Quit? Press O to exit the feature.
If you see... Then...
y Completed This indicates a feature has been activated.
! Failed The display returns to the menu in a few seconds.
Enter PIN
or
Enter Name
Enter requested information,then press O.
u Busy
Try Later
You may have requested information while your phone was completing another task.
s The scroll bar indicates where you are in a menu.
w Your phone may take a few seconds to request settings from the network.
08Menus-kg.fm Page 55 Wednesday, November 3, 2004 9:37 PM

56 Using the Menus
Using the Quick Access Menu
The Quick Access menu is a way to keep your favorite menu options readily accessible. Each digit key, 1 to 9, is matched to a Quick Access feature. See the table on page 57 for the default setup.
If you know the number of the feature, activating that option takes only two button presses! If you do not know the number or want to review your options, just scroll through the icon menu and read the tag attached to each option.
Activate the Feature DirectlyTo access the feature directly:
Press E, and then press the digit key of the feature.
Scroll to the FeatureTo scroll to the feature:
1. Press E.
2. Press M to scroll through the available features.
3. Press O to select a feature.
08Menus-kg.fm Page 56 Wednesday, November 3, 2004 9:37 PM

Using the Menus 57
Default Quick Access SettingsThe following features (and associated icons) are the default settings for the Quick Access menu.
Customize the Quick Access MenuSee “Personalizing the Quick Access Menu” on page 162 for instructions on how to modify the feature selection on the Quick Access menu.
Key Icon Quick Access Feature
1 B Find Name searches your Phone Book by the full name.
2 J Mute mutes and unmutes a call in progress.
3 R Call Voicemail1 calls your voicemail number to check your voicemail.
4 G Battery Meter displays a fuel gauge indicating charge. The more bars, the greater the charge.
5 b Lock Now locks your phone immediately.
6 L Vibrate On/off activates or deactivates the vibrate alert function.
7 K Read Messages displays the newest message received.
8 f
Register Now initiates a search for the Iridium satellite network. You must wait three minutes between registration attempts.
9 P
Forward On/Off1 activates or deactivates unconditional call forwarding depending on the current setting.
1 You must subscribe to this network feature through your service provider. Contact your service provider for additional information.
08Menus-kg.fm Page 57 Wednesday, November 3, 2004 9:37 PM

58 Using the Menus
08Menus-kg.fm Page 58 Wednesday, November 3, 2004 9:37 PM

59
Managing the Phone Book
Your satellite phone can store up to 100 names and numbers, and your SIM card expands memory capacity even more.
You can use the dedicated keys or the Phone Book menu to add and retrieve numbers from the phone book. With the Phone Book menu you can also access phone book maintenance and security features.
09PhBook-kg.fm Page 59 Wednesday, November 3, 2004 9:37 PM

60 Managing the Phone Book
Phone Book Menu
Personal Numbers
Phone Book
Call Number
Find Entry By Location
Find Entry By Name
My Phone Number(s)
Fixed Dialing
Enter Name:
Erase Name And NumberModify Name Or Number
Call NumberEnter Location:
Erase Name And NumberModify Name Or Number
View Fixed Dial ListSetup Fixed Dialing
On/Off
Last Ten CallsLast Calls MadeErase All Numbers
One-Touch Dial SettingTo Phone MemoryTo SIM Card MemoryTo Fixed Dial List
Add To Phone MemoryAdd Entry
Add To SIM Card Memory
No Memory RestrictionsPrevent Access
To Phone MemoryTo SIM Card MemoryTo Phone & SIM Memory
Edit EntryAdd EntryErase Entry
Check Phone CapacityCheck Capacity
Check SIM Capacity
Show Services
09PhBook-kg.fm Page 60 Wednesday, November 3, 2004 9:37 PM

Managing the Phone Book 61
Organizing Your Phone Book
Each name and phone number in your Phone Book is stored in a numbered memory location. The satellite phone has two types of memory—phone memory and SIM card memory.
Your phone’s memory can seem overwhelming if you do not have a strategy for organizing your Phone Book. Begin setting up your Phone Book by asking yourself three questions:
Which numbers do I call most?Make a list of the numbers you call most frequently. You will probably want to store these numbers in the first nine memory locations of your Phone Book. You can then dial them with a single keystroke by using one-touch dialing.
Phone Memory SIM Card Memory1
Personal Numbers
100 entries 155 entries
Fixed Dial Numbers
No entries 40 entries
Phone Number Digits
32 20
Name Characters
16 16
Location Numbers
1-100 101-255
1 SIM card capacity varies depending upon the card issued by your service provider.
09PhBook-kg.fm Page 61 Wednesday, November 3, 2004 9:37 PM

62 Managing the Phone Book
When do I use these numbers?Group the numbers on the list according to when you use them. Most people call a different set of numbers during the day than they do in the evening and on weekends. You can switch one-touch dialing to your phone’s memory (locations 1–9), your SIM card’s memory (locations 101–109), or to your fixed dial list (locations 1–9). Store your evening and weekend numbers on one type of memory and your daytime numbers on another.
Which numbers do I need to keep secure?
Tip: If you have many entries, group them in blocks of ten to make them easier to find.
Use your SIM card to store the numbers you need to keep secure, like the numbers of friends and family members. You can remove your SIM card and keep it securely in your wallet or purse when you are not using your phone. If you wish, you can even require a PIN code every time your SIM card is inserted into any phone. (To deactivate your PIN code, see “Activate and Deactivate the SIM Card PIN Code” on page 133.) Store more public numbers, like business associates and travel agents in your phone’s memory.
09PhBook-kg.fm Page 62 Wednesday, November 3, 2004 9:37 PM

Managing the Phone Book 63
Storing Names and Numbers
Add an Entry
Use the Options Menu
1. Follow the steps in “Getting to Personal Numbers...” to get to Add Entry, and then press O.
2. Press M to scroll to Add To Phone Memory or Add To SIM Card Memory.
3. Press O to select. You will see Enter Number.
4. Enter a number, and then press O. You will see Enter Name.
Tip: Numbers should be entered in international format.
5. Enter a name (as described in “Entering Names” on page 65), and then press O. You will see Enter Location.
6. Enter a one-, two-, or three-digit location number (1-100 for phone memory or 101-255 for SIM memory*), and then press O. You will see Stored XXX.
or
Press O to select the next available location. You will see Stored XXX.
7. Press and hold C to exit the menu.
Getting to Personal Numbers...
1. Press M until you see Phone Book, and then press O.
2. Press M to scroll to Personal Numbers, and then press O.
3. Press M to scroll to one of the features described below.
* SIM memory is dependent on your SIM card.
09PhBook-kg.fm Page 63 Wednesday, November 3, 2004 9:37 PM

64 Managing the Phone Book
Use the Dedicated Keys
Tip: If you have more than one number for the same person, try attaching a descriptive tag to the name, like Home, Office, or Mobile.
1. Enter the phone number you want to store.
2. Press I to begin storing.
3. Press M to scroll to Add To Phone Memory or Add To SIM Card Memory, and then press O. You will see Enter Number, followed by the number you entered.
4. Press O to accept the number. You will see Enter Name.
5. Enter a name (as described in “Entering Names” on page 65), and then press O. You will see Enter Location.
6. Enter a one-, two-, or three-digit location number, and then press O. You will see Stored XXX.
or
Press O to store the entry in the next empty memory location. You will see Stored XXX.
Adding Entry Messages
When you enter the location number for your entry, you may see one of these messages:
Message Description
Stored XXX You have stored the entry.
Range XXX-XX
You have chosen a memory location outside the appropriate range. Enter a new number within the range listed on the display.
Overwrite?
You have chosen an occupied location. Press O to overwrite the location or press any other key to try another location.
09PhBook-kg.fm Page 64 Wednesday, November 3, 2004 9:37 PM

Managing the Phone Book 65
Entering Names
You can use the keypad to produce any letter in the alphabet. For example, press 2 to enter the letters A, B, or C, as shown:
Enter CharactersTip: Press and hold any numeric key to toggle between uppercase and lowercase characters.
1. Enter a letter by pressing a key as many times as necessary.
2. Press < to move the cursor.
3. Repeat steps 1 and 2 as many times as necessary, and then press O.
Correct an EntryTo delete a character:
1. Press < to scroll the cursor to the right of the character you want to delete.
2. Press C to delete one character at a time.
or
Press and hold C to clear the display.
To add a character:
1. Press < to scroll the cursor to the location where you want to add a character.
2. Enter a letter by pressing a key as many times as necessary.
press 1 time to insert an Apress 2 times to insert a Bpress 3 times to insert a C
press 4 times to insert a 2
09PhBook-kg.fm Page 65 Wednesday, November 3, 2004 9:37 PM

66 Managing the Phone Book
Available CharactersUse this chart as a guide for producing characters:
The upper line for each key shows the uppercase characters. The lower line for each key shows the lowercase characters.
1 Space . 1 ? ! , @ _ & : “ ( ) ‘ ¿ ¡ % £ $ Space . 1 ? ! , @ _ & : “ ( ) ‘ ¿ ¡ % £ $
2 A B C 2 Ä Å à Æ β Ç a b c 2 ä å à æ β Ç
3 D E F 3 ∆ É è Φ d e f 3 ∆ é è Φ
4 G H I 4 Γ ì g h i 4 Γ ì
5 J K L 5 Λ j k l 5 Λ
6 M N O 6 Ñ Ö Ø Ò Ω m n o 6 ñ ö ø ò Ω
7 P Q R S 7 Π ß Σ p q r s 7 Π ß Σ
8 T U V 8 Θ Ü ù t u v 8 Θ ü ù
9 W X Y Z 9 Ξ Ψ w x y z 9 Ξ Ψ
0 + - 0 x * / = > < # + - 0 x * / = > < #
09PhBook-kg.fm Page 66 Wednesday, November 3, 2004 9:37 PM

Managing the Phone Book 67
Using Pauses in Numbers
When you call automated systems, a recorded message prompts you for numbers such as PIN numbers and account numbers. You can store these numbers in the same memory location as the automated system’s access number. Separate the numbers with “pauses”—special characters that tell your phone to wait a few seconds before sending additional numbers—and store the string in the same way you would other numbers.
Tip: You can store 32 characters in a phone memory location, or 20 characters in a SIM card memory location. A pause is equal to one character.
Enter Pauses in Numbers1. Enter the phone number you use to access
the automated system.
2. Press and hold *. You will see a ® (pause) character inserted into the number entry.
3. Enter the next group of numbers. For example, enter your PIN number. If the automated system requires a * or #, enter those symbols, too.
4. Repeat steps 2 to 3 as many times as necessary.
5. To store the entry follow the procedures in “Add an Entry” on page 63.
09PhBook-kg.fm Page 67 Wednesday, November 3, 2004 9:37 PM

68 Managing the Phone Book
Dial Numbers With Pauses
To dial a number with pauses:
1. Recall the entry. (See “Locating Entries” on page 70.)
Tip: Your phone displays up to 32 digits (two rows of 16 digits) when you enter a number with pauses.
2. Press O to place the call.
The first pause in the number waits until the call is answered. When the automated system answers, your phone waits a few seconds and then automatically sends the next set of numbers, then the next, until all numbers are sent.
09PhBook-kg.fm Page 68 Wednesday, November 3, 2004 9:37 PM

Managing the Phone Book 69
Using Phone Number Prefixes
You can save time when you dial by storing the prefixes that you often use. This is sometimes called “postscripting.” Your satellite phone allows you to change or add to Phone Book entries without overwriting them.
Store a prefix in your Phone Book just as you would any other number. See “Storing Names and Numbers” on page 63.
Use a Stored PrefixTip: Try naming the prefix by area, like Downtown, Suburbs, or Germany.
To use a stored prefix:
1. Recall the prefix from your Phone Book. (See “Locating Entries” on page 70.)
2. Add the remaining numbers.
3. Press O to place the call.
Change Entry to a Similar NumberTo change an entry to a similar number:
1. Recall the number from your Phone Book. (See “Locating Entries” on page 70.)
2. Press C to delete the unwanted digits.
3. Enter the replacement digits.
4. Press O to place the call.
09PhBook-kg.fm Page 69 Wednesday, November 3, 2004 9:37 PM

70 Managing the Phone Book
Locating Entries
Find an Entry by NameSearch your Phone Book by the first few letters of the entry.
Tip: Your phone sorts SIM card memory and phone memory together alphabetically.
Note: If you have restricted access to either SIM card or phone memory, those entries will not be available. For more information, see “Preventing Access to the Phone Book” on page 74.
1. Follow the steps in “Getting to Personal Numbers...” to get to Find Entry By Name, and then press O to select. You will see Enter Name.
Tip: Use the
Mor < to
scroll through Phone Book entries.
2. Enter one or more characters of the entry, and then press O. If necessary, scroll to the entry you are looking for.
3. Press O to access options for that entry, and then proceed to “Calling, Modifying, or Erasing an Entry” on page 72.
Getting to Personal Numbers...
1. Press M until you see Phone Book, and then press O.
2. Press M to scroll to Personal Numbers, and then press O.
3. Press M to scroll to one of the features described below.
09PhBook-kg.fm Page 70 Wednesday, November 3, 2004 9:37 PM

Managing the Phone Book 71
Find an Entry by LocationFind an entry by its location number.
Use the Options Menu
1. Follow the steps in “Getting to Personal Numbers...” to get to Find Entry By Location, and then press O to select. You will see Enter Location.
2. Enter the one-, two-, or three-digit location number, and then press O. You will see the entry displayed.
If you enter an empty location number, you will see Location XXX is Empty. Your phone then selects the next available location. If no numbers are stored, you will see No Numbers Stored.
3. Press O to access options for that entry, and then proceed to “Calling, Modifying, or Erasing an Entry” on page 72.
Use the Dedicated Keys
1. Press Q. You will see Enter Location.
2. Enter the one-, two-, or three-digit location number of the entry, and then press O. You will see the entry displayed.
If you enter an empty location number, you will see Location XXX is Empty. Your phone then selects the next available location.
3. Press O to call the displayed entry. You will see the number followed by Calling.
Getting to Personal Numbers...
1. Press M until you see Phone Book, and then press O.
2. Press M to scroll to Personal Numbers, and then press O.
3. Press M to scroll to one of the features described below.
09PhBook-kg.fm Page 71 Wednesday, November 3, 2004 9:37 PM

72 Managing the Phone Book
Calling, Modifying, or Erasing an Entry
Once you have selected a Phone Book entry, you can call, change, or erase that entry.
Call a Selected Entry1. Find an entry, and then press O. (See
“Locating Entries” on page 70.)
2. Press O until you see Call Number, and then press O. You will see the Selected Name followed by calling.
Modify a Name or NumberTip: For help entering letters or changing entries, see “Entering Names” on page 65.
1. Find an entry, and then press O. (See “Locating Entries” on page 70.)
2. Press O until you see Modify Name Or Number, View Options, and then press O. You will see Edit Number, followed by the phone number stored in that entry.
3. Enter changes to the number, and then press O. You will see the name stored in that entry.
4. Enter changes to the name, and then press O. You will see Modified XXX.
Erase a Name and Number1. Find an entry, and then press O. (See
“Locating Entries” on page 70.)
2. Press O until you see Erase Name And Number, and then press O. You will see Erased xxx.
09PhBook-kg.fm Page 72 Wednesday, November 3, 2004 9:37 PM

Managing the Phone Book 73
Checking Phone Book Capacity
Use this feature to see how many available memory locations you have in either SIM card memory or phone memory.
1. Follow the steps in “Getting to Personal Numbers...” to get to Check Capacity, and then press O to select.
2. Press M until you see Check Phone Capacity or Check SIM Capacity, and then press O. You will see XXX Unused Locations.
3. Press and hold C to exit the menu.
Getting to Personal Numbers...
1. Press M until you see Phone Book, and then press O.
2. Press M to scroll to Personal Numbers, and then press O.
3. Press M to scroll to one of the features described below.
09PhBook-kg.fm Page 73 Wednesday, November 3, 2004 9:37 PM
74 Managing the Phone Book
Preventing Access to the Phone Book
You may want to restrict memory access when loaning your phone to others. You can choose to prevent access to the phone memory, SIM memory, or both.
1. Follow the steps in “Getting to Personal Numbers...” to get to Prevent Access, and then press O to select.
2. Press M until you see the restriction type you desire: No Memory Restrictions, To Phone Memory, To SIM Card Memory, or To Phone & SIM Memory.
3. Press O to select the displayed option. You will see Enter Security Code.
Tip: The factory default security code is: 000000.
4. Enter security code. Enter your six-digit security code. You will see Completed.
5. Press and hold C to exit the menu.
Note: If you restrict access to either phone memory or SIM memory and try to access an entry stored in that type of memory, you will see a list of the entries that are not restricted. If you prevent access to both your phone memory and SIM memory and then try to access an entry, you will see Restricted.
09PhBook-kg.fm Page 74 Wednesday, November 3, 2004 9:37 PM

Managing the Phone Book 75
Restricting Phone Use
You can restrict calling on your phone to a list of numbers that you create. When the fixed dialing feature is active, you can only call numbers or use prefixes (for example, country codes or area codes) that exactly match those stored in your fixed dial list. You can store up to 40 entries on your list. These entries are stored on your SIM card.
Activate Fixed DialingUse this feature to activate fixed dialing. For instructions on how to store entries in the fixed dial list, see “Add an Entry” on page 76.
Note: The fixed dialing feature restricts access to your SIM memory.
1. Follow the steps in “Getting to Fixed Dialing...” to get to Setup Fixed Dialing, and then press O to select. You will see Enter PIN2.
Tip: The default SIM card PIN2 code is 2222.
2. Enter code. Enter your SIM card PIN2 code, and then press O.
3. Press M until you see On or Off, and then press O. You will see Completed.
4. Press and hold C to exit the menu.
Getting to Fixed Dialing...
1. Press M until you see Phone Book, and then press O.
2. Press M to scroll to Fixed Dialing, and then press O.
3. Press M to scroll to one of the features described below.
09PhBook-kg.fm Page 75 Wednesday, November 3, 2004 9:37 PM

76 Managing the Phone Book
Add an EntryTo add an entry to the fixed dial list:
1. Follow the steps in “Getting to Fixed Dialing...” to get to Setup Fixed Dialing, and then press O to select. You will see Enter PIN2.
Tip: Phone numbers must be in international format.
2. Enter code. Enter your SIM card PIN2 code, and then press O.
3. Press M until you see Add Entry, and then press O. You will see Enter Number.
4. Enter the number, and then press O. You will see Enter Name.
Tip: See “Entering Names” on page 65 for help entering letters.
5. Enter the name, and then press O. You will see Enter Location.
6. Enter a location number, and then press O. You will see Stored.
7. Press and hold C to exit the menu.
09PhBook-kg.fm Page 76 Wednesday, November 3, 2004 9:37 PM

Managing the Phone Book 77
Erase an EntryTo erase an entry in the fixed dial list:
1. Follow the steps in “Getting to Fixed Dialing...” to get to Setup Fixed Dialing, and then press O to select. You will see Enter PIN2.
Tip: You should have received your SIM card PIN2 code from your service provider.
2. Enter code. Enter your SIM card PIN2 code, and then press O.
3. Press M until you see Erase Entry, and then press O to select. You will see the first entry in your fixed dial list.
4. Press M to scroll to the number you wish to erase. You will see Erased?.
5. Press O to confirm. You will see Erased.
6. Press and hold C to exit the menu.
Getting to Fixed Dialing...
1. Press M until you see Phone Book, and then press O.
2. Press M to scroll to Fixed Dialing, and then press O.
3. Press M to scroll to one of the features described below.
09PhBook-kg.fm Page 77 Wednesday, November 3, 2004 9:37 PM

78 Managing the Phone Book
Edit an EntryTo edit an entry in the fixed dial list:
1. Follow the steps in “Getting to Fixed Dialing...” to get to Setup Fixed Dialing, and then press O to select. You will see Enter PIN2.
2. Enter code. Enter your SIM card PIN2 code, and then press O.
3. Press M until you see Edit Entry, and then press O to select. You will see the first entry in your fixed dial list.
4. Press M to scroll to the entry you want to change, and then press O. You will see the current number for that location.
5. Enter changes to the number, and then press O. You will see the current name for that location.
6. Enter changes to the name, and then press O. You will see the current location.
7. Enter a new location, and then press O. You will see Modified.
8. Press and hold C to exit the menu.
09PhBook-kg.fm Page 78 Wednesday, November 3, 2004 9:37 PM

Managing the Phone Book 79
View Your Fixed Dialing ListThis feature enables you to review, but not change, your fixed dial list.
1. Follow the steps in “Getting to Fixed Dialing...” to get to View Fixed Dial List, and then press O to select. You will see the first number on your fixed dial list.
2. Press M to scroll through the numbers on your fixed dial list.
3. Press and hold C to exit the menu.
Getting to Fixed Dialing...
1. Press M until you see Phone Book, and then press O.
2. Press M to scroll to Fixed Dialing, and then press O.
3. Press M to scroll to one of the features described below.
09PhBook-kg.fm Page 79 Wednesday, November 3, 2004 9:37 PM

80 Managing the Phone Book
Viewing the Last Ten Calls Made or Received
Your phone saves the last ten phone numbers you dialed.
To view the phone numbers of the last ten calls you have made:
1. Follow the steps in “Getting to Phone Book Features...” to get to Last Ten Calls, and then press O to select.
Tip: If you want to add a number from Last Ten Calls to your Phone Book, press I when the number is displayed, then follow the steps in “Storing Names and Numbers” on page 63.
2. Press M to scroll to Last Calls Made or Erase All Numbers, and then press O to select.
3. If you select Last Calls Made, press M to scroll to the number you are looking for, and then press O to place a call to that number.
or
If you select Erase All Numbers, you will see Completed.
4. Press and hold C to exit the menu.
Getting to Phone Book Features...
1. Press M until you see Phone Book, and then press O.
2. Press M to scroll to one of the features described below. You will see the feature name, followed by Select?.
09PhBook-kg.fm Page 80 Wednesday, November 3, 2004 9:37 PM

Managing the Phone Book 81
Viewing and Modifying Your Phone Numbers
View Your SIM Card Phone Number(s)You can program up to three phone numbers (such as your voice and data phone numbers) onto your SIM card. Use this feature to view your phone number(s).
Tip: Pressing Q # also brings up your phone number.
1. Follow the steps in “Getting to Phone Book Features...” to get to My Phone Number(s).
2. Press O to select. You will see your phone’s voice phone number followed by Modify?.
3. Press M to scroll through your numbers.
4. Press and hold C to exit the menu.
Note: If you do not see your phone number(s), they have not been programmed onto your SIM card. You can program your voice phone number and other phone numbers onto your SIM card by following the steps described in “Modify Your Phone Number(s)” on page 82.
09PhBook-kg.fm Page 81 Wednesday, November 3, 2004 9:37 PM

82 Managing the Phone Book
Modify Your Phone Number(s)Use this feature to modify or program your voice phone number onto your SIM card. You can also program other phone numbers (for example, a data phone number) onto your SIM card. You can have up to three phone numbers.
1. Follow the steps in “Getting to Phone Book Features...” to get to My Phone Number(s).
2. Press O to select. You will see your phone’s voice phone number followed by Modify?.
3. Press M to scroll to the number you want to modify.
4. Press O to modify the number. You will see Edit Number followed by the number for the selected entry.
5. Enter changes to the number, and then press O. You will see Edit Name followed by the name for the entry selected.
6. Enter changes to the name (as described in “Entering Names” on page 65) and then press O. You will see Stored.
7. Press and hold C to exit the menu.
Getting to Phone Book Features...
1. Press M until you see Phone Book, and then press O.
2. Press M to scroll to one of the features described below. You will see the feature name, followed by Select?.
09PhBook-kg.fm Page 82 Wednesday, November 3, 2004 9:37 PM

Managing the Phone Book 83
Using One-Touch Dialing
One-touch dialing enables you to place calls instantly. You can choose to dial the phone numbers in the first nine memory locations in either your SIM memory, phone memory, or your fixed dial list. You choose which type of memory you want to be active with this feature.
Set Up One-Touch DialingTo set the active memory for one-touch dialing:
1. Follow the steps in “Getting to Phone Book Features...” to get to One-Touch Dial Setting, and then press O to select.
2. Press M to scroll through To Phone Memory, To SIM Card Memory, or To Fixed Dial List, and then press O to select the displayed option. You will see Completed.
3. Press and hold C to exit the menu.
09PhBook-kg.fm Page 83 Wednesday, November 3, 2004 9:37 PM

84 Managing the Phone Book
Use One-Touch DialingTo use one-touch dialing:
Press and hold the appropriate digit key.
Tip: You do not need to press O to call the number when you use one-touch dialing.
For example, press and hold 2 to dial the number stored in location 2 of your phone memory, location 2 of your fixed dial list, or 102 of your SIM memory, depending on your setting.
Getting to Phone Book Features...
1. Press M until you see Phone Book, and then press O.
2. Press M to scroll to one of the features described below. You will see the feature name, followed by Select?.
09PhBook-kg.fm Page 84 Wednesday, November 3, 2004 9:37 PM

Managing the Phone Book 85
Viewing Service Phone Numbers
The show services feature provides a read-only list of service phone numbers that are pre-programmed by your service provider. This list resides on the SIM card and allows for call placement only.
1. Follow the steps in “Getting to Phone Book Features...” to get to Show Services.
2. Press O to select. You will see a list of service phone numbers.
3. Press M to scroll to the number you are looking for.
4. Press O to place a call to that number.
or
Press and hold C to exit the menu.
Note: If you do not see any service dialing number(s), they have not been programmed onto your SIM card. Contact your service provider for more information.
09PhBook-kg.fm Page 85 Wednesday, November 3, 2004 9:37 PM

86 Managing the Phone Book
09PhBook-kg.fm Page 86 Wednesday, November 3, 2004 9:37 PM

Using Calling Features 87
Using Calling Features
This chapter describes call-related features. Many of these features are network features that you must subscribe to in order to access.
10CallRelated-kg.fm Page 87 Tuesday, November 9, 2004 8:40 PM

88 Using Calling Features
Call Related Features Menu
1 This feature is network and subscription dependent.
2 This feature is network and subscription dependent. It is available only when the extended menus are activated.
Call Forwarding1
Show Battery Meter
Pending Call Drop
Call Related Features
Show Signal Strength
Forward All Voice Calls
Cancel All Forwarding
Forward When Unavailable
On/Off
Call Waiting1
On/OffForward All Calls
On/Off
If No AnswerOn/Off
Detailed Forwarding2
Forward Voice Calls
On/Off
If Not ReachableOn/Off
If BusyOn/Off
On/Off
Call Barring2
Bar Outgoing Calls
Change Bar Password
Intl CallsIntl Calls Except HomeAll CallsOn/Off
Bar Incoming Calls
On/Off
When RoamingAll Calls
Cancel All Barring
Forward Data Calls
10CallRelated-kg.fm Page 88 Wednesday, November 3, 2004 9:37 PM

Using Calling Features 89
Forwarding Calls When Unavailable
Use this feature when you are unable to answer your phone calls.
Note: You must subscribe to this network feature through your service provider. Contact your service provider for additional information.
To activate this feature:
1. Follow the steps in “Getting to Call Forwarding...” to get to Forward When Unavailable, and then press O to select. Your phone takes a moment to request the current setting from the network.
2. Press M to scroll to On or Off, and then press O to select.
• If you select On, continue with step 3
• If you select Off, continue with step 5
3. Press M to scroll to Voicemail or Other Number, and then press O to select.
Tip: If you have not yet stored a voicemail number, go to page 122 to learn how.
• If you select Voicemail, continue with step 5
• If you select Other Number, then you will see Enter Number. Continue with step 4
4. Enter the number you want calls forwarded to, and then press O.
5. Press and hold C to exit the menu.
Getting to Call Forwarding...
1. Press M until you see Call Related Features, and then press O.
2. Press M to scroll to Call Forwarding, and then press O.
3. Press M to scroll to one of the features described below.
10CallRelated-kg.fm Page 89 Tuesday, November 9, 2004 10:57 PM

90 Using Calling Features
Forwarding All Your Calls
This feature forwards all of your calls to the number you choose. Your phone does not ring.
Note: You must subscribe to this network feature through your service provider. Contact your service provider for additional information.
To activate this feature:
1. Follow the steps in “Getting to Call Forwarding...” to get to Forward All Calls, and then press O to select. Your phone takes a moment to request the current setting from the network.
2. Press M to scroll to either On or Off, and then press O to select.
• If you select On, your phone takes a moment to contact the network and update the setting. You will see Call Forward On. Continue with step 3
• If you select Off, continue with step 5
Getting to Call Forwarding...
1. Press M until you see Call Related Features, and then press O.
2. Press M to scroll to Call Forwarding, and then press O.
3. Press M to scroll to one of the features described below.
10CallRelated-kg.fm Page 90 Wednesday, November 3, 2004 9:37 PM

Using Calling Features 91
3. Press M to scroll to Voicemail or Other Number, and then press O to select.
Tip: If you have not yet stored a voicemail number, go to page 122 to learn how.
• If you select Voicemail, continue with step 5
• If you select Other Number, then you will see Enter Number. Continue with step 4
4. Enter the number you want calls forwarded to, and then press O.
5. Press and hold C to exit the menu.
10CallRelated-kg.fm Page 91 Tuesday, November 9, 2004 10:57 PM

92 Using Calling Features
Using Detailed Call Forwarding
This feature lets you select the specific situations when you want your calls forwarded. The Forward When Unavailable and Forward All Calls features override the settings you select here.
Notes: You must subscribe to this network feature through your service provider. Contact your service provider for additional information
This feature is available only when the extended menus are activated. See “Activating Extended Menus” on page 137
Voice CallsTo forward voice calls:
1. Follow the steps in “Getting to Call Forwarding...” to get to Detailed Forwarding, and then press O to select. Your phone takes a moment to request the current setting from the network.
2. Press M to scroll to Forward Voice Calls, and then press O to select.
3. Press M to scroll to the option you desire: Forward All Voice Calls, If Busy, If No Answer, or If Not Reachable.
Getting to Call Forwarding...
1. Press M until you see Call Related Features, and then press O.
2. Press M to scroll to Call Forwarding, and then press O.
3. Press M to scroll to one of the features described below.
10CallRelated-kg.fm Page 92 Wednesday, November 3, 2004 9:37 PM

Using Calling Features 93
4. Press O to select the displayed option. Your phone takes a moment to contact the network and update the setting. You will see Call Forward On.
5. Press M to scroll to either Voicemail or Other Number, and then press O.
Tip: If you have not yet stored a voicemail number, go to page 122 to learn how.
• If you select Voicemail, continue with step 7
• If you select Other Number, then you will see Enter Number. Continue with step 6
6. Enter the number you want calls forwarded to, and then press O.
7. Press and hold C to exit the menu.
10CallRelated-kg.fm Page 93 Tuesday, November 9, 2004 10:57 PM

94 Using Calling Features
Canceling All Forwarding
This feature cancels all call forwarding settings.
Note: You must subscribe to this network feature through your service provider. Contact your service provider for additional information.
1. Follow the steps in “Getting to Call Forwarding...” to get to Cancel All Forwarding, and then press O to select.
Your phone takes a moment to contact the network and update the setting. You will see Call Forward Off. All call forwarding settings are now set to Off.
2. Press and hold C to exit the menu.
Getting to Call Forwarding...
1. Press M until you see Call Related Features, and then press O.
2. Press M to scroll to Call Forwarding, and then press O.
3. Press M to scroll to one of the features described below.
10CallRelated-kg.fm Page 94 Wednesday, November 3, 2004 9:37 PM

Using Calling Features 95
Restricting Calls with Call Barring
You can use call barring to restrict both incoming and outgoing calls. Call barring is useful if you are loaning your phone to others or when you wish to control incoming calls. When you change one of your call barring settings, your phone takes a few seconds to request the setting from the network.
Notes: You must subscribe to this network feature through your service provider. Contact your service provider for additional information.
This feature is available only when the extended menus are activated. See “Activating Extended Menus” on page 137
Call forwarding must be disabled before call barring is activated.
Getting to Call Related Features...
1. Press M until you see Call Related Features, and then press O.
2. Press M to scroll to one of the features described below. You will see the feature name, followed by Select?.
10CallRelated-kg.fm Page 95 Tuesday, November 9, 2004 10:57 PM

96 Using Calling Features
Bar Outgoing CallsThis feature enables you to receive incoming calls but prevents outgoing calls.
To bar outgoing calls:
1. Follow the steps in “Getting to Call Barring...” to get to Bar Outgoing Calls, and then press O to select. Your phone takes a moment to request the current setting from the network.
2. Press M to scroll to Intl Calls, Intl Calls Except Home, All Calls, or Off, and then press O to select. You will see Enter Password.
Note: Since all Iridium calls are international, Intl Calls, Intl Calls Except Home, are not functional selections.
Tip: The default password is 0000.
3. Enter your bar password, and then press O. You will see Call Barring On or Call Barring Off.
4. Press and hold C to exit the menu.
Getting to Call Barring...
1. Press M until you see Call Related Features, and then press O.
2. Press M to scroll to Call Barring, and then press O.
3. Press M to scroll to one of the features described below. You will see the feature name, followed by Select?.
10CallRelated-kg.fm Page 96 Wednesday, November 3, 2004 9:37 PM

Using Calling Features 97
Bar Incoming CallsThis feature allows you to place calls, but refuses incoming calls. Callers hear a recording telling them that you are unavailable. To be sure not to miss a call, see “Using Detailed Call Forwarding” on page 92.
To bar incoming calls:
1. Follow the steps in “Getting to Call Barring...” to get to Bar Incoming Calls, and then press O to select. Your phone takes a moment to request the current setting from the network.
2. Press M to scroll to When Roaming, All Calls, or Off, and then press O to select. You will see Enter Password.
3. Enter your bar password, and then press O. You will see Call Barring On or Call Barring Off.
4. Press and hold C to exit the menu.
10CallRelated-kg.fm Page 97 Tuesday, November 9, 2004 10:57 PM

98 Using Calling Features
Cancel All BarringTo cancel all call barring settings:
1. Follow the steps in “Getting to Call Barring...” to get to Cancel All Barring, and then press O to select. You will see Enter Password.
2. Enter your bar password, and then press O. You will see Call Barring Off. All call barring settings are now set to Off.
3. Press and hold C to exit the menu.
Getting to Call Barring...
1. Press M until you see Call Related Features, and then press O.
2. Press M to scroll to Call Barring, and then press O.
3. Press M to scroll to one of the features described below. You will see the feature name, followed by Select?.
10CallRelated-kg.fm Page 98 Wednesday, November 3, 2004 9:37 PM

Using Calling Features 99
Change Bar PasswordWhen you subscribe to call barring, your service provider gives you a four-digit bar password. Use this feature to change it to something easy to remember.
1. Follow the steps in “Getting to Call Barring...” to get to Change Bar Password, and then press O to select. You will see Enter Password.
Tip: If you are changing the password for the first time, use the password 0000.
2. Enter your bar password, and then press O. You will see Enter New Password.
3. Enter the new bar password, and then press O.
4. Enter the new bar password again to confirm, and then press O.
5. Press and hold C to exit the menu.
10CallRelated-kg.fm Page 99 Tuesday, November 9, 2004 10:57 PM

100 Using Calling Features
Viewing the Battery Meter
Use this feature to check the charge level on your battery.
1. Follow the steps in “Getting to Call Related Features...” to scroll to Show Battery Meter, and the press O to select.
You will see the battery meter:
You may also see one of the following messages:
2. Press and hold C to exit.
Getting to Call Related Features...
1. Press M until you see Call Related Features, and then press O.
2. Press M to scroll to one of the features described below. You will see the feature name, followed by Select?.
Message Description
Charging Battery The battery is being charged.
Fast Charge
Completed The battery has completed charging.
Invalid Batt. You have an unapproved battery inserted in your phone.
Low Charge High Charge
Battery
Quit?
Battery
Quit?
10CallRelated-kg.fm Page 100 Wednesday, November 3, 2004 9:37 PM

Using Calling Features 101
Viewing Signal Strength
Use this feature to check the strength of the signal that your phone is receiving from the Iridium satellite network.
1. Follow the steps in “Getting to Call Related Features...” to get to Show Signal Strength.
2. Press O to select. You will see Checking Signal....
The signal strength indicator is located in the upper left corner of the display:
rx
Signal strength is sampled every four to five seconds; the indicator shows the average strength for the last three samples. The more segments displayed in the bar graph, the stronger the signal. Five bars indicate full signal strength. The indicator shows the tower icon but no bars when the signal is weak.
3. Press and hold C to exit the menu.
10CallRelated-kg.fm Page 101 Tuesday, November 9, 2004 10:57 PM

102 Using Calling Features
Deactivating Pending Call Drop Signal
Under rare circumstances, due to system overcapacity or a satellite outage, a satellite may not be available to take your call. When this happens, your phone notifies you with a series of three consecutive tones and displays Pending Call Drop. The tones continue periodically until a new satellite moves into range or the call is dropped.
To activate or deactivate the alert tones:
1. Follow the steps in the “Getting to Call Related Features...” to get to Pending Call Drop, and then press O to select.
2. Press M to scroll to either On or Off, and then press O to select.
3. Press and hold C to exit the menu..
Getting to Call Related Features...
1. Press M until you see Call Related Features, and then press O.
2. Press M to scroll to one of the features described below. You will see the feature name, followed by Select?.
10CallRelated-kg.fm Page 102 Wednesday, November 3, 2004 9:37 PM

103
Using Message Services
You can receive voicemail notification messages, and send and receive numeric and text messages through your Personal Mailbox service—around the world. Wherever you are, you can have instant reference to all your communication.
11Message-kg.fm Page 103 Wednesday, November 3, 2004 9:37 PM

104 Using Message Services
Messages Menu
Messages
Message SettingsVoicemail NumberService CentreExpiry PeriodOutgoing Message Type
Call Voicemail
Received Messages
Go to Next Message
(first message)
Edit Message
Message EditorSend MessageStore Message
Send MessageStore Message
Outgoing Messages
Go to Next Message
(first message)
Edit Message
Delete Message
Send MessageStore Message
Text
Delete Message(first message)
Send Message
Reply to SenderSend MessageStore Message
Return Call
11Message-kg.fm Page 104 Wednesday, November 3, 2004 9:37 PM

Using Message Services 105
Checking Your Voicemail
This feature makes checking your voicemail simple.
1. Follow the steps in “Getting to Message Features...” to get to Call Voicemail.
2. Press O to select. You will see your voicemail number followed by Calling.
If you have not previously stored a voicemail number, then you will see No Number Available. See “Store Your Voicemail Number” on page 122 for instructions on how to enter a voicemail number.
Getting to Message Features...
1. Press ? to go directly to the Messages menu.
or
Press M until you see Messages, and then press O.
2. Press M to scroll to one of the features described below. You will see the feature name, followed by Select?.
11Message-kg.fm Page 105 Wednesday, November 3, 2004 9:37 PM

106 Using Message Services
Managing Your Received Messages
How Your Phone Notifies You of MessagesIf your phone is powered on, it notifies you of received messages in the following ways:
• An alert sounds and/or the phone vibrates
Your phone beeps and/or vibrates three times to inform you of an incoming message. (See page 130 for instructions on how to set your phone’s alert.)
• The o (message) indicator is displayed
• The message is displayed immediately and remains on the display for several seconds.
or
• Message Read Now? is displayed if the message is an alphanumeric text message of up to 160 characters. For more information see “Read a New Message” on page 108
How Messages Are StoredYour phone stores all messages on your SIM card.
If the message indicator is flashing, your SIM card is full. See “Delete a Message” on page 110 to make room for the new message.
11Message-kg.fm Page 106 Wednesday, November 3, 2004 9:37 PM

Using Message Services 107
What Messages ContainYou can receive short text or numeric messages in your Personal Mailbox. Text messages may contain up to 160 characters. Numeric messages—typically phone numbers—may contain up to 20 digits.
Your personal mailbox works along with Call Forwarding. For more information see “Personal Mailbox” on page 47, and the Call Forwarding feature descriptions on pages 89-94.
Messages contain multiple screens with the following information:
• the message
• the date and time the message was sent
• the phone number (if available) from which the message was sent
11Message-kg.fm Page 107 Wednesday, November 3, 2004 9:37 PM

108 Using Message Services
Accessing Received Messages
Read a New Message
Notification Messages
An incoming voicemail notification message automatically scrolls across your screen. You can:
• Press O to store it on your SIM card
• Press C to delete it
Text Messages
When you receive a new alphanumeric message, you will see Message Read Now? To read it:
1. Press O and continue with step 2.
or
Press C to read the message later. See “Read a Stored Message” on page 109.
2. Press M to move forward through a message one screen at a time.
3. Press O to access menu options for the message. These options are described on pages 110-112.
Note: If the message storage space on your SIM card is full, you will not be able to store a message for later retrieval. Use the delete message feature (page 110) to make room for new messages on your SIM card.
11Message-kg.fm Page 108 Wednesday, November 3, 2004 9:37 PM

Using Message Services 109
Read a Stored MessageTo read a stored message that you have received:
1. Follow the steps in “Getting to Received Messages...” to enter the message center. You will see the number of messages stored, followed by the first message. If you do not have any messages, you will see No Messages.
2. Press M to scroll through the message one screen at a time.
3. Press O to access menu options for the message.
or
Press and hold C to exit the menu.
Getting to Received Messages...
1. Press ? to go directly to the Messages menu.
or
Press M until you see Messages, and then press O.
2. Press M to scroll to Received Messages, and then press O.
3. Press M to scroll to one of the features described below.
11Message-kg.fm Page 109 Wednesday, November 3, 2004 9:37 PM

110 Using Message Services
Go to the Next MessageTo go to the next message:
1. Follow the steps in “Read a Stored Message” on page 109.
2. Press M until you see Go To Next Message and then press O. You will see the next message. If you are at the end of your message list you will see the first message again.
3. Press M to scroll through the message one screen at a time.
4. Repeat steps 2 to 3 to read all of your messages.
5. Press and hold C to exit the menu.
Delete a MessageUse this feature to make room for new messages on your SIM card.
1. Follow the steps in “Go to the Next Message” (above) until you see the message you want to delete, and then press O.
2. Press M until you see Delete Message, and then press O. You will see Message Deleted.
3. Press and hold C to exit the menu.
11Message-kg.fm Page 110 Wednesday, November 3, 2004 9:37 PM

Using Message Services 111
Reply to SenderUse this feature to reply to a message.
1. Follow the steps in “Go to the Next Message” on page 110 until you see the message you want to reply to, and then press O.
2. Press M until you see Reply to Sender and then press O.
3. Compose your message. For more information, see the section titled “Managing Outgoing Messages” on page 113.
If you are replying to an email, the sender’s email address will appear, and a blinking cursor indicates where you should begin composing your message. Note: Leave a space between the email address and the beginning of your message.
4. Press O. You will see Send Message.
5. Press O. You will see Enter Number. If available, the sender’s phone number will automatically appear. If you are replying to an email, the standard email response number (00*2 or +*2) will appear.
6. Enter number (if none is present) and press O to send the message.
11Message-kg.fm Page 111 Wednesday, November 3, 2004 9:37 PM

112 Using Message Services
Edit a Received MessageYou can edit a message that you have received, then send the modified message and/or store it in the outgoing messages list.
1. Follow the steps in “Go to the Next Message” on page 110 until you see the message you want to edit, and then press O.
2. Press M until you see Edit Message and then press O.
The message is copied to the message editor. You will see the final portion of the message displayed in the editing area. The cursor is placed at the end of the message.
For instructions on how to edit a stored message, see “Edit a Stored Message” on page 120.
11Message-kg.fm Page 112 Wednesday, November 3, 2004 9:37 PM

Using Message Services 113
Managing Outgoing Messages
You can create a new message and send it immediately, or store it in an outgoing messages list for later use. You can also edit a message that you have received, then send and/or save the modified message. Messages are created and edited in the message editor.
Message EditorThe message editor lets you create a new message or modify a stored message.
You use the keypad to create or edit a message. You can produce any letter in the alphabet by pressing the appropriate key. For example, press 2 to enter the letters A, B, or C, as shown:
For a complete list of the characters you can enter from the keypad, see page 66.
Getting to Message Features...
1. Press ? to go directly to the Messages menu.
or
Press M until you see Messages, and then press O.
2. Press M to scroll to one of the features described below. You will see the feature name, followed by Select?.
press 1 time to insert an Apress 2 times to insert a Bpress 3 times to insert a C
press 4 times to insert a 2
11Message-kg.fm Page 113 Tuesday, November 9, 2004 11:13 PM
114 Using Message Services
Create a New MessageTo create a new message in the message editor:
1. Follow the steps in “Getting to Message Features...” on page 113 to get to Message Editor, and then press O to select.
The message editor displays the contents of the last message entered. If there are no previous messages, the cursor is placed in the upper left corner of the editing area.
2. Press and hold C to clear the entire message editor contents, if necessary.
Tip: Press and hold any numeric key to toggle between uppercase and lowercase characters.
3. Begin composing your message. Enter a letter by pressing a key as many times as necessary.
4. Press < to advance the cursor.
5. Repeat steps 3 and 4 as many times as necessary to complete your message.
Lines of text are automatically formatted in the display. When you reach the bottom of the editing area, the top lines of text scroll up and off the display in order to keep the cursor and the last few lines of text in view.
When you have finished composing your message:
6. Press O to access options for that entry.
Message editor menu options let you send the message immediately or store it for later use. These options are described on pages 116-117.
11Message-kg.fm Page 114 Wednesday, November 3, 2004 9:37 PM

Using Message Services 115
Create a New Email Message
Note: You must subscribe to this network feature through your service provider. Contact your service provider for additional information.
1. Follow the steps in “Create a New Message” on page 114 until you get to step 3.
2. Compose your message, starting with the destination email address, followed by a space, and then your message. For example:[email protected] This is a sample message.
Note: The maximum length of the entire message (including the destination email address) is 160 characters. The editor will stop after the 160th character has been entered
3. Press O to access options for that entry.
11Message-kg.fm Page 115 Wednesday, November 3, 2004 9:37 PM

116 Using Message Services
Edit a Message
You can edit a new message at any time while you are creating it.
You can also edit received messages or messages stored in the outgoing messages list. See “Edit a Received Message” on page 112 for instructions on how to copy a received message into the message editor. See “Edit a Stored Message” on page 120 for instructions on how to copy an outgoing message into the message editor.
To delete text in a message:
1. Press M to scroll the cursor to the right of the text you want to delete.
2. Press C to delete one character at a time.
or
Press and hold C to clear the display.
To add text to a message:
1. Press M to scroll the cursor to the location where you want to add new text.
2. Enter a letter by pressing a key as many times as necessary.
Send a Message
To send a message from the message editor:
1. Press O to access message editor menu options.
2. Press M until you see Send Message and then press O. You will be prompted to enter the destination address or phone number for the message.
3. Enter the destination address and then press O to send the message.
If the destination is a phone number, enter it beginning with “00” or “+”. If the destination is an email address, enter “00*2” or “+*2”.
11Message-kg.fm Page 116 Wednesday, November 3, 2004 9:37 PM

Using Message Services 117
The message is sent to your message service centre, which forwards the message to its final destination. You will see Message Sent when the message arrives at the service centre.
If the message cannot be delivered to the service centre, you will see Message Failed, followed by Resend? on the next line. You can:
Press O to resend the message.
or
Press C to abandon the attempt to send the message at this time. See “Store a Message” on page 117 for instructions on how to store the message for later mailing.
If you have not previously stored a service centre number, then you will see No Service Centre. See “Enter Service Centre Number” on page 123 for instructions on how to enter a service centre number.
Store a Message
To store the contents of the message editor to the outgoing messages list:
1. Press O to access message editor menu options.
2. Press M until you see Store Message and then press O. You will see Stored to Outgoing.
Outgoing messages are stored on your SIM card. When the SIM card is full (indicated by a flashing message indicator), you will not be able to store a message for later retrieval. Use the delete message feature (page 121) to make room for new messages on your SIM card.
11Message-kg.fm Page 117 Wednesday, November 3, 2004 9:37 PM

118 Using Message Services
Read a Stored MessageThis feature displays the first message stored in the outgoing messages list.
To read a stored message:
1. Follow the steps in “Getting to Outgoing Messages...” to enter the message center. You will see the number of messages stored, followed by the first message. If you do not have any messages, you will see No Messages.
2. Press M to scroll through the message one screen at a time.
3. Press O to access menu options for the message.
or
Press and hold C to exit the menu.
Getting to Outgoing Messages...
1. Press ? to go directly to the Messages menu.
or
Press M until you see Messages, and then press O.
2. Press M to scroll to Outgoing Messages, and then press O.
3. Press M to scroll to one of the features described below.
11Message-kg.fm Page 118 Wednesday, November 3, 2004 9:37 PM

Using Message Services 119
Go to the Next MessageThis feature takes you to the next message in the outgoing messages list.
To go to the next message:
1. Follow the steps in “Read a Stored Message” on page 118.
2. Press M until you see Go To Next Message and then press O. You will see the next message.
3. Press M to scroll through the message one screen at a time.
4. Repeat steps 2 to 3 to read all of your messages.
5. Press and hold C to exit the menu.
Send a Stored MessageThis feature sends a message stored in the outgoing messages list.
To send a stored message:
1. Follow the steps in “Read a Stored Message” on page 118.
2. Press M until you see Send Message and then press O. You will be prompted to enter the destination address (phone number) for the message.
3. Enter the destination address and then press O to send the message.
If the destination is a phone number, enter it beginning with “00” or “+”. If the destination is an email address, enter “00*2” or “+*2”.
The message is sent to your message service center, which forwards the message to its final destination. You will see Message Sent when the message arrives at the service center.
11Message-kg.fm Page 119 Wednesday, November 3, 2004 9:37 PM

120 Using Message Services
If the message cannot be delivered to the service centre, you will see Message Failed, followed by Resend? on the next line. You can:
Press O to resend the message.
or
Press C to abandon the attempt to send the message at this time.
If you have not previously stored a service center number, then you will see No Service Centre. See “Enter Service Centre Number” on page 123 for instructions on how to enter a service center number.
Edit a Stored MessageYou can edit a message that you have stored in the outgoing messages list.
To edit a stored message:
1. Follow the steps in “Go to the Next Message” on page 119 until you see the message you want to edit, and then press O.
2. Press M until you see Edit Message and then press O.
The message is copied to the message editor. You will see the final portion of the message displayed in the editing area. The cursor is placed at the end of the message.
For instructions on how to edit a received message, see “Edit a Received Message” on page 112.
11Message-kg.fm Page 120 Wednesday, November 3, 2004 9:37 PM

Using Message Services 121
Delete a Stored MessageUse this feature to make room for new messages on your SIM card.
To delete a stored message:
1. Follow the steps in “Go to the Next Message” on page 119 until you see the message you want to delete, and then press O.
2. Press M until you see Delete Message, and then press O. You will see Message Deleted.
3. Press and hold C to exit the menu.
11Message-kg.fm Page 121 Wednesday, November 3, 2004 9:37 PM

122 Using Message Services
Managing Other Message Settings
Store Your Voicemail NumberTo store a voicemail number:
Tip: Use pause dialing to store your voicemail access and PIN numbers together. See “Using Pauses in Numbers” on page 67.
1. Follow the steps in “Getting to Message Settings...” to get to Voicemail Number, and then press O to select. You will see Enter Voicemail Number followed by your current voicemail number. If this is the first time you have stored a number, continue with step 3.
2. Press O to select Voicemail Number. Press C to clear one digit at a time, or press and hold C to erase the entire number.
3. Enter the new number, and then press O. You will see Completed.
4. Press and hold C to exit the menu.
Getting to Message Settings...
1. Press ? to go directly to the Messages menu.
or
Press M until you see Messages, and then press O.
2. Press M to scroll to Message Settings, and then press O.
3. Press M to scroll to one of the features described below.
11Message-kg.fm Page 122 Wednesday, November 3, 2004 9:37 PM

Using Message Services 123
Enter Service Centre NumberUse this feature to enter the number for the service center that forwards your outgoing messages. You must specify a service number before you can send any messages.
To enter the service center number:
Tip: The service center number is provided by your service provider.
1. Follow the steps in “Getting to Message Settings...” on page 122 to get to Service Centre, and then press O to select. You will see Enter Service Number followed by your current service center number. If this is the first time you have stored a number, continue with step 3.
2. Press C to clear one digit at a time, or press and hold C to erase the entire number.
3. Enter the new number, and then press O. You will see Completed.
4. Press and hold C to exit the menu.
11Message-kg.fm Page 123 Wednesday, November 3, 2004 9:37 PM

124 Using Message Services
Set Expiry periodThis feature specifies the maximum amount of time, in hours, that an unforwarded outgoing message will remain at the service center before it is deleted.
To set the message expiration period:
Tip: The default expiration period setting is 7 days (168 hours).
1. Follow the steps in “Getting to Message Settings...” to get to Expiry Period, and then press O to select. You will see Enter Hours followed by the current setting.
2. Press C to clear one digit at a time, or press and hold C to erase the entire number.
3. Enter the new number, and then press O. You will see Hours followed by the number you entered.
4. Press and hold C to exit the menu.
Getting to Message Settings...
1. Press ? to go directly to the Messages menu.
or
Press M until you see Messages, and then press O.
2. Press M to scroll to Message Settings, and then press O.
3. Press M to scroll to one of the features described below.
11Message-kg.fm Page 124 Wednesday, November 3, 2004 9:37 PM

Using Message Services 125
Specify Outgoing Message TypeYou can send messages to a device which interprets them in a format other than text. Your service center converts the messages before forwarding them to the destination address.
Note: Currently, the only supported message type is “TEXT”.
To specify the outgoing message type:
1. Follow the steps in “Getting to Message Settings...” on page 124 to get to Outgoing Message Type, and then press O to select.
2. Press M to scroll to the desired type, and then press O to select it.
3. Press and hold C to exit the menu.
11Message-kg.fm Page 125 Wednesday, November 3, 2004 9:37 PM

126 Using Message Services
11Message-kg.fm Page 126 Wednesday, November 3, 2004 9:37 PM

127
Customizing Phone Features
Once you are comfortable with the basic features of your new phone, use the Phone Setup menu to configure your phone the way you like it.
12PhSetup-kg.fm Page 127 Wednesday, November 3, 2004 9:38 PM

128 Customizing Phone Features
Phone Setup Menu
1 This feature is available only when the extended menus are activated.
Phone Setup
Adjust Ring Volume
Phone Lock
Require SIM Card PINOn/OffChange SIM PIN Code
Automatic LockOn/Off
Lock NowChange Unlock Code
Set Ringer ToneStandard Tone
High Tone
Change SIM PIN2 Code
Extended MenusOn/Off
New Security Code
Ring or VibrateRing OnlyVibrate OnlyVibrate Then RingNo Ring or Vibrate
Show Time and Date1
Show Home Time + Date
Change Clock DisplayHome Time
Show Away Time + Date
Set Time and Date1
Set Home Time + DateSet Away Time + Date
Set Time Format1
12 Hour24 Hour
Select Keypad Tones1
Normal TonesSingle ToneNo Tones
Language Selection1
English
Türkçe
Away Time
Lights1
On/Off
The following Phone Setup menu items are available only when the extended menus are activated.
Phone Status1
Status ReviewMaster ResetMaster Clear
12PhSetup-kg.fm Page 128 Wednesday, November 3, 2004 9:38 PM

Customizing Phone Features 129
Managing Phone Ringer Settings
You can adjust your phone’s ringer volume and tone, and set the phone to ring or vibrate to notify you of incoming calls.
Adjust the Ringer VolumeUse this feature to adjust the volume of the ringer. The phone sounds the new volume level as you adjust it.
1. Follow the steps in “Getting to Phone Setup...” to get to Adjust Ring Volume, and then press O to select.
Tip: You can also press E, and then the up or down volume control key.
2. Increase the volume by pressing the upper volume control key on the side of the phone.
or
Decrease the volume by pressing the lower volume control key on the side of the phone.
3. Press and hold C to exit the menu.
Getting to Phone Setup...
1. Press M until you see Phone Setup, and then press O.
2. Press M to scroll to one of the features described below. You will see the feature name, followed by Select?.
12PhSetup-kg.fm Page 129 Wednesday, November 3, 2004 9:38 PM

130 Customizing Phone Features
Set the Phone to Ring or VibrateThis feature is ideal for situations where a ringing phone is inappropriate or in noisy places where you might not hear the ringer. The vibrate alert function notifies you of incoming calls by discreet vibrations.
1. Follow the steps in “Getting to Phone Setup...” to get to Ring or Vibrate, and then press O to select.
Tip: If you select Vibrate then Ring, your phone vibrates for two cycles, and then rings.
2. Press M to scroll to Ring Only, Vibrate Only, Vibrate then Ring, or No Ring or Vibrate, and then press O to select the displayed option. You will see Completed.
3. Press and hold C to exit the menu.
Set the Ringer ToneSelect your favorite tone from 10 different options.
1. Follow the steps in “Getting to Phone Setup...” to get to Set Ringer Tone, and then press O to select.
2. Press M to scroll through the ringer tone options. You will hear a one-ring-cycle demonstration of each tone as its name is displayed.
3. Press O to select the desired ringer tone.
4. Press and hold C to exit the menu.
12PhSetup-kg.fm Page 130 Wednesday, November 3, 2004 9:38 PM

Customizing Phone Features 131
Locking and Unlocking Your Phone
These features can help you prevent unwanted use of your phone.
Lock the Phone AutomaticallyUse this feature to set your phone to lock itself every time it is powered on.
1. Follow the steps in “Getting to Phone Lock...” to get to Automatic Lock, and then press O to select.
2. Press M to choose On or Off, and then press O to select. You will see Completed.
3. Press and hold C to exit the menu.
Lock the Phone InstantlyUse this feature to lock your phone immediately.
1. Follow the steps in “Getting to Phone Lock...” to get to Lock Now.
2. Press O to select. You will see: Locked.
Note: Once you unlock your phone, it remains unlocked until you lock it again.
Unlock the PhoneTip: The factory default unlock code is 1234.
1. Enter unlock code. Enter your four-digit phone unlock code.
2. Press O.
Getting to Phone Lock...
1. Press M until you see Phone Setup, and then press O.
2. Press M to scroll to Phone Lock, and then press O.
3. Press M to scroll to one of the features described below.
12PhSetup-kg.fm Page 131 Wednesday, November 3, 2004 9:38 PM

132 Customizing Phone Features
Change the Unlock CodeThe unlock code is originally set to 1234. You should change it as soon as possible.
1. Follow the steps in “Getting to Phone Lock...” to get to Change Unlock Code, and then press O to select. You will see Enter Security Code.
Tip: The factory default security code is 000000.
2. Enter security code. Enter your six-digit security code. You will see your current lock code and Enter Phone Unlock Code.
3. Press C to clear one digit at a time, or press and hold C to clear all the digits.
4. Enter new code. Enter a new four-digit unlock code, and then press O. You will see Phone Lock and the new lock code.
5. Press and hold C to exit the menu.
12PhSetup-kg.fm Page 132 Wednesday, November 3, 2004 9:38 PM

Customizing Phone Features 133
Protecting the SIM Card
You can use a Personal Identification Number (PIN) code to protect the information stored on your SIM card even when it is inserted into someone else’s phone.
Activate and Deactivate the SIM Card PIN CodeWhen you activate the SIM card PIN code, your phone requests the code whenever the phone is powered on. To change this setting, you need to enter the PIN code that your service provider gave you.
1. Follow the steps in “Getting to Require SIM Card PIN...”.
Tip: You should have received your SIM card PIN code from your service provider.
2. Press M to scroll to On or Off, and then press O. You will see Enter PIN.
3. Enter code. Enter your four- to eight-digit SIM card PIN code, and then press O. You will see Completed.
4. Press and hold C to exit the menu.
Getting to Require SIM Card PIN...
1. Press M until you see Phone Setup, and then press O.
2. Press M to scroll to Require SIM Card PIN, and then press O.
3. Press M to scroll to one of the features described below. You will see the feature name, followed by View Options?.
12PhSetup-kg.fm Page 133 Wednesday, November 3, 2004 9:38 PM

134 Customizing Phone Features
Change the SIM Card PIN CodeTo choose your own PIN code:
1. Follow the steps in “Getting to Require SIM Card PIN...” to get to Change SIM PIN Code, and then press O to select. You will see Enter Old PIN.
2. Enter the current PIN code, and then press O. You will see Enter New PIN.
3. Enter a new PIN code, and then press O. You will see Repeat New PIN.
4. Re-enter the new PIN code, and then press O again. You will see Completed.
5. Press and hold C to exit the menu.
Unblock the PIN Code
Tip: The message Blocked indicates that an incorrect PIN code was entered. The message ! Blocked indicates that an incorrect PIN2 code was entered.
If your PIN code is entered incorrectly three times in a row, Blocked appears in the display. You need to enter a PIN unblocking key (PUK1), which you can obtain from your service provider.
1. Press * * 0 5 *.
2. Enter unblocking key. Enter the eight-digit PUK1 unblocking key, and then press O. Your service provider supplies this code.
3. Enter a new PIN code, and then press O.
4. Re-enter the new PIN code, and then press O.
Getting to Require SIM Card PIN...
1. Press M until you see Phone Setup, and then press O.
2. Press M to scroll to Require SIM Card PIN, and then press O.
3. Press M to scroll to one of the features described below. You will see the feature name, followed by View Options?.
12PhSetup-kg.fm Page 134 Wednesday, November 3, 2004 9:38 PM

Customizing Phone Features 135
Managing Other Security Settings
Your phone includes other security features:
• a SIM card PIN2 code for accessing fixed dialing settings and other subscription-dependent features
• a security code controls access to security and other menu options
Change the SIM Card PIN2 CodeYour SIM card PIN2 code is used to access fixed dialing settings. This four- to eight-digit code is issued to you when you subscribe to the feature. Use this feature to choose a new code.
1. Follow the steps in “Getting to Phone Setup...” to get to Change SIM PIN2 Code, and then press O to select. You will see Enter Old PIN2.
Tip: You should have received your SIM card PIN2 code from your service provider.
2. Enter the current PIN2 code, and then press O. You will see Enter New PIN2.
3. Enter new PIN2 code, and then press O. You will see Repeat New PIN.
4. Re-enter the new PIN2 code, and then press O again. You will see Completed.
5. Press and hold C to exit the menu.
Getting to Phone Setup...
1. Press M until you see Phone Setup, and then press O.
2. Press M to scroll to one of the features described below. You will see the feature name, followed by Select?.
12PhSetup-kg.fm Page 135 Wednesday, November 3, 2004 9:38 PM

136 Customizing Phone Features
Unblock the PIN2 CodeIf your PIN2 code is entered incorrectly three times in a row, ! Blocked appears in the display. You need to enter a PIN2 unblocking key (PUK2), which you can obtain from your service provider.
1. Press * * 0 5 2 *.
2. Enter unblocking key. Enter the eight-digit PUK2 unblocking key, and then press O. Your service provider supplies this code.
3. Enter a new PIN2 code, and then press O.
4. Re-enter the new PIN2 code, and then press O.
Change the Security CodeThe security code is your phone’s primary security number. You use it to reset your phone to its default settings and prevent access to your phone book. It is originally set to 000000.
1. Follow the steps in “Getting to Phone Setup...” to get to New Security Code, and then press O to select. You will see Enter Security Code.
2. Enter the current security code, and then press O. You will see Enter New Security Code.
3. Enter a new security code, and then press O. You will see Secur. Code and the six-digit number selected.
4. Press and hold C to exit the menu.
Getting to Phone Setup...
1. Press M until you see Phone Setup, and then press O.
2. Press M to scroll to one of the features described below. You will see the feature name, followed by Select?.
12PhSetup-kg.fm Page 136 Wednesday, November 3, 2004 9:38 PM

Customizing Phone Features 137
Activating Extended Menus
This feature activates and deactivates the extended menus. See “Personalizing the Options Menu” on page 160 to learn how extended menus can make your phone even simpler to use.
1. Follow the steps in “Getting to Phone Setup...” to get to Extended Menus, and then press O to select.
2. Press M to choose On or Off, and then press O.
3. Press and hold C to exit the menu.
When extended menus are deactivated, you can activate them temporarily to access hidden features. Press and hold M to activate the extended menus temporarily. This shortcut displays all extended menus features until you exit the Options menu.
12PhSetup-kg.fm Page 137 Wednesday, November 3, 2004 9:38 PM

138 Customizing Phone Features
Managing Time and Date Settings
View the Time and DateUse this feature to view the current time and date in one of two time zones.
Note: This feature is available only when the extended menus are activated. See “Activating Extended Menus” on page 137.
1. Follow the steps in “Getting to Phone Setup...” to get to Show Time and Date, and then press O to select.
2. Press M to choose Show Home Time + Date or Show Away Time + Date, and then press O. The selected time and date are displayed.
3. Press any key to clear the time and date from the display and return to the menu.
4. Press and hold C to exit the menu.
Getting to Phone Setup...
1. Press M until you see Phone Setup, and then press O.
2. Press M to scroll to one of the features described below. You will see the feature name, followed by Select?.
12PhSetup-kg.fm Page 138 Wednesday, November 3, 2004 9:38 PM

Customizing Phone Features 139
Change the Time DisplayedUse this feature to determine which time is displayed on your real time clock indicator.
Note: This feature is available only when the extended menus are activated. See “Activating Extended Menus” on page 137.
1. Follow the steps in “Getting to Phone Setup...” to get to Show Time and Date, and then press O to select.
2. Press M to scroll to Change Clock Display, and then press O.
3. Press M to scroll to either Home Time or Away Time, and then press O to select.
4. Press and hold C to exit the menu.
Set the Time FormatYou can choose a12-hour or 24-hour time format.
Note: This feature is available only when the extended menus are activated. See “Activating Extended Menus” on page 137.
1. Follow the steps in “Getting to Phone Setup...” to get to Set Time Format, and then press O.
2. Press M to choose either 12-hour or 24-hour, and then press O to select.
3. Press and hold C to exit the menu.
12PhSetup-kg.fm Page 139 Wednesday, November 3, 2004 9:38 PM

140 Customizing Phone Features
Set the Time and DateTo make it easy to check the local time when you travel, your phone can save the current time and date for two different time zones.
Note: This feature is available only when the extended menus are activated. See “Activating Extended Menus” on page 137.
Tip: The time displayed (home or away) on the real time clock indicator is the one you selected on page 139.
1. Follow the steps in “Getting to Phone Setup...” to get to Set Time and Date, and then press O to select.
2. Press M to choose Set Home Time + Date or Set Away Time + Date, and then press O. You will see Enter Home Time or Enter Away Time and the time currently set.
3. Press O to accept the displayed time.
or
Enter the time in 24-hour format, and then press O. You will see Enter Home Date or Enter Away Time and the date currently set.
4. Press O to accept the displayed date. You will see Completed.
or
Enter the date in day(dd)-month(mm)-year(yy) form and then press O. You will see Completed.
5. Press and hold C to exit the menu.
Getting to Phone Setup...
1. Press M until you see Phone Setup, and then press O.
2. Press M to scroll to one of the features described below. You will see the feature name, followed by Select?.
12PhSetup-kg.fm Page 140 Wednesday, November 3, 2004 9:38 PM

Customizing Phone Features 141
Selecting the Display Language
Your phone contains 21 languages. Use this feature to select the language in which your phone displays menus and messages.
Note: This feature is available only when the extended menus are activated. See “Activating Extended Menus” on page 137.
1. Follow the steps in “Getting to Phone Setup...” to get to Language Selection, and then press O to select.
2. Press M to scroll through the choices, and then press O to select the displayed option.
3. Press and hold C to exit the menu.
If you accidentally change the language of your phone’s display, press and hold the C key to return to the idle display, then pressM 2 6 O to return directly to the language selection submenu.
12PhSetup-kg.fm Page 141 Wednesday, November 3, 2004 9:38 PM

142 Customizing Phone Features
Turning Lights On and Off
You can activate or deactivate all phone lighting, including the phone status indicator, display backlighting, and keypad backlighting.
Note: This feature is available only when the extended menus are activated. See “Activating Extended Menus” on page 137.
1. Follow the steps in “Getting to Phone Setup...” to get to Lights, and then press O to select.
2. Press M to choose On or Off, and then press O to select the displayed option.
3. Press and hold C to exit the menu.
Setting Keypad Tones
Choose the sounds your phone makes when its keys are pressed.
Note: This feature is available only when the extended menus are activated. See “Activating Extended Menus” on page 137.
1. Follow the steps in “Getting to Phone Setup...” to get to Select Keypad Tones, and then press O to select.
2. Press M to choose Normal Tones, Single Tone, or No Tones, and then press O.
3. Press and hold C to exit the menu.
Getting to Phone Setup...
1. Press M until you see Phone Setup, and then press O.
2. Press M to scroll to one of the features described below. You will see the feature name, followed by Select?.
12PhSetup-kg.fm Page 142 Wednesday, November 3, 2004 9:38 PM

Customizing Phone Features 143
Managing Phone Settings
Review Your Phone’s SettingsUse this feature to review all of your phone’s settings that have changed from their original default settings.
To review all settings:
1. Follow the steps in “Getting to Phone Status...” to get to Status Review, and then press O.
2. Press M to scroll through the list of all the menu items you have changed.
3. Press and hold C to exit the menu.
Note: You can reset your phone’s original settings if desired. See “Reset Phone Options to Factory Defaults” on page 144.
Getting to Phone Status...
1. Press M until you see Phone Setup, and then press O.
2. Press M to scroll to Phone Status, and then press O.
3. Press M to scroll to one of the features described below.
12PhSetup-kg.fm Page 143 Wednesday, November 3, 2004 9:38 PM

144 Customizing Phone Features
Reset Phone Options to Factory DefaultsUse the master reset feature to reset all settings to their original default settings. This feature:
• resets audible call timers, the in-call timer, and the automatic lock
• resets extended menus to default setting
• restores keypad tones to normal, ringer tone to standard, and the volume level to the middle (fourth bar) of its range
To reset all settings:
1. Follow the steps in “Getting to Phone Status...” on page 145 to get to Master Reset, and then press O to select. You will see Enter Security Code.
Tip: The factory default security code is 000000.
2. Enter your six-digit security code. You will see Reset Complete.
3. Press and hold C to exit the menu.
12PhSetup-kg.fm Page 144 Wednesday, November 3, 2004 9:38 PM

Customizing Phone Features 145
Clear All Stored InformationThe master clear feature resets the same items as master reset, plus the following:
• clear phone book entries from phone memory (not from SIM memory)
• clear last calls made and received lists
• reset resettable call timers
Master clear does not clear the:
• fixed dial list
• my number(s) list
• received messages list
To clear all settings:
1. Follow the steps in “Getting to Phone Status...” to get to Master Clear, and then press O to select. You will see Enter Security Code.
Tip: The factory default security code is 000000.
2. Enter your six-digit security code.You will see Reset Complete.
3. Press and hold C to exit the menu.
Getting to Phone Status...
1. Press M until you see Phone Setup, and then press O.
2. Press M to scroll to Phone Status, and then press O.
3. Press M to scroll to one of the features described below.
12PhSetup-kg.fm Page 145 Wednesday, November 3, 2004 9:38 PM

146 Customizing Phone Features
12PhSetup-kg.fm Page 146 Wednesday, November 3, 2004 9:38 PM

147
Accessing the Network
This chapter shows you how to register with the Iridium satellite network.
13Network-kg.fm Page 147 Wednesday, November 3, 2004 9:38 PM

148 Accessing the Network
Network Selection Menu
Network Selection
Register Now
13Network-kg.fm Page 148 Wednesday, November 3, 2004 9:38 PM

Accessing the Network 149
Registering With the Satellite Network
Use this feature to access Iridium satellite service. Your phone searches for the Iridium satellite network.
1. Rotate and extend the antenna upward. See “Holding the Phone” on page 40.
2. Follow the steps in “Getting to Network Selection...” to get to Register Now.
3. Press O to select. You will see Registering.... This may take a few seconds.
If the phone finds the signal, you will see Registered and the signal strength indicator:
rx
The n (home system) indicator also appears.
If the phone is unsuccessful you may see one of these messages: Check Signal, Busy Try Later, Please Try Later, or Restricted Area.
Note: You must wait three minutes between registration attempts.
Getting to Network Selection...
1. Press M until you see Network Selection, and then press O.
2. Press M to scroll to one of the features described below. You will see the feature name, followed by Select?.
13Network-kg.fm Page 149 Wednesday, November 3, 2004 9:38 PM

150 Accessing the Network
13Network-kg.fm Page 150 Wednesday, November 3, 2004 9:38 PM

151
Timing Your Calls
Your phone’s call meters give you a variety of options for tracking the time you spend on the phone. You can monitor the length of individual calls, set a timer to track monthly usage, or have the phone alert you with tones at specific intervals.
15Timers-kg.fm Page 151 Wednesday, November 3, 2004 9:38 PM

152 Timing Your Calls
Call Meters Menu
1 This feature is available only when the extended menus are activated.
Call Meters
Set In-Call DisplayShow Time Per CallNo In-Call Display
Set Audible Call TimersSingle Alert Timer
On/Off
On/OffRepetitive Timer
Lifetime Timer1
Show Call TimersShow Last CallTotal For All CallsReset All Timers
15Timers-kg.fm Page 152 Wednesday, November 3, 2004 9:38 PM

Timing Your Calls 153
Showing Call Timers
Call timers help you track your airtime. Keep a running tab of your monthly usage or view the airtime of your most recent call.
Show the Time of the Last CallUse this feature to display the elapsed time of your most recent call.
1. Follow the steps in “Getting to Show Call Timers...” to get to Show Last Call, and then press O to select.
You will see the airtime of the most recent call in hours, minutes, and seconds. After several seconds, the display returns to Show Last Call.
2. Press and hold C to exit the menu.
Note: The last call timer shows elapsed time of the most recent call made since your phone was turned on. This information is not saved when you shut off the phone.
Getting to Show Call Timers...
1. Press M until you see Call Meters, and then press O.
2. Press M to scroll to Show Call Timers, and then press O.
3. Press M to scroll to one of the features described below.
15Timers-kg.fm Page 153 Wednesday, November 3, 2004 9:38 PM

154 Timing Your Calls
Show Total Time for All CallsUse this feature to display your total airtime since you last reset the Call Timer.
1. Follow the steps in “Getting to Show Call Timers...” to get to Total For All Calls, and then press O to select.
You will see the airtime accumulated since the timer was last reset. The airtime is displayed in hours, minutes, and seconds. After several seconds, the display returns to Total For All Calls.
2. Press and hold C to exit the menu.
Reset All TimersReset your timers at the beginning of each billing cycle to keep track of your spending.
1. Follow the steps in “Getting to Show Call Timers...” to get to Reset All Timers, and then press O to select.
You will see Completed. The display then returns to Reset All Timers.
2. Press and hold C to exit the menu.
Note: This does not reset the Lifetime Timer described on page 158.
Getting to Show Call Timers...
1. Press M until you see Call Meters, and then press O.
2. Press M to scroll to Show Call Timers, and then press O.
3. Press M to scroll to one of the features described below.
15Timers-kg.fm Page 154 Wednesday, November 3, 2004 9:38 PM

Timing Your Calls 155
Setting Audible Call Timers
Let your phone watch the clock for you. The call timers signal at a set time or interval with beeps only you can hear.
Set the Single Alert TimerUse this feature to set your phone to alert you after an elapsed time.
1. Follow the steps in “Getting to Audible Call Timers...” to get to Single Alert Timer, and then press O to select.
2. Press M to scroll to On or Off, and then press O to select.
• If you select On, you will see Enter Seconds. Continue with step 3
• If you select Off, you will see Completed. Continue with step 4
3. Press O to accept the current setting. You will see Seconds XXX.
or
Enter a number from 11 to 999, and then press O. You will see Seconds XXX.
4. Press and hold C to exit the menu.
Getting to Audible Call Timers...
1. Press M until you see Call Meters, and then press O.
2. Press M to scroll to Set Audible Call Timers, and then press O.
3. Press M to scroll to one of the features described below.
15Timers-kg.fm Page 155 Wednesday, November 3, 2004 9:38 PM

156 Timing Your Calls
Set the Repetitive TimerUse this feature to set your phone to alert you at specific intervals, for example every 45 seconds.
1. Follow the steps in “Getting to Audible Call Timers...” to get to Repetitive Timer, and then press O to select.
2. Press M to scroll to On or Off, then press O to select.
• If you select On, you will see Enter Seconds. Continue with step 3
• If you select Off, you will see Completed. Continue with step 4
3. Press O to accept the current setting. You will see Seconds XXX.
or
Enter a number from 11 to 999, and then press O. You will see Seconds XXX.
4. Press and hold C to exit the menu.
Getting to Audible Call Timers...
1. Press M until you see Call Meters, and then press O.
2. Press M to scroll to Set Audible Call Timers, and then press O.
3. Press M to scroll to one of the features described below.
15Timers-kg.fm Page 156 Wednesday, November 3, 2004 9:38 PM

Timing Your Calls 157
Showing the In-Call Timer
Use this feature to display a running clock of the airtime elapsed while on a call.
1. Follow the steps in “Getting to Call Meters...” to get to Set In-Call Display, and then press O to select.
2. Press M to scroll to Show Time Per Call or No In-Call Display, and then press O to select.
3. Press and hold C to exit the menu.
Getting to Call Meters...
1. Press M until you see Call Meters, and then press O.
2. Press M to scroll to one of the features described below.
15Timers-kg.fm Page 157 Wednesday, November 3, 2004 9:38 PM

158 Timing Your Calls
Showing the Lifetime Timer
Use this feature to show the total time of all calls for the life of your phone.
Note: This feature is available only when the extended menus are activated. See “Activating Extended Menus” on page 137.
Tip: The lifetime timer can not be reset. The Reset All Timers feature has no effect on this timer.
1. Follow the steps in “Getting to Call Meters...” to get to Lifetime Timer, and then press O to select.
You will see the total airtime of your phone since it was manufactured.
2. Press and hold C to exit the menu.
Getting to Call Meters...
1. Press M until you see Call Meters, and then press O.
2. Press M to scroll to one of the features described below.
15Timers-kg.fm Page 158 Wednesday, November 3, 2004 9:38 PM

159
Customizing the Menu System
This chapter shows you how to hide the menu features you don’t use regularly, and how to add your favorite features to the Quick Access menu for instant recall.
16Custom-kg.fm Page 159 Wednesday, November 3, 2004 9:38 PM

160 Customizing the Menu System
Personalizing the Options Menu
You can customize the Options menu by moving features in and out of the extended menus. Features that you place on the extended menu are hidden when extended menus are turned off, and become visible when you activate the extended menus.
Note: The default factory setting for your phone is extended menus activated.
Move Menu FeaturesTo move menu features:
1. Find the feature you want to move.
2. Press and hold O. You will see one of two responses depending on where that menu feature is currently located. If you see:
Note: Some features and submenus cannot be moved. You will see Cannot Move Menu Item.
Message Description
Remove From
Short Menus
(The feature is in the short menu).
Press O to move the feature to the extended menu. You will see Menu Item Moved.
or
Press M to scroll to Leave in Short Menus, and then press O to select. You will see Move Cancelled.
Add To
Short Menus
(The feature is in the extended menu).
Press O to move the feature to the short menu. You will see Menu Item Moved.
or
Press M to scroll to Leave in Long Menus, and then press O to select. You will see Move Cancelled.
16Custom-kg.fm Page 160 Wednesday, November 3, 2004 9:38 PM

Customizing the Menu System 161
Activate/Deactivate Extended MenusUse the Options menu to activate and deactivate extended menus. Activate them when you need access to every feature. Deactivate them for everyday use.
1. Press M until you see Phone Setup, and then press O to select.
2. Press M to scroll to Extended Menus, and then press O to select.
3. Press M to scroll to either On or Off, and then press O to select.
All hidden features are accessible when you activate the extended menus.
Access Hidden FeaturesIf you want to access a feature hidden in the extended menus, but don’t want to leave the extended menus active, you can use this shortcut:
Press and hold M for a few seconds.
All extended menus features remain accessible until you exit the Options menu.
16Custom-kg.fm Page 161 Wednesday, November 3, 2004 9:38 PM

162 Customizing the Menu System
Personalizing the Quick Access Menu
You can replace the default Quick Access menu features described on page 57 with any of the following features.
To change a default quick access feature to one of the features listed above:
1. Press E and then press M to scroll to the feature you wish to change.
2. Press and hold O to access the list of features available.
3. Press M to scroll through the list until you find the desired feature.
4. Press O to store the displayed feature in the new location. You will see Completed.
Icon Quick Access Feature
D Find by Location recalls a Phone Book entry by its memory location number.
F Add Entry to Phone stores entered numbers in the next available phone memory location.
T Add Entry to SIM stores entered numbers in the next available SIM card location.
N Ring Volume displays and sets the incoming call ring tone volume.
e Check Signal checks the strength of the signal from the satellite network.
V Switch Memory switches one-touch dialing between the phone and SIM memories depending on the current setting.
Y Last Call Timer displays the duration of your last call.
%
Show Services displays a list of service phone numbers programmed by your service provider.
$ Mode Selection: This feature is not currently supported.
16Custom-kg.fm Page 162 Wednesday, November 3, 2004 9:38 PM

163
Troubleshooting
This chapter tells you what to do if you experience one of the following problems:
Problem Solution
You can’t turn the phone’s power on.
• Did you press and hold the S key for three seconds to turn the phone’s power on?
• Check the battery. Is it charged, properly fitted, and are the contacts clean and dry?
You can’t make calls.
• Check the antenna. Is it fully extended and rotated? Do you have a clear unobstructed view of the sky?
• Did you enter the number in international format? All calls made from the Iridium satellite system must be in international format.
• Check the signal strength indicator. If the signal is weak, ensure that you have a clear line of sight to the sky and there are no buildings, trees, etc. around.
• Try to register manually.
• Is Restricted displayed? Check the Call Barring setting.
• Has a new SIM card been inserted? Check that no new restrictions have been imposed.
• Check to see if your fixed dialing list is enabled. If so, you can only make calls to numbers or prefixes that are on the list.
You can’t receive calls.
• Check to see that your phone is powered on.
• Check the antenna. Is it fully extended and rotated? Do you have a clear unobstructed view of the sky?
• Check the signal strength indicator. If the signal is weak, ensure that you have a clear line of sight to the sky and there are no buildings, trees, etc. around.
• Check the Call Forwarding and Call Barring settings.
• Check the Ringer setting. If it is off, there is no audible ringer.
You can’t make international calls.
• Have you included the relevant codes? Press and hold the 0 key to display the international dialing prefix (+) and then enter the appropriate country code followed by the phone number.
18Trouble-kg.fm Page 163 Wednesday, November 3, 2004 9:39 PM

164 Troubleshooting
Your phone will not unlock.
• Have you inserted a new SIM card? Enter the new PIN code.
• Enter the default phone unlock code —1234.
• Have you forgotten the unlock code? Press M to change the unlock code (you need your security code).
Your PIN is blocked.
Enter the PIN unblocking key (PUK1) or contact your service provider. See “Unblock the PIN Code” on page 134 for additional information.
Your PIN2 is blocked.
Enter the PIN2 unblocking key (PUK2) or contact your service provider. See “Unblock the PIN2 Code” on page 136 for additional information.
Your SIM card will not work.
• Is the card inserted the correct way?
• Is the card visibly damaged or scratched? Return the card to your service provider.
• Check the SIM and phone contacts. If they are dirty, clean them with an antistatic cloth.
You can’t cancel Call Forwarding or Call Barring.
Wait until you are in an area with good network coverage and try again.
The o (message) indicator is flashing.
There is not enough memory available to store another message. Use the Messages menu to delete one or more messages.
The battery won’t charge.
• Check the charger. Is it properly connected? Are its contacts clean and dry?
• Check the battery contacts. Are they clean and dry?
• Check the battery temperature. If it is warm, let it cool before recharging.
• Is it an old battery? Battery performance declines after several years of use. Replace the battery.
• Make sure you have a Iridium approved battery installed. If you see Invalid Batt. in the display, you will not be able to charge this battery.
Problem Solution
18Trouble-kg.fm Page 164 Wednesday, November 3, 2004 9:39 PM

Troubleshooting 165
The battery drains faster than normal.
• Are you in an area of variable coverage? This uses extra battery power.
• Is your antenna fully rotated and extended? Do you have a clear unobstructed view of the sky? This helps use less battery power.
• Is it a new battery? A new battery needs two to three charge/discharge cycles to attain normal performance.
• Is it an old battery? Battery performance declines after several years of use. Replace the battery.
• Is it a battery that hasn’t been completely discharged? Allow the battery to fully discharge (until the phone turns itself off) and then charge the battery overnight.
• Are you using your phone in extreme temperatures? At extreme hot or cold temperatures, battery performance is significantly reduced.
You find your phone becoming warm during use.
You may notice this during long calls or during charging. The heat is produced by the electronic components within your phone and is quite normal.
Phone is not responding to user controls including the power key.
Remove the battery from the phone and then reattach it to cycle power and reset.
Your SIM card is inserted in the phone but the display says:
• Check Card or Insert CardCheck that the SIM card has been inserted correctly. The contacts of the SIM card may be dirty. Turn the phone off, remove the SIM card and rub the contacts with a clean cloth. Replace the card in the phone.
• Blocked or ! Blocked Enter the PIN unblocking key (PUK1) or the PIN2 unblocking key (PUK2) respectively, or contact your service provider. See “Unblock the PIN Code” on page 134 and “Unblock the PIN2 Code” on page 136 for additional information.
• Bad Card See Supplier
Please contact your service provider.
You find your phone’s prompts in a language other than your own.
1. Press and hold the C key to return to the idle display
2. Press M 2 6 O to go directly to the language selection submenu
3. Press M until you see your preferred language
4. Press O to select
Problem Solution
18Trouble-kg.fm Page 165 Wednesday, November 3, 2004 9:39 PM

166 Troubleshooting
18Trouble-kg.fm Page 166 Wednesday, November 3, 2004 9:39 PM

167
Index
Symbols* character 44+ character 44® character 44, 67
AAC travel charger 22accessories 21–24accessory connector
defined 17illustration 15
adapterantenna 24auto accessory 23
Add To Short Menus message 160airbag 11alert, incoming call 46alphanumeric keypad 15antenna
adapter 24attaching 26care 8detents 40extending 40illustration 40lock release button 15, 17, 26removing 26rotating 40
audible call timersrepetitive 156resetting default settings 144single alert 155
auto accessory adapter 23, 33–34
automatic lockresetting default 144setting 131
automatic redial 43
BBad Card See Supplier message
40, 165barring calls
incoming 97outgoing 96
batterycautions 9, 36charge indicator
defined 19displayed 33, 35illustration 15
charge meter 57, 100charging 33–??Charging Battery message 33,
100compartment illustration 31disposal 36Fast Charge Completed message
100installing 30internal charger 33–34Invalid Batt. message 100Low Battery message 35power level, checking 100removing 31–32standby time 21talk time 21troubleshooting 164, 165
Blocked message 40, 134, 165! Blocked message 40, 136,
165Busy Try Later message 43, 55,
149
Ccall
answering 45–47automatic redial 43
9505A-kgIX.fm Page 167 Wednesday, November 3, 2004 9:39 PM

168
barringincoming 97outgoing 96
dialing special characters 44ending 45, 47incoming call alert 46international call
dialing + character 44last ten calls 80muting 52placing 42–45receiving 45–47redialing last number 43unable to make call 163unable to make international
call 163unable to receive call 163
Call Answer? 45, 46call barring
barr passwordchanging 99entering 96–99
cancelling 98incoming calls 97outgoing calls 96unable to cancel 164
Call Failed message 46, 47call forwarding
all calls 90–91cancelling 94from Quick Access menu 57unable to cancel 164voice calls 92–93when unavailable 89
Call Meters menudiagram 152Lifetime Timer feature 158Repetitive Timer feature 156Reset All Timers feature 154Set Audible Call Timers feature
155–156Show Call Timers feature 153–
154
Show In-Call Display feature 157
Show Last Call feature 153Single Alert Timer feature 155Total For All Calls feature 154
call meters. See call timersCall Related Features menu
Call Barring feature 95–99Bar Incoming Calls 97Bar Outgoing Calls 96Cancel All Barring 98Change Bar Password 99
Call Forwarding feature 89–94Cancel All Forwarding 94Detailed Forwarding 92–93Forward All Calls 90–91Forward When Unavailable
89diagram 88Pending Call Drop feature 102Show Battery Meter feature
100Show Signal Strength feature
101call timers
all calls 154elapsed airtime 157in-call timer 157lifetime timer 158most recent call 153, 162repetitive 156resetting all 145, 154single alert 155total airtime 154
Call? 42Calling message 42Cannot Move Menu Item message
160carry case 24charger, AC travel 22Charging Battery message 33,
100Check Card message 39, 165check mark indicator
9505A-kgIX.fm Page 168 Wednesday, November 3, 2004 9:39 PM

169
defined 20Check Signal message 39, 149Checking Signal... message 101clear key, defined 16clearing stored information 145clear-line-of-sight 16clock 15, 19code
phone unlock 131–132security 74, 132, 136, 144, 145SIM card PIN 39, 133–134SIM card PIN2 75–78, 135–
136Completed message 55Connected message 42, 45, 46
Ddate
setting 140viewing 138
default settings, resetting 144detents, antenna 40dialing
0 44* character 44+ character 44® character 44, 67last ten calls 80number with pauses 68Phone Book entry 72phone number 42PIN numbers 44special characters 44supplementary service
numbers 44display
backlighting 142cold temperatures and 17icons 57, 162illustration 15indicators 15language, selecting 141special characters 44standby mode 41
status indicators 19–20wrong language displayed 165
Eearpiece
adjusting volume 48illustration 15
Edit a Stored Message 120elapsed airtime timer 157End Call? 42Enter Name message 55Enter Phone Unlock Code message
39, 132Enter PIN message 39, 55, 133Enter PIN2 message 75–78exiting menus and menu features
54extended menus
activating 137, 161Call Barring 95deactivating 137, 161default setting 160defined 160Detailed Call Forwarding 92Language Selection 141Lifetime Timer 158Lights 142moving menu features 160Select Keypad Tones 142Set Time and Date 140Set Time Format 139Show Time and Date 138, 139
FFailed message 55Fast Charge Completed message
100fixed dial list
defined 75entry
adding 76editing 78erasing 77
one-touch dialing 83
9505A-kgIX.fm Page 169 Wednesday, November 3, 2004 9:39 PM

170
viewing 79fixed dialing
activating 75PIN2 code 135viewing fixed dial list 79
forwarding callsall calls 90–91cancelling 94from Quick Access menu 57voice calls 92–93when unavailable 89
Hheadset 23headset jack 15, 17, 23home system indicator
defined 19displayed 38, 149
hourglass icondefined 20displayed 55
Iicons
hourglass 55Quick Access menu 20, 57,
162in use indicator 20In-Call feature
muting a call 52in-call timer
defined 157resetting 144
incoming call alert 46indicators
battery charge 15, 19, 33, 35check mark 20display 15, 19–20home system 19, 38, 149hourglass icon 20, 55in use 20message 19, 106, 117, 164no service 20, 38Quick Access menu icons 20
real time clock 19satellite mode 19scroll bar 20, 55signal strength 15, 19, 101,
149status 15, 18, 19–20
Insert Card message 39, 165international call
dialing + character 44unable to make 163
Invalid Account message 39Invalid Batt. message 100Iridium Call Attempt message 46
Kkey presses 14keypad
keypad tones, setting 142locking 48resetting default tones 144unlocking 48
keysalphanumeric keypad 15clear 16keypad tones, setting 142locking the keypad 48memory recall 16, 49, 71, 81memory store 16, 64, 80menu 16menu system, navigating 54message 15, 16, 105–125OK 16power 16quick access 15, 16, 49, 56,
129scroll 16unlocking the keypad 48volume control 15, 16, 48, 49,
129
Llanguage
selecting 141wrong language displayed 165
9505A-kgIX.fm Page 170 Wednesday, November 3, 2004 9:39 PM

171
last call timerdisplaying 153, 162
last ten callsclearing 145placing a call 80
LCD. See Liquid Crystal DisplayLeave in Long Menus message 160Leave in Short Menus message
160lifetime timer 158Liquid Crystal Display
cold temperatures and 17status indicators 19–20
locking the keypad 48locking the phone
automatically 131from Quick Access menu 57instantly 131see also unlocking the phone
Low Battery message 35
Mmaking a call 42–45master clear 145master reset 144memory
phone 61, 63, 64SIM card 61, 63, 64
memory recall key 16, 49, 71, 81memory store key 16, 64, 80menu
Add To Short Menus message 160
call meters 151–158call related features 87–102Cannot Move Menu Item message
160customizing 159–162defined 53exiting 54feature selection messages 55indicators 55Leave in Long Menus message
160
Leave in Short Menus message 160
Menu Item Moved message 160Messages 103–125Move Cancelled message 160Network Selection 147–149Phone Book 59–85Phone Setup 127–145questions 55Remove From Short Menus
message 160scrolling 54, 56using 53–??
Menu Item Moved message 160menu key 16message editor 113–117Message Failed Resend? 117, 120message indicator
defined 19displayed 106flashing 19, 106, 117, 164
message keydefined 16illustration 15using 105–125
Message Read Now? 106, 108Message Sent message 117, 119messages
contents 107creating 114deleting 110, 121editing 116feature selection indications 55go to next message 110, 119message key 105–125notification
incoming voicemail 108received message(s) 106
phone 14reading
from Quick Access menu 57incoming 108stored 109
received 47, 108–112
9505A-kgIX.fm Page 171 Wednesday, November 3, 2004 9:39 PM

172
sending 113–121voicemail 108
Messages menuCall Voicemail feature 105diagram 104enter service centre number
120, 123Message Editor feature 113–
117Message Settings feature 122–
125Outgoing Messages feature
118–121Received Messages feature
109–112Voicemail Number feature 122
microphone 15Move Cancelled message 160multiple-key answer 45, 46Mute message 52muting a call 52, 57
Nnetwork
satellite, registering 57, 149network features
call barring 95–99call forwarding 89–94
Network Selection menudiagram 148Register Now feature 149
No Number Available message 105No Service Center message 117,
120no service indicator
defined 20displayed 38
OOK key 16one-touch dialing
frequently called numbers 61switching memory, from Quick
Access menu 162
using 83Options menu
customizing 160–161defined 53entering 54exiting 54using 54–55
Overwrite? 64
Ppassword, call barring 96–99patent information 179pause dialing 44, 67–68pauses in numbers, entering 67pending call drop signal 102Personal Identification Number
code 133See also PIN code
personal mailbox 47, 107phone
becomes warm during use 165features, customizing 127–145holding 40illustration 15locking
automatically 131from Quick Access menu 57instantly 131
messages at power-on 39security code, default 132service phone numbers 85,
162settings
clearing 145resetting default 144viewing 143
turning on and off 38unable to make call 163unable to make international
call 163unable to receive call 163unable to turn on 163unable to unlock 164unblocking the PIN code 134
9505A-kgIX.fm Page 172 Wednesday, November 3, 2004 9:39 PM

173
unblocking the PIN2 code 136unlock code
changing 132default 131entering 131
unlocking 131use while driving 9use with other electronic
devices 10–11Phone Book
adding an entry 63–66capacity, checking 73characters, entering 65–66entries
clearing all 145scrolling through 48, 70
entryadding 63–66, 162calling 72changing 69correcting 65erasing 72locating 70–71modifying 72
find entry by location 71, 162find entry by name 57, 70fixed dial list
adding an entry 76editing an entry 78erasing an entry 77
fixed dialingactivating 75viewing fixed dial list 79
last ten calls 80memory recall key 71memory store key 64menu diagram 60name
entering 65–66storing 63–66
numbercalling 72entering 63–64storing 63–66
one-touch dialing 83organizing 61pauses in numbers
dialing 68entering 67
phone memory 61phone numbers
grouping 62security issues 62storing 61
prefixes, using 69preventing access 74Restricted message 74SIM card memory 61storage capacities 61
Phone Book menuAdd Entry feature 63–66Call Number feature 72Check Capacity feature 73diagram 60Erase Name And Number
feature 72Find Entry By Location feature
71Find Entry By Name feature 70Modify Name Or Number
feature 72My Phone Number(s) feature
81–82One-Touch Dial Setting feature
83Prevent Access feature 74Setup Fixed Dialing feature
activating 75Add Entry 76Edit Entry 78Erase Entry 77Last Ten Calls 80View Fixed Dial List 79
Show Services feature 85phone memory
checking capacity 73entries, clearing all 145one-touch dialing 83
9505A-kgIX.fm Page 173 Wednesday, November 3, 2004 9:39 PM

174
storage capacities 61phone number
dialing 42modifying on SIM card 82programming on SIM card 82using pauses in 67using prefixes 69viewing your own 81
phone settingsclearing 145resetting default 144viewing 143
Phone Setup menuAdjust Ring Volume feature
129Automatic Lock feature 131Change Clock feature 139Change SIM Card PIN feature
134Change SIM Card PIN2 feature
135Change Unlock Code feature
132diagram 128Extended Menus feature 137,
161Language Selection feature
141Lock Now feature 131Master Clear feature 145Master Reset feature 144New Security Code feature
136Phone Lock feature 131–132Phone Status feature 143–145Require SIM Card PIN feature
133–134Ring or Vibrate feature 130Select Keypad Tones feature
142Set Ringer Tone feature 130Set Time and Date feature 140Set Time Format feature 139
Show Time and Date feature 138
Status Review feature 143phone unlock code
changing 132default 131entering 131
PIN codeactivating 133Blocked message 40, 134, 165changing 134deactivating 133defined 133Enter PIN message 39, 133entering 39, 133–134incorrect entry 134unblocking 134
PIN unblocking key (PUK1)defined 134entering 134
PIN2 code! Blocked message 40, 136,
165changing 135defined 135Enter PIN2 message 75–78entering 75–78incorrect entry 136unblocking 136
PIN2 unblocking key (PUK2)defined 136entering 136
placing a call 42–45Please Try Later message 43,
149postscripting 69power
checking power level 100power-on messages 39turning phone on and off 38unable to turn on phone 163
power connectordefined 17illustration 15
9505A-kgIX.fm Page 174 Wednesday, November 3, 2004 9:39 PM

175
power keydefined 16illustration 16using 28, 33, 34, 38
prefixes 69prompts, defined 14PUK1. See PIN unblocking keyPUK2. See PIN2 unblocking key
Qquick access key
defined 16illustration 15ringer volume, adjusting 49,
129using 56
Quick Access menucustomizing 162default settings 57defined 56icons 20, 57, 162quick access key 56replacing features 162using 56–57
Quit? 55
RRange XXX-XX message 64real time clock 19receiving a call 45–47receiving messages 47redial
automatic 43last number 43
Redial Failed message 43Redial? 43Registered message 149registering
from Quick Access menu 57satellite network 149
Registering... message 39, 42, 149
Remove From Short Menus message 160
repetitive timerdefined 156resetting default setting 144setting 156
Restricted Area message 43, 149Restricted message 74restricting calls 95–99restricting phone use 75–79restricting SIM card access 75ringer
activating 130adjusting volume 49, 129, 162deactivating 130resetting default tone 144setting tone 130wakeup tone 38
Rotate and Extend Antenna message 149
Rotate Antenna Call Attempt message 46
Rotate Antenna Registering... message 39
Ssafety information 7–??, 8–11satellite antenna
illustration 40lock release button 15, 17
satellite modemuting a call 52
satellite mode indicatordefined 19
satellite network, registering 57, 149
scroll bardefined 20displayed 55
scroll key 16scrolling 54, 56Searching... message 39security code
changing 136default 74, 132, 136defined 136
9505A-kgIX.fm Page 175 Wednesday, November 3, 2004 9:39 PM

176
entering 74, 132, 136, 144, 145security features 133–136Select? 55service phone numbers 85, 162short menus 160signal strength indicator
defined 19illustration 15satellite network registration
and 149viewing 101, 162
SIM cardBad Card See Supplier message
40, 165Blocked message 40, 134, 165! Blocked message 40, 136,
165Check Card message 39, 165defined 27display messages 165fixed dial list 75Insert Card message 39, 165inserting 28phone number
entering 82modifying 82security issues 62viewing your own 49, 81
PIN codeactivating 133changing 134deactivating 133defined 133Enter PIN message 39, 133entering 39, 133–134incorrect entry 134unblocking 134
PIN2 codechanging 135defined 135Enter PIN2 message 75–78entering 75–78incorrect entry 136unblocking 136
precautions 27, 28protecting 133–134removing 29restricting access 75security features 133–136storing messages
outgoing 117received 108
troubleshooting 164, 165SIM card memory
checking capacity 73one-touch dialing 83storage capacities 61
single alert timerresetting default setting 144setting 155
special characters 44standby mode 41standby time, battery 21status indicator
defined 18display 19–20illustration 15
status indicators 15Stored to Outgoing message 117Stored XXX message 64submenus, defined 53supplementary service numbers
44
Ttalk time, battery 21time
away time, defined 140changing clock display 139home time, defined 140setting 140setting format 139viewing 138
timersall calls 154elapsed airtime 157in-call timer 157lifetime timer 158
9505A-kgIX.fm Page 176 Wednesday, November 3, 2004 9:39 PM

177
most recent call 153, 162repetitive 156resetting all 154single alert 155total airtime 154
total airtime timer 154travel charger 33–34troubleshooting 163–165
UUnanswered Call message 47unanswered calls 47unblocking
SIM card PIN code 134SIM card PIN2 code 136
unlock codechanging 132default 131entering 131
unlocking the keypad 48unlocking the phone 131
See also locking the phone
VVibraCall alert function
activating 57, 130deactivating 130phone power-on and 38
vibration mode. See VibraCall alert function
View Options? 55voicemail
call forwarding when unavailable 89
checking 57, 105detailed call forwarding 92–93forward all calls 90–91No Number Available message
105notification message 106, 108storing voicemail number 122
volumecontrol keys 16control keys illustration 15
earpiece, adjusting 48resetting default 144ringer, adjusting 49, 129, 162
volume level display 48
Wwakeup screen 38warranty information 181–184wrist strap 23
9505A-kgIX.fm Page 177 Wednesday, November 3, 2004 9:39 PM

178
9505A-kgIX.fm Page 178 Wednesday, November 3, 2004 9:39 PM

179
Patent Information
Manufactured under one or more of the following U.S. patents:
412121841386814193036425438243028454312074432731943296664369516436952243786034390963D269873439826544005844400585D270835D271491Re.314704431977443446144555344462098D275951448415344854864486624D2768094491972D2776674504834D27870845231554546329455042645516964564821D28216945715954573017457424345859574602218D284759D285439
46163144617520D28677846263094628529462982946303044630305463314146365934636741D28843246481254649543D2886834654655D2891564662691466733346689174670747467250246807874681476468358546927264704588D2925784706036D292920471072447113614715063471631947163914723305D29425747273064727583473019547346354736277473797647407944741018
47410344742562D2956274746242D295973D2959754751737D29618747616214764737D297734D2977354777564Re.32768D29913647979294798975480034848022364809356481137748114044827226482750748292744837534D30147648436214845772D302015485196648685764870686D30365648765524879533D30542748961244897873D305717490454949052884905301D306293D306441
D30659449126024918732492217849455704954796495985149638124963843496553749723554972432497245549758084984290D314173D315330D315346D315543D315559D3155655004992D3159075008925D316417D3168595017856501818850200915020092502009350280835028859502904450292335031028503653250539245057762D32078050598855060294D322783D3229555081674
5083304D324024D3243885095503D325028D3255835109536D32591551134365117450512104751224805122722D3270615128834D328302514255151426965146620514847151484735148961515035951503845152006515769351631595164652516659651757595175874D3322615182749D33278551855665187809519322351951065195108520106952049775210793521467552221045222251
D33733252300075230093523363352354925237257523912752415455241548524165052416935242767D33958252493025251331D340710526098852611195262710526305252767075278994D3431735280637D344087528755352875555287556D34451153013655321847D34888053495885359696536140053630715365549D3524975366826D353131D353361537514353752585379324D354055
D3540625384825D356084540244754061465406562D357224D3574575410741D357680D3576815428836D359734D359735D3599595432017D3606325438684D36107054426805446763544876354487715453997D362840545774454596405463646546541254691775475752D365094D3658175486843548718454883355488649D3668725493198549371454971265497382D36764054993945506490
D36869655106935511235D3691625513078D3693595519303551934655242765524278D370463553092255421165544250D37248155462755546380D37289655510785559471D374424D374872557219355749765577268D375732D375733D375734D375932D375952D37612755880415589796559017755947785594951D377792D37793456040505606730D3783665613229561386356152335621763
Other patents pending.
21Patents-kg.fm Page 179 Wednesday, November 3, 2004 9:40 PM

180
21Patents-kg.fm Page 180 Wednesday, November 3, 2004 9:40 PM
42639_Pg180 11/10/04 4:02 PM Page 1

181
Warranty Information
Iridium Limited Warranty For Satellite Subscriber Radiotelephone Products
1. Coverage and DurationIridium warrants that its new satellite subscriber radiotelephone products and accessories (the "Product") shall be free from defects in materials and workmanship for a period of twelve (12) months from the date such Product is delivered to the first end-user purchaser or first lessee (the "Purchaser"), or the date such Products are first placed into satellite subscriber service, whichever occurs earliest.
Iridium, at its option, shall at no charge to Purchaser, either repair or replace the Product, or refund the purchase price of a Product that does not conform to this warranty, provided the Product is returned in accordance with the instructions set out below and within the warranty period. These remedies are Purchaser's exclusive remedies under this warranty. Repair may include the replacement of parts or boards with functionally equivalent reconditioned or new parts or boards. A Product that has been repaired or replaced is warranted for the balance of the original warranty period. A Product for which a replacement has been provided shall become Iridium's property.
This warranty is made by Iridium to the Purchaser of the Products only, and it is not assignable or transferable by the Purchaser. This is Iridium's sole and complete warranty for the Products. Iridium assumes no obligation or liability for additions or modifications to this warranty unless made in writing and signed by an officer of Iridium. Iridium does not warrant any installation, maintenance, or service of the Products not performed by Iridium.
This Product is covered by a U.S.A. warranty. If the Product has been sold outside of the U.S.A., Iridium will honor the U.S.A. warranty terms and conditions only. Outside of the U.S.A., any different warranty terms, liabilities and/or legal requirements of the country in which the Product is sold are specifically disclaimed by Iridium.
2. Conditions Not Covered By This Warranty
a. Products that are integrated, installed, maintained, or serviced in any manner other than in accordance with the Iridium user documentation furnished with or applicable to the Product.
b. Product damage caused by the use of ancillary equipment not furnished by Iridium, including accessories and peripherals.
22Warranty-kg.fm Page 181 Wednesday, November 3, 2004 9:41 PM

182 Warranty Information
c. Problems where the Product is used in a combination with ancillary equipment not furnished by Iridium, and it is determined by Iridium there is no fault with the Product.
d. Ancillary equipment not furnished by Iridium which is attached to or used in connection with the Products is not the responsibility of Iridium, and all such equipment is expressly excluded from this warranty. Furthermore, Iridium does not warrant the integrated operation of the combination of the Products with any ancillary equipment not furnished by Iridium.
e. Defects or damage resulting from: use of the Product in any manner not normal or customary; misuse, accident or neglect including but not limited to dropping the Product onto hard surfaces, immersion in or exposure to water, rain or extreme humidity, immersion in or exposure to sand, dirt or other particulates, exposure to extreme heat, spills of food or liquid; improper testing, operation, maintenance, installation, adjustment; or any alteration or modification of any kind.
f. Batteries manufactured by Iridium and sold with Products whose capacity exceeds 80% of rated capacity are not covered. Batteries whose capacity falls below 80% of rated capacity, or that develop leakage, shall be considered non-conforming. This warranty is voided for batteries if: a) such batteries are charged by other than the Iridium-approved battery charger specified for charging such batteries; b) any seals on such batteries are broken or show evidence of tampering; or c) such batteries are used in equipment other than the Product for which they are specified; or d) such batteries are charged and stored at temperatures greater than 60 degrees centigrade.
g. Breakage or damage to antennas, or scratches or other damage to plastic surfaces or other externally exposed parts caused by Purchaser's use.
h. Products disassembled or repaired in such a manner as to adversely affect performance or prevent adequate inspection and testing to verify any warranty claim.
i. Products on which serial numbers or date tags have been removed, altered or obliterated.
j. Coil cords that are stretched or on which the modular tab is broken; leather cases, which are covered under separate manufacturers' warranties;
k. Products rented on a month-to-month basis.
l. Normal wear and tear.
3. Obtaining Warranty Service
For warranty questions, repairs, or for the return of Product, please call your Service Provider or Point-of-Sale, not Iridium. Equipment needing service should be returned to your Service Provider or Point-of-Sale, not Iridium.
SERVICE WORK PERFORMED BY SERVICE CENTERS NOT AUTHORIZED BY IRIDIUM TO PERFORM SUCH WORK WILL VOID THIS WARRANTY.
22Warranty-kg.fm Page 182 Wednesday, November 3, 2004 9:41 PM

Warranty Information 183
All Products shipped to Iridium's authorized Warranty Service Center must be shipped with freight and insurance prepaid. Purchaser must include with the Product a bill of sale, a lease, or some other comparable proof of purchase, the name and location of the installation facility, if any, and most importantly, the Purchaser's name, address, and telephone number and a written description of the problem. Product that is repaired or replaced under this warranty shall be returned to Purchaser at Iridium's expense for the freight and insurance, and at Purchaser's expense for any applicable duties or other charges. If additional information is needed, please contact Iridium at the address and phone number listed in Paragraph 6 below.
4. General Provisions
THIS WARRANTY IS GIVEN IN LIEU OF ALL OTHER WARRANTIES EXPRESS OR IMPLIED, INCLUDING BUT NOT LIMITED TO THE IMPLIED WARRANTIES OF MERCHANTABILITY AND FITNESS FOR A PARTICULAR PURPOSE. FURTHER, THIS WARRANTY COVERS THE PRODUCTS ONLY, AND NO WARRANTY IS MADE AS TO COVERAGE, AVAILABILITY, OR GRADE OF SERVICE PROVIDED BY IRIDIUM SEPARATELY FOR IRIDIUM SATELLITE SERVICES. IN NO EVENT SHALL IRIDIUM BE LIABLE FOR DAMAGES IN EXCESS OF THE PURCHASE PRICE OF THE PRODUCT IN QUESTION, OR FOR ANY LOSS OF USE, LOSS OF TIME, INCONVENIENCE, COMMERCIAL LOSS, LOST PROFITS OR SAVINGS OR OTHER INCIDENTAL, SPECIAL, OR CONSEQUENTIAL DAMAGES ARISING OUT OF THE USE OR INABILITY TO USE SUCH PRODUCT, TO THE FULL EXTENT SUCH MAY BE DISCLAIMED BY LAW.
5. Conditions of Use and Disclaimer of Liability
Users of the Iridium Satellite LLC ("Iridium") mobile satellite phone service and related equipment, including without limitation those using the phone service and equipment in any manner in conjunction with emergency 911or emergency 112 or any other distress calling or emergency services, both public of privately operated, acknowledge and agree as a condition of the provision of phone service and equipment by Iridium that they will make no claim, whether in contract, tort or otherwise, against Iridium for bodily injury, loss of life, damage to property or for any other loss whatsoever, or for special, incidental, indirect, consequential or punitive damages, by reason of any unavailability, delay, faultiness or failures of the Iridium facilities or phone service or equipment or for inaccuracies or failures with regard to any user information provided. This is a waiver and release and disclaimer of liability to the fullest extent permitted by applicable law and applies regardless of the cause of any liability, including without limitations, to wrongful conduct, omission or fault of employees or agents of Iridium.
Iridium makes no warranties, express or implied, including any implied warranty of merchantability or fitness for a particular purpose concerning Iridium service or equipment. Iridium cannot promise uninterrupted or error free service.
The Iridium service does not currently interact with E911 or E112 or other public emergency services. Such calls are not able to be made on the Iridium system.
Users by their use of the phone service and equipment consent to Iridium's disclosure of user information, including but not limited to name, address, telephone number and location information, including the geographic coordinates of equipment, to
22Warranty-kg.fm Page 183 Wednesday, November 3, 2004 9:41 PM

184 Warranty Information
governmental and quasi-governmental agencies such as emergency service providers and law enforcement agencies, where Iridium deems it necessary in its sole discretion to respond to an exigent circumstances. These governmental and quasi-governmental agencies shall be deemed "users" for all purposes of this Disclaimer of Liability.
6. State Law and Other Jurisdiction Rights; Software Copyrights
SOME STATES AND OTHER JURISDICTIONS DO NOT ALLOW THE EXCLUSION OR LIMITATION OF INCIDENTAL OR CONSEQUENTIAL DAMAGES, OR LIMITATION ON HOW LONG AN IMPLIED WARRANTY LASTS, SO THE ABOVE LIMITATIONS OR EXCLUSIONS MAY NOT APPLY TO PURCHASER.
This warranty gives Purchaser specific legal rights, and Purchaser may also have other rights which vary from jurisdiction to jurisdiction.
Laws in the United States and other countries preserve for Iridium certain exclusive rights for copyrighted Product software such as the exclusive rights to reproduce in copies and distribute copies of such Product software. Product software may be copied into, used in and redistributed with only the Product associated with such Product software. No other use, including without limitation disassembly, of such Product software or exercise of exclusive rights in such Product software is permitted.
7. Contact
For additional information about this Product warranty, please contact your Service Provider or Point of Sale.
For additional information about Iridium products and services, please contact Iridium as follows:
By Telephone: Customer ServiceToll Free Number: +1-866-947-4348
Local or International Number: +1-480-752-5155
By Email: [email protected]
By Mail: Iridium Satellite LLCAttn: Customer Service8440 S. River Parkway, Tempe, AZ 85284USA
22Warranty-kg.fm Page 184 Wednesday, November 3, 2004 9:41 PM