Embed Size (px)
Citation preview

Doctor Suite User Manual
Health Service ExecutivePrimary Care Reimbursement Service
Doctor Application Suite User Guide
Revision: 0.1Date: 22nd May 2006
1

Doctor Suite User Manual
Table of Contents1.0 Introduction..........................................................................................................32.0 System Requirements and Set-up.........................................................................33.0 Certificate Request and Security..........................................................................44.0 Menu Screen.........................................................................................................55.0 GP Capitation Drilldown......................................................................................66.0 Claim Entry and Enquiry...................................................................................167.0 Doctor Panel Corrections...................................................................................348.0 Client Identifier Checking System.....................................................................479.0 Panel and Itemised Listings...............................................................................4910.0 Drugs and Therapeutics Bulletin Subscription................................................5011.0 Logout/Session Expired...................................................................................5112.0 System Issues...................................................................................................5313.0 Appendix I........................................................................................................54
2

Doctor Suite User Manual
1.0 Introduction.
This document sets to outline the functionality of the Doctors Application Suite. The suite is a web facility that will allow users a single point of entry for access to multiple PCRS applications.It will be a client certificate trusted site and will be run over SSL (Secure Sockets Layer) protocol.
2.0 System Requirements and Set-up.
The URL for the Doctors Application Suite is:
https://hse.sspcrs.ie/doctor
The application is ideally displayed with the following PC settings: 1024 x 768 pixels or 800 x 600 pixels To change your settings or check if they are correct:
Click Start buttonClick SettingsClick Control PanelClick DisplayClick Settings Under the screen area here move the ruler back or forth until you get to 1024x768 or 800x600.
N.B. Navigation through the screen will be by using the tab key instead of pressing the enter key.This is to keep in line with codes of best practise.The tab key is identified on the keyboard by the key with 2 arrows pointing in opposite directions above the Caps Lock key on the left hand side.
Some basic system requirements are needed to access the PCRS Doctor Suite application. The following environments support the new applications MS Windows 2000 with Service Pack 4 MS Windows XP MS Internet Explorer v6.x Mozilla
To check your settings please see Appendix I.
3

Doctor Suite User Manual
3.0 Certificate Request and Security.
Fig 1.0
Enter the application URL in the address bar on your Internet browser. You will be prompted to select a certificate.Note: you should have a PCRS generated certificate installed on your machine.If you do not have a certificate you should contact the doctors unit in the PCRS for a registration pack.To access the application suite you must have the relevant access rights and you must be set up on the system with those access rights. These rights will be granted upon submission of the registration pack and certificate generation.
Choose the PCRS certificate from the Client Authentication pop-up window. The certificate details are submitted and checked to ensure that the certificate details match those on the PCRS system. If your certificate details match the PCRS user details you will be logged onto the system. Once you are successfully logged on you are then directed to the doctor suite menu screen.
4

Doctor Suite User Manual
4.0 Menu Screen.
Fig. 2.0
The GP will have the following options on the suite menu: Capitation Drilldown – this application allows users to view capitation informationon patient details. Details such as age/gender and distance from the practice centre of doctor of choice are given as well as patient eligibility details. Claim Entry and Enquiry – this application allows users to submit STC/SS claims and perform claim enquiries. Payments and Adjustments Capture – application to allow users to create payment adjustments due to changes in births/deaths figures and patient category details. Client Identifier Checking System – application to query patient eligibility details. Panel and Itemised Listings – application that supplies GP patient listings on a monthly basis and also Itemised Payment listings. Lists can be downloaded as pdf files. Drugs and Therapeutics Bulletin Subscription – application to allow users to check their DTB subscription and to sign up for a subscription if none exists.
5.0 GP Capitation Drilldown
The Capitation Drilldown application provides a breakdown or ‘drilldown’ of GP capitation information.
5

Doctor Suite User Manual
Capitation information specific to the GP’s panel details is provided such as patient age, gender and distance from the GP’s practice.The information can be viewed on-line or downloaded as a comma separated values (csv) file for storing to the GPs PC or the information can be printed.Additional patient eligibility information is also provided.
5.1 IntroductionThis section outlines the web pages that are available to users of the PCRS GP Capitation web site. The site itself consists of five main web pages. The pages are:
1 Home Page
2 Capitation Information Page
3 Patient Listing Page
4 Patient Details Page
5 Help Page
When a user connects to the site using a valid certificate the home page is displayed welcoming the GP and presenting some background information on the GP Capitation site. The Capitation Summary page of the site presents summary information on the patient numbers associated with the GP grouped by distance, age and sex. Further filtering facilities based on distance and age group are available and are discussed in greater detail in the following sections.A Patient Listing Page allows the GP to get a list of patients in a particular distance, age and sex category. The page displays 16 patients per page and the user interface provides the facility to allow users to go to the next and previous pages to see all patients. In addition page header information is displayed that identifies the chosen distance, age and sex categories.At the lowest level in the site (Patient Details Page) an individual patient record can be viewed.
Additionally, download options are provided that allow users to download capitation summary, and patient detail information to their local machine. The document format for these downloads is text-delimited files. Finally a Help page is available to display relevant help information.
5.2 The Home Page.If the user clicks on the Capitation Drilldown option on the Suite menu they are directed to the home page of the Capitation Drilldown application.
6

Doctor Suite User Manual
The Home Page for the PCRS GP site is the initial page that will be displayed. The information displayed on the page is the GP Name and Address information relating to the GP Number contained in the client certificate.
The following links are available on the Home Page:1 Clicking on the Home link will return the user to the home page for the PCRS GP site.2 Clicking on the Capitation Information link will display the Capitation Summary Page.3 Clicking on the Capitation Download link will allow the user to download the full Capitation Summary details to a file on their machine. The information included will be Distance, Age Group, Sex, Number of Patients and summation values.4 Clicking on the Patient Download link will allow the user to download the full Patient Listing details to a file on their machine. The information included will be Distance, Age Group, Medical Card Number, PPSN, Name, Sex, Date of Birth, Address and Patient Category.5 Clicking on the Help link will display user help information.
7

Doctor Suite User Manual
5.3 The Capitation Information Page.
The Capitation Information page displays the Distance, Age Group, Sex and Patient Numbers information. This information is grouped by Distance Code and Age Group and displays the numbers of patients for both Male and Female categories.The Patient Numbers fields displayed under the Male and Female headings on the page are actually links that allow the user to click on the value of interest and view the Patient Listing page.
The following links are available on the Capitation Information Page:1. Clicking on the Home link will return the user to the home page for the PCRS GP site.2. Clicking on the Capitation Information link will display the Capitation Summary Page.3. Clicking on the Capitation Download link will allow the user to download the full Capitation Summary details to a file on their machine. The information included will be Distance, Age Group, Sex, Number of Patients and summation values.4. Clicking on the Patient Download link will allow the user to download the full Patient Listing details to a file on their machine. The information included will be Distance, Age Group, Medical Card Number, PPSN, Name, Sex, Date of Birth, Address, and Patient Category.5. Clicking on the Help link will display user help information.
On the menu bar at the top of the page the user has the ability to filter the information displayed on this page.
8

Doctor Suite User Manual
The Drop Down Fields for Distance Code and Age Code allow the user to select a set of values on which they would like to filter. The user can select a particular value or ‘All’ values for display. After the user has chosen the required values they click on ‘Refresh’ to re-display the page with the filtered information. See the following screens for examples of filtered information.
The current set of available Age Codes are as follows.
Age Code Patient Category
Description
All N/A Returns all Age Codes0-4 0, 902 & 908 Not Categorised, Asylum Seeker and
Discretionary Medical Card Holder0-4 Age Group
5-15 0, 902 & 908 Not Categorised, Asylum Seeker and Discretionary Medical Card Holder5-15 Age Group
16-44 0, 902 & 908 Not Categorised, Asylum Seeker and Discretionary Medical Card Holder16-44 Age Group
55-64 0, 902 & 908 Not Categorised, Asylum Seeker and Discretionary Medical Card Holder55-64 Age Group
65-69 0, 902 & 908 Not Categorised, Asylum Seeker and Discretionary Medical Card Holder65-69 Age Group
70+ 0, 902 & 908 Not Categorised, Asylum Seeker and Discretionary Medical Card Holder70+ Age Group
New 70+ 901 Acquiring Card – being Over 70 on application after 01/07/2001 rather than being eligible by means.
70+ PN.Home 903 Over 70 in Private Nursing and the patients GP not receiving payment for any alternative source, e.g. Insurance.
70+ SM 904 Over 70 in state medical, nursing or care facility where medical facilities are provided. GPs will not receive capitation for such patients.
New 70+ Asylum Seeker 905 901 and 902 combined.New 70+ PN.Home 906 901 and 903 combined.New 70+ SM 907 901 and 904 combined.
5.4 Capitation Information Filtered by Age Group.
9

Doctor Suite User Manual
This page displays the Capitation Information for the result set chosen by the selection made for Distance Code and Age Group. In this example the result set is for ‘All’ Distance Codes and an Age Group category of ‘New 70+’.The filter choices are shown on the page just above the Capitation Summary table.
5.5 Capitation Information Filtered by Distance Code.
10

Doctor Suite User Manual
This page displays the Capitation Information for the result set chosen by the selection made for Distance Code and Age Group. In this example the result set is for a Distance Code category of ‘A’ and ‘All’ Age Group categories.The filter choices are shown on the page just above the Capitation Summary table.
5.6 Capitation Information Filtered by Distance Code & Age Group.
11

Doctor Suite User Manual
This page displays the Capitation Information for the result set chosen by the selection made for Distance Code and Age Group. In this example the result set is for a Distance Code category of ‘A’ and an Age Group category of ’45-64’.The filter choices are shown on the page just above the Capitation Summary table.
12

Doctor Suite User Manual
5.7 Patient Listing Page.
The Patient Listing page displays the Medical Card Number, Name, Date of Birth, PPSN and Patient Category for the GP Patients associated with the Distance, Age Group and Sex under which they are categorised by the PCRS GP Capitation application. The Name of the patient displayed is underlined to indicate that it is a link to the detailed patient information. Clicking on the required Patient Name will display the associated Patient Detail page.If the number of patients is greater than the number displayed on page then ‘Next Page’ and ‘Previous Page’ links will be available to allow the user page through the patient listing information as required.The Category field displays the Patient Category associated with the individual patient. For example if the age group being viewed is ‘0-4’ then the majority of patients will be ‘Not Categorised’, however there may also be patients who belong to either the ‘Asylum Seeker’ or Discretionary Medical Card’ categories and they will be identified as such by the category description field. For the following age groups the category description should always match the age group description, ‘New 70+’, ‘70+ PN.Home’, ‘70+ SM’, ‘New 70+ Asylum Seeker’, ‘New 70+ PN.Home’, ‘New 70+ SM’.
The following links are available on the Patient Listing Page:1. Clicking on the Home link will return the user to the home page for the PCRS GP site.2. Clicking on the Capitation Information link will display the Capitation Summary Page.3. Clicking on the Capitation Download link will allow the user to download the full Capitation Summary details to a file on their machine. The information included will be Distance, Age Group, Sex, Number of Patients and summation values.
13

Doctor Suite User Manual
4. Clicking on the Patient Download link will allow the user to download the full Patient Listing details to a file on their machine. The information included will be Distance, Age Group, Medical Card Number, PPSN, Name, Sex, Date of Birth, Address and Patient Category.5. Clicking on the Help link will display user help information.
5.8 Patient Details Page.
The Patient Details page displays the PPSN, Name, Address, Sex, Date of Birth, Medical Card Number and Patient Category.
The following links are available on the Patient Details Page:1. Clicking on the Home link will return the user to the home page for the PCRS GP site.2. Clicking on the Capitation Information link will display the Capitation Summary Page.3. Clicking on the Capitation Download link will allow the user to download the full Capitation Summary details to a file on their machine. The information included will be Distance, Age Group, Sex, Number of Patients and summation values.4. Clicking on the Patient Download link will allow the user to download the full Patient Listing details to a file on their machine. The information included will be Distance, Age Group, Medical Card Number, PPSN, Name, Sex, Date of Birth, Address and Patient Category.5. Clicking on the Help link will display user help information.
14

Doctor Suite User Manual
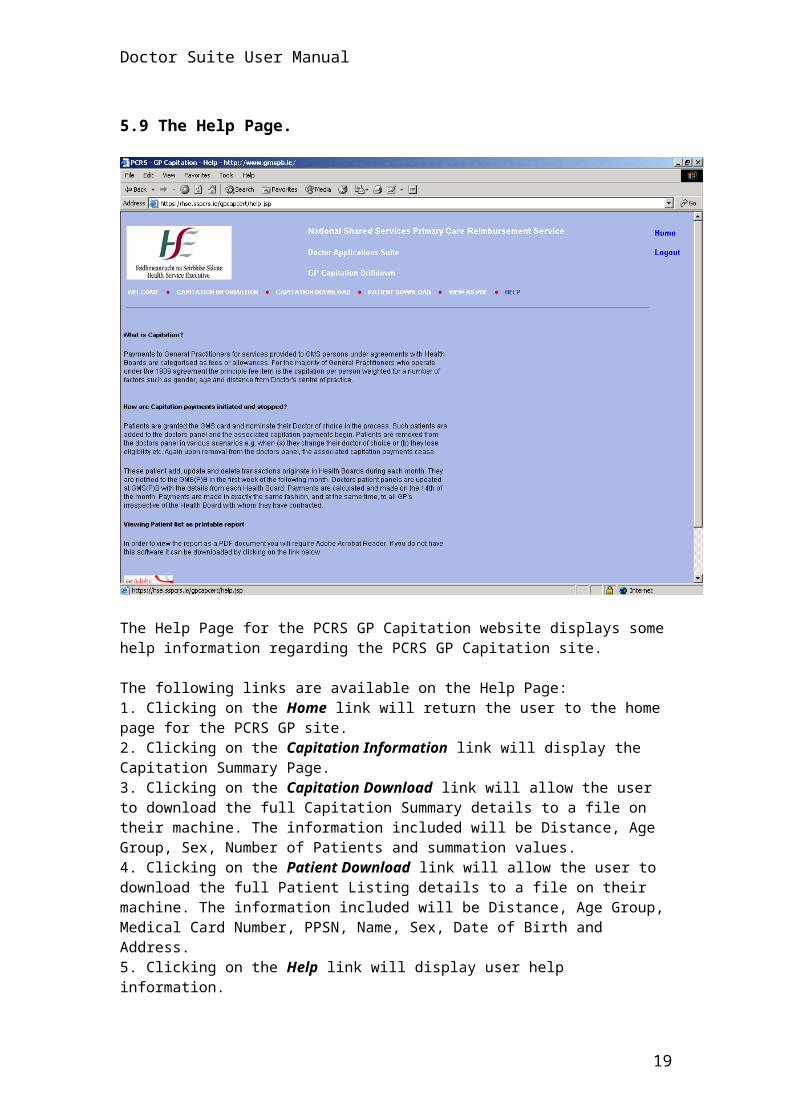
5.9 The Help Page.
The Help Page for the PCRS GP Capitation website displays some help information regarding the PCRS GP Capitation site.
The following links are available on the Help Page:1. Clicking on the Home link will return the user to the home page for the PCRS GP site.2. Clicking on the Capitation Information link will display the Capitation Summary Page.3. Clicking on the Capitation Download link will allow the user to download the full Capitation Summary details to a file on their machine. The information included will be Distance, Age Group, Sex, Number of Patients and summation values.4. Clicking on the Patient Download link will allow the user to download the full Patient Listing details to a file on their machine. The information included will be Distance, Age Group, Medical Card Number, PPSN, Name, Sex, Date of Birth and Address.5. Clicking on the Help link will display user help information.
15

Doctor Suite User Manual
6.0 Claim Entry and Enquiry
If the user chooses the Claim Entry and Enquiry option from the menu the user certificate details are checked again. To access the STC/SS application you must have the relevant access rights and you must be set up on the system with those access rights. All STC/SS users will have a basic claim entry and enquiry role.
If your certificate details match the PCRS user details you will be logged onto the system and brought to the STC/SS menu screen.
6.1 Menu Screen
Fig. 3.0
If you click on the first option - STC/SS Doctor Claim Entry - you are directed to the Batch Entry screen.
6.2 Batch Entry ScreenOn the Batch Entry screen key in the number of scripts in the bundle that you are going to key and also the type of claims (i.e. FPI Surgery, FPI Domiciliary or Capitation). You will not be able to change the doctor number or the processing month and year.
16

Doctor Suite User Manual
Fig. 4.0
Doctor No and Name.Doctor number is supplied via the certificate details and is populated on screen by the system. You cannot change the doctor number value. This ensures no external user doctor can submit claims under another doctors contract number.
Year/Month.The processing month and year is taken from the PCRS system and is set the current calendar month and year.
No of Forms.This is mandatory. No. Of Forms indicates the number of scripts you are going to key for the doctor.
Type of Claims.This field is mandatory. Valid values are A (a) for Capitation, D (d) for FPI Surgery or E (e) for FPI Domiciliary. Alternatively 1 can be entered for A, 2 for D or 3 for E.
Click on ‘Get Batch’ button. If a claim has already been entered for the doctor for the processing month and type of claims then the last claim details appear on the Claim Entry screen. See Fig. 5.0.An ‘OK’ message displaying ‘This is the Last Claim Keyed By This Doctor’ appears.Click ‘OK’ and the screen is cleared down. The batch header details remain on screen i.e. doctor no, no. of forms, type of claims.
17

Doctor Suite User Manual
Fig. 5.0 Last Claim Details
If it is the first claim to be keyed for the doctor for the current processing month and type of claims then an ‘OK’ message is displayed as seen in Fig. 6.0.In both cases the screen is cleared to allow a new claim to be entered.You can now begin to key a new claim – see Fig 7.0.
18
Doctor Suite User Manual
Fig. 6.0 New Batch For Doctor
Fig. 7.0 Claim Entry Screen
19

Doctor Suite User Manual
6.3 Claim Entry Screen.
Doctor Number.All the values keyed on the Batch Entry screen are stored and passed to the Claim Entry screen.The Doctor Number value is the value that has been entered through the Batch Entry screen.As already stated the doctor number cannot be updated.
Doctor Name.Value passed in from the Batch Entry screen. Can never be updated by the user.
Year/Month.Value passed in from the Batch Entry screen. Can never be updated by the user.
Num Entered/Num Claimed.The user cannot update these values. Num Claimed corresponds to the No. of Forms value entered in the Batch Entry screen. The Num Entered value is a counter value that increments from zero as each claim is saved to the system.
No. of Forms.Value passed in from the Batch Entry screen. If you wish to change the No. of Forms value you can do so via the Batch Entry screen.
Type of Claims.Value passed in from the Batch Entry screen. If you wish to change the Type of Claims value you can do so via the Batch Entry screen.
STC Type. This is a drop-down list from which you can choose a value if applicable or you can leave the STC code blank. The STC code defaults to a blank value.The following values are valid STC codes:
1 – Emergency2 – Temporary3 – EC Resident4 – Out of Hours5 – Second Medical Opinion
FPI Doctors claiming Claim Type D (FPI Surgery) or E (FPI Domiciliary) are not allowed to claim an STC or an SS code.For FPI Doctors claiming Claim Type D (FPI Surgery) or E (FPI Domiciliary) the user will not be able see any STC code options.For FPI Doctors claiming Claim Type A (STC/SS), only STC options C (EC Resident), E (Emergency), and T (Temporary) will be available to you as well as the default blank option.
Second Medical Opinion Claims.If the user chooses STC code ‘O’ – Second Medical Opinion Claim then the following 2 prompt messages appear. Valid values are ‘Y’, ’y’ or ‘1’ for Yes or ‘N’, ‘n’ or ‘2’ for No.
20

Doctor Suite User Manual
Fig. 8.0 Second Medical Opinion Prompt 1
21

Doctor Suite User Manual
Fig. 9.0 Second Medical Opinion Prompt 2
EC Resident Claims.If the user chooses STC code ‘C’ – EC Resident Claim you are directed to the EC Resident Data Capture Screen – Fig. 10.0. The user clicks ‘OK’ and is brought to the EC data capture screen – Fig.11.0.
The user keys the relevant data – there is a dummy option (country code = ‘OTH’) for claims where no country details are submitted.Click the ‘Capture EC Resident Details’ button to return to the main claim entry screen at any time. The cursor focus returns to the GMS Own Number field if the doctor is a co-operative doctor. Alternatively the focus returns to the Form No field if the doctor is not a co-operative doctor.
22

Doctor Suite User Manual
Fig. 10.0 Re-directing the user to the EC Resident Data Capture Screen
Fig. 11.0 EC Resident Data Capture Screen
23

Doctor Suite User Manual
GMS Own No.This is only mandatory if the doctor is a co-operative doctor. A valid number should be entered here if required.GMS Own No field will not appear on screen for users that are not set up in a co-operative.
Form No.This is mandatory and should be a valid number. After the Form No has been entered a check is done on the system to see if the form number keyed has already been processed for the current processing month for the claiming doctor.If the form number has already been keyed a prompt message appears as in Fig. 12.0.Submit ‘Y’, ’y’ or ‘1’ for Yes or ‘N’, ’n’, or ’2’ for No.If the user chooses ‘No’ the focus return to the Form Number field so as to allow the user to change the form number.If the user chooses ‘Yes’ the focus points to the next field on the screen.
Fig 12.0 Form Already Entered
Claim Date.This field is mandatory and should be in the format DDMMYYYY.This value defaults to the first of the processing month so for example for a processing month of 200605 the claim date will default to 01052006.If you key only the day and month the current calendar year will automatically be appended to the date.
LocationThis is a drop down list and defaults to S – Surgery.
24

Doctor Suite User Manual
This field is mandatory.
Patient No.A valid card number and letter should be entered here.A card and letter are required for a valid claim in almost all cases except for EC Resident Claims (in this case the system automatically sets the Patient No to ‘EC Resident’) or where the Special Service code is ‘M’ (Attendance at a case conference).Once you enter a card number and a patient letter in the field beside the patient number field a check is done on the system.This check searches the PCRS database for the card number and letter entered and if a match is found then the patients name is returned to the screen.If no match is found then ‘Patient Not Found’ appears in the patient name field.Focus returns to the Name Match field.
Name Match.This field defaults to ‘Y’. If the name of the patient that appears in the patient name field does NOT match the patient name on the script then name match should be set to ‘N’. Otherwise it should remain at ‘Y’.
Patient Name.The user cannot change this field. It is populated automatically by the system.
Visit Class.This is mandatory and is a drop down list. It defaults to ‘N’ for Normal Hours. Another option can also be chosen by the user including a blank option.
Distance Code.This is also a drop down list and defaults to a blank value.An option from a list of valid values can also be chosen.
Claim Time.If entering a value for the time of the claim then it must be submitted in 24-hour clock format with no decimal point or colons.For example 3.30 p.m. should be entered as 1530 or 9.45 a.m. should be keyed as 0945.Claim Time is mandatory for Out of Hours (STC code ‘H’) claims.
Pat Sig.This field is mandatory. Should be Y, y or 1 for Yes or N, n or 2 for No.
Special Service.This is another drop down list with values that are specific to the doctor number entered. The default is a blank value.If you choose a vaccination code (R, S, T or U) from the list the ‘Key Vacc. Details’ button becomes active.
R – PNEUMOCOCCAL.S – INFLUENZA.T - PNEUMOCOCCAL/INFLUENZA.U - HEPATITIS B.If you select one of the above and click on ‘Key Vacc. Button’ you are directed to the Vaccination Data Capture screen – see Fig. 13.0.
25

Doctor Suite User Manual
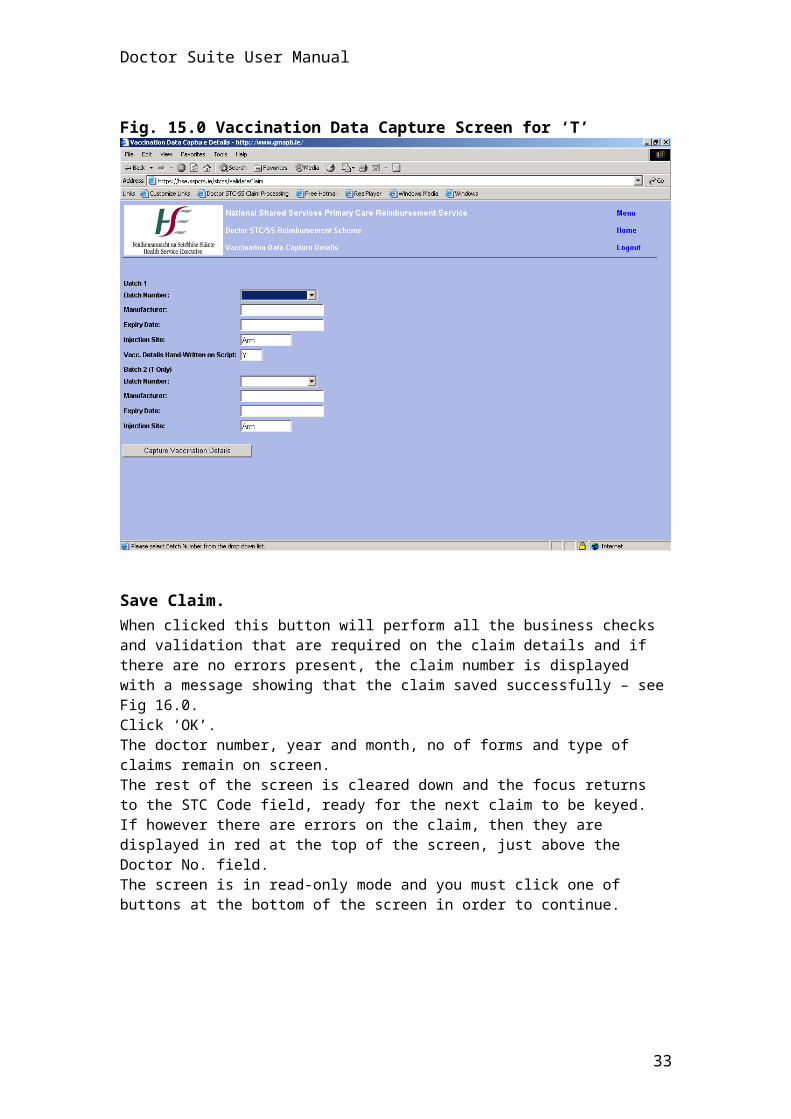
Click on the ‘OK’ button and the Vaccination Data Capture screen is displayed – see Fig. 14.0.If you select ‘U’ an extra field is required to be filled on the Vaccination screen – the ‘Shot No.’ field. This should be 1, 2 or 3.If you choose ‘T ‘ you have extra data to submit as seen in Fig. 15.0.Click on the ‘Capture Vaccination Details’ button to return to the main claim entry screen.
Fig. 13.0 Re-directing User to Vaccination Data Capture Screen
26

Doctor Suite User Manual
Fig. 14.0 Vaccination Data Capture Screen
Fig. 15.0 Vaccination Data Capture Screen for ‘T’
27

Doctor Suite User Manual
Save Claim.When clicked this button will perform all the business checks and validation that are required on the claim details and if there are no errors present, the claim number is displayed with a message showing that the claim saved successfully – see Fig 16.0.Click ‘OK’.The doctor number, year and month, no of forms and type of claims remain on screen.The rest of the screen is cleared down and the focus returns to the STC Code field, ready for the next claim to be keyed.If however there are errors on the claim, then they are displayed in red at the top of the screen, just above the Doctor No. field.The screen is in read-only mode and you must click one of buttons at the bottom of the screen in order to continue.
Fig. 16.0 Claim Saved with No Errors
Claim Errors.All STC/SS claims keyed externally must be valid and correct. If you key a claim that breaches the STC/SS Business rules in some way then the error(s) appear on screen as in Fig. 17.0. For a full list of STC/SS business rules see the PCRS STC/SS Business Rules Specification.
28

Doctor Suite User Manual
Fig. 17.0 Claim with Errors
When the ‘Fix Errors on Claim’ button is clicked the screen changes from read-only mode to one where the user can update the data.The focus will be on the field which caused the error – in this case the patient card field – see Fig. 18.0. The user can change this or any other claim data at this point with the exception of the batch header details (doc num, no. of forms and type of claims).These can only be changed through the Batch Entry screen.The user can click on ‘Save Claim’ again and the validation process and error generation if any is repeated as before.
29
Doctor Suite User Manual
Fig. 18.0 Fix Errors on Claim
30

Doctor Suite User Manual
6.5 Claim Enquiry Screen.
If the second option – STC/SS Claim Enquiry – from the main menu page is selected users are directed to the Doctor Claim Enquiry screen.
Fig 19.0 Claim Enquiry Menu
The user enters one or more of the search parameters and if data can be found on the system to match the search query then the results are displayed below.
31

Doctor Suite User Manual
Fig. 20 Claim Enquiry Screen – Results
All claims matching the search parameters are displayed i.e. to pay, paid and rejected claims. If the user wishes to view all the claim details they can click on the blue claim number and this directs the user to the claim entry screen.The screen is read-only so the data cannot be changed – it is enquiry only.
32
Doctor Suite User Manual
Fig. 21 Claim Enquiry through Claim Entry Screen
33

Doctor Suite User Manual
7.0 Doctor Panel Corrections If the user chooses the Doctor Panel Corrections option from the menu the users certificate details are again checked against the PCRS system to determine whether the user has access rights to the DPAC application.If the user does have the appropriate rights they are directed to the DPAC menu screen.
7.1 User RolesThere are four different roles associated with the use of this systemThey are
PCRS User Role Can only input adjustments for own health board and cannot approve adjustments.
Doctor User Role Can only input adjustments for own patients and cannot approve adjustments.
Health Board Administrator RoleCan only input adjustments for own health board. Can verify & cancel adjustments for own health board.
Payments Board RoleCan input adjustments for any health board. Can approve, reject & cancel adjustments for any health board.
7.2 Validation Rules
Using this system only valid adjustments will be paid. If online validation fails then the adjustment will not save. The status of the adjustment after saving depends on the users role. If a HB Supervisor then the adjustment is automatically verified. Otherwise the adjustment is saved at Input Status and a supervisor must verify the adjustment before it is paid. For an adjustment to be paid it must then be approved by a PCRS user.
Below is a list of reasons that cause Adjustment rejection.
Adjustments can only be made post 20031
This Doctor has left the GMS scheme
This Doctor number is not valid
Only Capitation Doctors are eligible for adjustment payment
The patient was not found
An Adjustment may only be processed for GMS type cards
The PPSN you entered is not a valid modulus 23 PPSN
The PPSN entered does not match the PPSN on record in the GMS
Date Payment should of commenced, cannot be greater than the patient’s date of birth
34

Doctor Suite User Manual
Date Payment should of ceased cannot be greater than the patient’s expiry date
An invalid Patient Category was entered
Corrected Patient Category End date cannot be greater than the patient’s expiry date
Corrected Date Payment should of commenced cannot be greater than the patients date of birth
No Fees are available for this patient category for this patient
An Adjustment (No. ****) already exists for this patient during this time period
A Late Cancellation Adjustment cannot be made for a Patient that is currently active
This Patient is not registered within your Health board
35

Doctor Suite User Manual
7.3 Menu
The user is given two options on the Panel Corrections menu screen.
They are
Late Registration / Late Cancellation/ Patient Category Adjustments
Adjustments Status View
36

Doctor Suite User Manual
7.4 Adjustment Selection Screen
The first link brings the user to the adjustment entry screen. The user must enter all fields in this screen. They must first select the type of adjustment they want to make.A valid capitation doctor number must then be entered along with a valid patient card number and modulus 23 PPSN number.
The user must then press Create Adjustment.This brings the user to adjustment entry screen
37

Doctor Suite User Manual
7.5 Late Cancellation Adjustment
If the user chooses a Late Cancellation Adjustment they are shown the currently recorded expiry date of the patient and they must key in the correct expiry date. Once they have keyed in the new date they must press ‘Calculate Payment’. This calculates the adjustment amount and displays it on the screen along with a line for each month of the calculation and the parameters used to calculate each month. If the user is happy with the calculated amount on the screen they must then press ‘Save Adjustment’. This commits the adjustment to the database and returns the user to adjustment entry screen. The date cannot be in the future and all adjustments can only be made for date’s post 200310.
38

Doctor Suite User Manual
7.6 Late Registration Adjustment
If the user chooses a Late Registration Adjustment they are shown the currently recorded commencement date of the patient and they must key in the correct commencement date. Once they have keyed in the new date they must press ‘Calculate Payment’. This calculates the adjustment amount and displays it on the screen. If the user is happy with the calculated amount on the screen they must then press ‘Save Adjustment’. This commits the adjustment to the database and returns the user to adjustment entry screen. The date cannot be in the future and all adjustments can only be made for date’s post 200310
39

Doctor Suite User Manual
7.7 Patient Category Adjustment
If a patient category adjustment is selected then the user must enter the correct patient category and start and end dates. This adjustment can be used to update when the patient category should have started or ended or also to update the patient category for which the doctor was paid. The current patient category and dates default into the form. All three fields are updateable. The patient category entered must be a valid category type for the adjustment to save. The valid categories are listed below.
0 Not Categorised901 70+ after 01/07/01 not by means902 Asylum Seeker903 Over 70 in Private Nursing904 Over 70 in State Medical905 901 and 902 combined906 901 and 903 combined
907 901 and 904 combined 908 Discretionary Medical Cards
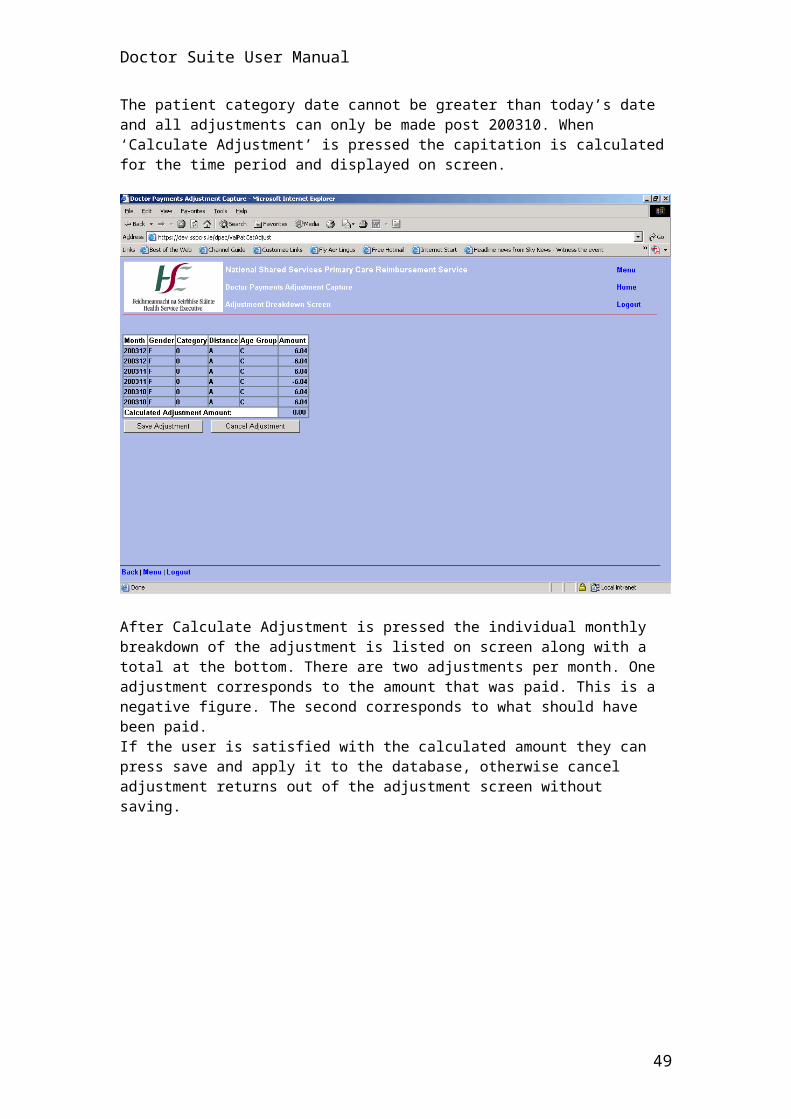
The patient category date cannot be greater than today’s date and all adjustments can only be made post 200310. When ‘Calculate Adjustment’ is pressed the capitation is calculated for the time period and displayed on screen.
40

Doctor Suite User Manual
After Calculate Adjustment is pressed the individual monthly breakdown of the adjustment is listed on screen along with a total at the bottom. There are two adjustments per month. One adjustment corresponds to the amount that was paid. This is a negative figure. The second corresponds to what should have been paid.If the user is satisfied with the calculated amount they can press save and apply it to the database, otherwise cancel adjustment returns out of the adjustment screen without saving.
41

Doctor Suite User Manual
7.8 Adjustment Status Review Input
Either Doctor number, Month Year or Patient Card Details must be entered before the query will execute.
42

Doctor Suite User Manual
7.9 Adjustment Review Screen for HSE user or Doctor User
The unique id of each adjustment is displayed along with payment month, card number, doctor number, adjustment type, calculated amount and the user associated with the adjustment. Double clicking on the adjustment id opens up a screen with the full adjustment details listed.
43

Doctor Suite User Manual
7.10 Adjustment Review Screen For HSE Supervisor or PCRS user
If the user has a HSE supervisor or PCRS role they will see an extra column in this screen called approve. The HSE supervisor role allows verification or cancellation of adjustments from their health board. The PCRS role allows approval or cancellation of all unpaid adjustment To approve or verify numerous adjustments at once click each tick box and press the approve button. The status of the adjustment will change to Verified if a HSE supervisor or Approved if a PCRS user. The adjustment cannot be updated after its status is set to verified by a HSE user. If the user wishes to examine the adjustment more closely they can click on the adjustment id and decide. A PCRS user must approve all adjustments at verified status in order for payment. If an adjustment is not approved by the PCRS it will not pay and will remain at verified status.
44

Doctor Suite User Manual
To approve an adjustment individually the user must click on the adjustment number in the review screen. The functions the user is allowed carry out depends on the role the user has.
HSE supervisorIf the adjustment is at input status there will be two buttons at the bottom of the screen. These are Approve and Cancel. If the user wishes to cancel the claim they press the cancel claim button.
PCRS RoleIf the adjustment is at input status or verified status there will be two buttons at the bottom of the screen. These are Approve and Cancel. If the user wishes to cancel the claim they press the cancel claim button.
45

Doctor Suite User Manual
7.11 Cancel Comment Screen.
Pressing the cancel button opens a new cancel comment window. A reason for cancelling the adjustment must be given here. Once save is pressed the status of the adjustment is updated to cancelled and the adjustment will not pay.
46

Doctor Suite User Manual
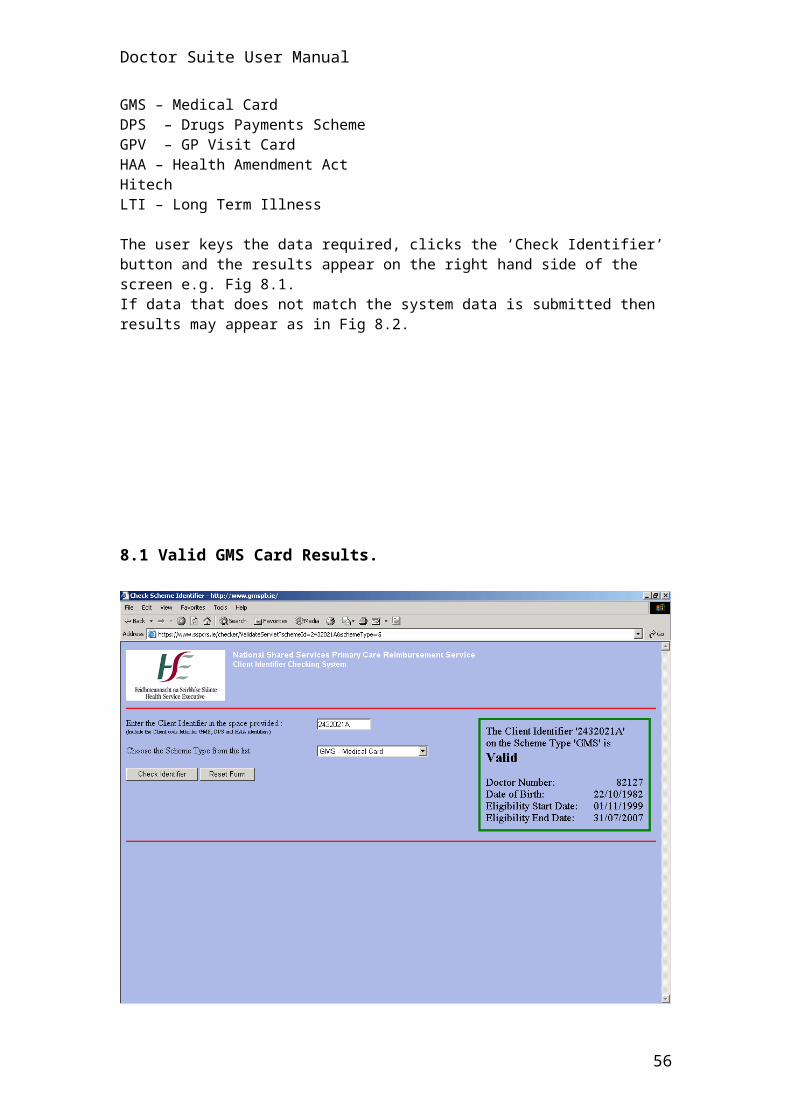
8.0 Client Identifier Checking System.
The Client Identifier Checking system is a means by which a GP can validate a patients PCRS card against the PCRS system. The patients’ card details are submitted and the scheme under which the card is held is chosen.Possible scheme types are:GMS – Medical CardDPS – Drugs Payments SchemeGPV – GP Visit CardHAA – Health Amendment ActHitech LTI – Long Term Illness
The user keys the data required, clicks the ‘Check Identifier’ button and the results appear on the right hand side of the screen e.g. Fig 8.1.If data that does not match the system data is submitted then results may appear as in Fig 8.2.
47

Doctor Suite User Manual
8.1 Valid GMS Card Results.
8.2 Invalid Card Results.
48
Doctor Suite User Manual
9.0 Panel and Itemised Listings.
This application provides users with historical listings for both patient and itemised payment files. They are displayed by year and month and can also be printed as pdf files.
49

Doctor Suite User Manual
10.0 Drugs and Therapeutics Bulletin Subscription.
As already stated, this application allows users to check their annual subscription to the Drugs and Therapeutics Monthly Bulletin.Users already signed up can check when their subscription is due for renewal and if it is within 3 months they can request to subscribe for a further twelve months.Users can request a new subscription if they have not subscribed and now wish to do so.
50

Doctor Suite User Manual
11.0 Logout/Session Expired.
If the user clicks on the ‘Logout’ link on the top right hand side of the suite menu, the user session is removed. Users are directed to a ‘goodbye’ page – Fig. 11.1.Likewise if a users session has expired they will be directed back to the application main menu - see Fig 11.2.A users session will expire if the user leaves the application unused for a certain period of time – usually about 1 hour.
11.1 Logout.
51

Doctor Suite User Manual
11.2 Session Expired.
52

Doctor Suite User Manual
12.0 System Issues.
If an issue in the background processes cause an error, the following error page will appear with the text ‘The following error has occurred. Please copy and paste this page and contact IT’. The specific error will then appear below this text – see Fig. 12.1 for an example error.Take a screen shot of the page – Press the ‘Print Scrn –SysRq’ button at the top right hand side of the keyboard near the F12 button.Open a blank word document and paste it onto here. Send to the doctors unit in PCRS for referral of problem.
12.1 System Error Page.
53

Doctor Suite User Manual
13.0 Appendix I
Check Operating SystemPlease check your version of windows. If you are using windows 2000 you must be on service pack 4. To check your computer, go to Start Settings Control Panel. In the control panel click on system and the service is listed under the general tab as in the figure below. If your service pack is under 4 please go to the following URL , follow the guidelines and update your system.
http://www.microsoft.com/windows2000/downloads/servicepacks/sp4/sp4Eng.mspx
Check Internet Browser VersionIf you are using Internet Explorer check the version by opening up Internet Explorer.Click on Help option at the top of the screen.
54

Doctor Suite User Manual
Click on About Internet Explorer to see the version of IE.
If you are using the Mozilla Firefox browser the check the version by doing the following:
55
Doctor Suite User Manual
Open up the Mozilla browser.Click on the Help option at the top of the screen.
Click on About Mozilla Firefox and this will display the browser version.
56

Doctor Suite User Manual
Terms of Reference
PCRS Primary Care Reimbursement ServiceGMS(P)B General Medical Services Payments BoardSTC/SS Special Type Consultation/Special ServicesDTB Drugs and Therapeutics Bulletin SubscriptionPDF Portable Document FormatFPI Fee Per ItemIE Internet Explorer
57