Embed Size (px)
Citation preview

IP CORELab#1ARM/Thumb Interworking
Nelson Y.C. Chang

Contents:
About ARM/Thumb InterworkingWhat is ARM/Thumb Interworking?Why using ARM/Thumb Interworking?How ARM/Thumb Interworking work?
ARM/Thumb Interworking ExamplesARM/Thumb Interworking in C/C++ only.
ProfilingARM/Thumb Interworking in ASM only.
No VeneerWith Veneer
ARM/Thumb Interworking between C/C++ and ASM.Lab Exercise
PartAPartBPartC
Reference Topics & Related Documents

About ARM/Thumb Interworking
What is ARM/Thumb Interworking?
An application is allowed to be written as a mix of ARM and Thumbinstruction sets.
Why using ARM/Thumb Interworking?
l Better code density using Thumb.l Certain ARM instructions have better performance over Thumb
ones.l ARM instructions provide some functionality which Thumb does
not.l Exception handling is required to run under ARM state.l Thumb program needs state changes from default ARM state
How ARM/Thumb Interworking work?
The ARM processor is initially set in ARM state. Therefore itrequires a state change when encountering Thumb instructions,otherwise it won’t work properly.
In order to branch to Thumb state, the bit0 in the branch targetaddress is set, this changes the processor state after branching. Thebit5 in the CPSR (t bit) would change to 1 indicating it’s in Thumbstate.
There are several ways to change the processor state. The usercould either change processor state manually using ASM or leave itto the ARM linker by adding interworking Veneer.
Interworking Veneer is a small segment of code which performsprocessor state change. It’s added by linker when a state change isdetected.

ARM/Thumb Interworking Examples
ARM/Thumb interworking using ASM (no Veneer)
l This program do computations among registers. No veneer isneeded, inteworking instruction change is implemented manually.
l The program consists of 4 parts:1. Main: Generate branch address, and set bit0=1 to arrive at
target in Thumb mode. Initial in ARM state.2. ThumbProg: Set values for r2, r3. Sum r2,r3 to r2.
Executed in Thumb state.3. ArmProg: Set values for r4, r5. Sum r4, r5 to r4. Executed
in ARM state.4. Stop: Terminate the program.
l Addreg.s code:
AREA AddReg,CODE,READONLY ;Name this block of code.ENTRY ;Mark first instruction to call.
MainADR r0,ThumbProg +1 ;Generate branch target address
;and set bit 0,hence arrive;at target in Thumb state.
BX r0 ;Branch exchange to ThumbProg.CODE16 ;Subsequent instructions are Thumb code.
ThumbProgMOV r2,#2 ;Load r2 with value 2.MOV r3,#3 ;Load r3 with value 3.ADD r2,r2,r3 ;r2 =r2 +r3ADR r0,ARMProgBX r0CODE32 ;Subsequent instructions are ARM code.
ARMProgMOV r4,#4MOV r5,#5ADD r4,r4,r5
Stop MOV r0,#0x18 ;angel_SWIreason_ReportExceptionLDR r1,=0x20026 ;ADP_Stopped_ApplicationExitSWI 0x123456 ;ARM semihosting SWIEND ;Mark end of this file.

l Building under command line:1. Type armasm –g addreg.s2. Type armlink addreg.o -o addreg
l Executing using ARM-synbolic-debugger under command line:1. Type armsd addreg2. Type help for help info. Type quit to quit armsd.3. Type step to step through the program.4. Type reg after each instruction execution to display registers.5. CPSR changes from “t” to “T” entering to Thumb state.
(t: ARM state; T: Thumb state.)

ARM/Thumb interworking using ASM (using Veneer)
l This program sets the values for r0, r1, r2. Interworking option isadded while linking. Veneers are added by linker.
l The program consist of 2 files.1. Arm.s: Sets the values for r0, r2. Calls for ThumbProg.
Executed in ARM state.2. Thumb.s: Sets the value for r1. Return back to ArmProg.
Executed in Thumb state.
l Arm.s code
l Thumb.s code
AREA Arm,CODE,READONLY ;Name this block of code.IMPORT ThumbProgENTRY ;Mark 1st instruction to call.
ARMProgMOV r0,#1 ;Set r0 to show in ARM code.BL ThumbProg ;Call Thumb subroutine.MOV r2,#3 ;Set r2 to show returned to ARM.
;Terminate execution.MOV r0,#0x18 ;angel_SWIreason_ReportExceptionLDR r1,=0x20026 ;ADP_Stopped_ApplicationExitSWI 0x123456 ;ARM semihosting SWIEND
AREA Thumb,CODE,READONLY ;Name this block of code.CODE16 ;Subsequent instructions are Thumb.EXPORT ThumbProg
ThumbProgMOV r1,#2 ;Set r1 to show reached Thumb code.BX lr ;Return to ARM subroutine.END ;Mark end of this file.

l Building under command line:1. Type armasm arm.s2. Type armasm -16 -apcs /interwork thumb.s3. Type armlink arm.o thumb.o -o count
(The callee must be compiled with interworking option if it is
implemented in a defferent state from the caller.)
l Running under command line1. Type armsd count.2. Type list 0x8000 to list the linked code.3. Observe that $Ven$AT$$ThumbProg is added to the code.
This is the veneer added by the linker.
l Linked code:

ARM/Thumb interworking using C/C++:
l This program consist of 2 parts:1. Armmain.c for main function using ARM instructions set.l Print stringsl Call Thumb functionl Compiled using ARM C/C++ compiler.
2. Thumbsub.c for sub function called by main function usingThumb instructions set.l Print stringsl Return to main functionl Compiled using Thumb C/C++ compiler.
l Armmain.c code:
l Thumbsub.c code:
#include <stdio.h>
extern void thumb_function(void);
int main(void){ printf("Hello from ARM\n"); thumb_function(); printf("And goodbye from ARM\n"); return (0);}
#include <stdio.h>
void thumb_function(void){ printf("Hello and goodbye from
Thumb\n");}

l Building under MS-DOS command line:1. Type armcc -c -g -O1 -apcs /interwork armmain.cl -c stands for compile.l -g generate debug information.l -O1 compile with median optimization.
2. Type tcc -c -g -O1 -apcs /interwork thumbsub.c3. Type armlink armmain.o thumbsub.o -o armtothumb.axf -info
veneers -info totals -callgraph -list Ex1.logl -o specify output image namel -info veneer print out veneer information on screen.l -info totals print out memory size information on
screen.l -callgraph creates static callgraph of functions in an
HTML file.l -list XXX.log redirects information to print in a text file.

l Building under CodeWarriorIDE:1. Start CodeWarriorIDE.
2. File>New to create a new project. 2.1 Select Thumb ARM Interworking Image under the Poject
tab.2.2 Type the project name, Ex1 for example.2.3 Specify the project path
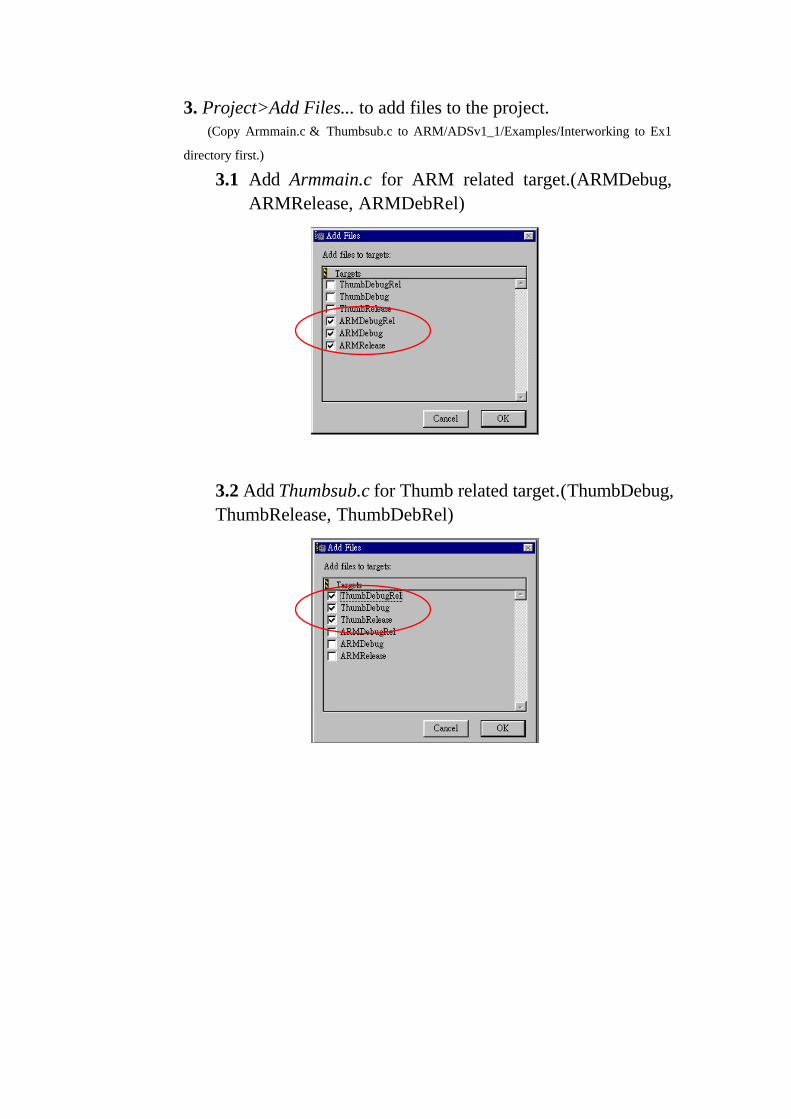
3. Project>Add Files... to add files to the project.(Copy Armmain.c & Thumbsub.c to ARM/ADSv1_1/Examples/Interworking to Ex1
directory first.)
3.1 Add Armmain.c for ARM related target.(ARMDebug,ARMRelease, ARMDebRel)
3.2 Add Thumbsub.c for Thumb related target.(ThumbDebug,ThumbRelease, ThumbDebRel)

4. After adding files to the project, a Project ManagementWindow would appear.
4.1 Hit Build Target Setting button.4.2 A ThumbDebRel Setting window appears. ClickLanguage Settings>ARM Assembler in Target SettingPanel.

4.3 Click ATPCS tab. And set as follow:l Check ARM/Thumb Interworking in
ARM/Thumb Procedure Call Standard Options.l A line “ -apcs /interwork” would be added to
Equivalent Command line automatically.
4.4 Repeat Step 4.1~4.2 for the rest of the compilers.(For Thumb ARM Interworking Project, Arm Thumb Interworking check
box in ATPCS is automatically checked.)

5. Hit the Make button to compile and link the project.5.1 A compiling and linking status window would appear toindicate making progress.5.2 After finishing compiling and linking, a result messagewindows would appear. Check for errors and warnings.

6. Hit the Run button to run the program.6.1 This would execute AXD to run the program. The imagewould be automatic loaded.

l Running Using AXD1. File>Load Image to load image file.l Load image file Ex1.axf in directory
Ex1/Ex1_data/ThumbDebRell Check the Profile checkbox.
2. Hit the Reload button in AXD to reload the image.

3. Hit the Show Processor Register button in AXD to show thecontents of the processor’s register.
3.1 Click on Current in the Processor Register Window.3.2 Observe how CPSR change during the execution.

3. Options>Profiling>Toggle Profiling to toggle AXD to gatherprofiling data.
4. Options>Profiling>Clear Collected to clear previousprofiling data.
5. Hit the Go button in AXD to run the image.
5.1 Hit the following buttons to step through the program.
Step into the next instruction.
Step the next instruction.
Complete the current function & return to the caller.
Run to the cursor position

6. Options>Profiling>Write To File to save the profiling datacollected. Save the file as Ex1.prf
7. Type armprof Ex1.prf under command line to view theprofiling information.
l About Profiling:¨ Profiler samples the program counter and computes the
percentage time of each function spent.¨ Flat Profiling: If only pc-sampling info.is present. It can only
display the time percentage spent in each function excludingthe time in its children.
¨ Callgraph Profiling: If function call count info. Is present. Itcan show the approximations of the time spent in eachfunction including the time in its children.
l Limitations:¨ Profiling is NOT available for code in ROM, or for
scatterloaded images.¨ No data is gathered for programs that are too small.

ARM/Thumb interworking between C/C++ & ASM using
Veneer:
l This program calls the ARM function with a parameter. TheARM function returns that parameter with 4 added.
l The program is consisted of 2 files:¨ thumb.c: The main function. Calls for ARM function with a
parameter i. It’s implemented in Thumb state using C/C++.¨ Arm.s: Add 4 to the parameter and returns. Called by Thumb
main function. Implemented in ARM state using ASM.
l thumb.c code:
l Arm.s code:
#include <stdio.h>extern int arm_function(int);int main(void){
int i =1;printf("i =%d \n",i);printf("And now i =%d \n",arm_function(i));return (0);
}
AREA Arm,CODE,READONLY ;Name this block of code.EXPORT arm_function
arm_functionADD r0,r0,#4 ;Add 4 to first parameter.BX LR ;ReturnEND

l Building under command line:1. Type tcc -c -apcs /interwork thumb.c2. Type armasm -apcs /interwork arm.s3. Type armlink arm.o thumb.o -o add
l Running under command line:1. Type armsd add.2. Type go.3. Type list main to list the linked code for main function.4. Type list arm_function to list the linked code.5. Observe that $Ven$AT$$ThumbProg is added to the code. This
is the veneer added by the linker.

Lab Exercise:Ø PartA: Interworking using C/C++
¨ Thumb Main & ARM Sub¨ Profiling
Ø PartB: Interworking using ASM¨ No Veneer¨ With Veneer
Ø PartC: Interworking using C/C++ and ASM¨ Modify the given example.

Lab Exercise - PART A:
l Write a program in C/C++. The main function is implemented inThumb instructions set. The called function is implemented inARM state.
l Specifications:¨ Thumbmain: Prints “Hello from thumb main!” & “Goodbye
from Thumb main!!”. Calls ARM function. Implemented inThumb instructions set.
¨ Armsub: Prints “Hello from ARM sub.”. Return back to main.Implemented in ARM instruction set.
¨ Show the veneers in the linked code and its info.¨ Observe how the t-bit in CPSR changes.¨ Load the image with profiling option checked. Use callgraph
profiling.¨ Toggle profiling and run the program.¨ Save the profiling data to file a.prf¨ Execute armprof a.prf to see the profiling information.

Lab Exercise - PART B:
l Write a program in ASM which swaps the value of [r1,r2],[r3,r4] , no linker added veneers should be added.
l Specifications:¨ Swap function is implemented in ARM instructions.¨ Main Program is implemented in Thumb instructions.¨ Manually change the instruction set using, no linker added
veneer.¨ Observe the linked code and the registers.
l Using veneer:¨ Do the above exercise using linker added veneer.¨ Show the veneers added.
ü Hints & Notes:¨ ARM is in ARM state at the beginning. A change to Thumb
state is needed.¨ ARMASM doesn’t include ARM-to-Thumb header
automatically as ARMCC does. You must manually changethe state to thumb at initial.
¨ Veneers are added when there’s a ARM/THUMB orTHUMB/ARM procedure call.

Lab Exercise - PART C:
l Modify the last example (interworking between C/C++ and ASMusing veneer). Such that the main is implemented in ASM, thefunction is implemented in C.
l Specifications:¨ Main: Implement in ASM using Thumb instructions. Call
the subroutine with a parameter.¨ Sub: Implement in C/C++ using ARM instructions. Add 4 to
the parameter passed from main and return.¨ Show the linked code.¨ Observe the register.¨ No need to print the results in the console window.
ü Hints & Notes:¨ C functions called by ASM code must have a return value.¨ 1st parameter and function return value use R0 to pass value.¨ 2nd to 4th parameters use R1 to R3 to pass values.¨ 5th and other more parameters should use stack to pass
values.¨ Standard I/O in C function does not work when it is being
called by ASM codes.(Which means you cannot use printf()in C fuctions called by ASM main).

Reference Documents:
• Overview of ARM architecture [ADS_AssemblerGuide 2.2]
• ARM instruction reference [ADS_AssemblerGuide 4]
[QRC_Armside]
• Thumb instruction reference [ADS_AssemblerGuide 5]
[QRC_Thumbside]
• Interworking with ARM & Thumb [ADS_DeveloperGuide 2.8,
3]
• About ARM-Thumb Procedure Call Standard (ATPCS)
[ADS_DeveloperGuide 2.1] [ATPCS spec]
• AXD,armsd [ADS_DebuggerGuide]
• Profiling [ADS_DebuggerGuide 4.7] [ADS_CompilerLinkerUtil
6.4]
• Mixing C,C++,ASM [ADS_DeveloperGuide 4]