Embed Size (px)
Citation preview
Hakeem Abass-ITM2 Internet Network Services Assignment 2
1. IntroductionAim
As a systems administrator you have been asked to implement the following Internet & Network services using Ubuntu for a company called KhufuNet.
1. Web Server (Apache) with Virtual Hosting two sites.2. DNS Server (BIND), Primary & Secondary3. DHCP Server for Ubuntu clients4. eMail Server (Postfix) & POP/IMAP Server (Dovecot)5. FTP Server6. SSH Server7. File Server (Samba)8. Network Printing (CUPS)
The domain name KhufuNet.com has already been registered. Apache will host www.KhufuNet.com and a WordPress instance; blog.KhufuNet.com
Other issue that you will need to address include but are not limited to:
User & Groups Disk Quotas Monitoring Ease of administration
Lab TopologyThe lab topology is made up of two PCs running VMware in “Bridged Mode” and connected via a hub. The virtual machines are specified as follows:
VM1 – Ubuntu desktop (DHCP client) VM2 – Apache Server/Name Server 1/Print Server/Samba Server VM3 – eMail Server/Name Server 2/DHCP Server/SSH Server/FTP Server VM4 – Ubuntu desktop (DHCP client)
3rd May, 2011.

Hakeem Abass-ITM2 Internet Network Services Assignment 2
2. Decisions
This project was to be done in group therefore between me and my group member, John Hennessy we divided the job with me having to handle the installations on VM3 and VM4.
The decision was made to use 192.168.10.0/24 as our network address and we gave each machine there IP addresses as follows:
VM1 - 192.168.10.8 VM2 – 192.168.10.9 Laptop1 – 192.168.10.10 VM3 – 192.168.10.6 VM4 – 192.168.10.7 Laptop2 – 192.168.10.11
After this we did the basic connections and we were able to communicate over the network by issuing the “ping” command. With this done we are now ready to start installation and configuration of packages necessary for this project to work.
3. Packages Required & Reason
The following packages are needed to implement our system and most of these packages are in APT repositories. In our installation section you will learn how to install and configure each.
Operating System - Linux Ubuntu 10.0 Security Cheap - It is free. Easy upgrade Hardware compatibility Applications
Name Server – Bind9To have a DNS server for the internal network of the company because long ago there were already too many computers to remember their IP and even too many computers to maintain a set of host files.To have a DNS server for the external servers, for external clients, etc. to solve this problems become a bigger problem when the growing organization can't supply more resources than one DNS server.
DHCP ServerDHCP is the short for Dynamic Host Configuration Protocol. Its purpose is to assign dynamic IP addresses to devices on a network. Dynamic addressing means that a device can have a different IP address each it connects to the network
SSH Server – OpenSSH server and clientSsh (Secure Shell) is a program to log into another computer over a network, to execute commands in a remote machine, and to move files one machine to another. It provides strong authentication and secure communications over unsecure channels. It is intended as a replacement for rlogin, rsh, and rcp
3rd May, 2011.

Hakeem Abass-ITM2 Internet Network Services Assignment 2
FTP Server – vsftp and filezillaFile Transfer Protocol - As the name suggests, FTP is used to transfer files between computers on the same network. You can use FTP to exchange files between computer accounts, transfer files between an account and a desktop computer, or access online software archives.
Email-Server Mail Transfer Agents - PostfixSimple, free and slick. Postfix is powerful, well established, but not too difficult to configure, and is security conscious from the start. And again its ease of setup and maintenance makes Postfix a good choice as the MTA agent.
Database - MySQLMySQL is well established and supported for the sort of lookups required in a mail server. It is widely used its ease of installation and configuration makes if a good choice. Postgres can also be used as the default database.
Webmail - SquirrelmailEasy to set up php based webmail client. And has an extensive plugin selection.
PHP5 & PHP5 cliNeeded for the installation and configuration of the webmail.
Mail Delivery Agent(MDA) – DovecotDovecot is an open source IMAP and POP3 email server for Linux/UNIX-like systems, written with security primarily in mind. Dovecot is an excellent choice for this small email server installation, It's fast, simple to set up, requires no special administration and it uses very little memory.
Added installations Authentication – Cyrus SASL
Secure and trusted cryptography technology for authentication of SMTP traffic. Encryption – SSl & TLS
Secure and trusted cryptography technology for encryption of SMTP traffic.
Content Check: Amavisd-new
Easy plug in solution for spam, virus checking etc. Spamassassin
Powerful Spam fighting tool Antivirus - Clamav
Free virus scanner that can be trusted and includes update daemon.
3rd May, 2011.

Hakeem Abass-ITM2 Internet Network Services Assignment 2
4. INSTALLATIONS & CONFIGURATIONS
A. Base Install – Ubuntu 10.10
For this project a going to install Ubuntu 10.10 Server and Desktop to achieve these setups of installing an Email server. I will assume a server install, but it should not differ.
I will not be explaining in detail how to download and install Ubuntu because this is not the main aim of this project but if whoever is reading this report and don’t understand how to do this, you can go to this address given below which gives the step by step of how to download and install Ubuntu 10.10;
http://www.ubuntu.com/server/get-ubuntu
B. Domain Name Server – Bind9
Step 1: Install bind 9:
#apt-get install bind9
Step 2: Configure the main Bind files. Usually, if you install Bind from the source code, you will have to edit the file named.conf. However, Ubuntu provides you with a pre-configured Bind, so we will edit another file:
1. I start by editing the named.conf file /etc/bind/named.conf.local and add:
#nano /etc/bind/named.conf.local
zone "KhufuNet.com" { type master; file "/etc/bind/zones/KhufuNet.com.db"; };# This is the zone definition for reverse DNS.
zone "10.168.192.in-addr.arpa" { type master; file "/etc/bind/zones/rev.10.168.192.in-addr.arpa"; };
2. Next I edit the options file:
#nano /etc/bind/named.conf.options
forwarders { 192.168.10.9;
};
3rd May, 2011.

Hakeem Abass-ITM2 Internet Network Services Assignment 2
3. Then I add the zone definition file with the address/machine names that the DNS server will be known:
#nano /etc/bind/zones/KhufuNet.com.db
KhufuNet.com IN SOA ns1.KhufuNet.com. hakeem.KhufuNet.com. ( 2011050801; Serial 604800 ; Refresh 86400 ; Retry 2419200 ; Expire 604800); Negative Cache TTLKhufuNet.com. IN NS ns1.KhufuNet.comKhufuNet.com. IN MX 10 mail.KhufuNet.com
www IN A 192.168.10.2ns1 IN A 192.168.10.1mail IN A 192.168.10.6
Save the file.
4. Make a zones directory:
#mkdir /etc/bind/zones
5. Then I create the reverse DNS zone file with the following contents:
#nano /etc/bind/zones/rev.10.168.192.in-addr.arpa
$TTL 604800@ IN SOA ns1.KhufuNet.com. hakeem.KhufuNet.com. ( 2006081401 ; 604800 ; 86400 ; 2419200 ; 604800);
IN A nsi.KhufuNet.com.1 IN A KhufuNet.com
Step 3: Restart bind:
#/etc/init.d/bind9 restart
Step 4: Modify the file resolv.conf with the following settings as shown below:
#nano /etc/resolv.conf
Namesever 192.168.10.1
Step5: Test
#dig @localhost or dig KhufuNet.com
3rd May, 2011.

Hakeem Abass-ITM2 Internet Network Services Assignment 2
C. DHCP Server
Installation
On the command line interface type:
#apt-get install dhcp3-server
At the end of the installation you will see errors like these:
Generating /etc/default/dhcp3-server...Starting DHCP server: dhcpd3 failed to start - check syslog for diagnostics.invoke-rc.d: initscript dhcp3-server, action "start" failed.
That's ok because we did not have the chance yet to configure our DHCP server.
Configuration
The error message the installation ends with might be a little confusing, but the following steps will help you configure the service:
Note: Please set your server and desktop VMs to “Bridged Mode”
First, we need to setup a static IP address for the DHCP server. We will need to edit the /etc/network/interfaces file;
# nano /etc/network/interfaces
This file should look as follows: First we see the loopback network interface,
auto loiface lo inet loopback
3rd May, 2011.

Hakeem Abass-ITM2 Internet Network Services Assignment 2
then the primary network interface,
auto eth0iface eth0 inet dhcp
Comment out the line iface eth0 inet dhcp and replace with the following lines:
iface eth0 inet staticaddress 192.168.10.6netmask 255.255.255.0gateway 192.168.10.1
Next, edit the DHCP configuration file /etc/dhcp3/dhcpd.conf. First make a backup copy:
# cp /etc/dhcp3/dhcpd.conf dhcpd.backup# nano /etc/dhcp3/dhcpd.conf
Next I need to write a subnet declaration, a listing of the IP addresses the DHCP server will hand out to client systems. The file comes with sample subnet declarations; the easiest way to write your own is to remove the comment marks (the # marks) from the lines and enter in your own values.
subnet 192.168.1.0 netmask 255.255.255.0 {range 192.168.10.10 192.168.1.100;option routers 192.168.10.1;option domain-name-servers 192.168.10.2, 192.168.10.3;default-lease-time 6000;max-lease-time 72000;}
Next you will need to edit one more file, the /etc/default/dhcp3-server file, to configure which network interfaces the DHCP server will listen on for client requests:
# nano /etc/default/dhcp3-server
Once editing the file, look for the line marked INTERFACES. You’ll need to edit that to allow the DHCP server to listen for requests on your system’s Ethernet card, which is usually eth0:
INTERFACES=”eth0″
Save the file, exit your text editor, and reboot your Ubuntu 10.10 Maverick Meerkat system. Once the system restarts, you can launch the DHCP server with this command and you need to restart networking services using the following commands:
# /etc/init.d/dhcp3-server start
Or
# service dhcp3-server start
3rd May, 2011.

Hakeem Abass-ITM2 Internet Network Services Assignment 2
Test
Uncomment out the line iface eth0 inet dhcp and disable the static address in the /etc/network/interfaces file, reboot the server.
When the server is back on issue this command;
#ifconfig
And the server should be given an IP address from the range specified in the configuration file. If this happens the installation and configuration is a success. On client command type:
#/etc/init.d/networking restart
D. FTP Server
File Transfer Protocol (FTP) is a TCP protocol for uploading and downloading files between computers. FTP works on a client/server model. The server component is called an FTP daemon. It continuously listens for FTP requests from remote clients. When a request is received, it manages the login and sets up the connection. For the duration of the session it executes any of commands sent by the FTP client.
Access to the FTP server will be managed using:
Authenticated
In the Authenticated mode a user must have an account and a password. User access to the FTP server directories and files is dependent on the permissions defined for the account used at login.
vsftpd - FTP Server Installation
vsftpd is an FTP daemon available in Ubuntu. It is easy to install, set up, and maintain. To install vsftpd you can run the following command:
#sudo apt-get install vsftpd
User Authenticated FTP Configuration
By default vsftpd is configured to authenticate system users and allow them to download files. If you want users to be able to upload files, edit /etc/vsftpd.conf file:
write_enable=YES
Now restart vsftpd:
#sudo restart vsftpd
3rd May, 2011.

Hakeem Abass-ITM2 Internet Network Services Assignment 2
Now when system users login to FTP they will start in their home directories where they can download, upload, create directories, etc. .
The configuration file consists of many configuration parameters. The information about each parameter is available in the configuration file.
Securing FTP
There are options in /etc/vsftpd.conf to help make vsftpd more secure. For example users can be limited to their home directories by uncommenting:
chroot_local_user=YES
You can also limit a specific list of users to just their home directories:
chroot_list_enable=YESchroot_list_file=/etc/vsftpd.chroot_list
After uncommenting the above options, create a /etc/vsftpd.chroot_list containing a list of users one per line. Then restart vsftpd:
#sudo restart vsftpd
Also, the /etc/ftp users file is a list of users that are disallowed FTP access. The default list includes root, daemon, nobody, etc. To disable FTP access for additional users simply add them to the list.
FTP can also be encrypted using FTPS. Different from SFTP, FTPS is FTP over Secure Socket Layer (SSL). SFTP is a FTP like session over an encrypted SSH connection. A major difference is that users of SFTP need to have a shell account on the system, instead of a nologin shell. Providing all users with a shell may not be ideal for some environments, such as a shared web host.
To configure FTPS, edit /etc/vsftpd.conf and at the bottom add:
ssl_enable=Yes
Also, notice the certificate and key related options:
rsa_cert_file=/etc/ssl/certs/ssl-cert-snakeoil.pemrsa_private_key_file=/etc/ssl/private/ssl-cert-snakeoil.key
By default these options are set the certificate and key provided by the ssl-cert package. In a production environment these should be replaced with a certificate and key generated for the specific host.
Now restart vsftpd, and non-anonymous users will be forced to use FTPS:
#sudo restart vsftpd
To allow users with a shell of /usr/sbin/nologin access to FTP, but have no shell access, edit /etc/shells adding the nologin shell:
#nano /etc/shells
3rd May, 2011.

Hakeem Abass-ITM2 Internet Network Services Assignment 2
/bin/csh/bin/sh/usr/bin/es/usr/bin/ksh/bin/ksh/usr/bin/rc/usr/bin/tcsh/bin/tcsh/usr/bin/esh/bin/dash/bin/bash/bin/rbash/usr/bin/screen/usr/sbin/nologin
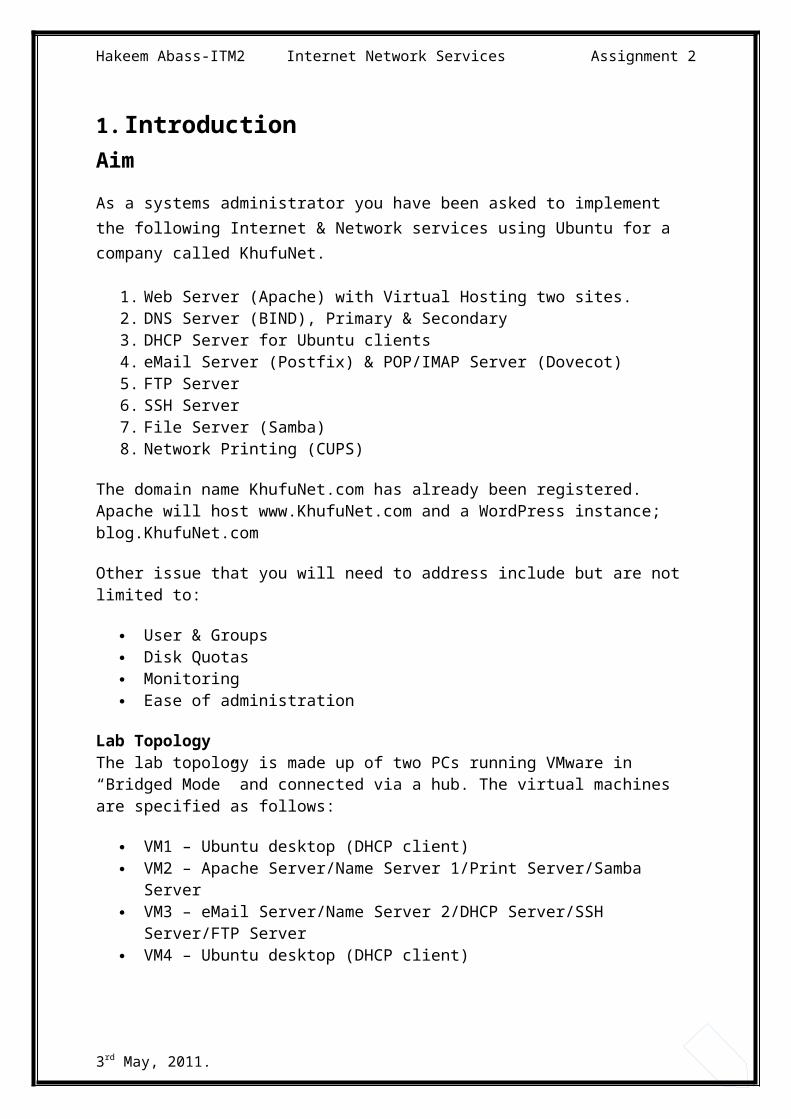
Test
Install filezilla on Ubuntu client and use to connect into the server(host), result should be as shown below:
E. OpenSSH Server
OpenSSH is a freely available version of the Secure Shell (SSH) protocol family of tools for remotely controlling a computer or transferring files between computers. Traditional tools used to accomplish these functions, such as telnet or rcp, are insecure and transmit the user's password in clear text when used. OpenSSH provides a server daemon and client tools to facilitate secure, encrypted remote control and file transfer operations, effectively replacing the legacy tools.
Installation
3rd May, 2011.

Hakeem Abass-ITM2 Internet Network Services Assignment 2
To install the OpenSSH server application, and related support files, use this command at a terminal prompt:
#sudo apt-get install openssh-server
This command will install both openssh client and server. The openssh-server package can also be selected to install during the Server Edition installation process.
Configuration
First I start by editing the /etc/ssh/sshd_config file but First copy the /etc/ssh/sshd_config file to make a backup:
#sudo cp /etc/ssh/sshd_config /etc/ssh/sshd_config.backup
#sudo chmod a-w /etc/ssh/sshd_config.backup
After making changes to the /etc/ssh/sshd_config file, save the file, and restart the sshd server application to effect the changes using the following command at a terminal prompt:
#sudo /etc/init.d/ssh restart
Configure SSH Keys
SSH keys allow authentication between two hosts without the need of a password. SSH key authentication uses two keys a private key and a public key.
To generate the keys, from a terminal prompt enter:
ssh-keygen -t dsa
This will generate the keys using a DSA authentication identity of the user. During the process you will be prompted for a password. Simply hit Enter when prompted to create the key.
By default the public key is saved in the file ~/.ssh/id_dsa.pub, while ~/.ssh/id_dsa is the private key. Now copy the id_dsa.pub file to the remote host and append it to ~/.ssh/authorized_keys by entering:
ssh-copy-id hakeem@localhost
Finally, double check the permissions on the authorized_keys file, only the authenticated user should have read and write permissions. If the permissions are not correct change them by:
#chmod 600 .ssh/authorized_keys
Test
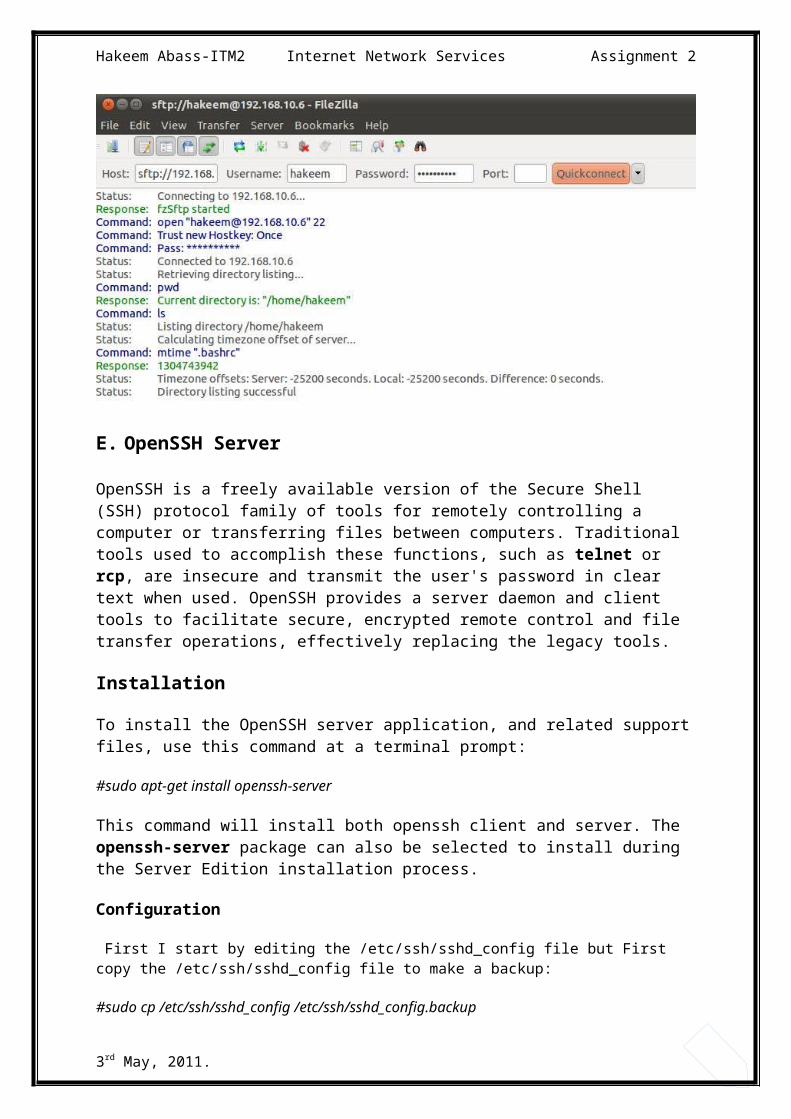
You should now be able to SSH to the host without being prompted for a password. In the Ubuntu client type
3rd May, 2011.

Hakeem Abass-ITM2 Internet Network Services Assignment 2
#ssh [email protected]
F. Install Postfix
In this setup I KhufuNetcom and it has a valid MX record setup as mail.KhufuNet.com. Remember to replace KhufuNetcom with yourdomain.com with your actual domain in the example codes in this howto. Also I assume that you know what an MX record is. To find out MX your type in a terminal:
#dig mx KhufuNet.com
To install postfix
#sudo apt-get install postfix
Install mailx or mailuils package for use as command mail utility program. Mail command is installed with this package.
sudo apt-get install mailutils
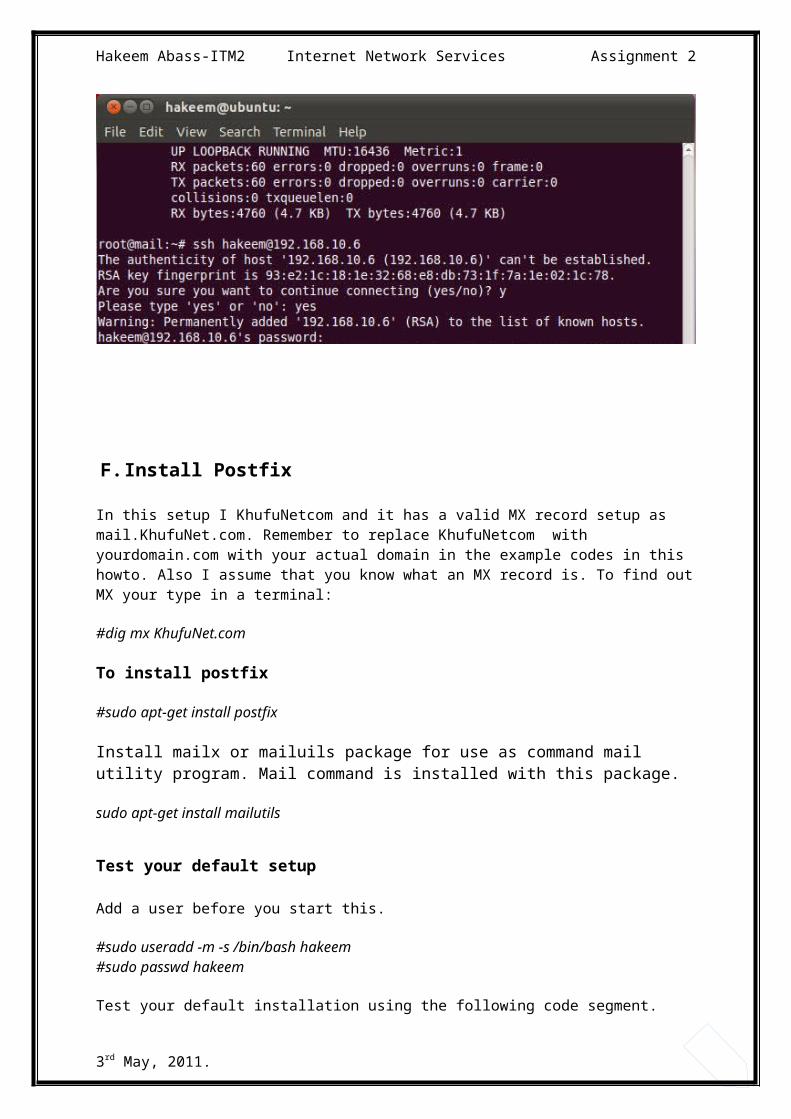
Test your default setup
Add a user before you start this.
#sudo useradd -m -s /bin/bash hakeem#sudo passwd hakeem
Test your default installation using the following code segment.
#telnet localhost 25
3rd May, 2011.
Hakeem Abass-ITM2 Internet Network Services Assignment 2
(if that doesn't work, check to see if postfix is running)
#sudo postfix status
If it is not running, start it
#sudo postfix start
Postfix will prompt like following in the terminal so that you can use to type SMTP commands.
Trying 127.0.0.1...Connected to mail.KhufuNet.com.Escape character is '^]'.220 localhost.localdomain ESMTP Postfix (Ubuntu)
Type the following code segment in Postfix's prompt.
ehlo localhostmail from: root@localhostrcpt to: hakeem@localhostdataSubject: My first mail on Postfix
Hi,Are you there?regards,Admin. (Type the .[dot] in a new Line and press Enter )quit
Check the mailbox of hakeem
su - hakeemmail
When you type mail command an output like follows display in your terminal.
3rd May, 2011.

Hakeem Abass-ITM2 Internet Network Services Assignment 2
You will observe that mails are indexed by numbers and you can type the number of which the mail that you want to read. For example type no "2" to read the 2nd mail. The type "q" to quit. The mail will be written to a file called maildir in user's home directory. According to our example it will be /home/hakeem/maildir.
Setting Postfix Support for Maildir-style Mailboxes
Maildir is a format for an e-mail spool that does not require file locking to maintain message integrity because the messages are kept in separate files with unique names. A Maildir is a directory (often named Maildir) with three subdirectories named tmp, new, and cur. The subdirectories should all reside on the same filesystem.
Another reason to use Maildir format is that Courier IMAP/POP3 servers only work with Maildir format of mailboxes.
Instruct Postfix to use Maildir instead of Box:
# sudo postconf -e "home_mailbox = Maildir/"
Ensure Procmail isn't used: (if the step was taken during dpkg-reconfigure, by mistake)
#sudo postconf -e "mailbox_command = "
Restart Postfix to make changes effect.
#sudo /etc/init.d/postfix restart
Test your setup again
Check the mailbox of hakeem
su - hakeemMAIL=/home/hakeem/MaildirMail
3rd May, 2011.
Hakeem Abass-ITM2 Internet Network Services Assignment 2
G. Installing courier IMAP and POP3
#sudo apt-get install courier-pop#sudo apt-get install courier-imap
Adding your local domains to postfix
Add your domains to mydestination: (my destination is a value in the postfix configuration file. to view your existing setting, type sudo postconf mydestination)
#sudo postconf -e "mydestination = mail.KhufuNet.com, localhost.localdomain, localhost, KhufuNet.com"
(note that command above will overwrite your previous settings of mydestination, so make note of your previous entries)
Add your local networks, too:
Postfix comes with the localhost (127.0.0.1) entry; then add your network
#sudo postconf -e "mynetworks = 127.0.0.0/8, 192.168.10.0/24"
Make Postfix to receive mail from the Internet
Instruct Postfix to receive on all interfaces:
#sudo postconf -e "inet_interfaces = all"
Make Postfix accept IPv4, IPv6 protocols
If you're not using IPv6 yet, and you're paranoid, use "ipv4" instead of "all". Again, this is to suit your own network sensibilities.
3rd May, 2011.

Hakeem Abass-ITM2 Internet Network Services Assignment 2
#sudo postconf -e "inet_protocols = all"
Finally, restart Postfix;
#sudo /etc/init.d/postfix restart
Test your setup again using following code:
telnet mail.KhufuNet.com 25ehlo KhufuNet.commail from: [email protected] to: [email protected]: My first mail for my domain
Hi,Are you there?regards,Admin. (and Enter In a new Line)quit
Check the mailbox of hakeem
su - hakeemcd Maildir/newls
Now you will see mail has a separate file.
Testing Courier POP3 & IMAP
Type in a terminal as above with changing to POP3 & IMAP
Local Alias database
Creating an alias for an account
The following codes illustrate how you can setup an alias, this step is optional.
Create a user
3rd May, 2011.

Hakeem Abass-ITM2 Internet Network Services Assignment 2
#sudo useradd -m -s /bin/bash sysadmin#sudo passwd sysadmin
Edit the alias table
Open the alias file with:
#sudo vi /etc/aliases
Add the following code:
hakeem: sysadmin
To make your changes take effect type:
#Sudo newaliases
To test your changes send a mail to hakeem and check the mail in /home/sysadmin/Maildir/new folder.
Postfix virtual Aliases for separate domains and Linux system accounts
With this approach, every hosted domain can have its own info etc. email address. However, it still uses Linux system accounts for local mailbox deliveries.
With virtual alias domains, each hosted address is aliased to a local UNIX system account or to a remote address. The example below shows how to use this mechanism for the fossedu.org and linuxelabs.com domains.
Inside the main.cf file, we tell it how to handle these virtual domains:
sudo postconf -e "virtual_alias_domains = KhufuNet.com"#sudo postconf -e "virtual_alias_maps = hash:/etc/postfix/virtual"
Edit the /etc/postfix/virtual file:
Add two Linux system accounts
sudo useradd -m -s /bin/bash hakeemsudo useradd -m -s /bin/bash john
Set passwords for the above users.
sudo passwd hakeemsudo passwd johnsudo vi /etc/postfix/virtual
Add the following code segment:
info@KhufuNet hakeem
3rd May, 2011.

Hakeem Abass-ITM2 Internet Network Services Assignment 2
To create a Map Database type :
#sudo postmap /etc/postfix/virtual
Postmap is utility program that will convert /etc/postfix/virtual to /etc/postfix/virtual.db in Berkley DB format, so that Postfix can access the data faster.
Note: Always restart Postfix when you make any to the Postfix files for the changes to take effect:
#sudo /etc/init.d/postfix restart
After the Postfix is working, next I install MYSQL and PHPmyAdmin.
Database
MySQL
Next I will need to create a user to use in MySQL for mail only. Then you need to create the database, Don’t forget your chosen mail username and password. You will need the password you specified for root during MySQL package installation.
Log in as root
#mysql -u root –p
Then enter password for the root account when prompted
#Enter password:
Then we create the mail database
#create database maildb;
Then we create a new user: "hakeem"
#GRANT SELECT,INSERT,UPDATE,DELETE,CREATE,DROP ON maildb.* TO 'hakeem'@'localhost' IDENTIFIED by 'mailPASSWORD'; GRANT SELECT,INSERT,UPDATE,DELETE,CREATE,DROP ON maildb.* TO 'hakeem'@'%' IDENTIFIED by 'mailPASSWORD';
#exit;
Edit(create) how to find the users mailbox location
#nano /etc/postfix/mysql_mailbox.cf
user=hakeem password=mailPASSWORD
3rd May, 2011.
Hakeem Abass-ITM2 Internet Network Services Assignment 2
dbname=maildb table=users select_field=maildir where_field=id hosts=127.0.0.1 additional_conditions = and enabled = 1
Create how to find the email domains
NOTE: All this SQL commands can be easily done using PHPmyadmin after you install it.
After installing and adding users and the domain to the database next is to install an email client to view the email on the Ubuntu client side.
Ubuntu comes with Evolution mail, you just need to set it up to send and receive email form the email server.
You can follow this easy to follow guide on the link below;
http://www.simplehelp.net/2007/08/11/how-to-set-up-evolution-for-email/
After this set up you are good to go and start using your email account.
3rd May, 2011.

Hakeem Abass-ITM2 Internet Network Services Assignment 2
Summary & Conclusion
Initially when we were given this project to perform I thought after performing the last assignment, this will be easier, but hell no it was really challenging but in a way a good avenue to learn. My main concern was that I have never perform any of this installations before but I was confident of the fact that I can research this over the time I had but I was wrong, it took me the whole Easter break and it was tough.
From the beginning, me and my partner (John) encounter our first issue when we configure the IP addresses of the Virtual machines and the Laptops, and we try to get the machines communicate by issuing the ping command but they won’t communicate. We were on this problem for some time before we discover that it’s the firewall on the laptops that were actually blocking the communication.
The next challenge was the issue of changing between the network adapters (NAT or BRIDGE). Though I got over the problem over the period of performing this task but it disrupt me at the beginning because services that were suppose to communicate and it took me sometimes before I got over this. And also I found out that whenever you change from DHCP To STATIC in the ‘/etc/network/interfaces’ file you have to reboot the machine for the change to take effect.
After scaling this initial problems, I was able to quickly recognise this initial issue and solve them during my installations and configurations of the remaining packages.
The next installation to give me a problem was the configuration of the ‘bind’ file, the main problem here deals with spelling errors, the right IP address and putting the dot(.) rightly. I spent over 2 days and 2 installations to get the DNS working. But because of my experience acquired during this project help me troubleshoot this problems and be able to solve them.
In conclusion, even though this project threw up many challenges I believe I have learned a lot during the execution of this project, such as what Postfix does? How it works? How to configure DHCP to give dynamic IP address?. Although, I wasn’t able to get some of the services to work as it’s suppose to work but I know these project has taught me a lot and I believe the experience will come into good use in my workplace in the future.
Finally, given the opportunity to start the project again I believe I will do better with a successful result in terms of my installations and configurations because I gave my all to make this service work and I know I did my best.
Reference
http://timhorgan.wordpress.com/2011/03/21/dhcp-server/
http://ubuntuforums.org/showthread.php?t=236093
https://help.ubuntu.com/community/PostfixBasicSetupHowto
https://help.ubuntu.com/10.10/serverguide/C/ftp-server.html
3rd May, 2011.