Embed Size (px)
Citation preview
SAN GABRIEL FLY FISHERS
All Fish, All Waters
INTRODUCTION
TO
FLY FISHING
San Gabriel Fly Fishers - P.O. Box 1366 – Georgetown, Texas 78627
www.sgflyfishers.com
Introduction to Fly-fishing Introduction This document is designed to introduce the angler to the basics of fly-fishing. Basic equipment, assembly, and
casting techniques are presented.
Narrative History “They fasten red wool around a hook and fix to the wool two feathers that grow under a cock’s
waddles, and which in color are like wax. The rod they use is six feet long and the line of the same
length. Then the angler lets fall his lure. The fish, attracted by its color and excited, draws close
and…forthwith opens its mouth, but is caught by the hook, and bitter indeed it the feast it enjoys,
inasmuch as it is captured.” Claudius Aelian
This description of fly-fishing was written by Aelian more than 17 centuries ago. It is not known whether
they fished for food or for sport but clearly fly-fishing has been around for a very long time. The earliest
written reference to fly-fishing in America dates from 1775.
The early American fly rods were anywhere from 12 to 20 feet long and made of three sections – butt
of ash, middle of hickory, and tip of lancewood. These rods eventually evolved to split bamboo in about
1850, to fiberglass, then to the graphite rods of today.
The fly reel was developed at about the same time as split bamboo rods. Previously line hung to the side
of the angler. The horsehair lines also became tapered – having more strands in the middle than at the end.
Fly casting as we now know it began to develop a few years later when silk oil dressed lines were introduced.
How is fly-fishing different from spin casting?
The biggest difference between spin casting and fly-fishing is that the line, not the lure or bait, provides
the weight for casting. So in essence you cast the line, not the bait. The fly rod is commonly seven to 10 feet
long, much longer than spinning rods. The rod provides the means to propel the line.
The reel serves as a storage unit for the fly line. In spin casting the line is cranked back into the reel
between casts. During fly-fishing the fly line is left hanging or coiled on the ground between casts.
Fly line is different from the monofilament line used for spin casting. It’s much heavier and thicker because
it provides the weight to get the fly to the target.
Why fly-fish? Many novices ask themselves. “Why would I want to fly-fish? Spin casting works just fine for me.” The
accomplished fly-fisher enjoys the sport for many reasons. He enjoys the challenges – coming up with the
right fly for the fishing conditions, learning about the insects he is trying to imitate, “reading” the river to
locate water that holds fish, and the feeling when a day of fishing comes together just right.
Equipment The equipment for fly-fishing is quite different from that of spin casting. Fly-fishing components are
similar in name, but there the similarities end.
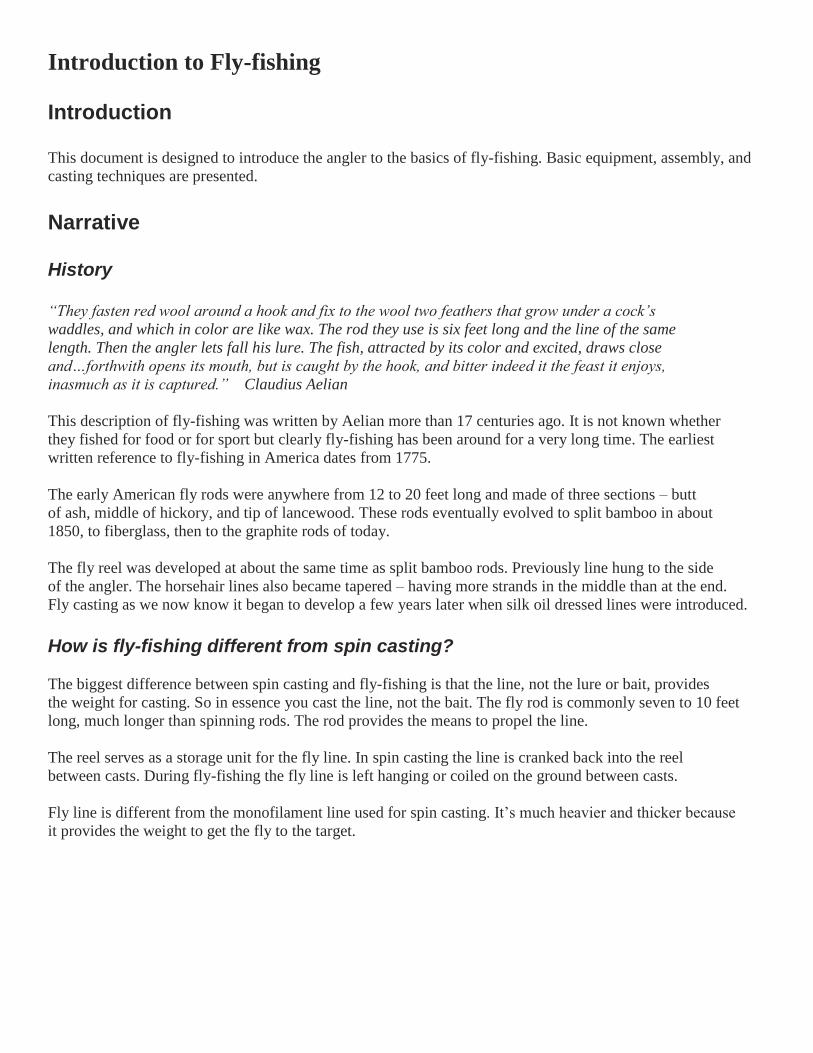
Line The fly line is attached to the fly reel by a section of braided line called backing. The thick fly line is
attached to the fine diameter leader and the leader in turn ends in an even finer diameter tippet.
Fly line
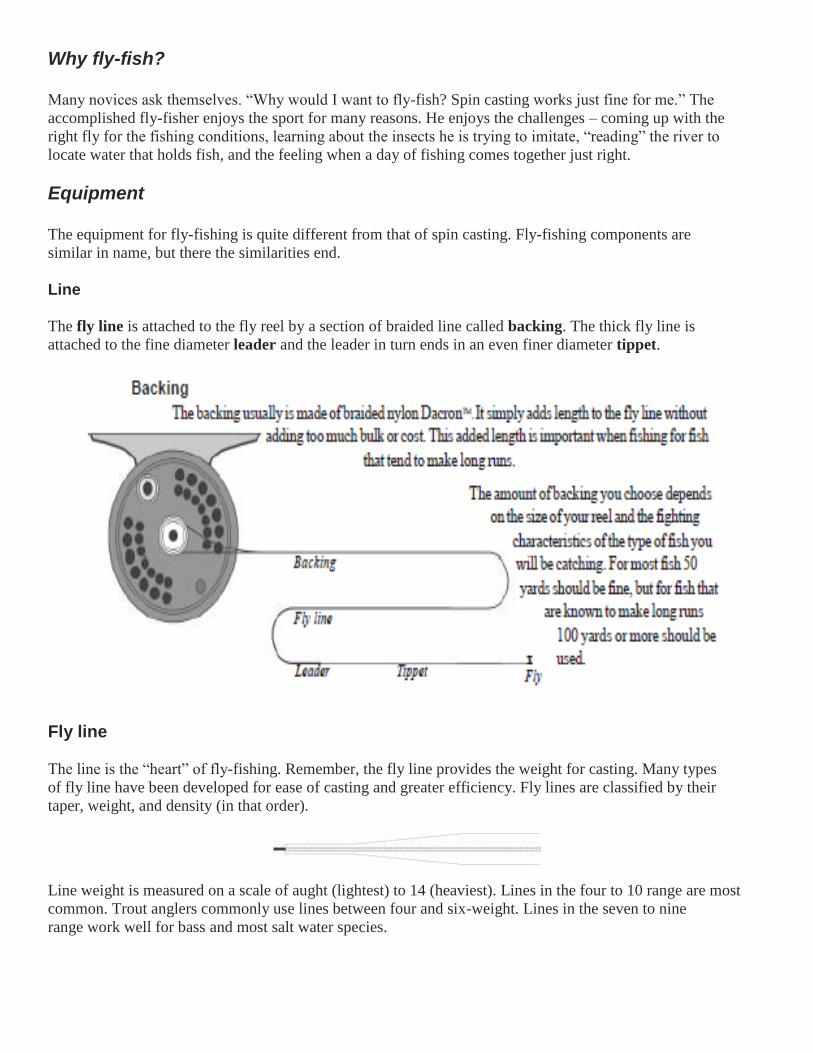
The line is the “heart” of fly-fishing. Remember, the fly line provides the weight for casting. Many types
of fly line have been developed for ease of casting and greater efficiency. Fly lines are classified by their
taper, weight, and density (in that order).
Line weight is measured on a scale of aught (lightest) to 14 (heaviest). Lines in the four to 10 range are most
common. Trout anglers commonly use lines between four and six-weight. Lines in the seven to nine
range work well for bass and most salt water species.
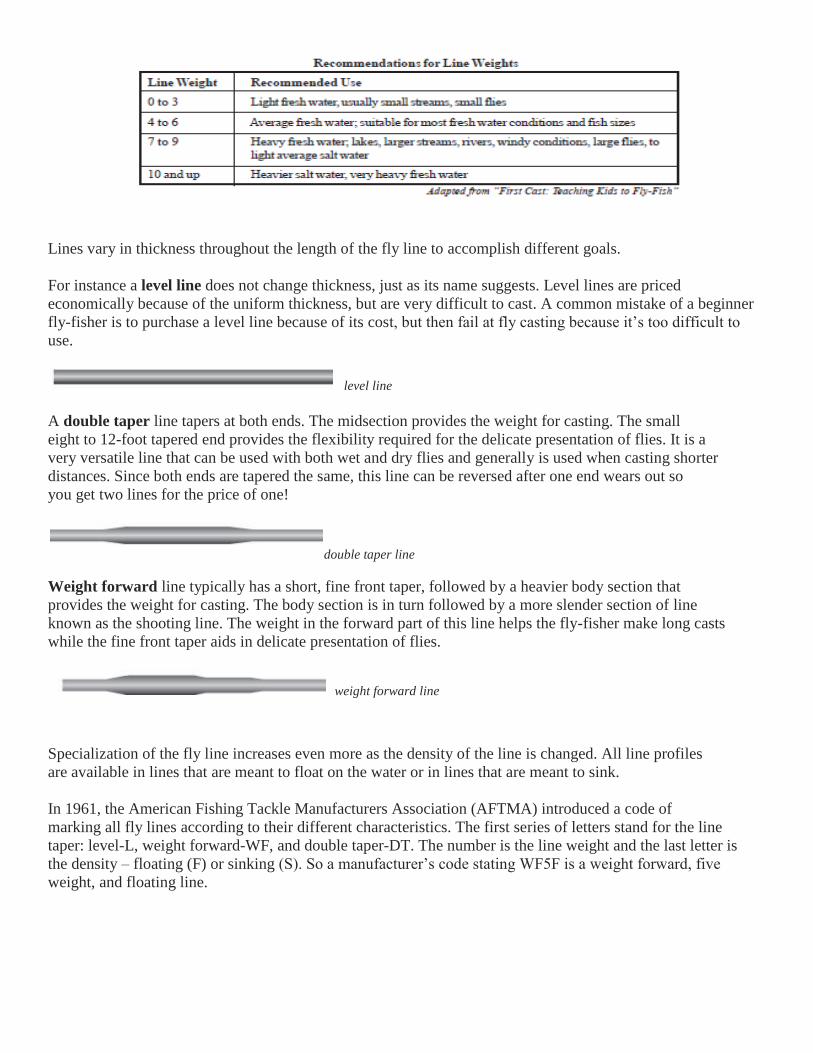
Lines vary in thickness throughout the length of the fly line to accomplish different goals.
For instance a level line does not change thickness, just as its name suggests. Level lines are priced
economically because of the uniform thickness, but are very difficult to cast. A common mistake of a beginner
fly-fisher is to purchase a level line because of its cost, but then fail at fly casting because it’s too difficult to
use.
level line
A double taper line tapers at both ends. The midsection provides the weight for casting. The small
eight to 12-foot tapered end provides the flexibility required for the delicate presentation of flies. It is a
very versatile line that can be used with both wet and dry flies and generally is used when casting shorter
distances. Since both ends are tapered the same, this line can be reversed after one end wears out so
you get two lines for the price of one!
double taper line
Weight forward line typically has a short, fine front taper, followed by a heavier body section that
provides the weight for casting. The body section is in turn followed by a more slender section of line
known as the shooting line. The weight in the forward part of this line helps the fly-fisher make long casts
while the fine front taper aids in delicate presentation of flies.
weight forward line
Specialization of the fly line increases even more as the density of the line is changed. All line profiles
are available in lines that are meant to float on the water or in lines that are meant to sink.
In 1961, the American Fishing Tackle Manufacturers Association (AFTMA) introduced a code of
marking all fly lines according to their different characteristics. The first series of letters stand for the line
taper: level-L, weight forward-WF, and double taper-DT. The number is the line weight and the last letter is
the density – floating (F) or sinking (S). So a manufacturer’s code stating WF5F is a weight forward, five
weight, and floating line.
Leaders The leader is a length of tapered, fine diameter line that connects the fly line to the fly. It is usually made
of monofilament and provides a nearly invisible connection between the fly and the line.
Leaders are normally tapered. The end with the largest diameter is attached to the fly line and is known
as the butt. The butt is followed by the midsection and then the section to which the flies are tied, called
the tippet. The leader should taper gradually down from the butt to the tippet.
Horsehair was the leader material used during the 19th Century until it was replaced with silk gut. Nylon
monofilament was developed during World War II. Its design has improved greatly. It is still used today.
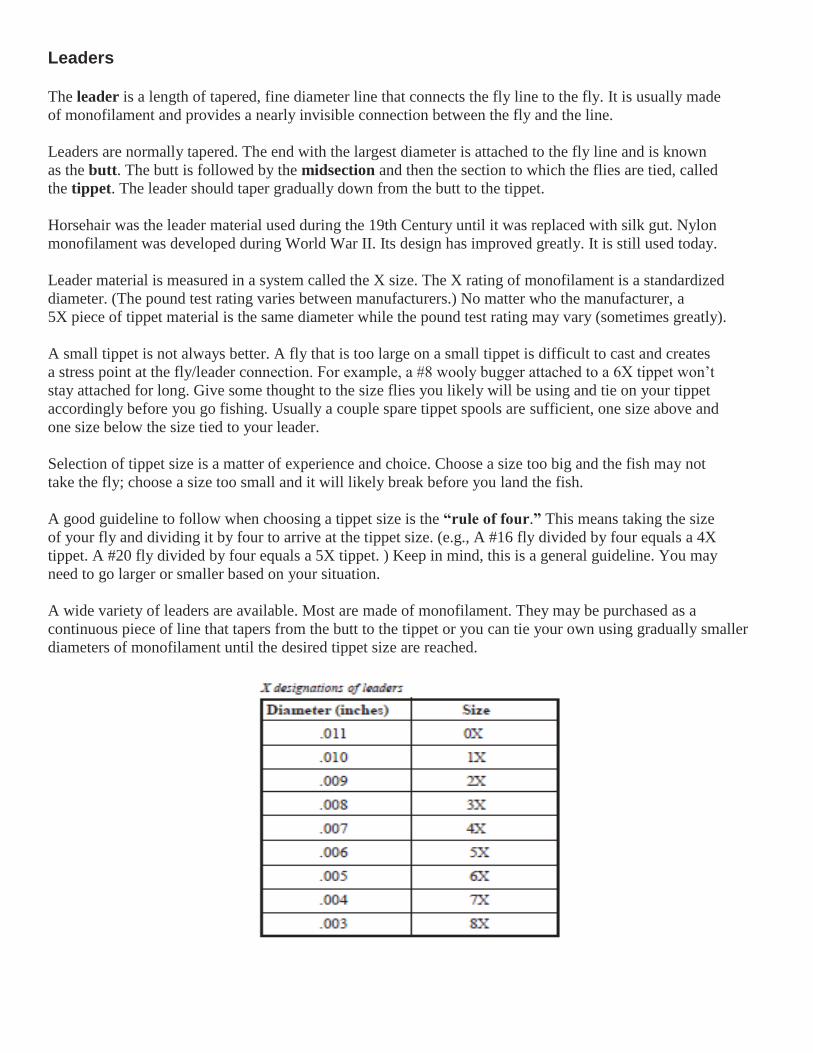
Leader material is measured in a system called the X size. The X rating of monofilament is a standardized
diameter. (The pound test rating varies between manufacturers.) No matter who the manufacturer, a
5X piece of tippet material is the same diameter while the pound test rating may vary (sometimes greatly).
A small tippet is not always better. A fly that is too large on a small tippet is difficult to cast and creates
a stress point at the fly/leader connection. For example, a #8 wooly bugger attached to a 6X tippet won’t
stay attached for long. Give some thought to the size flies you likely will be using and tie on your tippet
accordingly before you go fishing. Usually a couple spare tippet spools are sufficient, one size above and
one size below the size tied to your leader.
Selection of tippet size is a matter of experience and choice. Choose a size too big and the fish may not
take the fly; choose a size too small and it will likely break before you land the fish.
A good guideline to follow when choosing a tippet size is the “rule of four.” This means taking the size
of your fly and dividing it by four to arrive at the tippet size. (e.g., A #16 fly divided by four equals a 4X
tippet. A #20 fly divided by four equals a 5X tippet. ) Keep in mind, this is a general guideline. You may
need to go larger or smaller based on your situation.
A wide variety of leaders are available. Most are made of monofilament. They may be purchased as a
continuous piece of line that tapers from the butt to the tippet or you can tie your own using gradually smaller
diameters of monofilament until the desired tippet size are reached.
Rods The fly rod is a very important piece of equipment. It is the fly rod that delivers the energy from the casting
angler to propel the fly line. When it comes to fly rods the old adage, “You get what you pay for,” is especially
true.
Modern rods may be made of any one of three different materials: bamboo, fiberglass, or graphite. Some
traditional fly-fishers don’t believe that you are really fly-fishing unless you use a split bamboo rod. There are
still some very fine and expensive bamboo rods available, but today, most rods are made of graphite.
Graphite rods generally are lighter than their fiberglass or bamboo counterparts. It is critical to “balance” your
outfit (e.g., use the correct weight fly line for your rod). Manufacturers label rods with the information you need
to put together a “well balanced” outfit. Unfortunately, that information is not always located in the same
place or written in the same format. An example of one of these codes would read, “G763.” This rod is graphite,
seven feet six inches long, and intended for use with a three-weight line.
Keep in mind what type and size of flies you will be casting when selecting a rod. A six-weight rod is a good
choice for most beginners. It is appropriate for catching most pan fish, yet it is diverse enough to present small
flies delicately and heavy enough to cast large flies long distances.
Fly rods are rated by the weight of the fly line they cast best. Weights range from 0 (aught), the lightest, through
14, the heaviest. Rods at either end of the range are considered “specialty” rods and not suitable for general fly-
fishing. Most trout weight rods range from about a four-weight (used for smaller waters and shorter casts) up to
a six or seven-weight (used for longer casts and larger waters).
A seven, eight, or nine-weight rod often is used for bass fishing. Rods heavier than eight or nine-weight are
generally used in saltwater fishing for large fish such as tarpon, marlin, or even sharks. Modern rod
manufacturers rate their rods using a double taper (DT) line. When using a weight forward (WF) line you
should go up a line size. Thus, a five-weight rod casts best with a five-weight double taper line or a six-weight
forward line.
Line weight ratings are approximate and you may have a rod that you feel casts better with a line that’s one size
heavier or lighter than it’s rated for.
Fly rods come in a variety of lengths, each designed to fit individual needs. Short rods (six to eight feet) work
well for small brush lined creeks. If, however, you fish large rivers, lakes, or from a boat or float tube where
there is ample room, an eight or nine-foot rod makes longer casts more easily.
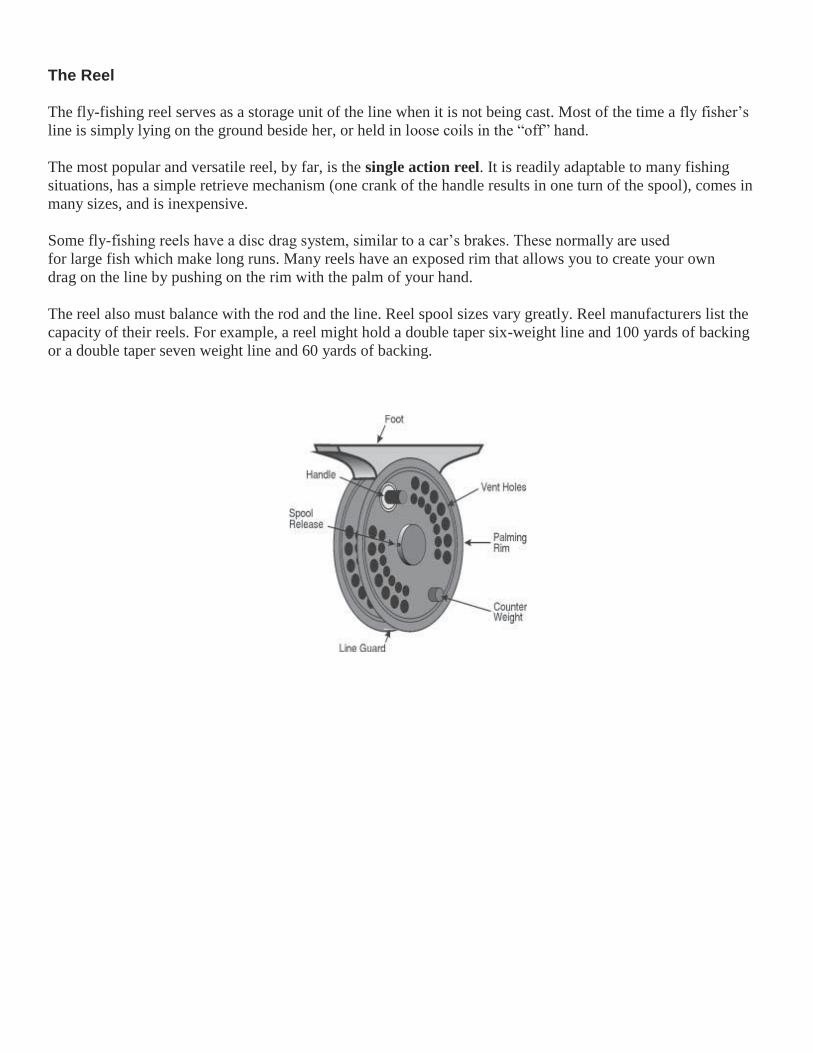
The Reel The fly-fishing reel serves as a storage unit of the line when it is not being cast. Most of the time a fly fisher’s
line is simply lying on the ground beside her, or held in loose coils in the “off” hand.
The most popular and versatile reel, by far, is the single action reel. It is readily adaptable to many fishing
situations, has a simple retrieve mechanism (one crank of the handle results in one turn of the spool), comes in
many sizes, and is inexpensive.
Some fly-fishing reels have a disc drag system, similar to a car’s brakes. These normally are used
for large fish which make long runs. Many reels have an exposed rim that allows you to create your own
drag on the line by pushing on the rim with the palm of your hand.
The reel also must balance with the rod and the line. Reel spool sizes vary greatly. Reel manufacturers list the
capacity of their reels. For example, a reel might hold a double taper six-weight line and 100 yards of backing
or a double taper seven weight line and 60 yards of backing.
Tackle Care Following are some important tips to remember:
Handling equipment carefully will provide years of trouble-free enjoyment. Always transport rods
broken down and in their protective rod tubes.
When moving from spot to spot while fishing, attach the fly to the fly keeper (if provided) or hook the
point inside the forward shroud that holds the reel foot. (Never place the hook into the grip.)
Reel in all slack so the rod remains straight but the fly line and/or leader are tight.
While walking, grip the rod so the reel is next to the front of your hand and the rod extends out the
backside of your arm. This prevents catching the rod tip on brush or other obstructions because the rod
follows whatever opening your body passes through.
Never lay the rod on the ground. Instead, stand it against a tree or large rock while taking a break.
Never let the fly reel come into contact with sand or gravel.
Always place your rod and reel under the windshield wiper of your vehicle when you first return
from fishing, before getting out of your waders and packing other gear away. This prevents accidentally
leaving your fly rod behind.
Periodically clean the fly line by running the working end through a rag soaked with fly line cleaner.
Many cleaners are available just for this purpose. This will extend the life of your line and help maintain
its performance.
When disjointing the rod, grip the rod firmly with your hands (dry) close together on each side of the
ferrule. Pull with each hand and gently twist the two sections at the same time. If the rod is stuck use a piece of
tire inner tube to get a firmer grip on it. Do not ‘twist’ to separate a bamboo fly rod. This will damage the
integrity of the bamboo fibers.
Tackle Storage During the off season, remove the fly line from the reel, clean thoroughly, and hang in large, loose coils.
Use a single twist-tie to prevent tangling. Leave a tag of the backing knotted to the fly line to distinguish
which end is which. Check the head of the fly line for cracks or other damage and clip off the old leader and
any damaged fly line. The line’s performance will suffer if more than a foot of fly line is removed. Consider a
new line in the case of a weight forward (WF) line or swap ends in the case of a double taper (DT) line.
Tie on a new leader at the beginning of the fishing season. Always store the line away from heat or
sunlight.
Clean the reel by removing the spool (if removable) and soak both the frame and spool in a bowl of
water containing mild dish soap. Allow it to soak overnight and then scrub all interior and exterior surfaces
with an old toothbrush. Rinse it thoroughly and lay on a towel. Let the reel dry completely. Then make sure
all screws and rivets are tight and lubricate moving parts with reel grease. If the reel has an adjustable drag,
set the drag knob to its lightest setting to avoid spring fatigue. Store it in an old clean sock.
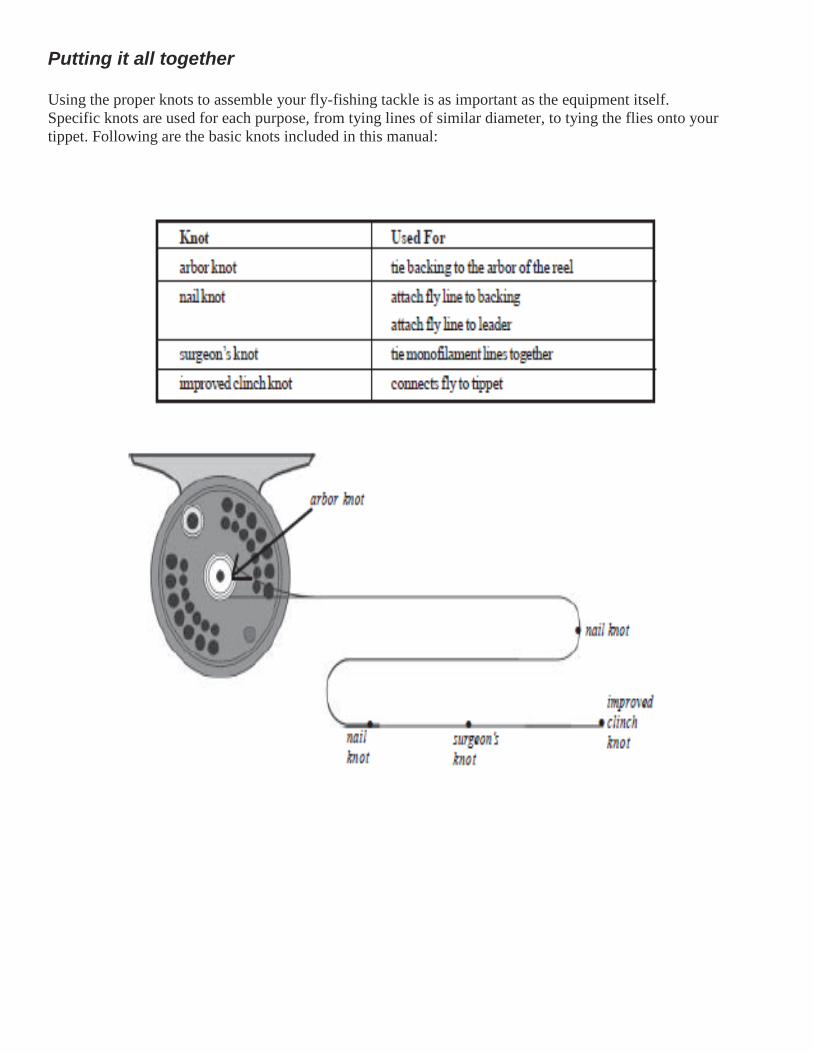
Putting it all together Using the proper knots to assemble your fly-fishing tackle is as important as the equipment itself.
Specific knots are used for each purpose, from tying lines of similar diameter, to tying the flies onto your
tippet. Following are the basic knots included in this manual:
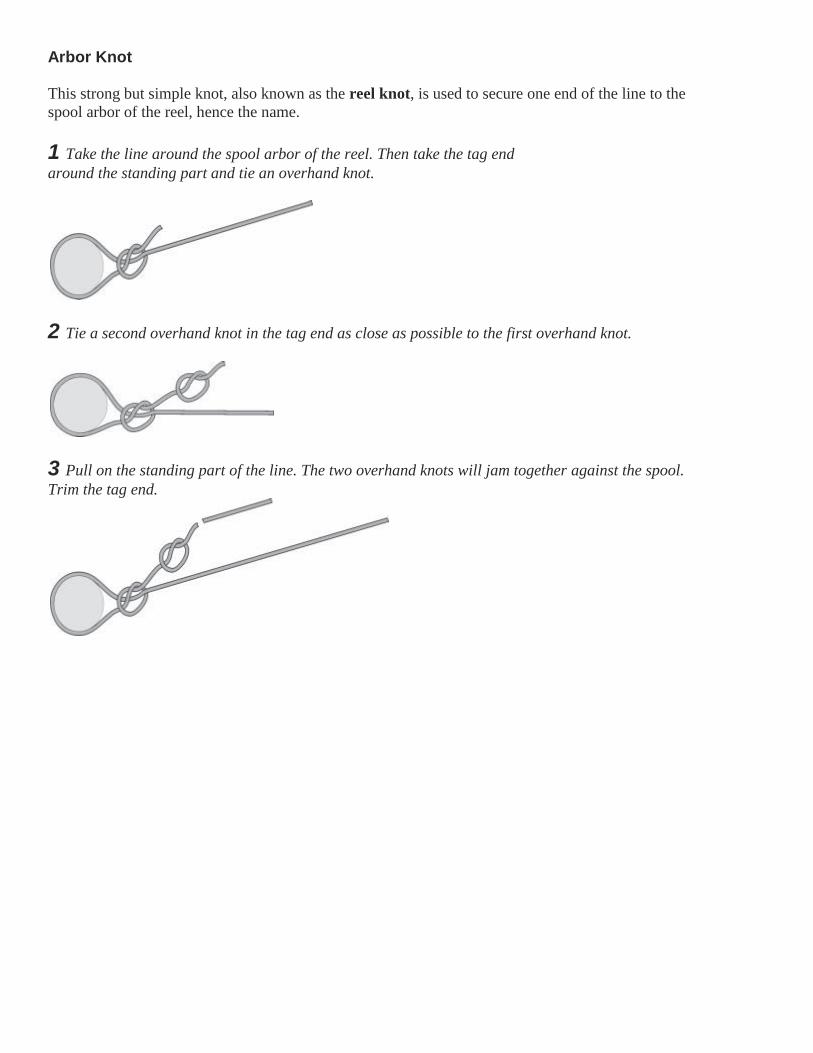
Arbor Knot This strong but simple knot, also known as the reel knot, is used to secure one end of the line to the
spool arbor of the reel, hence the name.
1 Take the line around the spool arbor of the reel. Then take the tag end
around the standing part and tie an overhand knot.
2 Tie a second overhand knot in the tag end as close as possible to the first overhand knot.
3 Pull on the standing part of the line. The two overhand knots will jam together against the spool.
Trim the tag end.
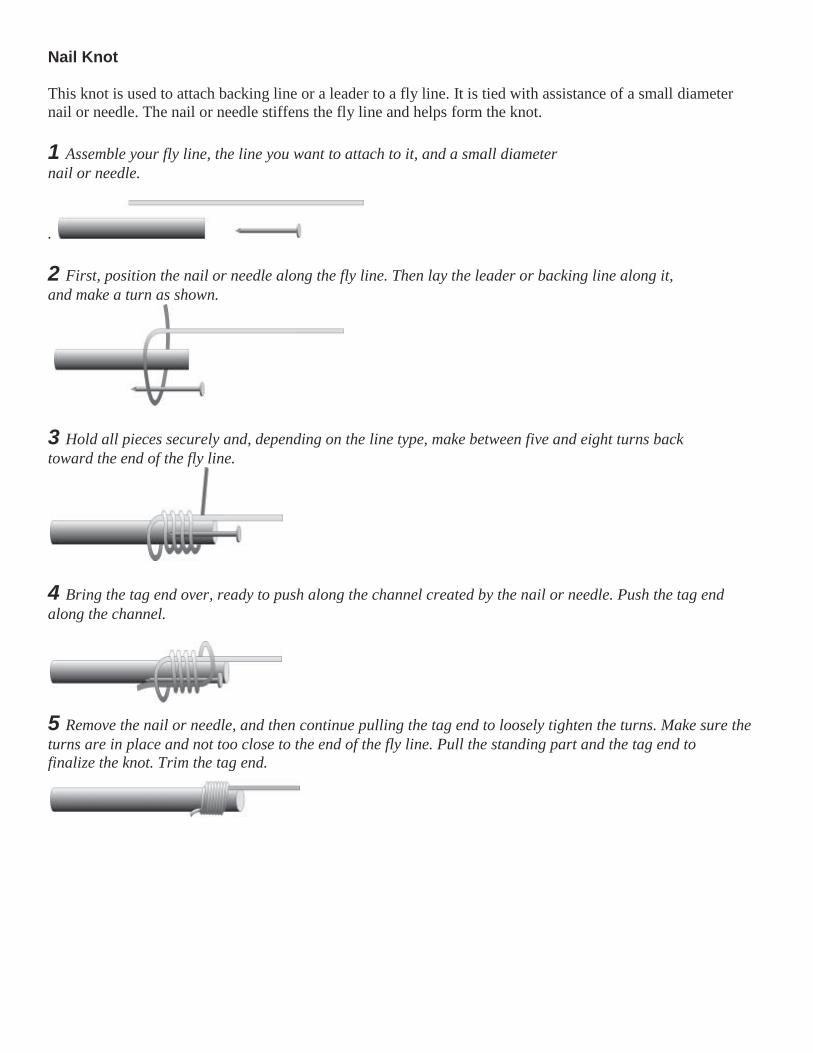
Nail Knot This knot is used to attach backing line or a leader to a fly line. It is tied with assistance of a small diameter
nail or needle. The nail or needle stiffens the fly line and helps form the knot.
1 Assemble your fly line, the line you want to attach to it, and a small diameter
nail or needle.
.
2 First, position the nail or needle along the fly line. Then lay the leader or backing line along it,
and make a turn as shown.
3 Hold all pieces securely and, depending on the line type, make between five and eight turns back
toward the end of the fly line.
4 Bring the tag end over, ready to push along the channel created by the nail or needle. Push the tag end
along the channel.
5 Remove the nail or needle, and then continue pulling the tag end to loosely tighten the turns. Make sure the
turns are in place and not too close to the end of the fly line. Pull the standing part and the tag end to
finalize the knot. Trim the tag end.
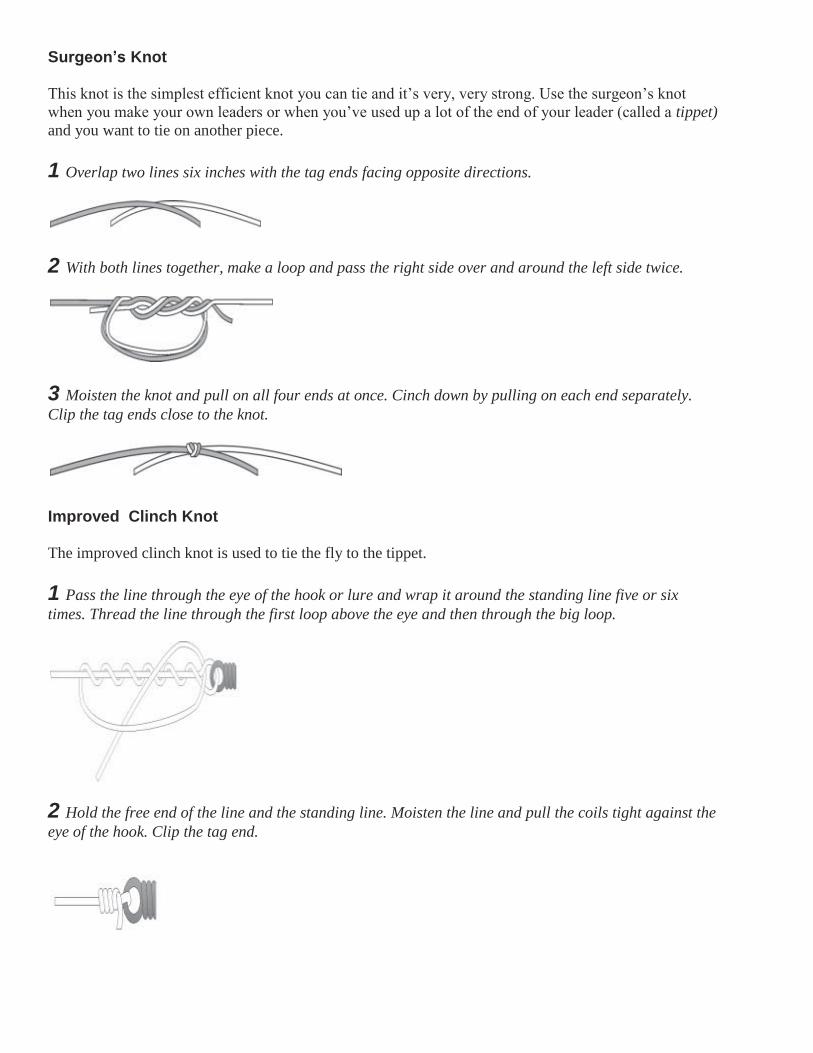
Surgeon’s Knot This knot is the simplest efficient knot you can tie and it’s very, very strong. Use the surgeon’s knot
when you make your own leaders or when you’ve used up a lot of the end of your leader (called a tippet)
and you want to tie on another piece.
1 Overlap two lines six inches with the tag ends facing opposite directions.
2 With both lines together, make a loop and pass the right side over and around the left side twice.
3 Moisten the knot and pull on all four ends at once. Cinch down by pulling on each end separately.
Clip the tag ends close to the knot.
Improved Clinch Knot The improved clinch knot is used to tie the fly to the tippet.
1 Pass the line through the eye of the hook or lure and wrap it around the standing line five or six
times. Thread the line through the first loop above the eye and then through the big loop.
2 Hold the free end of the line and the standing line. Moisten the line and pull the coils tight against the
eye of the hook. Clip the tag end.
Casting Fly casting is not about strength, but about timing and practice. When you are fly casting it is important
to keep the following points in mind:
You are casting the line, not the lure/fly at the end of the line.
You are transferring your energy to the rod and the rod casts the line.
A good back cast is just as important as a good forward cast.
The line will go where the rod tip points!
Getting Ready Safety
Always wear sunglasses and a broad-billed cap while casting. They provide protection from the
sun and serve as a shield to prevent eye or head injuries.
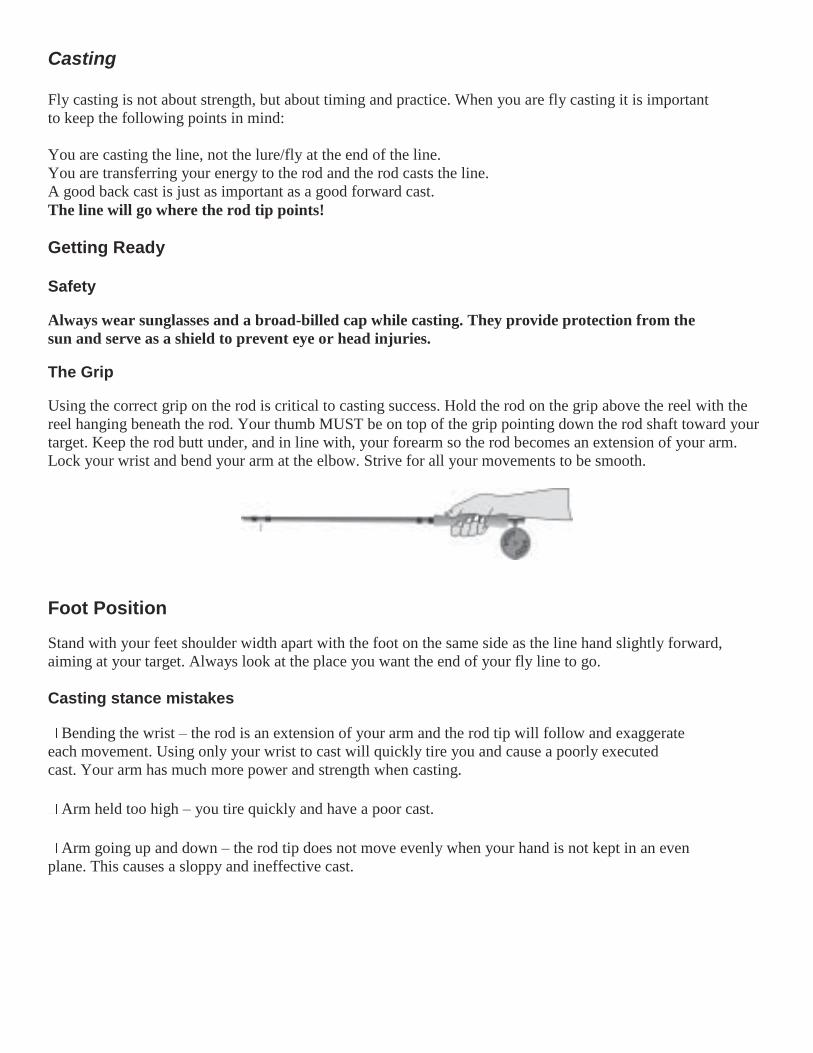
The Grip
Using the correct grip on the rod is critical to casting success. Hold the rod on the grip above the reel with the
reel hanging beneath the rod. Your thumb MUST be on top of the grip pointing down the rod shaft toward your
target. Keep the rod butt under, and in line with, your forearm so the rod becomes an extension of your arm.
Lock your wrist and bend your arm at the elbow. Strive for all your movements to be smooth.
Foot Position
Stand with your feet shoulder width apart with the foot on the same side as the line hand slightly forward,
aiming at your target. Always look at the place you want the end of your fly line to go.
Casting stance mistakes
Bending the wrist – the rod is an extension of your arm and the rod tip will follow and exaggerate
each movement. Using only your wrist to cast will quickly tire you and cause a poorly executed
cast. Your arm has much more power and strength when casting.
Arm held too high – you tire quickly and have a poor cast.
Arm going up and down – the rod tip does not move evenly when your hand is not kept in an even
plane. This causes a sloppy and ineffective cast.
The Overhead Cast Remember to check your grip and stance before each cast. Strip two to three rod lengths of line out in
front of you plus a few more feet. Hold the line in loose coils in your off hand. These coils will be pulled
from your fingers as you complete your forward cast and want to increase your distance. Check for clearance
for your back cast. You need the same amount of distance for your back cast as for your forward cast.
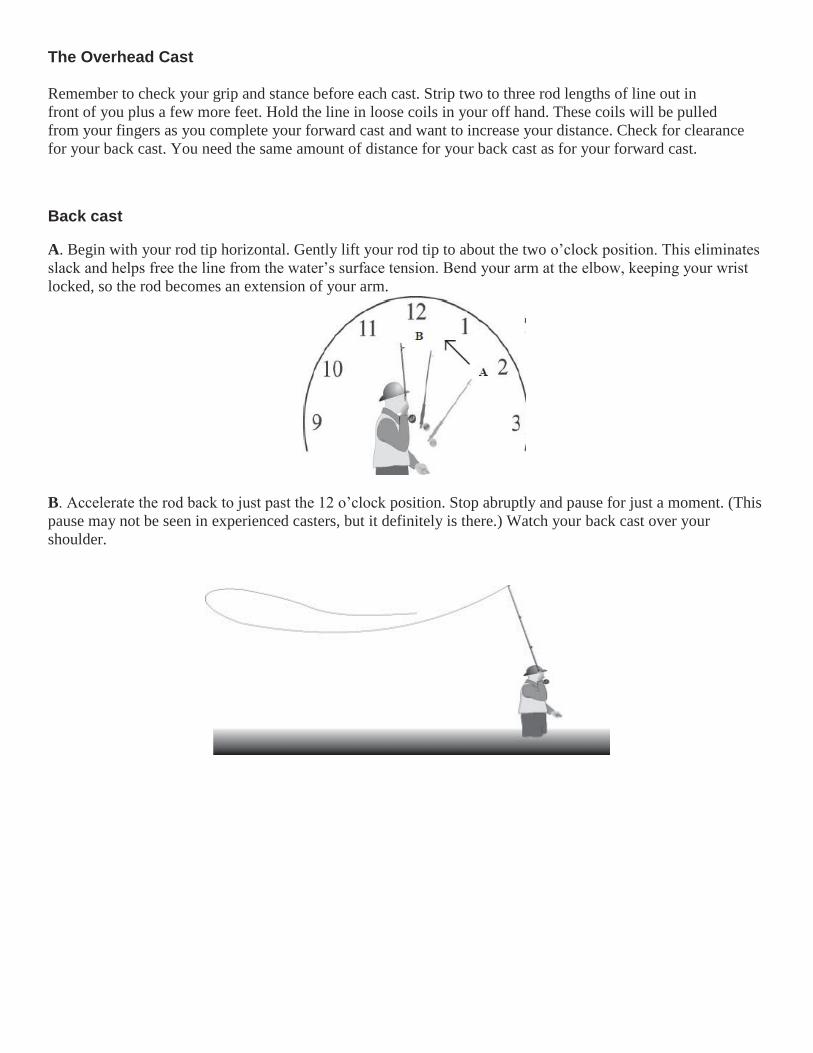
Back cast
A. Begin with your rod tip horizontal. Gently lift your rod tip to about the two o’clock position. This eliminates
slack and helps free the line from the water’s surface tension. Bend your arm at the elbow, keeping your wrist
locked, so the rod becomes an extension of your arm.
B. Accelerate the rod back to just past the 12 o’clock position. Stop abruptly and pause for just a moment. (This
pause may not be seen in experienced casters, but it definitely is there.) Watch your back cast over your
shoulder.
The Forward Cast
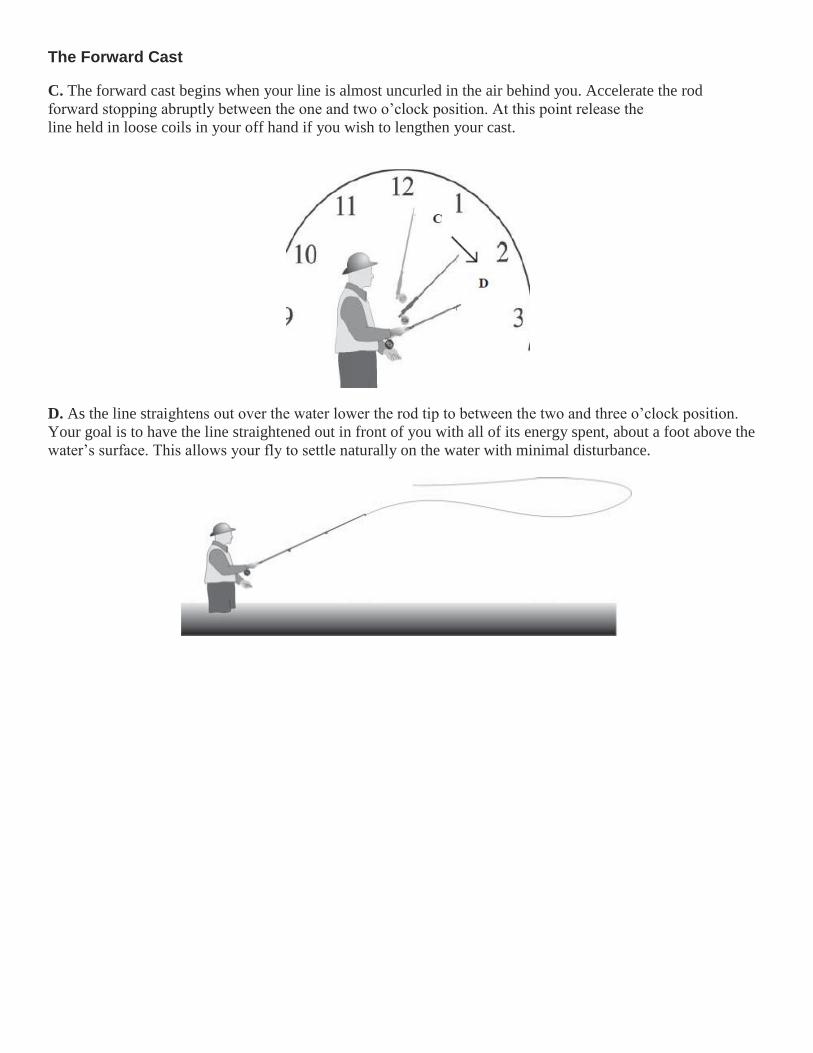
C. The forward cast begins when your line is almost uncurled in the air behind you. Accelerate the rod
forward stopping abruptly between the one and two o’clock position. At this point release the
line held in loose coils in your off hand if you wish to lengthen your cast.
D. As the line straightens out over the water lower the rod tip to between the two and three o’clock position.
Your goal is to have the line straightened out in front of you with all of its energy spent, about a foot above the
water’s surface. This allows your fly to settle naturally on the water with minimal disturbance.
Casting checklist
Check your stance – comfortable, legs shoulder width apart, line hand foot slightly forward, thumb
on top, grip not too tight, rod tip down
“Throw the line up over the trees!”- quick pick up, crisp hitch hiking motion, rigid wrist, hand in a
level plane, turn to follow the stroke
Accelerate to an abrupt STOP – stop the rod at just past the 12 o’clock position
Watch your back cast – start to bring the rod forward a split second before the line uncurls
“Flick that apple off the rod tip!” – stop the rod between the one and two o’clock position, rigid
wrist, hand in a level plane
Finish your cast - lower your casting arm and rod, the line will lay out straight on the lawn over your target.
Common casting problems
Wrist casting – the most common problem. Using this weak part of your body tires you quickly.
Casting too much line – a very common problem. Limit the amount of line to 30 to 40 feet maximum.
Control is more important than distance.
Line slamming into the water on the forward cast – caused by using too wide of a casting arc and
not stopping your cast high enough (between the one and two o’clock position) and following
through. Aim higher and stop your forward cast sooner.
Line collapsing on the back cast – your wrist is bent and there isn’t enough power on the pickup. If
the line hits the ground on the back cast; your cast will be unsuccessful.
Not enough power on the pickup – really throw the line up in the air on your back cast to make the
rest of the cast work.
Whip-cracking sound on the forward cast – caused by starting your forward cast before your
back cast is straightened. Follow your cast backward and wait one second on the abrupt stop
before bringing your cast forward.
Flies A “fly” is the name used for the artificial lure used in fly-fishing. The name comes from the first patterns
that was tied to imitate the insect called a “mayfly.” Today flies are tied to imitate nearly any kind of food a
fish might eat. Some don’t imitate anything in nature at all!
Flies may be purchased in stores but many fly-fishers find that tying their own flies is a wonderful hobby
in itself. Flies are made by tying bits of feather, fur, or tinsel onto a fish hook using a special thread made just
for that purpose.
There are many books and videotapes available to help you learn how to tie flies but it’s probably easier
to learn by having a fly tier show you how to get started. Check in sporting goods shops to see if someone
ties locally. Nearly all states have at least one fly tying club whose members get together for tying sessions
during the winter months. They welcome the chance to help get someone “new” started.
Flies may be broken down into several categories; dry flies, wet flies, nymphs, streamers, and bass bugs.
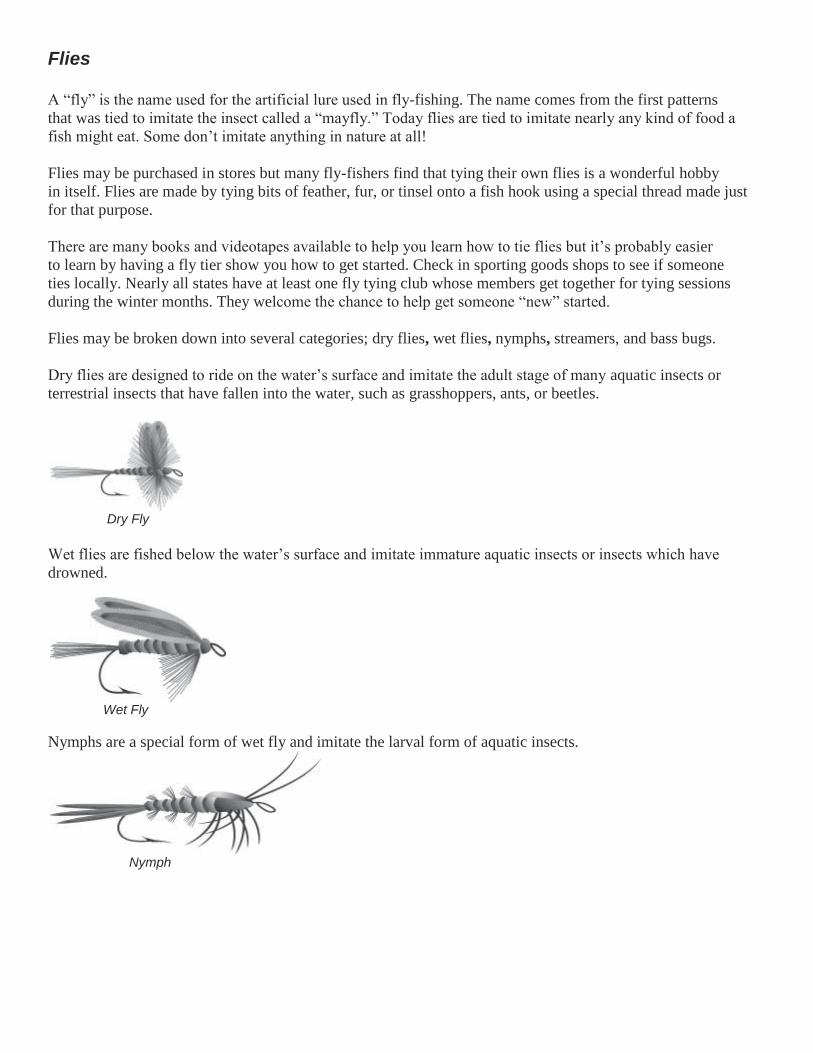
Dry flies are designed to ride on the water’s surface and imitate the adult stage of many aquatic insects or
terrestrial insects that have fallen into the water, such as grasshoppers, ants, or beetles.
Dry Fly
Wet flies are fished below the water’s surface and imitate immature aquatic insects or insects which have
drowned.
Wet Fly
Nymphs are a special form of wet fly and imitate the larval form of aquatic insects.
Nymph
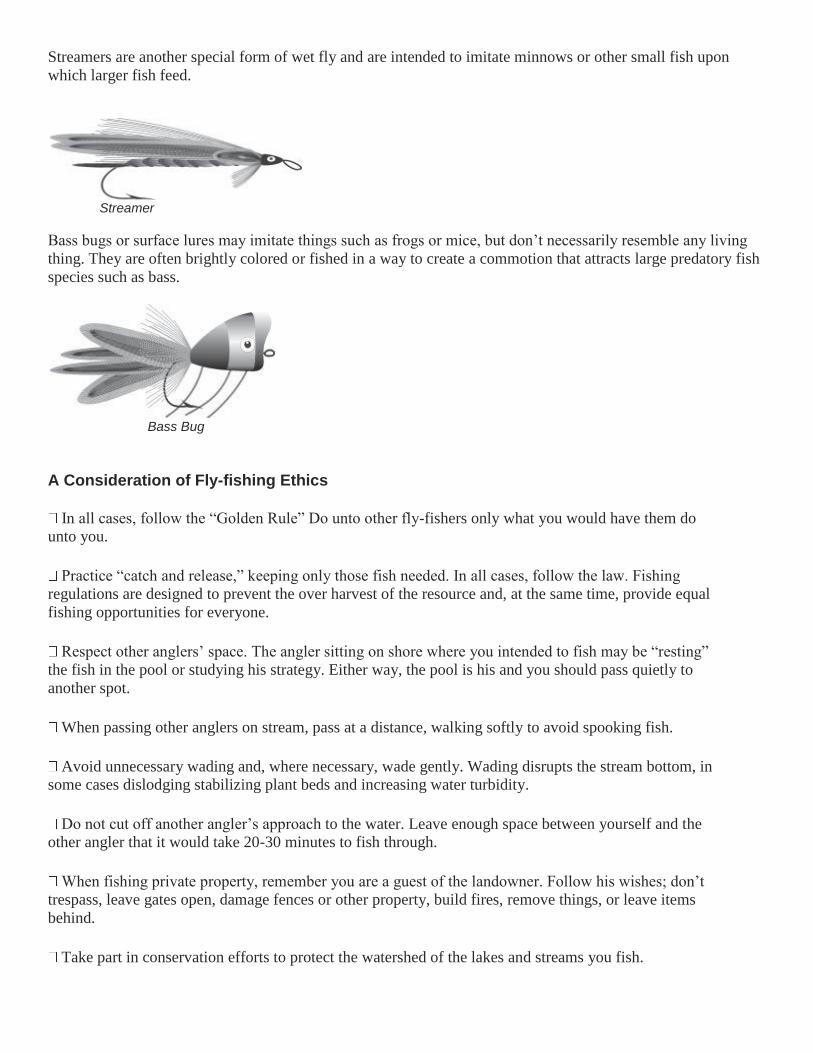
Streamers are another special form of wet fly and are intended to imitate minnows or other small fish upon
which larger fish feed.
Streamer
Bass bugs or surface lures may imitate things such as frogs or mice, but don’t necessarily resemble any living
thing. They are often brightly colored or fished in a way to create a commotion that attracts large predatory fish
species such as bass.
Bass Bug
A Consideration of Fly-fishing Ethics
In all cases, follow the “Golden Rule” Do unto other fly-fishers only what you would have them do
unto you.
Practice “catch and release,” keeping only those fish needed. In all cases, follow the law. Fishing
regulations are designed to prevent the over harvest of the resource and, at the same time, provide equal
fishing opportunities for everyone.
Respect other anglers’ space. The angler sitting on shore where you intended to fish may be “resting”
the fish in the pool or studying his strategy. Either way, the pool is his and you should pass quietly to
another spot.
When passing other anglers on stream, pass at a distance, walking softly to avoid spooking fish.
Avoid unnecessary wading and, where necessary, wade gently. Wading disrupts the stream bottom, in
some cases dislodging stabilizing plant beds and increasing water turbidity.
Do not cut off another angler’s approach to the water. Leave enough space between yourself and the
other angler that it would take 20-30 minutes to fish through.
When fishing private property, remember you are a guest of the landowner. Follow his wishes; don’t
trespass, leave gates open, damage fences or other property, build fires, remove things, or leave items
behind.
Take part in conservation efforts to protect the watershed of the lakes and streams you fish.
Share your angling knowledge and skills with your friends. By doing so you enlist the help of an ally in
protecting the resource.
When fishing public water, remember there is an ever increasing, often competing, demand on this
limited resource. Never litter the land or water. Never pollute and leave no trace for others to find.
Remember; “We do not inherit this land from our ancestors but, rather, borrow it from our grandchildren.”
Resources Aquatic Education Program
Iowa Department of Natural Resources
2473 160th Road
Guthrie Center, IA 50115-8518
Phone/fax: 641/747-2200
Email: [email protected]
Web site:www.iowadnr.gov/education/eylmtrl.html
Fish Iowa!ATeaching Module – printed 2004, basic spin casting teaching module available through
training sessions
Fish Iowa! An Introductory Guide to the Fish of Iowa – printed 1997, pamphlet describing about 30
Iowa fish species
Iowa Lake Fishing Guide – printed 2004, guide to lakes and river access areas managed by the DNR
Iowa Fishing Regulations – printed annually, summary of current fishing regulations
Other Useful References
Genova, P. 1998. First Cast – Teaching Kids to Fly-Fish. Stackpole Books: Mechanicsburg, PA.
Mayhew, J. (ed.) 1987. Iowa Fish and Fishing. Iowa Department of Natural Resources: Des Moines.
Iowa Trout Guide. 2000. Iowa Department of Natural Resources: Des Moines.
Hawkeye Fly Fishing Association web site: www.hawkeyeflyfishing.com
San Gabriel Fly Fishers – Georgetown, Texas - Information Sources for Beginning Fly Fishers web site:
http://www.sgflyfishers.com/BeginnersCorner.html
Rod Viator, ed.
Chairman
Community Outreach Programs
San Gabriel Fly Fishers


![Pursuit Of Fly Tying [Fly Fishing, Flytying]](https://img.dokumen.tips/doc/110x75/555529aab4c905b9318b59d7/pursuit-of-fly-tying-fly-fishing-flytying.jpg)