Embed Size (px)
DESCRIPTION
Guide to Cisco Unified Presence CUP practical labs.
Citation preview
Introduction to Cisco Unified Presence 8.0
Page 1 of 38
OVERVIEW
This guide has been developed for the Cisco Virtual Expert course entitled “Introduction to Cisco
Unified Presence (CUP) Hands-On”. The time required to complete the tasks in this guide is
approximately 2.5 hours.
Contents
LAB INFORMATION ...................................................................................................................................................... 3
LAB 01 Configuring Cisco Unified Presence Features and Implementing Cisco Unified Personal Communicator ..... 9
LAB 02 Integrate Cisco Unity Connection for Cisco Unified Personal Communicator Access .................................. 21
LAB 03 Configure the Different Profiles for Cisco Unified Personal Communicator ................................................ 24
Introduction to Cisco Unified Presence 8.0
Page 2 of 38
PLEASE READ THE FOLLOWING BEFORE PROCEEDING
1. Due to time constraint, not all features of the applications used are covered in this lab session.
2. Labs 01 and Lab 02 cover the Introduction to Cisco Unified Presence 8.0 topics.
3. This lab is accessible ONLY via Windows Remote Desktop Connection. Prior to accessing the lab, please
ensure that port 3389 has not been blocked from your location of access.
4. Each registered attendee is pre-assigned to a pod. The pod numbers, their respective IP addresses and
the RDP usernames/passwords have been provided at the end of the presentation. Please make sure you
use and access ONLY your assigned pod.
5. This lab is accessible ONLY within the designated time.
6. When starting a VM image (if not already started for you), you may be prompted to create a new
identifier. Please select to “keep” instead of “create” the identifier. This is to ensure that the
preconfigured CIPCs running in the XP clients register to the UC Manager with their original MAC address.
Introduction to Cisco Unified Presence 8.0
Page 3 of 38
LAB INFORMATION
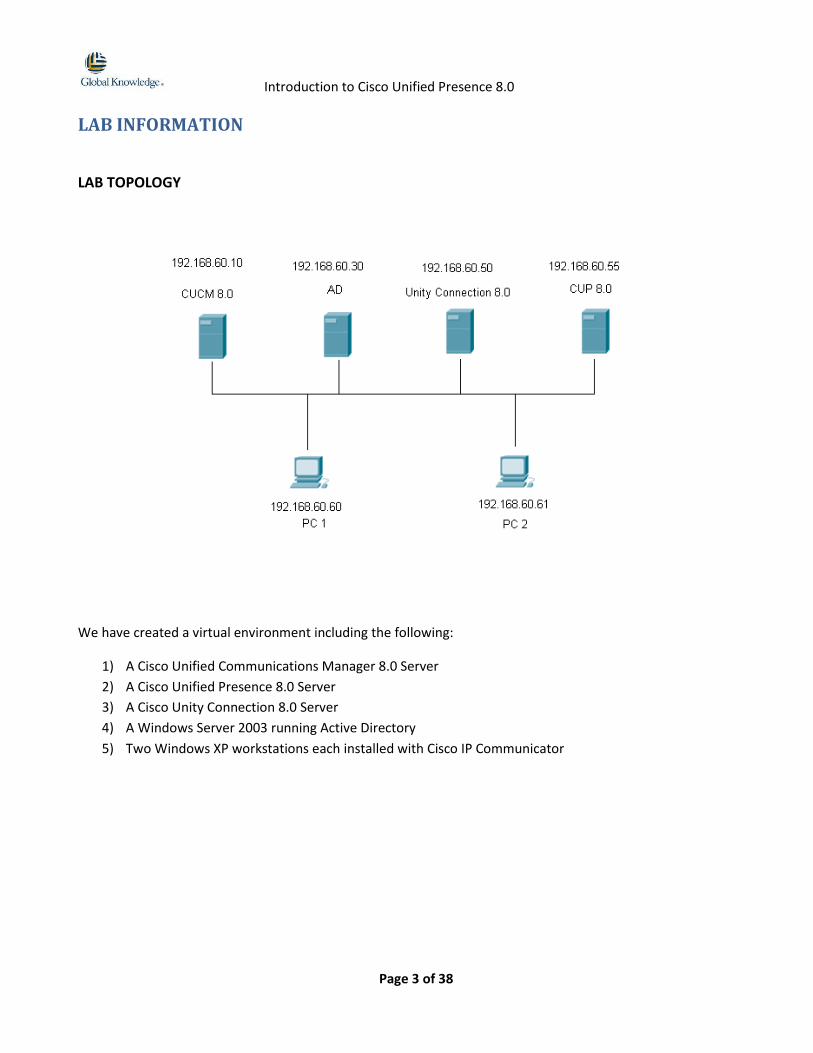
LAB TOPOLOGY
We have created a virtual environment including the following:
1) A Cisco Unified Communications Manager 8.0 Server
2) A Cisco Unified Presence 8.0 Server
3) A Cisco Unity Connection 8.0 Server
4) A Windows Server 2003 running Active Directory
5) Two Windows XP workstations each installed with Cisco IP Communicator
Introduction to Cisco Unified Presence 8.0
Page 4 of 38
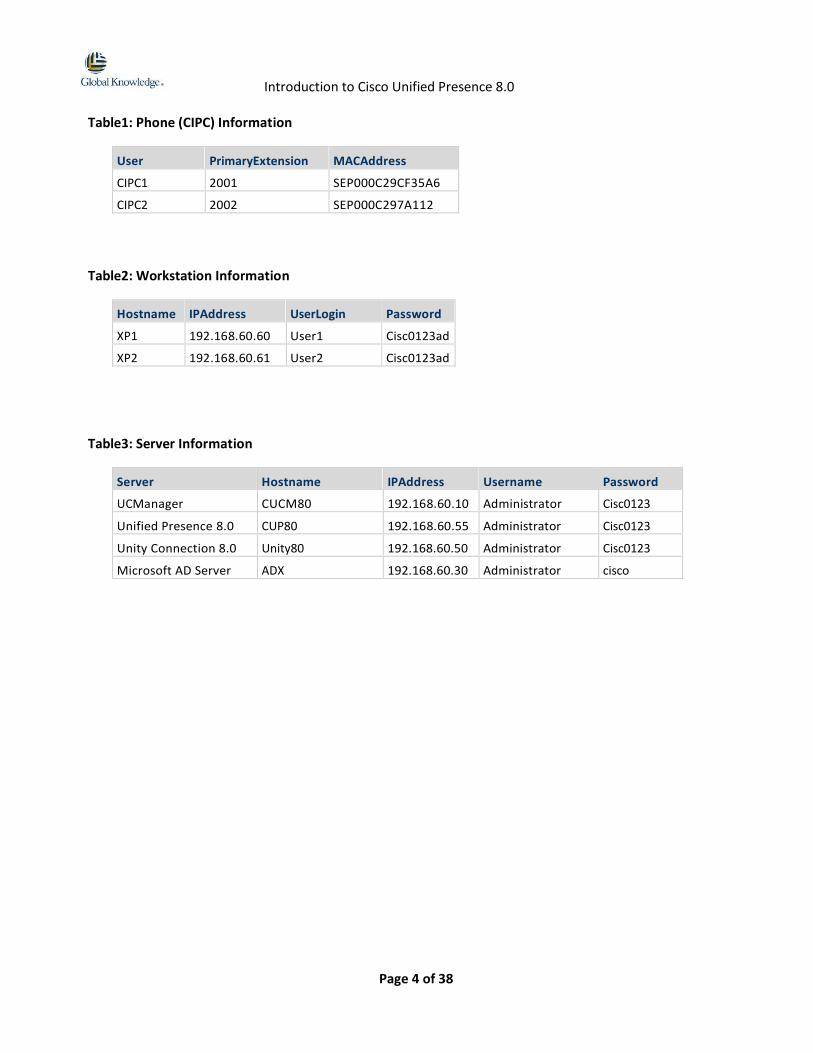
Table1: Phone (CIPC) Information
User PrimaryExtension MACAddress
CIPC1 2001 SEP000C29CF35A6
CIPC2 2002 SEP000C297A112
Table2: Workstation Information
Hostname IPAddress UserLogin Password
XP1 192.168.60.60 User1 Cisc0123ad
XP2 192.168.60.61 User2 Cisc0123ad
Table3: Server Information
Server Hostname IPAddress Username Password
UCManager CUCM80 192.168.60.10 Administrator Cisc0123
Unified Presence 8.0 CUP80 192.168.60.55 Administrator Cisc0123
Unity Connection 8.0 Unity80 192.168.60.50 Administrator Cisc0123
Microsoft AD Server ADX 192.168.60.30 Administrator cisco
Introduction to Cisco Unified Presence 8.0
Page 5 of 38
Accessing the Lab
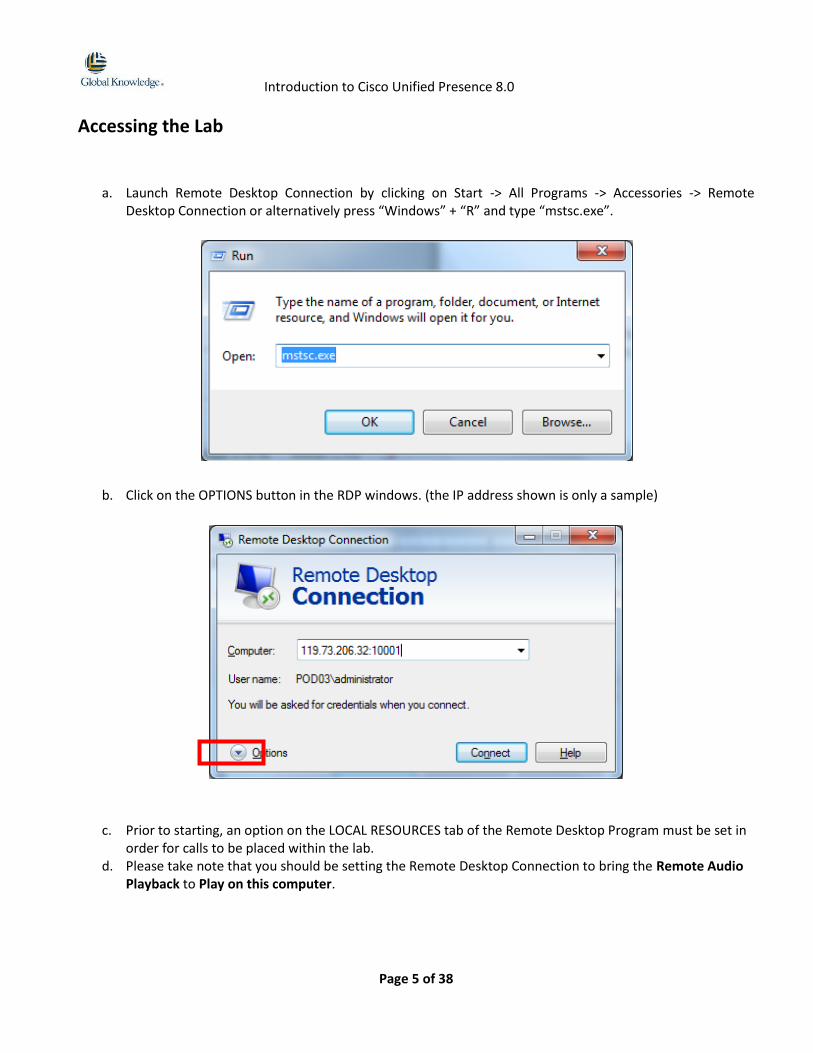
a. Launch Remote Desktop Connection by clicking on Start -> All Programs -> Accessories -> Remote Desktop Connection or alternatively press “Windows” + “R” and type “mstsc.exe”.
b. Click on the OPTIONS button in the RDP windows. (the IP address shown is only a sample)
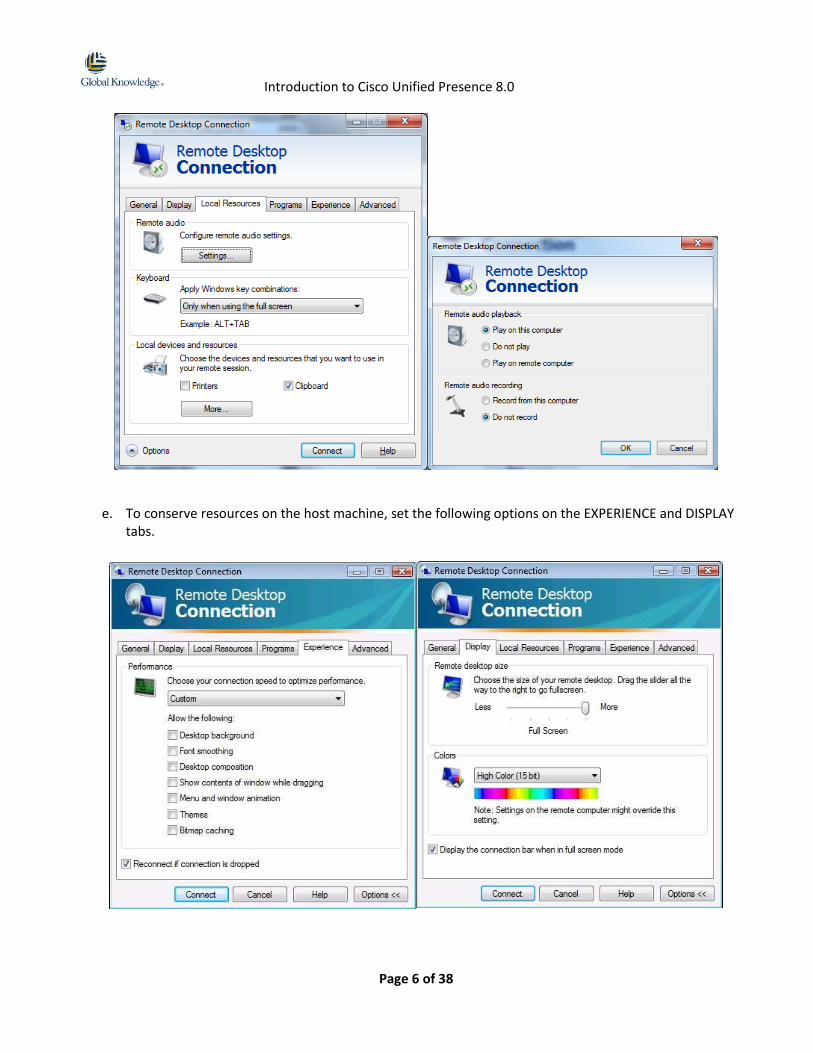
c. Prior to starting, an option on the LOCAL RESOURCES tab of the Remote Desktop Program must be set in order for calls to be placed within the lab.
d. Please take note that you should be setting the Remote Desktop Connection to bring the Remote Audio Playback to Play on this computer.
Introduction to Cisco Unified Presence 8.0
Page 6 of 38
e. To conserve resources on the host machine, set the following options on the EXPERIENCE and DISPLAY tabs.
Introduction to Cisco Unified Presence 8.0
Page 7 of 38
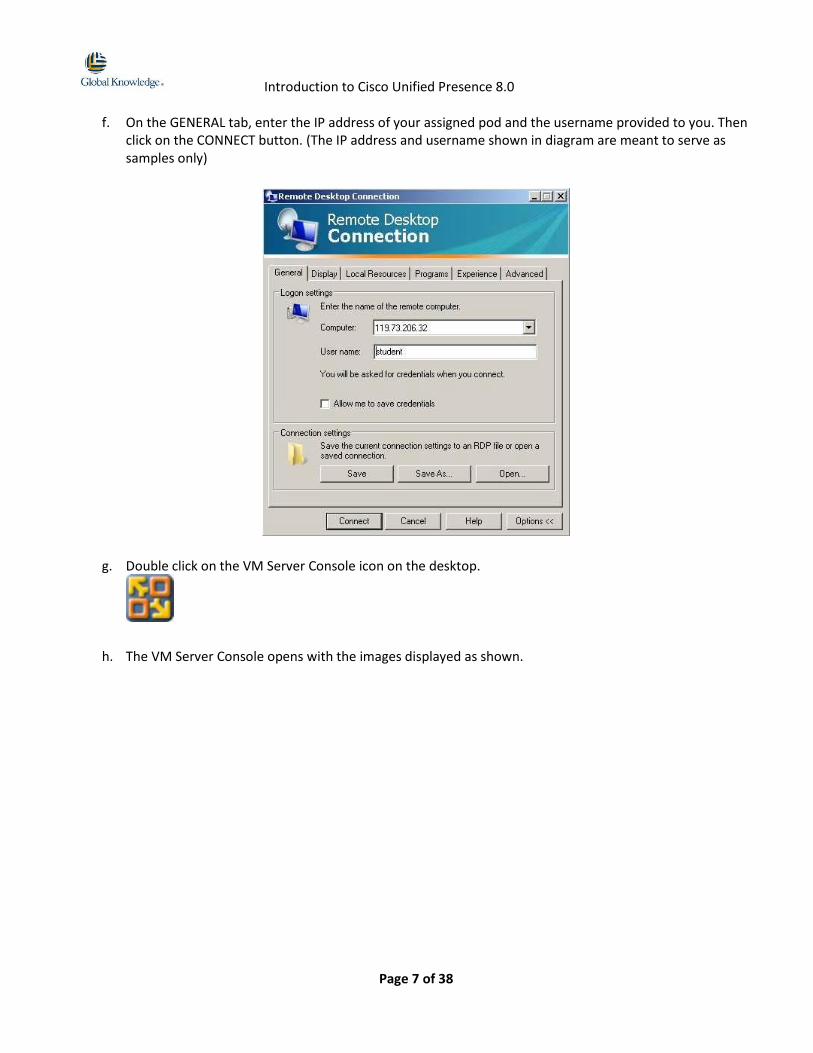
f. On the GENERAL tab, enter the IP address of your assigned pod and the username provided to you. Then click on the CONNECT button. (The IP address and username shown in diagram are meant to serve as samples only)
g. Double click on the VM Server Console icon on the desktop.
h. The VM Server Console opens with the images displayed as shown.
Introduction to Cisco Unified Presence 8.0
Page 8 of 38
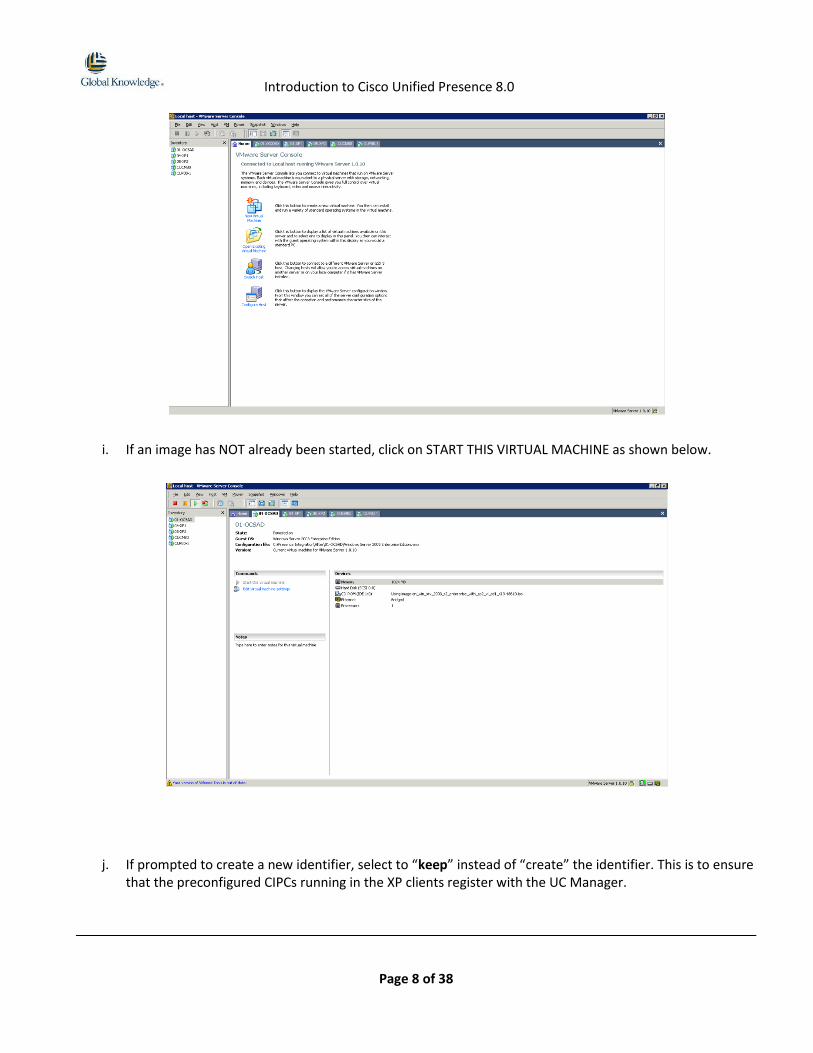
i. If an image has NOT already been started, click on START THIS VIRTUAL MACHINE as shown below.
j. If prompted to create a new identifier, select to “keep” instead of “create” the identifier. This is to ensure that the preconfigured CIPCs running in the XP clients register with the UC Manager.

Introduction to Cisco Unified Presence 8.0
Page 9 of 38
LAB 01 Configuring Cisco Unified Presence Features and Implementing
Cisco Unified Personal Communicator
Step 1: Ensure that Microsoft AD Server is already running. Login to the 04-XP1 with the following Windows
credentials.
Workstation Windows Login Password IP Address
04-XP1 User1 Cisc0123ad 192.168.60.60
Step 2: Access the CM Administration page by launching a browser and entering this URL
https://192.168.60.10/ccmadmin.
Step 3: Click Yes for the Security Alert warning.
Step 4: Login with the credentials:
Web Page Login ID Password
CM Administration Administrator Cisc0123
Introduction to Cisco Unified Presence 8.0
Page 10 of 38
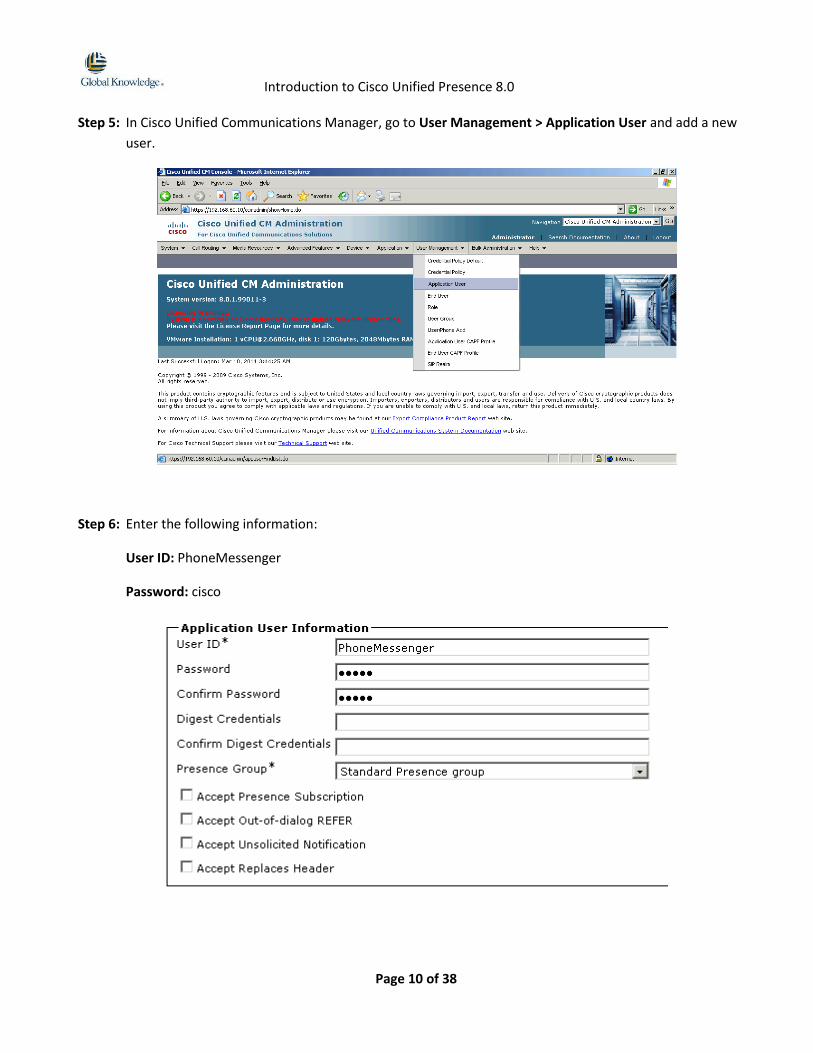
Step 5: In Cisco Unified Communications Manager, go to User Management > Application User and add a new
user.
Step 6: Enter the following information:
User ID: PhoneMessenger
Password: cisco
Introduction to Cisco Unified Presence 8.0
Page 11 of 38
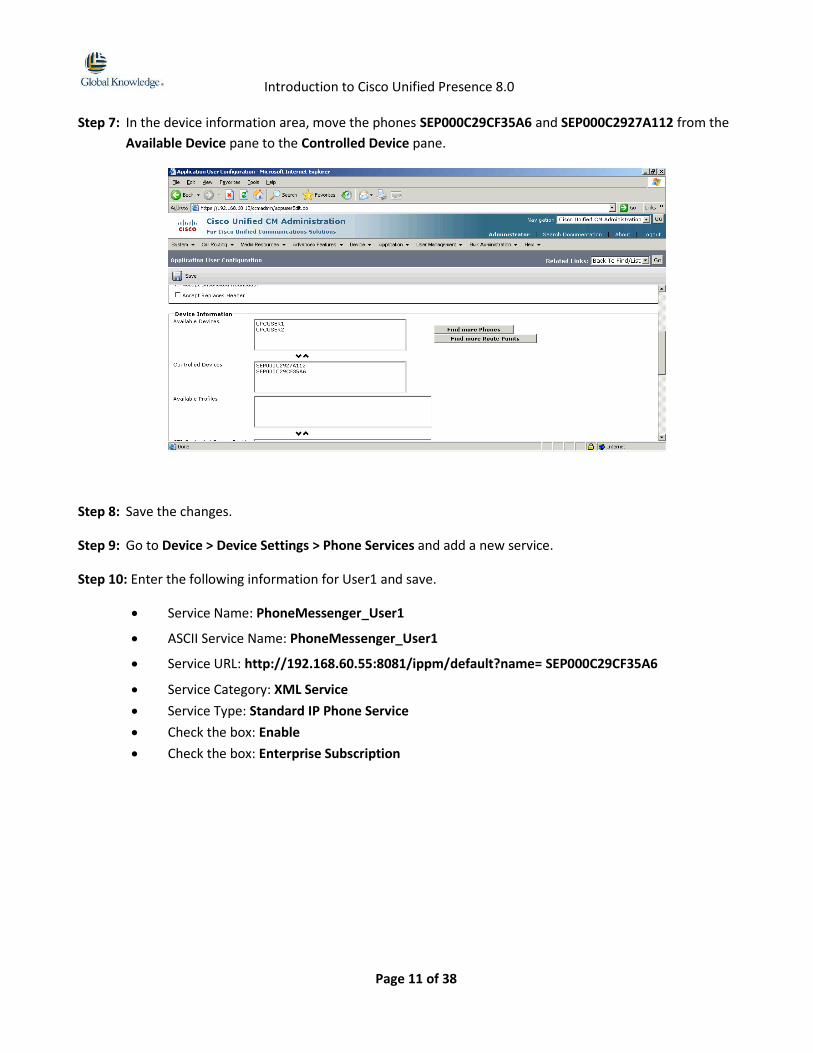
Step 7: In the device information area, move the phones SEP000C29CF35A6 and SEP000C2927A112 from the
Available Device pane to the Controlled Device pane.
Step 8: Save the changes.
Step 9: Go to Device > Device Settings > Phone Services and add a new service.
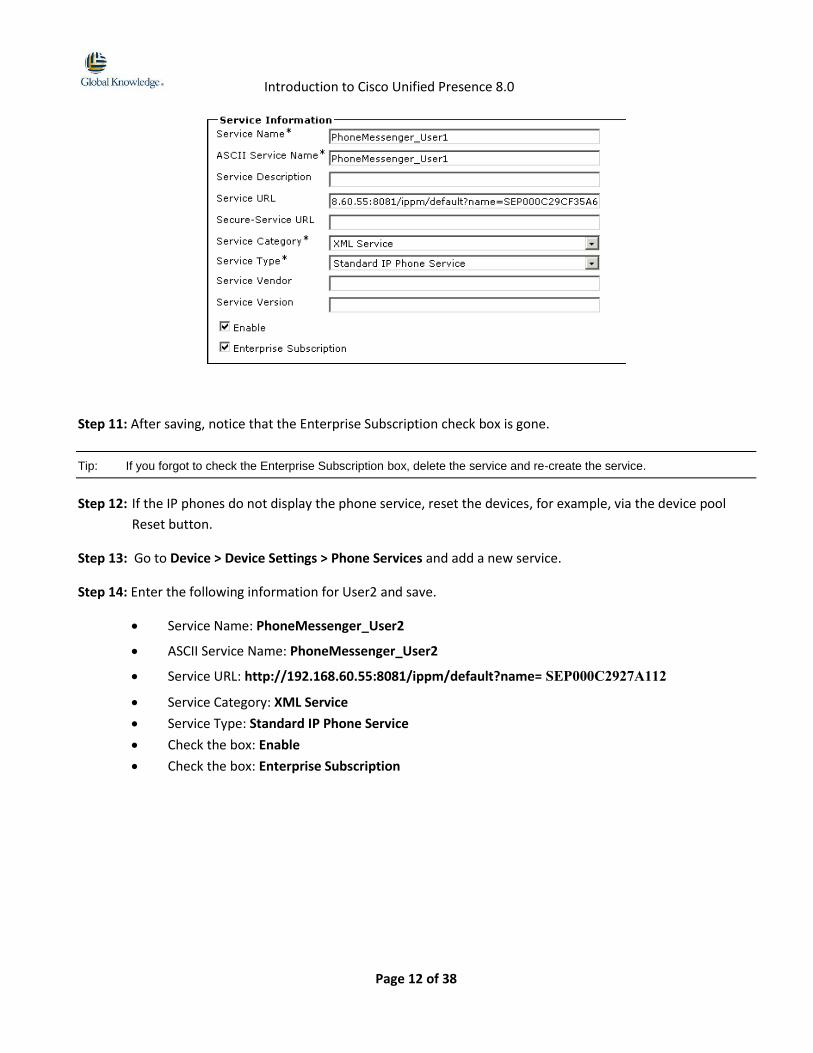
Step 10: Enter the following information for User1 and save.
Service Name: PhoneMessenger_User1
ASCII Service Name: PhoneMessenger_User1
Service URL: http://192.168.60.55:8081/ippm/default?name= SEP000C29CF35A6
Service Category: XML Service
Service Type: Standard IP Phone Service
Check the box: Enable
Check the box: Enterprise Subscription
Introduction to Cisco Unified Presence 8.0
Page 12 of 38
Step 11: After saving, notice that the Enterprise Subscription check box is gone.
Tip: If you forgot to check the Enterprise Subscription box, delete the service and re-create the service.
Step 12: If the IP phones do not display the phone service, reset the devices, for example, via the device pool
Reset button.
Step 13: Go to Device > Device Settings > Phone Services and add a new service.
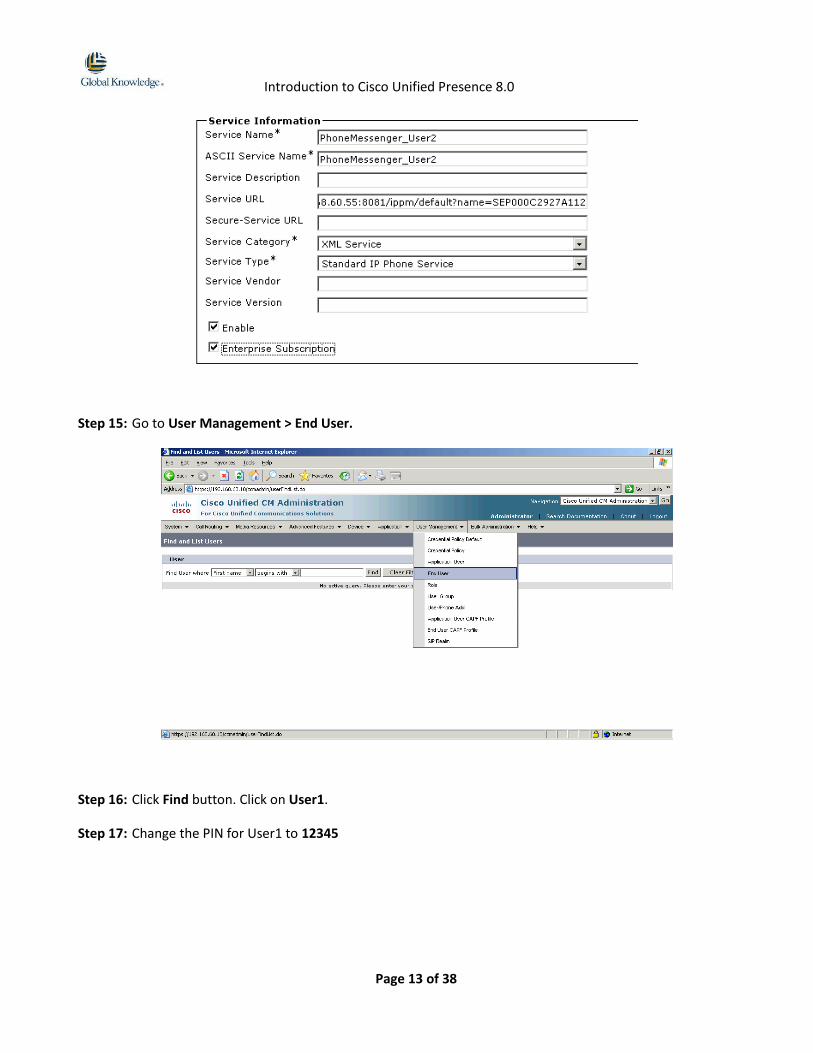
Step 14: Enter the following information for User2 and save.
Service Name: PhoneMessenger_User2
ASCII Service Name: PhoneMessenger_User2
Service URL: http://192.168.60.55:8081/ippm/default?name= SEP000C2927A112
Service Category: XML Service
Service Type: Standard IP Phone Service
Check the box: Enable
Check the box: Enterprise Subscription
Introduction to Cisco Unified Presence 8.0
Page 13 of 38
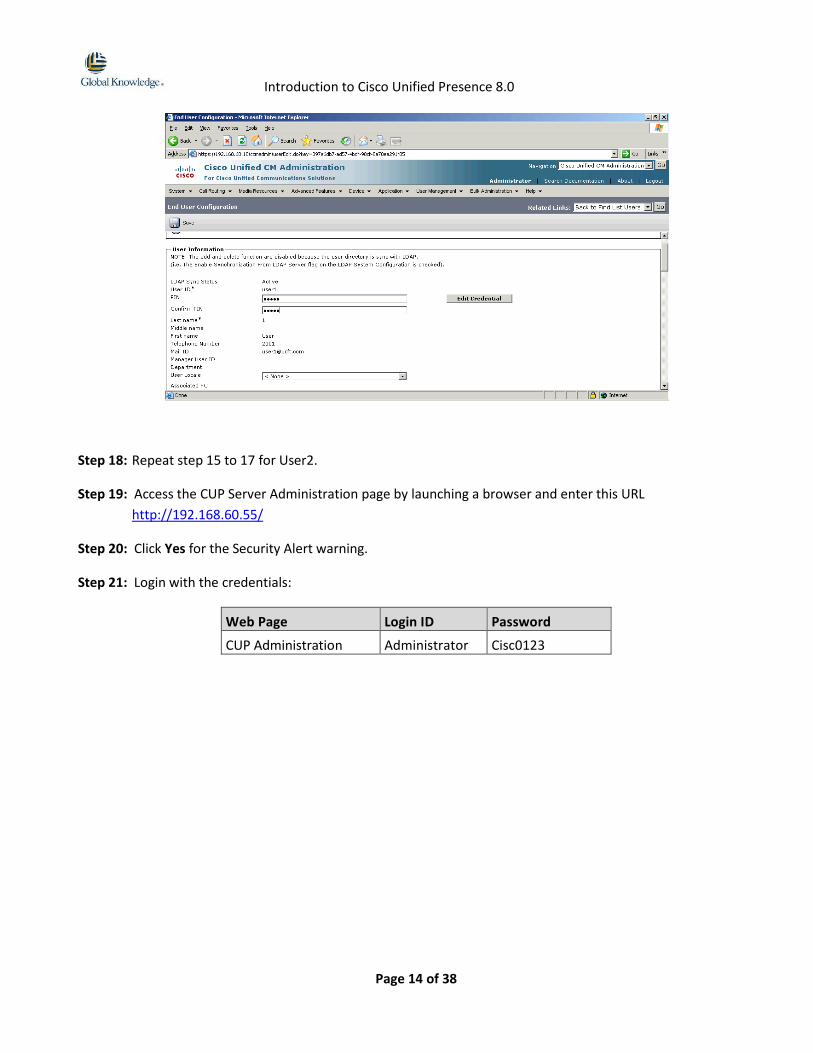
Step 15: Go to User Management > End User.
Step 16: Click Find button. Click on User1.
Step 17: Change the PIN for User1 to 12345
Introduction to Cisco Unified Presence 8.0
Page 14 of 38
Step 18: Repeat step 15 to 17 for User2.
Step 19: Access the CUP Server Administration page by launching a browser and enter this URL
http://192.168.60.55/
Step 20: Click Yes for the Security Alert warning.
Step 21: Login with the credentials:
Web Page Login ID Password
CUP Administration Administrator Cisc0123

Introduction to Cisco Unified Presence 8.0
Page 15 of 38
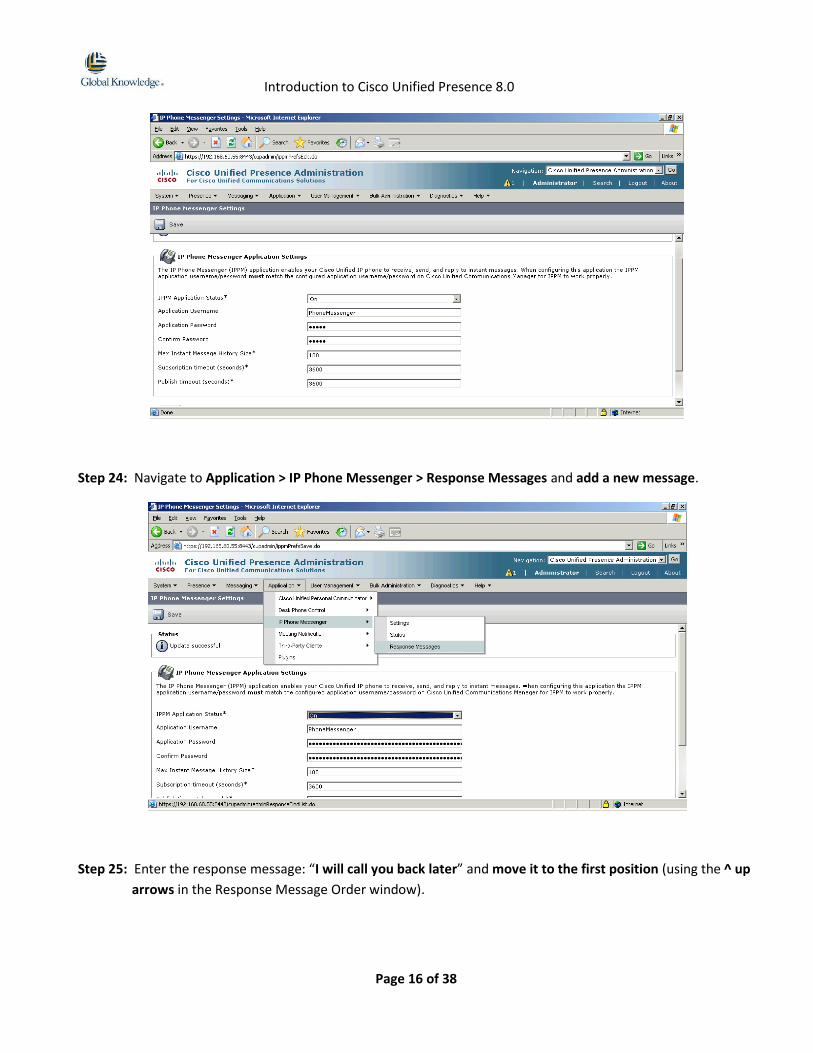
Step 22: In Cisco Unified Presence, go to Application > IP Phone Messenger > Settings.
Step 23: Set the following parameters and save.
IPPM Application Status: On
Application Username: PhoneMessenger
Application Password: cisco
Review the other parameter
Introduction to Cisco Unified Presence 8.0
Page 16 of 38
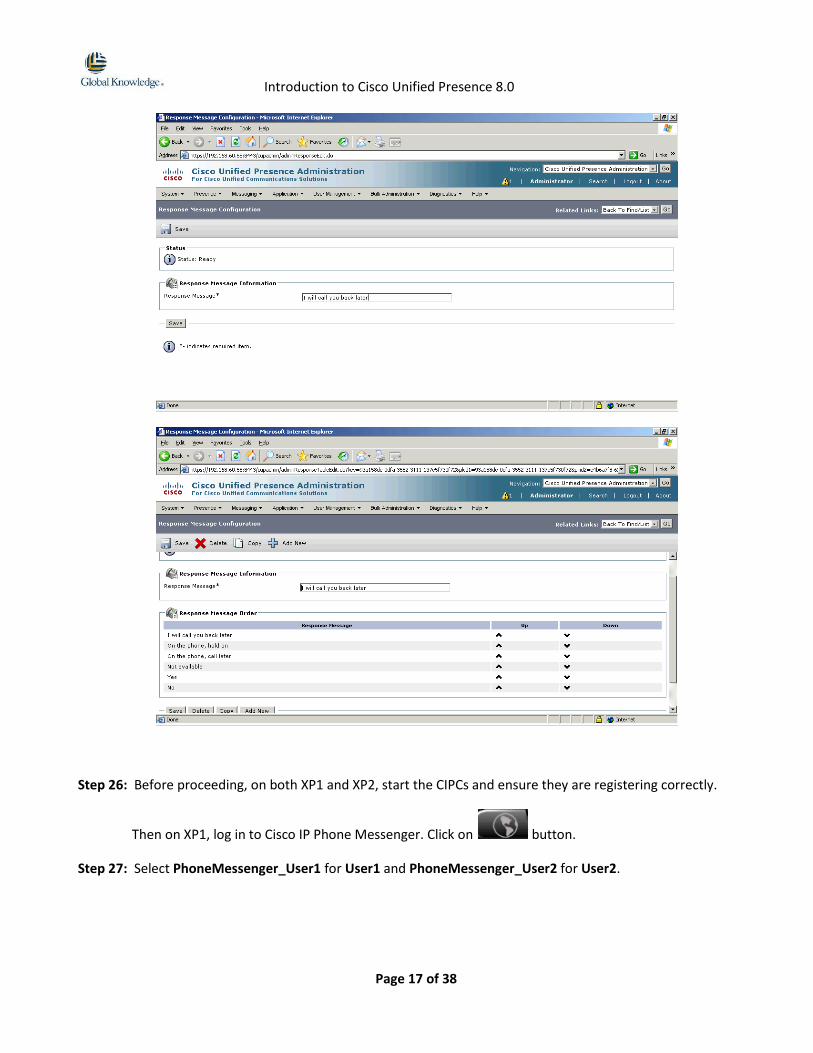
Step 24: Navigate to Application > IP Phone Messenger > Response Messages and add a new message.
Step 25: Enter the response message: “I will call you back later” and move it to the first position (using the ^ up
arrows in the Response Message Order window).
Introduction to Cisco Unified Presence 8.0
Page 17 of 38
Step 26: Before proceeding, on both XP1 and XP2, start the CIPCs and ensure they are registering correctly.
Then on XP1, log in to Cisco IP Phone Messenger. Click on button.
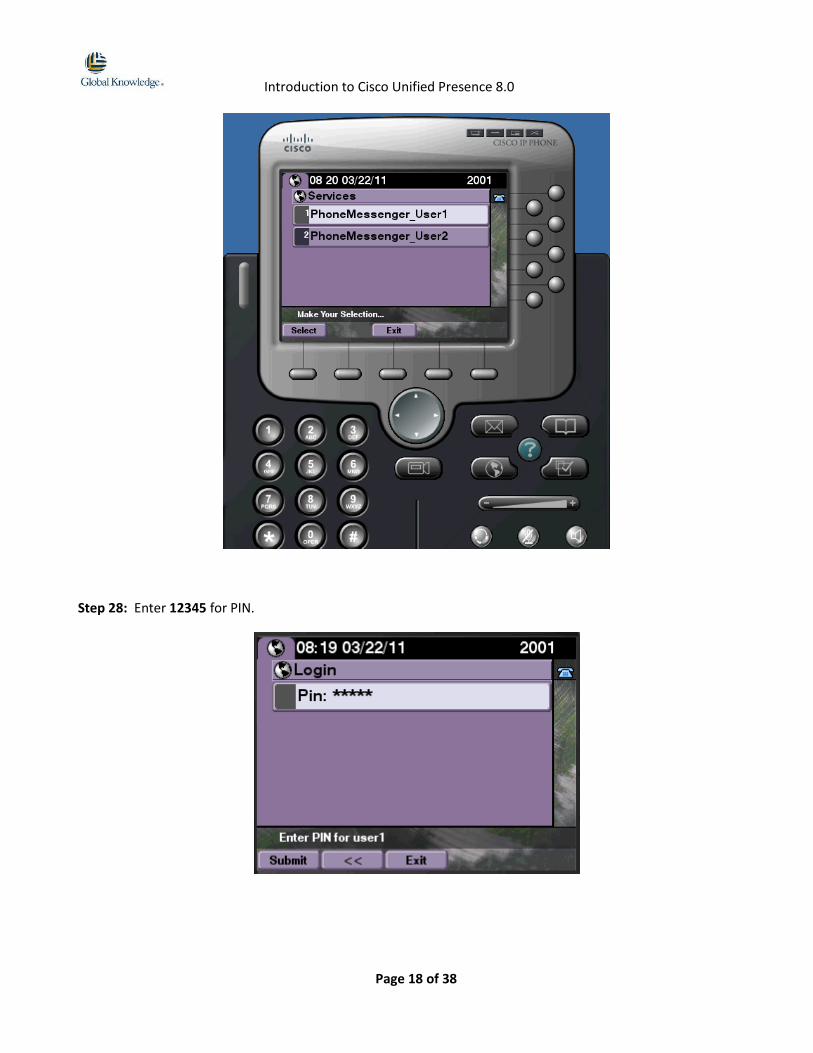
Step 27: Select PhoneMessenger_User1 for User1 and PhoneMessenger_User2 for User2.
Introduction to Cisco Unified Presence 8.0
Page 18 of 38
Step 28: Enter 12345 for PIN.
Introduction to Cisco Unified Presence 8.0
Page 19 of 38
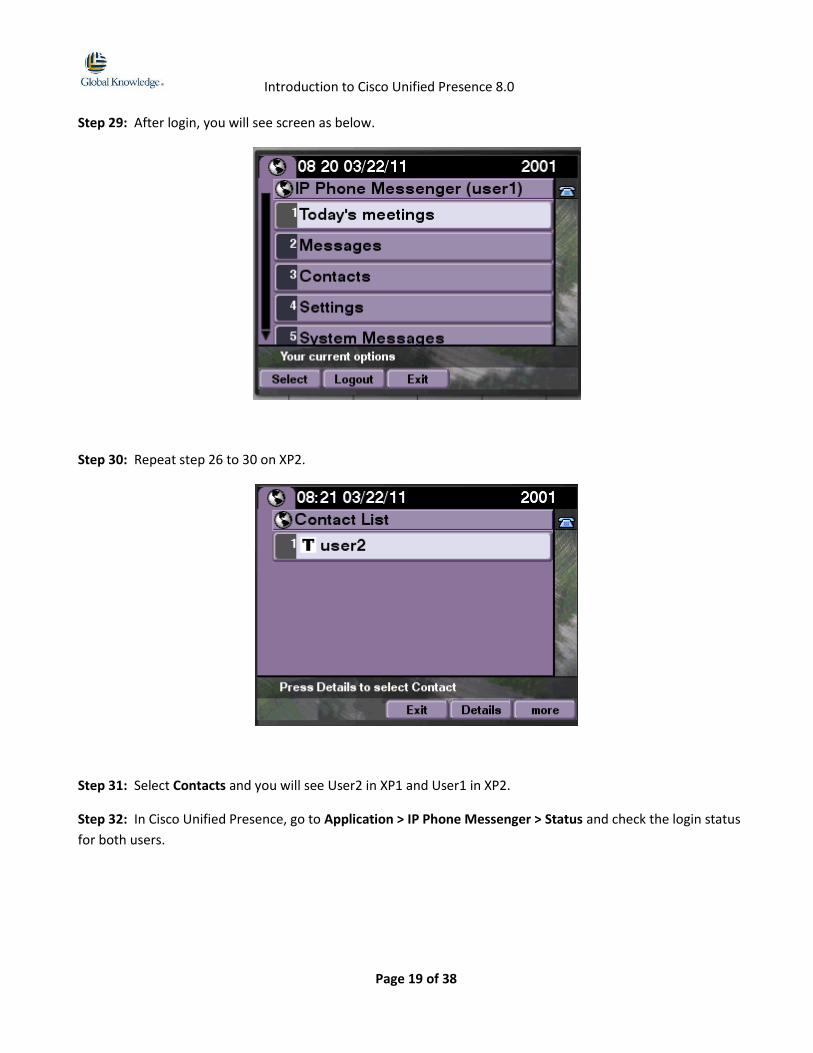
Step 29: After login, you will see screen as below.
Step 30: Repeat step 26 to 30 on XP2.
Step 31: Select Contacts and you will see User2 in XP1 and User1 in XP2.
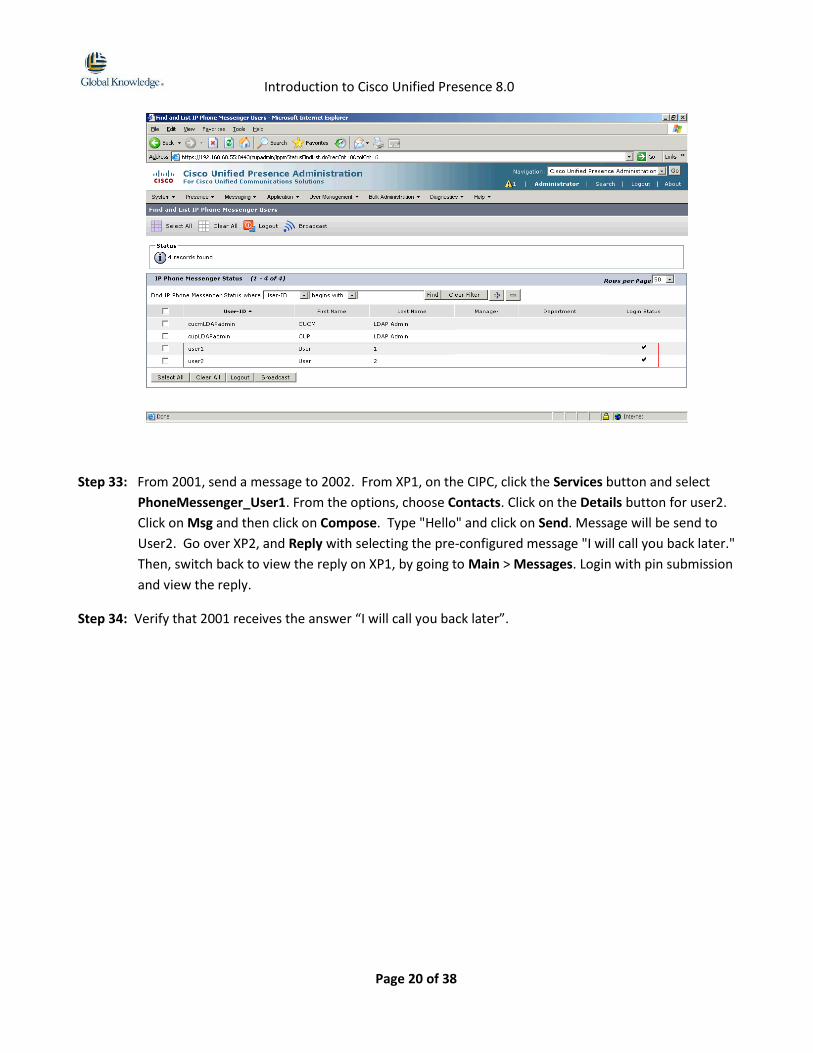
Step 32: In Cisco Unified Presence, go to Application > IP Phone Messenger > Status and check the login status
for both users.
Introduction to Cisco Unified Presence 8.0
Page 20 of 38
Step 33: From 2001, send a message to 2002. From XP1, on the CIPC, click the Services button and select
PhoneMessenger_User1. From the options, choose Contacts. Click on the Details button for user2.
Click on Msg and then click on Compose. Type "Hello" and click on Send. Message will be send to
User2. Go over XP2, and Reply with selecting the pre-configured message "I will call you back later."
Then, switch back to view the reply on XP1, by going to Main > Messages. Login with pin submission
and view the reply.
Step 34: Verify that 2001 receives the answer “I will call you back later”.

Introduction to Cisco Unified Presence 8.0
Page 21 of 38
LAB 02 Integrate Cisco Unity Connection for Cisco Unified Personal
Communicator Access
Step 1: Login to the 04-XP1 with the following Windows credentials:
Workstation Windows Login Password IP Address
04-XP1 User1 Cisc0123ad 192.168.60.60
Step 2: Access the CUC Administration page by launching a browser and enter this URL http://192.168.60.50
Step 3: Click Yes for the Security Alert warning.
Step 4: Login with the credentials:
Web Page Login ID Password
Cisco Unity Connection Administration Administrator Cisc0123
Step 5: In Cisco Unity Connection, go to Class of Service > Class of Service and allow the User1 and User2 to
receive their voice messages with the Cisco Unified Personal Communicator.
Introduction to Cisco Unified Presence 8.0
Page 22 of 38
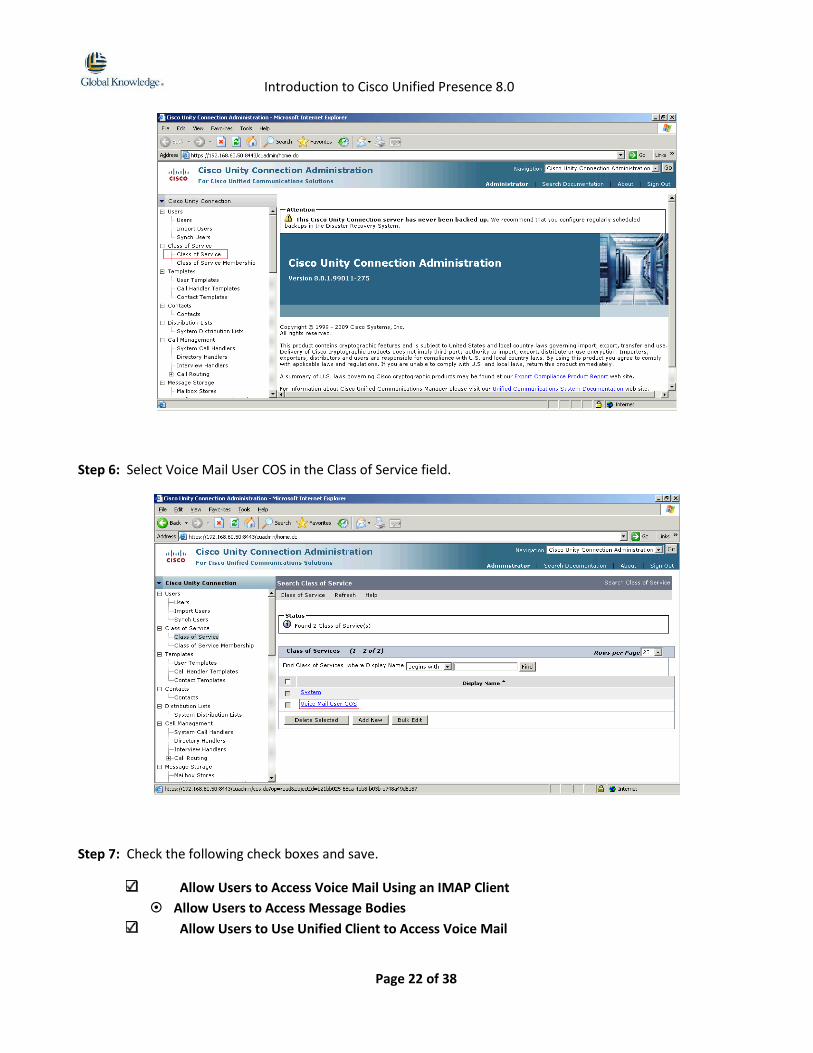
Step 6: Select Voice Mail User COS in the Class of Service field.
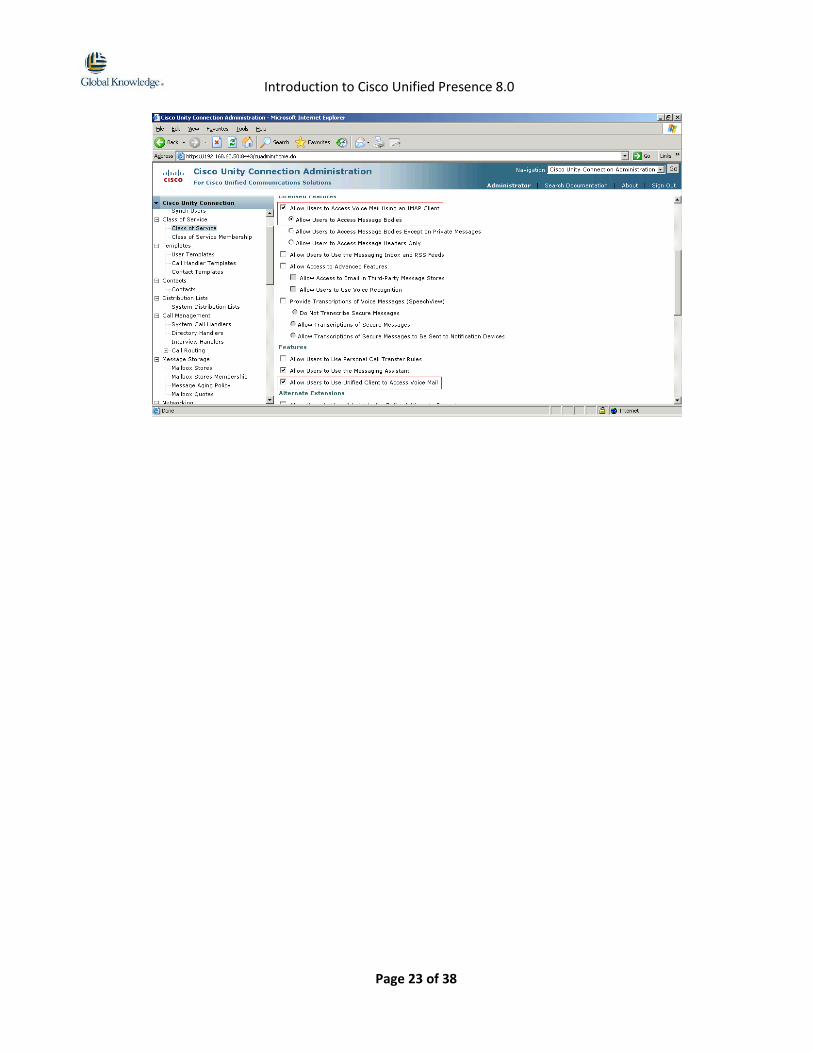
Step 7: Check the following check boxes and save.
Allow Users to Access Voice Mail Using an IMAP Client
Allow Users to Access Message Bodies
Allow Users to Use Unified Client to Access Voice Mail
Introduction to Cisco Unified Presence 8.0
Page 23 of 38

Introduction to Cisco Unified Presence 8.0
Page 24 of 38
LAB 03 Configure the Different Profiles for Cisco Unified Personal
Communicator
Step 1: Login to the 04-XP1with the following Windows credentials.
Workstation Windows Login Password IP Address
04-XP1 User1 Cisc0123ad 192.168.60.60
Step 2: Access the CM Administration page by launching a browser and enter this URL http://192.168.60.10
Step 3: Click Yes for the Security Alert warning.
Step 4: Login with the credentials:
Web Page Login ID Password
CM Administration Administrator Cisc0123
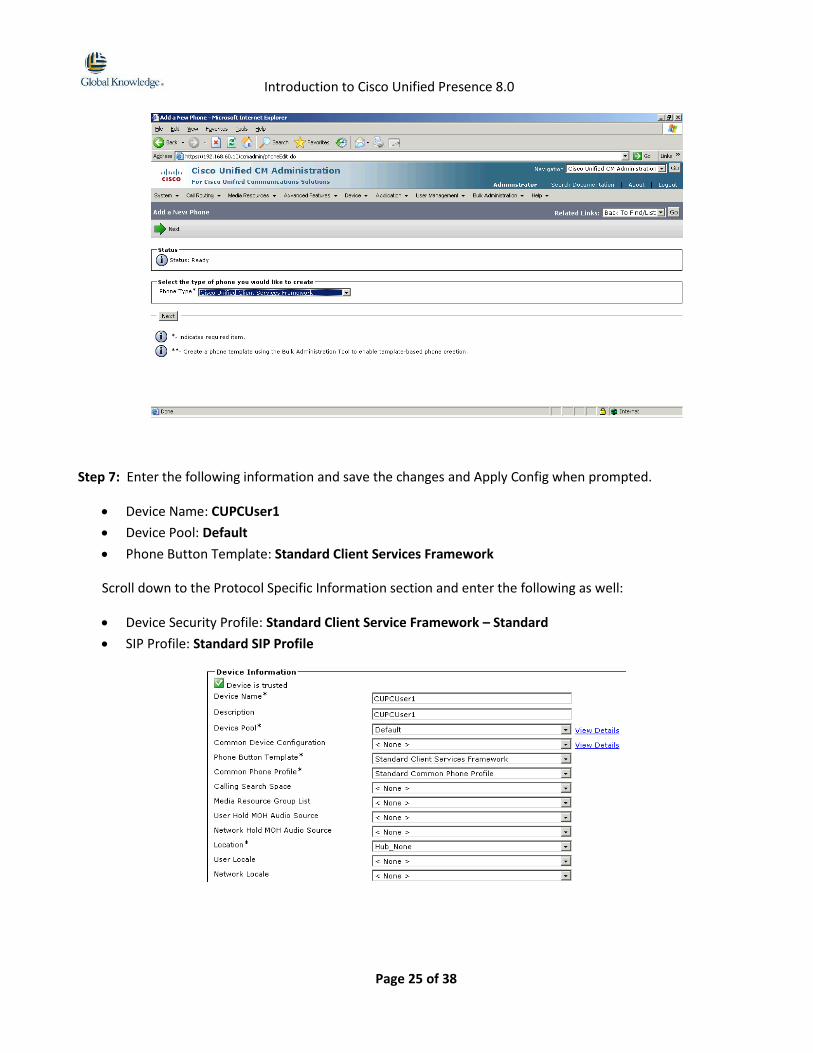
Step 5: In Cisco Unified Communications Manager, go to Device > Phone and add a new phone.
Step 6: Select Cisco Unified Client Services Framework in the Phone Type field and click Next.
Introduction to Cisco Unified Presence 8.0
Page 25 of 38
Step 7: Enter the following information and save the changes and Apply Config when prompted.
Device Name: CUPCUser1
Device Pool: Default
Phone Button Template: Standard Client Services Framework
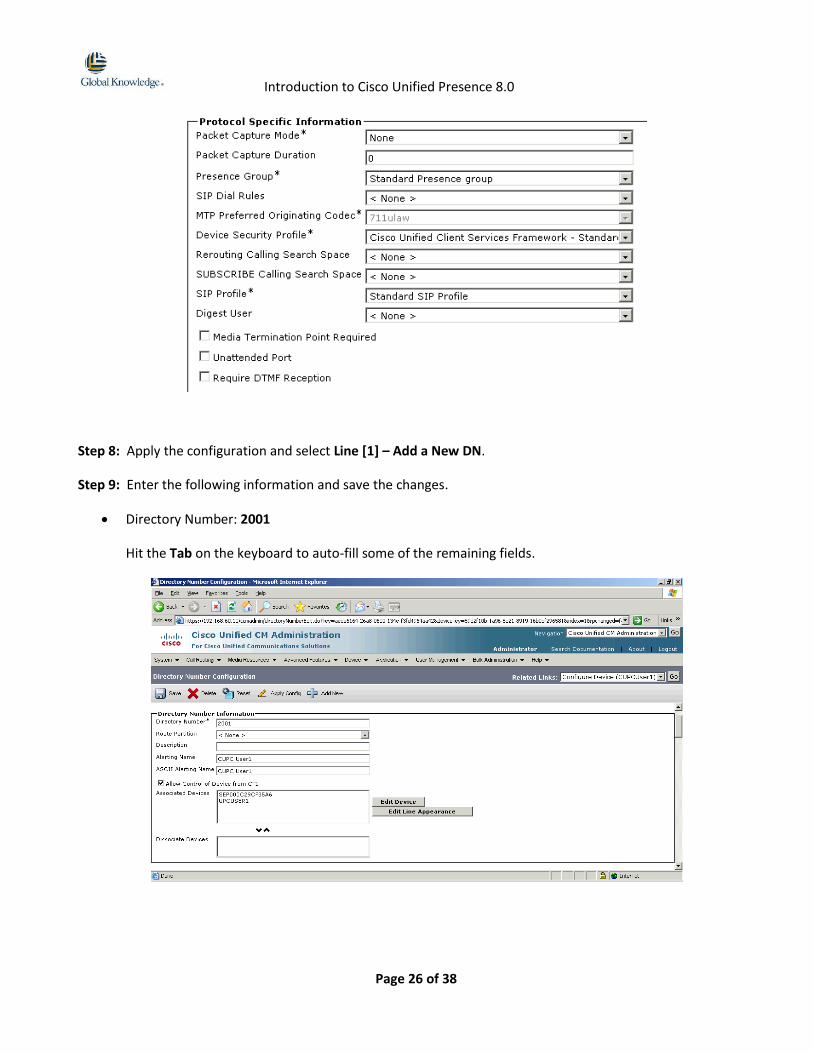
Scroll down to the Protocol Specific Information section and enter the following as well:
Device Security Profile: Standard Client Service Framework – Standard
SIP Profile: Standard SIP Profile
Introduction to Cisco Unified Presence 8.0
Page 26 of 38
Step 8: Apply the configuration and select Line [1] – Add a New DN.
Step 9: Enter the following information and save the changes.
Directory Number: 2001
Hit the Tab on the keyboard to auto-fill some of the remaining fields.

Introduction to Cisco Unified Presence 8.0
Page 27 of 38
Step 10: Go down to the area Users Associated with Line. Click Associate End Users. Find and select User1 and
click on Add Selected button.
Step 11: Go to User Management > End User and select the user User1.
Step 12: Verify that the CIPC, CUPC and CIFS devices are added to the devices listed in the Controlled Devices
area.
Step 13: Repeat Step 6 to 12 for User2.

Introduction to Cisco Unified Presence 8.0
Page 28 of 38
Introduction to Cisco Unified Presence 8.0
Page 29 of 38
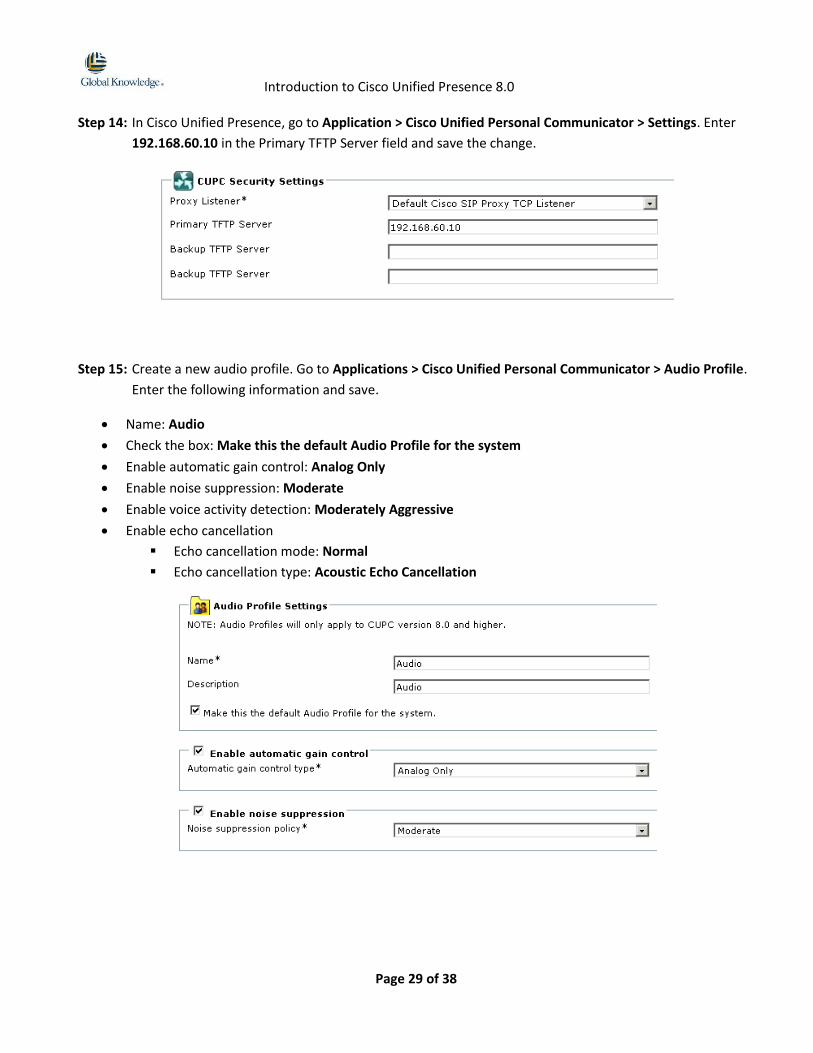
Step 14: In Cisco Unified Presence, go to Application > Cisco Unified Personal Communicator > Settings. Enter
192.168.60.10 in the Primary TFTP Server field and save the change.
Step 15: Create a new audio profile. Go to Applications > Cisco Unified Personal Communicator > Audio Profile.
Enter the following information and save.
Name: Audio
Check the box: Make this the default Audio Profile for the system
Enable automatic gain control: Analog Only
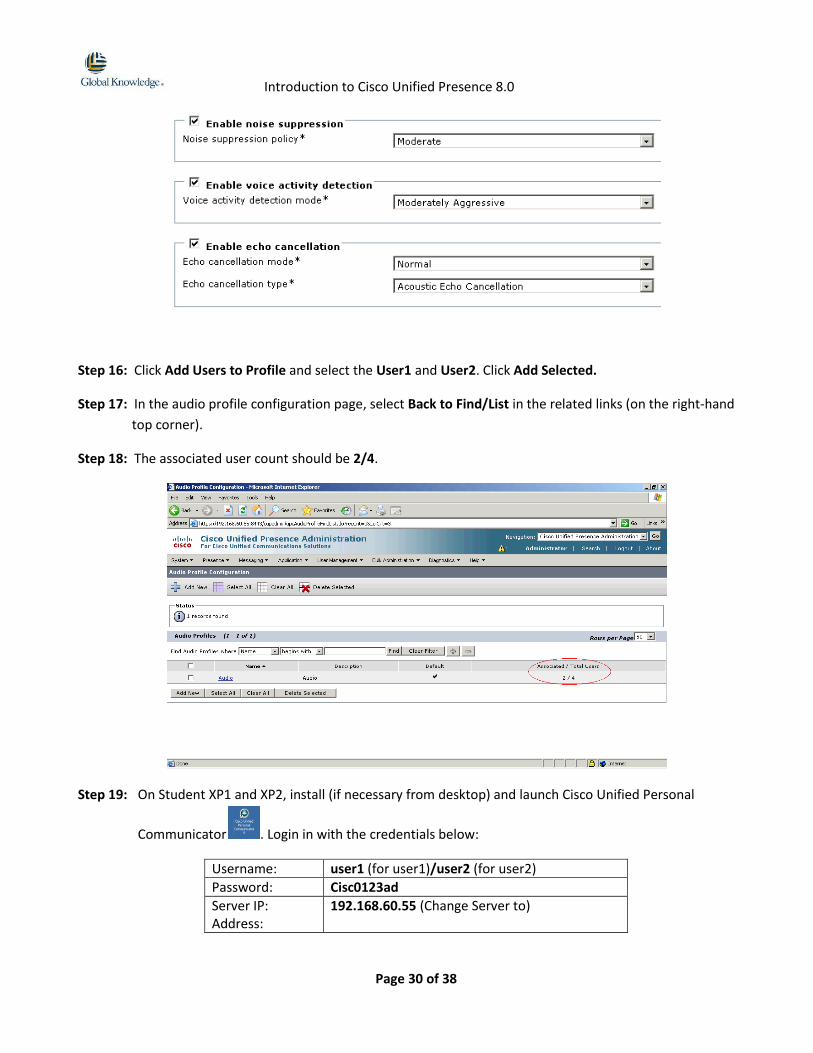
Enable noise suppression: Moderate
Enable voice activity detection: Moderately Aggressive
Enable echo cancellation
Echo cancellation mode: Normal
Echo cancellation type: Acoustic Echo Cancellation
Introduction to Cisco Unified Presence 8.0
Page 30 of 38
Step 16: Click Add Users to Profile and select the User1 and User2. Click Add Selected.
Step 17: In the audio profile configuration page, select Back to Find/List in the related links (on the right-hand
top corner).
Step 18: The associated user count should be 2/4.
Step 19: On Student XP1 and XP2, install (if necessary from desktop) and launch Cisco Unified Personal
Communicator . Login in with the credentials below:
Username: user1 (for user1)/user2 (for user2)
Password: Cisc0123ad
Server IP: Address:
192.168.60.55 (Change Server to)
Introduction to Cisco Unified Presence 8.0
Page 31 of 38
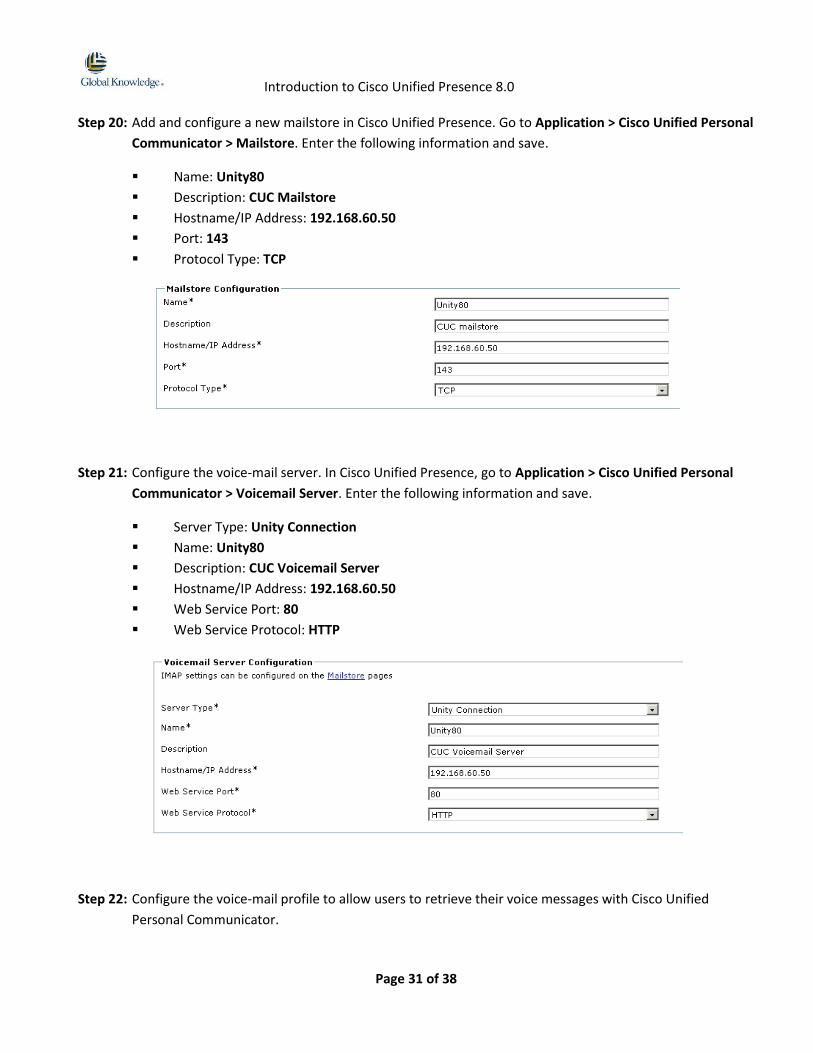
Step 20: Add and configure a new mailstore in Cisco Unified Presence. Go to Application > Cisco Unified Personal
Communicator > Mailstore. Enter the following information and save.
Name: Unity80
Description: CUC Mailstore
Hostname/IP Address: 192.168.60.50
Port: 143
Protocol Type: TCP
Step 21: Configure the voice-mail server. In Cisco Unified Presence, go to Application > Cisco Unified Personal
Communicator > Voicemail Server. Enter the following information and save.
Server Type: Unity Connection
Name: Unity80
Description: CUC Voicemail Server
Hostname/IP Address: 192.168.60.50
Web Service Port: 80
Web Service Protocol: HTTP
Step 22: Configure the voice-mail profile to allow users to retrieve their voice messages with Cisco Unified
Personal Communicator.
Introduction to Cisco Unified Presence 8.0
Page 32 of 38
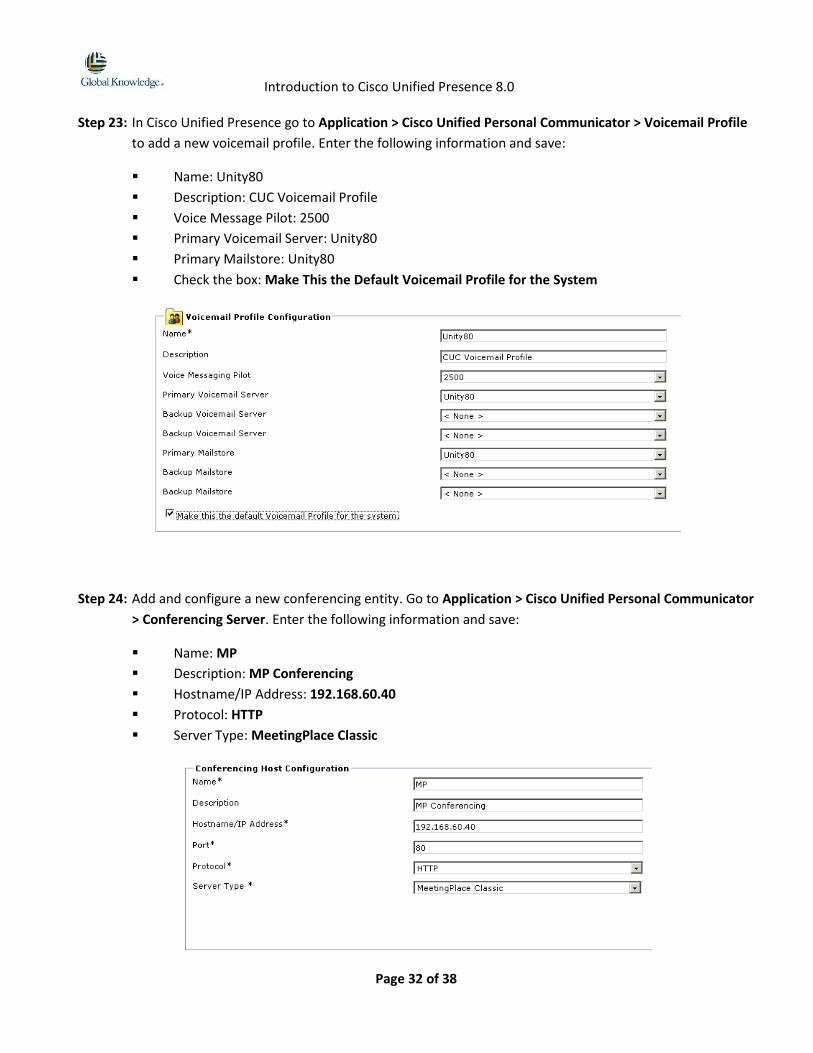
Step 23: In Cisco Unified Presence go to Application > Cisco Unified Personal Communicator > Voicemail Profile
to add a new voicemail profile. Enter the following information and save:
Name: Unity80
Description: CUC Voicemail Profile
Voice Message Pilot: 2500
Primary Voicemail Server: Unity80
Primary Mailstore: Unity80
Check the box: Make This the Default Voicemail Profile for the System
Step 24: Add and configure a new conferencing entity. Go to Application > Cisco Unified Personal Communicator
> Conferencing Server. Enter the following information and save:
Name: MP
Description: MP Conferencing
Hostname/IP Address: 192.168.60.40
Protocol: HTTP
Server Type: MeetingPlace Classic
Introduction to Cisco Unified Presence 8.0
Page 33 of 38
Note: There is no Cisco Unified MeetingPlace in the lab environment. In the Server Health tool, you will notice the
error message later where conference device is not accessible
Step 25: Configure the conferencing profile to allow Cisco Unified Personal Communicator users to initiate a
conference call or escalate a chat to a conference.
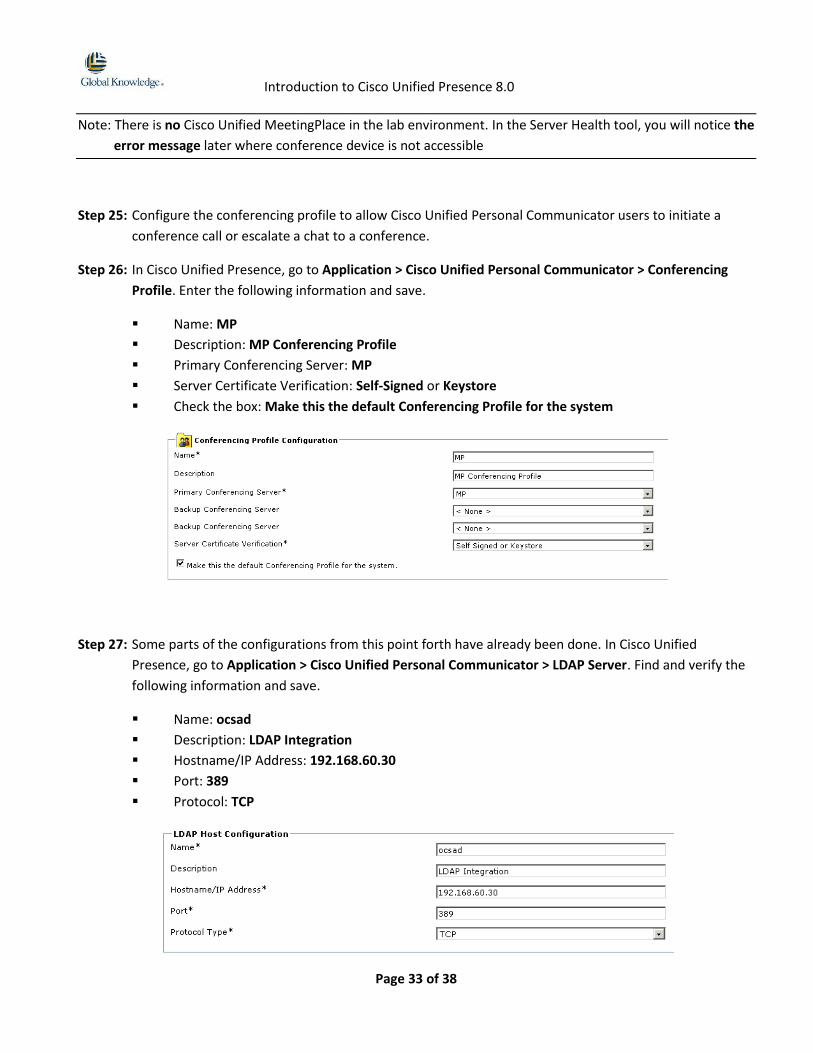
Step 26: In Cisco Unified Presence, go to Application > Cisco Unified Personal Communicator > Conferencing
Profile. Enter the following information and save.
Name: MP
Description: MP Conferencing Profile
Primary Conferencing Server: MP
Server Certificate Verification: Self-Signed or Keystore
Check the box: Make this the default Conferencing Profile for the system
Step 27: Some parts of the configurations from this point forth have already been done. In Cisco Unified
Presence, go to Application > Cisco Unified Personal Communicator > LDAP Server. Find and verify the
following information and save.
Name: ocsad
Description: LDAP Integration
Hostname/IP Address: 192.168.60.30
Port: 389
Protocol: TCP
Introduction to Cisco Unified Presence 8.0
Page 34 of 38
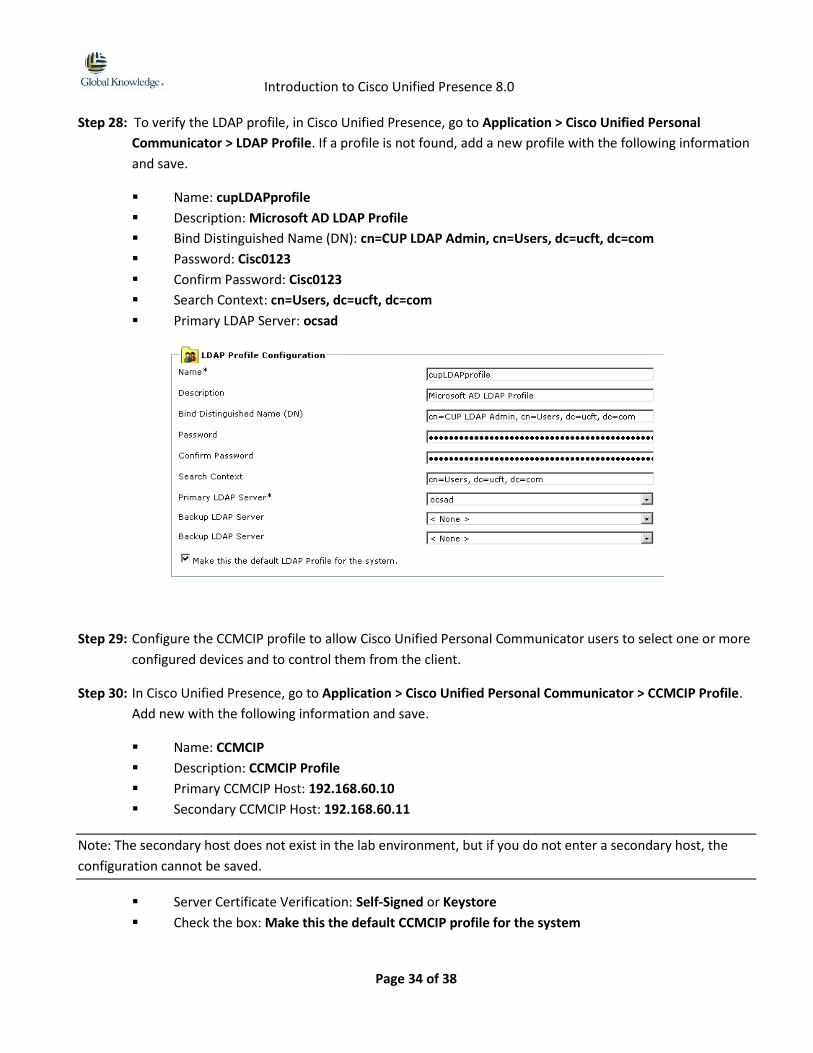
Step 28: To verify the LDAP profile, in Cisco Unified Presence, go to Application > Cisco Unified Personal
Communicator > LDAP Profile. If a profile is not found, add a new profile with the following information
and save.
Name: cupLDAPprofile
Description: Microsoft AD LDAP Profile
Bind Distinguished Name (DN): cn=CUP LDAP Admin, cn=Users, dc=ucft, dc=com
Password: Cisc0123
Confirm Password: Cisc0123
Search Context: cn=Users, dc=ucft, dc=com
Primary LDAP Server: ocsad
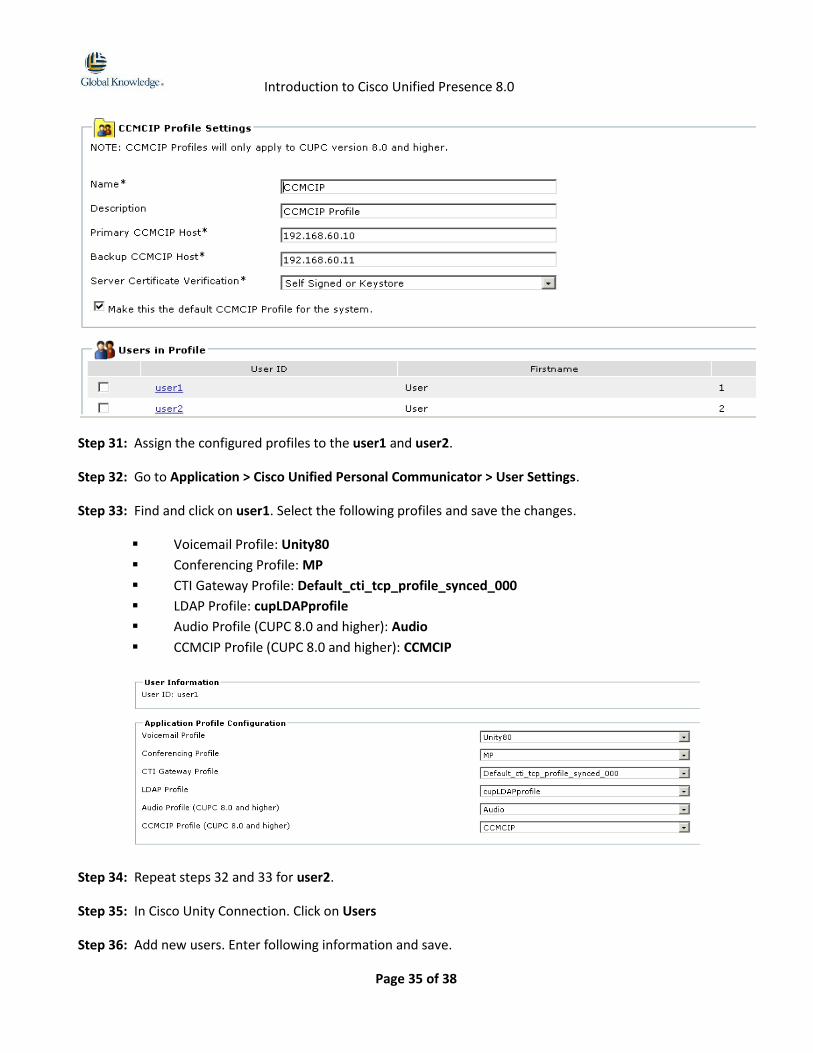
Step 29: Configure the CCMCIP profile to allow Cisco Unified Personal Communicator users to select one or more
configured devices and to control them from the client.
Step 30: In Cisco Unified Presence, go to Application > Cisco Unified Personal Communicator > CCMCIP Profile.
Add new with the following information and save.
Name: CCMCIP
Description: CCMCIP Profile
Primary CCMCIP Host: 192.168.60.10
Secondary CCMCIP Host: 192.168.60.11
Note: The secondary host does not exist in the lab environment, but if you do not enter a secondary host, the
configuration cannot be saved.
Server Certificate Verification: Self-Signed or Keystore
Check the box: Make this the default CCMCIP profile for the system
Introduction to Cisco Unified Presence 8.0
Page 35 of 38
Step 31: Assign the configured profiles to the user1 and user2.
Step 32: Go to Application > Cisco Unified Personal Communicator > User Settings.
Step 33: Find and click on user1. Select the following profiles and save the changes.
Voicemail Profile: Unity80
Conferencing Profile: MP
CTI Gateway Profile: Default_cti_tcp_profile_synced_000
LDAP Profile: cupLDAPprofile
Audio Profile (CUPC 8.0 and higher): Audio
CCMCIP Profile (CUPC 8.0 and higher): CCMCIP
Step 34: Repeat steps 32 and 33 for user2.
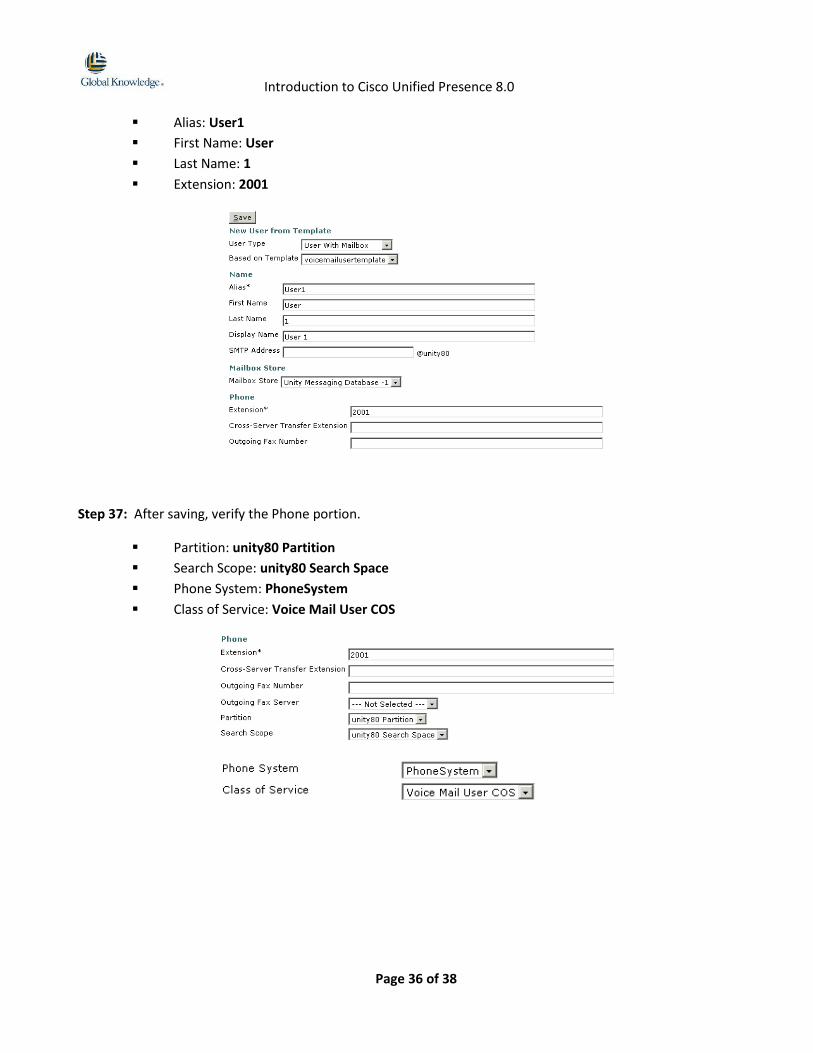
Step 35: In Cisco Unity Connection. Click on Users
Step 36: Add new users. Enter following information and save.
Introduction to Cisco Unified Presence 8.0
Page 36 of 38
Alias: User1
First Name: User
Last Name: 1
Extension: 2001
Step 37: After saving, verify the Phone portion.
Partition: unity80 Partition
Search Scope: unity80 Search Space
Phone System: PhoneSystem
Class of Service: Voice Mail User COS
Introduction to Cisco Unified Presence 8.0
Page 37 of 38
Step 38: Repeat step 36 and 37 for User2.
Alias: User2
First Name: User
Last Name: 2
Extension: 2002
Step 39: Click on Users on the left pane. Select User1.
Step 40: Select Edit -> Change Password. Choose Web Application from drop-down-list. Enter Cisc0123ad for
password and confirm with the same.
Step 41: Repeat step 40 for User2.
Step 42: In Cisco Unified Personal Communicator, go to File > Options and click Accounts.
Note: if you cannot see the Accounts, please close the CUPC and re-open.
Step 43: Enter the usernames and passwords for the following and click OK.
Voicemail Username: User1 (for user1) / User2 (for user2)
Voicemail Password: Cisc0123ad
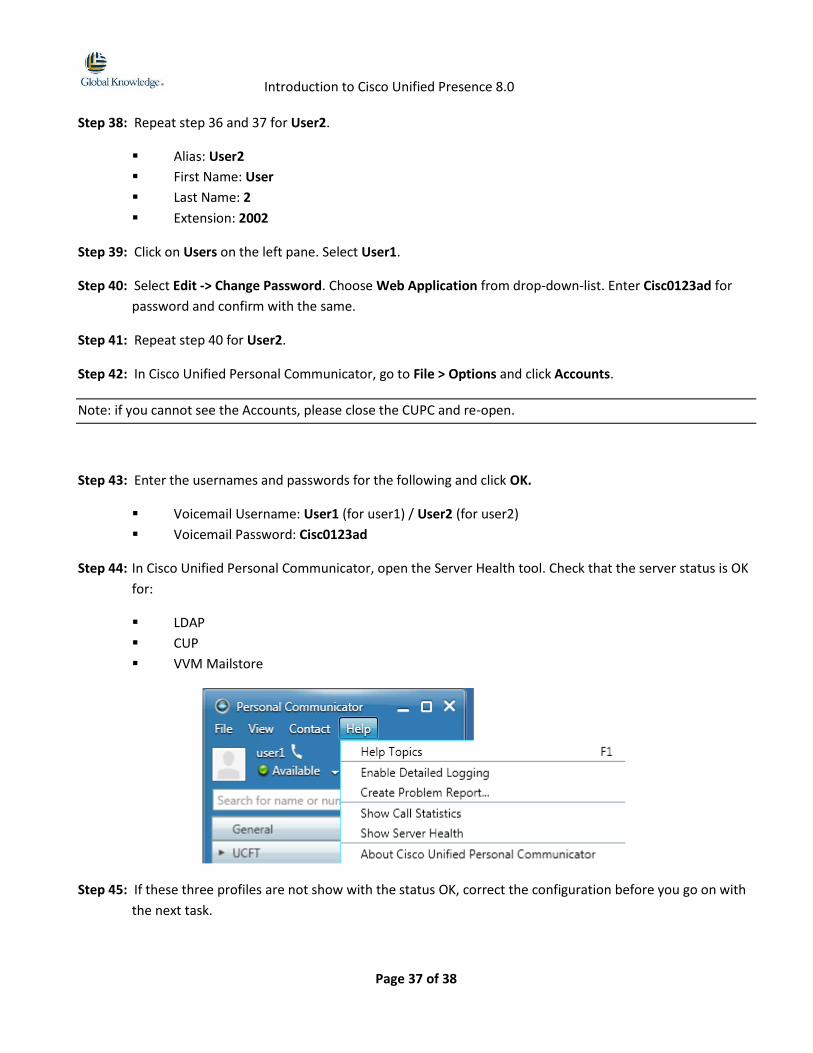
Step 44: In Cisco Unified Personal Communicator, open the Server Health tool. Check that the server status is OK
for:
LDAP
CUP
VVM Mailstore
Step 45: If these three profiles are not show with the status OK, correct the configuration before you go on with
the next task.
Introduction to Cisco Unified Presence 8.0
Page 38 of 38
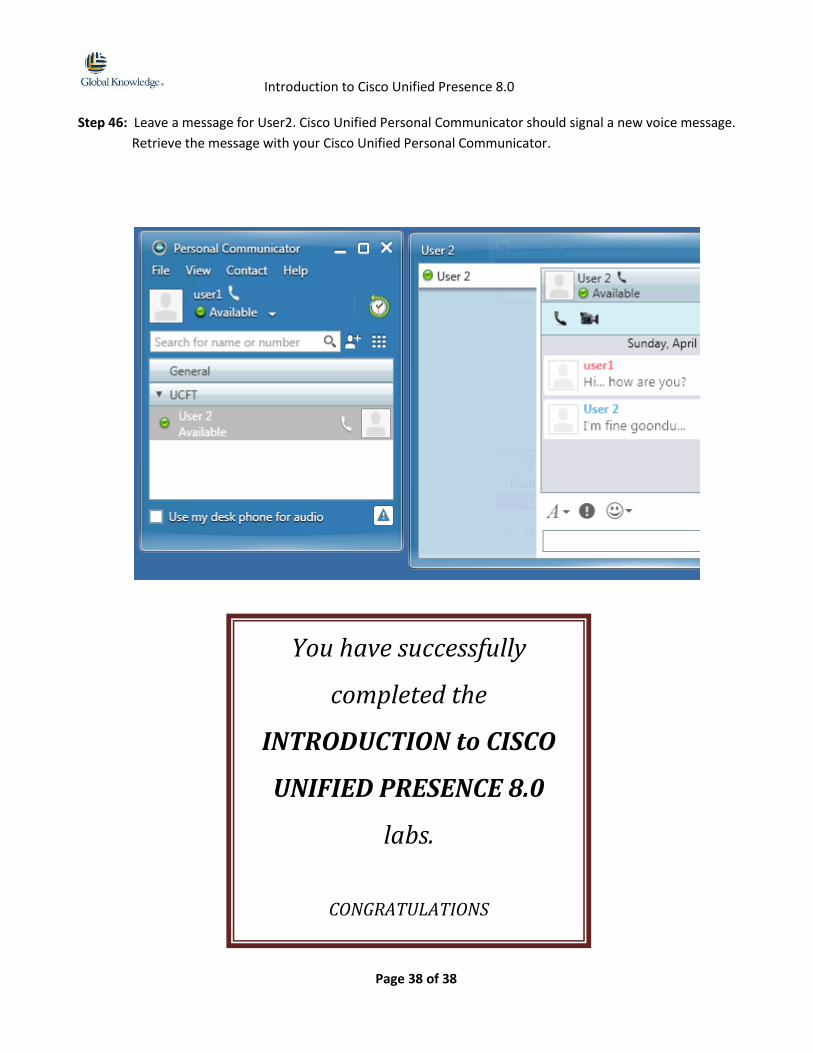
Step 46: Leave a message for User2. Cisco Unified Personal Communicator should signal a new voice message.
Retrieve the message with your Cisco Unified Personal Communicator.
You have successfully
completed the
INTRODUCTION to CISCO
UNIFIED PRESENCE 8.0
labs.
CONGRATULATIONS